Export Control
EAR Export Classification: Not subject to the EAR per 15 C.F.R. Chapter 1, Part 734.3(b)(3), except for the following Service Bulletins which are currently published as EAR Export Classification 9E991: SBE70-0992, SBE72-0483, SBE72-0580, SBE72-0588, SBE72-0640, SBE73-0209, SBE80-0024 and SBE80-0025.Copyright
© IAE International Aero Engines AG (2001, 2014 - 2021) The information contained in this document is the property of © IAE International Aero Engines AG and may not be copied or used for any purpose other than that for which it is supplied without the express written authority of © IAE International Aero Engines AG. (This does not preclude use by engine and aircraft operators for normal instructional, maintenance or overhaul purposes.).Applicability
All
Common Information
TASK 72-50-31-300-009 LPT Stage 5 Disk - Blend Repair, Repair-009 (VRS4164)
General
Price and availability - none
The practices and processes refered to in the procedure by the TASK numbers are in the SPM.
Make sure that the necessary cleaning and inspection procedures are done before this repair.
Repair Facilities
The source demonstration requirements of this repair means that any facility not authorized to accomplish this repair either, utilize the authorized repair vendors listed below or contact the IAE repair services group to determine if a qualification program can be initiated at their facility.
IAE International Aero Engines AG |
400 Main Street, M/S 121-10 |
East Hartford, CT 06118 |
USA |
Attn: Manager Repair Services |
Authorized repair vendors for shotpeen Repair VRS4164, TASK 72-50-31-300-009 (REPAIR-009) are listed below.
MTU Aero Engines AG |
Dachauer Strasse 665 |
80995 Muenchen |
Germany |
The designation by IAE of an authorized repair vendor indicates that the repair vendor has demonstrated the necessary capability to enable him to carry out the listed repair work. However, IAE make no warranties or representations concerning the qualifications or quality standards of the repair vendors to carry out the repair work, and accepts no responsibility whatsoever for any work that may be carried out by a repair vendor, other than when IAE is listed as the repair vendor. Authorized repair vendors do not act as agents or representatives of IAE.
NOTE
NOTE
Preliminary Requirements
Pre-Conditions
NONESupport Equipment
NONEConsumables, Materials and Expendables
| Name | Manufacturer | Part Number / Identification | Quantity | Remark |
|---|---|---|---|---|
| CoMat 01-103 FERRIC CHLORIDE HEXAHYDRATE | K6835 | CoMat 01-103 | ||
| CoMat 05-029 CAST STEEL SHOT, S110 | LOCAL | CoMat 05-029 | ||
| CoMat 05-138 SHOT, CAST STEEL, S110 | 11851 | CoMat 05-138 | ||
| CoMat 05-177 CUT WIRE SHOT,CW-14 | LOCAL | CoMat 05-177 | ||
| CoMat 05-248 CONDITIONED CUT-WIRE STEEL SHOT, SIZE SAE J441 CW-14 | LOCAL | CoMat 05-248 |
Spares
NONESafety Requirements
NONEProcedure
NOTE
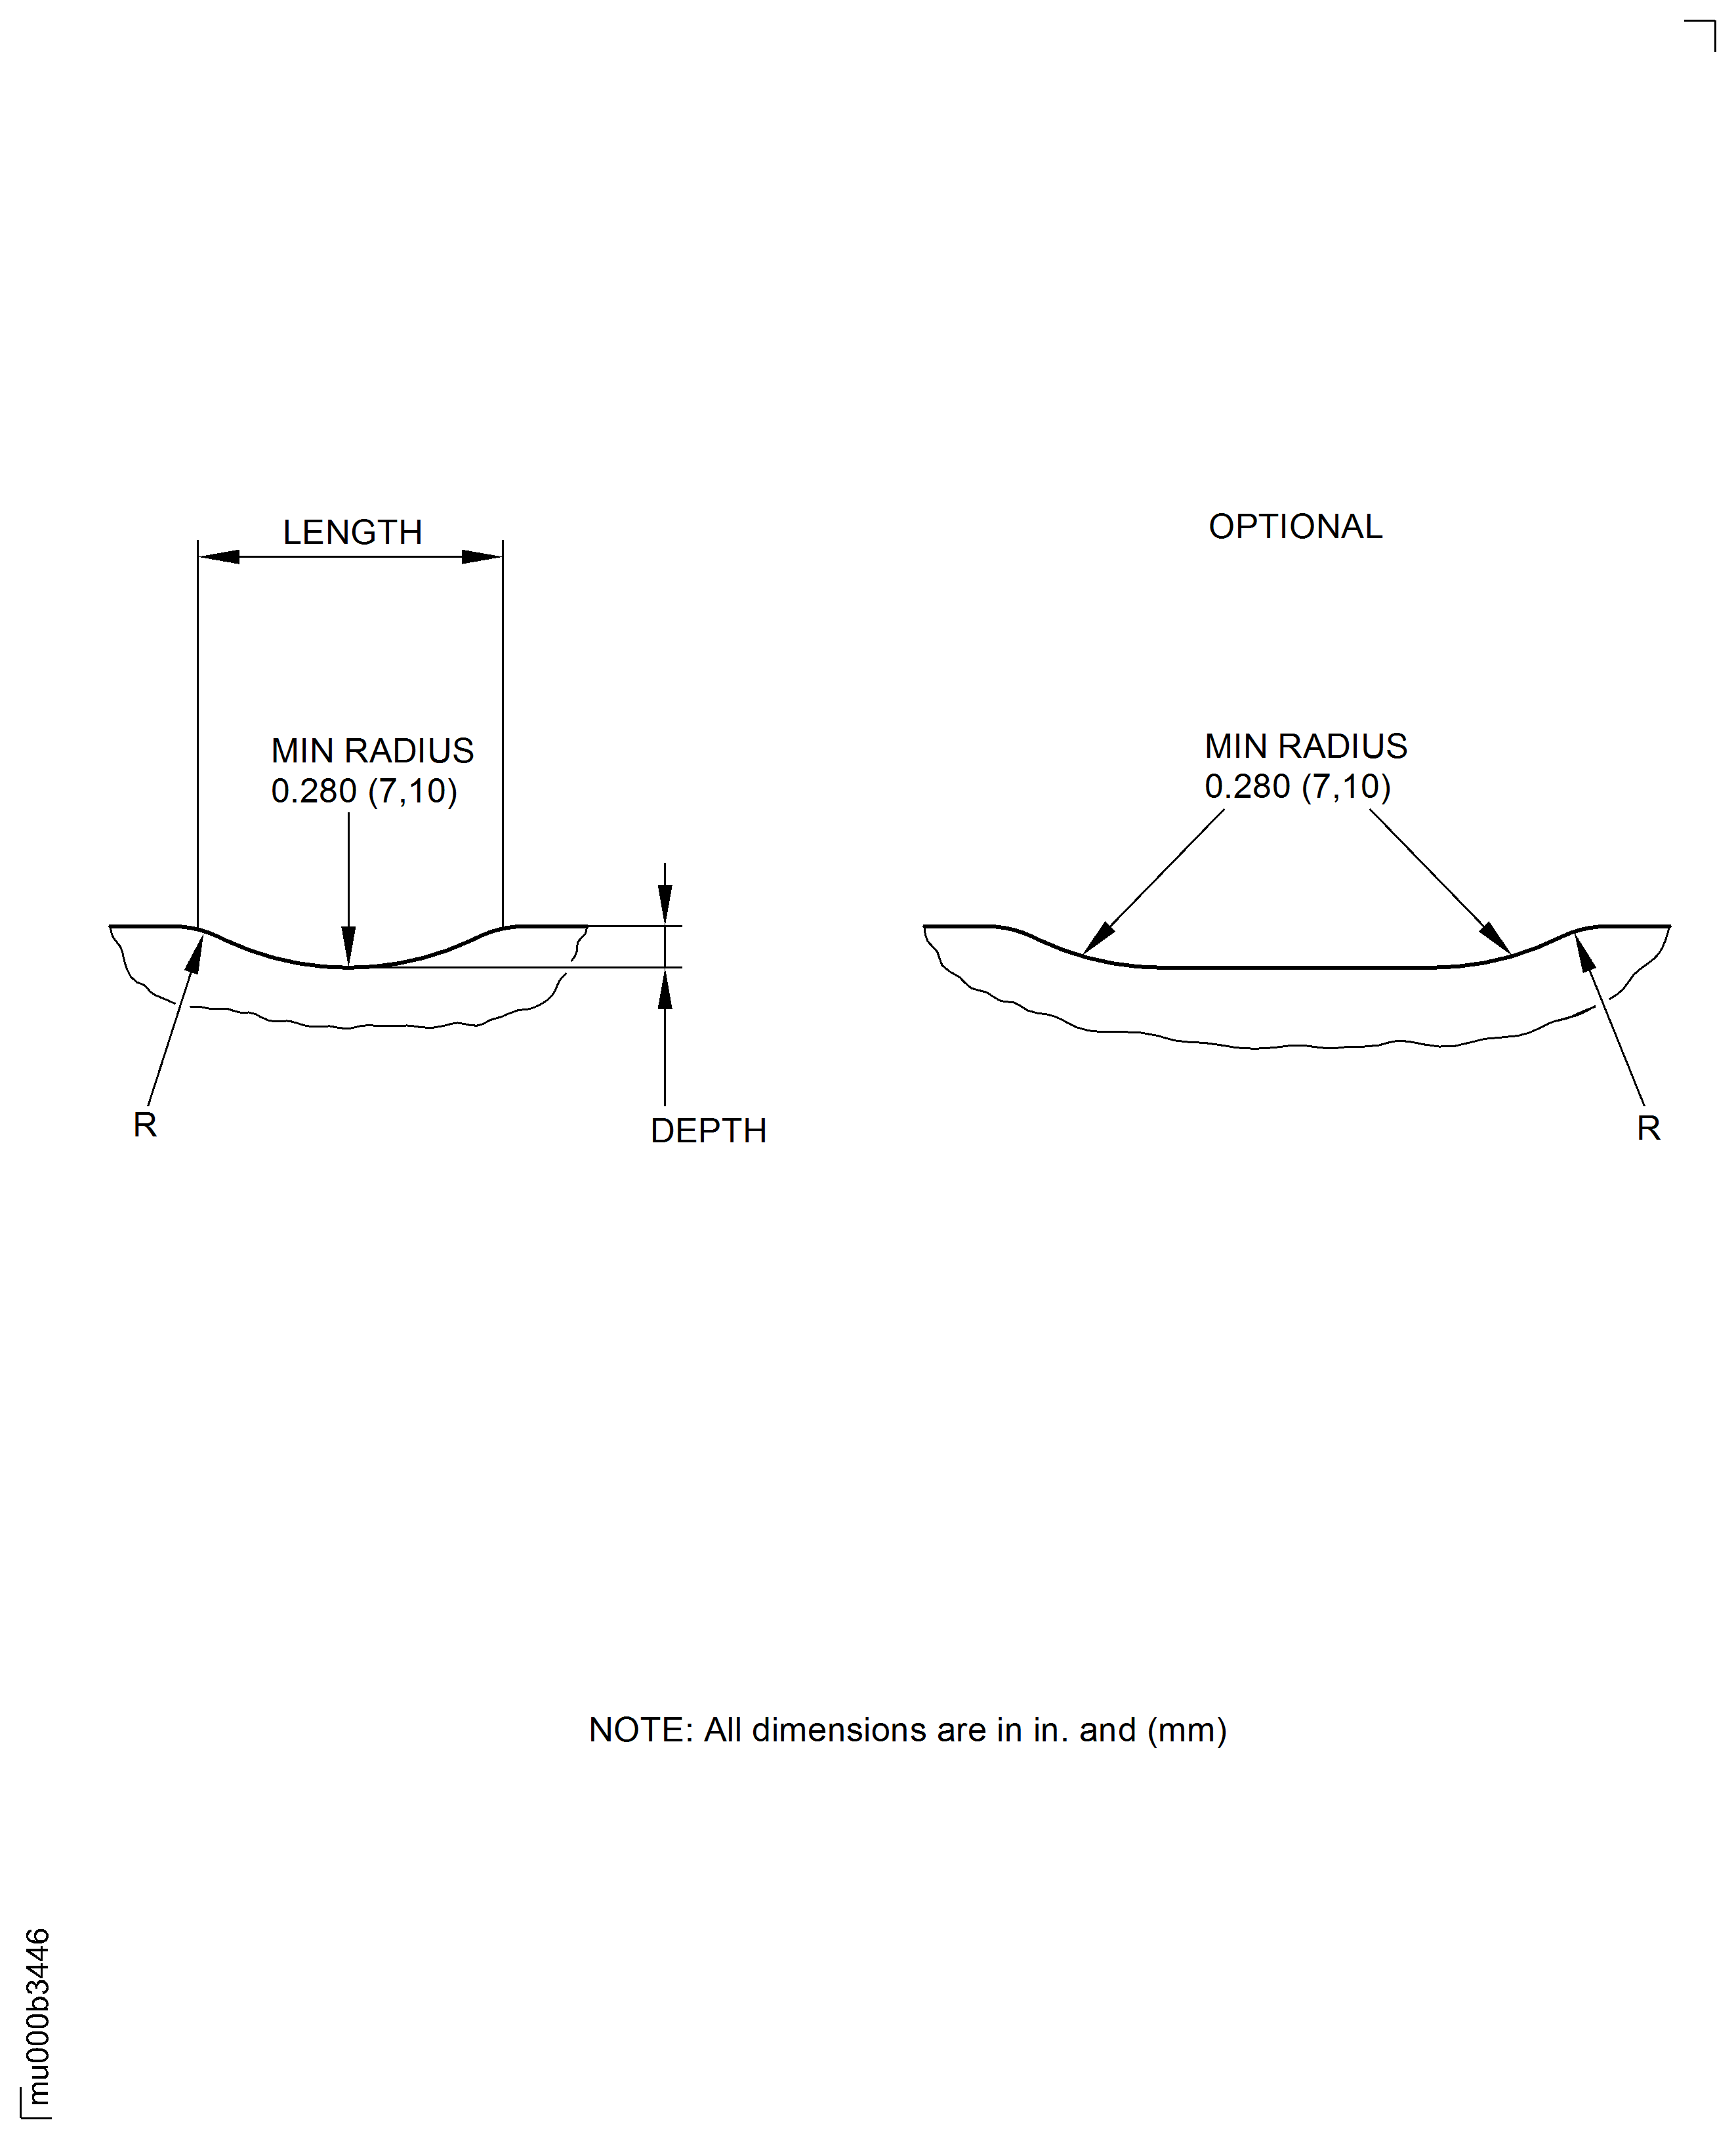
Refer to the SPM TASK 70-35-03-300-501 for blending surface damage.For local blending use a length to depth ratio of 100 to 1 minimum, refer to Figure.If there is a number of damage marks together blend the whole area to the specified depth. Unless given differently, there is no limit for the number of blends.Maximum permitted diameter of the holes is 0.2618 in. (6.65 mm).
Round bottom dents to a maximum depth of 0.005 in. (0.13 mm) are permitted in the lead-in radii without blendings, if any raised material is removed.
Refer to the SPM TASK 70-35-19-350-501.
Blend repair in area A3 (tiebolt holes).
Damage not more than 0.002 in. (0.05 mm) maximum depth to be blended to a 0.003 in. (0.08 mm) maximum depth.
Blend to sufficient depth to remove damage plus an additional 0.001 in. (0.03 mm).
Round bottom dents to a maximum depth of 0.005 in. (0.13 mm) are permitted in the lead-in radii without blendings, if any raised material is removed.
Refer to the SPM TASK 70-35-19-350-501.
Blend repair in area A3.1 (slots).
Maximum permitted diameter of the holes is 0.2402 in. (6.10 mm).
Round bottom dents to a maximum depth of 0.005 in. (0.13 mm) are permitted in the lead-in radii without blendings, if any raised material is removed.
Refer to the SPM TASK 70-35-19-350-501.
Blend repair in area A3.2 (stress relief holes).
Maximum permitted local blend depth is 0.004 in. (0.10 mm).
For blend areas 0.0625 sqin. (40.3 sqmm) or more damage not more than 0.002 in. (0.05 mm) maximum depth to be blended to a 0.003 in. (0.08 mm) maximum depth.
Blend to sufficient depth to remove damage plus an additional 0.001 in. (0.03 mm).
Use a length to depth ratio of 50 to 1 minimum.
Blend repair in area A8 (without areas A8.1, A8.2, and A8.3).
Damage not more than 0.002 in. (0.05 mm) maximum depth to be blended to a 0.003 in. (0.08 mm) maximum depth.
Blend to sufficient depth to remove damage plus an additional 0.001 in. (0.03 mm).
The total area of blend repair must not be more than 30 percent of the whole area A8.1.
Use a length to depth ratio of 30 to 1 minimum.
Blend repair in area A8.1.
Damage not more than 0.002 in. (0.05 mm) maximum depth to be blended to a 0.003 in. (0.08 mm) maximum depth.
Blend to sufficient depth to remove damage plus an additional 0.001 in. (0.03 mm).
The total area of blend repair must not be more than 30 percent of the whole area A8.2.
Use a length to depth ratio of 50 to 1 minimum.
Blend repair in area A8.2.
Damage not more than 0.002 in. (0.05 mm) maximum depth to be blended to a 0.003 in. (0.08 mm) maximum depth.
Blend to sufficient depth to remove damage plus an additional 0.001 in. (0.03 mm).
The total area of blend repair must not be more than 50 percent of the whole area A8.3.
Use a length to depth ratio of 30 to 1 minimum.
Blend repair in area A8.3.
Damage not more than 0.002 in. (0.05 mm) maximum depth to be blended to a 0.003 in. (0.08 mm) maximum depth.
Blend to sufficient depth to remove damage plus an additional 0.001 in. (0.03 mm).
After blend repair, locally etch blended areas refer to the SPM TASK 70-11-39-300-503.
No more than 25 blends are permitted.
If more than 25 blends are necessary do the skim machining, refer to Repair VRS 4544 TASK 72-50-31-300-040 (REPAIR-040).
Blend repair in area A9.
Maximum permitted blend depth is 0.006 in (0.15 mm).
No more than 25 blends are permitted.
If more than 25 blends are necessary do the skim machining, refer to Repair VRS 4544 TASK 72-50-31-300-040 (REPAIR-040).
Blend repair in area A11.
Maximum permitted blend depth is 0.006 in (0.15 mm).
No more than 25 blends are permitted.
If more than 25 blends are necessary do the skim machining, refer to Repair VRS 4544 TASK 72-50-31-300-040 (REPAIR-040).
Blend repair in area A16.
Maximum permitted blend depth is 0.006 in (0.15 mm).
No more than 25 blends are permitted.
If more than 25 blends are necessary do the skim machining, refer to Repair VRS 4544 TASK 72-50-31-300-040 (REPAIR-040).
Blend repair in area A17.
Maximum permitted blend depth is 0.006 in (0.15 mm).
No more than 25 blends are permitted.
If more than 25 blends are necessary do the skim machining, refer to Repair VRS 4544 TASK 72-50-31-300-040 (REPAIR-040).
Blend repair in area A18.
SUBTASK 72-50-31-350-056 Blend Repair of the Stage 5 Turbine Disk
Refer to the SPM TASK 70-35-19-350-501.
Butterfly polish all repaired holes and slots.
SUBTASK 72-50-31-350-094 Polish the Repaired Areas of Stage 5 Turbine Disk
Repair VRS4166, TASK 72-50-31-300-011 (REPAIR-011).
Rebalance the stage 5 turbine disk.
SUBTASK 72-50-31-350-067 Do the Post Repair
Figure: Repair Details and Dimensions
Repair Details and Dimensions
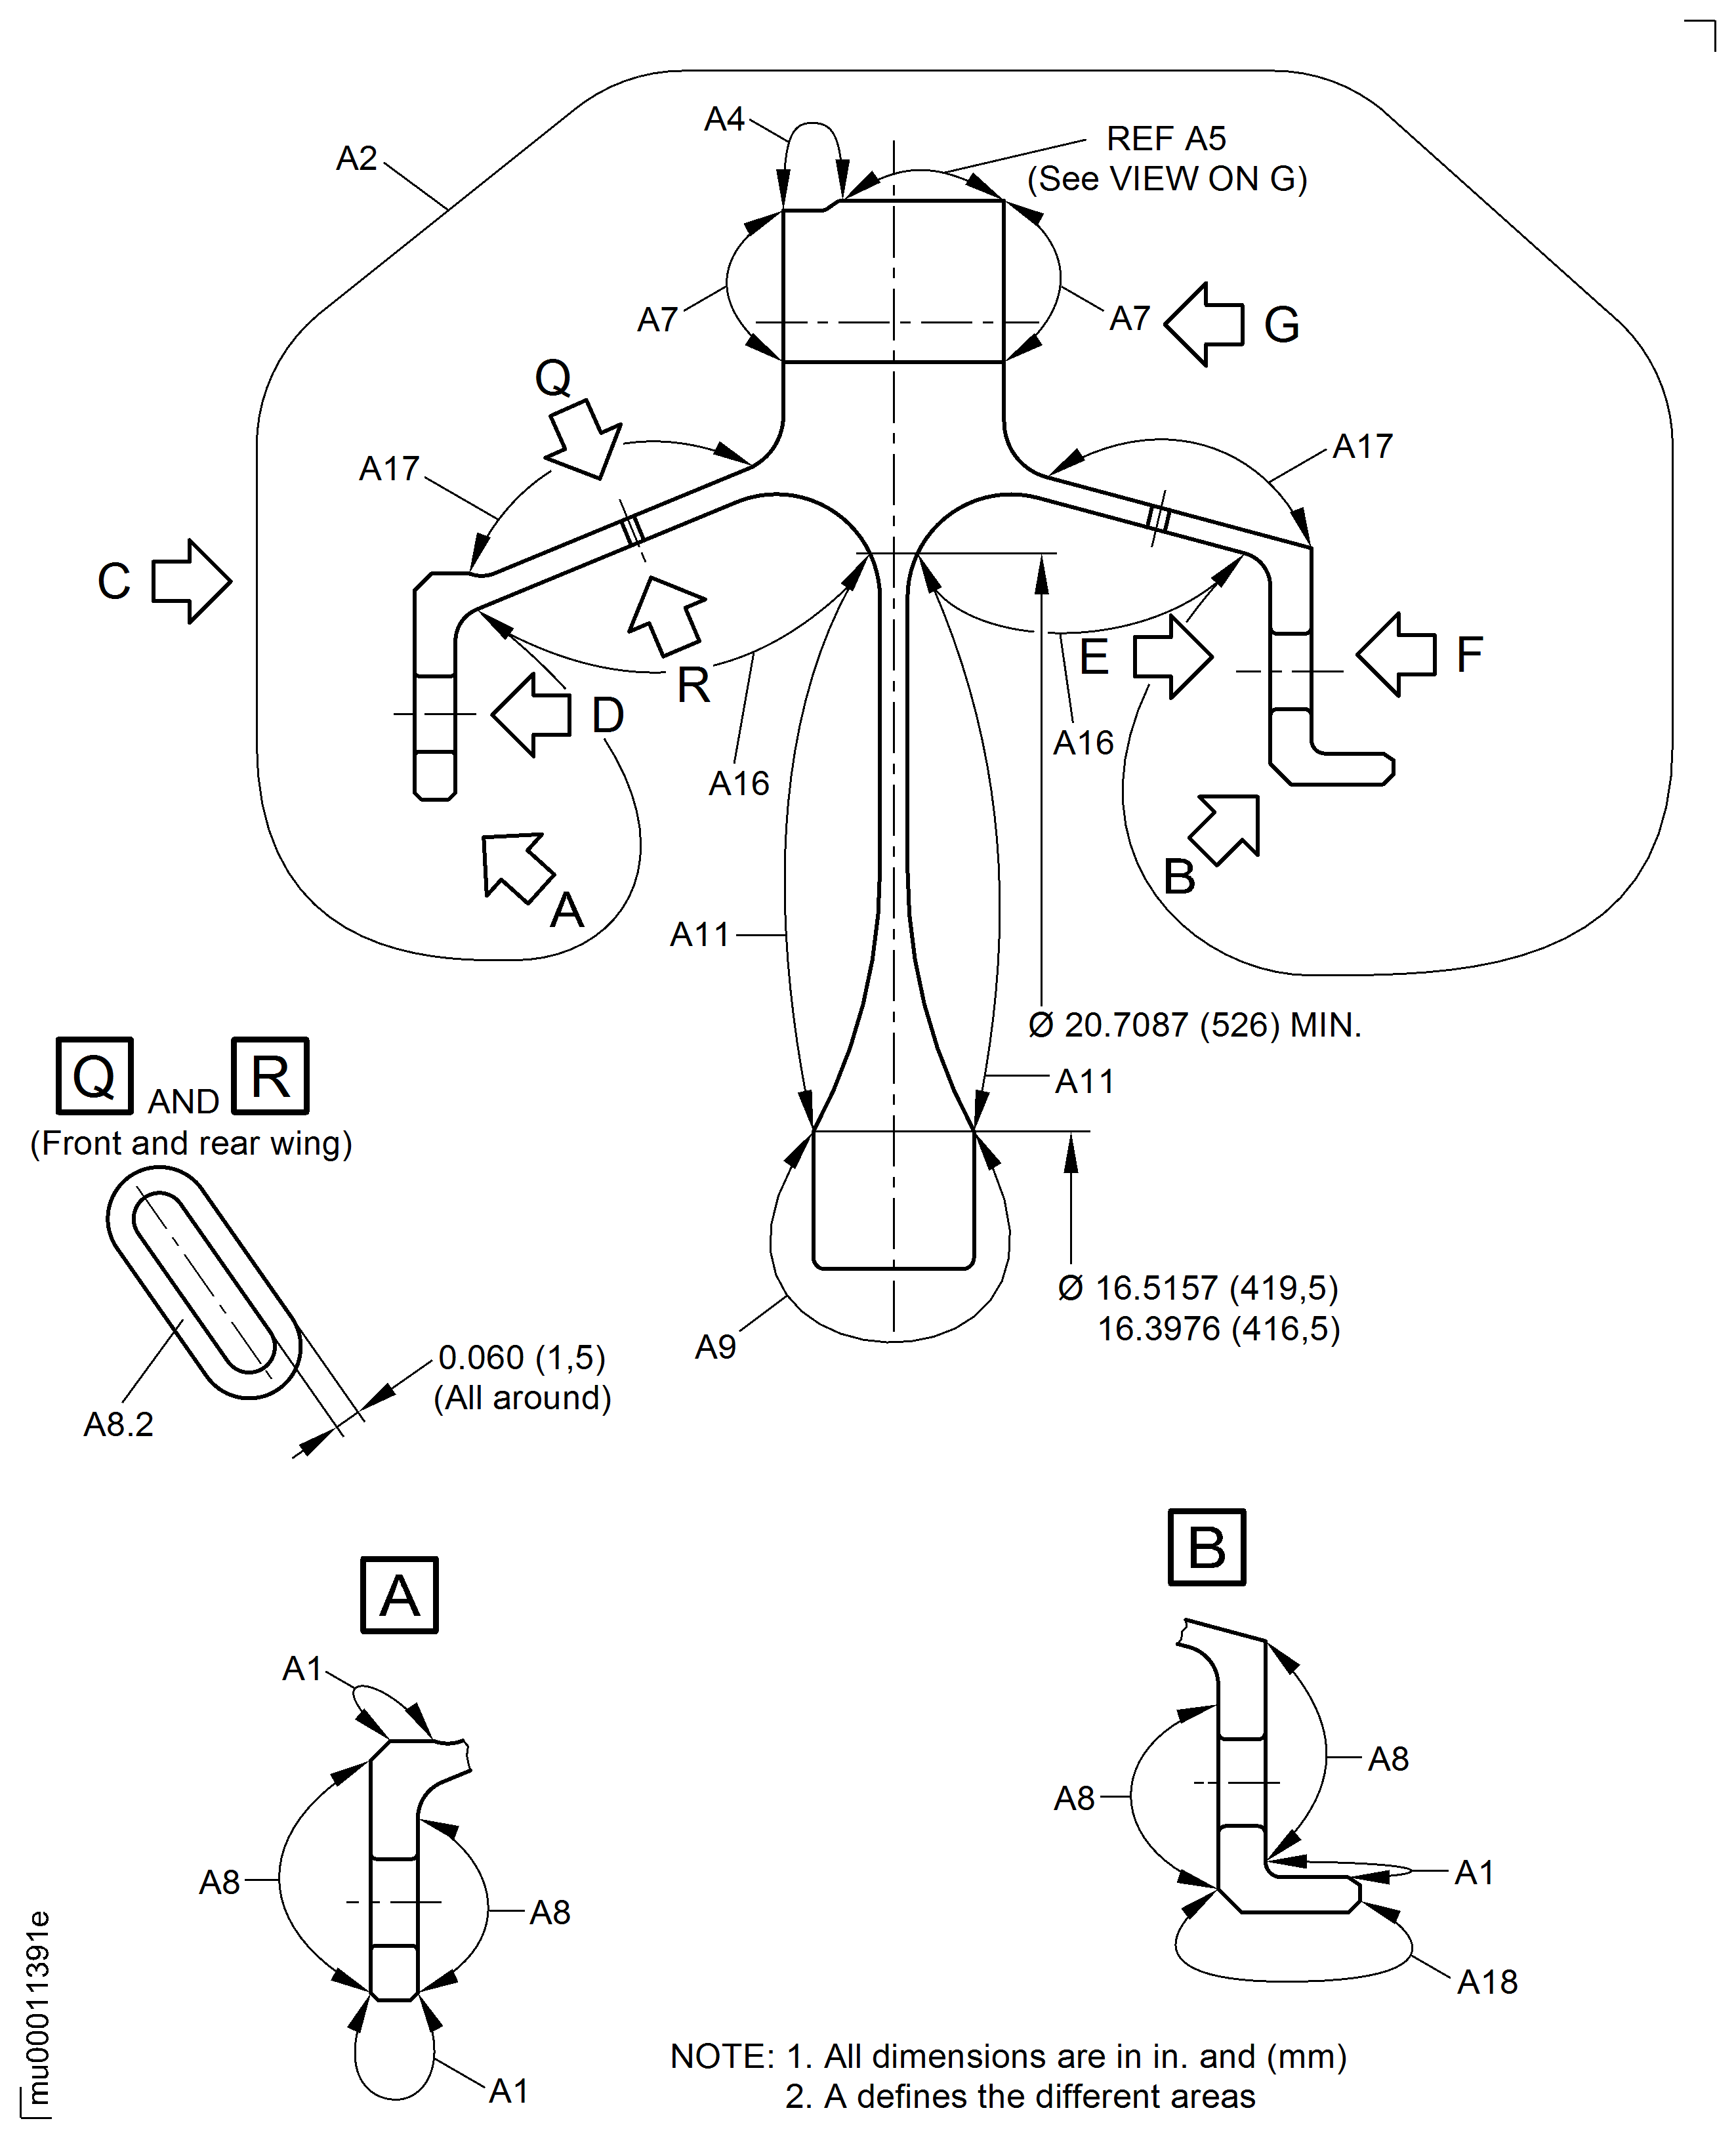
Figure: Repair Details and Dimensions
Repair Details and Dimensions
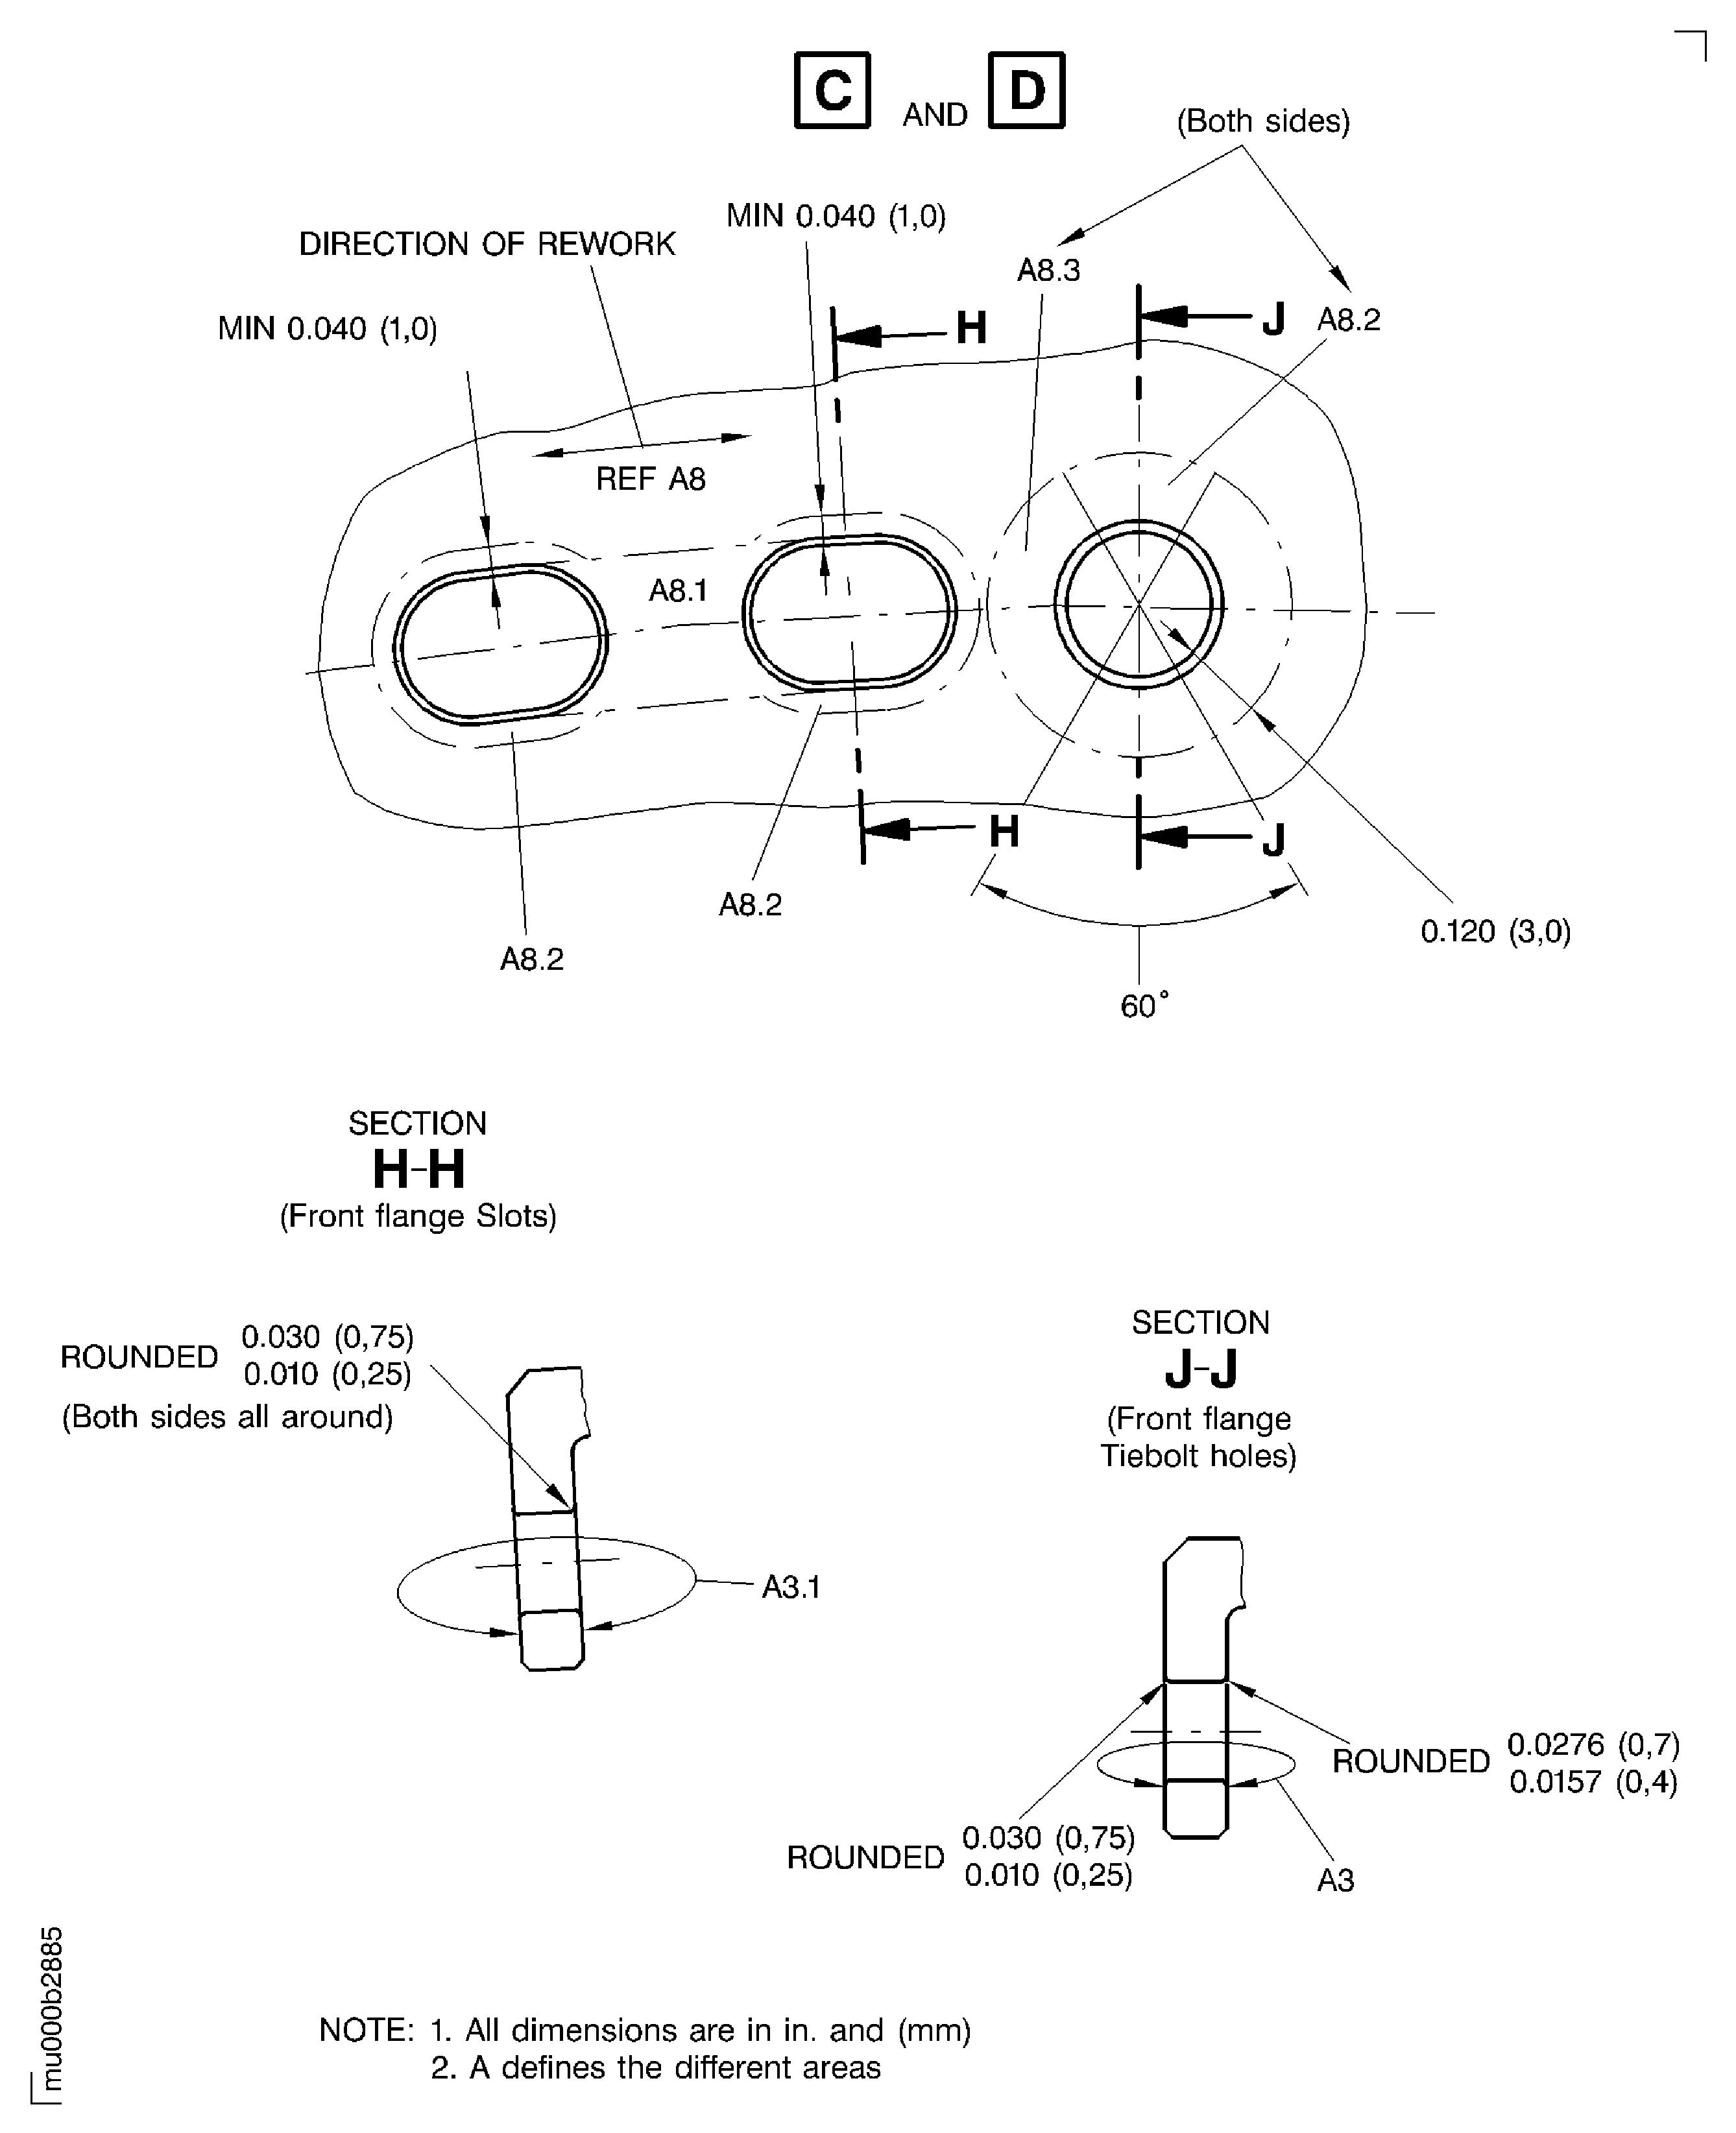
Figure: Repair Details and Dimensions
Repair Details and Dimensions
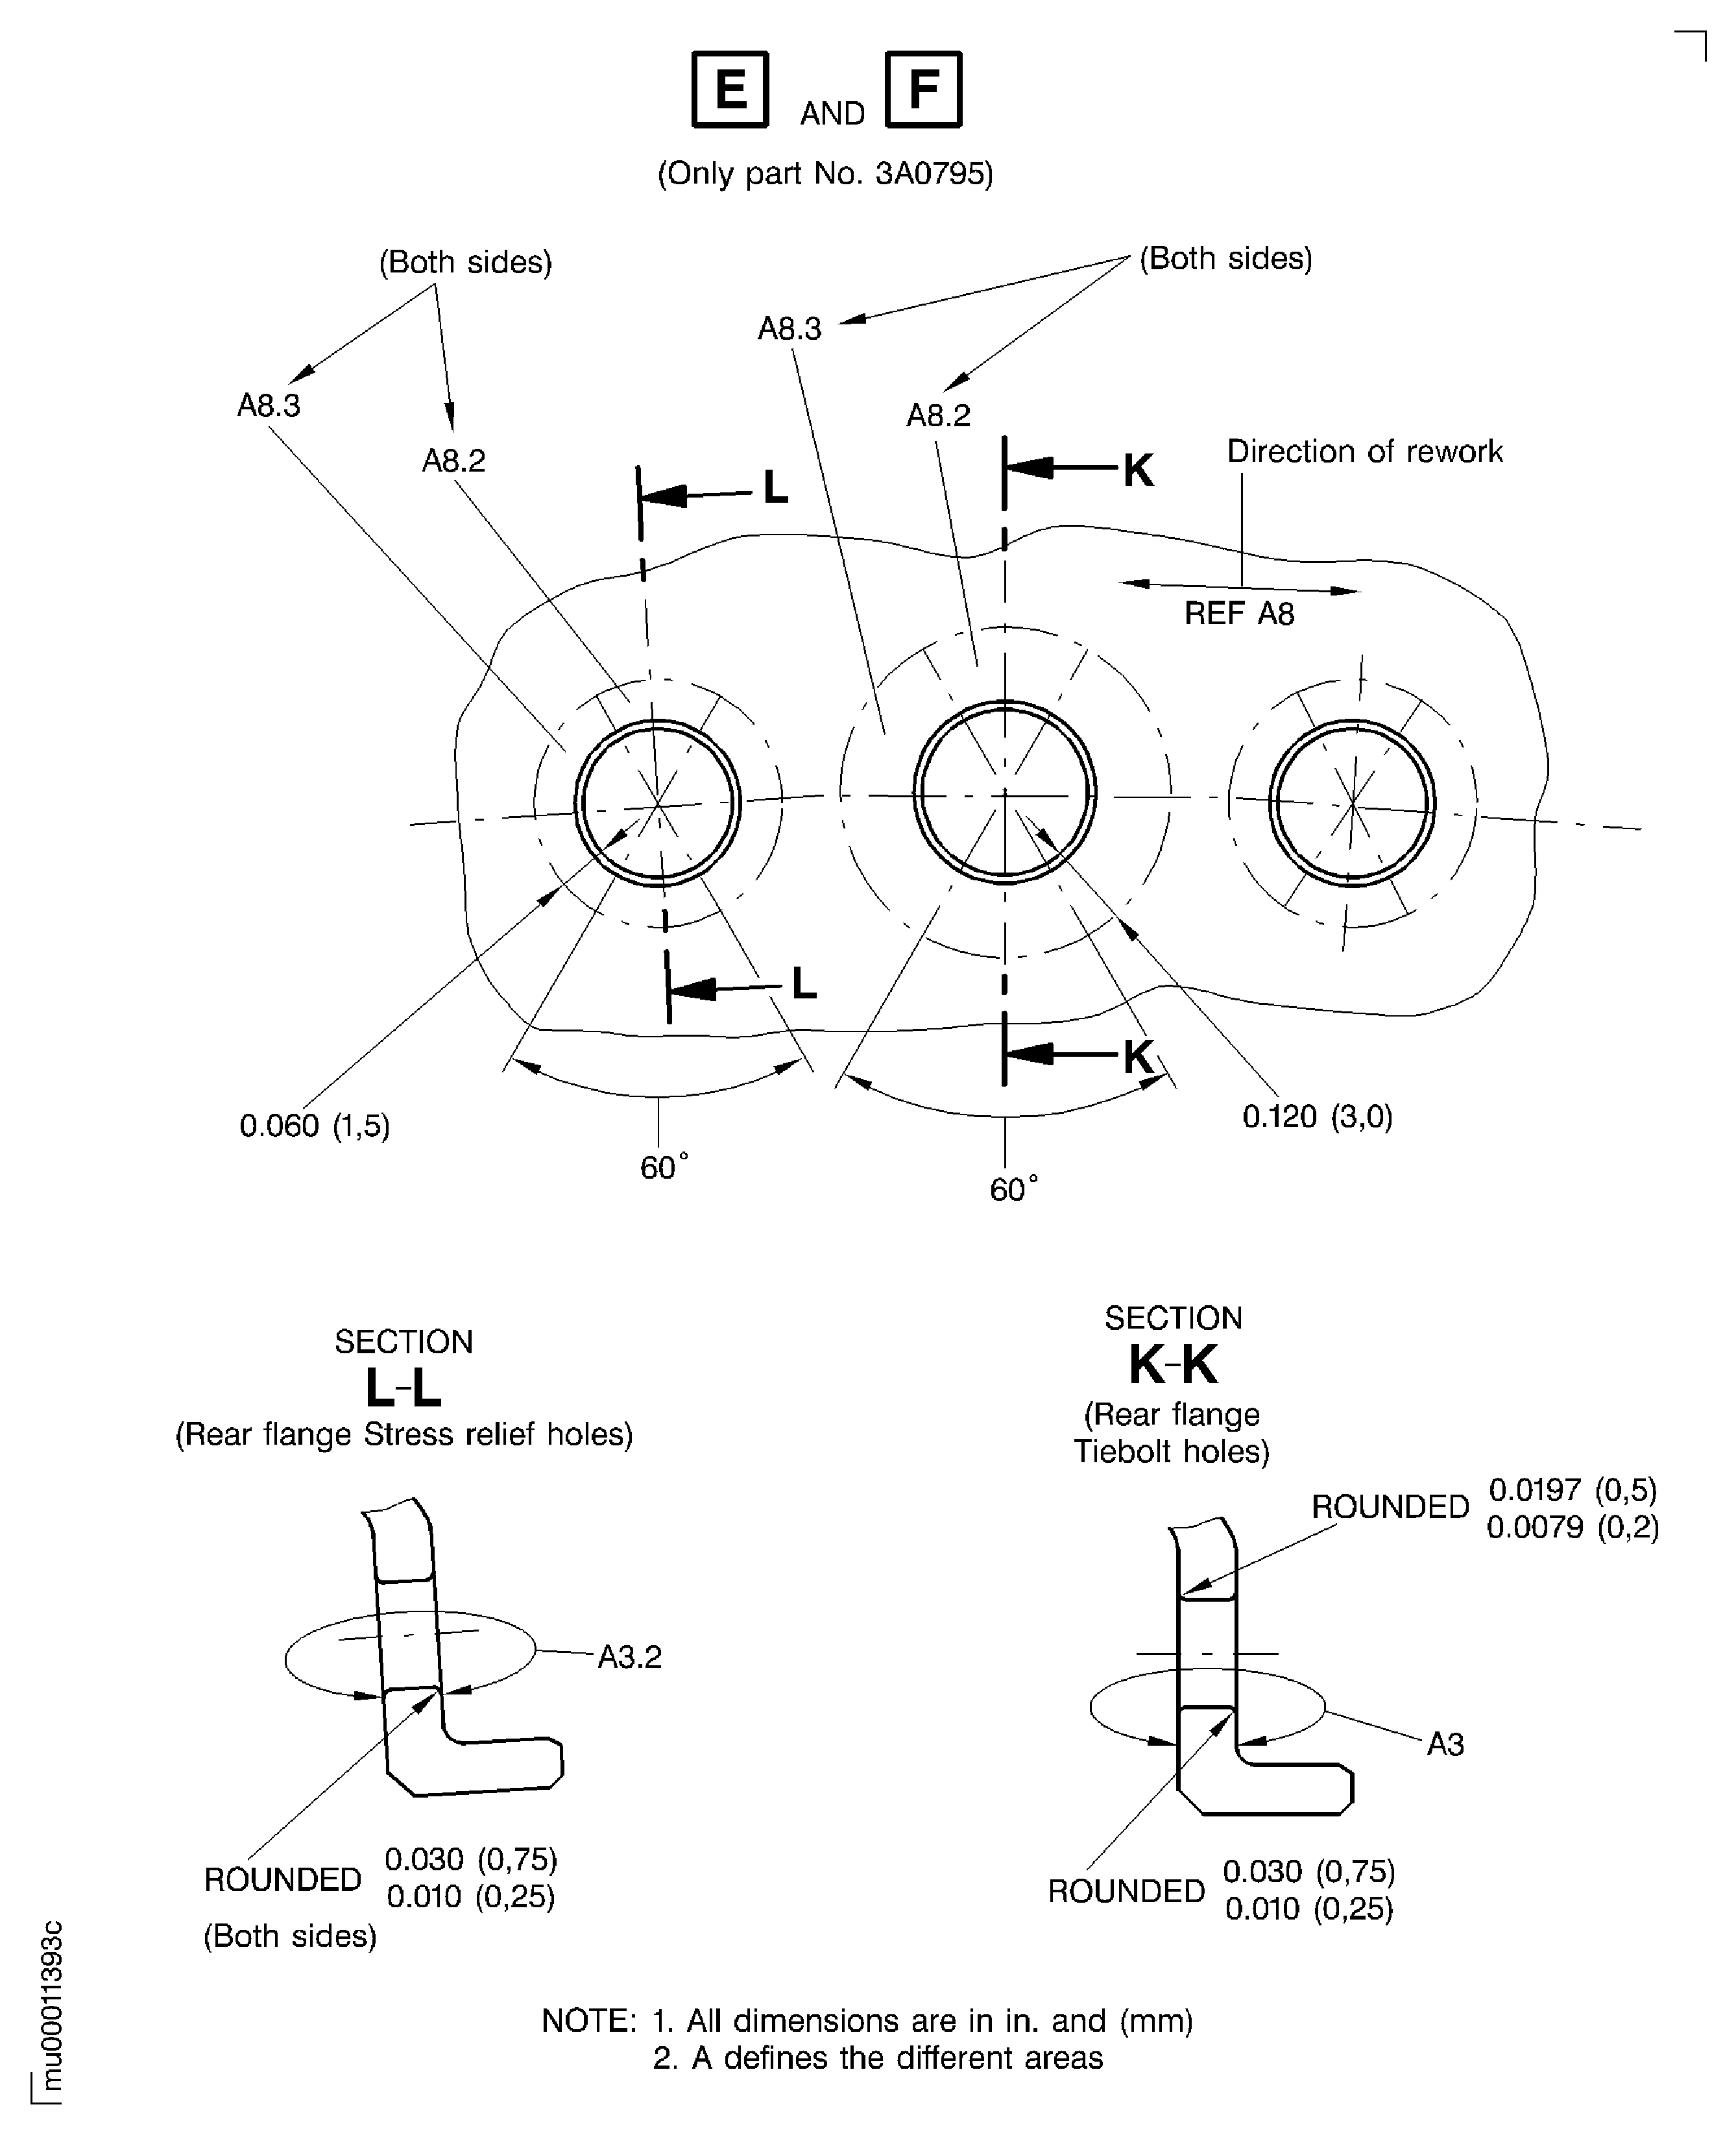
Figure: Repair Details and Dimensions
Repair Details and Dimensions
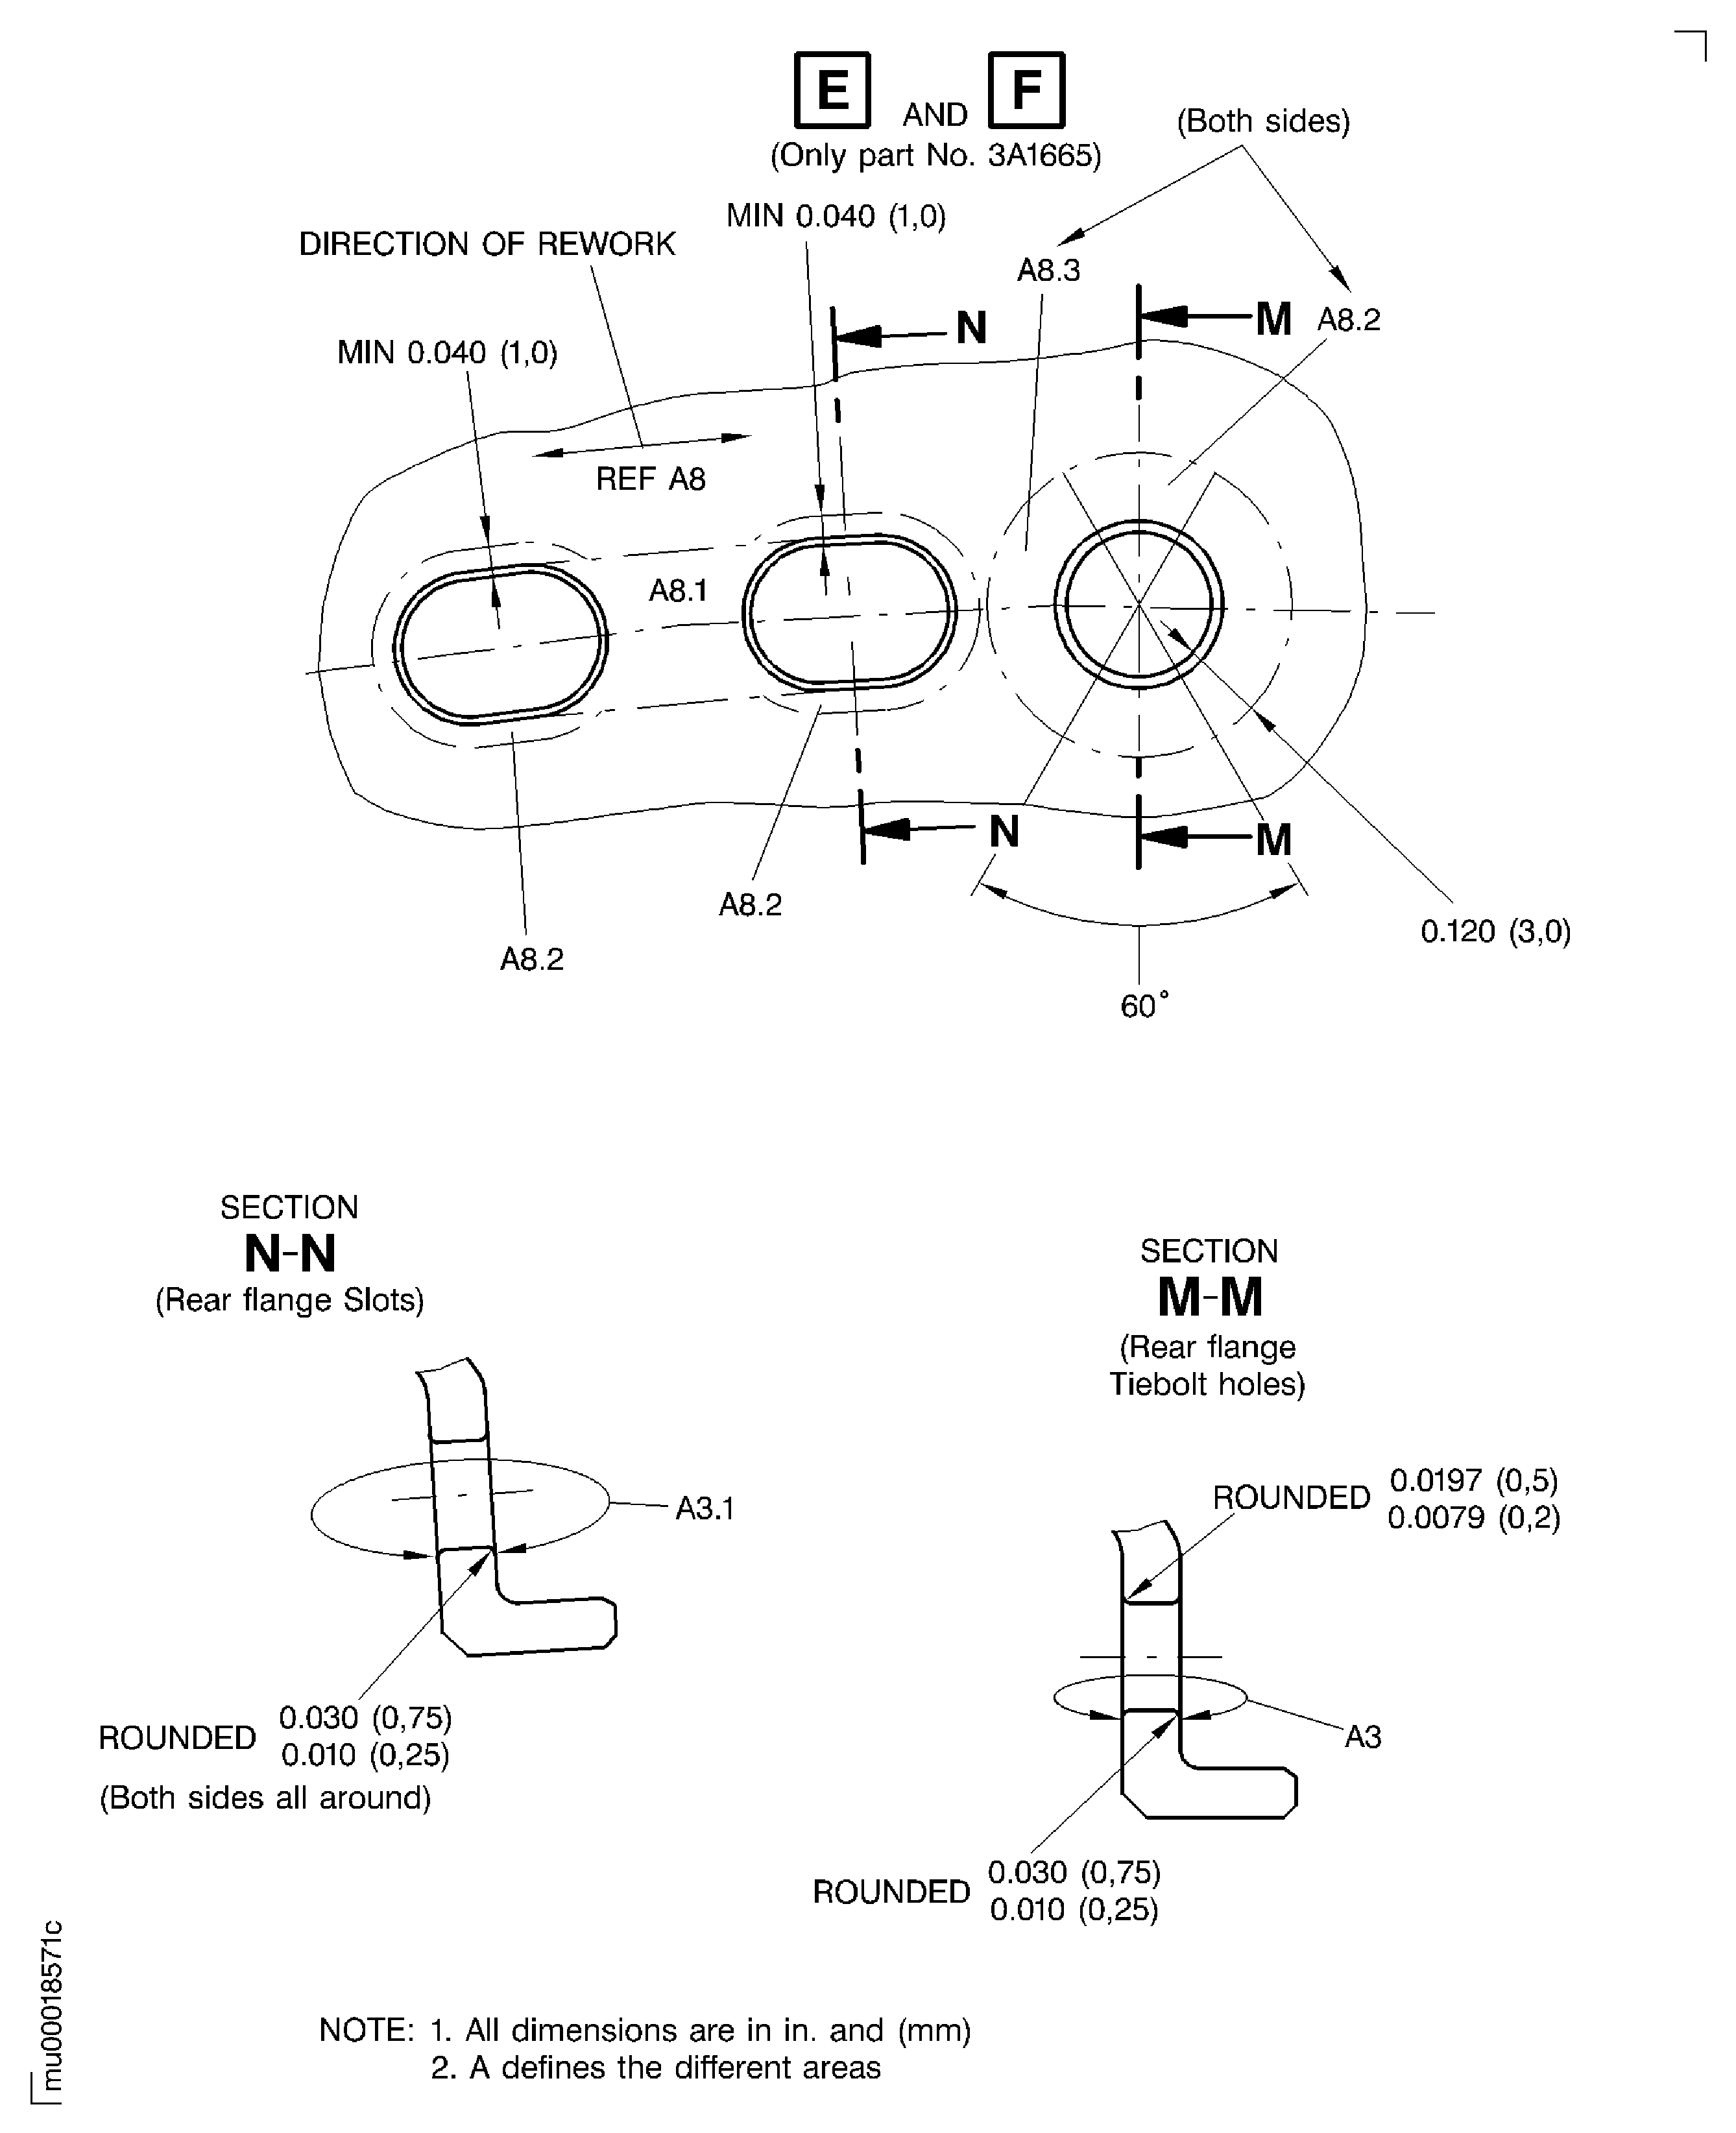
Figure: Repair Details and Dimensions
Repair Details and Dimensions
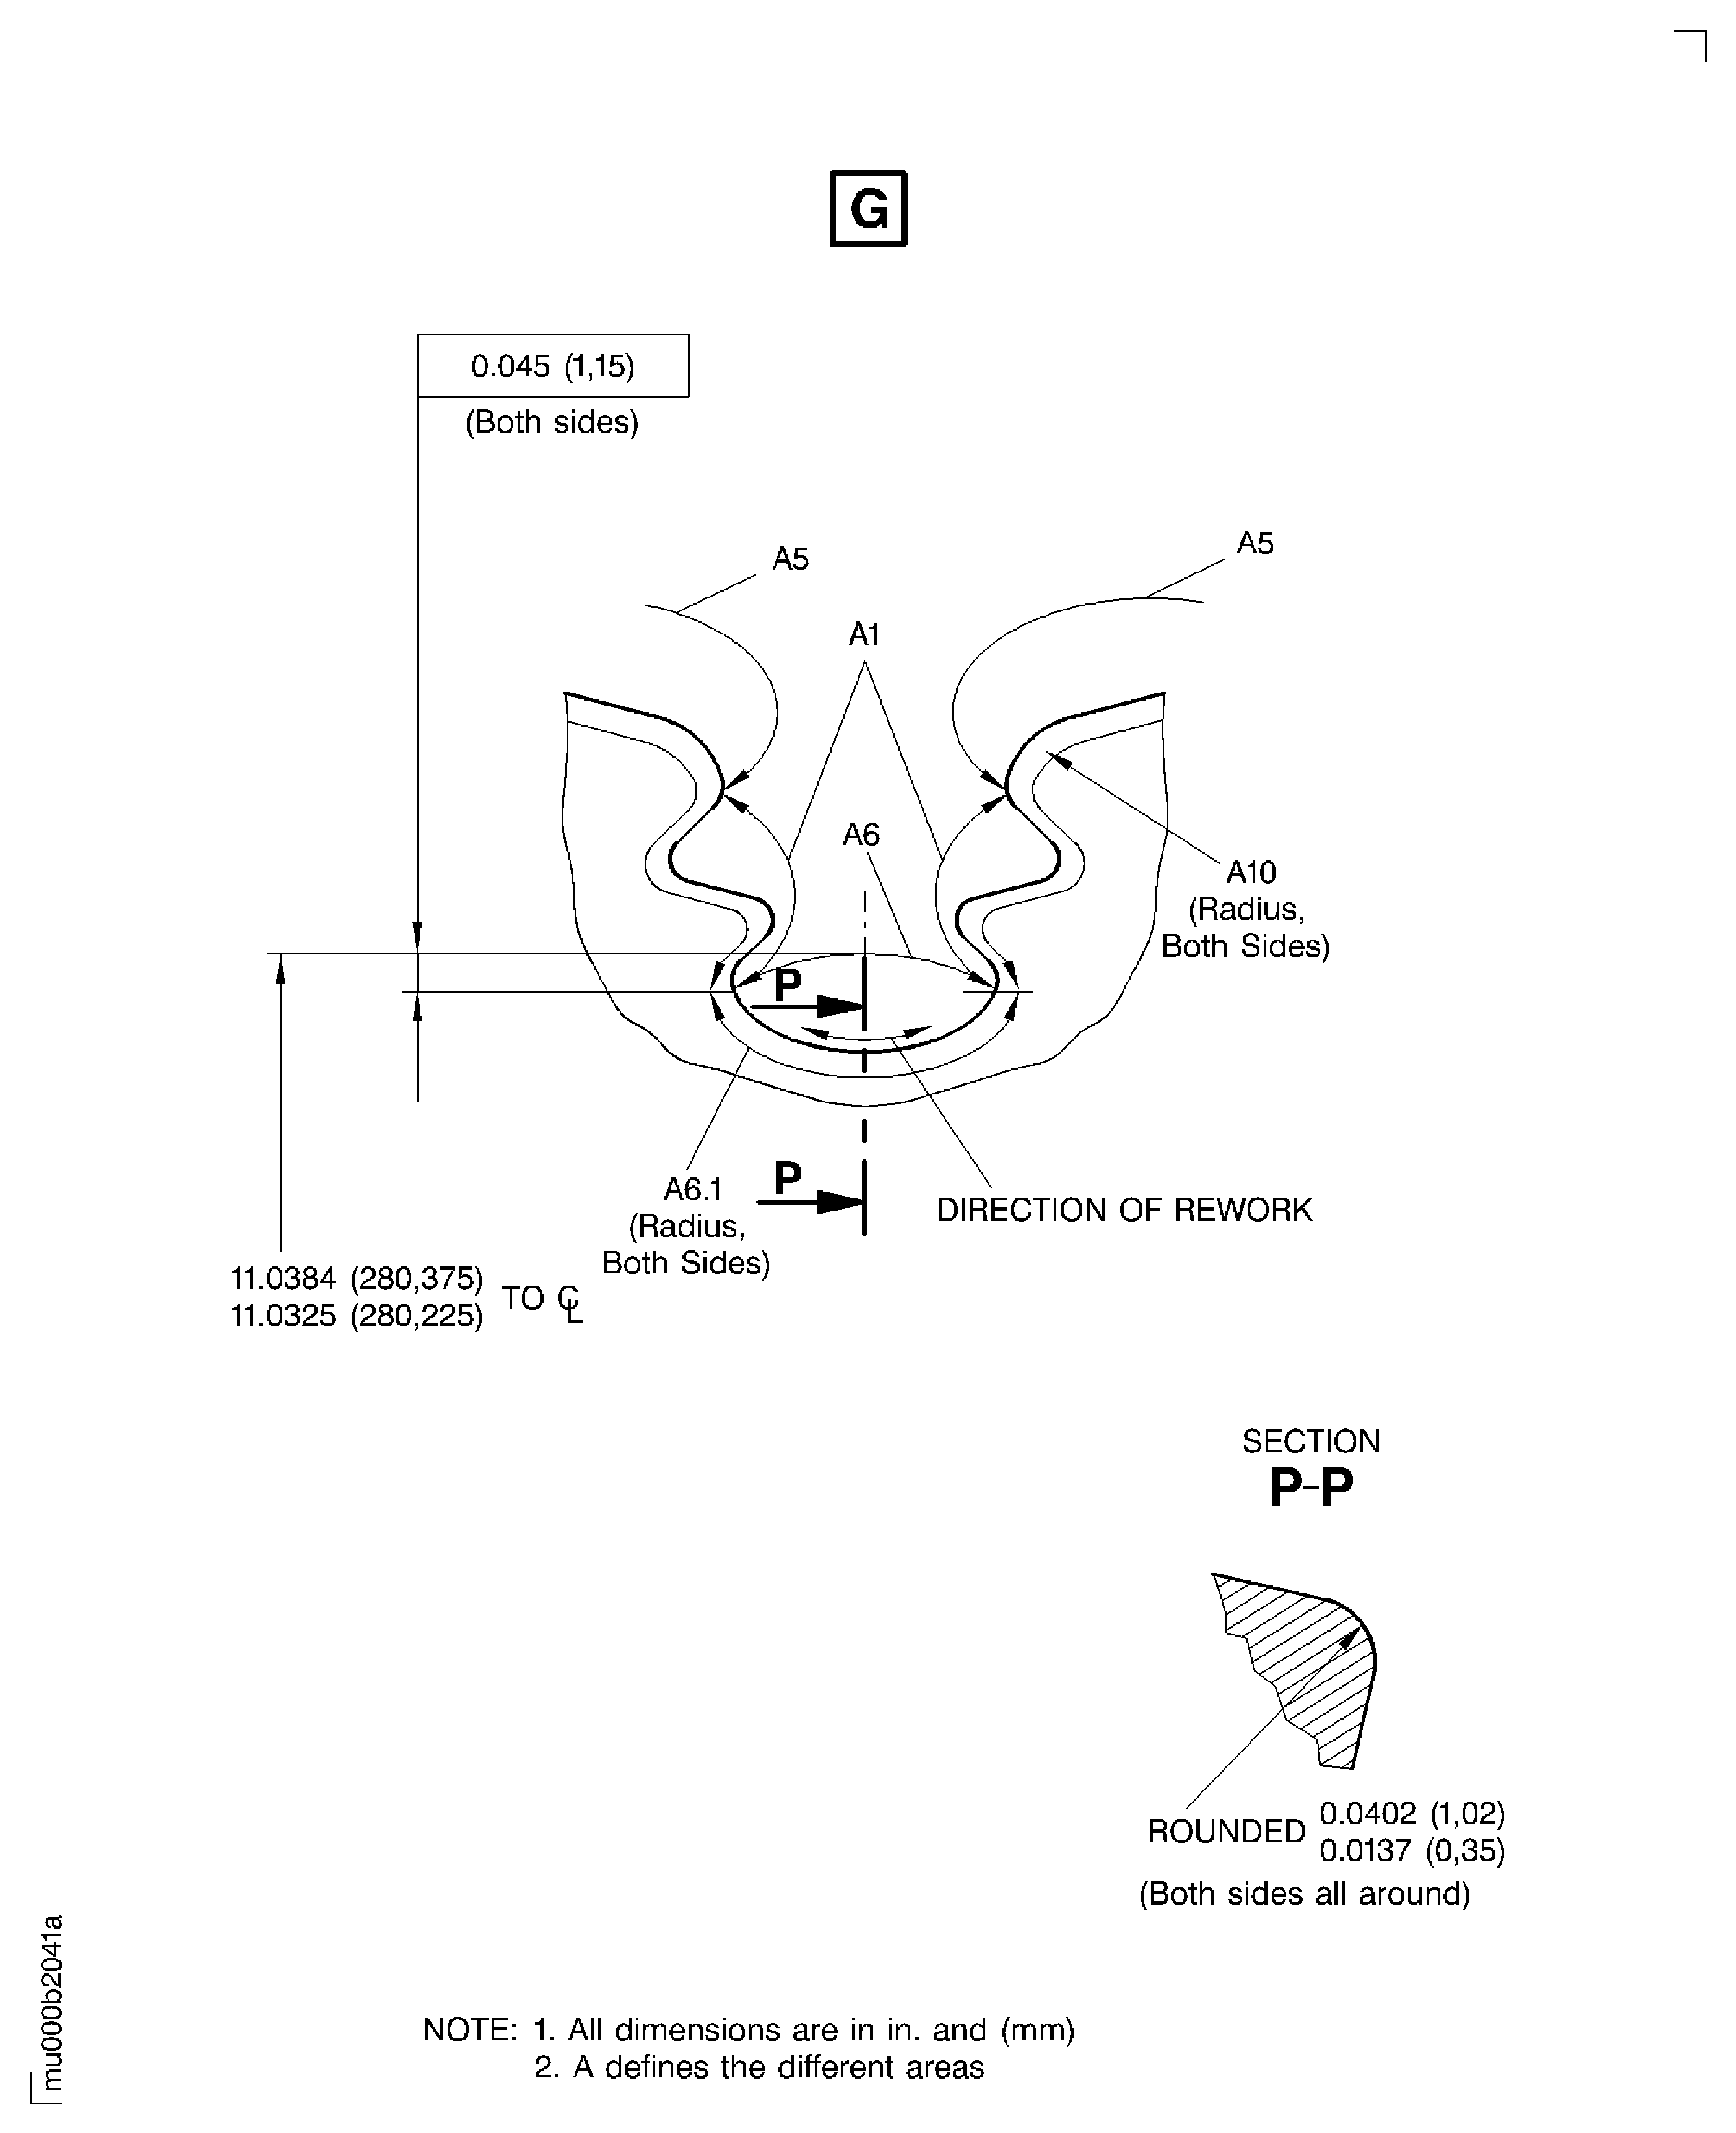
Figure: Repair Details and Dimensions
Repair Details and Dimensions
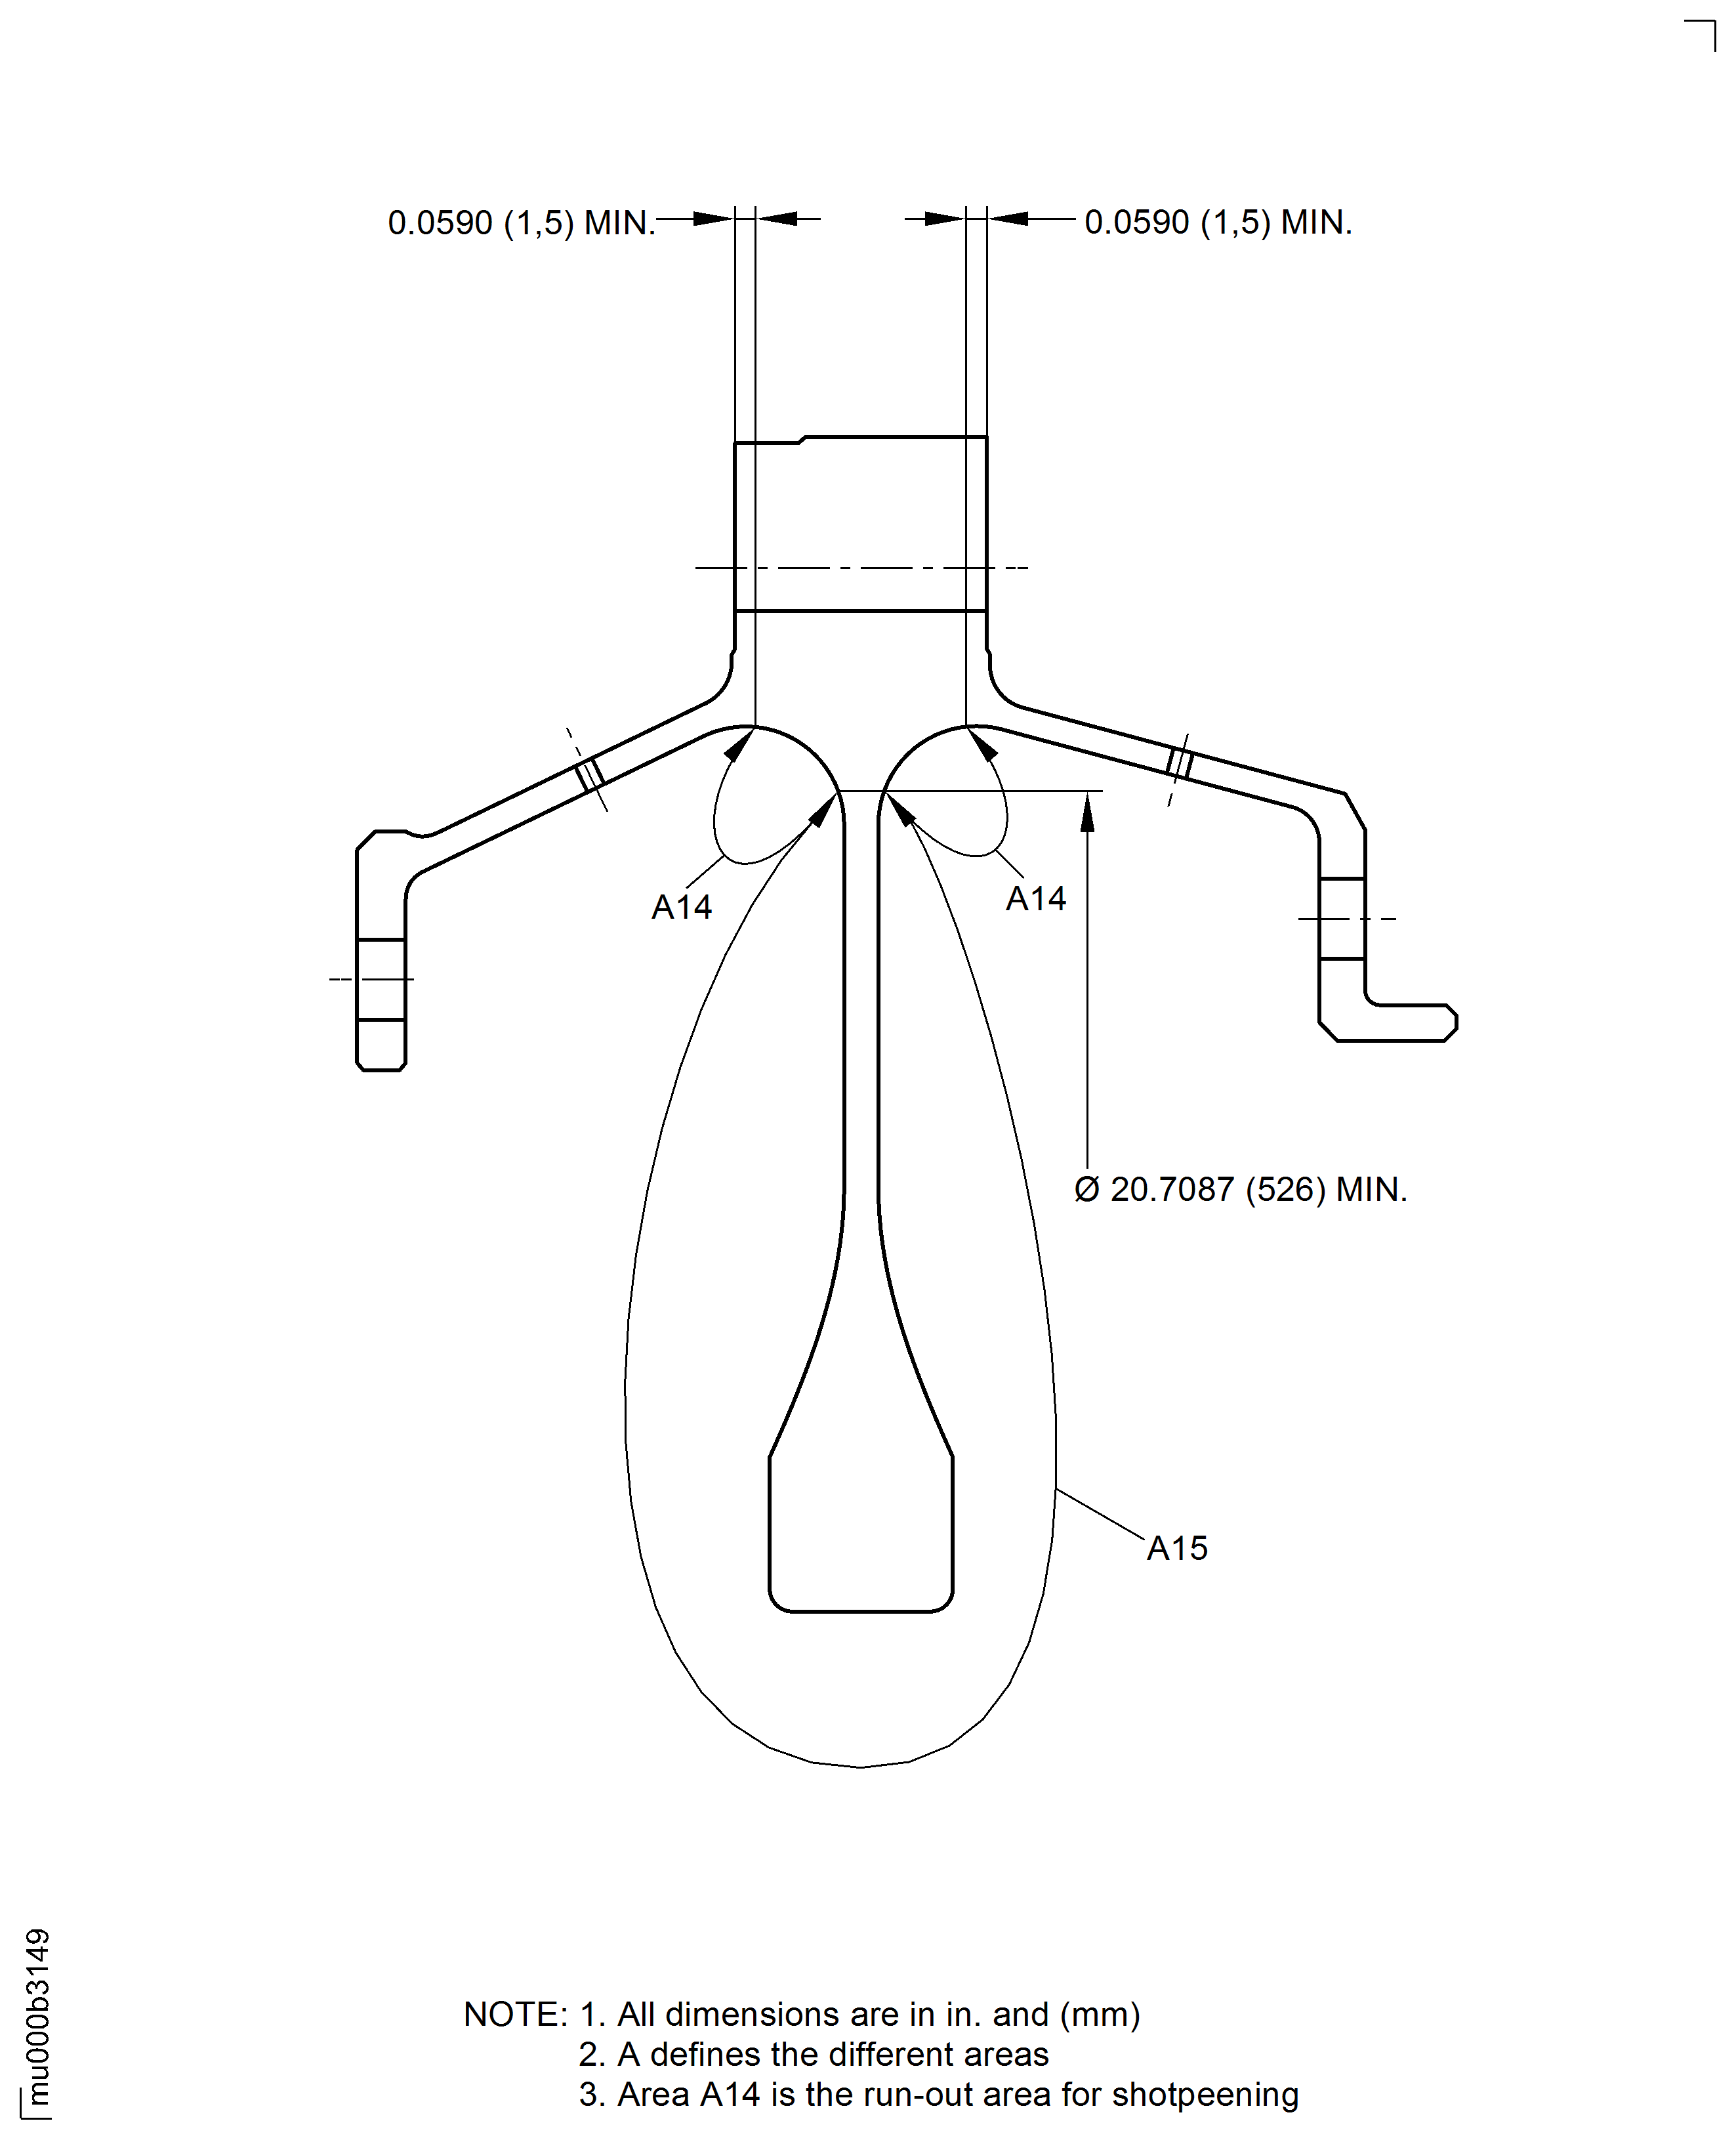
Figure: Repair Details and Dimensions
Repair Details and Dimensions
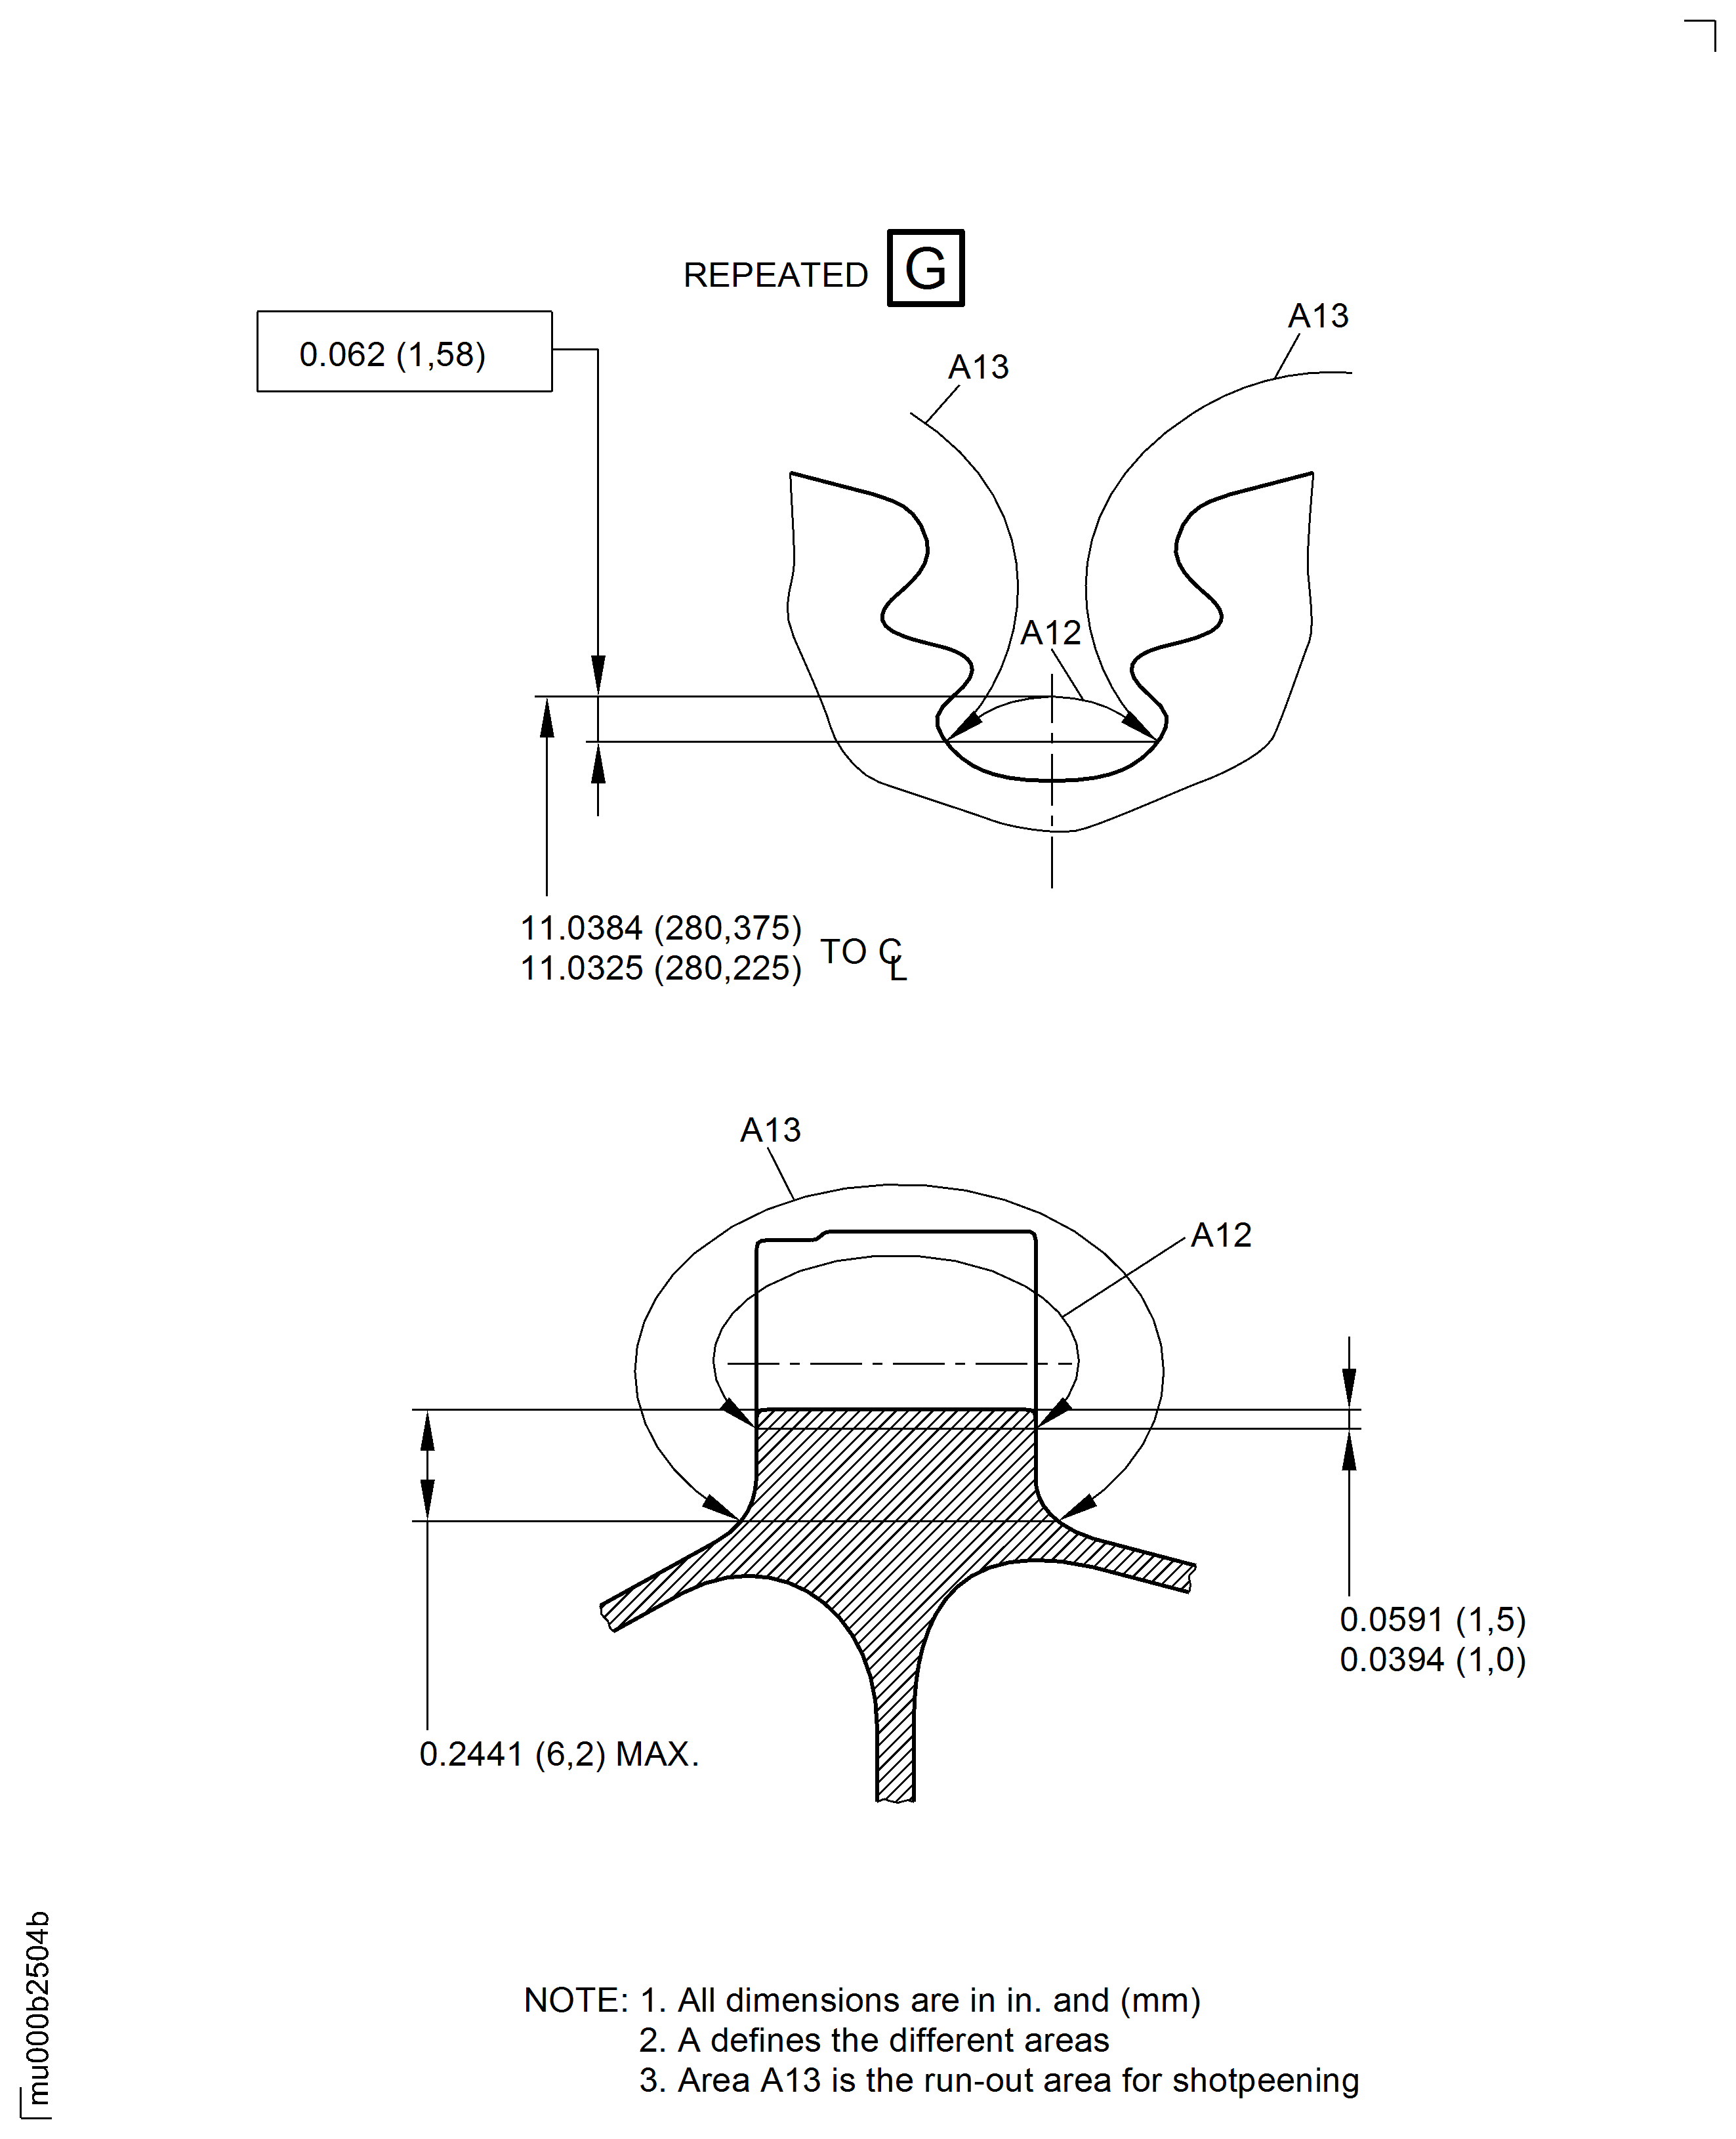
Figure: Repair Details and Dimensions
Repair Details and Dimensions
