Export Control
EAR Export Classification: Not subject to the EAR per 15 C.F.R. Chapter 1, Part 734.3(b)(3), except for the following Service Bulletins which are currently published as EAR Export Classification 9E991: SBE70-0992, SBE72-0483, SBE72-0580, SBE72-0588, SBE72-0640, SBE73-0209, SBE80-0024 and SBE80-0025.Copyright
© IAE International Aero Engines AG (2001, 2014 - 2021) The information contained in this document is the property of © IAE International Aero Engines AG and may not be copied or used for any purpose other than that for which it is supplied without the express written authority of © IAE International Aero Engines AG. (This does not preclude use by engine and aircraft operators for normal instructional, maintenance or overhaul purposes.).Applicability
All
Common Information
TASK 72-50-32-200-004-D00 LPT Stage 4 Blade - Examine, Inspection-004
General
This TASK gives the procedure for the inspection of the stage 4 turbine blades.
If there are signs of overheating, refer to TASK 72-50-32-200-007-A00 (INSPECTION/CHECK-007, CONFIG-001) before you do this inspection.
Fig./item numbers in parentheses in the procedure agree with those used in the EIPC.
A ** following any repair referenced in this inspection indicates that the repair is not yet published in the current revision of the manual and the part must be rejected. Contact IAE for additional information concerning FAA approved repair data.
The policy that is necessary for inspection is given in the SPM TASK 70-20-00-200-501.
All parts must be cleaned before any part is examined. Refer to the TASK 72-50-32-100-000 (72-050-032,CLEANING-000).
All parts must be visually examined for damage, corrosion and wear. Any defects that are not identified in the procedure must be referred to IAE.
The procedure for those parts which must have a crack test is given in SUBTASK 72-50-32-230-001. Do the crack test before the part is visually examined.
Do not discard any part until you are sure there are no repairs available. Refer to the instructions in Repair before a discarded part is used again or oversize parts are installed.
Parts which should be discarded can be held although no repair is available. The repair of a discarded part could be shown to be necessary at a later date.
All parts must be examined to make sure that all the repairs have been completed satisfactorily.
The practices and processes referred to in the procedure by the TASK numbers are in the SPM.
References
Refer to the SPM for data on these items.
Definitions of Damage, SPM TASK 70-02-02-350-501
Record and Control of the Lives of Parts, SPM TASK 70-05-00-220-501
Inspection of Parts, SPM TASK 70-20-00-200-501
Some data on these items is contained in this TASK. For more data on these items refer to the SPM.
Method of Testing for Crack Indications
Chemical Processes
Surface Protection
NOTE
Preliminary Requirements
Pre-Conditions
NONESupport Equipment
| Name | Manufacturer | Part Number / Identification | Quantity | Remark |
|---|---|---|---|---|
| IAE 2M14189 Inspection gage | 0AM53 | IAE 2M14189 | 1 | |
| IAE 2M14193 Inspection mounting block | 0AM53 | IAE 2M14193 | 1 |
Consumables, Materials and Expendables
NONESpares
NONESafety Requirements
NONEProcedure
Clean the parts. Refer to TASK 72-50-32-100-000 (CLEANING-000).
Repair, VRS4345 TASK 72-50-32-300-058 (REPAIR-058)
Cracked in the shroud notches
Repair, VRS4301 TASK 72-50-32-300-062 (REPAIR-062)
Not more than 0.040 in. (1.00 mm) maximum depth
Repair, VRS4519 TASK 72-50-32-300-070 (REPAIR-070)
More than in Step
Cracked in the knife edge seals.
Do the test for cracks on the parts that are given below. Use the applicable penetrant procedure.
PART IDENT TASK/SUBTASK
Stage 4 turbine blades
SUBTASK 72-50-32-230-183 Examine the Stage 4 Turbine Blades for Cracks
Refer to Figure.
NOTE
This examination includes surface defects which are permitted per production standard. Surface defects are not caused by hit of some objects or service operation.Fluorescent penetrant examine or visually examine areas A1 to A7 for surface defects. Refer to the SPM TASK 70-23-08-230-501 or SPM TASK 70-21-01-220-501.Surface defects larger than 0.015 in. (0.38 mm) diameter must have a bottom which can be seen.Surface defects not larger than 0.015 in. (0.38 mm) can be non bottomed.A cluster is a defect of four or more surface defects, clearly apart, which can be contained within a 0.200 in. (5.08 mm) diameter circle. In the cluster all surface defects must be 0.015 in. (0.38 mm) or lessIf not differently specified, surface defects of 0.015 in. (0.38 mm) or less must be ignored if they are not found in linear alignment or clusters, or in areas where 0.015 in. (0.38 mm) is the maximum permitted size.In areas where 0.015 in. (0.38 mm) is the maximum permitted size, surface defects 0.010 in. (0.25 mm) or less, not in linear alignment or clusters must be ignored.If acceptable limits on coated surfaces are ecxeeded, remove the coating and make an estimate of the surface defects again. Repair coating per VRS4294 TASK 72-50-32-300-041 (REPAIR-041) or VRS4296 TASK 72-50-32-300-043 (REPAIR-043).More than in Step
Examine the surface in area A3.
More than in Step
Examine the surface in area A5.
SUBTASK 72-50-32-220-422 Examine the Stage 4 Turbine Blades for Defects
Refer to Figure.
Repair, VRS4301 TASK 72-50-32-300-062 (REPAIR-062)
Not more than 0.010 in. (0.25 mm) maximum depth
Repair, VRS4519 TASK 72-50-32-300-070 (REPAIR-070)
More than in Step
Dented.
Repair, VRS4301 TASK 72-50-32-300-062 (REPAIR-062)
Not more than 0.005 in. (0.13 mm) maximum depth
Repair, VRS4519 TASK 72-50-32-300-070 (REPAIR-070)
More than in Step
Nicked or pitted.
Examine the knife edge seals in area A8.
SUBTASK 72-50-32-220-423 Examine the Stage 4 Turbine Blade in Area A8 for Surface Damage
Refer to Figure.
Repair, VRS4292 TASK 72-50-32-300-044 (REPAIR-044)
Nicked, dented or pitted
Examine the surface in area A9.
Repair, VRS4292 TASK 72-50-32-300-044 (REPAIR-044)
Nicked, dented, pitted.
Examine the surface in area A10.
Repair, VRS4292 TASK 72-50-32-300-044 (REPAIR-044)
Nicked, dented, pitted.
Examine the surface in area A11.
Repair, VRS4292 TASK 72-50-32-300-044 (REAPAIR-044)
Examine the surface in area A12.
Repair, VRS4292 TASK 72-50-32-300-044 (REPAIR-044)
Examine the surface in area A13.
Repair, VRS4292 TASK 72-50-32-300-044 (REPAIR-044)
Nicked, dented, pitted.
Examine the surface in area A14.
Repair, VRS4292 TASK 72-50-32-300-044 (REPAIR-044)
Nicked, dented, pitted.
Examine the surface in area A15.
Repair, VRS4292 TASK 72-50-32-300-044 (REPAIR-044)
More than in Step
Nicked, dented, pitted.
Examine the surface in area A16.
Repair, VRS4292 TASK 72-50-32-300-044 (REPAIR-044)
Not more than 0.035 in. (0.9 mm) maximum depth
Rubbed in because of vane contact in area A17.2.
Examine the surface in area A17.
More than in Step
Nicked, dented, pitted.
Examine the surface in area A19.
More than in Step
Grooved because of airseal contact.
Examine the surface in area A20.
More than in Step
Chipped, nicked, dented or pitted
Examine the surface in area A22.
More than in Step
Pitted.
Examine the surface in area A23.
SUBTASK 72-50-32-220-424 Examine the Stage 4 Turbine Blade in Area A9 - A23 for Surface Damage
Refer to Figure.
NOTE
Sulphidation pits have a dark bottom after dry grit abrasive blast per the SPM TASK 70-12-09-120-501.If dark bottom pits are visible after dry blast, remove coating per VRS4296 TASK 72-50-32-300-043 (REPAIR-043) before any part is examined.Other than in Step
Sulphidation pits or pustules.
Examine the surface in area A24.
Repair, VRS4292 TASK 72-50-32-300-044 (REPAIR-044)
Sulphidation pits or pustules
Examine the surface in area A25.
Other than in Step
Sulphidation pits or pustules.
Examine the surface in area A26.
Other than in Step
Sulphidation pits or pustules.
Examine the surface in area A27.
SUBTASK 72-50-32-220-425 Examine the Stage 4 Turbine Blade in Area A24 - A27 for Sulphidation
Refer to Figure.
Repair, VRS4296 TASK 72-50-32-300-043 (REPAIR-043)
Cracked coating
Repair, VRS4294 TASK 72-50-32-300-041 (REPAIR-041)
Blistered, damaged or chipped coating not more than 1.000 sq.in. (645,16 sq.mm) total area per blade (shrouds and arfoil together)
Repair VRS4296 TASK 72-50-32-300-043 (REPAIR-043)
Other than in Step
Examine the coating.
Examine the surface in area A10 - A18.
SUBTASK 72-50-32-220-426 Examine the Stage 4 Turbine Blade for Coating Damage
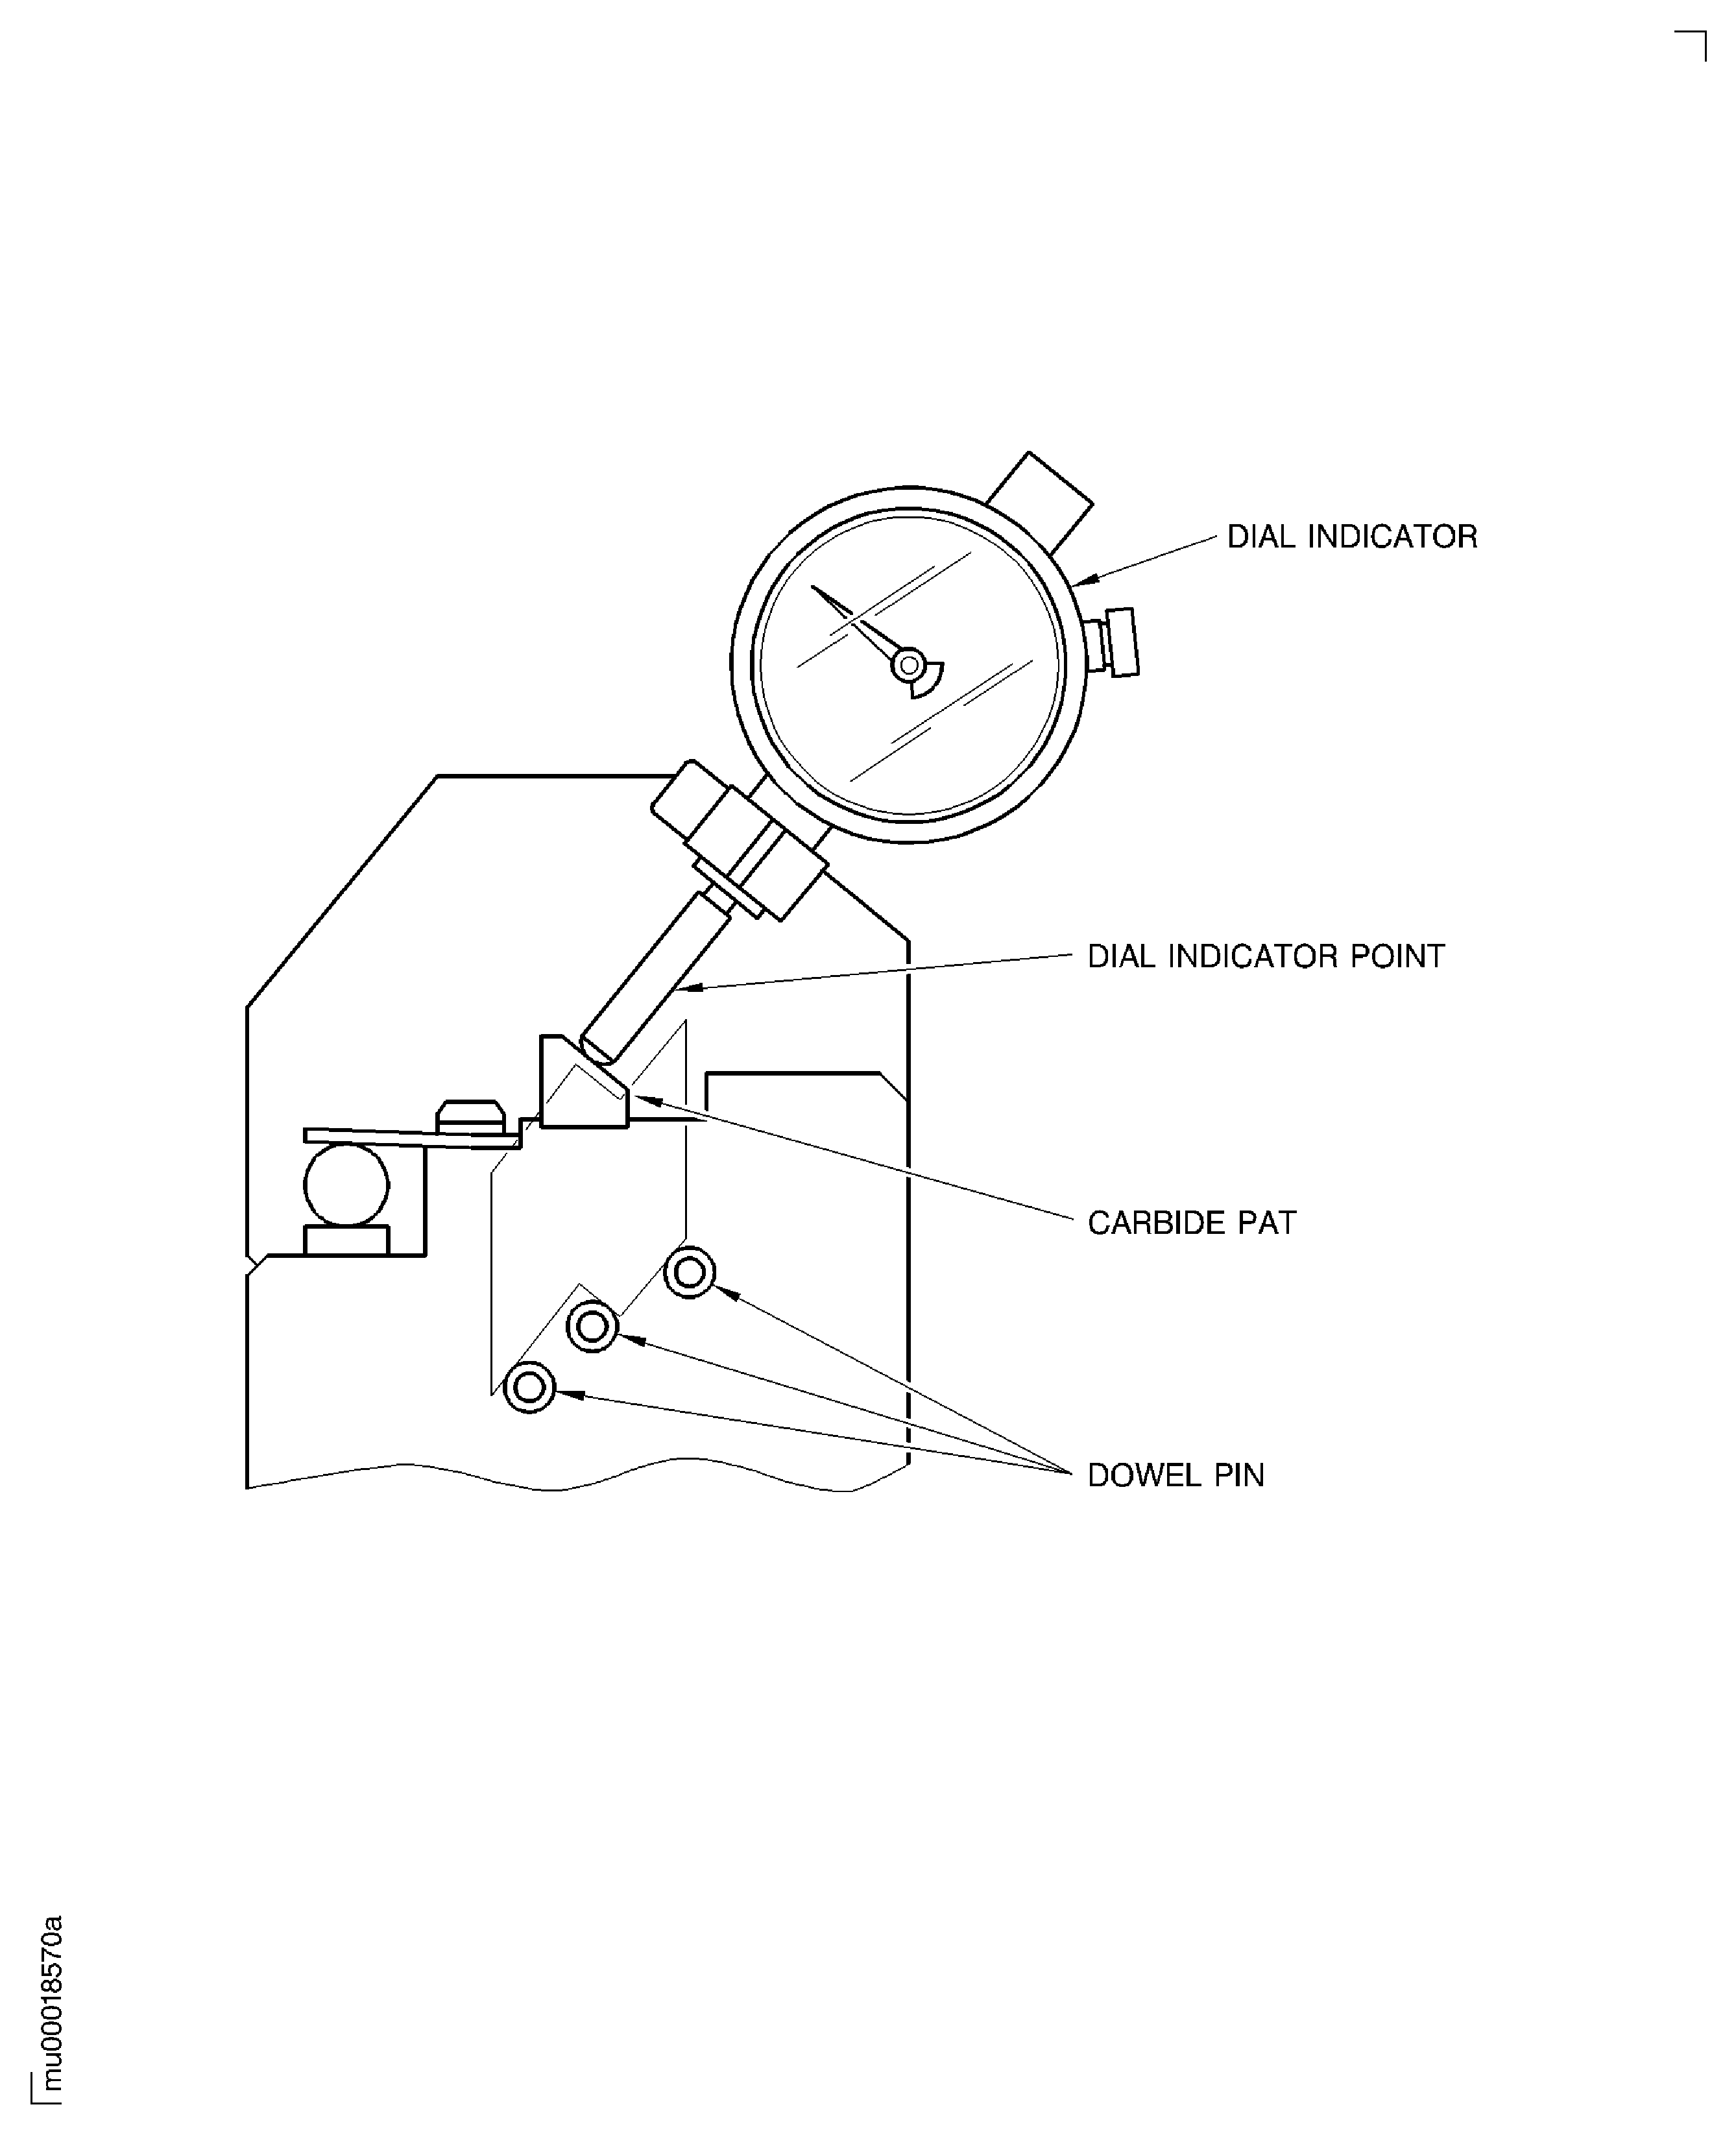
Install the stage 4 turbine blade with the convex side down on to IAE 2M14189 Inspection gage 1 off. Make sure that the stage 4 turbine blade is correctly installed on the inspection gage.
Repair, VRS4287 TASK 72-50-32-300-045 (REPAIR-045)
Less than in Step and not less than 0.7957 in. (20.21 mm)
Less than in Step
Find the actual result of the outer shroud dimension D1 as follows:
SUBTASK 72-50-32-220-427 Examine the Outer Shroud Dimension D1 of the Turbine Blade
Install the stage 4 turbine blade on to the IAE 2M14193 Inspection mounting block 1 off as follows:
Repair, VRS4305 TASK 72-50-32-300-046 (REPAIR-046)
Other than in Step
Measure the deviation between point P1 and point P2 on the front blade shroud as follows:
SUBTASK 72-50-32-220-428 Examine the Twist of the Turbine Blade
Repair, VRS4519 TASK 72-50-32-300-070 (REPAIR-070)
Less than in Step
Measure the dimension D3 between the front knife edge seal and the plane A on the inspection mounting block.
Repair, VRS4519 TASK 72-50-32-300-070 (REPAIR-070)
Less than in Step
Measure the dimension D4 between the rear knife edge seal and the plane A on the inspection mounting block.
SUBTASK 72-50-32-220-429 Examine the Knife Edge Seal of the Turbine Blade
Figure: Examine the Stage 4 Turbine Blades
Examine the Stage 4 Turbine Blades
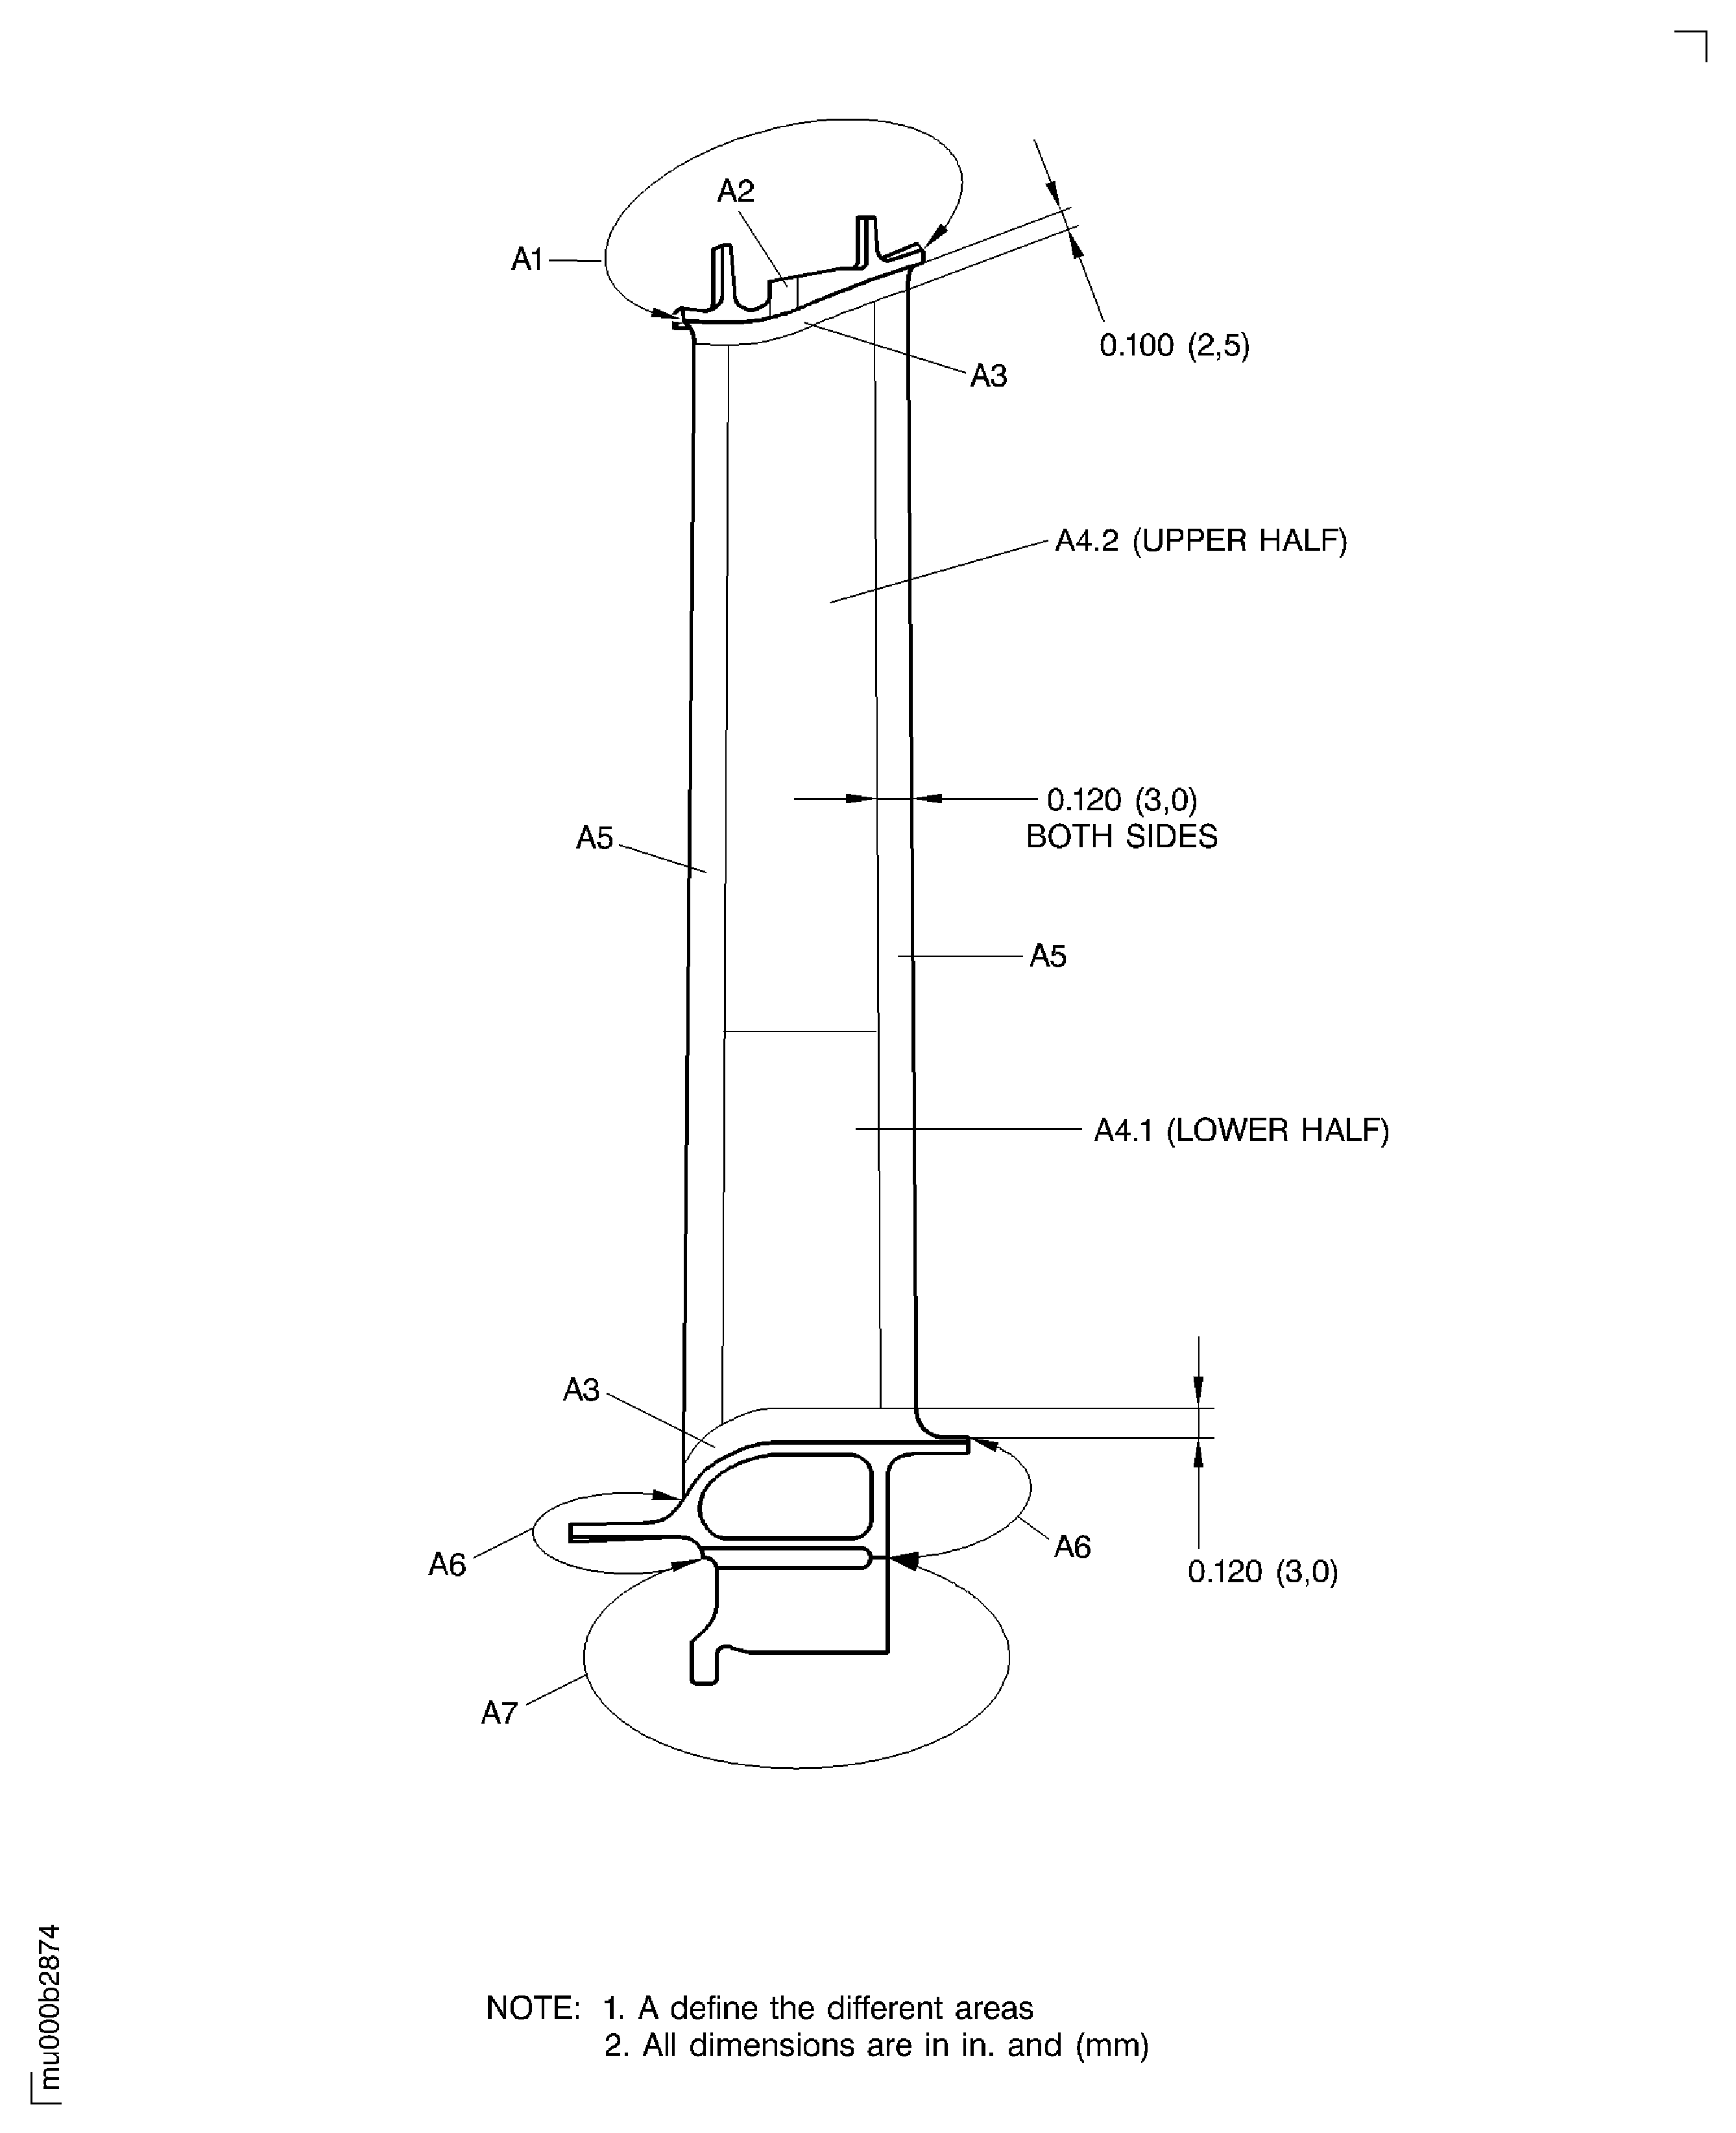
Figure: Examine the Stage 4 Turbine Blades
Examine the Stage 4 Turbine Blades
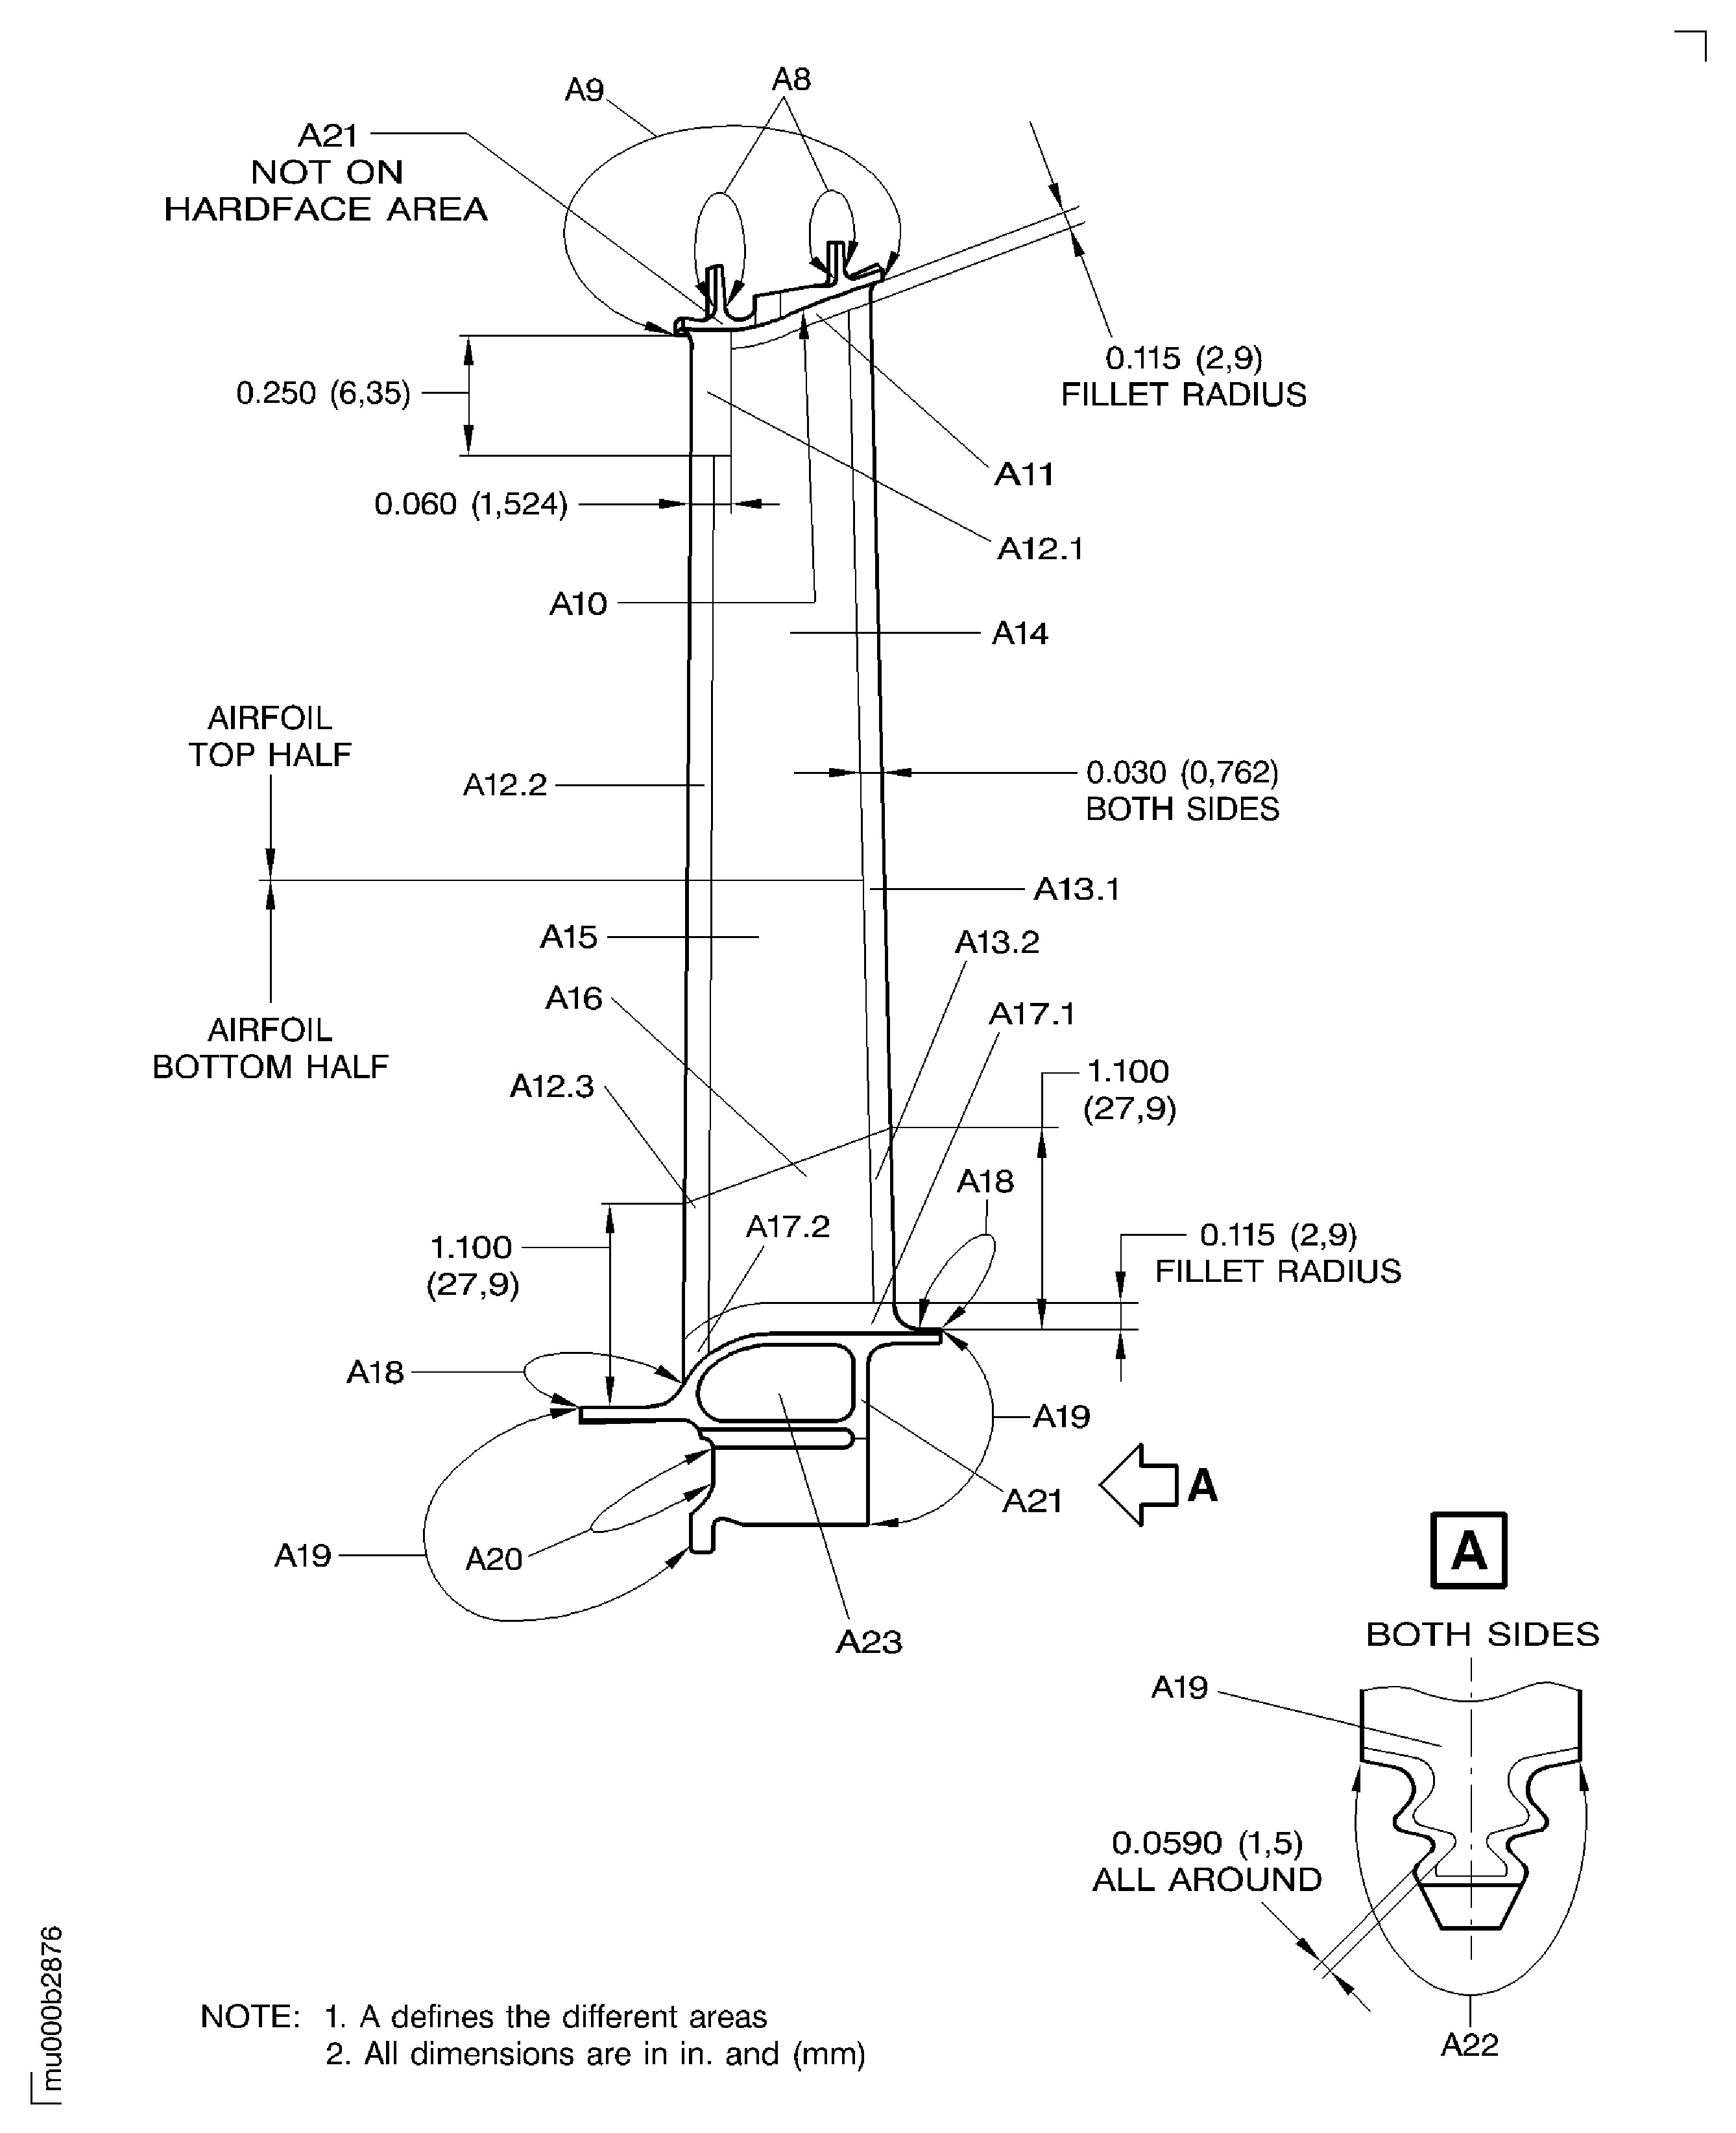
Figure: Examine the Stage 4 Turbine Blades
Examine the Stage 4 Turbine Blades

Figure: Examine the Stage 4 Turbine Blades
Examine the Stage 4 Turbine Blades
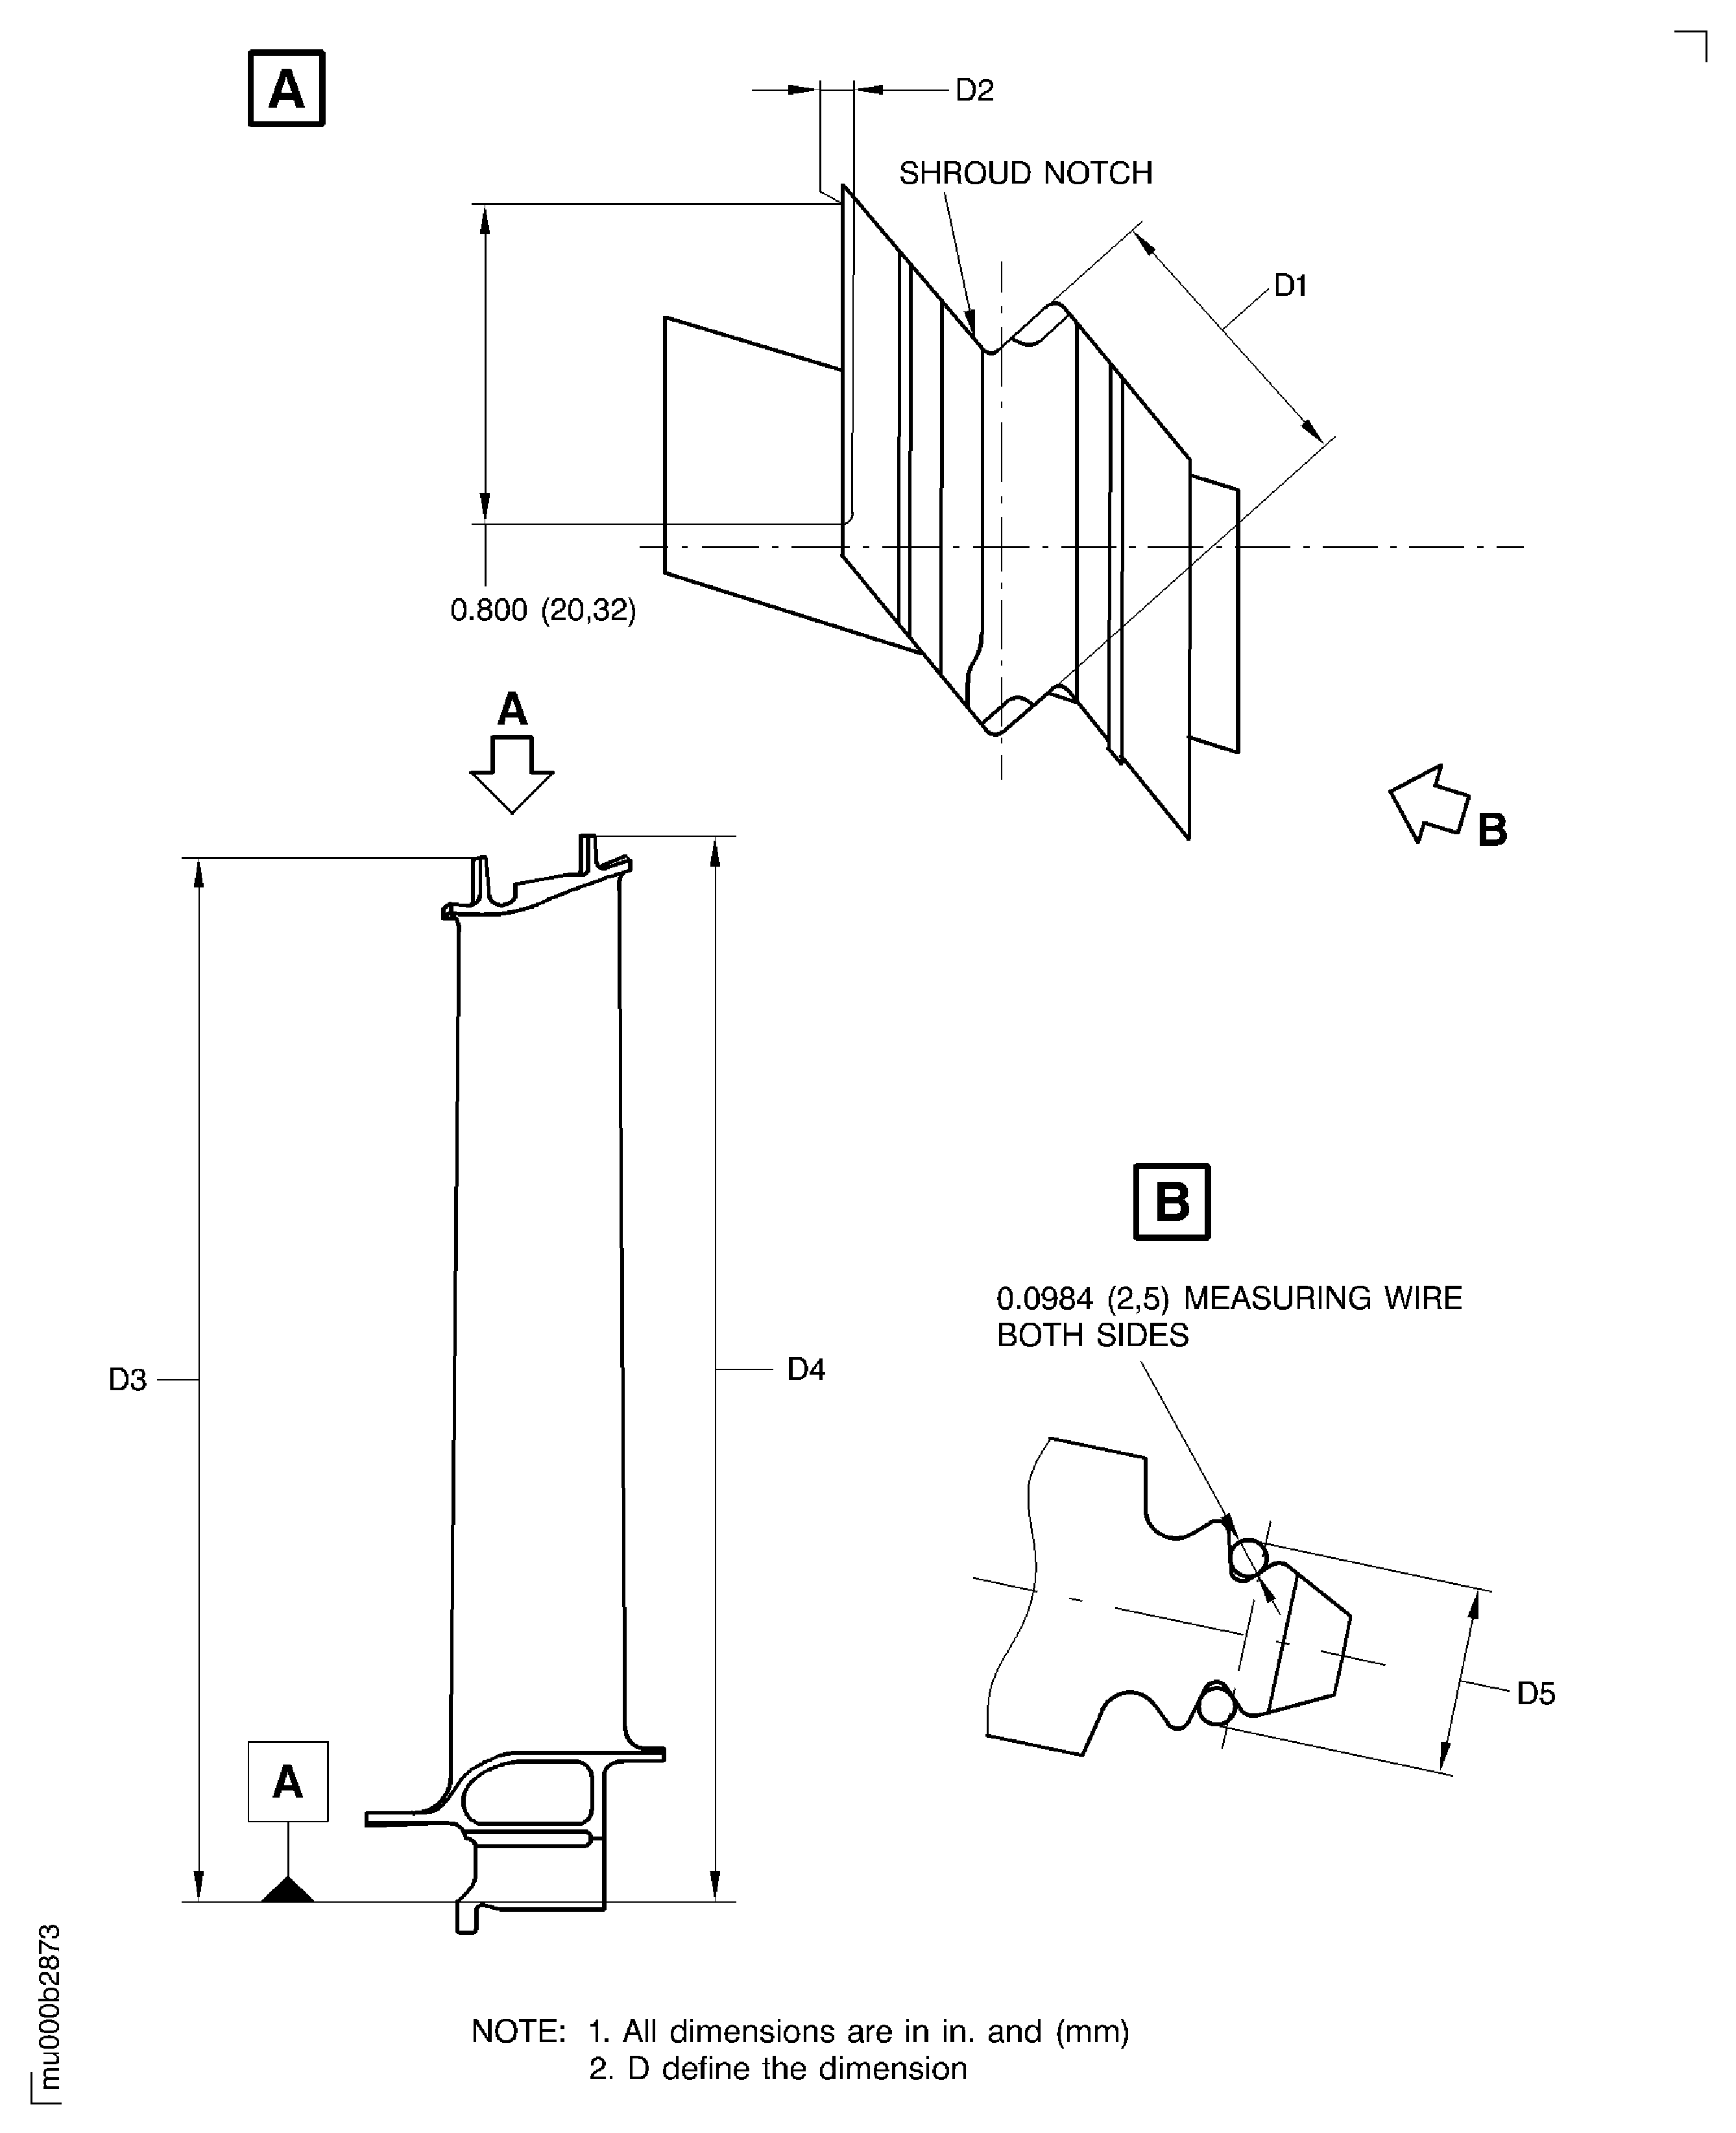
Figure: Install the Stage 4 Turbine Blades on to the Inspection Mounting Block
Install the Stage 4 Turbine Blades on to the Inspection Mounting Block
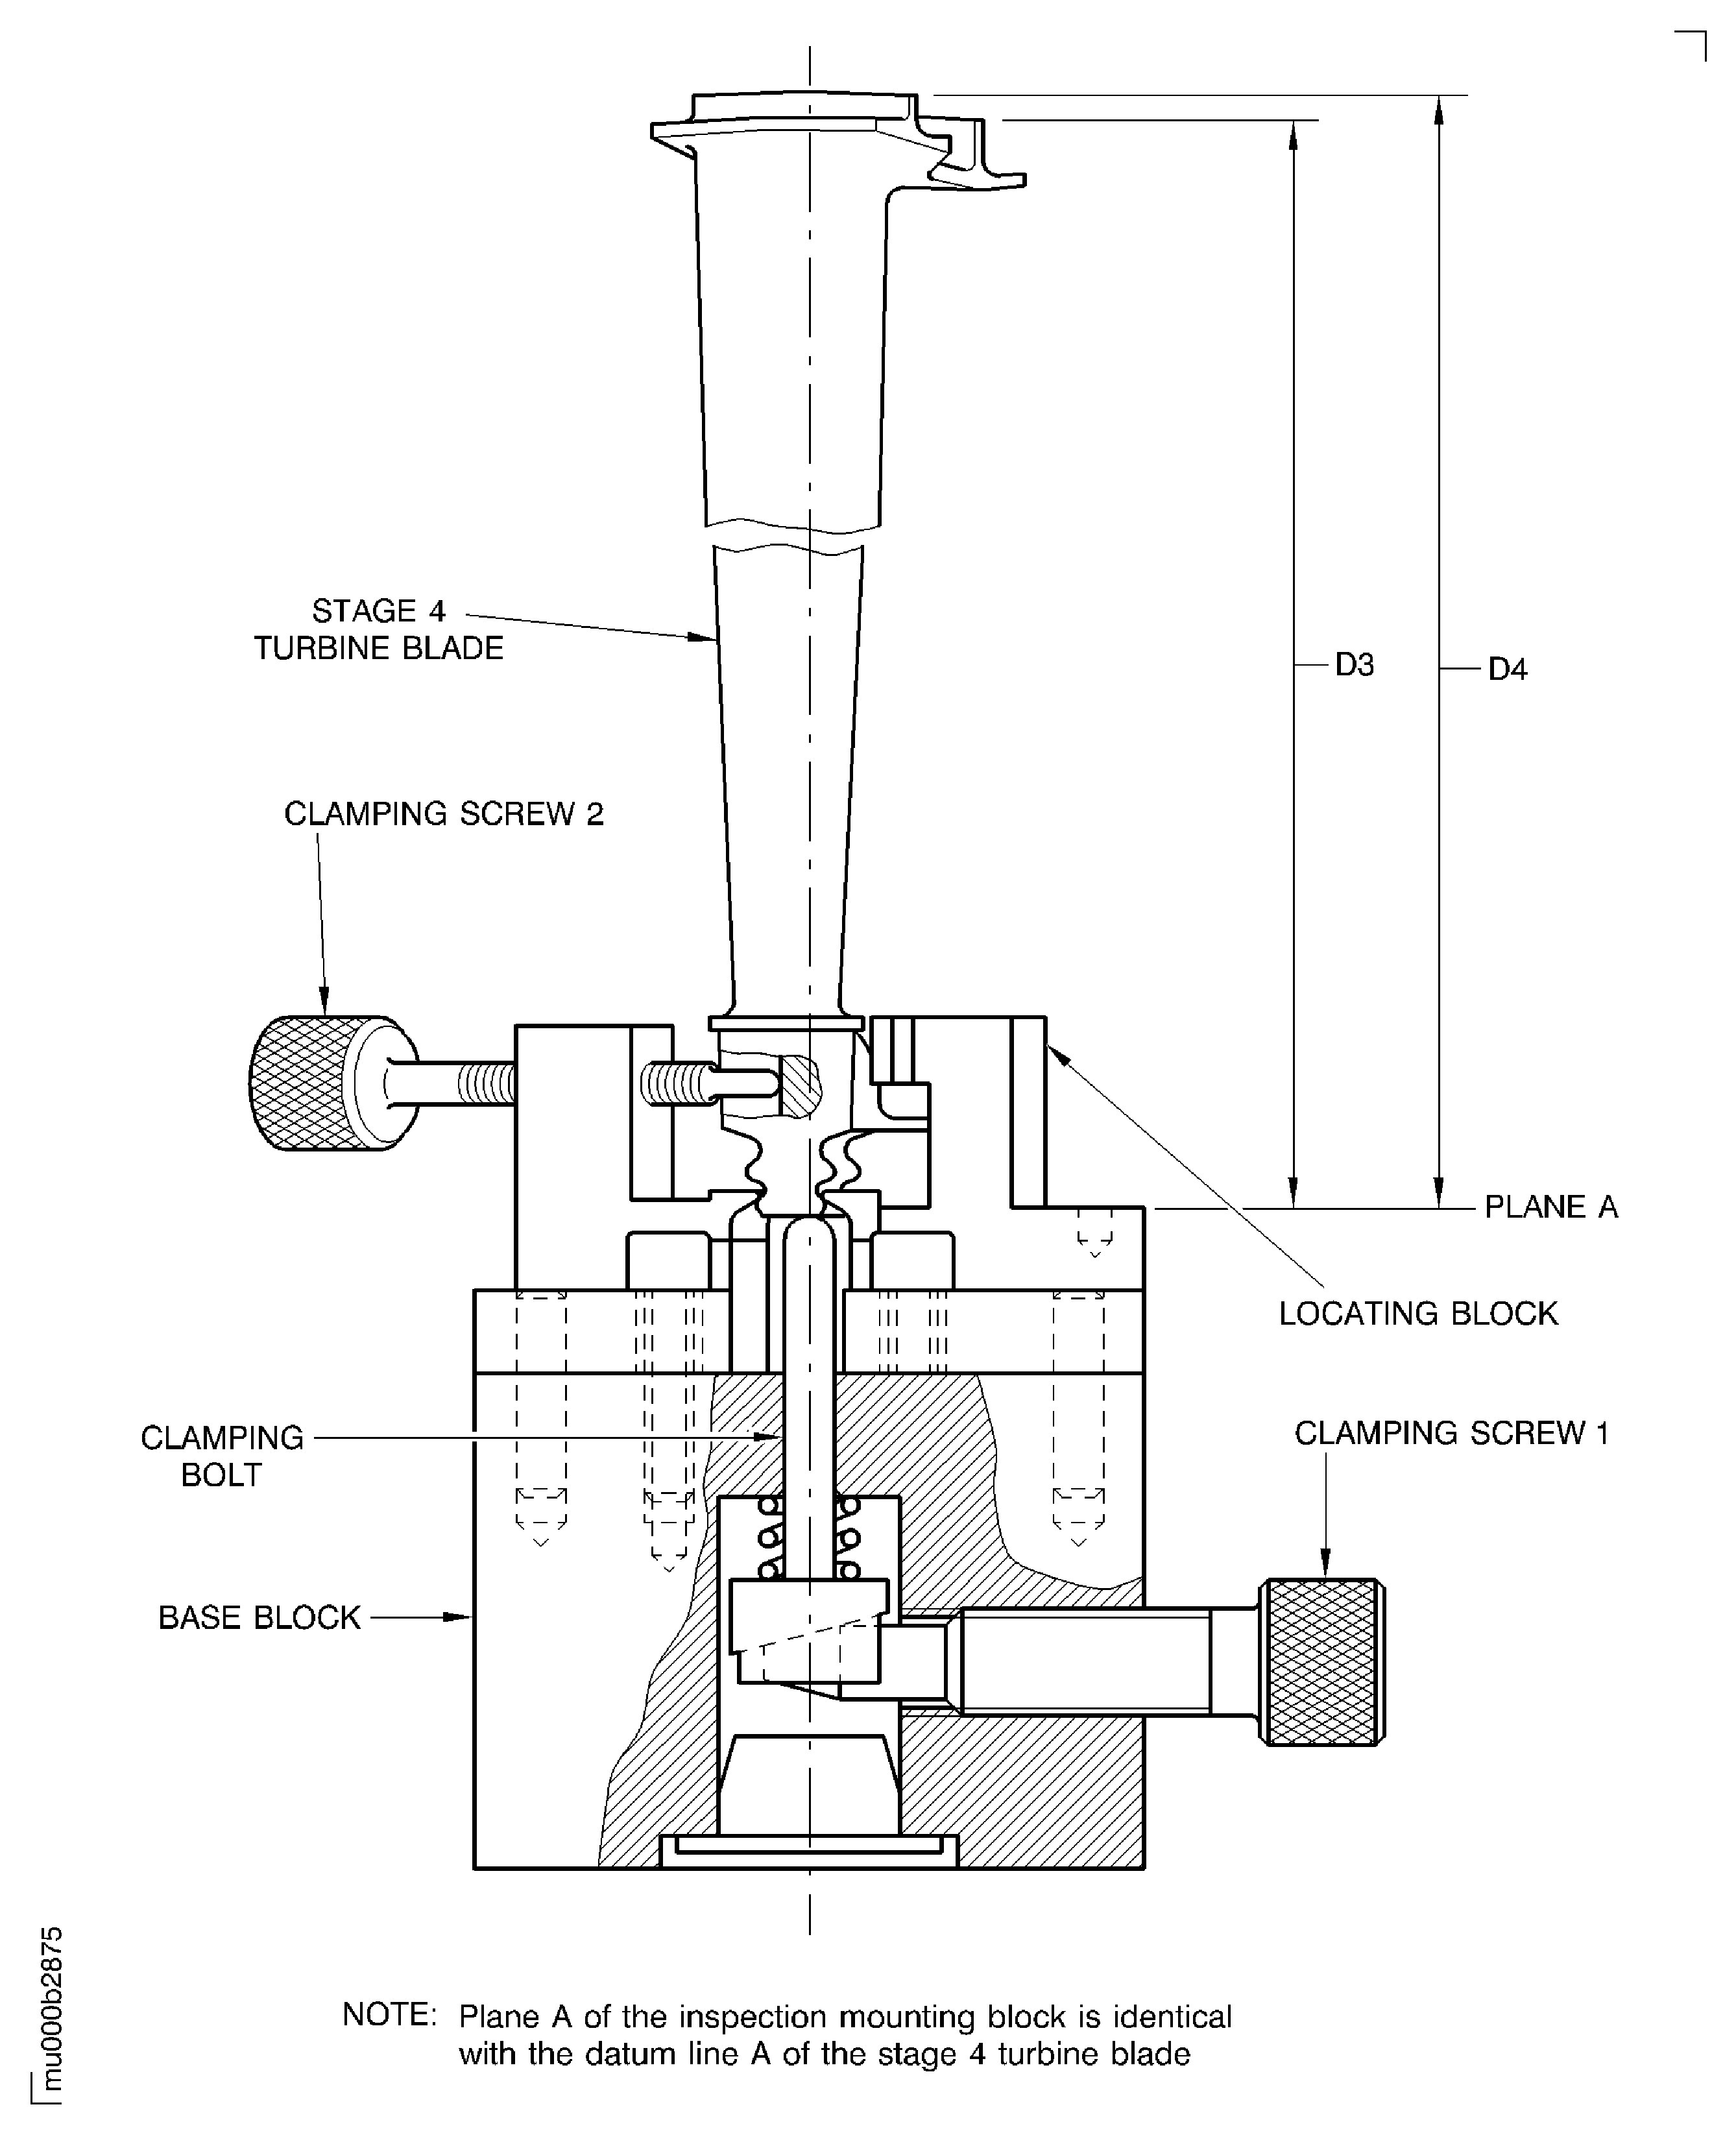
Figure: Install the Stage 4 Turbine Blades on to the Inspection Mounting Block
Install the Stage 4 Turbine Blades on to the Inspection Mounting Block
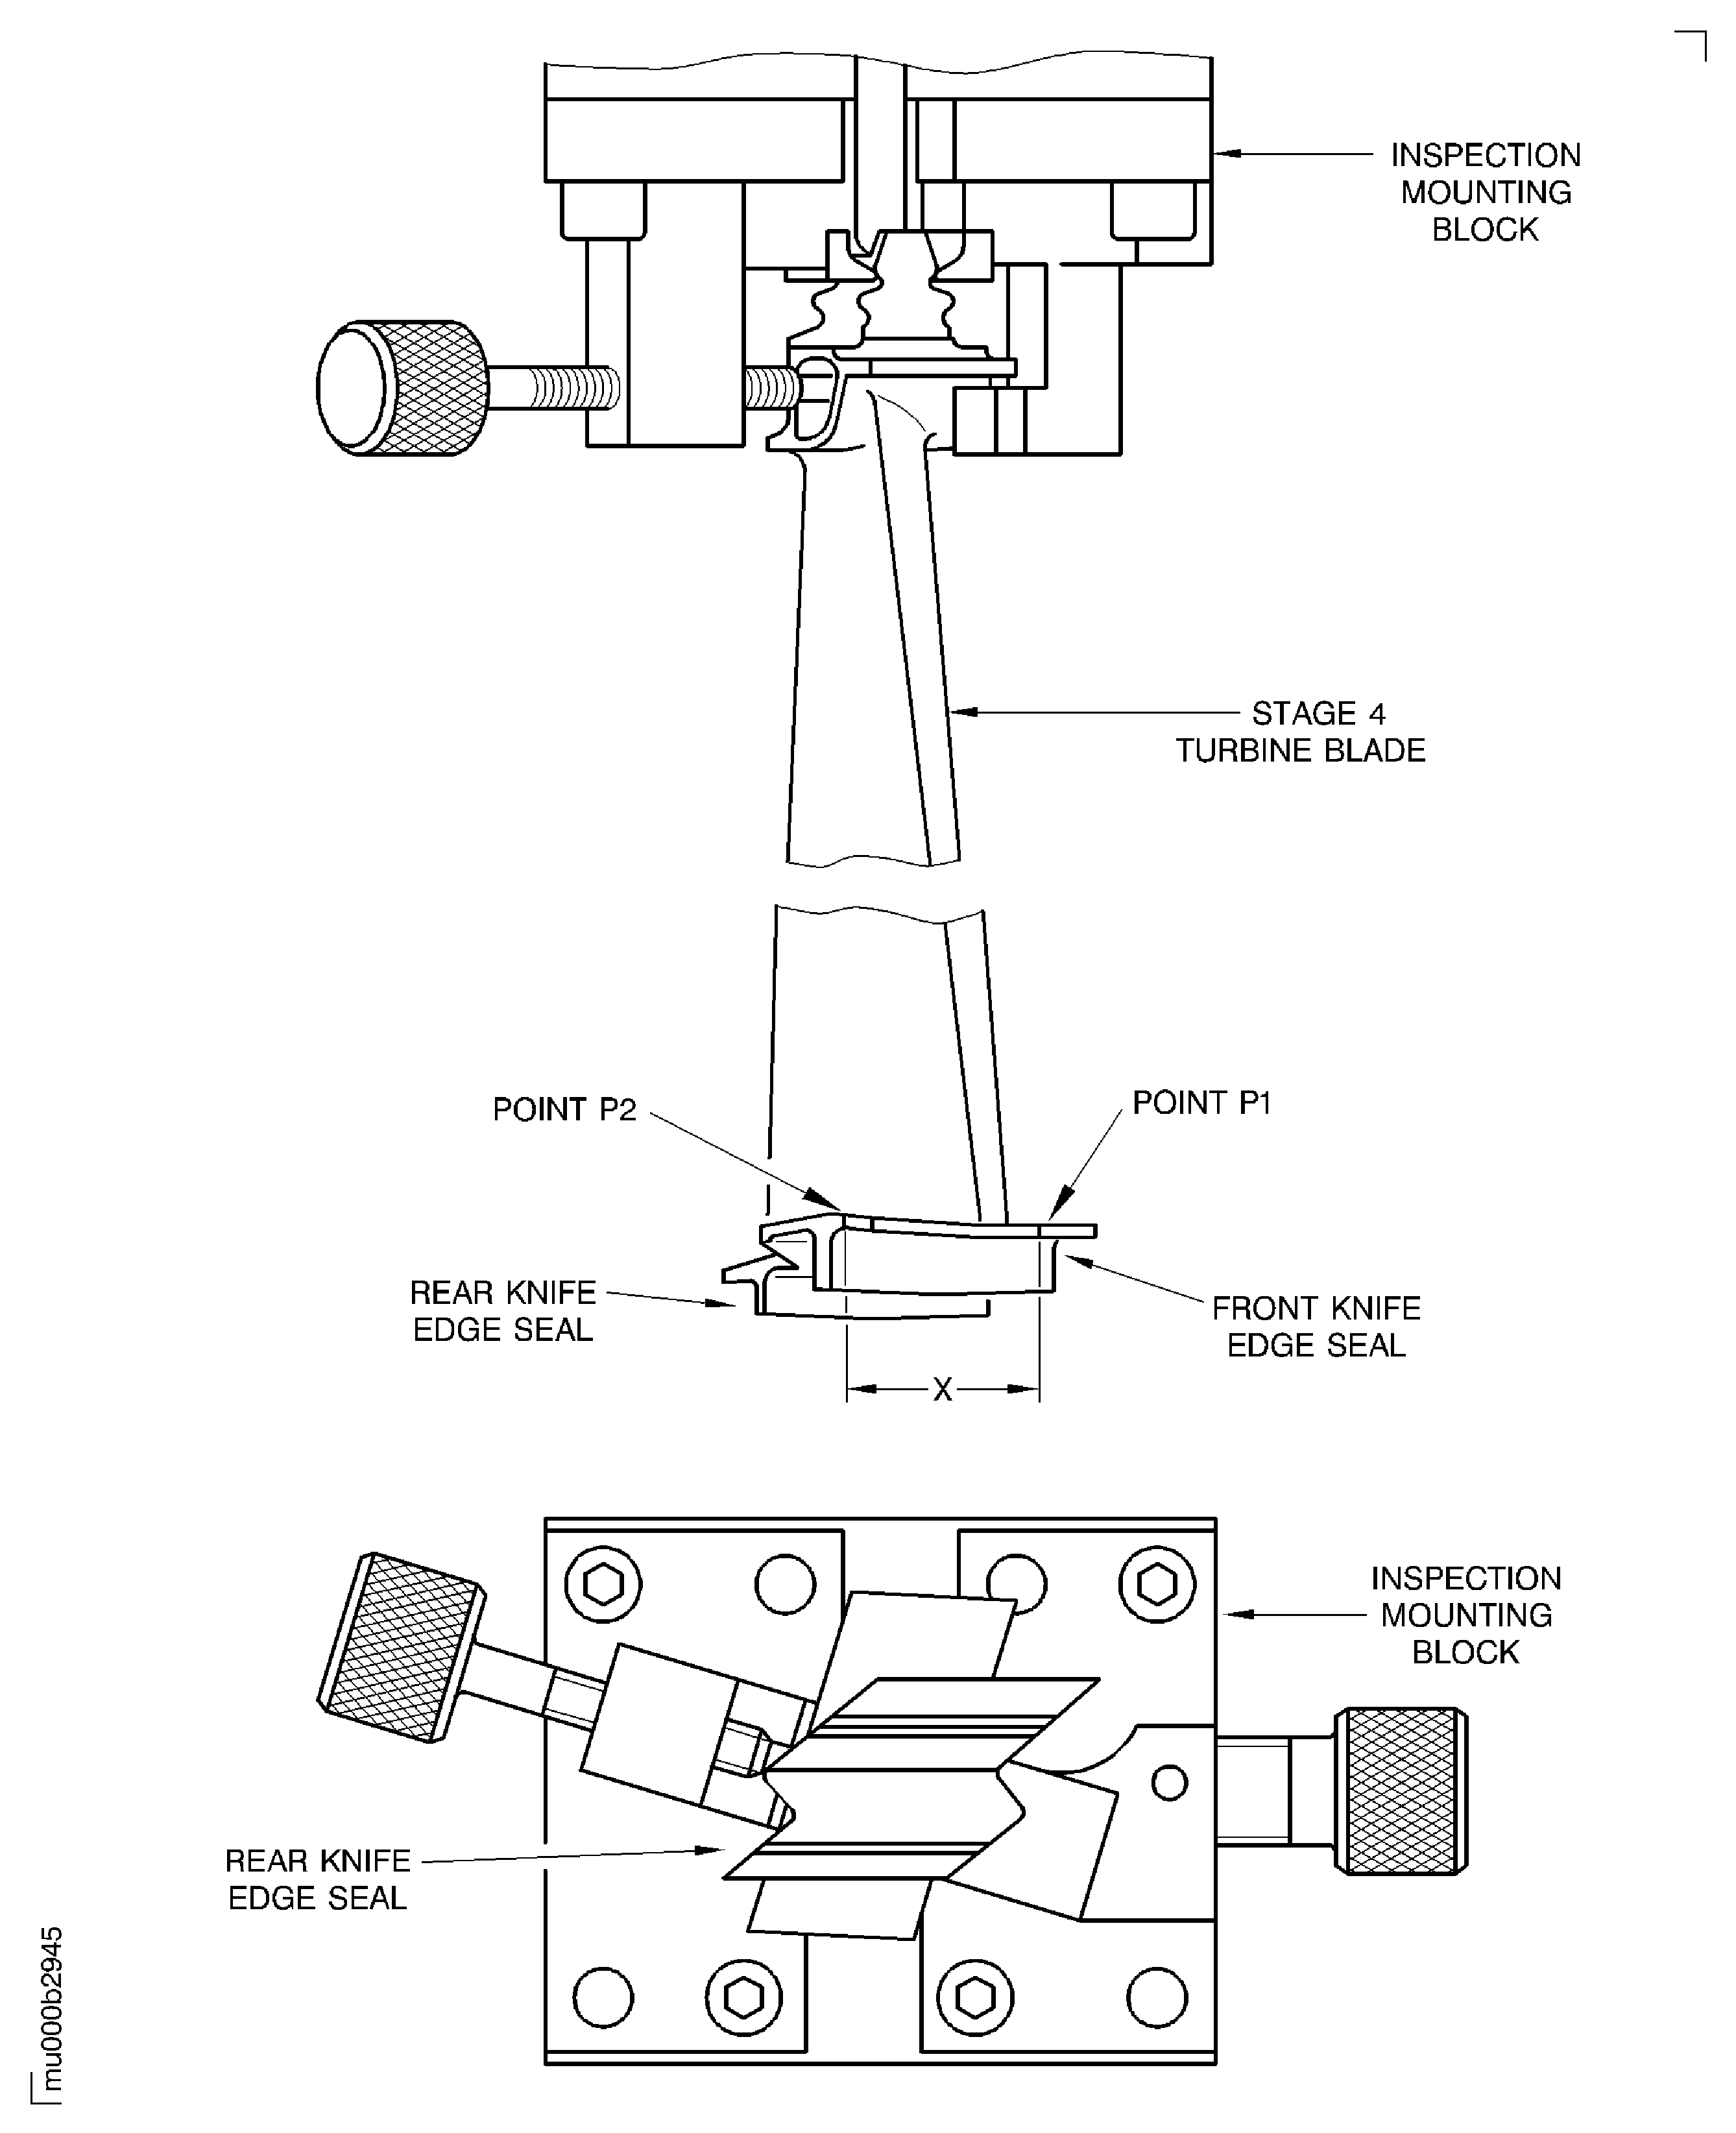
Figure: Install the Stage 4 Turbine Blades on to the Inspection Gage
Install the Stage 4 Turbine Blades on to the Inspection Gage
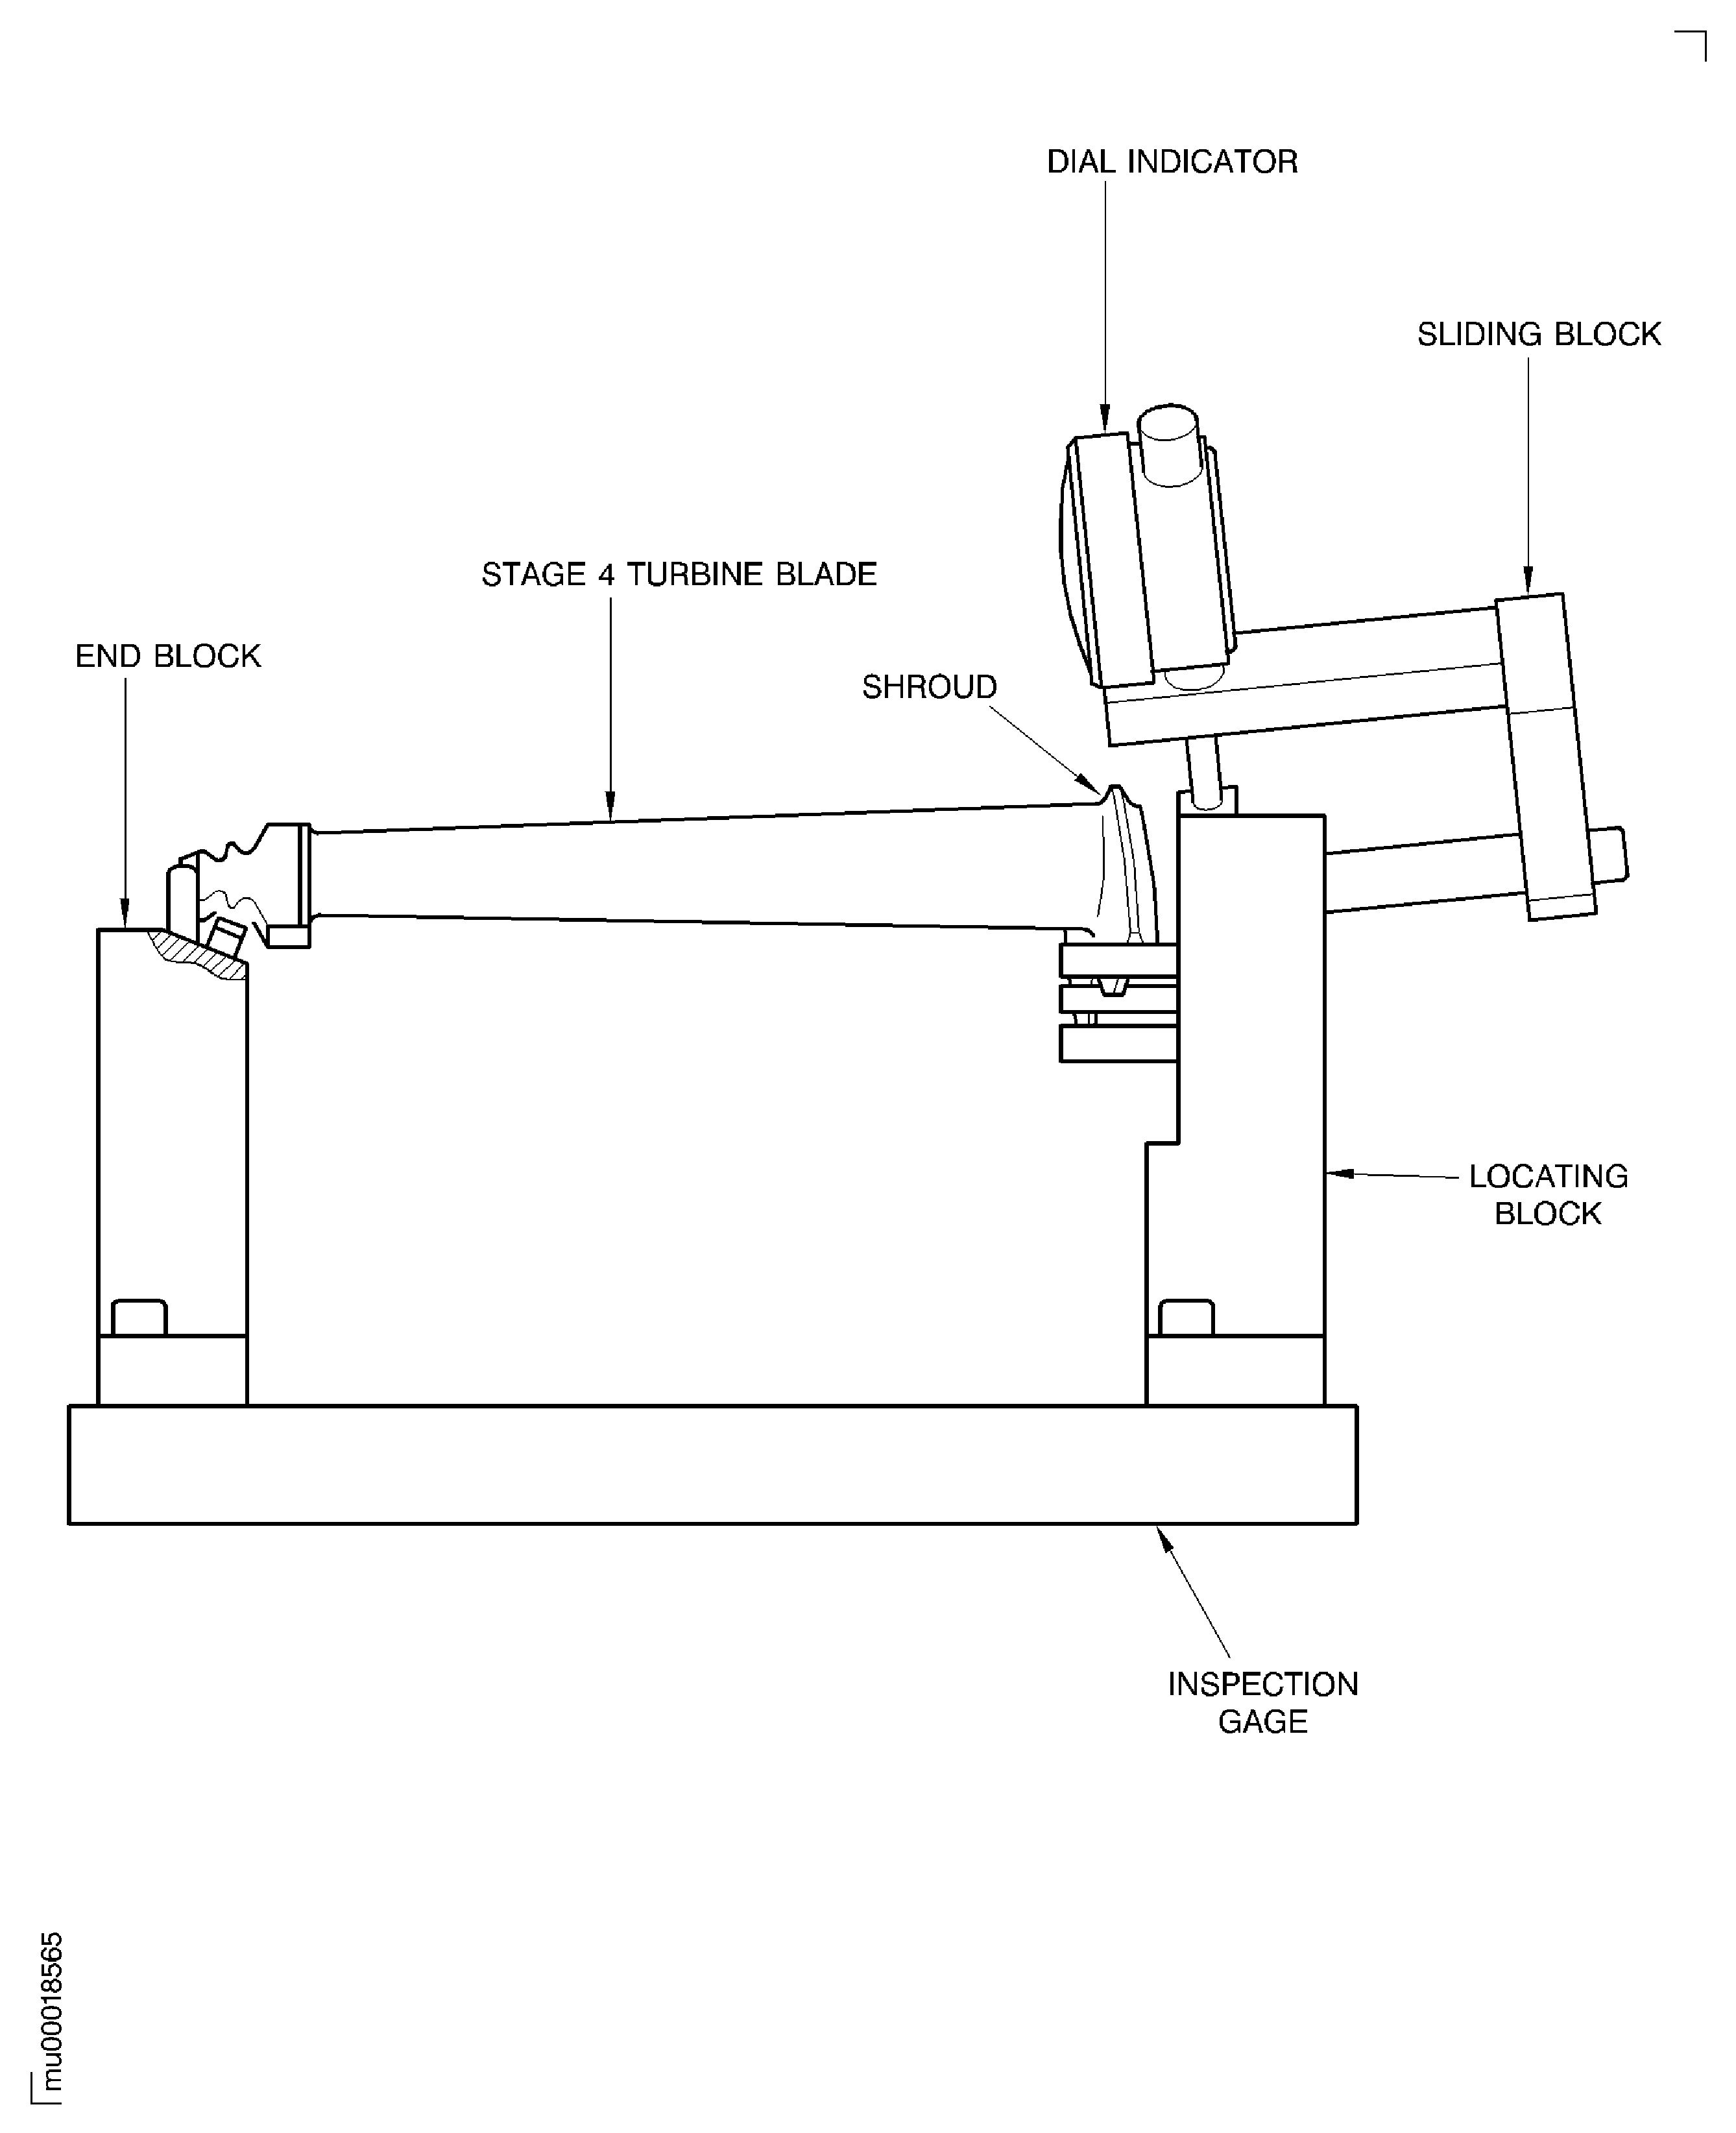
Figure: Install the Stage 4 Turbine Blades on to the Inspection Gage
Install the Stage 4 Turbine Blades on to the Inspection Gage
