Export Control
EAR Export Classification: Not subject to the EAR per 15 C.F.R. Chapter 1, Part 734.3(b)(3), except for the following Service Bulletins which are currently published as EAR Export Classification 9E991: SBE70-0992, SBE72-0483, SBE72-0580, SBE72-0588, SBE72-0640, SBE73-0209, SBE80-0024 and SBE80-0025.Copyright
© IAE International Aero Engines AG (2001, 2014 - 2021) The information contained in this document is the property of © IAE International Aero Engines AG and may not be copied or used for any purpose other than that for which it is supplied without the express written authority of © IAE International Aero Engines AG. (This does not preclude use by engine and aircraft operators for normal instructional, maintenance or overhaul purposes.).Applicability
All
Common Information
TASK 72-50-32-300-035 LPT Stage 5 Blade - Weld Build Up Repair, Repair-035 (VRS4291)
General
Price and availability - none
The practices and processes referred to in this procedure by the TASK number are in the SPM.
NOTE
NOTE
NOTE
NOTE
Do not repair the turbine blades that have cracks extending into the outer shroud.
Before you do the repair, write down the turbine blade length dimension, part number, heat code, blade life figure and serial number.
Preliminary Requirements
Pre-Conditions
NONESupport Equipment
| Name | Manufacturer | Part Number / Identification | Quantity | Remark |
|---|---|---|---|---|
| Dial caliper | LOCAL | Dial caliper | ||
| External grinding machine | LOCAL | External grinding machine | ||
| Gas furnace 2400 deg F (1315 deg C) | LOCAL | Gas furnace 2400 deg F (1315 deg C) | ||
| Radius gage set | LOCAL | Radius gage set | ||
| Roughness microtester | LOCAL | Roughness microtester | ||
| Tridimensional measuring unit | LOCAL | Tridimensional measuring unit | ||
| IAE 2M14194 Inspection mounting block | 0AM53 | IAE 2M14194 | 1 | |
| IAE 3M14413 Welding fixture | 0AM53 | IAE 3M14413 | 1 | |
| IAE 3M14466 Welding mounting block | 0AM53 | IAE 3M14466 | 1 | |
| IAE 3M14470 Grinding fixture | 0AM53 | IAE 3M14470 | 1 | |
| IAE 3M14524 Grinding mounting block | 0AM53 | IAE 3M14524 | 1 |
Consumables, Materials and Expendables
| Name | Manufacturer | Part Number / Identification | Quantity | Remark |
|---|---|---|---|---|
| CoMat 03-245 WELDING FILLER WIRE | LOCAL | CoMat 03-245 | ||
| CoMat 03-287 WELDING FILLER WIRE | LOCAL | CoMat 03-287 | ||
| CoMat 05-030 CAST STEEL SHOT DELETED | 0AM53 | CoMat 05-030 |
Spares
NONESafety Requirements
NONEProcedure
Use IAE 3M14470 Grinding fixture 1 off, grinding machine and IAE 3M14524 Grinding mounting block 1 off.
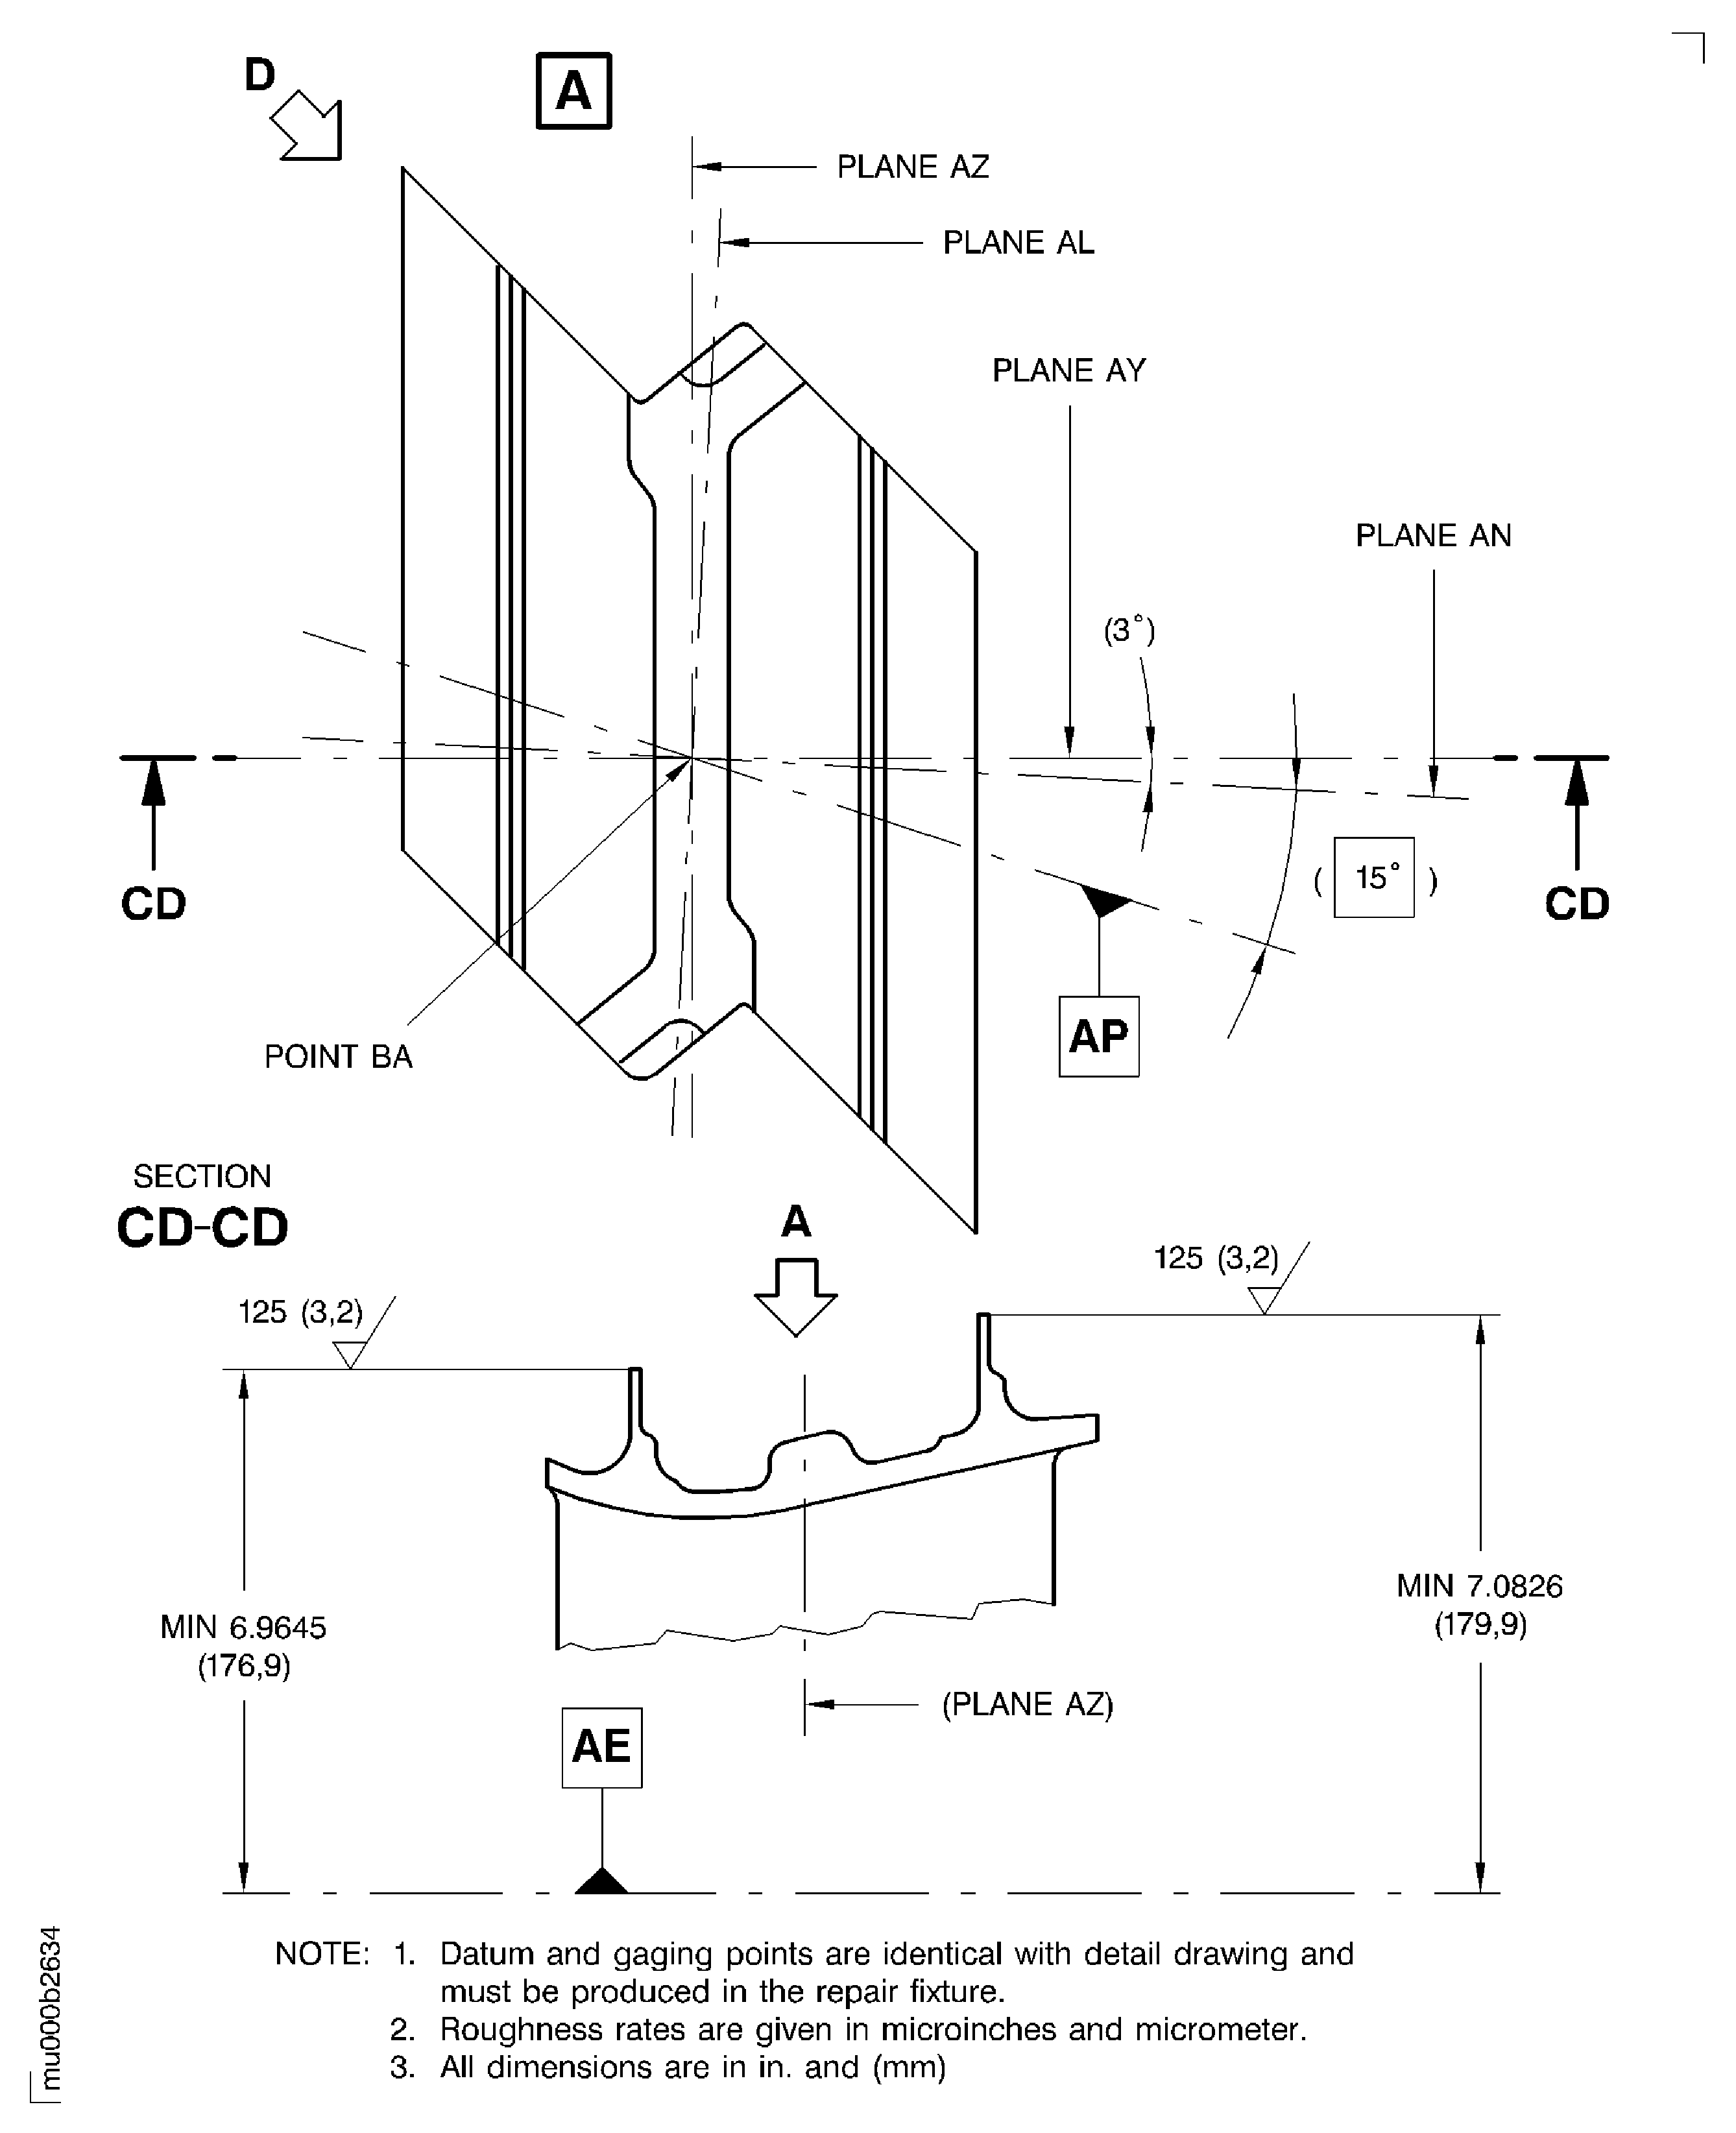
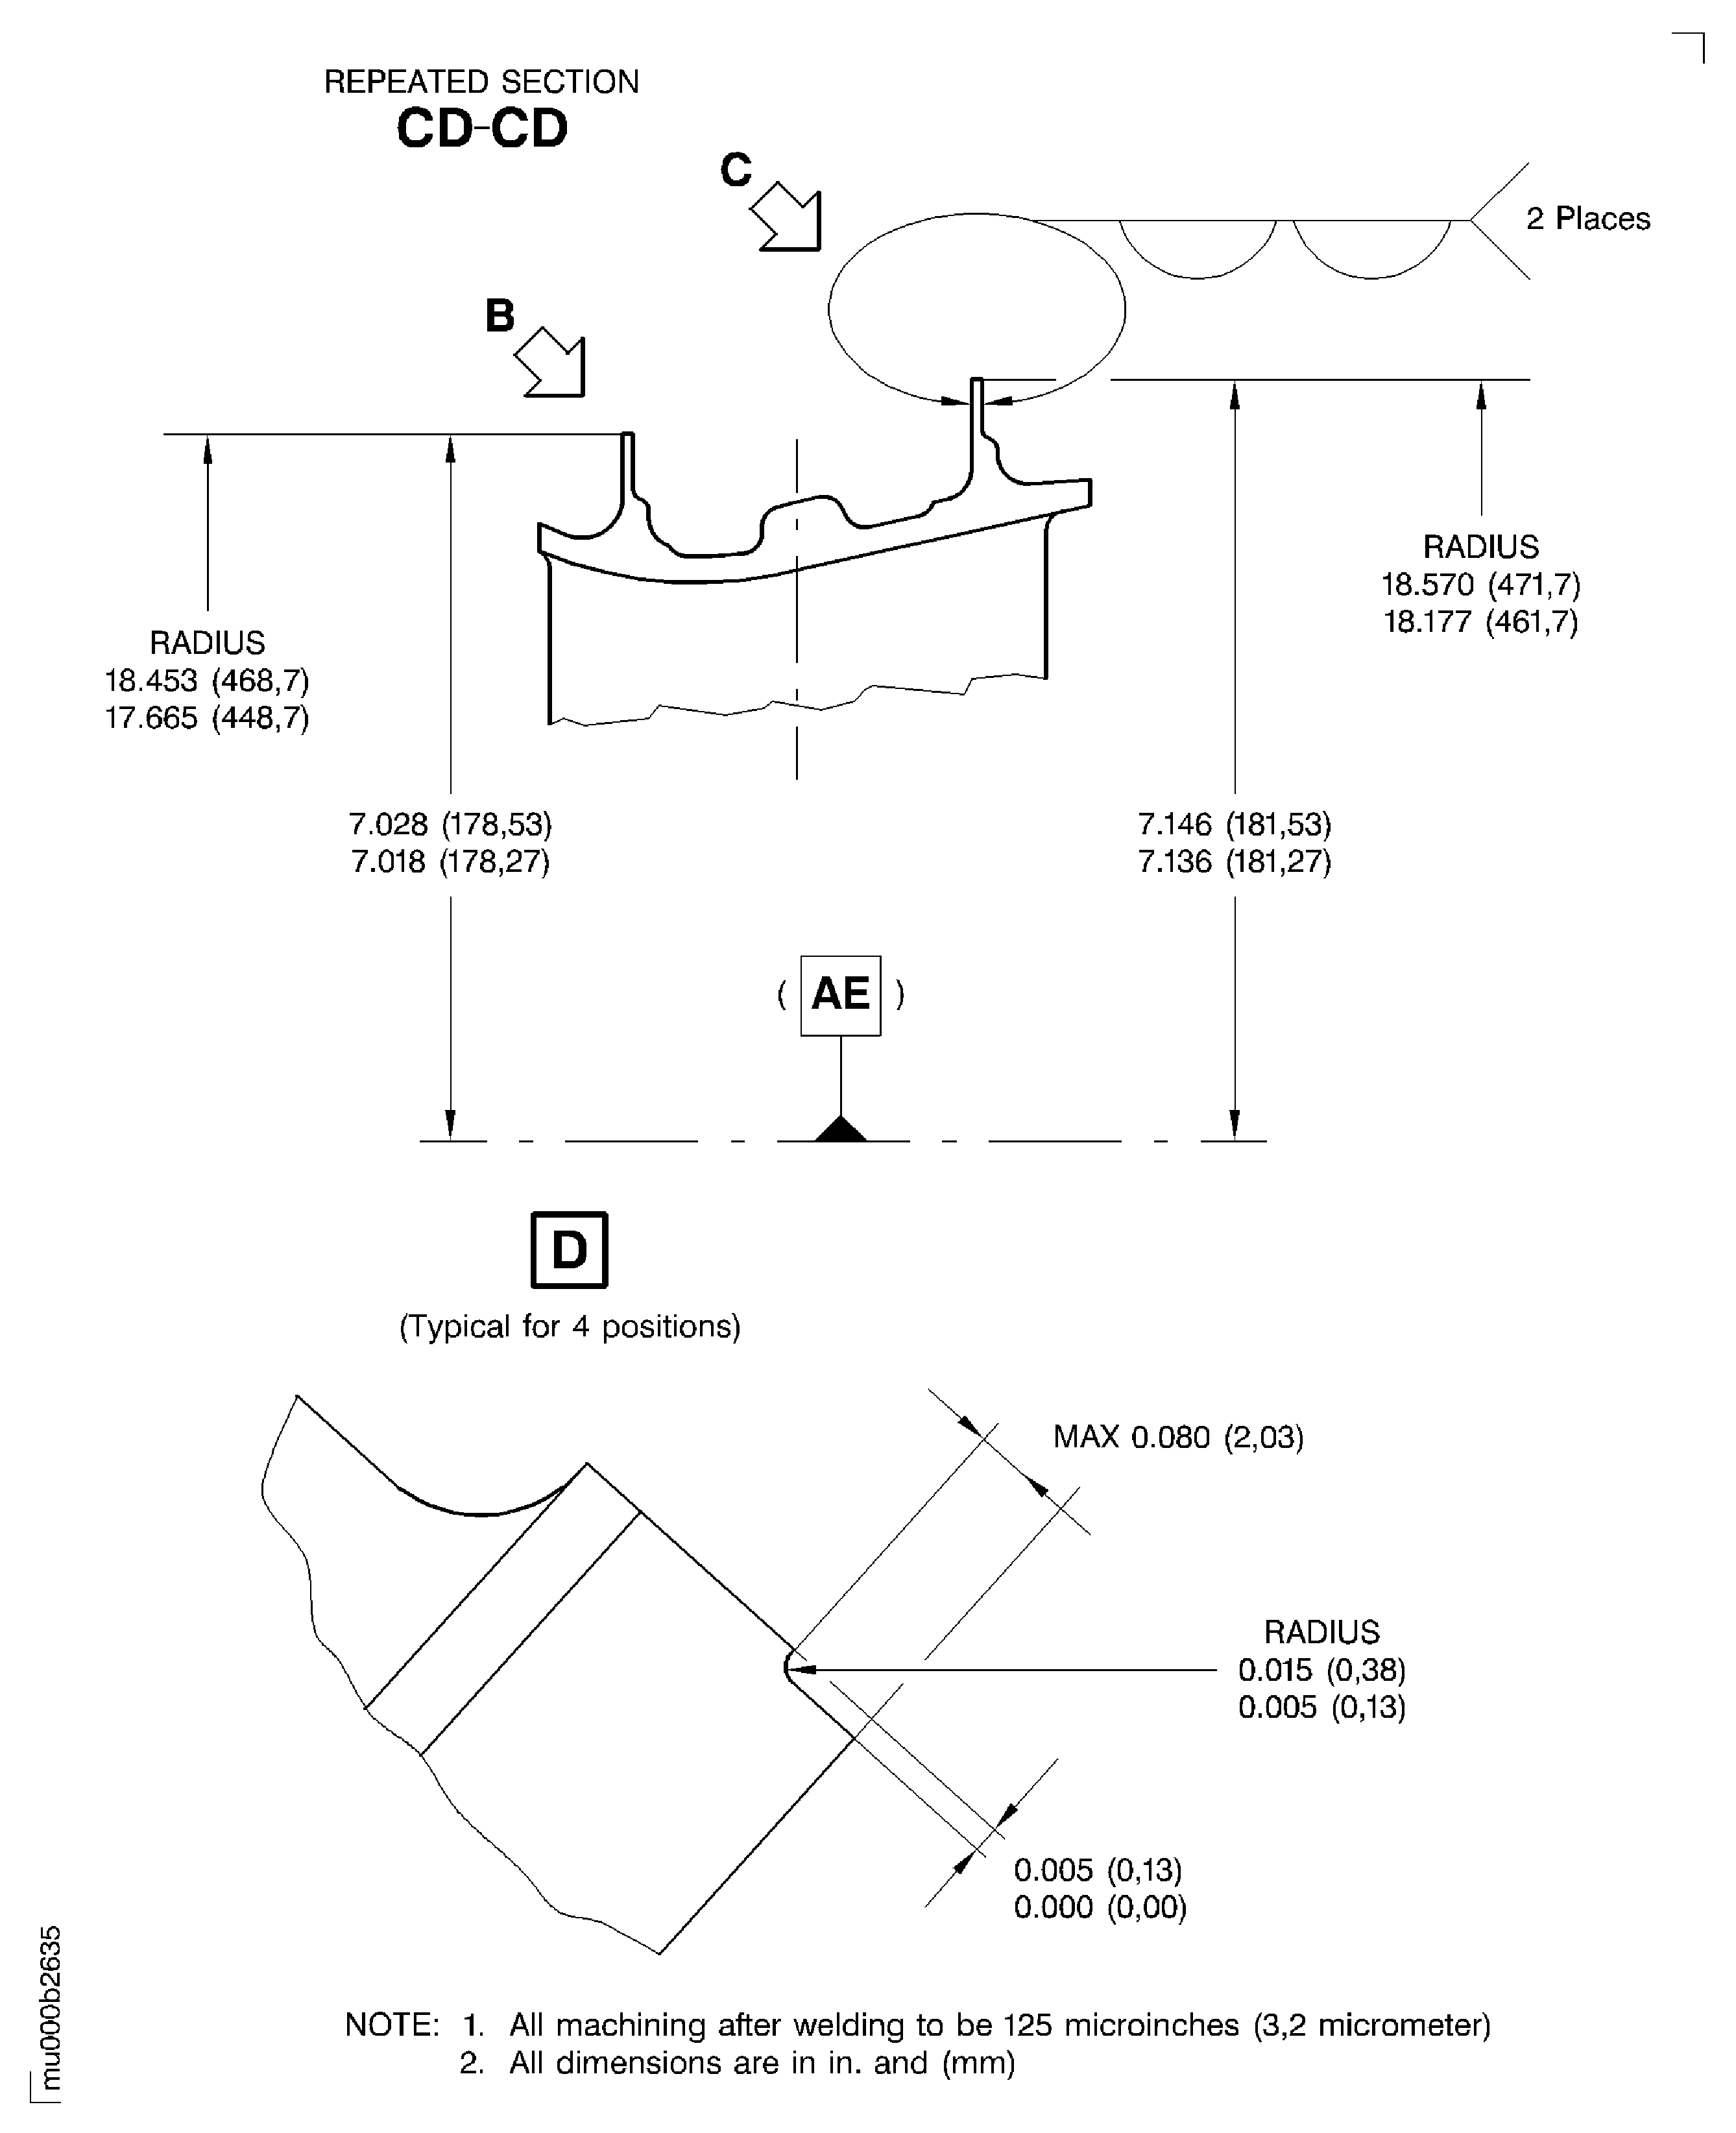
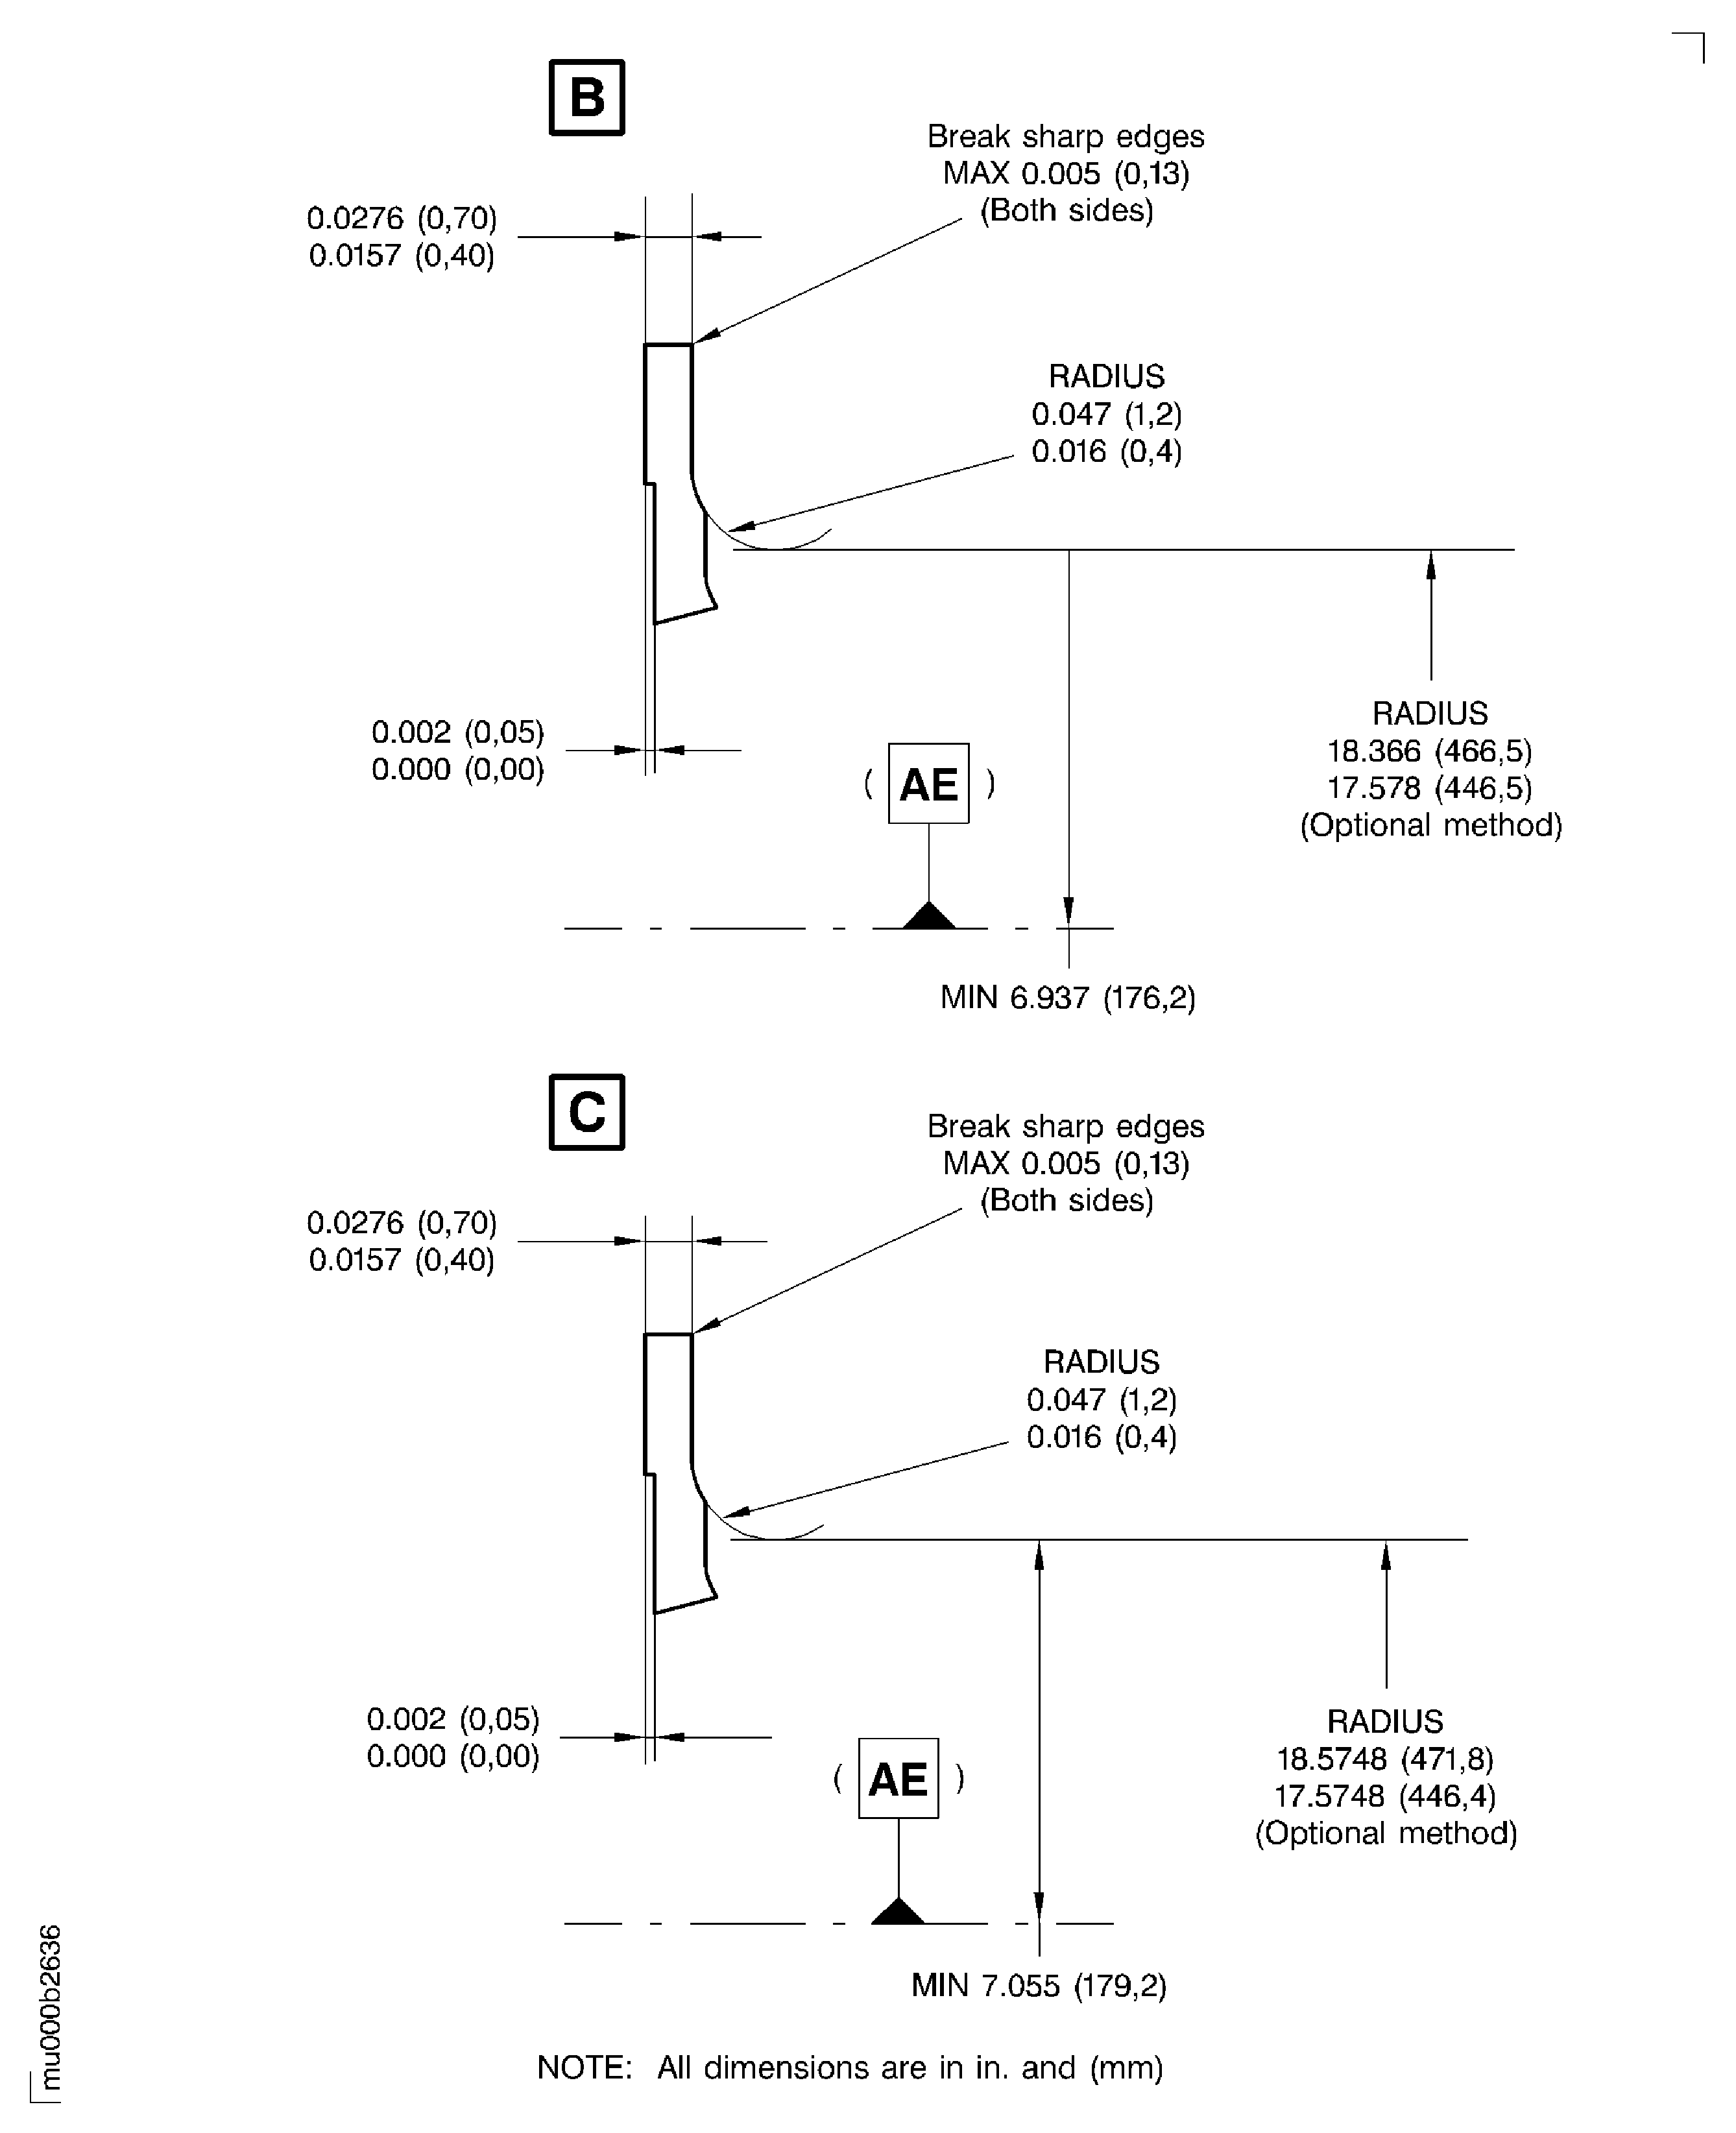
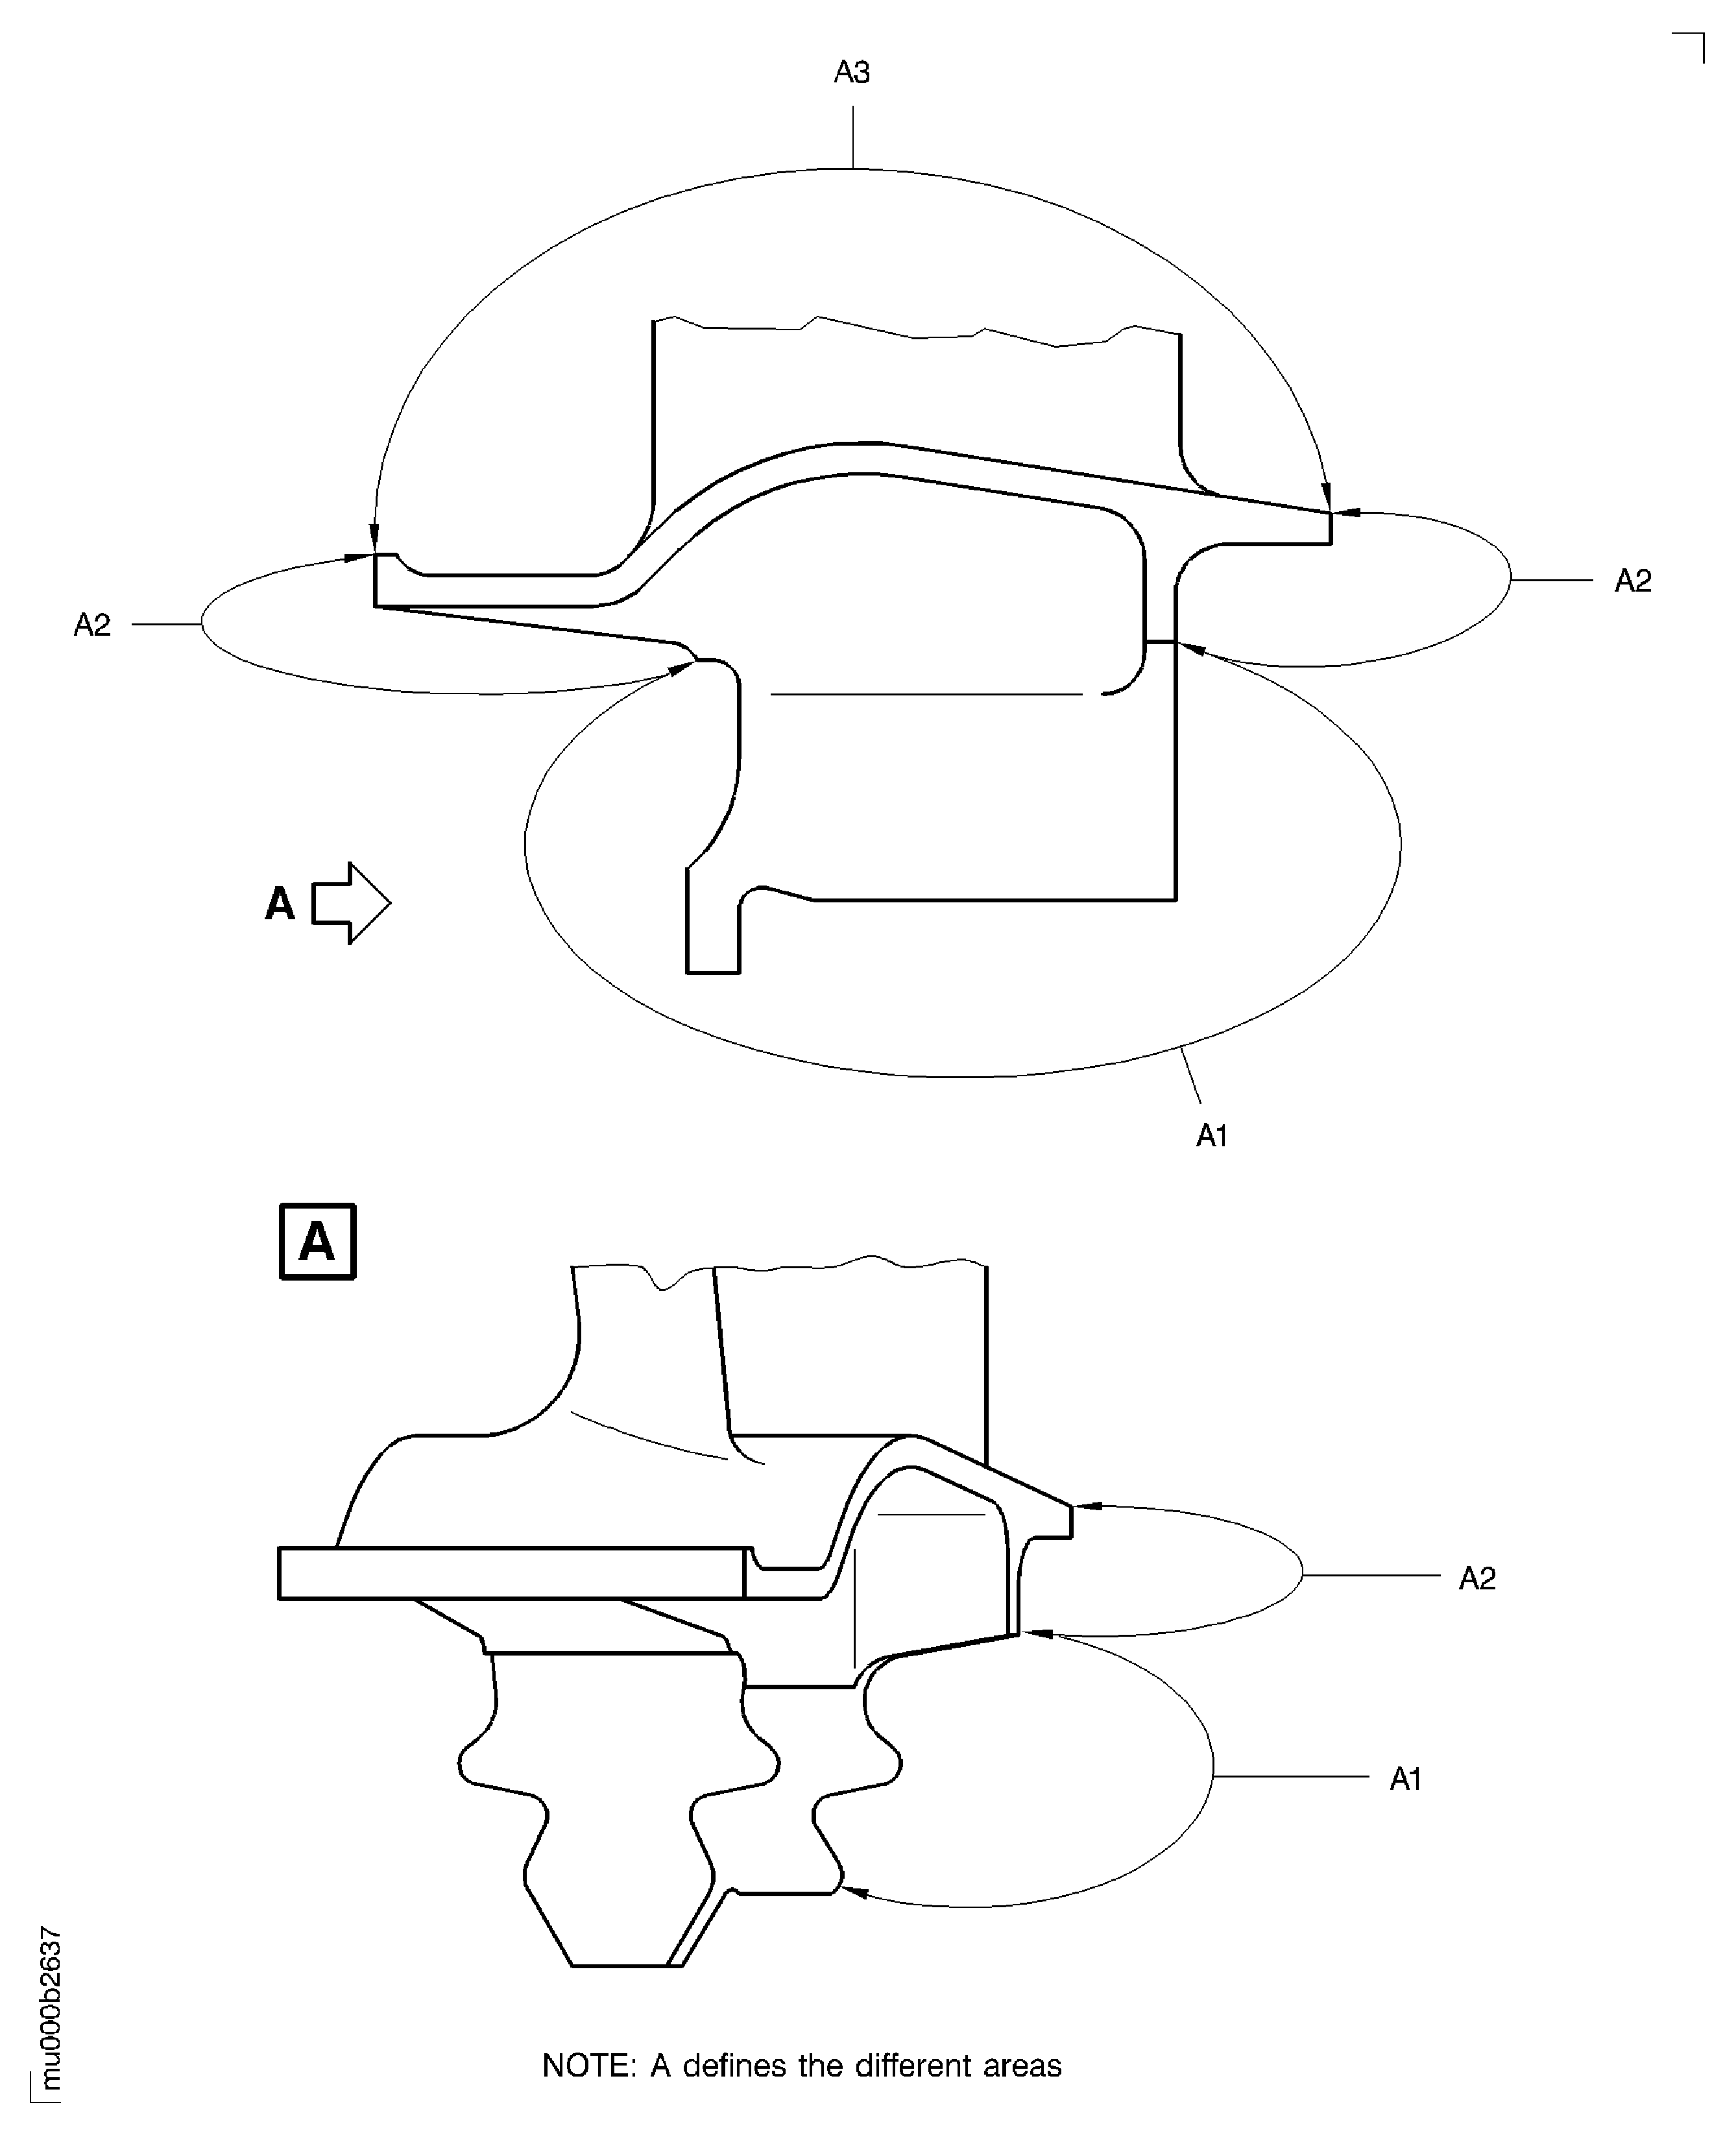
Refer to Figure.
Keep material removal to the minimum to allow subsequent repairs.
Machine the knife edge seals.
SUBTASK 72-50-32-325-058 Machine the Knife Edge Seals
Refer to the SPM TASK 70-11-03-300-503.
Aqueous degrease.
SUBTASK 72-50-32-110-130 Clean the Turbine Blade
Use IAE 3M14413 Welding fixture 1 off and IAE 3M14466 Welding mounting block 1 off.
Weld build-up sufficient material to do final machining.
Refer to the SPM TASK 70-31-13-310-501.
Machine or manual tungsten inert gas welding is permitted.
Decrease temperature of turbine blades to reduce heat affected zone to a minimum.
Tungsten inert gas weld build-up seal fins.
SUBTASK 72-50-32-310-077 Weld-Up Repair the Knife Edge Seals
Refer to the SPM TASK 70-23-04-230-501.
Cracks in the knife edge welds can be repaired if they do not extend into the shroud.
Do the test for cracks.
SUBTASK 72-50-32-230-155 Examine the Welded Areas for Cracks
Use IAE 3M14470 Grinding fixture 1 off, grinding machine and IAE 3M14524 Grinding mounting block 1 off.
Use IAE 2M14194 Inspection mounting block 1 off, tridimensional measuring unit, dial caliper, dial gage and roughness microtester.
Grind the seal tip radius, end faces, thickness and fillet radius.
SUBTASK 72-50-32-320-095 Machine the Welded Areas
Refer to the SPM TASK 70-23-05-230-501.
Use high sensitivity level.
Cracks in knife edge welds can be repaired.
For limits refer to Repair, VRS4192 TASK 72-50-32-300-014 (REPAIR-014).
Do the test for cracks.
SUBTASK 72-50-32-230-156 Examine the Blade for Cracks
Mask area A3 as shown in Figure.
Mask turbine blade.
Refer to the SPM TASK 70-38-04-300-503.
Use CoMat 05-030 CAST STEEL SHOT DELETED to an intensity of 6A.
Shot peening is permitted in area A2.
Shot peen area A1.
SUBTASK 72-50-32-350-124 Shot Peen the Surface A1 of the Turbine Blade
If any of these are unreadable, then make new marks.
Use the roll stamp method.
Refer to the SPM TASK 70-09-00-400-501.
Examine markings of turbine blade length, part number, heat code and serial number.
If this marking is unreadable, then make a new mark.
Use the vibro-peen method.
Refer to the SPM TASK 70-09-00-400-501.
Examine marking of turbine blade life.
SUBTASK 72-50-32-220-330 Examine the Blade Markings
Refer to the SPM TASK 70-09-00-400-501.
Vibro-peen VRS4291 and the applicable beehive symbol adjacent to the part number.
SUBTASK 72-50-32-320-096 Mark the Blade after Repair
Figure: Weld build-up knife edge seals of stage 5 turbine blade
Weld build-up knife edge seals of stage 5 turbine blade

Figure: Weld build-up knife edge seals of stage 5 turbine blade
Sheet 1

Figure: Weld build-up knife edge seals of stage 5 turbine blade
Sheet 2

Figure: Weld build-up knife edge seals of stage 5 turbine blade
Weld build-up knife edge seals of stage 5 turbine blade

