Export Control
EAR Export Classification: Not subject to the EAR per 15 C.F.R. Chapter 1, Part 734.3(b)(3), except for the following Service Bulletins which are currently published as EAR Export Classification 9E991: SBE70-0992, SBE72-0483, SBE72-0580, SBE72-0588, SBE72-0640, SBE73-0209, SBE80-0024 and SBE80-0025.Copyright
© IAE International Aero Engines AG (2001, 2014 - 2021) The information contained in this document is the property of © IAE International Aero Engines AG and may not be copied or used for any purpose other than that for which it is supplied without the express written authority of © IAE International Aero Engines AG. (This does not preclude use by engine and aircraft operators for normal instructional, maintenance or overhaul purposes.).Applicability
All
Common Information
TASK 72-50-33-200-003-A00 LPT Stage 5 Rotating Airseal - Examine, Inspection-003
General
This TASK gives the procedure for the inspection of the stage 5 turbine air seal. For the other LP Turbine rotating seal parts, refer to TASK 72-50-33-200-000 (INSPECTION-000).
Fig/item numbers in parentheses in the procedure agree with those used in the EIPC.
The policy that is necessary for inspection is given in the SPM TASK 70-20-00-200-501.
All the parts must be cleaned before any part is examined. Refer to TASK 72-50-33-100-000 (CLEANING-000).
All parts must be visually examined for damage, corrosion and wear. Any defects that are not identified in the procedure must be referred to IAE.
The procedure for those parts which must have a crack test is given in Step and Step. Do the test before the part is visually examined.
Do not discard any part until you are sure there are no repairs available. Refer to the instructions in Repair before a discarded part is used again or oversize parts are installed.
Parts which should be discarded can be held although no repair is available. The repair of a discarded part could be shown to be necessary at a later date.
All parts must be examined to make sure that all the repairs have been completed satisfactorily.
The practices and processes referred to in the procedure by the TASK numbers are in the SPM.
References
Refer to the SPM for data on these items.
Definitions of Damage, SPM TASK 70-02-02-350-501
Record and Control of the Lives of Parts, SPM TASK 70-05-00-220-501
Inspection of Parts, SPM TASK 70-20-00-200-501
Some data on these items is contained in this TASK. For more data on these items refer to the SPM.
Method of Testing for Crack Indications
Chemical Processes
Surface Protection
Preliminary Requirements
Pre-Conditions
NONESupport Equipment
| Name | Manufacturer | Part Number / Identification | Quantity | Remark |
|---|---|---|---|---|
| Horizontal rotating table | LOCAL | Horizontal rotating table | ||
| Illuminated magnifier (portable) | LOCAL | Illuminated magnifier (portable) |
Consumables, Materials and Expendables
NONESpares
NONESafety Requirements
NONEProcedure
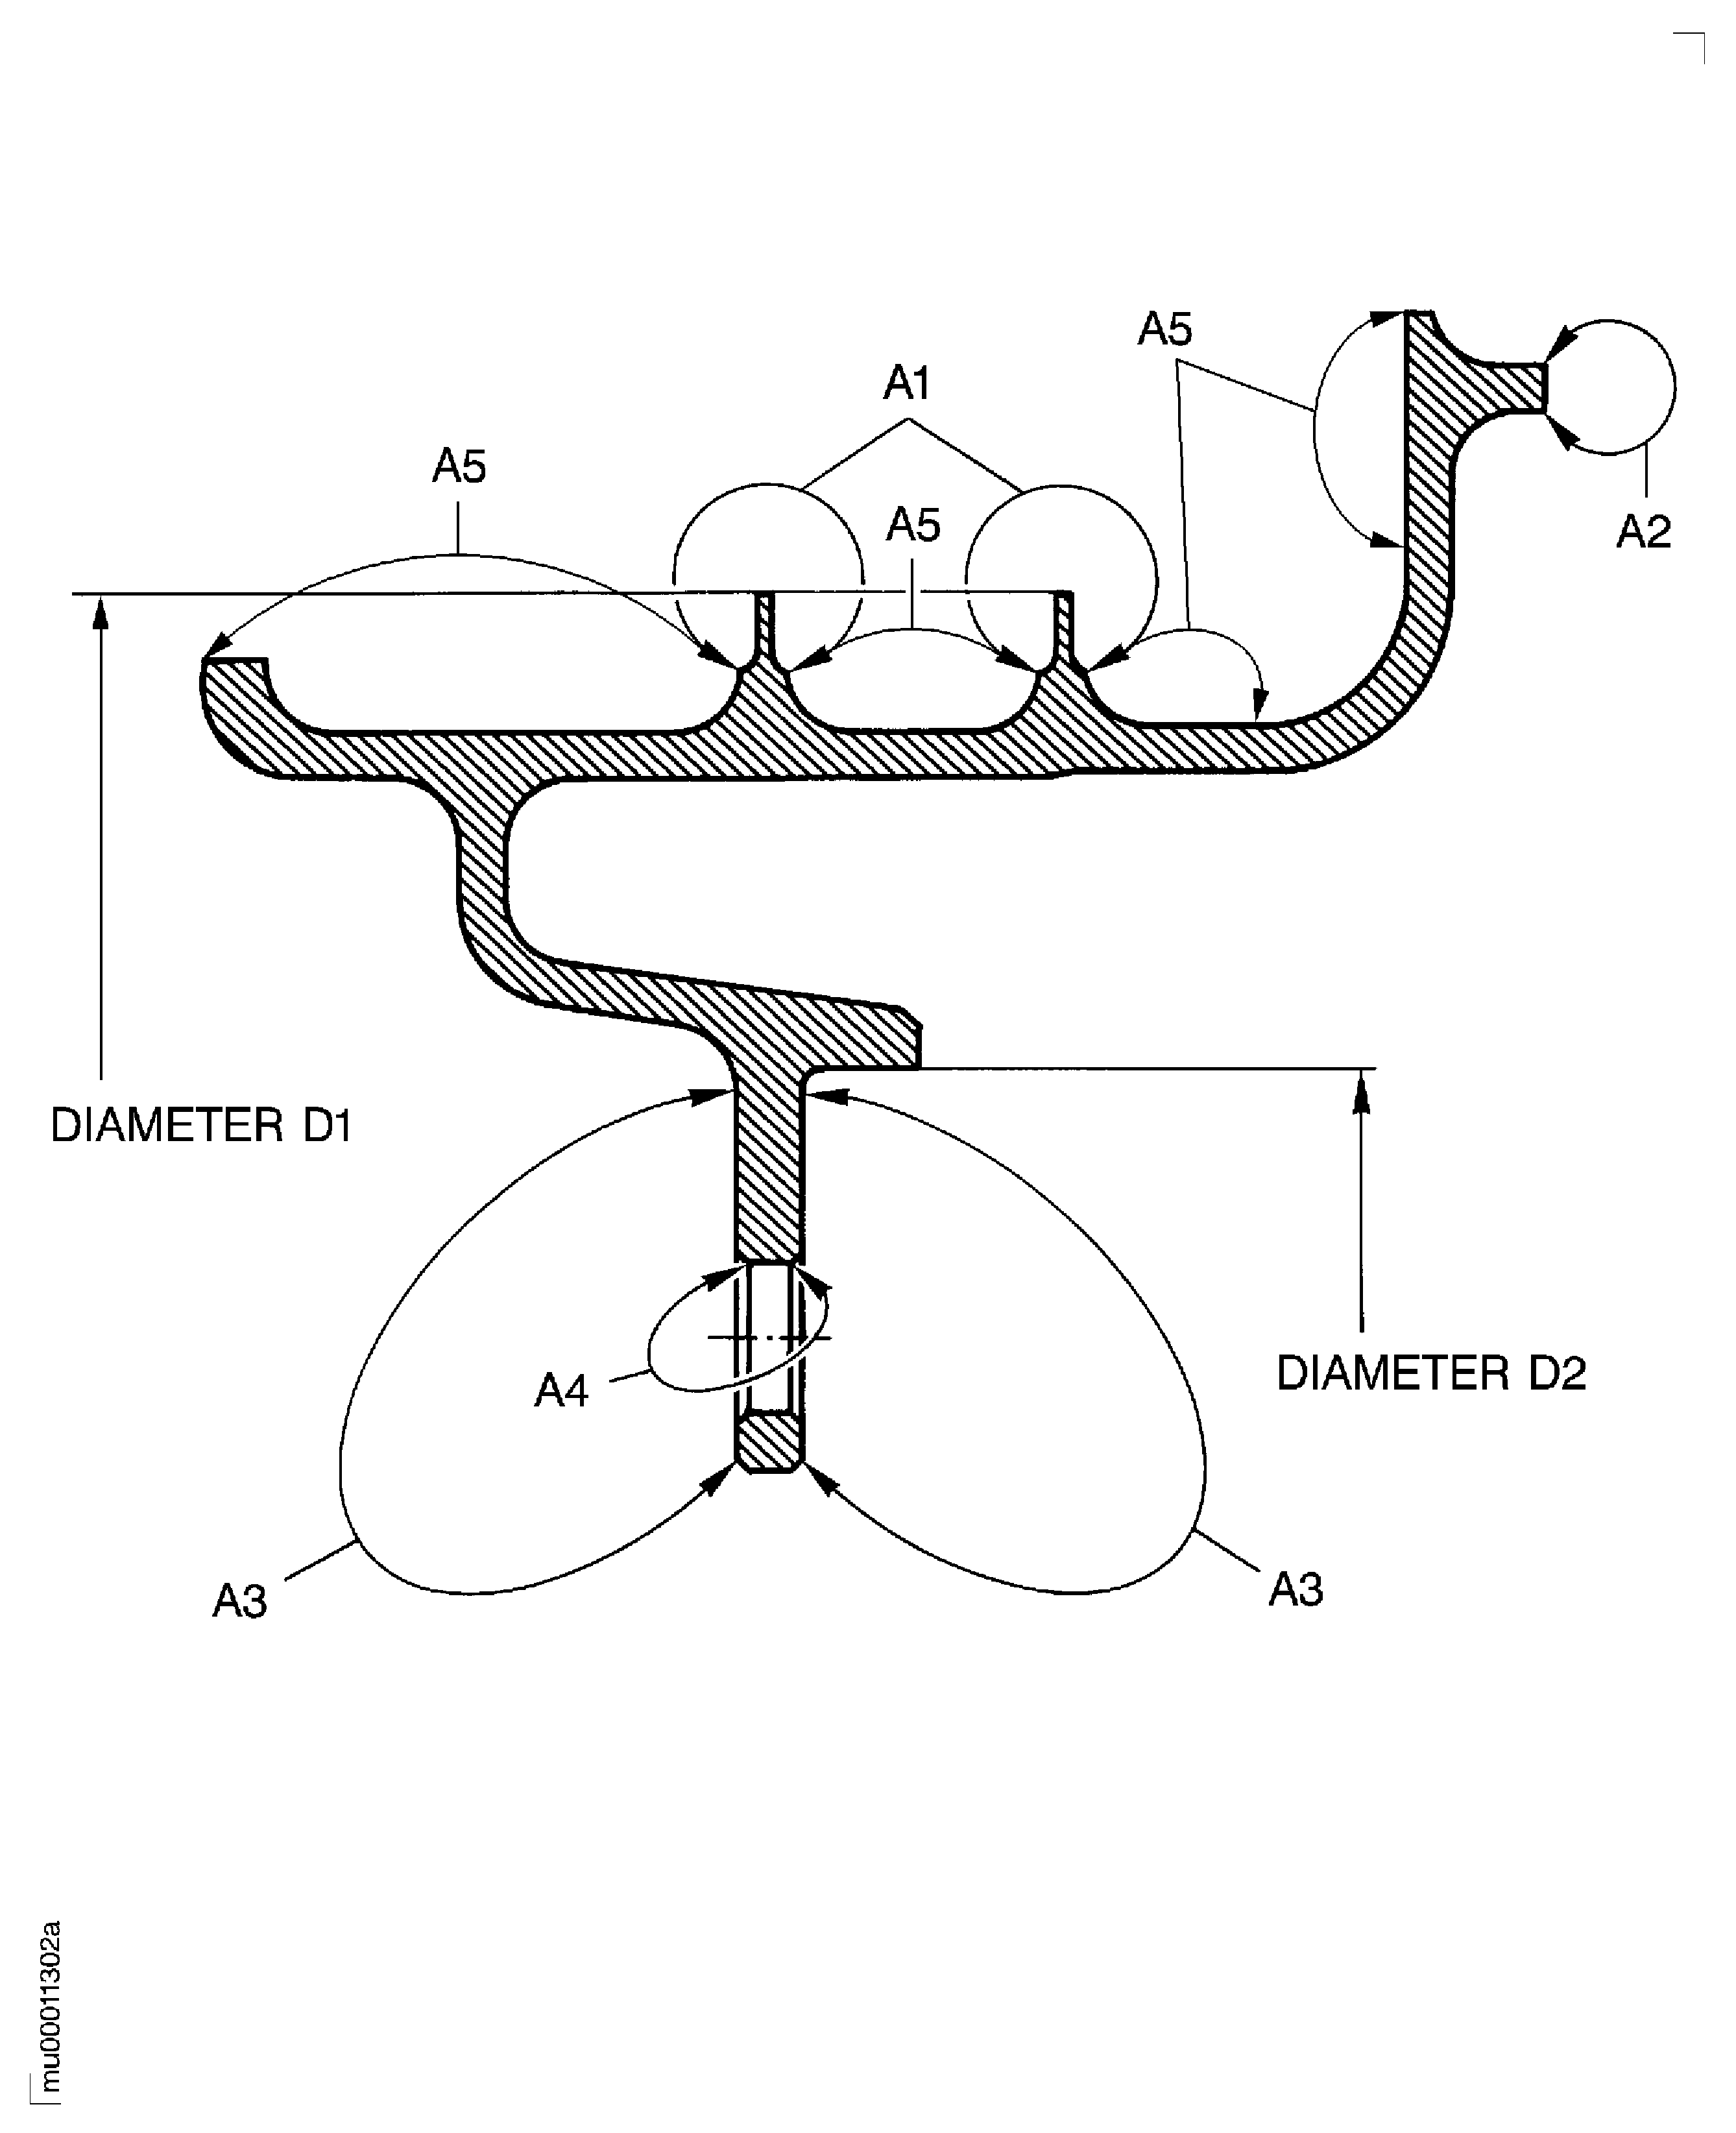
Refer to: Figure
Before inspection clean the air seal. Refer to TASK 72-50-33-100-000 (CLEANING-000).
SUBTASK 72-50-33-230-055 Examine the Stage 5 Turbine Air Seal for Cracks
Refer to: Figure
Repair, VRS4227 TASK 72-50-33-300-016 (REPAIR-016)
Depth up to 0.040 in. (1.0 mm)
Repair, VRS4228 TASK 72-50-33-300-017 (REPAIR-017)
More than in (a)
Cracked.
Do the test for cracks at location A1. Use the applicable penetrant procedure.
PART IDENT TASK/SUBTASK
Stage 5 Turbine Air Seal
SUBTASK 72-50-33-230-056 Examine the Stage 5 Turbine Air Seal for Cracks at Location A1
Refer to: Figure
Repair, VRS4226 TASK 72-50-33-300-015 (REPAIR-015)
More than in (a)
Dented.
Repair, VRS4226 TASK 72-50-33-300-015 (REPAIR-015)
More than in (a)
Nicked.
Examine the seal surface for damage on all locations without except at location A1. Use horizontal rotating table.
Repair, VRS4226 TASK 72-50-33-300-015 (REPAIR-015)
More than in (1)
Examine the seal surface for foreign material, deposits, corrosion, scale on all locations except at locations A1 and A5.
Repair, VRS4226 TASK 72-50-33-300-015 (REPAIR-015)
More than in (1)
Examine the seal surface for foreign material, deposits, corrosion, scale at locations A5.
SUBTASK 72-50-33-220-068 Examine the Stage 5 Turbine Air Seal for Surface Damage
Refer to: Figure
Repair, VRS4227 TASK 72-50-33-300-016 (REPAIR-016)
More than in (a)
Nicked.
Repair, VRS4227 TASK 72-50-33-300-016 (REPAIR-016)
More than in (a)
Dented.
Repair, VRS4228 TASK 72-50-33-300-017 (REPAIR-017)
More than in (a)
Bent.
Repair, VRS4231 TASK 72-50-33-300-020 (REPAIR-020)
More than in (a)
Chipped coating.
Examine the seal surface for damage at location A1.
SUBTASK 72-50-33-220-069 Examine the Stage 5 Turbine Air Seal for Surface Damage at Location A1
Refer to: Figure
Repair, VRS4226 TASK 72-50-33-300-015 (REPAIR-015)
Nicked
Repair, VRS4226 TASK 72-50-33-300-015 (REPAIR-015)
Dented
Examine the air seal for damage at location A4, (at the tie bolt holes).
SUBTASK 72-50-33-220-070 Examine the Stage 5 Turbine Air Seal for Damage
Refer to: Figure
Repair, VRS4232 TASK 72-50-33-300-021 (REPAIR-021)
More than in (a)
Fretted.
Examine the air seal for fretting at location A2.
SUBTASK 72-50-33-220-071 Examine the Stage 5 Turbine Air Seal for Fretting
Refer to: Figure
SUBTASK 72-50-33-220-072 Examine the Stage 5 Turbine Air Seal for Fretting
Refer to: Figure
Repair, VRS4228 TASK 72-50-33-300-017 (REPAIR-017) or Repair, VRS4231 TASK 72-50-33-300-020 (REPAIR-020)
Less than in (1)
Measure the diameter D1 for wear at the two seal fins at 120, 240 and 360 degrees. Get an average dimension.
SUBTASK 72-50-33-220-073 Examine the Stage 5 Turbine Air Seal for Wear
Refer to: Figure
Repair, VRS4229 TASK 72-50-33-300-018 (REPAIR-018). Shrunken or grown diameter must not be plasma spray repaired
More than in (1)
Measure the diameter D2 for wear at 120, 240 and 360 degrees. Get an average dimension.
Accept the part for select fit only
NOTE
This part can be used only if the mating part has a diameter that will result in a fit of reference 3349 or 3649 or 3749. Refer to TASK 72-50-30-440-003.
Between 20.3524 and 20.3642 in. (516.95 and 517.25 mm)
Measure the diameter D2 for shrinkage and growth at 120, 240 and 360 degrees. Get an average dimension.
SUBTASK 72-50-33-220-074 Examine the Stage 5 Turbine Air Seal Snap Diameter D2
Figure: Examine the stage 5 turbine air seal
Examine the stage 5 turbine air seal

