Export Control
EAR Export Classification: Not subject to the EAR per 15 C.F.R. Chapter 1, Part 734.3(b)(3), except for the following Service Bulletins which are currently published as EAR Export Classification 9E991: SBE70-0992, SBE72-0483, SBE72-0580, SBE72-0588, SBE72-0640, SBE73-0209, SBE80-0024 and SBE80-0025.Copyright
© IAE International Aero Engines AG (2001, 2014 - 2021) The information contained in this document is the property of © IAE International Aero Engines AG and may not be copied or used for any purpose other than that for which it is supplied without the express written authority of © IAE International Aero Engines AG. (This does not preclude use by engine and aircraft operators for normal instructional, maintenance or overhaul purposes.).Applicability
All
Common Information
TASK 72-50-53-300-090 Turbine Exhaust Case (TEC) - Cracked R Rail Load Share Boss Attachment Holes - Weld Repair-090 (VRS3849)
Effectivity
FIG/ITEM | PART NO. |
|---|---|
21-300 | 2A1209-01 |
21-300 | 2A2620-01 |
21-300 | 2A3111-01 |
21-300 | 2A3183-01 |
21-300 | 2A3183-101 |
21-300 | 2A3455-01 |
21-300 | 2A4258-01 |
21-300 | 2A4263-01 |
Material of Component
DESCRIPTION | SYMBOL | MATERIAL |
|---|---|---|
Turbine Exhaust Case Assembly | - | Corrosion and Heat Resistant Steel AMS5616 |
General
The practices and processes referred to in this procedure by TASK numbers are in the SPM.
Preliminary Requirements
Pre-Conditions
| Action/Condition | Data Module/Technical Publication |
|---|---|
| Make sure that all necessary cleaning and inspection procedures are done before this repair. | |
| If necessary, remove all details from the part by the applicable repairs. |
Support Equipment
NONEConsumables, Materials and Expendables
| Name | Manufacturer | Part Number / Identification | Quantity | Remark |
|---|---|---|---|---|
| CoMat 03-378 WELDING WIRE | LOCAL | CoMat 03-378 | AR |
Spares
NONESafety Requirements
NONEProcedure
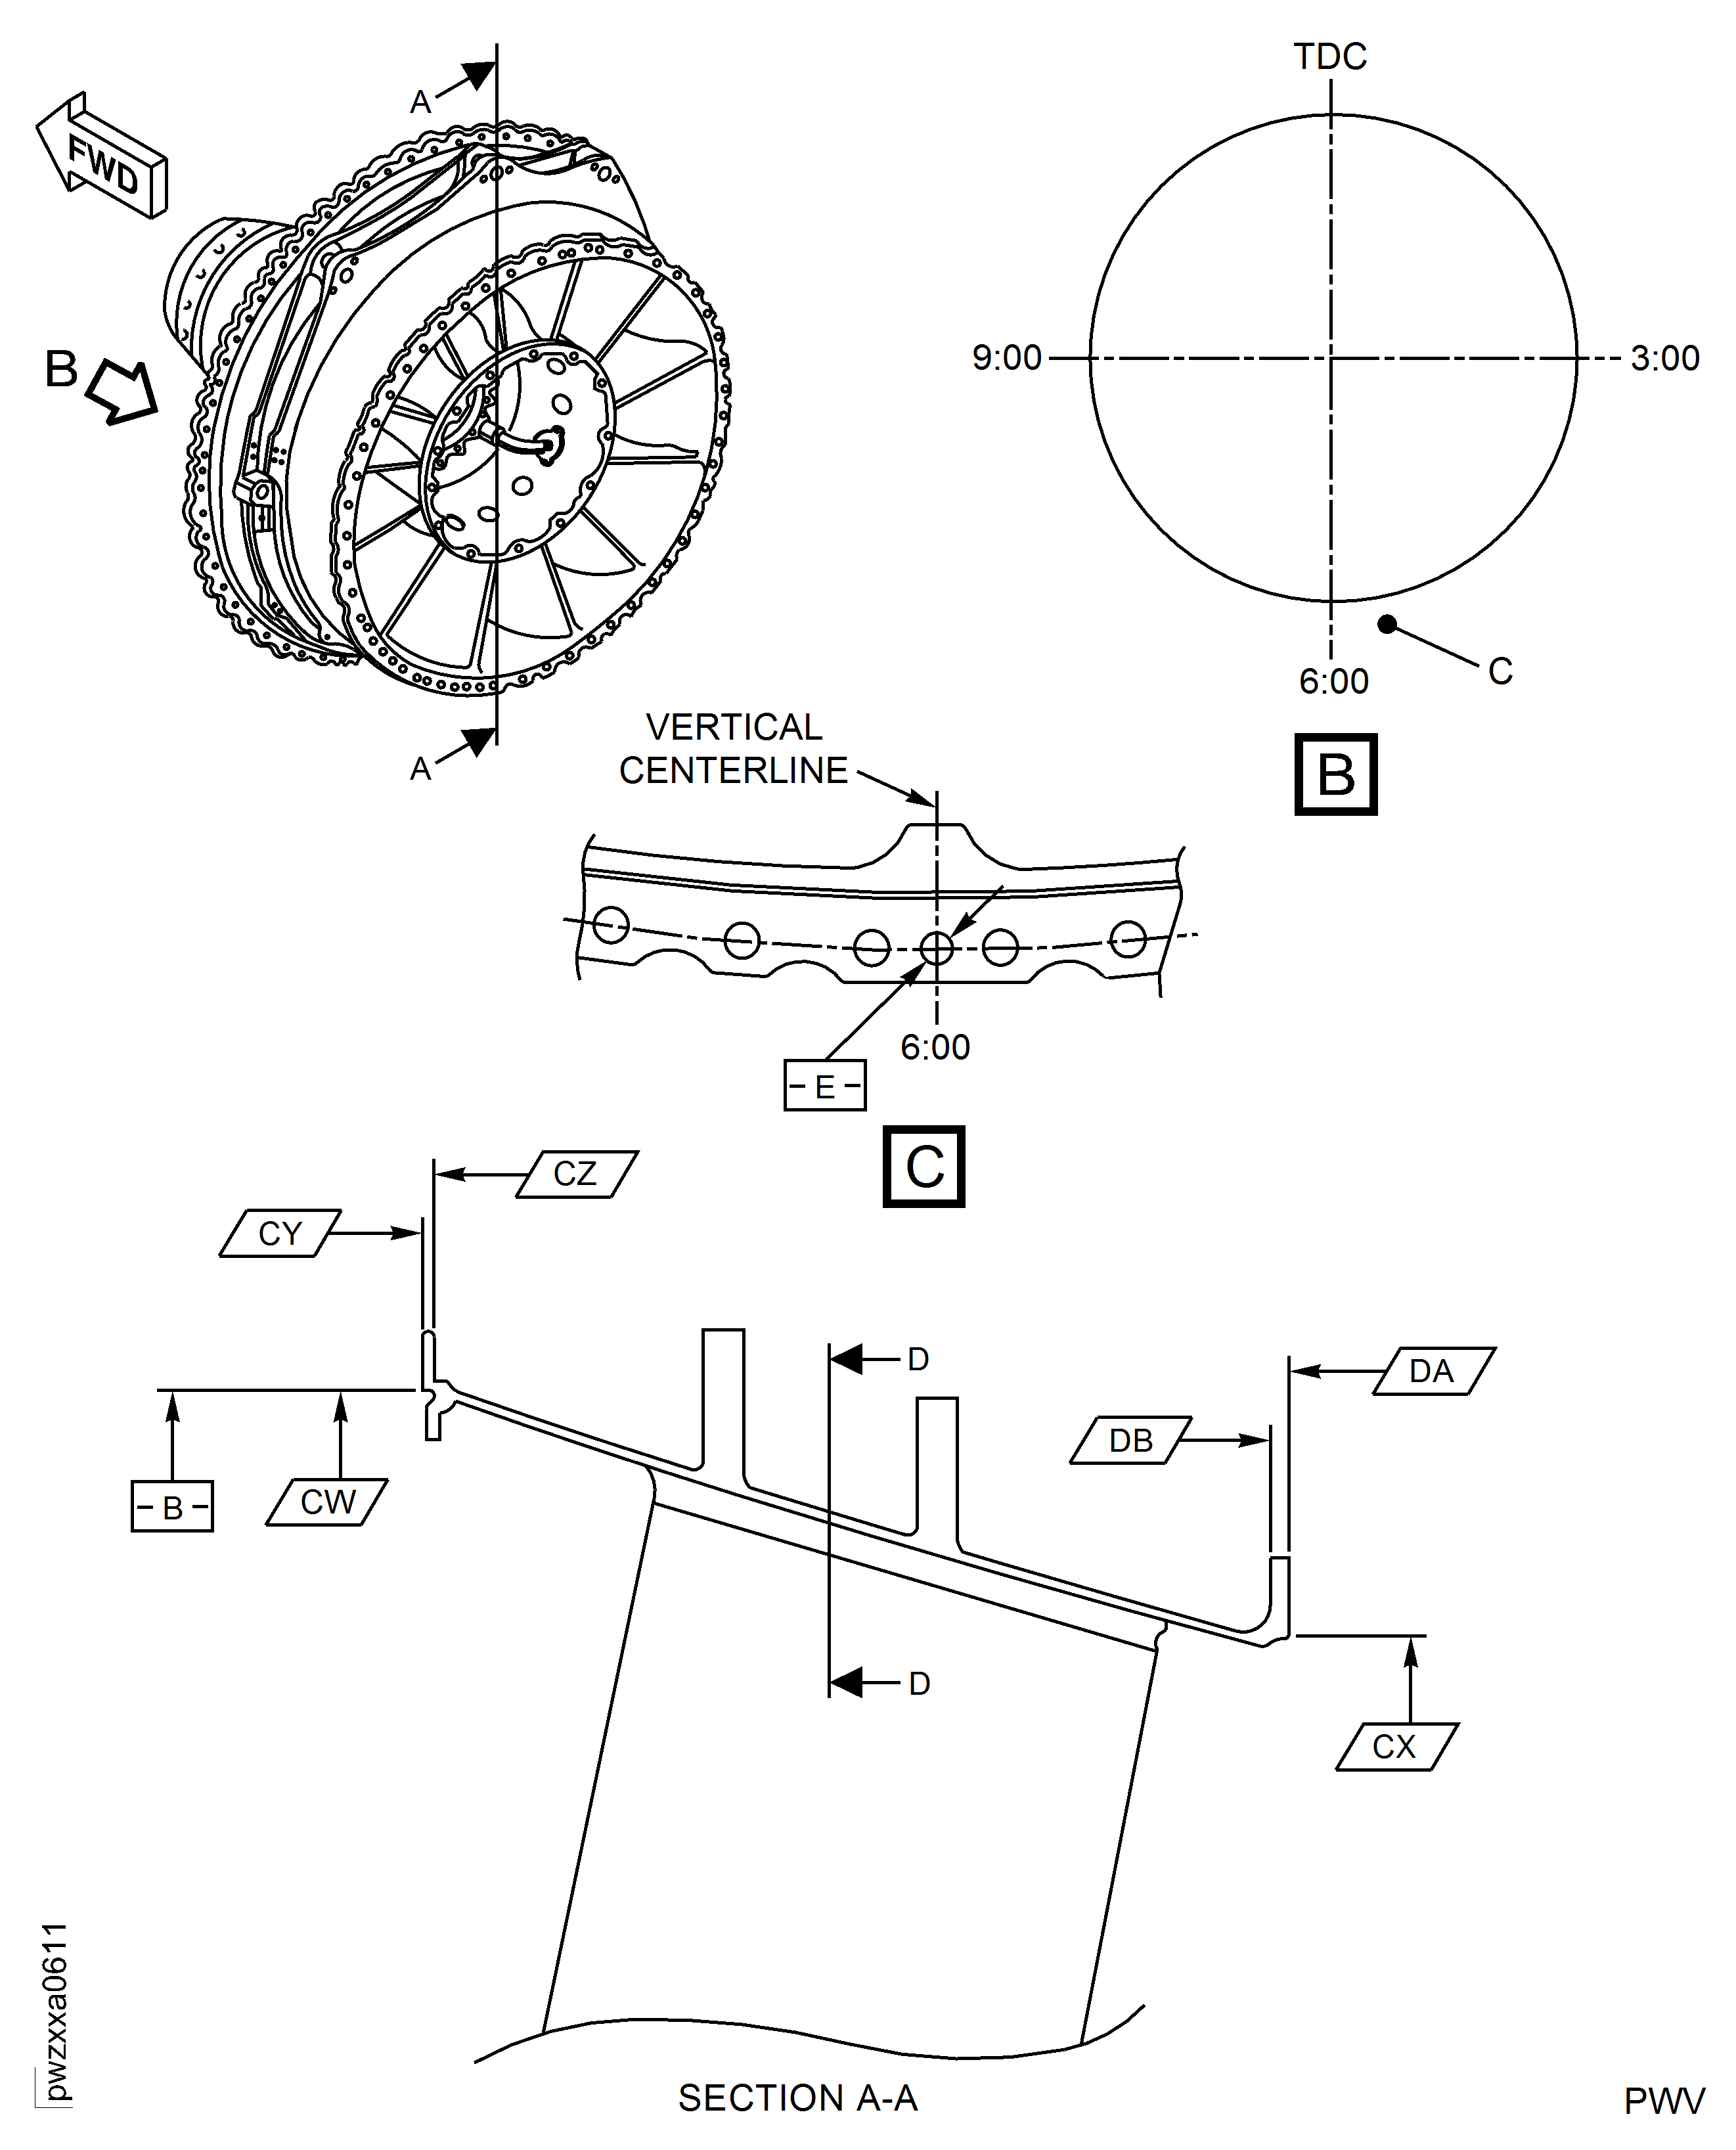
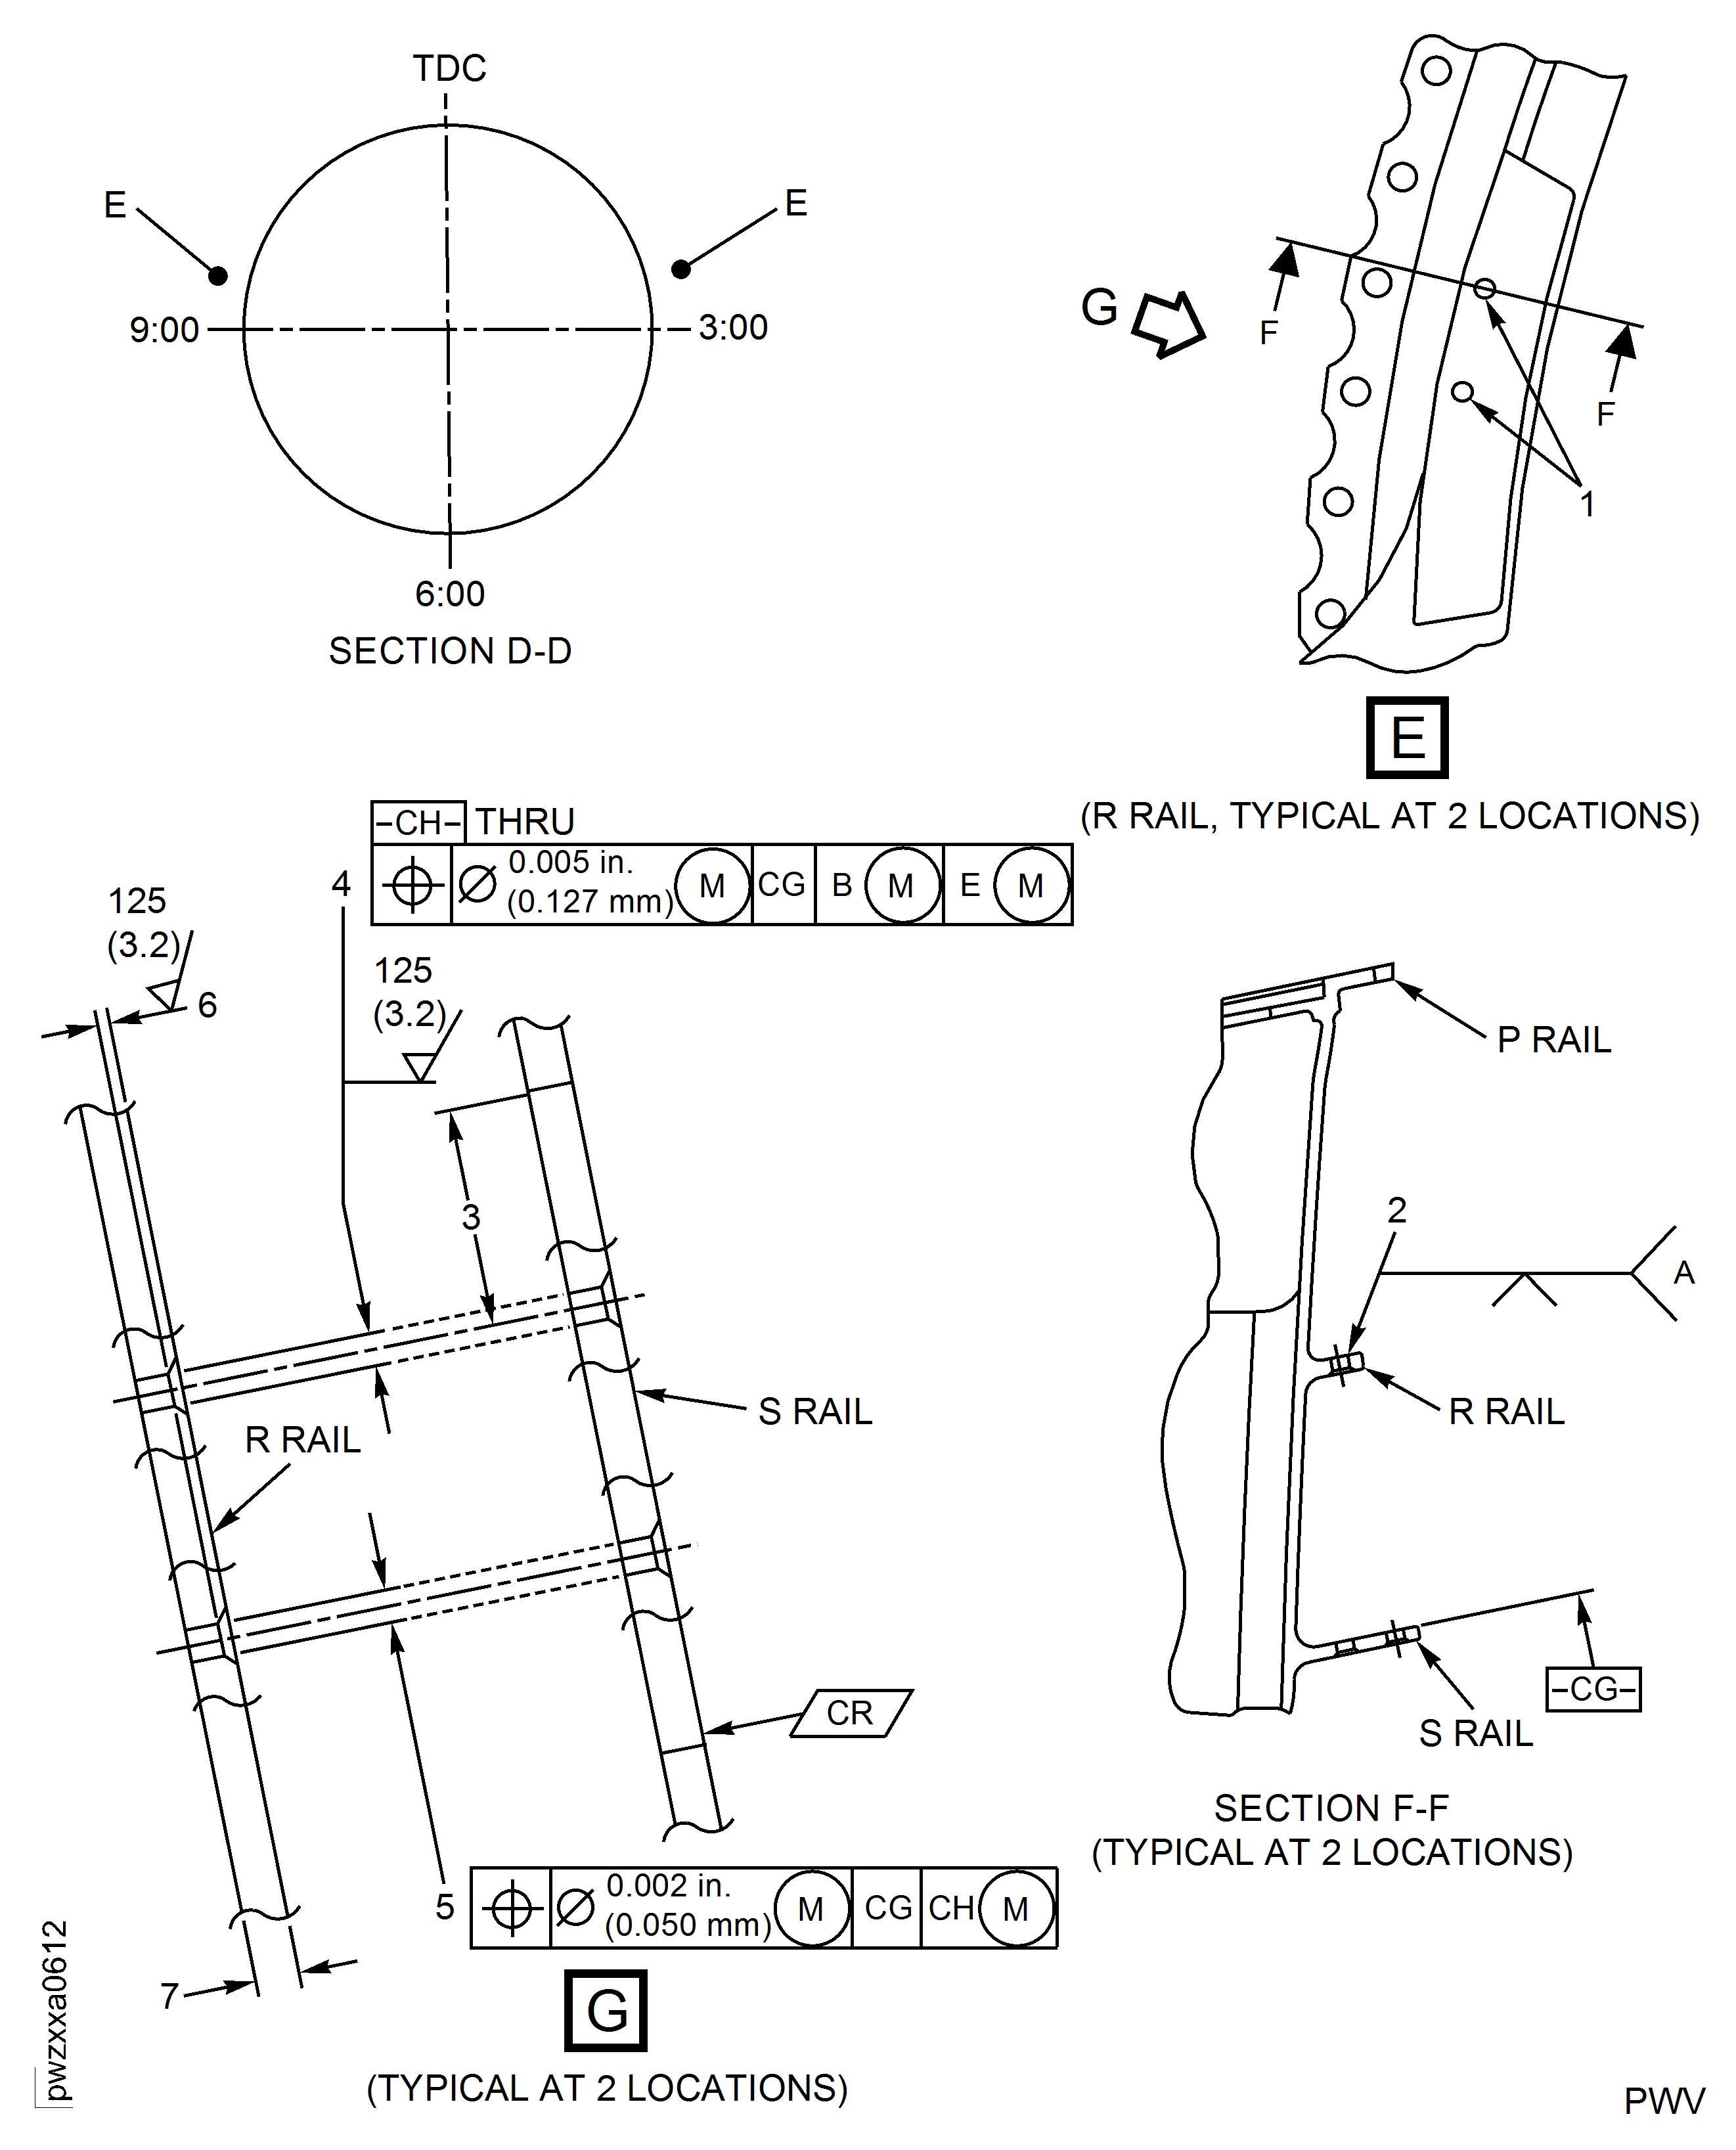
Refer to Figure.
Refer to SPM TASK 70-31-13-310-501.
Remove the minimum amount of parent material necessary to accomplish this repair.
Rout to completely remove the crack(s) from the part.
SUBTASK 72-50-53-350-225 Rout the Crack(s) from the R Rail Load Share Boss Attachment Hole(s)
Refer to SPM TASK 70-11-03-300-503.
Clean the repair area(s).
SUBTASK 72-50-53-110-214 Clean the R Rail Load Share Boss Attachment Hole(s)
Refer to SPM TASK 70-23-05-230-501. Use high sensitivity penetrant.
No cracks or indications are permitted.
Do a fluorescent penetrant inspection of repair area(s).
SUBTASK 72-50-53-230-152 Fluorescent Penetrant Inspect the Repair Area(s)
Refer to SPM TASK 70-31-13-310-501.
Use a rotary austenitic stainless steel wire brush or silicon carbide abrasive wheel to remove oxides and prepare the area for welding.
SUBTASK 72-50-53-350-226 Prepare the Repair Area(s)
Refer to SPM TASK 70-11-03-300-503.
Clean the repair area(s).
SUBTASK 72-50-53-110-215 Clean the Repair Area(s)
Refer to Figure.
Refer to SPM TASK 70-31-13-310-501 (IAE 16-2). Use CoMat 03-378 WELDING WIRE.
Weld the repair area(s). Use the Manual Gas Tungsten Arc Weld (GTAW-MA) procedure.
SUBTASK 72-50-53-310-090 Weld Repair the Cracked R Rail Load Share Boss Holes
Refer to SPM TASK 70-37-13-370-501.
Do a local stress relief of the repair area(s).
SUBTASK 72-50-53-370-107 Stress-Relieve the Repair Area
Refer to SPM TASK 70-31-13-310-501.
Finish blend the welded area(s) flush on the face(s) of the R Rail(s) to 0.000 in. - 0.010 in. (0.000 mm - 0.254 mm) above the adjacent rail surface. See Figure.
SUBTASK 72-50-53-350-227 Finish Blend the Repair Area(s) - Face(s)
Refer to SPM TASK 70-31-13-310-501.
Break edges 0.003 in. to 0.015 in. (0.077 mm to 0.381 mm).
No mismatch permitted.
Finish machine the welded area(s) in the attachment hole and the chamfer to the limits shown in Figure.
SUBTASK 72-50-53-320-178 Finish Machine the Repair Area(s) - Chamfer(s)
Refer to SPM TASK 70-11-03-300-503.
Clean the repair area(s).
SUBTASK 72-50-53-110-216 Clean the Repair Area(s)
Refer to SPM TASK 70-23-05-230-501. Use high sensitivity penetrant.
Do a fluorescent penetrant inspection of the repaired area(s).
SUBTASK 72-50-53-230-153 Fluorescent Penetrant Inspect the Repair Area(s)
Refer to Figure.
SUBTASK 72-50-53-220-282 Do a Dimensional Inspection
Refer to the SPM TASK 70-09-00-400-501.
Mark VRS3849 adjacent to the part number.
SUBTASK 72-50-53-350-228 Identify the Repair
Figure: Repair Details and Dimensions
Repair Details and Dimensions

Repair Details and Dimensions

NOTEAll dimensions apply when Surface CY and DA are flat in 0.005 in. (0.127 mm) and Diameters CW and CX maintain a clearance envelope of 38.6513 in. (981.7431 mm) and 33.0172 in. (838.6369 mm) respectively, in a free state or constrained. Constraint contact allowed only on Surfaces CY, CZ, DA, DB, and Diameters CW and CX. NOTEIn a free state Surfaces CY and DA are flat in 0.005 in. (0.127 mm) and Diameters CW and CX are 38.607 in. - 38.704 in. (980.618 mm - 983.081 mm) and 32.983 in. - 33.059 in. (837.769 mm - 839.698 mm) respectively. NOTEBreak edges 0.003 in. - 0.015 in. (0.077 mm - 0.381 mm). |
