Export Control
EAR Export Classification: Not subject to the EAR per 15 C.F.R. Chapter 1, Part 734.3(b)(3), except for the following Service Bulletins which are currently published as EAR Export Classification 9E991: SBE70-0992, SBE72-0483, SBE72-0580, SBE72-0588, SBE72-0640, SBE73-0209, SBE80-0024 and SBE80-0025.Copyright
© IAE International Aero Engines AG (2001, 2014 - 2021) The information contained in this document is the property of © IAE International Aero Engines AG and may not be copied or used for any purpose other than that for which it is supplied without the express written authority of © IAE International Aero Engines AG. (This does not preclude use by engine and aircraft operators for normal instructional, maintenance or overhaul purposes.).Applicability
All
Common Information
TASK 79-21-41-200-403-C00 Oil Pressure Pump/Filter Housing - Related Parts - Examine The Driven Gear, Inspection-003
General
This TASK gives the procedure for the inspection of the driven gear. For the other parts of the oil pressure pump/filter housing, refer to Inspection-000TASK 79-21-41-200-400.
Fig/item numbers in parentheses in the procedure agree with those used in the IPC.
The policy that is necessary for inspection is given in SPM TASK 70-20-01-200-501.
All the parts must be cleaned before any part is examined. Refer to the Cleaning-000TASK 79-21-41-100-400.
All parts must be visually examined for damage, corrosion and wear. Any defects that are not identified in the procedure must be referred to IAE.
Do not discard any part until you are sure there are no repairs available. Refer to the instructions in Repair before a discarded part is used again or oversize parts are installed.
Parts which should be discarded can be held although no repair is available. The repair of a discarded part could be shown to be necessary at a later date.
All parts must be examined to make sure that all the repairs have been completed satisfactorily.
The practices and processes referred to in the procedure by the TASK/SUBTASK numbers are in the SPM.
References
Refer to the SPM for data on these items.
Definition of Damage, SPM TASK 70-02-02-350-501.
Record and Control of the Lives of Parts, SPM TASK 70-05-00-220-501.
Inspection of Parts, SPM TASK 70-20-00-200-501.
Some data on these items is contained in this TASK. For more data on these items refer to the SPM.
Method of Testing for Crack Indications
Chemical Processes
Surface Protection
Preliminary Requirements
Pre-Conditions
NONESupport Equipment
| Name | Manufacturer | Part Number / Identification | Quantity | Remark |
|---|---|---|---|---|
| Workshop inspection equipment | LOCAL | Workshop inspection equipment | ||
| Magnetizing unit | LOCAL | Magnetizing unit | ||
| Demagnetizing unit | LOCAL | Demagnetizing unit |
Consumables, Materials and Expendables
NONESpares
NONESafety Requirements
NONEProcedure
Clean the part. Refer to Cleaning-001 TASK 79-21-41-100-400.
Reject.
Cracked.
Do the test for cracks on the parts that are given below. Use the applicable magnetic procedure.
PART IDENT
PROCEDURE
CURRENT/INSPECT
TASK/SUBTASK
Driven gear
CF
700 A
Refer to SPM TASK 70-24-01-240-501
SUBTASK 70-24-01-240-010
Coil
7000 A/T
Refer to SPM TASK 70-24-01-240-501
SUBTASK 70-24-01-240-014
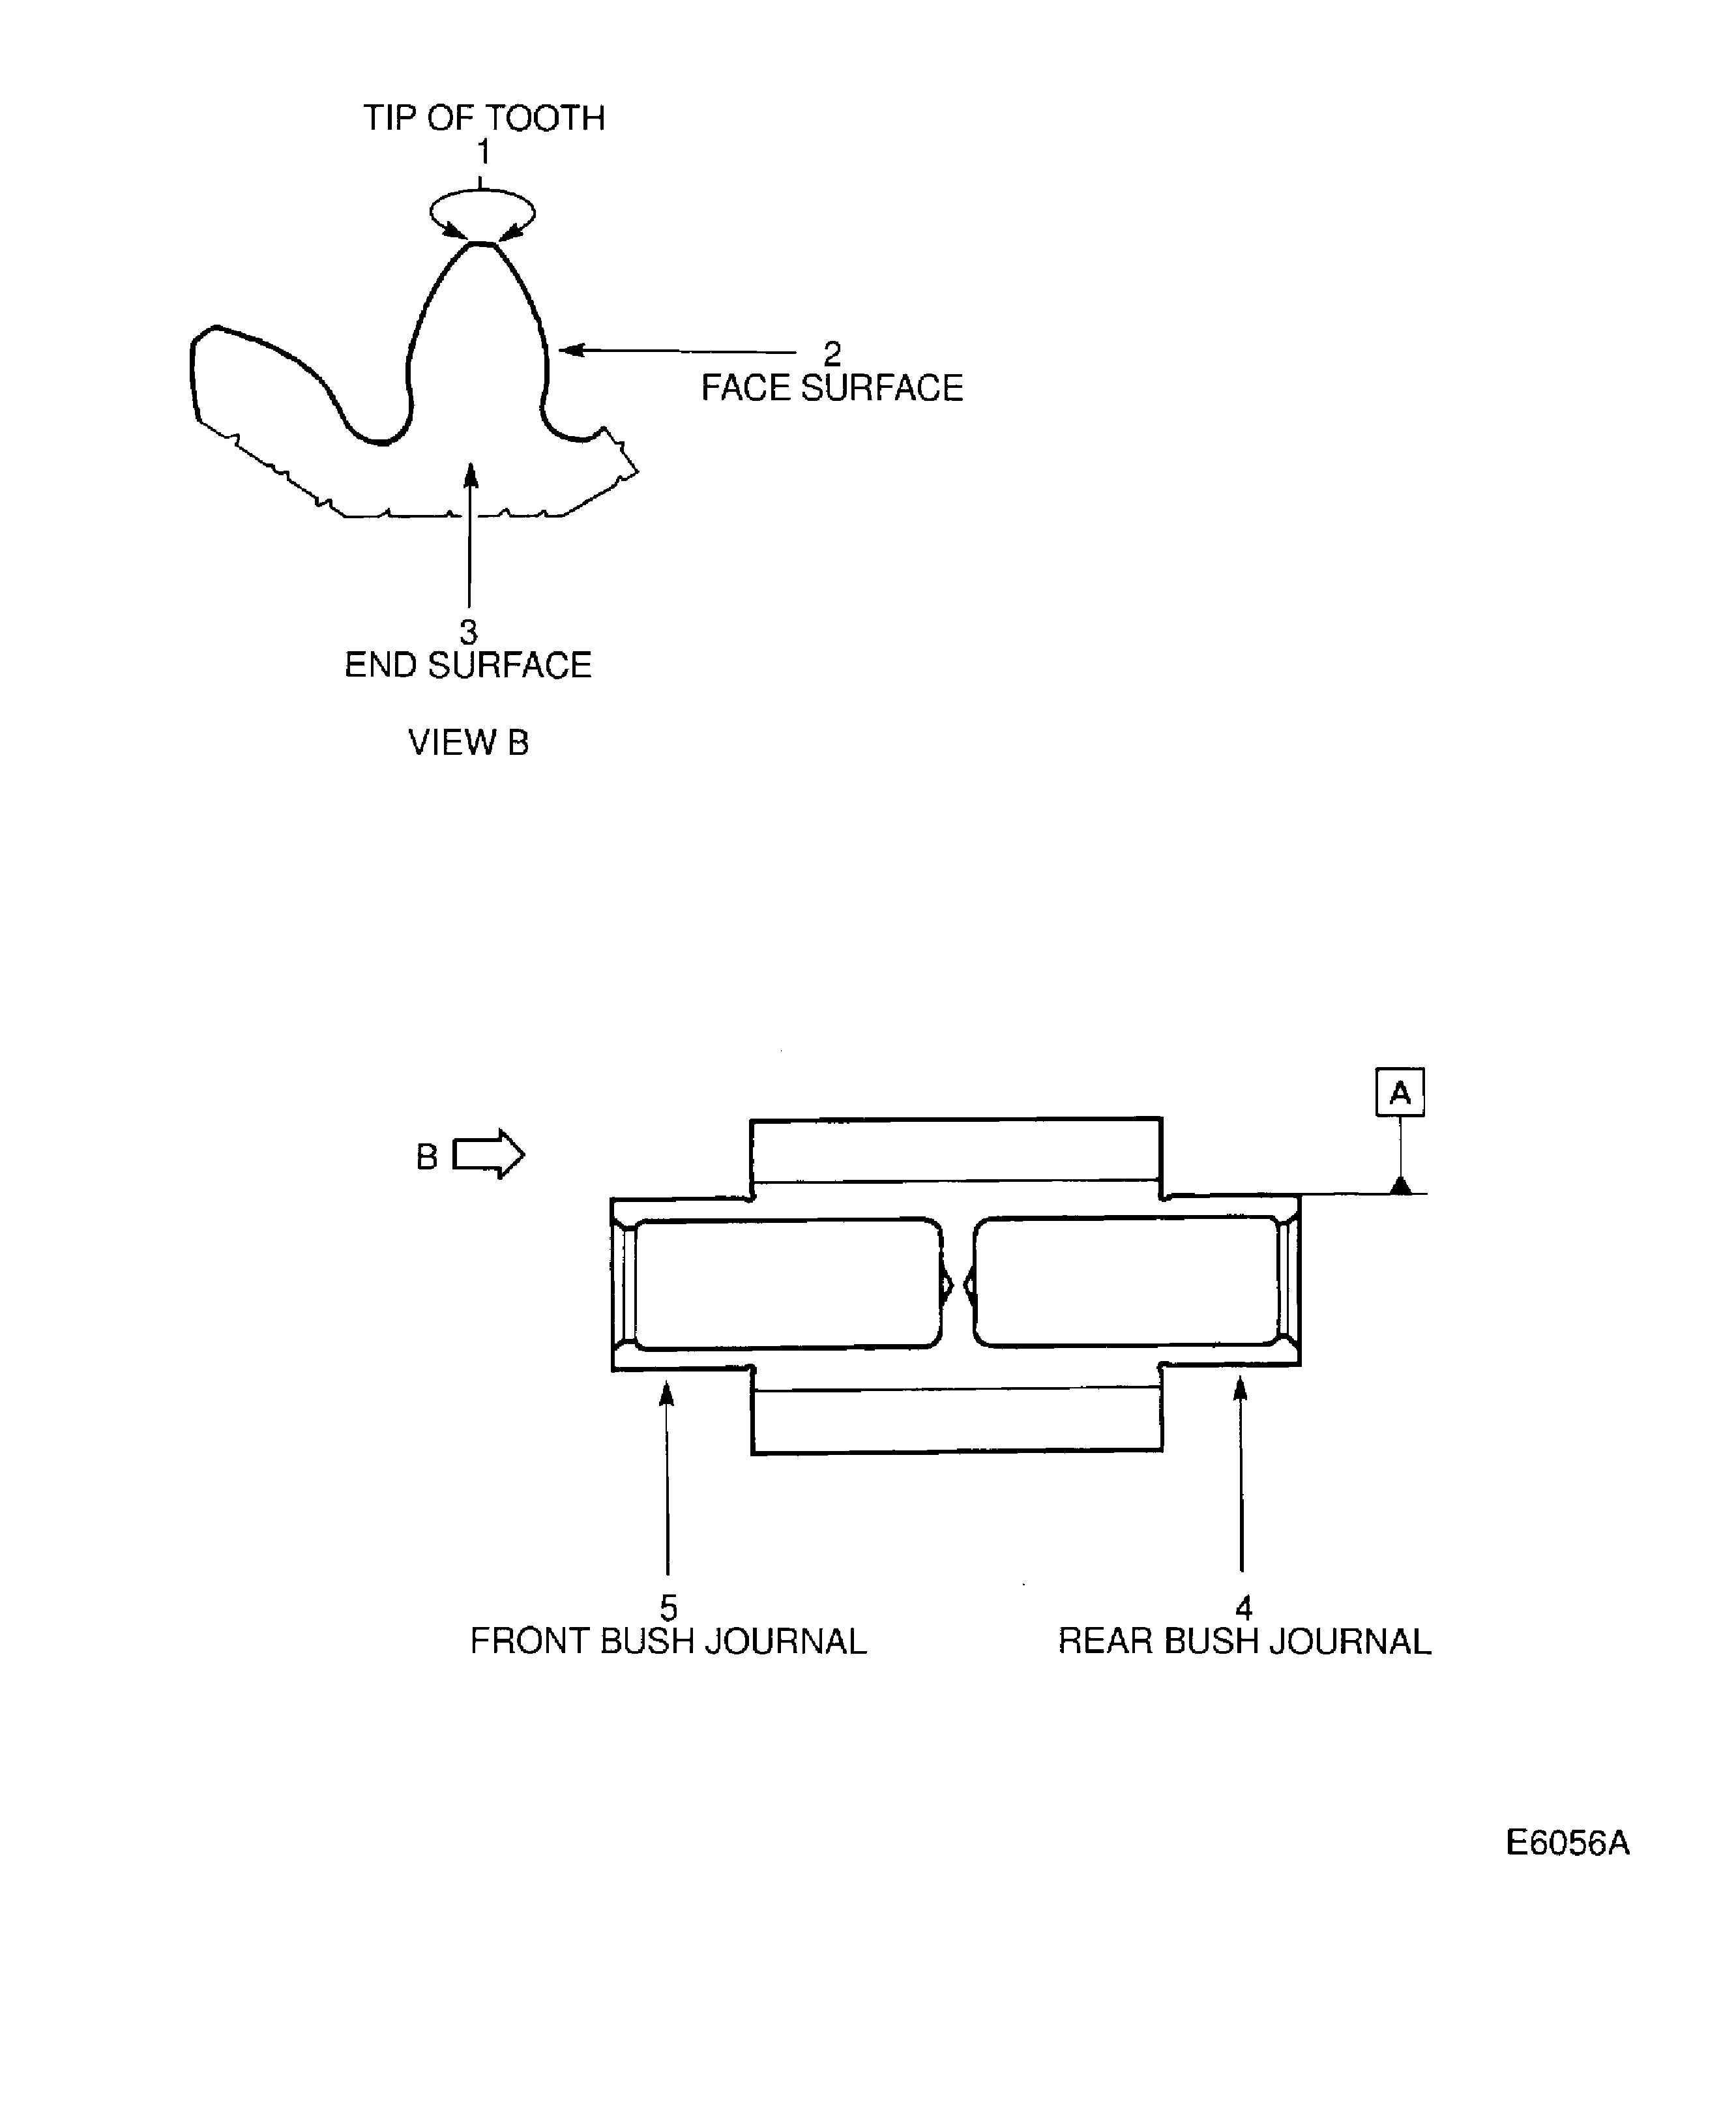
SUBTASK 79-21-41-240-055 Do aCrack Test on the Driven Gear (01-230) (Magnetic)
Refer to Figure.
Repair, VRS5653 (Repair-032) TASK 79-21-41-300-032.
Remove the sharp edges or high spots which could damage the mating gear teeth surfaces.
Damage of tip of tooth.
Accept
Between 1.7323 and 1.7313 in. (44.000 and 43.975 mm).
Reject
Less than 1.7313 in. (43.975 mm)
Worn
SUBTASK 79-21-41-220-109 Examine the Driven Gear (01-230) Tip of Tooth at Location 1
Refer to Figure.
Repair, VRS5653 (Repair-032) TASK 79-21-41-300-032.
Lightly remove raised material. A 32 micro inch (0.8 micrometer) finish is required.
Reject
Chipped, peeled or fretted.
Scored
Accept
Between 1.8768 and 1.8673 in. (47.671 and 47.444 mm).
Reject
Less than 1.8673 in. (47.444 mm).
Position between the teeth, two diametrically opposed 0.315 in. (8 mm) diameter pins and measure the dimensions over the pins.
Damage and sign of wear.
SUBTASK 79-21-41-220-110 Examine the Driven Gear (01-230) Teeth on the Face Surface at Location 2
Refer to Figure.
Accept
Can not be felt with a 0.04 in. (1 mm) radius spherical end.
Repair, VRS5653 (Repair-032) TASK 79-21-41-300-032.
Remove raised material with a fine stone.
Scored
SUBTASK 79-21-41-220-111 Examine the Driven Gear (01-230) Teeth on the End of the Surface at Location 3
Refer to Figure.
Repair, VRS5653 (Repair-032) TASK 79-21-41-300-032.
Remove lifted metal with a fine stone. Scores must have a circumferential direction. A 10 micro in. (0.25 micrometer) finish is necessary.
Scored
SUBTASK 79-21-41-220-112 Examine the Driven Gear (01-230) Rear and Front Journals at Locations 4 and 5
Refer to Figure.
Accept
Between 0.8858 and 0.8852 in. (22.500 and 21.485 mm) diameter.
Reject
Less than 0.8852 in. (22.485 mm) diameter.
Worn
SUBTASK 79-21-41-220-114 Examine the Driven Gear (01-230) Rear Bush Journal at Location 4
Figure: Locations On The Driven Gear
Locations On The Driven Gear

