Export Control
EAR Export Classification: Not subject to the EAR per 15 C.F.R. Chapter 1, Part 734.3(b)(3), except for the following Service Bulletins which are currently published as EAR Export Classification 9E991: SBE70-0992, SBE72-0483, SBE72-0580, SBE72-0588, SBE72-0640, SBE73-0209, SBE80-0024 and SBE80-0025.Copyright
© IAE International Aero Engines AG (2001, 2014 - 2021) The information contained in this document is the property of © IAE International Aero Engines AG and may not be copied or used for any purpose other than that for which it is supplied without the express written authority of © IAE International Aero Engines AG. (This does not preclude use by engine and aircraft operators for normal instructional, maintenance or overhaul purposes.).Applicability
All
Common Information
TASK 79-22-49-200-102 Engine Scavenge Oil Tubes - Examine, Inspection-002
General
This TASK gives the procedure for the inspection of the tube assembly. For the other scavenge oil tubes-engine parts, refer to Inspection/Check 000 TASK 79-22-49-200-100.
Fig/item numbers in parentheses in the procedure agree with those used in the IPC.
The policy that is necessary for inspection is given in the SPM TASK 70-20-01-200-501.
All the parts must be cleaned before any part is examined. Refer to Cleaning-000 TASK 79-22-49-100-100.
All the parts must be visually examined for damage, corrosion and wear. Any defects that are not identified in the procedure must be referred to IAE.
The procedure for those parts which must have a crack test is given in StepDo the test before the part is visually examined.
Do not discard any part until you are sure there are no repairs available. Refer to the instructions in Repair before a discarded part is used gain or oversize parts are installed.
Parts which should be discarded can be held although no repair is available. The repair of a discarded part could be shown to be necessary at a later date.
All the parts must be examined to make sure that all the repairs have been completed satisfactorily.
The practices and processes referred to in the procedure by the TASK numbers are in the SPM.
References
Refer to the SPM for data on these items.
Definitions of Damage, SPM TASK 70-02-02-350-501.
Inspection of Parts, SPM TASK 70-20-01-200-501.
Some data on these items is contained in this TASK. For more data on these items refer to the SPM.
Method of Testing for Crack Indications.
Chemical Processes
Surface Protection
Preliminary Requirements
Pre-Conditions
NONESupport Equipment
| Name | Manufacturer | Part Number / Identification | Quantity | Remark |
|---|---|---|---|---|
| Fluorescent Penetrant Inspection Equipment | LOCAL | Fluorescent Penetrant Inspection Equipment |
Consumables, Materials and Expendables
NONESpares
NONESafety Requirements
NONEProcedure
Clean the parts. Refer to Cleaning-000 TASK 79-22-49-100-100.
SPM VRS7001 (Repair-001) TASK 70-35-24-300-501.
Cracked
Tube assembly. Refer to SPM TASK 70-23-02-230-501.
Do the test for cracks on the parts that are given below. Use the applicable penetrant inspection procedure.
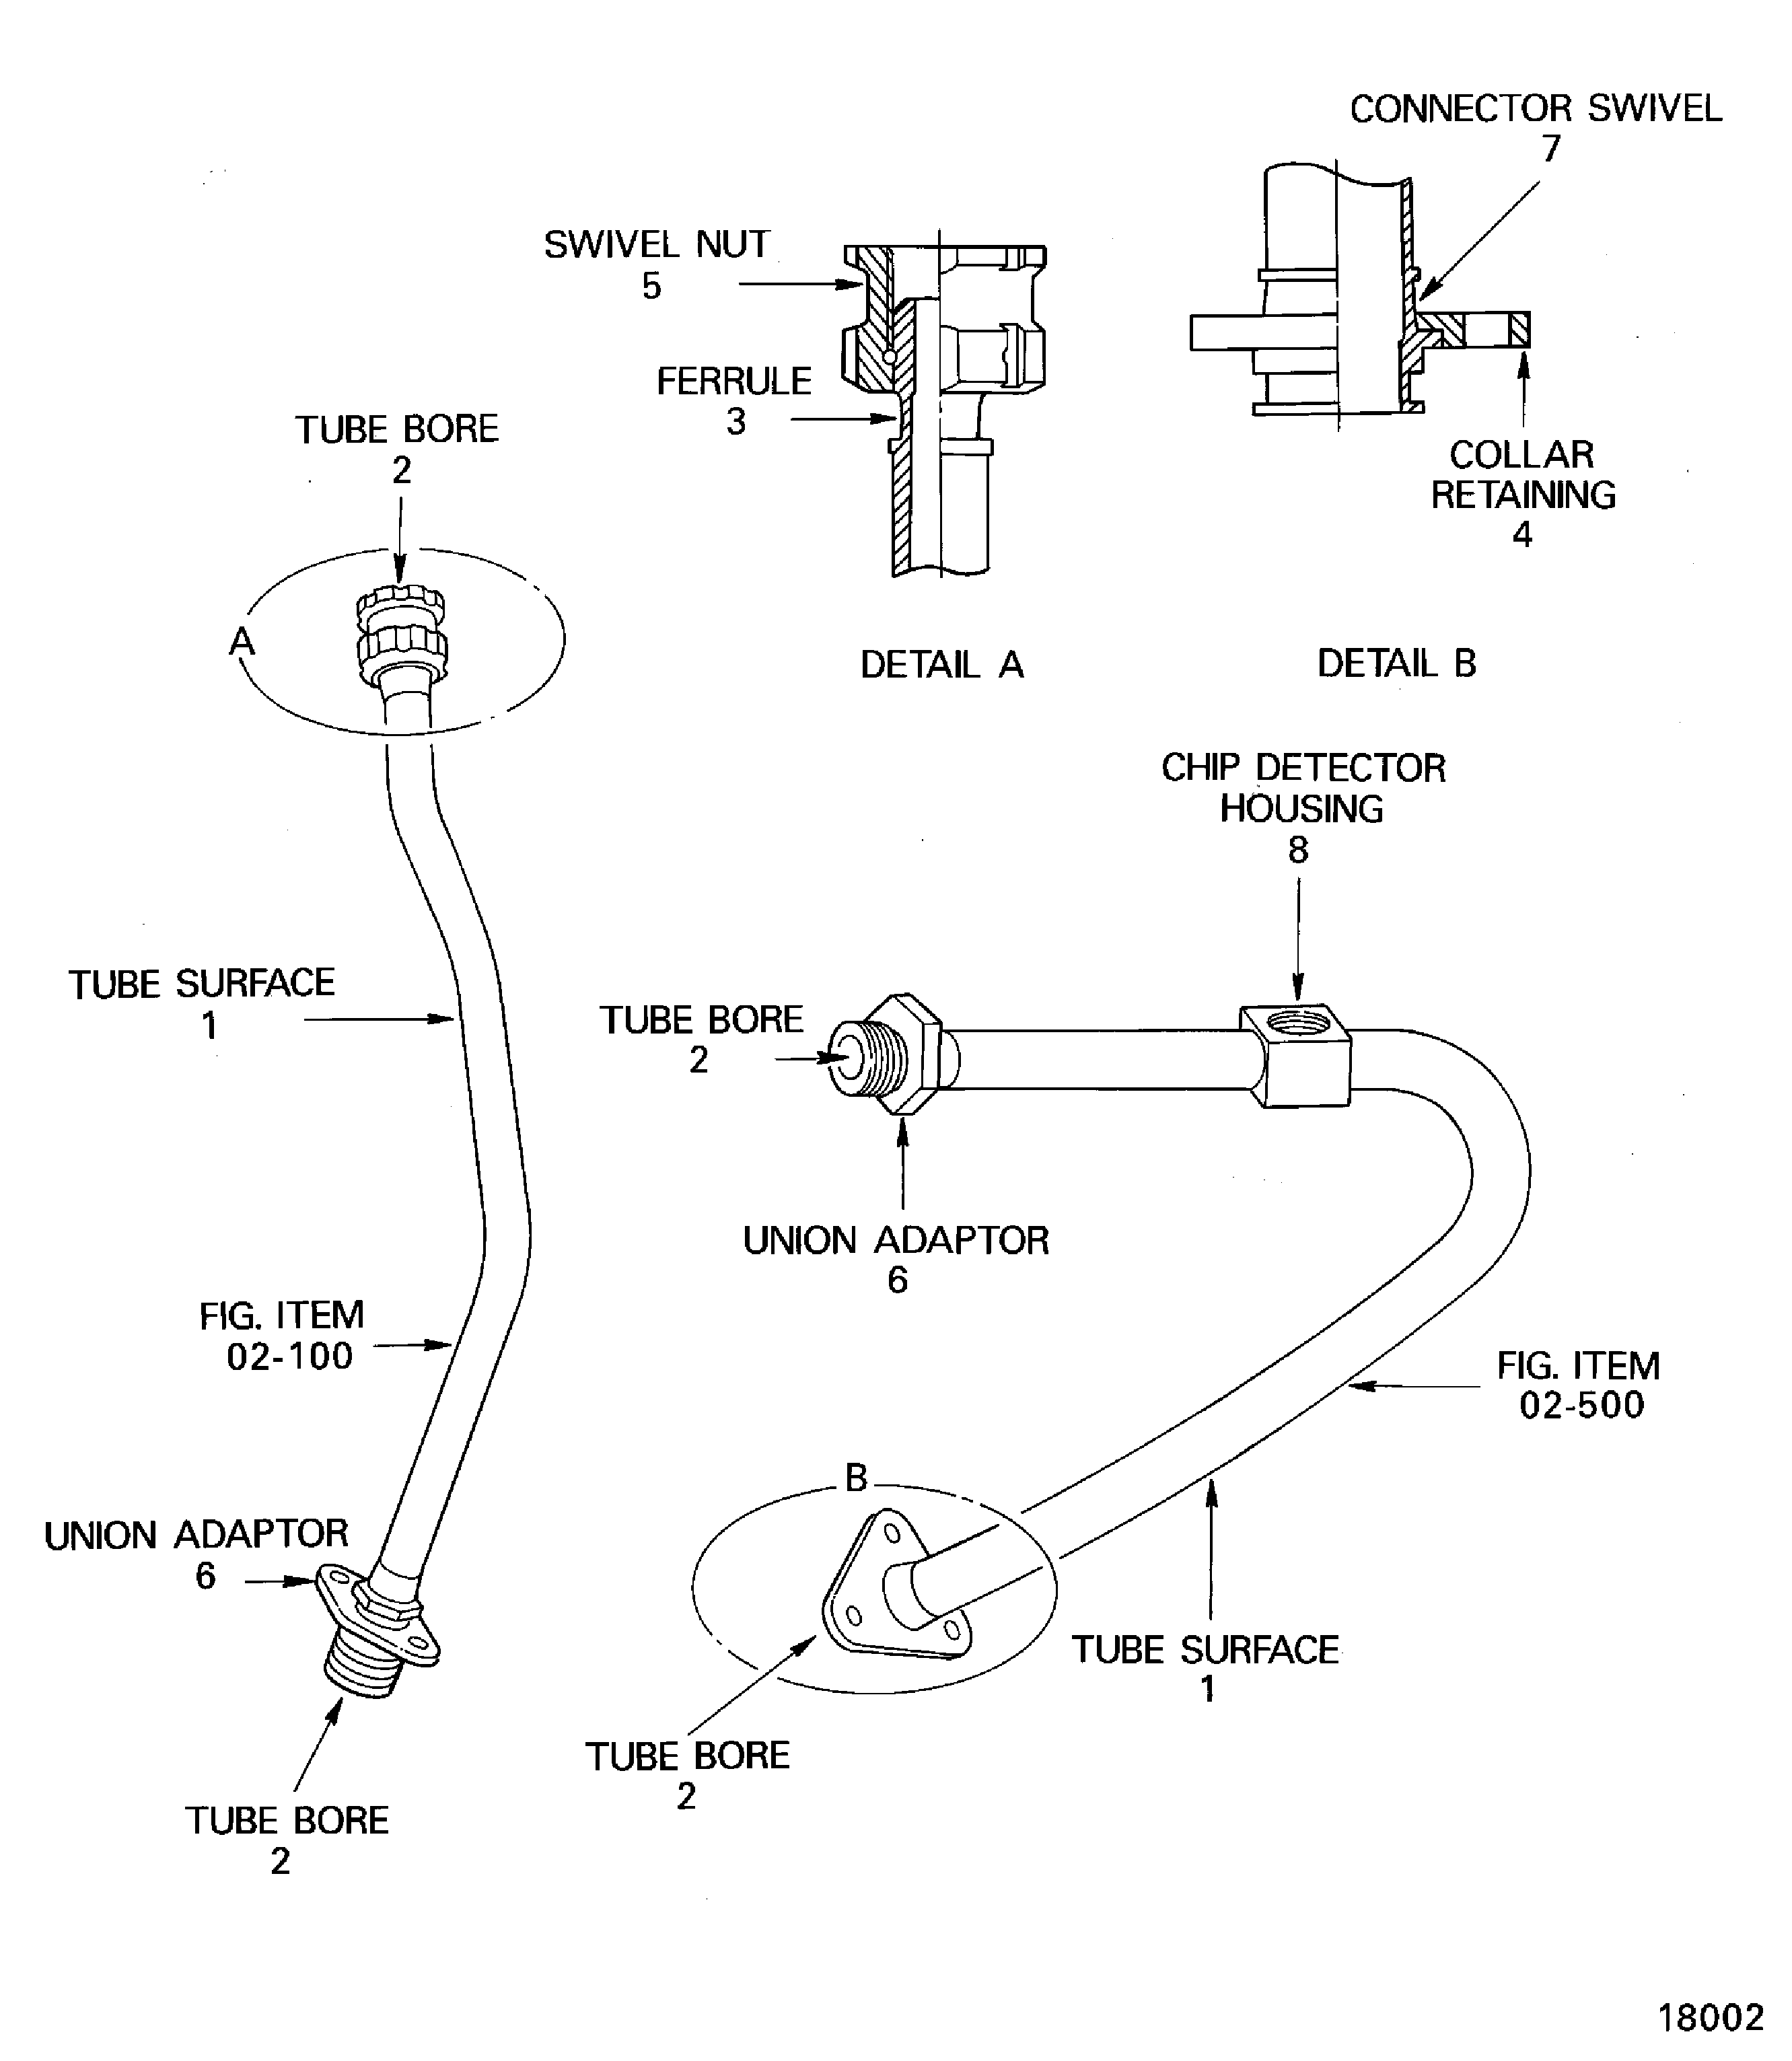
SUBTASK 79-22-49-230-051 Examine the Tube Assembly (02-100 and 02-500) for Cracks
Refer to Figure.
Repair, VRS1700 (Repair-001) TASK 79-22-49-300-001 or SPM VRS7001 (Repair-001) TASK 70-35-24-300-501.
Pitted
SPM VRS7001 (Repair-001) TASK 70-35-24-300-501.
In area of bend, or within 0.500 in. (12.70 mm) of bend or fitting.
Accept
In areas other than Step, of large smooth area if the maximum diameter is ten times the depth and bore is not decreased by more than ten per cent at any one point.
Accept
In areas other than Step, of small smooth area, that is up to 0.124 sq in. (80.0 sq mm) if depth does not more than 0.025 in. (0.64 mm).
SPM VRS7001 (Repair-001) TASK 70-35-24-300-501.
Dented
Repair, VRS1700 (Repair-001) TASK 79-22-49-300-001 or SPM VRS7001 (Repair-001) TASK 70-35-24-300-501.
On the outer surface of a bend.
Repair, VRS1700 (Repair-001) TASK 79-22-49-300-001 or SPM VRS7001 (Repair-001) TASK 70-35-24-300-501.
In areas other than Step, any nicks.
Nicked
Repair, VRS1700 (Repair-001) TASK 79-22-49-300-001 or SPM VRS7001 (Repair-001) TASK 70-35-24-300-501.
On the outer surface of a bend.
Repair, VRS1700 (Repair-001) TASK 79-22-49-300-001 or SPM VRS7001 (Repair-001) TASK 70-35-24-300-501.
In areas other than Step, any galls.
Galled
Examine the tube surface at location 1.
SUBTASK 79-22-49-220-051 Examine the Tube Assembly (02-100 and 02-500) Tube Surface
Refer to Figure.
Clean with dry air blast.
Plugged
Examine the tube bore at location 2.
SUBTASK 79-22-49-220-052 Examine the Tube Assembly (02-100 and 02-500) Tube Bore
Refer to Figure.
Repair, VRS1700 (Repair-001) TASK 79-22-49-300-001 or SPM VRS7001 (Repair-001) TASK 70-35-24-300-501.
Galled
Sealing face
Examine the ferrule at location 3.
SUBTASK 79-22-49-220-053 Examine the Tube Assembly (02-100 and 02-500) Ferrule
Refer to Figure.
SPM VRS7001 (Repair-001) TASK 70-35-24-300-501.
Cracked
Repair, VRS1700 (Repair-001) TASK 79-22-49-300-001 or SPM VRS7001 (Repair-001) TASK 70-35-24-300-501.
Galled
Flange
Repair, VRS1700 (Repair-001) TASK 79-22-49-300-001.
Burrs
Bolt hole
Examine the collar retaining at location 4.
SUBTASK 79-22-49-220-054 Examine the Tube Assembly (02-100 and 02-500) Collar Retaining
Refer to Figure.
Repair, VRS1700 (Repair-001) TASK 79-22-49-300-001.
Pick-up
SPM VRS7001 (Repair-001) TASK 70-35-24-300-501.
Crossed
Repair, VRS7001 SPM (Repair-001) TASK 70-35-24-300-501.
Stripped
Threads
Examine the swivel nut at location 5.
SUBTASK 79-22-49-220-055 Examine the Tube Assembly (02-100 and 02-500) Swivel Nut
Refer to Figure.
Repair, VRS1700 (Repair-001) TASK 79-22-49-300-001.
Pick-up
SPM VRS7001 (Repair-001) TASK 70-35-24-300-501.
Crossed
SPM VRS7001 (Repair-001) TASK 70-35-24-300-501.
Stripped
Threads
Repair, VRS1700 (Repair-001) TASK 79-22-49-300-001 or SPM VRS7001 (Repair-001) TASK 70-35-24-300-501.
Galled
Sealing face
Repair, VRS1700 (Repair-001) TASK 79-22-49-300-001.
Burrs
Bolt hole
Examine the union adaptor at location 6.
SUBTASK 79-22-49-220-056 Examine the Tube Assembly (02-100 and 02-500) Union Adaptor
Refer to Figure.
Repair, VRS1700 (Repair-001) TASK 79-22-49-300-001 or SPM VRS7001 (Repair-001) TASK 70-35-24-300-501.
Galled
Sealing face
Examine the connector swivel at location 7
SUBTASK 79-22-49-220-057 Examine the Tube Assembly (02-100 and 02-500) Connector Swivel
Refer to Figure.
Repair, VRS1700 (Repair-001) TASK 79-22-49-300-001 or SPM VRS7001 (Repair-001) TASK 70-35-24-300-501.
Galled
Sealing faces
Repair, VRS1700 (Repair-001) TASK 79-22-49-300-001.
Pick-up
SPM VRS7001 (Repair-001) TASK 70-35-24-300-501.
Crossed
SPM VRS7001 (Repair-001) TASK 70-35-24-300-501.
Stripped
Threads
Examine the chip detector housing at location 8.
SUBTASK 79-22-49-220-058 Examine the Tube Assembly (02-100 and 02-500) Chip Detector Housing
Figure: Locations on the Tube Assembly
Locations on the Tube Assembly

