TASK 72-00-31-220-001 LPC Fan Module - Examine The LPC Fan Module Front Face at Interface A-31, Inspection-001

DMC:V2500-A1-72-00-3100-00A-310A-B|Issue No:001.00|Issue Date:2014-05-01

Export Control

EAR Export Classification: Not subject to the EAR per 15 C.F.R. Chapter 1, Part 734.3(b)(3), except for the following Service Bulletins which are currently published as EAR Export Classification 9E991: SBE70-0992, SBE72-0483, SBE72-0580, SBE72-0588, SBE72-0640, SBE73-0209, SBE80-0024 and SBE80-0025.

Copyright

© IAE International Aero Engines AG (2001, 2014 - 2021) The information contained in this document is the property of © IAE International Aero Engines AG and may not be copied or used for any purpose other than that for which it is supplied without the express written authority of © IAE International Aero Engines AG. (This does not preclude use by engine and aircraft operators for normal instructional, maintenance or overhaul purposes.).

Applicability

V2500-A1

Common Information

TASK 72-00-31-220-001 LPC Fan Module - Examine The LPC Fan Module Front Face at Interface A-31, Inspection-001

General

This TASK is for A1 engines.

Refer to TASK 72-00-00-200-000 (Examine the modular/non modular interfaces) (INSPECTION/CHECK-000), before you do this TASK.

The policy that is necessary for inspection is given in the SPM TASK 70-20-01-200-501.

The word "reject" is used after an interface inspection statement to show that a higher level inspection and possible repair to the damaged part is necessary. Do the higher level inspection procedure as found in the applicable Chapter/Section/Subject of this manual on the damaged part(s). It is not necessary to do the higher level inspection on parts that are serviceable to the interface inspection standard.

Preliminary Requirements

Pre-Conditions

NONE

Support Equipment

NONE

Consumables, Materials and Expendables

NONE

Spares

NONE

Safety Requirements

NONE

Procedure

    1. SUBTASK 72-00-31-220-051 Visually Examine the Fan Blade Airfoils of the LP Compressor at Location 1

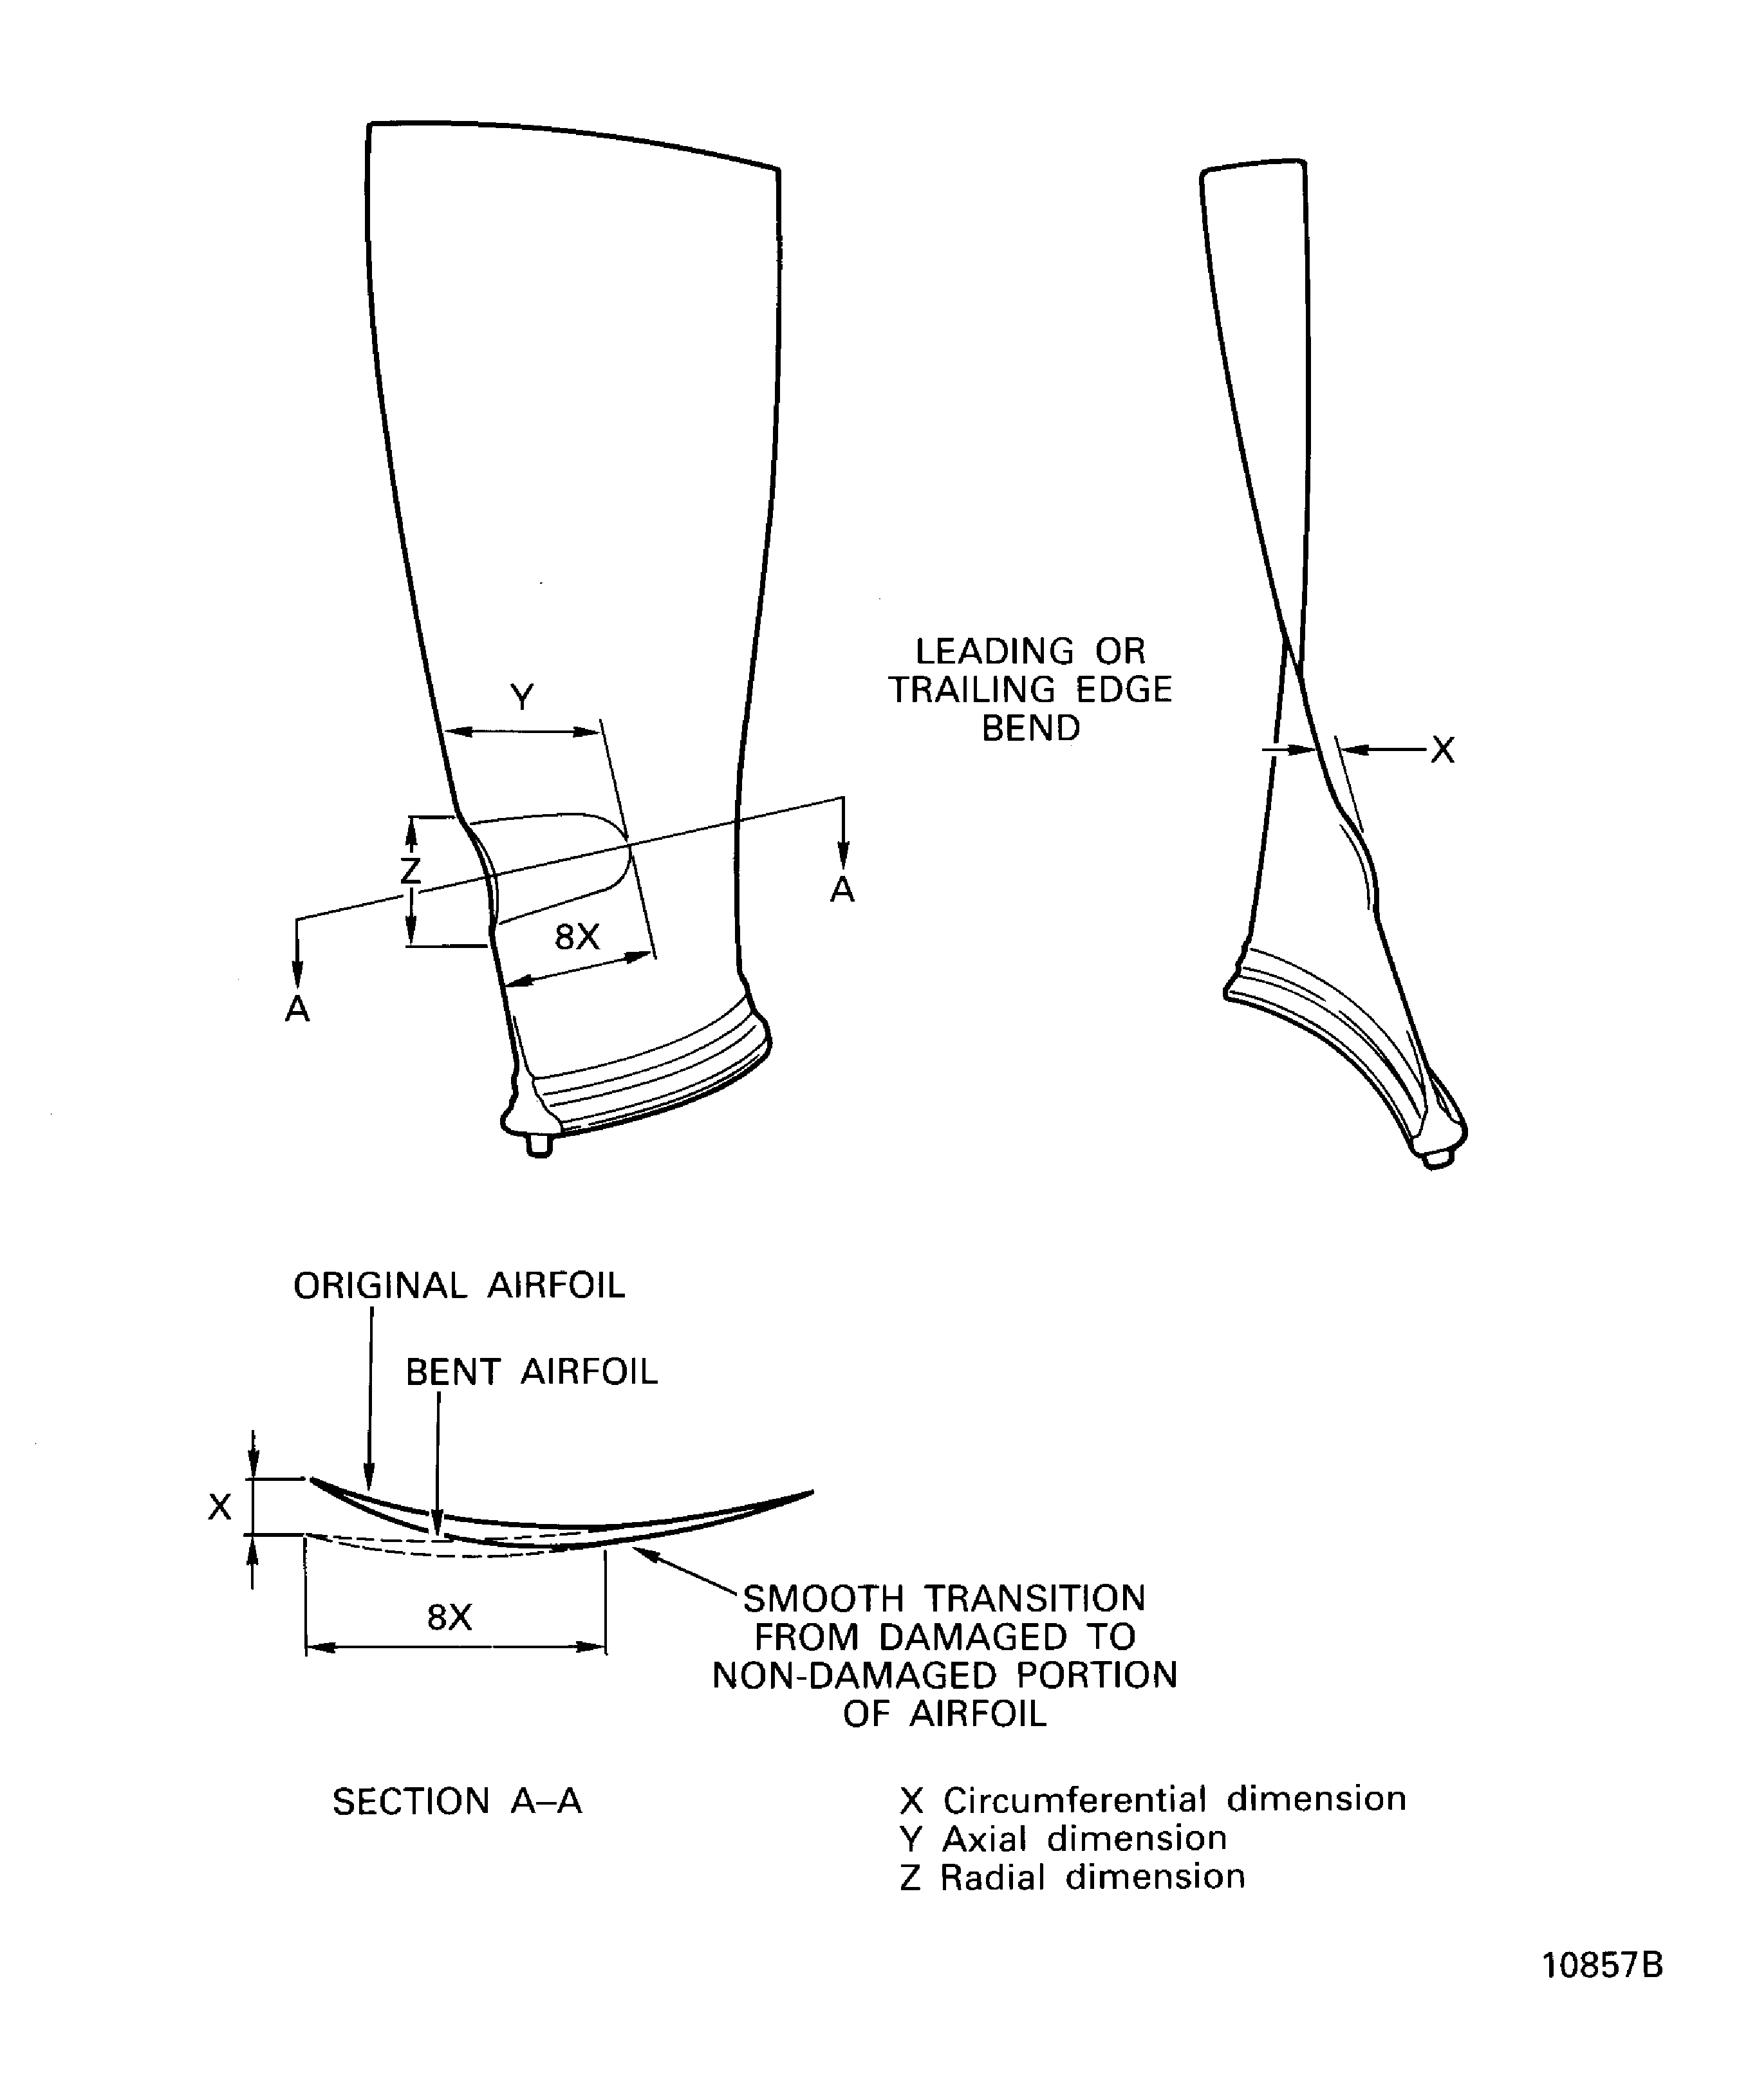
    2. Refer to Figure, Figure and Figure.

      1. Area Ar.

        1. Cracked

        2. Reject

        1. Nicked, dented, scored or scratched.

          1. Up to 0.008 in. (0.20 mm) in depth

          2. Accept

          1. More than Step

          2. Repair, VRS1111 TASK 72-00-31-300-002 (REPAIR-002)

        1. Arc-burn

        2. Reject

        1. NOTE

          An arc-burn is evident by a small circular or semi-circular heat affected area on the blade surface that may contain a shallow pitting, remelting or cracking. Visually a dark blue oxide discolouration is associated with the heat-affected area.

          Erosion

        2. Accept

      1. Area At.

        1. Cracked

        2. Reject

        1. Nicked, dented, scored or scratched.

          1. Up to 0.025 in. (0.63 mm) in depth

          2. Accept

          1. More than Step

          2. Repair, VRS1111 TASK 72-00-31-300-002 (REPAIR-002)

        1. Arc-burn

        2. Reject

        1. Erosion

        2. Accept

      1. Area Br.

        1. Cracked

        2. Reject

        1. Nicked, dented, scored or scratched.

          1. Up to 0.008 in. (0.20 mm) in depth

          2. Accept

          1. More than Step

          2. Repair, VRS1111 TASK 72-00-31-300-002 (REPAIR-002)

        1. Arc-burn

        2. Reject

      1. Area Bt.

        1. Cracked

        2. Reject

        1. Nicked, dented, scored or scratched.

          1. Up to 0.025 in. (0.63 mm) in depth

          2. Accept

          1. More than Step

          2. Reject

        1. Arc-burn

        2. Reject

      1. Area Ct.

        1. Cracked

        2. Reject

        1. Nicked, dented, scored or scratched.

          1. Up to 0.008 in. (0.20 mm) in depth

          2. Accept

          1. More than Step

          2. Reject

        1. Arc-burn

        2. Reject

      1. Area Cr.

        1. Cracked, nicked, dented, scored or scratched

        2. Reject

        1. Arc-burn

        2. Reject

      1. NOTE

        The leading and trailing edge bends must be outboard of the annulus fillers platform and can not extend below the outer platform surface of the annulus fillers.

        Leading and trailing edge bends.

        1. Blade bends - general.

          1. Maximum number of bent blades in one fan rotor assembly must not be more than three

          2. Accept

          1. Not more than one bend in one blade is permitted

          2. Accept

          1. Bend has no kinks, creases, tears, cracks and nicks

          2. Accept

          1. Any blade untwist

          2. Reject

          1. There is a smooth transition between the serviceable airfoil surface and the bent area

          2. Accept

        1. Circumferential deviation (X): a maximum of 0.20 in. (5.08 mm) is permitted if

        2. Accept

      2. Axial length of bend (Y) is not less than 8 times circumferential deviation (X).

      3. Radial length of bend (Z) is not less than 15 times circumferential deviation (X).

      4. Any bends does not extend into the panel area by more than 2.0 in. from the leading edge.

        1. Other than Step

        2. Reject

      1. Leading edge tip.

        1. Bent

        2. Reject

      1. Annulus line areas.

        1. Peeled.

          1. Any amount of peeling of polyurethane paint

          2. Accept

        1. Worn.

          1. Not more than 0.008 in. (0.20 mm)

          2. Accept

          1. More than Step

          2. Reject

      1. Tips and airfoil surfaces.

        1. Discoloured/blued.

          1. On the blade tips and on no more than 0.25 in. (6.53 mm)

          2. Accept

          1. More than Step

          2. Reject

    1. SUBTASK 72-00-31-280-051 Do a Transient Acoustic Propagation Test of the Stage 1 Fan Blades

      1. Do a transient acoustic propagation test

      2. Refer to TASK 72-00-00-200-010 (INSPECTION/CHECK-010)

    1. SUBTASK 72-00-31-220-052 Visually Examine the LP Compressor Annulus Fillers at Location 2

    2. Refer to Figure.

      1. Platform.

        1. Missing anti-erosion coating

        2. Reject

        1. Cracked, dented, nicked and/or scratched

        2. Reject

      1. Rubber seals.

        1. Raised above the annulus line provided that they are not detached from the annulus filler and that they have no cracks

        2. Accept

      2. Detached (partially or completely).

        1. Up to 6

        2. Repair, VRS1108, TASK 72-00-31-300-003 (REPAIR-003)

        1. NOTE

          Only one seal per annulus filler is permitted to be partially or completely detached.

          More than in Step

        2. Reject

      3. Missing (partially or completely).

        1. Up to 6

        2. Accept

        1. NOTE

          Only one seal per annulus filler is permitted to be partially or completely detached.

          More than in Step

        2. Reject

    1. SUBTASK 72-00-31-220-053 Visually Examine the Front Retaining Ring Snap Diameter at Location 3

    2. Refer to Figure.

      1. Scored

      2. Reject

    1. SUBTASK 72-00-31-220-054 Visually Examine the Front Retaining Ring at Location 4

    2. Refer to Figure.

      1. Scored

      2. Reject

        1. Shank nut.

          1. Damaged

          2. Reject

    1. SUBTASK 72-00-31-220-060 Visually Examine the Washer Plate at Location 5

    2. Refer to Figure.

      1. Unbond

      2. Reject

  1. Figure: Locations at interface A-31

    Locations at interface A-31
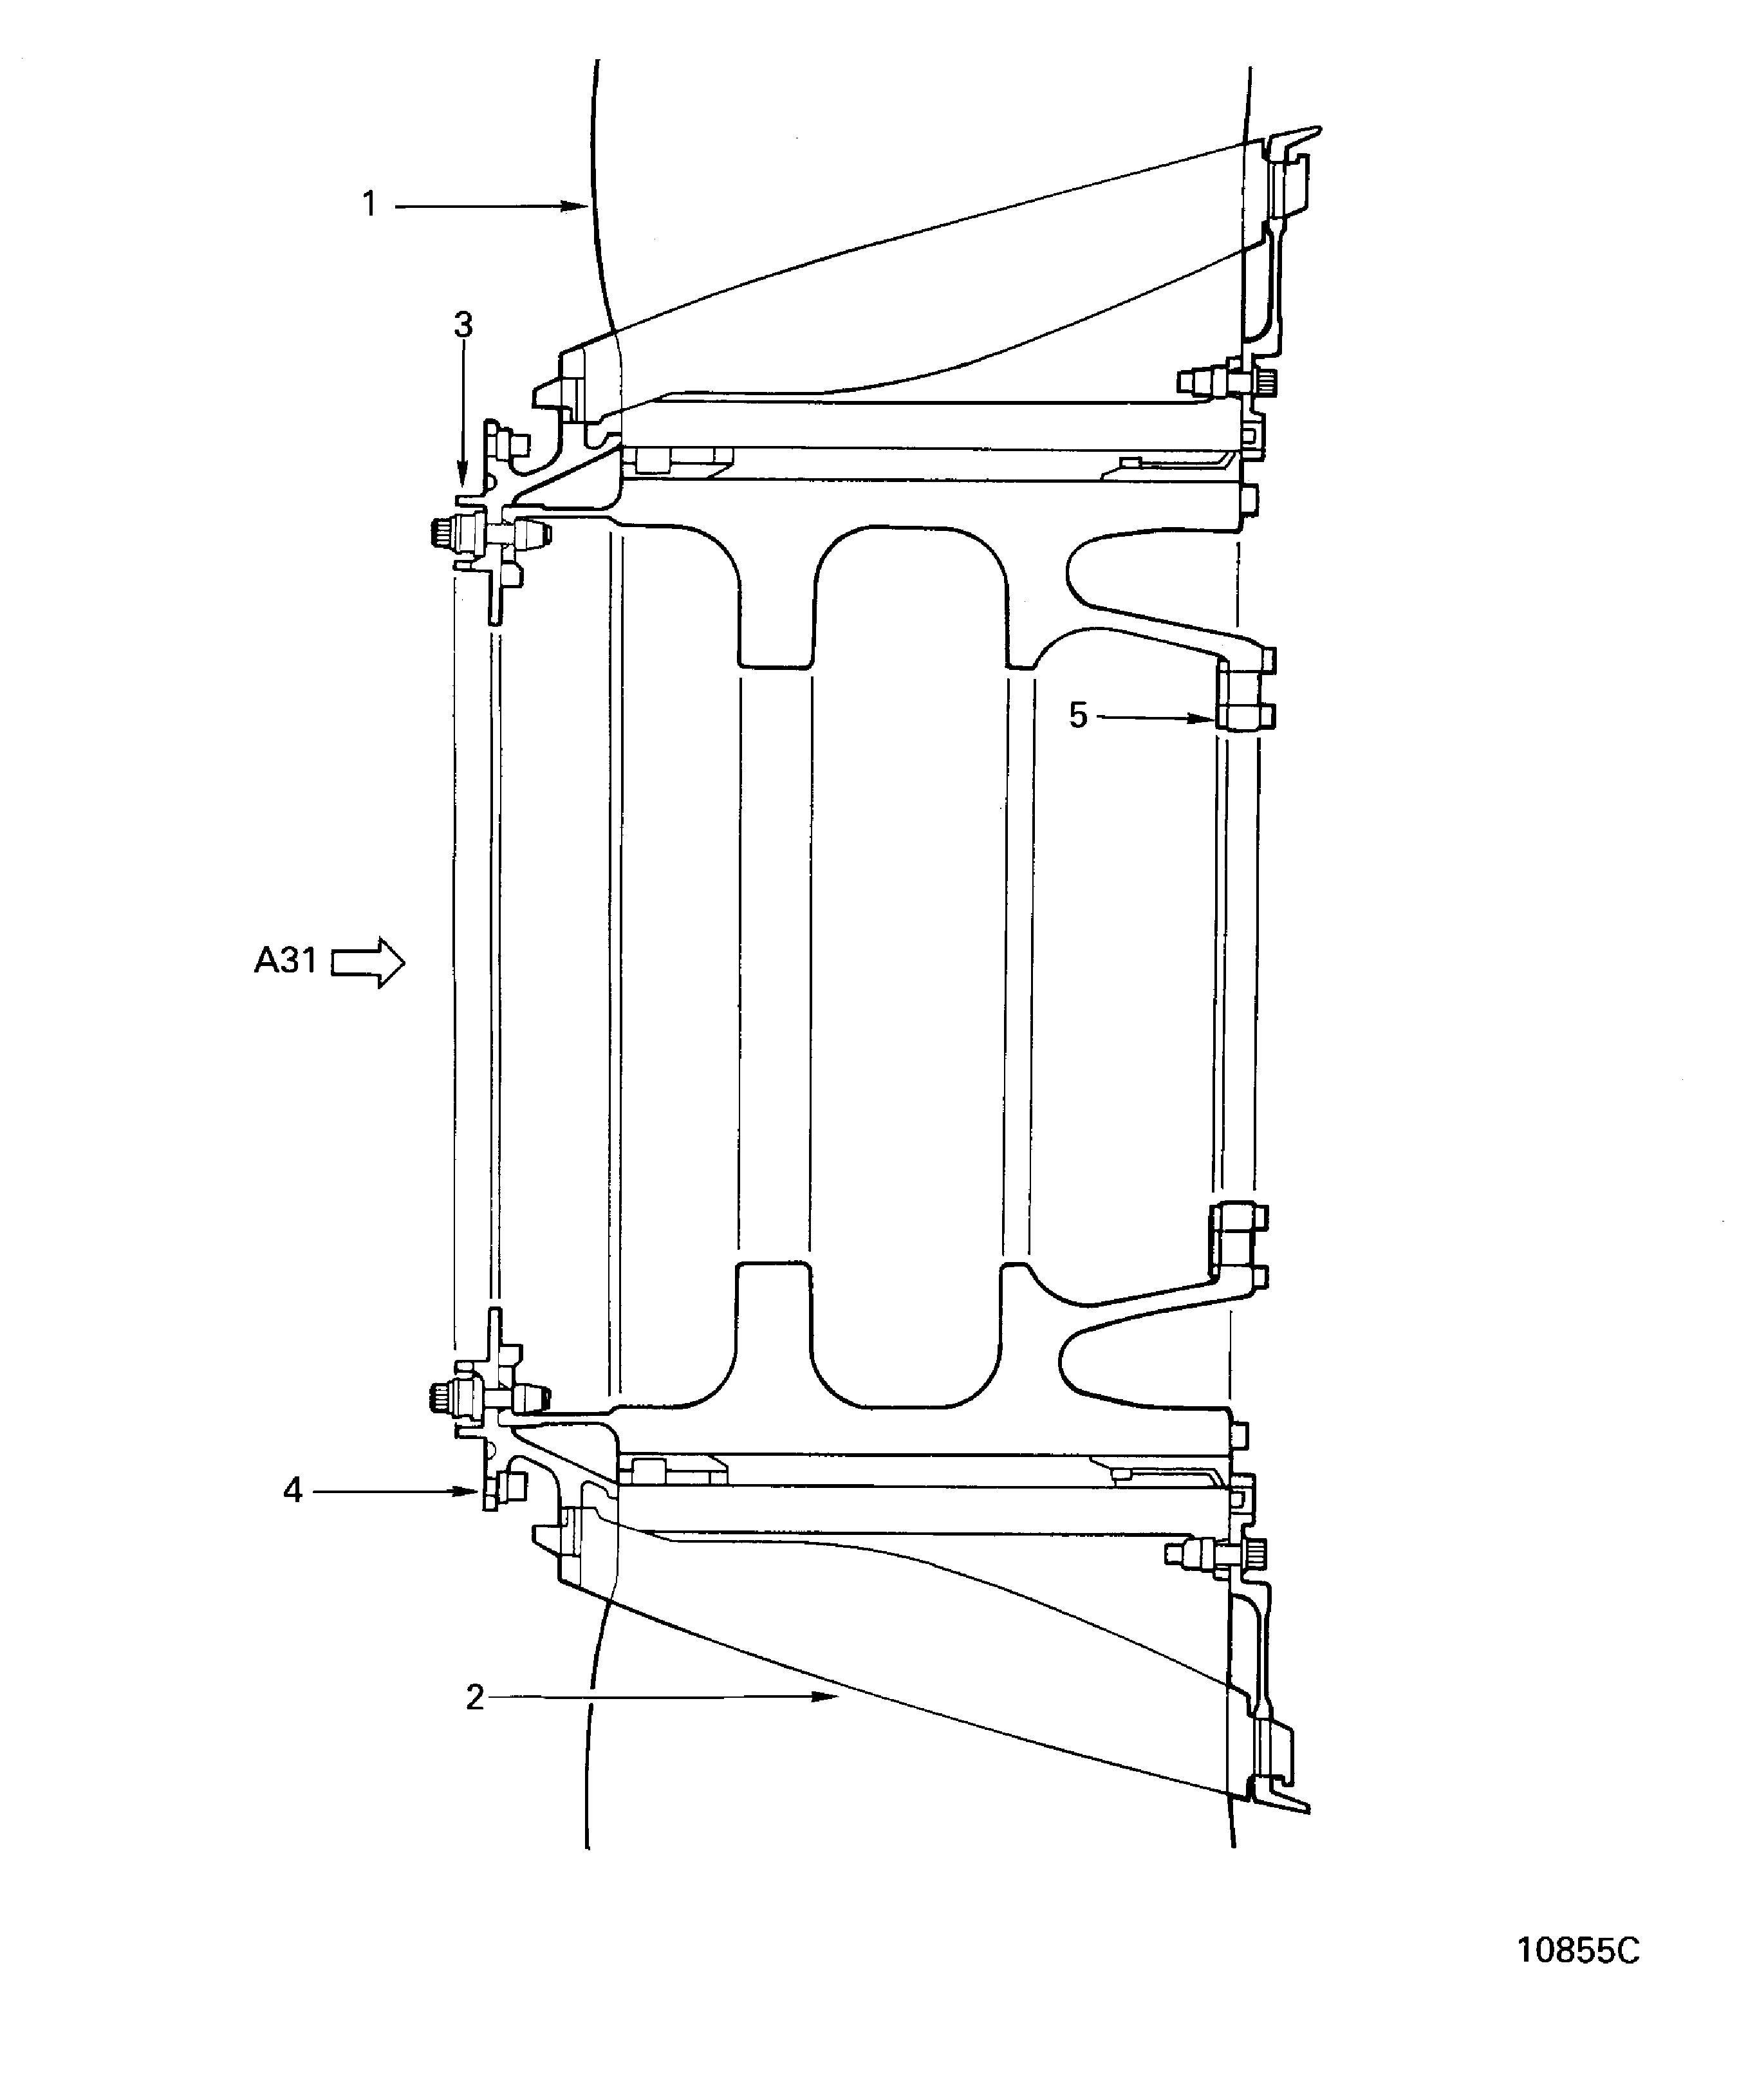
    Figure: Locations at interface A-31

    Locations at interface A-31
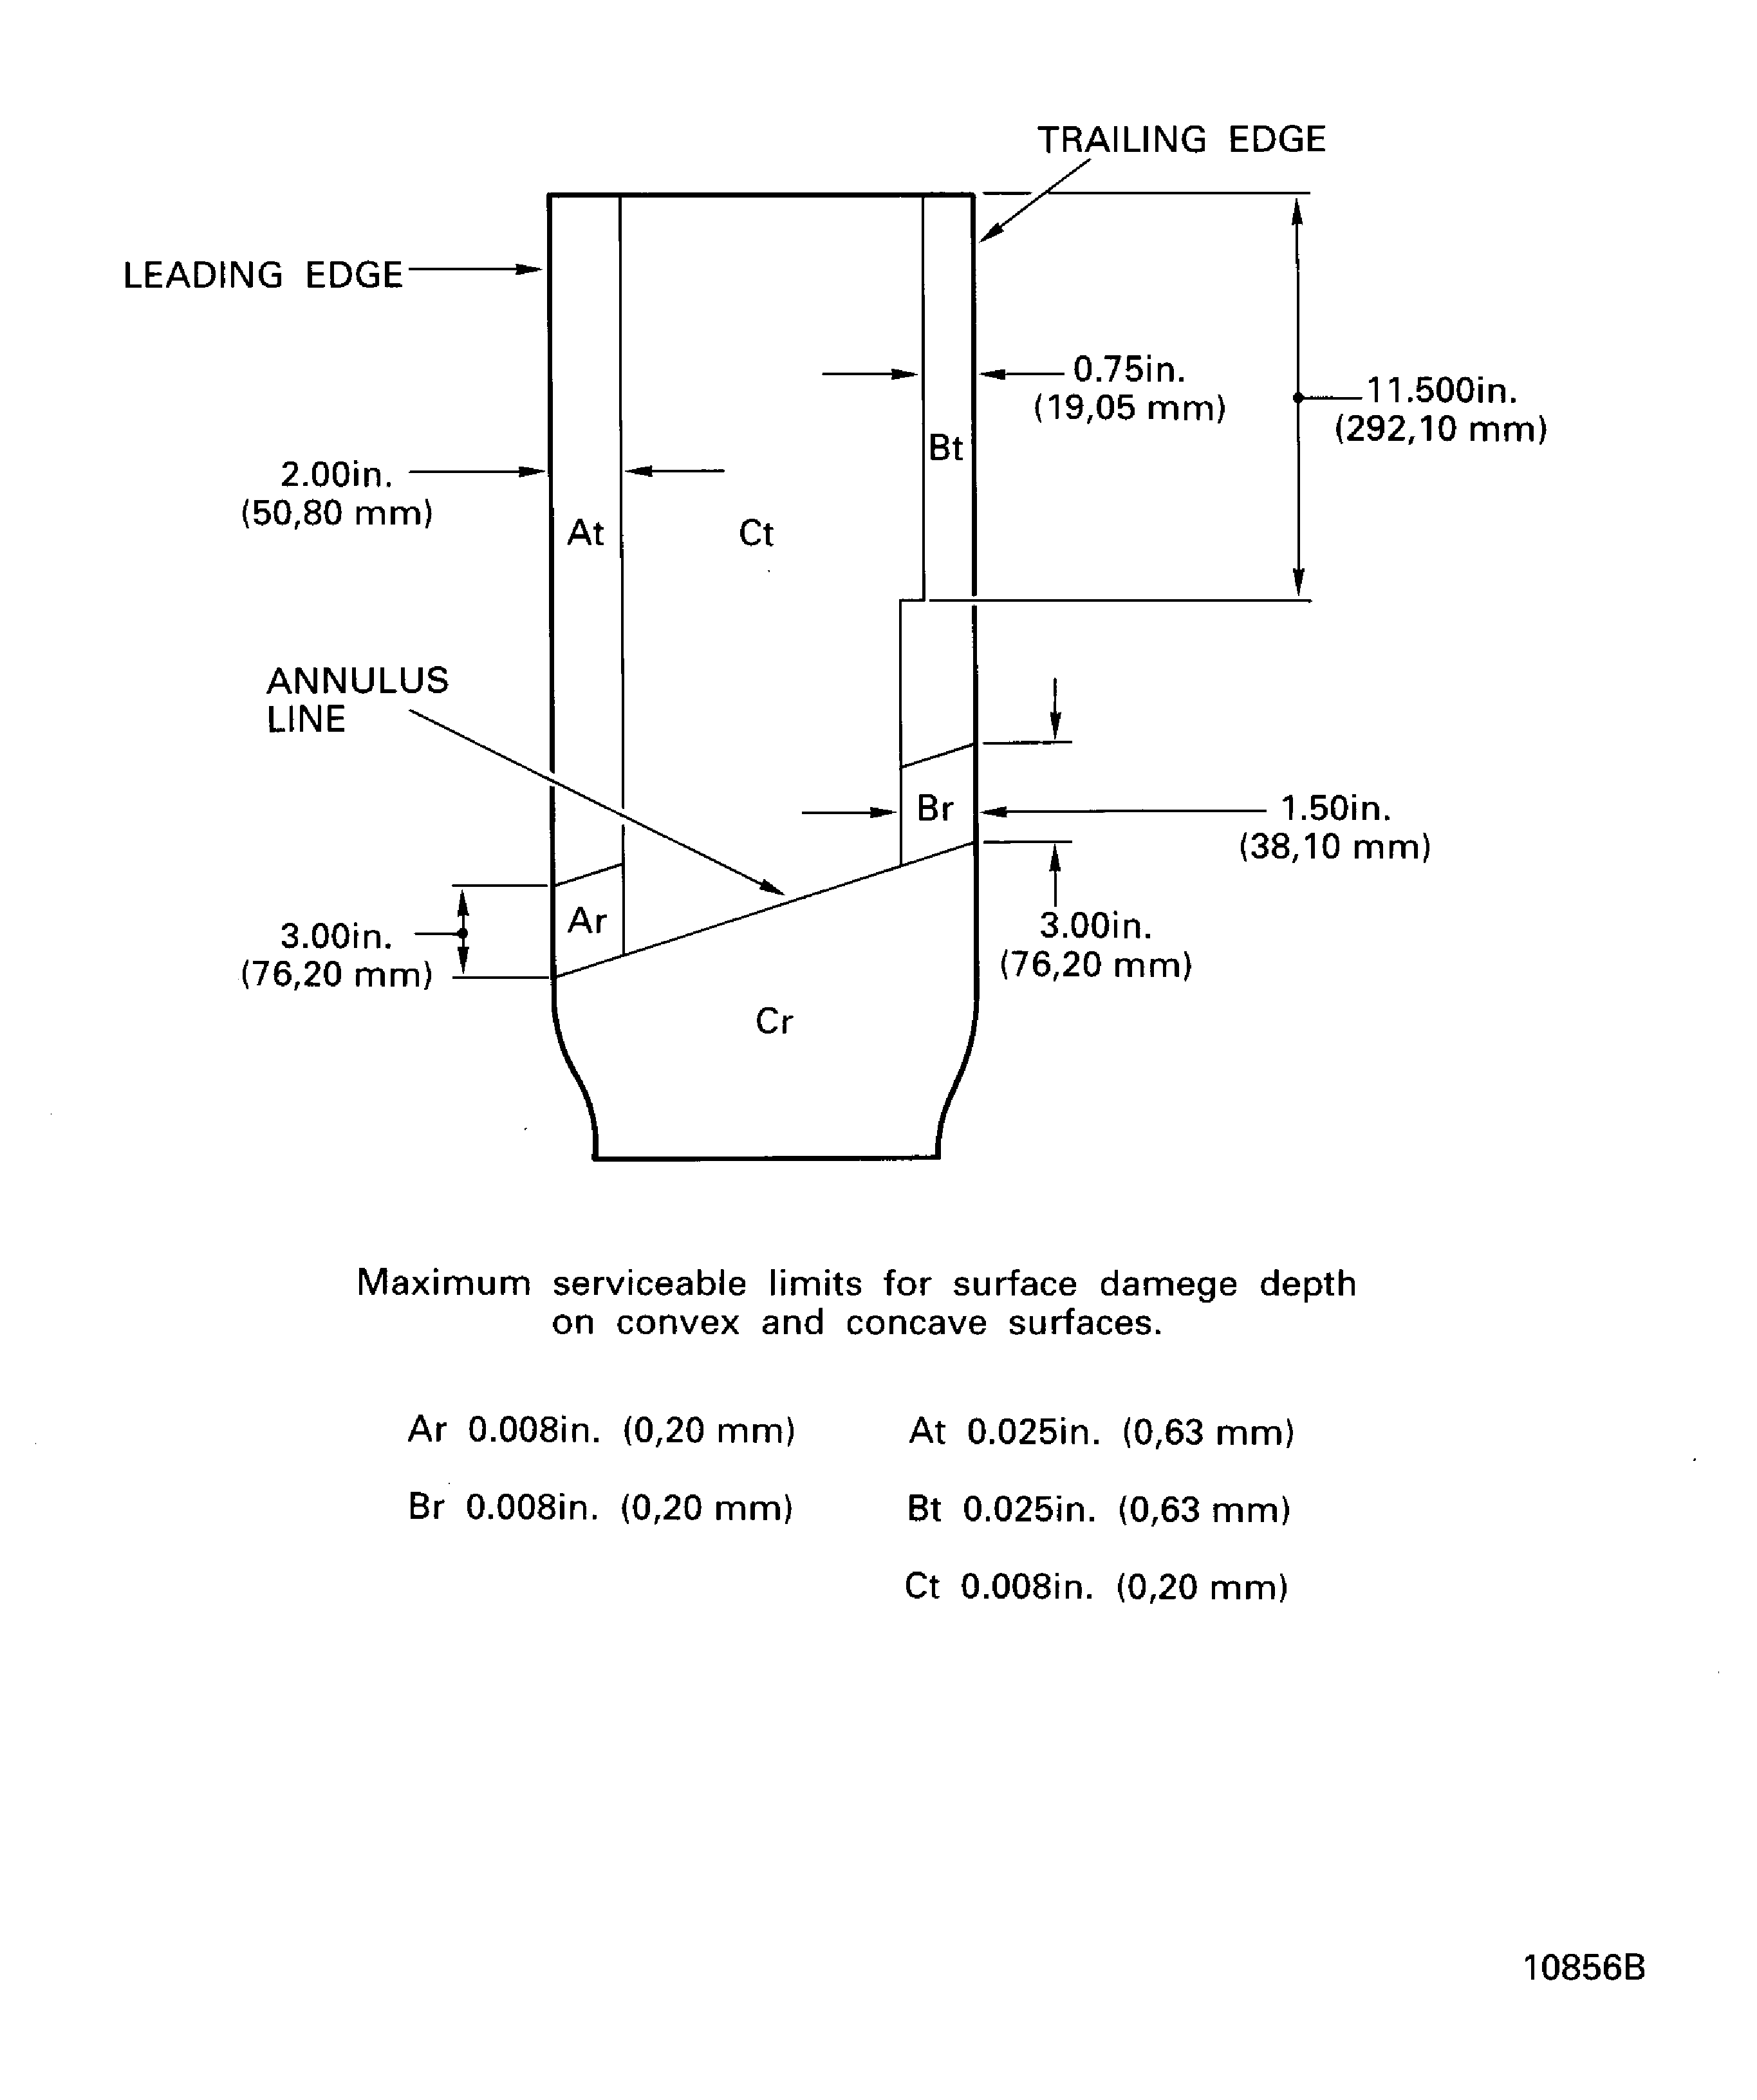
    Figure: Locations at interface A-31

    Locations at interface A-31
Requirements After Job Completion

Follow-On Conditions

NONE