Export Control
EAR Export Classification: Not subject to the EAR per 15 C.F.R. Chapter 1, Part 734.3(b)(3), except for the following Service Bulletins which are currently published as EAR Export Classification 9E991: SBE70-0992, SBE72-0483, SBE72-0580, SBE72-0588, SBE72-0640, SBE73-0209, SBE80-0024 and SBE80-0025.Copyright
© IAE International Aero Engines AG (2001, 2014 - 2021) The information contained in this document is the property of © IAE International Aero Engines AG and may not be copied or used for any purpose other than that for which it is supplied without the express written authority of © IAE International Aero Engines AG. (This does not preclude use by engine and aircraft operators for normal instructional, maintenance or overhaul purposes.).Applicability
V2500-A1
Common Information
TASK 72-45-23-200-004-A00 HPT Stage 1 Duct Segment - Examine, Inspection-004
General
This TASK gives the procedure for the inspection of the stage 1 HPT duct segment.
Fig/item numbers in parentheses in the procedure agree with those used in the IPC.
The policy that is necessary for inspection is given in the SPM TASK 70-20-00-200-501.
All the parts must be cleaned before any part is examined. Refer to TASK 72-45-23-100-000 (CLEANING-000).
All parts must be visually examined for damage, corrosion and wear. Any defects that are not identified in the procedure must be referred to IAE.
The procedure for those parts which must have a crack test is given in SUBTASK 72-45-23-230-054. Do the test before the part is visually inspected.
Do not discard any part until you are sure there are no repairs available. Refer to the instructions in Repair before a discarded part is used again or oversize parts are installed.
Parts which should be discarded can be held although no repair is available. The repair of a discarded part could be shown to be necessary at a later date.
All parts must be examined to make sure that all the repairs have been completed satisfactorily.
The practices and processes referred to in the procedure by the TASK numbers are in the SPM.
References
Refer to the SPM for data on these items.
Definitions of Damage, SPM TASK 70-02-02-350-501
Inspection of Parts, SPM TASK 70-20-00-200-501
Some data on these items is contained in this TASK. For more data on these items refer to the SPM.
Methods of Testing for Crack Indications
Chemical Processes
Surface Protection
Preliminary Requirements
Pre-Conditions
NONESupport Equipment
NONEConsumables, Materials and Expendables
NONESpares
NONESafety Requirements
NONEProcedure
Refer to: Figure
Clean the part. Refer to TASK 72-45-23-100-000 (CLEANING-000).
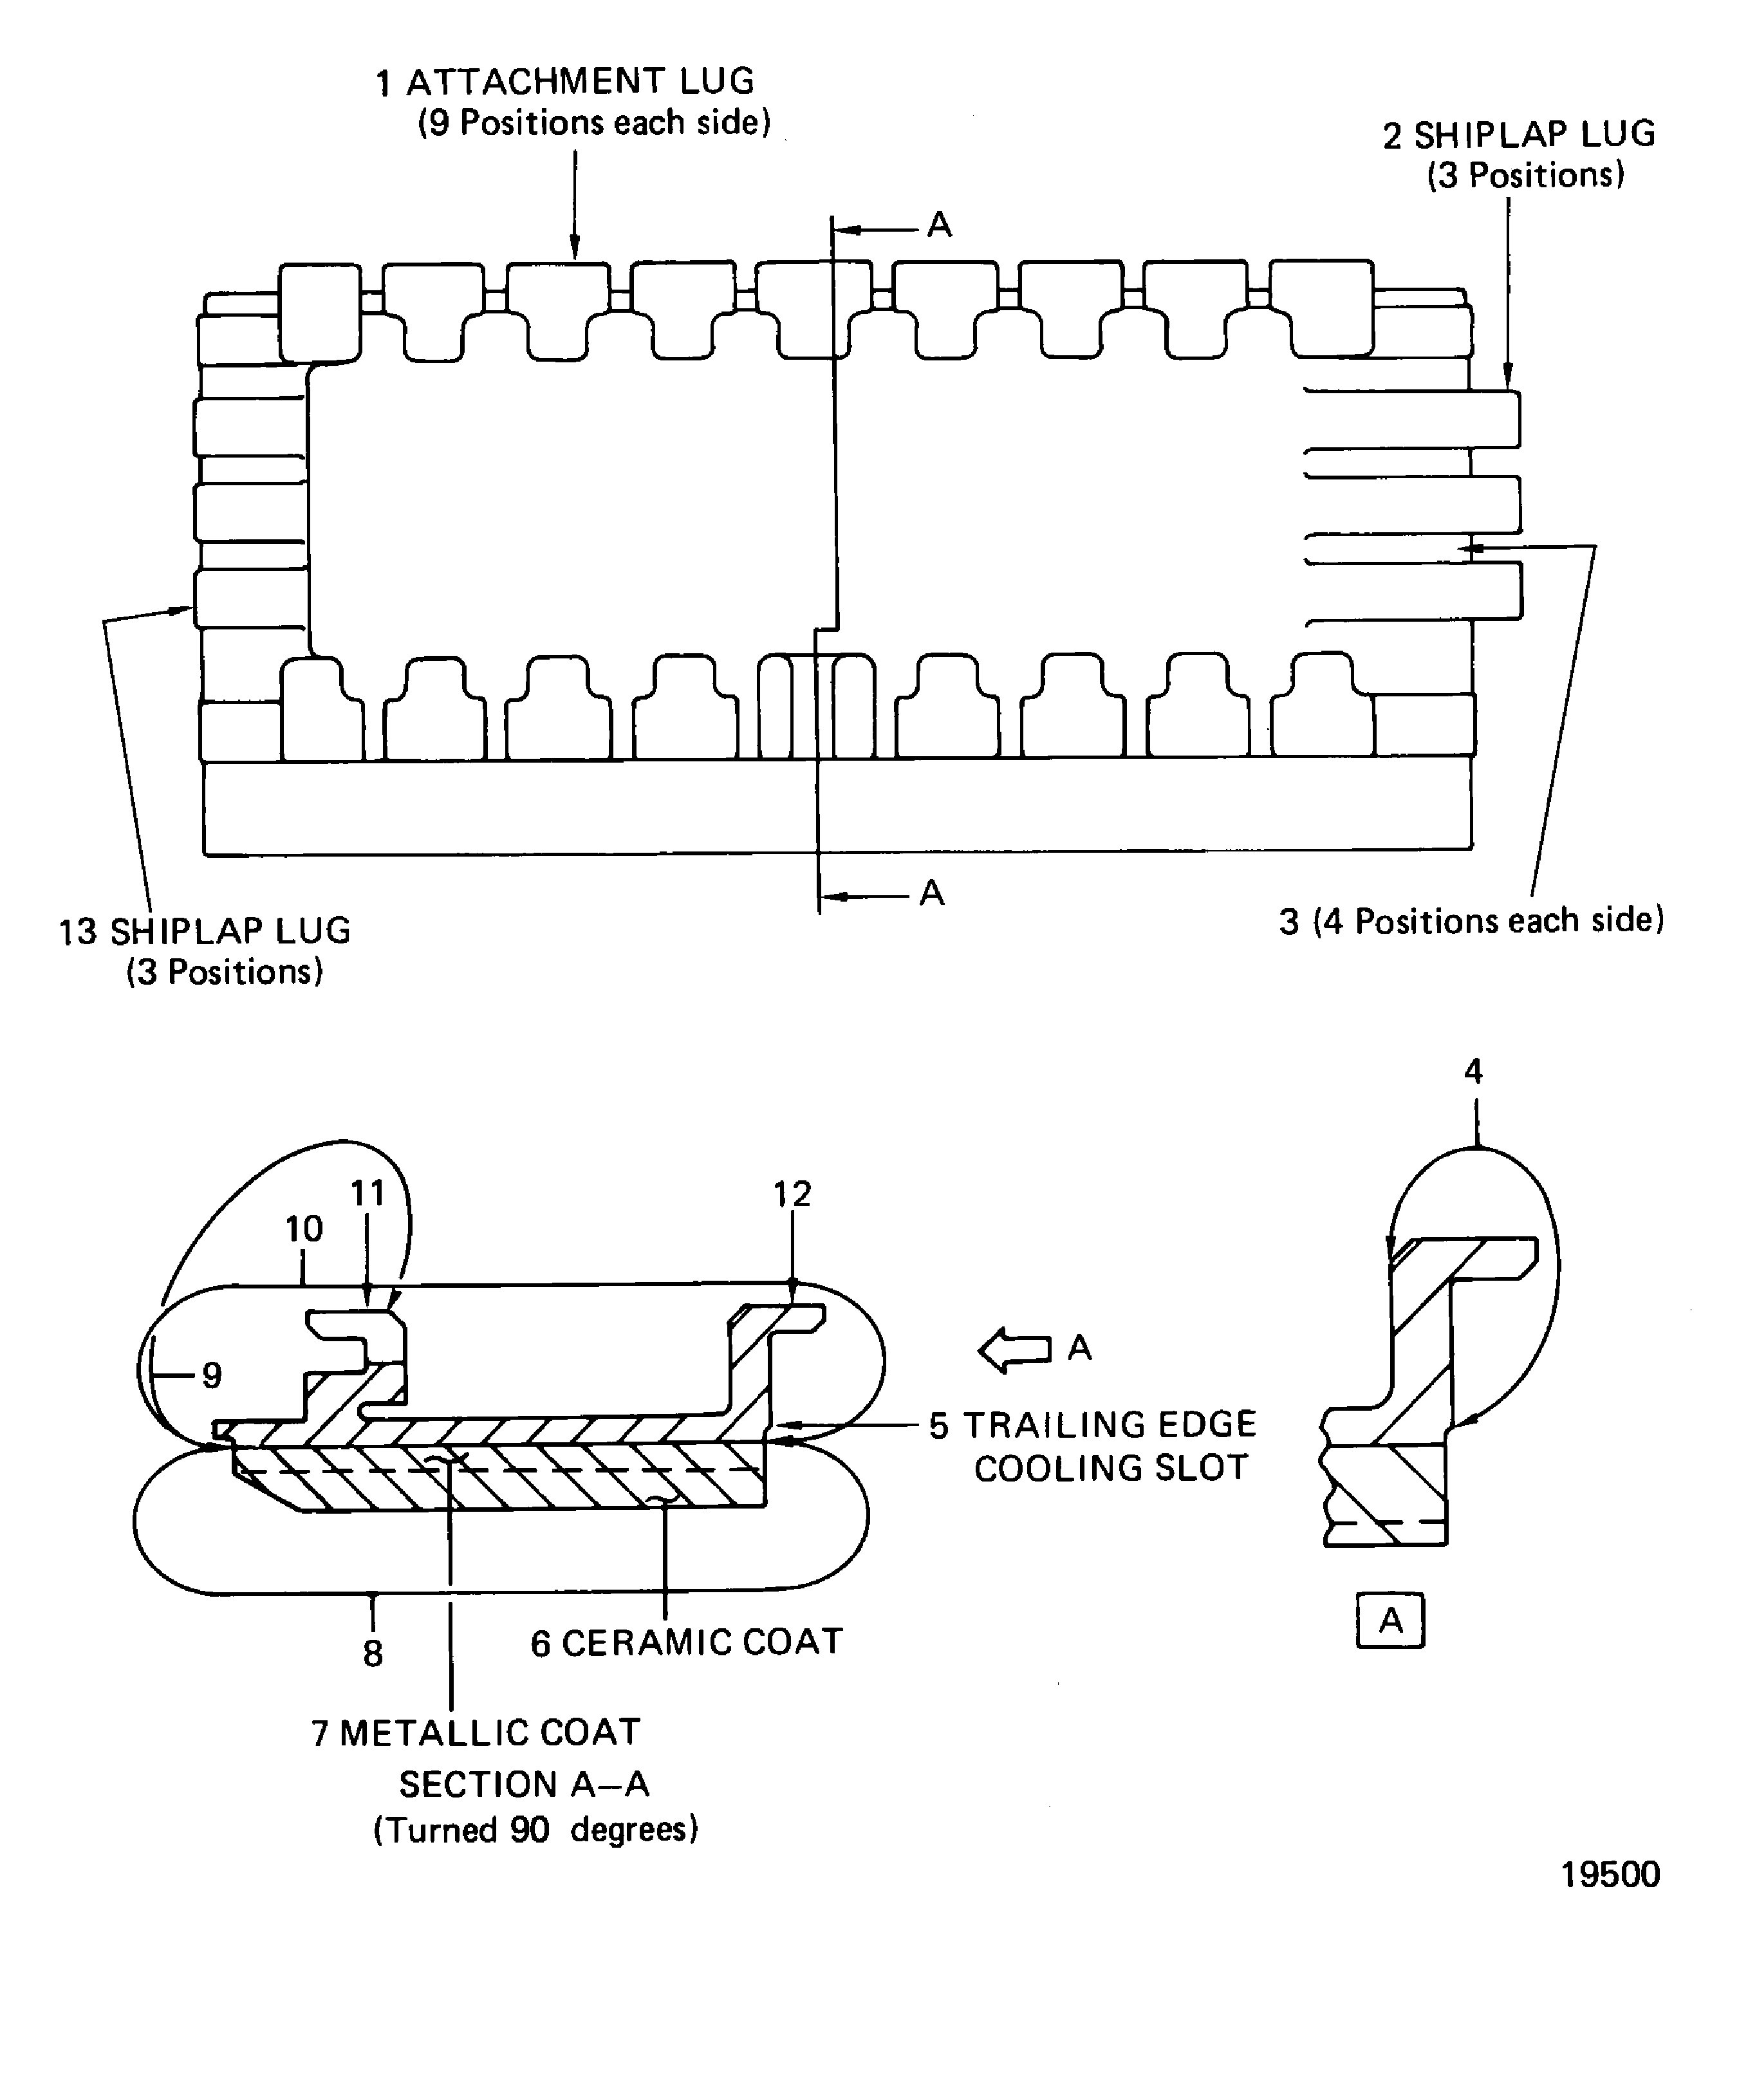
Do the test for cracks on the part that is given below. Examine the metal surfaces at location 10. Do not examine the ceramic and metallic coated areas at location 8. Look carefully at all the attachment and shiplap lugs at locations 1, 2, 11, 12 and 13. Use the applicable penetrant procedure.
PART IDENT
TASK/SUBTASK
Stage 1 HPT duct segment
SUBTASK 72-45-23-230-054-001 Examine the Stage 1 HPT Duct Segments (01-060) for Cracks
Refer to: Figure
Clean the part. Refer to the TASK 72-45-23-100-000 (CLEANING-000).
Do the test for cracks on the part that is given below. Examine the metal surfaces at location 10. Do not examine the ceramic and metallic coated areas at location 8. Look carefully at all the attachment and shiplap lugs at locations 1, 2, 11, 12 and 13. Use the applicable penetrant procedure.
PART IDENT
TASK/SUBTASK
Stage 1 HPT duct segment
SUBTASK 72-45-23-230-054-002 Examine the Stage 1 HPT Duct Segments (01-060) for Cracks
Refer to: Figure
SUBTASK 72-45-23-220-062 Examine the Stage 1 HPT Duct Segments (01-060) for Bent, Part Missing, Wear and Unwanted Material on the Attachment and Shiplap Lugs
Refer to: Figure
Repair, VRS3463 TASK 72-45-23-300-005 (REPAIR-005)
Unwanted material
Examine the duct segment at location 5 for unwanted material in the trailing edge cooling slots.
SUBTASK 72-45-23-220-063 Examine the Stage 1 HPT Duct Segments (01-060) for Unwanted Material in the Trailing Edge Cooling Slots
Refer to: Figure
Repair, VRS3464 TASK 72-45-23-300-003 (REPAIR-003)
Other than (a)
Corrosion, dents, erosion, nicks and pits
Examine the duct segment at location 10 for corrosion, dents, erosion, nicks and pits on all the base metal surfaces.
SUBTASK 72-45-23-220-064 Examine the Stage 1 HPT Duct Segments (01-060) for Corrosion, Dents, Erosion, Nicks and Pits on the Base Metal Surfaces
Examine the duct segment for chips, spalls and areas when you see a difference between the adjacent areas of the ceramic coating. Refer to Figure.
Repair, VRS3543 TASK 72-45-23-300-010 (REPAIR-010)
Metal transfer at location 2
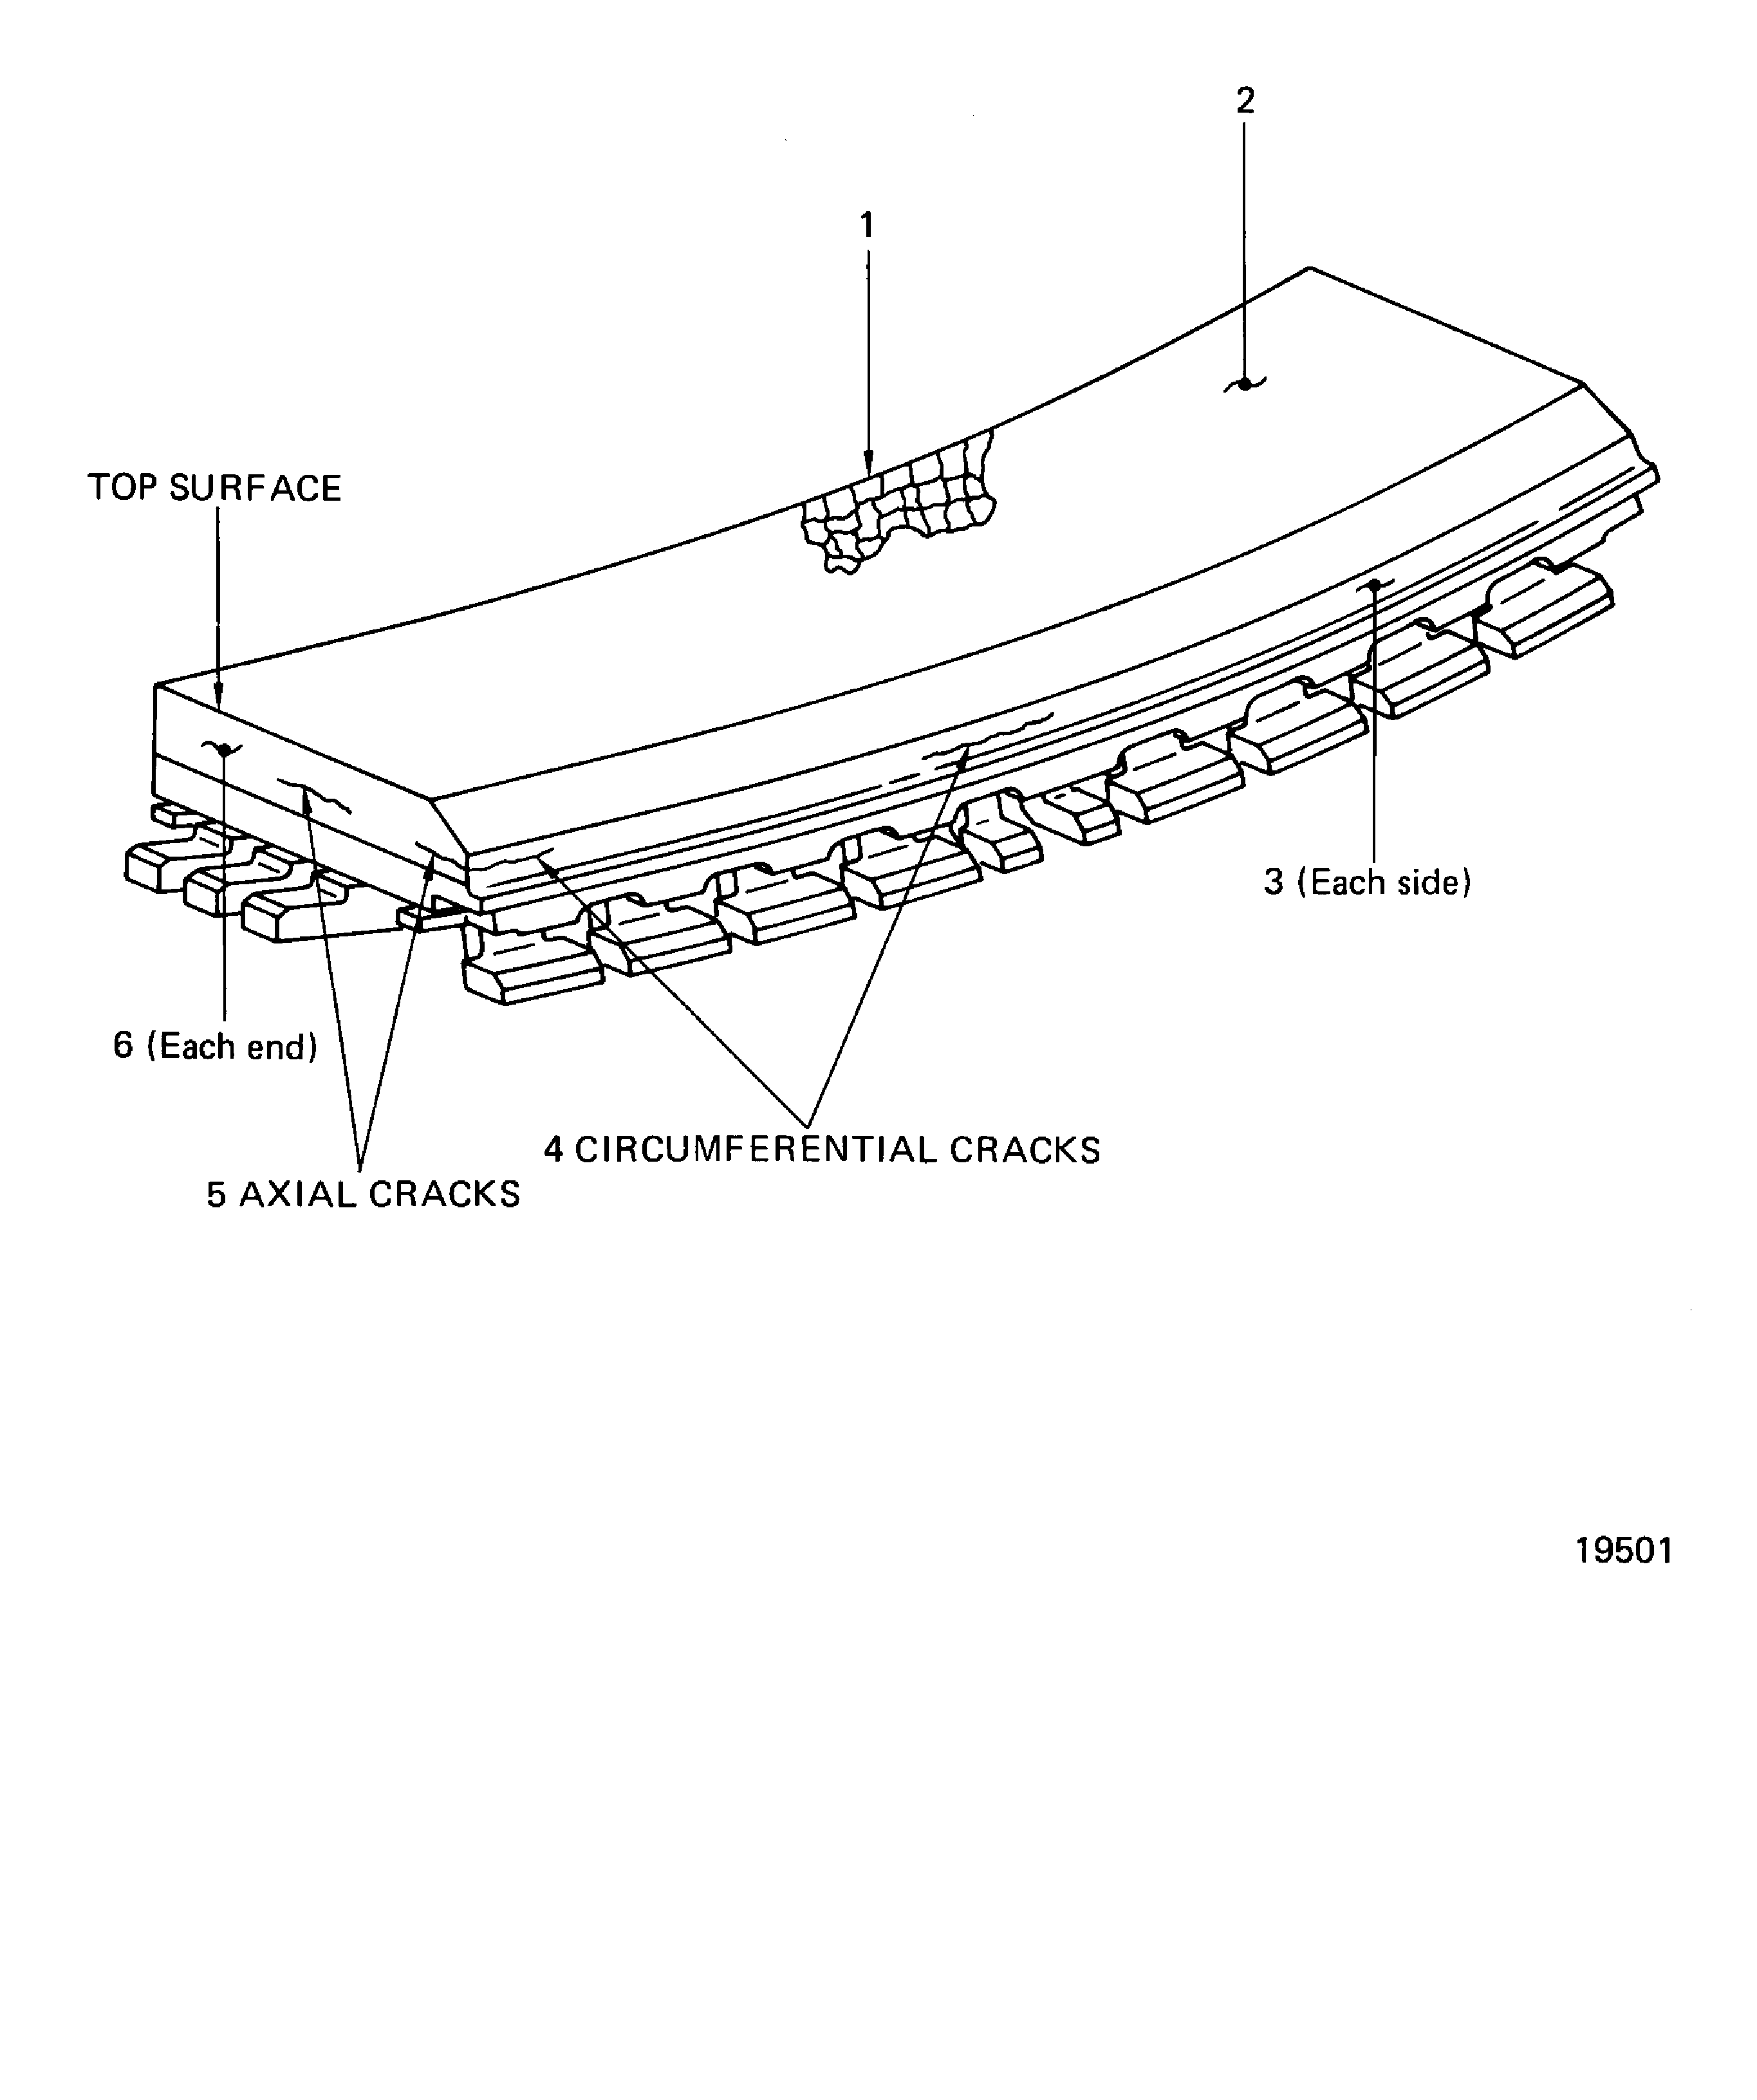
Examine the duct segment for metal transfer and cracks on the ceramic and metallic coating. Refer to Figure.
Examine the duct segment for erosion and rub at location 2. Refer to Figure.
SUBTASK 72-45-23-220-065 Examine the Stage 1 HPT Duct Segments (01-060) for Erosion, Rub, Metal Transfer, Cracks, Chips and Spalls on the Ceramic and Metallic Coatings
Figure: Stage 1 HPT duct segment inspection locations
Stage 1 HPT duct segment inspection locations

Figure: Stage 1 HPT duct segment inspection locations
Stage 1 HPT duct segment inspection locations

