Export Control
EAR Export Classification: Not subject to the EAR per 15 C.F.R. Chapter 1, Part 734.3(b)(3), except for the following Service Bulletins which are currently published as EAR Export Classification 9E991: SBE70-0992, SBE72-0483, SBE72-0580, SBE72-0588, SBE72-0640, SBE73-0209, SBE80-0024 and SBE80-0025.Copyright
© IAE International Aero Engines AG (2001, 2014 - 2021) The information contained in this document is the property of © IAE International Aero Engines AG and may not be copied or used for any purpose other than that for which it is supplied without the express written authority of © IAE International Aero Engines AG. (This does not preclude use by engine and aircraft operators for normal instructional, maintenance or overhaul purposes.).Applicability
V2500-A5
Common Information
TASK 72-41-32-200-003-B00 HPC Stage 4 Variable Stator Vane - Examine, Inspection-003
General
This TASK gives the procedure for the inspection of the stage 4 variable stator vanes.
Nicks and dents 0.005 in. (0.13 mm) or less are acceptable without limit to the airfoil and gas washed surfaces of the platforms.
Fig/item numbers in parentheses in the procedure agree with those used in the IPC. Only the primary Fig/item numbers are used. For the service bulletin alpha variants refer to the IPC.
The policy that is necessary for inspection is given in SPM TASK 70-20-01-200-501.
All the parts must be cleaned before any part is examined.
All the parts must be visually examined for damage, corrosion and wear. Any defects that are not identified in the procedure must be referred to IAE.
The procedure for those parts which must have a crack test is given in Step. Do the crack test before the part is visually examined.
Do not discard any part until you are sure there are no repairs available. Refer to the instructions in repair before a discarded part is used again or oversize parts are installed.
Parts which should be discarded can be held although no repair is available. The repair of a discarded part can be shown to be necessary at a subsequent date.
All the parts must be examined to make sure that all the repairs have been completed satisfactorily.
The practices and processes referred to in the procedure by the TASK/SUBTASK numbers are in SPM.
References
Refer to SPM for data on these items:
Definition of Damage, SPM TASK 70-02-02-350-501.
Record and Control of the Lives of Parts, SPM TASK 70-05-00-220-501.
Inspection of parts, SPM TASK 70-20-01-200-501.
Some data on these items are contained in this TASK. For more data on these items refer to SPM:
Methods of Testing for Crack Indications,
Chemical Processes,
Surface Protection.
Preliminary Requirements
Pre-Conditions
NONESupport Equipment
NONEConsumables, Materials and Expendables
NONESpares
NONESafety Requirements
NONEProcedure
Clean the parts. Refer to TASK 72-41-32-100-000 (CLEANING-000).
SUBTASK 72-41-32-230-093 Examine the Stage 4 Variable Stator Vanes for Cracks
Refer to Figure.
Reject.
More than in Step.
Nicked.
Reject.
More than in Step.
Dented.
Repair, VRS6035 TASK 72-41-32-300-005 (REPAIR-005).
Not more than 0.005 in. (0.13 mm) in depth.
Reject.
More than in Step.
Scratched.
Repair, VRS6035 TASK 72-41-32-300-005 (REPAIR-005)
Heavy pitting not more than 0.005 in. (0.13 mm) in depth.
Pitted.
SUBTASK 72-41-32-220-207 Examine the Stage 4 Variable Stator Vanes Airfoil at Location 1
Refer to Figure.
Reject.
More than in Step.
Nicked.
Reject.
More than in Step.
Dented.
Repair, VRS6035 TASK 72-41-32-300-005 (REPAIR-005).
Not more than 0.005 in. (0.13 mm) in depth.
Reject.
More than in Step.
Scored/Scratched.
SUBTASK 72-41-32-220-209 Examine the Stage 4 Variable Stator Vanes Leading and Trailing Edges at Locations 5 and 6
Refer to Figure.
Repair, VRS6077 TASK 72-41-32-300-006 (REPAIR-006).
Roughness more than in Step.
Measure the surface finish of the vanes. Use 10 percent of the vanes that have been removed.
SUBTASK 72-41-32-220-210 Examine the Stage 4 Variable Stator Vanes Airfoil Surface Finish at Location 1
Refer to Figure.
Repair, VRS6183 TASK 72-41-32-300-014 (REPAIR-014) or VRS9130 TASK 72-41-32-300-019 (REPAIR-019).
More than in Step.
Scored.
Repair, VRS6183 TASK 72-41-32-300-014 (REPAIR-014).
If the diameter of the spindle is between 0.4585 in. to 0.468 in. (11.646 mm to 11.90 mm).
Repair, VRS9130 TASK 72-41-32-300-019 (REPAIR-019).
If the diameter of the spindle is less than 0.4585 in. (11.646 mm).
Wear.
SUBTASK 72-41-32-220-211 Examine the Stage 4 Variable Stator Vanes Spindle at Location 7
Refer to Figure.
SUBTASK 72-41-32-220-212 Examine the Stage 4 Variable Stator Vanes Stud at Location 8
Refer to Figure.
Repair, VRS6183 TASK 72-41-32-300-014 (REPAIR-014) or VRS9130 TASK 72-41-32-300-019 (REPAIR-019).
More than in Step.
Scored.
Repair, VRS6183 TASK 72-41-32-300-014 (REPAIR-014).
If the diameter of the spindle is between 0.2609 in. to 0.271 in. (6.627 mm to 6.88 mm).
Repair, VRS9130 TASK 72-41-32-300-019 (REPAIR-019).
If the diameter of the spindle is less than 0.2609 in. (6.627 mm).
Worn.
SUBTASK 72-41-32-220-213 Examine the Stage 4 Variable Stator Vanes Inner Pivot Spindle at Location 1229
Refer to Figure.
SUBTASK 72-41-32-220-214 Examine the Stage 4 Variable Stator Vanes Wire Thread Insert at Location 9
Refer to Figure.
SUBTASK 72-41-32-220-215 Examine the Stage 4 Variable Stator Vanes Seal Ring Groove at Location 10
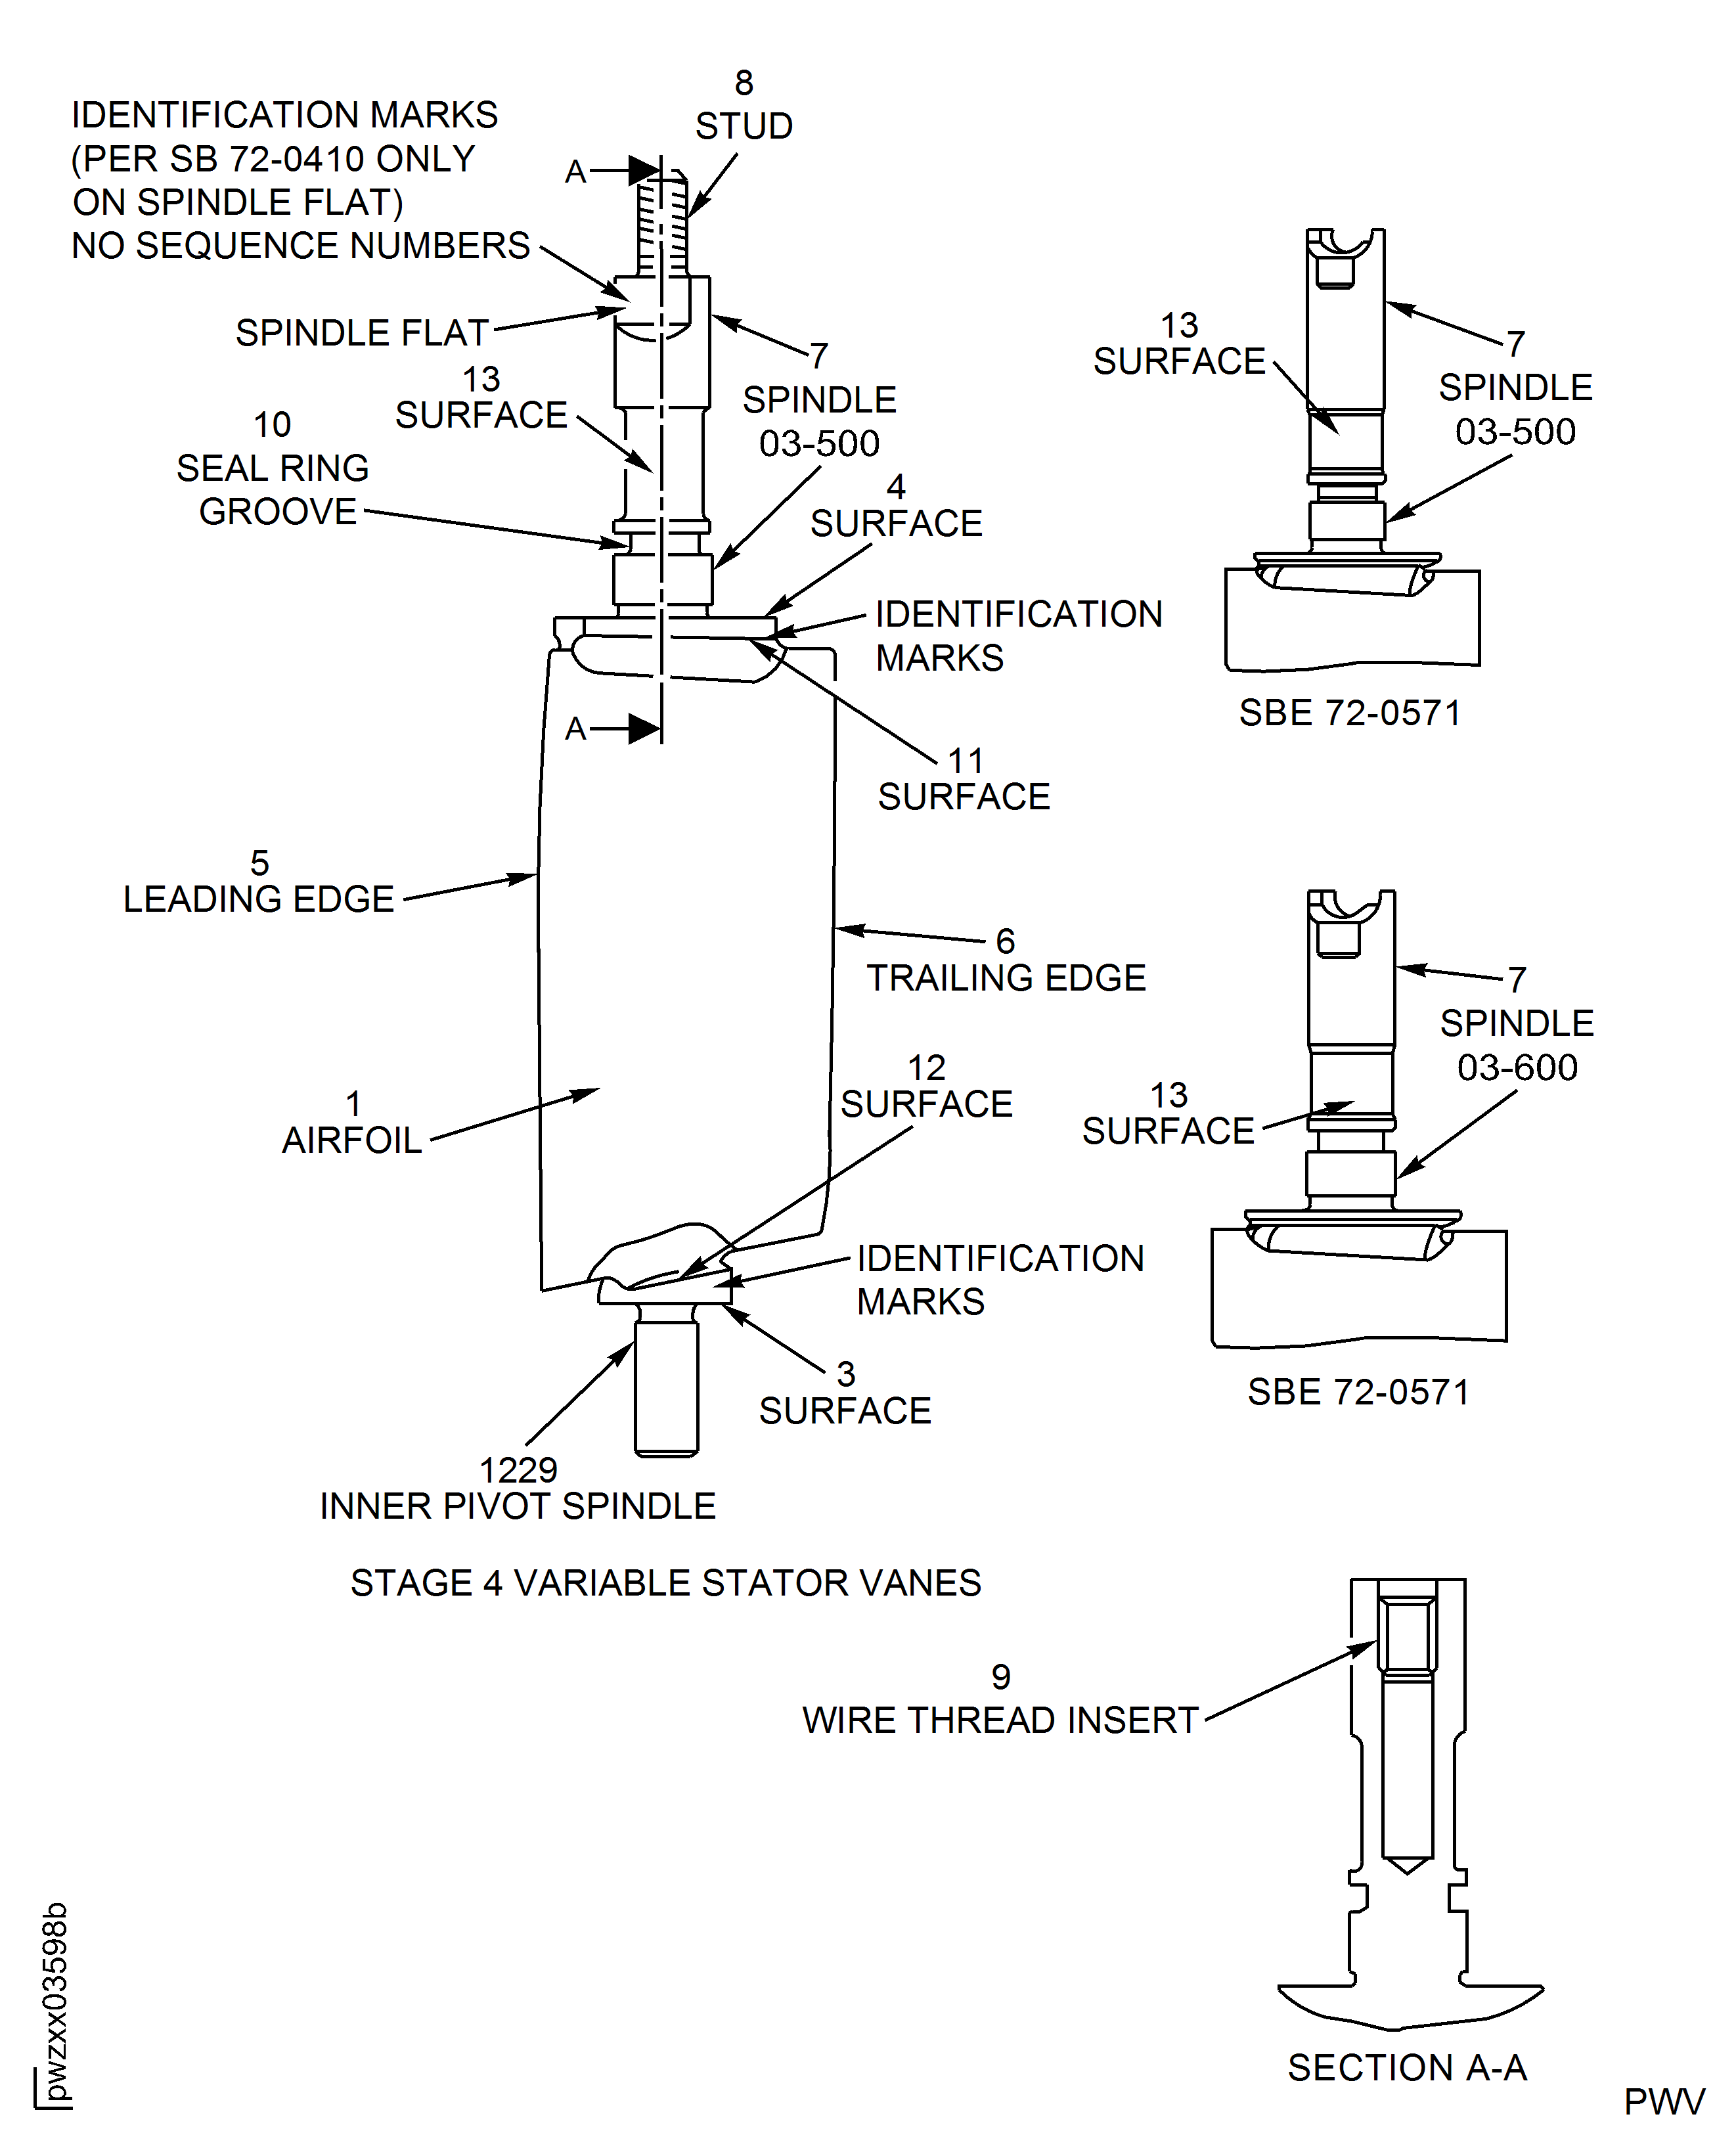
Figure: Stage 4 Variable Stator Vanes - Inspection Locations
Stage 4 Variable Stator Vanes - Inspection Locations

