Export Control
EAR Export Classification: Not subject to the EAR per 15 C.F.R. Chapter 1, Part 734.3(b)(3), except for the following Service Bulletins which are currently published as EAR Export Classification 9E991: SBE70-0992, SBE72-0483, SBE72-0580, SBE72-0588, SBE72-0640, SBE73-0209, SBE80-0024 and SBE80-0025.Copyright
© IAE International Aero Engines AG (2001, 2014 - 2021) The information contained in this document is the property of © IAE International Aero Engines AG and may not be copied or used for any purpose other than that for which it is supplied without the express written authority of © IAE International Aero Engines AG. (This does not preclude use by engine and aircraft operators for normal instructional, maintenance or overhaul purposes.).Applicability
V2500-A5
Common Information
TASK 72-41-34-200-028-B00 HPC Vane Actuating Crankshaft Bearing Housings - Examine The Front Bearing Housing, Inspection-028
General
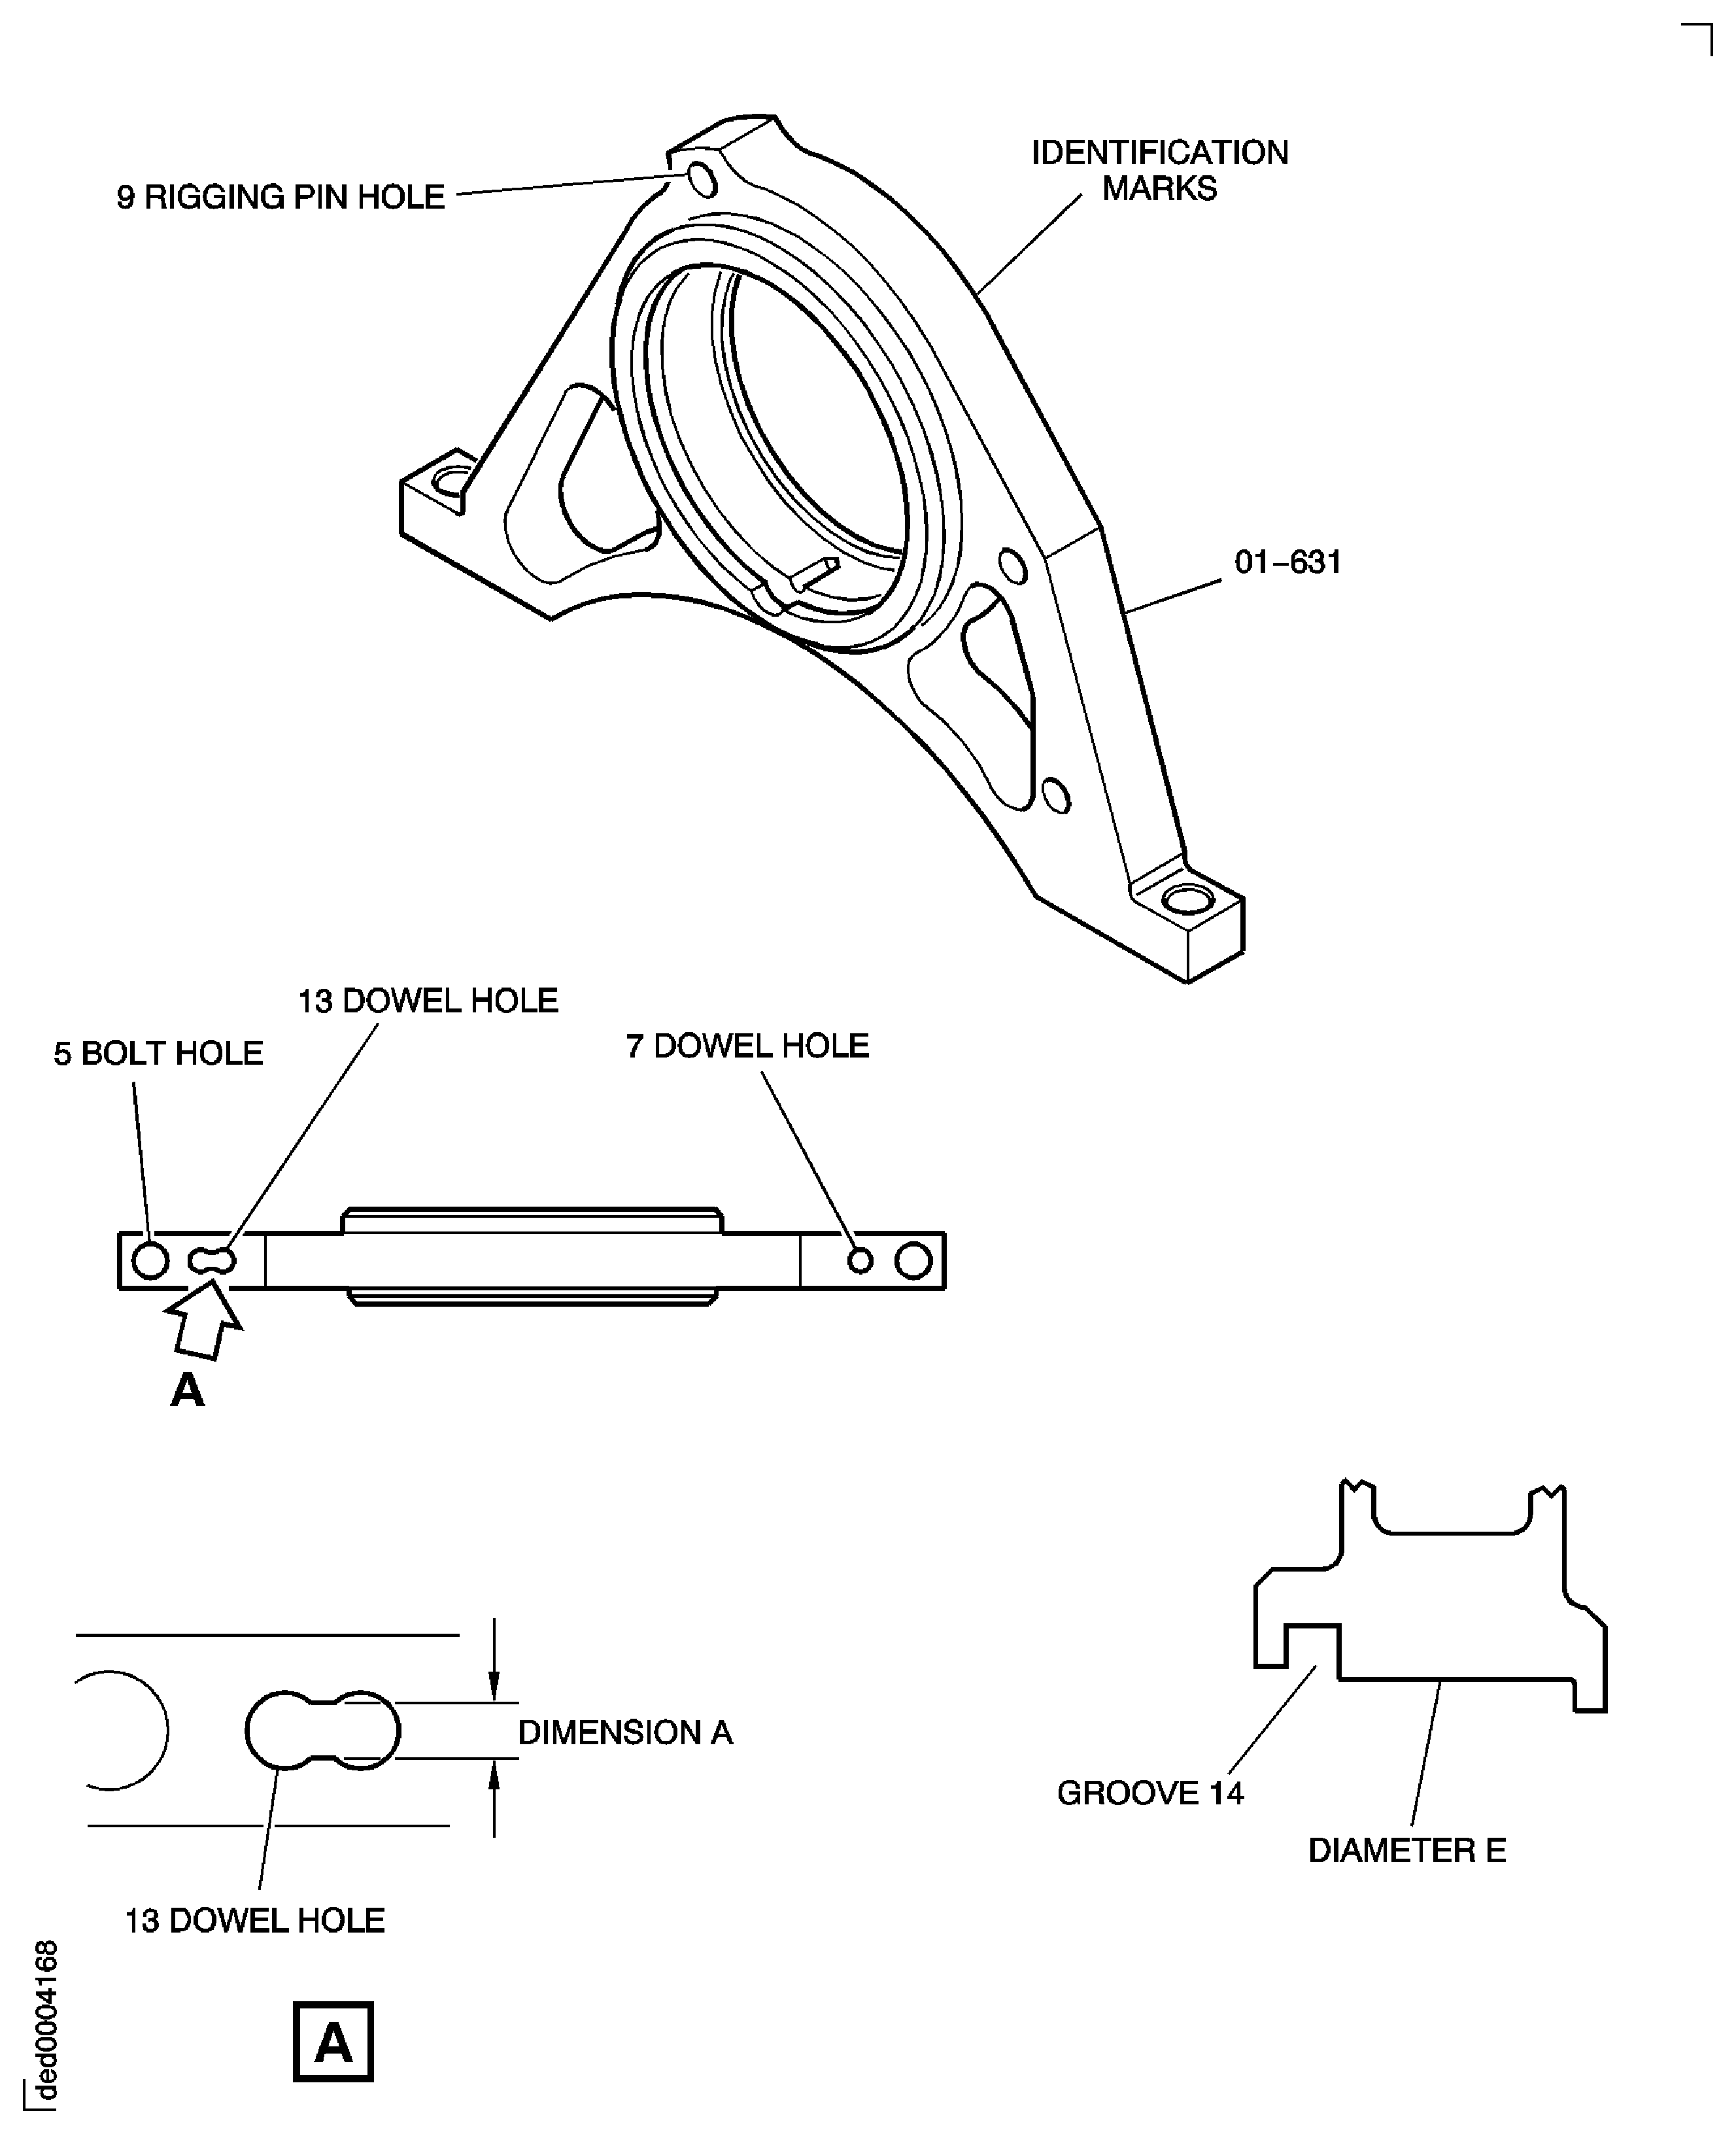
This TASK gives the procedure for the inspection of the SBE 72-0366 front bearing housing (01-631), spherical bearing (01-634), straight headless pin (01-638) and outer retaining ring (01-636).
Fig/item numbers in parentheses in the procedure agree with those used in the EIPC.
The policy that is necessary for inspection is given in the SPM TASK 70-20-01-200-501.
All the parts must be cleaned before any part is examined.
All the parts must be visually examined for damage, corrosion and wear. Any defects that are not identified in the procedure must be referred to IAE.
A ** following repair referenced in this inspection indicates that the repair is not yet published in the current revision of the manual and the part must be rejected. Contact IAE for additional information concerning FAA approved repair date.
The procedure for those parts which must have a crack test is given in Step. Do the crack test before the part is visually examined.
Do not discard any part until you are sure there are no repairs available. Refer to the instructions in Repair before a discarded part is used again or oversize parts are installed.
Parts which should be discarded can be held although no repair is available. The repair of a discarded part could be shown to be necessary at a subsequent date.
All the parts must be examined to make sure that all the repairs have been completed satisfactorily.
The practices and processes referred to in the procedure by the TASK numbers are in the SPM.
References
Refer to the SPM for data on these items:
Definition of Damage, SPM TASK 70-02-02-350-501.
Record and Control of the Lives of Parts, SPM TASK 70-05-00-220-501.
Inspection of Parts, SPM TASK 70-20-01-200-501.
Some data on these items is contained in this TASK. For more data on these item refer to the SPM:
Method of Testing for Crack Indications,
Chemical Processes,
Surface Protection.
Preliminary Requirements
Pre-Conditions
NONESupport Equipment
NONEConsumables, Materials and Expendables
NONESpares
NONESafety Requirements
NONEProcedure
Clean the parts. Refer to TASK 72-41-34-100-000.
SUBTASK 72-41-34-230-115 Examine the Components for Cracks
Refer to Figure.
Repair or replace by Repair, VRS6239 TASK 72-41-34-300-015 (REPAIR-015).
More than in Step.
Scored.
Repair or replace by Repair, VRS6239 TASK 72-41-34-300-015 (REPAIR-015).
More than in Step.
Scratched.
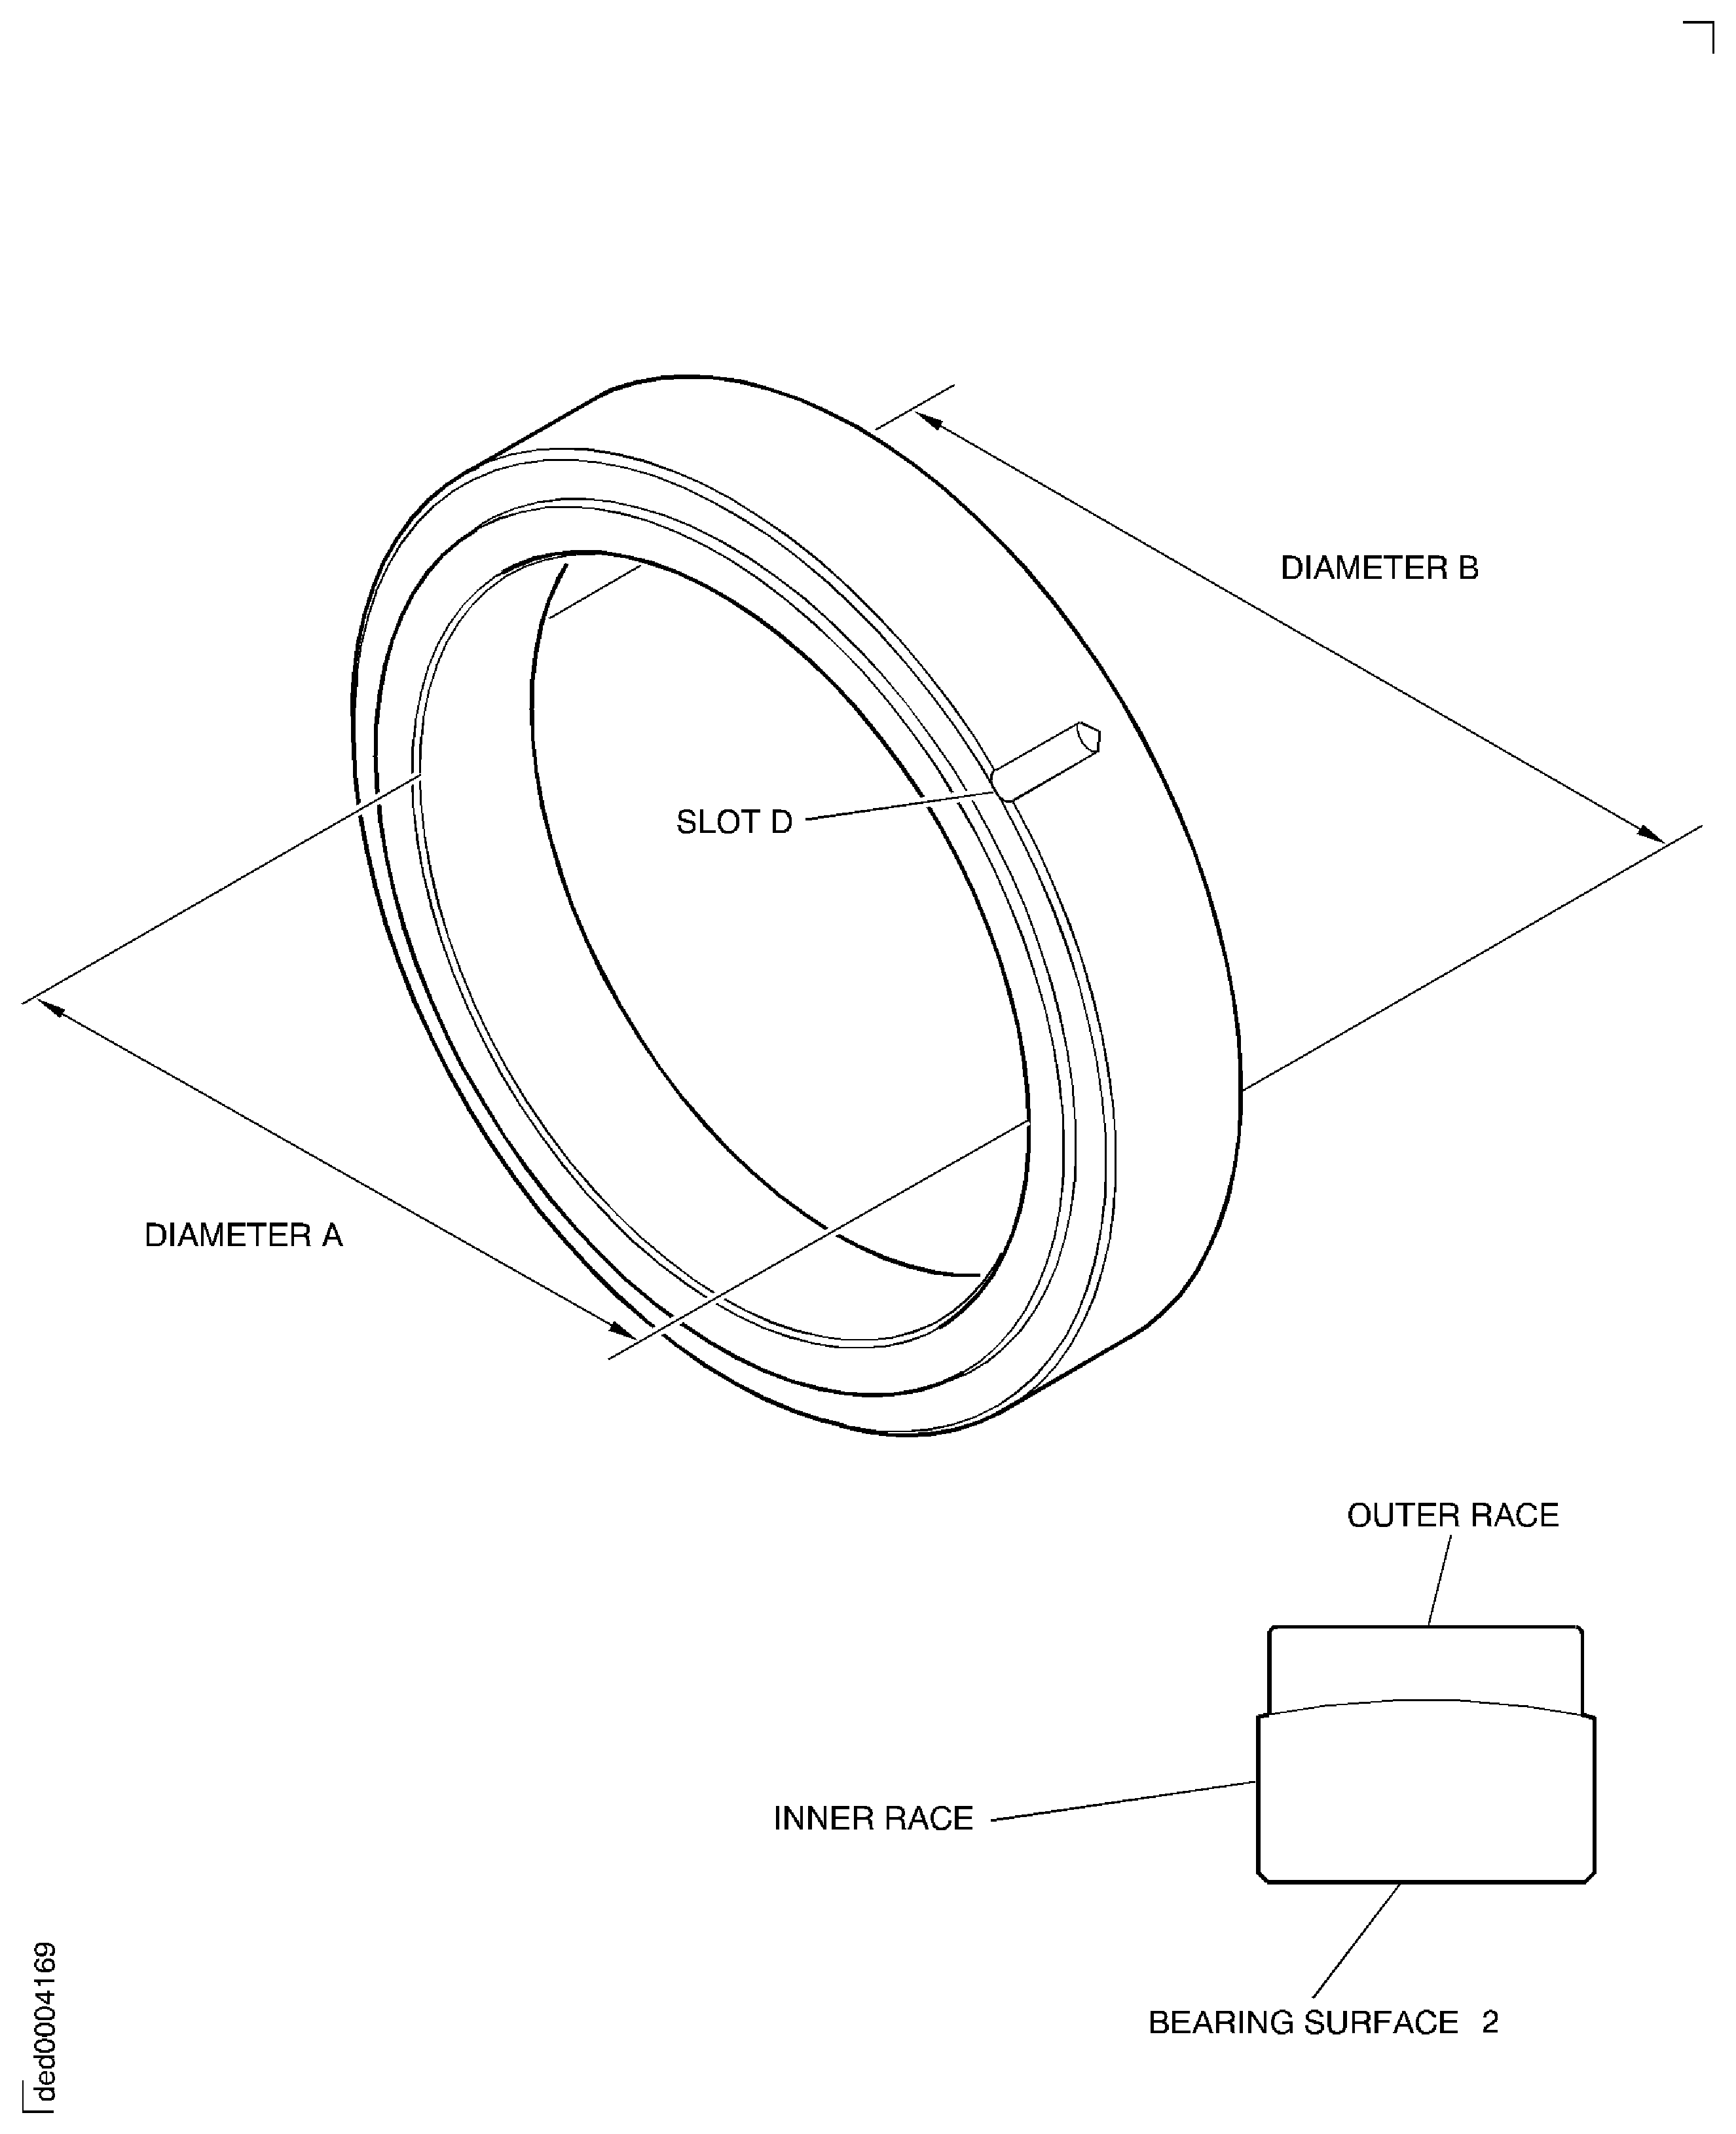
2 Bearing surface.
Repair or replace by Repair, VRS6239 TASK 72-41-34-300-015 (REPAIR-015).
More than in Step.
Wear.
Diameter A.
Repair or replace by Repair, VRS6239 TASK 72-41-34-300-015 (REPAIR-015).
More than in Step.
Scored.
Repair or replace by Repair, VRS6239 TASK 72-41-34-300-015 (REPAIR-015).
More than in Step.
Scratched.
Repair or replace by Repair, VRS6239 TASK 72-41-34-300-015 (REPAIR-015).
More than in Step.
Dented.
Outer race surface.
Repair or replace by Repair, VRS6239 TASK 72-41-34-300-015 (REPAIR-015).
More than in Step.
Wear.
Diameter B.
Repair or replace by Repair, VRS6239 TASK 72-41-34-300-015 (REPAIR-015).
Rotational binding.
Repair or replace by Repair, VRS6239 TASK 72-41-34-300-015 (REPAIR-015).
Radial movement.
Bearing race.
Repair or replace by Repair, VRS6239 TASK 72-41-34-300-015 (REPAIR-015).
More than in Step.
Repair or replace by Repair, VRS6239 TASK 72-41-34-300-015 (REPAIR-015).
Burred.
Scored.
Slot D.
SUBTASK 72-41-34-220-301 Examine the Front Housing Spherical Bearing
Refer to Figure.
SUBTASK 72-41-34-220-302 Examine the Front Bearing Housing Diameter E
Refer to Figure.
SUBTASK 72-41-34-220-303 Examine the Front Bearing Housing Groove 14
Refer to Figure.
SUBTASK 72-41-34-220-304 Examine the Front Bearing Housing (01-631) Bolt Holes at Location 5
Refer to Figure.
SUBTASK 72-41-34-220-305 Examine the Front Bearing Housing (01-631) Dowel Hole at Location 7
Refer to Figure.
SUBTASK 72-41-34-220-306 Examine the Front Bearing Housing (01-631) Dowel Hole at Location 13
Refer to Figure.
SUBTASK 72-41-34-220-307 Examine the Front Bearing Housing (01-631) Rigging Pin Hole at Location 9
Figure: SBE 72-0366: Front Bearing Housing - Inspection Locations
SBE 72-0366: Front Bearing Housing - Inspection Locations

Figure: SBE 72-0366: Front Bearing Housing Spherical Bearing - Inspection Locations
SBE 72-0366: Front Bearing Housing Spherical Bearing - Inspection Locations

