Export Control
EAR Export Classification: Not subject to the EAR per 15 C.F.R. Chapter 1, Part 734.3(b)(3), except for the following Service Bulletins which are currently published as EAR Export Classification 9E991: SBE70-0992, SBE72-0483, SBE72-0580, SBE72-0588, SBE72-0640, SBE73-0209, SBE80-0024 and SBE80-0025.Copyright
© IAE International Aero Engines AG (2001, 2014 - 2021) The information contained in this document is the property of © IAE International Aero Engines AG and may not be copied or used for any purpose other than that for which it is supplied without the express written authority of © IAE International Aero Engines AG. (This does not preclude use by engine and aircraft operators for normal instructional, maintenance or overhaul purposes.).Applicability
V2500-A5
Common Information
TASK 72-45-10-220-001-B00 HPT Stage 1 Rotor Assembly - Examine, Inspection-001
General
The word "reject" is used after an interface inspection statement to show that a higher level inspection and possible repair to the damaged part is necessary.
Do the higher level inspection procedure as found in the applicable Chapter/Section/Subject of this manual on the damaged part(s). It is not necessary to do the higher level inspection on parts that are serviceable to the interface inspection standard.
Preliminary Requirements
Pre-Conditions
NONESupport Equipment
NONEConsumables, Materials and Expendables
NONESpares
NONESafety Requirements
NONEProcedure
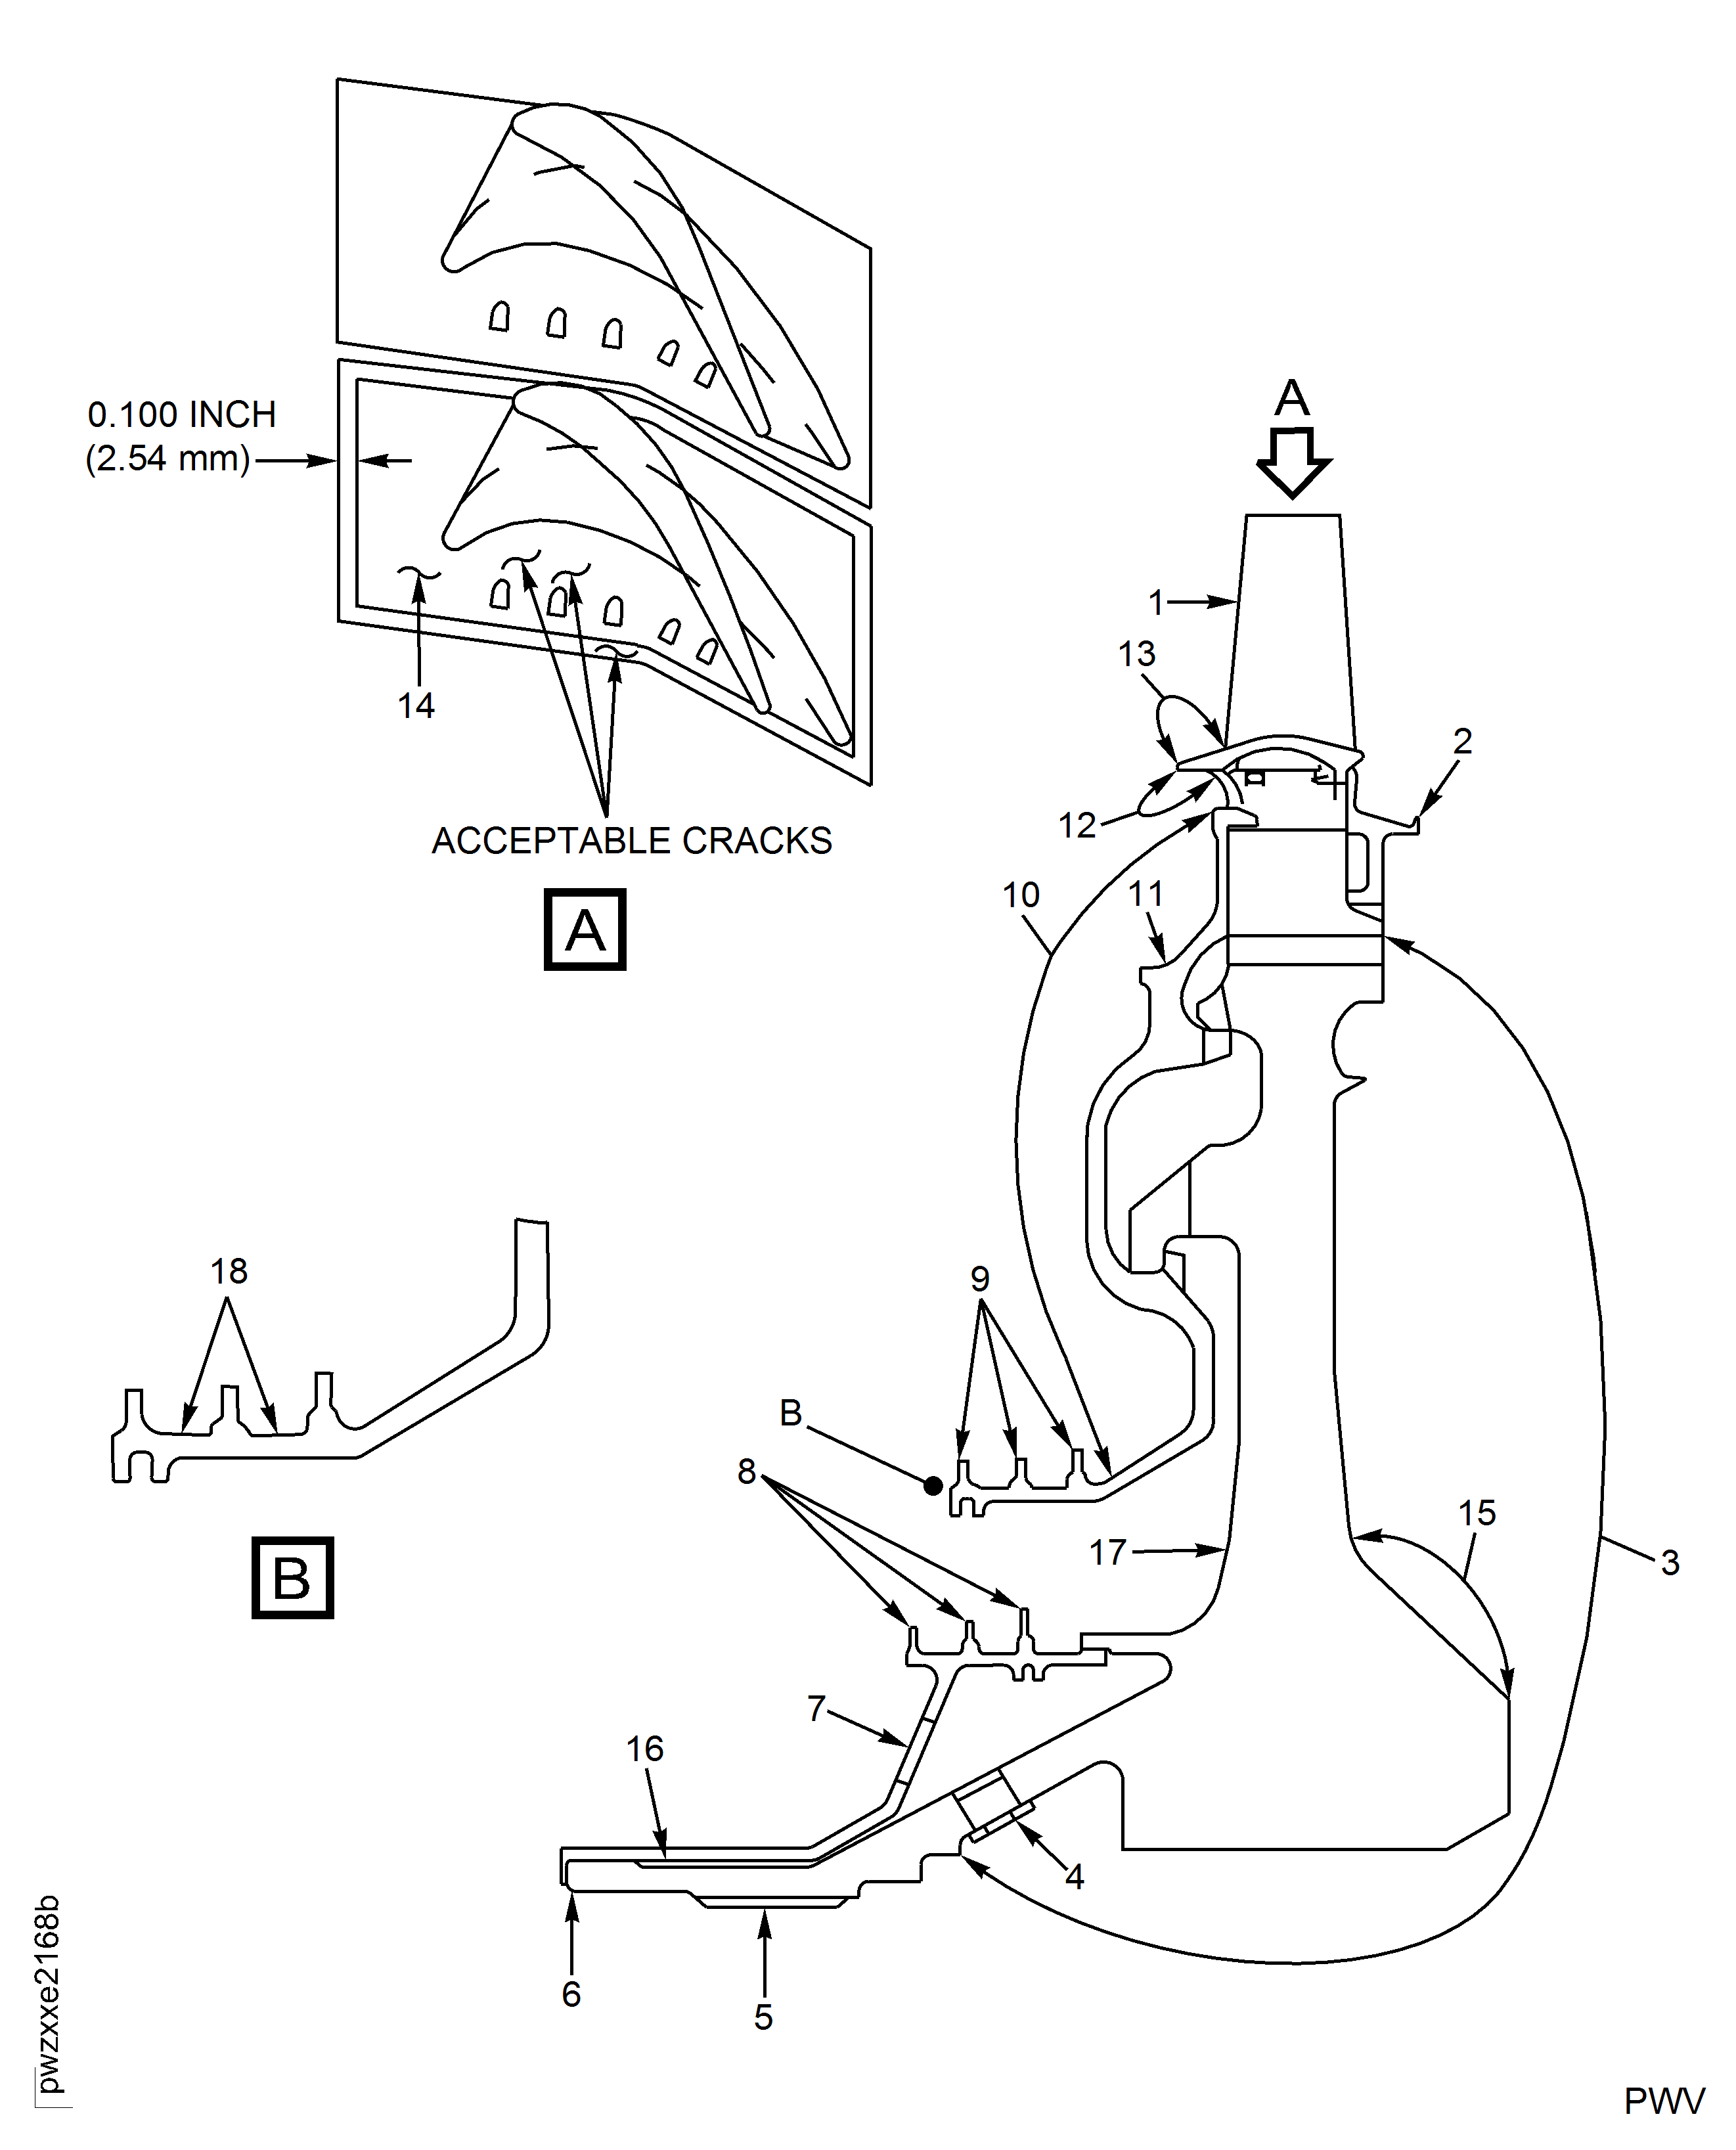
Refer to Figure.
Do inspection of HPT for possible oil ignition event. Refer to TASK 72-45-00-200-801. Report all findings to IAE Technical Services.
Soot or oil.
Examine the rotor assembly at Locations 3, 4, 7, 10, 16 and 17 for soot and oil.
SUBTASK 72-45-10-220-100 Examine the Stage 1 HPT Rotor Assembly for Soot and Oil

CAUTION
MAKE SURE THAT YOU DO THIS INSPECTION BEFORE YOU CLEAN THE PART OR CLEANING PROCEDURE WILL REMOVE THE INDICATION OF SOOT AND OIL.Refer to Figure.

CAUTION
FAILURE TO REPLACE AN ADEQUATE NUMBER OF BLADE TIPS MAY REDUCE ENGINE PERFORMANCE AND/OR REDUCE BLADE AND OUTER AIRSEAL REPAIRABILITY.NOTE
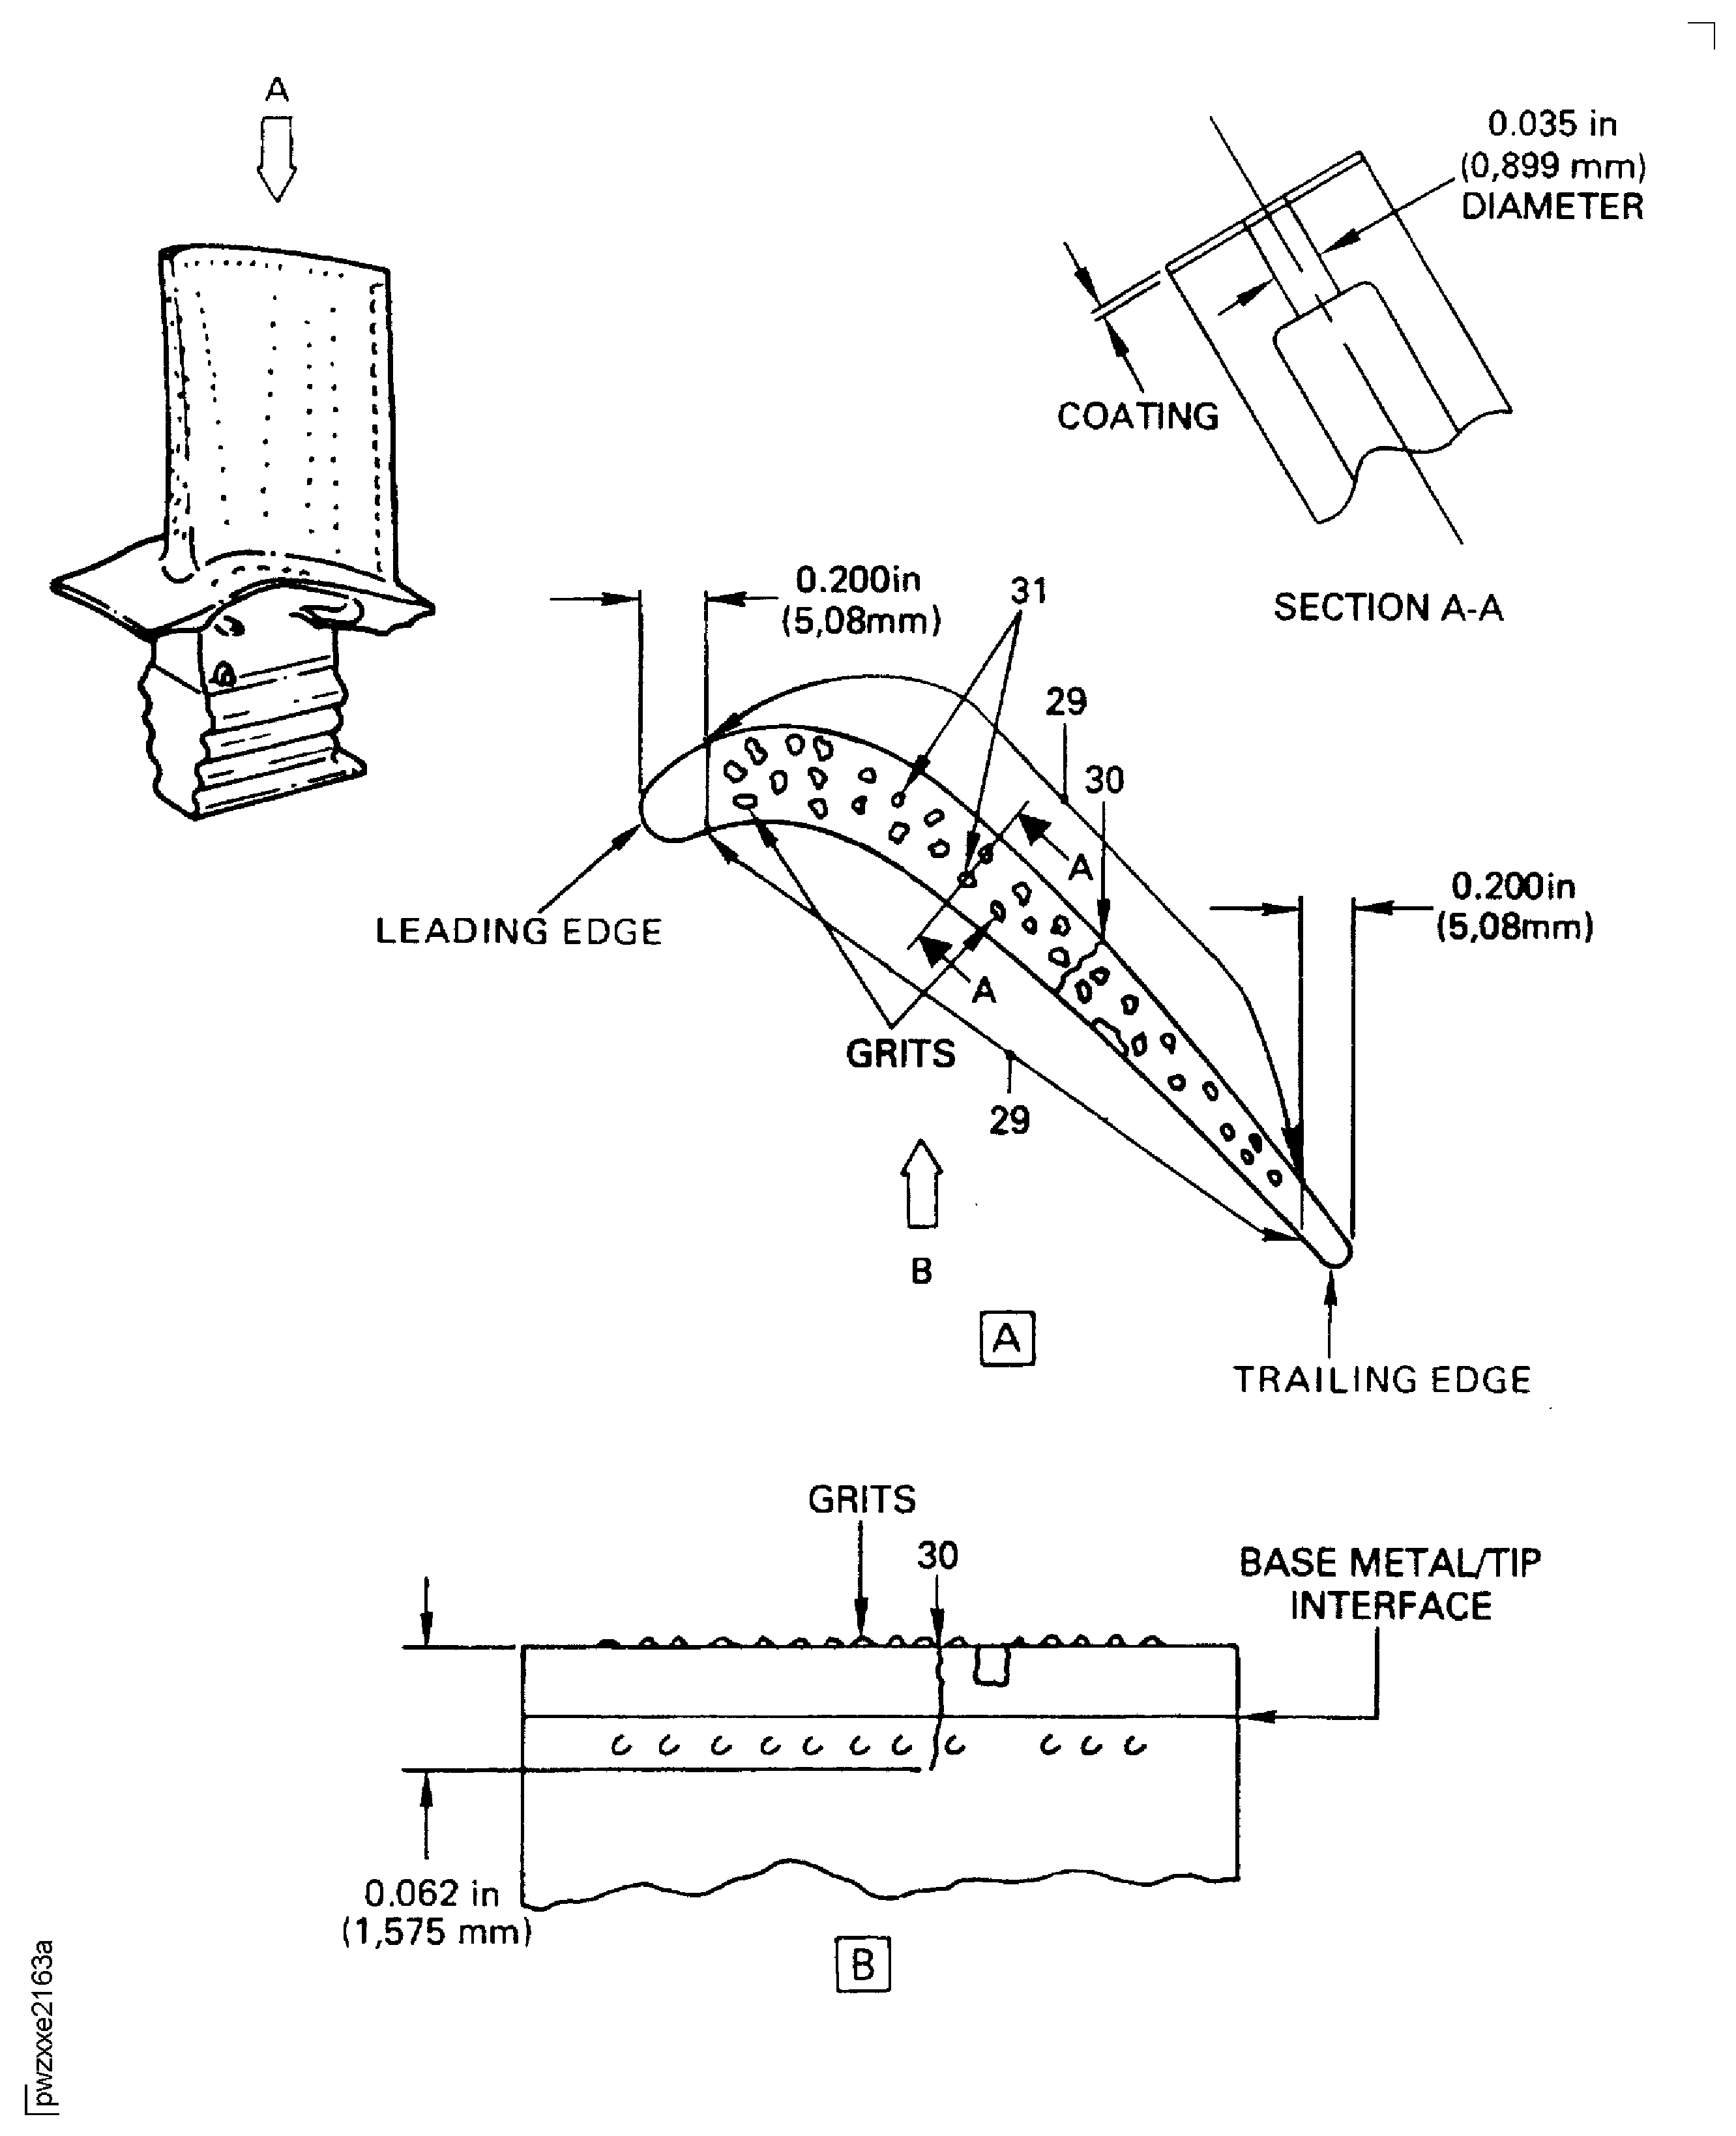
If new or fully repaired Stage 1 HPT Duct Segments (BOAS) are to be installed, two thirds of Stage 1 HPT blades must have fully repaired tips. One third of the blades can have complete, partial, or no tip coating.There is base metal that shows on the base metal/tip interface at Location 29
Examine the stage 1 HPT blade abrasive tip.
SUBTASK 72-45-10-220-082 Visually Examine the Stage 1 Turbine Blade at Location 1

CAUTION
YOU MUST BE VERY CAREFUL DURING THE INSPECTION OR HANDLING OF THE PARTS. INCORRECT HANDLING, SUCH AS TOUCHING THE BLADES WITH DIRTY HANDS, OR DROPPING THE BLADES ON THE GROUND, CAN CAUSE CHIPPING OF THE THERMAL BARRIER COATING AND DISCOLORATION OF THE BLADES.Refer to Figure
SUBTASK 72-45-10-220-083 Visually Examine the Outer Surface of the Outer Seal at Location 11
Refer to Figure
SUBTASK 72-45-10-220-084 Visually Examine the Outer Seal Surface at Location 10
Refer to Figure
SUBTASK 72-45-10-220-085 Visually Examine the Knife-Edges of the Outer Seal at Location 9
Refer to Figure
Repair, VRS3199 TASK 72-45-13-300-001 (REPAIR-001)
Nicks or bent
SUBTASK 72-45-10-220-086 Visually Examine the Knife-Edges of the Inner Seal at Location 8
Refer to Figure
SUBTASK 72-45-10-220-087 Visually Examine the Disk Surface at Location 3
Refer to Figure.
Reject. Inspect the No. 4 bearing rear carbon seal. Refer to TASK 72-43-20-200-002. Report all findings to IAE Technical Services
The metering plugs are missing, damaged, and/or have missing or cracked tangs
SUBTASK 72-45-10-220-088 Visually Examine the Stage 1 Disk Metering Plug at Location 4 (Pre SBE 72-0511)
Refer to Figure
SUBTASK 72-45-10-220-089 Visually Examine the Stage 1 Disk Splines at Location 5
Refer to Figure
Repair, VRS3184 TASK 72-45-11-300-001 (REPAIR-001)
Scored or high metal
SUBTASK 72-45-10-220-090 Visually Examine the Stage 1 Disk at Location 6
Refer to Figure
SUBTASK 72-45-10-220-091 Visually Examine the Cooling Air Holes of the Inner Seal at Location 7
Refer to Figure
SUBTASK 72-45-10-220-092 Visually Examine the Stage 1 HPT Air Seal at Location 2
Refer to Figure.
Accept.
No wear.
Do inspection of HPT for possible oil ignition event. Refer to TASK 72-45-00-200-801. Report all findings to IAE Technical Services.
Wear marks.
Examine the bore for wear at Location 15.
SUBTASK 72-45-00-220-118 Visually Examine the Disk Surface at Location 15
Refer to Figure.
Accept.
Chipped coating.
SUBTASK 72-45-10-220-109 Visually Examine the Outer Seal Area between the Knife-Edges at Location 18
Figure: Stage 1 Turbine Rotor Assembly Inspection
Stage 1 Turbine Rotor Assembly Inspection

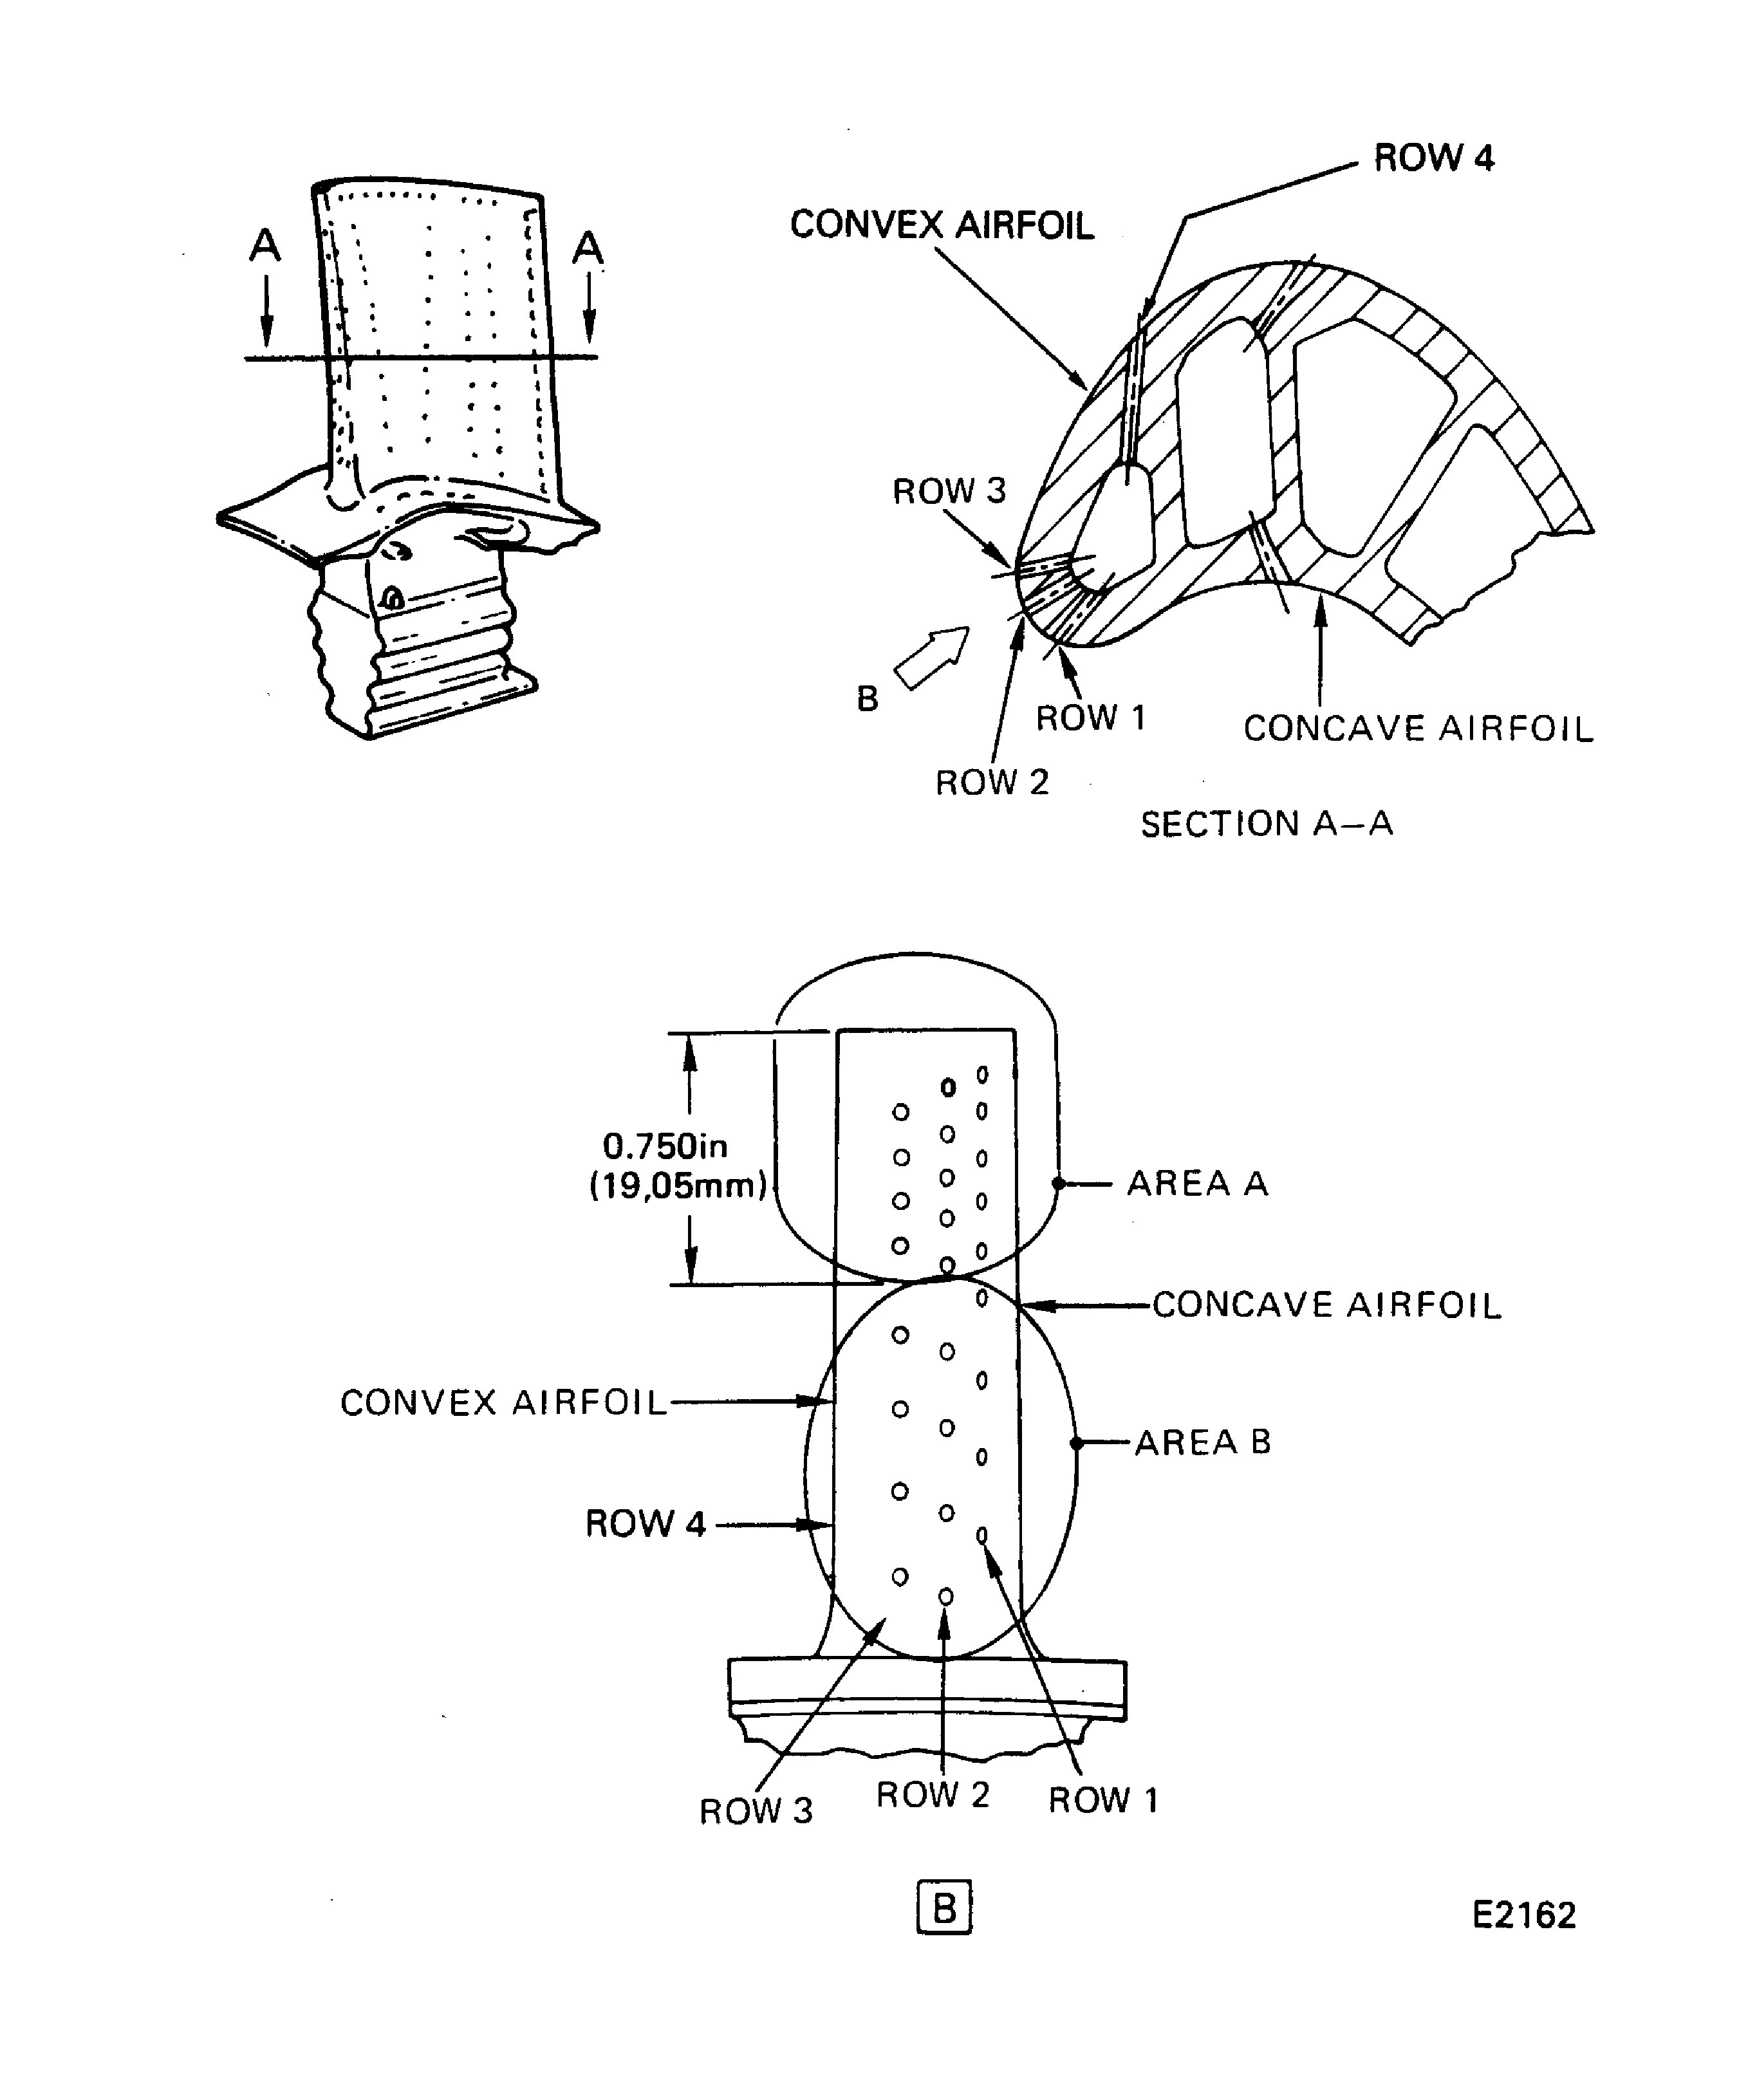
Figure: Stage 1 Turbine Rotor Assembly Inspection
Sheet 2

Figure: Stage 1 Turbine Rotor Assembly Inspection
Sheet 3

