Export Control
EAR Export Classification: Not subject to the EAR per 15 C.F.R. Chapter 1, Part 734.3(b)(3), except for the following Service Bulletins which are currently published as EAR Export Classification 9E991: SBE70-0992, SBE72-0483, SBE72-0580, SBE72-0588, SBE72-0640, SBE73-0209, SBE80-0024 and SBE80-0025.Copyright
© IAE International Aero Engines AG (2001, 2014 - 2021) The information contained in this document is the property of © IAE International Aero Engines AG and may not be copied or used for any purpose other than that for which it is supplied without the express written authority of © IAE International Aero Engines AG. (This does not preclude use by engine and aircraft operators for normal instructional, maintenance or overhaul purposes.).Applicability
All
Common Information
TASK 24-21-49-200-106 IDG Cooling Oil Tubes - Examine, Inspection-006
General
Refer to Inspection-000 TASK 24-21-49-200-100 for other IDG oil cooling tubes.
Fig/item numbers in parentheses in the procedure agree with those used in the IPC. Only the primary Fig/item numbers are used. For the service bulletin alpha variants refer to the IPC.
The policy that is necessary for Inspection-000 is given in the SPM TASK 70-20-01-200-501.
All the parts must be cleaned before they are examined. Refer to Cleaning-000 TASK 24-21-49-100-100.
All the parts must be visually examined for damage, corrosion and wear. Defects that are not identified in the procedure must be referred to International Aero Engines AG.
The procedure for those parts which must have a crack test, is given in Step Do the test before the part is visually examined. Limits for cracks are given in the SUBTASK for each part.
Do not discard a part until you are sure there are no repair available. Refer to the instructions in Repair before a discarded part is used again or oversize parts are installed.
Parts which must be discarded can be held although no repair is available. The repair of a discarded part could be shown to be necessary at a subsequent date.
All parts must be examined to make sure that all the repairs are completed satisfactorily.
The practices and processes referred to in the procedure by the TASK number are in the SPM.
References
Refer to the SPM for data on these items:
Definitions of Damage, Refer to SPM TASK 70-02-02-350-501.
Inspection of Parts, Refer to SPM TASK 70-20-01-200-501.
Some data on these items is contained in this TASK. For more data on these items refer to the SPM.
Procedures for crack tests.
Chemical processes
Surface protection
Preliminary Requirements
Pre-Conditions
NONESupport Equipment
NONEConsumables, Materials and Expendables
NONESpares
NONESafety Requirements
NONEProcedure
Reject
Cracked
Reject
Defective Weld
Tube (03-500). Refer to SPM TASK 70-23-01-230-501.
Do the test for cracks on the parts that follow.
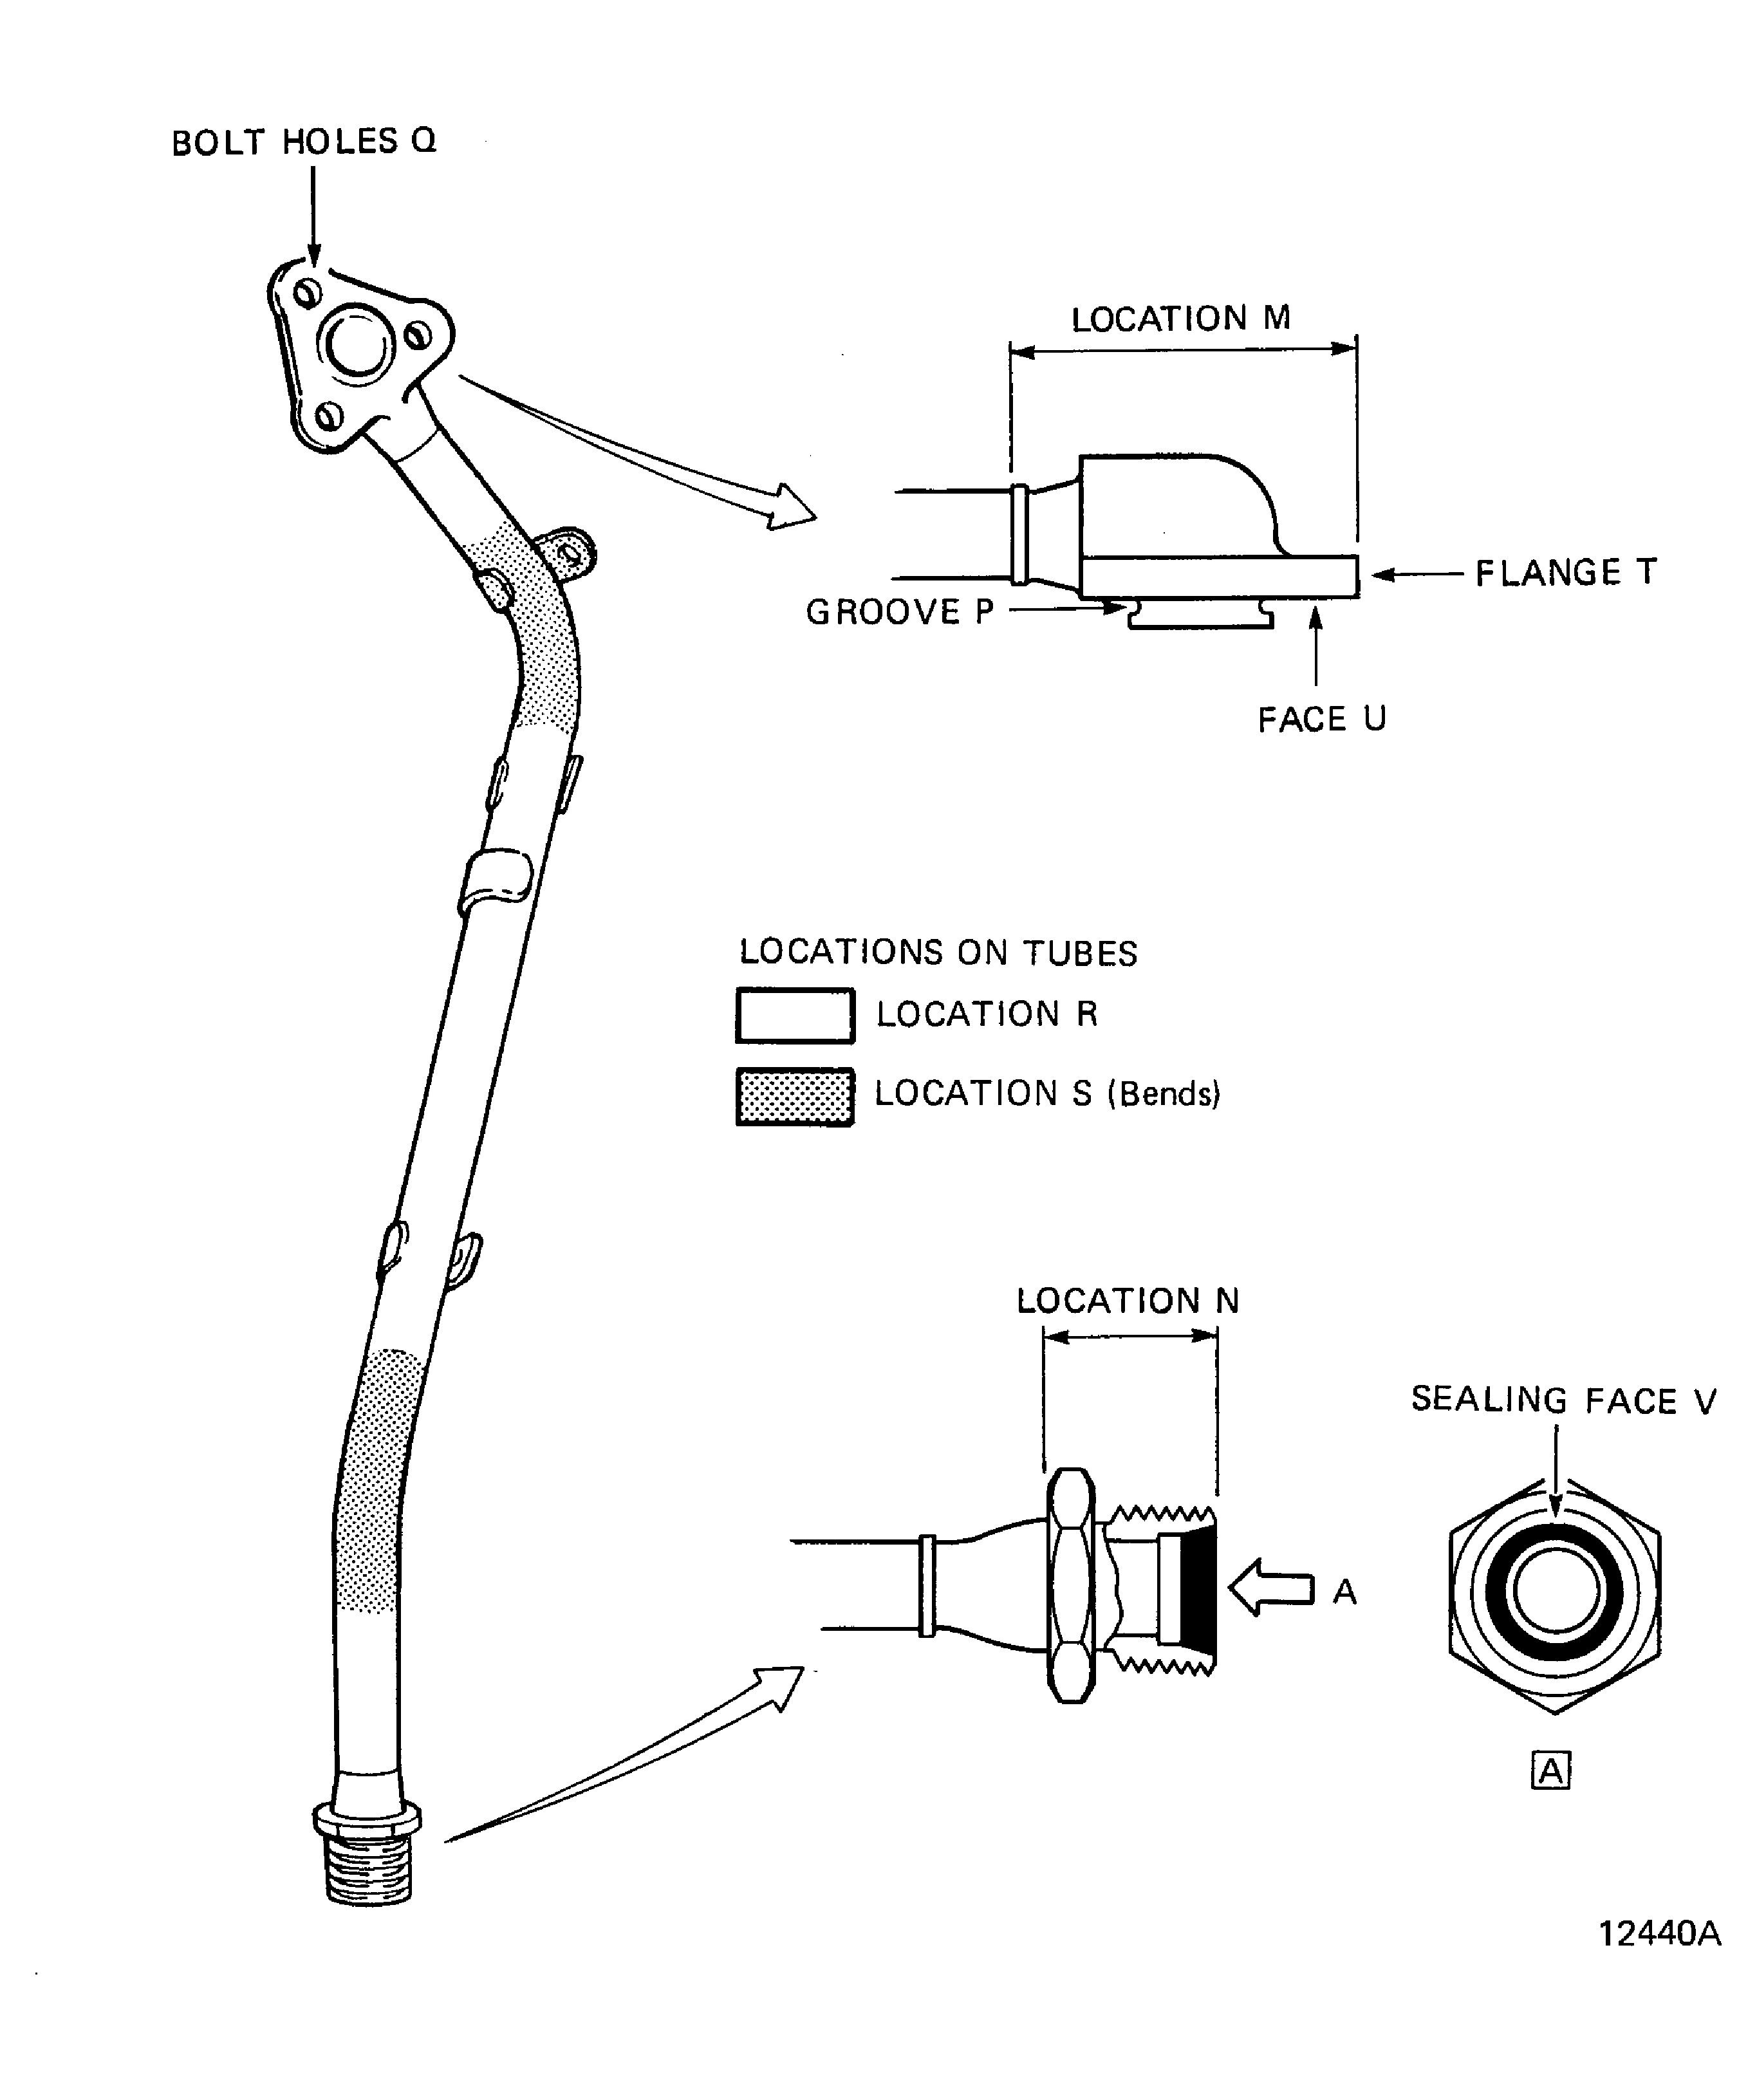
SUBTASK 24-21-49-230-056 Examine the Oil Cooling Tube (03-500) and all Welds for Cracks
Refer to Figure.
Repair, VRS2852 (Repair-002) TASK 24-21-49-300-002.
Up to 0.006 in. (0.15 mm) deep.
Reject
More than in Step.
Nicked
Repair, VRS2852 (Repair-002) TASK 24-21-49-300-002.
Up to 0.006 in. (0.15 mm) deep.
Reject
More than in Step.
Scratched
Repair, VRS2800 (Repair-001) TASK 24-21-49-300-001.
Up to 0.070 in. (1.78 mm) deep with any radius of the dent not less than 0.056 in. (1.42 mm).
Reject
Other than in Step.
One or more dents, with more than 1.00 in. (25.4 mm) between the edges of each of the dents.
Reject
More than one dent, with less than 1.00 in. (25.4 mm) between the edges of each of the dents.
Dented
Repair, VRS2852 (Repair-002) TASK 24-21-49-300-002.
Up to 0.006 in. (0.15 mm) deep.
Reject
More than in Step.
Rubbed
SUBTASK 24-21-49-220-078 Examine the Oil Cooling Tube (03-500) at Locations R
Refer to Figure.
Reject
Nicked
Reject
Scratched
Reject
More than in Step.
Distorted
Reject
Other than in Step.
One or more dents, with more than 1.00 in. (25.4 mm) between the edges of each of the dents.
Reject
More than one dent, with less than 1.00 in. (25.4 mm) between the edges of each of the dents.
Dented
Reject
Rubbed
SUBTASK 24-21-49-220-079 Examine the Oil Cooling Tube (03-500) at Locations S
Refer to Figure.
Repair, VRS2822 (Repair-006) TASK 24-21-49-300-006.
Distorted
SUBTASK 24-21-49-220-080 Examine the Oil Cooling Tube (03-500) Support Clips
Refer to Figure.
Repair, VRS2852 (Repair-002) TASK 24-21-49-300-002.
More than in Step.
Nicked
Repair, VRS2852 (Repair-002) TASK 24-21-49-300-002.
Burred
Reject
Any damage to the groove P.
Damaged
Reject
Any distortion of the flange T.
Distorted
Repair, VRS2852 (Repair-002) TASK 24-21-49-300-002.
Scores in the bolt holes Q.
Scored
Repair, VRS2852 (Repair-002) TASK 24-21-49-300-002.
Up to 0.015 in. (0.38 mm) deep.
Reject
Other than in Step.
Circumferential scratches on the face, location U.
Scratched
SUBTASK 24-21-49-220-081 Examine the Oil Cooling Tube (03-500) End Connector, Location M
Refer to Figure.
Repair, VRS2852 (Repair-002) TASK 24-21-49-300-002.
More than in Step.
Nicked
Repair, VRS2852 (Repair-002) TASK 24-21-49-300-002.
Burred
Repair, VRS2928 (Repair-003) TASK 24-21-49-300-003.
Damage to the lockwire holes.
Reject
Damage to the threads.
Damaged
SUBTASK 24-21-49-220-082 Examine the Oil Cooling Tube (03-500) Connector, Location N
Refer to Figure.
Repair, VRS2852 (Repair-002) TASK 24-21-49-300-002.
Circumferential scratches up to 0.010 in. (0.25 mm) deep.
Reject
Other than in Step.
Scratched
SUBTASK 24-21-49-220-083 Examine the Oil Cooling Tube (03-500) Sealing Face V
Figure: Locations on the Oil Cooling Tube (03-500)
Locations on the Oil Cooling Tube (03-500)

