TASK 72-00-31-200-003 LPC Fan Blade Front Retaining Ring - Examine (Level 2 Inspection Limits), Inspection-003

DMC:V2500-A0-72-00-3103-00A-310A-C|Issue No:001.00|Issue Date:2014-05-01

Export Control

EAR Export Classification: Not subject to the EAR per 15 C.F.R. Chapter 1, Part 734.3(b)(3), except for the following Service Bulletins which are currently published as EAR Export Classification 9E991: SBE70-0992, SBE72-0483, SBE72-0580, SBE72-0588, SBE72-0640, SBE73-0209, SBE80-0024 and SBE80-0025.

Copyright

© IAE International Aero Engines AG (2001, 2014 - 2021) The information contained in this document is the property of © IAE International Aero Engines AG and may not be copied or used for any purpose other than that for which it is supplied without the express written authority of © IAE International Aero Engines AG. (This does not preclude use by engine and aircraft operators for normal instructional, maintenance or overhaul purposes.).

Applicability

All

Common Information

TASK 72-00-31-200-003 LPC Fan Blade Front Retaining Ring - Examine (Level 2 Inspection Limits), Inspection-003

Effectivity

FIG/ITEM

PART NO.

5A6079

5A0898

General

This TASK gives the procedure for the inspection of the front blade retaining ring below major soft time and scheduled for a level 2 inspection, as given in the Maintenance Management Program.

All the parts must be cleaned before any parts is examined. Refer to the SPM TASK 70-11-03-300-503.

These inspections are to be carried out in conjunction with those given in the interface inspections (Refer to TASK 72-00-00-200-000).

The module will be sufficiently disassembled (TASK 72-31-00-030-001) for the components to be examined as specified in accordance with this procedure.

The word "Reject" is used after an interface/SP50 inspection statement to show that a higher-level inspection and possible repair to the damaged part is necessary if the part is rejected, refer to the respective inspection/check. Do the higher level inspection procedure as found in the applicable Chapter/Section/Subject of this manual on the damaged part(s).

The policy necessary for the inspection is given in the SPM TASK 70-20-00-200-501.

Preliminary Requirements

Pre-Conditions

NONE

Support Equipment

NONE

Consumables, Materials and Expendables

NONE

Spares

NONE

Safety Requirements

NONE

Procedure

    1. SUBTASK 72-00-31-220-084 Examine the Abutment Faces of the Front Blade Retaining Ring

    2. Refer to: Figure.

      1. CAUTION

        YOU MUST PERFORM THE FOLLOWING INSPECTIONS IN CONJUNTION WITH THE INTERFACE INSPECTIONS DEFINED ON TASK 72-00-31-220-001 AND TASK 72-00-31-220-002.

        Examine the blade abutment face at location 1.

        1. Galled.

          1. Not more than 0.002 in. (0.05 mm) in depth

          2. Repair, VRS1005 TASK 72-31-13-300-001 (REPAIR-001)

          1. More than in Step

          2. Reject

      1. Examine the filler abutment face at location 2.

        1. Galled.

          1. Not more than 0.003 in. (0.07 mm) in depth

          2. Repair, VRS1005 TASK 72-31-13-300-001 (REPAIR-001)

          1. More than in Step

          2. Reject

      1. Examine the disk abutment face at location 3.

        1. Galled.

          1. Not more than 0.003 in. (0.07 mm) in depth if less than 25 percent of the contact area is affected

          2. Repair, VRS1005 TASK 72-31-13-300-001 (REPAIR-001)

          1. More than in Step

          2. Reject

      1. Examine the inlet cone abutment face at location 4.

        1. Galled.

          1. Not more than 0.003 in. (0.07 mm) in depth if less than 25 percent of the contact area is affected

          2. Repair, VRS1005 TASK 72-31-13-300-001 (REPAIR-001)

          1. More than in Step

          2. Reject

    1. SUBTASK 72-00-31-220-085 Examine the Front Face of the Front Blade Retaining Ring

    2. Refer to Figure.

      1. Examine the front face at location 5.

        1. Galled.

          1. Not more than 0.003 in. (0.07 mm) in depth

          2. Repair, VRS1005 TASK 72-31-13-300-001 (REPAIR-001)

          1. More than in Step

          2. Reject

    1. SUBTASK 72-00-31-220-086 Examine the Bolt Holes of the Front Blade Retaining Ring

    2. Refer to: Figure.

      1. Examine the bolt holes at locations 6, 7 and 13.

        1. Edges burred

        2. Repair, VRS1005 TASK 72-31-13-300-001 (REPAIR-001)

    1. SUBTASK 72-00-31-220-087 Examine the Snap Diameter of the Front Blade Retaining Ring

    2. Refer to Figure.

      1. Examine the snap diameter at location 8.

        1. Scored.

          1. Not more than 0.003 in. (0.07 mm) in depth if removal does not cause loss of interface

          2. Repair, VRS1005 72-31-13-300-001 (REPAIR-001)

          1. More than in Step

          2. Reject

    1. SUBTASK 72-00-31-220-088 Examine the Snap Diameter of the Front Blade Retaining Ring

    2. Refer to Figure.

      1. Examine the snap diameter at location 9.

        1. Scored.

          1. Not more than 0.003 in. (0.07 mm) in depth if removal does not cause loss of interface

          2. Repair, VRS1005 72-31-13-300-001 (REPAIR-001)

          1. More than in Step

          2. Reject

    1. SUBTASK 72-00-31-220-089 Examine the Outside Diameter of the Front Blade Retaining Ring

    2. Refer to Figure.

      1. Examine the outside diameter at location 10.

        1. Any nicks, dents or scratches.

          1. Not more than 0.003 in. (0.07 mm) in depth

          2. Repair, VRS1005 72-31-13-300-001 (REPAIR-001)

          1. More than in Step

          2. Reject

    1. SUBTASK 72-00-31-220-090 Examine the Pin Holes of the Front Blade Retaining Ring

    2. Refer to Figure.

      1. Examine the pin holes at location 11.

        1. Scored.

          1. Not more than 0.002 in. (0.05 mm) in depth if removal does not cause loss of interface

          2. Repair, VRS1005 72-31-13-300-001 (REPAIR-001)

          1. More than in Step

          2. Reject

    1. SUBTASK 72-00-31-220-091 Examine the Pin Holes of the Front Blade Retaining Ring

    2. Refer to Figure.

      1. Examine the pin holes at location 12.

        1. Edges burred

        2. Repair, VRS1005 TASK 72-31-13-300-001 (REPAIR-001)

    1. SUBTASK 72-00-31-220-092 Examine the Shank Nut of the Front Blade Retaining Ring

    2. Refer to Figure.

      1. Examine the shank nuts at location 14.

        1. Loose

        2. Repair, VRS1161 TASK 72-31-13-300-003 (REPAIR-003)

        1. Damaged

        2. Repair, VRS1161 TASK 72-31-13-300-003 (REPAIR-003)

        1. If the locking torque is between 6.500 lbf.in (0.74 Nm) and 60.000 lbf.in (6.78 Nm)

        2. Accept

        1. Other than in Step

        2. Repair, VRS1161 TASK 72-31-13-300-003 (REPAIR-003)

    1. SUBTASK 72-00-31-220-093 Examine the Timing Mark of the Front Blade Retaining Ring

    2. Refer to Figure.

      1. Examine the timing mark at location 15.

        1. Missing of yellow paint

        2. Repair, VRS1173 TASK 72-31-13-300-006 (REPAIR-006)

    1. SUBTASK 72-00-31-220-094 Examine the Spacer of the Front Blade Retaining Ring

    2. Refer to Figure.

      1. Examine the spacer at location 16.

        1. Loose, missing or cracked

        2. Repair, VRS1168 TASK 72-31-13-300-005 (REPAIR-005)

    1. SUBTASK 72-00-31-220-095 Examine the Aft Flange Front Surface of the Front Blade Retaining Ring

    2. Refer to Figure.

      1. Examine the aft flange front surface at location 17.

        1. Nicked.

          1. Not more than 0.0027 in. (0.069 mm) in depth

          2. Repair, VRS1005 TASK 72-31-13-300-001 (REPAIR-001)

          1. More than in Step

          2. Reject

        1. Dented or scratched.

          1. Not more than 0.0039 in. (0.100 mm) in depth

          2. Repair, VRS1005 TASK 72-31-13-300-001 (REPAIR-001)

          1. More than in Step

          2. Reject

    1. SUBTASK 72-00-31-220-096 Examine the Spacer Wall of the Front Blade Retaining Ring

    2. Refer to Figure.

      1. Examine the spacer wall at location 18.

        1. Nicked, dented, scratched or gouged at front face.

          1. Not more than 0.036 in. (0.92 mm) in depth

          2. Repair, VRS1005 TASK 72-31-13-300-001 (REPAIR-001)

          1. More than in Step

          2. Reject

        1. Nicked, dented, scratched or gouged at the remaining surfaces.

          1. Not more than 0.011 in. (0.30 mm) in depth

          2. Repair, VRS1005 TASK 72-31-13-300-001 (REPAIR-001)

          1. More than in Step

          2. Reject

    1. SUBTASK 72-00-31-220-097 Examine the Shank Nut Anti Rotation Land of the Front Blade Retaining Ring

    2. Refer to Figure.

      1. Examine the shank nut anti rotation land at location 19.

        1. Nicked, dented, scratched or gouged.

          1. Not more than 0.011 in. (0.30 mm) in depth

          2. Repair, VRS1005 TASK 72-31-13-300-001 (REPAIR-001)

          1. More than in Step

          2. Reject

    1. SUBTASK 72-00-31-220-098 Examine the Locating Pin Holes of the Front Blade Retaining Ring

    2. Refer to Figure.

      1. Examine the locating pin holes at location 20.

        1. Gouged or rubbed.

          1. Not more than 0.078 in. (0.20 mm) in depth

          2. Repair, VRS1005 TASK 72-31-13-300-001 (REPAIR-001)

          1. More than in Step

          2. Reject

    1. SUBTASK 72-00-31-220-099 Examine the Threaded Holes of the Front Blade Retaining Ring

    2. Refer to Figure.

      1. Examine the threaded holes at location 21.

        1. Burred

        2. Repair, VRS1005 TASK 72-31-13-300-001 (REPAIR-001)

  1. Figure: Location on the Front Blade Retaining Ring
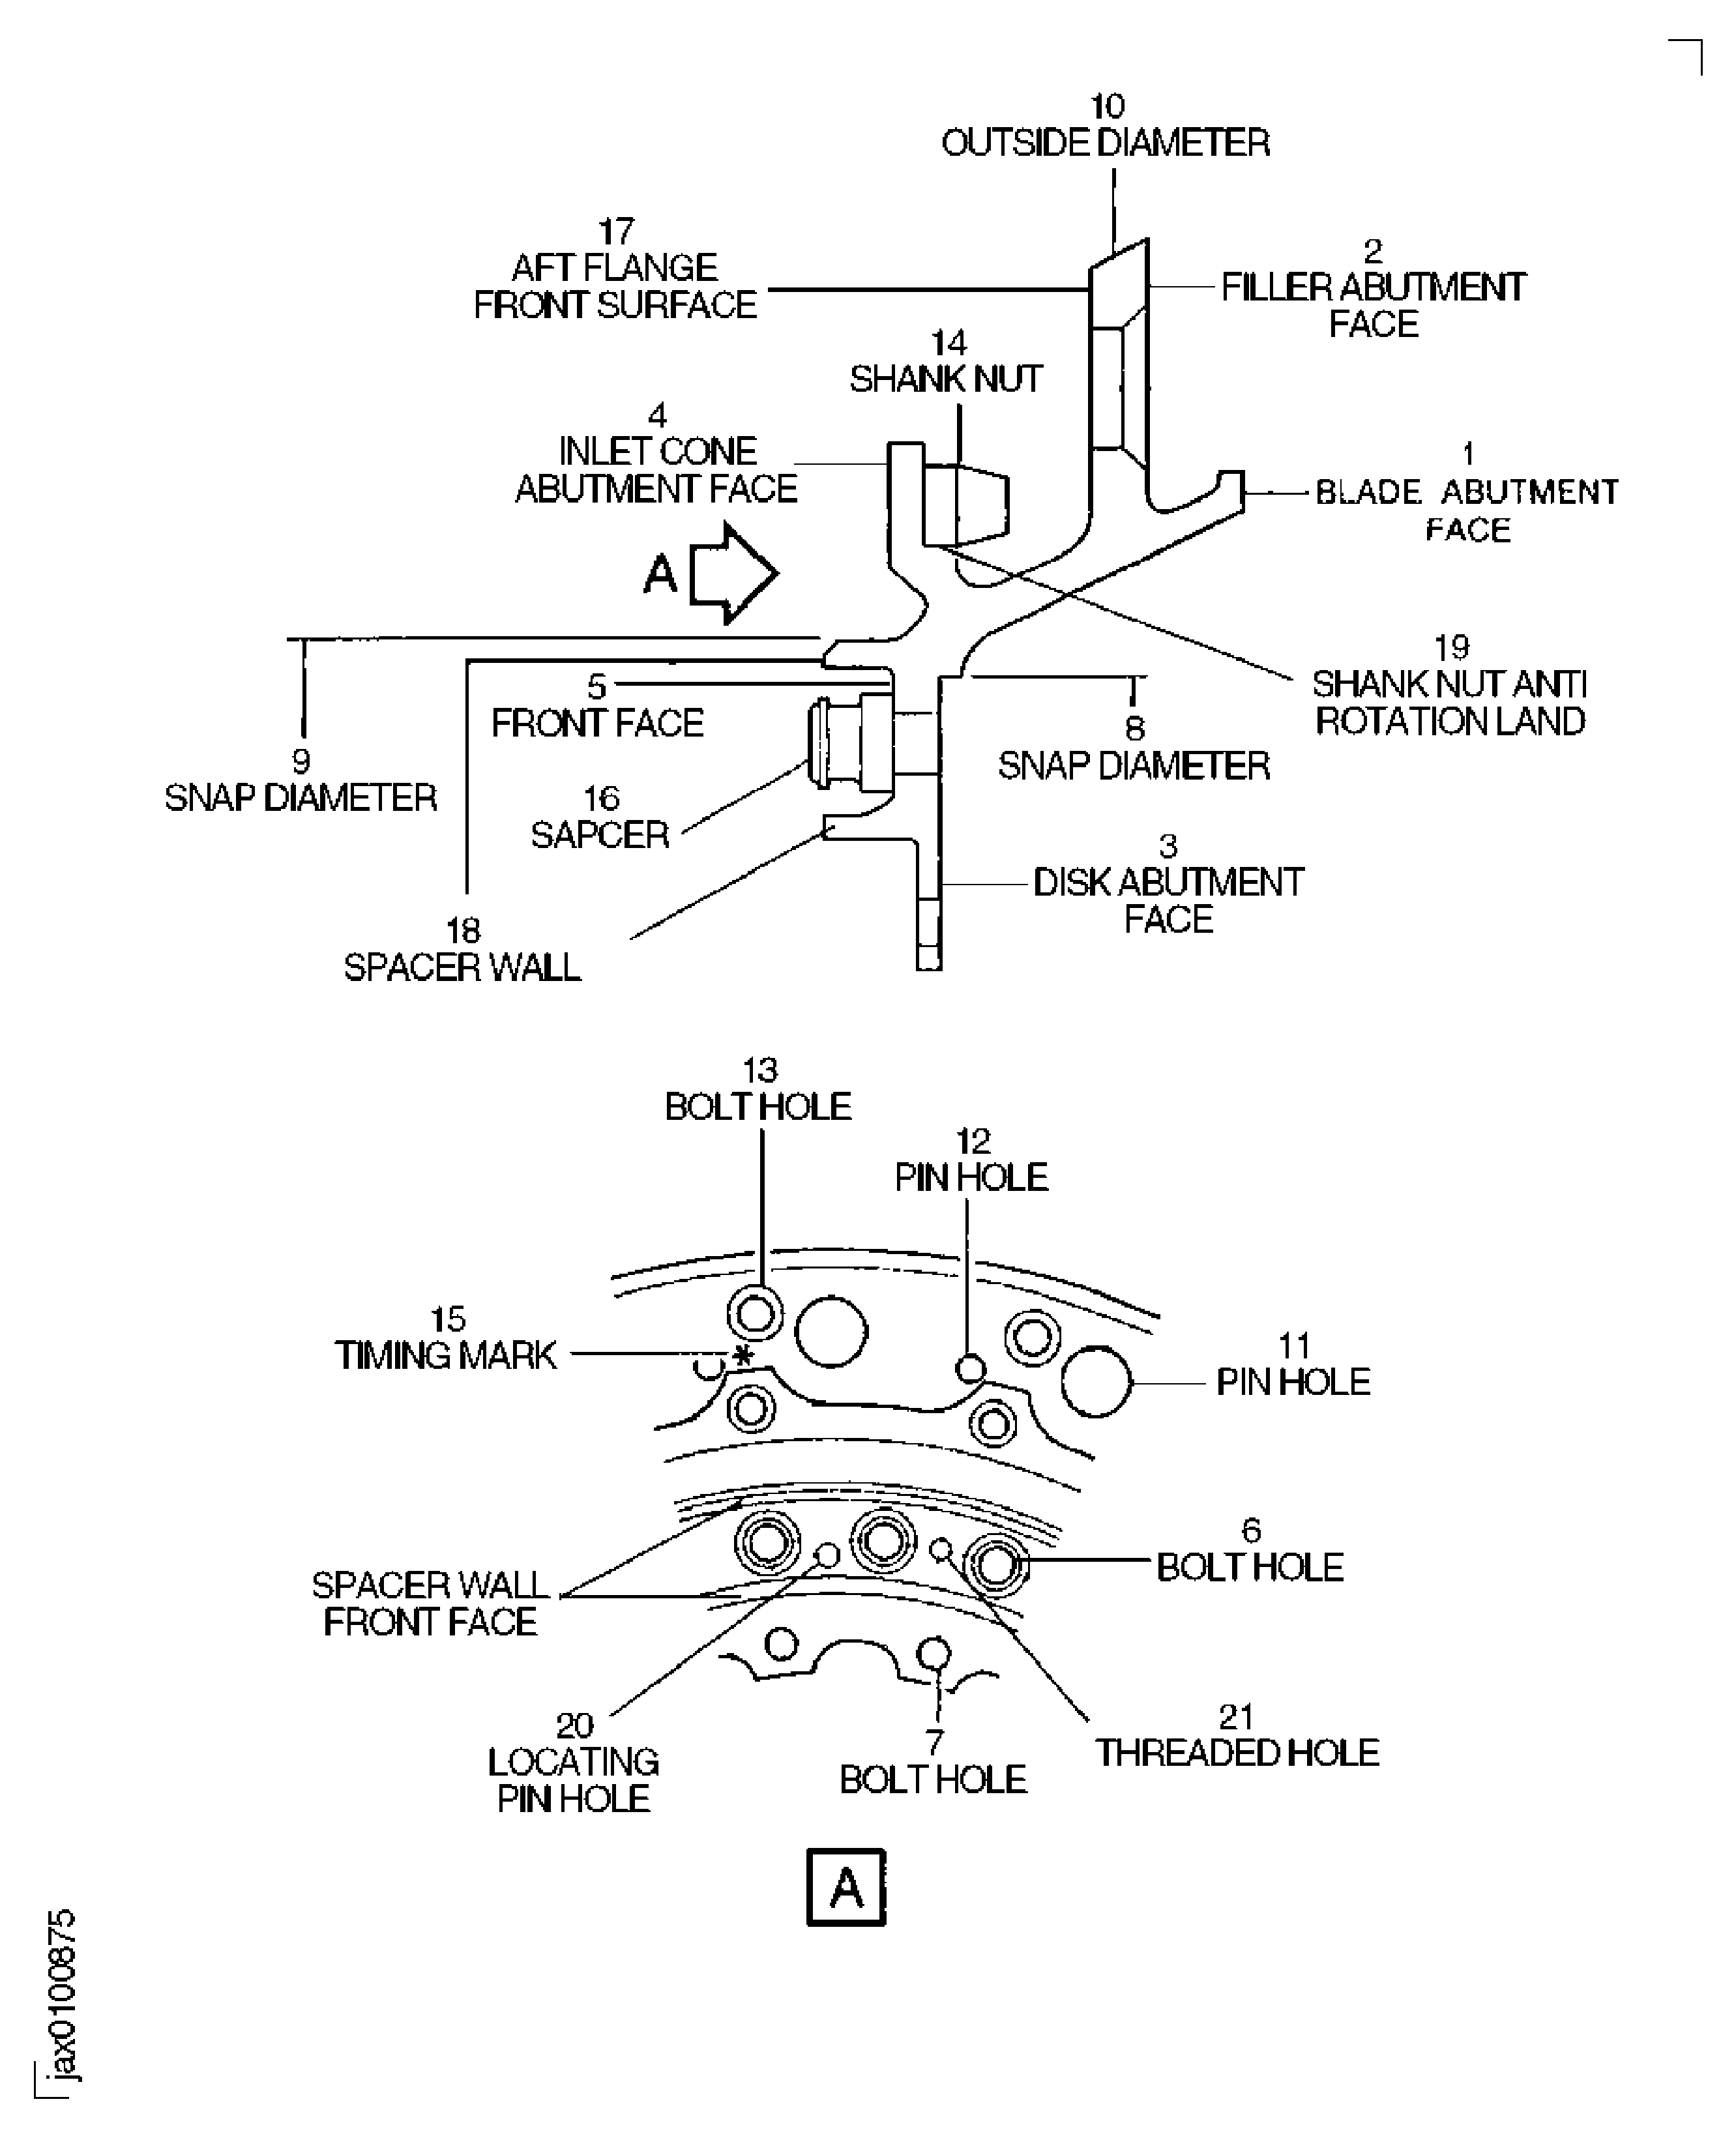
    Location on the Front Blade Retaining Ring

Requirements After Job Completion

Follow-On Conditions

NONE