Export Control
EAR Export Classification: Not subject to the EAR per 15 C.F.R. Chapter 1, Part 734.3(b)(3), except for the following Service Bulletins which are currently published as EAR Export Classification 9E991: SBE70-0992, SBE72-0483, SBE72-0580, SBE72-0588, SBE72-0640, SBE73-0209, SBE80-0024 and SBE80-0025.Copyright
© IAE International Aero Engines AG (2001, 2014 - 2021) The information contained in this document is the property of © IAE International Aero Engines AG and may not be copied or used for any purpose other than that for which it is supplied without the express written authority of © IAE International Aero Engines AG. (This does not preclude use by engine and aircraft operators for normal instructional, maintenance or overhaul purposes.).Applicability
All
Common Information
TASK 72-31-11-300-008 LPC Fan Blade - Repair The Airfoil Damage, Repair 008(VRS1003)
Effectivity
FIG/ITEM | PART NO. | |
|---|---|---|
01-300 | 6A3494 | Assembly A |
01-300 | 6A3971 | Assembly A |
01-300 | 6A5485 | Assembly A |
01-300 | 6A6519 | Assembly B |
01-300 | 6A4700 | Assembly C |
01-300 | 6A6521 | Assembly D |
01-300 | 6A7403 | Assembly A |
01-300 | 6A7656 | Assembly A |
01-300 | 6A7649 | Assembly A |
01-300 | 6A7650 | Assembly A |
01-300 | 6A7651 | Assembly A |
01-300 | 6A7653 | Assembly A |
01-300 | 6A7658 | Assembly A |
01-300 | 6A7613 | Assembly B |
01-300 | 6A7652 | Assembly B |
01-300 | 6A7654 | Assembly C |
01-300 | 6A7614 | Assembly D |
01-300 | 6A7655 | Assembly D |
General
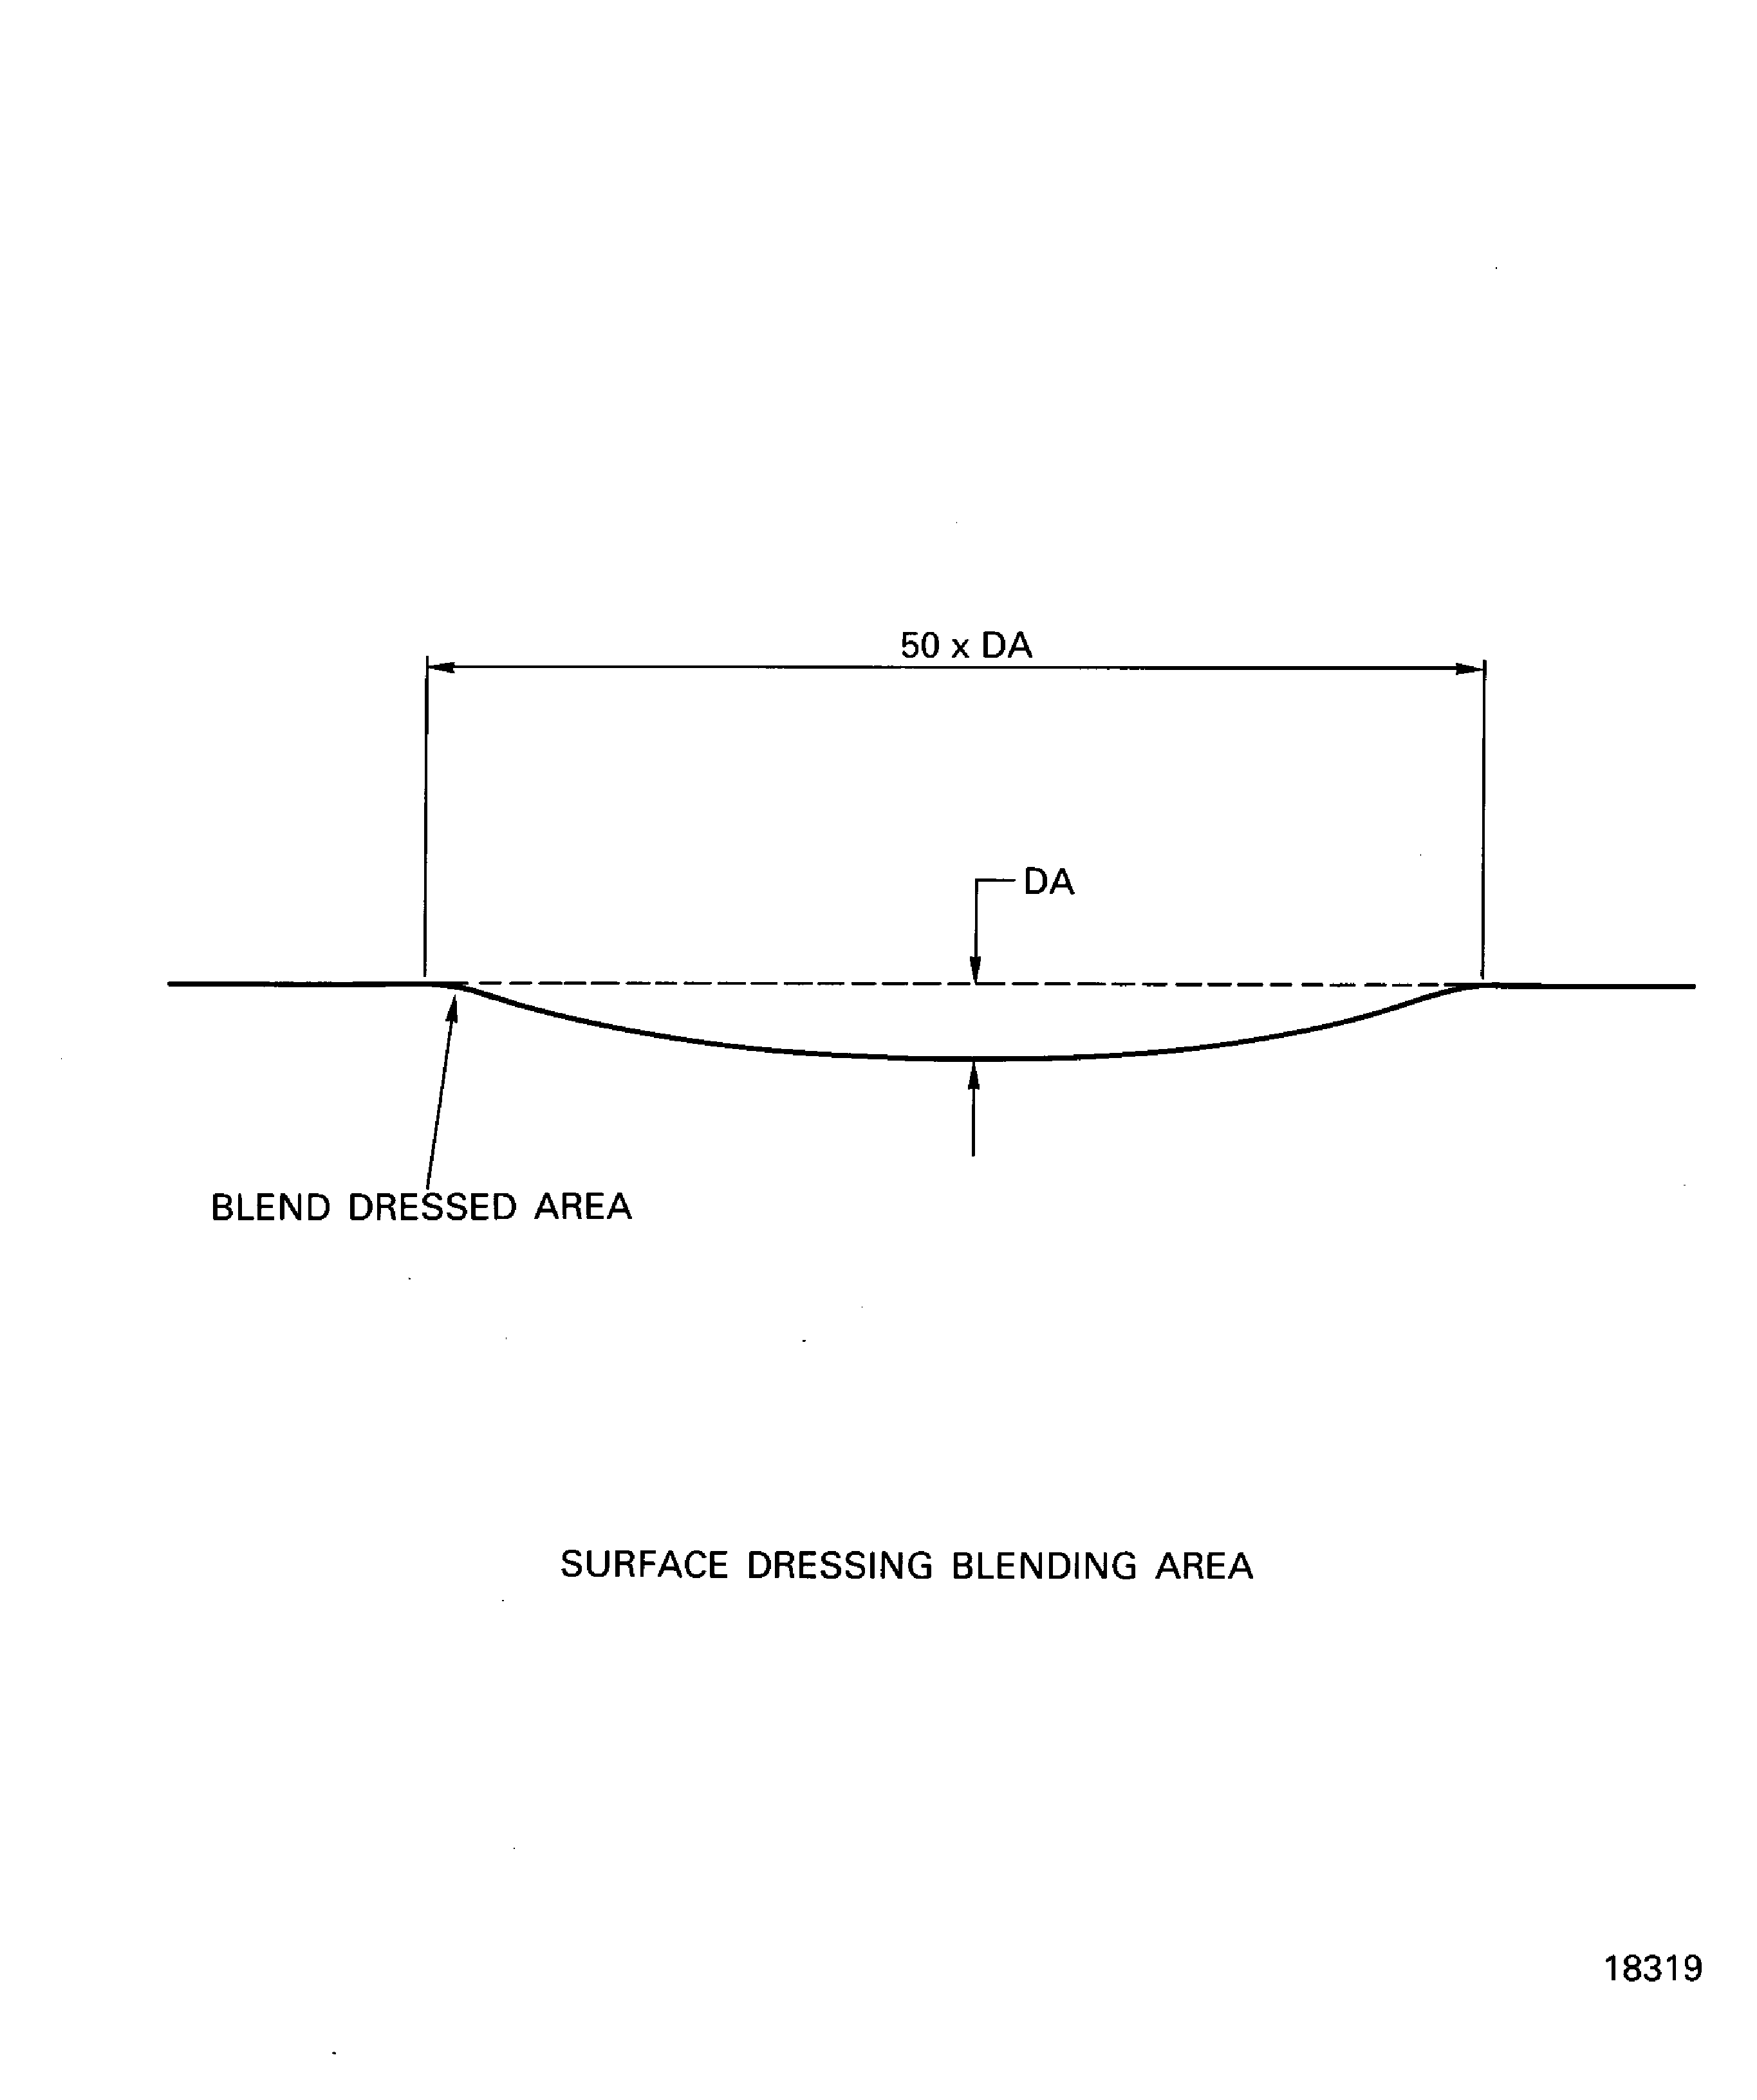
This repair gives the procedure to glass bead peen (Ref to VRS1724) to restore the airfoil surface finish. The VRS1724 can only be carried out on a blade the maximum five times. If VRS1724/5 is engraved adjacent to the part number, the blade cannot be glass bead peened and must be discarded.
This repair must only be done when the instruction to do so is given in 72-31-11 Inspection/Check.
Rotor blades must be repaired as soon as damage or wear is monitored, to get back LP Compressor efficiency and extend the rotor blade life.
The maximum number of dressed blades for a given fan set is the equivalent of three blades dressed to the maximum limits. All the remaining blades must not be dressed. This maximum number of dressed blades must be obeyed to prevent a risk of blade vibration.
All airfoil damage must be removed prior to the glass bead peening operation, refer to VRS1002, TASK 72-31-11-300-007 (REPAIR-007).
The practices and processes refered to in the procedure by the TASK/SUBTASK numbers are in the SPM.
A change in fan balance can occur when fan blades are dressed to this TASK.
This repair should only be used after the blades are removed from the disk.
Material of component
PART IDENT | IAE SYMBOL | MATERIAL |
|---|---|---|
LP Compressor rotor blade assembly | TFH | Titanium, Aluminum and Vanadium alloy |
Price and availability - Refer to International Aero Engines.
Related repairs
LP Compressor Rotor Blade - Restore Airfoil Surface Finish, Refer to VRS1724 TASK 72-31-11-300-026 (REPAIR-026).
NOTE
NOTE
NOTE
Preliminary Requirements
Pre-Conditions
NONESupport Equipment
| Name | Manufacturer | Part Number / Identification | Quantity | Remark |
|---|---|---|---|---|
| Chemical cleaning equipment | LOCAL | Chemical cleaning equipment | ||
| Penetrant Crack Test Equipment | LOCAL | Penetrant crack test equipment | ||
| Ultrasonic thickness meter | LOCAL | Ultrasonic thickness meter | (see Note) | |
| Portablegrinding equipment | LOCAL | Portable grinding equipment | ||
| Transient accoustic propagation equipment | LOCAL | Transient accoustic propagation equipment | ||
| Workshop inspection equipment | LOCAL | Workshop inspection equipment | ||
| Vibro-engraving equipment | LOCAL | Vibro-engraving equipment | ||
| IAE 3R19397 Perspex template c/c Assembly A and B | 0AM53 | IAE 3R19397 | 1 | |
| IAE 3R19399 Perspex template c/c Assembly A and B | 0AM53 | IAE 3R19399 | 1 | |
| IAE 3R19401 Perspex template c/c Assembly C and D | 0AM53 | IAE 3R19401 | 1 | |
| IAE 3R19403 Perspex template c/c Assembly C and D | 0AM53 | IAE 3R19403 | 1 | |
| IAE 3R18011 Thickness calibration gage | 0AM53 | IAE 3R18011 | 1 |
Consumables, Materials and Expendables
| Name | Manufacturer | Part Number / Identification | Quantity | Remark |
|---|---|---|---|---|
| CoMat 05-075 WATERPROOF SILICON CARBIDE | IE241 | CoMat 05-075 | ||
| CoMat 05-076 WATERPROOF SILICON CARBIDE | K3895 | CoMat 05-076 | ||
| CoMat 05-077 WATERPROOF SILICON CARBIDE | K6835 | CoMat 05-077 | ||
| CoMat 05-079 WATERPROOF SILICON CARBIDE | K3895 | CoMat 05-079 | ||
| CoMat 05-082 WATERPROOF SILICON CARBIDE | 44197 | CoMat 05-082 | ||
| CoMat 06-022 FLUORESCENT PENETRANT (POST-EMULSIFIED ULTRA HIGH SENSITIVITY) | LOCAL | CoMat 06-022 |
Spares
NONESafety Requirements
CAUTION
CAUTION
CAUTION
Procedure
Refer to TASK 72-31-11-200-000 (INSPECTION/CHECK-000).
Do a transient acoustic propagation check on the blade airfoil.
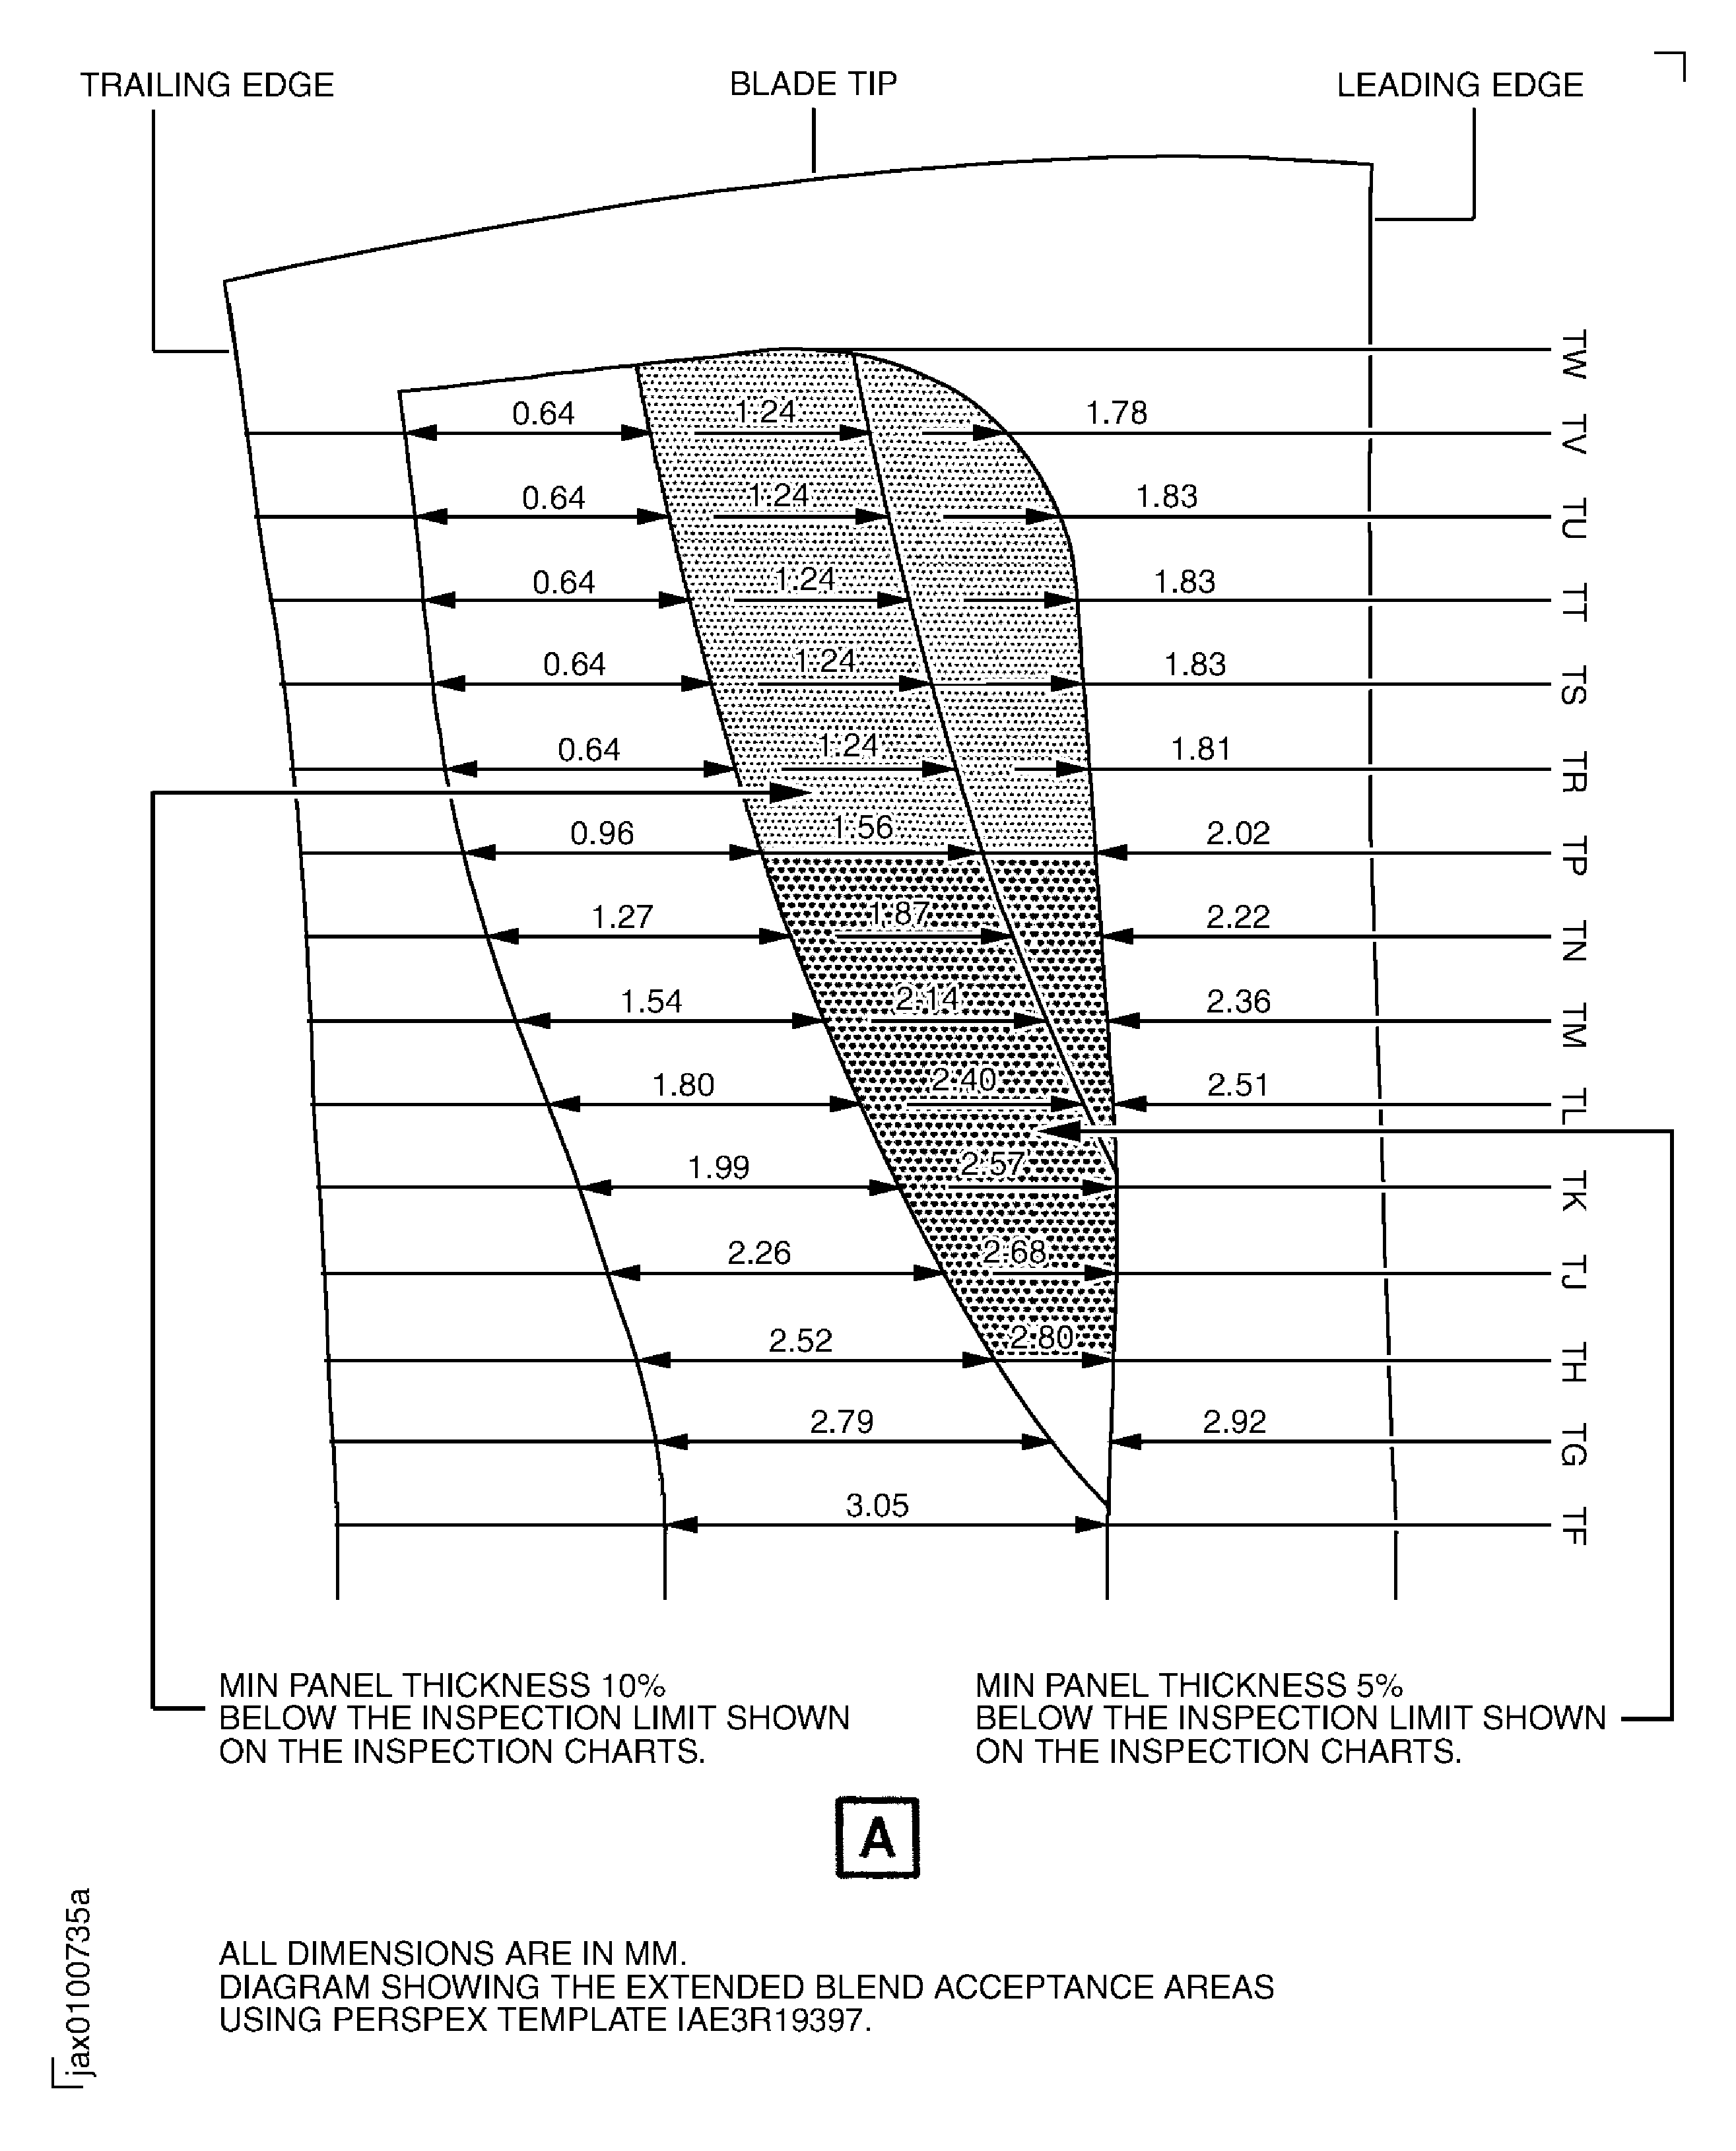
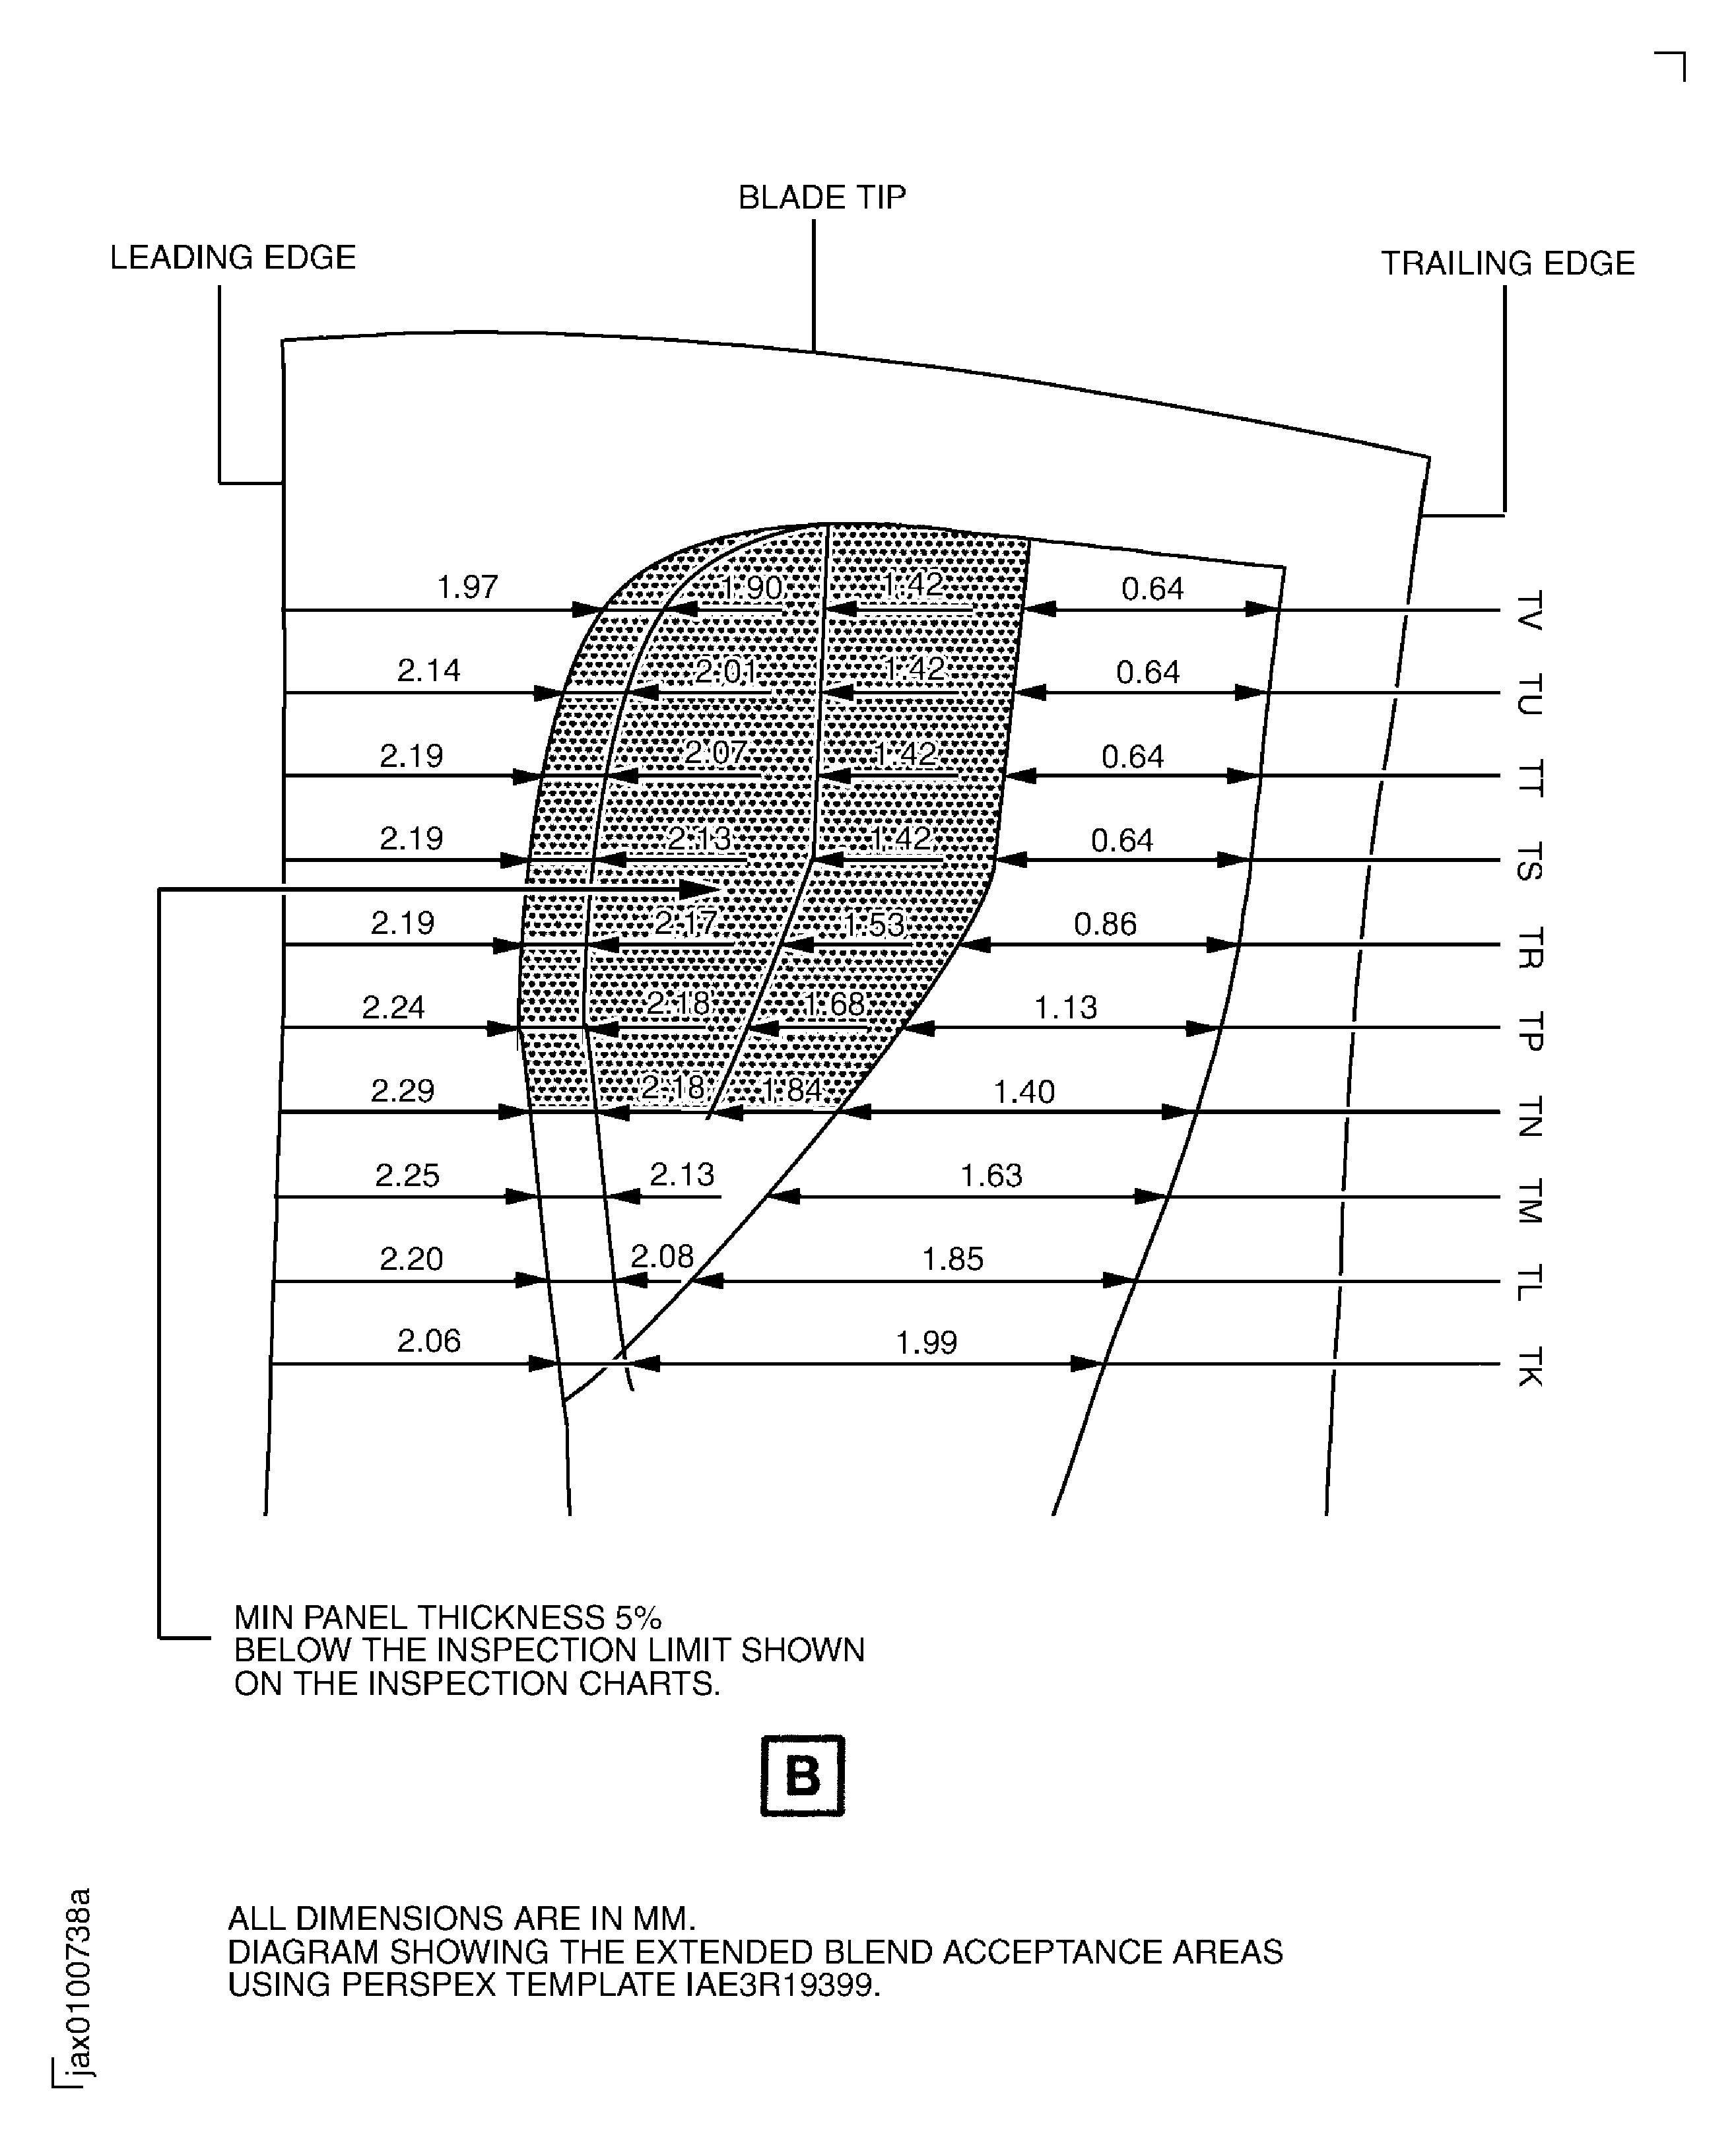
Use IAE 3R19397 Perspex template c/c Assembly A and B 1 off, and/or IAE 3R19399 Perspex template c/c Assembly A and B 1 off, and an ultrasonic thickness meter.
Find the honeycomb area on the blade airfoil.
Use IAE 3R19397 Perspex template c/c Assembly A and B 1 off, and/or IAE 3R19399 Perspex template c/c Assembly A and B 1 off, IAE 3R18011 Thickness calibration gage 1 off and an ultrasonic thickness meter.
Make sure there is sufficient material to allow for the damage to be removed.
The minimum thickness after repair is indicated on the perspex templates.
NOTE
Calibration Procedure.
Calibration is done by the use of IAE 3R18011 Thickness calibration gage 1 off. Put the ultrasonic thickness meter probe on the thickness calibration gage. Use the area nearest in thickness to that of the damaged area to be measured. Refer to the manufacturers instructions and adjust the meter to give the correct indication. Measure each side to make sure calibration range is correct, i.e. if the blade is 0.153 in. (3.90 mm) thick at the damaged area, calibrate on the 0.157 in. (4.00 mm) area and the 0.118 in. (3.00 mm) and 0.197 in. (5.00 mm) areas. If necessary, adjust the meter so that all three indications are correct.
NOTE
Thickness Calculation.
If a damage mark does not fall directly on a checking station the inspector is required to carry out a pro-rata calculation between the station points to determine what the thickness should be.
The required calculation is as follows:
Minimum thickness at damage area X = A - ((A - B) x percent C).
Where:
A = Thickness at first station.
B = Thickness at second station.
C = percent of distance from first station.
e.g. Damage is 40 percent from station A where:
A = 0.0484 in. (1.23 mm) and B = 0.025 in. (0.64 mm).
.
.
Therefore:
Minimum thickness X = 0.0484 - ((0.0484 - 0.025) x 40/100) = 0.039 in.
or.
Minimum thickness X = 1,23 - ((1.23 - 0.64) x 40/100) = 0.99 mm.
Measure the thickness of the material adjacent to the damage in the honeycomb area.
SUBTASK 72-31-11-270-054-A00 Do an Ultrasonic Test on the LP Compressor Rotor Blade Airfoil, Assembly A and Assembly B
Refer to TASK 72-31-11-200-000 (INSPECTION/CHECK-000).
Do a transient acoustic propagation check on the blade airfoil.
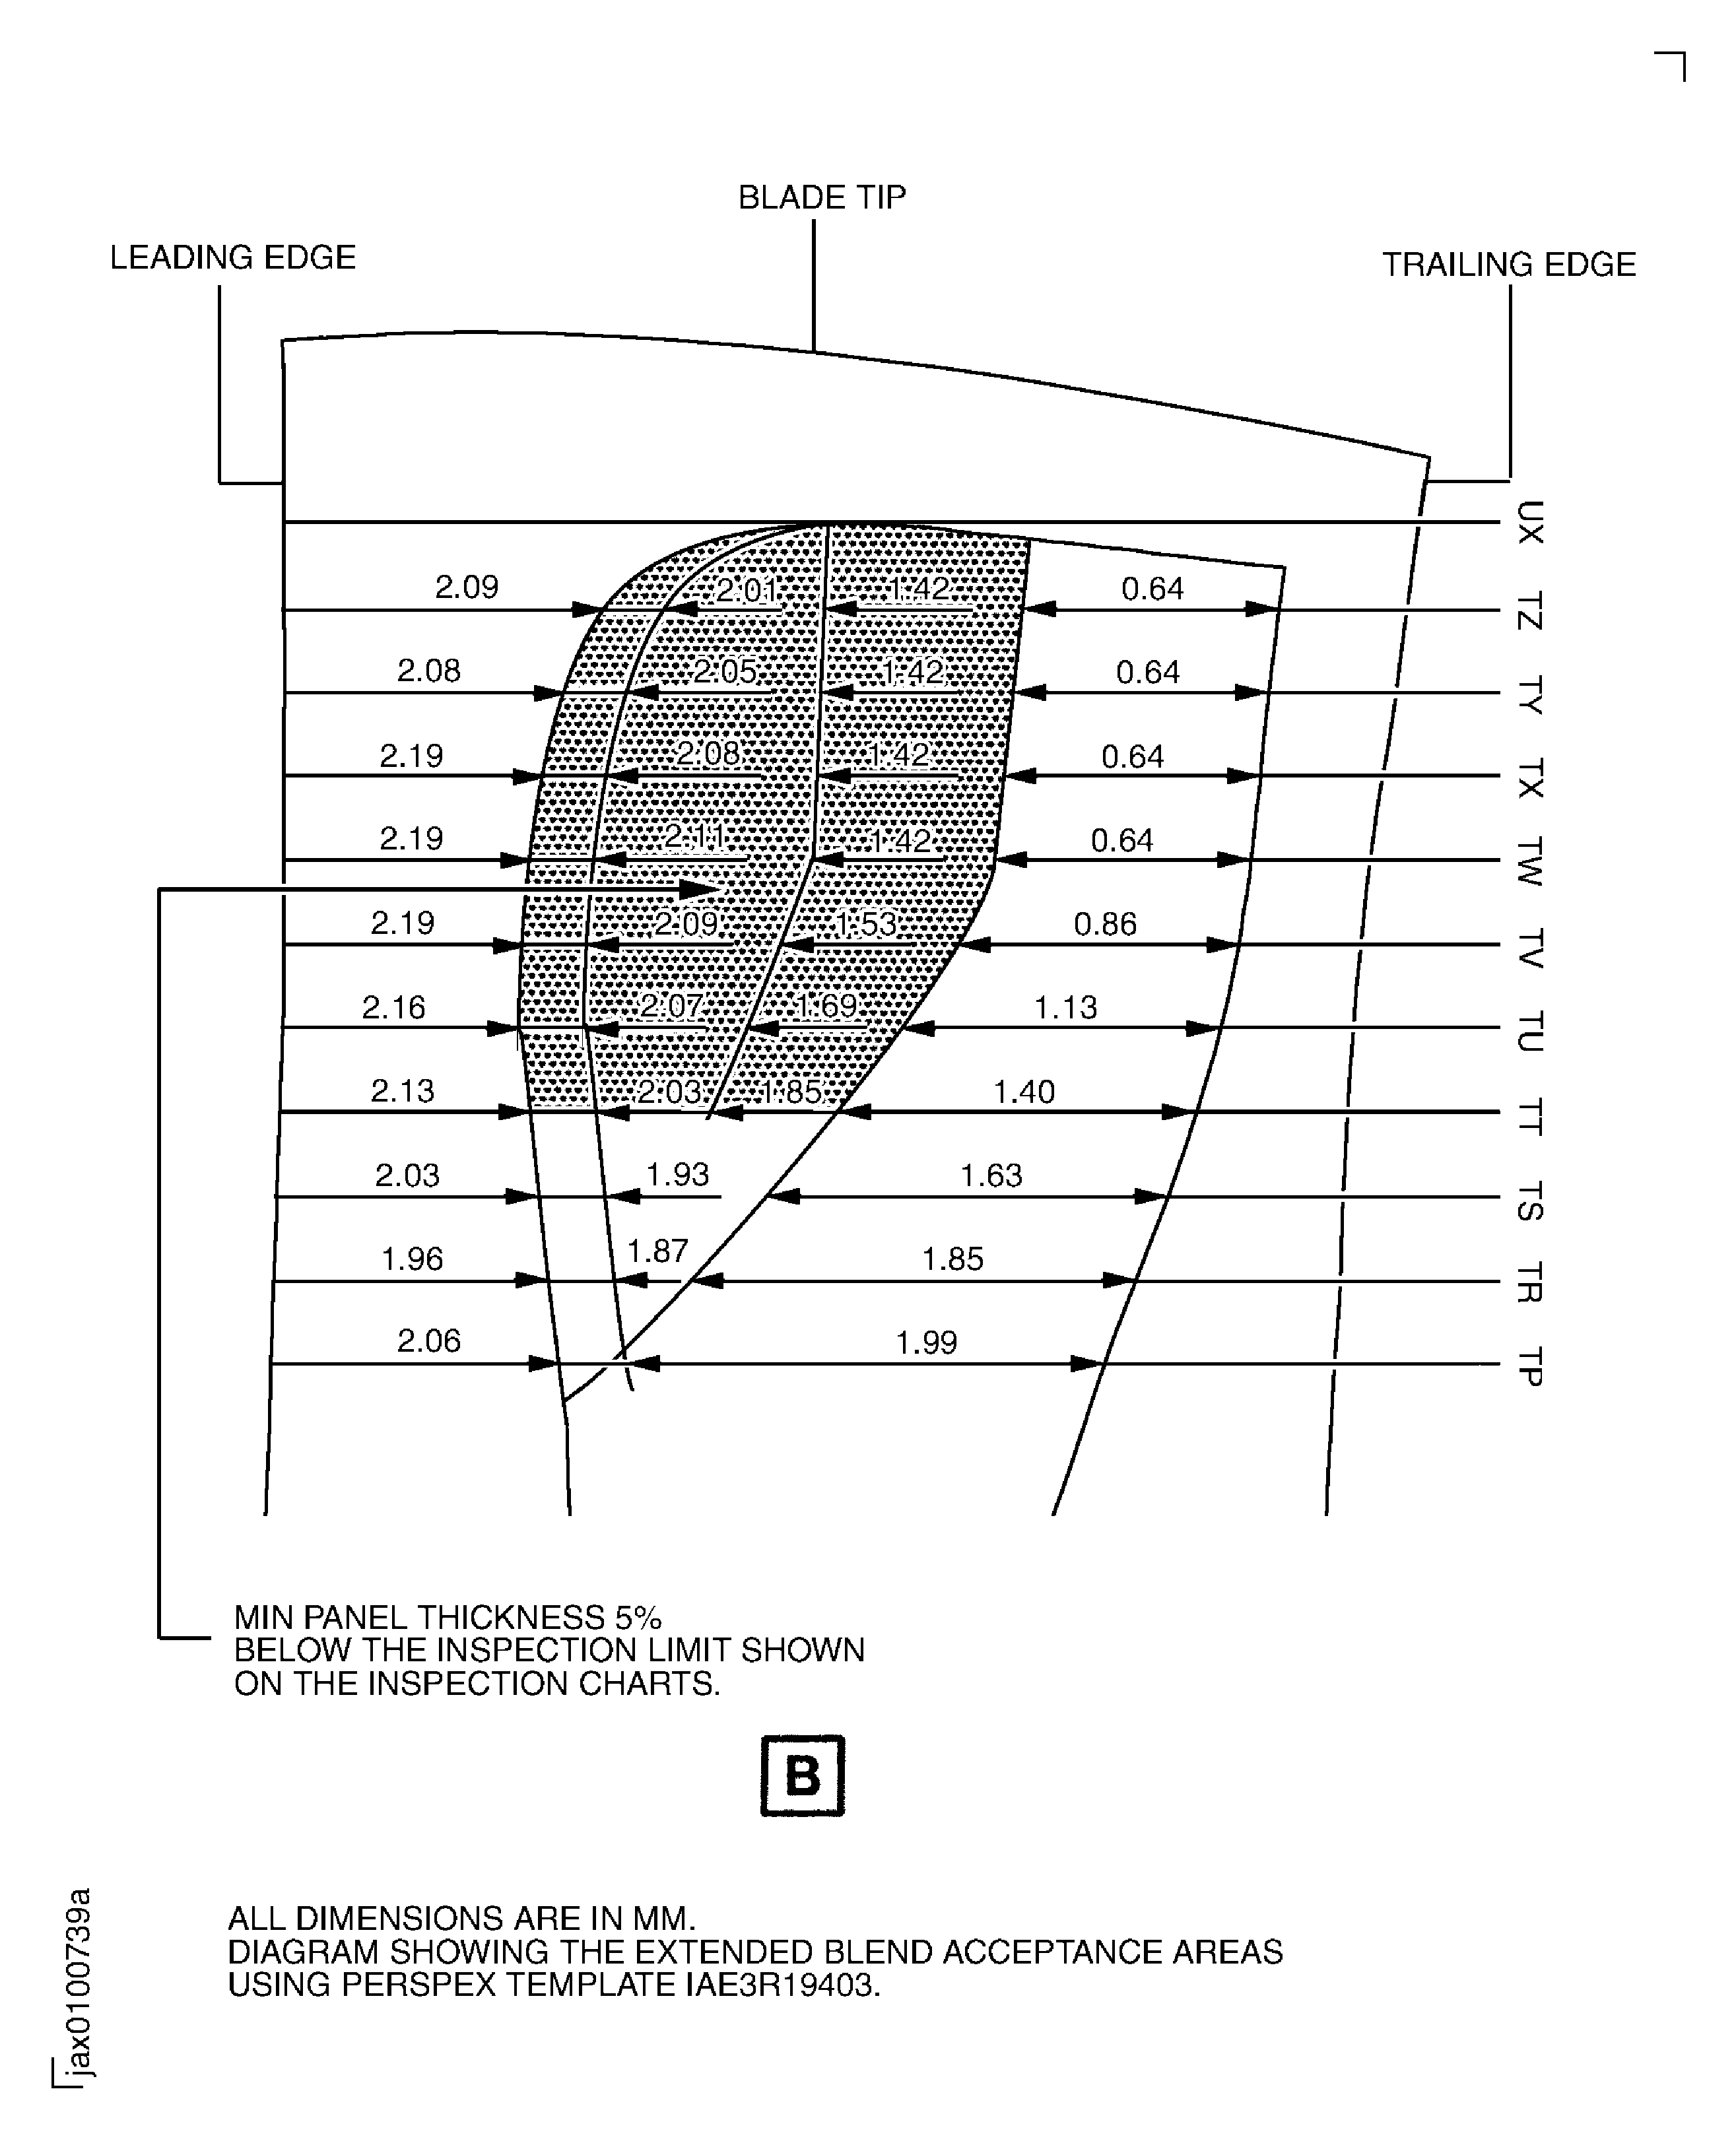
Use IAE 3R19401 Perspex template c/c Assembly C and D 1 off, and/or IAE 3R19403 Perspex template c/c Assembly C and D 1 off, and an ultrasonic thickness meter.
Find the honeycomb area on the blade airfoil.
Use IAE 3R19401 Perspex template c/c Assembly C and D 1 off, and/or IAE 3R19403 Perspex template c/c Assembly C and D 1 off, IAE 3R18011 Thickness calibration gage 1 off and an ultrasonic thickness meter.
Make sure there is sufficient material to allow for the damage to be removed.
The minimum thickness after repair is indicated on the perspex templates.
NOTE
Calibration Procedure.
Calibration is done by the use of IAE 3R18011 Thickness calibration gage thickness calibration gage, 1 off. Put the ultrasonic thickness meter probe on the thickness calibration gage. Use the area nearest in thickness to that of the damaged area to be measured. Refer to the manufacturers instructions and adjust the meter to give the correct indication. Measure each side to make sure calibration range is correct, i.e. if the blade is 0.153 in. (3.90 mm) thick at the damaged area, calibrate on the 0.157 in. (4.00 mm) area and the 0.118 in. (3.00 mm) and 0.197 in. (5.00 mm) areas. If necessary, adjust the meter so that all three indications are correct.
NOTE
Thickness Calculation.
If a damage mark does not fall directly on a checking station the inspector is required to carry out a pro-rata calculation between the station points to determine what the thickness should be.
The required calculation is as follows:
Minimum thickness at damage area X = A - ((A - B) x percent C).
Where:
A = Thickness at first station.
B = Thickness at second station.
C = percent of distance from first station.
e.g. Damage is 40 percent from station A where:
A = 0.0484 in. (1.23 mm) and B = 0.025 in. (0.64 mm).
.
.
Therefore:
Minimum thickness X = 0.0484 - ((0.0484 - 0.025) x 40/100) = 0.039 in.
or.
Minimum thickness X = 1.23 - ((1.23 - 0.64) x 40/100) = 0.99 mm.
Measure the thickness of the material adjacent to the damage in the honeycomb area.
SUBTASK 72-31-11-270-054-B00 Do an Ultrasonic Test on the LP Compressor Rotor Blade Airfoil, Assembly C and Assembly D
Use portable grinding equipment.
Continue to remove material until all the damage is removed.
Below the 2.5 in. (63.5 mm) line, material removal must not be more than 0.010 in. (0.25 mm) in depth.
Do not cut away below the airfoil fillet radius, 0.866 in. (22.0 mm) measured from the root bottom surface.
If you use mechanical tools do not exceed 1000 rpm.
Remove damage on the airfoil surfaces by material removal.
Use CoMat 05-075 WATERPROOF SILICON CARBIDE, CoMat 05-076 WATERPROOF SILICON CARBIDE or CoMat 05-077 WATERPROOF SILICON CARBIDE.
Polish the repaired area(s) to remove scratches and to give a surface finish the same as the adjacent material.
NOTE
The last polish is to be in a radial direction.
Polish the repaired area(s).
SUBTASK 72-31-11-350-054 Remove Damage from the LP Compressor Rotor Blade

CAUTION
TITANIUM COMPONENT - YOU MUST USE SILICON CARBIDE TYPE ABRASIVE WHEELS, STONES AND PAPERS TO DRESS, BLEND AND POLISH THIS COMPONENT.
CAUTION
TITANIUM COMPONENT - DO NOT USE FORCE WITH MECHANICAL CUTTERS OR THE MATERIAL WILL BECOME TOO HOT.
CAUTION
TITANIUM COMPONENT - IF THE MATERIAL SHOWS A CHANGE IN COLOR, TO DARKER THAN A LIGHT STRAW COLOR, THE COMPONENT IS TO BE REJECTED.
CAUTION
TITANIUM COMPONENT - MAXIMUM SPEED FOR MECHANICAL TOOLS MUST NOT EXCEED 1000 REVOLUTIONS PER MINUTE.Refer to the SPM TASK 70-23-05-230-501.
Use CoMat 06-022 FLUORESCENT PENETRANT (POST-EMULSIFIED ULTRA HIGH SENSITIVITY) with penetrant crack test equipment.
Cracks are not permitted.
Do a local penetrant crack test on the repaired area(s).
SUBTASK 72-31-11-230-070 Do a Crack Test

CAUTION
ENSURE THAT THE PENETRANT FLUIDS DO NOT MAKE CONTACT WITH THE BLADE ROOT DOVETAIL FACES IF THE LP COMPRESSOR BLADE ASSEMBLY IS POST SB72-0375 OR POST SB72-0384.Use IAE 3R19397 Perspex template c/c Assembly A and B 1 off, and/or IAE 3R19399 Perspex template c/c Assembly A and B 1 off, and an ultrasonic thickness meter.
Calibrate as specified in Step.
Make sure that minimum material thickness is remaining.
NOTE
Thickness Calculation.
If a repaired area(s) does not fall directly on a checking station the inspector is required to carry out a pro-rata calculation between the station points to determine what the thickness should be.
The required calculation is as follows:
Minimum thickness at damage area X = A - ((A - B) x percent C).
Where:
A = Thickness at first station.
B = Thickness at second station.
C = percent of distance from first station.
e.g. Damage is 40 percent from station A where:
A = 0.0484 in. (1.23 mm) and B = 0.025 in. (0.64 mm).
.
.
Therefore:
Minimum thickness X = 0.0484 - ((0.0484 - 0.025) x 40/100) = 0.039 in.
or.
Minimum thickness X = 1.23 - ((1.23 - 0.,64) x 40/100) = 0.99 mm.
Refer to the SPM TASK 70-21-01-220-501, SUBTASK 70-21-01-220-008.
Reject and mutilate the part.

CAUTION
YOU MUST REJECT AND MUTILATE THE FAN BLADE IF THE MEASURED THICKNESS IS BELOW THE MINIMUM THICKNESS. THIS WILL PREVENT REUSE OF UNSERVICEABLE PARTS.Thickness below the minimum thickness.
Measure the thickness of the material at the repaired area(s).
SUBTASK 72-31-11-270-055 Do an Ultrasonic Examination of the LP Compressor Rotor Blade Airfoil, Assembly A and Assembly B
Use IAE 3R19401 Perspex template c/c Assembly C and D 1 off, and/or IAE 3R19403 Perspex template c/c Assembly C and D 1 off, and an ultrasonic thickness meter.
Calibrate as specified in Step.
Make sure that minimum material thickness is remaining.
NOTE
Thickness Calculation.
If a repaired area(s) does not fall directly on a checking station the inspector is required to carry out a pro-rata calculation between the station points to determine what the thickness should be.
The required calculation is as follows:
Minimum thickness at damage area X = A - ((A - B) x percent C).
Where:
A = Thickness at first station.
B = Thickness at second station.
C = percent of distance from first station.
e.g. Damage is 40 percent from station A where:
A = 0.0484 in. (1.23 mm) and B = 0.025 in. (0.64 mm).
Therefore:
Minimum thickness X = 0.0484 - ((0.0484 - 0.025) x 40/100) = 0.039 in.
or.
Minimum thickness X = 1.23 - ((1.23 - 0.64) x 40/100) = 0.99 mm.
Refer to the SPM TASK 70-21-01-220-501, SUBTASK 70-21-01-220-008.
Reject and mutilate the part.

CAUTION
YOU MUST REJECT AND MUTILATE THE FAN BLADE IF THE MEASURED THICKNESS IS BELOW THE MINIMUM THICKNESS. THIS WILL PREVENT REUSE OF UNSERVICEABLE PARTS.Thickness below the minimum thickness.
Measure the thickness of the material at the repaired area(s).
SUBTASK 72-31-11-270-056 Do an Ultrasonic Examination of the LP Compressor Rotor Blade Airfoil, Assembly C and Assembly D
Refer to Figure.
Refer to VRS1724, TASK 72-31-11-300-026 (REPAIR-026).
Restore the airfoil surface finish.
SUBTASK 72-31-11-380-055 Restore the Airfoil Surface Finish
Figure: Repair Details and Dimensions
Sheet 1

Figure: Repair Details and Dimensions for Assembly A and B
Sheet 2

Figure: Repair Details and Dimensions for Assembly C and D
Sheet 3

Figure: Repair Details and Dimensions
Sheet 4

Figure: Repair Details and Dimensions for Assembly A and B
Sheet 5

Figure: Repair Details and Dimensions for Assembly C and D
Sheet 6

Figure: Repair Details and Dimensions
Repair Details and Dimensions

Figure: Repair Details and Dimensions
Repair Details and Dimensions

