Export Control
EAR Export Classification: Not subject to the EAR per 15 C.F.R. Chapter 1, Part 734.3(b)(3), except for the following Service Bulletins which are currently published as EAR Export Classification 9E991: SBE70-0992, SBE72-0483, SBE72-0580, SBE72-0588, SBE72-0640, SBE73-0209, SBE80-0024 and SBE80-0025.Copyright
© IAE International Aero Engines AG (2001, 2014 - 2021) The information contained in this document is the property of © IAE International Aero Engines AG and may not be copied or used for any purpose other than that for which it is supplied without the express written authority of © IAE International Aero Engines AG. (This does not preclude use by engine and aircraft operators for normal instructional, maintenance or overhaul purposes.).Applicability
All
Common Information
TASK 72-32-41-200-004 No. 1 Bearing Rear Support - Examine, Inspection-004
General
This TASK gives the procedure for the inspection of the No. 1 bearing rear support assembly. For other No. 1 bearing support parts, refer to (INSPECTION-000).
Fig/item numbers in parentheses in the procedure agree with those used in the IPC.
The policy that is necessary for inspection is given in the SPM TASK 70-20-01-200-501.
All the parts must be cleaned before any part is examined. Refer to TASK 72-32-41-100-000 (CLEANING-000).
All parts must be visually examined for damage, corrosion and wear. Any defects that are not identified in the procedure must be referred to IAE.
Do not discard any part until you are sure there are no repairs available. Refer to the instructions in Repair before a discarded part is used again or oversize parts are installed.
Parts which should be discarded can be held although no repair is available. The repair of a discarded part could be shown to be necessary at a later date.
All parts must be examined to make sure that all the repairs have been completed satisfactorily.
The procedure for crack test is given in Step. Do the test before the part is visually examined.
The practices and processes referred to in the procedure by the TASK numbers are in the SPM.
References
Refer to SPM for data on these items
Definitions of Damage, SPM TASK 70-02-02-350-501
Inspection of Parts, SPM TASK 70-20-00-200-501
Some data on these items are contained in this TASK. For more data on these items refer to the SPM
Method of Testing for Crack Indications
Chemical Processes
Surface Protection
Preliminary Requirements
Pre-Conditions
NONESupport Equipment
NONEConsumables, Materials and Expendables
NONESpares
NONESafety Requirements
NONEProcedure
Clean the parts. Refer to TASK 72-32-41-100-000 (CLEANING-000).
SUBTASK 72-32-41-240-055 Examine the No. 1 Bearing Rear Support Assembly (01-400) for Cracks
Refer to Figure.
Repair, VRS1966 TASK 72-32-41-300-014 (REPAIR-014)
More than Step
Nicked.
Repair, VRS1966 TASK 72-32-41-300-014 (REPAIR-014)
More than Step
Dented.
Repair, VRS1966 TASK 72-32-41-300-014 (REPAIR-014)
More than Step
Scratched.
Repair, VRS1966 TASK 72-32-41-300-014 (REPAIR-014)
More than Step
Corroded or pitted.
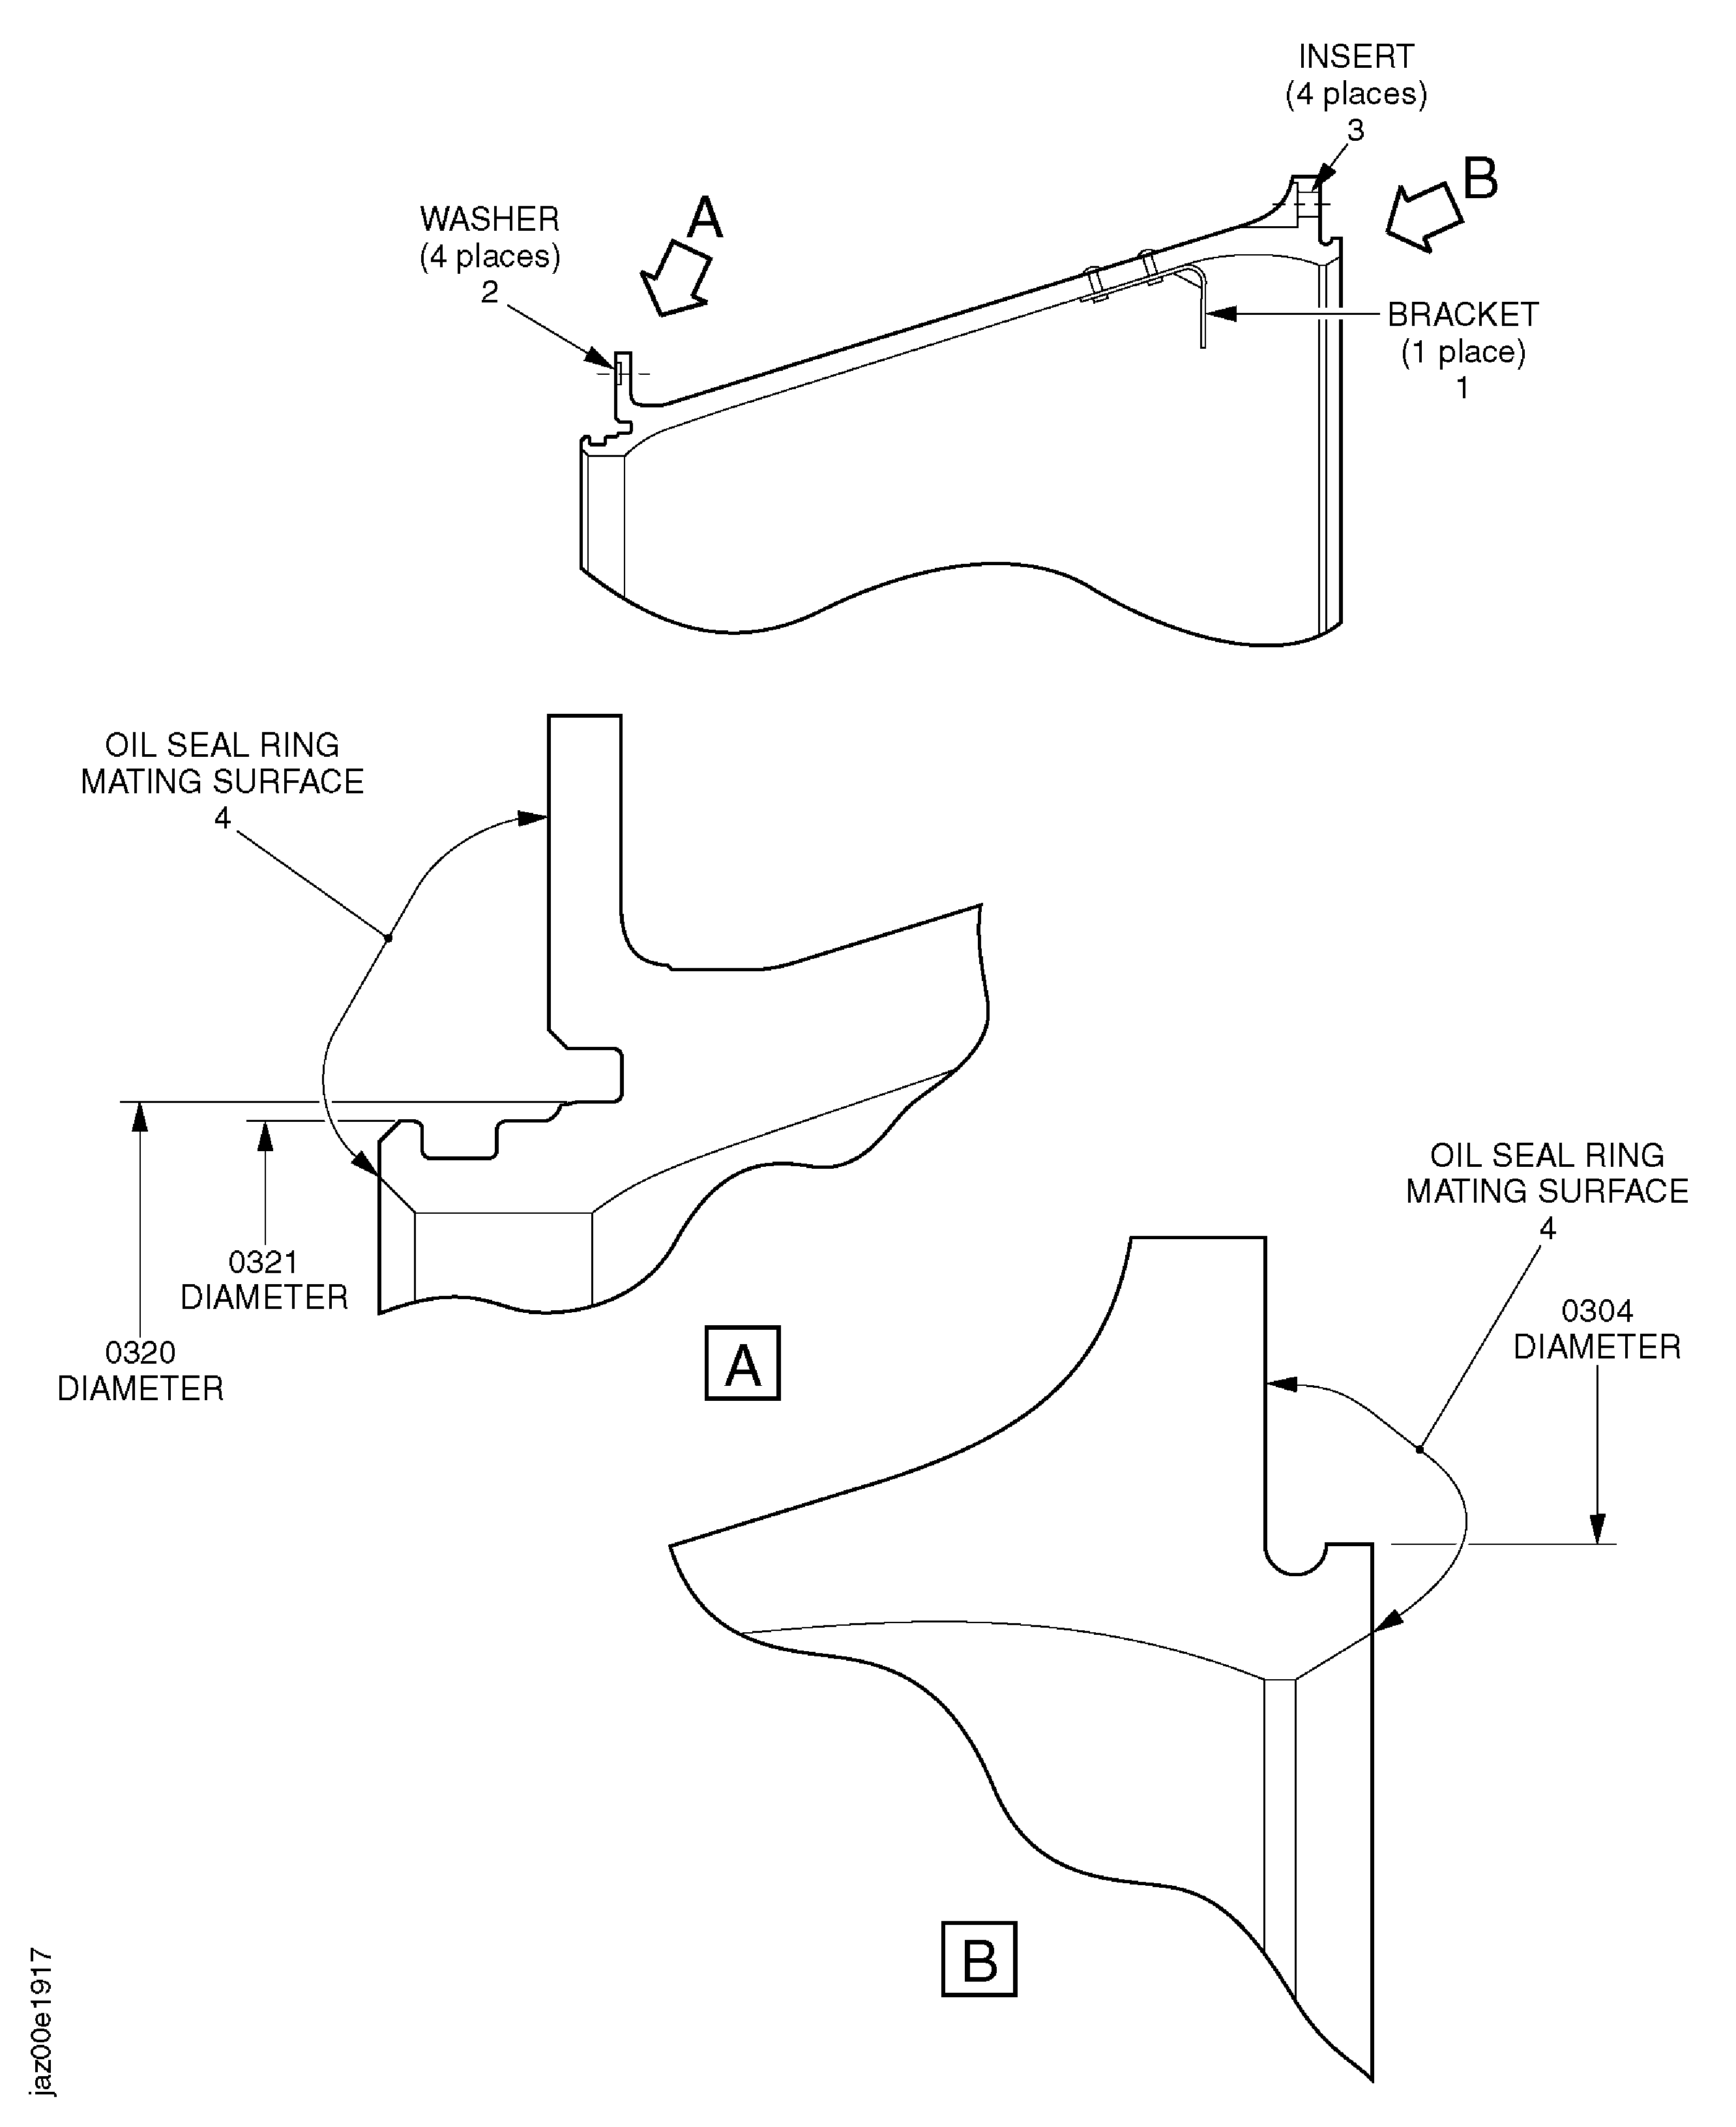
Examine all the surface except oil seal mating surface at location 4.
Repair, VRS1966 TASK 72-32-41-300-014 (REPAIR-014)
High metal
High metal.
More than in Step
Nicked.
More than in Step
Dented.
More than in Step
Scratched.
Examine the oil seal mating surface at location 4.
SUBTASK 72-32-41-220-076 Examine the No. 1 Bearing Rear Support Assembly (01-400) Surface
Refer to Figure.
Repair, VRS1967 TASK 72-32-41-300-015 (REPAIR-015)
Broken
Repair, VRS1967 TASK 72-32-41-300-015 (REPAIR-015)
Distorted
Repair, VRS1967 TASK 72-32-41-300-015 (REPAIR-015)
Cracked
Repair, VRS1967 TASK 72-32-41-300-015 (REPAIR-015)
Loosened rivet
Examine the bracket at locations 1.
SUBTASK 72-32-41-220-077 Examine the No. 1 Bearing Rear Support Assembly (01-400) Bracket
Refer to Figure.
Repair, VRS1968 TASK 72-32-41-300-017 (REPAIR-017)
Missing
Examine the washer at location 2.
SUBTASK 72-32-41-220-078 Examine the No. 1 Bearing Rear Support Assembly (01-400) Washer
Refer to Figure.
Repair, VRS1969 TASK 72-32-41-300-016 (REPAIR-016)
Any damage
Repair, VRS1969 TASK 72-32-41-300-016 (REPAIR-016)
Loose
Examine the surface paint at location 3.
SUBTASK 72-32-41-220-079 Examine the No. 1 Bearing Rear Support Assembly (01-400) Insert
Refer to Figure.
Accept the part for select fit only.
NOTE
This part can be used only if the mating part has a diameter that will result in a fit of reference No. 0304. Refer to TASK 72-32-00-430-005 (ASSEMBLY-005).
If the average diameter is between 21.5020 in. to 21.5067 in. (546.150 mm to 546.270 mm)
Dimensionally examine the average diameter.
SUBTASK 72-32-41-220-080 Examine the No. 1 Bearing Rear Support Assembly (01-400) at Location 0304
Refer to Figure.
Accept the part for select fit only.
NOTE
This part can be used only if the mating part has a diameter that will result in a fit of reference No. 0320. Refer to TASK 72-32-41-440-001 (ASSEMBLY-001).
If the average diameter is between 16.2748 in. to 16.2791 in. (413.380 mm to 413.489).
Dimensionally examine the average diameter.
SUBTASK 72-32-41-220-081 Examine the No. 1 Bearing Rear Support Assembly (01-400) at Location 0320
Refer to Figure.
Accept the part for select fit only.
NOTE
This part can be used only if the mating part has a diameter that will result in a fit of reference No. 0321. Refer to TASK 72-32-41-440-001 (ASSEMBLY-001).
If the average diameter is between 16.1785 in. to 16.1828 in. (410.935 mm to 411.043 mm).
Dimensionally examine the average diameter.
SUBTASK 72-32-41-220-082 Examine the No. 1 Bearing Rear Support Assembly (01-400) at Location 0321
Figure: Inspection of the No. 1 Bearing Rear Support Assembly
Inspection of the No. 1 Bearing Rear Support Assembly

