TASK 72-38-11-300-003 Inlet Cone Assembly - Replace The Segment, Repair-003 (VRS1467)

DMC:V2500-A0-72-38-1101-01A-920A-C|Issue No:002.00|Issue Date:2017-11-01

Export Control

EAR Export Classification: Not subject to the EAR per 15 C.F.R. Chapter 1, Part 734.3(b)(3), except for the following Service Bulletins which are currently published as EAR Export Classification 9E991: SBE70-0992, SBE72-0483, SBE72-0580, SBE72-0588, SBE72-0640, SBE73-0209, SBE80-0024 and SBE80-0025.

Copyright

© IAE International Aero Engines AG (2001, 2014 - 2021) The information contained in this document is the property of © IAE International Aero Engines AG and may not be copied or used for any purpose other than that for which it is supplied without the express written authority of © IAE International Aero Engines AG. (This does not preclude use by engine and aircraft operators for normal instructional, maintenance or overhaul purposes.).

Applicability

All

Common Information

TASK 72-38-11-300-003 Inlet Cone Assembly - Replace The Segment, Repair-003 (VRS1467)

Effectivity

FIG/ITEM

PART NO.

01-200

5A0015

Assembly A

01-200

5A1452

Assembly B

01-200

5A1733

Assembly C

Material of component

PART IDENT

IAE

SYMBOL

MATERIAL

Inlet cone

Fibre-reinforced plastic with polyurethane coating

General

Price and availability - none

The practice and processes referred to in the procedure by the TASK number are in the SPM.

All adhesive application and bonding operation shall be done in controlled environment room designated for non silicone material.

This repair is for one or two segments replacement. For selected segment replacement, do not remove more than three segments at any one time.

NOTE

To identify the consumable materials refer to the PCI.

NOTE

Special tools are identified in the procedure by the tool primary number.

Preliminary Requirements

Pre-Conditions

NONE

Support Equipment

NameManufacturerPart Number / IdentificationQuantityRemark
Double column machining centerLOCALDouble column machining center
Radial drillLOCALRadial drill
OvenLOCALOven
Abrasive blast equipmentLOCALAbrasive blast equipment
Rotary tableLOCALRotary table
IAE 3J12771 Fixture,drill0AM53IAE 3J127711
IAE 3J12772 Machining fixture0AM53IAE 3J127721
IAE 3J12773 TBD0AM53IAE 3J127731
IAE 3J12816 Fixture, Curing0AM53IAE 3J128161
IAE 3J12817 Fixture, Curing0AM53IAE 3J128171

Consumables, Materials and Expendables

NameManufacturerPart Number / IdentificationQuantityRemark
CoMat 01-124 ISOPROPYL ALCOHOLLOCALCoMat 01-124
CoMat 02-001 ADHESIVE TAPE (MASKING)LOCALCoMat 02-001
CoMat 05-004 ABRASIVE MEDIUM, ALUMINUM OXIDE, 140/400 GRADELOCALCoMat 05-004
CoMat 05-016 GARNET PAPER, 80-GRITLOCALCoMat 05-016
CoMat 05-017 GARNET PAPER, 60 GRITLOCALCoMat 05-017
CoMat 05-123 SILICON CARBIDE GRITIAE72CoMat 05-123
CoMat 08-015 RESINLOCALCoMat 08-015
CoMat 08-016 HARDENERLOCALCoMat 08-016

Spares

NameManufacturerPart Number / IdentificationQuantityRemark
Pin, dowel5A0013A/R
Ring, retainingAS20763A/R
Segment, locating5A1415A/R

(for Assembly A)

Segment, locating (for Assembly A, B5A1416

Safety Requirements

NONE

Procedure

    1. SUBTASK 72-38-11-220-079 Examine the Segment of the Inlet Cone Assembly

    2. Refer to Figure.

      1. Examine and identify damaged segment.

      2. Refer to TASK 72-38-11-200-000 (INSPECTION-000).

    3. Measure the diameter B at 12 equally spaced locations and write it on the record sheet.

    1. SUBTASK 72-38-11-360-064 Remove the Damaged Segment from the Inlet Cone Assembly

    2. Refer to Figure.

      1. NOTE

        Take care so that the pin hole or flange face do not become damaged.

        Set up the inlet cone assembly and fixture on the machine.

      2. Use double column machining center and rotary table.

      1. Machine the pin.

      2. Use centre drill and drill 0.216 in. (5.5 mm).

    3. Push out the pin and ring with a small hammer and punch.

      1. Machine the damaged segment from the inlet cone assembly.

      2. Use end mill cutter 1.378 in. (35 mm) and countersink milling cutter.

      1. Remove the remaining segment from the flange of the inlet cone.

      2. Use hand methods with hand held pneumatic grinder and rotary file or fine file.

      1. Remove the remaining adhesive from the flange of the inlet cone.

    4. Examine the flange to make sure that all of the adhesive has been removed.

    1. SUBTASK 72-38-11-360-065 Prepare the Surface of the Segment and Flange of the Inlet Cone

    2. CAUTION

      AFTER PREPARATION THE MATING SURFACES MUST BE FULLY CLEANED AND MUST NOT BE TOUCHED BY HAND TO PREVENT CONTAMINATION.

      Refer to Figure.

      1. Clean the mating surfaces of the segment and the flange.

      1. Mask all the area that are not to be blasted.

      1. Dry abrasive blast the mating surfaces.

        1. Use and air pressure of 43 to 57 psi (297 to 393 KPa) for a minimum time necessary to clean the parts.

    3. Remove the masking tape.

    4. Remove residual abrasive by vacuuming.

      1. Wipe the blasted surface.

    1. SUBTASK 72-38-11-360-066 Apply and Cure the Two Part Low Temperature Curing Sealant/Adhesive, Assembly A and B,

    2. Refer to Figure and Figure.

      1. CAUTION

        YOU MUST USE PLASTIC GLOVES, DURING PREPARATION AND USE OF THE ADHESIVE TO PREVENT CONTAMINATION OF THE SKIN.

        CAUTION

        YOU MUST NOT EAT OR SMOKE AT LOCATIONS WHERE THESE MATERIALS ARE USED.

        Make up the adhesive from two parts.

      2. Refer to the SPM TASK 70-36-02-360-501 and SUBTASK 70-36-02-360-021.

      1. Apply the adhesive to the mating surfaces on the segment and the flange of the inlet cone.

      2. Use a spatula or small trowel.

      1. Put the segment on to the curing fixture.

      2. Use IAE 3J12773 TBD 1 off.

    3. Install the two locating pins in to the bolt hole of the segment and curing fixture.

    4. Tighten the bolt with clamp.

    5. Remove unwanted adhesive compound from inlet cone flange.

      1. Cure the adhesive at 203 to 221 deg F (95 to 105 deg C) for one hour.

      2. Use an electric oven.

    6. Remove the inlet cone assembly from the curing fixture.

    1. SUBTASK 72-38-11-360-077 Apply and Cure the Two Part Low Temperature Curing Sealant/Adhesive, Assembly C,

    2. Refer to Figure and Figure

      1. CAUTION

        YOU MUST USE PLASTIC GLOVES, DURING PREPARATION AND USE OF THE ADHESIVE TO PREVENT CONTAMINATION OF THE SKIN.

        CAUTION

        YOU MUST NOT EAT OR SMOKE AT LOCATIONS WHERE THESE MATERIALS ARE USED.

        Make up the adhesive from two parts.

      2. Refer to the SPM TASK 70-36-02-360-501 and SUBTASK 70-36-02-360-021.

      1. Apply the adhesive to the mating surfaces on the segment and the flange of the inlet cone.

      2. Use a spatula or small trowel.

      1. Put the segment on to the curing fixture.

    3. Tighten the bolt with clamp.

    4. Remove unwanted adhesive compound from inlet cone flange.

      1. Cure the adhesive at 203 to 221 deg F (95 to 105 deg C) for one hour.

      2. Use an electric oven.

    5. Remove the inlet cone assembly from the curing fixture.

    1. SUBTASK 72-38-11-220-080 Examine the Repaired Area of the Inlet Cone Assembly

      1. Visually examine the repaired area for unbond, cracks.

      2. Unbond and cracks are not permitted.

    1. SUBTASK 72-38-11-322-051 Machine the Flange of the Inlet Cone Assembly

    2. Refer to Figure.

      1. Set-up the inlet cone assembly on the machine.

      2. Use IAE 3J12772 Machining fixture 1 off and rotary table.

      3. The runouts of the diameter B and the surface A must be 0.003in. (0.076 mm) FIR.

      1. Machine the replaced segment.

      2. Use end mill cutter 1.378 in. (35 mm) and 0.394 in. (10 mm).

      3. Break all sharp edges to between 0.004 to 0.019 in. (0.1 to 0.5 mm) after machining.

    1. SUBTASK 72-38-11-323-051 Machine the Bolt Hole and Pin Hole

    2. Refer to Figure.

      1. Set-up the inlet cone assembly and fixture on the machine.

      2. Use radial Radial drill.

    3. Install the bushing into the flange pin hole.

      1. Drill the pin hole.

      2. Use drill 0.157 in. (4.0 mm).

    4. Remove the bushing from the flange pin hole.

      1. Drill the pin hole.

      2. Use drill 0.236 in. (6.0 mm).

    5. Machine the pin hole.

    6. Install the bushing into the flange bolt hole.

      1. Drill the bolt hole.

      2. Use drill 0.1968 in. (5.0 mm).

    7. Remove the bushing from the flange.

      1. Drill the bolt hole.

      2. Use drill 0.346 in. (8.8 mm).

    8. Do steps G to J again.

    1. SUBTASK 72-38-11-220-083 Examine the Repaired Area of Inlet Cone Assembly,

    2. Refer to Figure and Figure.

      1. Visually examine the repaired area for unbond, cracks and chips.

      2. Unbond, cracks and chips are not permitted.

    3. Dimensionally examine the repaired area.

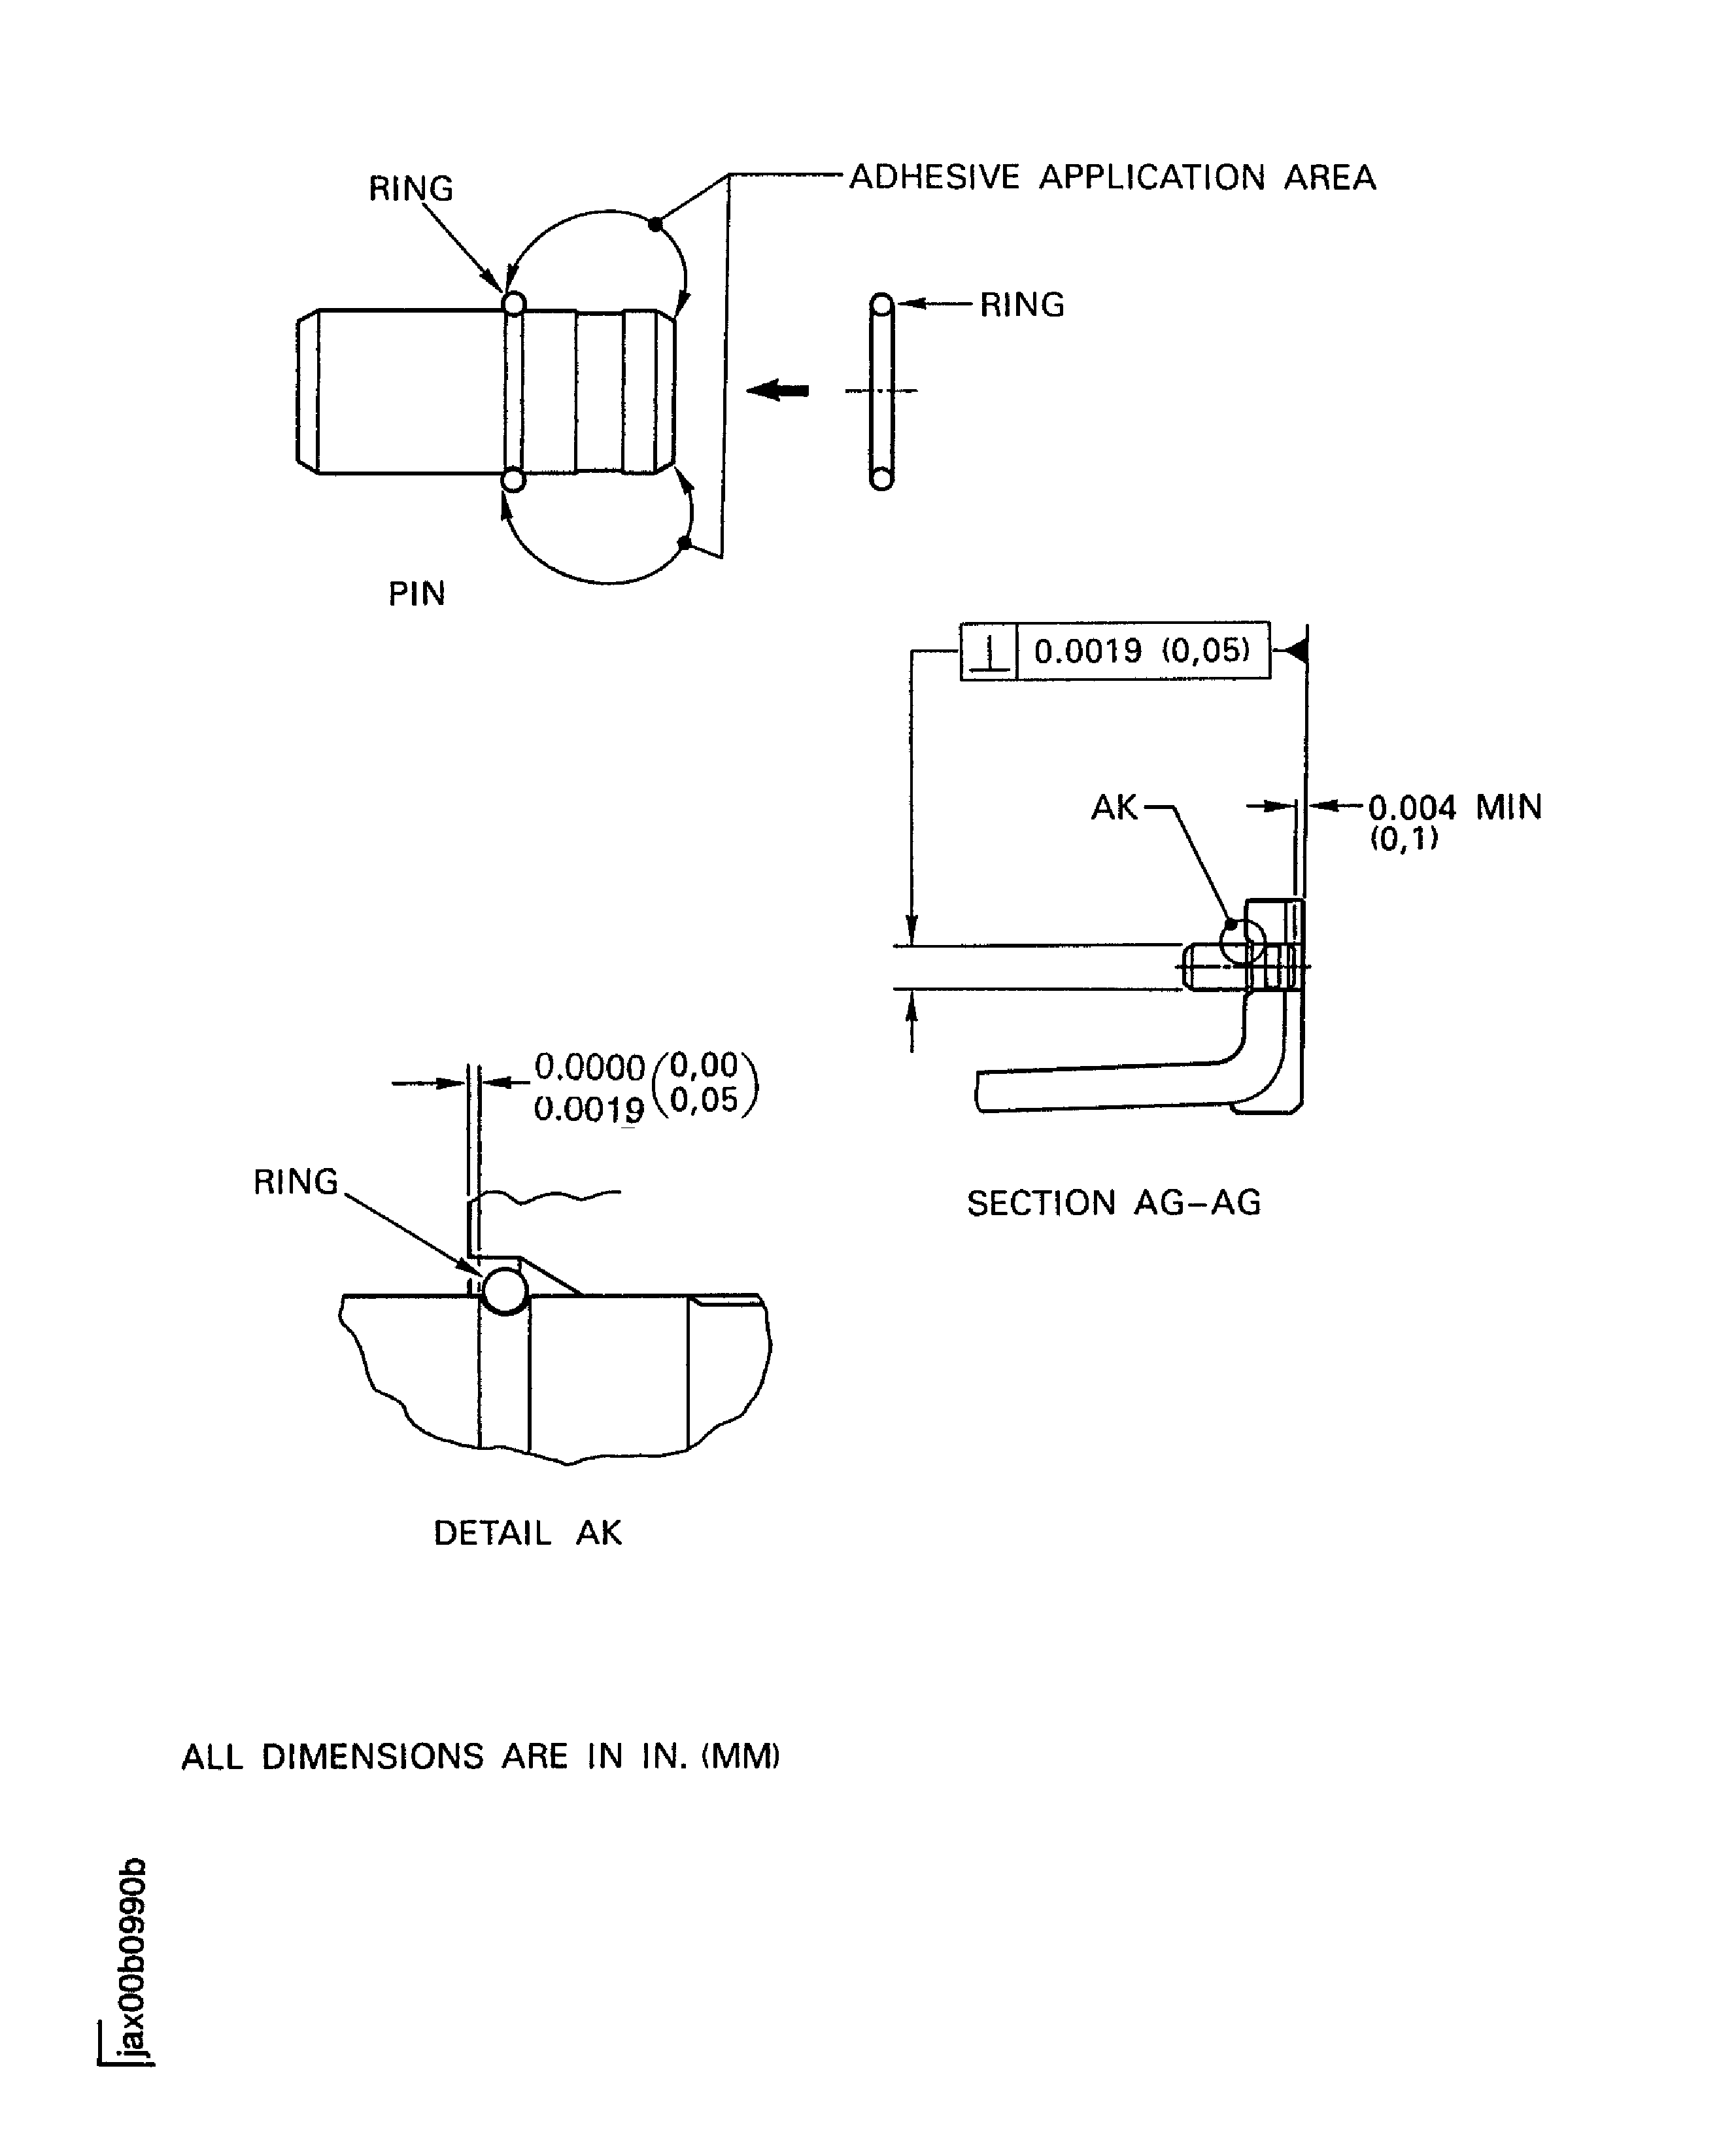
    1. SUBTASK 72-38-11-360-070 Prepare the Surface of the Pin and the Pin Hole of the Inlet Cone

    2. Refer to Figure.

      1. CAUTION

        AFTER PREPARATION THE MATING SURFACES MUST BE FULLY CLEANED AND MUST NOT BE TOUCHED BY HAND, TO PREVENT CONTAMINATION.

        Clean the mating surfaces on the pin and the pin hole.

      2. Refer to the SPM TASK 70-11-26-300-503.

    1. SUBTASK 72-38-11-360-067 Apply and Cure the Two Part Low Temperature Curing Sealant/Adhesive

    2. Refer to Figure.

    3. CAUTION

      YOU MUST USE PLASTIC GLOVES, DURING PREPARATION AND USE OF THE ADHESIVE TO PREVENT CONTAMINATION OF THE SKIN.
      YOU MUST NOT EAT ANYTHING OR SMOKE AT LOCATIONS WHERE THESE MATERIALS ARE USED.

      Assembly the ring to the pin.

    4. Apply the adhesive to the area mating surface on the pin.

    5. Install the pin in the flange of the inlet cone.

    6. Dimensionally examine for inlet cone assembly.

      1. Cure the adhesive at 203 to 221 deg F (95 to 105 deg C) for one hour.

      2. Use an electric oven.

    1. SUBTASK 72-38-11-220-084 Examine the Repaired Area of the Inlet Cone Assembly

    2. Refer to Figure.

    3. Dimensionally examine the repaired area for pin.

    1. SUBTASK 72-38-11-290-055 Measure and Correct the Unbalance for the Inlet Cone Assembly

      1. Measure the unbalance of the inlet cone assembly.

      2. Refer to Repair, VRS1464 TASK 72-38-11-300-005 (REPAIR-005).

      1. Correct the unbalance of the inlet cone assembly.

      2. Refer to Repair, VRS1464 TASK 72-38-11-300-005 (REPAIR-005).

    1. SUBTASK 72-38-11-350-055 Identify the Repair

      1. Make a mark VRS1467 adjacent to the part number. Use the ink method.

      2. Refer to the SPM TASK 70-09-00-400-501.

  1. Figure: Inlet cone pin and segment - Machining

    Inlet cone pin and segment - Machining

    Figure: Repair details and dimensions

    Repair details and dimensions
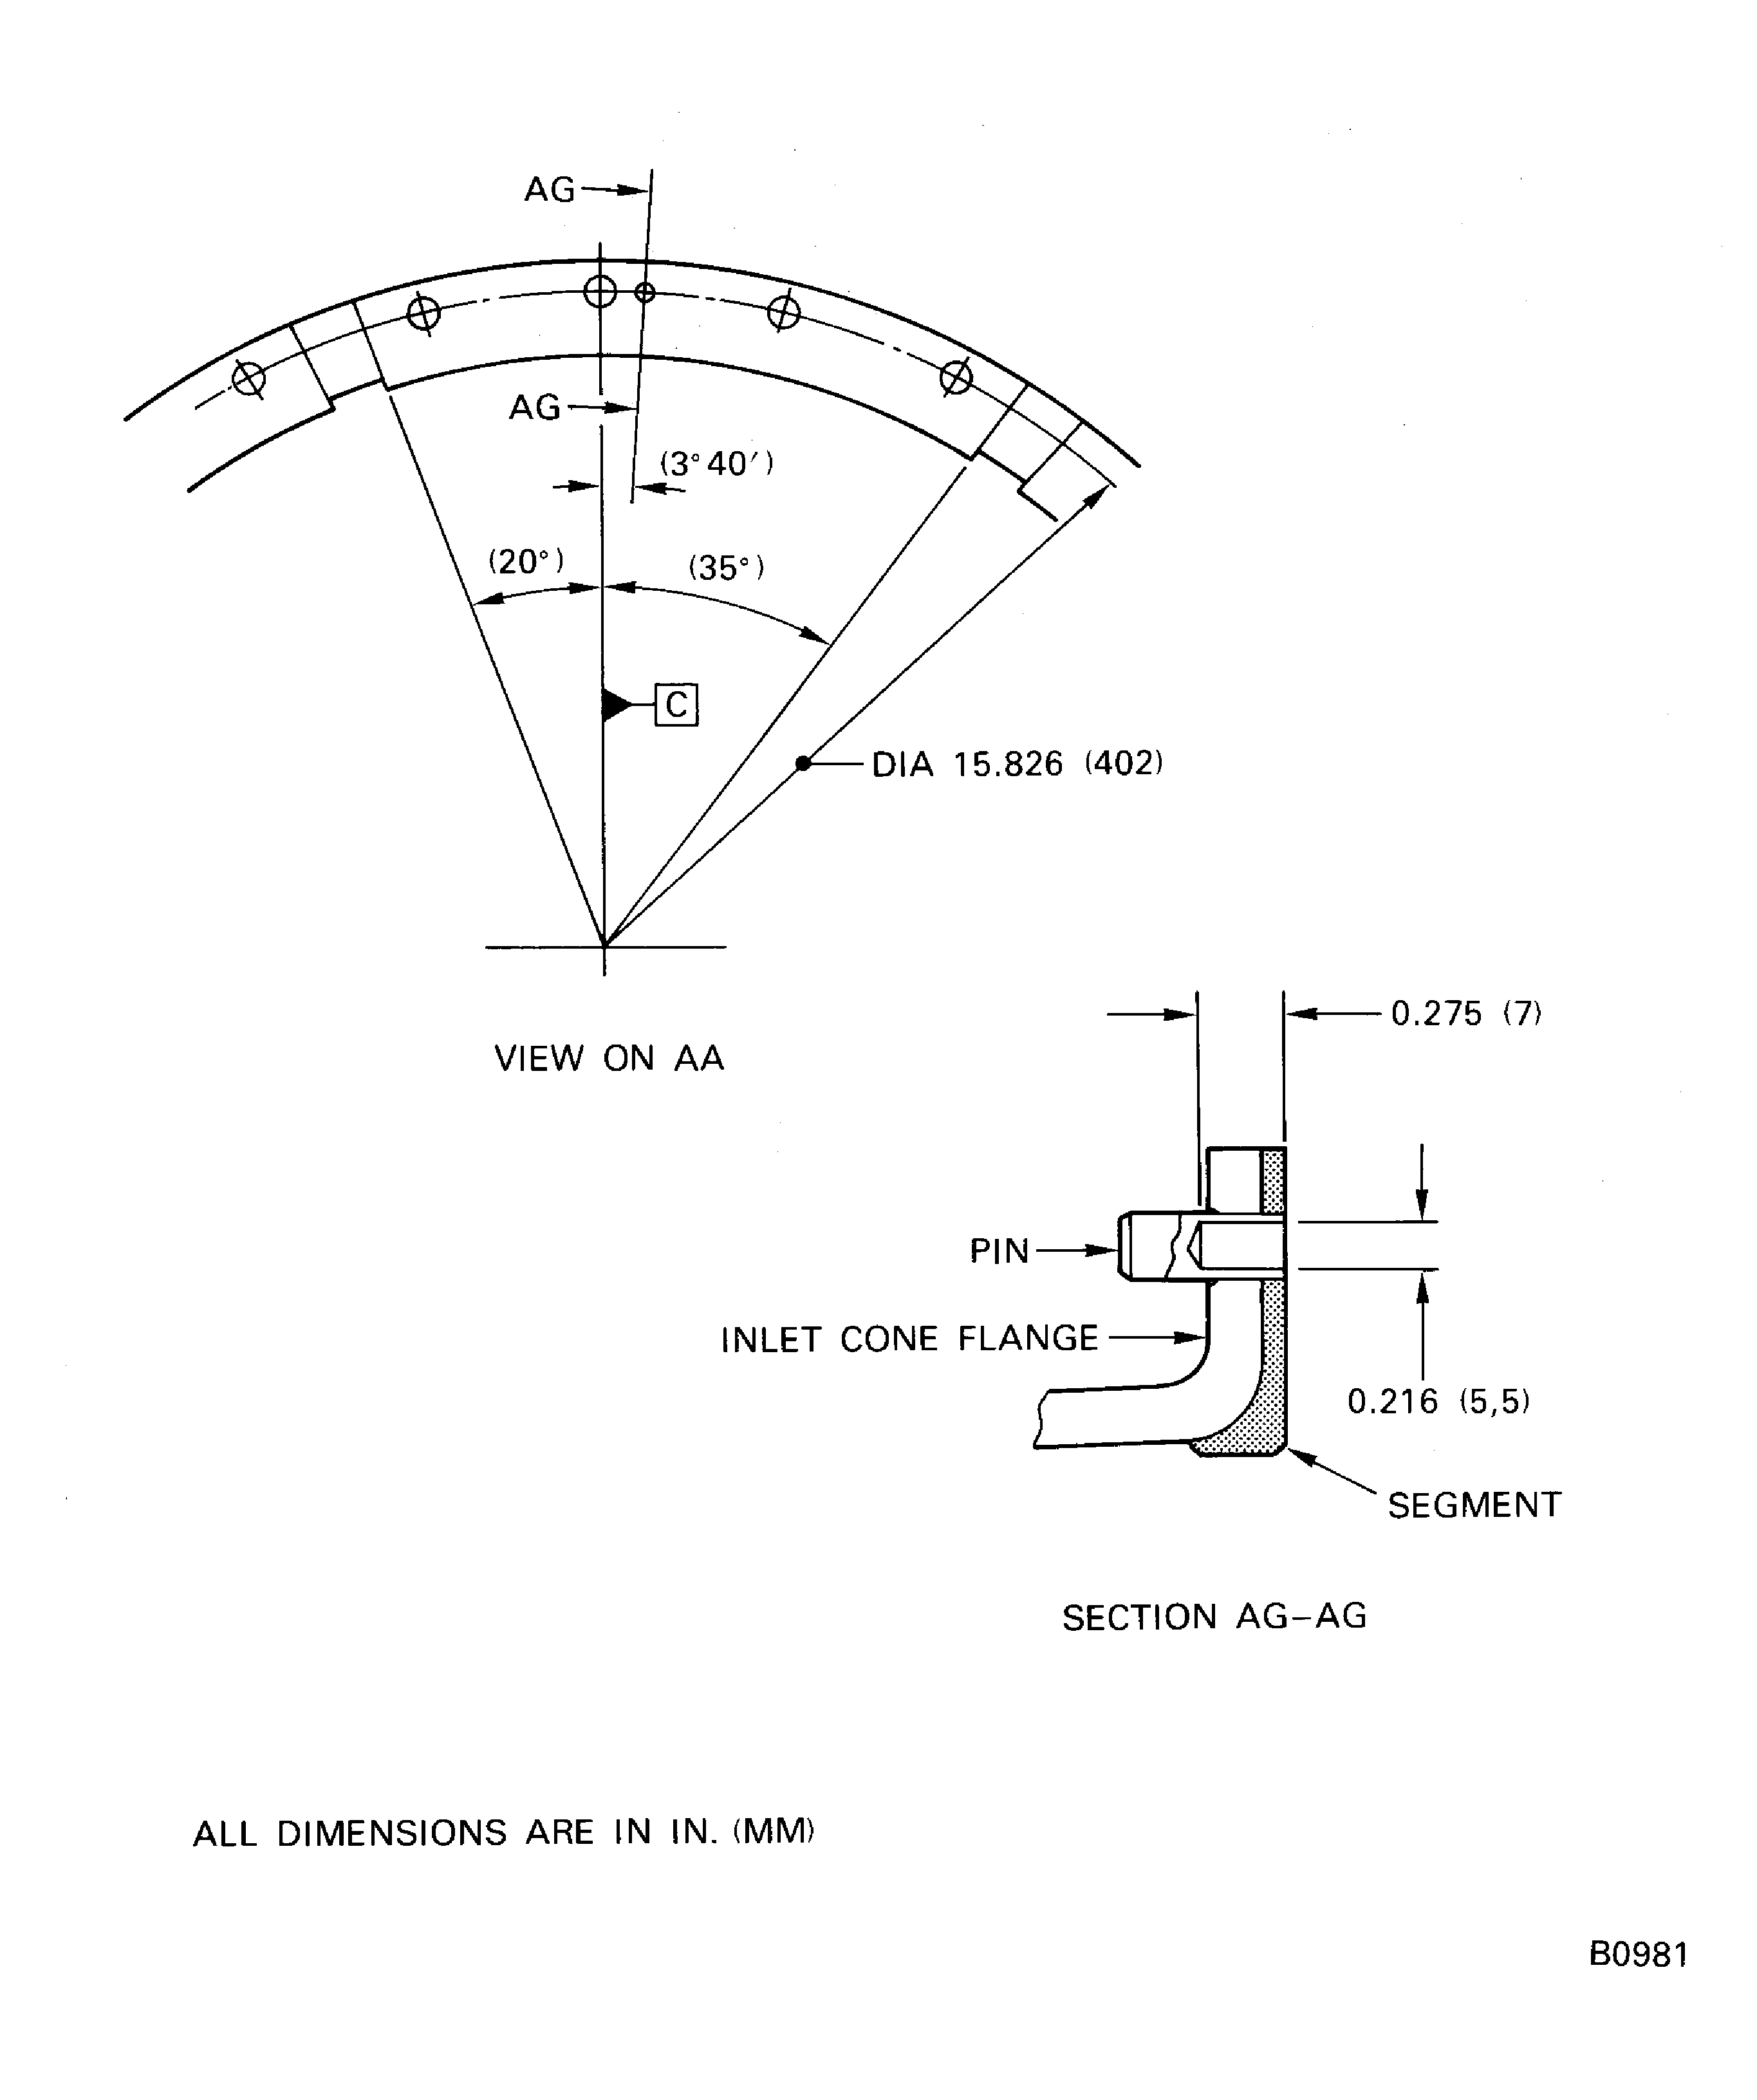
    Figure: Repair details and dimensions

    Repair details and dimensions
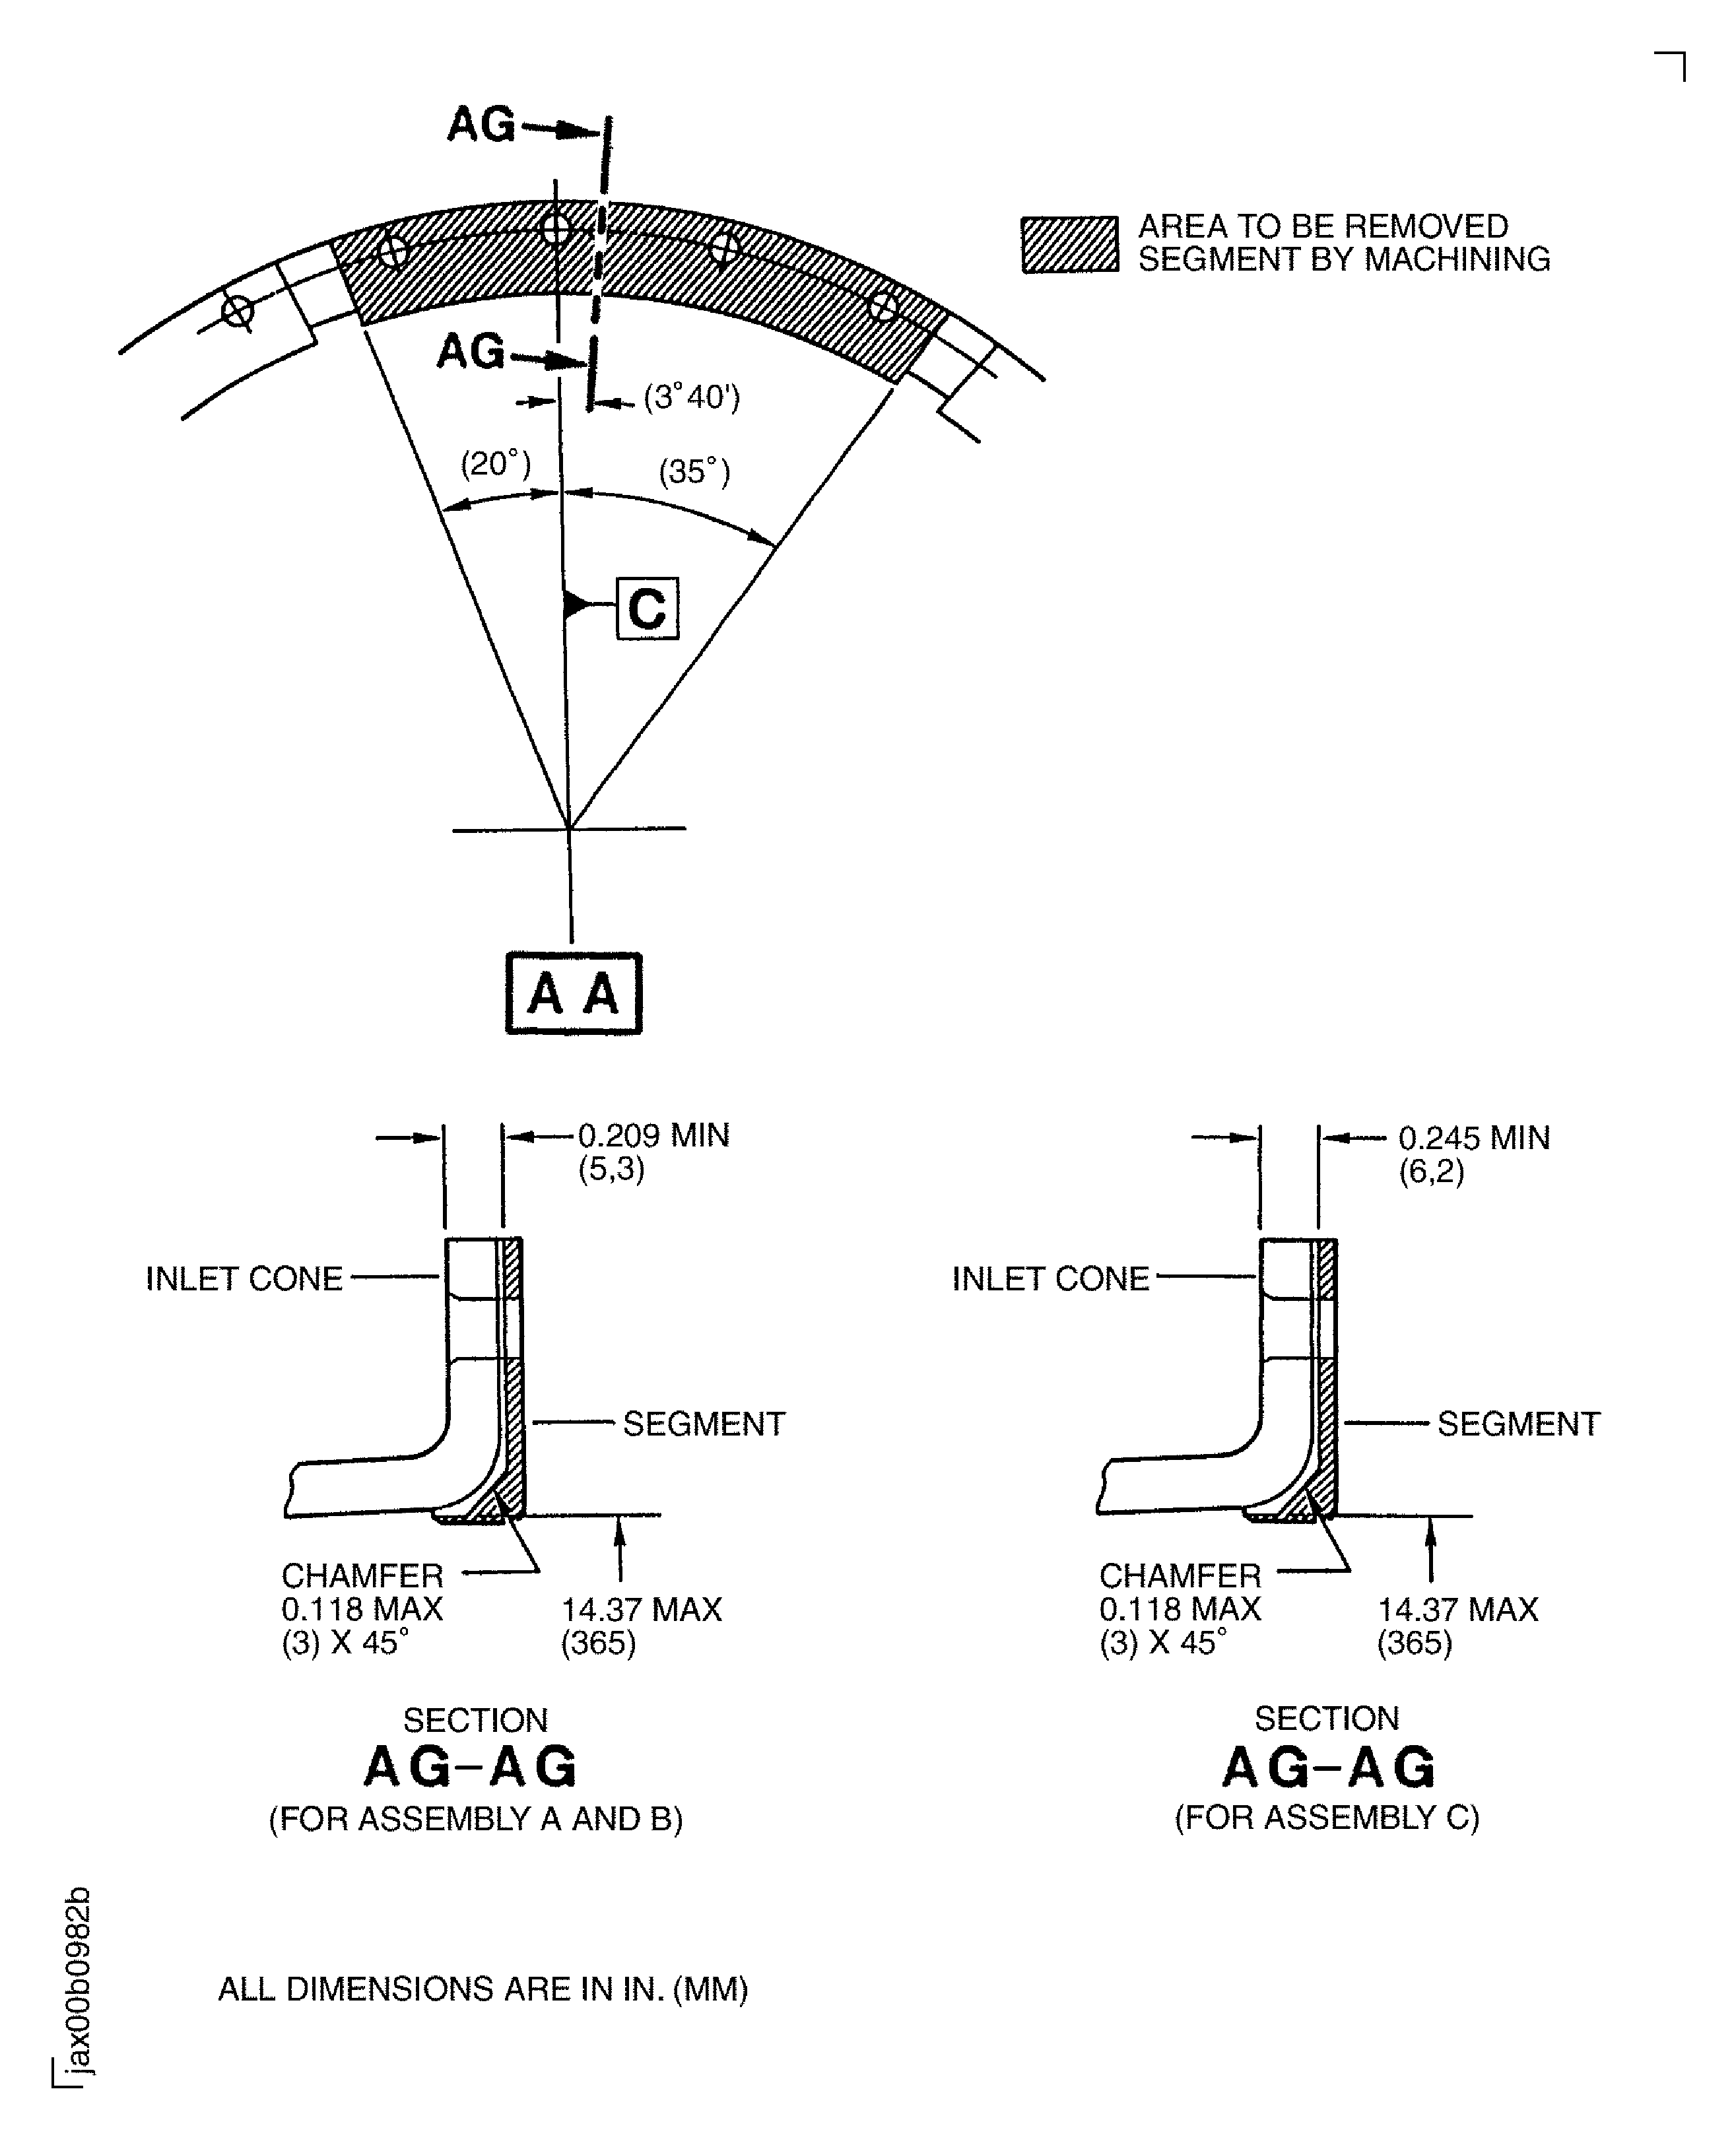
    Figure: Inlet cone flange and segment - Preparation

    Inlet cone flange and segment - Preparation

    Figure: Inlet cone and segment - Assembly

    Inlet cone and segment - Assembly
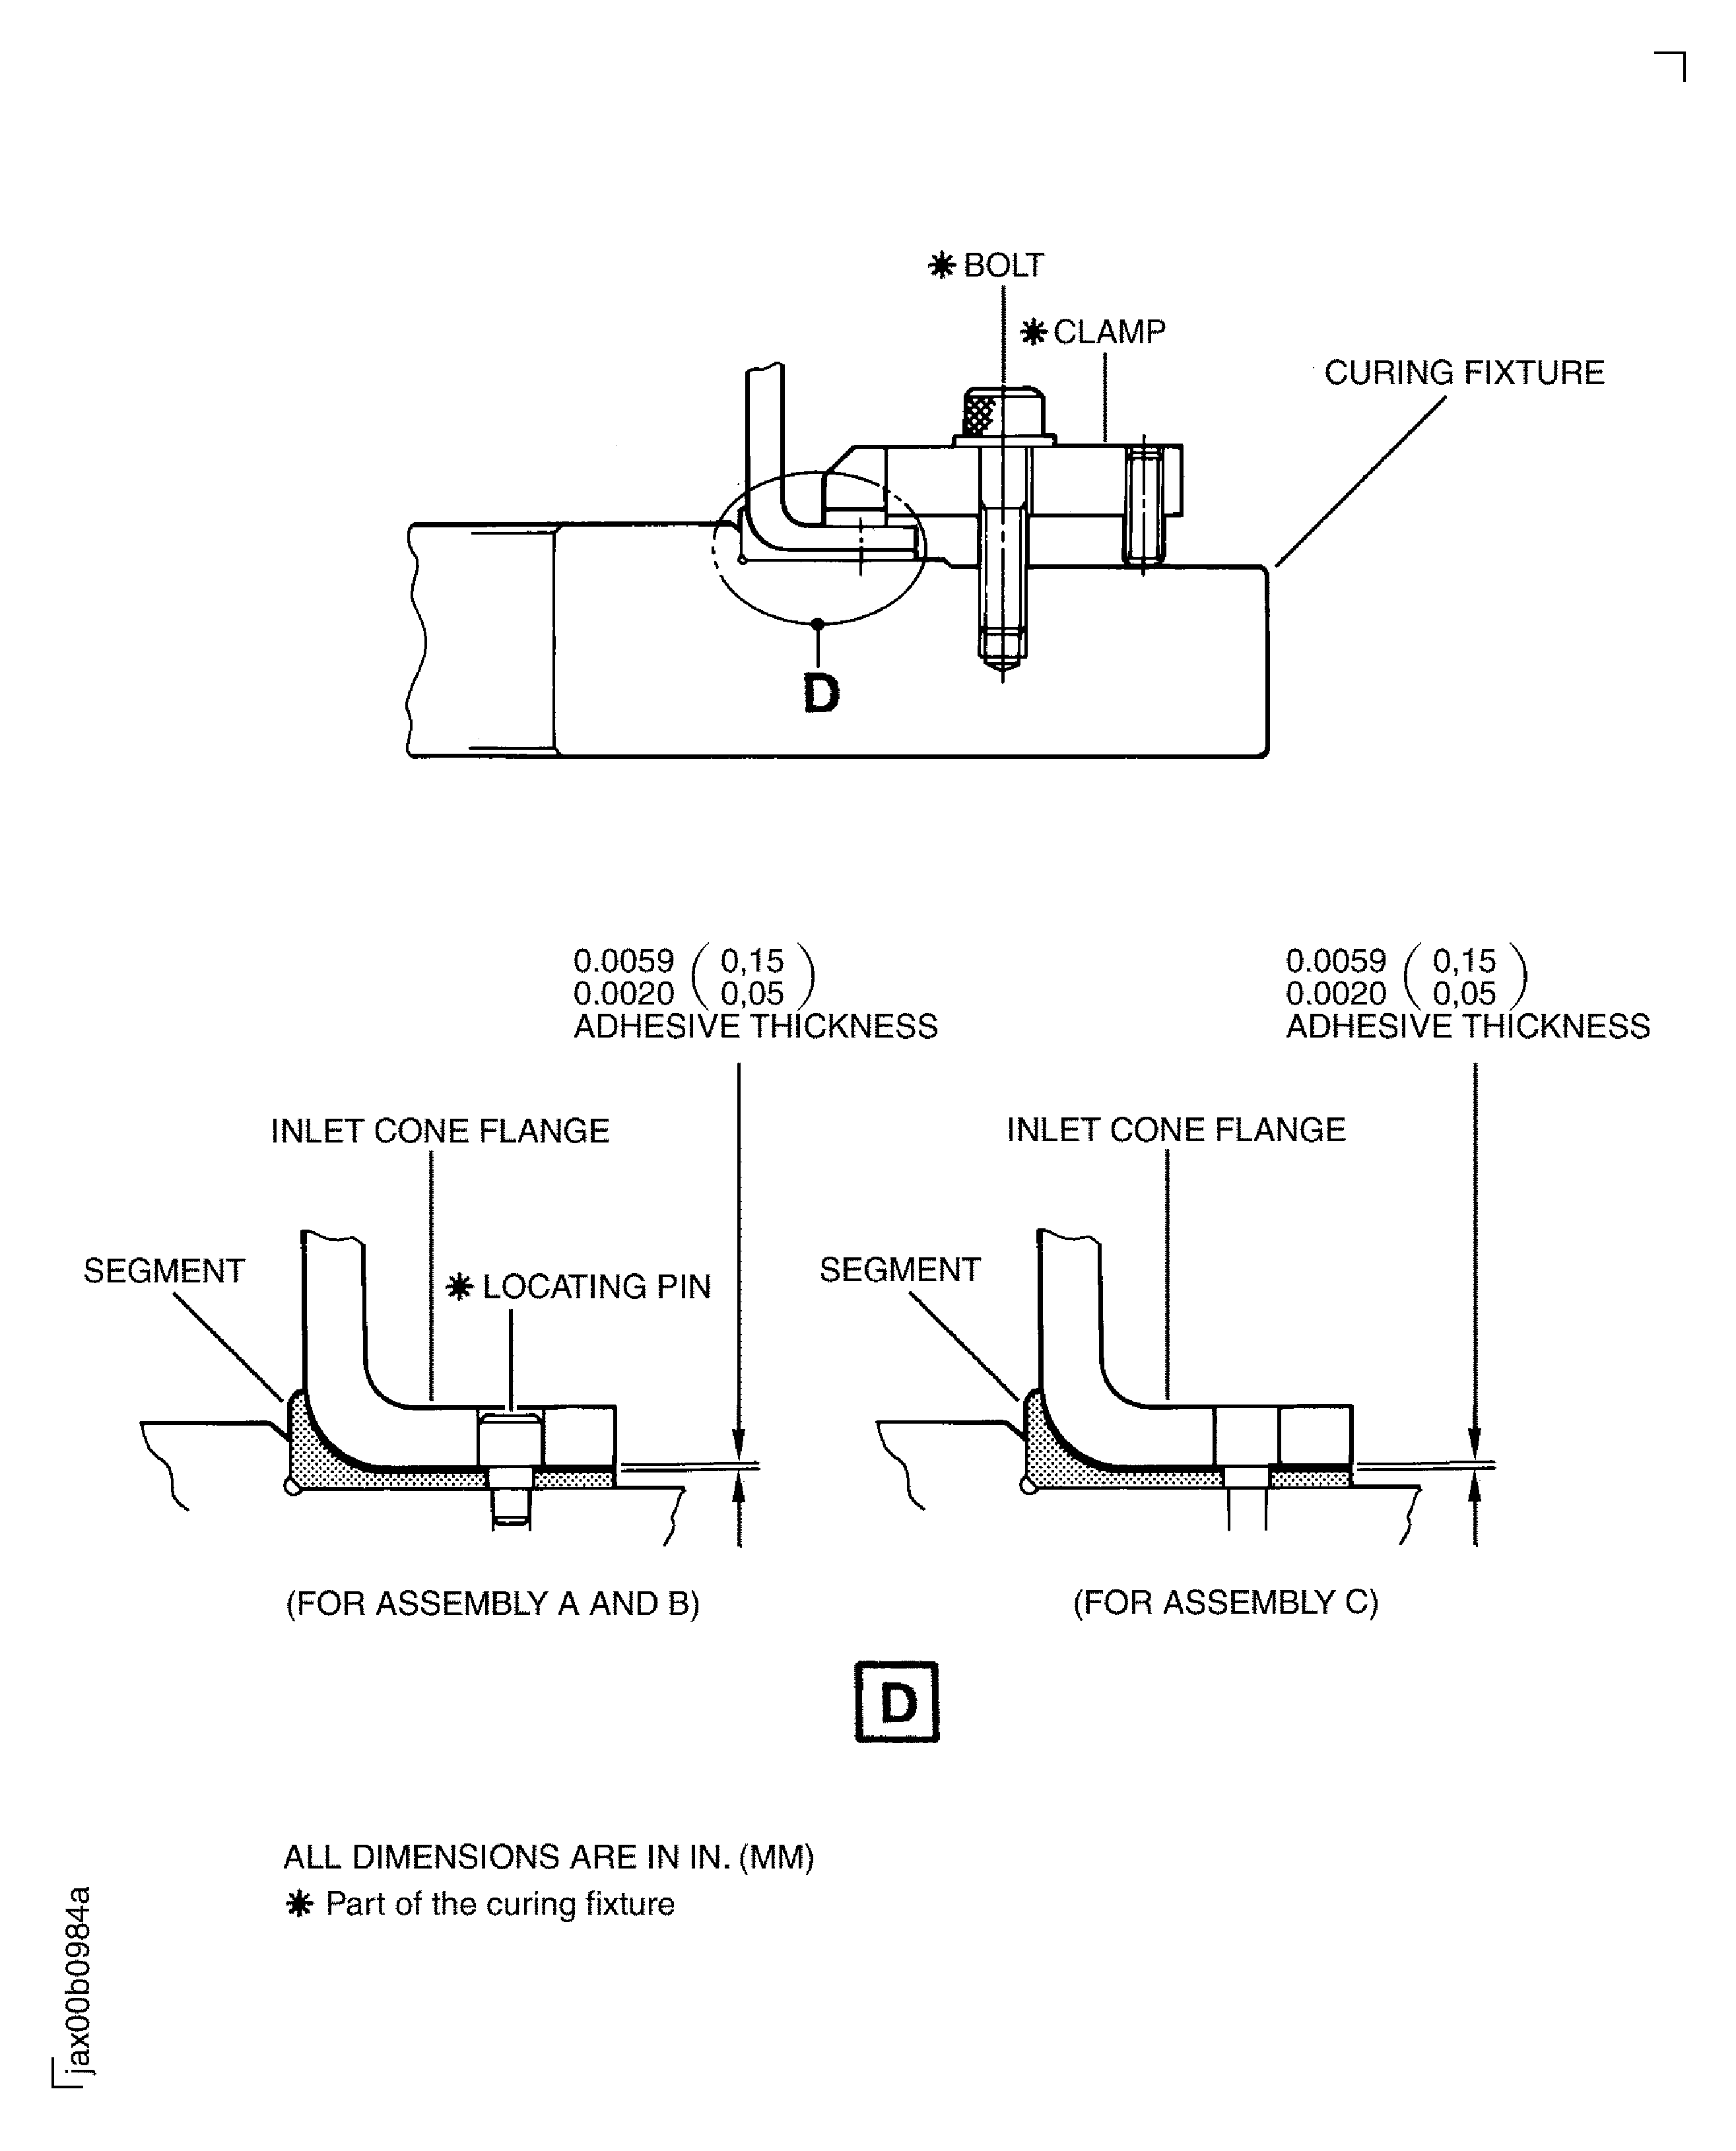
    Figure: Repair details and dimensions

    Repair details and dimensions

    Figure: Repair details and dimensions for Assembly A and B

    Repair details and dimensions for Assembly A and B

    Figure: Repair details and dimensions for Assembly C

    Repair details and dimensions for Assembly C

    Figure: Inlet cone segment - Drilling

    Inlet cone segment - Drilling
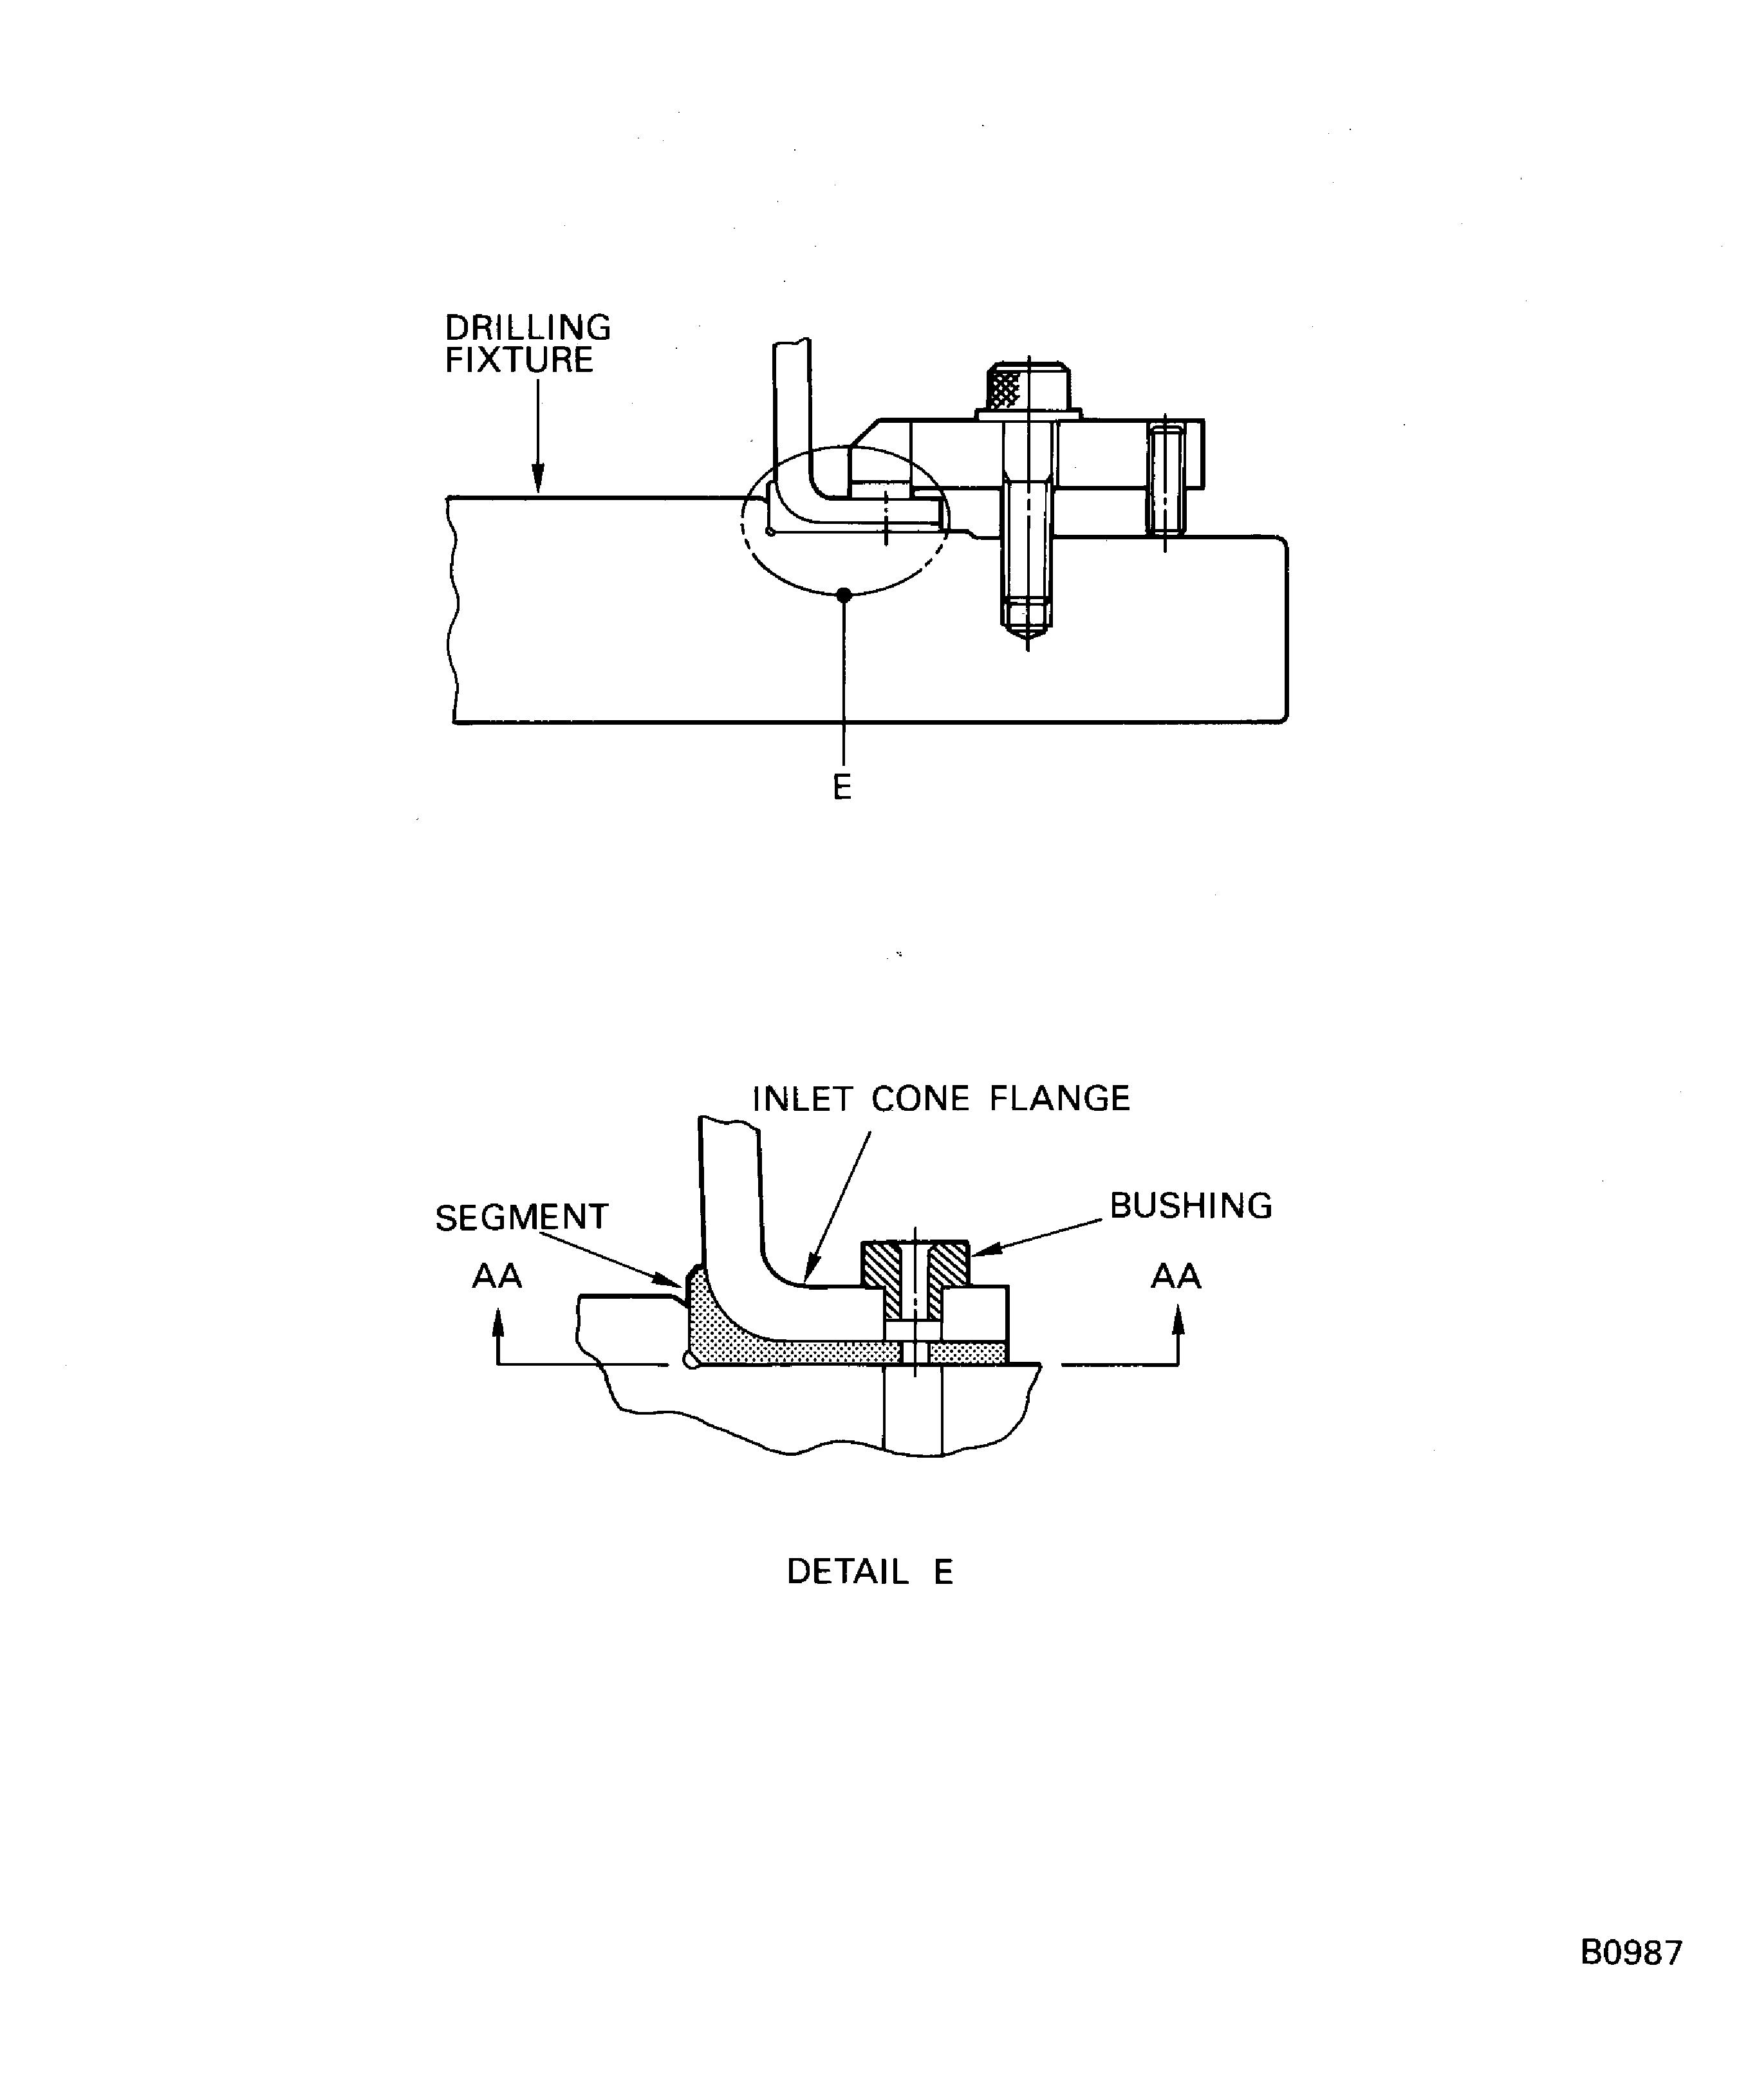
    Figure: Repair details and dimensions

    Repair details and dimensions

    Figure: Repair details and dimensions

    Repair details and dimensions

    Figure: Repair details and dimensions

    Repair details and dimensions
Requirements After Job Completion

Follow-On Conditions

NONE
Change Type:

Updated graphic titles per Eaglenet CAS-44067-V7S7K8 for assembly config clarification

Link not Found
Manufacturer Code:0AM53
Enterprise Name:IAE INTERNATIONAL AERO ENGINES AG
BU Name:NULL
Building:SUITE 400
Street:628 HEBRON AVENUE
City:GLASTONBURY
State:CT
Zip Code:06033
Country:USA
Manufacturer Code:IAE72
Enterprise Name:DELETED
BU Name:DELETED, SEE CAGE CODE SD349
Manufacturer Code:LOCAL
Enterprise Name:LOCALLY SUPPLIED
Link not Found
Link not Found
Link not Found
Link not Found
Manufacturer Code:LOCAL
Supply Number:CoMat 01-124
Type:sp01
Supply Short Name:CoMat 01-124 ISOPROPYL ALCOHOL
Supply Name:CoMat 01-124 ISOPROPYL ALCOHOL
Specification Groups:
Doc NumberType
OMAT:1/40GPR TECHNICAL GRADE
PMC 9094GPR TECHNICAL GRADE
JCR-011GPR TECHNICAL GRADE
Suppliers:
ManufacturerRemarks
LOCAL
U1185
24853
K6835
Manufacturer Code:LOCAL
Supply Number:CoMat 02-001
Type:sp01
Supply Short Name:CoMat 02-001 ADHESIVE TAPE (MASKING)
Supply Name:CoMat 02-001 ADHESIVE TAPE (MASKING)
Specification Groups:
Doc NumberType
OMAT: 230 (RR REF)ZINC OXIDE AT142
JCR-197 (JAEC REF)ZINC OXIDE AT142
Suppliers:
ManufacturerRemarks
LOCAL
K6835
U0415
Manufacturer Code:X222X
Supply Number:CoMat 05-004
Type:sp01
Supply Short Name:CoMat 05-004 ABRASIVE MEDIUM, ALUMINUM OXIDE, 140/400 GRADE
Supply Name:CoMat 05-004 ABRASIVE MEDIUM, ALUMINUM OXIDE, 140/400 GRADE
Specification Groups:
Doc NumberType
Use one of the CoMat 05-004 letter suffix alternatives.
Suppliers:
ManufacturerRemarks
X222X
Manufacturer Code:0KHE3
Supply Number:CoMat 05-016
Type:sp01
Supply Short Name:CoMat 05-016 GARNET PAPER, 80-GRIT
Supply Name:CoMat 05-016 GARNET PAPER, 80-GRIT
Specification Groups:
Doc NumberType
GARNET PAPER, CAMI GRIT SIZE 80 GRADE 0 (ANSI B74.18)
Suppliers:
ManufacturerRemarks
0KHE3
1E1X8
LOCAL
C4347
K0993
K2F42
K6835
V571V
Manufacturer Code:0KHE3
Supply Number:CoMat 05-017
Type:sp01
Supply Short Name:CoMat 05-017 GARNET PAPER, 60 GRIT
Supply Name:CoMat 05-017 GARNET PAPER, 60 GRIT
Specification Groups:
Doc NumberType
GARNET PAPER, CAMI GRIT SIZE 60 GRADE 1/2 (ANSI B74.18)
Suppliers:
ManufacturerRemarks
0KHE3
1E1X8
C4347
LOCAL
K0993
K6835
Manufacturer Code:SD349
Supply Number:CoMat 05-123
Type:sp01
Supply Short Name:CoMat 05-123 SILICON CARBIDE GRIT
Supply Name:CoMat 05-123 SILICON CARBIDE GRIT
Specification Groups:
Doc NumberType
JIS R 6111 (JAEC REF)DENSIC C"80
Suppliers:
ManufacturerRemarks
SD349
Manufacturer Code:LOCAL
Supply Number:CoMat 08-015
Type:sp01
Supply Short Name:CoMat 08-015 RESIN
Supply Name:CoMat 08-015 RESIN
Specification Groups:
Doc NumberType
RENGEL SV.409 OMAT: 805
RENGEL SV.409 JCR-146
Suppliers:
ManufacturerRemarks
LOCAL
IE432
IE200
IAE77
K1007
k3504
Manufacturer Code:LOCAL
Supply Number:CoMat 08-016
Type:sp01
Supply Short Name:CoMat 08-016 HARDENER
Supply Name:CoMat 08-016 HARDENER
Specification Groups:
Doc NumberType
CRAYAMID 140 OMAT: 806
CRAYAMID 140 JCR-147
Suppliers:
ManufacturerRemarks
LOCAL
18598
IE200
k3504
K3713
K6835
Link not Found
Manufacturer Code:LOCAL
Tool Number:Double column machining center
Tool Name:Double column machining center
Manufacturer Code:0AM53
Tool Number:IAE 3J12771
Tool Name:IAE 3J12771 Fixture,drill
Manufacturer Code:0AM53
Tool Number:IAE 3J12772
Tool Name:IAE 3J12772 Machining fixture
Manufacturer Code:0AM53
Tool Number:IAE 3J12773
Tool Name:IAE 3J12773 TBD
Manufacturer Code:0AM53
Tool Number:IAE 3J12816
Tool Name:IAE 3J12816 Fixture, Curing
Manufacturer Code:0AM53
Tool Number:IAE 3J12817
Tool Name:IAE 3J12817 Fixture, Curing
Manufacturer Code:LOCAL
Tool Number:Oven
Tool Name:Oven
Manufacturer Code:LOCAL
Tool Number:Radial drill
Tool Name:Radial drill
Manufacturer Code:LOCAL
Tool Number:Rotary table
Tool Name:Rotary table