TASK 72-41-10-040-001-A00 HPC Rotor Assembly - Disassemble The Rotor Assembly, Disassembly-001

DMC:V2500-A0-72-41-1000-00B-530A-B|Issue No:002.00|Issue Date:2014-11-01

Export Control

EAR Export Classification: Not subject to the EAR per 15 C.F.R. Chapter 1, Part 734.3(b)(3), except for the following Service Bulletins which are currently published as EAR Export Classification 9E991: SBE70-0992, SBE72-0483, SBE72-0580, SBE72-0588, SBE72-0640, SBE73-0209, SBE80-0024 and SBE80-0025.

Copyright

© IAE International Aero Engines AG (2001, 2014 - 2021) The information contained in this document is the property of © IAE International Aero Engines AG and may not be copied or used for any purpose other than that for which it is supplied without the express written authority of © IAE International Aero Engines AG. (This does not preclude use by engine and aircraft operators for normal instructional, maintenance or overhaul purposes.).

Applicability

All

Common Information

TASK 72-41-10-040-001-A00 HPC Rotor Assembly - Disassemble The Rotor Assembly, Disassembly-001

General

This TASK gives the procedure to disassemble the HP compressor rotor assembly. It includes the procedure to measure the seal and stator path diameters and the blade lengths before removal.

Make sure the tip check and seal check equipment has been calibrated before you use it. Refer to the Illustrated Tools and Equipment Manual, Pub ref ITE-V2500-1IA.

Fig/item numbers in parentheses in the procedure agree with those used in the IPC. Only the primary Fig/item numbers are used. For the service bulletin alpha variants refer to the IPC.

For all parts identified in a different Chapter/Section/Subject the applicable Chapter/Section/Subject comes before the Fig/item number.

Apply the approved penetrating oil before the removal of threaded parts and parts with an interference fit. Let the parts soak before removal. For the approved oils and procedures, refer to the SPM TASK 70-64-00-640-501.

If it is necessary to remove blades from the disks they must be correlated to the disk.

NOTE

To identify the consumable materials refer to the PCI.

NOTE

Special tools are identified in the procedure by the tool primary number.

Preliminary Requirements

Pre-Conditions

NONE

Support Equipment

NameManufacturerPart Number / IdentificationQuantityRemark
Digital read out equipmentLOCALDigital read out equipment
Grinding machineLOCALGrinding machine
Snap-on TM70B wrenchLOCALSnap-on TM70B wrench
Snap-on TMX60 extensionLOCALSnap-on TMX60 extension
IAE 1F10026 Hydraulic hand pump0AM53IAE 1F100261
IAE 1R18020 Build stand0AM53IAE 1R180201
IAE 1R18021 Support ring0AM53IAE 1R180211
IAE 1R18024 Geared indexing spanner0AM53IAE 1R180241
IAE 1R18025 Turnover stand adapter0AM53IAE 1R180251
IAE 1R18026 Lifting fixture0AM53IAE 1R180261
IAE 1R18027 Indexing ring0AM53IAE 1R180271
IAE 1R18029 Blanking tool0AM53IAE 1R180291
IAE 1R18059 Trolley0AM53IAE 1R180591
IAE 1R18061 Rail0AM53IAE 1R180612
IAE 1R18065 Lifter0AM53IAE 1R180651
IAE 1R18067 Extractor0AM53IAE 1R180671
IAE 1R18079 Drift0AM53IAE 1R180791
IAE 1R18080 Drift0AM53IAE 1R180801
IAE 1R18081 Beam sling0AM53IAE 1R180811
IAE 1R18089 Lifting adapter0AM53IAE 1R180891
IAE 1R18090 Safety support stand0AM53IAE 1R180901
IAE 1R18091 Support stand0AM53IAE 1R180911
IAE 1R18092 Support tool0AM53IAE 1R180921
IAE 1R18093 Extractor0AM53IAE 1R180931
IAE 1R18095 Universal slinging adapter0AM53IAE 1R180952
IAE 1R18097 Drift0AM53IAE 1R180971
IAE 1R18322 Turnover stand0AM53IAE 1R183221
IAE 1R18400 Protection sleeve0AM53IAE 1R184001
IAE 1R18441 Lifting adapter0AM53IAE 1R184411
IAE 1R18443 Puller0AM53IAE 1R184431
IAE 1R18451 Tip check fixture0AM53IAE 1R184511
IAE 1R18452 Bearing housing (rear)0AM53IAE 1R184521
IAE 1R18453 Bearing housing (front)0AM53IAE 1R184531
IAE 1R18454 Location block0AM53IAE 1R184542
IAE 1R18455 Location block0AM53IAE 1R184552
IAE 1R18457 Seal check beam0AM53IAE 1R184571
IAE 1R18458 Brake strap0AM53IAE 1R184581
IAE 1R18459 Axial setting gage0AM53IAE 1R184591
IAE 1R18460 Transducer carrier0AM53IAE 1R184601
IAE 1R18461 Transducer carrier0AM53IAE 1R184611
IAE 1R18462 Transducer carrier0AM53IAE 1R184621
IAE 1R18463 Transducer carrier0AM53IAE 1R184631
IAE 1R18464 Transducer carrier0AM53IAE 1R184641
IAE 1R18466 Thruster plate0AM53IAE 1R184661
IAE 1R18467 Setting block0AM53IAE 1R184671
IAE 1R18496 Setting block0AM53IAE 1R184961
IAE 1R18497 Setting block0AM53IAE 1R184971
IAE 1R78498 Setting block0AM53IAE 1R784981
IAE 1R18590 Socket end0AM53IAE 1R185901
IAE 1R18628 Extractor0AM53IAE 1R186281
IAE 1R18629 Protective cover0AM53IAE 1R186291
IAE 1R18639 Setting gage0AM53IAE 1R186391
IAE 1R18673 Dummy stub shaft0AM53IAE 1R186731
Hydraulic jack0AM53ENERPAC 1021
IAE 1R18911 Drill0AM53IAE 1R189111
IAE 1R18914 Setting gage0AM53IAE 1R189141
IAE 1R18913 Setting gage0AM53IAE 1R189131
IAE 1R18912 Setting gage0AM53IAE 1R189121
IAE 1R18201 Torque spanner0AM53IAE 1R182011
IAE 1R18214 Build stand0AM53IAE 1R18214
IAE 1R18498 Setting block0AM53IAE 1R18498
IAE 18914 Setting gage0AM53IAE 18914
IAE 18913 Setting gage0AM53IAE 18913

Consumables, Materials and Expendables

NameManufacturerPart Number / IdentificationQuantityRemark
CoMat 02-121 TEMPORARY MARKER PENCIL/CRAYONIE304CoMat 02-121
CoMat 02-122 TEMPORARY MARKER PENCIL/CRAYONK6835CoMat 02-122

Spares

NONE

Safety Requirements

NONE

Procedure

    1. SUBTASK 72-41-10-040-051 Prepare the Tip Check Fixture for Installation of the HP Compressor Rotor Assembly

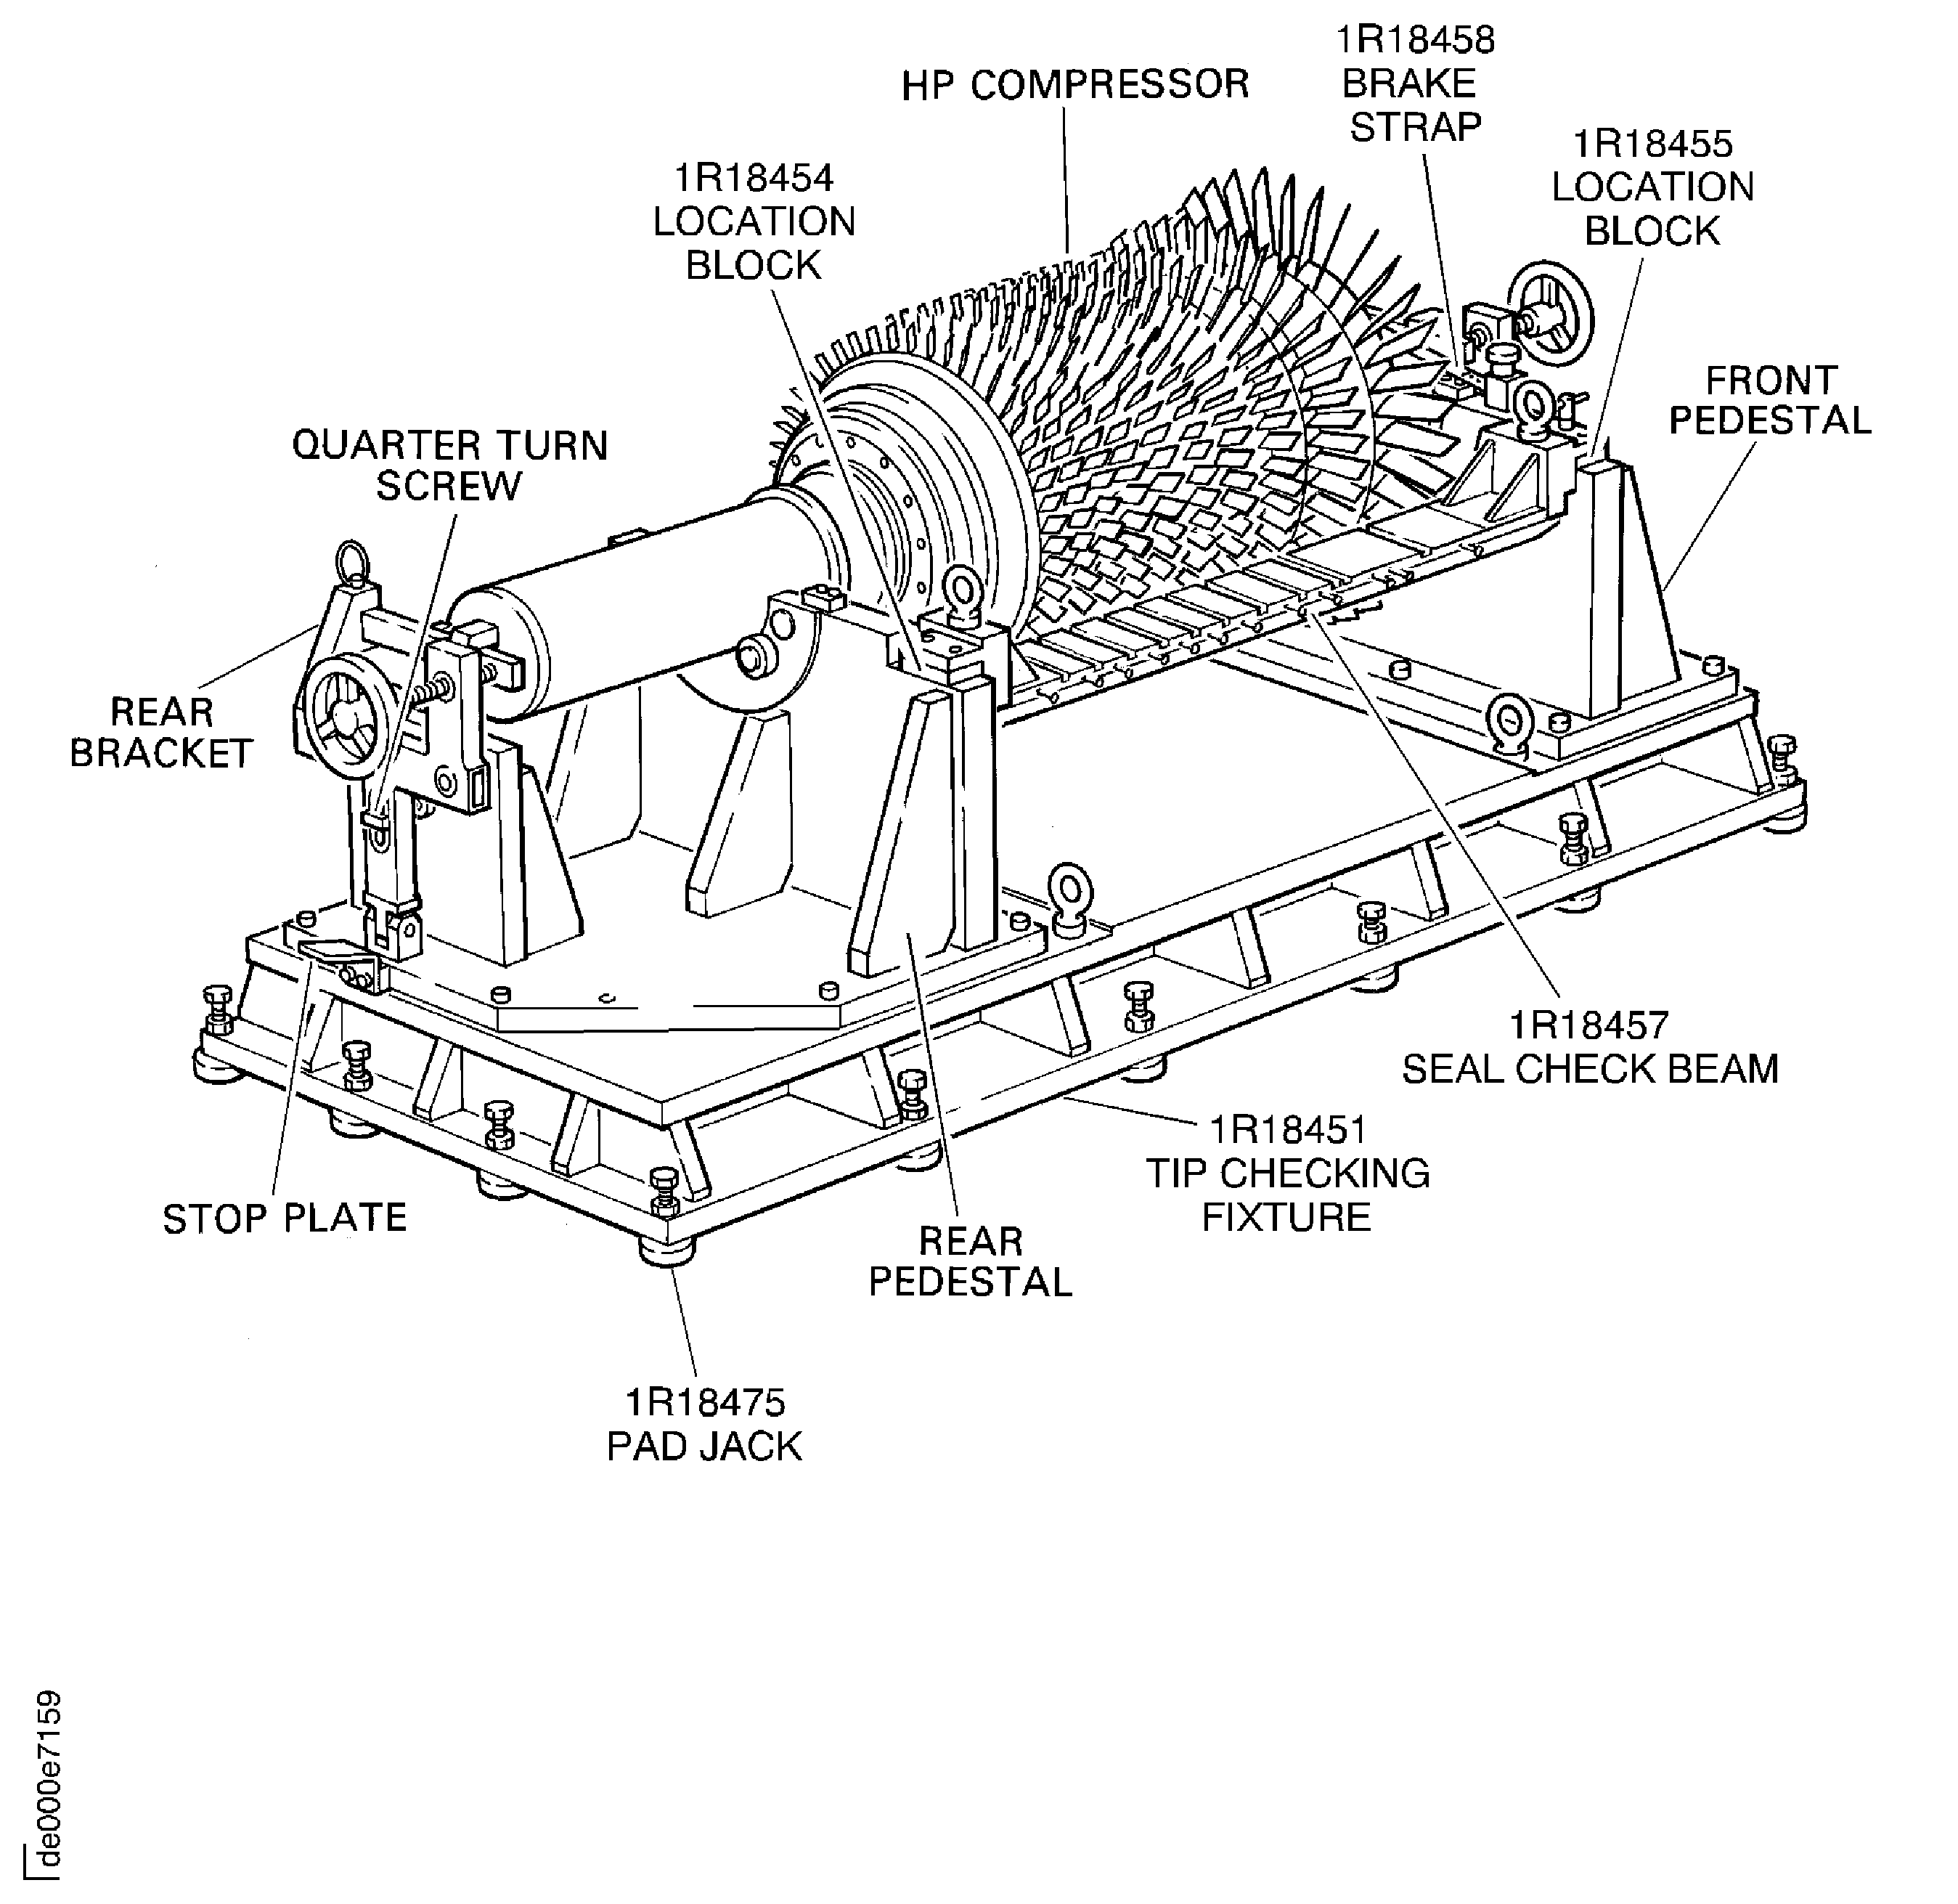
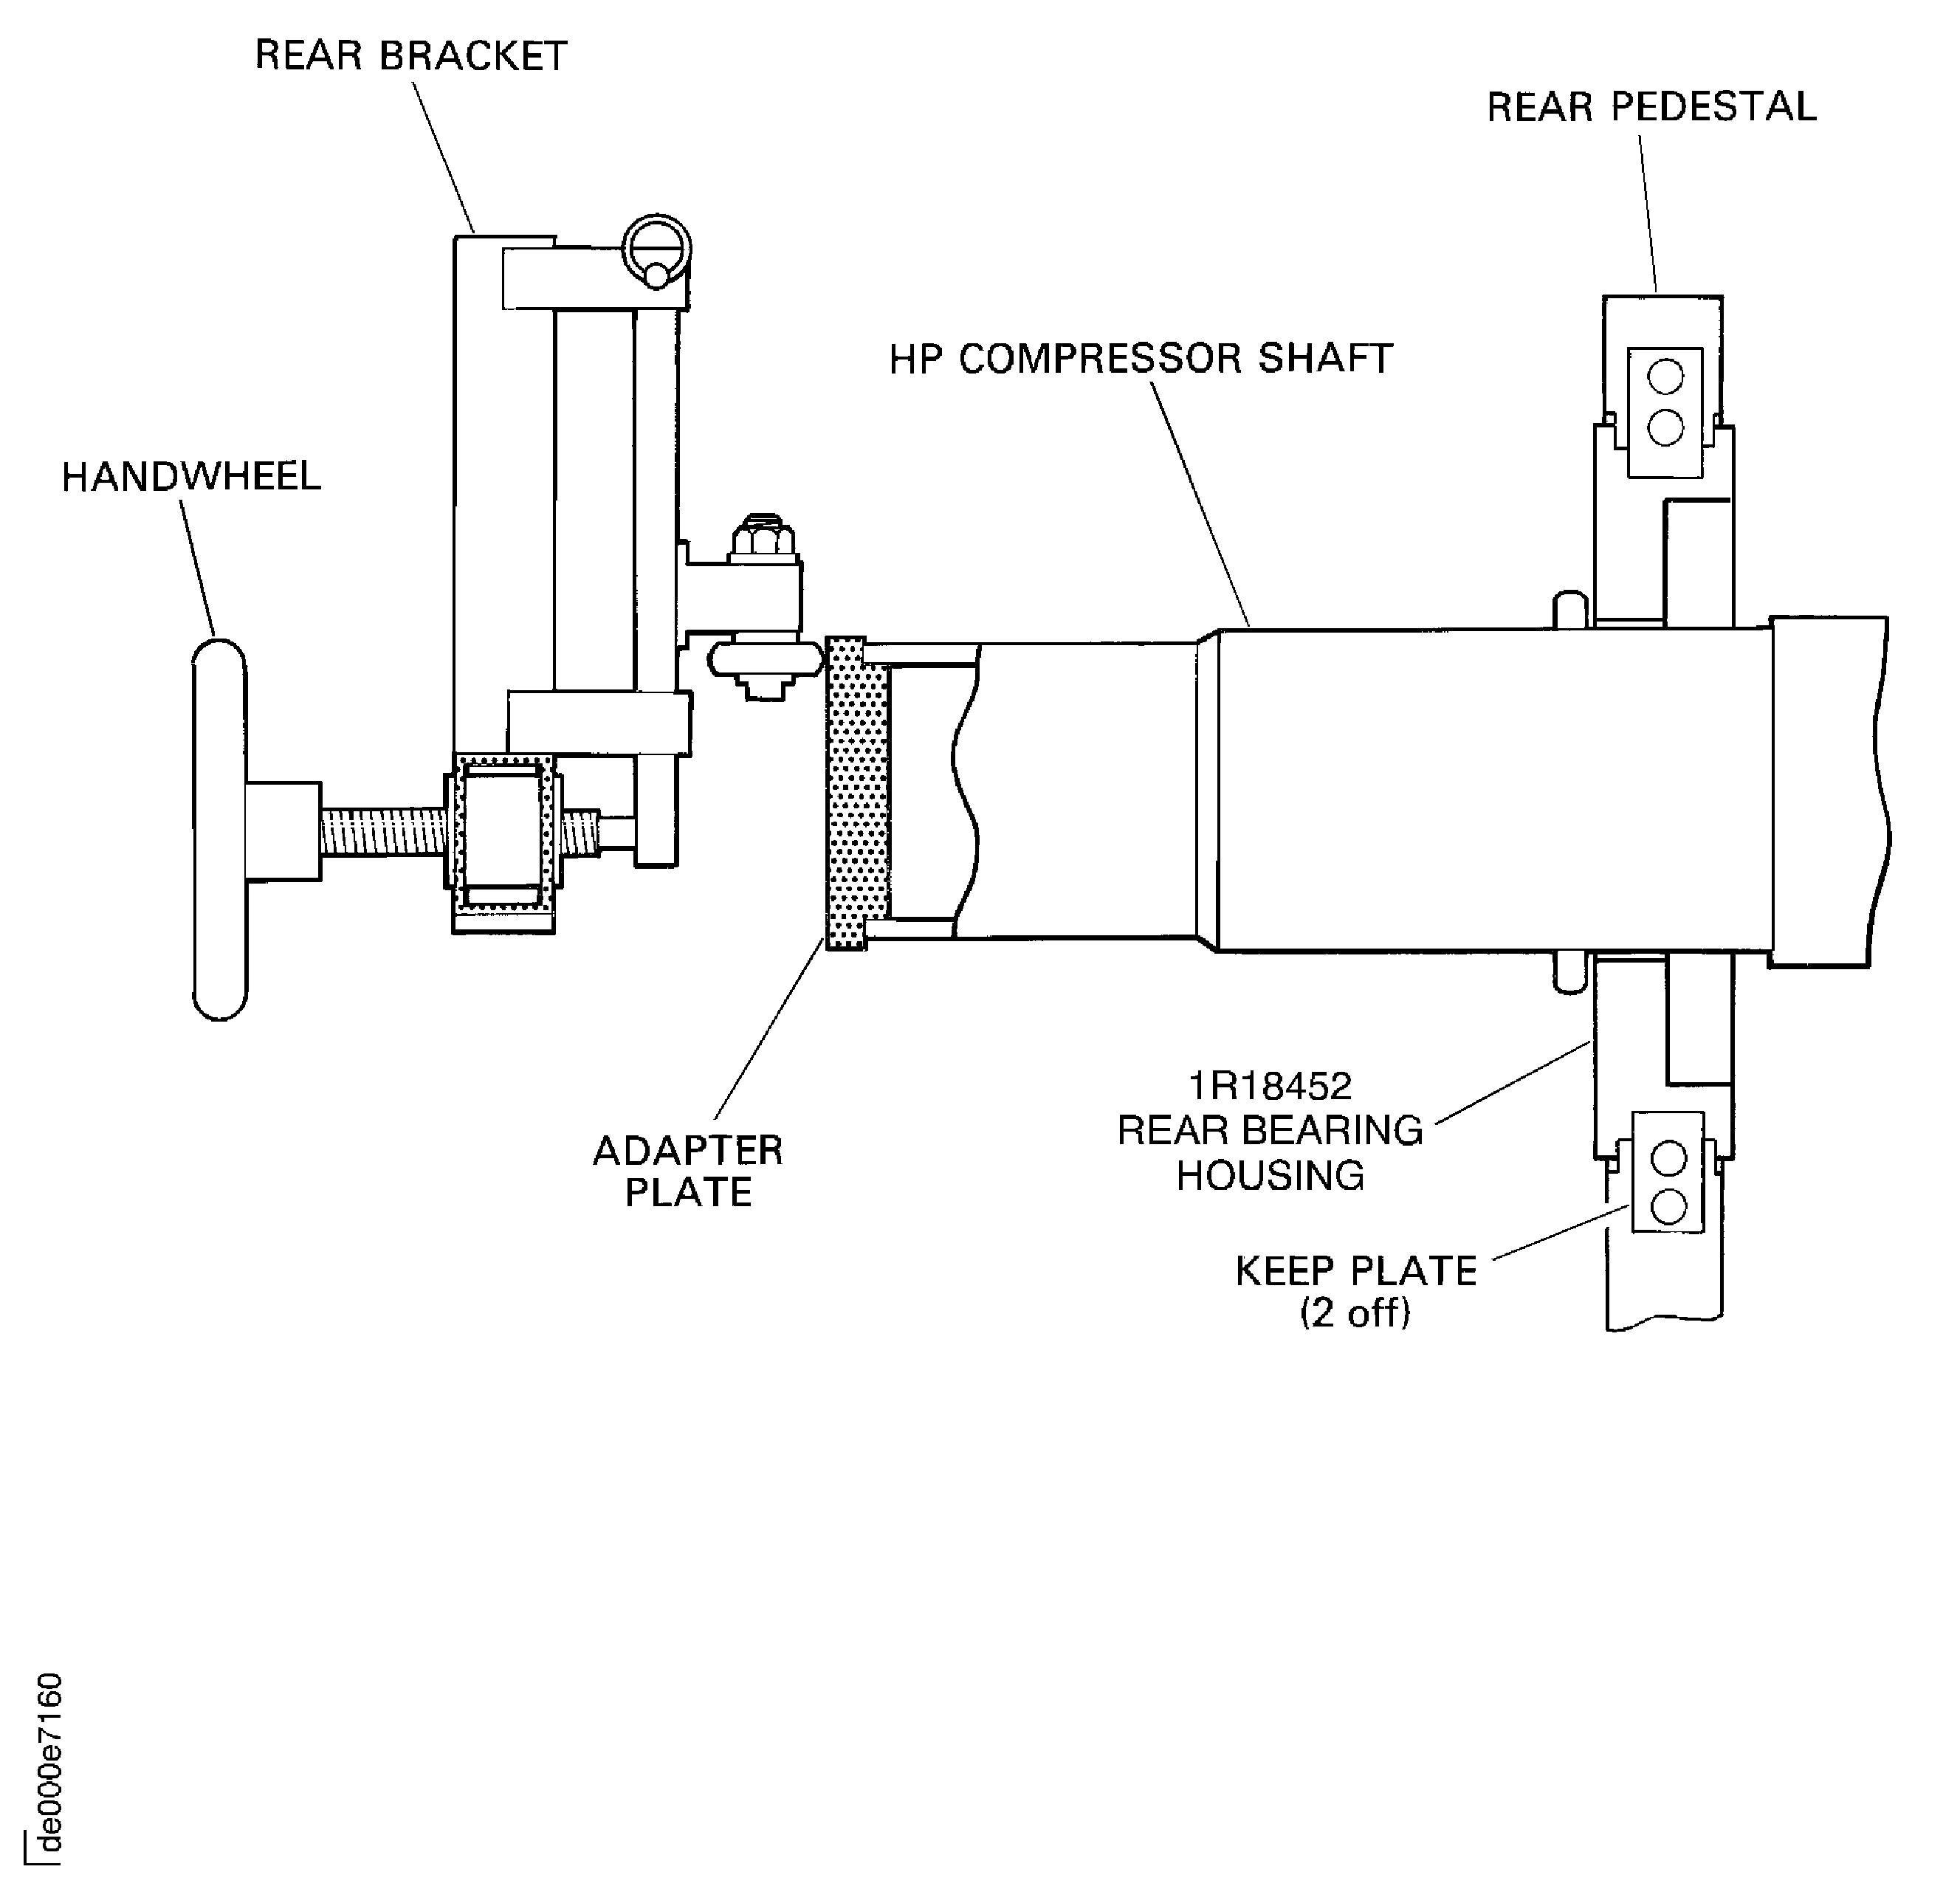
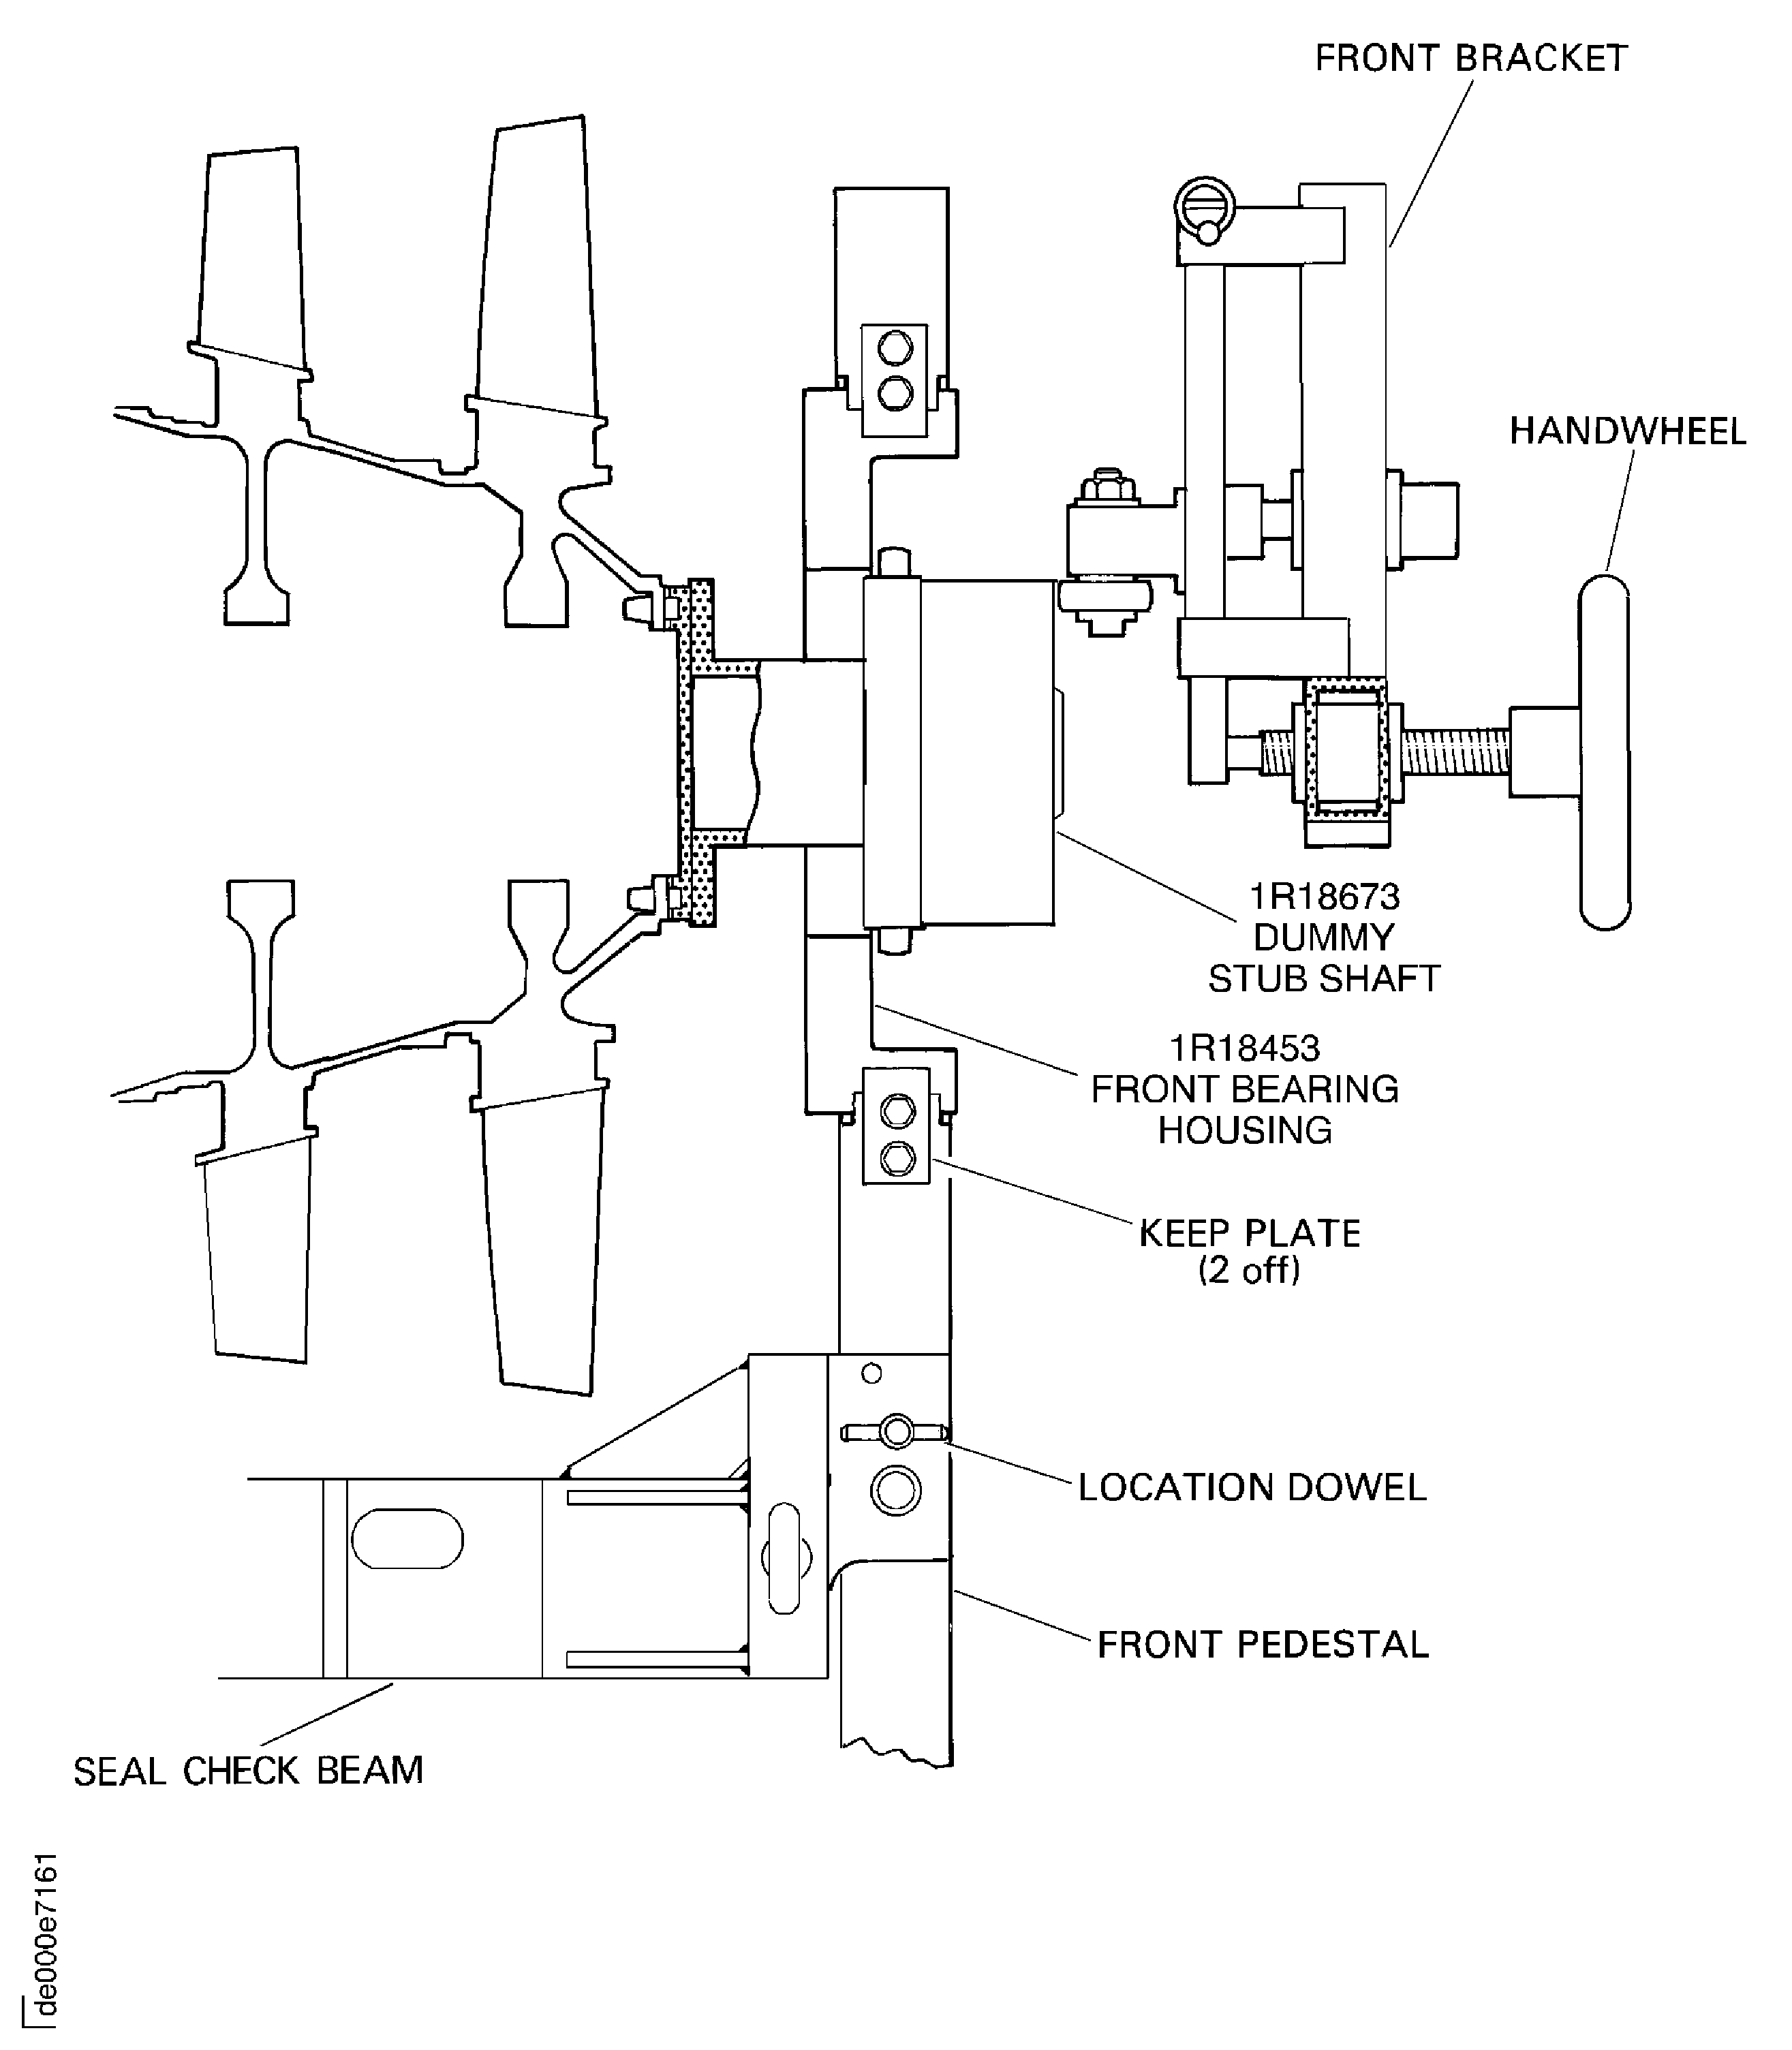
    2. Refer to: Figure, Figure, Figure and Figure

    3. Install IAE 1R18454 Location block 2 off on to the rear pedestal of IAE 1R18451 Tip check fixture 1 off and safety.

    4. Install IAE 1R18455 Location block 2 off on to the front pedestal of the tip check fixture and safety.

    5. Install the IAE 1R18453 Bearing housing (front) 1 off and safety with the two keep plates.

    6. Install the IAE 1R18452 Bearing housing (rear) 1 off and safety with the two keep plates.

    7. Turn the quarter turn screw, in the front bracket, 90 degrees and move the front bracket down on to the stop plate.

    8. Do step E. again for the rear bracket.

    1. SUBTASK 72-41-10-040-052 Install the HP Compressor Rotor Assembly in to the Tip Check Fixture

      NOTE

      The HP compressor rotor assembly is on the build stand (IAE 1R18214 Build stand) with the dummy stub shaft installed.
      1. Install the IAE 1R18629 Protective cover 1 off on to the compressor rotating air seal. Refer to Figure.

      2. Put the cover over the compressor shaft and move the cover down the shaft.

      3. Engage the cover over the rotating air seal. Make sure the cover is correctly installed.

      4. Attach the O-ring on to the O-ring location to safety the cover.

    2. Install the IAE 1R18089 Lifting adapter 1 off on to the end of the compressor shaft and tighten.

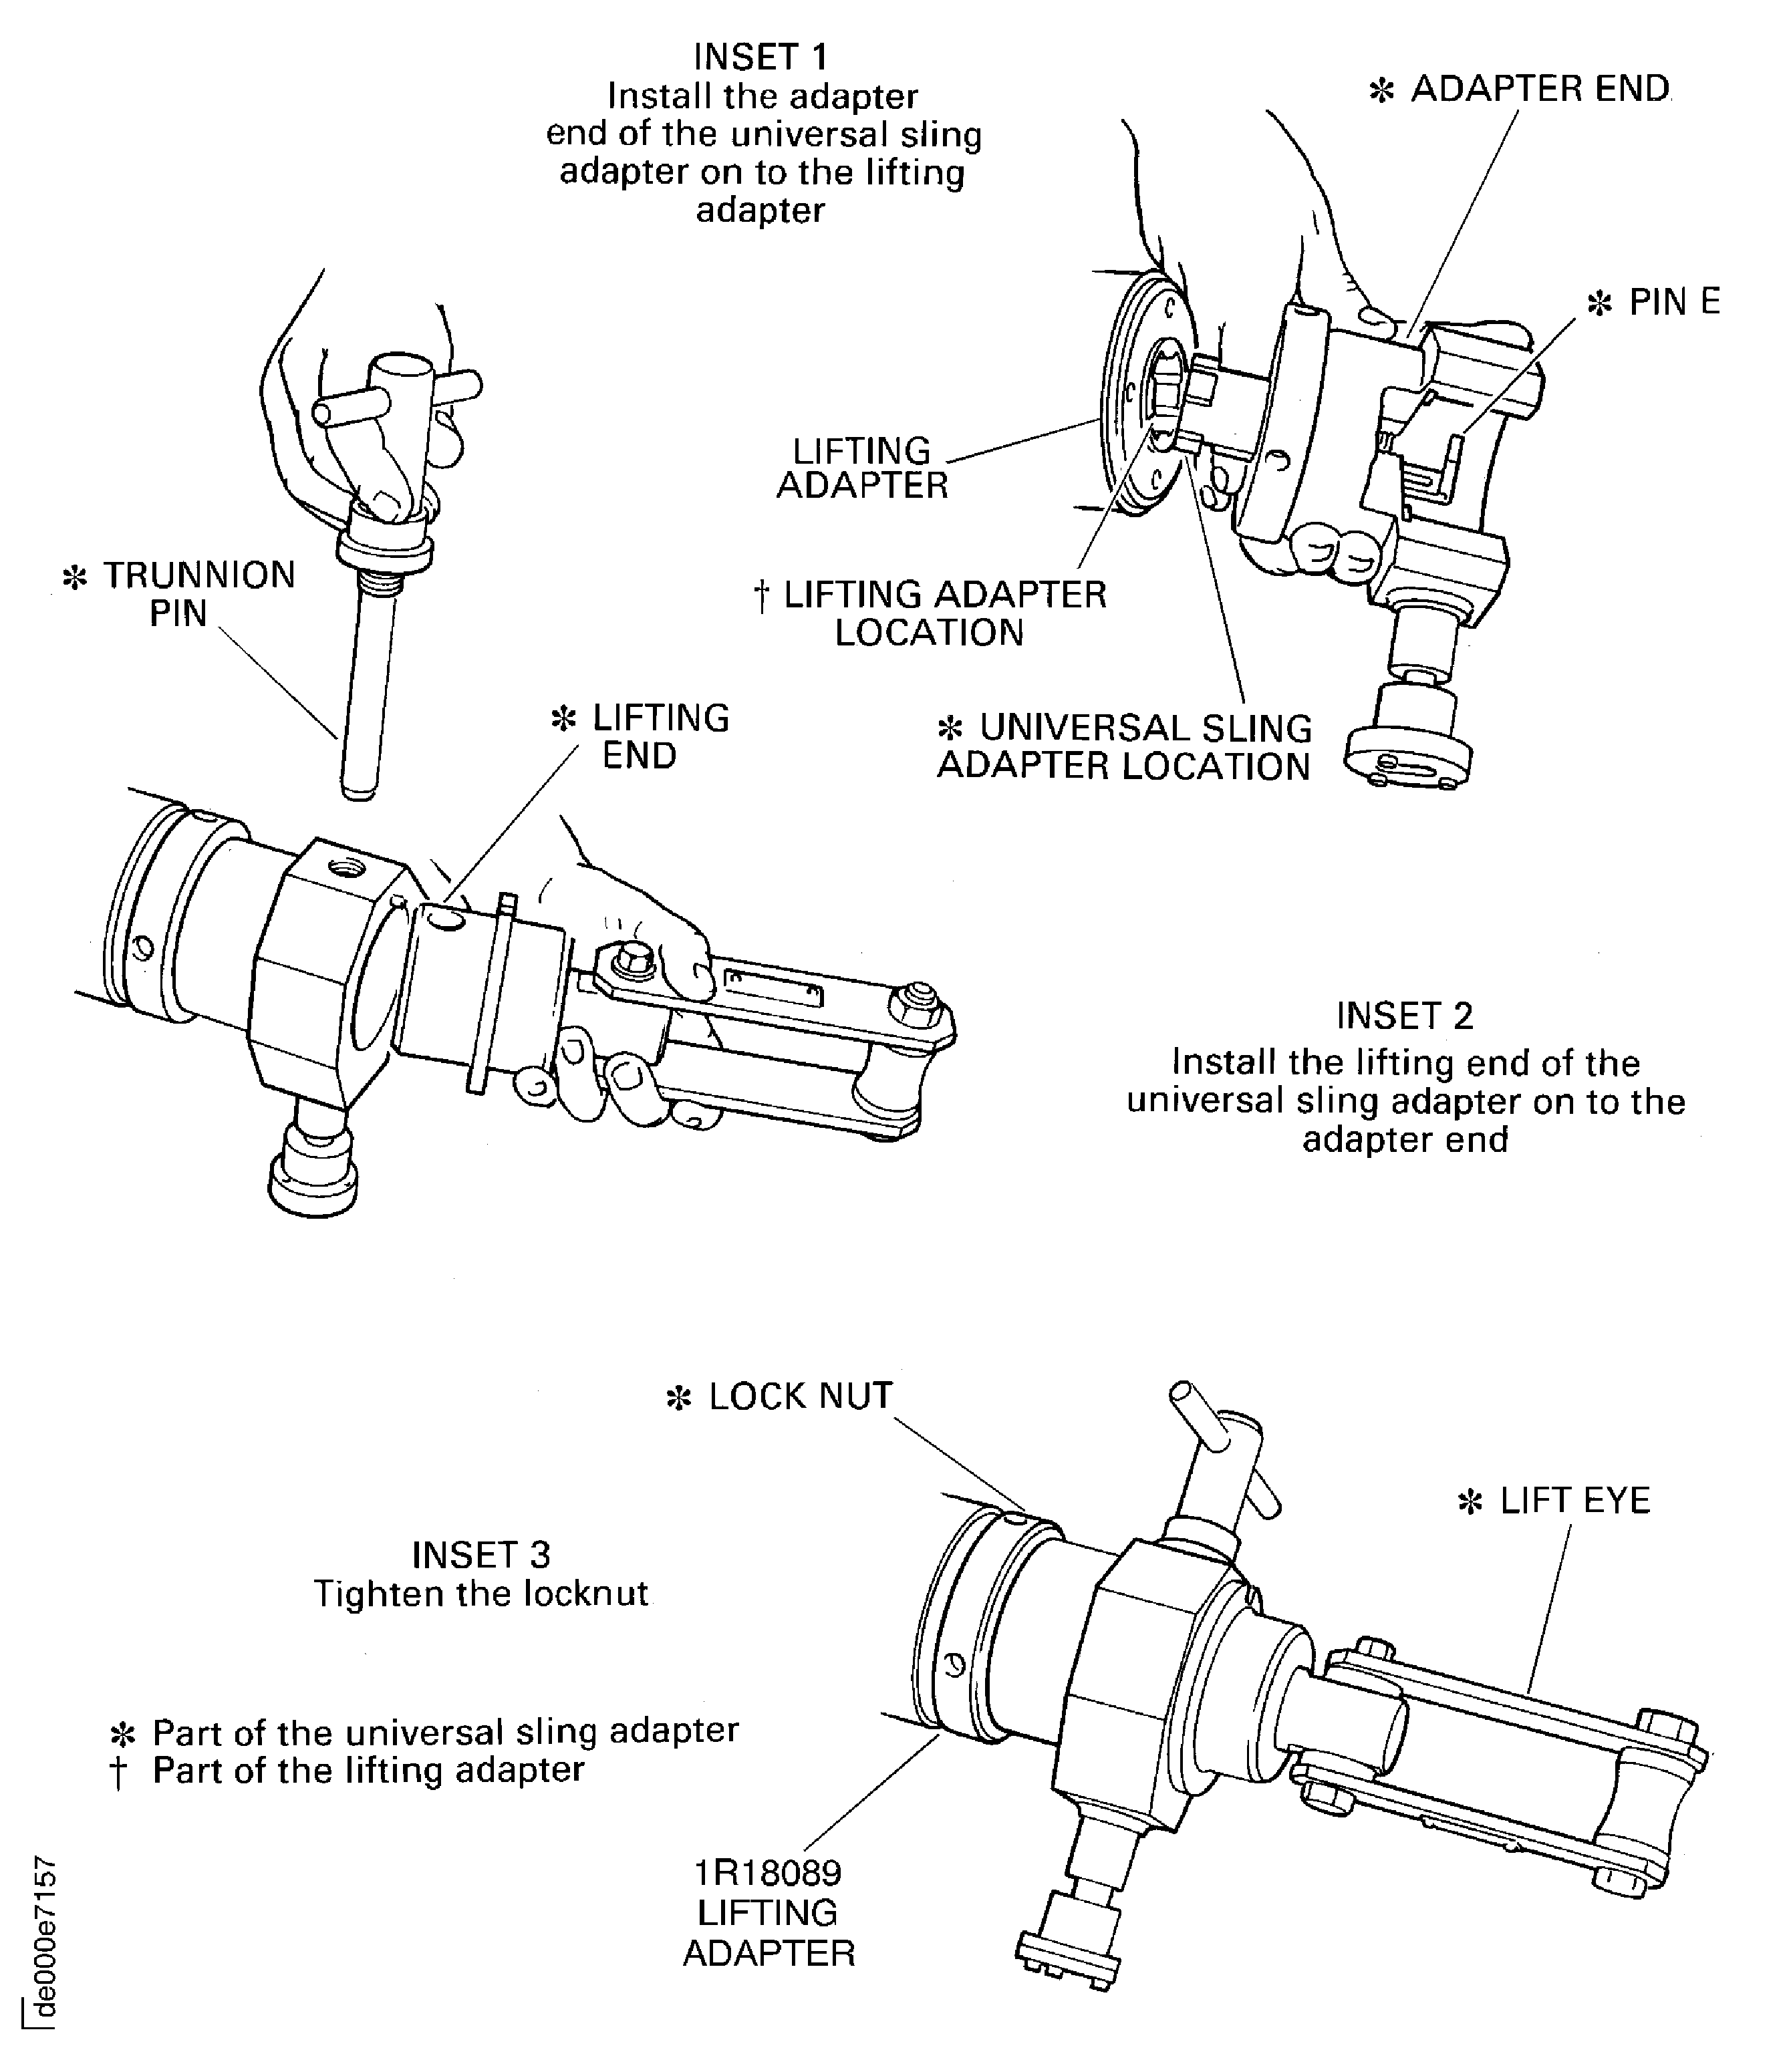
      1. Attach IAE 1R18095 Universal slinging adapter 1 off on to the lifting adapter. Refer to Figure and Figure.

      2. Lift pin E and put the adapter end of the tool in to the lifting adapter. Turn the tool to engage it and lower the pin E.

      3. Install the lifting end of the tool in to the adapter end. Install the trunnion pin through both parts of the tool and tighten it.

      4. Tighten the locknut on to the lifting adapter attach a hoist to the lift eye.

    3. CAUTION

      YOU MUST NOT LET THE COMPRESSOR ROTOR ASSEMBLY HIT THE BUILD STAND.

      Remove the compressor rotor assembly from the build stand.

      1. Install IAE 1R18095 Universal slinging adapter 1 off on to the dummy stub shaft. Refer to Figure.

      2. Install the compressor rotor assembly on to the safety support stand.

      3. Attach the universal slinging adapter on to the dummy stub shaft. Refer to step C.(1) thru C.(3).

    4. Lift the compressor rotor assembly off the safety support stand.

    5. CAUTION

      YOU MUST NOT LET THE COMPRESSOR ROTOR ASSEMBLY HIT THE TIP CHECK FIXTURE.

      Install the compressor rotor assembly in to the IAE 1R18451 Tip check fixture 1 off. Make sure the dummy stub shaft is correctly located in the front bearing housing.

    6. Remove the universal slinging adapter and the lifting adapter from the compressor shaft and the universal slinging adapter from the dummy stub shaft.

    7. Install the IAE 1R18466 Thruster plate 1 off in to the compressor shaft.

    8. Adjust the handwheels on the front and rear brackets to make sure the thruster brackets are fully retracted.

    9. Lift the front and rear brackets up in to position and safety with the quarter turn screws.

    1. SUBTASK 72-41-10-040-053 Set the Axial Position of the HP Compressor Rotor Assembly

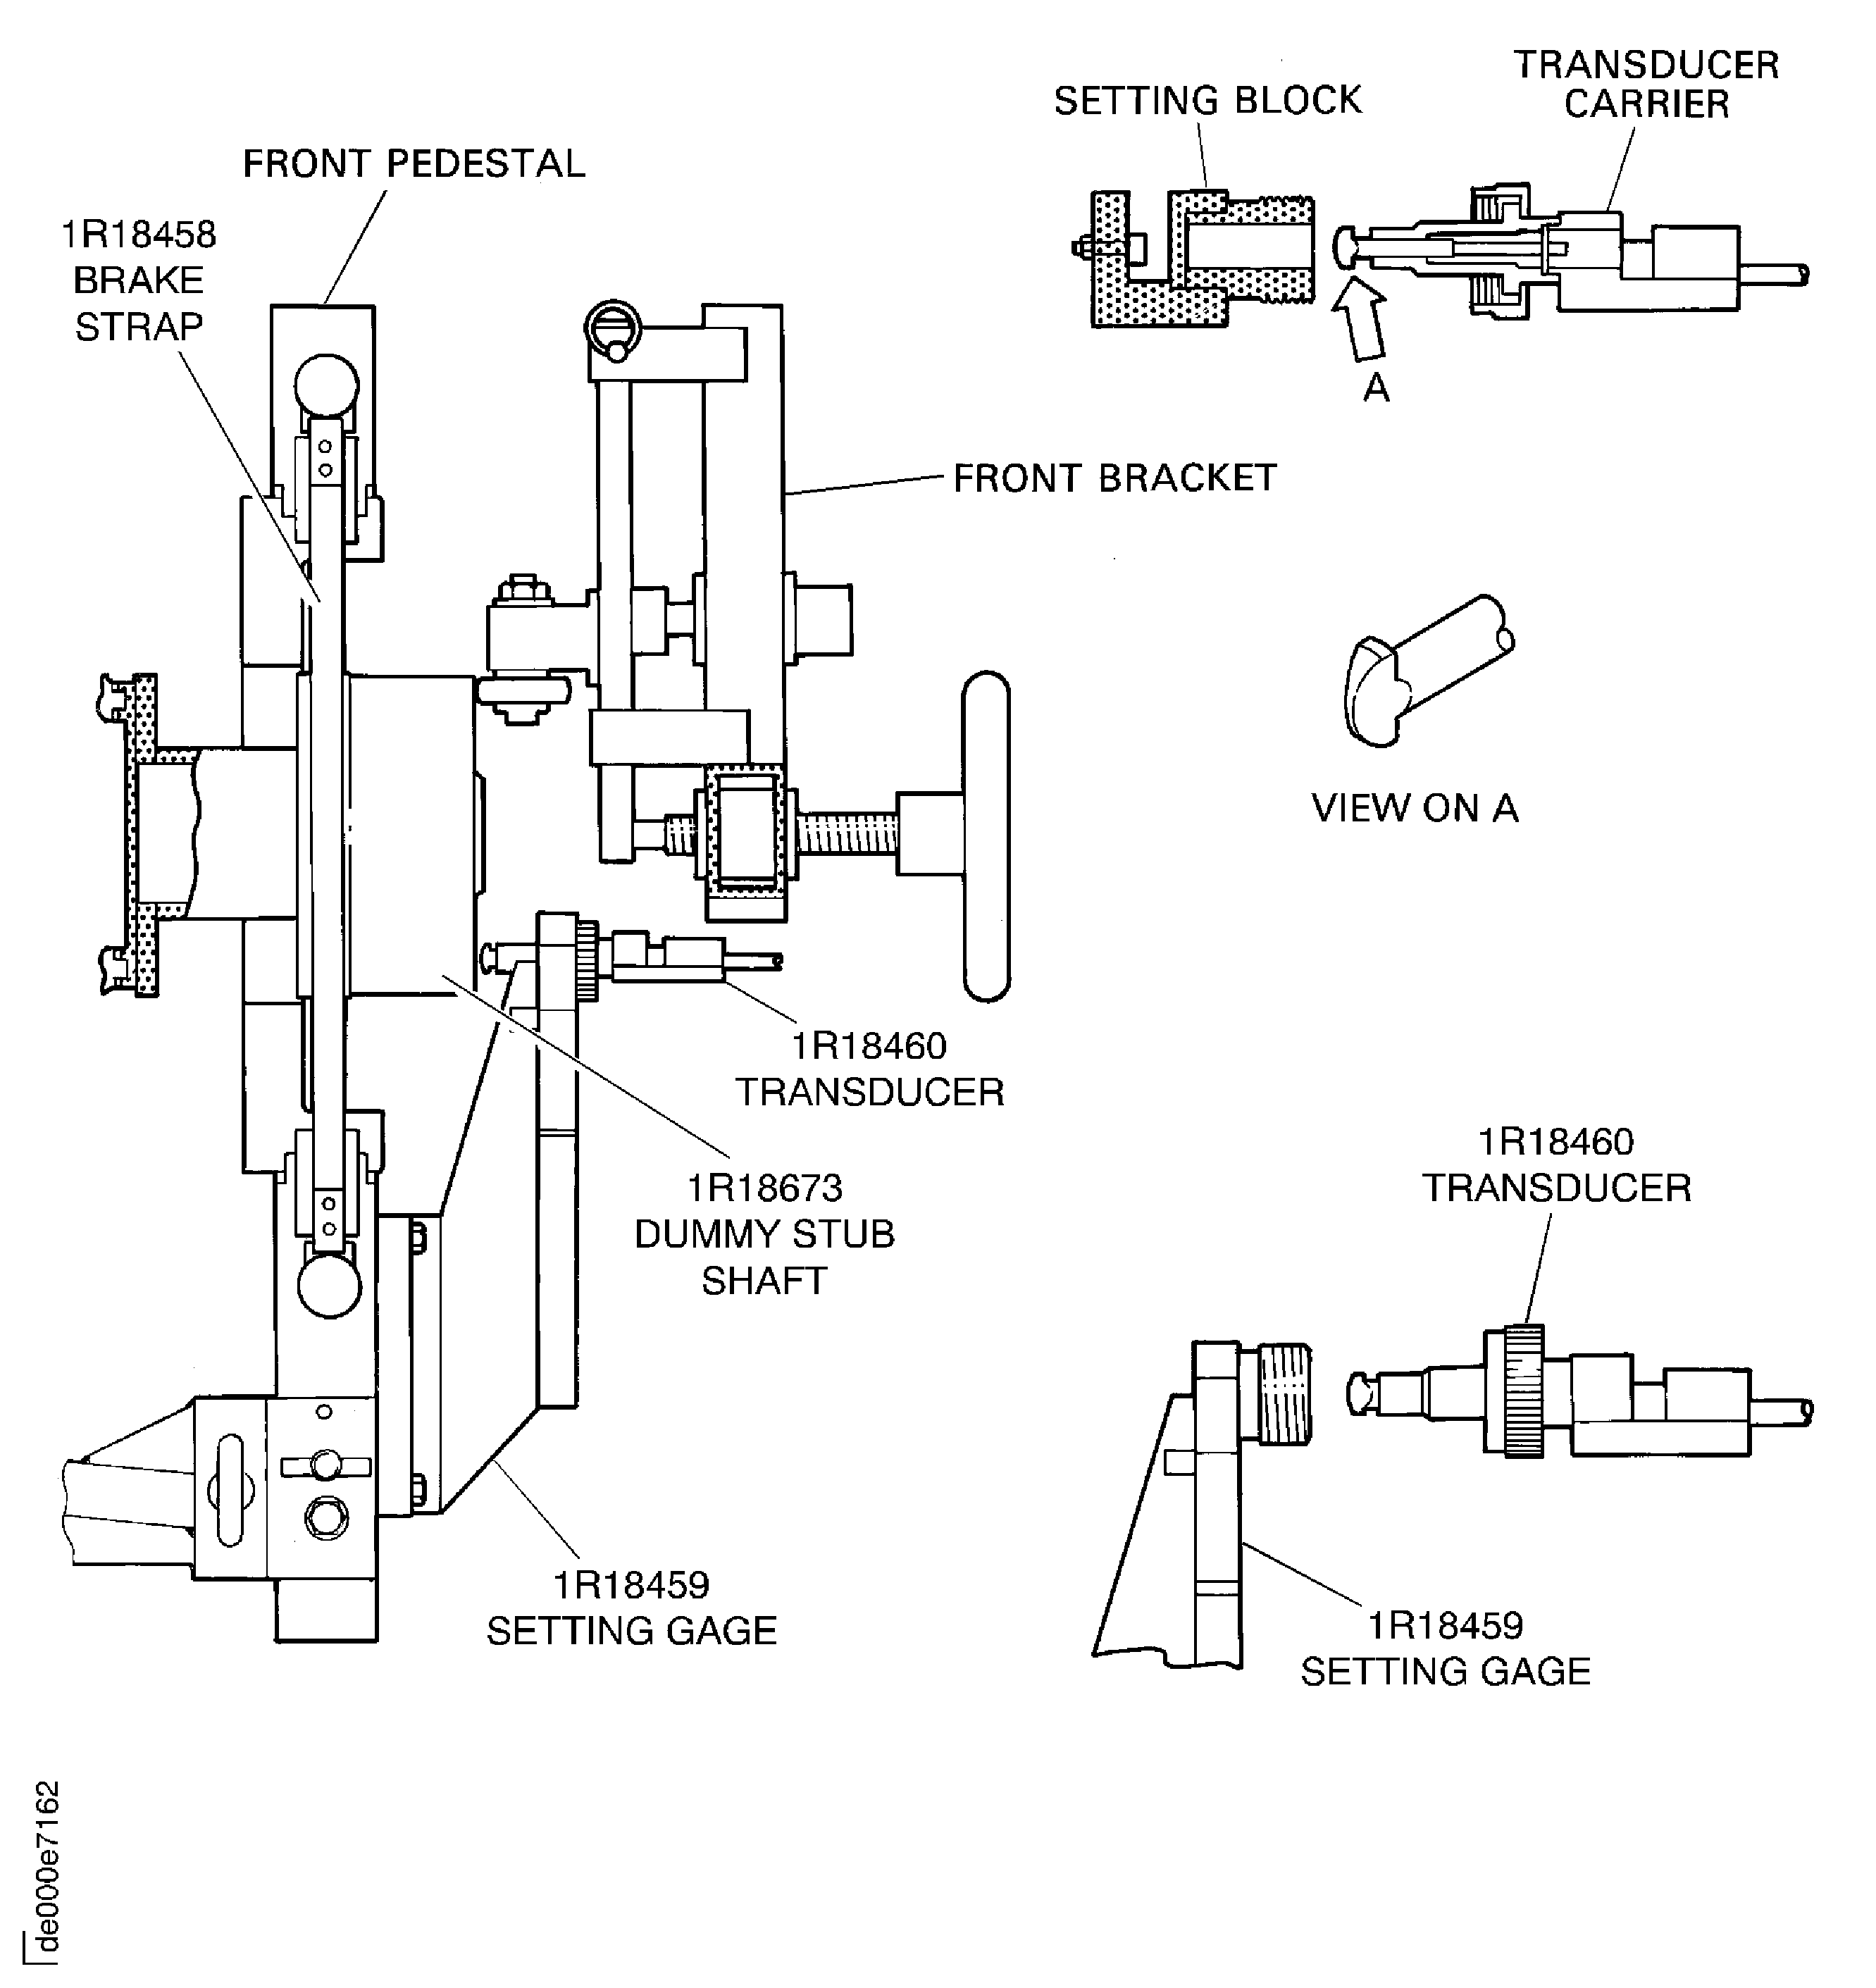
    2. Refer to: Figure, Figure, Figure and Figure

    3. Install the IAE 1R18459 Axial setting gage 1 off on to the front pedestal.

    4. With IAE 1R18467 Setting block 1 off adjust the IAE 1R18460 Transducer carrier 1 off to the applicable zero setting on the digital read out equipment.

    5. Install the transducer in to the axial setting gage and hand tighten the knurled nut.

    6. With the front and rear handwheels, adjust the position of the compressor rotor assembly in the fixture until the dummy stub shaft front face causes the transducer plunger to operate. Continue to adjust the position of the rotor until the transducer gives the initial zero reading.

    7. Remove the transducer carrier and the axial setting gage.

      1. Install the IAE 1R18457 Seal check beam 1 off on the front and rear location blocks.

      2. Locate the two dowels and safety the beam in position with the two bolts and washers.

    8. Install the IAE 1R18458 Brake strap 1 off on to the front pedestal and adjust.

    1. SUBTASK 72-41-10-040-054 Do a Check on the Compressor Rotor for Concentricity and Swash

    2. Refer to: Figure and Figure

    3. With standard workshop equipment measure the swash at face A; the swash must not be more than 0.0051in. (0.130 mm). Measure the concentricity at diameter B; the concentricity must not be more than 0.0031in. (0.080 mm).

    1. SUBTASK 72-41-10-040-079 Set the Transducer Carrier to the Zero Position

    2. Refer to: Figure

      1. Set the zero position of the 3 to 4 seal land rear rotating seal transducer carrier. Use IAE 1R18463 Transducer carrier 1 off.

      2. Install the IAE 1R18496 Setting block 1 off on to the carrier using a suitable bolt.

      3. Connect the transducer carrier to the digital read out equipment.

      4. Loosen the two setscrews that safety the transducer in to the rear transducer block.

        1. Install the transducer carrier on to IAE 1R18639 Setting gage 1 off.

        2. Align the transducer with the correct setting block on the setting gage and at the same time locate the two location plates of the transducer carrier in to the location slot in the setting gage.

        3. Make sure that the IAE 1R18496 Setting block touches the front stop on the setting gage.

      5. Adjust the position of the transducer in the rear transducer block until the roller touches the setting block and the transducer is approximately in the middle of its range of movement.

      6. Tighten the two setscrews to safety the transducer in position in the rear transducer block.

      7. Set the display of the resolver angle position unit to rear zero and make sure that a positive (+) reading is given when the plunger moves in to the transducer.

      8. Remove the transducer carrier from the setting gage.

    1. SUBTASK 72-41-10-040-068 Measure and Calculate the Stage 3 to 4 Seal Fin Diameters at Location 1001

    2. Refer to: Figure and Figure

      1. Set the zero position of the IAE 1R18463 Transducer carrier 1 off.

      2. Do the procedure given in Step.

      1. Measure the stage 3 to 4 seal fin diameters at location 1001.

        1. Install IAE 1R18463 Transducer carrier 1 off in the correct position on the IAE 1R18457 Seal check beam.

        2. Carefully locate the transducer roller on the first seal fin and at the same time locate the transducer carriers two location plates in to the slot in the seal check beam.

        3. Move the transducer carrier in the location slot until the IAE 1R18496 Setting block 1 off touches the threaded stop on the seal check beam.

      2. Turn the HP compressor rotor smoothly in a clockwise direction.

      3. Write down the minimum and maximum values given on the transducer display. Also record the values as a negative or positive reading.

      4. Carefully move the front transducer block until the transducer roller is located on the second seal fin.

      5. Do steps B.(2) and B.(3) again.

      6. Carefully move the front transducer block until the transducer roller is located on the third seal fin.

      7. Do steps B.(2) and B.(3) again.

      8. Carefully move the front transducer block until the transducer roller is located on the fourth seal fin.

      9. Do steps B.(2) and B.(3) again.

      10. Remove the transducer carrier from the seal check beam.

      1. Calculate the stage 3 to 4 seal fin diameters at location 1001.

      2. Calculate the diameter of each of the four seal fins as follows:

        Seal fin diameter = 2 (A+B)

        where, A = Tool setting radius = 5.1181in. (130.00 mm)

        B = Transducer reading

        Example 1, where B = -0.046in.

        Seal fin diameter = 2 (5.1181 + -0.046)

        = 10.144in.

        Example 2, where B = 0.046in.

        Seal fin diameter = 2 (5.1181 + 0.046)

        = 10.328in.

      3. Write down the calculated minimum and maximum diameters for each of the four seal fins. This data is to be used in the INSPECTION/CHECK of the 3 to 8 compressor disks. Refer to TASK 72-41-11-200-000 (INSPECTION/CHECK-000).

    1. SUBTASK 72-41-10-040-080 Set the Transducer Carrier to the Zero Position

    2. Refer to: Figure

      1. Set the zero position of the 4 to 5 seal transducer carrier. Use IAE 1R18462 Transducer carrier 1 off.

      2. Connect the transducer carrier to the digital read out equipment.

      3. Loosen the two setscrews that safety the transducer in to the rear transducer block.

        1. Install the transducer carrier on to IAE 1R18639 Setting gage 1 off.

        2. Align the transducer with the correct setting block on the setting gage and at the same time locate the two location plates of the transducer carrier in to the location slot in the setting gage.

        3. Make sure that the setting block, part of the IAE 1R18462 Transducer carrier, touches the front stop on the setting gage.

      4. Adjust the position of the transducer in the rear transducer block until the roller touches the setting block and the transducer is approximately in the middle of its range of movement.

      5. Tighten the two setscrews to safety the transducer in position in the rear transducer block.

      6. Set the display of the resolver angle position unit to read zero and make sure that a positive (+) reading is given when the plunger moves in to the transducer.

      7. Remove the transducer carrier from the setting gage.

    1. SUBTASK 72-41-10-040-069 Measure and Calculate the Stage 4 to 5 Seal Fin Diameters at Locations 1002 and 1003

    2. Refer to: Figure and Figure

      1. Set the zero position of IAE 1R18462 Transducer carrier 1 off.

      2. Do the procedure given in Step.

      1. Measure the stage 4 to 5 seal fin diameter at location 1002.

        1. Install the transducer carrier in the correct position on the seal check beam.

        2. Carefully locate the transducer roller on to the seal fin at location 1002 and at the same time locate the transducer carriers two location plates in to the slot in the seal check beam.

        3. Move the transducer carrier in the location slot until the setting block touches the threaded stop on the seal check beam.

      2. Turn the HP compressor rotor smoothly in a clockwise direction.

      3. Write down the minimum and maximum values given on the transducer display. Also record the values as a negative or positive reading.

      1. Calculate the stage 4 to 5 seal fin diameter at location 1002.

      2. Calculate the diameter of the seal fin as follows:

        Seal fin diameter = 2 (A + B)

        where, A Tool setting radius = 5.8858in. (149.5 mm)

        B = Transducer reading

        Refer to Step for calculation examples

      3. Write down the calculated minimum and maximum diameter for the seal fin. This data is to be used in the INSPECTION/CHECK of the 3 to 8 compressor disks. Refer to TASK 72-41-11-200-000 (INSPECTION/CHECK-000).

      1. Measure the stage 4 to 5 seal fin diameters at location 1003.

      2. Remove IAE 1R18462 Transducer carrier from the seal check beam.

        1. Install the transducer carrier in the correct position on the seal check beam.

        2. Carefully locate the transducer roller on to the first seal fin at location 1003 and at the same time locate the transducer carriers two location plates in to the slot in the seal check beam.

        3. Move the transducer carrier in the location slot until the setting block touches the threaded stop on the seal check beam.

      3. Turn the HP compressor rotor smoothly in a clockwise direction.

      4. Write down the minimum and maximum values given on the transducer display. Also record the values as a negative or positive reading.

      5. Carefully move the front transducer block until the transducer roller is located on the second seal fin.

      6. Do steps D.(3) and D.(4) again.

      7. Remove the transducer carrier from the seal check beam.

      1. Calculate the stage 4 to 5 seal fin diameters at location 1003.

      2. Calculate the diameter of each of the seal fins as follows:

        Seal fin diameter = 2 (A + B)

        where A, = Tool setting radius = 6.0827in. (154.5 mm)

        B = Transducer reading

        Refer to Step for calculation examples.

      3. Write down the calculated minimum and maximum diameters for each of the two seal fins. This data is to be used in the INSPECTION/CHECK of the 3 to 8 compressor disks. Refer to TASK 72-41-11-200-000 (INSPECTION/CHECK-000).

    1. SUBTASK 72-41-10-040-081 Set the Transducer Carrier to the Zero Position

    2. Refer to: Figure

      1. Set the zero position of the 3 to 4 seal transducer carrier. Use IAE 1R18461 Transducer carrier 1 off.

      2. Connect the transducer carrier to the digital read out equipment.

      3. Loosen the two setscrews that safety the transducer in to the rear transducer block.

        1. Install the transducer carrier on to IAE 1R18639 Setting gage Align the transducer with the correct setting block on the setting gage and at the same time locate the two location plates of the transducer carrier in to the location slot in the setting gage.

        2. Make sure that the setting block, part of IAE 1R18461 Transducer carrier, touches the front stop on the setting gage.

      4. Adjust the position of the transducer in the rear transducer block until the roller touches the setting block and the transducer is approximately in the middle of its range of movement.

      5. Tighten the two setscrews to safety the transducer in position in the rear transducer block.

      6. Set the display of the resolver angle position unit to read zero and make sure that a positive (+) reading is given when the plunger moves in to the transducer.

      7. Remove the transducer carrier from the setting gage.

    1. SUBTASK 72-41-10-040-070 Measure and Calculate the Stage 5 to 6 Seal Fin Diameters at Location 1004

    2. Refer to: Figure and Figure

      1. Set the zero position of IAE 1R18461 Transducer carrier 1 off.

      2. Do the procedure given in Step.

      1. Measure the stage 5 to 6 seal fin diameters at location 1004.

        1. Install the transducer carrier in the correct position on the seal check beam.

        2. Carefully locate the transducer roller on to the first seal fin and at the same time locate the transducer carriers two location plates in to the slot in the seal check beam.

        3. Move the transducer carrier in the location slot until the setting block touches the threaded stop on the seal check beam.

      2. Turn the HP compressor rotor smoothly in a clockwise direction.

      3. Write down the minimum and maximum values given on the transducer display. Also record the values as a negative or positive reading.

      4. Carefully move the front transducer block until the transducer roller is located on the second seal fin.

      5. Do steps B.(2) and B.(3) again.

      6. Carefully move the front transducer block until the transducer roller is located on the third seal fin.

      7. Do steps B.(2) and B.(3) again.

      8. Remove the transducer carrier from the seal check beam.

      1. Calculate the stage 5 to 6 seal fin diameters at location 1004.

      2. Calculate the diameter of each of the seal fins as follows:

        Seal fin diameter = 2 (A + B)

        where A, = Tooling setting radius = 6.8898in. (175.00 mm)

        B = Transducer reading

        Refer to Step for calculation examples.

      3. Write down the calculated minimum and maximum diameters for each of the four seal fins. This data is to be used in the INSPECTION/CHECK of the 3 to 8 compressor disks. Refer to TASK 72-41-11-200-000 (INSPECTION/CHECK-000).

    1. SUBTASK 72-41-10-040-082 Set the Transducer Carrier to the Zero Position

    2. Refer to: Figure

      1. Set the zero position of the stator vane path transducer carrier. Use IAE 1R18464 Transducer carrier 1 off.

      2. Connect the transducer carrier to the digital read out equipment.

      3. Loosen the two setscrews that safety the transducer in to the rear transducer block.

        1. Install the transducer carrier on to IAE 1R18639 Setting gage 1 off.

        2. Align the transducer with the correct setting block on the setting gage and at the same time locate the two location plates of the transducer carrier in to the location slot in the setting gage.

        3. Make sure that the setting block, part of IAE 1R18464 Transducer carrier, touches the front stop on the setting gage.

      4. Adjust the position of the transducer in the rear transducer block until the roller touches the setting block and the transducer is approximately in the middle of its range of movement.

      5. Tighten the two setscrews to safety the transducer in position in the rear transducer block.

      6. Set the display of the resolver angle position unit to read zero and make sure that a position (+) reading is given when the plunger moves in to the transducer.

      7. Remove the transducer carrier from the setting gage.

    1. SUBTASK 72-41-10-040-071 Measure and Calculate the Stator Vane Path Diameters

    2. Refer to: Figure and Figure

      1. Set the zero position of IAE 1R18464 Transducer carrier 1 off.

      2. Do the procedure given in Step.

      1. Measure the stage 6 to 7 stator vane path diameter at location 1056.

        1. Install the transducer carrier in the correct position on the seal check beam.

        2. Carefully locate the transducer roller on to the vane path and at the same time locate the transducer carriers two location plates in to the slot in the seal check beam.

        3. Move the transducer carrier in the location slot until the setting block touches the threaded stop on the seal check beam.

      2. Turn the HP compressor rotor smoothly in a clockwise direction.

      3. Write down the minimum and maximum values given on the transducer display. Also record the values as a negative or positive reading.

      4. Remove the transducer carrier from the seal check beam.

      1. Measure the stage 7 to 8 stator vane path diameter at location 1057.

      2. Do steps A.(1) and B.(1) thru B.(4) to measure the stage 7 to 8 stator vane path diameter.

      1. Measure the stage 8 to 9 stator vane path diameter at location 1058.

      2. Do steps A.(1) and B.(1) thru B.(4) to measure the stage 8 to 9 stator vanes path diameter.

      1. Measure the stage 9 to 10 stator vane path diameter at location 1059.

      2. Do steps A.(1) and B.(1) thru B.(4) to measure the stage 9 to 10 stator vane path diameter.

      1. Measure the stage 10 to 11 stator vane path diameter at location 1060.

      2. Do steps A.(1) and B.(1) thru B.(4) to measure the stage 10 to 11 stator vane path diameter.

      1. Measure the stage 11 to 12 stator vane path diameter at location 1061.

      2. Do steps A.(1) and B.(1) thru B.(4) to measure the stage 11 to 12 stator vane path diameter.

      1. Calculate the stator vane path diameters.

        1. Calculate the diameter of each of the stator vane paths as follows:

          Stator vane path diameter = 2 (A + B)

          where, A = Tool setting radius

          B = Transducer setting

        2. The tool setting radius values (A) used in the calculations for the different stator vane path diameters are as follows:

          A = 8.5630in. (217.50 mm) for the stage 6 to 7 vane path (location 1056).

          A = 8.8976in. (226.00 mm) for the stage 7 to 8 vane path (location 1057).

          A = 9.1142in. (231.50 mm) for the stage 8 to 9 vane path (location 1058).

          A = 9.2520in. (235.00 mm) for the stage 9 to 10 vane path (location 1059).

          A = 9.2716in. (235.50 mm) for the stage 10 to 11 vane path (location 1060).

          A = 9.2716in. (235.50 mm) for the stage 11 to 12 vane path (location 1061).

          Refer to Step for calculation examples.

      2. Write down the calculated minimum and maximum diameters for each of the stator vane paths. The 6 to 7 and 7 to 8 stator vane path diameters are to be used in the INSPECTION/CHECK of the 3 to 8 compressor disk; refer to TASK 72-41-11-200-000 (INSPECTION/CHECK-000). The 8 to 9, 9 to 10, 10 to 11 and 11 to 12 stator vane path diameters are to be used in the INSPECTION/CHECK of the 9 to 12 compressor disk assembly; refer to TASK 72-41-12-200-000 (INSPECTION/CHECK-000).

    1. SUBTASK 72-41-10-040-083 Set the Transducer Carrier to the Zero Position

    2. Refer to: Figure

      1. Set the zero position of the 3 to 4 seal and rear rotating seal transducer carrier. Use IAE 1R18463 Transducer carrier 1 off.

        1. Install the necessary setting block on to the transducer carrier using a suitable bolt.

        2. IAE 1R18496 Setting block 1 off for the rear fin diameter.

        3. IAE 1R18497 Setting block 1 off for the middle fin diameter.

        4. IAE 1R18498 Setting block 1 off for the front fin diameter.

      2. Connect the transducer carrier to the digital read out equipment.

      3. Loosen the two setscrews that safety the transducer in to the rear transducer block.

        1. Install the transducer carrier on to IAE 1R18639 Setting gage 1 off.

        2. Align the transducer with the correct setting block on the setting gage and at the same time locate the two location plates of the transducer carrier in to the location slot in the setting gage.

        3. Make sure that the setting block IAE 1R18496 Setting block, IAE 1R18497 Setting block or IAE 1R18498 Setting block touches the front stop on the setting gage.

        4. Adjust the position of the transducer in the rear transducer block until the roller touches the setting block and the transducer is approximately in the middle of its range of movement.

        5. Tighten the two setscrews to safety the transducer in position in the rear transducer block.

    1. SUBTASK 72-41-10-040-072 Measure and Calculate the HP Compressor Rear Rotating Seal Fin Diameters

    2. Refer to: Figure and Figure

      1. Set the zero position of IAE 1R18463 Transducer carrier 1 off.

      2. Do the procedure given in Step using IAE 1R18498 Setting block 1 off.

      1. Measure the rear rotating seal fin diameter at locations 1401A.

        1. Install the transducer carrier in the correct position on the seal check beam.

        2. Carefully locate the transducer roller on the front seal fin at location 1401A and at the same time locate the transducer carriers two location plates in to the slot in the seal check beam.

        3. Move the transducer carrier in the location slot until the setting block touches the threaded stop on the seal check beam.

      2. Turn the HP compressor rotor smoothly in a clockwise direction.

      3. Write down the minimum and maximum values given on the transducer display. Also record the values as a negative or positive reading.

      4. Remove the transducer carrier from the seal check beam.

      1. Set the zero position of IAE 1R18463 Transducer carrier.

      2. Do the procedure given in SUBTASK 72-41-10-090-083 using IAE 1R18497 Setting block 1 off.

      1. Measure the rear rotating seal fin diameter at locations 1401B.

        1. Install the transducer carrier in the correct position on the seal check beam.

        2. Carefully locate the transducer roller on the middle seal fin at location 1401B and at the same time locate the transducer carriers two location plates in to the slot in the seal check beam.

        3. Move the transducer carrier in the location slot until the setting block touches the threaded stop on the seal check beam.

      2. Turn the HP compressor rotor smoothly in a clockwise direction.

      3. Write down the minimum and maximum values given on the transducer display. Also record the values as a negative or positive reading.

      4. Remove the transducer carrier from the seal check beam.

      1. Set the zero position of IAE 1R18463 Transducer carrier.

      2. Do the procedure given in SUBTASK 72-41-10-090-083 using IAE 1R18496 Setting block 1 off.

      1. Measure the rear rotating seal fin diameter at locations 1401C.

        1. Install the transducer carrier in the correct position on the seal check beam.

        2. Carefully locate the transducer roller on the first seal fin at location 1401C and at the same time locate the transducer carriers two location plates in to the slot in the seal check beam.

        3. Move the transducer carrier in the location slot until the setting block touches the threaded stop on the seal check beam.

      2. Turn the HP compressor rotor smoothly in a clockwise direction.

      3. Write down the minimum and maximum values given on the transducer display. Also record the values as a negative or positive reading.

      4. Remove the transducer carrier from the seal check beam.

      1. Calculate the rear rotating seal fin diameters at locations 1401A, 1401B and 1401C.

      2. Calculate the diameter of each of the seal fins as follows:

        Seal fin diameter = 2 (A + B)

        where A = Tool setting radius = 4.5669in. (116.00 mm)

        B = Transducer reading

        Refer to TASK 72-41-10-040-001-B00, SUBTASK 72-41-10-040-086 for calculation examples

      3. Write down the calculated minimum and maximum diameters for each of the seal fins. This data is to be used in the INSPECTION/CHECK of the rear rotating air seal. Refer to TASK 72-41-14-200-000.

    1. SUBTASK 72-41-10-040-056 Remove the HP Compressor Rotor Assembly from the Tip Check Fixture

    2. Remove the seal check beam from the tip check fixture.

    3. Remove the brake strap from the front pedestal.

    4. Remove the front and rear location blocks from the front and rear pedestals.

    5. Turn the quarter turn screw in the front and rear brackets, 90 degrees and move the brackets down on to the stop plates.

    6. Remove the thruster plate adapter from the compressor shaft.

    7. Attach a hoist to the compressor rotor and lift the rotor clear of the tip check fixture.

    1. SUBTASK 72-41-10-040-057 Install the HP Compressor Rotor Assembly in to the Trolley

    2. Refer to: Figure

      1. CAUTION

        DO NOT LET THE COMPRESSOR ROTOR ASSEMBLY HIT THE TROLLEY.

        Install the compressor rotor assembly in to the IAE 1R18059 Trolley 1 off.

      2. Move the compressor rotor and put it above the trolley. Make sure the trunnions on the universal slinging adapter (front) are above the trunnion supports.

      3. Lower the rotor until the trunnions engage in the trunnion supports.

    3. Remove the hoist.

      1. Install the IAE 1R18061 Rail 2 off on to the trolley.

      2. Remove the eight bolts from the trolley rail locations.

      3. Install the rails on to the trolley and safety with the eight bolts.

    1. SUBTASK 72-41-10-040-074 Remove the HP Compressor Rotor Assembly from the Trolley and Install it in to the Grinding Machine

    2. Refer to: Figure and Figure

      1. Install IAE 1R18081 Beam sling 1 off to the HP compressor rotor assembly.

      2. Make sure that the bracket is at the identified position for the center of gravity of the beam sling only.

      3. Attach a hoist to the ring.

      4. Lift the beam sling and put it above the rotor assembly.

      5. Adjust the height of the beam sling until the shackles and screw pins can be attached to the universal sling adapter. Remove the screw pins.

      6. Install the screw pins through the shackles and universal sling adapters; tighten the screw pins.

      7. Set the beam sling to the identified position for the center of gravity of the beam sling and rotor assembly.

    3. Carefully lift the HP compressor rotor assembly out of the trolley and install it on to an applicable stand which will permit the grinding machine tools to be installed.

      1. Remove the beam sling from the HP compressor rotor assembly.

      2. Set the beam sling to the identified position for the center of gravity of the beam sling only.

      3. Remove the screw pins from the shackles and disengage the shackles from the universal sling adapters.

      4. Install the screw pins in to the shackles and then lift the beam sling away from the rotor assembly. Put the beam sling on to an applicable surface and remove the hoist.

    4. Remove the necessary tools from the HP compressor rotor assembly to permit the grinding machine adapters to be installed. Refer to Figure.

    5. Install the applicable grinding machine adapters on to the HP compressor rotor assembly to prepare it for installation in to the grinding machine.

    6. Install the applicable tools which are necessary to lift the HP compressor rotor assembly.

    7. Carefully lift the HP compressor rotor assembly and install it in to the grinding machine.

    8. Safety the headstock and tailstock adapters in position.

    9. Remove the tools which were used to lift the HP compressor rotor assembly.

    1. SUBTASK 72-41-10-040-075 Measure the Swash and Run-out of the HP Compressor Rotor Assembly

    2. Measure the swash and run-out of the HP compressor rotor assembly on the applicable tool surfaces.

    3. Make sure the swash and run-out are not more than 0.0012in. (0.03 mm).

    1. SUBTASK 72-41-10-040-073 Measure the Length of the HP Compressor Blades (SBE 72-0370)

    2. Refer to: Figure and Figure

    3. SBE 72-0370: HP compressor blades - introduction of increased stage 4 rotor blade tip clearance

      NOTE

      The grinding machine must use a laser to measure the blade lengths.
    4. Measure the blade lengths and write the results.

    1. SUBTASK 72-41-10-040-076 Remove the HP Compressor Rotor Assembly from the Grinding Machine and Install it in to the Trolley

    2. Refer to: Figure and Figure

    3. Install the tools which are necessary to lift the HP compressor rotor assembly out of the grinding machine.

    4. Attach a hoist to the tools.

    5. Remove the bolts which secure the HP compressor rotor assembly to the headstock and tailstock of the grinding machine.

    6. Lift the HP compressor rotor assembly out of the grinding machine and put it on to an applicable stand.

    7. Remove the hoist and tools which were installed on to the HP compressor rotor assembly for installation in to the grinding machine.

    8. Put IAE 1R18629 Protective cover 1 off on to the end of the HP compressor shaft.

    9. Install IAE 1R18089 Lifting adapter 1 off to the end of the HP compressor shaft. Tighten the lifting adapter.

      1. Attach one of IAE 1R18095 Universal slinging adapter 1 off on to the lifting adapter. Refer to Figure and Figure.

      2. Lift pin E and put the adapter end of the tool in to the adapter. Turn the tool to engage the locations. Lower pin E.

      3. Install the lifting end of the tool in to the adapter end. Install the trunnion pin through both parts of the tool and tighten it.

      4. Tighten the locknut on to the lifting adapter.

      1. Make sure the IAE 1R18673 Dummy stub shaft 1 off is installed to the HP compressor rotor assembly. Do the steps which follow if the dummy stub shaft was removed for the installation of the grinding machine tools.

      2. Examine the curvic teeth of the dummy stub shaft and the stage 3 disk for contamination and/or high metal. If there is contamination then the curvic teeth must be cleaned. If there is high metal, use a stone to make the surface smooth.

      3. Align the four location dowels in the dummy stub shaft with the holes in the stage 3 disk curvic coupling.

      4. Install the dummy stub shaft on to the curvic coupling and engage the 20 bolts in the dummy stub shaft in to the holes in the stage 3 disk. Lightly tighten the bolts.

        1. Torque all of the bolts. Do these three steps in the sequence shown. Refer to Figure.

        2. Torque all of the bolts to 18 lbfin (2.034 Nm).

        3. Torque all of the bolts to 35 lbfin (3.955 Nm).

        4. Torque all of the bolts to 70 * lbfin (7.900 Nm).

      1. Install the second universal sling adapter on to the dummy stub shaft.

      2. Do steps H.(1) thru H.(3) again.

    10. Install IAE 1R18081 Beam sling 1 off to the HP compressor rotor assembly. Refer to Step.

      1. Install the HP compressor rotor assembly in to IAE 1R18059 Trolley 1 off. Refer to Figure and Figure.

      2. Lift the compressor rotor assembly and put it above the trolley. Make sure that the trunnions on the universal sling adapters are above the trunnion supports.

      3. Carefully lower the compressor rotor assembly in to the trolley. Make sure that the trunnions on the universal sling adapters engage in the trunnion supports of the trolley.

      1. Make sure IAE 1R18629 Protective cover is installed on to the compressor rotating air seals. Refer to Figure.

      2. Engage the protective cover over the compressor rotating air seals. Make sure the protective cover is correctly installed on the seals.

      3. Attach the O ring on to the O ring location to safety the protective cover.

    11. Remove the beam sling from the compressor rotor assembly. Refer to Step.

      1. Install IAE 1R18061 Rail 2 off on to the trolley.

      2. Remove the eight bolts from the trolley rail locations.

      3. Install the rails on to the trolley and safety with the eight bolts.

    1. SUBTASK 72-41-10-040-058-A00 Remove the Blades from the HP Compressor Rotor Assembly (Pre SBE 70-0064, Pre SBE 72-0161, Pre SBE 72-0300 and Pre SBE 72-0304)

      NOTE

      Keep the blades that were identified with a mark (in SUBTASK 72-41-10-040-073-B00) apart from the other blades during removal.
      1. Remove the stage 12 blades.

      2. With IAE 1R18590 Socket end 1 off release the two jacking screws and locknuts.

      3. With IAE 1R18097 Drift 1 off move the blades around the disk until a blade can be removed through the loading slot.

      4. Do step (2) again, to remove each blade and the two jacking screws and locknuts, until all the blades have been removed.

      5. Discard all the jacking screws and locknuts.

      1. Remove the blades from the stages 11 thru 6 disks.

      2. Do steps A.(1) thru A.(3) for each stage of blades.

      1. Remove the blades from the stage 3 disk.

      2. With an approved tool remove the lockplates from the rear of the stage 3 disk and discard.

      3. With IAE 1R18079 Drift 1 off move the retaining plates around the disk to close up the spaces between them. This will give sufficient space to remove one blade, forwards, from the disk.

      4. Continue to move the retaining plates around in a counterclockwise direction (when viewed from the rear) until the next blade can be removed.

      5. Continue this procedure until sufficient blades have been removed to let you remove one of the retaining plates.

      6. Move the retaining plates, in turn, around the disk until they have all been removed.

      7. Remove the remaining blades in a counterclockwise direction from the stage 3 disk.

      1. Remove the blades from the stage 4 disk.

      2. With an approved tool remove the lockplates from the front of the stage 4 disk and discard.

      3. With IAE 1R18080 Drift 1 off move the retaining plates around the disk to close up the space between them. This will give sufficient space to remove one blade, forwards, from the disk.

      4. Continue to move the retaining plates around the disk until sufficient blades have been removed to let you remove one of the retaining plates.

      5. Move the retaining plates, in turn, around the disk until they have all been removed.

      6. Remove the remaining blades from the stage 4 disk.

      7. Remove and discard the sealing strips HPC Rotor Blades (72-41-15, 01-520) from all the stage 4 blades.

      1. Remove the blades from the stage 5 disk.

      2. Do steps D.(1) thru D.(5) to remove the retaining plates and the blades from the stage 5 disk.

      3. Remove and discard the sealing strips HPC Rotor Blades (72-41-15, 01-820) from all the stage 5 blades.

    1. SUBTASK 72-41-10-040-058-B00 Remove the Blades from the HP Compressor Rotor Assembly (SBE 70-0064, SBE 72-0161, Pre SBE 72-0300 and Pre SBE 72-0304)

      NOTE

      1. Keep the blades that were identified with a mark (in SUBTASK 72-41-10-073-B00) apart from the other blades during removal.

      2. Each nut and screw lock assembly must be kept as a set.

    2. SBE 70-0064: Provide matched pairs of compressor blade locking bolts and jackscrews

      SBE 72-0161: HP disks and blades - Stages 7 and 8 rotor blades with damping wires and stages 6, 7 and 8 blades with anti-fret coating

      1. Remove the stage 12 blades.

      2. With IAE 1R18590 Socket end 1 off release the two nut and screw lock assemblies.

      3. With IAE 1R18097 Drift 1 off move the blades around the disk until a blade can be removed through the loading slot.

      4. Do step (2) again, to remove each blade and the two nut and screw lock assemblies, until all the blades have been removed.

      1. Remove the blades from the stages 11, 10 and 9 disks.

      2. Do steps A.(1) thru A.(3) for each stage of blades.

        NOTE

        To drill out seized blade locknuts use the following tools: IAE 1R18911 Drill 1 off, IAE 18914 Setting gage 1 off (stage 6), IAE 18913 Setting gage 1 off (stage 7) and IAE 1R18912 Setting gage 1 off (stage 8).
      1. Remove the blades from the stage 6, 7 and 8 disks.

      2. Remove the damping wires from the disks and do steps A.(1) thru A.(3) to remove the blades.

      1. Remove the blades from the stage 3 disk.

      2. With an applicable tool remove the lockplates from the rear of the stage 3 disk and discard.

      3. With IAE 1R18079 Drift 1 off move the retaining plates around the disk to close up the spaces between them. This will give sufficient space to remove one blade, forwards, from the disk.

      4. Continue to move the retaining plates around in a counterclockwise direction (when viewed from the rear) until the next blade can be removed.

      5. Continue this procedure until sufficient blades have been removed to let you remove one of the retaining plates.

      6. Move the retaining plates, in turn, around the disk until they have all been removed.

      7. Remove the remaining blades in a counterclockwise direction from the stage 3 disk.

      1. Remove the blades from the stage 4 disk.

      2. With an applicable tool remove the lockplates from the front of the stage 4 disk and discard.

      3. With IAE 1R18080 Drift 1 off move the retaining plates around the disk to close up the space between them. This will give sufficient space to remove one blade, forwards, from the disk.

      4. Continue to move the retaining plates around the disk until sufficient blades have been removed to let you remove one of the retaining plates.

      5. Move the retaining plates, in turn, around the disk until they have all been removed.

      6. Remove the remaining blades from the stage 4 disk.

      7. Remove and discard the sealing strips HPC Rotor Blades (72-41-15, 01-520) from all the stage 4 blades.

      1. Remove the blades from the stage 5 disk.

      2. Do steps E.(1) thru E.(5) to remove the retaining plates and the blades from the stage 5 disk.

      3. Remove and discard the sealing strips HPC Rotor Blades (72-41-15, 01-820) from all the stage 5 blades.

    1. SUBTASK 72-41-10-040-058-C00 Remove the Blades from the HP Compressor Rotor Assembly (SBE 72-0300)

      CAUTION

      SBE72-0300 STAGE 3-8 DISKS AND SEALING WIRES HPC Stage 3 - 8 Drum Disk And Wire Seals (72-41-11, 01-390 , HPC Stage 3 - 8 Drum Disk And Wire Seals 01-392, HPC Stage 3 - 8 Drum Disk And Wire Seals 01-394 AND HPC Stage 3 - 8 Drum Disk And Wire Seals 01-396) ARE NOT INTERCHANGEABLE WITH OTHER SERVICE BULLETIN STANDARDS.

      NOTE

      1. Keep the blades that were identified with a mark (in SUBTASK 72-41-10-040-073-B00) apart from the other blades during removal.

      2. Each nut and screw lock assembly must be kept as a set.

    2. SBE 72-0300: HP disks and blades - Introduction of revised stage 3 to 8 disk and revised stage 7 and 8 sealing wires

      1. Remove the stage 12 blades.

      2. With IAE 1R18590 Socket end 1 off release the two nut and screw lock assemblies.

      3. With IAE 1R18097 Drift 1 off move the blades around the disk until a blade can be removed through the loading slot.

      4. Do step (2) again, to remove each blade and the two nut and screw lock assemblies, until all the blades have been removed.

      1. Remove the blades from the stages 11, 10 and 9 disks.

      2. Do steps A.(1) thru A.(3) for each stage of blades.

        NOTE

        To drill out seized blade locknuts use the following tools: IAE 1R18911 Drill 1 off, IAE 18914 Setting gage 1 off (stage 6), IAE 18913 Setting gage 1 off (stage 7) and IAE 1R18912 Setting gage 1 off (stage 8).
      1. Remove the blades from the stage 6, 7 and 8 disks.

      2. Remove the sealing wires from the disks and do steps A.(1) thru A.(3) to remove the blades.

      1. Remove the blades from the stage 3 disk.

      2. With an applicable tool remove the lockplates from the rear of the stage 3 disk and discard.

      3. With IAE 1R18079 Drift 1 off move the retaining plates around the disk to close up the spaces between them. This will give sufficient space to remove one blade, forwards, from the disk.

      4. Continue to move the retaining plates around in a counterclockwise direction (when viewed from the rear) until the next blade can be removed.

      5. Continue this procedure until sufficient blades have been removed to let you remove one of the retaining plates.

      6. Move the retaining plates, in turn, around the disk until they have all been removed.

      7. Remove the remaining blades in a counterclockwise direction from the stage 3 disk.

      1. Remove the blades from the stage 4 disk.

      2. With an applicable tool remove the lockplates from the front of the stage 4 disk and discard.

      3. With IAE 1R18080 Drift 1 off move the retaining plates around the disk to close up the space between them. This will give sufficient space to remove one blade, forwards, from the disk.

      4. Continue to move the retaining plates around the disk until sufficient blades have been removed to let you remove one of the retaining plates.

      5. Move the retaining plates, in turn, around the disk until they have all been removed.

      6. Remove the remaining blades from the stage 4 disk.

      7. Remove and discard the sealing strips HPC Rotor Blades (72-41-15, 01-520) from all the stage 4 blades.

      1. Remove the blades from the stage 5 disk.

      2. Do steps E.(1) thru E.(5) to remove the retaining plates and the blades from the stage 5 disk.

      3. Remove and discard the sealing strips HPC Rotor Blades (72-41-15, 01-820) from all the stage 5 blades.

    1. SUBTASK 72-41-10-040-058-D00 Remove the Blades from the HP Compressor Rotor Assembly (SBE 72-0304)

      CAUTION

      SBE72-0304 STAGE 3-8 DISKS AND SEALING WIRES HPC Stage 3 - 8 Drum Disk And Wire Seals (72-41-11, 01-392 AND HPC Stage 3 - 8 Drum Disk And Wire Seals01-394) ARE NOT INTERCHANGEABLE WITH OTHER SERVICE BULLETIN STANDARDS.

      NOTE

      1. Keep the blades that were identified with a mark (in SUBTASK 72-41-10-040-073-B00) apart from the other blades during removal.

      2. Each nut and screw lock assembly must be kept as a set.

    2. SBE 72-0304: HP disks and blades - Introduction of a reworked stage 3 to 8 disk with revised L shaped sealing wires

      1. Remove the stage 12 blades.

      2. With IAE 1R18590 Socket end 1 off release the two nut and screw lock assemblies.

      3. With IAE 1R18097 Drift 1 off move the blades around the disk until a blade can be removed through the loading slot.

      4. Do step (2) again, to remove each blade and the two nut and screw lock assemblies, until all the blades have been removed.

      1. Remove the blades from the stages 11, 10 and 9 disks.

      2. Do steps A.(1) thru A.(3) for each stage of blades.

      1. CAUTION

        DO NOT REMOVE STAGE 7 AND 8 SEALING WIRES BEFORE REMOVAL OF STAGE 7 AND 8 BLADES.

        NOTE

        To drill out seized blade locknuts use the following tools: IAE 1R18911 Drill 1 off, IAE 18914 Setting gage 1 off (stage 6), IAE 18913 Setting gage 1 off (stage 7) and IAE 1R18912 Setting gage 1 off (stage 8).

        Remove the blades from the stage 6, 7 and 8 disks.

      2. Do steps A.(1) thru A.(3) to remove the blades and remove the sealing wires from the disks.

      1. Remove the blades from the stage 3 disk.

      2. With an applicable tool remove the lockplates from the rear of the stage 3 disk and discard.

      3. With IAE 1R18079 Drift 1 off move the retaining plates around the disk to close up the spaces between them. This will give sufficient space to remove one blade, forwards, from the disk.

      4. Continue to move the retaining plates around in a counterclockwise direction (when viewed from the rear) until the next blade can be removed.

      5. Continue this procedure until sufficient blades have been removed to let you remove one of the retaining plates.

      6. Move the retaining plates, in turn, around the disk until they have all been removed.

      7. Remove the remaining blades in a counterclockwise direction from the stage 3 disk.

      1. Remove the blades from the stage 4 disk.

      2. With an applicable tool remove the lockplates from the front of the stage 4 disk and discard.

      3. With IAE 1R18080 Drift 1 off move the retaining plates around the disk to close up the space between them. This will give sufficient space to remove one blade, forwards, from the disk.

      4. Continue to move the retaining plates around the disk until sufficient blades have been removed to let you remove one of the retaining plates.

      5. Move the retaining plates, in turn, around the disk until they have all been removed.

      6. Remove the remaining blades from the stage 4 disk.

      7. Remove and discard the sealing strips HPC Rotor Blades (72-41-15, 01-520) from all the stage 4 blades.

      1. Remove the blades from the stage 5 disk.

      2. Do steps E.(1) thru E.(5) to remove the retaining plates and the blades from the stage 5 disk.

      3. Remove and discard the sealing strips HPC Rotor Blades (72-41-15, 01-820) from all the stage 5 blades.

    1. SUBTASK 72-41-10-040-059 Install the HP Compressor Disks and Shaft Assembly in to the Build Stand

    2. Refer to: Figure, Figure, Figure and Figure

    3. Install the IAE 1R18091 Support stand 1 off on to the IAE 1R18090 Safety support stand 1 off. Refer to Figure.

    4. Lift the compressor disks and shaft assembly from the trolley and install it on to the safety support stand.

    5. Remove the universal slinging adapter from the dummy stub shaft.

    6. Lift the compressor disks and shaft assembly off the safety support stand and put it above the IAE 1R18020 Build stand 1 off. Refer to Figure.

    7. CAUTION

      YOU MUST NOT LET THE COMPRESSOR DISKS AND SHAFT ASSEMBLY HIT THE BUILD STAND.

      Slowly lower the compressor disks and shaft assembly in to the build stand. Make sure the dummy stub shaft engages in the location in the bottom of the build stand.

    8. Remove the eight screws from the top of the build stand.

      NOTE

      The edge of the support ring that touches the compressor disks and shaft assembly is at an angle. Thus, one face of the support ring is shorter than the other face. The short face must go to the top.
    9. Put one half of IAE 1R18021 Support ring 1 off on to the top of the build stand; align the four holes in the support ring with the four holes in the build stand. Install four of the screws through the support ring in to the build stand. Tighten the screws.

    10. Install the other half of the support ring. Refer to step F. and G.

    11. Remove the lifting adapter and universal slinging adapter from the end of the compressor shaft. Refer to Figure and Figure.

    1. SUBTASK 72-41-10-040-060 Remove the Rotating Air Seal

    2. Refer to: Figure

    3. Remove the protective cover from the rotating air seal.

    4. Remove the bolts that attach the rotating air seal to the compressor shaft.

      1. Install the IAE 1R18628 Extractor 1 off.

      2. Install the thrust plate in to the end of the compressor shaft.

      3. Assemble the extractor and locate the two puller halves on the rotating air seal. Slide the retaining ring down on to the puller halves.

      4. Install the Hydraulic jack 1 off in to the extractor and with IAE 1F10026 Hydraulic hand pump 1 off slowly remove the rotating air seal. Put the rotating air seal on to an applicable surface.

      5. Remove the thrust plate from the compressor shaft.

    1. SUBTASK 72-41-10-040-061 Remove the HP Compressor Shaft

    2. Refer to: Figure and Figure

    3. Install the IAE 1R18441 Lifting adapter 1 off on to the end of the compressor shaft. Refer to Figure.

    4. Remove the nuts that attach the compressor shaft to the stage 9 to 12 disks.

    5. Assemble the IAE 1R18093 Extractor 1 off with the two split rings located on the front face of the shaft forward flange. Make sure the tufnol pads are correctly located on the rear face of the stage 12 disk. Refer to Figure.

    6. With a hoist support the compressor shaft.

    7. CAUTION

      THE SET SCREWS MUST BE TIGHTENED IN SEQUENCE AND NOT MORE THAN ONE TURN AT A TIME.

      Turn each of the six set screws in small increments until the shaft is released from the stage 12 disk. Lift the shaft clear of the stage 12 disk and put it on an applicable surface.

    8. Release the double retaining washers and remove the square head bolts. Discard the double retaining washers.

    1. SUBTASK 72-41-10-040-062-001 Remove the Splined Nuts and Anti-score Washers (Geared Indexing Spanner Method)

    2. Refer to Figure, Figure and Figure.

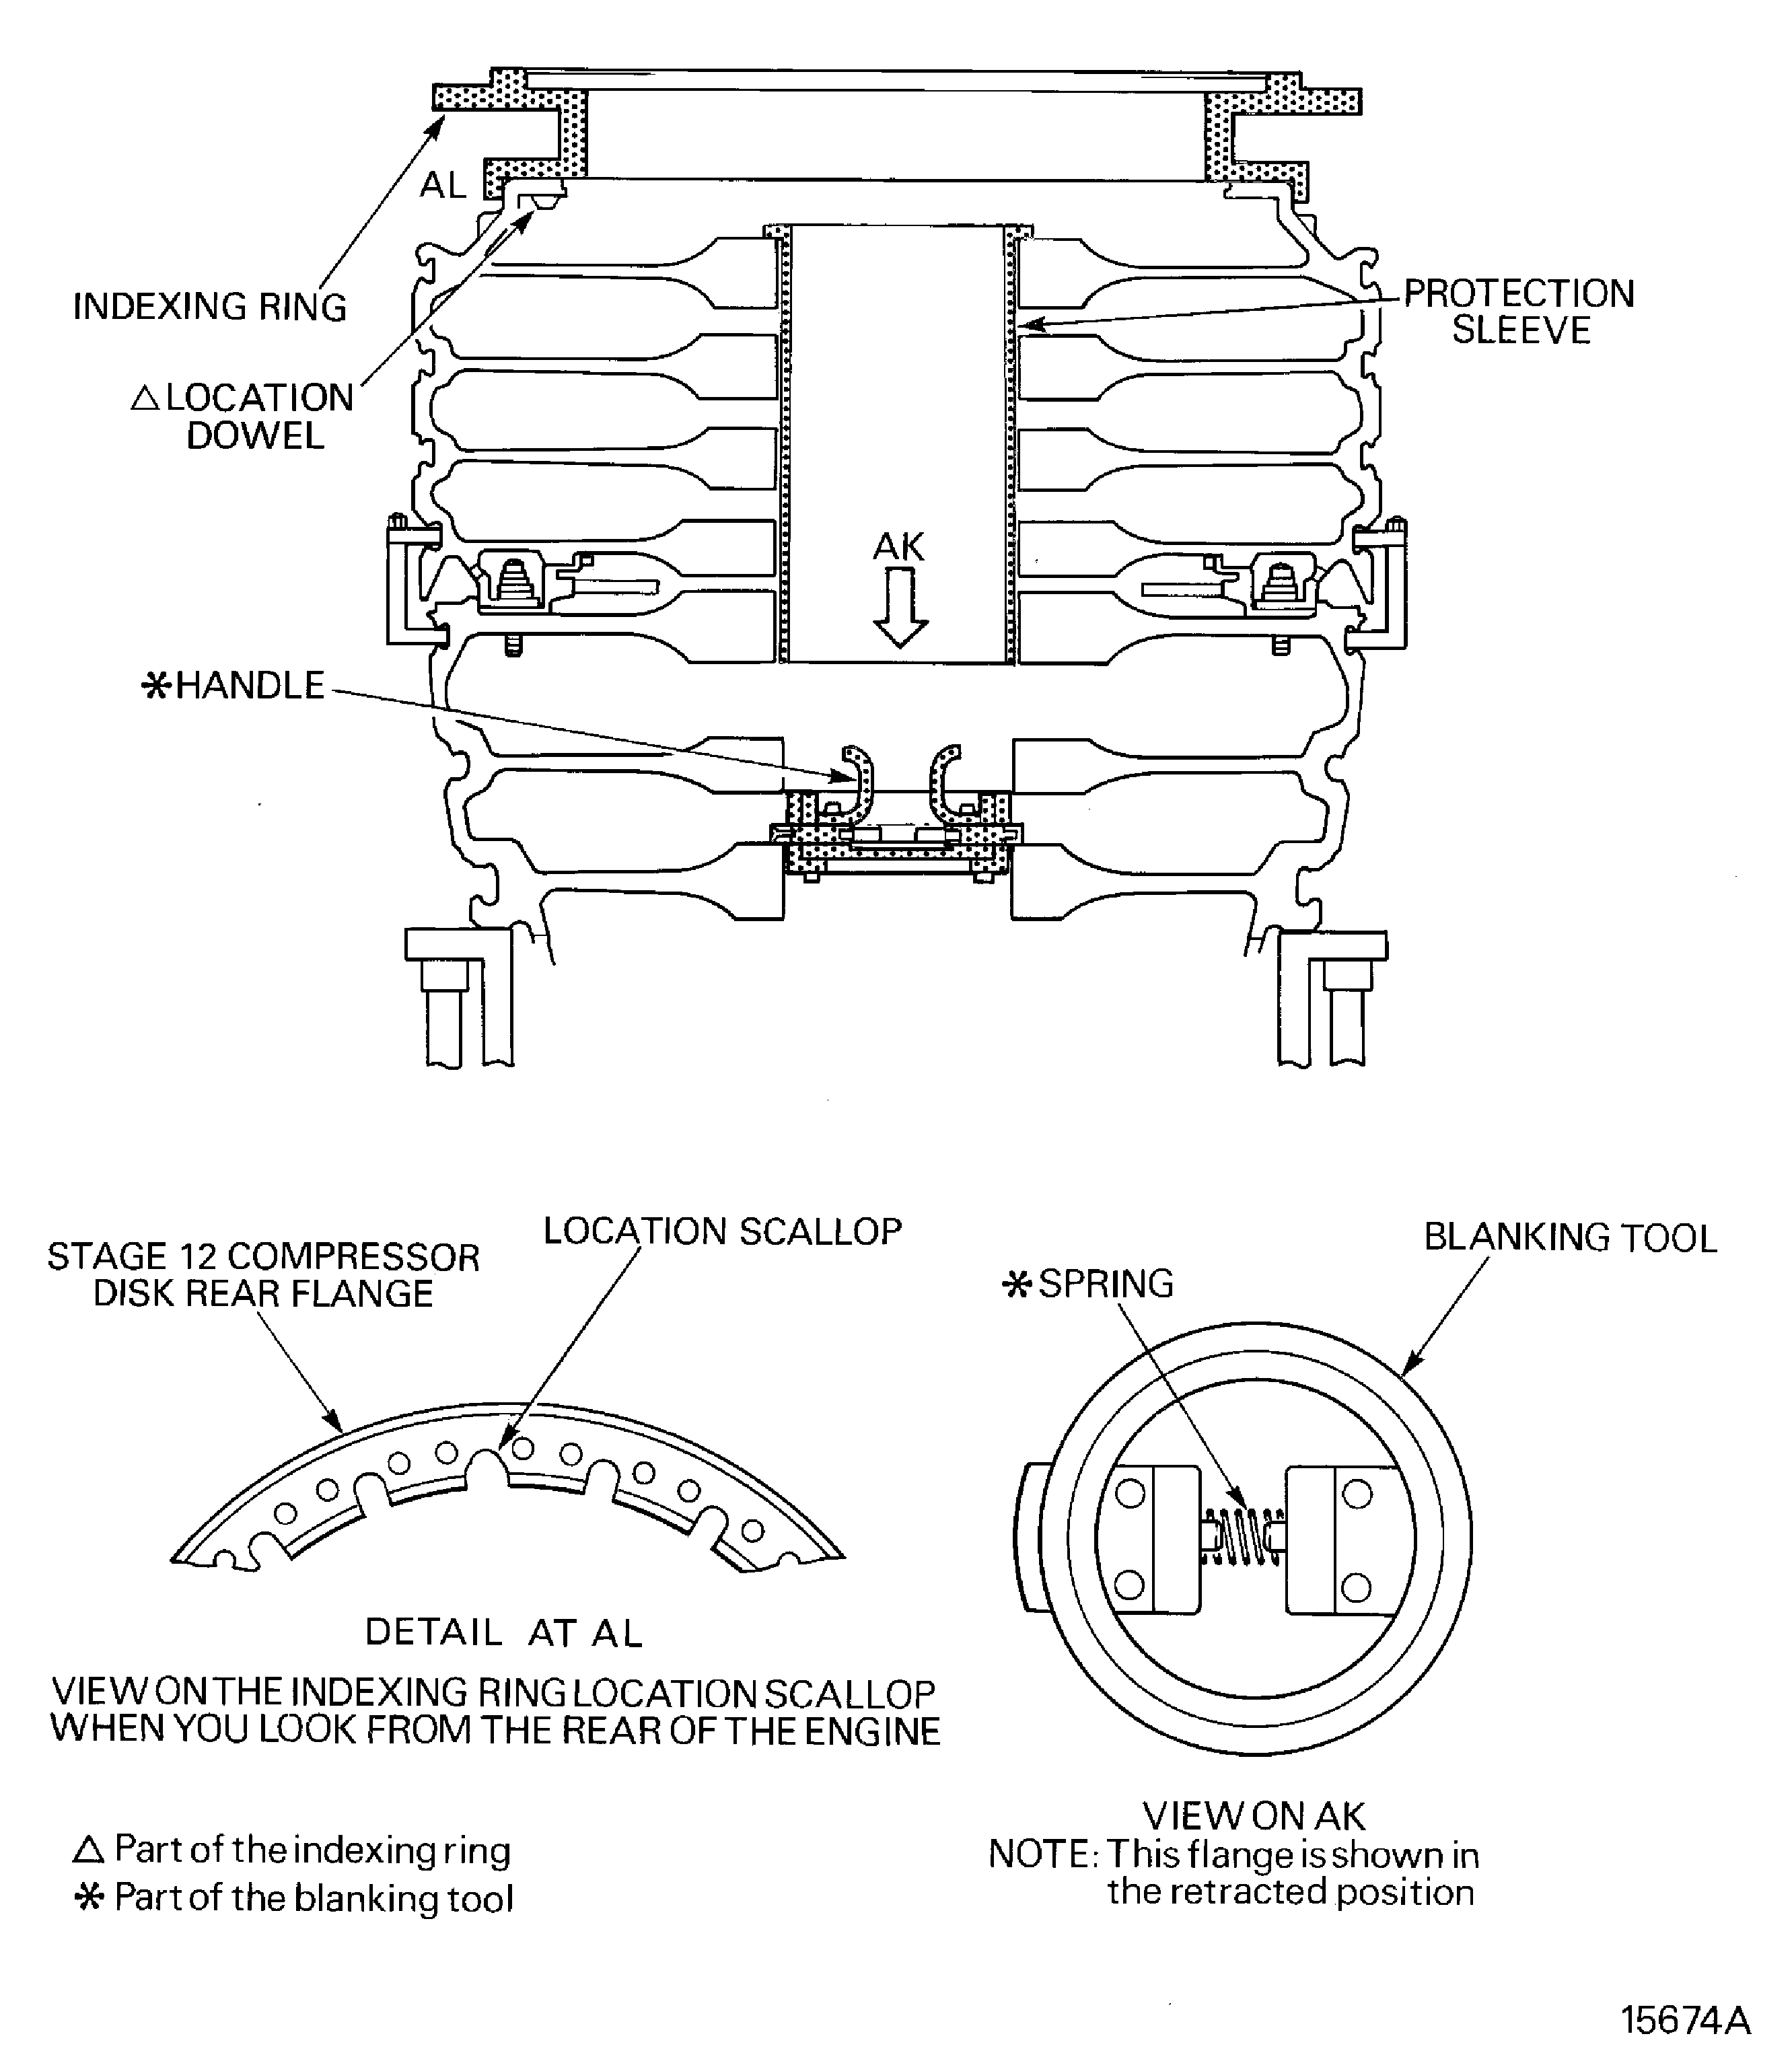
      1. Install IAE 1R18029 Blanking tool 1 off in to the bore of the stages 3 to 12 compressor disks assembly.

      2. Move the handles together to compress the spring and retract the flanges.

      3. Put the blanking tool in to the bore of the stages 3 to 12 compressor disks assembly. Make sure the flanges are aligned with the space between the stage 7 and 6 compressor disks.

      4. Release the handles and put the blanking tool on to the stage 6 compressor disk.

      1. Install IAE 1R18400 Protection sleeve 1 off in to the bore of the stages 3 to 12 compressor disks assembly.

      2. Carefully lower the protection sleeve in to the bore of the stages 3 to 12 compressor disk assembly. Let the rear flange of the protection sleeve touch the rear face of the stage 12 compressor disk.

      1. Install the IAE 1R18027 Indexing ring 1 off on to the stage 12 compressor disk rear flange.

      2. Find the location dowel hole on the stage 12 compressor disk rear flange.

      3. Put the indexing ring (with the numbers to the top) on to the stage 12 compressor disk rear flange. Engage the dowel in the indexing ring in to the location dowel hole. Make sure the stage 12 compressor disk rear flange outer diameter is fully engaged in the indexing ring.

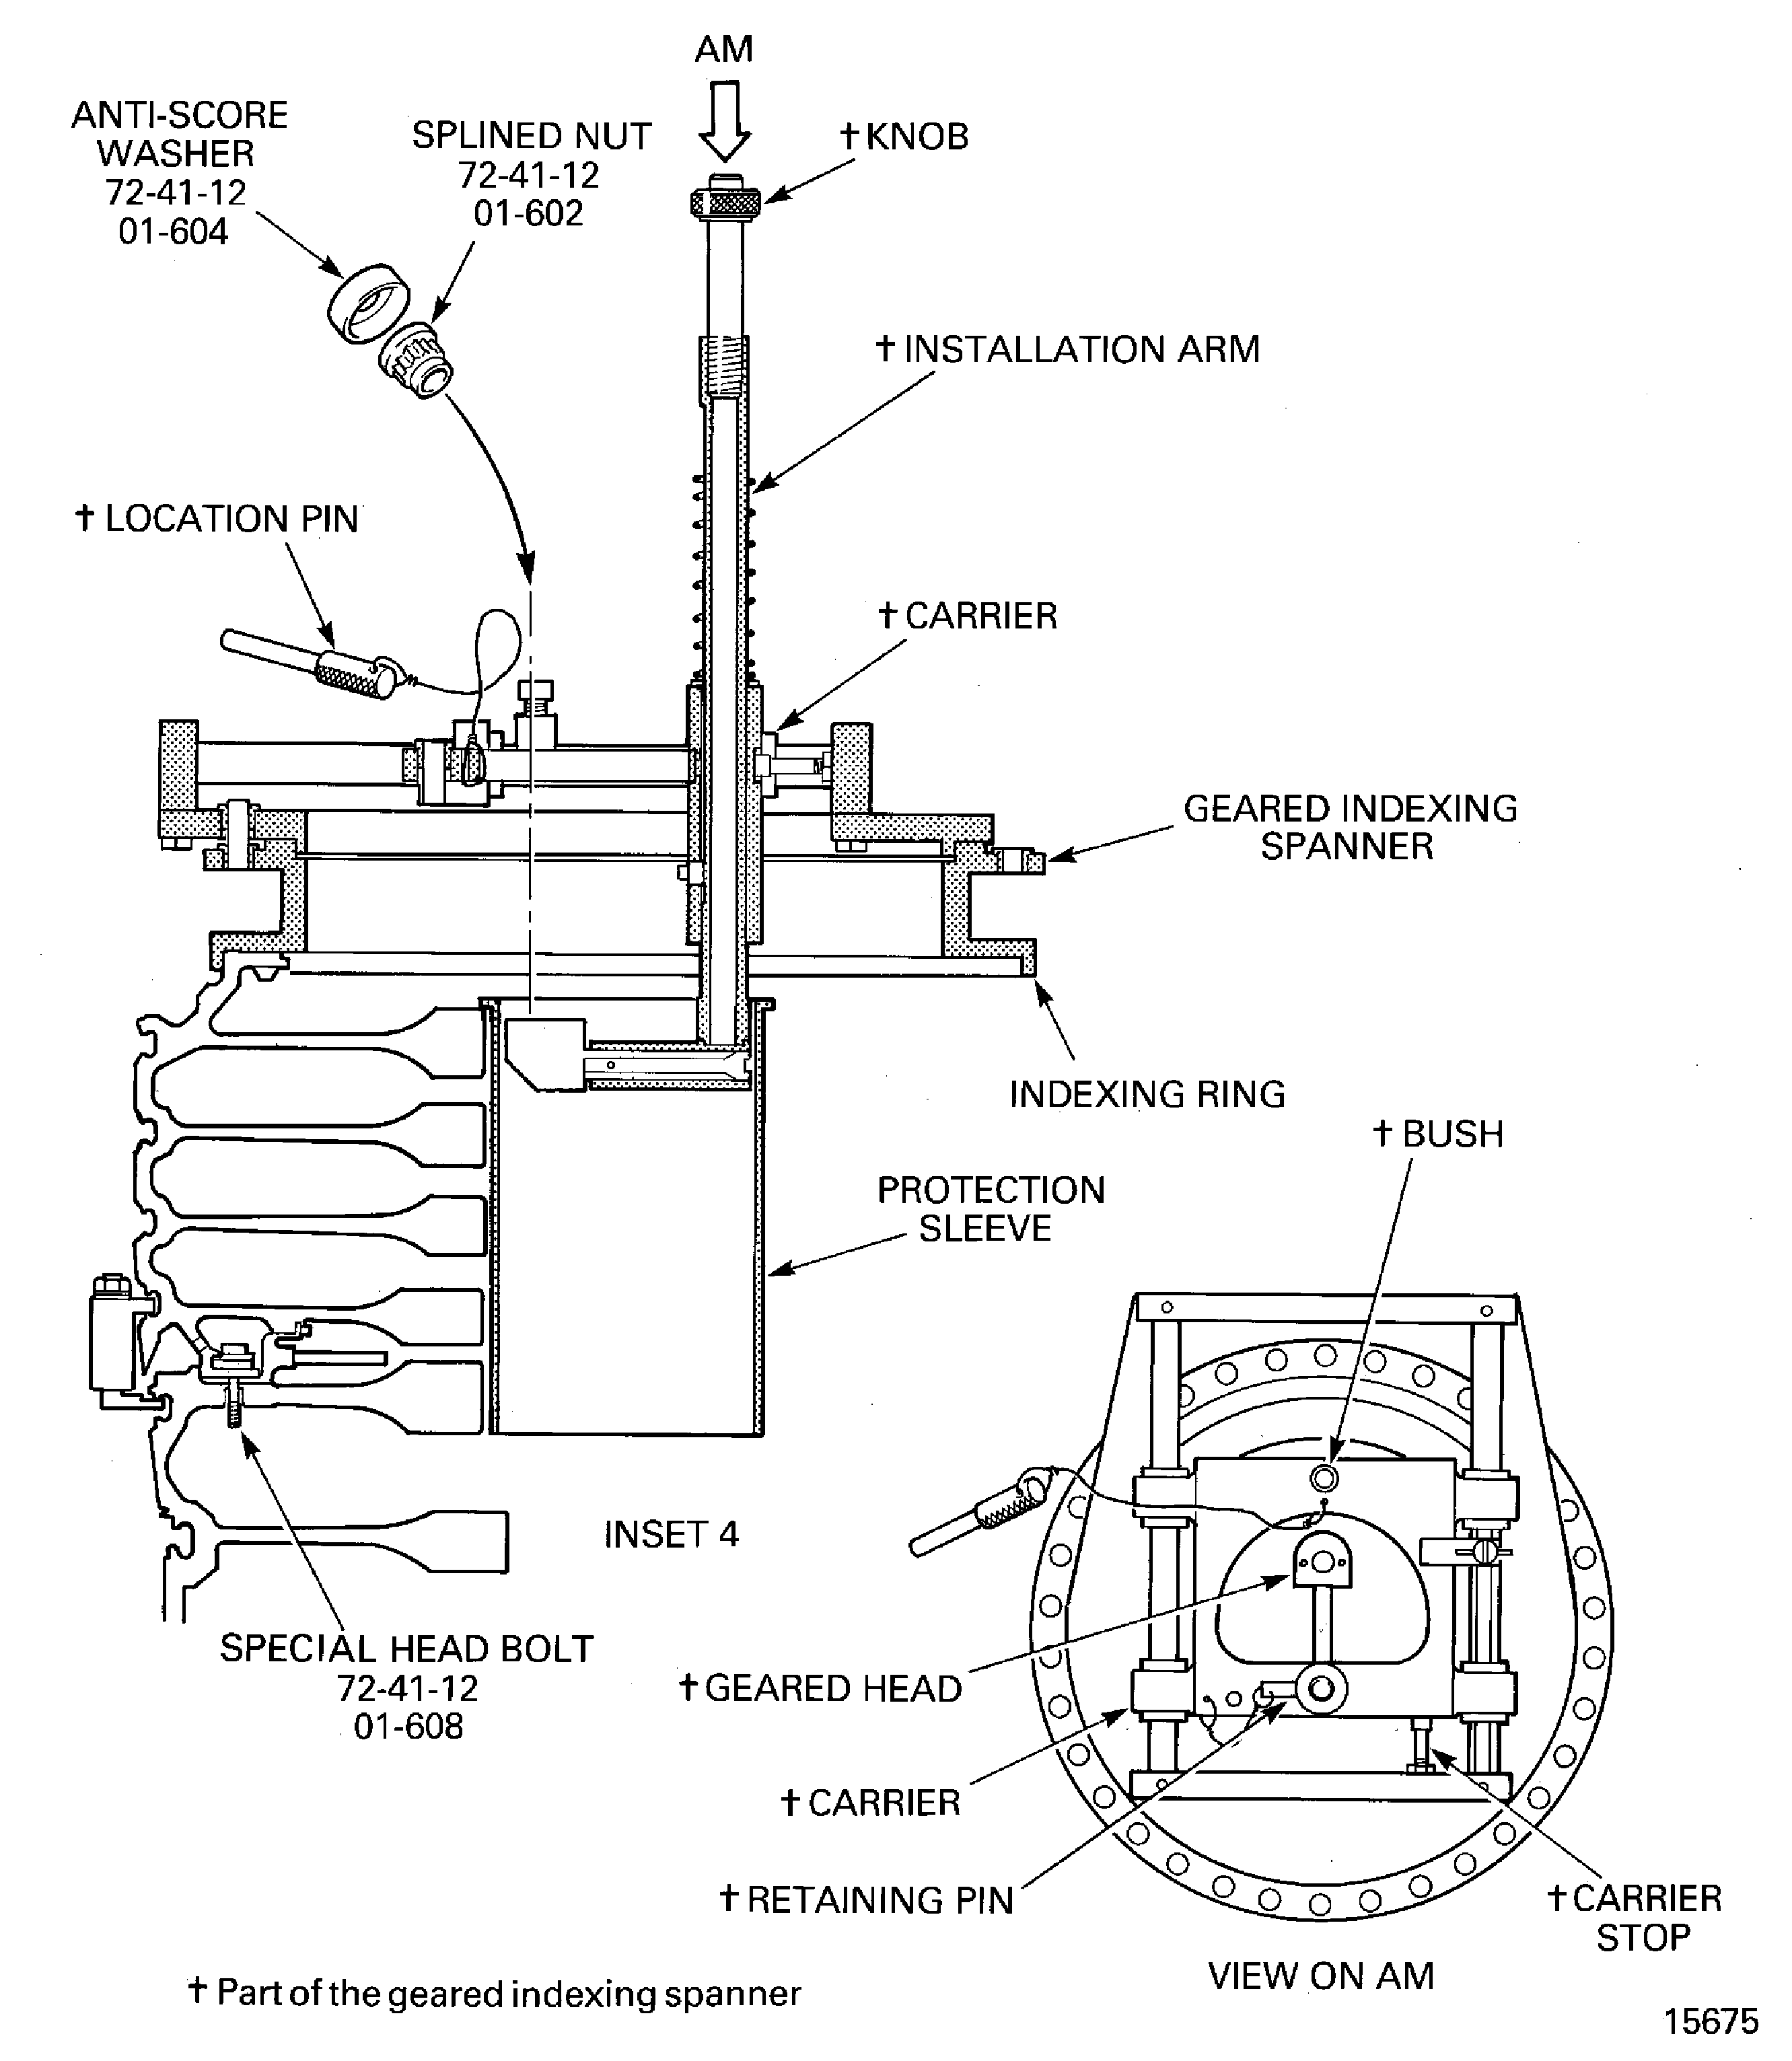
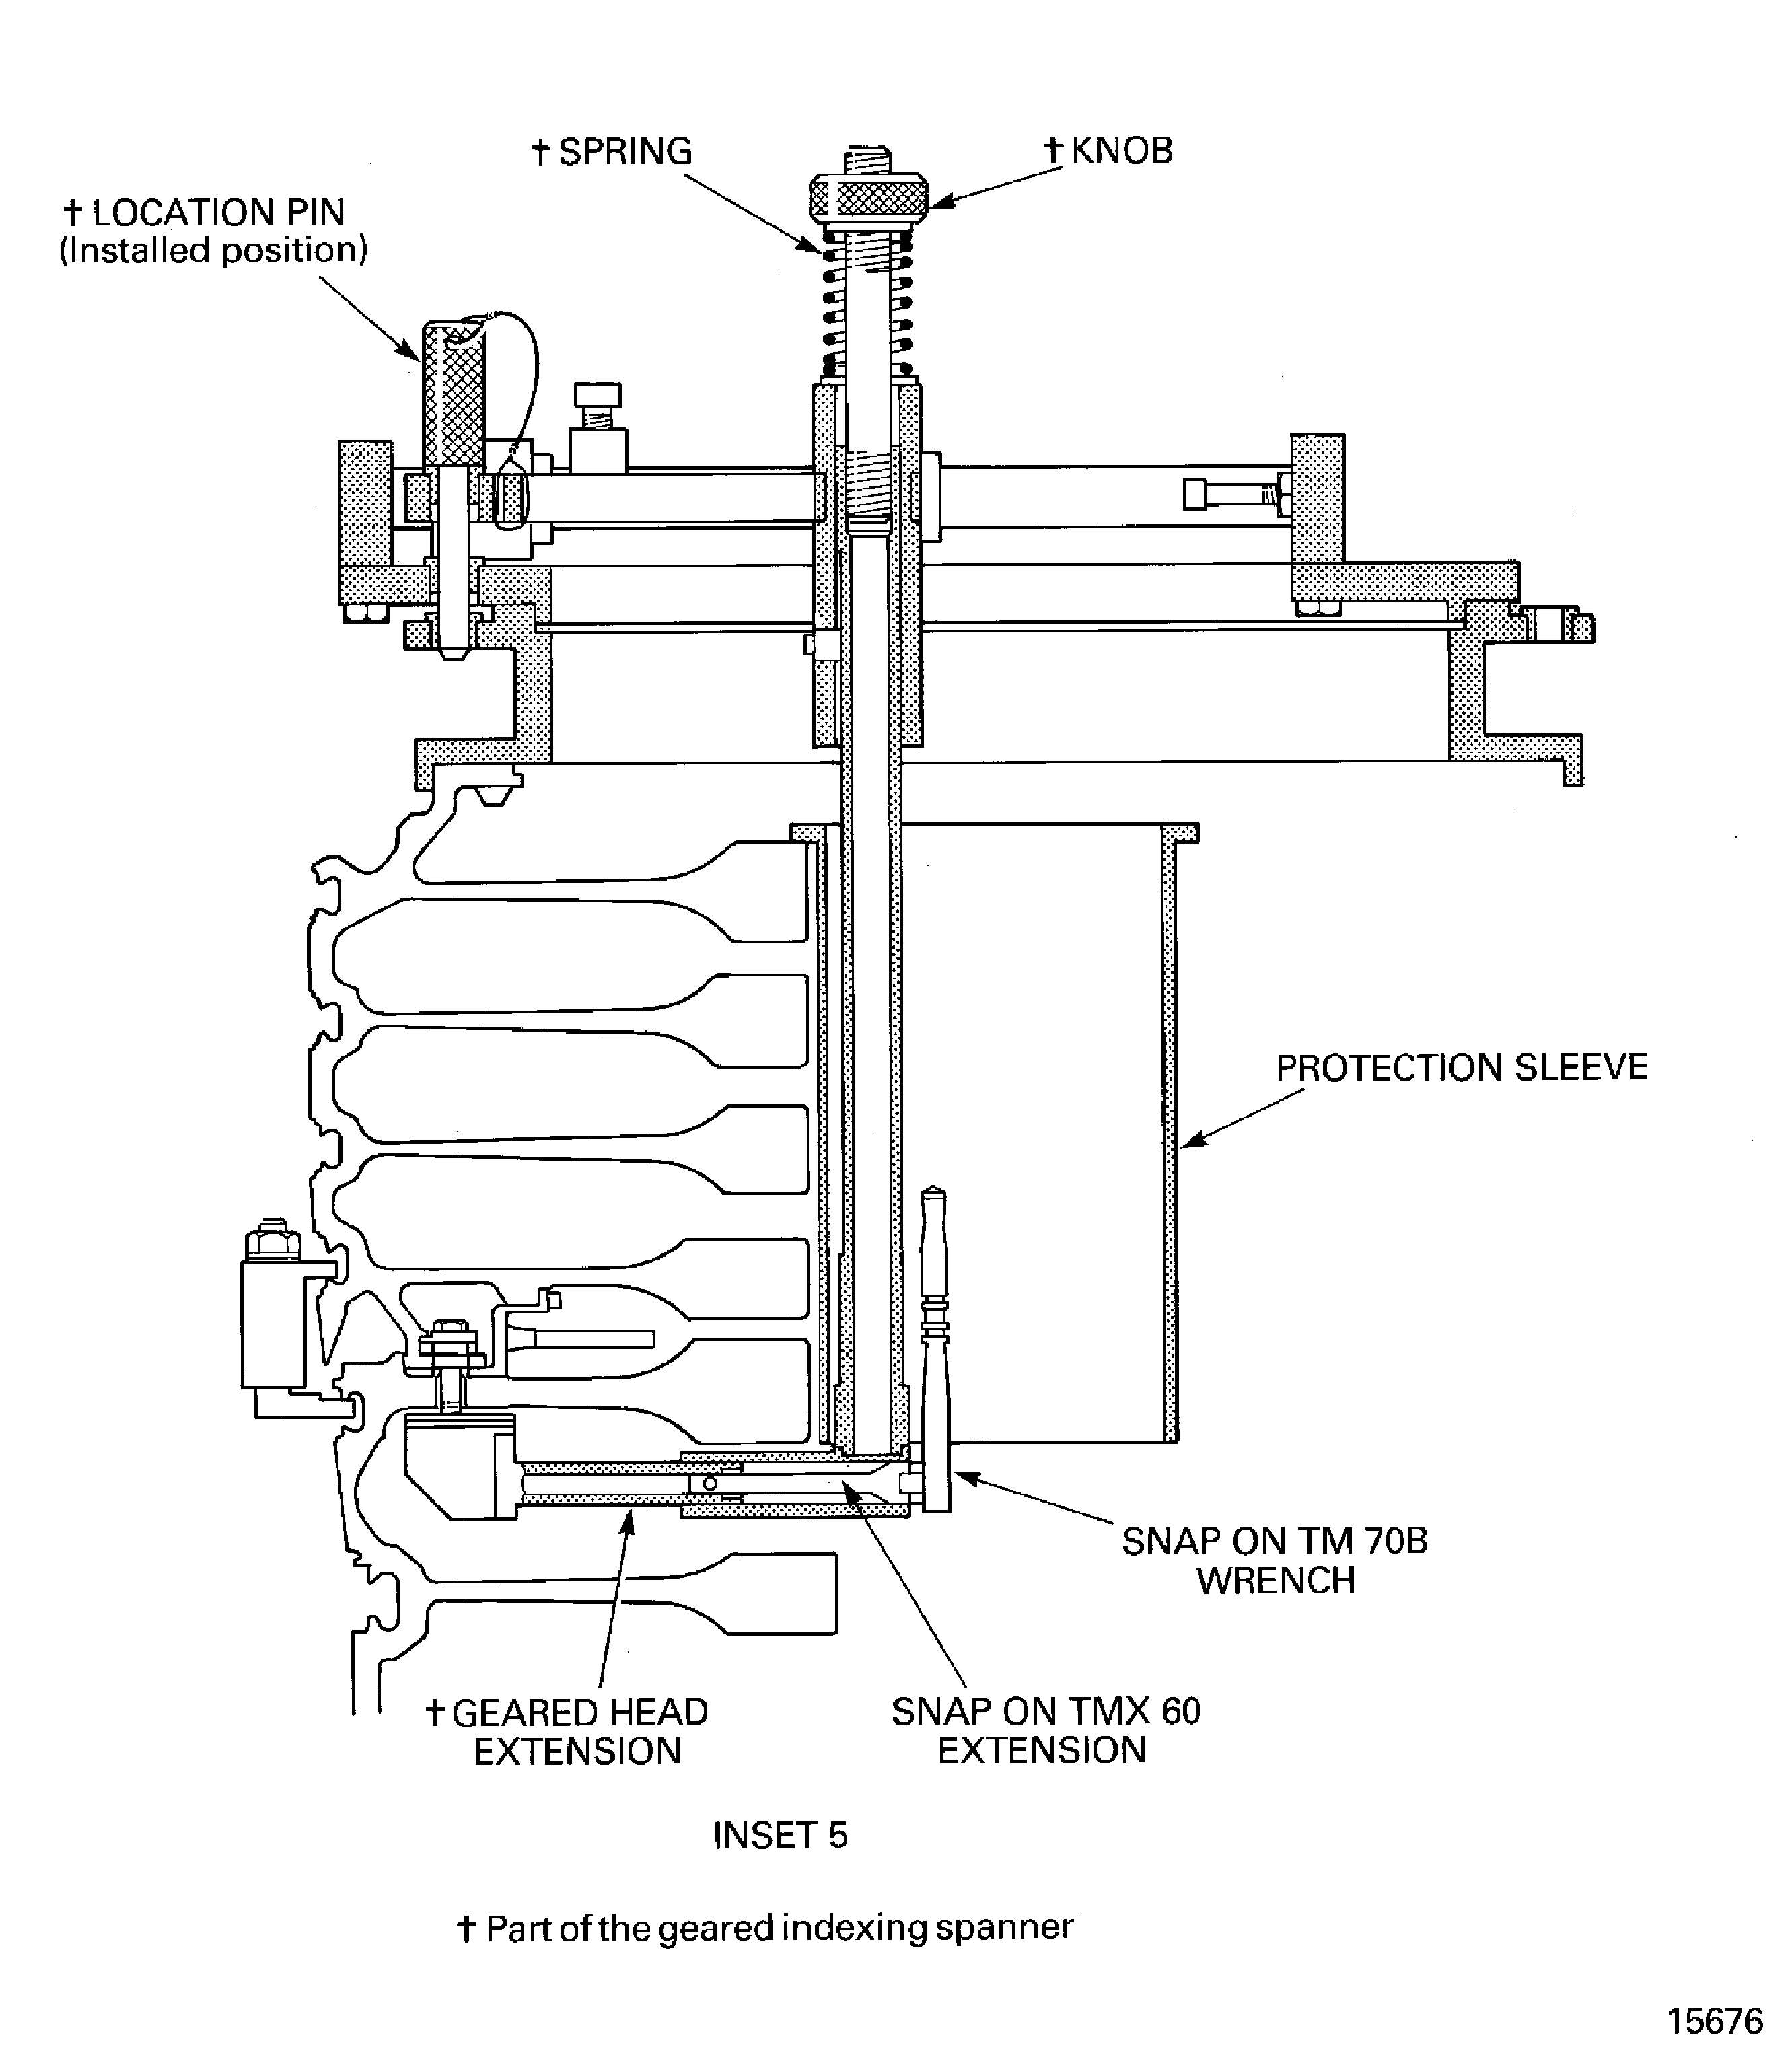
      1. Prepare the IAE 1R18024 Geared indexing spanner 1 off for installation.

      2. Remove the location pin from the bush in the carrier.

      3. Pull the knob (on the end of the installation arm) to move the installation arm out of the carrier.

      4. Install the retaining pin through the hole in the carrier and the installation arm.

      5. Move the carrier until it touches the carrier stop.

      1. Install the geared indexing spanner on to the indexing ring.

      2. Lift the geared indexing spanner and put it on to the indexing ring. Make sure the geared head goes in to the protection sleeve.

      1. Remove the anti-score washers and splined nuts from the special head bolt.

      2. Remove the retaining pin from the carrier and installation arm.

      3. Move the installation arm in to the bore of the stages 3 to 12 compressor disks assembly.

      4. Move the carrier away from the carrier stop until the bush is aligned with the holes in the indexing ring.

      5. Adjust the position of the geared indexing spanner until the bush is aligned with the No. 1 hole in the indexing ring.

      6. Install the location pin through the bush and the No. 1 hole.

      7. Install a Snap-on TMX60 extension in to the geared head extension. Push the extension to move the geared head towards the special head bolts.

      8. Install a Snap-on TM70B wrench on to the extension.

      9. Push the knob (on the end of the installation arm) to compress the spring. At the same time, push the wrench to make the geared head align with the special head bolts. Remove pressure from the knob.

      10. Operate the wrench to remove the splined nut from the special head bolt.

      1. Release the geared head from the splined nut.

      2. Push the knob (on the end of the installation arm) to compress the spring. At the same time, pull the wrench to move the geared head clear of the special head bolt.

      3. Remove the wrench from the extension.

      4. Pull the extension to make the geared head extension fully retract.

      5. Remove the extension from the geared head extension.

      6. Remove the location pin from the bush in the carrier.

      7. Move the carrier until it touches the carrier stop.

      8. Pull the knob (on the end of the installation arm) to move the installation arm out of the carrier.

      9. Install the retaining pin through the hole in the carrier and the installation arm. Remove the splined nut and anti-score washer from the geared head extension.

      1. Remove the other 33 anti-score washers and splined nuts from the special head bolts.

      2. Do steps D. thru H. again and again until all of the spline nuts and anti-score washers have been removed.

      3. Remove all the tooling.

      4. Discard all the splined nuts, anti-score washers, special head bolts and anti-fret plates. Do not use this hardware again.

    1. SUBTASK 72-41-10-040-062-002 Remove the Splined Nuts and Anti-score Washers (Torque Spanner Method)

    2. Refer to Figure and Figure.

      1. Install IAE 1R18029 Blanking tool 1 off in to the bore of the stages 3 to 12 compressor disks assembly.

      2. Move the handles together to compress the spring and retract the flanges.

      3. Put the blanking tool in to the bore of the stages 3 to 12 compressor disks assembly. Make sure the flanges are aligned with the space between the stage 7 and 6 compressor disks.

      4. Release the handles and put the blanking tool on to the stage 6 compressor disk.

      1. Install IAE 1R18400 Protection sleeve 1 off in to the bore of the stages 3 to 12 compressor disks assembly.

      2. Carefully lower the protection sleeve in to the bore of the stages 3 to 12 compressor disk assembly. Let the rear flange of the protection sleeve touch the rear face of the stage 12 compressor disk.

      1. Install the IAE 1R18027 Indexing ring 1 off on to the stage 12 compressor disk rear flange.

      2. Find the location dowel hole on the stage 12 compressor disk rear flange.

      3. Put the indexing ring (with the numbers to the top) on to the stage 12 compressor disk rear flange. Engage the dowel in the indexing ring in to the location dowel hole. Make sure the stage 12 compressor disk rear flange outer diameter is fully engaged in the indexing ring.

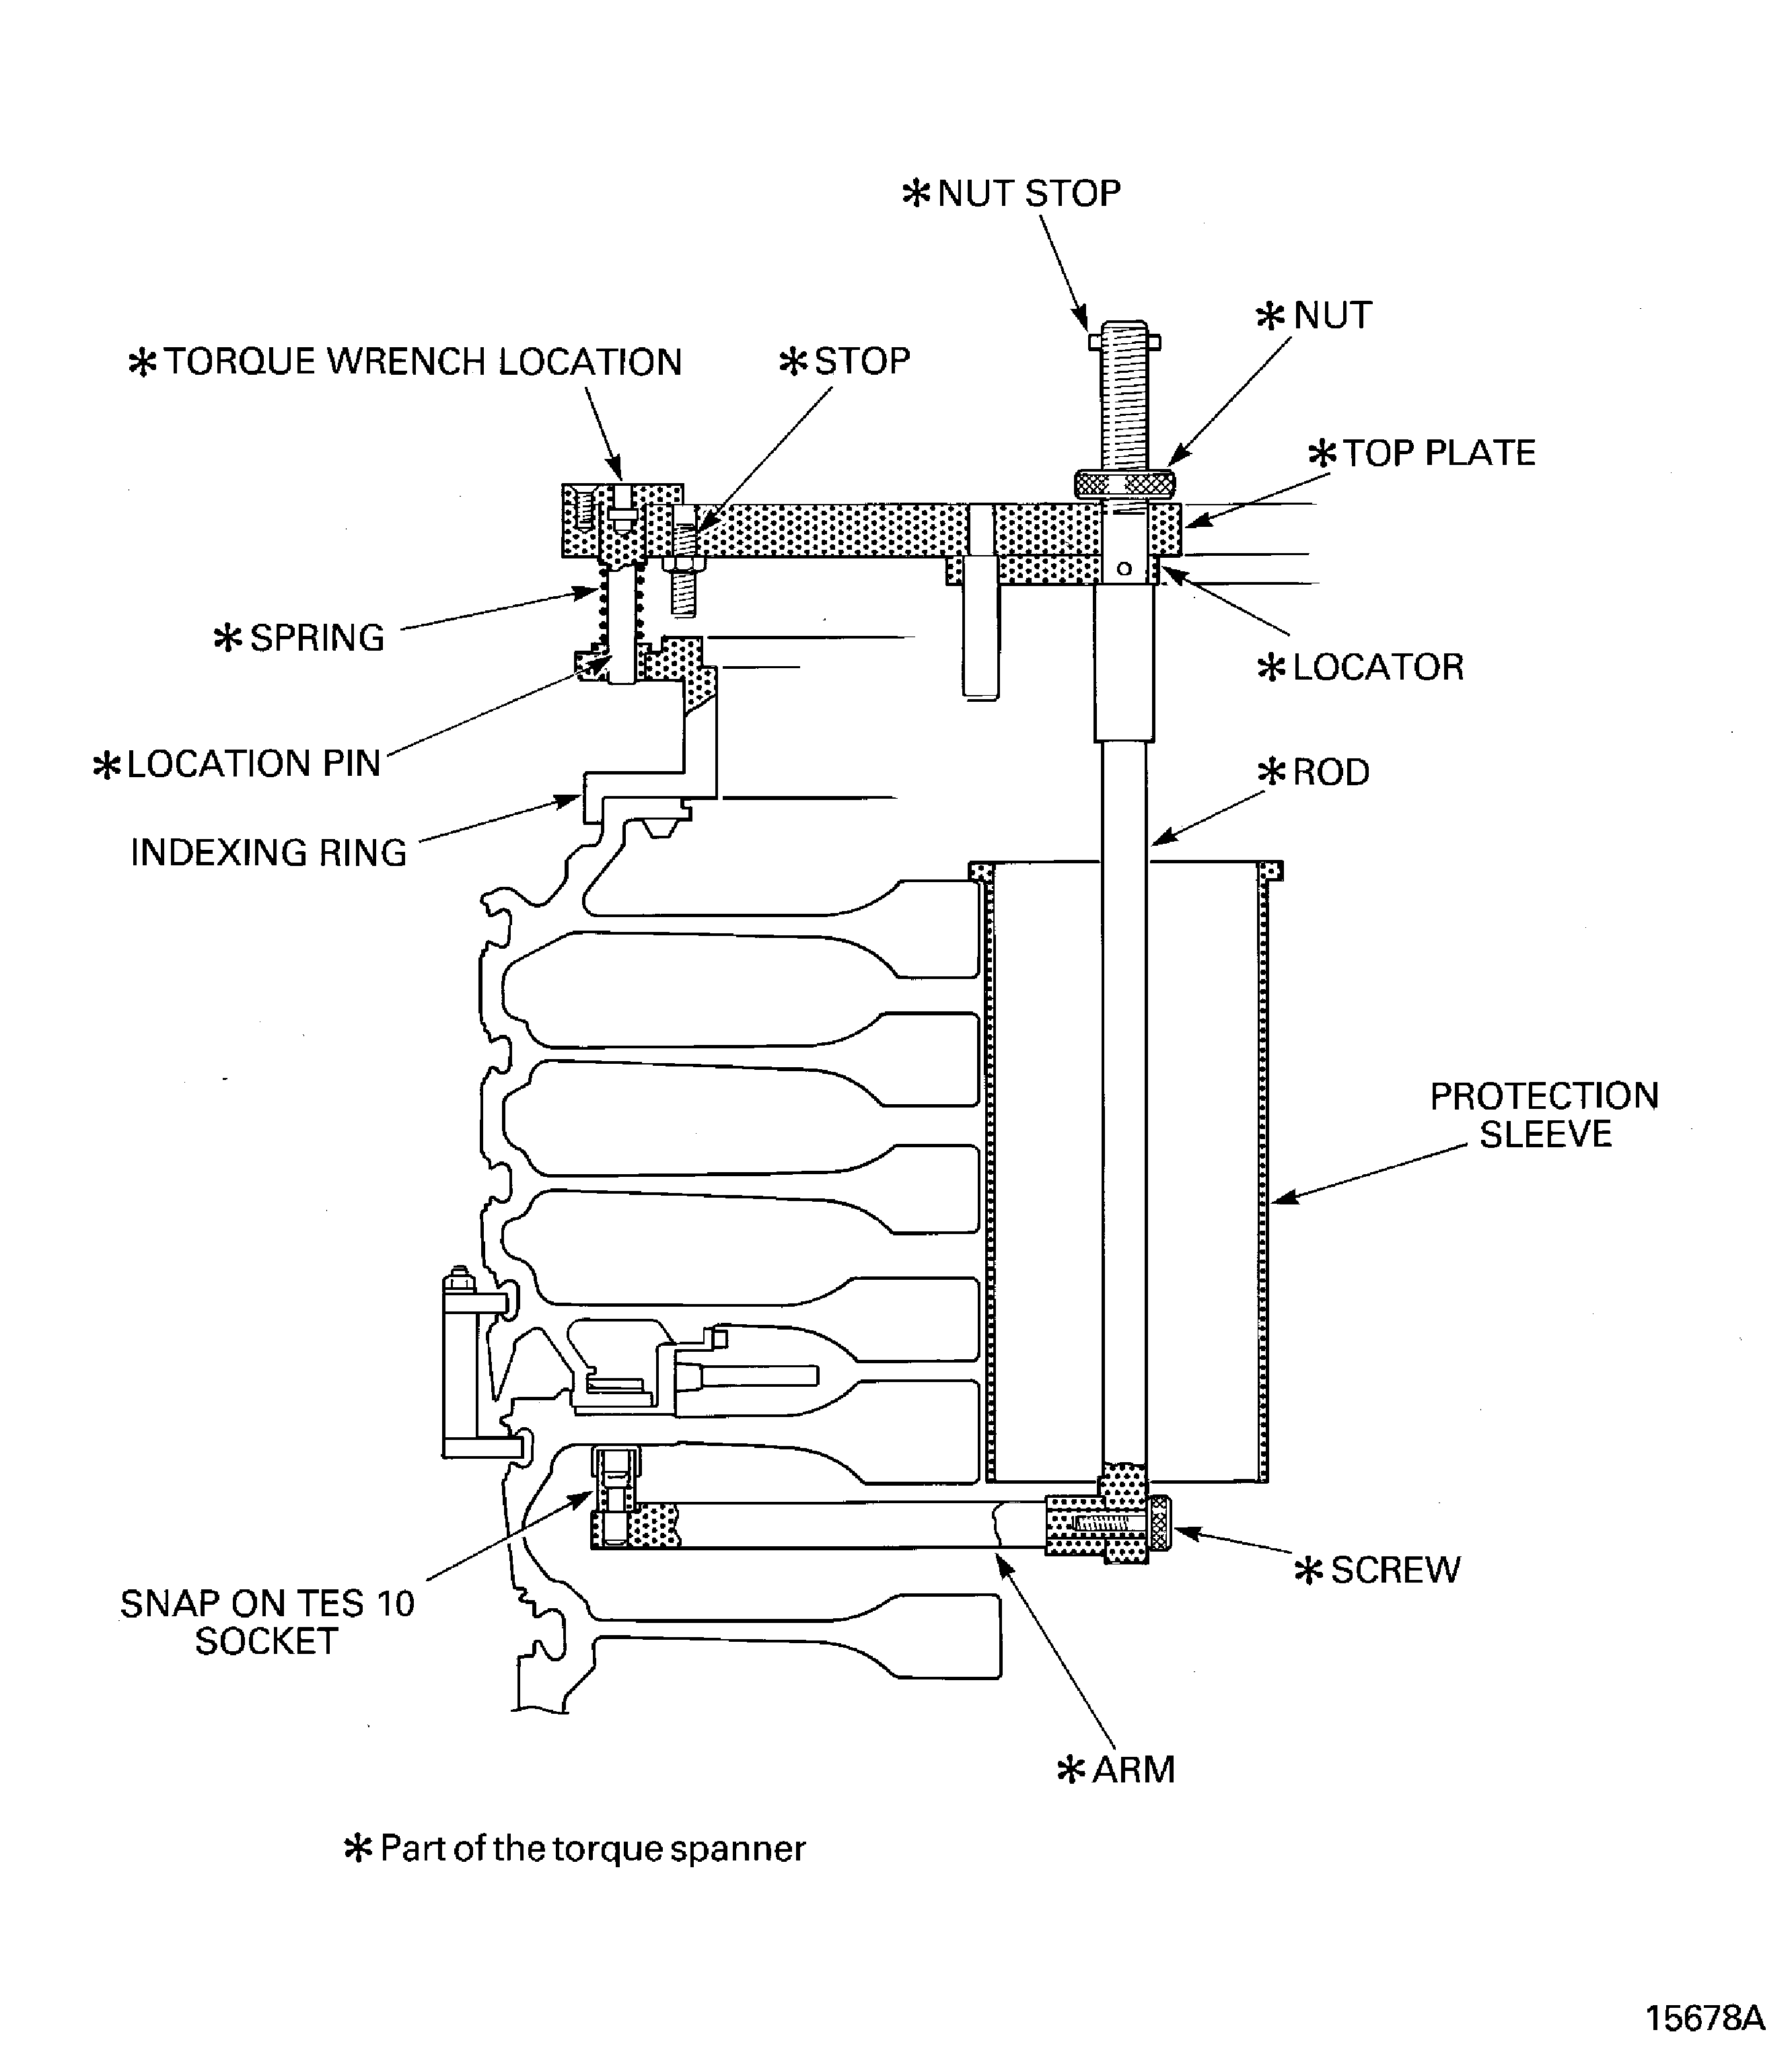
      1. Prepare the IAE 1R18201 Torque spanner 1 off for installation.

      2. Make sure the nut (part of the IAE 1R18201 Torque spanner) is loose.

      3. Install a Snap-on TES10 socket on to the arm.

      4. Install the arm, socket end first, through the bore of the stages 3 to 12 compressor disk. Put the arm through the space between the stage 8 and 9 compressor disk.

      1. Install the torque spanner on to the indexing ring.

        NOTE

        Make sure the spring is installed on the location pin.

        NOTE

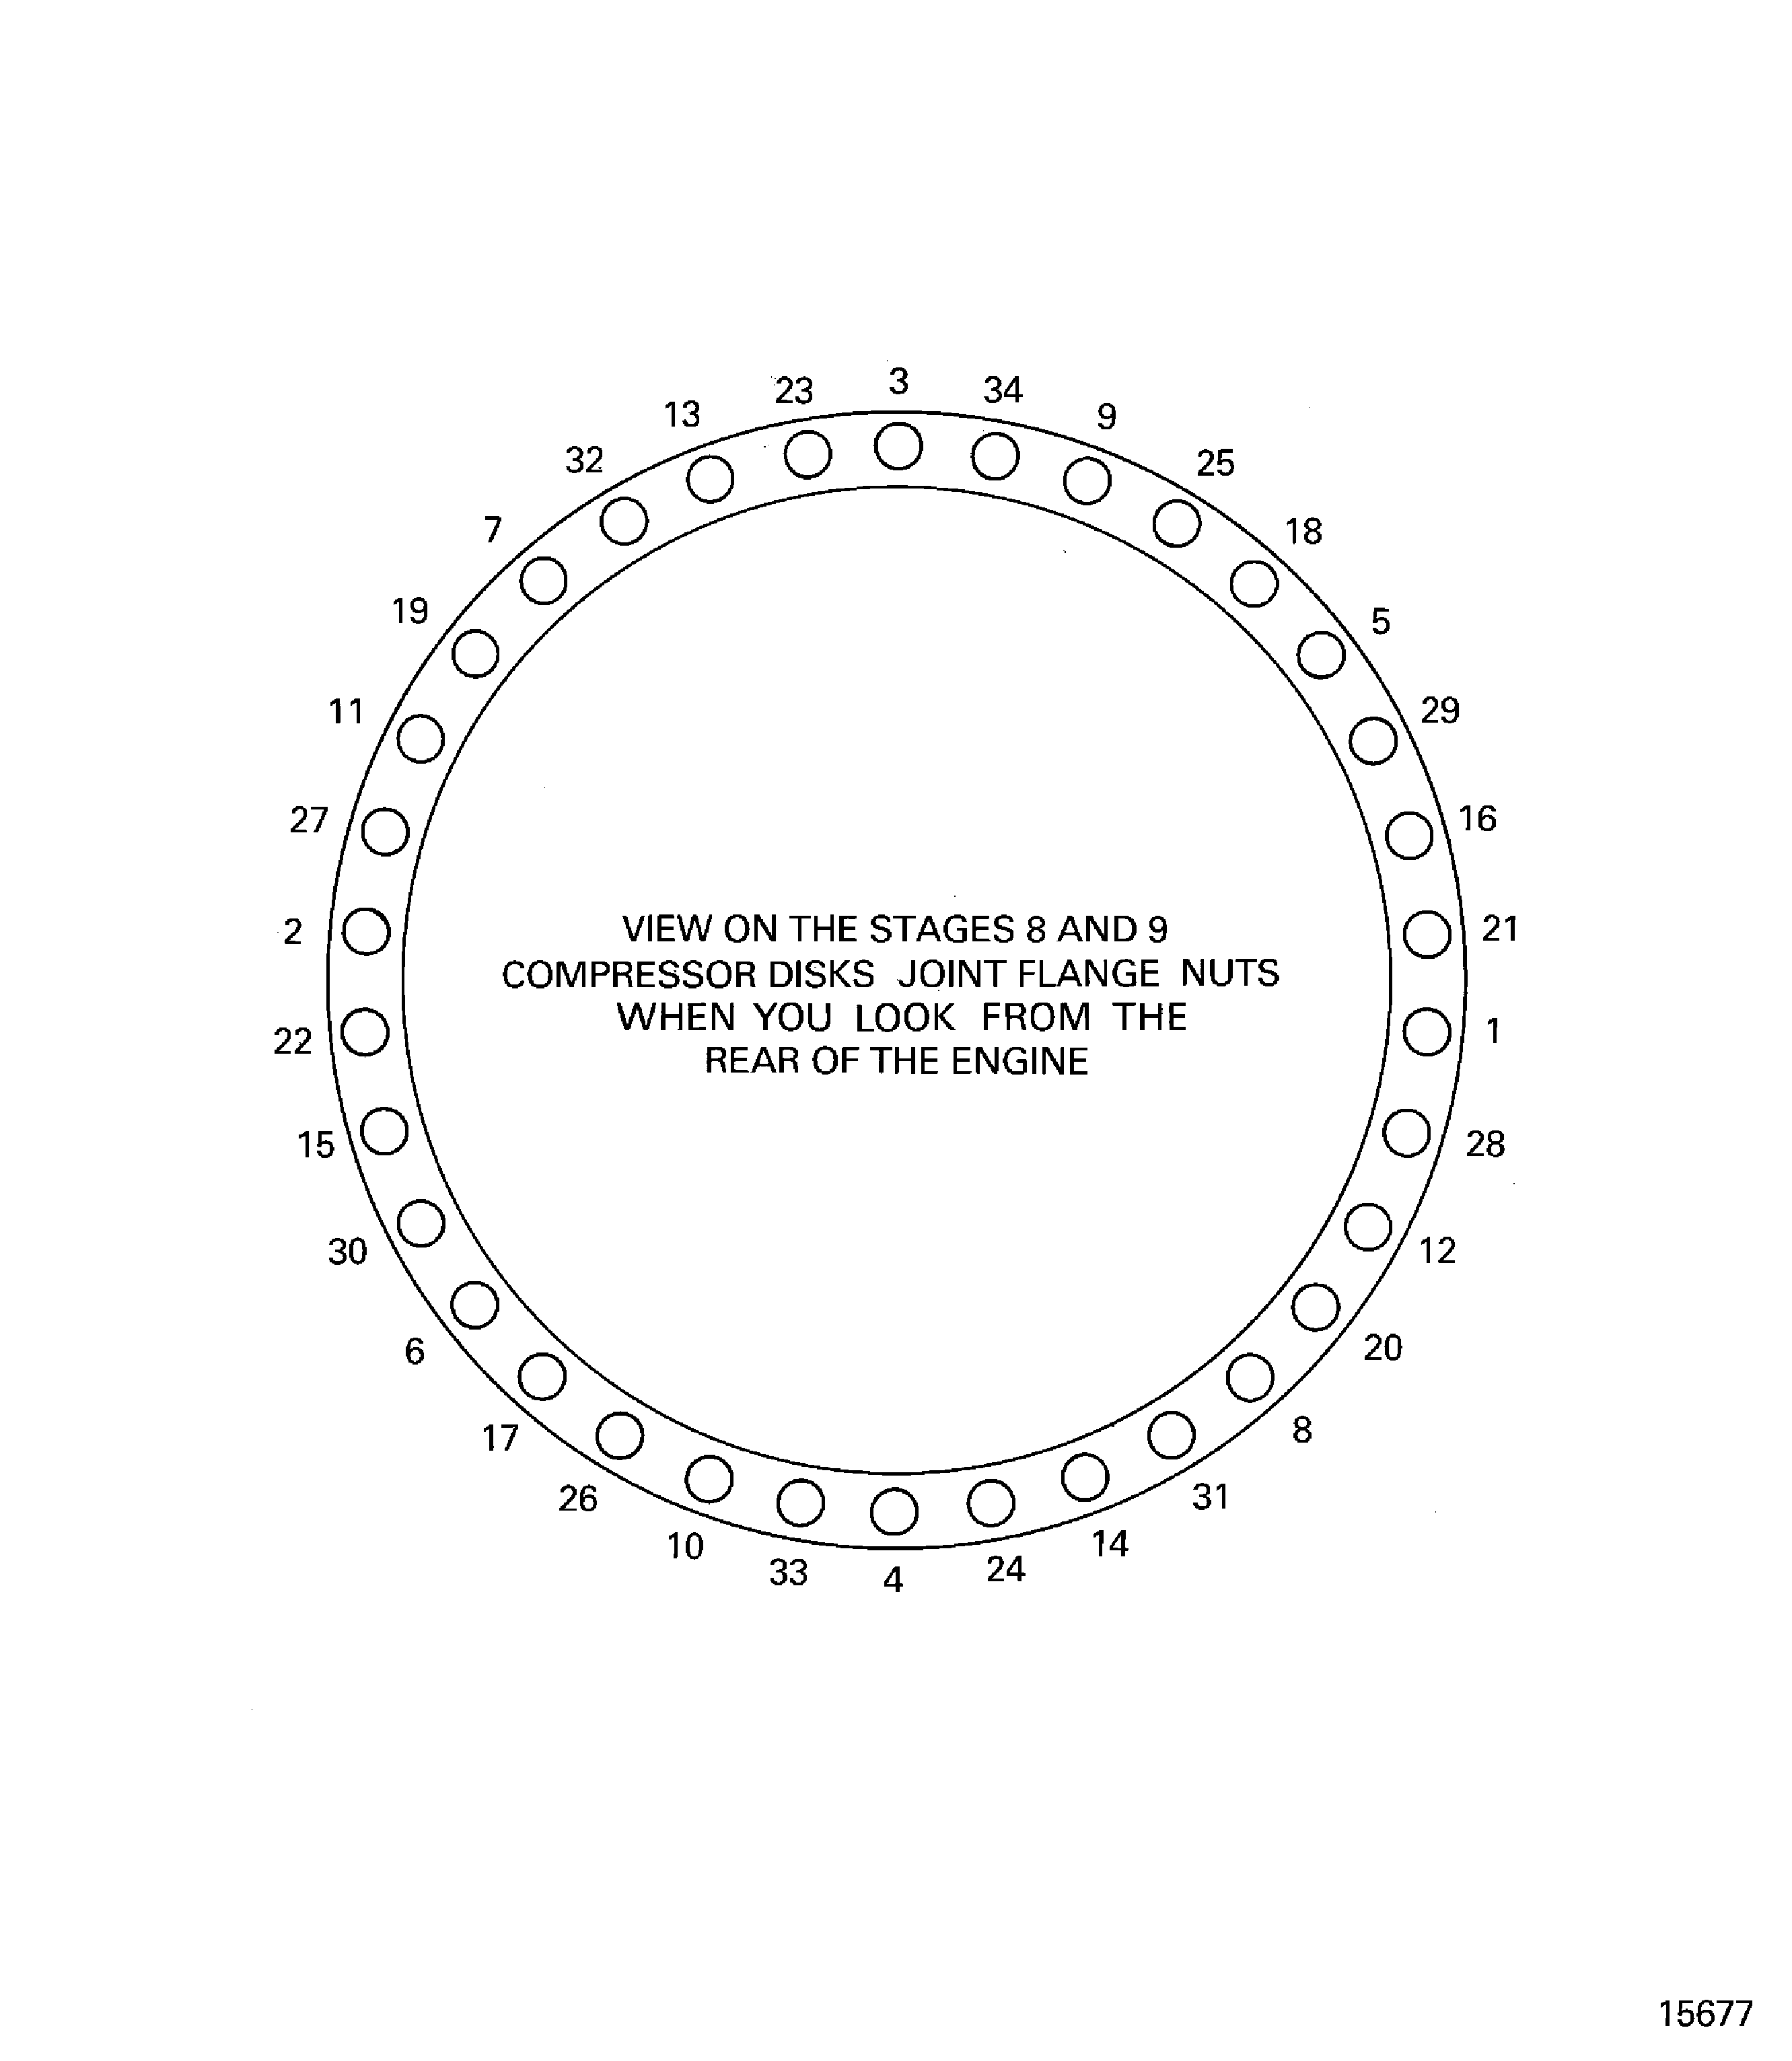
        The hole position numbers are identified on the indexing ring and on Fig. 72-41-10-990-202-004.
      2. Put the rod through the bore of the stages 3 to 12 compressor disks. Engage the location pin in to the indexing ring at the No. 1 position.

      1. Remove the anti-score washers and splined nuts from the special head bolt.

      2. Engage the end of the rod on to the end of the arm.

      3. Install the screw, through the rod, in to the arm. Hand tighten the screw.

        NOTE

        Make sure the locator touches the top plate before the nut is tightened.
      4. Tighten the nut to engage the socket on to the first splined nut.

      5. Attach a torque wrench to the torque wrench location.

      6. Operate the torque wrench to remove the splined nut from the special head bolt.

      1. Move the torque spanner to the No. 2 hole position.

      2. Loosen the nut on the rod.

        NOTE

        Step H.(2) will release the socket from the splined nut.
      3. Push the top plate until the stop touches the indexing ring.

      4. Pull the top plate until the location pin is clear of the bush in the indexing ring. Make sure the rod does not move.

      5. Move the torque spanner to the No. 2 position.

        NOTE

        Make sure the locator touches the top plate before the nut is tightened.
      6. Tighten the nut to engage the socket on to the second splined nut.

    3. Do step G.(4) and G.(5) again.

      1. Remove the other 32 splined nuts and anti-score washers.

      2. Do steps H. thru I. again and again until all of the spline nuts and anti-score washers have been removed.

      3. Remove all the tooling.

      4. Discard all the splined nuts, anti-score washers, special head bolts and anti-fret plates. Do not use this hardware again.

    1. SUBTASK 72-41-10-040-063 Remove the Stage 9 to 12 Disks and Vortex Reducer Ring from the Stage 3 to 8 Disks

    2. Refer to: Figure, Figure and Figure

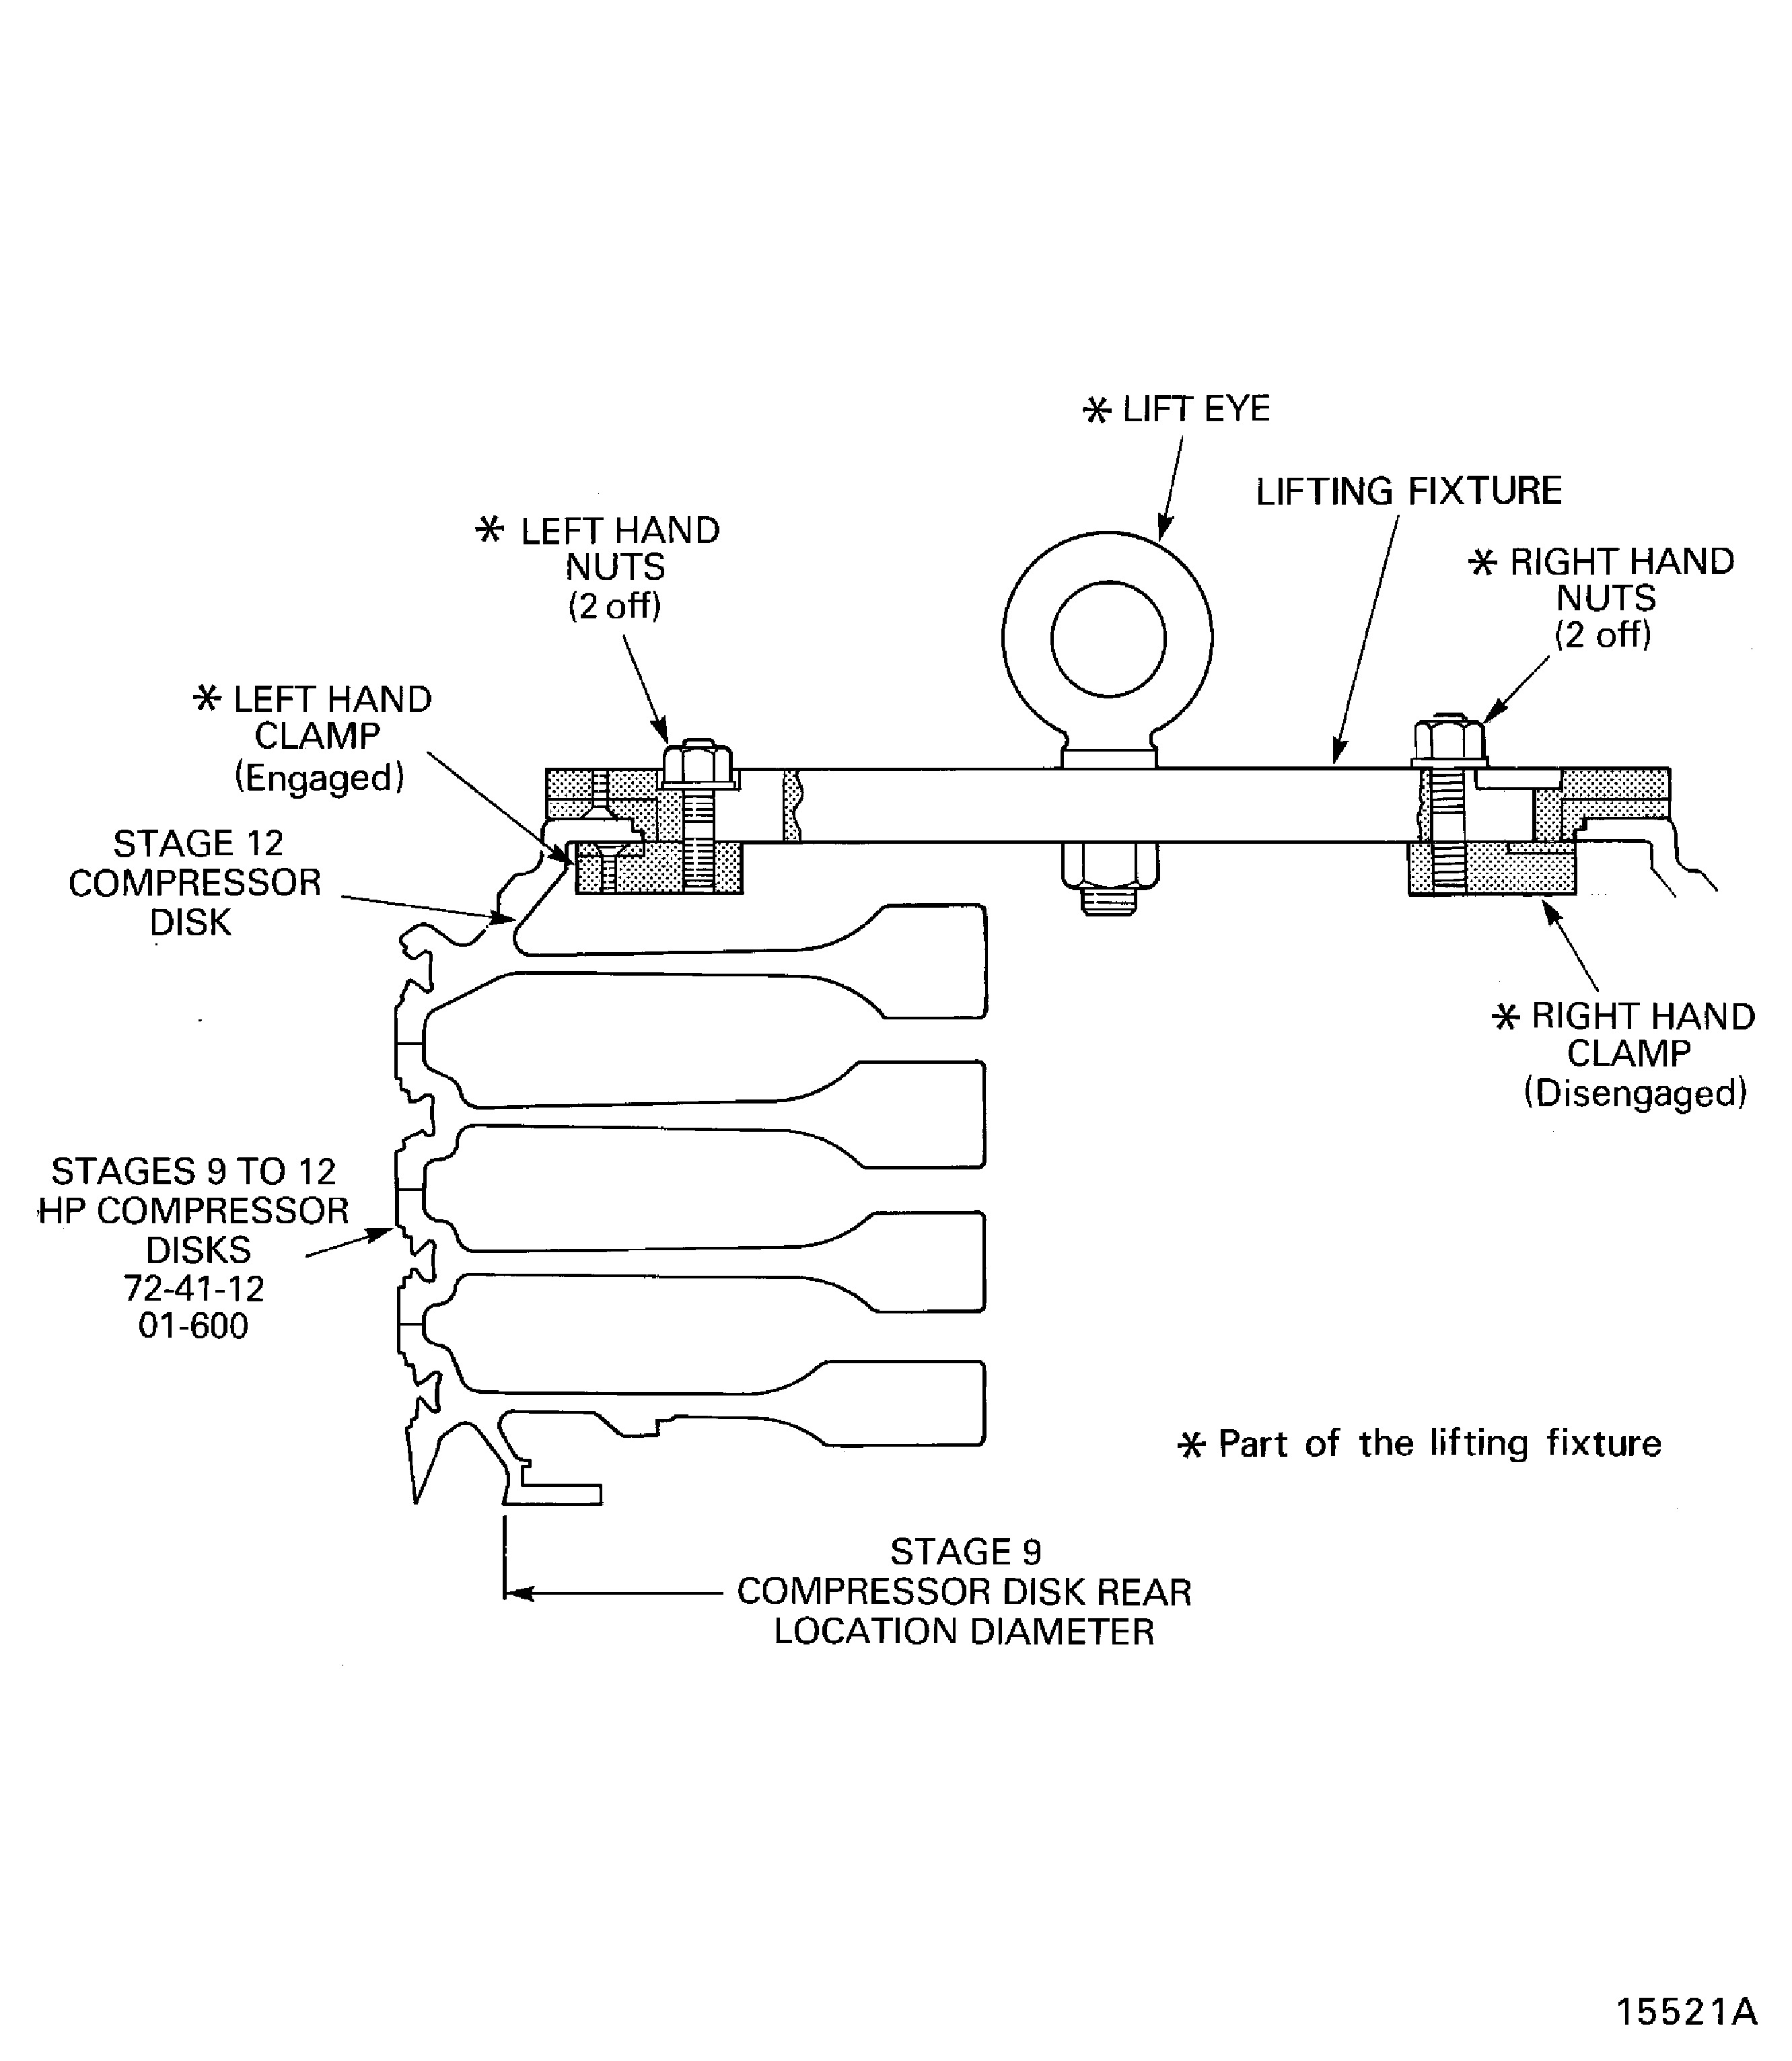
    3. Install the IAE 1R18026 Lifting fixture 1 off on to the stage 12 disk. Refer to Figure.

      1. Install the IAE 1R18067 Extractor 1 off on to the compressor disks assembly. Refer to Figure.

      2. Assemble the lower split ring and install it on the stage 8 disk.

      3. Assemble the top split ring assembly and install it on the stage 9 disk. Make sure the six set screws touch the lower split ring assembly.

    4. With a hoist support the stage 9 to 12 disks.

    5. CAUTION

      THE SET SCREWS MUST BE TIGHTENED IN SEQUENCE AND NOT MORE THAN ONE TURN AT A TIME.

      Turn each of the set screws in small increments until the stage 9 to 12 disks is released from the stage 3 to 8 disks.

    6. Lift the stage 9 to 12 disks clear of the stage 3 to 8 disks.

    7. Install the IAE 1R18025 Turnover stand adapter 1 off on to the IAE 1R18322 Turnover stand 1 off. Refer to Figure.

    8. Install the stage 9 to 12 disks in the turnover stand.

    1. SUBTASK 72-41-10-040-064 Remove the Vortex Reducer Ring from the Stage 9 to 12 Disks

    2. Refer to: Figure

    3. Operate the turnover stand to turn the stage 9 to 12 disks until the lifter is at the bottom.

      1. Install the IAE 1R18443 Puller 1 off on to the vortex reducer ring.

      2. Loosen the eight clamp nuts sufficient to let the four clamps be moved to the center of the lifter.

      3. Lift the clamp nuts and move the clamps to the center of the lifter.

      4. Make sure that the six extraction bolts are fully retracted.

      5. Use the handles to lift the puller and install it on to the stage 9 disk. Engage the special head bolts through the holes in the puller.

      6. Make sure that all of the pressure ring touches the stage 9 disk.

      7. Lift the clamp nuts and move the clamps to the outer edge of the puller. Make sure the clamps are engaged correctly on the vortex reducer ring. Tighten the eight clamp nuts.

      8. CAUTION

        THE EXTRACTION BOLTS MUST BE TIGHTENED IN SEQUENCE AND NOT MORE THAN ONE TURN AT A TIME. YOU MUST MAKE SURE THERE IS A CLEARANCE BETWEEN THE SPECIAL HEADED BOLTS AND THE HOLES IN THE PULLER.

        Tighten the six extraction bolts in small increments until the vortex reducer ring is released from the stage 9 disk.

      9. Use the handles to lift the puller and vortex reducer ring assembly off the stage 9 disk. Put the assembly on an applicable surface and remove the puller.

    1. SUBTASK 72-41-10-040-065 Remove the Stage 3 to 8 Disks from the Build Stand

    2. Refer to: Figure, Figure and Figure

    3. Install the IAE 1R18065 Lifter 1 off on to the stage 8 disk. Refer to Figure.

    4. Remove the bolts that attach the dummy stub shaft to the stage 3 to 8 disks. Refer to Figure.

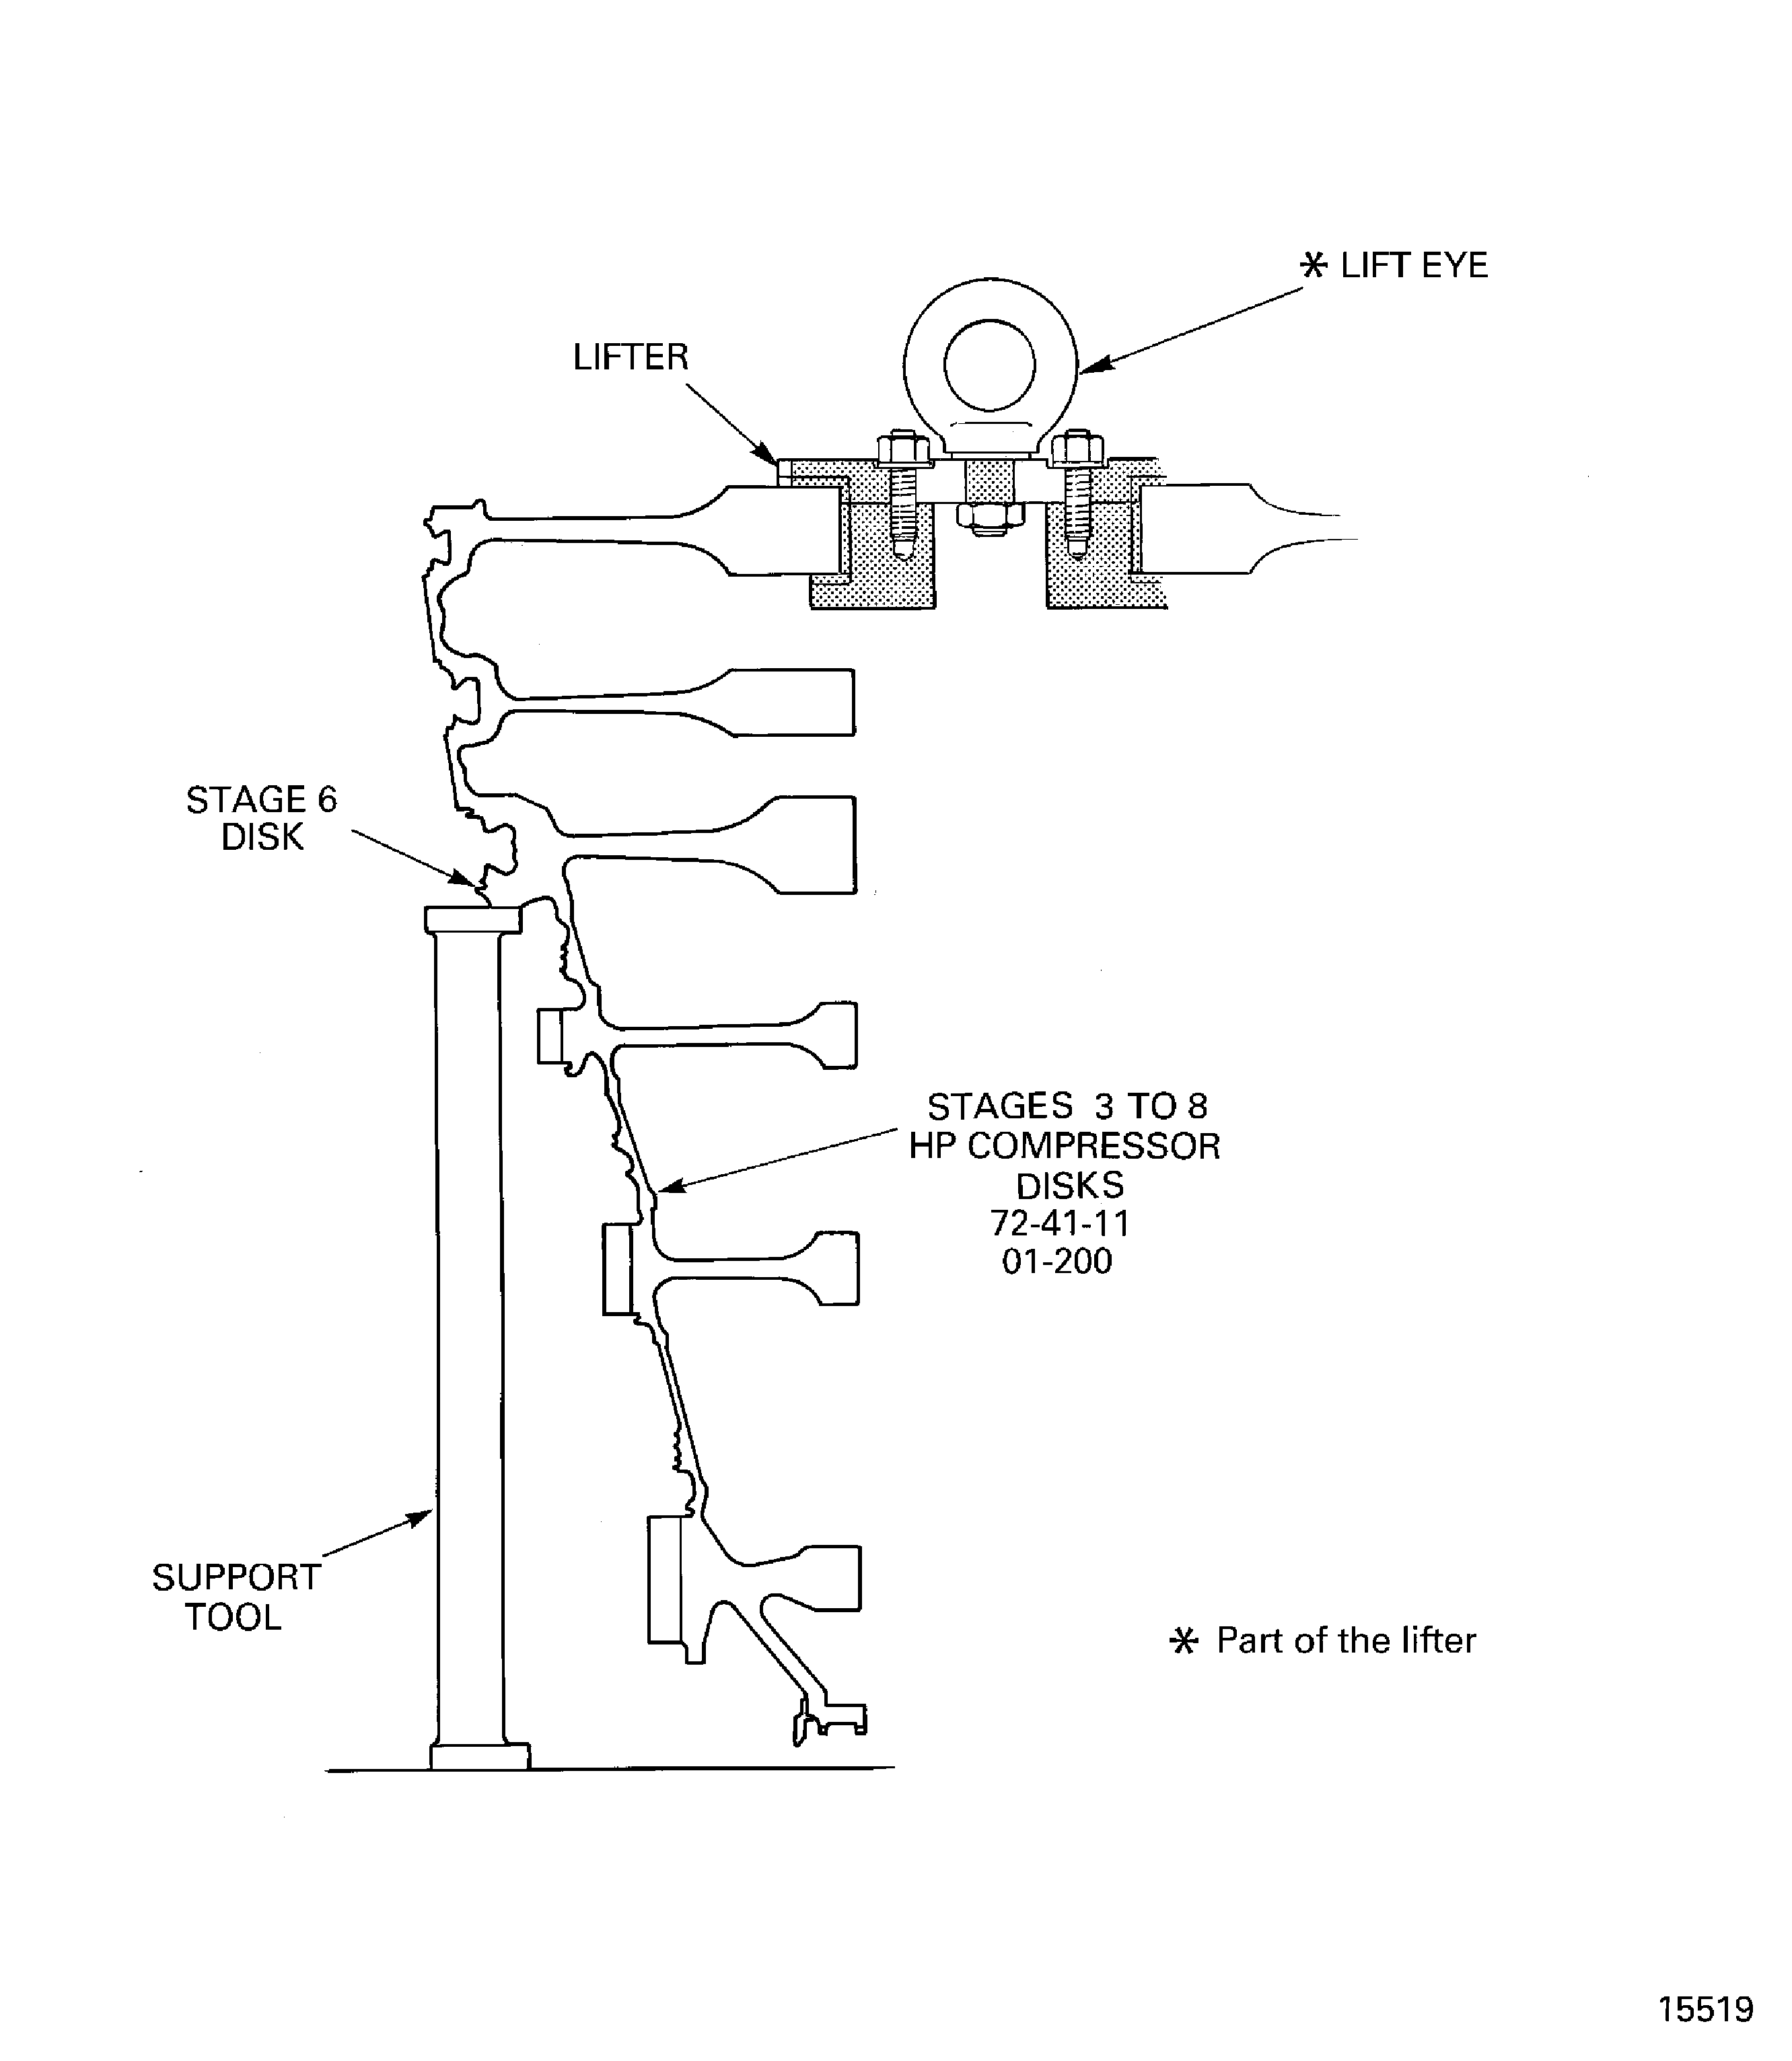
    5. Attach a hoist and lift the stage 3 to 8 disks clear of the build stand and the dummy stub shaft and install it in the IAE 1R18092 Support tool 1 off. Refer to Figure.

    6. Remove the IAE 1R18673 Dummy stub shaft and install the curvic protector.

  1. Figure: Install the protective cover on the rotating air seal

    Install the protective cover on the rotating air seal
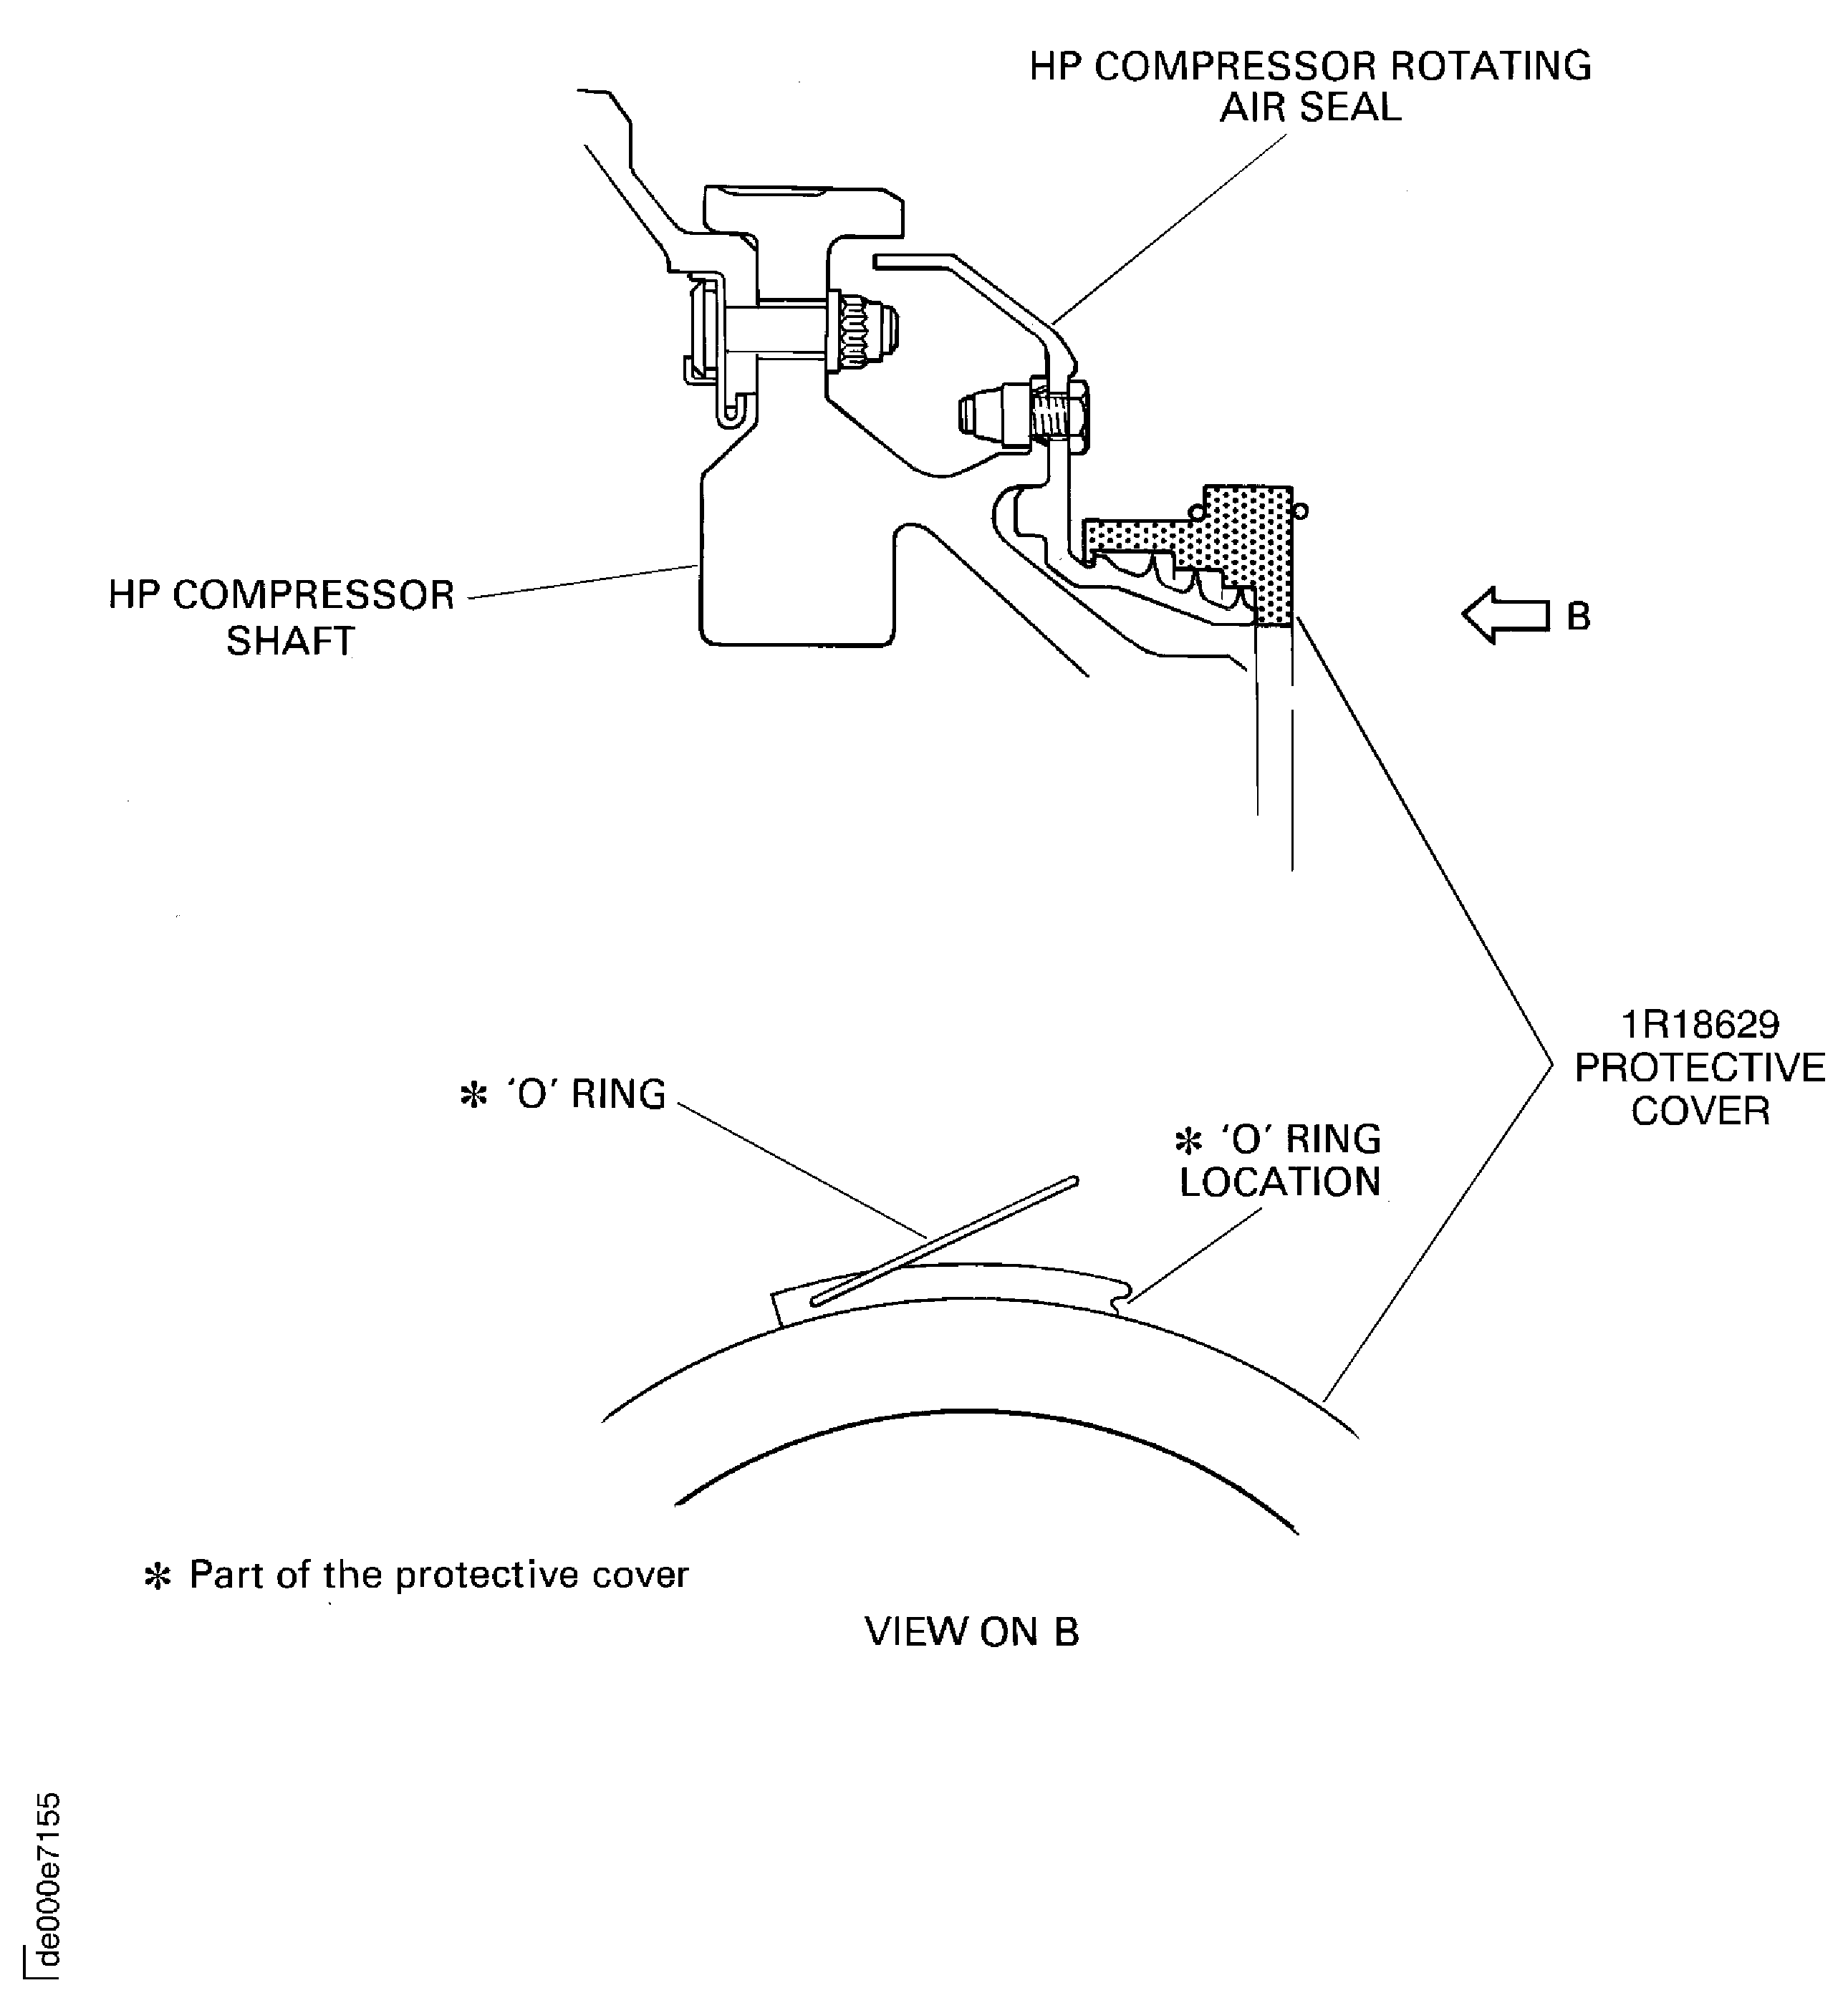
    Figure: Install the beam sling on to the HP compressor rotor assembly

    Sheet 1

    Legend
    Install the beam sling on to the HP compressor rotor assembly

    Sheet 1

    Close

    Figure: Remove/install the universal sling adapters

    Sheet 2
    Legend
    Remove/install the universal sling adapters

    Sheet 2

    Close

    Figure: Install the HP compressor rotor assembly on to the safety support stand

    Install the HP compressor rotor assembly on to the safety support stand
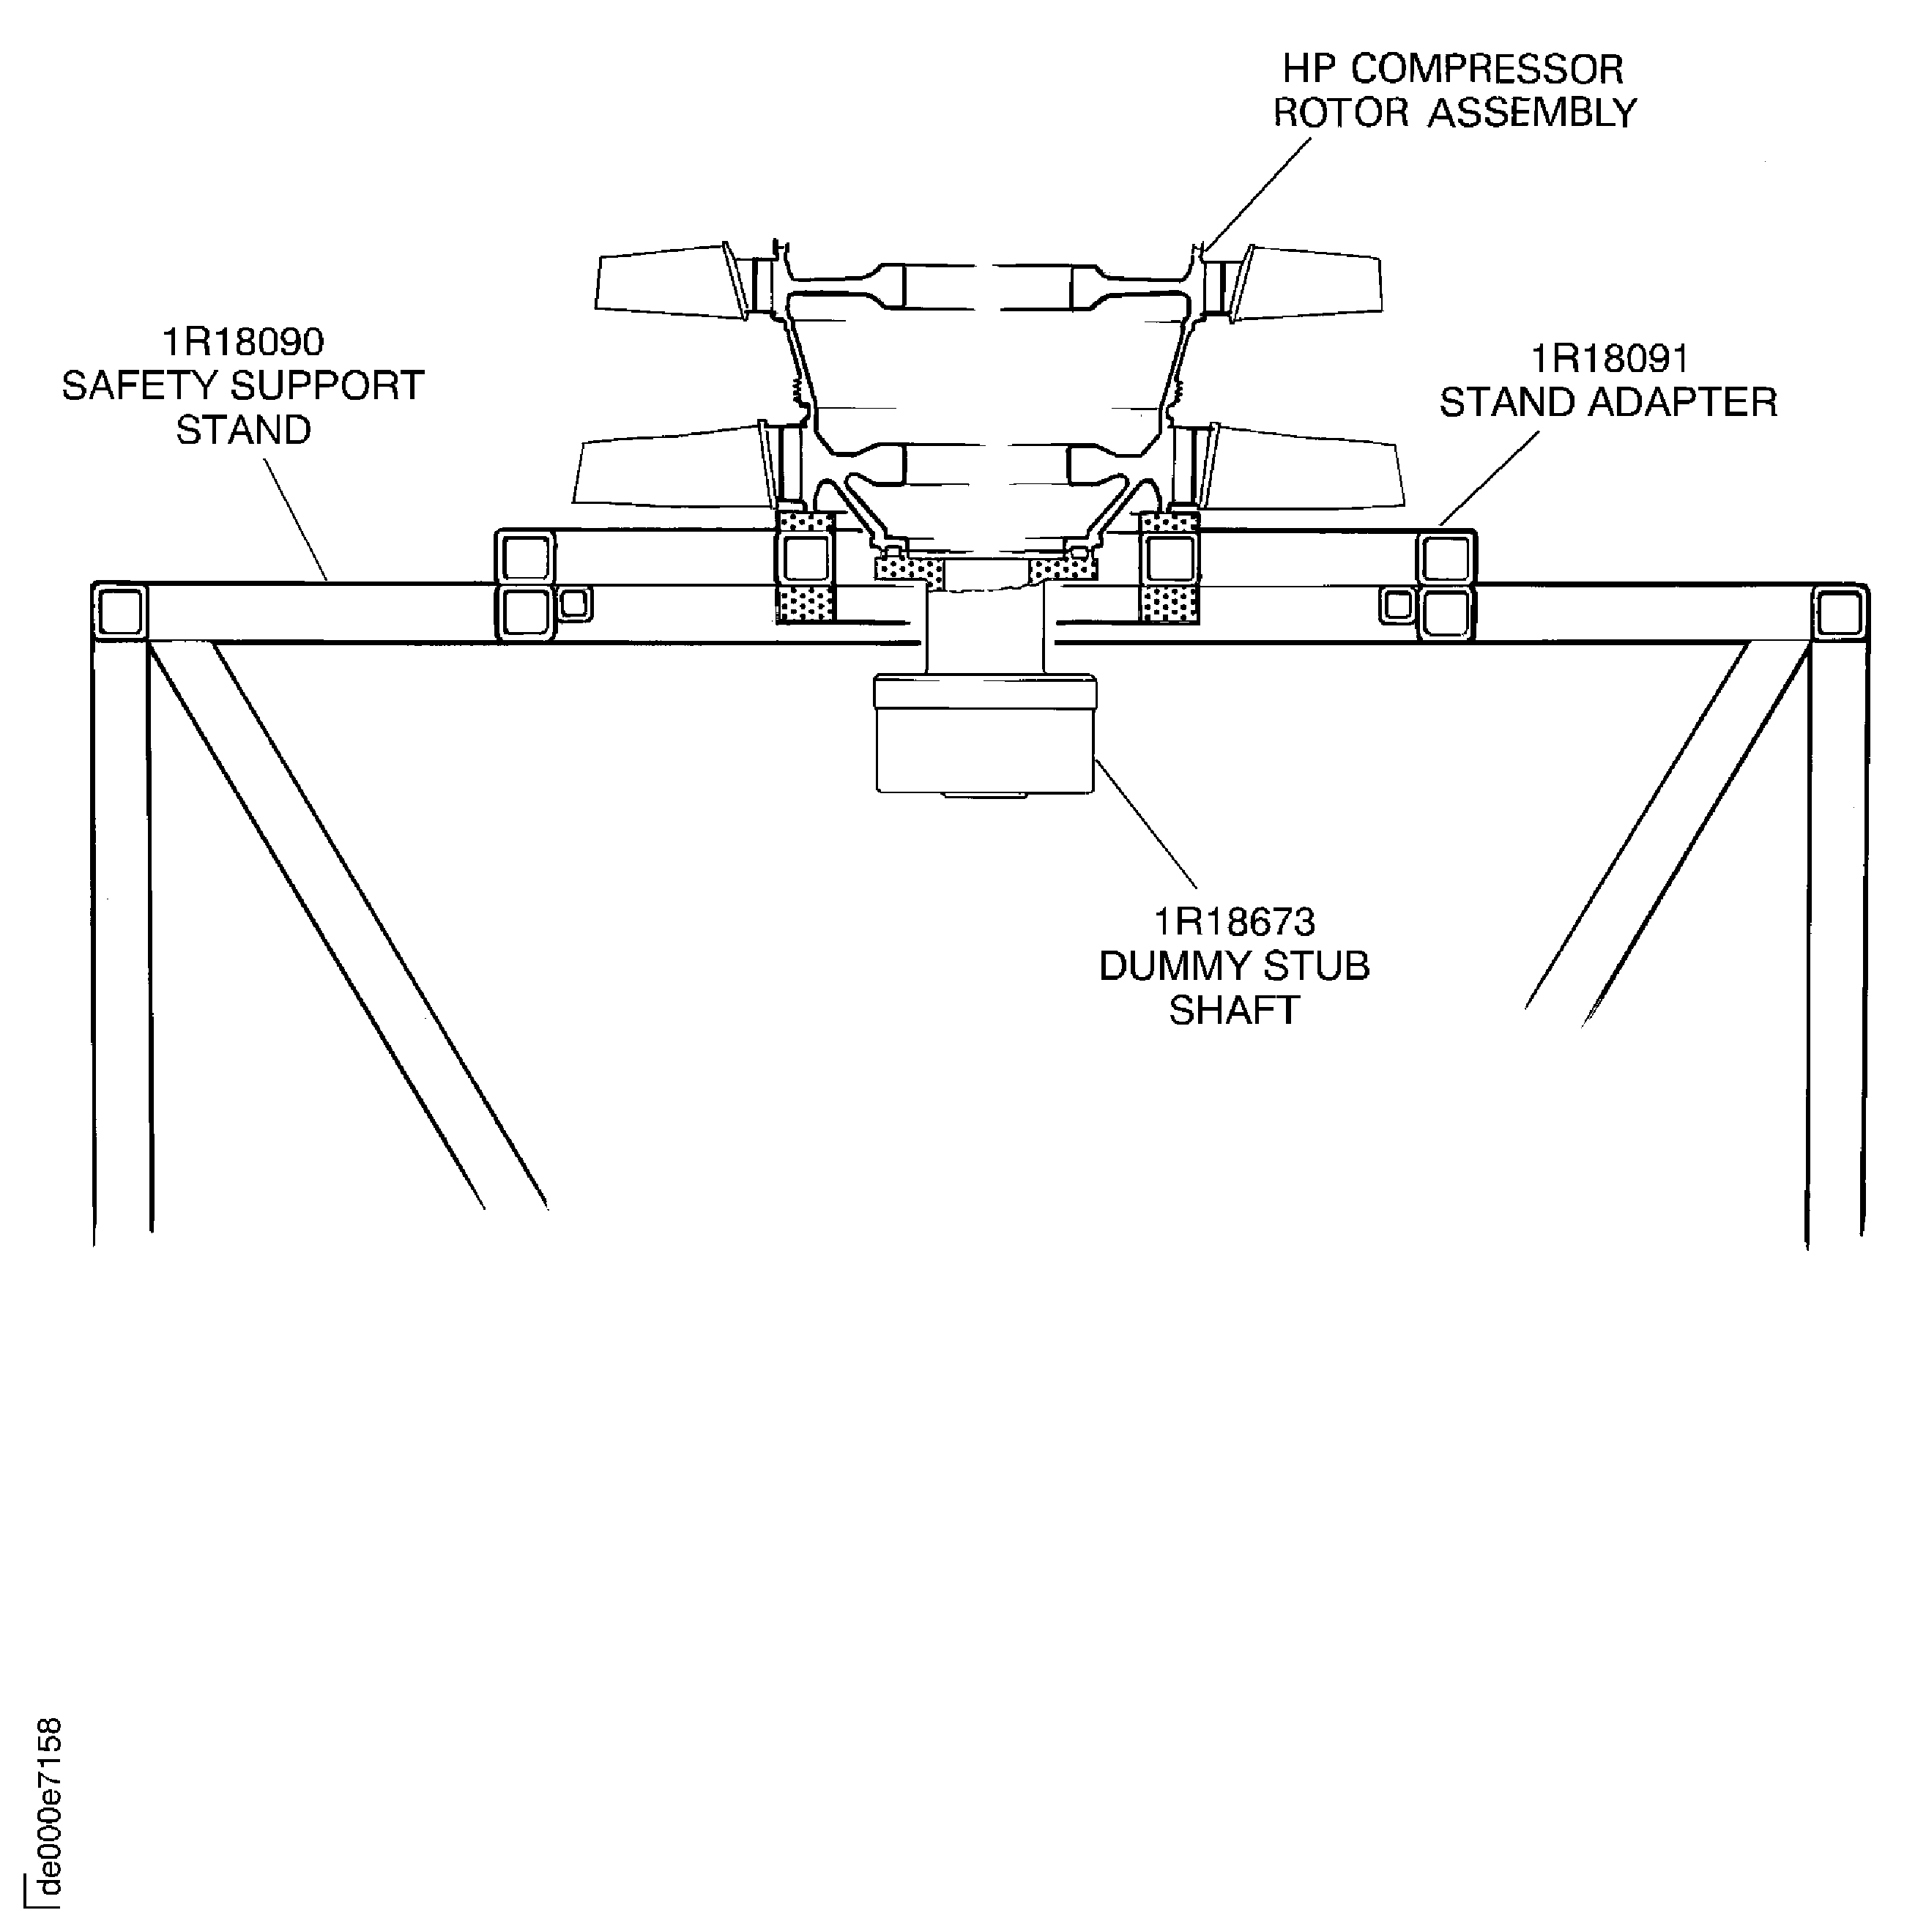
    Figure: Install the HP compressor rotor in to the tip check fixture

    Sheet 1
    Legend
    Install the HP compressor rotor in to the tip check fixture

    Sheet 1

    Close

    Figure: Install the HP compressor rotor in to the tip check fixture

    Sheet 2
    Legend
    Install the HP compressor rotor in to the tip check fixture

    Sheet 2

    Close

    Figure: Install the HP compressor rotor in to the tip check fixture

    Sheet 3
    Legend
    Install the HP compressor rotor in to the tip check fixture

    Sheet 3

    Close

    Figure: Install the HP compressor rotor in to the tip check fixture

    Sheet 4
    Legend
    Install the HP compressor rotor in to the tip check fixture

    Sheet 4

    Close

    Figure: Set the transducer carriers to zero

    Set the transducer carriers to zero
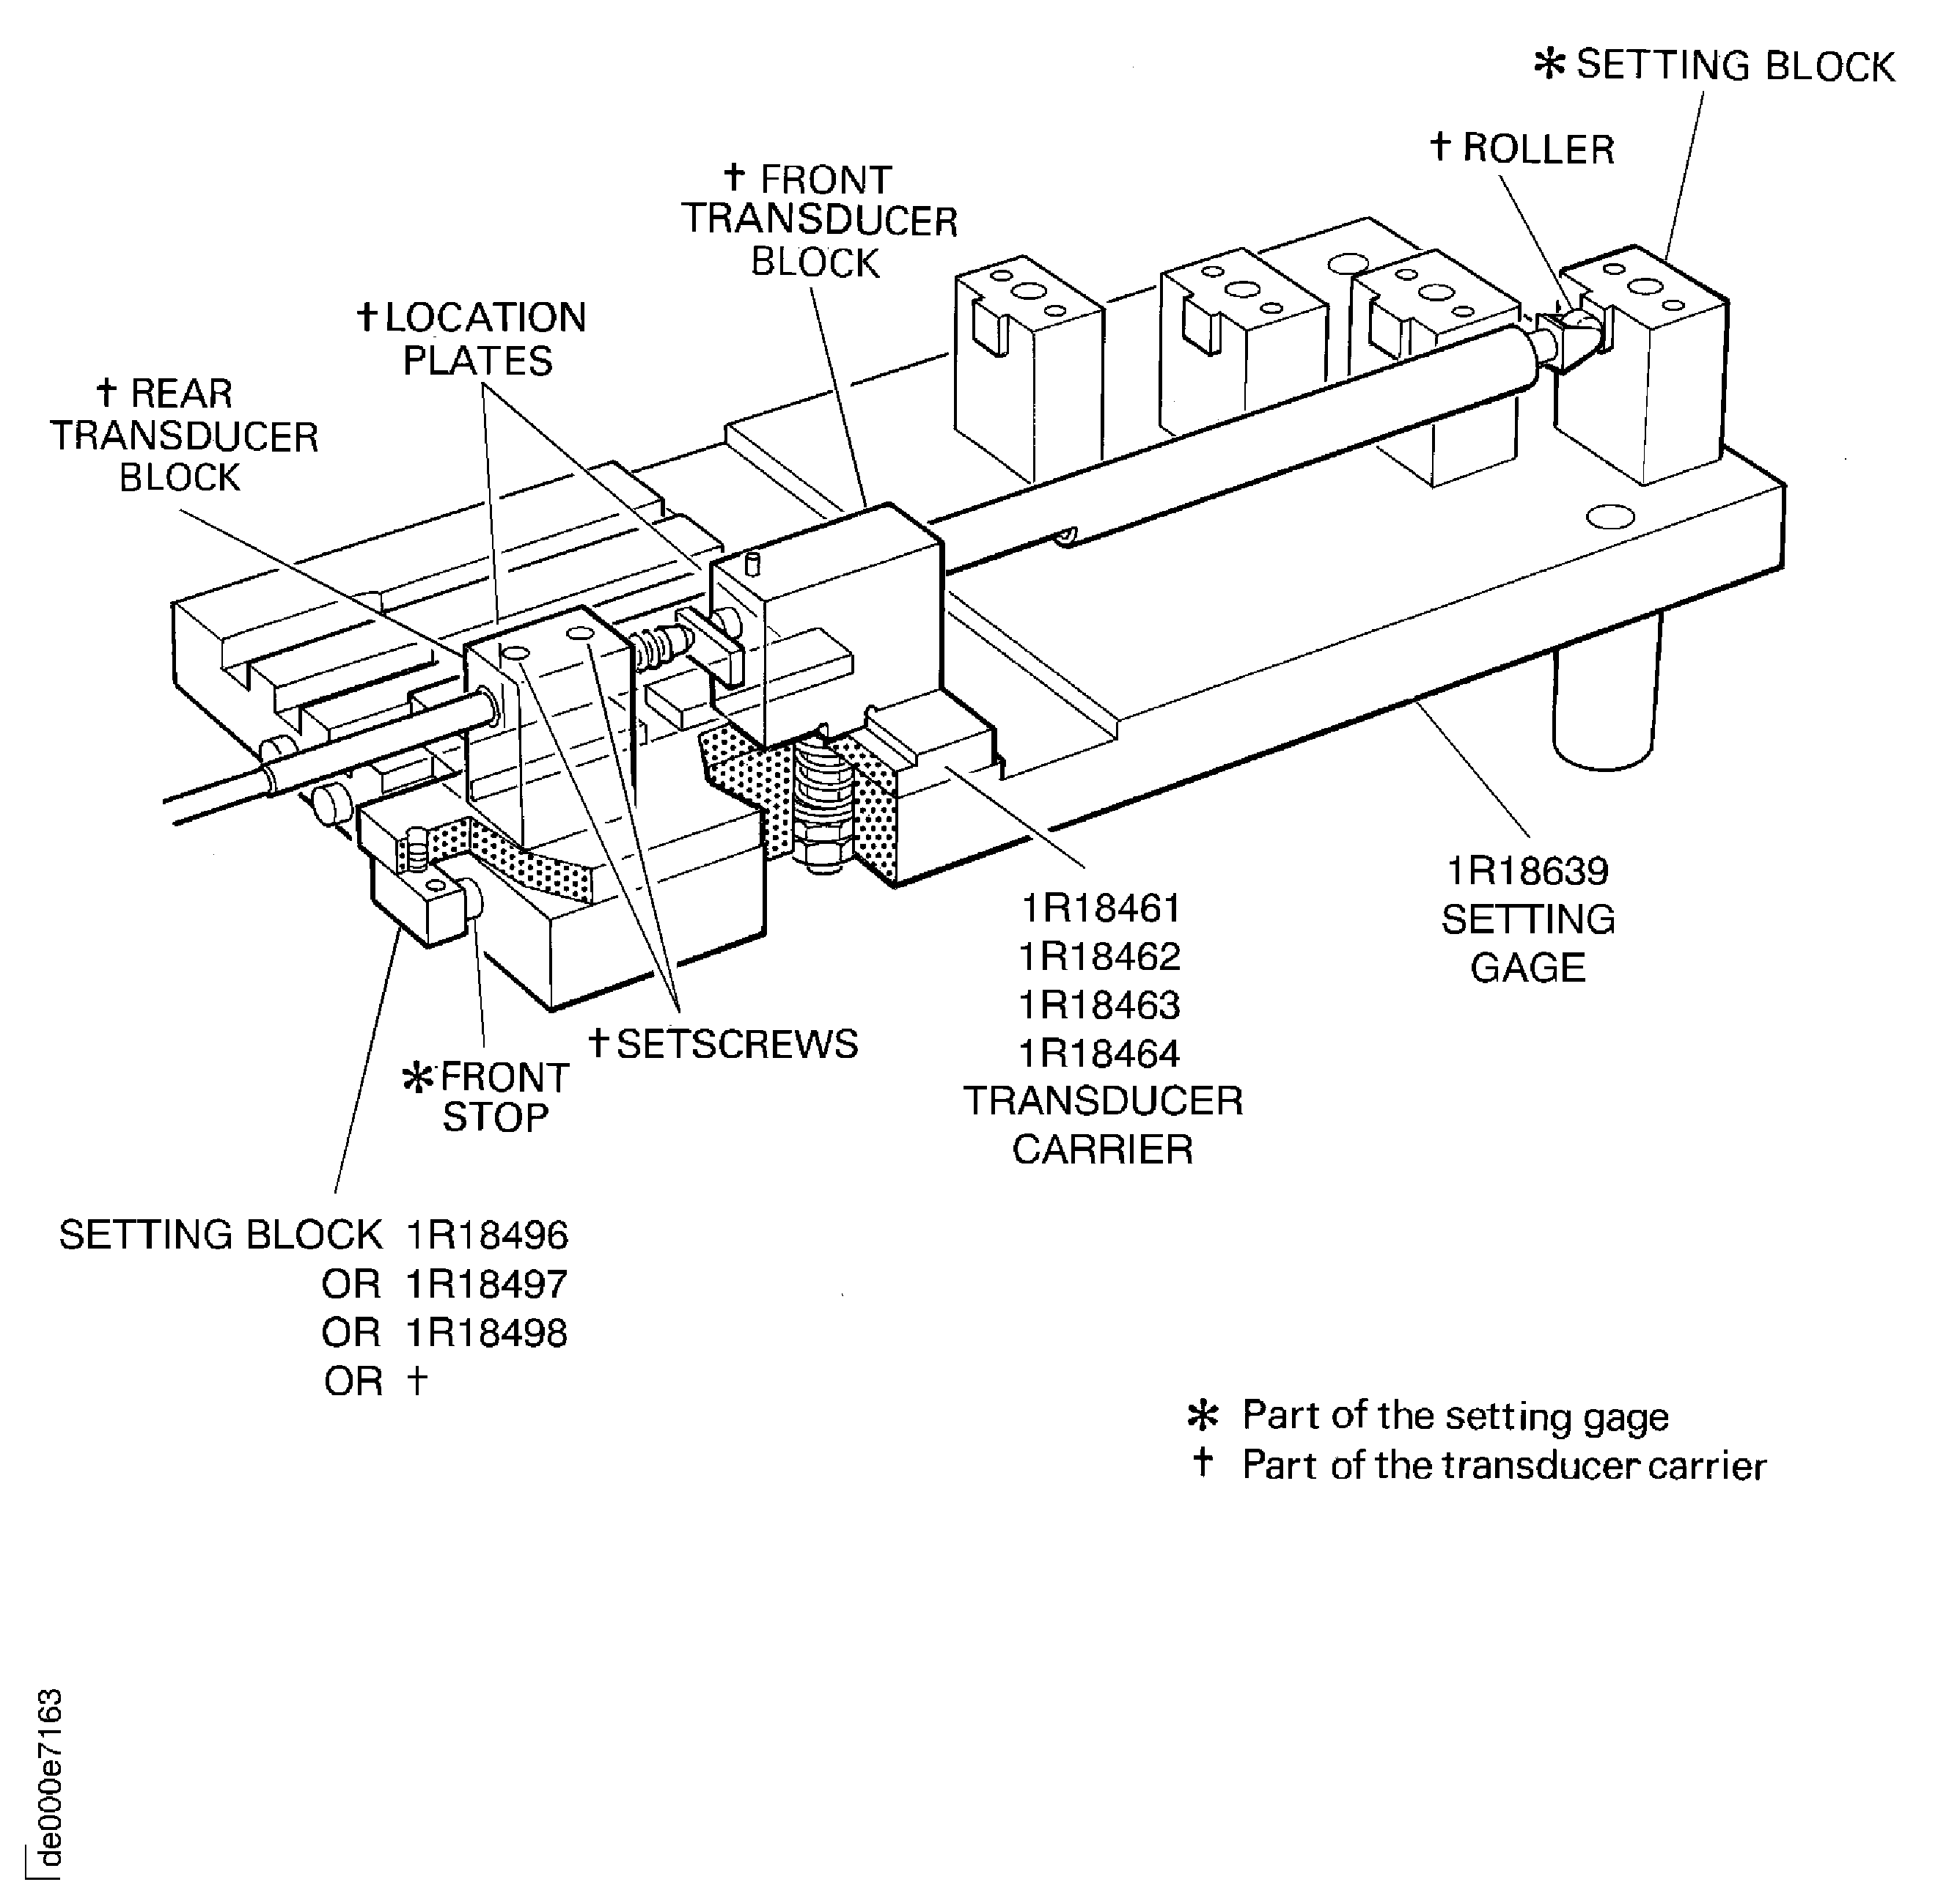
    Figure: Measure the seal and stator path diameters

    Sheet 1
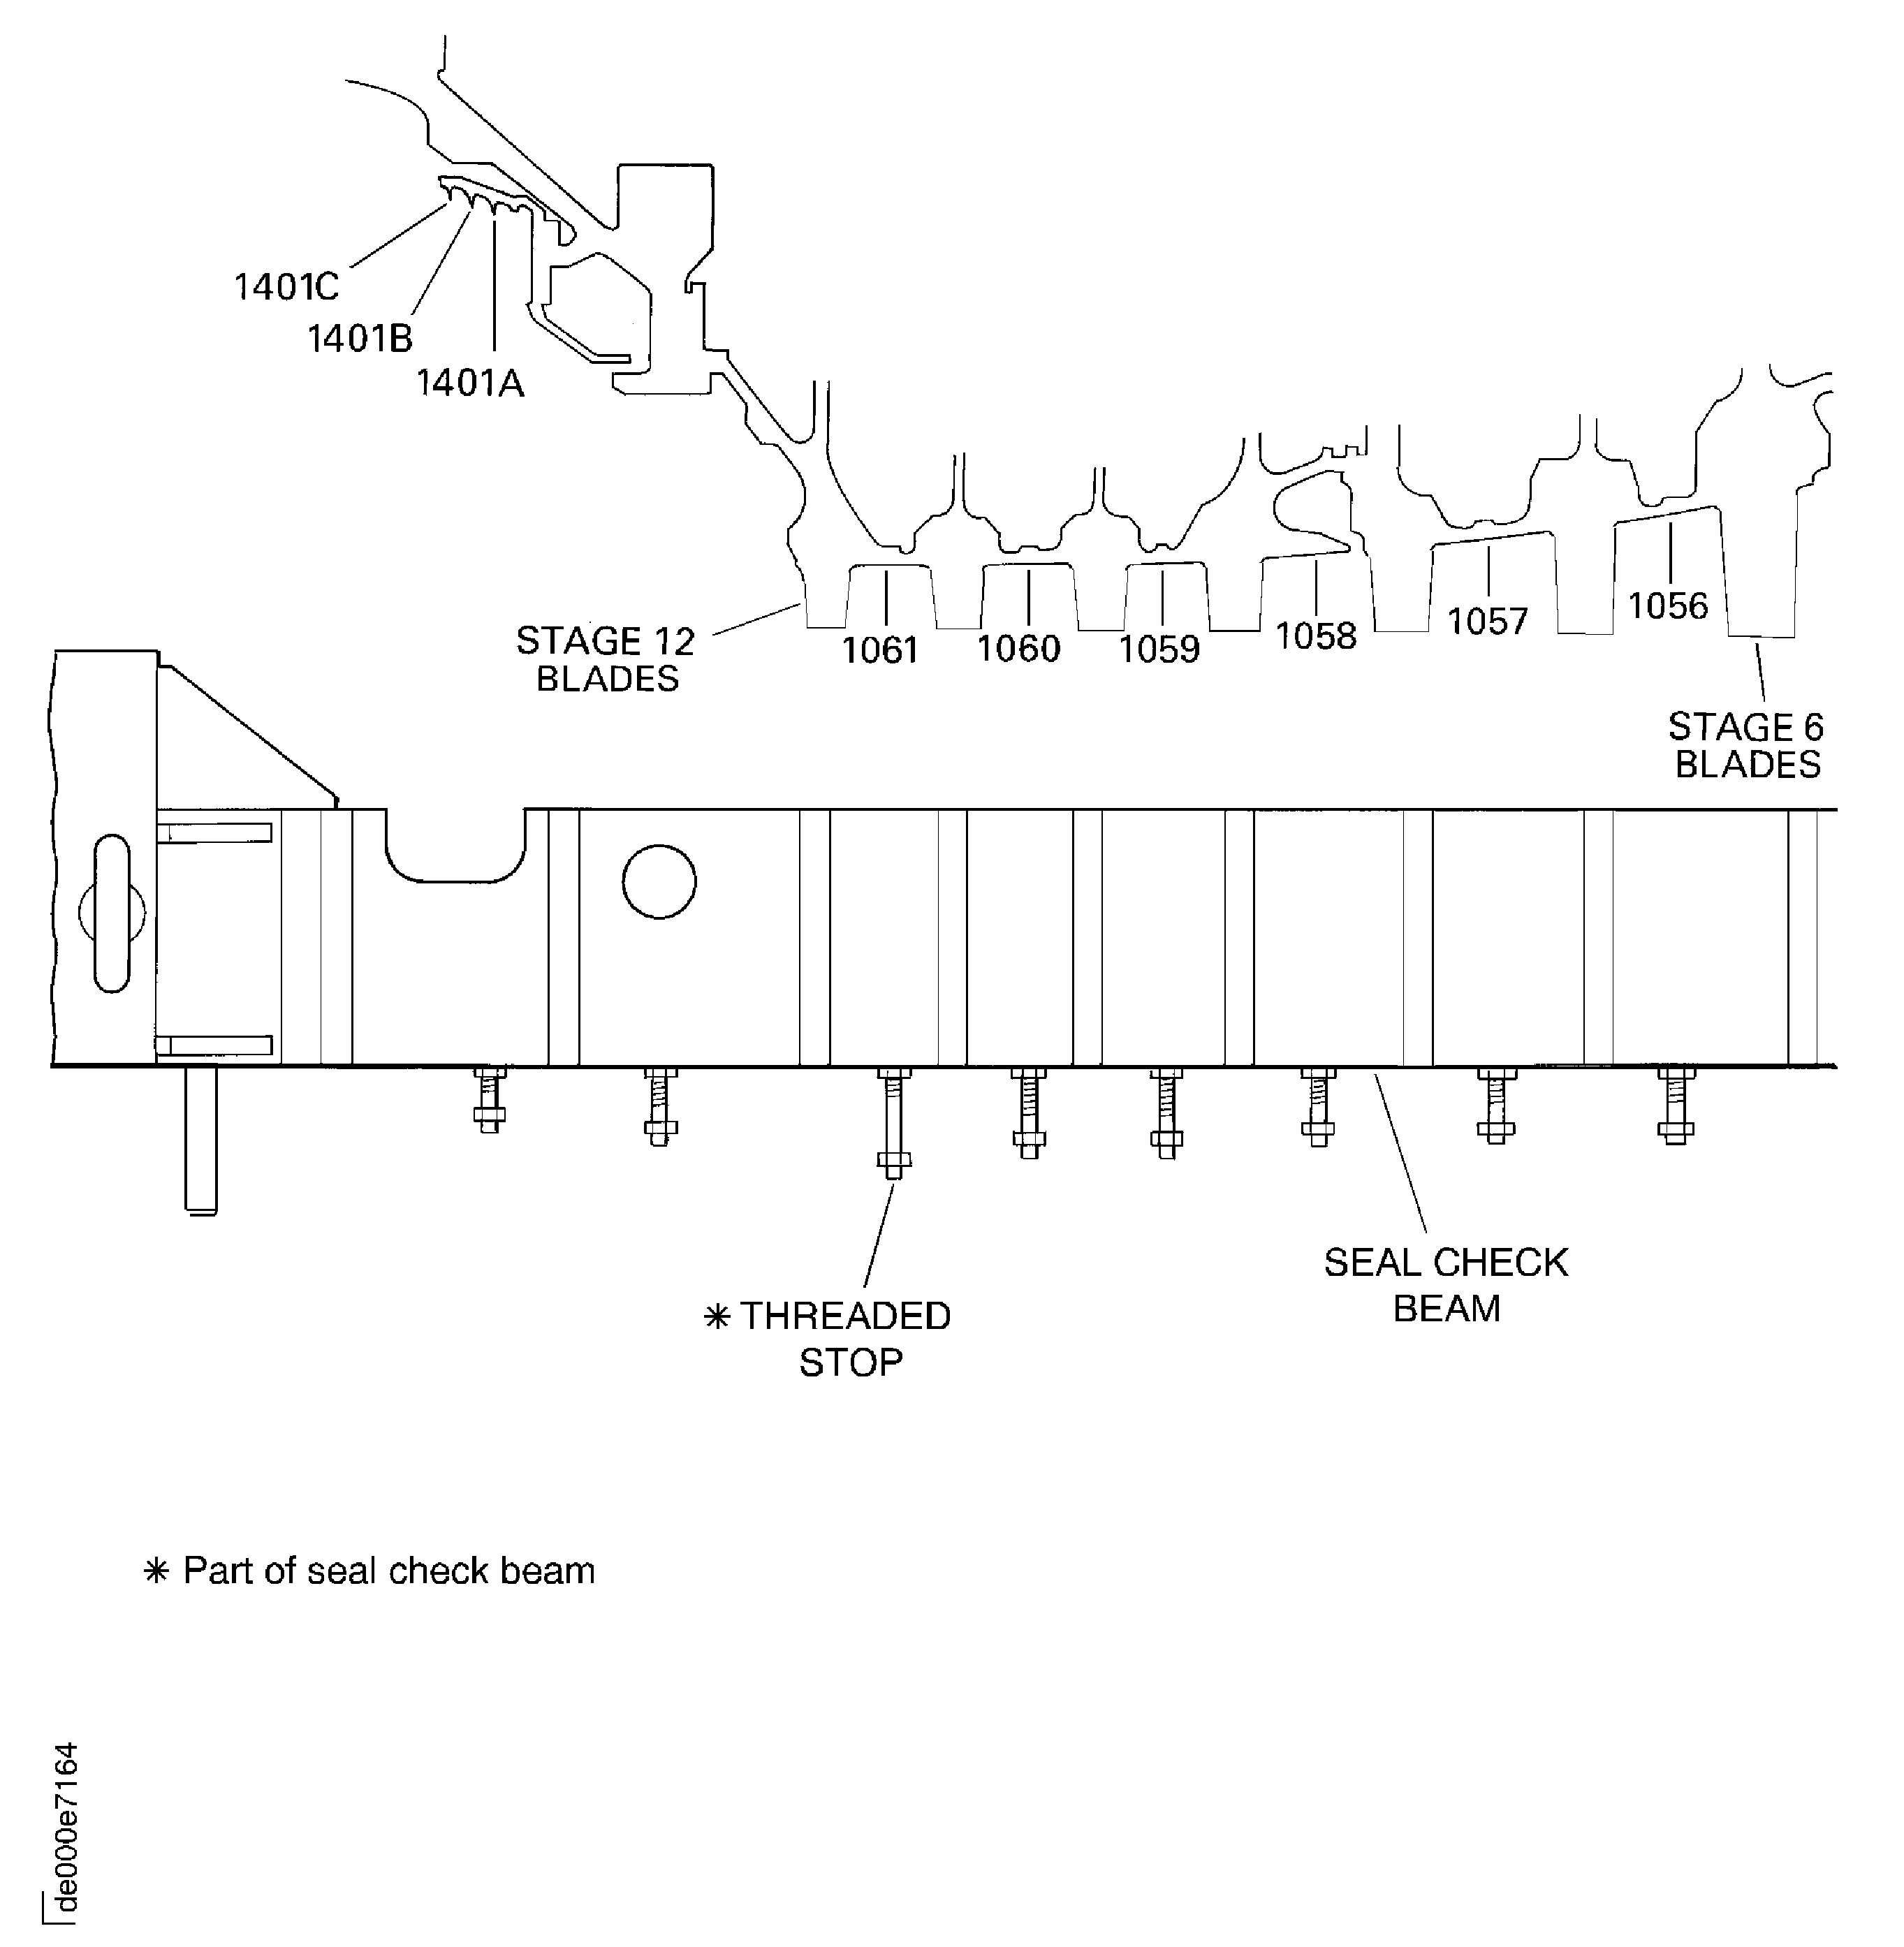
    Legend
    Measure the seal and stator path diameters

    Sheet 1

    Close

    Figure: Measure the seal and stator path diameters

    Sheet 2
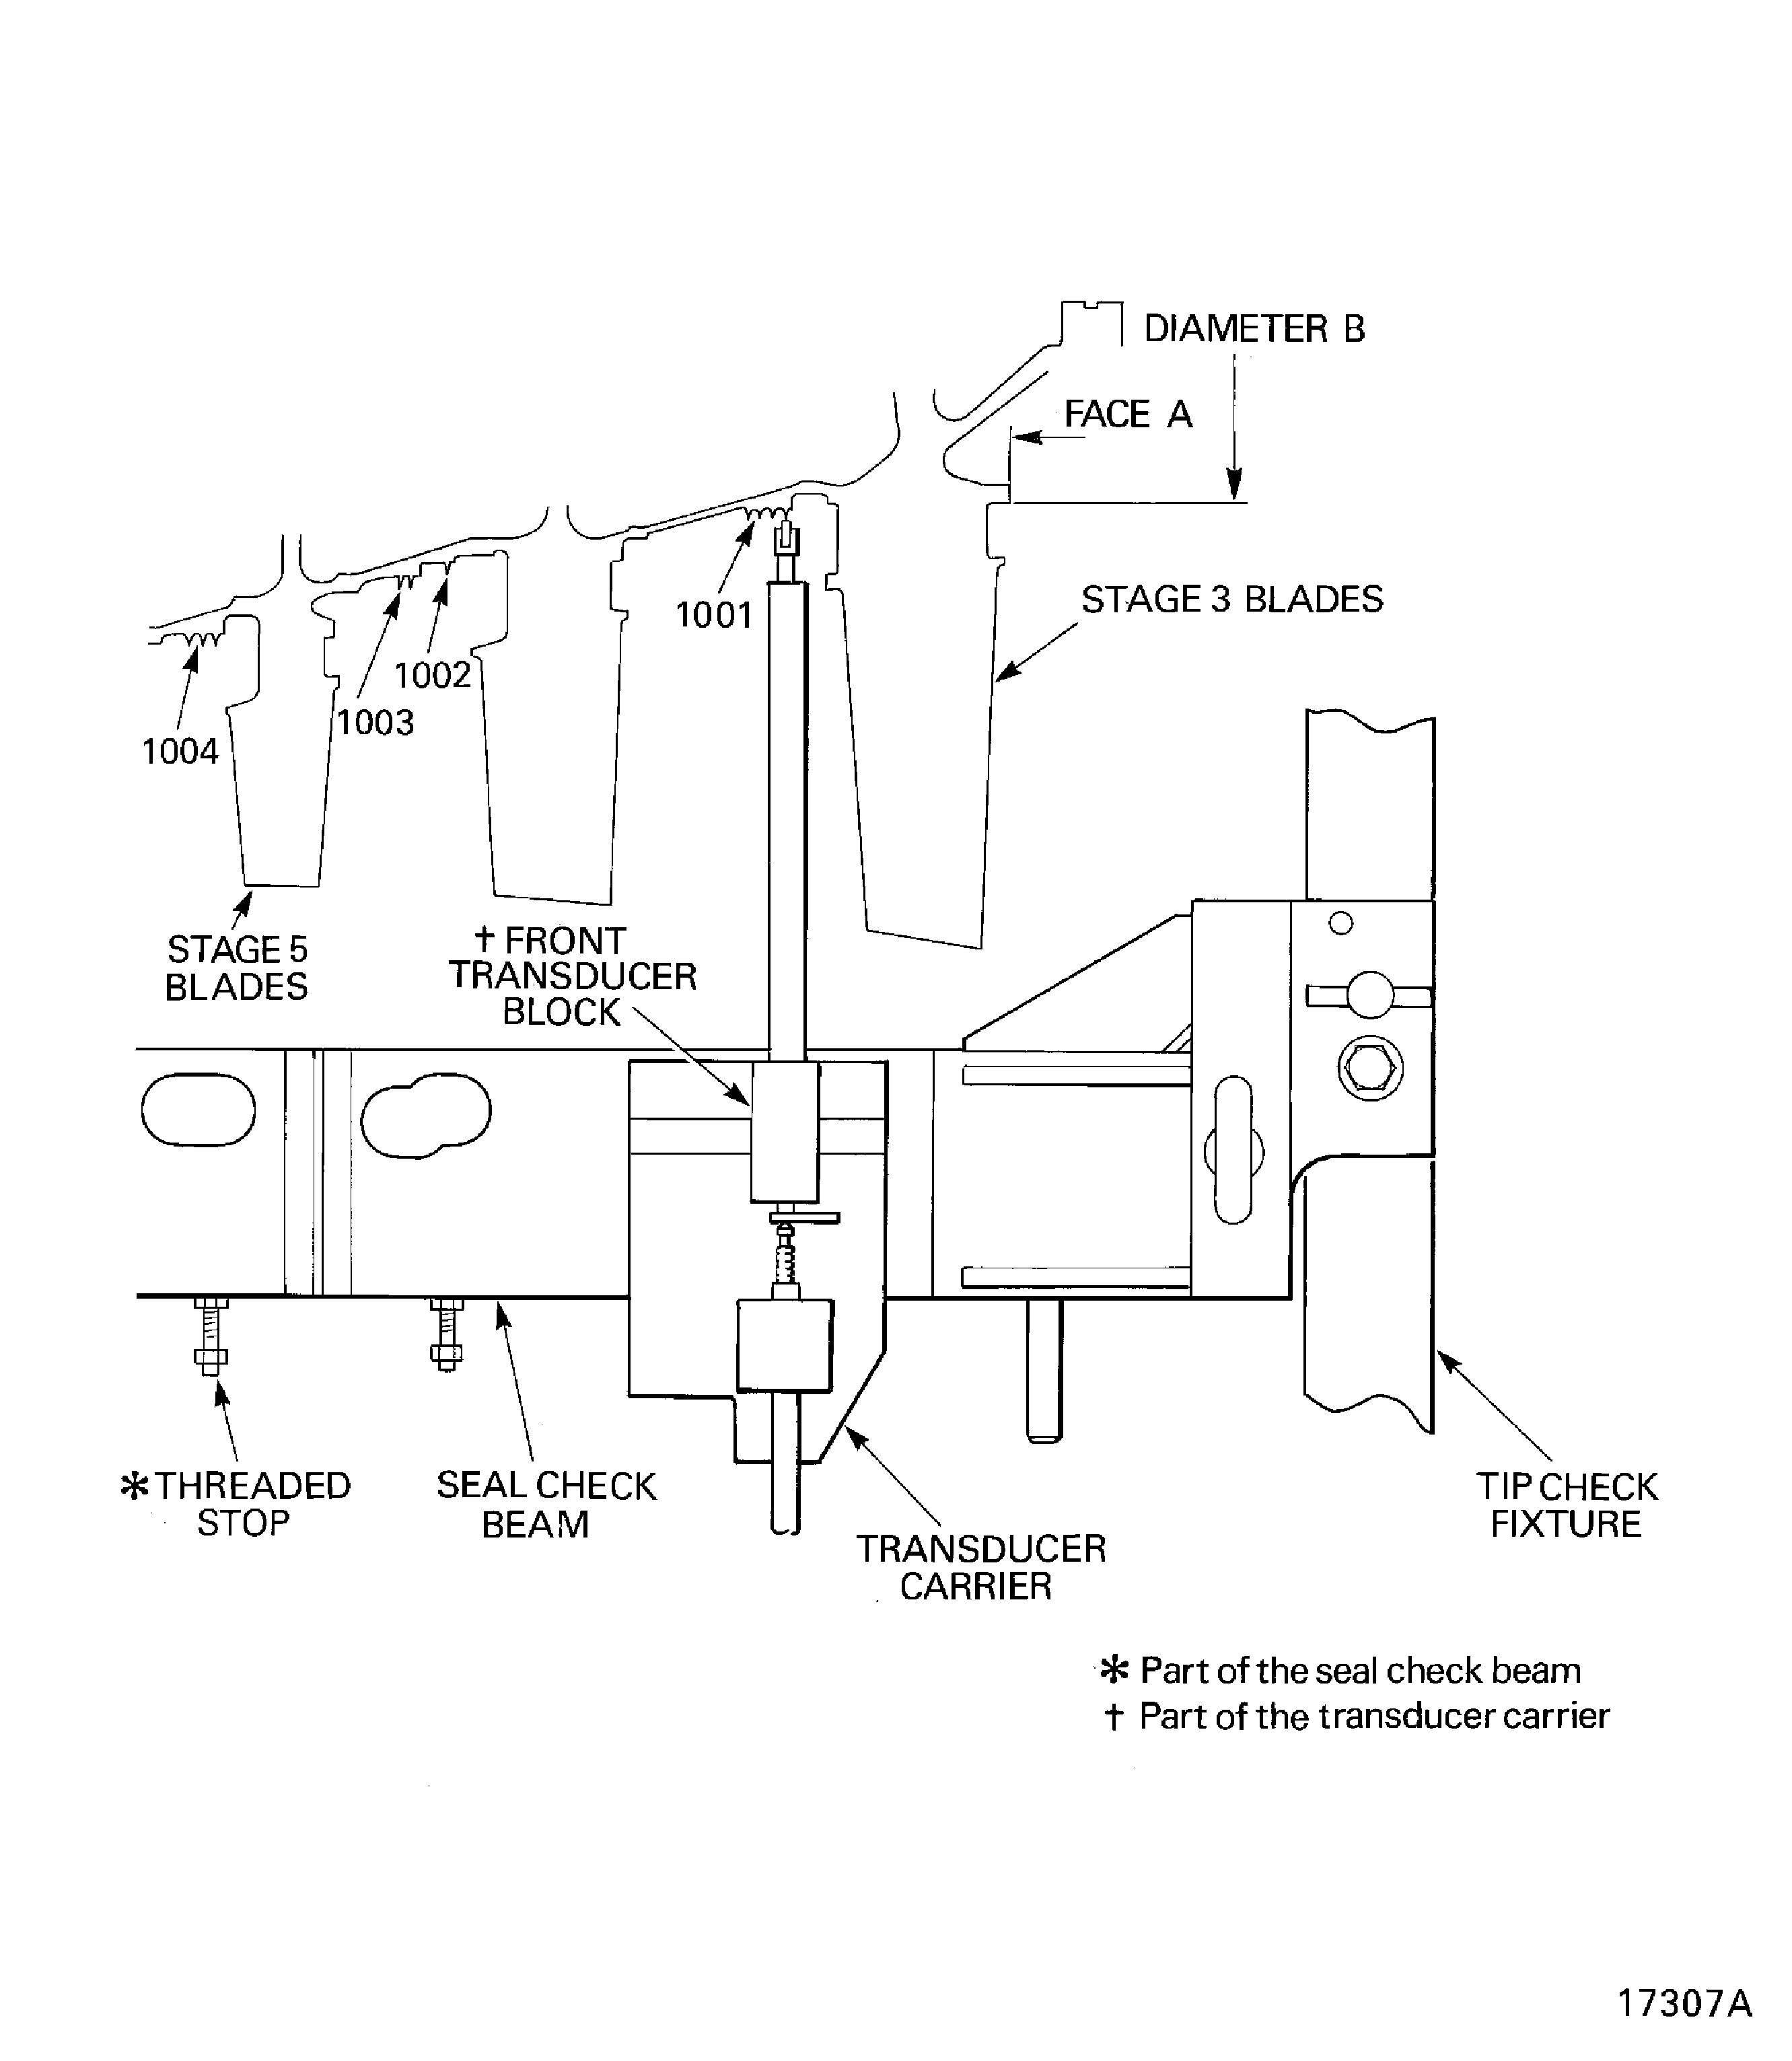
    Legend
    Measure the seal and stator path diameters

    Sheet 2

    Close

    Figure: Install the HP compressor rotor assembly in to the trolley

    Install the HP compressor rotor assembly in to the trolley
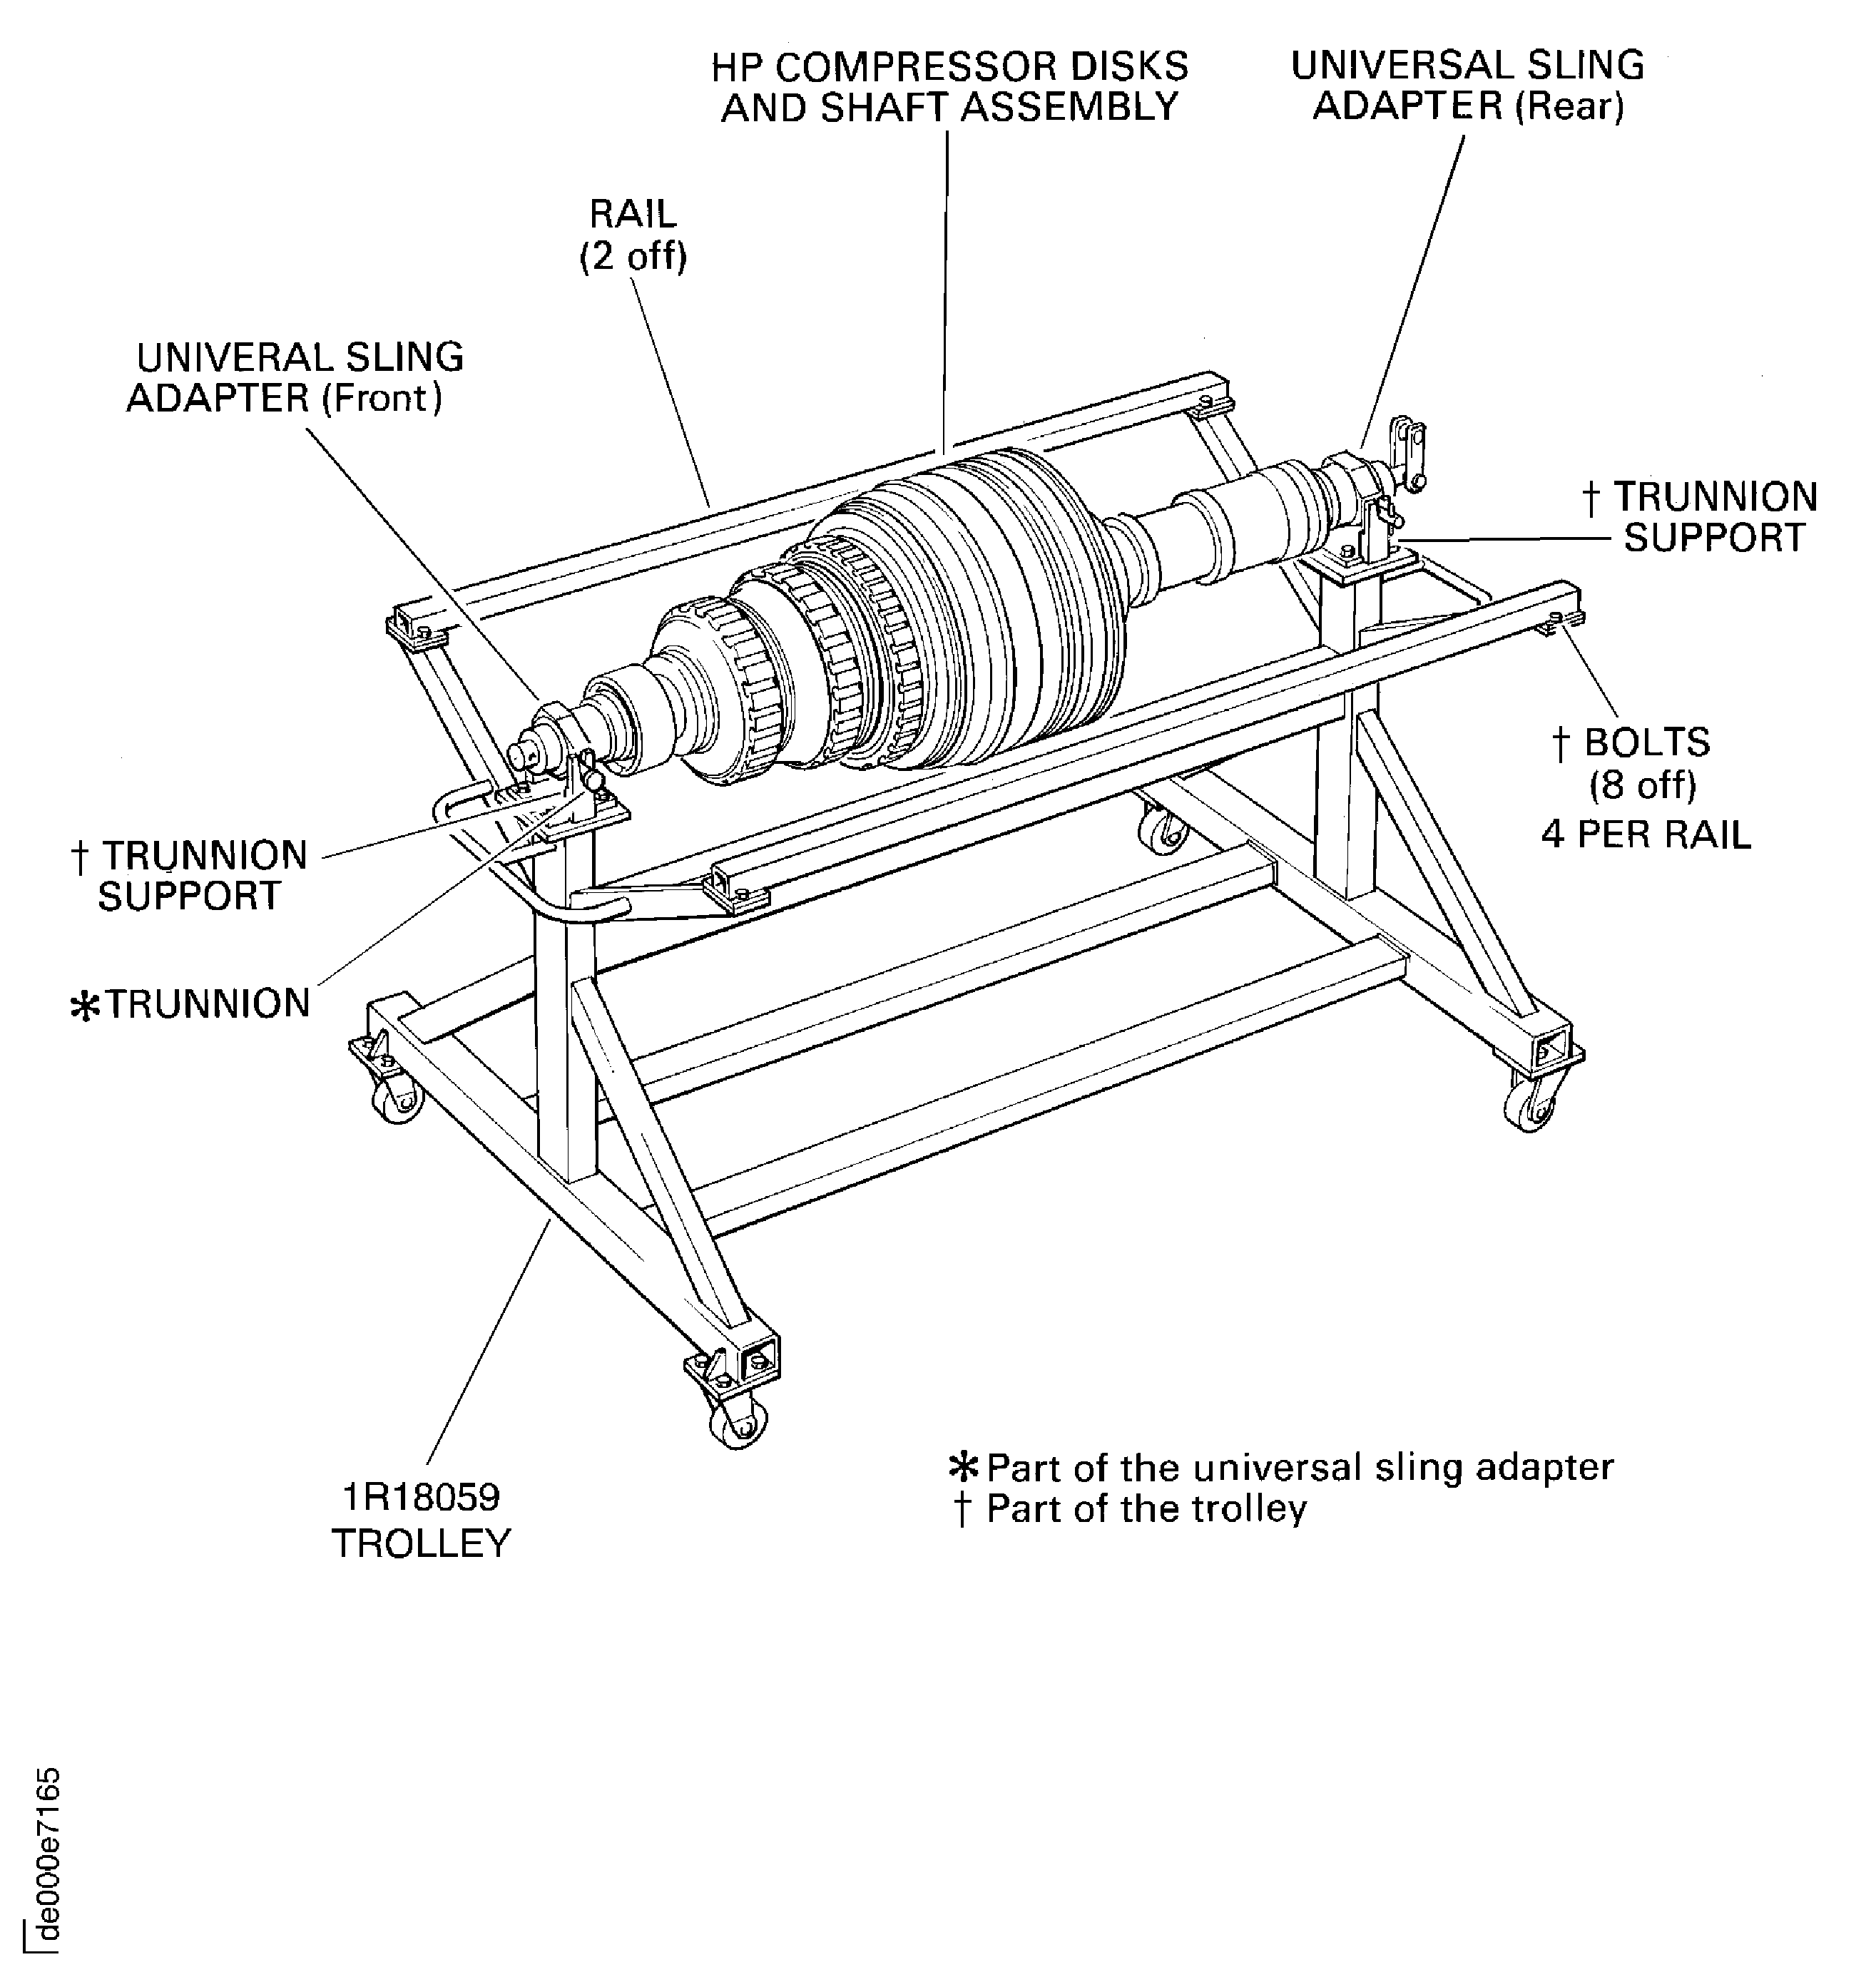
    Figure: HP compressor rotor tip radius - axial position (dimension AA)

    HP compressor rotor tip radius - axial position (dimension AA)
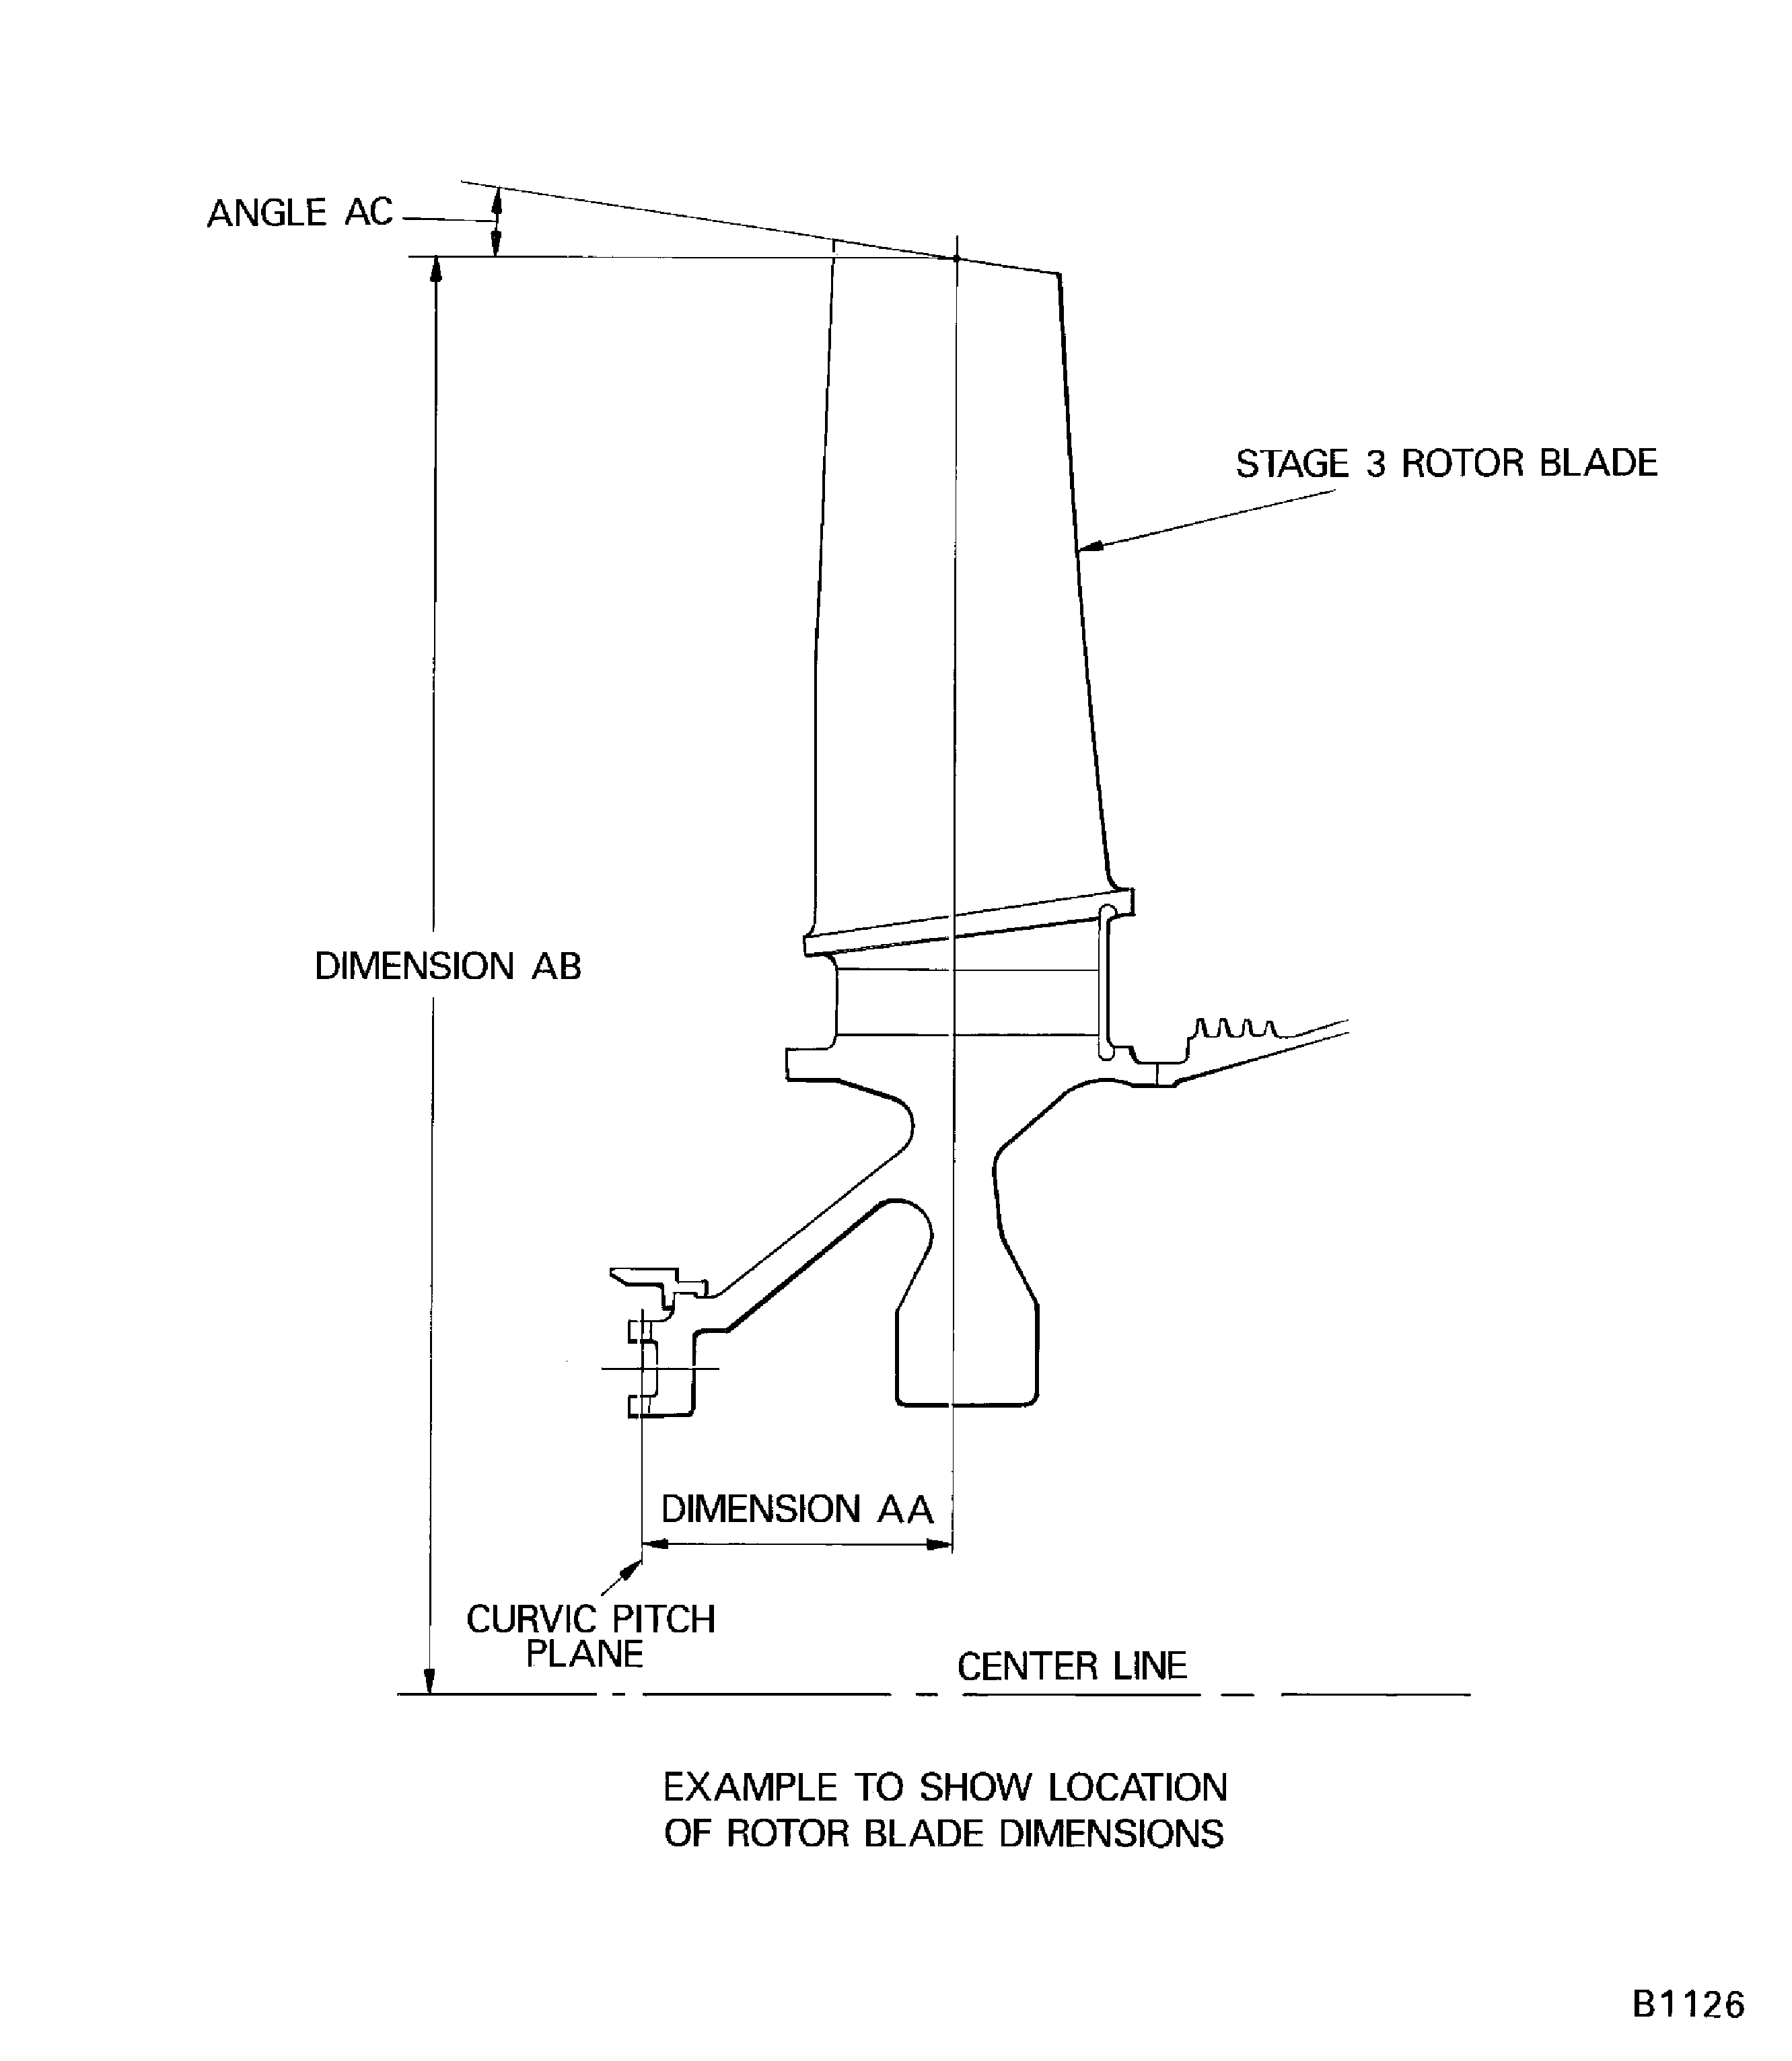
    Figure: Pre SBE 72-0370 : HP compressor rotor tip radius

    Pre SBE 72-0370 : HP compressor rotor tip radius

    Figure: SBE 72-0370 : HP compressor rotor tip radius

    SBE 72-0370 : HP compressor rotor tip radius
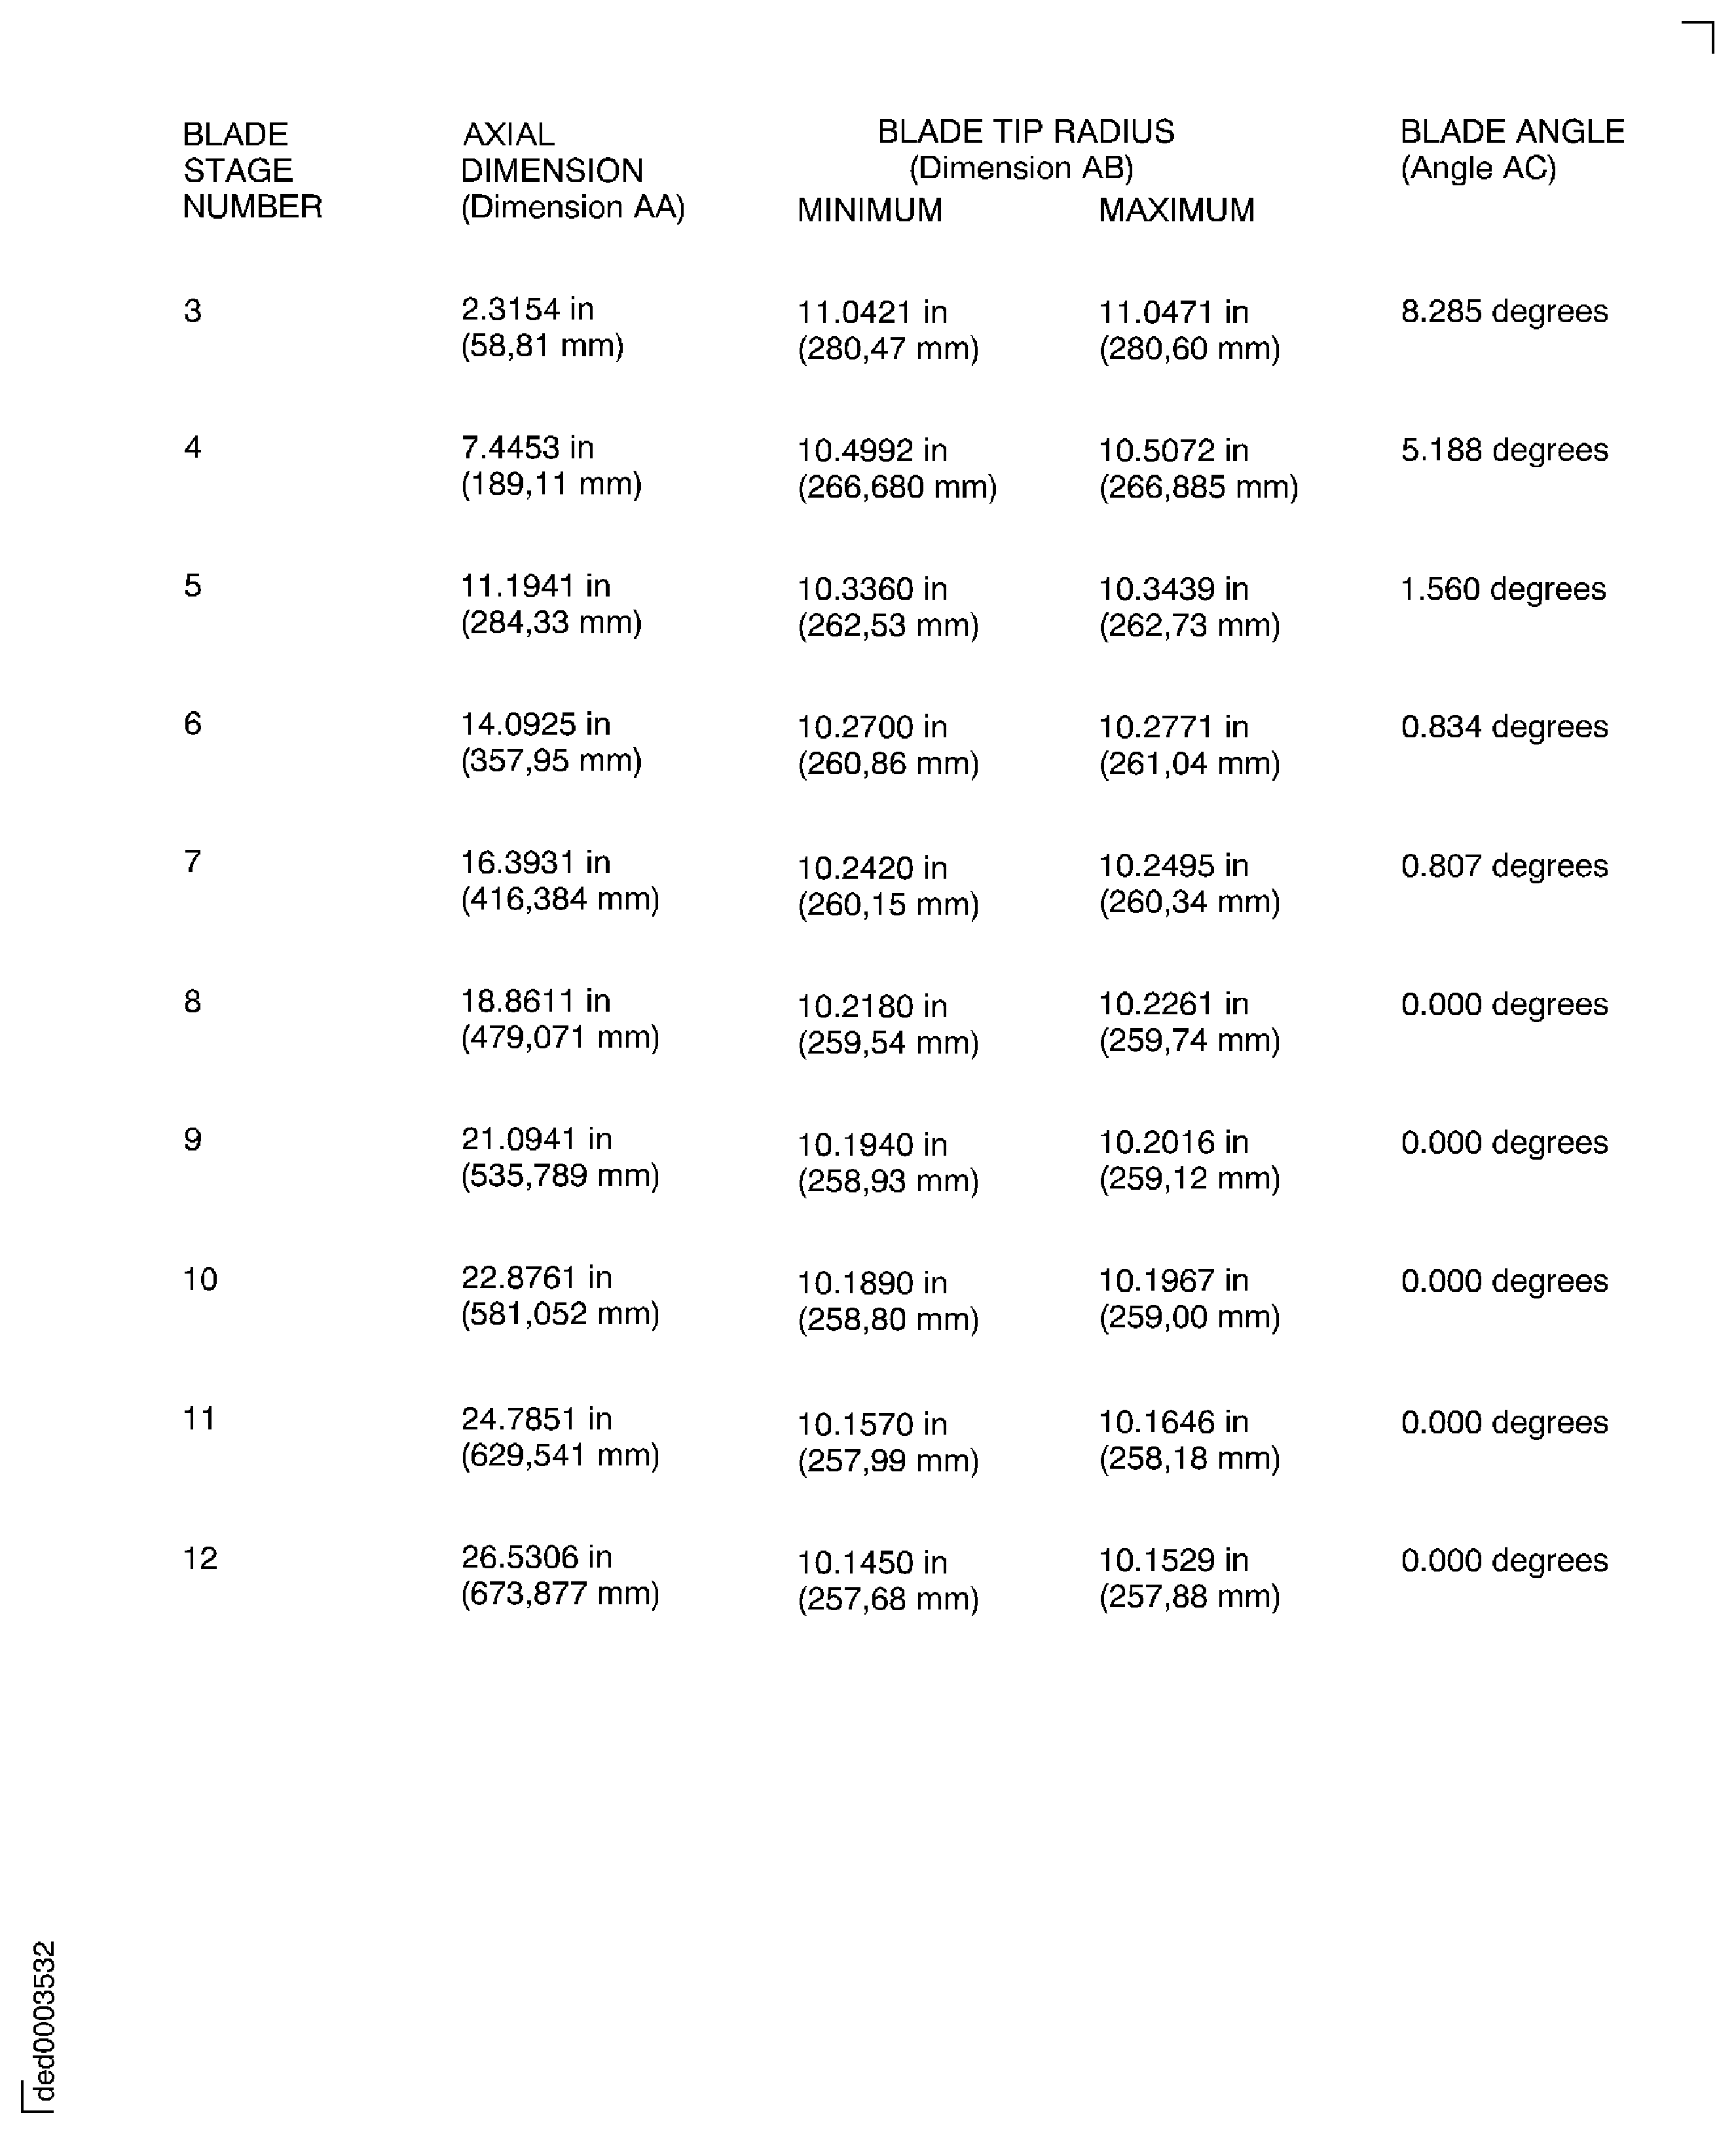
    Figure: Stage 3 disk curvic coupling bolts torque sequence

    Stage 3 disk curvic coupling bolts torque sequence
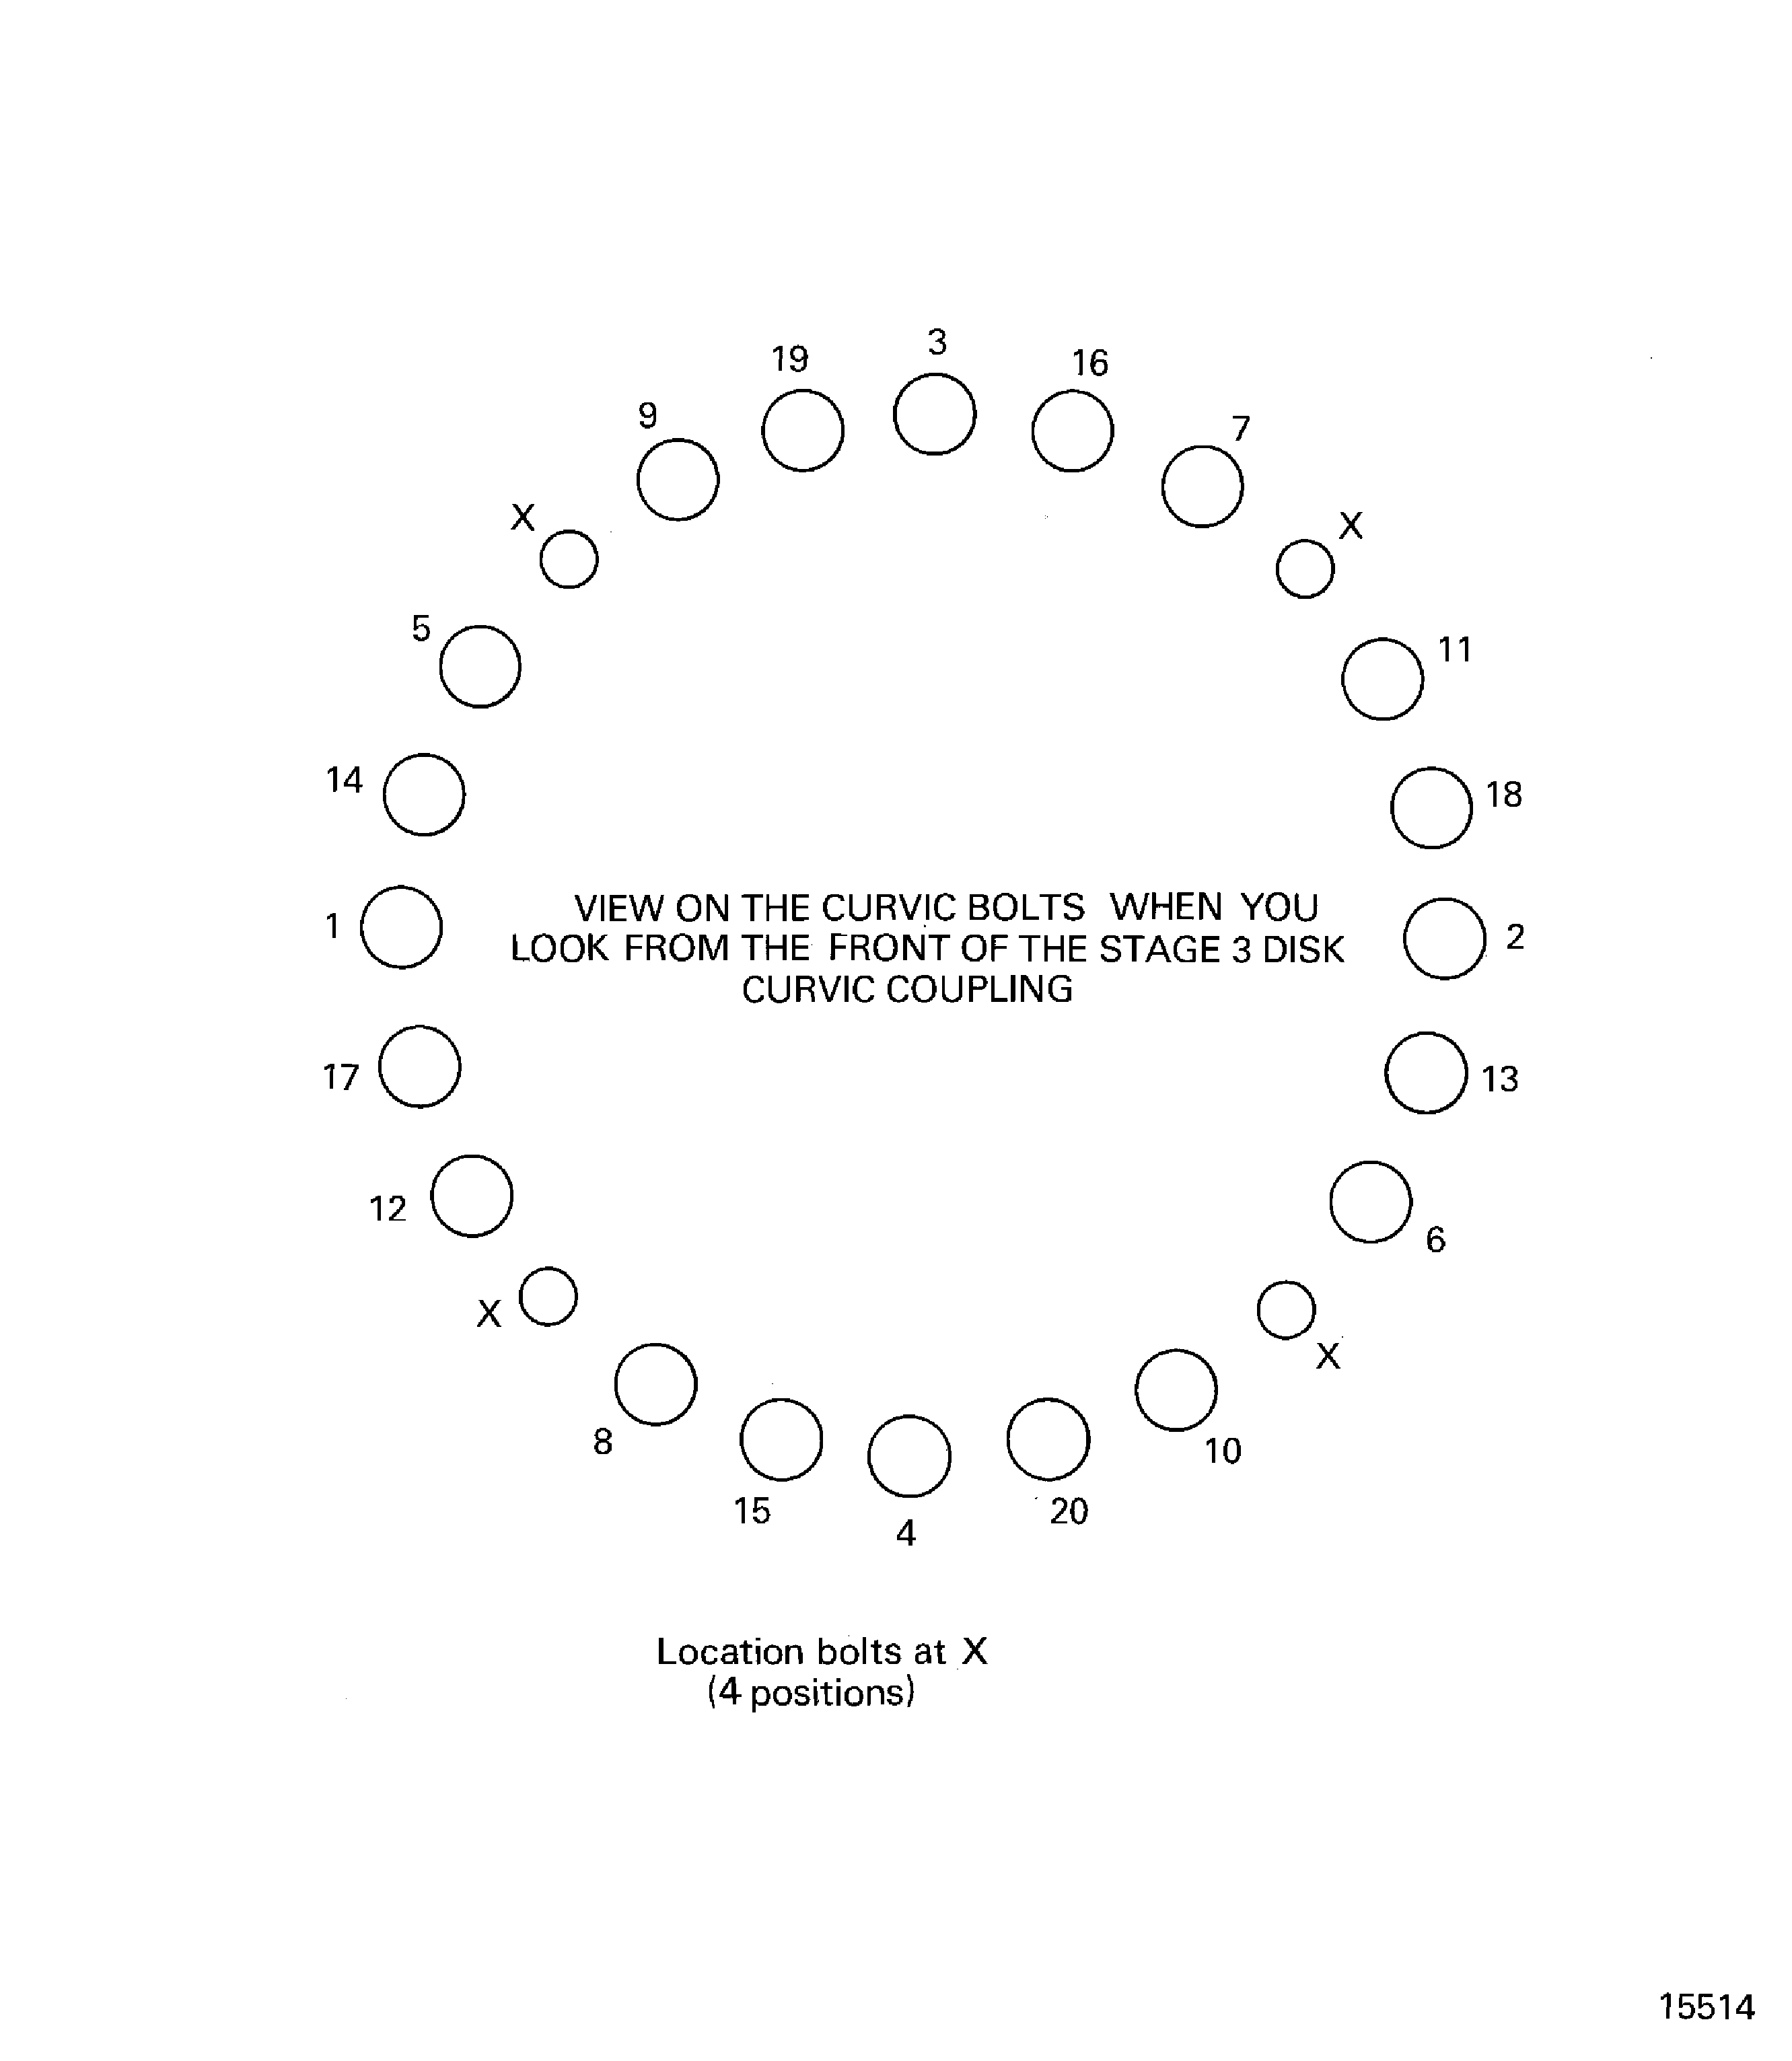
    Figure: Install the HP compressor rotor assembly in to the build stand

    Install the HP compressor rotor assembly in to the build stand
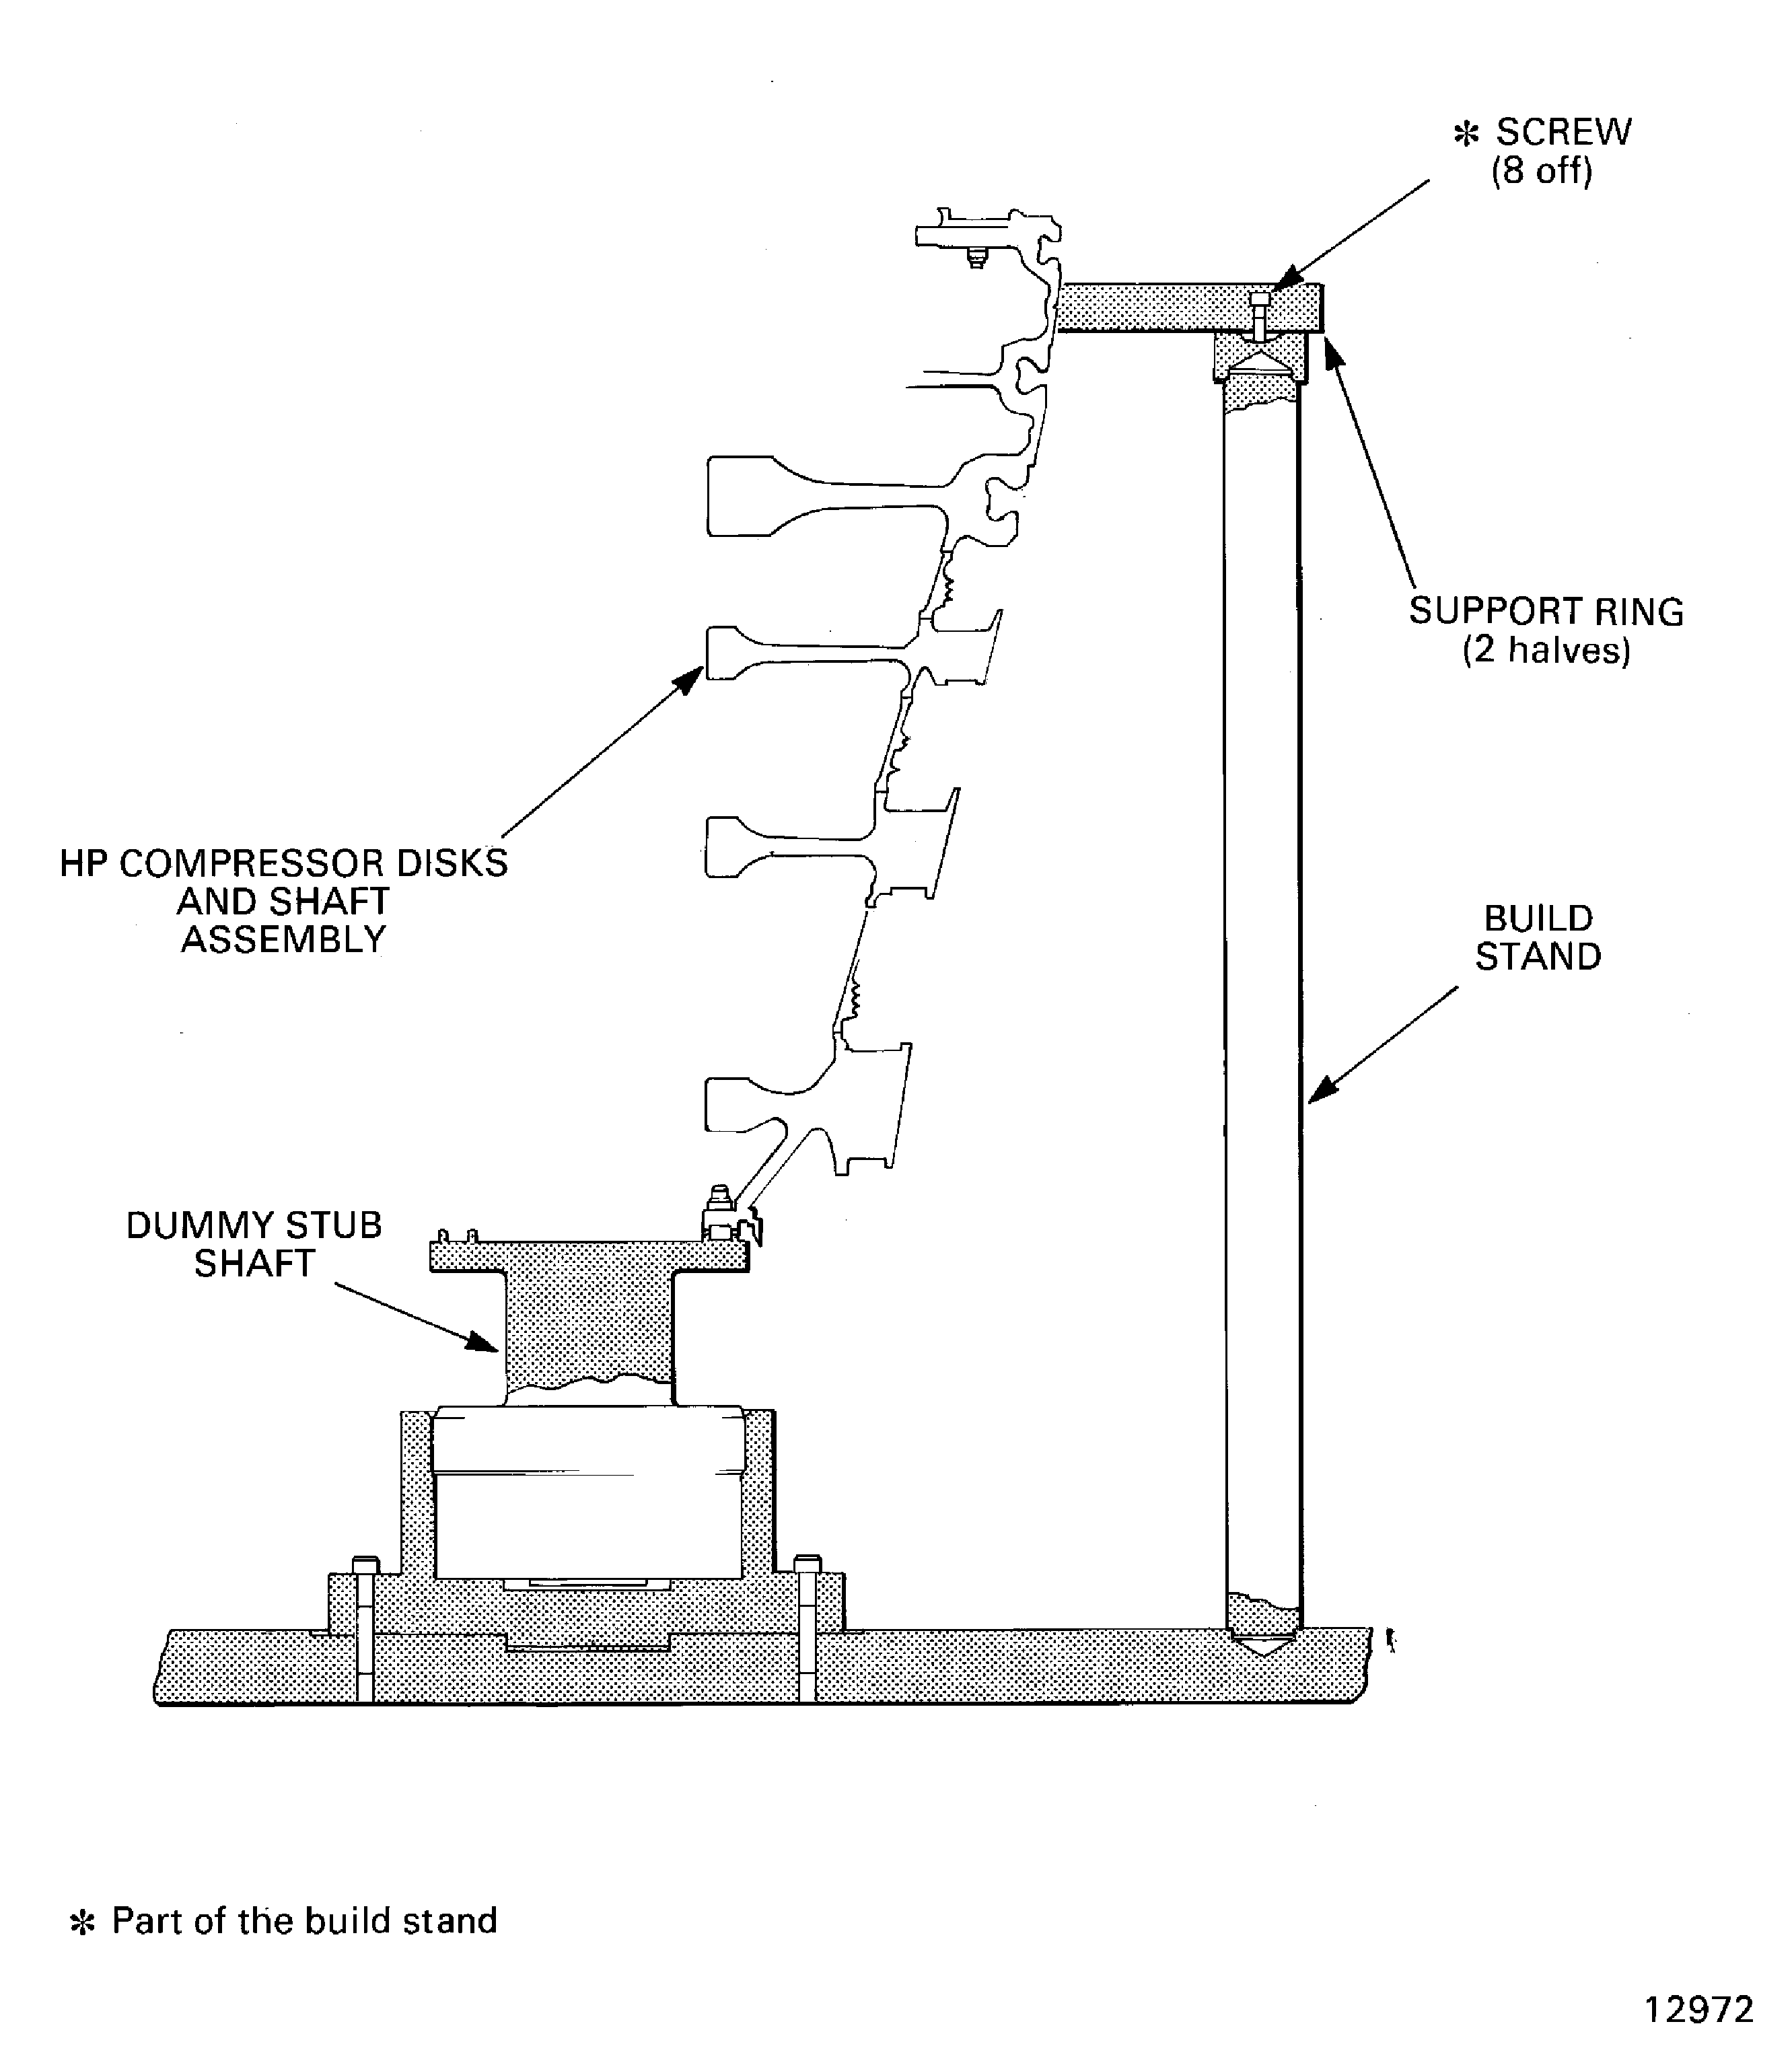
    Figure: Remove the rotating air seal

    Remove the rotating air seal
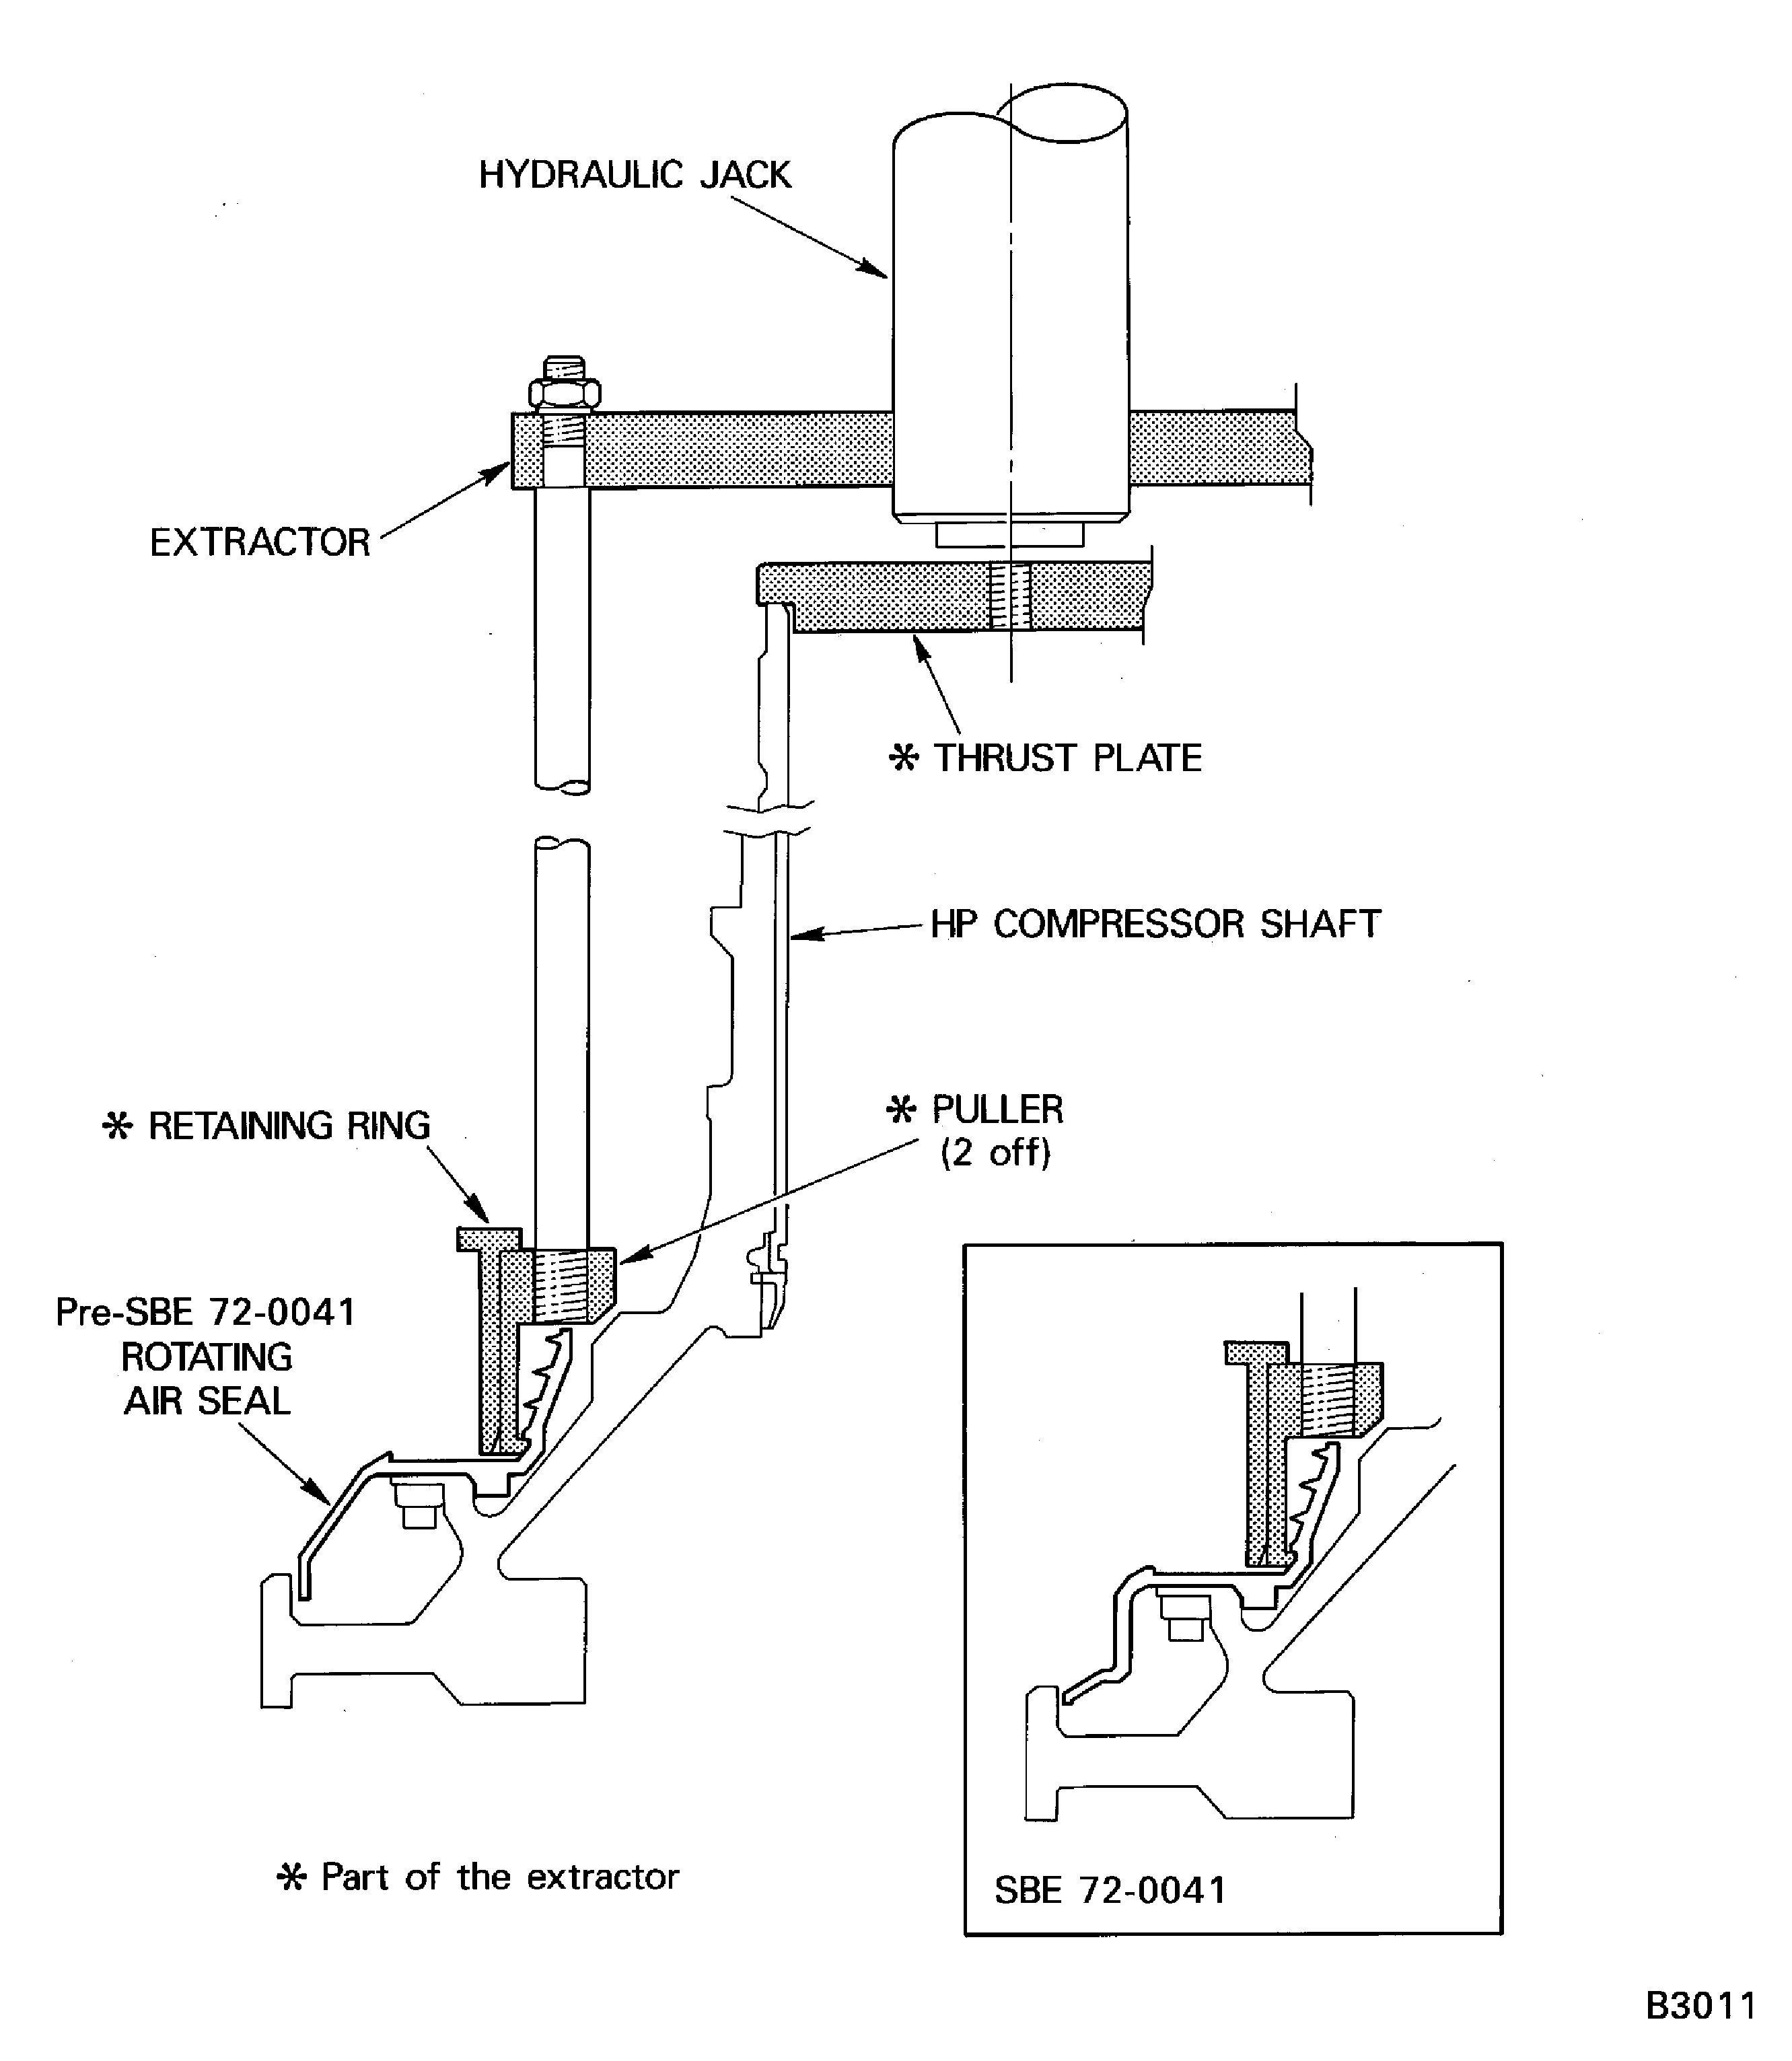
    Figure: Install the lifter on the compressor shaft

    Install the lifter on the compressor shaft
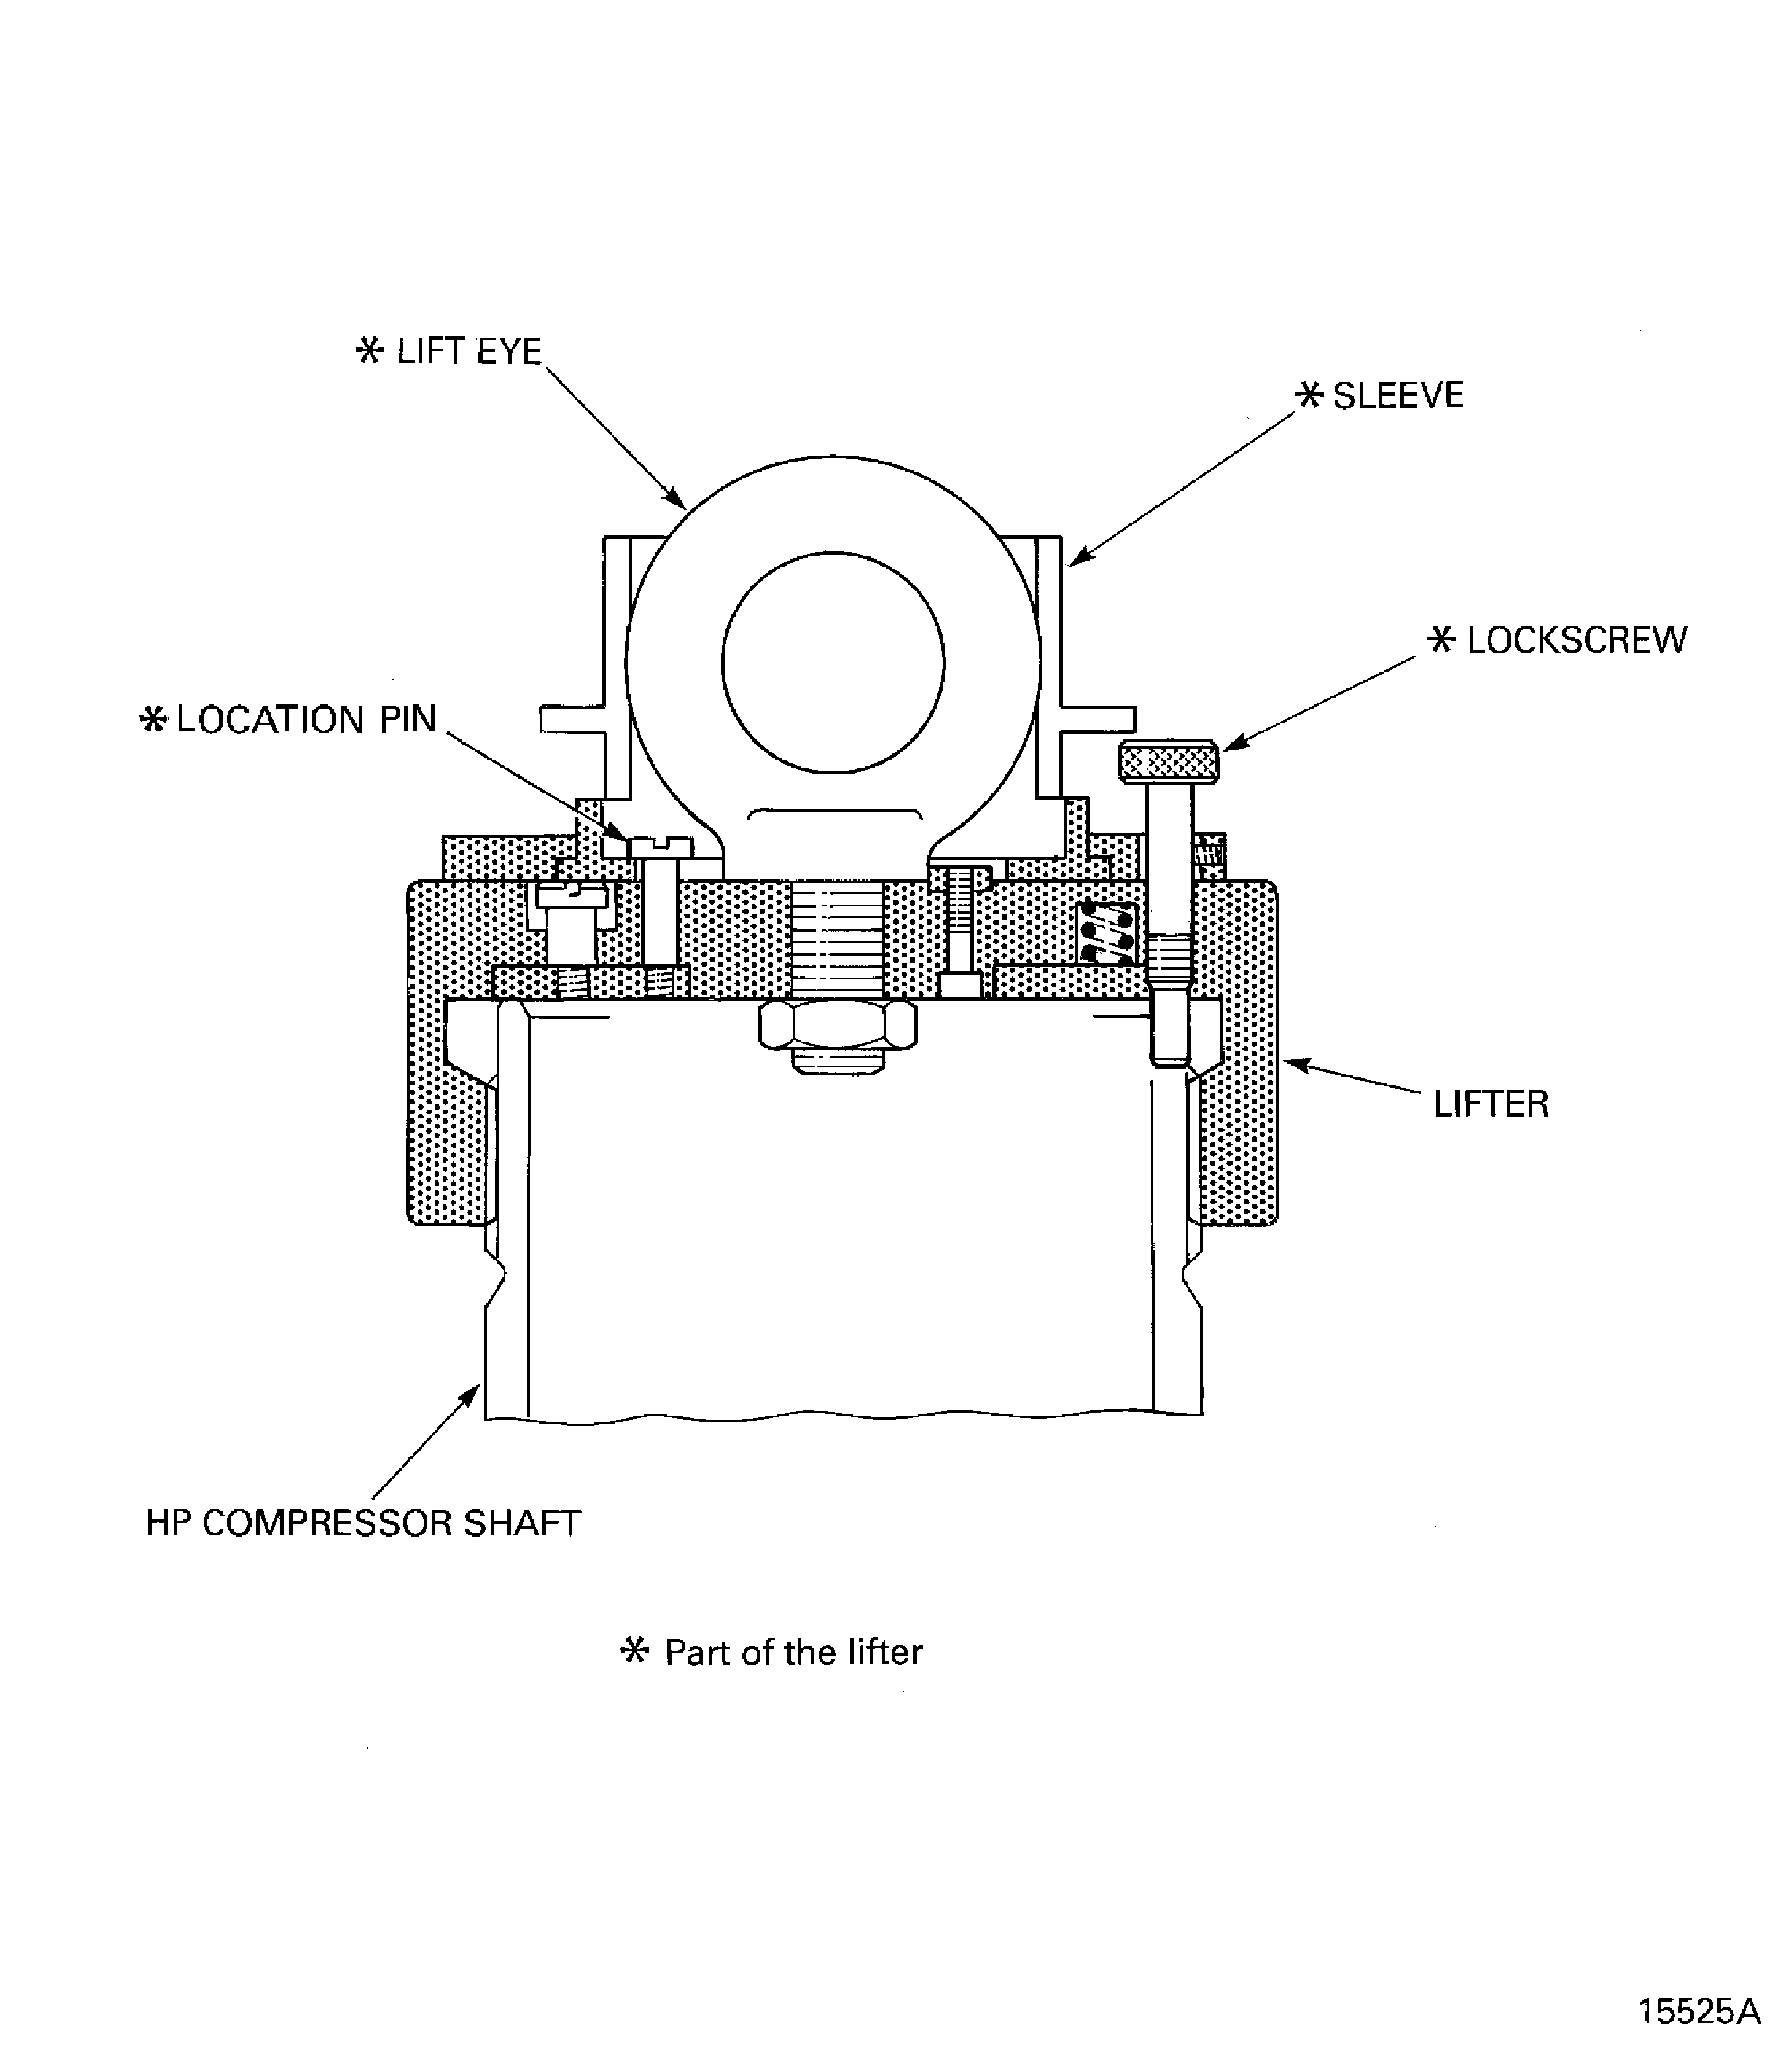
    Figure: Remove the HP compressor shaft

    Remove the HP compressor shaft
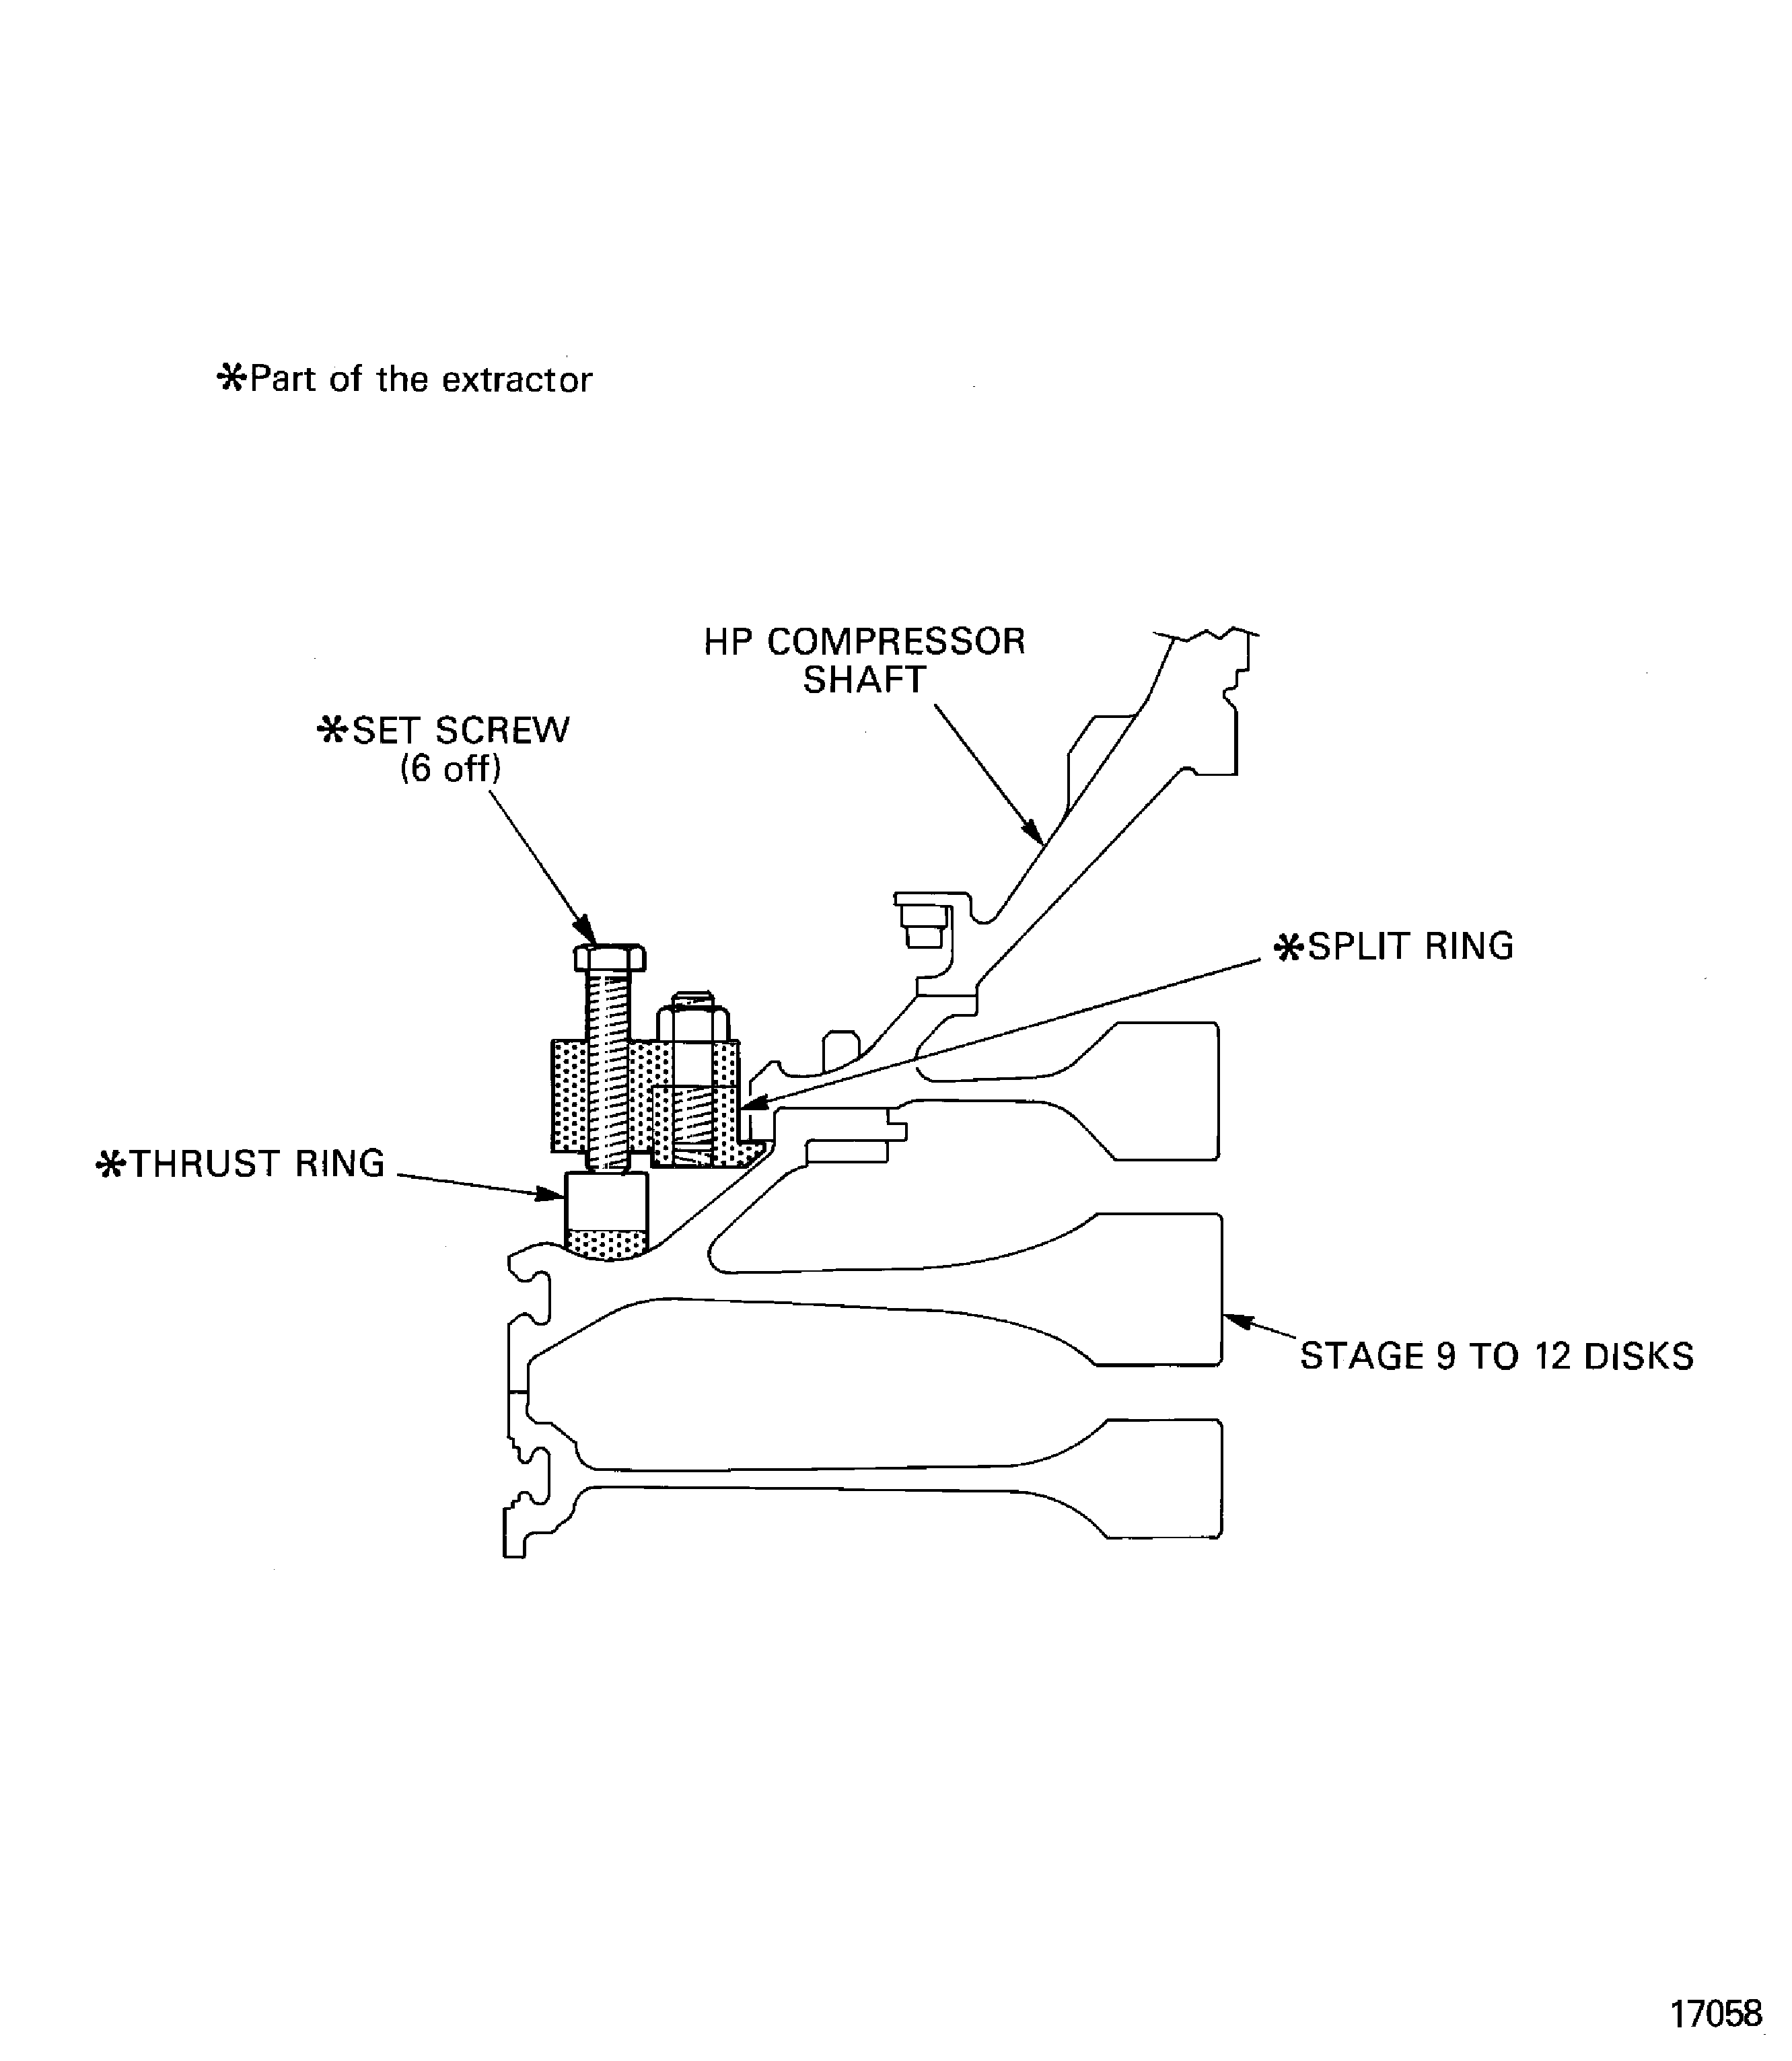
    Figure: Remove the splined nuts and the anti-score washers

    Sheet 1
    Legend
    Remove the splined nuts and the anti-score washers

    Sheet 1

    Close

    Figure: Remove the splined nuts and the anti-score washers

    Sheet 2
    Legend
    Remove the splined nuts and the anti-score washers

    Sheet 2

    Close

    Figure: Remove the splined nuts and the anti-score washers

    Sheet 3
    Legend
    Remove the splined nuts and the anti-score washers

    Sheet 3

    Close

    Figure: Remove the splined nuts and the anti-score washers

    Sheet 4
    Legend
    Remove the splined nuts and the anti-score washers

    Sheet 4

    Close

    Figure: Remove the splined nuts and the anti-score washers

    Sheet 5
    Legend
    Remove the splined nuts and the anti-score washers

    Sheet 5

    Close

    Figure: Install the lifter on the stage 12 disk
    Install the lifter on the stage 12 disk

    Figure: Remove the stage 9 to 12 disks from the stage 3 to 8 disks

    Remove the stage 9 to 12 disks from the stage 3 to 8 disks
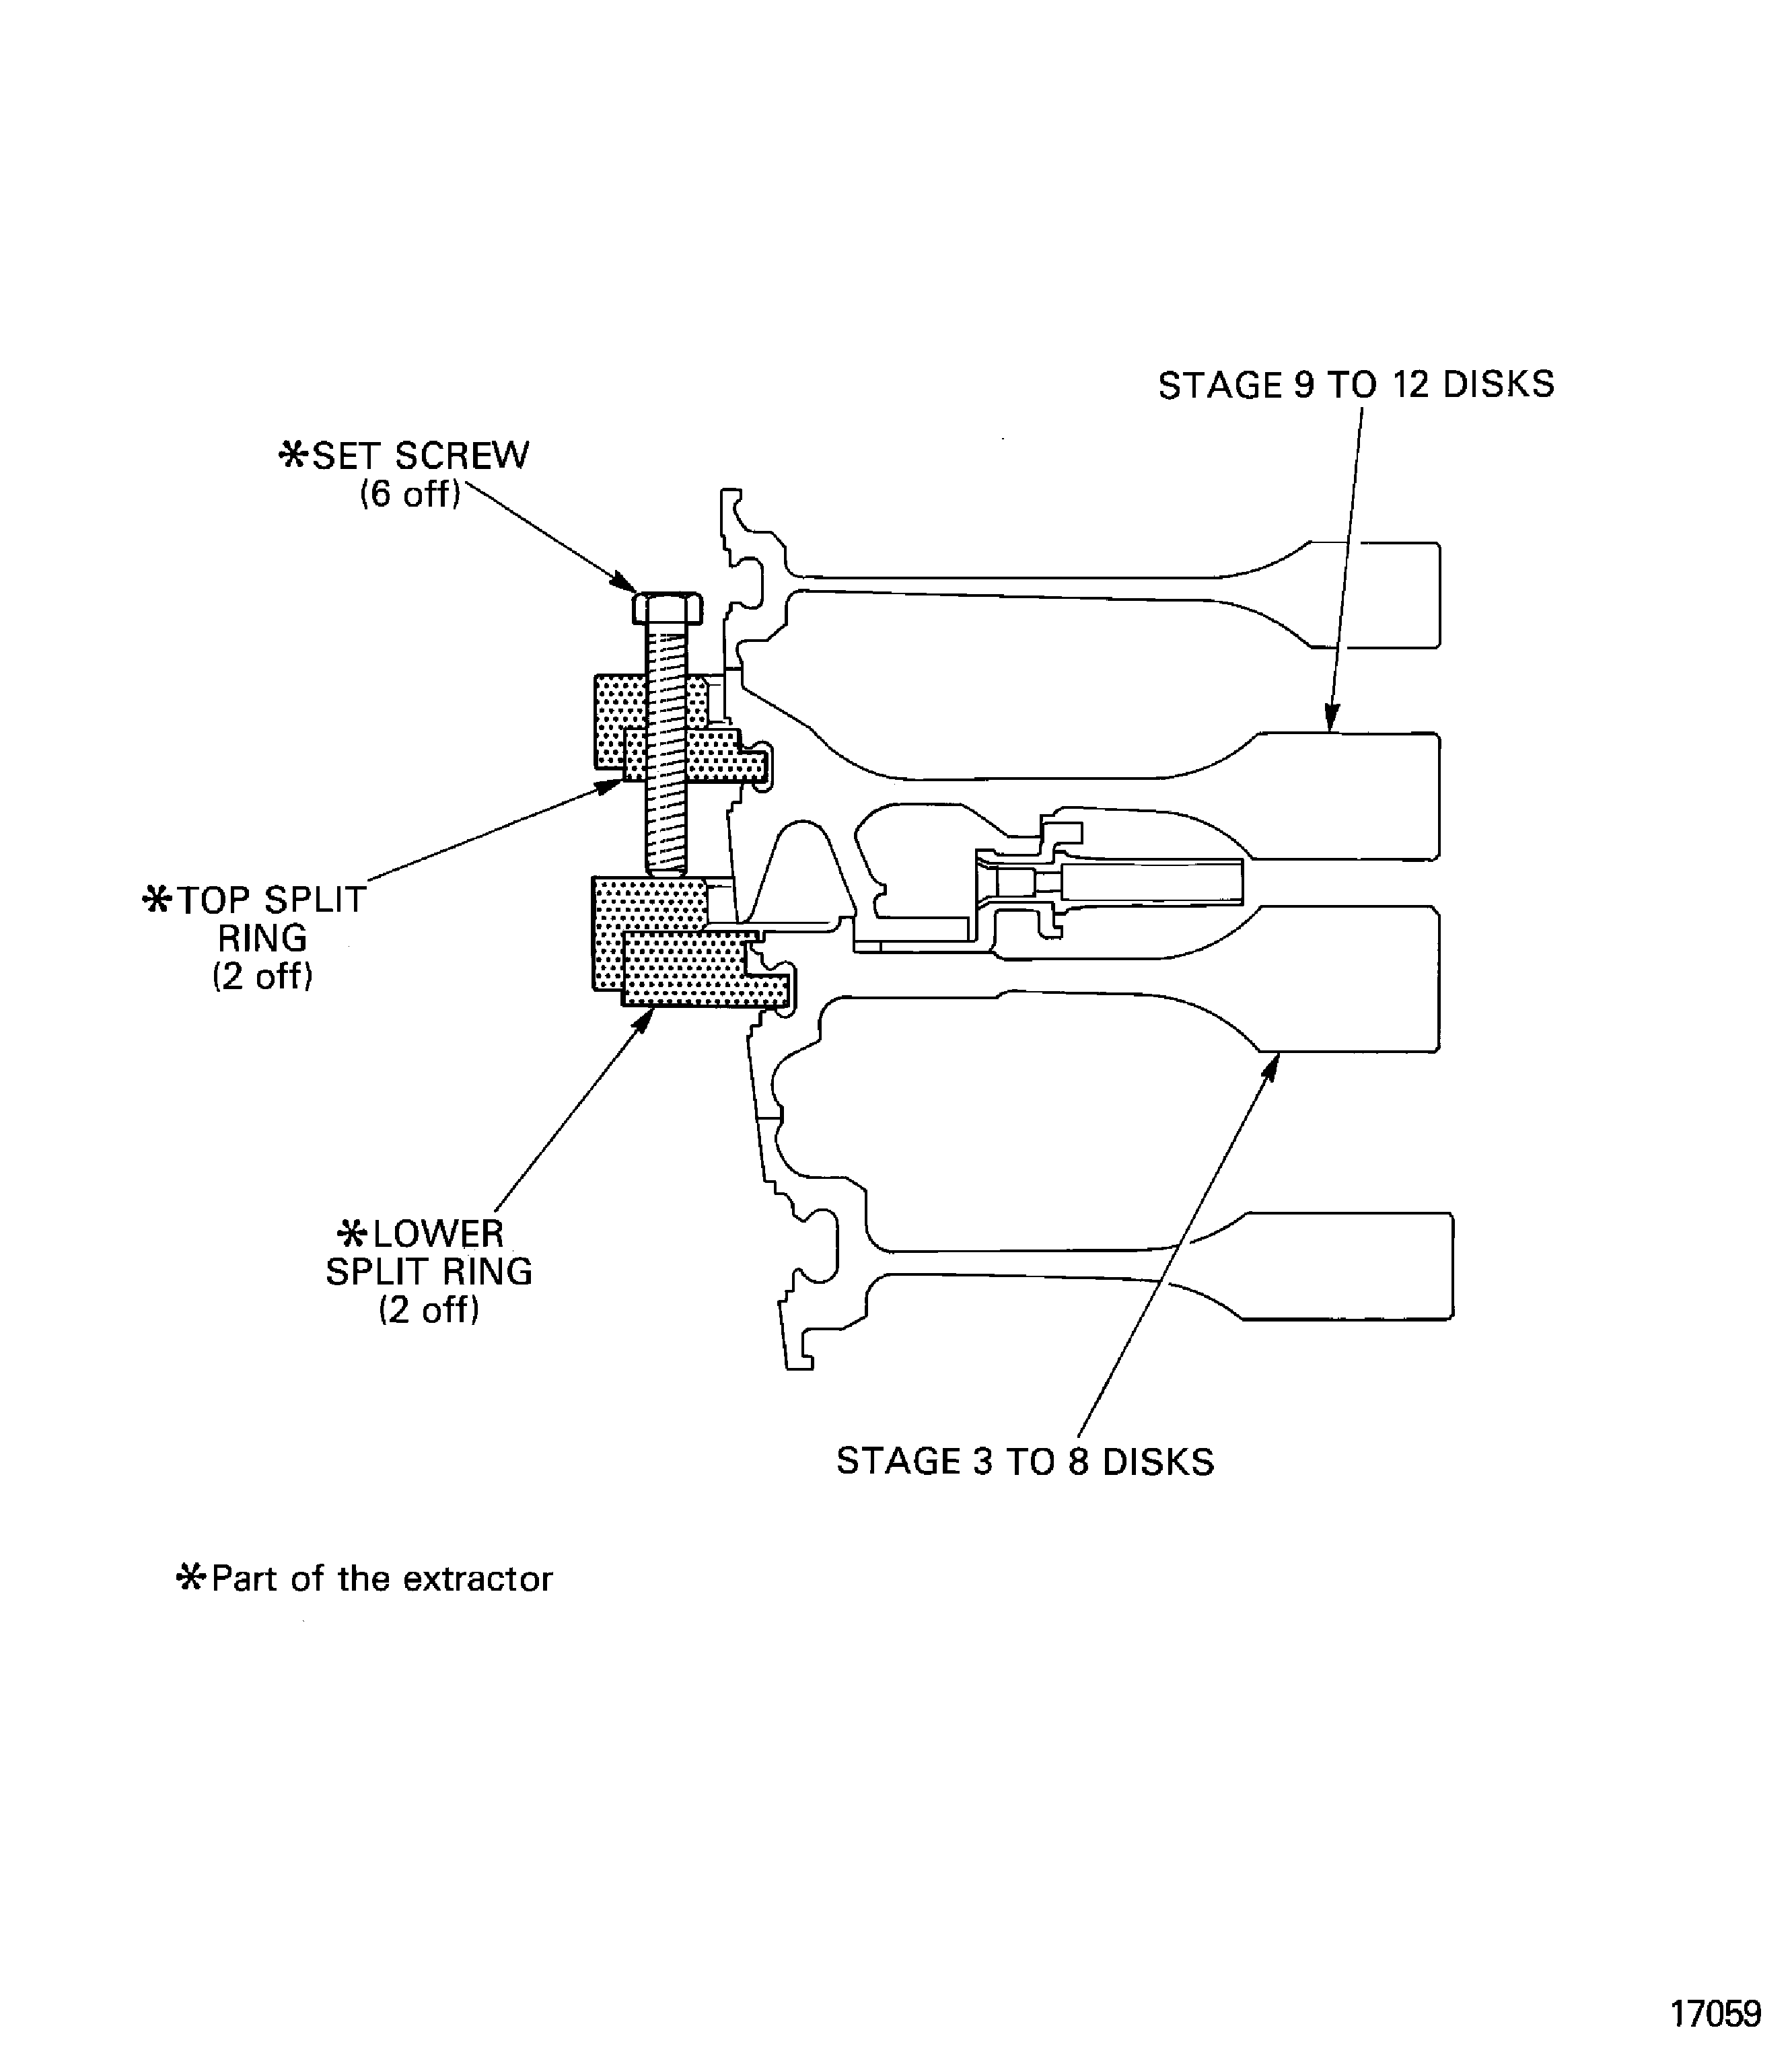
    Figure: Install the stage 9 to 12 disks in the turnover stand

    Install the stage 9 to 12 disks in the turnover stand
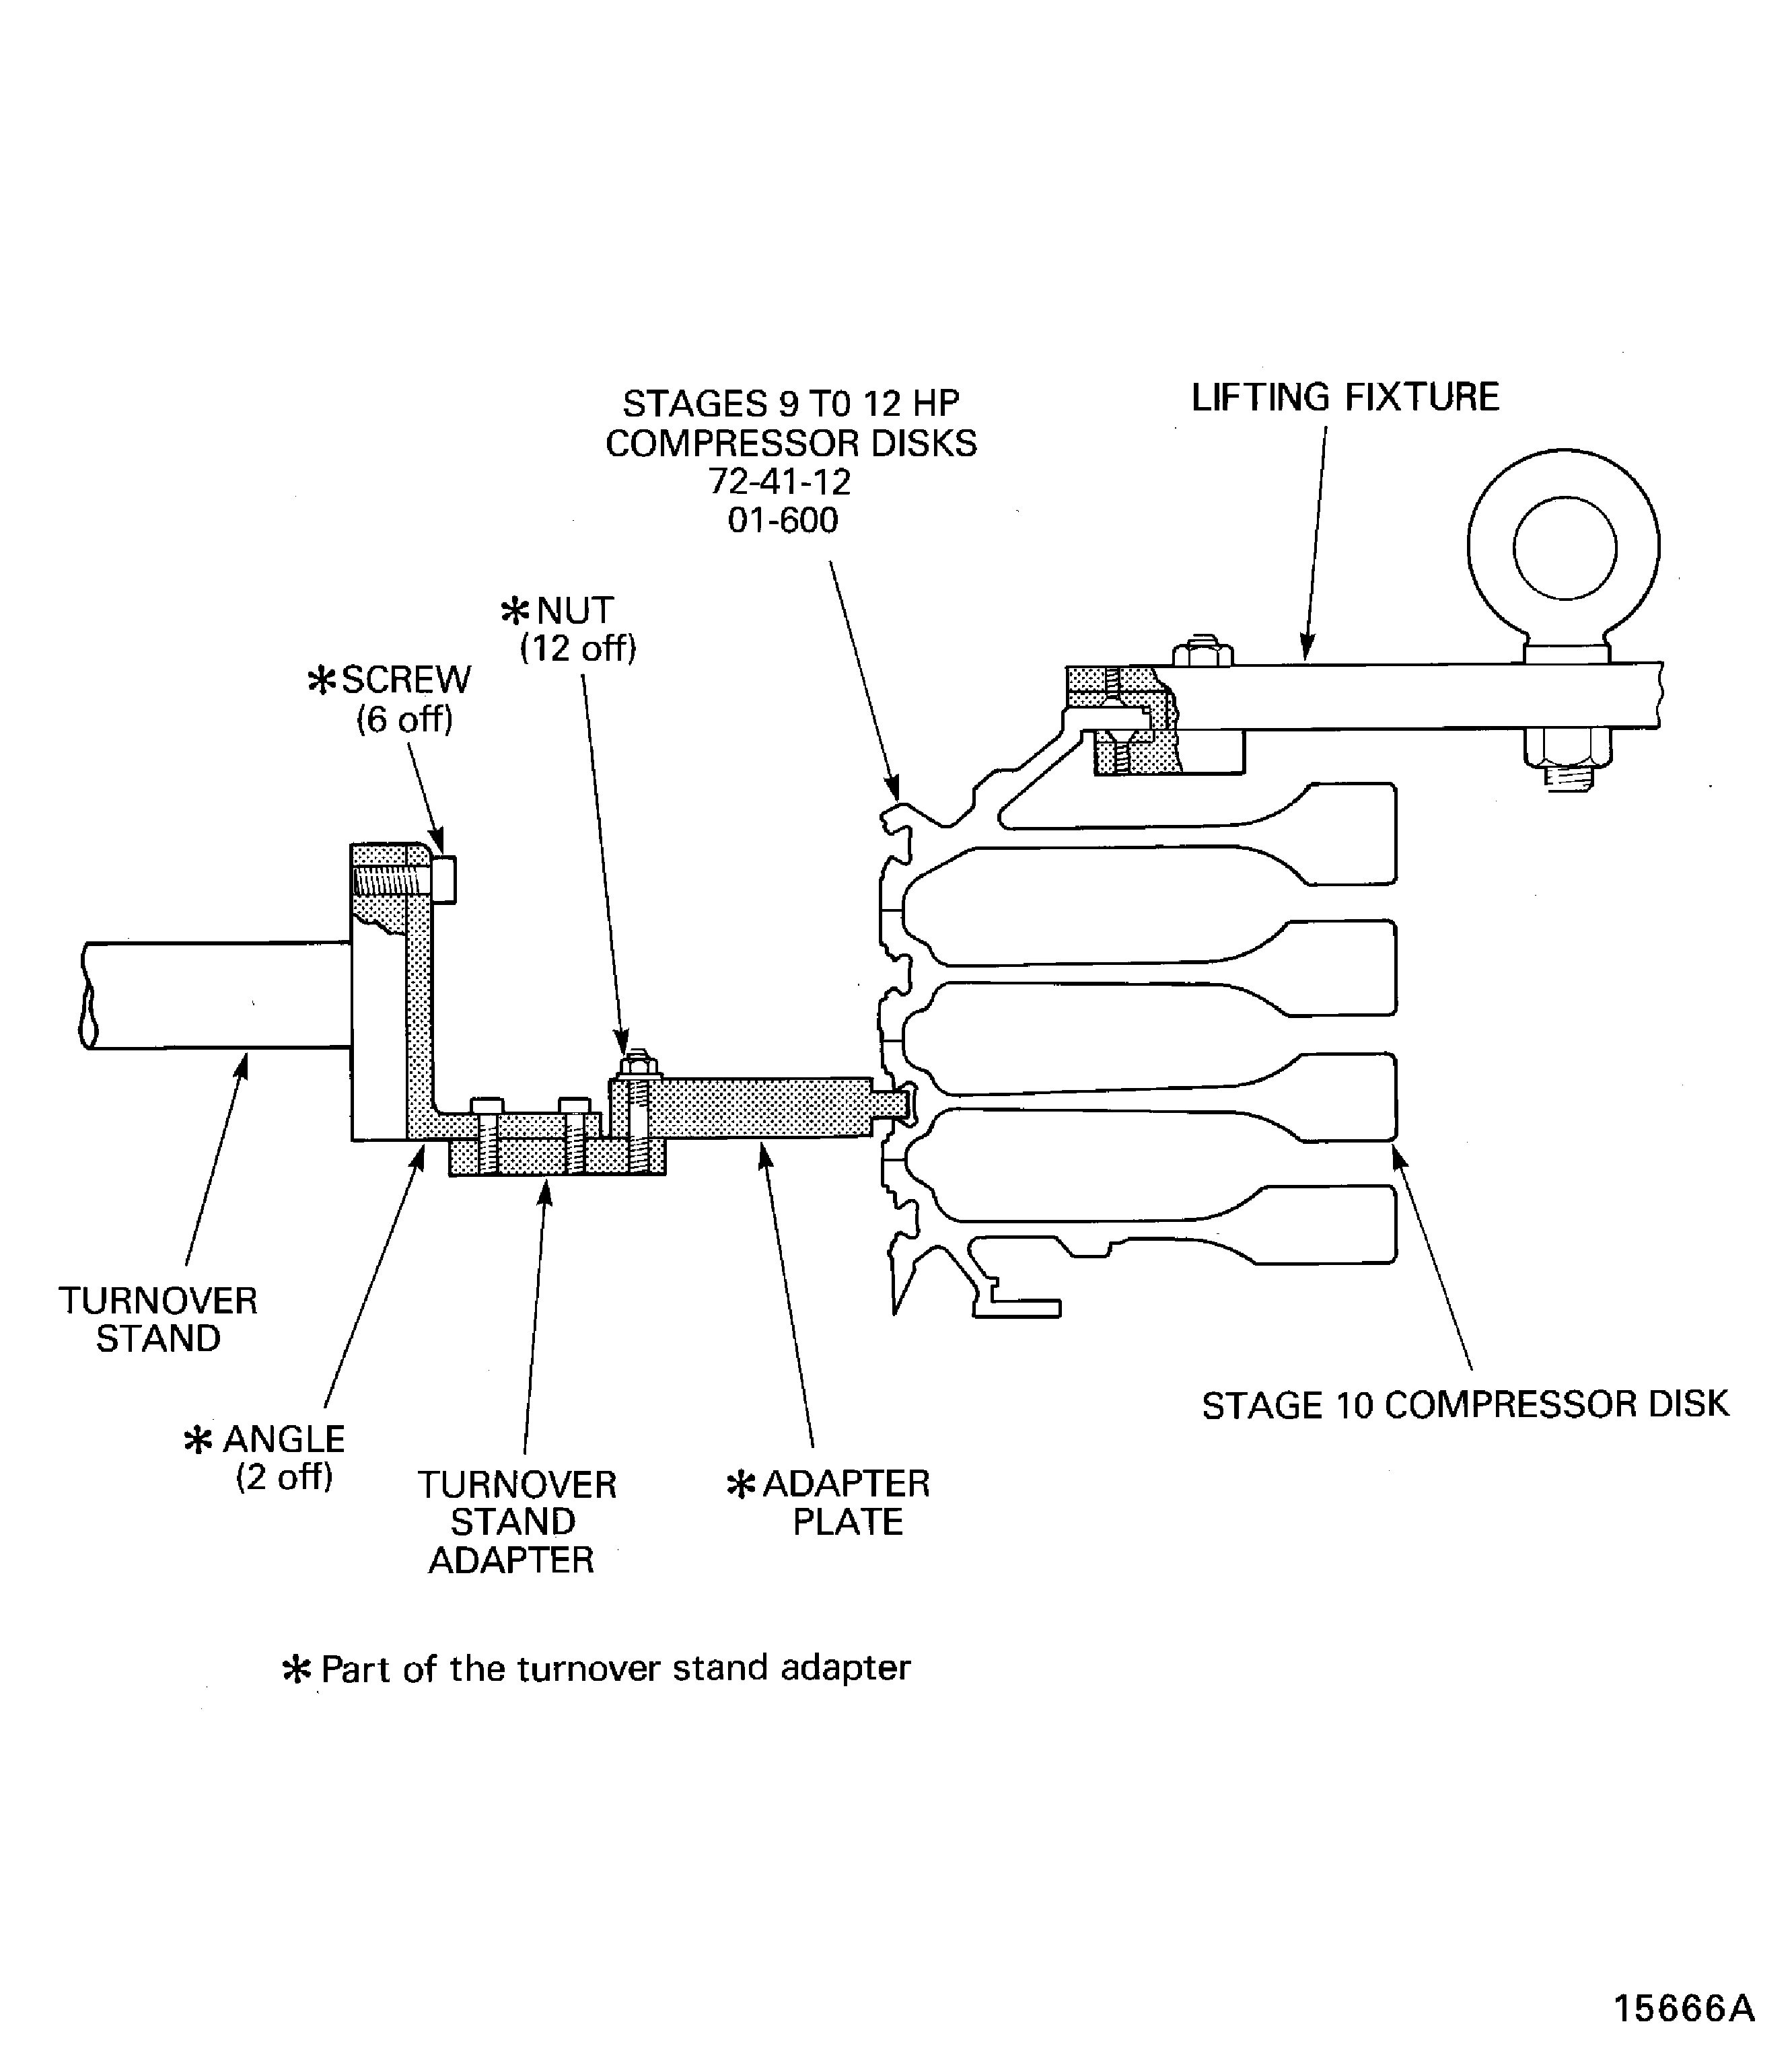
    Figure: Remove the vortex reducer ring from the stage 9 to 12 disks

    Remove the vortex reducer ring from the stage 9 to 12 disks
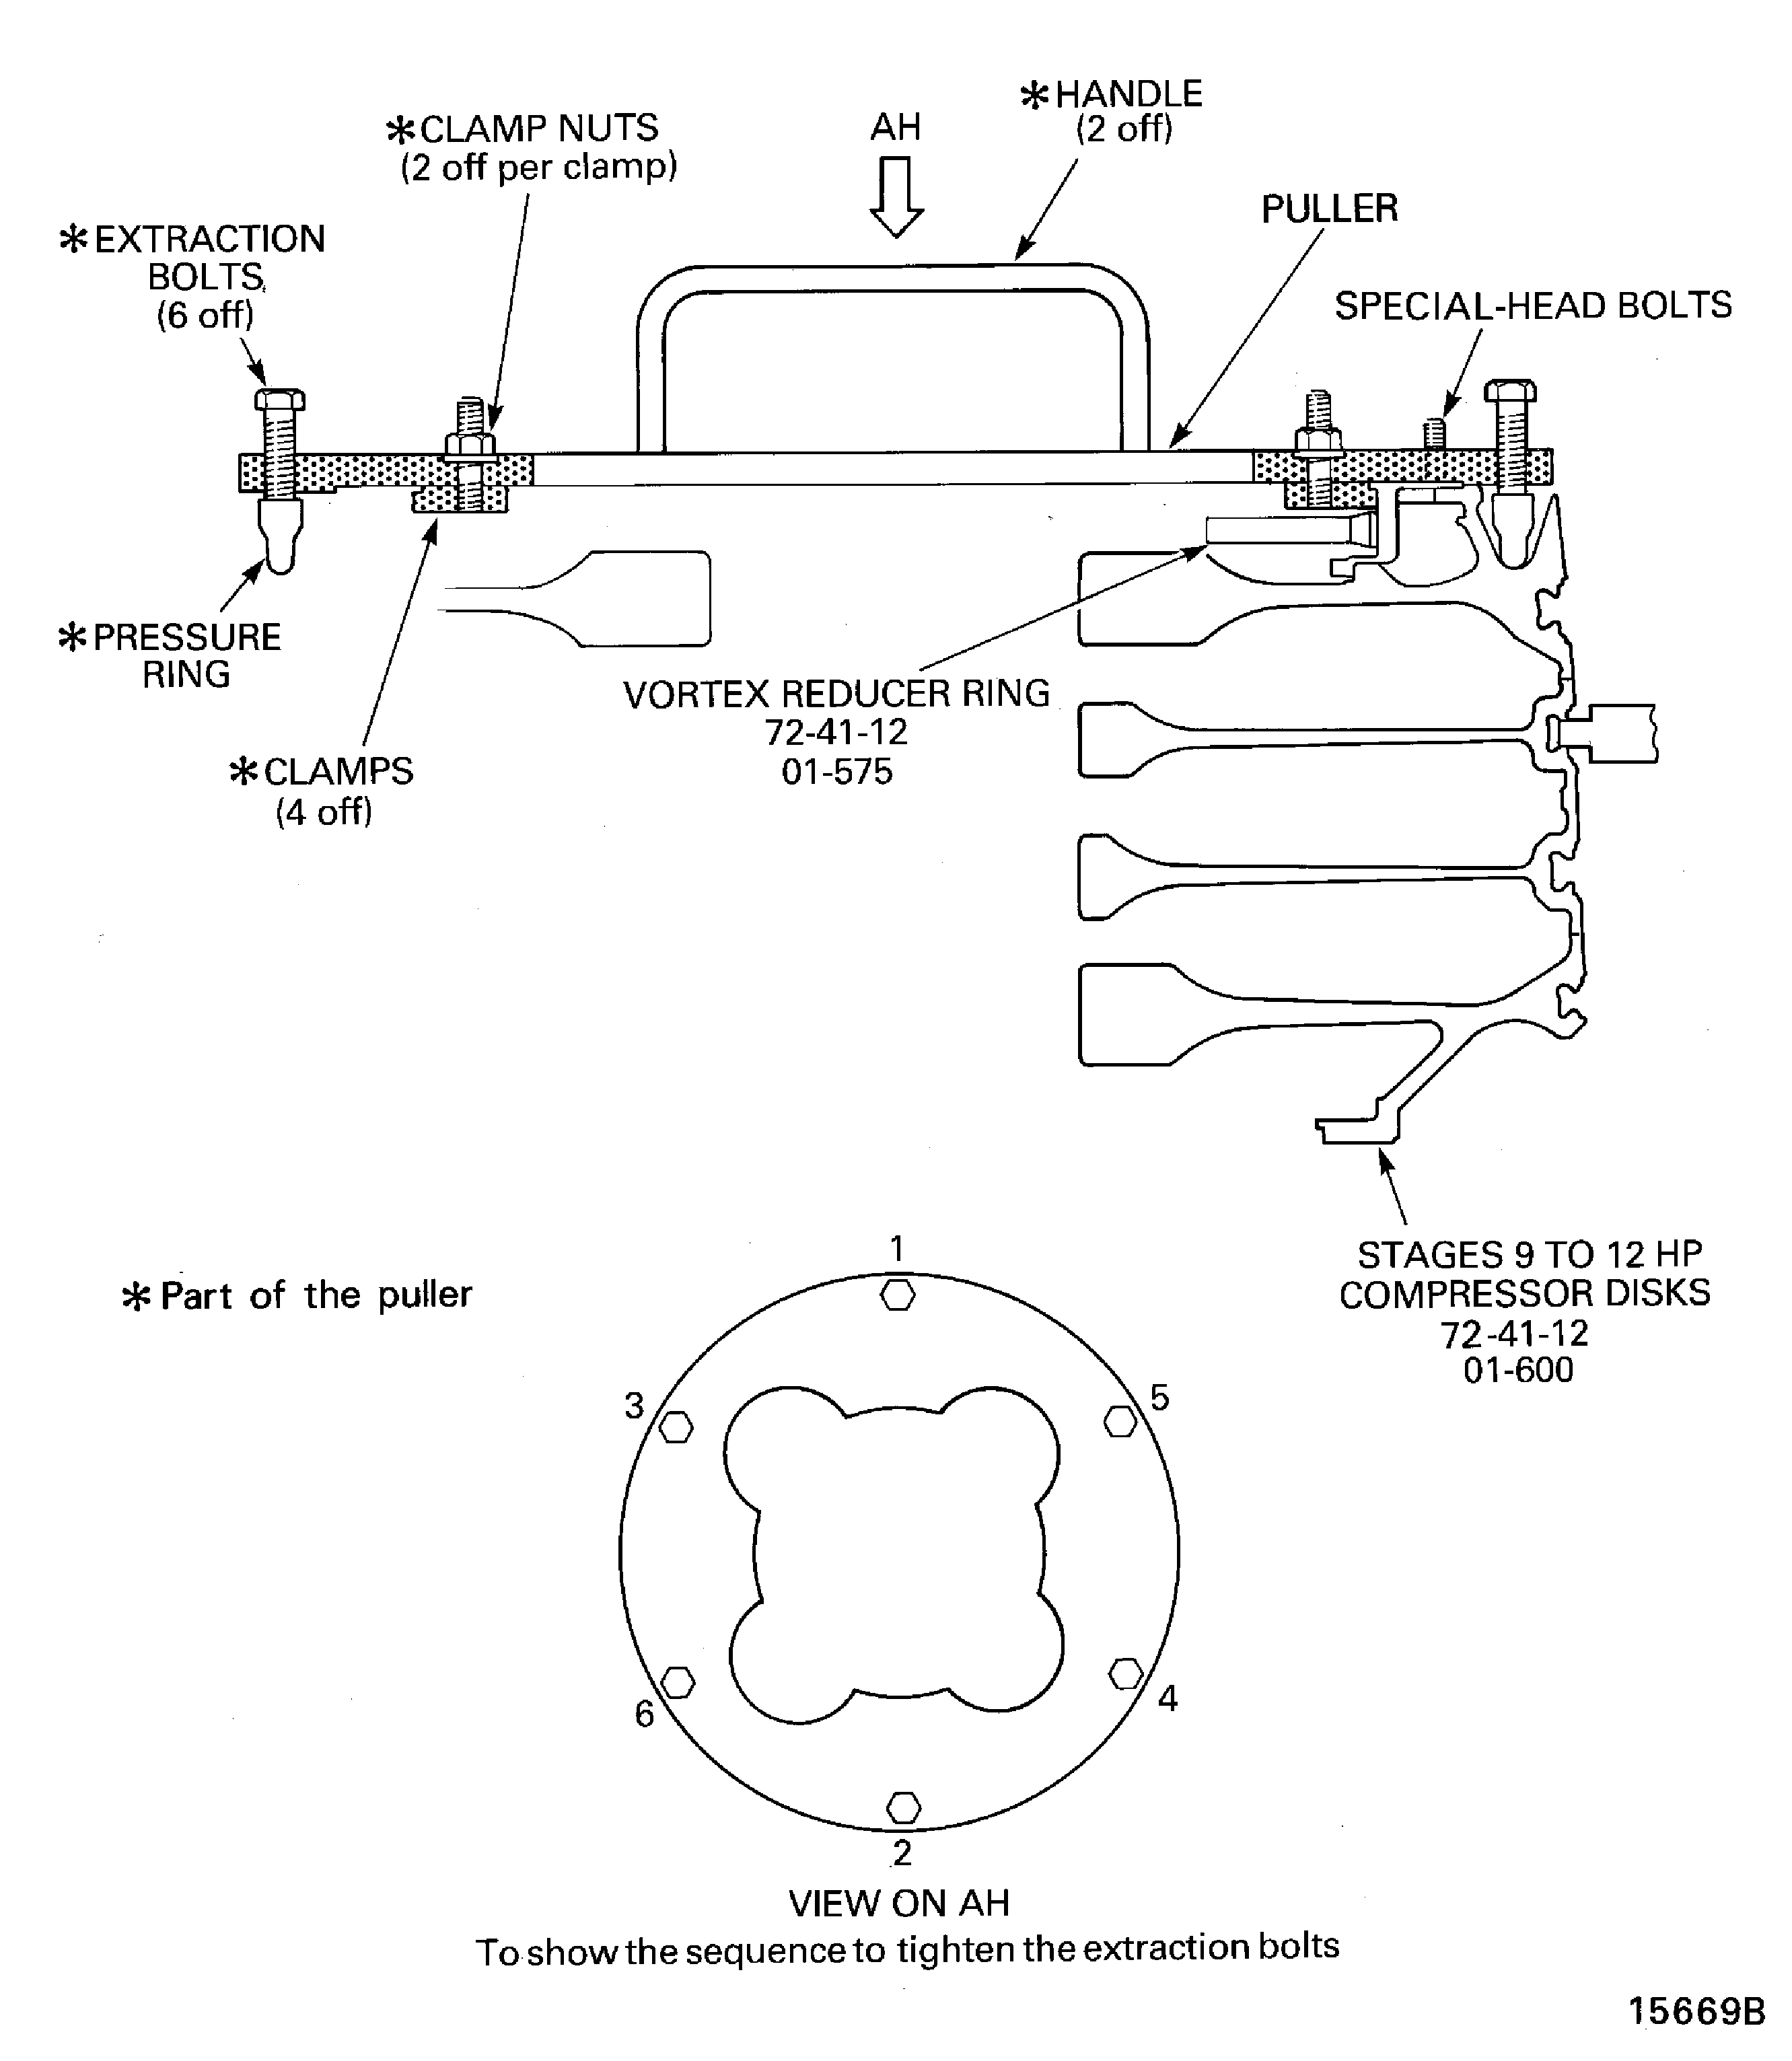
    Figure: Install the lifter on to the stage 8 disk

    Install the lifter on to the stage 8 disk
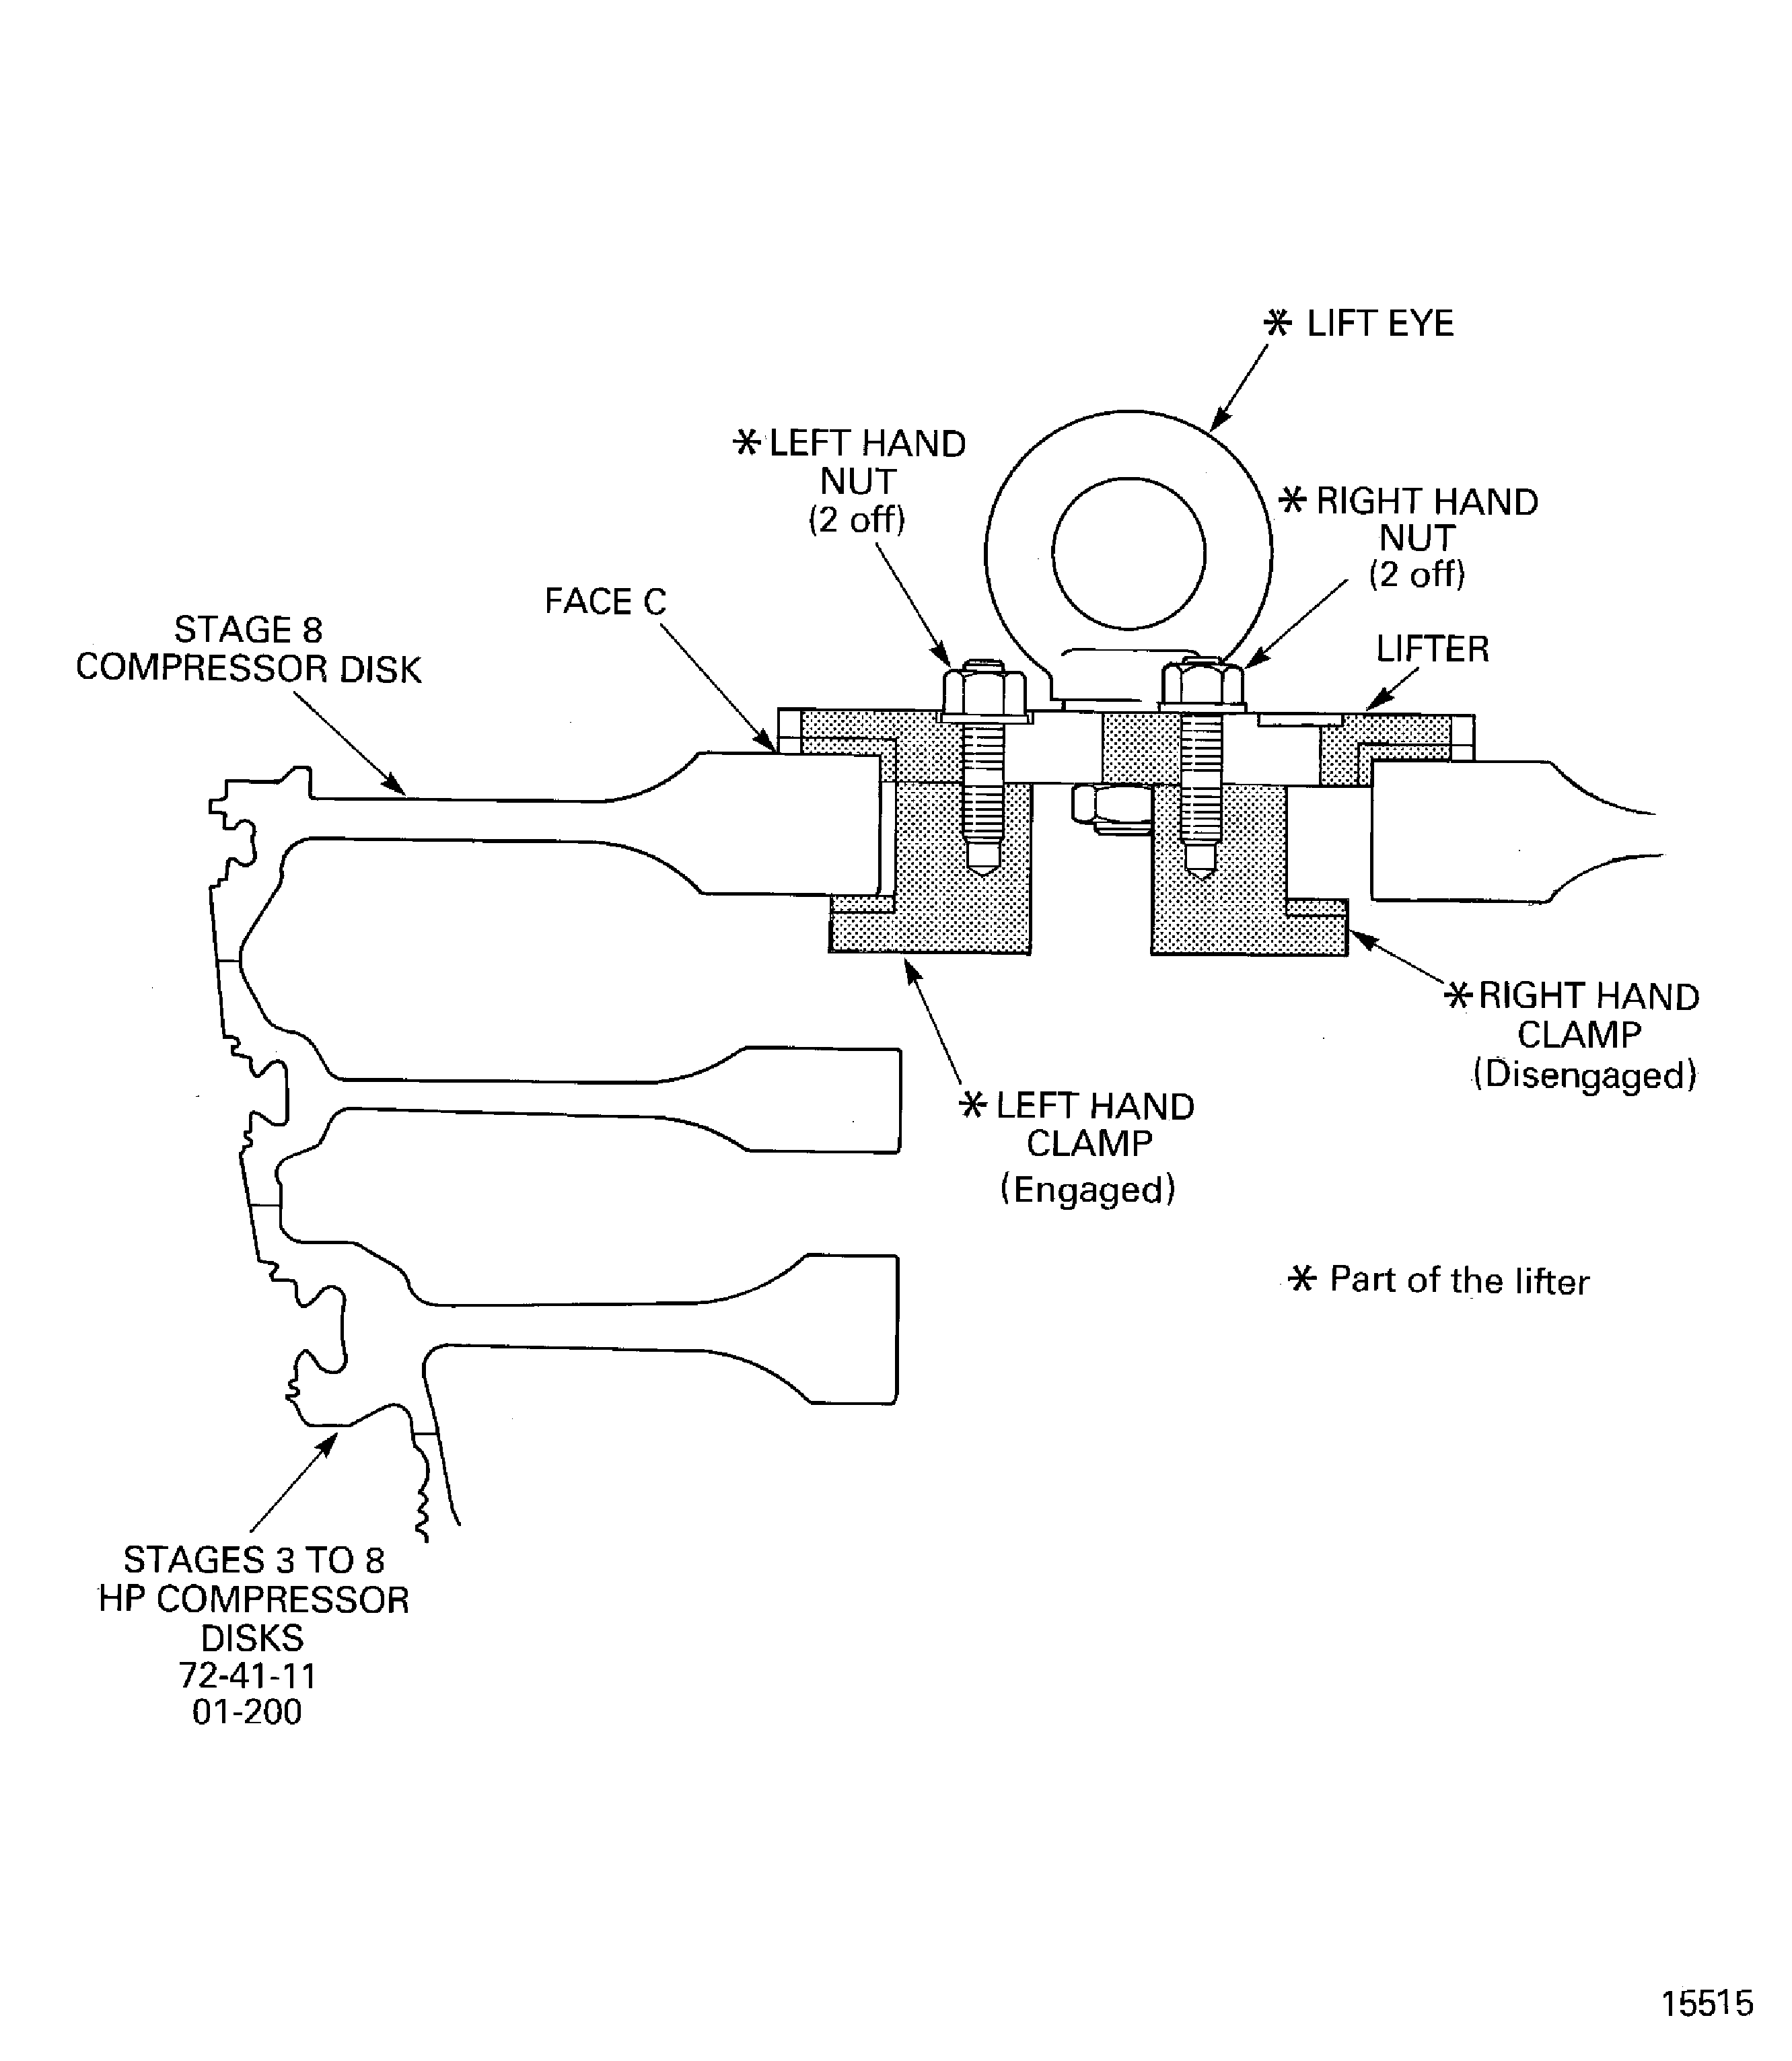
    Figure: Remove the dummy stub shaft

    Remove the dummy stub shaft
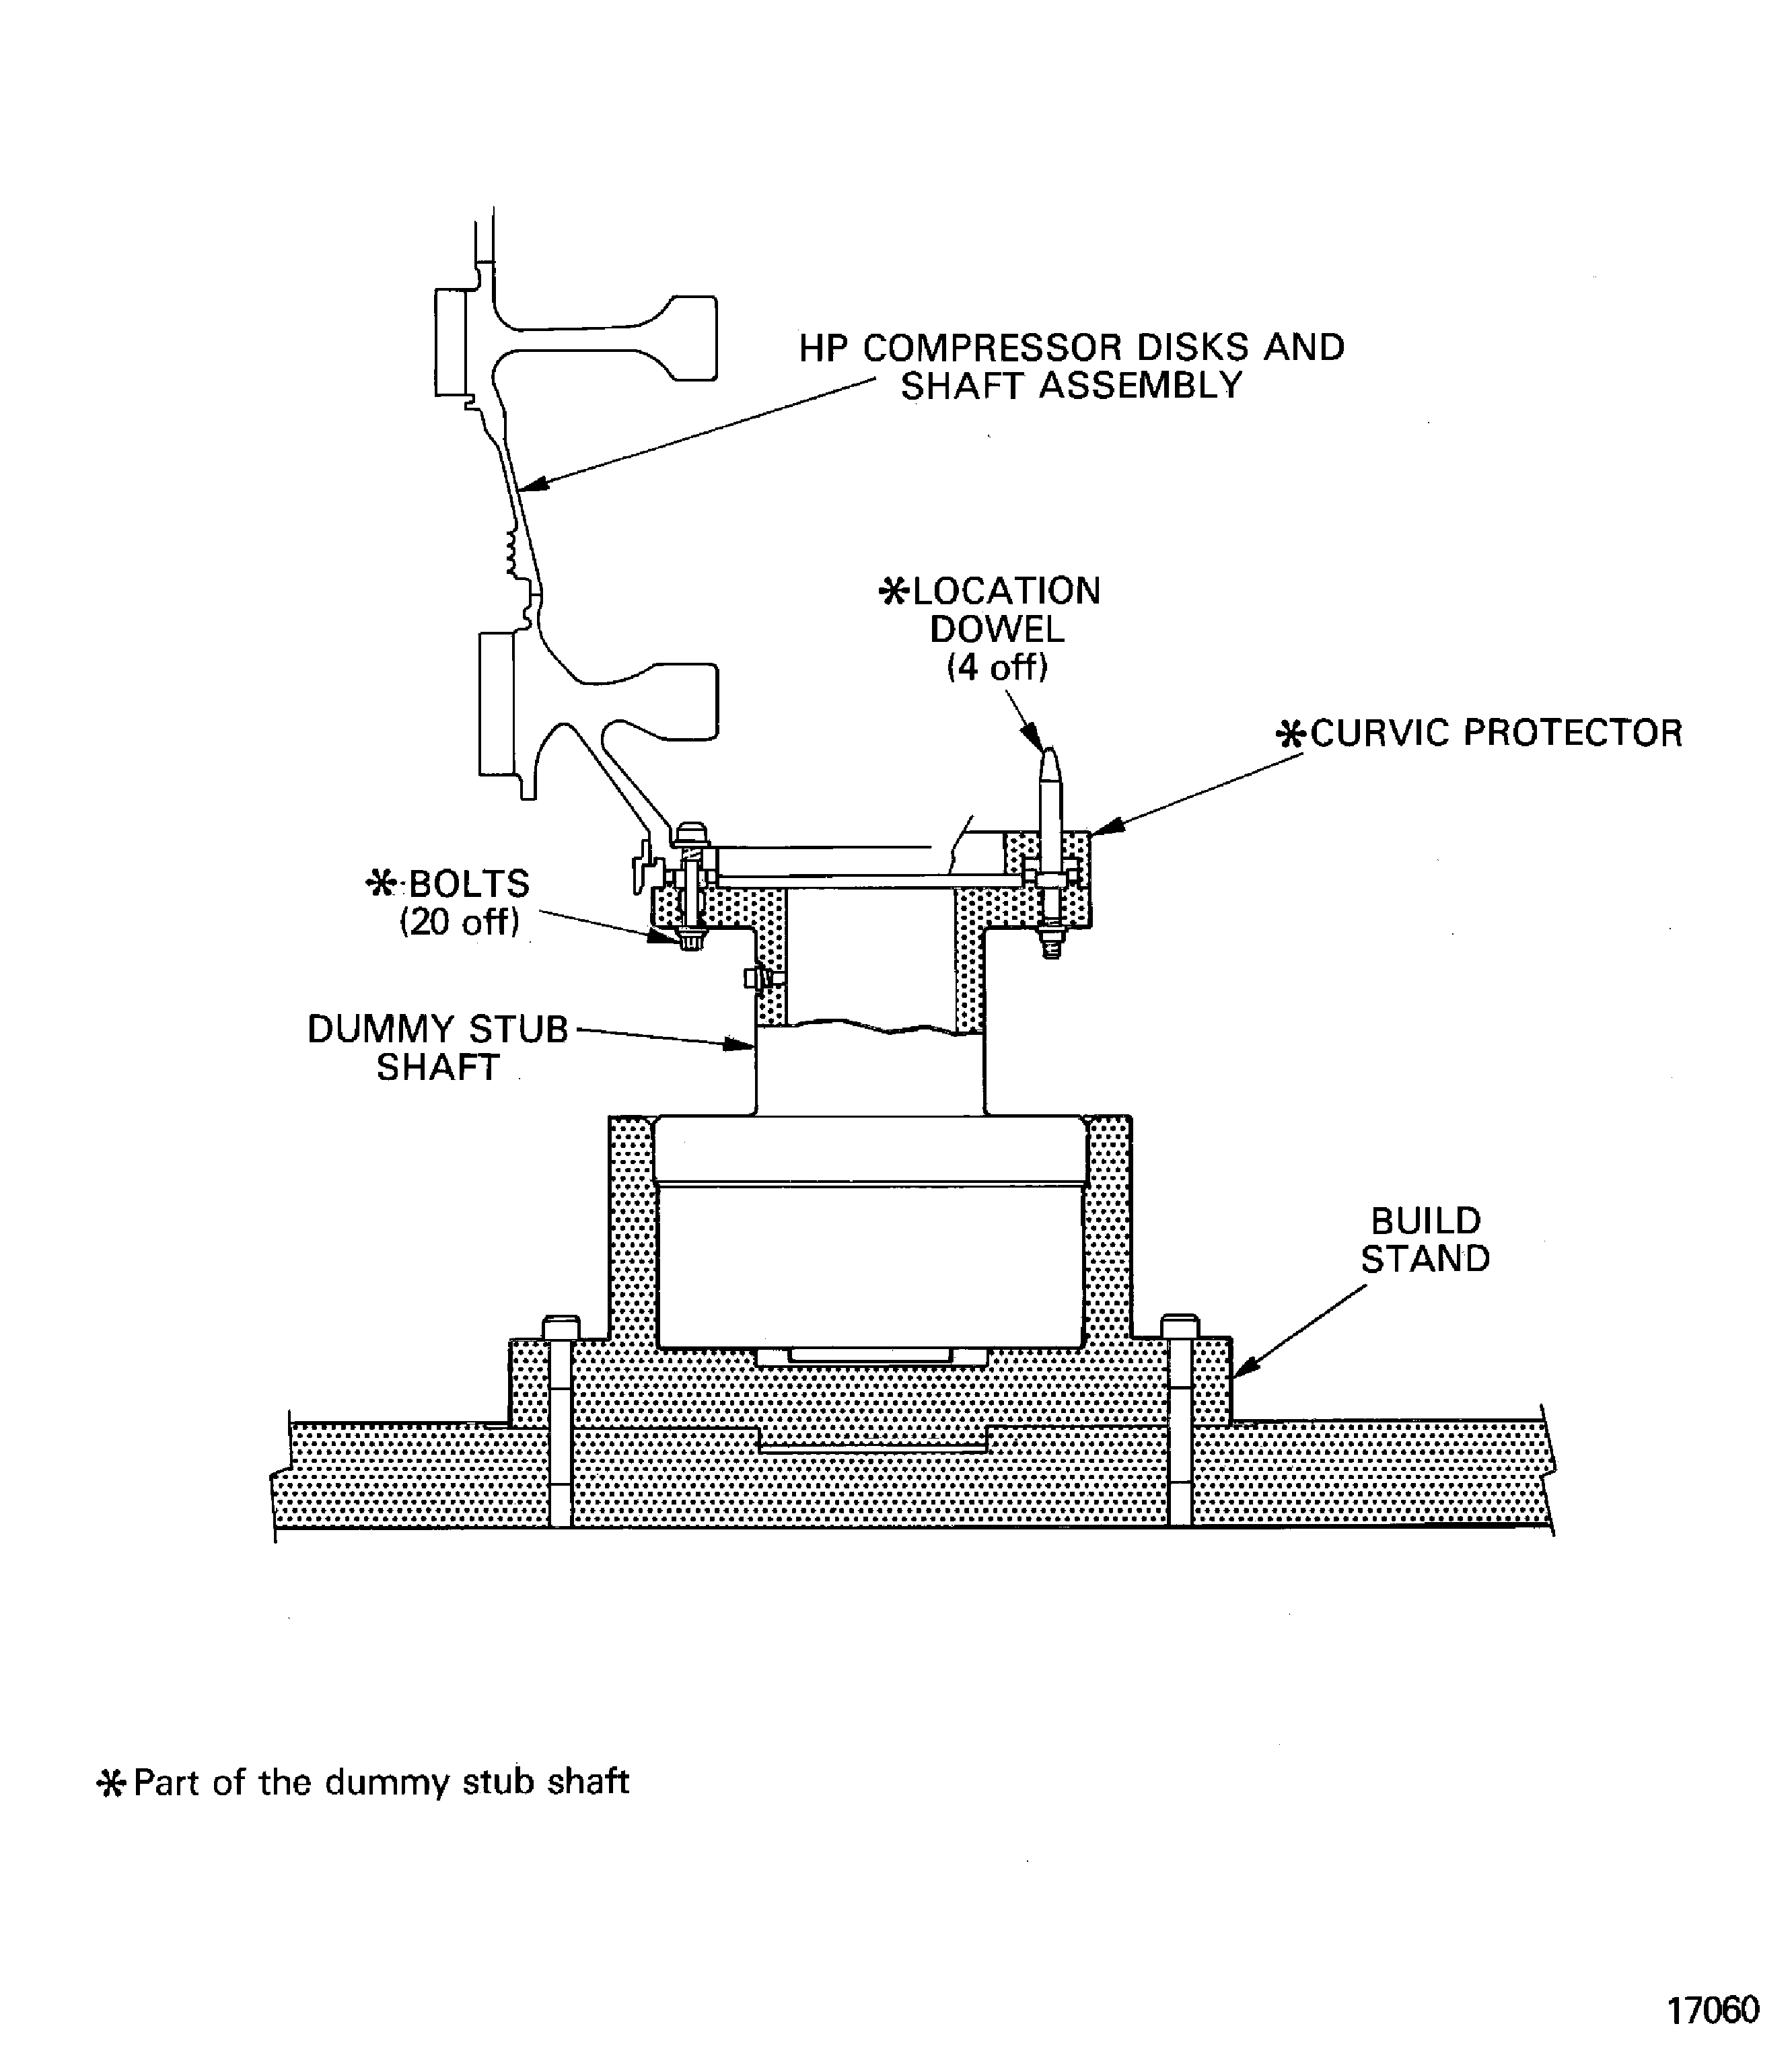
    Figure: Install the stage 3 to 8 disks in the support tool

    Install the stage 3 to 8 disks in the support tool
Requirements After Job Completion

Follow-On Conditions

NONE
Change Type:

Revised the procedure. (EA14VC068)

Manufacturer Code:0AM53
Enterprise Name:IAE INTERNATIONAL AERO ENGINES AG
BU Name:NULL
Building:SUITE 400
Street:628 HEBRON AVENUE
City:GLASTONBURY
State:CT
Zip Code:06033
Country:USA
Manufacturer Code:IE304
Enterprise Name:DELETED
BU Name:DELETED,SEE CAGE CODE 0V6W9
Manufacturer Code:K6835
Enterprise Name:MED-LAB LTD
BU Name:MED-LAB LTD
Street:COPELAND ST
City:DERBY
Zip Code:DE1 2PU
Country:GREAT BRITAIN
Phone Number:44-1332-349094
Fax Number:44-1332-371237
Email:sales@med-lab.co.uk
Internet:www.med-lab.co.uk
Manufacturer Code:LOCAL
Enterprise Name:LOCALLY SUPPLIED
Manufacturer Code:IE304
Supply Number:CoMat 02-121
Type:sp01
Supply Short Name:CoMat 02-121 TEMPORARY MARKER PENCIL/CRAYON
Supply Name:CoMat 02-121 TEMPORARY MARKER PENCIL/CRAYON
Specification Groups:
Doc NumberType
OMAT: 261BEROL VERITHIN (HARD TYPE)
Suppliers:
ManufacturerRemarks
IE304
K5720
K6835
LOCAL
Manufacturer Code:K6835
Supply Number:CoMat 02-122
Type:sp01
Supply Short Name:CoMat 02-122 TEMPORARY MARKER PENCIL/CRAYON
Supply Name:CoMat 02-122 TEMPORARY MARKER PENCIL/CRAYON
Specification Groups:
Doc NumberType
DELETED
Suppliers:
ManufacturerRemarks
K6835
IE133
Manufacturer Code:LOCAL
Tool Number:Digital read out equipment
Tool Name:Digital read out equipment
Manufacturer Code:0AM53
Tool Number:ENERPAC 102
Tool Name:Hydraulic jack
Link not Found
Manufacturer Code:0AM53
Tool Number:IAE 18913
Tool Name:IAE 18913 Setting gage
Manufacturer Code:0AM53
Tool Number:IAE 18914
Tool Name:IAE 18914 Setting gage
Manufacturer Code:0AM53
Tool Number:IAE 1F10026
Tool Name:IAE 1F10026 Hydraulic hand pump
Manufacturer Code:0AM53
Tool Number:IAE 1R18020
Tool Name:IAE 1R18020 Build stand
Manufacturer Code:0AM53
Tool Number:IAE 1R18021
Tool Name:IAE 1R18021 Support ring
Manufacturer Code:0AM53
Tool Number:IAE 1R18024
Tool Name:IAE 1R18024 Geared indexing spanner
Manufacturer Code:0AM53
Tool Number:IAE 1R18025
Tool Name:IAE 1R18025 Turnover stand adapter
Manufacturer Code:0AM53
Tool Number:IAE 1R18026
Tool Name:IAE 1R18026 Lifting fixture
Manufacturer Code:0AM53
Tool Number:IAE 1R18027
Tool Name:IAE 1R18027 Indexing ring
Manufacturer Code:0AM53
Tool Number:IAE 1R18029
Tool Name:IAE 1R18029 Blanking tool
Manufacturer Code:0AM53
Tool Number:IAE 1R18059
Tool Name:IAE 1R18059 Trolley
Manufacturer Code:0AM53
Tool Number:IAE 1R18061
Tool Name:IAE 1R18061 Rail
Manufacturer Code:0AM53
Tool Number:IAE 1R18065
Tool Name:IAE 1R18065 Lifter
Manufacturer Code:0AM53
Tool Number:IAE 1R18067
Tool Name:IAE 1R18067 Extractor
Manufacturer Code:0AM53
Tool Number:IAE 1R18079
Tool Name:IAE 1R18079 Drift
Manufacturer Code:0AM53
Tool Number:IAE 1R18080
Tool Name:IAE 1R18080 Drift
Manufacturer Code:0AM53
Tool Number:IAE 1R18081
Tool Name:IAE 1R18081 Beam sling
Manufacturer Code:0AM53
Tool Number:IAE 1R18089
Tool Name:IAE 1R18089 Lifting adapter
Manufacturer Code:0AM53
Tool Number:IAE 1R18090
Tool Name:IAE 1R18090 Safety support stand
Manufacturer Code:0AM53
Tool Number:IAE 1R18091
Tool Name:IAE 1R18091 Support stand
Manufacturer Code:0AM53
Tool Number:IAE 1R18092
Tool Name:IAE 1R18092 Support tool
Manufacturer Code:0AM53
Tool Number:IAE 1R18093
Tool Name:IAE 1R18093 Extractor
Manufacturer Code:0AM53
Tool Number:IAE 1R18095
Tool Name:IAE 1R18095 Universal slinging adapter
Manufacturer Code:0AM53
Tool Number:IAE 1R18097
Tool Name:IAE 1R18097 Drift
Manufacturer Code:0AM53
Tool Number:IAE 1R18201
Tool Name:IAE 1R18201 Torque spanner
Manufacturer Code:0AM53
Tool Number:IAE 1R18214
Tool Name:IAE 1R18214 Build stand
Manufacturer Code:0AM53
Tool Number:IAE 1R18322
Tool Name:IAE 1R18322 Turnover stand
Manufacturer Code:0AM53
Tool Number:IAE 1R18400
Tool Name:IAE 1R18400 Protection sleeve
Manufacturer Code:0AM53
Tool Number:IAE 1R18441
Tool Name:IAE 1R18441 Lifting adapter
Manufacturer Code:0AM53
Tool Number:IAE 1R18443
Tool Name:IAE 1R18443 Puller
Manufacturer Code:0AM53
Tool Number:IAE 1R18451
Tool Name:IAE 1R18451 Tip check fixture
Manufacturer Code:0AM53
Tool Number:IAE 1R18452
Tool Name:IAE 1R18452 Bearing housing (rear)
Manufacturer Code:0AM53
Tool Number:IAE 1R18453
Tool Name:IAE 1R18453 Bearing housing (front)
Manufacturer Code:0AM53
Tool Number:IAE 1R18454
Tool Name:IAE 1R18454 Location block
Manufacturer Code:0AM53
Tool Number:IAE 1R18455
Tool Name:IAE 1R18455 Location block
Manufacturer Code:0AM53
Tool Number:IAE 1R18457
Tool Name:IAE 1R18457 Seal check beam
Manufacturer Code:0AM53
Tool Number:IAE 1R18458
Tool Name:IAE 1R18458 Brake strap
Manufacturer Code:0AM53
Tool Number:IAE 1R18459
Tool Name:IAE 1R18459 Axial setting gage
Manufacturer Code:0AM53
Tool Number:IAE 1R18460
Tool Name:IAE 1R18460 Transducer carrier
Manufacturer Code:0AM53
Tool Number:IAE 1R18461
Tool Name:IAE 1R18461 Transducer carrier
Manufacturer Code:0AM53
Tool Number:IAE 1R18462
Tool Name:IAE 1R18462 Transducer carrier
Manufacturer Code:0AM53
Tool Number:IAE 1R18463
Tool Name:IAE 1R18463 Transducer carrier
Manufacturer Code:0AM53
Tool Number:IAE 1R18464
Tool Name:IAE 1R18464 Transducer carrier
Manufacturer Code:0AM53
Tool Number:IAE 1R18466
Tool Name:IAE 1R18466 Thruster plate
Manufacturer Code:0AM53
Tool Number:IAE 1R18467
Tool Name:IAE 1R18467 Setting block
Manufacturer Code:0AM53
Tool Number:IAE 1R18496
Tool Name:IAE 1R18496 Setting block
Manufacturer Code:0AM53
Tool Number:IAE 1R18497
Tool Name:IAE 1R18497 Setting block
Manufacturer Code:0AM53
Tool Number:IAE 1R18498
Tool Name:IAE 1R18498 Setting block
Manufacturer Code:0AM53
Tool Number:IAE 1R18590
Tool Name:IAE 1R18590 Socket end
Manufacturer Code:0AM53
Tool Number:IAE 1R18628
Tool Name:IAE 1R18628 Extractor
Manufacturer Code:0AM53
Tool Number:IAE 1R18629
Tool Name:IAE 1R18629 Protective cover
Manufacturer Code:0AM53
Tool Number:IAE 1R18639
Tool Name:IAE 1R18639 Setting gage
Manufacturer Code:0AM53
Tool Number:IAE 1R18673
Tool Name:IAE 1R18673 Dummy stub shaft
Manufacturer Code:0AM53
Tool Number:IAE 1R18911
Tool Name:IAE 1R18911 Drill
Manufacturer Code:0AM53
Tool Number:IAE 1R18912
Tool Name:IAE 1R18912 Setting gage
Manufacturer Code:0AM53
Tool Number:IAE 1R18913
Tool Name:IAE 1R18913 Setting gage
Manufacturer Code:0AM53
Tool Number:IAE 1R18914
Tool Name:IAE 1R18914 Setting gage
Manufacturer Code:0AM53
Tool Number:IAE 1R78498
Tool Name:IAE 1R78498 Setting block
Manufacturer Code:LOCAL
Tool Number:Snap-on TM70B wrench
Tool Name:Snap-on TM70B wrench
Manufacturer Code:LOCAL
Tool Number:Snap-on TMX60 extension
Tool Name:Snap-on TMX60 extension