Export Control
EAR Export Classification: Not subject to the EAR per 15 C.F.R. Chapter 1, Part 734.3(b)(3), except for the following Service Bulletins which are currently published as EAR Export Classification 9E991: SBE70-0992, SBE72-0483, SBE72-0580, SBE72-0588, SBE72-0640, SBE73-0209, SBE80-0024 and SBE80-0025.Copyright
© IAE International Aero Engines AG (2001, 2014 - 2021) The information contained in this document is the property of © IAE International Aero Engines AG and may not be copied or used for any purpose other than that for which it is supplied without the express written authority of © IAE International Aero Engines AG. (This does not preclude use by engine and aircraft operators for normal instructional, maintenance or overhaul purposes.).Applicability
All
Common Information
TASK 72-42-20-200-105 No. 4 Bearing Scavenge Oil Tube - Examine, Inspection-005
Effectivity
FIG/ITEM | PART NO. |
02-020 | 2A0830-01 |
02-020 | 2A0830-001 |
02-020 | 2A1949-01 |
02-020 | 2A2028-01 |
02-020 | 2A2074-01 |
02-020 | 2A2274-01 |
02-020 | 2A4379-01 |
General
This TASK gives the procedure for the inspection of the No. 4 bearing scavenge tube. For the other parts of the No. 4 bearing compartment tubes, refer to Inspection-000 TASK 72-42-20-200-100.
Fig/item numbers in parentheses in the procedure agree with those used in the IPC.
The policy that is necessary for inspection is given in the SPM TASK 70-20-01-200-501.
All the parts must be cleaned before any part is examined. Refer to the SPM TASK 70-10-00-100-501.
All parts must be visually examined for damage, corrosion and wear. Any defects that are not identified in the procedure must be referred to IAE.
Do not discard any part until you are sure there are no repairs available. Refer to the instructions in Repair before a discarded part is used again or oversize parts are installed.
Parts which should be discarded can be held although no repair is available. The repair of a discarded part could be shown to be necessary at a later date.
All parts must be examined to make sure that all the repairs have been completed satisfactorily.
The practices and processes referred to in the procedure by the TASK numbers are in the SPM.
References
Refer to the SPM for data on these items:
Definitions of Damage, SPM TASK 70-02-02-350-501.
Inspection of Parts, SPM TASK 70-20-01-200-501.
Preliminary Requirements
Pre-Conditions
NONESupport Equipment
| Name | Manufacturer | Part Number / Identification | Quantity | Remark |
|---|---|---|---|---|
| IAE 2P16248 Pressure test adapter | 0AM53 | IAE 2P16248 | 1 off | |
| IAE 2P16249 Pressure test plug | 0AM53 | IAE 2P16249 | 1 off |
Consumables, Materials and Expendables
NONESpares
NONESafety Requirements
NONEProcedure
Refer to Figure.
Repair, VRS3759 (Repair-025) TASK 72-42-20-300-025.
Other than Step.
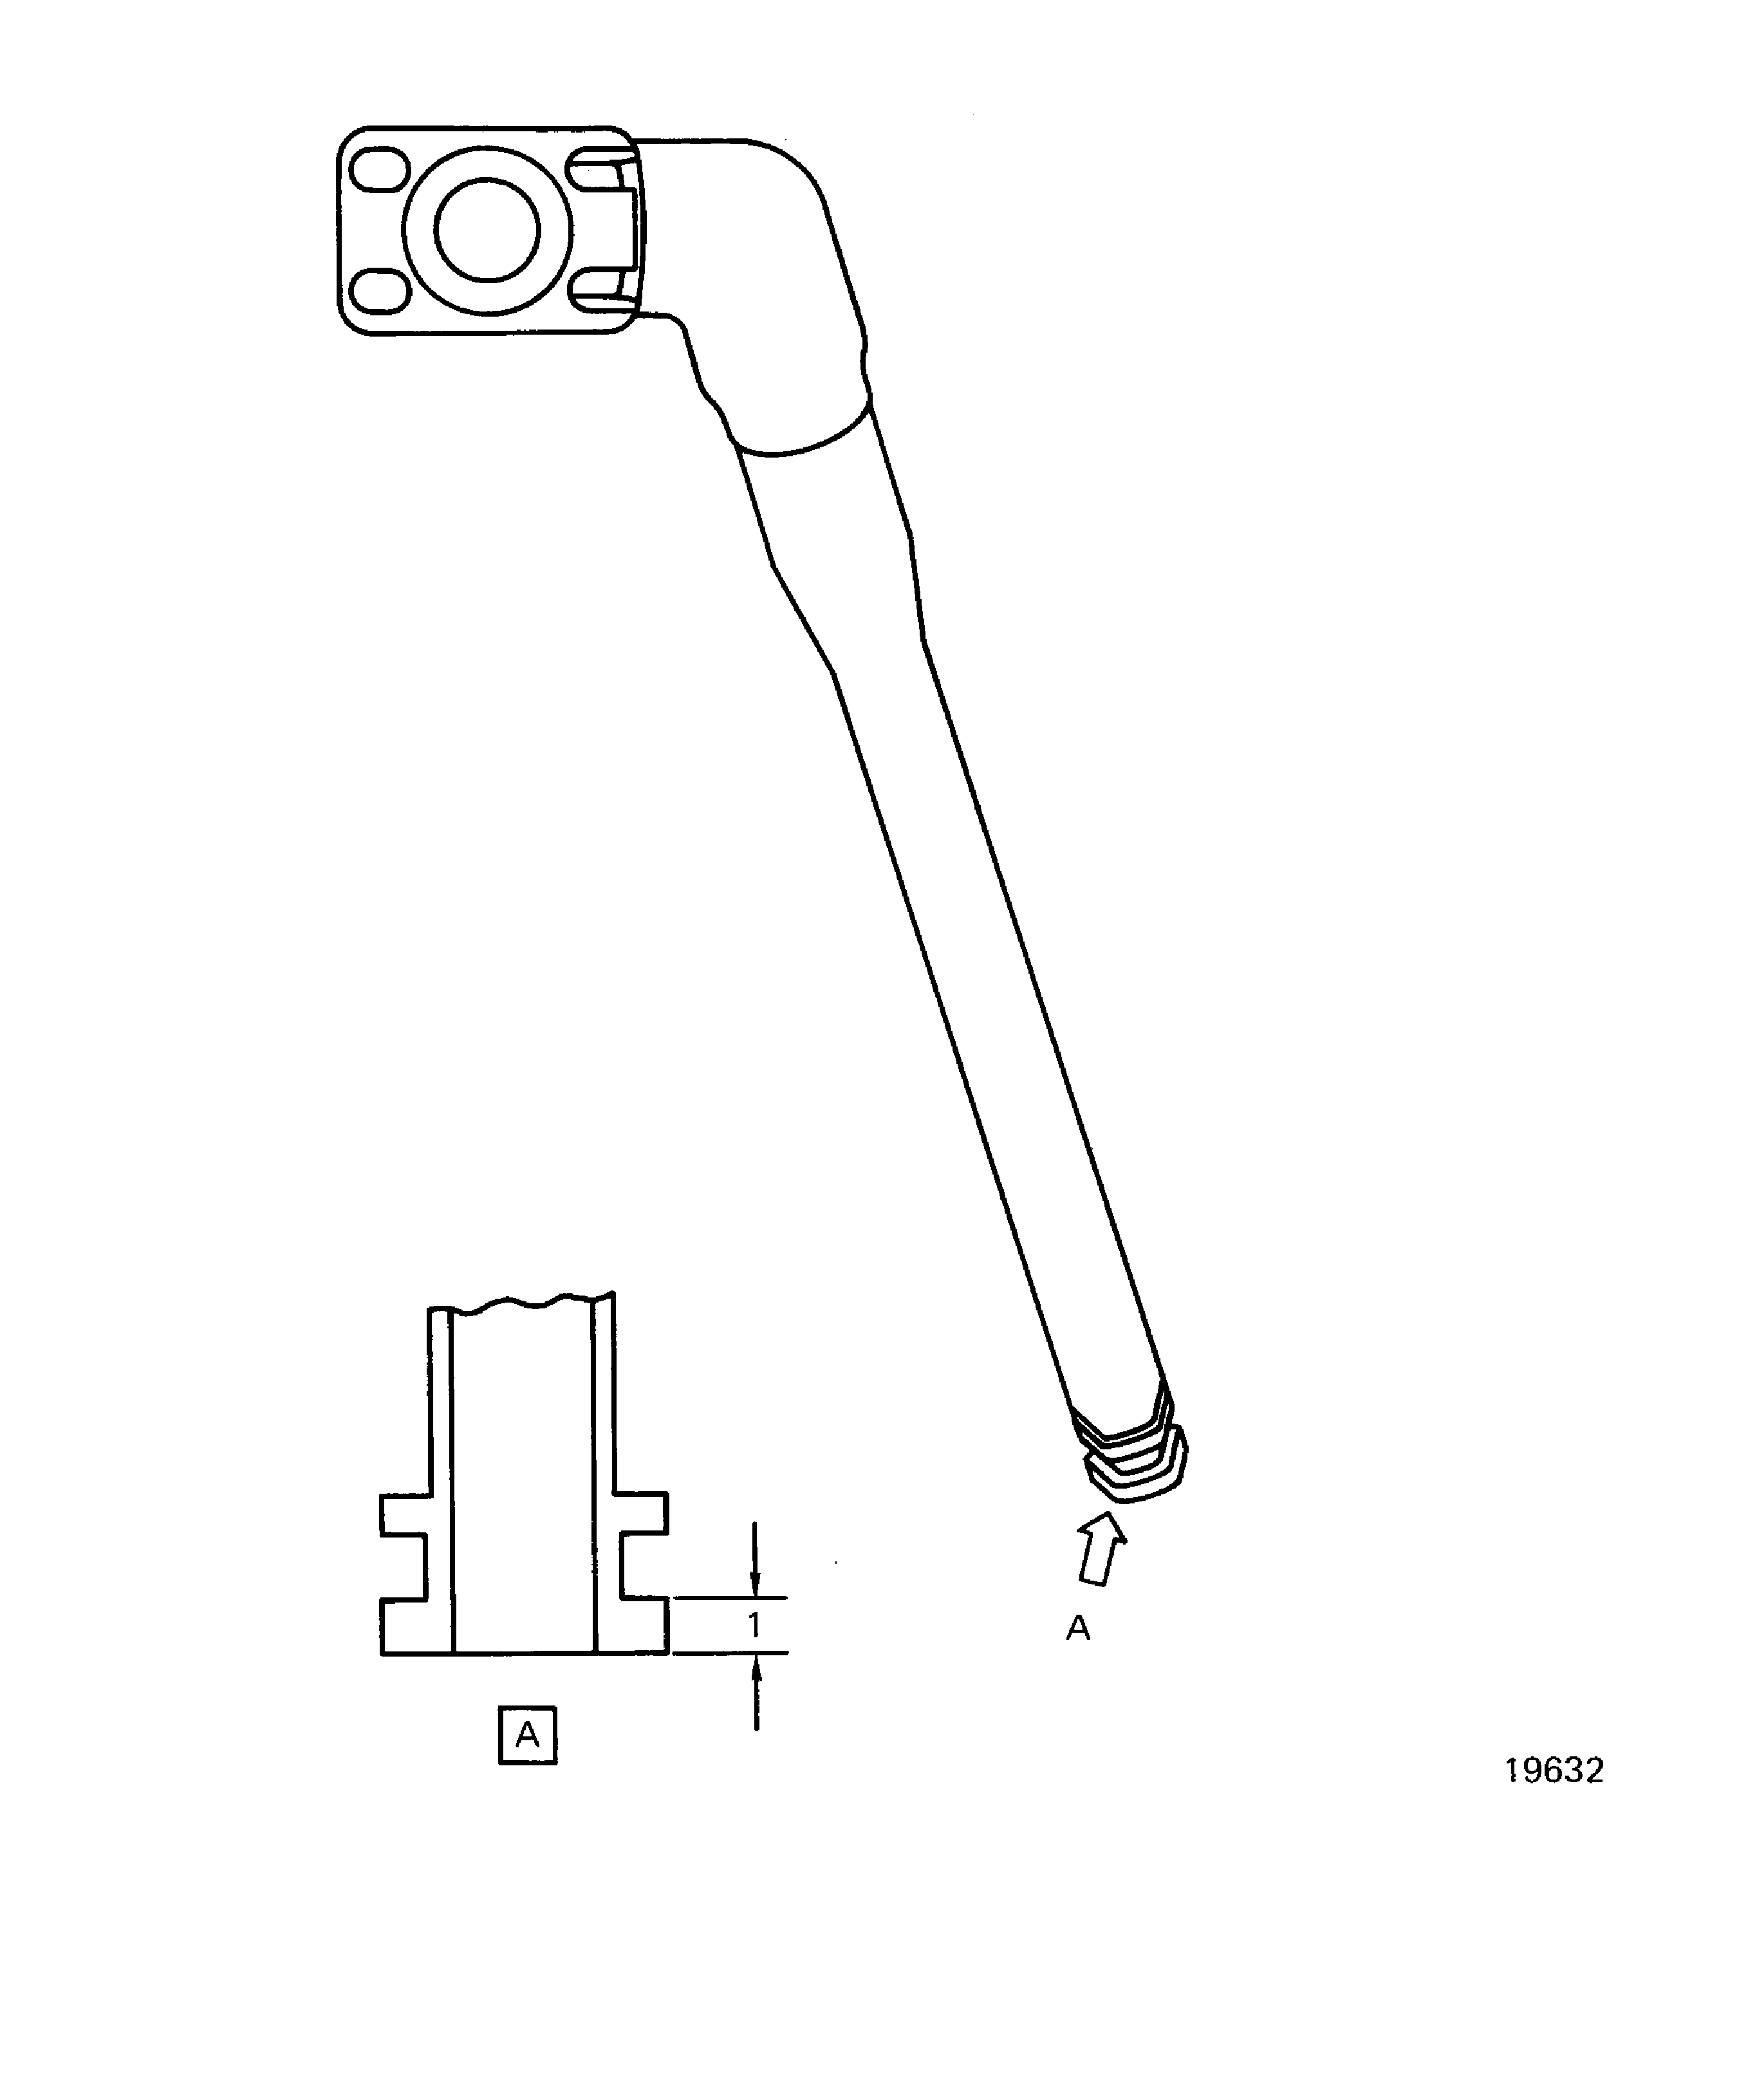
Examine the tube at location 1 for the thickness of the lower lip.
SUBTASK 72-42-20-220-082 Examine the No. 4 Bearing Scavenge Tube (02-020) for the Thickness of the Lower Lip
Refer to Figure.
Install IAE 2P16248 Pressure test adapter 1 off onto the tube connector. Attach standard pressure test equipment to the adapter.
Install IAE 2P16249 Pressure test plug 1 off onto the opposite end of the tube.
Repair, VRS3759 TASK 72-42-20-300-025 (REPAIR-025).
Leaks
Do a pressure test with water at 225 to 248 psig (1551.32 to 1709.90 kPa) and hold for 10 minutes.
Remove the pressure test plug and the pressure test adapter from the ends of the tube.
SUBTASK 72-42-20-220-083 Examine the No. 4 Bearing Scavenge Tube (02-020) for Leaks
Heatshield
Repair, VRS3759 TASK 72-42-20-300-025 (REPAIR-025) or Repair, VRS3775 TASK 72-42-20-300-027 (REPAIR-027) or Repair, VRS3832 TASK 72-42-20-300-028 (REPAIR-028).
Other than Step.
Repair, VRS3759 TASK 72-42-20-300-025 (REPAIR-025) per applicable part numbers.
For PN 2A4379-01 only, reject.
Cracks
No. 4 bearing scavenge tube. Refer to SPM TASK 70-23-08-230-501. Do not immerse.
Do the test for cracks on the part that is given below. Use the applicable penetrant procedure.
Clean the part. Refer to Cleaning-000 TASK 72-42-20-100-100.
SUBTASK 72-42-20-230-067-001 Examine the No. 4 Bearing Scavenge Tube with Heatshields (02-020) for Cracks
Refer to Figure.
Repair, VRS3759 (Repair-025) TASK 72-42-20-300-025.
Cracks to welds
Scrap
If you find cracks
No. 4 bearing scavenge tube. Refer to SPM TASK 70-23-08-230-501.
Do the test for cracks on the part that is given below. Use the applicable penetrant procedure.
Clean the part. Refer to Cleaning-010 TASK 72-42-20-100-110 or Cleaning-022 TASK 72-42-20-100-122.
SUBTASK 72-42-20-230-067-002 Examine the No. 4 Bearing Scavenge Tube without Heatshields (02-020) for Cracks
Refer to Figure.
Repair, VRS3759 (Repair-025) TASK 72-42-20-300-025
Other than Step.
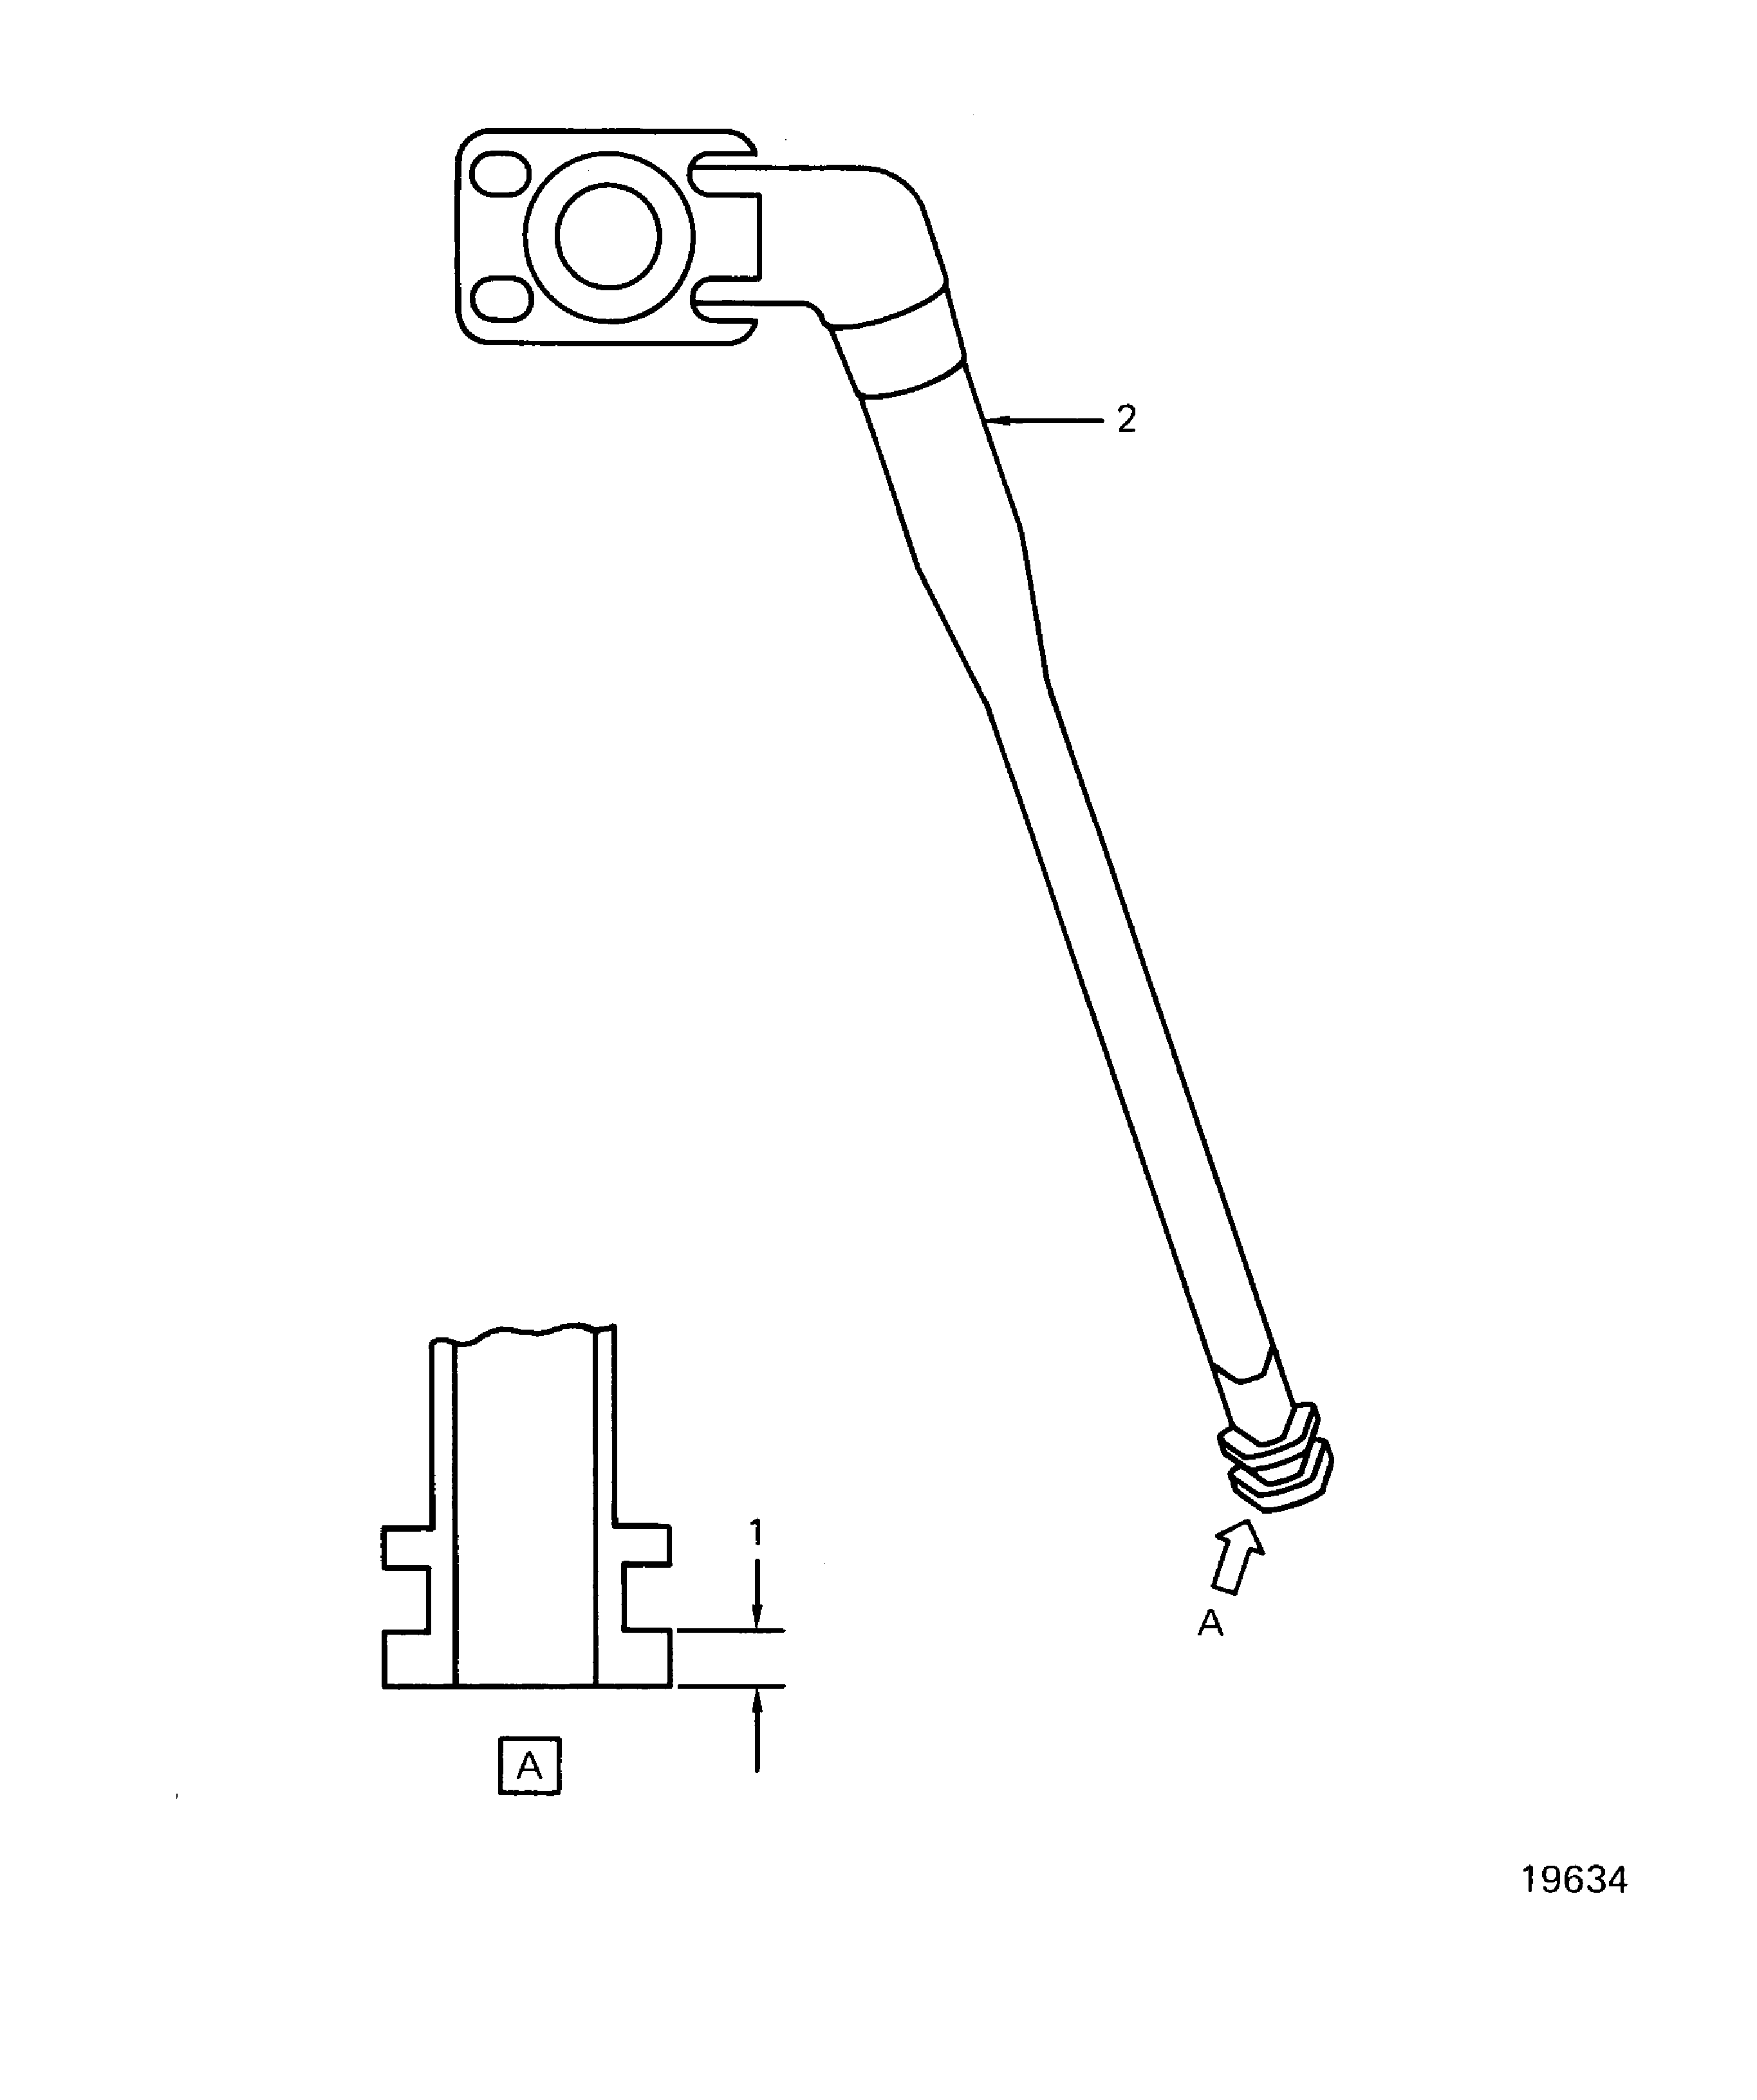
Examine the tube at location 1 for the thickness of the lower lip
SUBTASK 72-42-20-220-084 Examine the No. 4 Bearing Scavenge Tube (02-020) for the Thickness of the Lower Lip
Refer to Figure.
Repair, VRS3759 (Repair-025) TASK 72-42-20-300-025
Other than Step.
Dents
Repair, VRS3759 TASK 72-42-20-300-025 (REPAIR-025).
Other than Step.
Nicks and scratches
Repair, VRS3759 (Repair-025) TASK 72-42-20-300-025.
Any wear that indicates the tube rubs on the inside of the diffuser case strut.
Wear
Examine the tube for dents, nicks, scratches and wear
SUBTASK 72-42-20-220-085 Examine the No. 4 Bearing Scavenge Tube (02-020) for Dents, Nicks, Scratches and Wear
Refer to Figure.
Install IAE 2P16248 Pressure test adapter 1 off onto the tube connector. Attach standard pressure test equipment to the adapter.
Install IAE 2P16249 Pressure test plug 1 off onto the opposite end of the tube.
Repair, VRS3759 TASK 72-42-20-300-025 (REPAIR-025).
Leaks
Do a pressure test with water at 225 to 248 psig (1551.32 to 1709.90 kPa) and hold for 10 minutes
Remove the pressure test plug and the pressure test adapter from the ends of the tube.
SUBTASK 72-42-20-220-086 Examine the No. 4 Bearing Scavenge Tube (02-020) for Leaks
Refer to Figure.
Accept
Nicks and scratches that are not radial across the gasket mating surfaces.
Repair, VRS3759 TASK 72-42-20-300-025 (REPAIR-025) per applicable part numbers.
For PN 2A4379-01 only, reject.
Radial scratches across the gasket mating surfaces.
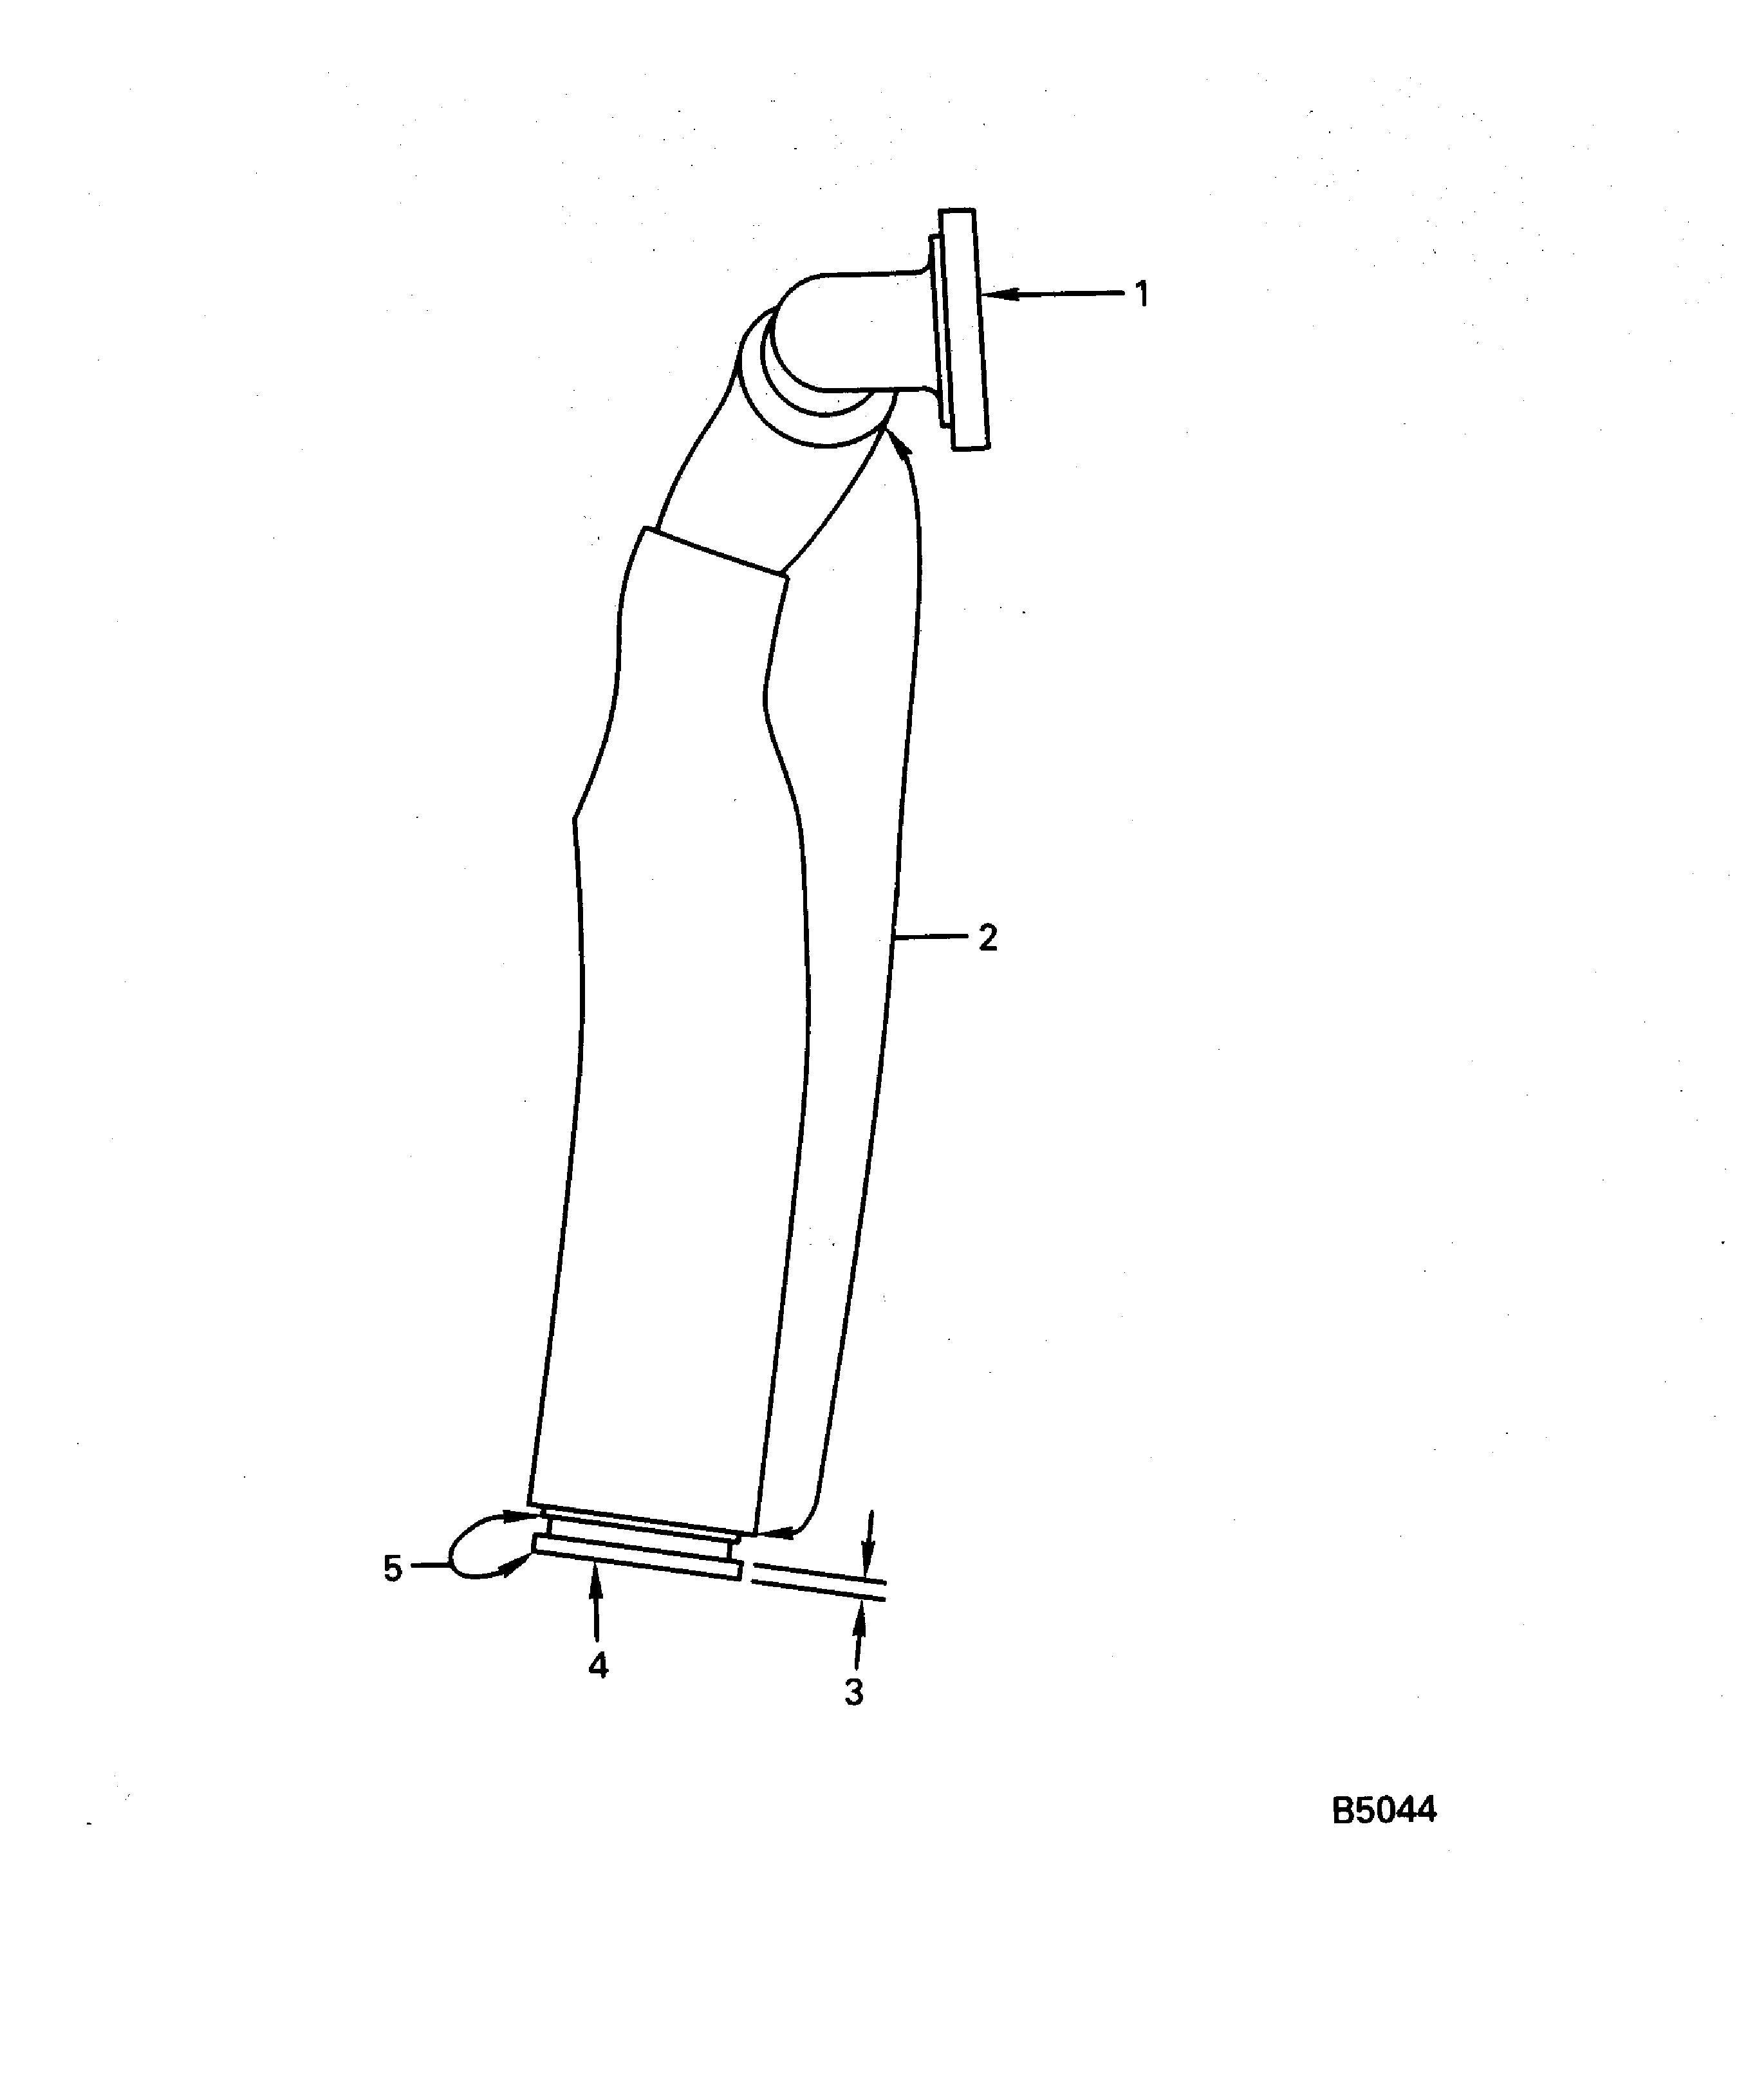
Examine the tube at locations 1 and 4 for nicks and scratches on the mating surfaces.
SUBTASK 72-42-20-220-099 Examine the No. 4 Bearing Scavenge Tube (02-020) for Nicks and Scratches on the Mating Surfaces
Refer to Figure.
Repair, VRS3759 TASK 72-42-20-300-025 (REPAIR-025) or Repair, VRS3832 TASK 72-42-20-300-028 (REPAIR-028).
Other than Step.
Dents
Repair, VRS3759 TASK 72-42-20-300-025 (REPAIR-025) or Repair, VRS3832 TASK 72-42-20-300-028 (REPAIR-028).
Other than Step.
Nicks and scratches
Repair, VRS3759 TASK 72-42-20-300-025 (REPAIR-025) or Repair, VRS3832 TASK 72-42-20-300-028 (REPAIR-028).
Wear that indicates the tube rubs on the inside of the diffuser case strut and is more than 0.010 in. (0.25 mm) in depth
Repair, VRS3759 TASK 72-42-20-300-025 (REPAIR-025) or Repair, VRS3832 TASK 72-42-20-300-028 (REPAIR-028).
Looseness not allowed
Examine the tube at location 2 for dents, nicks, scratches, wear and looseness on the heatshields.
SUBTASK 72-42-20-220-100 Examine the No. 4 Bearing Scavenge Tube (02-020) for Dents, Nicks, Scratches, Wear and Looseness on the Heatshields
Refer to Figure.
Repair, VRS3759 TASK 72-42-20-300-025 (REPAIR-025) per applicable part numbers.
For PN 2A4379-01 only, reject.
Other than Step.
Examine the tube at location 3 for the thickness of the lower lip
SUBTASK 72-42-20-220-101 Examine the No. 4 Bearing Scavenge Tube (02-020) for the Thickness of the Lower Lip
Refer to Figure.
Repair, VRS3759 TASK 72-42-20-300-025 (REPAIR-025) per applicable part numbers.
For PN 2A4379-01 only, reject.
Other than Step.
Nicks and scratches
Repair, VRS3759 TASK 72-42-20-300-025 (REPAIR-025) per applicable part numbers.
For PN 2A4379-01 only, reject.
Other than Step.
Dents and distortion
Examine the tube at location 5 for damage on the lower lip and groove.
SUBTASK 72-42-20-220-102 Examine the No. 4 Bearing Scavenge Tube (02-020) for Damage on the Lower Lip and Groove
Refer to Figure.
Install IAE 2P16248 Pressure test adapter 1 off onto the tube connector. Attach standard pressure test equipment to the adapter.
Install IAE 2P16249 Pressure test plug 1 off onto the opposite end of the tube.
Repair, VRS3759 TASK 72-42-20-300-025 (REPAIR-025) or Repair, VRS3775 TASK 72-42-20-300-027 (REPAIR-027) per applicable part numbers.
For PN 2A4379-01 only, reject.
Leaks
Do a pressure test with water at 225 to 248 psig (1551.32 to 1709.90 kpa) and hold for 10 minutes
Remove the pressure test plug and the pressure test adapter from the ends of the tube.
SUBTASK 72-42-20-220-103 Examine the No. 4 Bearing Scavenge Tube (02-020) for Leaks
Figure: No. 4 Bearing Scavenge Tube (PN 2A0830-01 and 2A1949-01) Inspection Locations
No. 4 Bearing Scavenge Tube (PN 2A0830-01 and 2A1949-01) Inspection Locations

Figure: No.4 Bearing Scavenge Tube (PN 2A0830-001 and 2A2028-01) Inspection Locations
No.4 Bearing Scavenge Tube (PN 2A0830-001 and 2A2028-01) Inspection Locations

Figure: No. 4 Bearing Scavenge Tube (PN 2A2074-01, 2A2274-01 and 2A4379-01) Inspection Locations
No. 4 Bearing Scavenge Tube (PN 2A2074-01, 2A2274-01 and 2A4379-01) Inspection Locations

