Export Control
EAR Export Classification: Not subject to the EAR per 15 C.F.R. Chapter 1, Part 734.3(b)(3), except for the following Service Bulletins which are currently published as EAR Export Classification 9E991: SBE70-0992, SBE72-0483, SBE72-0580, SBE72-0588, SBE72-0640, SBE73-0209, SBE80-0024 and SBE80-0025.Copyright
© IAE International Aero Engines AG (2001, 2014 - 2021) The information contained in this document is the property of © IAE International Aero Engines AG and may not be copied or used for any purpose other than that for which it is supplied without the express written authority of © IAE International Aero Engines AG. (This does not preclude use by engine and aircraft operators for normal instructional, maintenance or overhaul purposes.).Applicability
All
Common Information
TASK 72-42-20-300-027 No. 4 Bearing Scavenge Oil Tube - Weld Repair The Tube Body Weld Joints, Repair-027 (VRS3775)
General
Material of component - none
Price and availability - refer to IAE
The practices and processes referred to in the procedure by the TASK number are in the SPM.
Tube Assemblies that have weld repair marks that you can see on tube bodies with VRS3759-HT1 or VRS3775-HT1 can only undergo one repair heat treatment cycle.
This repair is not permitted on tube assemblies with two repair heat treatment cycles done, such as those marked VRS3759-HT2 or VRS3775- HT2, which indicates that such tube assemblies have the maximum number of repair heat treatment cycles.
Preliminary Requirements
Pre-Conditions
NONESupport Equipment
NONEConsumables, Materials and Expendables
| Name | Manufacturer | Part Number / Identification | Quantity | Remark |
|---|---|---|---|---|
| CoMat 03-284 WELDING FILLER WIRE, NiBASE | LOCAL | CoMat 03-284 | ||
| CoMat 03-286 WELDING WIRE | LOCAL | CoMat 03-286 |
Spares
| Name | Manufacturer | Part Number / Identification | Quantity | Remark |
|---|---|---|---|---|
| Shield-Heat, No. 4 Bearing Scavenge Tube | 0AM53 | 2A2074-06 | ||
| Shield-Heat, No. 4 Bearing Scavenge Tube | 0AM53 | 2A2074-07 | ||
| Shield-Heat, No. 4 Bearing Scavenge Tube | 0AM53 | 2A2074-08 | ||
| Shield-Heat, No. 4 Bearing Scavenge Tube | 0AM53 | 2A2074-09 | ||
| Insulation blanket | 0AM53 | 2A2074-10 |
Safety Requirements
NONEProcedure
Refer to Figure.
Do a grind operation for the welds that hold the heatshield halves together to remove the heatshields from the tube assembly.
SUBTASK 72-42-20-320-095 Remove the No.4 Bearing Scavenge Tube Assembly Heatshields and Insulation Blanket
Do a visual inspection of the heatshields for cracks or damaged areas. Keep the heatshields that you can use and discard the damaged heatshields.
Do a visual inspection of the insulation blanket for tears, loose material or dark color. Insulation blanket must be pliable and not hard. Keep the insulation blanket that you can use and discard the damaged insulation blanket.
SUBTASK 72-42-20-220-134 Examine the Heatshields and Insulation Blanket for Damage
Refer to Figure.
If there are indications of repairs done before that heat treatment, mark the part VRS3775-HT2 by Step after you do this repair.
Do a visual inspection of the tube body for the indications of heat treatment repairs done before that includes weld marks on tube body.
SUBTASK 72-42-20-220-144 Examine the Tube Body for Repair History
Refer to Figure.
Refer to SPM TASK 70-11-03-300-503.
Clean the tube body and tube body weld joints.
Do a visual inspection of the tube body and tube body weld joints for cracks or damaged areas.
SUBTASK 72-42-20-220-135 Examine the Tube Body and Tube Body Weld Joints for Damage to Find the Repairable Parts
Refer to Figure.
Refer to SPM TASK 70-23-02-230-501.
Do a fluorescent penetrant inspection of the tube body and tube body weld joints.
SUBTASK 72-42-20-230-079 Examine the Tube Body and Tube Body Weld Joints for Damage to Find the Repairable Parts
Refer to Figure.
Refer to SPM TASK 70-26-01-260-501.
X-Ray the tube body and the tube body weld joints.
Cracks in the tube body weld joints with length to a maximum of 0.750 in. (19.05 mm).

CAUTION
THE LIMITS THAT YOU CAN REPAIR GIVEN IN THE STEP BELOW ARE APPLICABLE ONLY FOR TUBE BODY WELD JOINTS. THESE LIMITS DO NOT APPLY TO ALL OTHER AREAS.Make sure that the cracked areas on the tube body weld joints are not more than the repairable limits, discontinue this repair if the repairable limit is more or damages are out of the repairable area.
SUBTASK 72-42-20-260-001 Examine the Tube Body and Tube Body Weld Joints for Damage to Find the Repairable Parts
Refer to Figure.
Do a machine or grind operation to remove cracks on the tube body weld joints.
SUBTASK 72-42-20-320-106 Remove Cracks on the Tube Body Weld Joints
Refer to Figure.
Refer to SPM TASK 70-11-03-300-503.
Clean the tube body weld joints.
Refer to SPM TASK 70-23-02-230-501.
Do a fluorescent penetrant inspection of the tube body weld joints.
SUBTASK 72-42-20-230-080 Examine the Tube Body Weld Joints After Crack Removal
Refer to Figure.
Use a rotary austenitic stainless steel wire brush or silicon carbide abrasive wheel.
Remove oxides from the repair areas on the tube body weld joints.
Refer to SPM TASK 70-11-26-300-503.
Clean the repair areas on the tube body weld joints by the solvent wipe method.
SUBTASK 72-42-20-350-079 Prepare the Tube Body Weld Joints for Welding
Refer to Figure.
Use the Manual Gas Tungsten Arc (GTAW-MA) method.
Refer to SPM TASK 70-31-13-310-501.
Weld repair the tube body weld joints.
SUBTASK 72-42-20-310-056 Weld Repair the Tube Body Weld Joints
Refer to Figure.
Refer to SPM TASK 70-37-32-370-501.
Do a full heat treatment on the tube assembly.
SUBTASK 72-42-20-350-080 Heat Treat the Tube Assembly
Refer to Figure.
Elbow: Hardness must be Rockwell C34 minimum.
Other parts: Hardness must be Rockwell C36 minimum. Do not keep hardness impressions on the tube body.
Do a hardness check on tube assembly to make sure that you obey one of the limits.
SUBTASK 72-42-20-220-145 Do a Hardness Check on the Tube Body
Refer to Inspection-005 TASK 72-42-20-200-105. Examine the No. 4 bearing scavenge tube for leaks.
Do a leak test on the tube assembly.
SUBTASK 72-42-20-220-136 Do a Leak Test on the Tube Assembly
Refer to Figure.
Use a silicon carbide rag wheel or equivalent.
Do not undercut material.
Finish the weld-repaired areas on the tube body weld joints flush and smooth to adjacent surfaces.
SUBTASK 72-42-20-320-097 Blend the Weld-Repaired Areas on the Tube Body Weld Joints
Refer to Figure.
Refer to SPM TASK 70-23-02-230-501.
Do a fluorescent penetrant inspection of the tube body and the tube body weld joints.
SUBTASK 72-42-20-230-081 Examine the Tube Body and Tube Body Weld Joints After the Weld Repair
Refer to Figure.
Do a visual inspection of ID and OD of the weld joints to the limits of SPM TASK 70-31-13-310-501. Fusion Welding. Melt through must not be more than 50 percent of the parent material thickness. ID inspection is necessary only for circumferential weld joints.
SUBTASK 72-42-20-220-146 Examine the Tube Body and Tube Body Weld Joints After the Weld Repair
Refer to Figure.
Refer to SPM TASK 70-26-01-260-501.
No cracks, not full (lack of) penetration, or not full (lack of) fusion permitted.
The maximum discontinuity dimension is not more than 0.015 in. (0.38 mm).
The total permitted number of discontinuities, regardless of type, must not be more than four for each weld.
The separation between discontinuities in linear alignment must be more than 0.050 in. (1.27 mm).
Porosity, low density inclusions, or high density inclusions are permitted, if the limits are as follows:
X-Ray the tube body and tube body weld joints to make sure that they must obey the limits that follow:
SUBTASK 72-42-20-260-002 X-Ray the Tube Body and Tube Body Weld Joints
Refer to Figure.
Use a rotary austenitic stainless steel wire brush or silicon carbide abrasive wheel.
Remove oxides from the areas where the heatshields that you can use again are to be welded.
Refer to SPM TASK 70-11-26-300-503.
Clean the weld areas on the heatshields that you can use again by the solvent wipe method.
SUBTASK 72-42-20-350-081 Prepare the Heatshields that You Can Use Again for Weld Build-Up
Refer to Figure.
Use the Manual Gas Tungsten Arc (GTAW-MA) method.
Refer to SPM TASK 70-31-13-310-501.
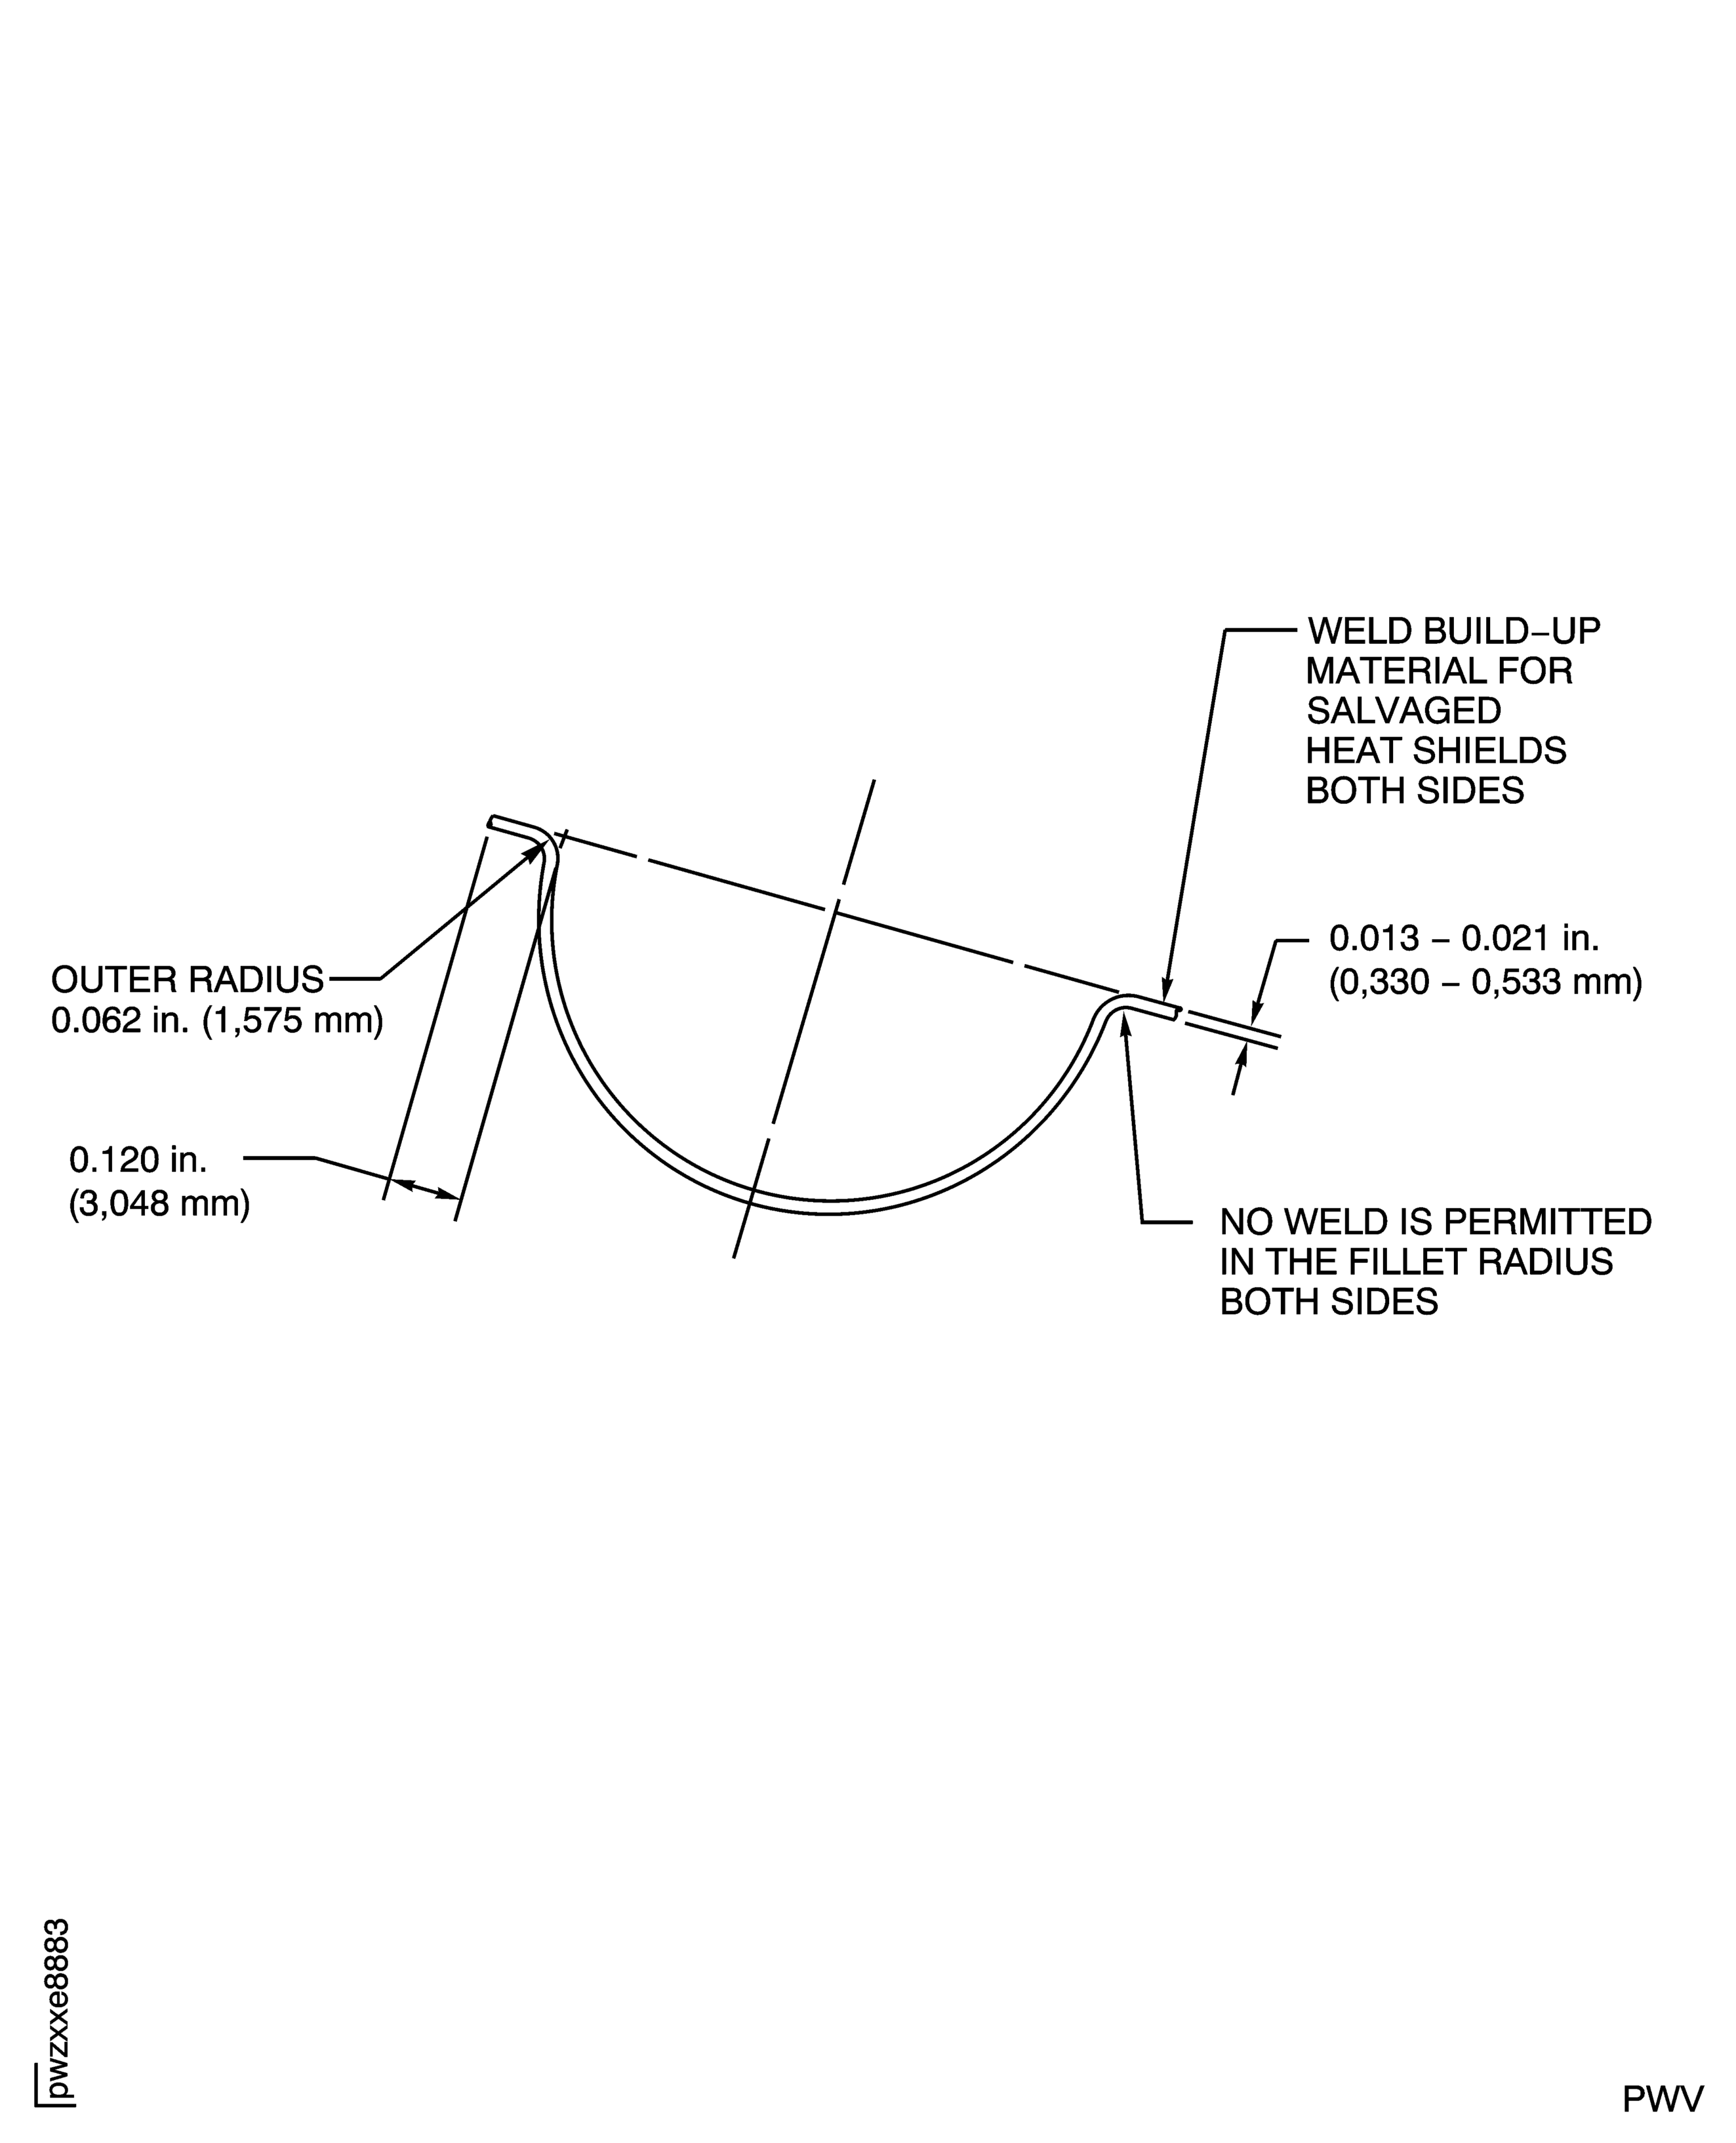
As necessary, weld build-up material on the heatshields that you can use again in the areas where the heatshield halves are to be welded together. No welding permitted in the fillet radius.
Use a silicon carbide rag wheel or equivalent.
Finish the welded areas on the heatshields that you can use again to a 0.013 to 0.021 in. (0.33 to 0.53 mm) thickness and smooth to adjacent surfaces and restore original contour.
SUBTASK 72-42-20-310-057 Weld Build-Up Material on the Heatshields that You Can Use Again
Refer to Figure.
Use a rotary austenitic stainless steel wire brush or silicon carbide abrasive wheel.
Refer to Repair, VRS3759 (Repair-025) TASK 72-42-20-300-025.
Remove oxides from the areas where the heatshield halves that you can use again or replace are to be welded together. Replacement insulation blankets can be locally made by Repair-025 (VRS3759).
Refer to SPM TASK 70-11-26-300-503.
Clean the areas on the heatshields that you can use again or replace where the heatshield halves are to be welded together by the solvent wipe method.
SUBTASK 72-42-20-350-087 Prepare the Heatshields for Installation onto the Tube Assembly
Refer to Repair, VRS3759 (Repair-025) TASK 72-42-20-300-025.
Prepare the replacement insulation blankets as necessary. Replacement of insulation blankets can be locally made by Repair-025.
Install reusable or replacement insulation blankets over the tube body and elbow. Insulation can be installed as multiple subsections but there must be no gaps throughout the insulation area.
Use the Manual Gas Tungsten Arc (GTAW-MA) method.
Refer to SPM TASK 70-31-13-310-501.
Install the heatshield halves that you can use or replacement heatshield halves on to the tube assembly. Weld heatshield halves to each other.
Do a visual inspection of the welds on the heatshields for cracks or damaged areas.
SUBTASK 72-42-20-350-082 Install the Insulation Blanket and Heatshields onto the Tube Assembly
Refer to TASK 72-42-20-200-100.
Do a visual and dimensional inspection of the tube assembly.
Repair, VRS3759 (Repair-025) TASK 72-42-20-300-025.
Do a detail replacement repair, if you do not obey the dimensional limits and more than one heat treatment repair was not done on tube assembly during its full repair history.
Scrap the tube assembly, if you do not obey the dimensional limits and more than one heat treatment repair was done on tube assembly during its full repair history.
It is permitted to do the heatshield and insulation replacement area only of VRS3759, if you do not obey the heatshield dimensional limits and the tube is on the second repair, heat treat is necessary
SUBTASK 72-42-20-220-138 Examine the Tube Assembly After Repair
Make a permanent mark by one of the procedures given in SPM TASK 70-09-00-400-501.
Tube assemblies with no heat treatment done before this repair, make a mark VRS3775-HT1 on the elbow, adjacent to the part number. Tube assemblies with one heat treatment repair done before this repair, make a mark VRS3775-HT2 on the elbow, adjacent to the part number.
SUBTASK 72-42-20-350-088 Identify the Repair and Heat Treatment History
Figure: Repair Details and Dimensions
Repair Details and Dimensions
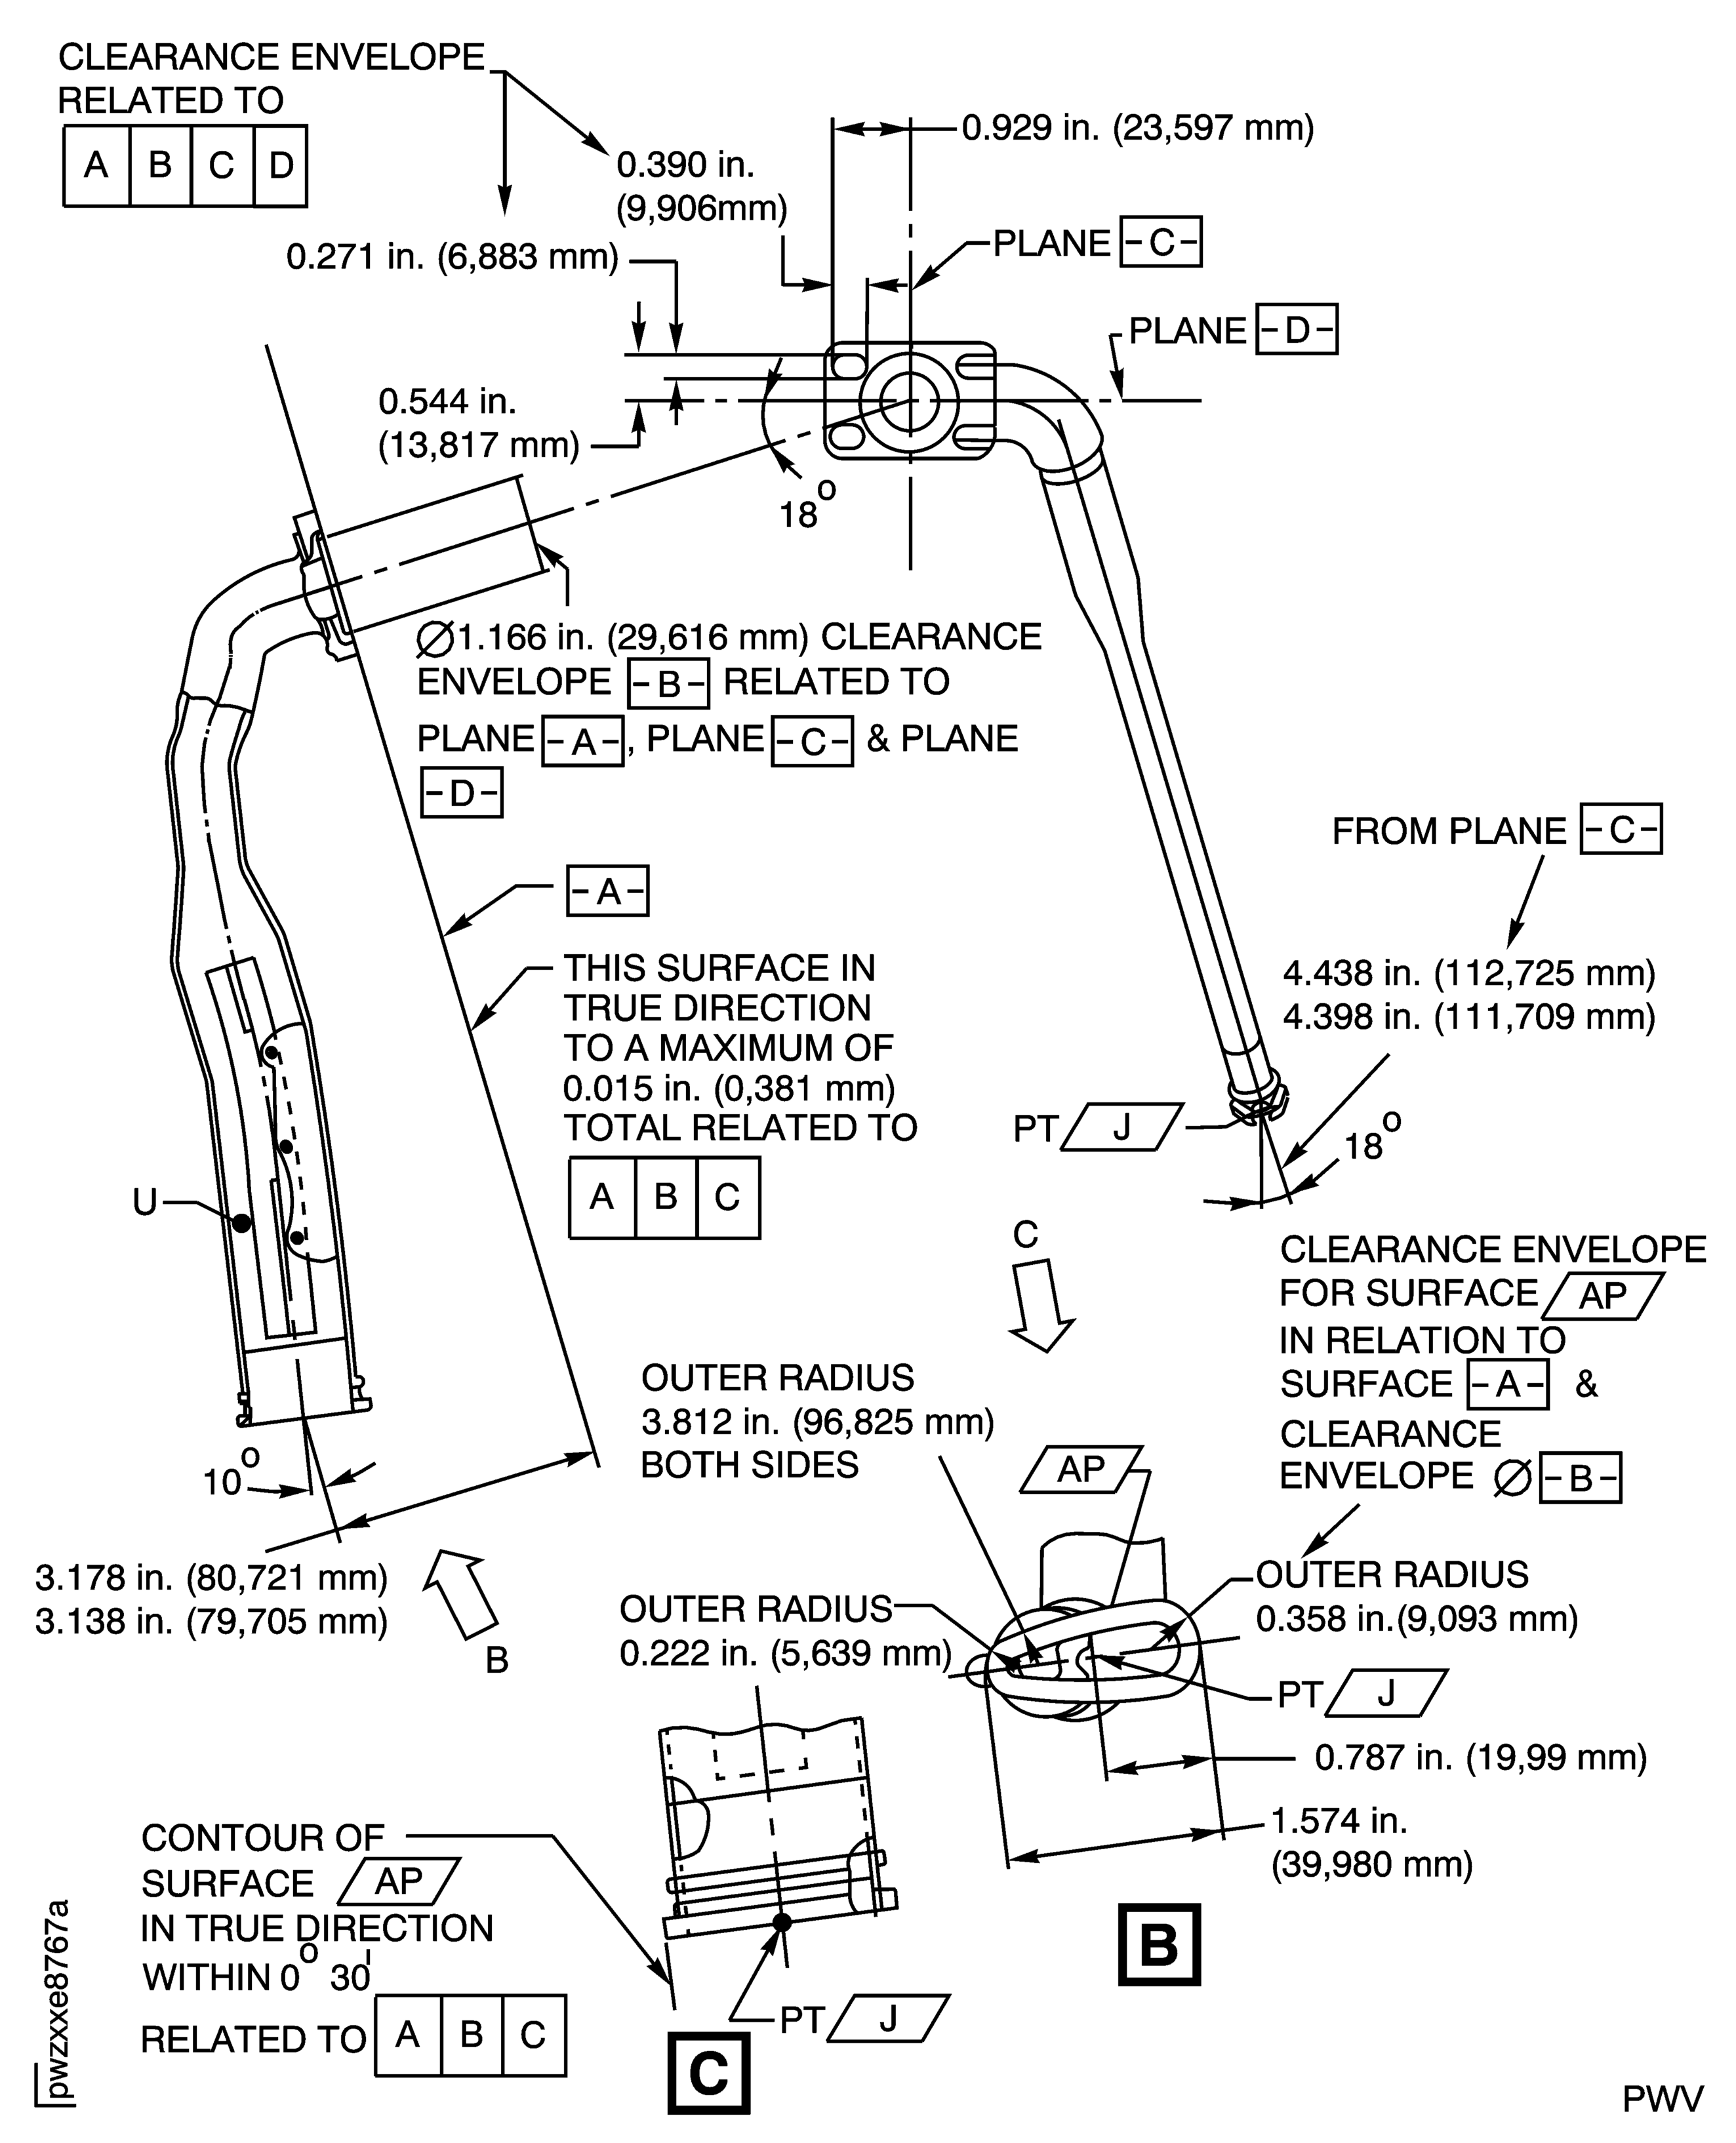
Figure: Repair Details and Dimensions
Repair Details and Dimensions
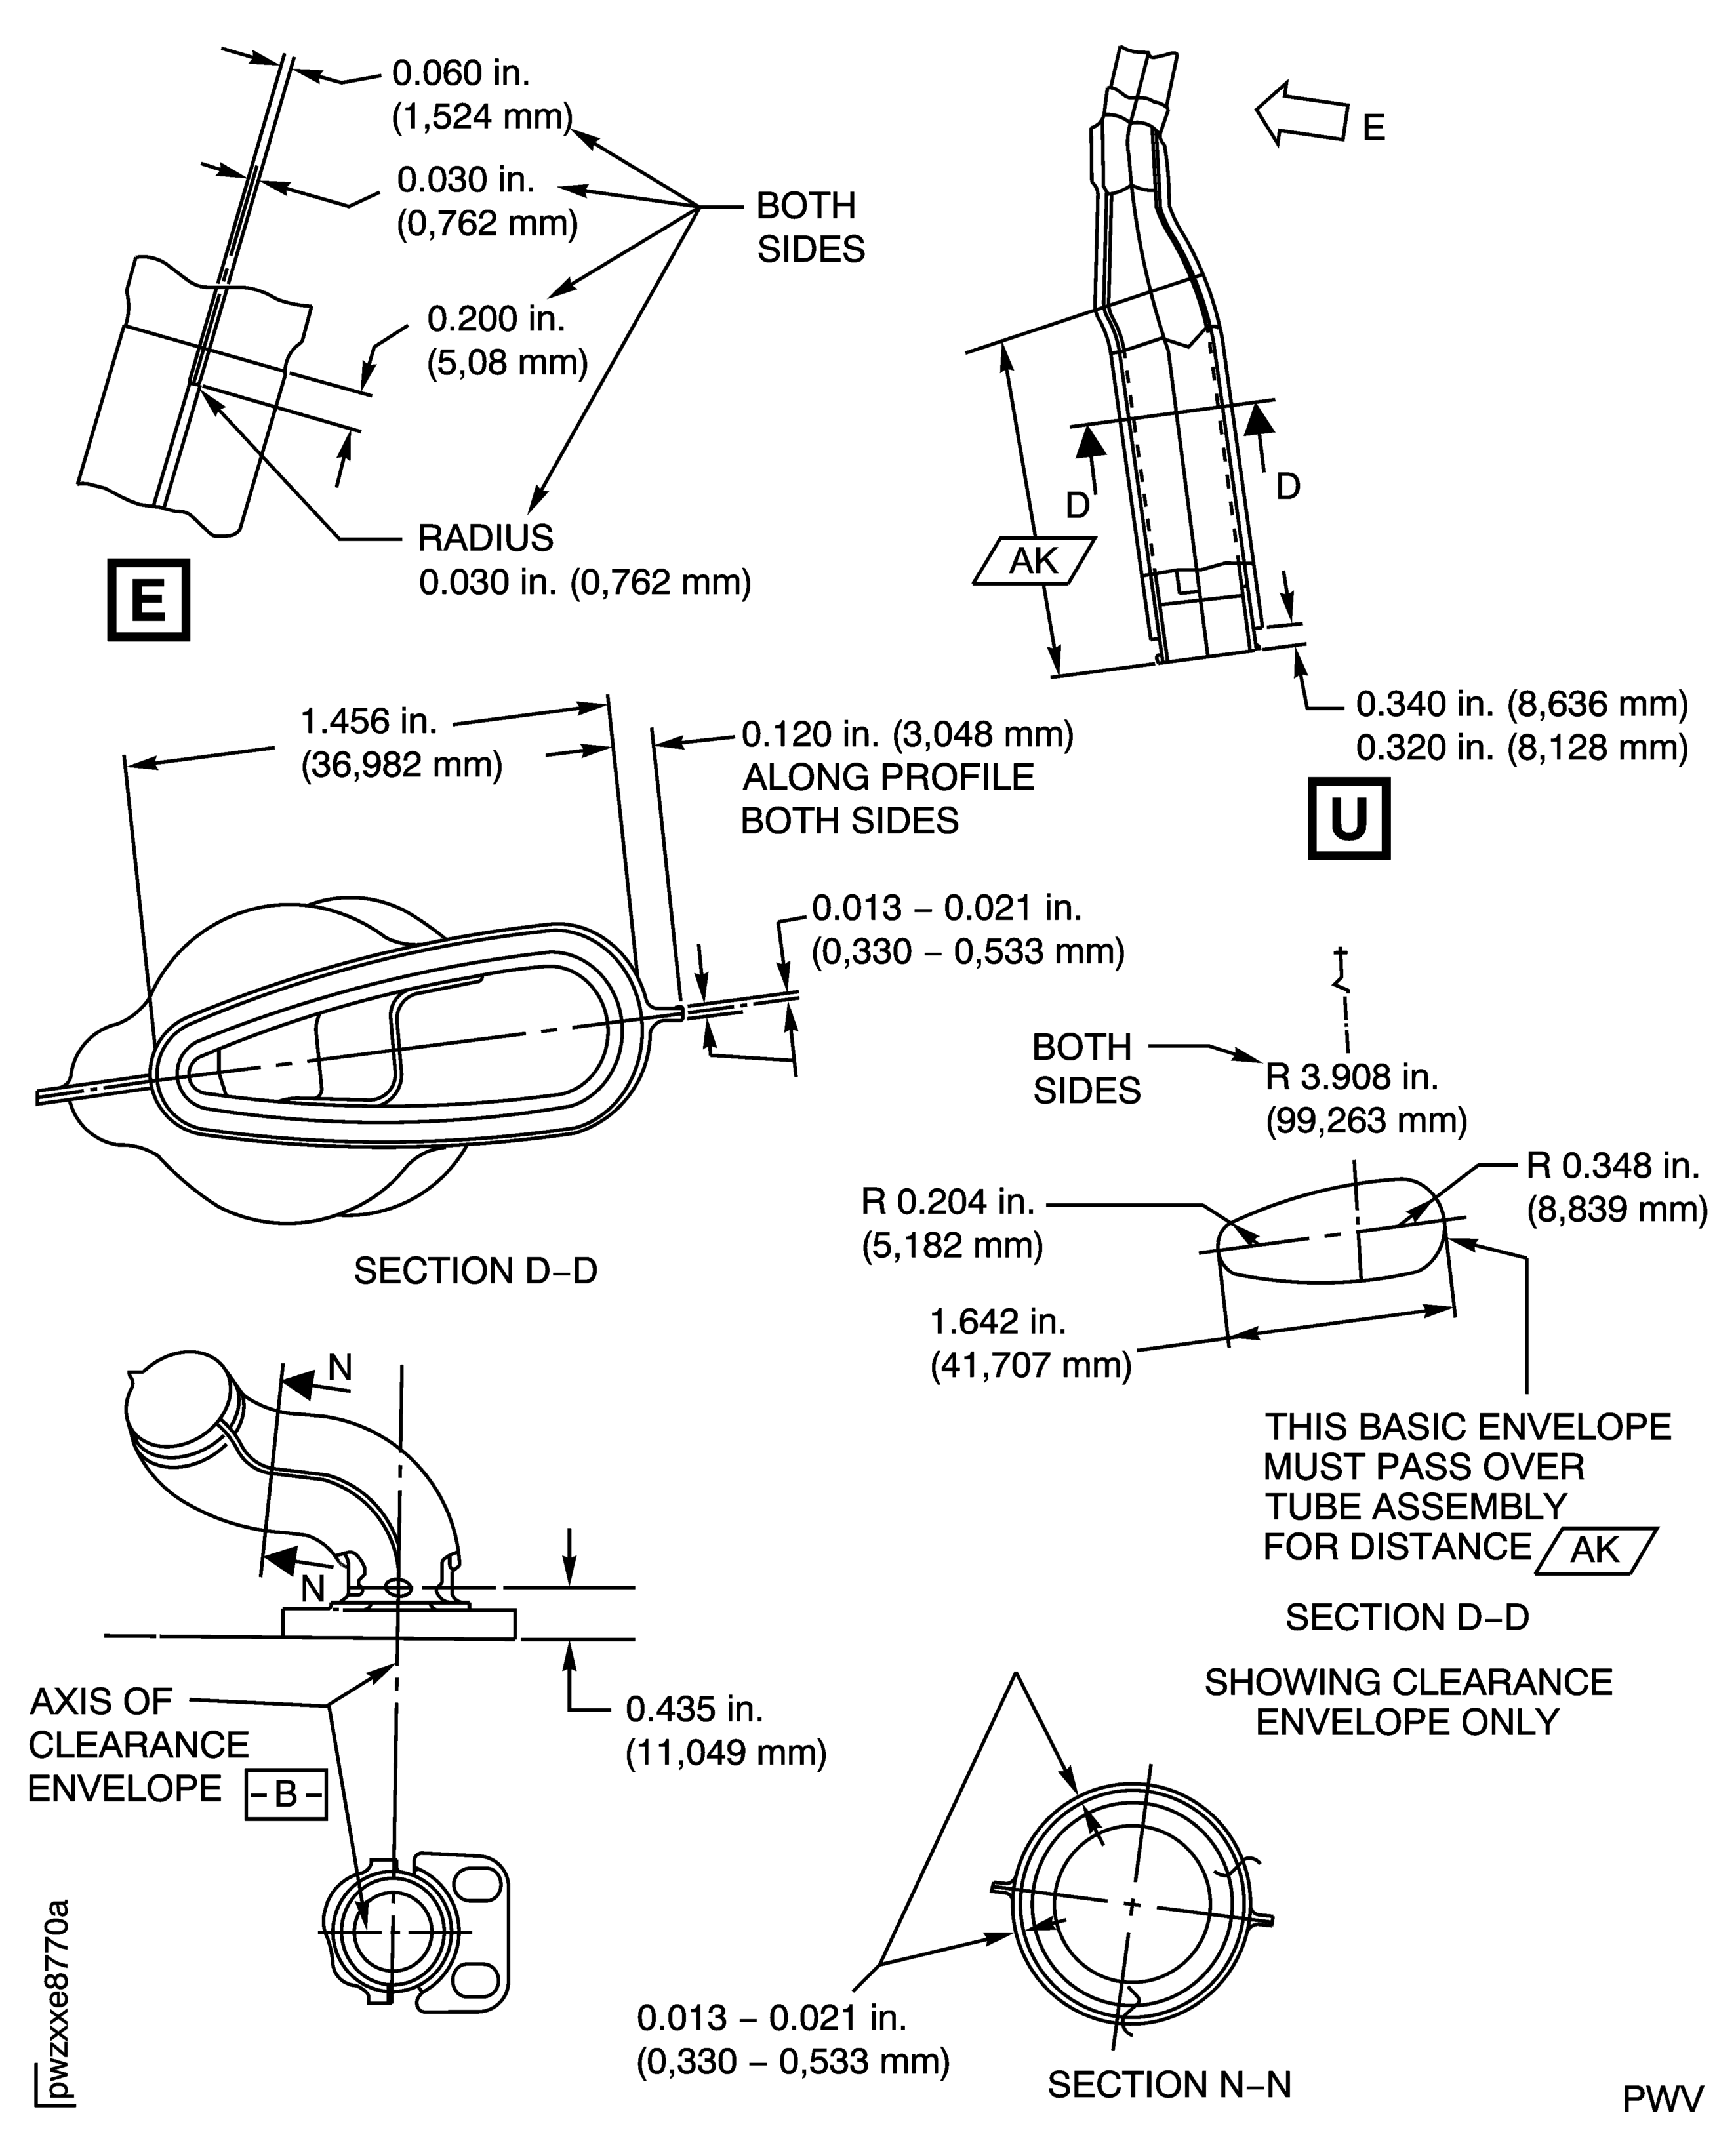
Figure: Repair Details and Dimensions
Repair Details and Dimensions
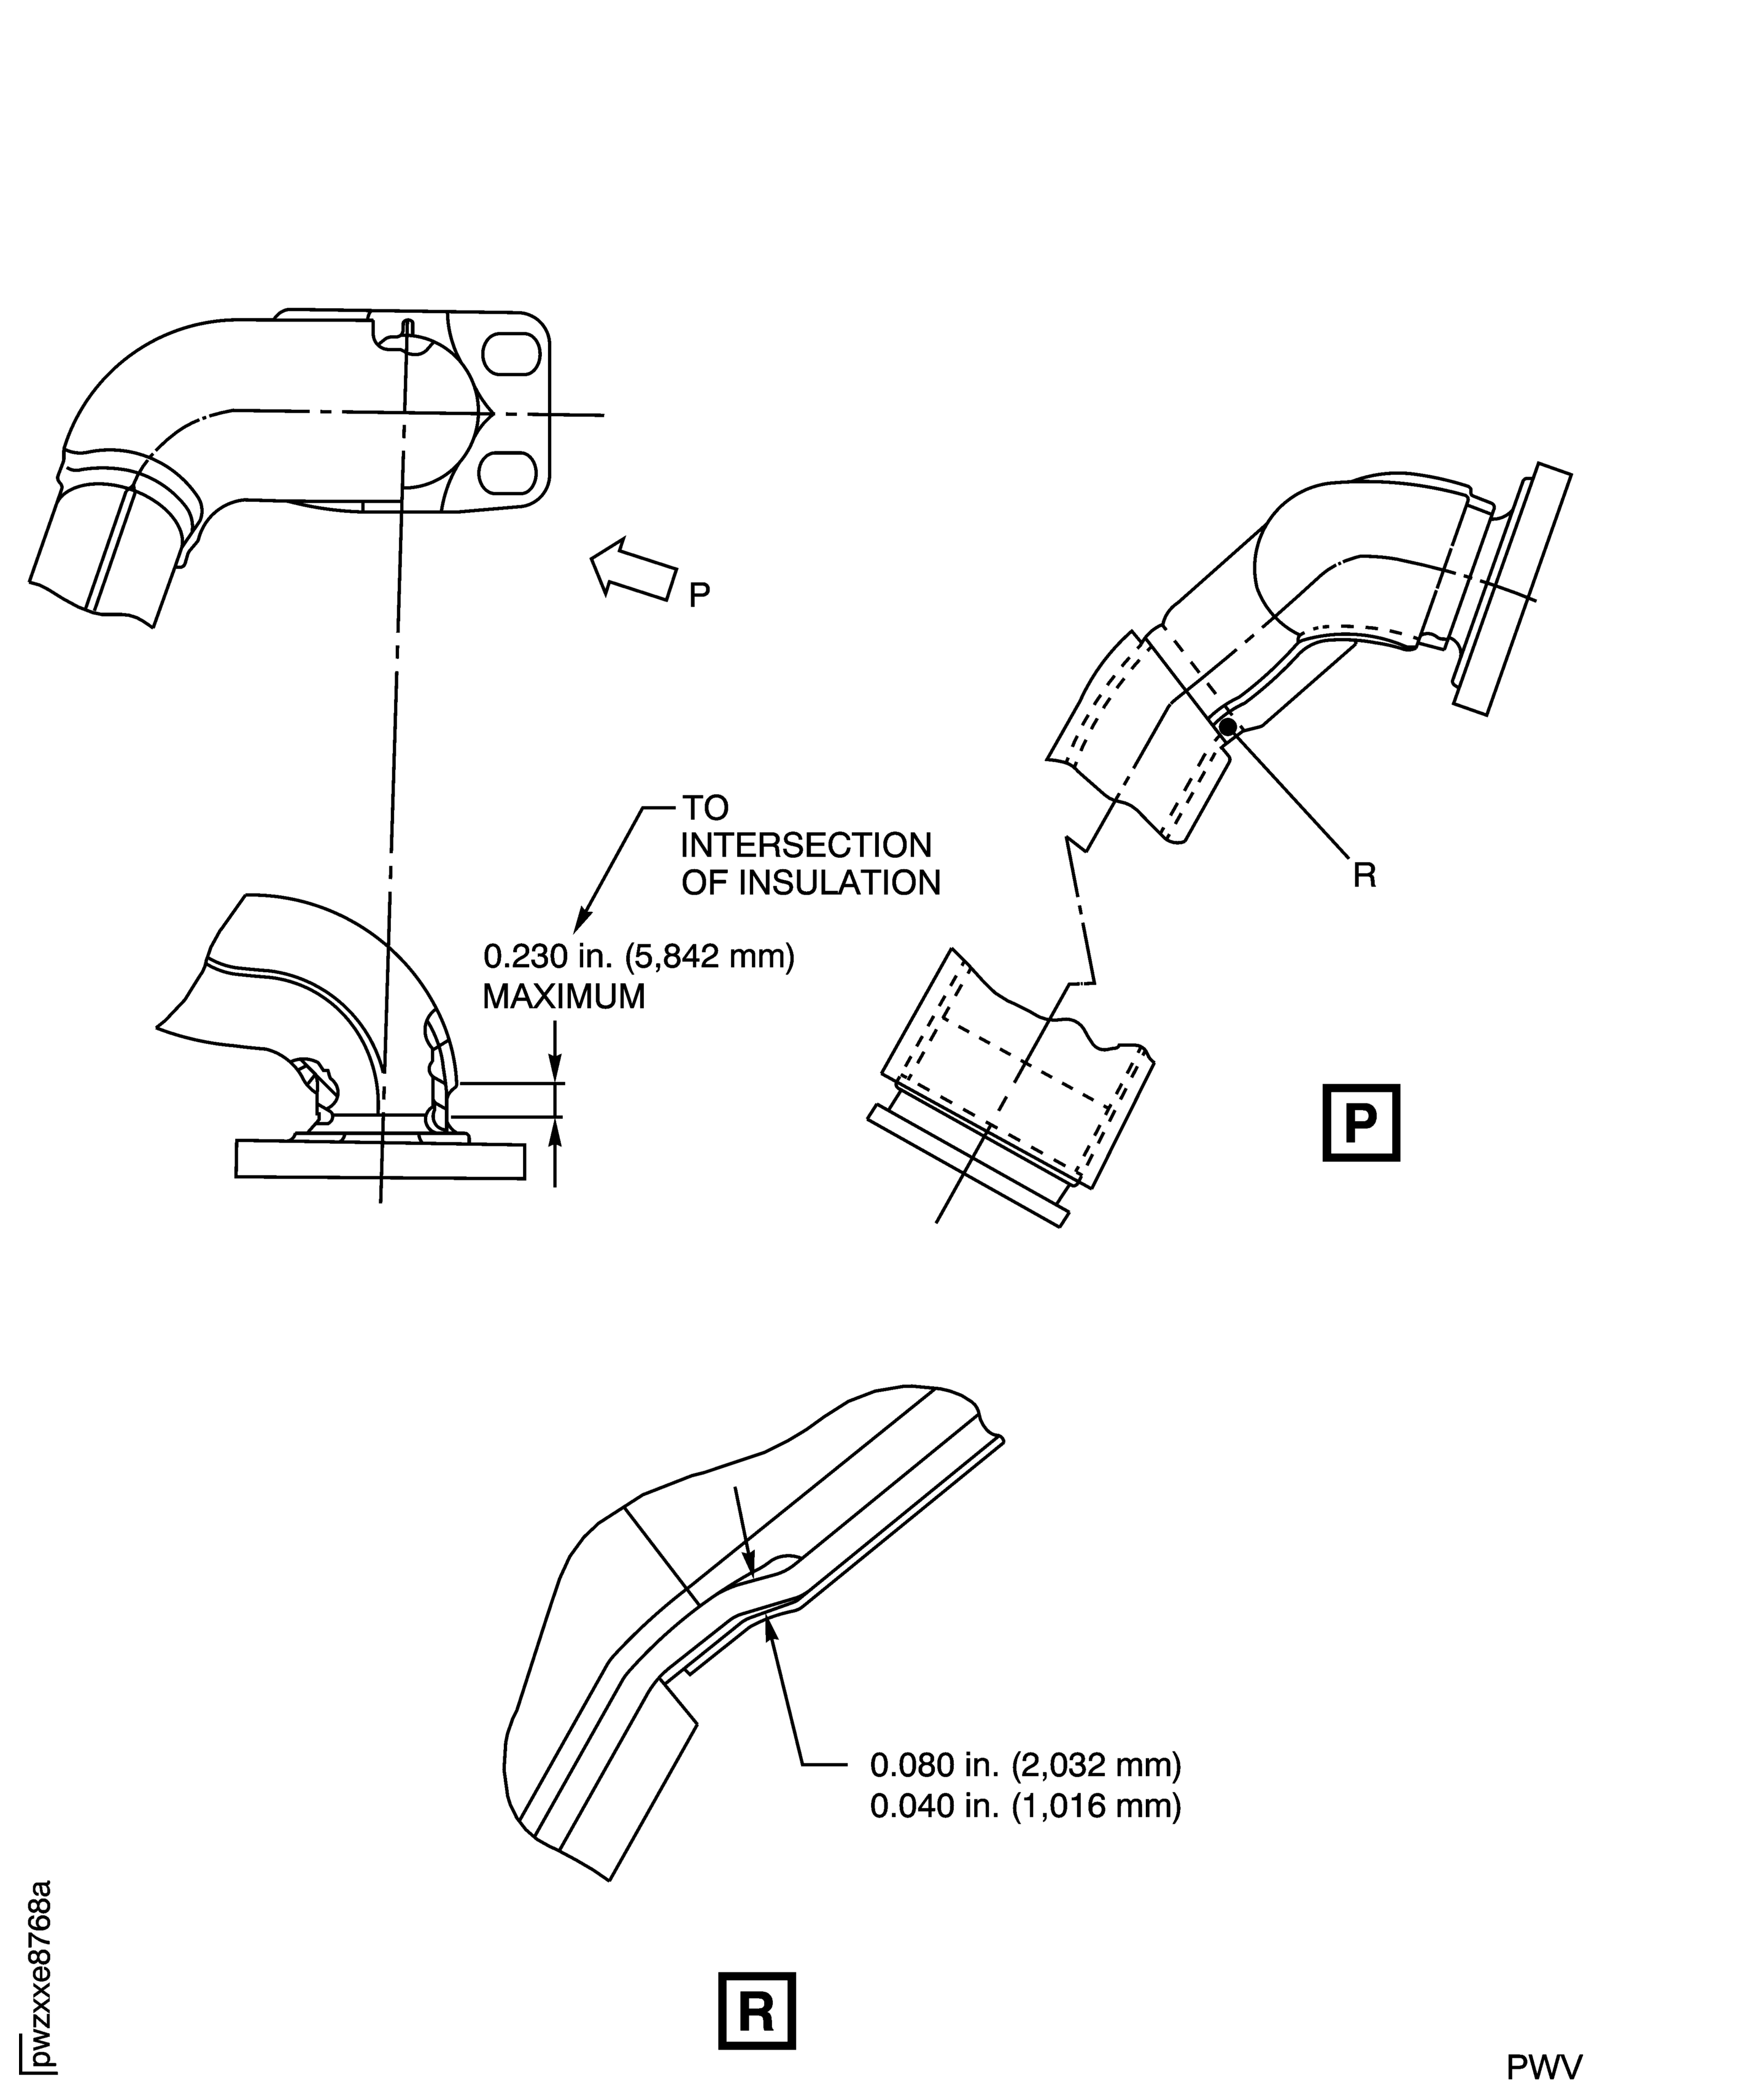
Figure: Repair Details and Dimensions (without Heatshields)
Repair Details and Dimensions (without Heatshields)
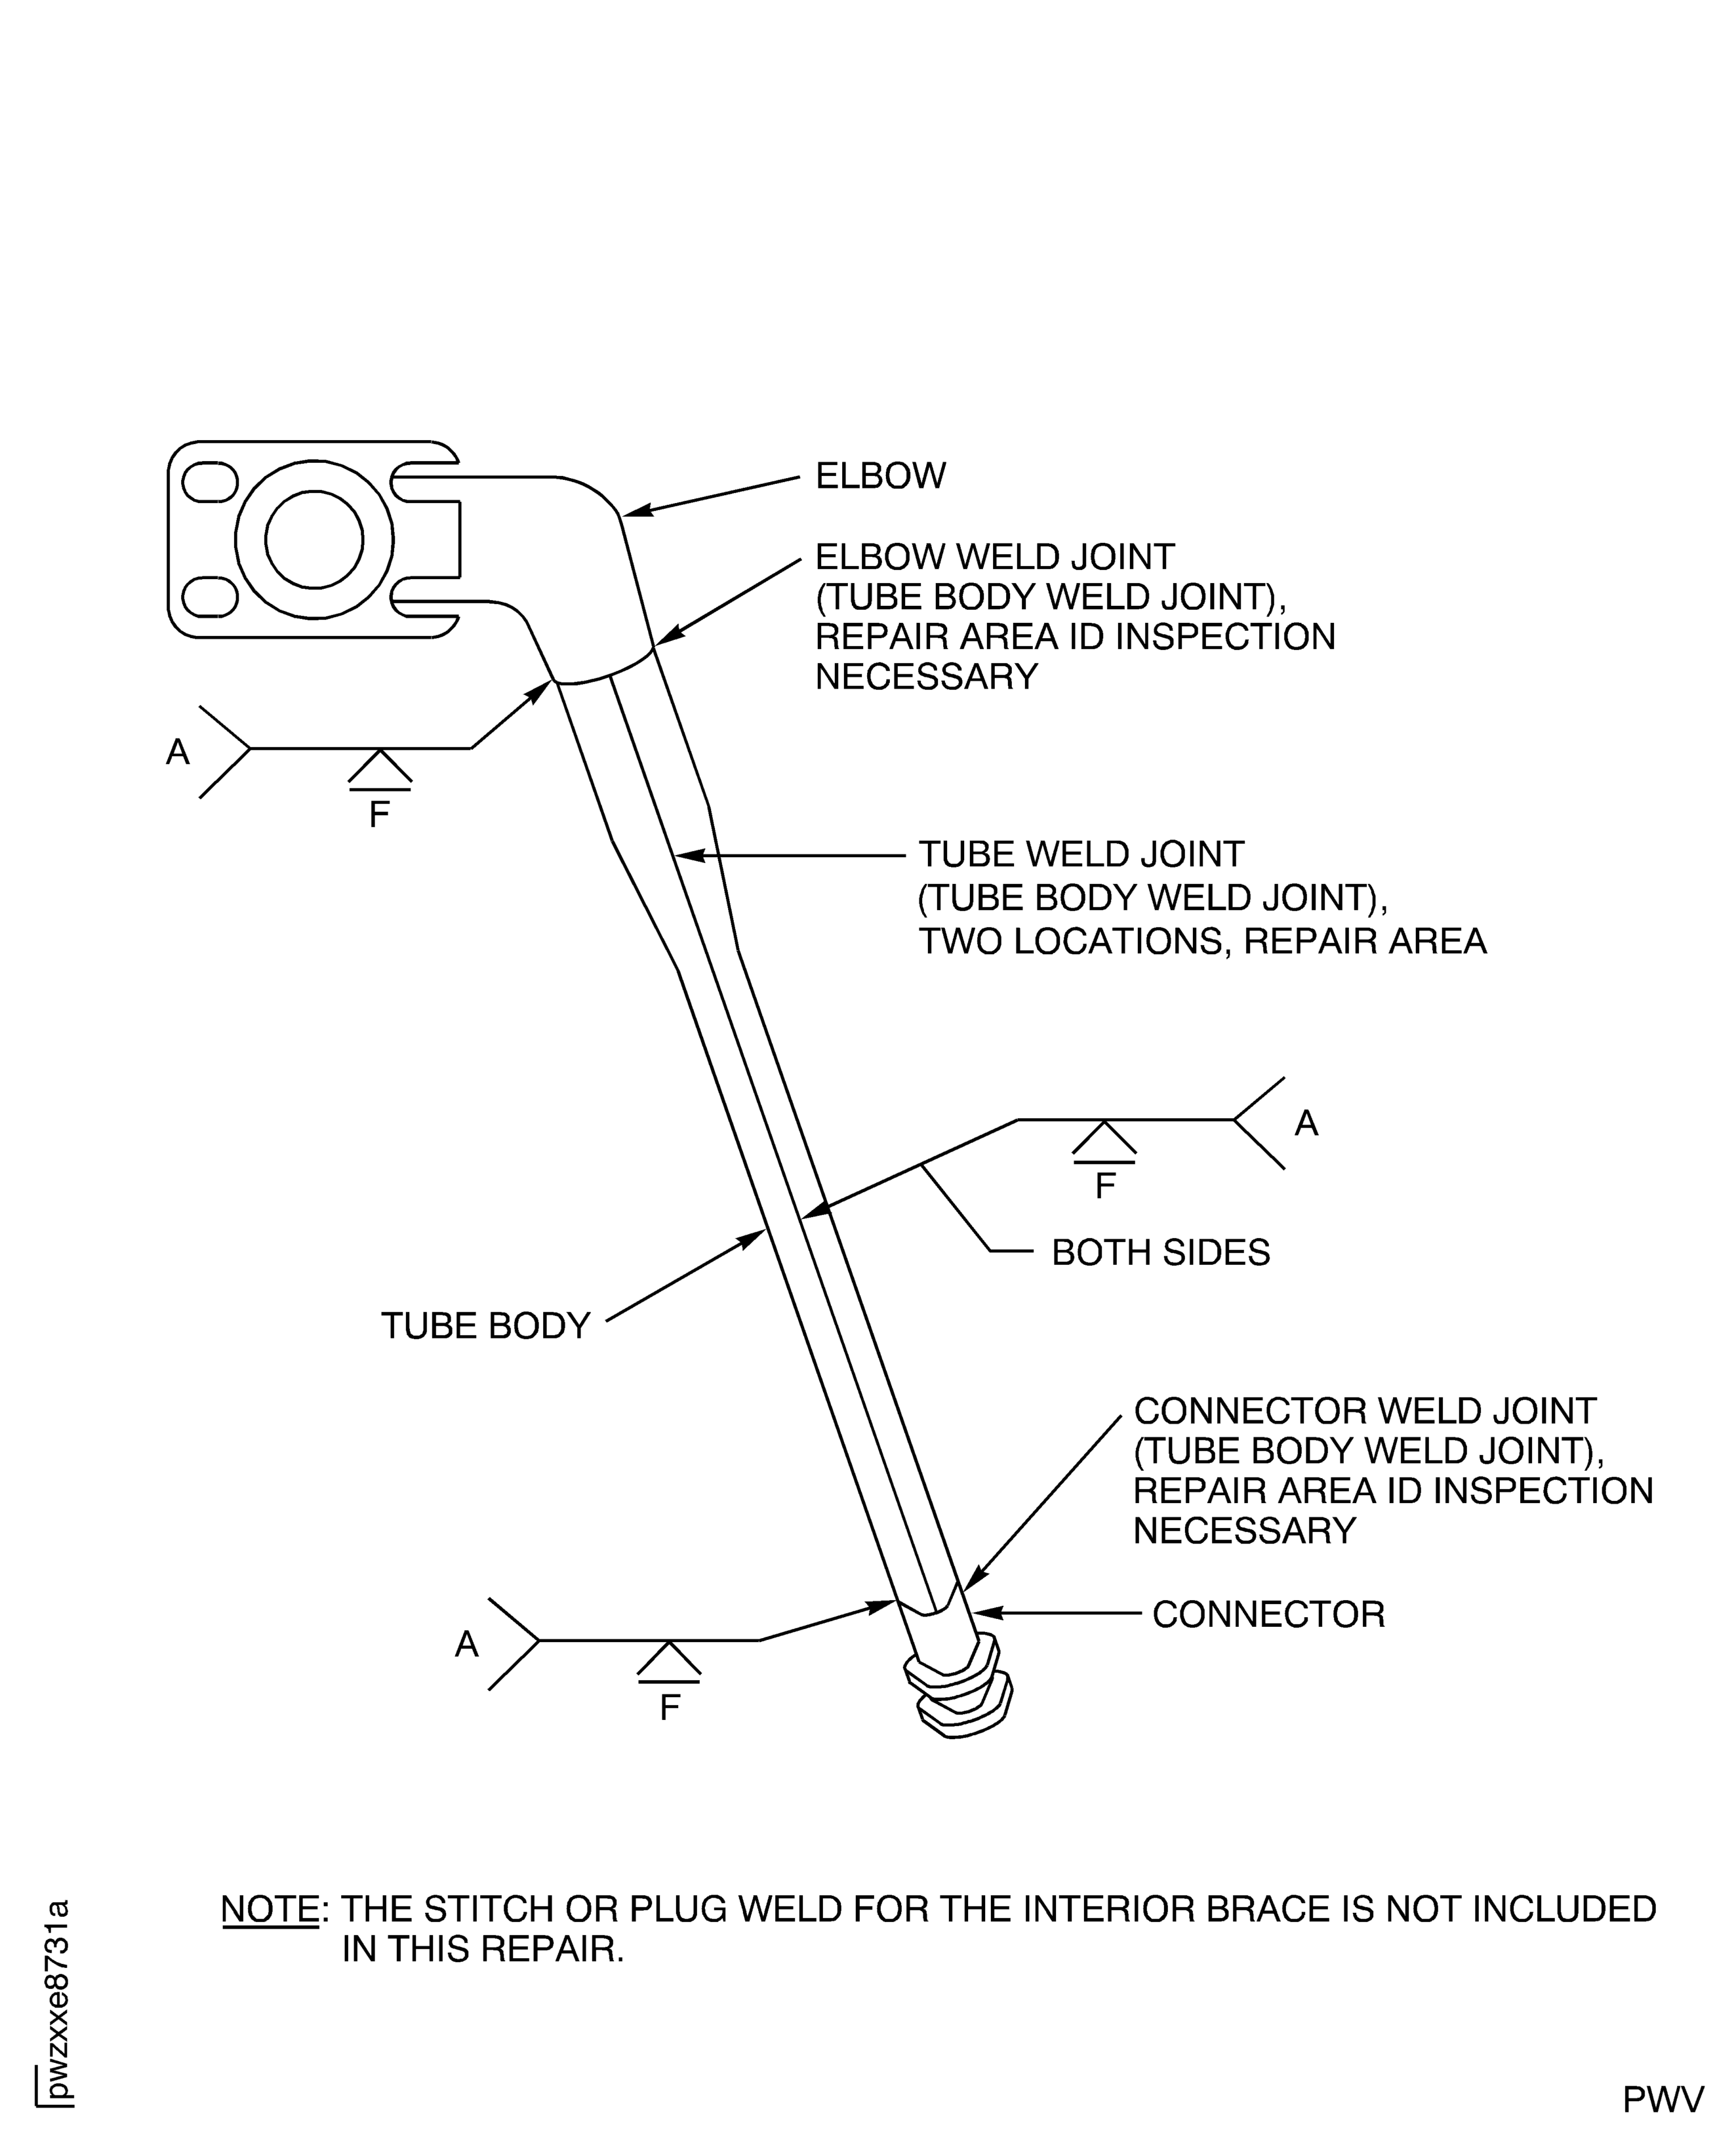
Figure: Repair Details and Dimensions (with Heatshields)
Repair Details and Dimensions (with Heatshields)
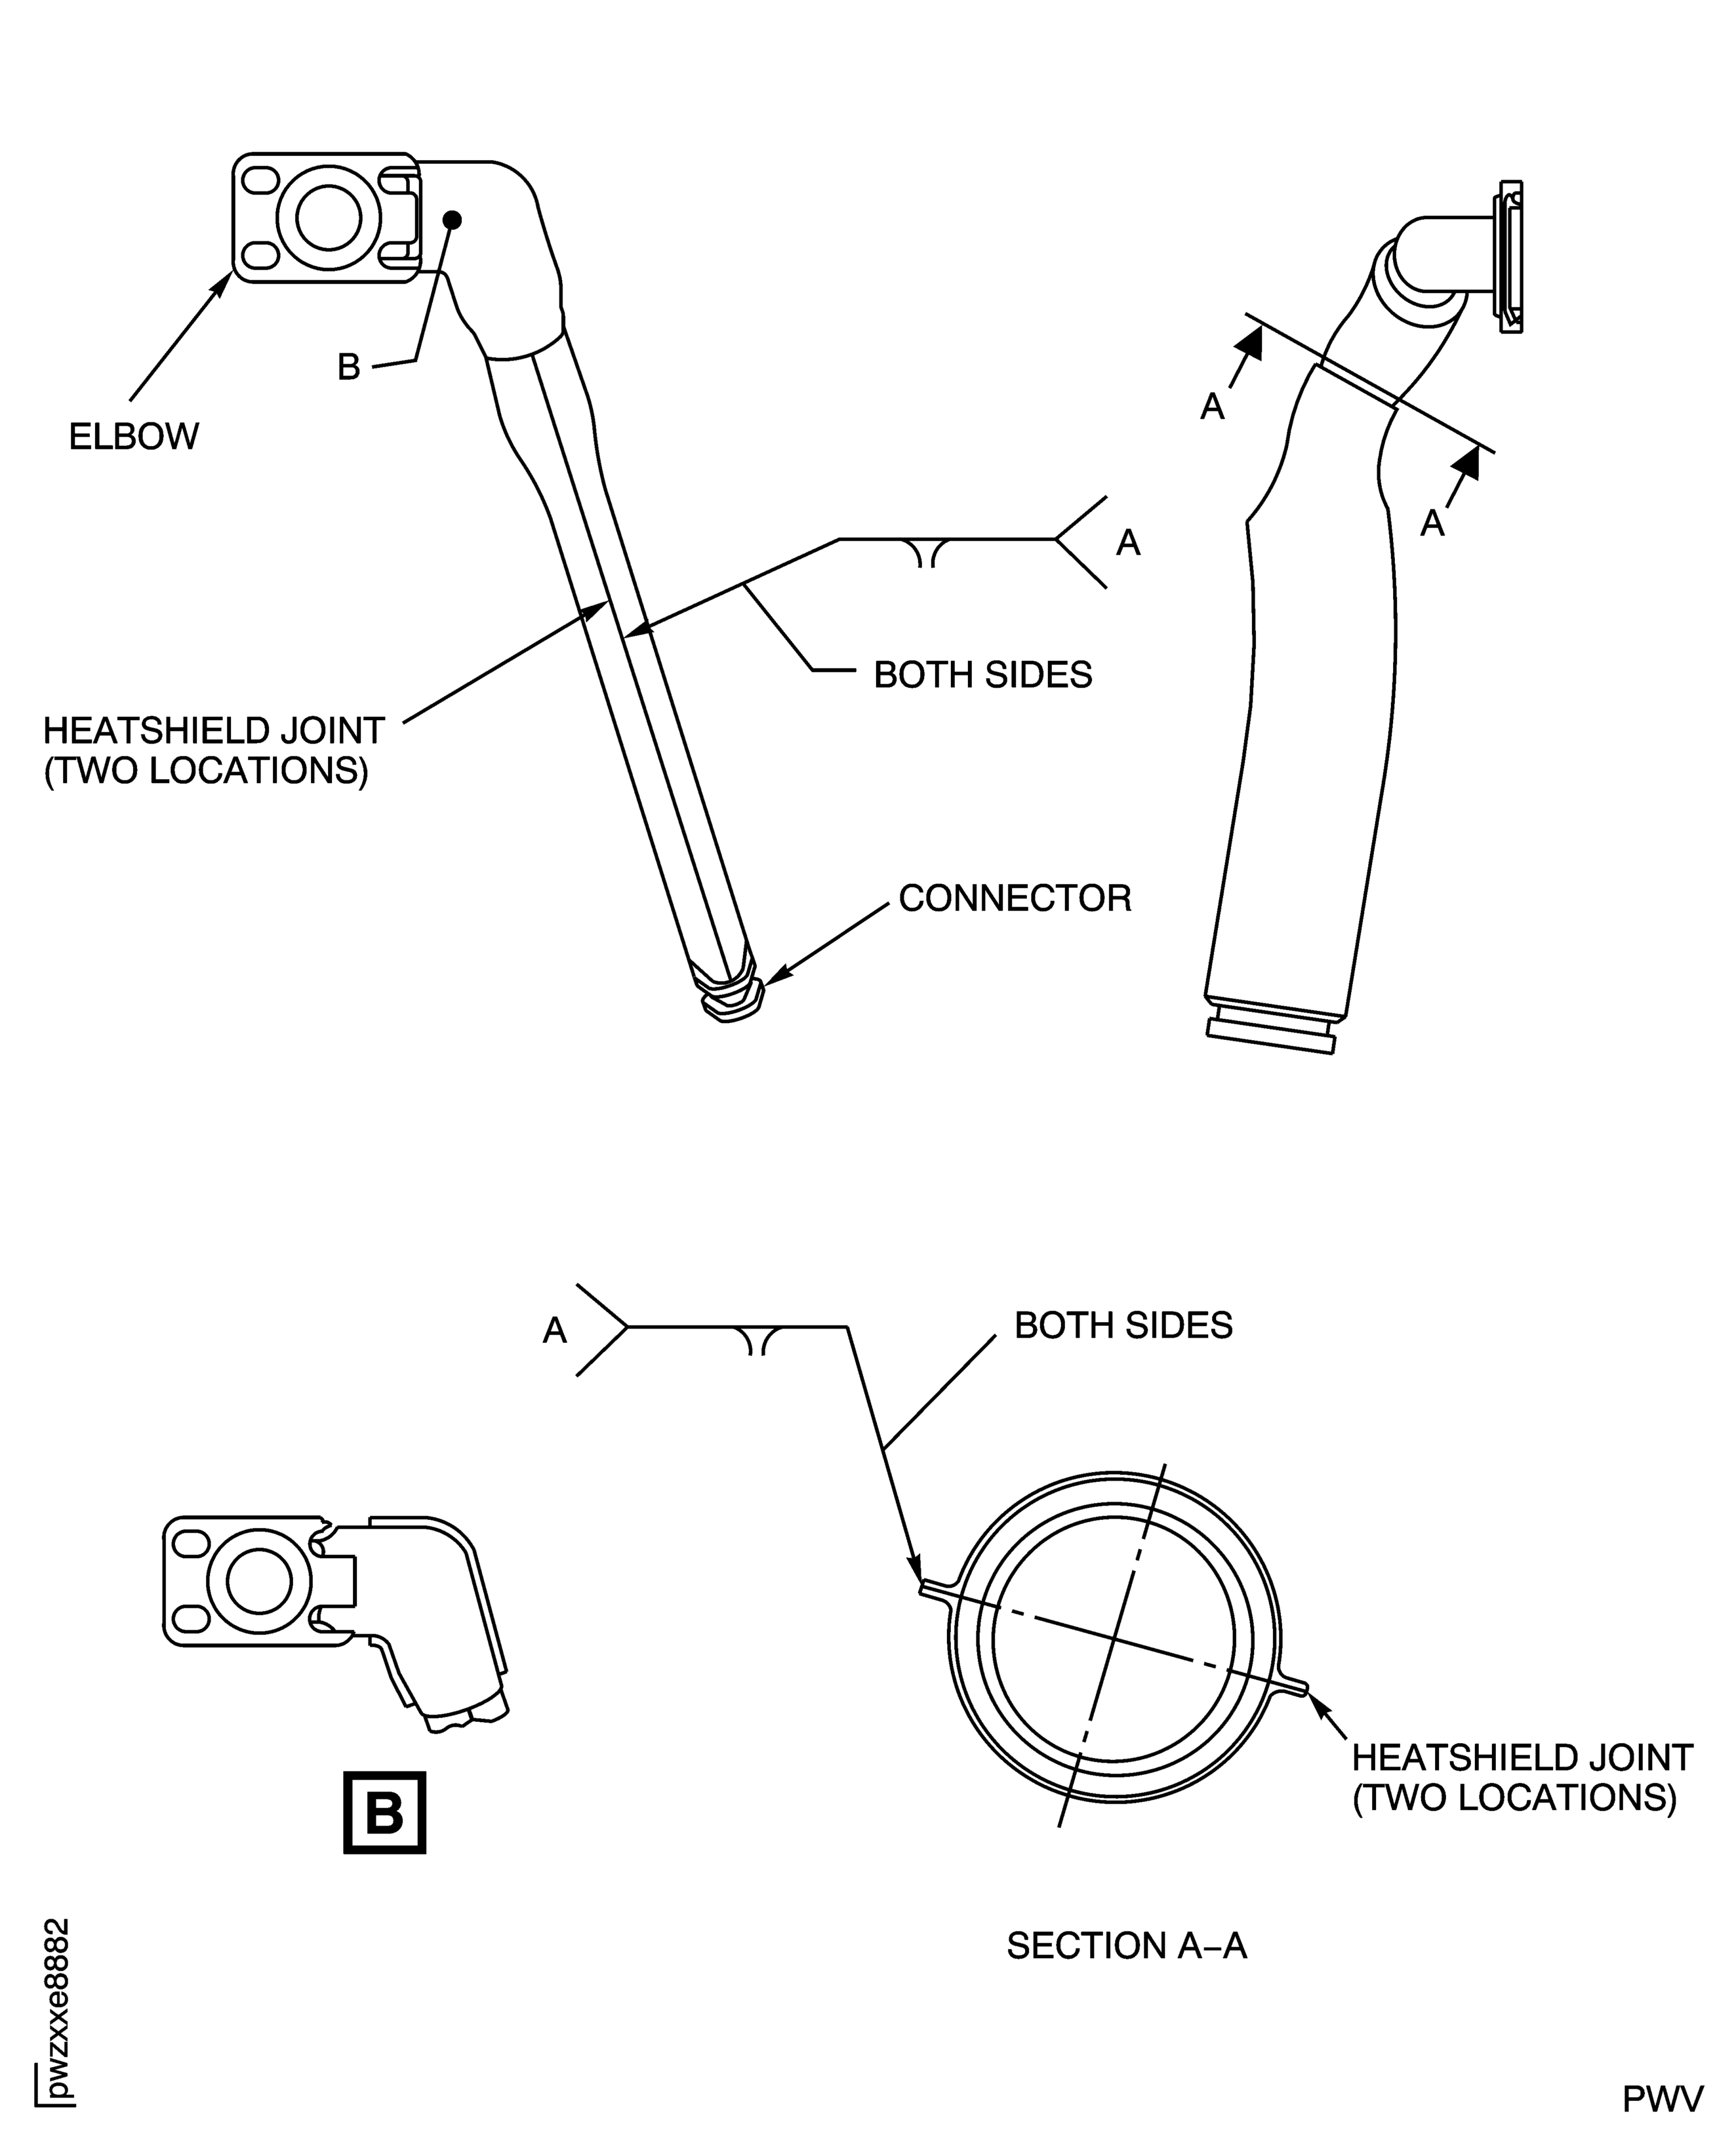
Figure: Repair Details and Dimensions (before Installation)
Repair Details and Dimensions (before Installation)
