Export Control
EAR Export Classification: Not subject to the EAR per 15 C.F.R. Chapter 1, Part 734.3(b)(3), except for the following Service Bulletins which are currently published as EAR Export Classification 9E991: SBE70-0992, SBE72-0483, SBE72-0580, SBE72-0588, SBE72-0640, SBE73-0209, SBE80-0024 and SBE80-0025.Copyright
© IAE International Aero Engines AG (2001, 2014 - 2021) The information contained in this document is the property of © IAE International Aero Engines AG and may not be copied or used for any purpose other than that for which it is supplied without the express written authority of © IAE International Aero Engines AG. (This does not preclude use by engine and aircraft operators for normal instructional, maintenance or overhaul purposes.).Applicability
All
Common Information
TASK 72-42-50-300-002 HPC Rear Static Seal - Replace The Inner Seal Carrier, Repair-002 (VRS6203)
Material of component
RR | ||
|---|---|---|
DESCRIPTION | SYMBOL | MATERIAL |
Support cone | QAW or | Nimonic 80A |
QAL | ||
Inner seal carrier | QAH or | C263 |
QAU | ||
Rivets | QBE | Nimonic 75 |
General
This repair must only be done when the instruction to do so is given in TASK 72-42-50 Inspection.
The practices and processes referred to in the procedure by the TASK/SUBTASK numbers are in the SPM.
Price and availability
Refer to International Aero Engines
Related repairs
None
NOTE
NOTE
Preliminary Requirements
Pre-Conditions
NONESupport Equipment
| Name | Manufacturer | Part Number / Identification | Quantity | Remark |
|---|---|---|---|---|
| Hand grinder | LOCAL | Hand grinder | ||
| Vertical drilling machine | LOCAL | Vertical drilling machine | ||
| Standard workshop equipment | LOCAL | Standard workshop equipment | ||
| Penetrant Crack Test Equipment | LOCAL | Penetrant crack test equipment | ||
| Special container for liquid nitrogen | LOCAL | Special container for liquid nitrogen | ||
| Heat protection gloves | LOCAL | Heat protection gloves | ||
| Hot squeeze riveting electrodes | LOCAL | Hot squeeze riveting electrodes | ||
| Resistance welding machine | LOCAL | Resistance welding machine | ||
| Lathe | LOCAL | Lathe | ||
| Dial indicator | LOCAL | Dial indicator | ||
| Dimensional inspection equipment | LOCAL | Dimensional inspection equipment | ||
| Vibro-engraving equipment | LOCAL | Vibro-engraving equipment | ||
| IAE 3R18736 Turning fixture | 0AM53 | IAE 3R18736 | 1 | |
| IAE 3R18749 Tool holder | 0AM53 | IAE 3R18749 | 1 | |
| IAE 3R18750 Insert use with | 0AM53 | IAE 3R18750 | 1 |
Consumables, Materials and Expendables
| Name | Manufacturer | Part Number / Identification | Quantity | Remark |
|---|---|---|---|---|
| CoMat 03-026 LIQUID NITROGEN | LOCAL | CoMat 03-026 | ||
| CoMat 06-022 FLUORESCENT PENETRANT (POST-EMULSIFIED ULTRA HIGH SENSITIVITY) | LOCAL | CoMat 06-022 |
Spares
| Name | Manufacturer | Part Number / Identification | Quantity | Remark |
|---|---|---|---|---|
| Seal, assembly of inner carrier (Assembly A and Assembly B) | 6A4143 | 1 | ||
| Rivet, solid, universal head (Assembly A and Assembly B) | AS16289 | 36AR | ||
| Rivet, solid, universal head (Assembly A and Assembly B) | AS16330 | 36AR | ||
| Seal, assembly of inner carrier (Assembly C) | 6A5943 | 1 | ||
| Rivet, solid, universal head (Assembly C) | AS16289 | 30AR | ||
| Rivet, solid, universal head (Assembly C) | AS16330 | 30AR |
Safety Requirements
NONEProcedure
Refer to Figure
SUBTASK 72-42-50-323-051-A00 Drill Damaged Rivet Holes, Assembly A and Assembly B
Refer to Figure
SUBTASK 72-42-50-323-051-B00 Drill Damaged Rivet Holes, Assembly C
Refer to SPM TASK 70-23-05-230-501.
Use CoMat 06-022 FLUORESCENT PENETRANT (POST-EMULSIFIED ULTRA HIGH SENSITIVITY) with penetrant crack test equipment.
Cracks are not permitted.
Do a local penetrant crack test of the drilled hole(s).
SUBTASK 72-42-50-230-060 Do a Crack Test
Use, seal, assembly of, inner carrier 1 off, 01-160, with CoMat 03-026 LIQUID NITROGEN put in a suitable container for liquid nitrogen.
Use protective gloves.
Freeze the inner seal carrier.
SUBTASK 72-42-50-350-056-A00 Drill the Rivet Holes in the Inner Seal Carrier, Assembly A
Use seal, assembly of, inner carrier 1 off, 01-160, with CoMat 03-026 LIQUID NITROGEN put in a suitable container for liquid nitrogen.
Use protective gloves.
Freeze the inner seal carrier.
SUBTASK 72-42-50-350-056-B00 Drill the Rivet Holes in the Inner Seal Carrier, Assembly B
Use seal, assembly of, inner carrier 1 off, 01-160, with CoMat 03-026 LIQUID NITROGEN put in a suitable container for liquid nitrogen.
Use protective gloves.
Freeze the inner seal carrier.
SUBTASK 72-42-50-350-056-C00 Drill the Rivet Holes in the Inner Seal Carrier, Assembly C
Repair, VRS9205 TASK 72-42-50-300-008 (REPAIR-008).
Repair inner seal feltmetal.
Use replacement part 6A4447 or 6B1412.
Replace inner seal carrier.
SUBTASK 72-42-50-350-067 Repair or Replace the Inner Seal Carrier
Refer to Figure
Refer to SPM TASK 70-39-02-390-501.
Use hot squeeze riveting electrodes, with resistance welding machine.
NOTE
The machine settings must be established by trial using suitable test pieces. Use a low voltage setting and the minimum amount of heat required to make the rivet force over.
Hot squeeze the rivets.
SUBTASK 72-42-50-390-051-001-A00 Secure the Inner Seal Carrier, Assembly A and Assembly B
Refer to Figure
Refer to SPM TASK 70-39-02-390-501.
Use hot squeeze riveting electrodes, with resistance welding machine.
NOTE
The machine settings must be established by trial using suitable test pieces. Use a low voltage setting and the minimum amount of heat required to make the rivet force over.
Hot squeeze the rivets.
SUBTASK 72-42-50-390-051-001-B00 Secure the Inner Seal Carrier, Assembly C
Refer to Figure
Refer to SPM TASK 70-39-03-390-501.
Use standard workshop equipment.
Cold squeeze the rivets.
SUBTASK 72-42-50-390-051-002-A00 Secure the Inner Seal Carrier, Assembly A and Assembly B
Refer to Figure
Refer to SPM TASK 70-39-03-390-501.
Use standard workshop equipment.
Cold squeeze the rivets.
SUBTASK 72-42-50-390-051-002-B00 Secure the Inner Seal Carrier, Assembly C
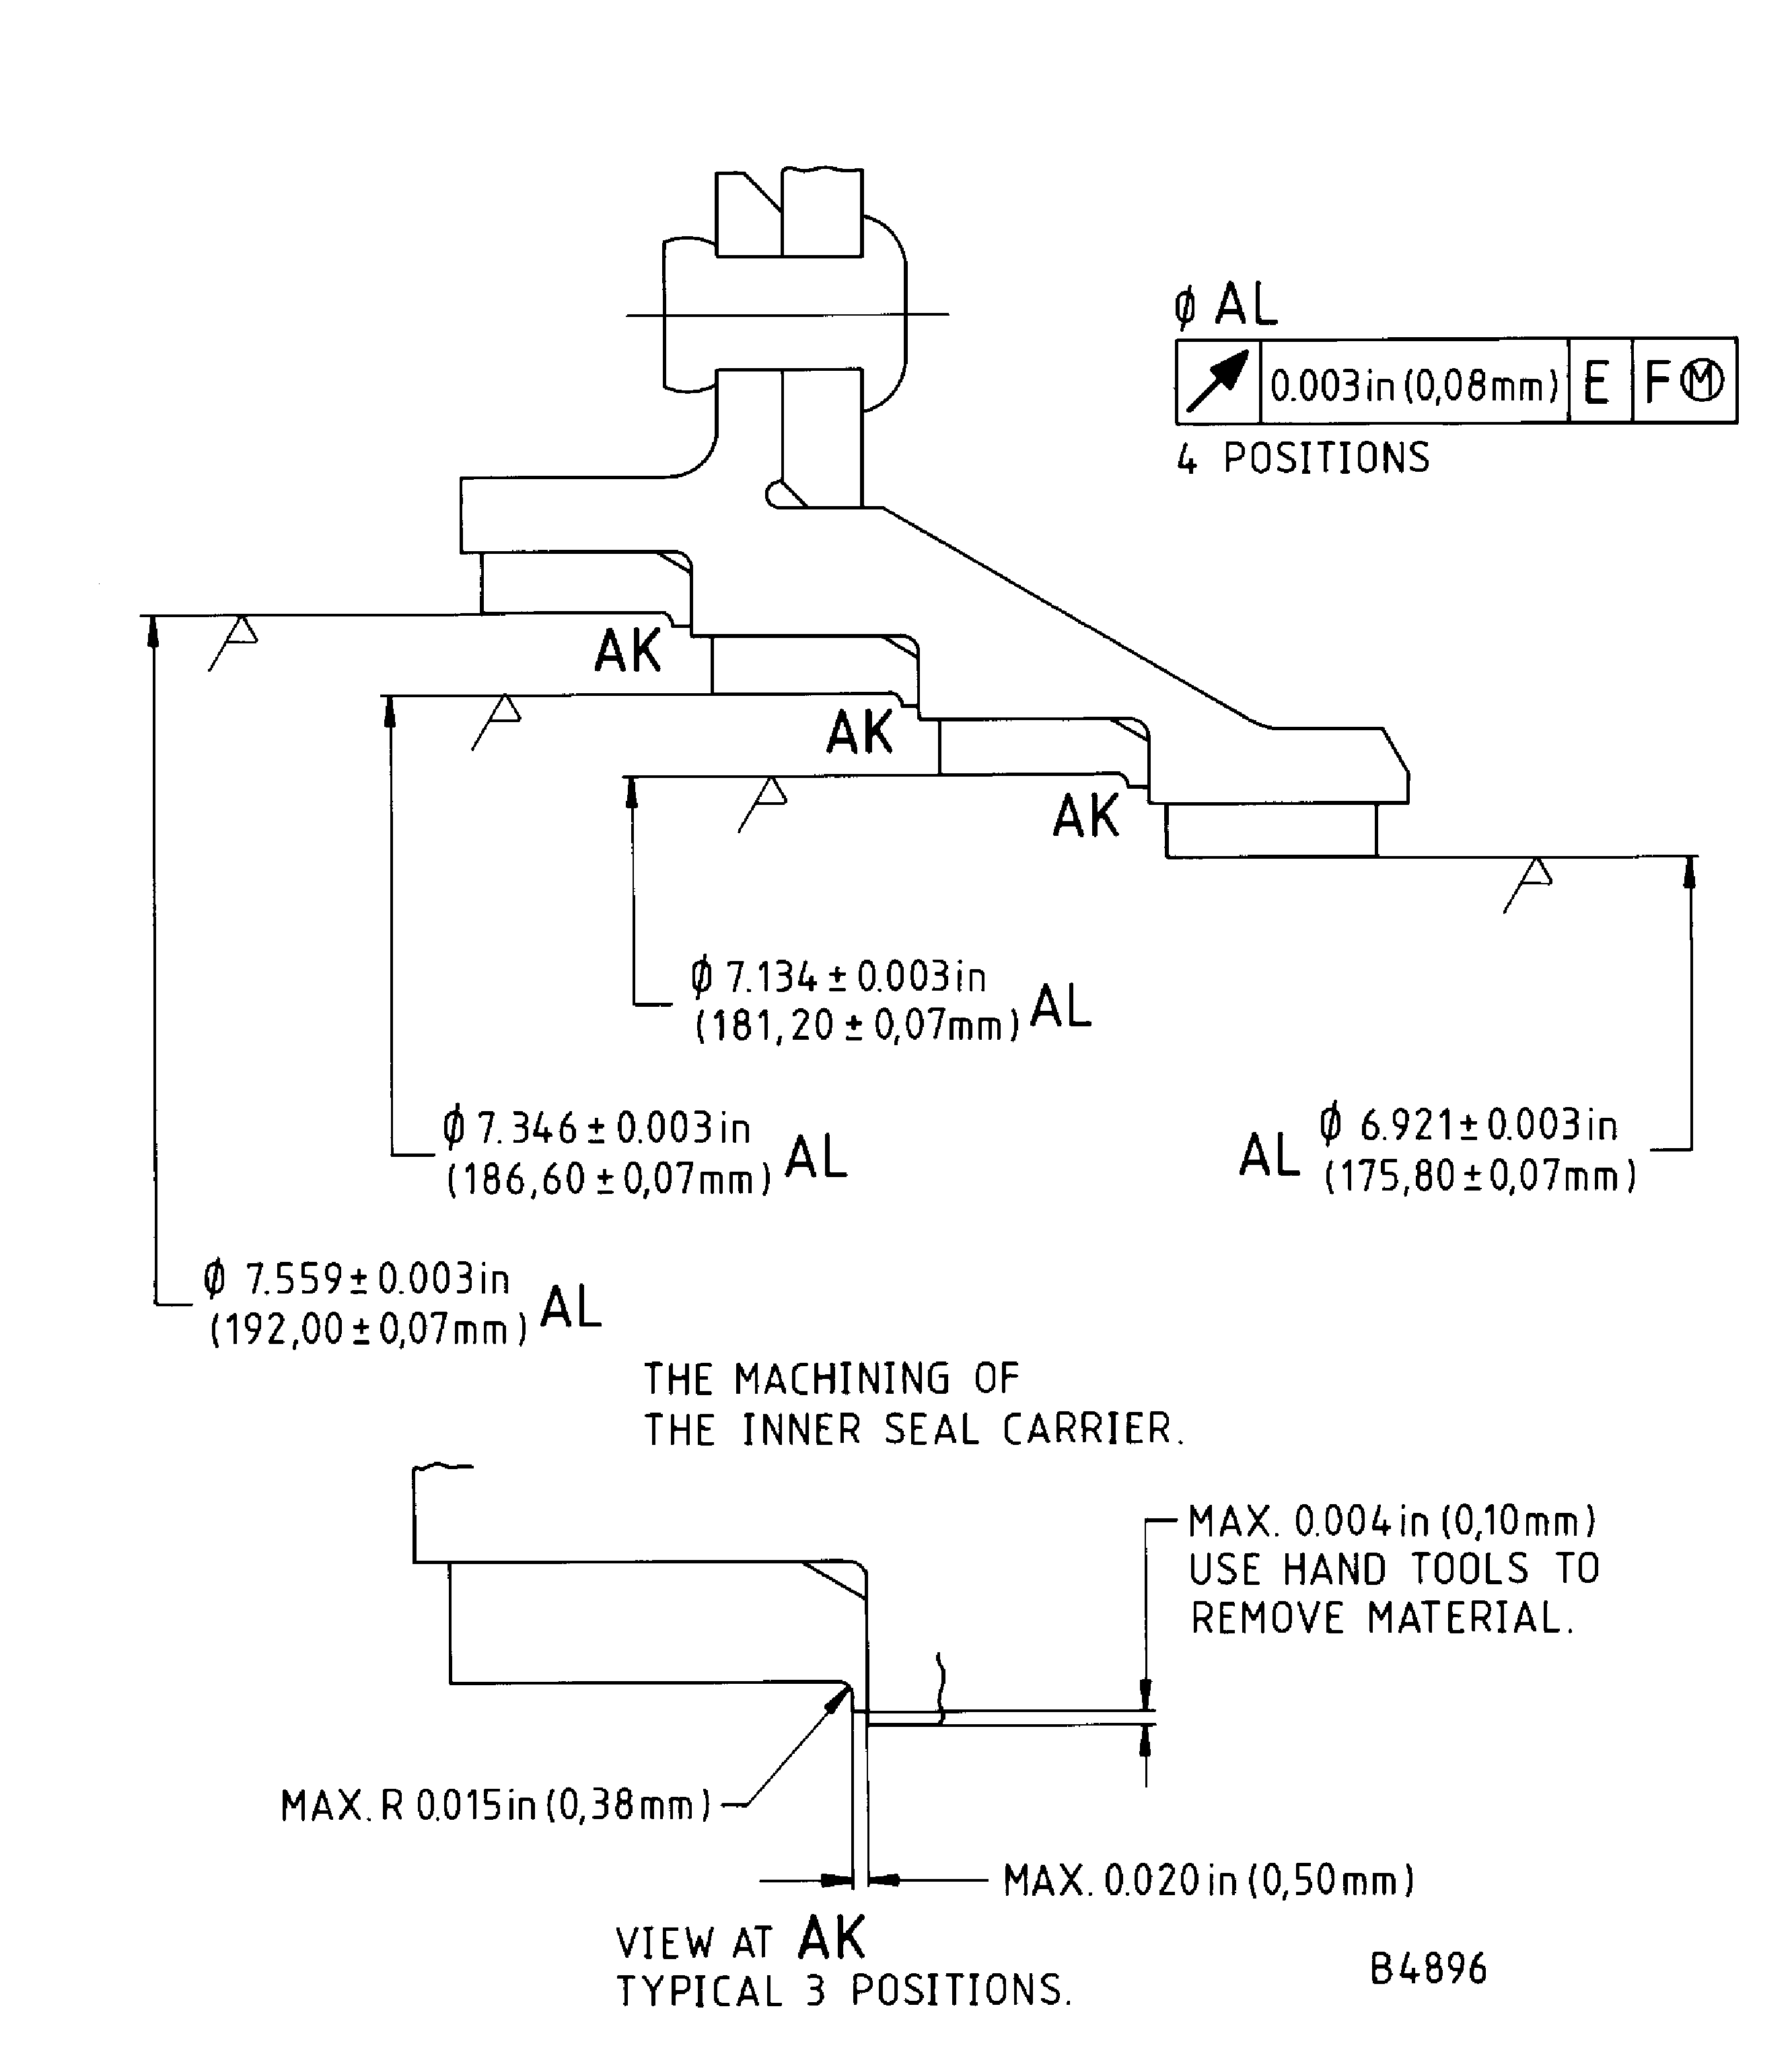
Refer to Figure
Use IAE 3R18736 Turning fixture 1 off, with a lathe and dial test indicator.
Set up the turning fixture on the lathe and set to run true.
Use IAE 3R18749 Tool holder 1 off, with IAE 3R18750 Insert use with 1 off.
Machine data:
Speed
470 surface feet (143 metres) per minute.
Feed
0.005 in. (0.127 mm) per rev.
Depth of cut:
Rough
0.010 in. to 0.030 in. (0.25 mm to 0.75 mm).
Finish
0.001 in. to 0.010 in. (0.025 mm to 0.25mm)
NOTE
Use a higher feed rate and a higher cutting speed for finishing cuts. Machine dry, and keep a sharp cutting tool.
Machine the three seals.
SUBTASK 72-42-50-325-052-A00 Machine the Seals in the Inner Carrier Ring, Assembly A and Assembly B
Refer to Figure
Use IAE 3R18736 Turning fixture 1 off, with a lathe and dial test indicator.
Set up the turning fixture on the lathe and set to run true.
Use IAE 3R18749 Tool holder 1 off, with IAE 3R18750 Insert use with 1 off.
Machine data:
Speed
470 surface feet (143 metres) per minute.
Feed
0.005 in. (0.127 mm) per rev.
Depth of cut:
Rough
0.010 in. to 0.030 in. (0.25 mm to 0.75 mm).
Finish
0.001 in. to 0.010 in. (0.025 mm to 0.25 mm)
NOTE
Use a higher feed rate and a higher cutting speed for finishing cuts. Machine dry, and keep a sharp cutting tool.
Machine the four seals.
SUBTASK 72-42-50-325-002-B00 Machine the Seals in the Inner Carrier Ring, Assembly C
Refer to Figure
SUBTASK 72-42-50-220-067-A00 Examine the Assembly, Assembly A and Assembly B
Refer to Figure
SUBTASK 72-42-50-220-067-B00 Examine the Assembly, Assembly C
Refer to TASK 70-09-00-400-501, SUBTASK 70-09-00-400-001.
Use vibro-engraving equipment.
Make a mark VRS6203 adjacent to the part number on the support cone.
SUBTASK 72-42-50-350-057 Identify the Repair
Figure: Repair Details and Dimensions - Assembly A
Repair Details and Dimensions - Assembly A
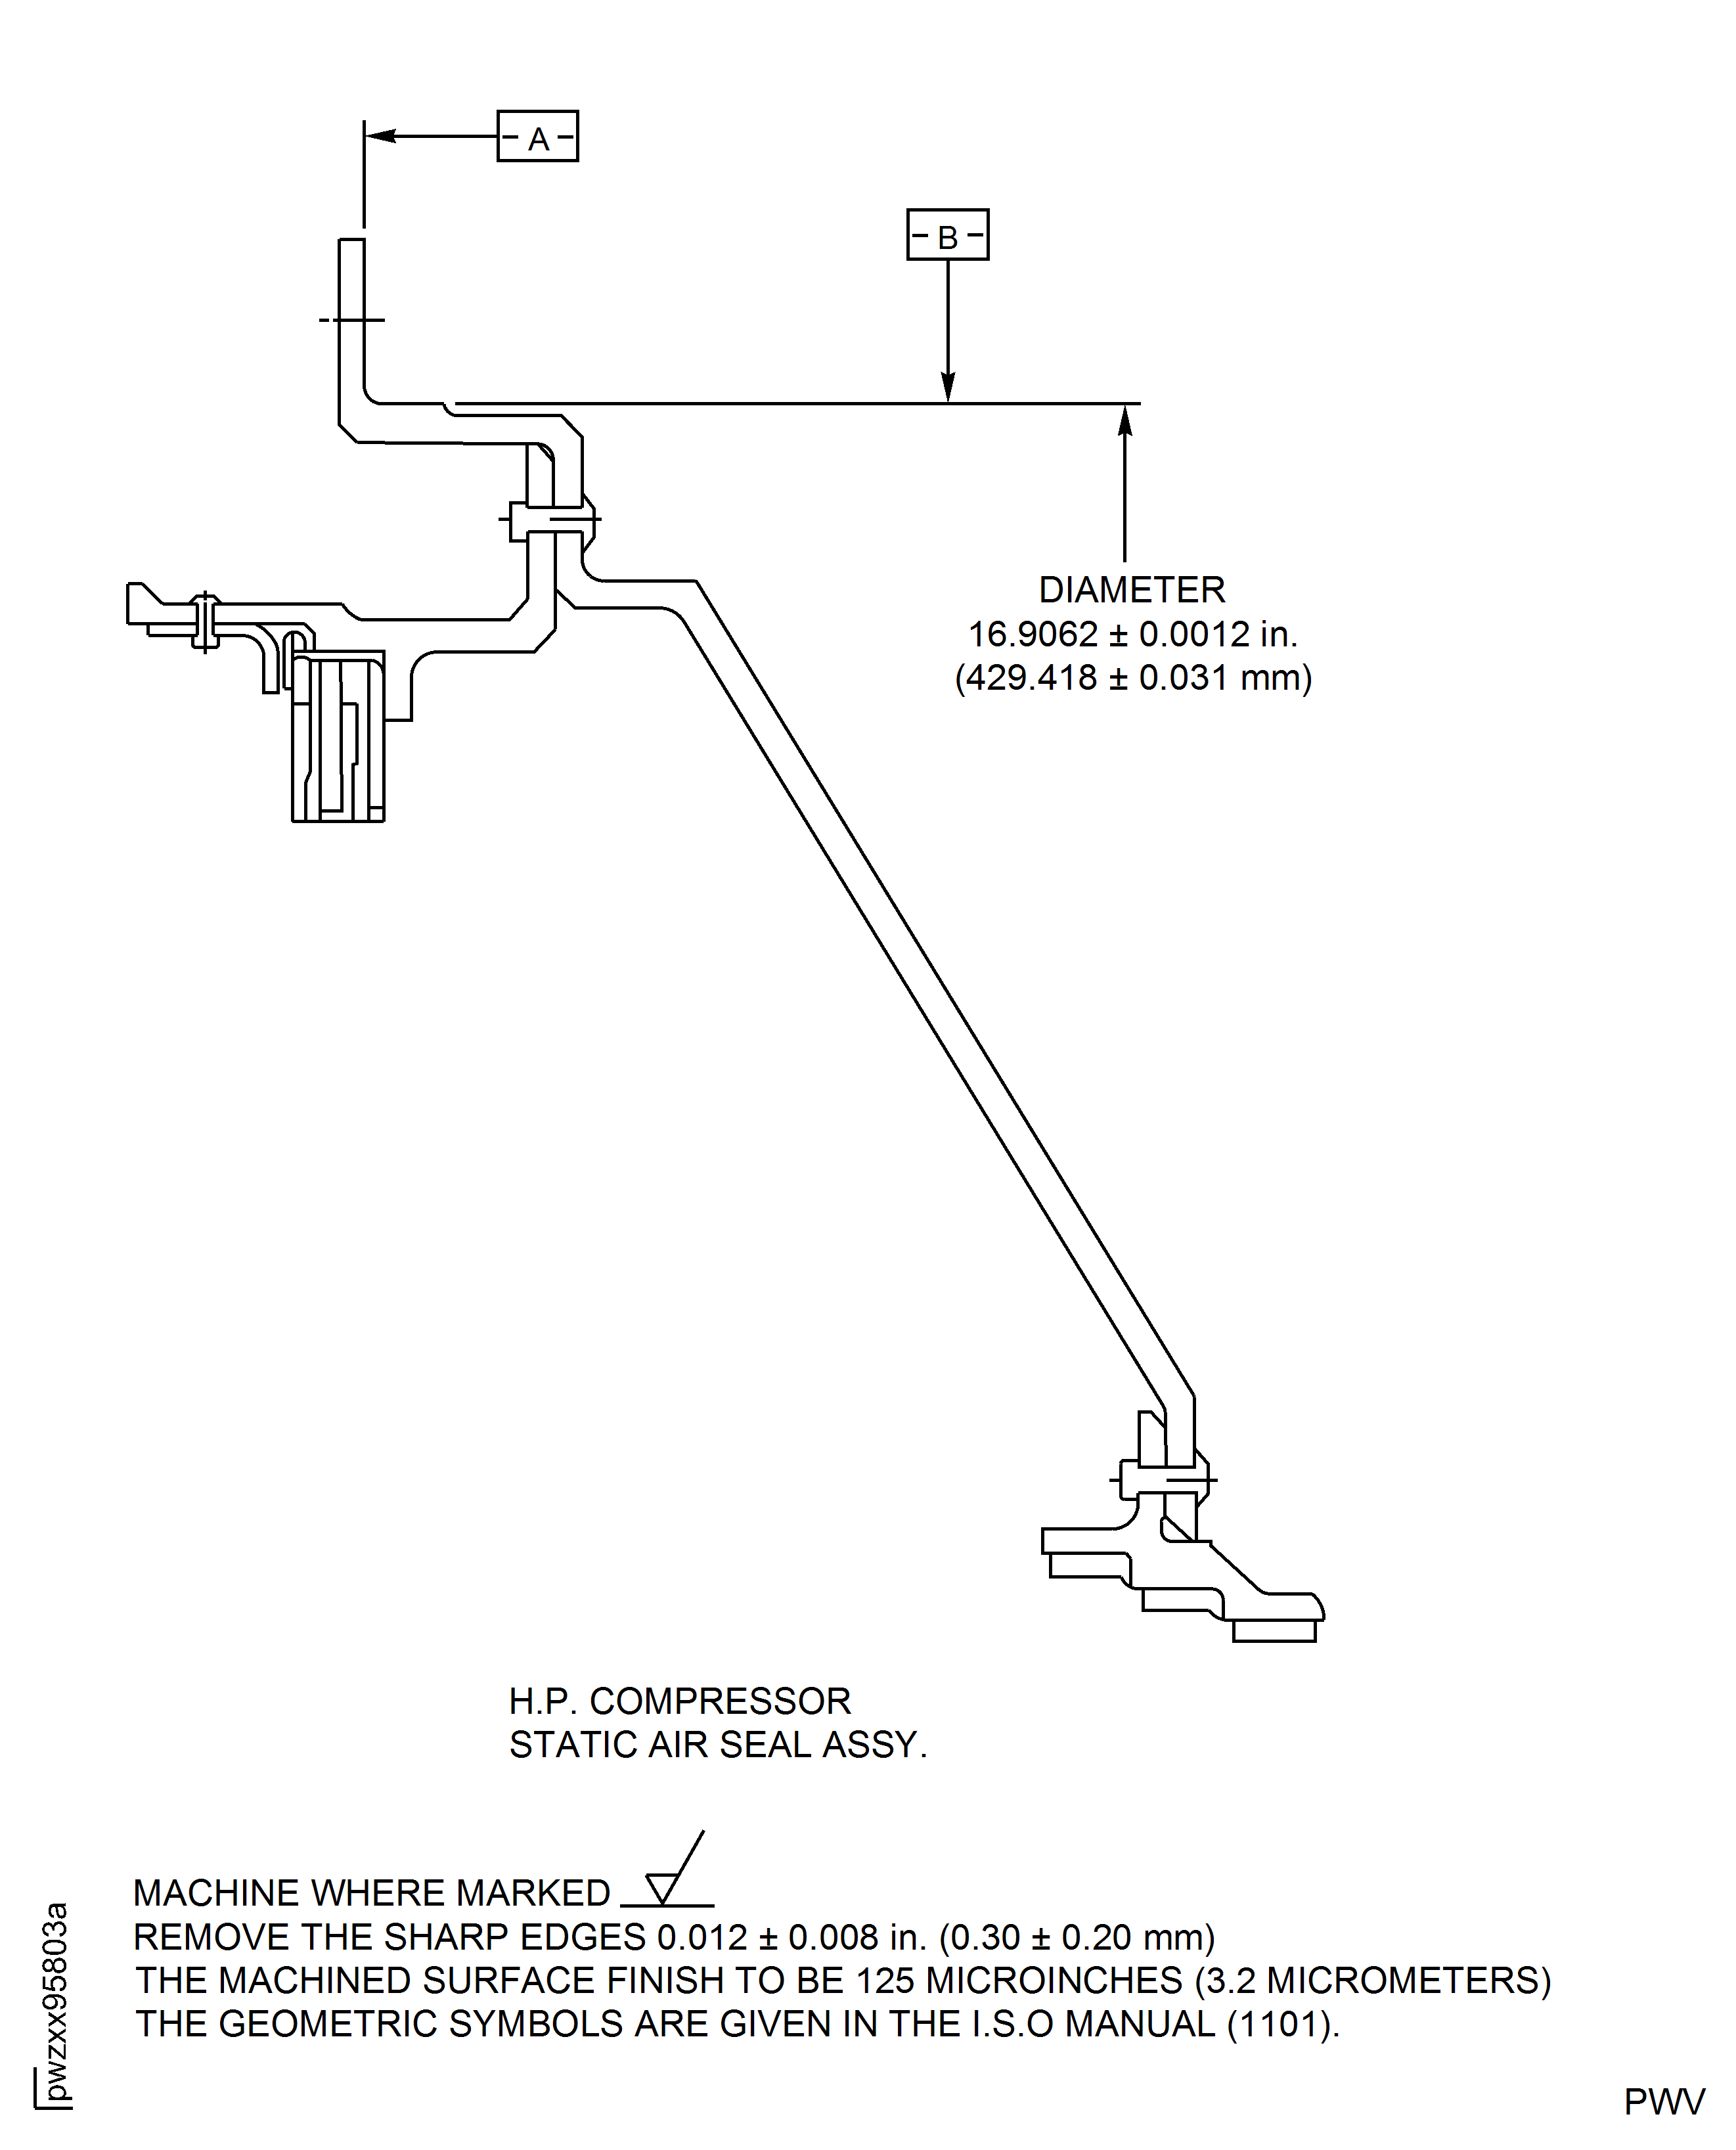
Figure: Repair Details and Dimensions - Assembly B
Repair Details and Dimensions - Assembly B
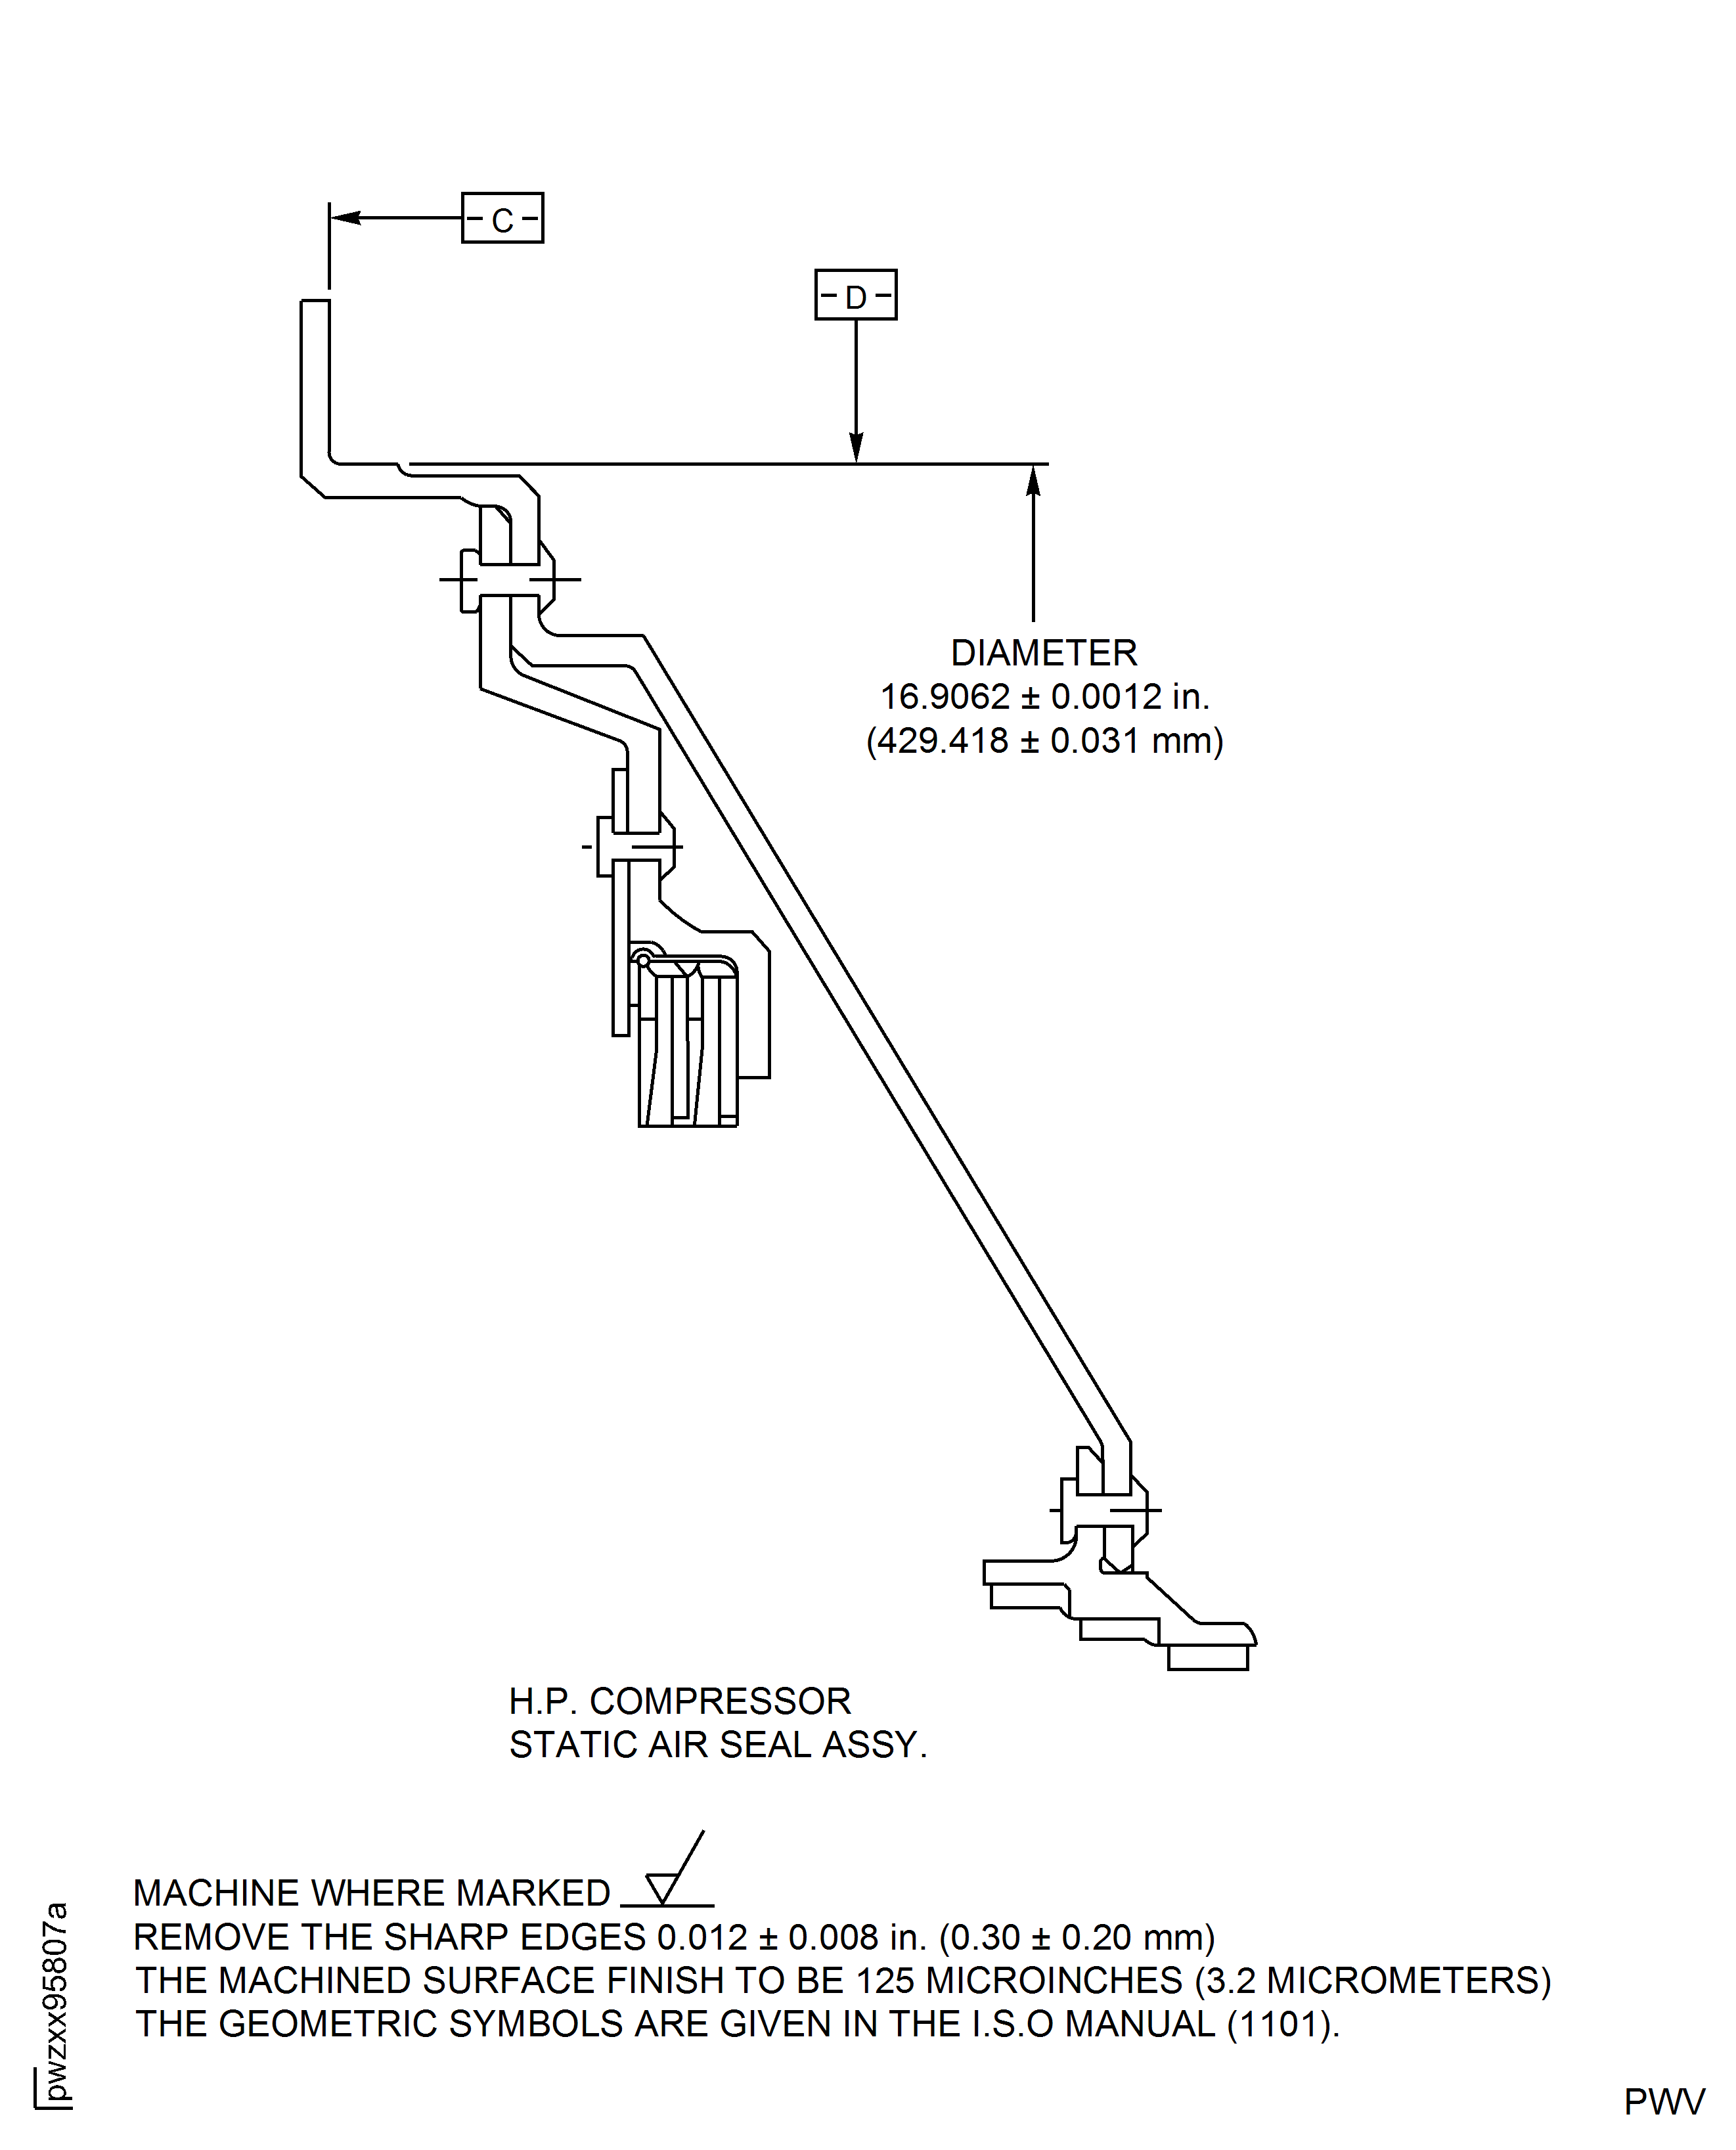
Figure: Repair Details and Dimensions - Assembly A and Assembly B
Repair Details and Dimensions - Assembly A and Assembly B
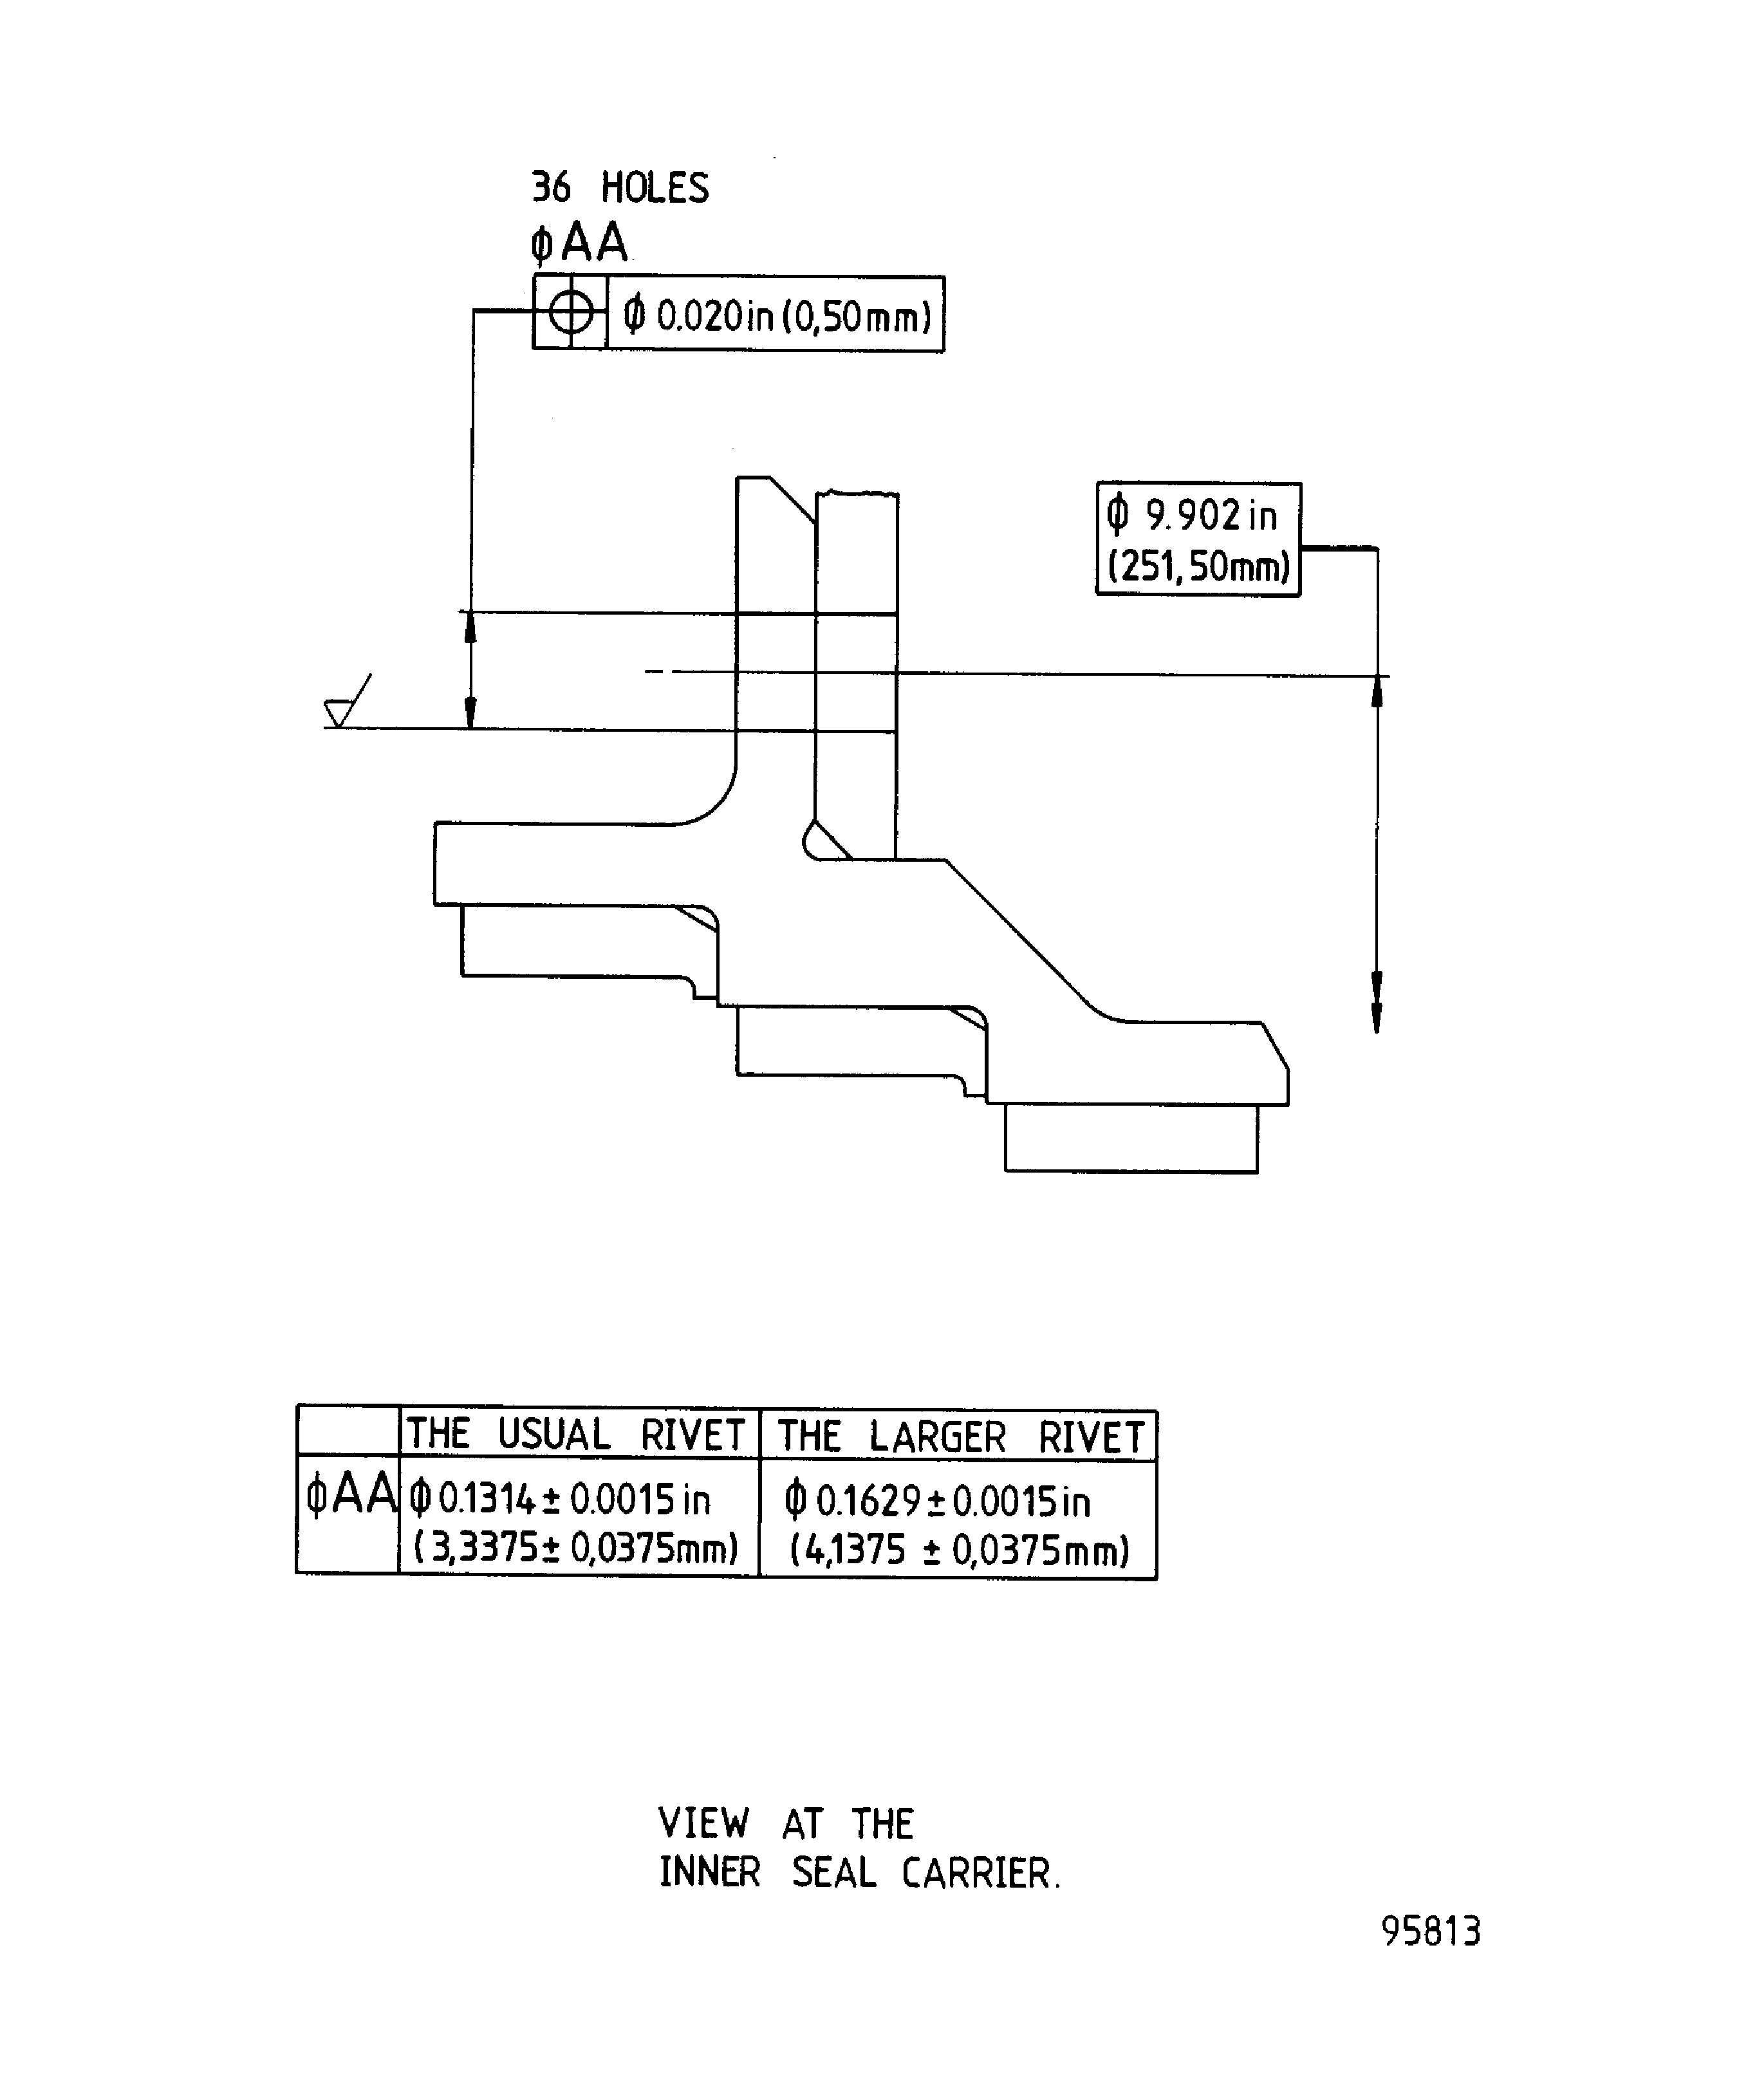
Figure: Repair Details and Dimensions - Assembly A and Assembly B
Repair Details and Dimensions - Assembly A and Assembly B
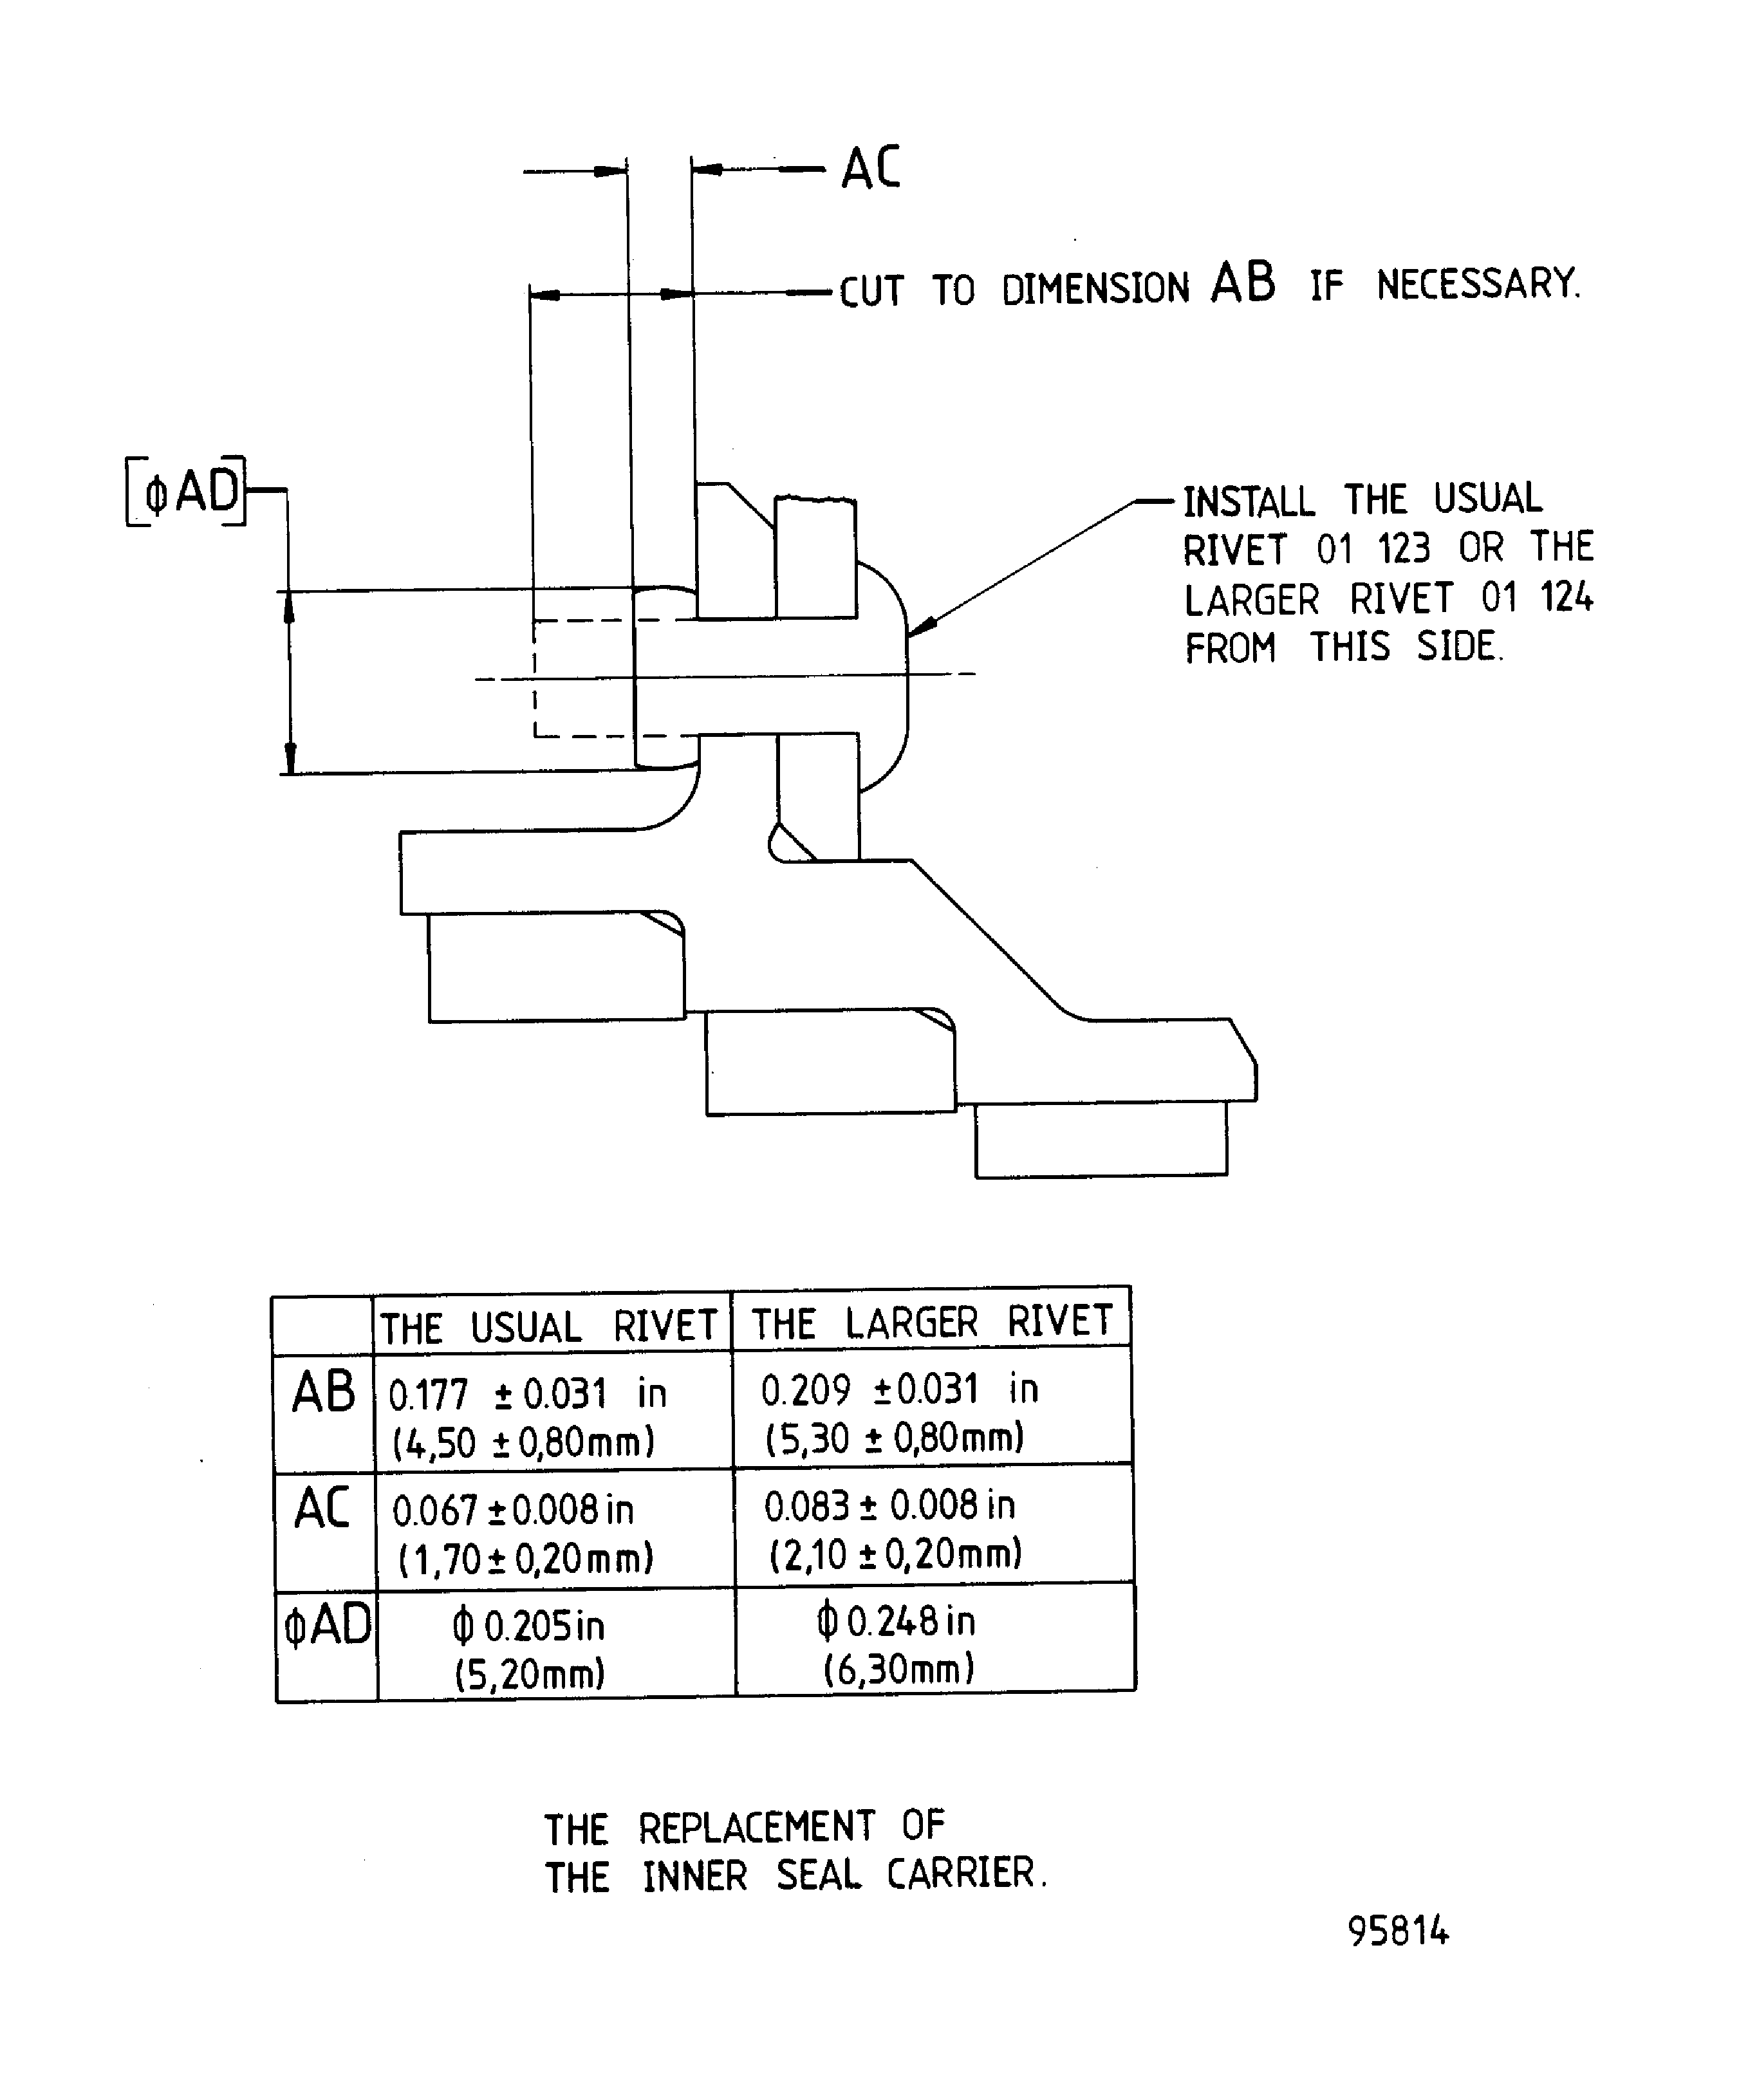
Figure: Repair Details and Dimensions - Assembly A and Assembly B
Repair Details and Dimensions - Assembly A and Assembly B
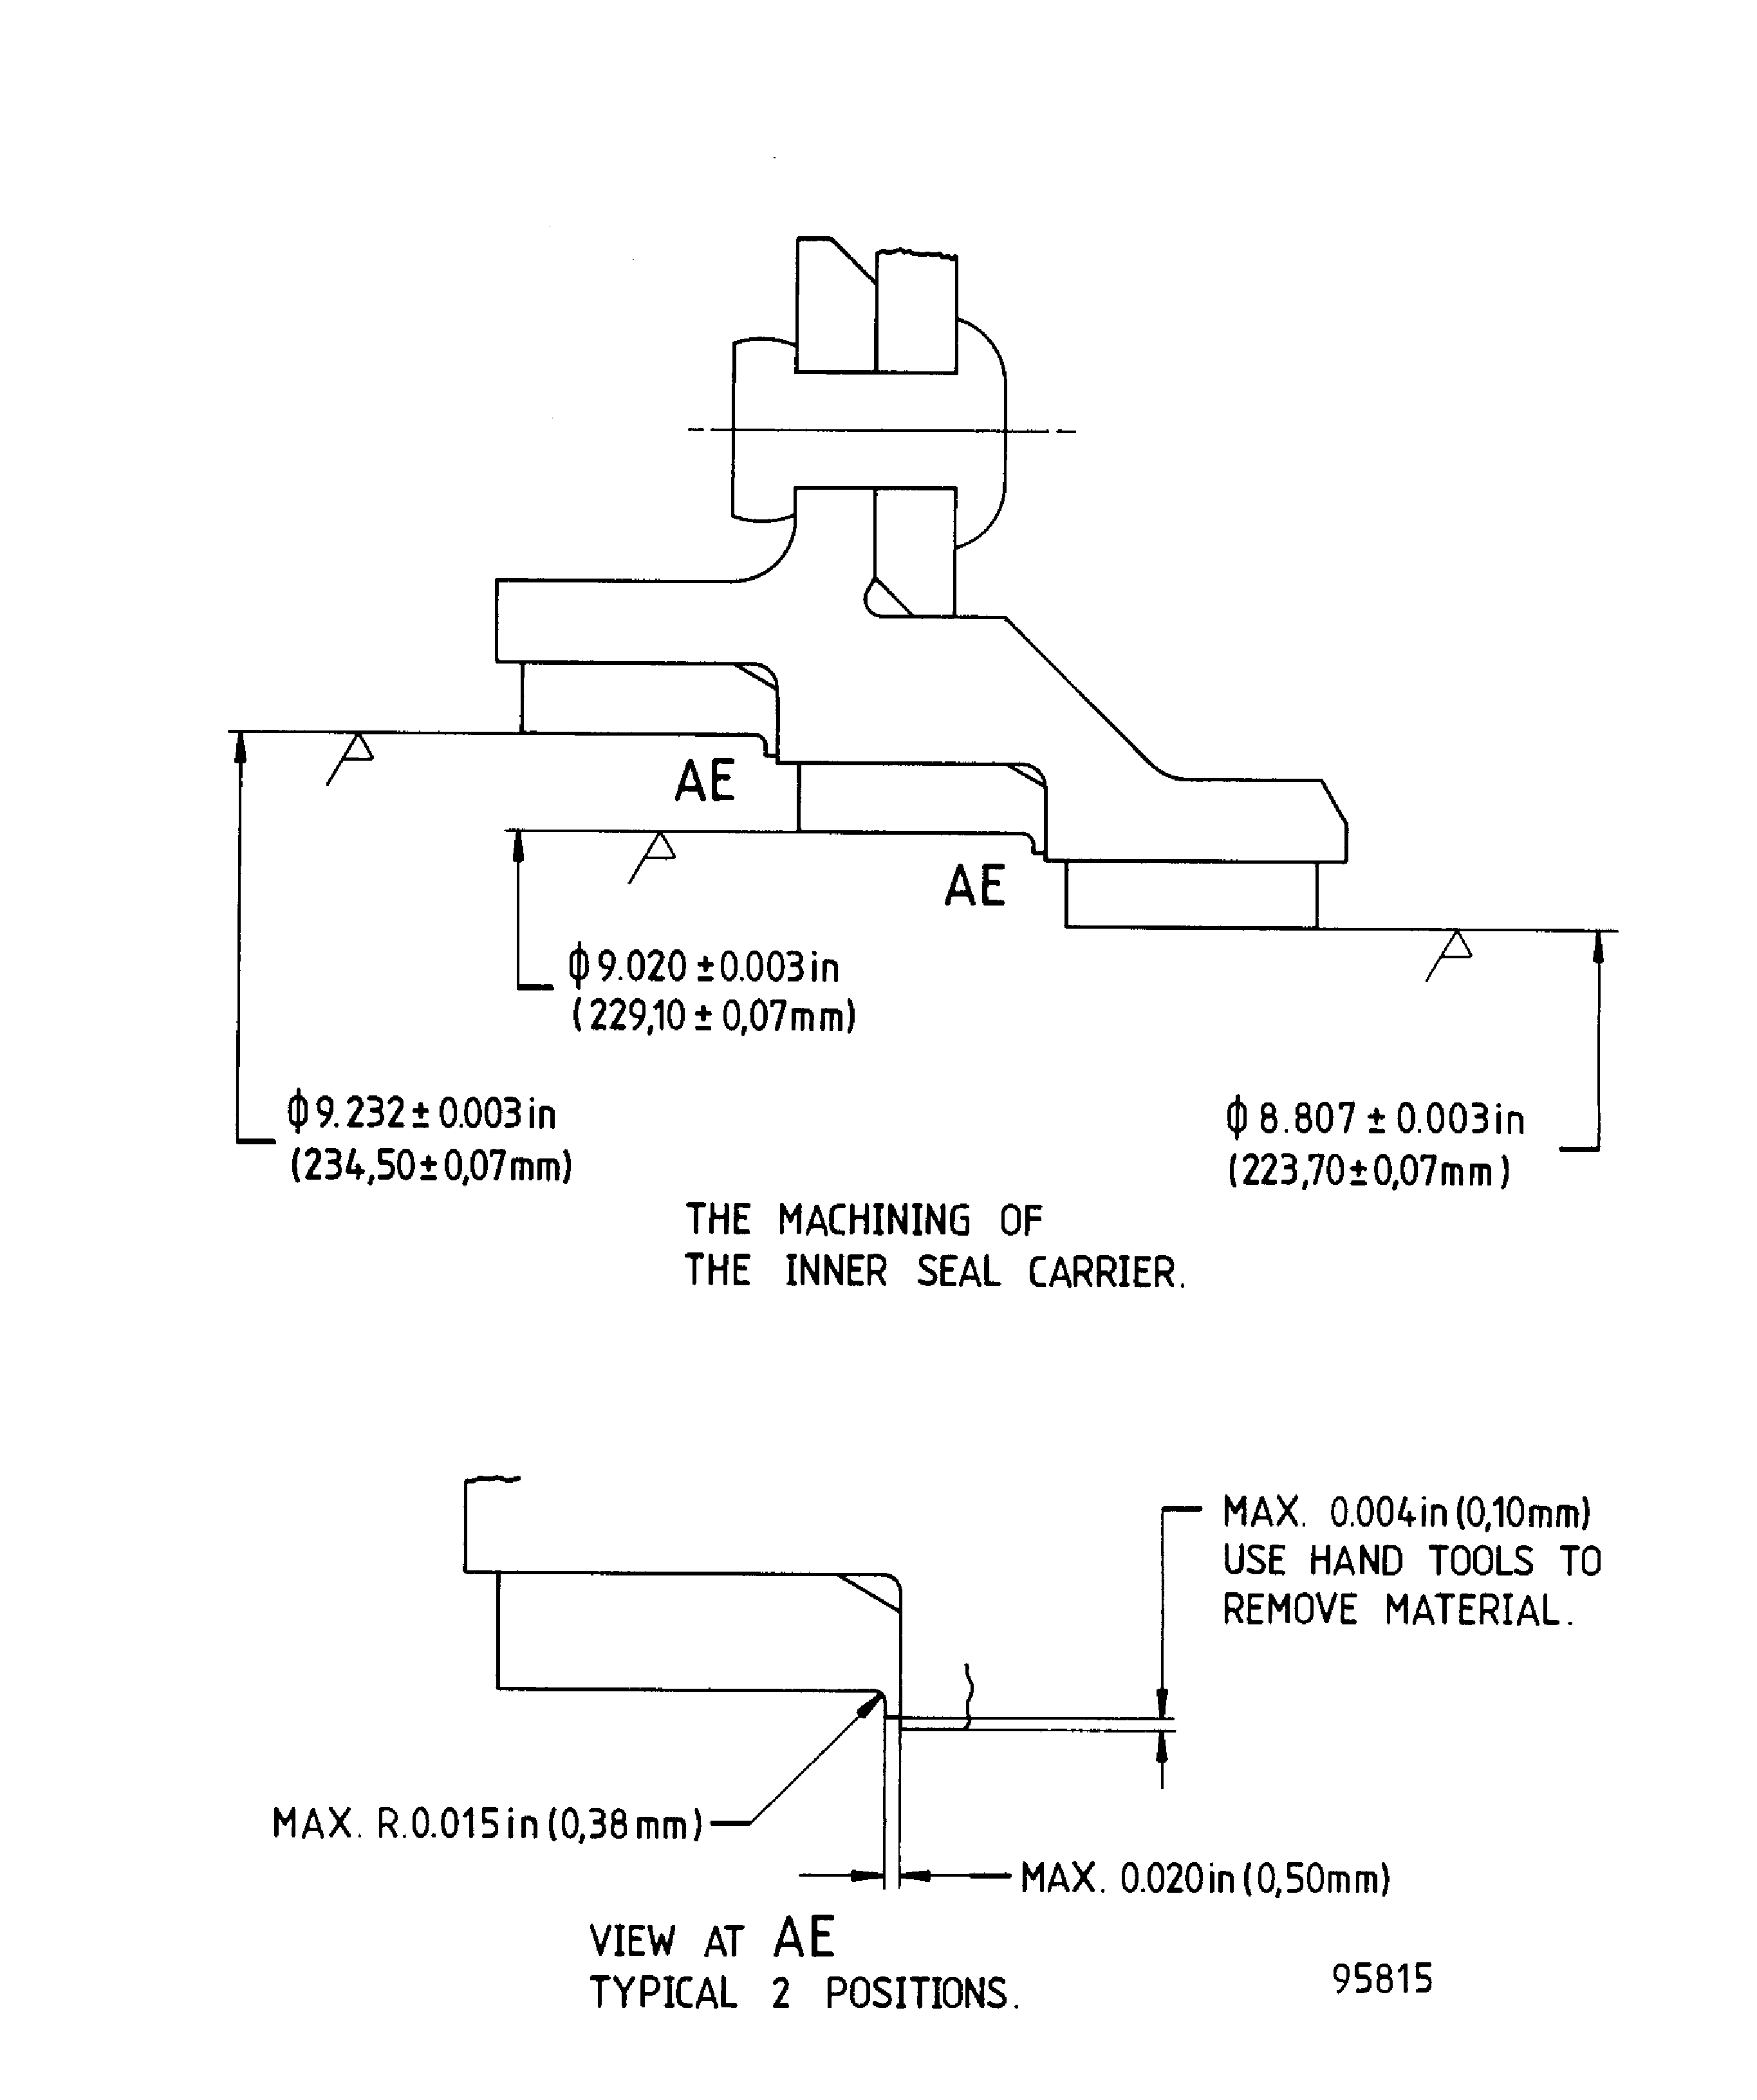
Figure: Repair Details and Dimensions - Assembly C
Repair Details and Dimensions - Assembly C
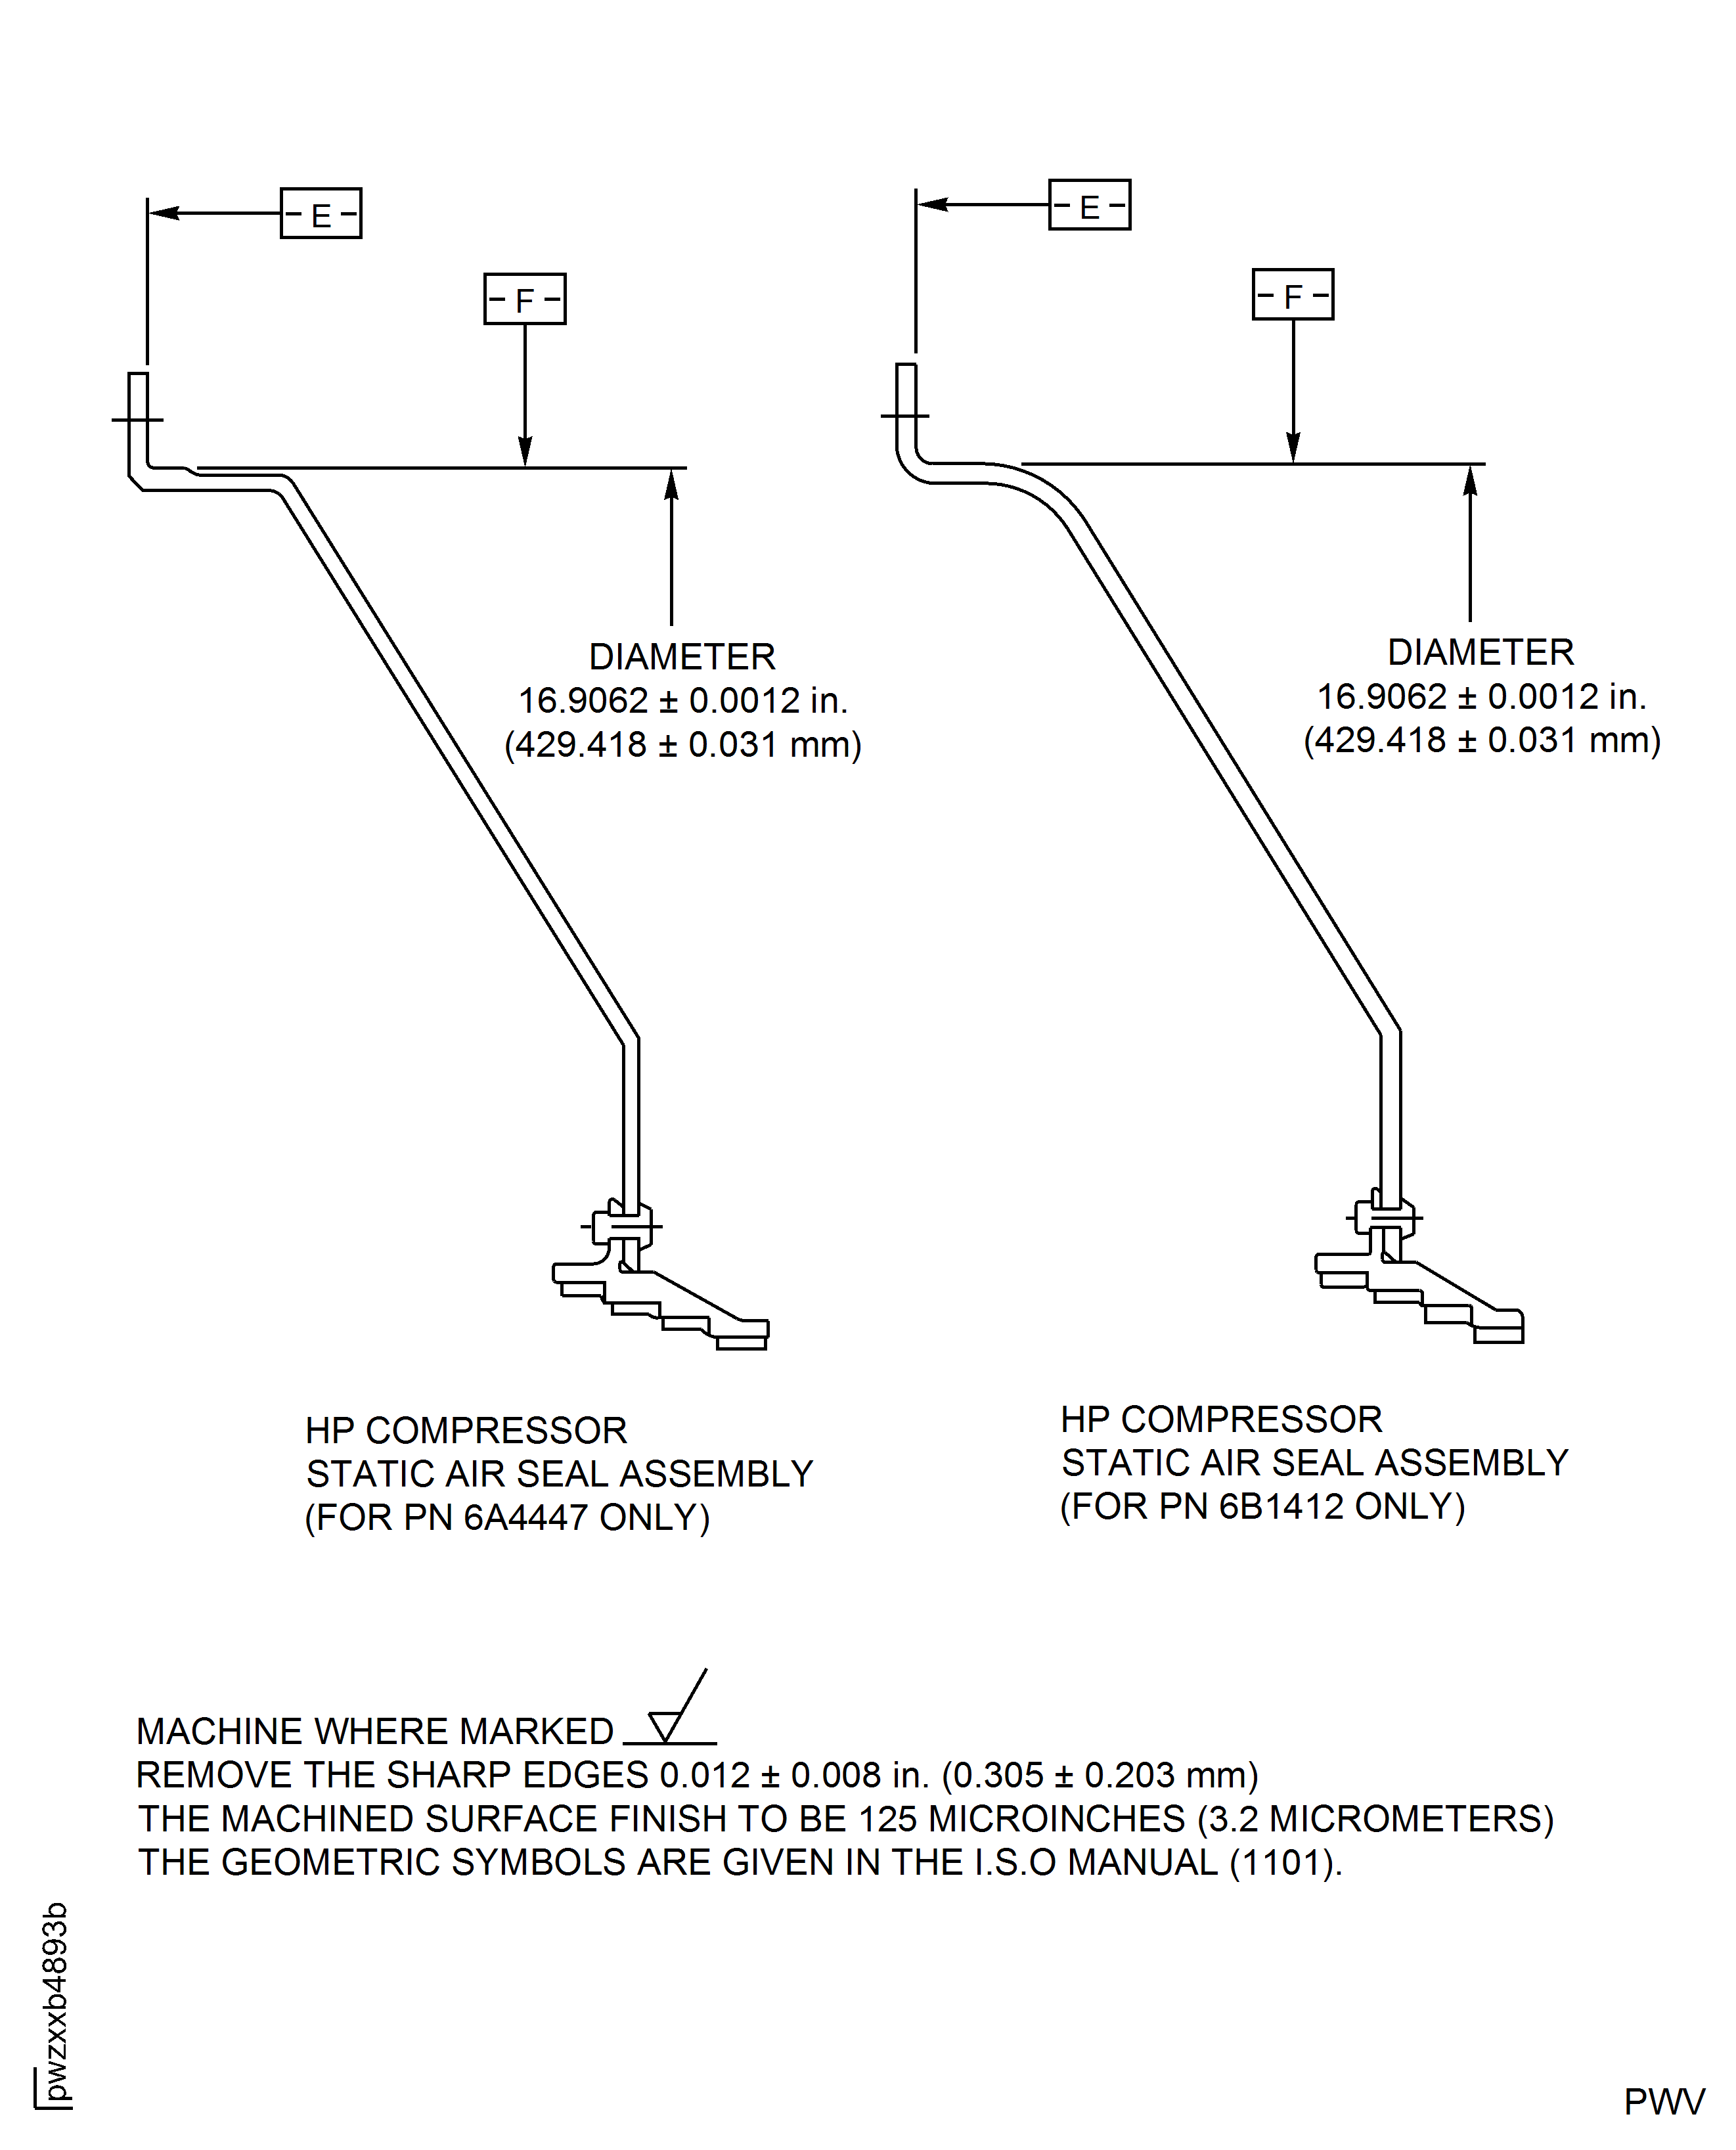
Figure: Repair Details and Dimensions - Assembly C
Repair Details and Dimensions - Assembly C
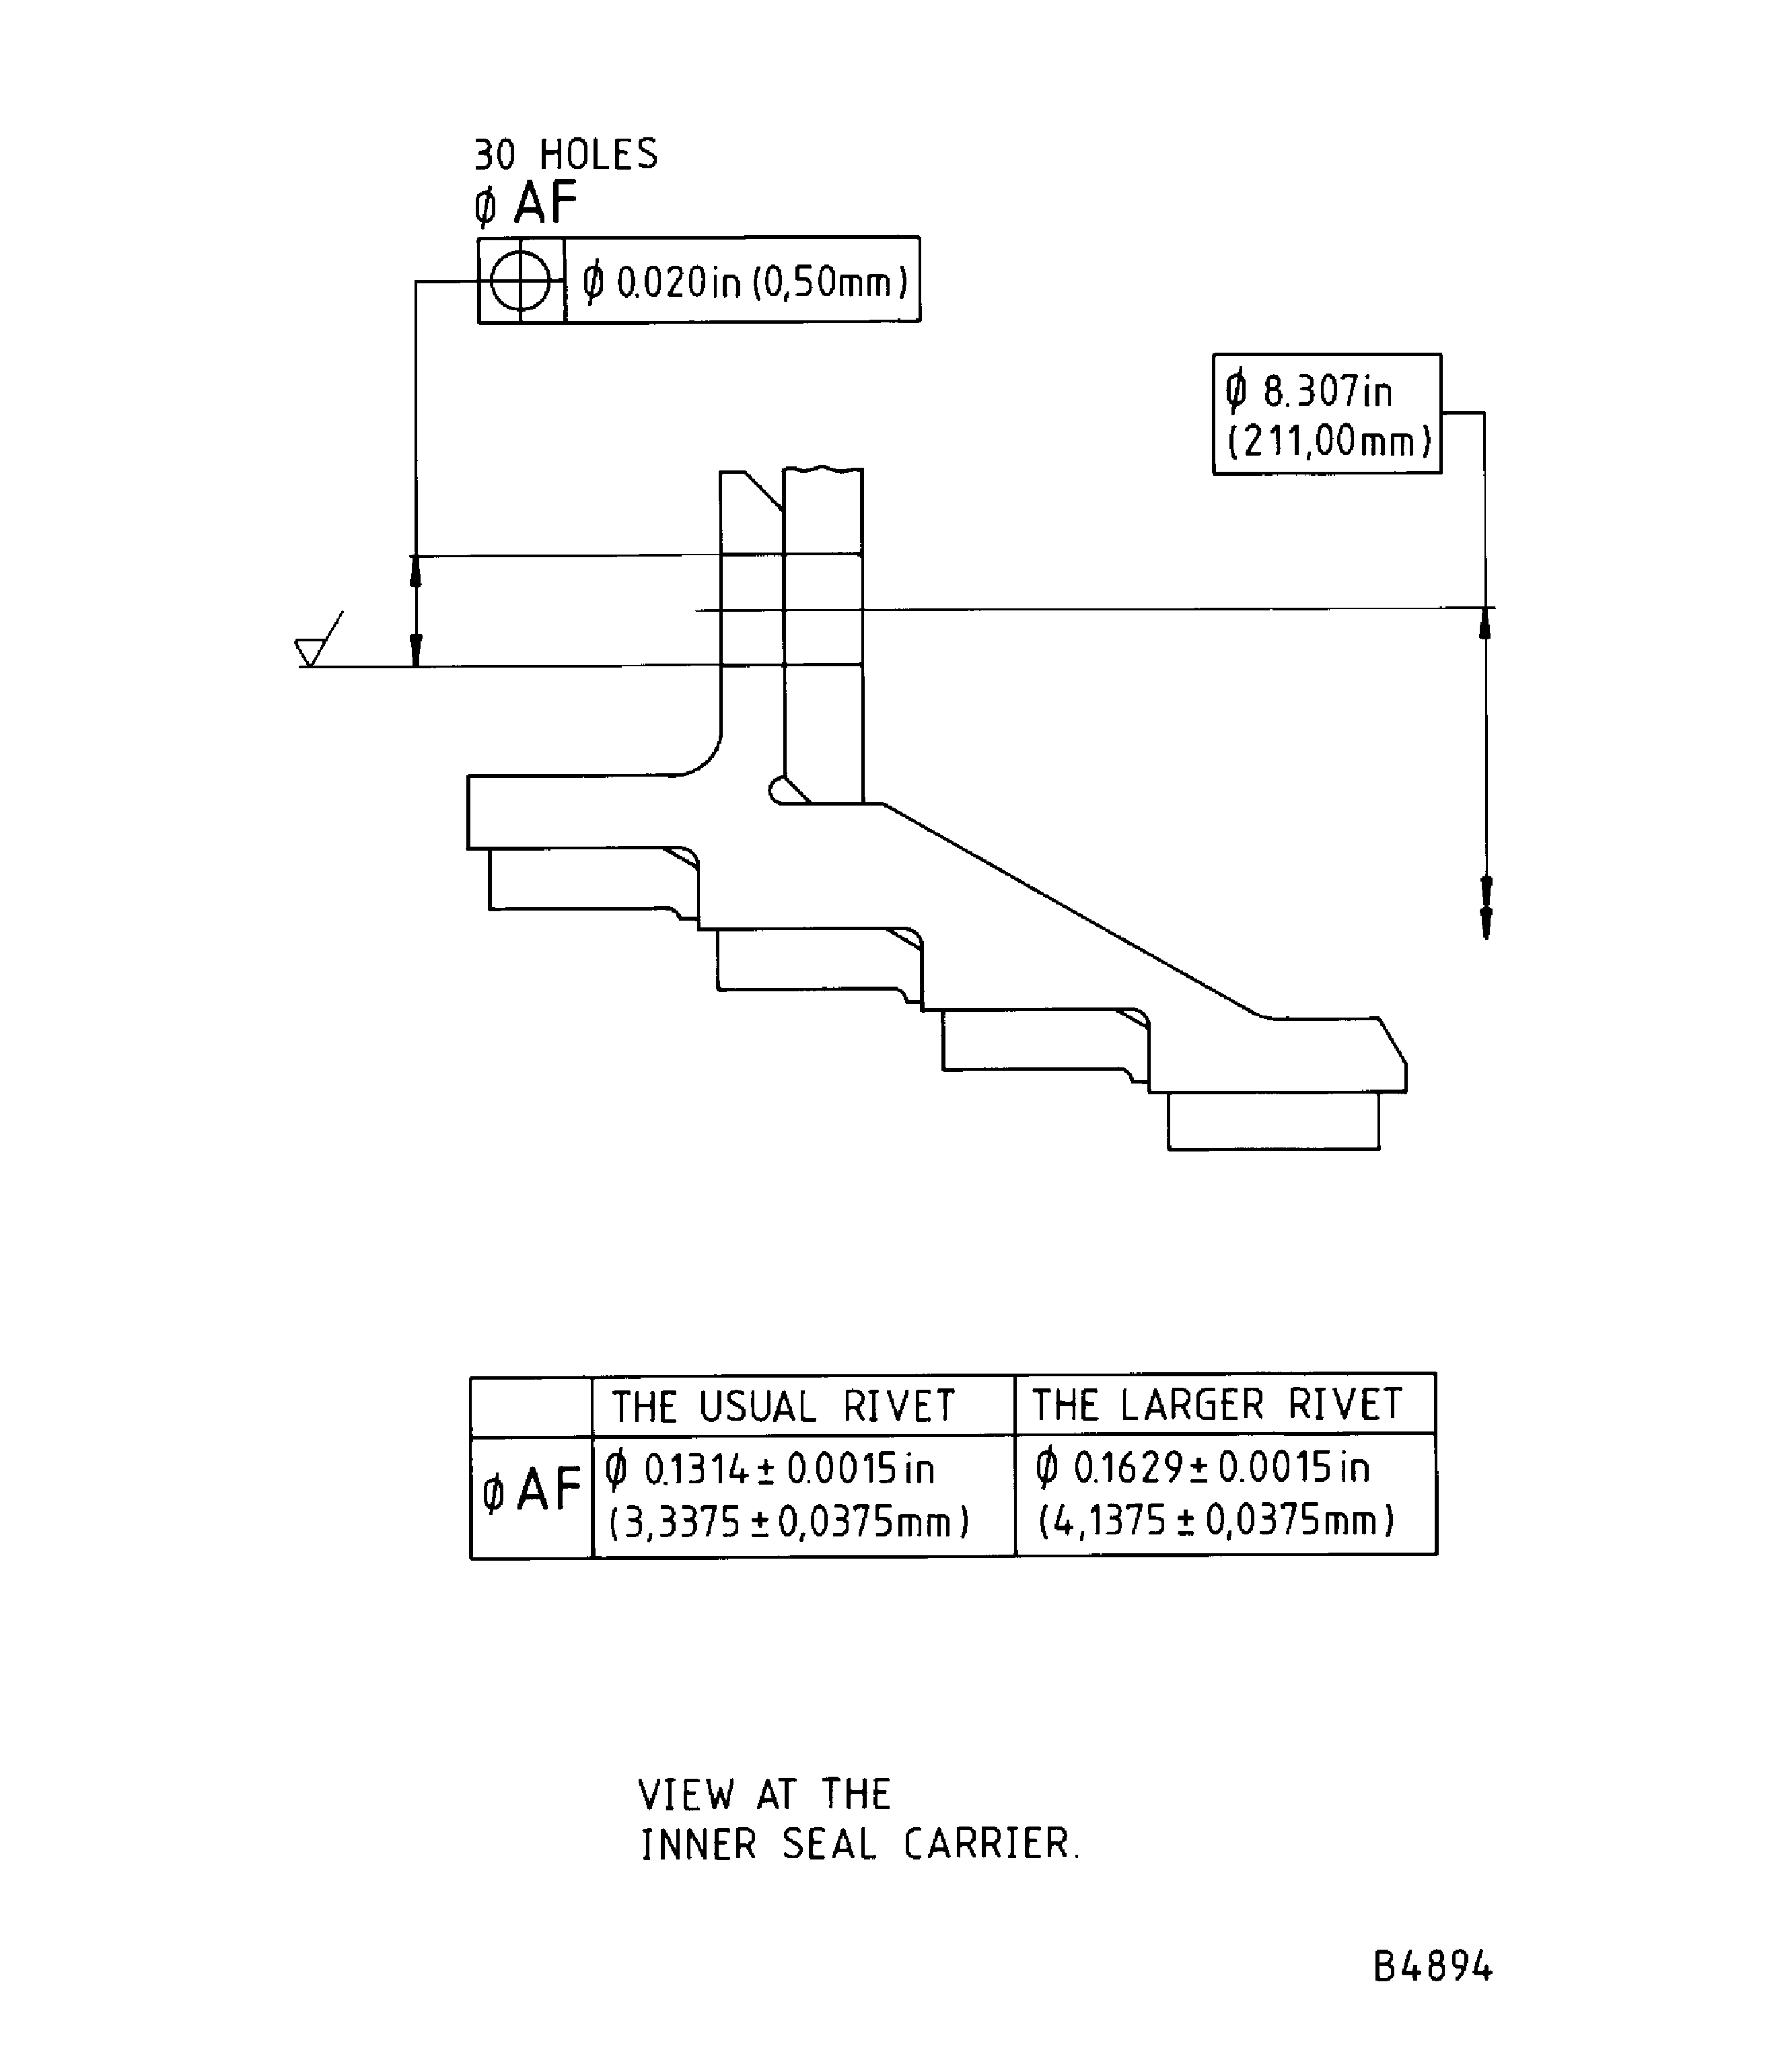
Figure: Repair Details and Dimensions - Assembly C
Repair Details and Dimensions - Assembly C
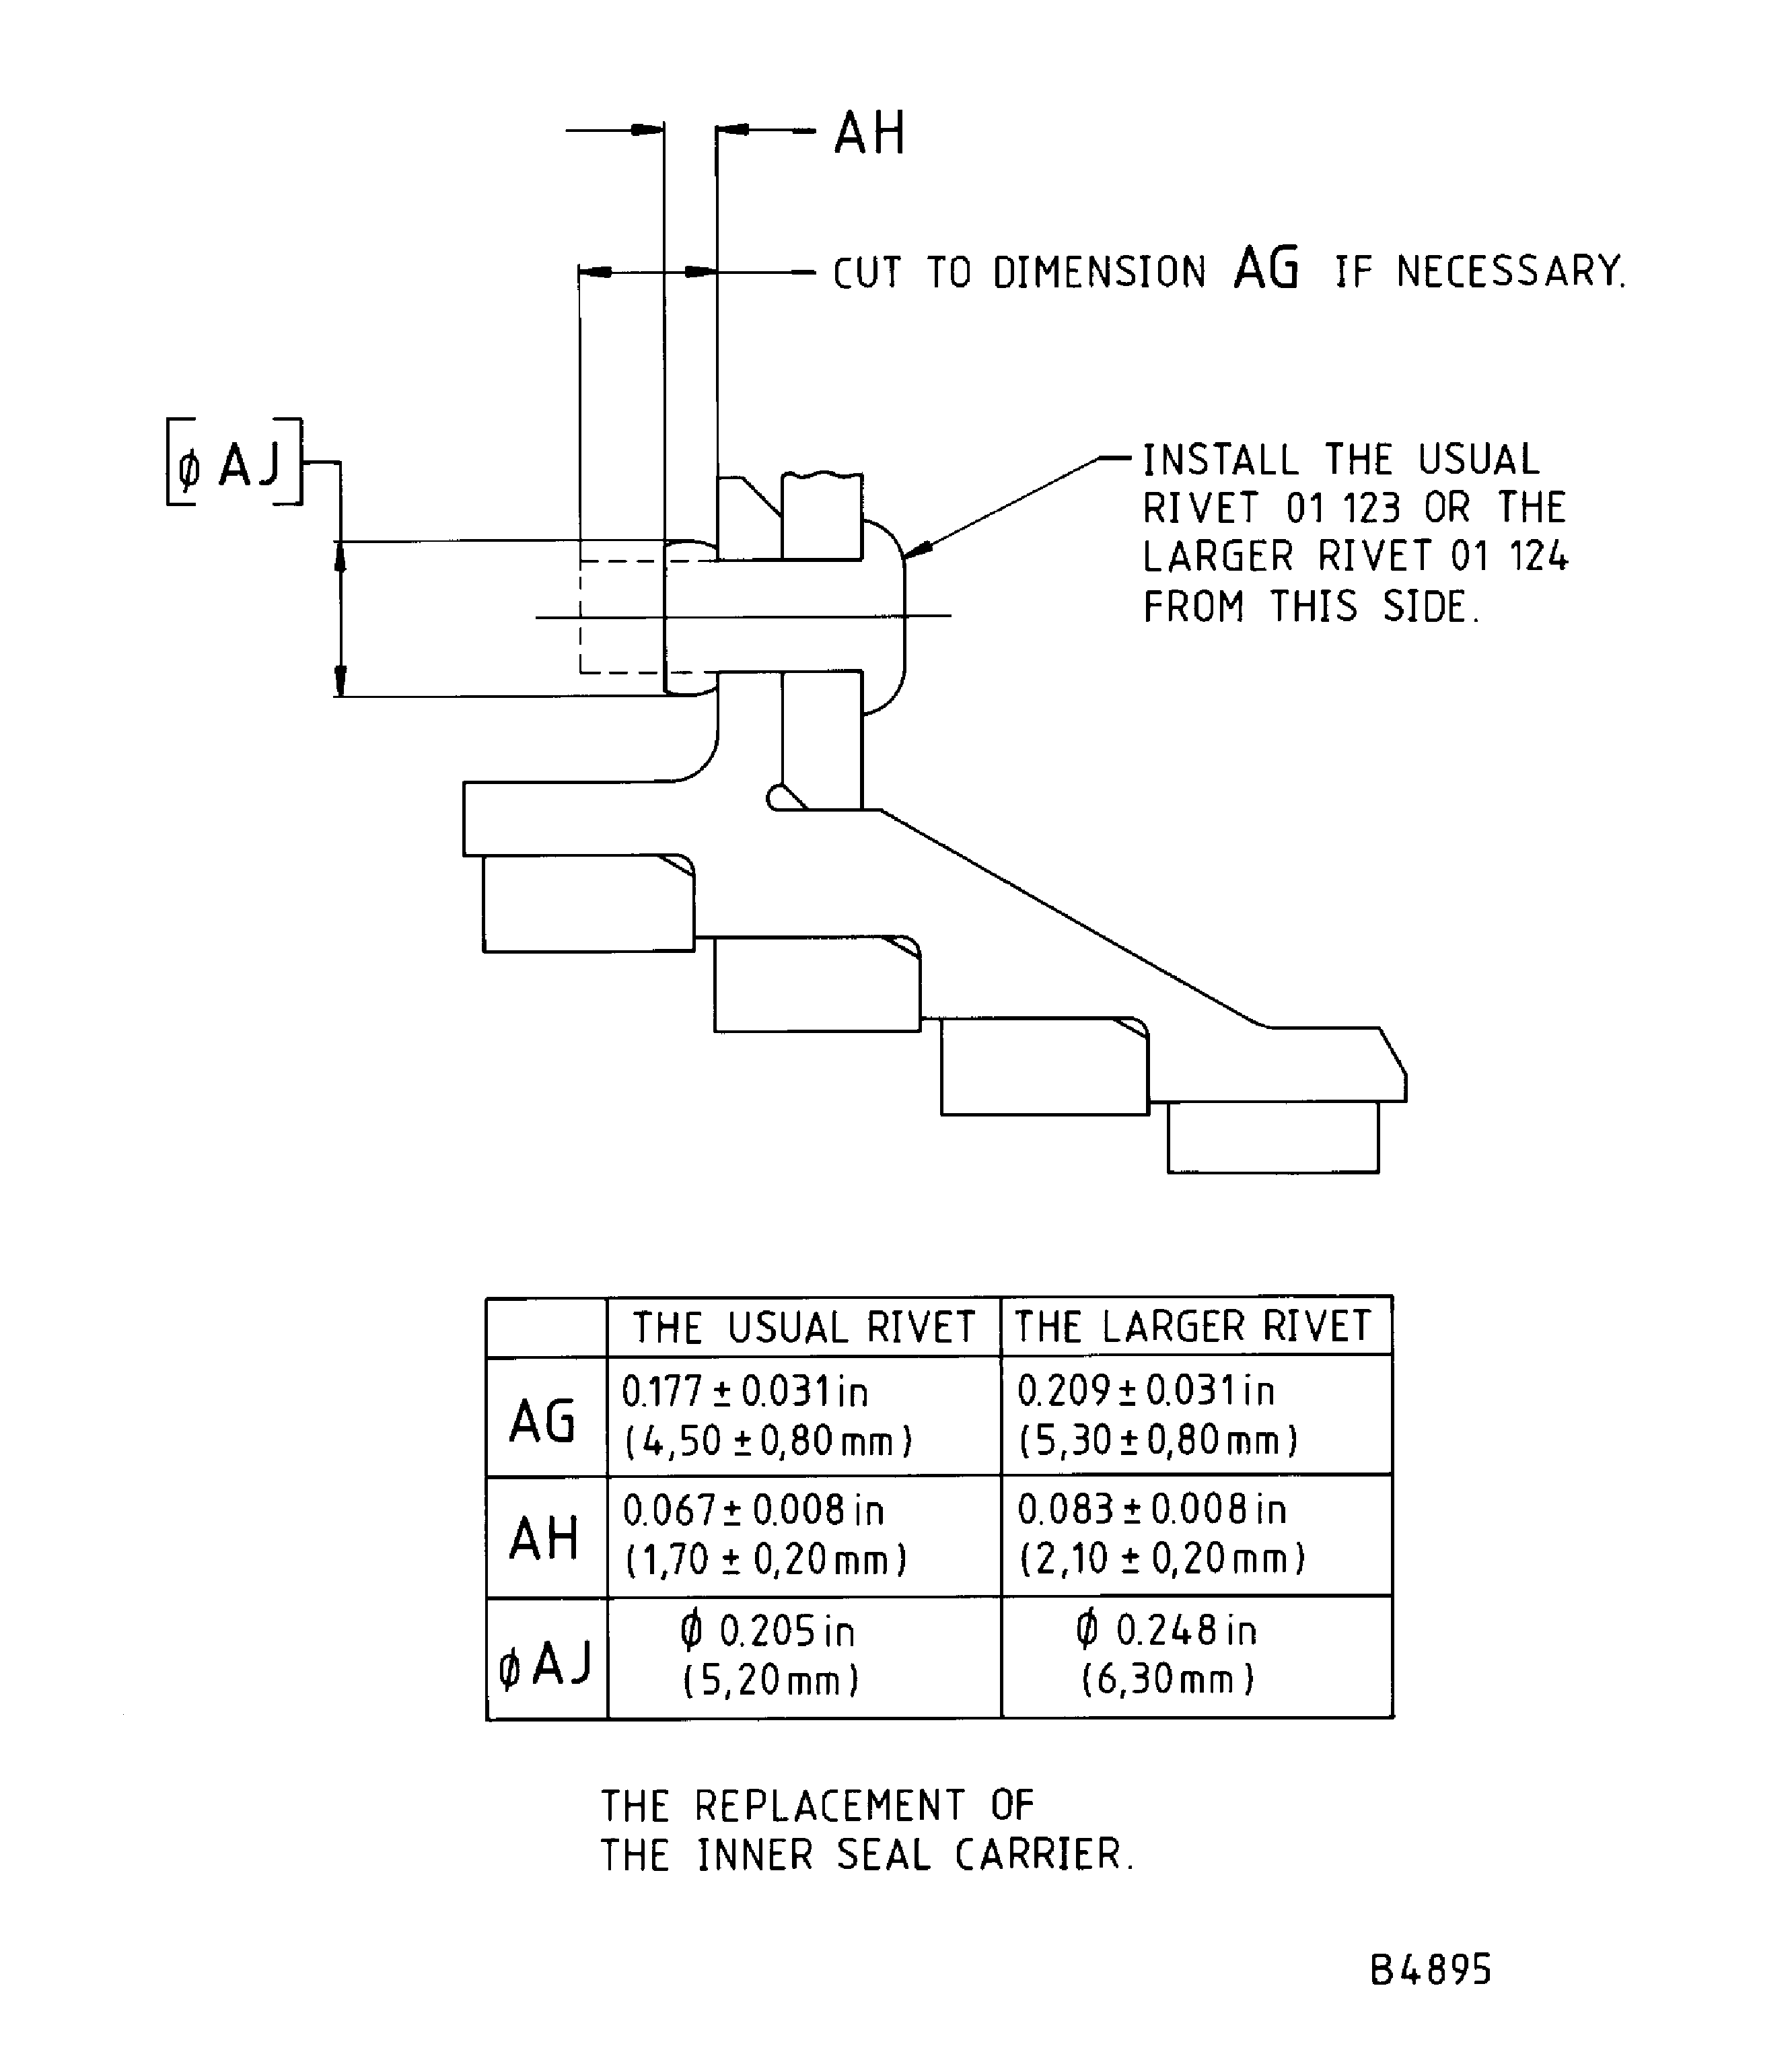
Figure: Repair Details and Dimensions - Assembly C
Repair Details and Dimensions - Assembly C
