Export Control
EAR Export Classification: Not subject to the EAR per 15 C.F.R. Chapter 1, Part 734.3(b)(3), except for the following Service Bulletins which are currently published as EAR Export Classification 9E991: SBE70-0992, SBE72-0483, SBE72-0580, SBE72-0588, SBE72-0640, SBE73-0209, SBE80-0024 and SBE80-0025.Copyright
© IAE International Aero Engines AG (2001, 2014 - 2021) The information contained in this document is the property of © IAE International Aero Engines AG and may not be copied or used for any purpose other than that for which it is supplied without the express written authority of © IAE International Aero Engines AG. (This does not preclude use by engine and aircraft operators for normal instructional, maintenance or overhaul purposes.).Applicability
All
Common Information
TASK 72-45-15-200-001 HPT Stage 1 Rotating Rear Seal - Examine, Inspection-001
General
This TASK gives the procedure for the inspection of the stage 1 HPT air seal. For the other parts of the stage 1 HPT airseal (rear), refer to TASK 72-45-15-200-000 (INSPECTION-000).
Fig/item numbers in parentheses in the procedure agree with those used in the IPC.
The policy that is necessary for inspection is given in the SPM TASK 70-20-00-200-501.
All parts must be visually examined for damage, corrosion and wear. Any defects that are not identified in the procedure must be referred to IAE.
All the parts must be cleaned before any part is examined. Refer to TASK 70-10-00-100-501.
The procedure for those parts which must have a crack test is given in SUBTASK 72-45-15-230-051. Do the test before the part is visually examined.
Do not discard any part until you are sure there are no repairs available. Refer to the instructions in Repair before a discarded part is used again or oversize parts are installed.
Parts which should be discarded can be held although no repair is available. The repair of a discarded part could be shown to be necessary at a later date.
All parts must be examined to make sure that all the repairs have been completed satisfactorily.
The practices and processes referred to in the procedure by the TASK numbers are in the SPM.
References
Refer to the SPM for data on these items.
Definitions of Damage, SPM TASK 70-02-02-350-501
Inspection of Parts, SPM TASK 70-20-01-200-501
Some data on these items is contained in this TASK. For more data on these items refer to the SPM.
Method of Testing for Crack Indications
Chemical Processes
Surface Protection
Preliminary Requirements
Pre-Conditions
NONESupport Equipment
NONEConsumables, Materials and Expendables
NONESpares
NONESafety Requirements
NONEProcedure
Clean the part. Refer to TASK 72-45-15-100-000 (CLEANING-000).
SUBTASK 72-45-15-230-051-001 Examine the Stage 1 HPT Air Seal (01-020) for Cracks
Clean the part. Refer to TASK 72-45-15-100-000 (CLEANING-000).
SUBTASK 72-45-15-230-051-002 Examine the Stage 1 HPT Air Seal (01-020) for Cracks
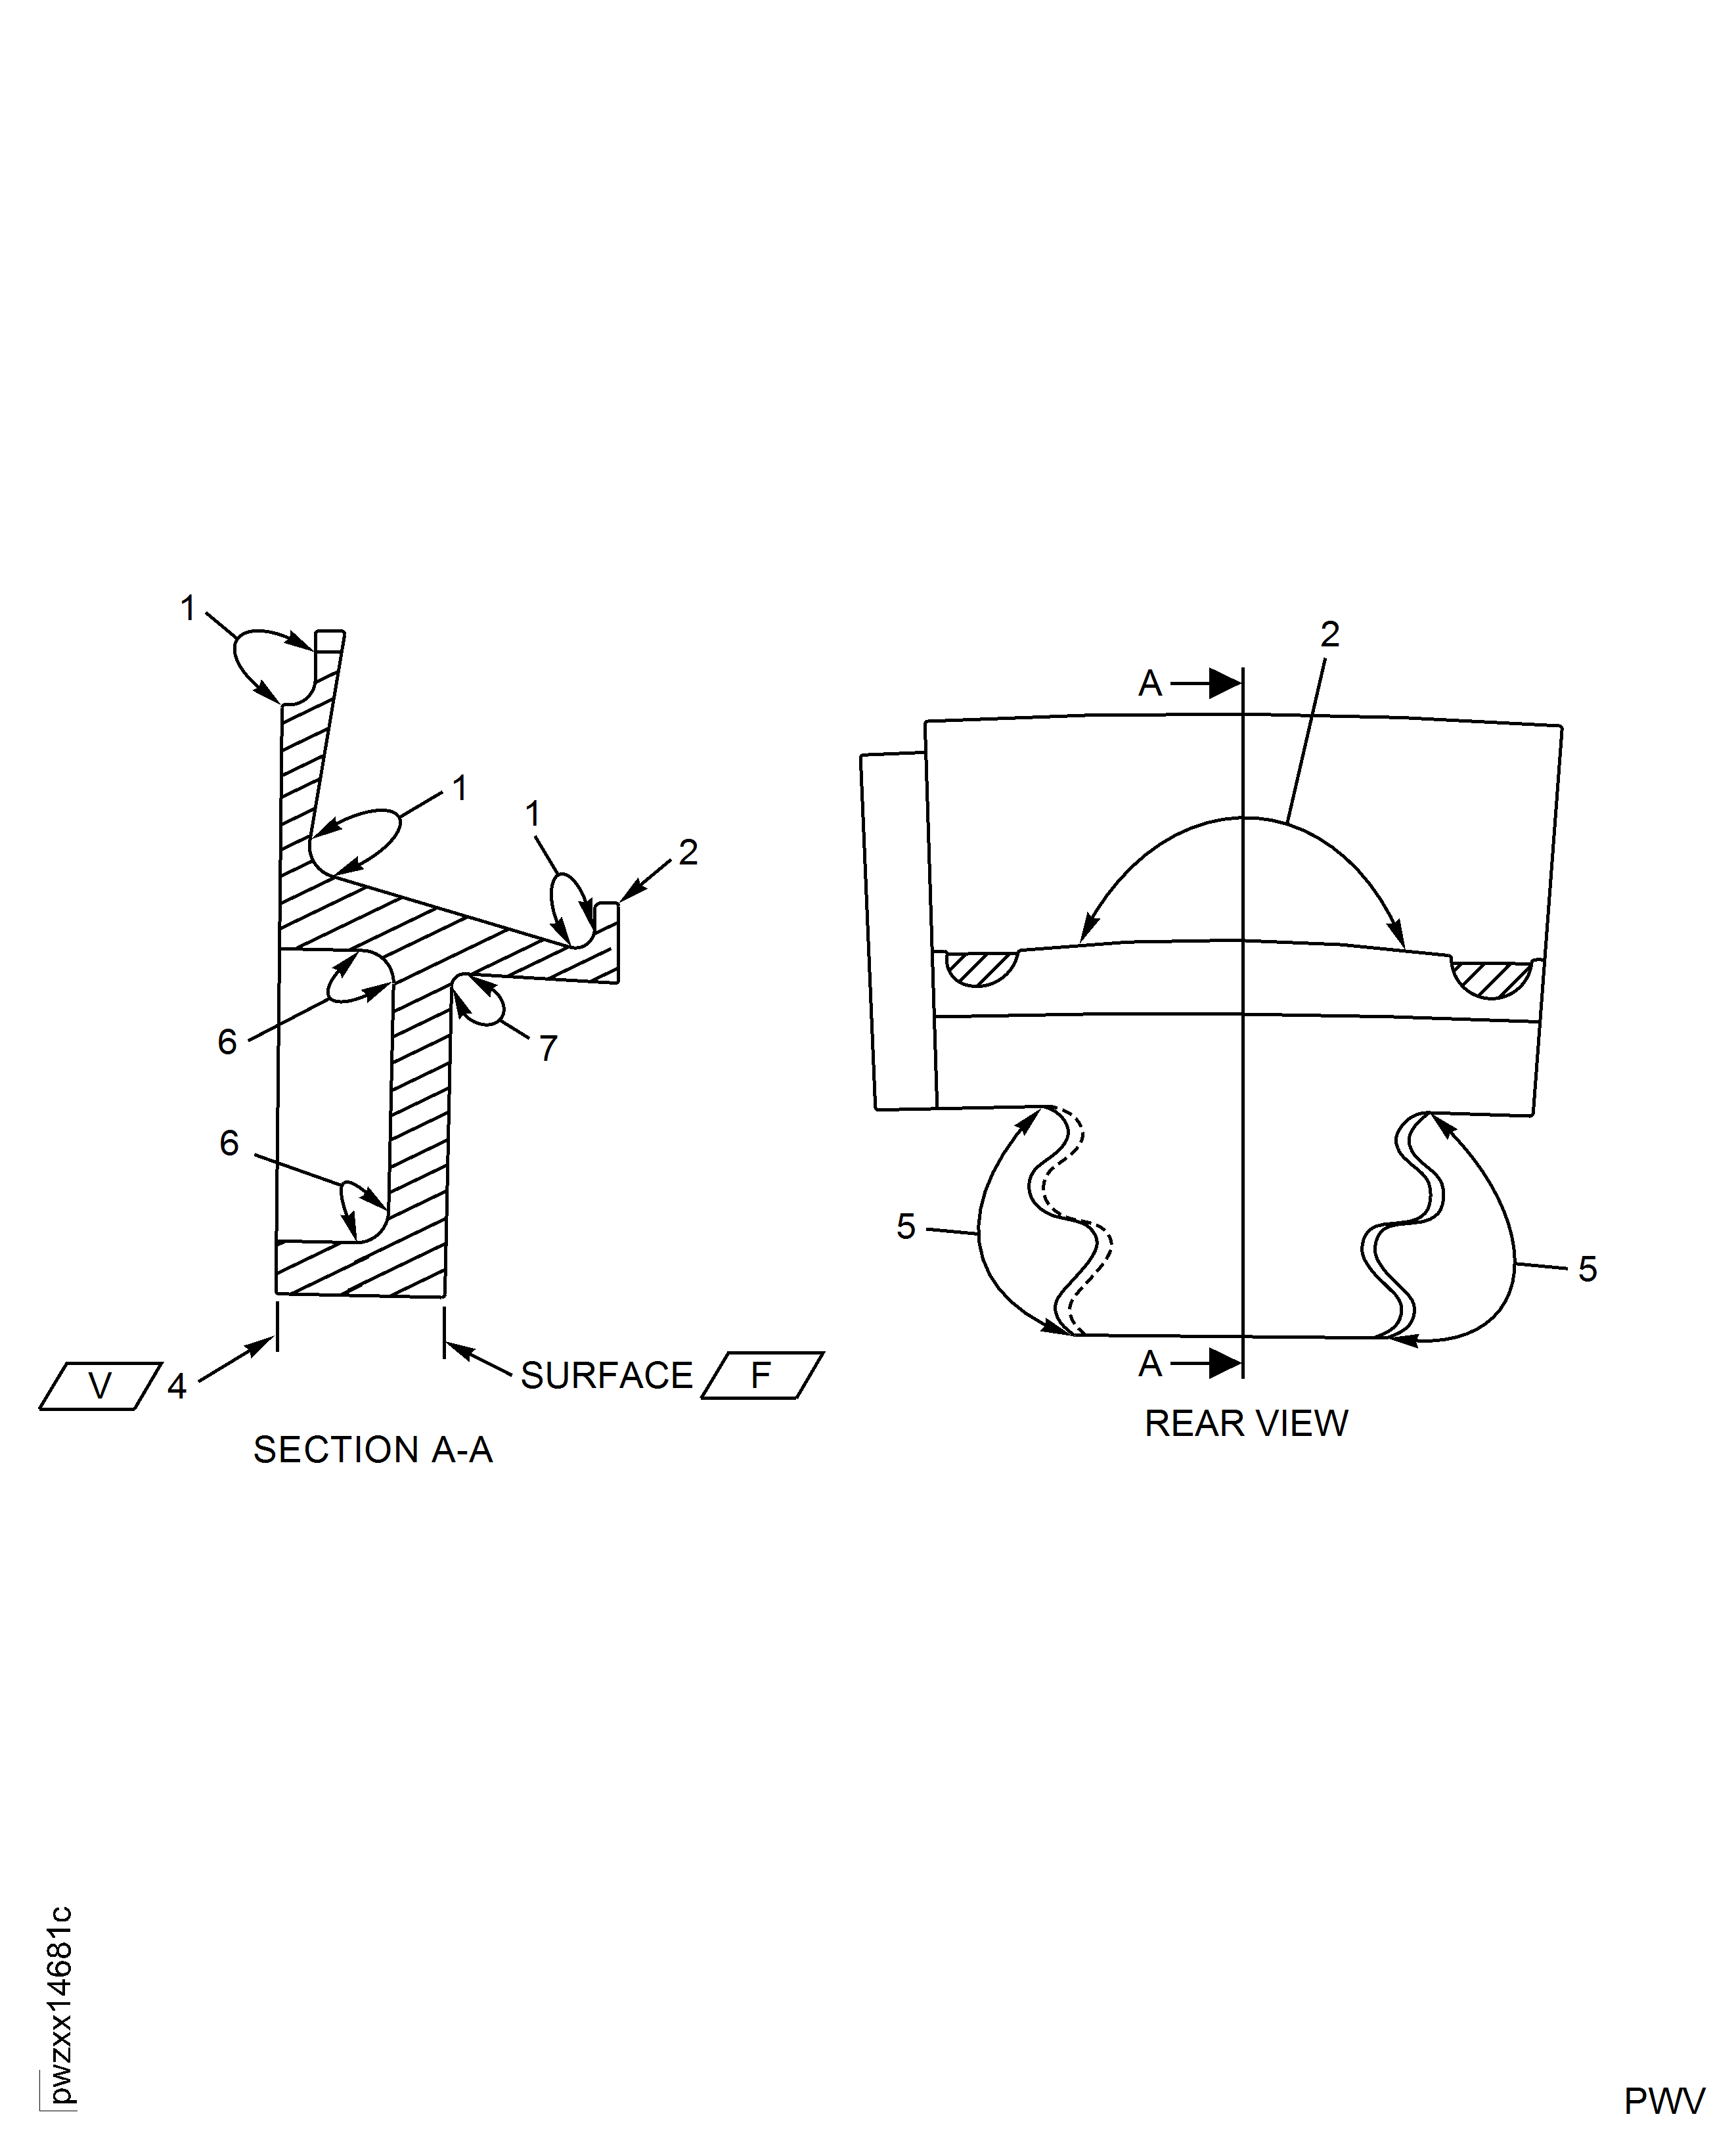
Refer to Figure.
SUBTASK 72-45-15-220-051 Examine the Stage 1 HPT Air Seal (01-020) Front Outer Contact Surface for Wear
Refer to Figure.
SUBTASK 72-45-15-220-053 Examine the Stage 1 HPT Air Seal (01-020) Fir Tree Load Bearing Surfaces for Wear
Refer to Figure.
SUBTASK 72-45-15-220-054 Examine the Stage 1 HPT Air Seal (01-020) for Corrosion, Dents and Nicks
Accept part for select fit only.
Write down the dimension.
NOTE
This part can only be used, if the mating parts dimensions will result in fit of reference No. 1552. Refer to TASK 72-45-10-440-001-A00, TASK 72-45-10-440-001-C00, TASK 72-45-10-440-001-D00.
If the dimension is 0.272 in. (6.91 mm) or more and less than 0.274 in. (6.96 mm).
Axial dimension.
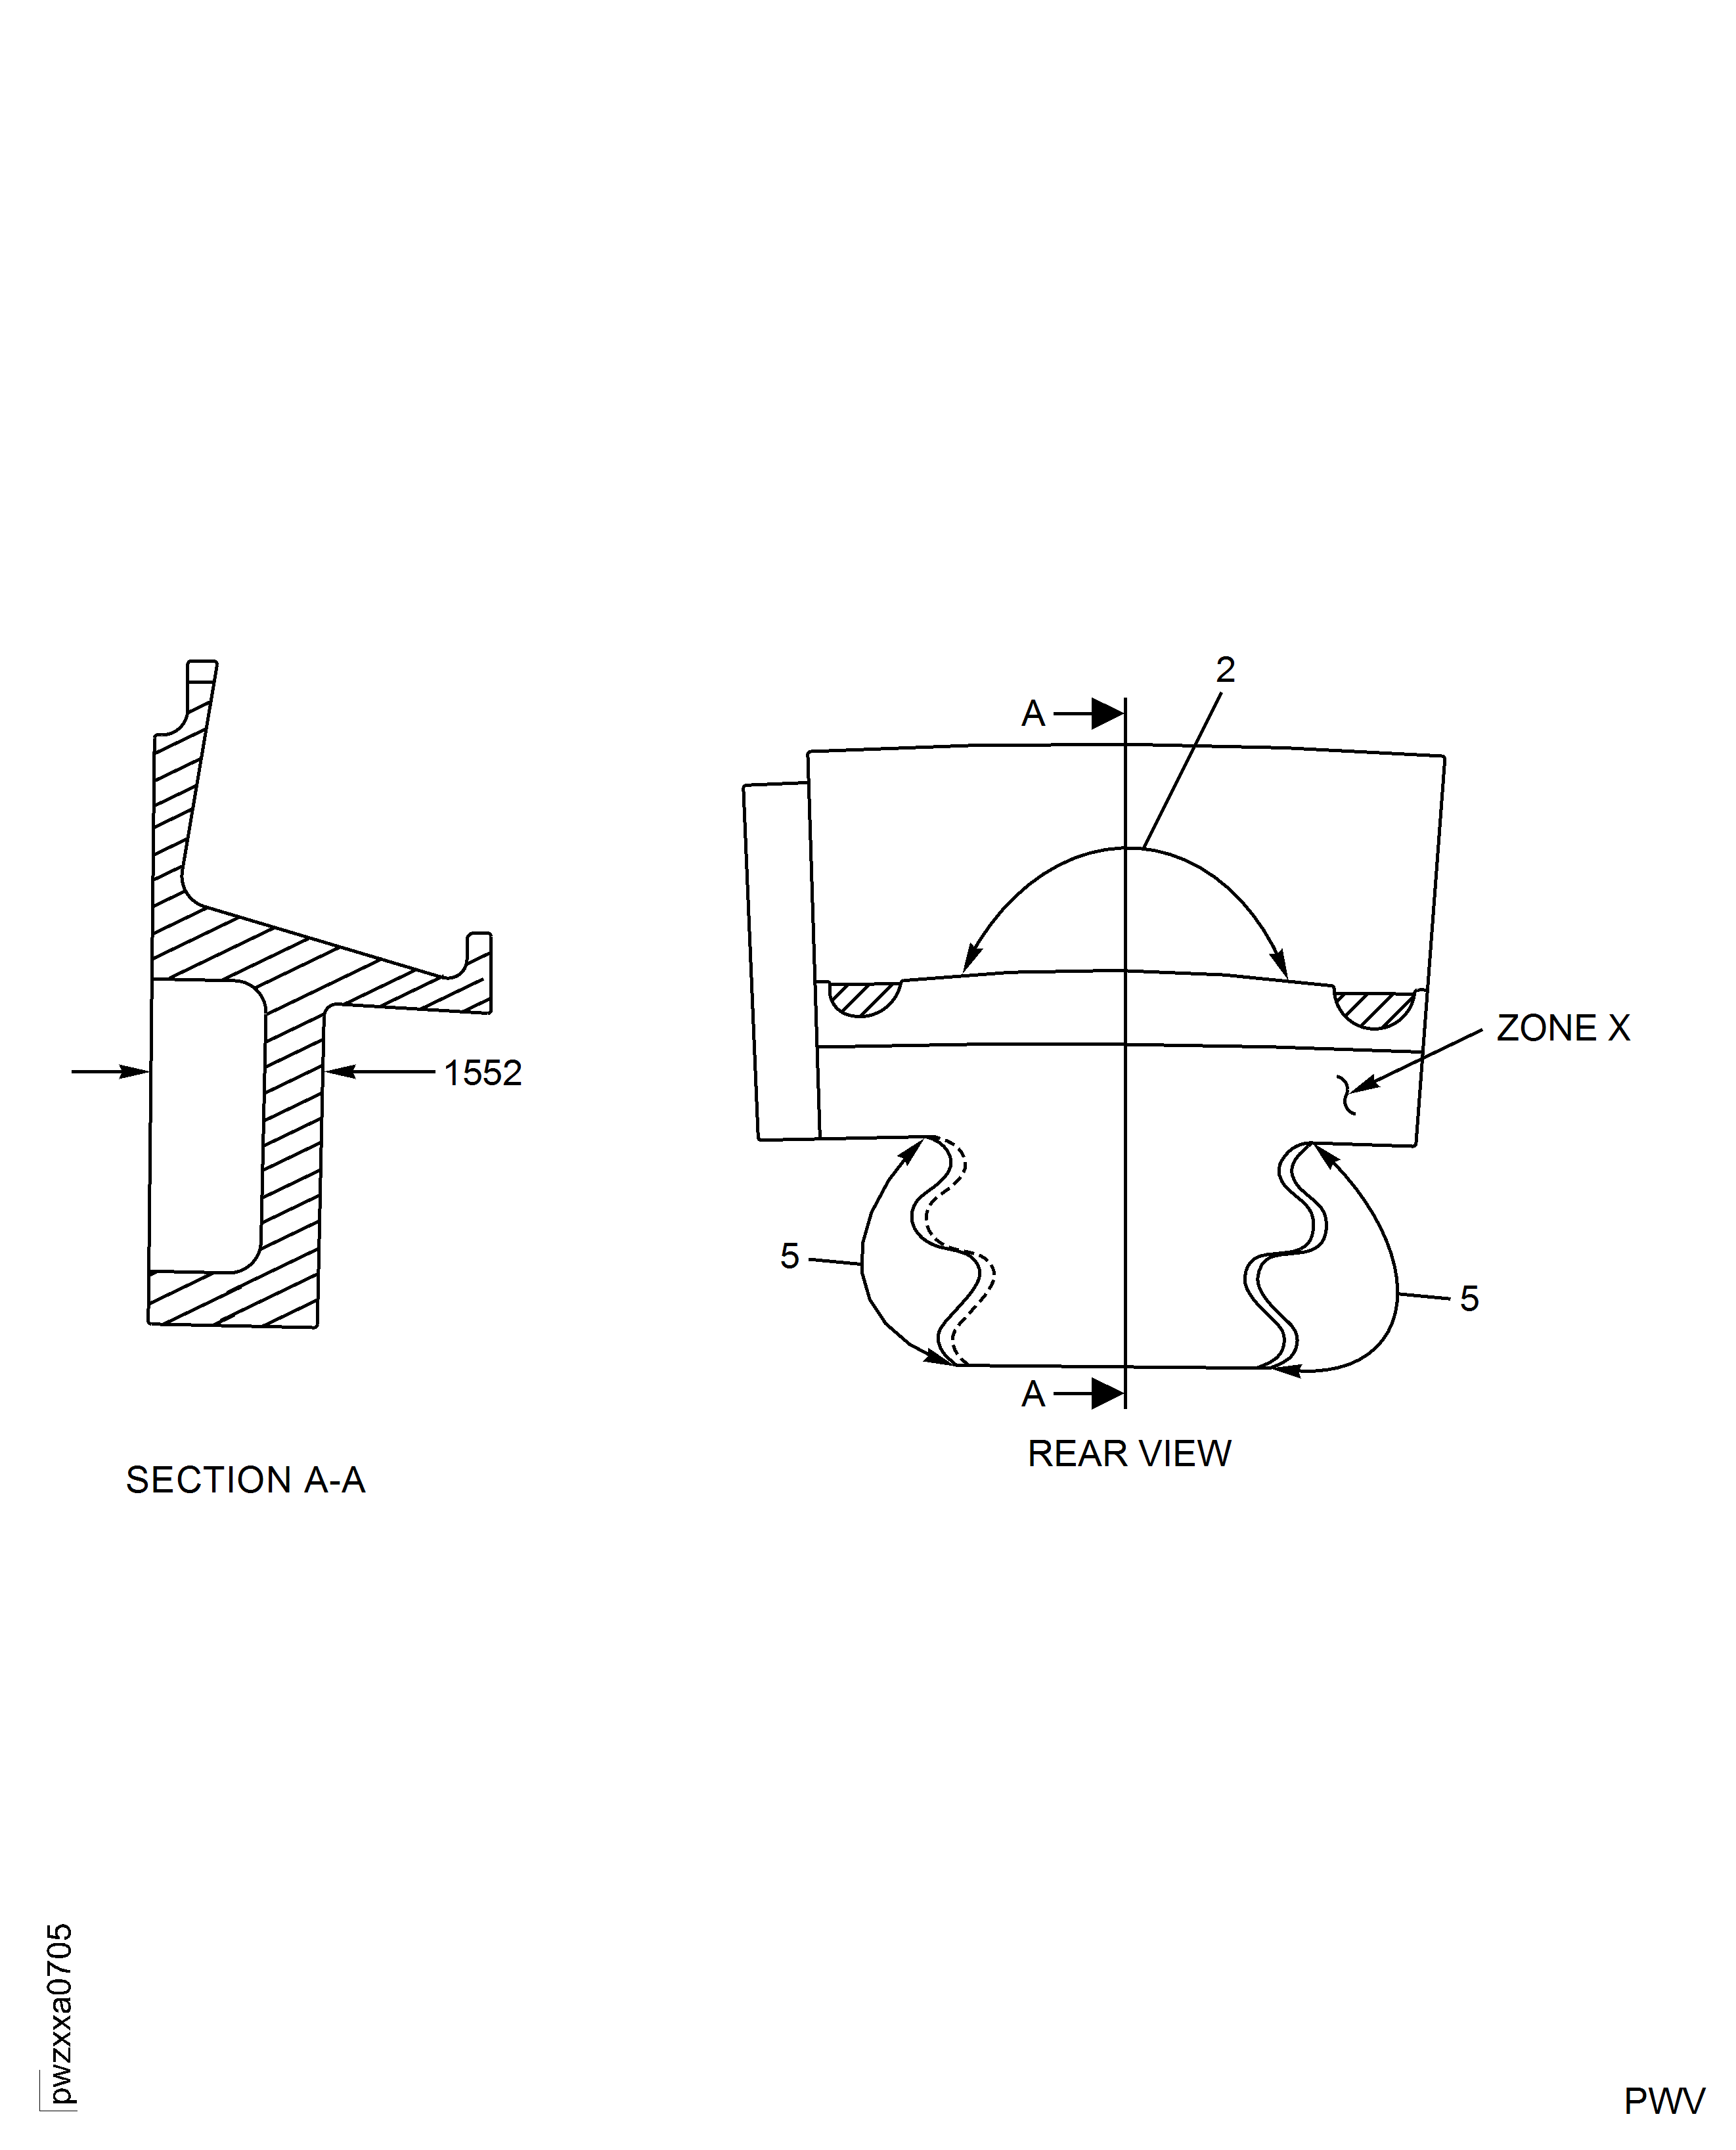
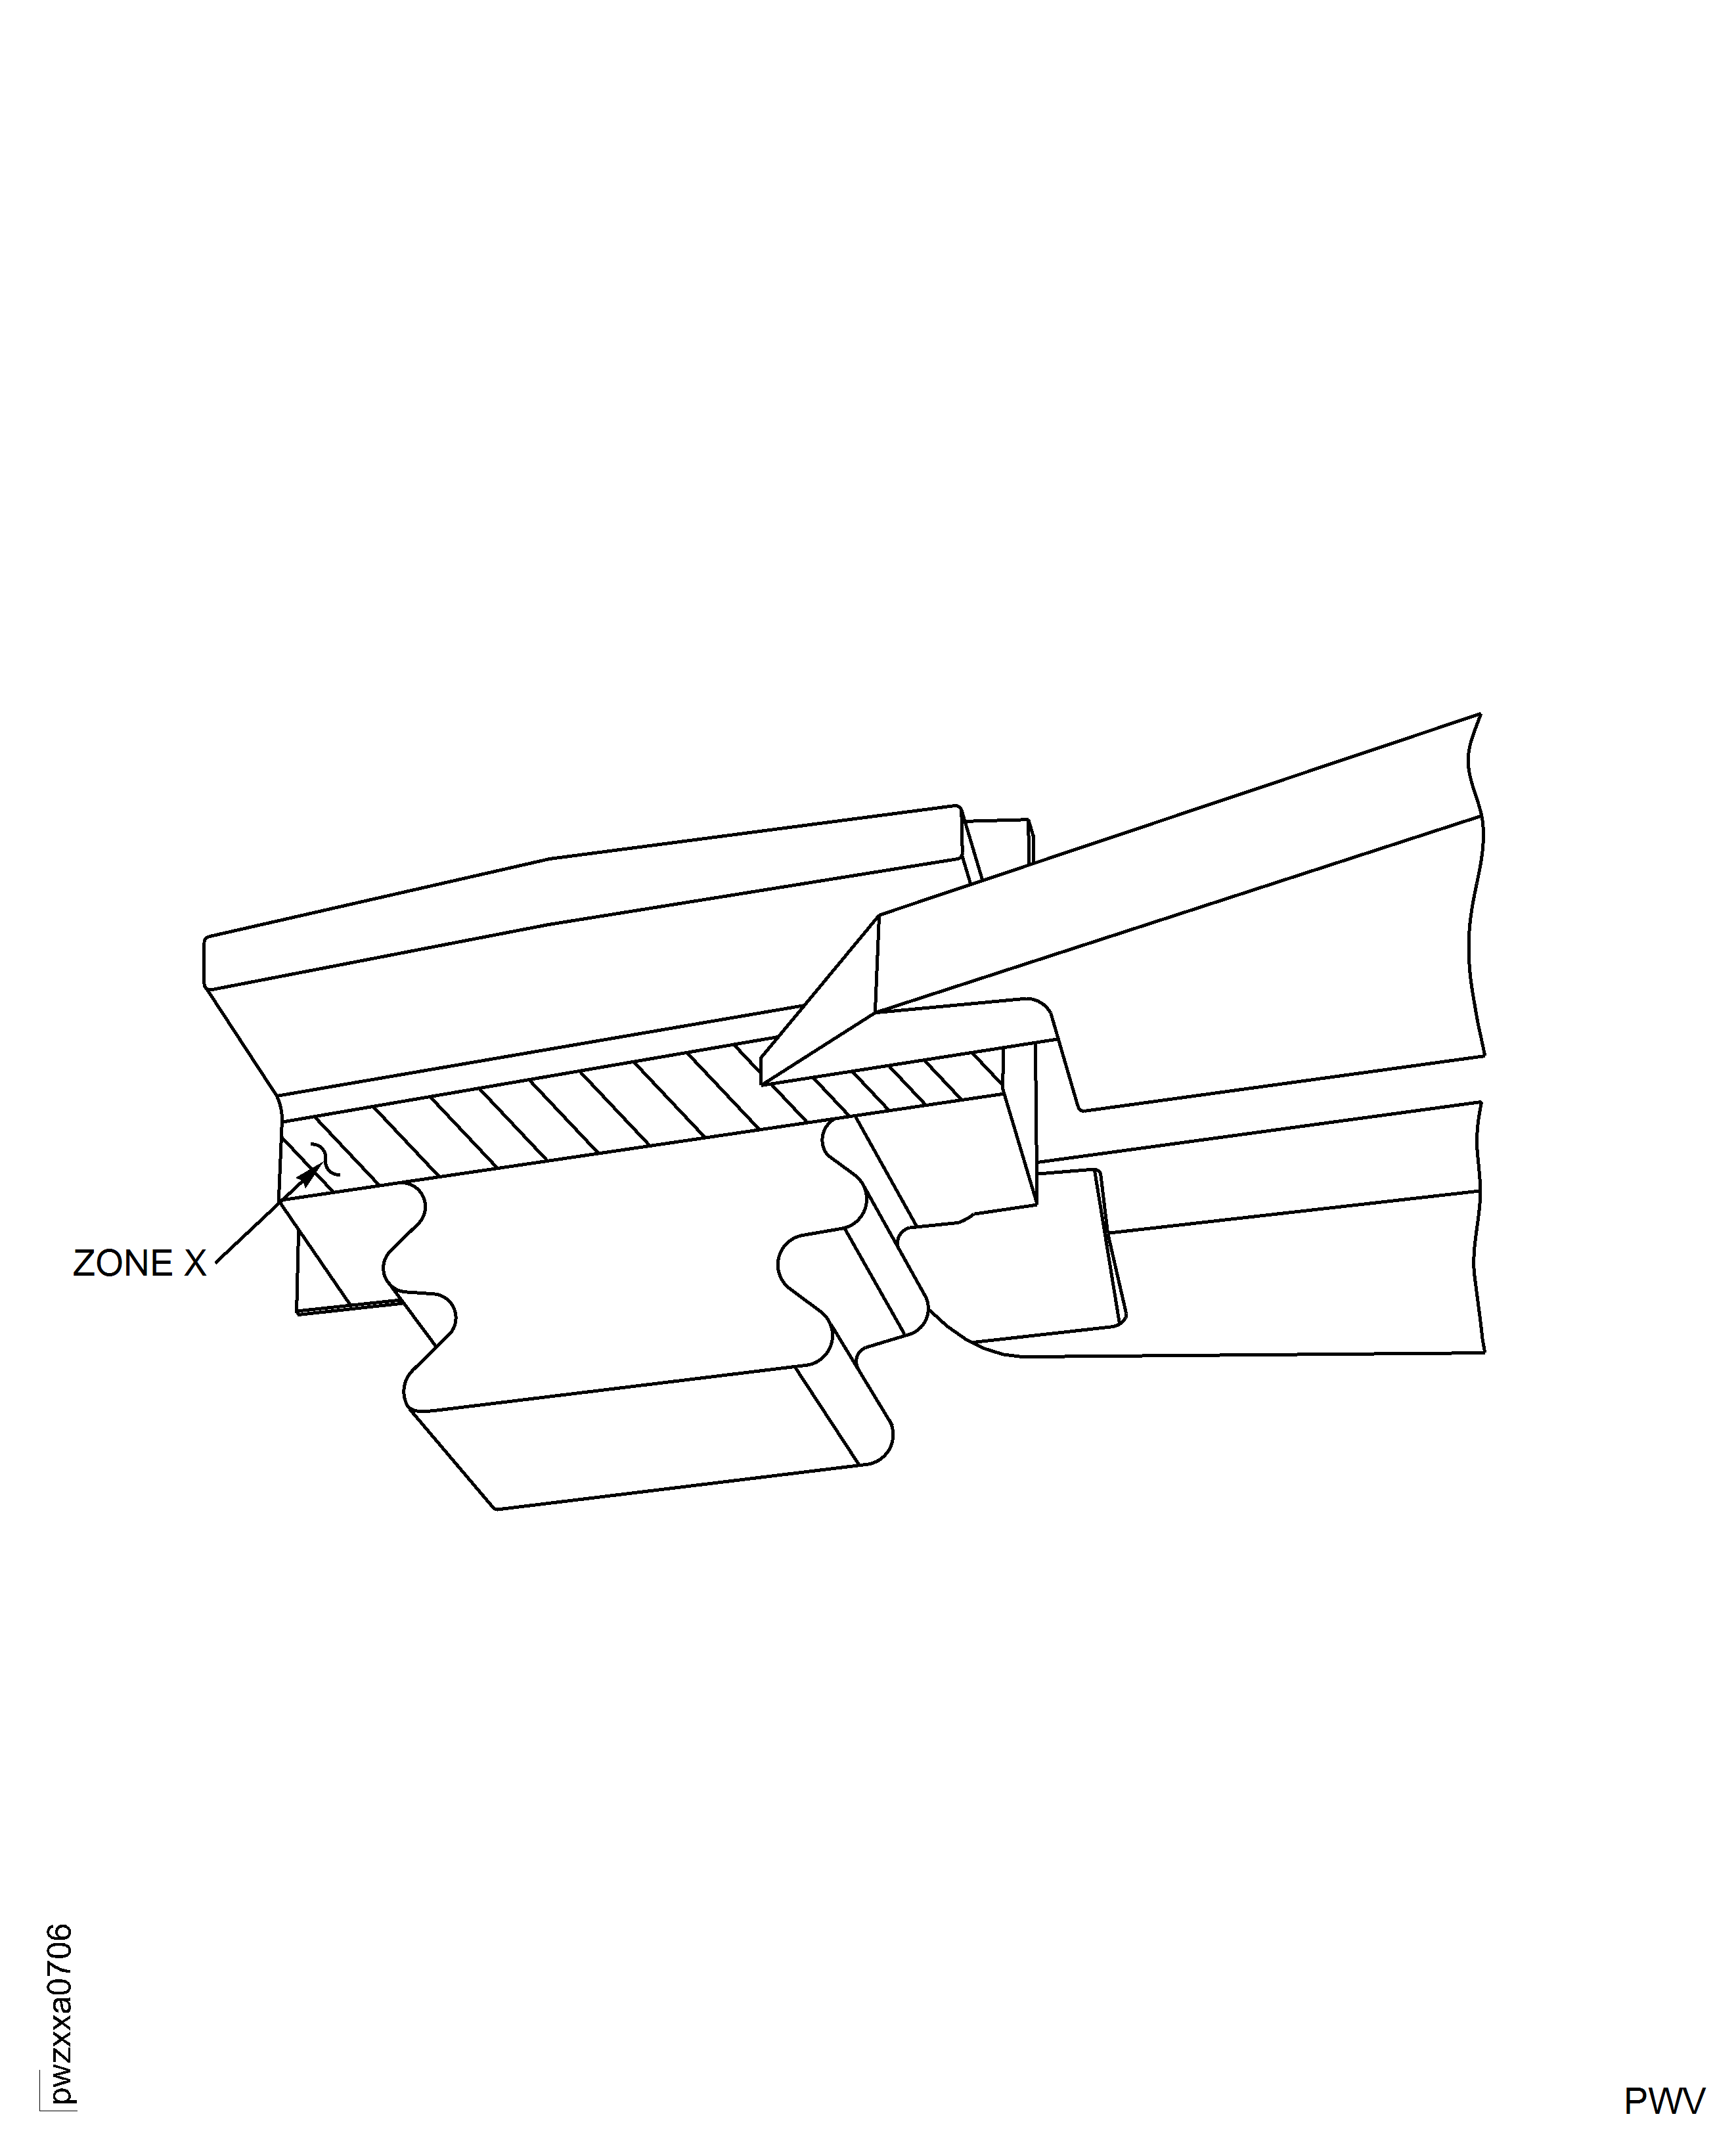
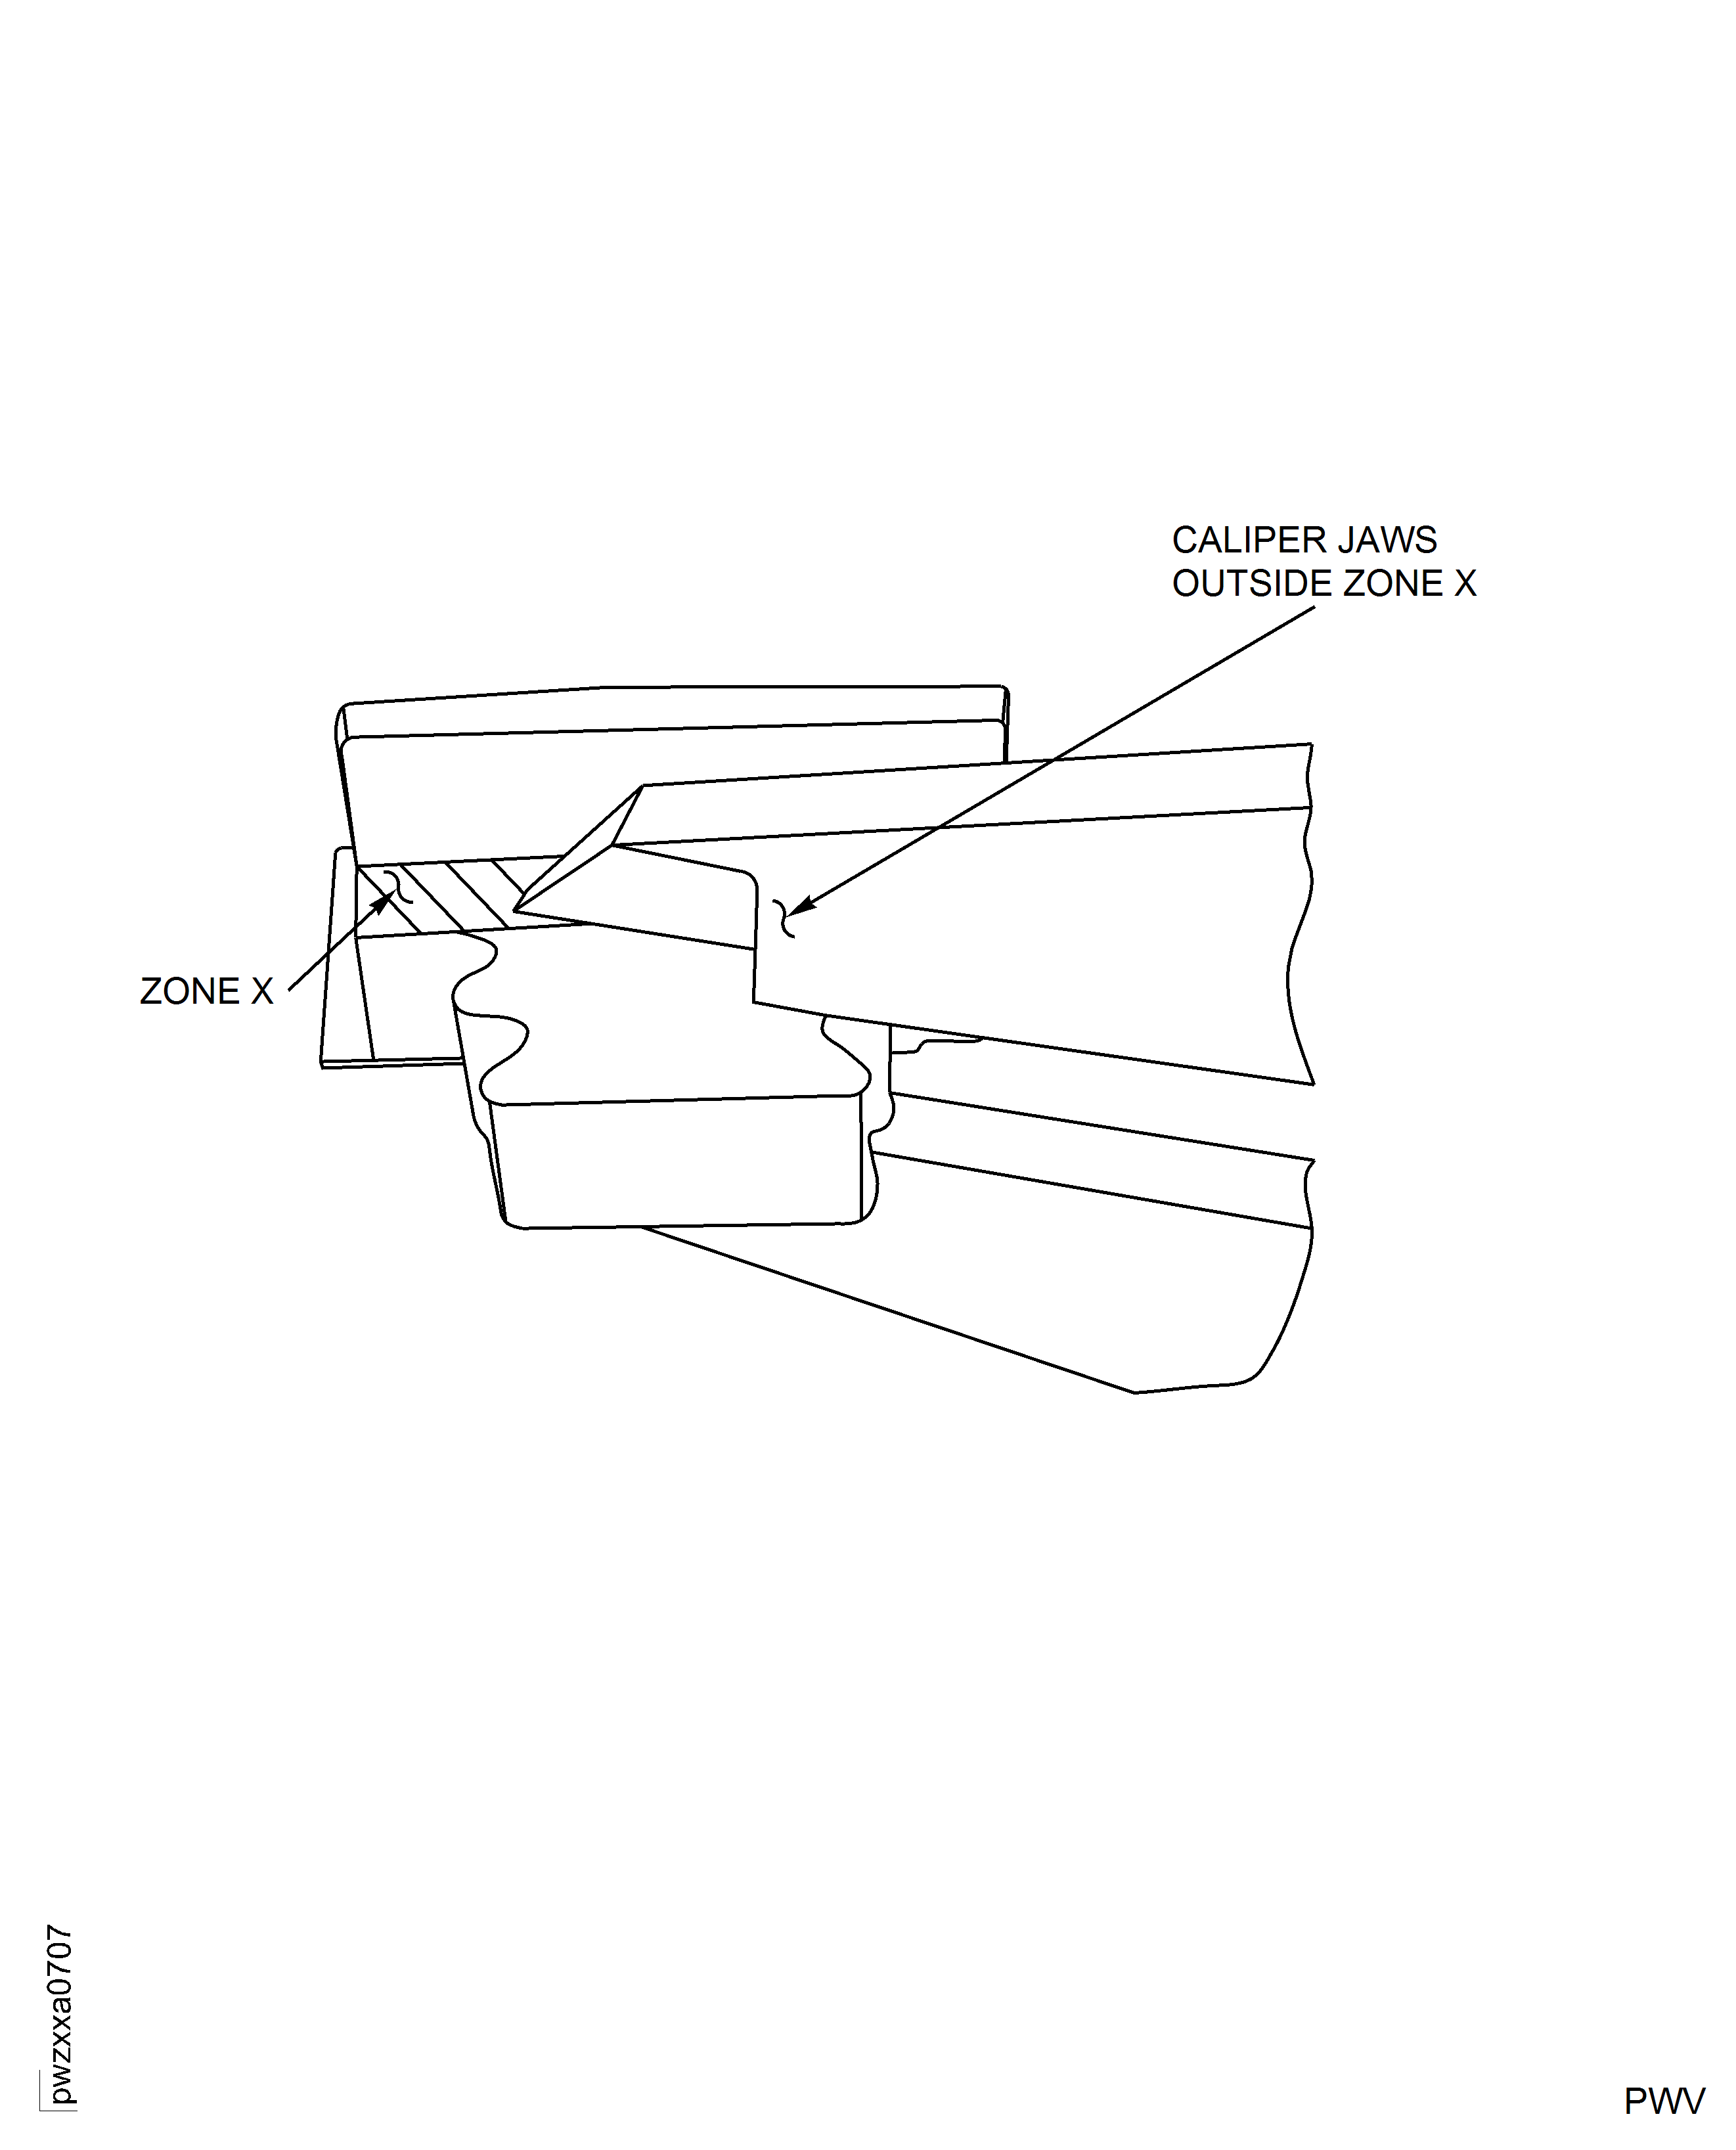
Visually inspect zone "X" for wear. Measure axial dimension 1552 in zone "X", taking measurement in area showing wear, if present. If measuring with calipers, ensure that measurement is taken with caliper jaws inside zone "X".
SUBTASK 72-45-15-220-055 Examine the Stage 1 HPT Air Seal (01-020) for the Axial Dimension

CAUTION
YOU MUST DO AN INSPECTION FOR ALL THE SIXTY FOUR (64) AIRSEALS INDIVIDUALLY. IF THE INDIVIDUAL INSPECTION IS UNSATISFACTORY, IT CAN CAUSE FIT PROBLEMS DURING ASSEMBLY PROCEDURE.
Figure: Stage 1 HPT Air Seal Inspection Locations
Stage 1 HPT Air Seal Inspection Locations

Figure: Stage 1 HPT Air Seal Inspection Locations
Stage 1 HPT Air Seal Inspection Locations

Figure: Correct Measurement Of Axial Dimension 1552
Correct Measurement Of Axial Dimension 1552

Figure: Incorrect Measurement Of Axial Dimension 1552
Incorrect Measurement Of Axial Dimension 1552

