Export Control
EAR Export Classification: Not subject to the EAR per 15 C.F.R. Chapter 1, Part 734.3(b)(3), except for the following Service Bulletins which are currently published as EAR Export Classification 9E991: SBE70-0992, SBE72-0483, SBE72-0580, SBE72-0588, SBE72-0640, SBE73-0209, SBE80-0024 and SBE80-0025.Copyright
© IAE International Aero Engines AG (2001, 2014 - 2021) The information contained in this document is the property of © IAE International Aero Engines AG and may not be copied or used for any purpose other than that for which it is supplied without the express written authority of © IAE International Aero Engines AG. (This does not preclude use by engine and aircraft operators for normal instructional, maintenance or overhaul purposes.).Applicability
All
Common Information
TASK 73-11-41-200-101-A00 Fuel Nozzle Supply Fuel Manifolds - Examine, Inspection-001
Effectivity
FIG/ITEM | PART NO. |
01-060 | 2A0504-01 |
01-060 | 2A0508-01 |
01-060 | 2A3229-01 |
01-060 | 2A3229-001 |
01-060 | 2A3256-01 |
01-160 | 2A0508-01 |
01-160 | 2A3230-01 |
01-160 | 2A3230-001 |
01-160 | 2A3257-01 |
01-260 | 2A0509-01 |
01-260 | 2A3231-01 |
01-260 | 2A3231-001 |
01-260 | 2A3258-01 |
02-060 | 2A0510-01 |
02-060 | 2A3259-01 |
02-060 | 2A3232-001 |
02-160 | 2A0511-01 |
02-160 | 2A3233-01 |
02-160 | 2A3260-01 |
02-260 | 2A0510-01 |
02-260 | 2A0516-01 |
02-260 | 2A3236-001 |
02-260 | 2A3259-01 |
02-260 | 2A3261-01 |
03-060 | 2A0515-01 |
03-060 | 2A3235-01 |
03-060 | 2A3263-01 |
03-160 | 2A1229-01 |
03-160 | 2A3237-01 |
03-160 | 2A3264-01 |
03-260 | 2A0513-01 |
03-260 | 2A3234-01 |
03-260 | 2A3265-01 |
03-360 | 2A1389-01 |
03-360 | 2A3238-01 |
03-360 | 2A3266-01 |
General
Fig/item numbers in parentheses in the procedure agree with those used in the IPC. Only the primary Fig/item numbers are used. For the service bulletin alpha variants refer to the IPC.
The policy that is necessary for inspection is given in SPM TASK 70-20-01-200-501.
All the parts must be cleaned before any part is examined. Refer to Cleaning-000 TASK 73-11-41-100-100.
All parts must be visually examined for damage, corrosion and wear. Any defects that are not identified in the procedure must be referred to IAE.
Do not discard any part until you are sure there are no repairs available. Refer to the instructions in Repair before a discarded part is used again or oversize parts are installed.
Parts which should be discarded can be held although no repair is available. The repair of a discarded part could be shown to be necessary at a later date.
All parts must be examined to make sure that all the repairs have been completed satisfactorily.
The practices and processes referred to in the procedure by the TASK numbers are in the SPM.
To identify the consumable materials refer to the PCI.
References
Refer to the SPM for data on these items.
Definitions of Damage, Refer to SPM TASK 70-02-02-350-501.
Inspection of Parts, Refer to SPM TASK 70-20-01-200-501.
Some data on these items are contained in this TASK. For more data on these items refer to the SPM.
Method of Testing for Crack Indications.
Chemical Processes.
Surface Protection.
Equipment IAE 3P16640 and IAE 3P16641 are available from:
Pratt & Whitney
Tool Support Services (TSS)
411 Silver Lane
East Hartford, CT 06118
Phone: (860) 610-2675
FAX: (860) 610-2670
E-Mail: pwtools@pweh.com
Preliminary Requirements
Pre-Conditions
NONESupport Equipment
| Name | Manufacturer | Part Number / Identification | Quantity | Remark |
|---|---|---|---|---|
| IAE 3P16640 Facer - Conical Fitting Repair .500 x .750-16 | 0AM53 | IAE 3P16640 | ||
| IAE 3P16641 Facer - Conical Fitting Repair .4375 x .625-18 | 0AM53 | IAE 3P16641 |
Consumables, Materials and Expendables
| Name | Manufacturer | Part Number / Identification | Quantity | Remark |
|---|---|---|---|---|
| CoMat 02-402 CARBON PAPER | LOCAL | CoMat 02-402 | ||
| CoMat 02-404 PASTE, PRUSSIAN BLUE | 1PBQ8 | CoMat 02-404 | ||
| CoMat 10-045 LEAK CHECK FLUID, BUBBLES-TYPE | 03530 | CoMat 10-045 | ||
| CoMat 10-061 STODDARD SOLVENT | LOCAL | CoMat 10-061 |
Spares
NONESafety Requirements
NONEProcedure
Refer to Figure.
Reject.
Kinks
Repair, VRS3378 TASK 73-11-41-300-001 (Repair-001) .
Other than Step.
Dents
Repair, VRS3378 TASK 73-11-41-300-001 (Repair-001).
Other than Step.
Nicks
Repair, VRS3378 TASK 73-11-41-300-001 (Repair-001).
Other than Step.
Chafing
Repair, VRS3378 TASK 73-11-41-300-001 (Repair-001).
Other than Step.
Scratches
Repair, VRS3378 TASK 73-11-41-300-001 (Repair-001).
Other than Step.
Corrosion
Accept.
Chafing and wear at the sleeve, on the tubes with reinforcing sleeves, that does not go into the tube surface.
SUBTASK 73-11-41-220-051 Examine the Fuel Manifolds for Kinks, Dents, Nicks, Chafing, Corrosion, Scratches and Wear
Refer to Figure.
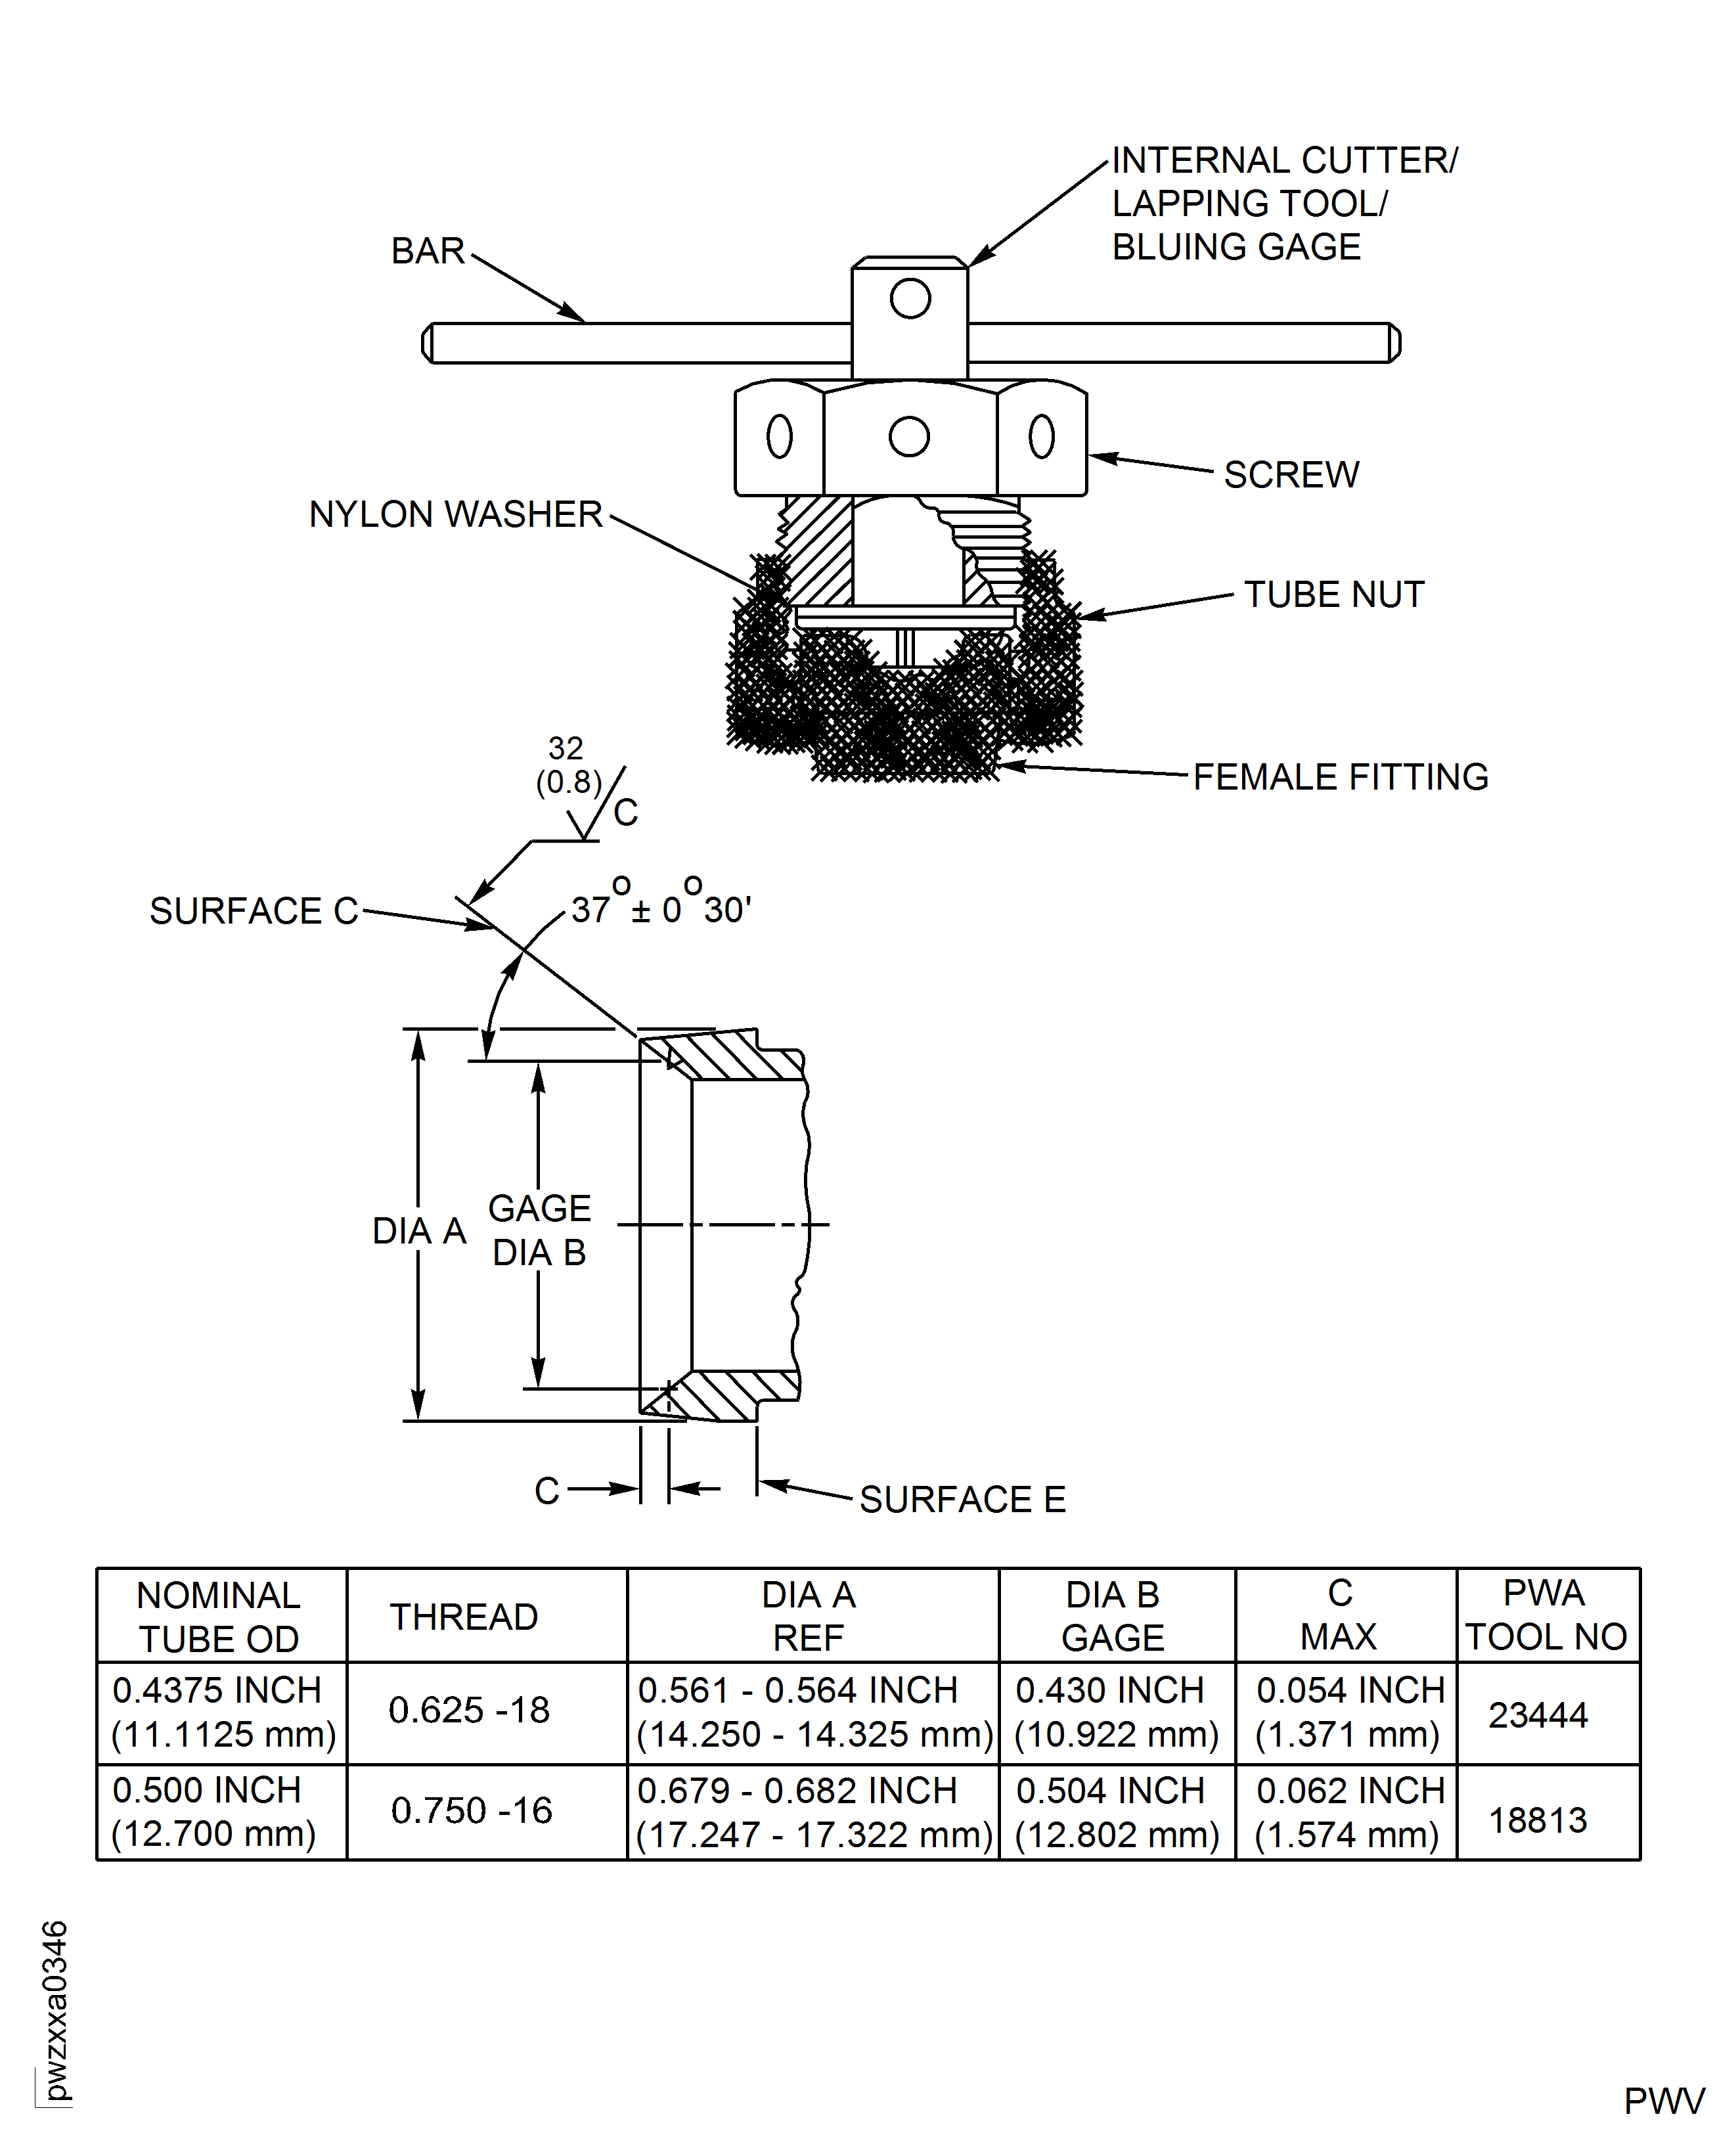
Use IAE 3P16640 Facer - Conical Fitting Repair .500 x .750-16 or IAE 3P16641 Facer - Conical Fitting Repair .4375 x .625-18 to example tube fitting.
Install the bluing gage detail of the applicable tool through the screw.
Insert the bar through the hole in the gage detail.
If CoMat 02-402 CARBON PAPER is used, make the ink side slightly wet with CoMat 10-061 STODDARD SOLVENT, and wipe the conical surface of the gage with the ink side of the wet carbon paper.
Apply one of the following materials to the conical surface of the bluing gage.
Turn the screw detail of the tool into the tube nut until the conical surfaces touch.
Rotate the screw detail an additional 45 degrees (maximum), and then rotate it back to the start position.
Seat the gage as follows.
Rotate the gage one-half turn and then rotate the gage back to the start position.
Remove the gage from the tube nut.
Show the pattern of contact as follows.
NOTE
The pattern of contact shows where the gage touches the part.
Examine the conical seat of the tube fitting as follows.
Repair, VRS3844 TASK 73-11-41-300-003 (REPAIR-003).
Nicks or dents on the sealing surface seat that are no more than 0.005 in. (0.076 mm) in depth.
Reject.
Other than Step.
Nicks, circumferential scratches, and dents on conical seat.
Repair, VRS3844 TASK 73-11-41-300-003 (REPAIR-003).
Ridges on the sealing surface seats are constant around the total circumference and are no more than 0.003 in. (0.076 mm) in height.
Repair, VRS3844 TASK 73-11-41-300-003 (REPAIR-003).
Ridges that are more than 0.003 in. (0.076 mm) but are not more than 0.005 in. (0.127 mm) in height.
Repair, VRS3844 TASK 73-11-41-300-003 (REPAIR-003).
Ridges that are not fully circumferential and are no more than 0.005 in. (0.127 mm) in height.
Repair, VRS3844 TASK 73-11-41-300-003 (REPAIR-003).
Ridges that are not constant and are no more than 0.005 in. (0.127 mm) in height.
Reject.
Ridges that are more than 0.005 in. (0.127 mm) in height.
Circumferential ridges on conical seat.
Repair, VRS3844 TASK 73-11-41-300-003 (REPAIR-003).
Vertical scratches on the sealing surface are no more than 0.005 in. (0.127 mm) in depth.
Reject.
Other than Step.
Vertical scratches on conical seat.
SUBTASK 73-11-41-220-052 Examine the End Fittings for Conical Seat Damage
Do a visual inspection of the tube-to-ferrule braze joint at the end furthest from the tee. Use a 10X or greater magnifying glass.
Use the procedure for a local high sensitivity inspection.
The braze joint at the ferrule furthest from the tee is the only location on each fuel nozzle supply manifold assembly that must be inspected.
Cracks in the fuel nozzle supply manifold assemblies at this location are not acceptable. Replace any assembly that has this condition.
Do a fluorescent penetrant inspection by the procedure given in SPM TASK 70-23-05-230-501.
SUBTASK 73-11-41-220-054 Examine the Tube-To-Ferrule Braze Joint (PRE SB 73-0131, PRE SB 73-0139 and PRE SB 73-0147)
Refer to Figure.
Deleted.
Use the procedure for a local high sensitivity inspection.
Reject.
Cracked.
Reject.
Defective weld.
Do a fluorescent penetrant inspection by the procedure given in SPM TASK 70-23-05-230-501.
SUBTASK 73-11-41-220-063 Examine the Tube-To-Ferrule Weld Joint (POST SB 73-0131, POST SB 73-0139 and POST SB 73-0147)
Put the fittings on the end of the manifold where the fuel nozzles connect.
Attach a suitable adapter to the end of manifold that connects to the fuel distribution valve.
Connect a regulated air supply to the adapter.
Apply 95 psig to 105 psig (655.0 kPa to 723.9 kPa) of the air pressure.
Do a leak check with CoMat 10-045 LEAK CHECK FLUID, BUBBLES-TYPE. Do a careful check of all the manifold joints.
Reject.
If any leaks are found on the manifold
Do a pressure test as follows:
SUBTASK 73-11-41-790-051 Examine the Fuel Manifolds for Leaks
Figure: Fuel Manifold Inspection Locations
Fuel Manifold Inspection Locations
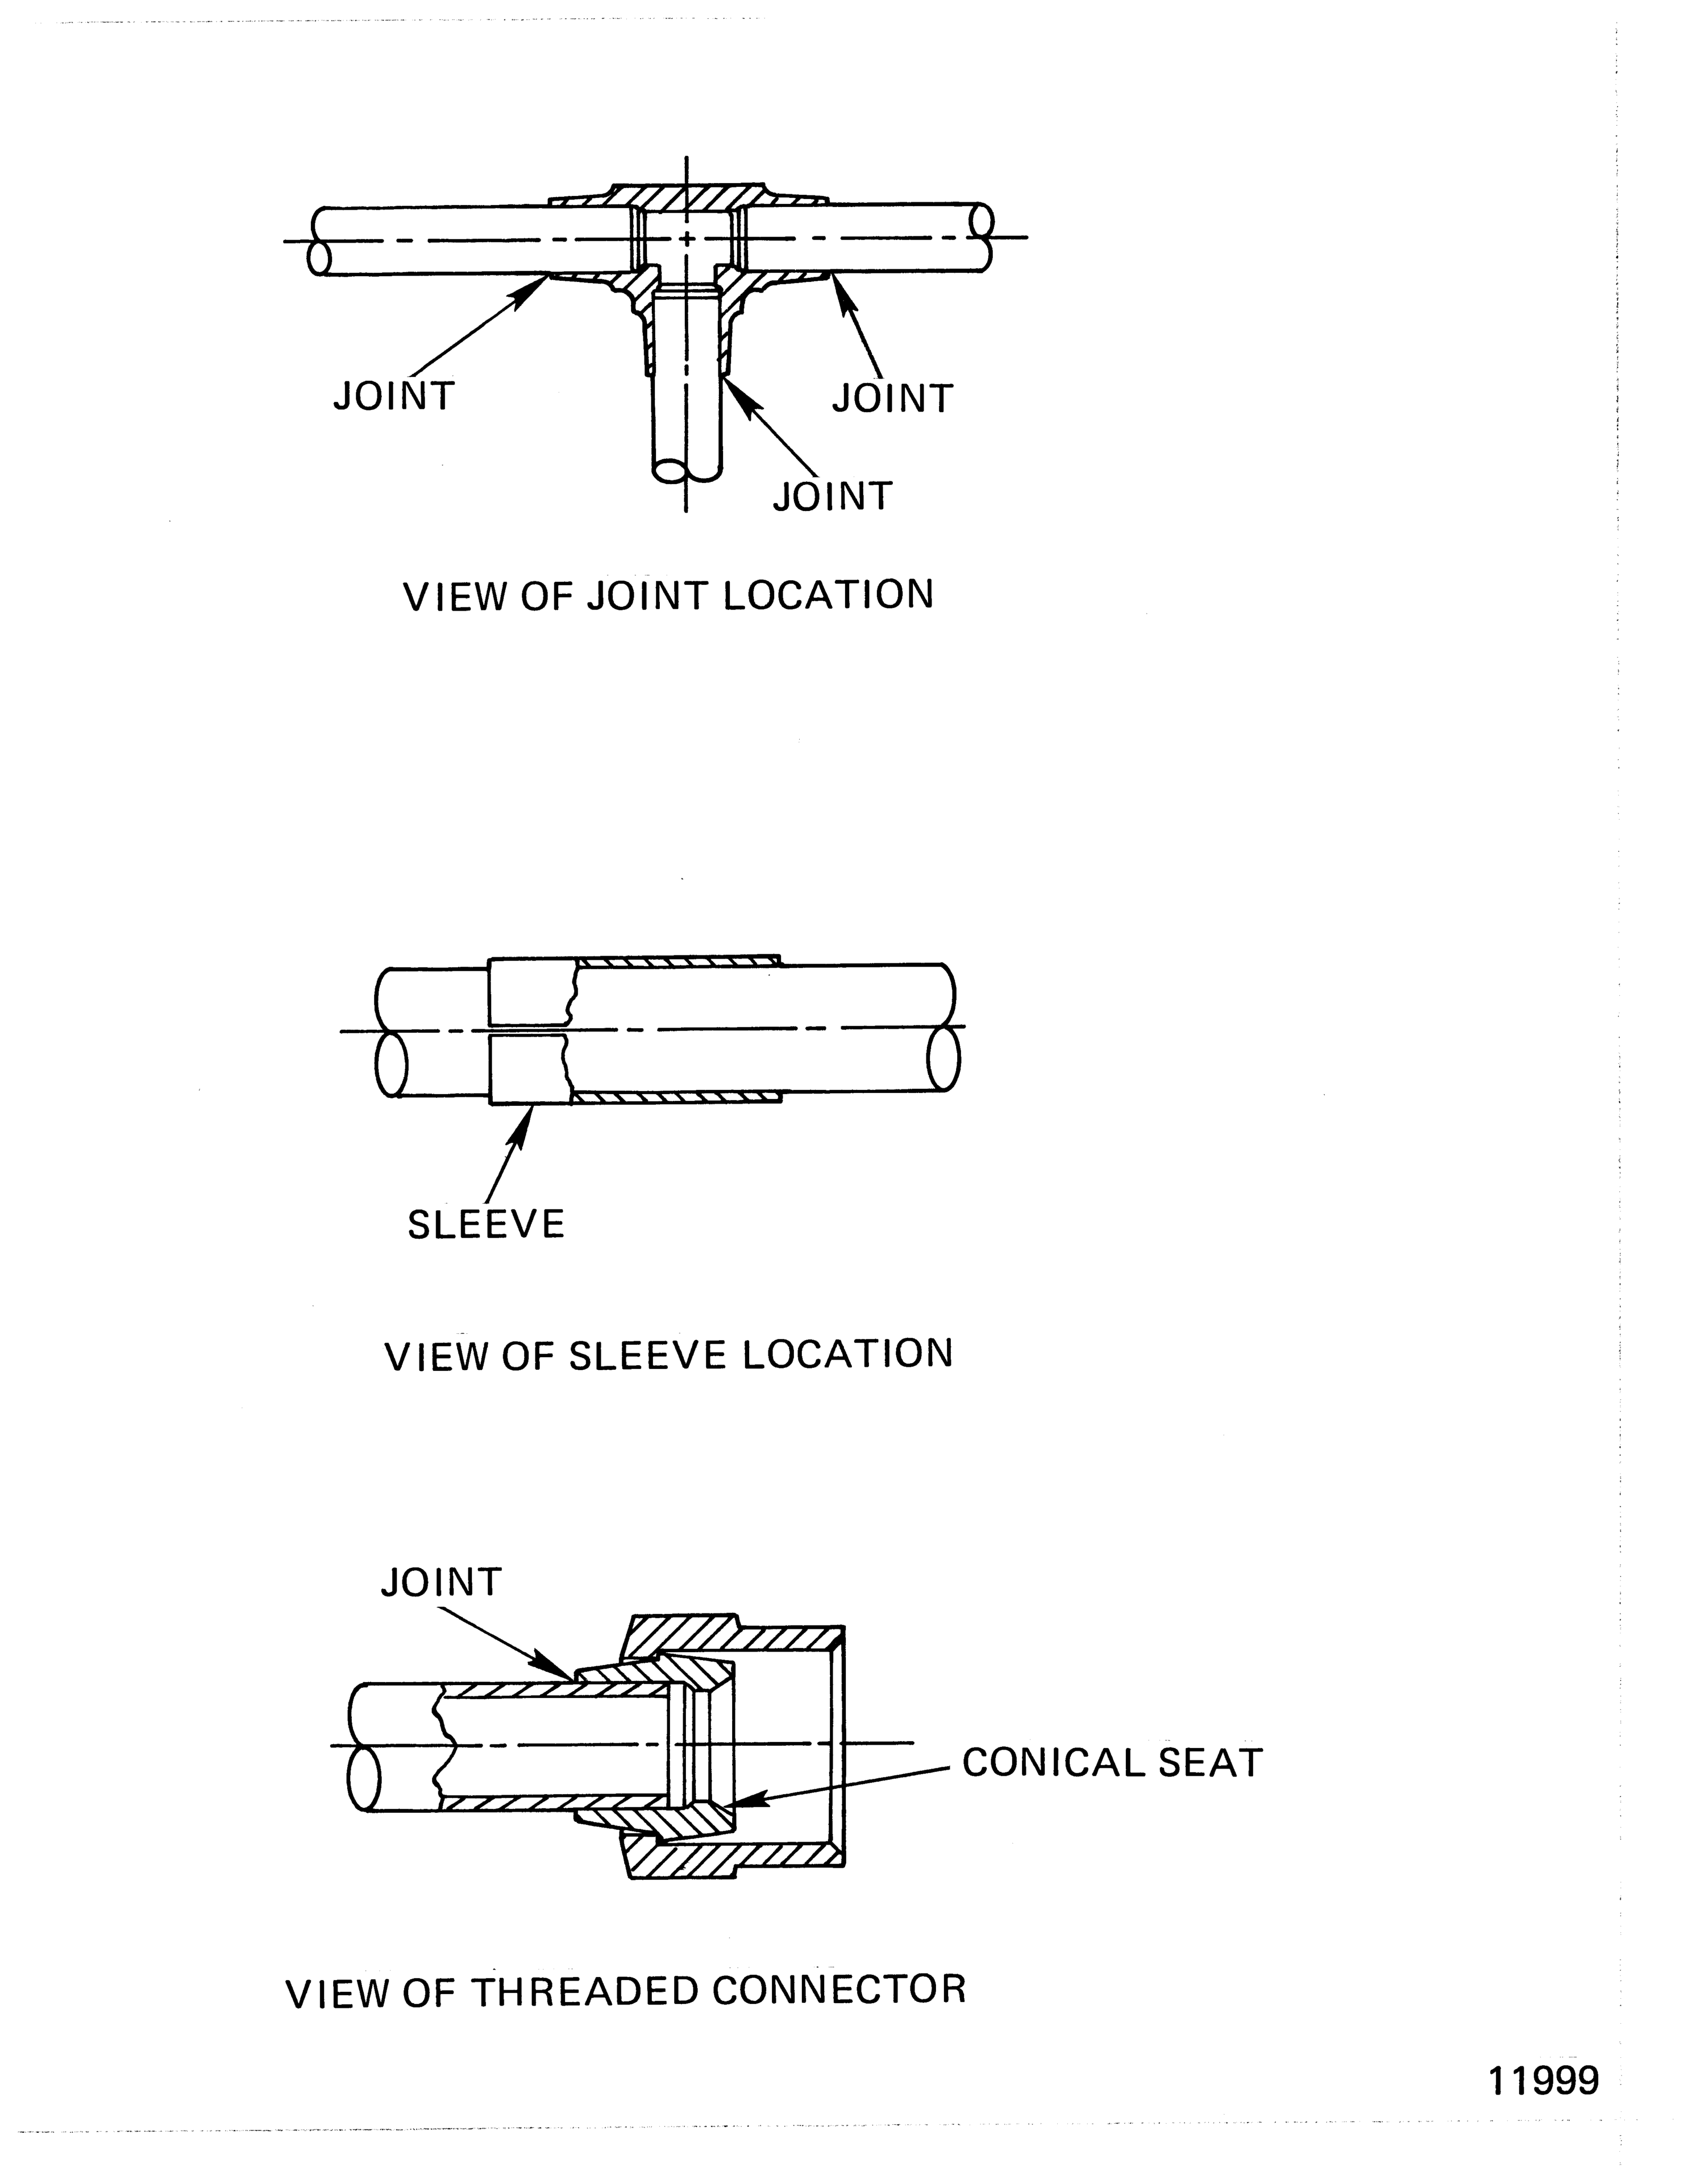
Figure: Inspection Of The Fuel Nozzle Supply Manifold Of Brazed Joints Pre SB 73-0131, Pre SB 73-0139 And Pre SB 73-0147
Inspection Of The Fuel Nozzle Supply Manifold Of Brazed Joints Pre SB 73-0131, Pre SB 73-0139 And Pre SB 73-0147
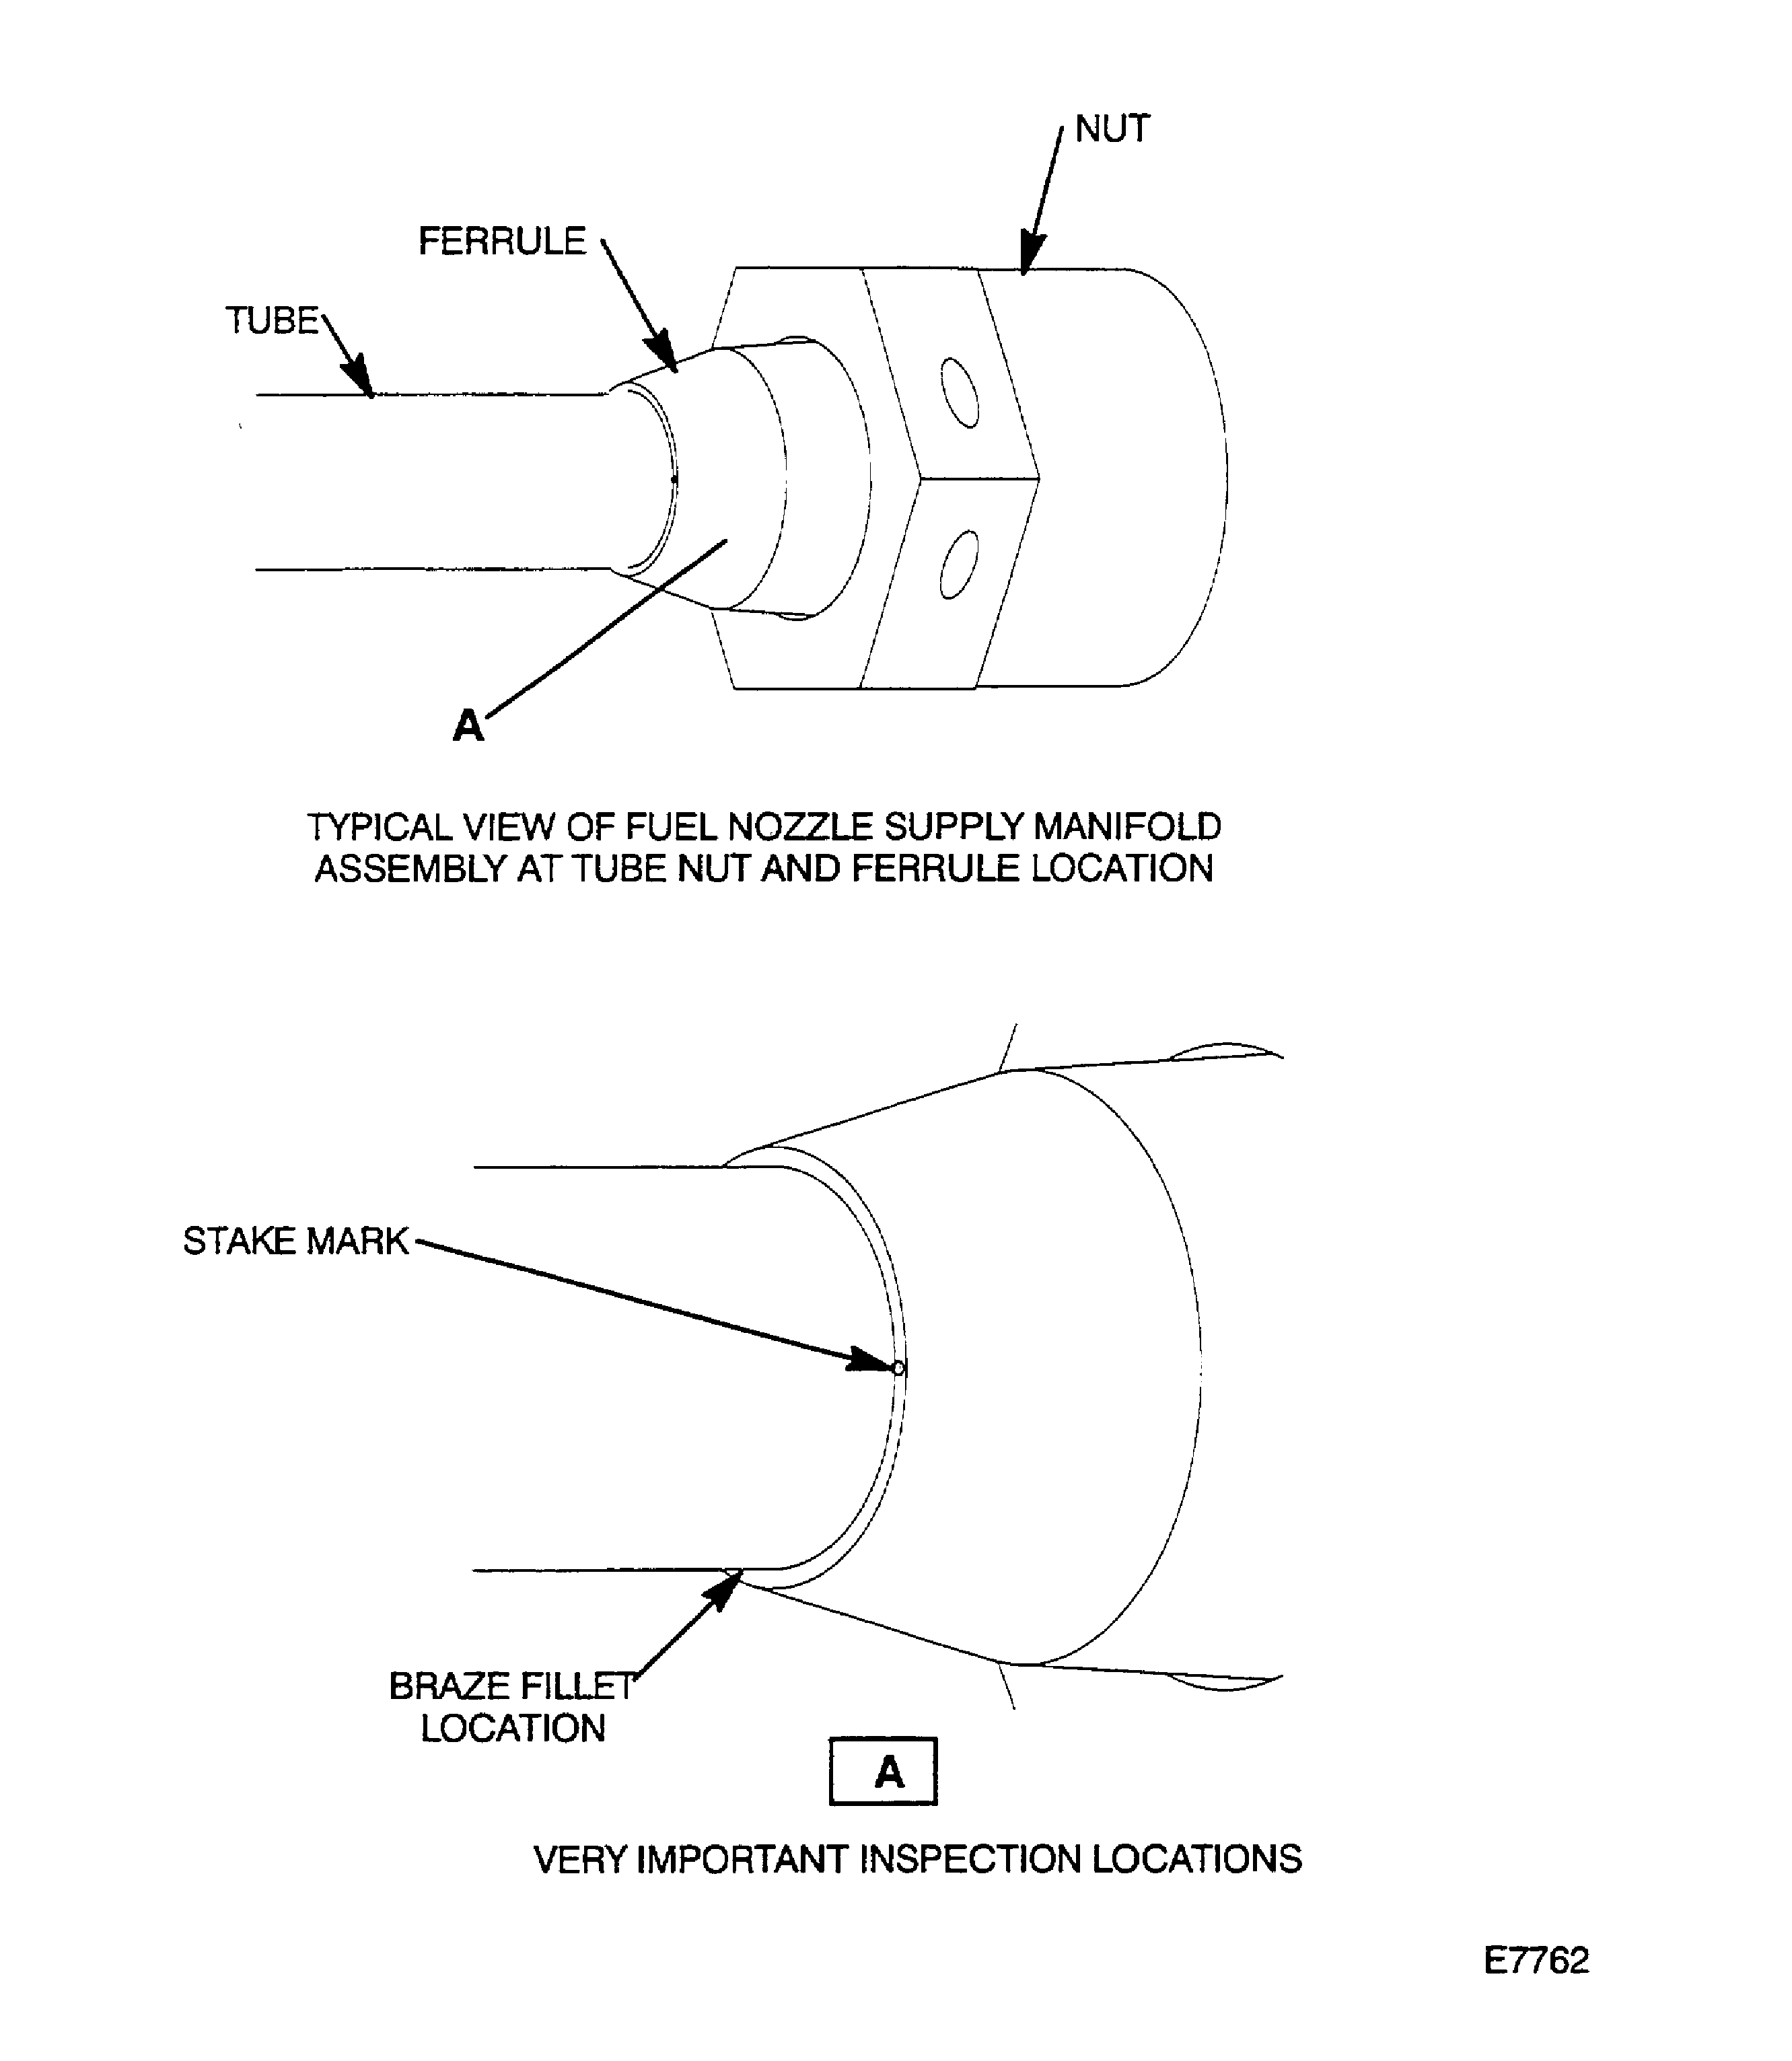
Figure: Inspection of the Fuel Nozzle Supply Manifold
Inspection of the Fuel Nozzle Supply Manifold
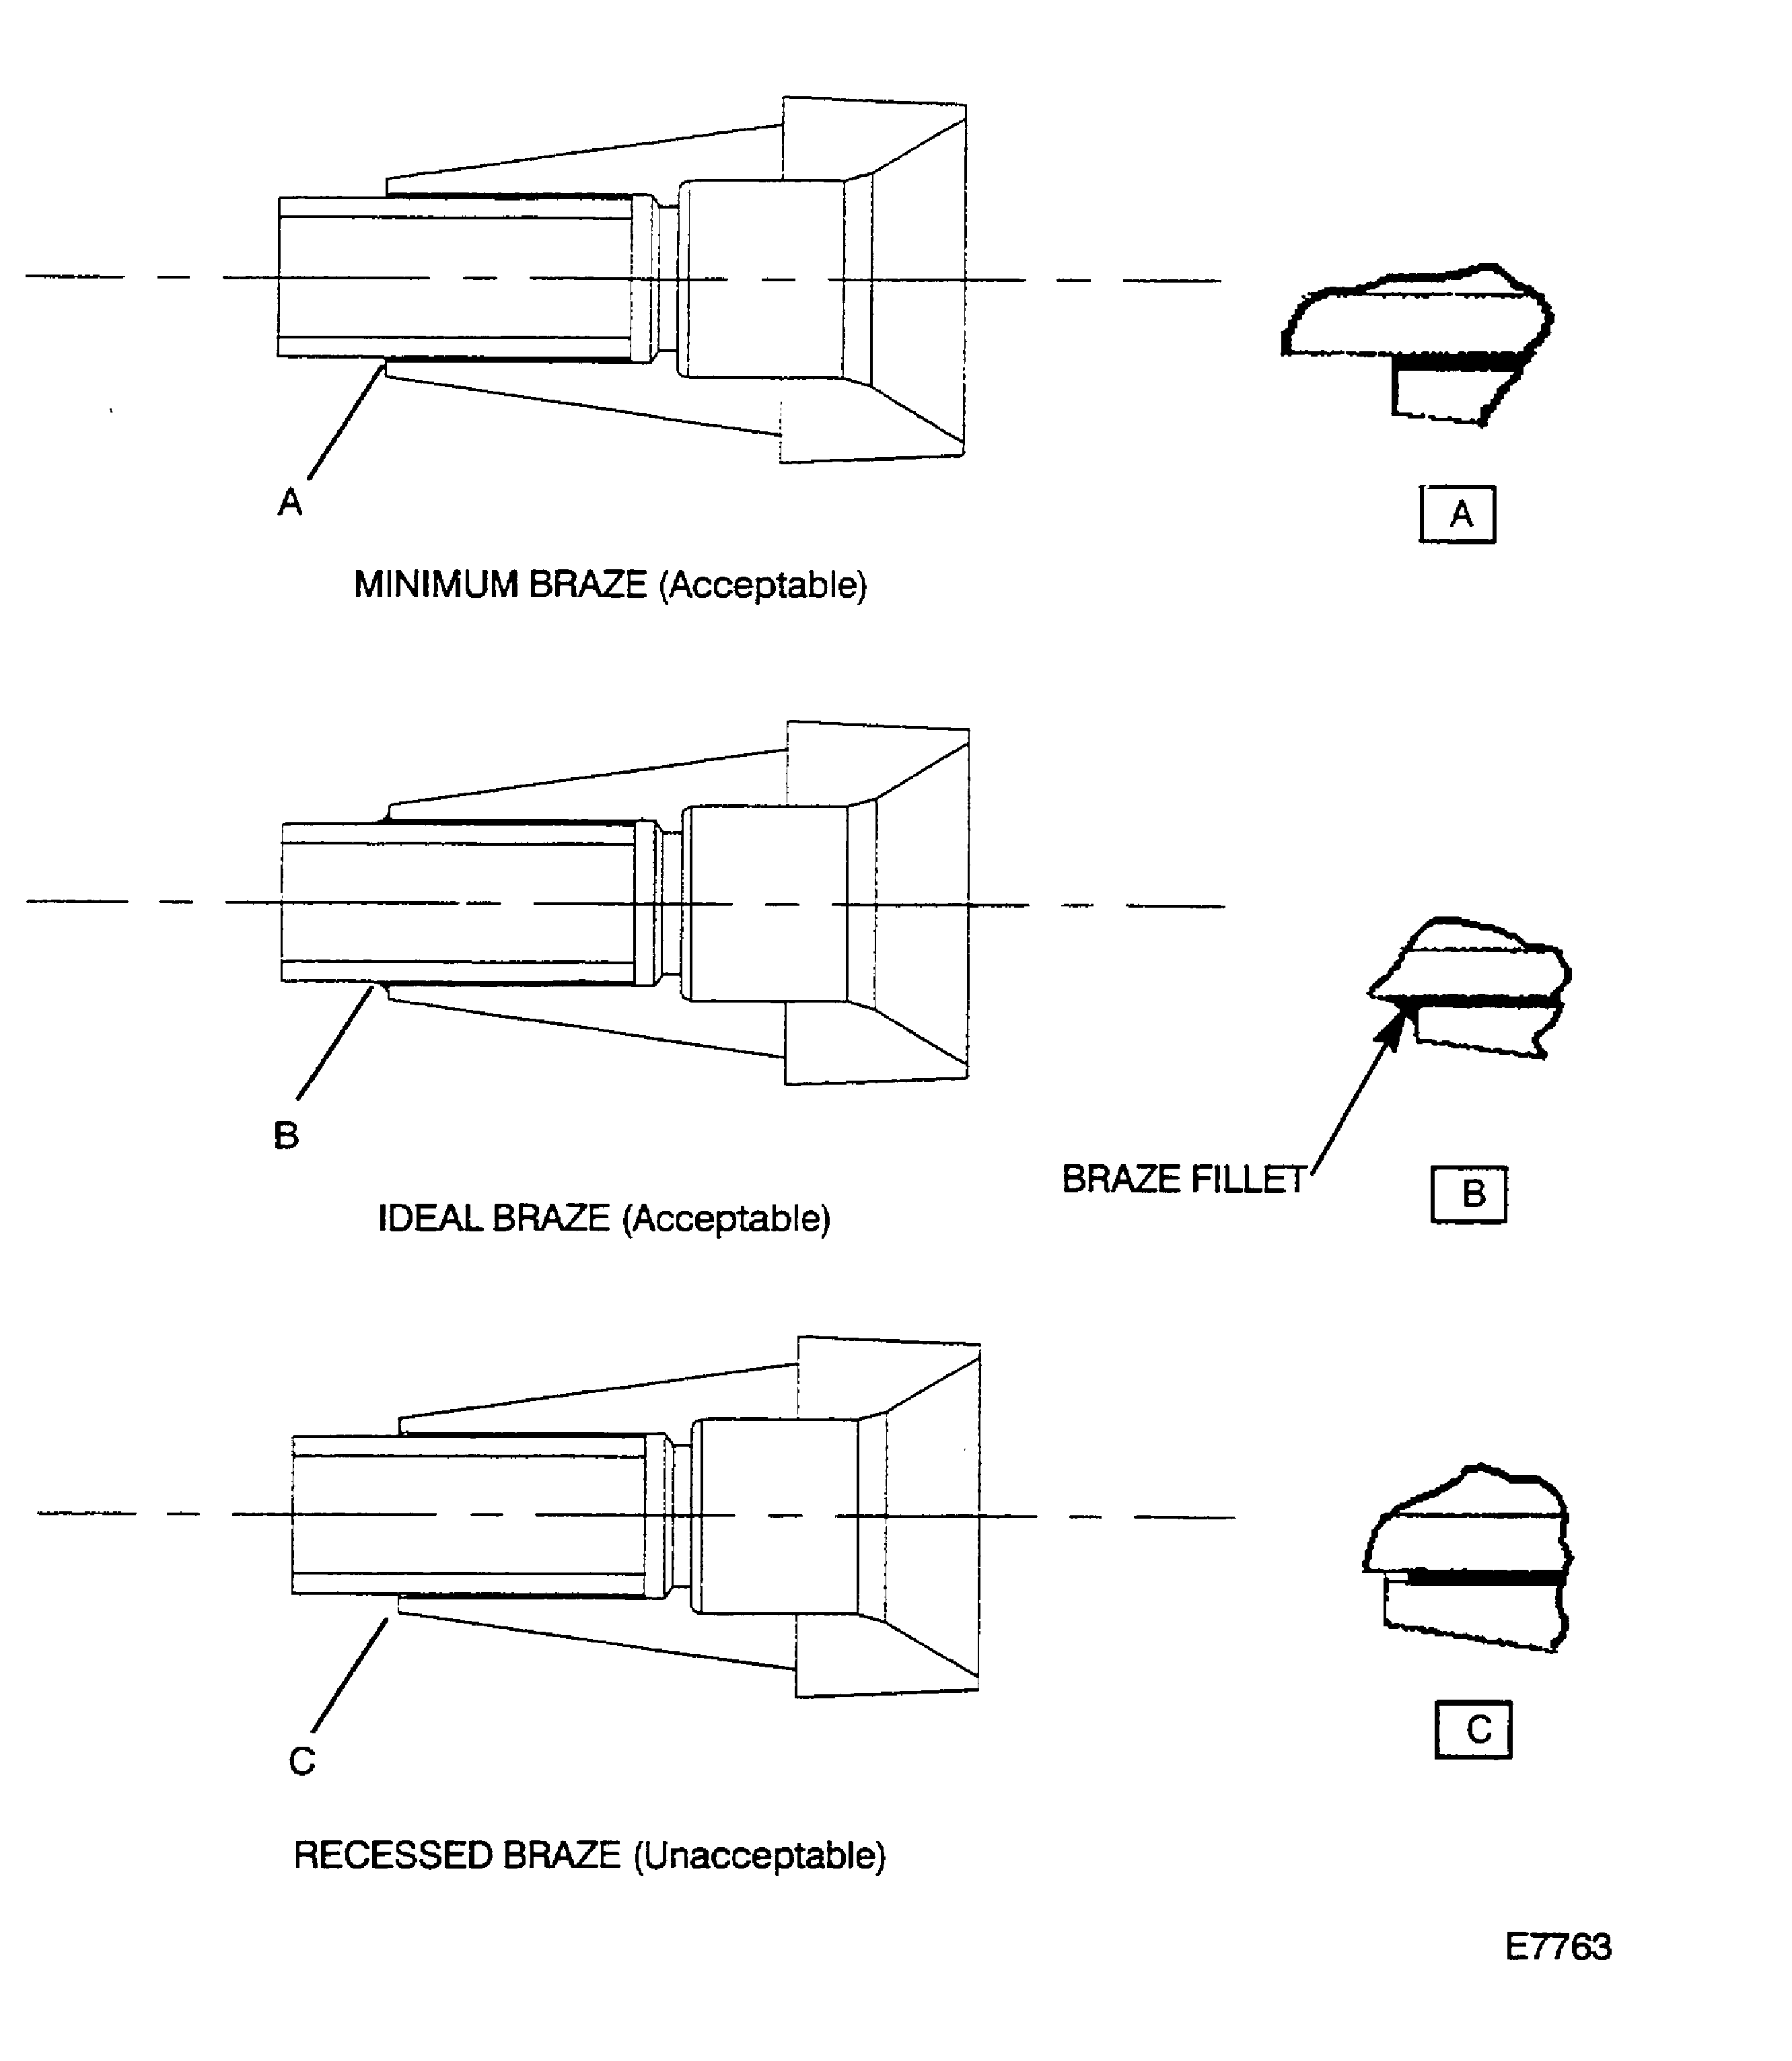
Figure: Inspection Of The Fuel Nozzle Supply Manifold Of Welded Joints Post SB 73-0131, Post SB 73-0139 And Post SB 73-0147
Inspection Of The Fuel Nozzle Supply Manifold Of Welded Joints Post SB 73-0131, Post SB 73-0139 And Post SB 73-0147
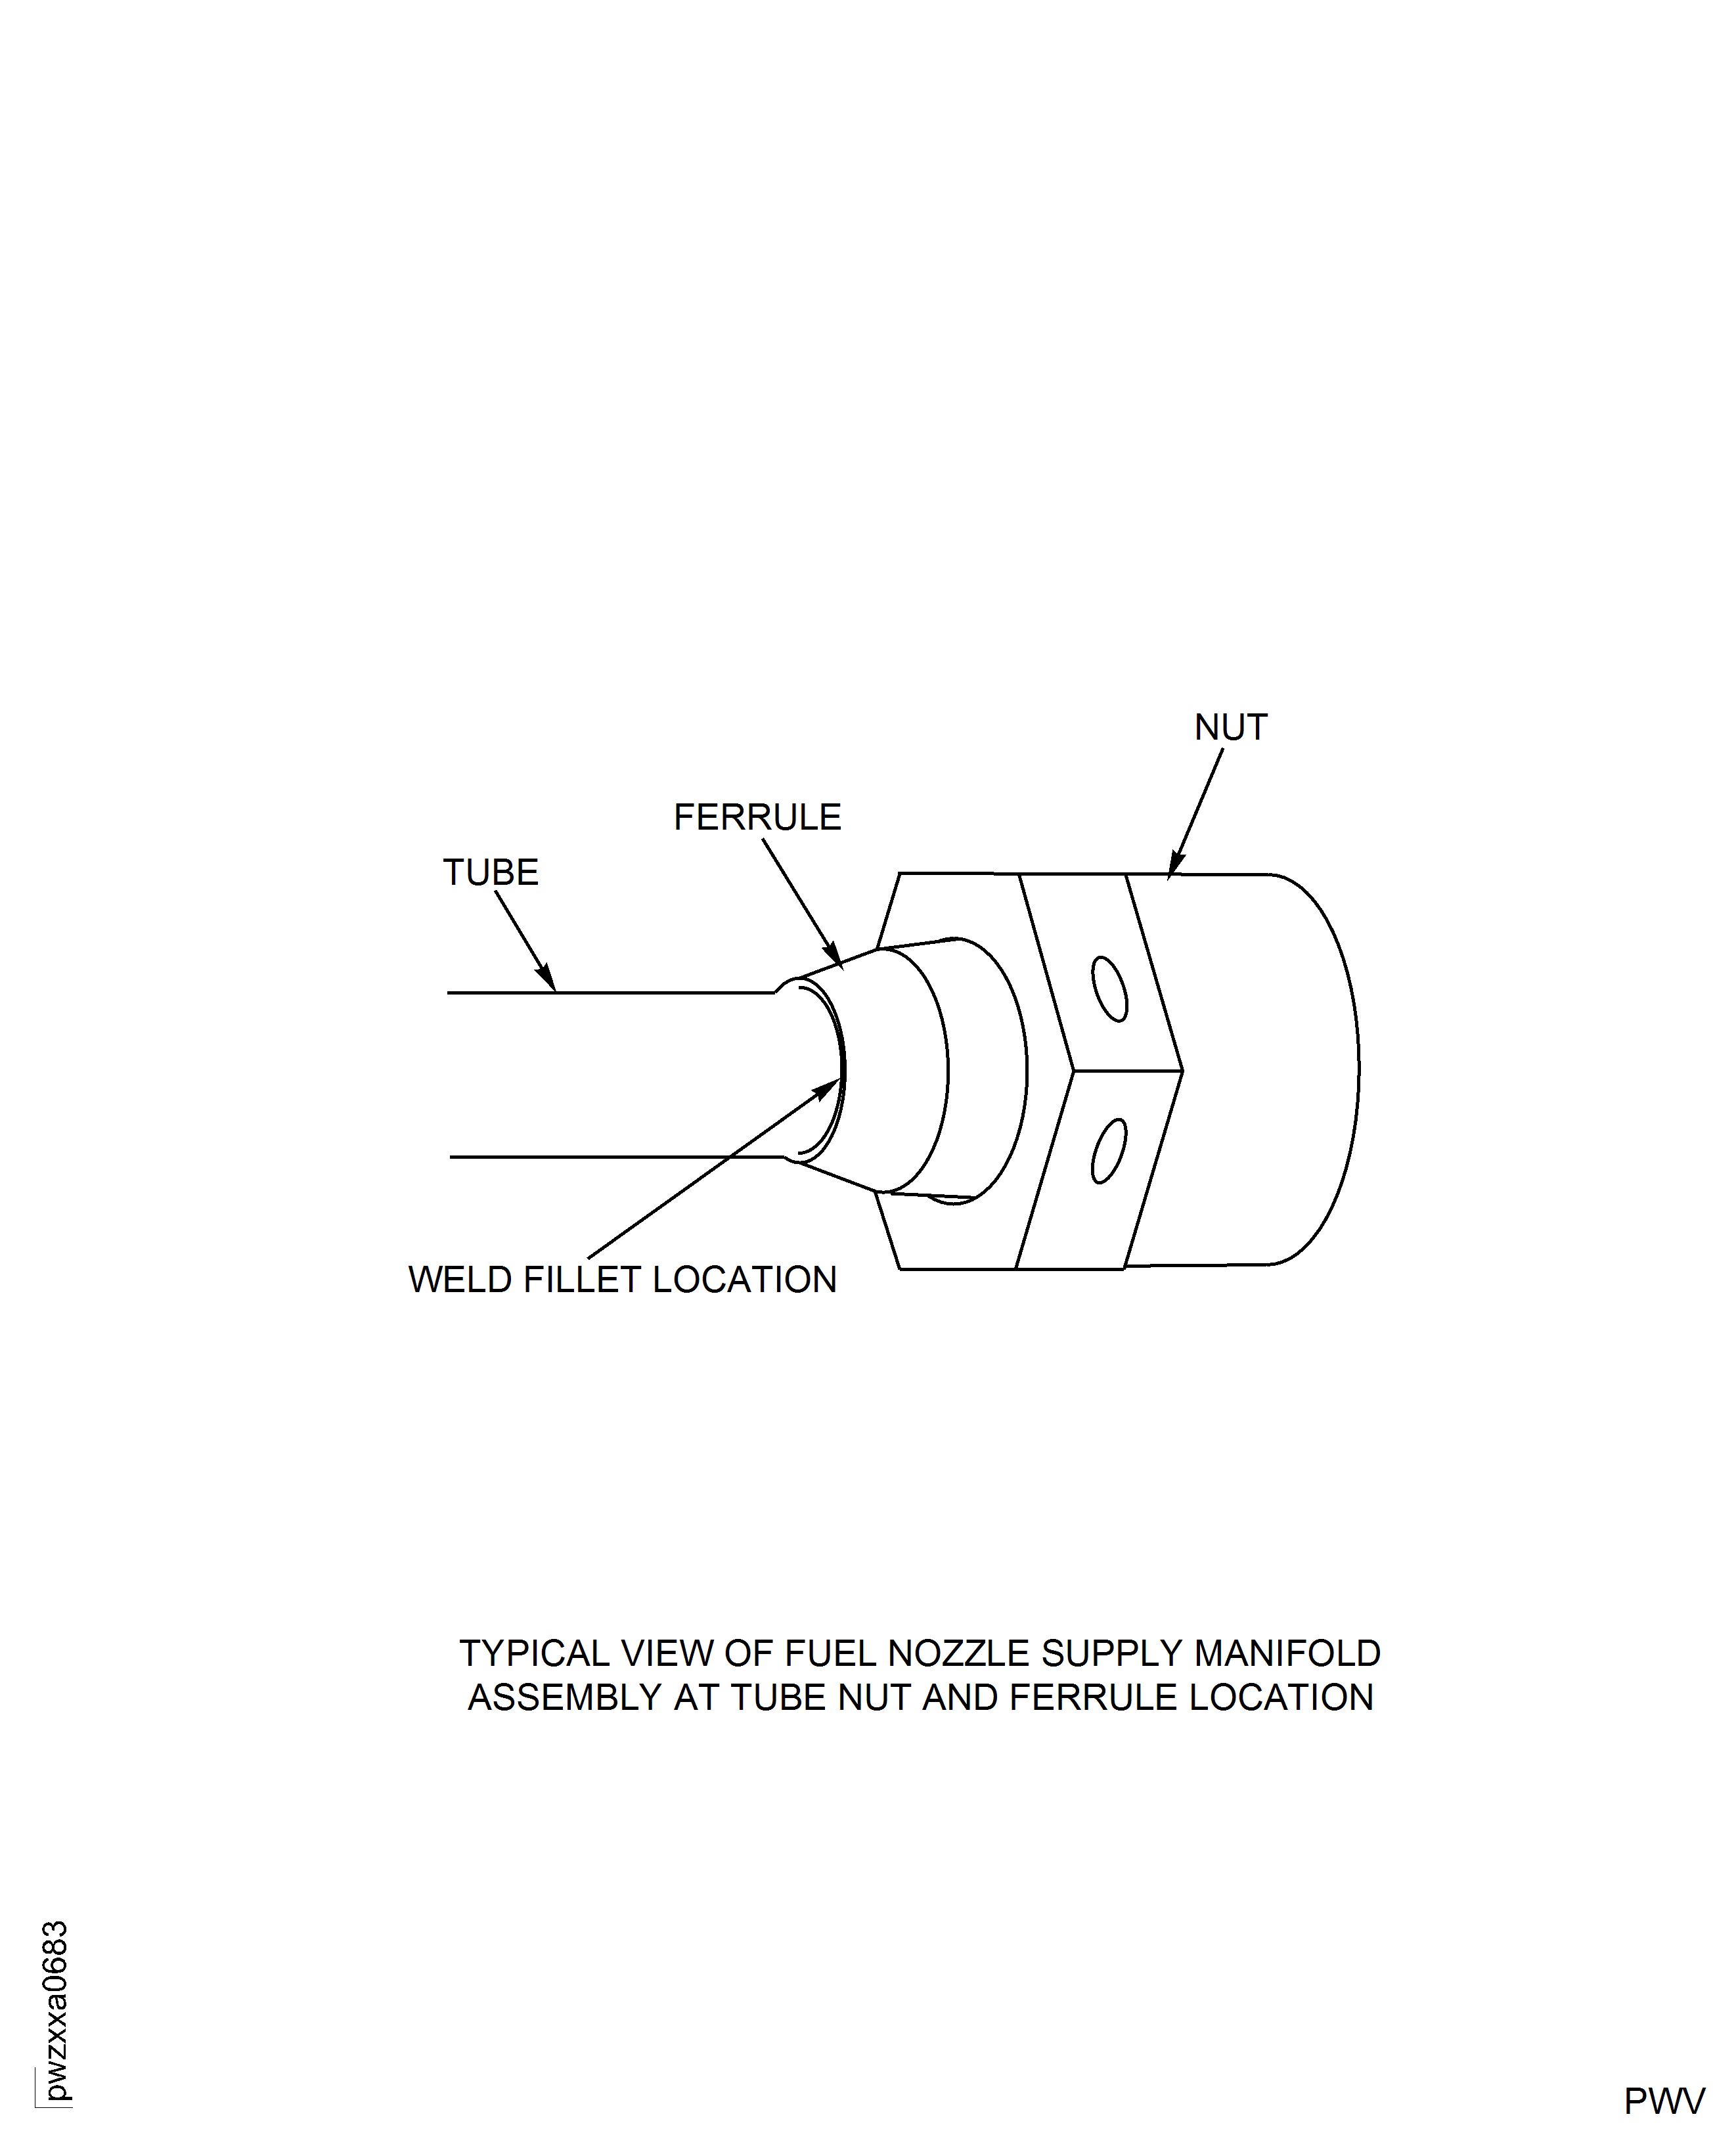
Figure: Inspection of the Conical Seat for End Fittings
Inspection of the Conical Seat for End Fittings
