Export Control
EAR Export Classification: Not subject to the EAR per 15 C.F.R. Chapter 1, Part 734.3(b)(3), except for the following Service Bulletins which are currently published as EAR Export Classification 9E991: SBE70-0992, SBE72-0483, SBE72-0580, SBE72-0588, SBE72-0640, SBE73-0209, SBE80-0024 and SBE80-0025.Copyright
© IAE International Aero Engines AG (2001, 2014 - 2021) The information contained in this document is the property of © IAE International Aero Engines AG and may not be copied or used for any purpose other than that for which it is supplied without the express written authority of © IAE International Aero Engines AG. (This does not preclude use by engine and aircraft operators for normal instructional, maintenance or overhaul purposes.).Applicability
All
Common Information
TASK 79-21-49-200-103 Engine Pressure Oil Tubes - Examine, Inspection-003
Effectivity
FIG/ITEM | PART NO. |
10-100 | 5R8132 |
10-100 | 6A5394 |
11-100 | 5R8133 |
11-100 | 6A5395 |
12-100 | 5R8135 |
12-100 | 6A5397 |
13-100 | 5R8134 |
13-100 | 6A5396 |
13-100 | 6A6202 |
General
This TASK gives the procedure for the inspection of the pressure oil tubes.
Fig/item numbers in parentheses in the procedure agree with those used in the IPC. Only the primary Fig/item numbers are used. For the service bulletin alpha variants refer to the IPC..
All the parts must be cleaned before the part is examined. Refer to Cleaning-000 TASK 79-21-49-100-100.
All parts must be visually examined for damage, corrosion and wear. Defects that are not identified in the procedure must be referred to IAE.
Do not discard the part until you are sure there are no repairs available. Refer to the instructions in Repair before a discarded part is used again or oversize parts are installed.
Parts which must be discarded can be held although no repair is available. The repair of a discarded part could be shown to be necessary at a subsequent date.
All the parts must be examined to make sure that all the repairs have been completed satisfactorily.
The practices and processes referred to in the procedure by the TASK numbers are in the SPM.
References
Refer to the SPM for data on these items:
Definitions of Damage, SPM TASK 70-02-02-350-501.
Inspection of Parts, SPM TASK 70-20-01-200-501.
Preliminary Requirements
Pre-Conditions
NONESupport Equipment
NONEConsumables, Materials and Expendables
NONESpares
NONESafety Requirements
NONEProcedure
Clean the parts. Refer to Cleaning-000 TASK 79-21-49-100-100.
Repair, VRS7001 (Repair-001) SPM TASK 70-35-24-300-501.
Cracked
Tubes. Refer to SPM TASK 70-23-01-230-501.
Do a crack test on the parts given below. Use the applicable penetrant procedure.
SUBTASK 79-21-49-230-053 Examine the Tubes (10-100, 11-100, 12-100 and 13-100) for Cracks
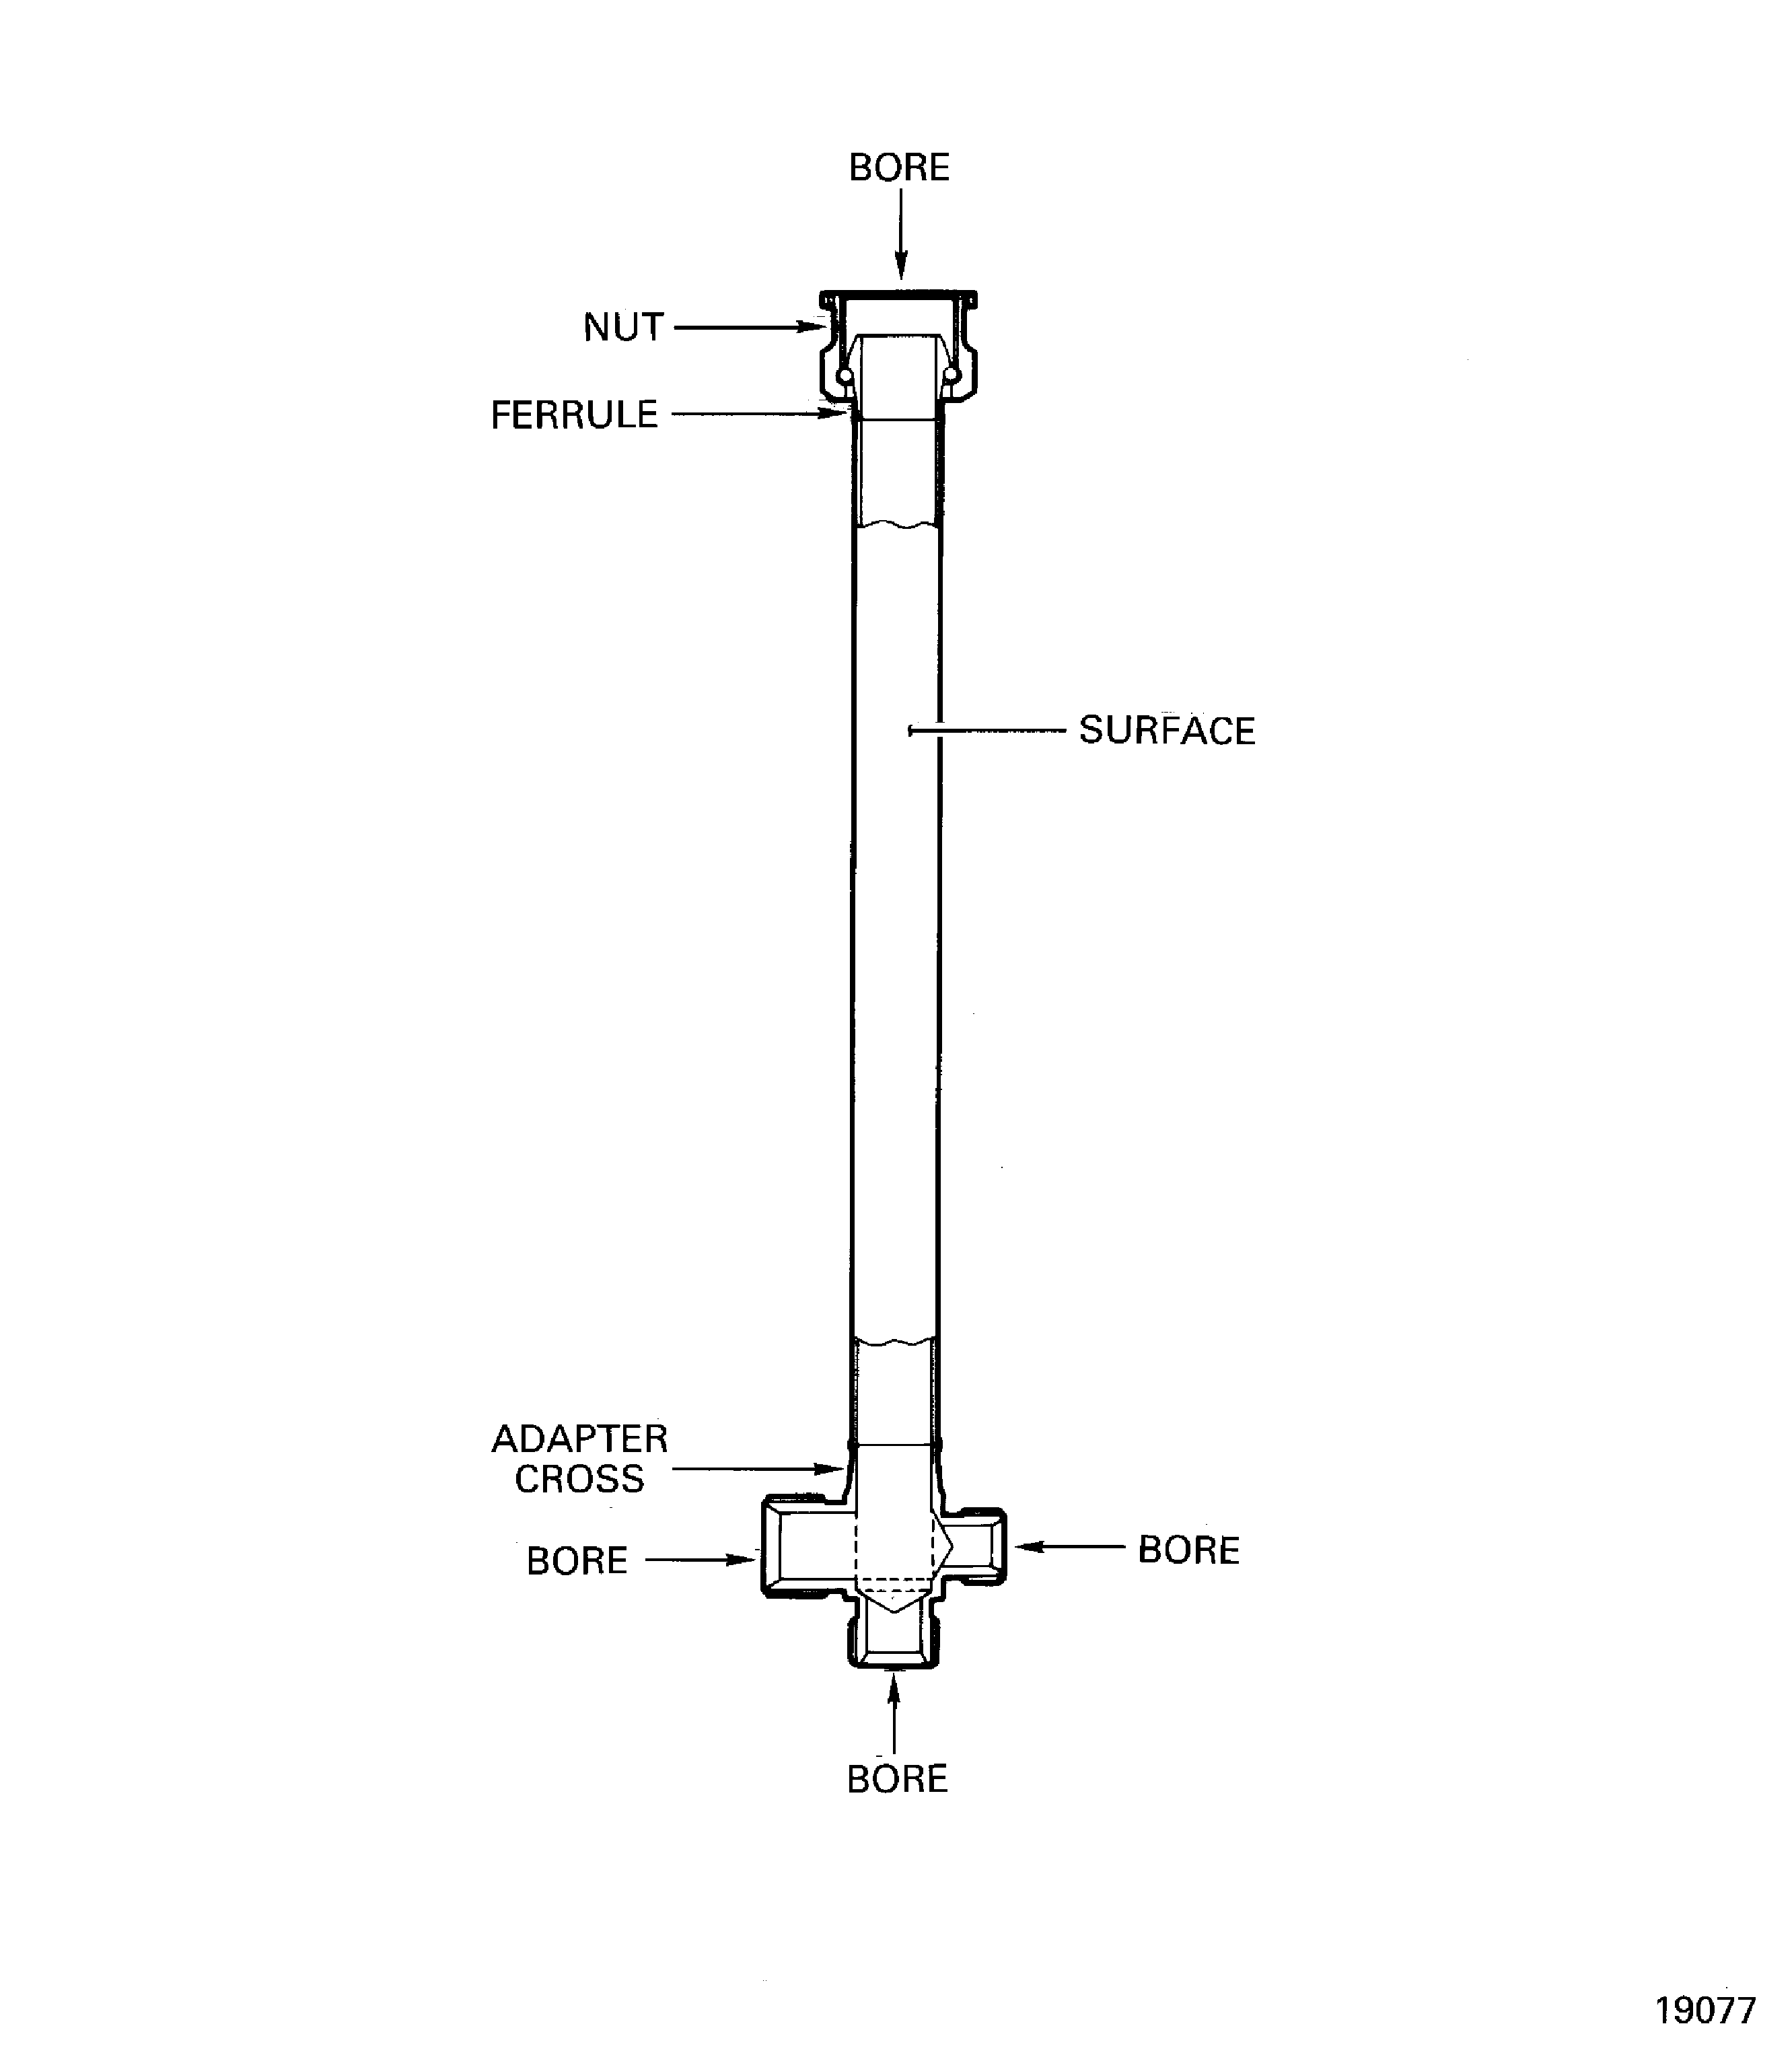
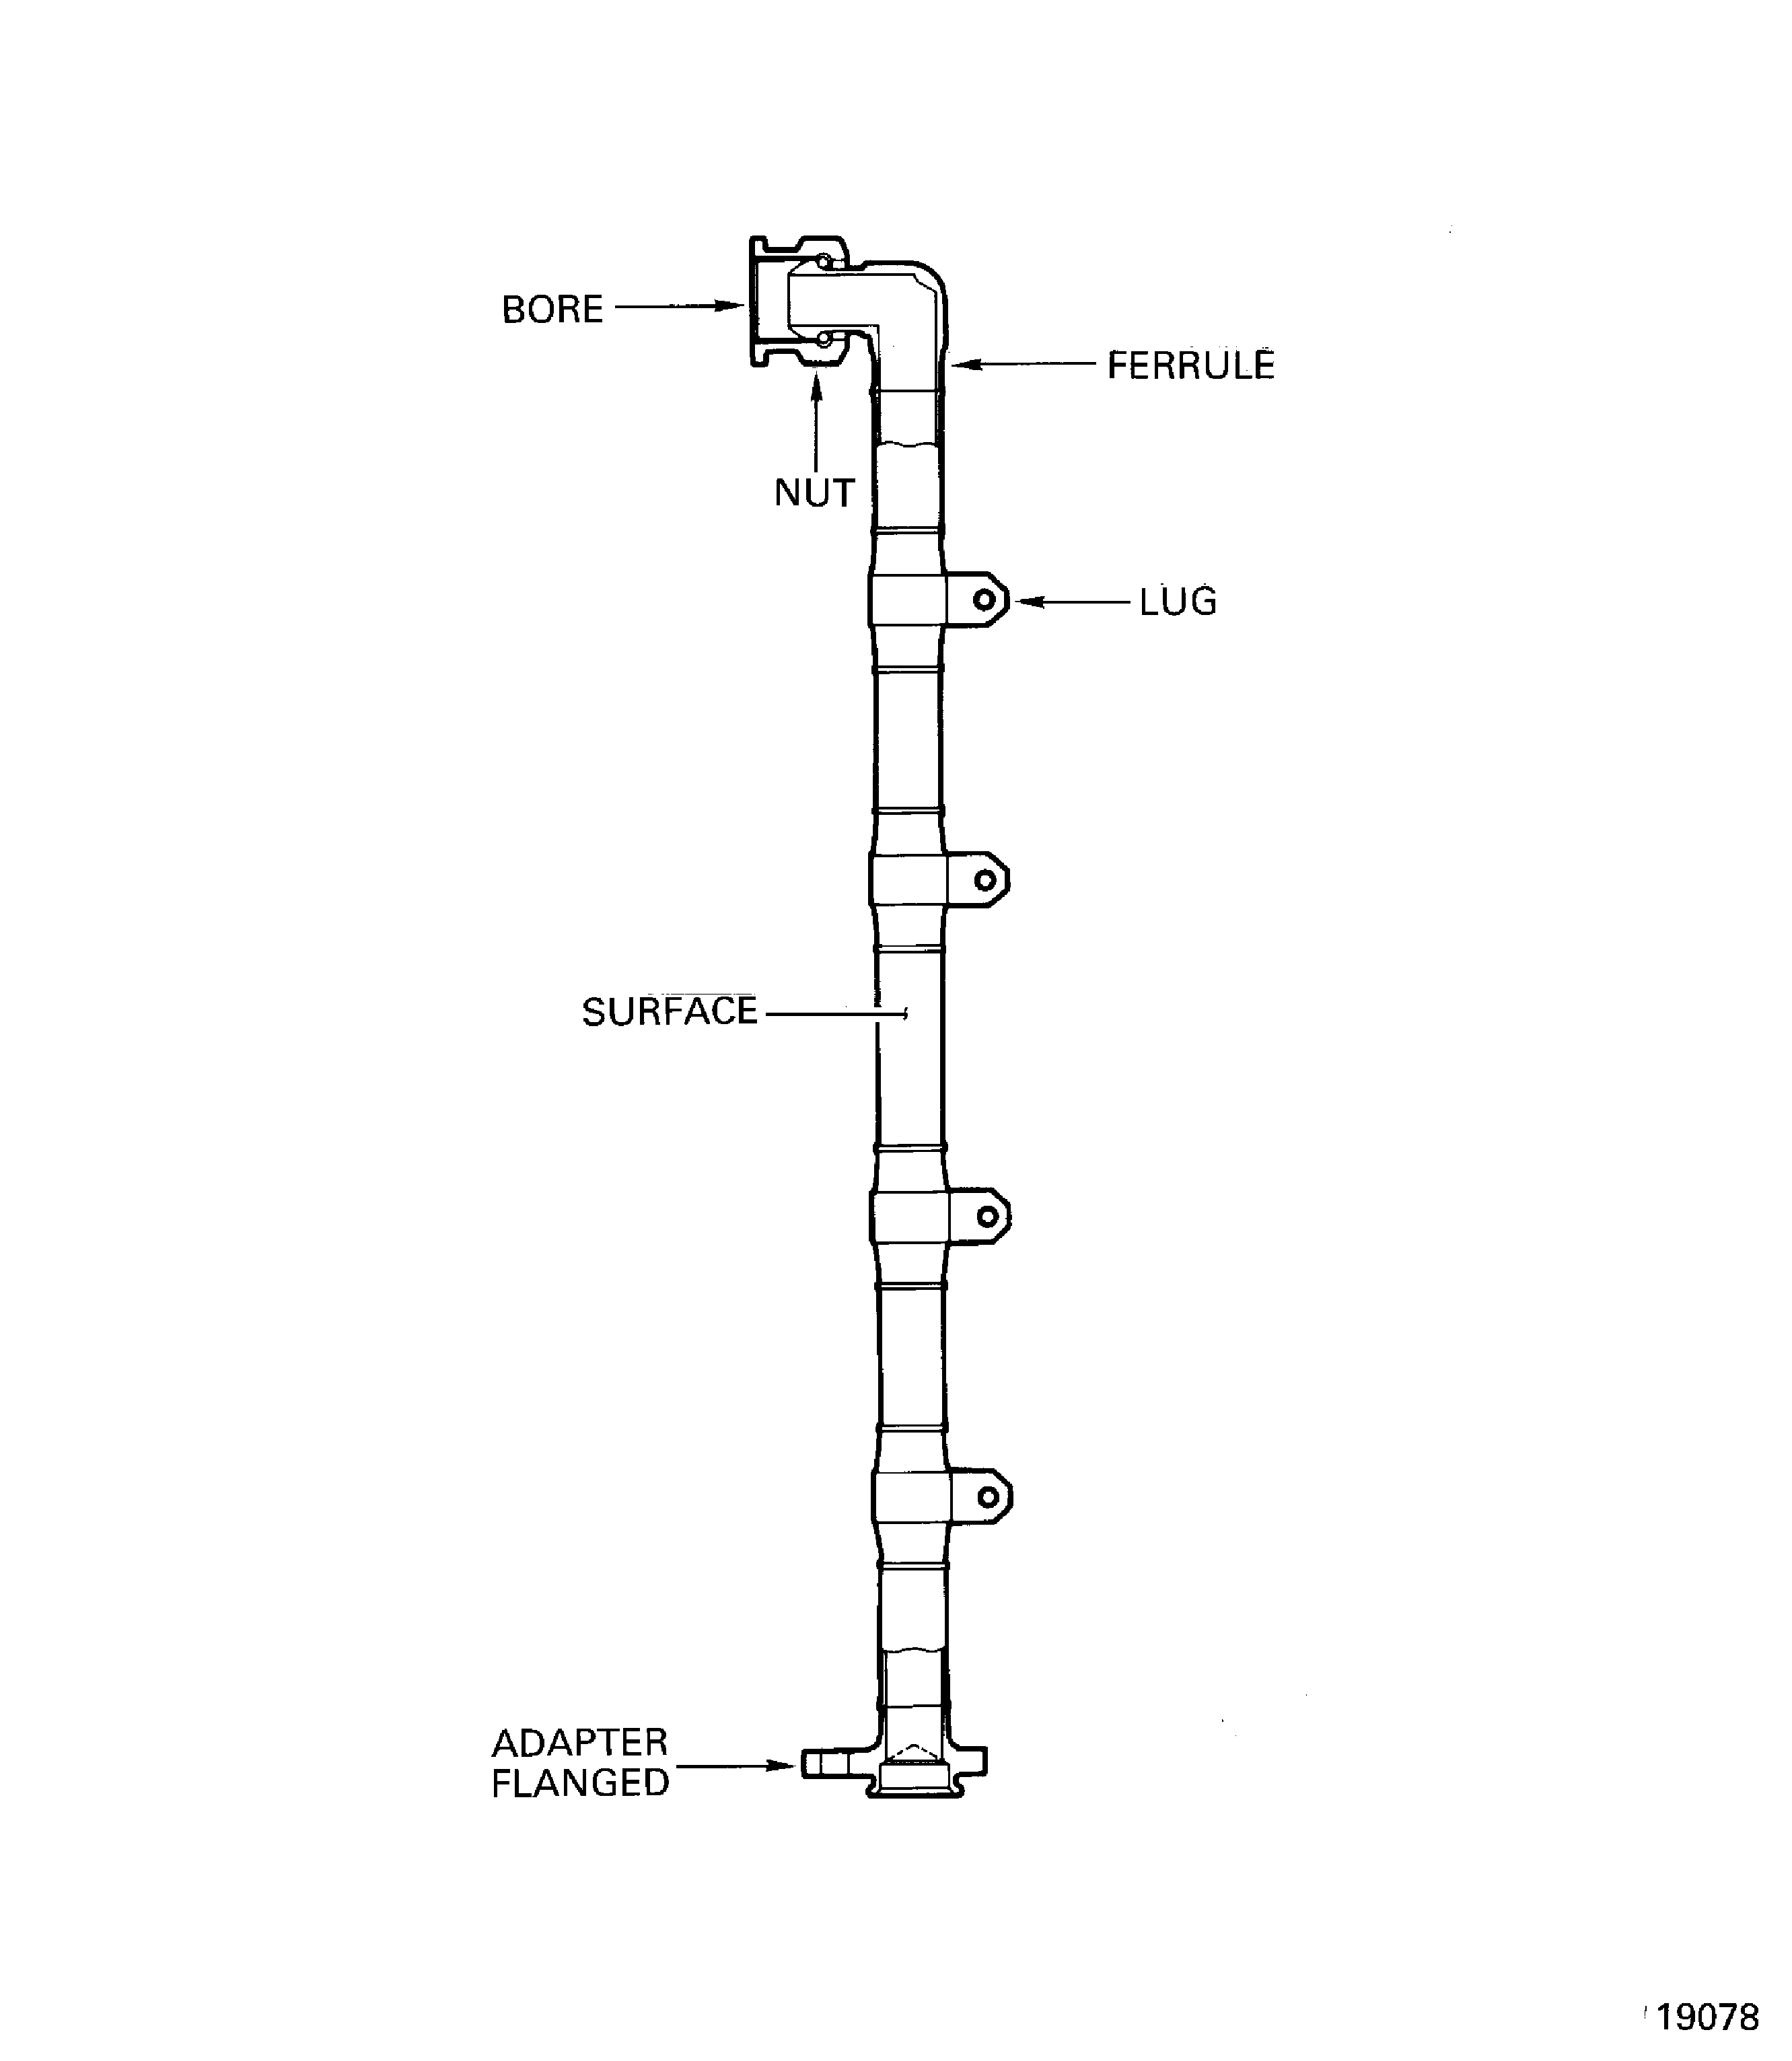
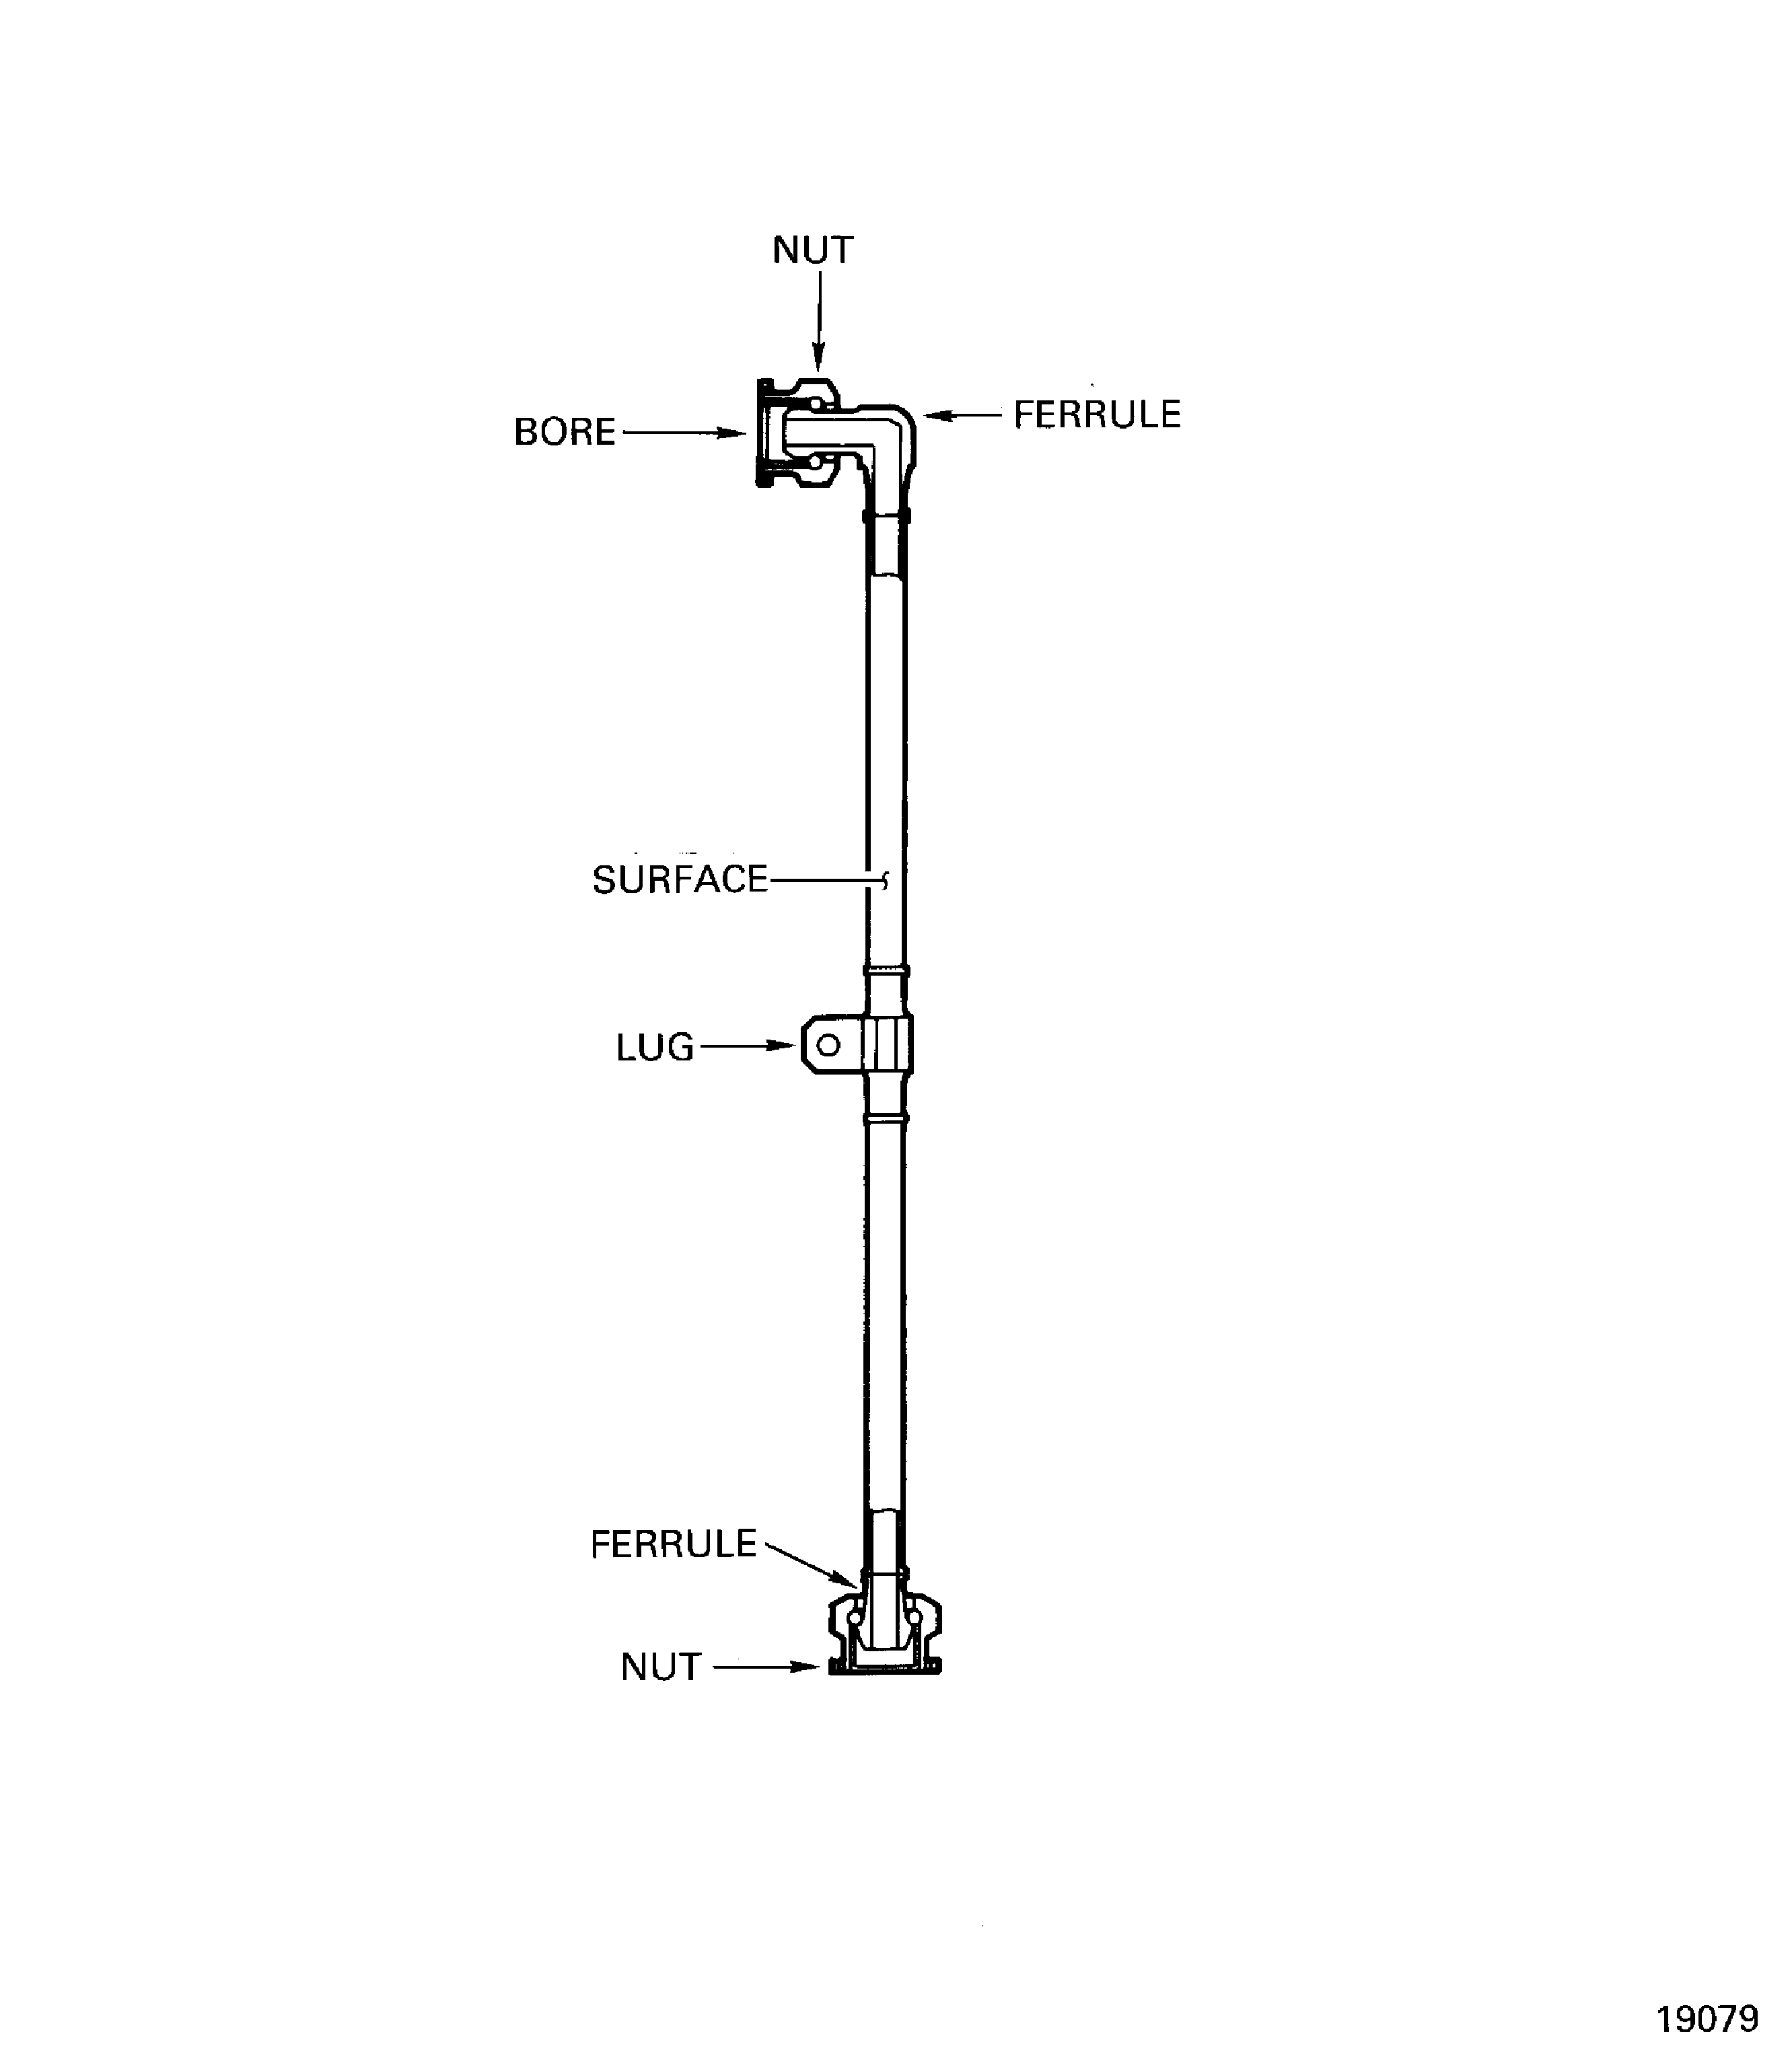
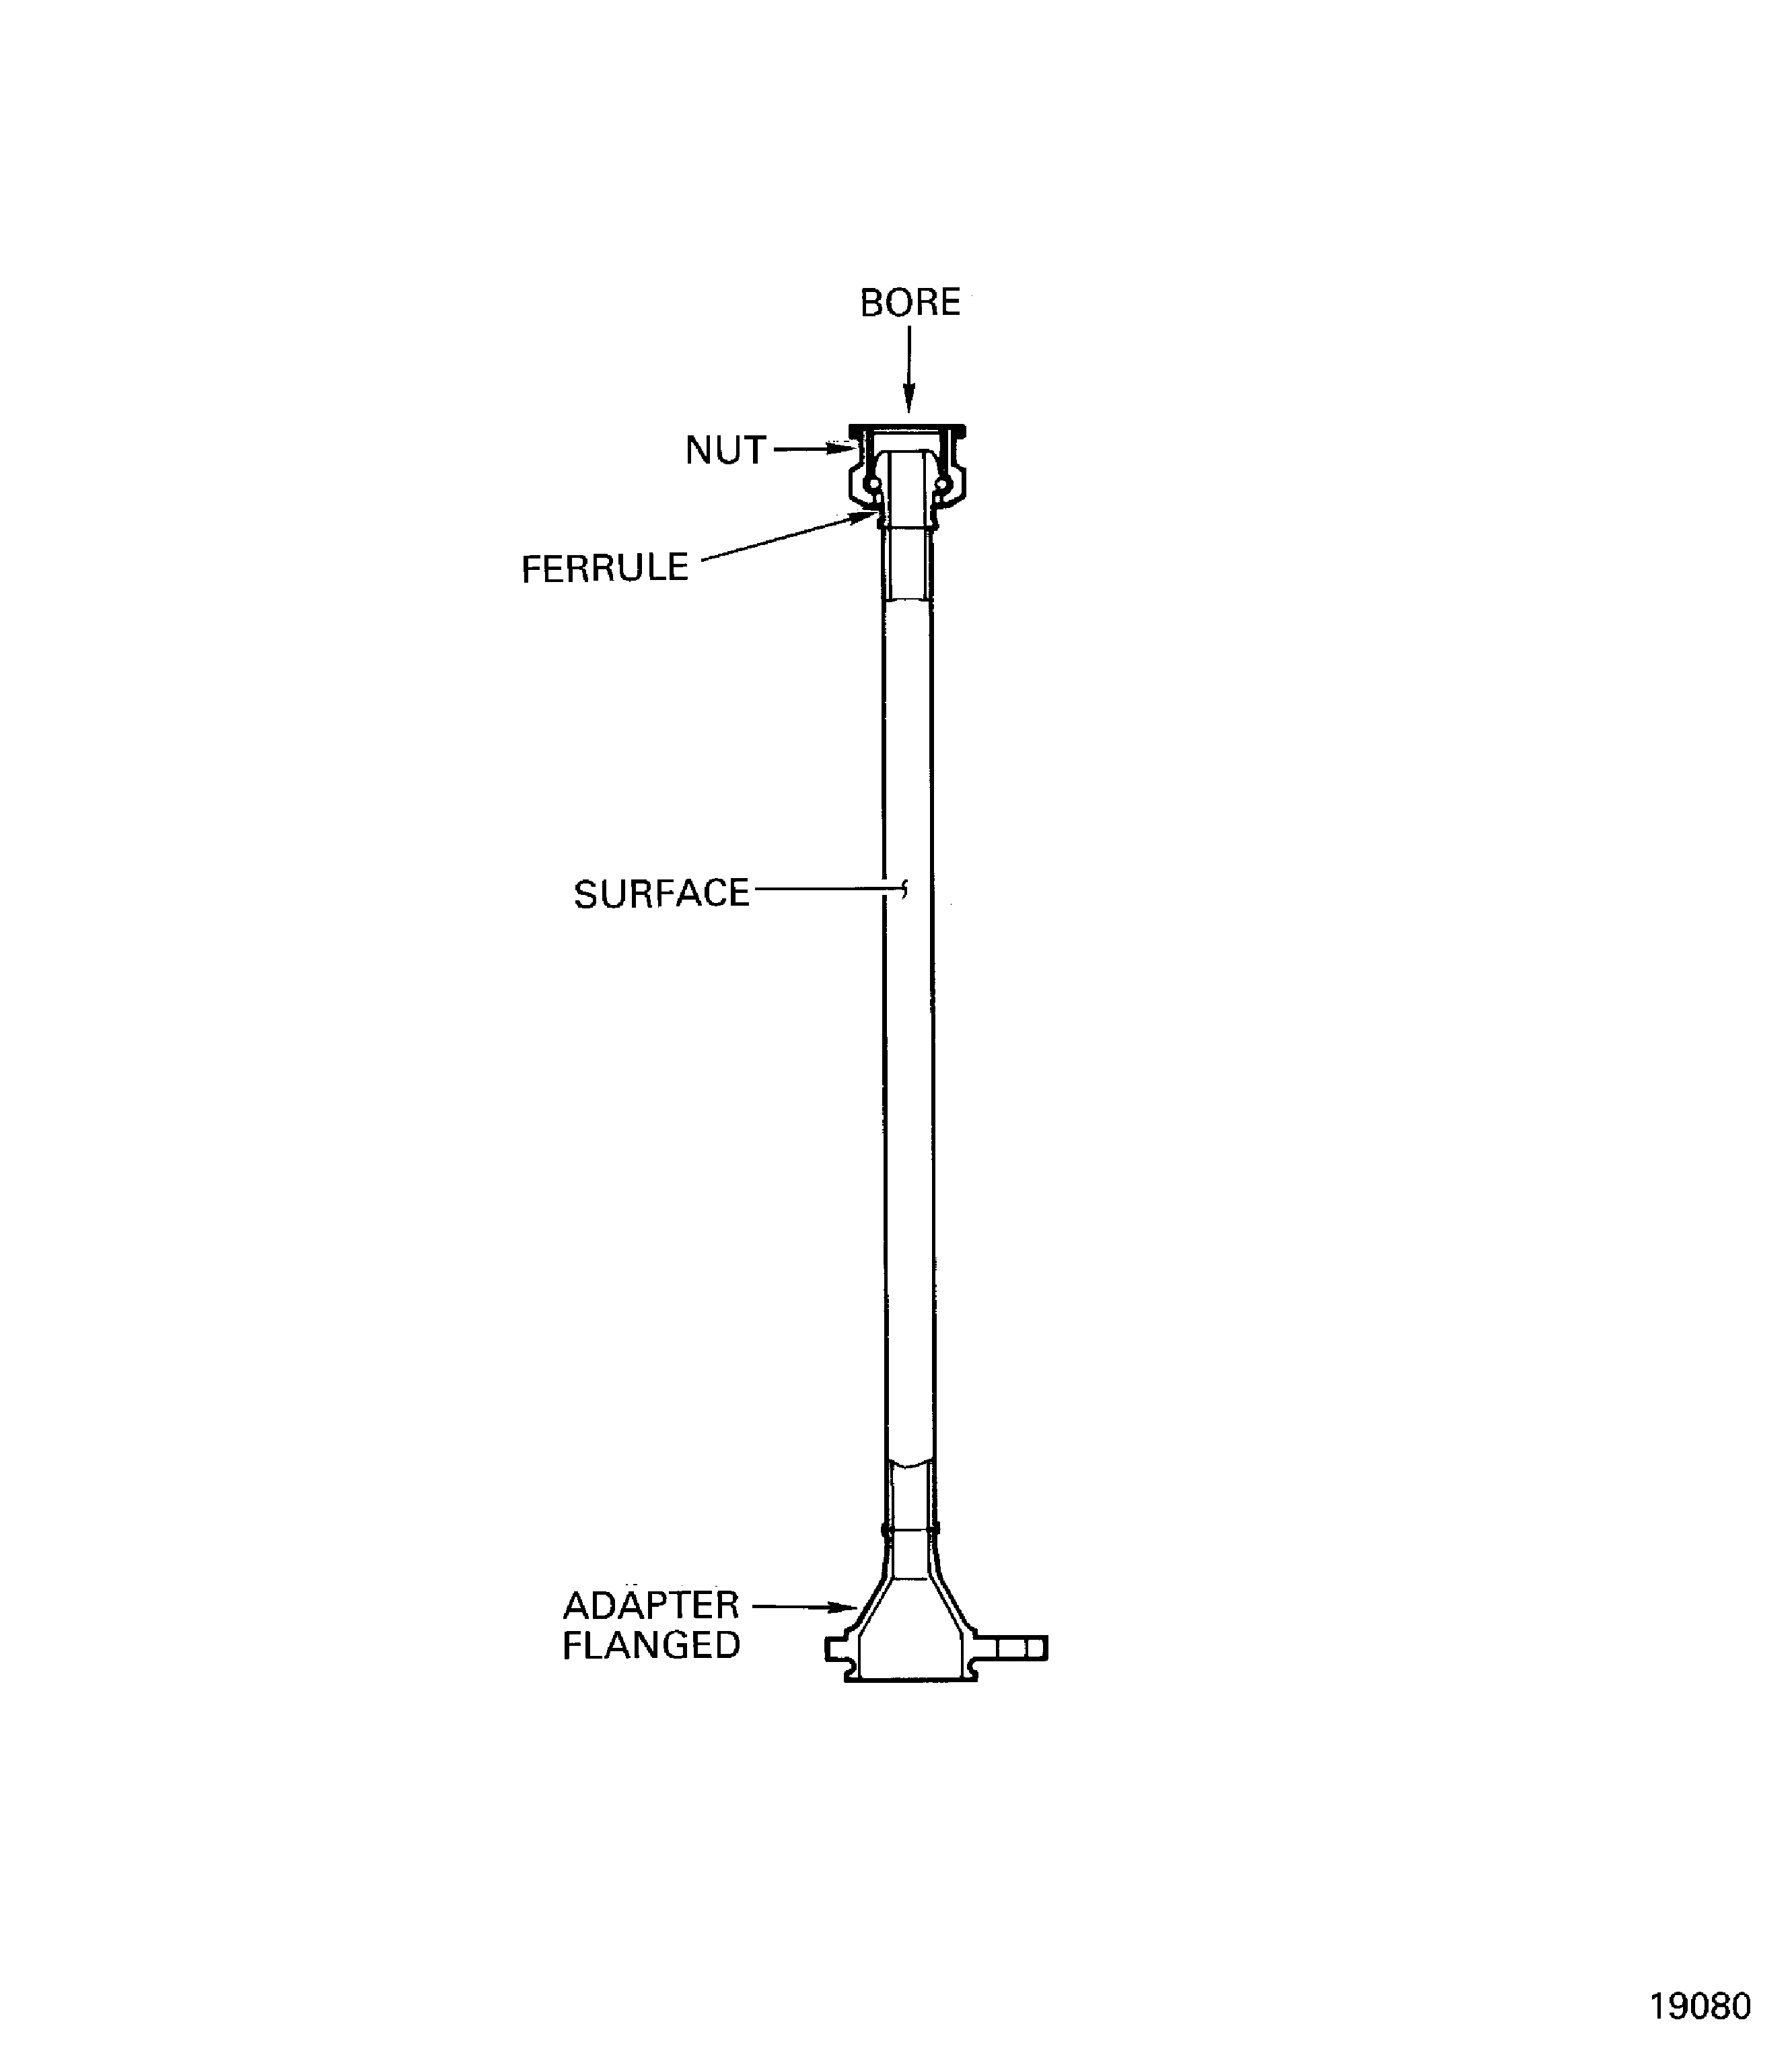
Refer to Figure.
Repair, VRS1689 (Repair-014) TASK 79-21-49-300-014 or Repair, VRS7001 (Repair-001) SPM TASK 70-35-24-300-501.
Pitted
Repair, VRS7001 (Repair-001) SPM TASK 70-35-24-300-501.
Less than 0.25 in. (6.35 mm) from a weld joint.
Repair, VRS7001 (Repair-001) SPM TASK 70-35-24-300-501.
Dents more than Step.
Dented
Repair, VRS7001 (Repair-001) SPM TASK 70-35-24-300-501.
More than Step.
Nicked
Repair, VRS7001 (Repair-001) SPM TASK 70-35-24-300-501.
Nicks more than Step
Fretted
Repair, VRS1689 (Repair-014) TASK 79-21-49-300-014.
Less than 0.004 in. (0.10 mm) in depth.
Repair, VRS7001 (Repair-001) SPM TASK 70-35-24-300-501.
More than Step.
Scored
Examine the surface.
SUBTASK 79-21-49-220-066 Examine the Tube (10-100, 11-100, 12-100 and 13-100) Surface
Examine the bore.
Clear with dry compressed air.
Plugged
SUBTASK 79-21-49-220-067 Examine the Tube (10-100, 11-100, 12-100 and 13-100) Bore
Repair VRS1689 (Repair-014) TASK 79-21-49-300-014.
Slight distortion can be removed, if the original shape is restored and cracks are not caused.
Repair, VRS7001 (Repair-001) SPM TASK 70-35-24-300-501.
Distortion more than Step.
Distorted
Repair, VRS7001 (Repair-001) SPM TASK 70-35-24-300-501.
Lugs broken or cracked.
Repair, VRS1689 (Repair-014) TASK 79-21-49-300-014.
Bolt hole edges burred.
Examine the lug.
SUBTASK 79-21-49-220-068 Examine the Tube (11-100 and 12-100) Lugs
Examine the adapters.
Repair, VRS1689 (Repair-014) TASK 79-21-49-300-014.
Pick-up
Repair, VRS7001 (Repair-001) SPM TASK 70-35-24-300-501.
Crossed and stripped
Threads
Repair, VRS1689 (Repair-014) TASK 79-21-49-300-014 or Repair VRS7001, (Repair-001) SPM TASK 70-35-24-300-501.
Galled
Sealing face
Repair, VRS1689 (Repair-014) TASK 79-21-49-300-014.
Burred
Bolt hole
SUBTASK 79-21-49-220-069 Examine the Tube (10-100) Cross Adapter and Flanged Adapter
Examine the ferrule
Repair, VRS1689 (Repair-014) TASK 79-21-49-300-014 or Repair, VRS7001 (Repair-001) SPM TASK 70-35-24-300-501
Galled
Sealing face
SUBTASK 79-21-49-220-070 Examine the Tube (10-100, 11-100, 12-100 and 13-100) Ferrule
Examine the nut.
Repair, VRS1689 (Repair-014) TASK 79-21-49-300-014.
Pick-up
Repair, VRS7001 (Repair-001) SPM TASK 70-35-24-300-501.
Crossed and stripped
Threads
SUBTASK 79-21-49-220-071 Examine the Tube (10-100, 11-100, 12-100 and 13-100) Nut
Figure: Pressure Oil Tube (10-100) Inspection Locations
Pressure Oil Tube (10-100) Inspection Locations

Pressure Oil Tube (10-100) Inspection Locations

Pressure Oil Tube (10-100) Inspection Locations

Pressure Oil Tube (10-100) Inspection Locations

