Export Control
EAR Export Classification: Not subject to the EAR per 15 C.F.R. Chapter 1, Part 734.3(b)(3), except for the following Service Bulletins which are currently published as EAR Export Classification 9E991: SBE70-0992, SBE72-0483, SBE72-0580, SBE72-0588, SBE72-0640, SBE73-0209, SBE80-0024 and SBE80-0025.Copyright
© IAE International Aero Engines AG (2001, 2014 - 2021) The information contained in this document is the property of © IAE International Aero Engines AG and may not be copied or used for any purpose other than that for which it is supplied without the express written authority of © IAE International Aero Engines AG. (This does not preclude use by engine and aircraft operators for normal instructional, maintenance or overhaul purposes.).Applicability
V2500-A1 and Pre SBE 72-0190
Common Information
TASK 72-00-45-220-002-A00 HPT Assembly - Examine The HPT Assembly Front Face At Interface M-45, Inspection-002 - Pre SBE 72-0190
General
The word "Reject" is used after an interface inspection statement to show that a higher level inspection and possible repair to the damaged part is necessary.
Do the higher level inspection procedure as found in the applicable Chapter/Section/Suject of this manual on the damaged part(s). It is not necessary to do the higher level inspection on parts that are serviceable to the interface inspection standard.
Refer to TASK 72-00-00-200-000 (INSPECTION/CHECK-000) (examine the modular/non-modular interfaces) before you do this TASK.
The policy that is necessary for inspection is given in the SPM TASK 70-20-01-200-001.
Decreased module run time will result if you install modules that are near the maximum interface limits.
Erosion damage - Indications having a weathered, abraded, or corroded appearance.
All parts must be visually examined for damage, corrosion and wear. All defects (distress, missing hardware etc.) that are not identified in the procedure must be documented and referred to IAE Technical Services.
NOTE
Preliminary Requirements
Pre-Conditions
NONESupport Equipment
| Name | Manufacturer | Part Number / Identification | Quantity | Remark |
|---|---|---|---|---|
| IAE 1P16046 Removal/Installation fixture | 0AM53 | IAE 1P16046 | ||
| IAE 1P16222 Fixture | 0AM53 | IAE 1P16222 | 1 | |
| IAE 1P16543 Removal/Installation fixture | 0AM53 | IAE 1P16543 |
Consumables, Materials and Expendables
NONESpares
NONESafety Requirements
NONEProcedure
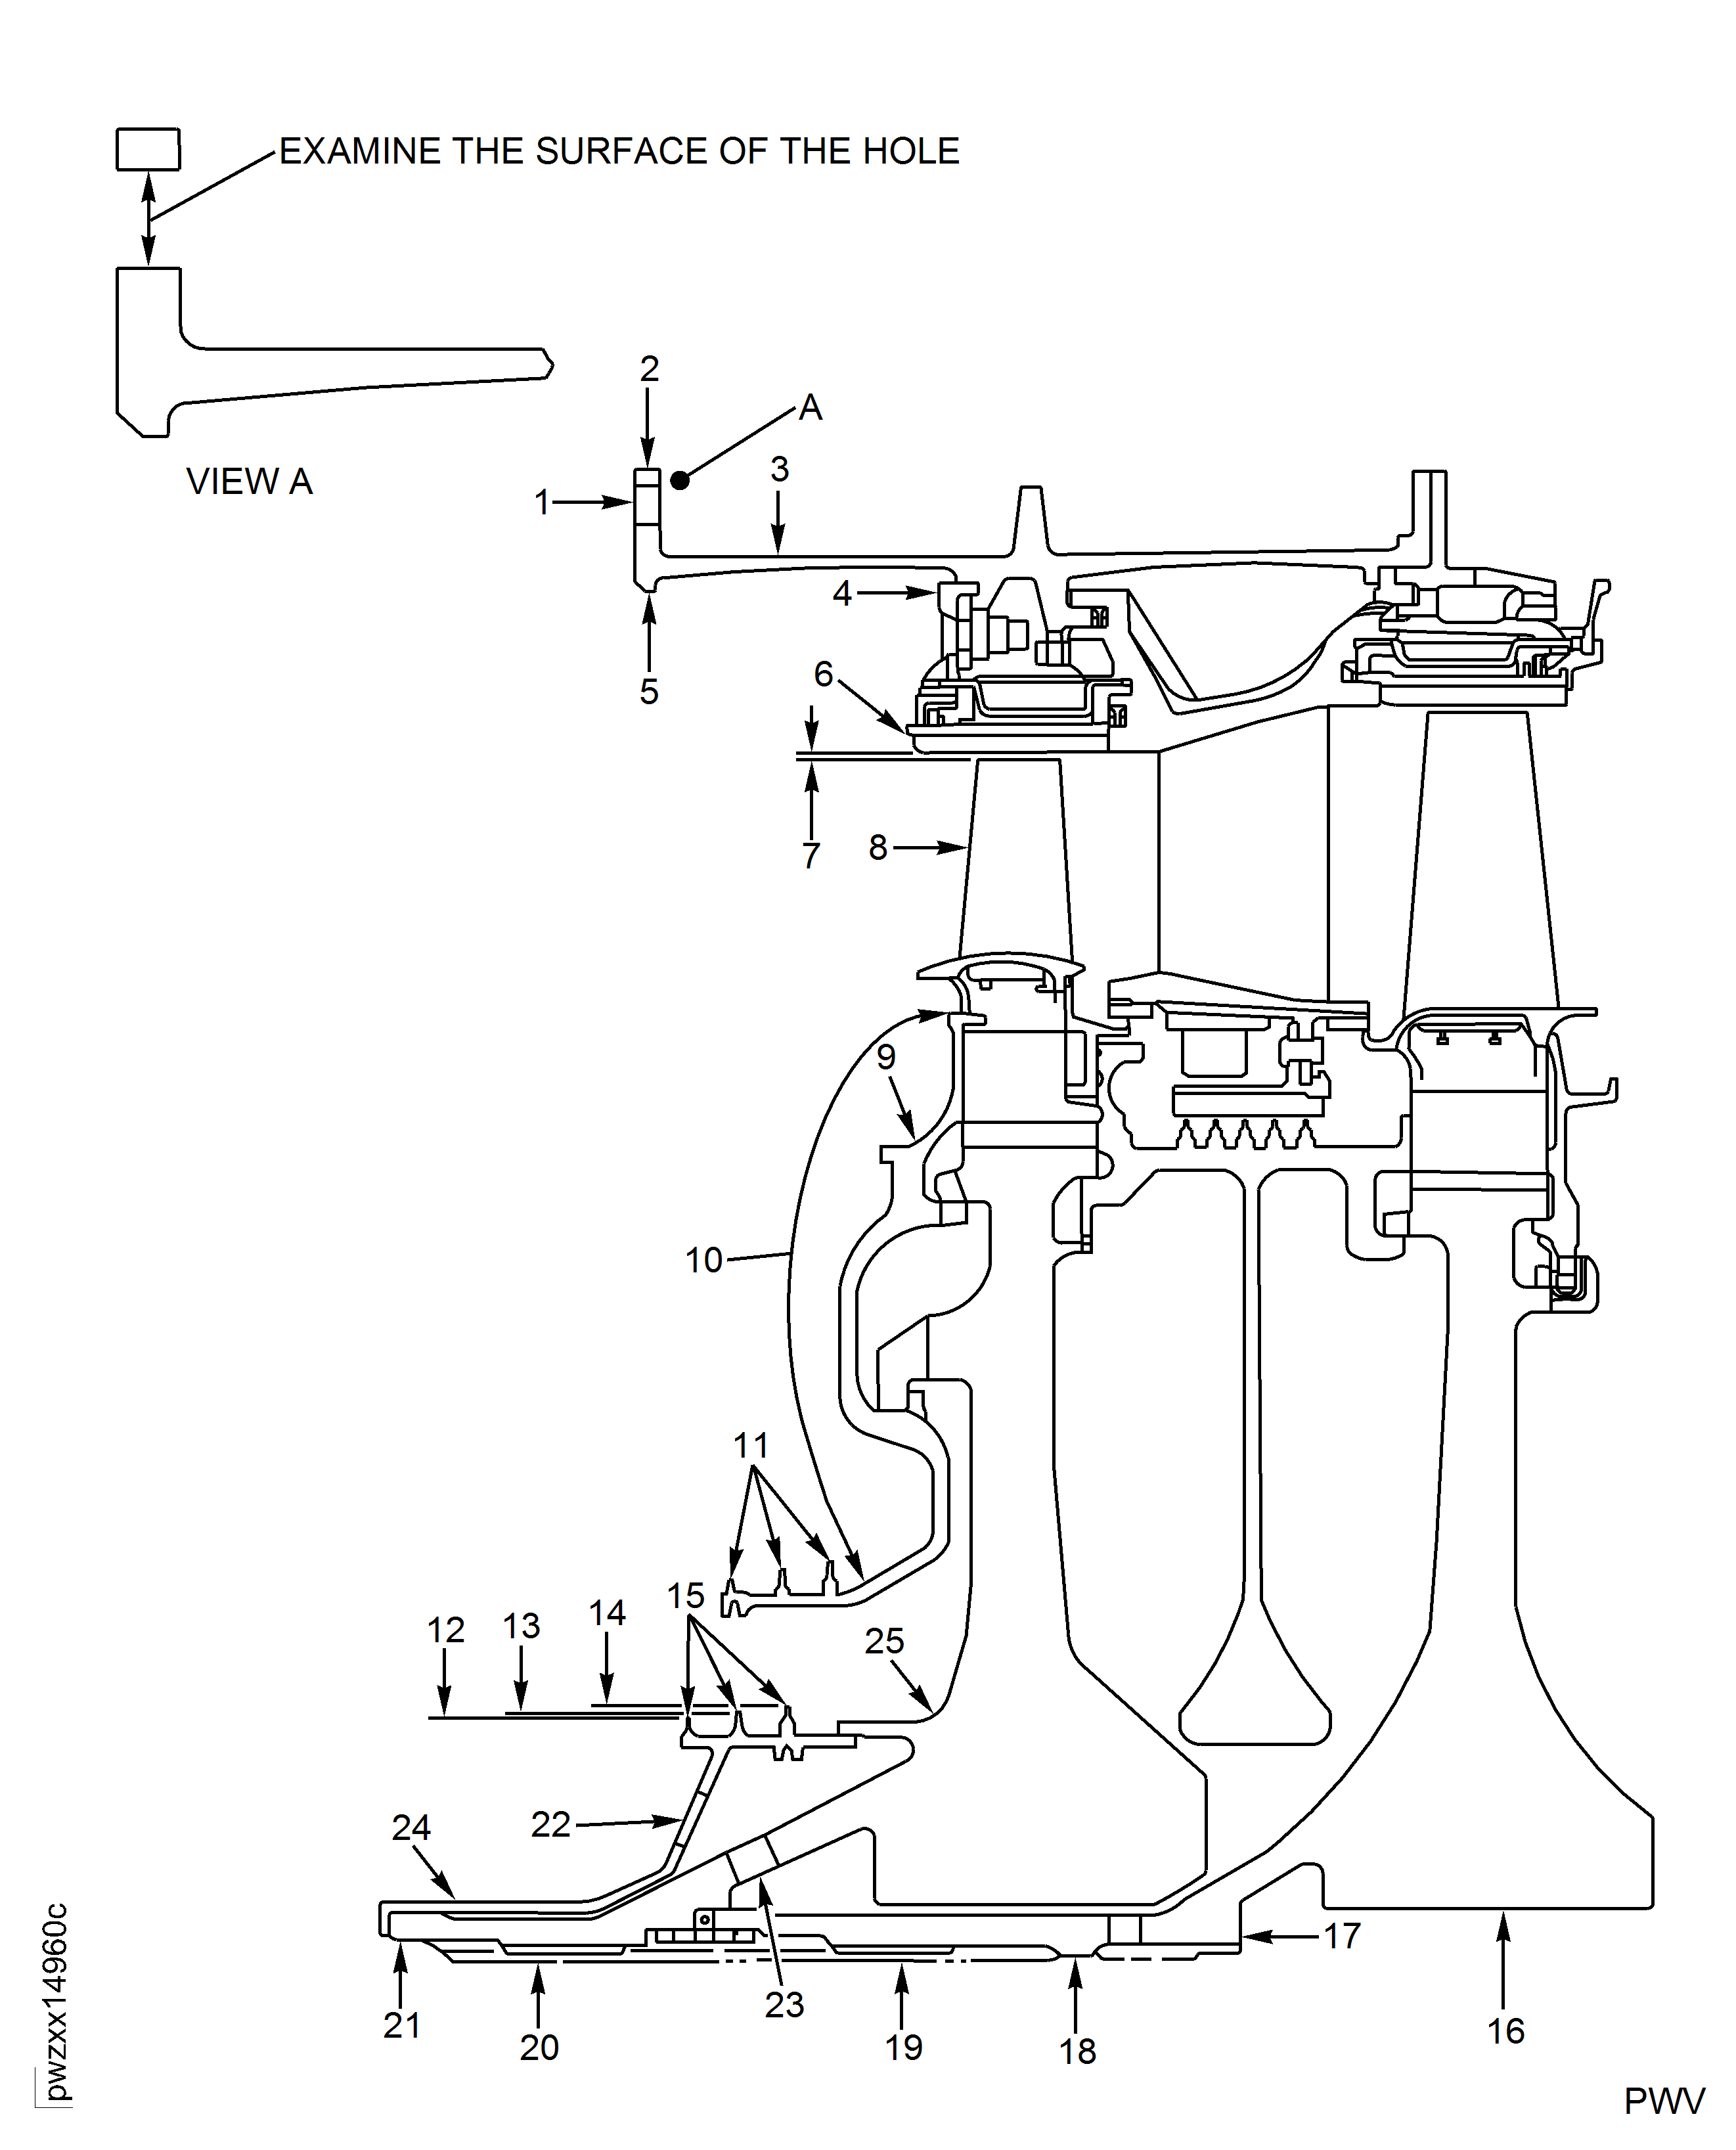
Refer to Figure.
SUBTASK 72-00-45-220-080 Visually Examine the Bolt Holes of the Case Flange at Location 1
Refer to Figure.
Clean the bolt holes per SPM TASK 70-11-26-300-503 (PW equivalent SPOP 208).
Perform local FPI per SPM TASK 70-23-05-230-501 (high sensitivity) (or equivalent PW SPOP 70).
Examine the flange bolt holes carefully.
Reject.
If you find any indication.
SUBTASK 72-00-45-220-254 Examine the Bolt Holes of the Case Flange at Location 1
Refer to Figure.
SUBTASK 72-00-45-220-081 Visually Examine the Case Flange at Location 2
Refer to Figure.
SUBTASK 72-00-45-220-082 Visually Examine the Surface of the Case at Location 3
Refer to Figure.
SUBTASK 72-00-45-220-083 Visually Examine the Hardface on the Outer Airseal Supports at Location 4
Refer to Figure.
SUBTASK 72-00-45-220-084 Visually Examine the Diameter of the Case Flange at Location 5
Refer to Figure.
SUBTASK 72-00-45-220-085 Visually Examine the Stage 1 Ceramic Outer Airseals at Location 6
Refer to Figure.
NOTE
This fixture is required to do this inspection. The HP turbine case assembly must be held for this inspection. Also the IAE 1P16046 Removal/Installation fixture or IAE 1P16543 Removal/Installation fixture is installed when you remove the HP turbine rotor and stator assembly from the engine. Do not remove this fixture when you do the inspection.Install the IAE 1P16222 Fixture 1 off to the front flange of the HP turbine case assembly.
SUBTASK 72-00-45-220-086 Measure the Stage 1 Turbine Blade Tip Clearance at Location 7
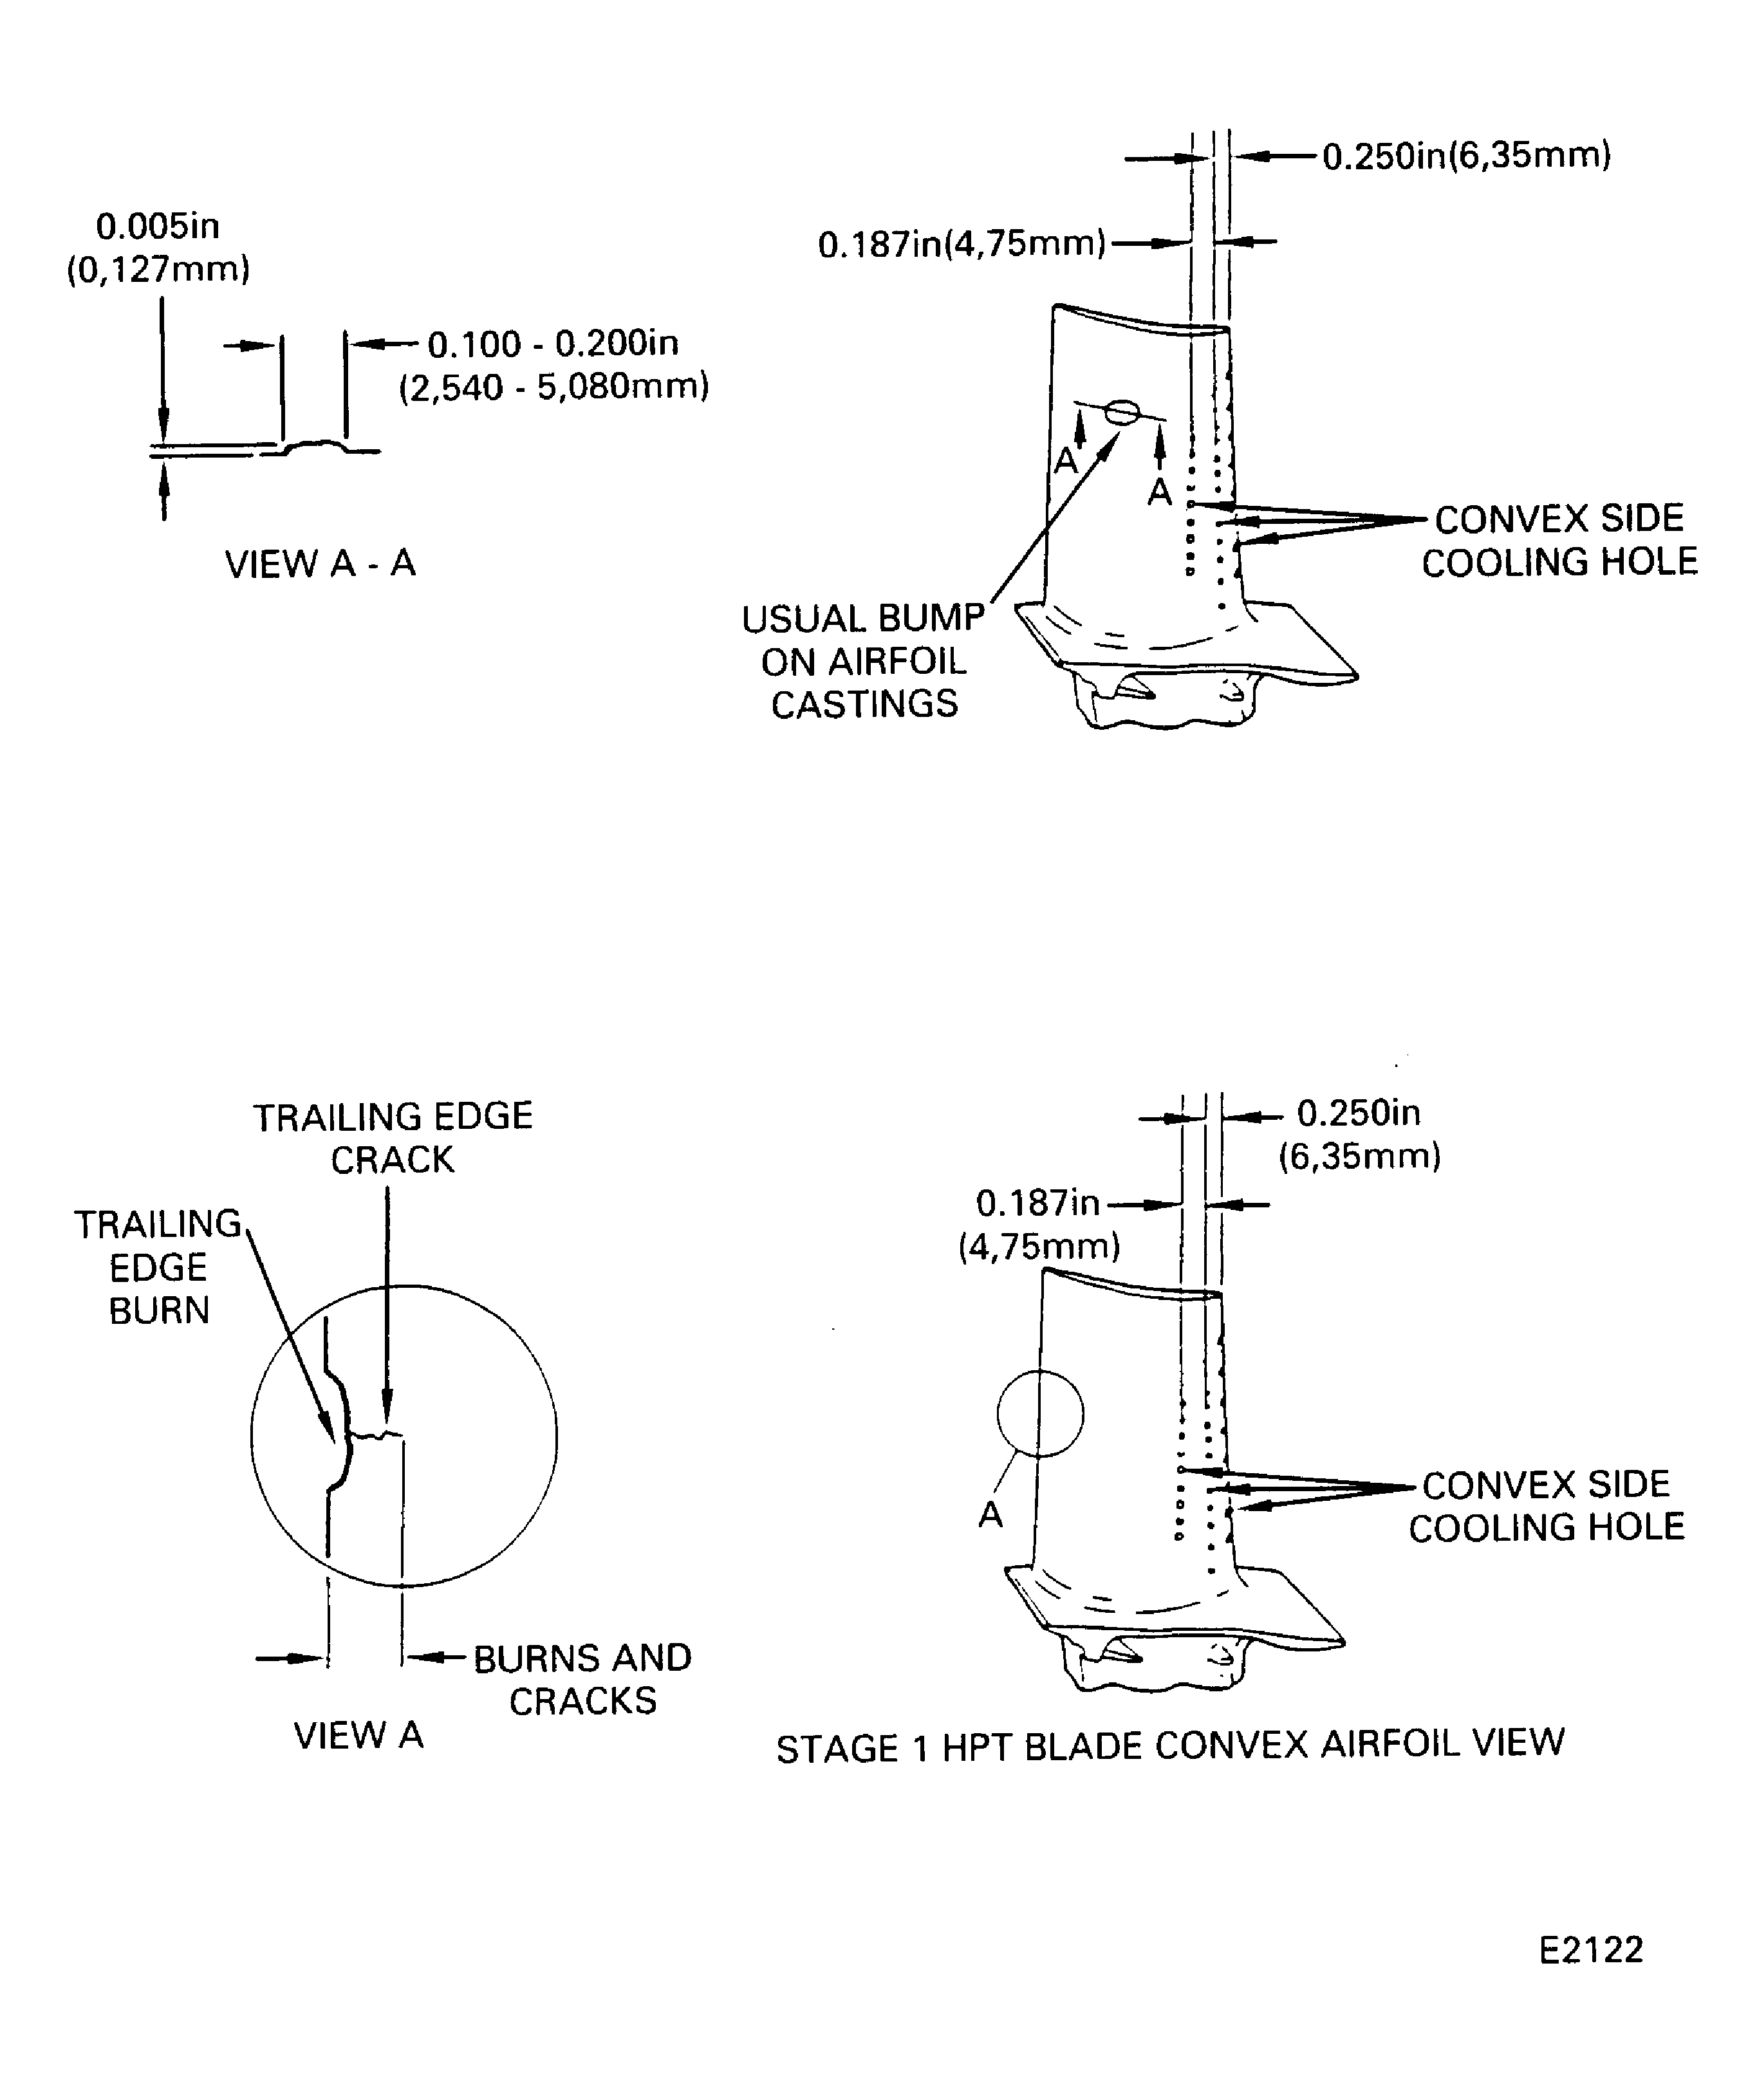
Refer to Figure.
Reject
NOTE
For reference, the concave side tip cooling holes are 0.080 in. (2.032 mm) from the tip.NOTE
The tip of the trailing edge may have a blend no more than 0.060 in. (0.24 mm) deep, extending from the tip to the middle of the third trailing edge window. Reference Repair, TASK 72-45-14-300-021. This condition is acceptable.
If the erosion or burn on the blade tip is more than 0.060 in. (1.52 mm) radially
Erosion or burns on the airfoil or platforms.
SUBTASK 72-00-45-220-087 Visually Examine the Stage 1 Turbine Blades at Location 8
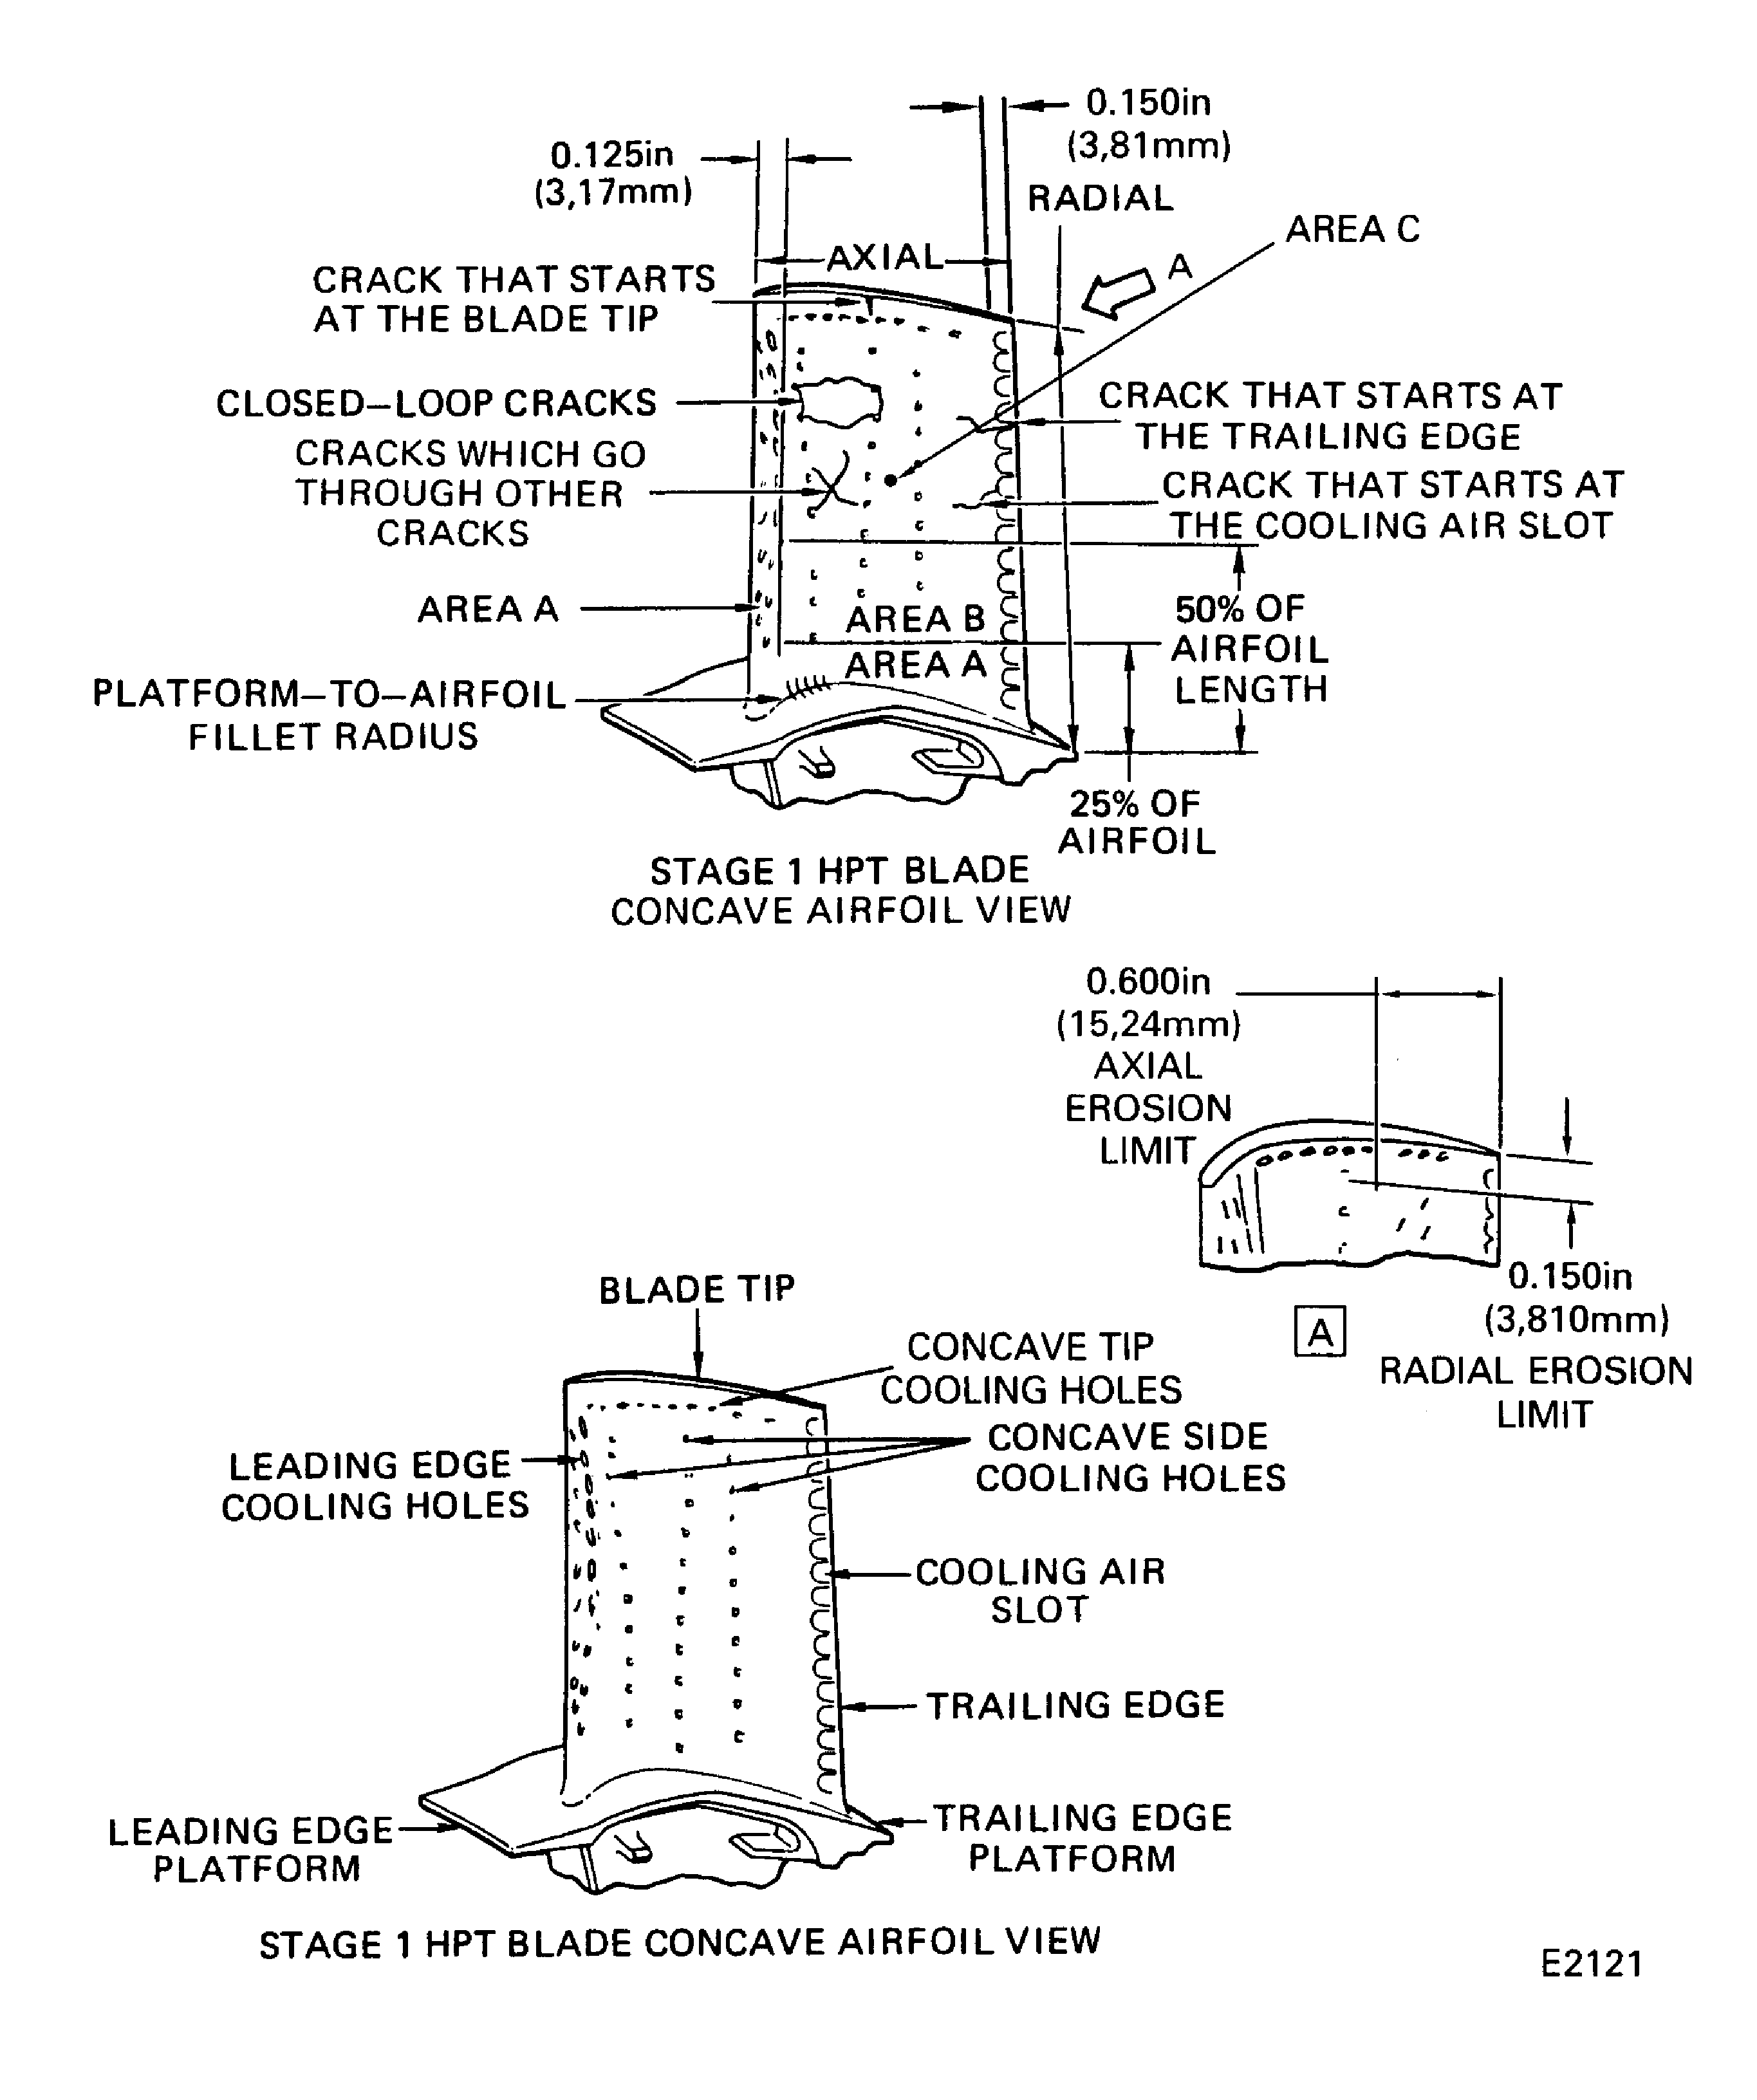
Refer to Figure.
SUBTASK 72-00-45-220-088 Visually Examine the Outer Surface of the Outer Seal at Location 9
Refer to Figure.
If signs of soot and oil are found, inspect the High Pressure Turbine for possible oil ignition event. Refer to TASK 72-45-00-200-801.
Report all findings to IAE Technical Services.
Look for sign of soot or oil.
SUBTASK 72-00-45-220-089 Visually Examine the Outer Seal Surface at Location 10
Refer to Figure.
SUBTASK 72-00-45-220-090 Visually Examine the Knife-Edges of the Outer Seal at Location 11
Refer to Figure.
SUBTASK 72-00-45-220-091 Measure the Inner Seal Knife-Edge Diameters at Locations 12, 13 and 14
Refer to Figure.
SUBTASK 72-00-45-220-092 Visually Examine the Knife-Edges of the Inner Seal Location 15
Refer to Figure.
SUBTASK 72-00-45-220-093 Visually Examine the Disk Surface at Location 16
Refer to Figure.
SUBTASK 72-00-45-220-094 Visually Examine the Stage 2 Turbine Disk at the HPT Retaining Nut Mating Face at Location 17
Refer to Figure.
SUBTASK 72-00-45-220-095 Visually Examine the Stage 2 Disk at Location 18
Refer to Figure.
SUBTASK 72-00-45-220-096 Visually Examine the Stage 2 Disk Splines at Location 19
Refer to Figure.
SUBTASK 72-00-45-220-097 Visually Examine the Stage 1 Disk Splines at Location 20
Refer to Figure.
SUBTASK 72-00-45-220-098 Visually Examine the Stage 1 Disk at Location 21
Refer to Figure.
SUBTASK 72-00-45-220-099 Visually Examine the Cooling Air Holes of the Inner Seal at Location 22
Refer to Figure.
SUBTASK 72-00-45-220-205 Visually Inspect the TOBI Seal Inner Diameter at Location 24
Refer to Figure.
SUBTASK 72-00-45-220-206 Visually Inspect All of the Metering Plugs of the Stage 1 Disk at Location 23
If signs of soot and oil are found, inspect the High Pressure Turbine for possible oil ignition event. Refer to TASK 72-45-00-200-801.
Report all findings to IAE Technical Services.
There are signs of soot and oil.
SUBTASK 72-00-45-220-246 Visually Inspect Area of HPT Stage 1 Hub between Inner and Outer Air Seal at Location 25
Figure: Locations at Interface M-45
Sheet 1

Figure: Locations at Interface M-45
Sheet 2

Figure: Locations at Interface M-45
Sheet 3

