Export Control
EAR Export Classification: Not subject to the EAR per 15 C.F.R. Chapter 1, Part 734.3(b)(3), except for the following Service Bulletins which are currently published as EAR Export Classification 9E991: SBE70-0992, SBE72-0483, SBE72-0580, SBE72-0588, SBE72-0640, SBE73-0209, SBE80-0024 and SBE80-0025.Copyright
© IAE International Aero Engines AG (2001, 2014 - 2021) The information contained in this document is the property of © IAE International Aero Engines AG and may not be copied or used for any purpose other than that for which it is supplied without the express written authority of © IAE International Aero Engines AG. (This does not preclude use by engine and aircraft operators for normal instructional, maintenance or overhaul purposes.).Applicability
V2500-A1
Common Information
TASK 72-32-00-430-013-A00 LPC/Intermediate Case Module - Install The LPC Inlet Guide Vane Assembly, Assembly-013
General
This TASK gives the procedure to install the LPC inlet guide vane assembly.
Fig/item numbers in parentheses in the procedure agree with those used in the IPC. Only the primary Fig/item numbers are used. For the service bulletin alpha variants refer to the IPC.
For all parts identified in a different Chapter/Section/Subject, the applicable Chapter/Section/Subject comes before the Fig/item number.
For standard torque data and procedures, refer to the SPM TASK 70-41-00-400-501 and SPM TASK 70-41-02-400-501.
Special torque data and assembly tolerances are included in the procedure.
Lubricate all threads and abutment faces of nuts and bolts with the approved engine oils, unless other lubricants are referred to in the procedure, refer to the SPM TASK 70-64-00-640-501.
The abbreviation Intf shows an interference or tight fit. This causes REJECT IF MORE THAN to become REJECT IF LESS THAN. The abbreviation Clear shows a clearance fit.
The number for each radial location must be identified in a clockwise direction. These start at the engine top position when you look from the rear of the engine, unless stated differently in the procedure.
The No.1 strut, which is the top position strut of the fan frame assembly, is identified by the five pressure tubes on the No.1 strut leading edge.
NOTE
NOTE
Preliminary Requirements
Pre-Conditions
NONESupport Equipment
| Name | Manufacturer | Part Number / Identification | Quantity | Remark |
|---|---|---|---|---|
| IAE 1J12457 Measuring stretch | 0AM53 | IAE 1J12457 | 1 | |
| IAE 1J12483 Socket wrench | 0AM53 | IAE 1J12483 | 1 | |
| IAE 1J12509 TBD | 0AM53 | IAE 1J12509 | 1 |
Consumables, Materials and Expendables
| Name | Manufacturer | Part Number / Identification | Quantity | Remark |
|---|---|---|---|---|
| CoMat 01-124 ISOPROPYL ALCOHOL | LOCAL | CoMat 01-124 | ||
| CoMat 04-004 JOINTING COMPOUND, LIGHT GRADE | LOCAL | CoMat 04-004 |
Spares
NONESafety Requirements
NONEProcedure
Refer to Figure.
Reference clearance at location 0661. If required, use the data written as a note in TASK 72-32-81-200-001-A00 (INSPECTION-001, CONFIG-001).
Table 1. Fits and Clearances (all dimensions are in inches) NEW PART
DIMENSIONS
WORN PART
DIMENSIONS
REJECT IF
PART IDENT
Size
Clearance
(Non-select)
MORE THAN
Location 0661
Radial clearance
Inlet guide vane ENGINE-FAN OUTLET INNER VANE ASSEMBLY (72-32-91, 01-400),
seal bore and LP compressor
stage 1.5 - 2.5 disk assembly
"ENGINE-LP COMPRESSOR STAGE 1.5,2 AND 2.5 DISC (72-32-81, 01-200), seal diameter
Inlet guide vane seal
12.8830
12.8790
0.0240
LP compressor stage 1.5 - 2.5
disk assembly seal
12.8620
12.8600
0.0180
Table 2. Fits and Clearances (all dimensions are in millimeters) NEW PART
DIMENSIONS
WORN PART
DIMENSIONS
REJECT IF
PART IDENT
Size
Clearance
(Non-select)
MORE THAN
Location 0661
Radial clearance
Inlet guide vane ENGINE-FAN OUTLET INNER VANE ASSEMBLY (72-32-91, 01-400),
seal bore and LP compressor
stage 1.5 - 2.5 disk assembly
"ENGINE-LP COMPRESSOR STAGE 1.5,2 AND 2.5 DISC (72-32-81, 01-200), seal diameter
Inlet guide vane seal
LP compressor stage 1.5 - 2.5
disk assembly seal
327.250
327.150
326.700
326.630
0.610
0.450
SUBTASK 72-32-00-220-090 Reference Fits and Clearance of the Stage 1.5 - 2.5 Disk Seal Fin and the LP Compressor Inlet Guide Vane Assembly Seal Bore at Location 0661
Refer to Figure.
Make sure that the fan frame and fan case assembly is installed horizontally on the turnover stand. Refer to TASK 72-32-00-430-011-A00 (ASSEMBLY-011, CONFIG-001).
Make sure that the work mat is in position in the fan case. Refer to TASK 72-32-00-430-011-A00 (ASSEMBLY-011, CONFIG-001).
Use a clean cloth made moist with CoMat 01-124 ISOPROPYL ALCOHOL to clean the mating faces.
NOTE
Install the LPC inlet guide vane assembly on to the LP compressor front case before the jointing compound becomes dry.Apply CoMat 04-004 JOINTING COMPOUND, LIGHT GRADE to the mating faces with a soft brush.
SUBTASK 72-32-00-430-164 Apply Jointing Compound to the Mating Faces on the LP Compressor Front Case
NOTE
The brackets A and B are almost the same in their shapes. The distances between the two locating pins on each bracket are slightly different. Make sure of the Fig/item numbers and part numbers to install them correctly.Install the eight brackets A V2500-A5-72-32-93-01A-941A-D (72-32-93, 01-500), B V2500-A5-72-32-93-01A-941A-D (72-32-93, 01-515), C V2500-A5-72-32-93-01A-941A-D (72-32-93, 01-530) and D V2500-A5-72-32-93-01A-941A-D (72-32-93, 01-545) onto the front case.
Torque the 46 bolts (01-265 and 72-32-93, 01-570) to between 36 and 45 lbfin (4.00 and 5.00 Nm). UseIAE 1J12483 Socket wrench 1 off to apply the torque to the 34 bolts which attach the brackets.
SUBTASK 72-32-00-430-165 Install the LPC Inlet Guide Vane Assembly (Vane Assembly) to the LP Compressor Front Case (Front Case)
Refer to Figure.
Make sure that the curvic teeth on the stub shaft and the measuring stretch are clean. Clean the teeth with a clean cloth made moist with CoMat 01-124 ISOPROPYL ALCOHOL if the curvic teeth are not clean.
Install IAE 1J12457 Measuring stretch 1 off on to the stub shaft.
SUBTASK 72-32-00-430-166 Install the Measuring Stretch
Refer to Figure.
NOTE
No.1 bearing axial play causes the LP stub shaft to be moveable when the module is in horizontal position. The LP stub shaft must be at the rear position in the movement range for correct measurement of AA1. The LP stub shaft moves correctly to the rear end position if you push it by sufficient force.Apply force of 33 lbs (15 kg) or more than to push the LP stub shaft rearwards by hand until its movement stops. Continue pushing to keep the LP stub shaft in position until step D. is completed.
Read the tool dimensions L and H marked on the clocking pin C (part of IAE 1J12457 Measuring stretch 1 off) and the measuring stretch.
SUBTASK 72-32-00-220-091-A00 Measure the Module Interface Dimension for the Installation of the LP Compressor (Fan) Module (Pre SBE 72-0391)
Refer to Figure.
NOTE
No.1 bearing axial play causes the LP stub shaft to be moveable when the module is in horizontal position. The LP stub shaft must be at the rear position in the movement range for correct measurement of AA1. The LP stub shaft moves correctly to the rear end position if you push it by sufficient force.Apply force of 33 lbs (15 kg) or more than to push the LP stub shaft rearwards by hand until its movement stops. Continue pushing to keep the LP stub shaft in position until step D. is completed.
Read the tool dimensions L and H marked on the clocking pin C (part of IAE 1J12457 Measuring stretch 1 off) and the measuring stretch.
SUBTASK 72-32-00-220-091-B00 Measure the Module Interface Dimension for the Installation of the LP Compressor (Fan) Module, Method 1 (SBE 72-0391)
SBE 72-0391: New separate type No. 1 bearing support assembly
Refer to Figure.
SUBTASK 72-32-00-430-169 Remove the Measuring Stretch
NOTE
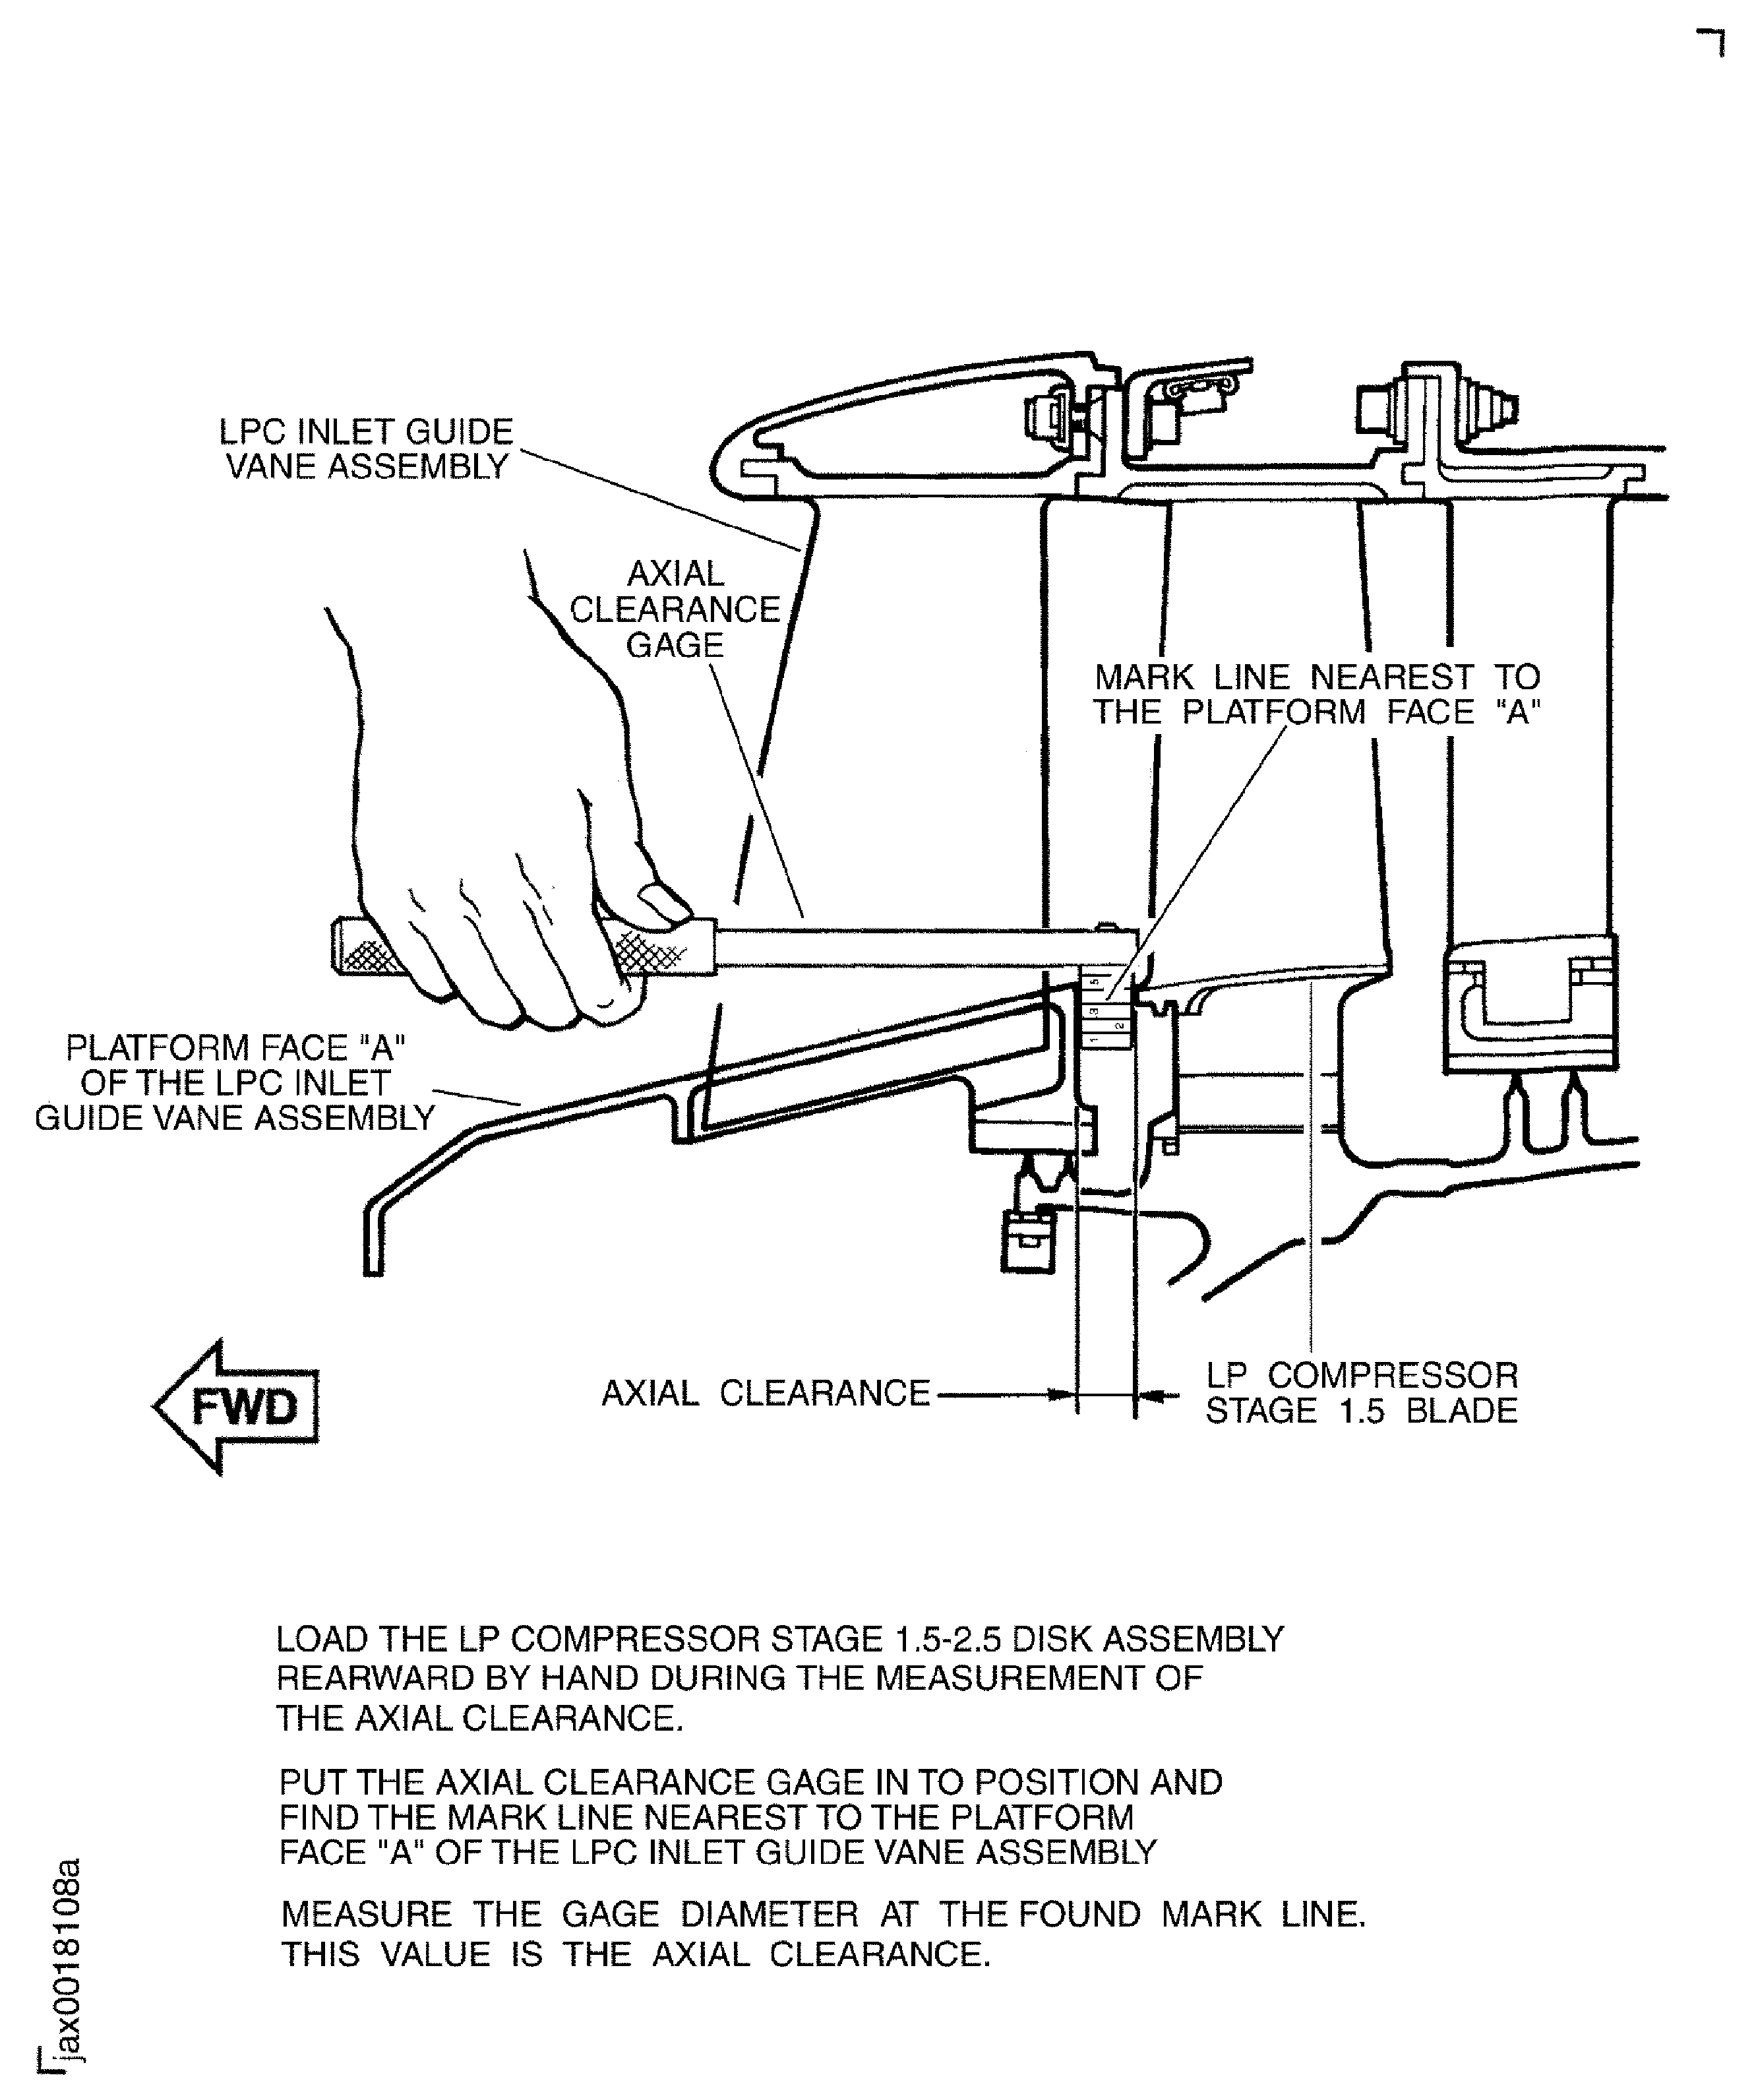
No.1 bearing axial play causes the LP stub shaft to be moveable when the module is in horizontal position. The LP stub shaft must be at the rear position in the movement range for correct measurement of axial clearance. The LP stub shaft moves correctly to the rear end position if you push it by sufficient force.Apply force of 33 lbs (15 kg) or more than to push the LP stub shaft rearwards by hand until its movement stops. Continue pushing to keep the LP stub shaft in position until step (2) is completed.
Measure the axial clearance at 12, 3, 6 and 9 o'clock positions with IAE 1J12509 TBD 1 off.
Measure the axial clearance between the inlet guide vane and the LP compressor stage 1.5 blade at location 0618.
NOTE
This will make sure that the LP compressor booster stage assembly and the inlet guide vane assembly were installed to engine correctly in TASK 72-32-00-430-010-A00 and this TASK.Make sure that the axial clearance is between 0.4217 in. (10.71 mm) and 0.4712 in. (11.97 mm).
SUBTASK 72-32-00-220-092-A00 Make sure that the Axial Clearance Between the Inlet Guide Vane and the LP Compressor Stage 1.5 Blade are in the Limits given at Location 0618 (Pre SBE 72-0391)
NOTE
No. 1 bearing axial play causes the LP stub shaft to be moveable when the module is in horizontal position. The LP stub shaft must be at the rear position in the movement range for correct measurement of axial clearance. The LP stub shaft moves correctly to the rear end position if you push it by sufficient force.Apply force of 33 lbs (15 kg) or more than to push the LP stub shaft rearwards by hand until its movement stops. Continue pushing to keep the LP stub shaft in position until step (2) is completed.
Measure the axial clearance at 12, 3, 6 and 9 o'clock positions with IAE 1J12509 TBD 1 off.
Measure the axial clearance between the inlet guide vane and the LP compressor stage 1.5 blade at location 0618.
NOTE
This will make sure that the LP compressor booster stage assembly and the inlet guide vane assembly were installed to engine correctly in TASK 72-32-00-430-010-A00 and this TASK.Make sure that the axial clearance is between 0.4402 in. (11.18 mm) and 0.4897 in. (12.44 mm).
SUBTASK 72-32-00-220-092-B00 Make sure that the Axial Clearance Between the Inlet Guide Vane and the LP Compressor Stage 1.5 Blade are in the Limits given at Location 0618 (SBE 72-0391)
SBE 72-0391: New separate type No. 1 bearing support assembly
Figure: Location for axial clearance and radial clearance
Location for axial clearance and radial clearance
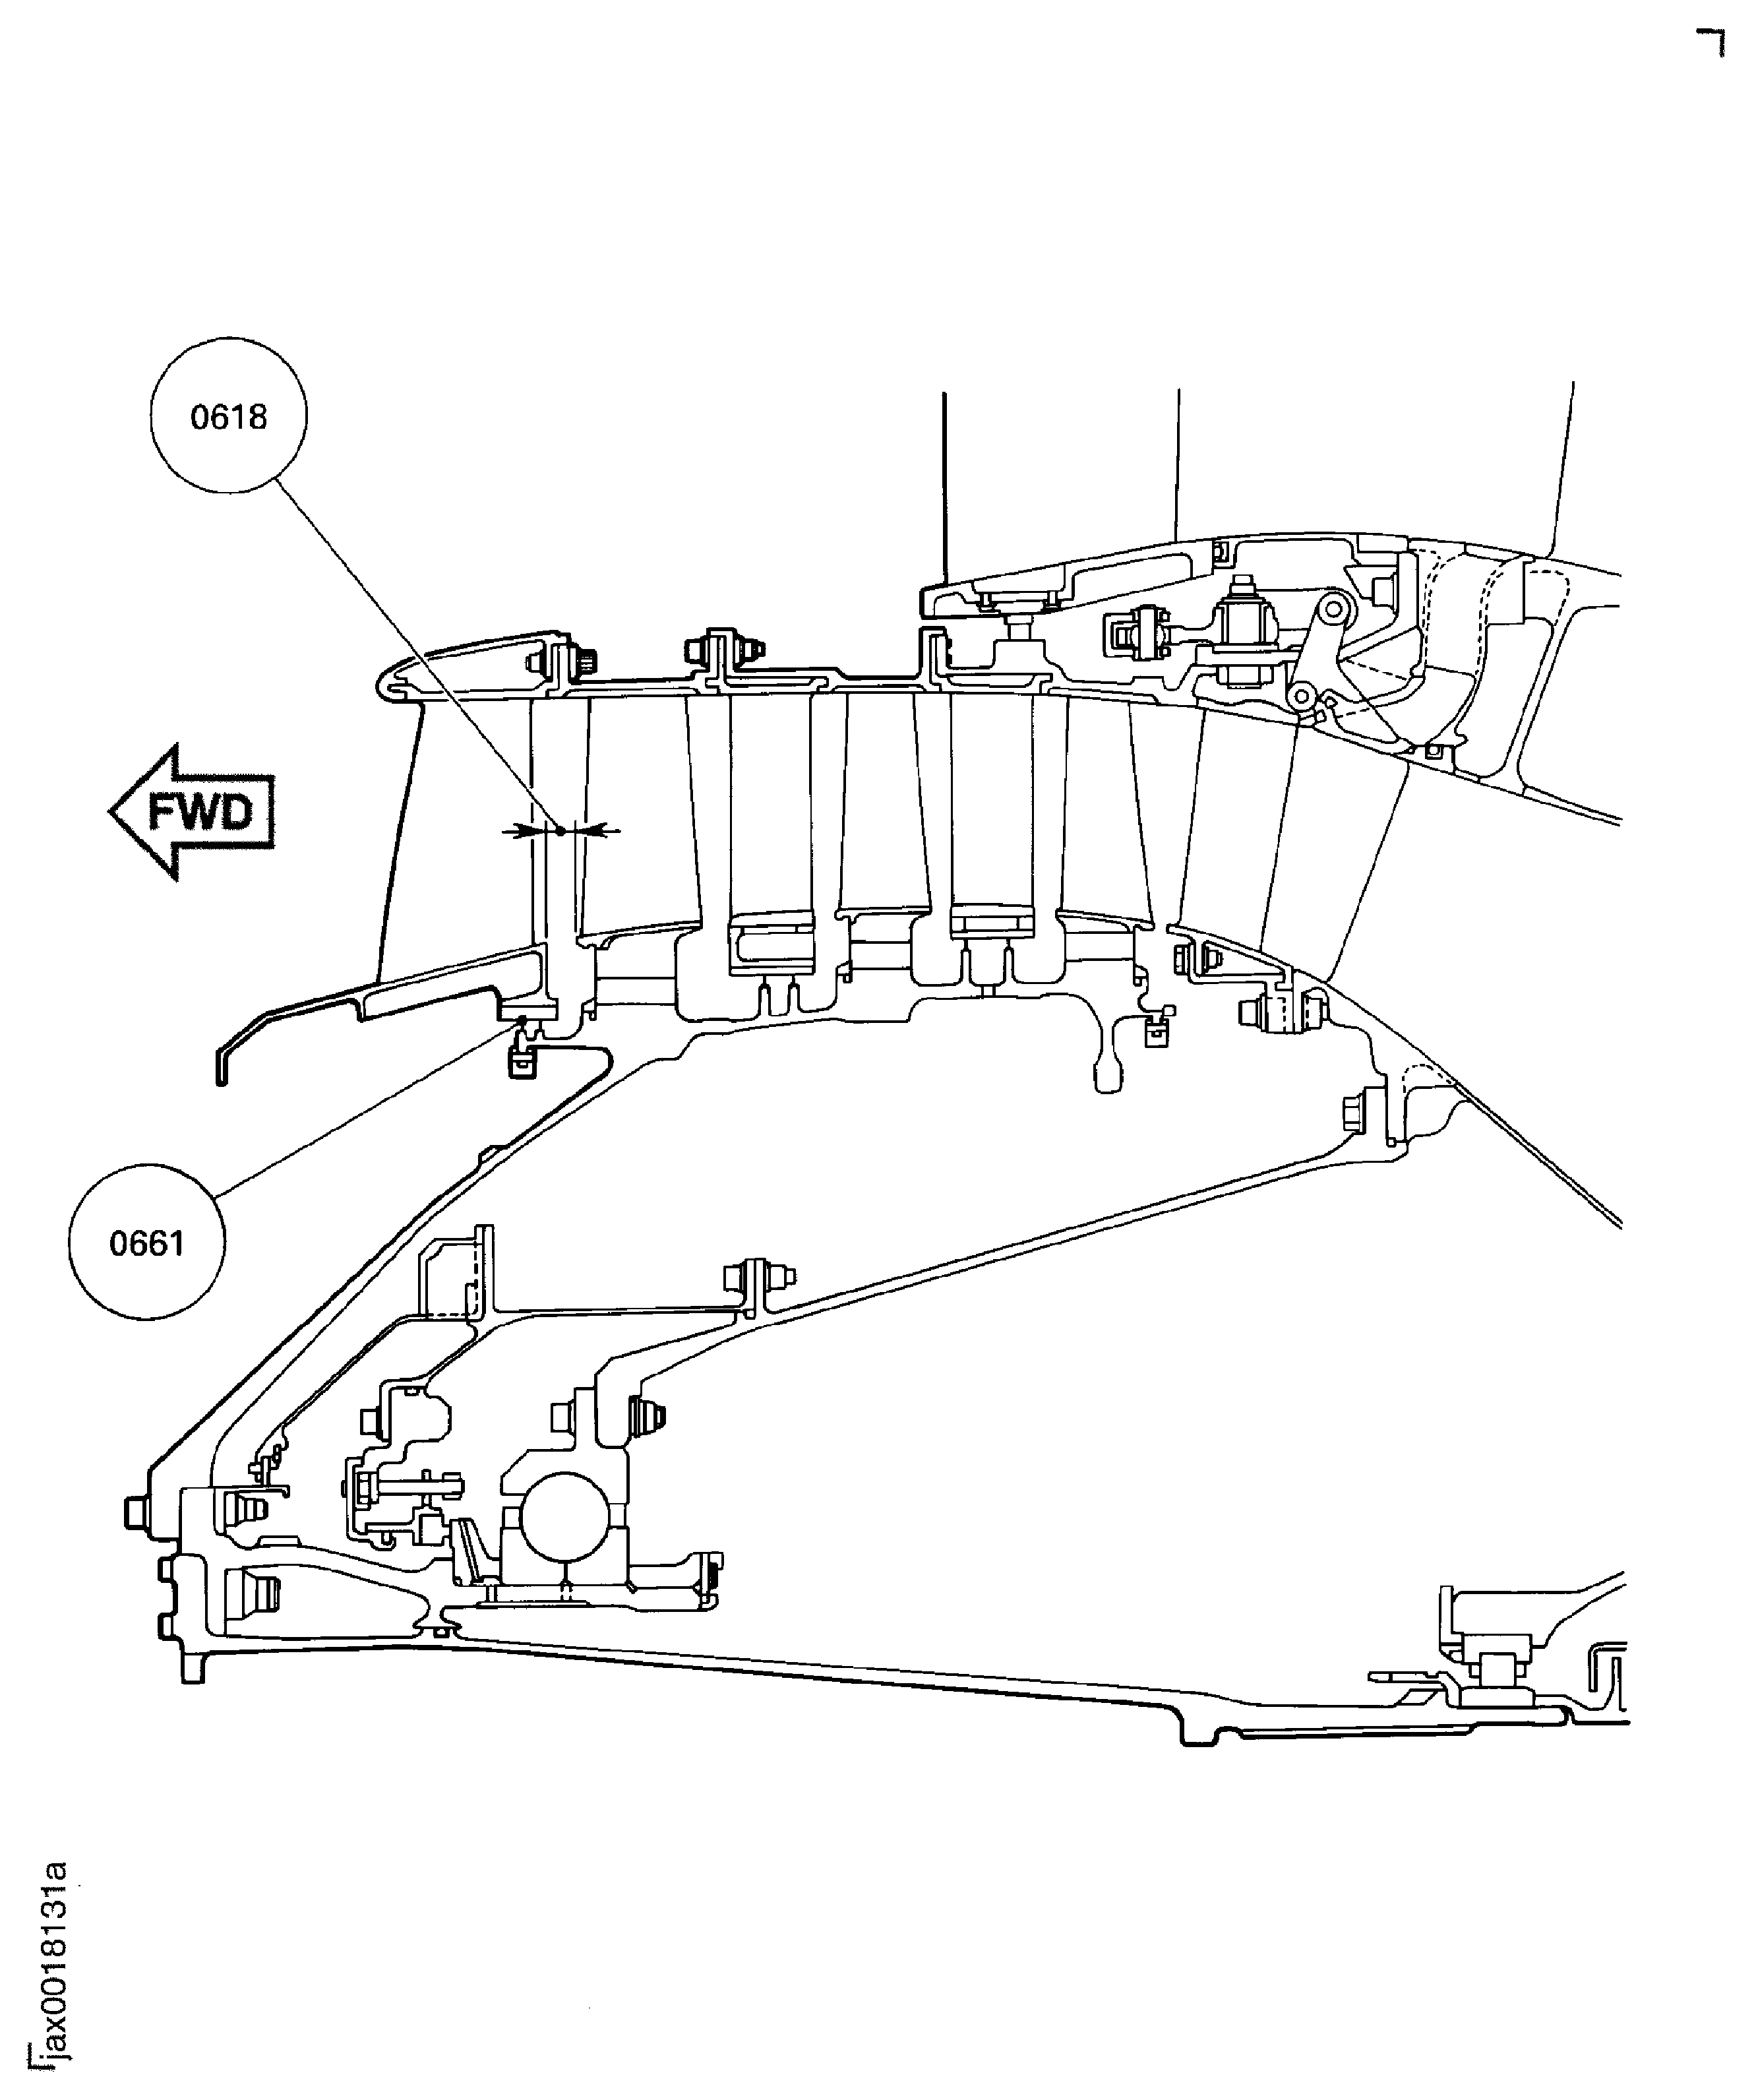
Figure: Apply jointing compound to the mating faces on the LP compressor front case
Apply jointing compound to the mating faces on the LP compressor front case
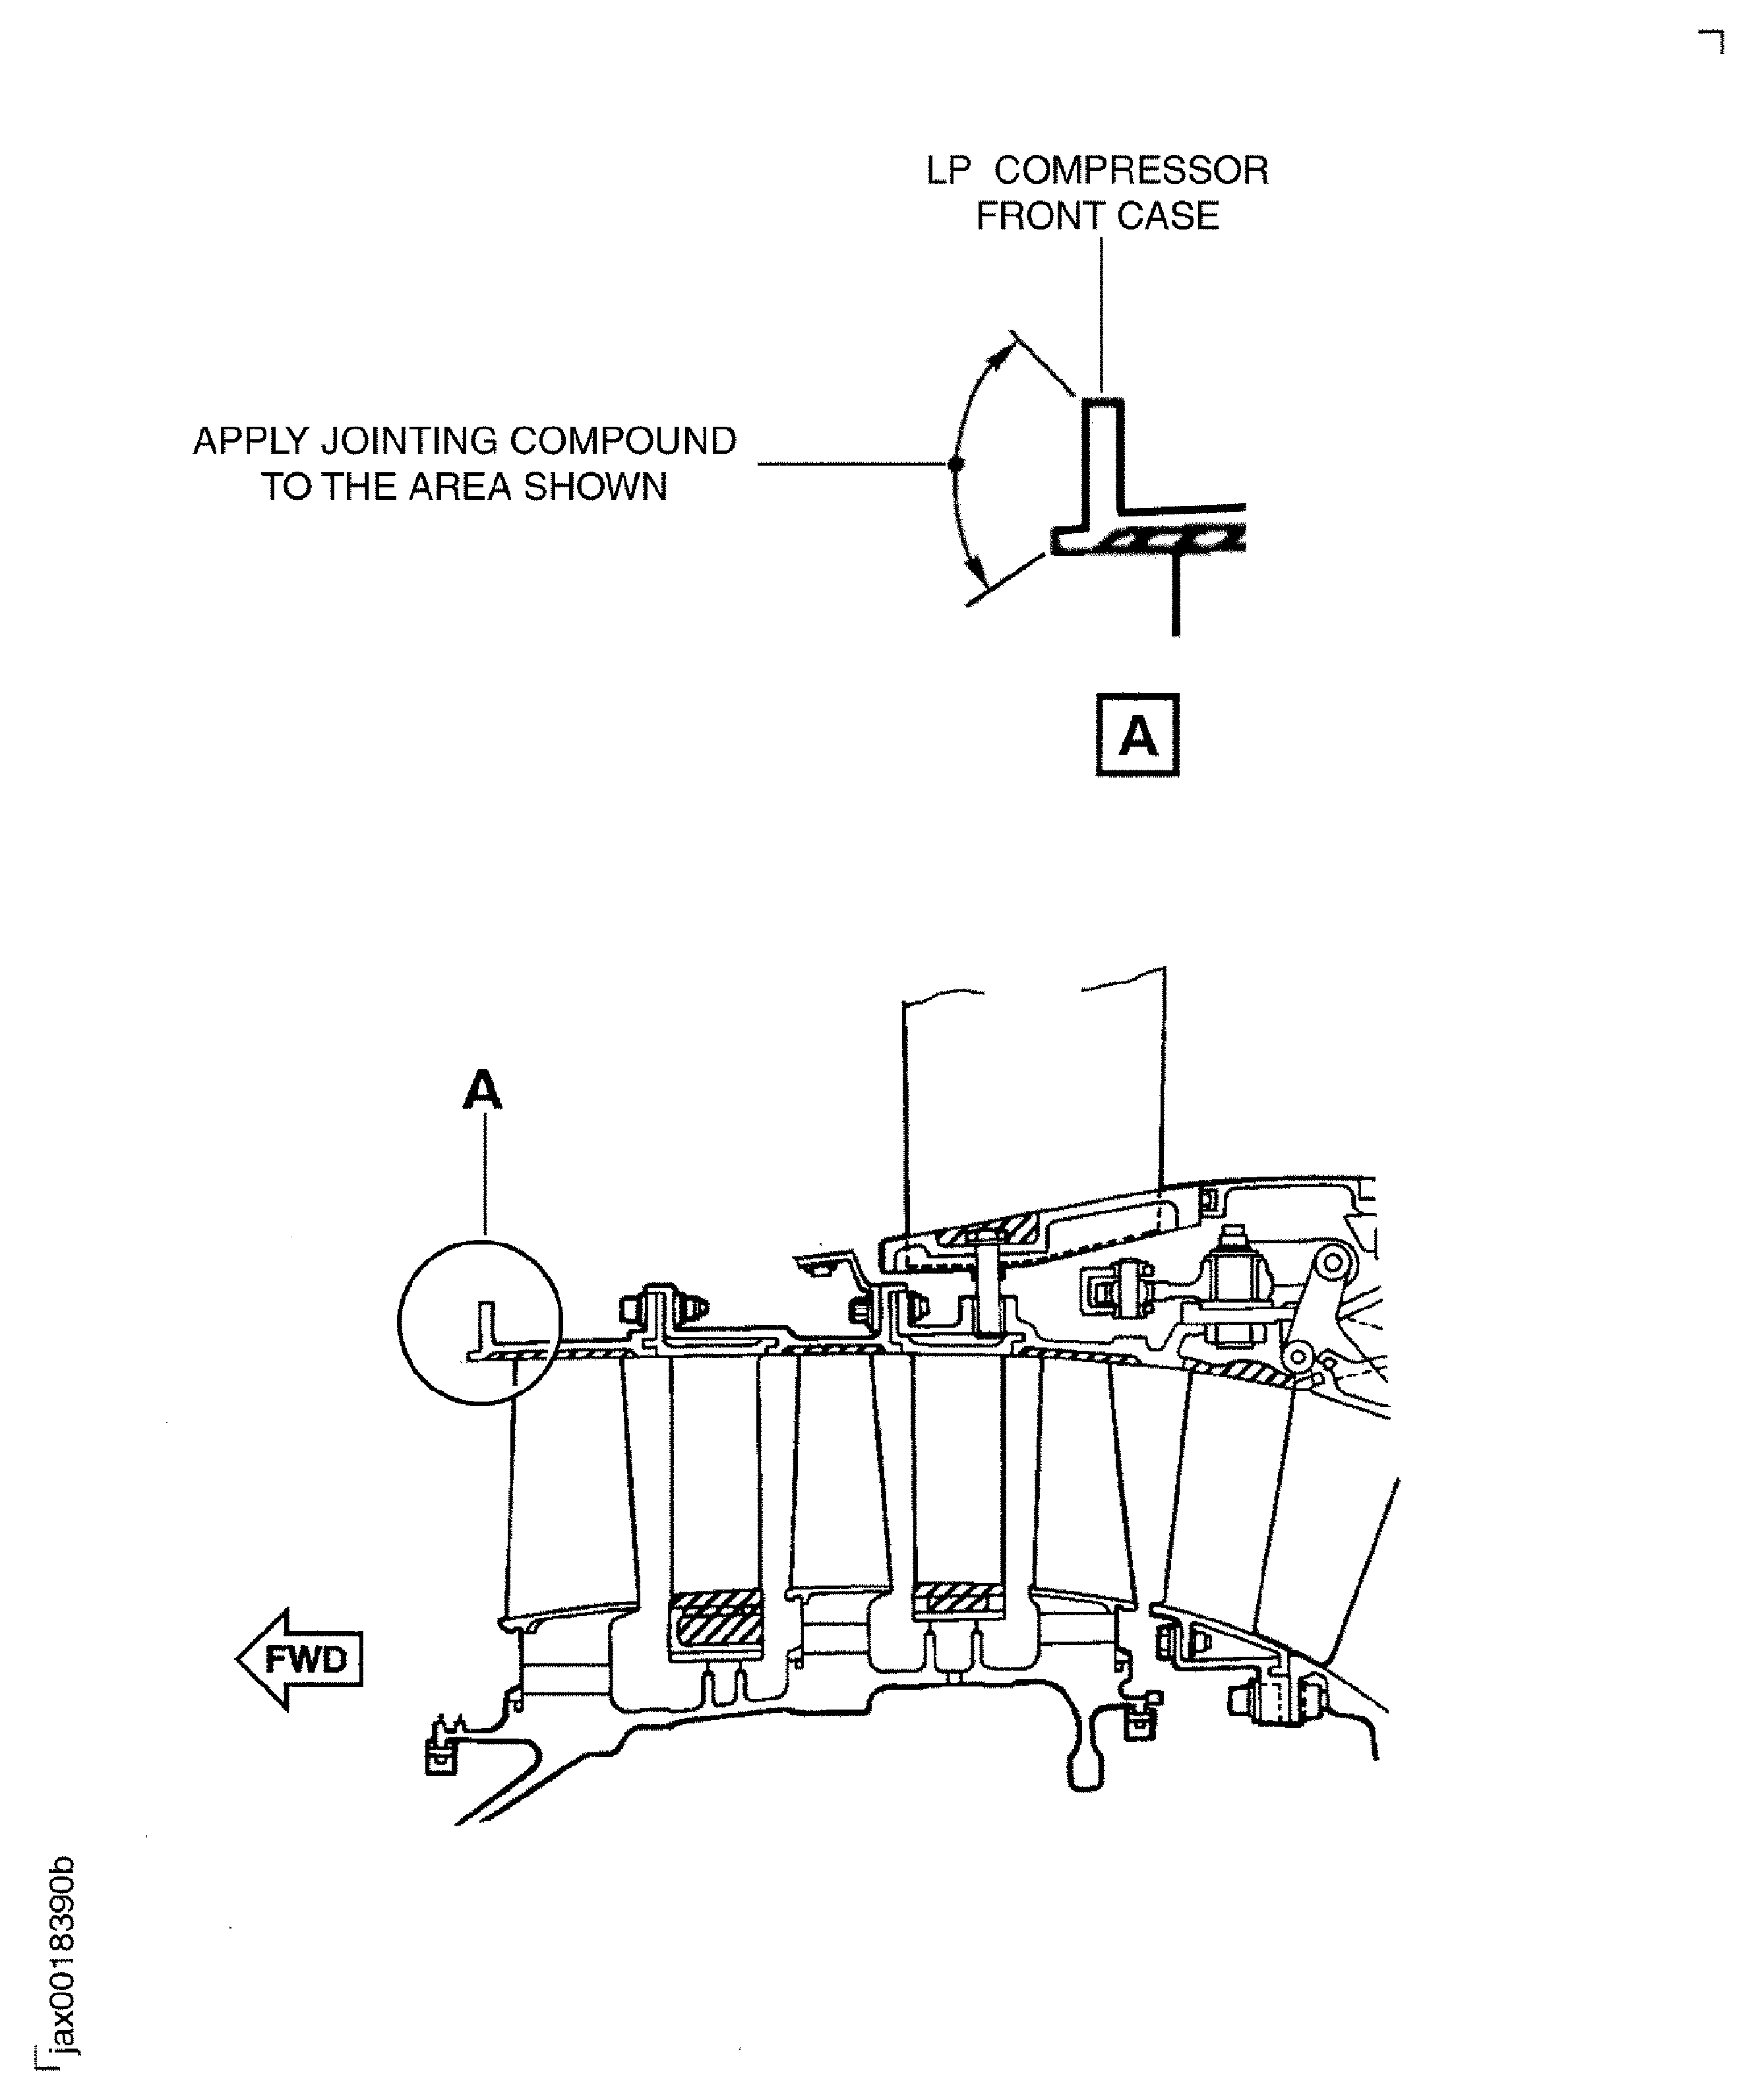
Figure: Install the LPC inlet guide vane assembly on to the LP compressor front case
Install the LPC inlet guide vane assembly on to the LP compressor front case
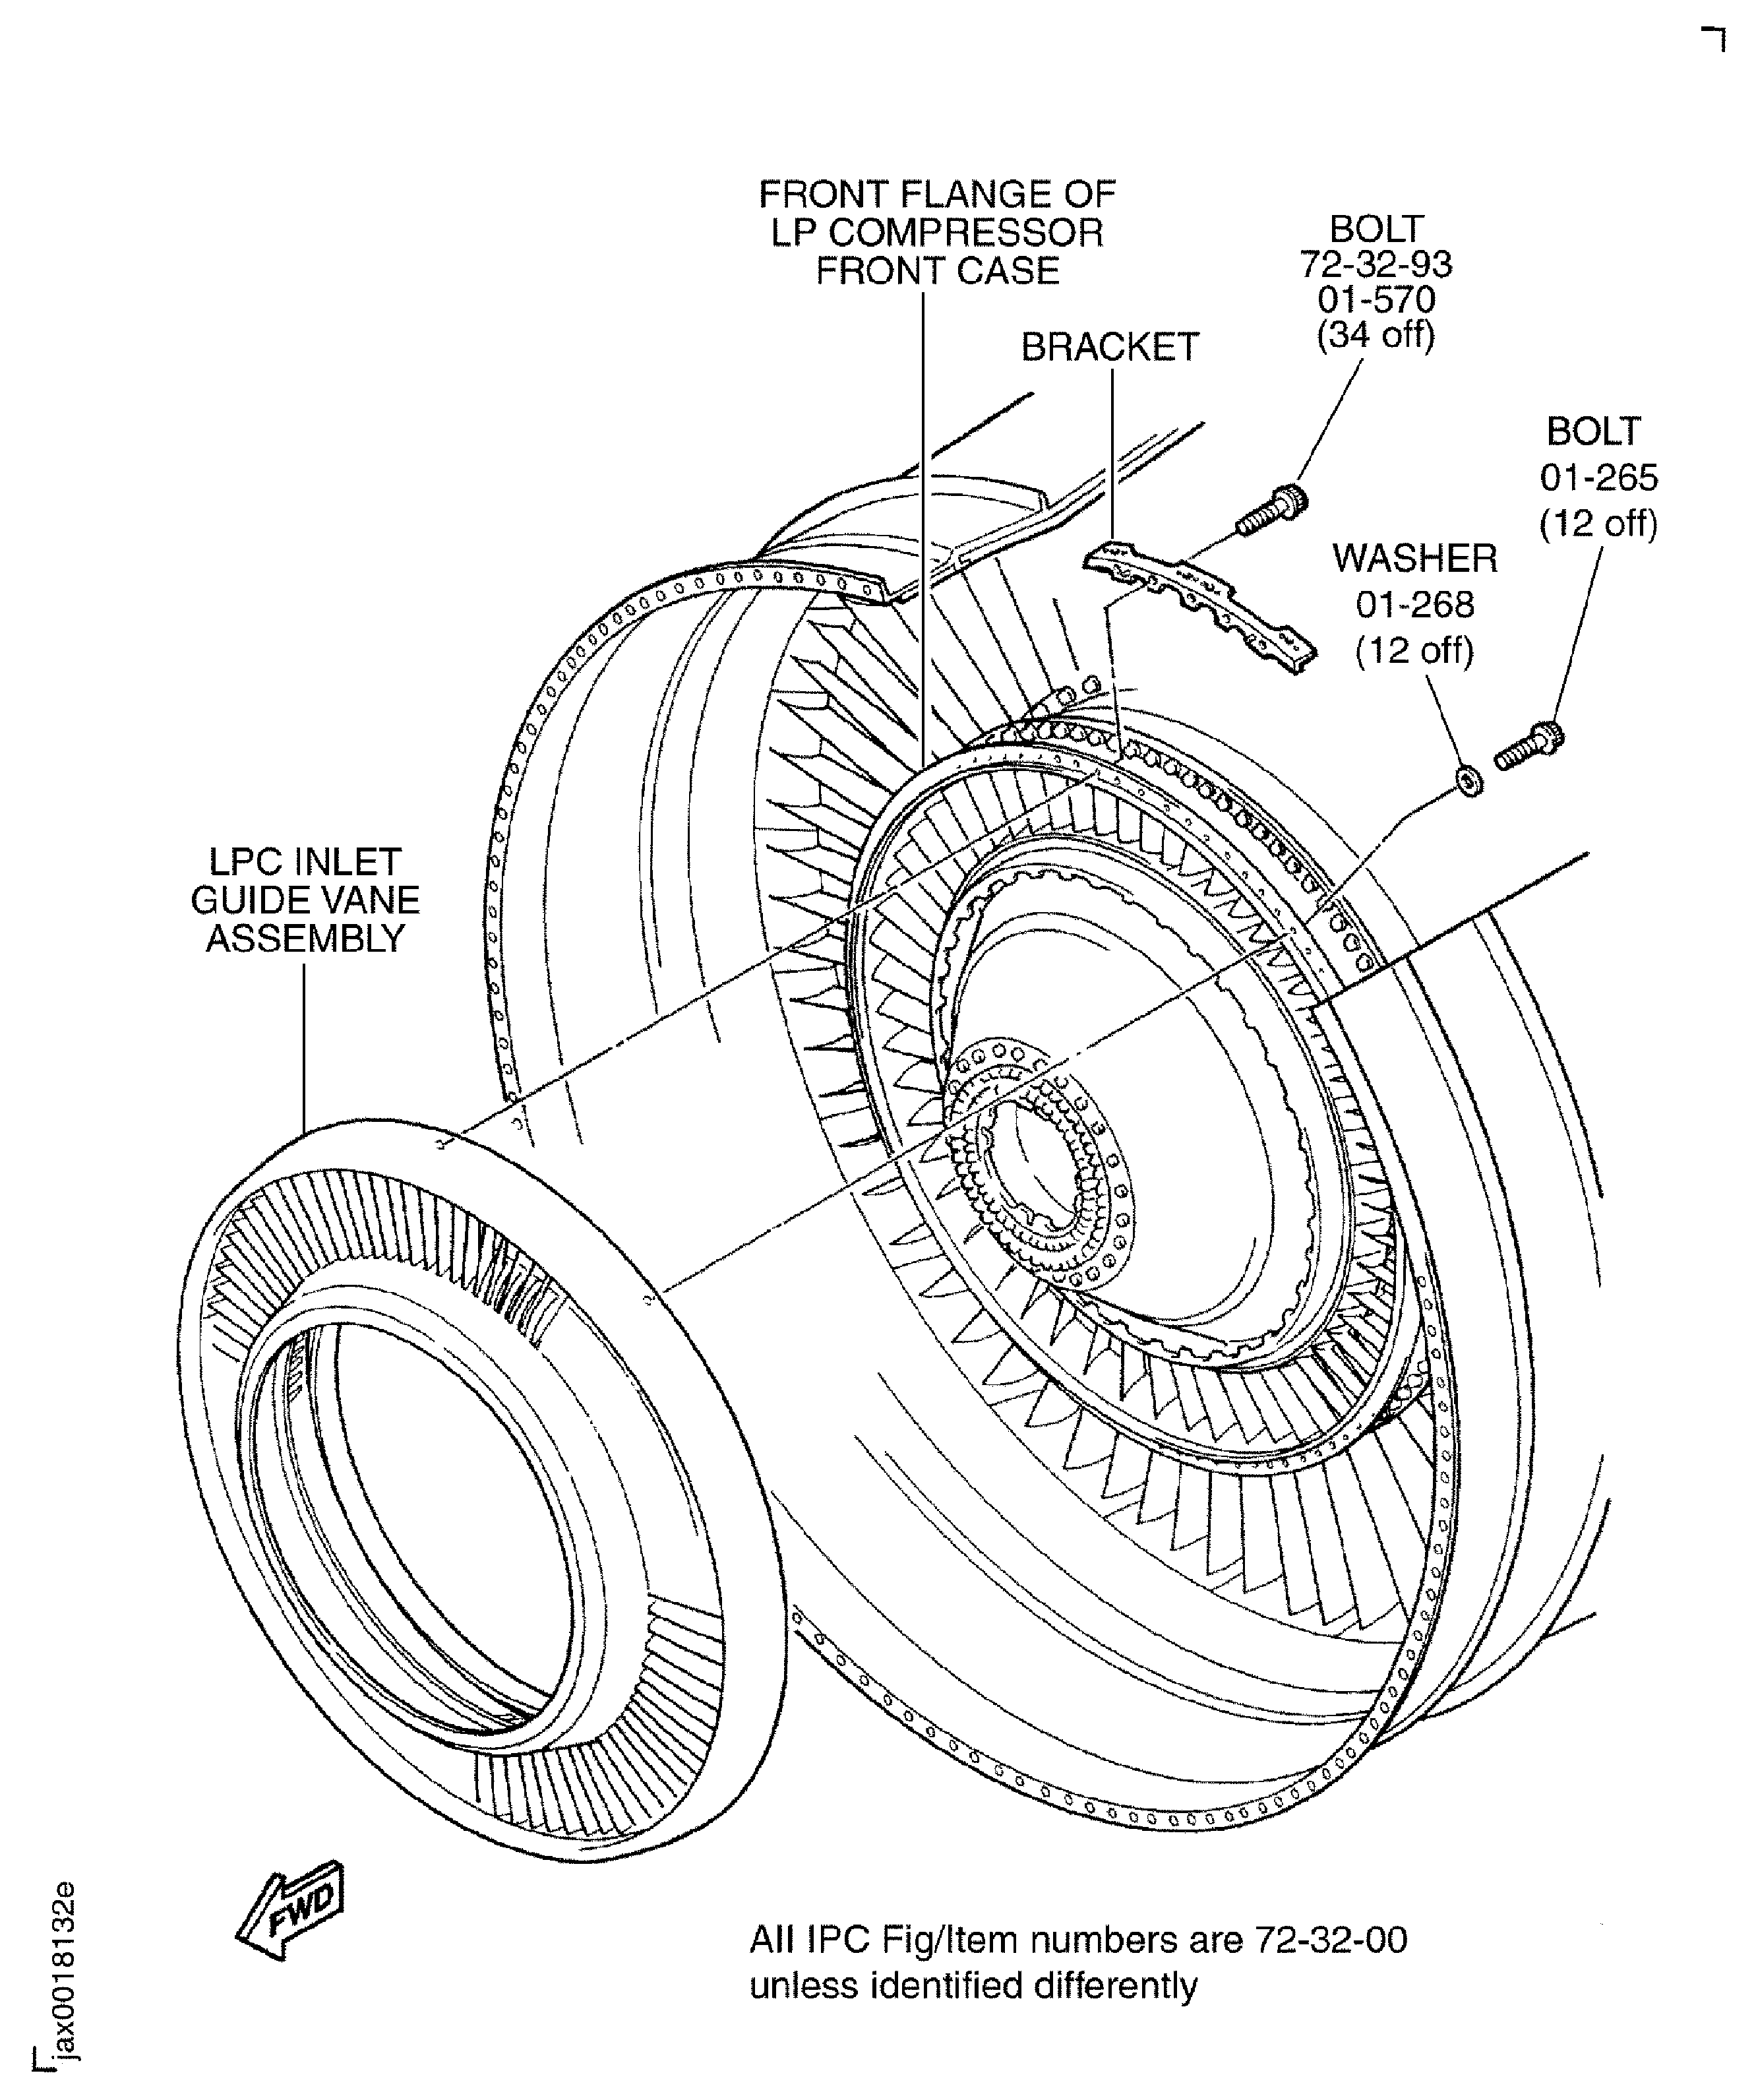
Figure: Install the brackets on to the LP compressor front case
Install the brackets on to the LP compressor front case
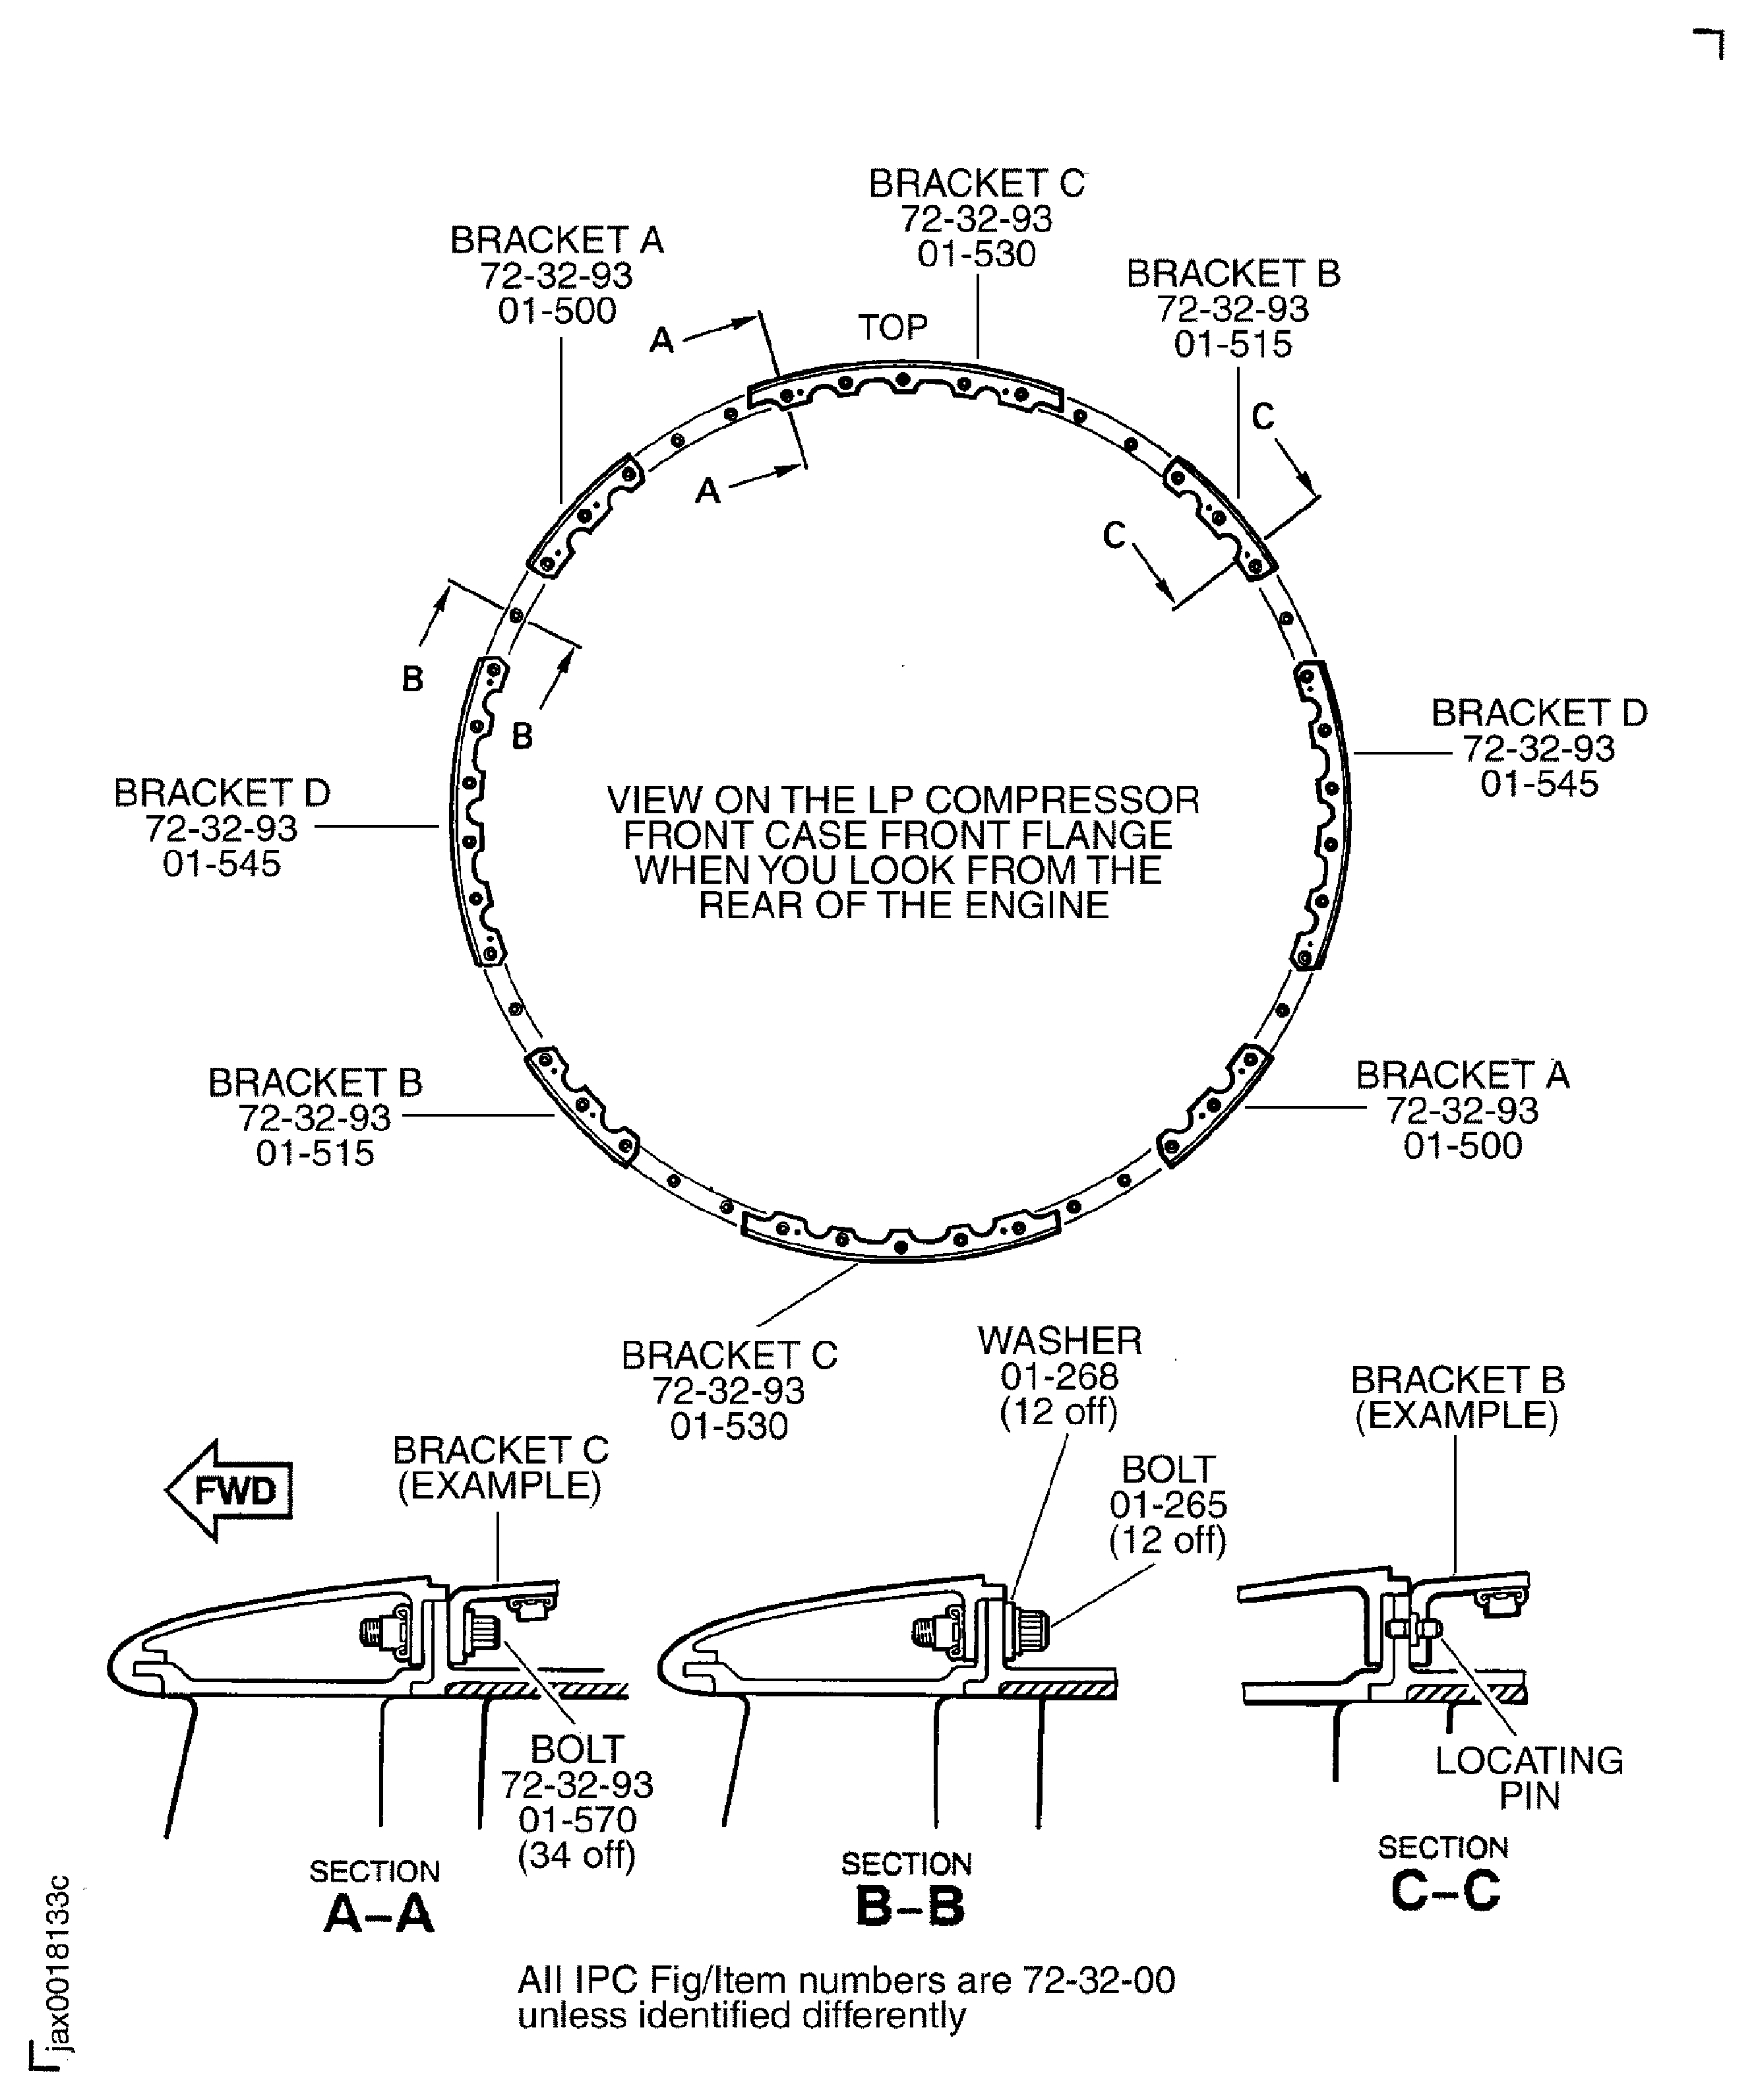
Figure: Measure the module interface dimension for the installation of the LP compressor (fan) module
Measure the module interface dimension for the installation of the LP compressor (fan) module
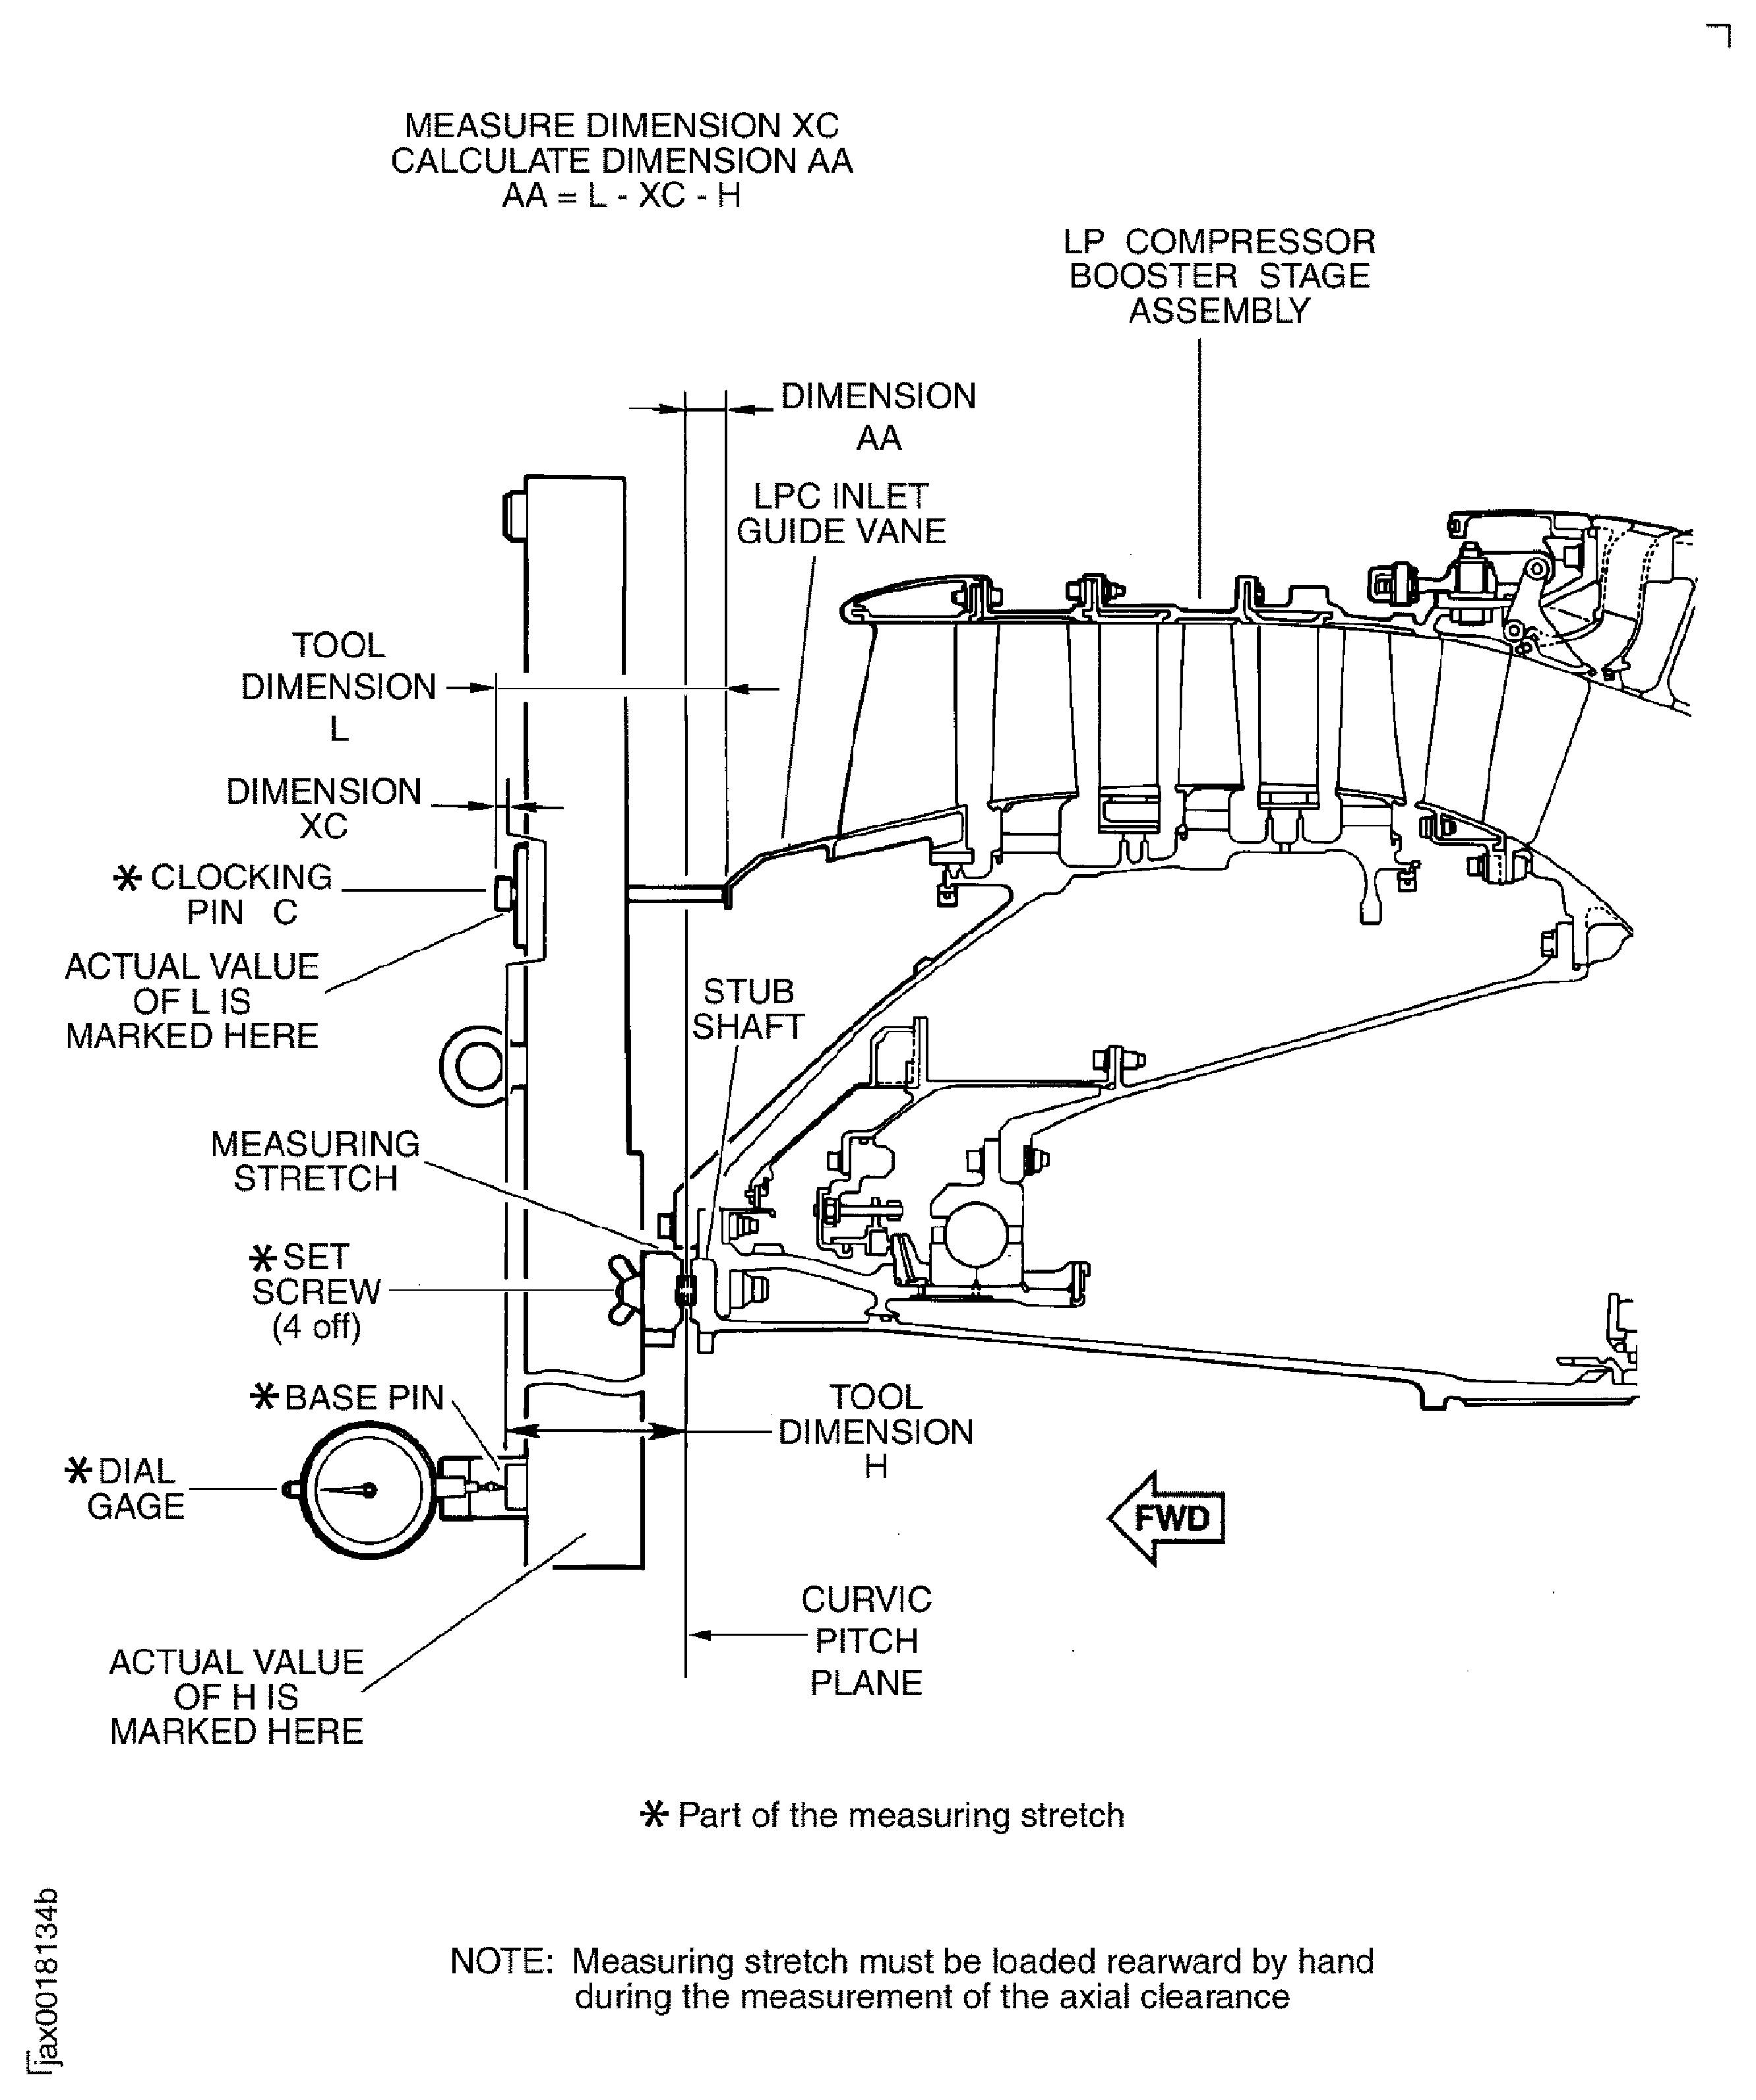
Figure: Remove the stopper and release the lock pin to turn the fan frame and fan case assembly from horizontal to vertical
Remove the stopper and release the lock pin to turn the fan frame and fan case assembly from horizontal to vertical

Figure: Measure the axial clearance between the fan outlet inner vane assembly and the LP compressor stage 1.5 blade
Measure the axial clearance between the fan outlet inner vane assembly and the LP compressor stage 1.5 blade
