Export Control
EAR Export Classification: Not subject to the EAR per 15 C.F.R. Chapter 1, Part 734.3(b)(3), except for the following Service Bulletins which are currently published as EAR Export Classification 9E991: SBE70-0992, SBE72-0483, SBE72-0580, SBE72-0588, SBE72-0640, SBE73-0209, SBE80-0024 and SBE80-0025.Copyright
© IAE International Aero Engines AG (2001, 2014 - 2021) The information contained in this document is the property of © IAE International Aero Engines AG and may not be copied or used for any purpose other than that for which it is supplied without the express written authority of © IAE International Aero Engines AG. (This does not preclude use by engine and aircraft operators for normal instructional, maintenance or overhaul purposes.).Applicability
V2500-A5
Common Information
TASK 72-45-27-200-002-B00 HPT Stage 2 Support - Examine, Inspection-002
General
This TASK gives the procedure for the inspection of the stage 2 HPT support assembly. For the other stage 2 HPT support assembly parts, refer to TASK 72-45-27-200-000.
Fig/item numbers in parentheses in the procedure agree with those used in the IPC.
The policy that is necessary for inspection is given in SPM TASK 70-20-00-200-501.
All the parts must be cleaned before any part is examined. Refer to SPM TASK 70-10-00-100-501.
All parts must be visually examined for damage, corrosion and wear. Any defects that are not identified in the procedure must be referred to IAE.
The procedure for those parts which must have a crack test is given in SUBTASK 72-45-27-230-054. Do the test before the part is visually examined.
Do not discard any part until you are sure there are no repairs available. Refer to the instructions in Repair before a discarded part is used again or oversize parts are installed.
Parts which should be discarded can be held although no repair is available. The repair of a discarded part could be shown to be necessary at a later date.
All parts must be examined to make sure that all the repairs have been completed satisfactorily.
The practices and processes referred to in the procedure by the TASK numbers are in SPM.
References
Refer to SPM for data on these items:
Definitions of Damage, SPM TASK 70-02-02-350-501.
Inspection of Parts, SPM TASK 70-20-01-200-501.
Some data on these items is contained in this TASK. For more data on these items refer to SPM.
Method of Testing for Crack Indications.
Chemical Processes.
Surface Protection.
Preliminary Requirements
Pre-Conditions
NONESupport Equipment
NONEConsumables, Materials and Expendables
NONESpares
NONESafety Requirements
NONEProcedure
Refer to Figure.
Clean the Part. Refer to TASK 72-45-27-100-000 (CLEANING-000).
SUBTASK 72-45-27-230-054-001 Examine the Stage 2 HPT Support Assembly (01-010) for Cracks
Refer to Figure.
Clean the part. Refer to TASK 72-45-27-100-000 (CLEANING-000).
SUBTASK 72-45-27-230-054-002 Examine the Stage 2 HPT Support Assembly (01-010) for Cracks
Refer to Figure.
SUBTASK 72-45-27-220-067 Examine the Stage 2 HPT Support Assembly (01-010) Front and Rear Groove for Wear and Galling
Refer to Figure.
Repair, VRS3227 TASK 72-45-27-300-005 (REPAIR-005).
Other than Step at location 9.
Repair, VRS3229 TASK 72-45-27-300-006 (REPAIR-006).
Other than Step at location 4.
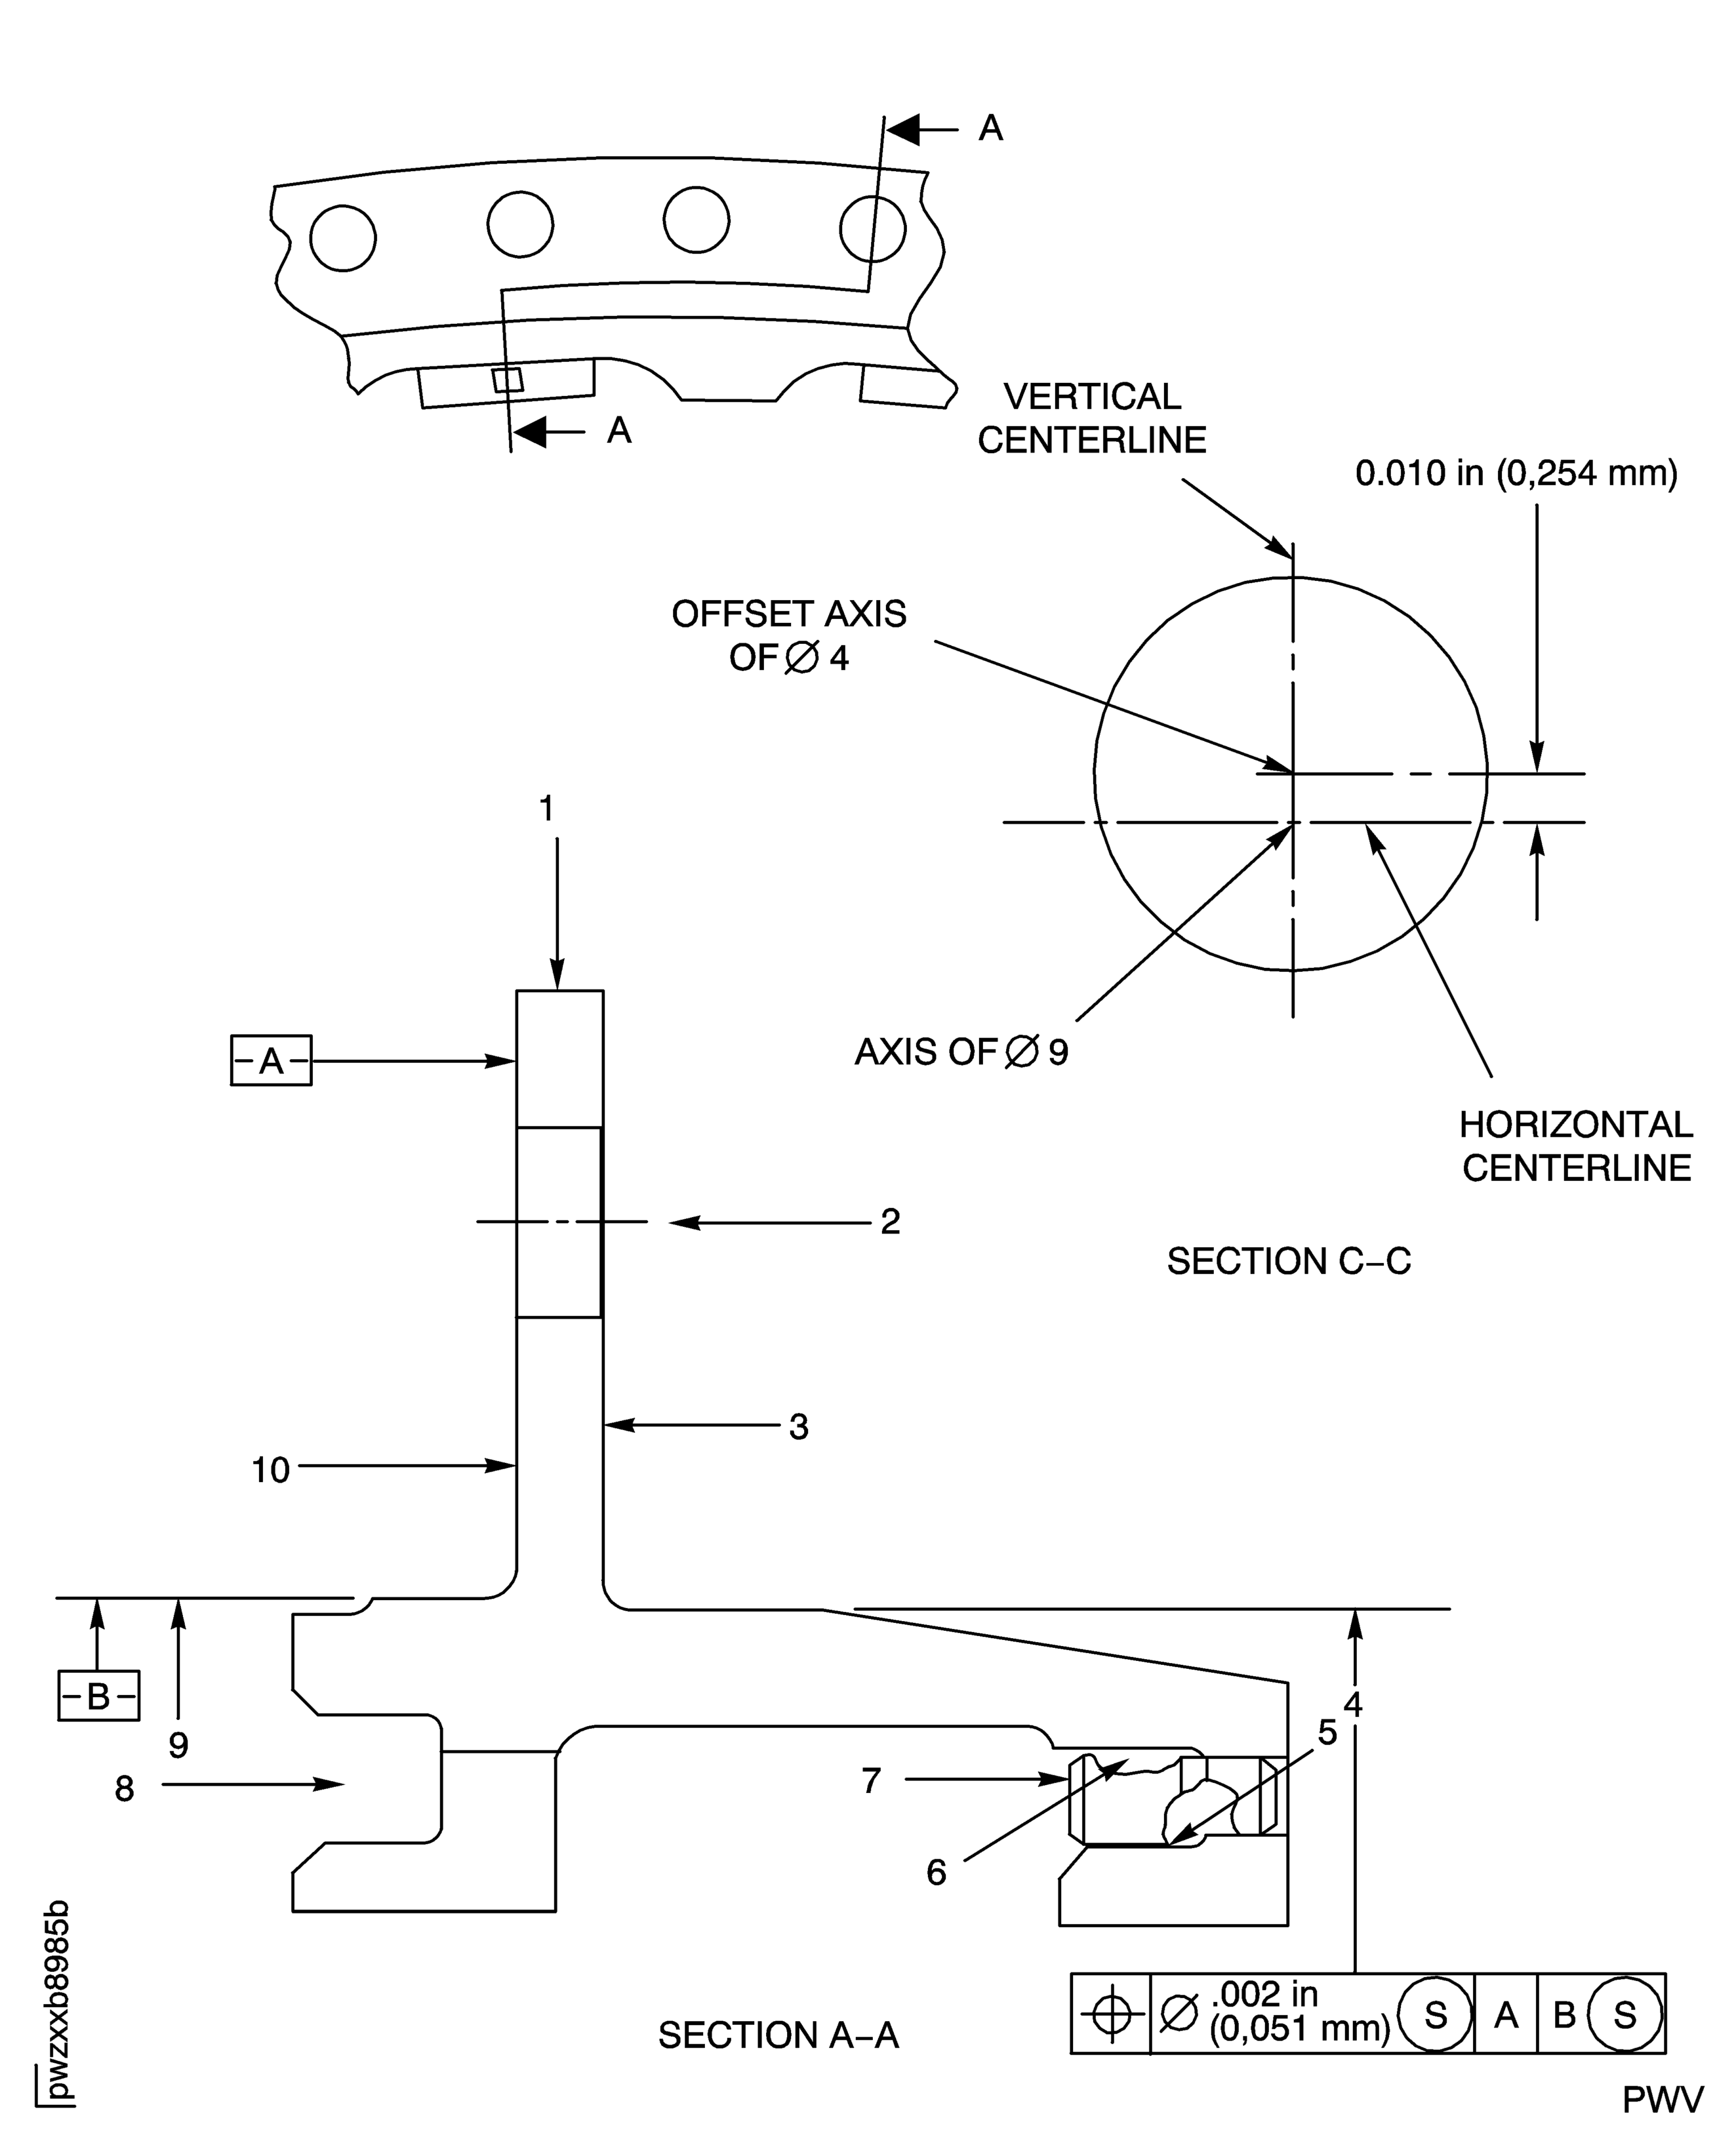
Examine the support front diameter at location 9 and the rear diameter at location 4 for wear. Note that the diameters at locations 4 and 9 are offset.
SUBTASK 72-45-27-220-069 Examine the Stage 2 HPT Support Assembly (01-010) Front and Rear Diameters for Wear
Refer to Figure.
Repair, VRS3228 TASK 72-45-27-300-007 (REPAIR-007).
Repair, VRS3228 TASK 72-45-27-300-007 (REPAIR-007).
Other than Step.
Loose or bent.
Examine the support for bent, loose and worn pins (19 positions) at location 7.
SUBTASK 72-45-27-220-070 Examine the Stage 2 HPT Support Assembly (01-010) for Bent, Loose and Worn Pins
Refer to Figure.
Accept part for select fit only.
NOTE
This part can be used only if the mating part has a diameter that will result in a fit of Reference 1510. Refer to TASK 72-45-20-440-002-B00.
If the dimension is between 28.580 in.and 28.591 in. (725.93 mm and 726.21 mm) average.
Repair, VRS3227 TASK 72-45-27-300-005 (REPAIR-005).
Examine the support front diameter at location 9 (Reference No. 1510).
Repair, VRS3229 TASK 72-45-27-300-006 (REPAIR-006).
Other than Step.
Examine the support rear diameter and offset at location 4 (Reference No. 5624).
SUBTASK 72-45-27-220-071 Examine the Stage 2 HPT Support Assembly (01-010) Front and Rear Diameters
Refer to Figure.
(Location 4, rear) Repair, VRS3229 TASK 72-45-27-300-006 (REPAIR-006), (Location 9, front) Repair, VRS3227 TASK 72-45-27-300-005 (REPAIR-005).
Plasma coat that is chipped or not there.
Examine the support assembly at location 4 and 9 for plasma spray coat that is chipped or not there.
SUBTASK 72-45-27-220-072 Examine the Stage 2 HPT Support Assembly (01-010) for Plasma Spray Coat that is Chipped or Not There on the Front and Rear Diameters
NOTE
This inspection is only for the support assembly that incorporated the plasma spray coat on the rear diameter.
Figure: Stage 2 HPT Support Assembly Inspection Locations
Stage 2 HPT Support Assembly Inspection Locations

