Export Control
EAR Export Classification: Not subject to the EAR per 15 C.F.R. Chapter 1, Part 734.3(b)(3), except for the following Service Bulletins which are currently published as EAR Export Classification 9E991: SBE70-0992, SBE72-0483, SBE72-0580, SBE72-0588, SBE72-0640, SBE73-0209, SBE80-0024 and SBE80-0025.Copyright
© IAE International Aero Engines AG (2001, 2014 - 2021) The information contained in this document is the property of © IAE International Aero Engines AG and may not be copied or used for any purpose other than that for which it is supplied without the express written authority of © IAE International Aero Engines AG. (This does not preclude use by engine and aircraft operators for normal instructional, maintenance or overhaul purposes.).Applicability
All
Common Information
TASK 72-40-00-300-004 No. 4 Bearing/HPT Nut - Blend Repair By Hand Stoning, Repair-004 (VRS3454)
General
Price and availability - none
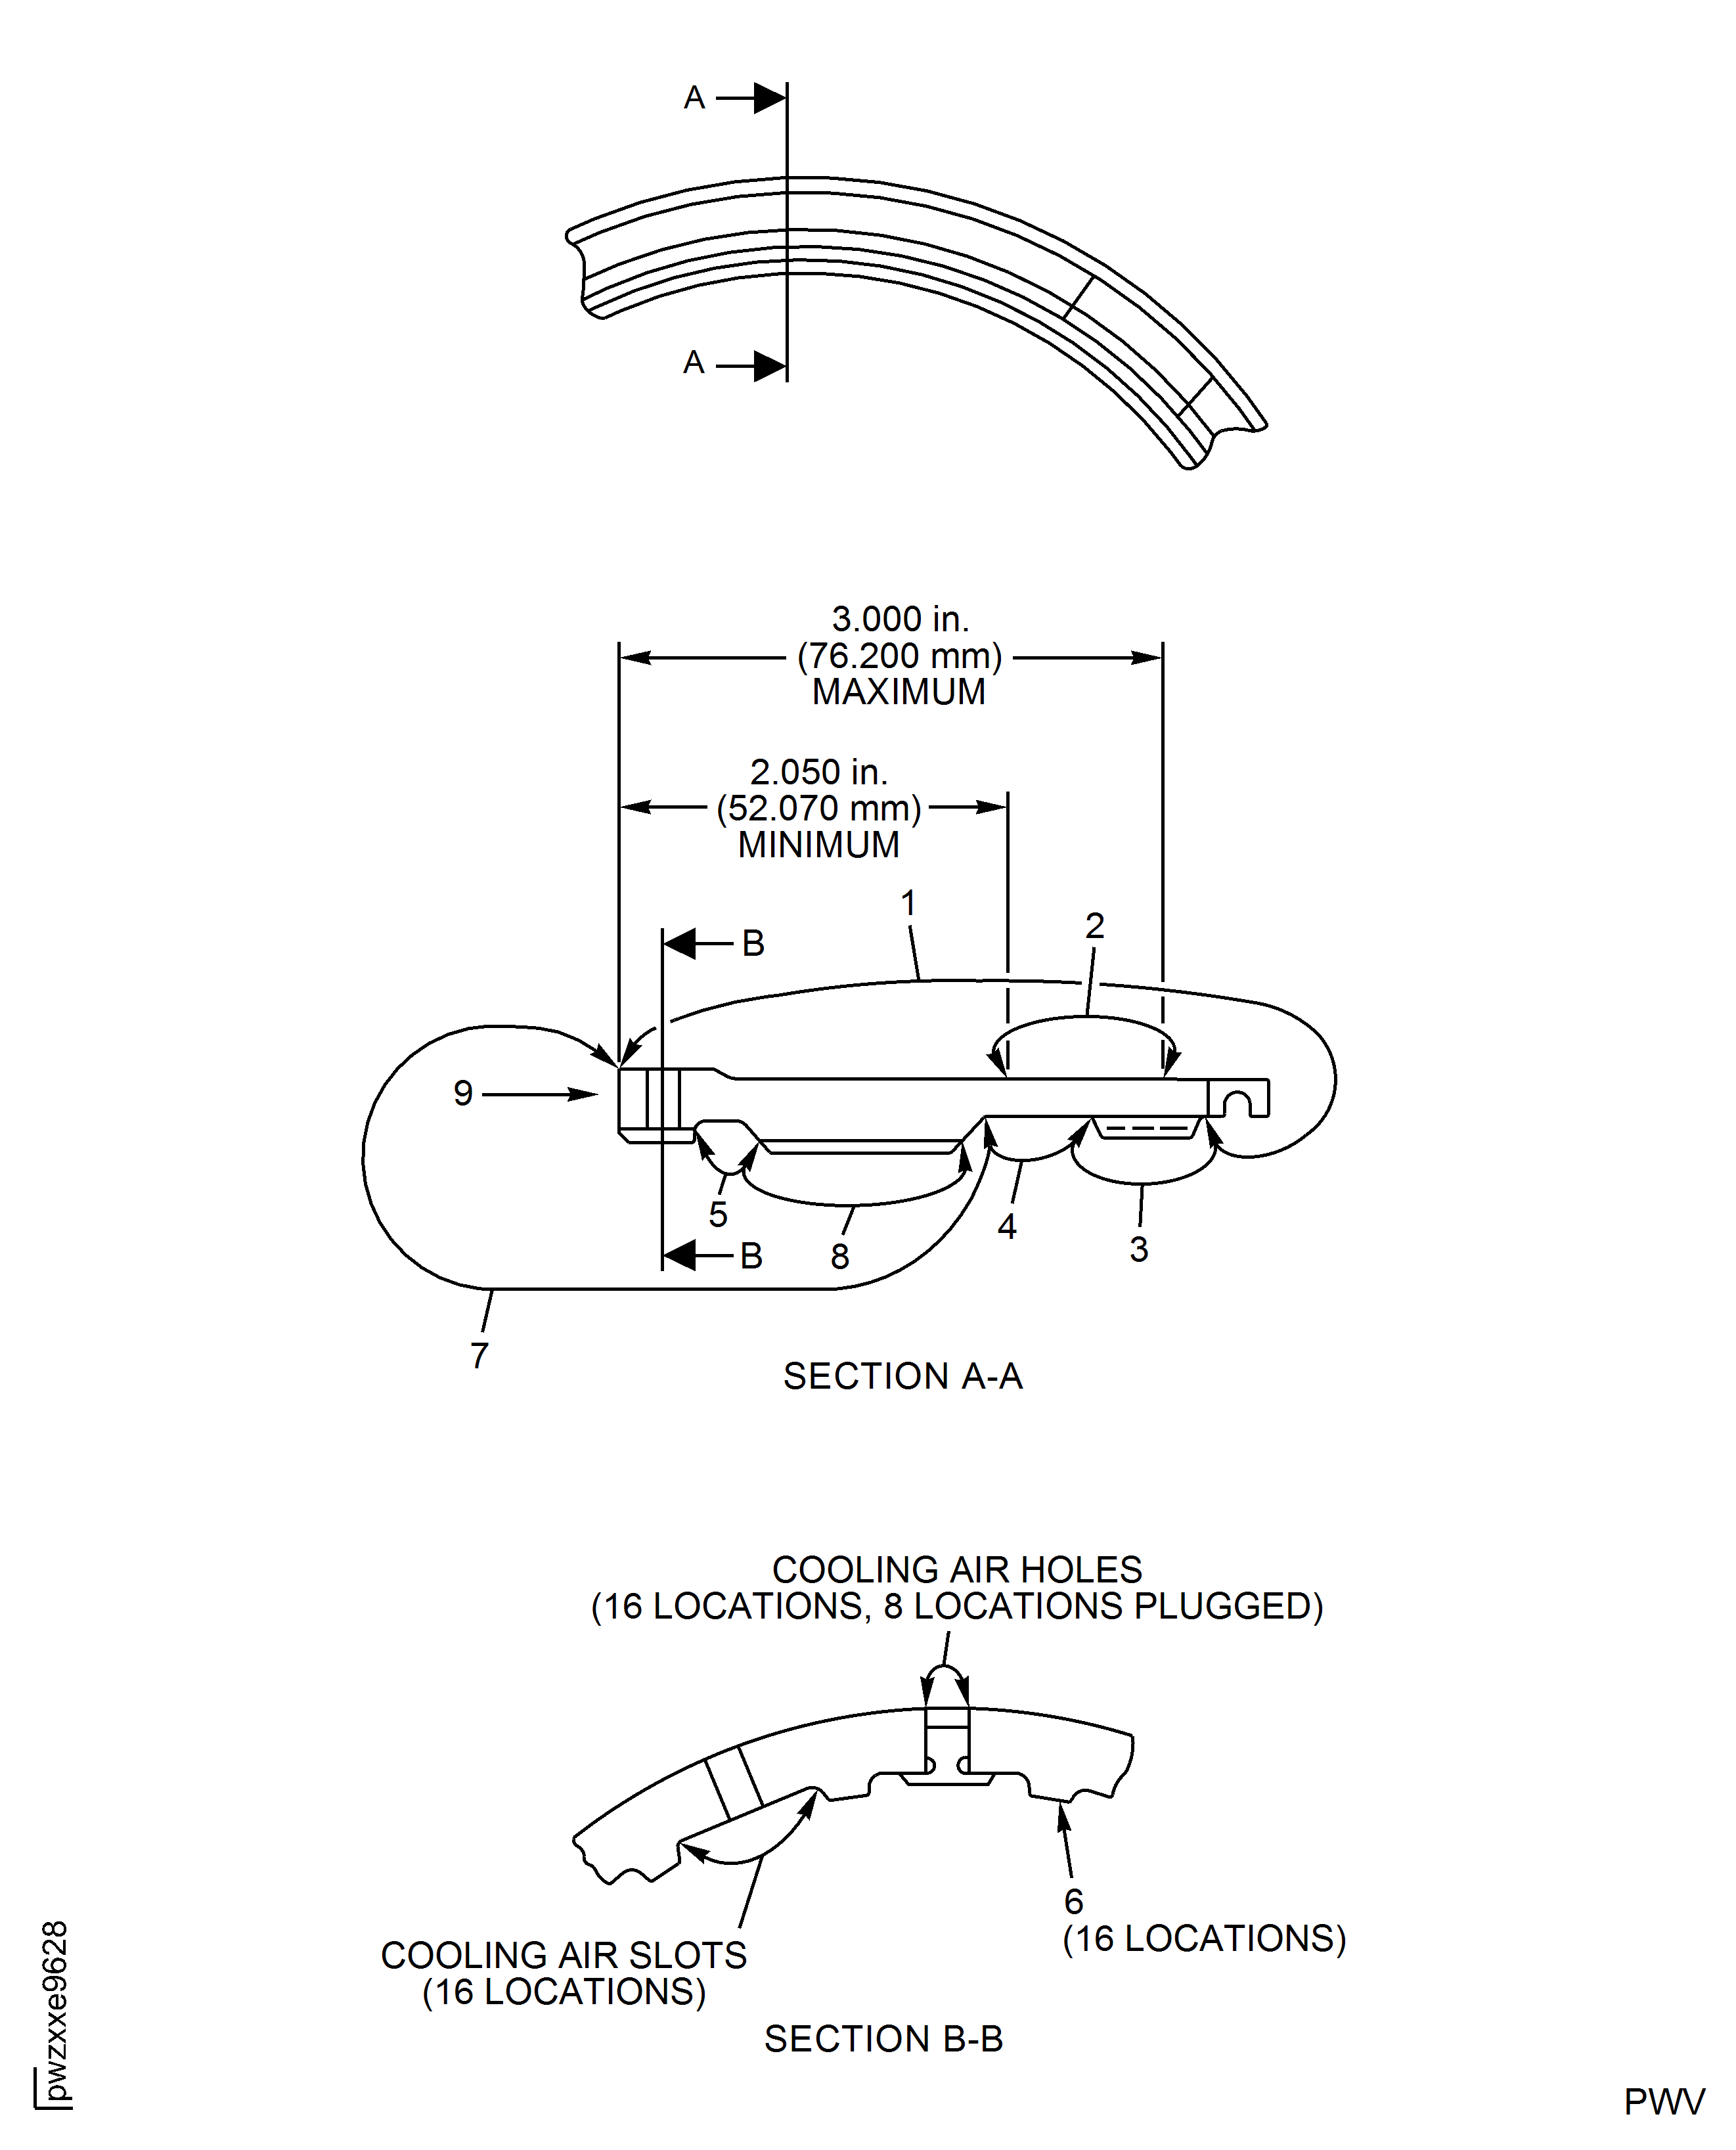
If you did the procedure in Rework-001, TASK 72-40-00-840-001 (REWORK-001) to get PN 2A2247, you do not have to remove the eight plugs (PN 2A2248) to do this repair.
This repair must only be done when the instruction to do so is given in TASK 72-40-00-200-000 (INSPECTION-000).
The practices and processes refered to in the procedure by the TASK numbers are in the SPM.
NOTE
Preliminary Requirements
Pre-Conditions
NONESupport Equipment
| Name | Manufacturer | Part Number / Identification | Quantity | Remark |
|---|---|---|---|---|
| Workshop inspection equipment | LOCAL | Workshop inspection equipment |
Consumables, Materials and Expendables
| Name | Manufacturer | Part Number / Identification | Quantity | Remark |
|---|---|---|---|---|
| CoMat 05-106 ABRASIVE STONE | K6835 | CoMat 05-106 |
Spares
NONESafety Requirements
NONEProcedure
Use a CoMat 05-106 ABRASIVE STONE.
Remove all of the high material necessary to smooth out the defects.
Hand stone any nicks that exceed the inspection limits.
You are permitted to stone the full length of the spline.
Up to five splines can be repaired.
A repaired spline must be isolated by five splines that are not repaired.
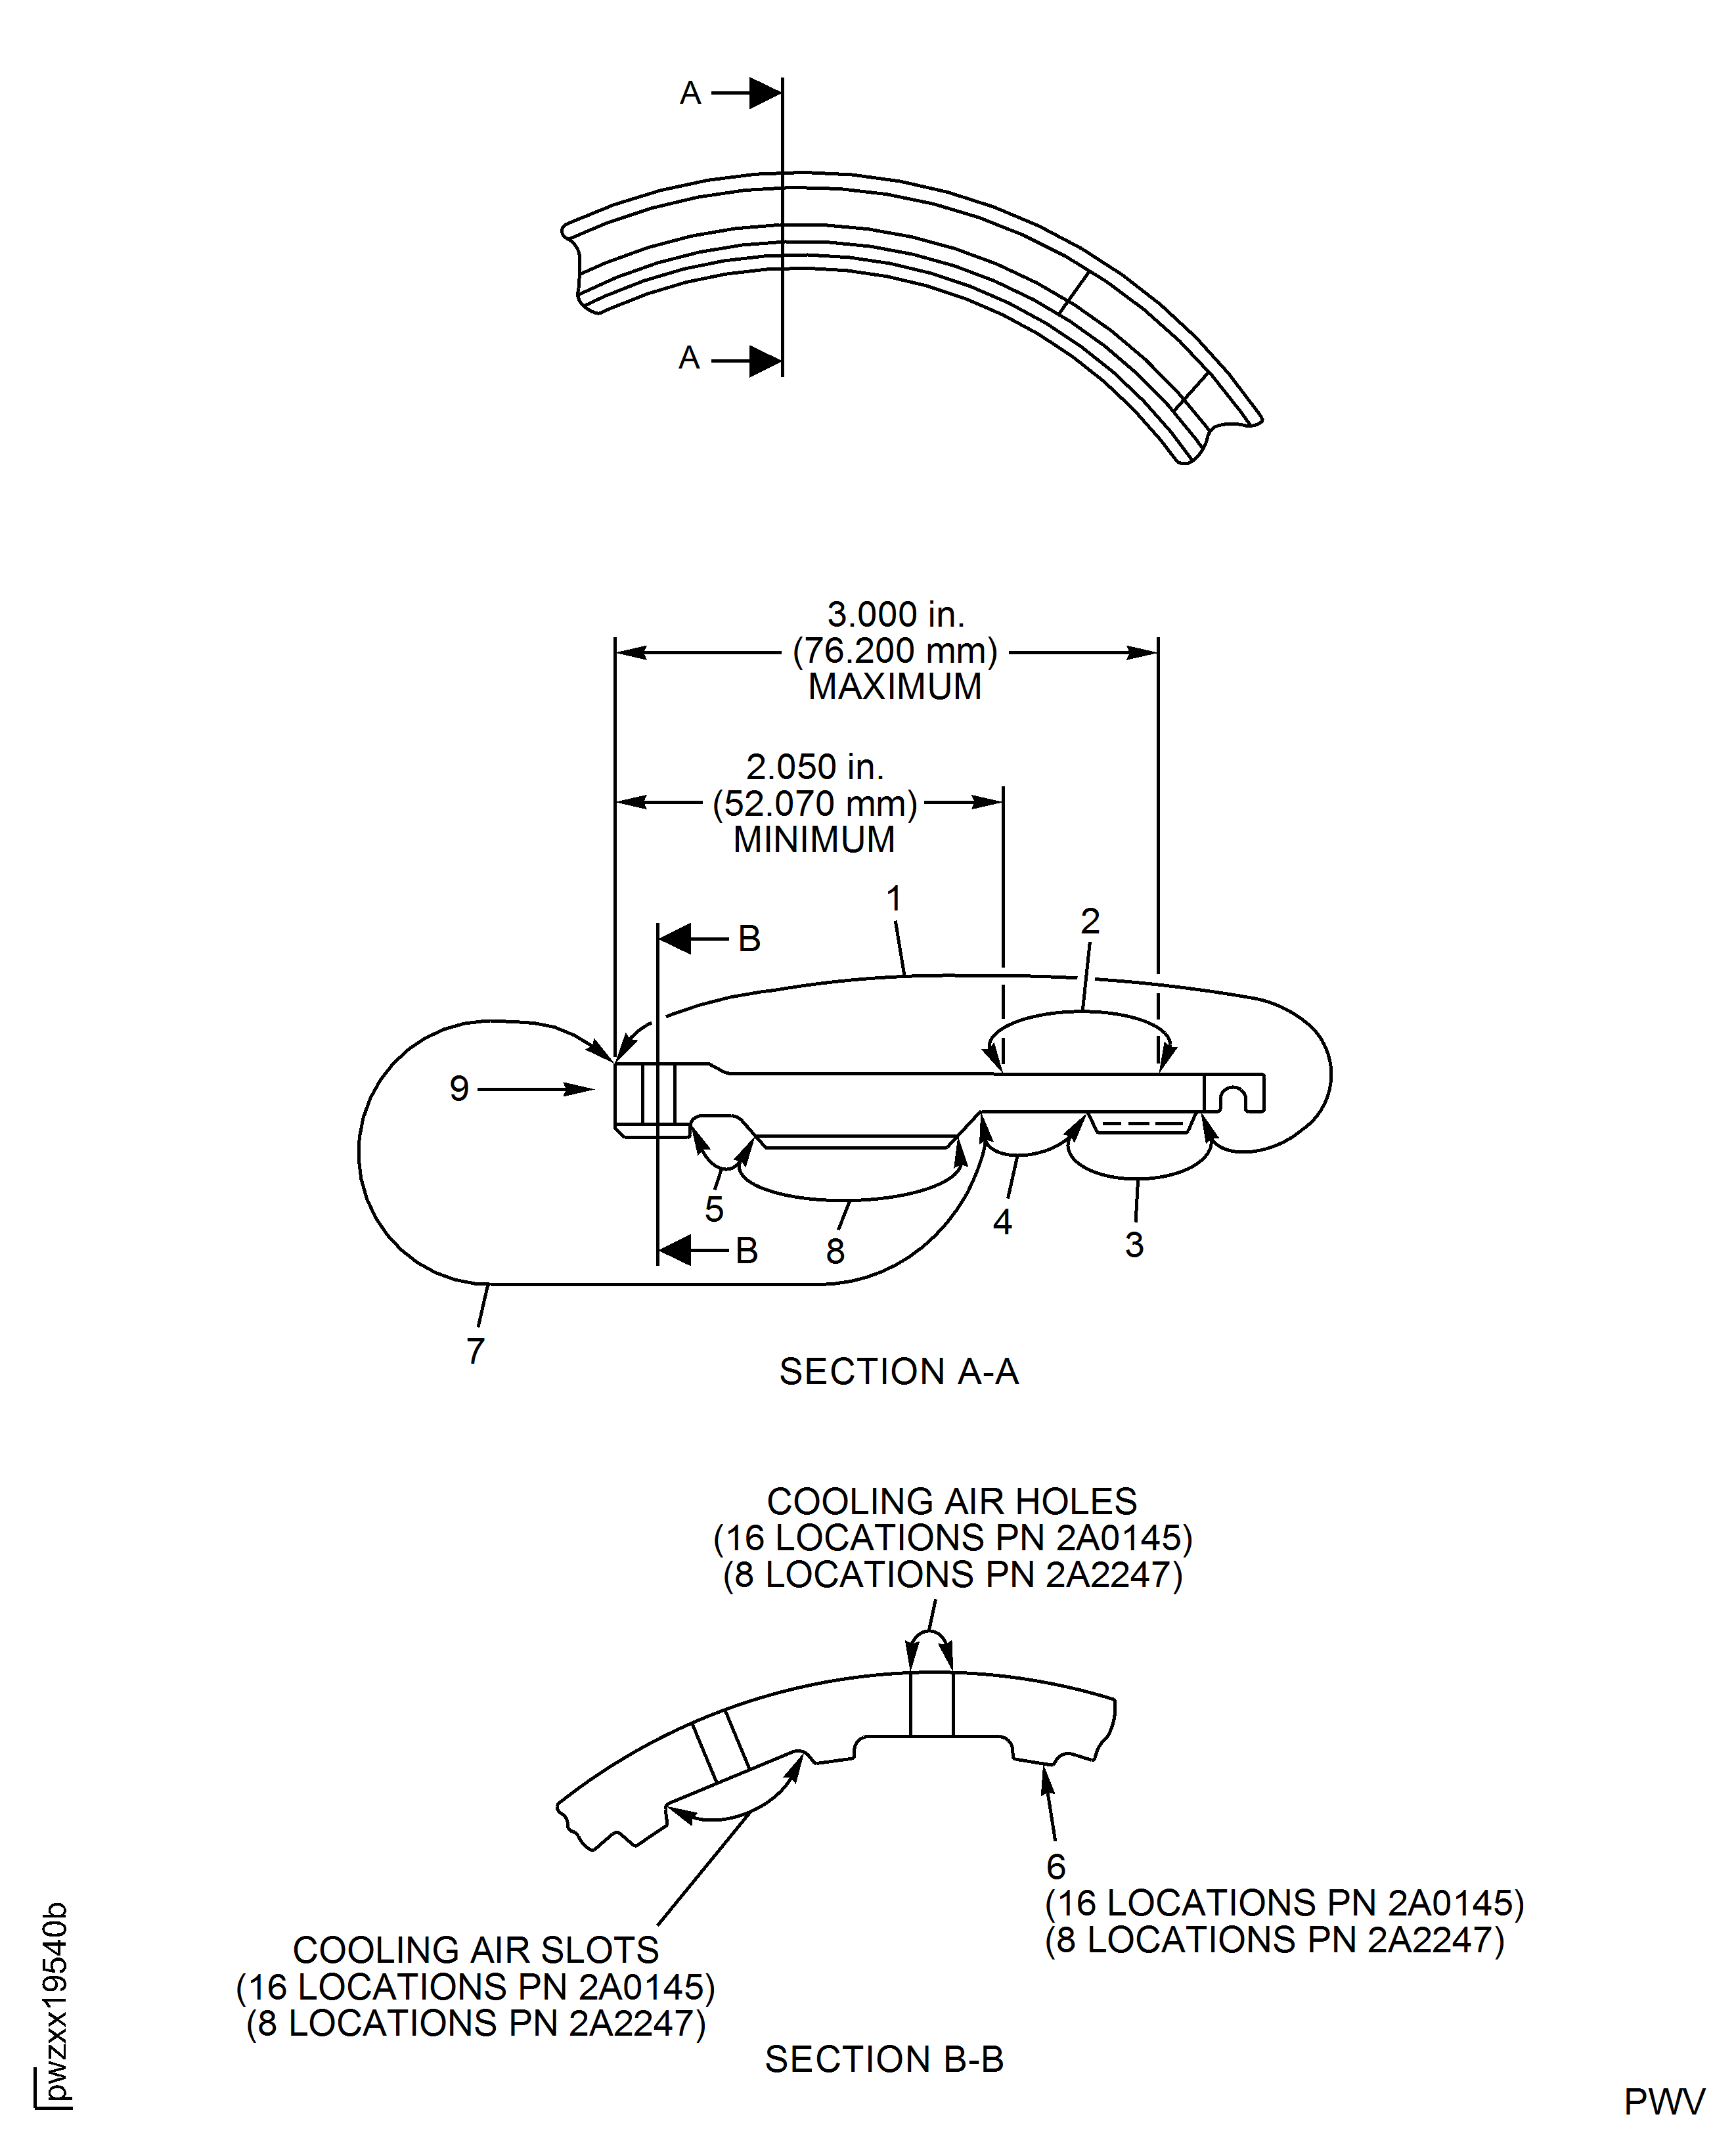
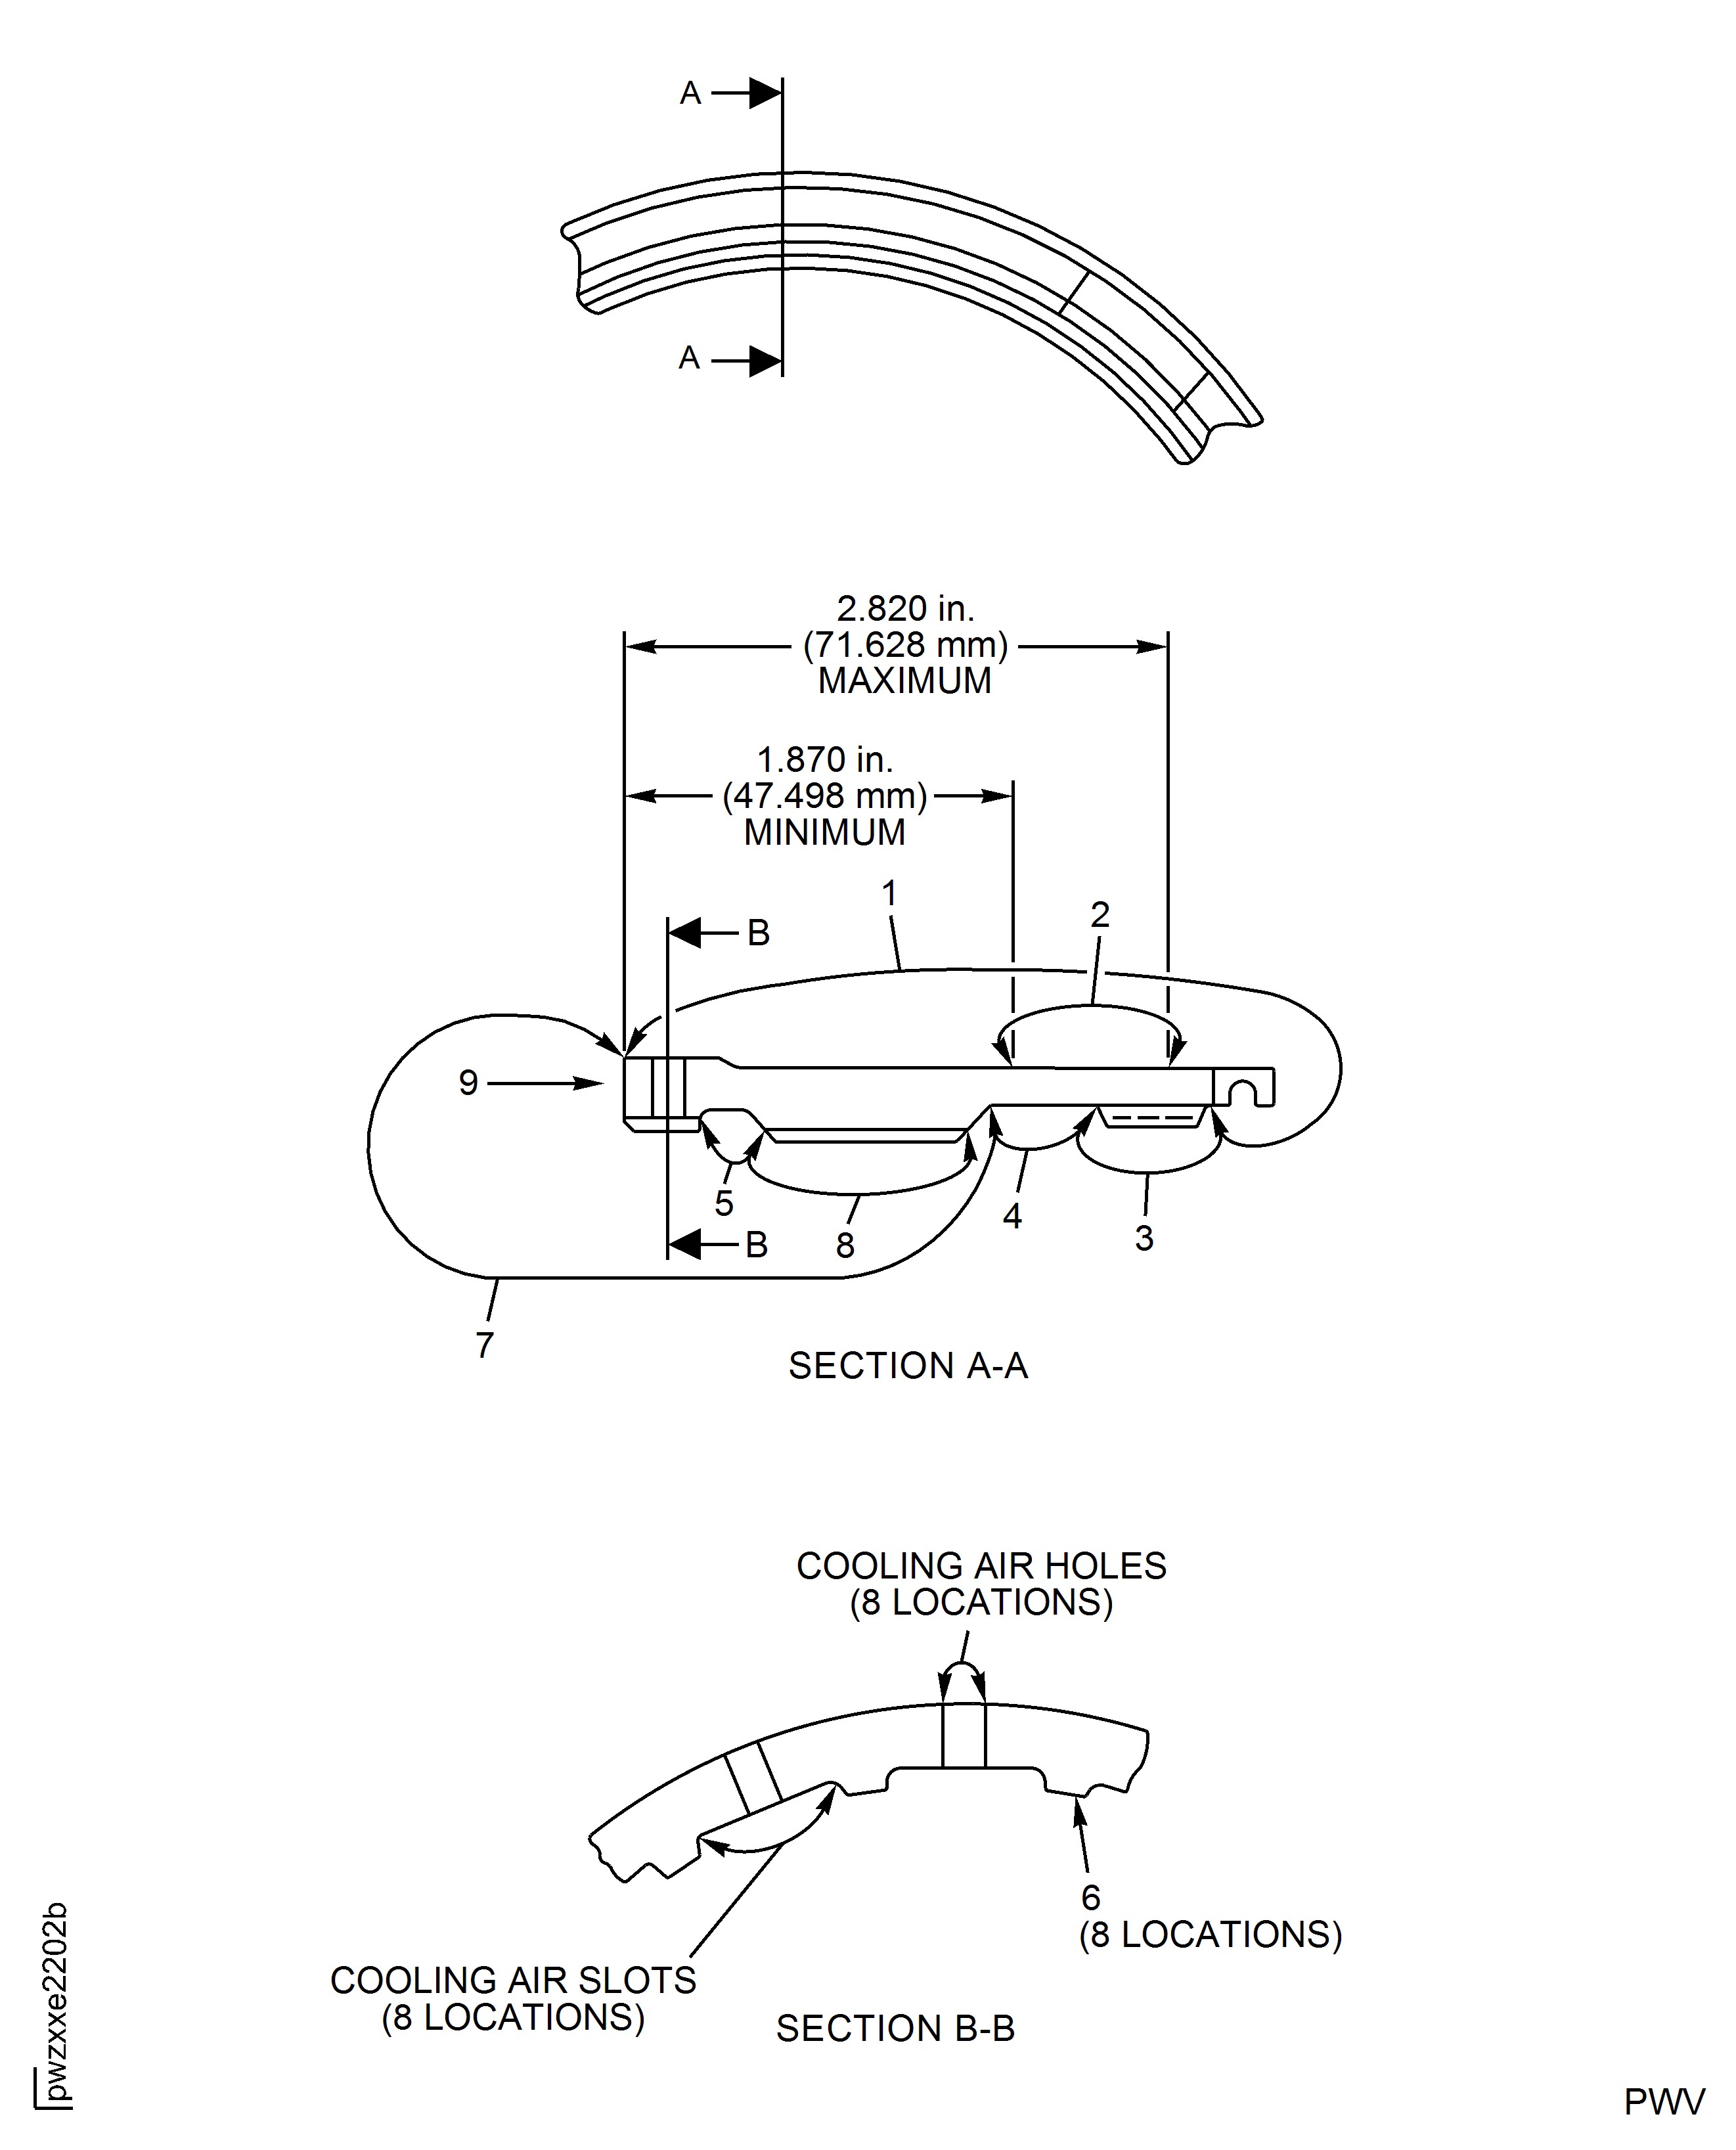
Hand stone to remove the burrs, scratches and surface damage at location 3.
SUBTASK 72-40-00-350-056 Remove the Damage on the Splines
SUBTASK 72-40-00-220-113 Examine the Repaired Splines
Use a CoMat 05-106 ABRASIVE STONE.
You must do the hand stoning in a circumferential direction.
Make a continuous smooth surface and up to 0.003in. (0.076 mm) below the surface.
Up to 20 percent of the total surface area on the front face can be repaired by stoning.
You must repair all the galling, nicks and scratches on the front face by Repair, VRS3010 TASK 72-40-00-300-005 (REPAIR-005).
Hand stone to remove all the burrs and pick-up at location 9.
SUBTASK 72-40-00-350-057 Remove the Damage on the Front Face
Accept the repairs that are smooth and up to 0.003in. (0.076 mm below the surface.
The ratio of the circumferential length to depth must be a minimum of 10.
The circumferential length of a stoned area up to 0.500in. (12.7 mm).
The minimum length between the repaired areas must be 1.00in. (25.4 mm) or more.
Do a visual and dimensional inspection at location 9.
SUBTASK 72-40-00-220-114 Examine the Repaired Front Face
Use a CoMat 05-106 ABRASIVE STONE.
You must do the hand stoning in a circumferential direction.
Make a continuous smooth surface and up to 0.003in. (0.076 mm) below the surface.
You can stone the full axial and circumferential length of the lug surface.
The front inner diameter is not a continuous surface.
The total surface area consists only of the contact surface on the lugs.
The cooling slots and holes are not included.
Up to 20 per cent of the total surface area on the front inner diameter can be repaired by hand stoning.
Two repaired lugs must be divided by a minimum of one lug that is not repaired.
Repair all galling or pick up on the front inner diameter by repair, VRS3489 TASK 72-40-00-300-010 (REPAIR-010).
Hand stone to remove all the burrs from the lugs at location 6.
SUBTASK 72-40-00-350-058 Remove the Damage on the Front Inner Diameter
Use a CoMat 05-106 ABRASIVE STONE.
You must do the hand stoning in a circumferential direction.
Blend up to 0.010 in. (0.254 mm) in depth.
Remove the minimum quantity of material when you make the damaged surface smooth.
Up to 20 percent of the total surface area can be repaired by hand stoning.
Hand stone to remove all the surface damage at location 1, 4 and 5. This includes all high material, nicks, and scratches that exceed the inspection depth.
SUBTASK 72-40-00-350-059 Remove the Damage at All Other Areas
Accept repairs that are smooth and up to 0.010 in. (0.254 mm) in depth.
The ratio of the length in a circumferential direction to depth must be a minimum of 10.
The length of a blended area must not be more than 0.600 in. (15.24 mm).
The minimum length between the repaired areas in all directions must be 1.00 in. (25.4 mm) or more.
Do a visual and dimensional inspection at locations 1, 4 and 5.
SUBTASK 72-40-00-220-116 Examine the Repaired Areas
Make a permanent mark by SPM TASK 70-09-00-400-501.
Electrical contact permitted only at location 2.
Make a mark VRS3454 adjacent to the part number.
SUBTASK 72-40-00-350-060 Identify the Repair
Refer to VRS3011 TASK 72-40-00-300-006 (REPAIR-006).
Plate the bearing retaining nut with the silver plate and treat with anti-galling compound.
SUBTASK 72-40-00-330-052 Plate the Bearing Retaining Nut with the Silver Plate and Treat with Anti-Galling Compound
Figure: Bearing retaining nut (PN 2A0145 and 2A2247) hand stoning
Bearing retaining nut (PN 2A0145 and 2A2247) hand stoning

Figure: Bearing retaining nut (PN 2A2245) hand stoning
Bearing retaining nut (PN 2A2245) hand stoning

Figure: Bearing retaining nut (2A2247, re-operated from 2A0145 per SBE 72-0095) hand stoning
Bearing retaining nut (2A2247, re-operated from 2A0145 per SBE 72-0095) hand stoning

