Export Control
EAR Export Classification: Not subject to the EAR per 15 C.F.R. Chapter 1, Part 734.3(b)(3), except for the following Service Bulletins which are currently published as EAR Export Classification 9E991: SBE70-0992, SBE72-0483, SBE72-0580, SBE72-0588, SBE72-0640, SBE73-0209, SBE80-0024 and SBE80-0025.Copyright
© IAE International Aero Engines AG (2001, 2014 - 2021) The information contained in this document is the property of © IAE International Aero Engines AG and may not be copied or used for any purpose other than that for which it is supplied without the express written authority of © IAE International Aero Engines AG. (This does not preclude use by engine and aircraft operators for normal instructional, maintenance or overhaul purposes.).Applicability
All
Common Information
TASK 72-41-11-840-003 HPC Stage 3 - 8 Drum Disk - Machine The Grooves For The Revised L-Shaped Wire Seals, Rework-003 - SBE72-0304
Effectivity
FIG/ITEM | PART NO. |
|---|---|
01-200 | 6A4900 |
01-200 | 6A5467 |
01-200 | 6A5592 |
01-200 | 6A5594 |
01-200 | 6A5659 |
01-200 | 6A6473 |
General
The practices and processes referred to in the procedure by TASK/SUBTASK number are in the SPM.
Refer to the indicated Service Bulletin for specific application requirements.
Preliminary Requirements
Pre-Conditions
NONESupport Equipment
| Name | Manufacturer | Part Number / Identification | Quantity | Remark |
|---|---|---|---|---|
| Centre lathe | LOCAL | Centre lathe | ||
| Dial test indicators | LOCAL | Dial test indicators | ||
| Standard turning tool | LOCAL | Standard turning tool | ||
| Standard workshop tools | LOCAL | Standard workshop tools | ||
| Vibrating marking pencil | LOCAL | Vibrating marking pencil | ||
| IAE 3R18735 Turning arbor | 0AM53 | IAE 3R18735 | ||
| IAE 3R19079 Front groove tool | 0AM53 | IAE 3R19079 | ||
| IAE 3R19314 Rear groove tool | 0AM53 | IAE 3R19314 | ||
| IAE 3R19361 Front groovetool | 0AM53 | IAE 3R19361 |
Consumables, Materials and Expendables
NONESpares
NONESafety Requirements
CAUTION
Procedure
Refer to the SPM TASK 70-11-34-300-503.
Clean the disk assembly.
SUBTASK 72-41-11-110-080 Clean the Surfaces
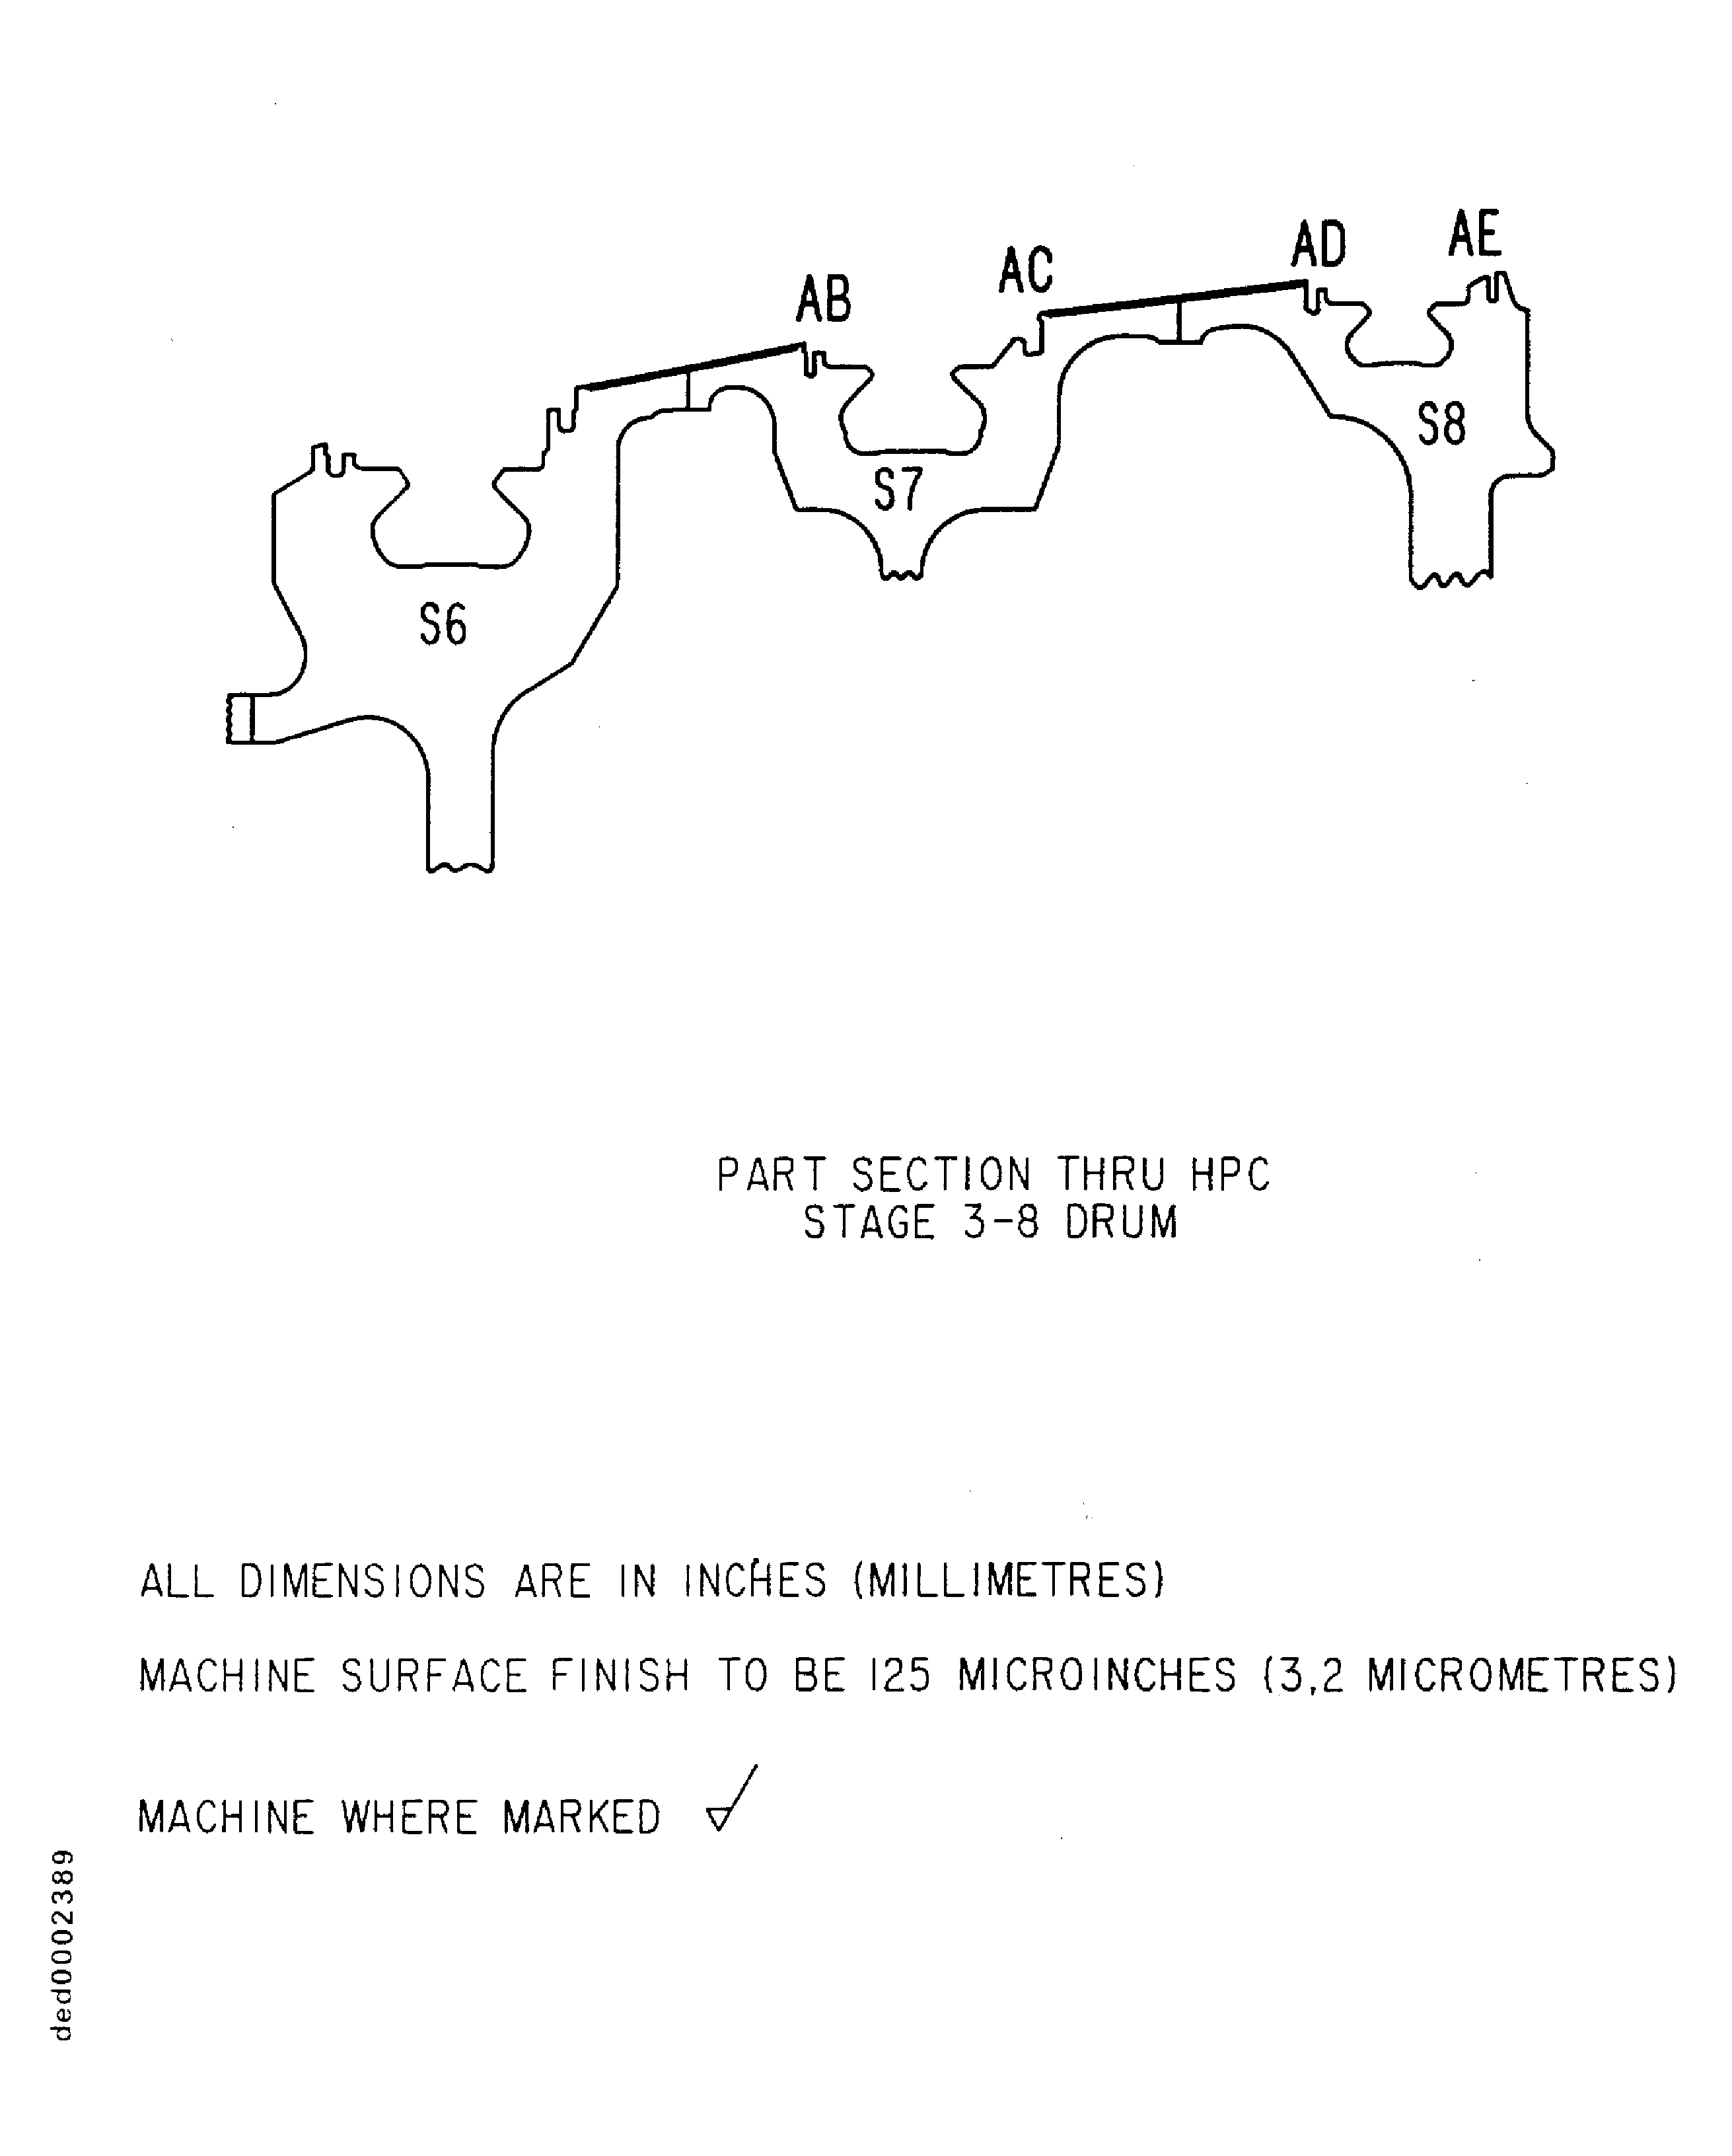
Refer to Figure.
Use IAE 3R18735 Turning arbor 1 off with centre lathe.
Use dial test indicator to ensure disk assembly runs true.
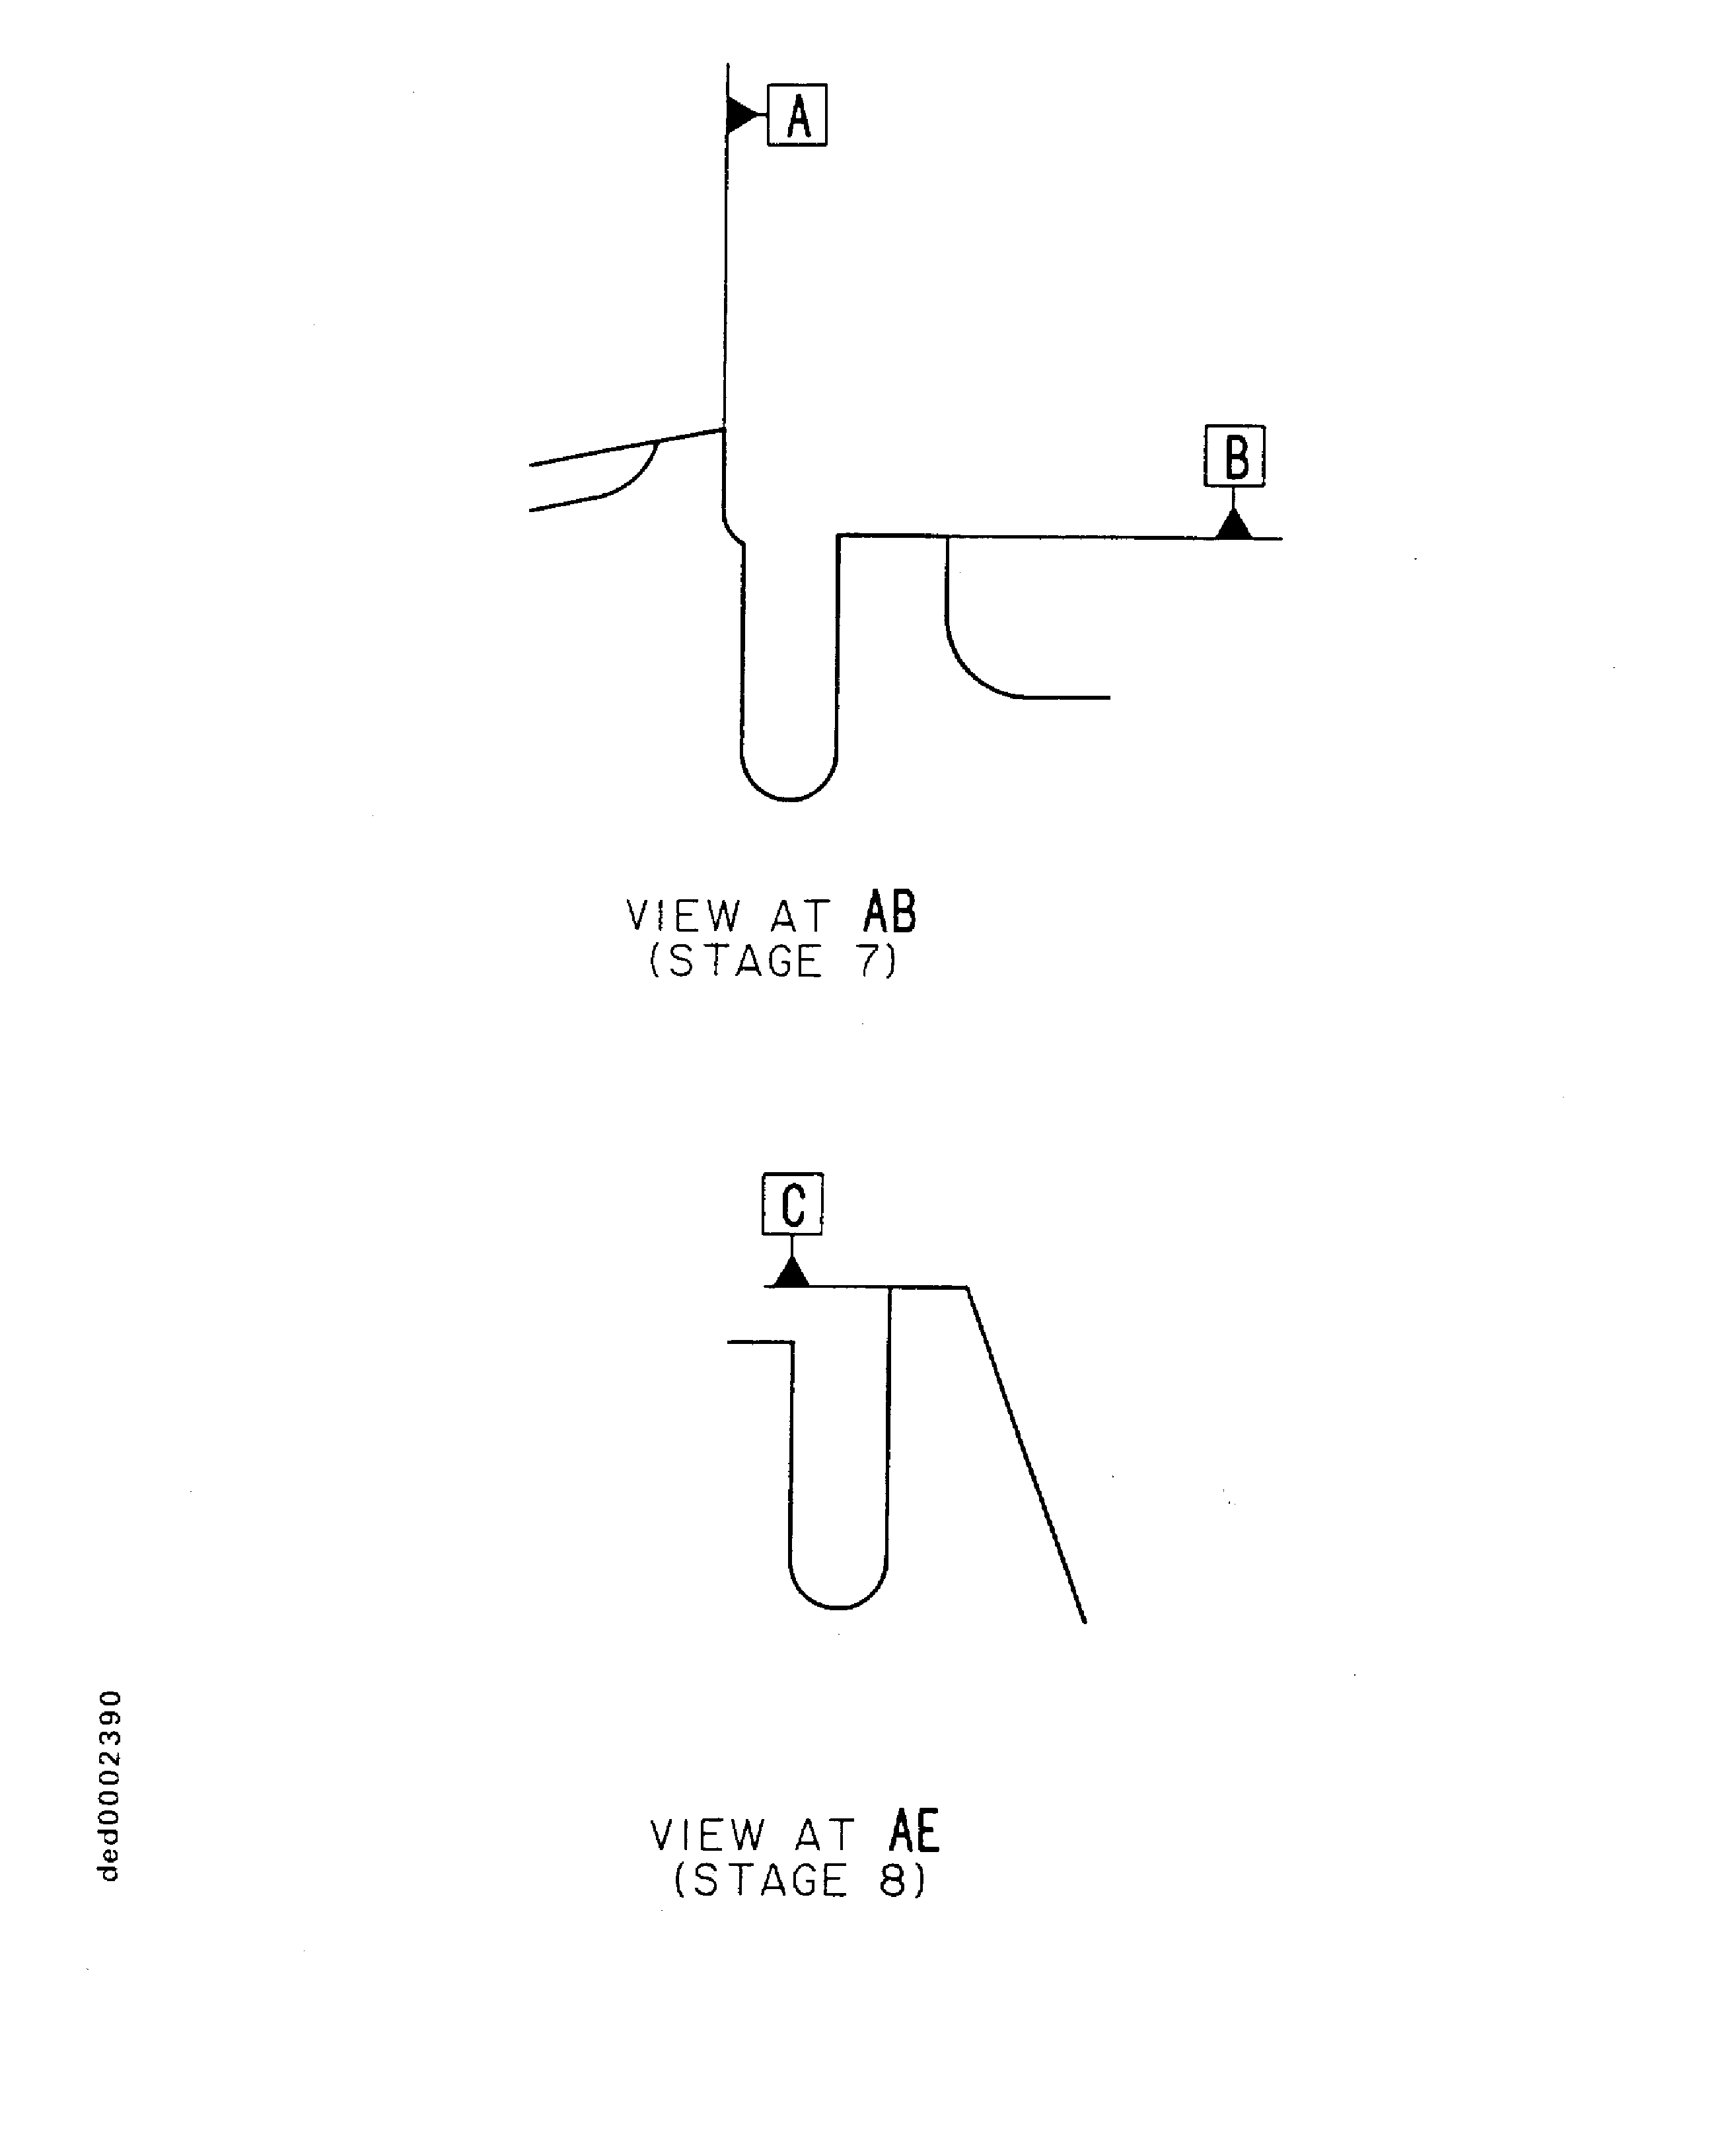
Make sure datum A, datum B and datum C run true.
Set up the disk assembly for machining.
Use a turning speed of 114.8 ft (35m.) per minute, with a feed of 0.002 in. (0.05 mm) per revolution.
Use IAE 3R19079 Front groove tool 1 off.

CAUTION
YOU MUST BE CAREFUL WHEN YOU MACHINE THE STAGE 7 REAR AND THE STAGE 8 FRONT SEALING WIRE LOCATION SLOTS.Machine the sealing wire location slots at the rear of the Stage 7 and the front of the Stage 8 blade root location.
Use a turning speed of 114.8 ft (35m.) per minute, with a feed of 0.002 in. (0.05 mm) per revolution.
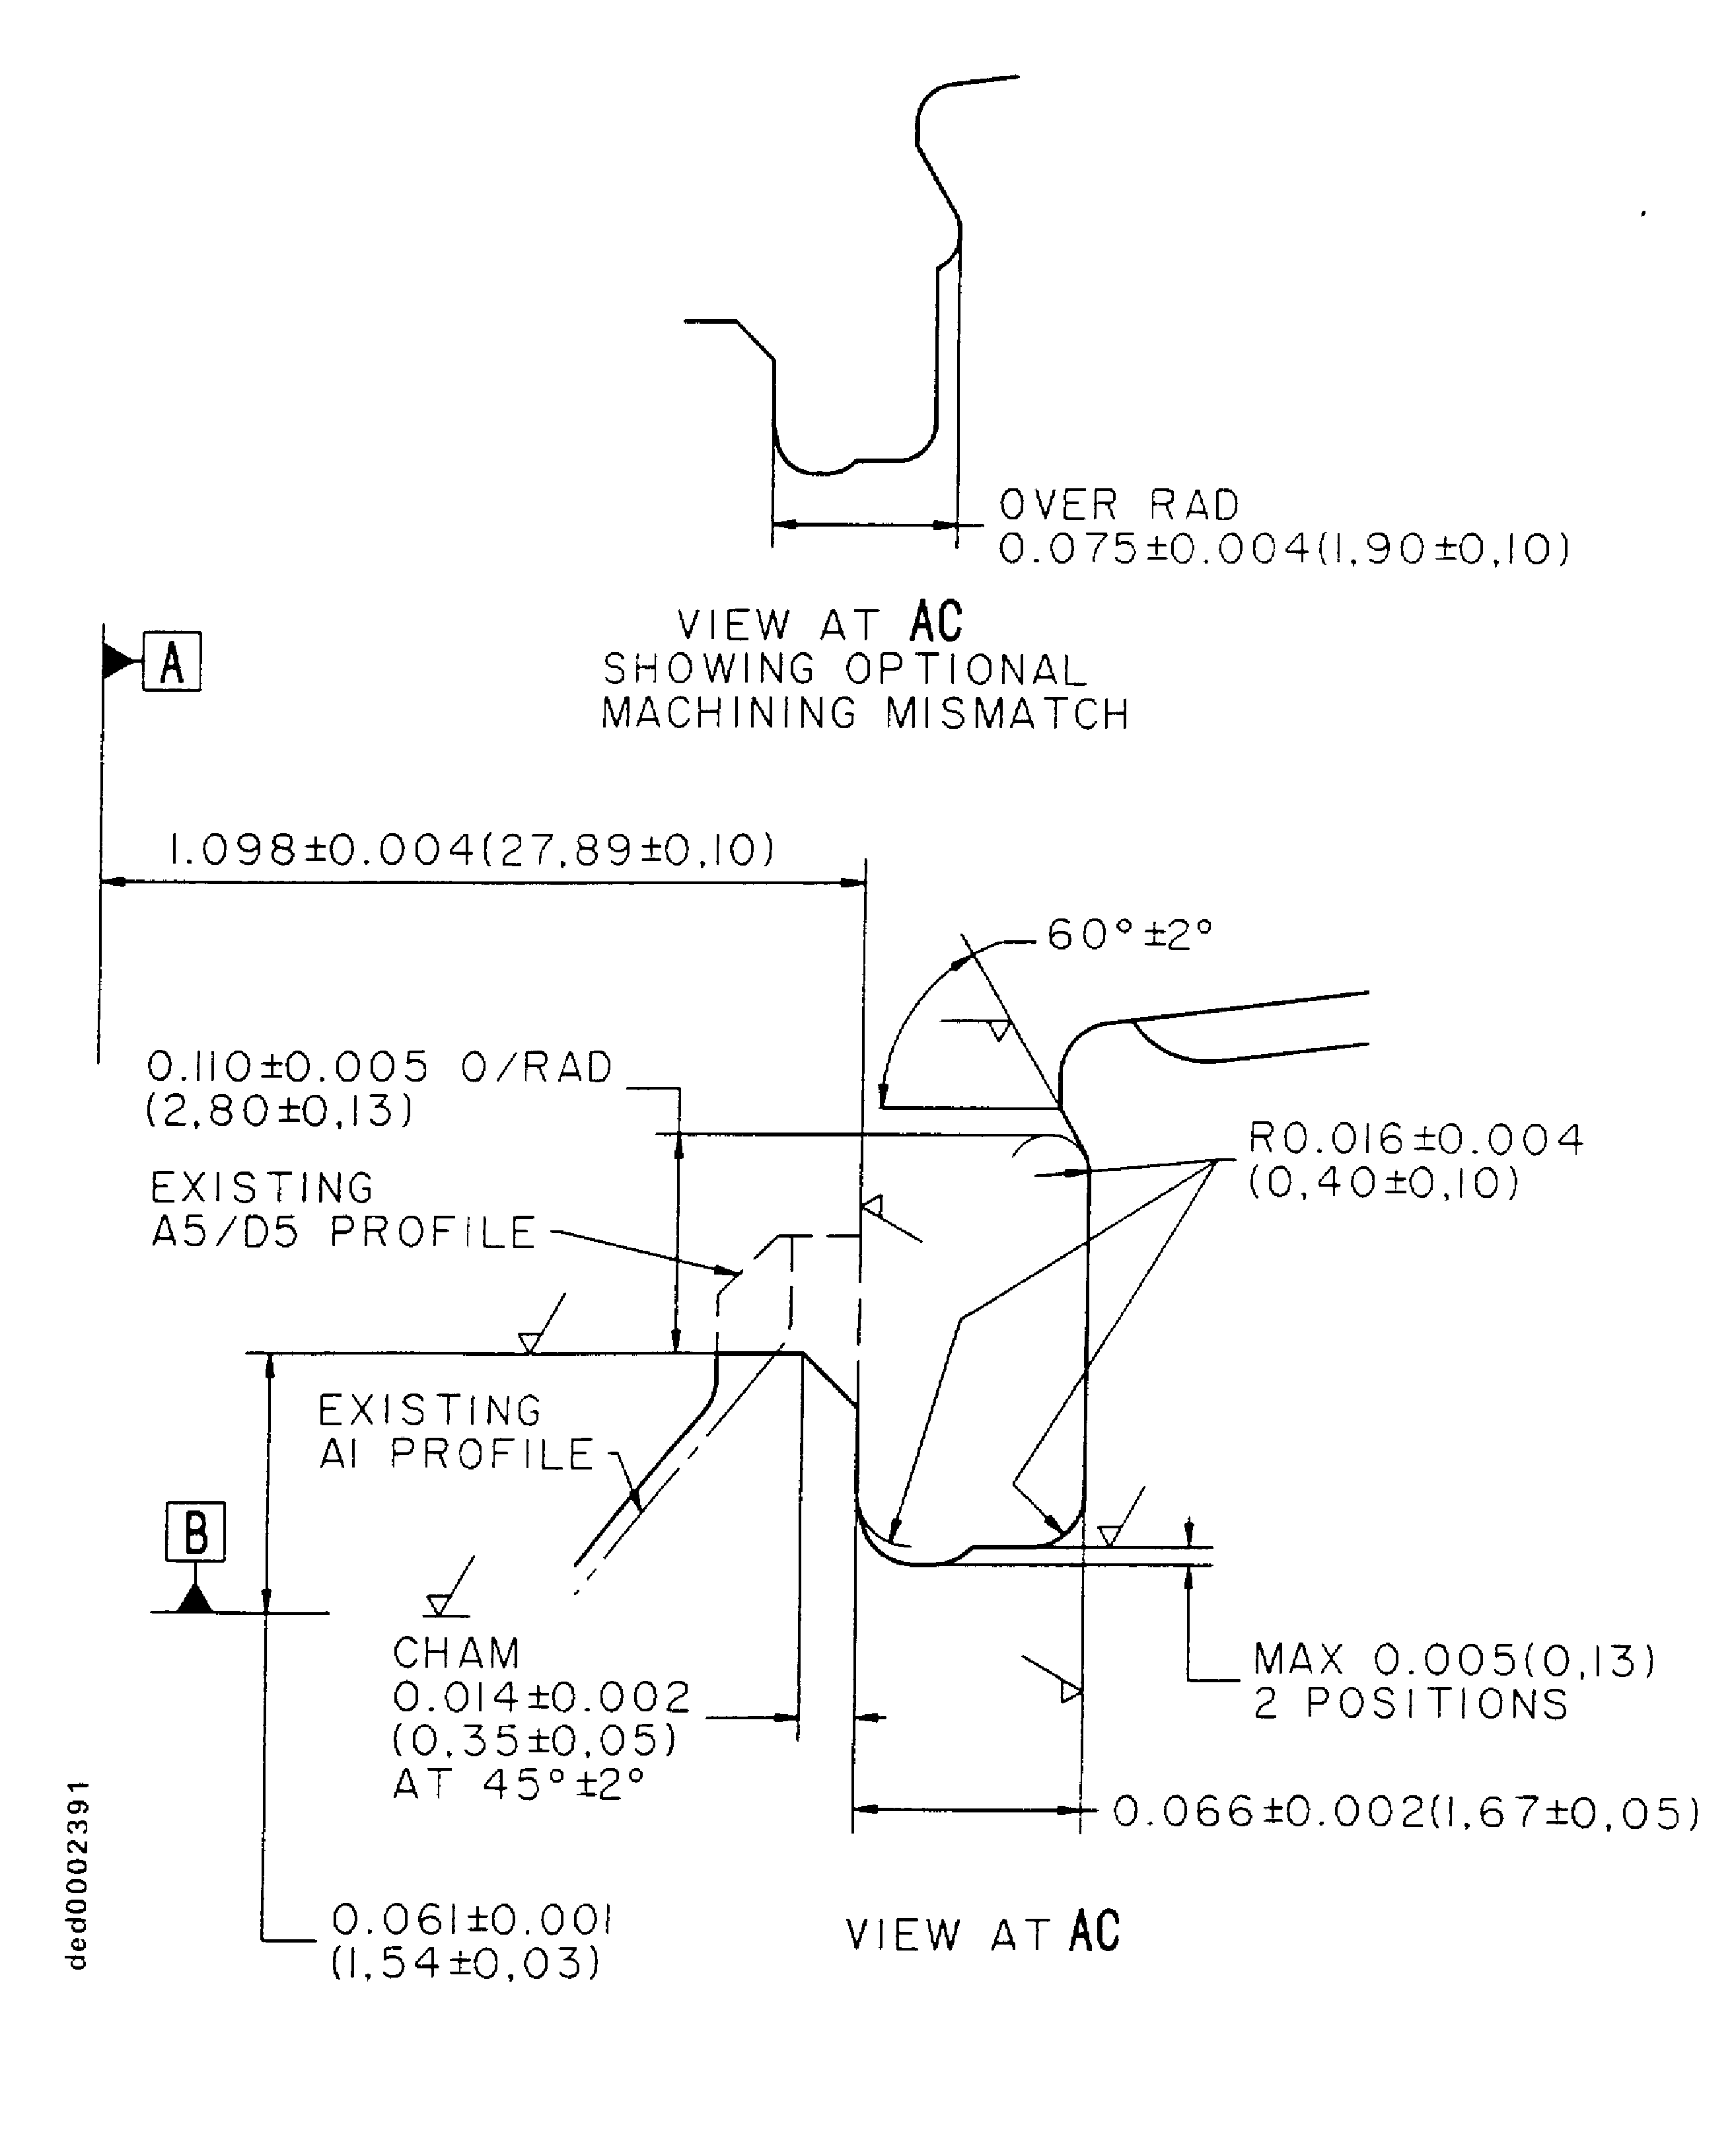
Finish machine to the dimensions given.
Use IAE 3R19079 Front groove tool 1 off.
NOTE
Do not machine to full depth of the slots. An allowance of 0.005 in. to 0.010 in. (0.127 mm to 0.254 mm) for final machining is necessary.Do the final machine of the front face of the Stage 7 rear sealing wire slot.
Use a turning speed of 114.8 ft (35m.) per minute, with a feed of 0.002 in. (0.05 mm) per revolution.
Use IAE 3R19314 Rear groove tool 1 off.
Rough machine the rear face and 60 degree angle of the Stage 7 rear sealing wire slot.
Use a turning speed of 114.8 ft (35 m.) per minute, with a feed of 0.002 in. (0.05 mm) per revolution.
Finish machine to the dimensions given.
Use IAE 3R19314 Rear groove tool 1 off.
NOTE
Do not machine to full depth of the slots. An allowance of 0.005 in. to 0.010 in. (0.127 mm to 0.254 mm) for final machining is necessary.Do the final machine of the rear face of the Stage 7 rear sealing wire slot.
Use a turning speed of 114.8 ft (35 m.) per minute, with a feed of 0.002 in. (0.05 mm) per revolution.
Use IAE 3R19361 Front groovetool 1 off.
Rough machine the Stage 8 front sealing wire slot.
Use a turning speed of 114.8 ft (35 m.) per minute, with a feed of 0.002 in. (0.05 mm) per revolution.
Finish machine to the dimensions given.
Use IAE 3R19361 Front groovetool 1 off.
NOTE
Do not machine to full dimensions of the slots. An allowance of 0.005 in. to 0.010 in. (0.127 mm to 0.254 mm) for final machining is necessary.Do the final machine of the Stage 8 front sealing wire slot.
SUBTASK 72-41-11-320-055 Machine the Sealing Wire Location Slots
Refer to Figure.
SUBTASK 72-41-11-220-226 Measure the Dimensions of the Machined Slots
Refer to the SPM TASK 70-11-26-300-503.

CAUTION
MAKE SURE THAT YOU PROTECT THE RUB-STRIP MATERIAL BEFORE YOU DO WET PROCESSING OPERATIONS ON THE WIRE LOCATION SLOTS. IF THE RUB-STRIP HAS ANY CONTAMINATION, THEN YOU MUST DO REPAIR VRS6007 TASK 72-41-11-300-002 (REPAIR-002) AND REPLACE THE STAGE 6 AND 7 RUB-STRIP LININGS.Chemically clean the machined surfaces in preparation for crack test.
Refer to the SPM TASK 70-11-08-300-503, SUBTASK 70-11-08-300-001, and SUBTASK 70-11-08-300-002.
Chemically clean and swab etch machined surfaces.
SUBTASK 72-41-11-110-081 Clean the Surfaces
Refer to the SPM TASK 70-23-04-230-501.
Reject if cracked.
Do a penetrant crack test.
SUBTASK 72-41-11-230-086 Do a Crack Test
Refer to the EM TASK 72-41-11-100-001-B00, SUBTASK 72-41-11-110-057
Clean the disk assembly.
SUBTASK 72-41-11-110-081 Clean the Disk Assembly
Refer to the SPM TASK 70-09-00-400-501.
Replace the part number with the new part number.
SUBTASK 72-41-11-850-051 Identify the Reworked Part with the New Part Number
Make a record of accomplishment for SBE 72-0304 in the relevant documents.
SUBTASK 72-41-11-840-051 Make a Record of Accomplishment for SB 72-0304
Refer to the SPM TASK 72-41-10-440-000 (72-41-10 ASSEMBLY-000) for information for the assembly of the HP compressor rotor.
SUBTASK 72-41-11-440-051 Assemble the Stage 3 to 8 HP Compressor Disk Assembly
Figure: HP Compressor Stage 3 to 8 Disk Assembly Locations and Dimensional Information
Sheet 1

Figure: HP Compressor Stage 3 to 8 Disk Assembly Locations and Dimensional Information
Sheet 2

Figure: HP Compressor Stage 3 to 8 Disk Assembly Locations and Dimensional Information
Sheet 3

Figure: HP Compressor Stage 3 to 8 Disk Assembly Locations and Dimensional Information
Sheet 4

