Export Control
EAR Export Classification: Not subject to the EAR per 15 C.F.R. Chapter 1, Part 734.3(b)(3), except for the following Service Bulletins which are currently published as EAR Export Classification 9E991: SBE70-0992, SBE72-0483, SBE72-0580, SBE72-0588, SBE72-0640, SBE73-0209, SBE80-0024 and SBE80-0025.Copyright
© IAE International Aero Engines AG (2001, 2014 - 2021) The information contained in this document is the property of © IAE International Aero Engines AG and may not be copied or used for any purpose other than that for which it is supplied without the express written authority of © IAE International Aero Engines AG. (This does not preclude use by engine and aircraft operators for normal instructional, maintenance or overhaul purposes.).Applicability
All
Common Information
TASK 72-41-23-300-022 HPC Rear Outer Case - Weld Repair The Damaged Insert Hole(s), Repair-022 (VRS6526)
Effectivity
FIG/ITEM | PART NO. | ASSEMBLY |
|---|---|---|
02-400 | 6A2949 | A |
02-400 | 6A3557 | B |
02-400 | 6A4154 | C |
02-400 | 6A5495 | D |
02-400 | 6A5682 | D |
02-400 | 6A8162 | E |
02-400 | 6B1427 | E |
Material of component
PART IDENT | MATERIAL |
HP Compressor Rear Outer Case Assembly | Corrosion resistant steel |
General
This repair must only be done when the instruction to do so is given in the 72-41-23, Inspection/Check.
This TASK gives the procedure to repair the damaged insert holes on the HP Compressor Rear Outer Case by welding.
TASKS identified by SPM TASK are in the Standard Practices Manual (SPM)
Price and Availability
Refer to International Aero Engines
Related Repairs
Repair the HP Compressor Rear Outer Case by Replacing the Surface Protection, refer to VRS6178, TASK 72-41-23-300-003 (REPAIR-003).
Repair Damaged Helicoil or Thinwall Insert(s) in the HP Compressor Rear Outer Case Assembly, by Replacement, refer to VRS6306, TASK 72-41-23-300-019 (REPAIR-019).
NOTE
NOTE
NOTE
NOTE
Preliminary Requirements
Pre-Conditions
NONESupport Equipment
| Name | Manufacturer | Part Number / Identification | Quantity | Remark |
|---|---|---|---|---|
| Welding equipment | LOCAL | Welding equipment | ||
| Chemical cleaning equipment | LOCAL | Chemical cleaning equipment | ||
| Drilling equipment | LOCAL | Drilling equipment | ||
| Penetrant Crack Test Equipment | LOCAL | Penetrant crack test equipment | ||
| Standard workshop tools | LOCAL | Standard workshop tools | ||
| Thermal blanket | LOCAL | Thermal blanket | ||
| Vibrating marking pencil | LOCAL | Vibrating marking pencil | ||
| Workshop inspection equipment | LOCAL | Workshop inspection equipment |
Consumables, Materials and Expendables
| Name | Manufacturer | Part Number / Identification | Quantity | Remark |
|---|---|---|---|---|
| CoMat 02-121 TEMPORARY MARKER PENCIL/CRAYON | IE304 | CoMat 02-121 | ||
| CoMat 03-181 WELDING WIRE 12% Cr. STEEL | LOCAL | CoMat 03-181 | ||
| CoMat 06-064 FLUORESCENT PENETRANT (WATER WASHABLE MEDIUM SENSITIVITY) | LOCAL | CoMat 06-064 |
Spares
NONESafety Requirements
NONEProcedure
Refer to TASK 72-41-23-100-003 (CLEANING-003).
Chemically clean the HP Compressor Rear Outer Case.
SUBTASK 72-41-23-110-079 Chemically Clean
Refer to SPM TASK 70-23-02-230-501.
Cracks are not permitted.
Do a penetrant crack test on the part.
SUBTASK 72-41-23-220-171 Do a Crack Test
Use recommended standard drill size to remove the thread.
Use Drilling equipment.
Machine the damaged insert holes.
SUBTASK 72-41-23-350-082 Machine the Damaged Holes
Refer to SPM TASK 70-11-26-300-503.
Locally clean the repair area.
SUBTASK 72-41-23-110-080 Chemically Clean
Make sure that all thread form are removed. If not, do from Step again.
Visually examine the repair area.
SUBTASK 72-41-23-220-172 Examine the Repair Area
Refer to SPM TASK 70-23-05-230-501.
Cracks are not permitted.
Do a local penetrant crack test on the repair area.
SUBTASK 72-41-23-230-088 Do a Crack Test
Refer to SPM TASK 70-11-26-300-503.
Locally clean the repair area.
SUBTASK 72-41-23-110-081 Chemically Clean
Refer to SPM TASK 70-31-02-310-501-001 and SPM TASK 70-31-02-310-501-008.
Apply the weld filler to the repaired area(s).
Apply sufficient weld to let it for final machining.
Use Welding equipment.
Use locally manufactured fixtures and chills to minimize distortion.
Weld build up damaged holes.
SUBTASK 72-41-23-350-083 Weld Build up Damaged Holes
Refer to SPM TASK 70-31-02-310-501-001.
Increase the temperature to 610 deg C (1130 deg F) for 60 minutes.
Use Thermal blanket.
Locally heat treat the repaired areas only.
SUBTASK 72-41-23-350-084 Heat Treat the Part
Refer to SPM TASK 70-11-26-300-503.
Locally clean the repaired areas.
SUBTASK 72-41-23-110-082 Chemically Clean
Refer to SPM TASK 70-23-05-230-501.
Cracks are not permitted.
Do a local penetrant crack test on the repaired area.
SUBTASK 72-41-23-230-089 Do a Crack Test
Refer to SPM TASK 70-09-00-400-501, SUBTASK 70-09-00-400-001.
Mark VRS6526 adjacent to the part number.
SUBTASK 72-41-23-350-087 Identify the Repair
Refer to VRS6178, TASK 72-41-23-300-003 (REPAIR-003).
Apply surface protection again with identity marking.
SUBTASK 72-41-23-350-088 Apply Surface Protection again
Refer to VRS6306, TASK 72-41-23-300-019 (REPAIR-019).
Use new replacement insert.
Replace the inserts as required.
SUBTASK 72-41-23-350-089 Replace the Inserts
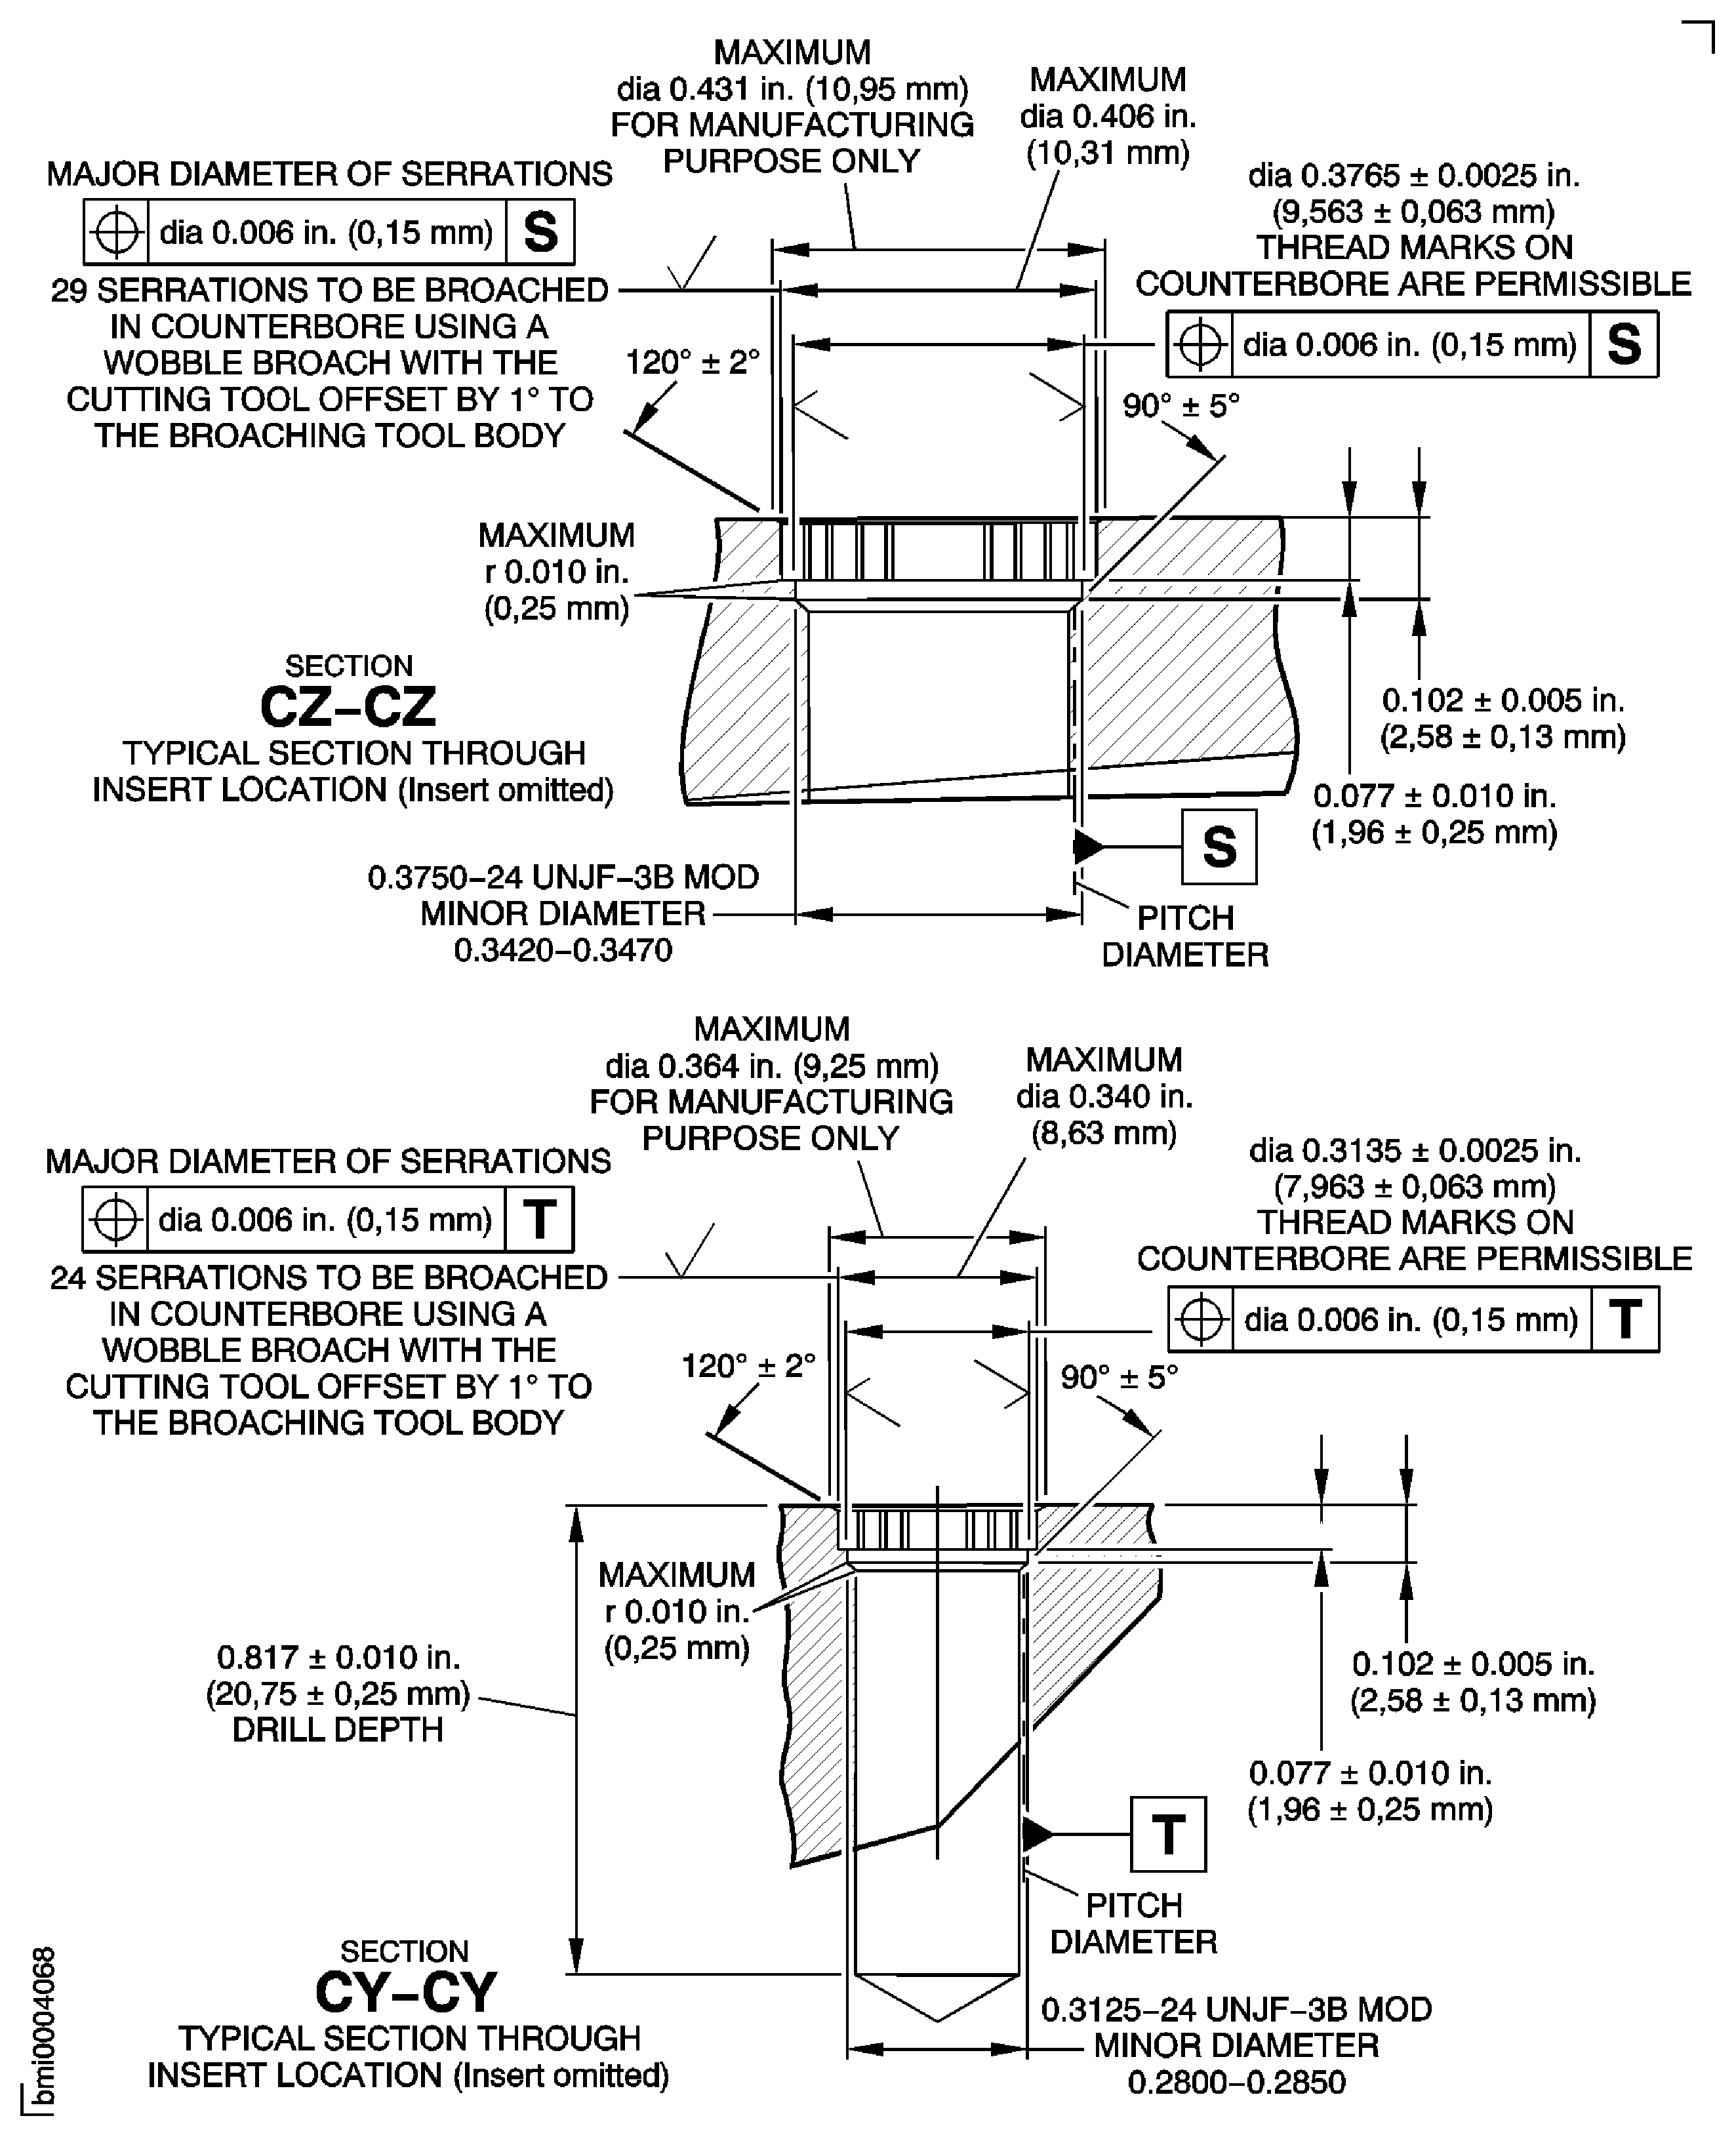
Figure: Repair Details and Dimensions Assembly A, Assembly B, Assembly C, Assembly D and Assembly E
Repair Details and Dimensions Assembly A, Assembly B, Assembly C, Assembly D and Assembly E
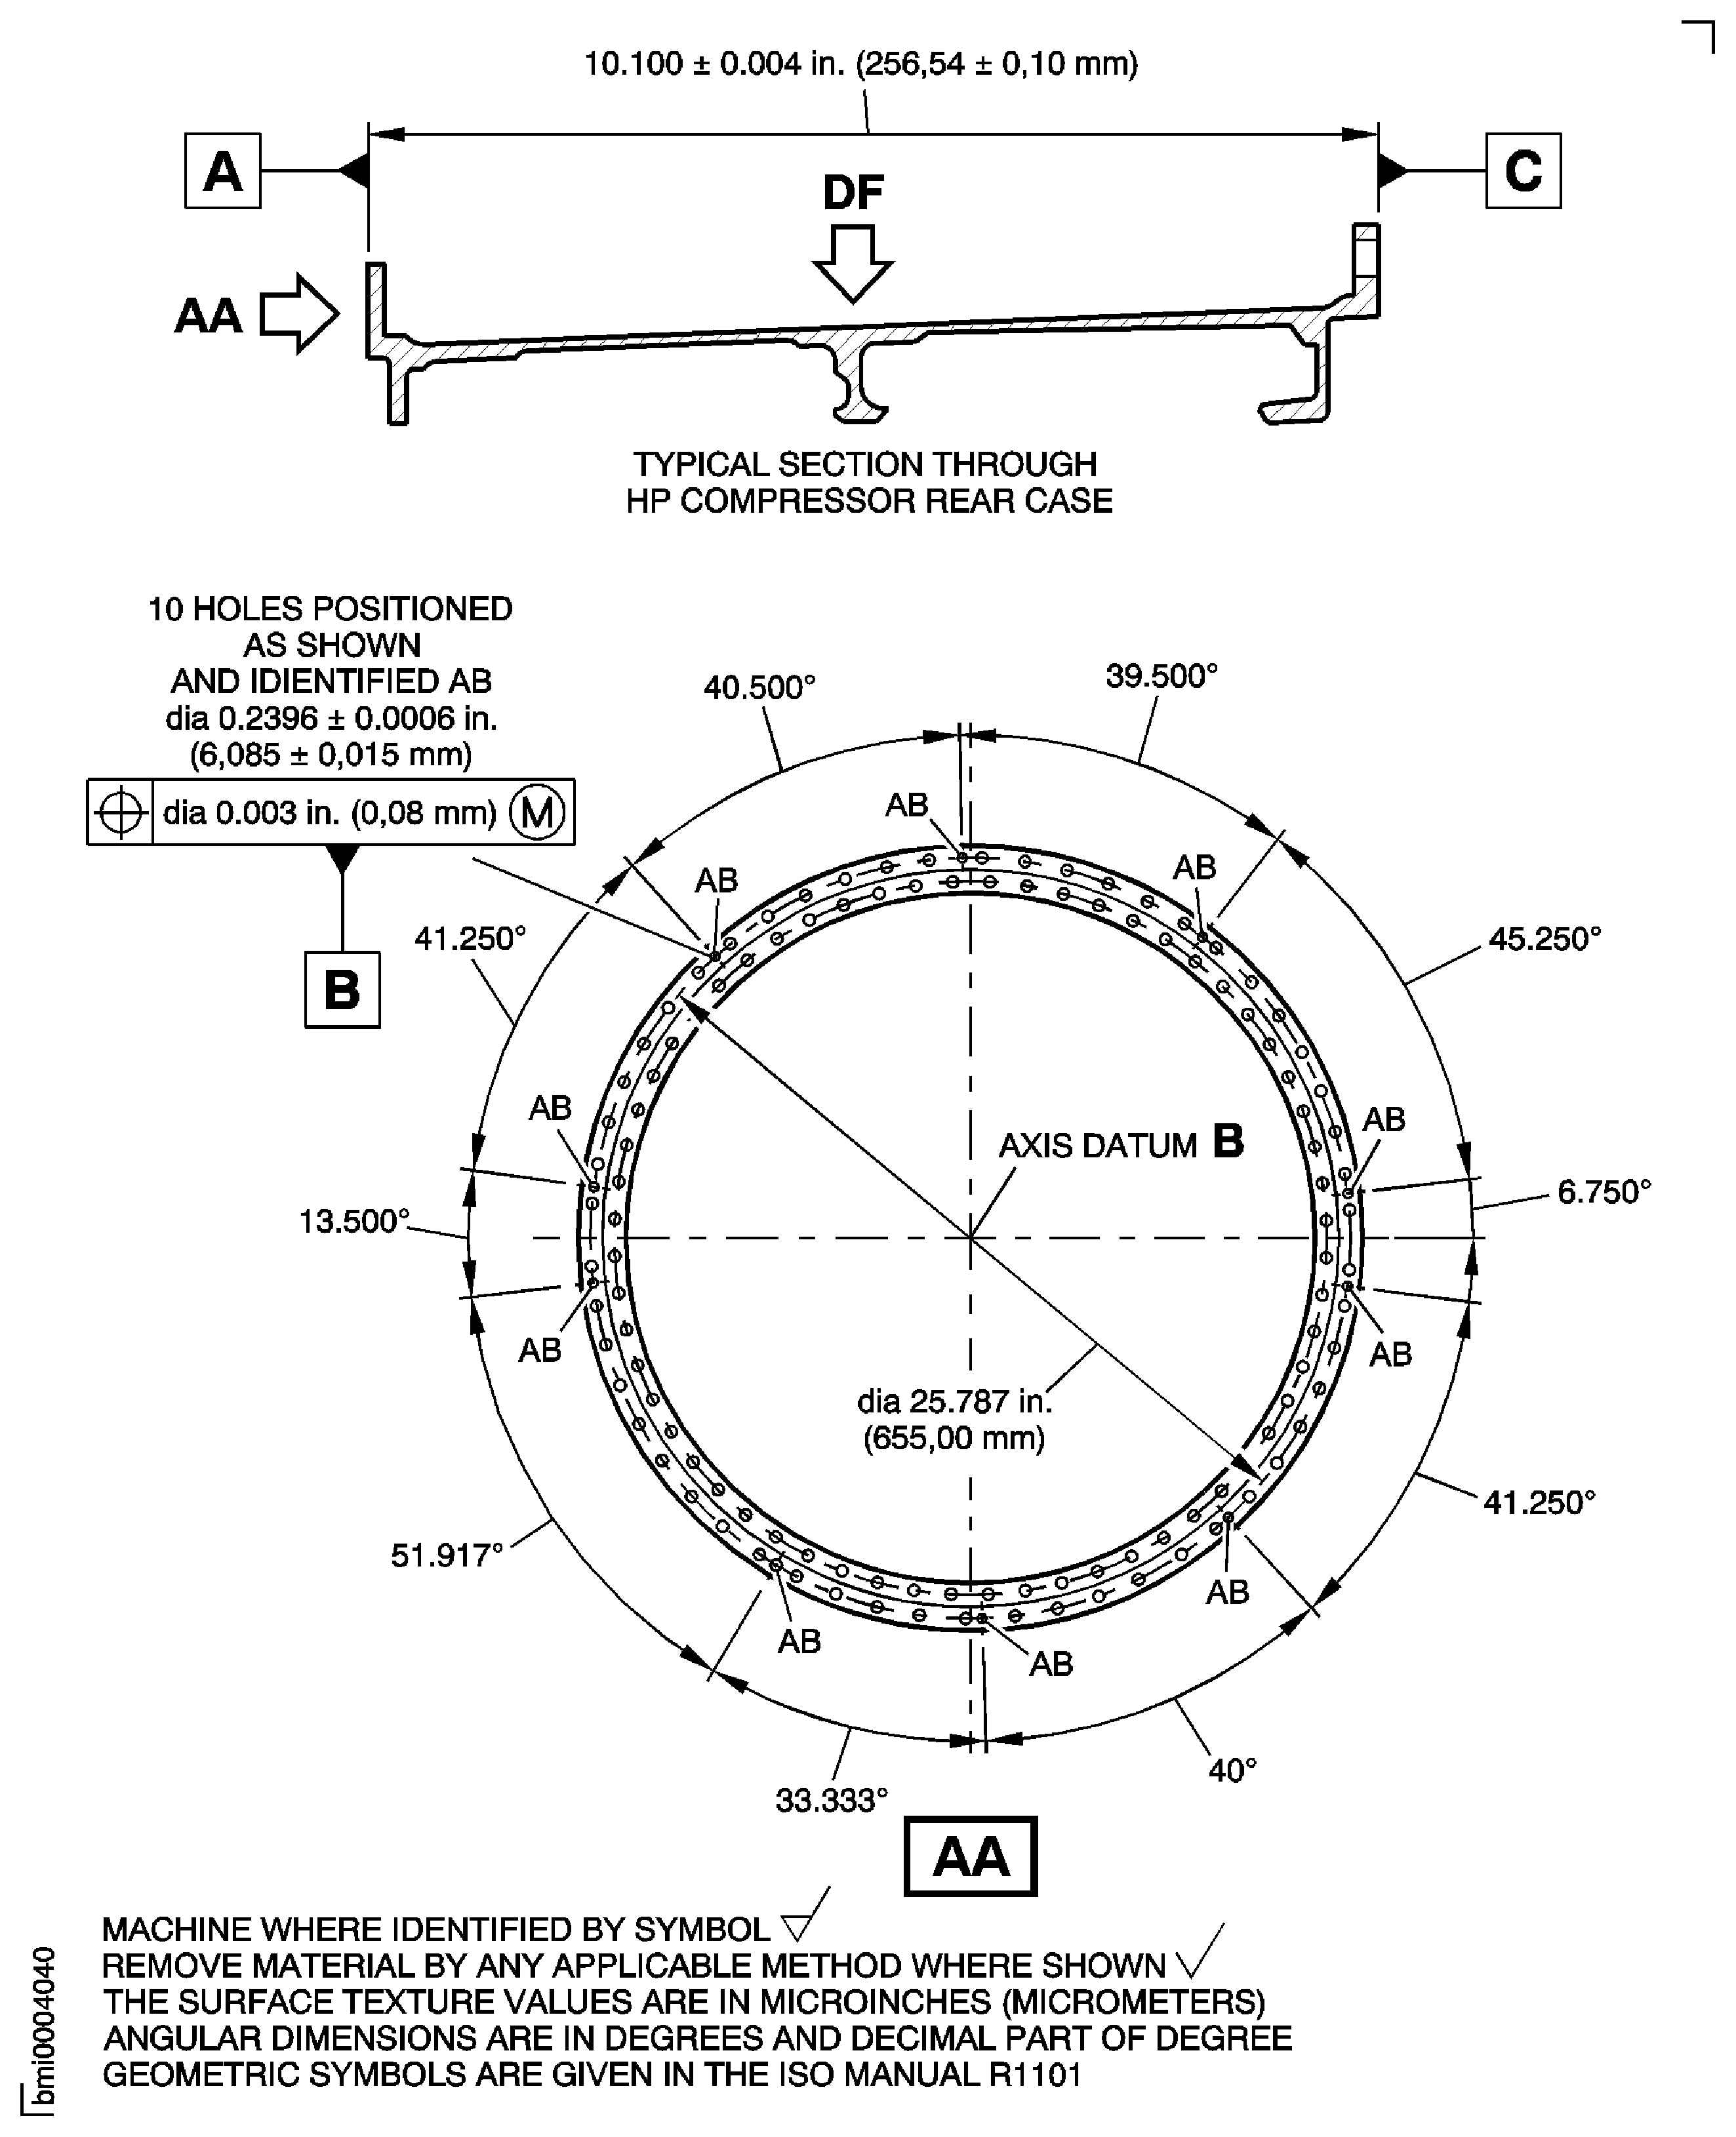
Figure: Repair Details and Dimensions - Assembly A
Repair Details and Dimensions - Assembly A
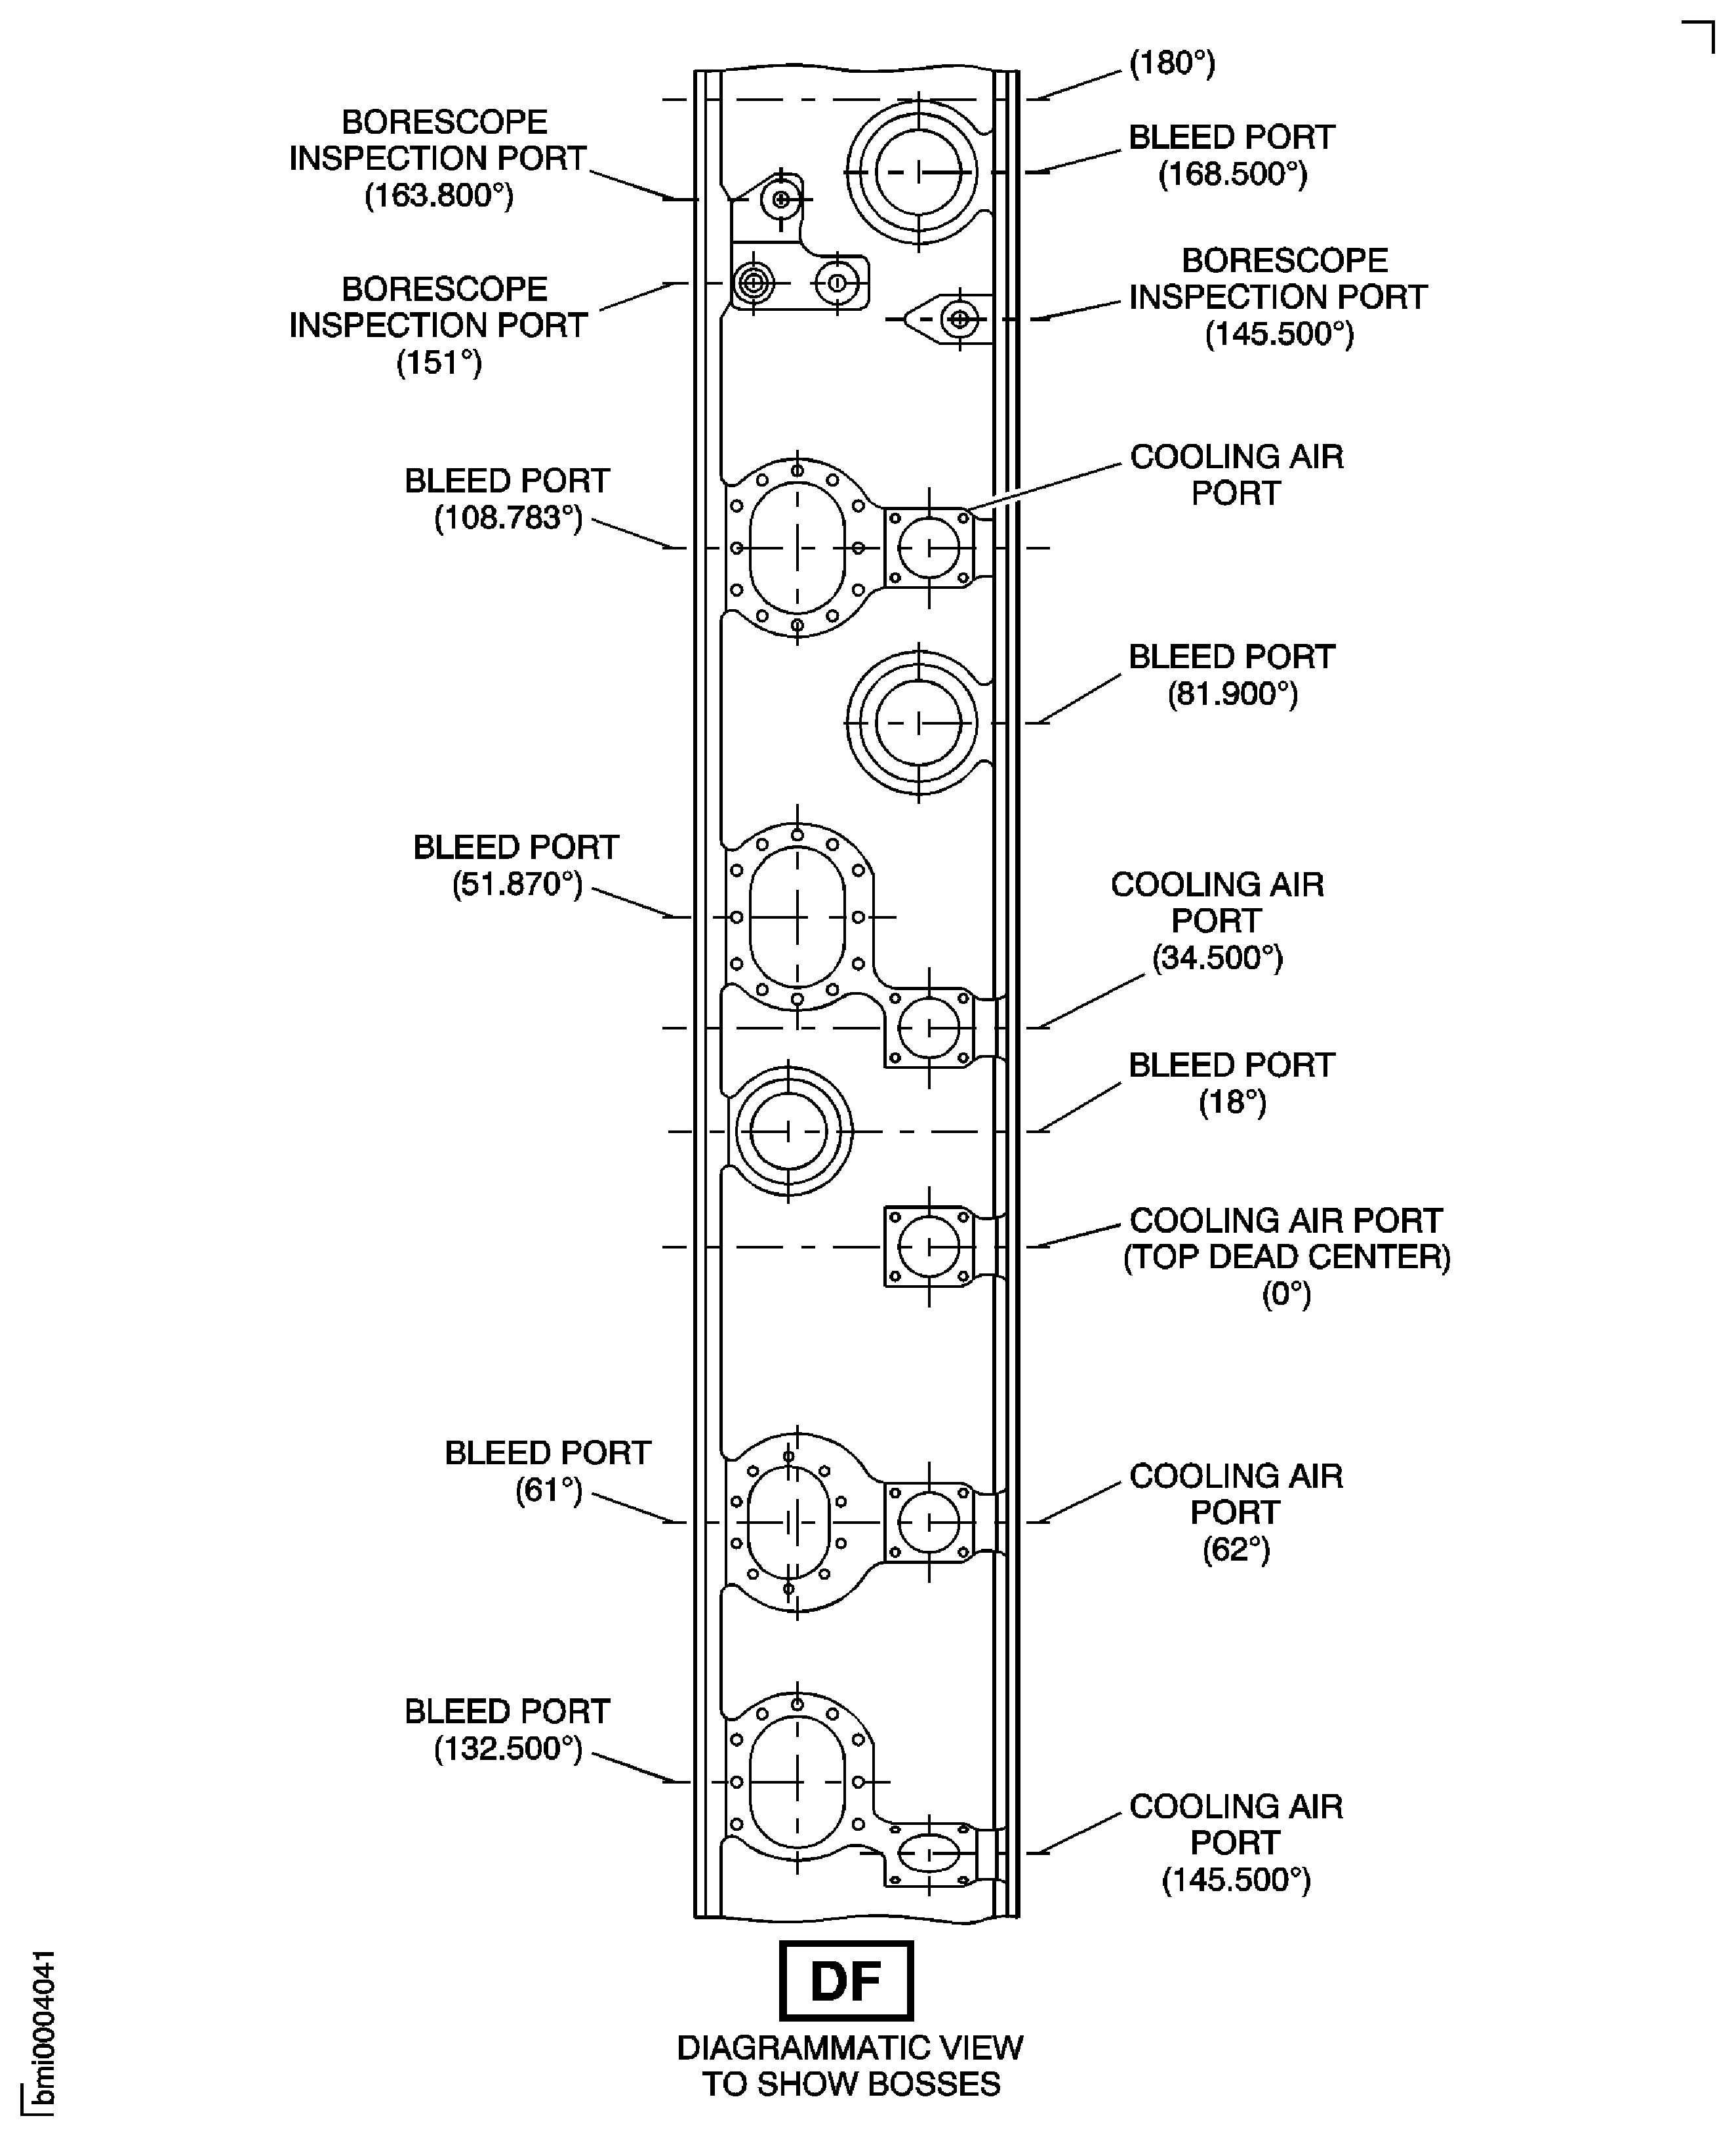
Figure: Repair Details and Dimensions Assembly B, Assembly C, Assembly D and Assembly E
Repair Details and Dimensions Assembly B, Assembly C, Assembly D and Assembly E
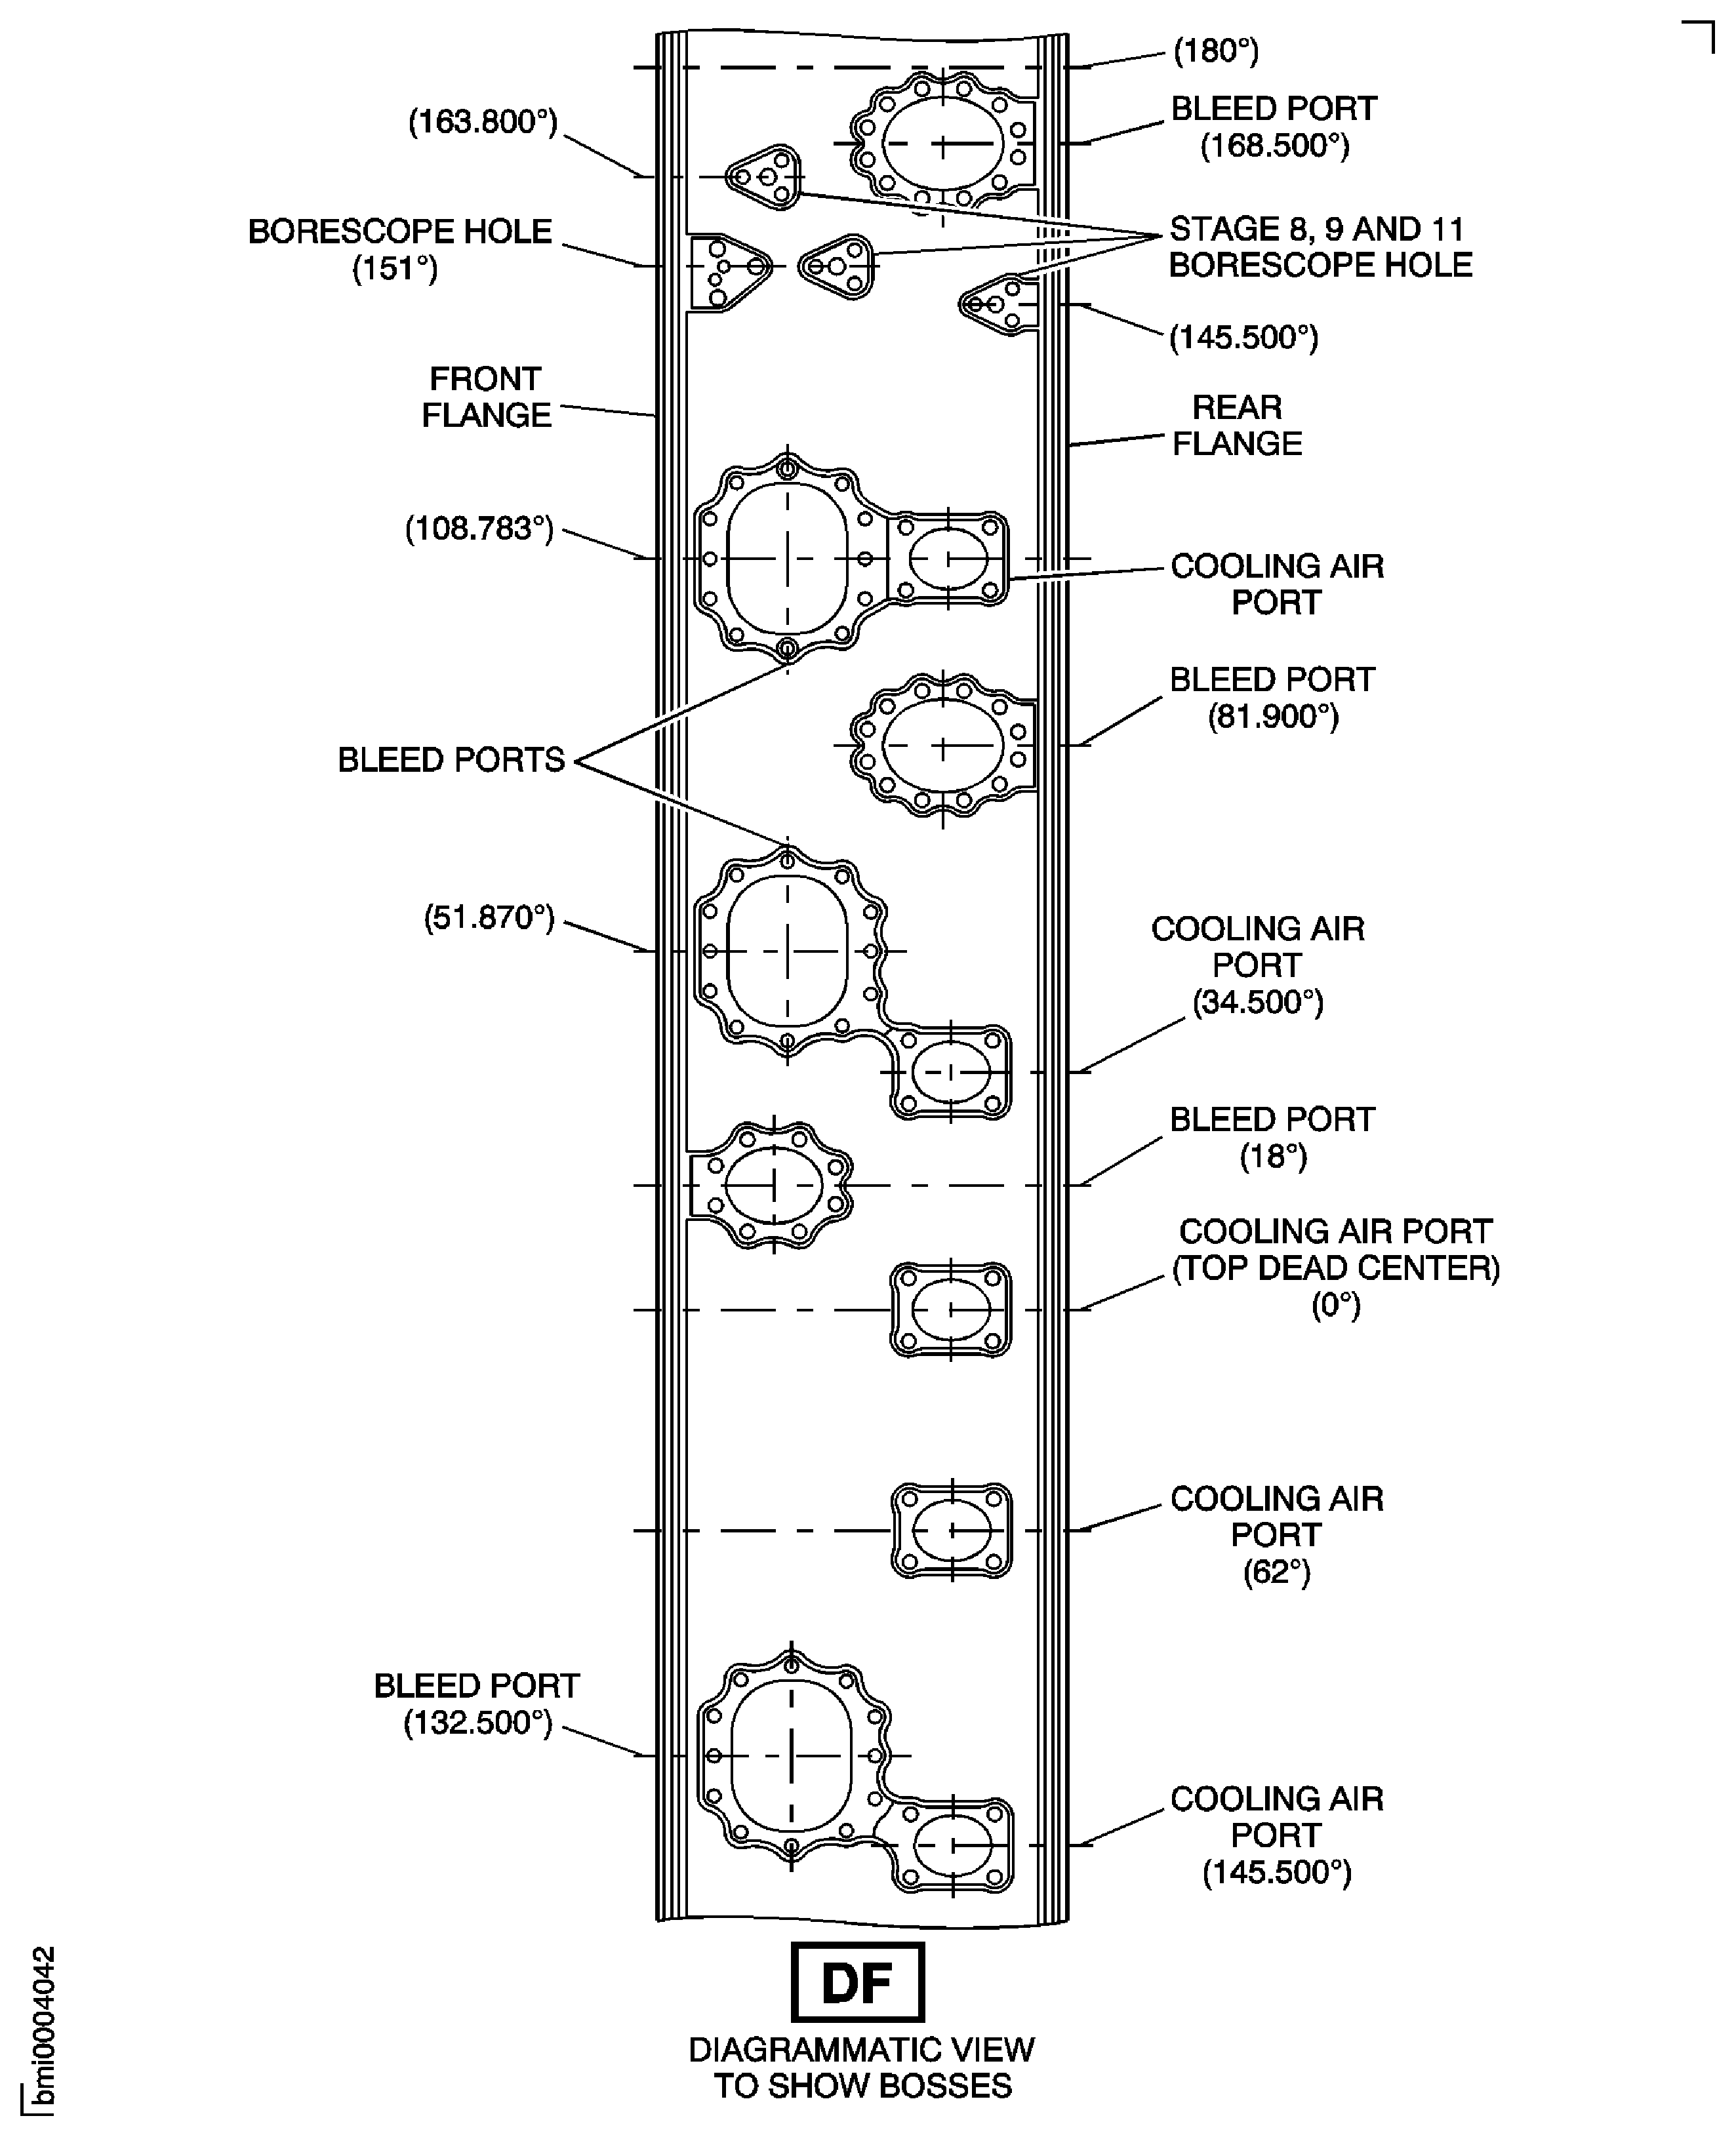
Figure: Repair Details and Dimensions Assembly A, Assembly B, Assembly C, Assembly D and Assembly E
Repair Details and Dimensions Assembly A, Assembly B, Assembly C, Assembly D and Assembly E

Figure: Repair Details and Dimensions - Assembly A
Repair Details and Dimensions - Assembly A

Figure: Repair Details and Dimensions - Assembly B
Repair Details and Dimensions - Assembly B
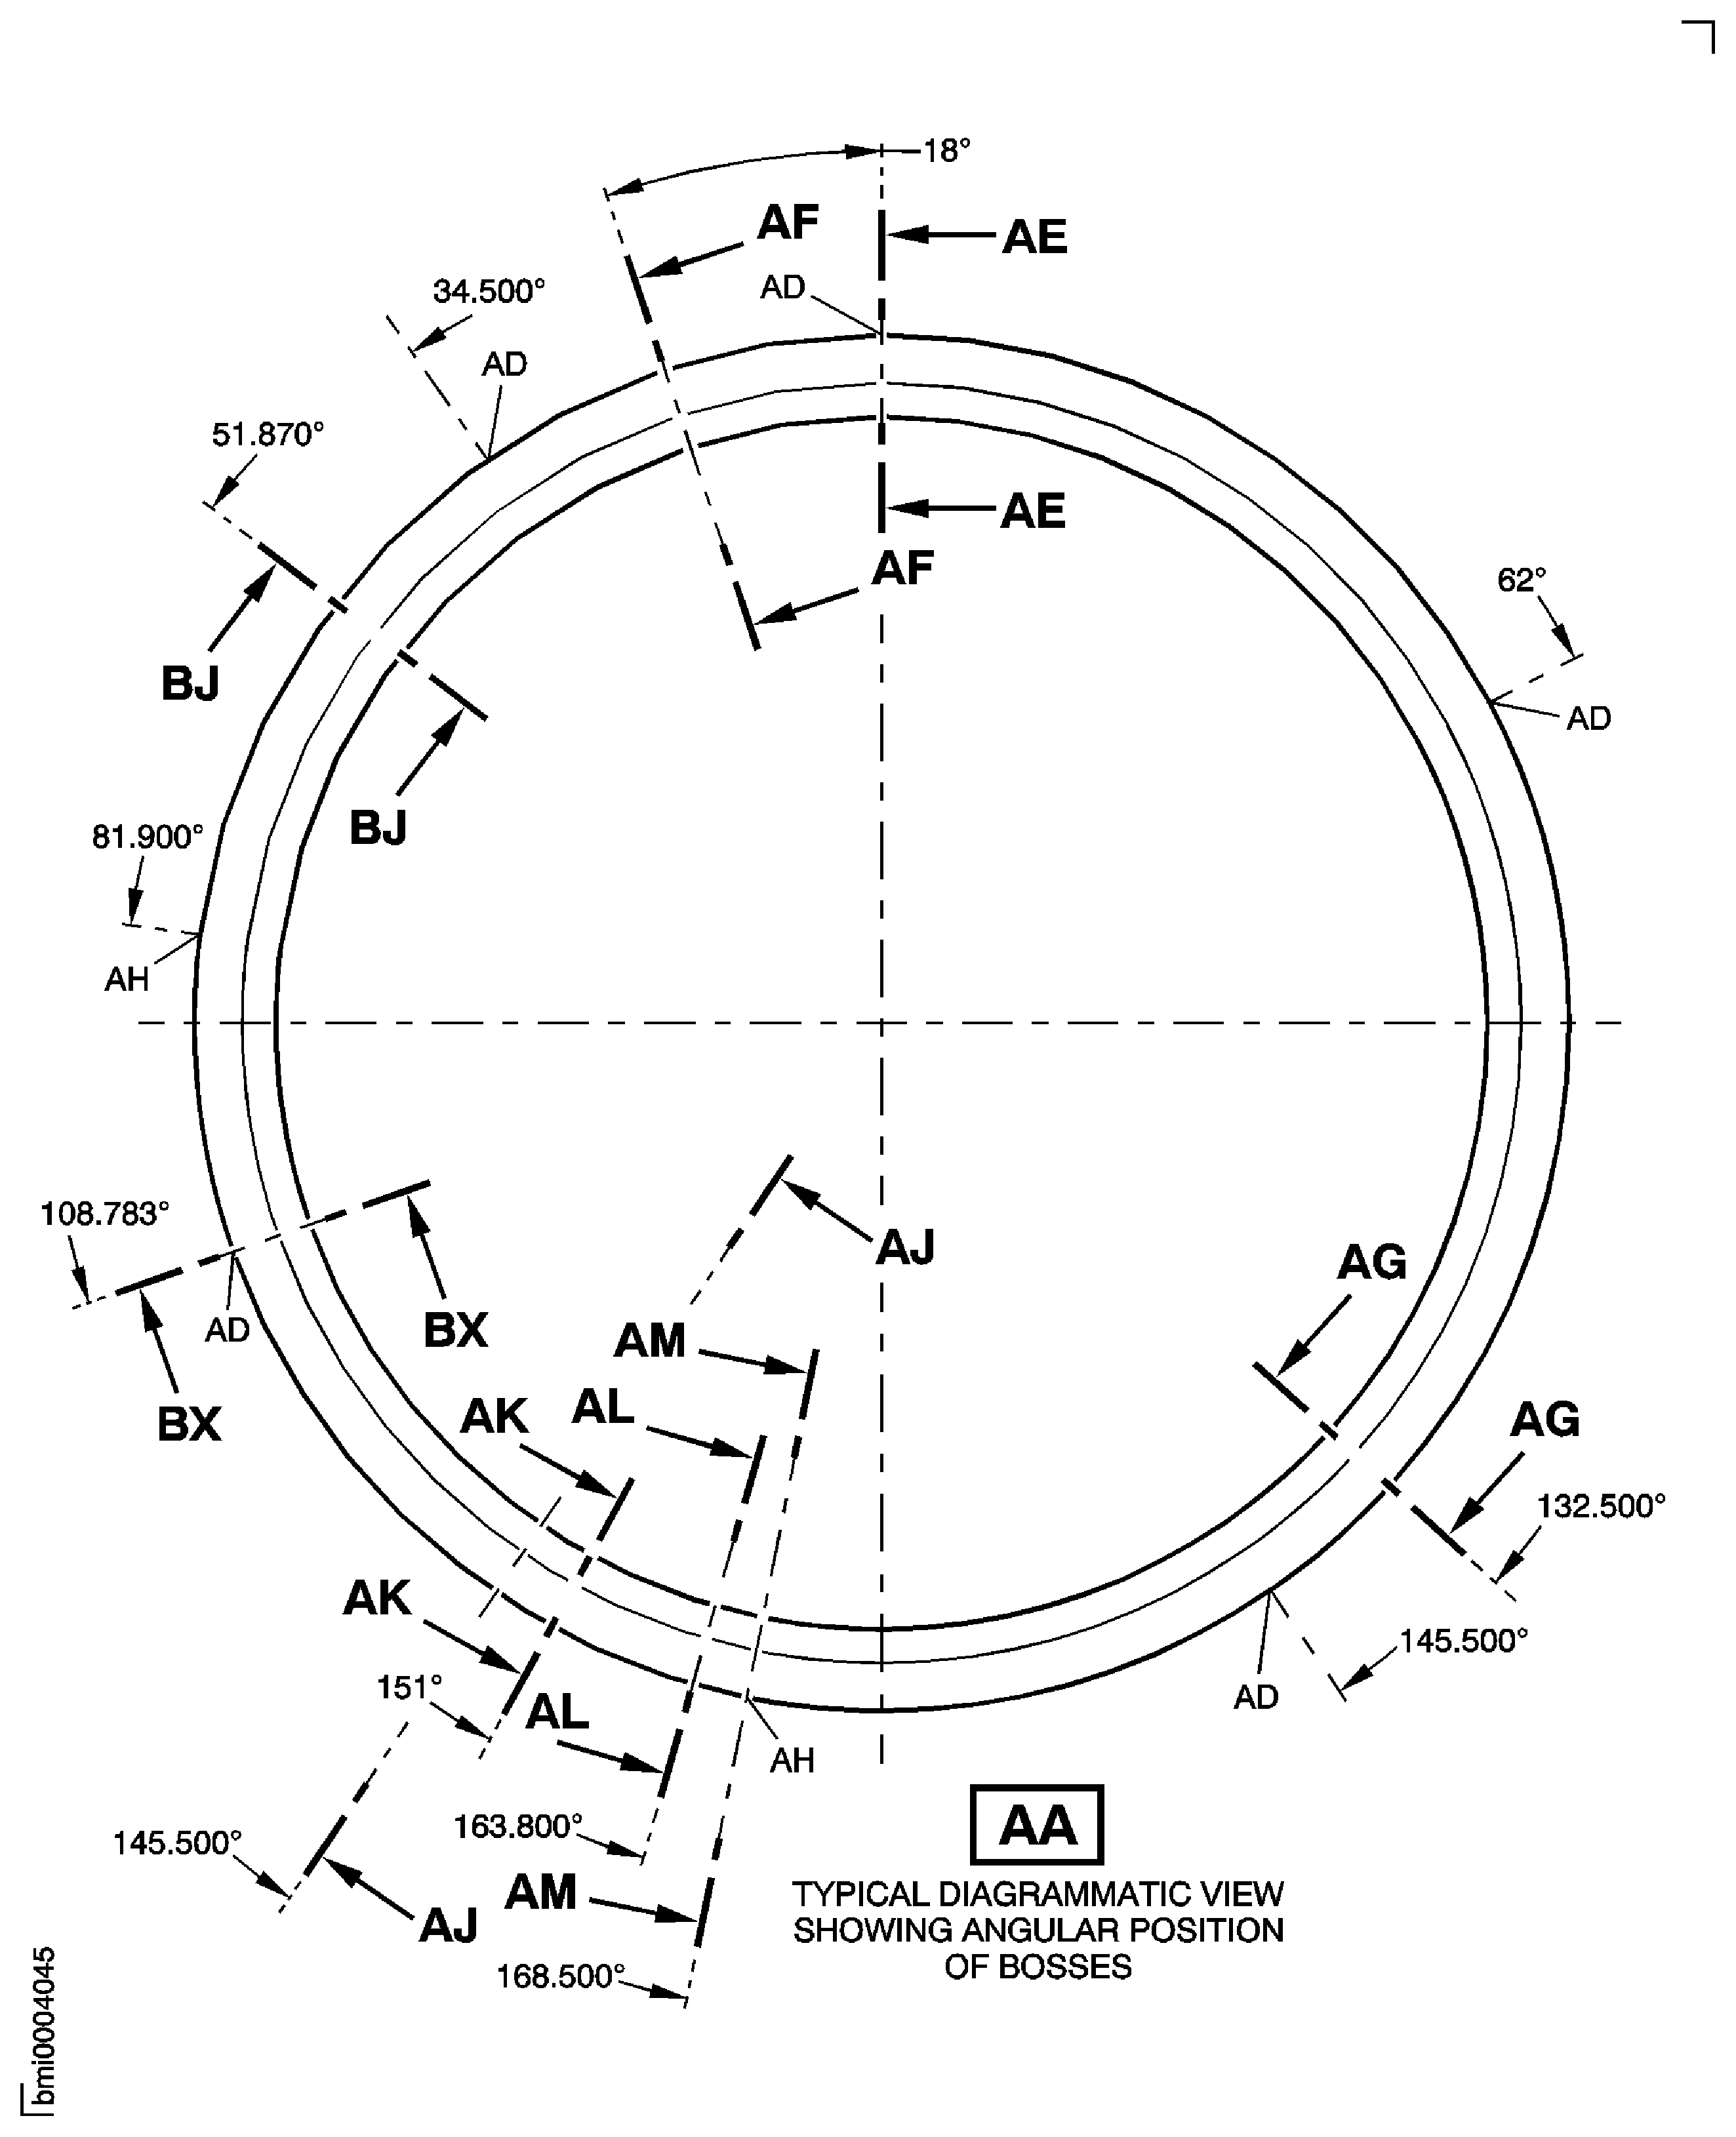
Figure: Repair Details and Dimensions Assembly C, Assembly D and Assembly E
Repair Details and Dimensions Assembly C, Assembly D and Assembly E
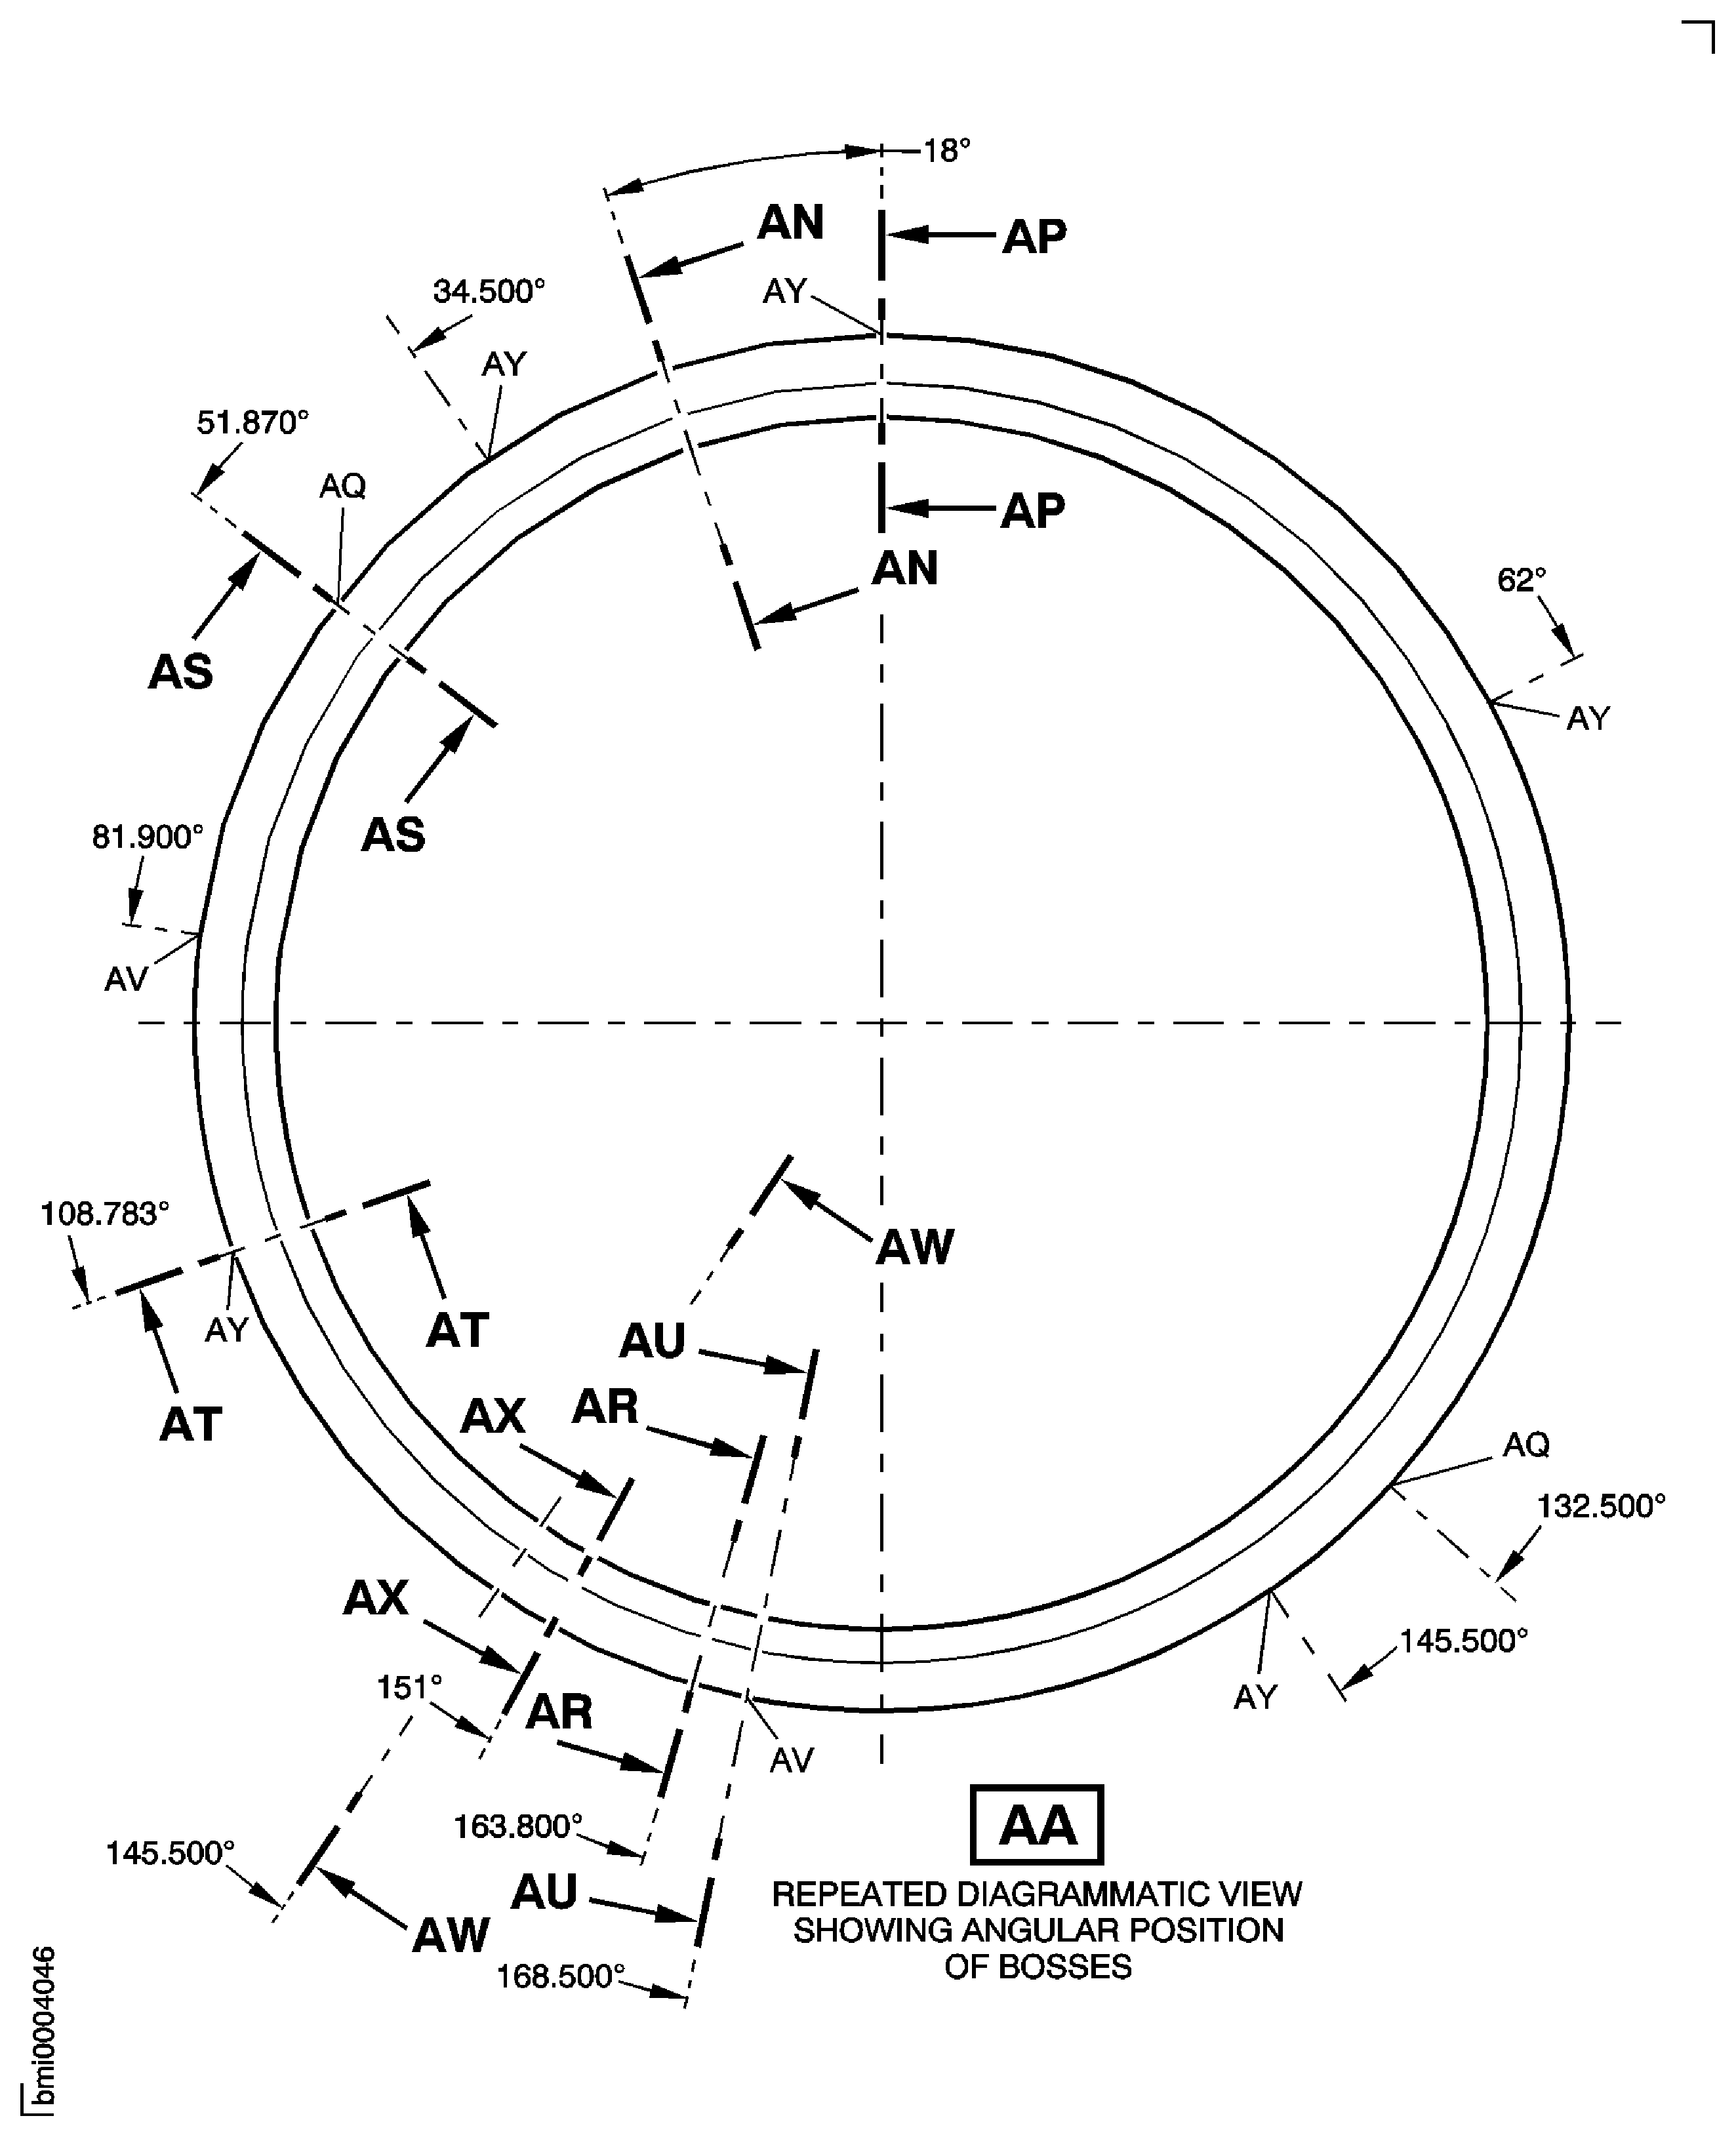
Figure: Repair Details and Dimensions Assembly A and Assembly B
Repair Details and Dimensions Assembly A and Assembly B
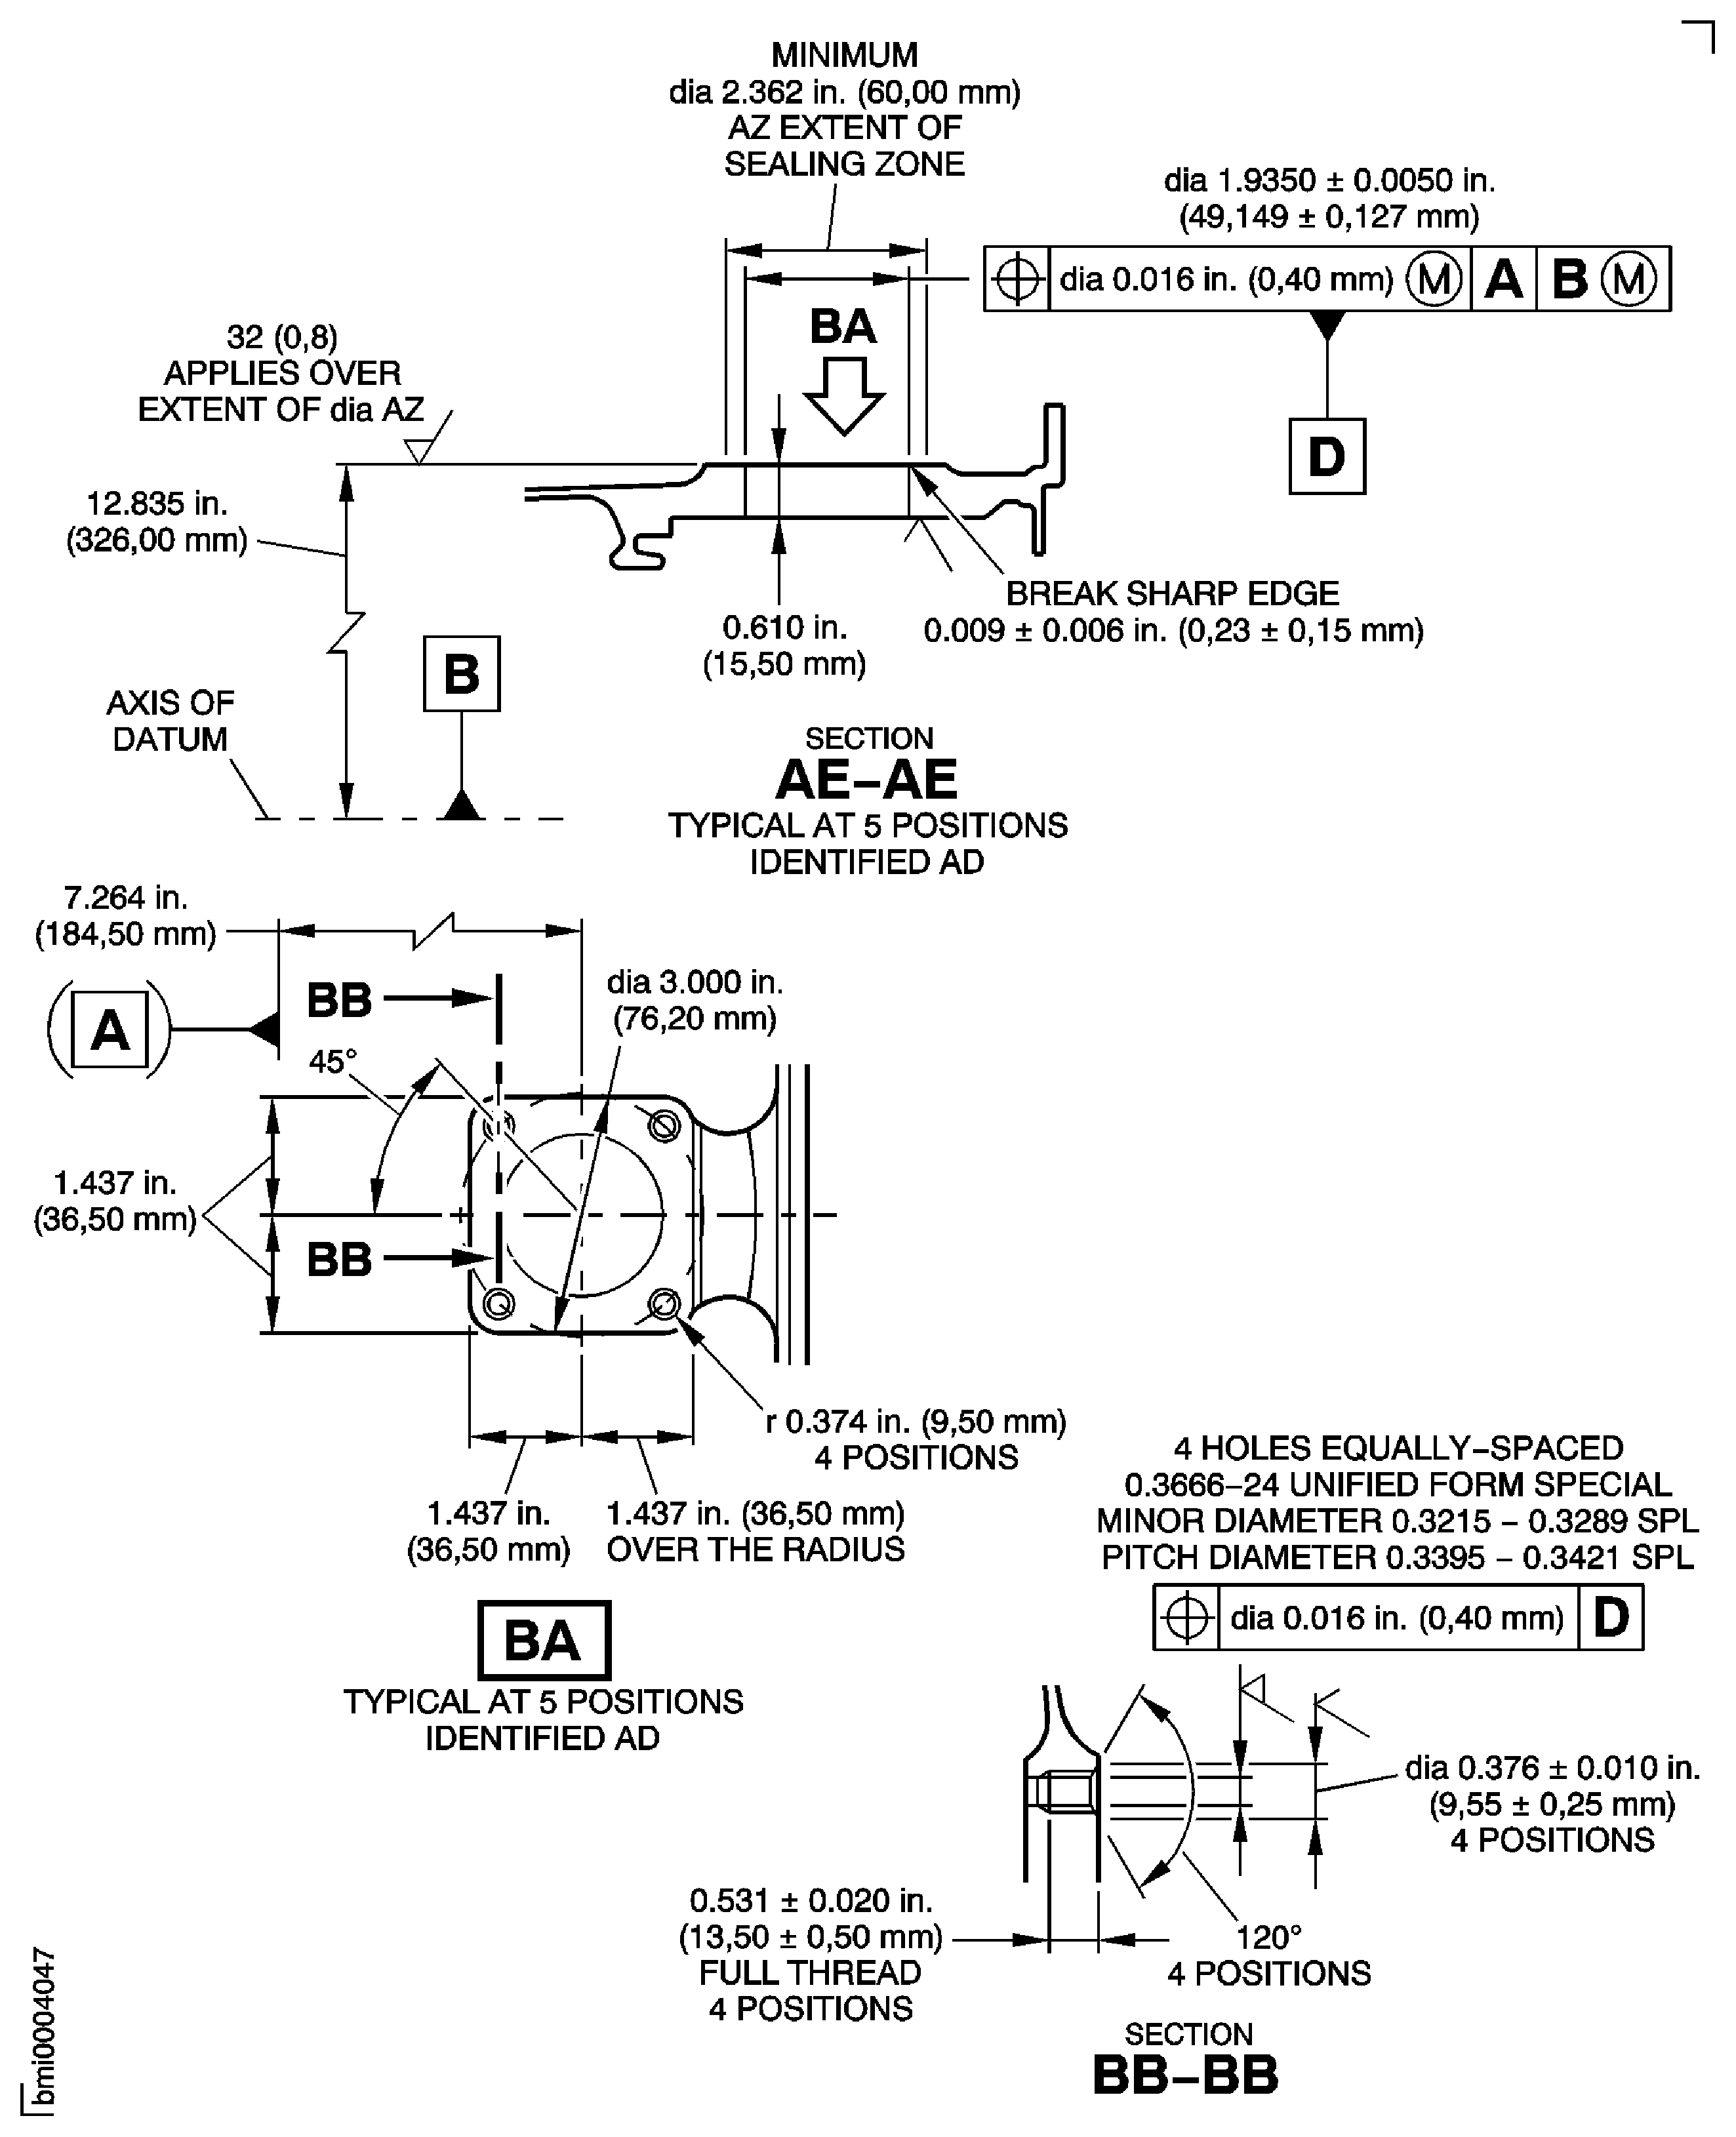
Figure: Repair Details and Dimensions Assembly A and Assembly B
Repair Details and Dimensions Assembly A and Assembly B
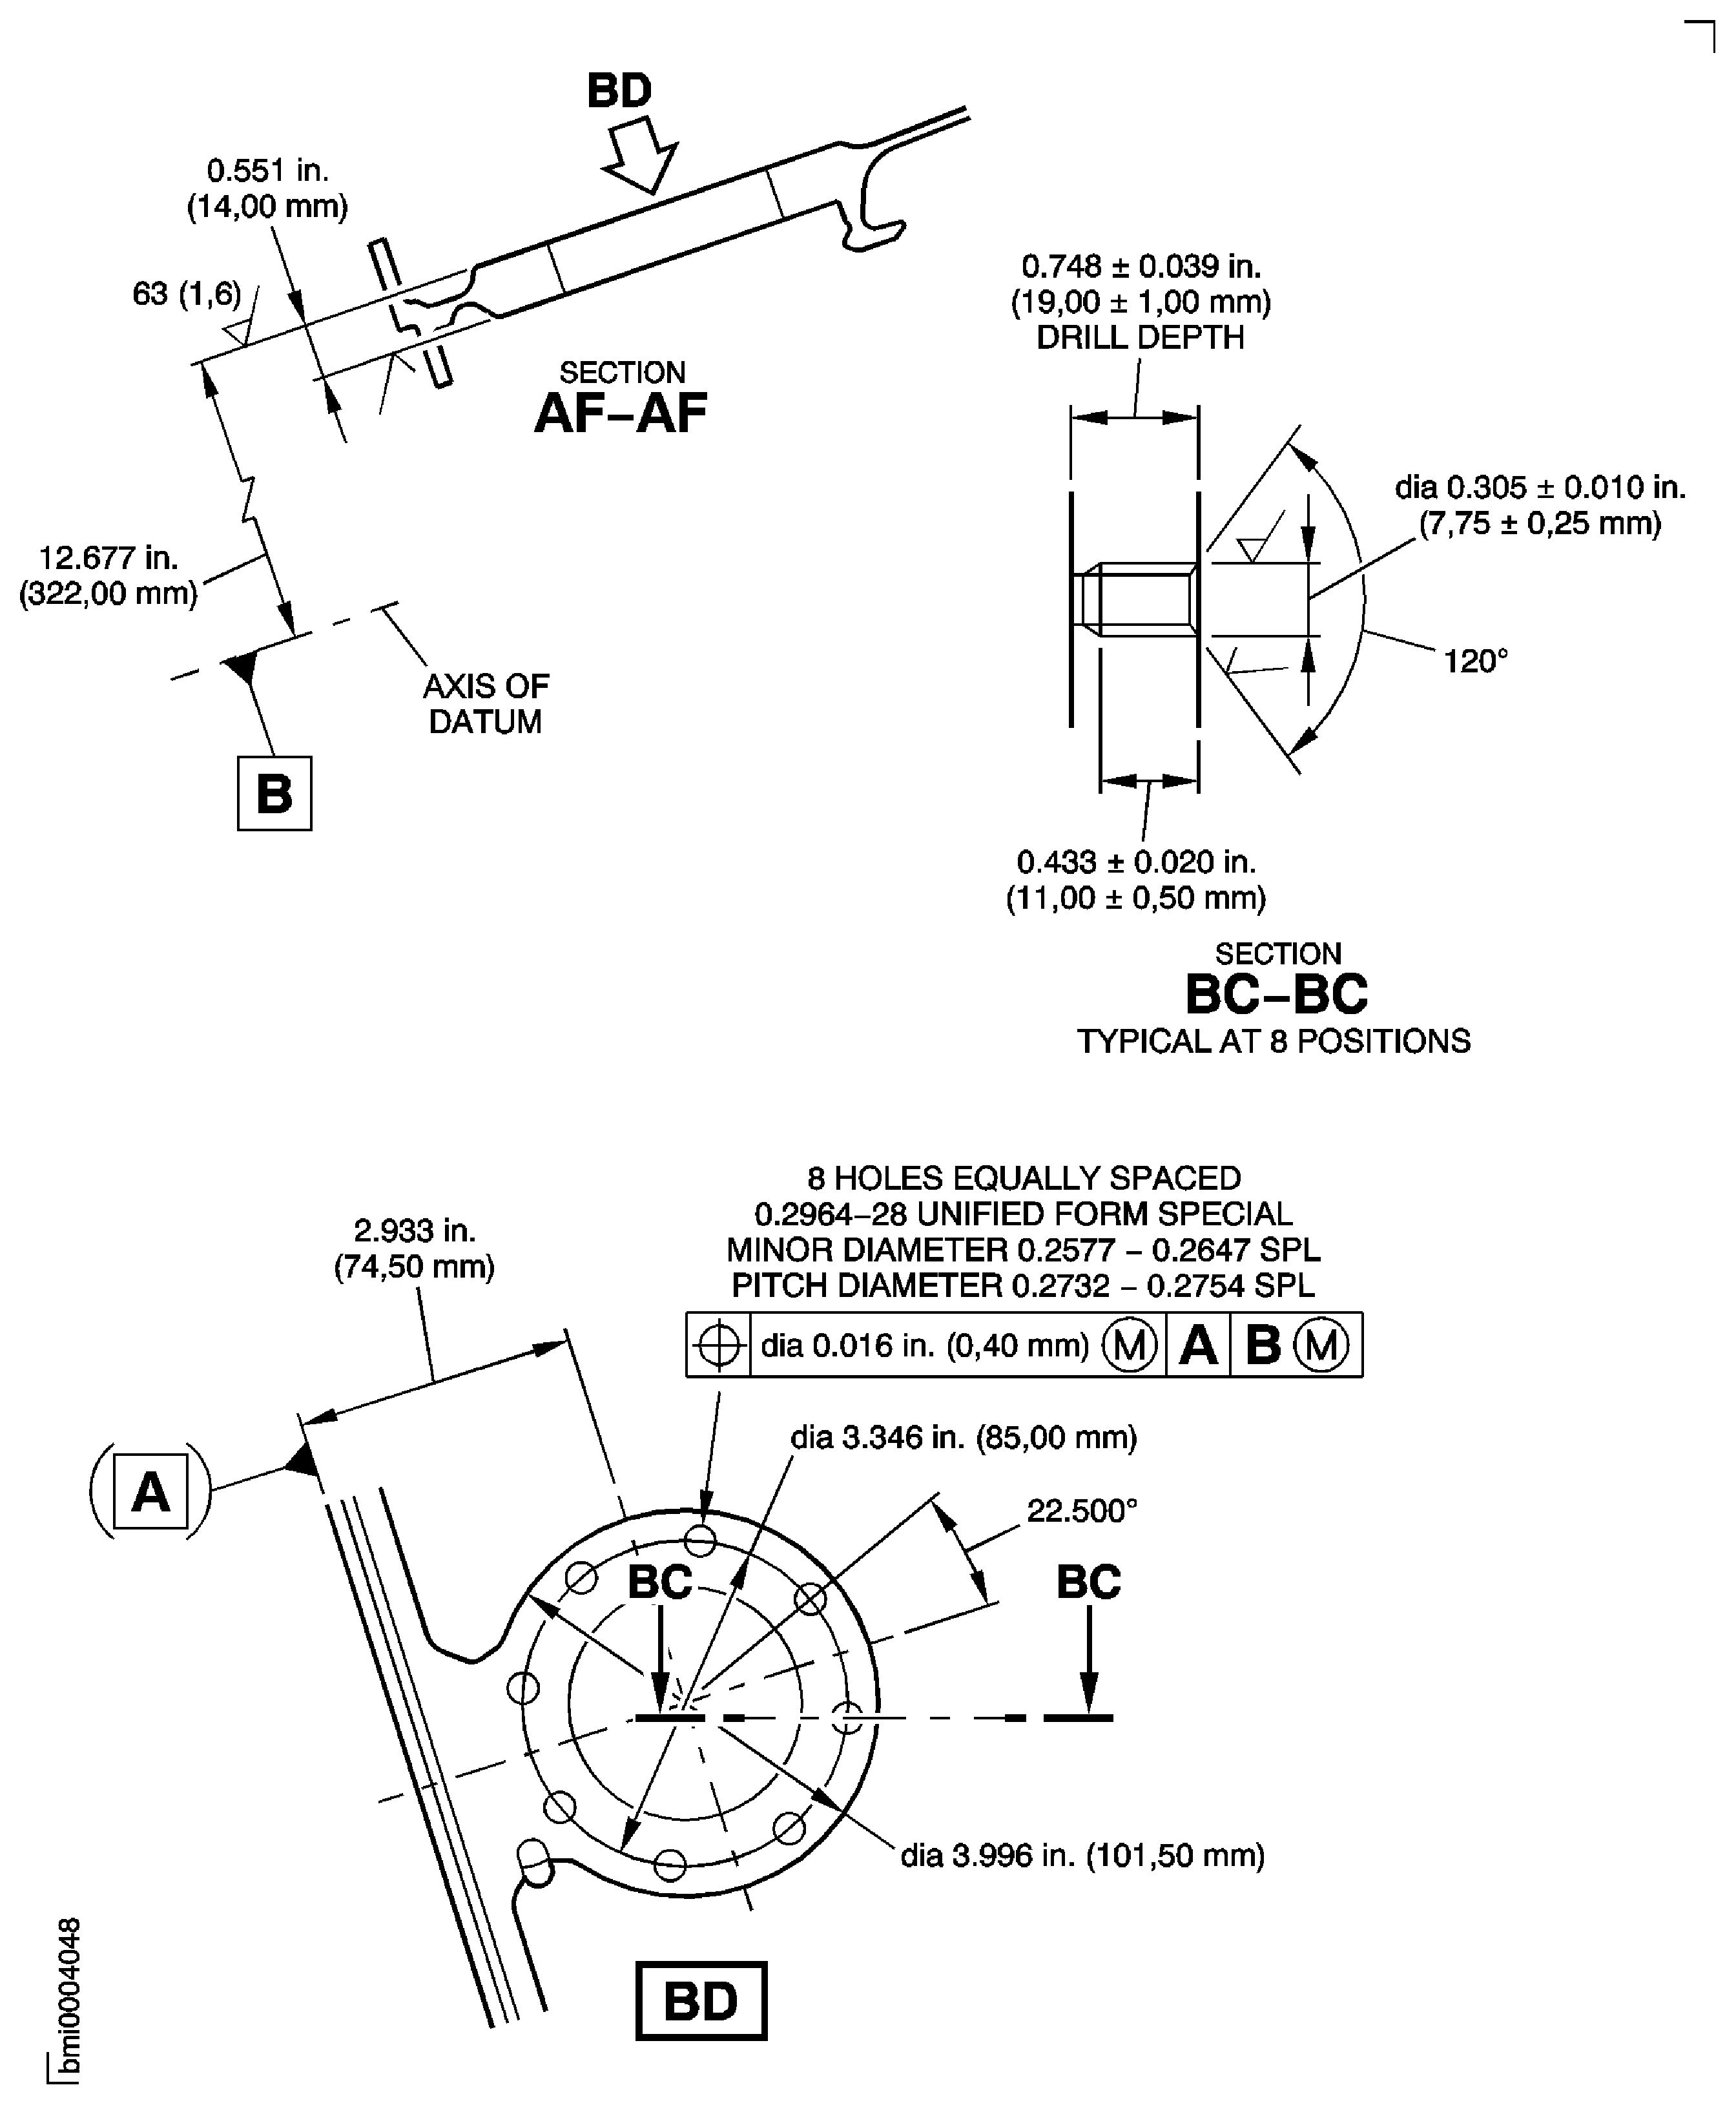
Figure: Repair Details and Dimensions Assembly A and Assembly B
Repair Details and Dimensions Assembly A and Assembly B
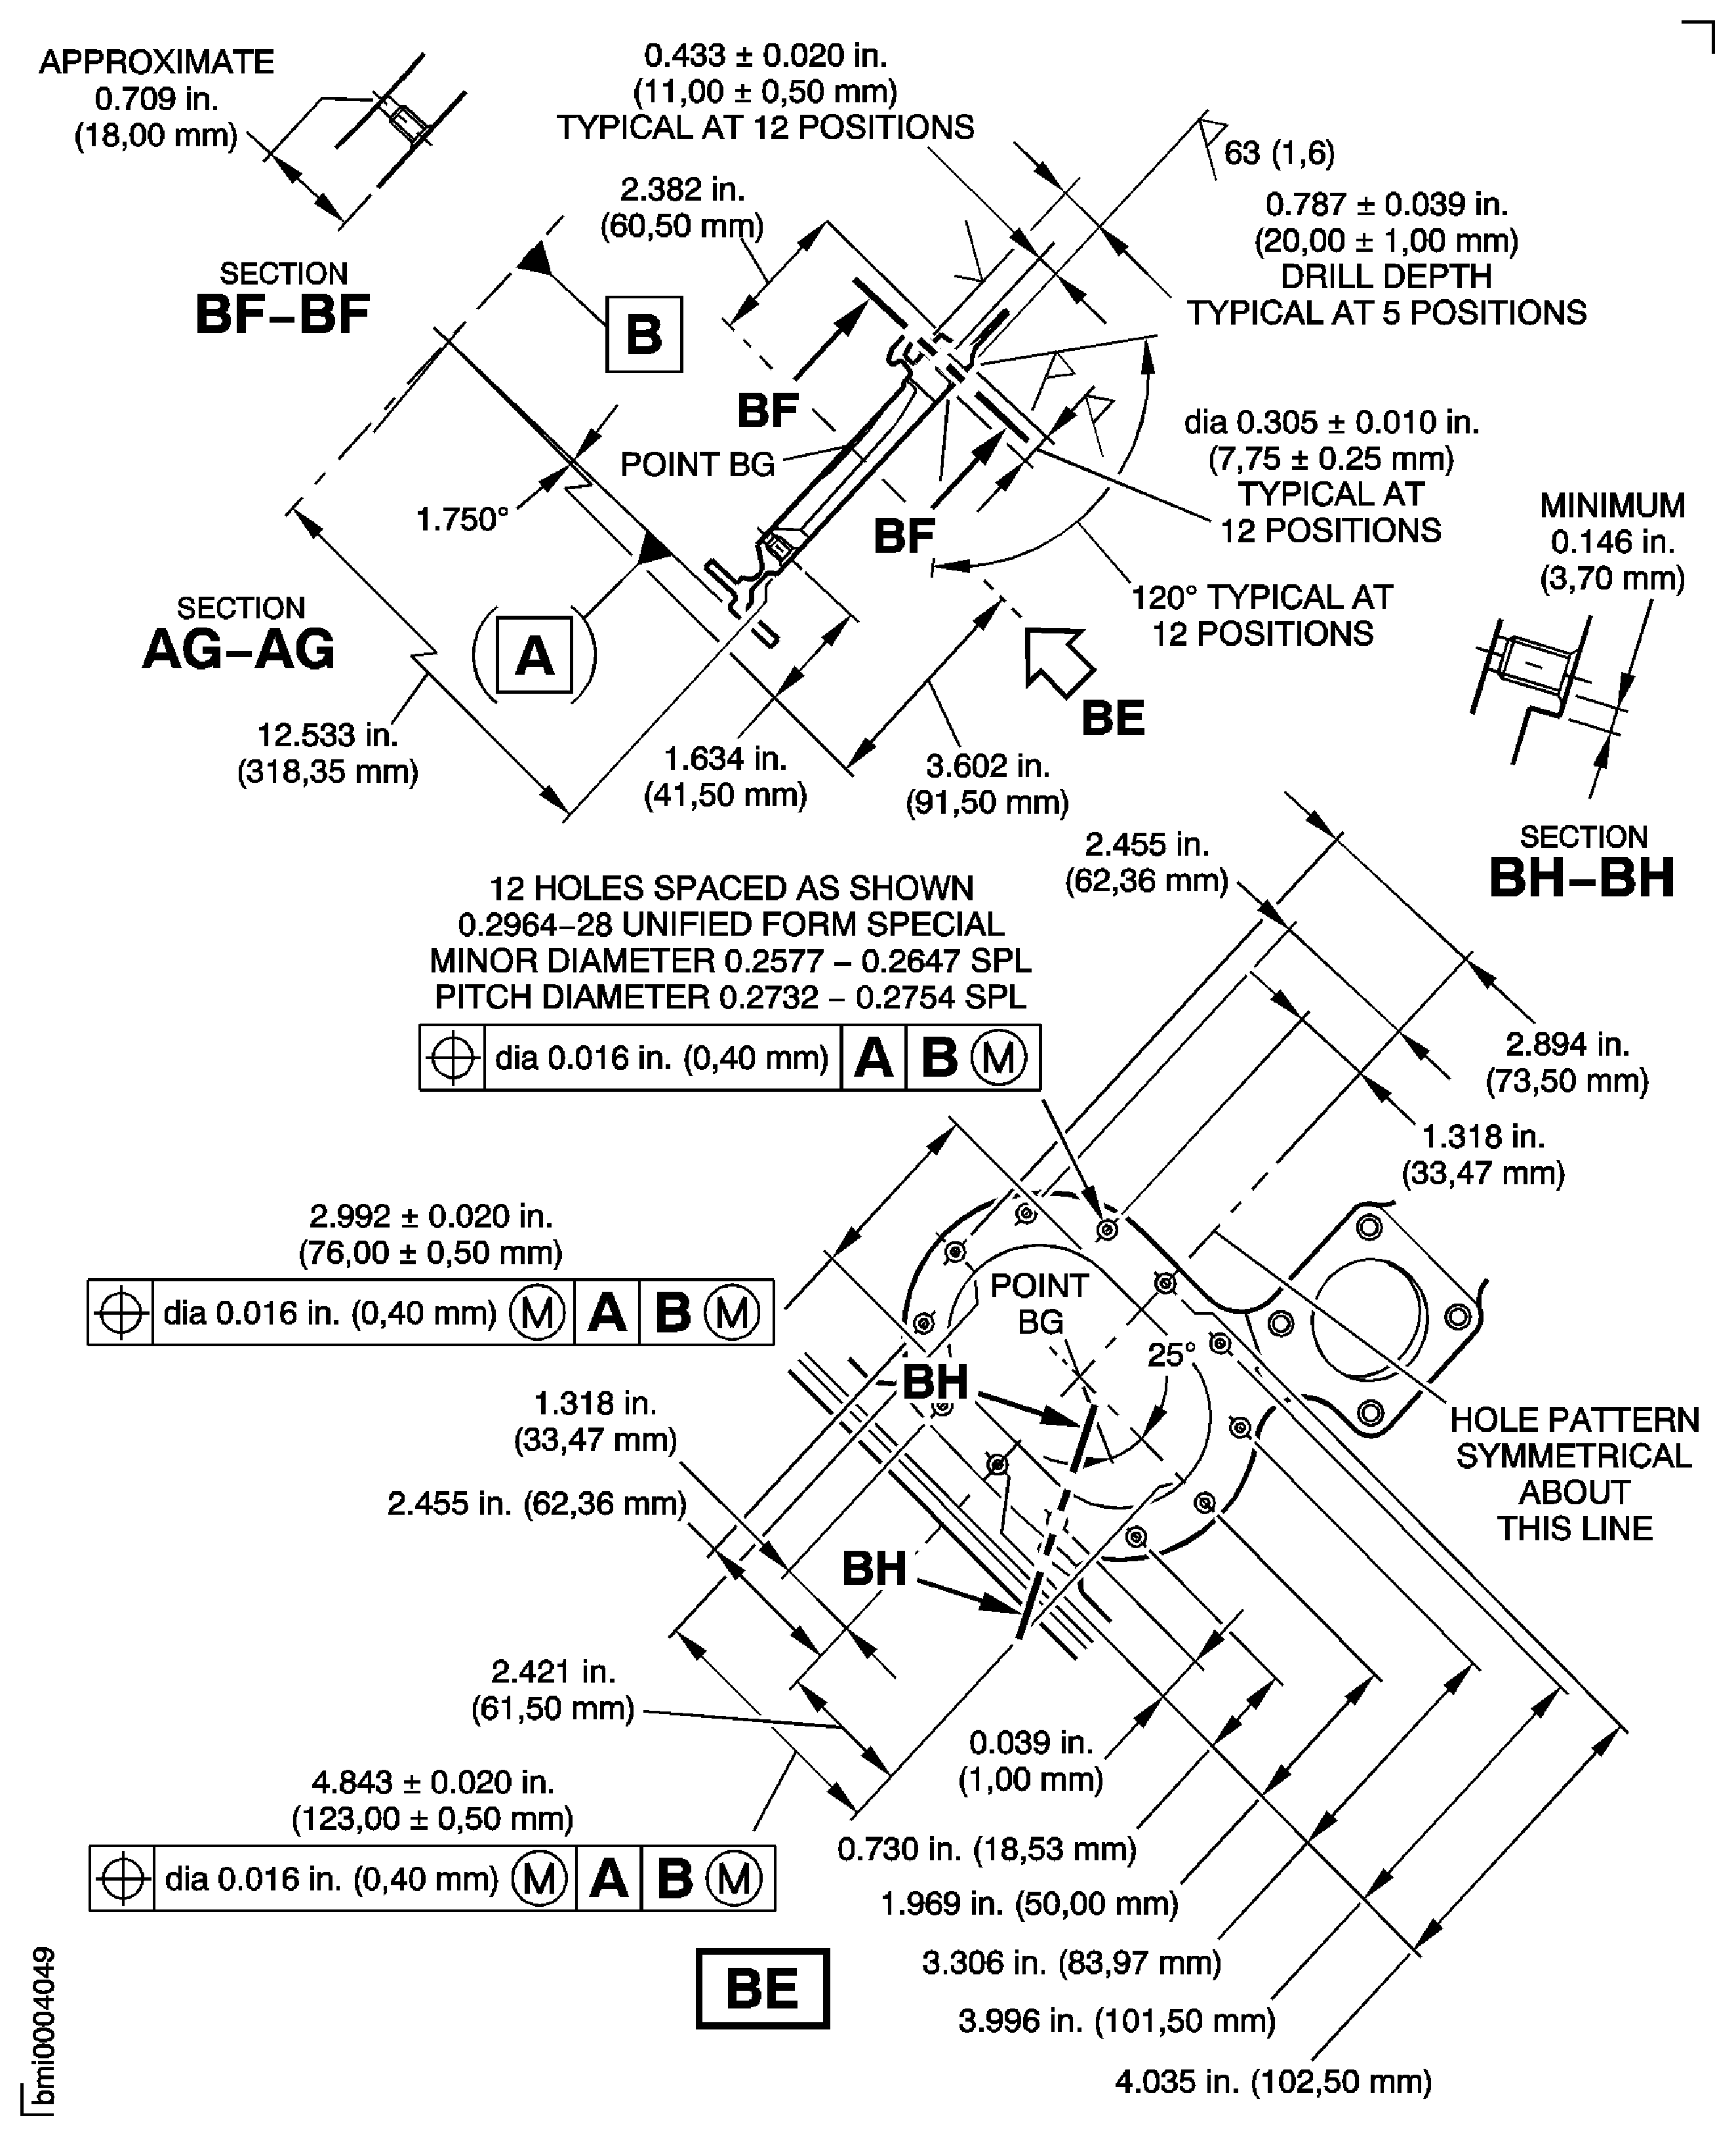
Figure: Repair Details and Dimensions Assembly A and Assembly B
Repair Details and Dimensions Assembly A and Assembly B
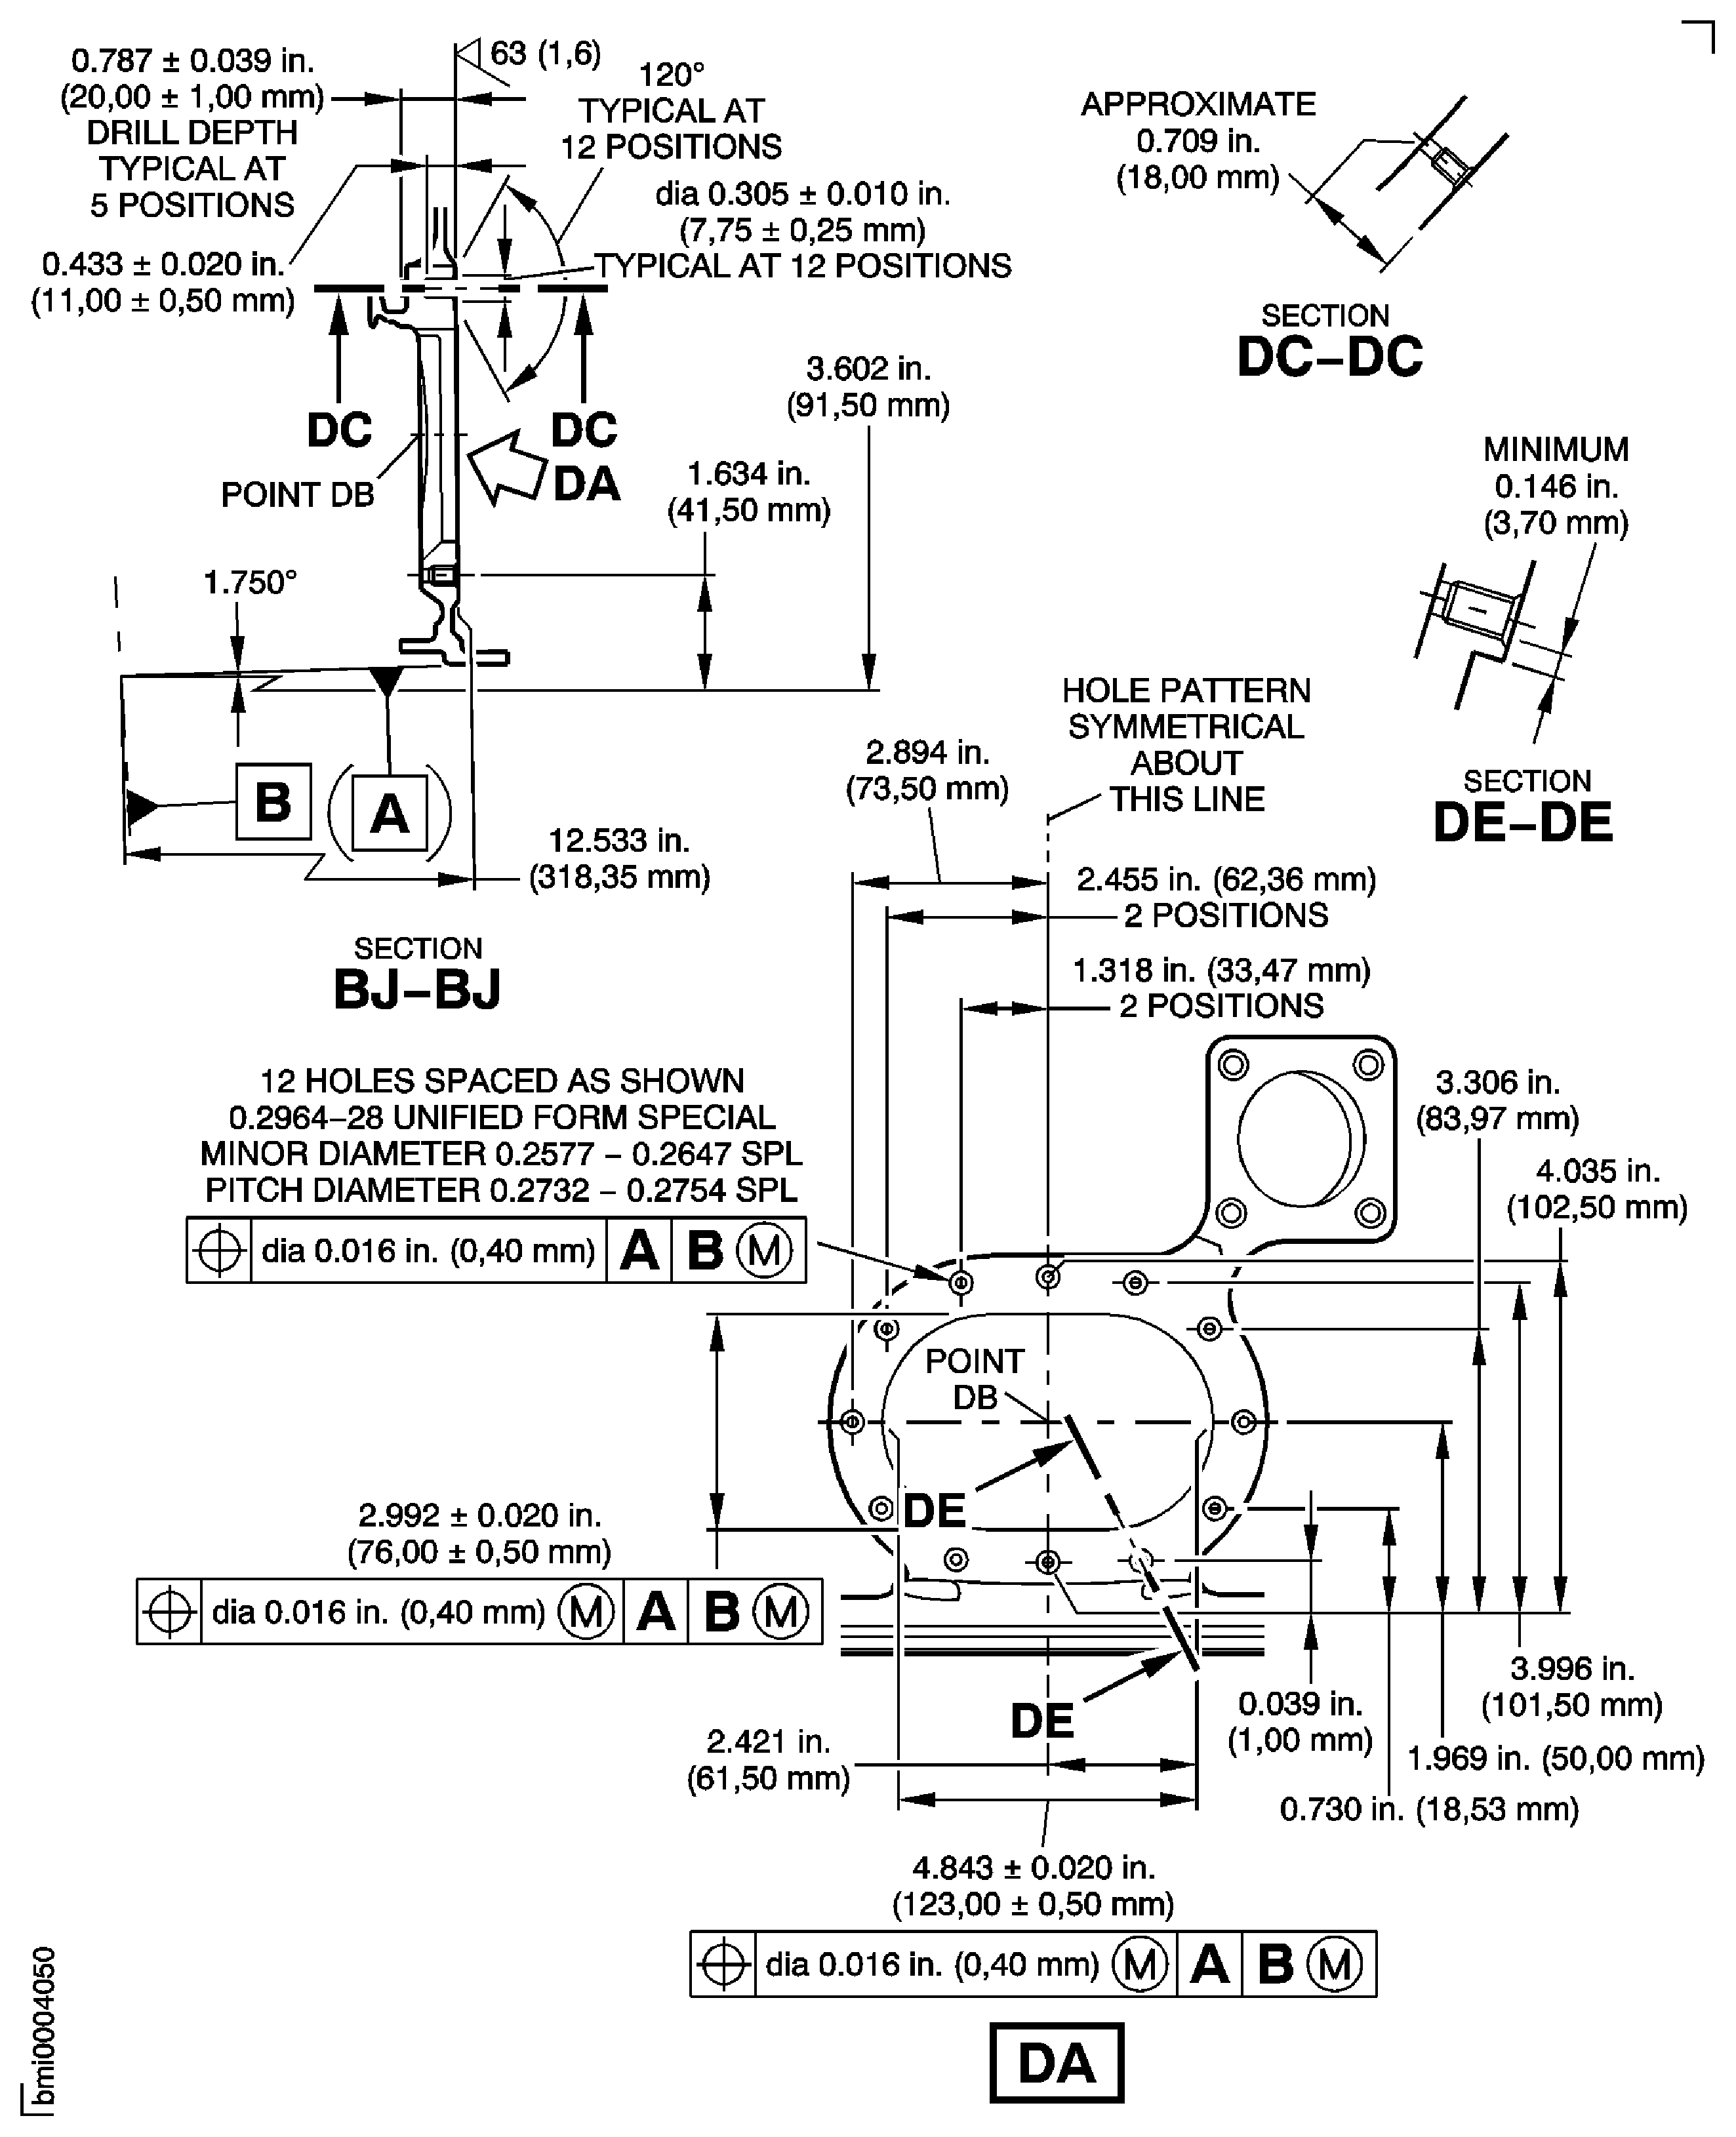
Figure: Repair Details and Dimensions Assembly A and Assembly B
Repair Details and Dimensions Assembly A and Assembly B
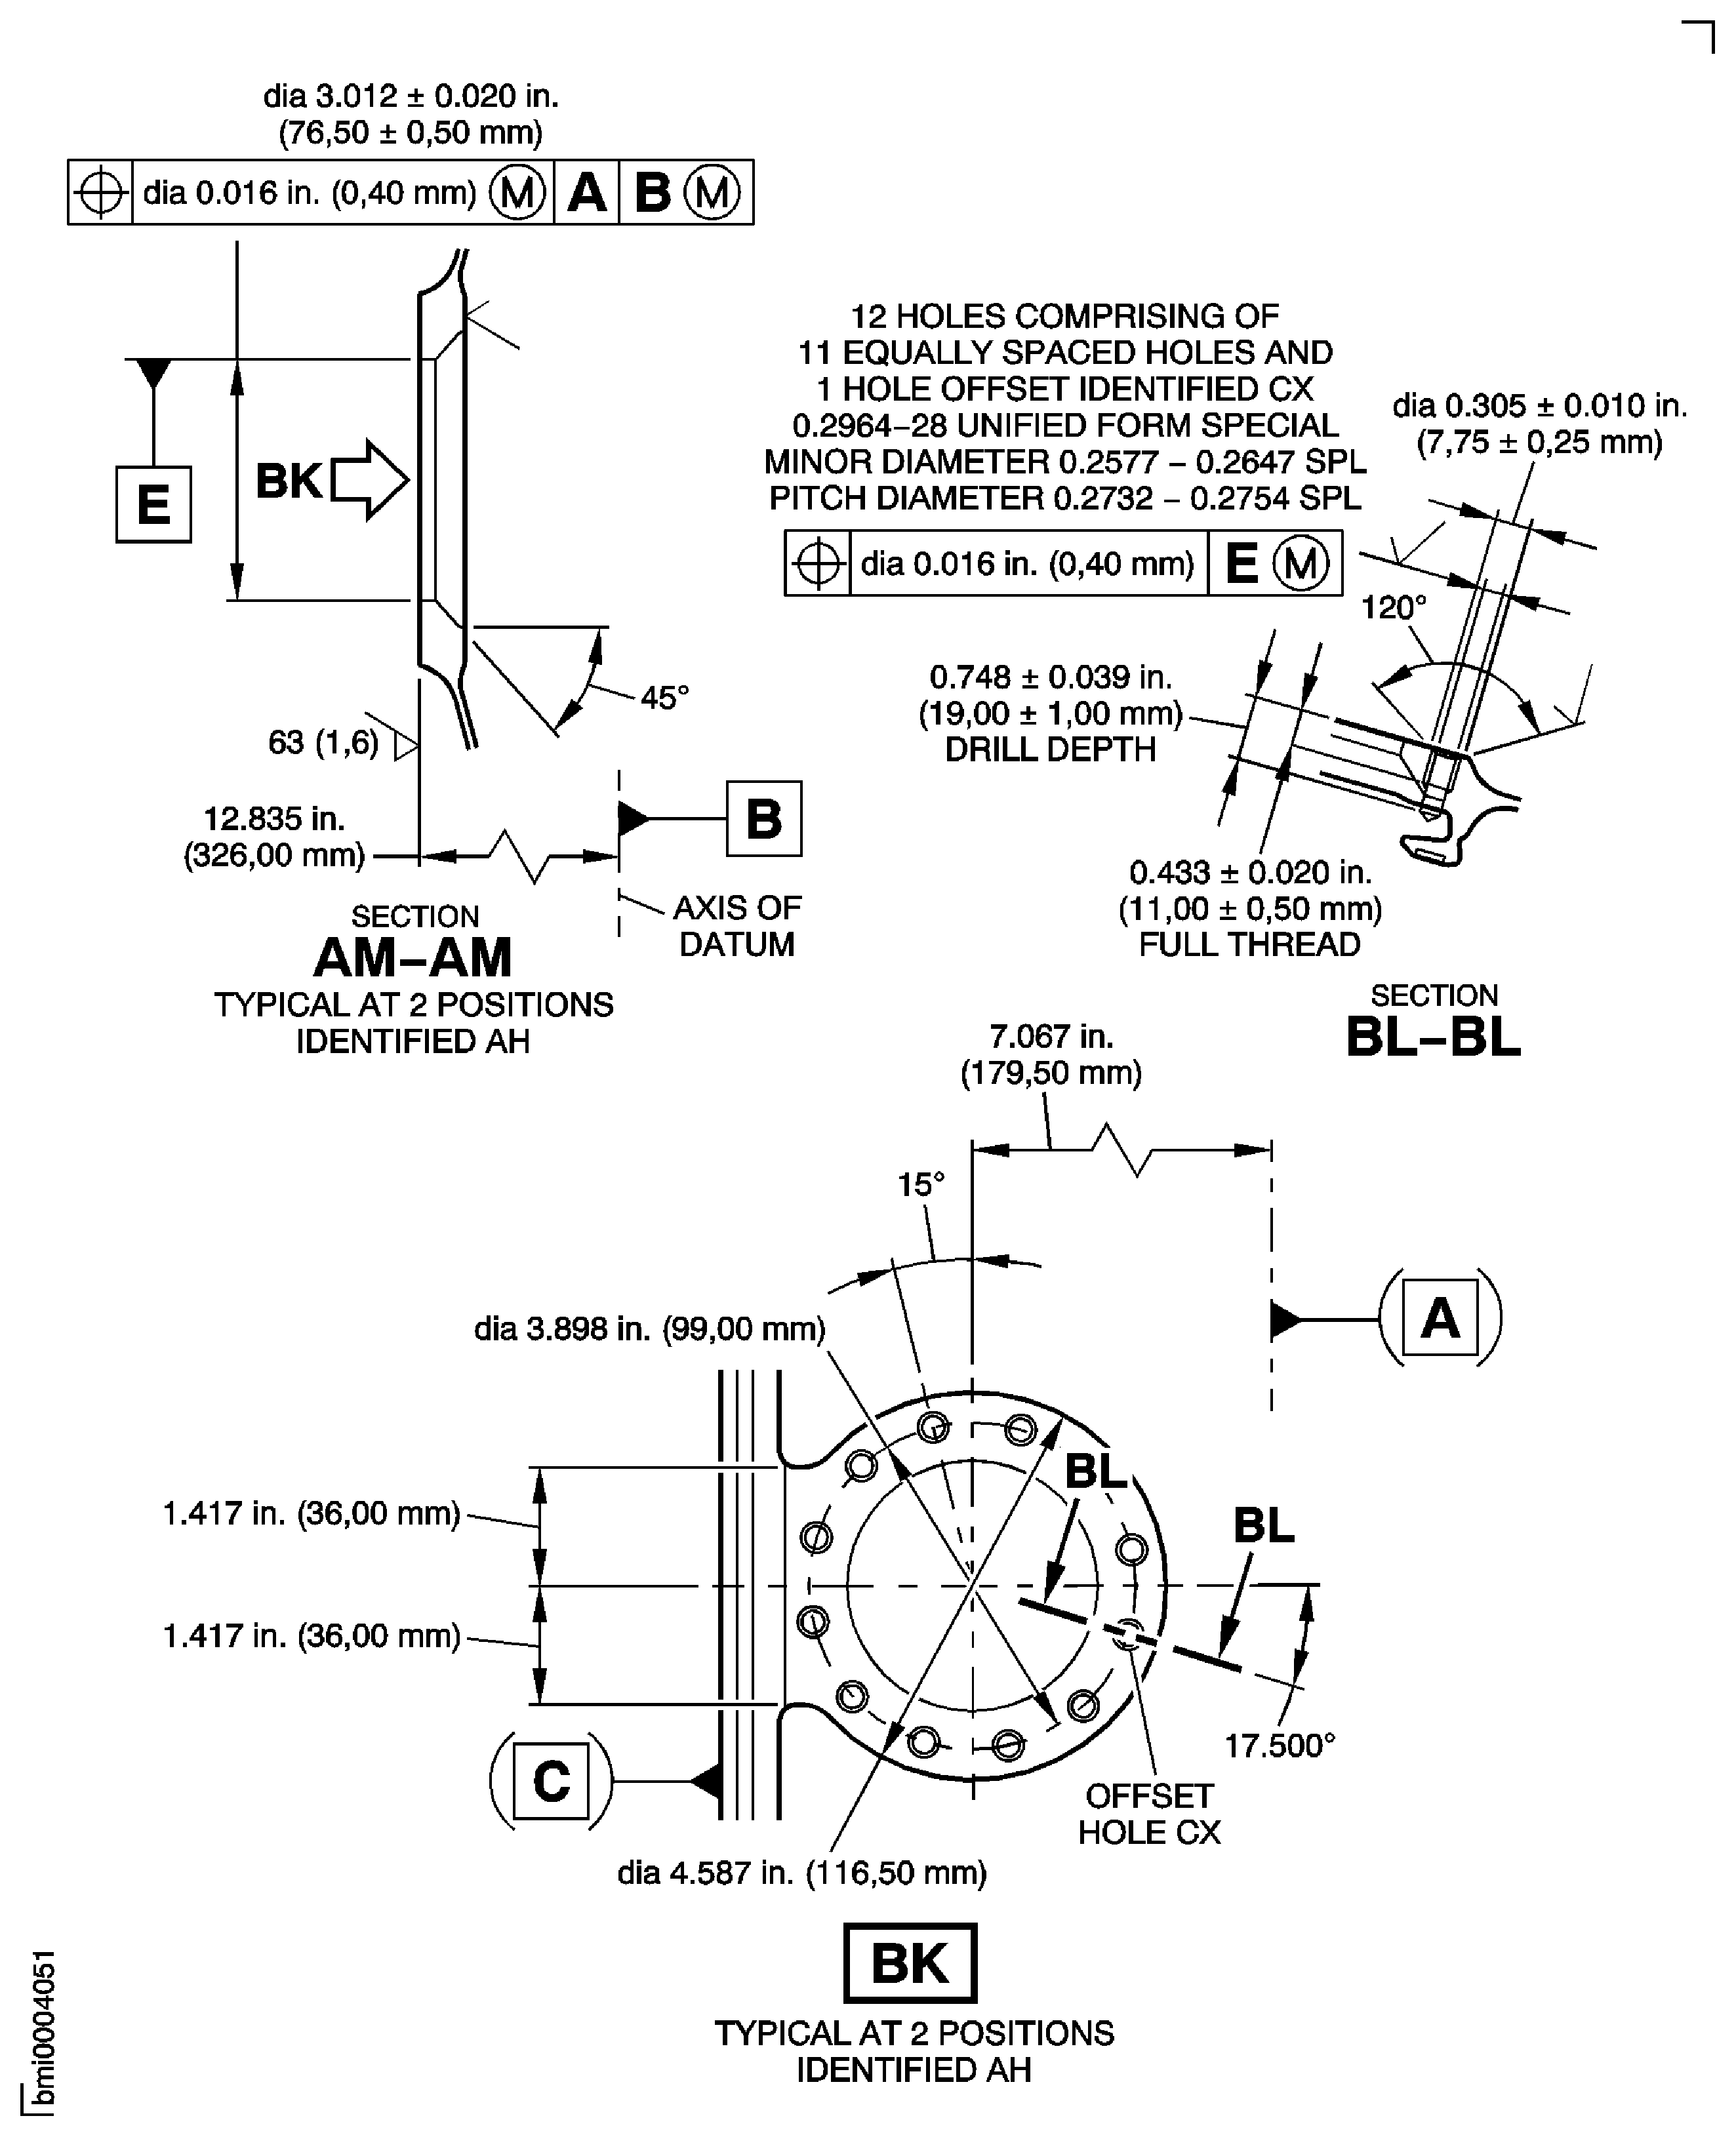
Figure: Repair Details and Dimensions Assembly A and Assembly B
Repair Details and Dimensions Assembly A and Assembly B
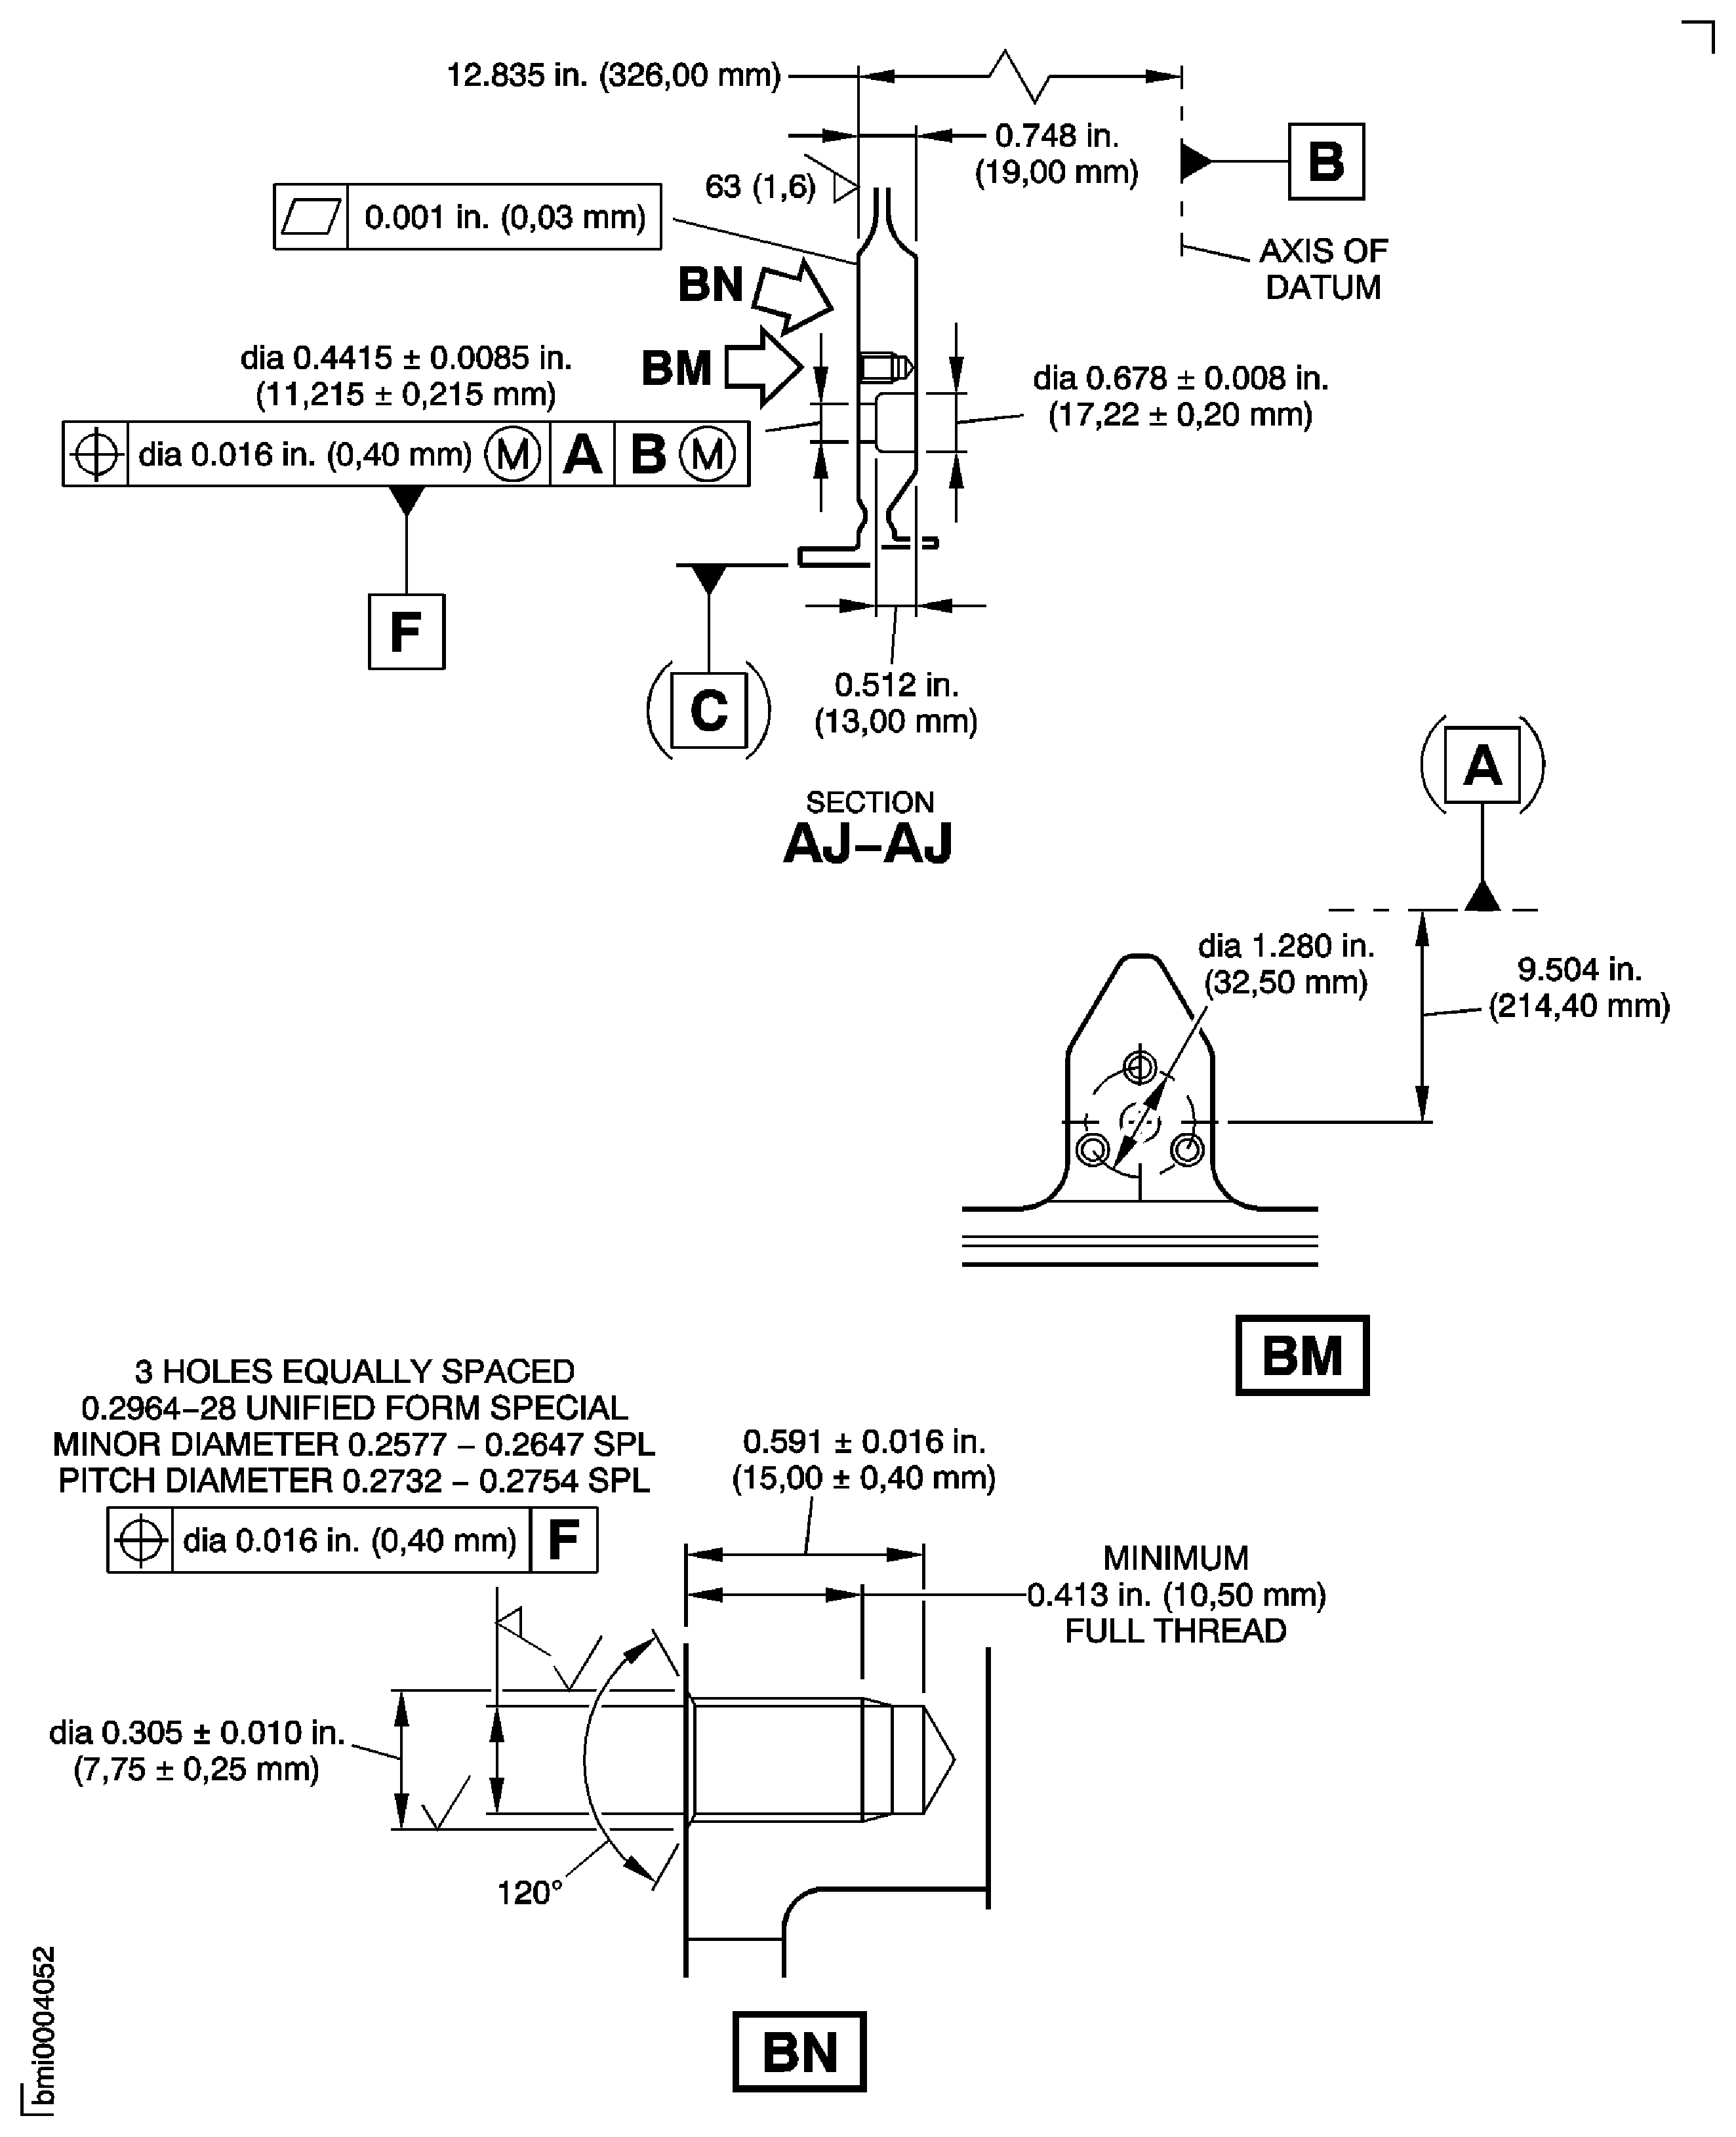
Figure: Repair Details and Dimensions Assembly A and Assembly B
Repair Details and Dimensions Assembly A and Assembly B
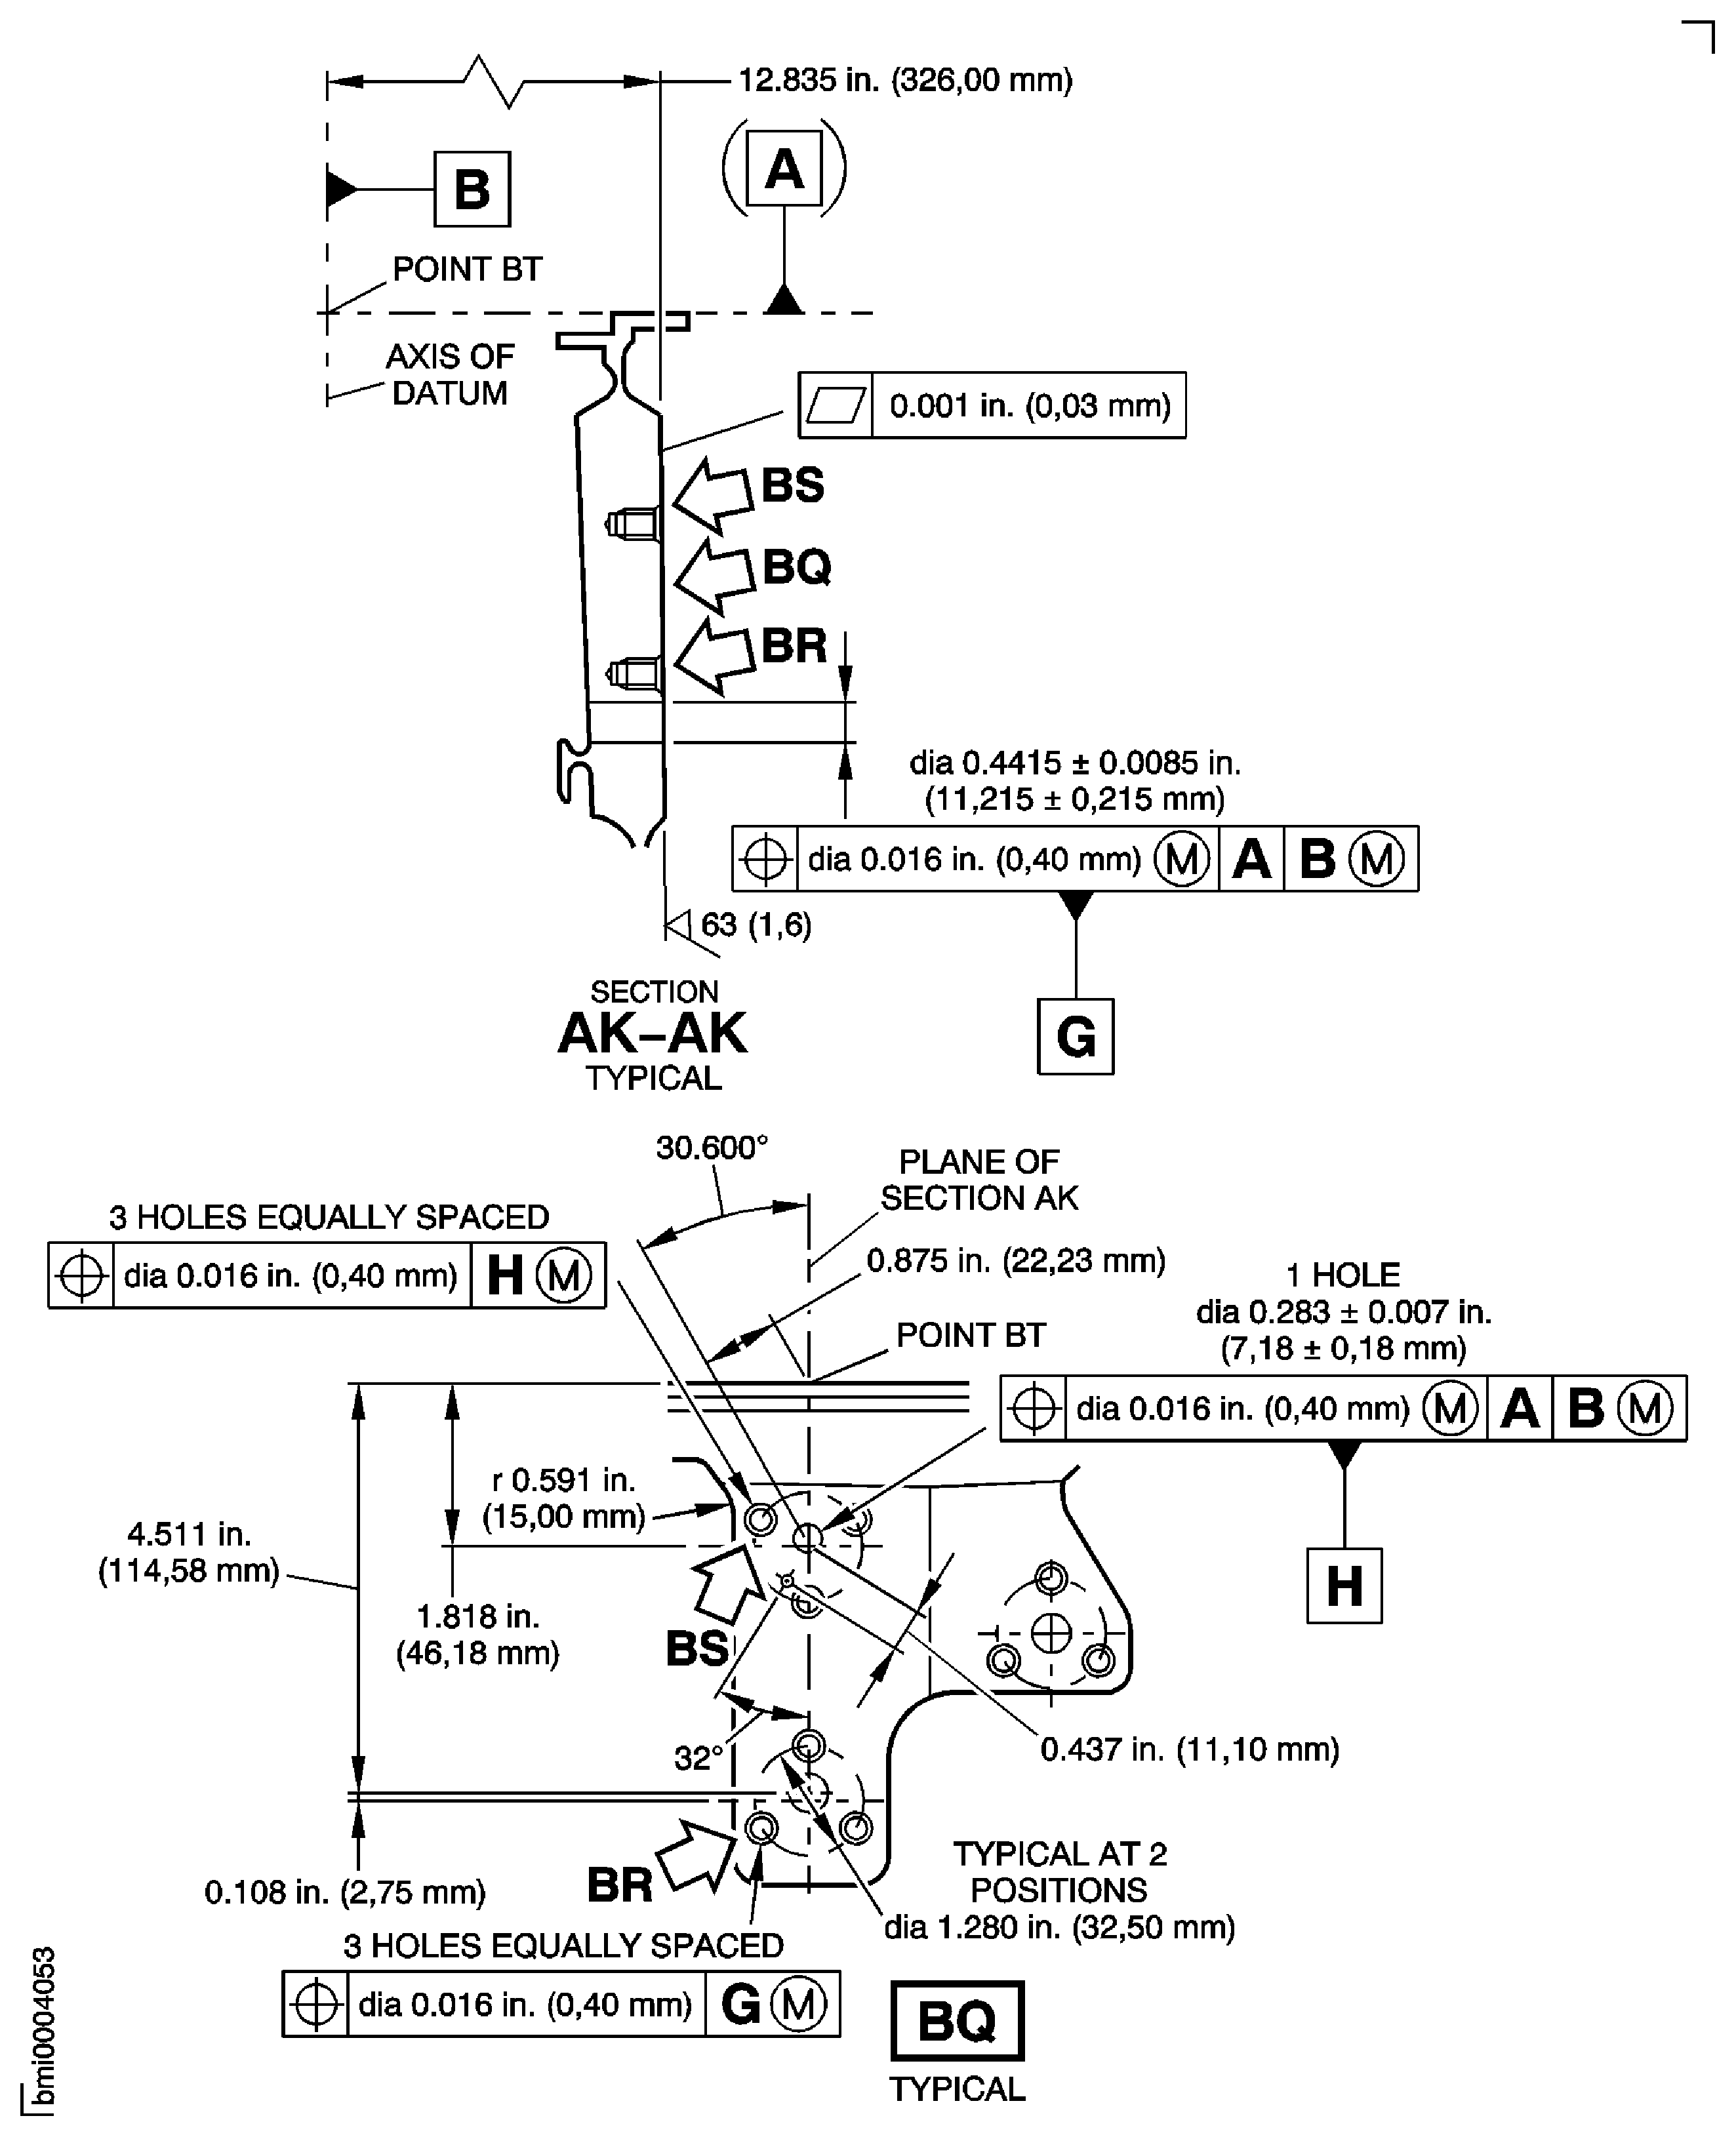
Figure: Repair Details and Dimensions Assembly A and Assembly B
Repair Details and Dimensions Assembly A and Assembly B
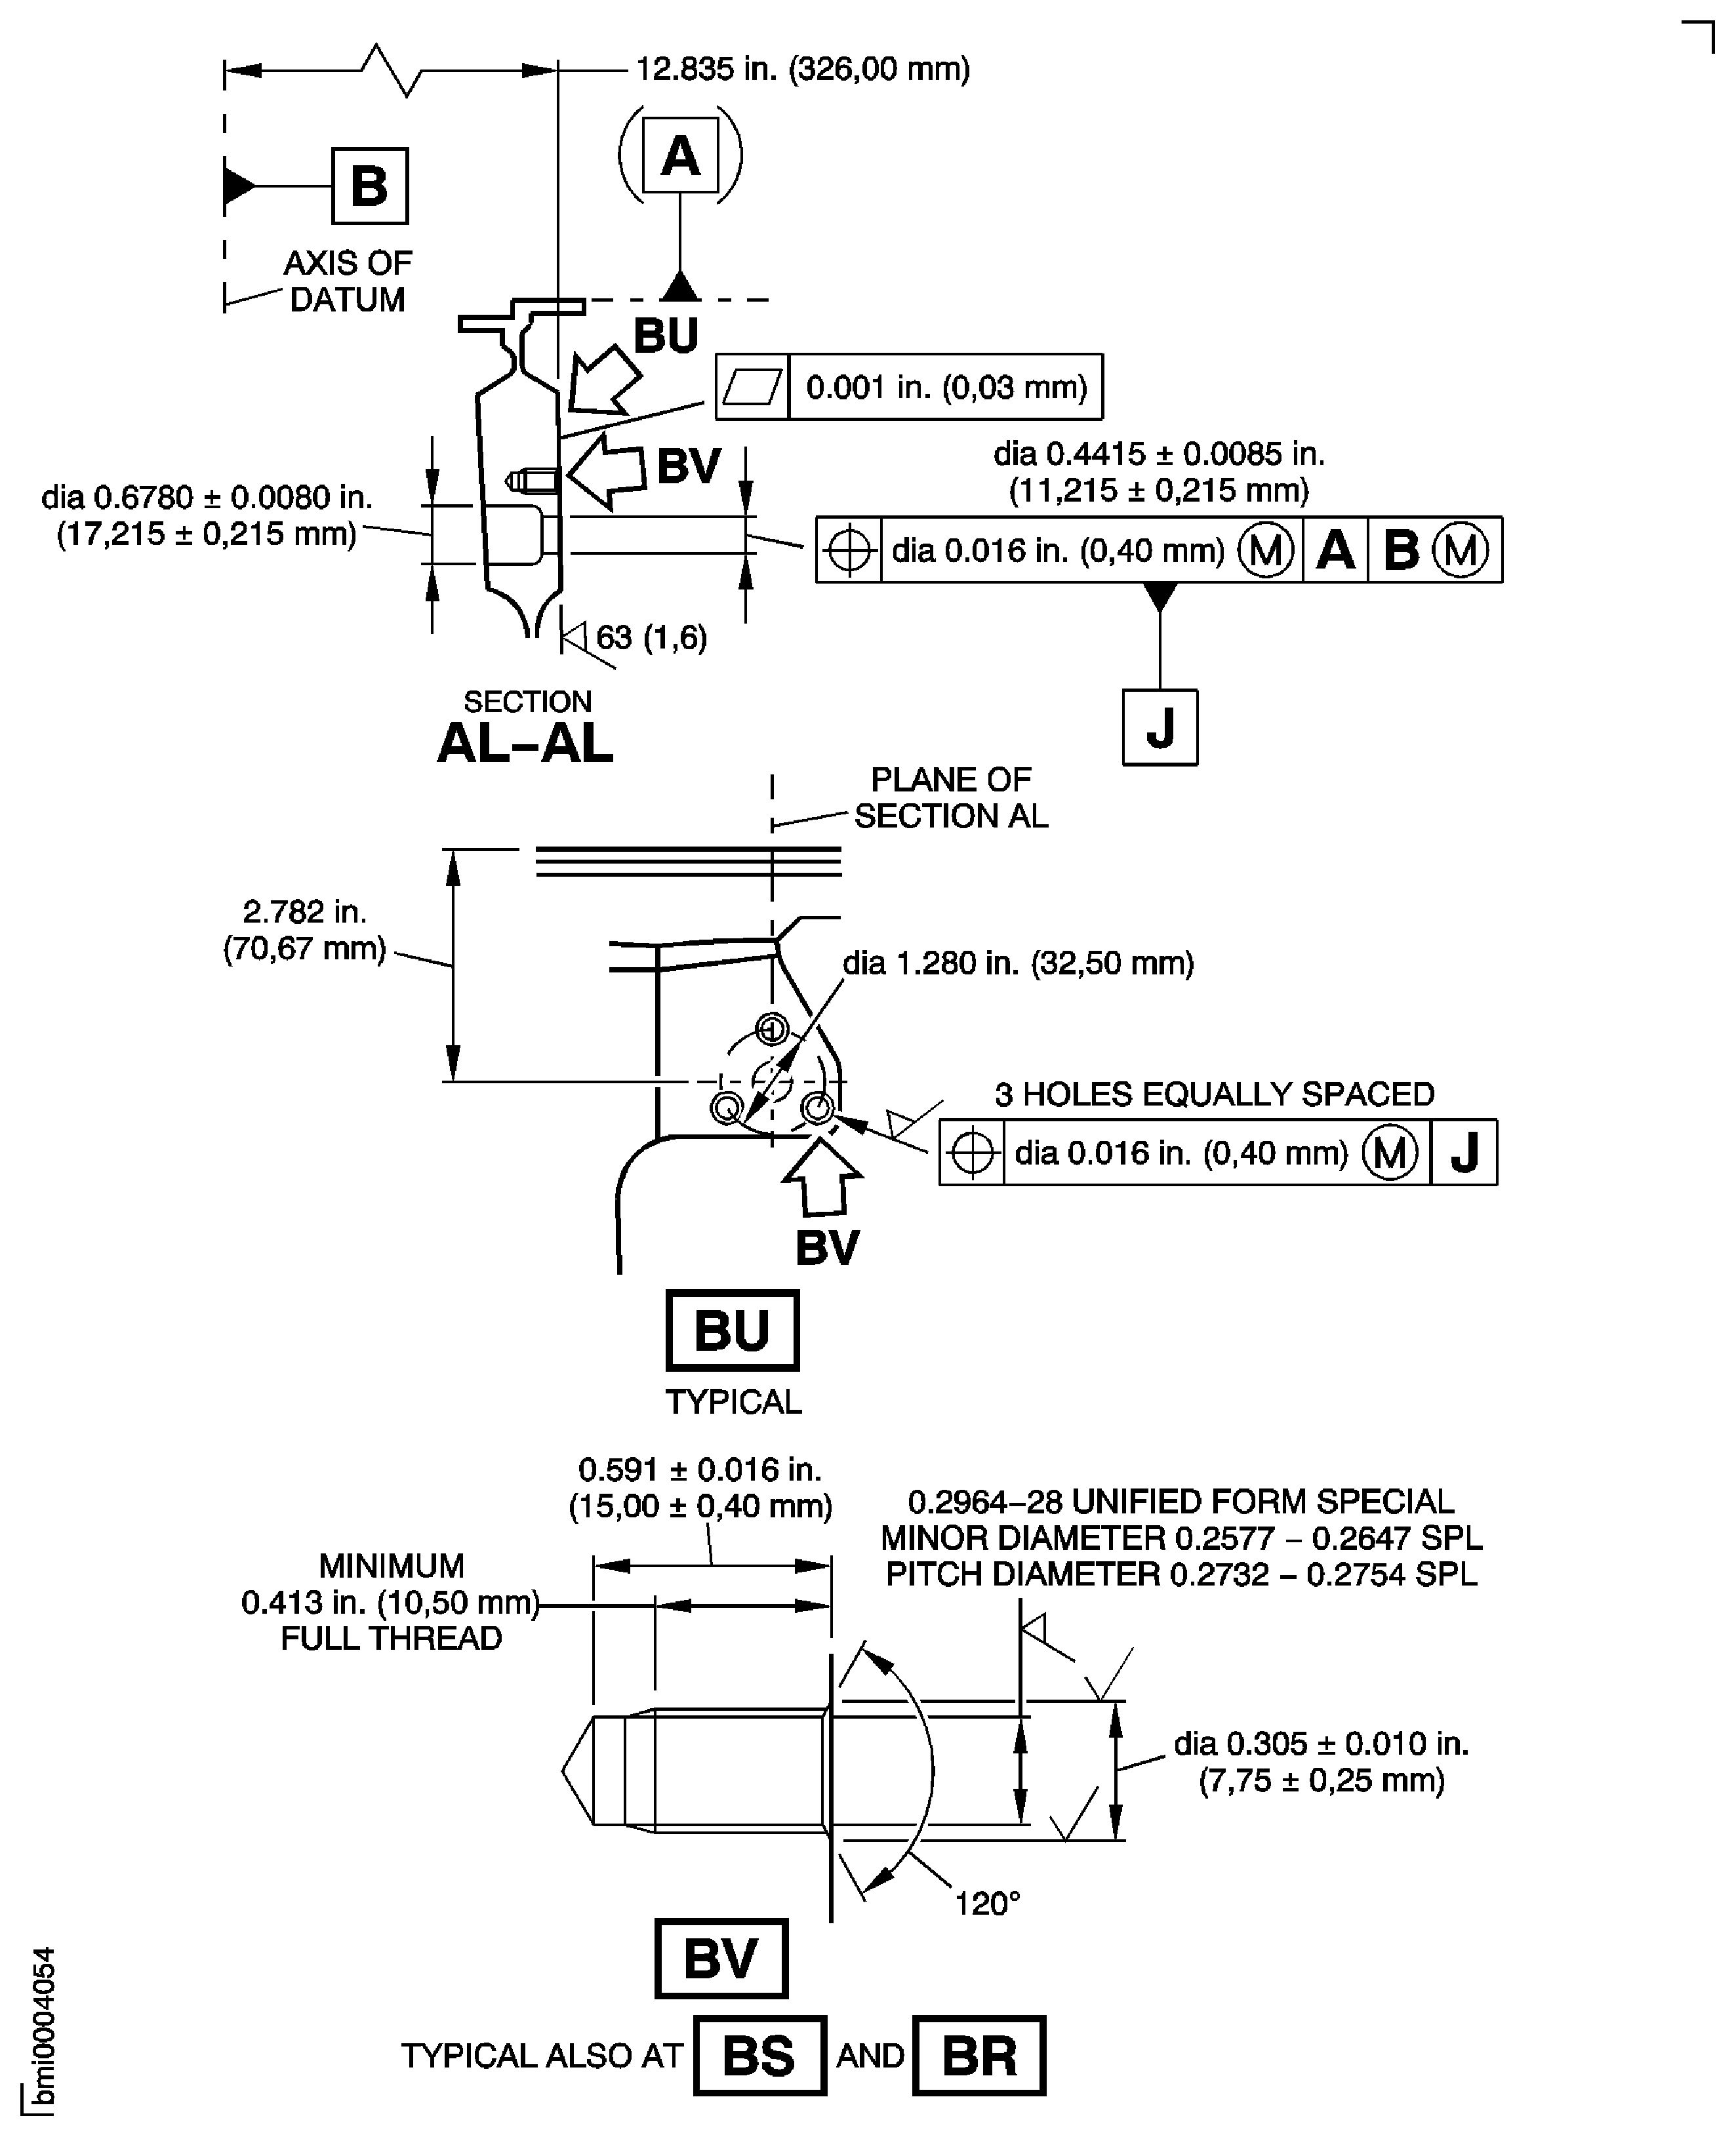
Figure: Repair Details and Dimensions - Assembly A
Repair Details and Dimensions - Assembly A
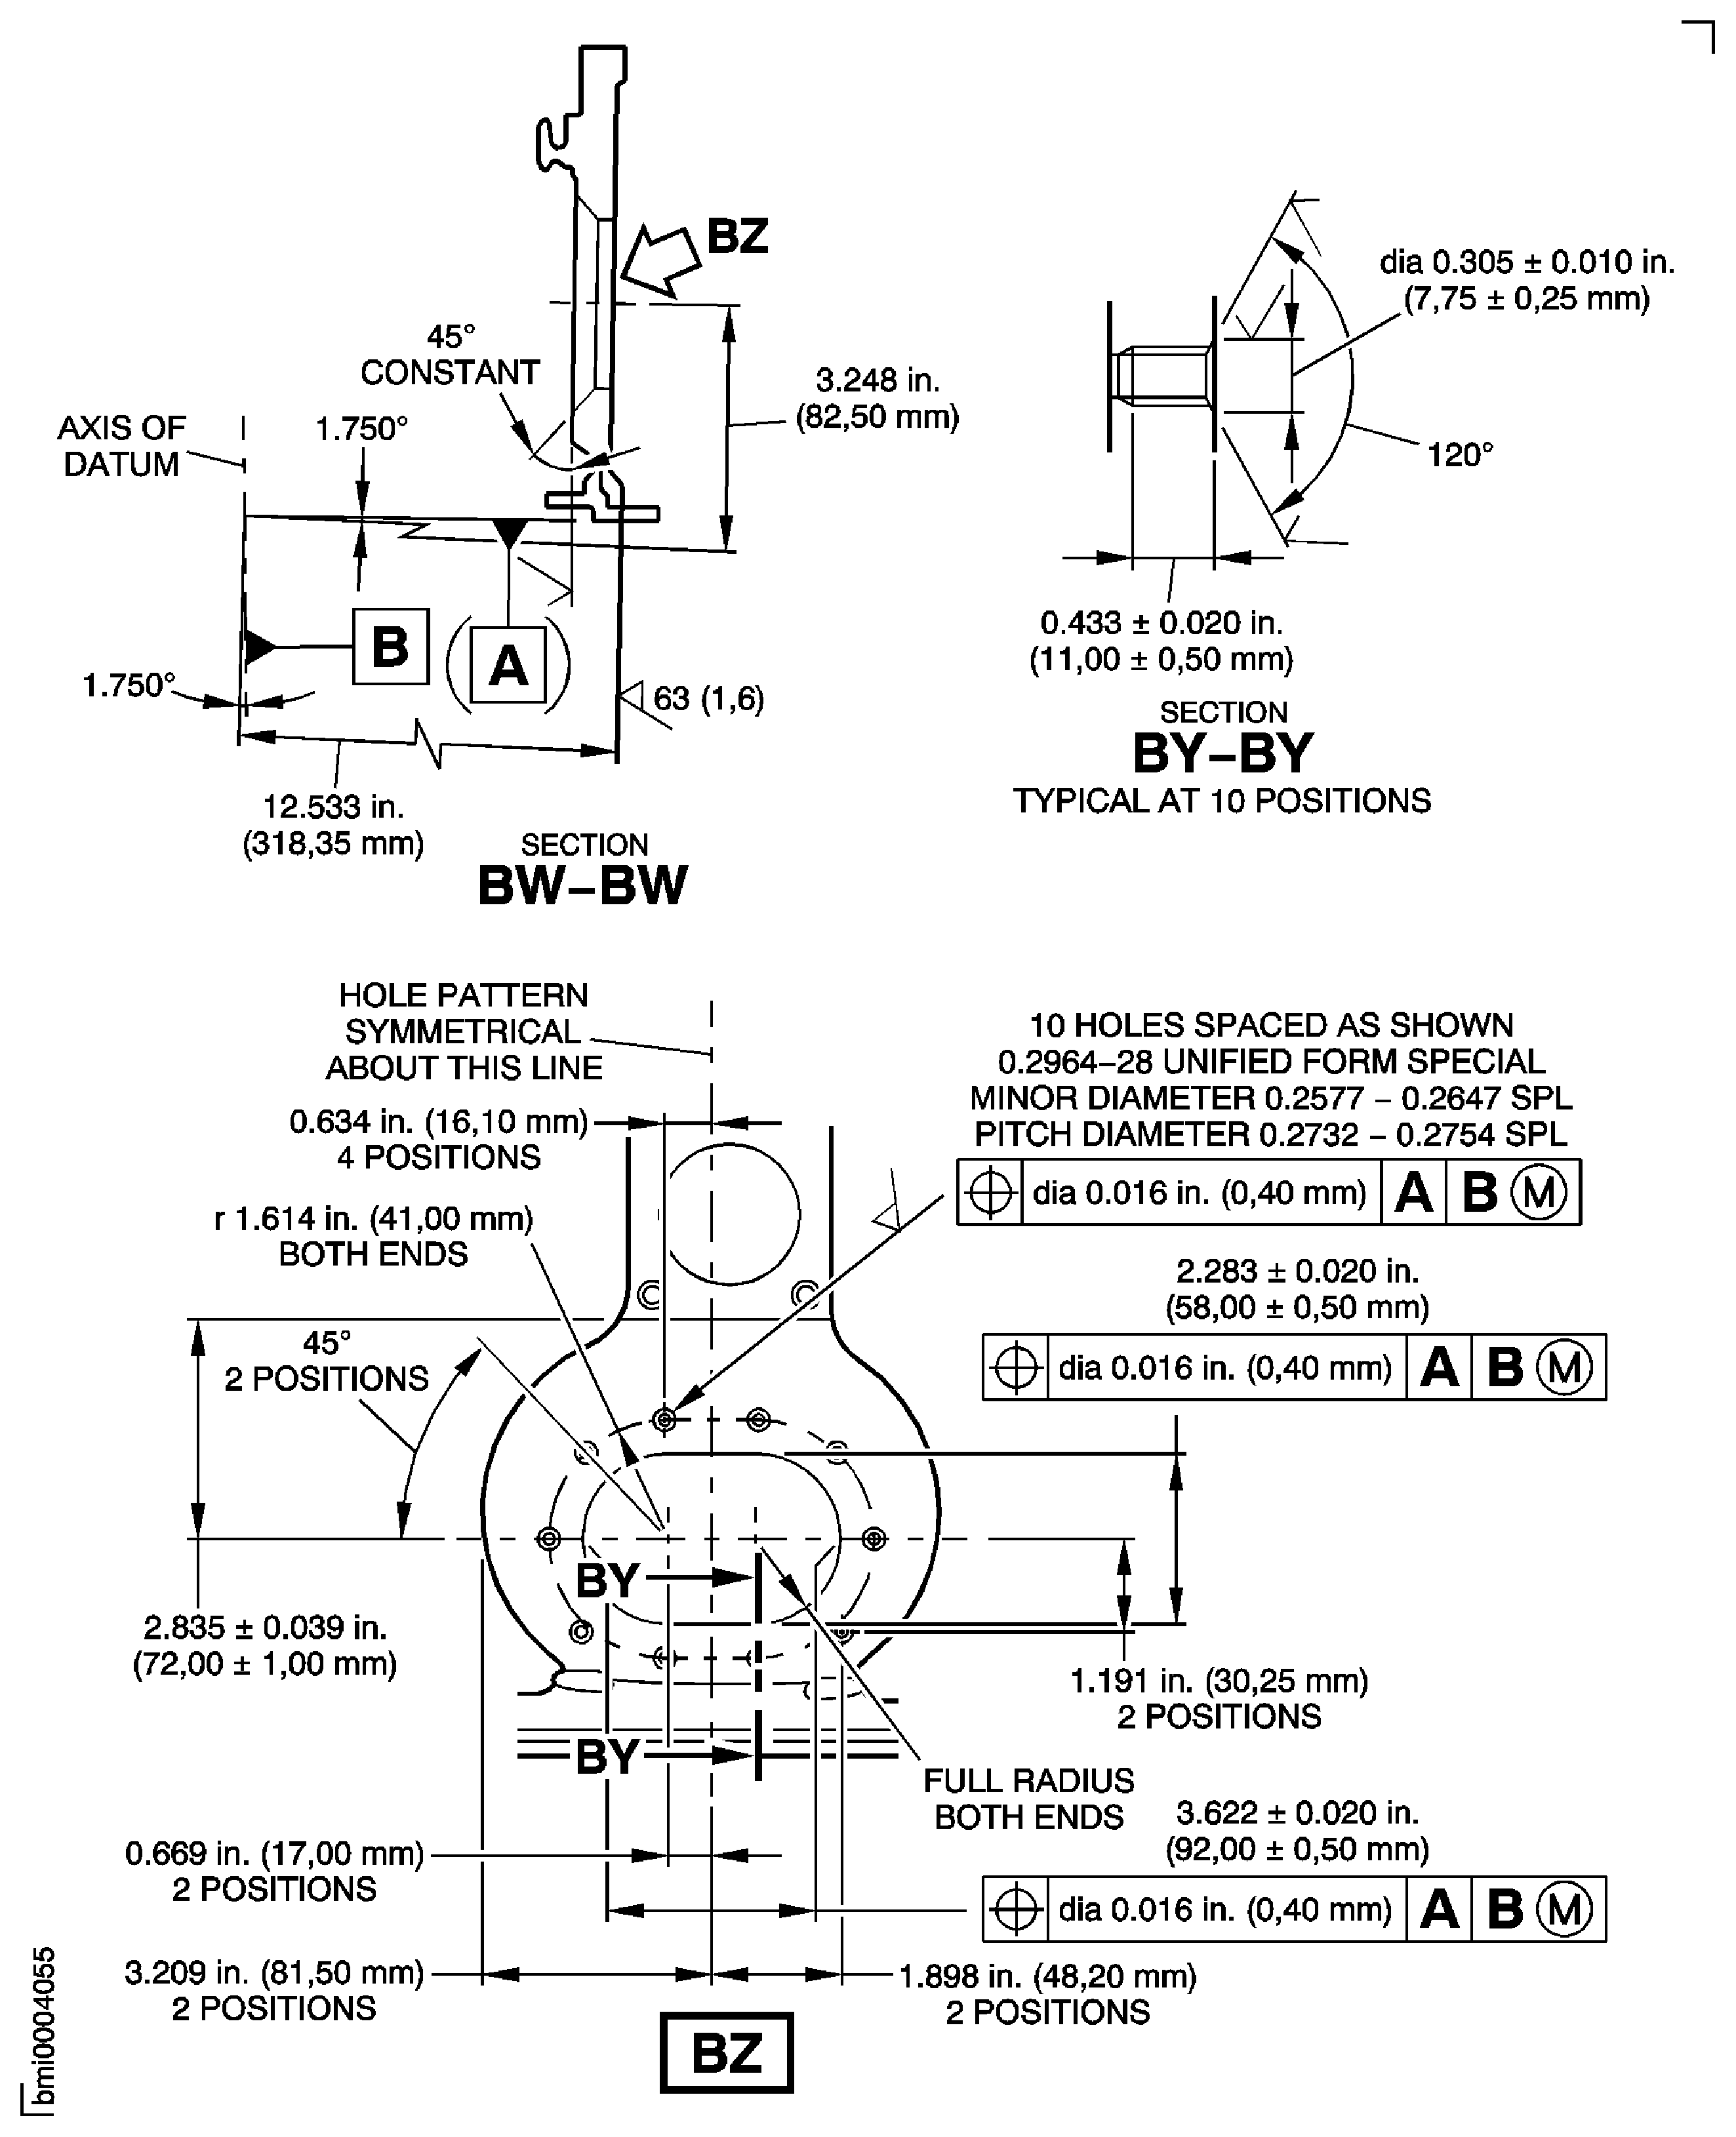
Figure: Repair Details and Dimensions Assembly A and Assembly B
Repair Details and Dimensions Assembly A and Assembly B
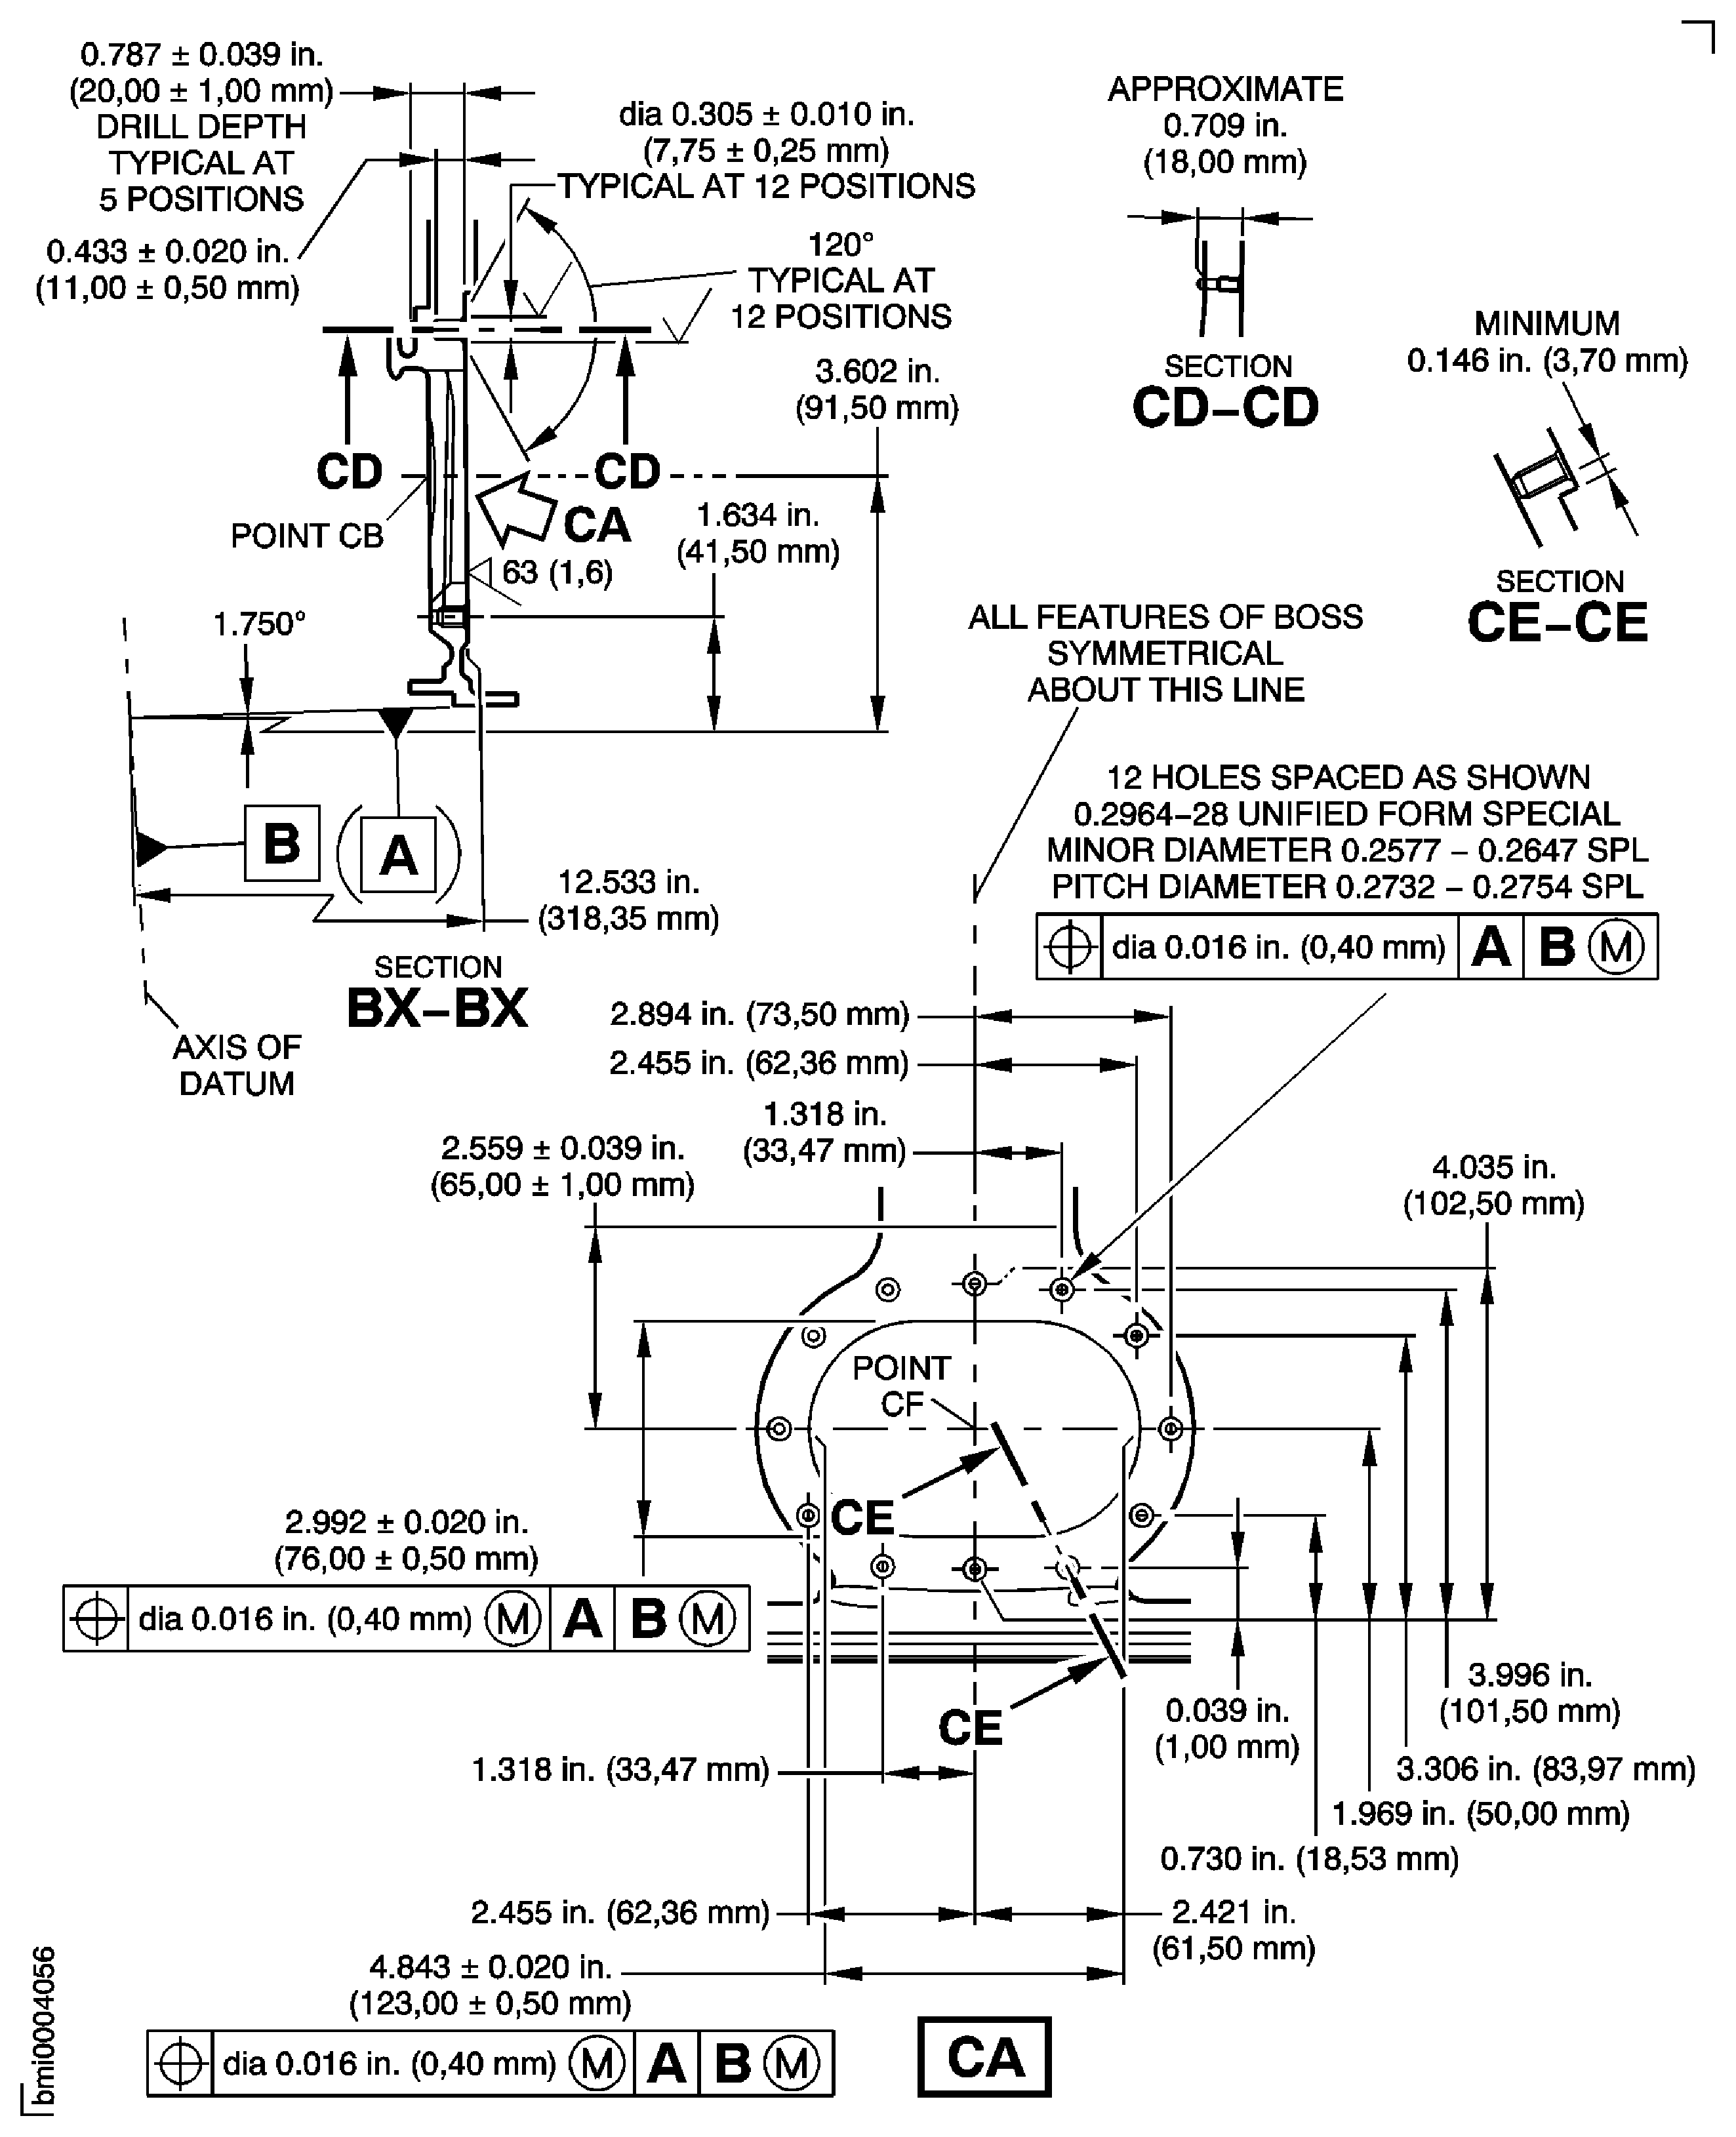
Figure: Repair Details and Dimensions Assembly C, Assembly D and Assembly E
Repair Details and Dimensions Assembly C, Assembly D and Assembly E
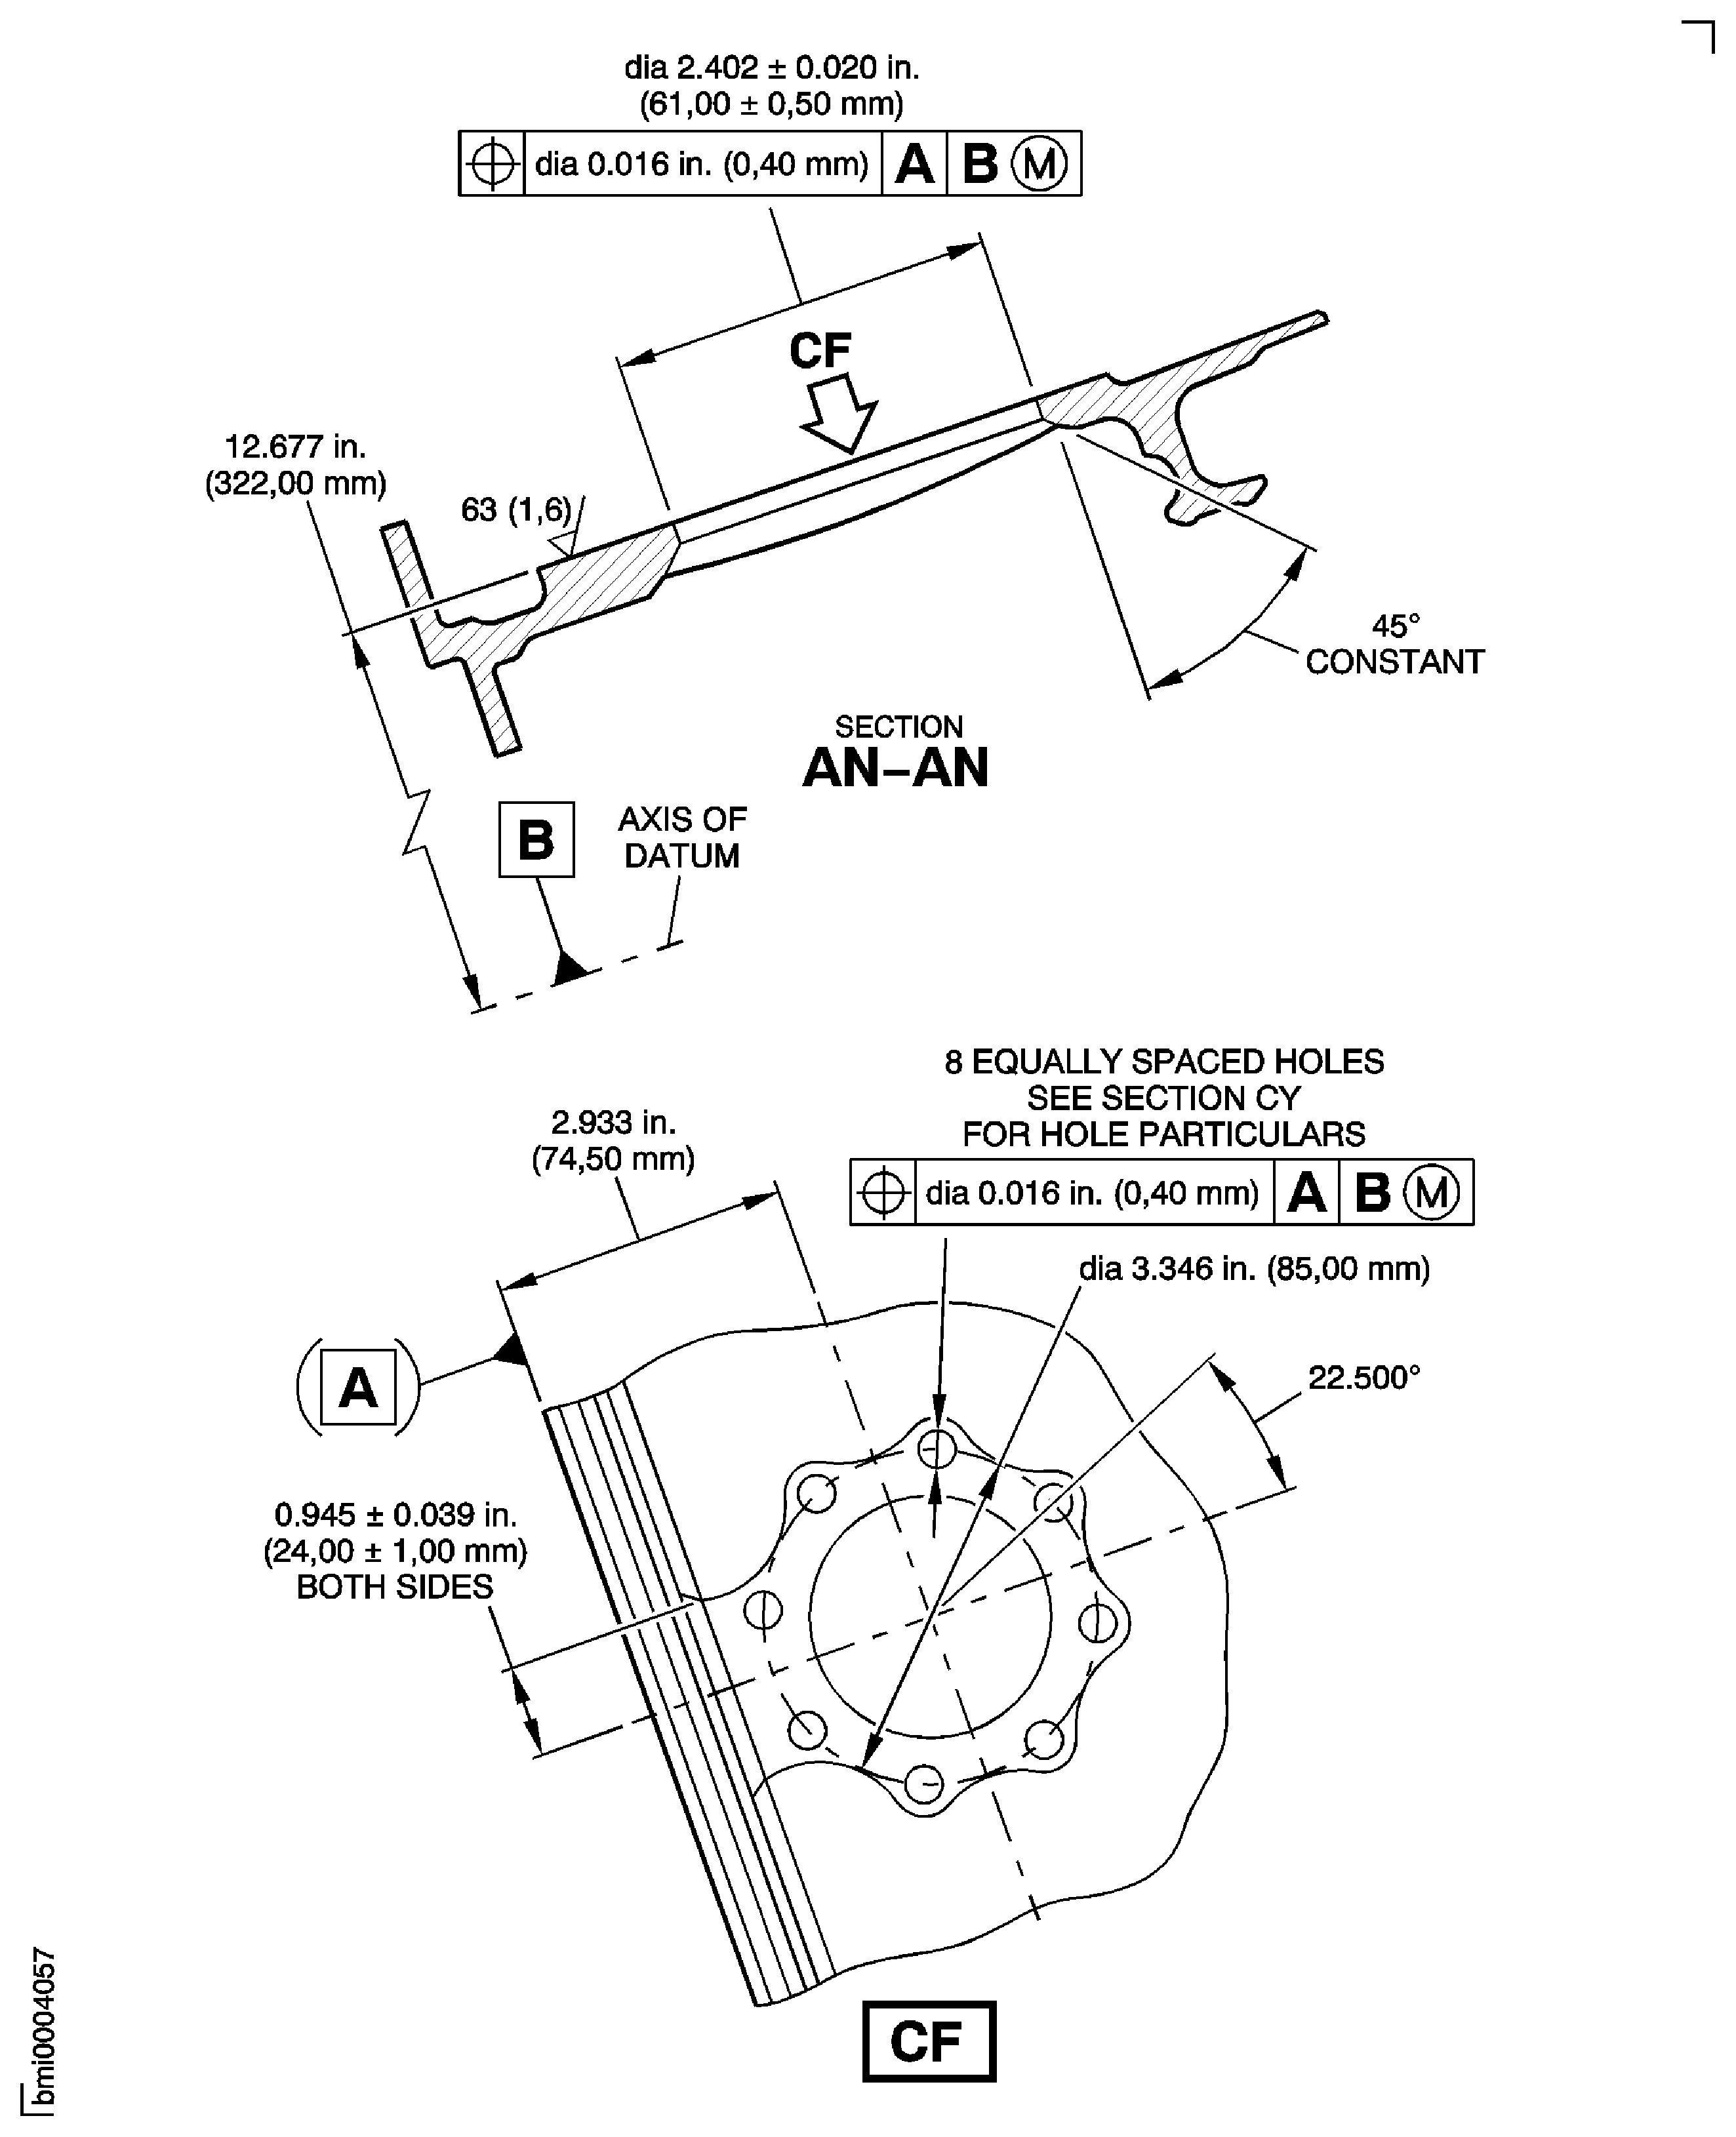
Figure: Repair Details and Dimensions Assembly C and Assembly D
Repair Details and Dimensions Assembly C and Assembly D
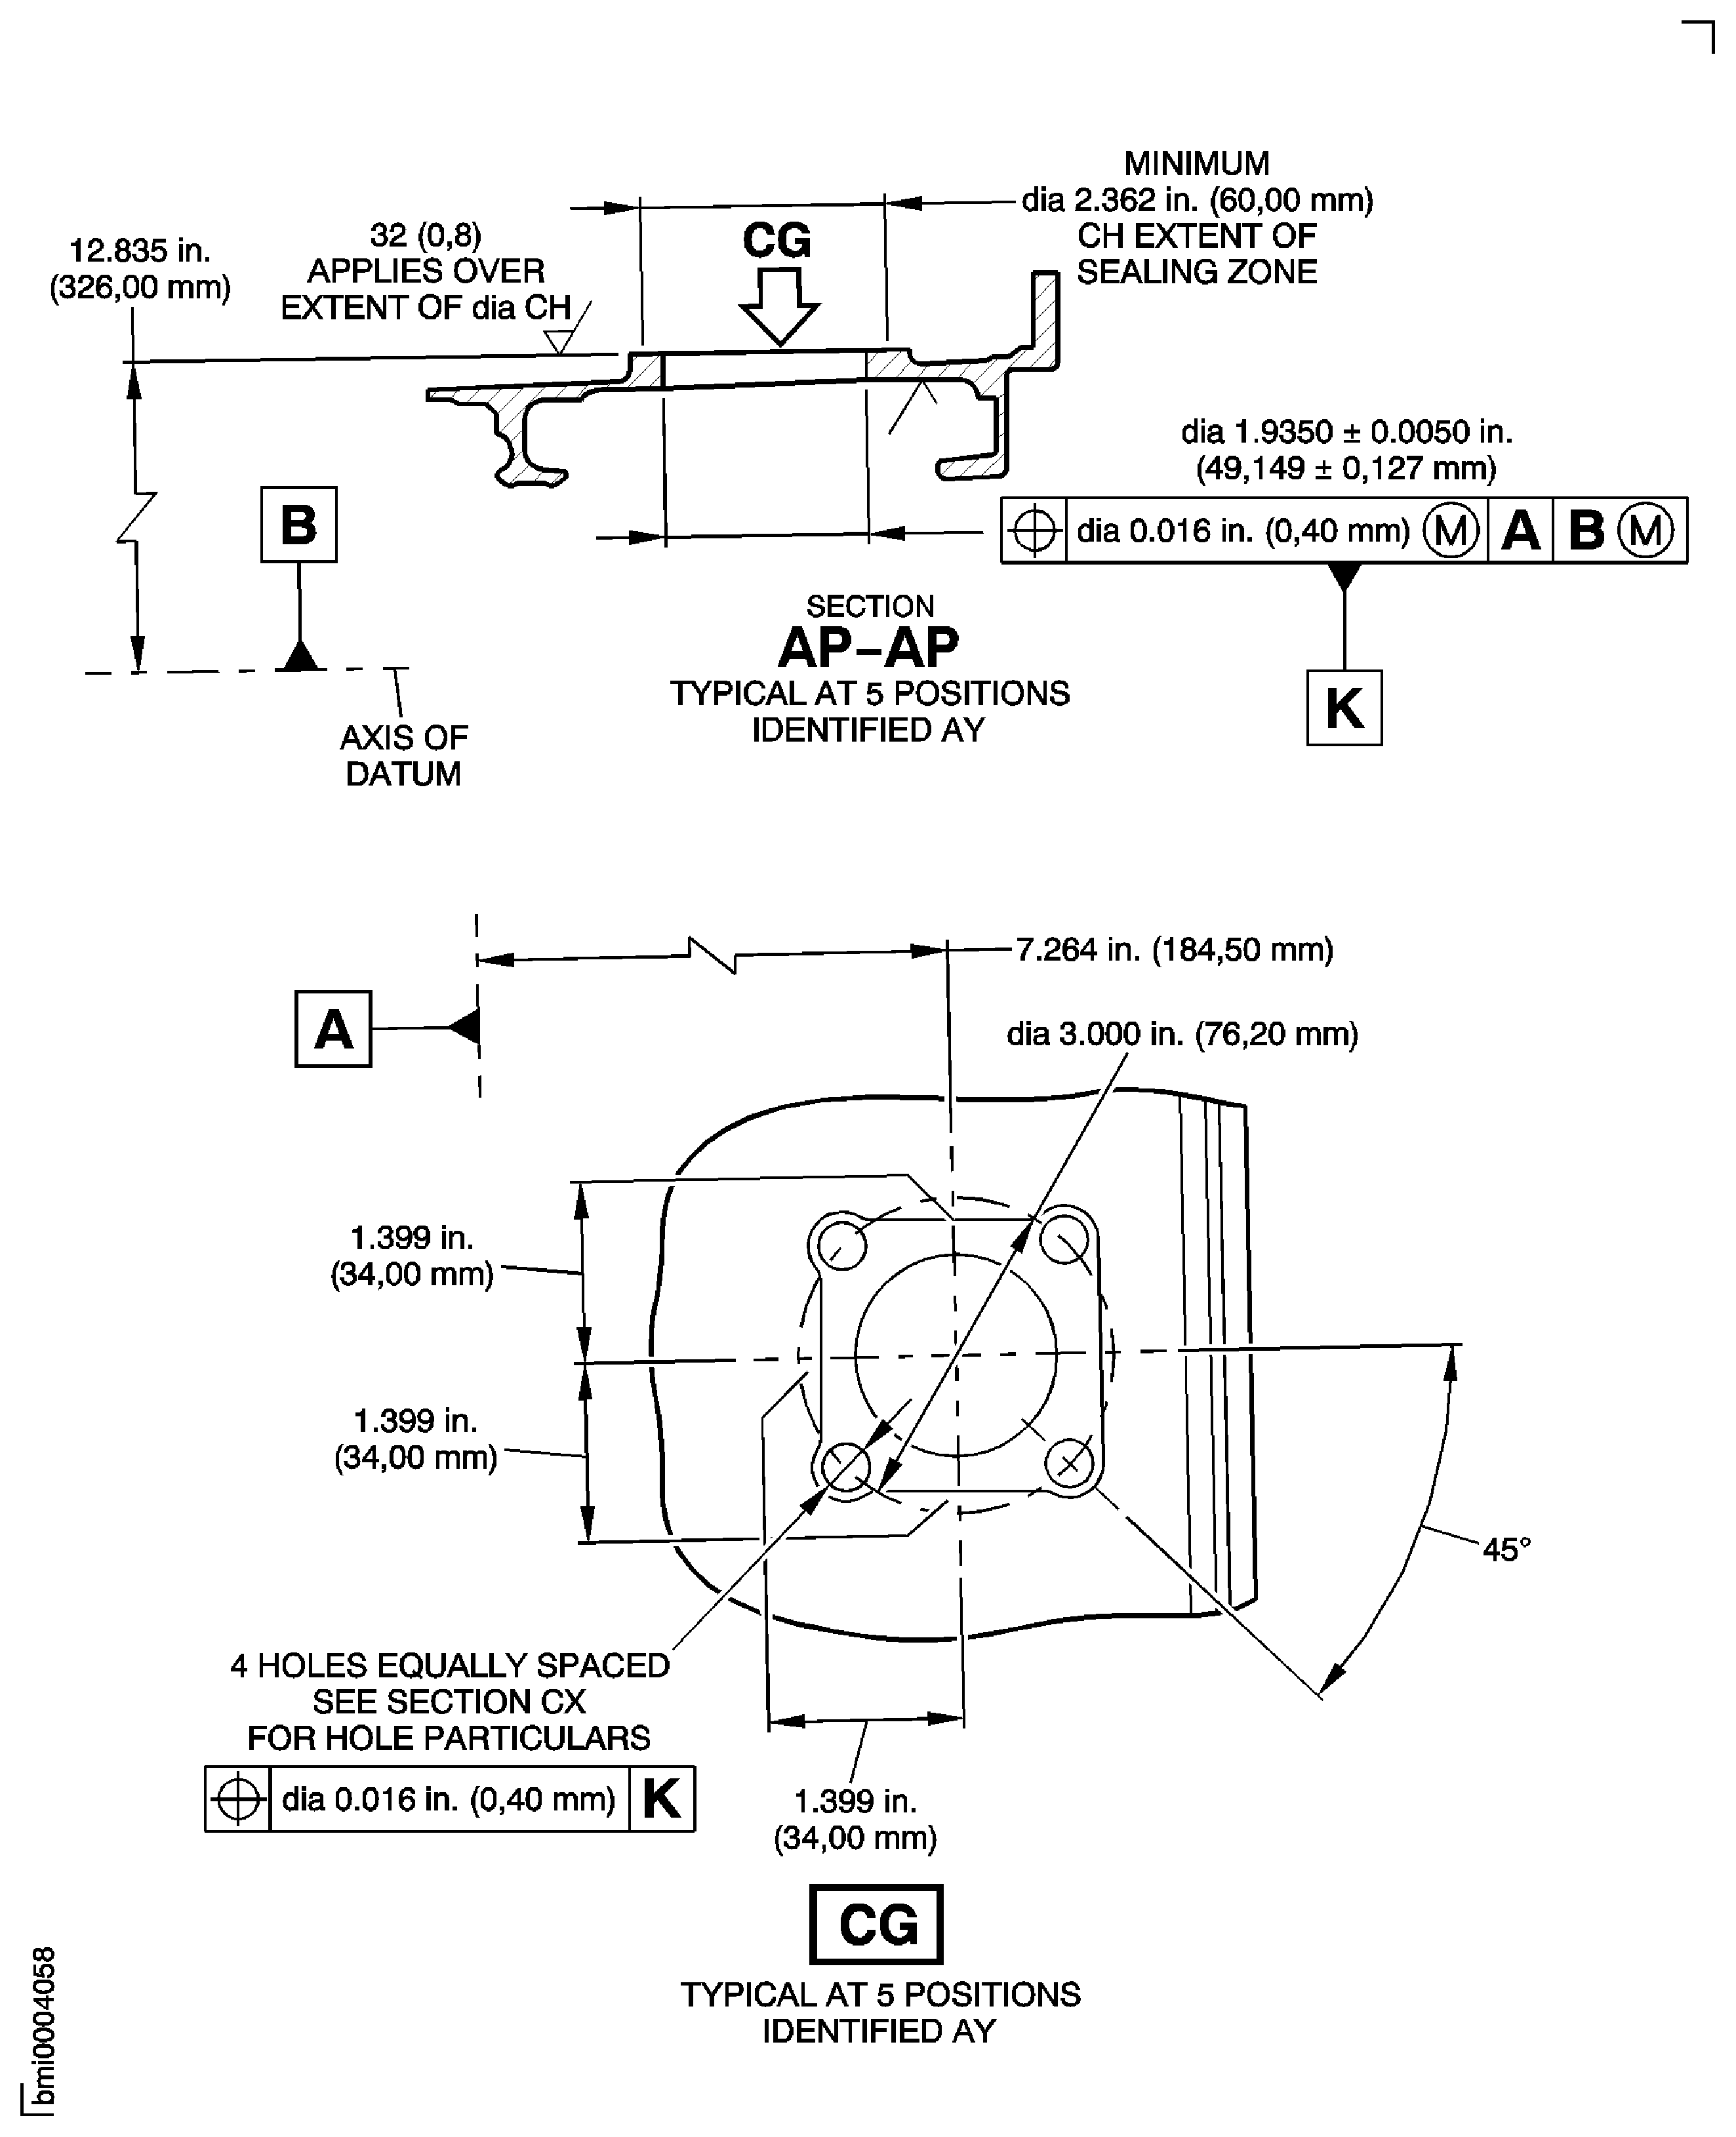
Figure: Repair Details and Dimensions - Assembly E
Repair Details and Dimensions - Assembly E

Figure: Repair Details and Dimensions Assembly C, Assembly D and Assembly E
Repair Details and Dimensions Assembly C, Assembly D and Assembly E
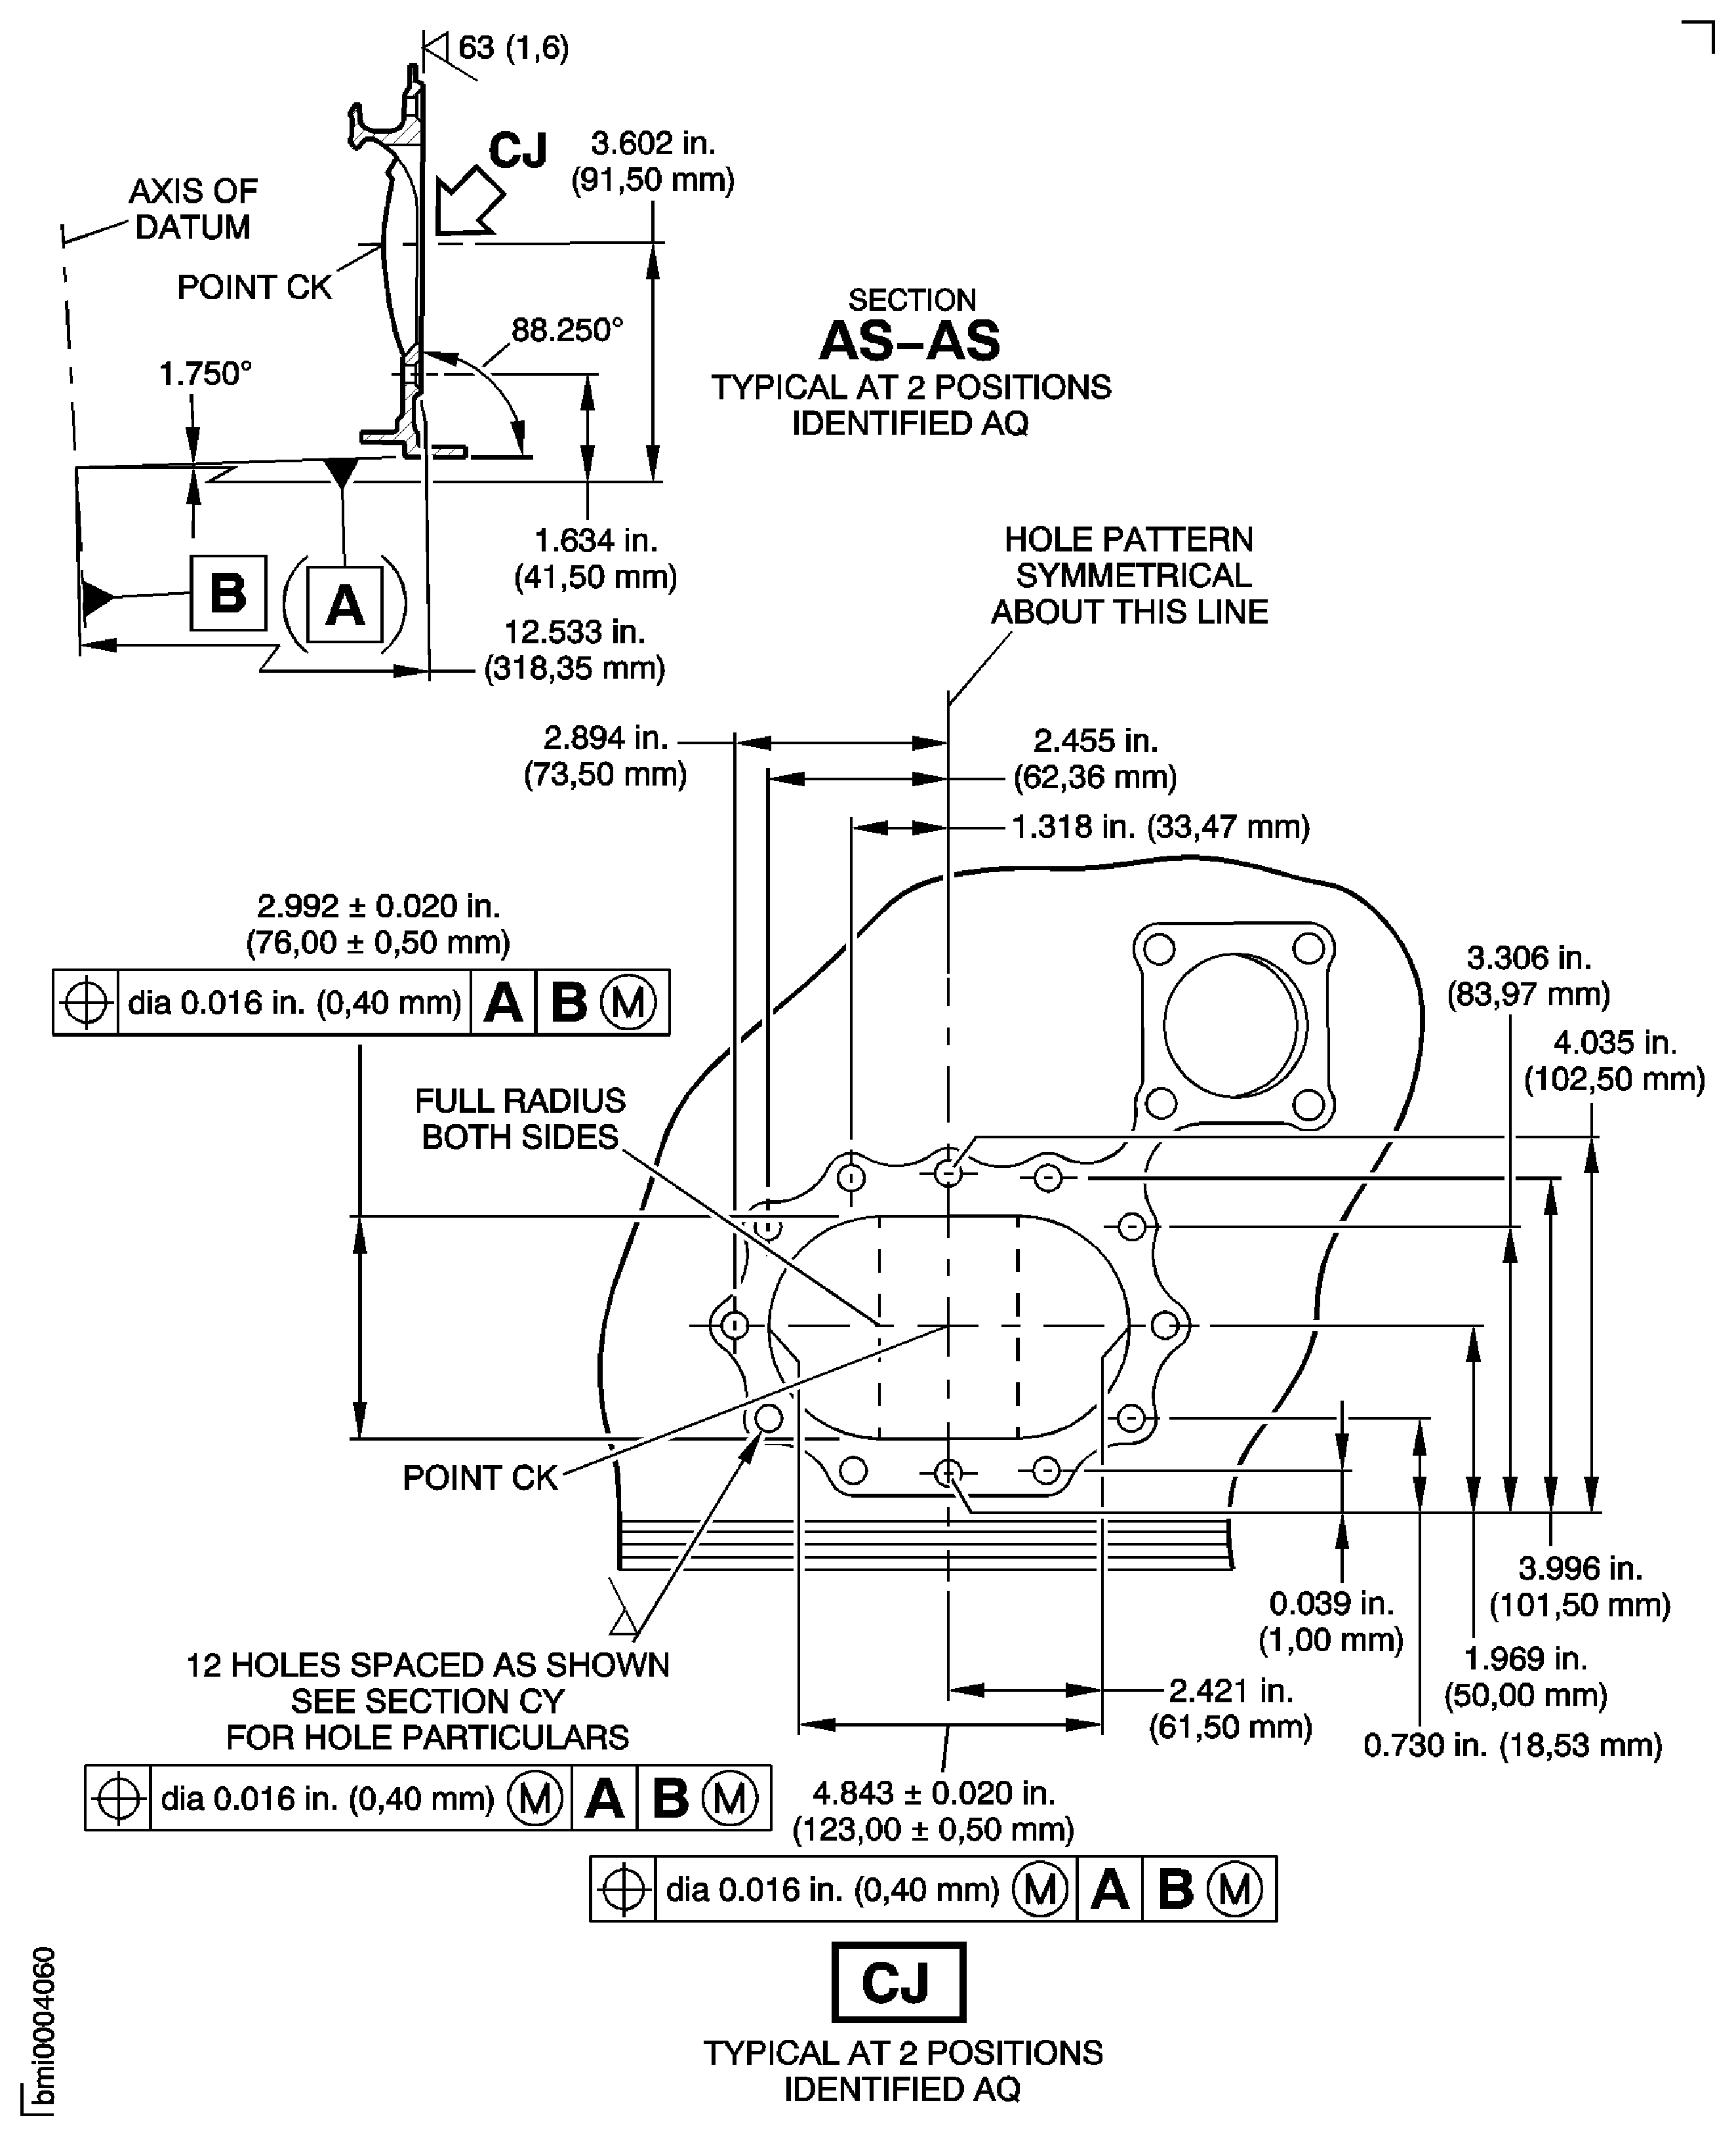
Figure: Repair Details and Dimensions Assembly C, Assembly D and Assembly E
Repair Details and Dimensions Assembly C, Assembly D and Assembly E
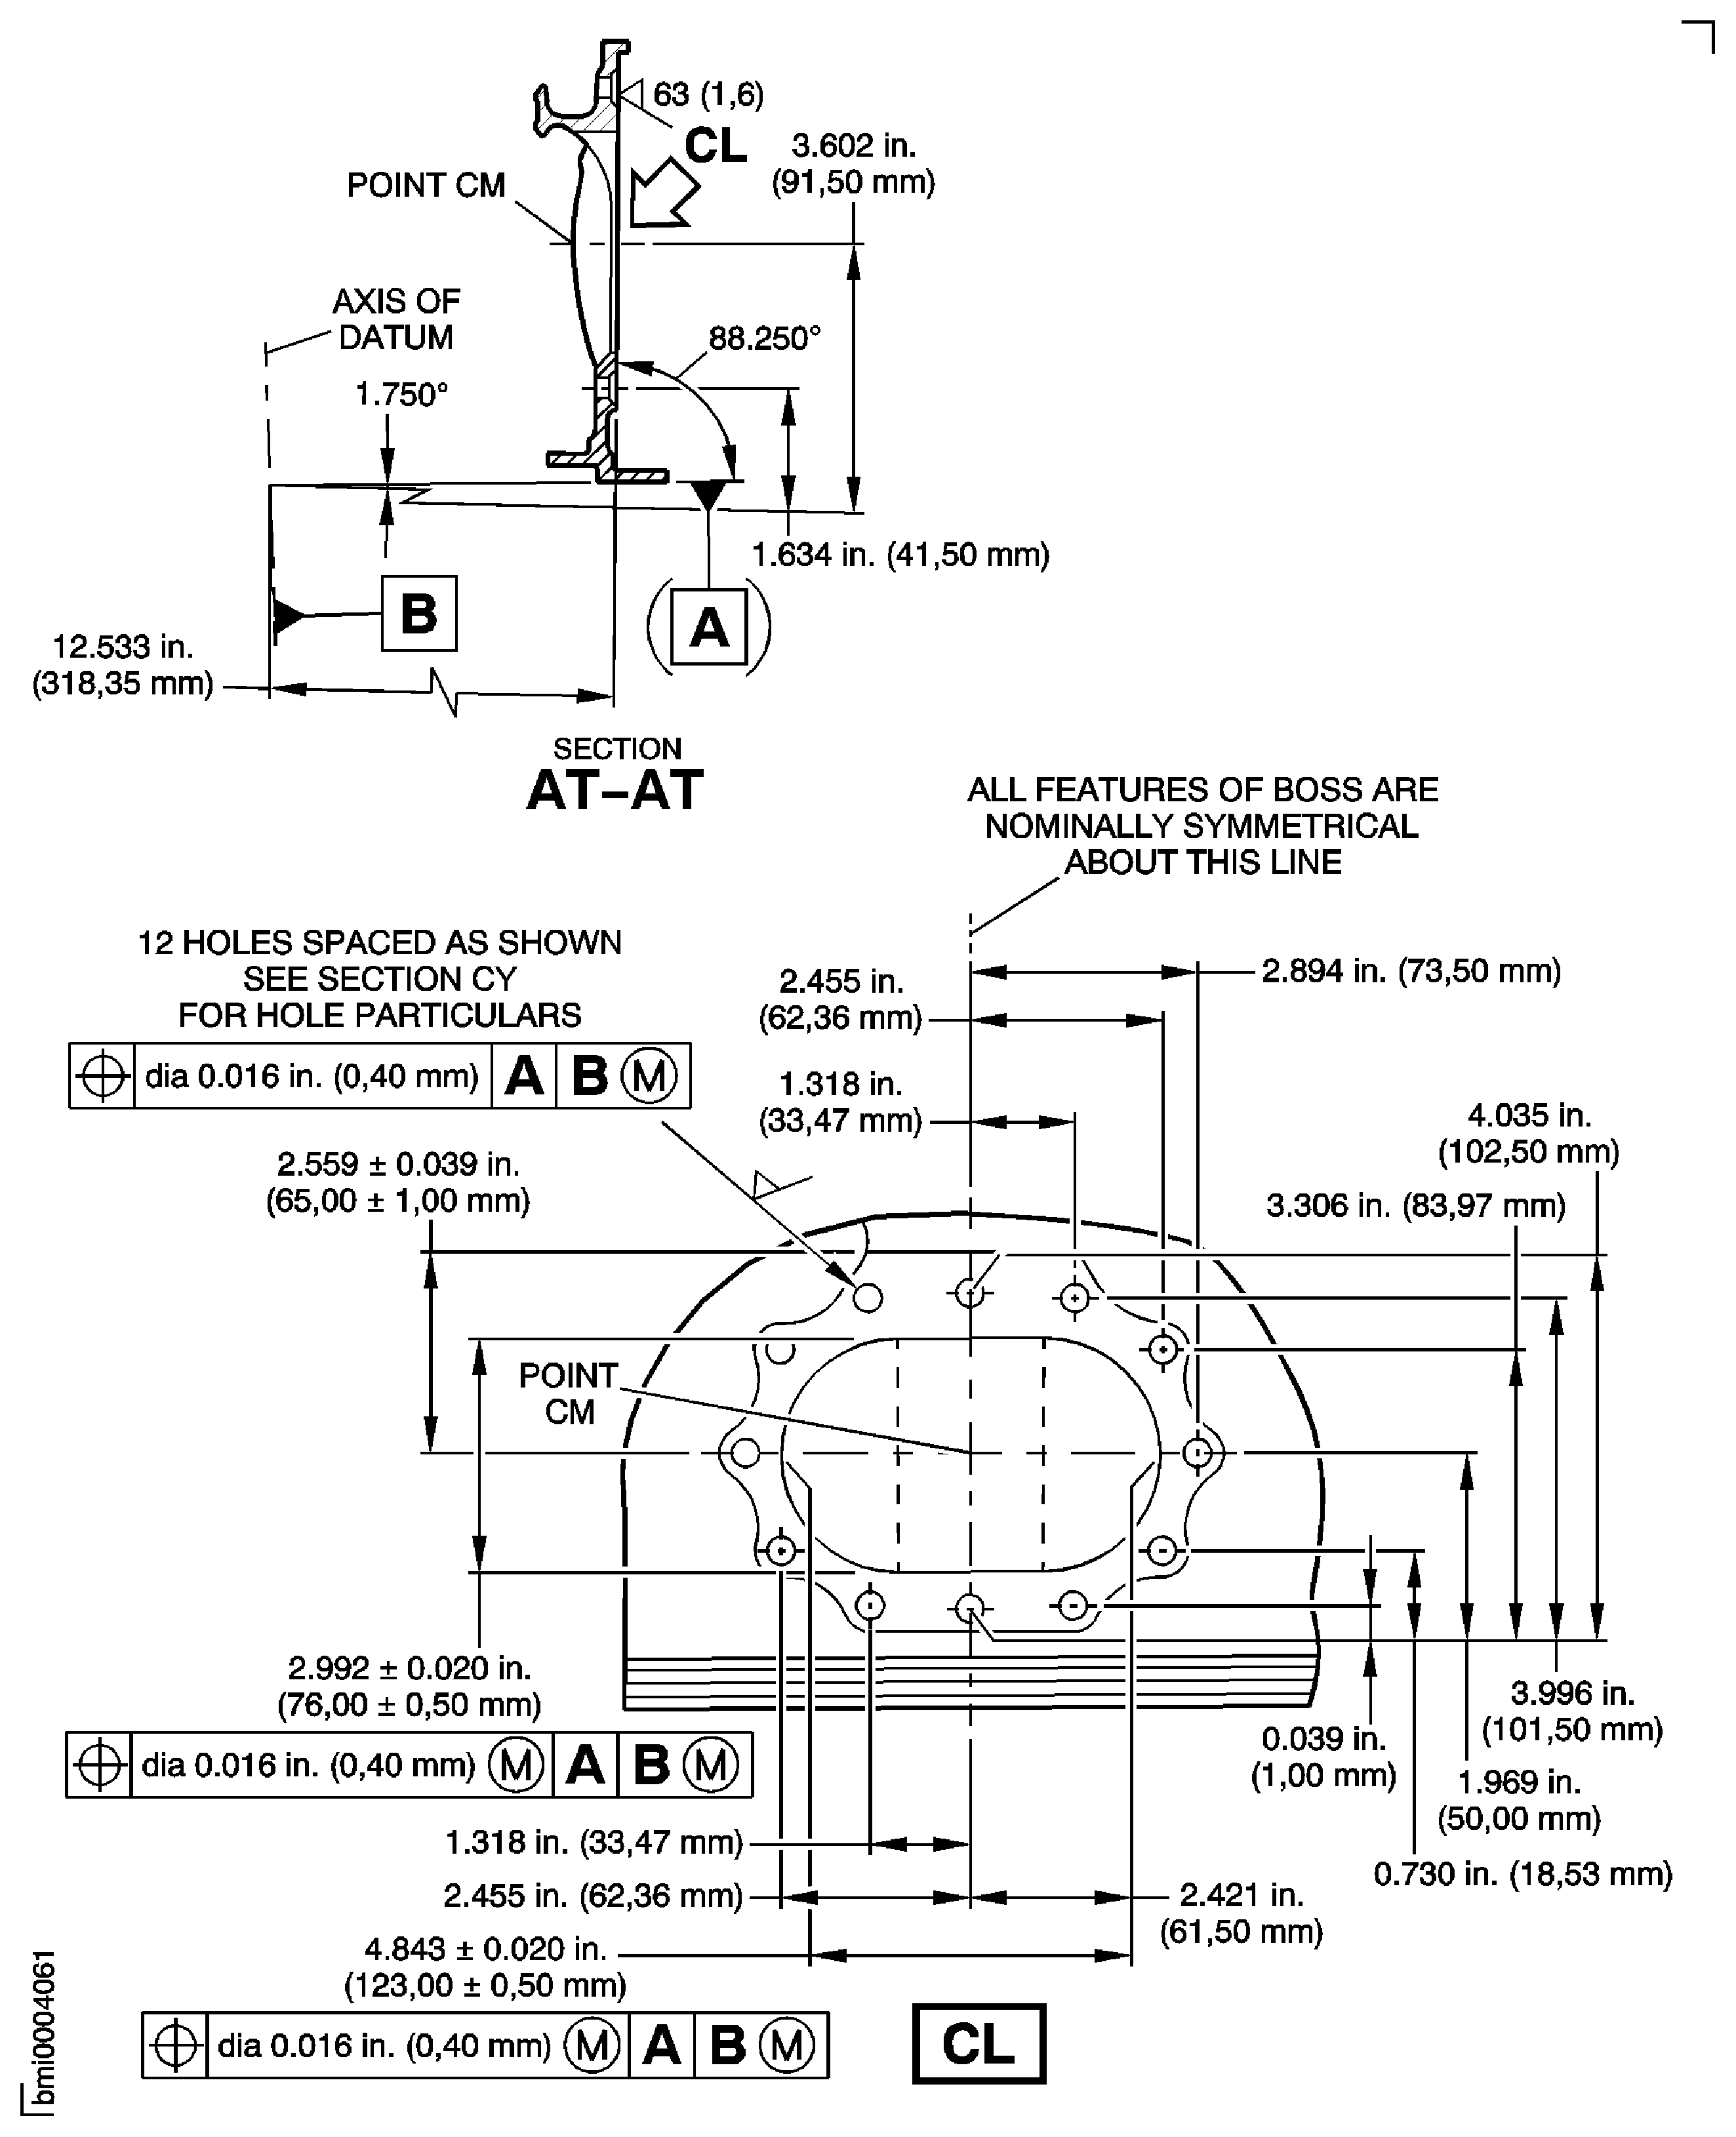
Figure: Repair Details and Dimensions Assembly C, Assembly D and Assembly E
Repair Details and Dimensions Assembly C, Assembly D and Assembly E
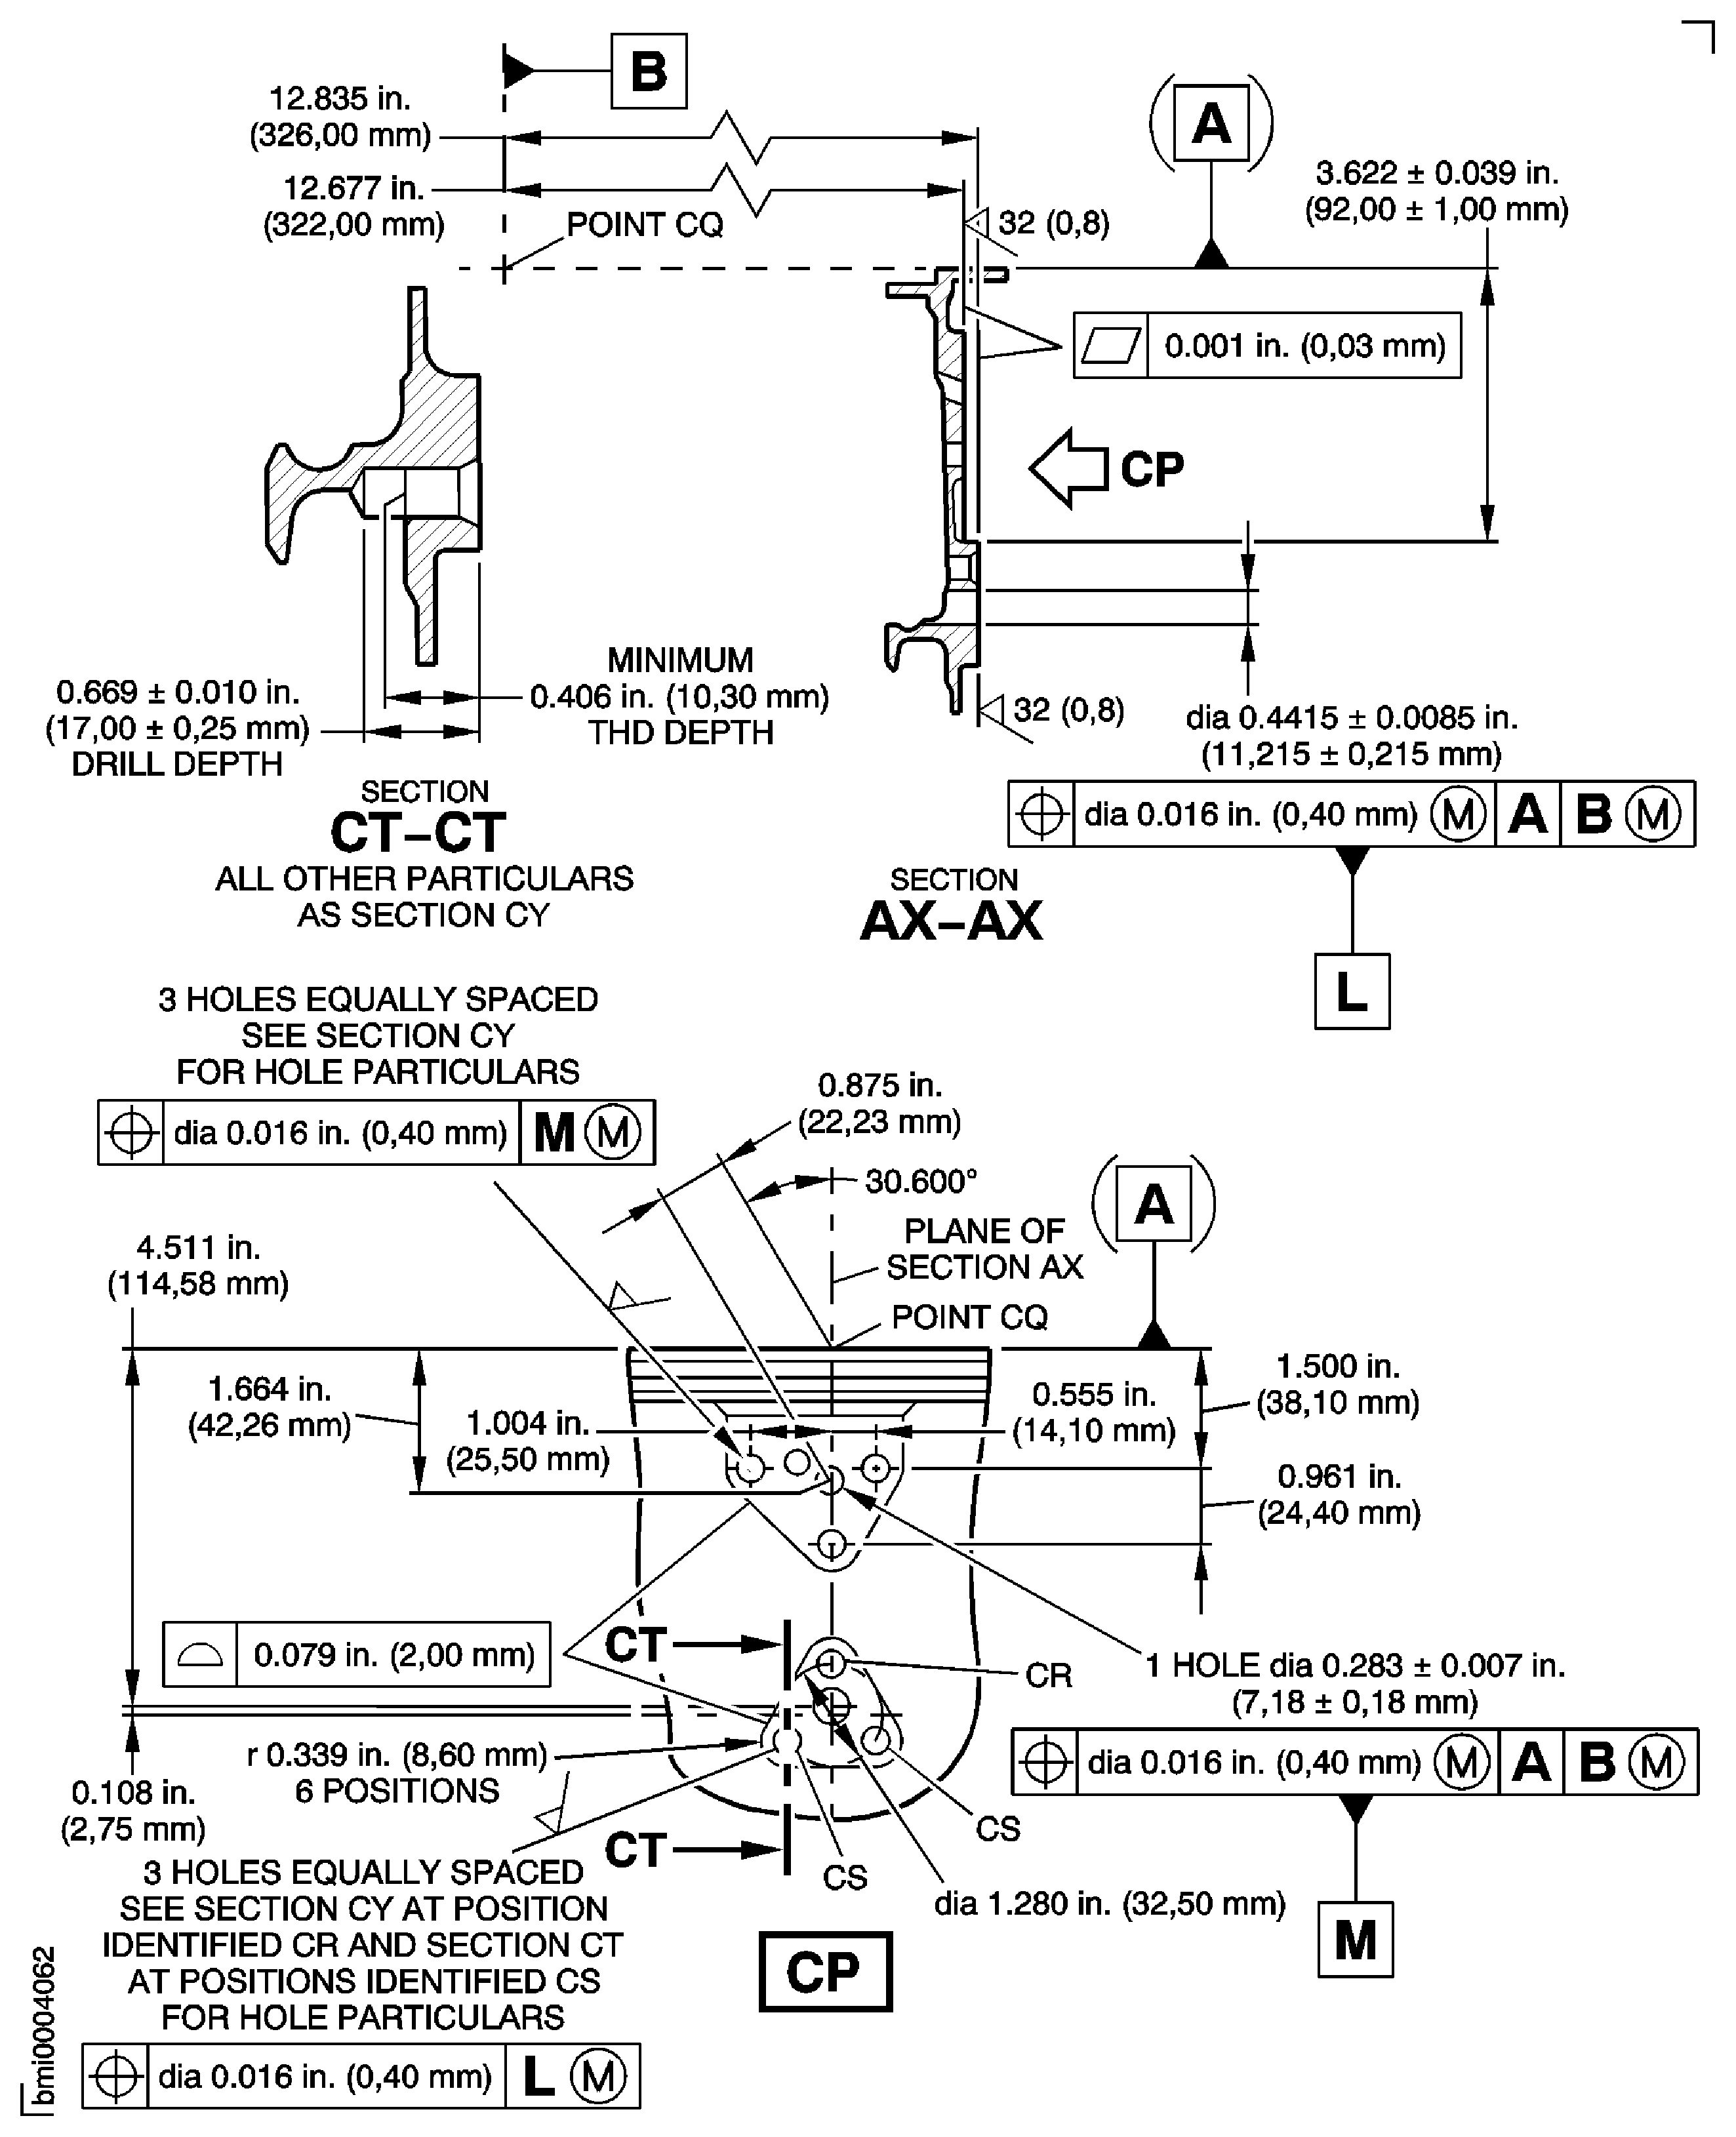
Figure: Repair Details and Dimensions Assembly C, Assembly D and Assembly E
Repair Details and Dimensions Assembly C, Assembly D and Assembly E
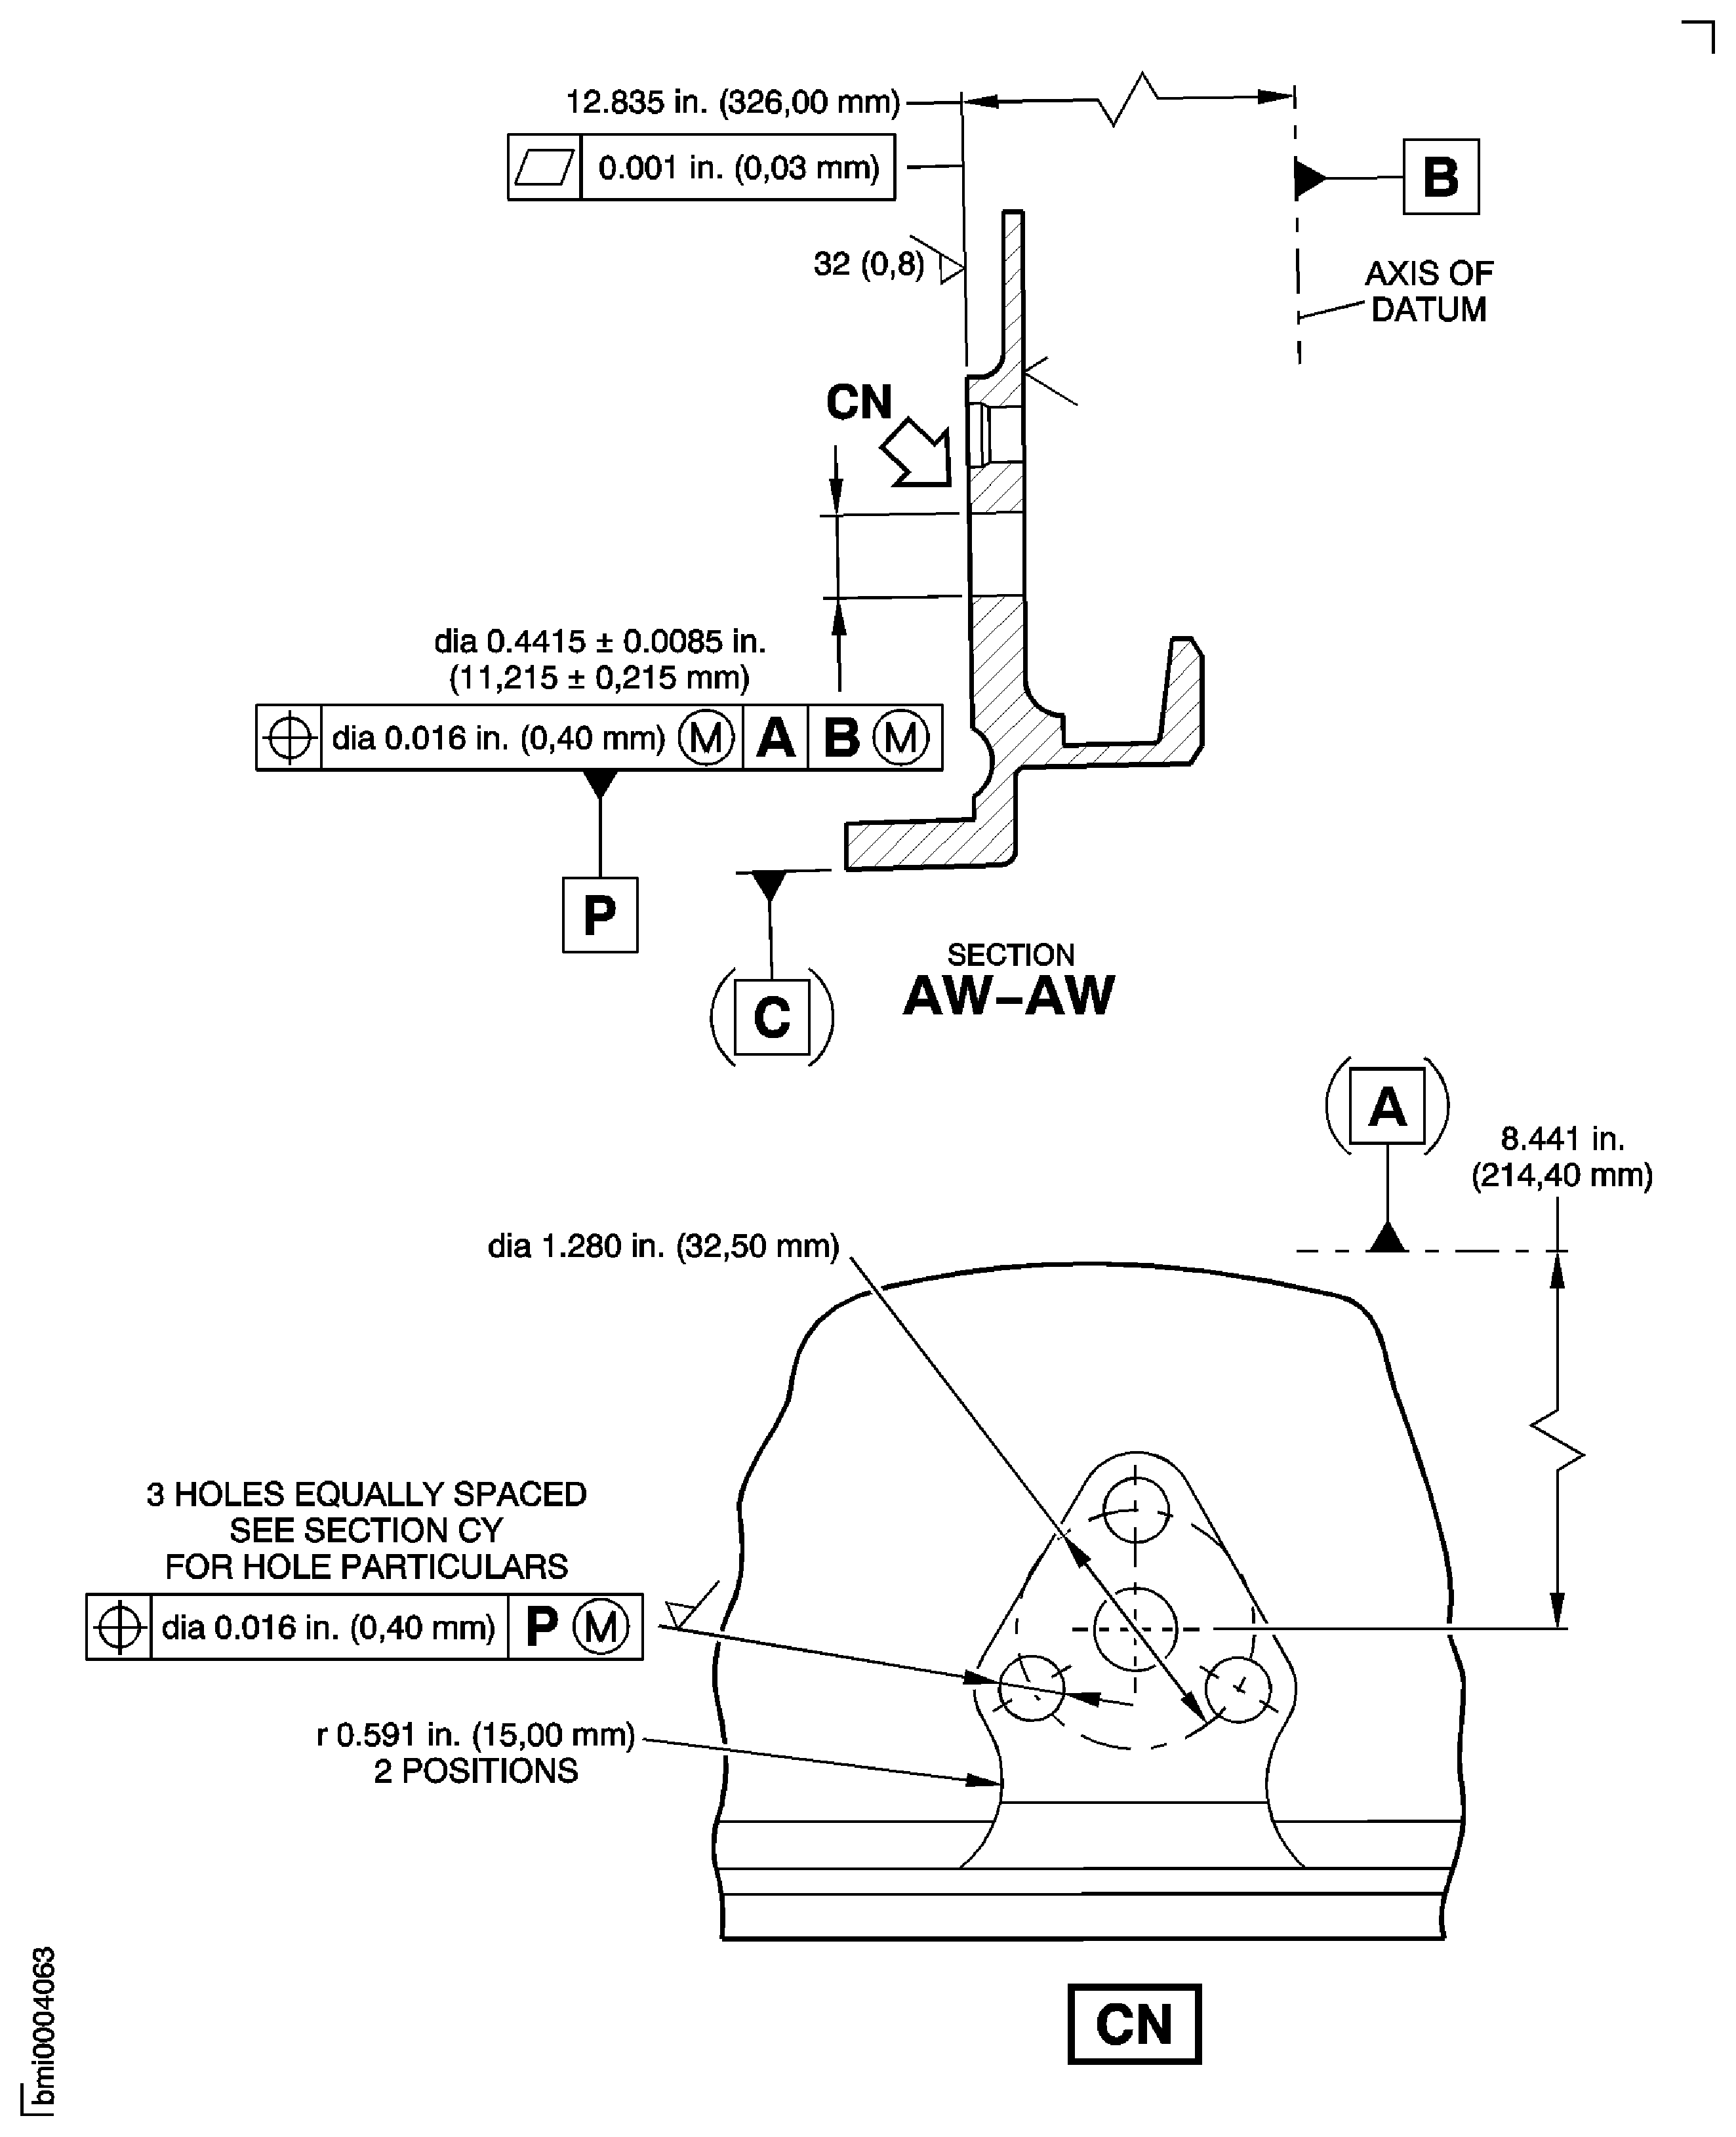
Figure: Repair Details and Dimensions Assembly C, Assembly D and Assembly E
Repair Details and Dimensions Assembly C, Assembly D and Assembly E
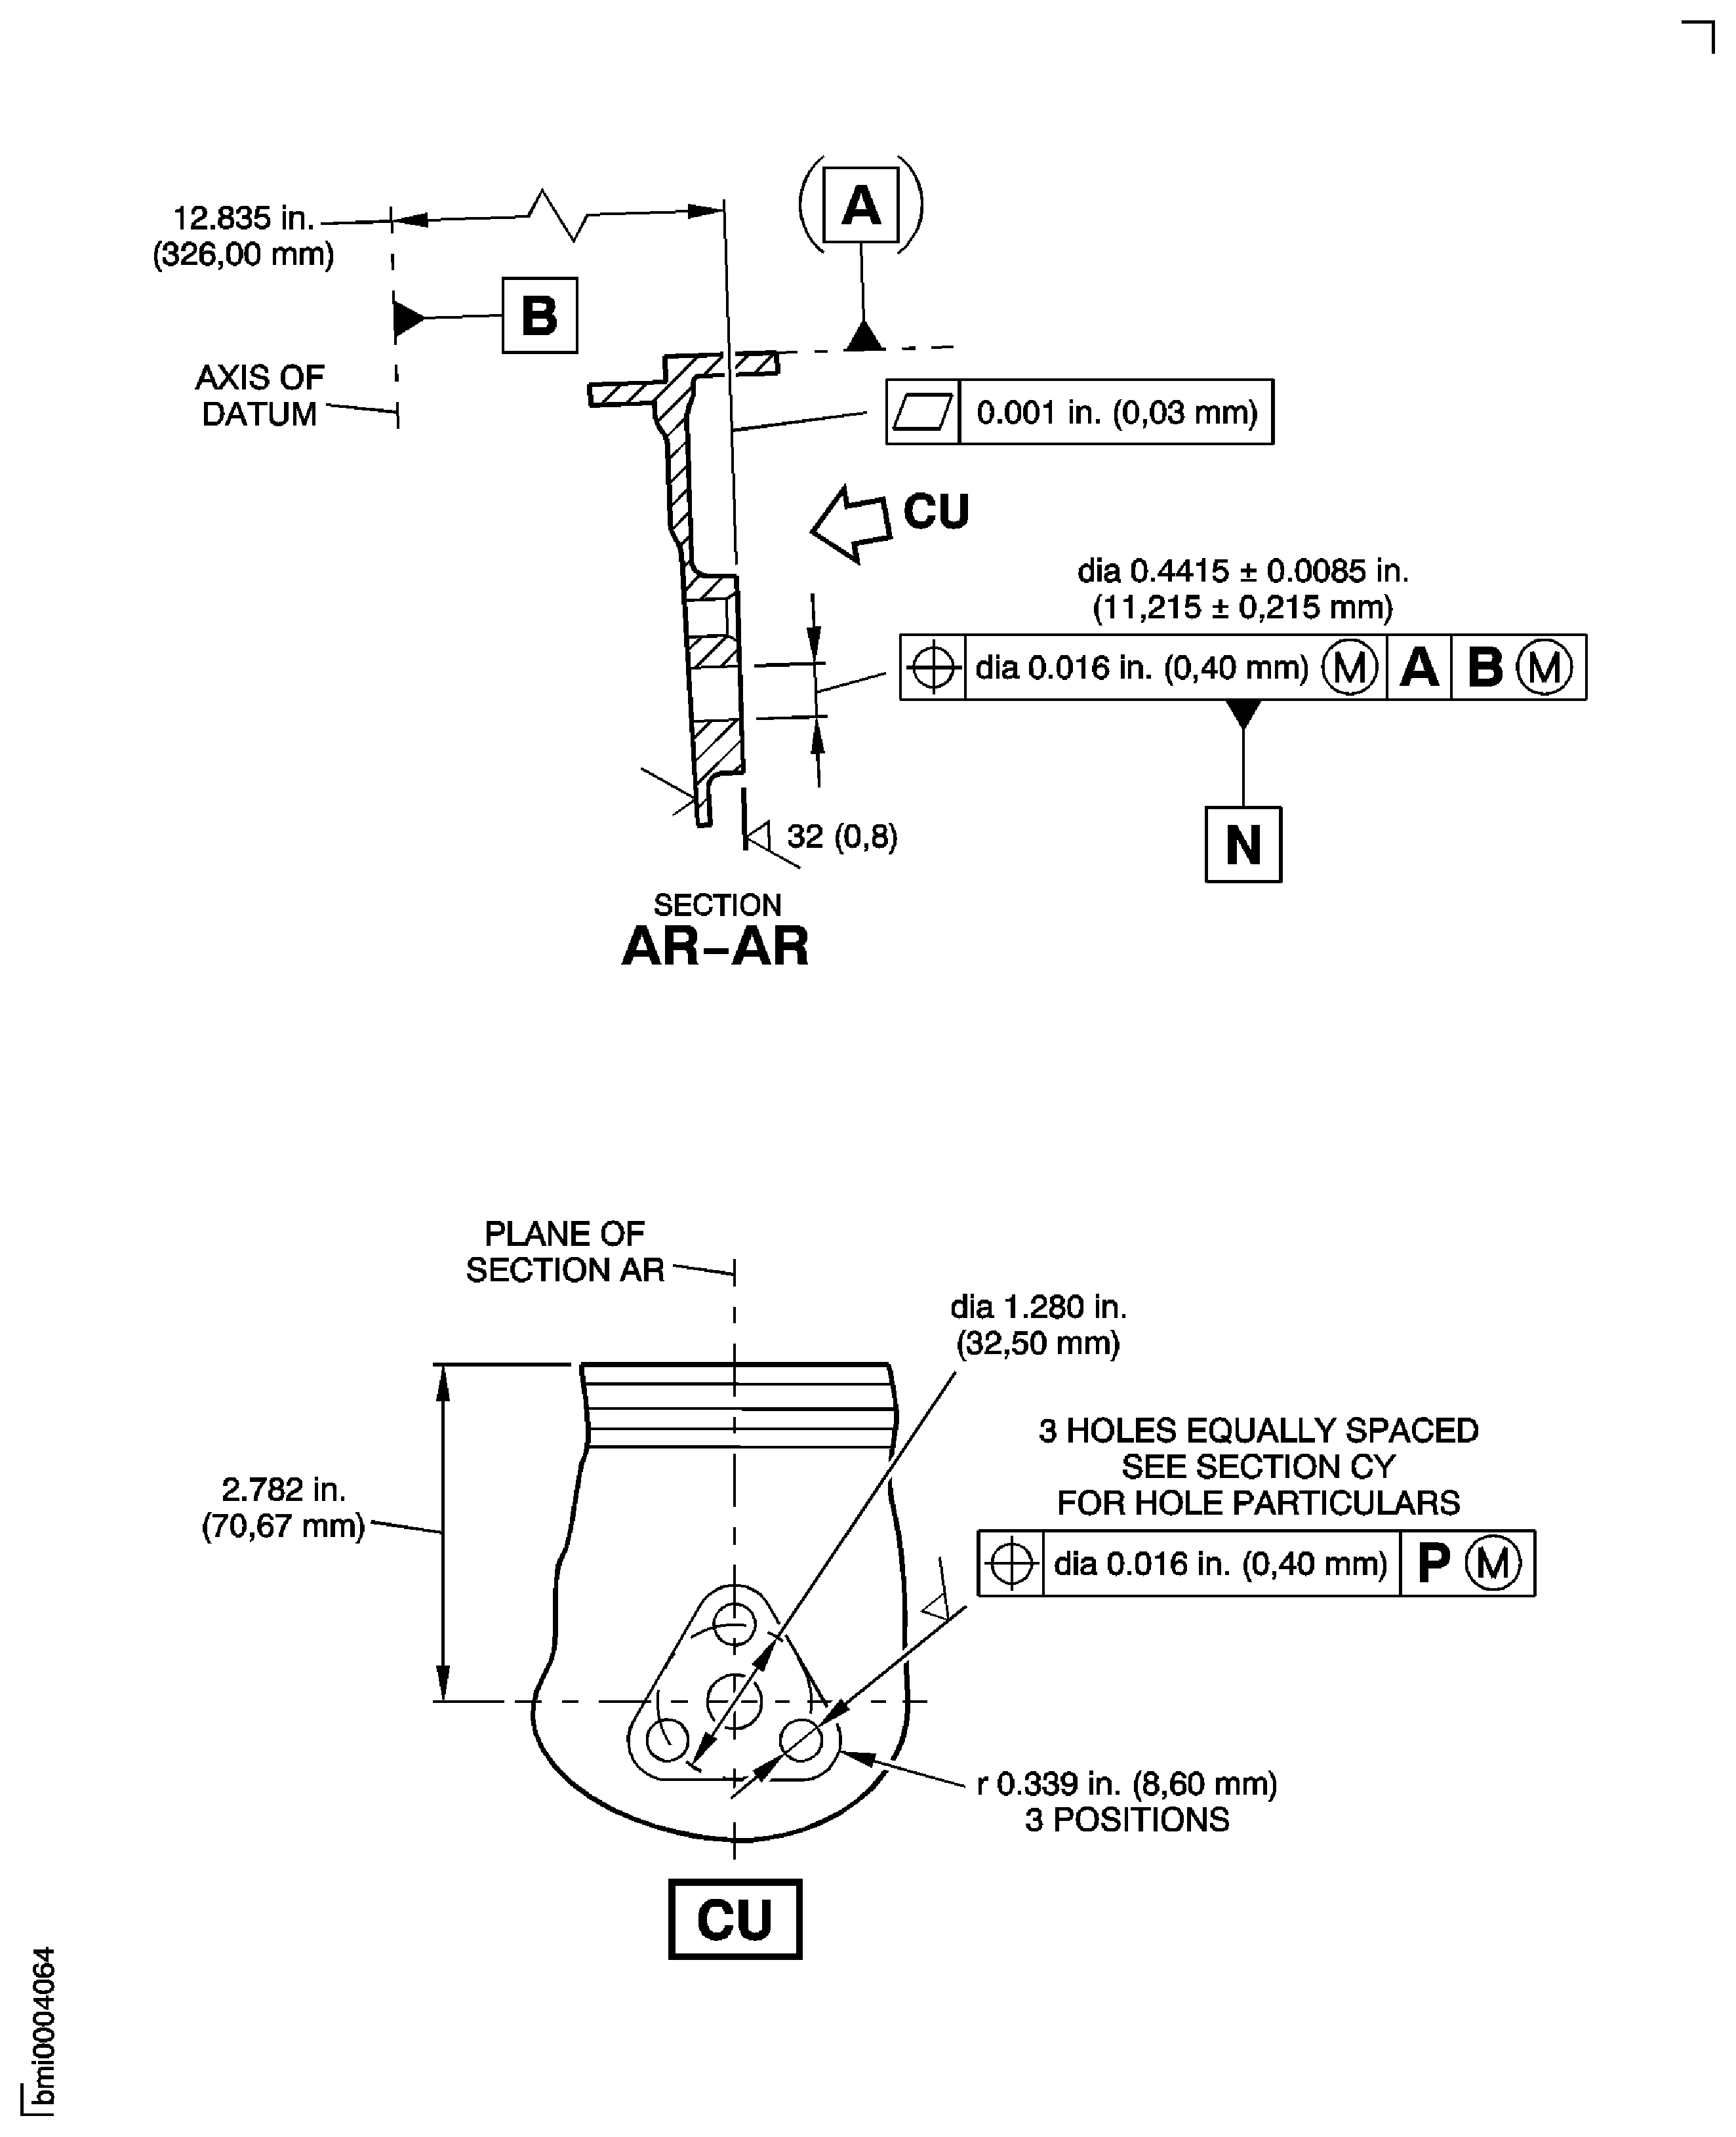
Figure: Repair Details and Dimensions - Assembly C
Repair Details and Dimensions - Assembly C
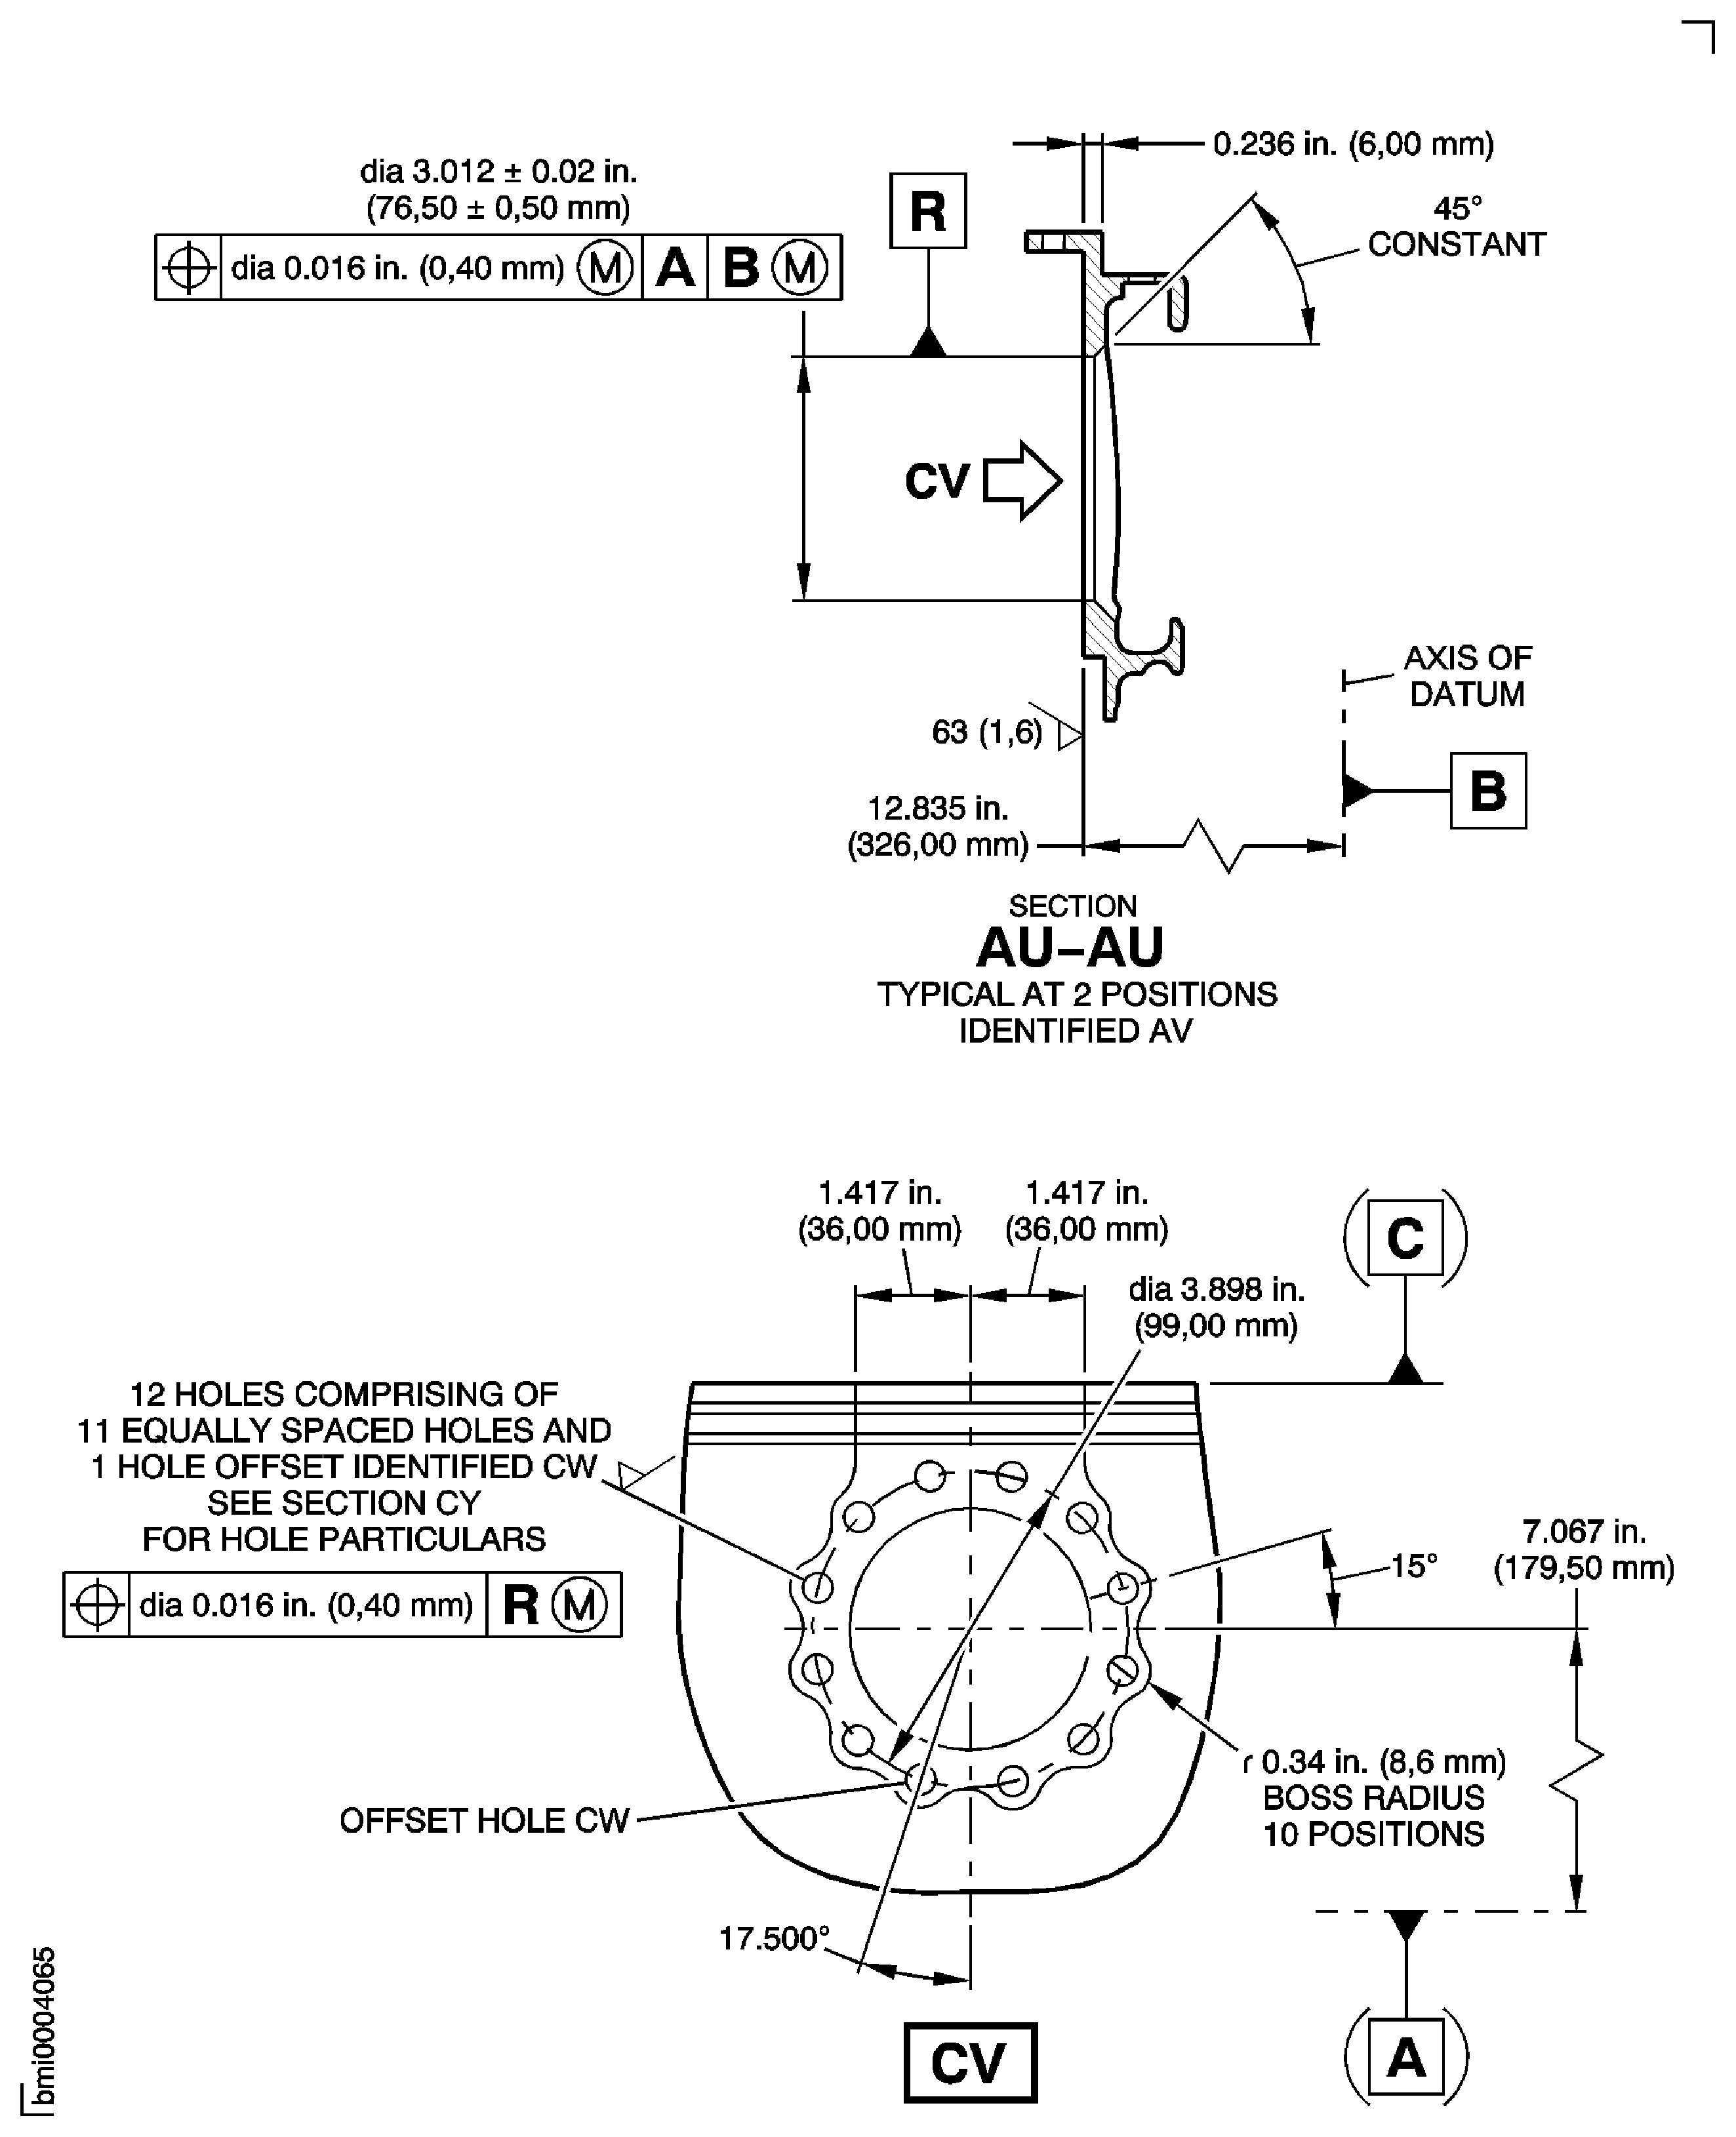
Figure: Repair Details and Dimensions Assembly D and Assembly E
Repair Details and Dimensions Assembly D and Assembly E

Figure: Repair Details and Dimensions - Assembly C
Repair Details and Dimensions - Assembly C
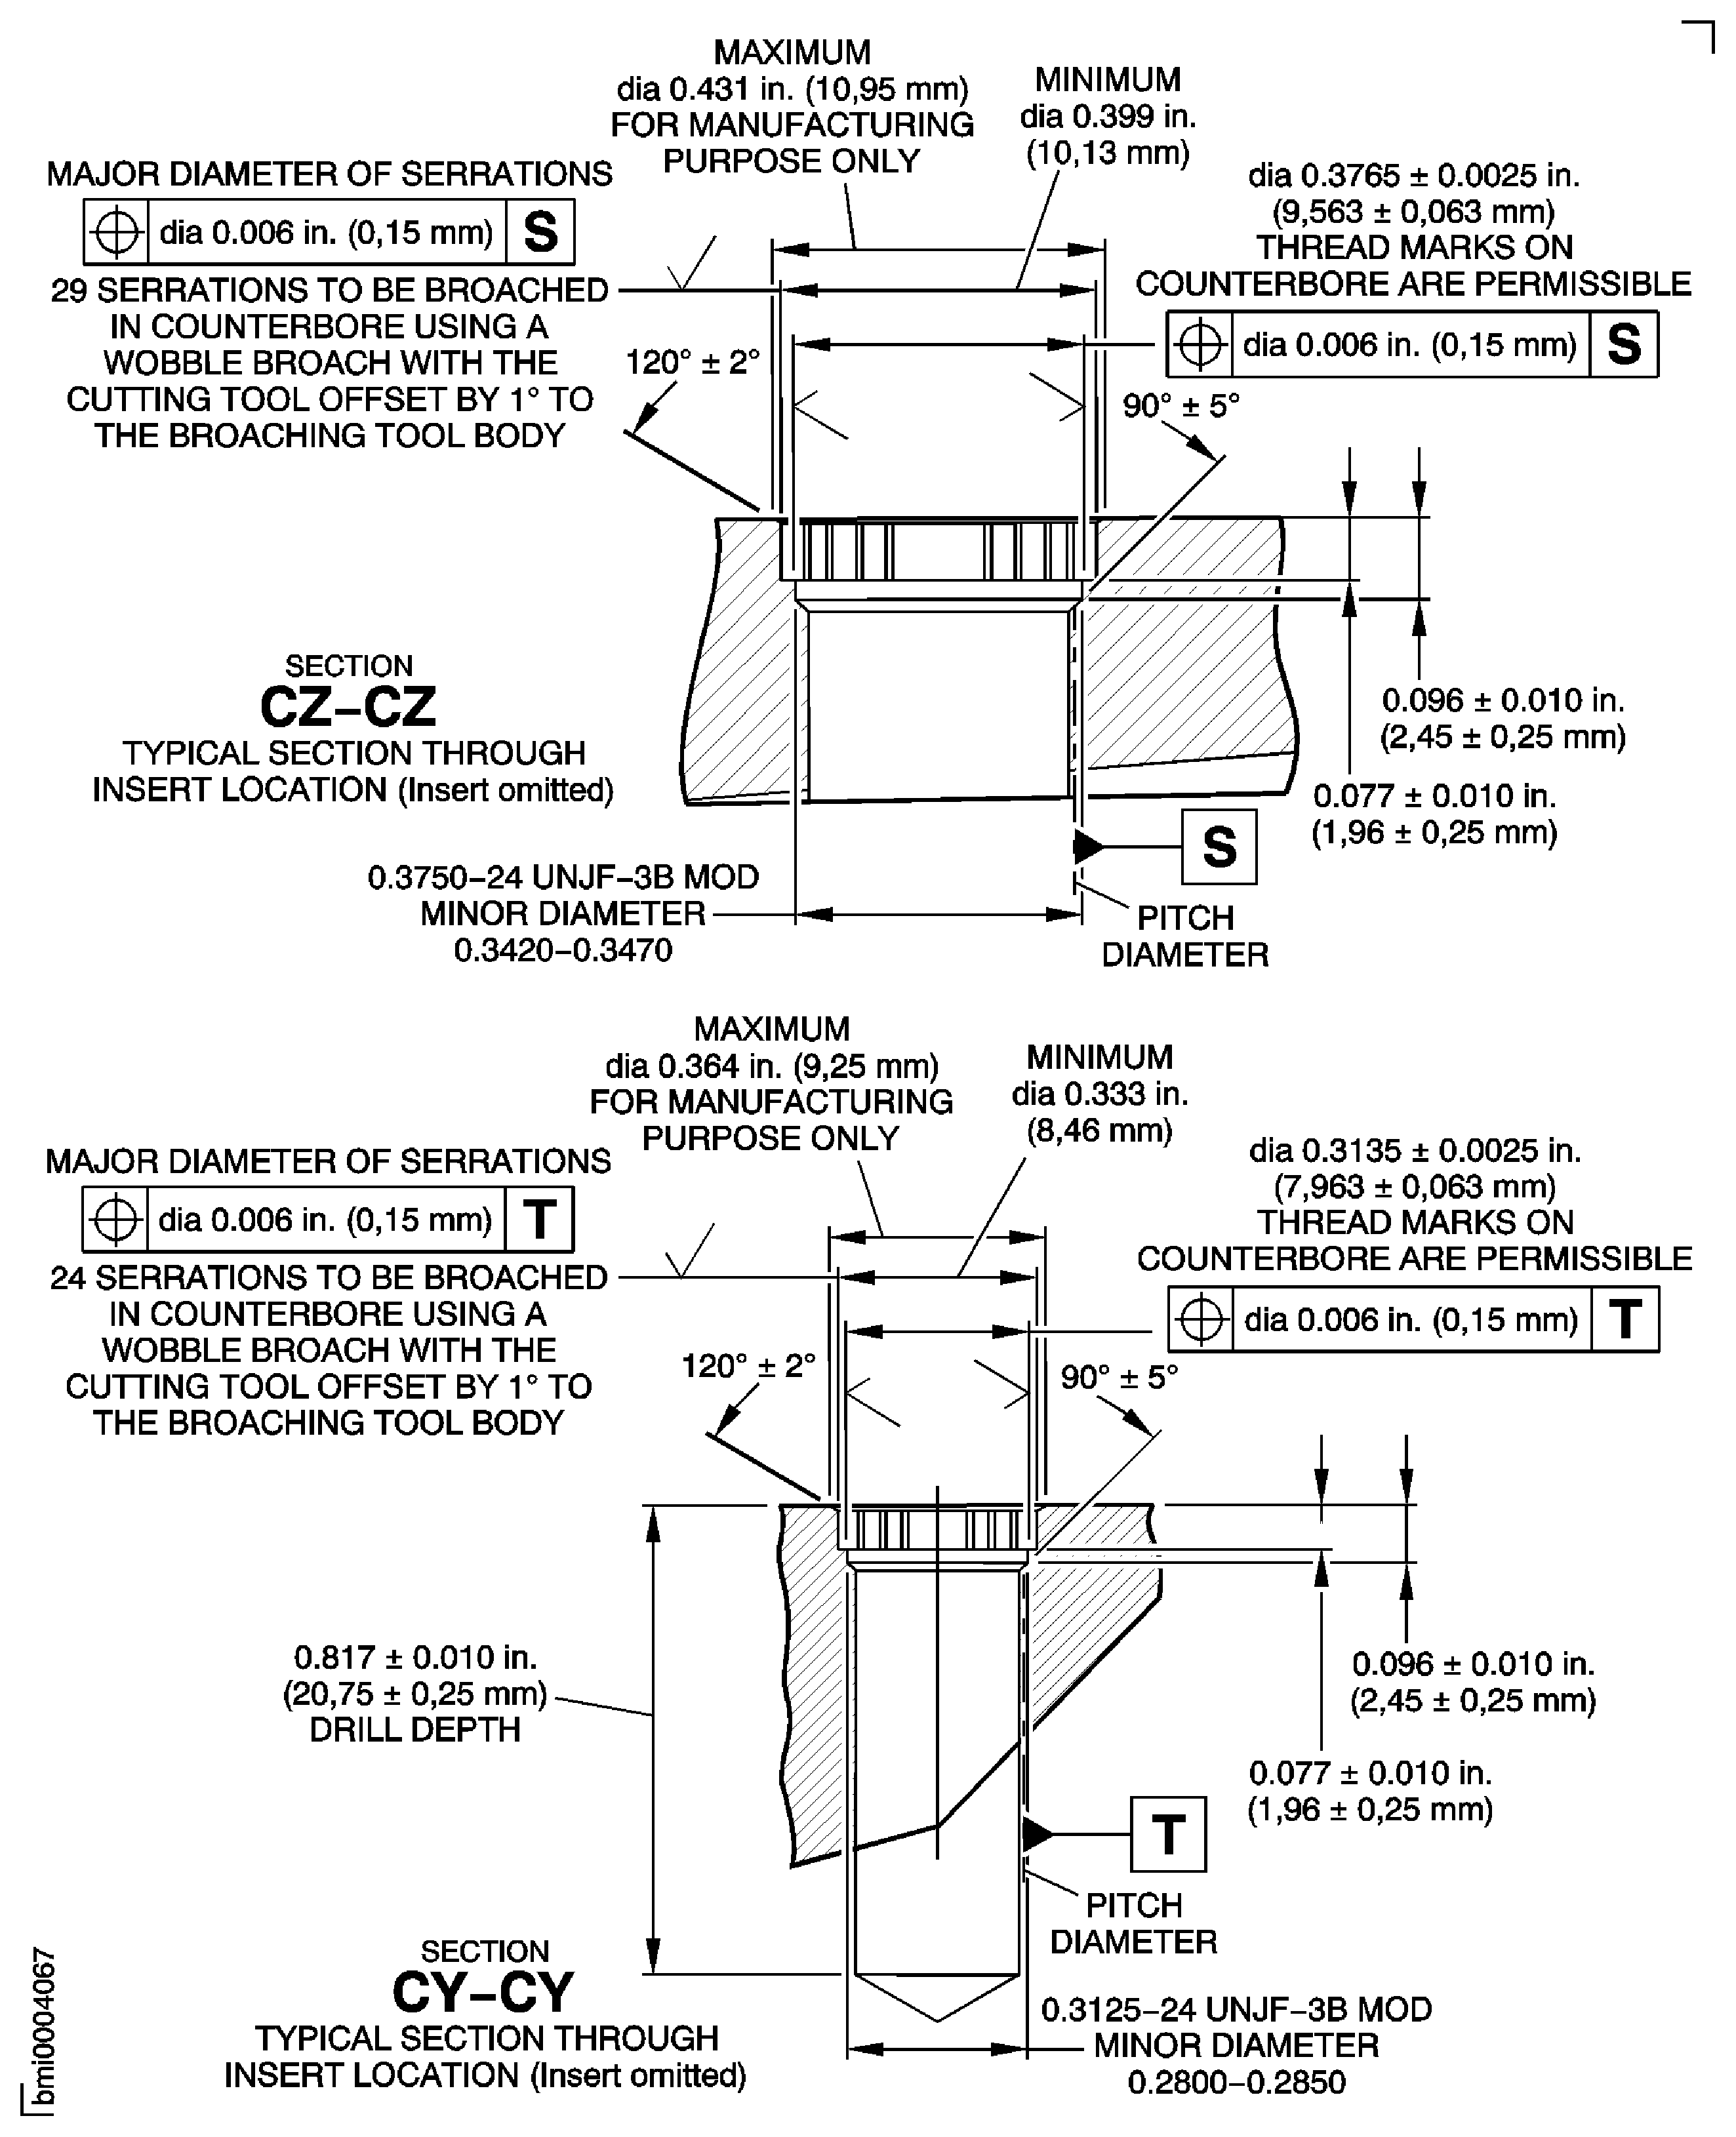
Figure: Repair Details and Dimensions Assembly D and Assembly E
Repair Details and Dimensions Assembly D and Assembly E
