Export Control
EAR Export Classification: Not subject to the EAR per 15 C.F.R. Chapter 1, Part 734.3(b)(3), except for the following Service Bulletins which are currently published as EAR Export Classification 9E991: SBE70-0992, SBE72-0483, SBE72-0580, SBE72-0588, SBE72-0640, SBE73-0209, SBE80-0024 and SBE80-0025.Copyright
© IAE International Aero Engines AG (2001, 2014 - 2021) The information contained in this document is the property of © IAE International Aero Engines AG and may not be copied or used for any purpose other than that for which it is supplied without the express written authority of © IAE International Aero Engines AG. (This does not preclude use by engine and aircraft operators for normal instructional, maintenance or overhaul purposes.).Applicability
All
Common Information
TASK 72-43-14-200-001-B00 No. 4 Bearing Rear Seal Seat - Examine, Inspection-001
General
This TASK gives the procedure for the inspection of the No.4 bearing rear seal seat. For the other parts of the No. 4 bearing rear seal seat, refer to TASK 72-43-14-200-000 (INSPECTION/CHECK-000).
Fig/item numbers in parentheses in the procedure agree with those used in the IPC.
The policy that is necessary for inspection is given in the SPM TASK 70-20-00-200-501.
All the parts must be cleaned before any part is examined. Refer to the SPM TASK 70-10-00-100-501.
All parts must be visually examined for damage, corrosion and wear. Any defects that are not identified in the procedure must be referred to IAE.
The procedure for those parts which must have a crack test is given in Step. Do the test before the part is visually inspected.
Do not discard any part until you are sure there are no repairs available. Refer to the instructions in Repair before a discarded part is used again or oversize parts are installed.
Parts which should be discarded can be held although no repair is available. The repair of a discarded part could be shown to be necessary at a later date.
All parts must be examined to make sure that all the repairs have been completed satisfactorily.
The practices and processes referred to in the procedure by the TASK numbers are in the SPM.
References
Refer to the SPM for data on these items.
Definitions of Damage, SPM TASK 70-02-02-350-501
Record and Control of the Lives of Parts, SPM TASK 70-05-00-220-501
Marking of Parts, SPM TASK 70-09-00-400-501
Procedure for Moderate Cleaning, SPM TASK 70-11-03-300-503
Procedure to Vapor Degrease, SPM TASK 70-11-01-300-503
Inspection of Parts, SPM TASK 70-20-01-200-501
General Information for Magnetic Particle Inspection, SPM TASK 70-24-00-240-501
Some data on these items is contained in this TASK. For more data on these items refer to the SPM.
Method of Testing for Crack Indications
Chemical Processes
Surface Protection
NOTE
Preliminary Requirements
Pre-Conditions
NONESupport Equipment
| Name | Manufacturer | Part Number / Identification | Quantity | Remark |
|---|---|---|---|---|
| Magna Gage | LOCAL | Magna Gage | 1 |
Consumables, Materials and Expendables
| Name | Manufacturer | Part Number / Identification | Quantity | Remark |
|---|---|---|---|---|
| CoMat 01-177 PETROLEUM (SOLVENT) | 23373 | CoMat 01-177 | ||
| CoMat 10-061 STODDARD SOLVENT | LOCAL | CoMat 10-061 | ||
| CoMat 12-015 CORROSION PREVENTIVE, FINGERPRINT REMOVER | 0AM53 | CoMat 12-015 | ||
| CoMat 12-016 CORROSION PREVENTIVE THIN FILM | 2H517 | CoMat 12-016 |
Spares
NONESafety Requirements
NONEProcedure
Clean the Part. Refer to the TASK 72-43-14-100-001 (CLEANING-001, CONFIG-001).
If necessary, moderately clean the part by the procedure given in the SPM TASK 70-11-03-300-503 or vapor degrease the part by the procedure given in the SPM TASK 70-11-01-300-503.
Do the magnetic particle inspection by magnetizing circularly and rotate the part eccentrically on an insulated copper rod. Use 1500 amperage. Refer to the SPM TASK 70-24-00-240-501.
NOTE
When you use the fluorescent magnetic particles, carefully dip the part in CoMat 10-061 STODDARD SOLVENT to remove the unwanted fluorescent background.Do the magnetic particle inspection by induction. Use 2500 amperage and a 4.00in. (101.6 mm) diameter soft iron core. Use the manual or fixture method. Refer to the SPM TASK 70-24-00-240-501.
Clean the part with CoMat 01-177 PETROLEUM (SOLVENT).
Apply a thin coat of CoMat 12-015 CORROSION PREVENTIVE, FINGERPRINT REMOVER or CoMat 12-016 CORROSION PREVENTIVE THIN FILM on the part.
SUBTASK 72-43-14-240-052 Examine the No. 4 Bearing Rear Seal Seat (01-020) for Cracks
NOTE
After you clean the part, the hardface area can change color or become tracked. These conditions are permitted.Refer to Figure
Repair, VRS3108 TASK 72-43-14-300-002 (REPAIR-002) or Repair, VRS3694 TASK 72-43-14-300-005 (REPAIR-005)
Other than (a) and (b)
Chips.
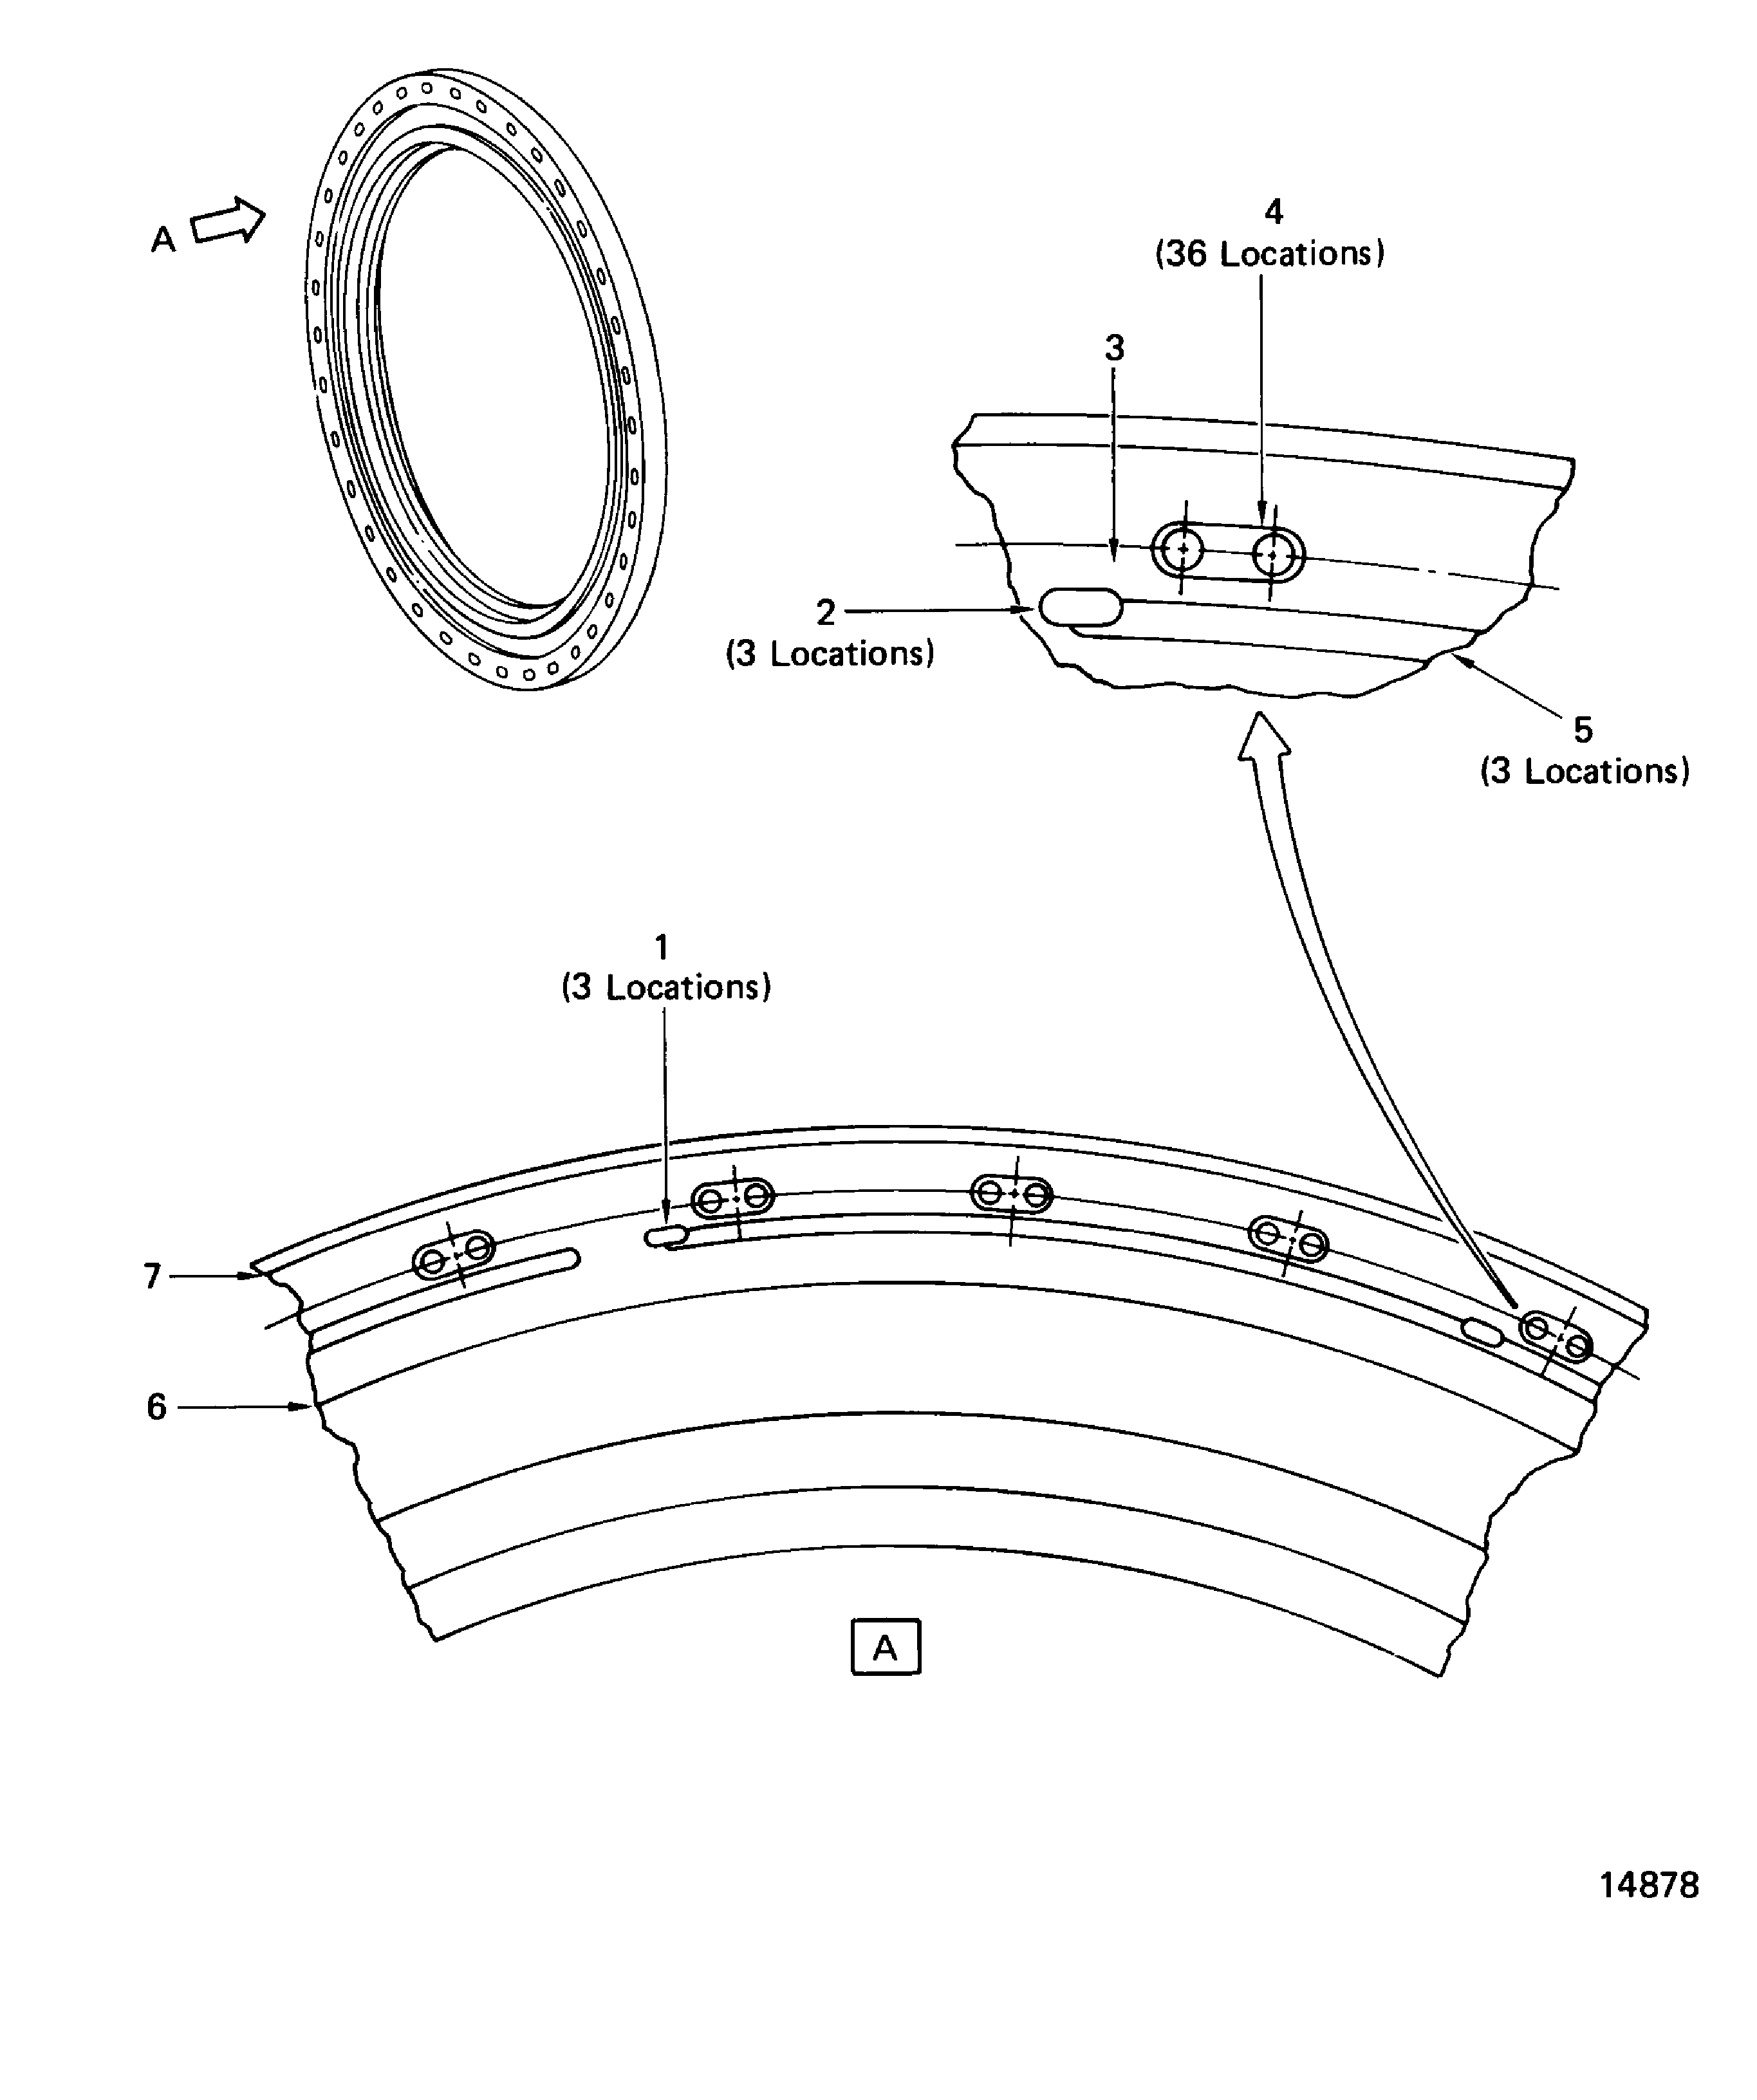
Examine the seal seat at locations 1, 2, 4 and 5 for chipped hardface.
Repair, VRS3108 TASK 72-43-14-300-002 (REPAIR-002) or Repair, VRS3694 TASK 72-43-14-300-005 (REPAIR-005)
Other than (a)
Chips.
Examine the seal seat at location 3 for chipped hardface at the opposite edges of the slots and grooves.
Repair, VRS3108 TASK 72-43-14-300-002 (REPAIR-002) or Repair, VRS3694 TASK 72-43-14-300-005 (REPAIR-005)
Other than (a)
Chips.
Examine the seal seat at the inner and outer edges at locations 6 and 7 for chipped hardface.
SUBTASK 72-43-14-220-060 Examine the No. 4 Bearing Rear Seal Seat (01-020) for Chipped Hardface
Refer to Figure
There can be a maximum of four pits. Any one pit can be as much as 0.030 in. (0.78 mm). There must be a one inch (25.4 mm) minimum distance between pits that are more than 0.010 in. (0.254 mm). Pits on functional surfaces must be a minimum of 0.500 in. (12.7 mm) from any pit on adjacent surfaces that are not functional
Repair, VRS3108 TASK 72-43-14-300-002 (REPAIR-002) or Repair, VRS3694 TASK 72-43-14-300-005 (REPAIR-005)
Other than (a) or (b)
Pits.
Examine the seal seat for pitted hardface.
Repair, VRS3108 TASK 72-43-14-300-002 (REPAIR-002) or Repair, VRS3694 TASK 72-43-14-300-005 (REPAIR-005)
Other than (a)
Scratches.
Examine the seal seat for scratched hardface.
Repair, VRS3108 TASK 72-43-14-300-002 (REPAIR-002) or Repair, VRS3694 TASK 72-43-14-300-005 (REPAIR-005)
Other than (a)
Hardface that is not there.
Examine the seal seat for hardface that is not there.
SUBTASK 72-43-14-220-061 Examine the No. 4 Bearing Rear Seal Seat (01-020) for Hardface that is Pitted, Scratched or Not There
Refer to Figure
SUBTASK 72-43-14-220-062 Examine the No. 4 Bearing Rear Seal Seat (01-020) for Nicks, Dents, Scratches and Pits on Areas Other than the Hardface
Refer to Figure
Holes must be cleaned, blockage is not permitted.
Clean, TASK 72-43-14-100-001 (CLEANING-001, CONFIG-001).
Blocked oil holes
Examine the seal seat at locations 1, 2 and 4 for blocked oil holes.
Slots must be cleaned, blockage is not permitted.
Clean, TASK 72-43-14-100-001 (CLEANING-001, CONFIG-001).
Blocked oil slots
Examine the seal seat at location 5 for blocked oil slots.
SUBTASK 72-43-14-220-063 Examine the No. 4 Bearing Rear Seal Seat (01-020) for Blocked Oil Holes
Refer to Figure
Repair, VRS3694 TASK 72-43-14-300-005 (REPAIR-005)
If the surface finish is other than the finish given in the figure
Examine the seal seat for the surface finish of all the hardfaced areas.
Repair, VRS3694 TASK 72-43-14-300-005 (REPAIR-005)
If the part is not flat by 0.00002 in. (0.00051 mm)
Use an optical flat measuring tool to examine the seal seat at location 1 for flatness.
SUBTASK 72-43-14-220-064 Examine the No. 4 Bearing Rear Seal Seat (01-020) for the Surface Finish and the Flatness of the Hardface
Refer to Figure
Repair, VRS3108 TASK 72-43-14-300-002 (REPAIR-002) or Repair, VRS3694 TASK 72-43-14-300-005 (REPAIR-005)
Other than (a)
Axial dimension.
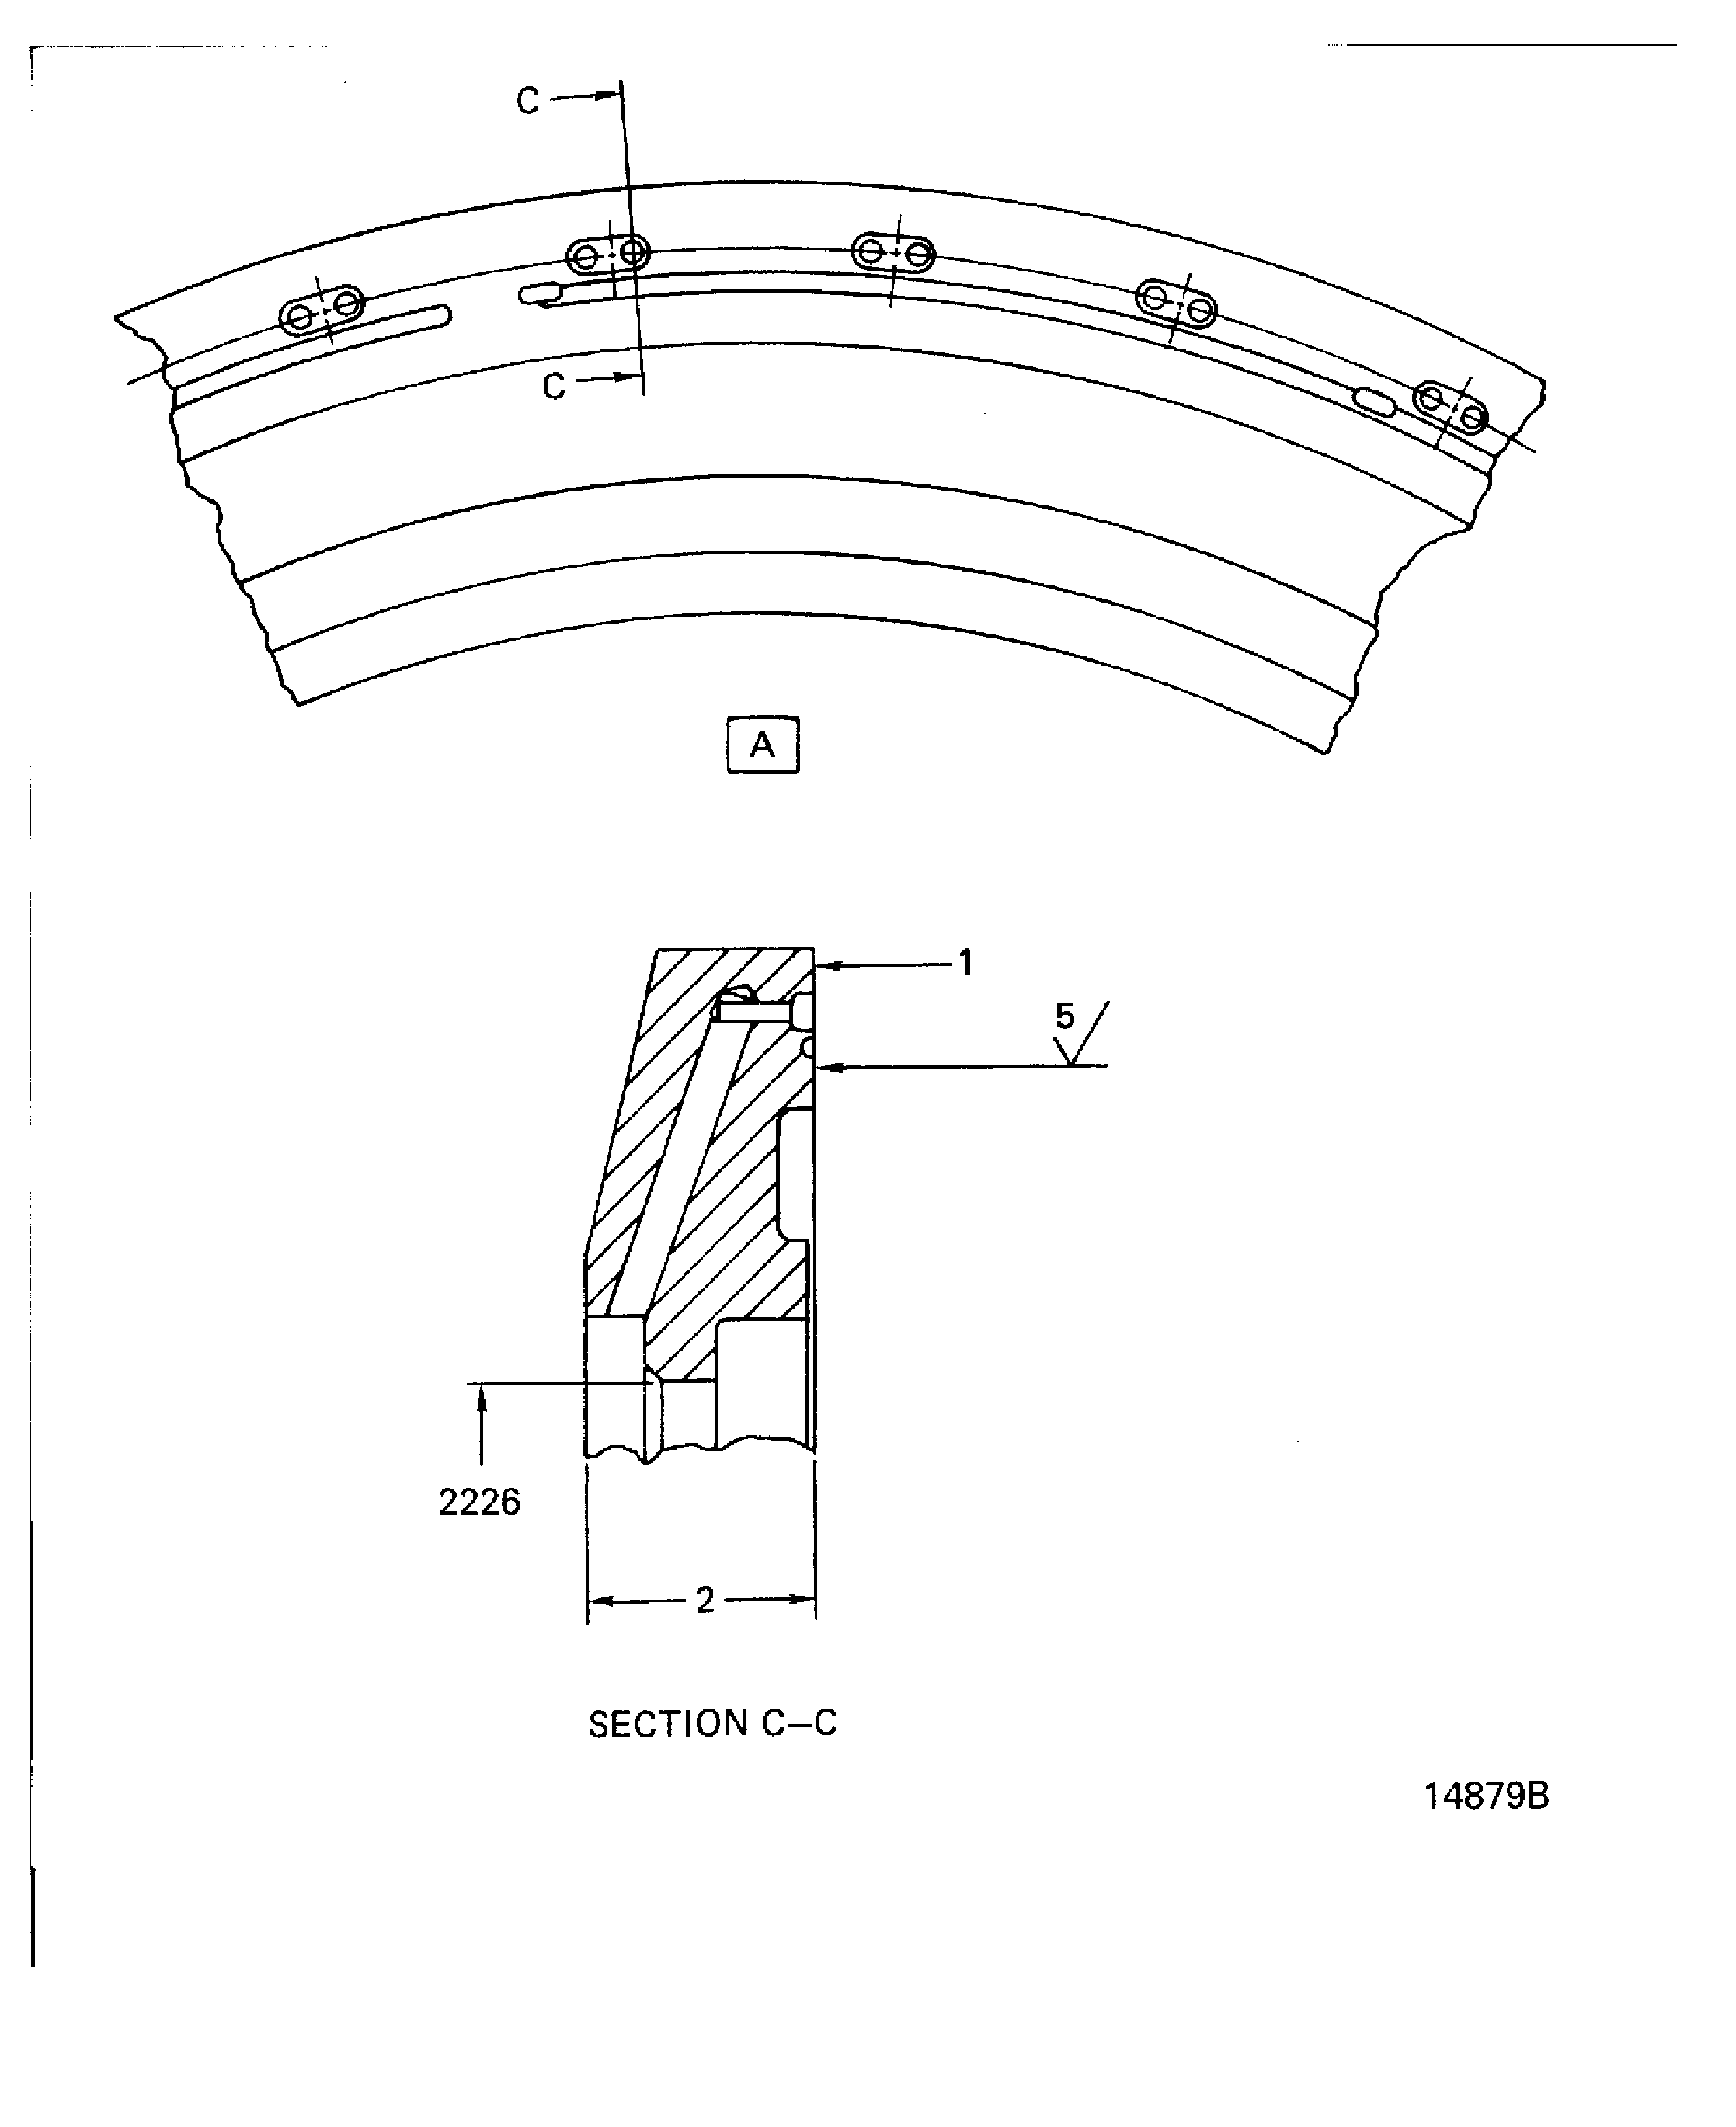
Examine the seal seat at location 2 for the axial dimension.
SUBTASK 72-43-14-220-065 Examine the No. 4 Bearing Rear Seal Seat (01-020) for the Axial Dimension
Refer to Figure
Repair, VRS3109 TASK 72-43-14-300-003 (REPAIR-003)
Other than (a)
Inside diameter.
Examine the seal seat at location 2226 for the pilot inside diameter.
SUBTASK 72-43-14-220-066 Examine the No. 4 Bearing Rear Seal Seat (01-020) for the Pilot Inside Diameter
Refer to Figure
Repair, VRS3108 TASK 72-43-14-300-002 (REPAIR-002)
Other than (a)
Thickness.
Use a Magna Gage to measure the thickness of the hardface.
SUBTASK 72-43-14-220-067 Examine the No. 4 Bearing Rear Seal Seat (01-020) for the Thickness of the Hardface
Figure: No. 4 Bearing Rear Seal Seat Inspection Locations
No. 4 Bearing Rear Seal Seat Inspection Locations

Figure: No. 4 Bearing Rear Seal Seat Inspection Locations
No. 4 Bearing Rear Seal Seat Inspection Locations

