Export Control
EAR Export Classification: Not subject to the EAR per 15 C.F.R. Chapter 1, Part 734.3(b)(3), except for the following Service Bulletins which are currently published as EAR Export Classification 9E991: SBE70-0992, SBE72-0483, SBE72-0580, SBE72-0588, SBE72-0640, SBE73-0209, SBE80-0024 and SBE80-0025.Copyright
© IAE International Aero Engines AG (2001, 2014 - 2021) The information contained in this document is the property of © IAE International Aero Engines AG and may not be copied or used for any purpose other than that for which it is supplied without the express written authority of © IAE International Aero Engines AG. (This does not preclude use by engine and aircraft operators for normal instructional, maintenance or overhaul purposes.).Applicability
All
Common Information
TASK 72-50-22-200-007-A00 LPT Stage 3 Vane - Examine
General
This TASK gives the procedure for the inspection of the stage 3 turbine vane.
Before you do this inspection refer to TASK 72-50-32-200-006-A00 (INSPECTION/CHECK-006).
Fig/item numbers in parentheses in the procedure agree with those used in the IPC.
The policy that is necessary for inspection is given in the SPM TASK 70-20-01-200-501.
All parts must be cleaned before any part is examined. Refer to TASK 72-50-00-100-000 (CLEANING).
All parts must be visually examined for damage, corrosion, and wear. Any defects that are not identified in the procedure must be referred to IAE.
The procedure for those parts which must have a crack test is given in Step. Do the crack test before the part is visually examined.
Do not discard any part until you are sure there are no repairs available. Refer to the instructions in Repair before a discarded part is used again or oversize parts are installed.
Parts which should be discarded can be held although no repair is available. The repair of a discarded part could be shown to be necessary at a later date.
All parts must be examined to make sure that all the repairs have been completed satisfactorily.
The practices and processes referred to in the procedure by the TASK numbers are in the SPM.
References
Refer to the SPM for data on these items.
Definitions of Damage, SPM TASK 70-02-02-350-501
Record and Control of the Lives of Parts, SPM TASK 70-05-00-220-501
Inspection of Parts, SPM TASK 70-20-01-200-501
Some data on these items is contained in this TASK. For more data on these items refer to the SPM.
Method of Testing for Crack Indications
Chemical Processes
Surface Protection
Preliminary Requirements
Pre-Conditions
NONESupport Equipment
NONEConsumables, Materials and Expendables
NONESpares
NONESafety Requirements
NONEProcedure
Clean the parts. Refer to TASK 72-50-00-100-000 (CLEANING).
Repair-073, VRS4376 TASK 72-50-22-300-073
Not more than 0.010 in. (0.25 mm) maximum depth
Repair-106, VRS4514 TASK 72-50-22-300-106
More than in Step but not more than 0.010 in. (0.25 mm) maximum width and 0.079 in. (2.00 mm) maximum length, not area A12
Cracked inner or outer platforms in area A9
Repair-106, VRS4514 TASK 72-50-22-300-106
Not more than 0.010 in. (0.25 mm) maximum width and 0.079 in. (2.00 mm) maximum length
Cracked airfoils in areas A1 to A8
Do the test for cracks on the parts that are given below. Use the applicable penetrant procedure.
PART IDENT
TASK/SUBTASK
Stage 3 Turbine Vane
SUBTASK 72-50-22-230-113 Examine the Stage 3 Turbine Vane for Cracks
Repair-054, VRS4269 TASK 72-50-22-300-054
Damaged or not sufficient coating in areas total less than 1.000 sq in. (645.16 sq mm) per vane airfoil
Repair-094, VRS4429 TASK 72-50-22-300-094
More than in Step
Damaged or not sufficient coating
SPM TASK 70-28-00-280-501 and SPM TASK 70-28-01-280-501
Do the heat tint test
Repair-094, VRS4429 TASK 72-50-22-300-094 or Repair-073, VRS4376 TASK 72-50-22-300-073
Not within limits
Blistering, sulphidation
SUBTASK 72-50-22-220-242 Examine the Airfoil, Inner and Outer Annulus/Gaspath Surfaces of the Stage 3 Turbine Vane for Coating Damage
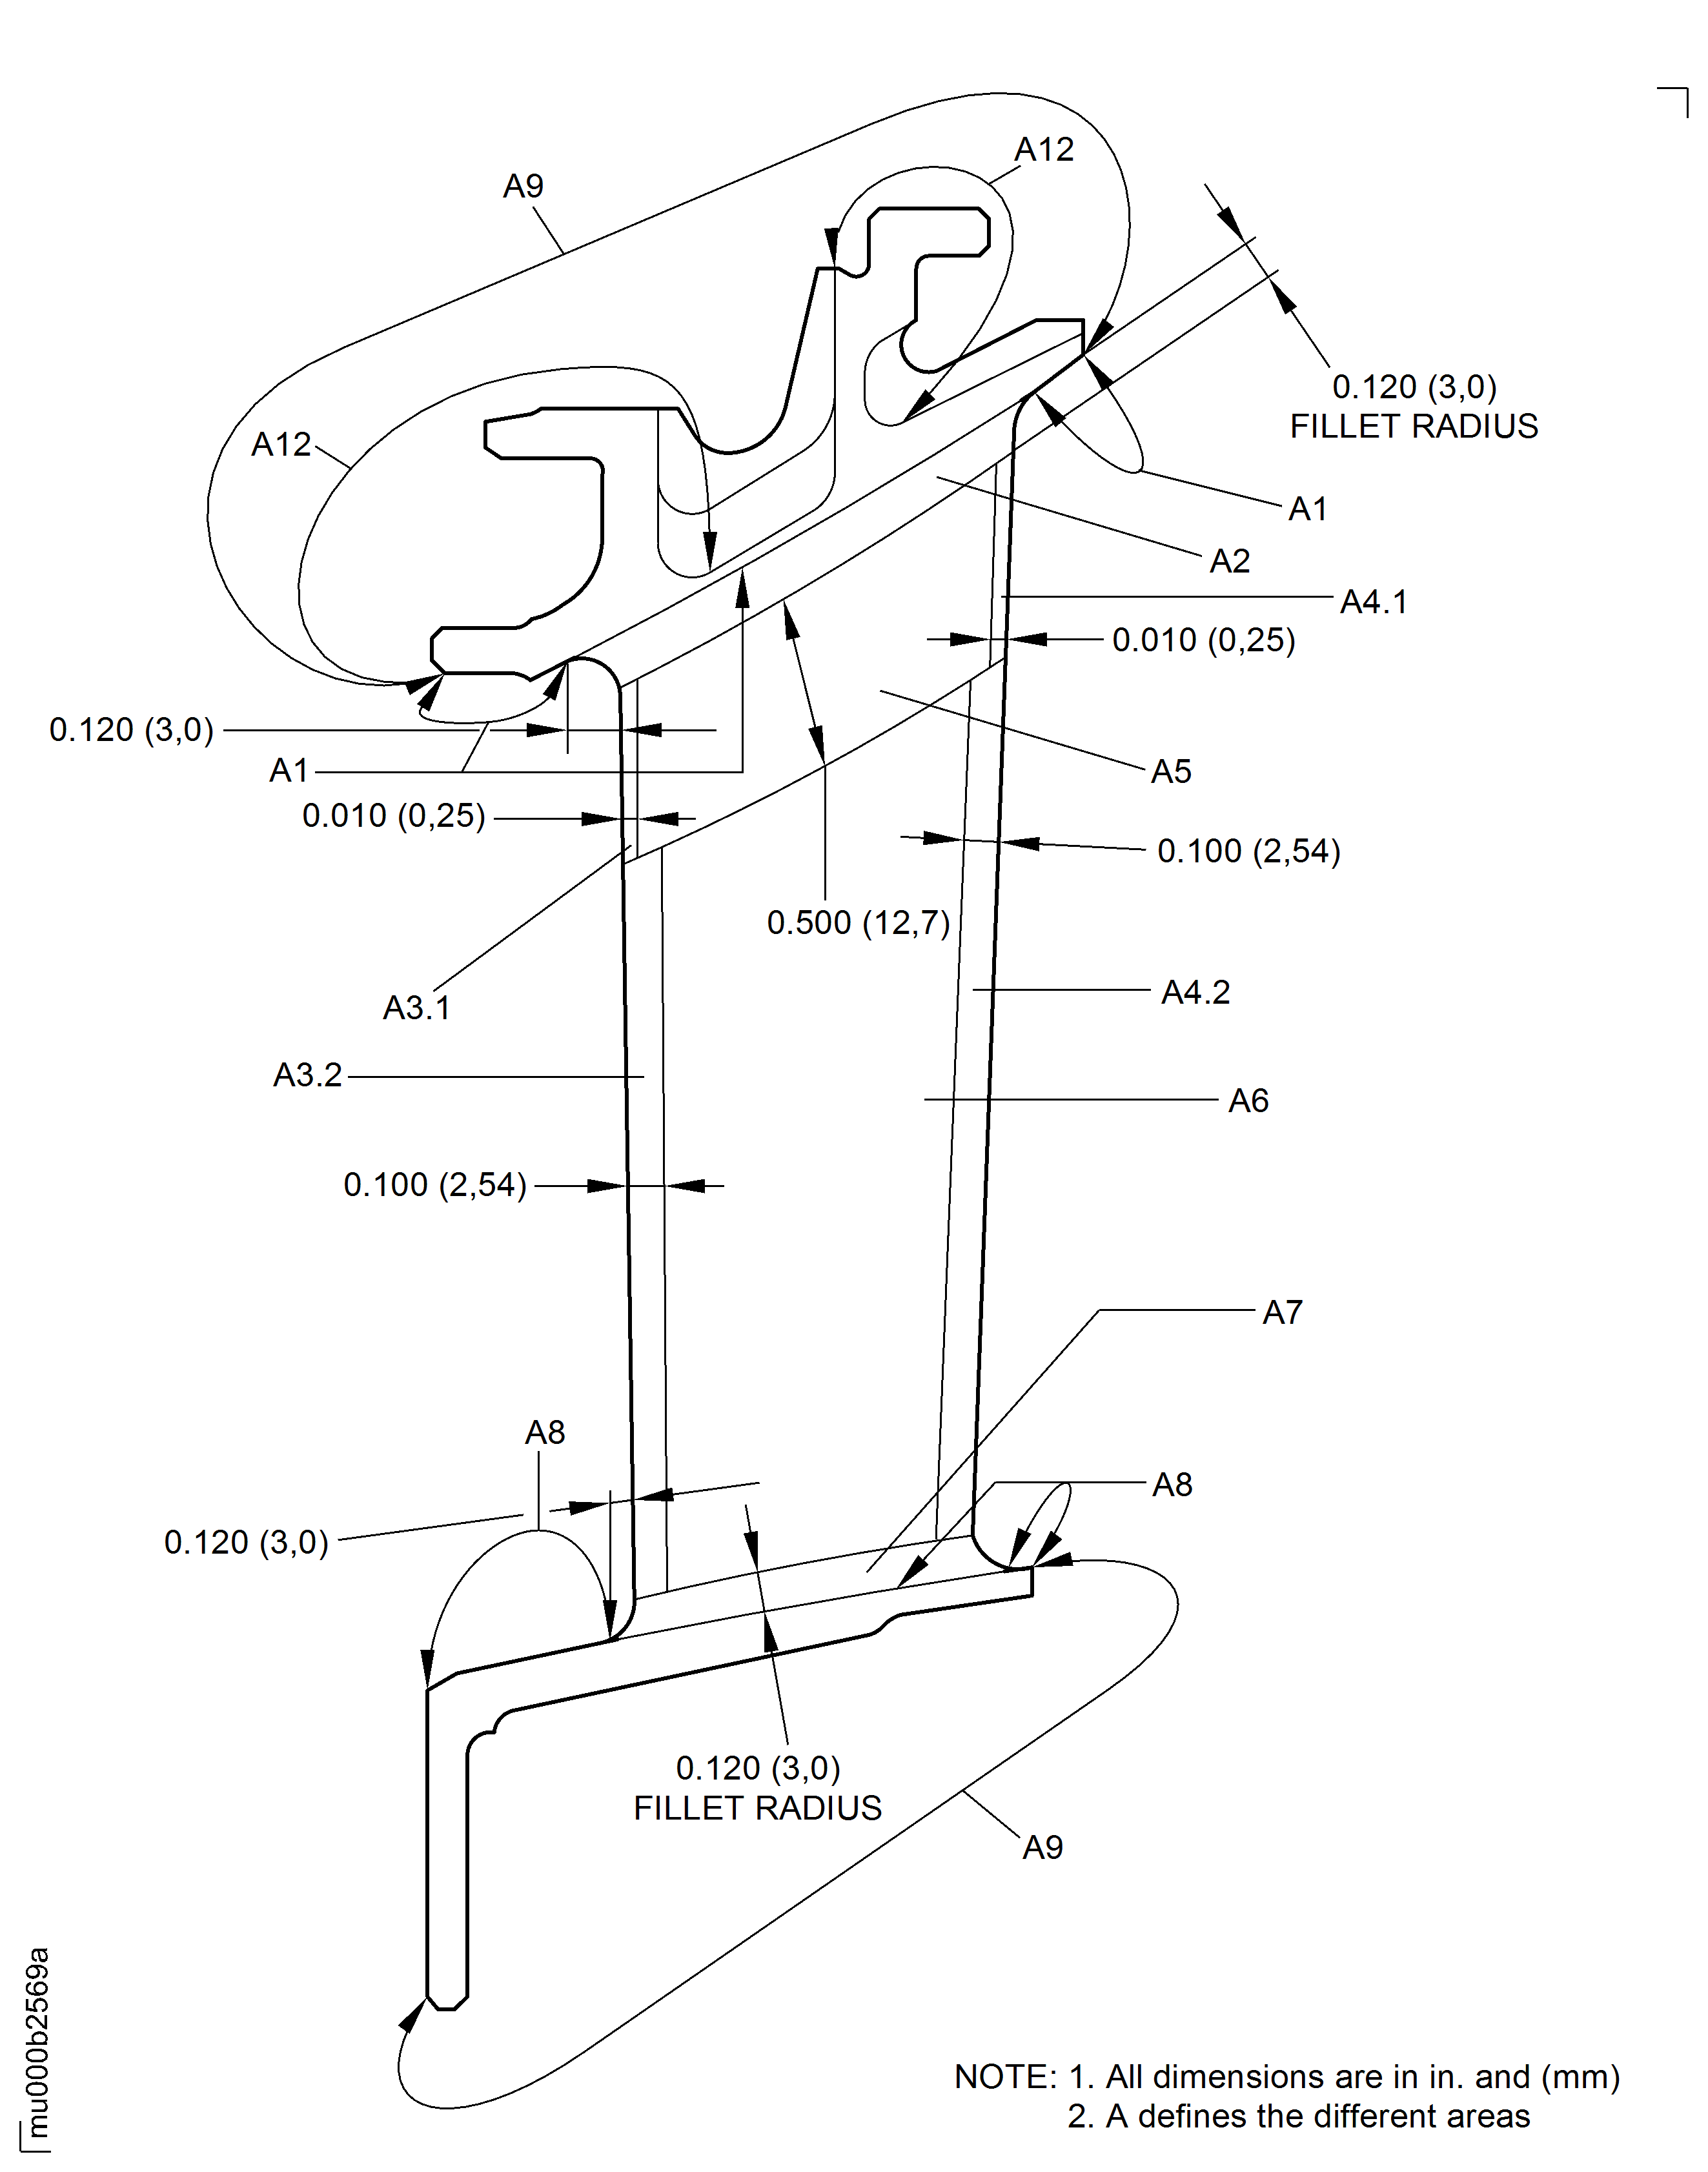
Refer to Figure.
Repair-073, VRS4376 TASK 72-50-22-300-073 or Repair-106, VRS4514 TASK 72-50-22-300-106
Nicked, dented, pitted
Examine the surface in area A1.
Repair-106, VRS4514 TASK 72-50-22-300-106
Nicked, dented, pitted
Examine the surface in area A2.
Repair-073, VRS4376 TASK 72-50-22-300-073 or Repair-106, VRS4514 TASK 72-50-22-300-106
More than in Step
Nicked, dented, pitted in area A3.1
Repair-073, VRS4376 TASK 72-50-22-300-073 or Repair-106, VRS4514 TASK 72-50-22-300-106
Nicked, dented, pitted in area A3.2
Examine the surface in area A3.
Repair-073, VRS4376 TASK 72-50-22-300-073 or Repair-106, VRS4514 TASK 72-50-22-300-106
More than in Step
Nicked, dented, pitted in area A4.1
Repair-073, VRS4376 TASK 72-50-22-300-073 or Repair-106, VRS4514 TASK 72-50-22-300-106
Nicked, dented, pitted in area A4.2
Examine the surface in area A4.
Repair-073, VRS4376 TASK 72-50-22-300-073 or Repair-106, VRS4514 TASK 72-50-22-300-106
Nicked, dented, pitted
Examine the surface in area A5.
Repair-073, VRS4376 TASK 72-50-22-300-073 or Repair-106, VRS4514 TASK 72-50-22-300-106
Nicked, dented, pitted
Examine the surface in area A6.
Repair-106, VRS4514 TASK 72-50-22-300-106
Nicked, dented, pitted
Examine the surface in area A7.
Repair-073, VRS4376 TASK 72-50-22-300-073 or Repair-106, VRS4514 TASK 72-50-22-300-106
Nicked, dented, pitted
Examine the surface in area A8.
Repair-073, VRS4376 TASK 72-50-22-300-073 or Repair-106, VRS4514 TASK 72-50-22-300-106
More than in Step
Nicked, dented, pitted
Examine the surface in area A9.
SUBTASK 72-50-22-220-270 Examine the Stage 3 Turbine Vane in Area A1 to A9 for Surface Damage
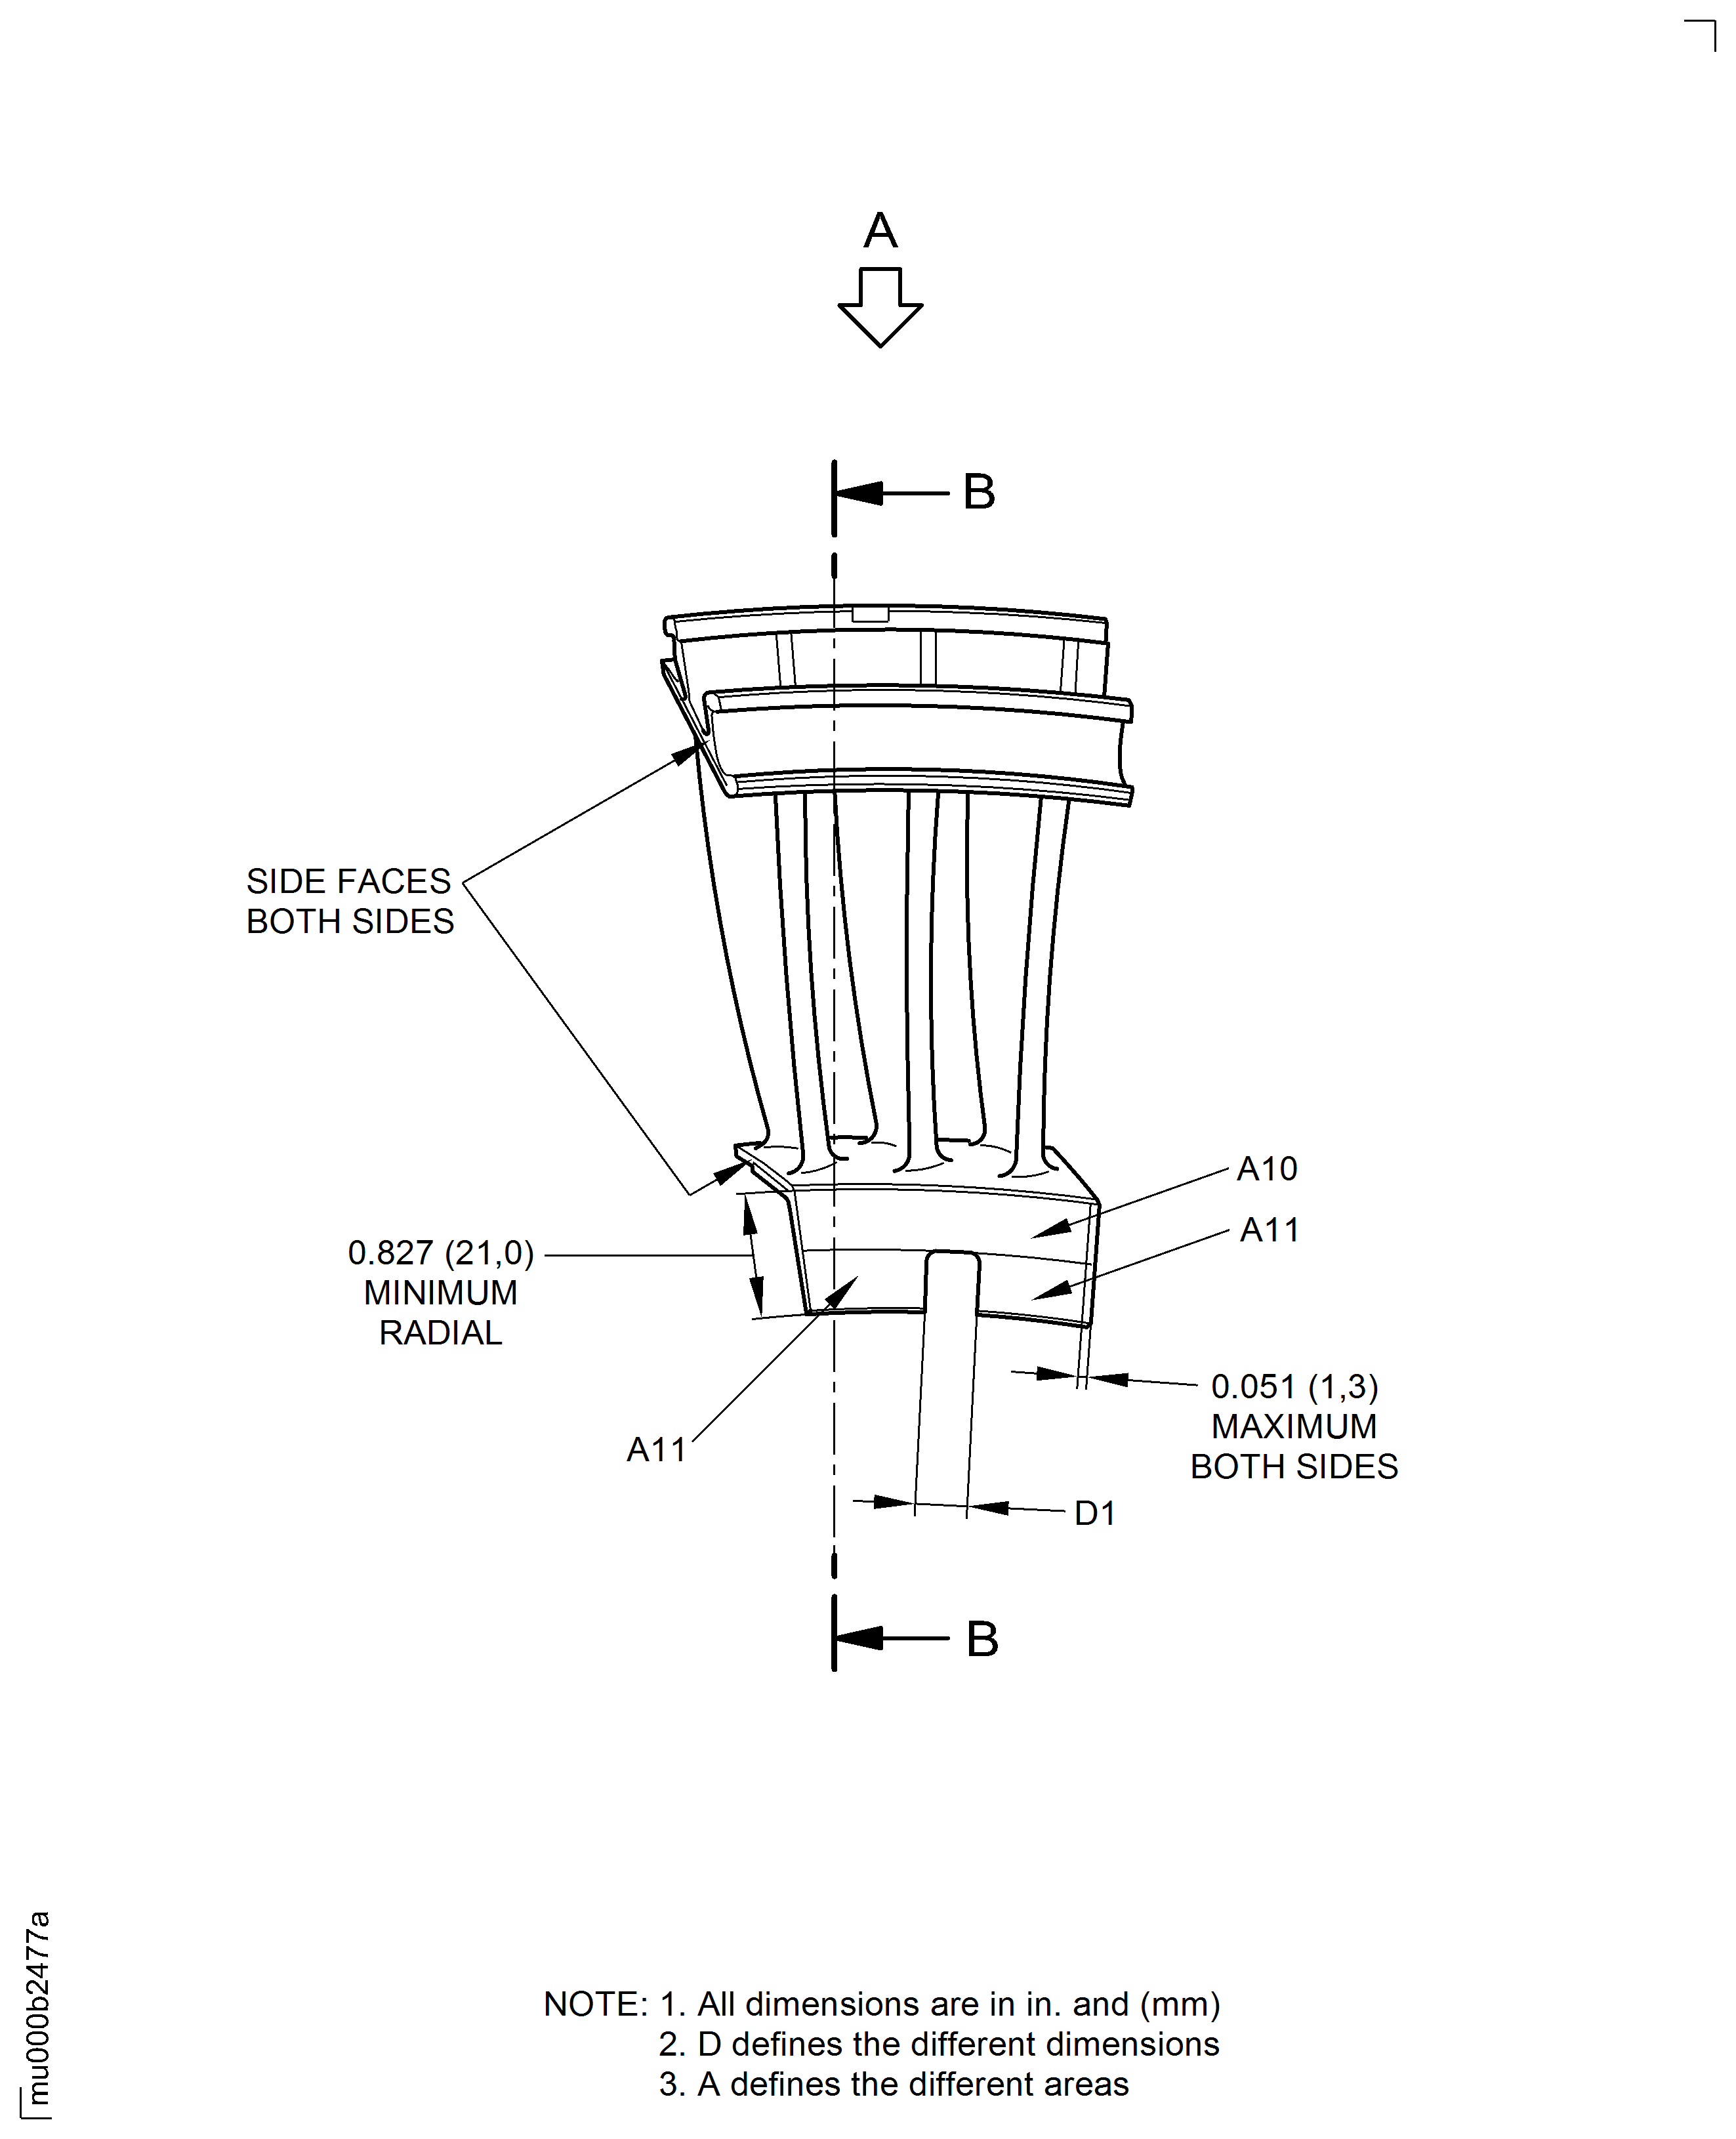
Refer to Figure.
Repair-103, VRS4475 TASK 72-50-22-300-103
More than in Step
Damaged or missing hardface coating in area A10
SUBTASK 72-50-22-220-245 Examine the Stage 3 Turbine Vane in Area A10 and A11 for Hardface Damage
Refer to Figure.
Reject
More than in Step
Fretted
Repair-125, VRS4588 TASK 72-50-22-300-125
Stucked seal strips
Repair-125, VRS4588 TASK 72-50-22-300-125
Seal slot deterioration
SUBTASK 72-50-22-220-243 Examine the Inner and Outer Platform Side Faces of the Stage 3 Turbine Vane
Refer to Figure.
Repair-074, VRS4404 TASK 72-50-22-300-074
More than in Step
Worn, measure dimension D1
SUBTASK 72-50-22-220-244 Examine the Stage 3 Turbine Vane at Dimension D1 for Wear
Refer to Figure.
Repair-089, VRS4377 TASK 72-50-22-300-089
Less than in Step
Worn, measure dimension D2
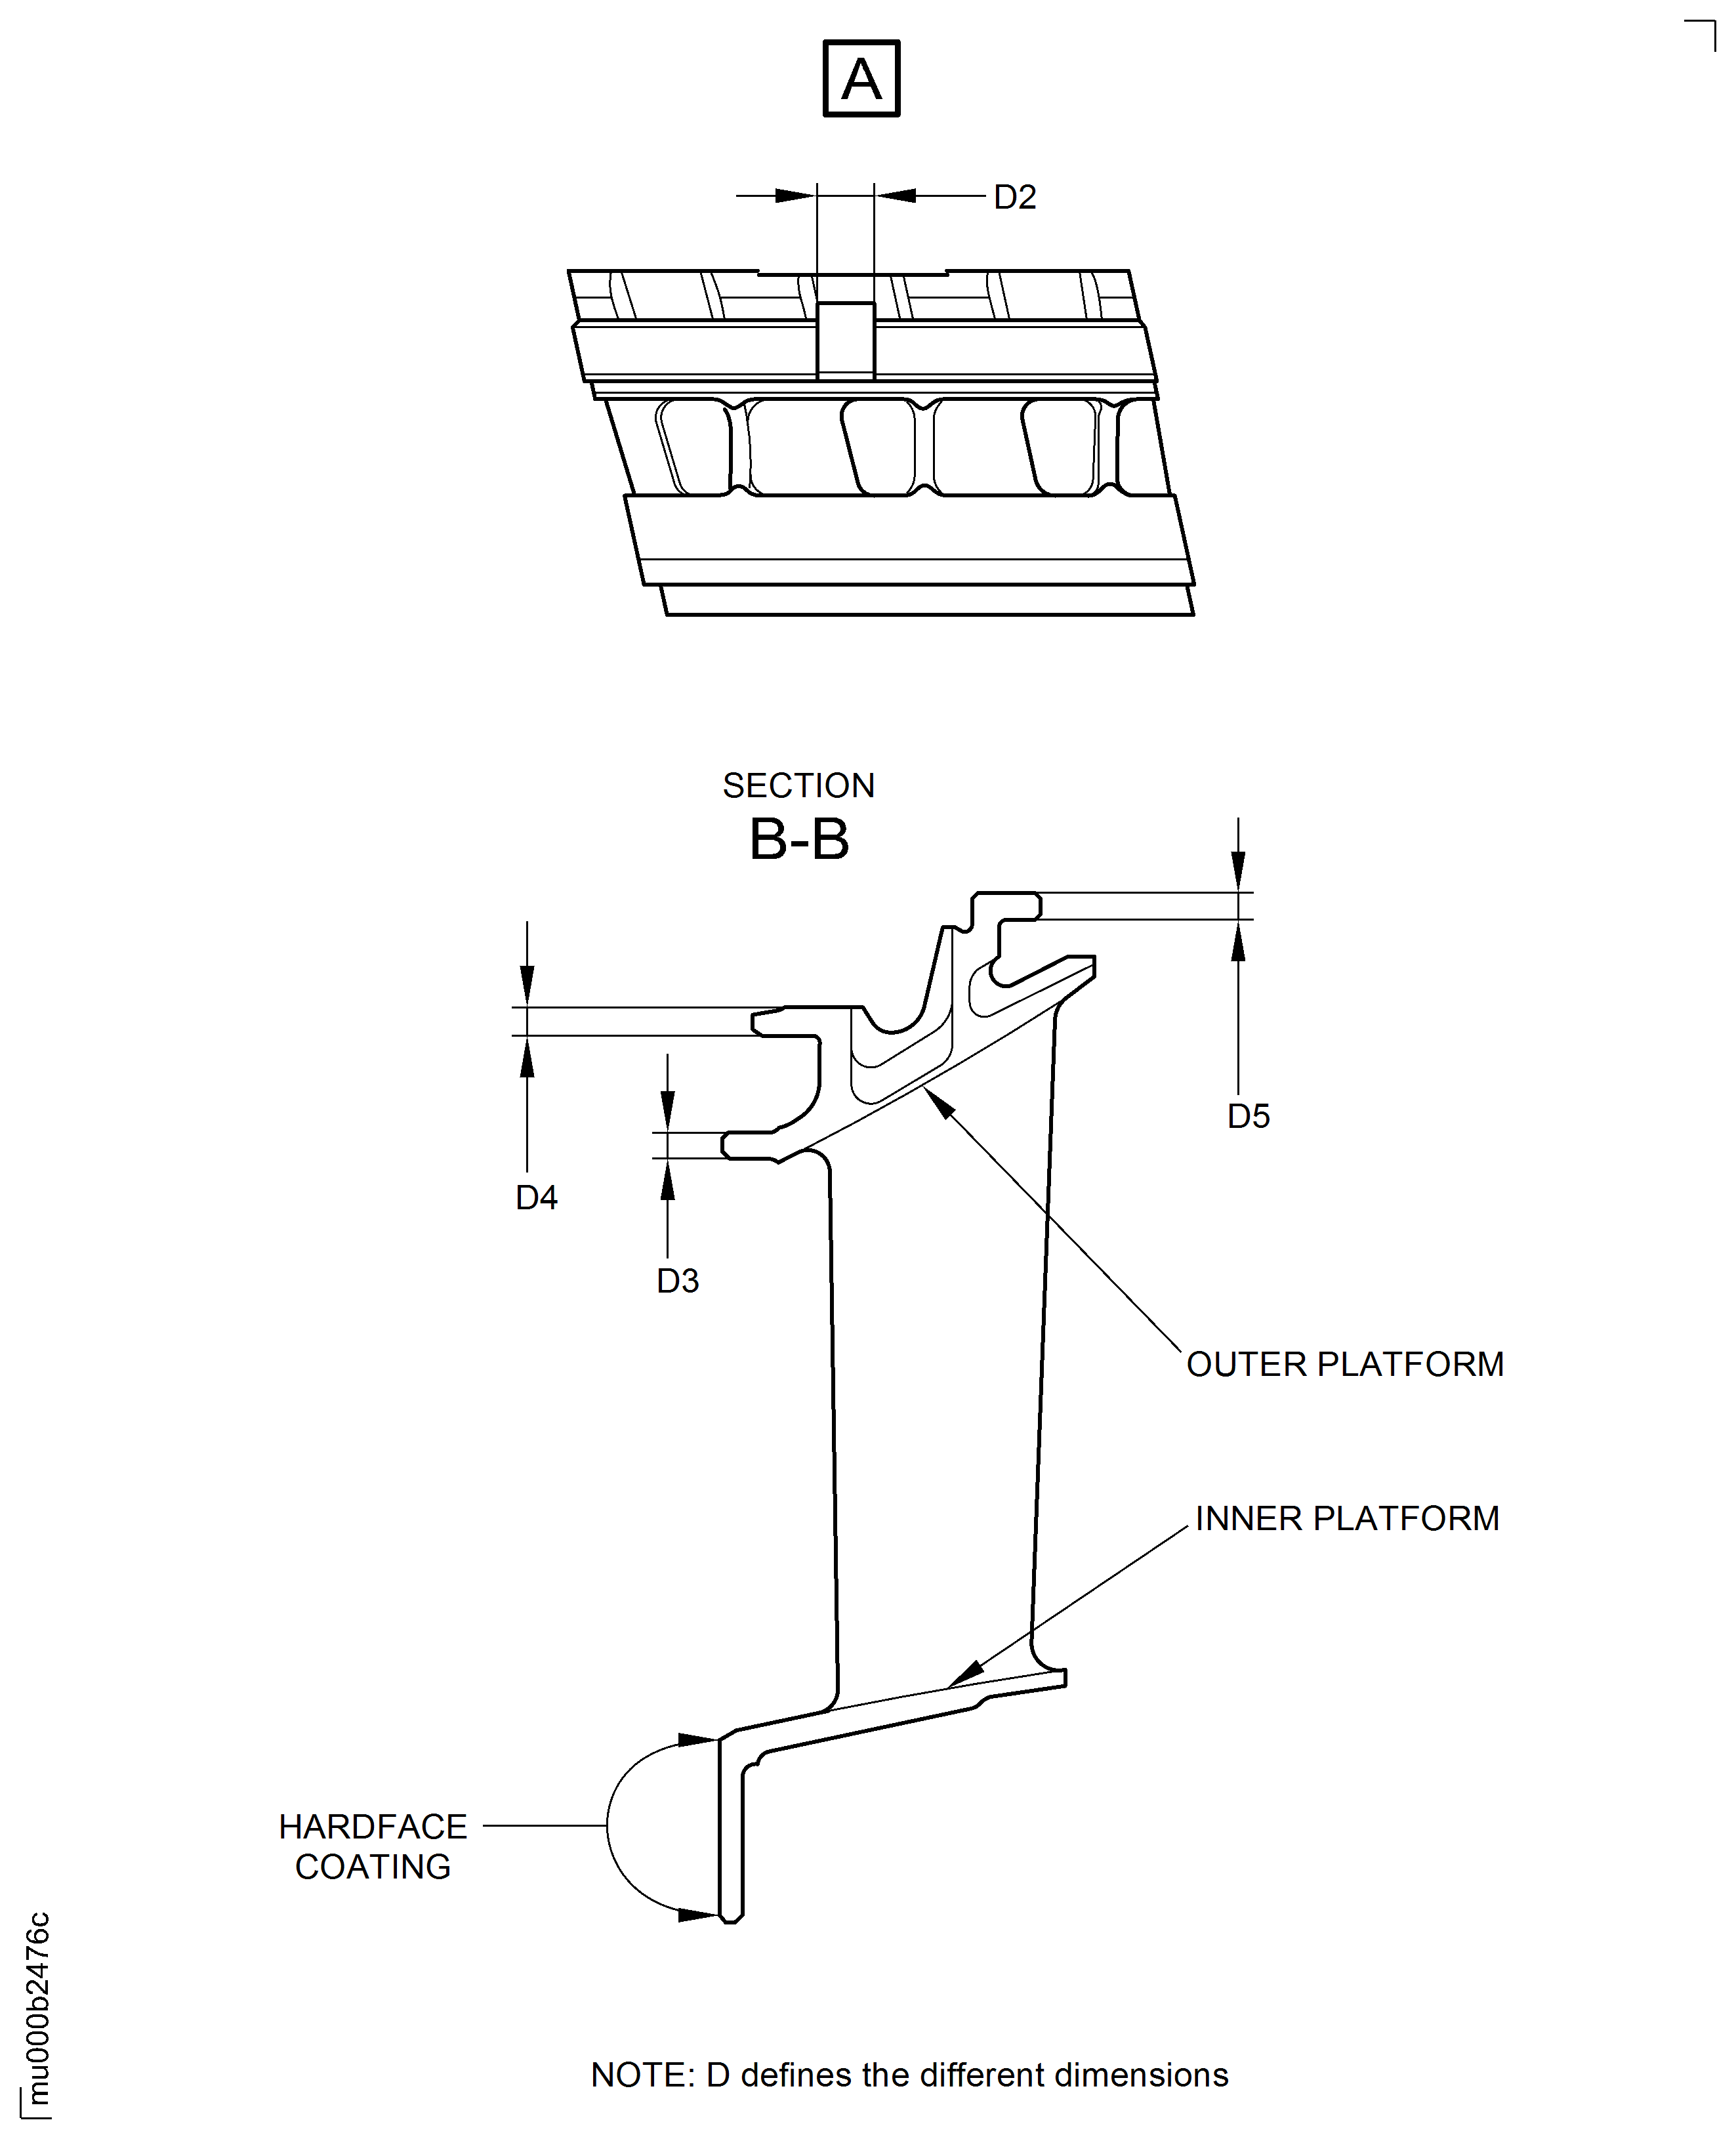
SUBTASK 72-50-22-220-246 Examine the Stage 3 Turbine Vane at Dimension D2 for Wear
Refer to Figure.
Repair-106, VRS4514 TASK 72-50-22-300-106
Less than in Step but not less than 0.116 in. (2.95 mm)
Worn, measure dimension D3
SUBTASK 72-50-22-220-248 Examine the Stage 3 Turbine Vane at Dimension D3 for Wear
Refer to Figure.
Repair-106, VRS4514 TASK 72-50-22-300-106
Less than in Step but not less than 0.135 in. (3.43 mm)
Worn, measure dimension D4
SUBTASK 72-50-22-220-249 Examine the Stage 3 Turbine Vane at Dimension D4 for Wear
Refer to Figure.
Repair-106, VRS4514 TASK 72-50-22-300-106
Less than in Step but not less than 0.109 in. (2.78 mm)
Worn, measure dimension D5
SUBTASK 72-50-22-220-250 Examine the Stage 3 Turbine Vane at Dimension D5 for Wear
Figure: Examine the stage 3 turbine vane
Examine the stage 3 turbine vane

Figure: Examine the stage 3 turbine vane
Examine the stage 3 turbine vane

Figure: Examine the stage 3 turbine vane
Examine the stage 3 turbine vane

