TASK 72-50-30-440-001 LPT Stage 3 Rotor Assembly - Assemble, Assembly-001

DMC:V2500-A0-72-50-3003-00A-710A-B|Issue No:006.00|Issue Date:2020-11-01

Export Control

EAR Export Classification: Not subject to the EAR per 15 C.F.R. Chapter 1, Part 734.3(b)(3), except for the following Service Bulletins which are currently published as EAR Export Classification 9E991: SBE70-0992, SBE72-0483, SBE72-0580, SBE72-0588, SBE72-0640, SBE73-0209, SBE80-0024 and SBE80-0025.

Copyright

© IAE International Aero Engines AG (2001, 2014 - 2021) The information contained in this document is the property of © IAE International Aero Engines AG and may not be copied or used for any purpose other than that for which it is supplied without the express written authority of © IAE International Aero Engines AG. (This does not preclude use by engine and aircraft operators for normal instructional, maintenance or overhaul purposes.).

Applicability

All

Common Information

TASK 72-50-30-440-001 LPT Stage 3 Rotor Assembly - Assemble, Assembly-001

General

Fig/item numbers in parentheses in the procedure agree with those used in the IPC. Only the primary Fig/item numbers are used. For the service bulletin alpha variants refer to the IPC.

For all parts identified in a different Chapter/Section/Subject, the applicable Chapter/Section/Subject comes before the Fig/item number.

For standard torque data and procedures, refer to the SPM TASK 70-41-01-400-501 and SPM TASK 70-41-02-400-501.

Special torque data and assembly tolerances are included in the procedure.

The number for each radial location must be identified in a clockwise direction. These start at the engine top position when you look from the rear of the engine, unless stated differently in the procedure.

Refer to TASK 72-50-00-990-501 for a sectional view of the LP turbine module.

Use new rotor bolts and nuts

NOTE

To identify the consumable materials refer to the PCI.

NOTE

Special tools are identified in the procedure by the tool primary number.

NOTE

During assembly, it is not necessary to measure, calculate and record the fits and clearances if:
a) Both parts are new, or
b) Used parts (inspected and/or repaired) are within limits.
Above is valid for any combinations of a) and b), except for "Selected Fit" parts.

Preliminary Requirements

Pre-Conditions

NONE

Support Equipment

NameManufacturerPart Number / IdentificationQuantityRemark
Balancing machineLOCALBalancing machine
Blade distribution systemLOCALBlade distribution system
Feeler gageLOCALFeeler gage
IAE 1M14015 Blade holder0AM53IAE 1M140151
IAE 1M14016 Radius adapter0AM53IAE 1M140161
IAE 1M14019 Mounting adapter0AM53IAE 1M140191
IAE 1M14020 Balancing base plate0AM53IAE 1M140201
IAE 1M14021 Balancing fixture sleeve0AM53IAE 1M140211
IAE 1M14022 Balancing fixture disk0AM53IAE 1M140221
IAE 1M14030 Assembly trolley0AM53IAE 1M140301
IAE 1M14049 Position retainer0AM53IAE 1M140491
IAE 1M14054 Torque wrench adapter0AM53IAE 1M140541
IAE 1M14055 Special wrench0AM53IAE 1M140551
IAE 1M14061 Heating fixture0AM53IAE 1M140611
IAE 1M14074 Heating fixture carrier0AM53IAE 1M140741
IAE 1M14078 Clamping ring0AM53IAE 1M140781
IAE 1M14079 Plastic wedge0AM53IAE 1M140791
IAE 1M14132 Guide pin0AM53IAE 1M141321
IAE 1M14135 Installation bolt/nut0AM53IAE 1M141356
IAE 1M14142 Clamping ring0AM53IAE 1M141421
IAE 1M14153 Assy/disassy stand0AM53IAE 1M141531
IAE 1M14156 Lifting fixture0AM53IAE 1M141561
IAE 6F10027 Heater control unit0AM53IAE 6F100271
MalletLOCALMallet

Soft headed

Moment weighing equipmentLOCALMoment weighing equipment
Rack palletLOCALRack pallet
Torch lightLOCALTorch light

Consumables, Materials and Expendables

NameManufacturerPart Number / IdentificationQuantityRemark
CoMat 01-031 ACETONE (CH3)2COLOCALCoMat 01-031
CoMat 02-069 DISPOSABLE CLEANING TISSUES33591CoMat 02-069
CoMat 02-129 MARKERIAE28CoMat 02-129
CoMat 10-129 ANTI-SEIZE PASTE34568CoMat 10-129
CoMat 10-129A ANTI-SEIZE PASTE71984CoMat 10-129A

Spares

NameManufacturerPart Number / IdentificationQuantityRemark
BOLT36
NUT36

Safety Requirements

WARNING

DO NOT GET ANTI-SEIZE PASTE ON YOUR SKIN WHEN YOU LUBRICATE THREADS AND ABUTMENT FACES OF NUTS AND BOLTS. WEAR PROTECTIVE GLOVES.

Procedure

    1. SUBTASK 72-50-30-220-051-A00 V2500-A1: Make Sure that the Fits and Clearances between the Stage 3 Disk and Stage 3 Air Seal are in the Limits given at Location 3341 (Pre SBE 72-0138, SBE 72-0157 and Pre SBE 72-0157)

    2. Refer to Figure.

    3. Calculate the clearance at location 3341.

      Table 1. Fits and Clearances (all dimensions are in inches)

      NEW PART

      DIMENSIONS

      WORN PART

      DIMENSIONS

      REJECT IF

      PART IDENT

      Size

      Clearance

      (Non-select)

      MORE THAN

      LOCATION 3341

      Stage 3 air seal LPT Stage 3, 4, 5, 6, 7 Rotating Air Seals (72-50-33,01-200)

      abutment diameter to stage 3

      turbine disk LPT Stage 3, 4, 5, 6, 7 Disks (72-50-31,01-200)

      Air seal dia

      18.7756

      18.7717

      Intf

      0.0354

      Intf

      0.0393

      Disk dia

      18.7441

      18.7402

      0.0276

      0.0236

      Table 2. Fits and Clearances (all dimensions are in millimeters)

      NEW PART

      DIMENSIONS

      WORN PART

      DIMENSIONS

      REJECT IF

      PART IDENT

      Size

      Clearance

      (Non-select)

      MORE THAN

      LOCATION 3341

      Stage 3 air seal LPT Stage 3, 4, 5, 6, 7 Rotating Air Seals (72-50-33,01-200)

      abutment diameter to stage 3

      turbine disk LPT Stage 3, 4, 5, 6, 7 Disks (72-50-31,01-200)

      Air seal dia

      476.90

      476.80

      Intf

      0.90

      Intf

      1.00

      Disk dia

      476.10

      476.00

      0.70

      0.60

    1. SUBTASK 72-50-30-220-051-B00 V2500-A5: Make sure that the Fits and Clearances between the Stage 3 Disk and Stage 3 Air Seal are in the Limits given at Location 3641 (SBE 72-0138 and SBE 72-0157)

    2. Refer to Figure.

    3. SBE 72-0138: Rotor and stator assembly introduce new LP turbine blades and vanes

    4. Calculate the clearance at location 3641.

      Table 3. Fits and Clearances (all dimensions are in inches)

      NEW PART

      DIMENSIONS

      WORN PART

      DIMENSIONS

      REJECT IF

      PART IDENT

      Size

      Clearance

      (Non-select)

      MORE THAN

      LOCATION 3641

      Stage 3 air seal LPT Stage 3, 4, 5, 6, 7 Rotating Air Seals (72-50-33,01-200)

      abutment diameter to stage 3

      turbine disk LPT Stage 3, 4, 5, 6, 7 Disks (72-50-31,01-200)

      Air seal dia

      18.7756

      18.7717

      Intf

      0.0354

      Intf

      0.0393

      Disk dia

      18.7441

      18.7402

      0.0276

      0.0236

      Table 4. Fits and Clearances (all dimensions are in millimeters)

      NEW PART

      DIMENSIONS

      WORN PART

      DIMENSIONS

      REJECT IF

      PART IDENT

      Size

      Clearance

      (Non-select)

      MORE THAN

      LOCATION 3641

      Stage 3 air seal LPT Stage 3, 4, 5, 6, 7 Rotating Air Seals (72-50-33,01-200)

      abutment diameter to stage 3

      turbine disk LPT Stage 3, 4, 5, 6, 7 Disks (72-50-31,01-200)

      Air seal dia

      476.90

      476.80

      Intf

      0.90

      Intf

      1.00

      Disk dia

      476.10

      476.00

      0.70

      0.60

    1. SUBTASK 72-50-30-220-051-C00 V2500-A5: Make sure that the Fits and Clearances between the Stage 3 Disk and Stage 3 Air Seal are in the Limits given at Location 3741 (SBE 70-0522, SBE 70-0705 and SBE 72-0307)

    2. Refer to Figure.

    3. Calculate the clearance at location 3741.

      Table 5. Fits and Clearances (all dimensions are in inches)

      NEW PART

      DIMENSIONS

      WORN PART

      DIMENSIONS

      REJECT IF

      PART IDENT

      Size

      Clearance

      (Non-select)

      MORE THAN

      LOCATION 3741

      Stage 3 air seal LPT Stage 3, 4, 5, 6, 7 Rotating Air Seals (72-50-33,01-200)

      abutment diameter to stage 3

      turbine disk LPT Stage 3, 4, 5, 6, 7 Disks (72-50-31,01-200)

      Air seal dia

      18.7756

      18.7717

      Intf

      0.0314

      Intf

      0.0354

      Disk dia

      18.7480

      18.7441

      0.0236

      0.0197

      Table 6. Fits and Clearances (all dimensions are in millimeters)

      NEW PART

      DIMENSIONS

      WORN PART

      DIMENSIONS

      REJECT IF

      PART IDENT

      Size

      Clearance

      (Non-select)

      MORE THAN

      LOCATION 3741

      Stage 3 air seal LPT Stage 3, 4, 5, 6, 7 Rotating Air Seals (72-50-33,01-200)

      abutment diameter to stage 3

      turbine disk LPT Stage 3, 4, 5, 6, 7 Disks (72-50-31,01-200)

      Air seal dia

      476.90

      476.80

      Intf

      0.80

      Intf

      0.90

      Disk dia

      476.20

      476.10

      0.60

      0.50

    1. SUBTASK 72-50-30-440-051 Calibrate the Moment Weight Equipment

      NOTE

      To get constantly correct results during the moment weight of the LP turbine blades obey the following procedures Step to Step.
    2. Refer to Figure.

    3. Protect the moment weight equipment for environmental effect.

    4. Install the moment weight equipment on a surface plate which is free from vibrations.

    5. Do not change the adjustment of the hydraulic stabilizer at the moment weight equipment.

    6. Make sure that during the moment weight of the blades no tension or load will be applied to the moment weight equipment.

    7. Balance the moment weight equipment with the adjusting screw and the spirit level.

    8. Install the blade distribution system to the moment weight equipment.

    9. Install the IAE 1M14019 Mounting adapter 1 off with the four screws on to the mounting flange of the moment weight equipment.

    10. Install the IAE 1M14016 Radius adapter 1 off to the mounting adapter.

    11. Install the IAE 1M14015 Blade holder 1 off to the radius adapter.

    12. Put the required weights from the weight set on to the counter weight scale. Set the moment weight equipment in accordance with the manufacturers instructions to zero. For fine adjustment use the movable weight at the moment weight equipment.

    1. SUBTASK 72-50-30-440-052 Weigh the Stage 3 Turbine Blades

    2. Refer to Figure.

    3. Before you weigh the stage 3 turbine blades, examine if a unbalance value is engraved on the stage 3 turbine disk. Refer to Figure. If there is a unbalanced value engraved on the disk, use this value on the disk for technical data to blade distribution in Step.

    4. Turn on the installed blade distribution system.

    5. Use the blade distribution diskette and put it in to the computer.

    6. Make the input for all required technical data to do blade distribution in accordance with the computer manual in to the blade distribution system.

    7. Put a 3.880 oz (110 g) weight from the weight set on the counter weight scale.

    8. Identify the stage 3 turbine blades with number one to 97. Use CoMat 02-129 MARKER.

    9. Install the stage 3 turbine blade with number one on to the blade holder.

    10. After the blade distribution system has read the moment weight of the blade, remove the blade from the blade holder. Put the blade in to a storage box.

    11. Repeat the Step and Step until all stage 3 turbine blade moment weights are specified.

    12. Operate the blade distribution system to get a blade distribution protocol for the stage 3 turbine blades.

    13. Remove the weights from the counter weight scale.

    14. Remove the blade holder and the radius adapter from the mounting adapter.

    1. SUBTASK 72-50-30-440-053 Install the Stage 3 Turbine Blades to the Stage 3 Turbine Disk

    2. Refer to Figure.

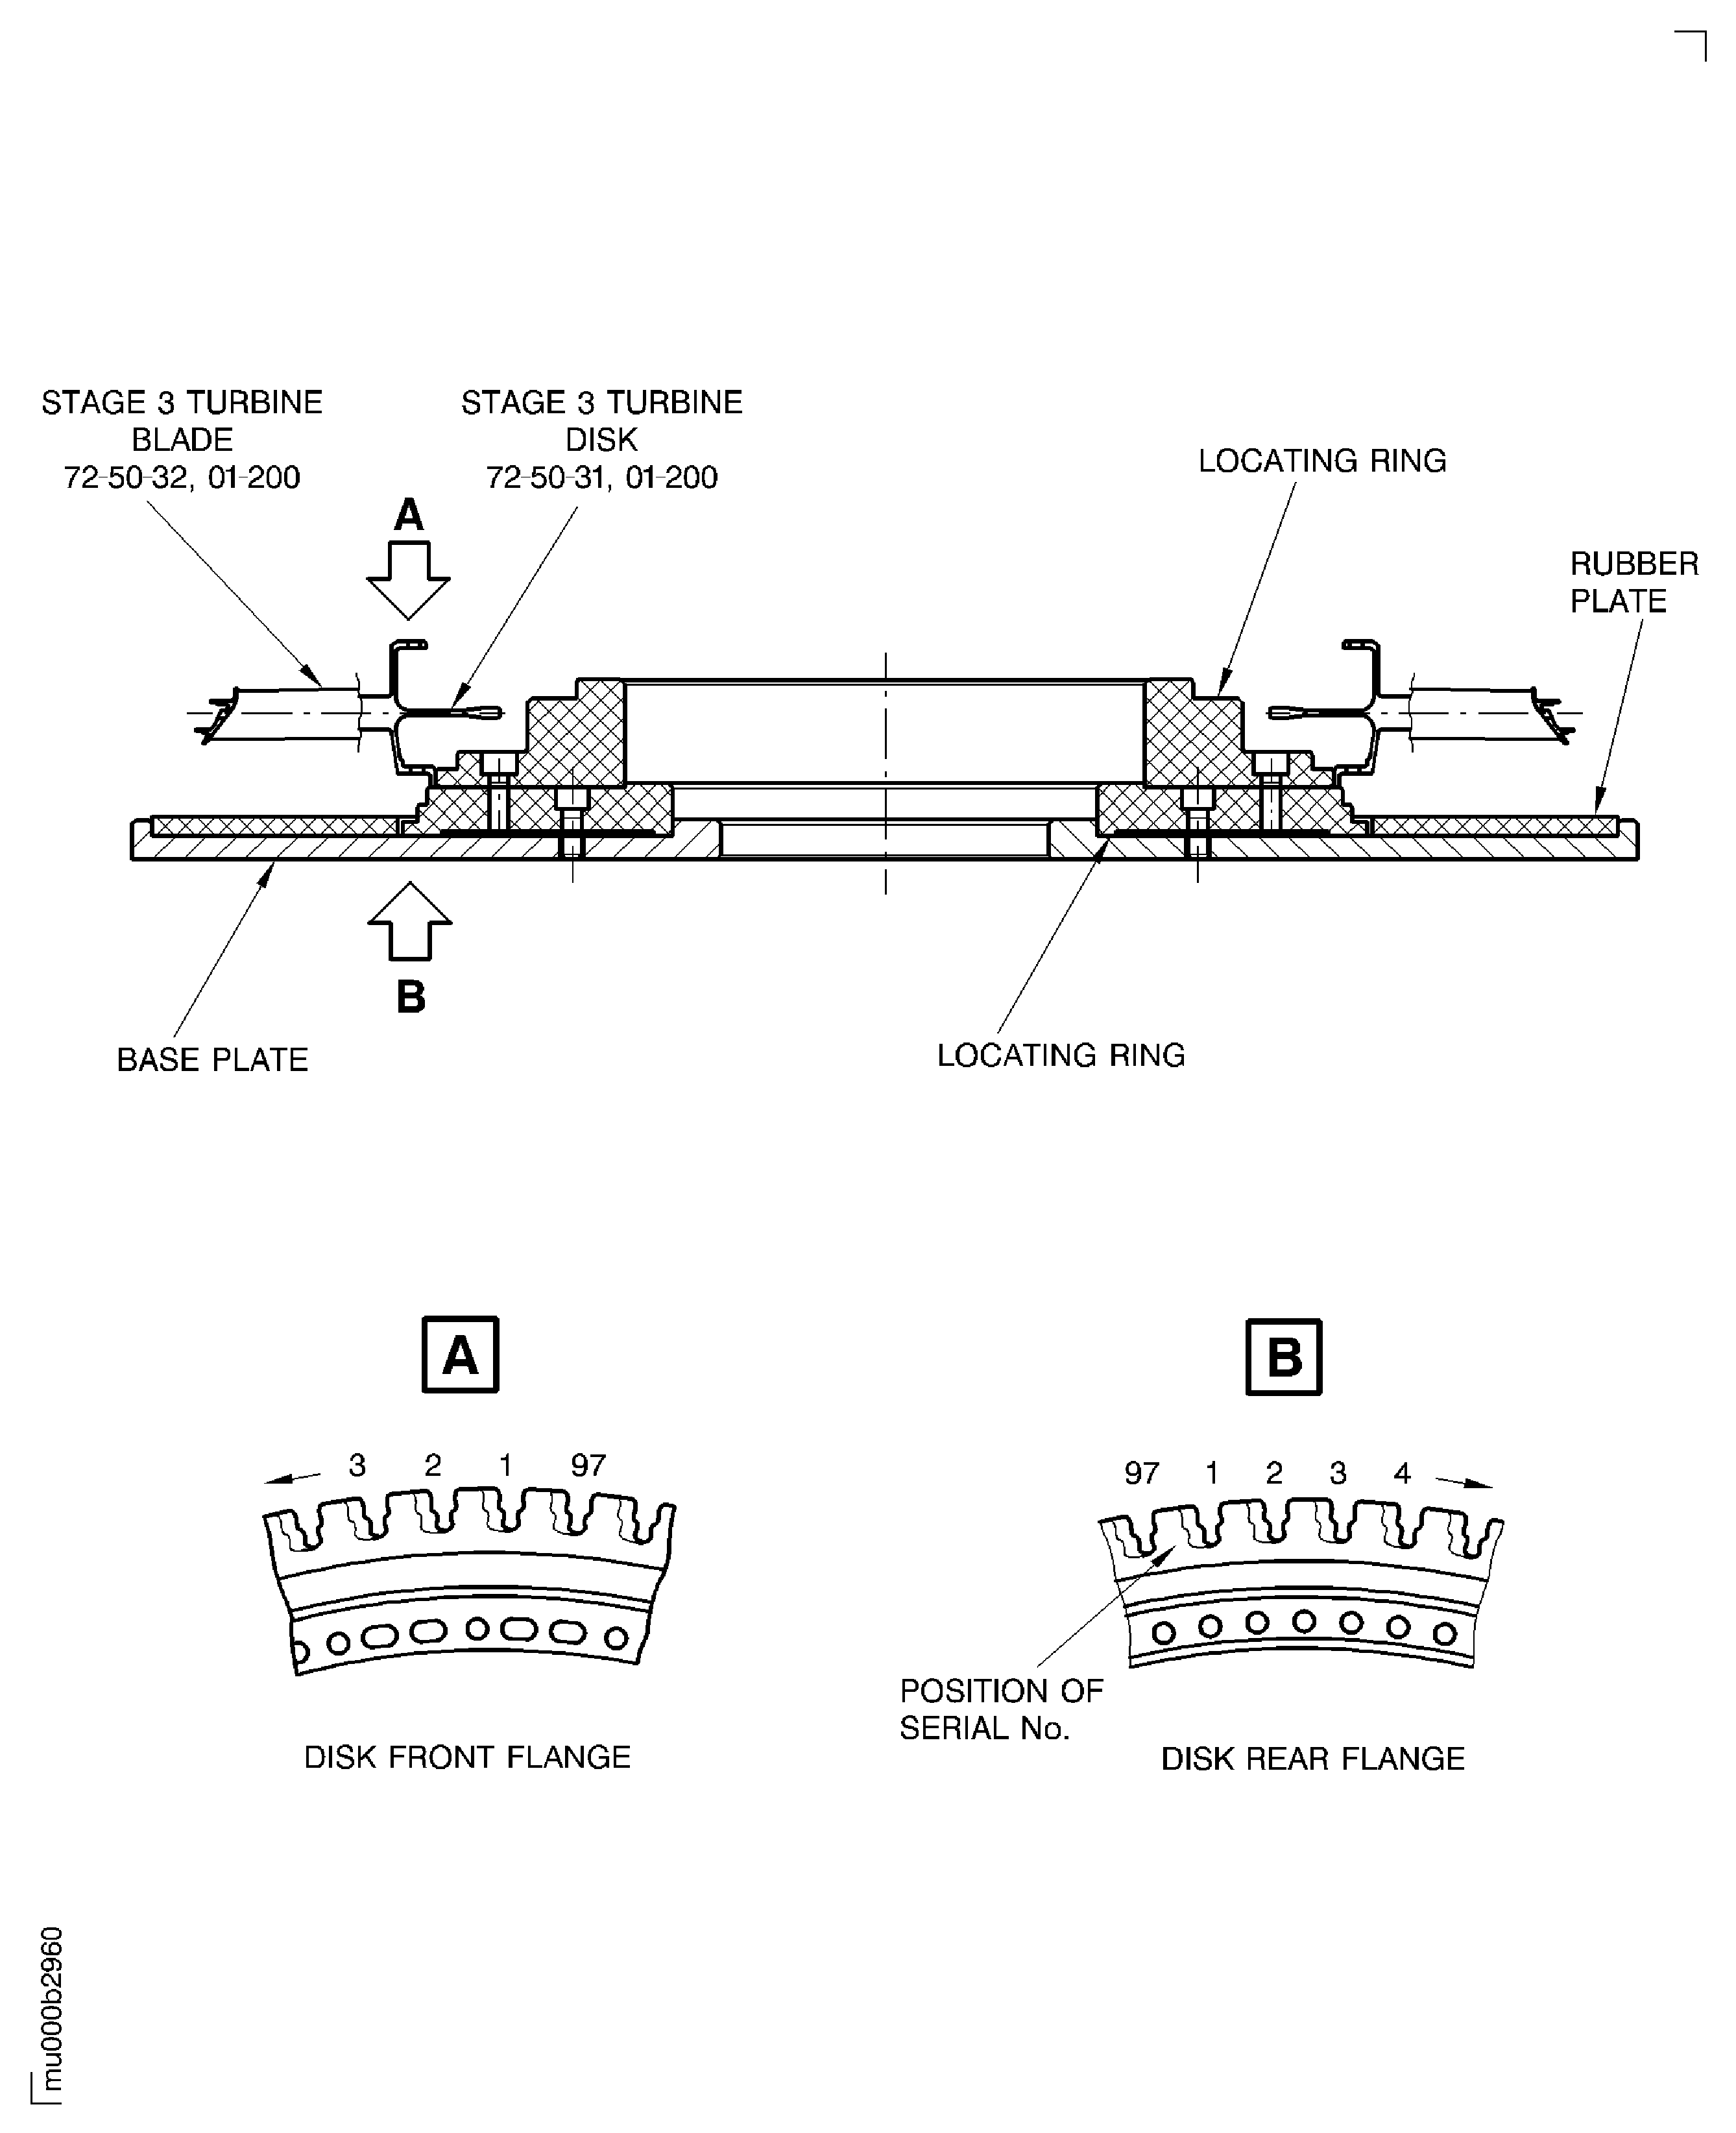
    3. Identify the disk slot with the disk serial number. The serial number is vibrograved on the rear face of the disk. The groove number one is the first groove on the right side of the serial number. Make a mark to the groove number one at the front side. Use CoMat 02-129 MARKER.

    4. NOTE

      Make sure that you use the correct locating ring of the IAE 1M14153 Assy/disassy stand 1 off for the stage 3 disk.

      Put the stage 3 turbine disk on the IAE 1M14153 Assy/disassy stand 1 off, turbine disk front flange upwards.

    5. NOTE

      The turbine blade identification number is the same as the blade identification number at the blade distribution protocol.

      Insert the first stage 3 turbine blade in accordance with the blade distribution protocol in to the groove number one.

    6. Insert the remaining turbine blades in accordance with the blade distribution protocol. Work in counterclockwise direction look to the front side of the disk and insert blades helical in to the grooves.

    7. Lightly hit the blades at the blade roots. Operate stepwise and in counter clockwise direction to engage the blades. Move stepwise the support of the assy/disassy stand upwards. Use the IAE 1M14079 Plastic wedge 1 off and a soft headed mallet.

    8. Repeat Step until all the blades are fully engaged in to the grooves of the disk. Make sure that the hook from each turbine blade root is in contact with the turbine disk front face.

    9. Inspect the gap at the stage 3 turbine blade inner platforms. Use a torch light. If you can not see a gap, use a feeler gage to measure the correct gap (minimum thickness 0.00118 in. (0.03 mm)).

    1. SUBTASK 72-50-30-440-054-A00 V2500-A1 Install the Clamping Ring on to the Stage 3 Turbine Disk

    2. Refer to Figure.

    3. Install the two halves of the IAE 1M14078 Clamping ring 1 off to the stage 3 turbine disk.

    4. Connect the two halves with the single acting ball lock pin.

    5. Attach the clamping ring with the hand knob.

    6. Tighten the hand knob.

    1. SUBTASK 72-50-30-440-054-B00 V2500-A5 Install the Clamping Ring on to the Stage 3 Turbine Disk

    2. Refer to Figure.

    3. Install the two halves of the IAE 1M14142 Clamping ring 1 off to the stage 3 turbine disk.

    4. Connect the two halves with the single acting ball lock pin.

    5. Attach the clamping ring with the hand knob.

    6. Tighten the hand knob.

    1. SUBTASK 72-50-30-440-055 Install the Stage 3 Turbine Disk on to the Balancing Machine

    2. Refer to Figure.

      1. Make sure that the set screw, part of the IAE 1M14020 Balancing base plate 1 off, is correctly adjusted.

      2. Use hoist equipment. Lower the balancing base plate on rack pallet. Remove hoist equipment.

      3. Use hoist equipment. Install the IAE 1M14022 Balancing fixture disk 1 off on to the balancing base plate. Align the TOP marks.

      4. Measure Dimension A on the balancing fixture sleeve.

      5. Measure Dimension B from the balancing fixture disk to the set screw, part of the balancing base plate. Dimension B must be equal to Dimension A plus set Dimension S.

      6. Use hoist equipment. Remove the balancing fixture disk.

      7. Adjust the set screw to achieve set Dimension S if necessary. Secure the set screw with the nut. Control the Dimension B again. Do the Step, Step, and Step.

    3. Use hoist equipment. Install the balancing fixture base plate to the balancing machine. Align the TOP marks. Remove hoist equipment. Install the three bolts. Tighten the bolts.

    4. Use hoist equipment. Install the balancing fixture disk to the balancing fixture base plate. Align the TOP marks. Remove hoist equipment.

    5. Attach the balancing fixture disk with the 12 screws to the balancing fixture base plate. Tighten the screws.

    6. NOTE

      1. The balancing fixture sleeve is used to safety the LP turbine rotor assembly in radial position. This is achieved when the balancing fixture disk is pushed at the inner diameter against the balancing base plate. The caused deflection of the balancing fixture disk goes to a small diameter reduction at the abutment face to the LPT rotor disk rear snap diameter. Correct adjustment of the set screw, part of the balancing base plate prevents overstressing.

      2. Do not tighten the balancing fixture sleeve bolt at this moment.

      Install the IAE 1M14021 Balancing fixture sleeve 1 off to the balancing fixture disk. Turn the threaded end of the bolt, part of the balancing fixture sleeve in to the bushing, part of the balancing base plate. Align the installation groove of the balancing fixture sleeve with the dowel pin of the balancing fixture disk.

    7. Move the three slide blocks, part of balancing fixture disk in the inner position.

    8. Install the IAE 1M14156 Lifting fixture 1 off to hoist equipment.

    9. Attach the lifting fixture to the clamping ring. Lift the stage 3 turbine disk carefully above the installed balancing tool assembly. Turn the stage 3 turbine disk rear flange down. Lower it carefully on to the installed balancing fixture disk.

    10. Align the serial number (TOP mark of the turbine disk) to the TOP mark of the balancing fixture disk.

    11. NOTE

      Do not apply too much force to the stage 3 turbine disk.

      Make sure that the three dowel pins of the balancing fixture disk are correctly engaged in to the turbine disk bolt holes.

    12. Tighten the bolt of the balancing fixture sleeve until the bolt front end touches the set screw.

    13. Move the three slide blocks, part of the balancing fixture disk in the outer position.

    1. SUBTASK 72-50-30-440-056 Remove the Clamping Ring from the Stage 3 Turbine Disk

    2. Refer to Figure.

    3. Remove the lifting fixture and the hoist equipment from the clamping ring.

    4. Loosen the hand knob and disconnect the single acting ball lock pin at the clamping ring.

    5. Remove the two halves of the clamping ring from the stage 3 turbine disk and blades.

    1. SUBTASK 72-50-30-440-057-A00 V2500-A1 Balance the Stage 3 Turbine Disk and Blades

    2. Make sure that all tools are correctly installed on to the balancing machine.

    3. Adjust the balance radius for the stage 3 turbine disk 12.52 in. (318 mm) at the balancing machine.

    4. NOTE

      The direction of the revolution on the balancing machine must be in counterclockwise direction.

      Do static unbalance check of the stage 3 turbine disk at 900 rpm.

    5. Install the IAE 1M14078 Clamping ring 1 off on to the stage 3 turbine disk. Refer to Step.

    6. Install the IAE 1M14156 Lifting fixture 1 off to the clamping ring. Use hoist equipment.

    7. Move the three slide blocks of the balancing fixture disk in the inner position.

    8. Loosen the bolt of the balancing fixture sleeve.

    9. Make sure that the stage 3 turbine disk is free from the tool assembly.

    10. Lift the stage 3 turbine disk carefully above of the tool assembly. Lower the stage 3 turbine disk and install it 180 degrees opposite of the balance position in to the tool assembly.

    11. Remove the lifting fixture from the clamping ring. Remove the clamping ring. Refer to Step.

    12. Tighten the bolt of the balancing fixture sleeve.

    13. Move the slide blocks of the balancing fixture disk in the outer position.

    14. Repeat Step.

      1. Remaining unbalance must not be more than 1.0 ozin (720 gmm). If the unbalance is within the limits, continue with Step. If not, correct the unbalance by blade selection as follows:

      2. Use CoMat 02-129 MARKER to mark the unbalance and the position on the blades.

      3. Release the stage 3 turbine disk from the balancing machine. Refer to Step through Step.

      4. Lift the stage 3 turbine disk carefully from the balancing machine and put it on the assy/disassy stand, front flange upwards.

      5. Remove the lifting fixture, the hoist equipment and the clamping ring.

      6. Lightly hit the blades at the blade roots. Operate stepwise and in clockwise direction to disengage the blades. Use the IAE 1M14079 Plastic wedge 1 off and soft headed mallet.

      7. Change the blades marked before with the blades located 180 degrees on the opposite side of the disk.

      8. Insert the changed blades in to the disk grooves. Refer to Step through Step. Write the changed blades down to the blade distribution protocol.

      9. Install the clamping ring to the stage 3 turbine disk. Refer to Step. Remove the quick acting knob and the bar.

      10. Install the stage 3 turbine disk to the balancing machine. Refer to Step.

      11. Remove the clamping ring. Refer to Step.

      12. Repeat Step through Step.

    15. Write the unbalance down to the stage 3 turbine disk blade distribution protocol.

    1. SUBTASK 72-50-30-440-057-B00 V2500-A5 Balance the Stage 3 Turbine Disk and Blades

    2. Make sure that all tools are correctly installed on to the balancing machine.

    3. Adjust the balance radius for the stage 3 turbine disk 12.52 in. (318 mm) at the balancing machine.

    4. NOTE

      The direction of the revolution on the balancing machine must be in counterclockwise direction.

      Do static unbalance check of the stage 3 turbine disk at 900 rpm.

    5. Install the IAE 1M14142 Clamping ring 1 off on to the stage 3 turbine disk. Refer to Step.

    6. Install the IAE 1M14156 Lifting fixture 1 off to the clamping ring. Use hoist equipment.

    7. Move the three slide blocks of the balancing fixture disk in the inner position.

    8. Loosen the bolt of the balancing fixture sleeve.

    9. Make sure that the stage 3 turbine disk is free from the tool assembly.

    10. Lift the stage 3 turbine disk carefully above of the tool assembly. Lower the stage 3 turbine disk and install it 180 degrees opposite of the balance position in to the tool assembly.

    11. Remove the lifting fixture from the clamping ring. Remove the clamping ring. Refer to Step.

    12. Tighten the bolt of the balancing fixture sleeve.

    13. Move the slide blocks of the balancing fixture disk in the outer position.

    14. Repeat Step.

      1. Remaining unbalance must not be more than 1.0 ozin (720 gmm). If the unbalance is within the limits, continue with Step. If not, correct the unbalance by blade selection as follows:

      2. Use CoMat 02-129 MARKER to mark the unbalance and the position on the blades.

      3. Release the stage 3 turbine disk from the balancing machine. Refer to Step through Step.

      4. Lift the stage 3 turbine disk carefully from the balancing machine and put it on the assy/disassy stand, front flange upwards.

      5. Remove the lifting fixture, the hoist equipment and the clamping ring.

      6. Lightly hit the blades at the blade roots. Operate stepwise and in clockwise direction to disengage the blades. Use the IAE 1M14079 Plastic wedge 1 off and a soft headed mallet.

      7. Change the blades marked before with the blades located 180 degrees on the opposite side of the disk.

      8. Insert the changed blades in to the disk grooves. Refer to Step through Step. Write the changed blades down to the blade distribution protocol.

      9. Install the clamping ring to the stage 3 turbine disk. Refer to Step. Remove the quick acting knob and the bar.

      10. Install the stage 3 turbine disk to the balancing machine. Refer to Step.

      11. Remove the clamping ring. Refer to Step.

      12. Repeat Step through Step.

    15. Write the unbalance down to the stage 3 turbine disk blade distribution protocol.

    1. SUBTASK 72-50-30-440-058-A00 V2500-A1 Remove the Stage 3 Turbine Disk from the Balancing Machine

    2. Move the slide blocks of the balancing fixture disk in the inner position.

    3. Remove the identification numbers from the turbine blades and the mark on the disk groove number one. Use CoMat 02-069 DISPOSABLE CLEANING TISSUES or clean cloth and CoMat 01-031 ACETONE (CH3)2CO.

    4. Loosen the bolt of the balancing fixture sleeve.

    5. Install the IAE 1M14078 Clamping ring 1 off to the stage 3 turbine disk. Refer to Step.

    6. Install the IAE 1M14156 Lifting fixture 1 off to the clamping ring. Use hoist equipment.

    7. Make sure that the stage 3 turbine disk is free from the tool assembly. Lift the turbine disk. Turn the turbine disk front flange in the upper position. Lower the turbine disk carefully on rack pallet.

    8. Remove the hoist equipment and the lifting fixture from the clamping ring.

    1. SUBTASK 72-50-30-440-058-B00 V2500-A5 Remove the Stage 3 Turbine Disk from the Balancing Machine

    2. Move the slide blocks of the balancing fixture disk in the inner position.

    3. Remove the identification numbers from the turbine blades and the mark on the disk groove number one. Use CoMat 02-069 DISPOSABLE CLEANING TISSUES or clean cloth and CoMat 01-031 ACETONE (CH3)2CO.

    4. Loosen the bolt of the balancing fixture sleeve.

    5. Install the IAE 1M14142 Clamping ring 1 off to the stage 3 turbine disk. Refer to Step.

    6. Install the IAE 1M14156 Lifting fixture 1 off to the clamping ring. Use hoist equipment.

    7. Make sure that the stage 3 turbine disk is free from the tool assembly. Lift the turbine disk. Turn the turbine disk front flange in the upper position. Lower the turbine disk carefully on rack pallet.

    8. Remove the hoist equipment and the lifting fixture from the clamping ring.

    1. SUBTASK 72-50-30-440-059 Remove the Tools from the Balancing Machine

    2. Refer to Figure.

    3. Turn of the bolt of the balancing fixture sleeve. Remove the balancing fixture sleeve from the balancing fixture disk.

    4. Remove the 12 screws which attach the balancing fixture disk at the balancing base plate.

    5. Use hoist equipment. Remove the balancing fixture disk from the balancing base plate.

    6. Remove the bolts which attach the balancing base plate to the balancing machine.

    7. Use hoist equipment. Remove the balancing base plate from the balancing machine.

    1. SUBTASK 72-50-30-440-060 Install the Stage 3 Air Seal to the Stage 3 Turbine Disk

    2. Refer to Figure and Figure.

    3. Use the IAE 1M14156 Lifting fixture 1 off with hoist equipment. Install the lifting fixture to the installed clamping ring.

    4. Lift the stage 3 turbine disk above the IAE 1M14030 Assembly trolley 1 off.

    5. Turn the turbine disk, front flange in the upper position. Lower the turbine disk on to the assembly trolley.

    6. Remove the lifting fixture and the hoist equipment.

    7. Remove the clamping ring from the stage 3 turbine disk, refer to Step.

    8. Install the IAE 1M14061 Heating fixture 1 off to the IAE 1M14074 Heating fixture carrier 1 off. Attach the heating fixture to the heating fixture carrier with the two hand knobs.

    9. Install the assembled heating fixture to the stage 3 turbine disk front flange.

    10. Connect the IAE 6F10027 Heater control unit 1 off to the heating fixture.

    11. CAUTION

      DO NOT EXCEED MAXIMUM TEMPERATURE OF 464 DEG F (240 DEG C) OTHERWISE TURBINE SEAL CAN BE DAMAGED.

      Operate the heating fixture. Increase the temperature of the disk until a differential temperature to the ambient temperature of 338 deg F (170 deg C) is reached.

    12. WARNING

      USE PROTECTIVE GLOVES.

      If the stage 3 turbine disk has the correct temperature disconnect the heater control unit from the heater.

    13. Remove the heating fixture with the heating fixture carrier from the stage 3 turbine disk.

    14. Install the IAE 1M14132 Guide pin 1 off in to a bolt hole of the stage 3 turbine disk front flange. Safety the guide pin with the IAE 1M14049 Position retainer 1 off.

    15. NOTE

      1. The high points of the parts are identified by the delta symbol in a circle.

      2. The turbine disk stage 3 and the air seal stage 3 must be assembled so that the high points are 180 degrees apart.

      Move the stage 3 air seal above the stage 3 turbine disk.

    16. Install the stage 3 air seal on to the stage 3 turbine disk.

    17. CAUTION

      HOLD THE INSTALLATION BOLTS IN THEIR POSITION WHEN YOU INSTALL THE INSTALLATION NUTS ON TO THE INSTALLATION BOLTS. DO NOT TURN THE INSTALLATION BOLTS OR MAKE TO-AND-FROM MOVEMENTS. THE DISK-/INNER AIR SEAL FLANGES CAN BE DAMAGED BY SCORES.

      Install 60 degrees apart six installation bolts with the head up and six installation nuts, parts of the IAE 1M14135 Installation bolt/nut 6 off, to the disk flanges.

    18. Tighten the installation nuts. Use the IAE 1M14055 Special wrench 1 off.

    19. Torque the installation nuts from 119.0 to 133.0 lbfin. (13.5 to 15.0 Nm). Use the IAE 1M14054 Torque wrench adapter 1 off.

    20. Remove the position retainer and the guide pin from the stage 3 disk.

    1. SUBTASK 72-50-30-440-101-A00 V2500-A1: Attach the Stage 3 Airseal and the Stage 3 Disk with the Bolts and the Nuts

    2. Refer to Figure, Figure, and Figure.

    3. Wait until the temperature of the disk flanges decrease to room temperature.

    4. CAUTION

      USE NEW ROTOR BOLTS AND NEW NUTS.

    5. WARNING

      DO NOT GET ANTI-SEIZE PASTE ON YOUR SKIN WHEN YOU LUBRICATE THREADS AND ABUTMENT FACES OF NUTS AND BOLTS. WEAR PROTECTIVE GLOVES.

      1. Lubricate all new bolts and new nuts with CoMat 10-129A ANTI-SEIZE PASTE as follows:

      2. Apply the anti-seize paste on to the thread of all bolts. Use a paint brush to apply the anti-seize paste on to the bolts.

      3. Apply the anti-seize paste on to the mating surface of all nuts. Use a paint brush to apply the anti-seize paste on to the nuts.

    6. CAUTION

      HOLD THE BOLTS IN THEIR POSITION WHEN YOU INSTALL/REMOVE THE NUTS ON TO/FROM THE BOLTS. DO NOT TURN THE BOLTS OR MAKE TO-AND-FROM MOVEMENTS. THE DISK-/INNER AIR SEAL FLANGES AND/OR THE BOLTS CAN BE DAMAGED BY SCORES.
      MAKE SURE THAT THE LOCKING TORQUE OF THE NUTS IS NOT LESS THAN A MINIMUM OF 3.5 LBFIN (0.4 NM). TURN THE NUTS DOWN ON TO THE BOLTS UNTIL FINGER TIGHT. CONTINUE TO TURN THE NUTS WITH A WRENCH. MAKE SURE THAT THE NUTS GIVE SUFFICIENT RESISTANCE. IT SHOWS THAT THE SELF LOCKING PROPERTY IS STILL AVAILABLE.
      IT IS PERMITTED TO USE POWER TOOLS TO TURN THE NUTS ON TO THE REMAINING BOLT THREADS. MAKE SURE THAT THE POWER TOOL IS SET TO A TORQUE VALUE WHICH IS NOT MORE THAN 50 PERCENT OF THE FINAL TORQUE VALUE. THE SPEED MUST BE SLOW TO PREVENT INCREASE OF HEAT, WHICH CAN CAUSE THREAD PICK-UP AND SEIZURE.

      Install 30 new bolts with the head up and the new nuts to the disk flanges. Tighten the nuts on to the bolts with the IAE 1M14055 Special wrench 1 off.

    7. Loosen the six installation nuts.

    8. Remove the installation nuts and installation bolts. Use the IAE 1M14055 Special wrench to remove the installation nuts.

    9. Install the remaining six new bolts with the head up and the six new nuts. Tighten the nuts on to the bolts with the IAE 1M14055 Special wrench.

      1. CAUTION

        MAKE SURE THAT ALL INSTALLATION BOLTS AND INSTALLATION NUTS ARE REPLACED.

        NOTE

        The tightening torque value includes the self locking torque value.

        Torque the nuts with the IAE 1M14054 Torque wrench adapter 1 off in two steps. For the torque sequence, refer to Figure.

      2. Torque the nuts at the first step from 62.0 to 71.0 lbfin (7.0 to 8.0 Nm).

      3. Torque the nuts at the second step from 119.00 to 133.0 lbfin. (13.5 to 15.0 Nm).

    10. Check all nuts again in clockwise direction for final torque. Use the IAE 1M14054 Torque wrench adapter.

    11. Use CoMat 02-129 MARKER and make a dash in a circle on the disk hub at the caused high point location.

    12. Install the IAE 1M14078 Clamping ring 1 off to the stage 3 turbine disk, refer to Step.

    13. Install the IAE 1M14156 Lifting fixture 1 off to the stage 3 turbine disk. Use hoist equipment.

    14. Lift the assembled stage 3 turbine disk from the assembly trolley. Lower it on to a rack pallet, air seal in upper position.

    15. Remove the lifting fixture and the hoist equipment from the clamping ring.

    16. Remove the clamping ring, refer to Step.

    17. Remove the heating fixture from the heating fixture carrier.

    1. SUBTASK 72-50-30-440-101-B00 V2500-A5: Attach the Stage 3 Airseal and the Stage 3 Disk with the Bolts and the Nuts

    2. Refer to Figure and Figure.

    3. Wait until the temperature of the disk flanges decrease to room temperature.

    4. CAUTION

      USE NEW ROTOR BOLTS AND NEW NUTS.

    5. WARNING

      DO NOT GET ANTI-SEIZE PASTE ON YOUR SKIN WHEN YOU LUBRICATE THREADS AND ABUTMENT FACES OF NUTS AND BOLTS. WEAR PROTECTIVE GLOVES.

      1. Lubricate all new bolts and new nuts with CoMat 10-129A ANTI-SEIZE PASTE as follows:

      2. Apply the anti-seize paste on to the thread of all bolts. Use a paint brush to apply the anti-seize paste on to the bolts.

      3. Apply the anti-seize paste on to the mating surface of all nuts. Use a paint brush to apply the anti-seize paste on to the nuts.

    6. CAUTION

      HOLD THE BOLTS IN THEIR POSITION WHEN YOU INSTALL/REMOVE THE NUTS ON TO/FROM THE BOLTS. DO NOT TURN THE BOLTS OR MAKE TO-AND-FROM MOVEMENTS. THE DISK-/INNER AIR SEAL FLANGES AND/OR THE BOLTS CAN BE DAMAGED BY SCORES.
      MAKE SURE THAT THE LOCKING TORQUE OF THE NUTS IS BETWEEN 3.5 AND 30.0 LBFIN (0.4 AND 3.4 NM). TURN THE NUTS DOWN ON TO THE BOLTS UNTIL FINGER TIGHT. CONTINUE TO TURN THE NUTS WITH A WRENCH. MAKE SURE THAT THE NUTS GIVE SUFFICIENT RESISTANCE. IT SHOWS THAT THE SELF LOCKING PROPERTY IS STILL AVAILABLE.
      IT IS PERMITTED TO USE POWER TOOLS TO TURN THE NUTS ON TO THE REMAINING BOLT THREADS. MAKE SURE THAT THE POWER TOOL IS SET TO A TORQUE VALUE WHICH IS NOT MORE THAN 50 PERCENT OF THE FINAL TORQUE VALUE. THE SPEED MUST BE SLOW TO PREVENT INCREASE OF HEAT, WHICH CAN CAUSE THREAD PICK-UP AND SEIZURE.

      Install 30 new bolts with the head up and the new nuts to the disk flanges. Tighten the nuts on to the bolts with the IAE 1M14055 Special wrench 1 off.

    7. Loosen the six installation nuts.

    8. Remove the installation nuts and installation bolts. Use the IAE 1M14055 Special wrench to remove the installation nuts.

    9. Install the remaining six new bolts with the head up and the six new nuts. Tighten the nuts on to the bolts with the IAE 1M14055 Special wrench.

      1. CAUTION

        MAKE SURE THAT ALL INSTALLATION BOLTS AND INSTALLATION NUTS ARE REPLACED.

        NOTE

        The tightening torque value includes the self locking torque value.

        Torque the nuts with the IAE 1M14054 Torque wrench adapter 1 off in two steps. For the torque sequence, refer to Figure.

      2. Torque the nuts at the first step from 62.0 to 71.0 lbfin (7.0 to 8.0 Nm).

      3. Torque the nuts at the second step from 119.00 to 133.0 lbfin. (13.5 to 15.0 Nm).

    10. Check all nuts again in clockwise direction for final torque. Use the IAE 1M14054 Torque wrench adapter.

    11. Use CoMat 02-129 MARKER and make a dash in a circle on the disk hub at the caused high point location.

    12. Install the IAE 1M14142 Clamping ring 1 off to the stage 3 turbine disk, refer to Step.

    13. Install the IAE 1M14156 Lifting fixture 1 off to the stage 3 turbine disk. Use hoist equipment.

    14. Lift the assembled stage 3 turbine disk from the assembly trolley. Lower it on to a rack pallet, air seal in upper position.

    15. Remove the lifting fixture and the hoist equipment from the clamping ring.

    16. Remove the clamping ring, refer to Step.

    17. Remove the heating fixture from the heating fixture carrier.

  1. Figure: PRE SBE 72-0138: V2500-A1 The Stage 3Tturbine Disk and Stage 3 Air - Seal Fits and Clearances

    Sheet 1

    Legend
    PRE SBE 72-0138: V2500-A1 The Stage 3Tturbine Disk and Stage 3 Air - Seal Fits and Clearances

    Sheet 1

    Close

    Figure: SBE 72-0138 V2500-A1: The Stage 3 Turbine Disk and Stage 3 Air Seal Fits and Clearances

    Sheet 2

    Legend
    SBE 72-0138 V2500-A1: The Stage 3 Turbine Disk and Stage 3 Air Seal Fits and Clearances

    Sheet 2

    Close

    Figure: V2500-A5: The Stage 3 Turbine Disk and the Stage 3 Air Seal - Fits and Clearances

    V2500-A5: The Stage 3 Turbine Disk and the Stage 3 Air Seal - Fits and Clearances

    Figure: Calibrate the Moment Weight Equipment for the Stage 3 Turbine Blades

    Calibrate the Moment Weight Equipment for the Stage 3 Turbine Blades
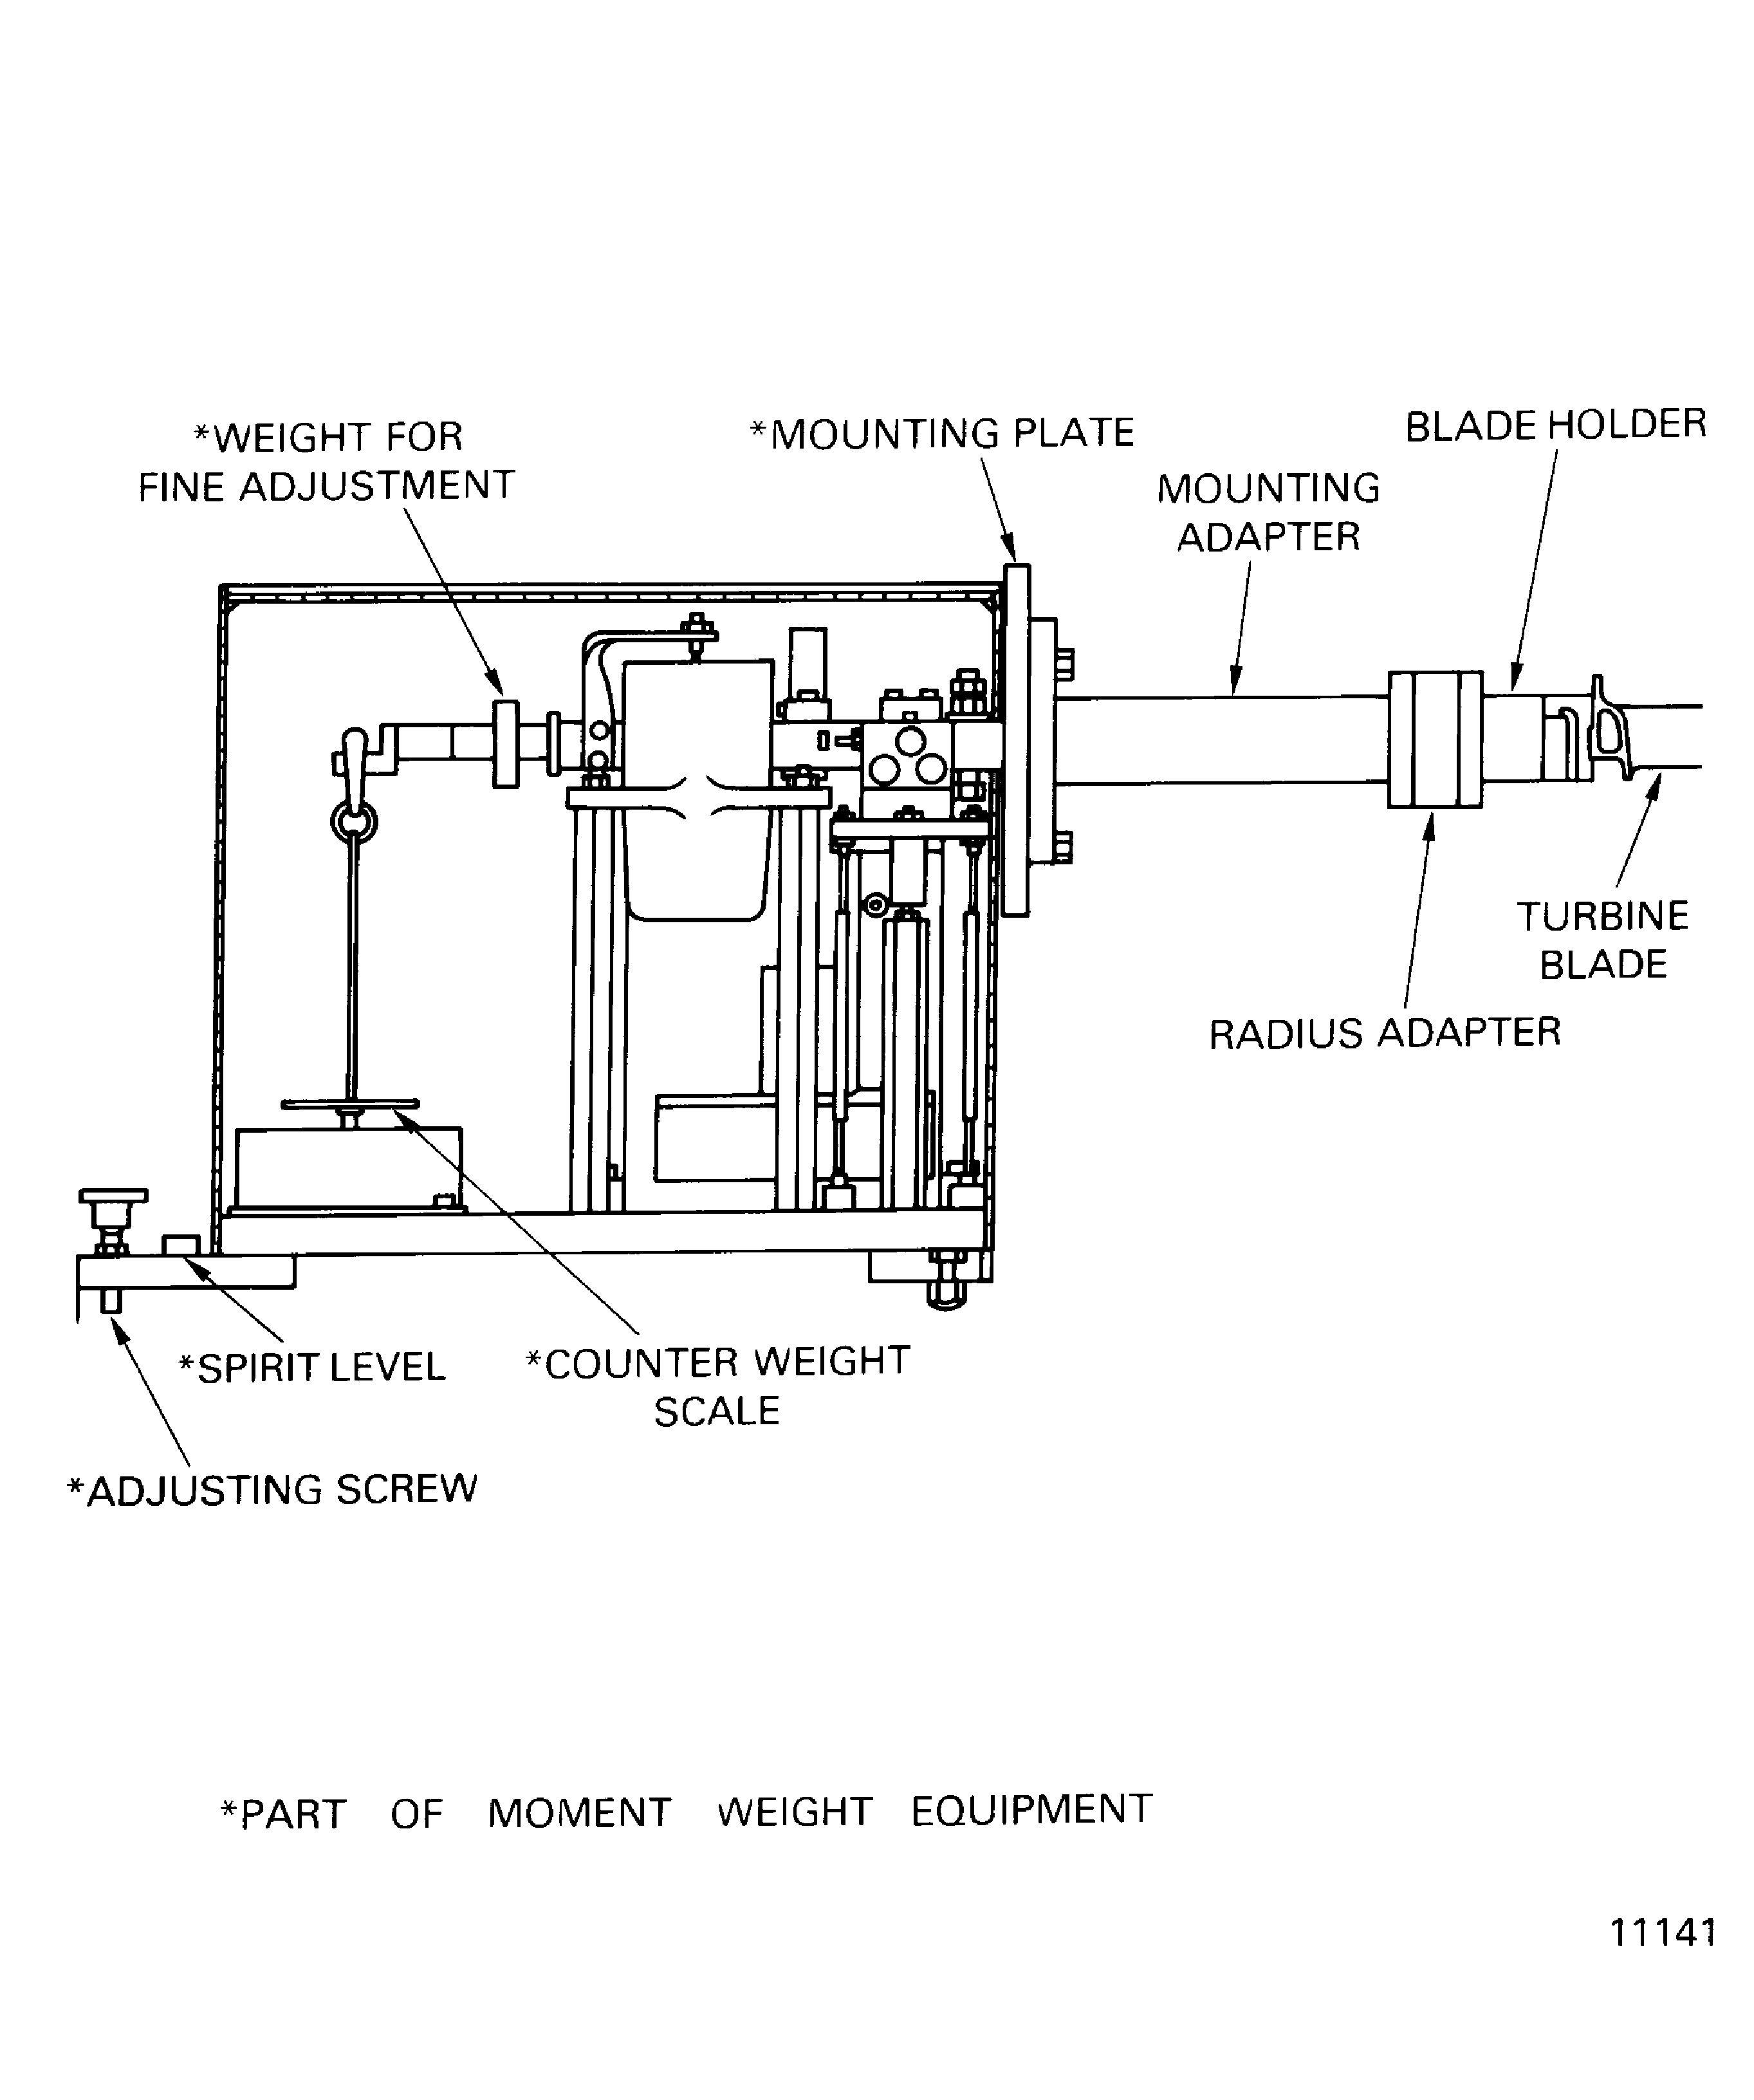
    Figure: Disk-Marking Areas of the Stage 3 Turbine Disk

    Disk-Marking Areas of the Stage 3 Turbine Disk

    Figure: Install the Stage 3 Turbine Blades

    Install the Stage 3 Turbine Blades

    Figure: Turn the Stage 3 Turbine Disk with the Clamping Ring

    Turn the Stage 3 Turbine Disk with the Clamping Ring
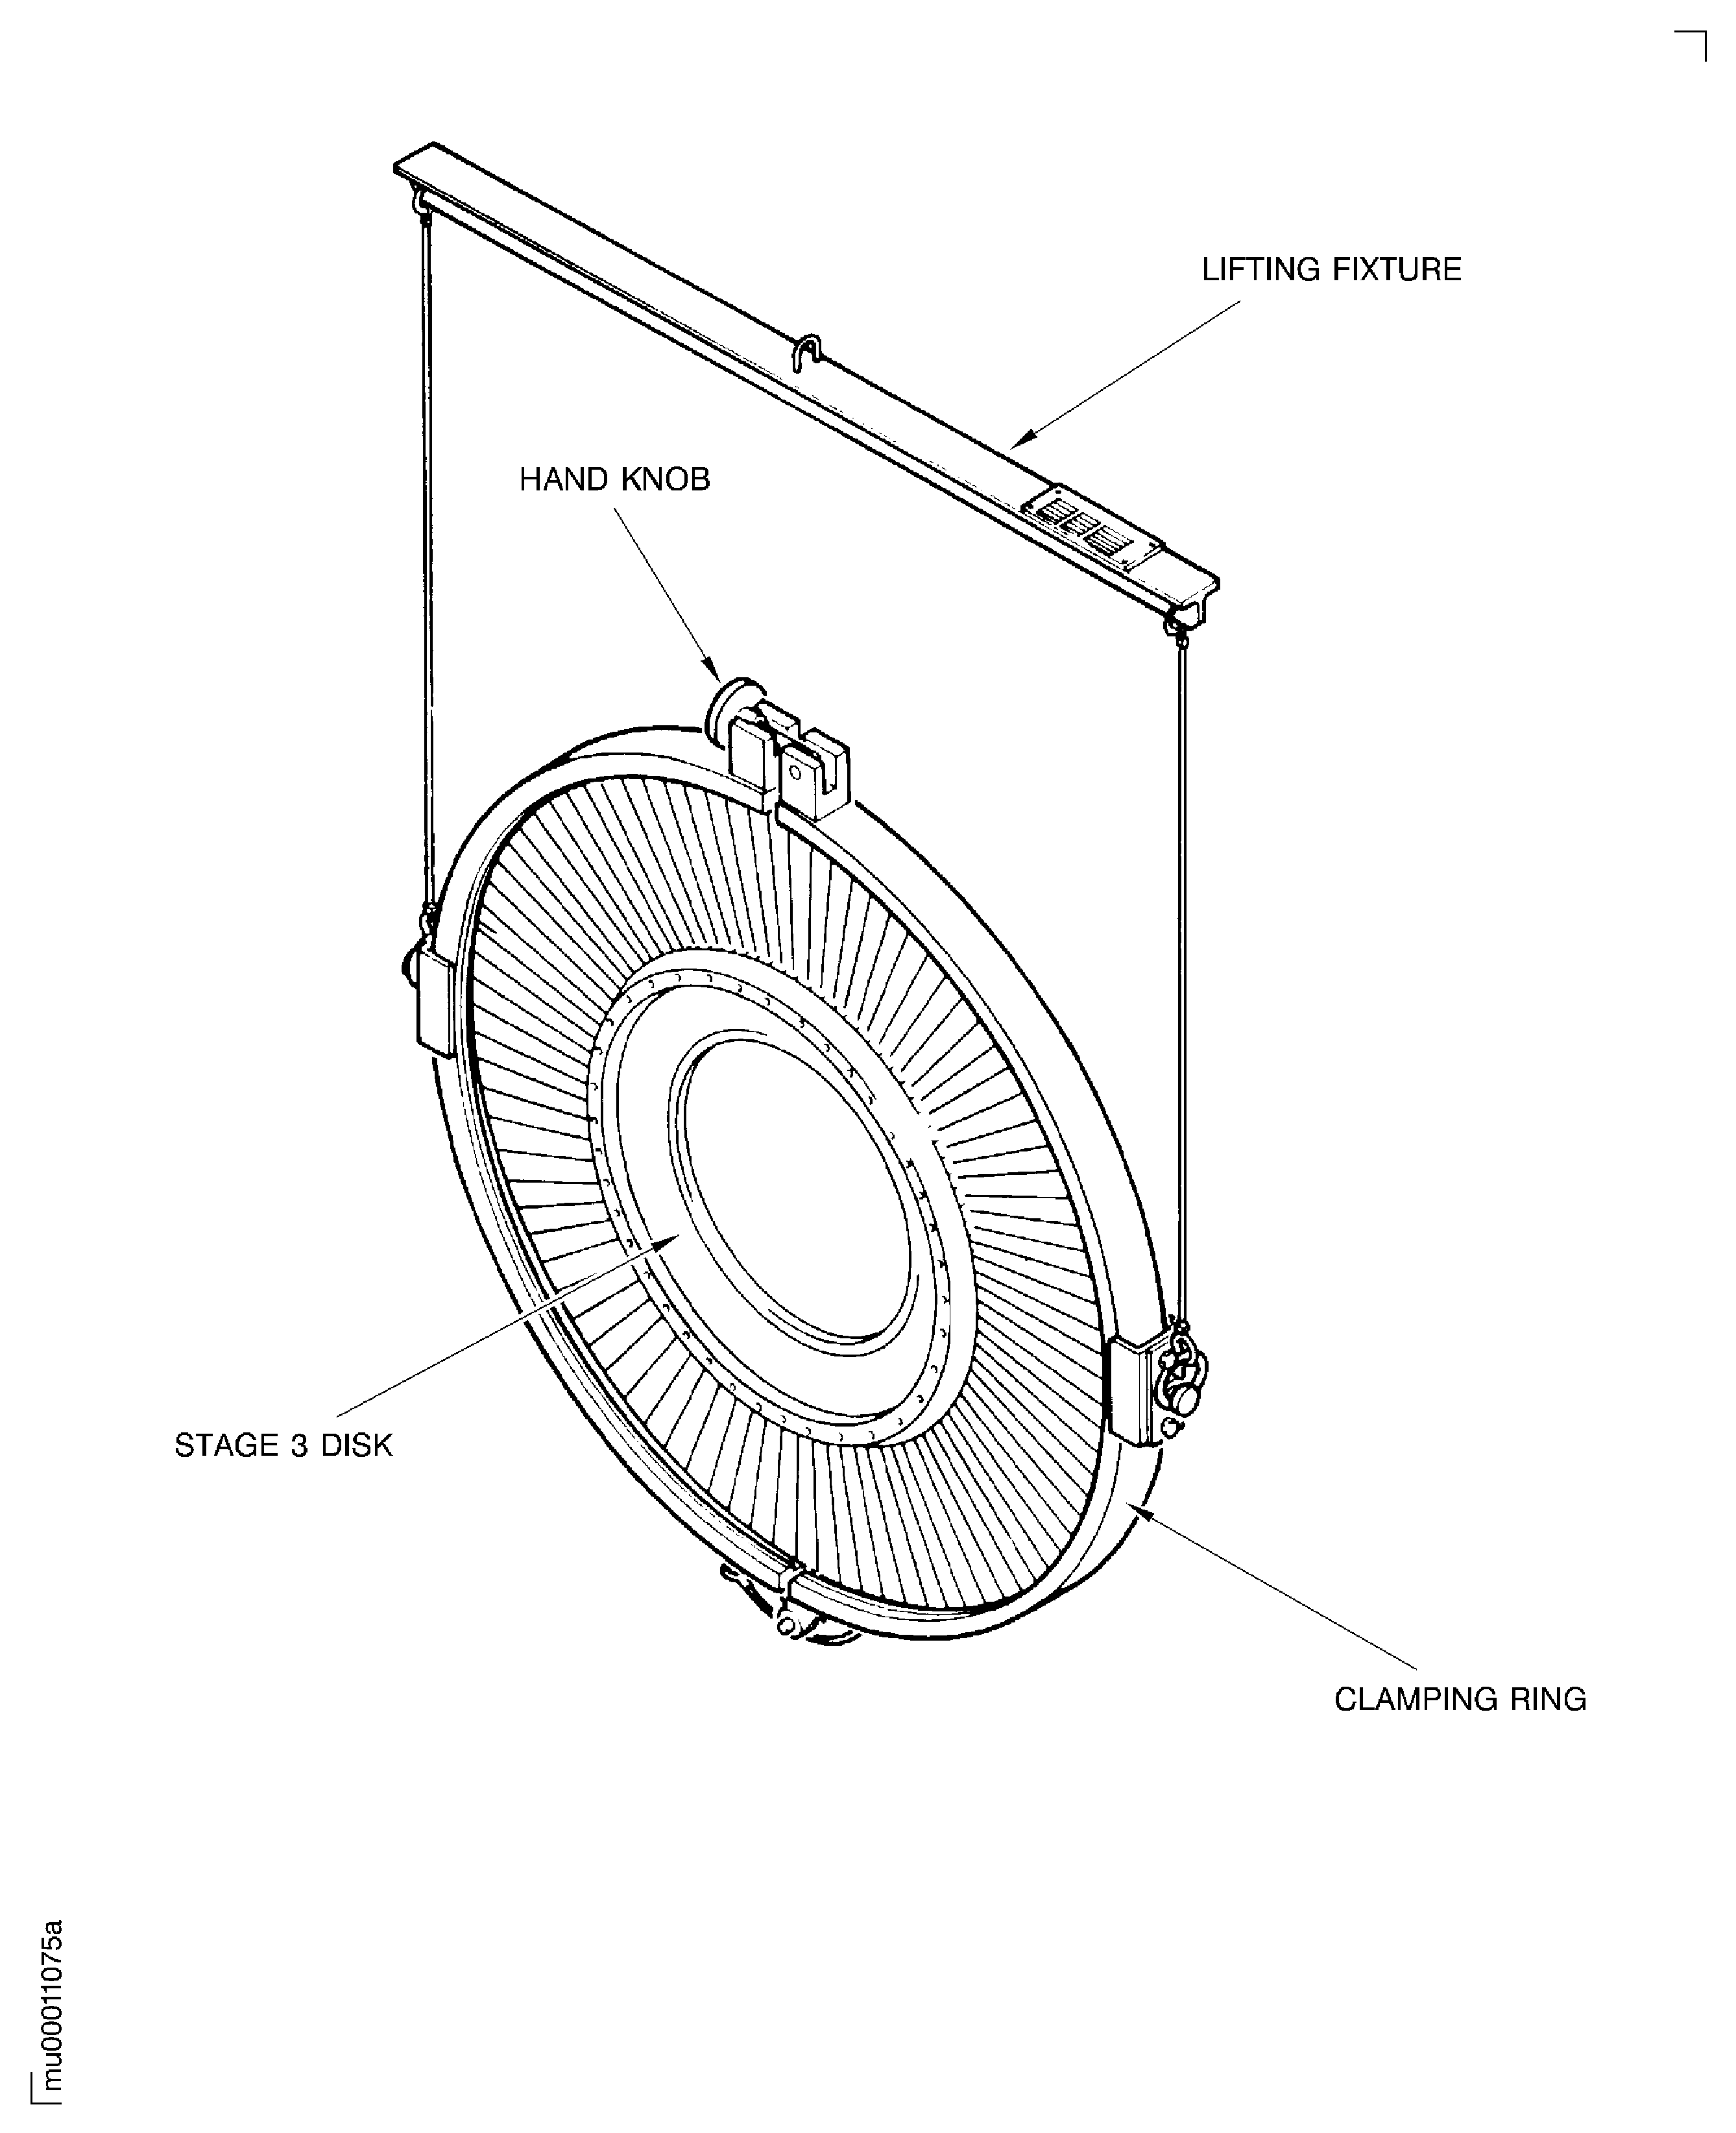
    Figure: Install the Stage 3 Turbine Disk to the Balancing Tool Assembly

    Install the Stage 3 Turbine Disk to the Balancing Tool Assembly
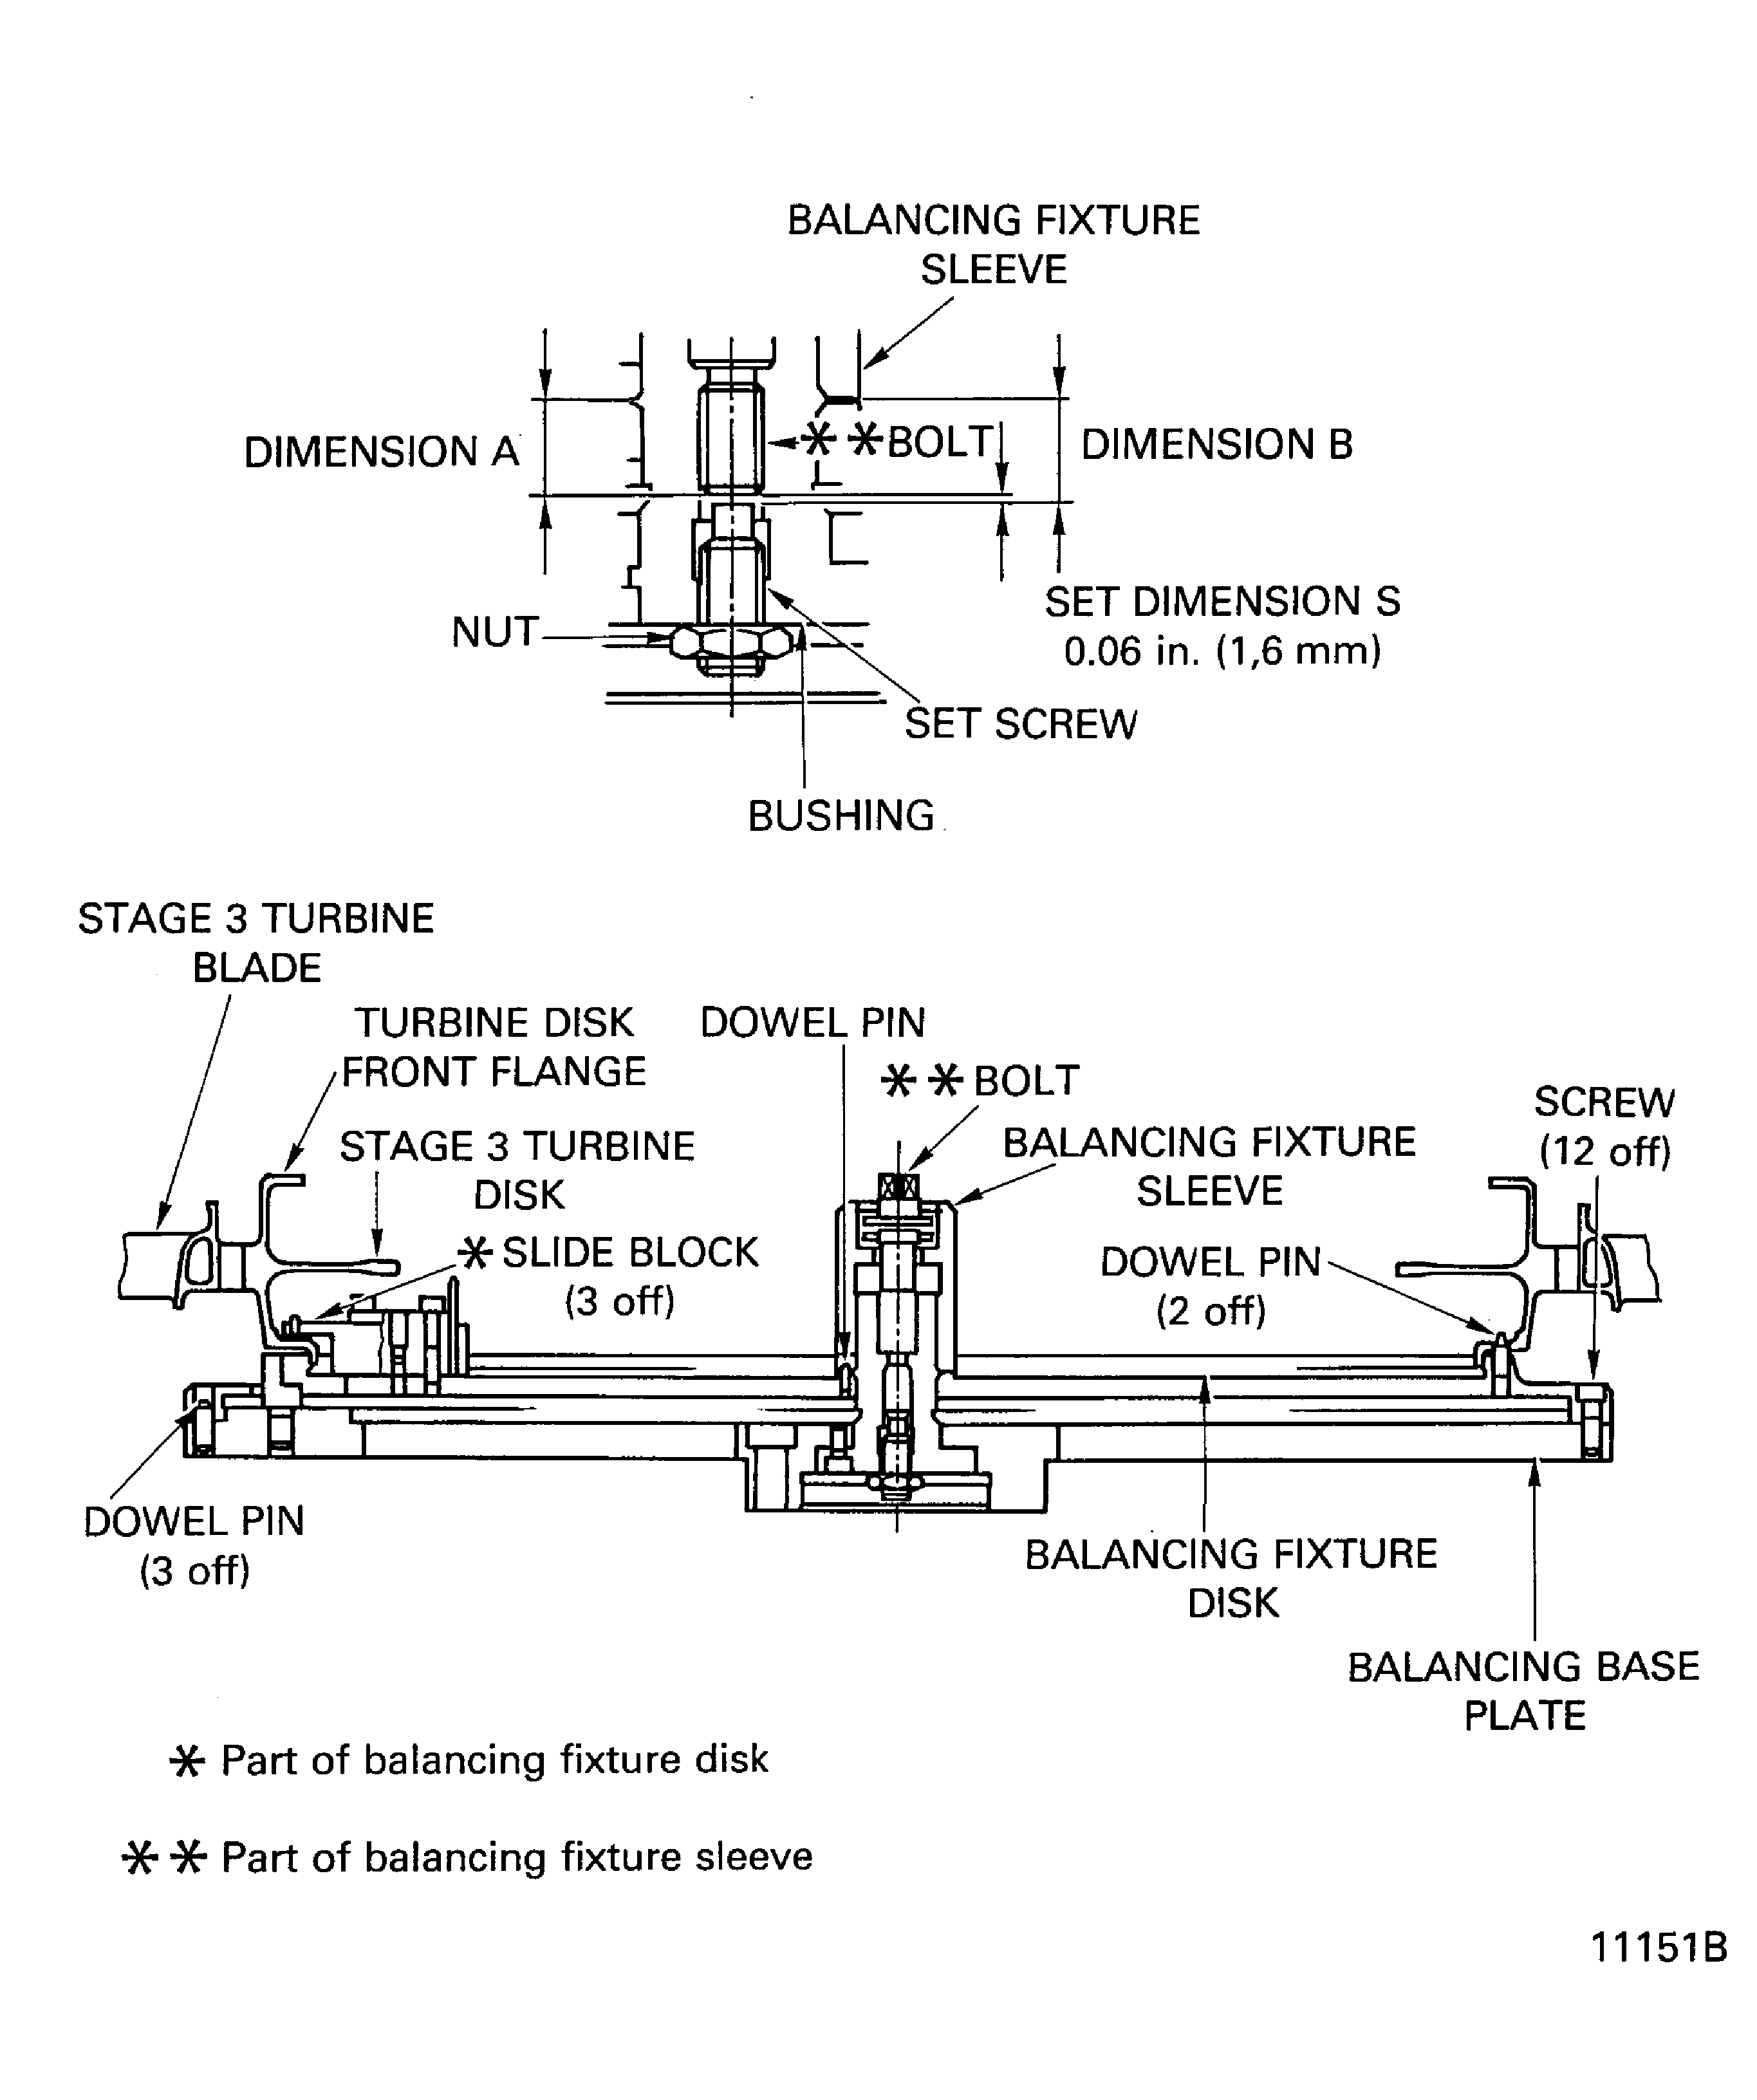
    Figure: Install the Heating Fixture to the Stage 3 Turbine Disk

    Install the Heating Fixture to the Stage 3 Turbine Disk

    Figure: Install the Stage 3 Air Seal to the Stage 3 Turbine Disk

    Install the Stage 3 Air Seal to the Stage 3 Turbine Disk
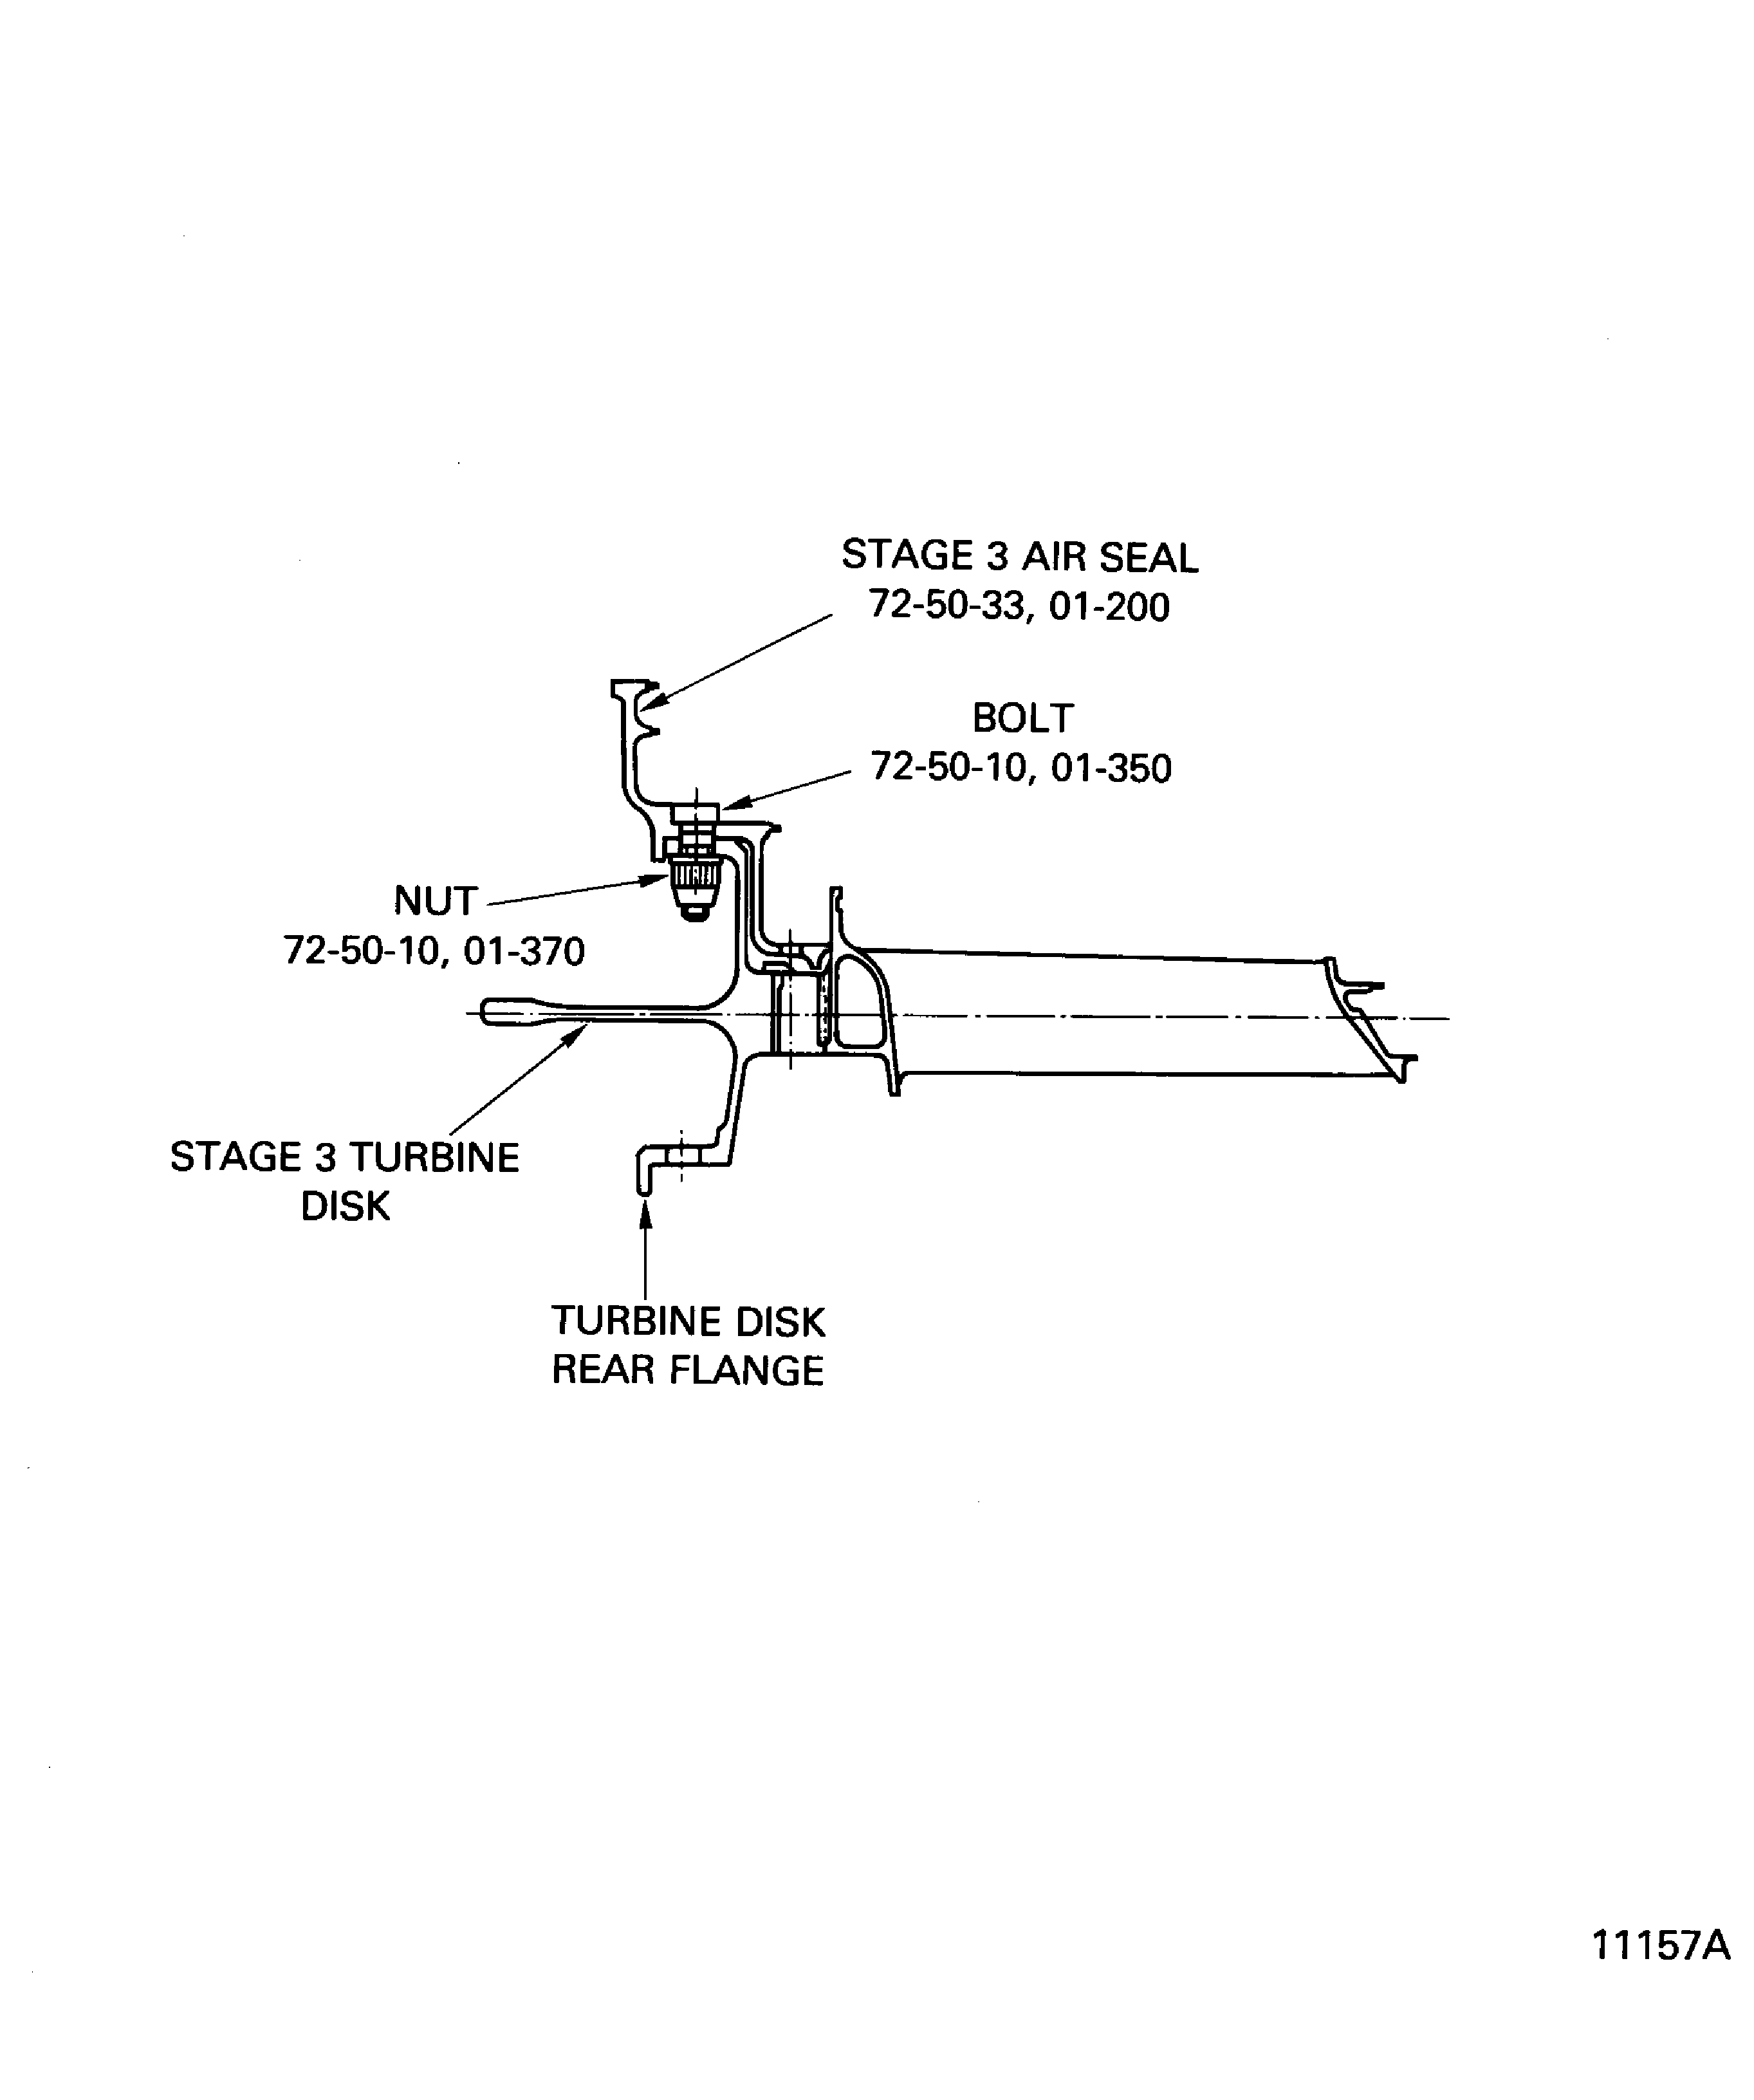
    Figure: Torque Sequence of the Nuts Which Attach the Stage 3 Disk and the Stage 3 Air Seal

    Torque Sequence of the Nuts Which Attach the Stage 3 Disk and the Stage 3 Air Seal
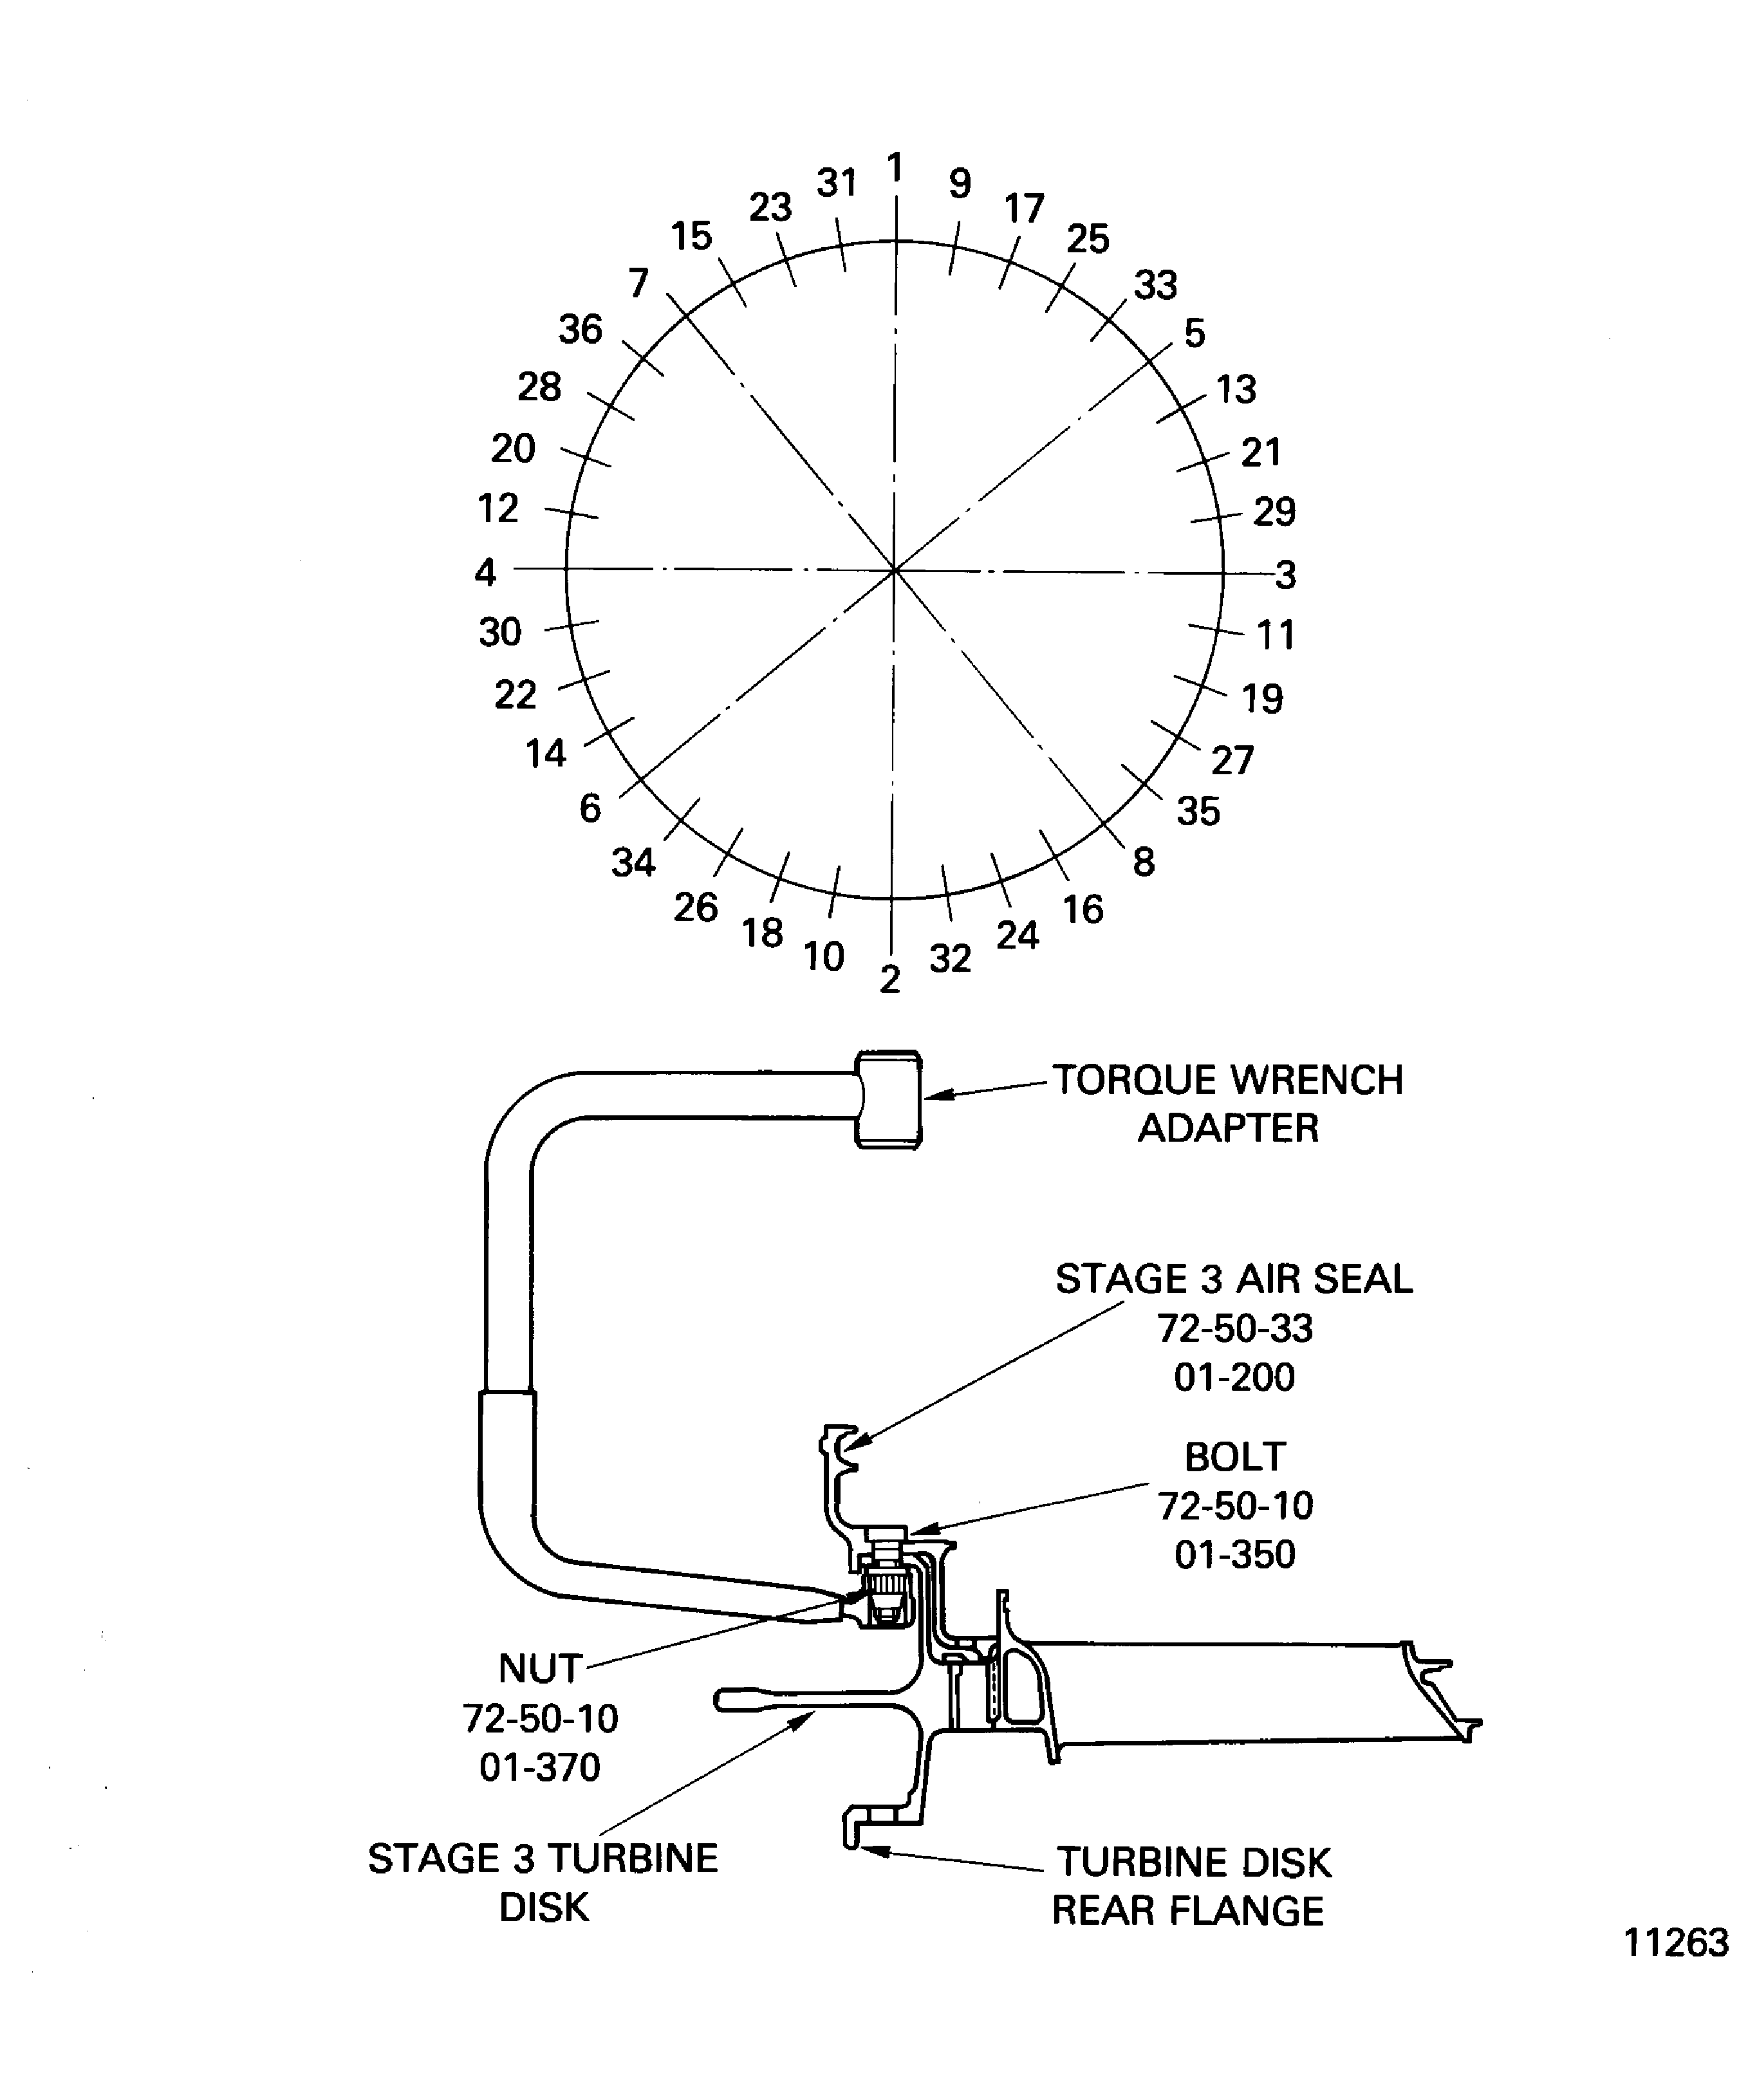
    Figure: Install the Nuts with the Special Wrench

    Install the Nuts with the Special Wrench

    Figure: Lubrication of the Bolt Thread and the Nut Mating Surface

    Lubrication of the Bolt Thread and the Nut Mating Surface
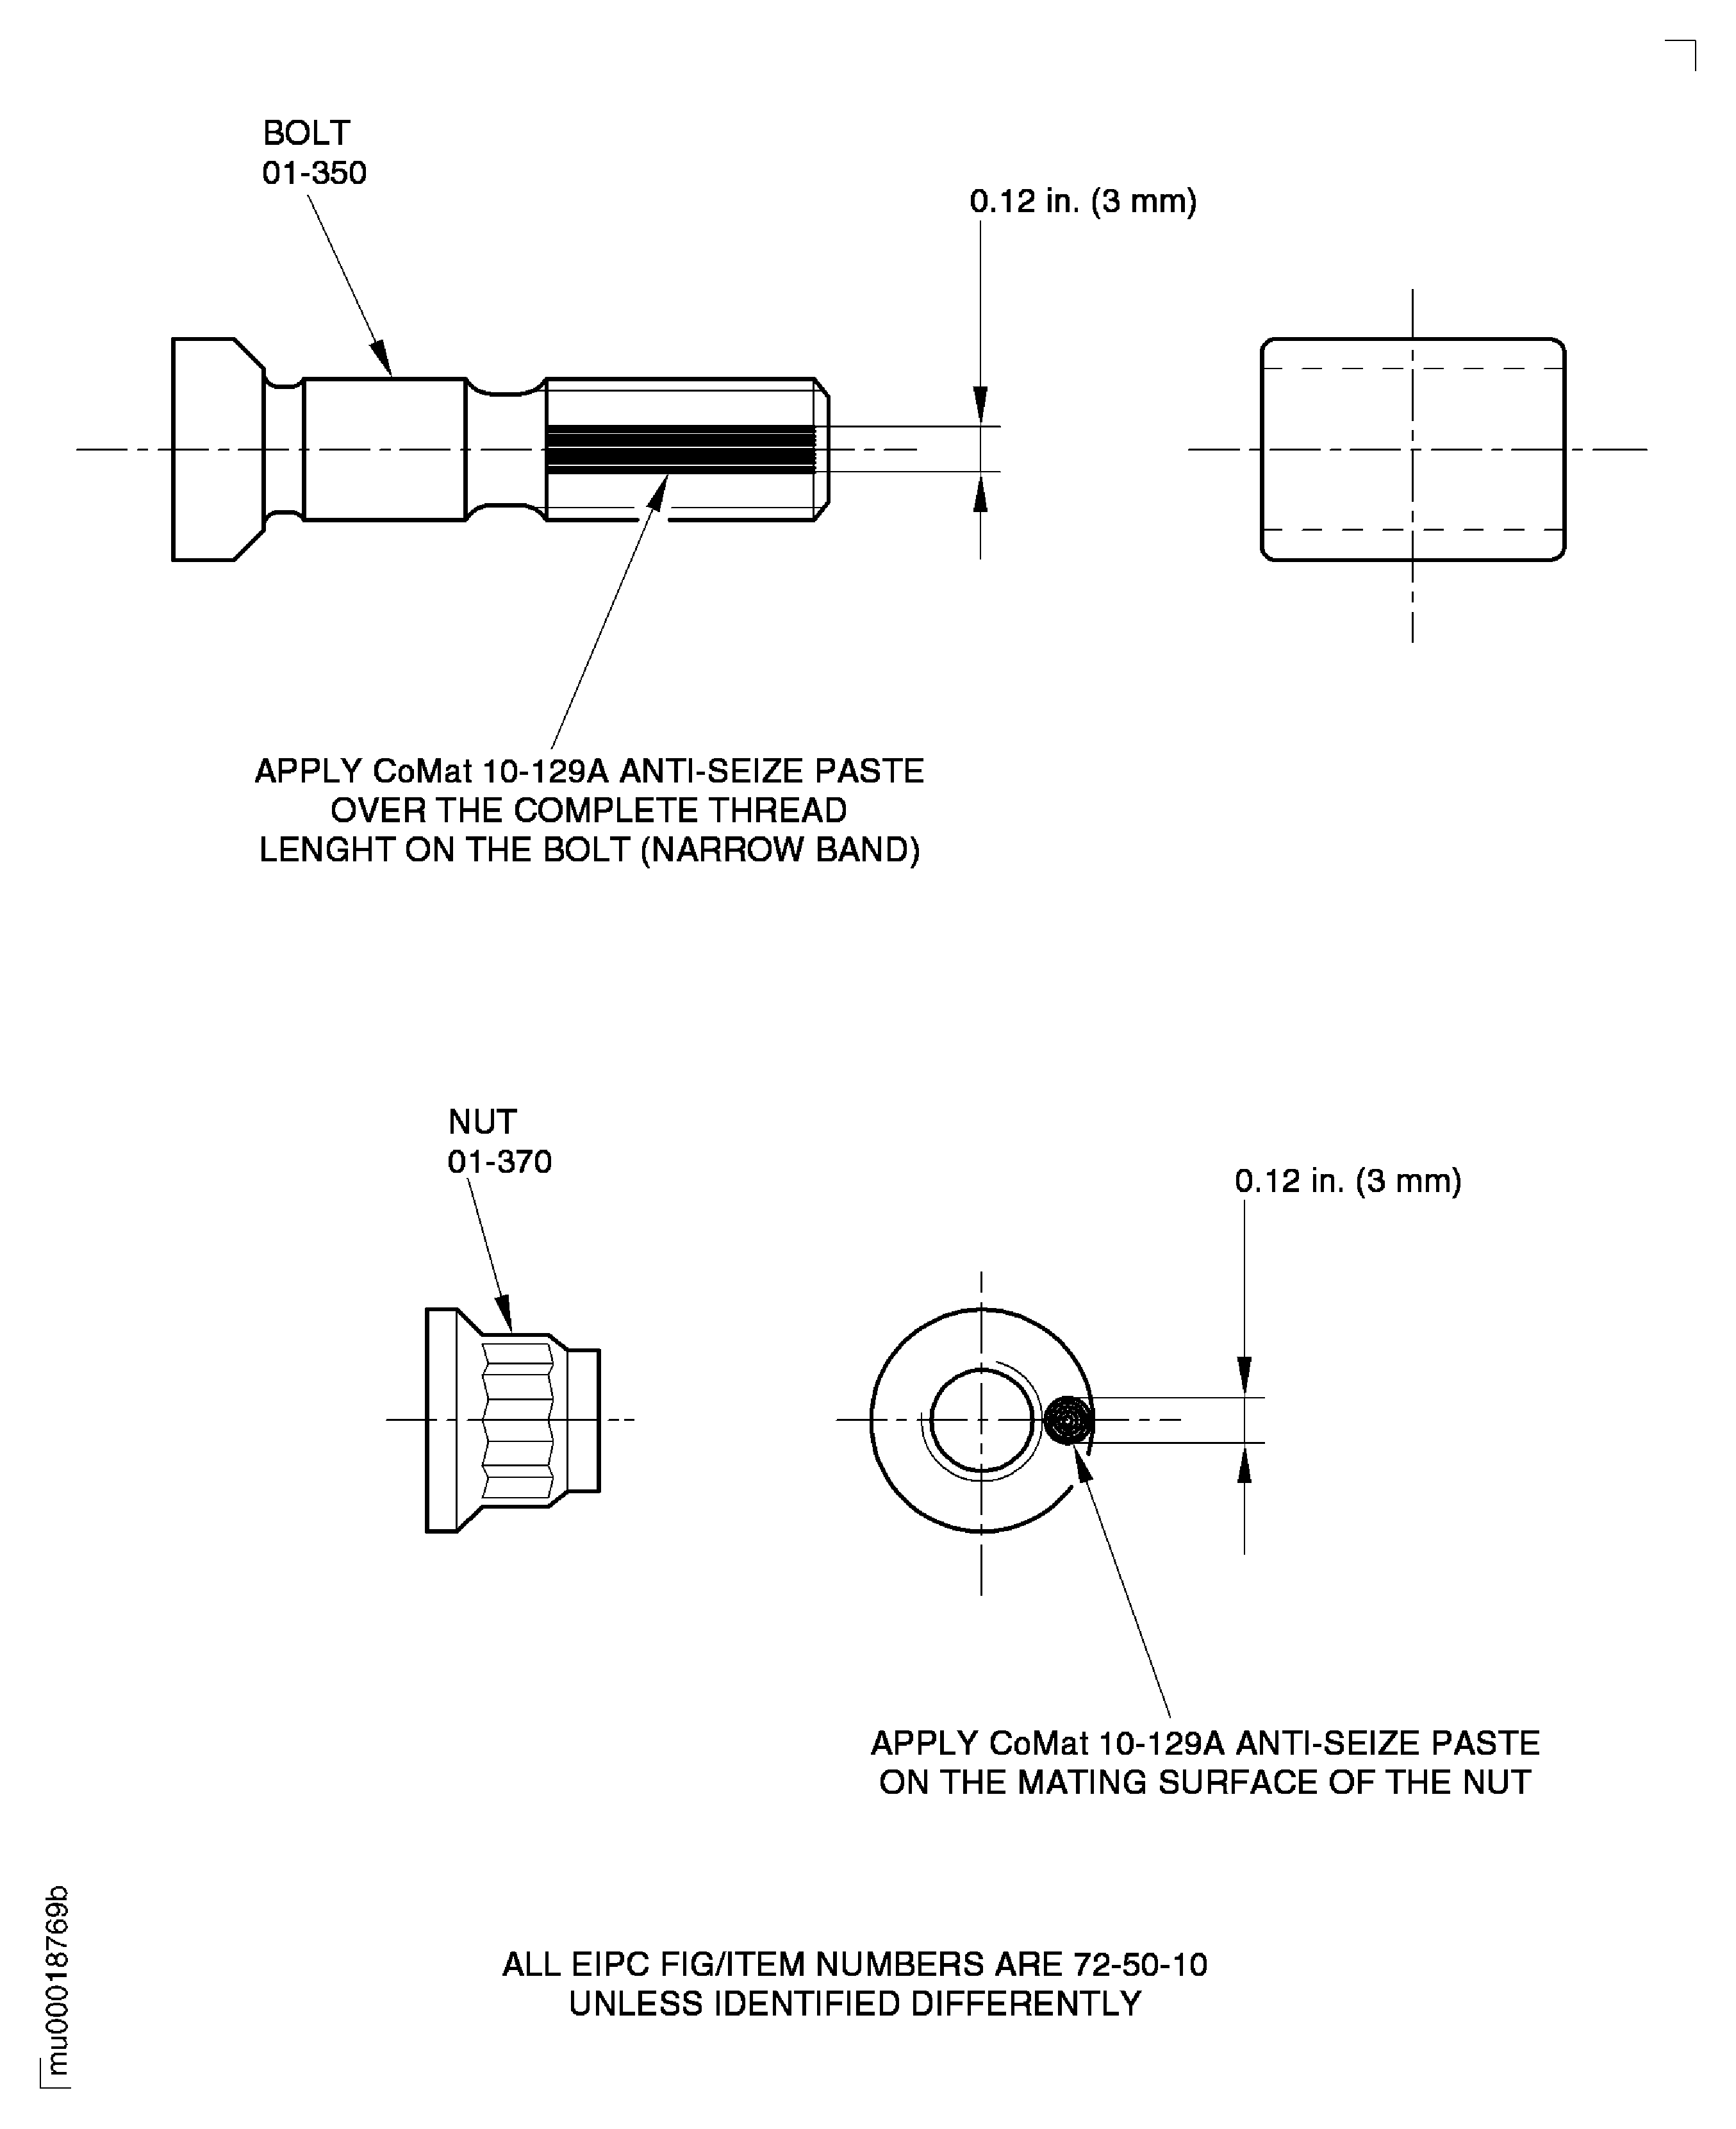
    Figure: Install the Stage 3 Turbine Blades

    Install the Stage 3 Turbine Blades
Requirements After Job Completion

Follow-On Conditions

NONE
Change Type:

Revised tool nomenclature. Revised consumable nomenclature. Revised catalog sequence number. Added link. Revised procedural step. (Editorial)

Link not Found
Manufacturer Code:0AM53
Enterprise Name:IAE INTERNATIONAL AERO ENGINES AG
BU Name:NULL
Building:SUITE 400
Street:628 HEBRON AVENUE
City:GLASTONBURY
State:CT
Zip Code:06033
Country:USA
Manufacturer Code:33591
Enterprise Name:KIMBERLY-CLARK CORP
BU Name:KIMBERLY-CLARK CORP
Street:1400 HOLCOMB BRIDGE ROAD
City:ROSWELL
State:GA
Zip Code:30076-2199
Country:USA
Phone Number:1-215-888-0040
Fax Number:1-920-380-1303
Internet:www.kimberley-clark.com
Manufacturer Code:34568
Enterprise Name:TIODIZE CO., INC.
BU Name:TIODIZE CO., INC.
Street:5858 ENGINEER DRIVE
City:HUNTINGTON BEACH
State:CA
Zip Code:92649
Country:USA
Phone Number:1-714-898-4377
Fax Number:1-714-891-7467
Internet:www.tiodize.com
Manufacturer Code:71984
Enterprise Name:DOW SILICONES CORP
BU Name:DOW SILICONES CORP
Street:2200 W SALZBURG RD
City:MIDLAND
State:MI
Zip Code:48611
Country:UNITED STATES OF AMERICA
Phone Number:1-800-248-2481, 1-989-496-7881, 1-989-496-6000
Fax Number:1-989-496-6731, 1-989-496-5956
Internet:www.dowcorning.com
Manufacturer Code:IAE28
Enterprise Name:DELETED
BU Name:DELETED, SEE CAGE CODE C4690
Manufacturer Code:LOCAL
Enterprise Name:LOCALLY SUPPLIED
Link not Found
Manufacturer Code:LOCAL
Supply Number:CoMat 01-031
Type:sp01
Supply Short Name:CoMat 01-031 ACETONE (CH3)2CO
Supply Name:CoMat 01-031 ACETONE (CH3)2CO
Specification Groups:
Doc NumberType
OMAT: 150 (RR REF)COMMERCIAL GRADE O-A-51
PMC 9008 (PW REF)COMMERCIAL GRADE O-A-51
JCR-041 (JAEC REF)COMMERCIAL GRADE O-A-51
MTH 169 (98%) (MTU REF)COMMERCIAL GRADE O-A-51
Suppliers:
ManufacturerRemarks
LOCAL
K6835
81348
K3504
U1185
24853
70657
Manufacturer Code:33591
Supply Number:CoMat 02-069
Type:sp01
Supply Short Name:CoMat 02-069 DISPOSABLE CLEANING TISSUES
Supply Name:CoMat 02-069 DISPOSABLE CLEANING TISSUES
Specification Groups:
Doc NumberType
OMAT: 2/67WORKHORSE / KIMWIPES NO. 7105
Suppliers:
ManufacturerRemarks
33591
IE319
IE320
IE321
K4182
LOCAL
Manufacturer Code:IAE28
Supply Number:CoMat 02-129
Type:sp01
Supply Short Name:CoMat 02-129 MARKER
Supply Name:CoMat 02-129 MARKER
Specification Groups:
Doc NumberType
MTH 557FELT PEN
MTH 558FELT PEN
Suppliers:
ManufacturerRemarks
IAE28
Manufacturer Code:34568
Supply Number:CoMat 10-129
Type:sp01
Supply Short Name:CoMat 10-129 ANTI-SEIZE PASTE
Supply Name:CoMat 10-129 ANTI-SEIZE PASTE
Specification Groups:
Doc NumberType
TIODIZE T8E PASTE
Suppliers:
ManufacturerRemarks
34568
Manufacturer Code:3CU95
Supply Number:CoMat 10-129A
Type:sp01
Supply Short Name:CoMat 10-129A ANTI-SEIZE PASTE
Supply Name:CoMat 10-129A ANTI-SEIZE PASTE
Specification Groups:
Doc NumberType
MOLYKOTE P-37
Suppliers:
ManufacturerRemarks
3CU95
818U1
Manufacturer Code:LOCAL
Tool Number:Balancing machine
Tool Name:Balancing machine
Manufacturer Code:LOCAL
Tool Number:Blade distribution system
Tool Name:Blade distribution system
Manufacturer Code:LOCAL
Tool Number:Feeler gage
Tool Name:Feeler gage
Manufacturer Code:0AM53
Tool Number:IAE 1M14015
Tool Name:IAE 1M14015 Blade holder
Manufacturer Code:0AM53
Tool Number:IAE 1M14016
Tool Name:IAE 1M14016 Radius adapter
Manufacturer Code:0AM53
Tool Number:IAE 1M14019
Tool Name:IAE 1M14019 Mounting adapter
Manufacturer Code:0AM53
Tool Number:IAE 1M14020
Tool Name:IAE 1M14020 Balancing base plate
Manufacturer Code:0AM53
Tool Number:IAE 1M14021
Tool Name:IAE 1M14021 Balancing fixture sleeve
Manufacturer Code:0AM53
Tool Number:IAE 1M14022
Tool Name:IAE 1M14022 Balancing fixture disk
Manufacturer Code:0AM53
Tool Number:IAE 1M14030
Tool Name:IAE 1M14030 Assembly trolley
Manufacturer Code:0AM53
Tool Number:IAE 1M14049
Tool Name:IAE 1M14049 Position retainer
Manufacturer Code:0AM53
Tool Number:IAE 1M14054
Tool Name:IAE 1M14054 Torque wrench adapter
Manufacturer Code:0AM53
Tool Number:IAE 1M14055
Tool Name:IAE 1M14055 Special wrench
Manufacturer Code:0AM53
Tool Number:IAE 1M14061
Tool Name:IAE 1M14061 Heating fixture
Manufacturer Code:0AM53
Tool Number:IAE 1M14074
Tool Name:IAE 1M14074 Heating fixture carrier
Manufacturer Code:0AM53
Tool Number:IAE 1M14078
Tool Name:IAE 1M14078 Clamping ring
Manufacturer Code:0AM53
Tool Number:IAE 1M14079
Tool Name:IAE 1M14079 Plastic wedge
Manufacturer Code:0AM53
Tool Number:IAE 1M14132
Tool Name:IAE 1M14132 Guide pin
Manufacturer Code:0AM53
Tool Number:IAE 1M14135
Tool Name:IAE 1M14135 Installation bolt/nut
Manufacturer Code:0AM53
Tool Number:IAE 1M14142
Tool Name:IAE 1M14142 Clamping ring
Manufacturer Code:0AM53
Tool Number:IAE 1M14153
Tool Name:IAE 1M14153 Assy/disassy stand
Manufacturer Code:0AM53
Tool Number:IAE 1M14156
Tool Name:IAE 1M14156 Lifting fixture
Manufacturer Code:0AM53
Tool Number:IAE 6F10027
Tool Name:IAE 6F10027 Heater control unit
Manufacturer Code:LOCAL
Tool Number:Mallet
Tool Name:Mallet
Manufacturer Code:LOCAL
Tool Number:Moment weighing equipment
Tool Name:Moment weighing equipment
Manufacturer Code:LOCAL
Tool Number:Rack pallet
Tool Name:Rack pallet
Manufacturer Code:LOCAL
Tool Number:Torch light
Tool Name:Torch light