Export Control
EAR Export Classification: Not subject to the EAR per 15 C.F.R. Chapter 1, Part 734.3(b)(3), except for the following Service Bulletins which are currently published as EAR Export Classification 9E991: SBE70-0992, SBE72-0483, SBE72-0580, SBE72-0588, SBE72-0640, SBE73-0209, SBE80-0024 and SBE80-0025.Copyright
© IAE International Aero Engines AG (2001, 2014 - 2021) The information contained in this document is the property of © IAE International Aero Engines AG and may not be copied or used for any purpose other than that for which it is supplied without the express written authority of © IAE International Aero Engines AG. (This does not preclude use by engine and aircraft operators for normal instructional, maintenance or overhaul purposes.).Applicability
All
Common Information
TASK 72-50-30-440-004 LPT Stage 6 Rotor Assembly - Assemble, Assembly-001
General
Fig/item numbers in parentheses in the procedure agree with those used in the IPC. Only the primary Fig/item numbers are used. For the service bulletin alpha variants refer to the IPC.
For all parts identified in a different Chapter/Section/Subject, the applicable Chapter/Section/Subject comes before the Fig/item number.
For standard torque data and procedures, refer to the SPM TASK 70-41-01-400-501 and SPM TASK 70-41-02-400-501.
Special torque data and assembly tolerances are included in the procedure.
Lubricate all threads and abutment faces of nuts and bolts with CoMat 10-077 APPROVED ENGINE OILS, unless other lubricants are referred to in the procedure.
To identify, lubricate and install seal rings, refer to the SPM TASK 70-44-01-400-501.
After assembly apply CoMat 07-038 AIR DRYING ENAMEL to any damaged surface protection, joint flanges and attach parts. Use the correct color of the air drying enamel. Refer to the SPM TASK 70-63-02-380-501.
The number for each radial location must be identified in a clockwise direction. These start at the engine top position when you look from the rear of the engine, unless stated differently in the procedure.
Refer to TASK 72-50-00-990-501 for a sectional view of the LP turbine module.
The abbreviation Intf. shows an interference or tight fit. This cause REJECT IF MORE THAN to become REJECT IF LESS THAN. The abbreviation Clear shows a clearance fit.
NOTE
NOTE
NOTE
Preliminary Requirements
Pre-Conditions
NONESupport Equipment
| Name | Manufacturer | Part Number / Identification | Quantity | Remark |
|---|---|---|---|---|
| Balancing machine | LOCAL | Balancing machine | ||
| Blade distribution system | LOCAL | Blade distribution system | ||
| Feeler gage | LOCAL | Feeler gage | ||
| IAE 1M14018 Blade holder | 0AM53 | IAE 1M14018 | 1 | |
| IAE 1M14019 Mounting adapter | 0AM53 | IAE 1M14019 | 1 | |
| IAE 1M14021 Balancing fixture sleeve | 0AM53 | IAE 1M14021 | 1 | |
| IAE 1M14027 Balancing fixture disk | 0AM53 | IAE 1M14027 | 1 | |
| IAE 1M14030 Assembly trolley | 0AM53 | IAE 1M14030 | 1 | |
| IAE 1M14049 Position retainer | 0AM53 | IAE 1M14049 | 1 | |
| IAE 1M14079 Plastic wedge | 0AM53 | IAE 1M14079 | 1 | |
| IAE 1M14132 Guide pin | 0AM53 | IAE 1M14132 | 1 | |
| IAE 1M14153 Assy/disassy stand | 0AM53 | IAE 1M14153 | 1 | |
| IAE 1M14155 Clamping ring | 0AM53 | IAE 1M14155 | 1 | |
| IAE 1M14156 Lifting fixture | 0AM53 | IAE 1M14156 | 1 | |
| Mallet | LOCAL | Mallet | Soft head | |
| Moment weighing equipment | LOCAL | Moment weighing equipment | ||
| Oven | LOCAL | Oven | ||
| Rack pallet | LOCAL | Rack pallet | ||
| Torch light | LOCAL | Torch light |
Consumables, Materials and Expendables
| Name | Manufacturer | Part Number / Identification | Quantity | Remark |
|---|---|---|---|---|
| CoMat 01-031 ACETONE (CH3)2CO | LOCAL | CoMat 01-031 | ||
| CoMat 02-069 DISPOSABLE CLEANING TISSUES | 33591 | CoMat 02-069 | ||
| CoMat 02-129 MARKER | IAE28 | CoMat 02-129 | ||
| CoMat 07-038 AIR DRYING ENAMEL | K3504 | CoMat 07-038 | ||
| CoMat 10-077 APPROVED ENGINE OILS | LOCAL | CoMat 10-077 |
Spares
NONESafety Requirements
NONEProcedure
Refer to Figure.
Calculate the clearance at location 3358.
Table 1. Fits and Clearances (all dimensions are in inches) NEW PART
DIMENSIONS
WORN PART
DIMENSIONS
REJECT IF
PART IDENT
Size
Clearance
(Non-select)
MORE THAN
LOCATION 3358
Stage 6 air seal LPT Stage 3, 4, 5, 6, 7 Rotating Air Seals (72-50-33,01-050)
abutment diameter to stage 6
turbine disk LPT Stage 3, 4, 5, 6, 7 Disks (72-50-31,01-050)
Disk dia
20.4921
20.4882
Intf
0.0157
Intf
0.0177
Air seal dia
20.4803
20.4764
0.0079
0.0020
Table 2. Fits and Clearances (all dimensions are in millimeters) NEW PART
DIMENSIONS
WORN PART
DIMENSIONS
REJECT IF
PART IDENT
Size
Clearance
(Non-select)
MORE THAN
LOCATION 3358
Stage 6 air seal LPT Stage 3, 4, 5, 6, 7 Rotating Air Seals (72-50-33,01-050)
abutment diameter to stage 6
turbine disk LPT Stage 3, 4, 5, 6, 7 Disks (72-50-31,01-050)
Disk dia
520.5
520.4
Intf
0.4
Intf
0.45
Air seal dia
520.2
520.1
0.2
0.05
SUBTASK 72-50-30-220-054-A00 V2500-A1: Make sure that the Fits and Clearances between the Stage 6 Disk and Stage 6 Air Seal are in the Limits given at Location 3358 (Pre SBE 72-0138)
Refer to Figure.
SBE 72-0138: Rotor and stator assembly introduce new LP turbine blades and vanes.
Calculate the clearance at location 3658.
Table 3. Fits and Clearances (all dimensions are in inches) NEW PART
DIMENSIONS
WORN PART
DIMENSIONS
REJECT IF
PART IDENT
Size
Clearance
(Non-select)
MORE THAN
LOCATION 3658
Stage 6 air seal LPT Stage 3, 4, 5, 6, 7 Rotating Air Seals (72-50-33,01-050)
abutment diameter to stage 6
turbine disk LPT Stage 3, 4, 5, 6, 7 Disks (72-50-31,01-050)
Disk dia
20.4921
20.4882
Intf
0.0157
Intf
0.0177
Air seal dia
20.4803
20.4764
0.0079
0.0020
Table 4. Fits and Clearances (all dimensions are in millimeters) NEW PART
DIMENSIONS
WORN PART
DIMENSIONS
REJECT IF
PART IDENT
Size
Clearance
(Non-select)
MORE THAN
LOCATION 3658
Stage 6 air seal LPT Stage 3, 4, 5, 6, 7 Rotating Air Seals (72-50-33,01-050)
abutment diameter to stage 6
turbine disk LPT Stage 3, 4, 5, 6, 7 Disks (72-50-31,01-050)
Disk dia
520.5
520.4
Intf
0.4
Intf
0.45
Air seal dia
520.2
520.1
0.2
0.05
SUBTASK 72-50-30-220-054-B00 V2500-A1: Make sure that the Fits and Clearances between the Stage 6 Disk and Stage 6 Air Seal are in the Limits given at Location 3658 (SBE 72-0138)
Refer to Figure.
Calculate the clearance at location 3758.
Table 5. Fits and Clearances (all dimensions are in inches) NEW PART
DIMENSIONS
WORN PART
DIMENSIONS
REJECT IF
PART IDENT
Size
Clearance
(Non-select)
MORE THAN
LOCATION 3758
Stage 6 air seal LPT Stage 3, 4, 5, 6, 7 Rotating Air Seals (72-50-33,01-050)
abutment diameter to stage 6
turbine disk LPT Stage 3, 4, 5, 6, 7 Disks (72-50-31,01-050)
Disk dia
20.4921
20.4882
Intf
0.0157
Intf
0.0177
Air seal dia
20.4803
20.4764
0.0079
0.0020
Table 6. Fits and Clearances (all dimensions are in millimeters) NEW PART
DIMENSIONS
WORN PART
DIMENSIONS
REJECT IF
PART IDENT
Size
Clearance
(Non-select)
MORE THAN
LOCATION 3758
Stage 6 air seal LPT Stage 3, 4, 5, 6, 7 Rotating Air Seals (72-50-33,01-050)
abutment diameter to stage 6
turbine disk LPT Stage 3, 4, 5, 6, 7 Disks (72-50-31,01-050)
Disk dia
520.5
520.4
Intf
0.4
Intf
0.45
Air seal dia
520.2
520.1
0.2
0.05
SUBTASK 72-50-30-220-054-C00 V2500-A5: Make sure that the Fits and Clearances between the Stage 6 Disk and Stage 6 Air Seal are in the Limits given at Location 3758
Refer to Figure.
Install the IAE 1M14019 Mounting adapter 1 off with the four screws on to the mounting flange of the moment weight equipment.
Install the IAE 1M14018 Blade holder 1 off with the four screws on to the mounting adapter.
SUBTASK 72-50-30-440-081 Calibrate the Moment Weight Equipment
Refer to Figure.
Identify the stage 6 turbine blades with number one to 85. Use CoMat 02-129 MARKER.
SUBTASK 72-50-30-440-082 Weigh the Stage 6 Turbine Blades
Refer to Figure.
NOTE
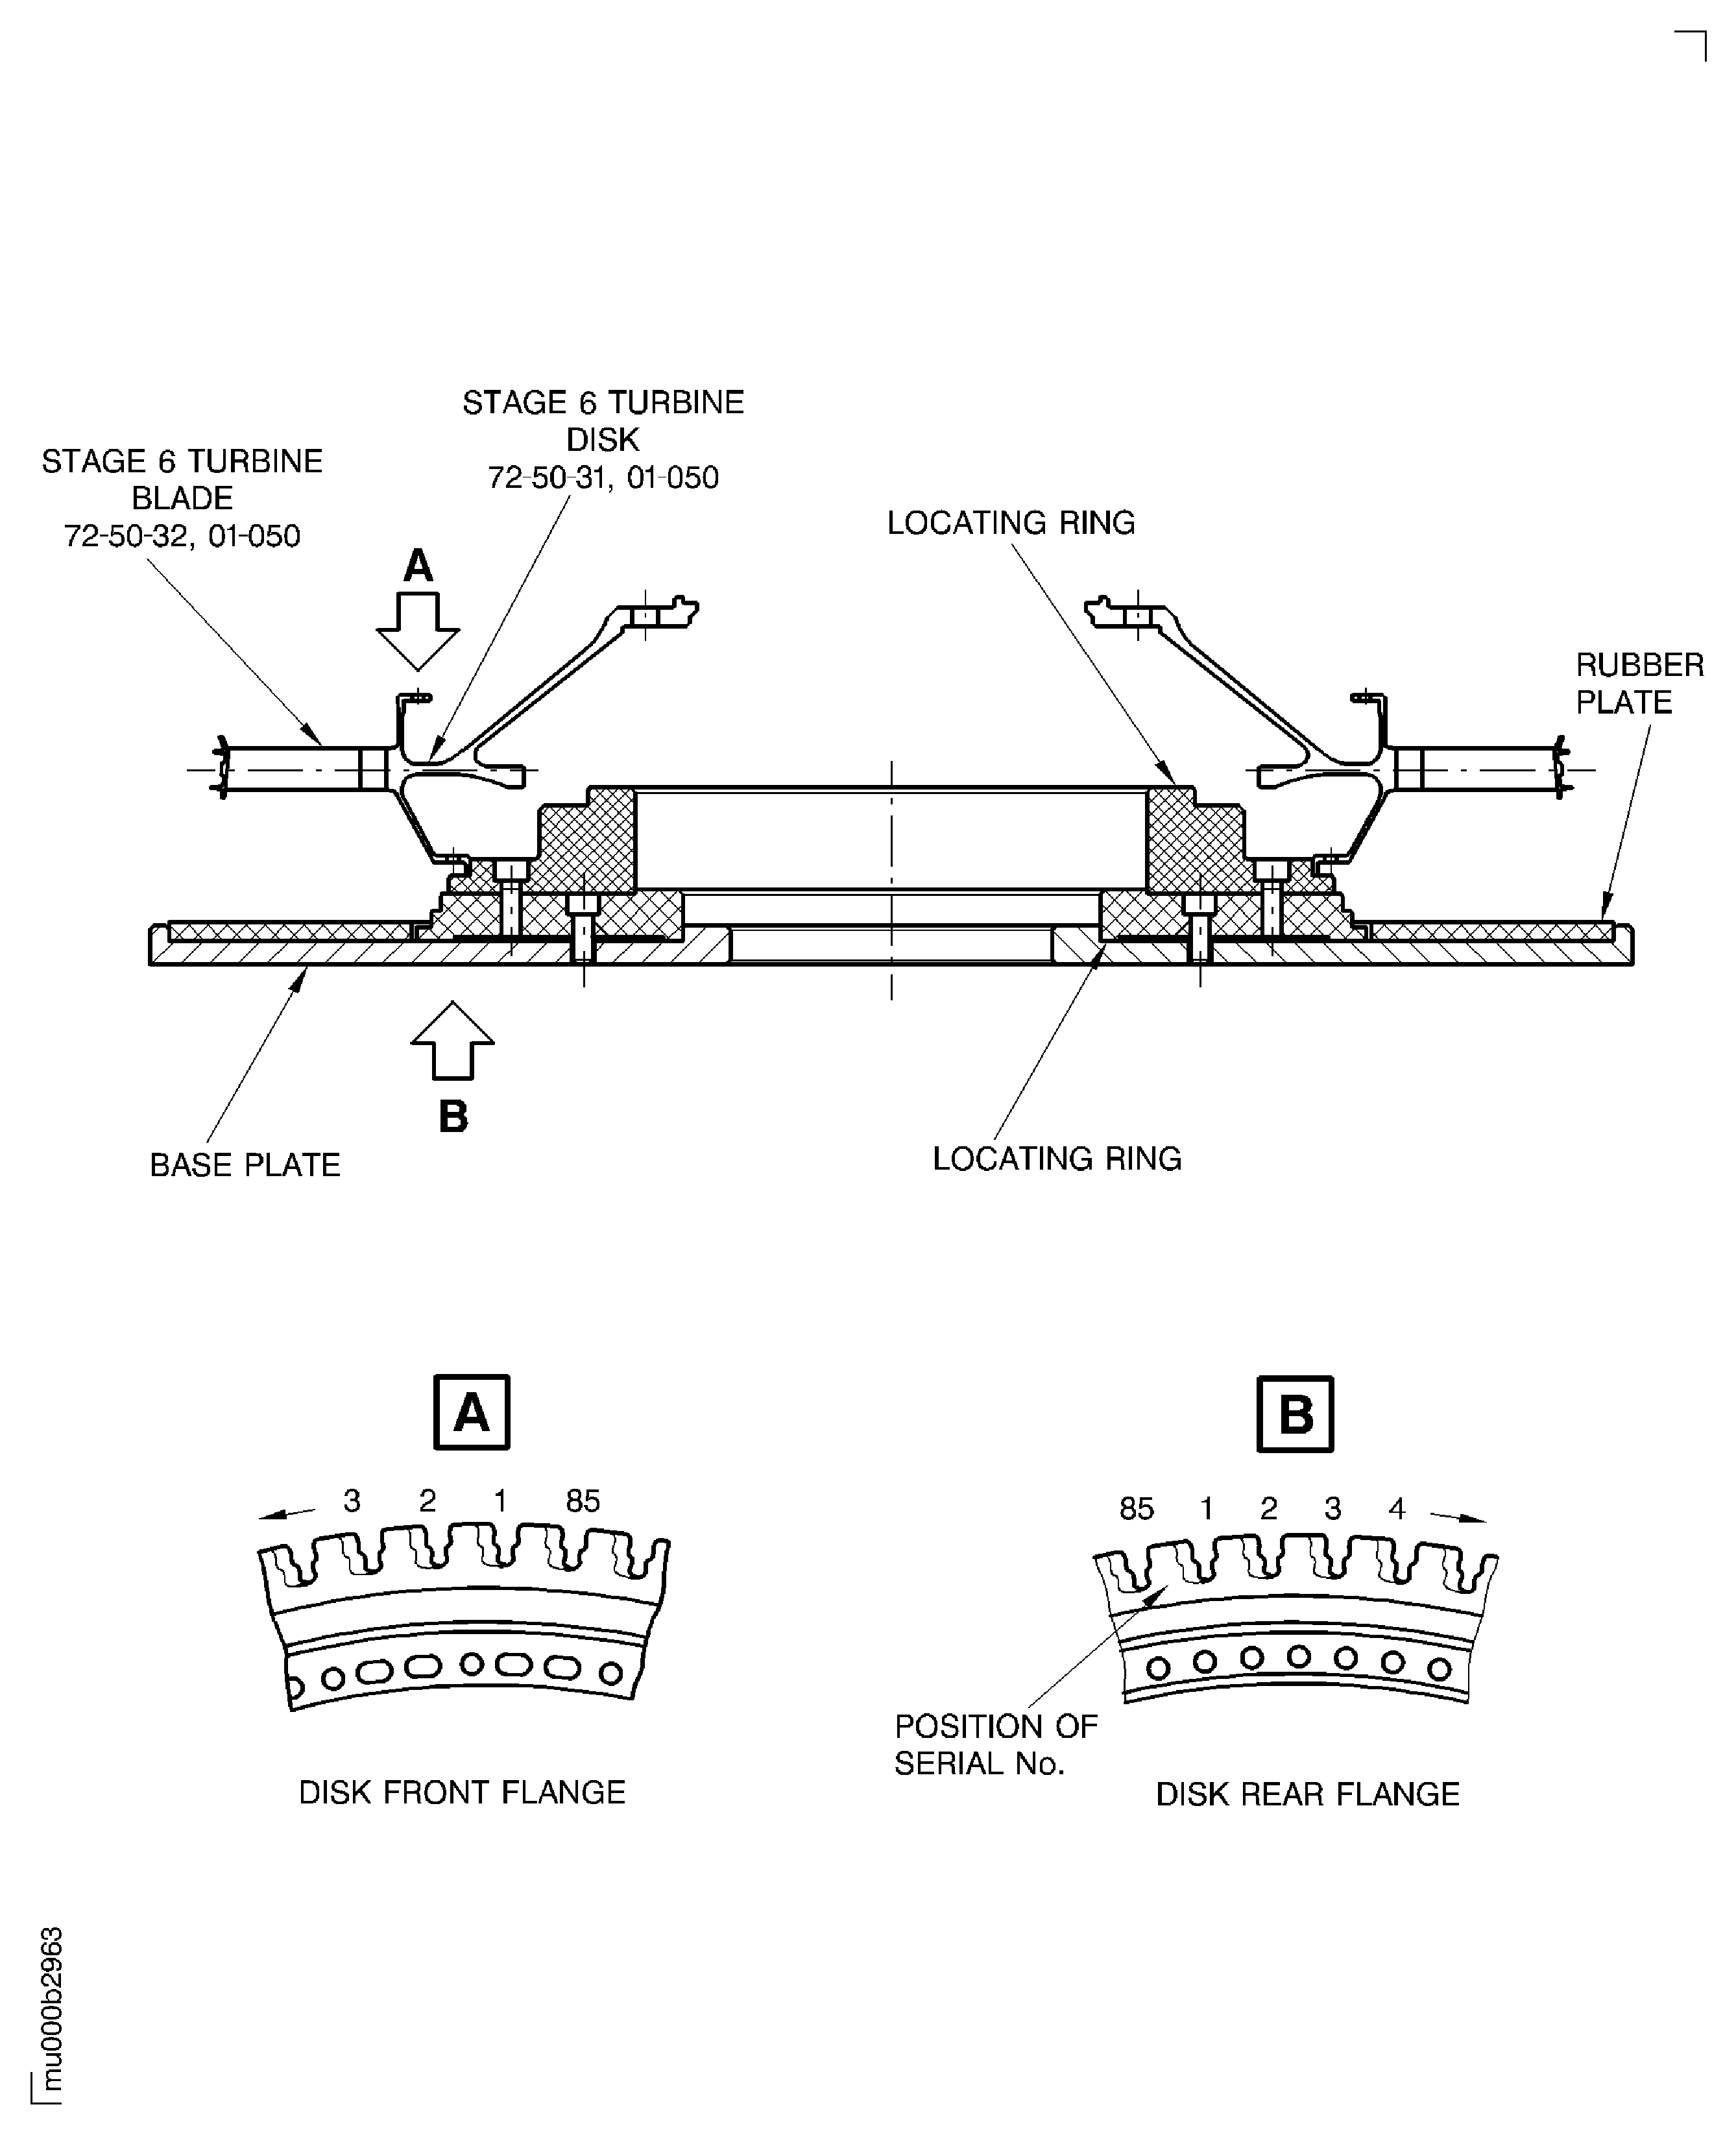
Make sure that you use the correct locating ring of the IAE 1M14153 Assy/disassy stand 1 off for the stage 6 disk.Identify the disk slot with the disk serial number. The serial number is vibro-engraved on the rear face of the disk. The groove number one is the first groove on the right side of the serial number. Make a mark to the groove number one at the front side. Use CoMat 02-129 MARKER.
NOTE
The turbine blade identification number is the same as the blade identification number at the blade distribution protocol.Put the stage 6 turbine disk on the IAE 1M14153 Assy/disassy stand 1 off, turbine disk front flange upwards.
Lightly hit the blades at the blade roots. Operate stepwise and in counter clockwise direction to engage the blades. Move stepwise the support of the assy/disassy stand upwards. Use the IAE 1M14079 Plastic wedge 1 off and a soft headed mallet.
Repeat Step. until all the blades are fully engaged in to the grooves of the disk. Make sure that the hook from each turbine blade root is in contact with the turbine disk front face.
SUBTASK 72-50-30-440-083 Install the Stage 6 Turbine Blades to the Stage 6 Turbine Disk
Refer to Figure.
Install the two halves of the IAE 1M14155 Clamping ring 1 off to the stage 6 turbine disk.
SUBTASK 72-50-30-440-084 Install the Clamping Ring on to the Stage 6 Turbine Disk
Refer to Figure.
Measure Dimension A on the IAE 1M14021 Balancing fixture sleeve 1 off.
Make sure that the set screw, part of IAE 1M14027 Balancing fixture disk 1 off, is correctly adjusted.
NOTE
The balancing fixture sleeve is used to safety the LP turbine rotor assembly in radial position. This is achieved when the balancing fixture disk is pushed at the inner diameter against the balancing base plate. The caused deflection of the balancing fixture disk goes to a small diameter reduction at the abutment face to the LPT rotor disk snap diameter. Correct adjustment of the set screw part of the balancing base plate avoids overstressing.
Do not tighten the balancing fixture sleeve bolt at this moment.
Install the balancing fixture sleeve to the balancing fixture mounting disk. Turn the threaded end of the bolt, part of the balancing fixture sleeve in the bushing, part of the balancing fixture. Align the installation groove of the balancing fixture sleeve with the dowel pin of the balancing fixture disk.
Install the IAE 1M14156 Lifting fixture 1 off to hoist equipment.
SUBTASK 72-50-30-440-085 Install the Stage 6 Turbine Disk on to the Balancing Machine
Refer to Figure.
SUBTASK 72-50-30-440-086 Remove the Clamping Ring from the Stage 6 Turbine Disk
Install the IAE 1M14155 Clamping ring 1 off on to the stage 6 turbine disk. Refer to Step.
Install the IAE 1M14156 Lifting fixture 1 off to the clamping ring. Use hoist equipment.
Remove the lifting fixture from the clamping ring. Remove the clamping ring. Refer to Step.
Repeat Step.
Use CoMat 02-129 MARKER to mark the unbalance and the position on the blades.
Lightly hit the blades at the blade roots. Operate stepwise and in clockwise direction to disengage the blades. Use the IAE 1M14079 Plastic wedge 1 off and soft headed mallet.
Install the clamping ring to the stage 6 turbine disk. Refer to Step. Remove the quick acting bolt and the bar.
Install the stage 6 turbine disk to the balancing machine. Refer to Step.
Remove the clamping ring. Refer to Step.
Remaining unbalance must not be more than 1.0 ozin (720 gmm). If the unbalance is within the limits, continue with Step. If not, correct the unbalance by blade selection as follows:
SUBTASK 72-50-30-440-087 Balance the Stage 6 Turbine Disk and Blades
Remove the identification numbers from the turbine blades and the mark on the disk groove number one. Use CoMat 02-069 DISPOSABLE CLEANING TISSUES or clean cloth, or clean cloth and CoMat 01-031 ACETONE (CH3)2CO.
Install the IAE 1M14155 Clamping ring 1 off to the stage 6 turbine disk. Refer to Step.
Install the IAE 1M14156 Lifting fixture 1 off to the clamping ring. Use hoist equipment.
SUBTASK 72-50-30-440-088 Remove the Stage 6 Turbine Disk from the Balancing Machine
Refer to Figure.
SUBTASK 72-50-30-440-089 Remove the Tools from the Balancing Machine
Refer to Figure.
Lift the stage 6 turbine disk above the IAE 1M14030 Assembly trolley 1 off. Use the IAE 1M14156 Lifting fixture 1 off with hoist equipment.
Remove the clamping ring from the stage 6 turbine disk. Refer to Step.
Install the IAE 1M14132 Guide pin 1 off in to a bolt hole of the stage 6 turbine front flange. Safety the guide pin with the IAE 1M14049 Position retainer 1 off.

CAUTION
HOLD THE BOLTS IN THEIR POSITION WHEN YOU INSTALL THE NUTS ON TO THE BOLTS. DO NOT TURN THE BOLTS OR MAKE TO-AND-FROM MOVEMENTS. THE DISK/INNER AIR SEAL FLANGES AND/OR THE BOLTS CAN BE DAMAGED BY SCORES.Install six work bolts and work nuts to attach the air seal on the disk. Tighten the nuts.
Let the temperature of all parts decrease to room temperature. Install the IAE 1M14155 Clamping ring 1 off to the stage 6 turbine disk. Refer to Step.
Use CoMat 02-129 MARKER and mark a dash in a circle on the disk hub at the caused high point location.
Remove the clamping ring. Refer to Step.
SUBTASK 72-50-30-440-090 Install the Stage 6 Air Seal to the Stage 6 Turbine Disk
Figure: Pre SBE 72-0138 V2500-A1: The Stage 6 Turbine Disk and Stage 6 Air Seal Fits and Clearances
Sheet 1
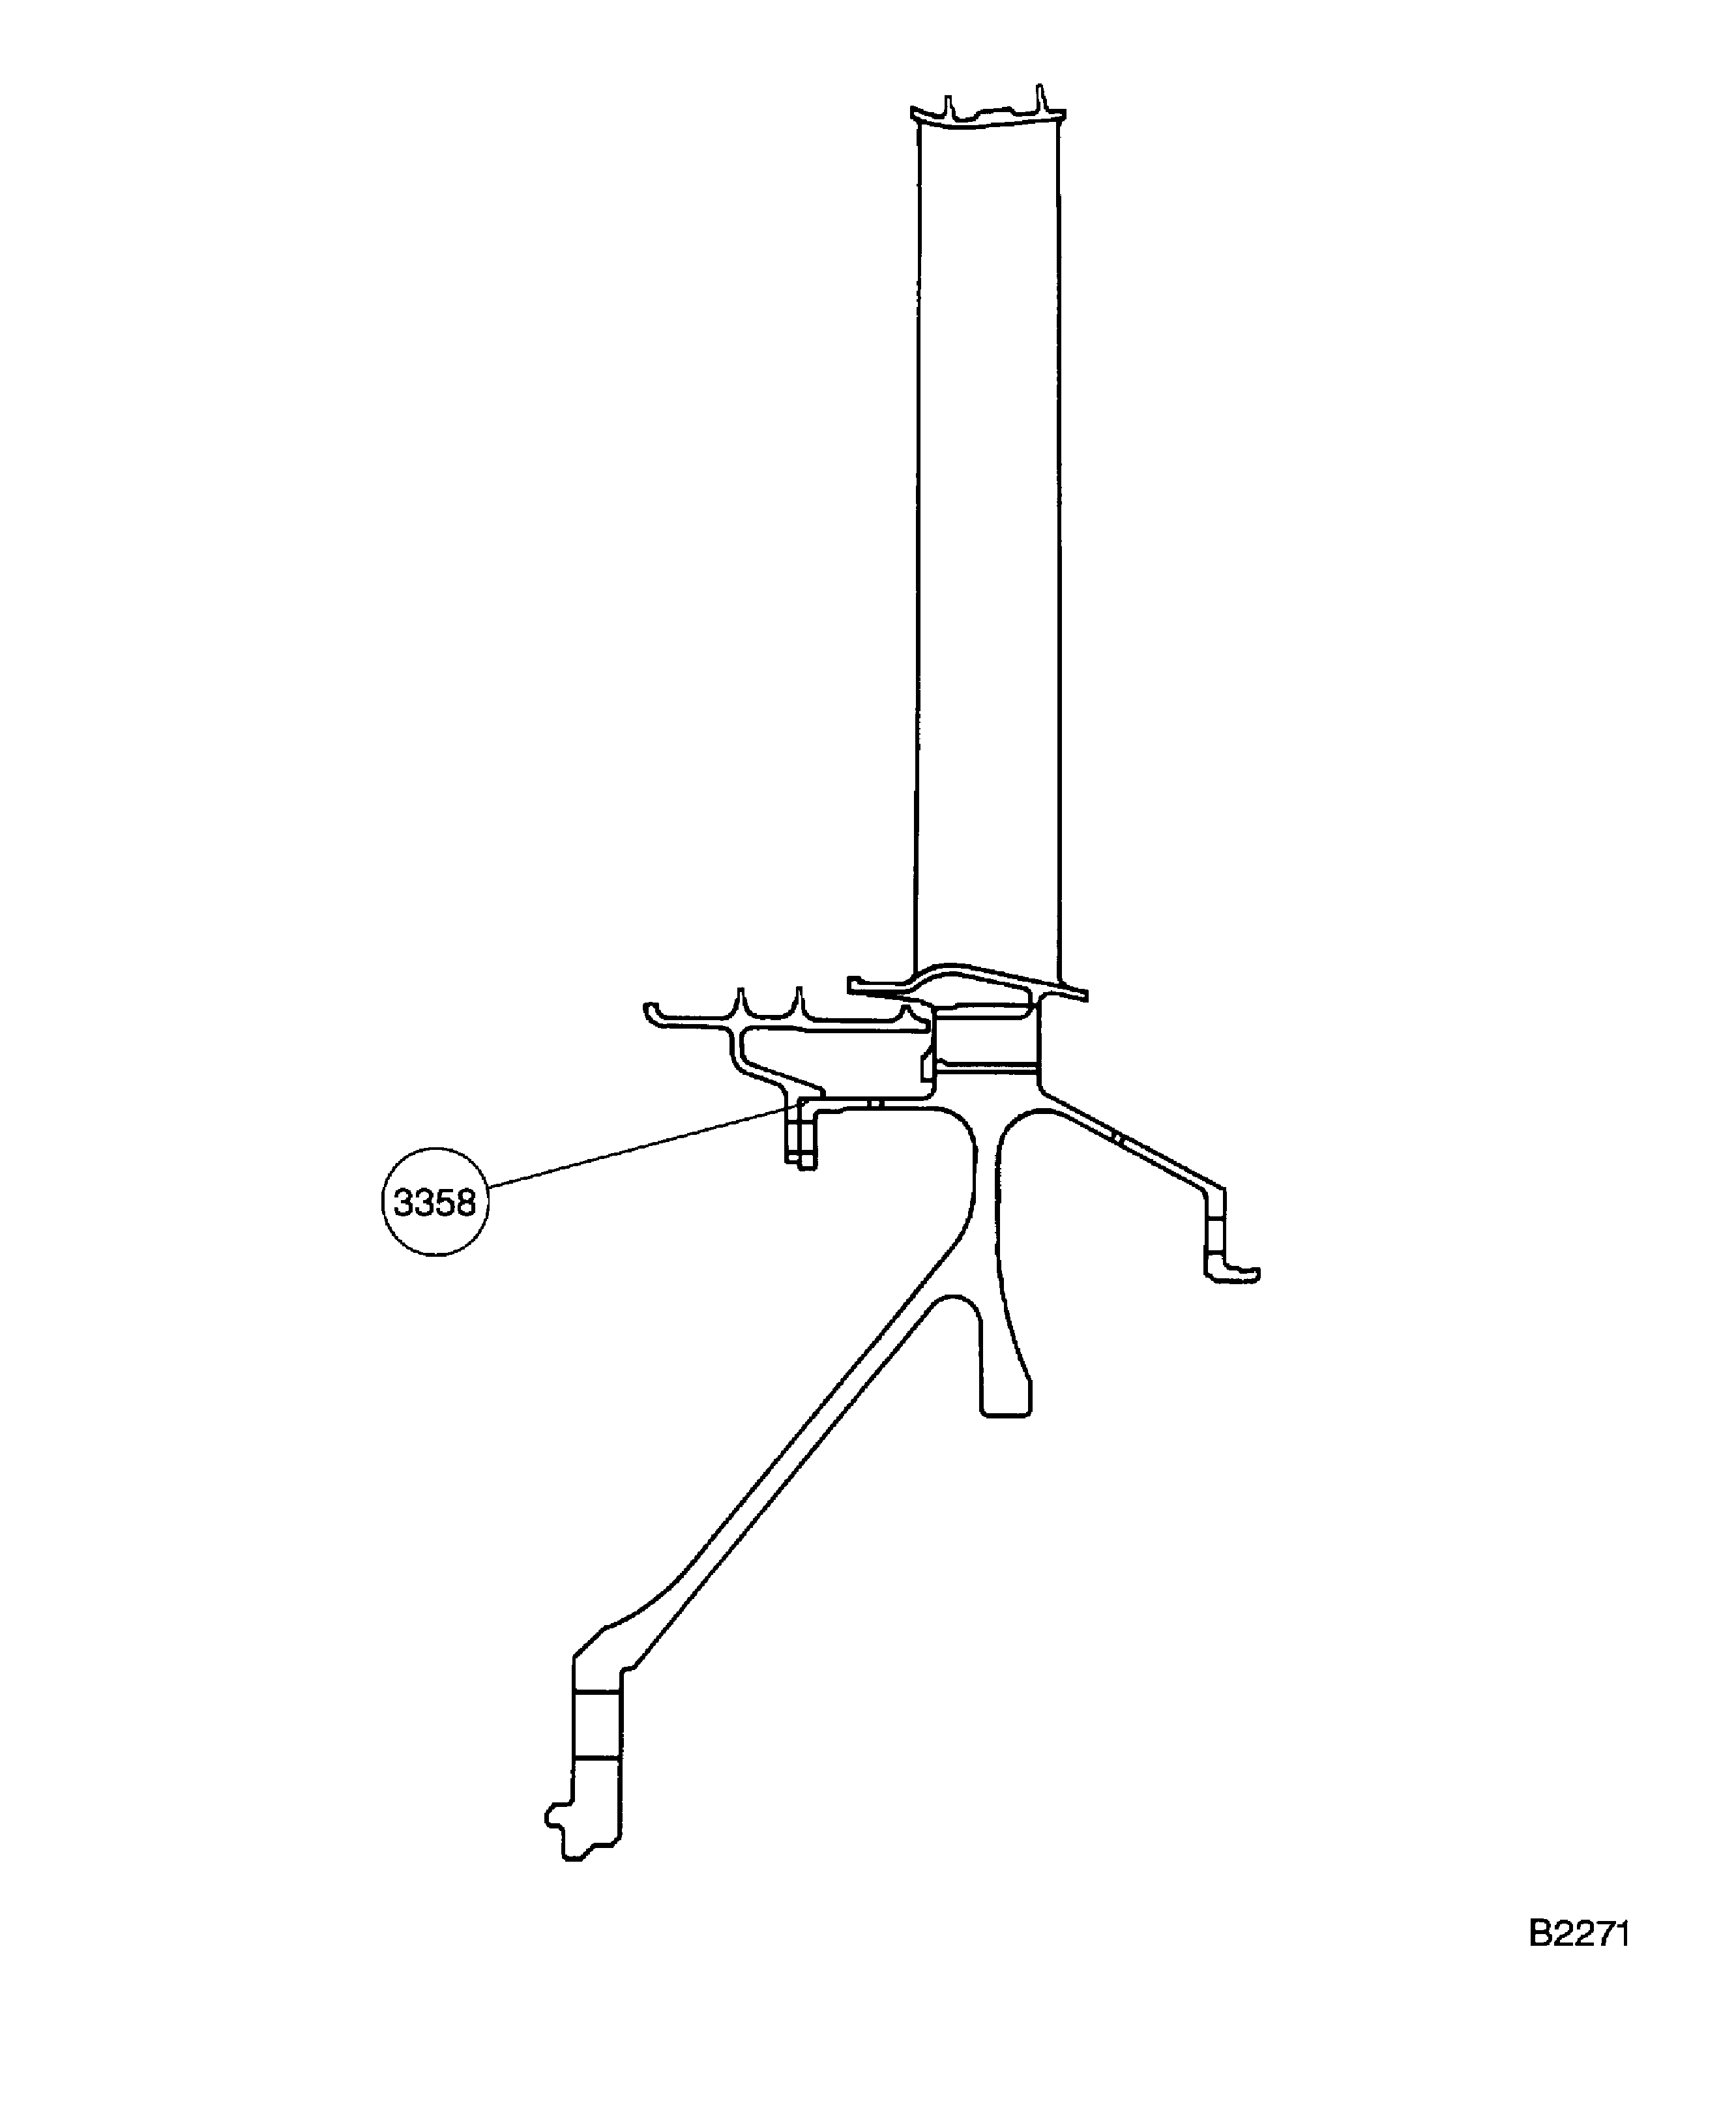
Figure: SBE 72-0138 V2500-A1: The stage 6 Turbine Disk and Stage 6 Air Seal - Fits and Clearances
Sheet 2
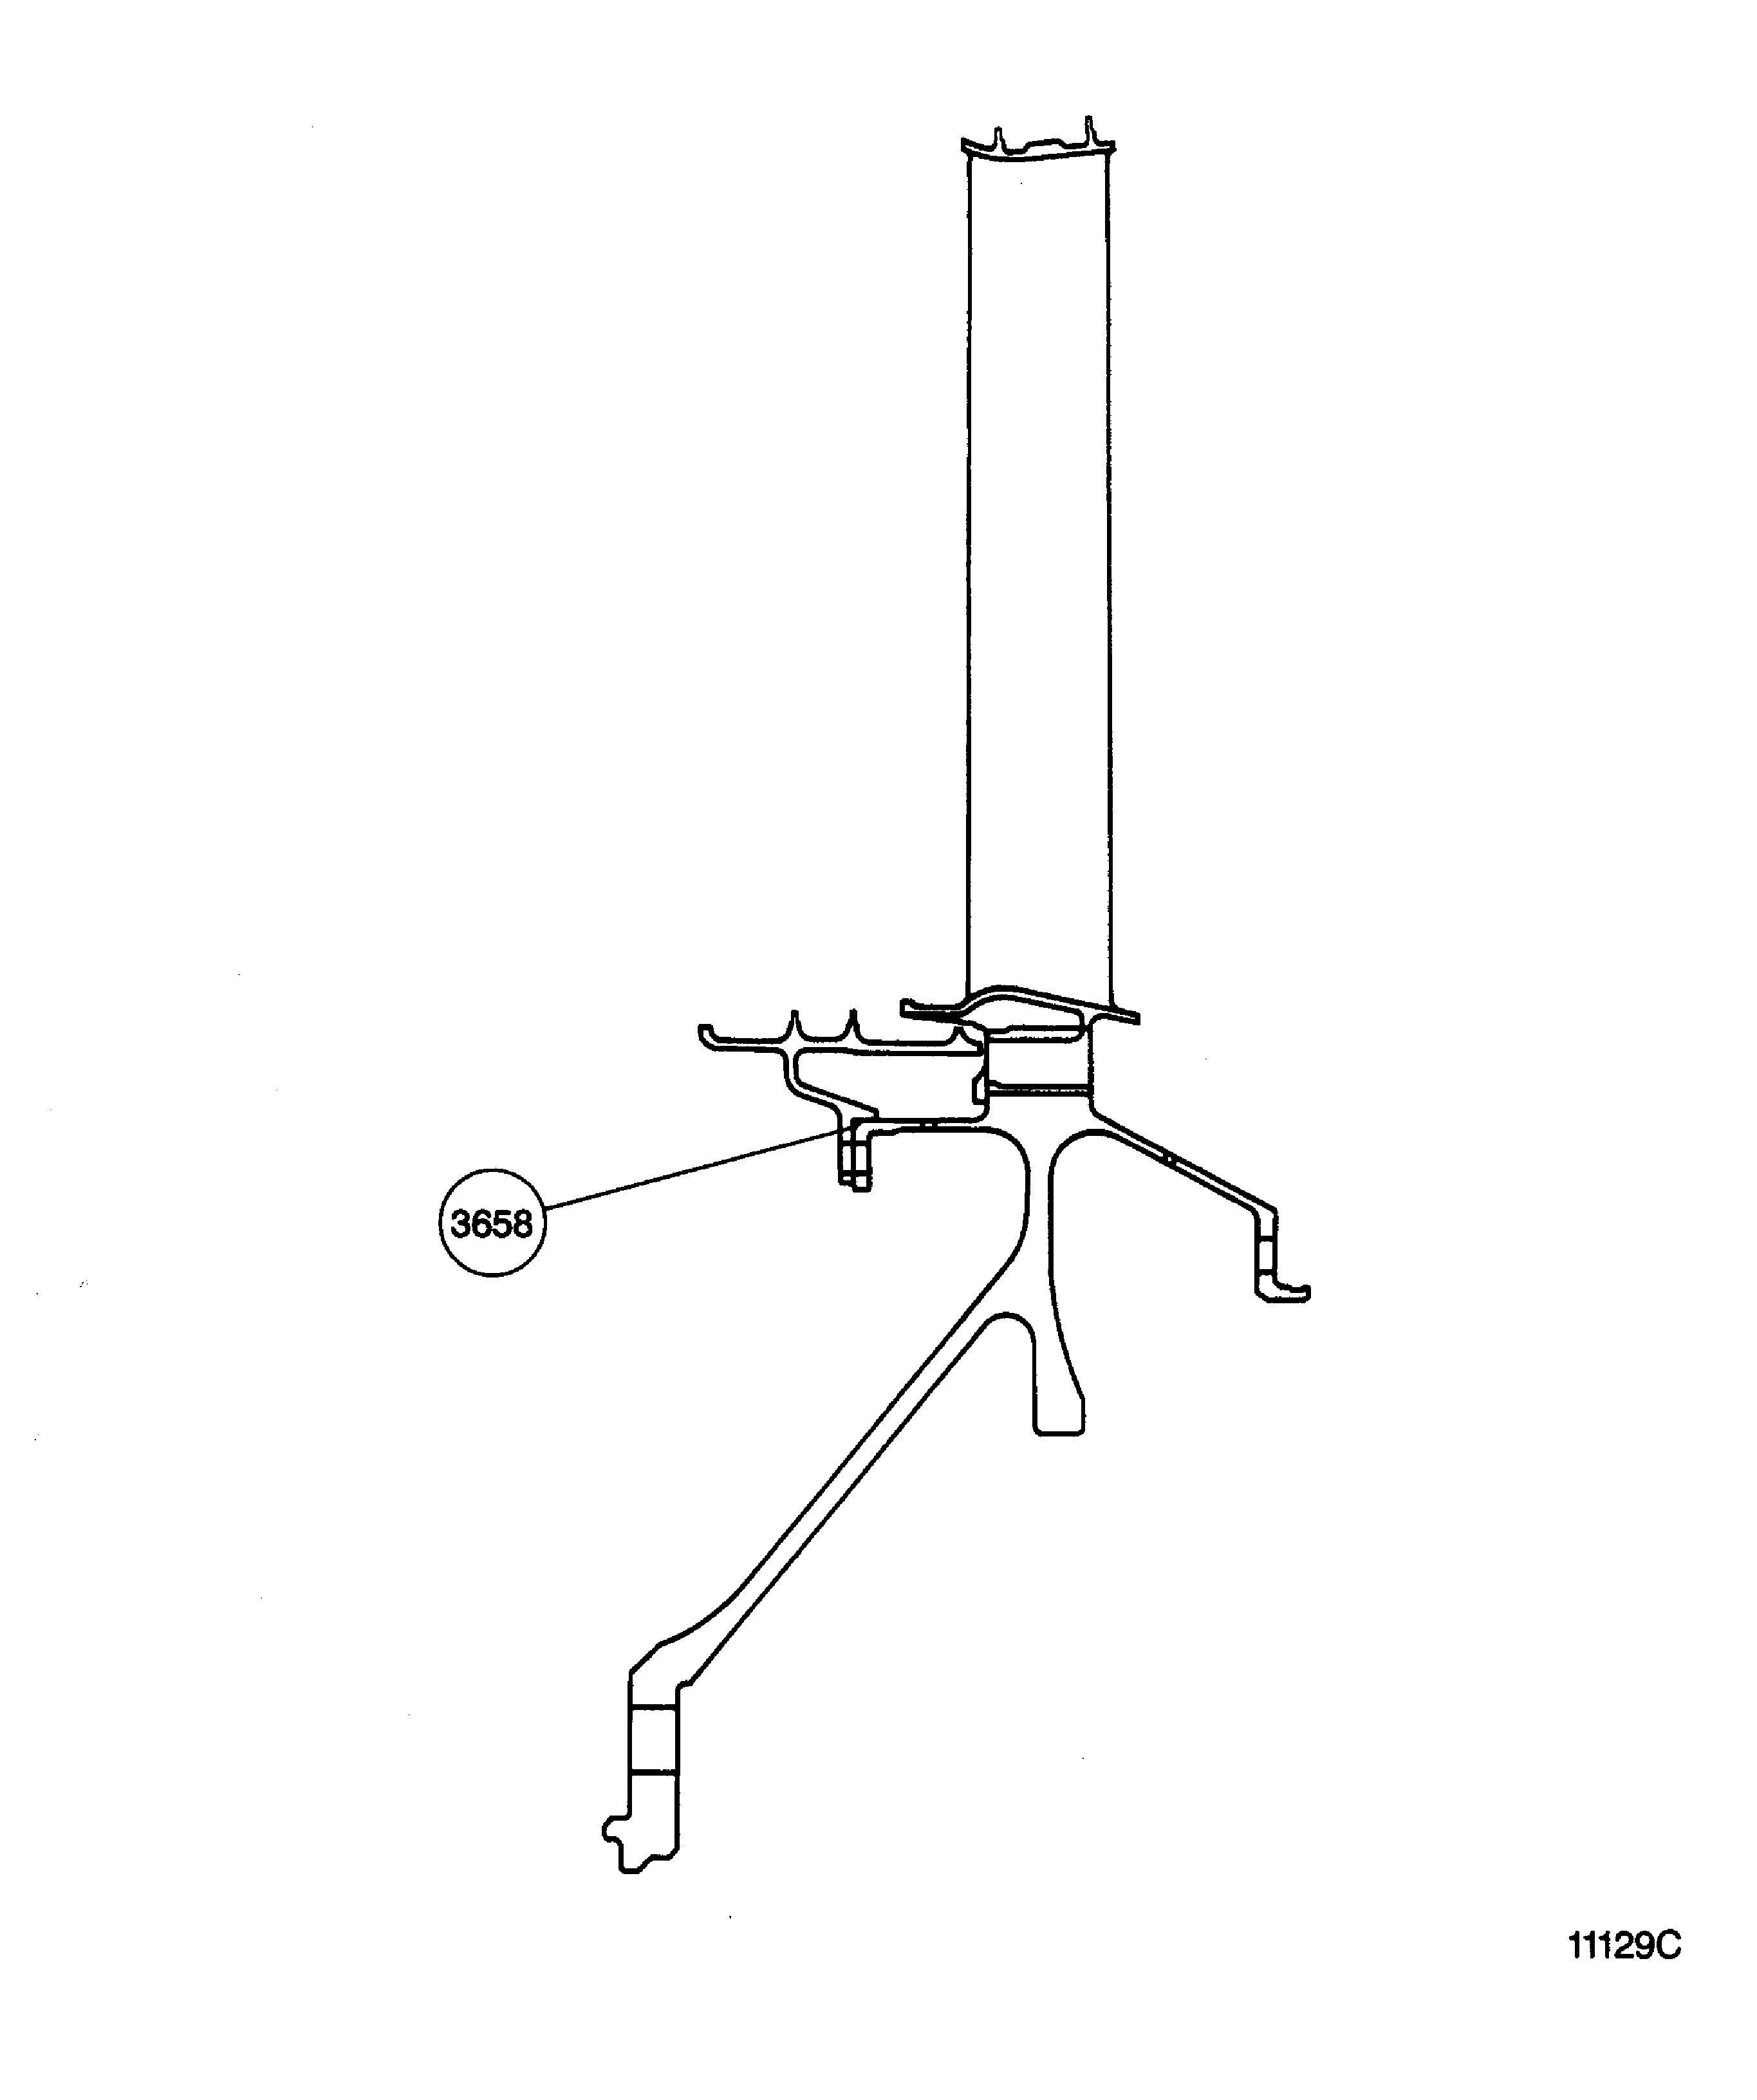
Figure: V2500-A5: The Stage 6 Turbine Disk and the Stage 6 Air Seal - Fits and Clearances
V2500-A5: The Stage 6 Turbine Disk and the Stage 6 Air Seal - Fits and Clearances
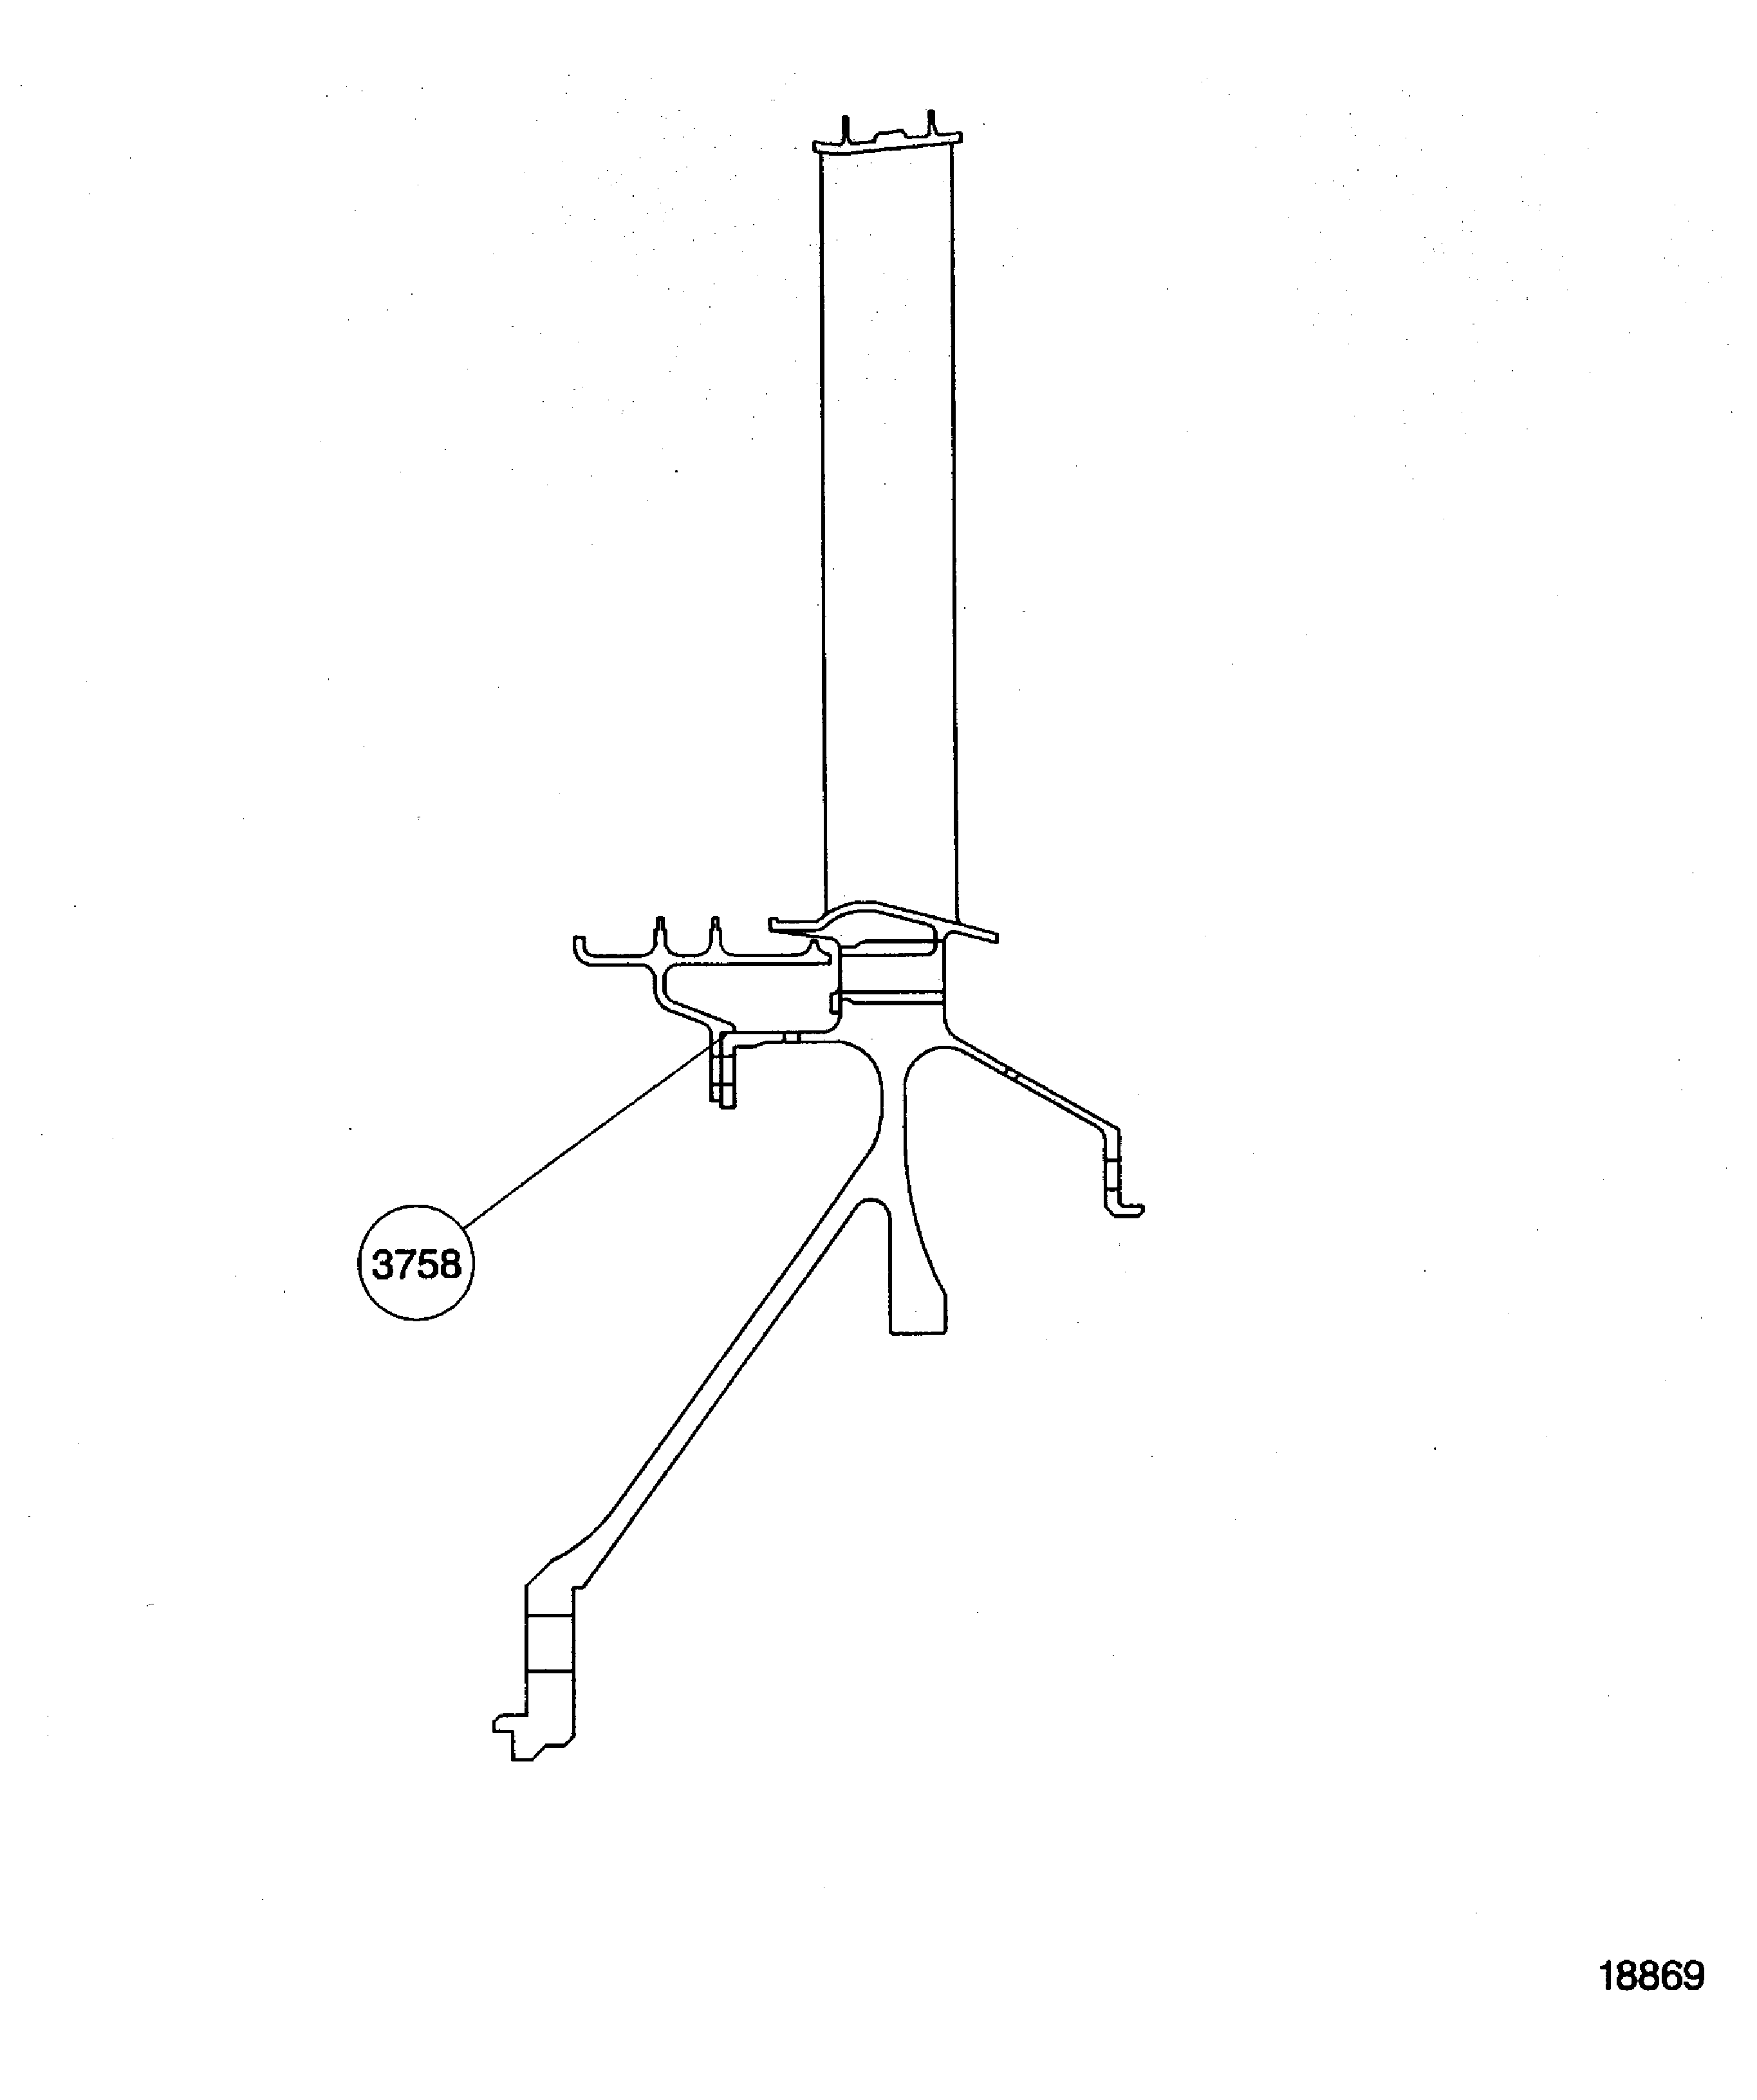
Figure: Calibrate the Moment Weight Equipment for the Stage 6 Turbine Blades
Calibrate the Moment Weight Equipment for the Stage 6 Turbine Blades
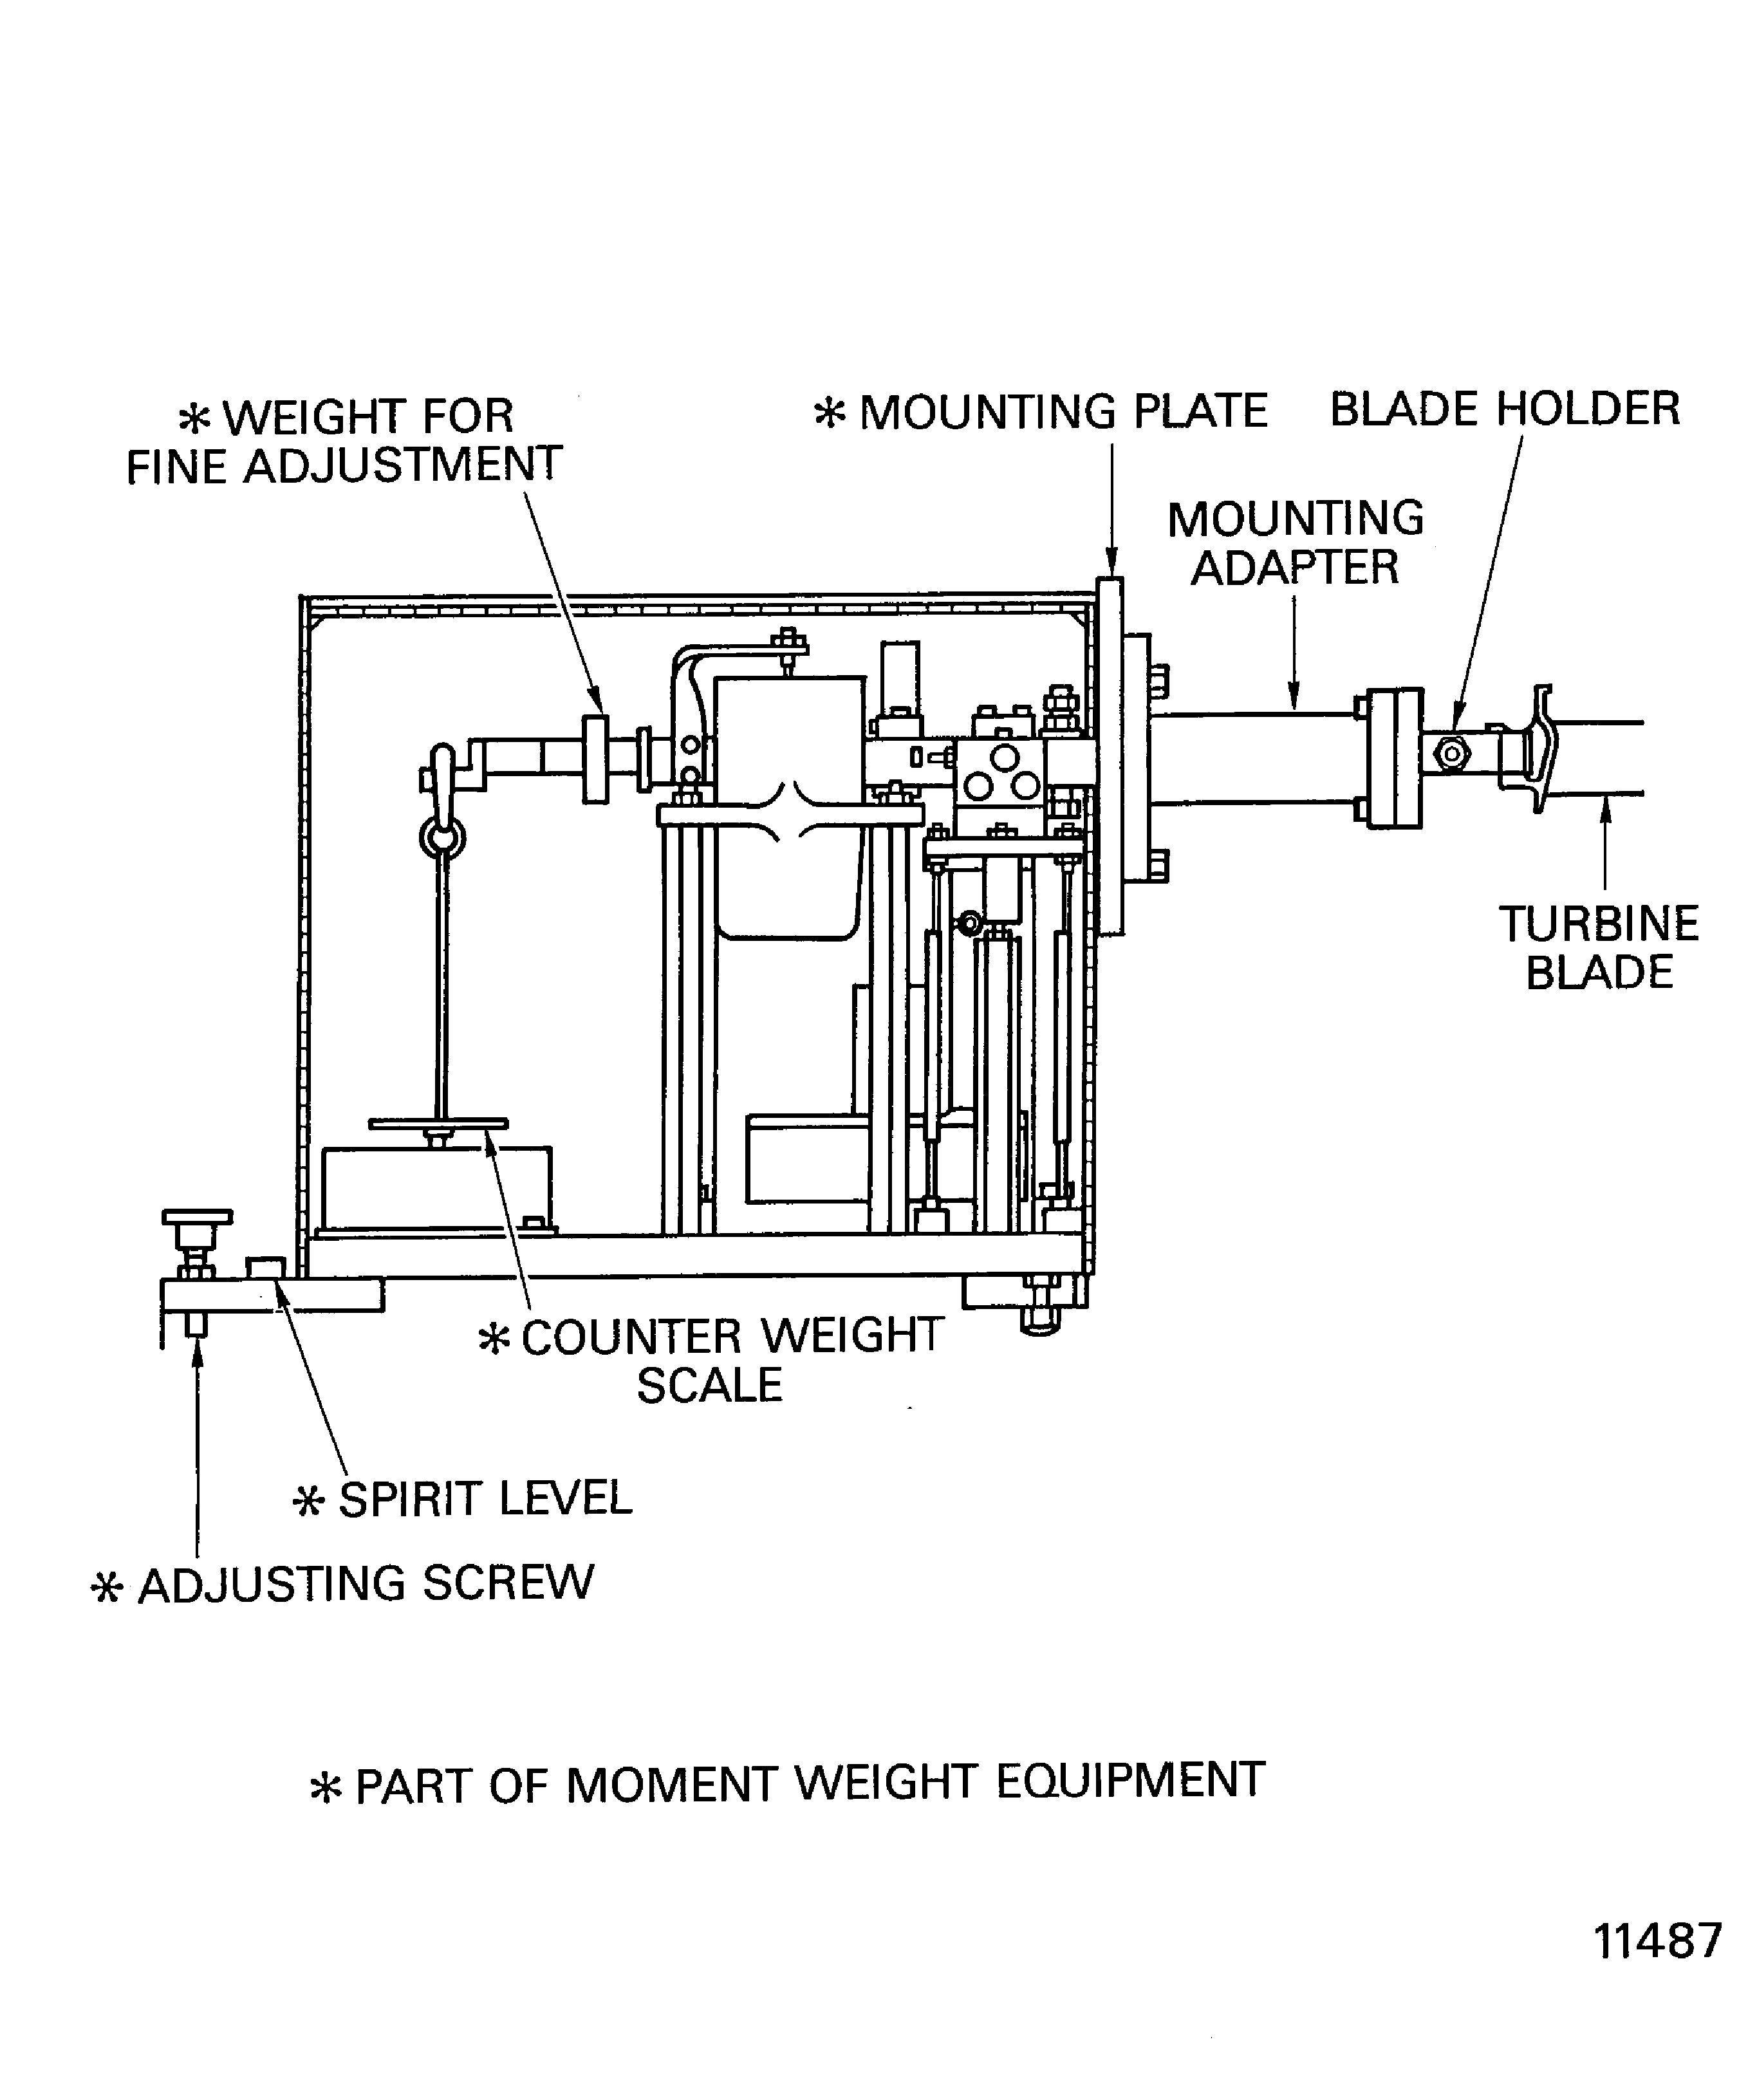
Figure: Disk-marking Areas of the Stage 6 Turbine Disk
Disk-marking Areas of the Stage 6 Turbine Disk
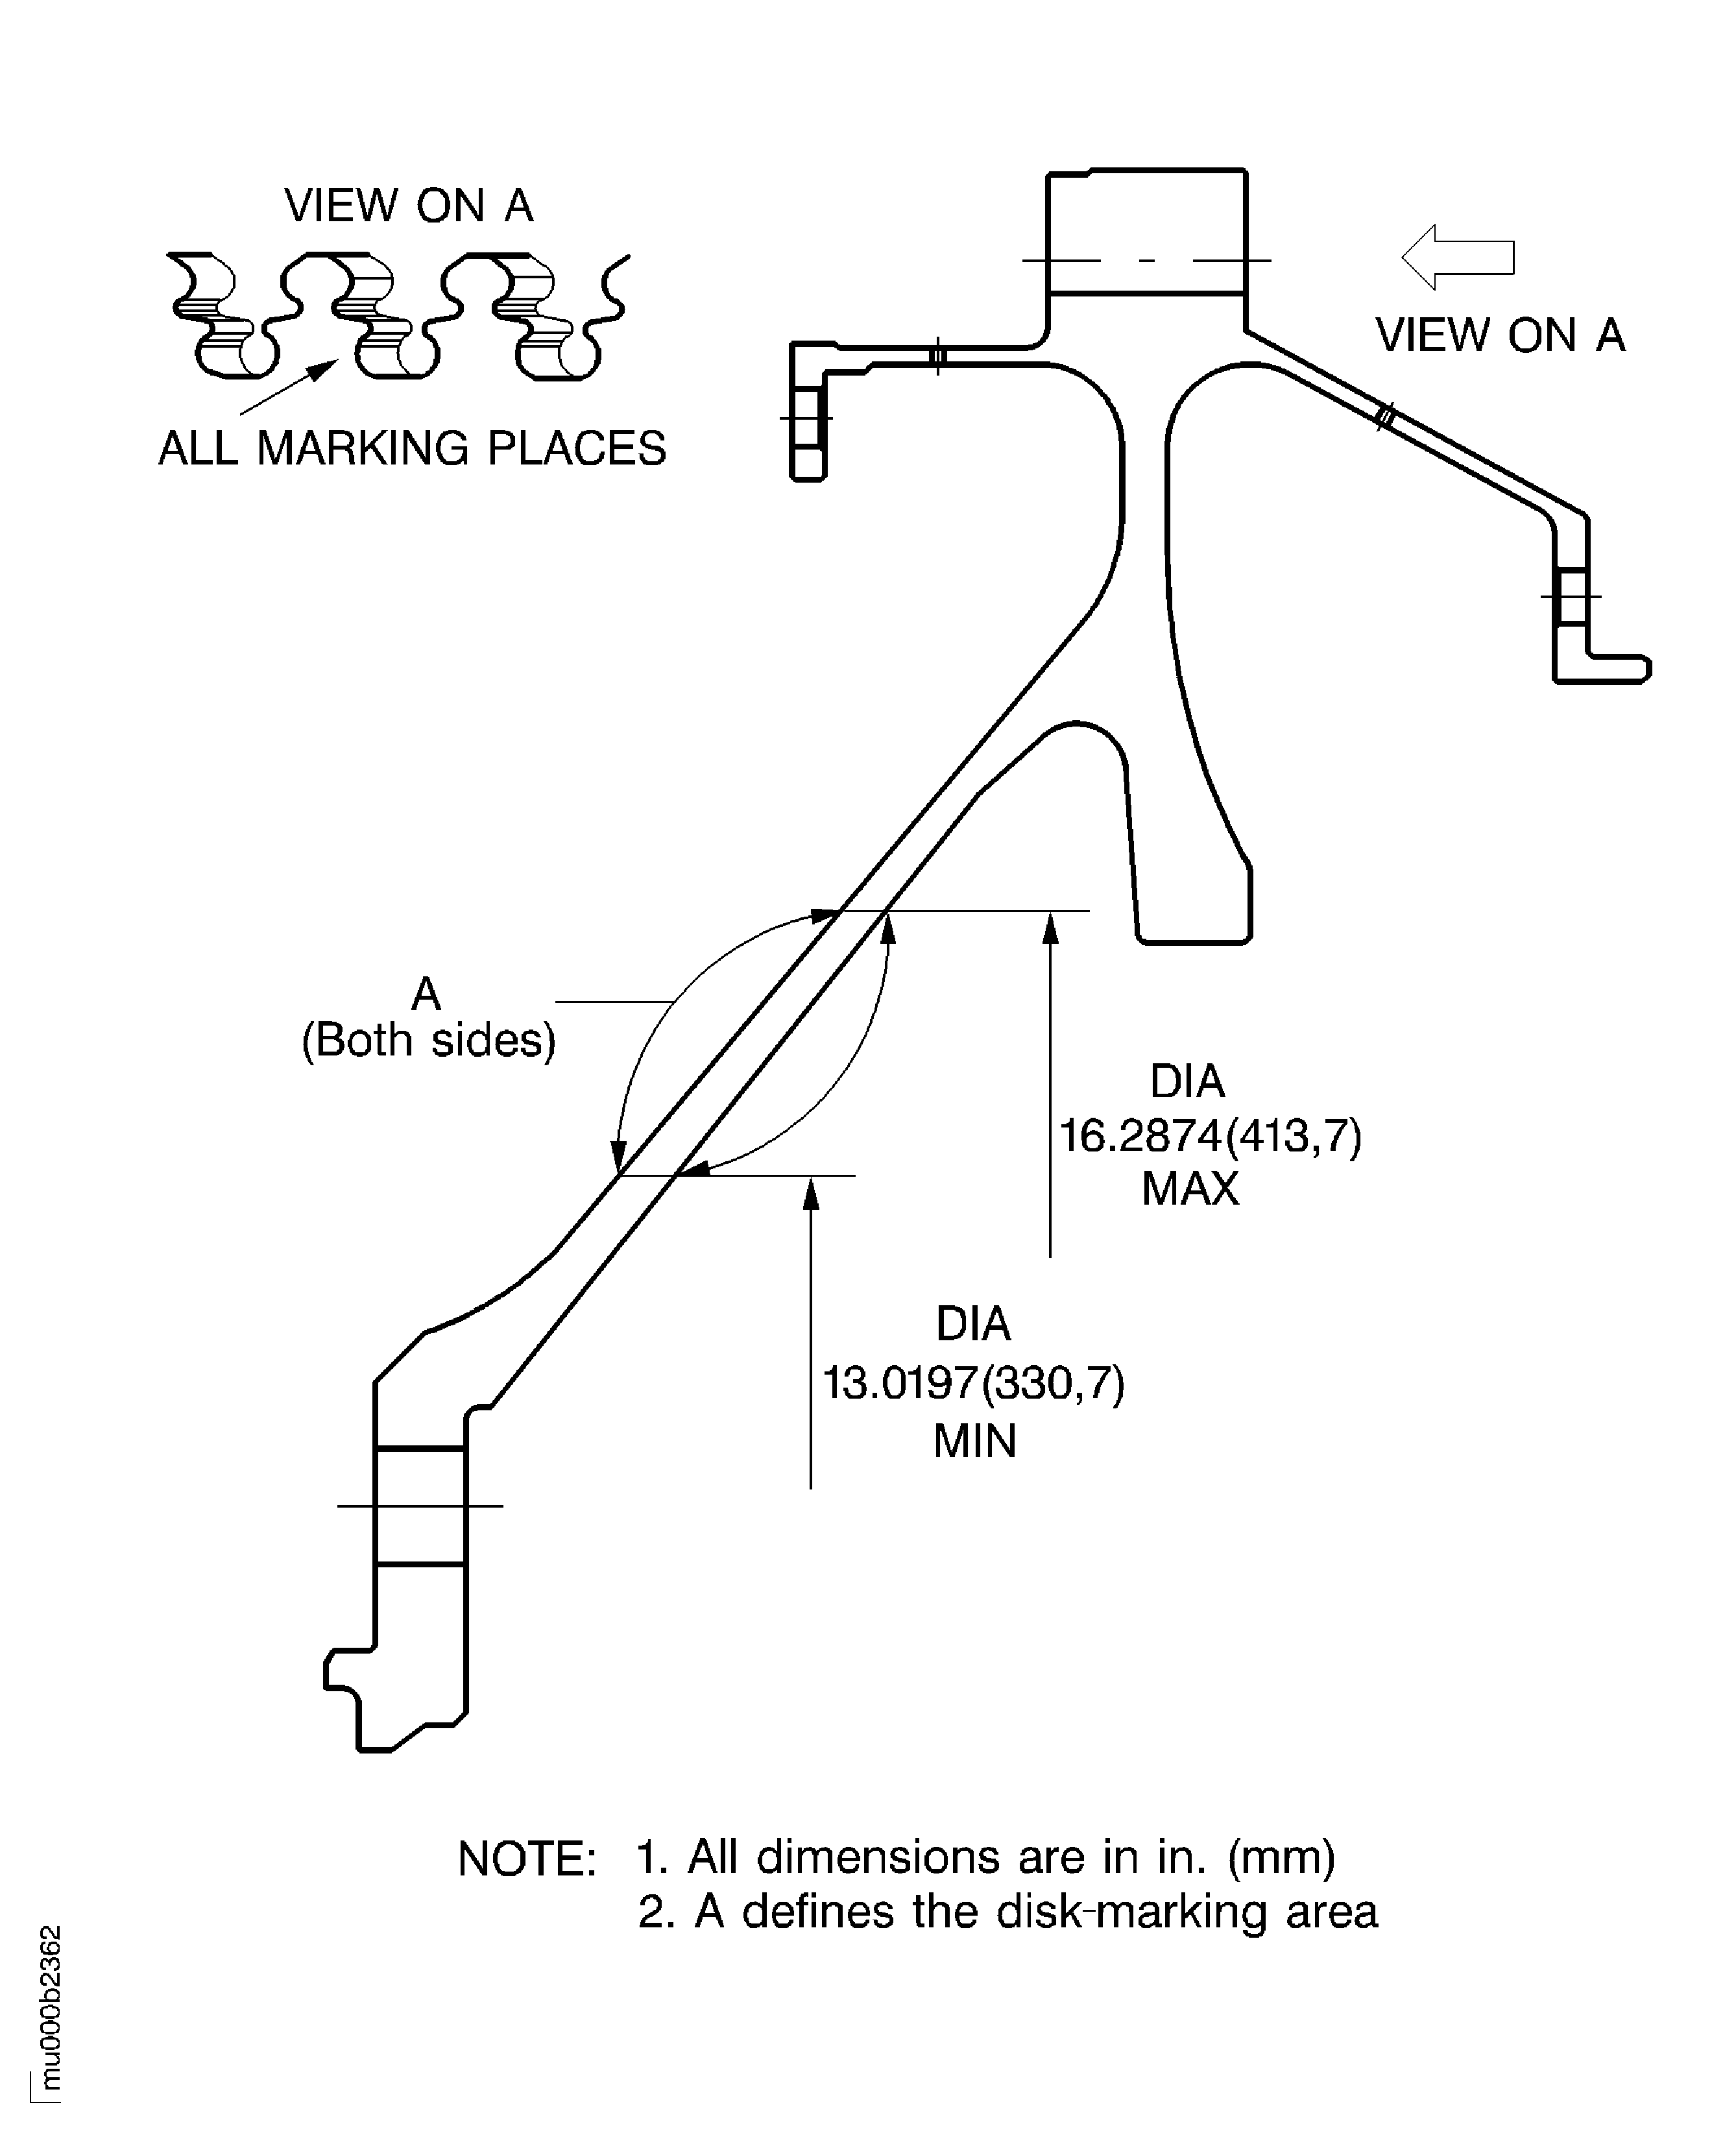
Figure: Install the Stage 6 Turbine Blades
Install the Stage 6 Turbine Blades

Figure: Turn the Stage 6 Turbine Disk with the Clamping Ring
Turn the Stage 6 Turbine Disk with the Clamping Ring
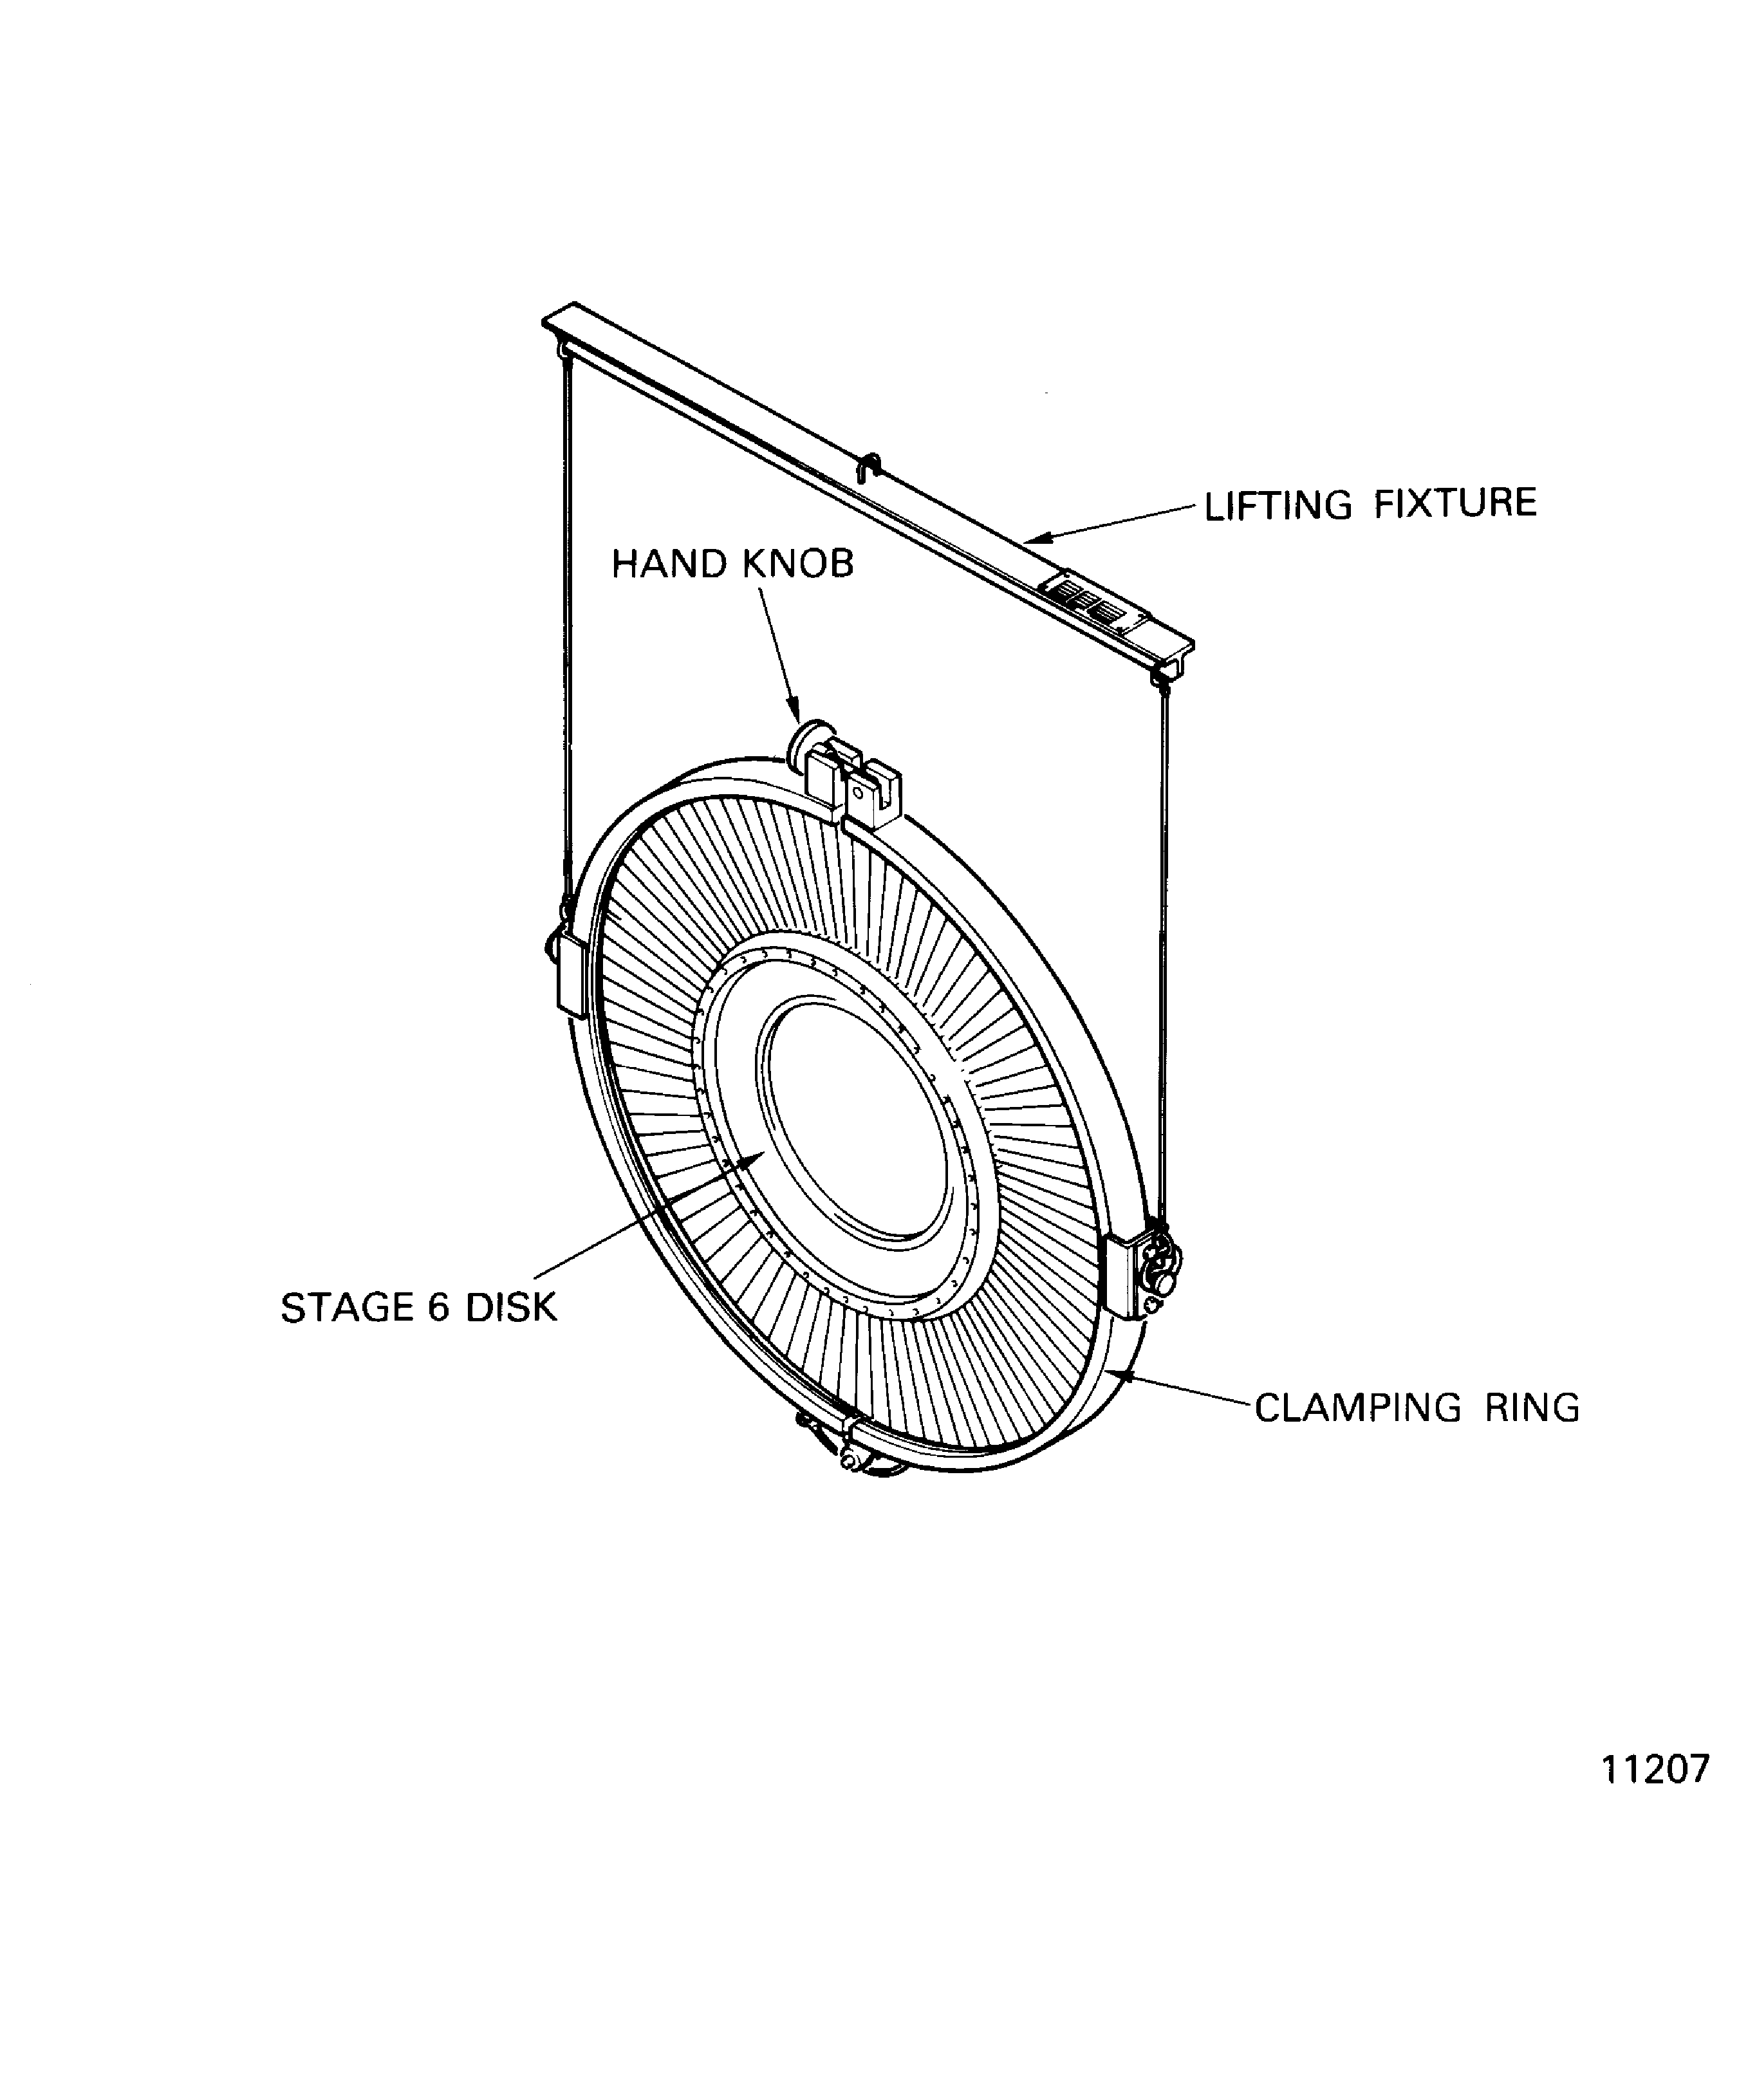
Figure: Install the Stage 6 Turbine Disk to the Balancing Tool Assembly
Install the Stage 6 Turbine Disk to the Balancing Tool Assembly
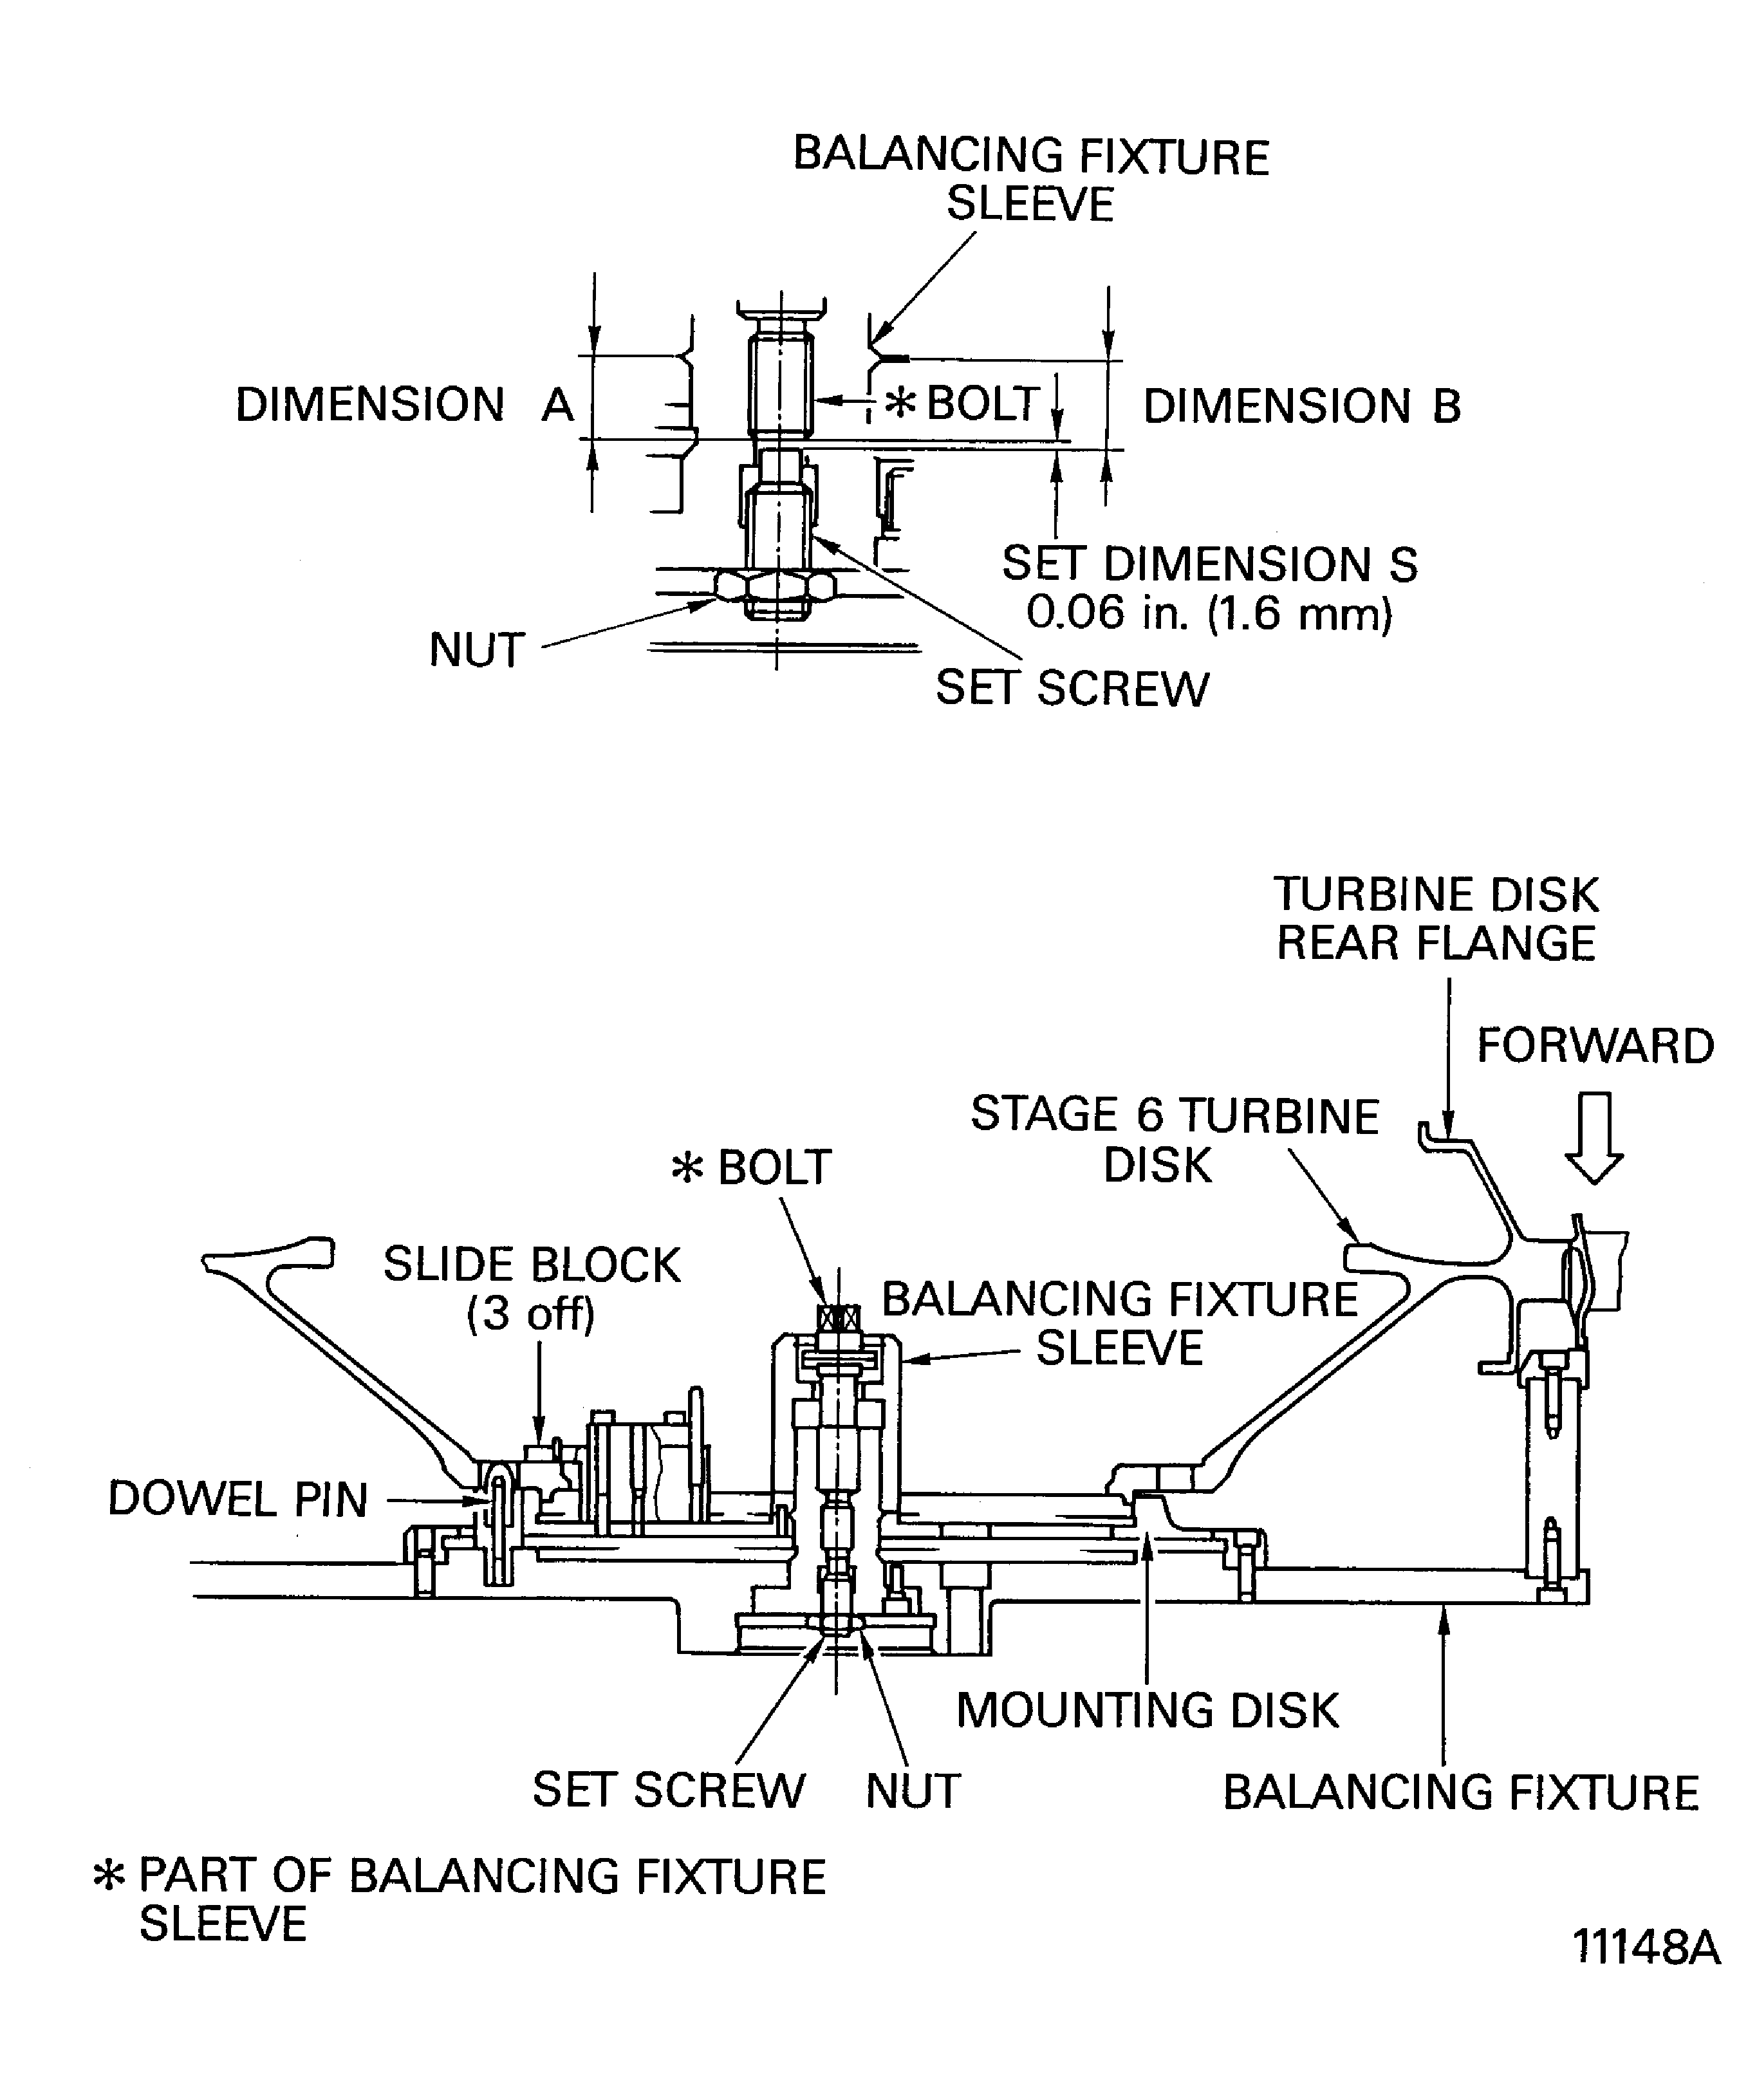
Figure: Install the Stage 6 Air Seal to the Stage 6 Turbine Disk
Install the Stage 6 Air Seal to the Stage 6 Turbine Disk
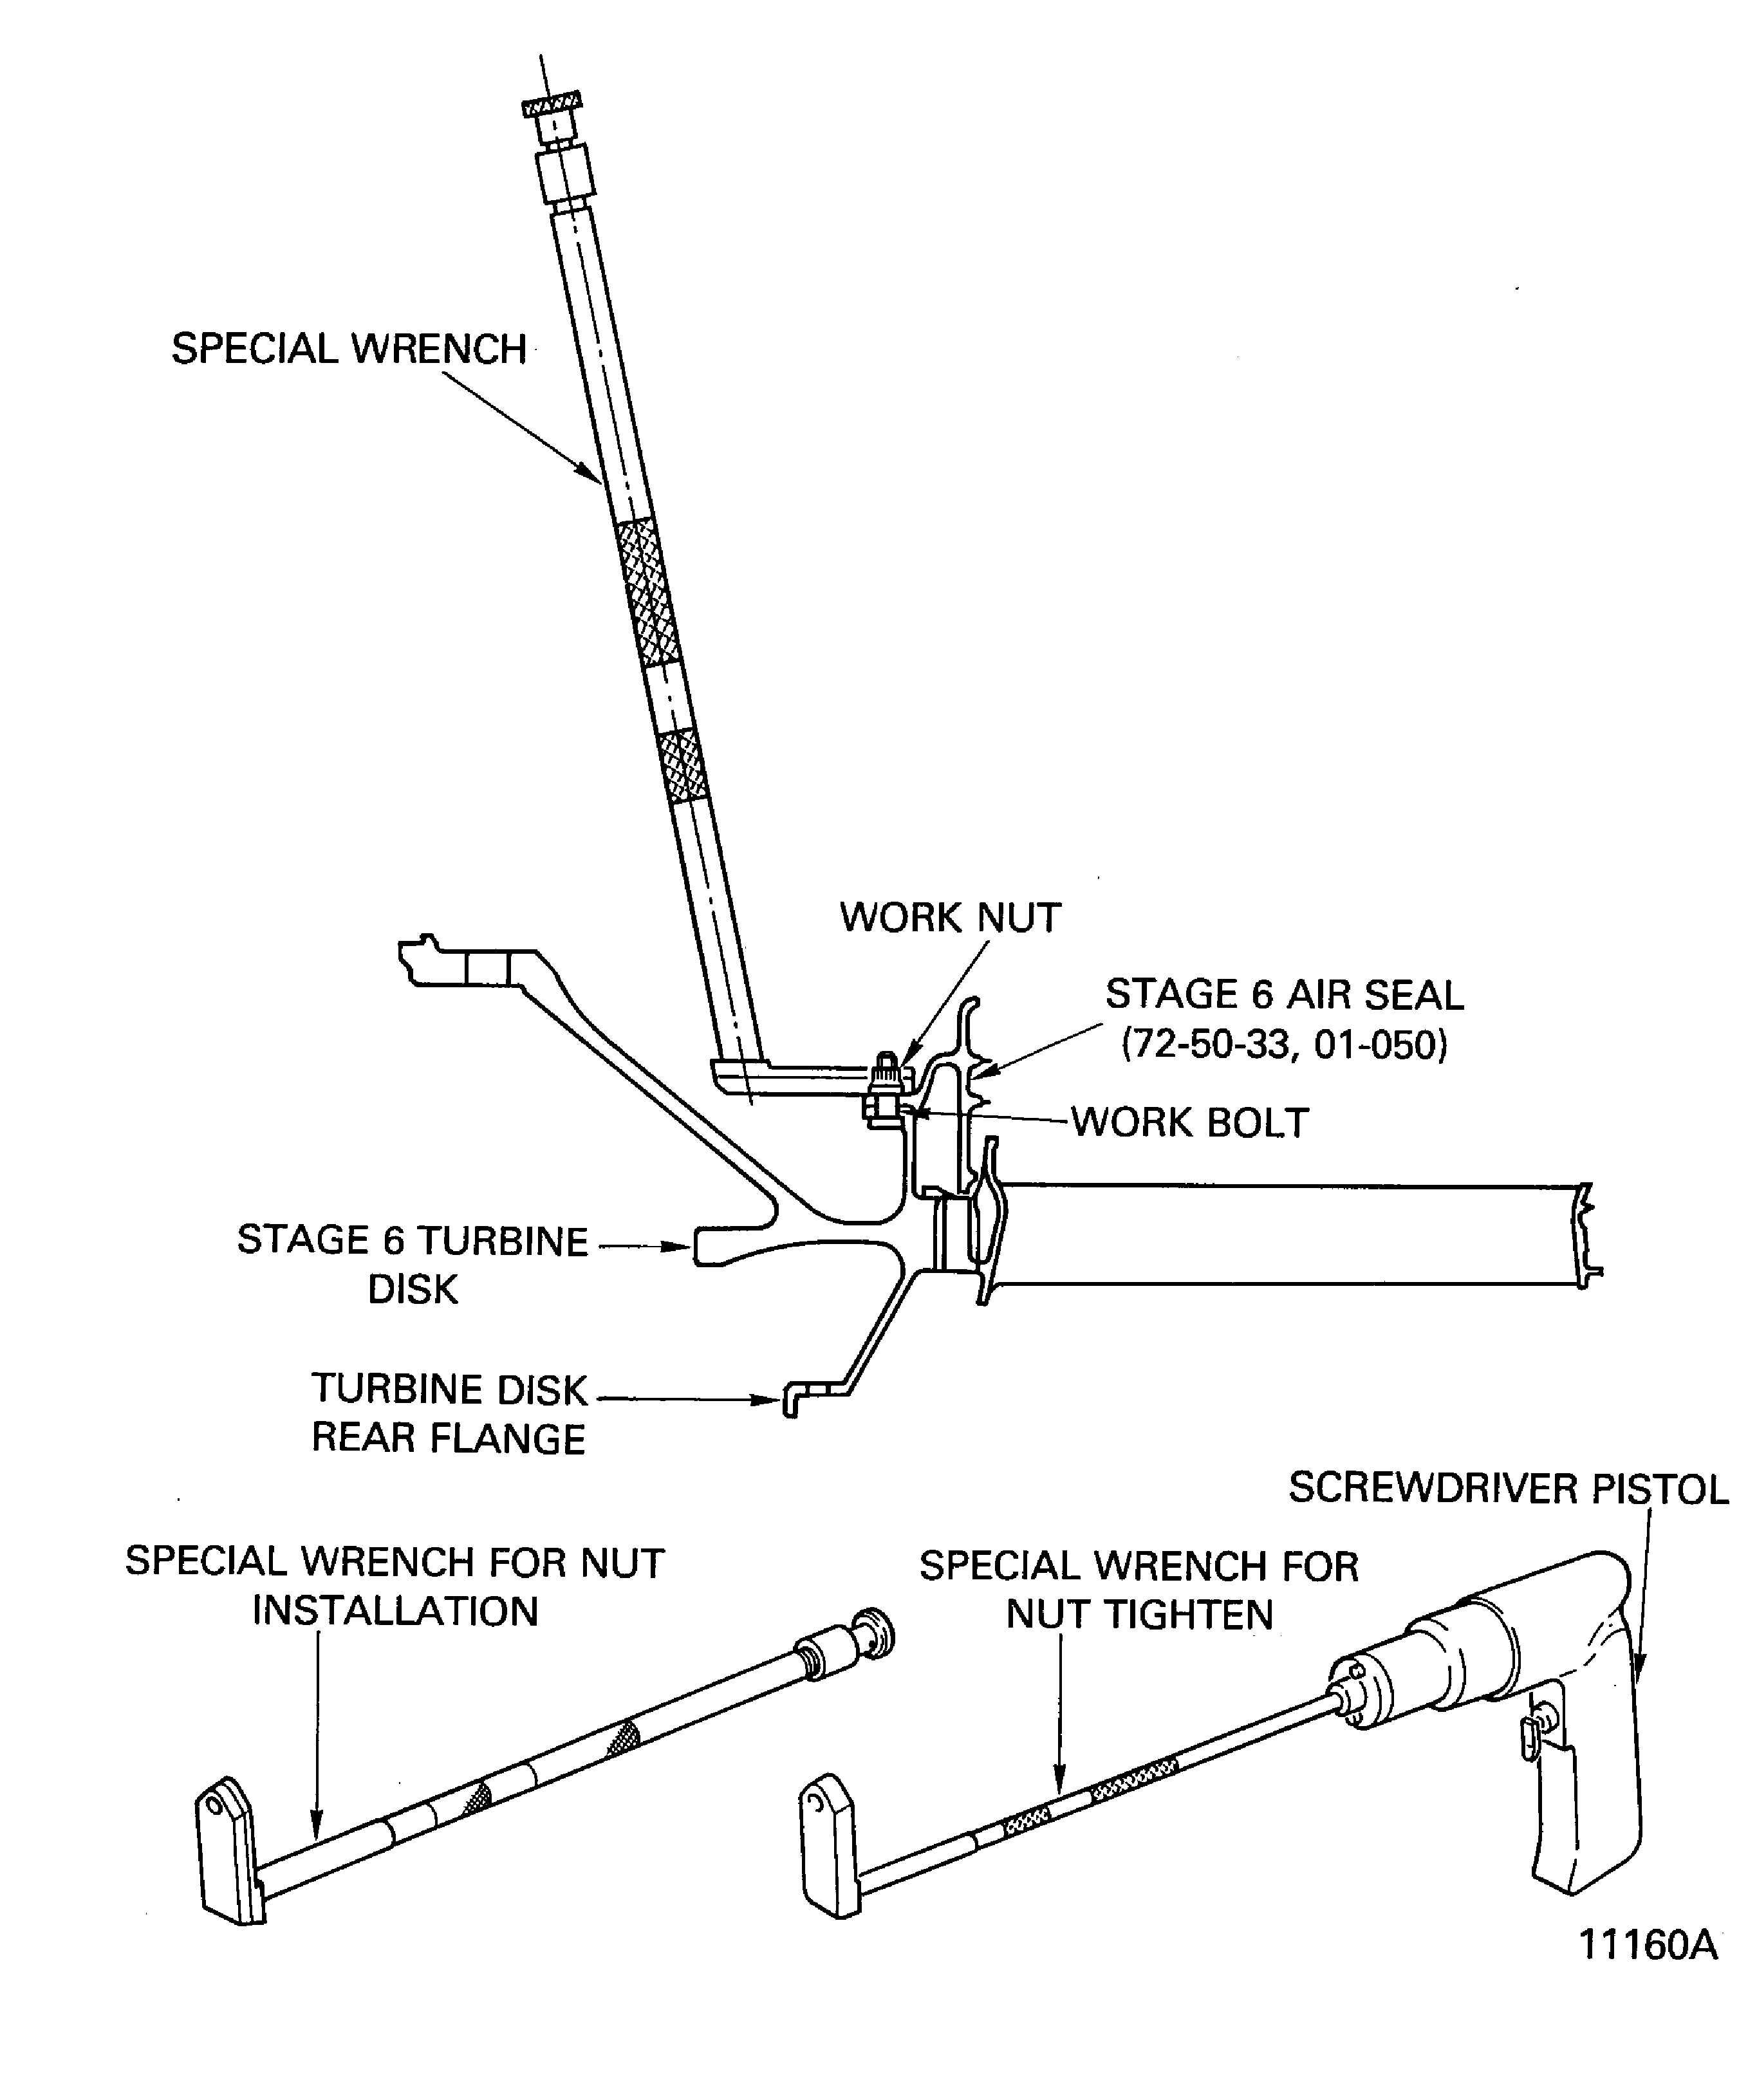
Figure: Install the Stage 6 Turbine Blades
Install the Stage 6 Turbine Blades
