Export Control
EAR Export Classification: Not subject to the EAR per 15 C.F.R. Chapter 1, Part 734.3(b)(3), except for the following Service Bulletins which are currently published as EAR Export Classification 9E991: SBE70-0992, SBE72-0483, SBE72-0580, SBE72-0588, SBE72-0640, SBE73-0209, SBE80-0024 and SBE80-0025.Copyright
© IAE International Aero Engines AG (2001, 2014 - 2021) The information contained in this document is the property of © IAE International Aero Engines AG and may not be copied or used for any purpose other than that for which it is supplied without the express written authority of © IAE International Aero Engines AG. (This does not preclude use by engine and aircraft operators for normal instructional, maintenance or overhaul purposes.).Applicability
All
Common Information
TASK 73-22-49-200-104 Fuel System Sensing Air Tubes - Examine The EEC PS3 Pressure Air Tube, Inspection-004
Effectivity
FIG./ITEM | PART NO. |
06-100 | 5A0446 |
06-100 | 5A8735 |
06-100 | 5A8799 |
06-100 | 6A6211 |
06-100 | 6A9040 |
06-500 | 5A9093 |
06-500 | 6A6212 |
06-500 | 6A9045 |
07-100 | 5A0448 |
07-100 | 6A8091 |
07-100 | 5A8736 |
07-100 | 5A8800 |
07-100 | 6A9039 |
General
This TASK gives the procedure for the inspection of the EEC PS3 pressure air tube assembly. For the other fuel system air tubes and parts, refer to Inspection-000 TASK 73-22-49-200-100 and Inspection-000 TASK 73-22-49-200-400 in the Component Maintenance Manual (CMM-MECH-V2500-1IA) .
Fig./item numbers in parentheses in the procedure agree with those used in the IPC. Only the primary Fig./item numbers are used. For the service bulletin alpha variants refer to the IPC.
The policy that is necessary for Inspection is given in the SPM TASK 70-20-01-200-501.
All the parts must be cleaned before they are examined. Refer to Cleaning-000 TASK 73-22-49-100-100.
All the parts must be visually examined for damage, corrosion and wear. Any defects that are not identified in the procedure must be referred to IAE.
The procedure for those parts which must have a crack test is given in the relevant SUBTASK. Do the crack test before the part is visually examined.
Do not discard a part until you are sure there are no repairs available. Refer to the instructions in Repair before a discarded part is used again or oversize parts are installed.
Parts which must be discarded can be held although no repair is available. The repair of a discarded part could be shown to be necessary at a subsequent date.
All parts must be examined to make sure that all the repairs are completed satisfactorily.
Practices and processes referred to in the procedure by the TASK/SUBTASK number are in the SPM.
NOTE
References
Refer to the SPM for data on these items:
Definitions of Damage - Specified Types of Damage, SPM TASK 70-02-02-350-501.
Inspection Policy and Inspection of Parts, SPM TASK 70-20-01-200-501.
Some data on these items is contained in this TASK. For more data on these items refer to the SPM:
Methods of Testing for Crack Indications
Chemical Processes
Surface Protection
Preliminary Requirements
Pre-Conditions
NONESupport Equipment
| Name | Manufacturer | Part Number / Identification | Quantity | Remark |
|---|---|---|---|---|
| Pneumatic pressure testing rig | LOCAL | Pneumatic pressure testing rig | ||
| MS21913-4 Blanking plug | 0AM53 | MS21913-4 |
Consumables, Materials and Expendables
NONESpares
NONESafety Requirements
NONEProcedure
Clean the part. Refer to Cleaning-000 TASK 73-22-49-100-100.
SPM, VRS7001 (Repair-001) TASK 70-35-24-300-501.
Cracked
EEC PS3 pressure air tube assembly (73-22-49,06-100), (73-22-49,06-500) and (73-22-49,07-100).
Do the crack test on the parts that are given below. Use the applicable penetrant inspection procedure.
SUBTASK 73-22-49-230-058 Examine the PS3 Sensor Line Air Tube Assembly for Cracks (Pre SBE 73-0198) (SBE 73-0198)
Torque the MS21913-4 Blanking plug Refer to SPM TASK 70-41-01-400-501 for .4375-20 UNJF thread size.
Install the MS21913-4 Blanking plug 1 off to the flexible end of the tube.
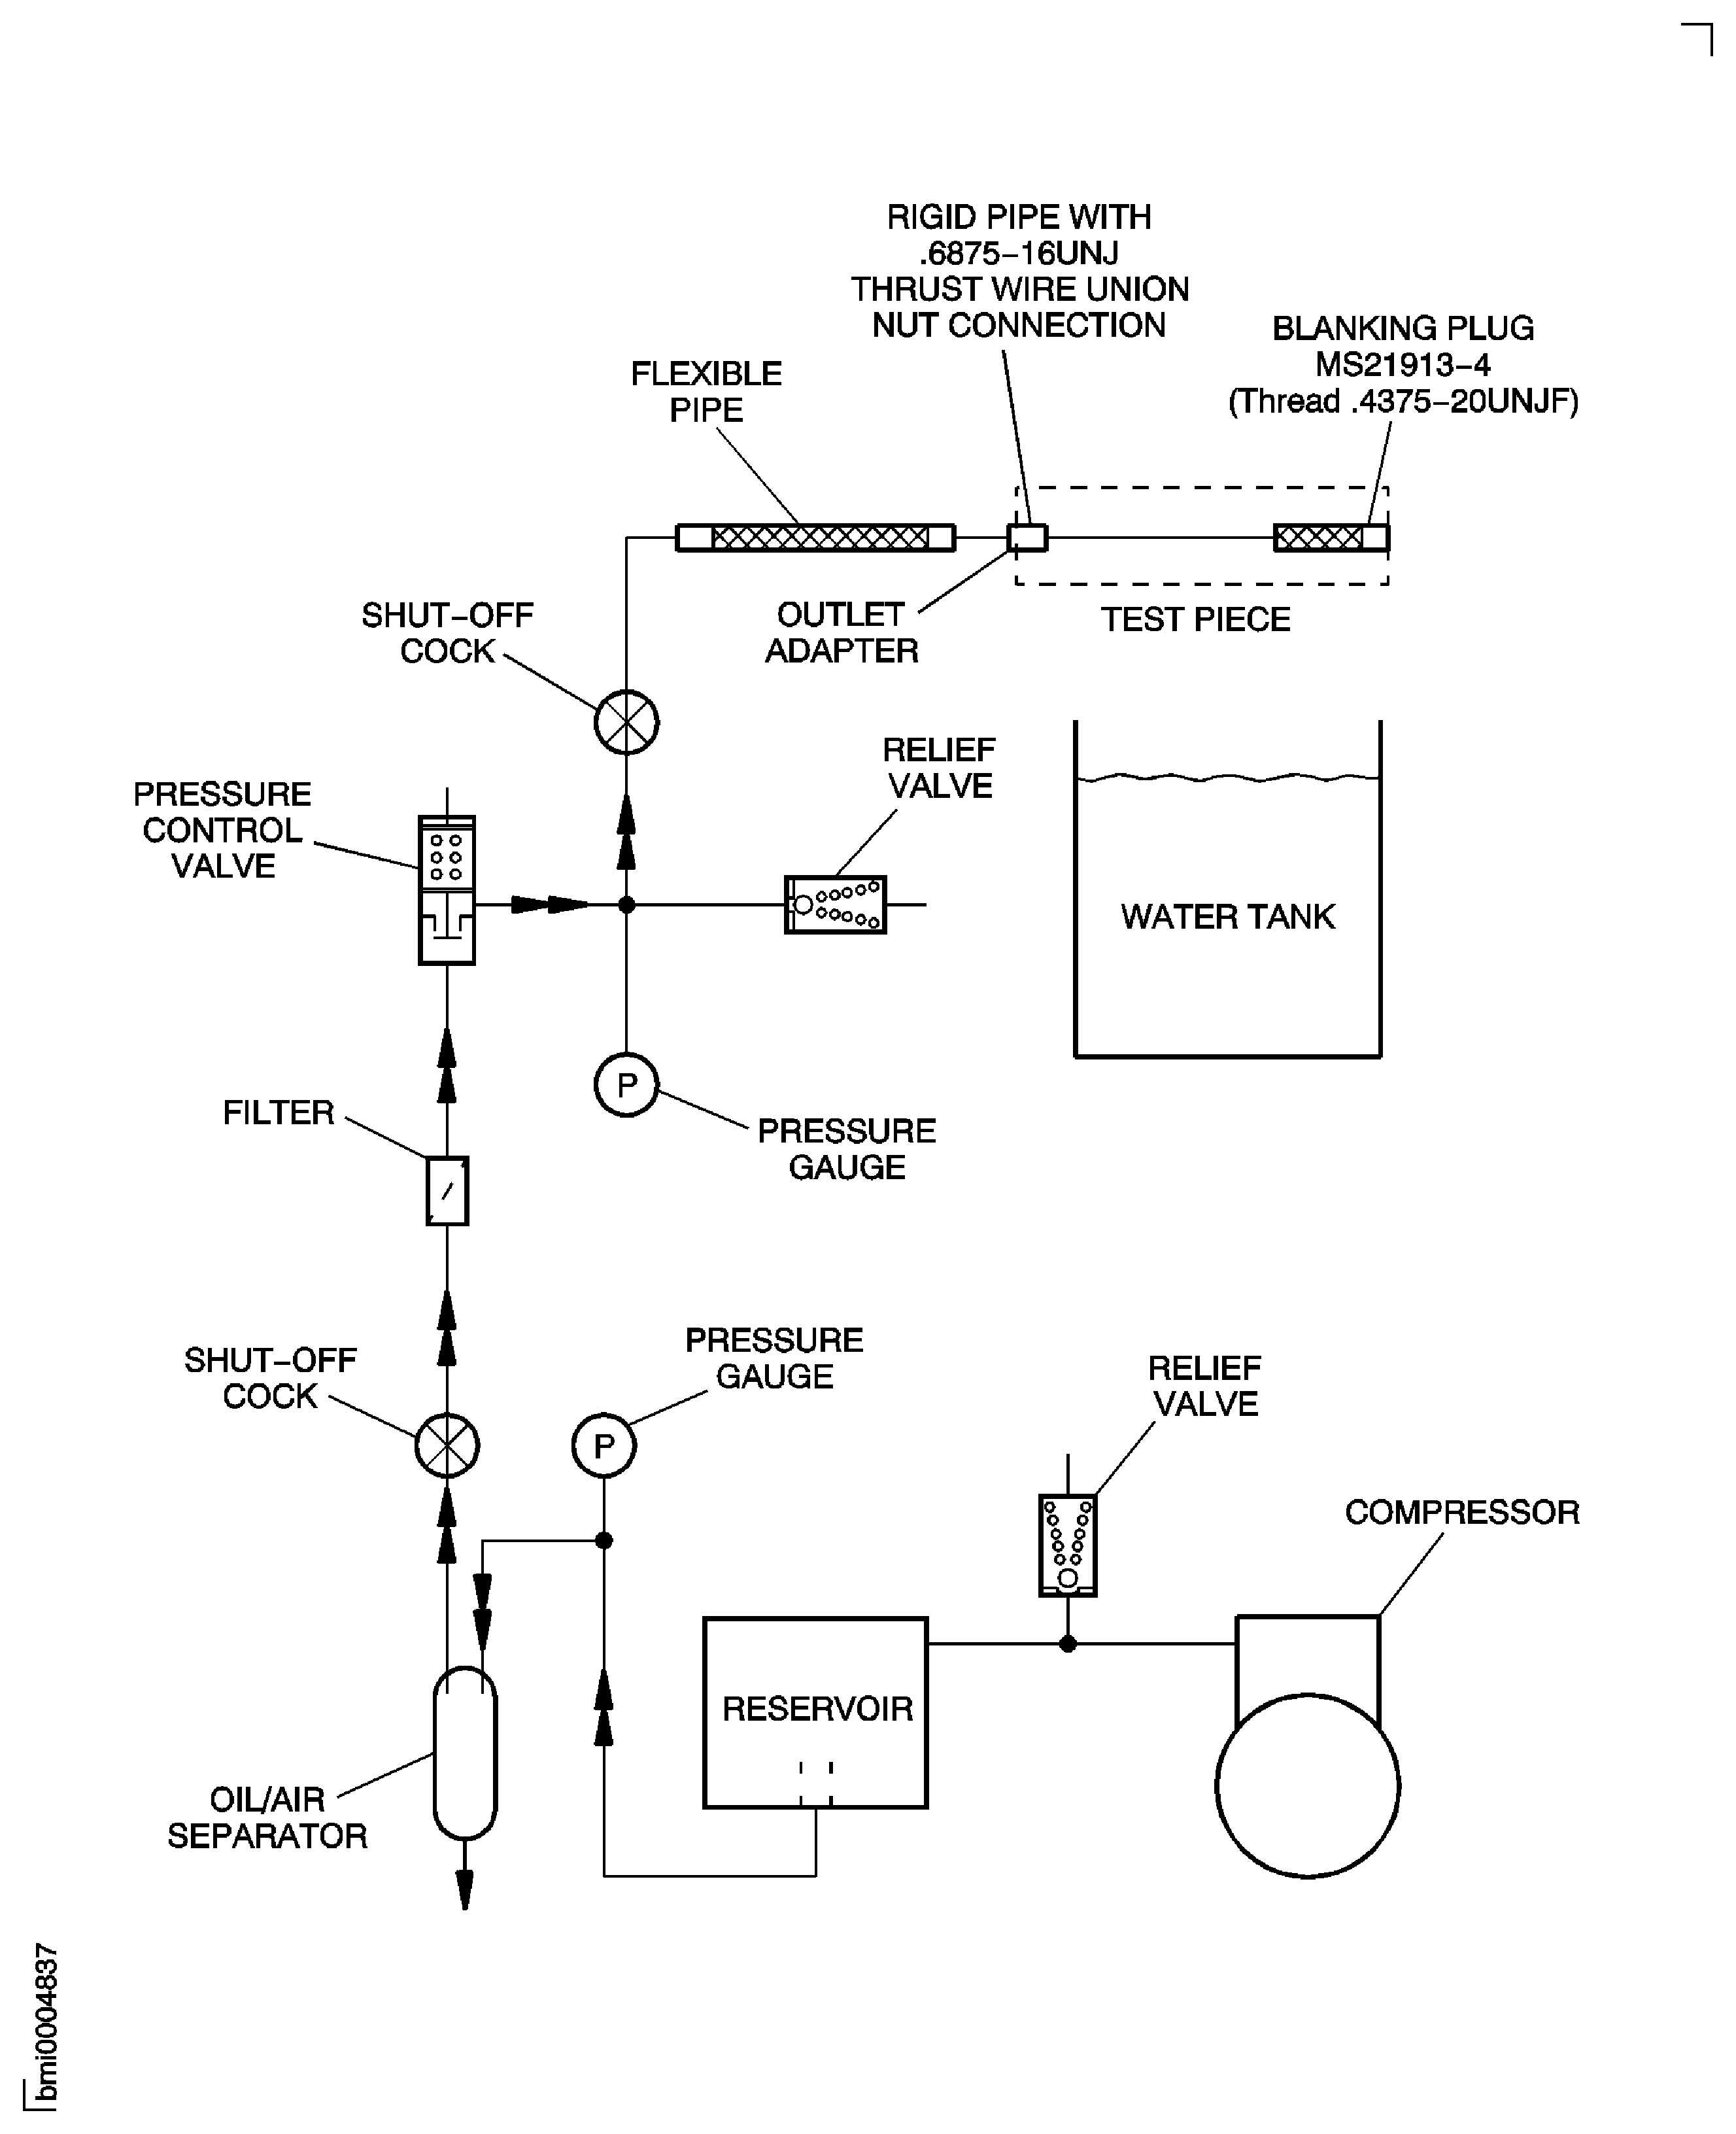
SUBTASK 73-22-49-230-079 Prepare the Tube (73-22-49, 07-100) for the Pneumatic Pressure Test (SBE 73-0198)
Torque the thrust wire union nut. Refer to SPM TASK 70-41-01-400-501 for .6875-16 UNJF thread size.
Connect the test piece rigid tube to the outlet adapter of the Pneumatic pressure testing rig.
Apply the pressure of 14.5 psi (100 kPa) in the tube.
Put the flexible tube in the water tank.
Let the pressure stay in the tube for one minute.
Make sure that the tube has no leaks. If the tube has leaks, reject the tube, Refer to TASK 36-21-49-200-100.
Decrease the pressure in the tube to zero.
Disconnect the tube from the outlet of the Pneumatic pressure testing rig.
Remove the MS21913-4 Blanking plug 1 off from the tube.
SUBTASK 73-22-49-230-078 Do the Pneumatic Pressure Test on the Tube (73-22-49, 07-100) (SBE 73-0198)
Refer to Figure.
SPM, VRS7001 (Repair-001) TASK 70-35-24-300-501.
Pitted
SPM, VRS7001 (Repair-001) TASK 70-35-24-300-501.
Not more than 0.500 in. (12.70 mm) from fittings or bends.
Accept
In areas other than in Step: Of large smooth area if the maximum diameter is 10 times the depth and bore is not decreased by more than 10 percent at any one point.
Accept
In areas other than in Step: Of small smooth area not more than 0.125 sq in. (80.00 sq mm) if depth is not more than 0.025 in. (0.64 mm).
SPM, VRS7001 (Repair-001) TASK 70-35-24-300-501.
Dented
Repair, VRS1620 (Repair-001) TASK 73-22-49-300-001.
On the outer surface of a bend rounded bottom and not more than 0.003 in. (0.076 mm) in depth.
Repair, VRS1620 (Repair-001) TASK 73-22-49-300-001.
In areas other than in Step with rounded bottom and not more than 0.0030 in. (0.076 mm) in depth.
SPM, VRS7001 (Repair-001) TASK 70-35-24-300-501.
Nicked
Repair, VRS1620 (Repair-001) TASK 73-22-49-300-001.
On the outer surface of a bend not more than 0.0030 in. (0.076 mm) in depth.
Repair, VRS1620 (Repair-001) TASK 73-22-49-300-001.
In areas other than in Step not more than 0.0030 in. (0.076 mm) in depth.
SPM, VRS7001 (Repair-001) TASK 70-35-24-300-501.
Galled
Repair, VRS1620 (Repair-001) TASK 73-22-49-300-001.
On the outer surface of a bend not more than 0.0030 in. (0.076 mm) in depth.
Repair, VRS1620 (Repair-001) TASK 73-22-49-300-001.
In areas other than Step not more than 0.0030 in. (0.076 mm) in depth.
SPM, VRS7001 (Repair-001) TASK 70-35-24-300-501.
SPM, VRS7001 (Repair-001) TASK 70-35-24-300-501.
Limits more than Step.
Scratched or scored.
SPM, VRS7001 (Repair-001) TASK 70-35-24-300-501.
More than in Step.
Wrinkled
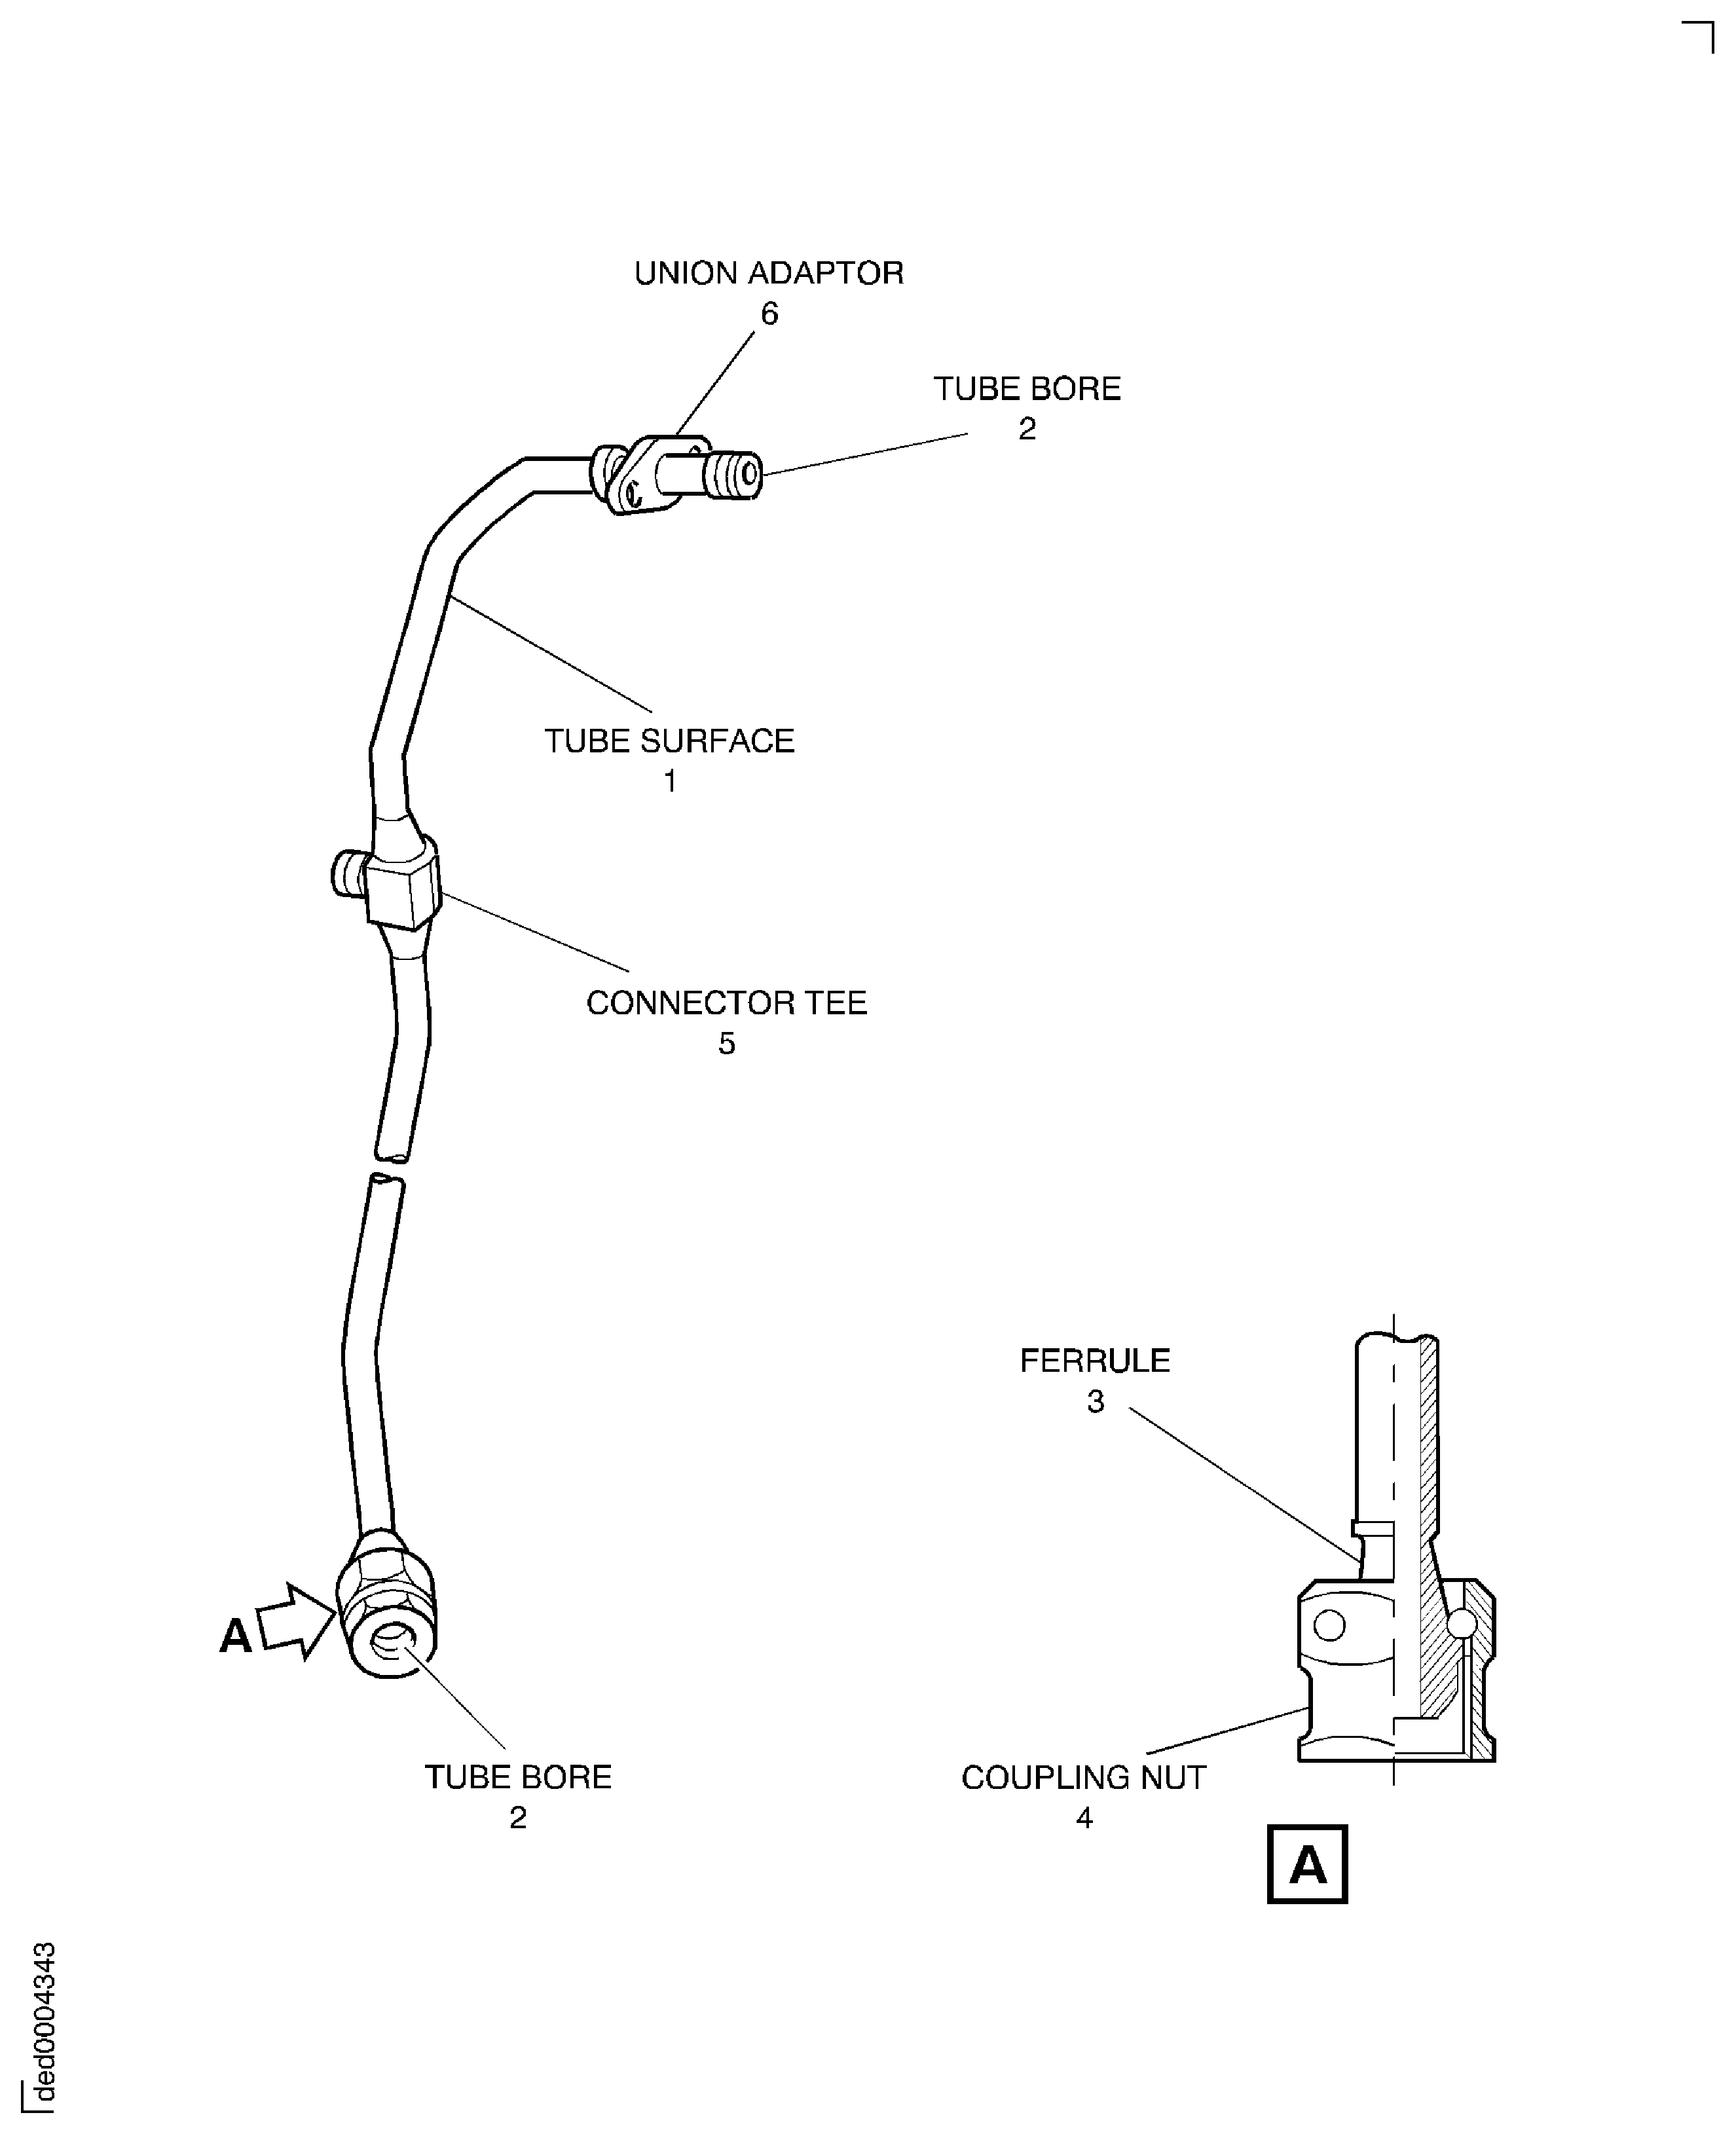
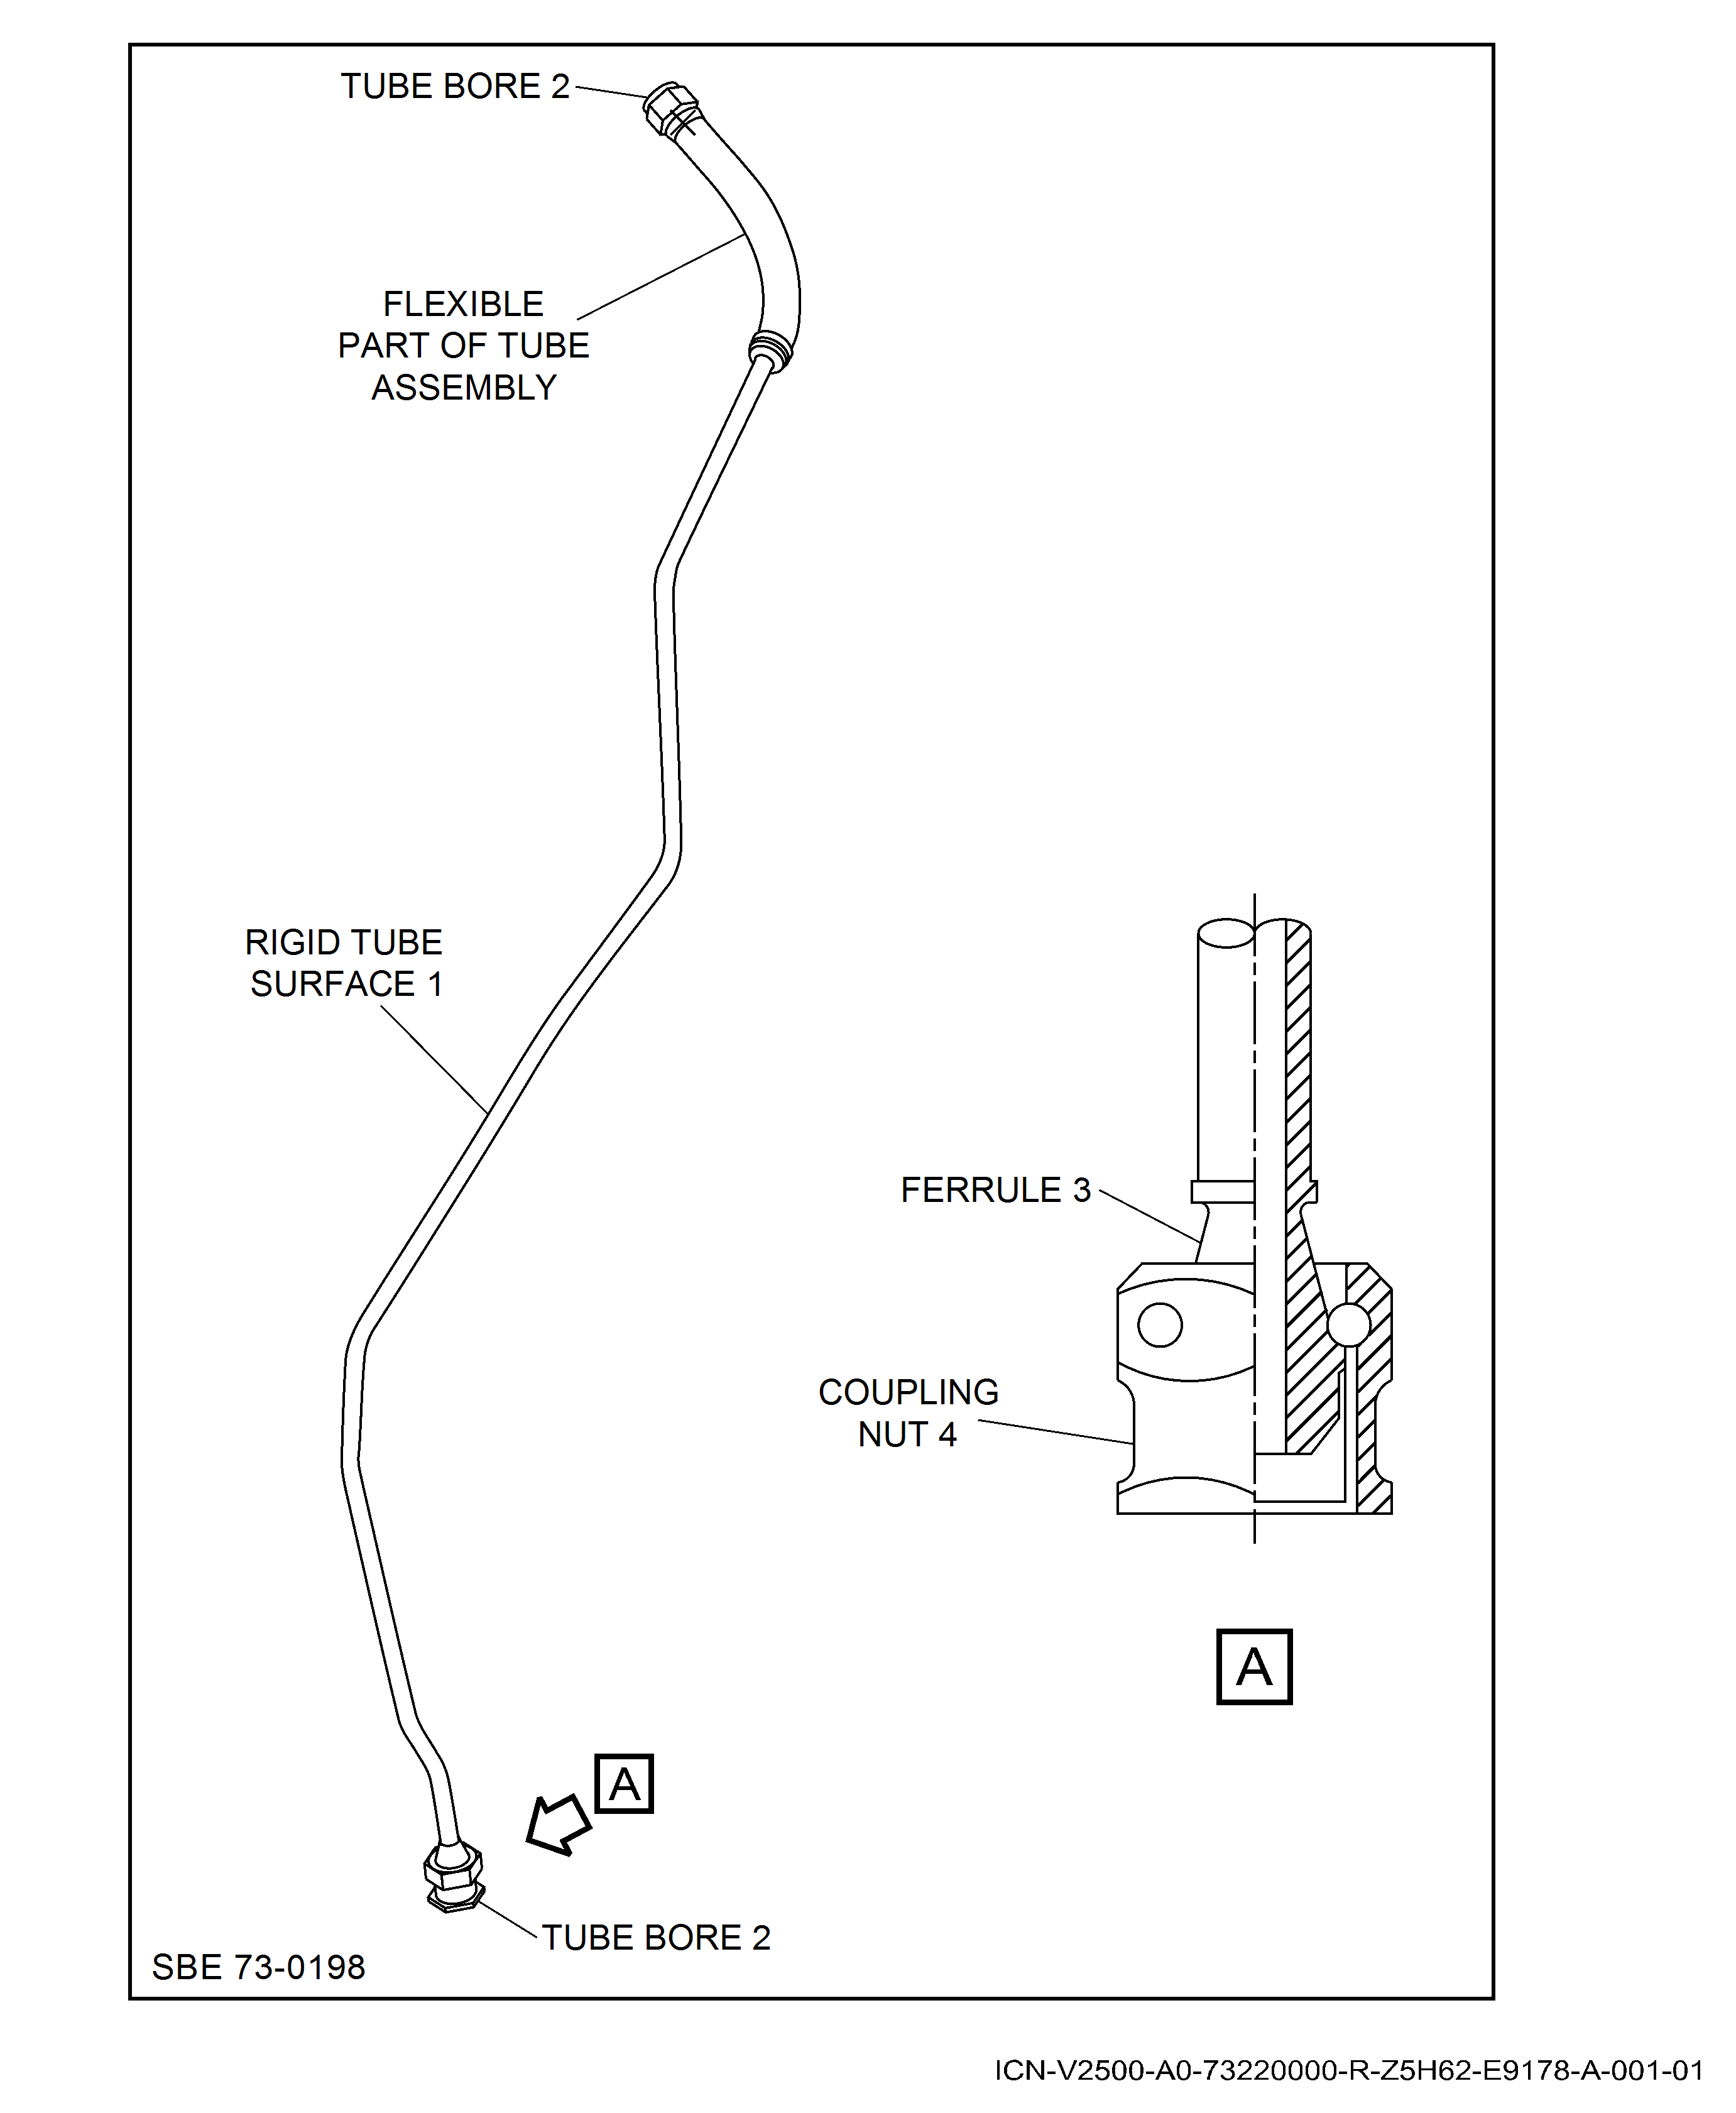
Examine the rigid tube surface at location 1.
SUBTASK 73-22-49-220-081 Examine the EEC PS3 Pressure Air Tube Assembly Tube Surface
Refer to Figure.
Clear with dry air blast.
Plugged
Examine the tube bore at location 2.
SUBTASK 73-22-49-220-082 Examine the EEC PS3 Pressure Air Tube Assembly Tube Bore
Refer to Figure.
Repair, VRS1620 (Repair-001) TASK 73-22-49-300-001 or SPM, VRS7001 (Repair-001) TASK 70-35-24-300-501.
Galled
Sealing face.
Examine the ferrule at location 3.
SUBTASK 73-22-49-220-083 Examine the EEC PS3 Pressure Air Tube Assembly (06-100) and (07-100) Ferrule
Refer to Figure.
Repair, VRS1620 (Repair-001) TASK 73-22-49-300-001.
Pick-up
SPM, VRS7001 (Repair-001) TASK 70-35-24-300-501.
Crossed or stripped
Threads
SPM, VRS7001 (Repair-001) TASK 70-35-24-300-501.
Damaged
Lockwire holes
Examine the coupling nut at location 4.
SUBTASK 73-22-49-220-084 Examine the EEC PS3 Pressure Air Tube Assembly (06-100) and (07-100) Coupling Nut
Refer to Figure.
Repair, VRS1620 (Repair-001) TASK 73-22-49-300-001.
Pick-up
SPM, VRS7001 (Repair-001) TASK 70-35-24-300-501.
Crossed or stripped
Threads
Repair, VRS1620 (Repair-001) TASK 73-22-49-300-001 or SPM, VRS7001 (Repair-001) TASK 70-35-24-300-501.
Galled
Sealing face
SPM, VRS7001 (Repair-001) TASK 70-35-24-300-501.
Damaged
Lockwire hole
Examine the connector tee at location 5.
SUBTASK 73-22-49-220-085 Examine the EEC PS3 Pressure Air Tube Assembly (73-22-49, 06-100) and (73-22-49, 07-100) Connector Tee (Pre SBE 73-0198)
Refer to Figure.
Repair, VRS1620 (Repair-001) TASK 73-22-49-300-001.
Pick-up
SPM, VRS7001 (Repair-001) TASK 70-35-24-300-501.
Crossed or stripped
Threads
Repair, VRS1620 (Repair-001) TASK 73-22-49-300-001 or SPM, VRS7001 (Repair-001) TASK 70-35-24-300-501.
Galled
Sealing face
SPM, VRS7001 (Repair-001) TASK 70-35-24-300-501.
Damaged
Lockwire holes
Examine the union adapter at location 6.
SUBTASK 73-22-49-220-086 Examine the EEC PS3 Pressure Air Tube Assembly Union Adapter (Pre SBE 73-0198)
Figure: Pre SBE 73-0198: Locations on the EEC Ps3 Pressure Air Tube Assembly
Pre SBE 73-0198: Locations on the EEC Ps3 Pressure Air Tube Assembly

Figure: SBE 73-0198: Locations on the EEC Ps3 Pressure Air Tube Assembly
SBE 73-0198: Locations on the EEC Ps3 Pressure Air Tube Assembly

Figure: Pneumatic Pressure Testing Rig
Pneumatic Pressure Testing Rig

