Export Control
EAR Export Classification: Not subject to the EAR per 15 C.F.R. Chapter 1, Part 734.3(b)(3), except for the following Service Bulletins which are currently published as EAR Export Classification 9E991: SBE70-0992, SBE72-0483, SBE72-0580, SBE72-0588, SBE72-0640, SBE73-0209, SBE80-0024 and SBE80-0025.Copyright
© IAE International Aero Engines AG (2001, 2014 - 2021) The information contained in this document is the property of © IAE International Aero Engines AG and may not be copied or used for any purpose other than that for which it is supplied without the express written authority of © IAE International Aero Engines AG. (This does not preclude use by engine and aircraft operators for normal instructional, maintenance or overhaul purposes.).Applicability
All
Common Information
TASK 79-21-41-200-405 Oil Pressure Pump/Filter Housing - Related Parts - Examine The Casing Assembly, Inspection-005
General
CAUTION
This TASK gives the procedure for the inspection of the casing assembly.
Fig./item numbers in parentheses in the procedure agree with those used in the IPC.
The policy that is necessary for inspection is given in SPM TASK 70-20-00-200-501.
All parts must be visually examined for damage, corrosion and wear. Any defects that are not identified in the procedure must be referred to IAE.
Do dimensional checks only if the visual checks or some other condition makes it necessary.
A ** following repair referenced in this inspection indicates that the repair is not yet published in the current revision of the manual and the part must be rejected. Contact IAE for additional information concerning FAA approved repair date.
Do not discard any part until you are sure there are no repairs available. Refer to the instructions in Repair before a discarded part is used again or oversize parts are installed.
Parts which should be discarded can be held although no repair is available. The repair of a discarded part could be shown to be necessary at a later date.
All parts must be examined to make sure that all the repairs have been completed satisfactorily.
The practices and processes referred to in the procedure by the TASK numbers are in the SPM.
References
Refer to the SPM for data on these items.
Definitions of Damage, SPM TASK 70-02-02-350-501.
Record and Control of the Lives of Parts, SPM TASK 70-05-00-220-501.
Inspection of Parts, SPM TASK 70-20-00-200-501.
Some data on these items is contained in this TASK. For more data on these items refer to the SPM.
Method of Testing for Crack Indications.
Chemical Processes.
Surface Protection.
Preliminary Requirements
Pre-Conditions
NONESupport Equipment
| Name | Manufacturer | Part Number / Identification | Quantity | Remark |
|---|---|---|---|---|
| Workshop inspection equipment | LOCAL | Workshop inspection equipment |
Consumables, Materials and Expendables
NONESpares
NONESafety Requirements
NONEProcedure
Clean the parts. Refer to Cleaning-000 TASK 79-21-41-100-400.
Reject.
Cracked.
Reject.
Through porosity.
Casing Assembly. Refer to SPM TASK 70-23-01-230-501.
Do the test for cracks on the parts that are given below. Use the applicable penetrant procedure.
SUBTASK 79-21-41-230-052 Do a Crack Test on the Casing Assembly (01-750) (Fluorescent Penetrant)
Reject.
Evident cracks.
SUBTASK 79-21-41-220-058 Examine the Casing Assembly (01-750) All Areas
Refer to Figure.
Repair VRS5305, (Repair-003) TASK 79-21-41-300-003.
More than Step.
Nicked, scored, dented or scratched.
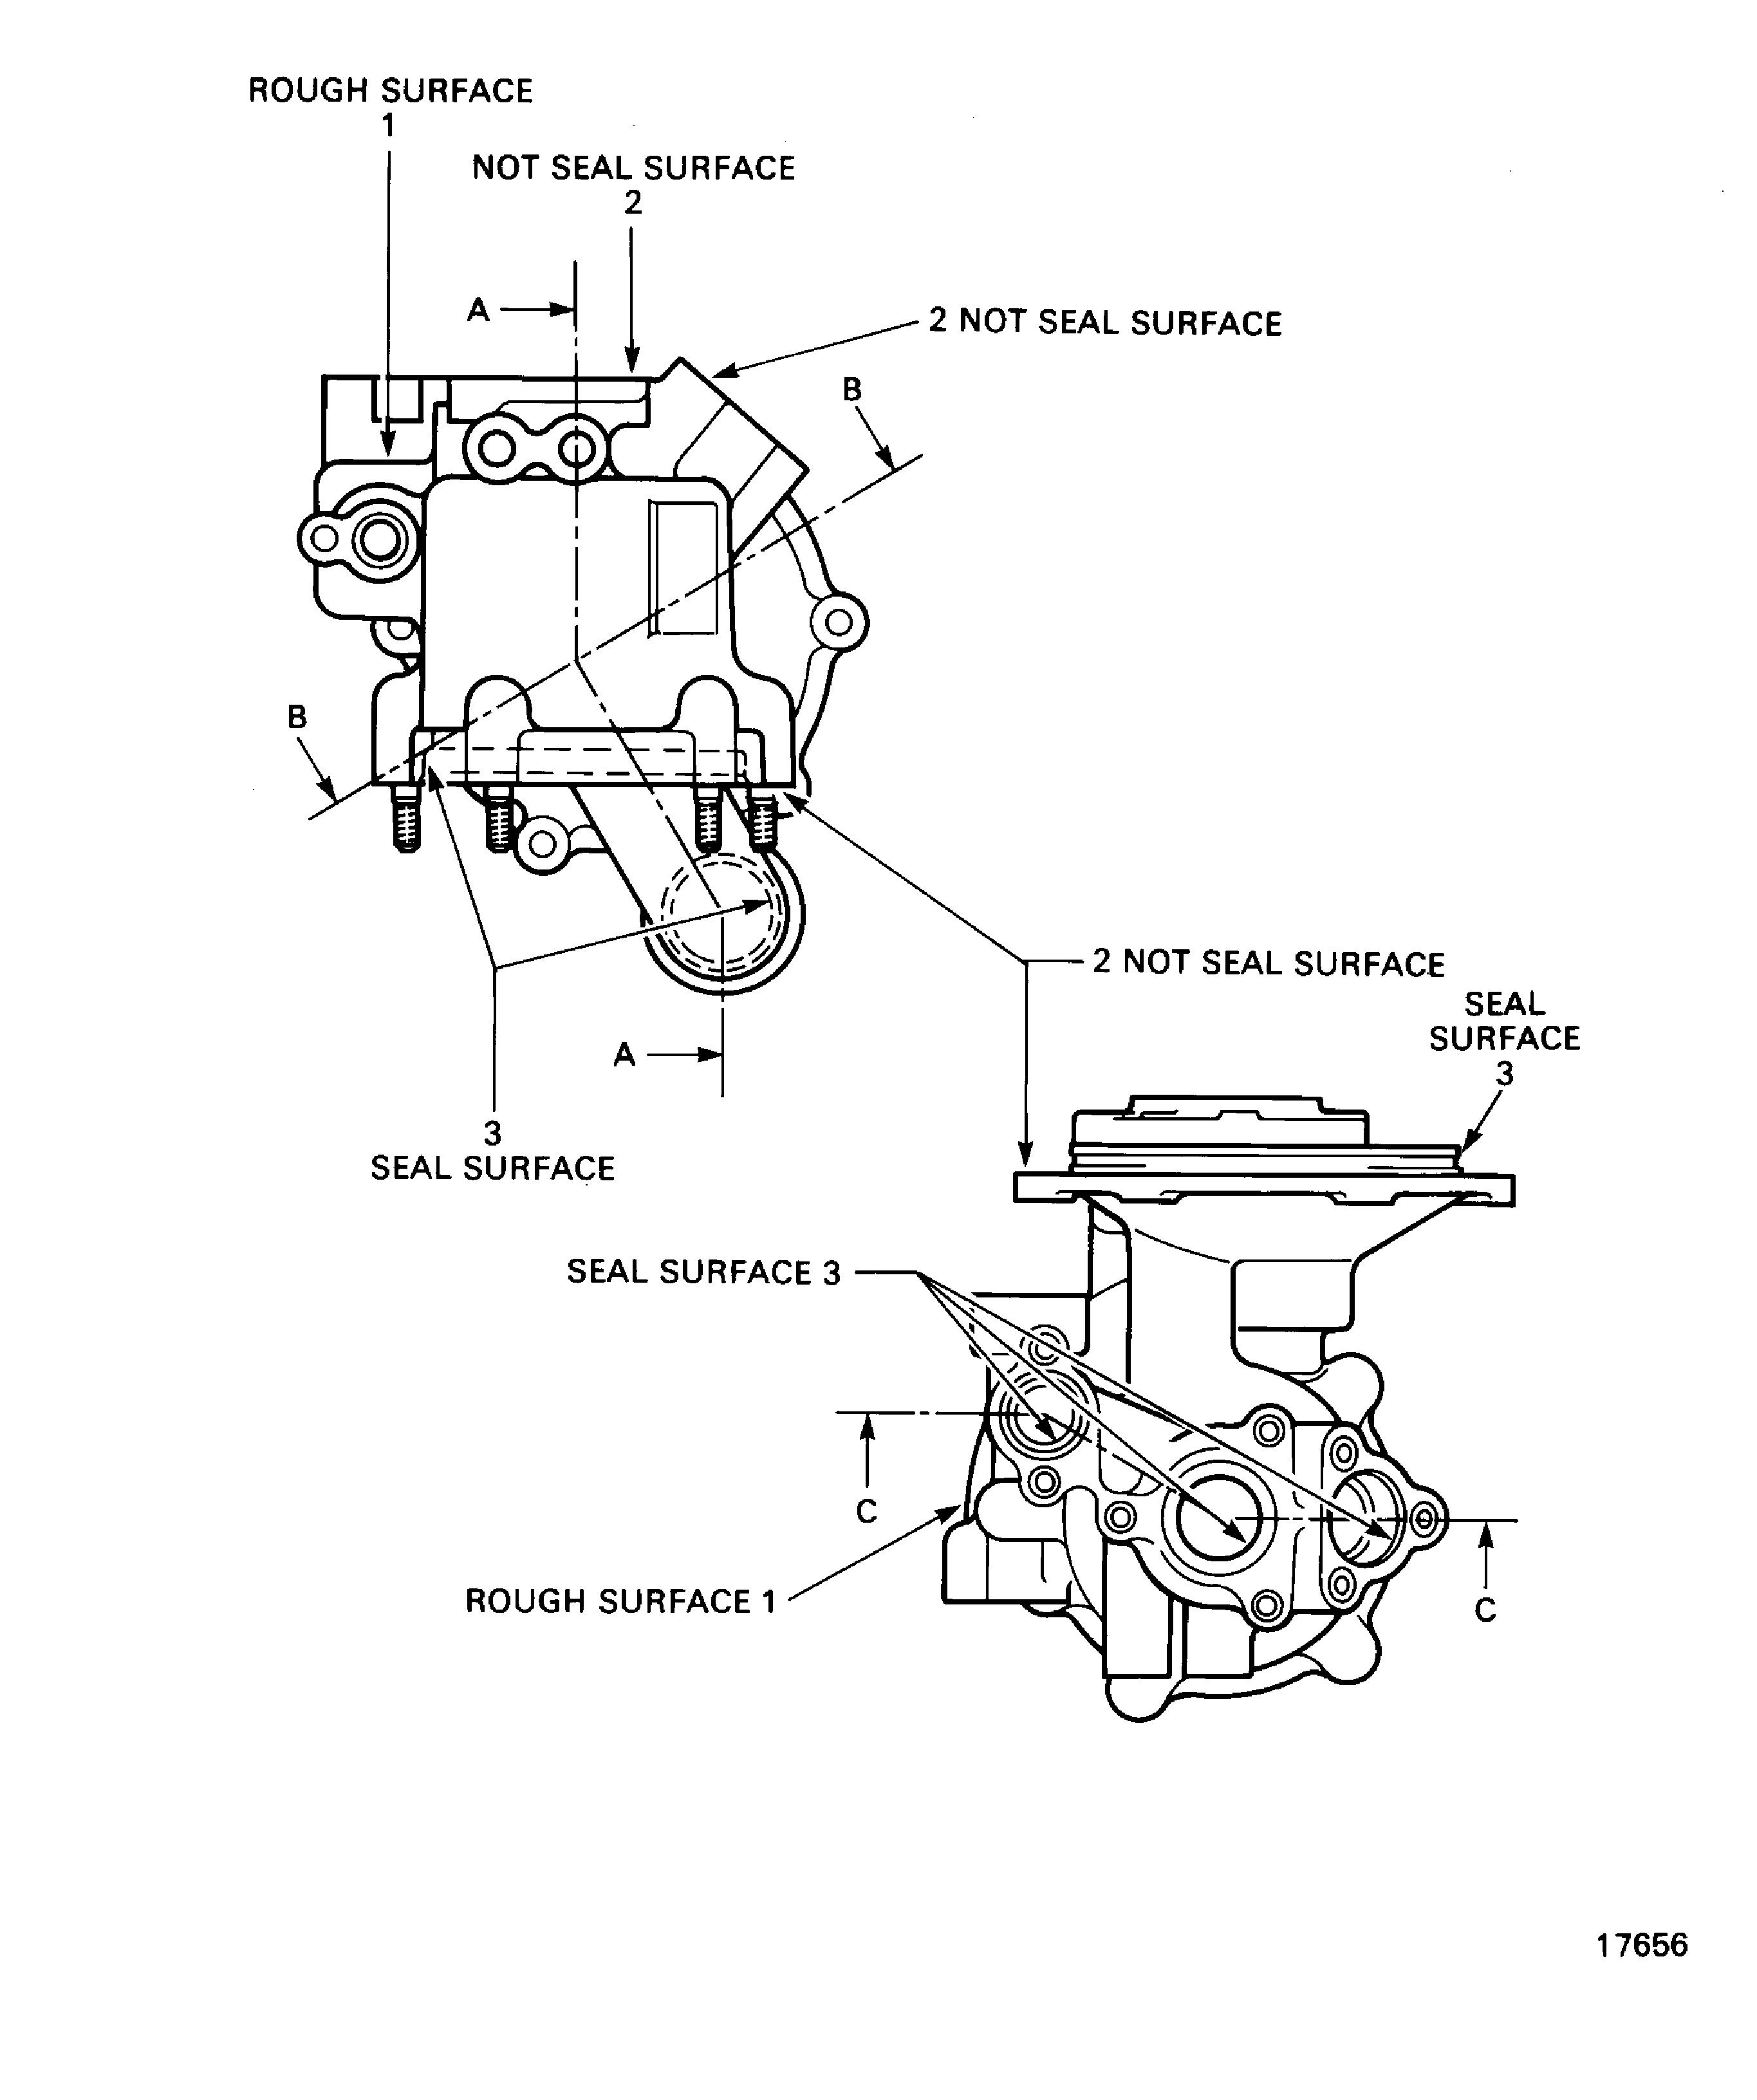
SUBTASK 79-21-41-220-059 Examine the Casing Assembly (01-750) Rough Surfaces at Location 1
Refer to Figure.
Repair VRS5305, (Repair-003) TASK 79-21-41-300-003.
More than Step.
Nicks, scores, dents or scratches.
SUBTASK 79-21-41-220-060 Examine the Casing Assembly (01-750) Machined not Seal Surfaces at Location 2
Refer to Figure.
Repair VRS5305, (Repair-003) TASK 79-21-41-300-003.
More than Step.
Nicks, scores, dents or scratches.
SUBTASK 79-21-41-220-061 Examine the Casing Assembly (01-750) Machined Seal Surfaces at Location 3
Repair VRS5306, (Repair-004) TASK 79-21-41-300-004.
Light corrosion or pitting.
SUBTASK 79-21-41-220-062 Examine the Casing Assembly (01-750) Protective Finish
Repair VRS5307, (Repair-007) TASK 79-21-41-300-007.
More than 0.0138 in. (0.350 mm) each 3.937 in. (100 mm).
Repair VRS5307, (Repair-007) TASK 79-21-41-300-007.
Thread damage or missing.
Perpendicularity.
SUBTASK 79-21-41-220-063 Examine the Casing Assembly (01-750) Studs/Lock-Rings
Repair VRS5308, (Repair-008) TASK 79-21-41-300-008.
No movement is permitted. Loose, missing or internal thread damage.
SUBTASK 79-21-41-220-064 Examine the Casing Assembly (01-750) Helicoil Insert
Refer to Figure.
Repair VRS5310, (Repair-010) 79-21-41- 300-010**.
More than Step.
Inner diameter.
Repair VRS5310, (Repair-010) 79-21-41-300-010**.
More than Step.
Perpendicularity.
Repair VRS5310, (Repair-010) 79-21-41-300-010**.
More than Step.
Concentricity.
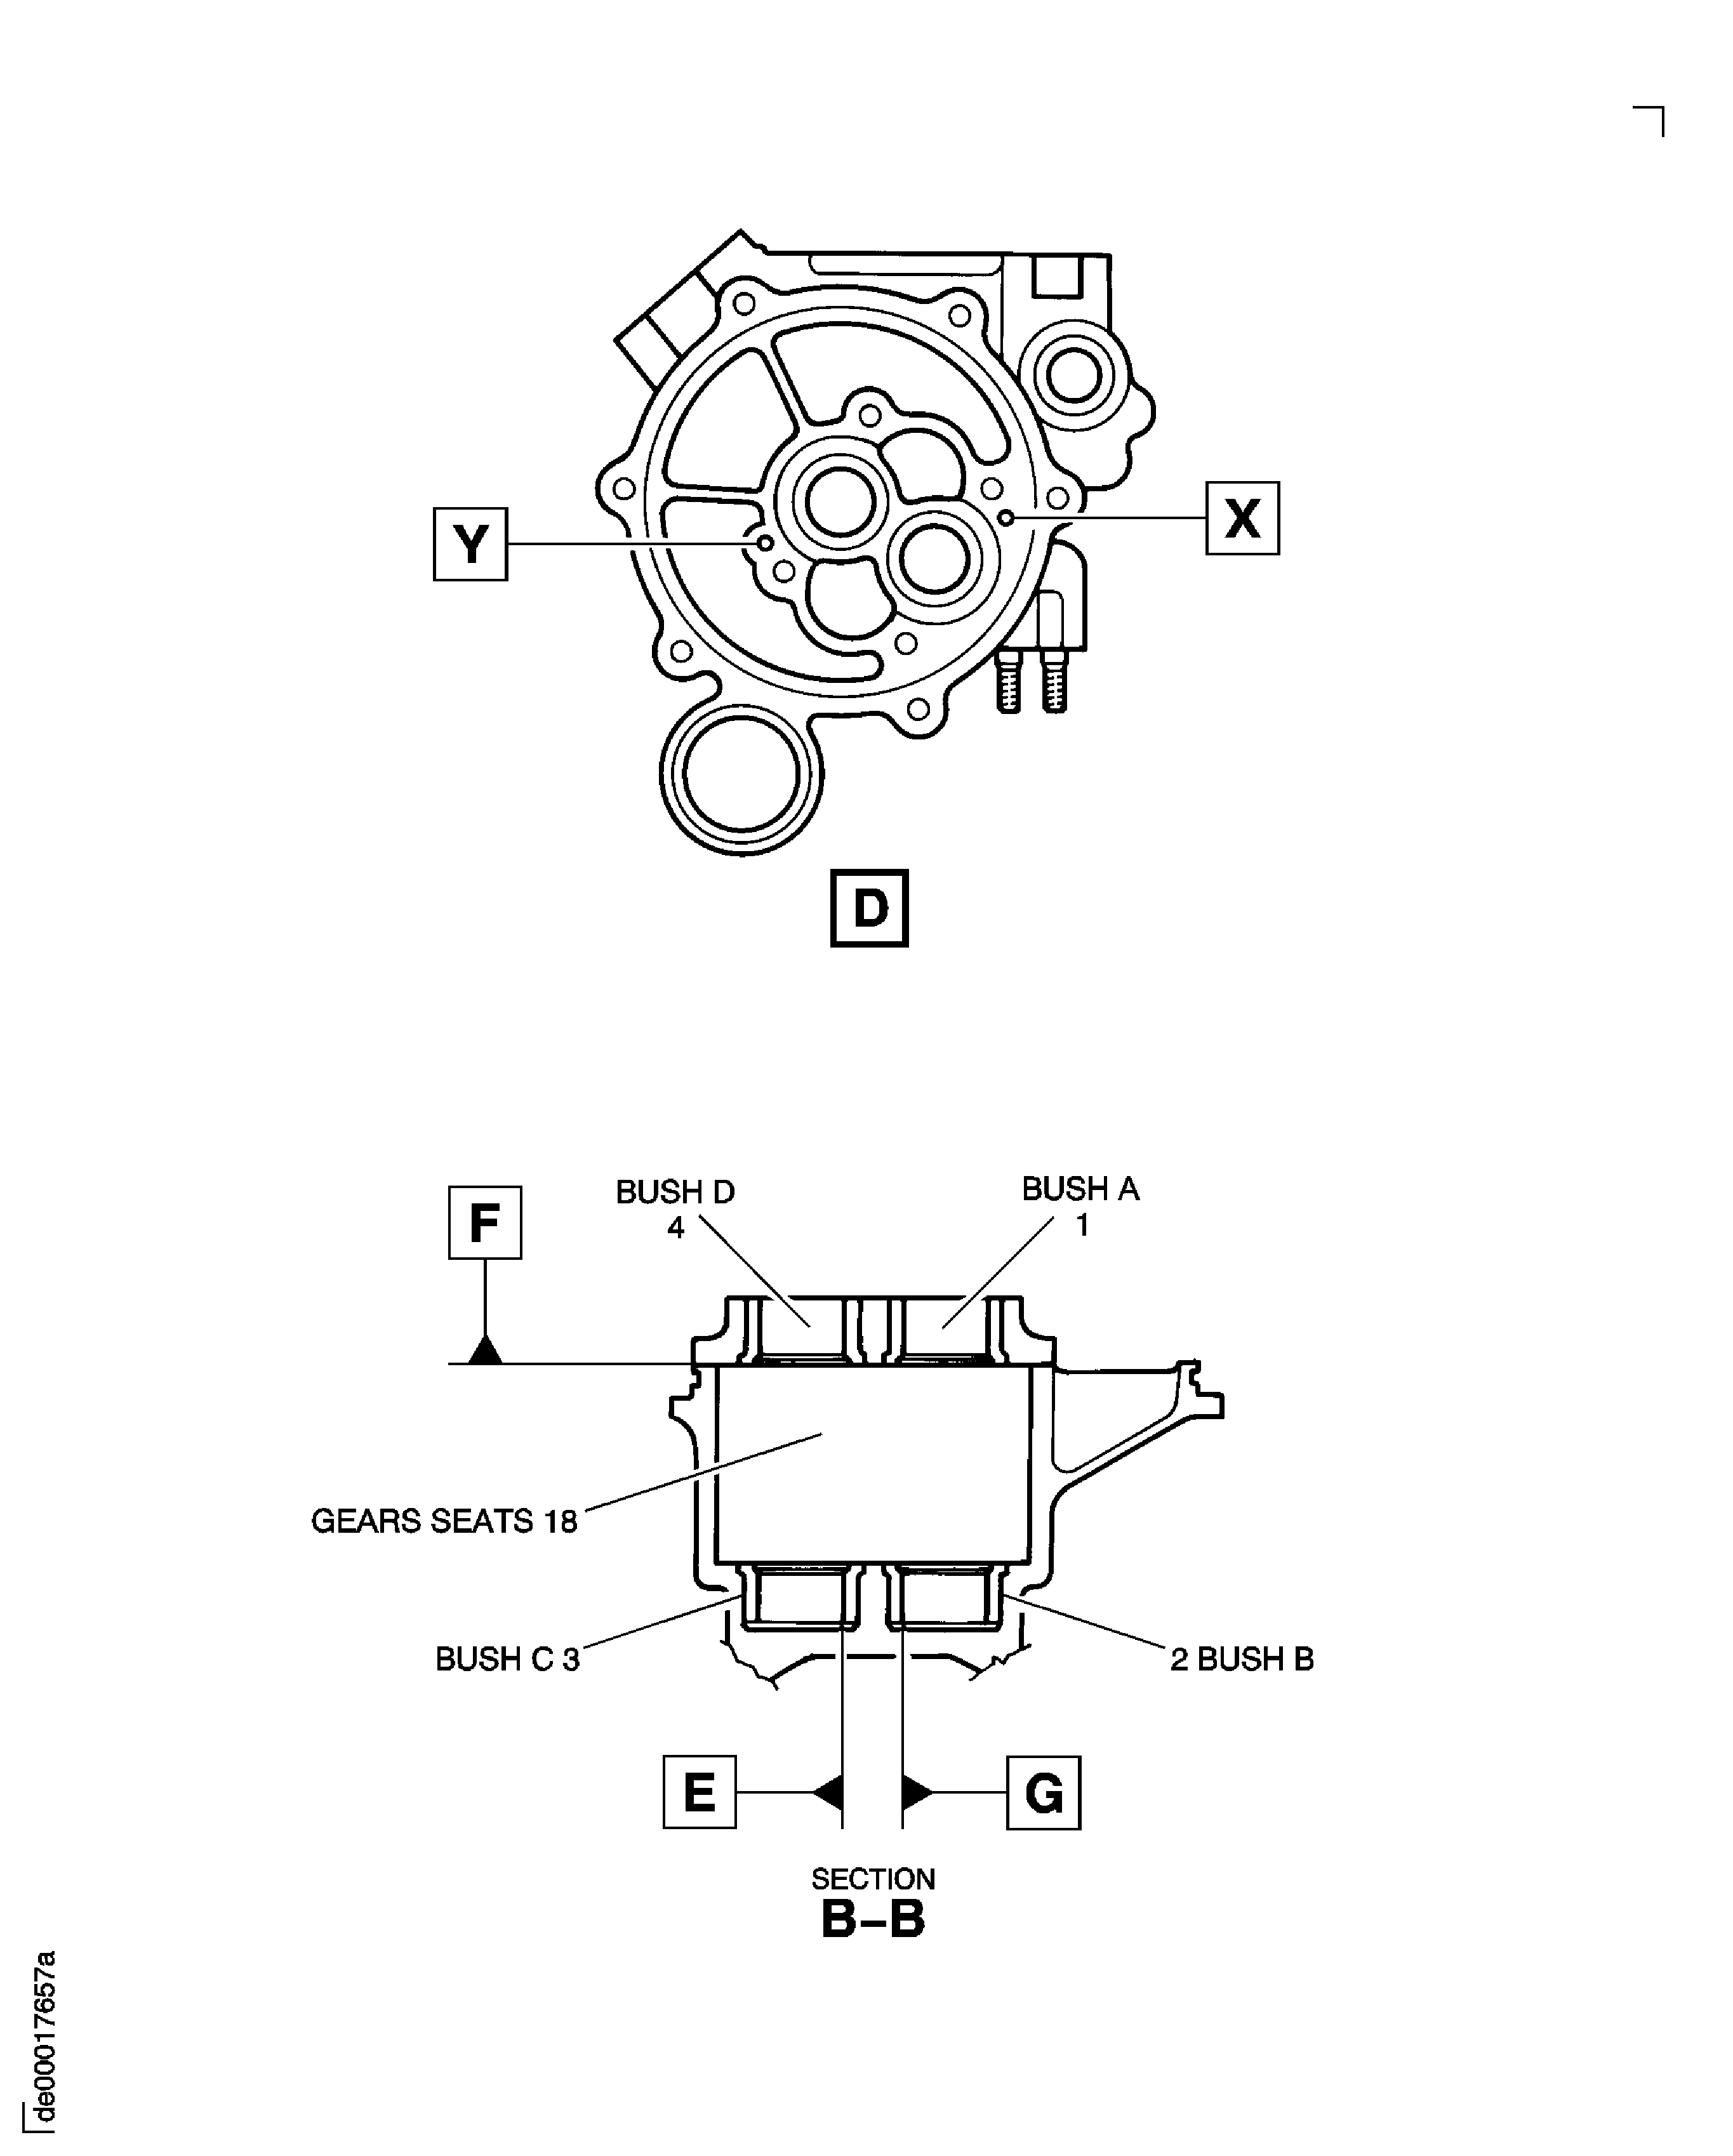
SUBTASK 79-21-41-220-066-A00 Examine the Casing Assembly (01-750) Bush A at Location 1 (Pre SBE 79-0071)
Refer to Figure.
Repair VRS5310, (Repair-010) 79-21-41-300-010**.
More than Step.
Inner diameter.
Repair , (Repair-010) 79-21-41-300-010.
More than Step.
Perpendicularity.
Repair VRS5310, (Repair-010) 79-21-41- 300-010**.
More than Step.
Concentricity.
SUBTASK 79-21-41-220-066-B00 Examine the Casing Assembly (01-750) Bush A at Location 1 (SBE 79-0071)
Refer to Figure.
Repair VRS5310, (Repair-010) 79-21-41-300-010**.
More than Step.
Inner diameter.
Repair VRS5310, (Repair-010) 79-21-41-300-010**.
More than Step.
Perpendicularity.
Repair VRS5310, (Repair-010) 79-21-41-300-010**.
More than Step.
True position.
SUBTASK 79-21-41-220-067-A00 Examine the Casing Assembly (01-750) Bush B at Location 2 (Pre SBE 79-0071)
Refer to Figure.
Repair VRS5310, (Repair-010) 79-21-41-300-010**.
More than Step.
Inner diameter.
Repair VRS5310, (Repair-010) 79-21-41-300-010**.
More than Step.
Perpendicularity.
Repair VRS5310, (Repair-010) 79-21-41-300-010**.
More than Step.
True position.
SUBTASK 79-21-41-220-067-B00 Examine the Casing Assembly (01-750) Bush B at Location 2 (SBE 79-0071)
Refer to Figure.
Repair VRS5310, (Repair-010) 79-21-41-300-010**.
More than Step.
Inner diameter.
Repair VRS5310, (Repair-010) 79-21-41-300-010**.
More than Step.
Perpendicularity.
Repair VRS5310, (Repair-010) 79-21-31-300-010**.
More than Step.
True position.
SUBTASK 79-21-41-220-068-A00 Examine the Casing Assembly (01-750) Bush C at Location 3 (Pre SBE 79-0071)
Refer to Figure.
Repair VRS5310, (Repair-010) 79-21-41-300-010**.
More than Step.
Inner diameter.
Repair VRS5310, (Repair-010) 79-21-41-300-010**.
More than Step.
Perpendicularity.
Repair VRS5310, (Repair-010) 79-21-31-300-010**.
More than Step.
True position.
SUBTASK 79-21-41-220-068-B00 Examine the Casing Assembly (01-750) Bush C at Location 3 (SBE 79-0071)
Refer to Figure.
Repair VRS5310, (Repair-010) 79-21-41-300-010**.
More than Step.
Inner diameter.
Repair VRS5310, (Repair-010) 79-21-41-300-010**.
More than Step.
Perpendicularity.
Repair VRS5310, (Repair-010) 79-21-41-300-010**.
More than Step.
Concentricity.
SUBTASK 79-21-41-220-069-A00 Examine the Casing Assembly (01-750) Bush D at Location 4 (Pre SBE 79-0071)
Refer to Figure.
Repair VRS5310, (Repair-010) 79-21-41-300-010**.
More than Step.
Inner diameter.
Repair VRS5310, (Repair-010) 79-21-41-300-010**.
More than Step.
Perpendicularity.
Repair VRS5310, (Repair-010) 79-21-41-300-010**.
More than Step.
Concentricity.
SUBTASK 79-21-41-220-069-B00 Examine the Casing Assembly (01-750) Bush D at Location 4 (SBE 79-0071)
Refer to Figure.
Repair VRS5320, (Repair-020) TASK 79-21-41-300-020.
More than Step.
Inner diameter.
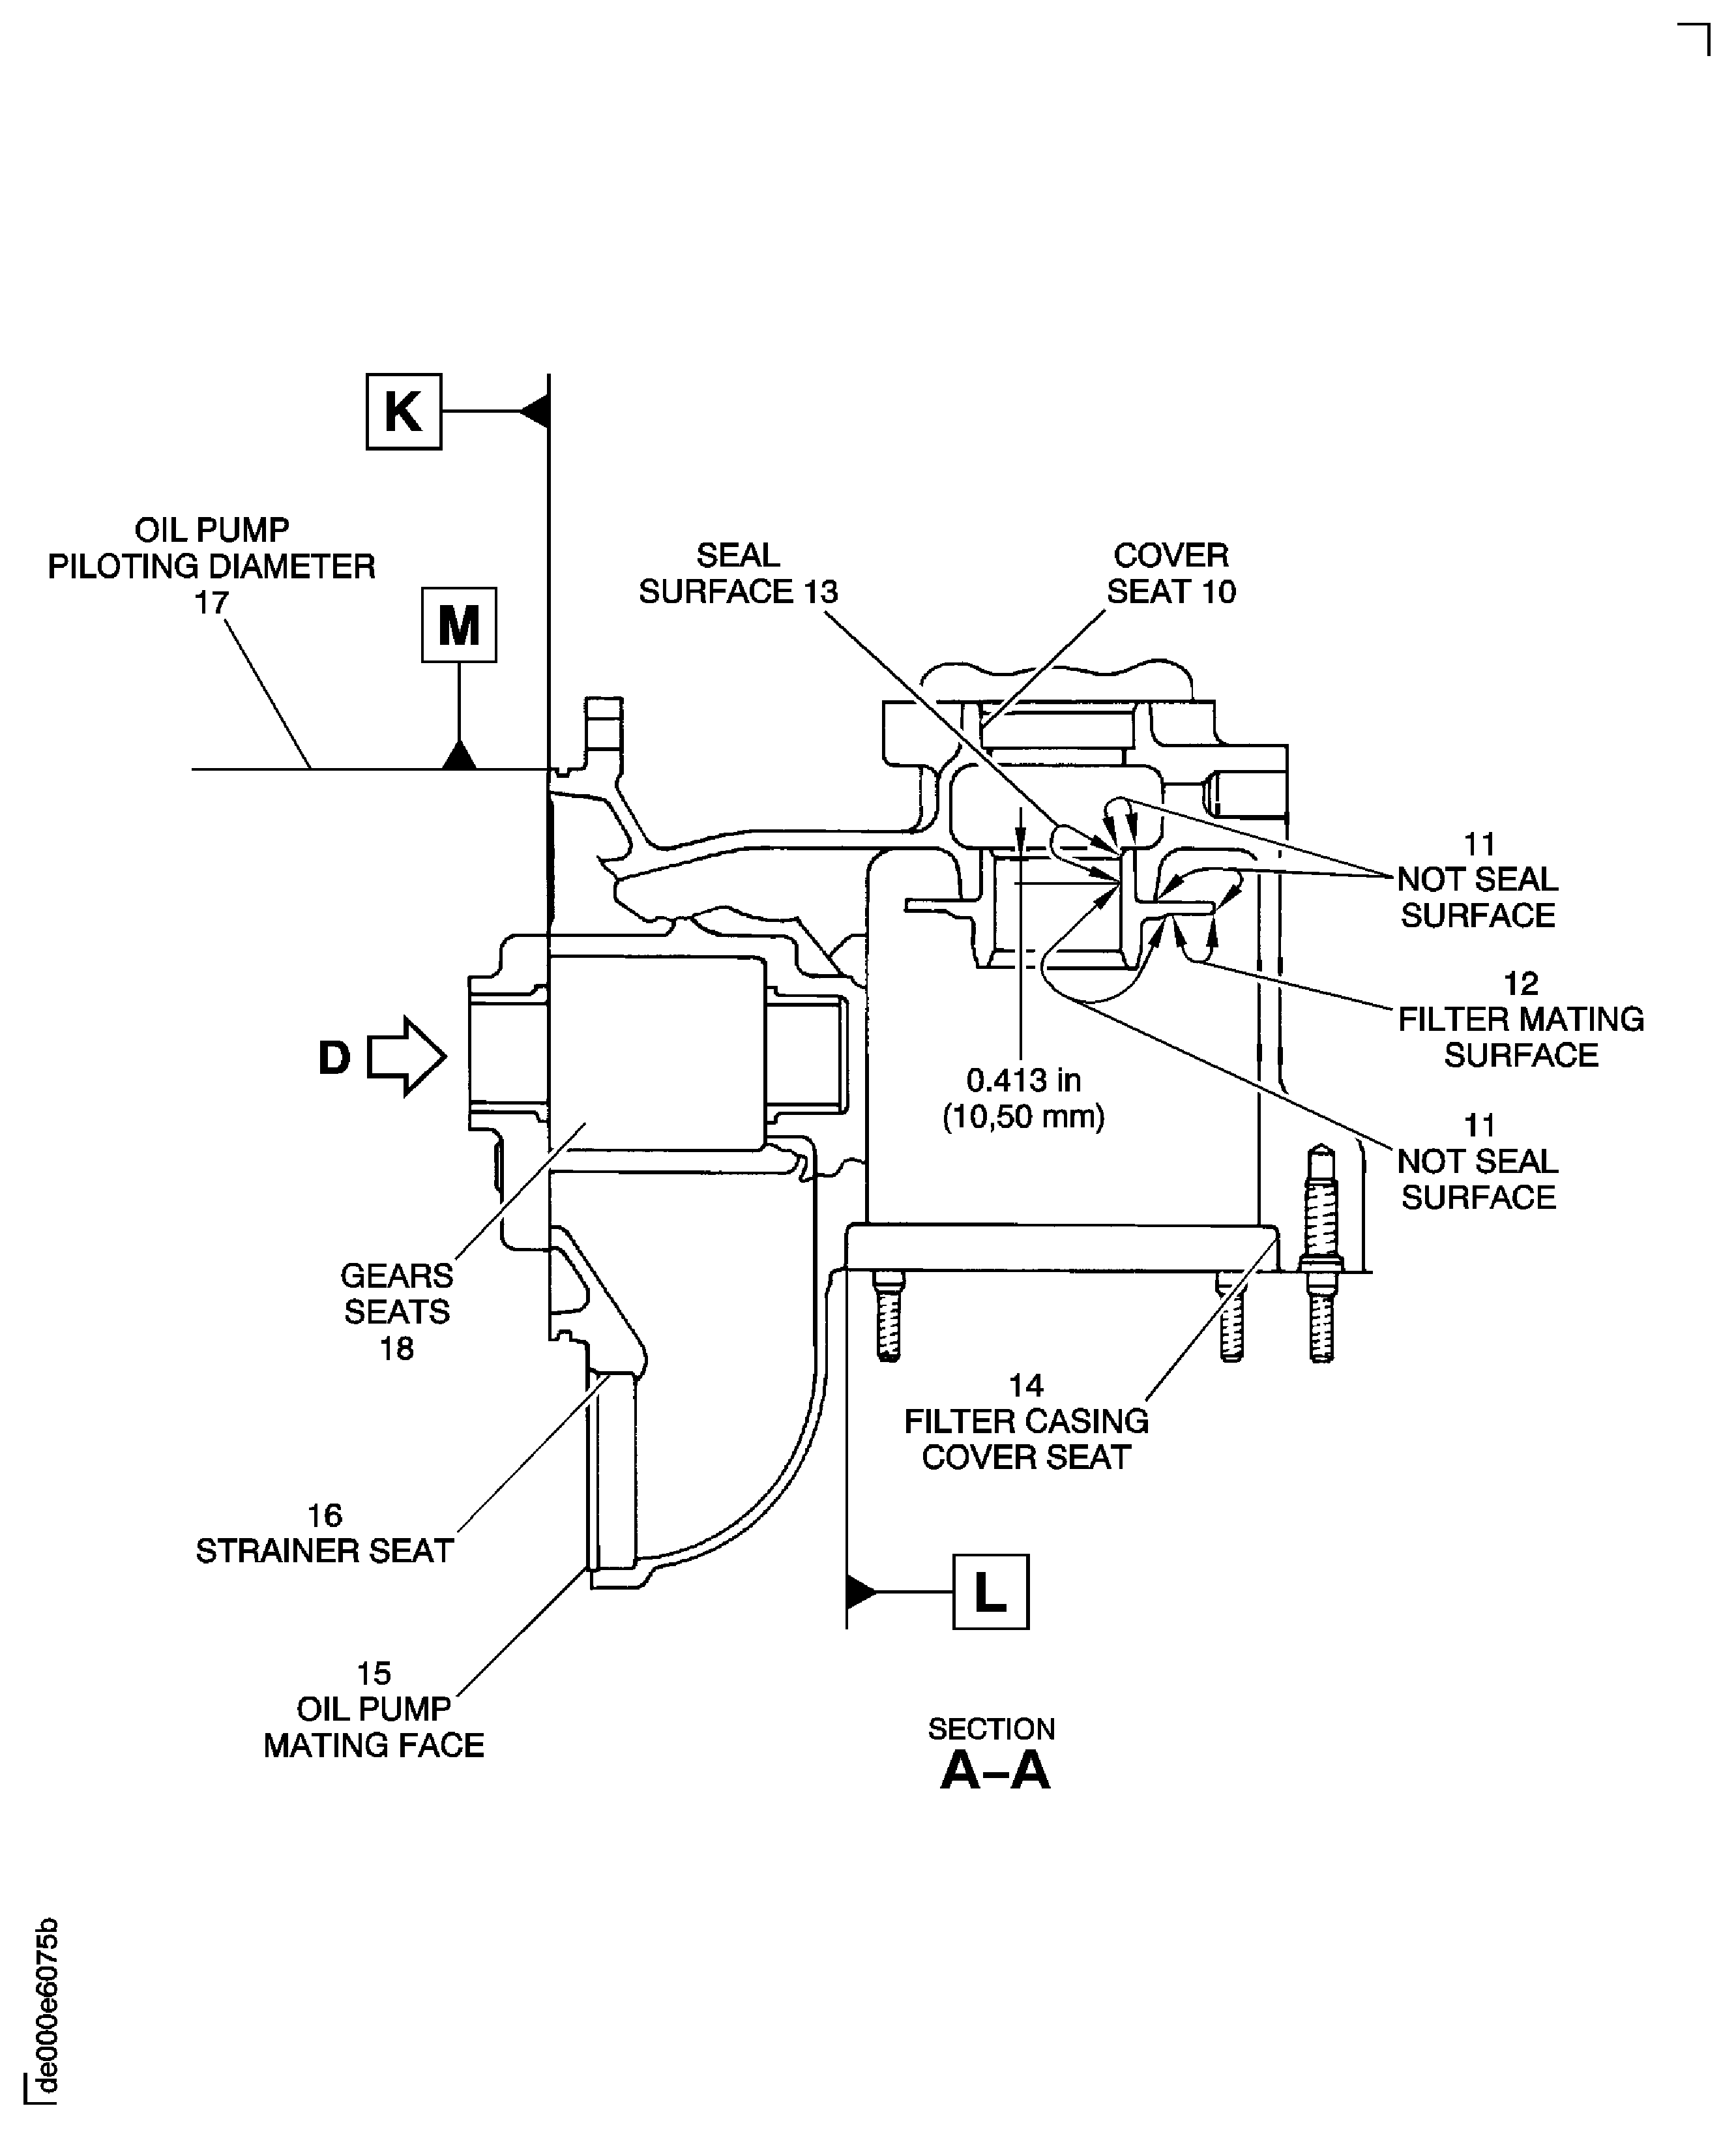
SUBTASK 79-21-41-220-079 Examine the Casing Assembly (01-750) Cover Seat at Location 10
Refer to Figure.
Repair VRS5620, (Repair-034) TASK 79-21-41-300-034.
More than Step.
Nicked, scored, dented or scratched.
SUBTASK 79-21-41-220-134 Examine the Casing Assembly (01-750) Support Filter on Not Seal Surfaces Location 11
Refer to Figure.
Repair VRS5620, (Repair-034) TASK 79-21-41-300-034.
More than Step.
Wear.
SUBTASK 79-21-41-220-135 Examine the Casing Assembly (01-750) Support Filter Mating Surface at Location 12
Refer to Figure.
Repair VRS5620, (Repair-034) TASK 79-21-41-300-034.
More than Step.
Nicked, scored, dented or scratched.
SUBTASK 79-21-41-220-136 Examine the Casing Assembly (01-750) Support Filter On Seal Surface at Location 13
Refer to Figure.
Repair VRS5323, (Repair-023) TASK 79-21-41-300-023.
More than Step
Inner diameter.
SUBTASK 79-21-41-220-082 Examine the Casing Assembly (01-750) Oil Filter Cover Seat at Location 14
Refer to Figure.
Repair VRS5324, (Repair-024) TASK 79-21-41-300-024.
More than Step.
Parallelism.
Repair VRS5305, (Repair-003) TASK 79-21-41-300-003.
More than Step.
Nicked, scored, dented or scratched.
Reject.
More than Step.
Nicked, dented corners.
SUBTASK 79-21-41-220-083 Examine the Casing Assembly (01-750) Oil Pump Mating Surface at Location 15
Refer to Figure.
Repair VRS5325, (Repair-025) TASK 79-21-41-300-025.
More than Step.
Inner diameter.
SUBTASK 79-21-41-220-084 Examine the Casing Assembly (01-750) Strainer Seat at Location 16
Refer to Figure.
Repair VRS5326, (Repair-026) TASK 79-21-41-300-026.
More than Step.
Diameter.
Repair VRS5305, (Repair-003) TASK 79-21-41-300-003.
More than Step.
Nicked, scored, dented or scratched.
SUBTASK 79-21-41-220-085 Examine the Casing Assembly (01-750) Piloting Diameter at Location 17
Refer to Figure
Reject.
More than Step.
Cavitation damage.
NOTE
Usually the cavitation damage on the flat surfaces is found near the oil inlet port.The damage is an erosion or missing material in the bottom corners of the gear seats and the cover surface.Accept.
Any quantity, not more than 0.008 in. (0.20 mm) in depth.
Reject.
More than Step.
Scored or nicked.
NOTE
Usually scores are found on the cylindrical surfaces of the gear seats.
SUBTASK 79-21-41-220-187 Examine the Casing Assembly (01-750) Gear Seats at Location 18
Figure: Locations on the Oil Pump Casing Assembly
Locations on the Oil Pump Casing Assembly

Figure: Locations on the Oil Pump Casing Assembly
Locations on the Oil Pump Casing Assembly

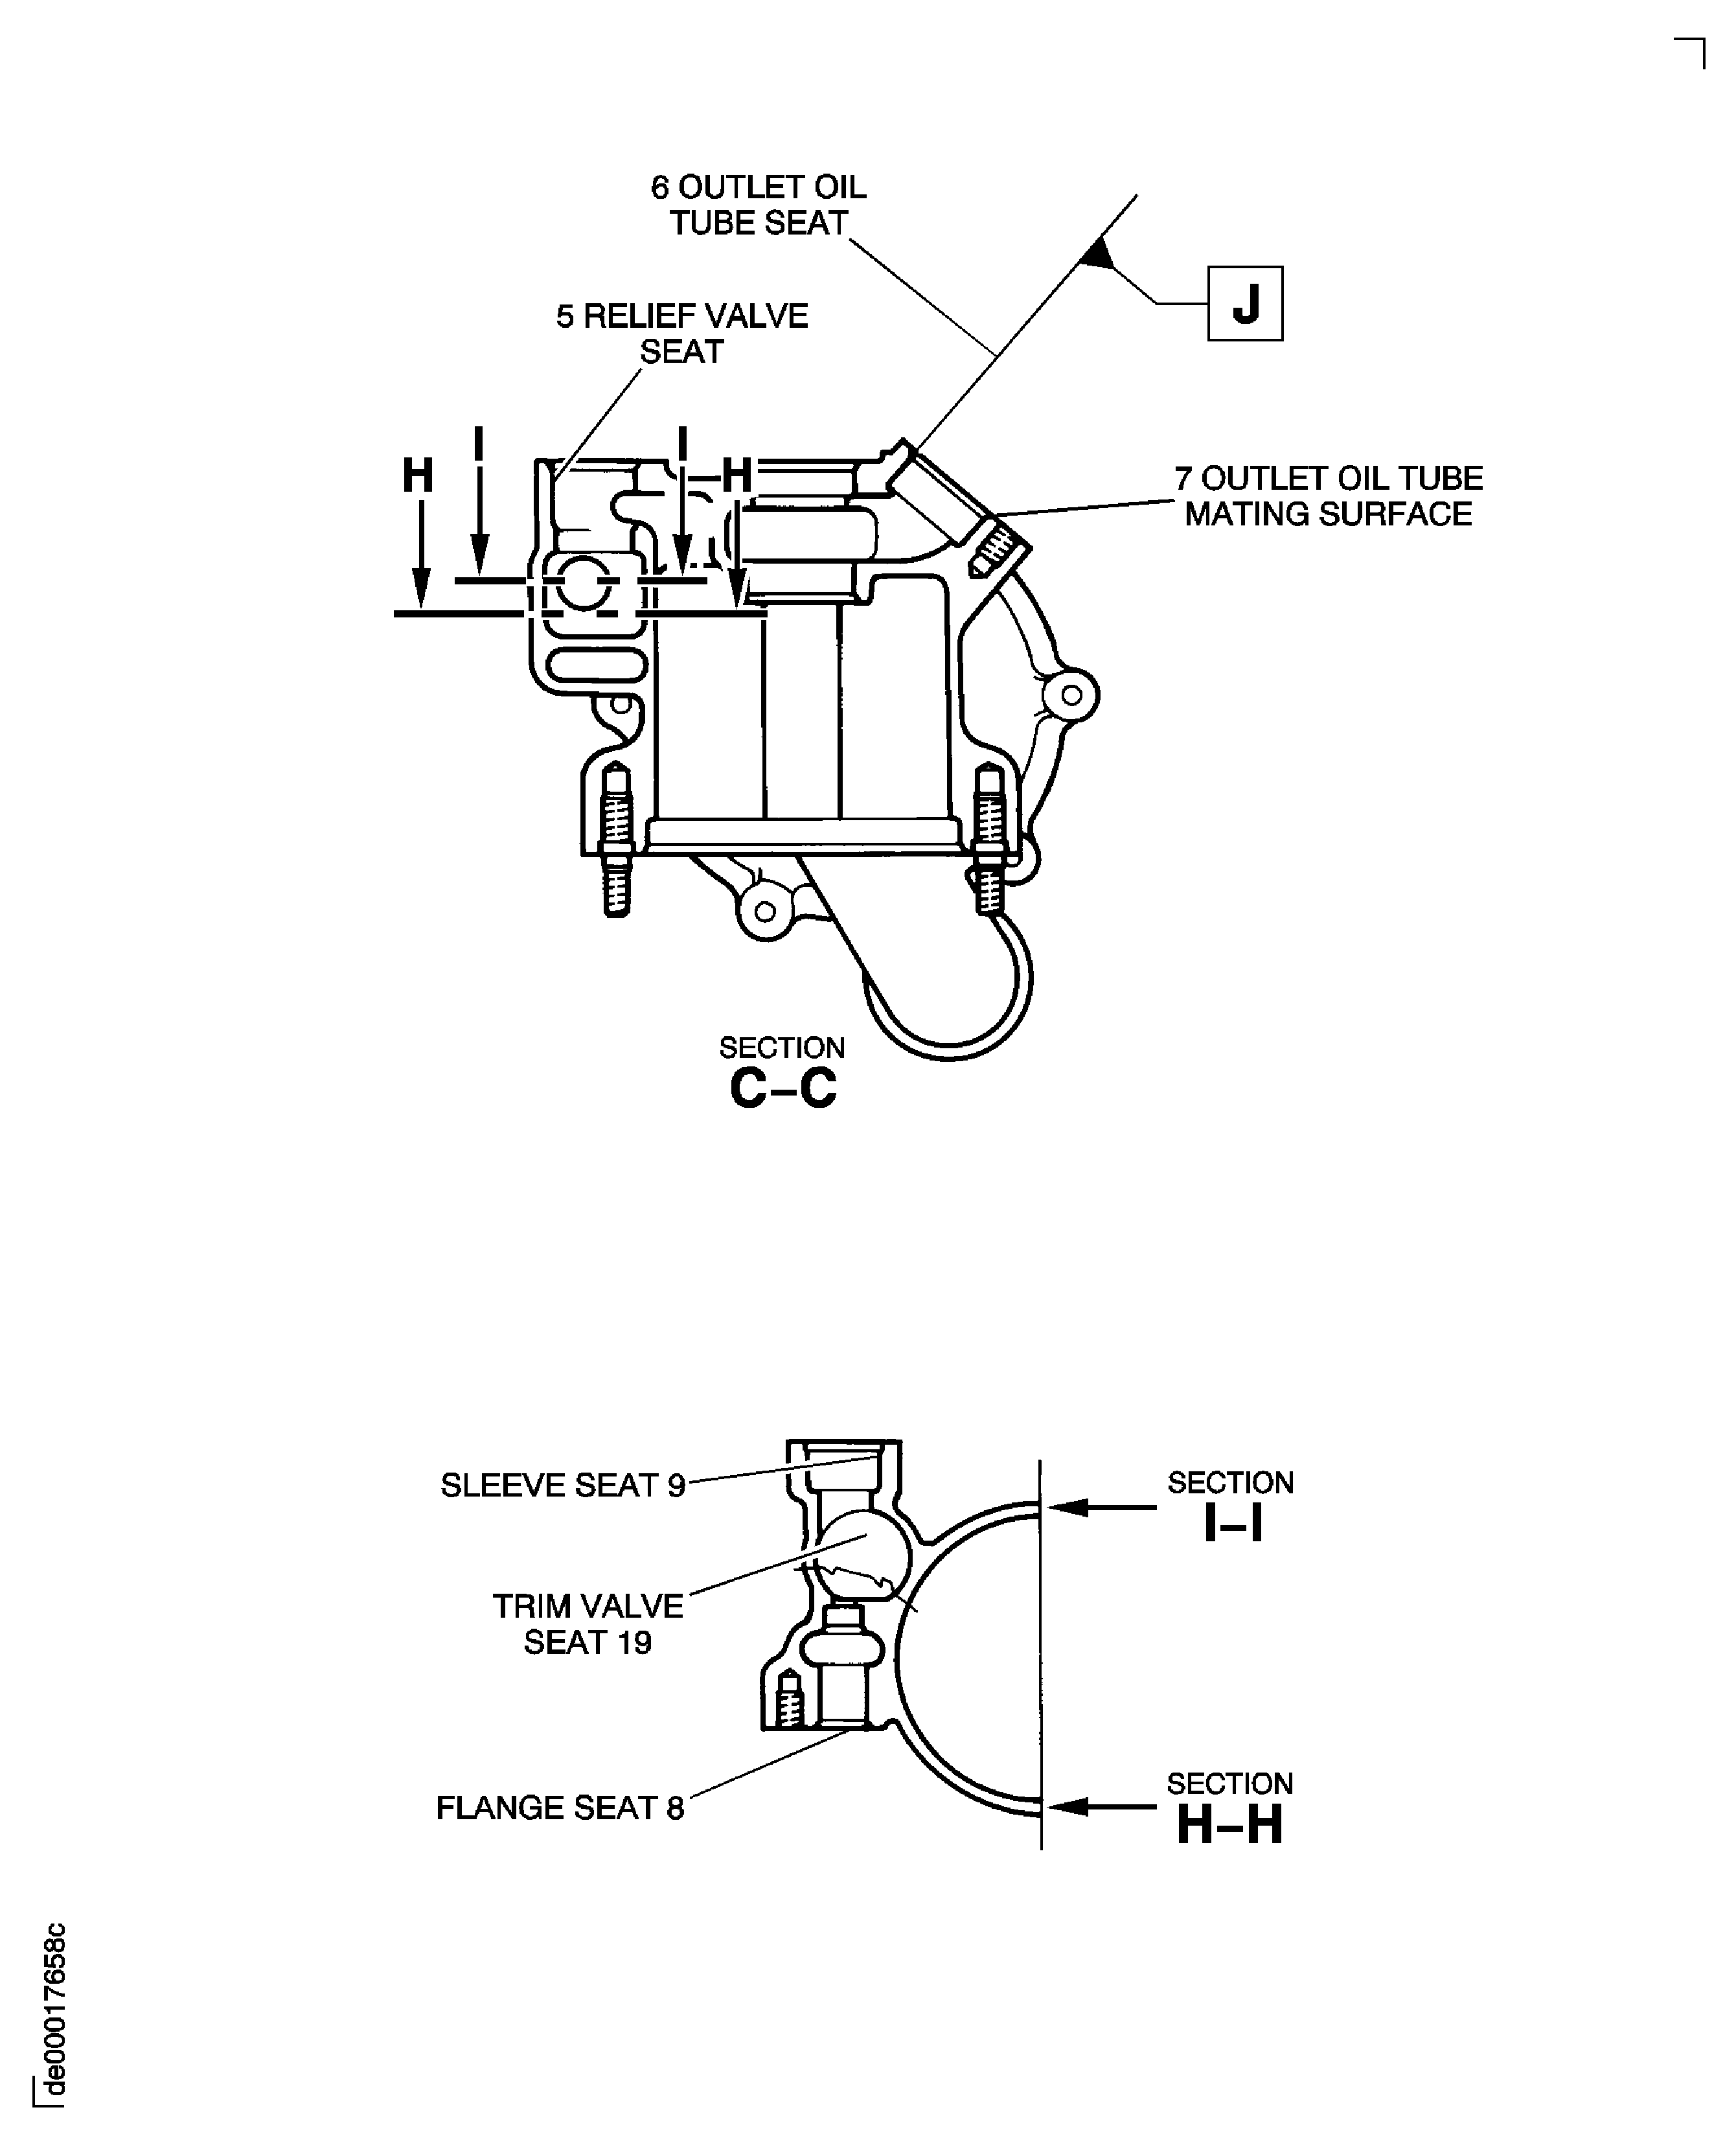
Figure: Locations on the Oil Pump Casing Assembly
Locations on the Oil Pump Casing Assembly

Figure: Locations on the Oil Pump Casing Assembly
Locations on the Oil Pump Casing Assembly

