Export Control
EAR Export Classification: Not subject to the EAR per 15 C.F.R. Chapter 1, Part 734.3(b)(3), except for the following Service Bulletins which are currently published as EAR Export Classification 9E991: SBE70-0992, SBE72-0483, SBE72-0580, SBE72-0588, SBE72-0640, SBE73-0209, SBE80-0024 and SBE80-0025.Copyright
© IAE International Aero Engines AG (2001, 2014 - 2021) The information contained in this document is the property of © IAE International Aero Engines AG and may not be copied or used for any purpose other than that for which it is supplied without the express written authority of © IAE International Aero Engines AG. (This does not preclude use by engine and aircraft operators for normal instructional, maintenance or overhaul purposes.).Applicability
All
Common Information
TASK 79-22-43-200-402 Scavenge Oil Filter Housing - Related Parts - Examine The Casing Assembly, Inspection-002
General
This TASK gives the procedure for the inspection of the casing assembly. For the other parts of the scavenge oil filter housing assembly, refer to Inspection-000 TASK 79-22-43-200-400.
The policy that is necessary for inspection is given in the SPM TASK 70-20-01-200-501.
All parts must be visually examined for damage, corrosion and wear. Any defects that are not identified in the procedure must be referred to IAE.
Do not discard any part until you are sure there are no repairs available. Refer to the instructions in repair before a discarded part is used again or oversize parts are installed.
Parts which should be discarded can be held although no repair is available. The repair of a discarded part could be shown to be necessary at a later date.
All parts must be examined to make sure that all the repairs have been completed satisfactorily.
The practices and processes referred to in the procedure by the TASK numbers are in the SPM.
References
Refer to the SPM for data on these items:
Definitions of Damage, SPM TASK 70-02-02-350-501.
Record and Control of the Lives of Parts, SPM TASK 70-05-00-220-501.
Inspection of Parts, SPM TASK 70-20-00-200-501.
Some data on these items is contained in this TASK. For more data on these items refer to the SPM.
Method of Testing for Crack Indications
Chemical Processes
Surface Protection
Preliminary Requirements
Pre-Conditions
NONESupport Equipment
| Name | Manufacturer | Part Number / Identification | Quantity | Remark |
|---|---|---|---|---|
| Workshop inspection equipment | LOCAL | Workshop inspection equipment |
Consumables, Materials and Expendables
NONESpares
NONESafety Requirements
NONEProcedure
Clean the part. Refer to Cleaning-000 TASK 79-22-43-100-400.
Reject
Cracked
Reject
Trough porosity
Casing Assembly. Refer to SPM TASK 70-23-01-230-501.
Do the test for cracks on the part that is given below.
SUBTASK 79-22-43-230-052 Do a Crack Test on the Casing Assembly (Fluorescent Penetrant)
Reject
Evident cracks
SUBTASK 79-22-43-220-058 Examine the Casing Assembly All Areas
Repair, VRS5241 (Repair-003) TASK 79-22-43-300-003.
More than Step.
Nicked, scored, dented or scratched
SUBTASK 79-22-43-220-059 Examine the Casing Assembly Rough Surfaces at Location 1
Repair, VRS5241 (Repair-003) TASK 79-22-43-300-003.
More than Step.
Nicked, scored, dented or scratched
SUBTASK 79-22-43-220-060 Examine the Casing Assembly Machined Seal Surfaces at Location 2
Repair, VRS5241 (Repair-003) TASK 79-22-43-300-003.
More than Step.
Nicked, scored, dented or scratched
SUBTASK 79-22-43-220-061 Examine the Casing Assembly Machined Seal Surfaces at Location 3
Repair, VRS5242 (Repair-004) TASK 79-22-43-300-004.
Light corrosion or pitting
SUBTASK 79-22-43-220-062 Examine the Casing Assembly Protective Finish
Repair, VRS5243 (Repair-009) TASK 79-22-43-300-009, or Repair, VRS5656 (Repair-022) TASK 79-22-43-300-022.
Loose, missing or internal thread damage
SUBTASK 79-22-43-220-063 Examine the Casing Assembly Helicoil Inserts
Accept
Between 1.458 and 1.46 in. (37.033 and 37.083 mm).
Repair, VRS5244 (Repair-010) TASK 79-22-43-300-010.
More than 1.46 in. (37.083 mm)
Inner diameter
Accept
In a diameter of 0.0098 in. (0.25 mm) FIR in relation to Surfaces C and D.
Repair, VRS5244 (Reapir-010) TASK 79-22-43-300-010.
More than Step.
True position
SUBTASK 79-22-43-220-064 Examine the Casing Assembly Tank Tube Seat at Location 4
Repair, VRS5245 (Repair-011) TASK 79-22-43-300-011.
More than Step.
Perpendicularity
SUBTASK 79-22-43-220-065 Examine the Casing Assembly Tank Tube Mating Surface at Location 5
Accept
Between 1.4181 and 1.4197 in. (36.02 and 36.06 mm).
Repair, VRS5246 (Repair-012) TASK 79-22-43-300-012.
More than 1.4197 in. (36.06 mm)
Inner diameter
Accept
In a diameter of 0.0098 in. (0.25 mm) FIR in relation to Surfaces C and D.
Repair, VRS5246 (Repair-012) TASK 79-22-43-300-012.
More than Step.
True position
SUBTASK 79-22-43-220-066 Examine the Casing Assembly Cover Seat at Location 6
Repair, VRS5251 (Repair-015) TASK 79-22-43-300-015.
More than Step.
Perpendicularity
SUBTASK 79-22-43-220-069 Examine the Casing Assembly Filter Cover Mating Surface at Location 7
Accept
Between 3.978 and 3.9795 in. (101.08 and 101.08 mm).
Repair, VRS5252 (Repair-016) TASK 79-22-43-300-016.
More than 3.9795 in. (101.04 mm).
Inner diameter
Accept
In a diameter of 0.0098 in. (0.25 mm) FIR in relation to Surface H.
Repair, VRS5252 (Repair-016) TASK 79-22-43-300-016.
More than Step.
True position
Repair, VRS5252 (Repair-016) TASK 79-22-43-300-016.
More than Step.
Perpendicularity
SUBTASK 79-22-43-220-070 Examine the Casing Assembly Filter Cover Seat at Location 8
Refer to Figure.
Accept
Between 1.458 and 1.46 in. (37.033 and 37.083 mm).
Repair, VRS5249 (Repair-017) TASK 79-22-43-300-017.
More than 1.46 in. (37.083 mm).
Inner diameter
Accept
In a diameter of 0.0098 in. (0.25 mm) FIR in relation to surface H
Repair, VRS5249 (Repair-017) TASK 79-22-43-300-017.
More than Step.
True position
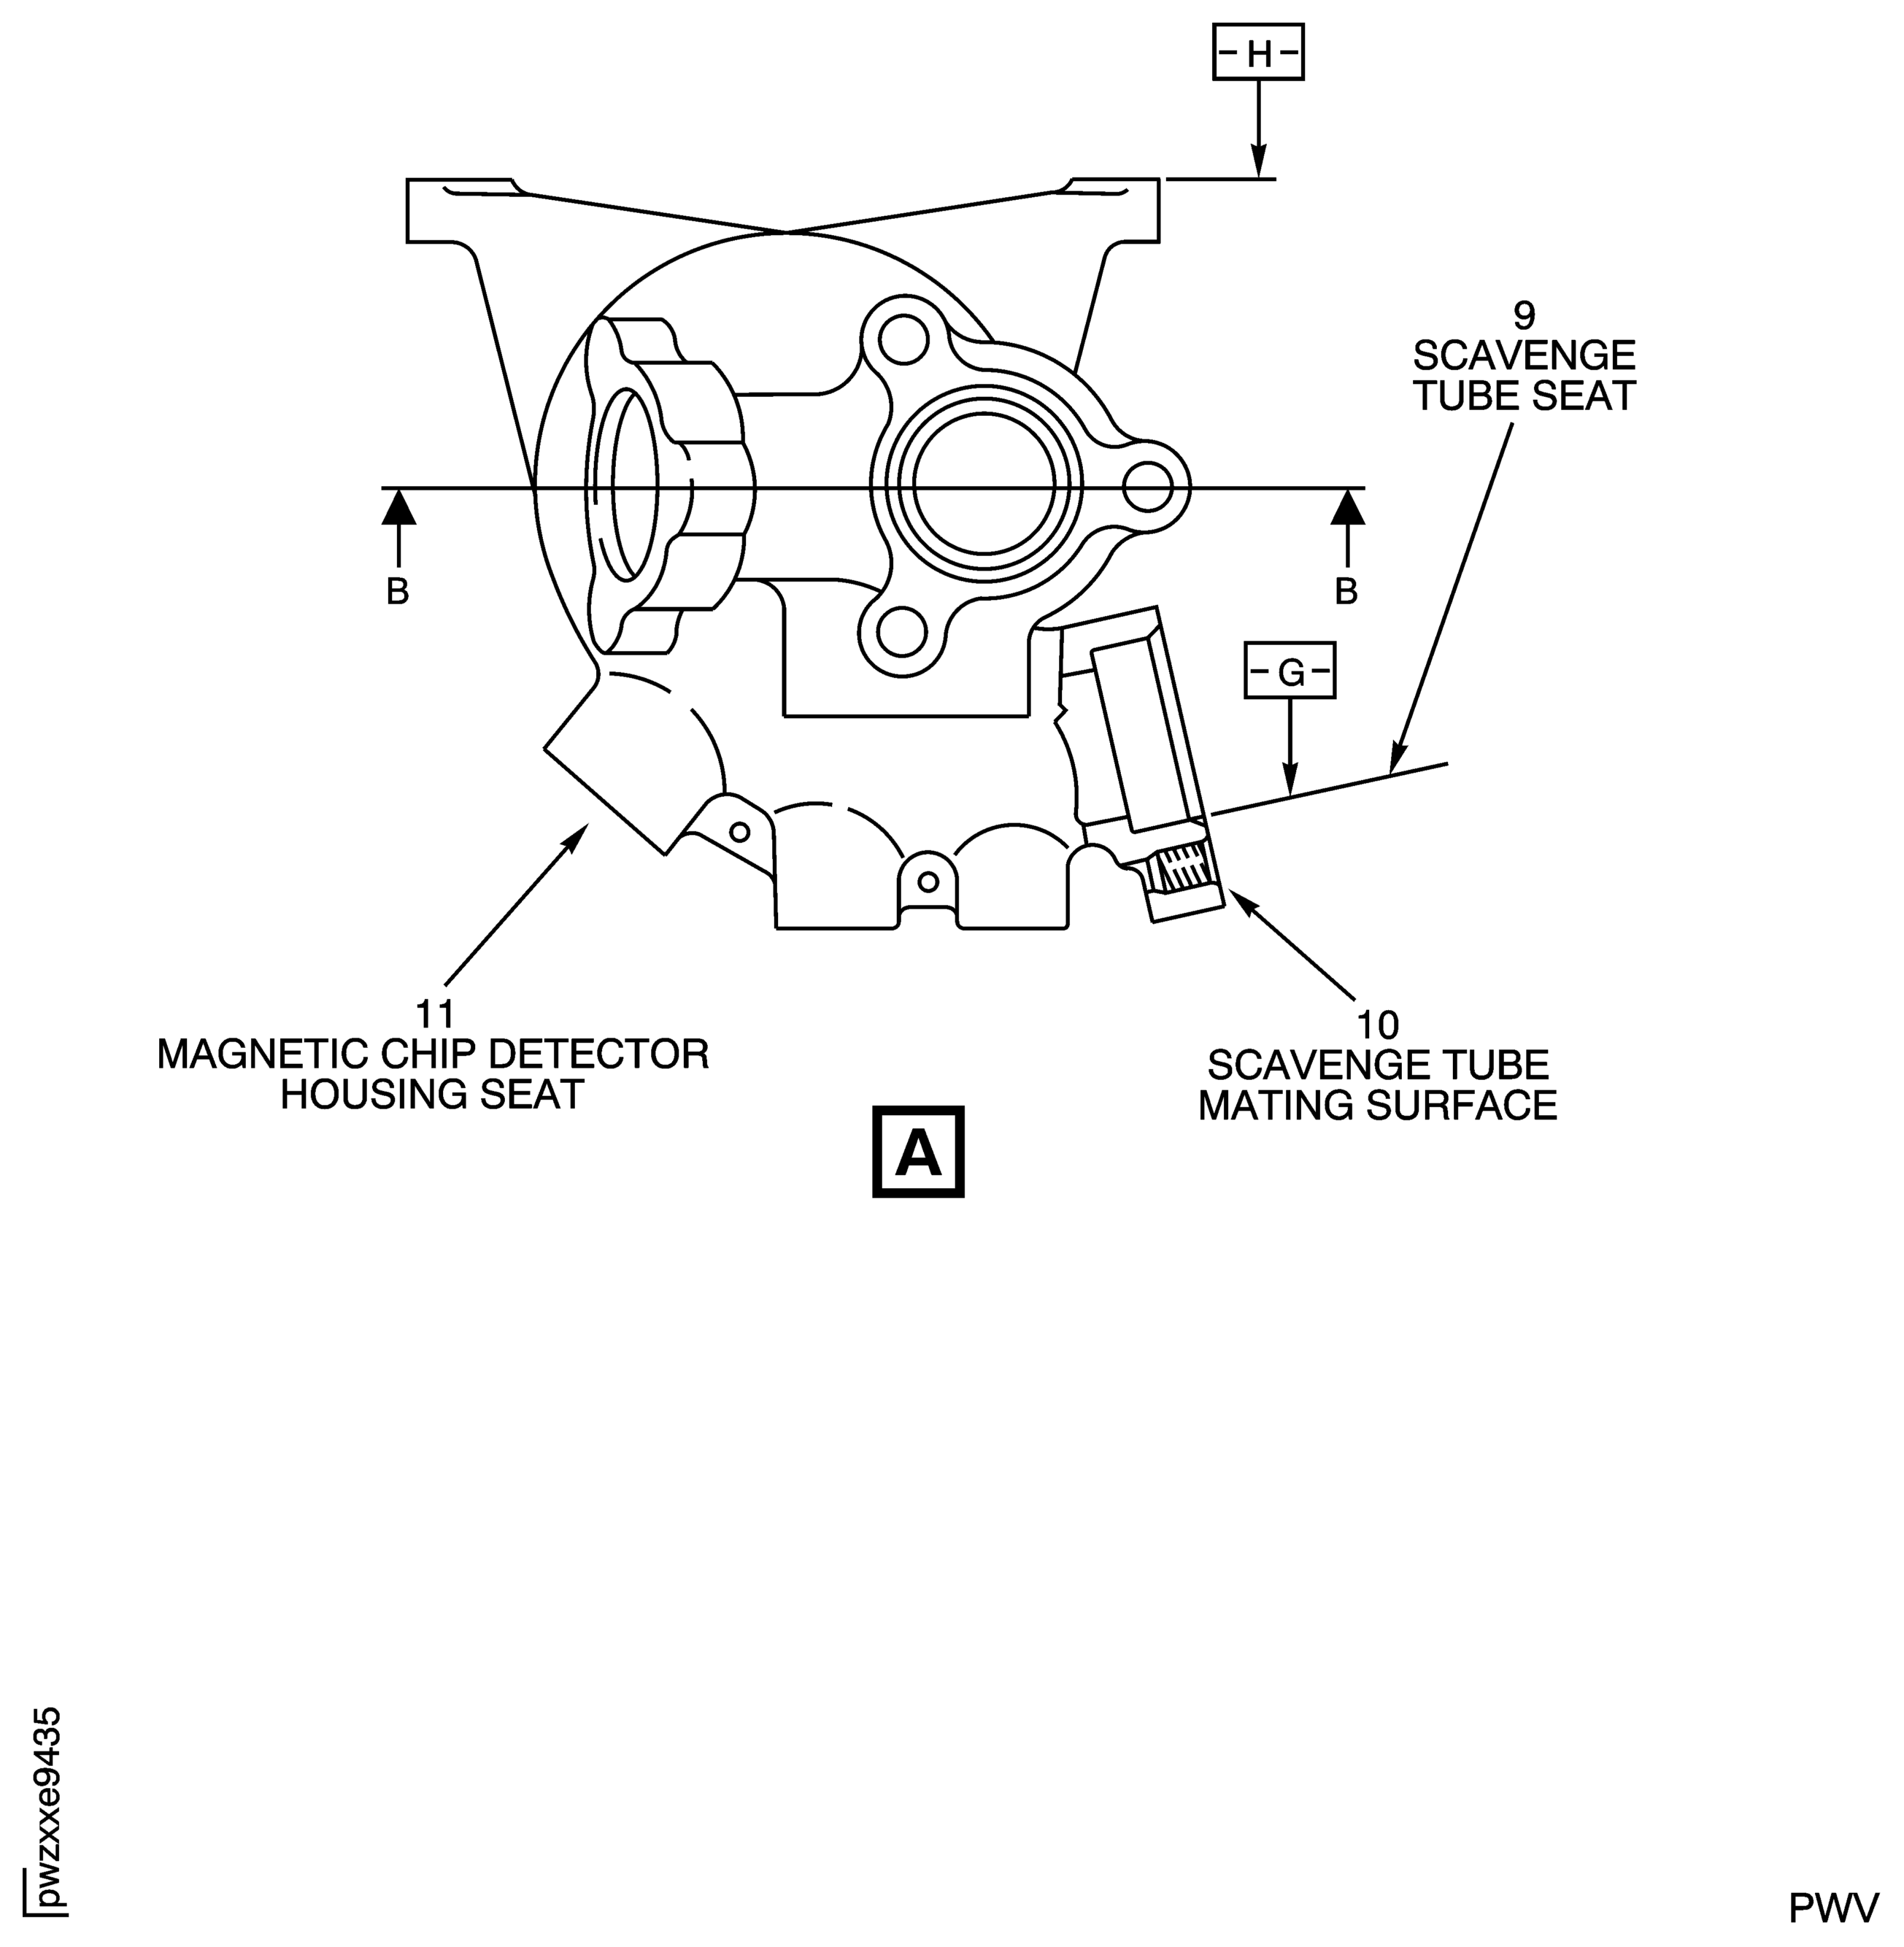
SUBTASK 79-22-43-220-071 Examine the Casing Assembly Scavenge Tube Seat at Location 9
Repair, VRS5250 (Repair-018) TASK 79-22-43-300-018.
More than Step.
Perpendicularity
SUBTASK 79-22-43-220-072 Examine the Casing Assembly Scavenge Tube Mating Surface at Location 10
Repair, VRS5431 (Repair-020) TASK 79-22-43-300-020.
Internal thread damage
SUBTASK 79-22-43-220-075 Examine the Casing Assembly Magnetic Chip Detector Housing Seat at Location 11
Repair, VRS5651 (Repair-021) TASK 79-22-43-300-021.
More than Step.
Wear
SUBTASK 79-22-43-220-076 Examine the Casing Assembly Filter Mating Face at Location 12
Figure: Locations on the Oil Filter Casing Assembly (pre SBE 79-0101)
Locations on the Oil Filter Casing Assembly (pre SBE 79-0101)
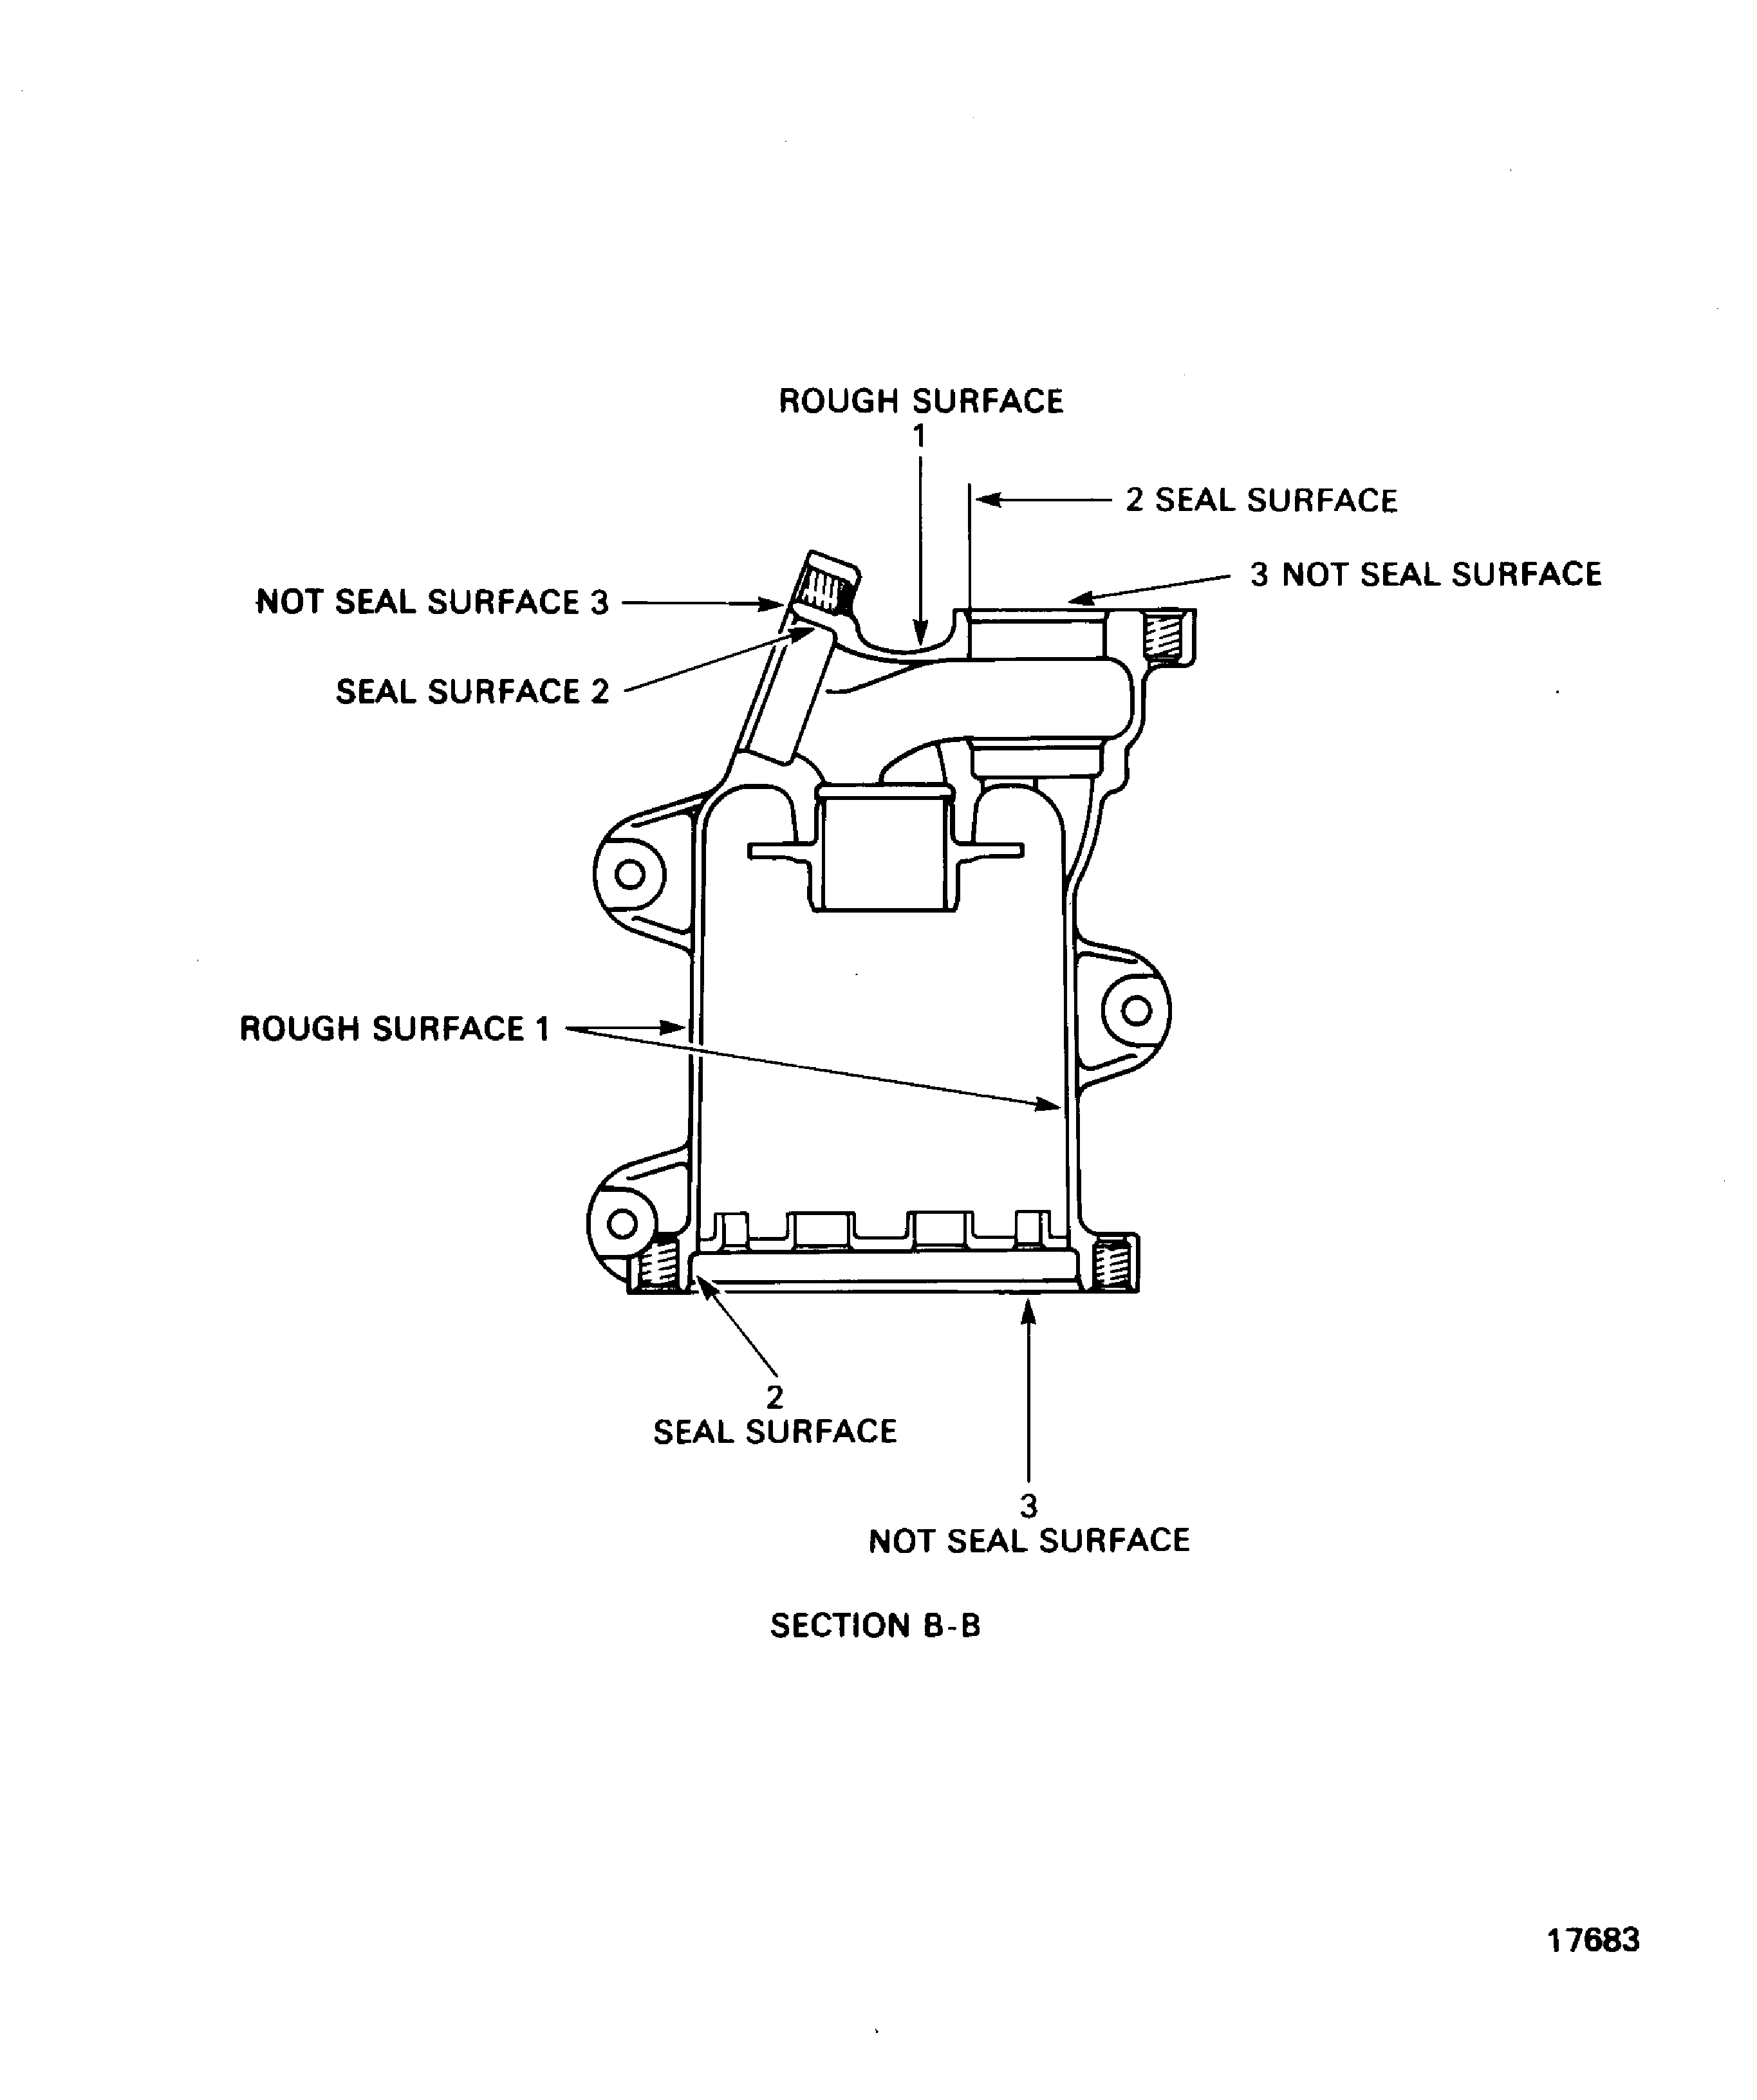
Figure: Oil Filter Casing Assembly (post SBE 79-0101)
Oil Filter Casing Assembly (post SBE 79-0101)
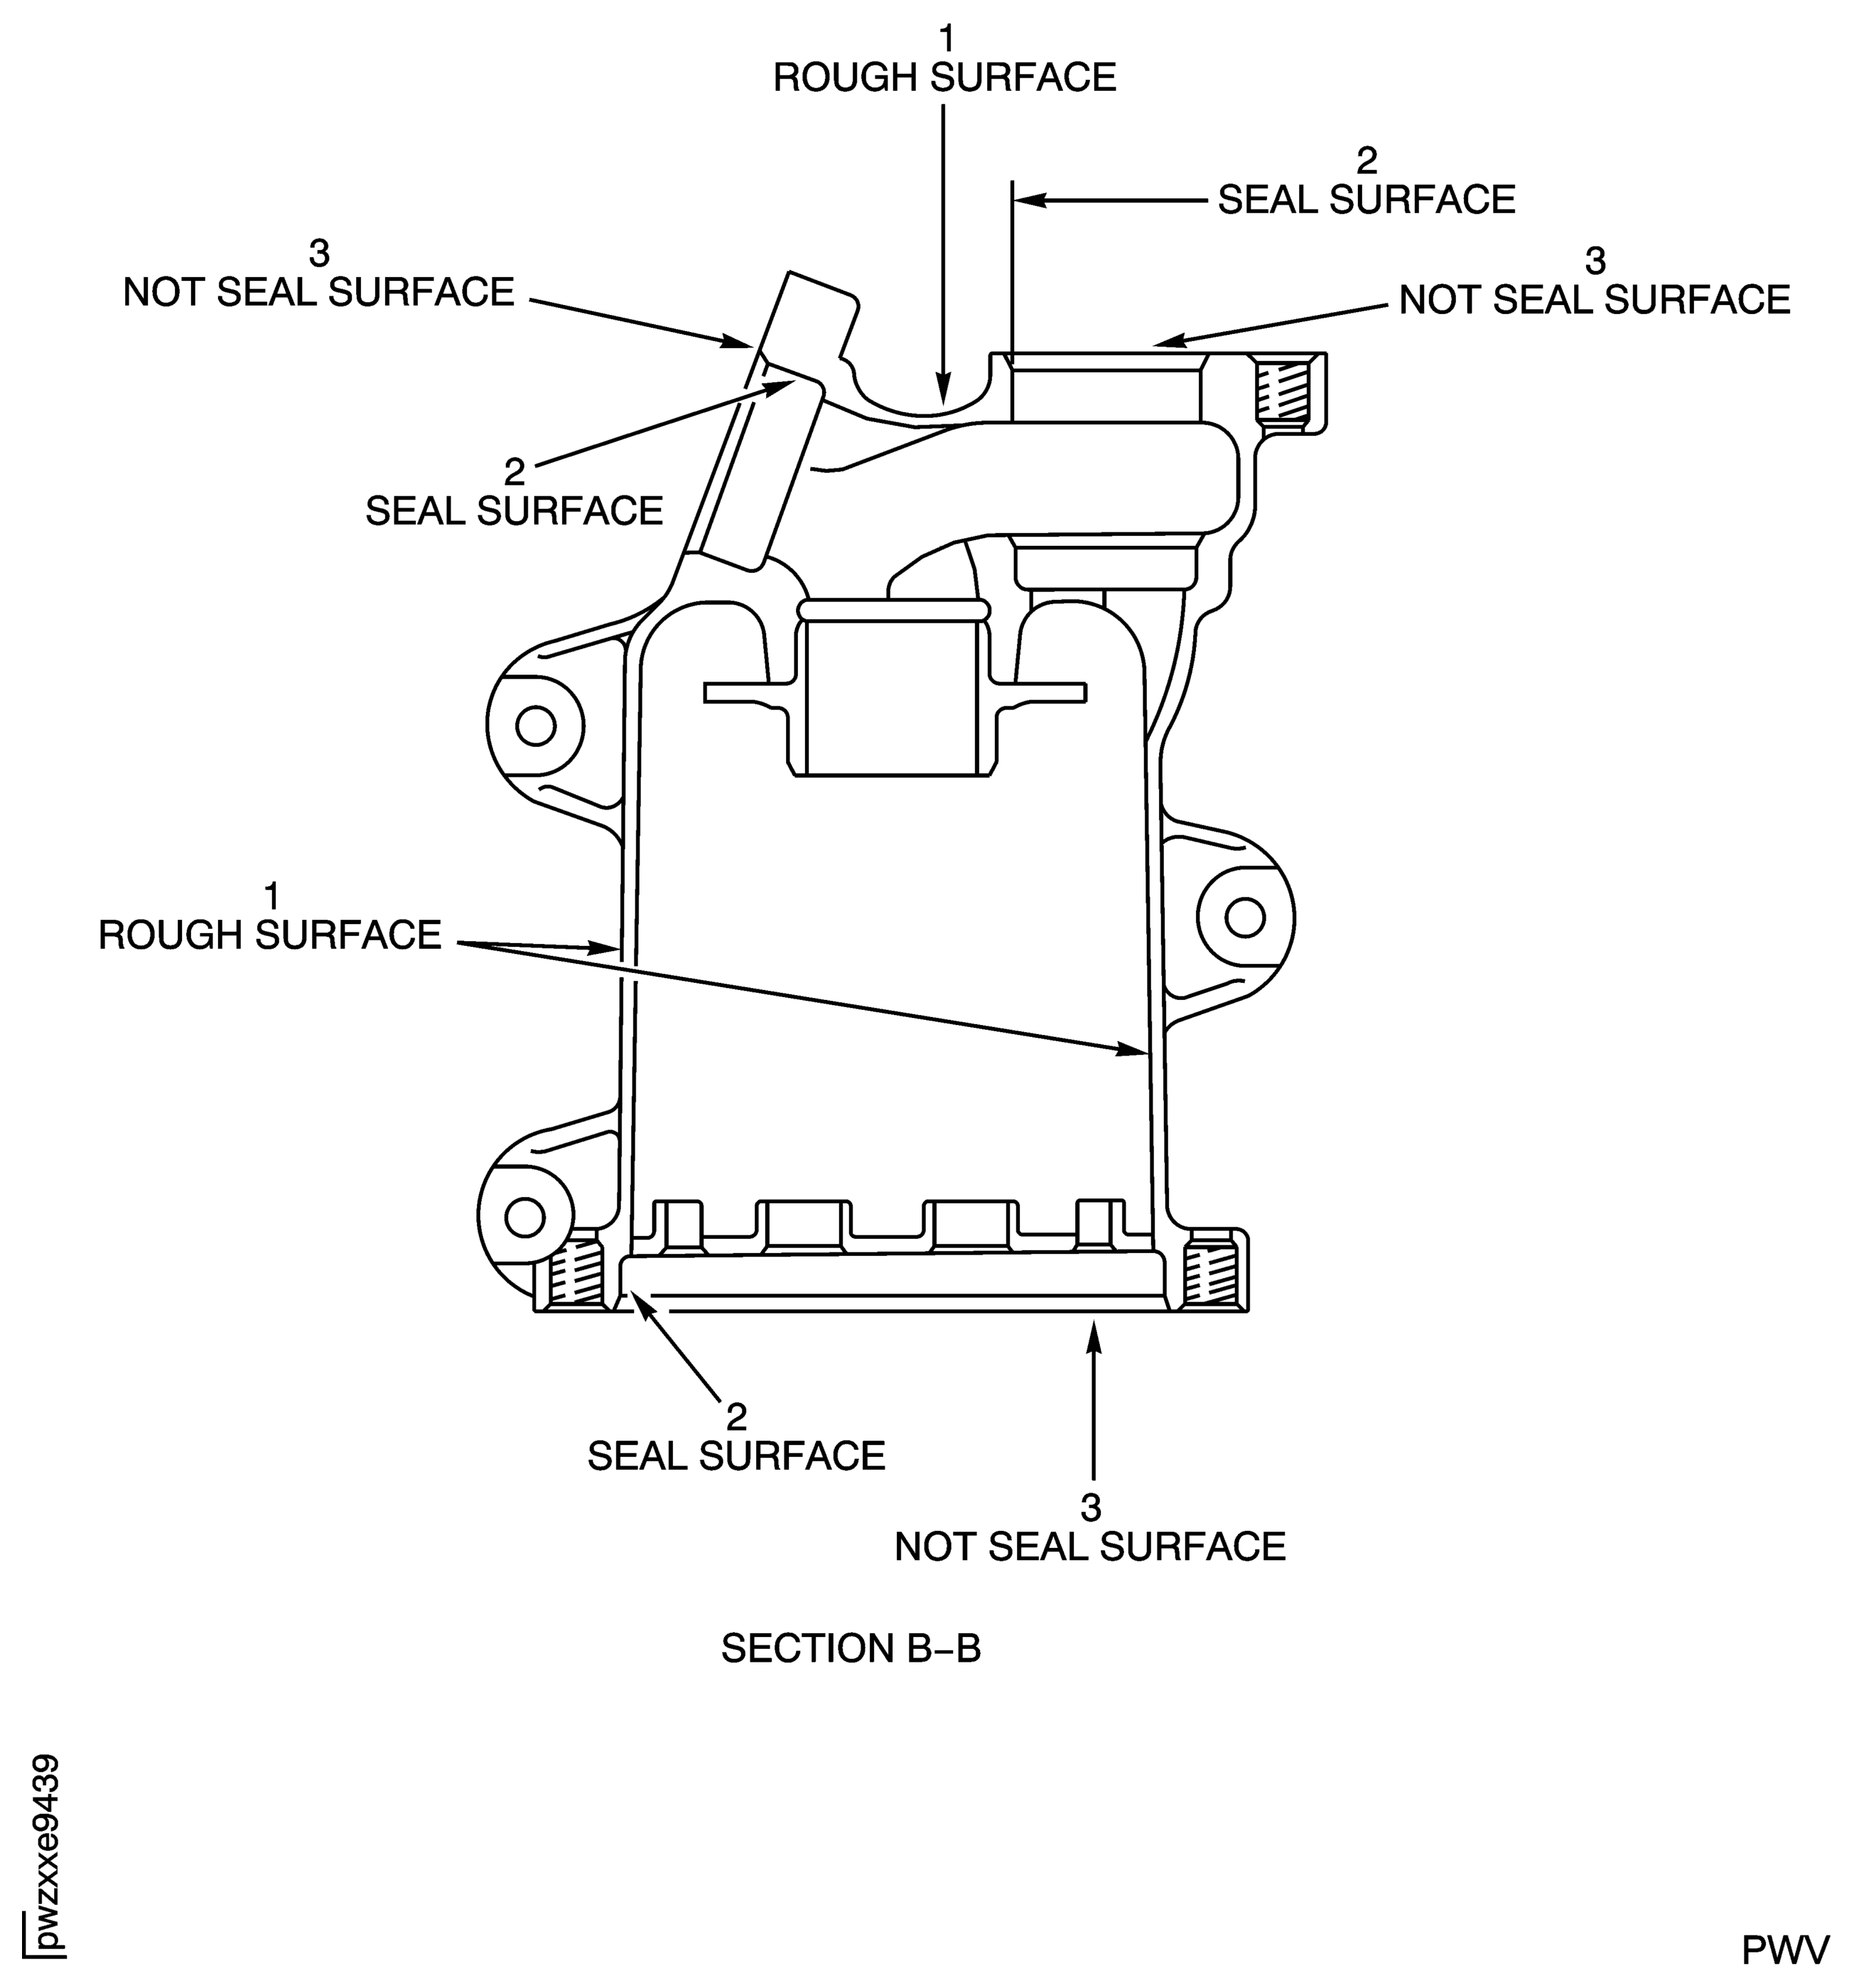
Figure: Locations on the Oil Filter Casing Assembly (pre SBE 79-0101)
Locations on the Oil Filter Casing Assembly (pre SBE 79-0101)
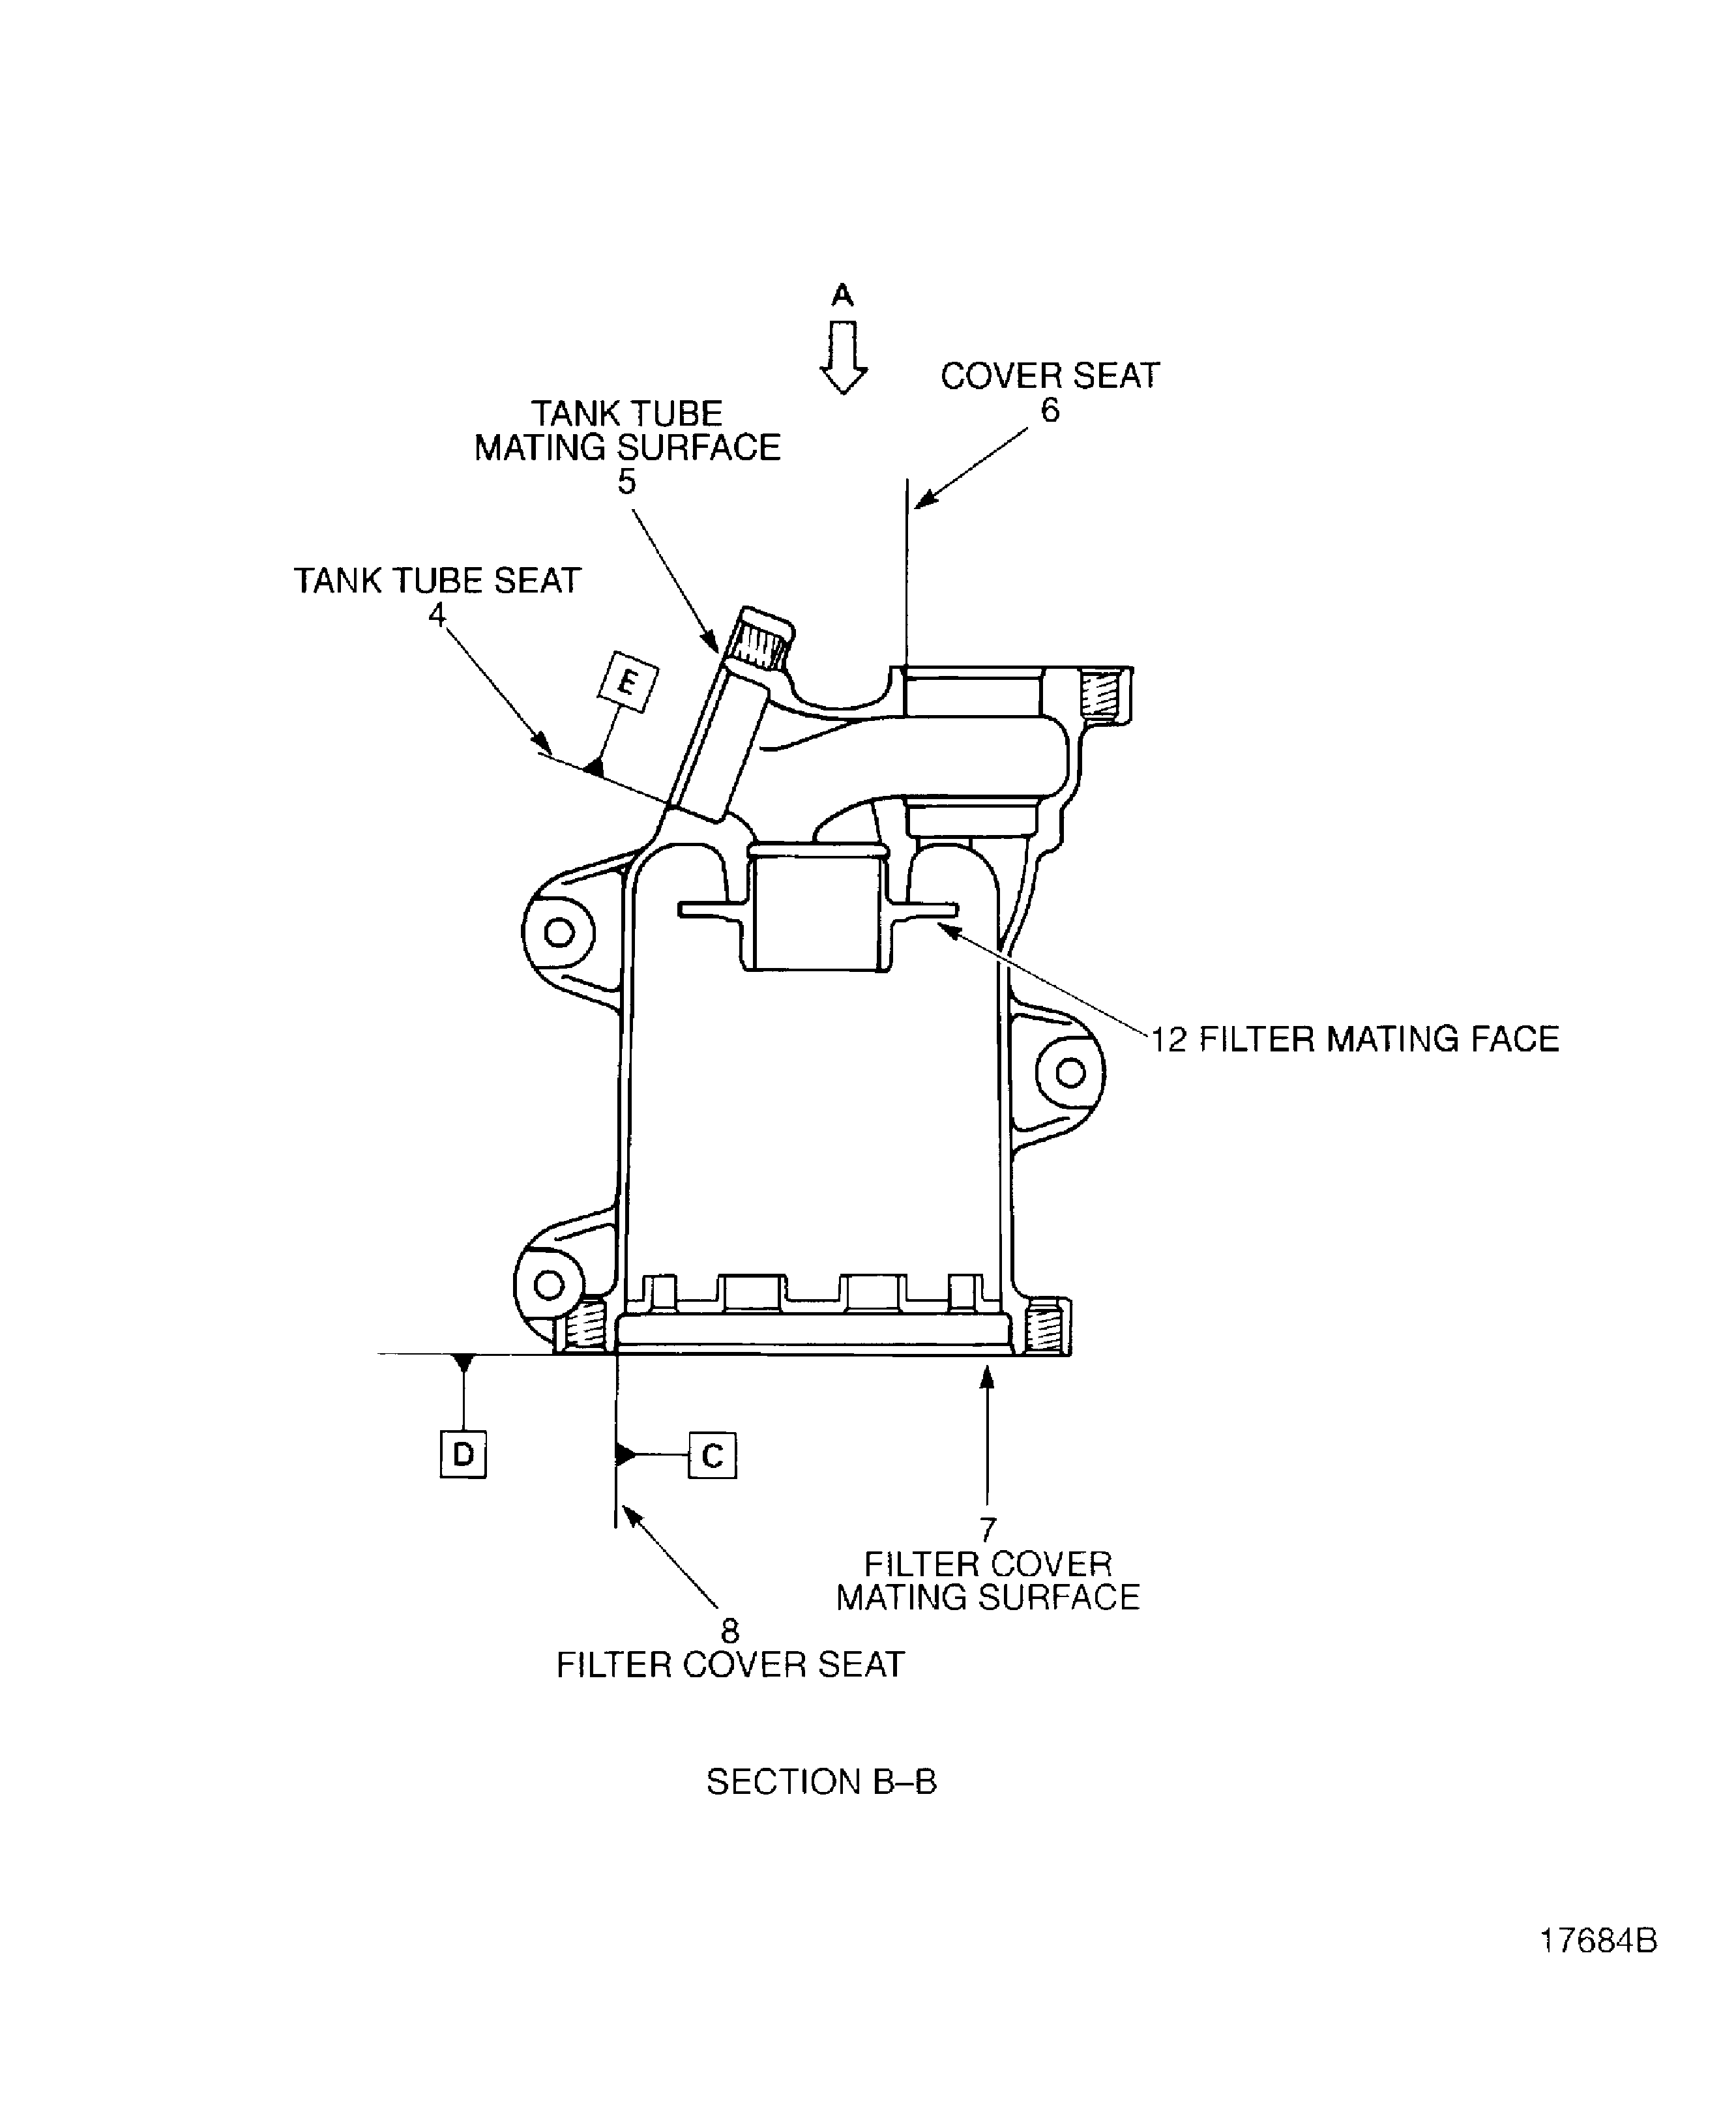
Figure: Locations on the Oil Filter Casing Assembly (Post SBE 79-0101)
Locations on the Oil Filter Casing Assembly (Post SBE 79-0101)
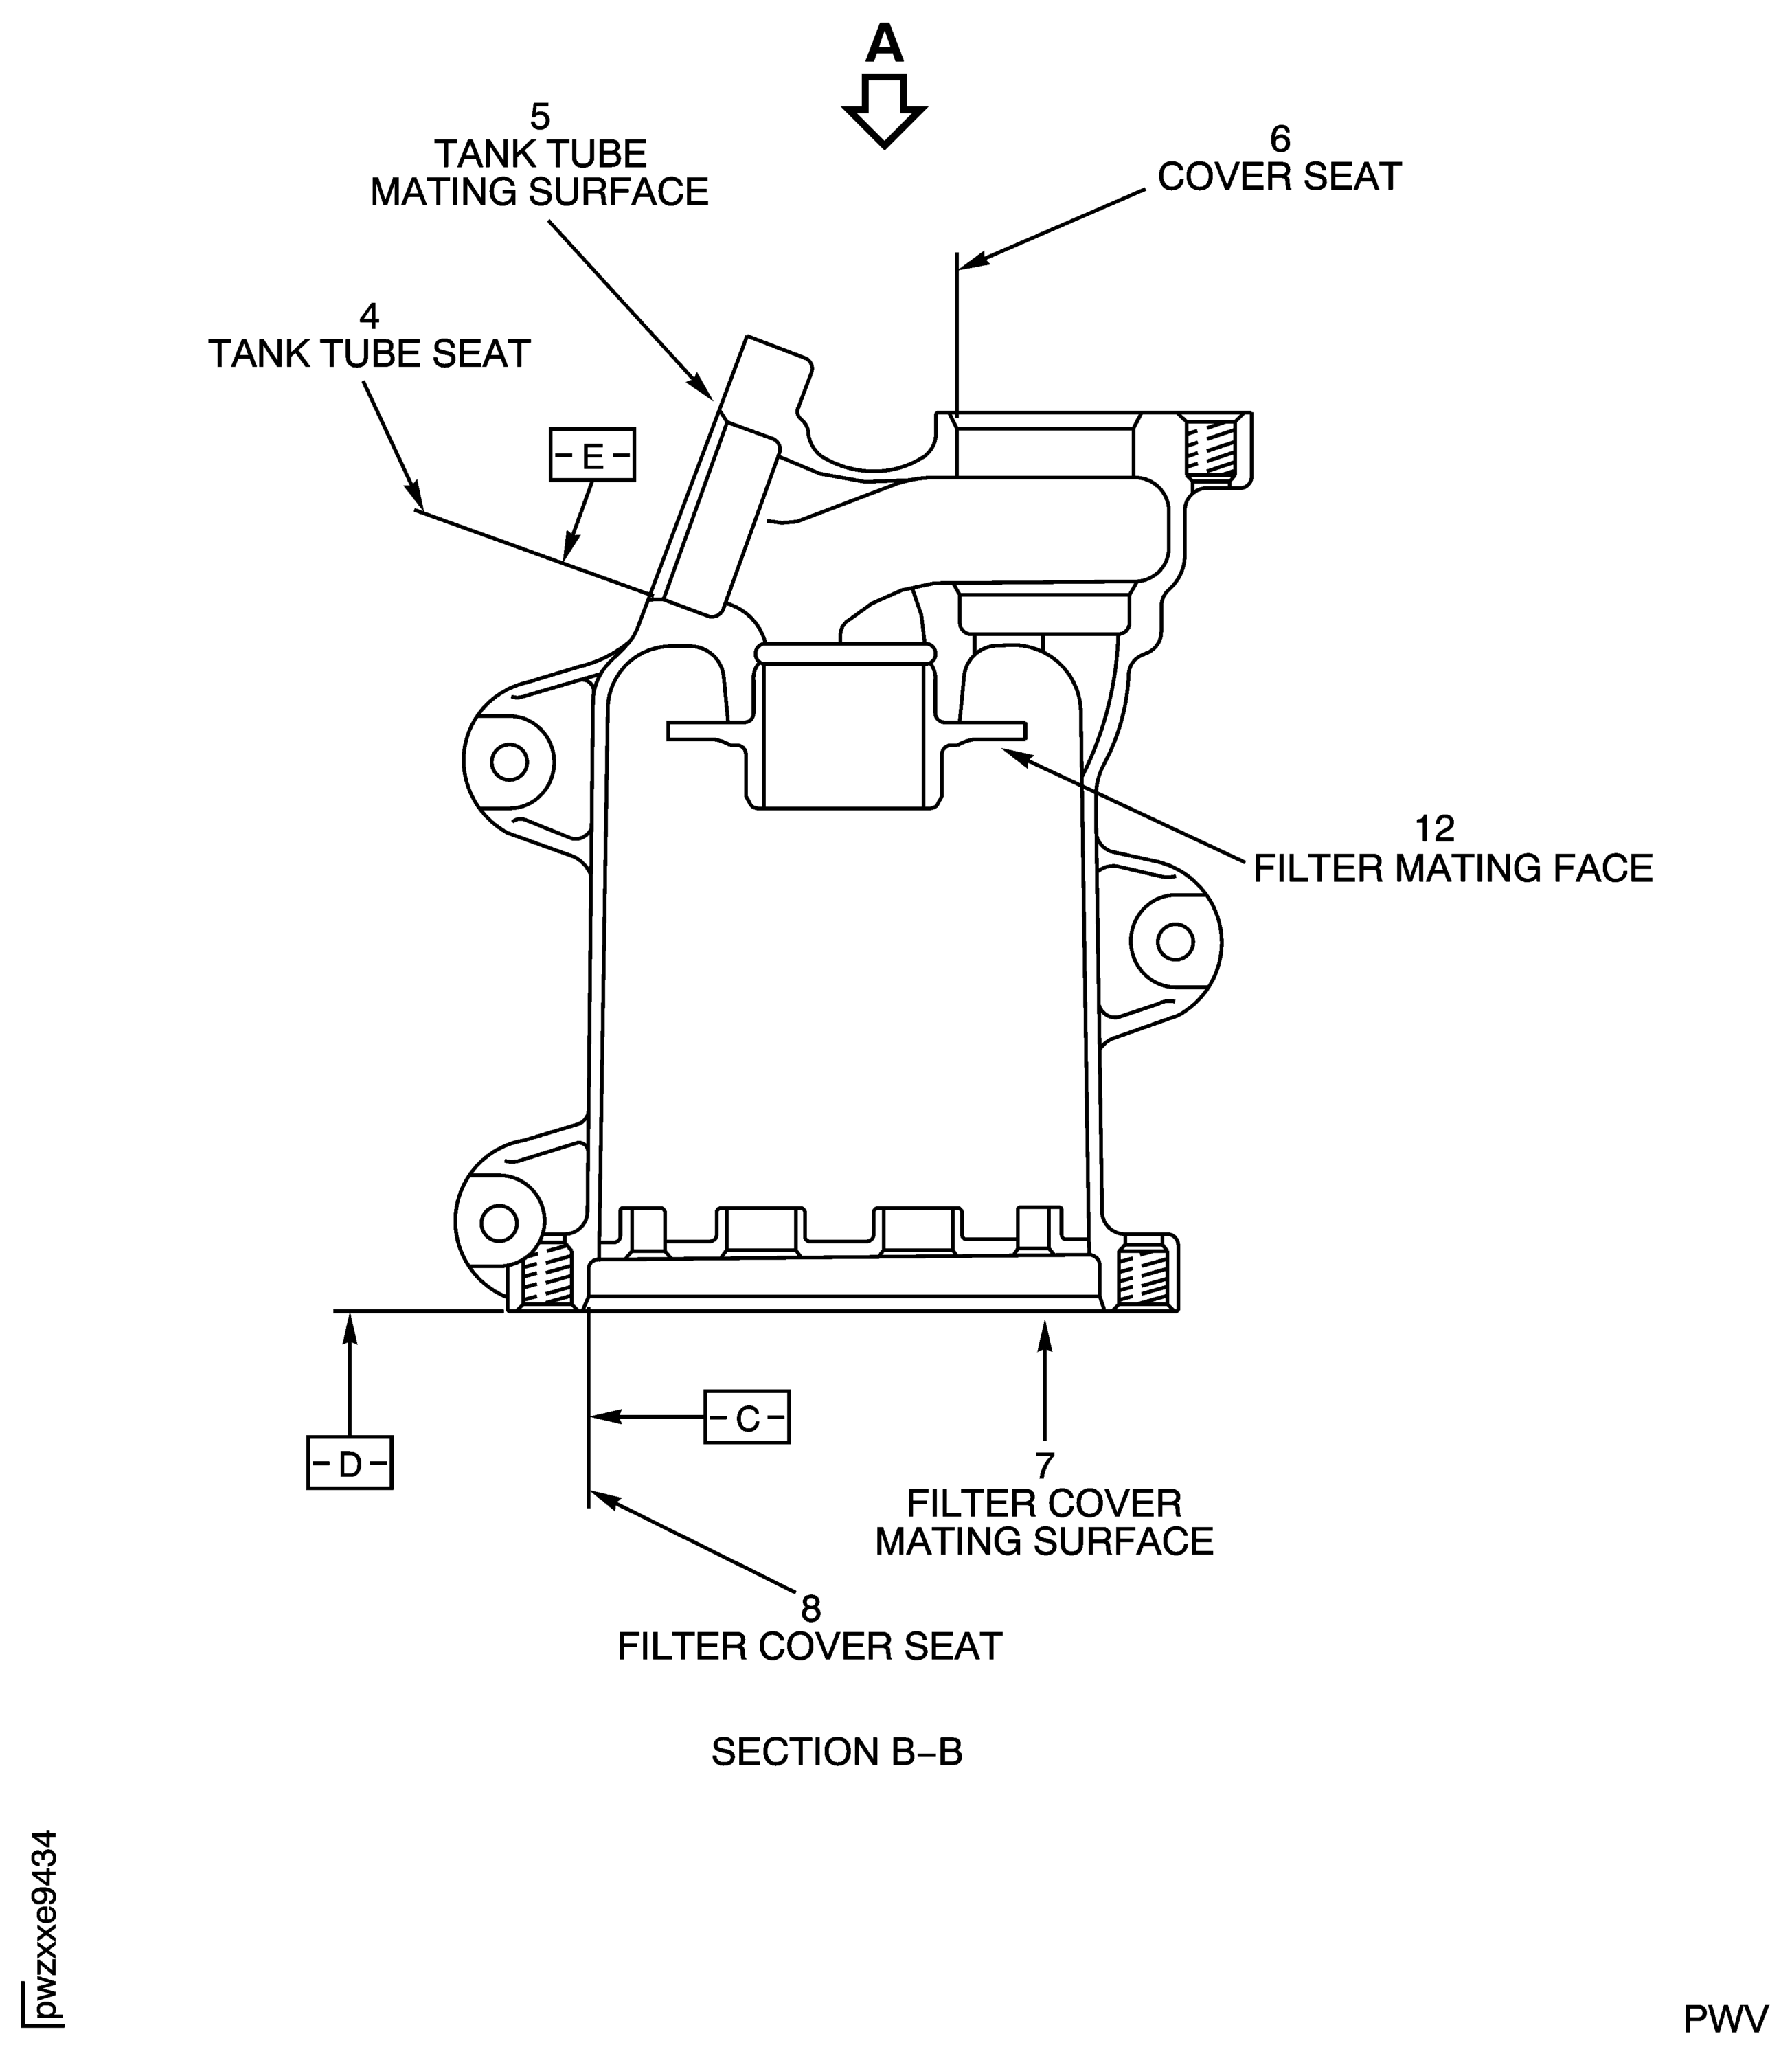
Figure: Locations on the Oil Filter Casing Assembly (pre SBE 79-0101)
Locations on the Oil Filter Casing Assembly (pre SBE 79-0101)
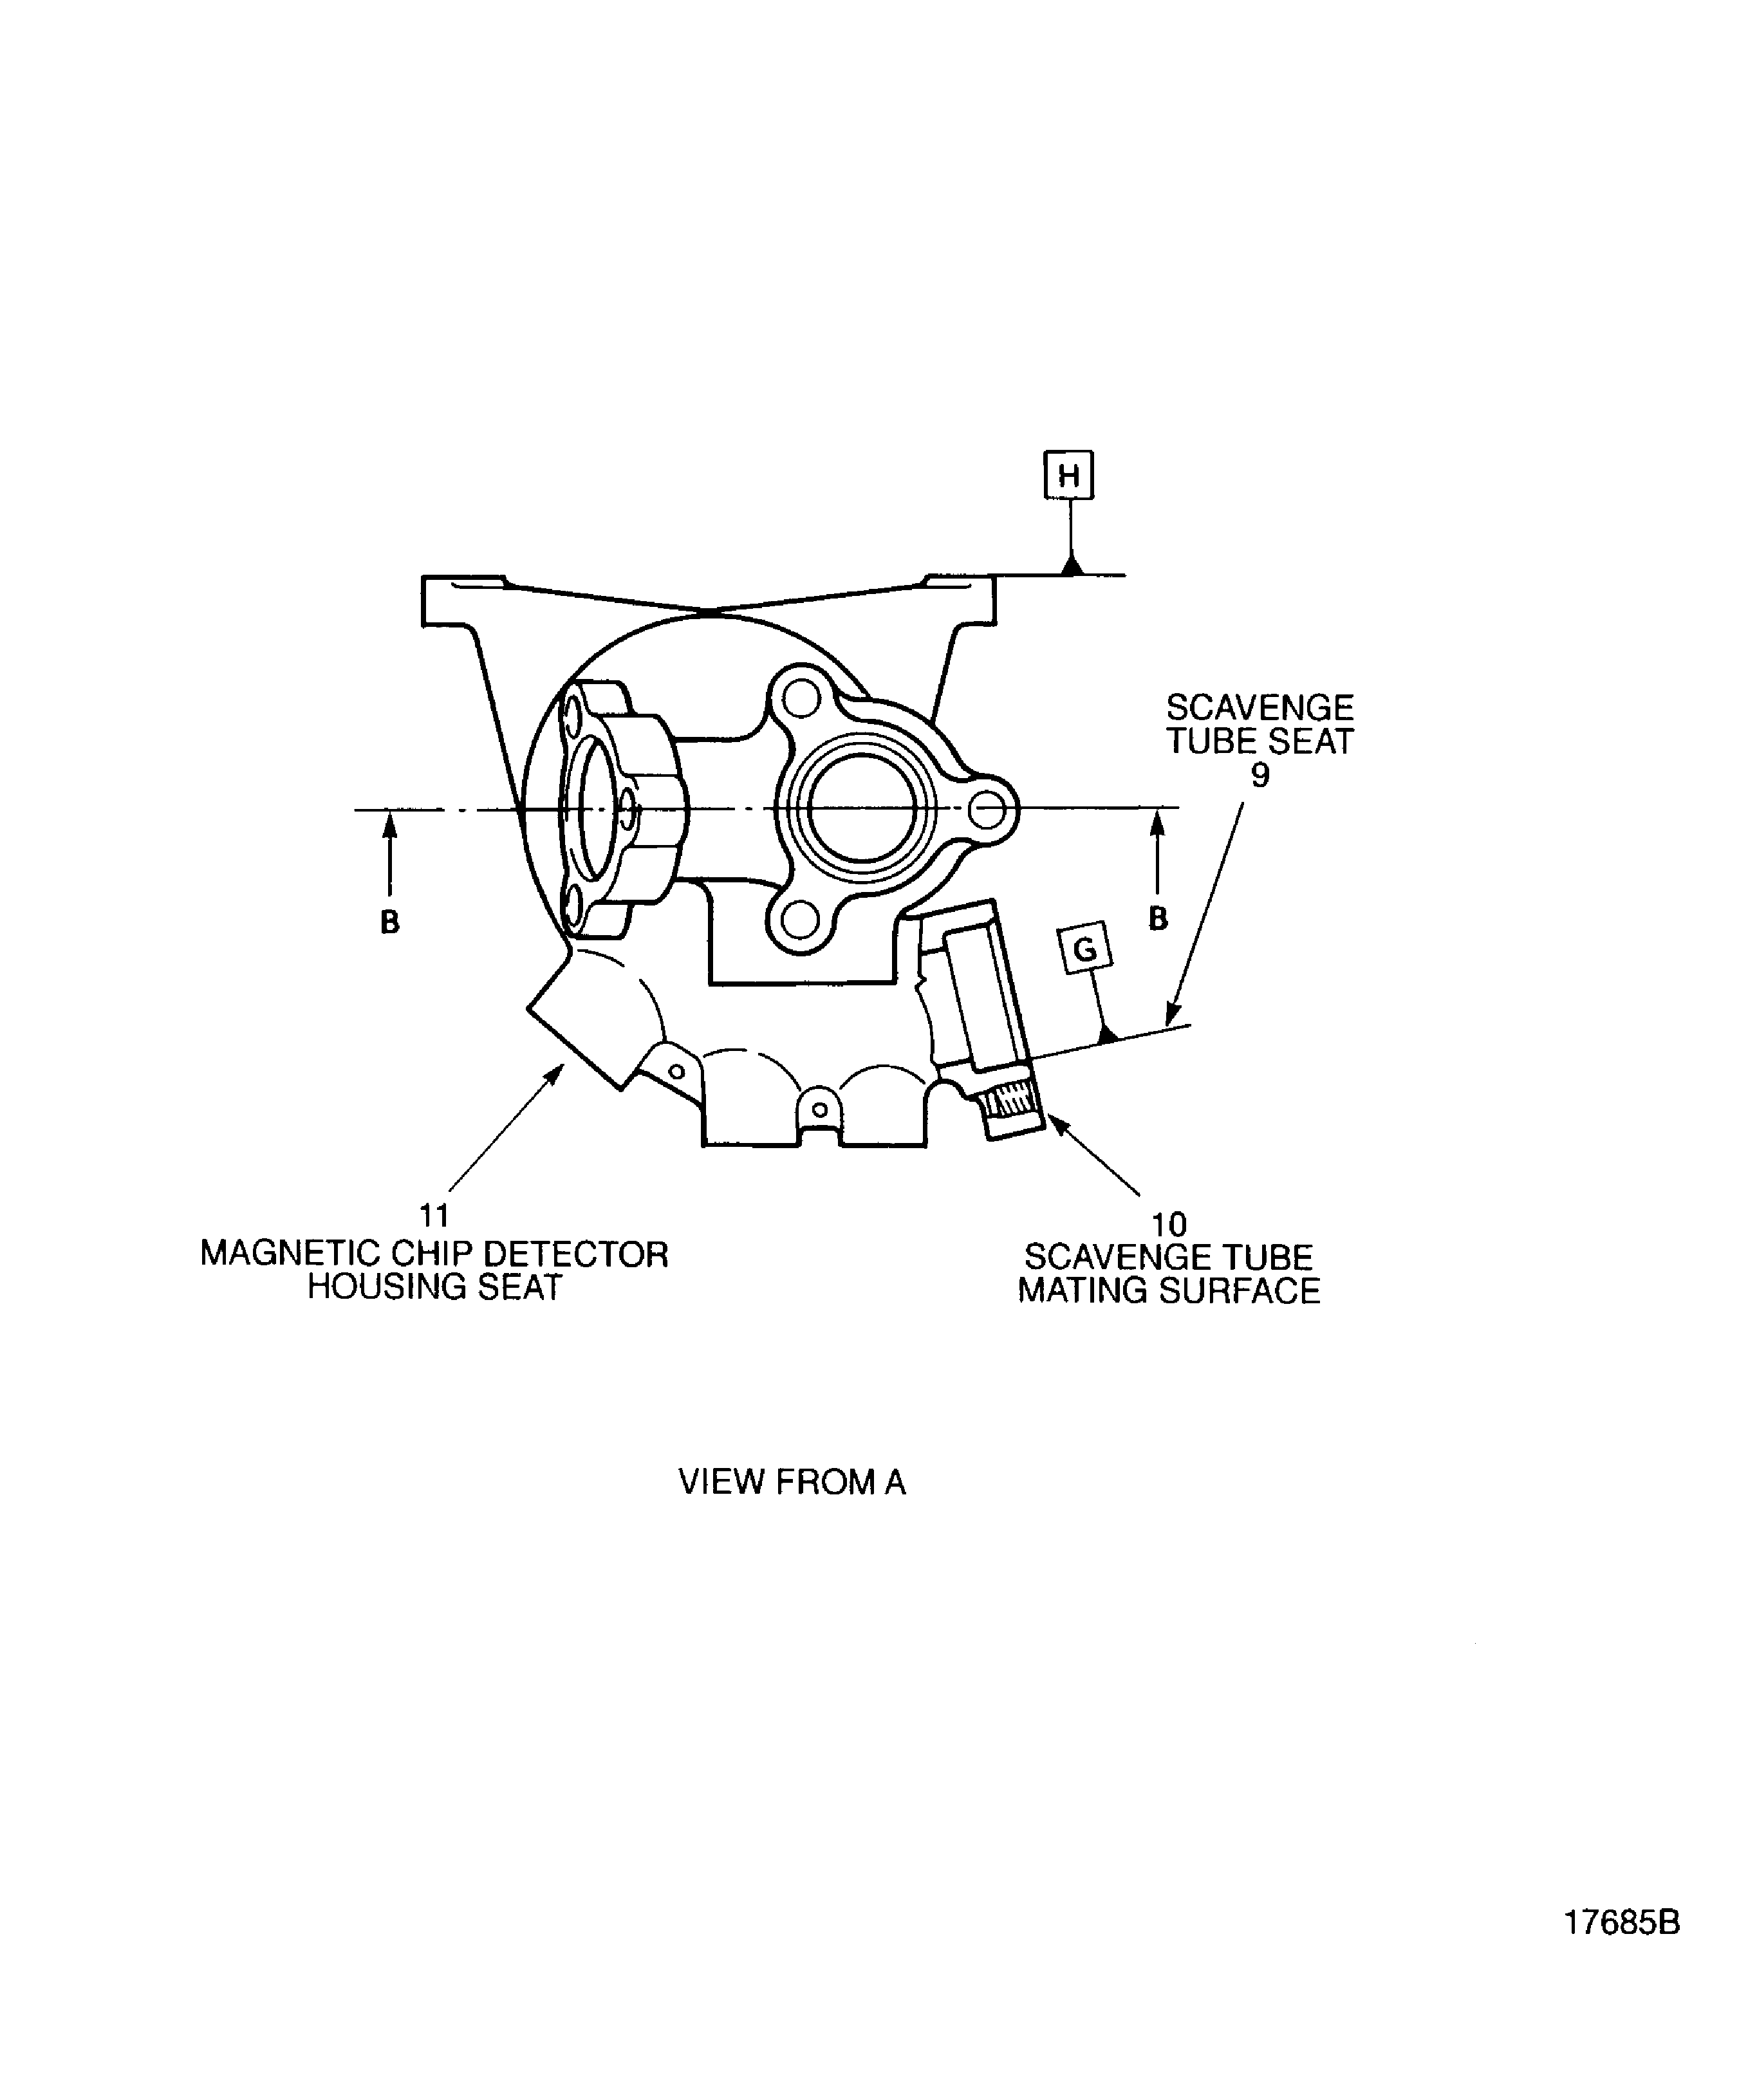
Figure: Locations on the Oil Filter Casing Assembly (post SBE 79-0101)
Locations on the Oil Filter Casing Assembly (post SBE 79-0101)
