Export Control
EAR Export Classification: Not subject to the EAR per 15 C.F.R. Chapter 1, Part 734.3(b)(3), except for the following Service Bulletins which are currently published as EAR Export Classification 9E991: SBE70-0992, SBE72-0483, SBE72-0580, SBE72-0588, SBE72-0640, SBE73-0209, SBE80-0024 and SBE80-0025.Copyright
© IAE International Aero Engines AG (2001, 2014 - 2021) The information contained in this document is the property of © IAE International Aero Engines AG and may not be copied or used for any purpose other than that for which it is supplied without the express written authority of © IAE International Aero Engines AG. (This does not preclude use by engine and aircraft operators for normal instructional, maintenance or overhaul purposes.).Applicability
V2500-A1
Common Information
TASK 72-00-00-200-004-A00 Engine General - Examine (Borescope) The HPT Stage 1 Blades, Inspection-004
General
All Fig/item numbers in the procedure agree with those used in the IPC. Only the primary Fig/item numbers are used. For the service bulletin alpha variants refer to the IPC.
For all parts identified in a different Chapter/Section/Subject, the applicable Chapter/Section/Subject comes before the Fig/item number.
For standard torque data and procedures refer to the SPM TASK 70-41-00-400-501, SPM TASK 70-41-00-400-501 and SPM TASK 70-41-01-400-501.
Special torque data is identified with the symbol * after the torque value.
Assembly tolerances are included in this procedure.
Lubricate all threads and abutment faces of nuts and bolts with CoMat 10-077 APPROVED ENGINE OILS, unless other lubricants are referred to in the procedure.
The number for each radial location must be identified in a clockwise direction. These start at the engine top position when you look from the rear of the engine, unless stated differently in the procedure.
Definitions and General Information
This TASK is for inspection of A1 engines only. This TASK gives the procedure for the borescope inspection of the stage 1 HPT blades and duct segments. This TASK recommends the use of a flexible borescope. You can use a rigid borescope to inspect for general damage to the blades, but a rigid borescope will not permit you to see sufficient detail to inspect the blades or duct segments to the limits in this TASK.
Pre SBE 72-0221: Borescope ports are identified in Figure, Figure and Figure.
SBE 72-0221: Borescope ports are identified in Figure, Figure and Figure.
The names of the different parts and areas of the Stage 1 HPT blades are shown Figure.
Use the names which follow when you identify a blade condition seen at borescope inspection:
Erosion: A local area where material has been removed by causes other than heat distress.
Leading Edge Burn-Through: A hole in the leading edge open to the cooling air passage.
Burns: A local area where material has been removed because of heat distress.
Coating damage: Chipping, flaking, blistering, peeling or oxidation of blade confined to coating.
Trailing edge metal loss: A burn through the convex trailing edge wall that causes a shorter airfoil chord length
Use the names which follow when you identify a duct segment condition seen at borescope inspection:
Cracks: A linear opening that can easily be seen and which can cause the material to break.
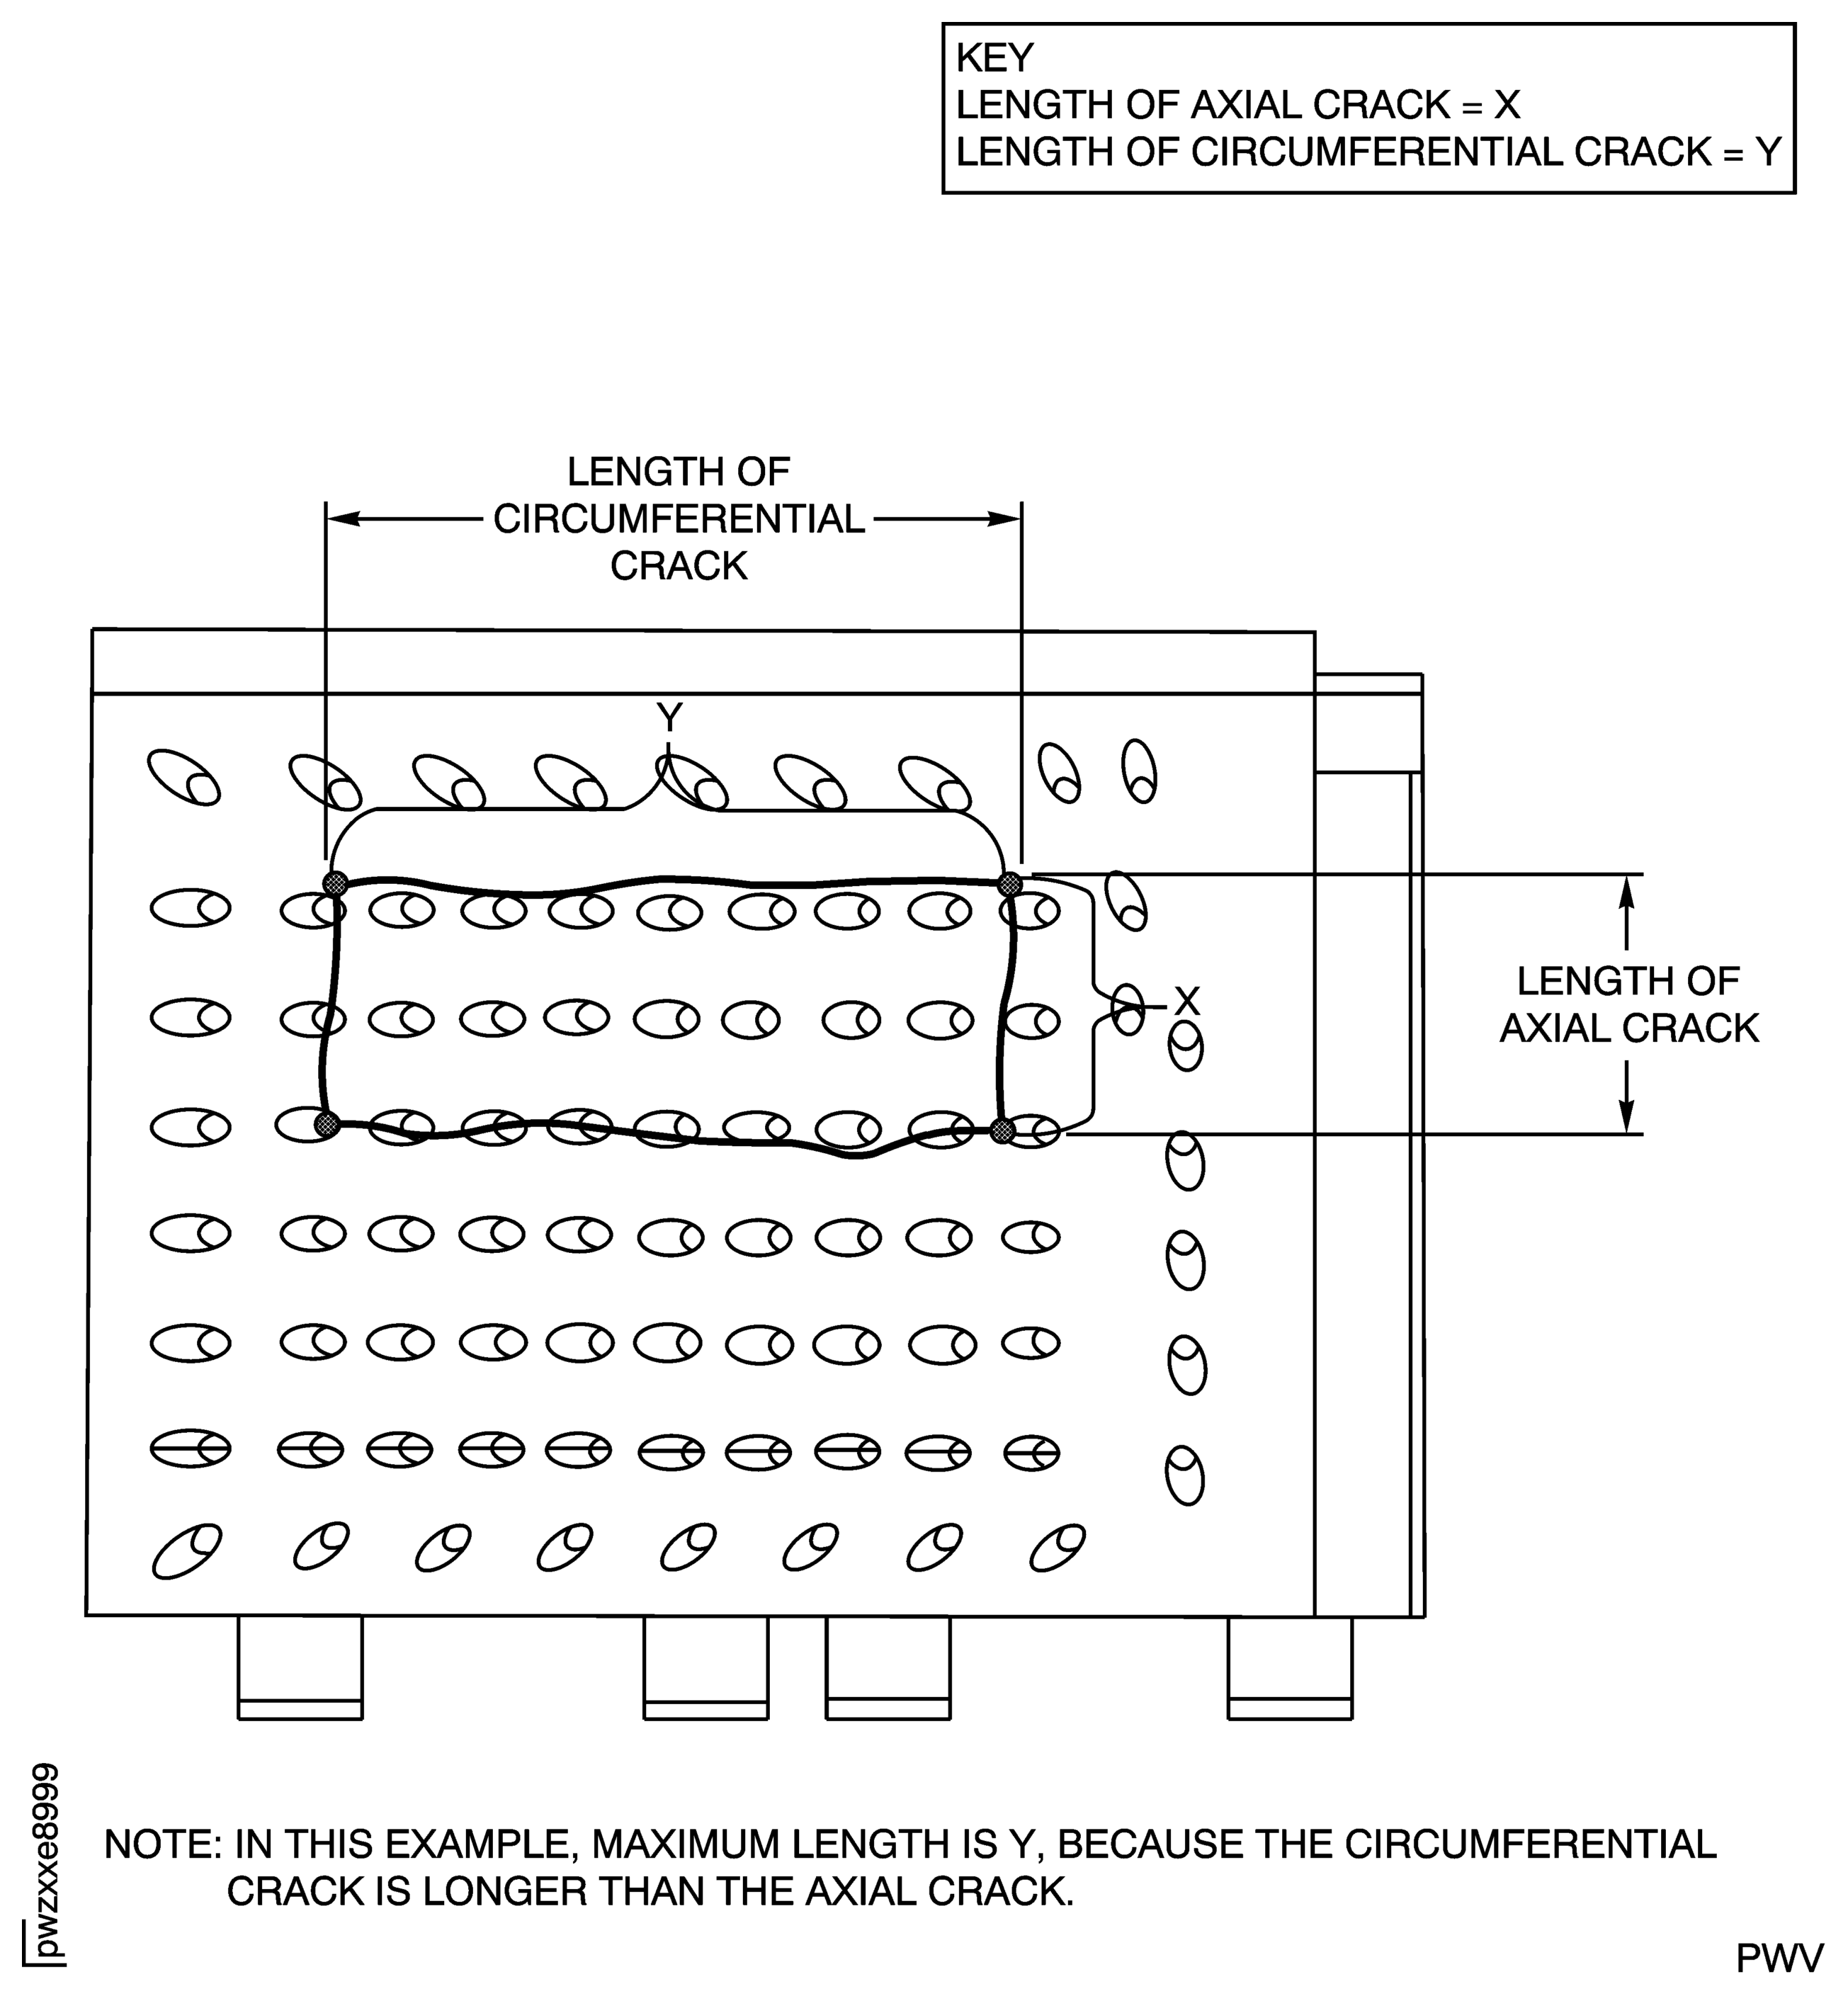
Closed loop of cracks: Adjoining cracks that close in on themselves.
Intersecting cracks: One or more axial or circumferential cracks that go through each other.
Burns: A local area where material was removed because of heat distress.
Burn-Through: A hole in the duct segment gas path side which is open to the cavity behind it.
Erosion: A local area where material was removed by causes other than heat distress.
Leading edge (LE) lifting: When the duct segment leading edge has become loose and can move radially inward.
Impingement plate: The wall that seals the internal cavity from the backside of the duct segment.
Shiplap: Location where adjoining duct segments overlap.
NOTE
NOTE
NOTE
NOTE
NOTE
Preliminary Requirements
Pre-Conditions
NONESupport Equipment
| Name | Manufacturer | Part Number / Identification | Quantity | Remark |
|---|---|---|---|---|
| Torque wrench, range 0 to 250 lbfin (0 to 20 Nm) | LOCAL | Torque Wrench 0-250 | ||
| Flexible borescope | LOCAL | Flexible borescope | ||
| Rigid borescope | LOCAL | Rigid borescope | ||
| Cover (eye) | LOCAL | Cover (eye) | ||
| Motor drive unit | LOCAL | Motor drive unit | ||
| IAE 1P16184 Puller | 0AM53 | IAE 1P16184 | 1 | |
| IAE 2P16204 Guide Tube | 0AM53 | IAE 2P16204 | 1 |
Consumables, Materials and Expendables
| Name | Manufacturer | Part Number / Identification | Quantity | Remark |
|---|---|---|---|---|
| CoMat 02-024 MASKING TAPE (CREPE PAPERBACKING) | 0AM53 | CoMat 02-024 | ||
| CoMat 02-141 LOCKWIRE | LOCAL | CoMat 02-141 | ||
| CoMat 10-029 CORROSION PREVENTIVESLUSHING OIL | 0AM53 | CoMat 10-029 | ||
| CoMat 10-077 APPROVED ENGINE OILS | LOCAL | CoMat 10-077 | ||
| CoMat 10-094 ANTI-SEIZE COMPOUND, PURE Ni-SPECIAL | LOCAL | CoMat 10-094 | ||
| CoMat 10-129 ANTI-SEIZE PASTE | 34568 | CoMat 10-129 |
Safety Requirements
WARNING
CAUTION
Procedure
Refer to: Figure
SUBTASK 72-00-00-420-057 Install the Foot-Operated Motor Drive Unit to the Gearbox Crank Pad
Put the flexible borescope into the IAE 2P16204 Guide Tube 1 off until the end of the borescope is even with the end of the tube. This will be a limit mark on the borescope so you will not insert the borescope too far and cause damage to the borescope.
Put a piece of CoMat 02-024 MASKING TAPE (CREPE PAPERBACKING) on the borescope fiber bundle 3.250in. (82.55 mm) from the other end of the guide tube.
Push the guide tube in until it touches the stop.
NOTE
In this position, the slot in the stop will be up.
A cover for the eye which is not used will decrease eye tension.
If you use an adjustable clamp to hold the borescope, you will be able to easily move the borescope dial and the fiber bundle.
Some borescope units have closed-circuit television adapters. We highly recommend this unit.

CAUTION
MAKE SURE THAT THE BORESCOPE TIP IS NOT IN THE PATH OF THE STAGE 1 HPT BLADES BEFORE YOU TURN THE ENGINE.NOTE
At this point, the borescope is between two Stage 1 HPT vanes and at a location to see the concave side of the Stage 1 HPT blades.Move the borescope end slightly, while pushing in, and find the Stage 1 HPT blades. Turn the borescope fiber bundle to help you locate the stage 1 HPT blades. Do not push the borescope past the tape mark.
Install the tube into the IP1 port.
SUBTASK 72-00-00-420-058-A00 Install the Guide Tube and the Flexible Borescope into the IP1 Borescope Port to Examine the Stage 1 Blades, thru (Pre SBE 72-0221)
SBE 72-0221: Introduce a new diffuser case
Put the flexible borescope into the IAE 2P16204 Guide Tube 1 off until the end of the borescope is even with the end of the tube. This will be a limit mark on the borescope so you will not insert the borescope too far and cause damage to the borescope.
Put a piece of CoMat 02-024 MASKING TAPE (CREPE PAPERBACKING) on the borescope fiber bundle 3.250 in. (82.55 mm) from the other end of the guide tube.
Push the guide tube in until it touches the stop.
NOTE
In this position, the slot in the stop will be up.
A cover for the eye which is not used will decrease eye tension.
If you use an adjustable clamp to hold the borescope, you will be able to easily move the borescope dial and the fiber bundle.
Some borescope units have closed-circuit television adapters. We highly recommend this unit.

CAUTION
MAKE SURE THAT THE BORESCOPE TIP IS NOT IN THE PATH OF THE STAGE 1 HPT BLADES BEFORE YOU TURN THE ENGINE.NOTE
At this point, the borescope is between two stage 1 HPT vanes and at a location to see the concave side of the stage 1 HPT blades.Move the borescope end slightly, while pushing in, and find the stage 1 HPT blades. Turn the borescope fiber bundle to help you locate the stage 1 HPT blades. Do not push the borescope past the tape mark.
Install the tube into the IP1 port.
SUBTASK 72-00-00-420-058-B00 Install the Guide Tube and the Flexible Borescope into the IP1 Borescope Port to Examine the Stage 1 HPT Blades (SBE 72-0221)
For a close up inspection, do the procedure in the paragraph above.
An eye cover for the eye which is not used will decrease eye tension.
Removal of the plugs at both of the locations will permit you to examine both leading and trailing edges.
Put the IAE 1P16184 Puller 1 off in to the center hole of the plug (use if required).
Get access to the stage 1 HPT blades through the T1/2L and the T1/2R ports, Figure.
Put a rigid borescope through the B2 or B3 port, Figure.
Put a rigid borescope through the T1/2L or T1/2R port, Figure.
SUBTASK 72-00-00-020-057-A00 Install a Rigid Borescope to Examine the Stage 1 HPT Blades through the B2 or B3 and T1/2L or T1/2R Ports,thru (Pre SBE 72-0221)
NOTE
For a close up inspection, do the procedure in SUBTASK 72-00-00-420-058-B00.
An eye cover for the eye which is not used will decrease eye tension.
Removal of the plugs at both of the locations will permit you to examine both the leading and trailing edges.
SBE 72-0221: Introduce a new diffuser case
Put the IAE 1P16184 Puller 1 off into the centre hole of the plug (use if required).

WARNING
MAKE SURE THAT THE BLANKING PLUG IS COOL BEFORE YOU REMOVE IT. THE PLUG STAYS HOT FOR A SHORT TIME AFTER THE ENGINE IS SHUT DOWN.Get access to the stage 1 HPT blades through the T1/2L and the T1/2R ports, Figure.
Put a rigid borescope through the B3 or B4 port, Figure.
Put a rigid borescope through the T1/2L or T1/2R port, Figure.
SUBTASK 72-00-00-020-057-B00 Install a Rigid Borescope to Examine the Stage 1 HPT Blades through the B3 or B4 and T1/2L or T1/2R Ports (SBE 72-0221)
NOTE
NOTE
There will be unwanted material on the airfoil because of the casting procedure. Refer to Figure. During borescope inspection, this material will look like small bumps on the concave and convex surfaces of the airfoil. These bumps are usually round or oval, are between 0.100 to 0.200 in. (2.54 to 5.08 mm) wide and are 0.005 in. (0.13 mm) high. These bumps are acceptable. No action is necessary.
Tip Zone - The lower edge of the upper tip cooling holes to tip. In this zone a crack going through another crack is permitted.
The crack in Area A (does not include the inner 25 percent of the leading or trailing edge span) or Area B extends from a burned area and the combination of the burn plus a crack is longer than 0.120 in. (3.05 mm). Maximum crack length is 0.070 in. (1.78 mm). Also, the combination of the burn plus the crack in Area A is not more than 0.220 in. (5.59 mm) and in Area B is not more than 0.15 in. (3.8 mm).
Accept with an inspection each 600 hours if:
SUBTASK 72-00-00-220-075 Examine the Stage 1 HPT Blades for Cracks on the Airfoil
Refer to Figure.
NOTE
It is acceptable to have small pieces of the Stage 1 HPT seal (72-45-14,01-060) out between the rear platform of the Stage 1 HPT blade HPT Stage 1 Blade And Related Parts (72-45-14,01-010) and the Stage 1 HPT air seal ENGINE-STAGE 1 AIR SEAL (REAR) (72-45-15,01-020).
SUBTASK 72-00-00-220-076 Examine the Stage 1 HPT Blades for Cracks on the Platform
The erosion or burns on the blade tip are more than 0.060 in. (1.52 mm) radially. (For reference, the concave side tip cooling holes (OD) are 0.080 in. (2.03 mm) from the tip).
NOTE
The blade trailing edge tip is 0.15 in. (3.81 mm) radially from the tip and 0.100 in. (2.54 mm) from the trailing edge and burning or erosion is permitted within this area.
Accept with an inspection each 600 hours if:
The leading edge burn-through on the outer 50 percent span in Area A is less than 0.20 in. (5.1 mm) in any direction. Note that the internal wall as seen through the burn-through hole is breached or has burns.
NOTE
Burns on the platform cannot increase the gap to the adjacent platform to more than 0.05 in. (1.3 mm).
Accept with an inspection each 300 hours if:
SUBTASK 72-00-00-220-077 Examine the Stage 1 HPT Blades for Erosion or Burns on the Airfoil or Platform
Damage in columns A and B will need reduced on-wing inspections of either 300 hours or 125 hours if you do not replace the damaged duct segments. It is recommended that, because of the reduced inspection intervals, you review the timing of the next maintenance interval for the HPT and find out if you must replace the duct segments before you return the engine to service.
Damage in Column C means you must replace the duct segments before you return the engine to service.
NOTE
The HPT Stage 1 BOAS has a protective coating underneath the ceramic coating. Chipping and spalling of the ceramic coating is acceptable without a decrease in borescope inspection Interval. The smearing of blade tip material on the HPT Stage 1 BOAS is acceptable without a decrease in the borescope inspection interval.CONDITION
A
300-HR. INSPECTION
B
125-HR. INSPECTION
C
REPLACE THE DUCT SEGMENT
Axial cracks
Any crack is longer than 0.250 in. (6.35 mm) and shorter than 0.500 in. (12.70 mm)
Any crack is longer than or equal to 0.500 in. (12.70 mm) but shorter than 1.20 in. (30.48 mm)
Any crack is longer than or equal to 1.20 in. (30.48 mm)
Circumferential cracks
Any crack is longer than 0.375 in. (9.53 mm) and shorter than 0.500 in. (12.70 mm)
Any crack is longer than or equal to 0.500 in. (12.70 mm) but shorter than 1.50 in. (38.1 mm)
Any crack is longer than or equal to 1.50 in. (31.38 mm)
Intersecting cracks
A combined crack that is longer than 0.250 in. (6.35 mm) and shorter than 0.500 in. (12.70 mm) axially or longer than 0.375 in. (9.53 mm) and shorter than 0.500 in. (12.70 mm) circumferentially
A combined crack that is longer than or equal to 0.500 in. (12.70 mm) and shorter than 1.20 in. (30.48 mm) axially or longer than or equal to 0.500 in. (12.70 mm) and shorter than 1.500 in. (38.10 mm) circumferentially
A combined crack that is longer than or equal to 1.20 in. (30.48 mm) axially or 1.500 in. (38.10 mm) circumferentially
Closed loop of cracks
Does not apply
Maximum length in X or Y direction that is less than 0.500 in. (12.70 mm)
Maximum length in X or Y direction that is more than or equal to 0.500 in. (12.70 mm)
Burning or erosion of the base metal at Area 1 (no burn-through)
Any amount more than two connecting holes
Does not apply
Does not apply
Burning or erosion of the base metal at Area 2 (no burn-through)
Shiplap burning more than the first row of cooling holes and not more than the second row of cooling holes
Shiplap burning goes through the second row of cooling holes
Does not apply
Burn-through in Areas 1 and 2
Does not apply
Less than 0.500 in. (12.7 mm) of continuous burn-through in Area 1, Area 2 or Areas 1 and 2 together
More than or equal to 0.500 in. (12.70 mm) continuous burn-through in Area 1, Area 2 or Areas 1 and 2 together
Burn-through with adjoining cracks in the axial direction
Does not apply
Combined length of X¹+X²+Z is less than 1.20 in. (30.48 mm) and Z is less than 0.500 in. (12.70 mm) in Area 1, Area 2 or Areas 1 and 2 together
Combined length of X¹+X²+Z is more than or equal to 1.20 in. (30.48 mm) or Z is more than or equal to 0.500 in. (12.70 mm)
Burn-through with adjoining cracks in the circumferential direction
Does not apply
Combined length of Y¹+Y²+Z is less than 1.50 in. (38.10 mm) and Z is less than 0.500 in. (12.70 mm) in Area 1, Area 2 or Areas 1 and 2 together
Combined length of Y¹+Y²+Z is more than or equal to 1.50 in. (38.10 mm) or Z is more than or equal to 0.500 in. (12.70 mm)
Burn-through the impingement plate
Does not apply
Does not apply
Any amount
Material on the Leading Edge is lifted up
Does not apply
Does not apply
Seal edge is lifted
Loss of Leading Edge material (parent material loss)
Less than 0.300 in. (7.62 mm)
More than or equal to 0.300 in. (7.62 mm) but less than 0.500 in. (12.70 mm)
More than or equal to 0.500 in. (12.70 mm)
If an engine is in the shop for maintenance other than the HPT, you must do a 360-degree inspection of the stage 1 HPT duct segments.
SUBTASK 72-00-00-220-093 Examine the Stage 1 HPT Duct Segments
Lubricate the plug threads with CoMat 10-129 ANTI-SEIZE PASTE or CoMat 10-094 ANTI-SEIZE COMPOUND, PURE Ni-SPECIAL. Wipe off excess paste.
Install the plug ENGINE-DIFFUSER CASE ASSEMBLY AND FITTINGS (72-42-10,01-020) and the ENGINE-DIFFUSER CASE ASSEMBLY AND FITTINGS (72-42-10,01-010) gasket 1 off, Figure.
Safety the plug with CoMat 02-141 LOCKWIRE.
For the B2 or B3 port proceed as follows:
NOTE
It is permissible to correct minor thread damage to the threaded hole with a 0.5625-18UNF-3B die.Put the ENGINE-HP TURBINE ROTOR AND STATOR ASSEMBLY (72-45-00,01-120) gasket 1 off in the case recess, Figure.
Put the gasket on the plug (2) ENGINE-HP TURBINE ROTOR AND STATOR ASSEMBLY (72-45-00,01-140) and install it in the case.
NOTE
It is permissible to correct minor thread damage to the threaded hole with a 0.5625-18UNF-3B die.Lubricate the bolt threads with CoMat 10-029 CORROSION PREVENTIVESLUSHING OIL anti-seize paste or CoMat 10-094 ANTI-SEIZE COMPOUND, PURE Ni-SPECIAL. Wipe off excess paste.
Safety the bolts with CoMat 02-141 LOCKWIRE.
For the T1/T2 and T1/2R port proceed as follows:
SUBTASK 72-00-00-420-060-A00 Close the Borescope Inspection Ports after the Borescope Inspection is Completed (Pre SBE 72-0221)
Lubricate the plug threads with CoMat 10-129 ANTI-SEIZE PASTE or CoMat 10-094 ANTI-SEIZE COMPOUND, PURE Ni-SPECIAL. Wipe off excess paste.
Install the plug ENGINE-DIFFUSER CASE ASSEMBLY AND FITTINGS (72-42-10, 01-020) and the ENGINE-DIFFUSER CASE ASSEMBLY AND FITTINGS (72-42-10, 01-010) gasket 1 off, Figure.
Safety the plug with CoMat 02-141 LOCKWIRE.
For the B3 or B4 port proceed as follows:
NOTE
It is permissible to correct minor thread damage to the threaded hole with a 0.5625-18UNF-3B die.Put the ENGINE-HP TURBINE ROTOR AND STATOR ASSEMBLY (72-45-00, 01-120) gasket 1 off in the case recess, Figure.

CAUTION
USE CAUTION WHEN INSTALLING PLUG. IF THE PLUG BREAKS DURING INSTALLATION AND FALLS INTO 2ND STAGE VANE CAVITY, REMOVE PLUG PIECE PRIOR TO RETURNING ENGINE TO SERVICE. IF NECESSARY, ACCESS TO THE CAVITY CAN BE OBTAINED BY REMOVING THE TCA TUBE.Put the gasket on the plug ENGINE-HP TURBINE ROTOR AND STATOR ASSEMBLY (72-45-00, 01-140) and install it in the case.
NOTE
It is permissible to correct minor thread damage to the threaded hole with a 0.5625-18UNF-3B die.Lubricate the bolt threads with CoMat 10-129 ANTI-SEIZE PASTE or CoMat 10-094 ANTI-SEIZE COMPOUND, PURE Ni-SPECIAL. Wipe off excess paste.
NOTE
Make sure that the borescope plug is correctly installed and bolt holes are aligned prior to continuing to next step.Install the bolts ENGINE-HP TURBINE ROTOR AND STATOR ASSEMBLY (72-45-00, 01-160).
Safety the bolts with CoMat 02-141 LOCKWIRE.
For the T1/2L and T1/2R port proceed as follows:
SUBTASK 72-00-00-420-060-B00 Close the Borescope Inspection Ports after the Borescope Inspection is Completed (SBE 72-0221)
SBE 72-0221: Introduce a new diffuser case
Figure: Crank Pad Location
Crank Pad Location
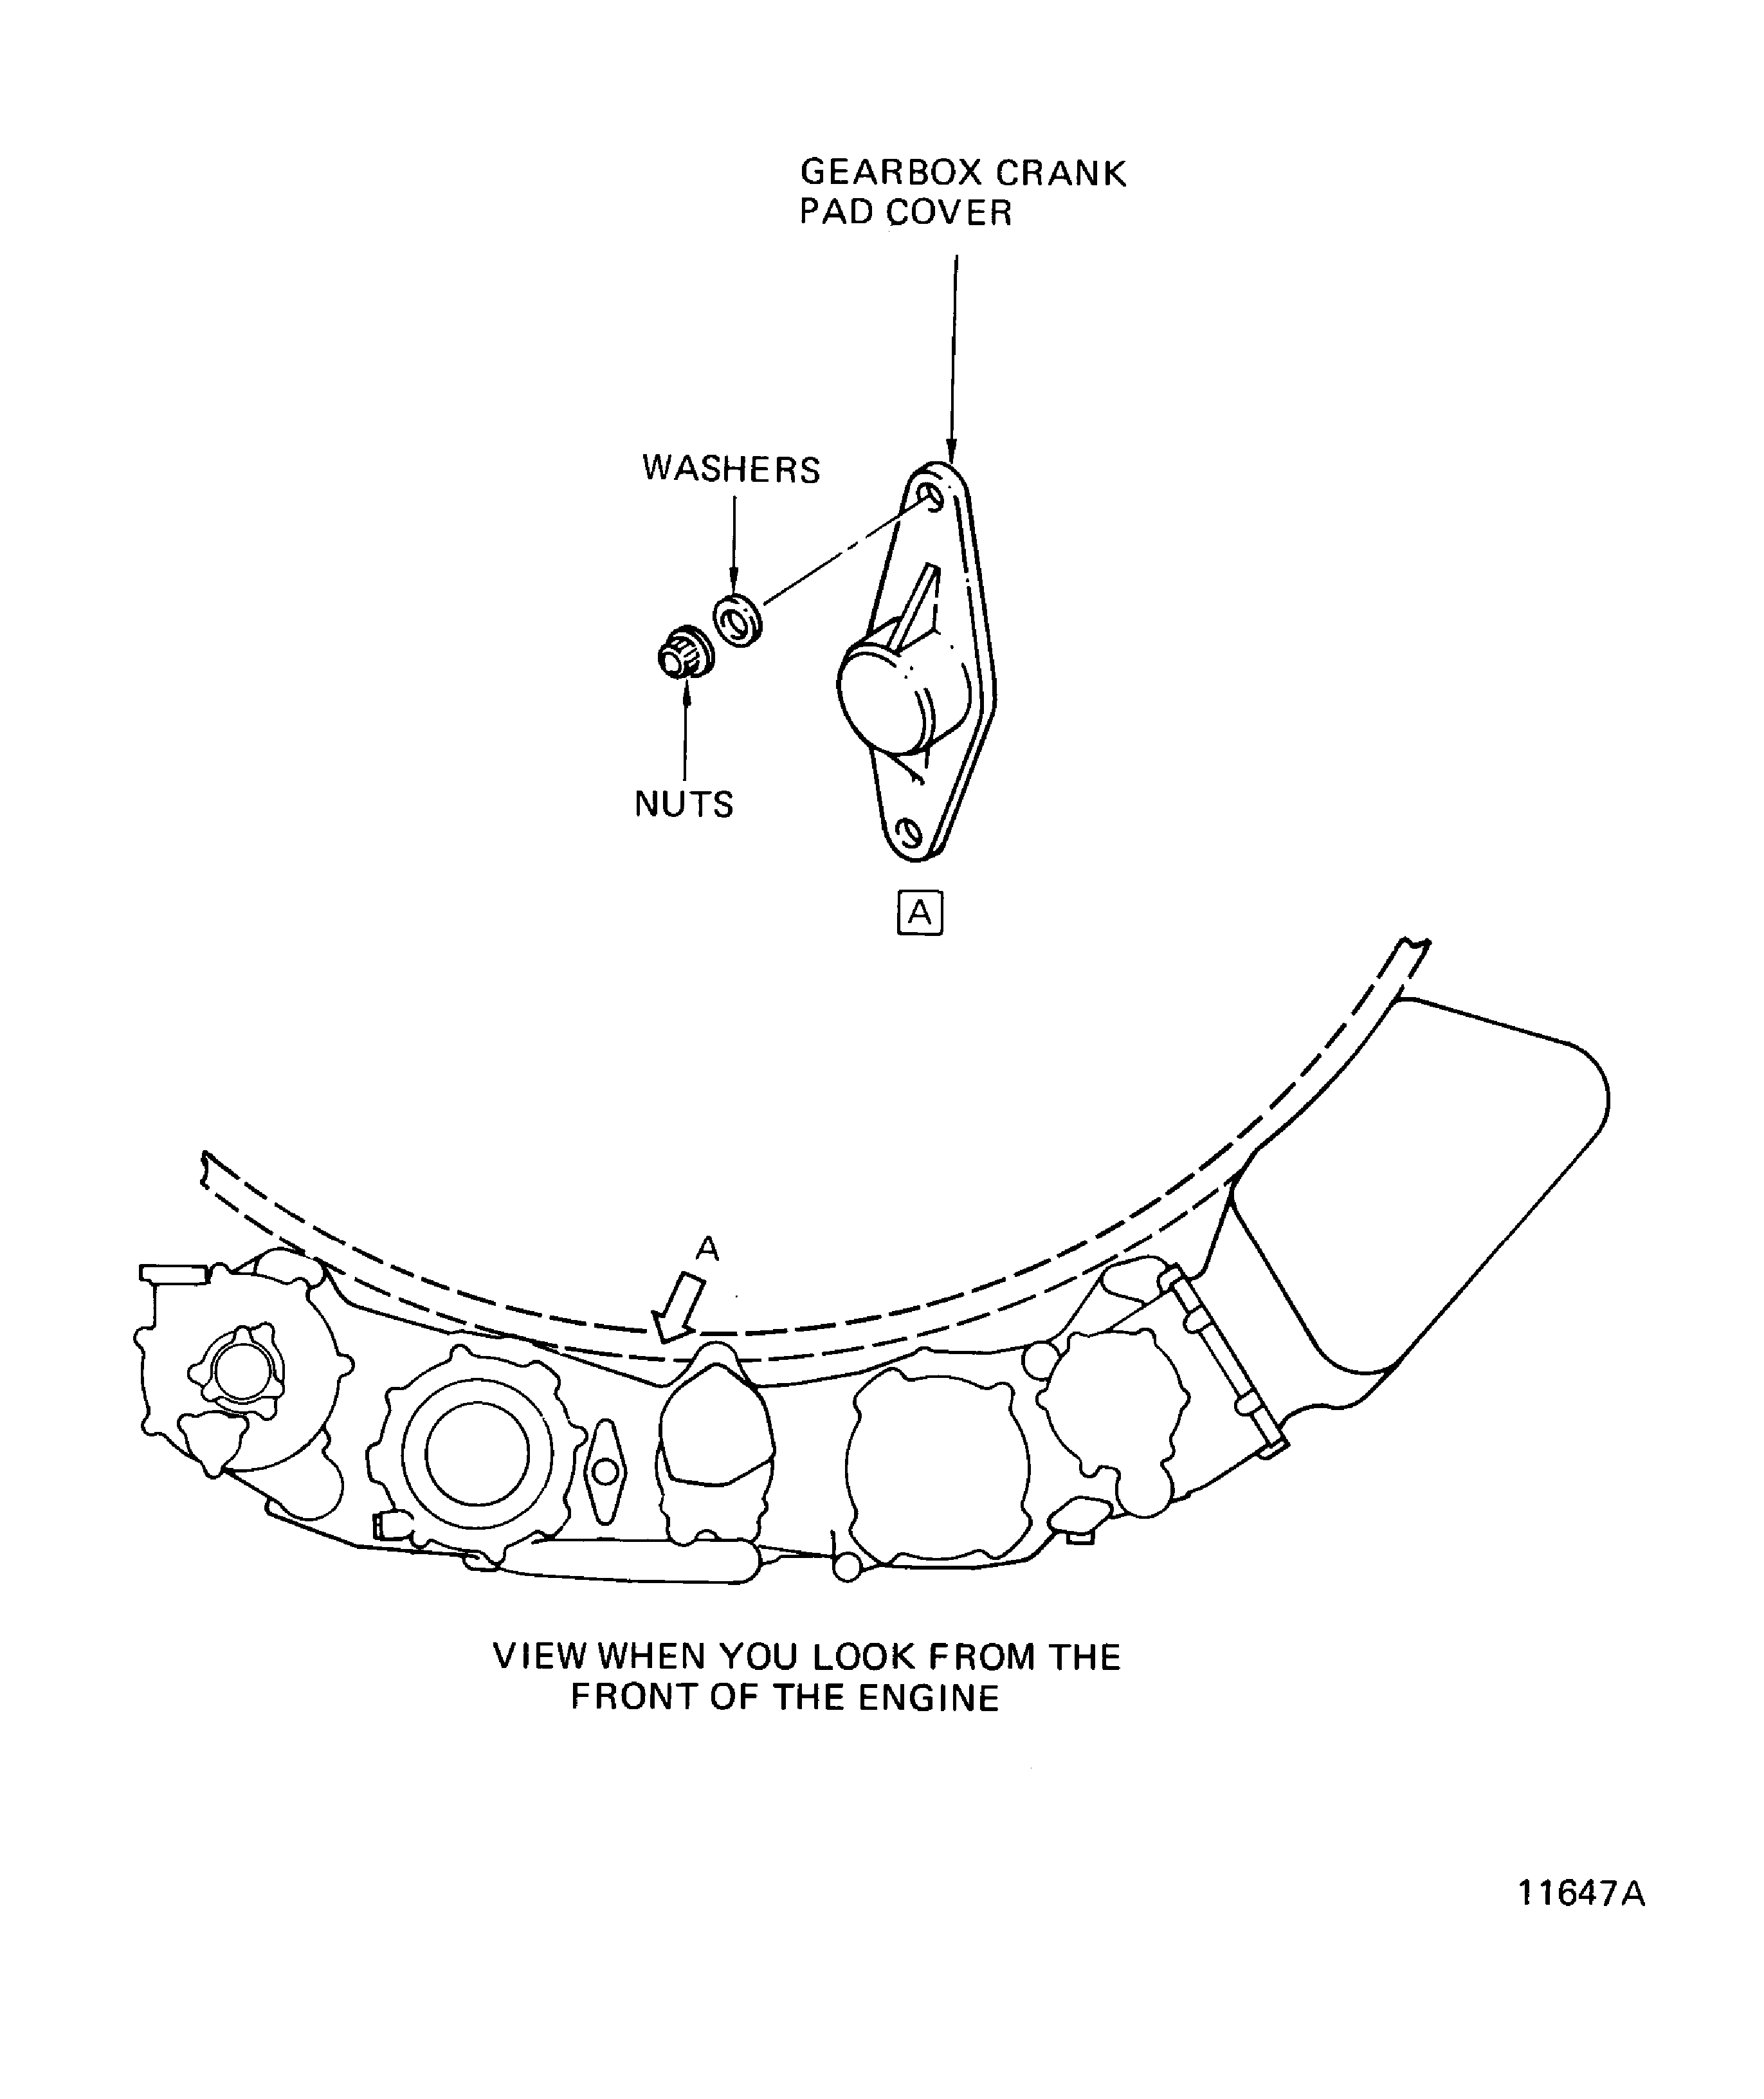
Figure: Pre SBE 72-0221: HP Turbine Borescope Locations for Inspection of the Stage 1 HPT Blades (Left Side)
Pre SBE 72-0221: HP Turbine Borescope Locations for Inspection of the Stage 1 HPT Blades (Left Side)
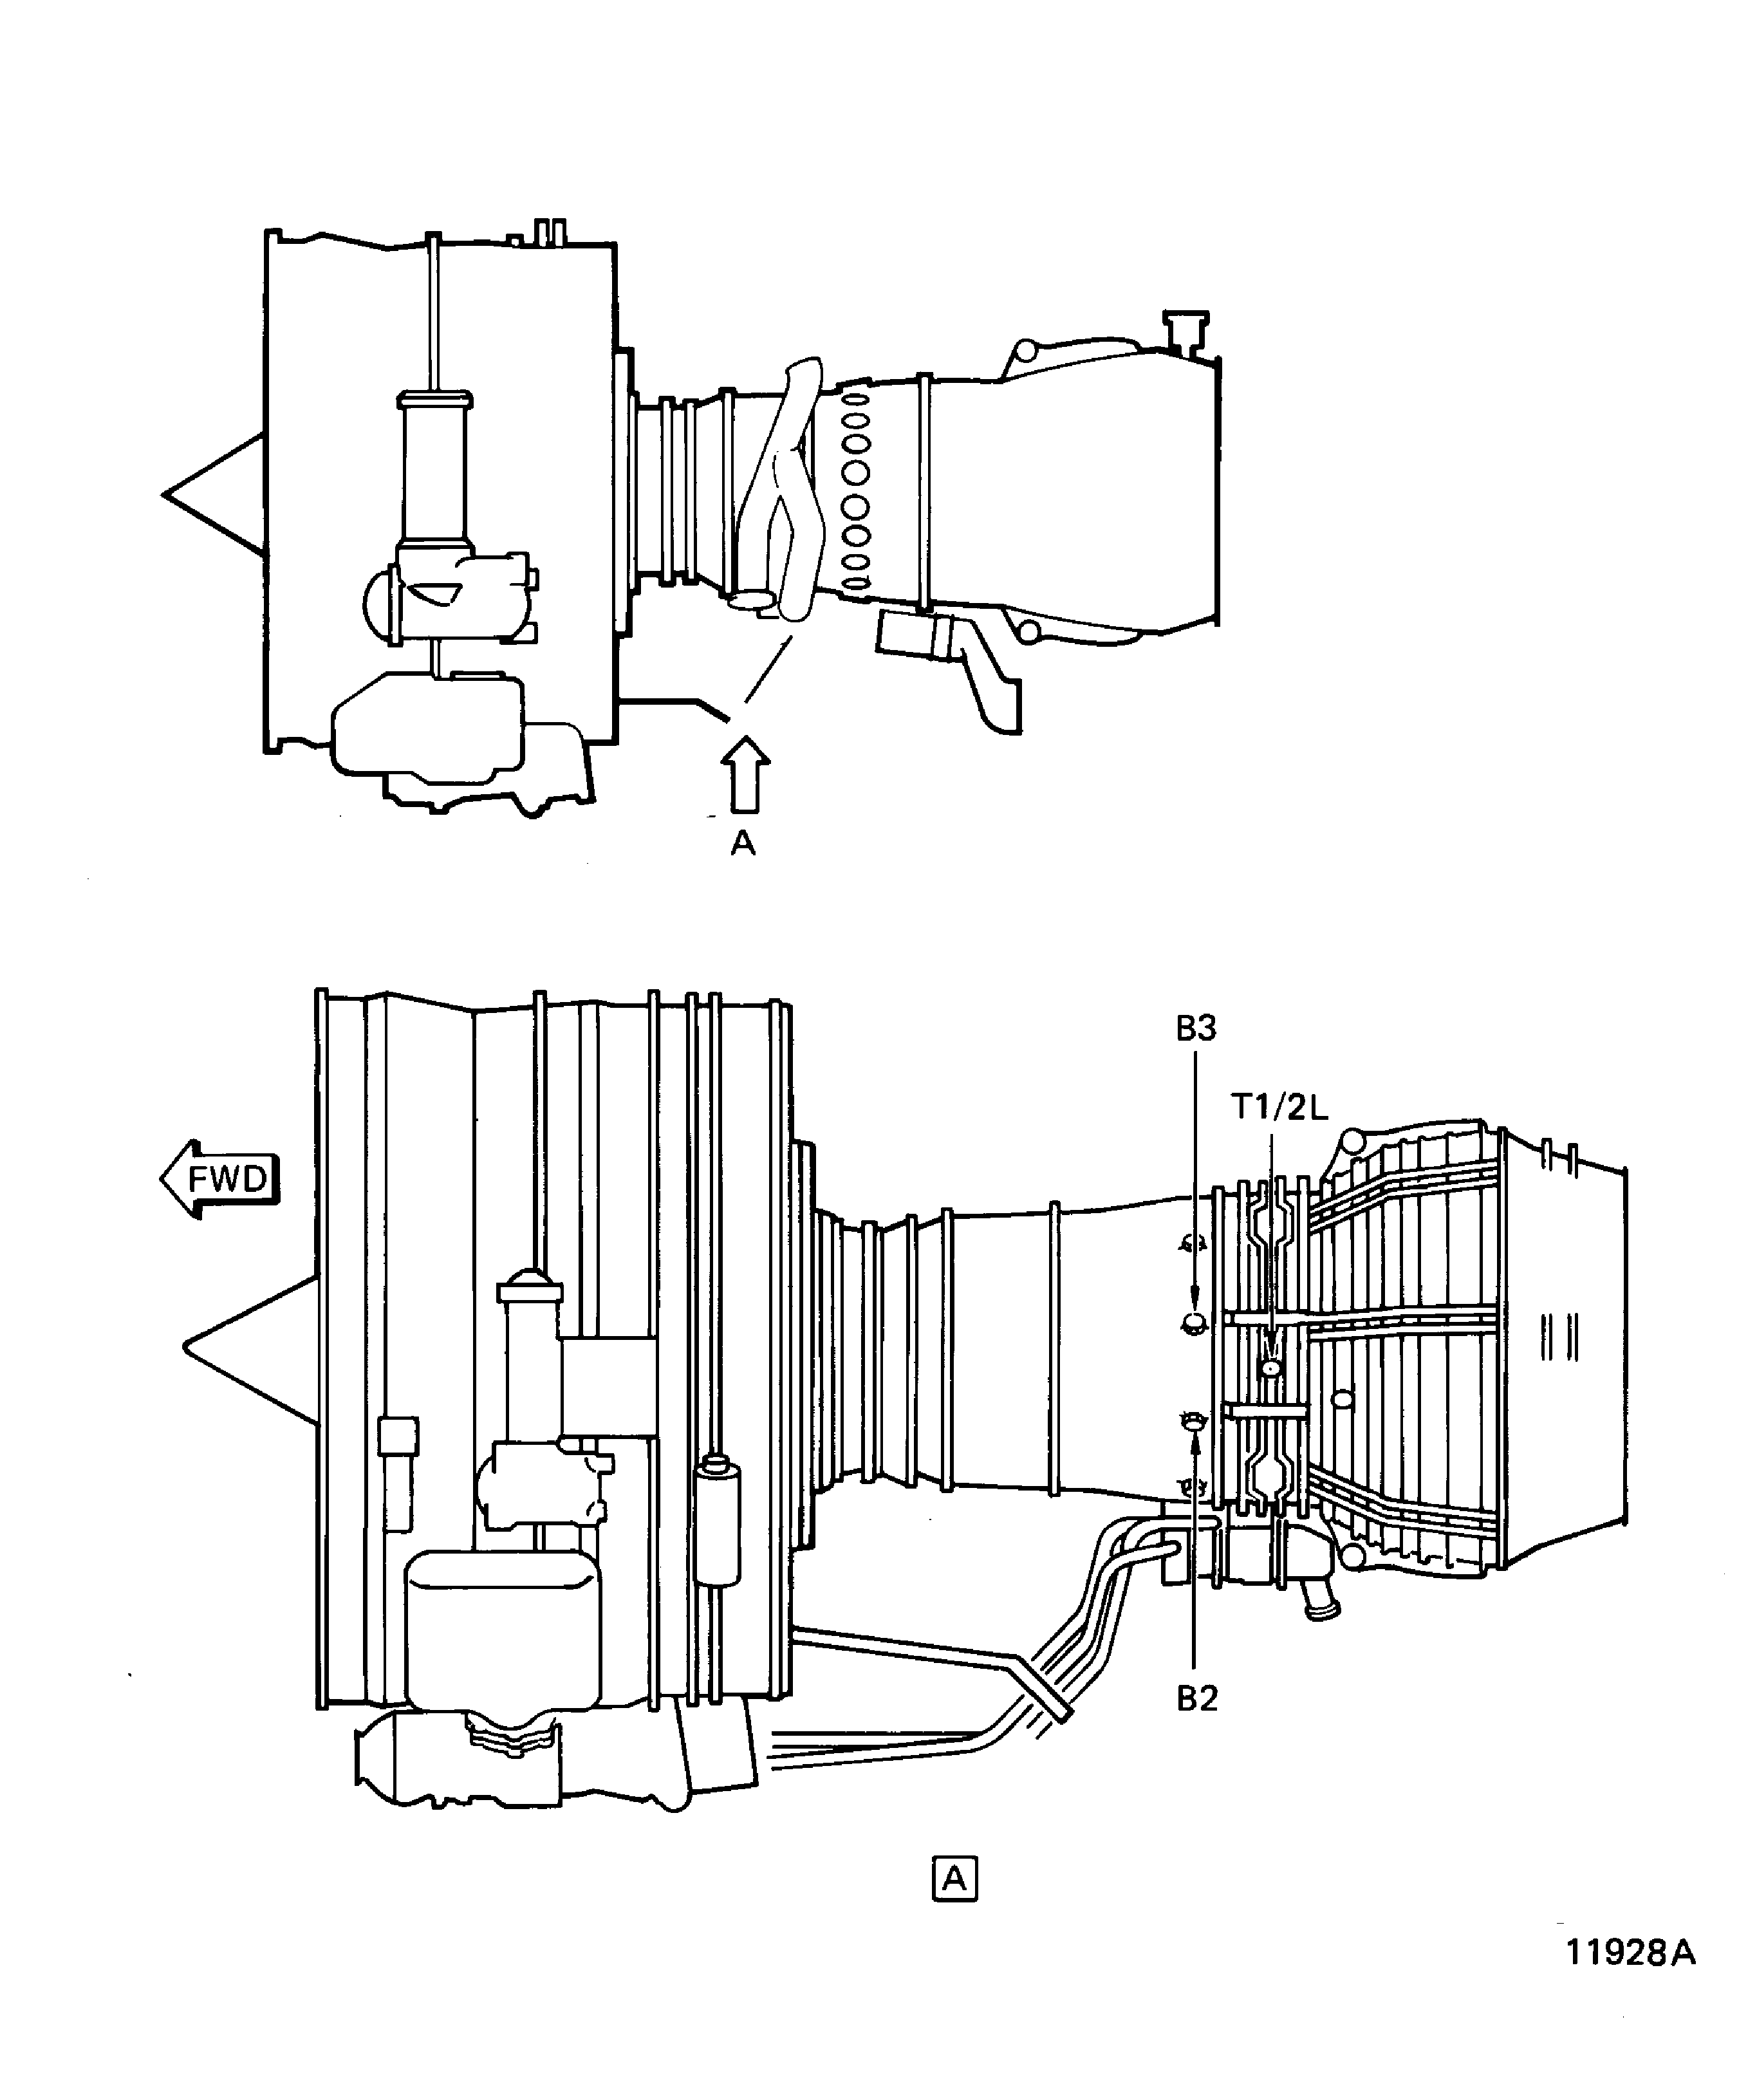
Figure: SBE 72-0221: HP Turbine Borescope Locations for Inspection of the Stage 1 HPT Blades (Left Side)
SBE 72-0221: HP Turbine Borescope Locations for Inspection of the Stage 1 HPT Blades (Left Side)
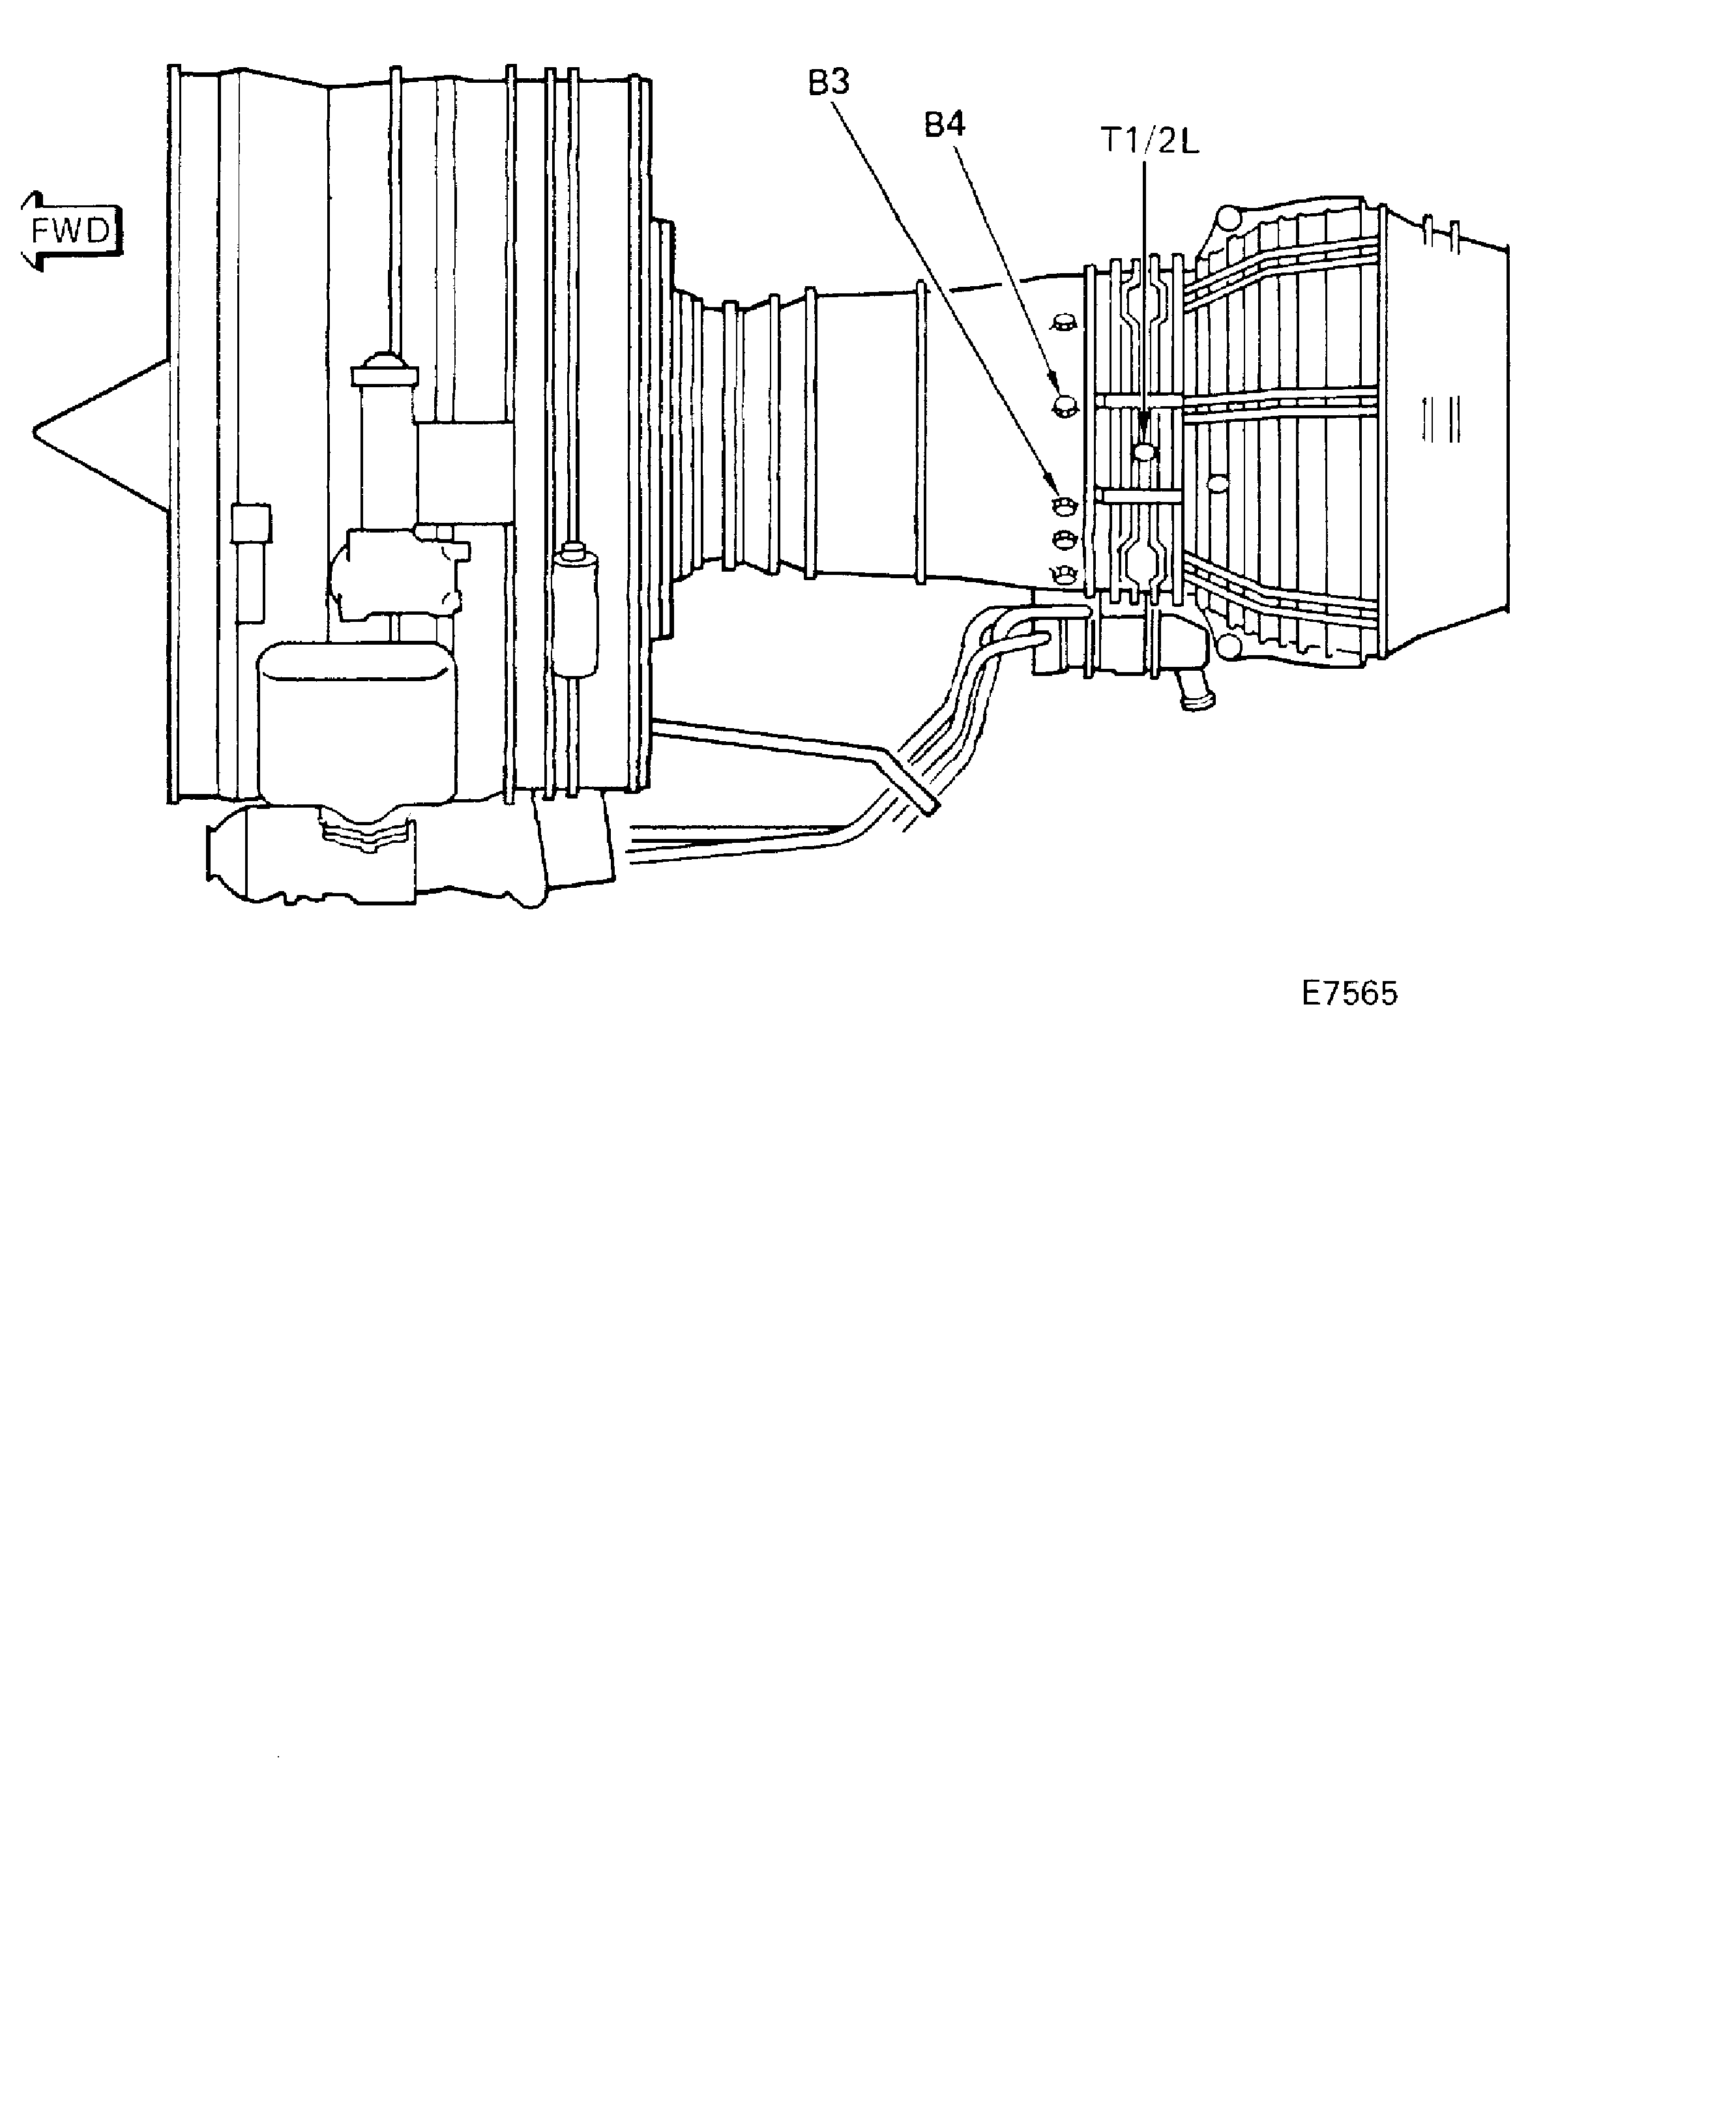
Figure: Pre SBE 72-0221: HP Turbine Borescope Ports for Inspection of the Stage 1 HPT Blades (Right Side)
Pre SBE 72-0221: HP Turbine Borescope Ports for Inspection of the Stage 1 HPT Blades (Right Side)
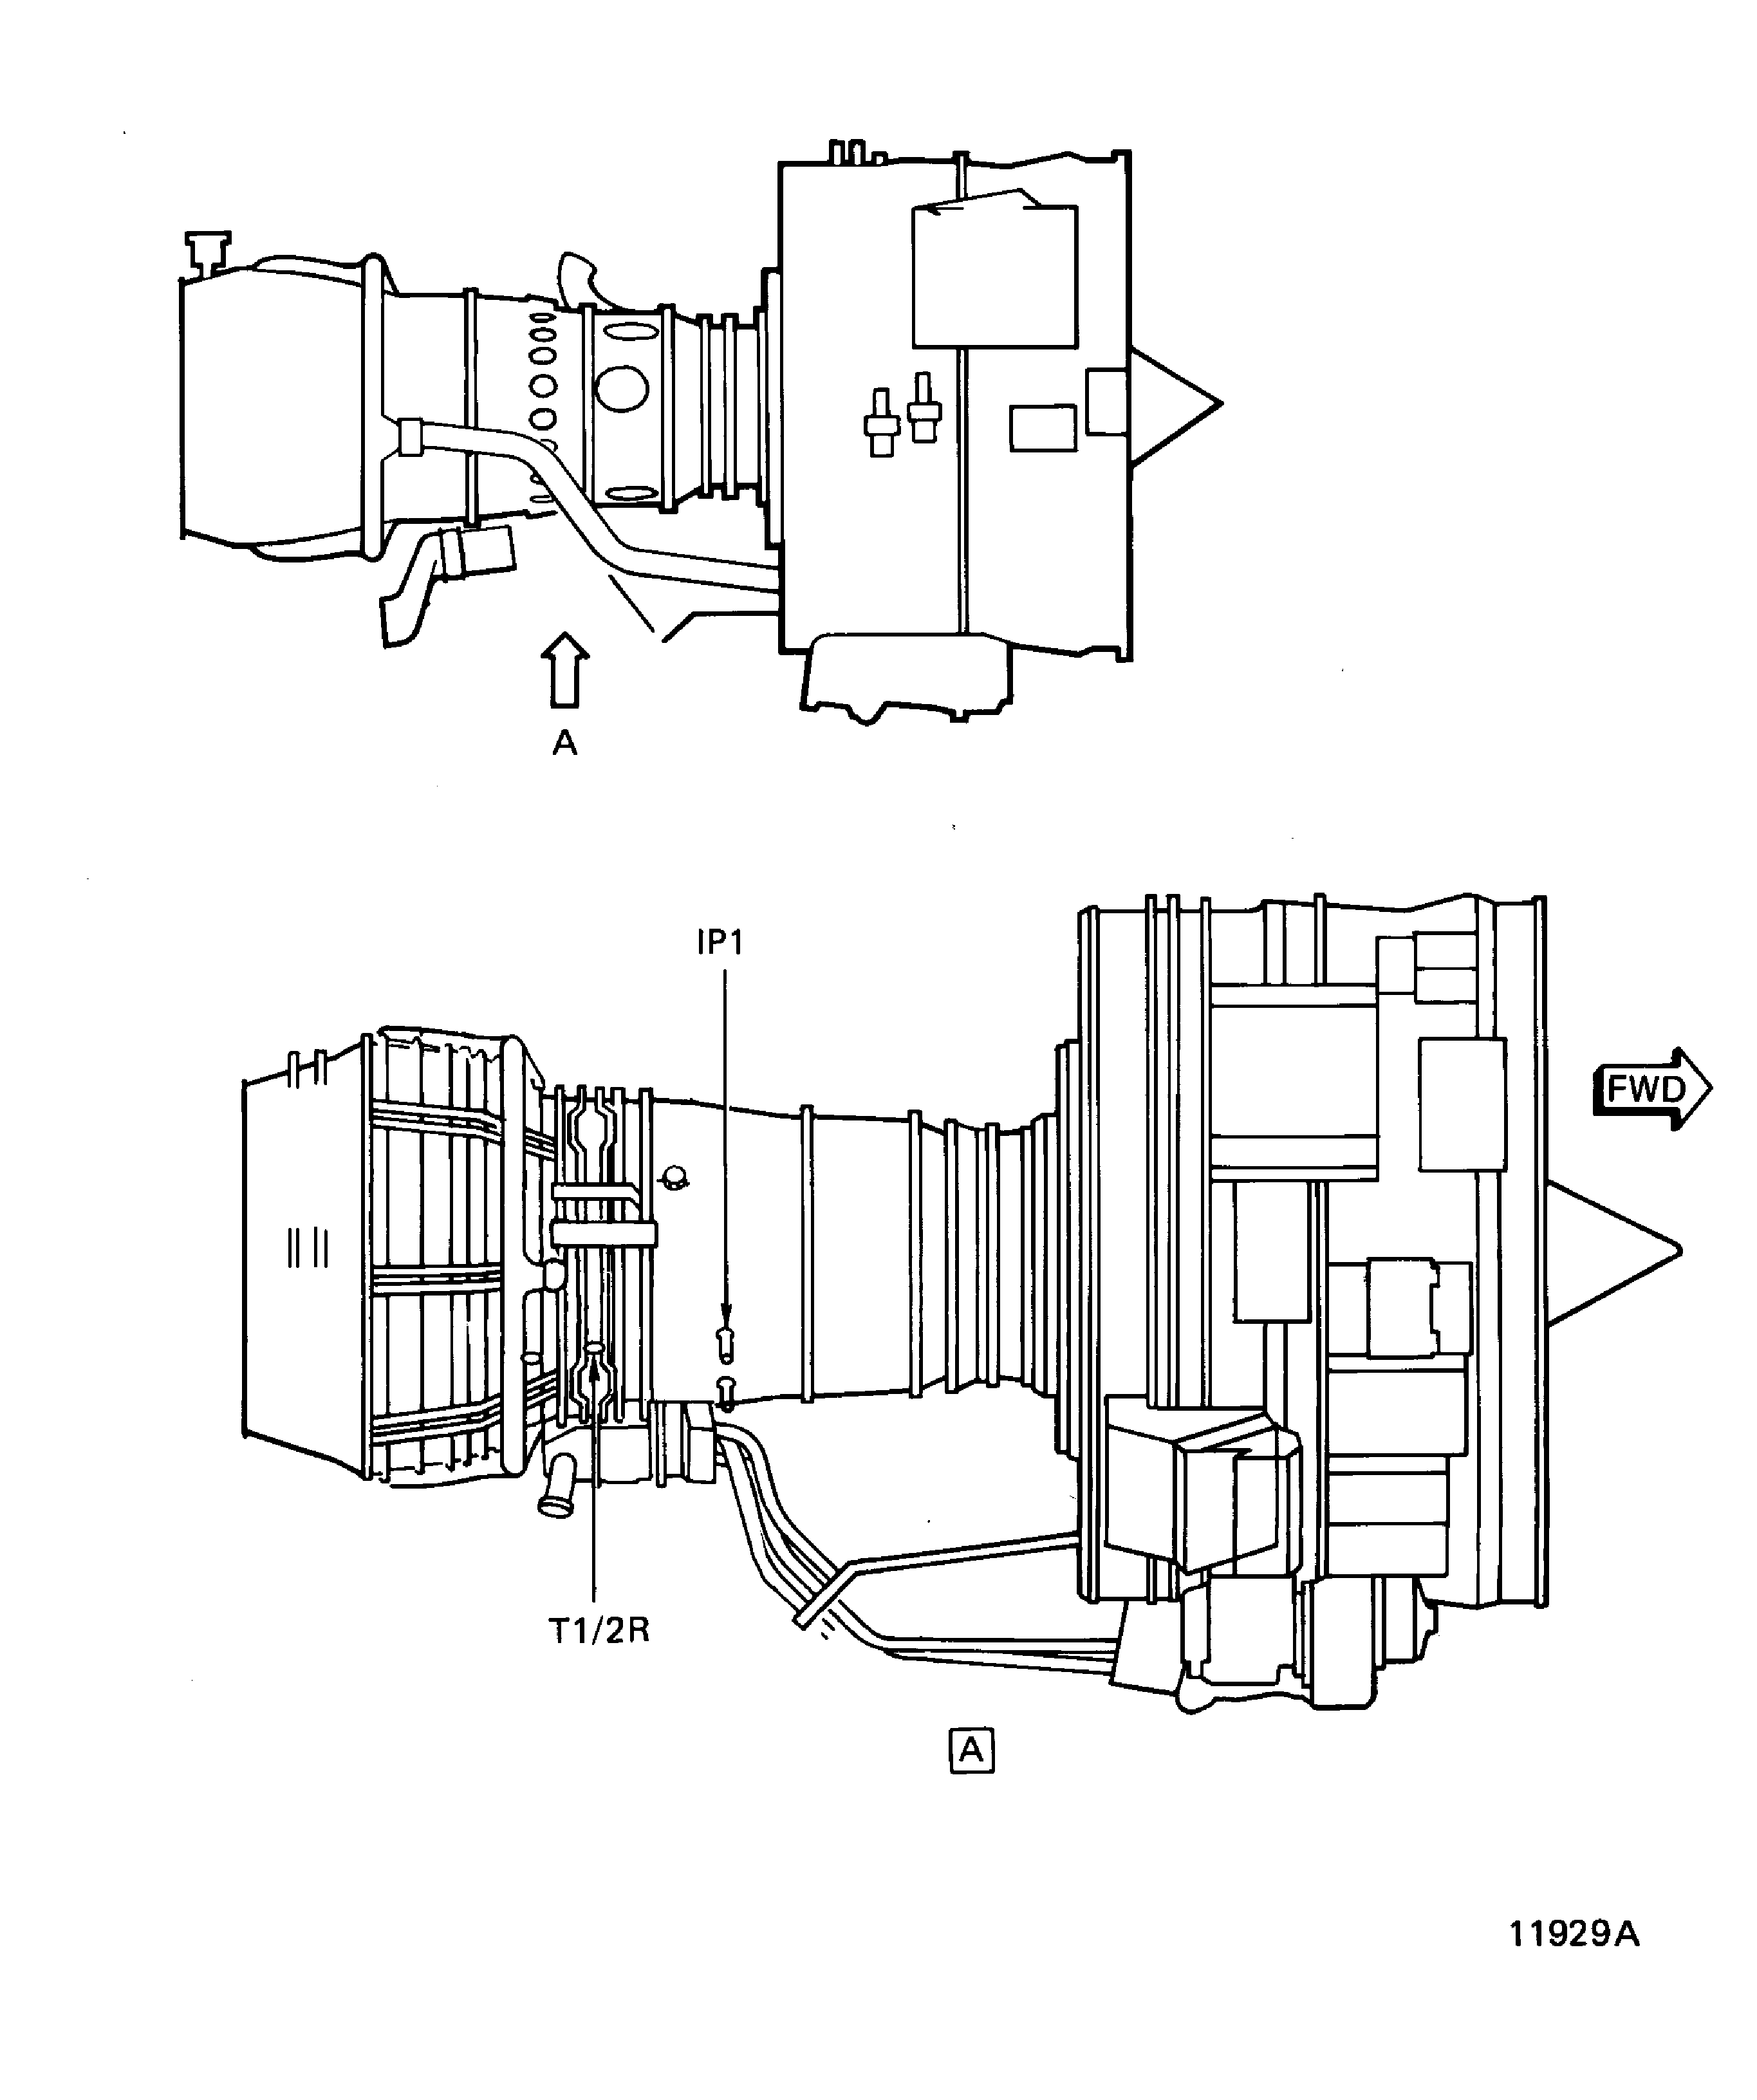
Figure: SBE 72-0221: HP Turbine Borescope Ports for Inspection of the Stage 1 HPT bBades (Right Side)
SBE 72-0221: HP Turbine Borescope Ports for Inspection of the Stage 1 HPT bBades (Right Side)
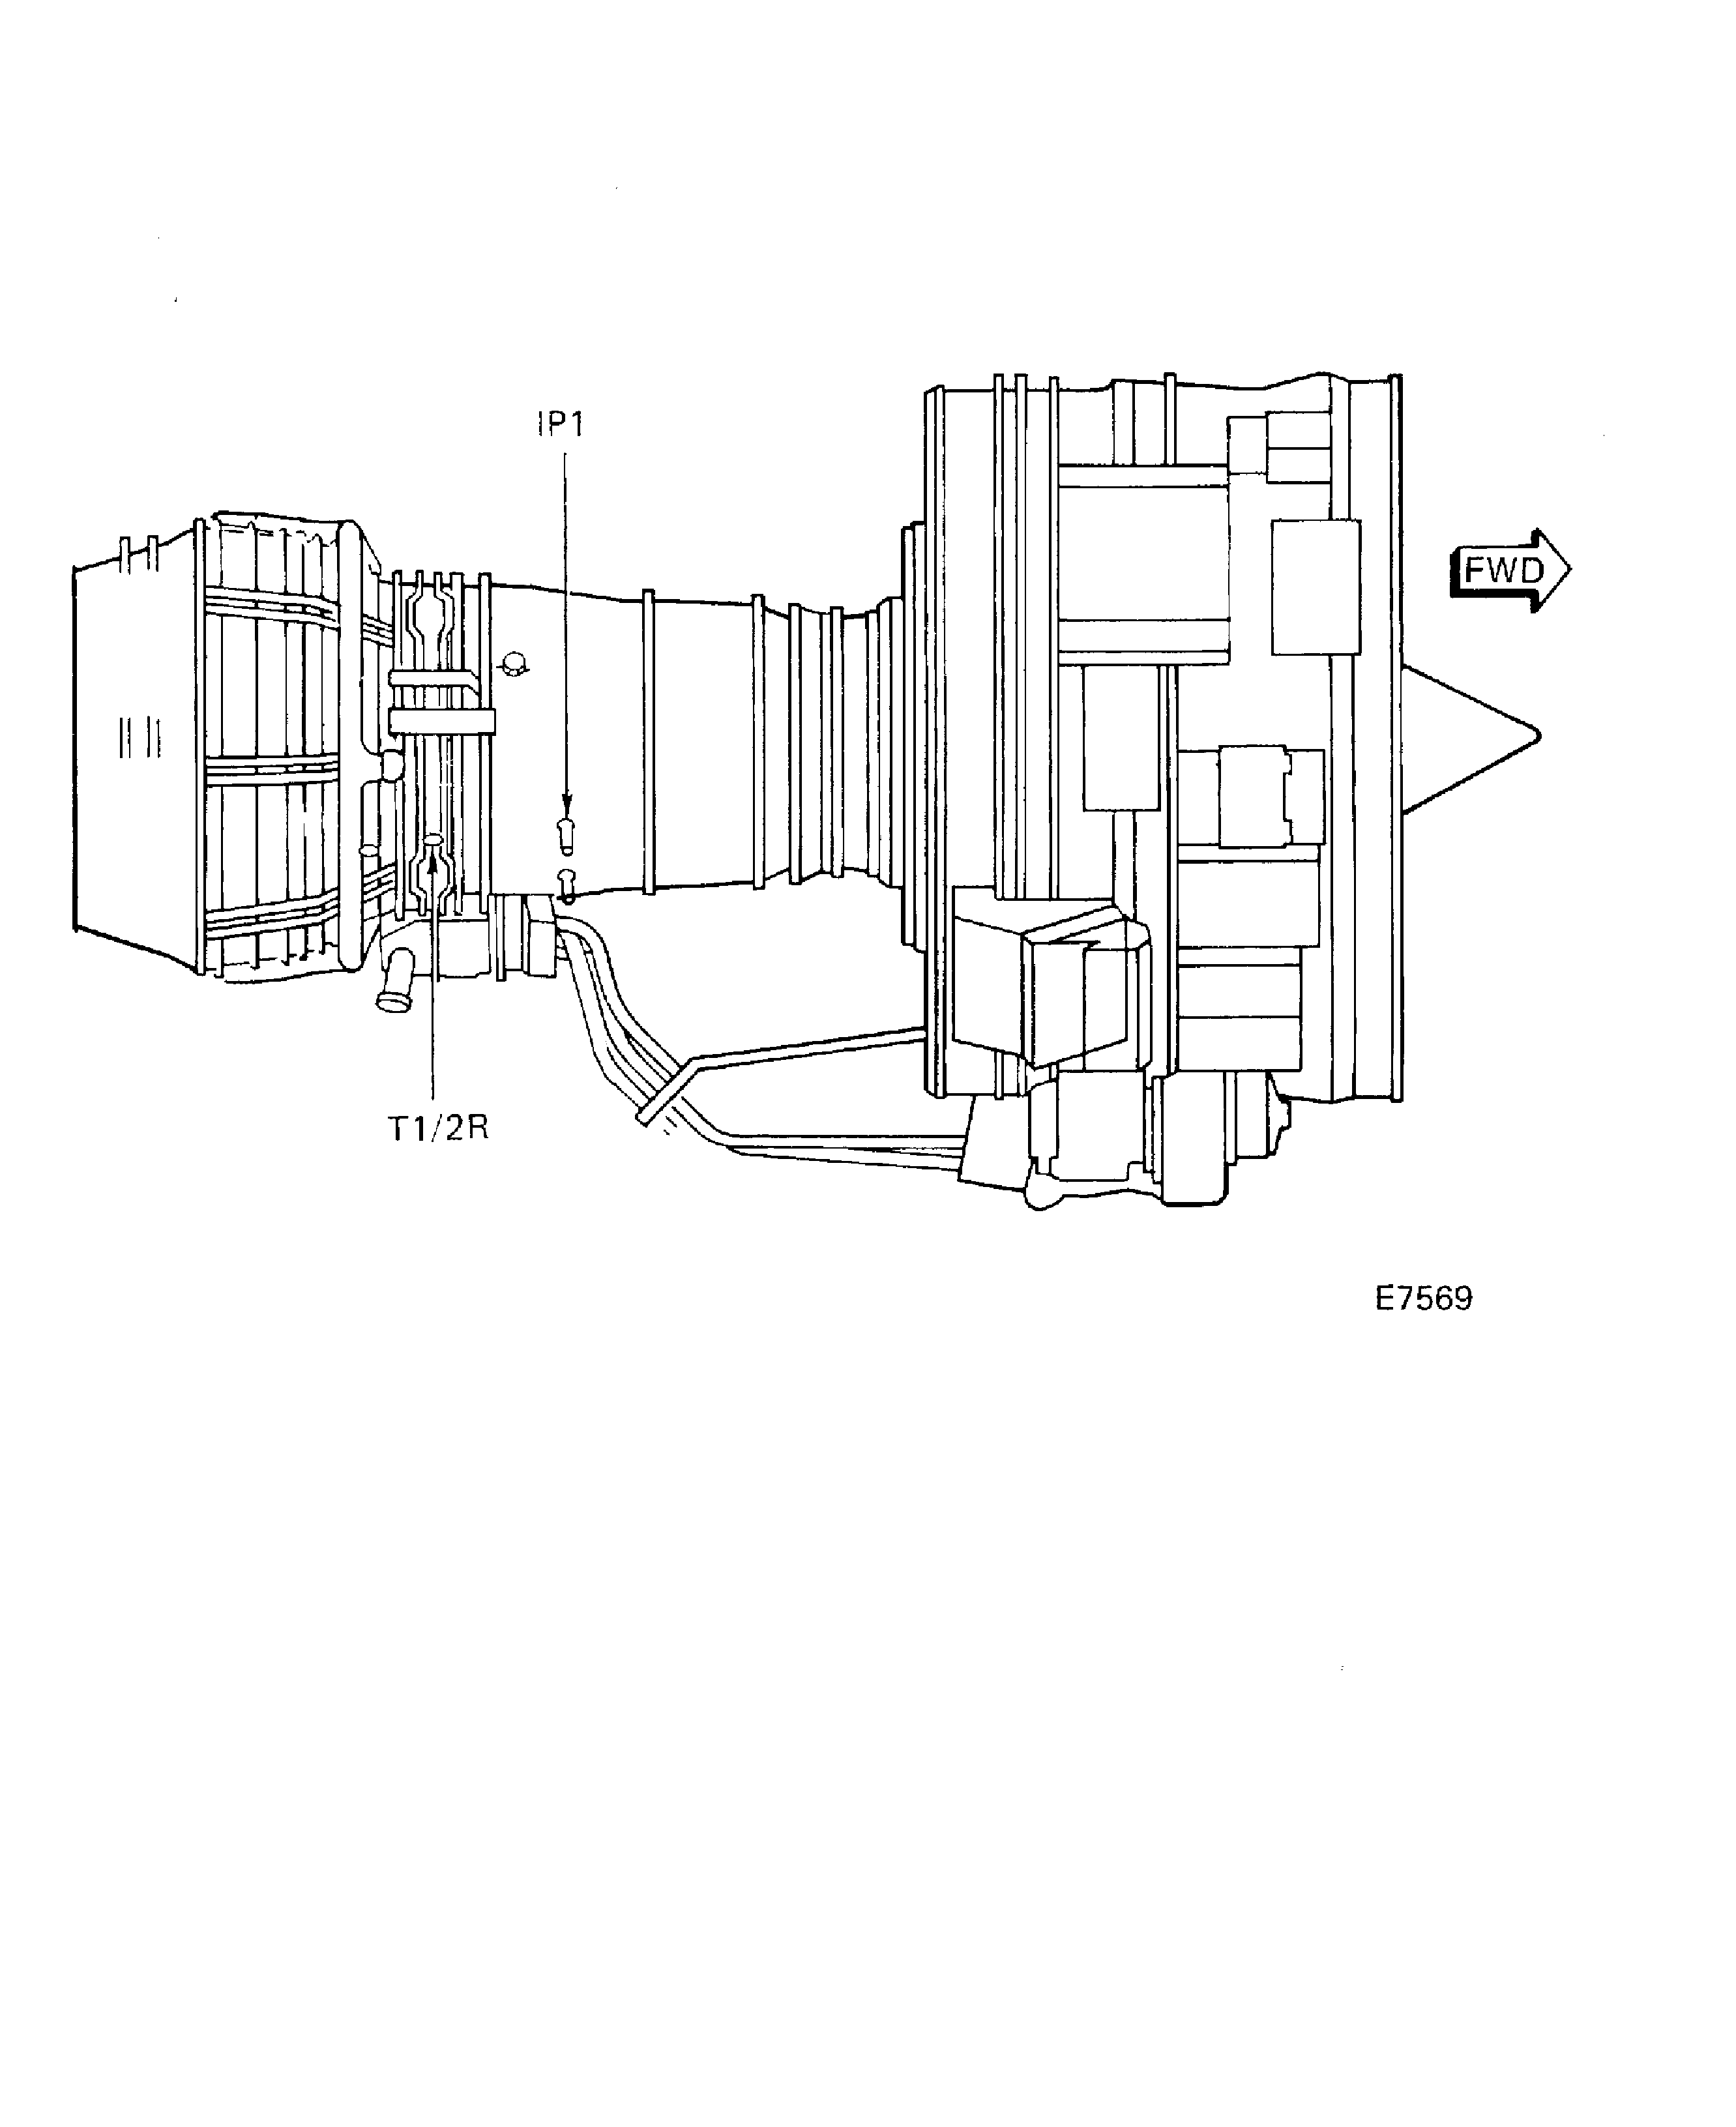
Figure: Pre SBE 72-0221: HP Turbine Ports for Inspection of the Stage 1 HPT Blades
Pre SBE 72-0221: HP Turbine Ports for Inspection of the Stage 1 HPT Blades
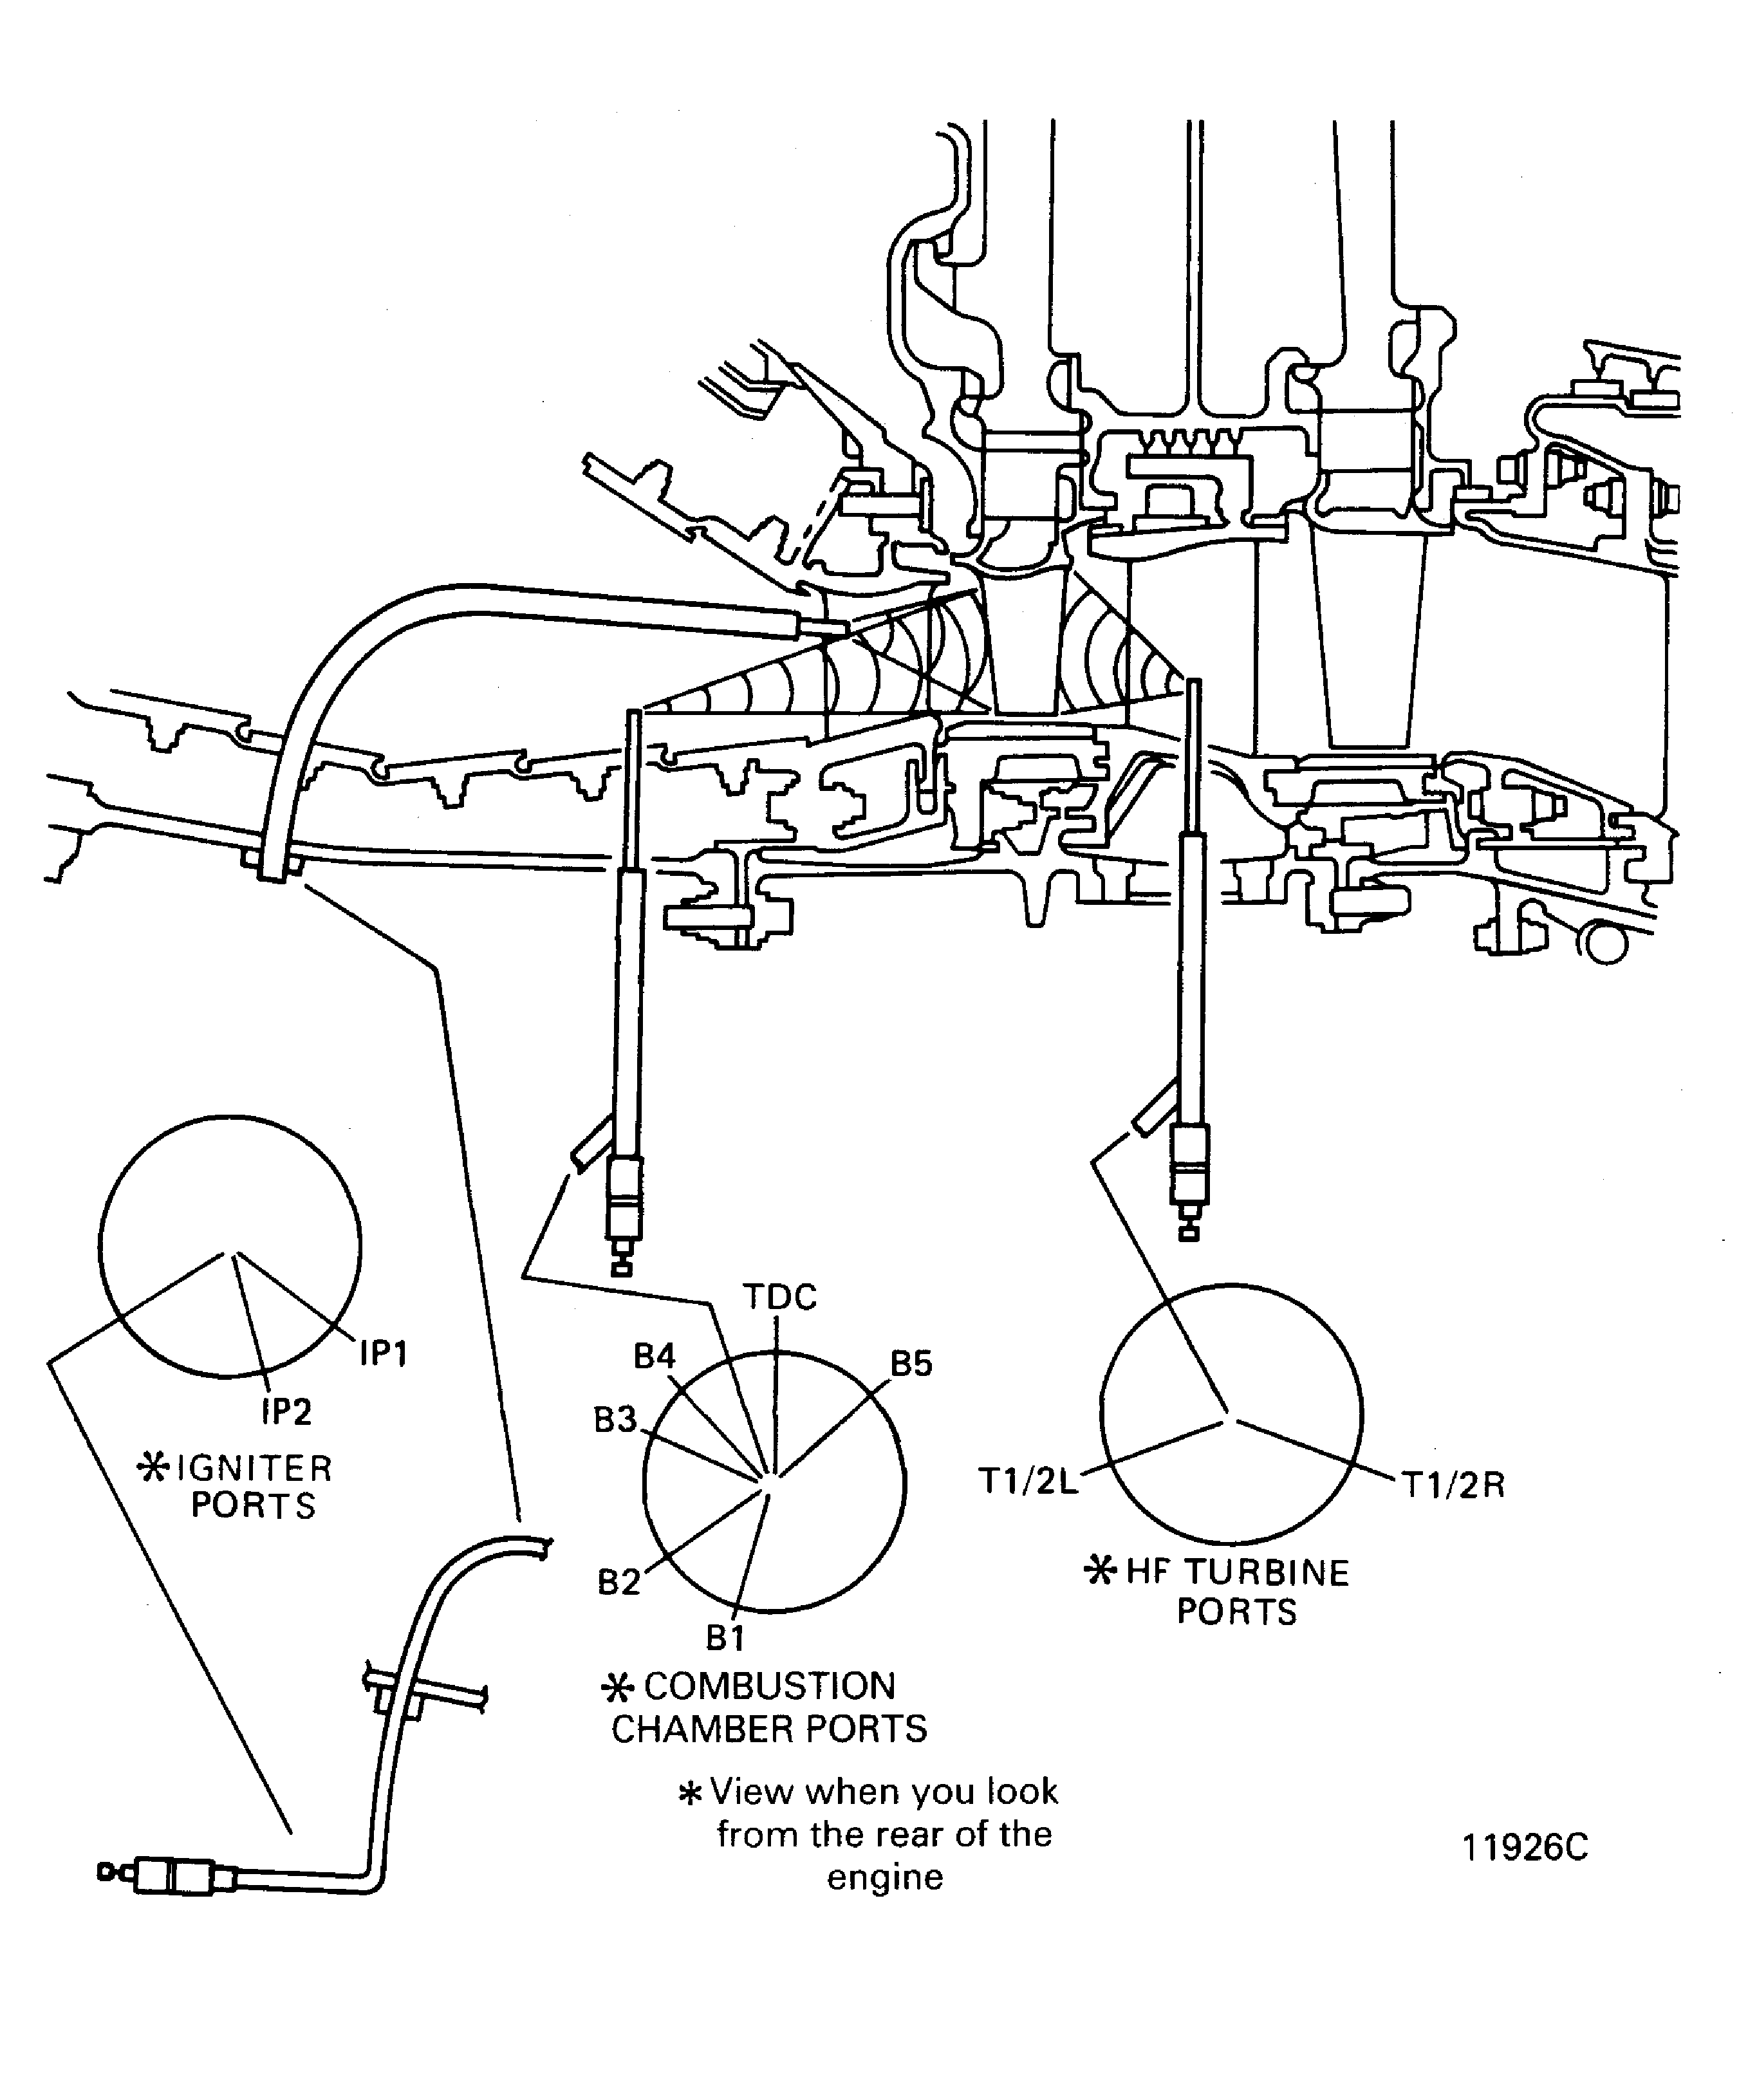
Figure: SBE 72-0221: HP Turbine Ports for Inspection of the Stage 1 HPT Blades
SBE 72-0221: HP Turbine Ports for Inspection of the Stage 1 HPT Blades
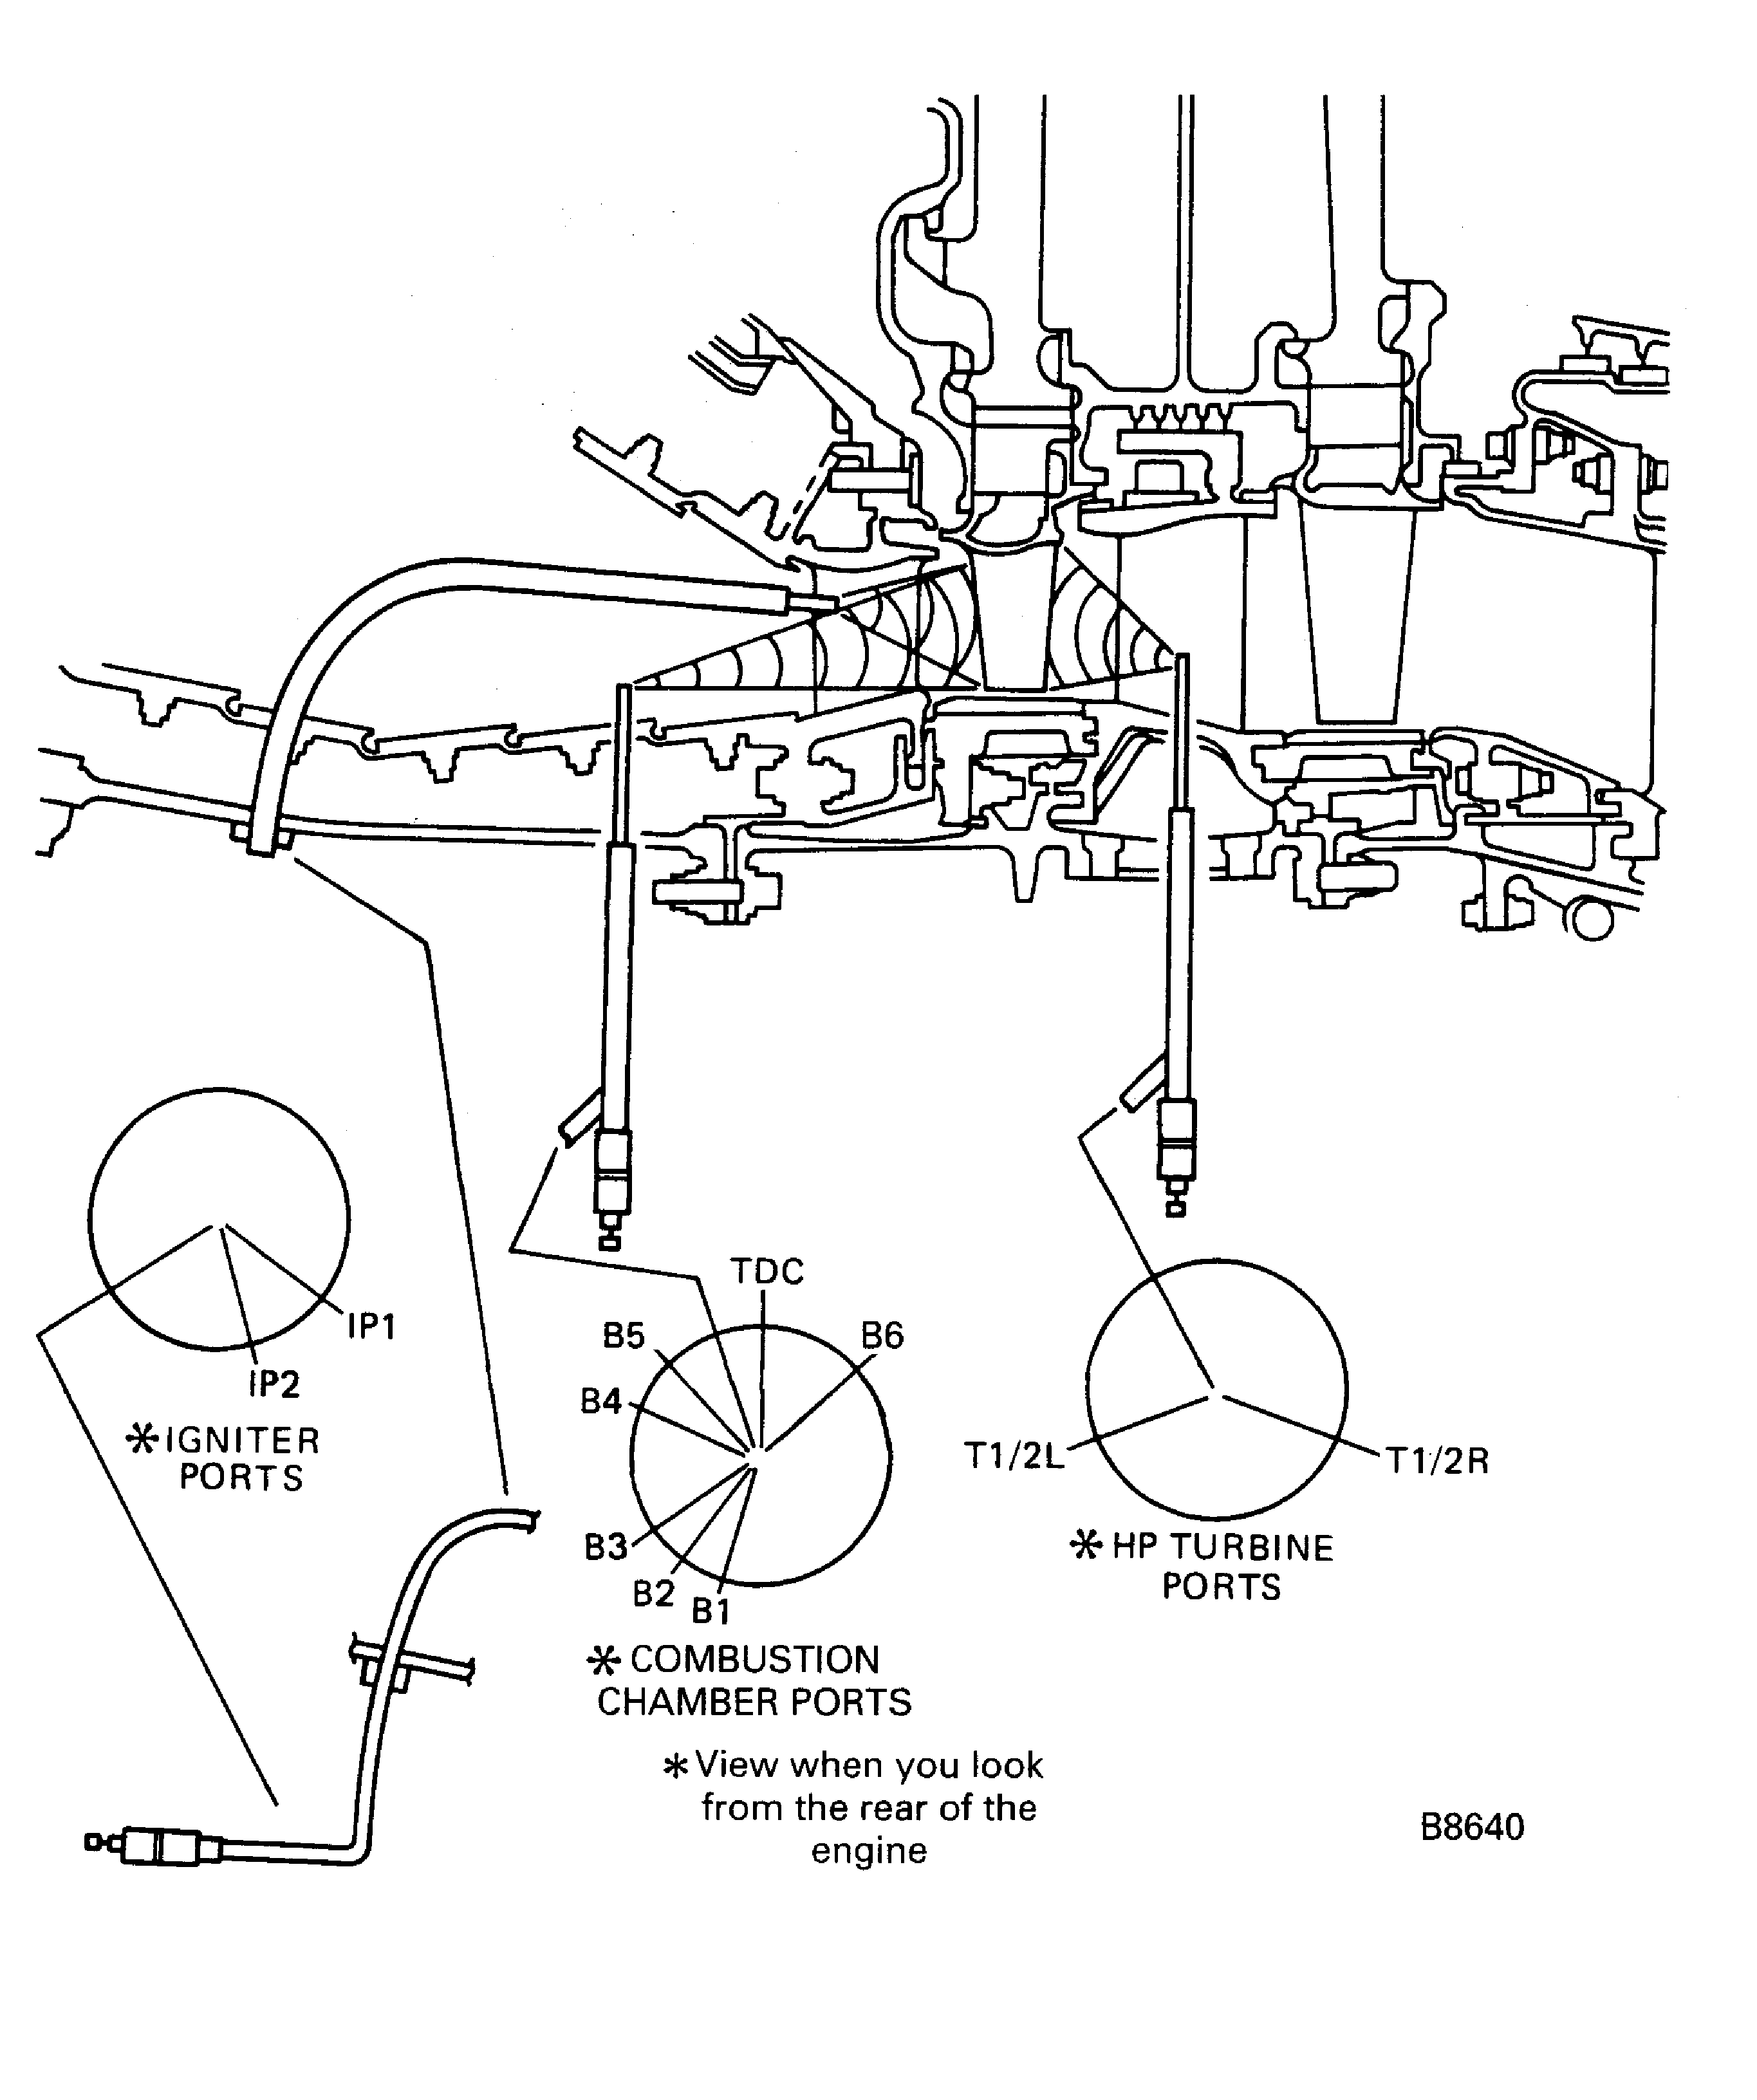
Figure: Borescope Equipment
Borescope Equipment

Figure: Pre SBE 72-0221: Borescope Ports
Pre SBE 72-0221: Borescope Ports
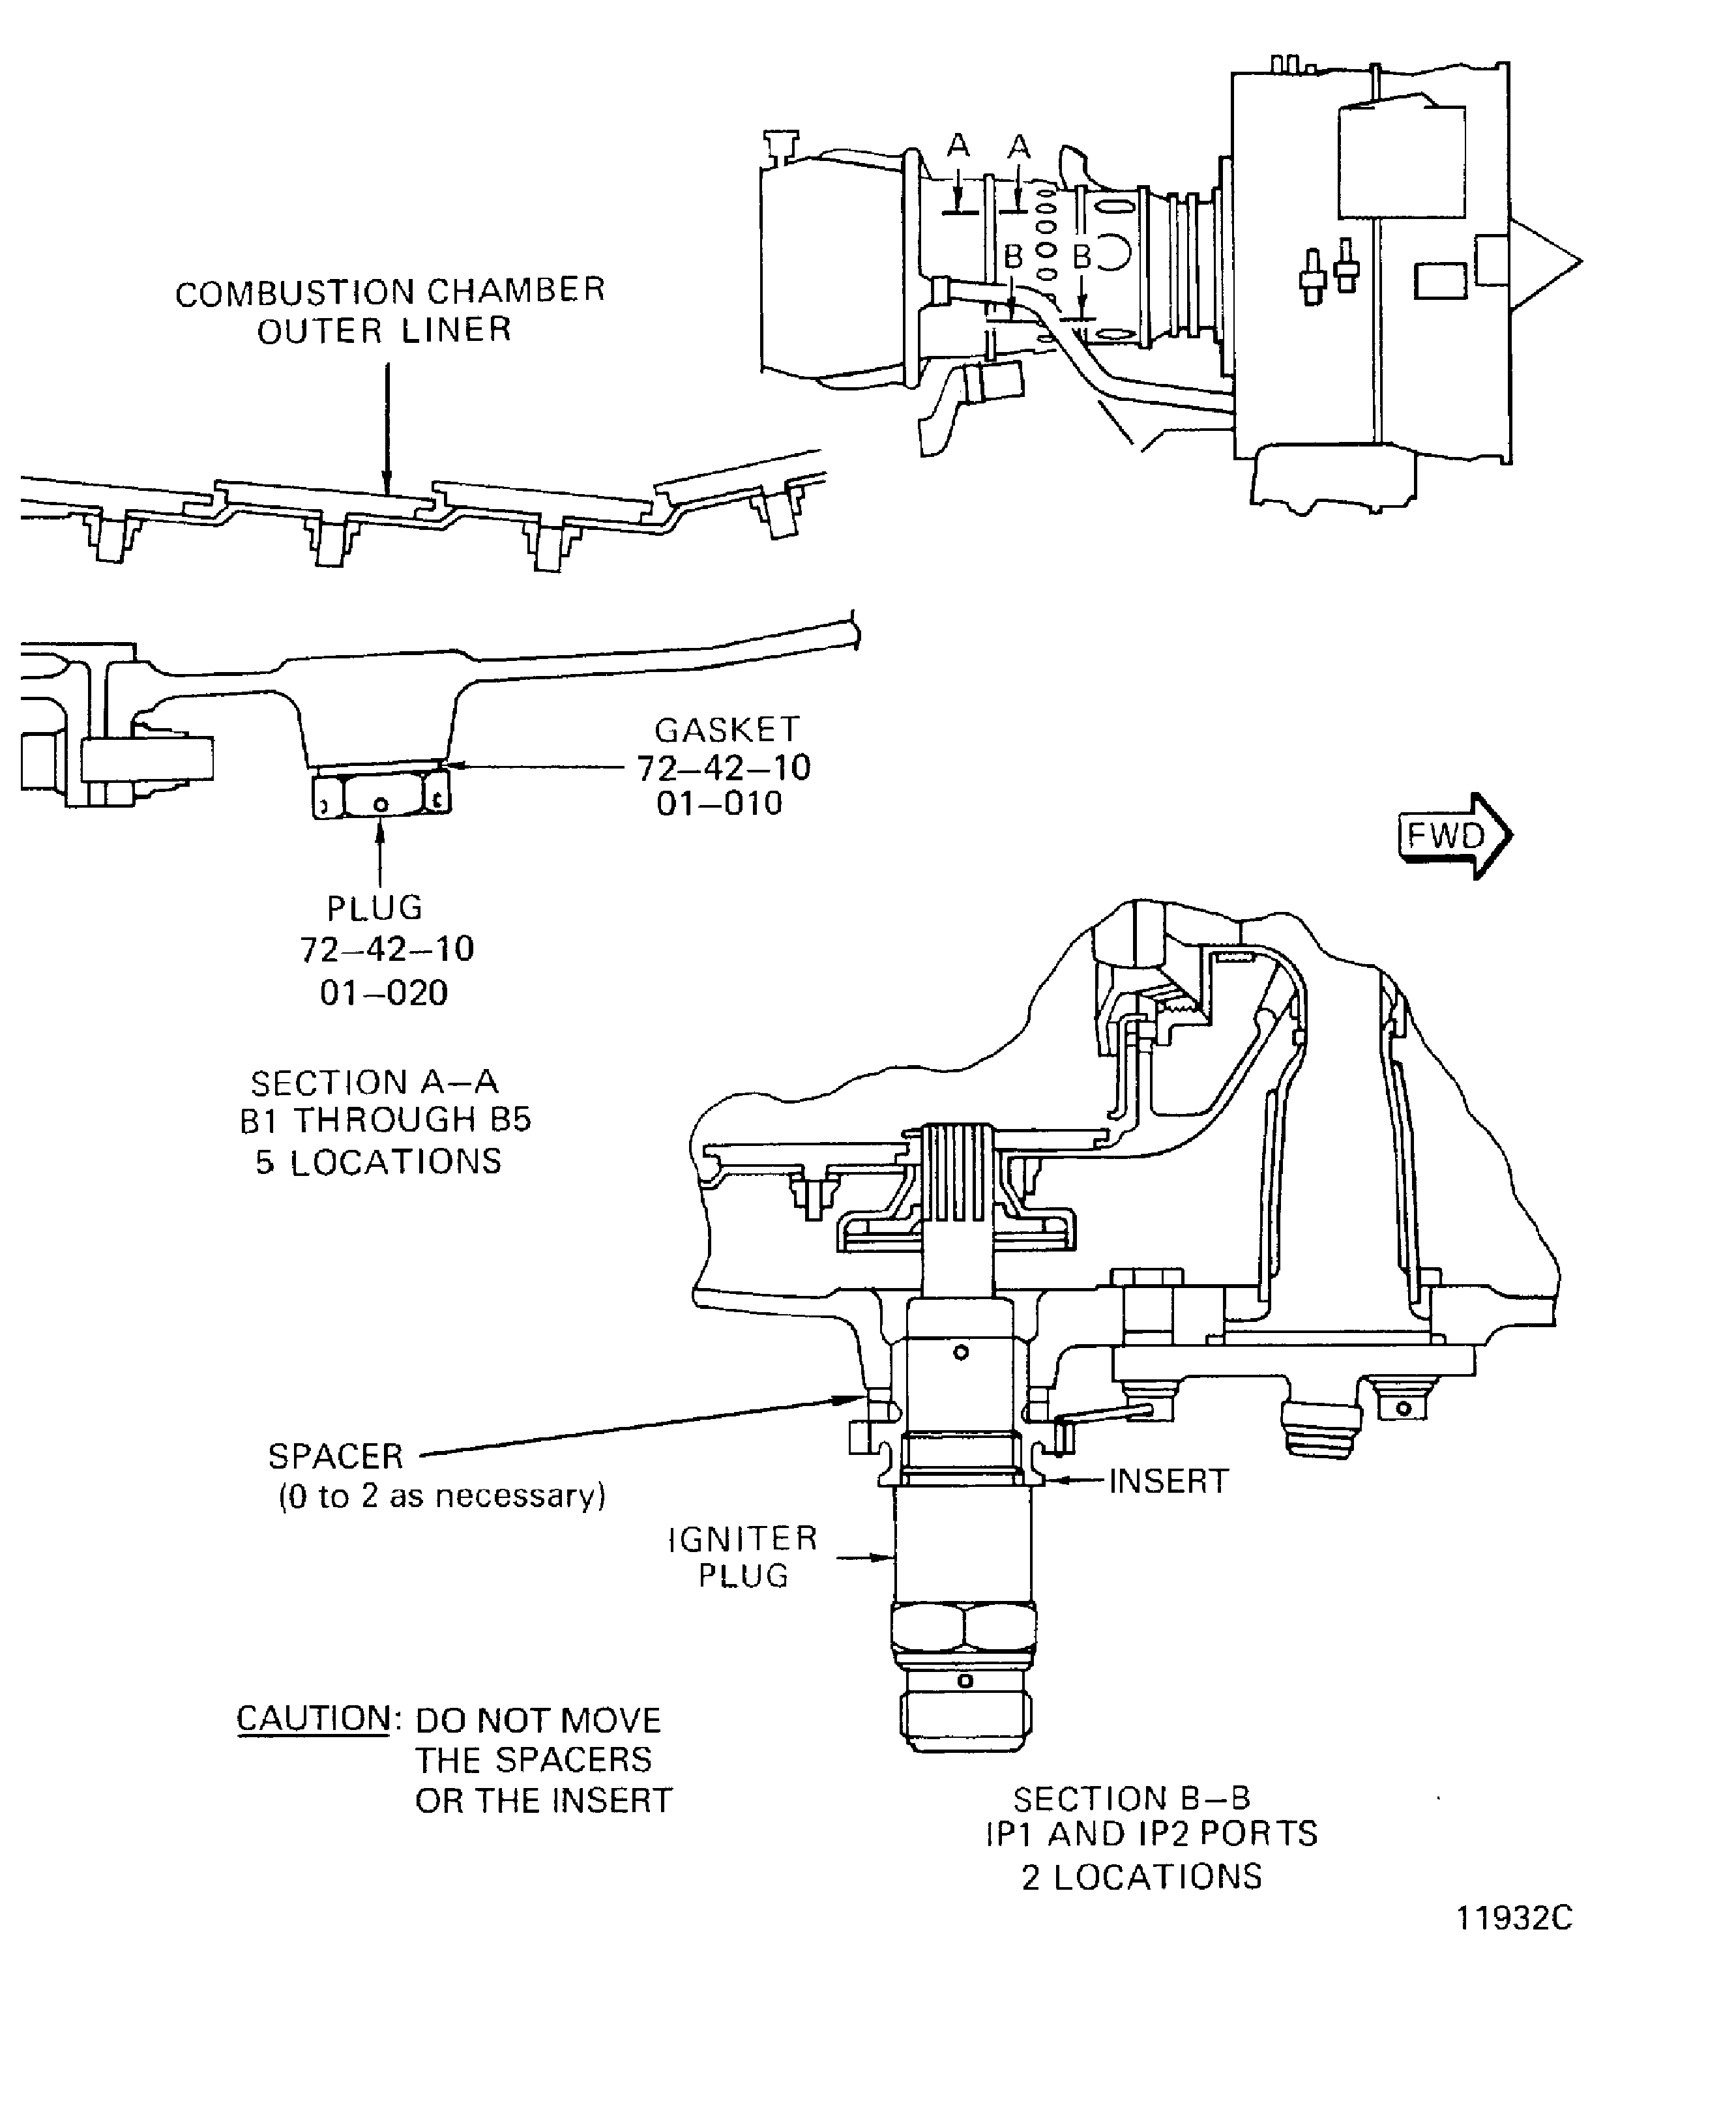
Figure: SBE 72-0221: Borescope Ports
SBE 72-0221: Borescope Ports
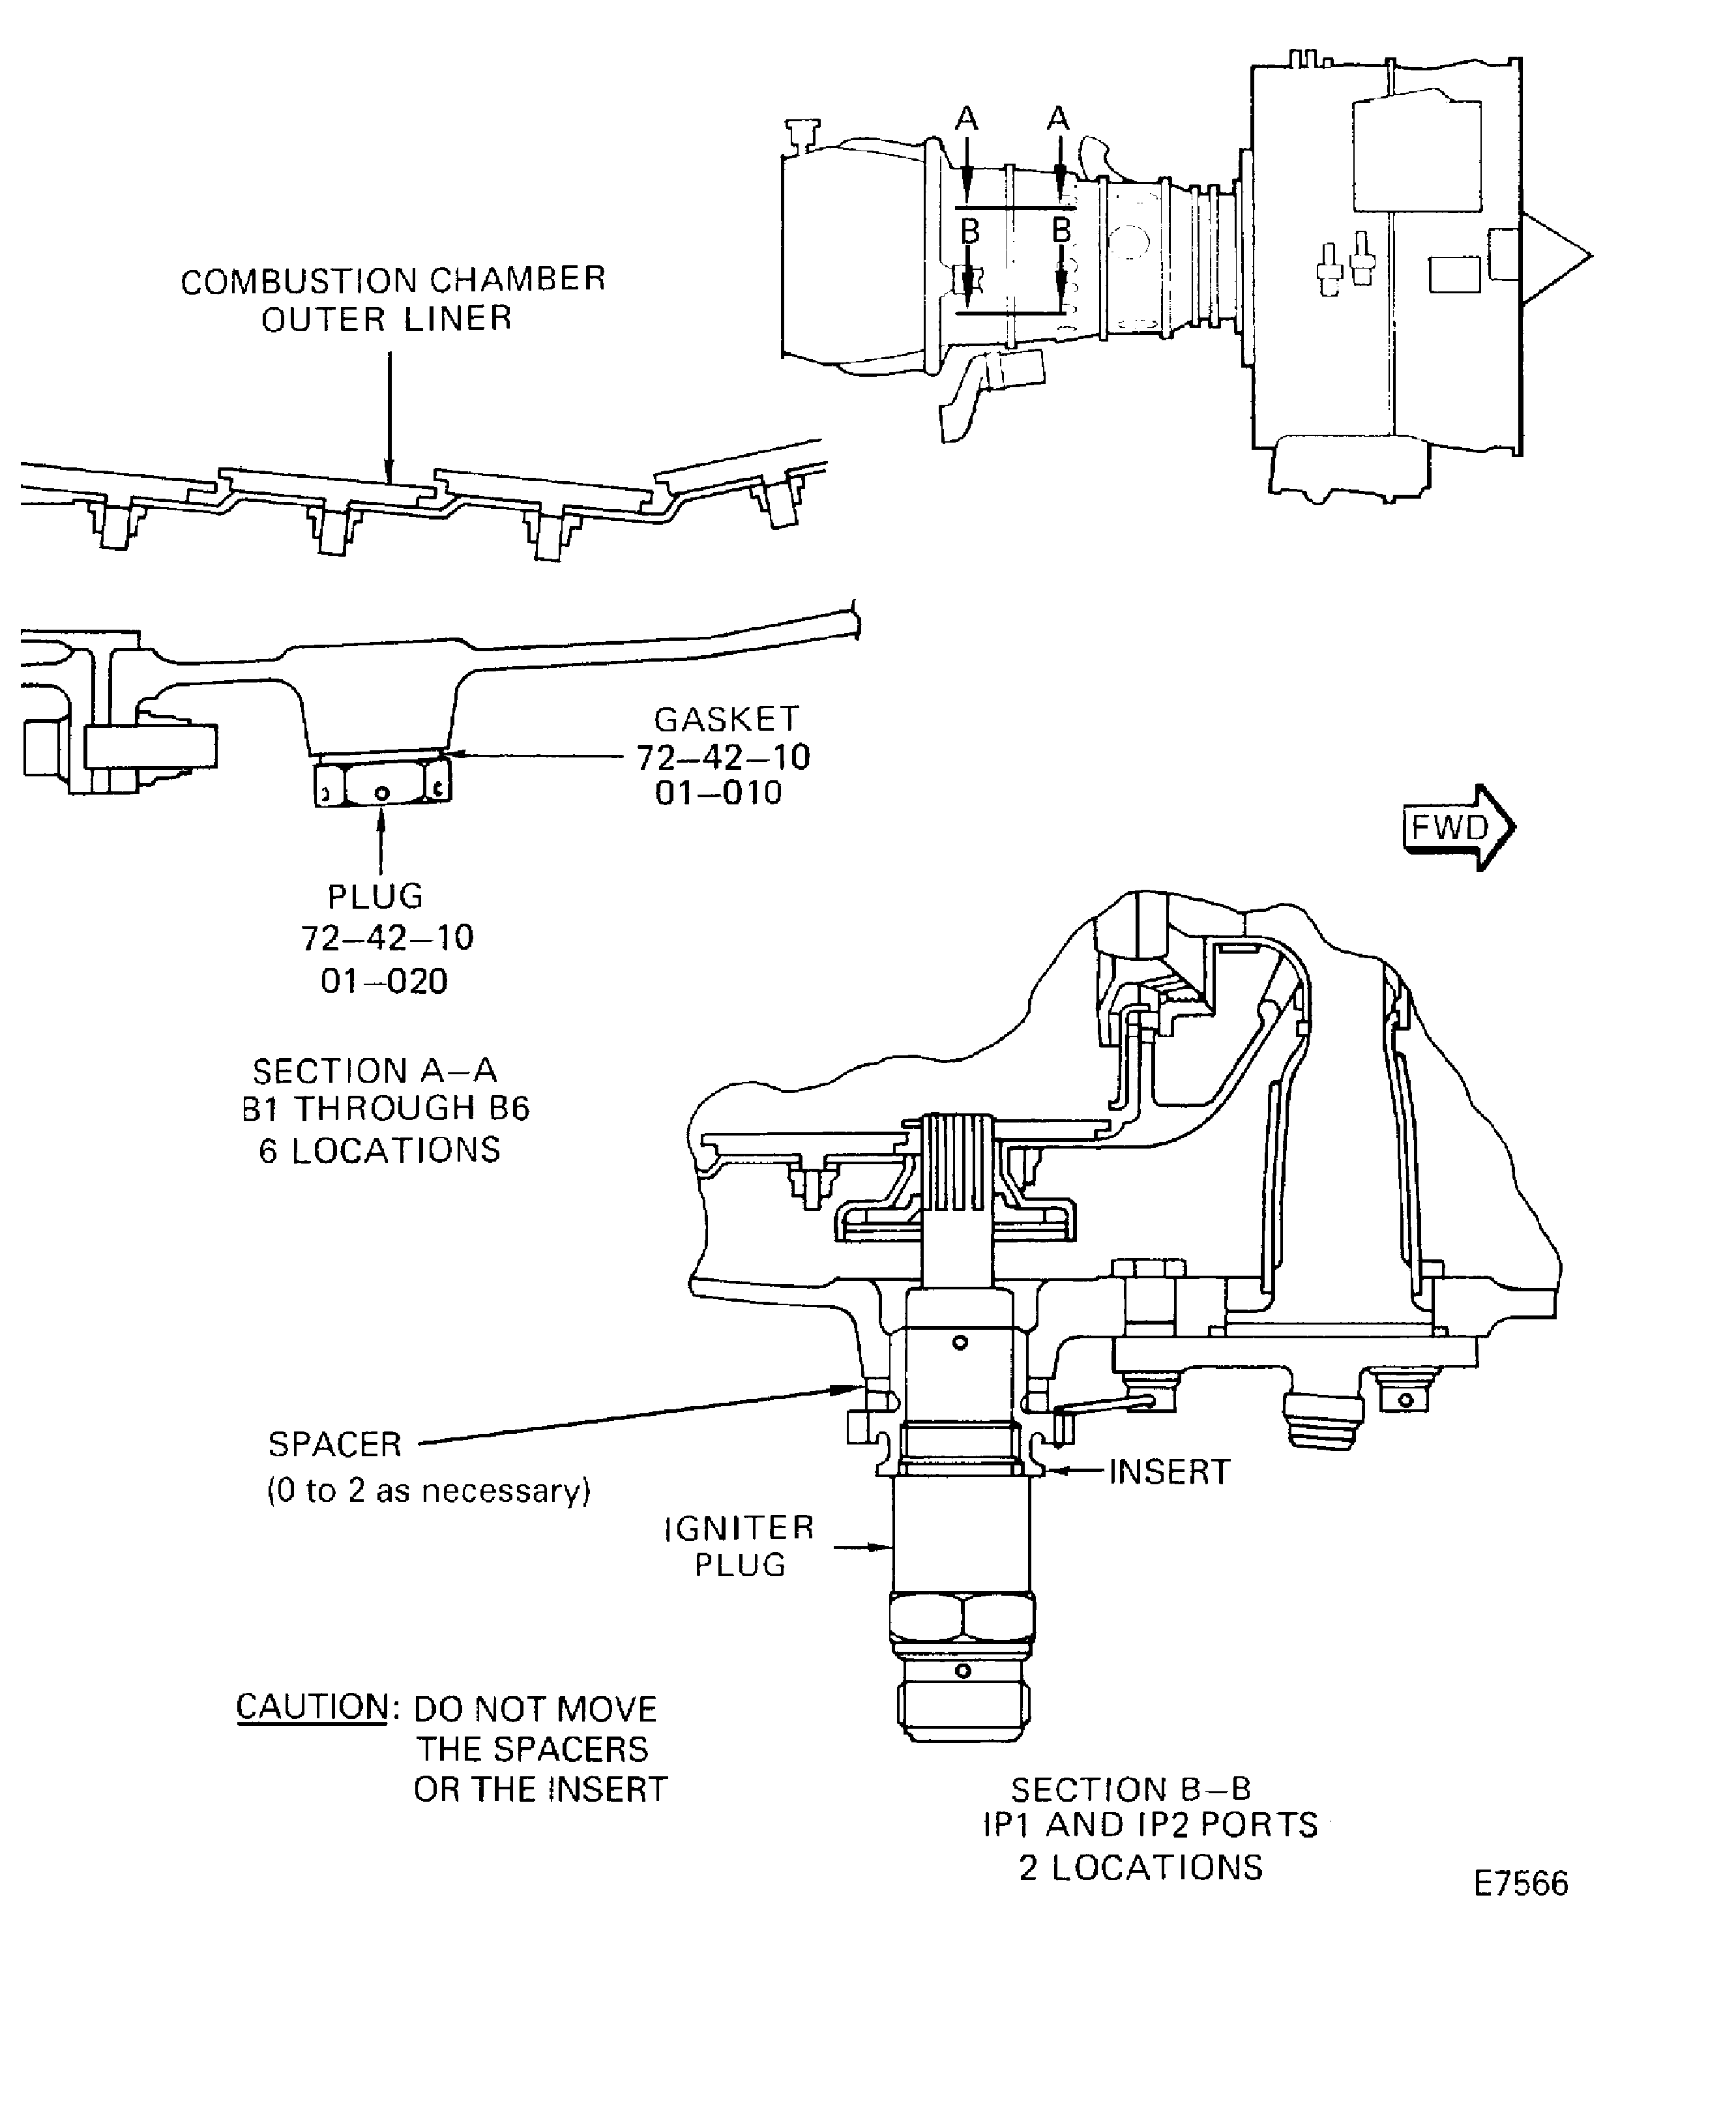
Figure: Borescope Ports
Borescope Ports

Figure: Stage 1 HPT Blade Inspection Areas
Stage 1 HPT Blade Inspection Areas
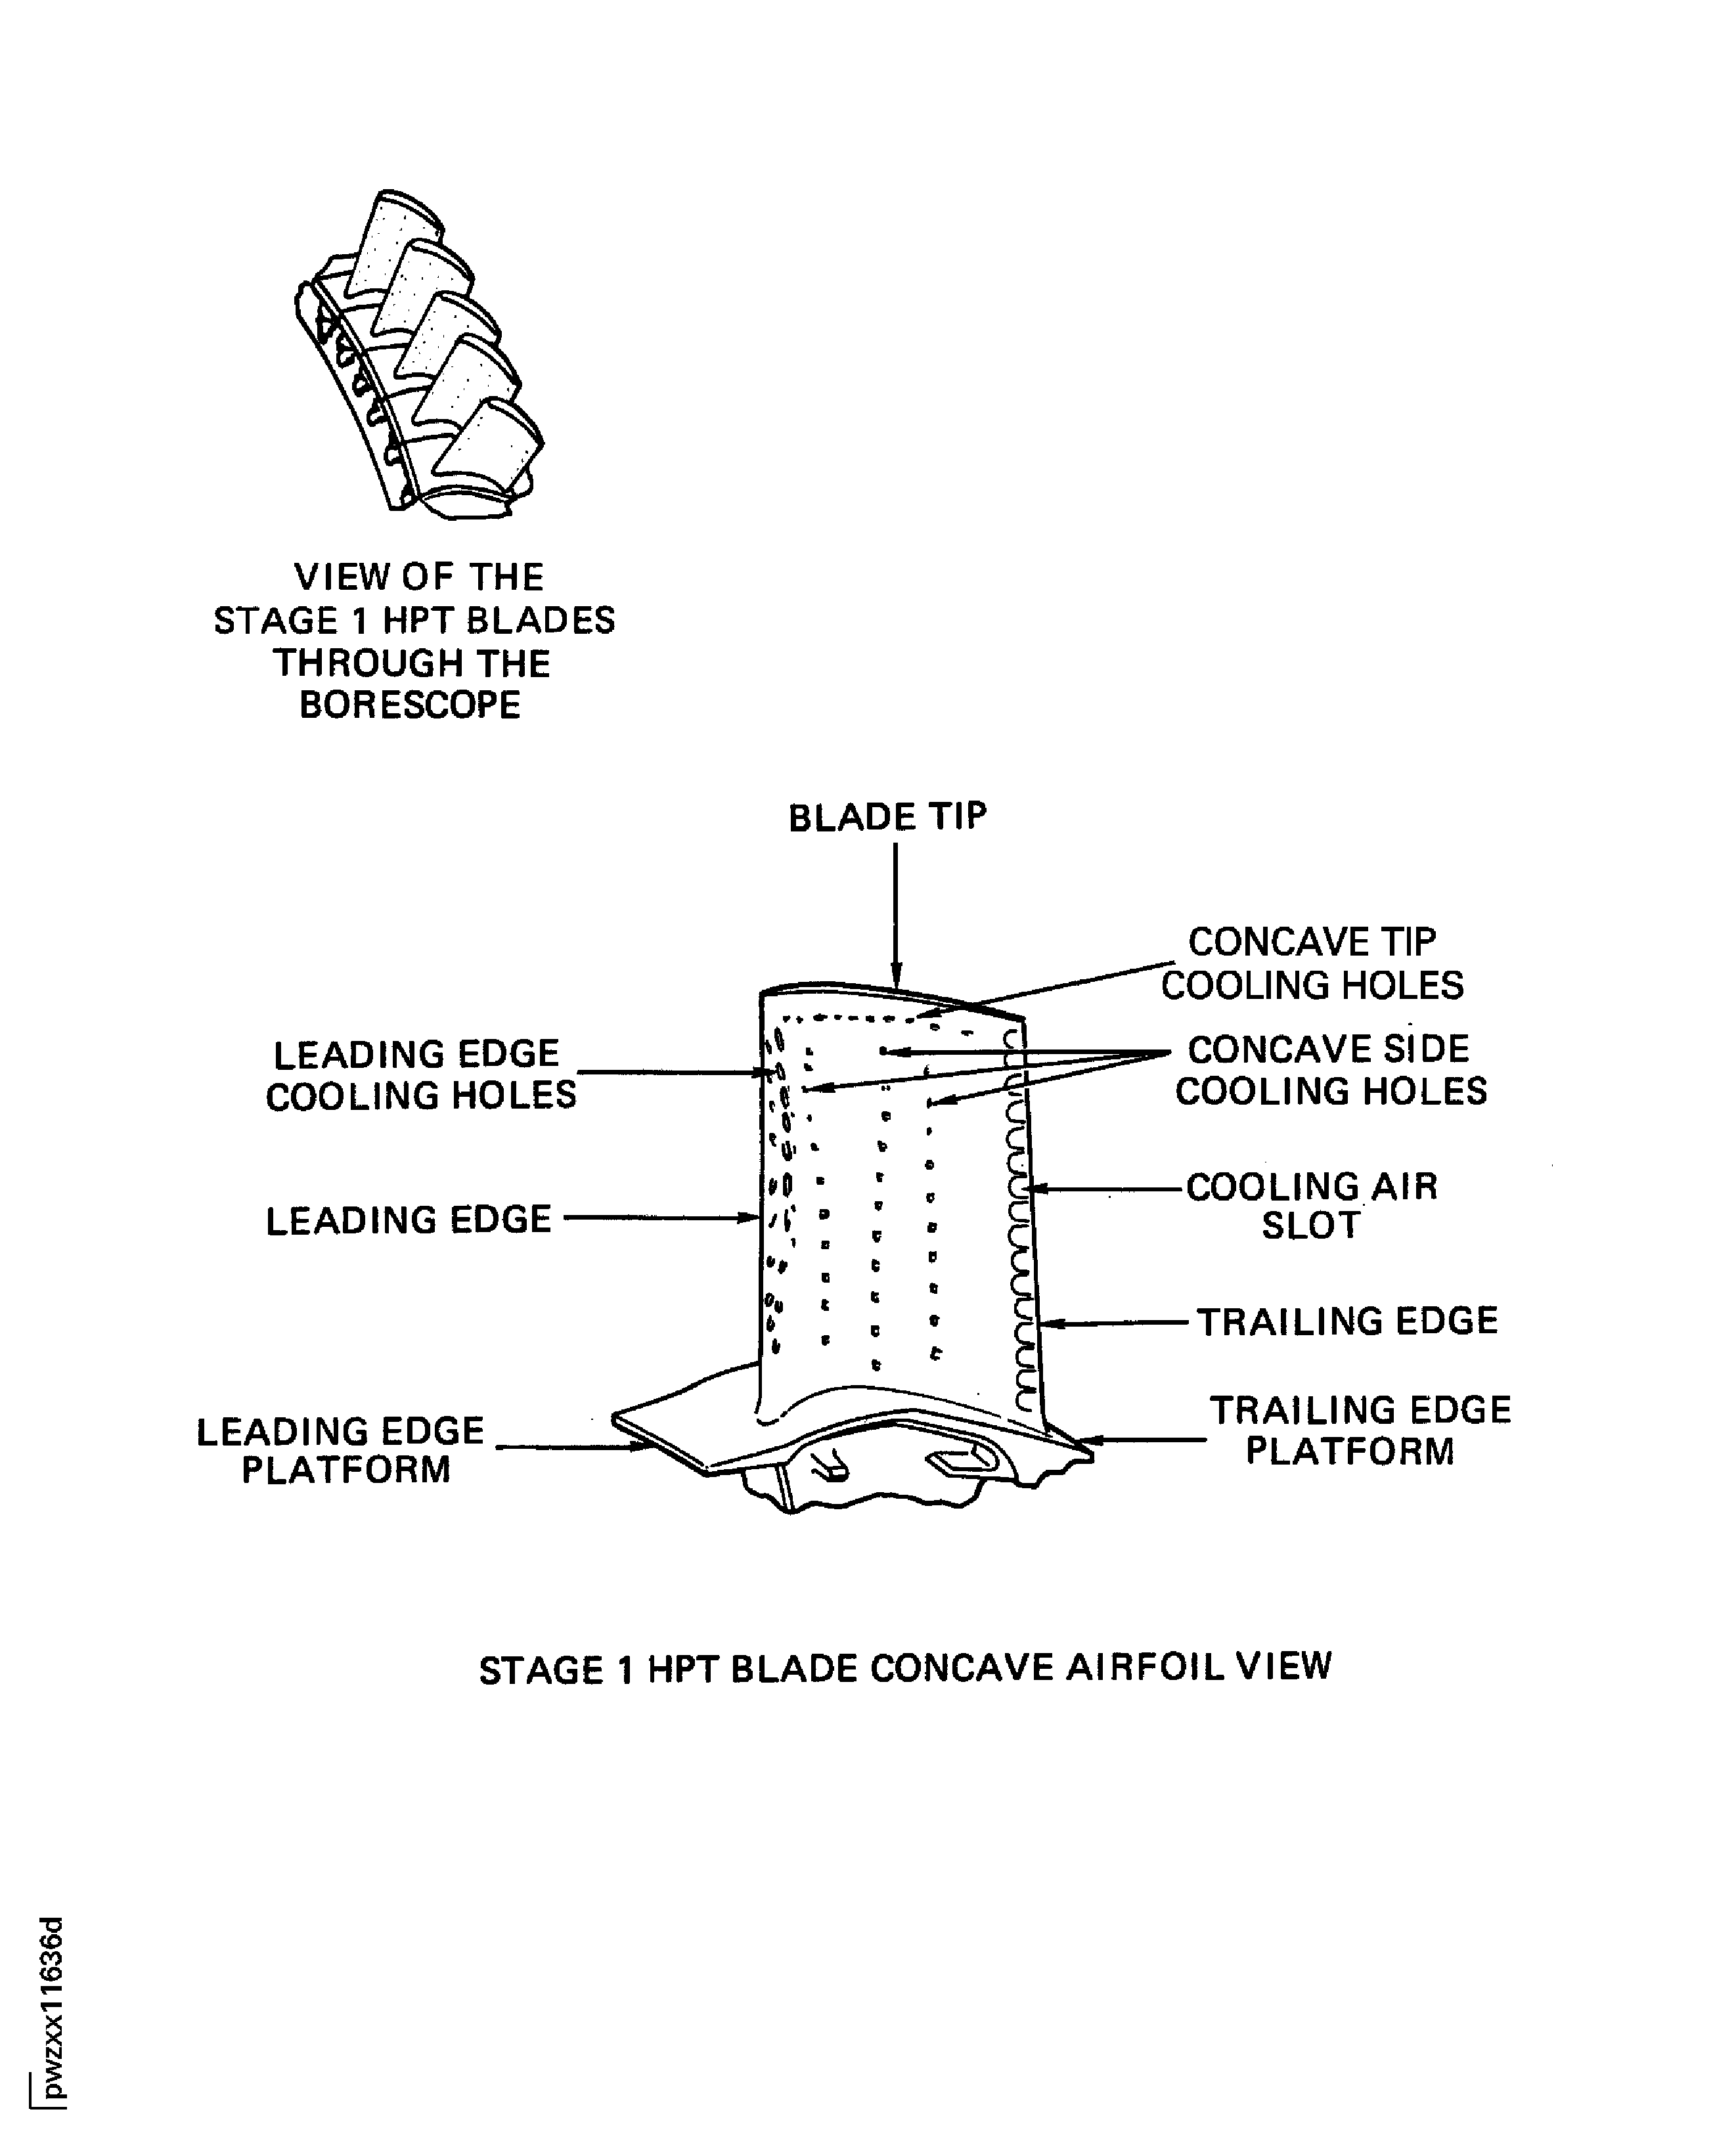
Figure: Stage 1 HPT Blade Inspection Areas
Stage 1 HPT Blade Inspection Areas
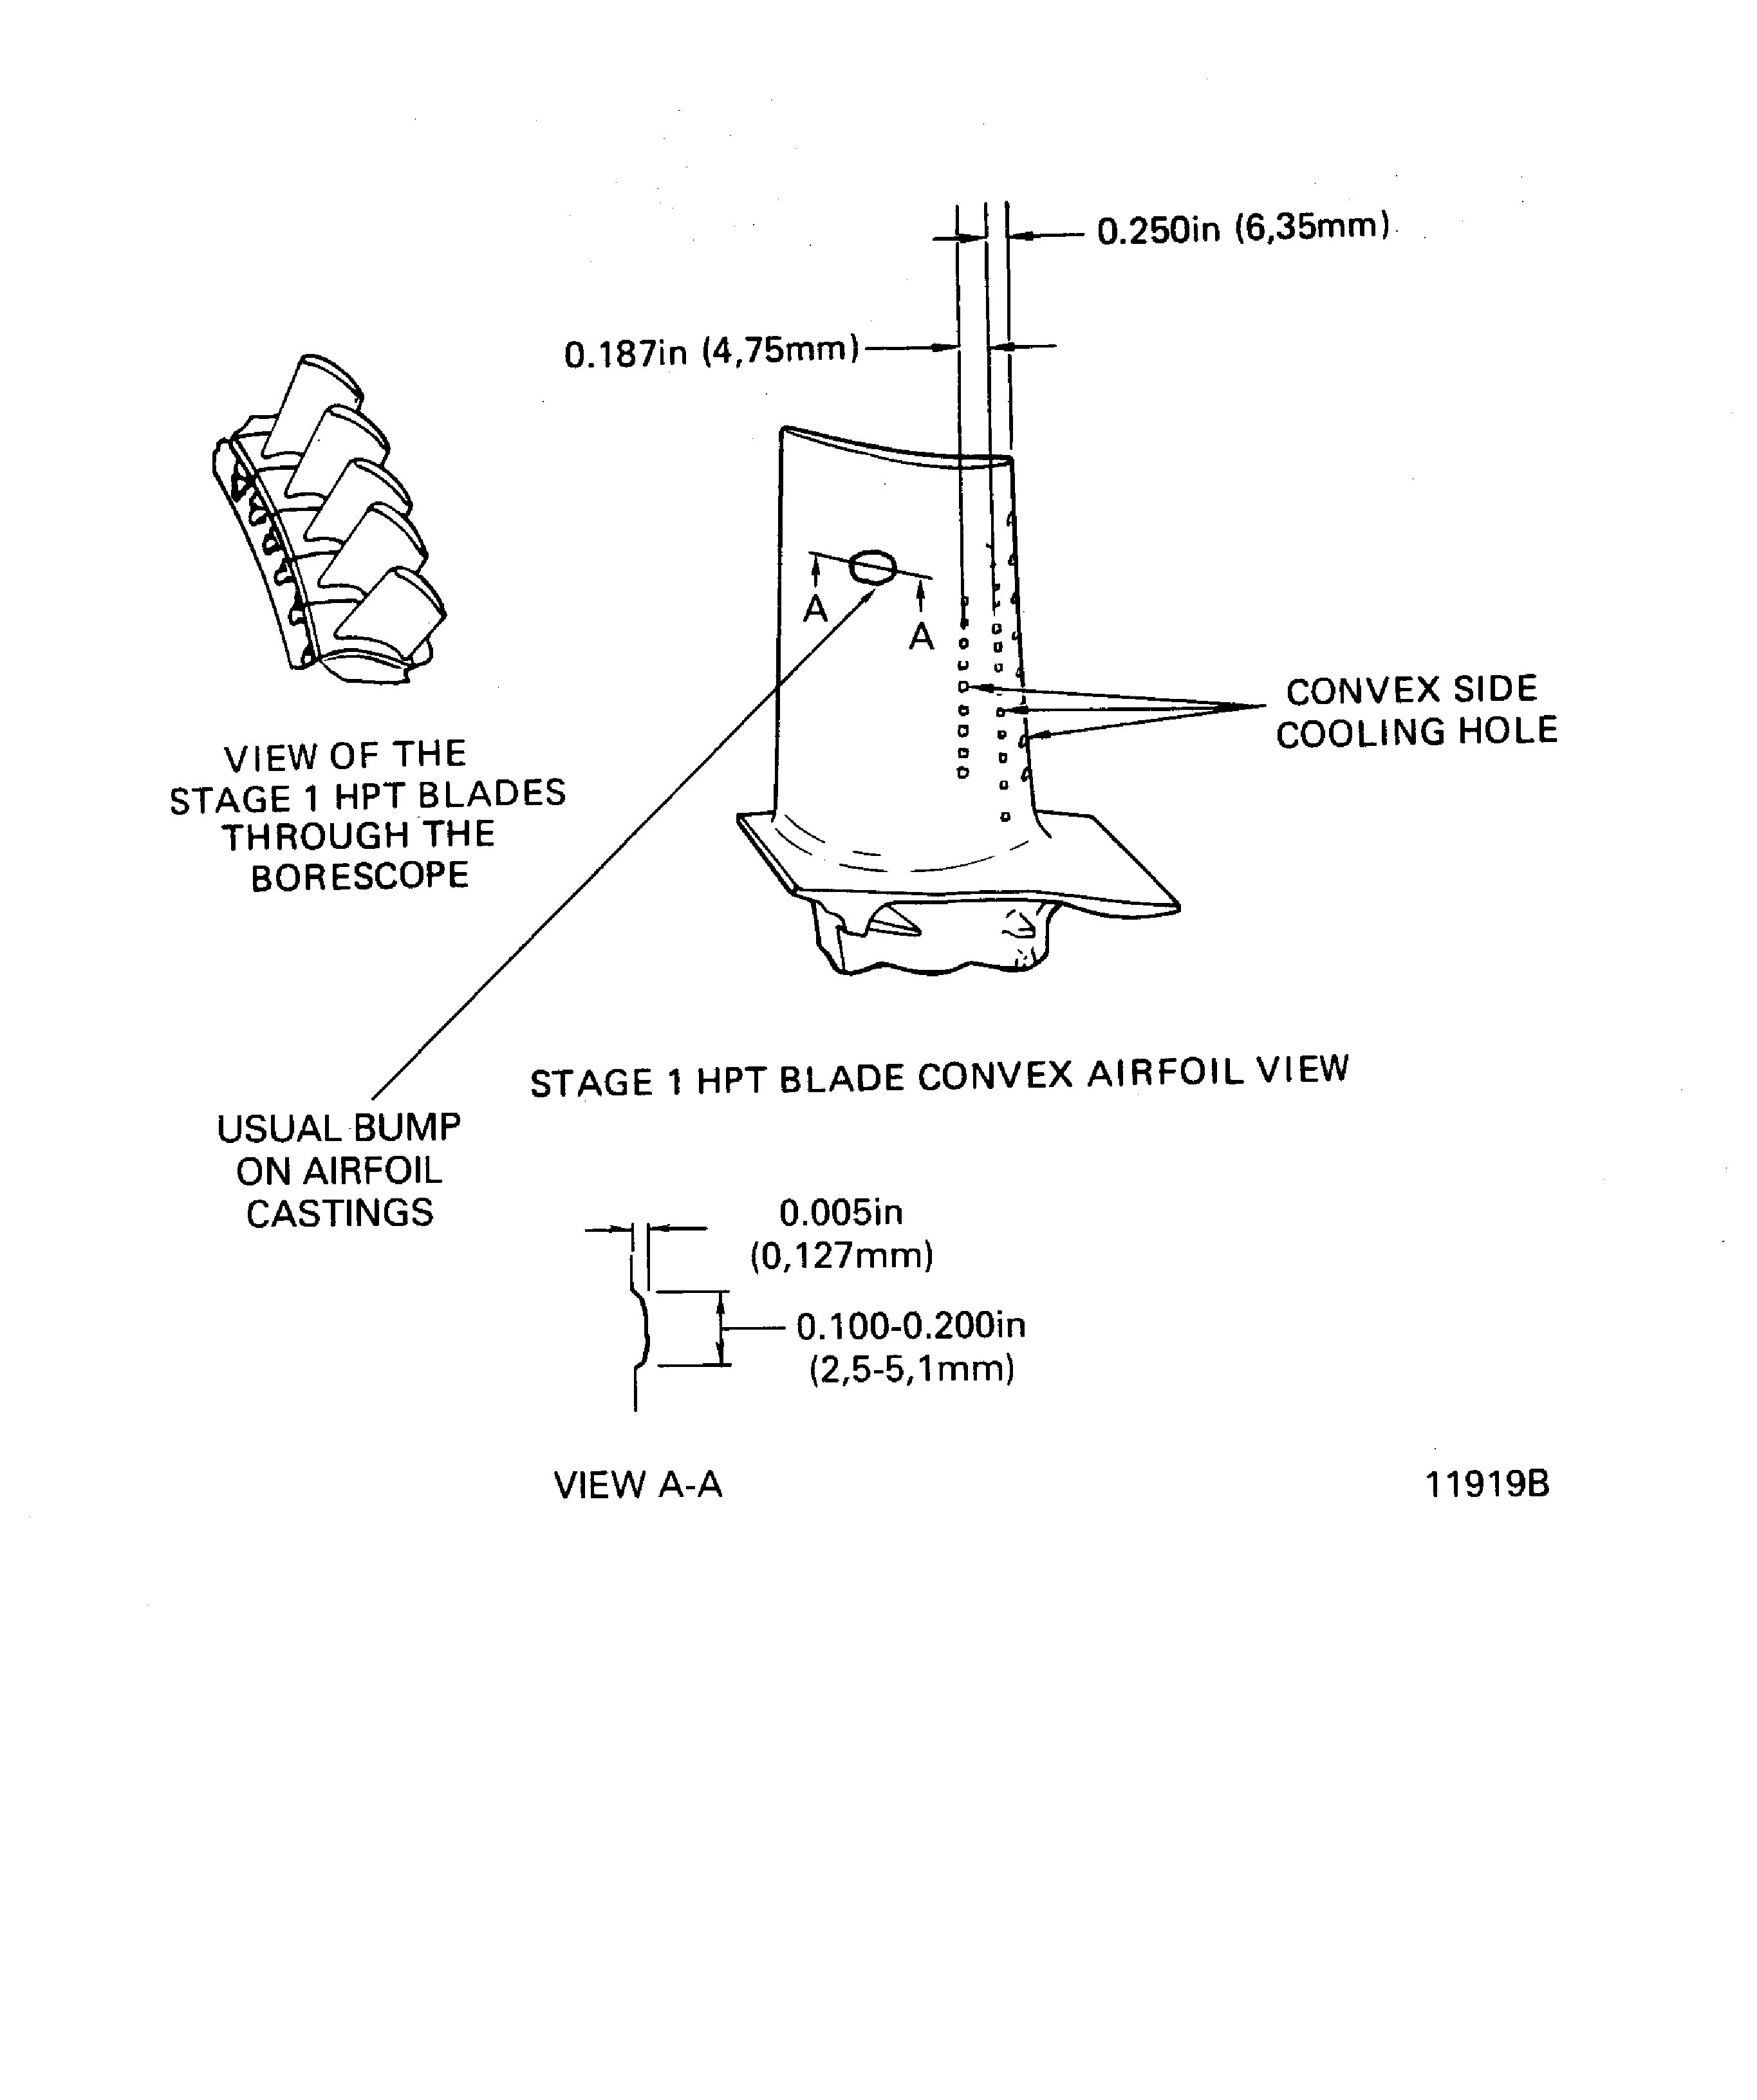
Figure: Stage 1 HPT Blade Inspection Areas
Stage 1 HPT Blade Inspection Areas
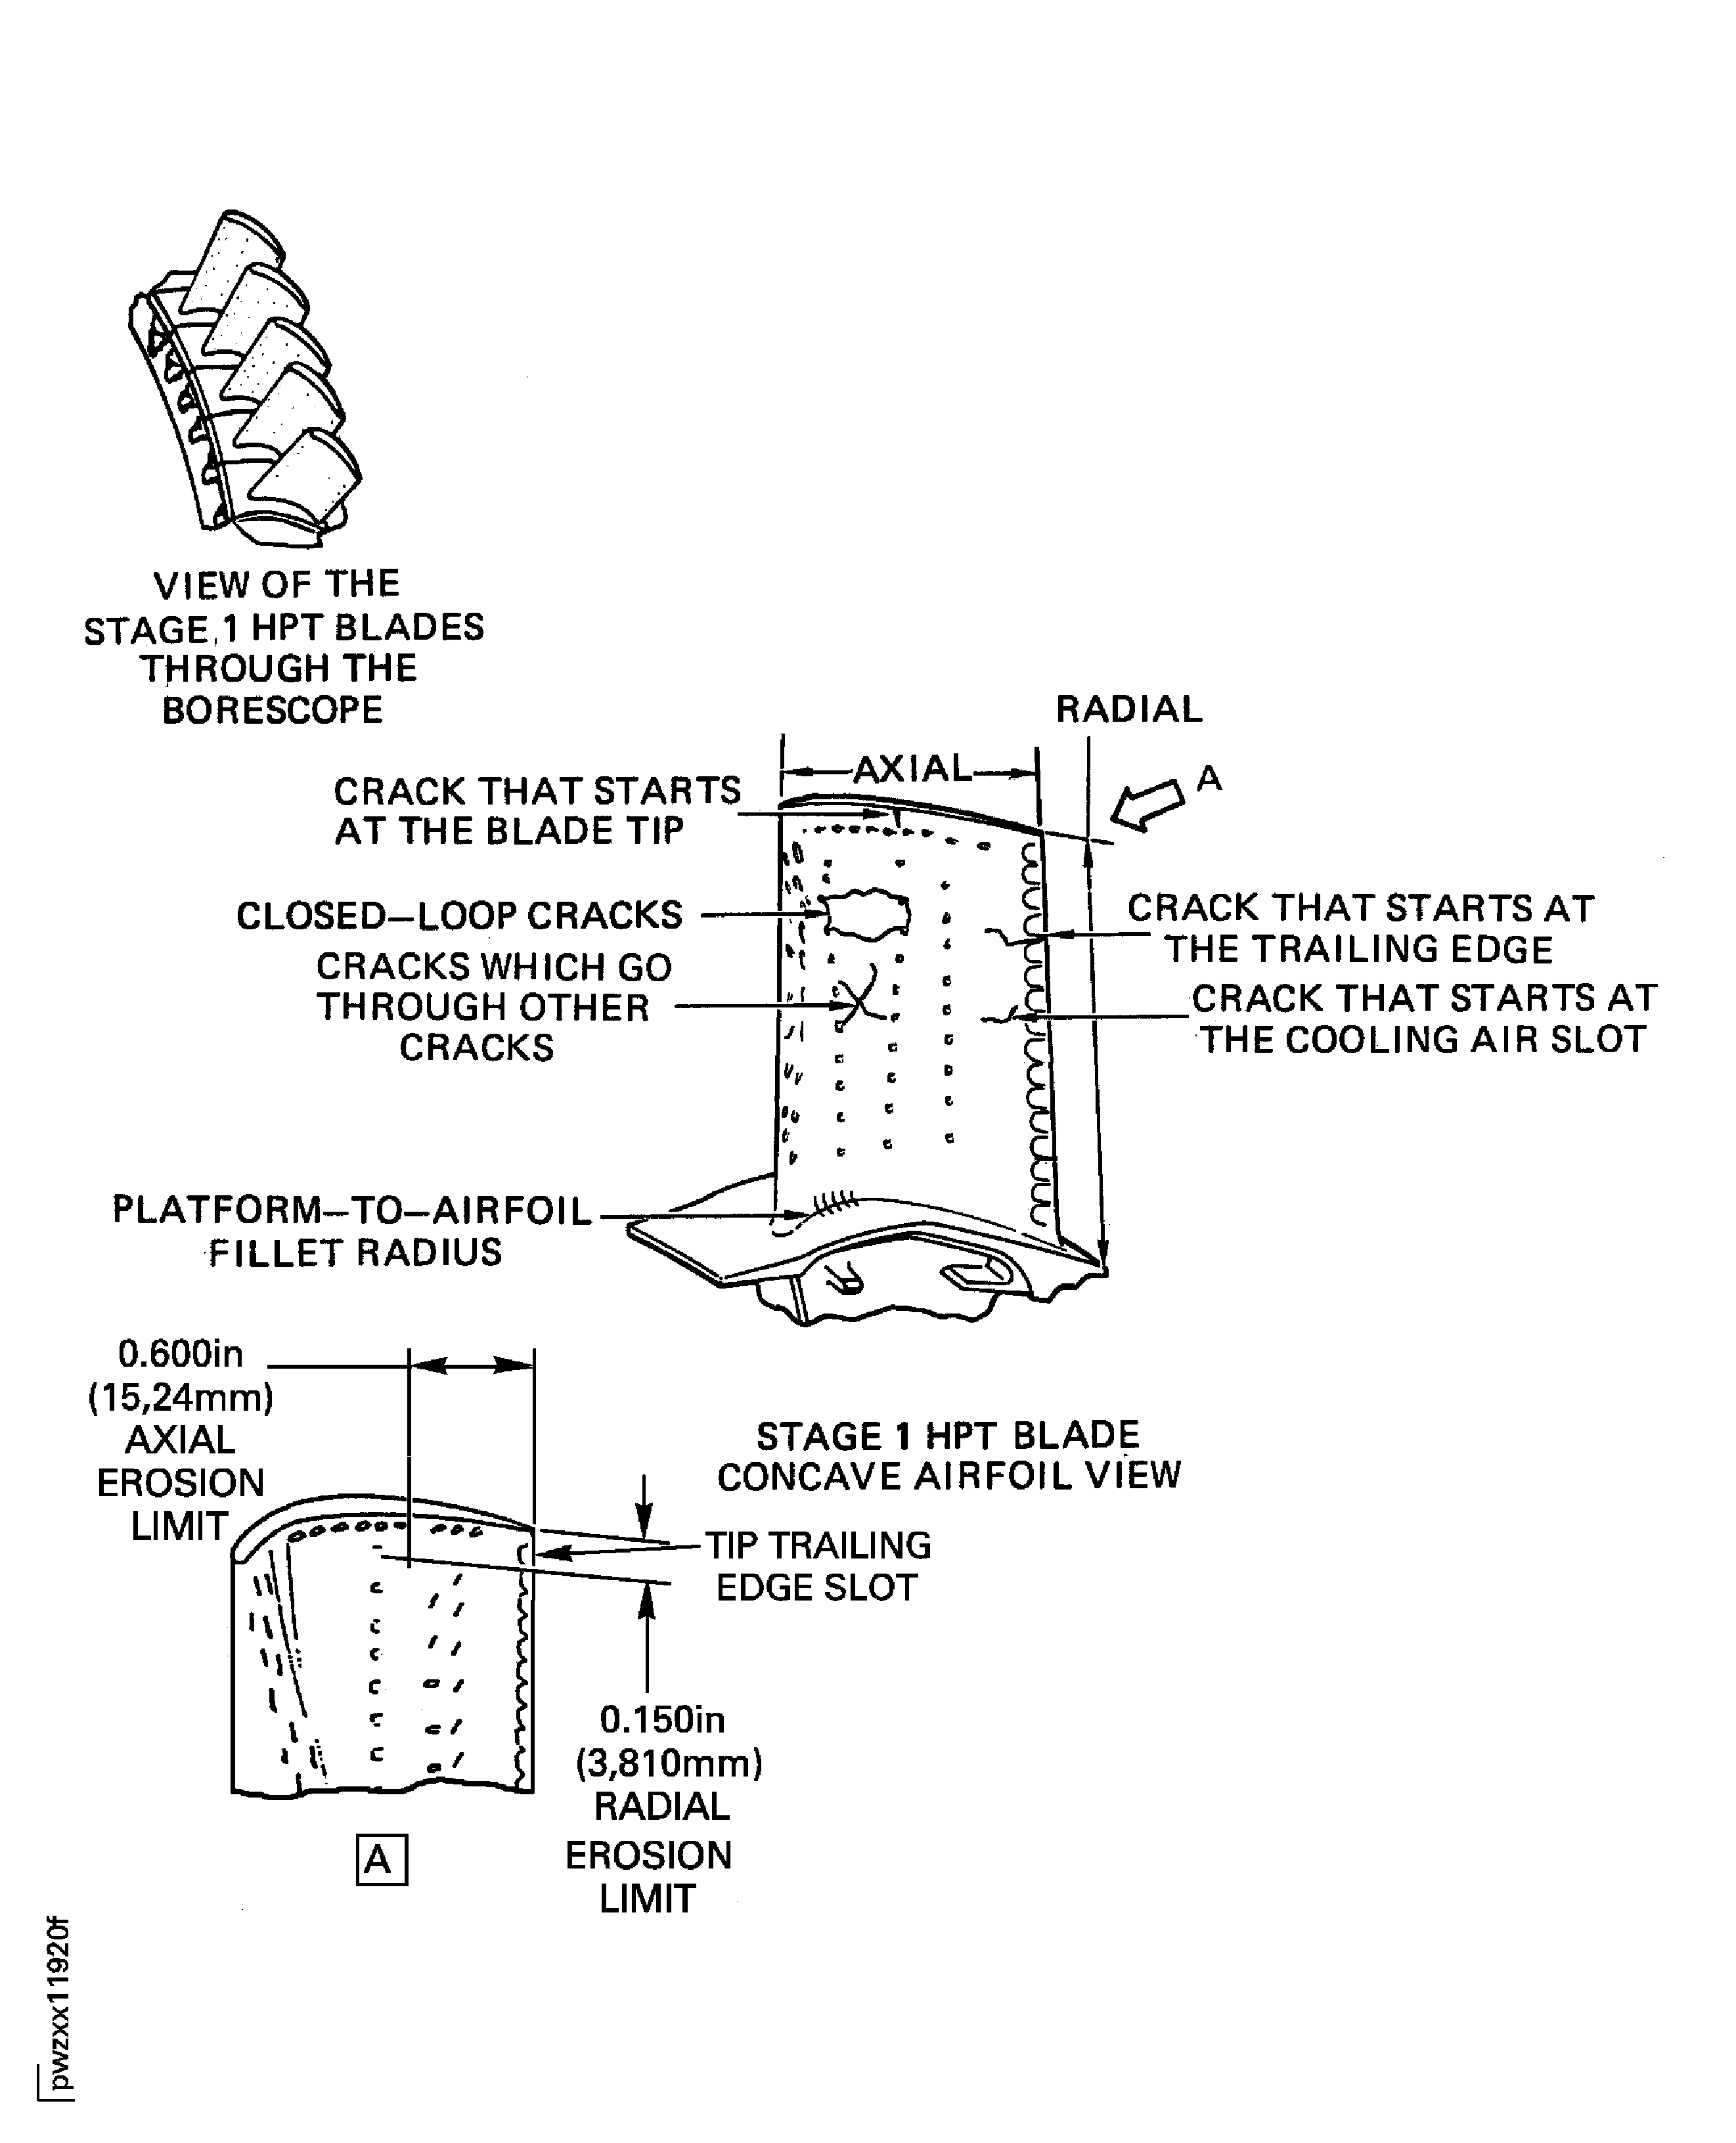
Figure: Stage 1 HPT Blade Inspection Aeas
Stage 1 HPT Blade Inspection Aeas
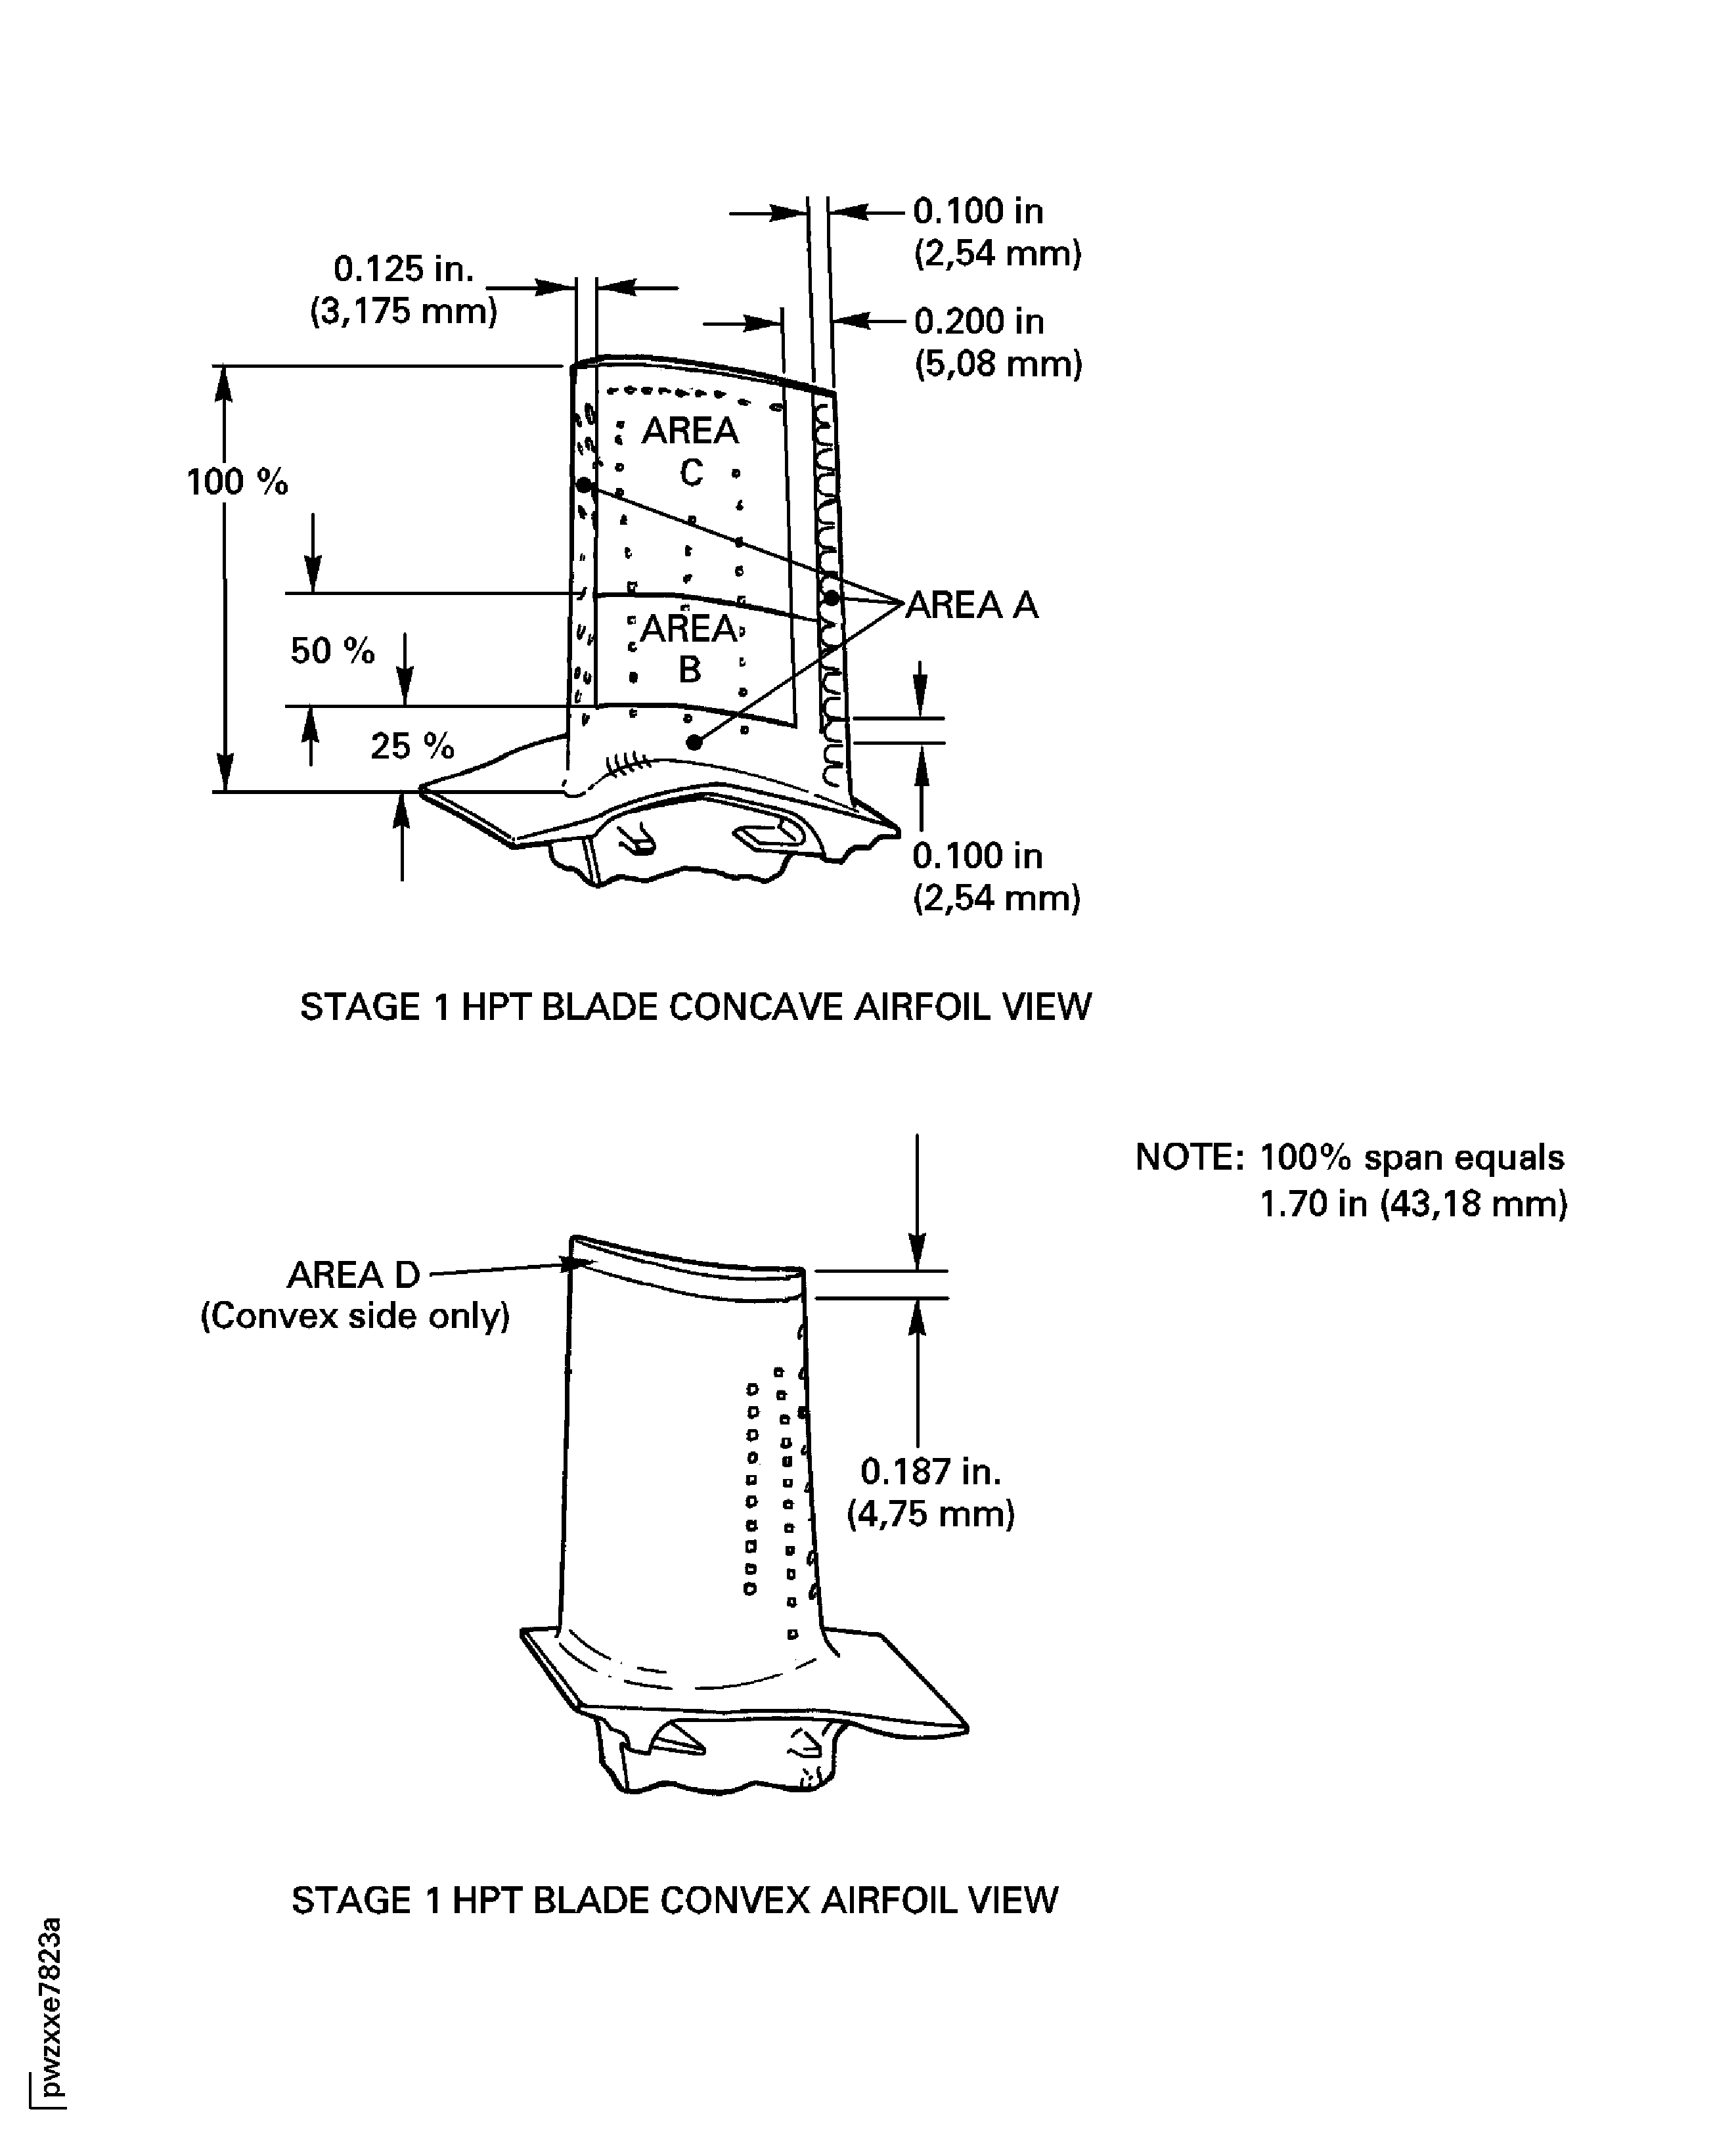
Figure: Stage 1 HPT Duct Segment Inspection Locations
Sheet 1

Figure: Stage 1 HPT Duct Segment Inspection Locations
Sheet 2
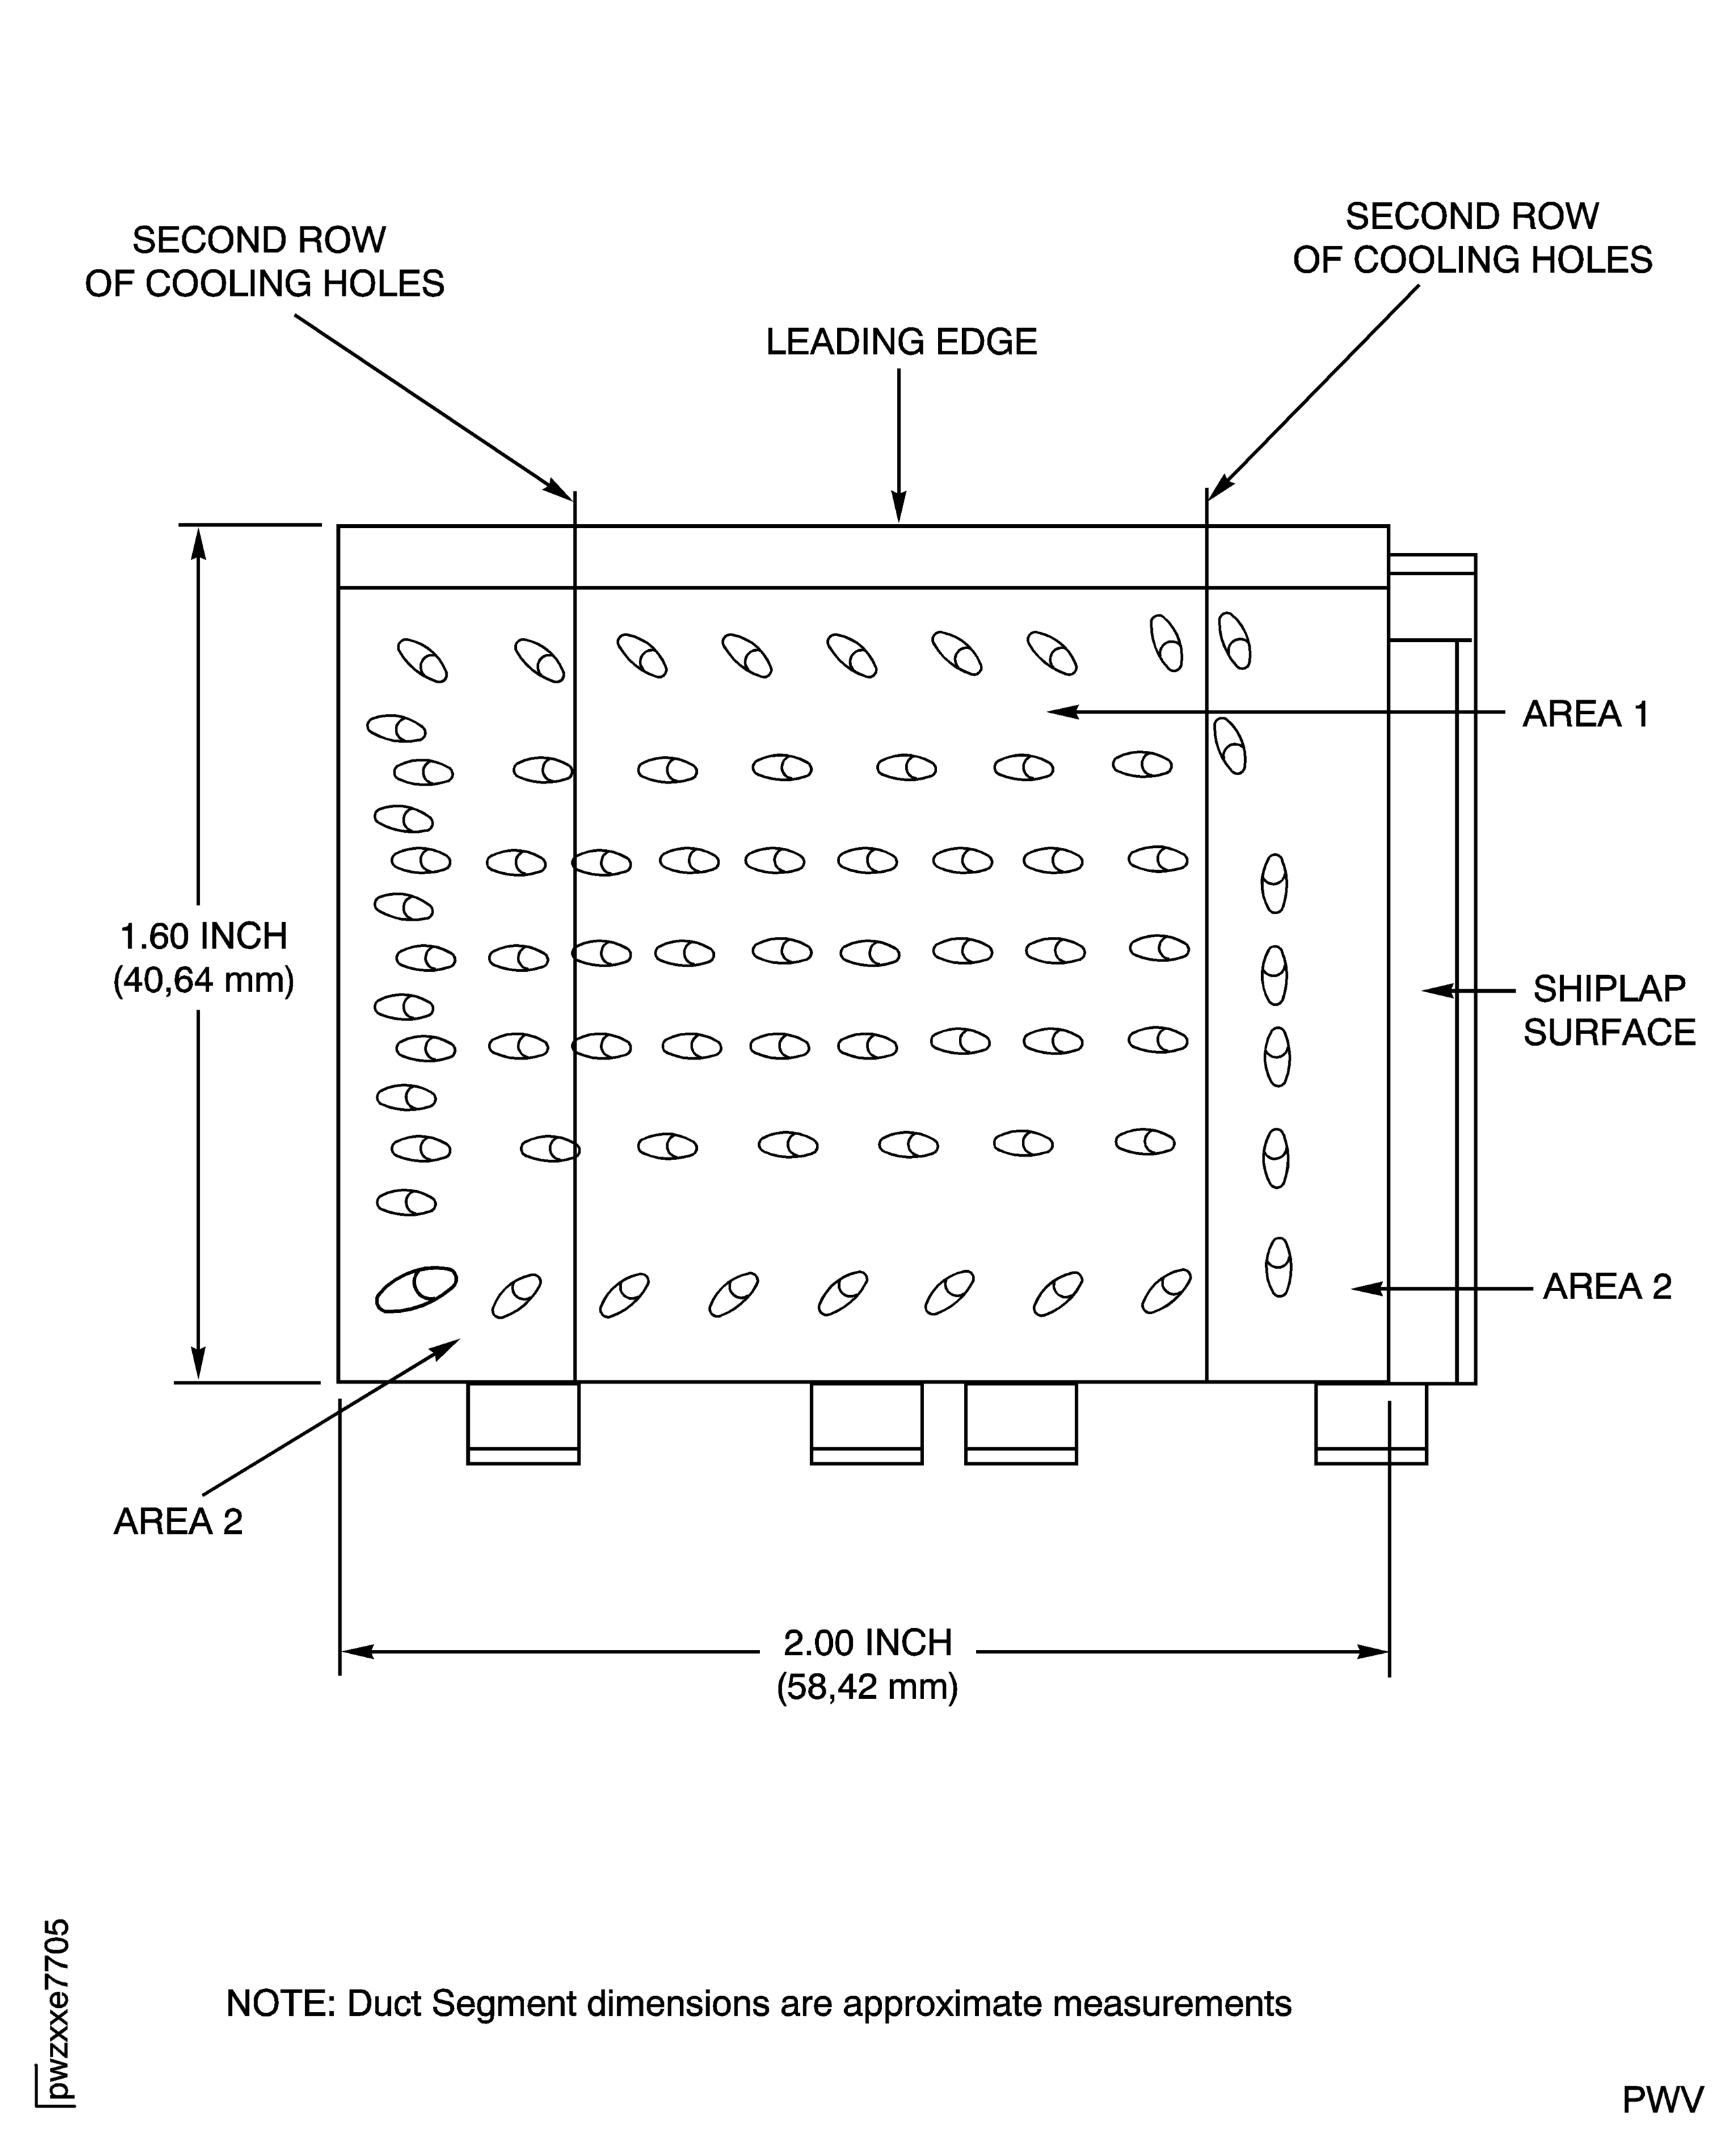
Figure: Stage 1 HPT Blade Inspection Areas
Stage 1 HPT Blade Inspection Areas
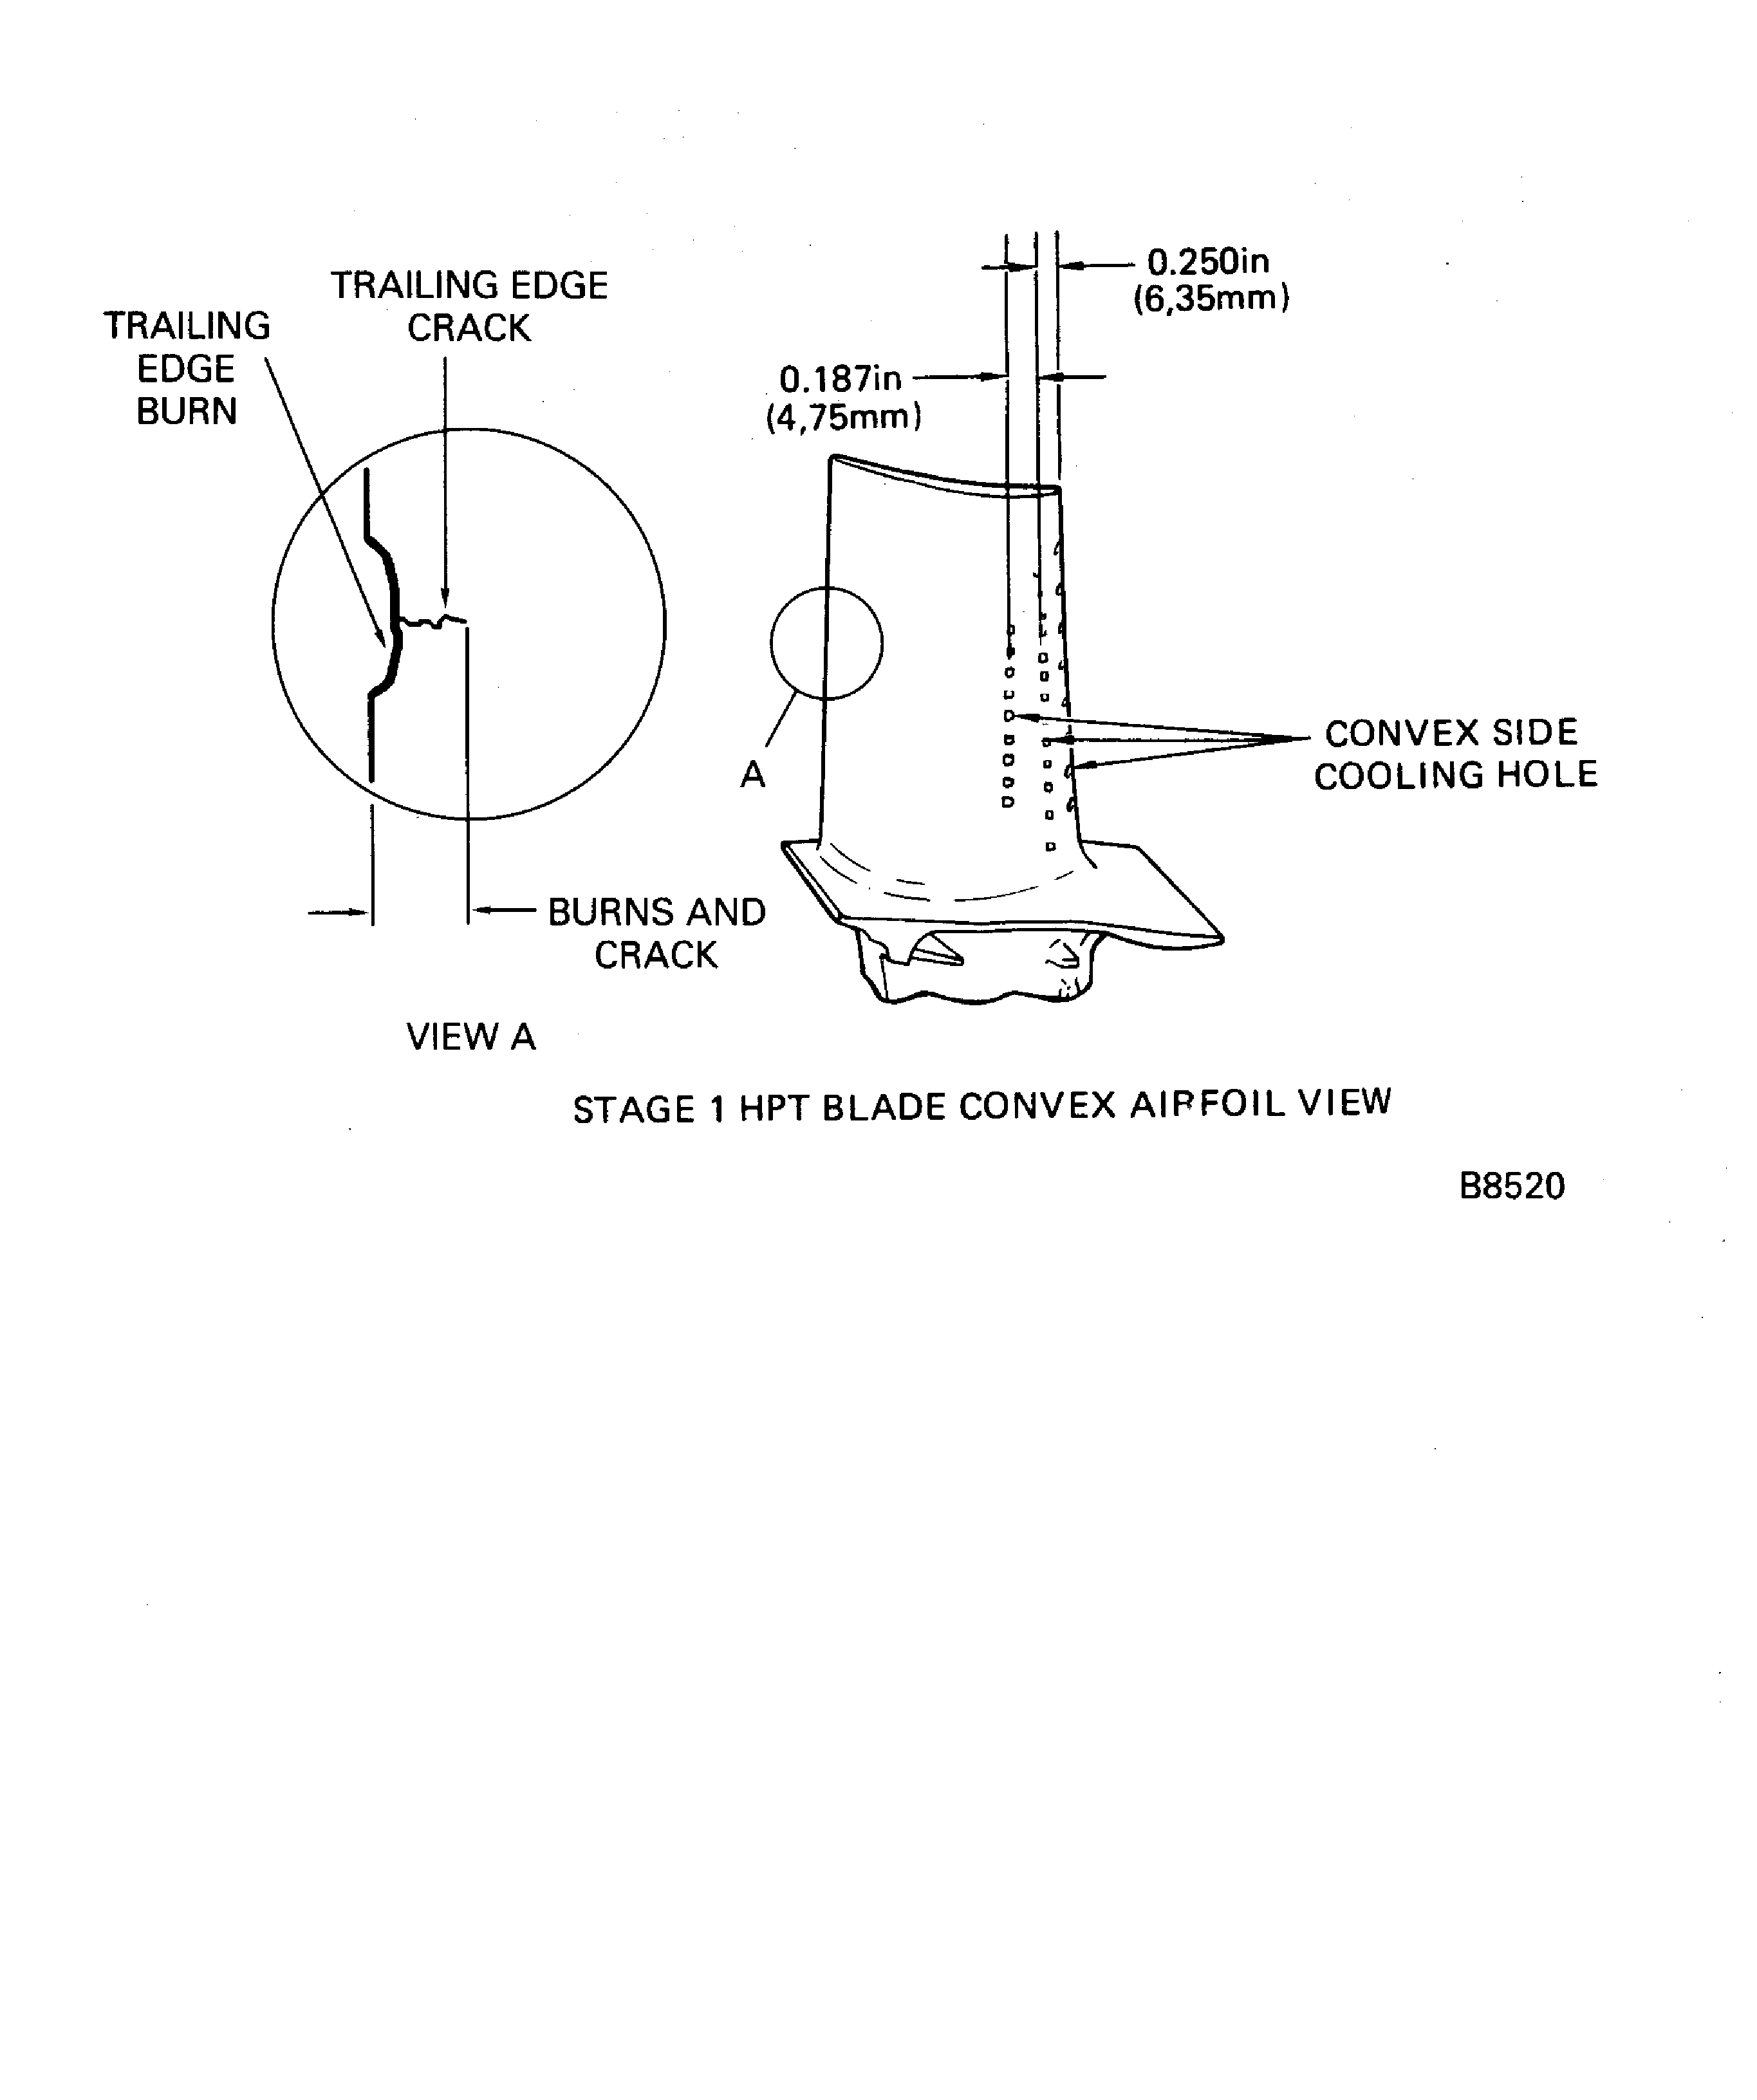
Figure: HPT Stage 1 HPT Segment Intersecting Cracks
HPT Stage 1 HPT Segment Intersecting Cracks
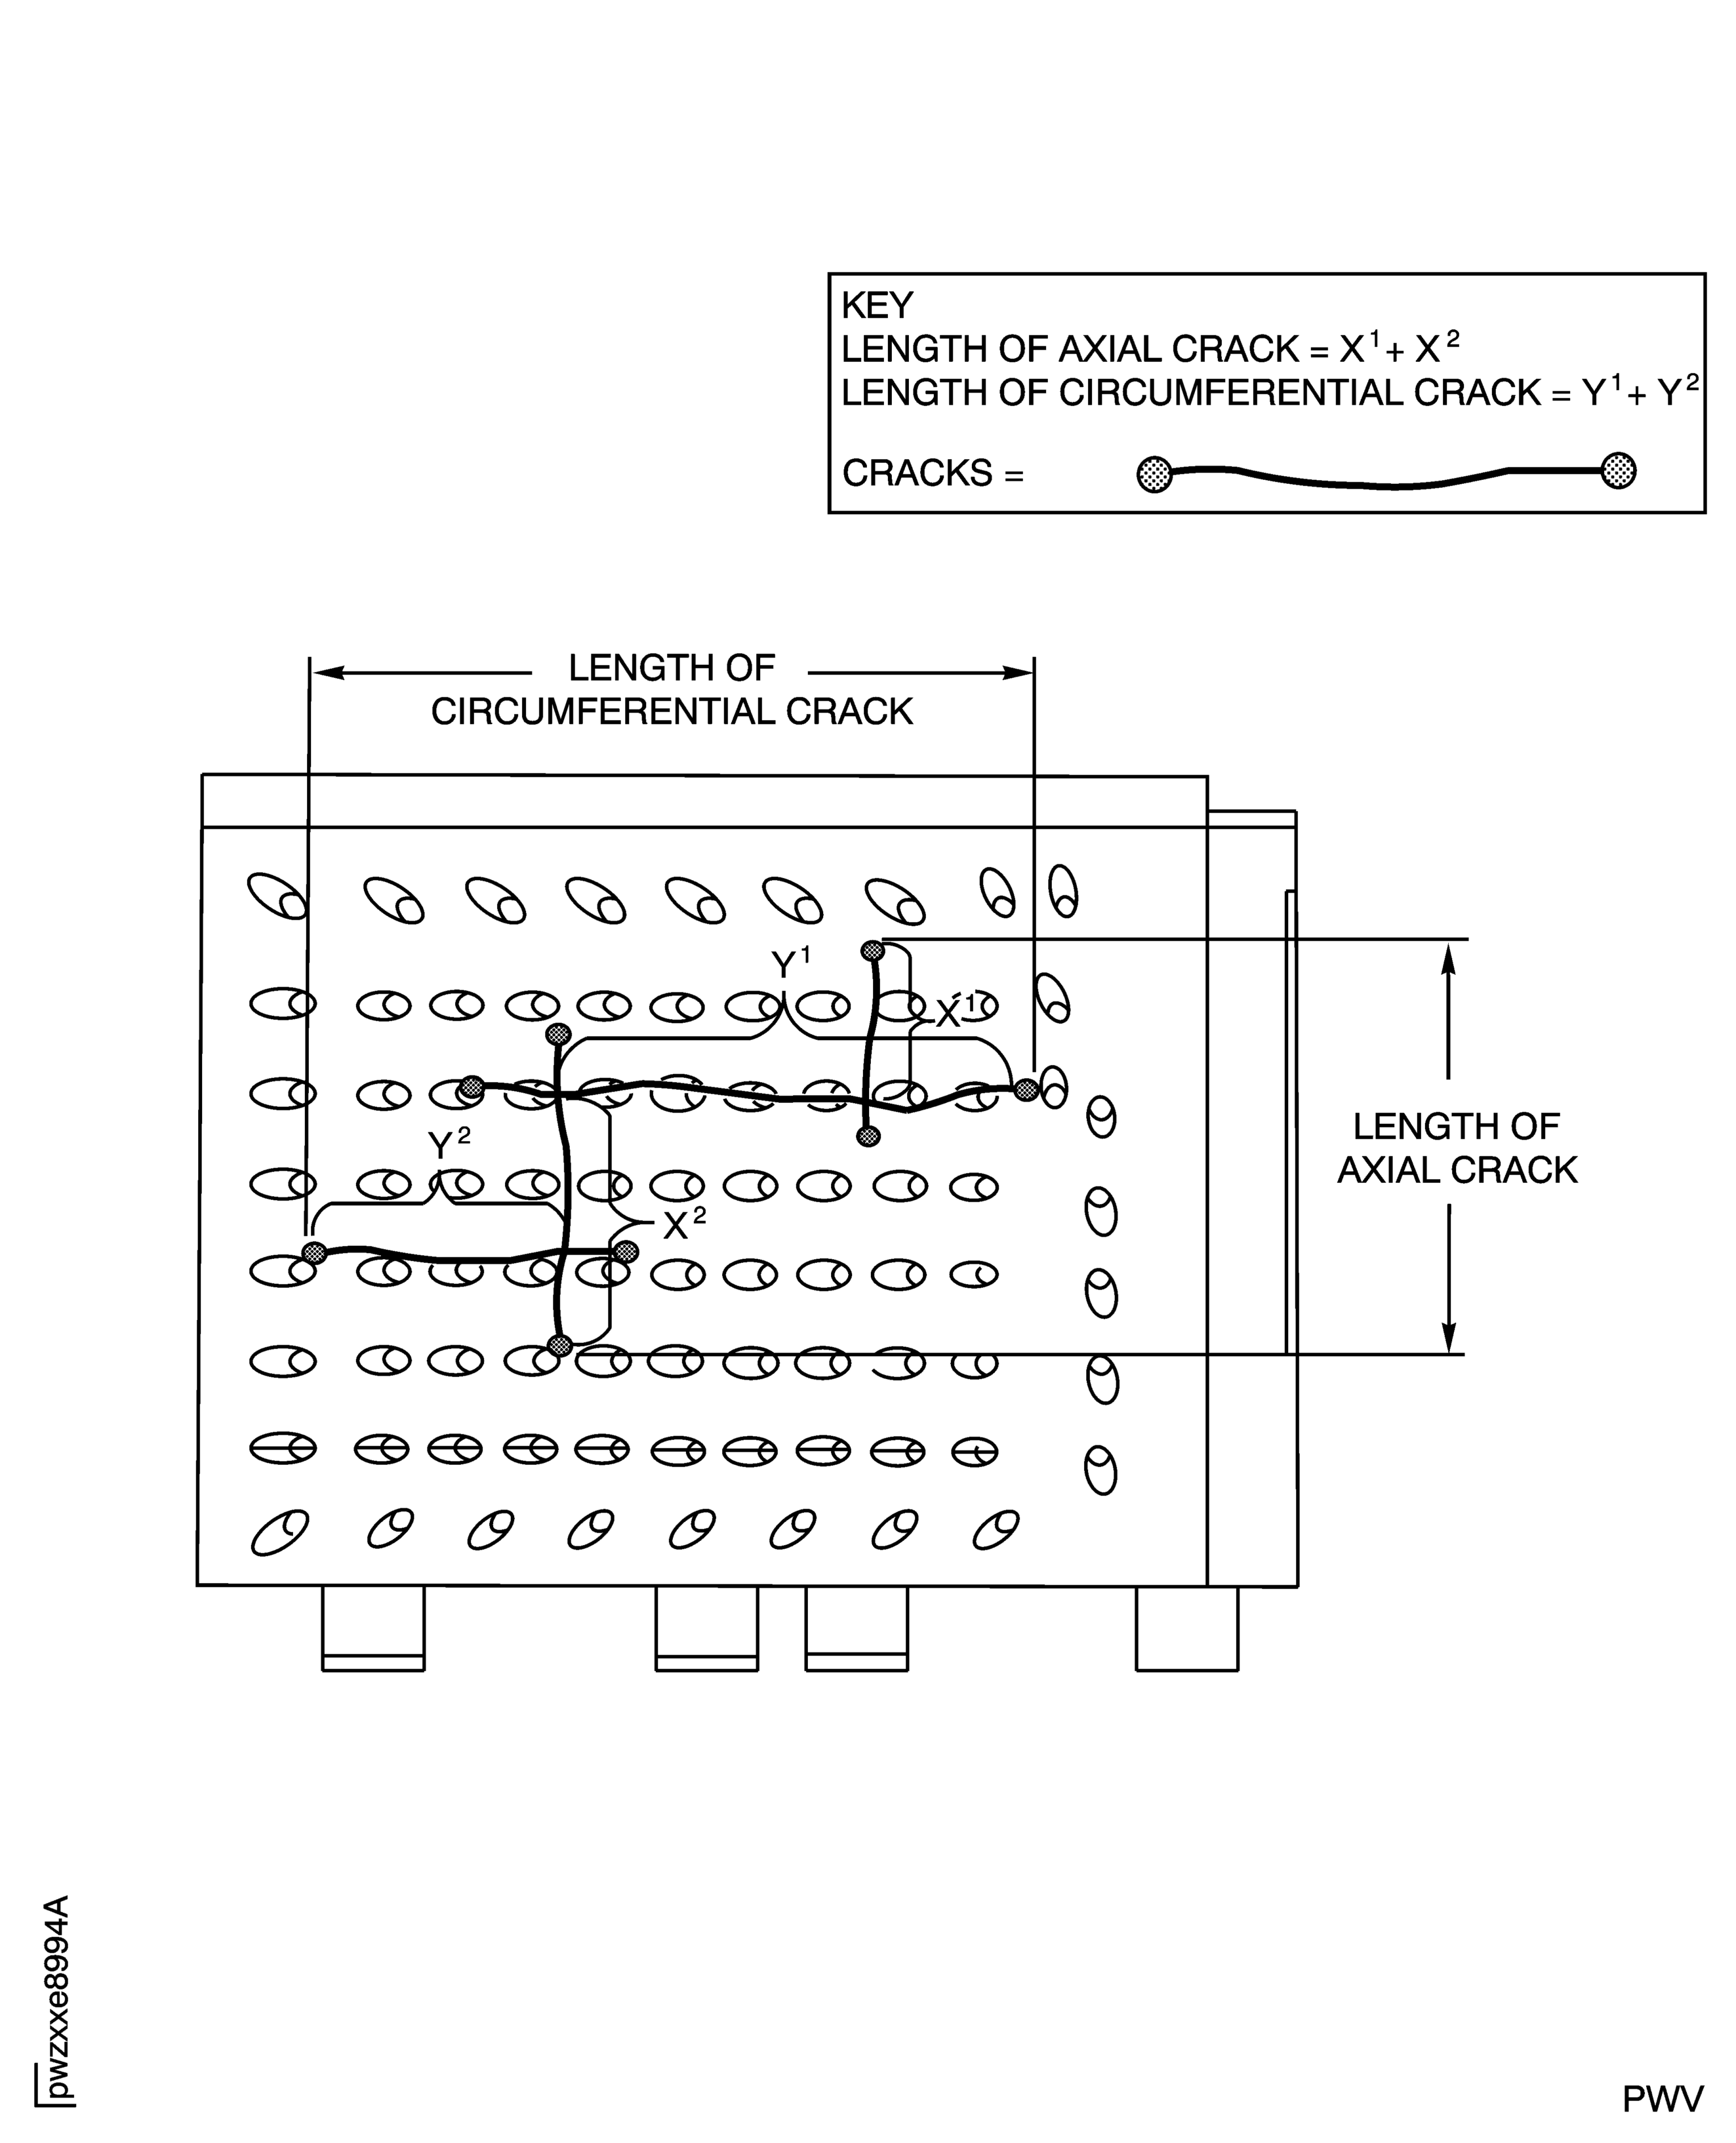
Figure: HPT Stage 1 HPT Segment Intersecting Cracks
HPT Stage 1 HPT Segment Intersecting Cracks
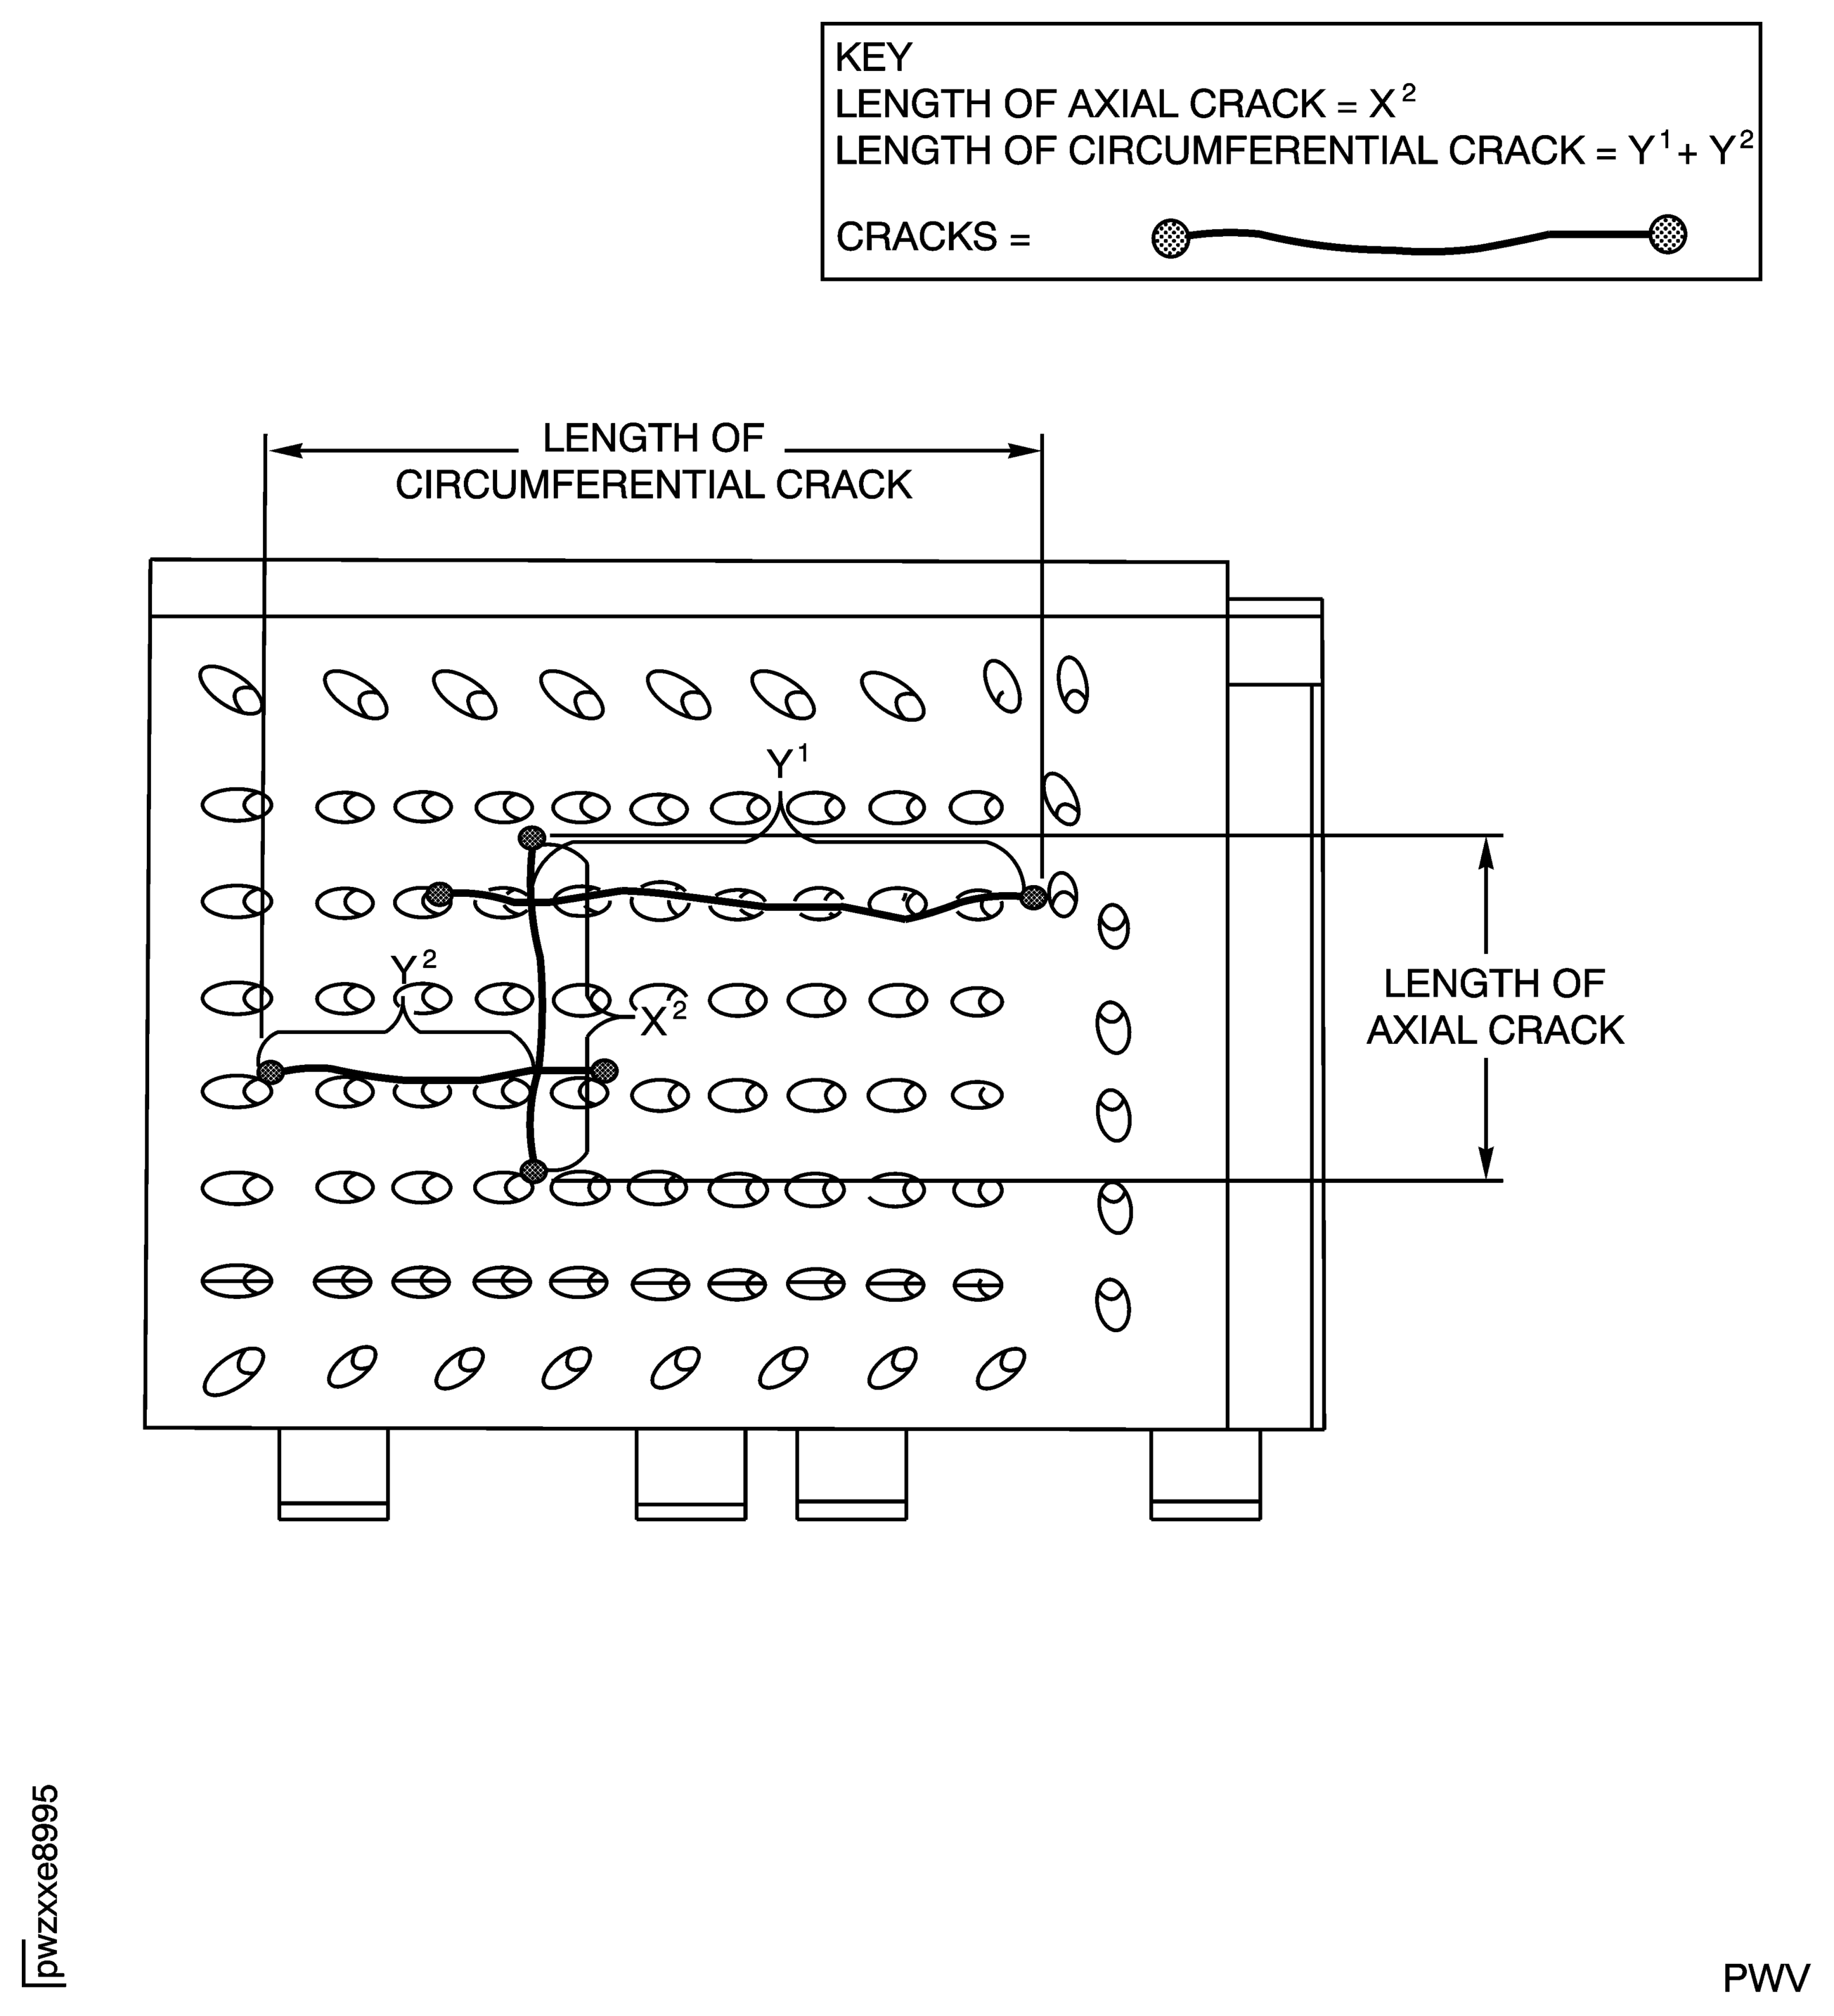
Figure: HPT Stage 1 HPT Segment Intersecting Cracks
HPT Stage 1 HPT Segment Intersecting Cracks

Figure: Burn through with Adjoining Cracks in Axial Direction
Burn through with Adjoining Cracks in Axial Direction

Figure: Burn through with Adjoining Cracks in Circumferential Direction
Burn through with Adjoining Cracks in Circumferential Direction
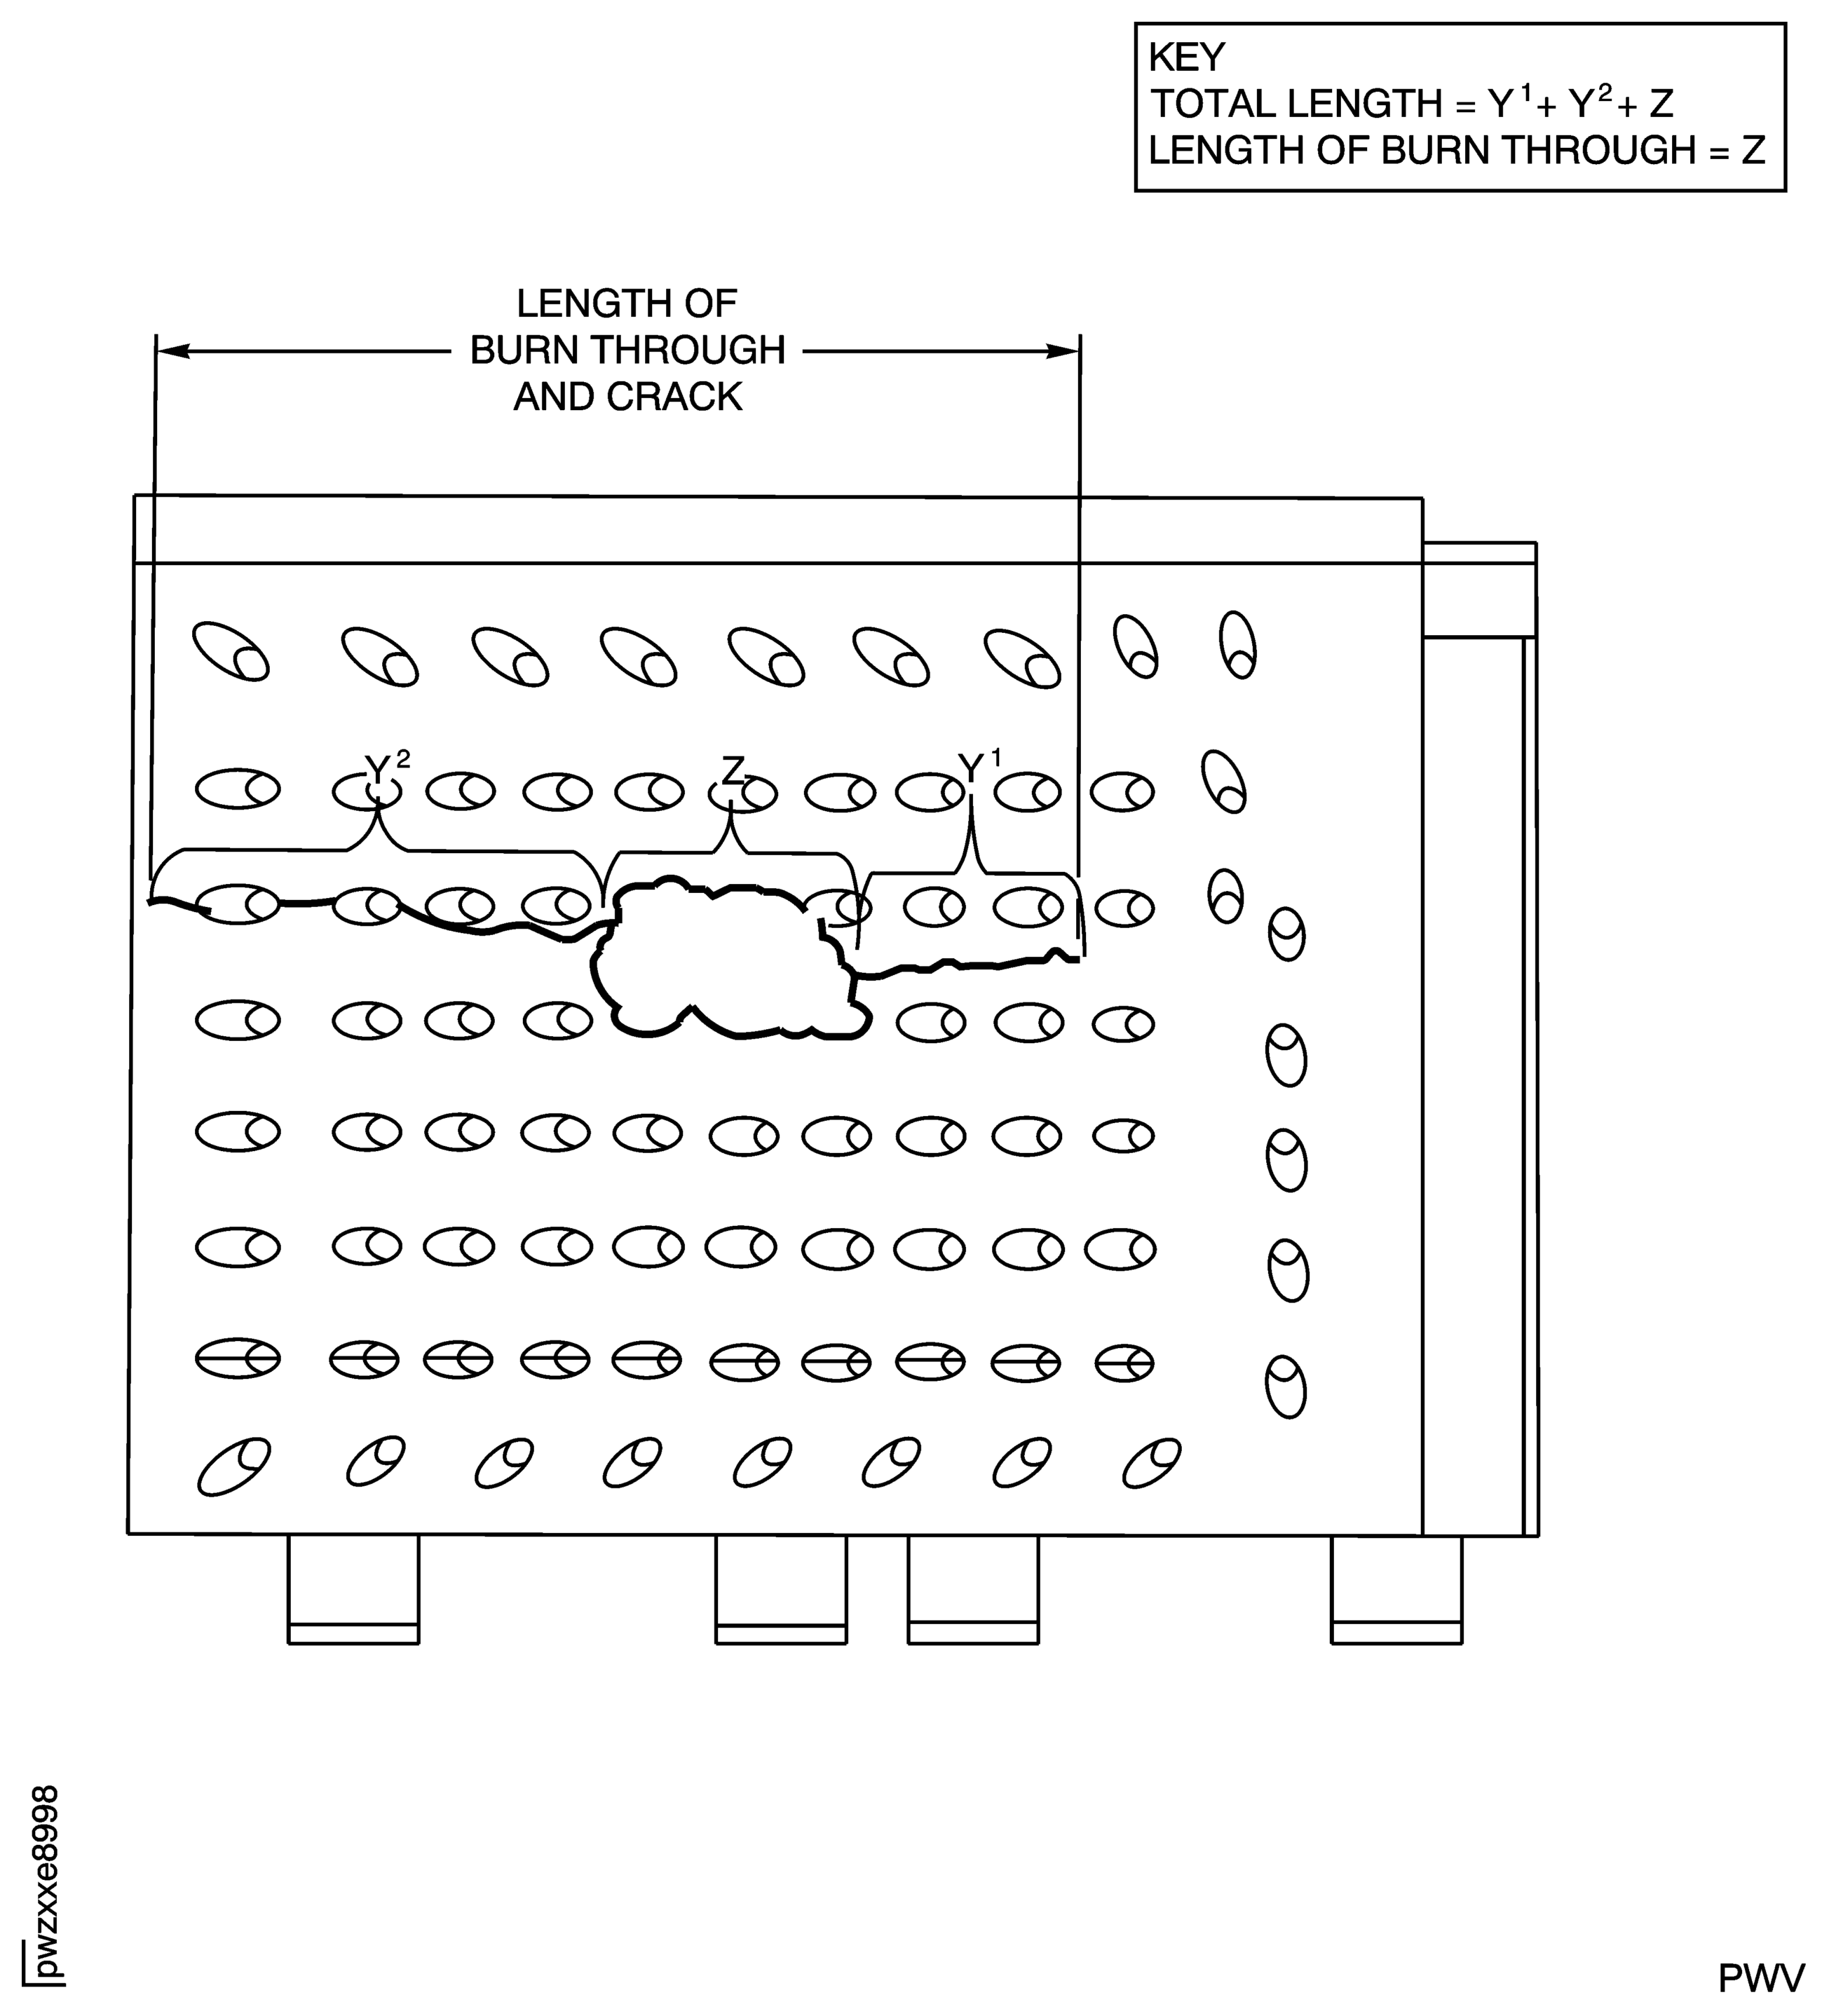
Figure: Closed Loop of Cracks
Closed Loop of Cracks
