Export Control
EAR Export Classification: Not subject to the EAR per 15 C.F.R. Chapter 1, Part 734.3(b)(3), except for the following Service Bulletins which are currently published as EAR Export Classification 9E991: SBE70-0992, SBE72-0483, SBE72-0580, SBE72-0588, SBE72-0640, SBE73-0209, SBE80-0024 and SBE80-0025.Copyright
© IAE International Aero Engines AG (2001, 2014 - 2021) The information contained in this document is the property of © IAE International Aero Engines AG and may not be copied or used for any purpose other than that for which it is supplied without the express written authority of © IAE International Aero Engines AG. (This does not preclude use by engine and aircraft operators for normal instructional, maintenance or overhaul purposes.).Applicability
V2500-A5
Common Information
TASK 72-41-30-440-002-B02 HPC Front Case And Vane Assembly - Measure And Machine The Stage 6 Stator Vanes And Stage 3 Through 6 Rotor Path Rings (Mechanical Clamping Tool Method), Assembly-002
General
Fig/item numbers in parentheses in the procedure agree with those used in the IPC. Only the primary Fig/item numbers are used. For the service bulletin alpha variants refer to the IPC.
For standard torque data and procedures, refer to SPM TASK 70-41-00-400-501, SPM TASK 70-41-01-400-501 and SPM TASK 70-41-02-400-501.
Special torque data and assembly tolerances are included in the procedure.
Lubricate all threads and touch faces of nuts and bolts with CoMat 10-077 APPROVED ENGINE OILS unless other lubricants are referred to in the procedure.
To identify, lubricate and install seal rings, refer to the SPM TASK 70-44-01-400-501.
After assembly apply CoMat 07-038 AIR DRYING ENAMEL to any damaged surface protection, joint flanges and parts used to attach. Use the correct color of the air drying enamel. Refer to SPM TASK 70-63-02-380-501.
The number for each radial location must be identified in a clockwise direction. These start at the engine top position when you look from the rear of the engine, unless stated differently in the procedure.
This TASK gives the procedure to measure and then machine the stage 6 stator vanes and the stage 3, 4, 5 and 6 rotor path rings. The subsequent TASKS give the procedure to assemble HP compressor front cases.
TASK 72-41-30-440-001-C00 (ASSEMBLY-001, CONFIG-003) Install the HP Compressor Stage 3, 4 and 5 Rotor Path Rings and Stage 6 Rotor Ring Segments
Install the VIGV by TASK 72-41-30-440-003-B00 (ASSEMBLY-003, CONFIG-002).
Install the Stage 3 VSV by TASK 72-41-30-440-004-B00 (ASSEMBLY-004, CONFIG-002).
Install the Stage 4 VSV by TASK 72-41-30-440-005-B00 (ASSEMBLY-005, CONFIG-002).
Install the Stage 5 VSV by TASK 72-41-30-440-006-B00 (ASSEMBLY-006, CONFIG-002).
Install the Stage 6 Stator Vanes by TASK 72-41-30-440-007-B00 (ASSEMBLY-007, CONFIG-002).
Install the VIGV and the Stages 3 to 5 Bridge Pieces by TASK 72-41-30-440-008-B00 (ASSEMBLY-008, CONFIG-002).
Measure the HP Compressor Front Cases by TASK 72-41-30-440-009-B00 (ASSEMBLY-009, CONFIG-002).
Disassemble the HP Compressor Front CasesTASK 72-41-30-440-010-B00 (ASSEMBLY-010, CONFIG-002).
TASK 72-41-30-440-011-B00 (ASSEMBLY-011, CONFIG-002) Check and Set VSV System with Optimised Build and Setting Clearances - SBE 72-0400.
Machine Requirements
The information that follows is a guideline. If any additional information is necessary contact IAE.
For the rotor path ring machining, a machine is necessary that can meet the conditions that follow:
Permits a 34.00 in. (863.6 mm) diameter by 18.00 in. (457.2 mm) depth workpiece to be installed.
The workpiece must be turned in a counterclockwise direction, when viewed from the tailstock.
Permits a K grade carbide I.T.T. turning too with a 0.031 in. (0.80 mm) radius tip to be installed.
The conditions that follow must be used when you machine the rotor path linings:
A component surface speed of 70 m/min. This is equivalent to speed of 42 r.p.m.
The maximum depth of cut to be used is 0.006 in. (0.15 mm).
The feed rate is to be determined by general feel for the workpiece.
For the stator vane tip grinding, a machine is necessary that can meet the conditions that follow:
Permits a 34.00 in. (863.6 mm) diameter by 18.00 in. (457.2 mm) depth workpiece to be installed.
The workpiece must be turned in a clockwise direction, when viewed from the tailstock.
Permits a grinding set-up to be attached to the machine. It will be necessary for the grinding wheel to be turned.
The grinding wheel must be turned in a counterclockwise direction, when viewed from the tailstock.
Permits a swarf extraction unit to be installed.
The conditions that follow must be used when you are grinding the stator vane tips:
A component surface speed of 34 m/min. This is equivalent to a speed of 23 r.p.m.
A grinding wheel surface speed of 1675 m/min. This is equivalent to a speed of approximately 4090 r.p.m. at the recommended grinding wheel diameter.
A grinding wheel diameter of between 4.6 in. (118 mm) and 5.5 in. (140 mm).
It is recommended that you use a plunge grinding method with an infeed rate of 0,0075 mm per revolution.
Use a 'spark-out' time of 10 revolutions or 25 seconds.
NOTE
NOTE
Preliminary Requirements
Pre-Conditions
NONESupport Equipment
| Name | Manufacturer | Part Number / Identification | Quantity | Remark |
|---|---|---|---|---|
| Grinding Machine | LOCAL | Grinding Machine | ||
| Mechanical Brush | LOCAL | Mechanical Brush | ||
| Lathe | LOCAL | Lathe | ||
| Vibration peening equipment | LOCAL | Vibration peening equipment | ||
| K Grade I.T.T. Turning Tool | LOCAL | K Grade I.T.T. Turning Tool | ||
| Protective Gloves | LOCAL | Protective Gloves | ||
| IAE 1R18205 Lifting tool | 0AM53 | IAE 1R18205 | 1 | |
| IAE 1R18207 Support stand | 0AM53 | IAE 1R18207 | 1 | |
| IAE 1R18212 Support ring | 0AM53 | IAE 1R18212 | 1 | |
| IAE 1R18321 Turnover stand | 0AM53 | IAE 1R18321 | 1 | |
| IAE 1R18410 Transport/park stand | 0AM53 | IAE 1R18410 | 1 | |
| IAE 1R18411 Machine fixture | 0AM53 | IAE 1R18411 | 1 | |
| IAE 1R18413 Turnover stand adaptor | 0AM53 | IAE 1R18413 | 1 | |
| IAE 1R18414 Boring bar | 0AM53 | IAE 1R18414 | 1 | |
| IAE 1R18417 Lifting Turnover trunnions | 0AM53 | IAE 1R18417 | 2 | |
| IAE 1R18418 Multiflex holder | 0AM53 | IAE 1R18418 | 1 | |
| IAE 1R18419 Probe holder | 0AM53 | IAE 1R18419 | 1 | |
| IAE 1R18430 Turning holder | 0AM53 | IAE 1R18430 | 1 | |
| IAE 1R18431 Lifting beam | 0AM53 | IAE 1R18431 | 1 | |
| IAE 1R19284 Lifting fixture | 0AM53 | IAE 1R19284 | 2 | |
| IAE 1R19834 Centralising tool | 0AM53 | IAE 1R19834 | 1 | |
| IAE 1R19835 Clamping tool | 0AM53 | IAE 1R19835 | 1 | |
| IAE 3R18232 Lifting beam | 0AM53 | IAE 3R18232 | 1 | |
| Vacuum | LOCAL | Vacuum | 1 |
Consumables, Materials and Expendables
| Name | Manufacturer | Part Number / Identification | Quantity | Remark |
|---|---|---|---|---|
| CoMat 07-038 AIR DRYING ENAMEL | k3504 | CoMat 07-038 | ||
| CoMat 10-077 APPROVED ENGINE OILS | X333X | CoMat 10-077 |
Spares
NONESafety Requirements
NONEProcedure
Install 20 stage 6 stator vanes (HPC Stator Vanes (72-41-22,01-400) and HPC Stator Vanes (72-41-22,01-448) or HPC Stator Vanes (72-41-22,01-450)) in to the right hand side of the upper half HP compressor front case.
Install 20 stage 6 stator vanes (HPC Stator Vanes (72-41-22,01-400) and HPC Stator Vanes (72-41-22,01-448) or HPC Stator Vanes (72-41-22,01-450)) and one stage 6 stop vane HPC Stator Vanes (72-41-22,01-350) in to the left hand side of the upper half HP compressor front case.
Install 20 stage 6 stator vanes (HPC Stator Vanes (72-41-22,01-400) and HPC Stator Vanes (72-41-22,01-448) or HPC Stator Vanes (72-41-22,01-450)) in to the left hand side of the lower half HP compressor front case.
Install 20 stage 6 stator vanes (HPC Stator Vanes (72-41-22,01-400) and HPC Stator Vanes (72-41-22,01-448) or HPC Stator Vanes (72-41-22,01-450)) and one stage 6 stop vane HPC Stator Vanes (72-41-22,01-350) in to the right hand side of the lower half HP compressor front case.
SUBTASK 72-41-30-440-215 Install the Stage 6 Stator Vanes

CAUTION
THE STAGE 6 STATOR VANES HAVE BEEN IDENTIFIED WITH THEIR POSITION NUMBERS. MAKE SURE THE VANES ARE INSTALLED IN THEIR CORRECT POSITIONS. IF THE VANES ARE NOT INSTALLED IN THEIR CORRECT POSITION YOU CAN CAUSE DAMAGE TO THE STATOR VANES.Install IAE 1R19284 Lifting fixture 2 off, on to the rear flanges of the upper and lower half front cases.
Install the two stage 4 sealing strips HP COMPRESSOR SPLIT CASE (72-41-31,01-678) in to the slots in the stage 4 rotor path ring at the split line flanges.
Install the two stage 5 sealing strips HP COMPRESSOR SPLIT CASE (72-41-31,01-679) in to the slots in the stage 5 rotor path ring at the split line flanges.
Install the two stage 6 sealing strips HP COMPRESSOR SPLIT CASE (72-41-31,01-680) in to the slots in the stage 6 rotor ring segments at the split line flanges.

CAUTION
YOU MUST NOT LET THE BOLTS TURN WHEN YOU INSTALL THEM AND WHEN YOU TORQUE THE NUTS. THE BOLTS ARE A CLOSE TOLERANCE FIT.Install the four bolts HPC Assembly (72-41-00,01-112) and four nuts HPC Assembly (72-41-00,01-101) at positions 23, 27, 29 and 31. Install the 28 bolts HPC Assembly (72-41-00,01-108), 28 spacers HPC Assembly (72-41-00,01-104) and 28 nuts HPC Assembly (72-41-00,01-102) at the remaining split line flange positions.
Torque the nuts to 180 lbfin to 220 lbfin (20.00 Nm to 25.00 Nm). Refer to Figure for the sequence to torque the nuts.
SUBTASK 72-41-30-440-216 Install the HP Compressor Front Case Split Line Flange Bolts
Refer to Figure.
SUBTASK 72-41-30-220-453 Measure the Stage 6 Stator Vanes Inter-Platform Clearances
Remove the HP compressor front case split line flange nuts, spacers and bolts as given in Step.

CAUTION
YOU MUST OBEY THESE INSTRUCTIONS WHEN YOU INSTALL THE UNDERSIZE VANES:A MAXIMUM OF FIVE UNDERSIZE VANES CAN BE USED BETWEEN ANY TWO ADJACENT STOP VANES.THE UNDERSIZE VANES MUST BE INSTALLED AT EQUAL DISTANCES BETWEEN THE STOP VANES.THE UNDERSIZE VANES MUST NOT BE INSTALLED ADJACENT TO STOP VANES OR OTHER UNDERSIZE VANES.Remove and install the stage 6 stator vanes HPC Stator Vanes (72-41-22,01-448) or stage 6 undersize vanes HPC Stator Vanes (72-41-22,01-450) as necessary. One undersize vane will give an increase in the inter-platform clearance of 0.0157 in. (0.400 mm).
Install the HP compressor front case split line flange bolts as given in Step.
Measure the stage 6 stator vanes inter-platform clearances as given in Step.
SUBTASK 72-41-30-440-217 Install the Stage 6 Undersize Vanes
NOTE
To get the specified inter-platform clearance at the four stage 6 stop vanes HPC Stator Vanes (72-41-22,01-350), use the undersize stator vanes HPC Stator Vanes (72-41-22,01-450) or stage 6 stator vanes HPC Stator Vanes (72-41-22,01-448) as necessary.This SUBTASK must only be done if the inter-platform clearances measured in SUBTASK 72-41-30-220-453 are not correct.Do the checks that follow the clamping elements (part of the IAE 1R19835 Clamping tool) before use.

CAUTION
MAKE SURE THAT THE EYE BOLTS ARE REMOVED FROM THE TOP PLATE AFTER INSTALLATION.
CAUTION
TAKE CARE NOT TO MARK THE VANES WHEN YOU INSERT THE BOLTS. ALWAYS USE AN ALLEN KEY TO PREVENT DAMAGE TO THE THREADS OF THE BOLTS.Place the top plate No. 1 equally on the vanes and install. Hold a corresponding bottom plate below the vanes aligned by number and tighten the four bolts.
Install the clamping elements at stage 6.
SUBTASK 72-41-30-440-232 Install the Clamping Tool for HP Compressor Front Case Stage 6

CAUTION
MAKE SURE THE TOOL FACES AND COMPONENT FACES THAT TOUCH ARE CLEAN AND NOT DAMAGED. DIRTY OR DAMAGED SURFACES CAN CAUSE INCORRECT INDICATIONS AND CAN DAMAGE COMPONENTS.
CAUTION
YOU MUST REPLACE DAMAGED CLAMPING ELEMENTS. DAMAGED CLAMPING ELEMENTS CAN CAUSE DAMAGE TO THE STATOR VANES DURING THE GRINDING PROCEDURE.NOTE
Rotor paths must be machined before fitting the mechanical clamping tool.Install the centralising pillar (part of the IAE 1R19834 Centralising tool) on the draw bar.
Install the spider (part of the IAE 1R19834 Centralising tool) on the setting bush for stage 6 with the four arms inward.

WARNING
DO NOT INFLATE THE CENTRALISING RING TYRE TO 3.5 BAR (51 PSI). IF YOU PUT TOO MUCH PRESSURE IN THE TYRE, THE TYRE CAN EXPLODE. AN EXPLOSION CAN CAUSE INJURY TO PERSONNEL AND/OR DAMAGE EQUIPMENT.Connect the airline and pressure gauge to the tyre of centralising ring and inflate to a maximum pressure of 3.5 bar (51 psi).
Tighten the bolts (part of the IAE 1R19834 Centralising tool) on the stage 6 clamps with the power driver.
SUBTASK 72-41-30-440-233 Install the Centralising Tool for HP Compressor Front Case Stage 6
Refer to Figure.
Install IAE 1R18413 Turnover stand adaptor 1 off in IAE 1R18321 Turnover stand turnover stand 1 off.
Install IAE 1R18411 Machine fixture 1 off in to the turnover adapter.
SUBTASK 72-41-30-440-220 Assemble the Tools to Turn the HP Compressor Front Cases
Tighten the six bolts installed in Step.
Install IAE 1R18205 Lifting tool 1 off, on the HP Compressor front case rear flange.
Install the HP compressor front case in IAE 1R18411 Machine fixture 1 off.
Install IAE 3R18232 Lifting beam 1 off on to the HP Compressor front case and machine fixture.
Use a suitable hoist and lift the HP Compressor front case and machine fixture from the turnover stand. Lower the assembly in to IAE 1R18410 Transport/park stand 1 off.
SUBTASK 72-41-30-440-221 Install the HP Compressor Front Case in the Machine Fixture
Refer to Figure.
Use the conditions given in 3. Machine Requirements, to machine the stage 6 stator vanes to the dimensions given in Figure. Write a record of the dimensions which the stator vanes are machined to.
Install IAE 3R18232 Lifting beam 1 off, on to the HP Compressor front case and the machine fixture.
SUBTASK 72-41-30-324-054 Machine the Stage 6 Stator Vanes
Attach the IAE 1R18414 Boring bar 1 off to the machine tool post. Safety with the three set screws.
Install the IAE 1R18418 Multiflex holder 1 off in the locating slot on the measure support. Safety with the three grub screws.
Attach the IAE 1R18430 Turning holder 1 off at the measurement holder interface. Safety with the allen screw.
To measure the rotor path linings, remove the turning holder and attach the IAE 1R18419 Probe holder 1 off to the measurement holder interface. Safety with the allen screw.
Set up the tools to machine the stage 3, 4, 5 and 6 rotor path linings.
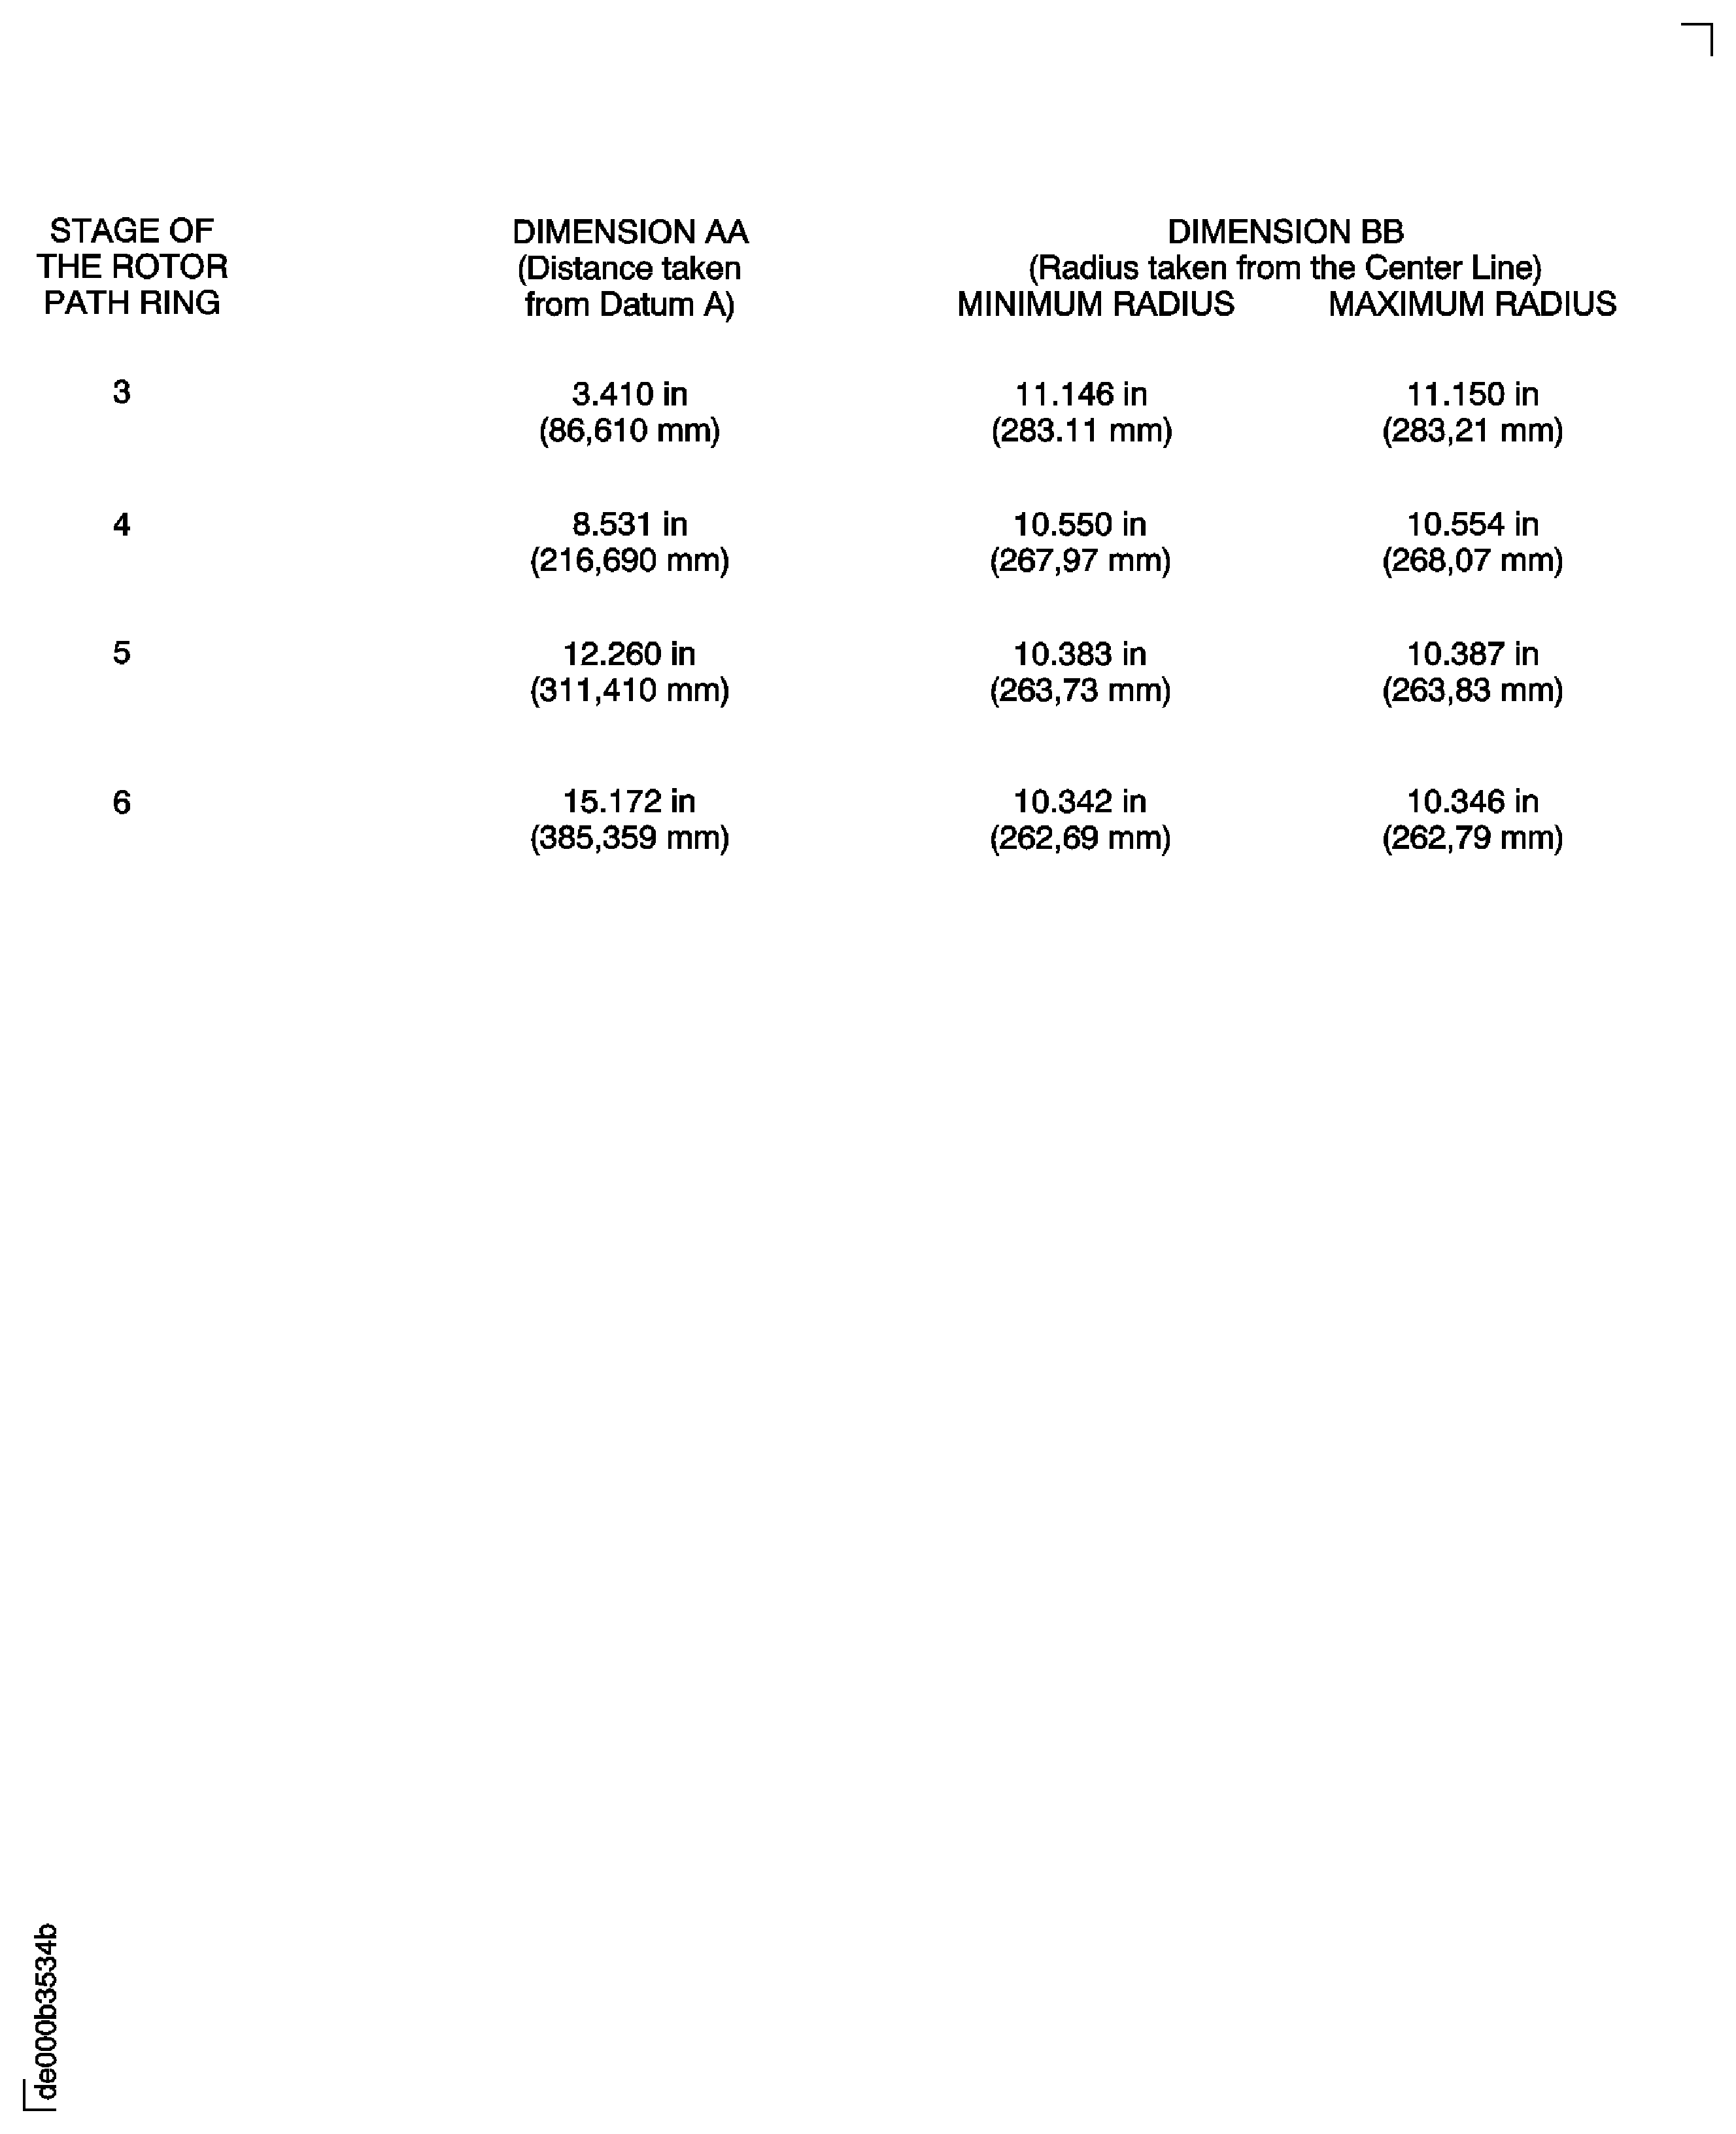
Use the conditions given in 3. Machine Requirements, to machine the stage 4, 5 and 6 rotor path linings to the dimensions given in Figure.
When the rotor path linings have been machined remove the unwanted abradable lining. Remove the unwanted abradable lining as shown in detail A on Figure at the front and rear of each rotor path linings. Remove only the minimum quantity of abradable lining to show the metal at the front and rear of the lining.
Install IAE 3R18232 Lifting beam 1 off on to the HP Compressor front case and machine fixture.
Install the HP Compressor front case and machine fixture in IAE 1R18410 Transport/park stand 1 off.
SUBTASK 72-41-30-325-053 Machine the Stage 3, 4, 5 and 6 Rotor Path Linings
Install IAE 3R18232 Lifting beam 1 off on to the HP Compressor front case and machine fixture. Refer to Step.
Use a suitable hoist and install the assembly in to IAE 1R18413 Turnover stand adaptor 1 off. The turnover adapter is installed in the turnover stand. Refer to Step. Remove the lifting adapter.
Install IAE 1R18205 Lifting tool 1 off as given in Step.
Carefully lower the HP Compressor front case on to IAE 1R18207 Support stand 1 off.
Remove the lifting fixture as given in Step.
SUBTASK 72-41-30-440-223 Install the HP Compressor Front Cases on the Stand
Use a Vacuum to remove any loose swarf or dust which may have accumulated during the grinding process.
Clean the HP Compressor front cases and Stage 6 stator vanes by TASK 70-11-03-300-503
Carefully move the upper and lower HP Compressor front cases apart. Make sure the sealing strips at the split line flanges are kept in their locations.
NOTE
The stop vanes at the top center position and the bottom center position are kept in position by the stage 6 rotor path ring segments. Do not remove these two stop vanes.
SUBTASK 72-41-30-110-053 Clean and Disassemble the HP Compressor Front Cases and the Stage 6 Stator Vanes
Figure: Install the Stage 6 Stator Vanes
Sheet 1
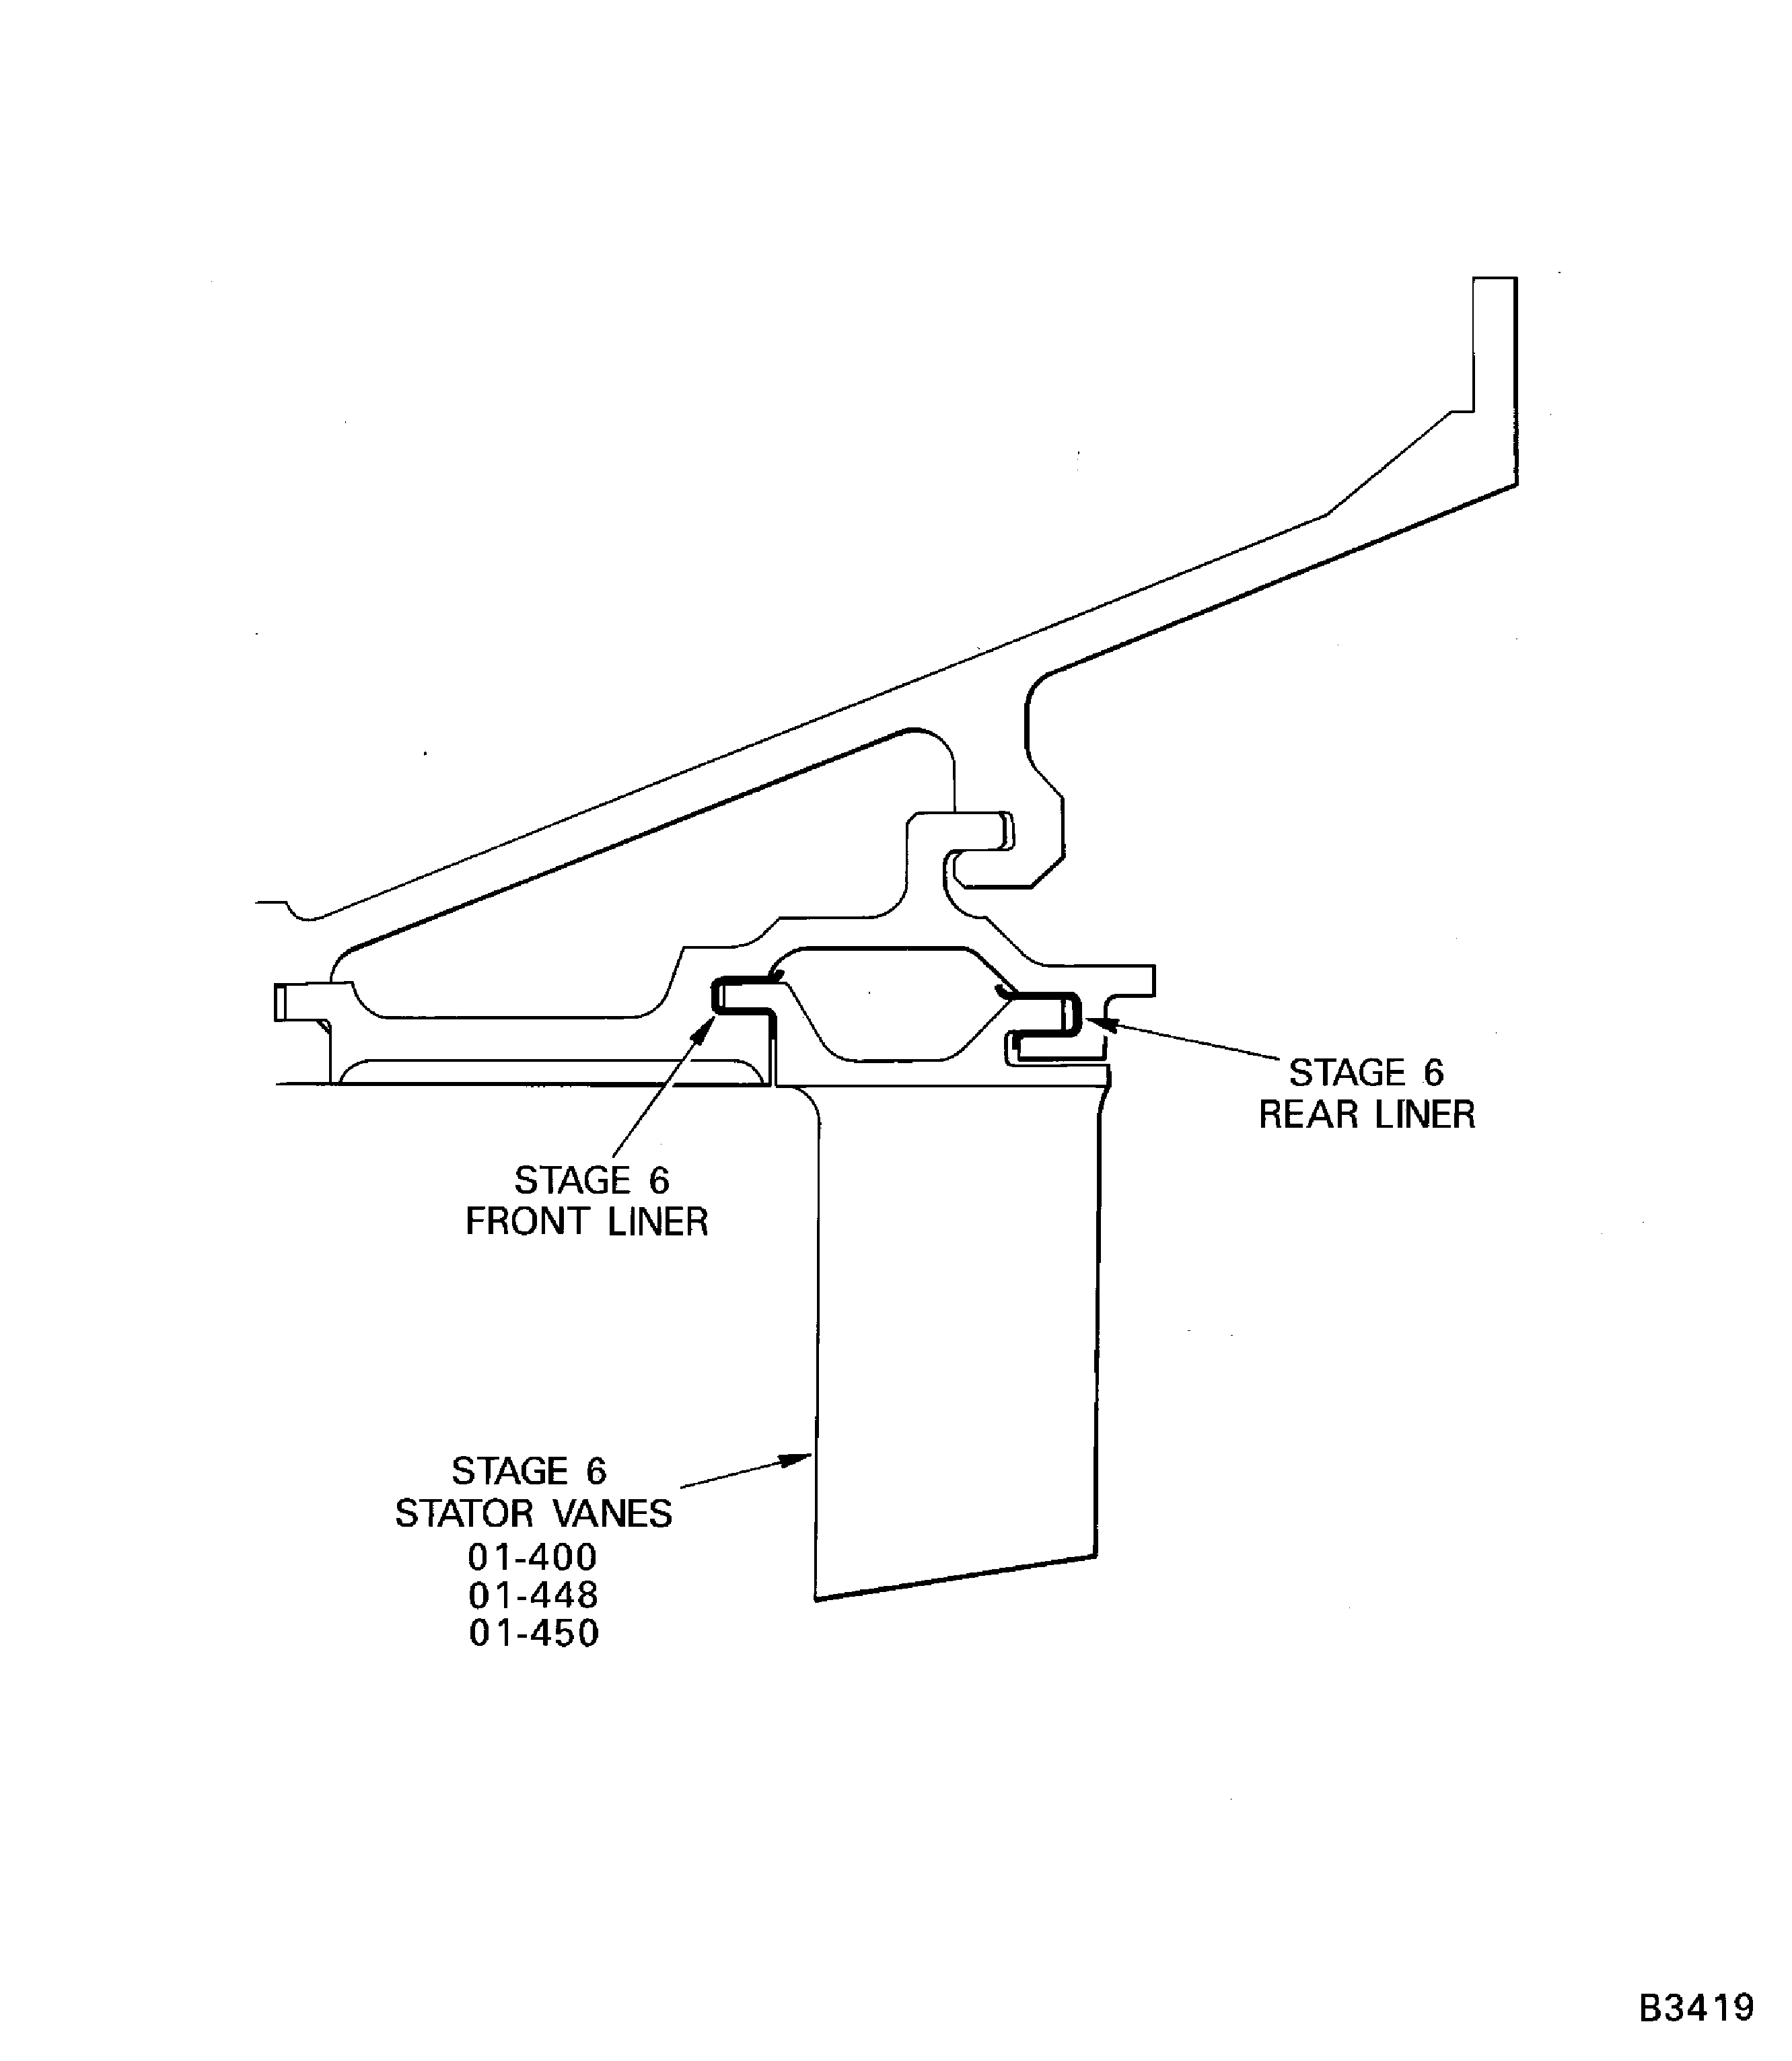
Figure: Install the Stage 6 Stator Vanes
Sheet 2
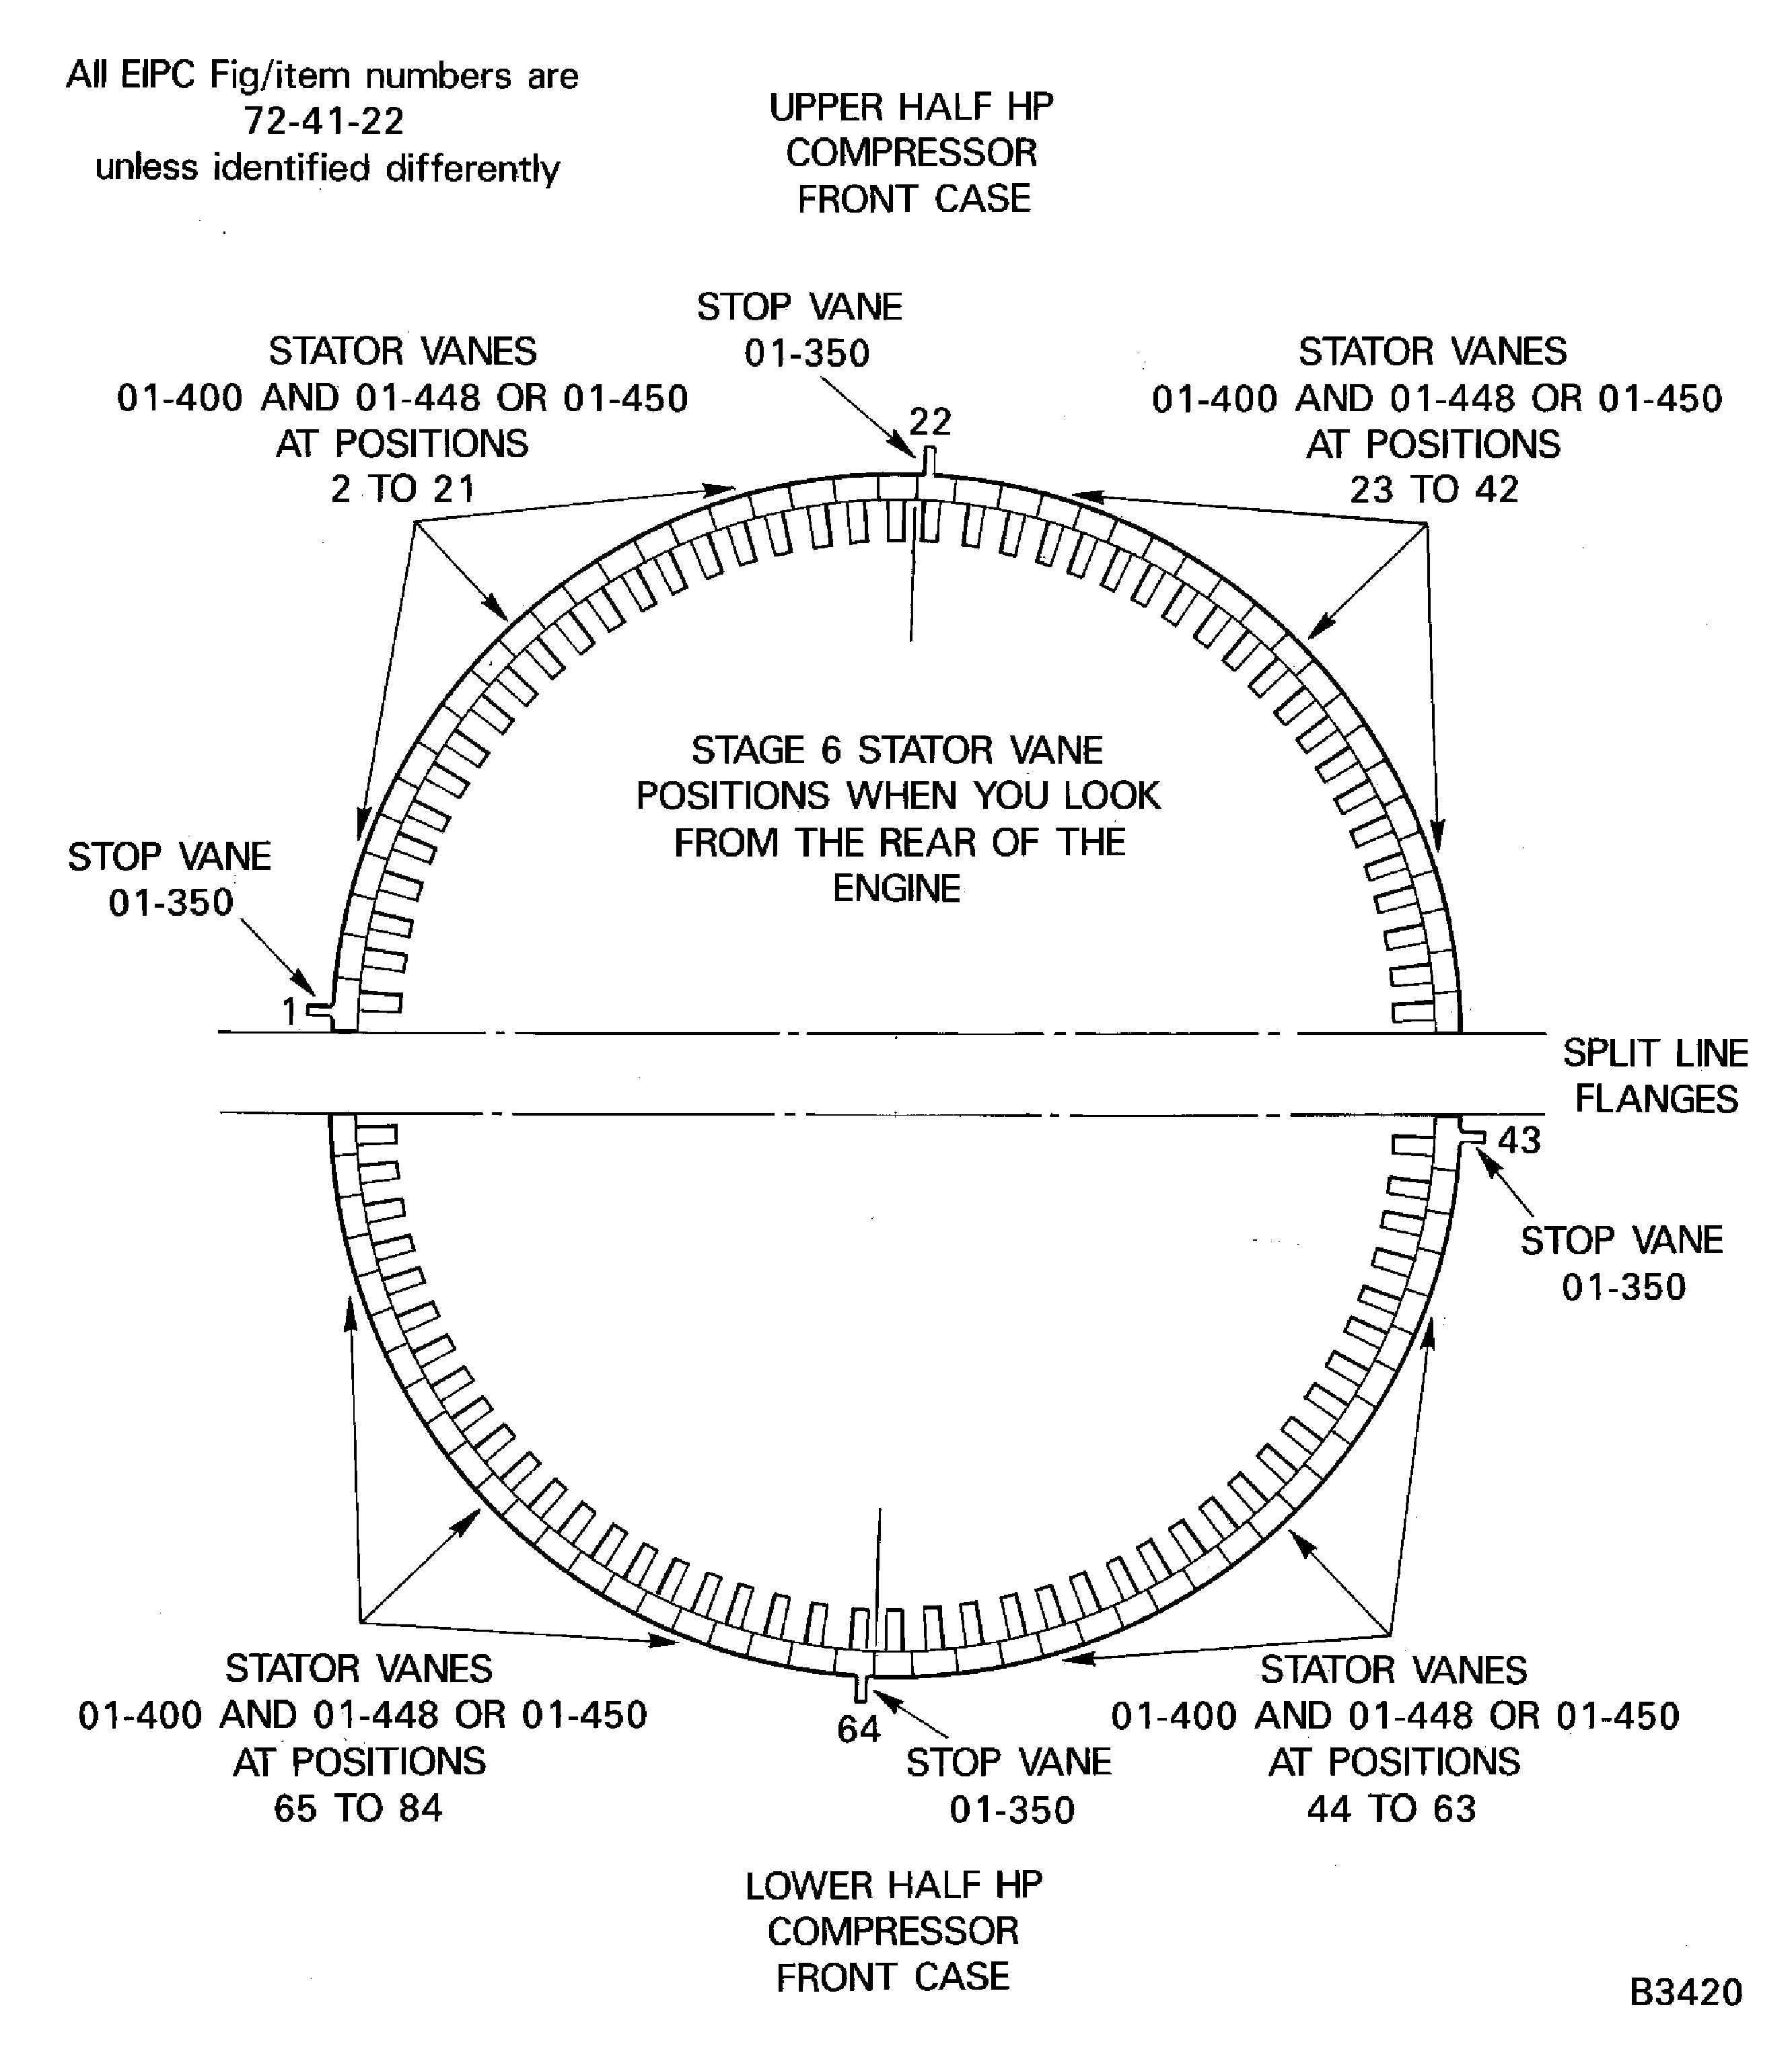
Figure: Install the Stage 6 Stator Vanes
Sheet 3
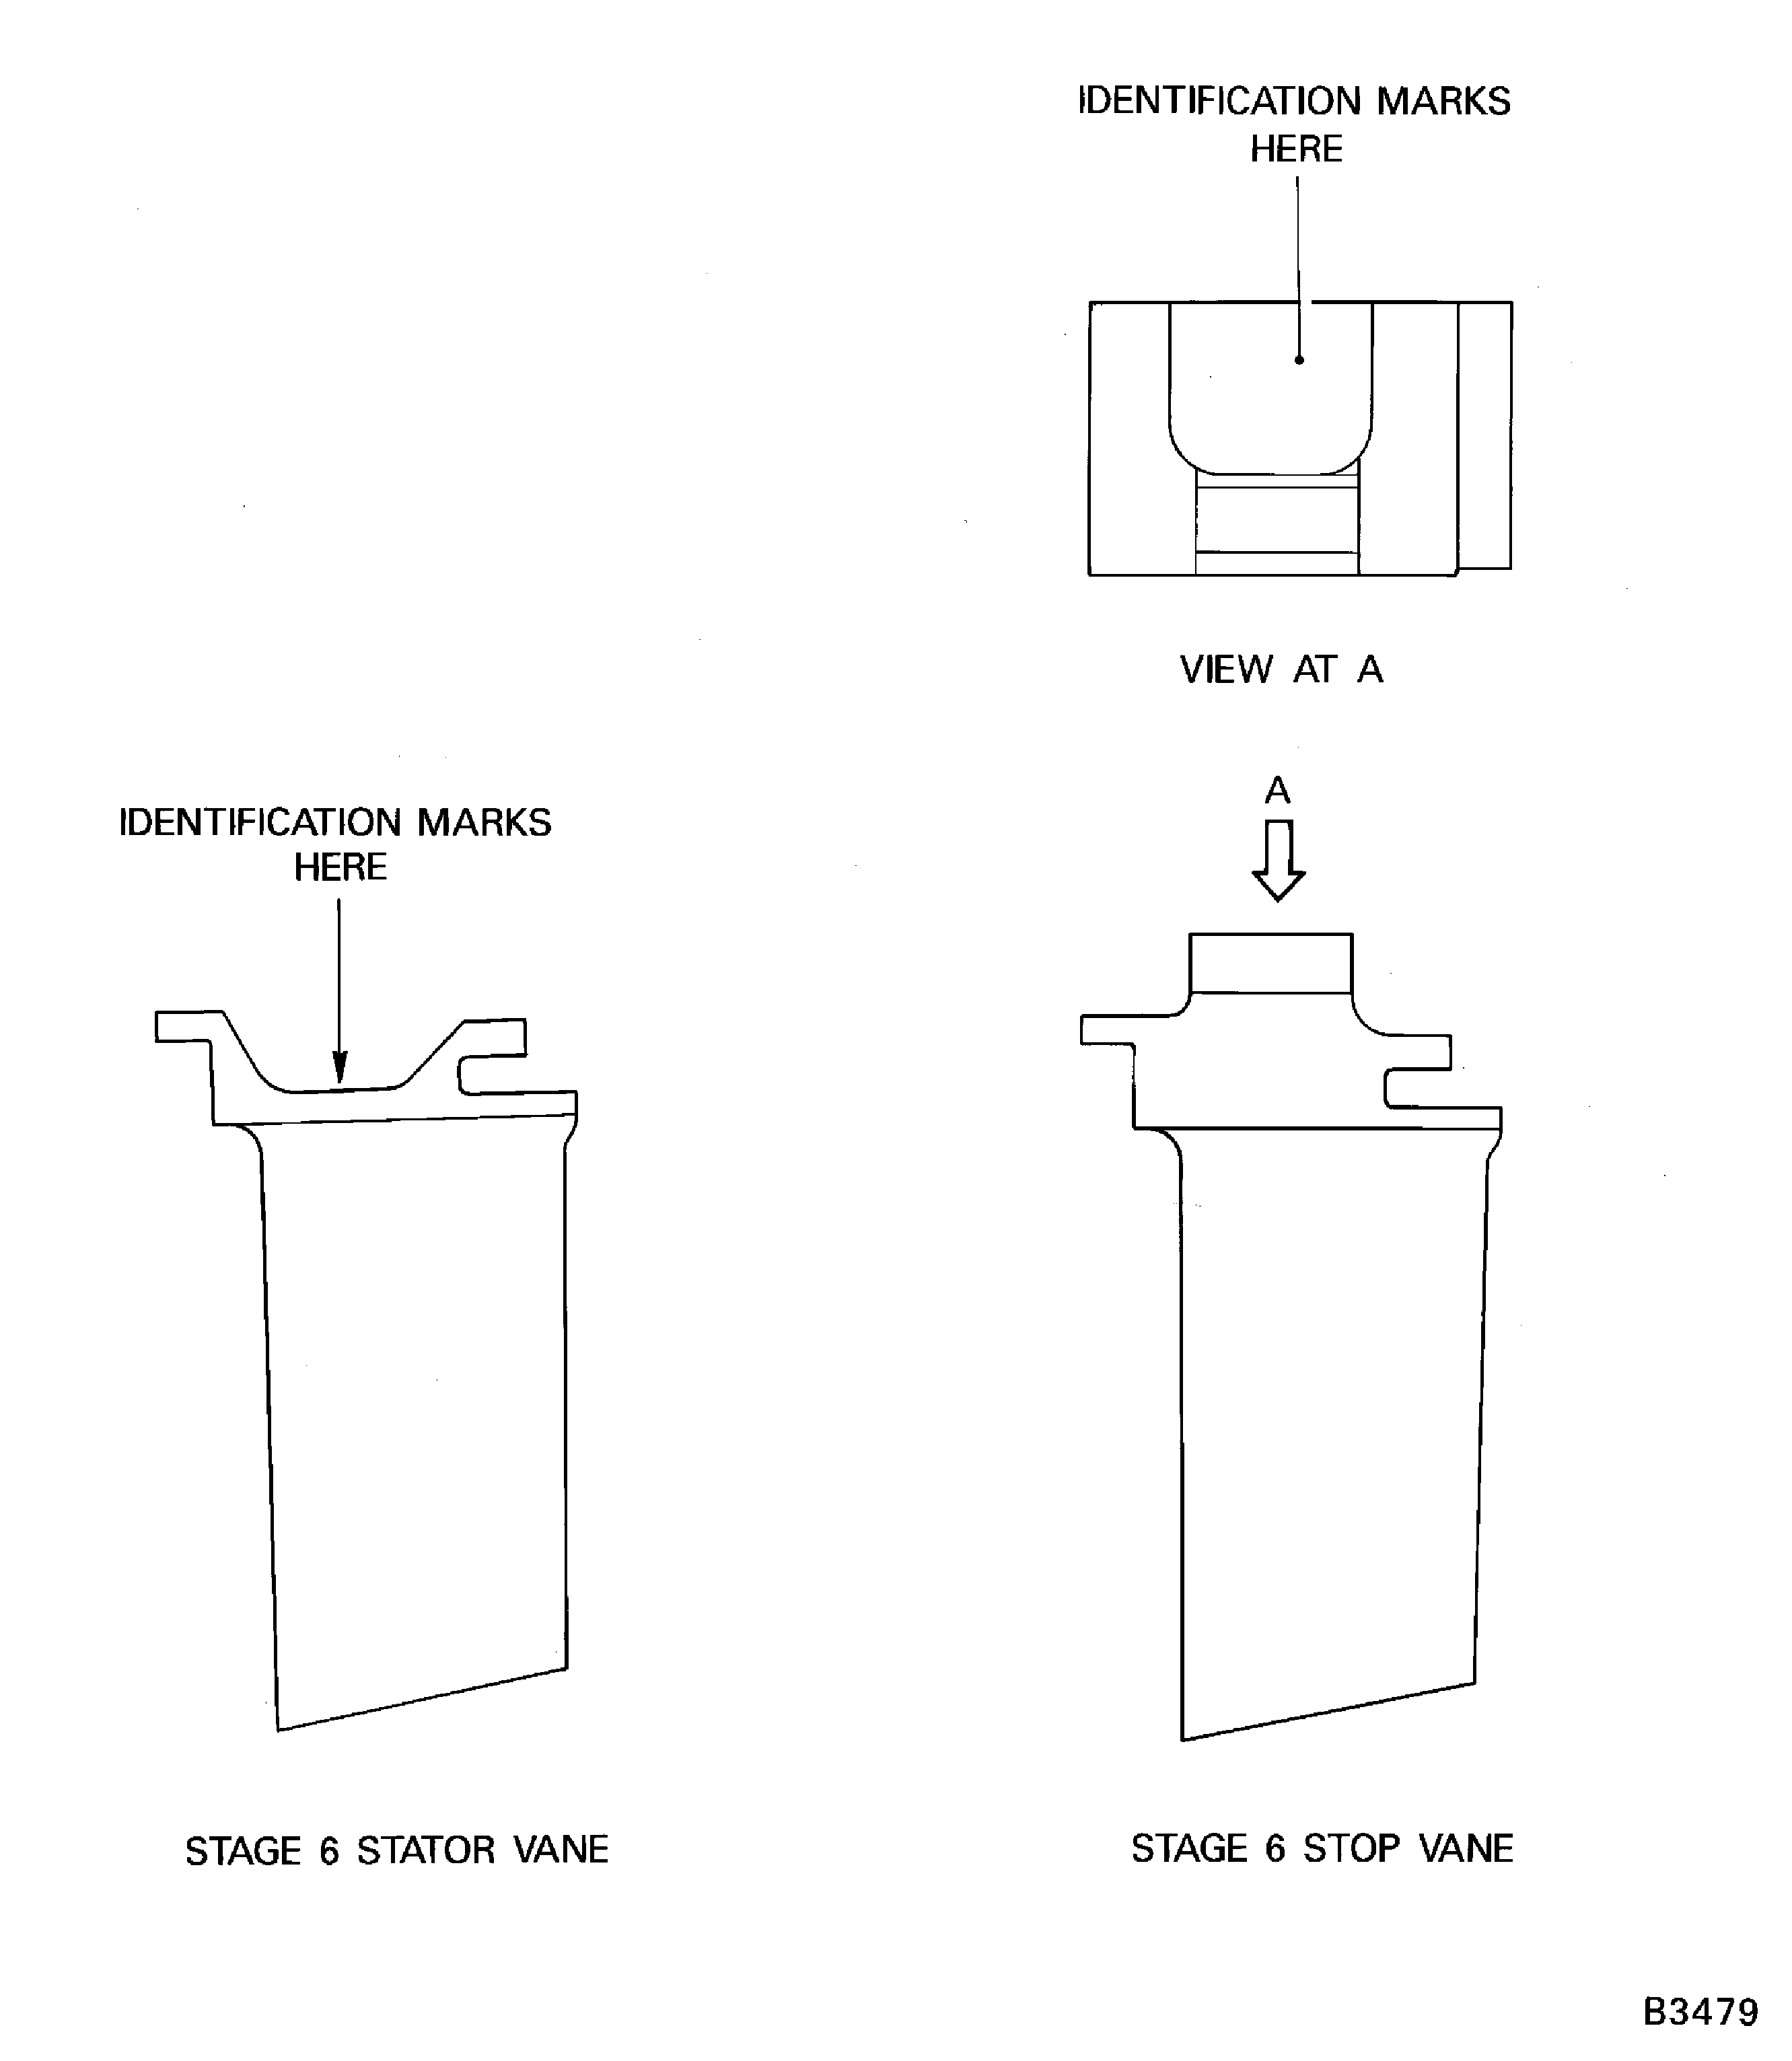
Figure: Install the Lifting Fixture
Install the Lifting Fixture
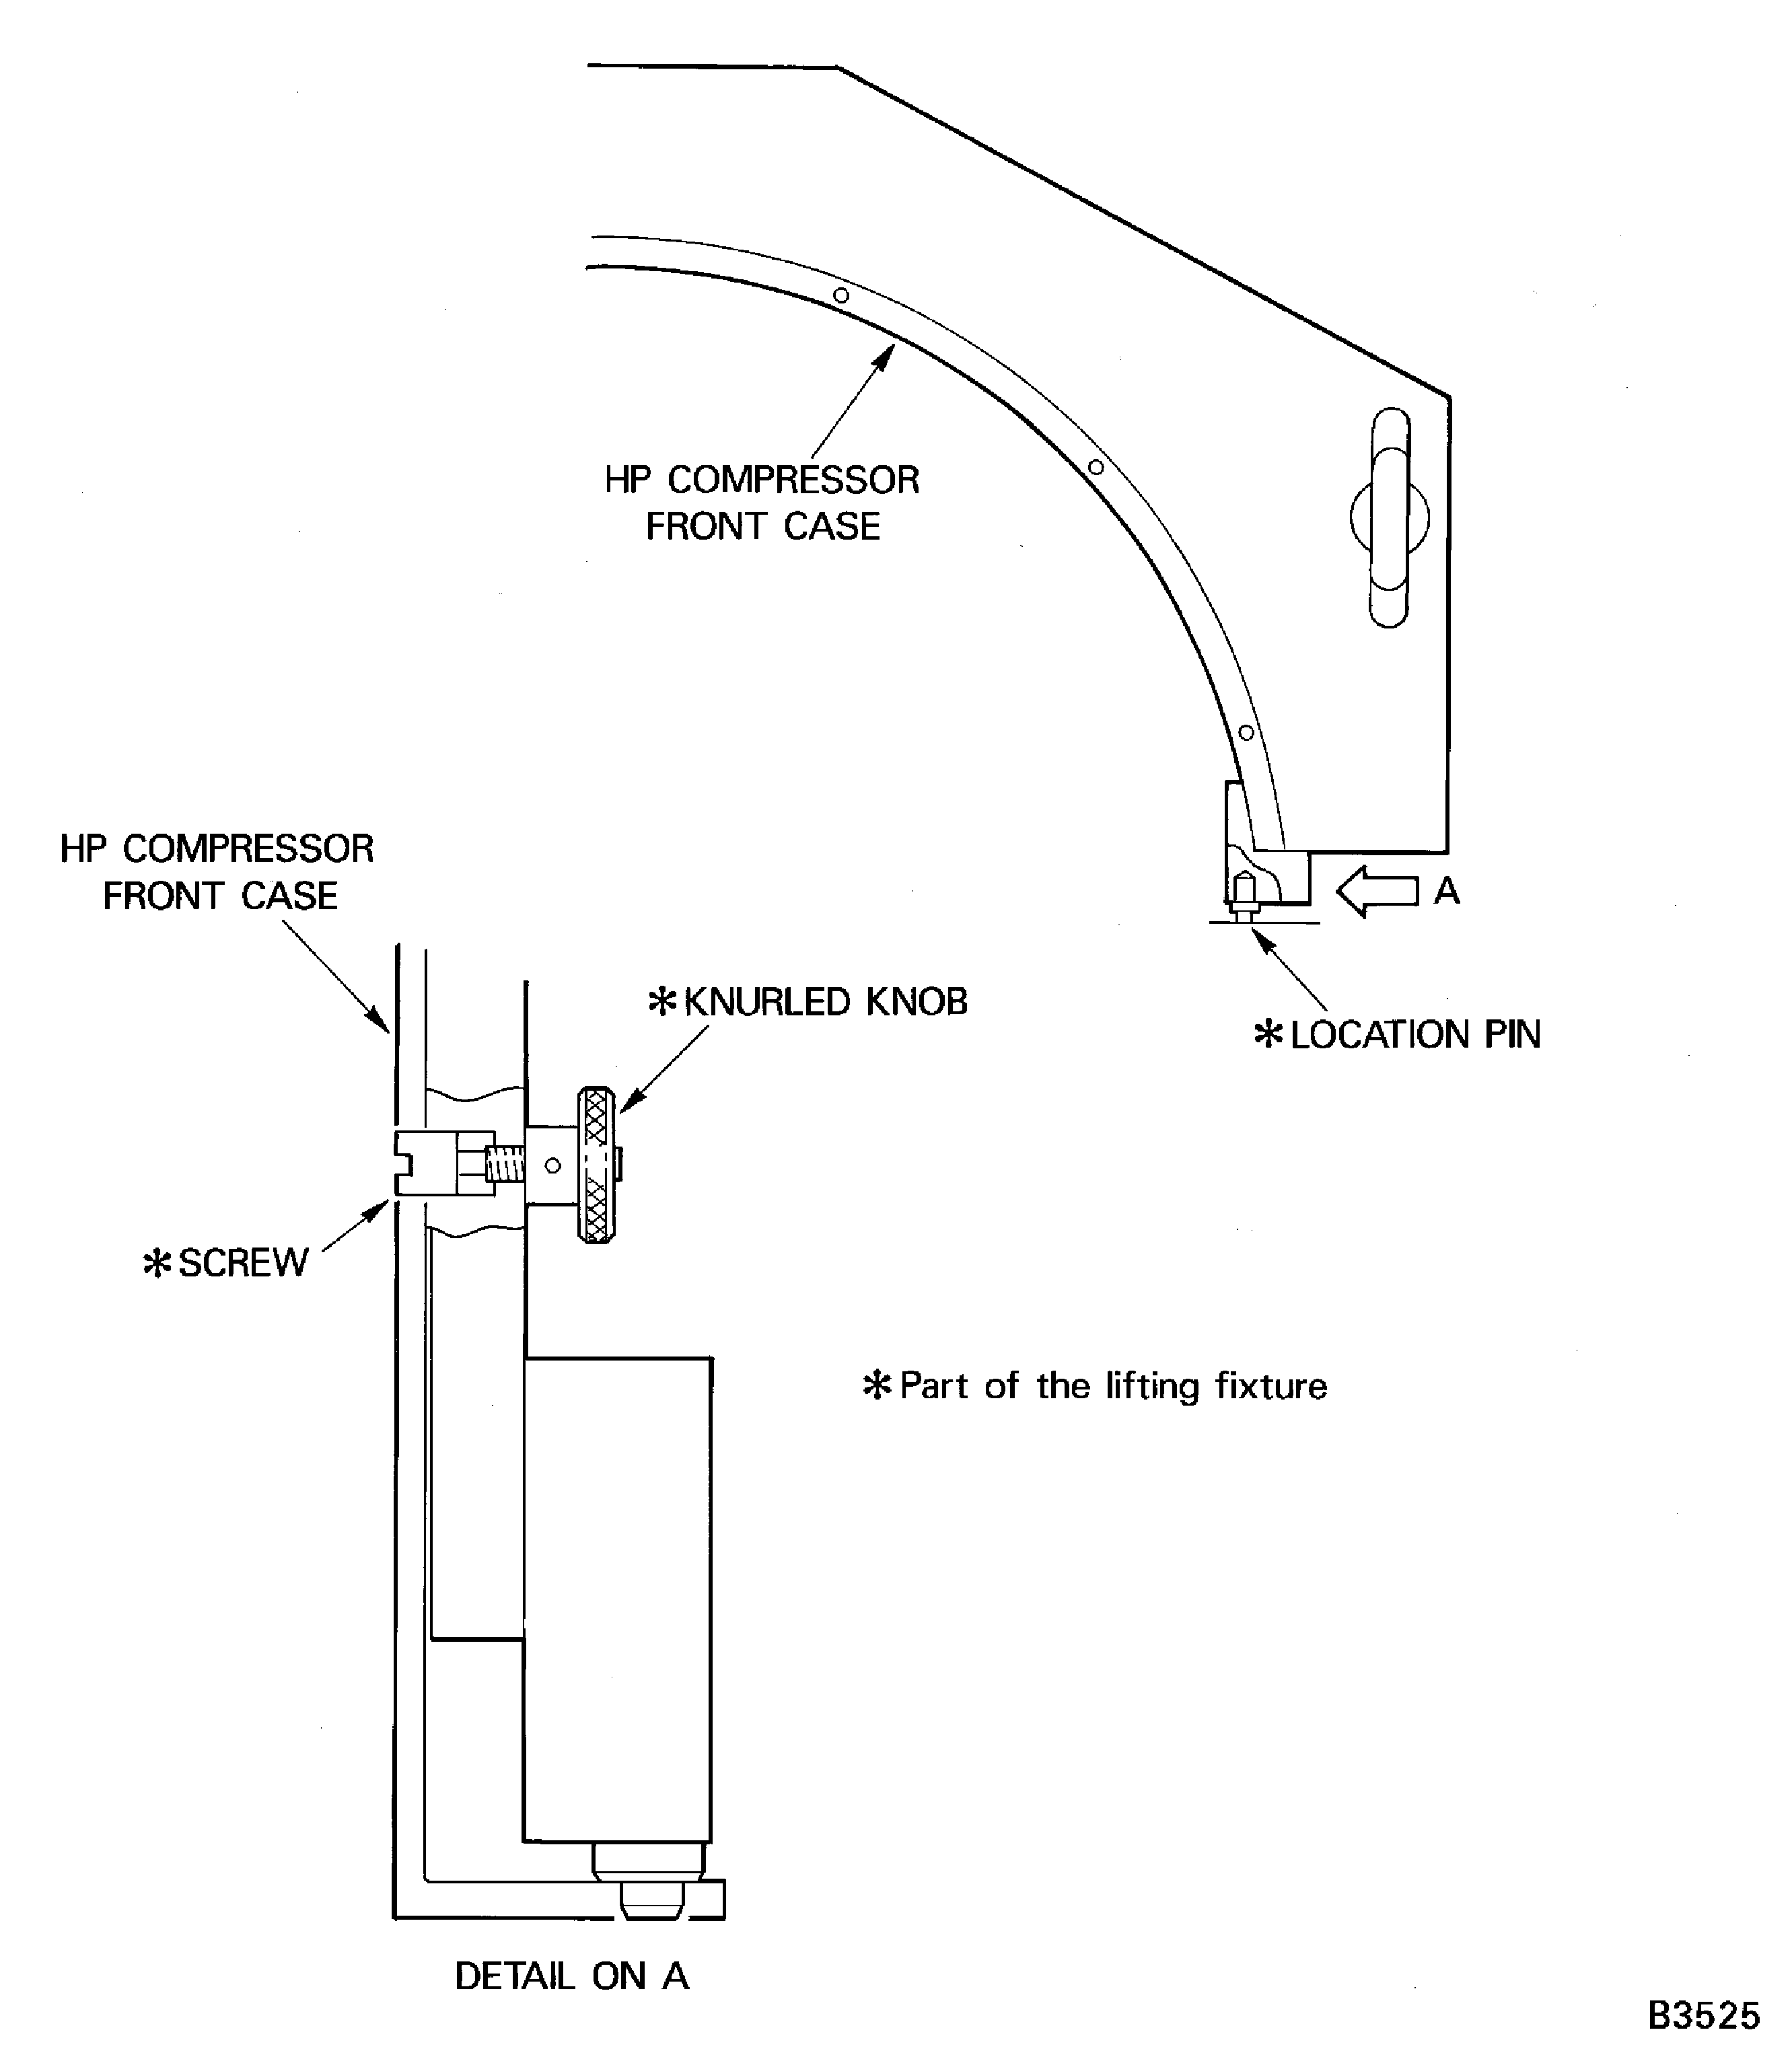
Figure: Install the HP Compressor Front Case Split Line Flange Bolts
Install the HP Compressor Front Case Split Line Flange Bolts
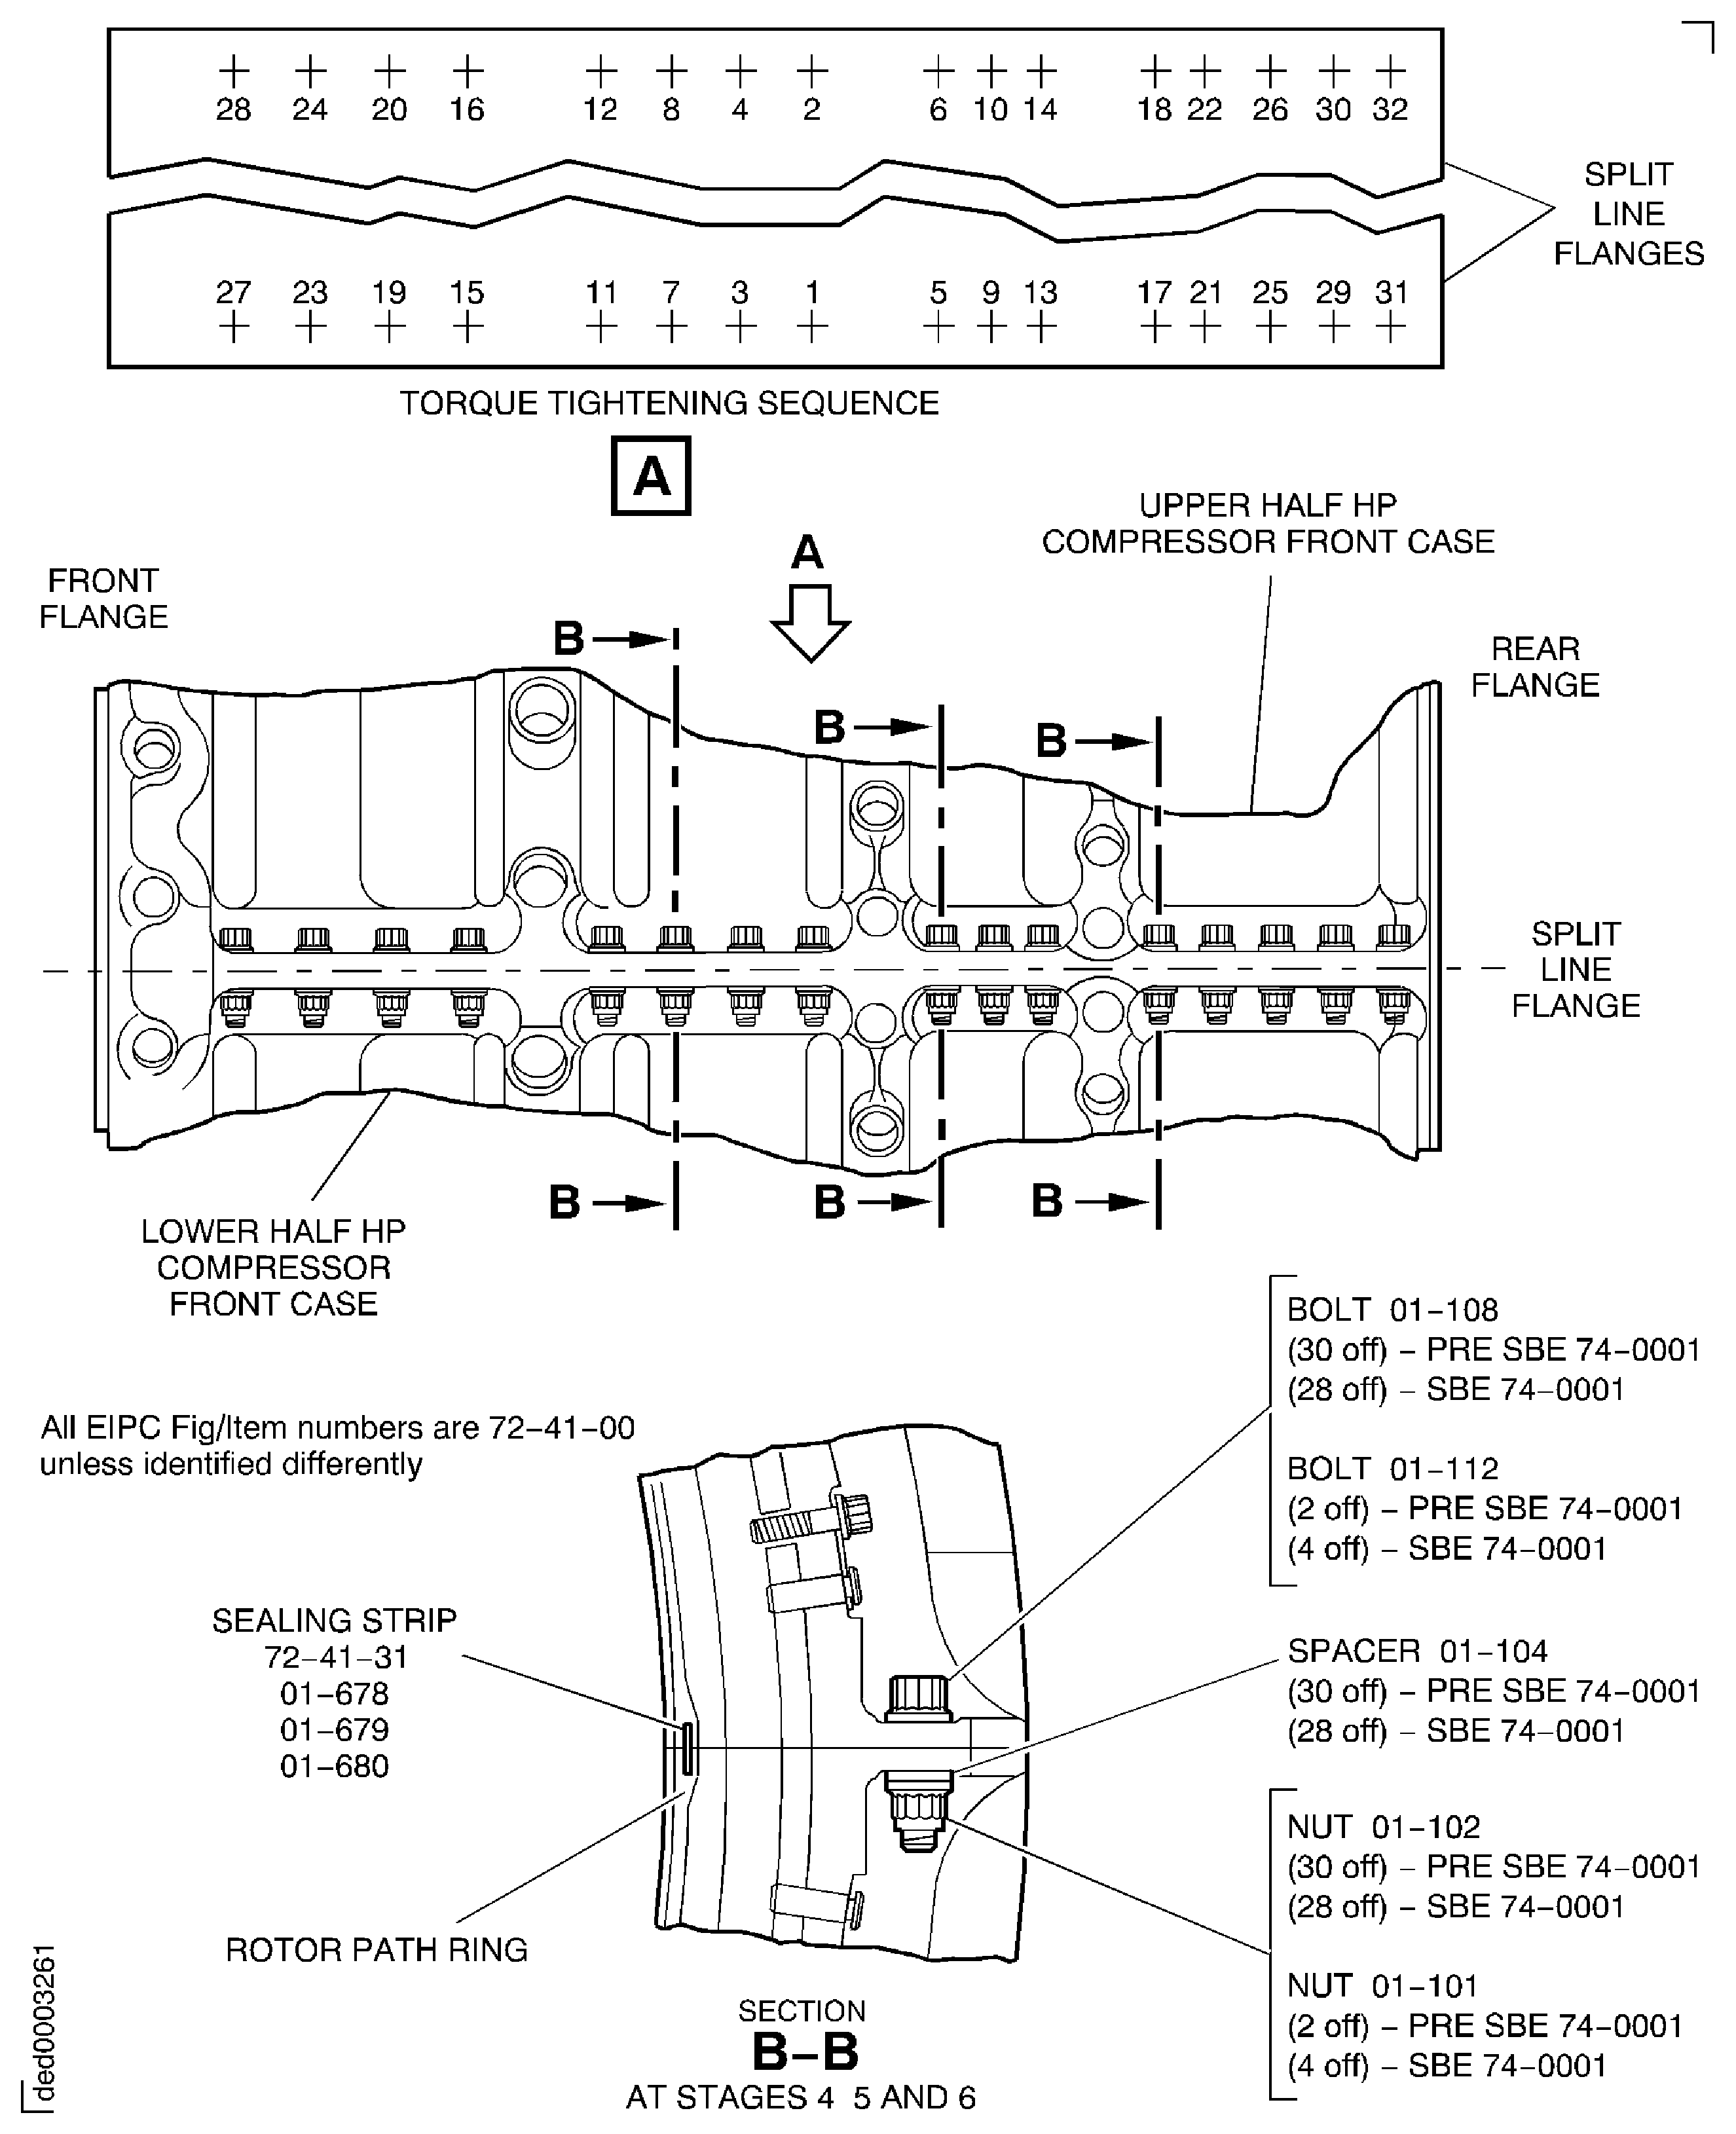
Figure: Measure the Inter-Platform Clearances
Measure the Inter-Platform Clearances
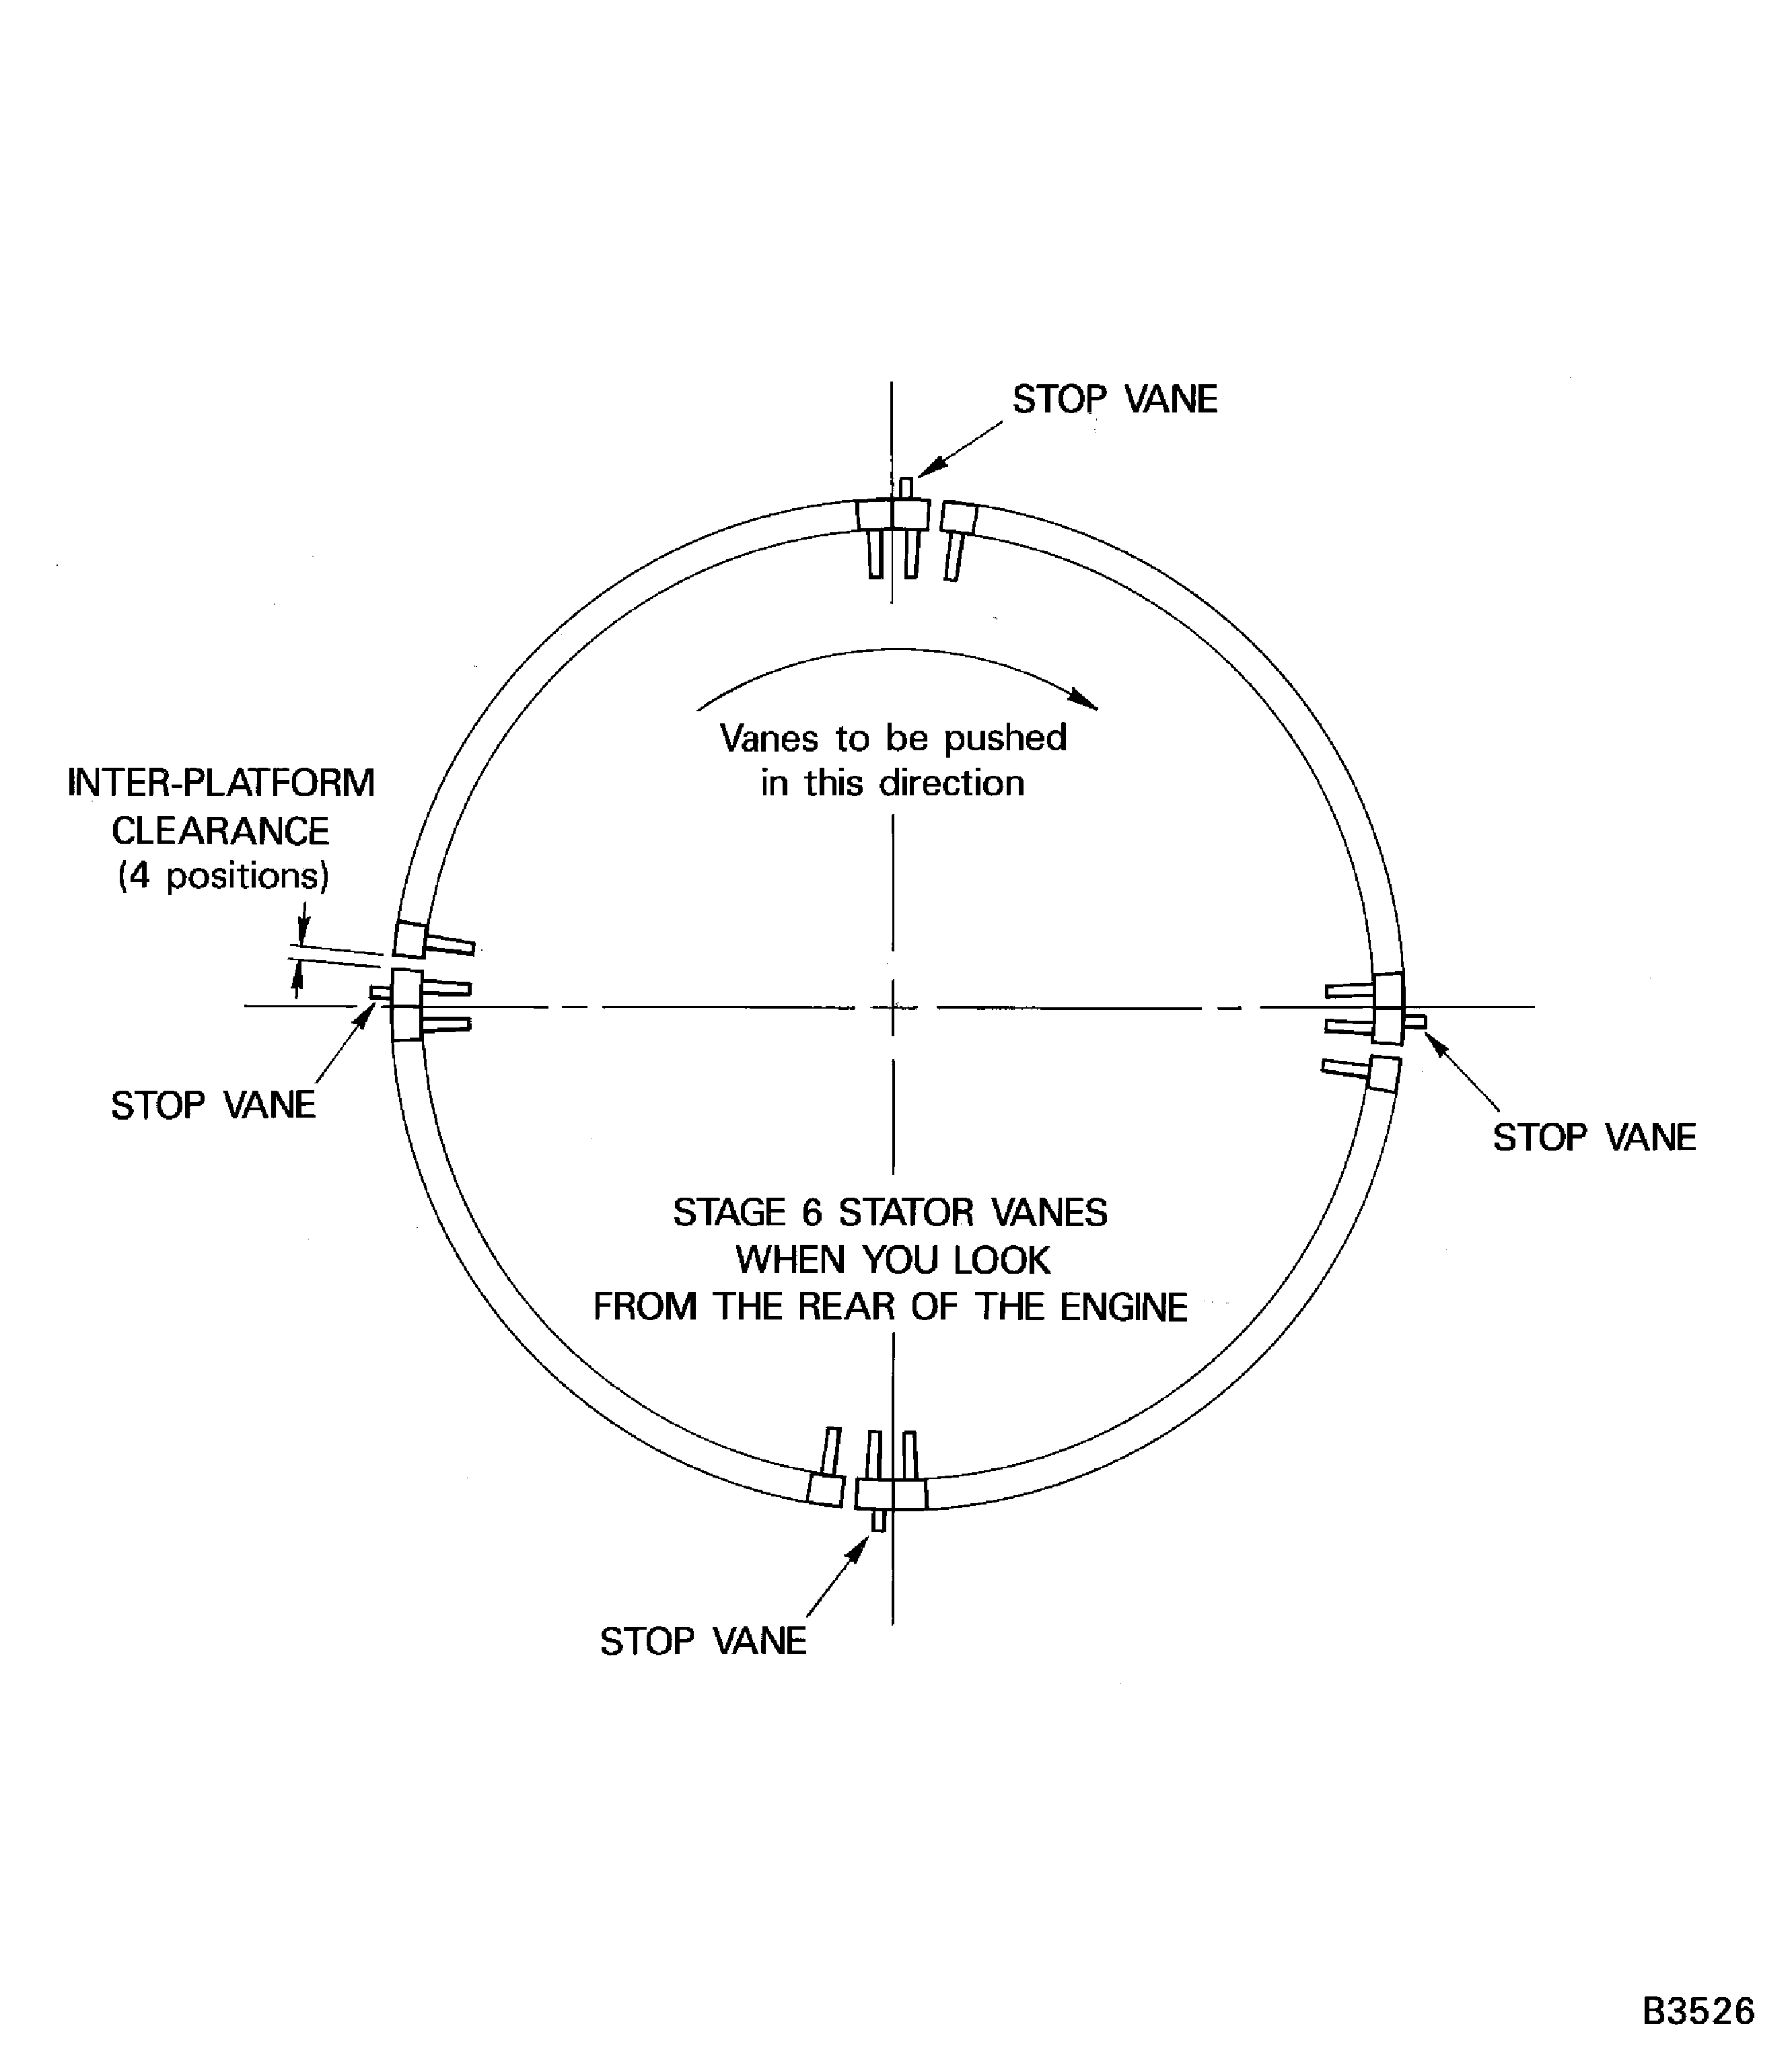
Figure: Install the Clamping Tool
Sheet 1

Figure: Install the Clamping Tool
Sheet 2

Figure: Install the Centralising Tool
Sheet 1

Figure: Install the Centralising Tool
Sheet 2
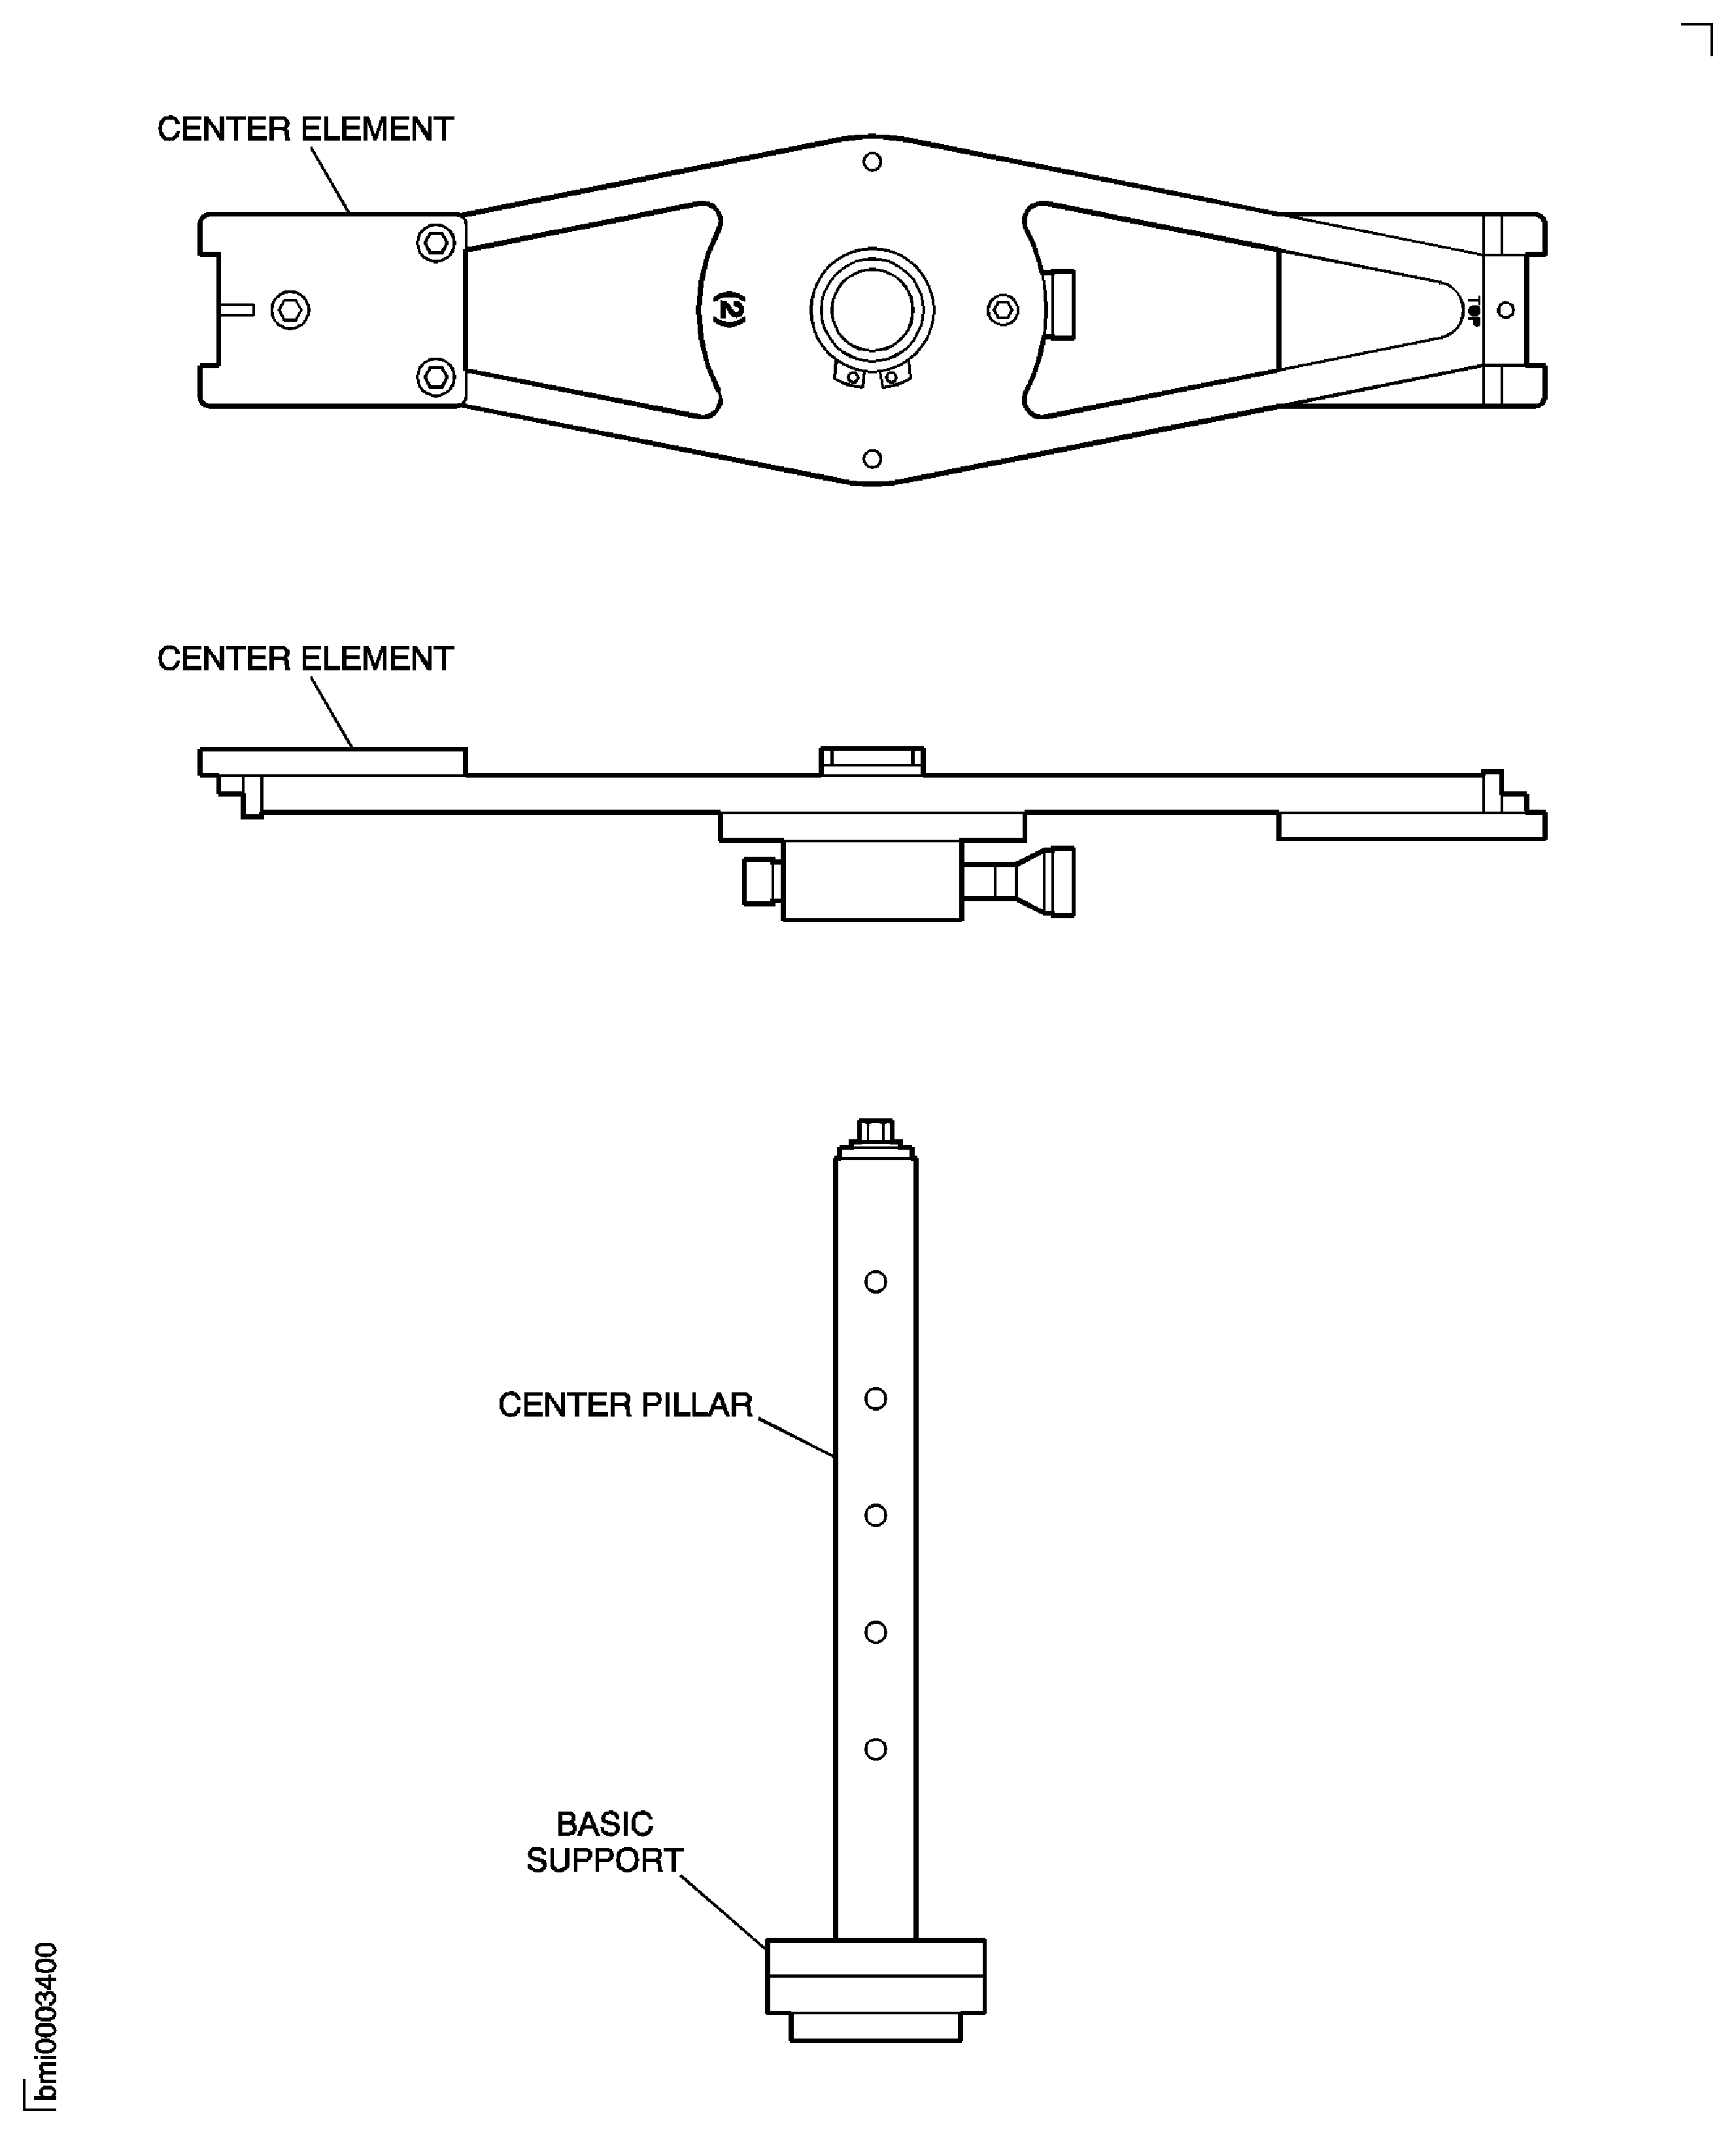
Figure: Install the Centralising Tool
Sheet 3
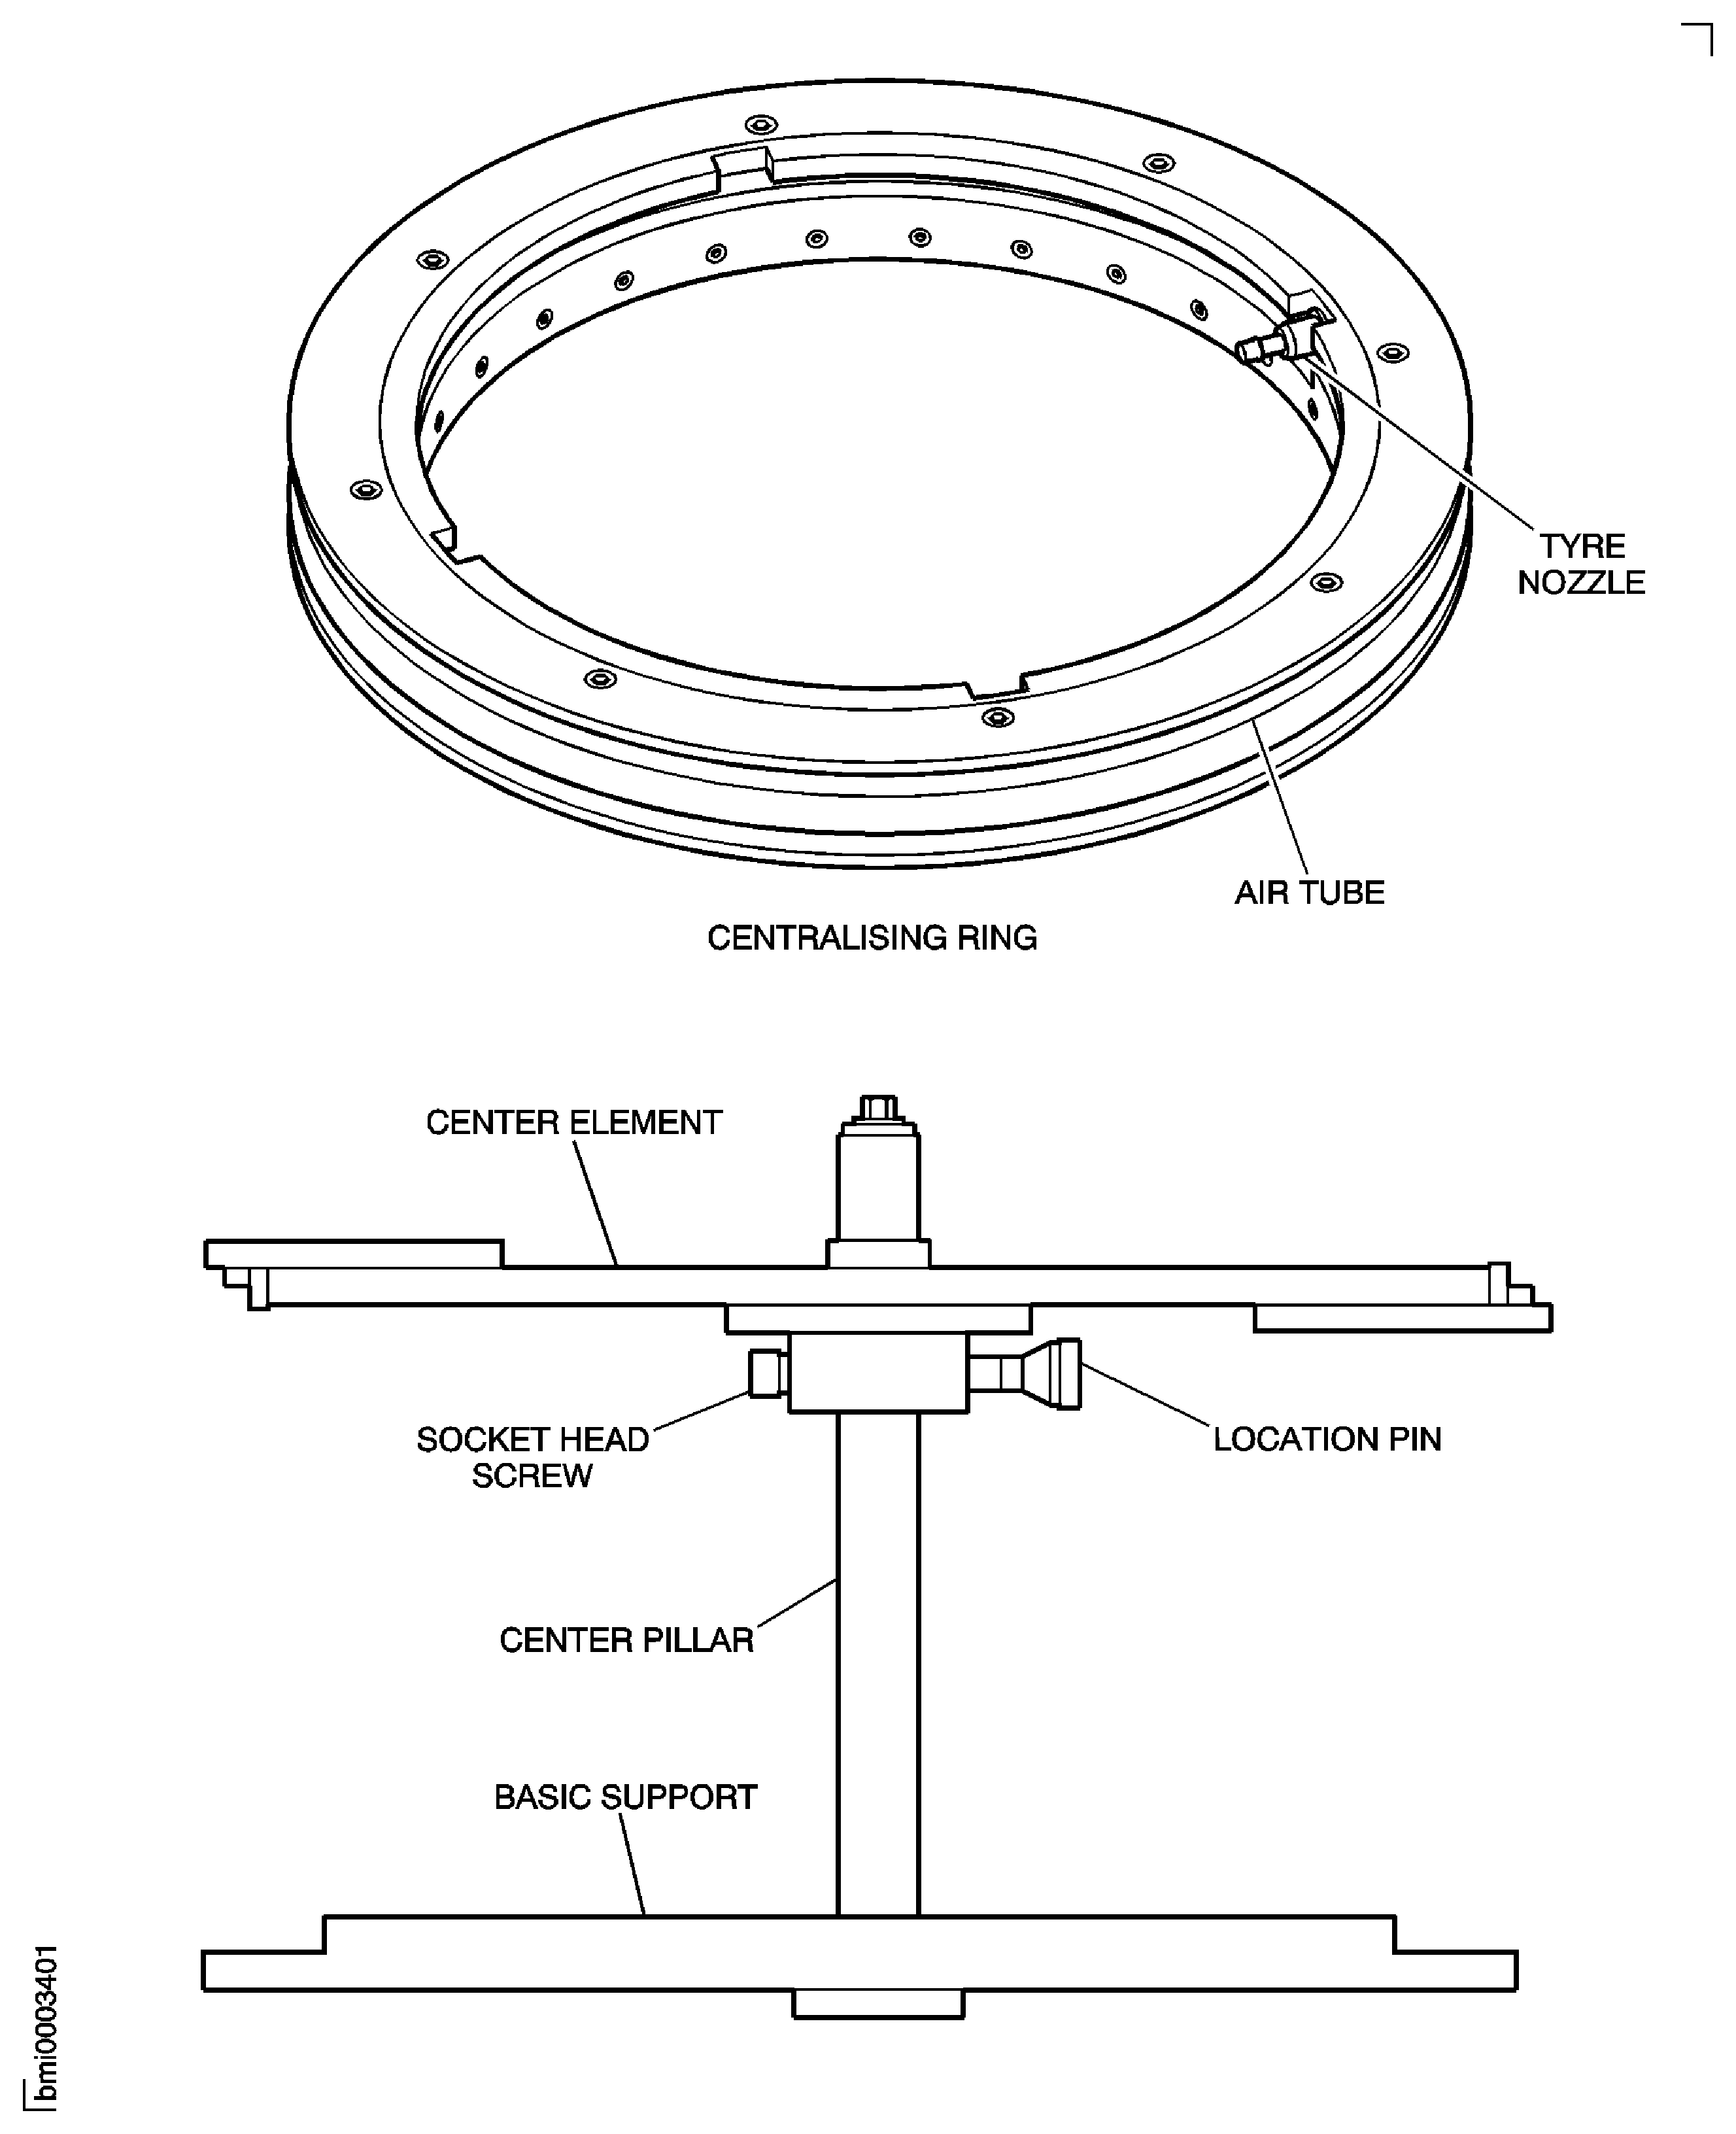
Figure: Install the Centralising Tool
Sheet 4

Figure: Assemble the Tools to Turn the HP Compressor Front Case
Assemble the Tools to Turn the HP Compressor Front Case
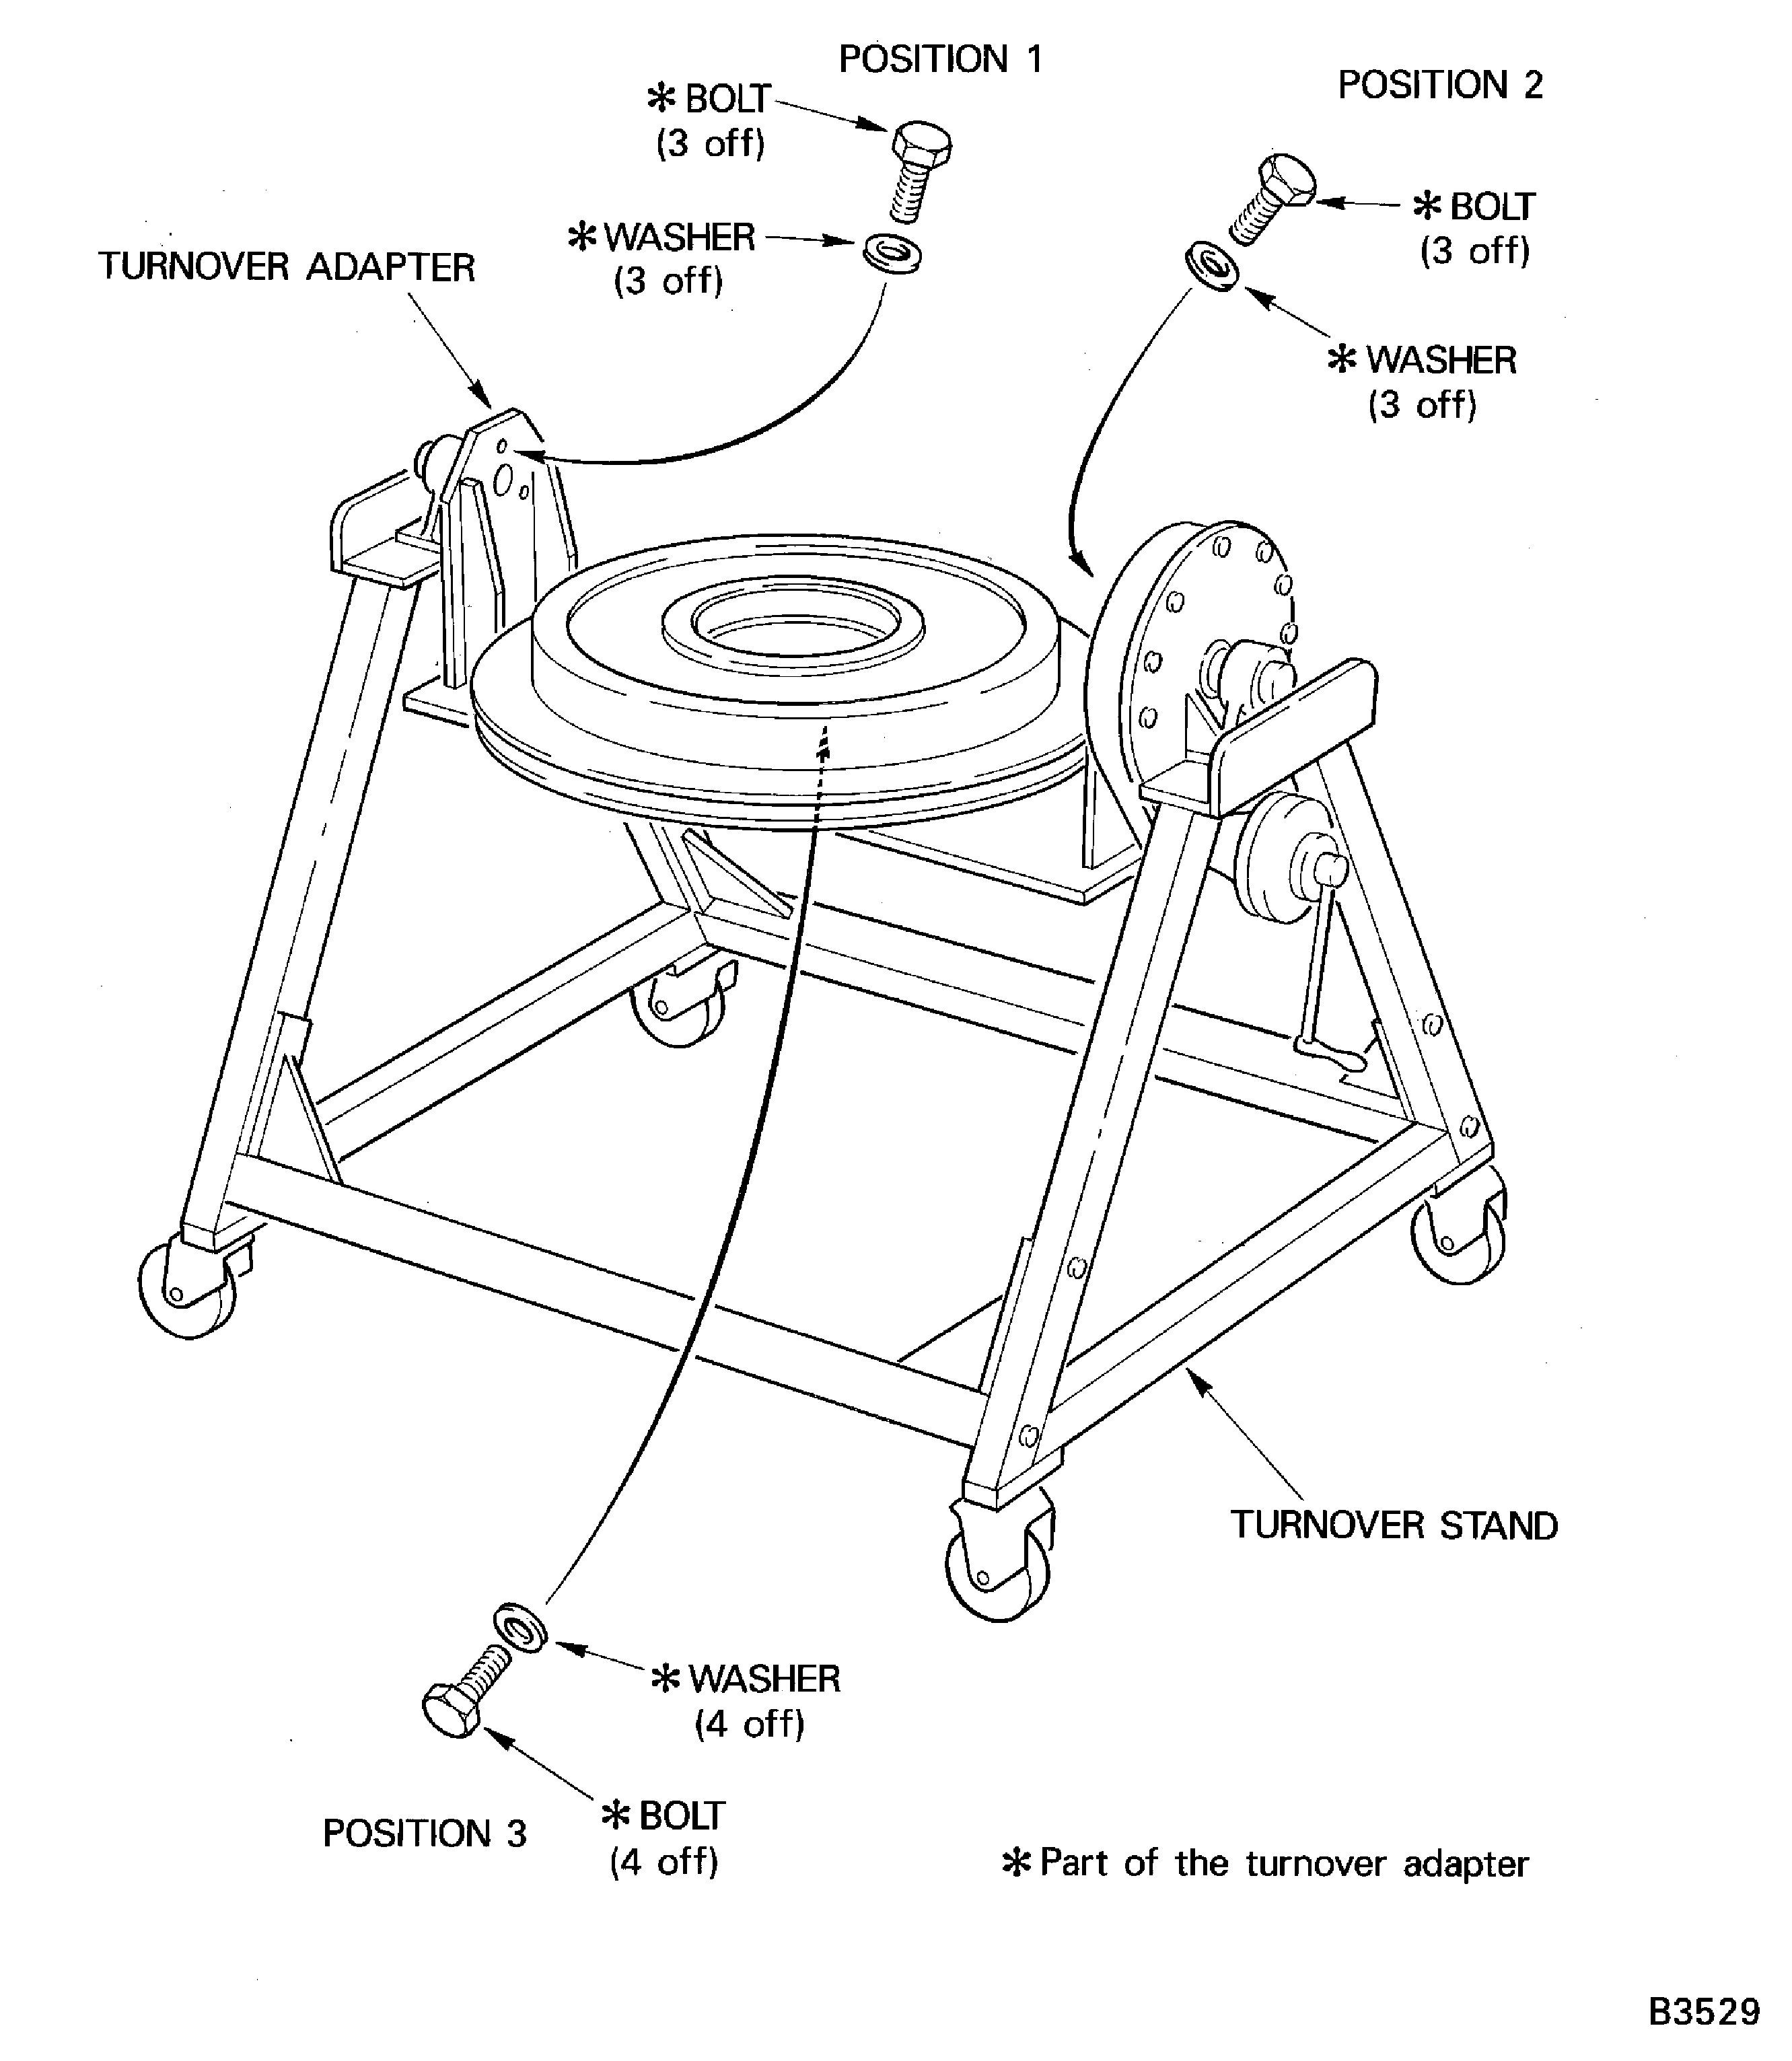
Figure: Install the Lifting Fixture
Install the Lifting Fixture
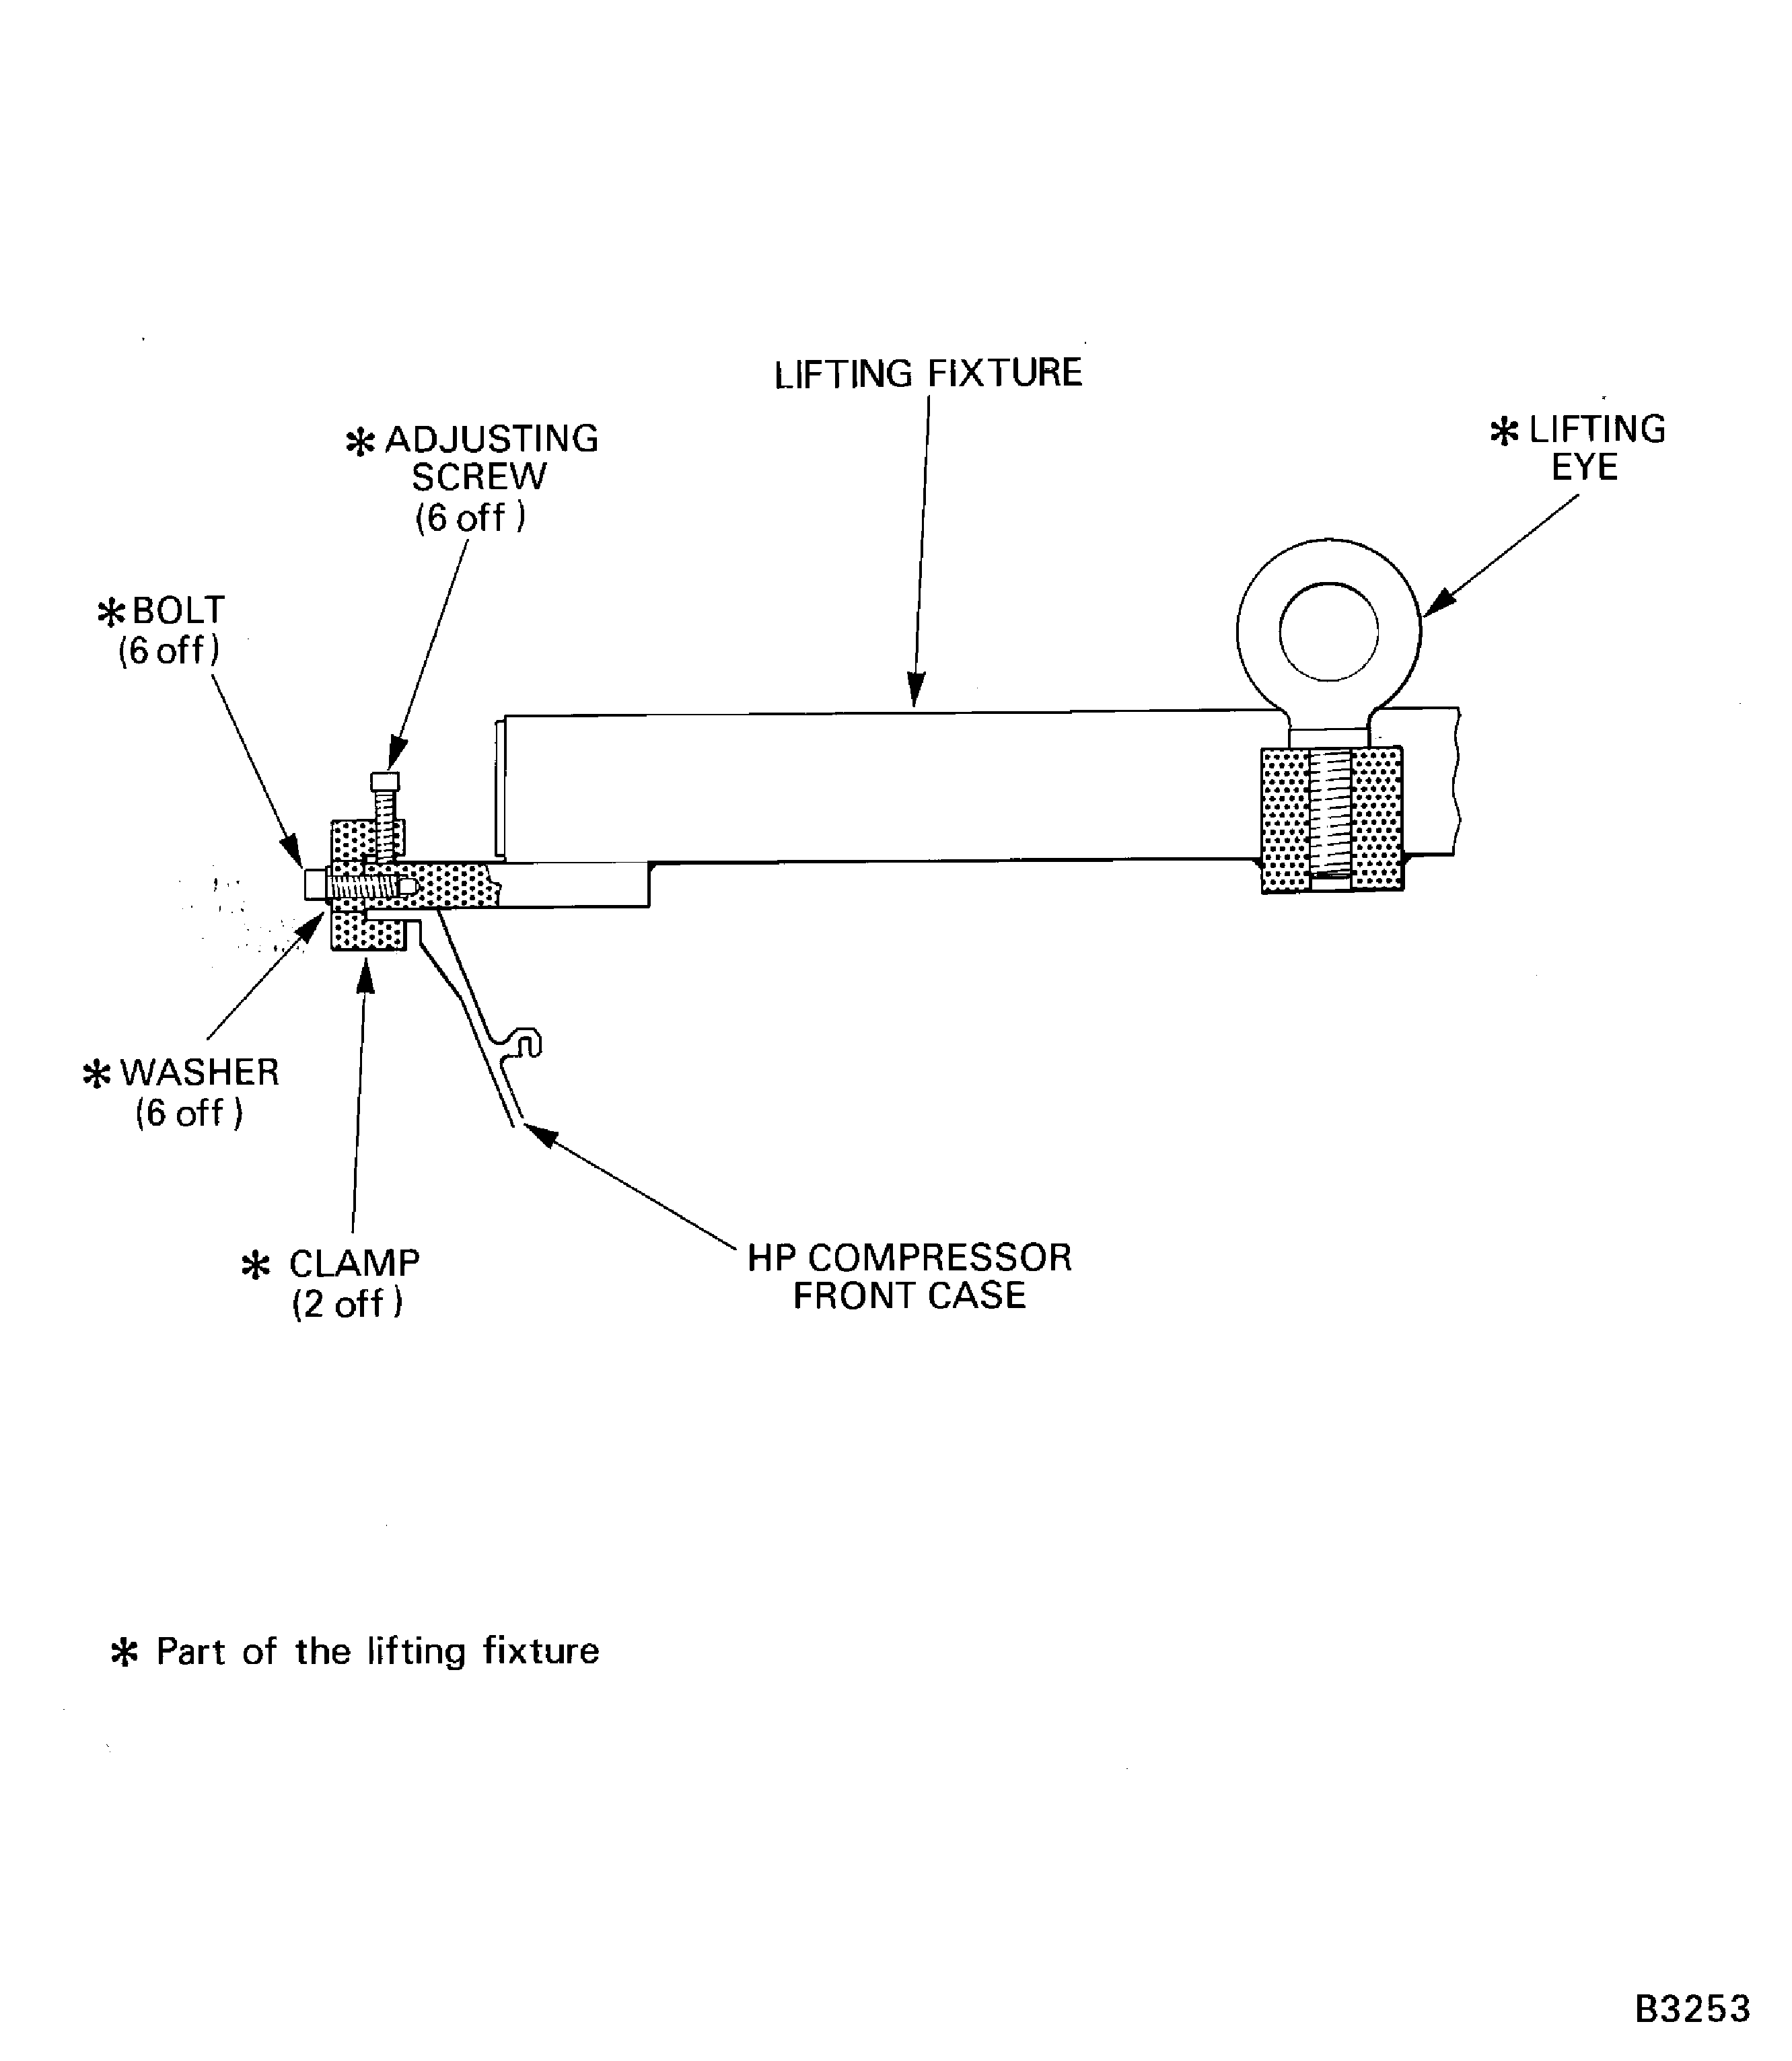
Figure: Install the HP Compressor Front Case in the Machine Fixture
Sheet 1
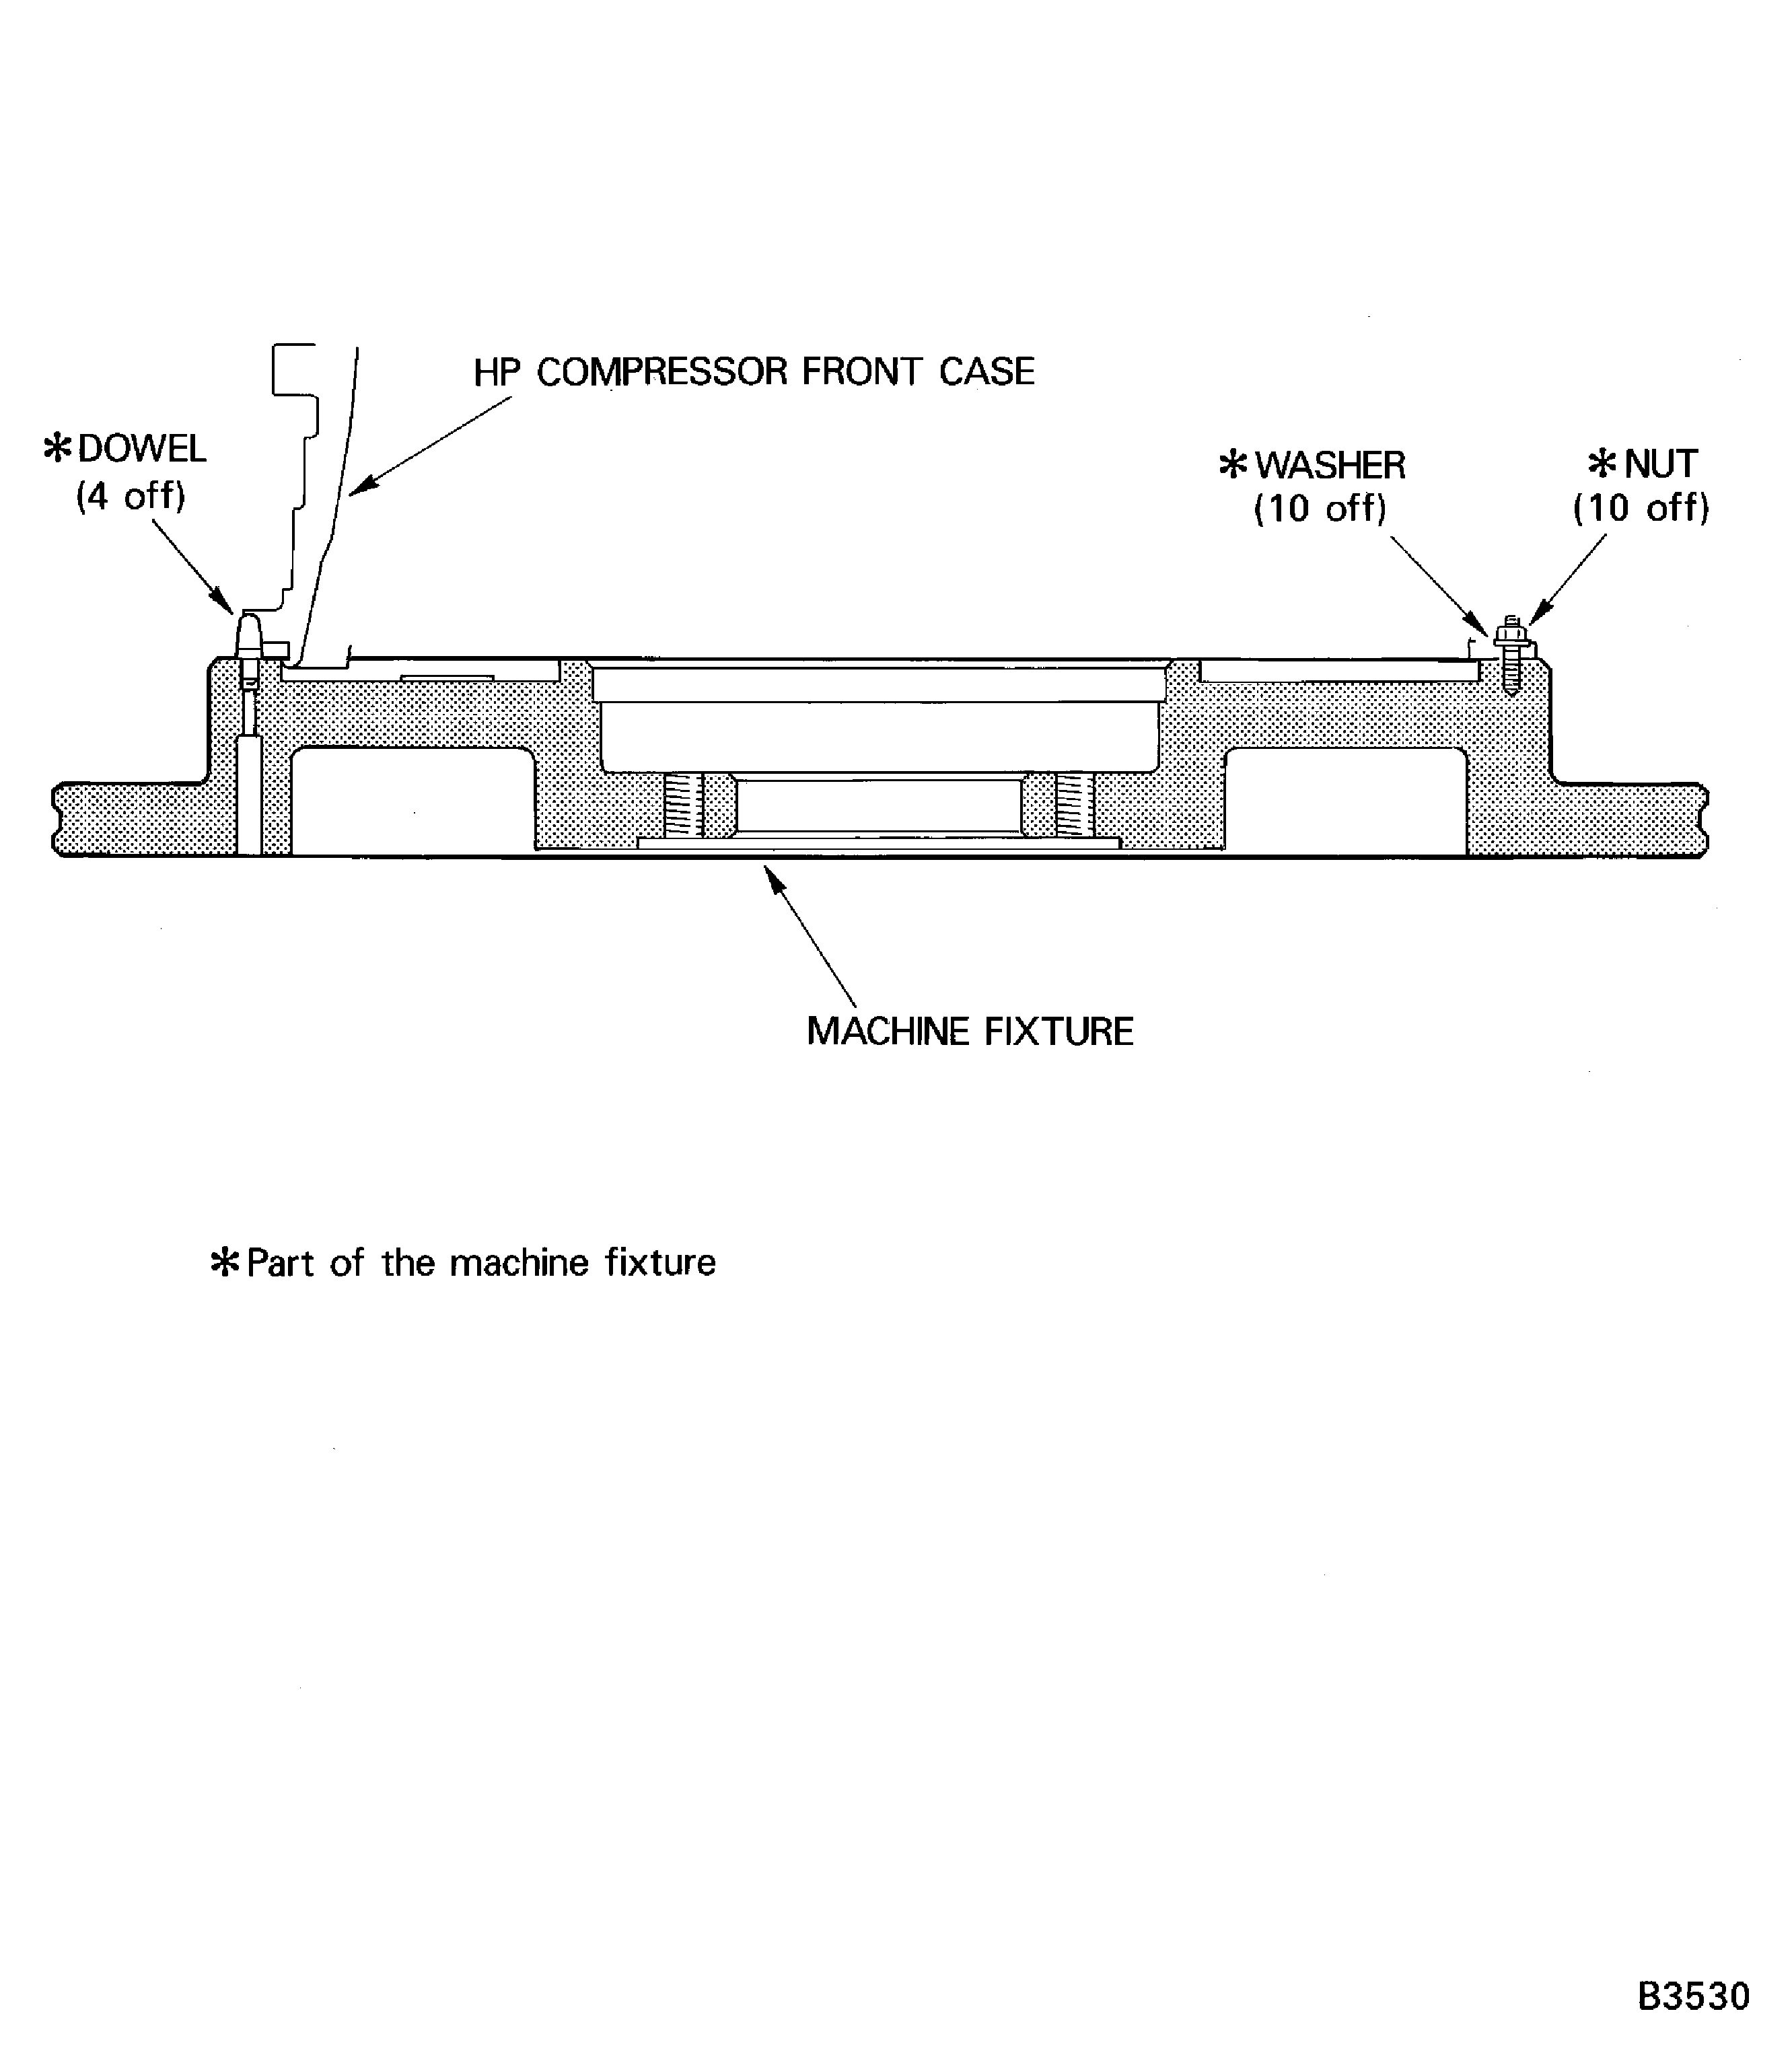
Figure: Install the HP Compressor Front Case in the Machine Fixture
Sheet 2
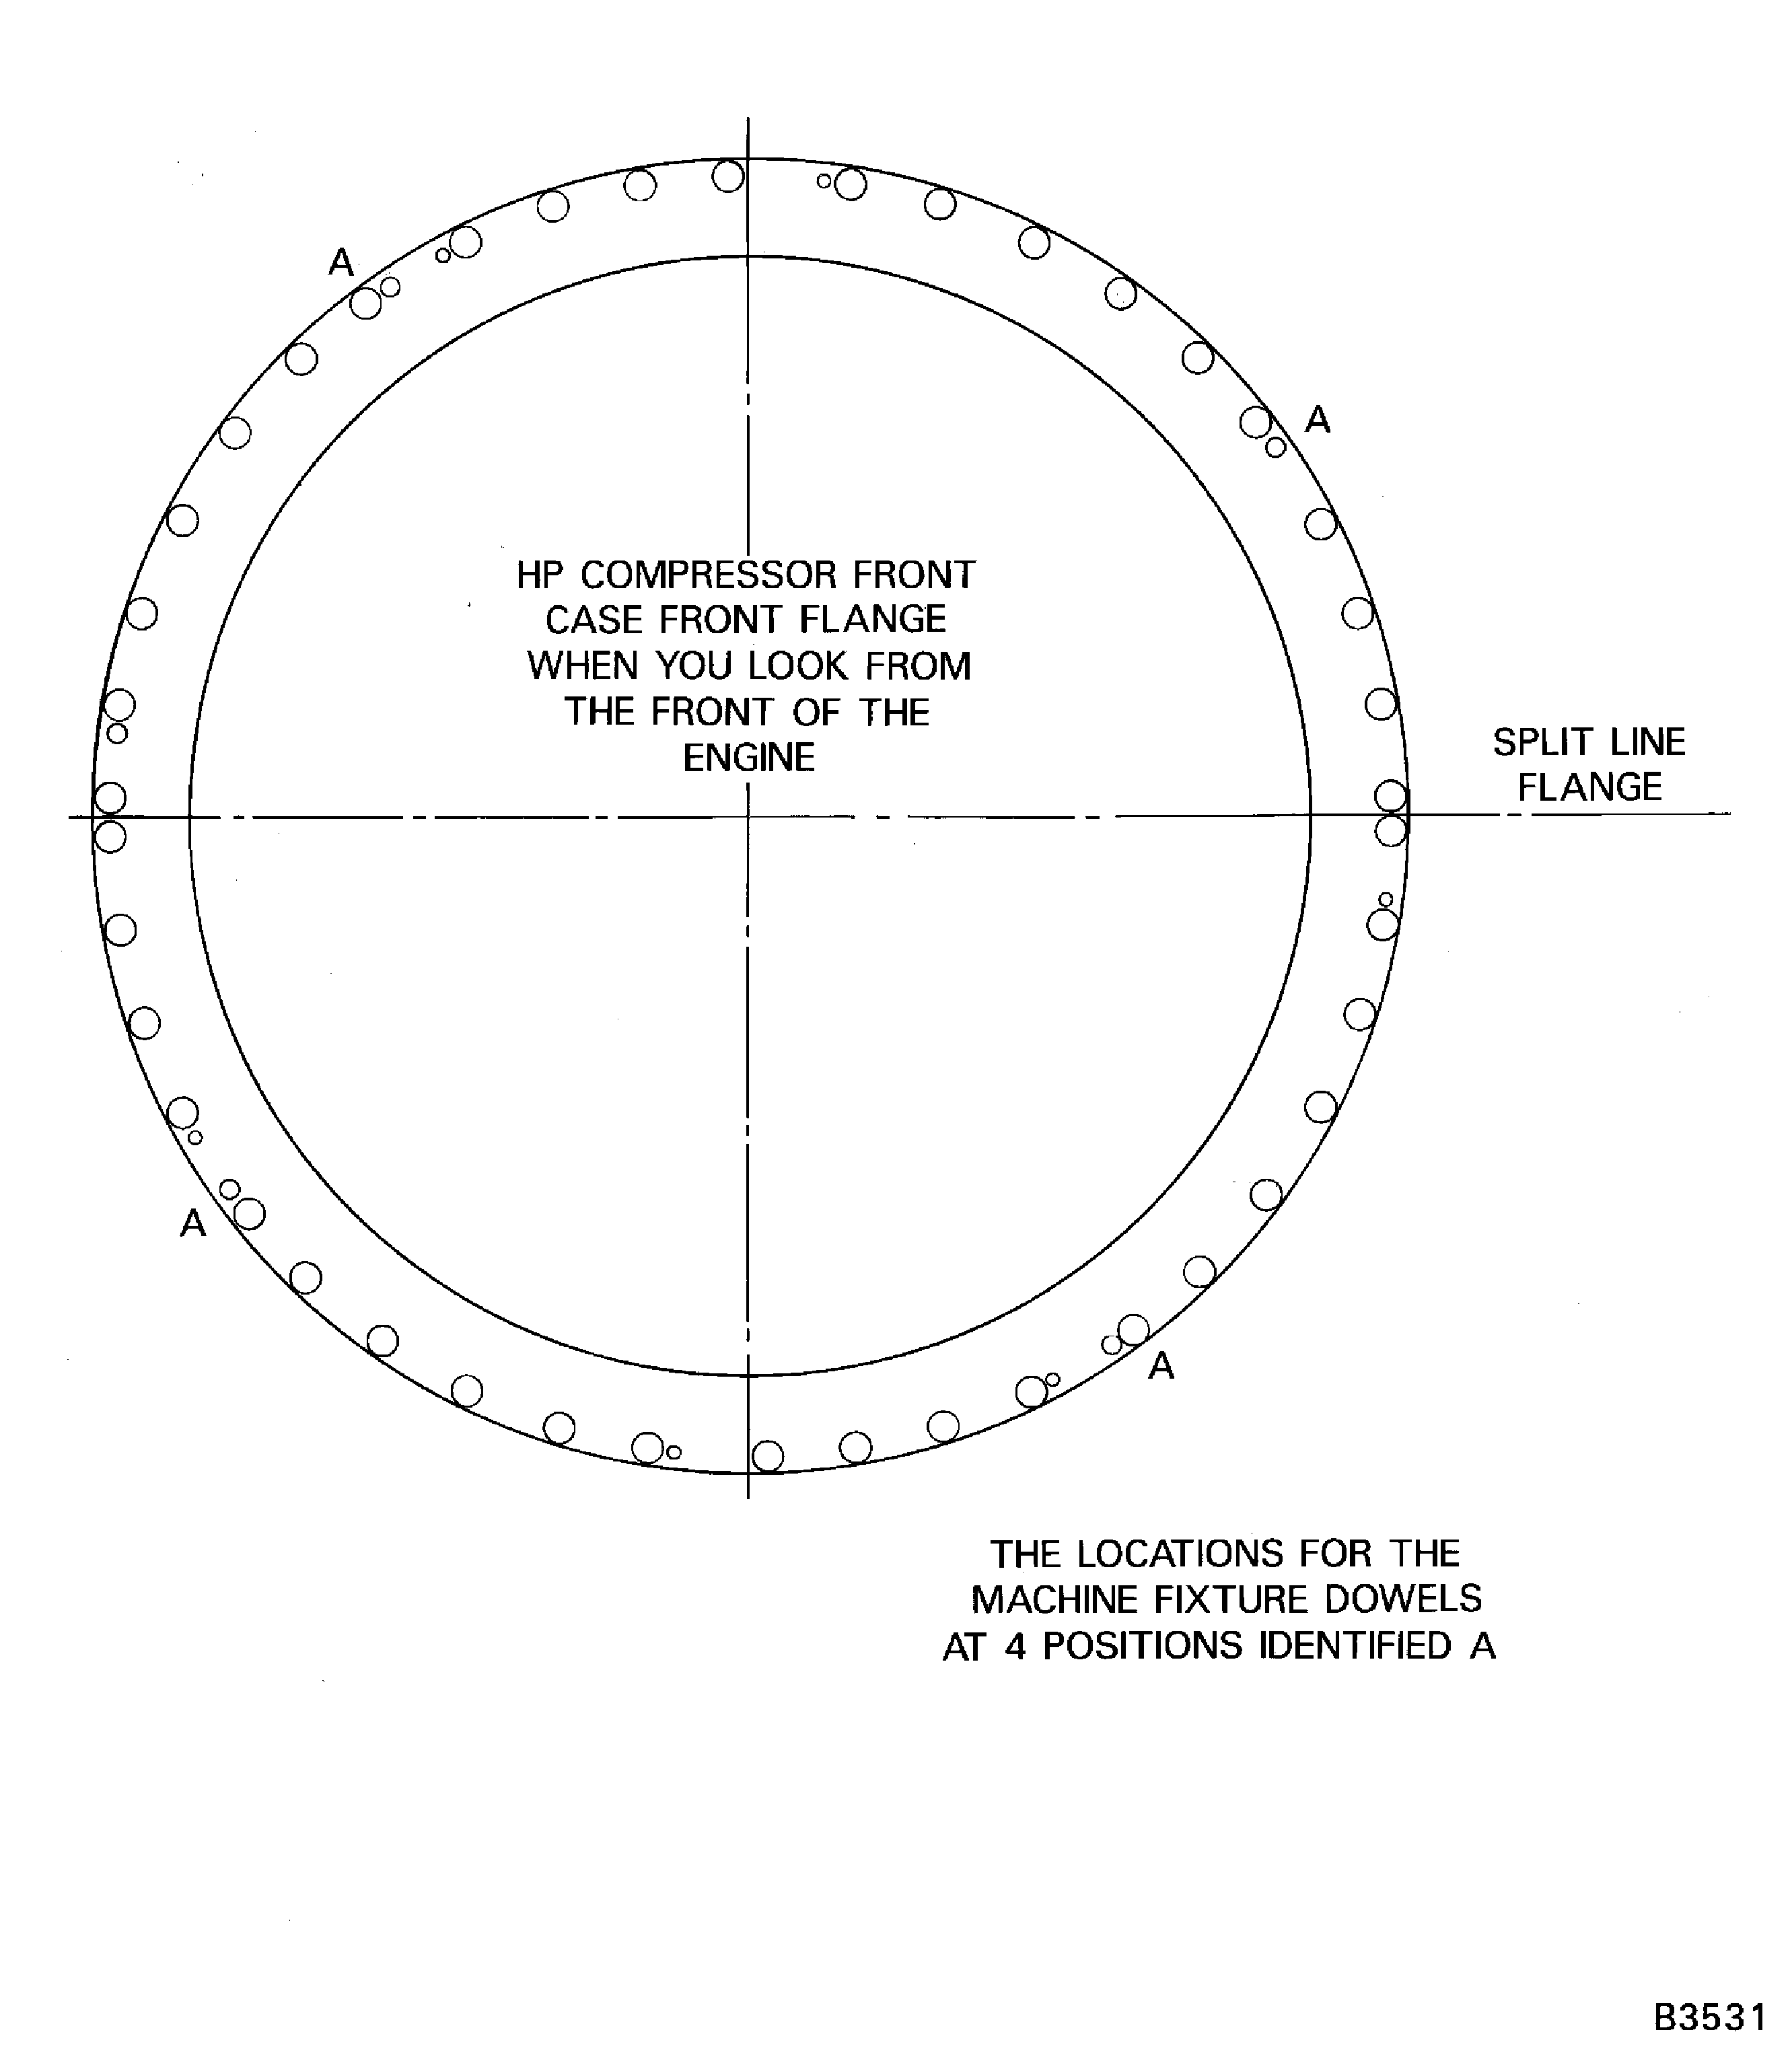
Figure: Machine the Stage 6 Stator Vanes
Machine the Stage 6 Stator Vanes
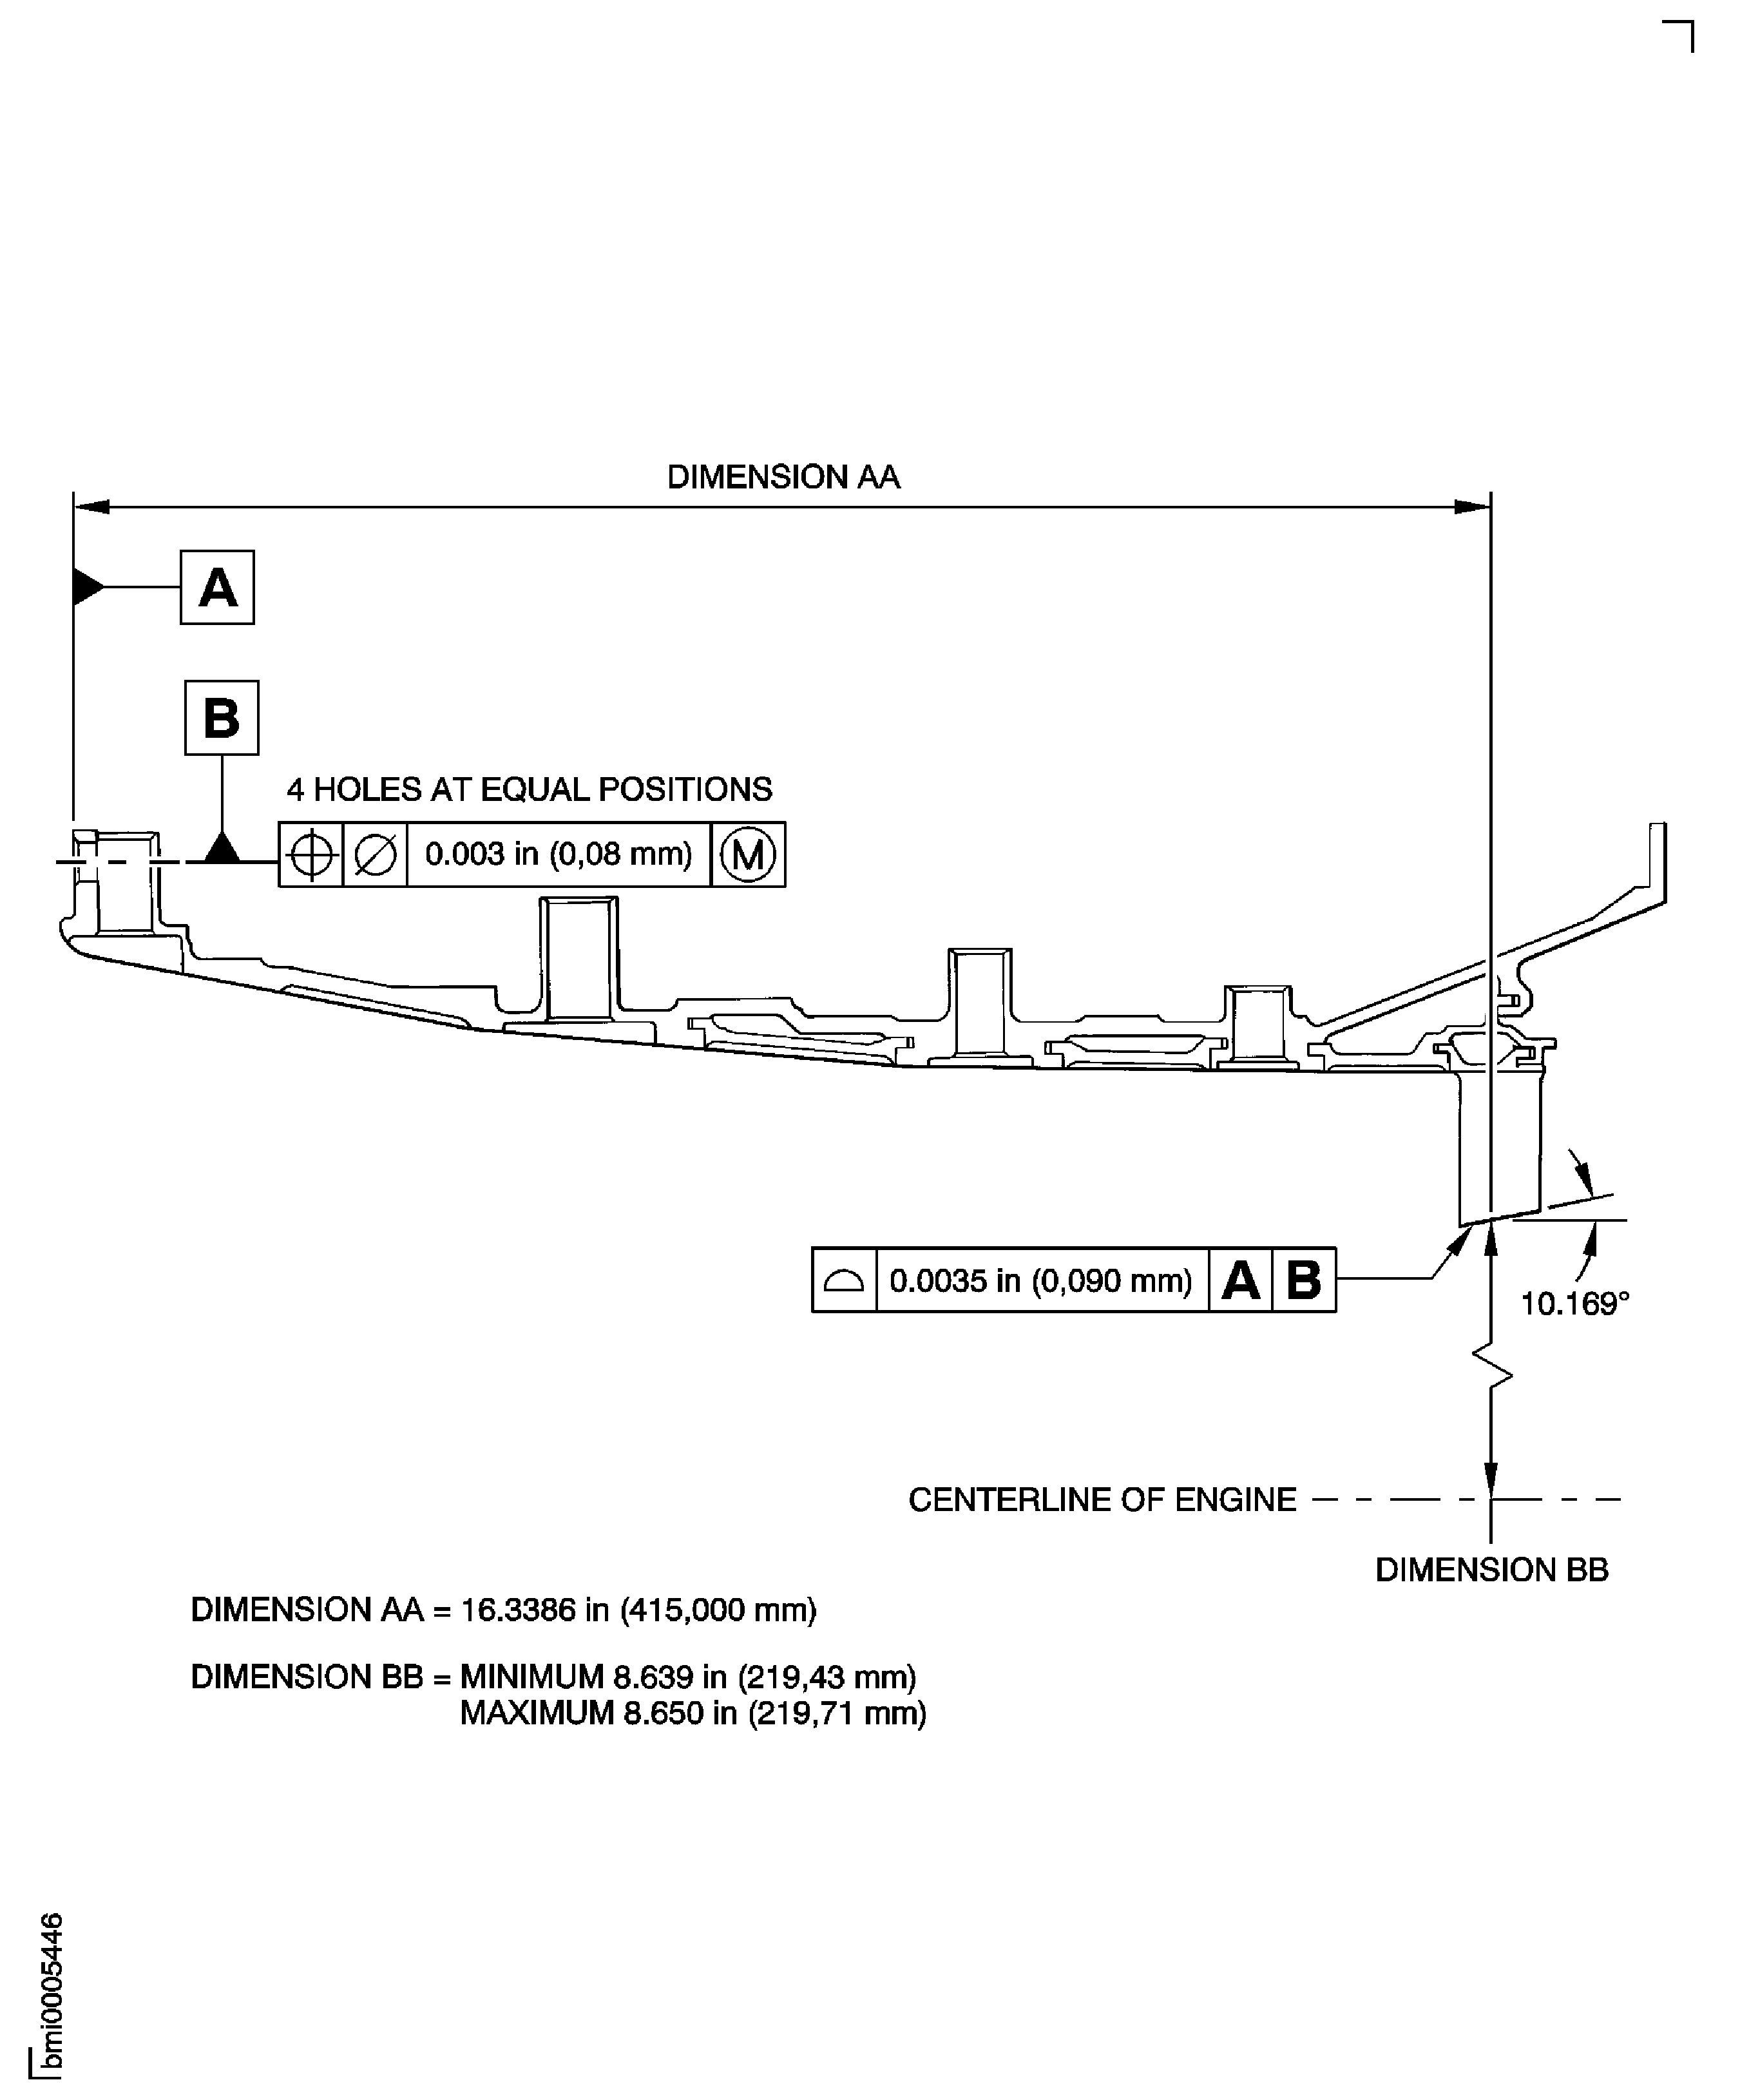
Figure: Dimensions to Machine the Stage 3, 4, 5 and 6 Rotor Path Linings
Sheet 1
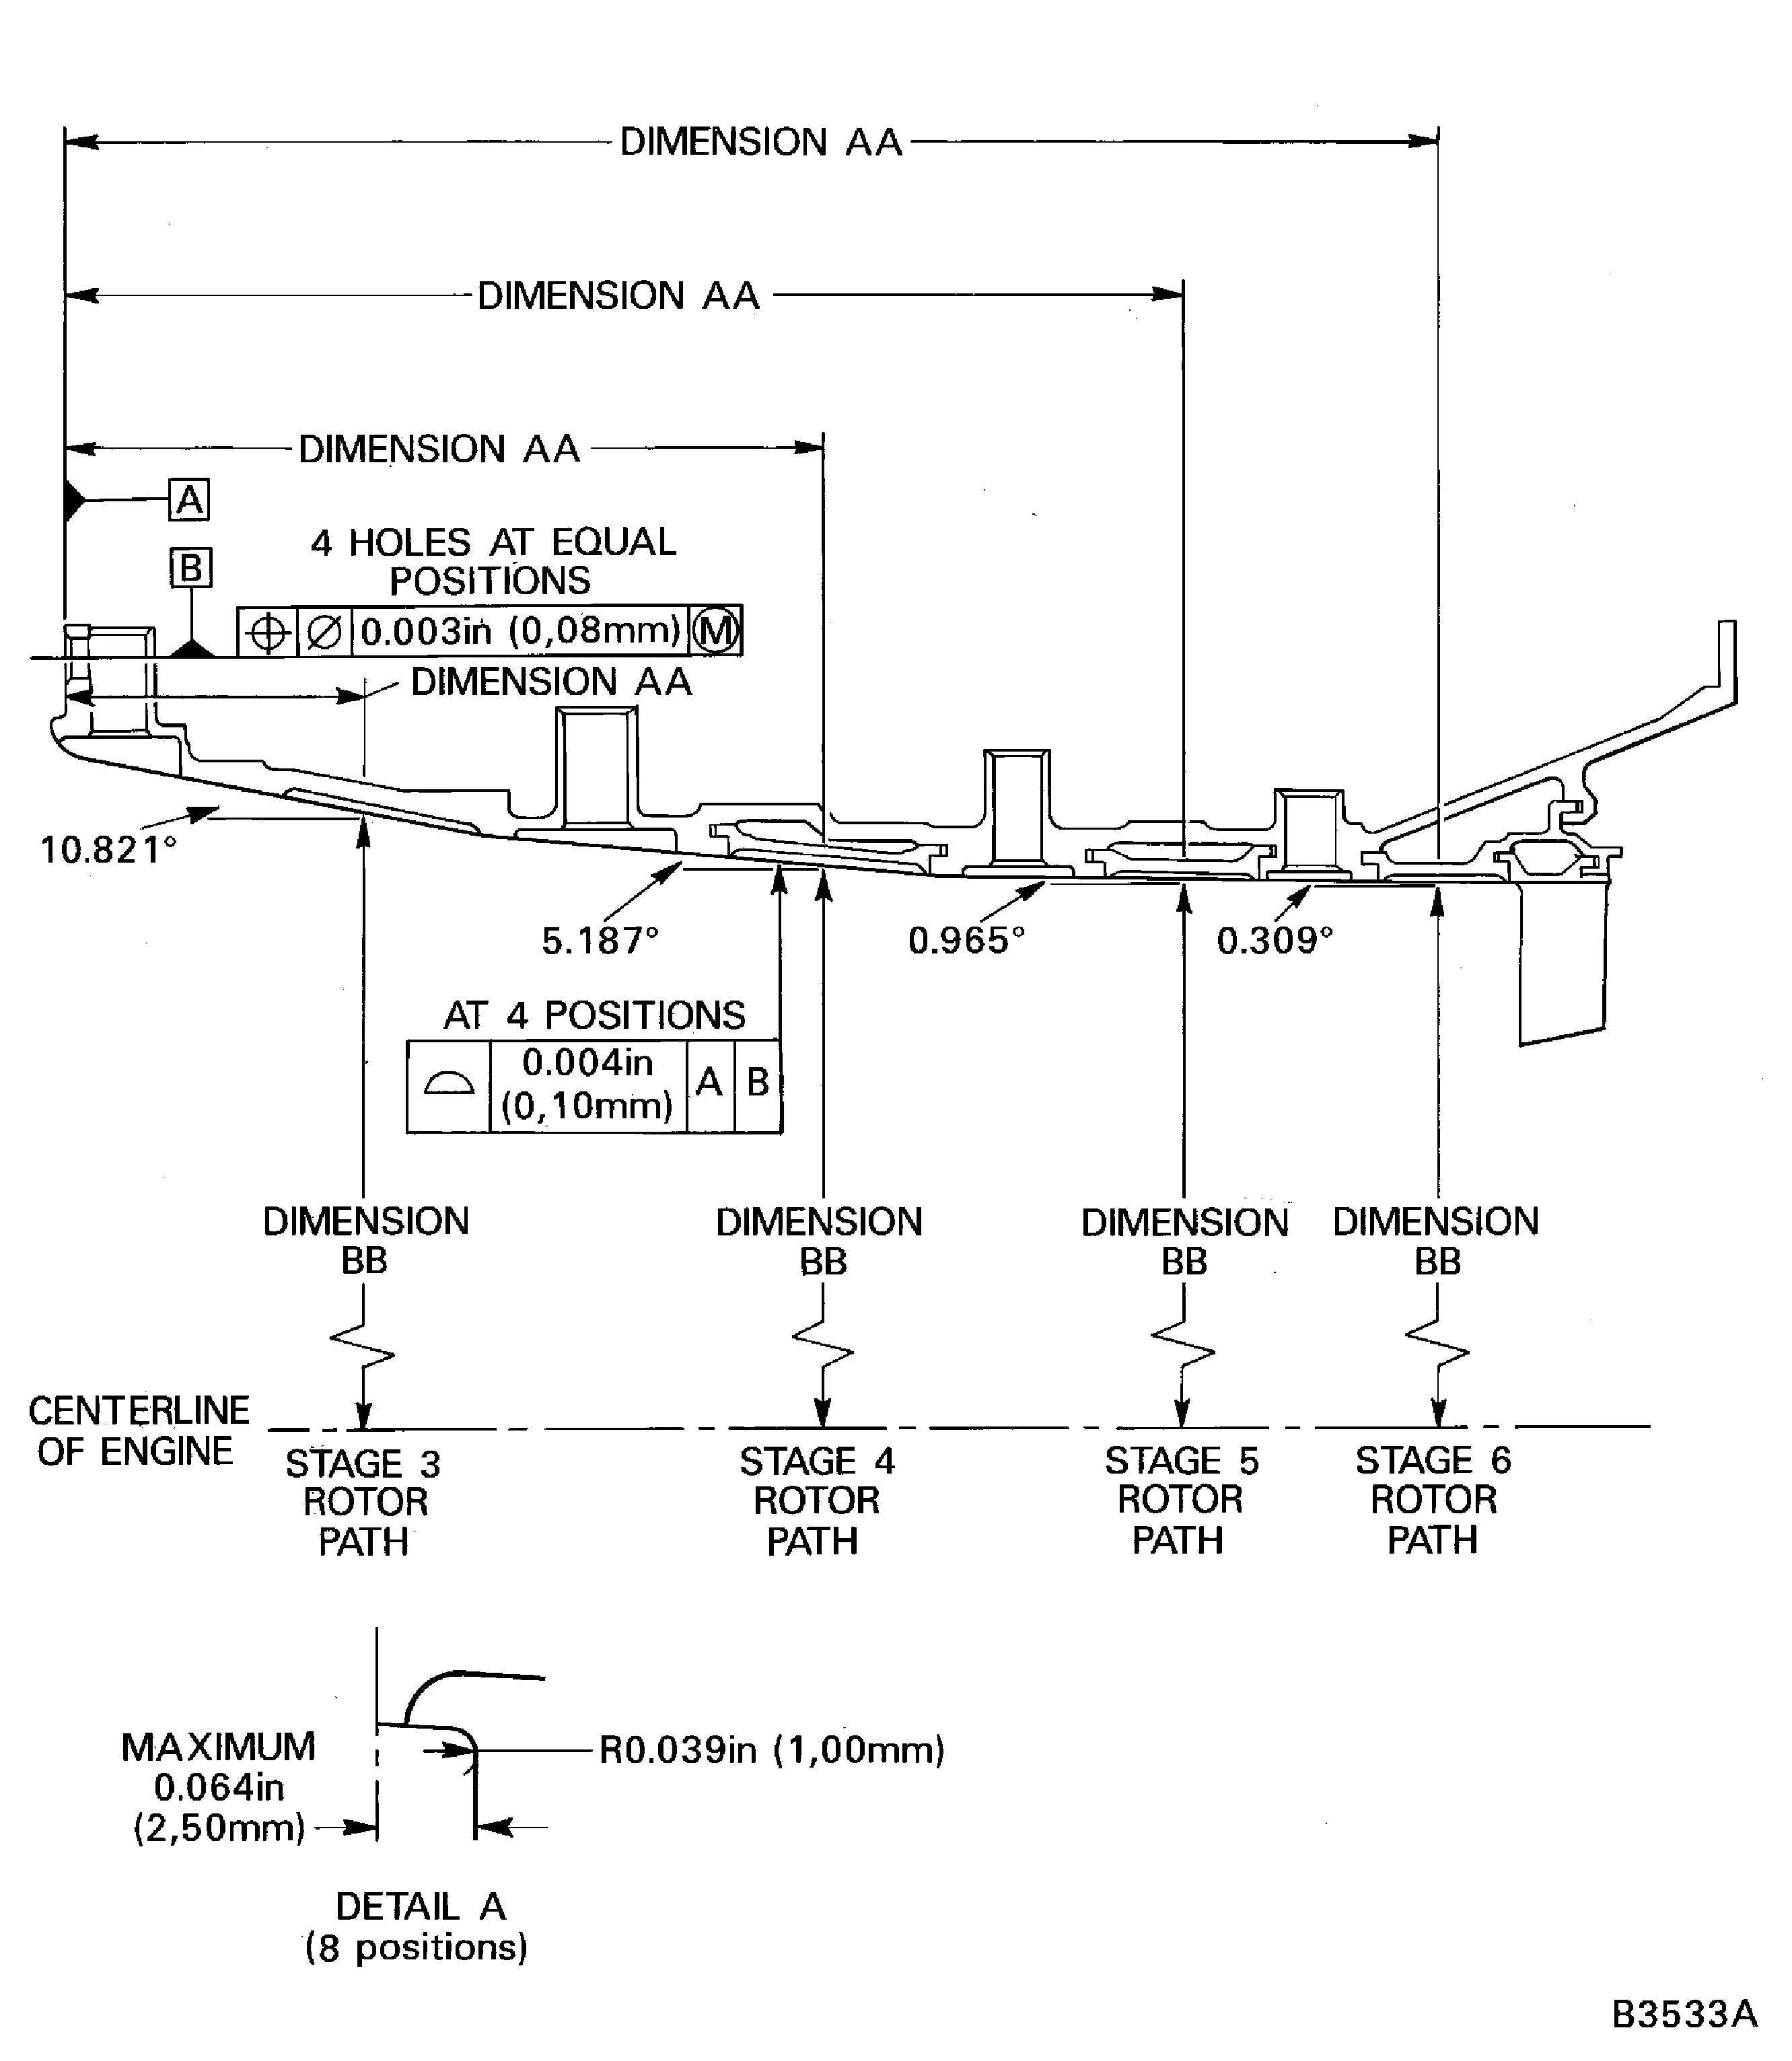
Figure: Dimensions to Machine the Stage 3, 4, 5 and 6 Rotor Path Linings
Sheet 2
