TASK 72-00-50-220-001 LPT Module - Examine The LPT Module Front Face At Interface D-50/10, Inspection-001

DMC:V2500-A0-72-00-5000-00A-300A-B|Issue No:008.00|Issue Date:2019-05-01

Export Control

EAR Export Classification: Not subject to the EAR per 15 C.F.R. Chapter 1, Part 734.3(b)(3), except for the following Service Bulletins which are currently published as EAR Export Classification 9E991: SBE70-0992, SBE72-0483, SBE72-0580, SBE72-0588, SBE72-0640, SBE73-0209, SBE80-0024 and SBE80-0025.

Copyright

© IAE International Aero Engines AG (2001, 2014 - 2021) The information contained in this document is the property of © IAE International Aero Engines AG and may not be copied or used for any purpose other than that for which it is supplied without the express written authority of © IAE International Aero Engines AG. (This does not preclude use by engine and aircraft operators for normal instructional, maintenance or overhaul purposes.).

Applicability

All

Common Information

TASK 72-00-50-220-001 LPT Module - Examine The LPT Module Front Face At Interface D-50/10, Inspection-001

Effectivity

FIG/ITEM

PART NO.

01-001

4W5192

01-001

4W5222

01-001

4W5224

01-001

4W5225

01-001

4W5227

01-001

4W6013

01-001

4W6423

01-001

4W6243

General

The word 'reject' is used after an interface inspection statement to show that a higher level inspection and possible repair to the damaged part is necessary. Do the higher level inspection procedure as found in the applicable Chapter/Section/Subject of this manual on the damaged part(s). It is not necessary to do the higher level inspection on parts that are serviceable to the interface inspection standard.

Refer to TASK 72-00-00-200-000 (INSPECTION-000) before you do this TASK.

The policy that is necessary for inspection is given in SPM TASK 70-20-01-200-501.

All parts must be visually examined for damage, corrosion, and wear. Any defects that are not identified in the procedure must be referred to IAE.

NOTE

Unless specified differently, there is no limitation in the number of acceptable or repairable damages on the airfoils. But there is an effect on the performance of the LP turbine, if excessive usage of the limits on a high number of airfoils.
Before you do this inspection refer to TASK 72-50-24-840-001 (REWORK-001).

Preliminary Requirements

Pre-Conditions

NONE

Support Equipment

NameManufacturerPart Number / IdentificationQuantityRemark
10x illuminated magnifierLOCAL10x illuminated magnifier

Consumables, Materials and Expendables

NONE

Spares

NONE

Safety Requirements

NONE

Procedure

    1. SUBTASK 72-00-50-220-131 General Instructions for the Inspection of the LP Turbine at Interface

    2. Before inspection, clean the interface parts. Refer to TASK 72-00-50-100-001 (CLEANING-001).

    1. SUBTASK 72-00-50-280-001 Visually Examine the LP Turbine Module for Unusual Running Conditions

      1. Oil fire/Titanium fire

      2. Disassemble the LP turbine module. Refer to TASK 72-50-00-030-000 (DISASSEMBLY-000).

        Do not clean the parts without prior agreement of IAE Technical Services.

        Visually inspect all parts for unusual signs of overheating, melting, discoloration, soot, and deposits.

        Do the hardness test on disk stage 3

        Do the overtemperature inspection on blade stage 3. If stage 3 blades show signs of melting, reject complete set of stage 3 blades and vanes and examine stage 4 blades for overheating.

        Take photos from all damaged parts.

        Tell IAE Technical Services.

    1. SUBTASK 72-00-50-220-070 Visually Examine the LP Turbine Case

    2. Refer to Figure and Figure.

      1. Light corrosion

      2. Accept

      1. Examine the outer duct support hook for open stop holes which are 0.085 to 0.095 in. (2.16 to 2.41 mm) diameter.

      2. Repair, VRS4343 TASK 72-50-21-300-031 (REPAIR-031)

      1. NOTE

        A total of ten air cooling holes that are 0.114 to 0.125 in. (2.90 to 3.20 mm) diameter must be open.

        Cracked

        1. Cracked in area A1 (outer duct support hook)

        2. Accept

        1. Cracked through to cooling air hole

        2. Accept

        1. Cracked in area A1, going across into area A1.1

        2. Repair, VRS4343 TASK 72-50-21-300-031 (REPAIR-031)

        1. Cracked in any other area

        2. Reject

      1. Nicked, dented

        1. Not more than 0.010 in. (0.25 mm) maximum depth

        2. Accept

        1. More than in Step

        2. Reject

      1. Sign of isolated heat spots in areas of missing HPT outer airseal coating

      2. Reject

    1. SUBTASK 72-00-50-220-071 Visually Examine the Front Flange of the LP Turbine Case at Location 1

    2. Refer to Figure and Figure.

      1. Visibly deformed

      2. Reject

      1. Light fretting on snap diameter within dimensional requirements. Refer to Step.

      2. Accept

    1. SUBTASK 72-00-50-220-072 Measure the Front Flange of the LP Turbine Case at Location 4

    2. Refer to Figure, Figure, and Figure.

      1. Measure the snap diameter D1.

        1. Not less than 28.527 in. (724.59 mm) and not more than 28.533 in. (724.73 mm)

        2. Accept

        1. Less than in Step, but assembly to HPT is not affected.

        2. Accept

        1. Other than in Step or Step

        2. Reject

    1. SUBTASK 72-00-50-220-073 Visually Examine the Outer Diffuser Segment at Location 6

    2. Refer to Figure.

      1. Cracked

      2. Reject

      1. Buckled

      2. Reject

      1. Coating loss or damage (only applicable when the duct was originally aluminide coated)

        1. Blistered, damaged, or chipped coating not more than 1.000 sq.in. (645.16 sq.mm) total area per segment

        2. Accept

        1. More than in Step

        2. Reject

      1. Nicked, dented

        1. Not more than 0.004 in. (0.10 mm) maximum depth, no raised material

        2. Accept

        1. More than in Step

          1. Coated segment

          2. Reject

          1. Uncoated segment

          2. Repair, VRS4375 TASK 72-50-00-300-008 (REPAIR-008)

      1. Seal strip deterioration

        1. Deterioration of seal strips, not more than five missing or cracked seals or a total of 7.874 in. (200.00 mm) missing or cracked seal length

        2. Accept

        1. More than in Step

        2. Reject

      1. Sign of hot gas ingestion at attachment flange

      2. Reject

      1. Deposits

        1. Deposits caused with normal engine running

        2. Accept

        1. Deposits not caused with normal engine running

        2. Refer to Step.

    1. SUBTASK 72-00-50-220-074-A00 Visually Examine the Inner Duct Segment at Location 7 (Pre SBE 72-0359)

    2. Refer to Figure, Figure, and Figure.

      NOTE

      It is important to determine the radial, axial, and circumferential gap and looseness of each ITD Segment. Use a dial gauge.
      1. Cracked

      2. Reject

      1. Measure the radial looseness.

        1. Pull the segment forward in axial direction as far as possible. Subsequently turn the rear end of the segment most inward and the front end most outward and inverse. Measure the deviation between the inner and outer end positions at the rear end of the segment at each location 12 and 13.

          1. Not more than 0.020 in. (0.51 mm) maximum deviation

          2. Accept

          1. More than in Step

          2. Reject

      1. Measure the axial looseness.

        1. Pull the segment forward in axial direction as far as possible. Measure the gap at dimension D8.

          1. Not more than 0.051 in. (1.30 mm) maximum gap

          2. Accept

          1. More than in Step

          2. Reject

      1. Measure the circumferential looseness.

        1. Pull the segment forward in axial direction as far as possible. Subsequently turn the rear end of the segment most outward and the front end most inward. The adjacent segments must be pushed away in circumferential direction as far as possible. Measure the deviation between dimensions D3 and D4 or between dimensions D5 and D6.

          1. Not more than 0.040 in. (1.02 mm) circumferential looseness

          2. Accept

          1. More than in Step

          2. Reject

      1. Damaged honeycomb cells

        1. One unbonded area of 20 adjacent cells maximum

        2. Accept

        1. Three rows of bent or damaged cells maximum 0.800 in. (20.3 mm) in length

        2. Accept

        1. Rub damage maximum 0.015 in. (0.38 mm) in depth, 0.120 in. (3.0 mm) in width

        2. Accept

        1. More than in Step, Step, or Step

        2. Reject

      1. Blistering, sulphidation, and coating damage

        1. Blistering, sulphidation, coating damage

        2. Accept any amount

        1. Areas of coating loss with definite contour, smooth, and even base material surface

        2. Tell IAE Technical Services.

        1. Other than in Step and Step

        2. Reject

      1. Seal strip deterioration

        1. Deterioration of seal strips, not more than four missing or cracked seals or a total of 7.992 in. (203.00 mm) missing or cracked seal length

        2. Accept

        1. More than in Step

        2. Reject

      1. Deposits

        1. Deposits caused with normal engine running

        2. Accept

        1. Deposits not caused with normal engine running

        2. Refer to Step.

    1. SUBTASK 72-00-50-220-074-B00 Visually Examine the Inner Duct Segment at Location 7 (SBE 72-0359)

    2. Refer to Figure, Figure, and Figure.

      NOTE

      It is important to determine the radial, axial, and circumferential gap and looseness of each ITD Segment. Use a dial gauge.
      1. Cracked

      2. Reject

      1. Measure the radial looseness.

        1. Pull the segment forward in axial direction as far as possible. Subsequently turn the rear end of the segment most inward and the front end most outward and inverse. Measure the deviation between the inner and outer end positions at the rear end of the segment at each location 12 and 13.

          1. Not more than 0.020 in. (0.51 mm) maximum deviation

          2. Accept

          1. More than in Step

          2. Reject

      1. Measure the axial looseness.

        1. Pull the segment forward in axial direction as far as possible. Measure the gap at dimension D8.

          1. Not more than 0.051 in. (1.30 mm) maximum gap

          2. Accept

          1. More than in Step

          2. Reject

      1. Measure the circumferential looseness.

        1. Pull the segment forward in axial direction as far as possible. Subsequently turn the rear end of the segment most outward and the front end most inward. The adjacent segments must be pushed away in circumferential direction as far as possible. Measure the gap at dimension D7.

          1. Not more than 0.126 in. (3.20 mm) maximum gap

          2. Accept

          1. More than in Step but total maximum one gap not more than 0.386 in. (9.80 mm) maximum gap if axial and radial looseness are within limits and if not more than three seal strips are missing or cracked.

          2. Accept

          1. More than in Step

          2. Reject

      1. Damaged honeycomb cells

        1. One unbonded area of 20 adjacent cells maximum

        2. Accept

        1. Three rows of bent or damaged cells maximum 0.800 in. (20.3 mm) in length

        2. Accept

        1. Rub damage maximum 0.015 in. (0.38 mm) in depth, 0.120 in. (3.0 mm) in width

        2. Accept

        1. More than in Step, Step, or Step

        2. Reject

      1. Blistering, sulphidation, and coating damage

        1. Blistering, sulphidation, coating damage

        2. Accept any amount

        1. Areas of coating loss with definite contour, smooth, and even base material surface

        2. Tell IAE Technical Services.

        1. Other than in Step and Step

        2. Reject

      1. Seal strip deterioration

        1. Deterioration of seal strips, not more than four missing or cracked seals or a total of 7.992 in. (203.00 mm) missing or cracked seal length

        2. Accept

        1. More than in Step

        2. Reject

      1. Deposits

        1. Deposits caused with normal engine running

        2. Accept

        1. Deposits not caused with normal engine running

        2. Refer to Step.

    1. SUBTASK 72-00-50-220-075 Measure the Air Seal Diameter at the Inner Duct Segment at Location 8

    2. Refer to Figure.

      1. Measure diameter D2 on normal honeycomb surface.

        1. Not less than 19.896 in. (505.36 mm) and not more than 19.925 in. (506.10 mm)

        2. Accept

        1. Other than in Step

        2. Reject

    1. SUBTASK 72-00-50-220-079 Visually Examine the Stage 3 Turbine Vanes at Location 2

    2. Refer to Figure, Figure, and Figure.

      NOTE

      Do the examination to the extent possible.
      1. Examine the shrouds and airfoils for cracks without area A2.2.

        1. Cracked

        2. Reject

      1. Examine the fillet radius in area A2.2 for cracks. Use 10x illuminated magnifier.

        1. Cracked

        2. Reject

      1. Examine the surface in area A2.1.

        1. Nicked, dented, pitted

          1. Round bottom dents not more than 0.020 in. (0.51 mm) maximum depth, not more than ten percent of area A2.1

          2. Accept

          1. Nicked or pitted not more than 0.005 in. (0.13 mm) maximum depth

          2. Accept

          1. More than in Step

          2. Repair, VRS4375 TASK 72-50-00-300-008 (REPAIR-008)

      1. Examine the surface in area A2.2.

        1. Nicked, dented, pitted

          1. Round bottom dents not more than 0.010 in. (0.25 mm) maximum depth

          2. Accept

          1. Nicked or pitted not more than 0.005 in. (0.13 mm) maximum depth, no raised material

          2. Accept

          1. More than in Step or Step

          2. Reject

      1. Examine the surface in area A2.3.

        1. Nicked, dented, pitted in area A2.3.1

          1. Round bottom dents not more than 0.010 in. (0.25 mm) maximum depth

          2. Accept

          1. Nicked or pitted not more than 0.005 in. (0.13 mm) maximum depth

          2. Accept

          1. More than in Step or Step

          2. Repair, VRS4375 TASK 72-50-00-300-008 (REPAIR-008)

        1. Nicked, dented, pitted in area A2.3.2

          1. Not more than 0.005 in. (0.13 mm) maximum depth

          2. Accept

          1. One round bottom dent per airfoil not more than 0.010 in. (0.25 mm) maximum depth

          2. Accept

          1. More than in Step or Step

          2. Repair, VRS4375 TASK 72-50-00-300-008 (REPAIR-008)

      1. Examine the surface in area A2.4.

        1. Nicked, dented, pitted in area A2.4.1

          1. Round bottom dents not more than 0.010 in. (0.25 mm) maximum depth

          2. Accept

          1. Nicked or pitted not more than 0.005 in. (0.13 mm) maximum depth

          2. Accept

          1. More than in Step or Step

          2. Repair, VRS4375 TASK 72-50-00-300-008 (REPAIR-008)

        1. Nicked, dented, pitted in area A2.4.2

          1. Round bottom dents not more than 0.010 in. (0.25 mm) maximum depth

          2. Accept

          1. Nicked or pitted not more than 0.005 in. (0.13 mm) maximum depth

          2. Accept

          1. Bent not more than 0.020 in. (0.51 mm) maximum deflection and 0.700 in. (17.78 mm) total maximum length each airfoil

          2. Accept

          1. More than in Step or Step or Step

          2. Repair, VRS4375 TASK 72-50-00-300-008 (REPAIR-008)

      1. Examine the surface in area A2.5.

        1. Nicked, dented, pitted

          1. Round bottom dents not more than 0.010 in. (0.25 mm) maximum depth

          2. Accept

          1. Nicked or pitted not more than 0.005 in. (0.13 mm) maximum depth

          2. Accept

          1. More than in Step

          2. Repair, VRS4375 TASK 72-50-00-300-008 (REPAIR-008)

      1. Examine the surface in area A2.6.

        1. Nicked, dented, pitted

          1. Round bottom dents not more than 0.020 in. (0.51 mm) maximum depth, not visible from other side, not more than ten percent of surface of area A2.6

          2. Accept

          1. Nicked or pitted not more than 0.005 in. (0.13 mm) maximum depth

          2. Accept

          1. More than in Step

          2. Repair, VRS4375 TASK 72-50-00-300-008 (REPAIR-008)

      1. Examine the surface in area A2.7.

        1. Nicked, dented, pitted

          1. Round bottom dents not more than 0.010 in. (0.25 mm) maximum depth

          2. Accept

          1. Nicked or pitted not more than 0.007 in. (0.18 mm) maximum depth, no raised material

          2. Accept

          1. More than in Step or Step

          2. Reject

      1. Examine the surface in area A2.8.

        1. Nicked, dented, pitted

          1. Round bottom dents not more than 0.020 in. (0.51 mm) maximum depth, not visible from other side, not more than ten percent of area A2.8

          2. Accept

          1. Nicked or pitted not more than 0.005 in. (0.13 mm) maximum depth

          2. Accept

          1. More than in Step

          2. Repair, VRS4375 TASK 72-50-00-300-008 (REPAIR-008)

      1. Coating loss or damage

        1. Blistered, damaged, or chipped coating not more than 1.000 sq.in. (645.16 sq.mm) total area per vane cluster (shrouds and airfoils together)

        2. Accept

        1. Cracked or chipped coating at nick or dent

        2. Repair, VRS4375 TASK 72-50-00-300-008 (REPAIR-008)

        1. More than in Step or Step

        2. Reject

      1. Separated cluster bonds

        NOTE

        This inspection is only applicable for brazed turbine vane clusters.
        1. Complete separation of outer shroud cluster bonds

        2. Accept

        1. Separation of inner shroud cluster bonds, any number, total a half of a complete braze joint for each cluster

        2. Accept

      1. Deposits

        1. Deposits caused with normal engine running

        2. Accept

        1. Deposits not caused with normal engine running

        2. Refer to Step

    1. SUBTASK 72-00-50-220-007 Visually Examine the Stage 3 Turbine Vanes at Outer Shroud Side Faces for Sulphidation/Corrosion at Location 2

    2. Refer to Figure, Figure, and Figure.

      1. Examine the side face and outer shroud platform for sulphidation.

        1. Sulphidation originating from the side face not reaching the fillet radius

        2. Accept with inspection each 2000 cycles or 3500 hours whichever occurs first

        1. Sulphidation originating from the side face reaching the fillet radius but not extending into the radius

        2. Accept with inspection each 600 cycles or 1000 hours whichever occurs first

        1. Sulphidation originating from the side face extending into the fillet radius

        2. Accept for 20 cycles

        1. Other than in Step

        2. Reject

    1. SUBTASK 72-00-50-220-077 Visually Examine the Stage 3 Turbine Blades at Location 3

    2. Refer to Figure, Figure, and Figure.

      NOTE

      Do the examination to the extent possible.
      1. Examine the shrouds and airfoils for cracks.

        1. Cracked

        2. Reject

      1. Examine the surface in area A3.1.

        1. Nicked, dented, pitted

          1. Round bottom dents not more than 0.005 in. (0.13 mm) maximum depth

          2. Accept

          1. Nicked or pitted not more than 0.004 in. (0.10 mm) maximum depth

          2. Accept

          1. More than in Step

          2. Repair, VRS4375 TASK 72-50-00-300-008 (REPAIR-008)

      1. Examine the surface in area A3.2.

        1. Nicked, dented, pitted

          1. Round bottom dents not more than 0.020 in. (0.51 mm) maximum depth

          2. Accept

          1. Nicked or pitted not more than 0.020 in. (0.51 mm) maximum depth

          2. Accept

          1. More than in Step or Step

          2. Reject

      1. Examine the surface in area A3.3.

        1. Nicked, dented, pitted in area A3.3.1

          1. Round bottom dents not more than 0.020 in. (0.51 mm) maximum depth

          2. Accept

          1. Nicked or pitted not more than 0.020 in. (0.51 mm) maximum depth

          2. Accept

        1. Nicked, dented, pitted in area A3.3.2

          1. Round bottom dents not more than 0.039 in. (1.00 mm) maximum depth

          2. Accept

          1. Nicked or pitted not more than 0.039 in. (1.00 mm) maximum depth

          2. Accept

          1. More than in Step or Step

          2. Reject

        1. Nicked, dented, pitted in area A3.3.3

          1. Round bottom dents not more than 0.010 in. (0.25 mm) maximum depth

          2. Accept

        1. More than in Step or Step

        2. Repair, VRS4375 TASK 72-50-00-300-008 (REPAIR-008)

      1. Examine the surface in area A3.4.

        1. Nicked, dented, pitted in area A3.4.1

          1. Round bottom dents not more than 0.010 in. (0.25 mm) maximum depth

          2. Accept

          1. Nicked or pitted not more than 0.004 in. (0.10 mm) maximum depth

          2. Accept

        1. Nicked, dented, pitted in area A3.4.2

          1. Round bottom dents not more than 0.010 in. (0.25 mm) maximum depth

          2. Accept

        1. More than in Step or Step

        2. Repair, VRS4375 TASK 72-50-00-300-008 (REPAIR-008)

      1. Examine the surface in area A3.5.

        1. Nicked, dented, pitted

          1. Round bottom dents not more than 0.027 in. (0.70 mm) maximum depth, not visible from other side, not more than ten percent of surface of area A3.5

          2. Accept

          1. Nicked or pitted not more than 0.027 in. (0.70 mm) maximum depth, not more than ten percent of area A3.5

          2. Accept

          1. Other than in Step

          2. Repair, VRS4375 TASK 72-50-00-300-008 (REPAIR-008)

      1. Examine the surface in area A3.6.

        1. Nicked, dented, pitted

          1. Round bottom dents not more than 0.027 in. (0.70 mm) maximum depth, not visible from other side, not more than ten percent of area A3.6

          2. Accept

          1. Nicked or pitted not more than 0.027 in. (0.70 mm) maximum depth, not more than ten percent of area A3.6

          2. Accept

          1. Other than in Step

          2. Repair, VRS4375 TASK 72-50-00-300-008 (REPAIR-008)

      1. Examine the surface in area A3.7.

        1. Nicked, dented, pitted

          1. Round bottom dents not more than 0.010 in. (0.25 mm) maximum depth

          2. Accept

          1. Nicked or pitted not more than 0.004 in. (0.10 mm) maximum depth

          2. Accept

          1. More than in Step

          2. Repair, VRS4375 TASK 72-50-00-300-008 (REPAIR-008)

      1. Examine the surface in area A3.8.

        1. Nicked, dented, pitted

          1. Round bottom dents not more than 0.010 in. (0.25 mm) maximum depth, no raised material

          2. Accept

          1. Nicked or pitted not more than 0.002 in. (0.05 mm) maximum depth

          2. Accept

          1. More than in Step or Step

          2. Reject

      1. Examine the surface in area A3.9.

        1. Nicked, dented, pitted

          1. Round bottom dents not more than 0.020 in. (0.51 mm) maximum depth, no raised material

          2. Accept

          1. Nicked or pitted not more than 0.020 in. (0.51 mm) maximum depth

          2. Accept

          1. More than in Step or Step

          2. Reject

      1. Deposits

        1. Deposits caused with normal engine running

        2. Accept

        1. Deposits not caused with normal engine running

        2. Refer to Step.

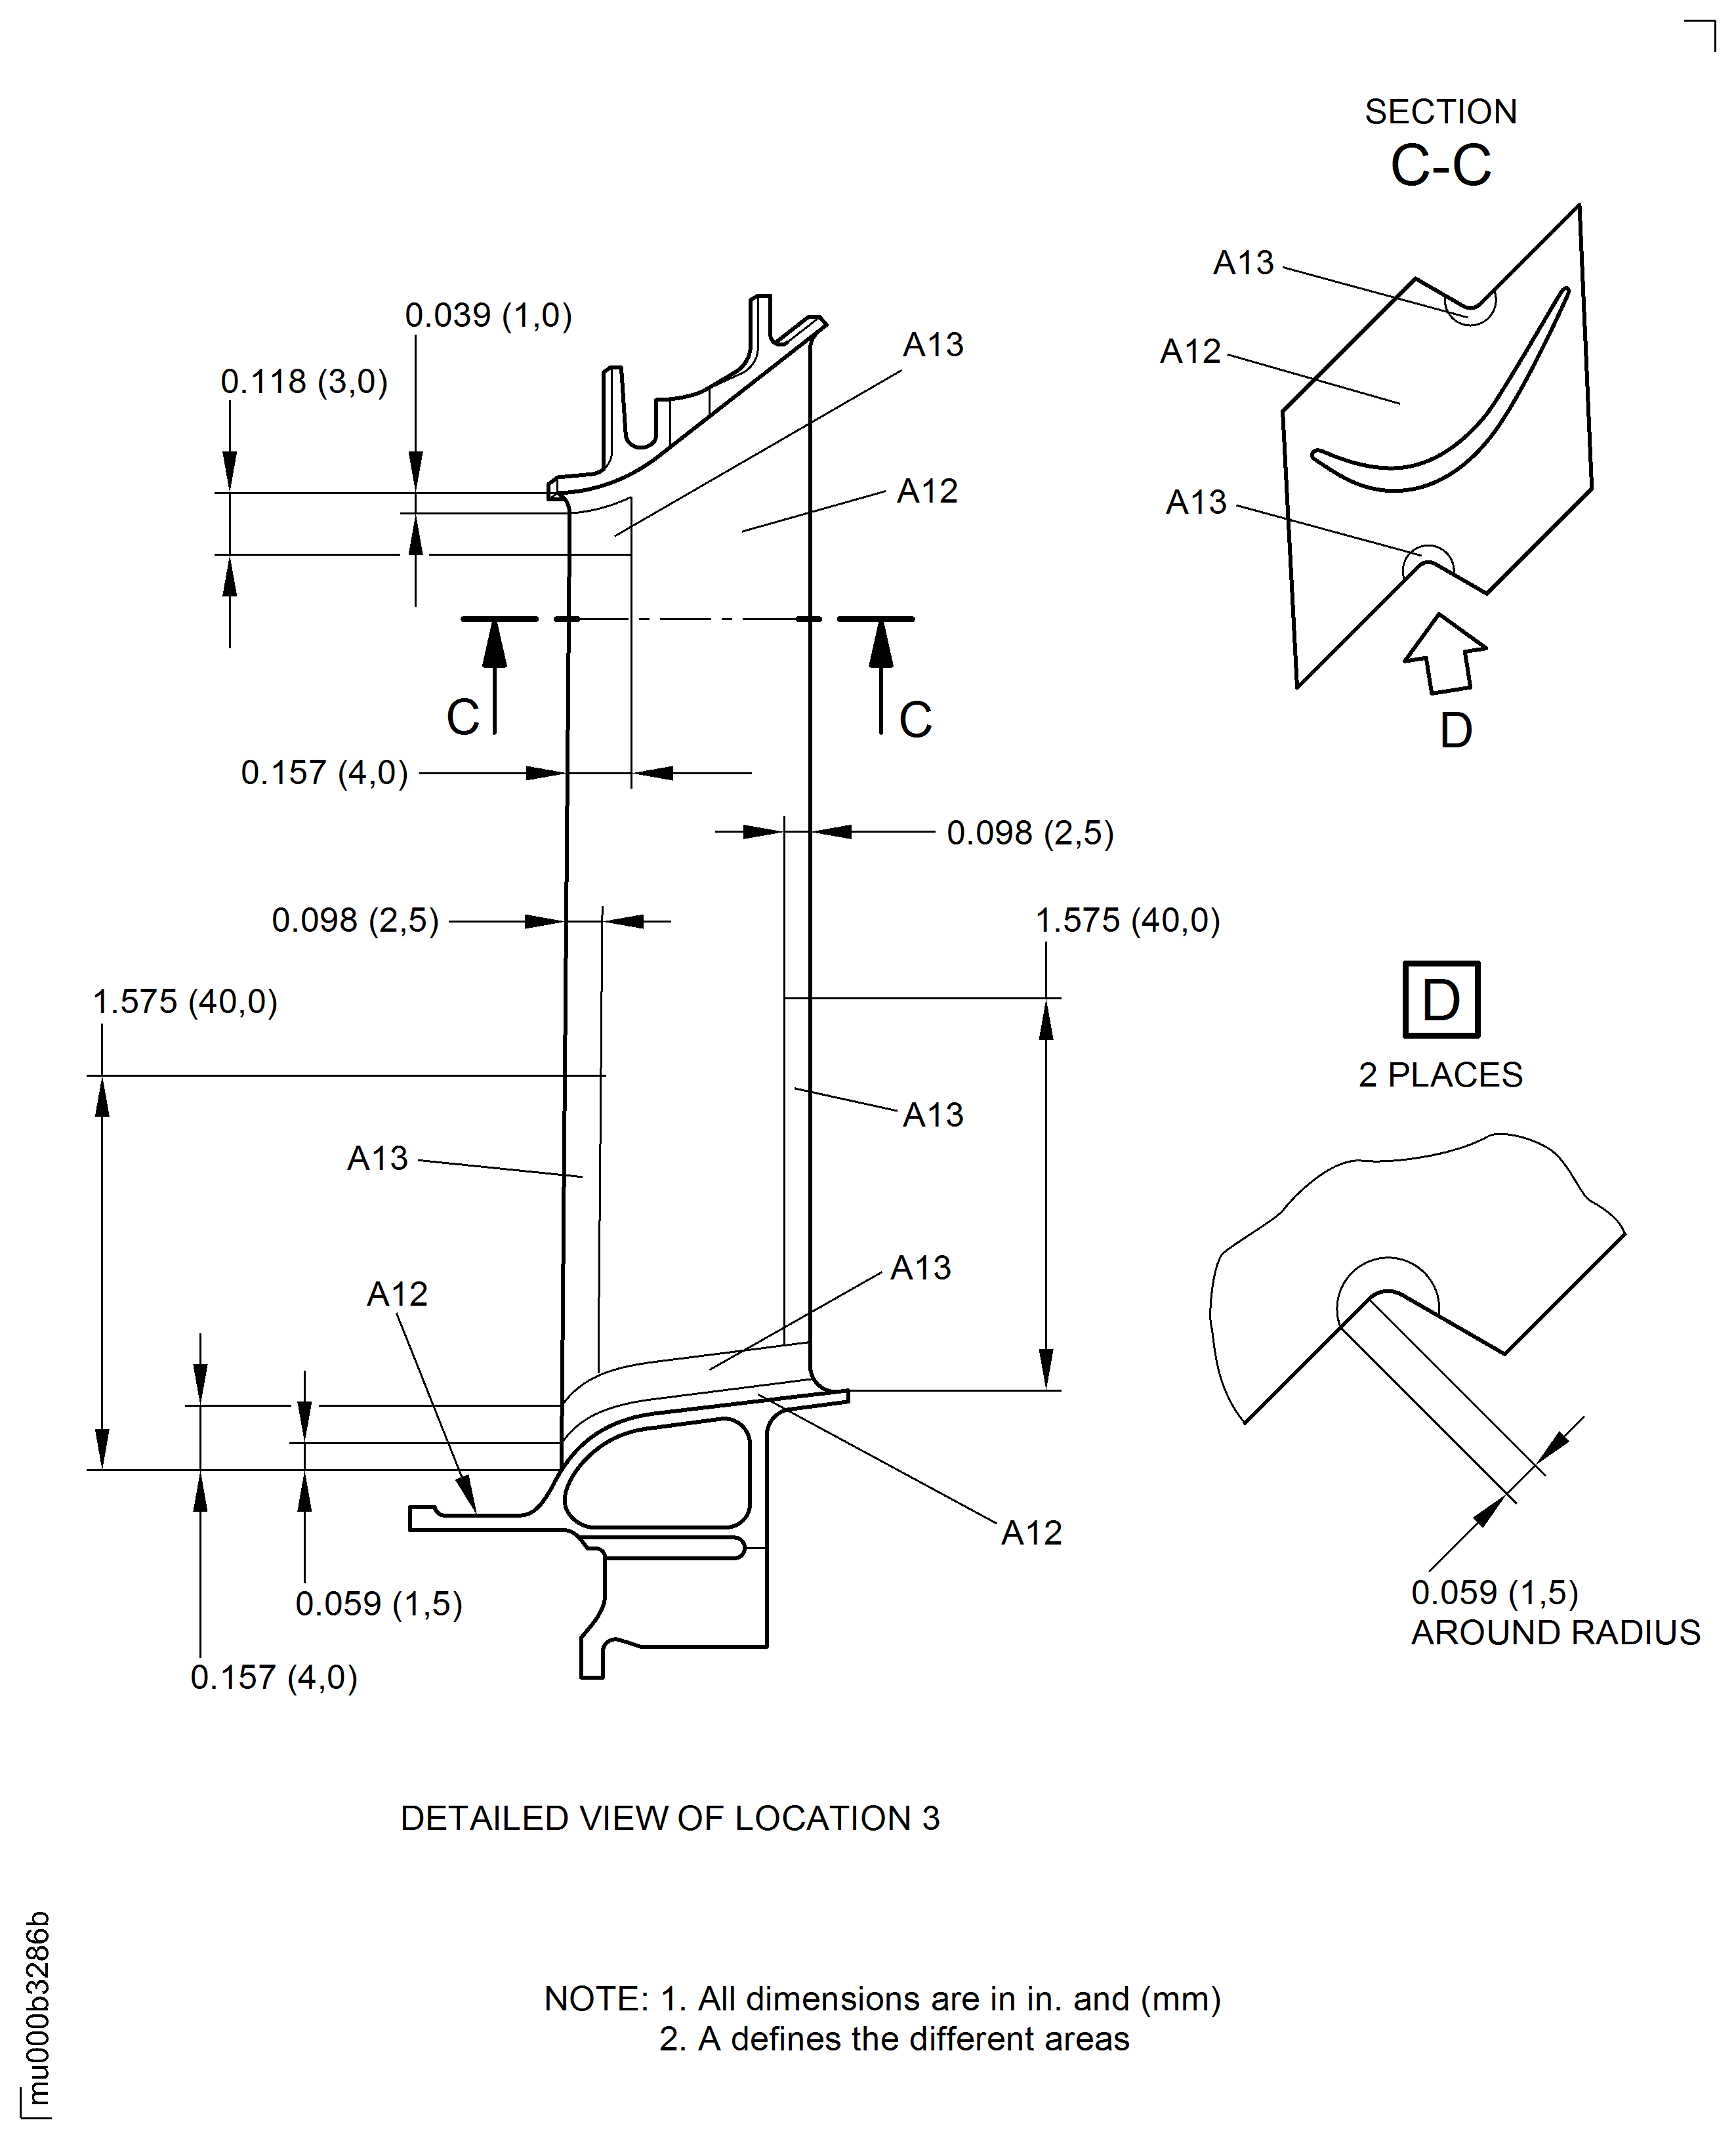
    1. SUBTASK 72-00-50-220-250 Visually Examine the Stage 3 Turbine Blades for Sulphidation/Corrosion/Blistering/Coating Damage at Location 3

    2. NOTE

      For damaged coating associated with crack, nick, or dent refer to Step.
      1. Examine the surface in area A12.

        1. Dark corrosion, blistering, coating loss, or damage

        2. Accept

        1. Single pits in base material or raised pustules

          1. Not more than 0.079 in. (2.00 mm) in diameter or length

          2. Accept

          1. More than Step

          2. Reject

      1. Examine the surface in area A13.

        1. Dark corrosion or blistering

        2. Accept

        1. Areas of coating loss or damage

          1. Not more than 0.059 in. (1.50 mm) in diameter or length

          2. Accept

          1. More than in Step but not more than 0.118 in. (3.00 mm) in diameter or length with a minimum separation of 0.118 in. (3.00 mm)

          2. Accept

          1. Other than in Step or Step

          2. Reject

        1. Single pits in base material

          1. Not more than 0.020 in. (0.50 mm) in diameter or length

          2. Accept

          1. More than in Step

          2. Reject

    1. SUBTASK 72-00-50-220-081 Visually Examine the Stage 3 Air Seal Ring at Location 9

    2. Refer to Figure.

      1. Damaged honeycomb cells

        1. Unbonded areas, maximum 20 adjacent cells, minimum distance 60 degrees apart

        2. Accept

        1. Three rows of bent or damaged cells maximum length 0.800 in. (20.3 mm)

        2. Accept

        1. Rub damage maximum 0.015 in. (0.38 mm) in depth, 0.160 in. (4.06 mm) in width

        2. Accept

        1. More than in Step, Step, or Step

        2. Reject

    1. SUBTASK 72-00-50-220-225 Visually Examine the Stage 3 Rotating Air Seal at Location 10

    2. Refer to Figure.

      NOTE

      Do the examination to the extent possible.
      1. Cracked

      2. Reject

      1. Nicks, dents, or scratches caused by internal objects during engine run

      2. Reject

      1. Nicks, dents, or scratches caused by handling

        1. Nicked, dented

          1. Not more than 0.002 in. (0.05 mm) maximum depth without lifted material

          2. Accept

          1. More than in Step

          2. Reject

        1. Scratched

          1. Not more than 0.0004 in. (0.01 mm) maximum depth if in a circumferential direction and 0.0002 in. (0.005 mm) maximum depth if in any other direction

          2. Accept

          1. More than in Step

          2. Reject

      1. Missing nuts or broken bolts at airseal/disk joint

      2. Reject

      1. Deposits

        1. Deposits caused with normal engine running

        2. Accept

        1. Deposits not caused with normal engine running

        2. Refer to Step.

    1. SUBTASK 72-00-50-220-226 Visually Examine the Stage 3 to 6 Turbine Disks at Location 11

    2. Refer to Figure.

      NOTE

      Do the examination to the extent possible.
      1. Cracked

      2. Reject

      1. Nicks, dents, or scratches caused by internal objects during engine run

      2. Reject

      1. Nicks, dents, or scratches caused by handling

        1. Nicked, dented

          1. Not more than 0.0004 in. (0.01 mm) maximum depth without lifted material

          2. Accept

          1. More than in Step

          2. Reject

        1. Scratched

          1. Not more than 0.0004 in. (0.01 mm) maximum depth if in a circumferential direction and 0.0002 in. (0.005 mm) maximum depth if in any other direction

          2. Accept

          1. More than in Step

          2. Reject

      1. Missing nuts or broken bolts at disk joints

      2. Reject

      1. Corroded

      2. Reject

      1. Deposits

        1. Deposits caused with normal engine running

        2. Accept

        1. Deposits not caused with normal engine running

        2. Refer to Step.

    1. SUBTASK 72-00-50-220-249 Visually Examine the Stage 3 Blades for Unlatching

    2. Refer to Figure.

      NOTE

      Blades are in unlatched condition if the outer shroud interlock between two blades is lost.
      1. Examine all blades for signs of unlatching.

        1. Unlatched

        2. Reject

    1. SUBTASK 72-00-50-220-008 Visually Examine the Stage 3 Blades for Shingling

    2. Refer to Figure.

      1. Examine all blades for signs of shingling.

        1. Shingled

        2. Reject

  1. Figure: Locations at Interface D-50/10

    Locations at Interface D-50/10

    Figure: Locations at Interface D-50/10

    Locations at Interface D-50/10

    Figure: Locations at Interface D-50/10

    Locations at Interface D-50/10
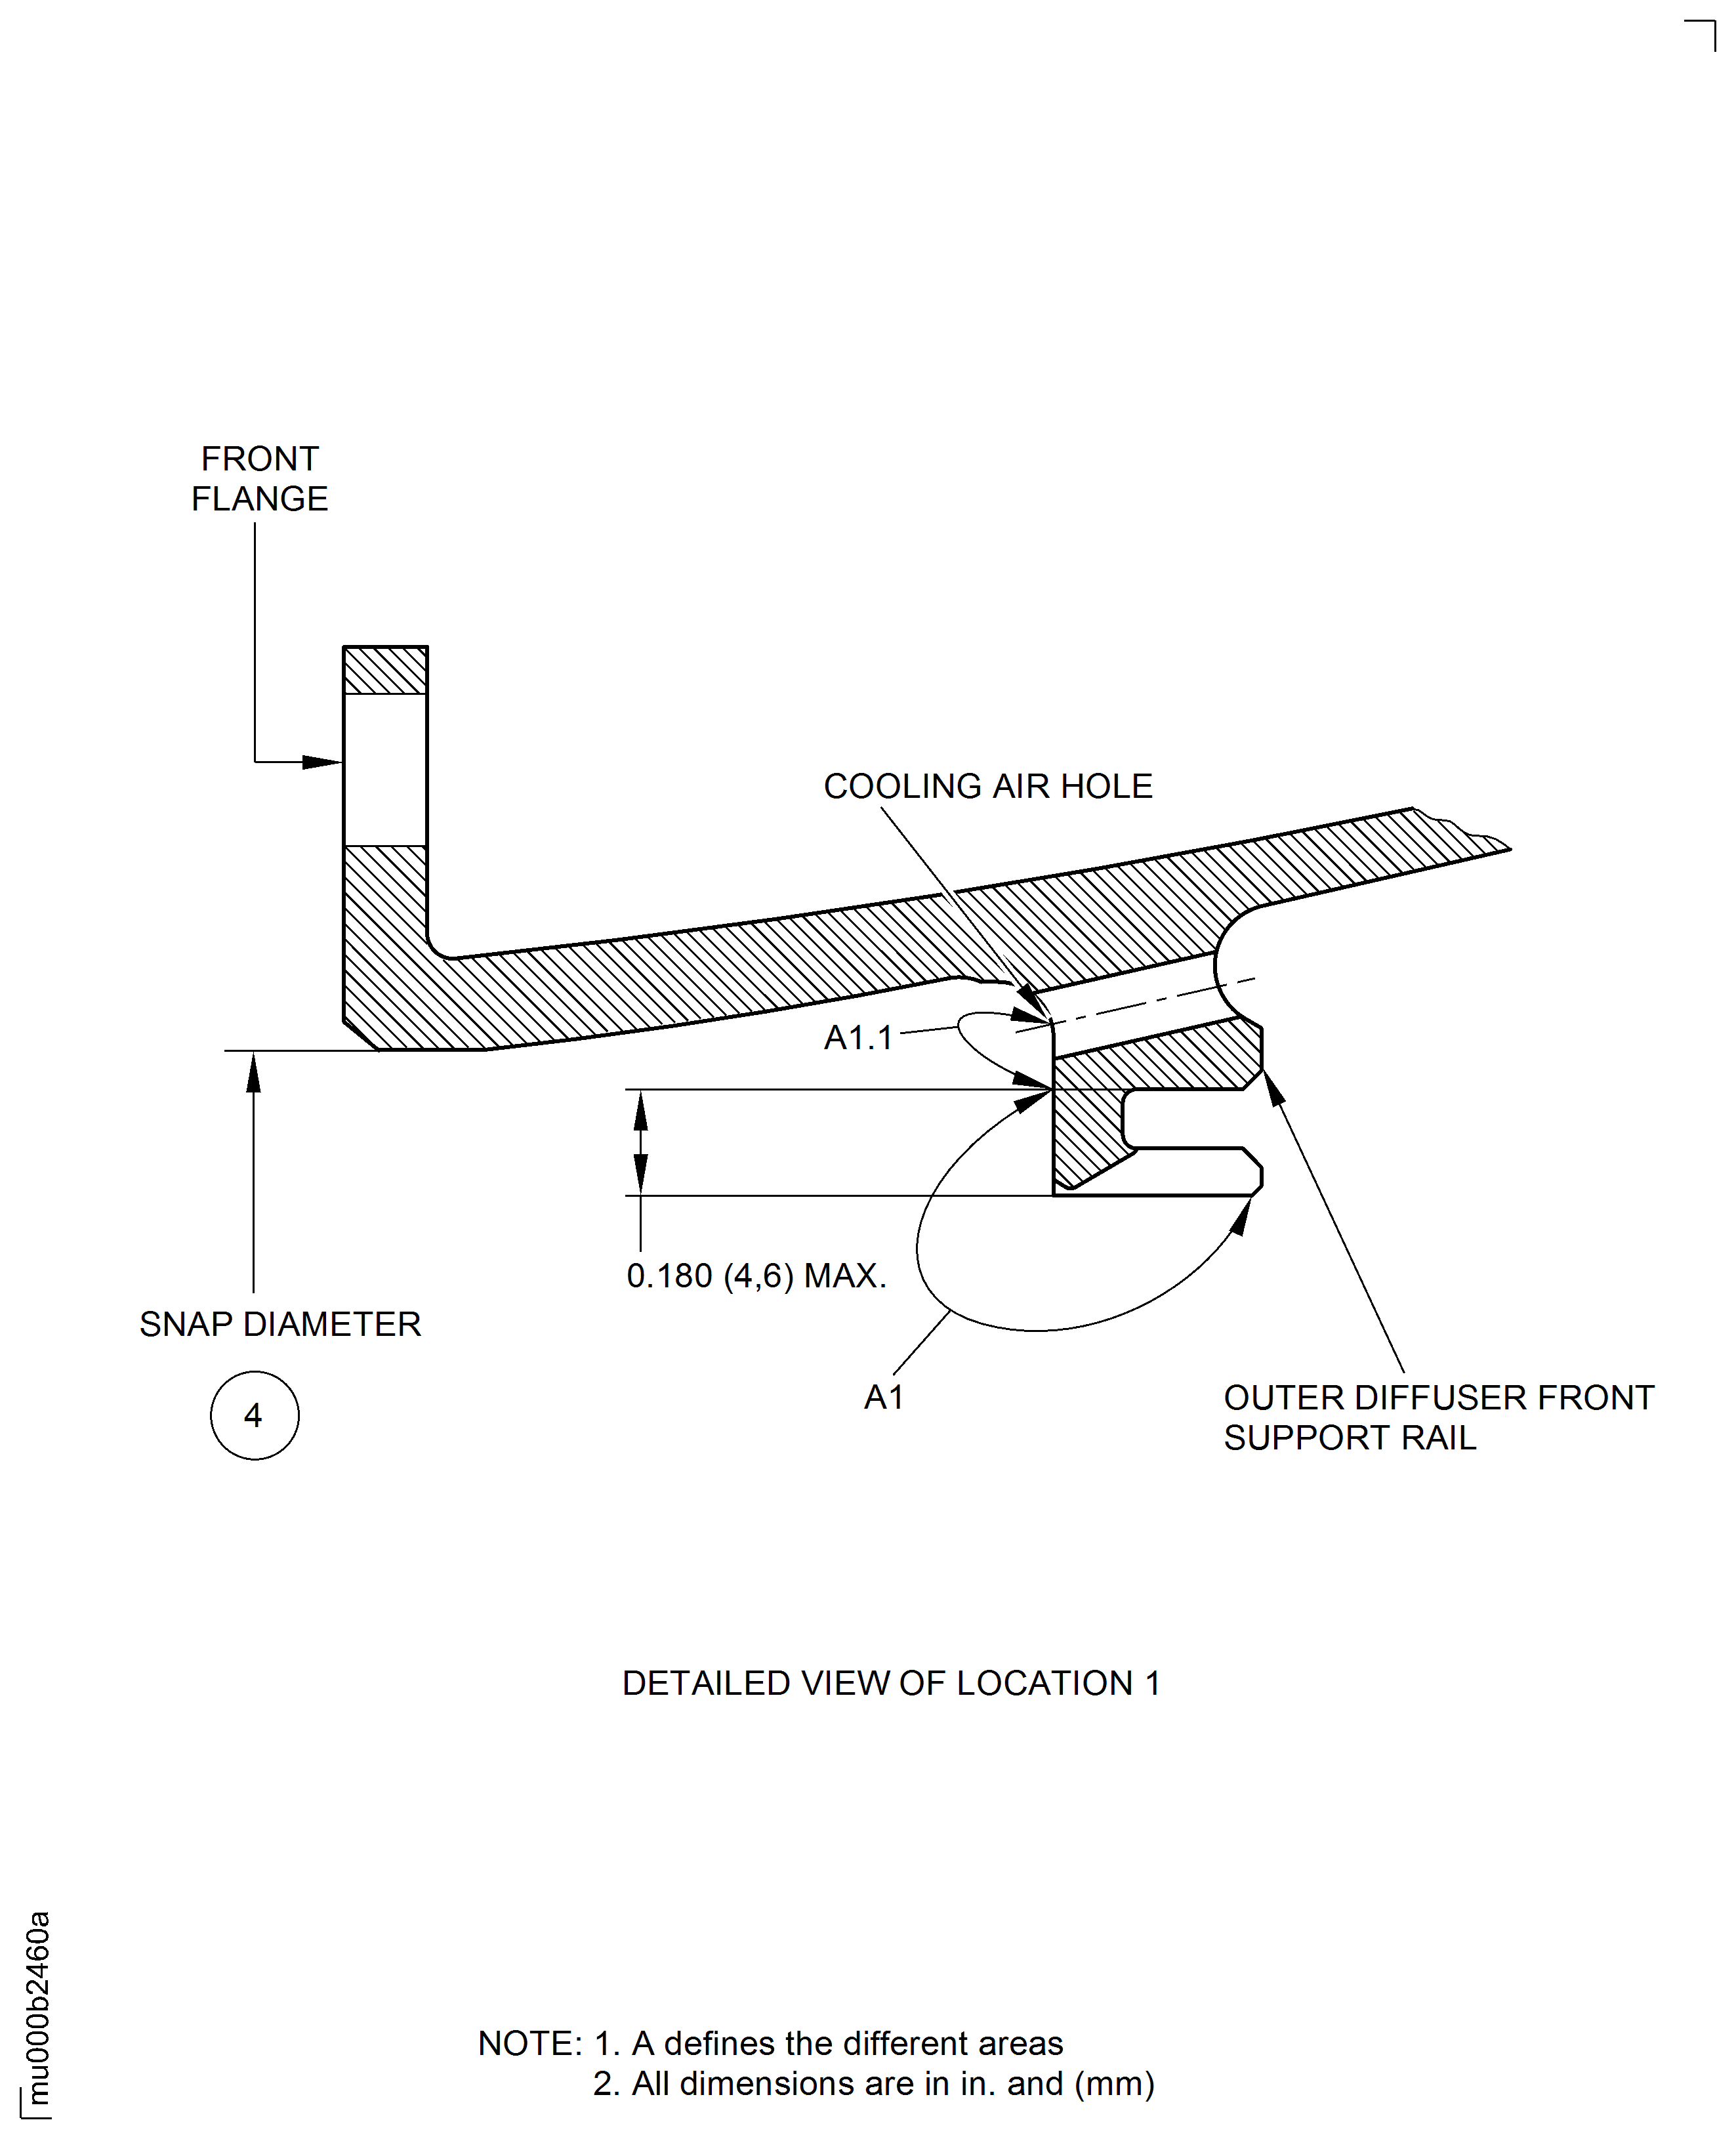
    Figure: Locations at Interface D-50/10

    Locations at Interface D-50/10

    Figure: Locations at Interface D-50/10

    Locations at Interface D-50/10
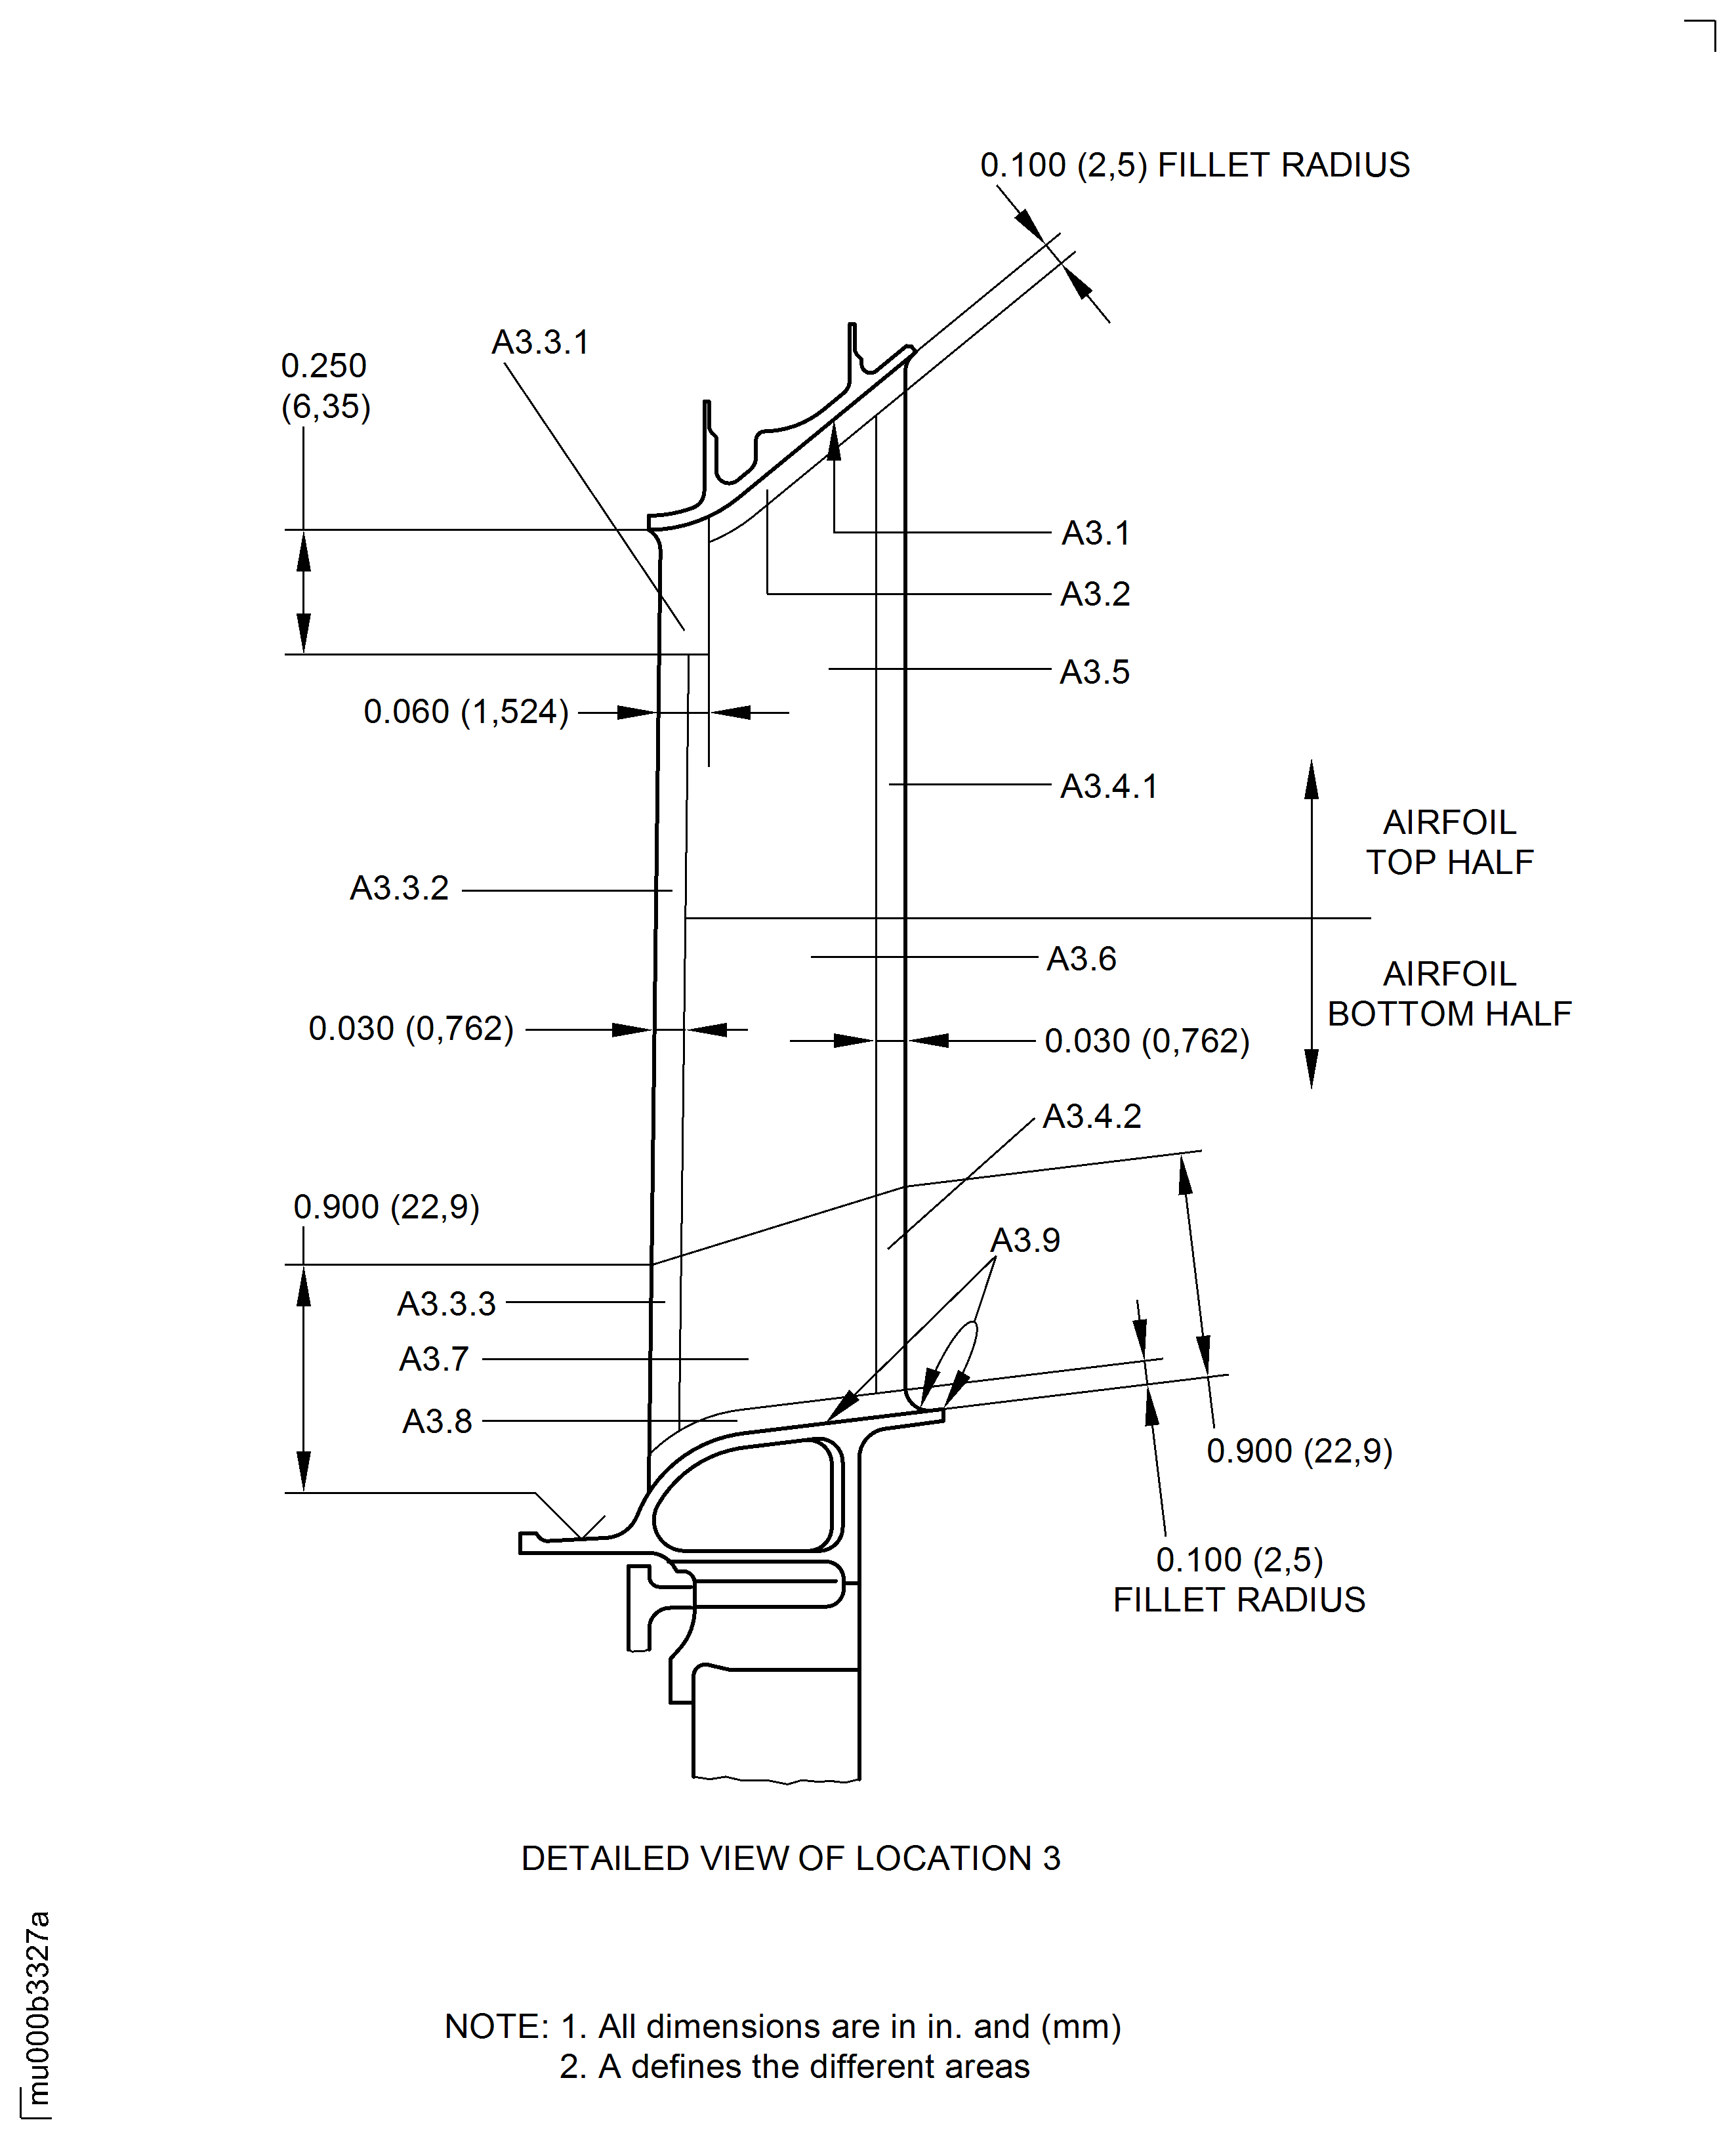
    Figure: Locations at Interface D-50/10

    Locations at Interface D-50/10

    Figure: Locations at Interface D-50/10

    Locations at Interface D-50/10
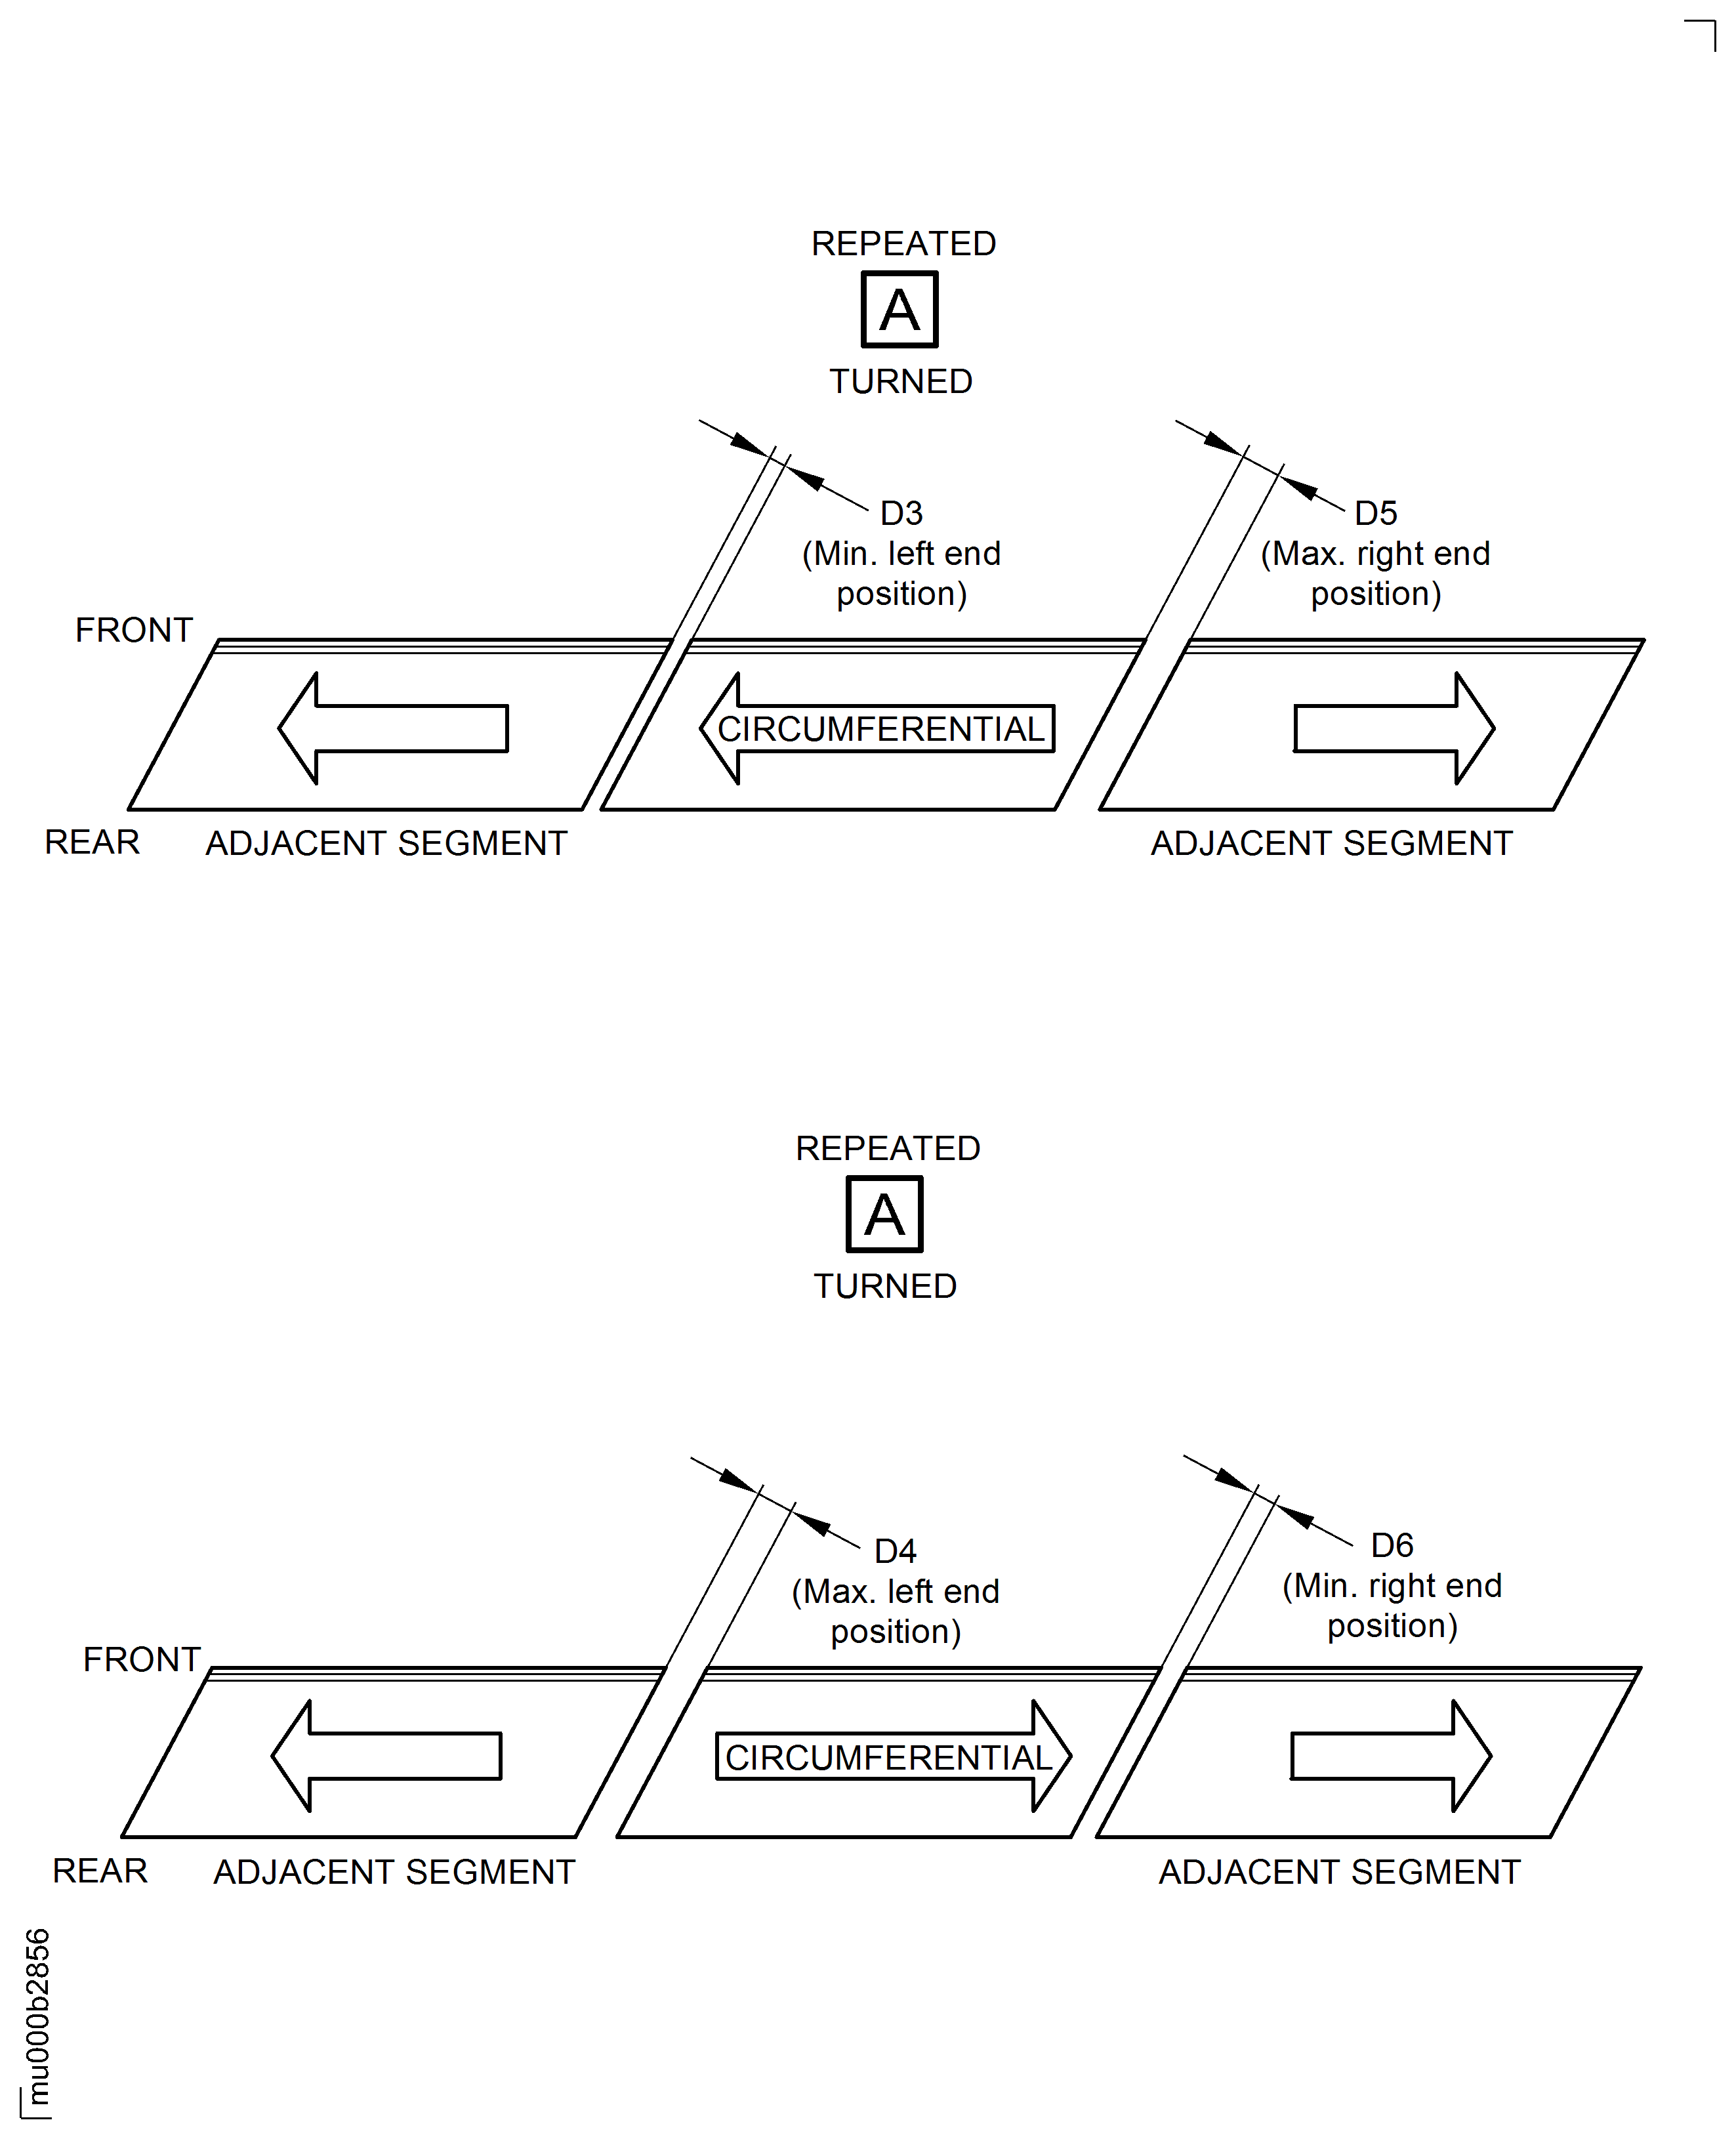
    Figure: Locations at Interface D-50/10

    Locations at Interface D-50/10

    Figure: Unlatched Blades at Interface D-50/10

    Unlatched Blades at Interface D-50/10

    Figure: Locations at Interface D-50/10

    Locations at Interface D-50/10
    Locations at Interface D-50/10

    Locations at Interface D-50/10

    Locations at Interface D-50/10
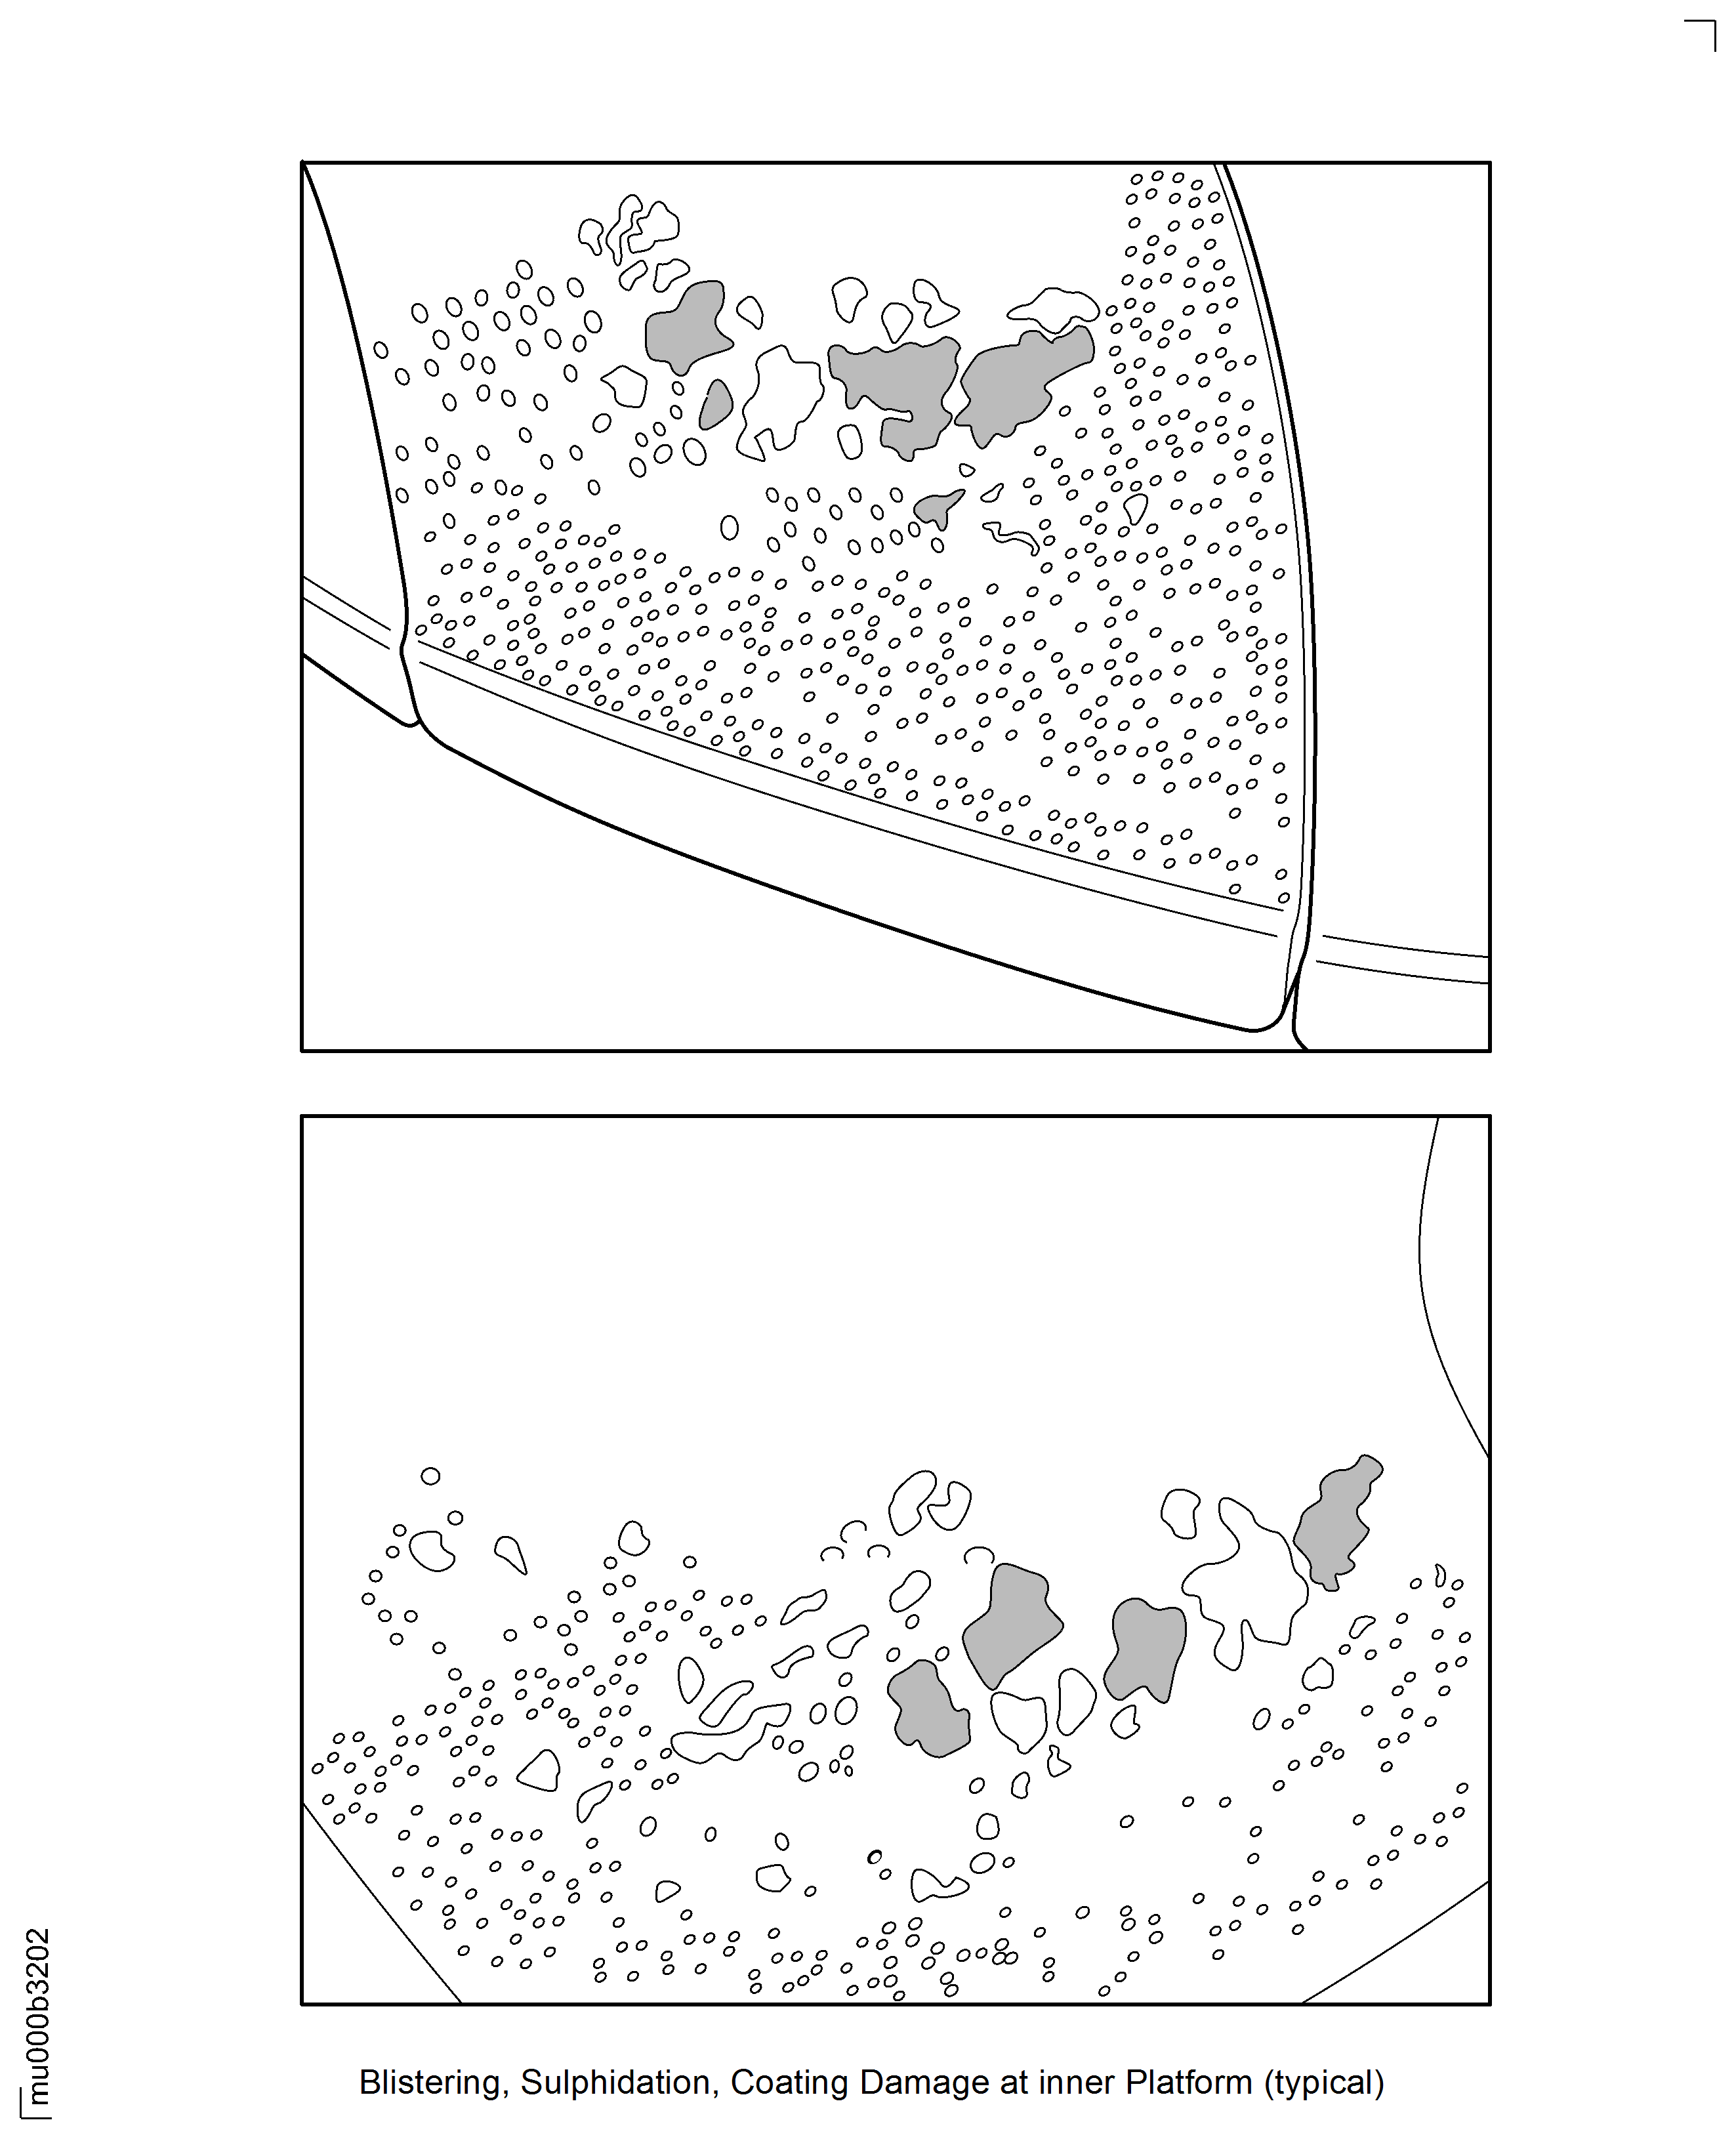
    Locations at Interface D-50/10
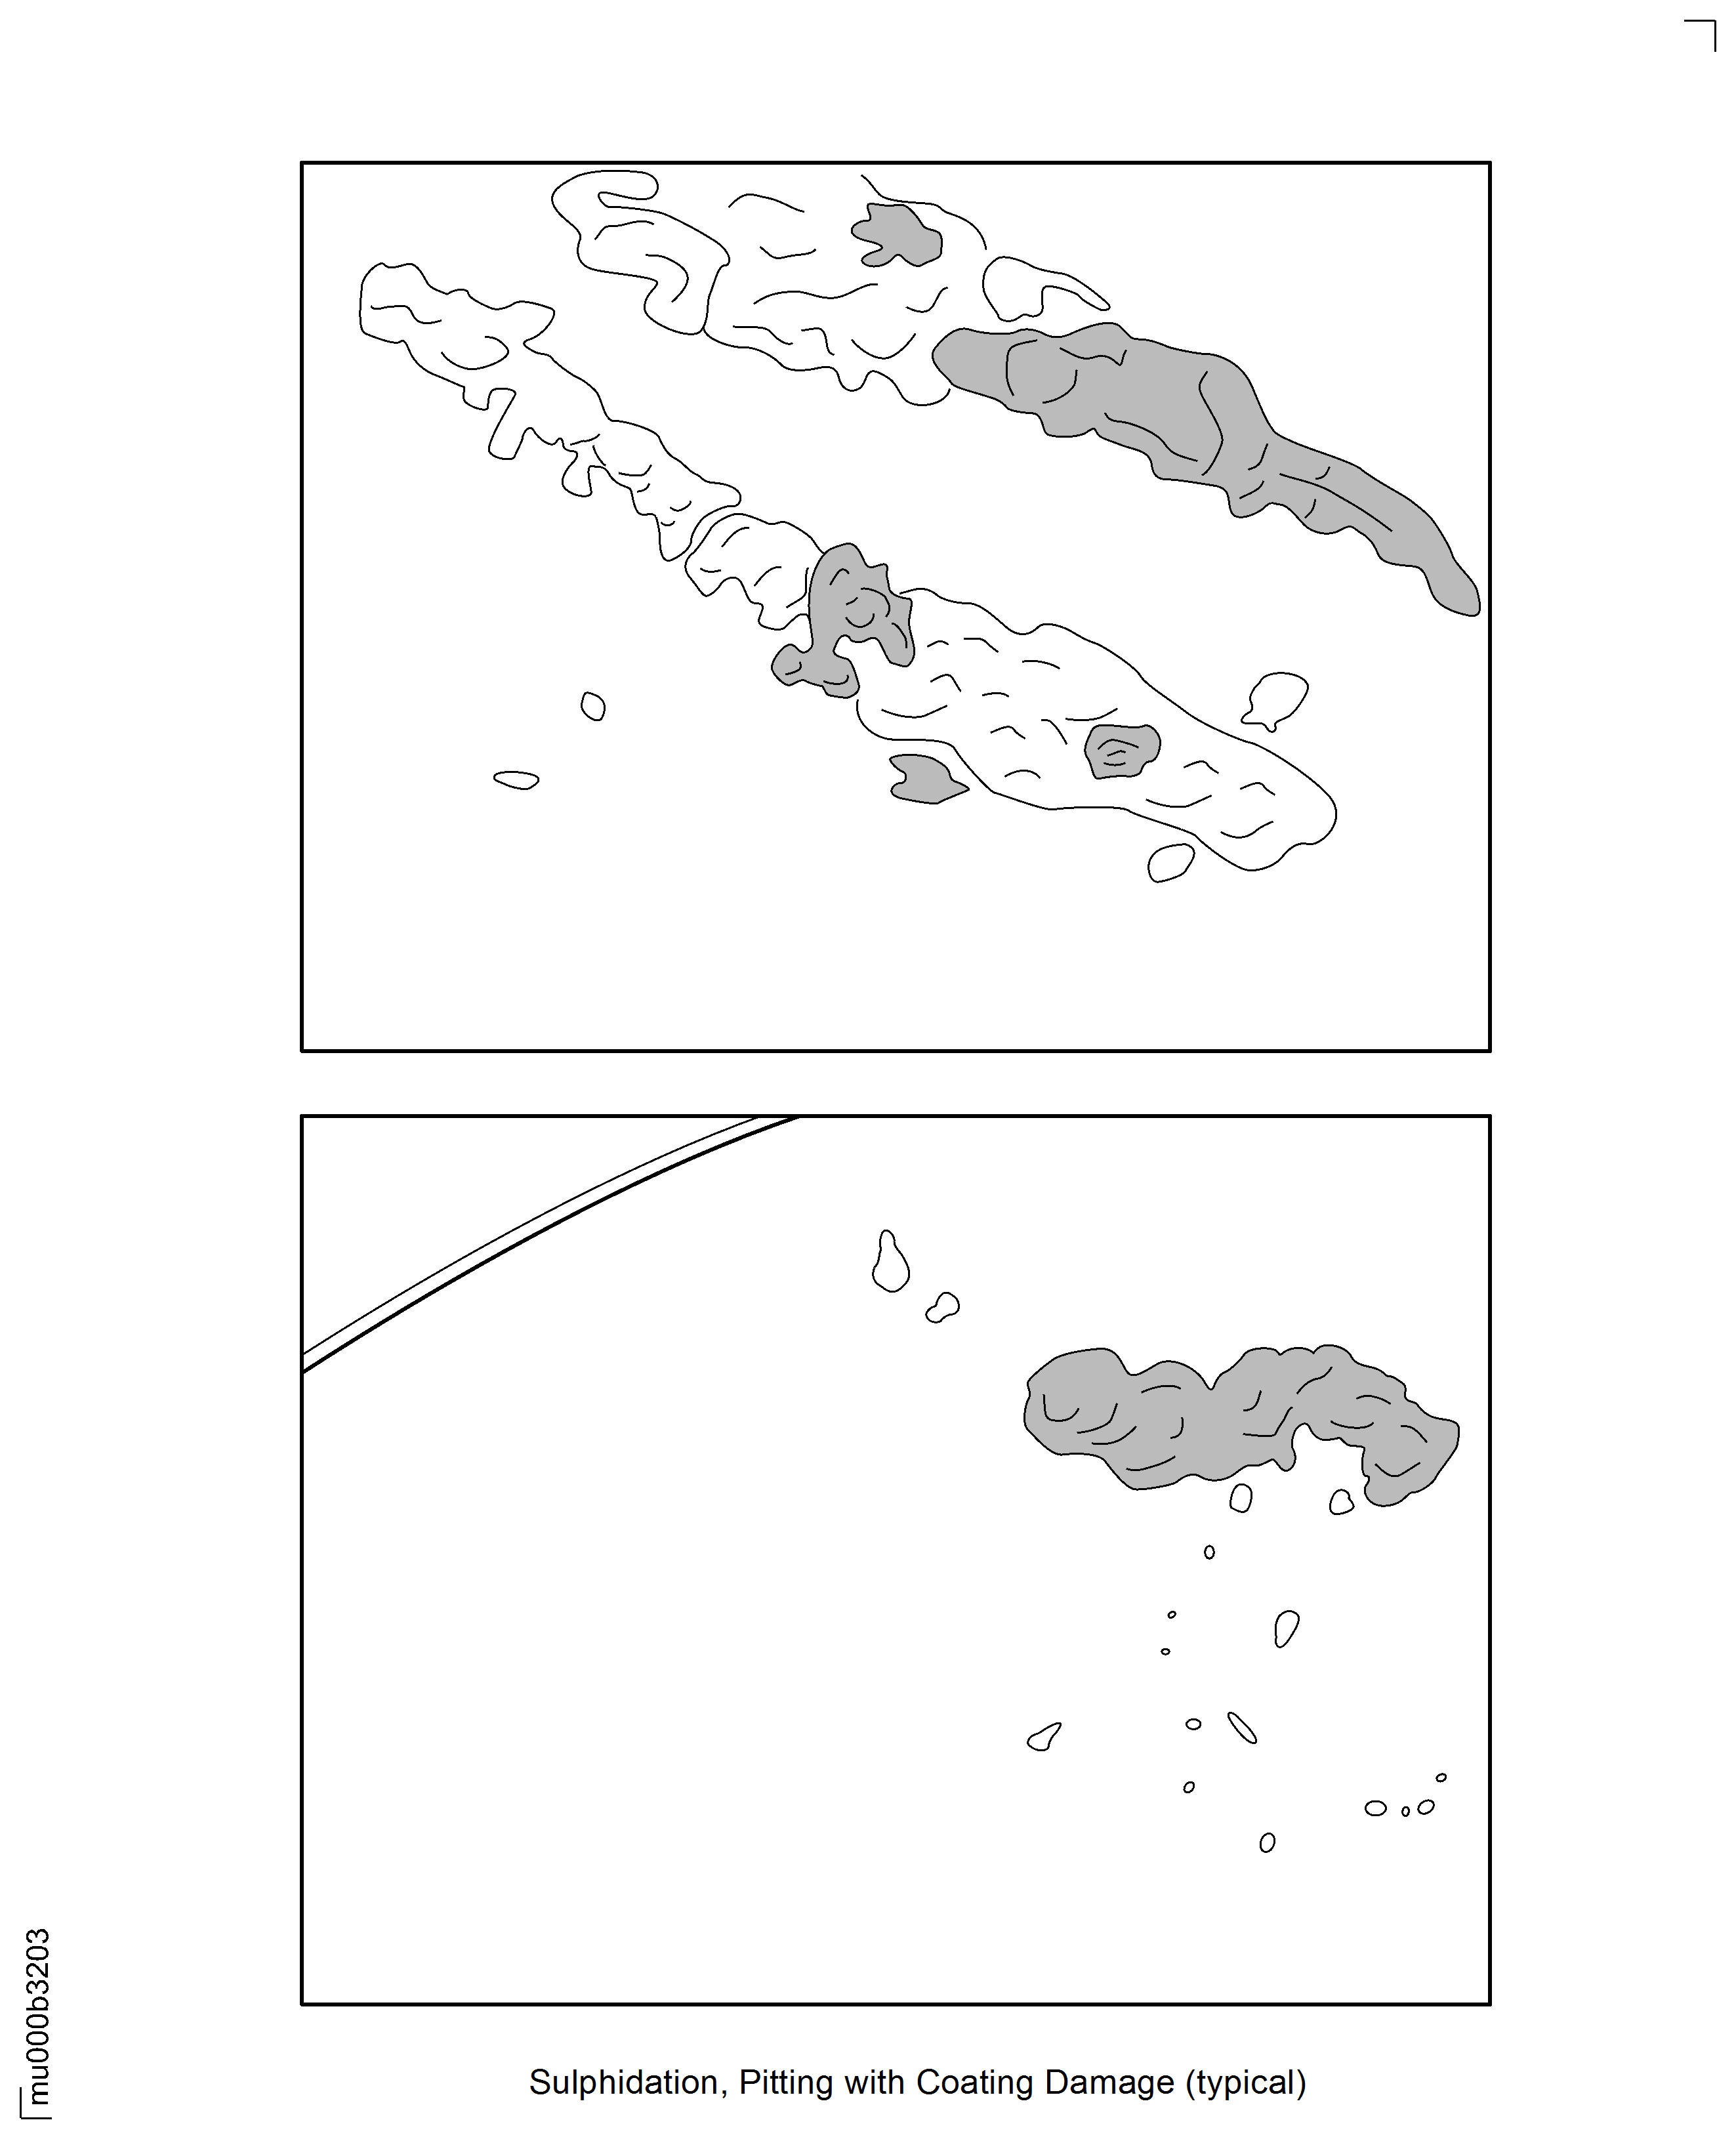
    Locations at Interface D-50/10

    Locations at Interface D-50/10
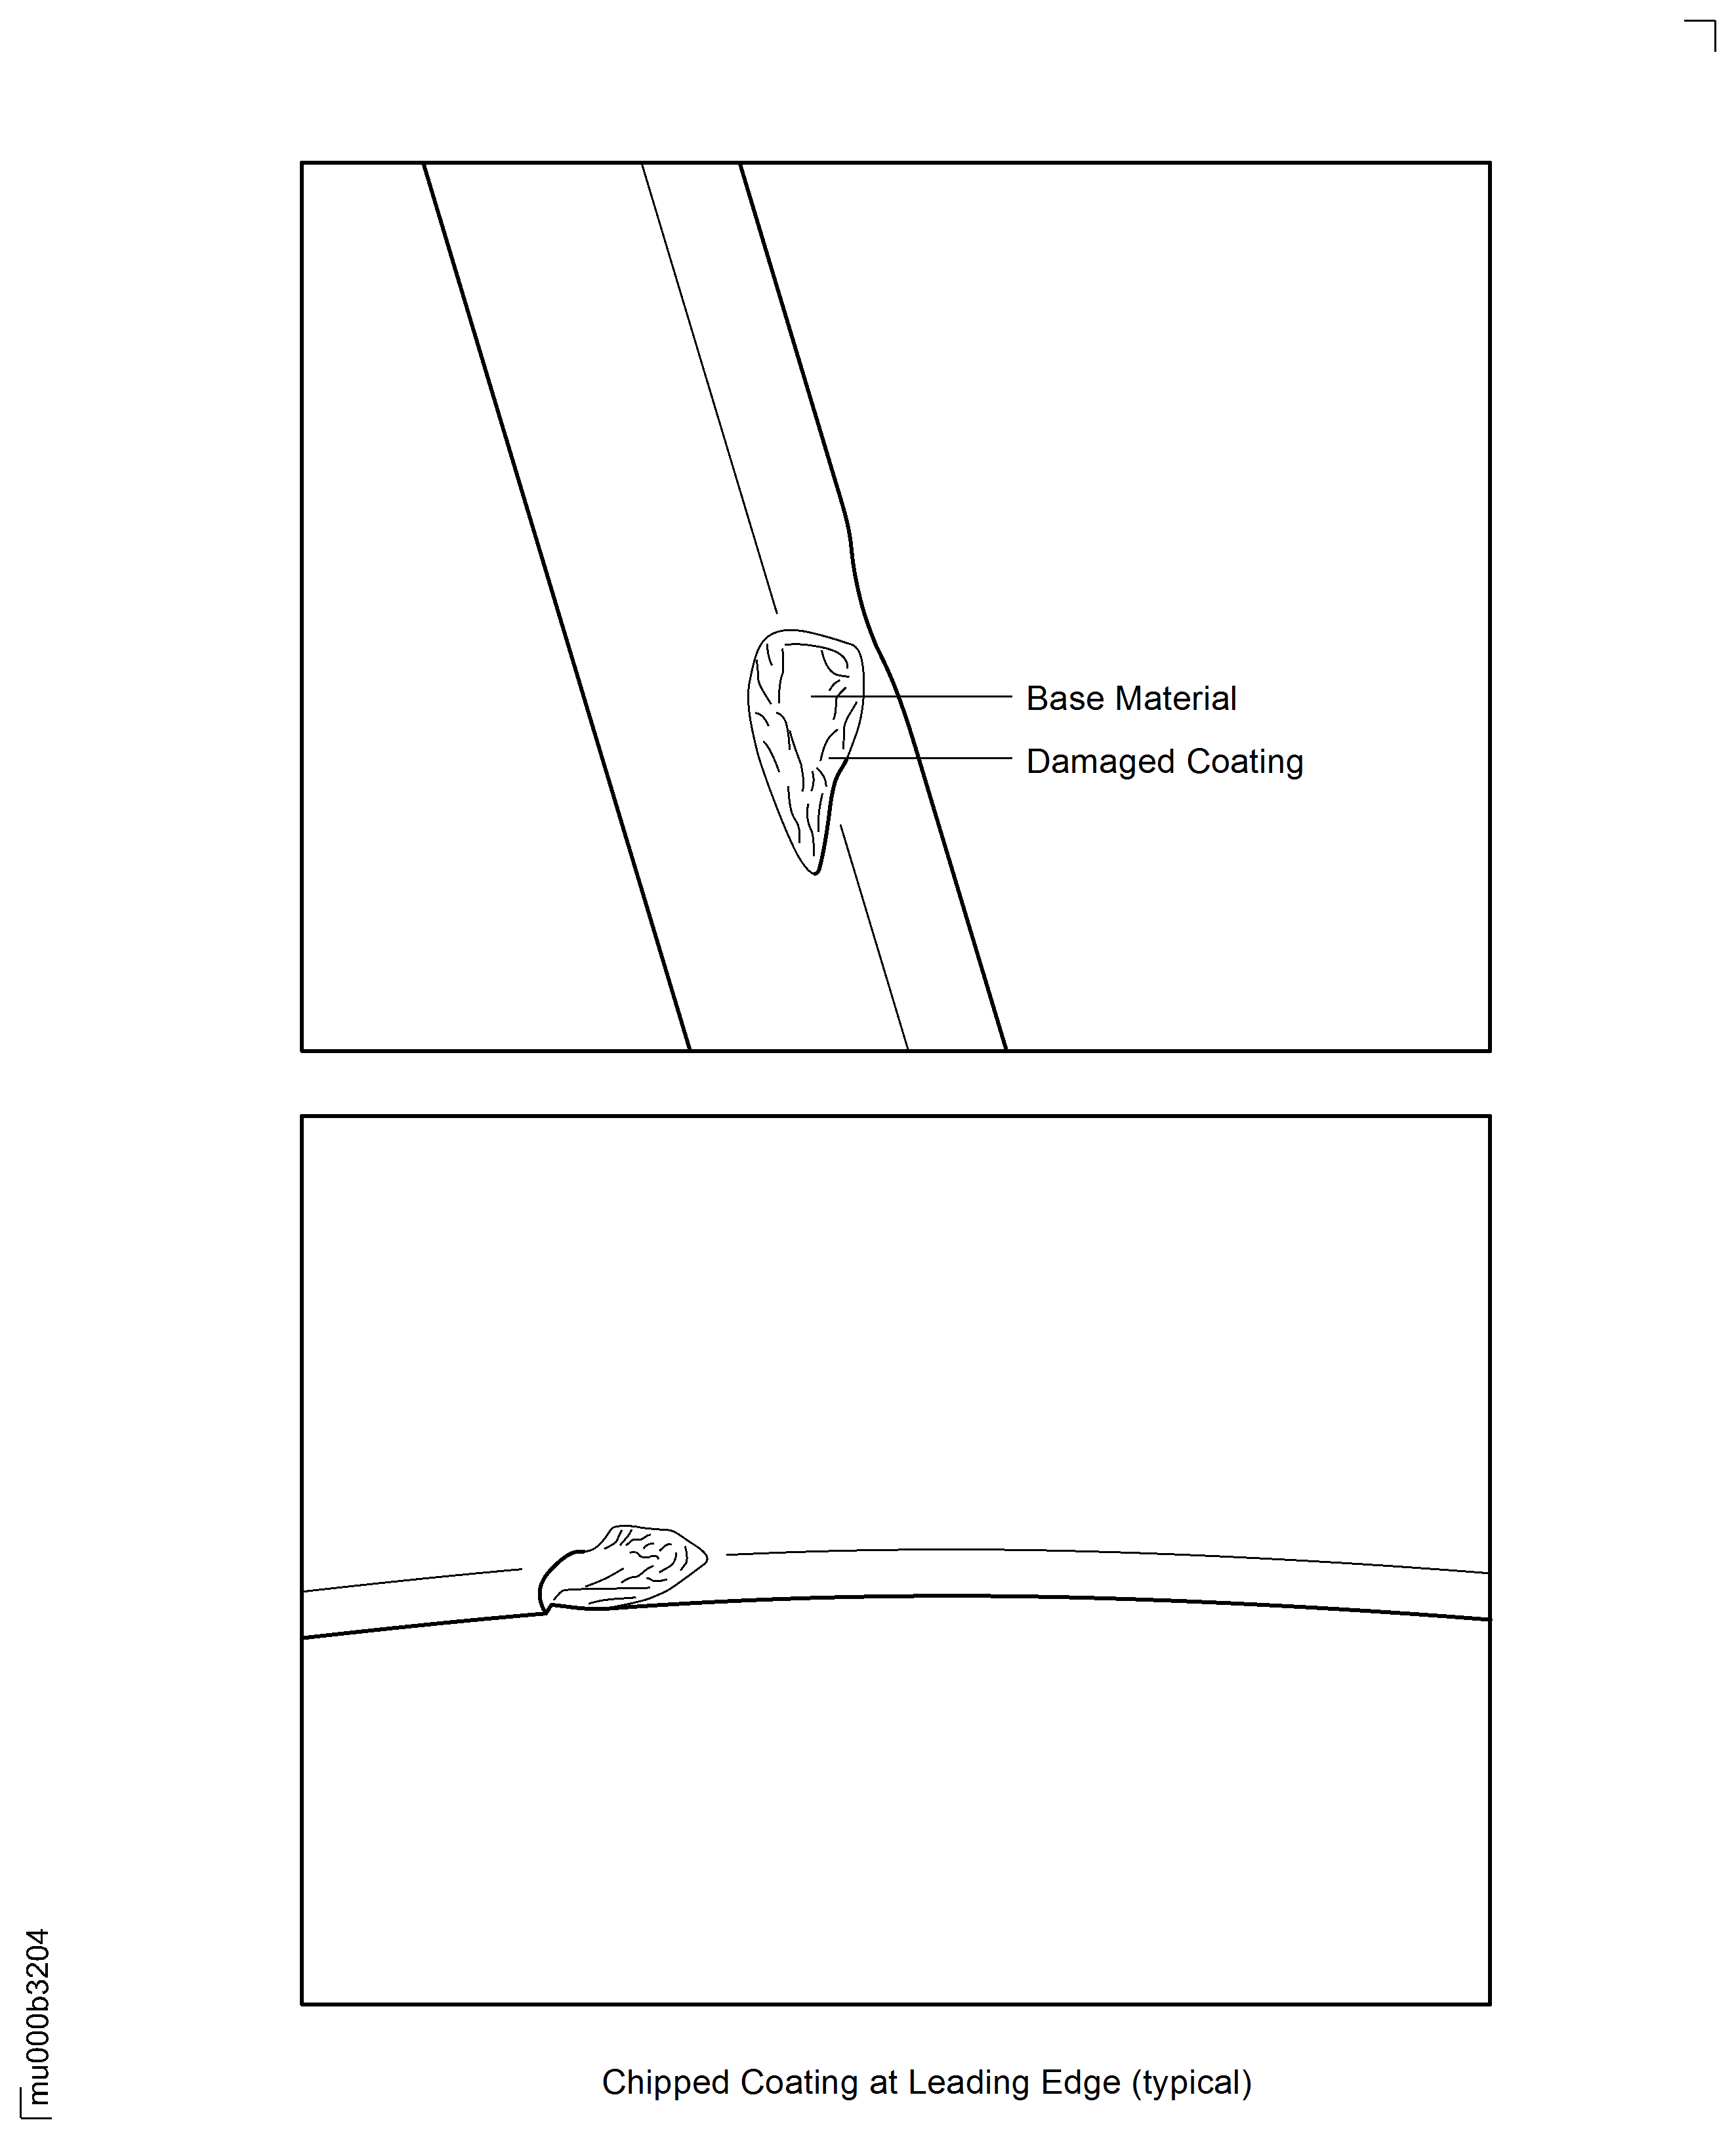
    Locations at Interface D-50/10
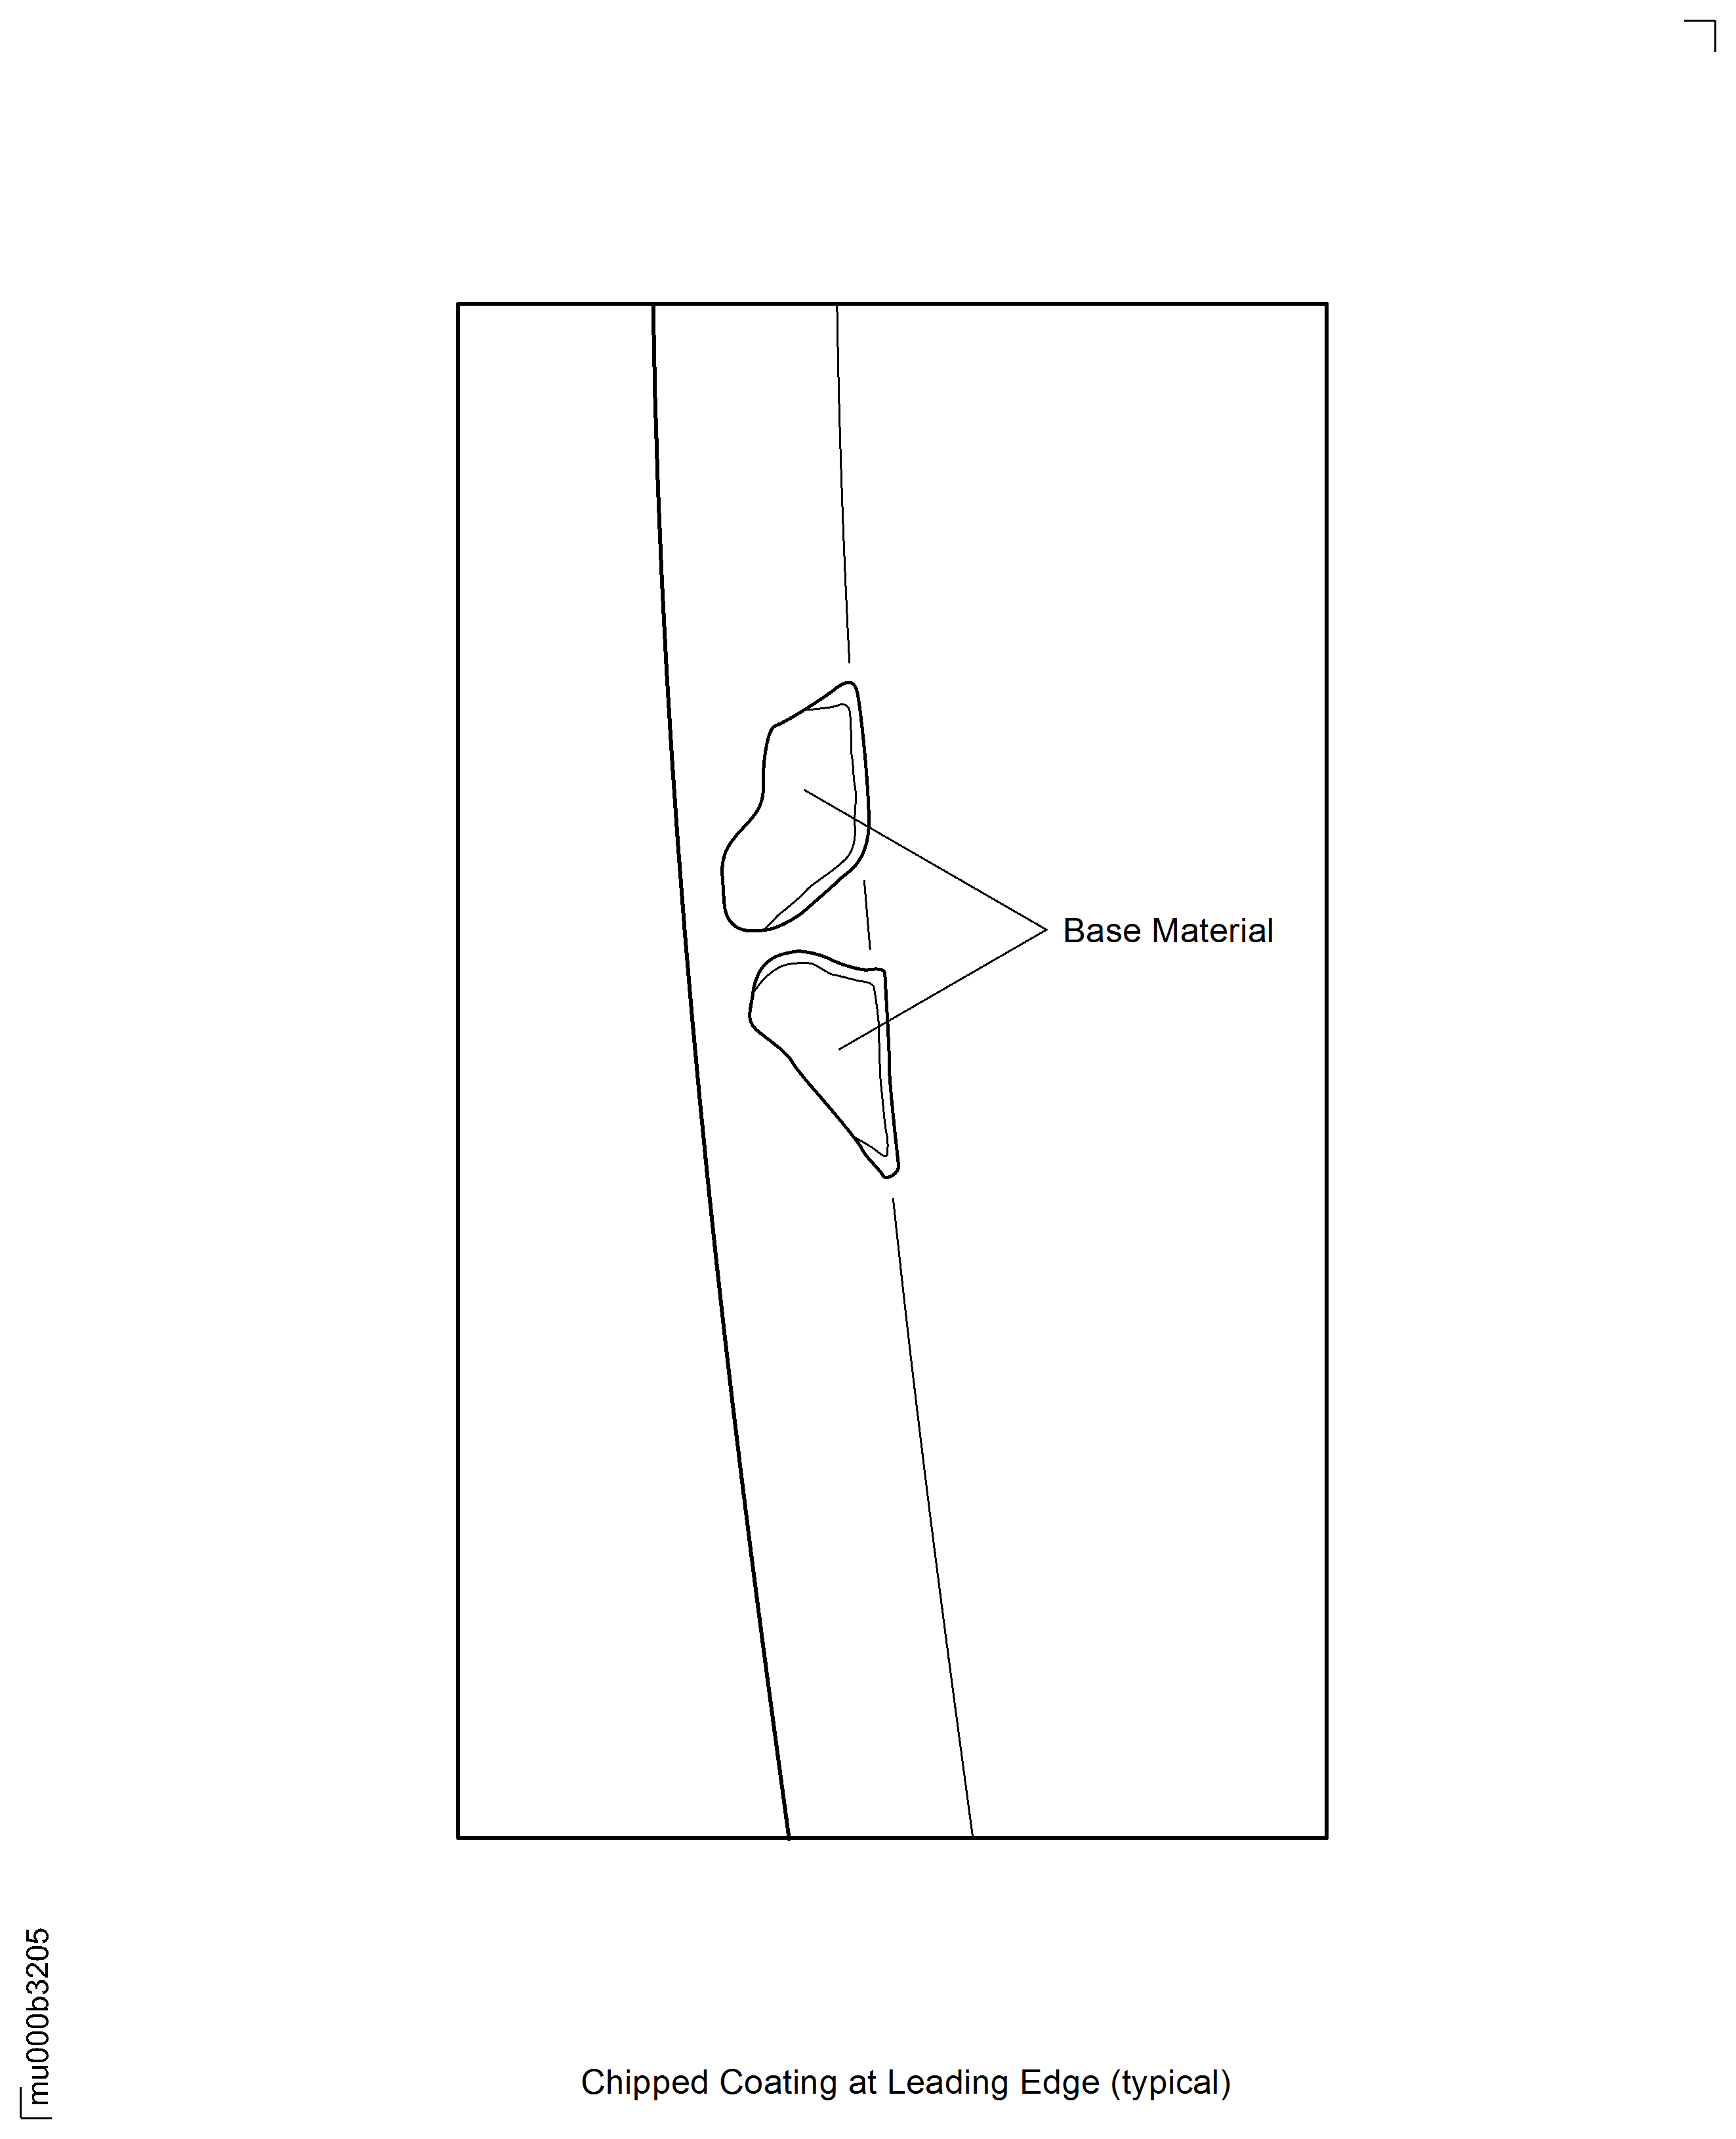
    Locations at Interface D-50/10

    Figure: Damaged Blades at Interface D-50/10

    Damaged Blades at Interface D-50/10

    Figure: Sulphidated Vanes Outer Shroud Side Faces at Interface D-50/10

    Sulphidated Vanes Outer Shroud Side Faces at Interface D-50/10

    Figure: Sulphidated Vanes Outer Shroud Side Faces at Interface D-50/10

    Sulphidated Vanes Outer Shroud Side Faces at Interface D-50/10

    Figure: Sulphidated Vanes Outer Shroud Side Faces at Interface D-50/10

    Sulphidated Vanes Outer Shroud Side Faces at Interface D-50/10

    Figure: Shingled Blades at Interface D-50/10

    Shingled Blades at Interface D-50/10

Requirements After Job Completion

Follow-On Conditions

NONE
Change Type:

Revised para. Added SUBTASK. Added figure. Revised graphic. (EC87VM503P)

Manufacturer Code:LOCAL
Enterprise Name:LOCALLY SUPPLIED
Manufacturer Code:LOCAL
Tool Number:10x illuminated magnifier
Tool Name:10x illuminated magnifier