Export Control
EAR Export Classification: Not subject to the EAR per 15 C.F.R. Chapter 1, Part 734.3(b)(3), except for the following Service Bulletins which are currently published as EAR Export Classification 9E991: SBE70-0992, SBE72-0483, SBE72-0580, SBE72-0588, SBE72-0640, SBE73-0209, SBE80-0024 and SBE80-0025.Copyright
© IAE International Aero Engines AG (2001, 2014 - 2021) The information contained in this document is the property of © IAE International Aero Engines AG and may not be copied or used for any purpose other than that for which it is supplied without the express written authority of © IAE International Aero Engines AG. (This does not preclude use by engine and aircraft operators for normal instructional, maintenance or overhaul purposes.).Applicability
All
Common Information
TASK 72-32-17-200-007-A00 No. 2 Bearing Support - Examine, Inspection-007
General
This TASK gives the procedure for the inspection of the No. 2 bearing support assembly. For the other parts of the No. 2 bearing support and probe bracket, refer to TASK 72-32-17-200-000 (INSPECTION-000)
Fig/item numbers in parentheses in the procedure agree with those used in the IPC. Only the primary Fig/item numbers are used. For the service bulletin alpha variants refer to the IPC.
The policy that is necessary for inspection is given in the SPM TASK 70-20-01-200-501.
All the parts must be cleaned before any part is examined. Refer to TASK 72-32-17-100-000 (CLEANING-000).
All parts must be visually examined for damage, corrosion and wear. Any defects that are not identified in the procedure must be referred to IAE.
The procedure for those parts which must have a crack test is given in Step. Do the test before the part is visually examined.
Do not discard any part until you are sure there are no repairs available. Refer to the instructions in Repair before a discarded part is used again or oversize parts are installed.
Parts which should be discarded can be held although no repair is available. The repair of a discarded part could be shown to be necessary at a later date.
All parts must be examined to make sure that all the repairs have been completed satisfactorily.
The practices and processes referred to in the procedure by the TASK numbers are in the SPM.
References
Refer to the SPM for data on these items.
Definitions of Damage, SPM TASK 70-02-02-350-501
Record and Control of the Lives of Parts, SPM TASK 70-05-00-220-501
Inspection of Parts, SPM TASK 70-20-01-200-501
NOTE
Preliminary Requirements
Pre-Conditions
NONESupport Equipment
| Name | Manufacturer | Part Number / Identification | Quantity | Remark |
|---|---|---|---|---|
| Fluorescent Penetrant Inspection Equipment | LOCAL | Fluorescent penetrant inspection equipment |
Consumables, Materials and Expendables
NONESpares
NONESafety Requirements
NONEProcedure
Clean the part. Refer to TASK 72-32-17-100-000 (CLEANING-000).
SUBTASK 72-32-17-230-052 Examine the No. 2 Bearing Support (01-850) for Cracks
Refer to Figure.
Repair, VRS1210 TASK 72-32-17-300-004 (REPAIR-004)
Any nicks
Repair, VRS1210 TASK 72-32-17-300-004 (REPAIR-004)
Any dents
Repair, VRS1210 TASK 72-32-17-300-004 (REPAIR-004)
Any scratches
Examine the casting surface.
SUBTASK 72-32-17-220-065 Examine the No. 2 Bearing Support Assembly (01-850) Casting Surface
Refer to Figure.
Repair, VRS1210 TASK 72-32-17-300-004 (REPAIR-004)
More than in Step
Nick.
Repair, VRS1210 TASK 72-32-17-300-004 (REPAIR-004)
More than in Step
Dent.
Repair, VRS1210 TASK 72-32-17-300-004 (REPAIR-004)
More than in Step
Scratch.
Repair, VRS1210 TASK 72-32-17-300-004 (REPAIR-004)
More than in Step
Galling.
Examine the machined surface.
SUBTASK 72-32-17-220-066 Examine the No. 2 Bearing Support Assembly (01-850) Machined Surface (Except the Tower Shaft Upper Bearing Bore Surface, the Bearing Bore and Shoulder Surface and the Oil Jet Bores)
Refer to Figure.
Repair, VRS1210 TASK 72-32-17-300-004 (REPAIR-004)
Any nicks
Repair, VRS1210 TASK 72-32-17-300-004 (REPAIR-004)
Any dents
Repair, VRS1210 TASK 72-32-17-300-004 (REPAIR-004)
Any scratches
Repair, VRS1210 TASK 72-32-17-300-004 (REPAIR-004)
Any galling
Repair, VRS1210 TASK 72-32-17-300-004 (REPAIR-004)
Any raised metal
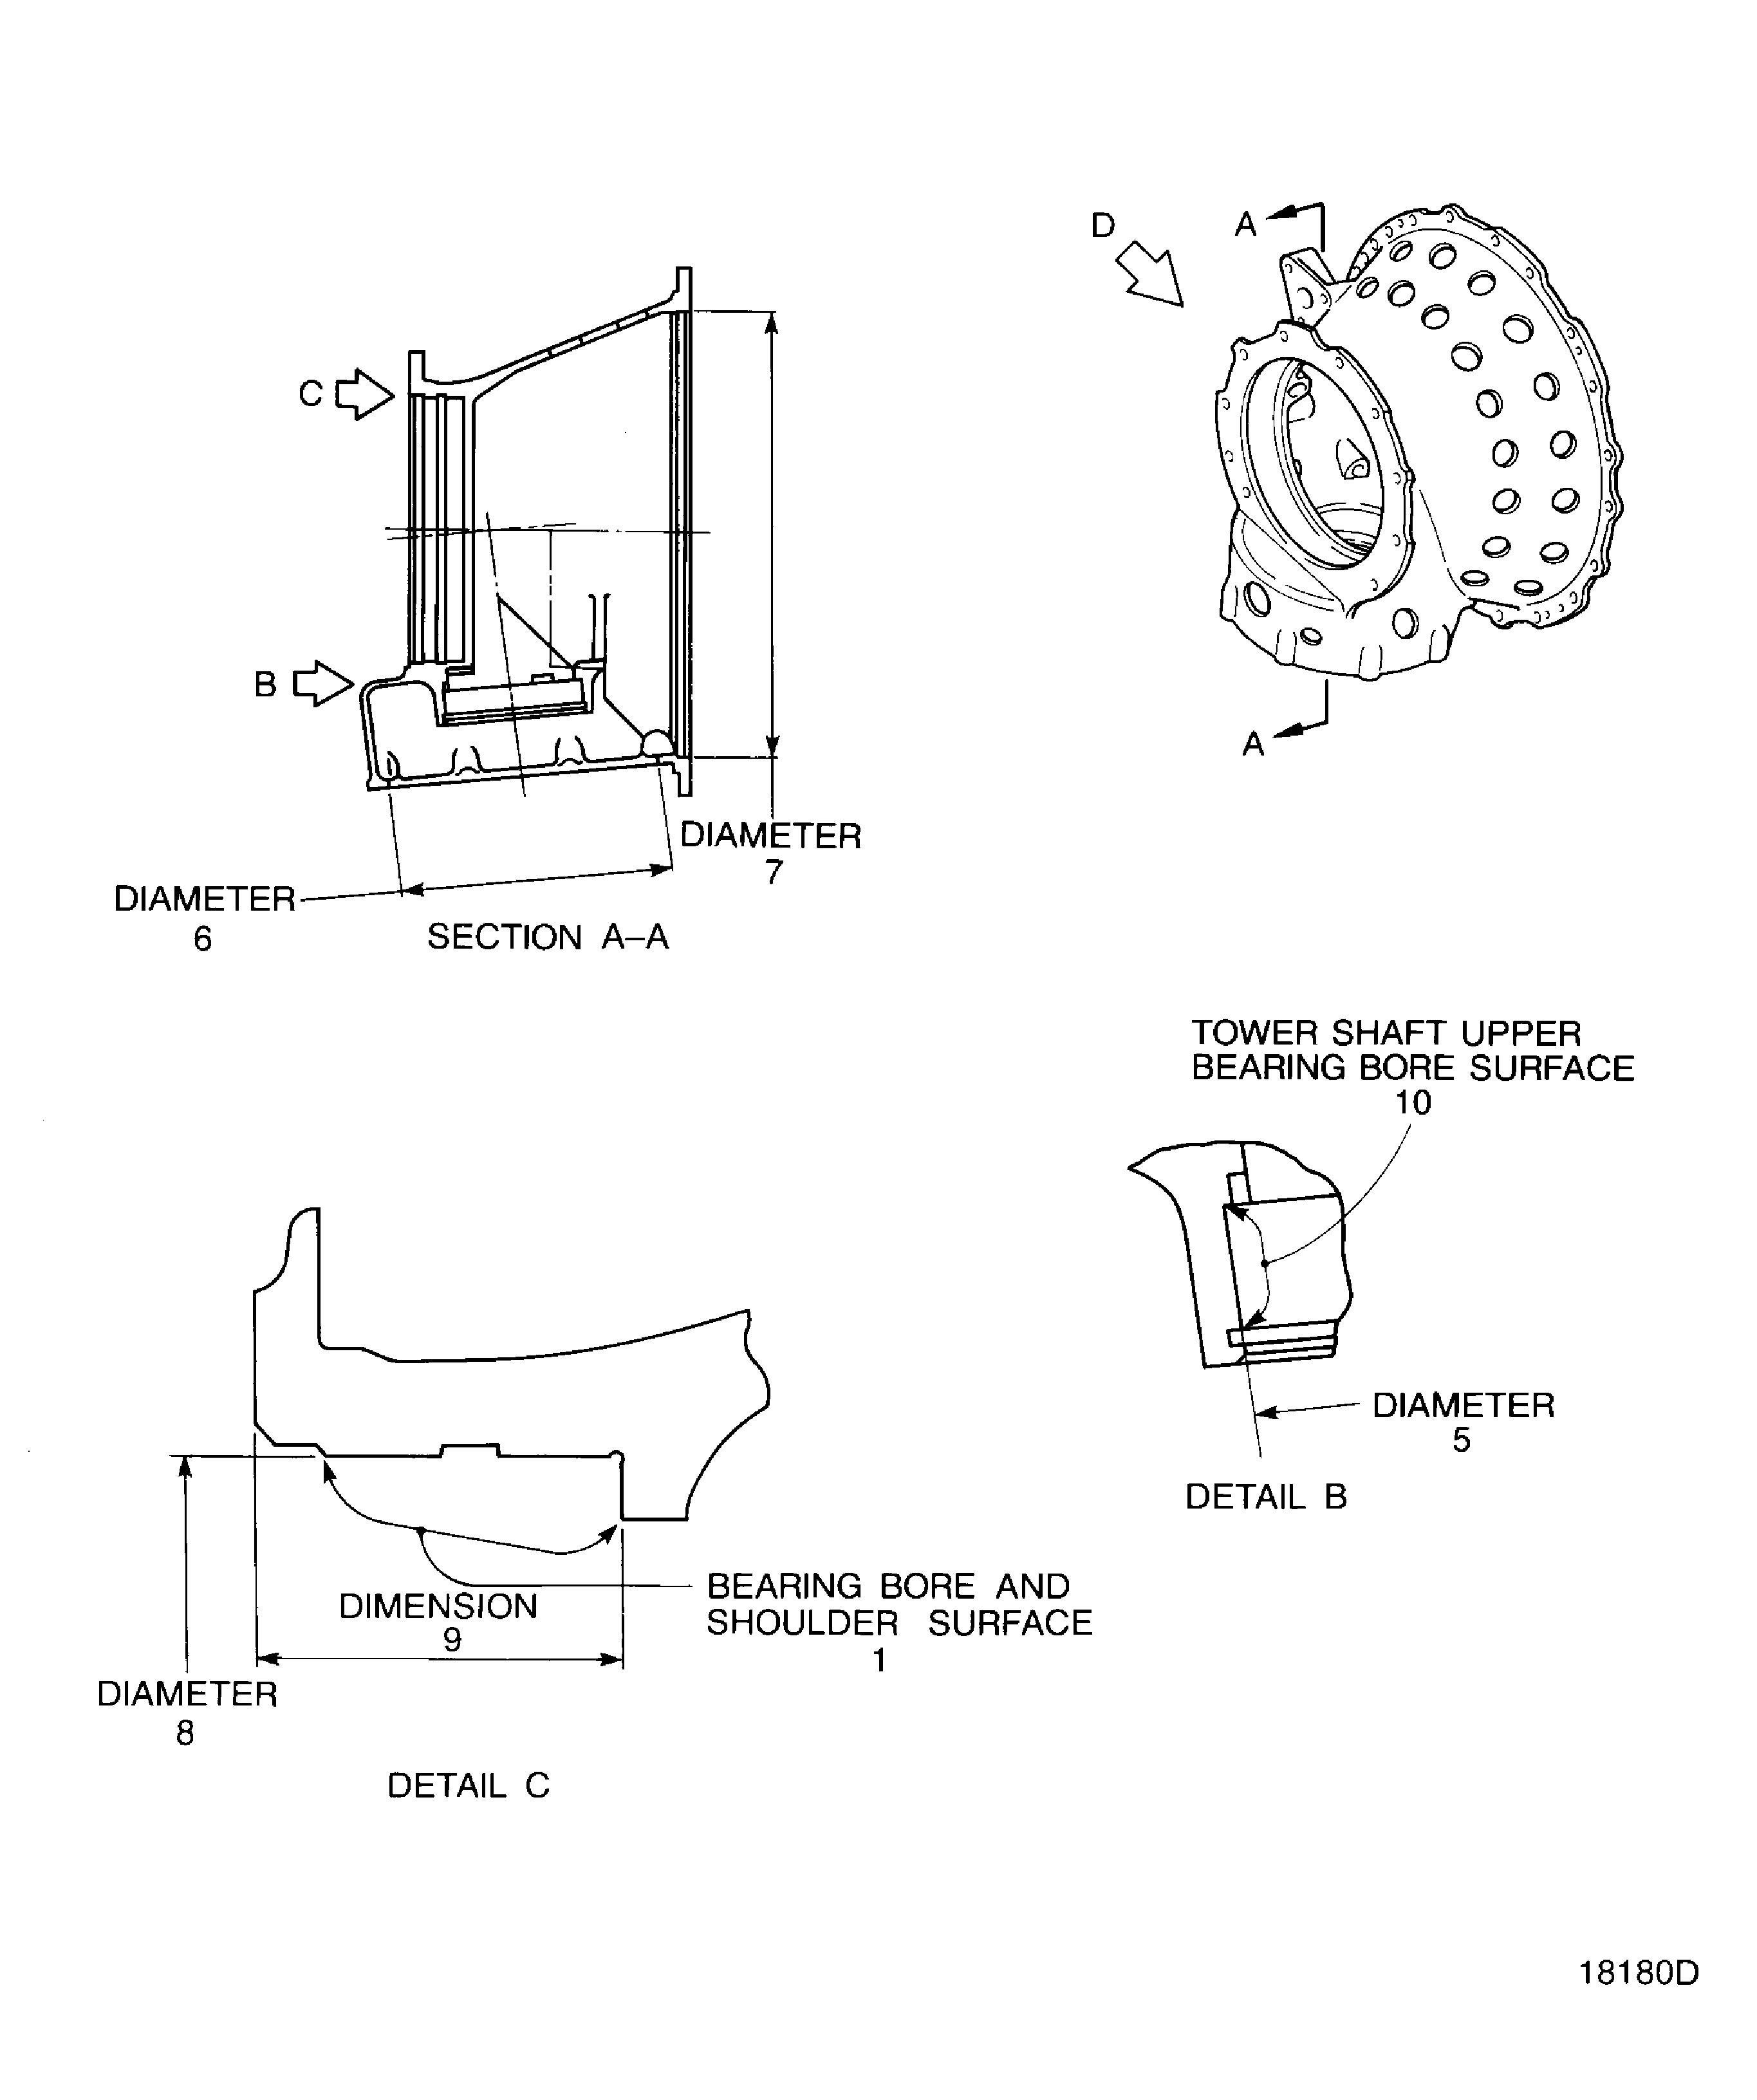
Examine the bearing bore and shoulder surface at location 1.
SUBTASK 72-32-17-220-067 Examine the No. 2 Bearing Support Assembly (01-850) Bearing Bore and Shoulder Surface
Refer to Figure.
Repair, VRS1210 TASK 72-32-17-300-004 (REPAIR-004)
Any nicks
Repair, VRS1210 TASK 72-32-17-300-004 (REPAIR-004)
Any dents
Repair, VRS1210 TASK 72-32-17-300-004 (REPAIR-004)
Any scratches
Repair, VRS1210 TASK 72-32-17-300-004 (REPAIR-004)
Any raised metal
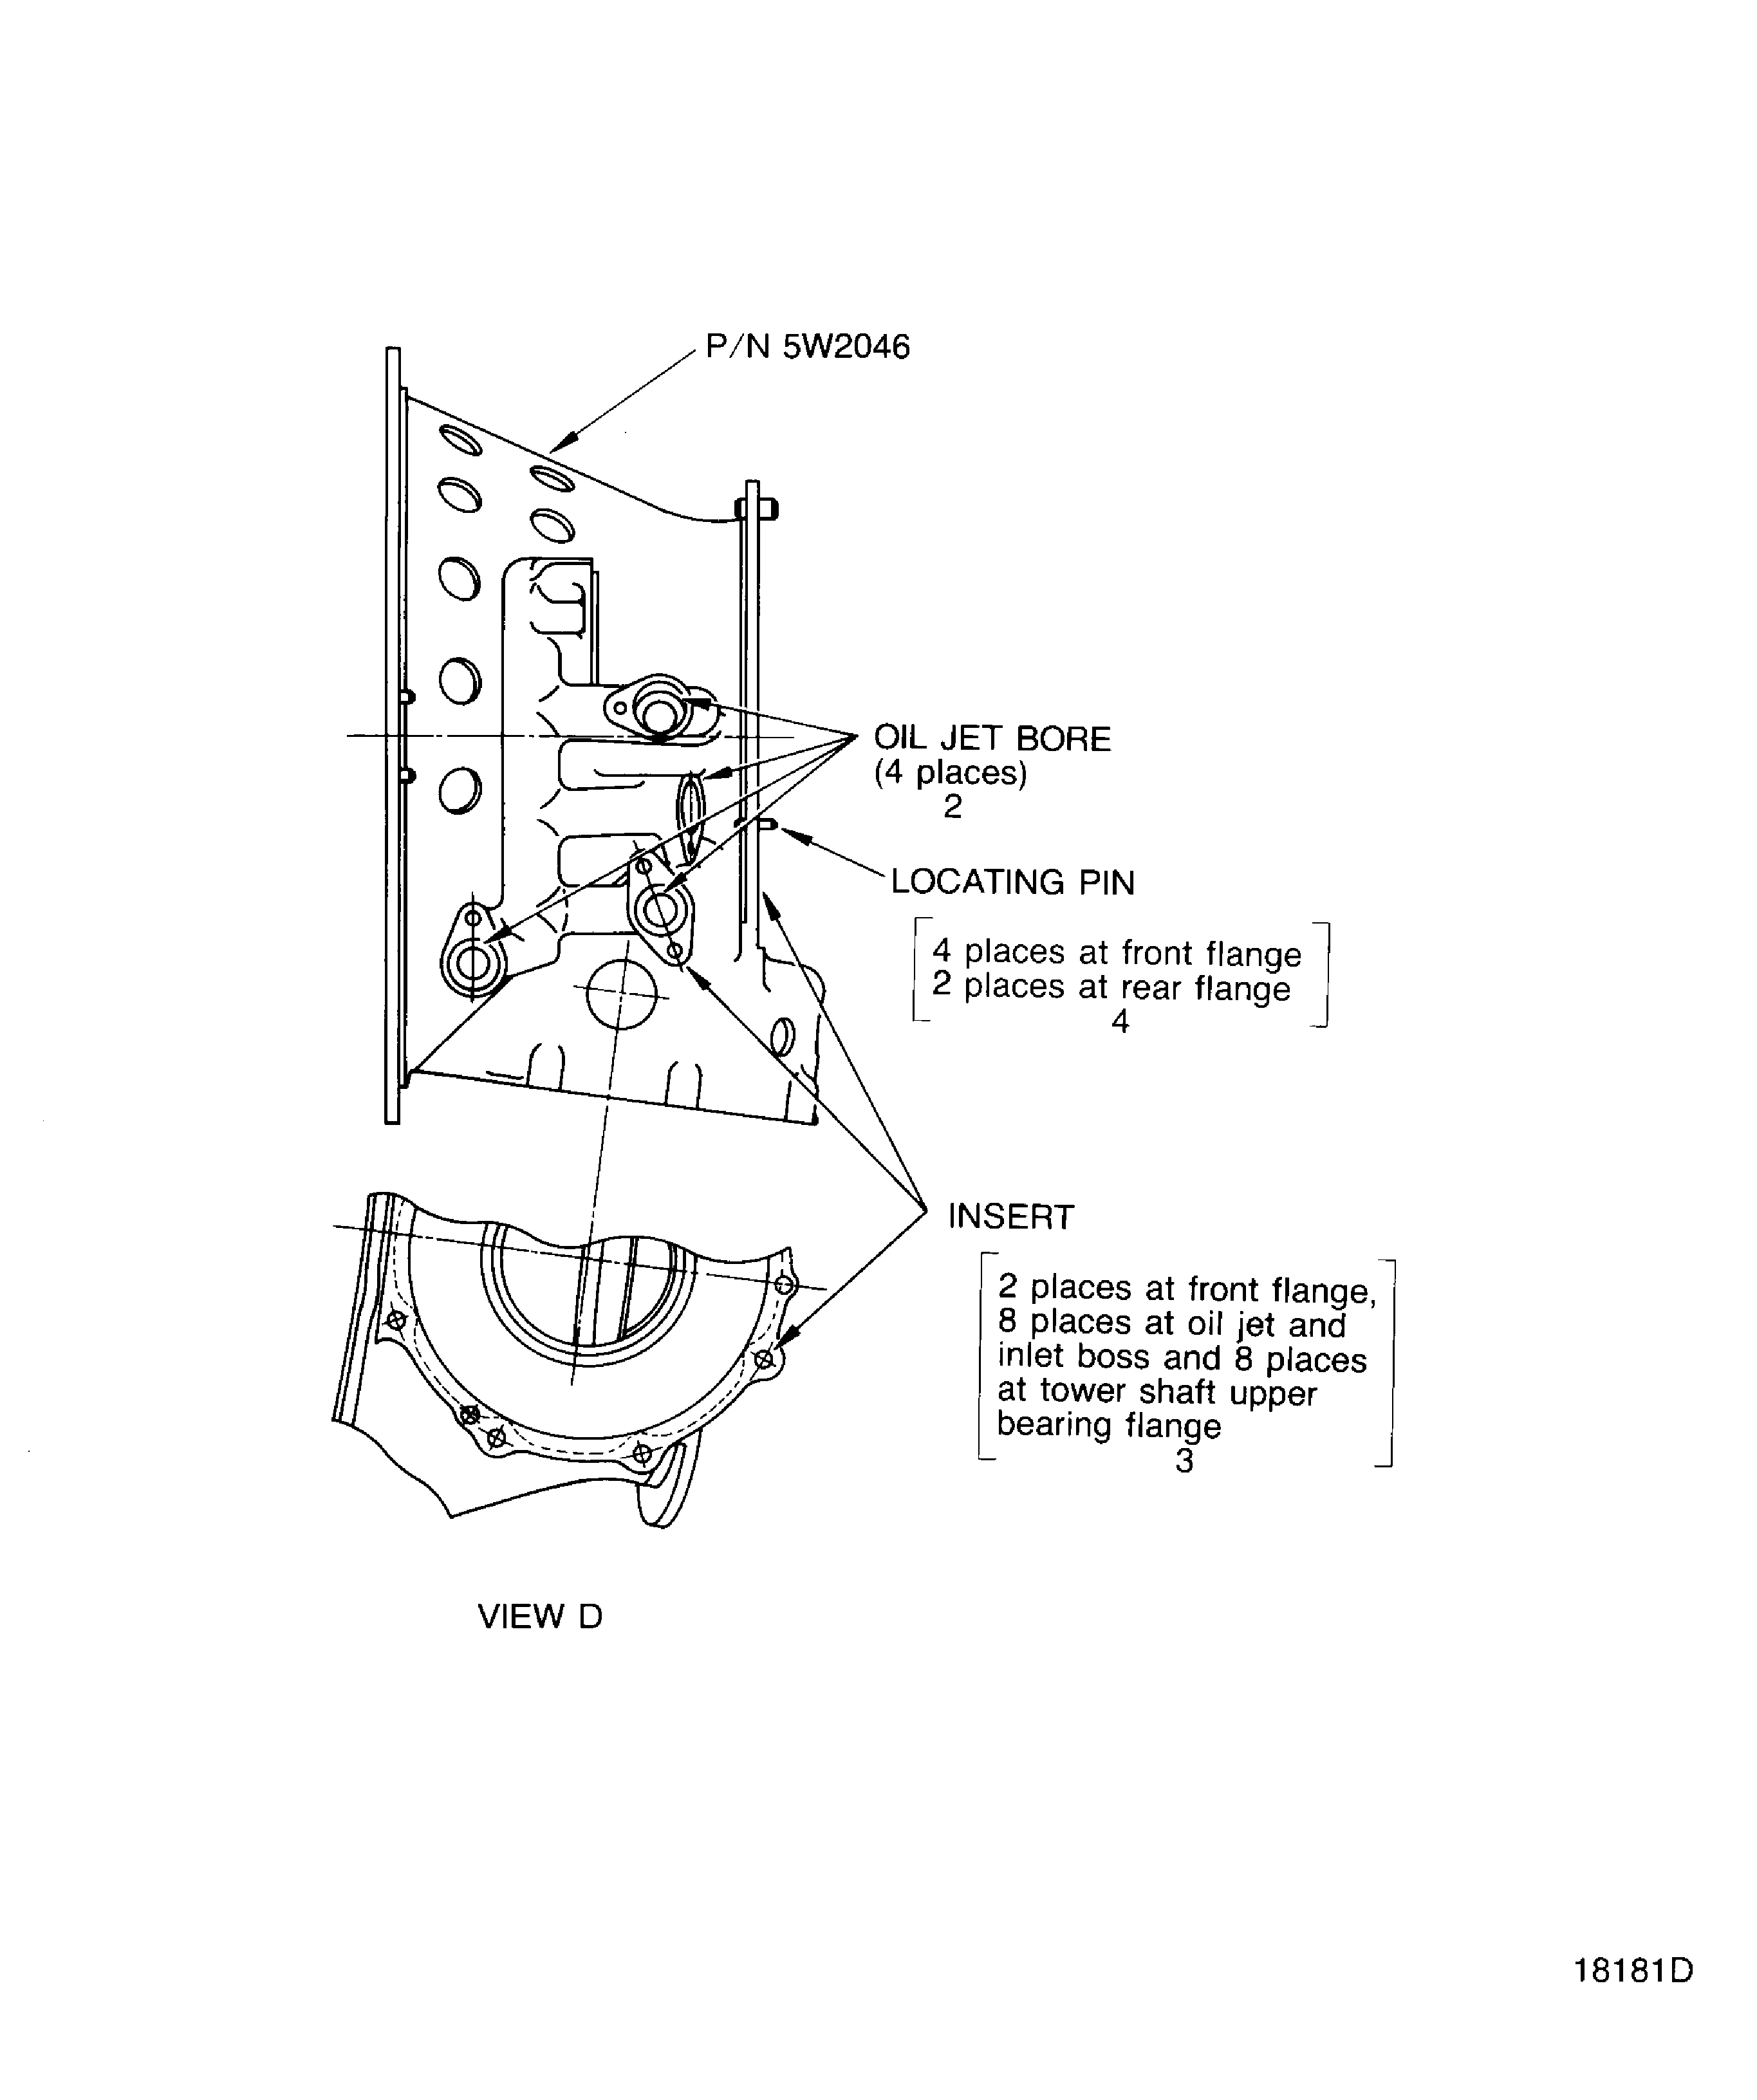
Examine the oil jet bore surface at location 2.
SUBTASK 72-32-17-220-068 Examine the No. 2 Bearing Support Assembly (01-850) Oil Jet Bores
Refer to Figure.
Repair, VRS1211 TASK 72-32-17-300-005 (REPAIR-005)
Any damage
Repair, VRS1211 TASK 72-32-17-300-005 (REPAIR-005)
Loose
Examine the insert at location 3.
SUBTASK 72-32-17-220-069 Examine the No. 2 Bearing Support Assembly (01-850) Insert
Refer to Figure.
Repair, VRS1217 TASK 72-32-17-300-010 (REPAIR-010)
Any damage
Examine the locating pin at location 4.
SUBTASK 72-32-17-220-070 Examine the No. 2 Bearing Support Assembly (01-850) Locating Pin
Refer to Figure
Repair, VRS1212 TASK 72-32-17-300-006 (REPAIR-006)
Greater than or equal to 3.14976 in. (80.004 mm) and less than or equal to 3.16000 in. (80.264 mm) in maximum diameter
Examine the diameter at location 5.
Repair, VRS1213 TASK 72-32-17-300-007 (REPAIR-007)
Greater than or equal to 6.06456 in. (154.040 mm) and less than or equal to 6.08456 in. (154.548 mm) in maximum diameter
Examine the diameter at location 6.
Accept the part for select fit only
NOTE
This part can be used only if the mating part has a diameter that will result in a fit of reference No. 0307. Refer to TASK 72-32-10-440-001-A00.
Greater than or equal to 10.9789 in. (278.864 mm) and less than 10.9798 in. (278.887 mm) in average diameter
Repair, VRS1215 TASK 72-32-17-300-008 (REPAIR-008)
Greater than or equal to 10.9807 in. (278.910 mm) and less than or equal to 11.0007 in. (279.418 mm) in average diameter
Examine the diameter at location 7 (fit of reference No. 0307).
Repair, VRS1218 TASK 72-32-17-300-011 (REPAIR-011)
Greater than or equal to 6.63027 in. (168.409 mm) and less than or equal to 6.64827 in. (168.866 mm) in maximum diameter
Examine the diameter at location 8.
Repair, VRS1219 TASK 72-32-17-300-012 (REPAIR-012)
Greater than or equal to 1.2023 in (30.538 mm) and less than or equal to 1.2053 in. (30.615 mm) in dimension
Examine the dimension at location 9.
SUBTASK 72-32-17-220-071 Examine the No. 2 Bearing Support Assembly (01-850) Bore Diameters and Dimensions
Refer to Figure.
Repair, VRS1210 TASK 72-32-17-300-004 (REPAIR-004)
Any nicks
Repair, VRS1210 TASK 72-32-17-300-004 (REPAIR-004)
Any dents
Repair, VRS1210 TASK 72-32-17-300-004 (REPAIR-004)
Any scratches
Repair, VRS1210 TASK 72-32-17-300-004 (REPAIR-004)
Any galling
Repair, VRS1210 TASK 72-32-17-300-004 (REPAIR-004)
Any raised metals
Examine the tower shaft upper bearing bore surface at location 10.
SUBTASK 72-32-17-220-081 Examine the No. 2 Bearing Support Assembly (01-850) Tower Shaft Upper Bearing Bore Surface
Figure: Inspection of the No. 2 bearing support assembly
Sheet 1

Figure: Inspection of the No. 2 bearing support assembly
Sheet 2

