Export Control
EAR Export Classification: Not subject to the EAR per 15 C.F.R. Chapter 1, Part 734.3(b)(3), except for the following Service Bulletins which are currently published as EAR Export Classification 9E991: SBE70-0992, SBE72-0483, SBE72-0580, SBE72-0588, SBE72-0640, SBE73-0209, SBE80-0024 and SBE80-0025.Copyright
© IAE International Aero Engines AG (2001, 2014 - 2021) The information contained in this document is the property of © IAE International Aero Engines AG and may not be copied or used for any purpose other than that for which it is supplied without the express written authority of © IAE International Aero Engines AG. (This does not preclude use by engine and aircraft operators for normal instructional, maintenance or overhaul purposes.).Applicability
All
Common Information
TASK 72-32-83-200-003 LPC Rear Case - Examine, Inspection-003
General
This TASK gives the procedure for the inspection of the LPC rear case. For the LPC STG2 vanes parts, refer to TASK 72-32-83-200-000 (INSPECTION-000).
Fig/item numbers in parentheses in the procedure agree with those used in the IPC.
The policy that is necessary for inspection is given in the SPM TASK 70-20-01-200-501.
All the parts must be cleaned before any part is examined. Refer to TASK 72-32-83-100-000 (CLEANING-000).
All the parts must be visually examine for damage, corrosion and wear. Any defects that are not identified in the procedure must be referred to IAE.
Do not discard any part until you are sure there are no repairs available. Refer to the instructions in Repair before a discarded part is used again or oversize parts are installed.
Parts which should be discarded can be held although no repair is available. The repair of a discarded part could be shown to be necessary at a later date.
All the parts must be examined to make sure that all the repairs have been completed satisfactorily.
The procedure for crack test is given in SUBTASK 72-32-83-230-000. Do the test before the part is visually examined.
The practices and processes referred to in the procedure by the TASK number are in the SPM.
References
Refer to the SPM for data on these items.
Definitions of Damage, SPM TASK 70-02-02-300-501
Inspection of Parts, SPM TASK 70-20-01-200-501
Some data on these items are contained in this TASK. For more data on these items refer to the SPM.
Method of Testing for Crack Indications
Chemical Processes
Surface Protection
NOTE
Preliminary Requirements
Pre-Conditions
NONESupport Equipment
NONEConsumables, Materials and Expendables
NONESpares
NONESafety Requirements
NONEProcedure
NOTE
For the method to clean the parts, refer to the SPM TASK 70-11-33-110-501.Clean the parts. Refer to TASK 72-32-83-100-000 (CLEANING-000).
SUBTASK 72-32-83-230-058 Examine the LPC Rear Case Assembly (01-650) for Cracks
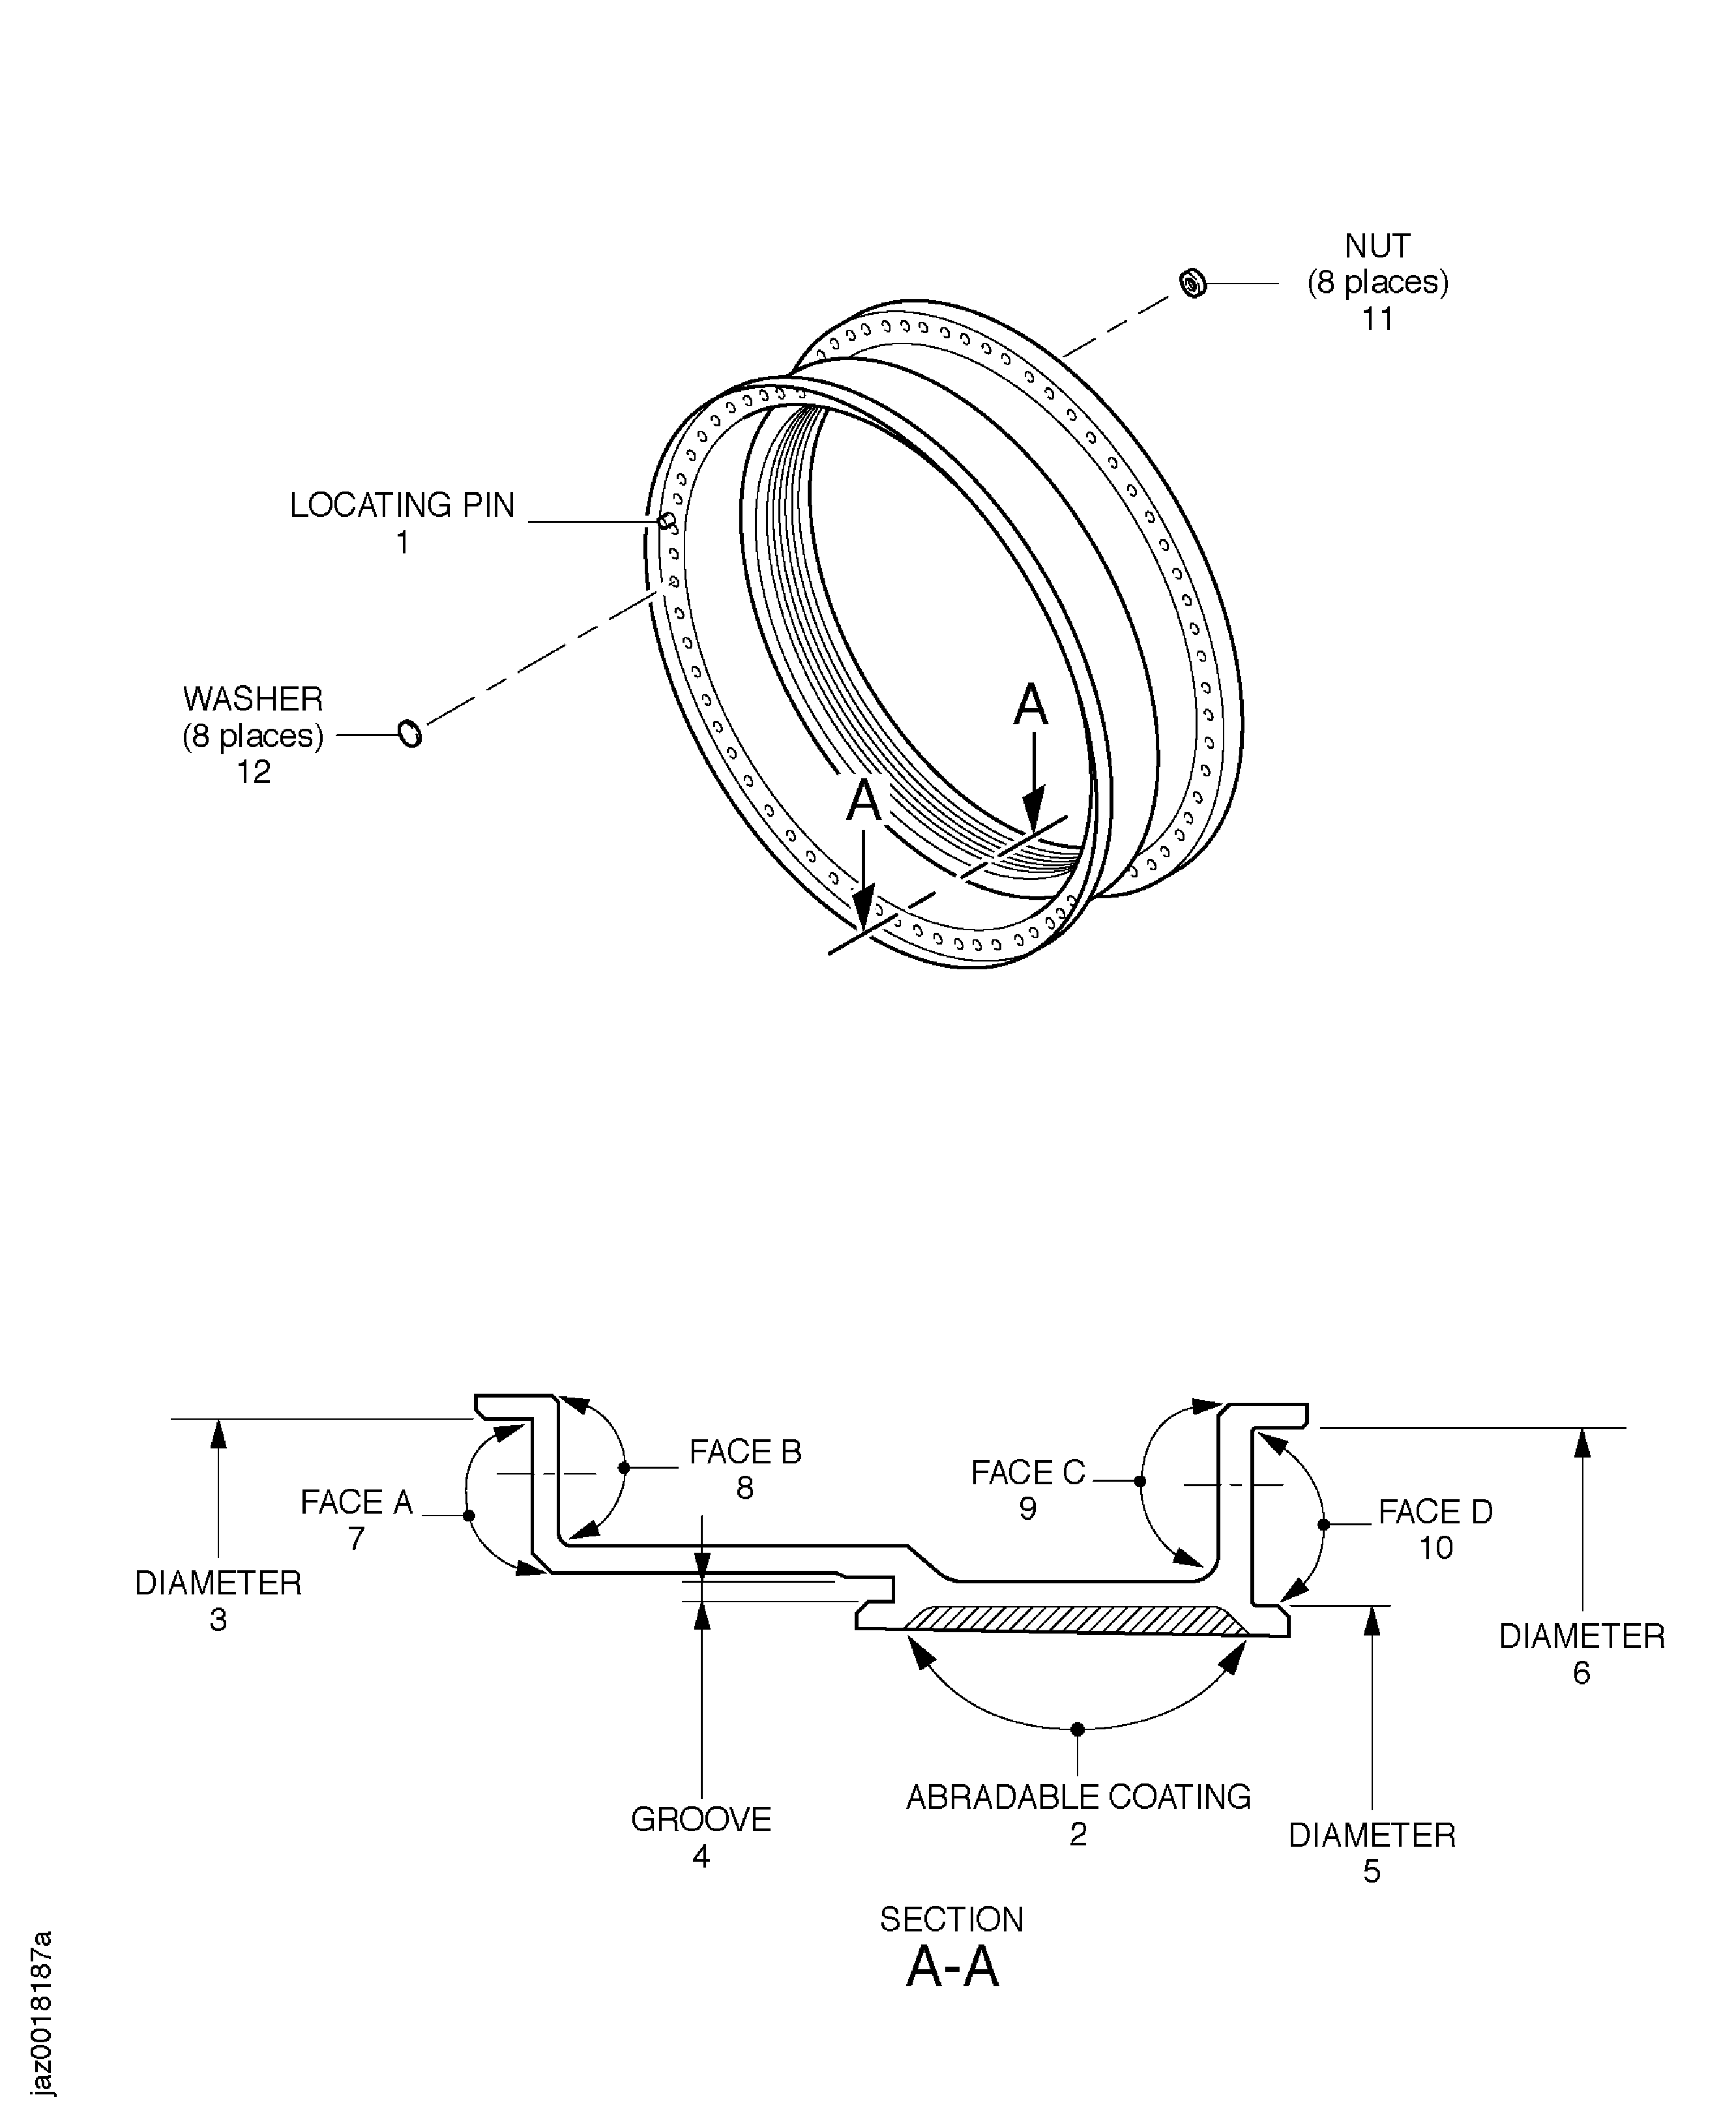
Refer to Figure.
Repair, VRS1396 TASK 72-32-83-300-003 (REPAIR-003)
More than in Step
Nicked.
Repair, VRS1396 TASK 72-32-83-300-003 (REPAIR-003)
More than in Step
Dented.
Repair, VRS1396 TASK 72-32-83-300-003 (REPAIR-003)
More than in Step
Scratched.
Repair, VRS1396 TASK 72-32-83-300-003 (REPAIR-003)
Corroded or pitted
Examine all the surface.
SUBTASK 72-32-83-220-072 Examine the LPC Rear Case Assembly (01-650) All Surface
Refer to Figure.
Repair, VRS1402 TASK 72-32-83-300-016 (REPAIR-016)
Deformation
Repair, VRS1402 TASK 72-32-83-300-016 (REPAIR-016)
Missing
Examine the locating pin at location 1.
SUBTASK 72-32-83-220-073 Examine the LPC Rear Case Assembly (01-650) Locating Pin
Refer to Figure.
Repair, VRS1397 TASK 72-32-83-300-013 (REPAIR-013)
Deteriorated
Repair, VRS1397 TASK 72-32-83-300-013 (REPAIR-013)
More than in Step
Rubbed, Refer to Figure
Repair, VRS1397 TASK 72-32-83-300-013 (REPAIR-013)
Unbonded
Examine the Abradable Coating at location 2.
SUBTASK 72-32-83-220-074 Examine the LPC Rear Case Assembly (01-650) Abradable Coating
Refer to Figure.
Repair, VRS1403 TASK 72-32-83-300-017 (REPAIR-017)
More than 37.362 in. (949.00 mm)
Worn.
Examine the diameter at location 3.
Repair, VRS1396 TASK 72-32-83-300-003 (REPAIR-003)
Scratched
Examine the groove at location 4.
Repair, VRS1404 TASK 72-32-83-300-018 (REPAIR-018)
Less than 35.737 in. (907.70 mm)
Worn.
Examine the snap diameter at location 5.
Repair, VRS1406 TASK 72-32-83-300-019 (REPAIR-019)
More than 37.224 in. (946.00 mm)
Worn.
Examine the diameter at location 6.
SUBTASK 72-32-83-220-075 Examine the LPC Rear Case Assembly (01-650) Diameter
Refer to Figure.
Repair, VRS1396 TASK 72-32-83-300-003 (REPAIR-003)
Galled
Examine the face A at location 7.
Repair, VRS1396 TASK 72-32-83-300-003 (REPAIR-003)
Galled
Examine the face B at location 8.
Repair, VRS1396 TASK 72-32-83-300-003 (REPAIR-003)
Galled
Examine the face C at location 9.
Repair, VRS1396 TASK 72-32-83-300-003 (REPAIR-003)
Galled
Examine the face D at location 10.
SUBTASK 72-32-83-220-076 Examine the LPC Rear Case Assembly (01-650) Faces
Refer to Figure.
Repair, VRS1374 TASK 72-32-83-300-056 (REPAIR-056)
More than in Step
Loose or missing.
Repair, VRS1374 TASK 72-32-83-300-056 (REPAIR-056)
More than in Step
Damaged.
Examine the nuts at location 11.
SUBTASK 72-32-83-220-233 Examine the LPC Rear Case Assembly (01-650) Nuts
Refer to Figure.
Repair, VRS1375 TASK 72-32-83-300-057 (REPAIR-057)
Loose or missing
Examine the washers at location 12.
SUBTASK 72-32-83-220-234 Examine the LPC Rear Case Assembly (01-650) Washers
Figure: Inspection of the LPC Rear Case Assembly
Inspection of the LPC Rear Case Assembly

