Export Control
EAR Export Classification: Not subject to the EAR per 15 C.F.R. Chapter 1, Part 734.3(b)(3), except for the following Service Bulletins which are currently published as EAR Export Classification 9E991: SBE70-0992, SBE72-0483, SBE72-0580, SBE72-0588, SBE72-0640, SBE73-0209, SBE80-0024 and SBE80-0025.Copyright
© IAE International Aero Engines AG (2001, 2014 - 2021) The information contained in this document is the property of © IAE International Aero Engines AG and may not be copied or used for any purpose other than that for which it is supplied without the express written authority of © IAE International Aero Engines AG. (This does not preclude use by engine and aircraft operators for normal instructional, maintenance or overhaul purposes.).Applicability
All
Common Information
TASK 72-38-11-300-017 Inlet Cone Assembly - Replace All The Segments At One Time, Repair-017 (VRS1617)
Material of Component
PART IDENT | IAE SYMBOL | MATERIAL |
|---|---|---|
Inlet cone | - | Fiber-reinforced plastic with polyurethane coating |
General
Price and availability - none
The practice and processes referred to in the procedure by the TASK number are in the SPM.
All adhesive application and bonding operation shall be done in controlled environment room designated for non silicone material.
This repair is for replacement of all segments at one time.
NOTE
NOTE
Preliminary Requirements
Pre-Conditions
NONESupport Equipment
| Name | Manufacturer | Part Number / Identification | Quantity | Remark |
|---|---|---|---|---|
| Abrasive Blast Equipment | LOCAL | Abrasive Blast Equipment | ||
| Double column machining center | LOCAL | Double column machining center | ||
| Oven | LOCAL | Oven | ||
| Radial drill | LOCAL | Radial drill | ||
| Rotary table | LOCAL | Rotary table | ||
| IAE 3J12771 Fixture,drill | 0AM53 | IAE 3J12771 | 1 | |
| IAE 3J12772 Machining fixture | 0AM53 | IAE 3J12772 | 1 | |
| IAE 3J12773 TBD | 0AM53 | IAE 3J12773 | 1 | |
| IAE 3J12816 Fixture, Curing | 0AM53 | IAE 3J12816 | 1 | |
| IAE 3J12817 Fixture, Curing | 0AM53 | IAE 3J12817 | 1 |
Consumables, Materials and Expendables
| Name | Manufacturer | Part Number / Identification | Quantity | Remark |
|---|---|---|---|---|
| CoMat 01-124 ISOPROPYL ALCOHOL | LOCAL | CoMat 01-124 | ||
| CoMat 02-001 ADHESIVE TAPE (MASKING) | LOCAL | CoMat 02-001 | ||
| CoMat 05-004 ABRASIVE MEDIUM, ALUMINUM OXIDE, 140/400 GRADE | X222X | CoMat 05-004 | ||
| CoMat 05-016 GARNET PAPER, 80-GRIT | LOCAL | CoMat 05-016 | ||
| CoMat 05-017 GARNET PAPER, 60 GRIT | LOCAL | CoMat 05-017 | ||
| CoMat 05-123 SILICON CARBIDE GRIT | SD349 | CoMat 05-123 | ||
| CoMat 08-015 RESIN | LOCAL | CoMat 08-015 | ||
| CoMat 08-016 HARDENER | LOCAL | CoMat 08-016 |
Spares
| Name | Manufacturer | Part Number / Identification | Quantity | Remark |
|---|---|---|---|---|
| Pin, dowel | LOCAL | 5A0013 | A/R | |
| Retaining Ring | LOCAL | AS20763 | A/R | |
| Segment, locating | LOCAL | 5A1415 | A/R | (for Assembly A) |
| Segment, locating | LOCAL | 5A1416 | (for Assembly A, B and C) |
Safety Requirements
NONEProcedure
Remove the inlet cone tip from the inlet cone assembly.
Refer to Repair, VRS1462 TASK 72-38-11-300-002 (REPAIR-002) and SUBTASK 72-38-11-330-053.
SUBTASK 72-38-11-350-089 Remove the Inlet Cone Tip from the Inlet Cone Assembly
Use IAE 3J12772 Machining fixture 1 off.

CAUTION
BE CAREFUL THAT YOU DO NOT CAUSE DAMAGE TO THE PIN HOLE OR FLANGE FACE.Set up the inlet cone assembly and fixture on the machine.
Use center drill and drill 0.216 in. (5.5 mm).
Machine the pin.
Push out the pin and ring with a small hammer and punch.
Use end mill cutter 1.378 in. (35 mm) and countersink milling cutter.
Machine all segments from the inlet cone assembly.
Use hand methods with hand held pneumatic grinder and rotary file or fine file.
Remove the remaining segment from the flange of the inlet cone.
Remove the remaining adhesive from the flange of the inlet cone.
Examine the flange to make sure that all of the adhesive has been removed.
SUBTASK 72-38-11-350-090 Remove All Segments from the Inlet Cone Assembly

CAUTION
AFTER PREPARATION OF THE MATING SURFACES, THE SURFACE MUST BE FULLY CLEANED AND MUST NOT BE TOUCHED BY HAND TO PREVENT CONTAMINATION.Refer to Figure.
Clean the mating surfaces of the segment and the flange.
Mask all the areas that are not to be blasted.
Use CoMat 05-123 SILICON CARBIDE GRIT for the segment.
Use CoMat 05-004 ABRASIVE MEDIUM, ALUMINUM OXIDE, 140/400 GRADE for the flange of the inlet cone.
Use and air pressure of 43 psi to 57 psi (297 KPa to 393 KPa) for a minimum time necessary to clean the parts.
Dry abrasive blast the mating surfaces.
Remove the masking tape.
Remove residual abrasive by vacuuming.
Wipe the blasted surface.
SUBTASK 72-38-11-340-001 Prepare the Surface of the Segment and Flange of the Inlet Cone
Use CoMat 08-015 RESIN and CoMat 08-016 HARDENER.
Refer to the SPM TASK 70-36-02-360-501 and SUBTASK 70-36-02-360-021.

WARNING
YOU MUST USE PLASTIC GLOVES TO PREVENT CONTAMINATION OF THE SKIN DURING PREPARATION AND USE OF ADHESIVE.
WARNING
YOU MUST NOT EAT OR SMOKE AT LOCATIONS WHERE YOU USE THESE MATERIALS.Make up the adhesive from two parts.
Use a spatula or small trowel.
Apply the adhesive to the mating surfaces on the segment and the flange of the inlet cone.
Use IAE 3J12773 TBD 1 off or IAE 3J12816 Fixture, Curing 1 off.
Put the segment on to the curing fixture.
Install the two locating pins in to the bolt hole of the segment and curing fixture.
Tighten the bolt with clamp.
Remove unwanted adhesive compound from inlet cone flange.
Use an Oven.
Cure the adhesive at 203 deg F to 221 deg F (95 deg C to 105 deg C) for one hour.
Remove the inlet cone assembly from the curing fixture.
SUBTASK 72-38-11-360-082 Apply and Cure the Two Part Low Temperature Curing Sealant/Adhesive, Assembly A and B
Use CoMat 08-015 RESIN and CoMat 08-016 HARDENER.
Refer to the SPM TASK 70-36-02-360-501 and SUBTASK 70-36-02-360-021.

WARNING
YOU MUST USE PLASTIC GLOVES TO PREVENT CONTAMINATION OF THE SKIN DURING PREPARATION AND USE OF ADHESIVE.
WARNING
YOU MUST NOT EAT OR SMOKE AT LOCATIONS WHERE YOU USE THESE MATERIALS.Make up the adhesive from two parts.
Use a spatula or small trowel.
Apply the adhesive to the mating surfaces on the segment and the flange of the inlet cone.
Use IAE 3J12817 Fixture, Curing 1 off.
Put the segment on to the curing fixture.
Tighten the bolt with clamp.
Remove unwanted adhesive compound from inlet cone flange.
Use an Oven.
Cure the adhesive at 203 deg F to 221 deg F (95 deg C to 105 deg C) for one hour.
Remove the inlet cone assembly from the curing fixture.
SUBTASK 72-38-11-360-083 Apply and Cure the Two Part Low Temperature Curing Sealant/Adhesive, Assembly C
Unbond and cracks are not permitted.
Visually examine the repaired area for unbond, cracks.
SUBTASK 72-38-11-220-191 Examine the Repaired Area of the Inlet Cone Assembly
Use IAE 3J12772 Machining fixture 1 off and Rotary table.
Set-up the inlet cone assembly on the machine.
Use end mill cutter 1.378 in. (35 mm) and 0.394 in. (10 mm).
Break all sharp edges to 0.004 in. to 0.019 in. (0.1 mm to 0.5 mm) after machining.
Machine the replaced segment.
SUBTASK 72-38-11-320-055 Machine the Flange of the Inlet Cone Assembly
Refer to the SPM TASK 70-11-26-300-503.
Wipe and clean the tip locating hole area of the inlet cone.
SUBTASK 72-38-11-110-063 Clean the Inlet Cone Tip locating Hole
The concentricity of the tip locating hole must be less than 0.020 in. (0.5 mm).
The runouts of the inner diameter at two positions specified in Figure must be less than 0.0157 in. (0.4 mm) FIR.
Set up and check the tip locating hole and the runouts of the inlet cone.
SUBTASK 72-38-11-220-192 Do a Check of the Inlet Cone Assembly
Use IAE 3J12771 Fixture,drill 1 off.
Use Radial drill.
Set-up the inlet cone assembly and fixture on the machine.
Install the bushing into the flange pin hole.
Use drill 0.157 in. (4.0 mm).
Drill the pin hole.
Remove the bushing from the flange pin hole.
Use drill 0.236 in. (6.0 mm).
Drill the pin hole.
Machine the pin hole.
Use drill 0.1968 in. (5.0 mm).
Drill the bolt hole.
Remove the bushing from the flange.
SUBTASK 72-38-11-320-056 Machine the Bolt Hole and Pin Hole
Refer to the SPM TASK 70-11-26-300-503.

CAUTION
AFTER PREPARATION OF THE MATING SURFACES, THE SURFACE MUST BE FULLY CLEANED AND MUST NOT BE TOUCHED BY HAND TO PREVENT CONTAMINATION.Clean the mating surfaces on the pin and the pin hole.
SUBTASK 72-38-11-340-002 Prepare the Surface of the Pin and the Pin Hole of the Inlet Cone
Use CoMat 08-015 RESIN and CoMat 08-016 HARDENER.
Refer to the SPM TASK 70-36-02-360-501.

WARNING
YOU MUST USE PLASTIC GLOVES TO PREVENT CONTAMINATION OF THE SKIN DURING PREPARATION AND USE OF ADHESIVE.
WARNING
YOU MUST NOT EAT OR SMOKE AT LOCATIONS WHERE YOU USE THESE MATERIALS.Make up the adhesive from two parts.
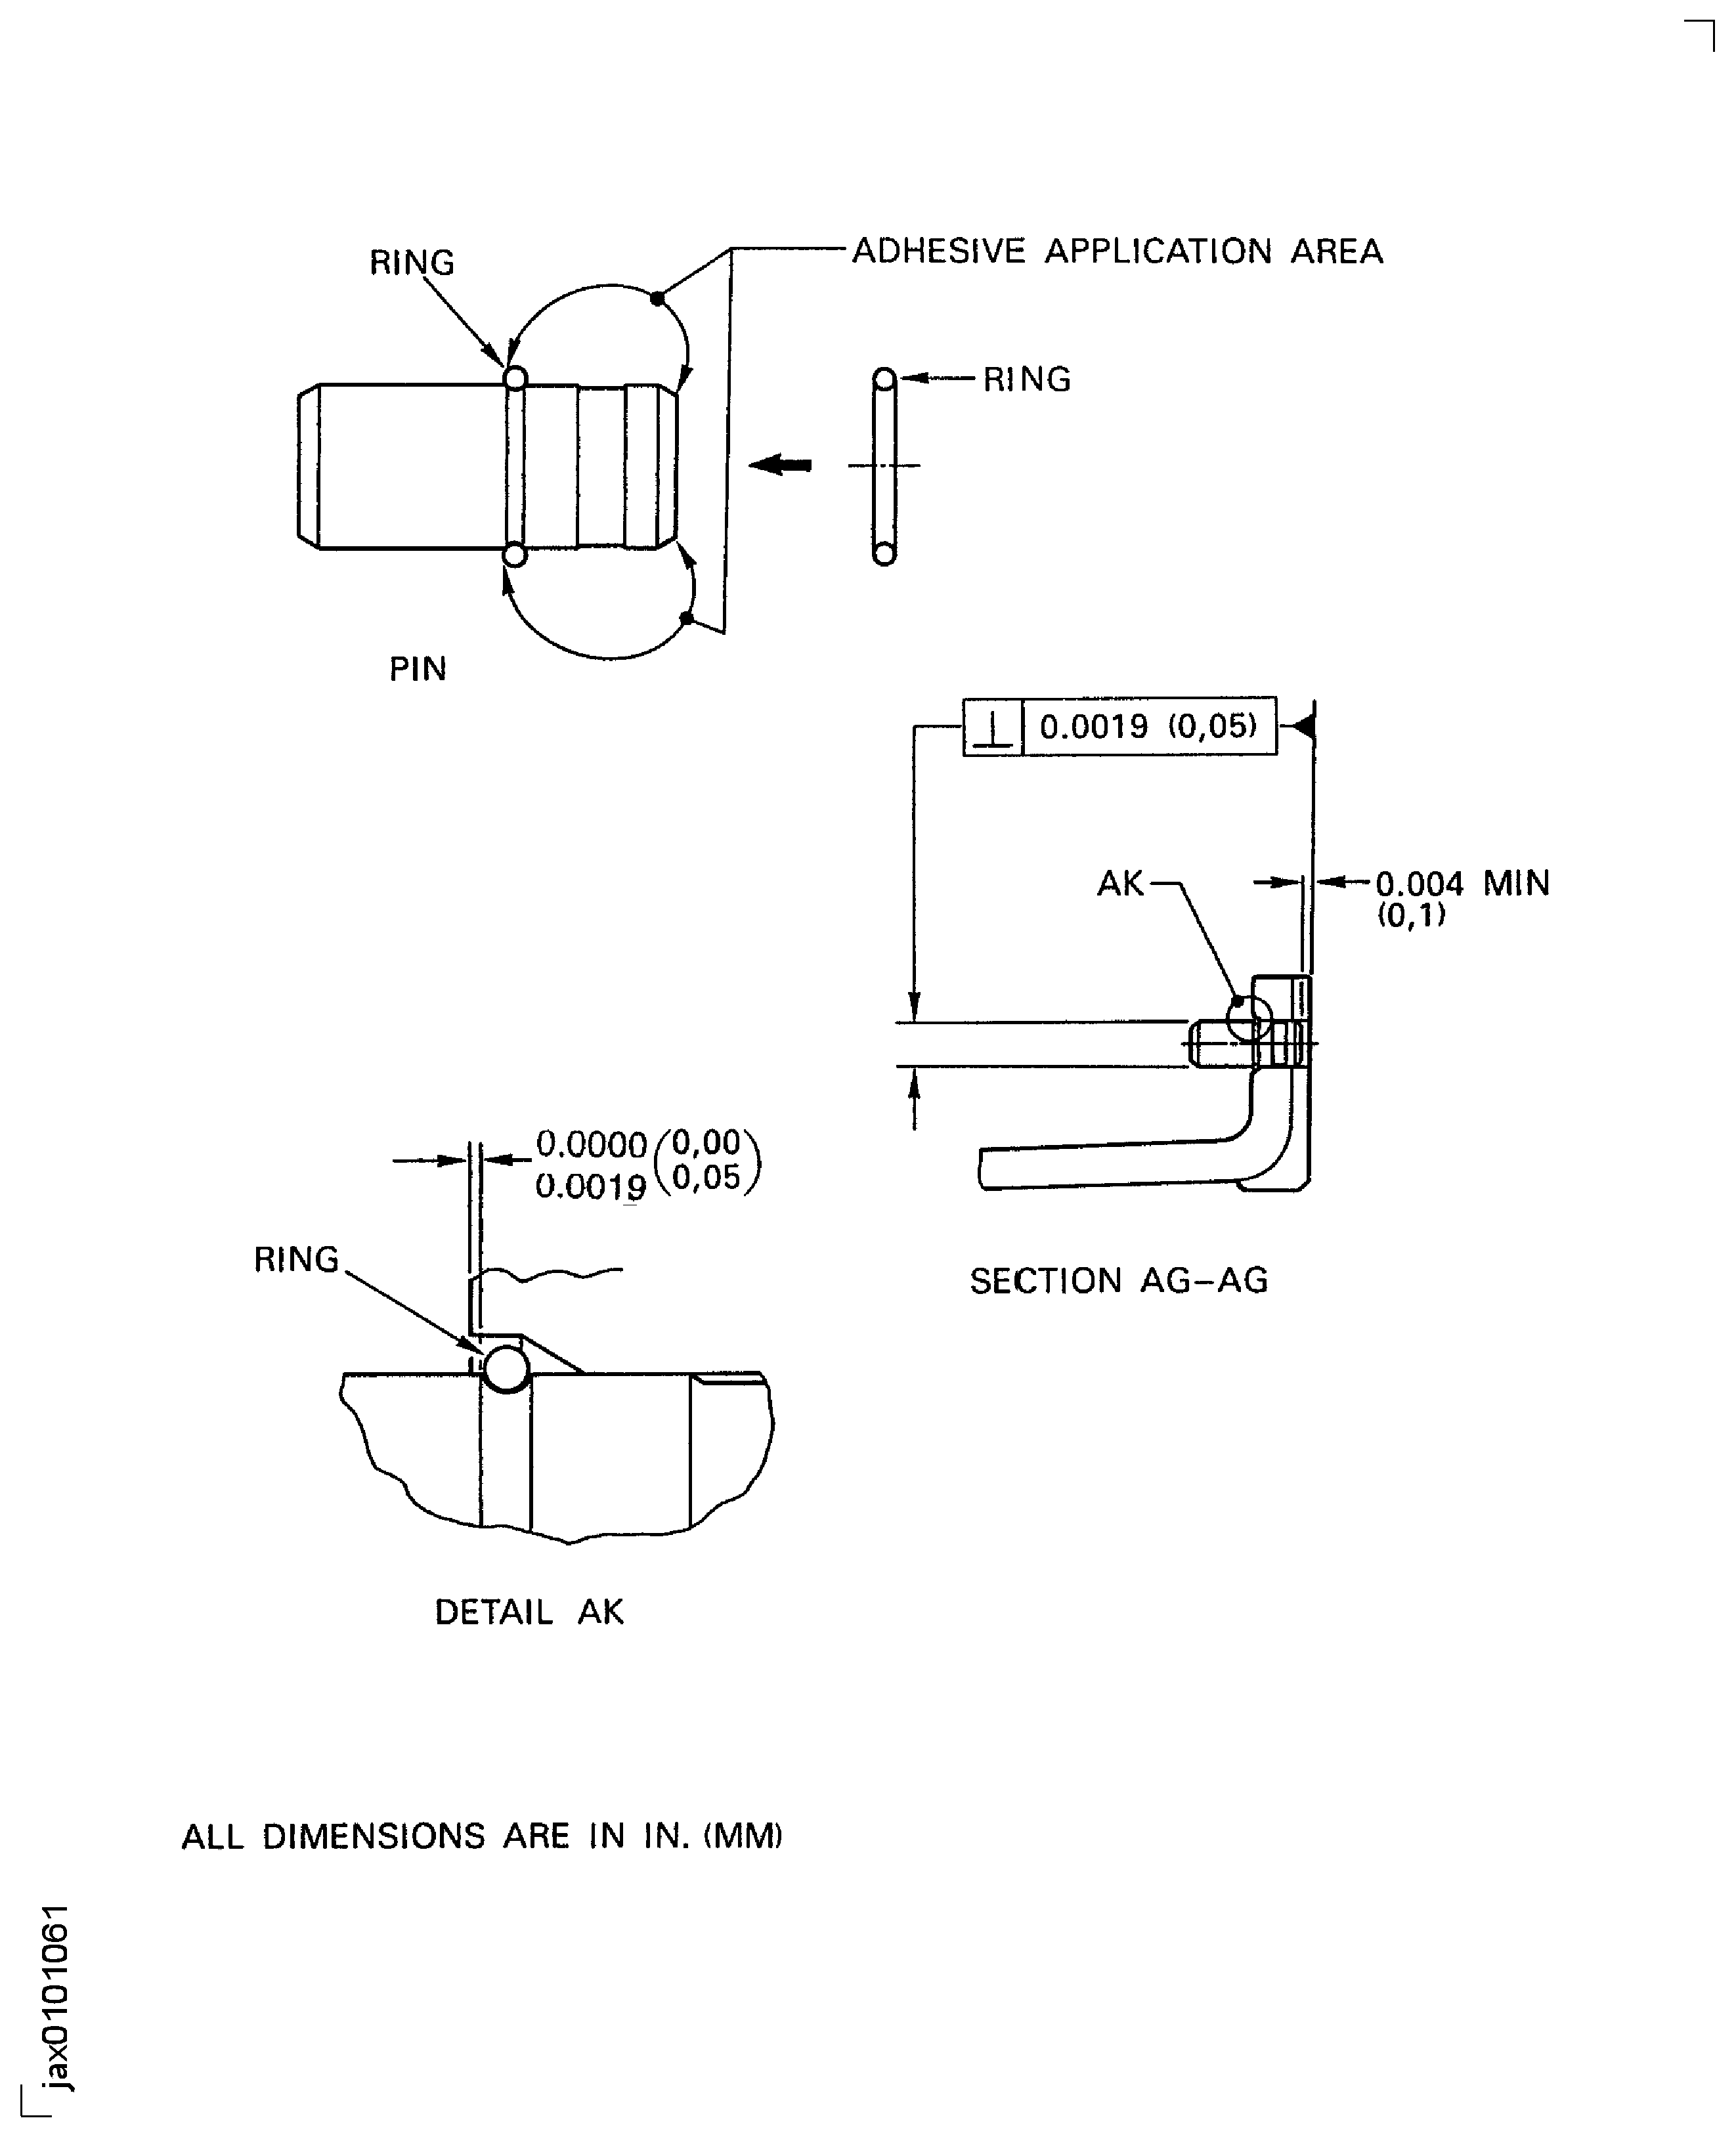
Install the ring to the pin.
Apply the adhesive to the area mating surface on the pin.
Install the pin in the flange of the inlet cone.
Remove unwanted adhesive compound from the inlet cone.
Dimensionally examine for inlet cone assembly.
Use an Oven.
Cure the adhesive at 203 deg F to 221 deg F (95 deg C to 105 deg C) for one hour.
SUBTASK 72-38-11-360-084 Apply and Cure the Two Part Low Temperature Curing Sealant/Adhesive
Refer to Repair, VRS1466 TASK 72-38-11-300-001 (REPAIR-001) or VRS1458 TASK 72-38-11-300-010 (REPAIR-010).
Apply the epoxy varnish coating and the polyurethane coating, if necessary.
NOTE
Do this step before Step.
SUBTASK 72-38-11-380-063 Apply the Epoxy Varnish Coating and the Polyurethane coating to the Inlet Cone Assembly, if Necessary
Refer to Repair, VRS1462 TASK 72-38-11-300-002 (REPAIR-002).
Install the inlet cone tip.
SUBTASK 72-38-11-350-091 Install the Inlet Cone Tip
Refer to Repair, VRS1464 TASK 72-38-11-300-005 (REPAIR-005).
Measure and correct the unbalance of the inlet cone assembly.
SUBTASK 72-38-11-220-195 Measure and Correct the Unbalance for the Inlet Cone Assembly
Refer to the SPM TASK 70-09-01-400-501.
Use the ink method.
Make a mark VRS1617 adjacent to the part number.
SUBTASK 72-38-11-350-092 Identify the Repair
Figure: Inlet Cone Pin And segment - Machining
Inlet Cone Pin And segment - Machining
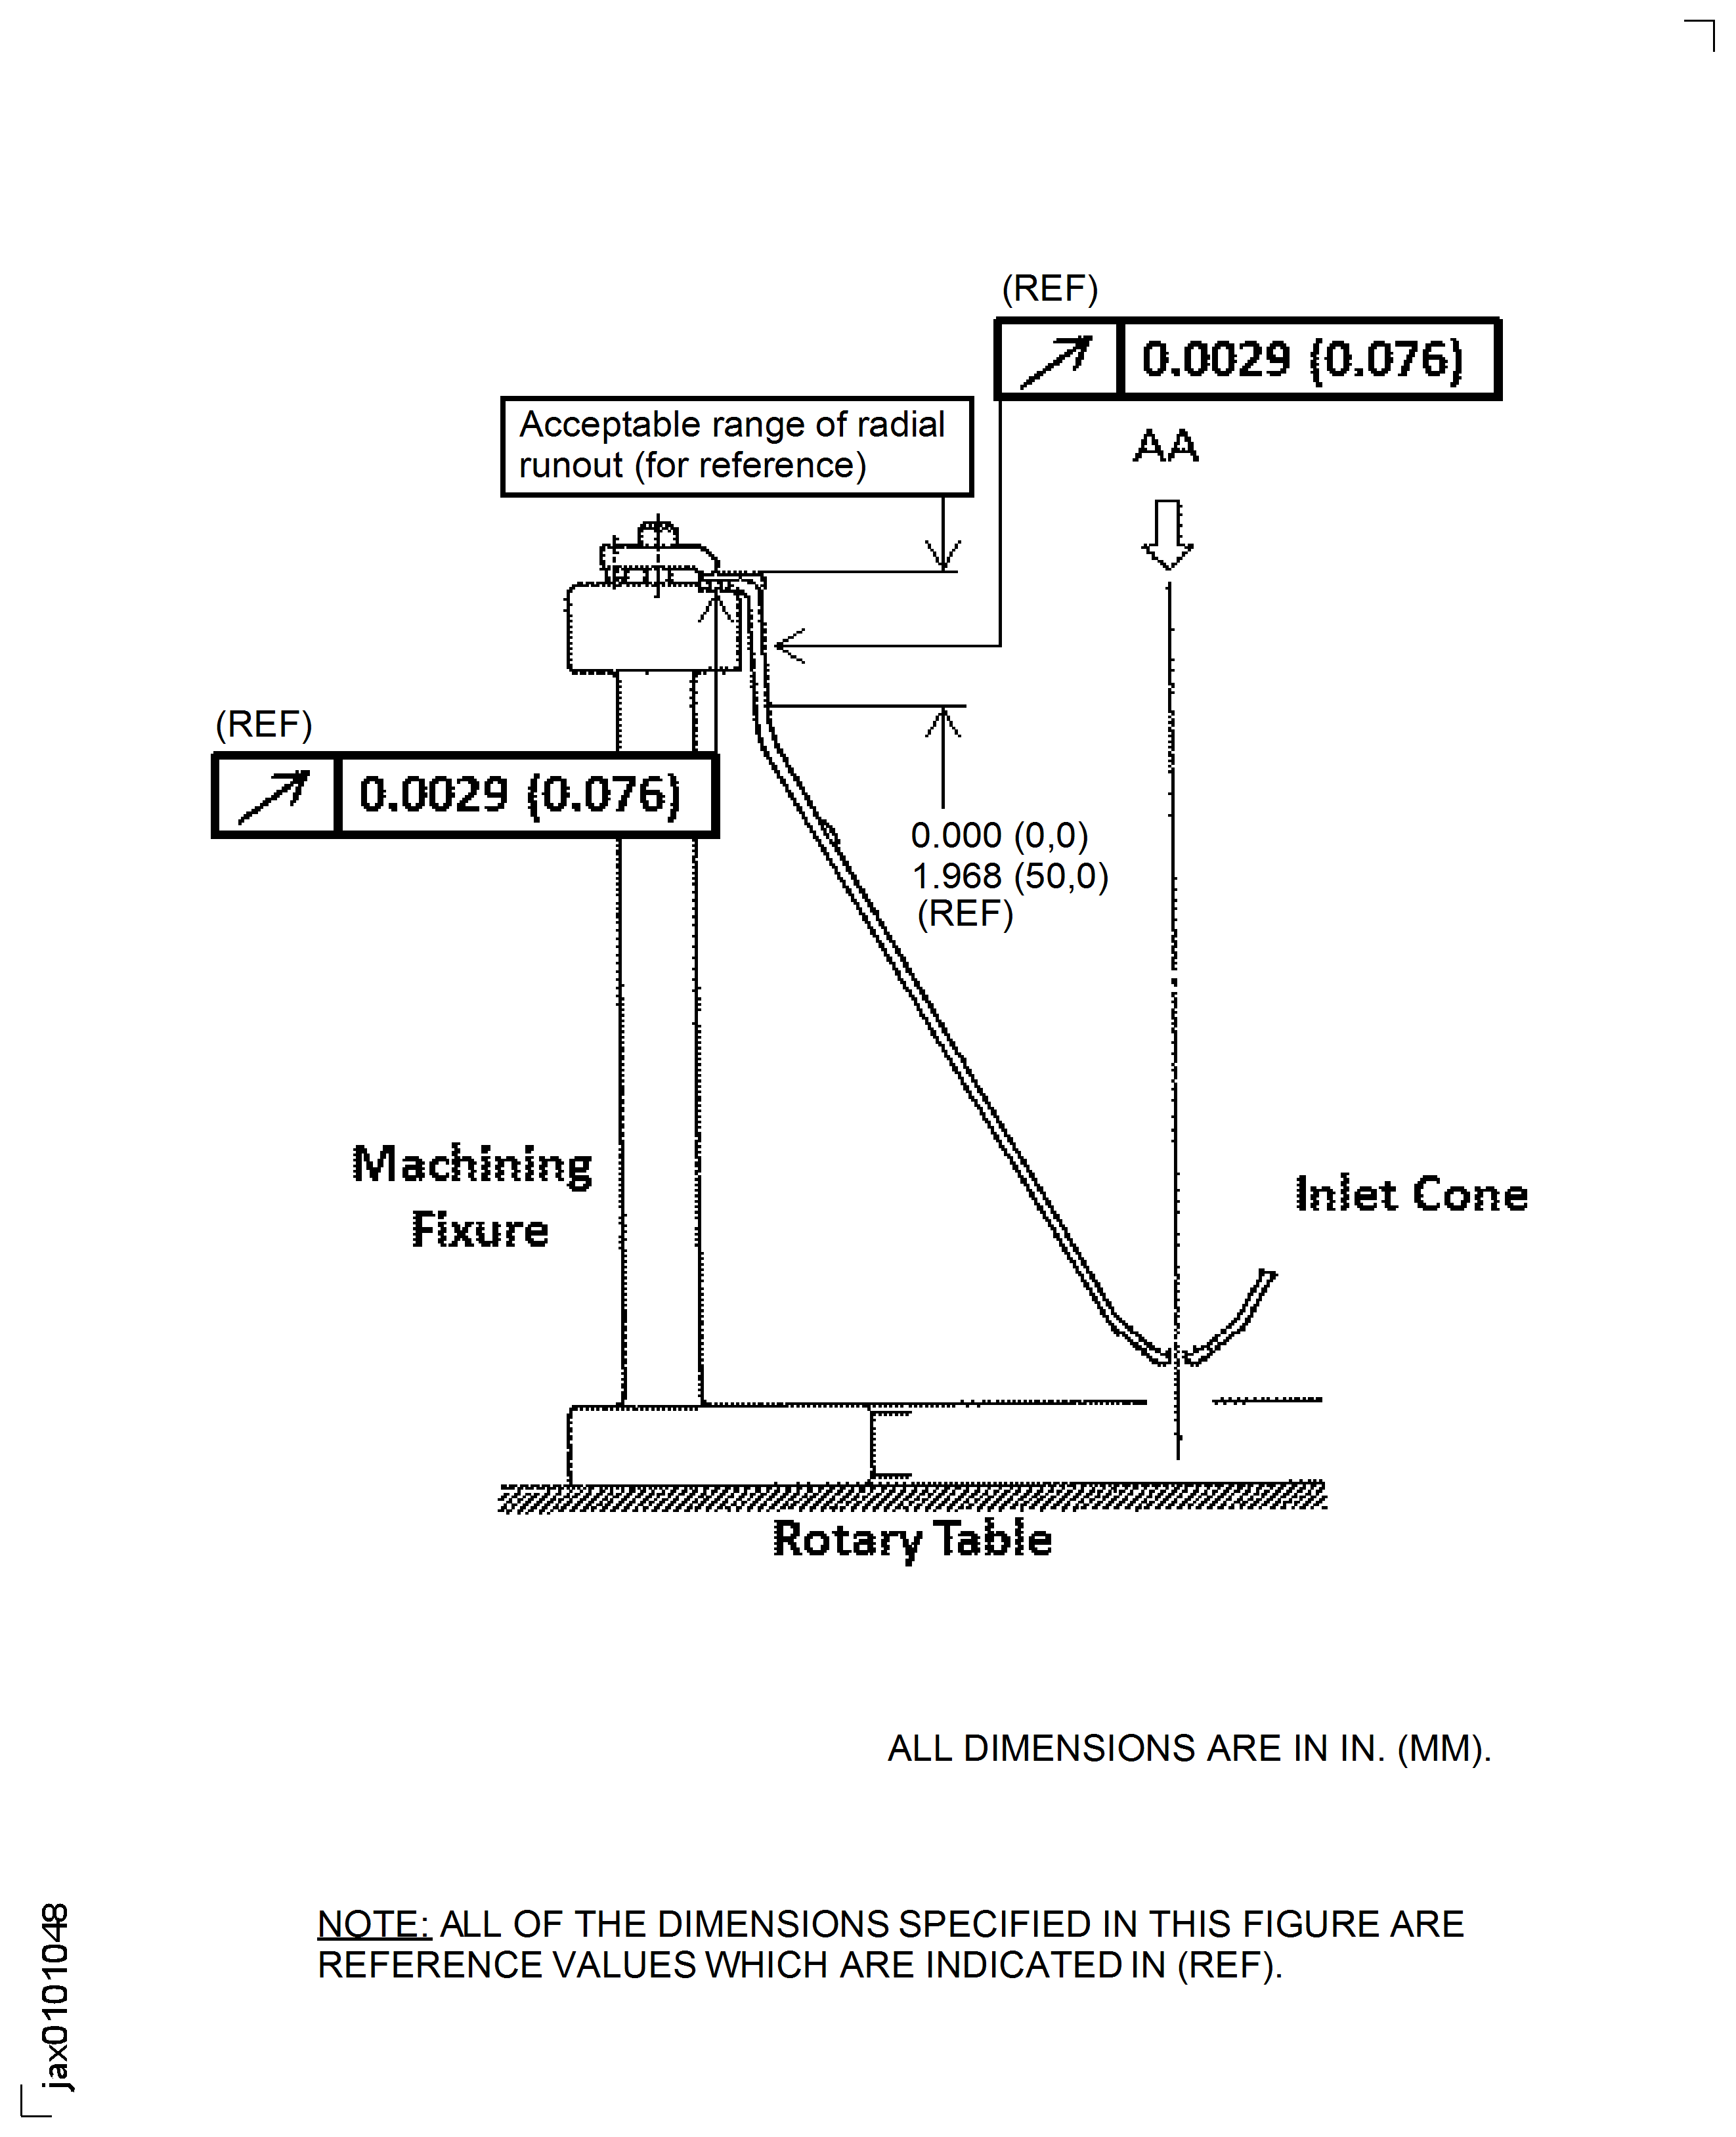
Figure: Repair Details And Dimensions
Repair Details And Dimensions
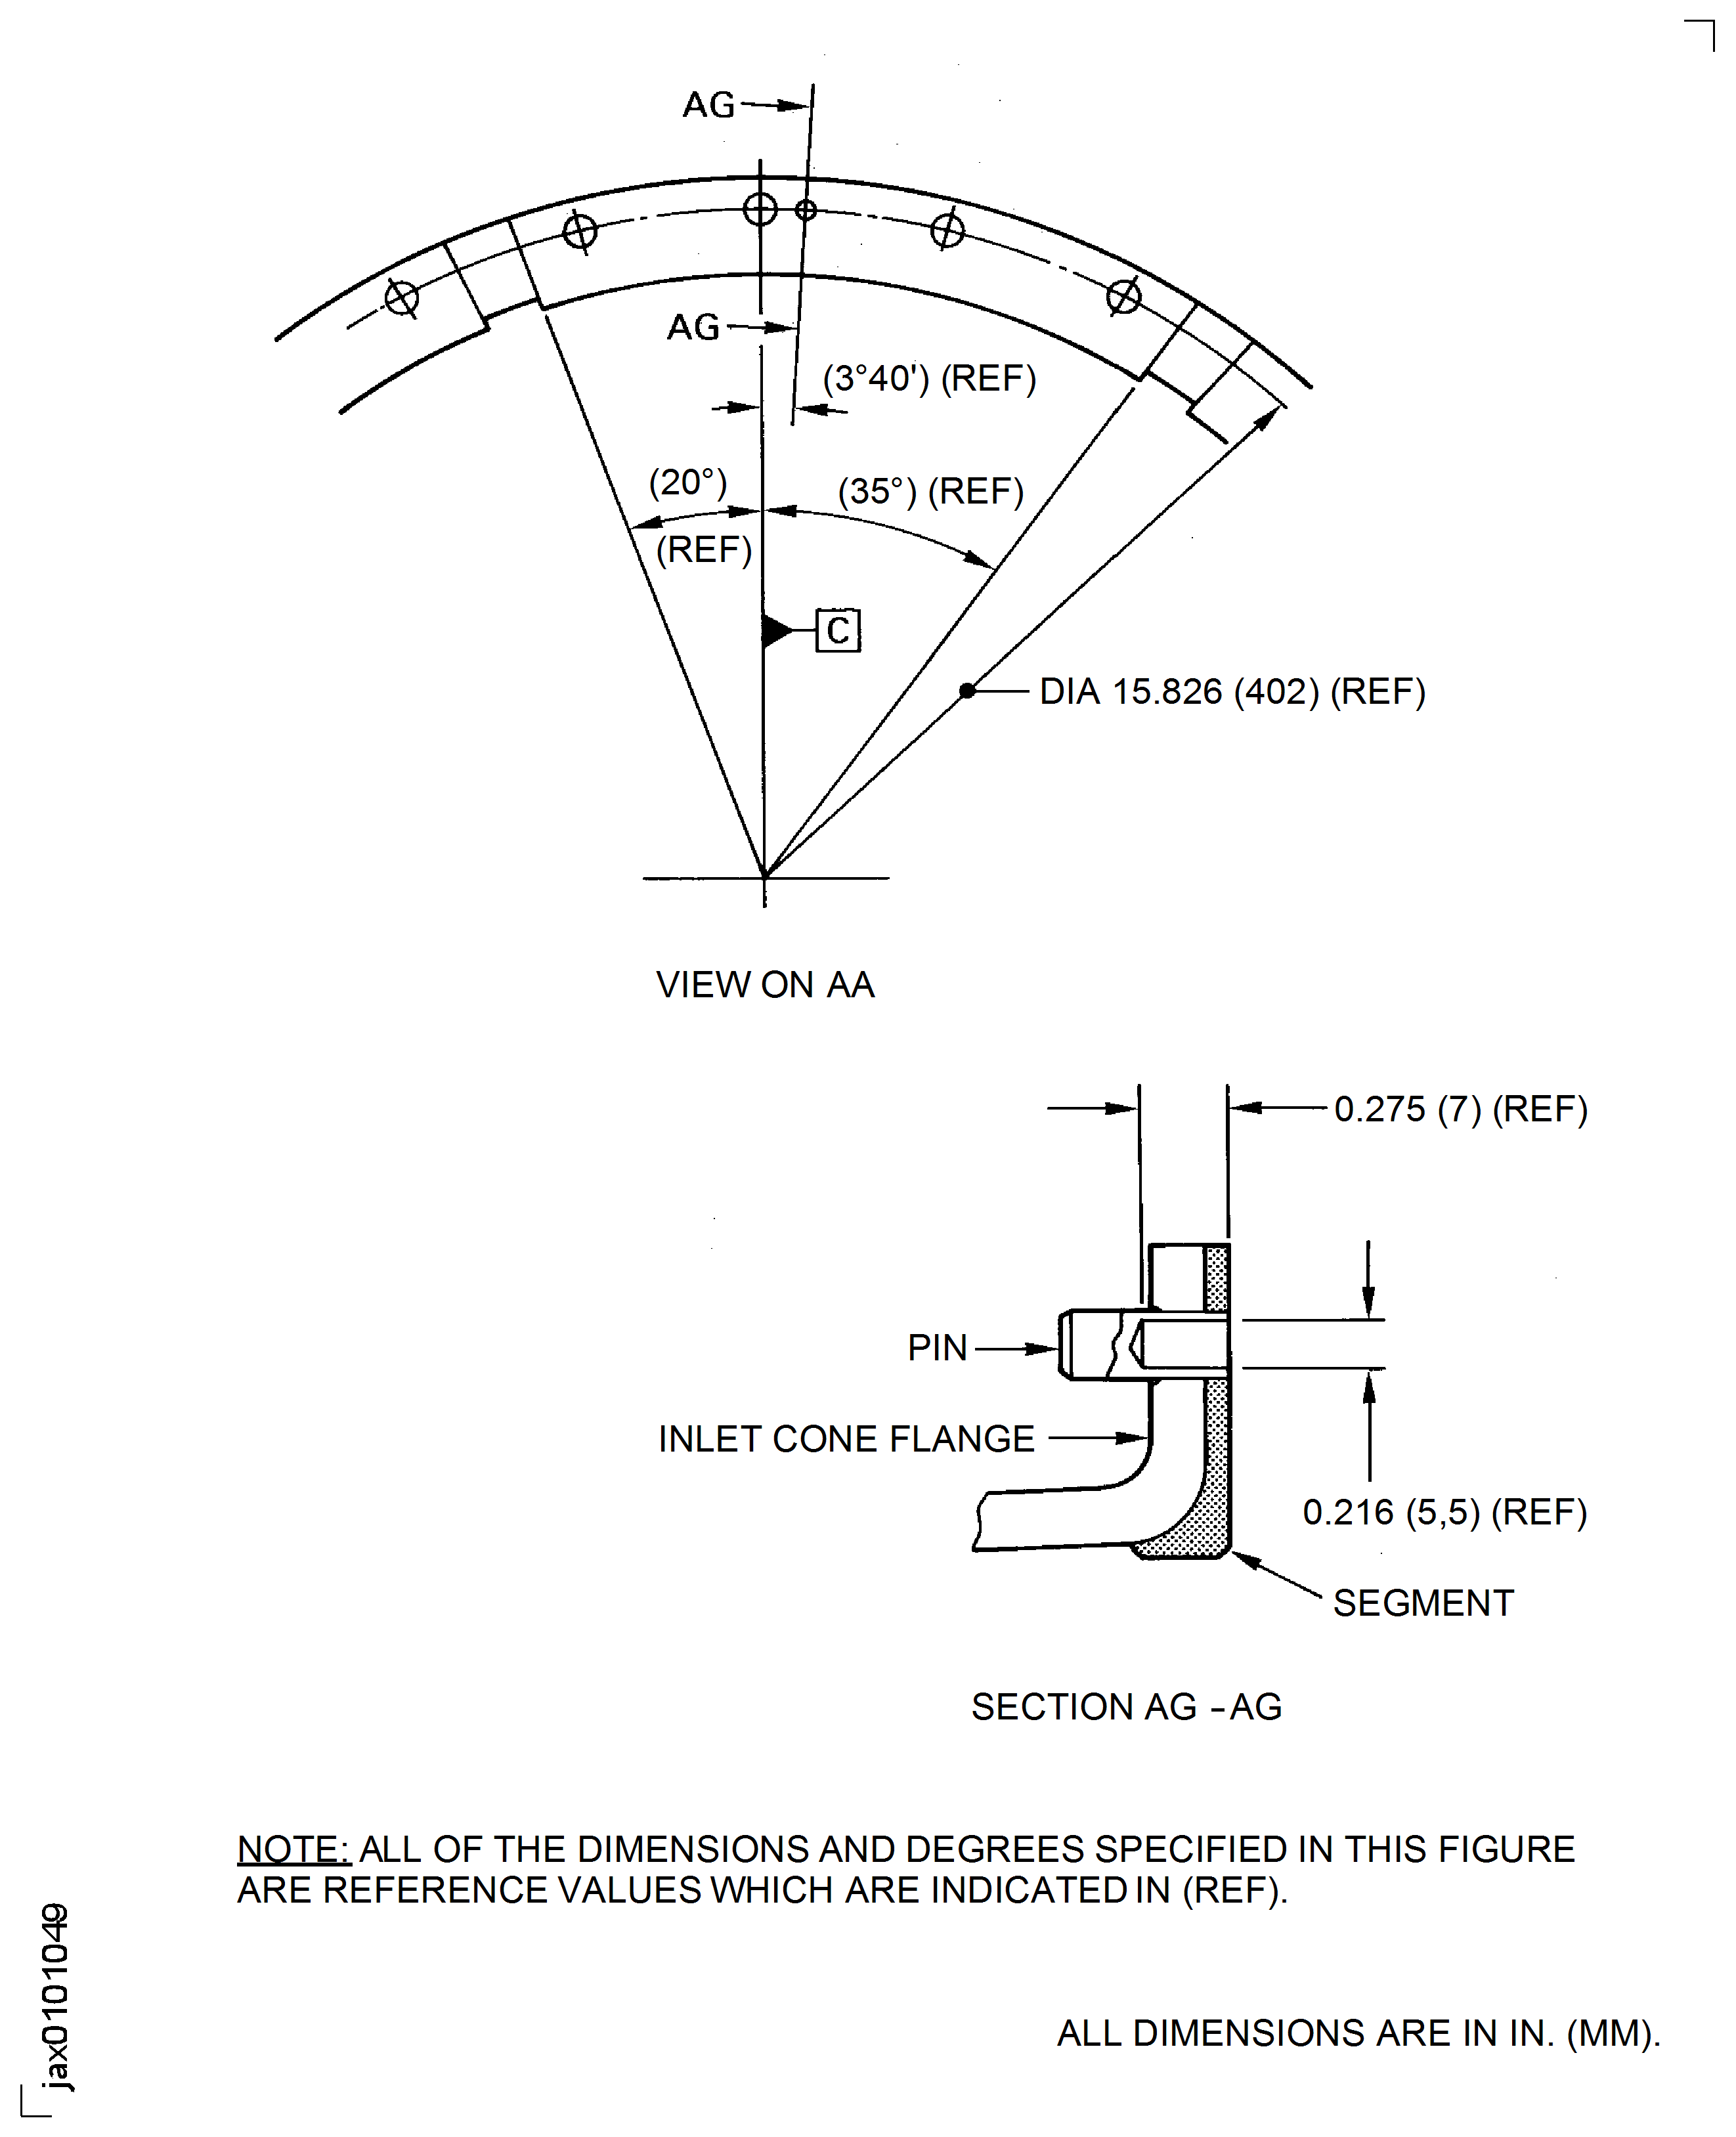
Figure: Repair Details And Dimensions
Repair Details And Dimensions
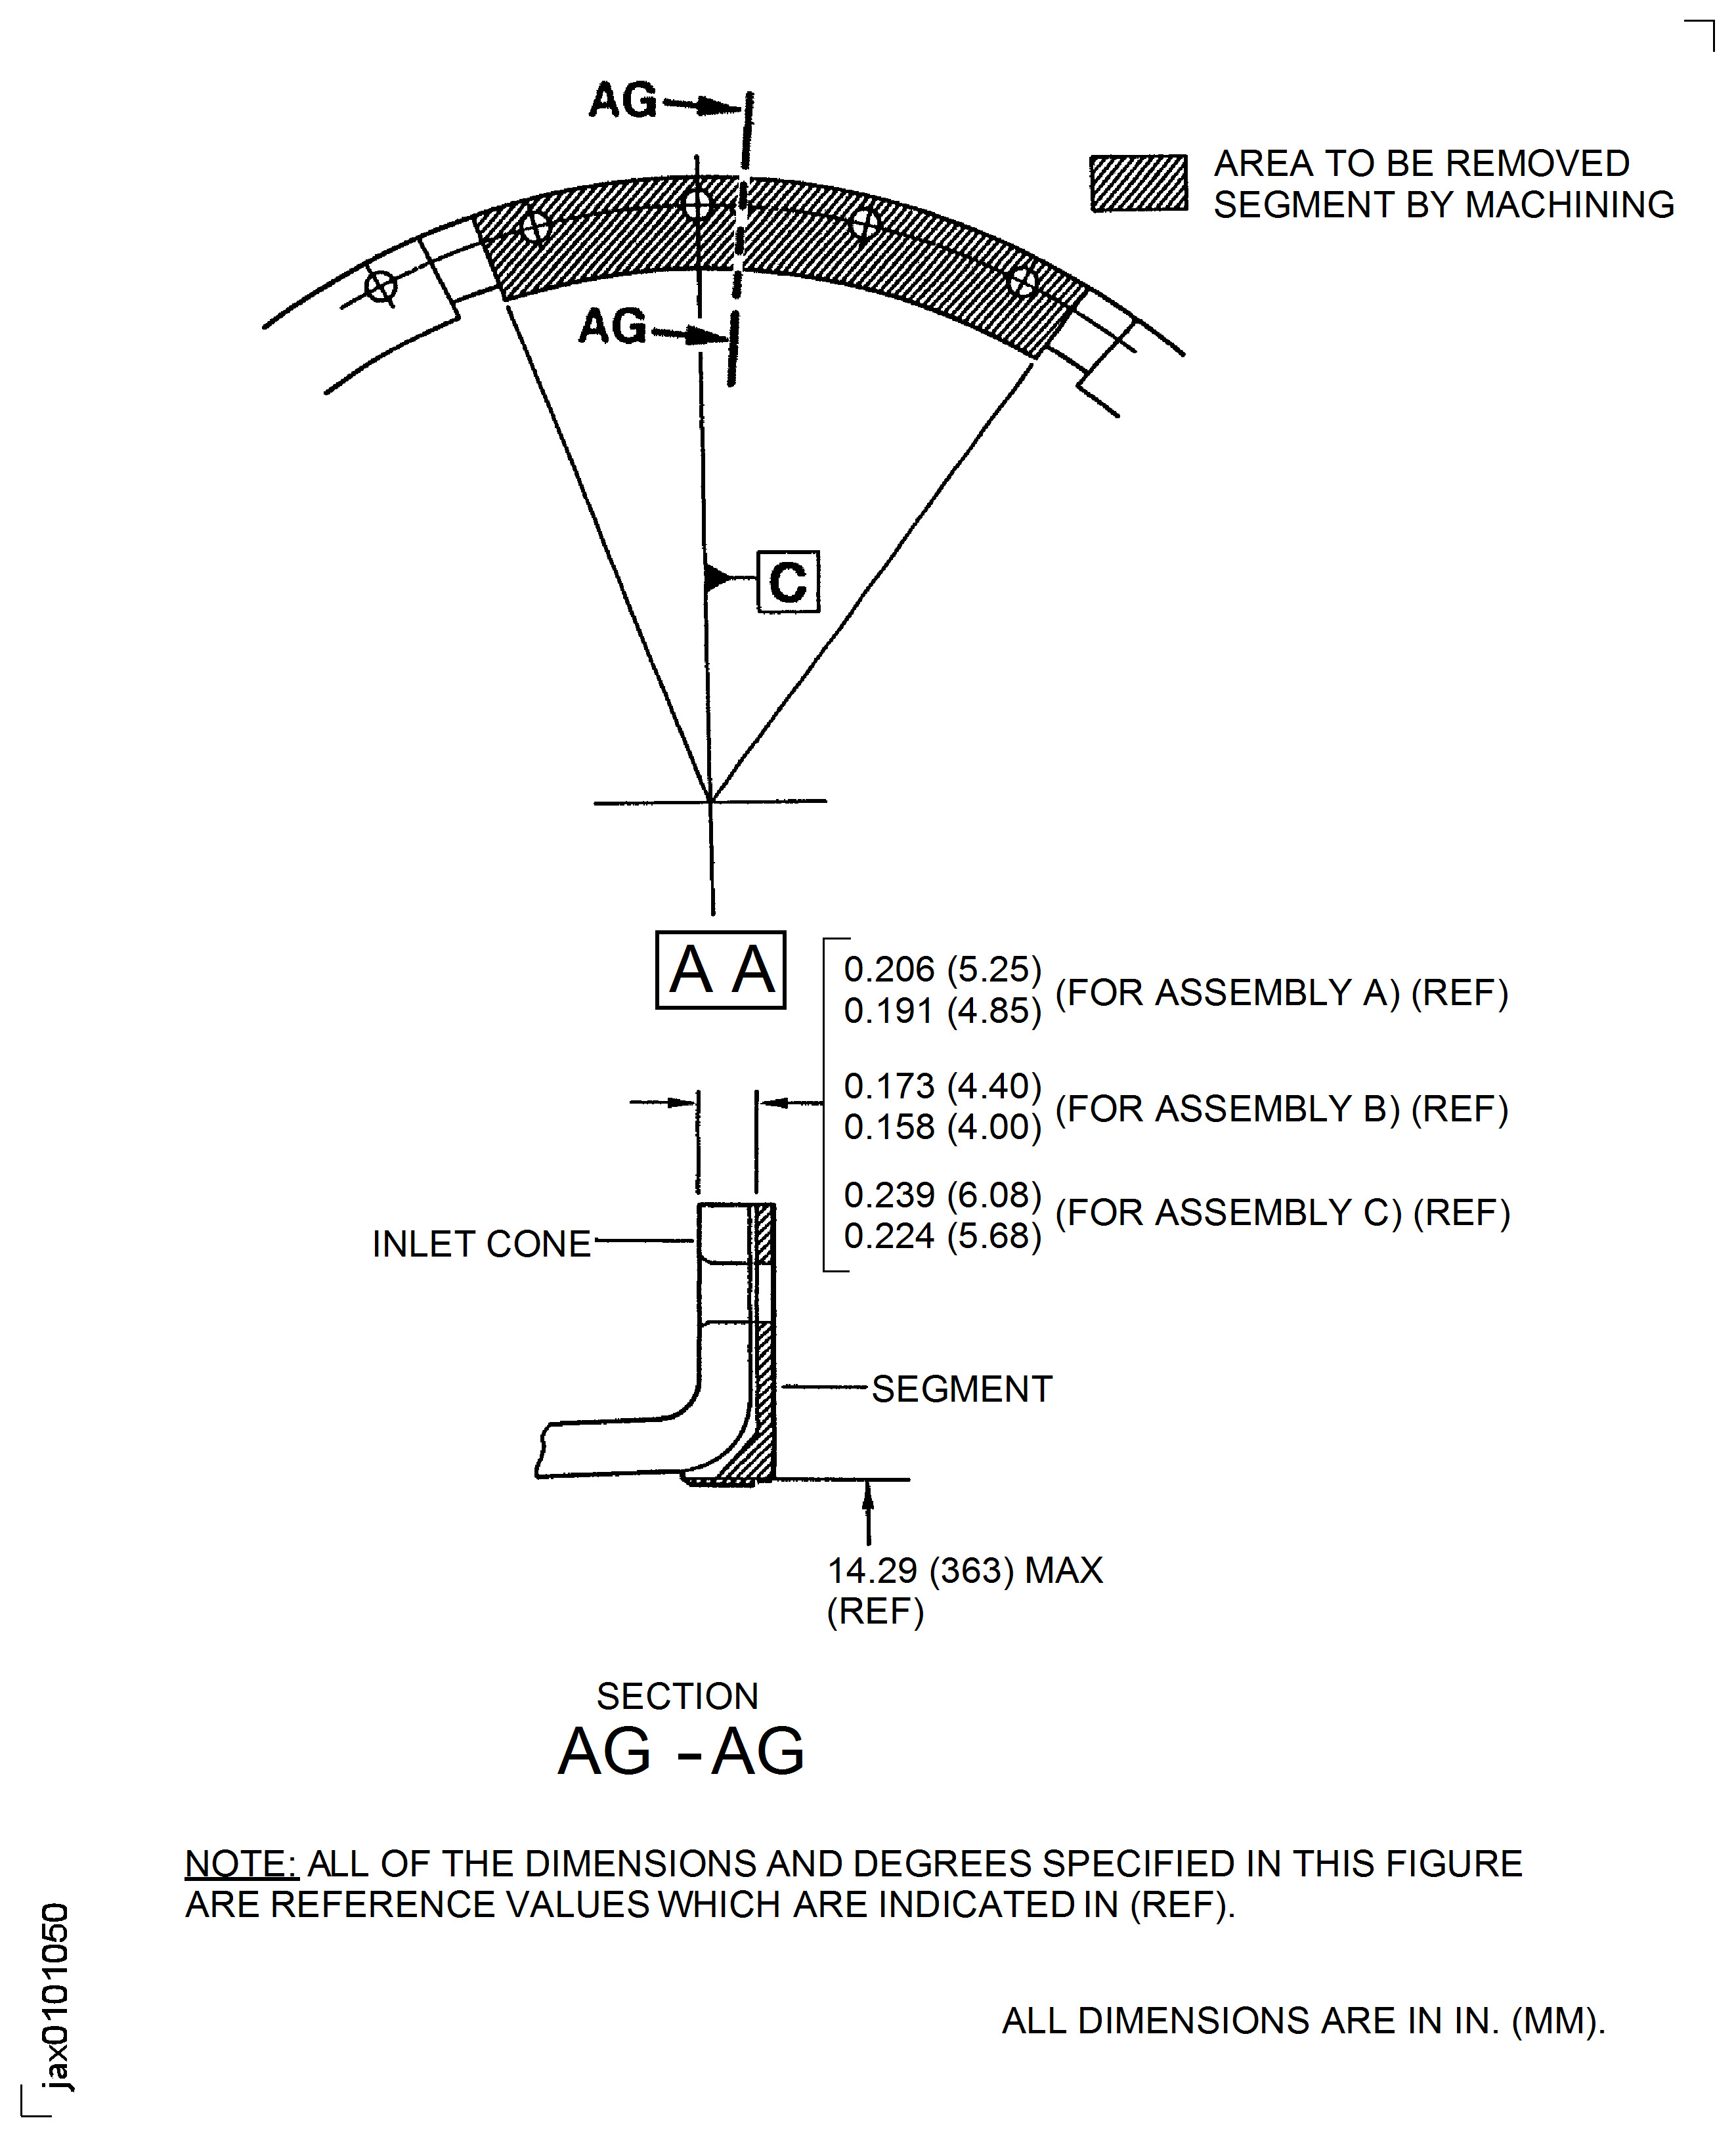
Figure: Inlet Cone Flange And Segment - Preparation
Inlet Cone Flange And Segment - Preparation
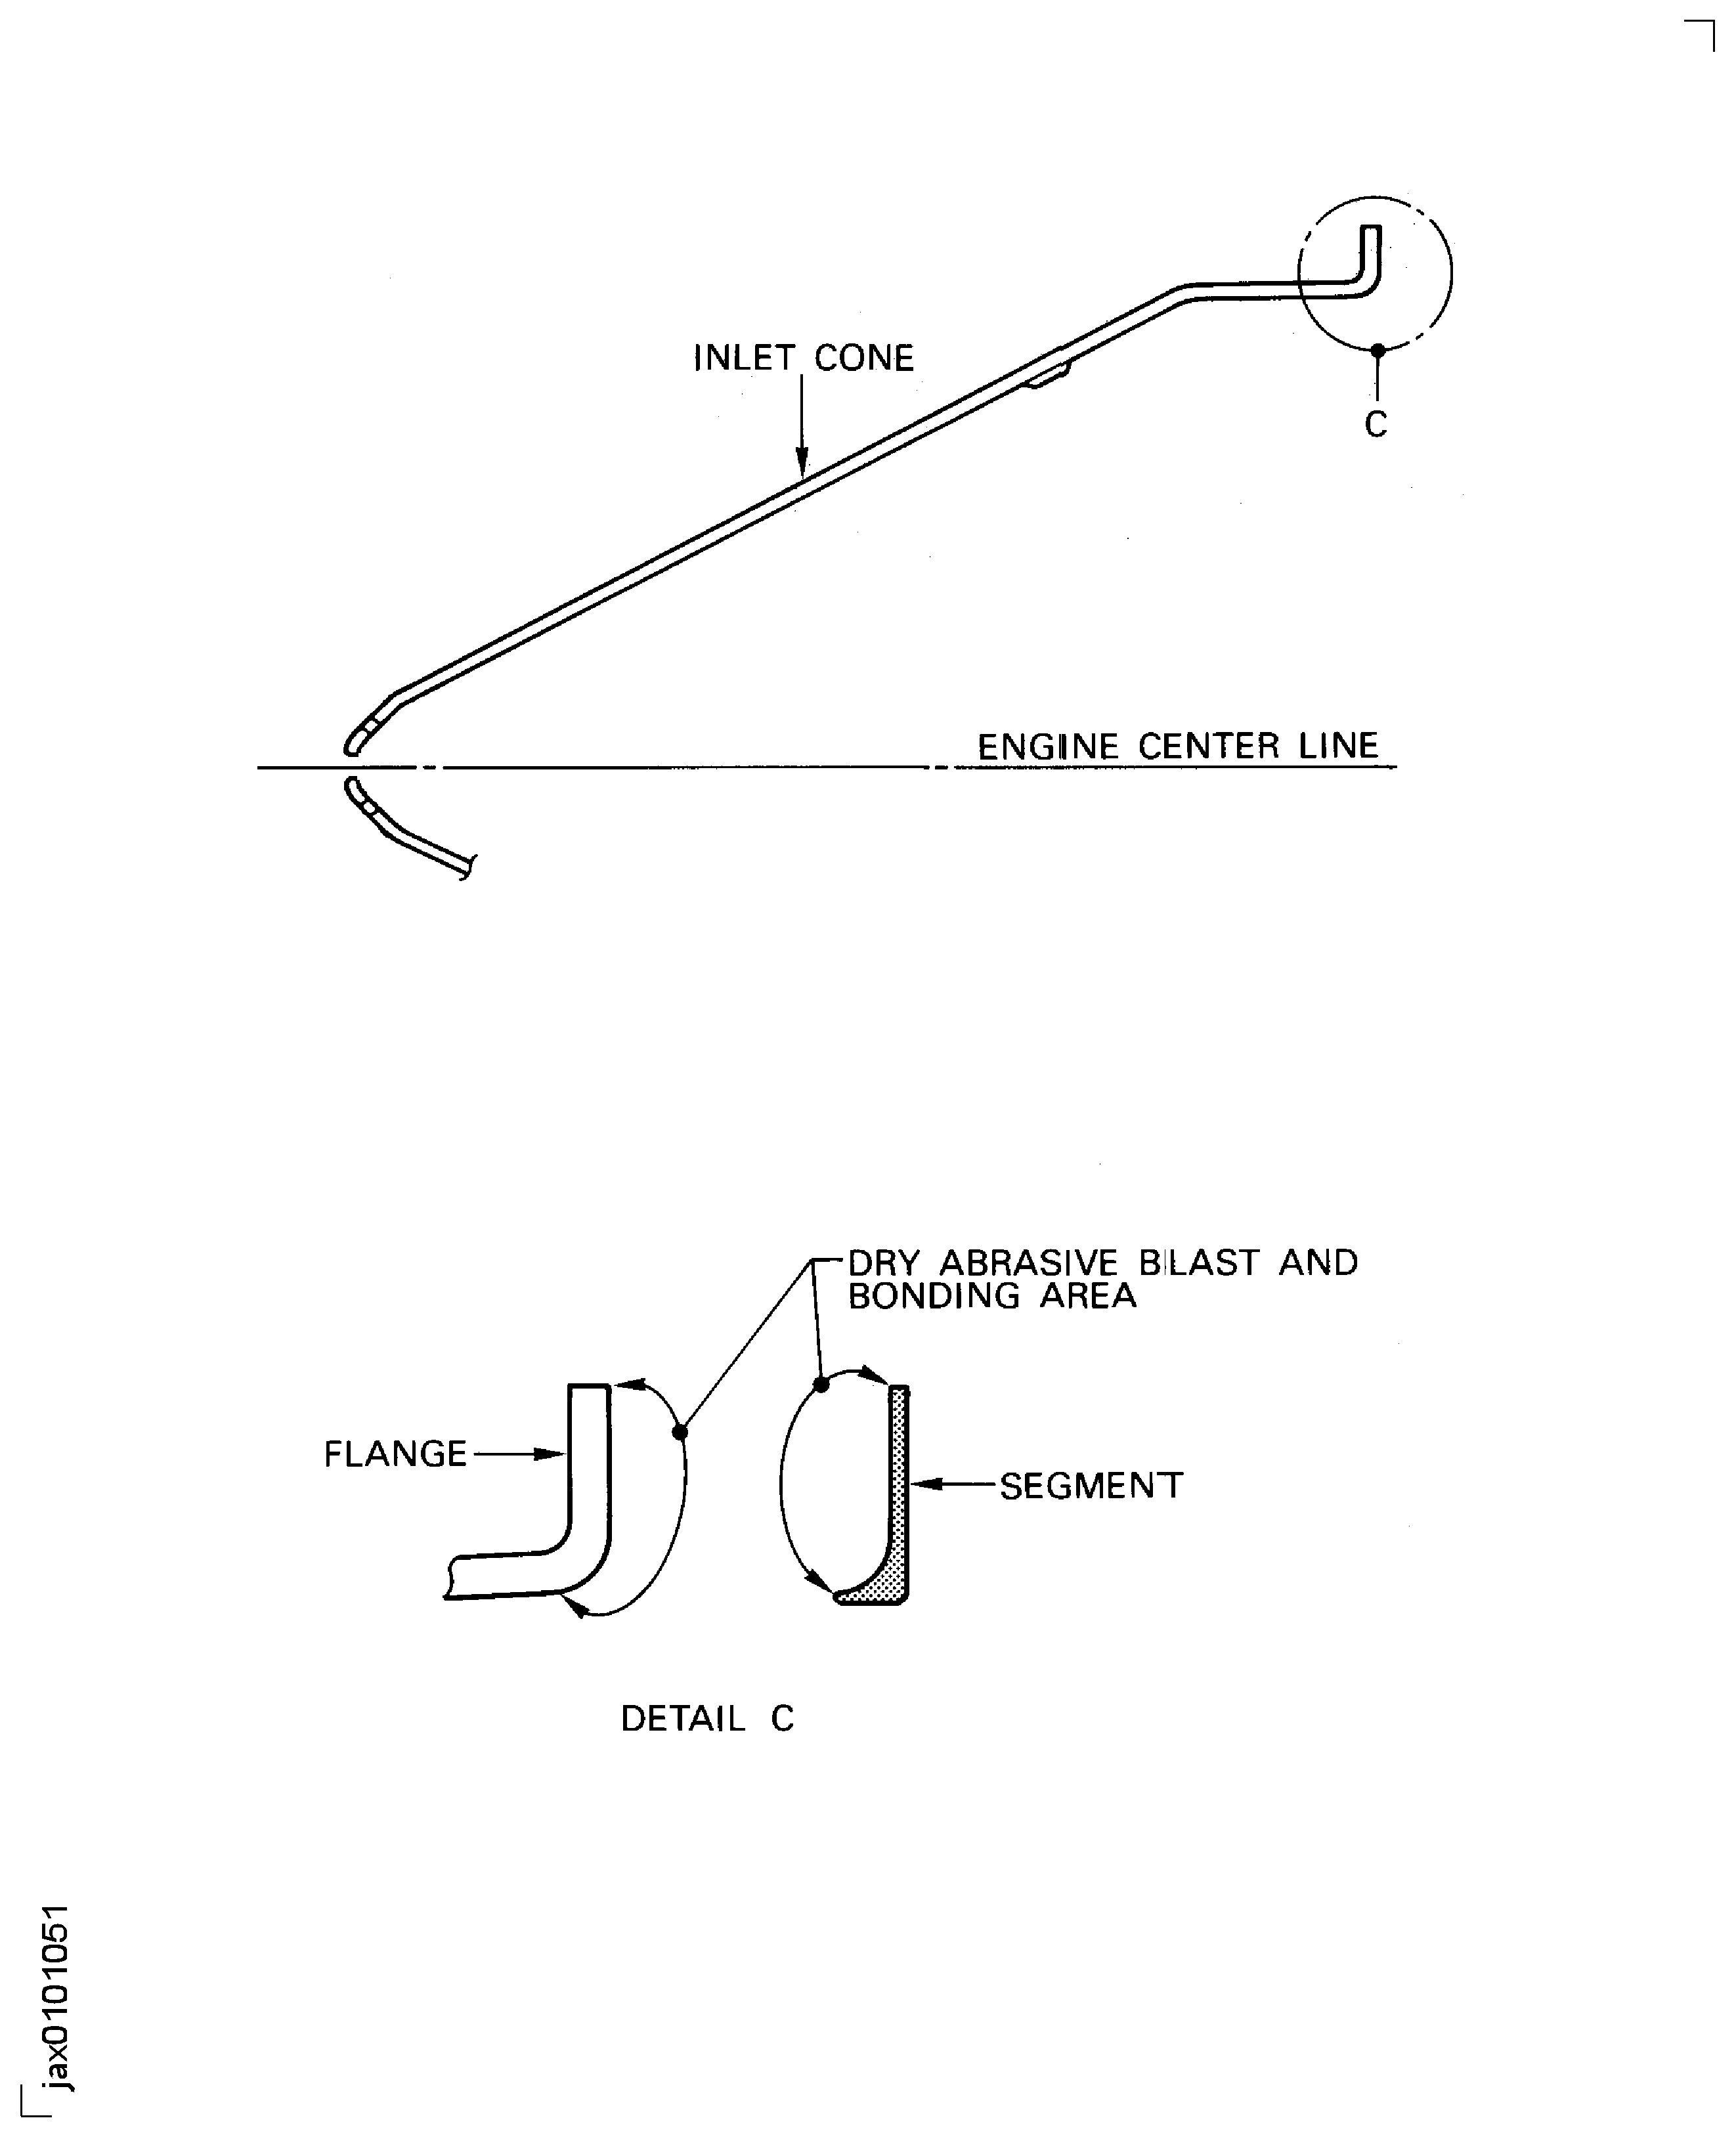
Figure: Inlet Cone And Segment - Assembly
Inlet Cone And Segment - Assembly

Figure: Repair Details And Dimensions
Repair Details And Dimensions

Figure: Repair Details and Dimensions For Assembly A And B
Repair Details and Dimensions For Assembly A And B

Figure: Repair Details And Dimensions For Assembly C
Repair Details And Dimensions For Assembly C

Figure: Repair Details And Dimensions
Repair Details And Dimensions
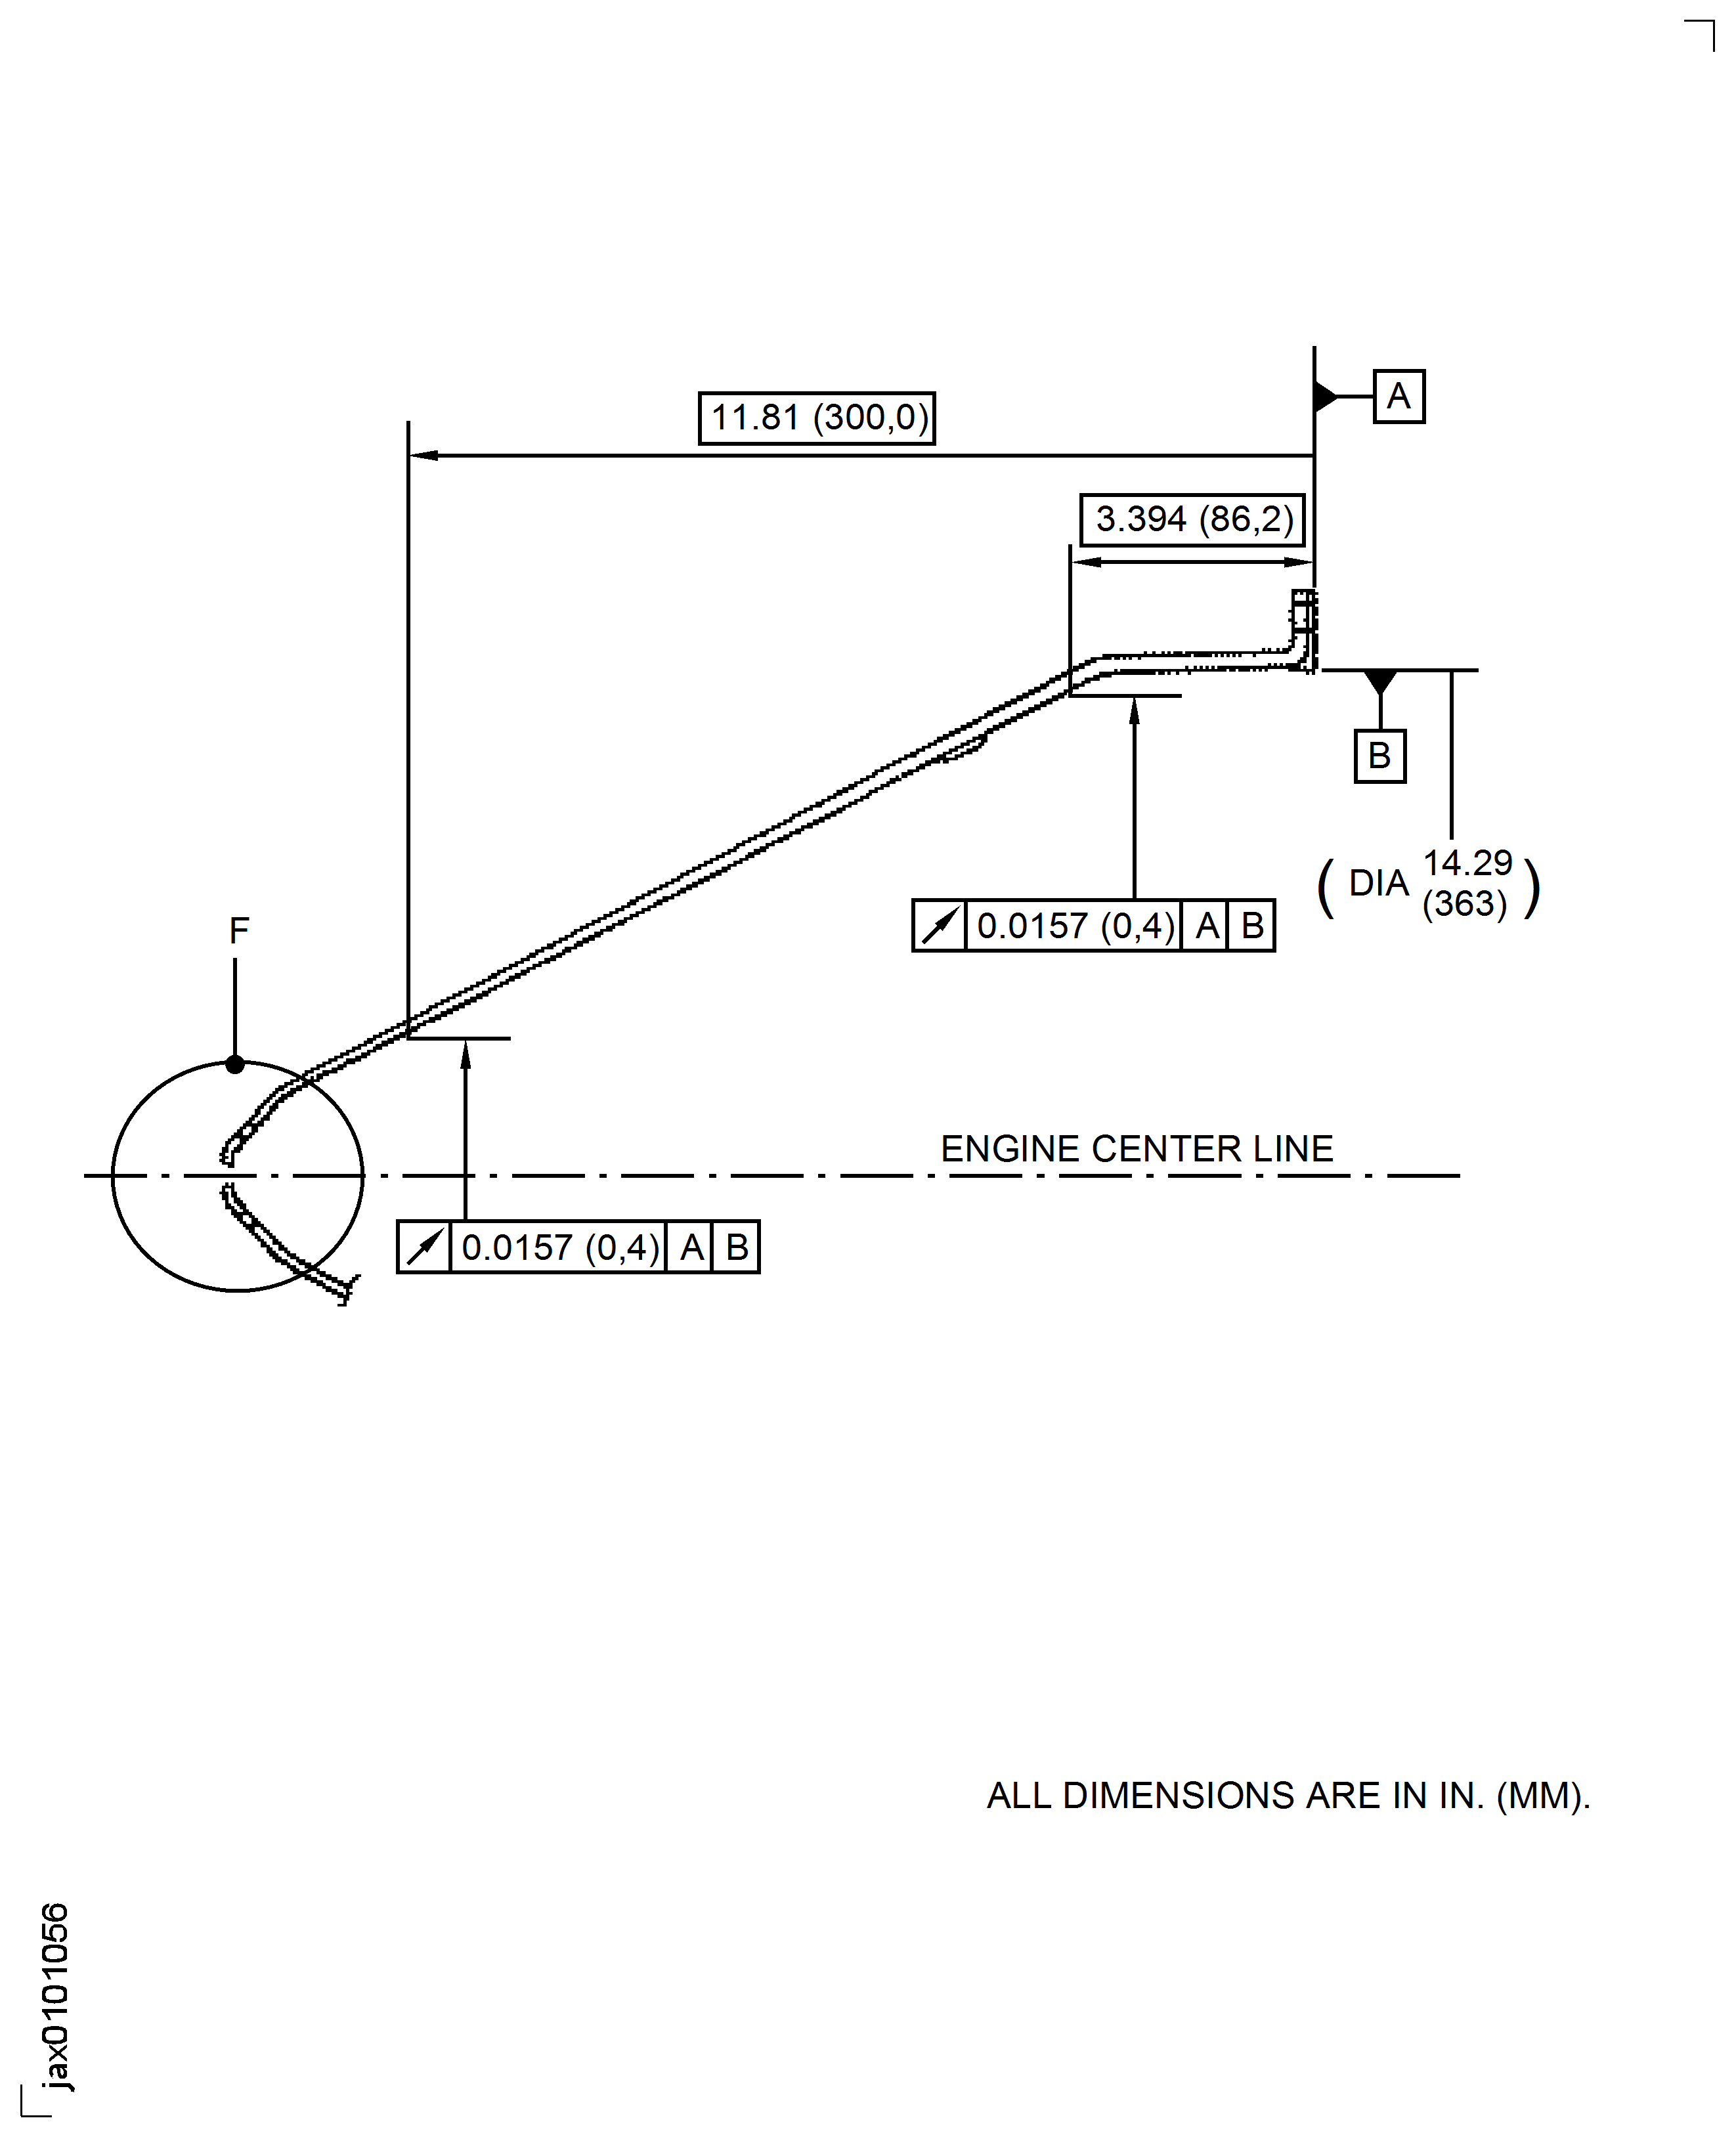
Figure: Repair Details And Dimensions
Repair Details And Dimensions
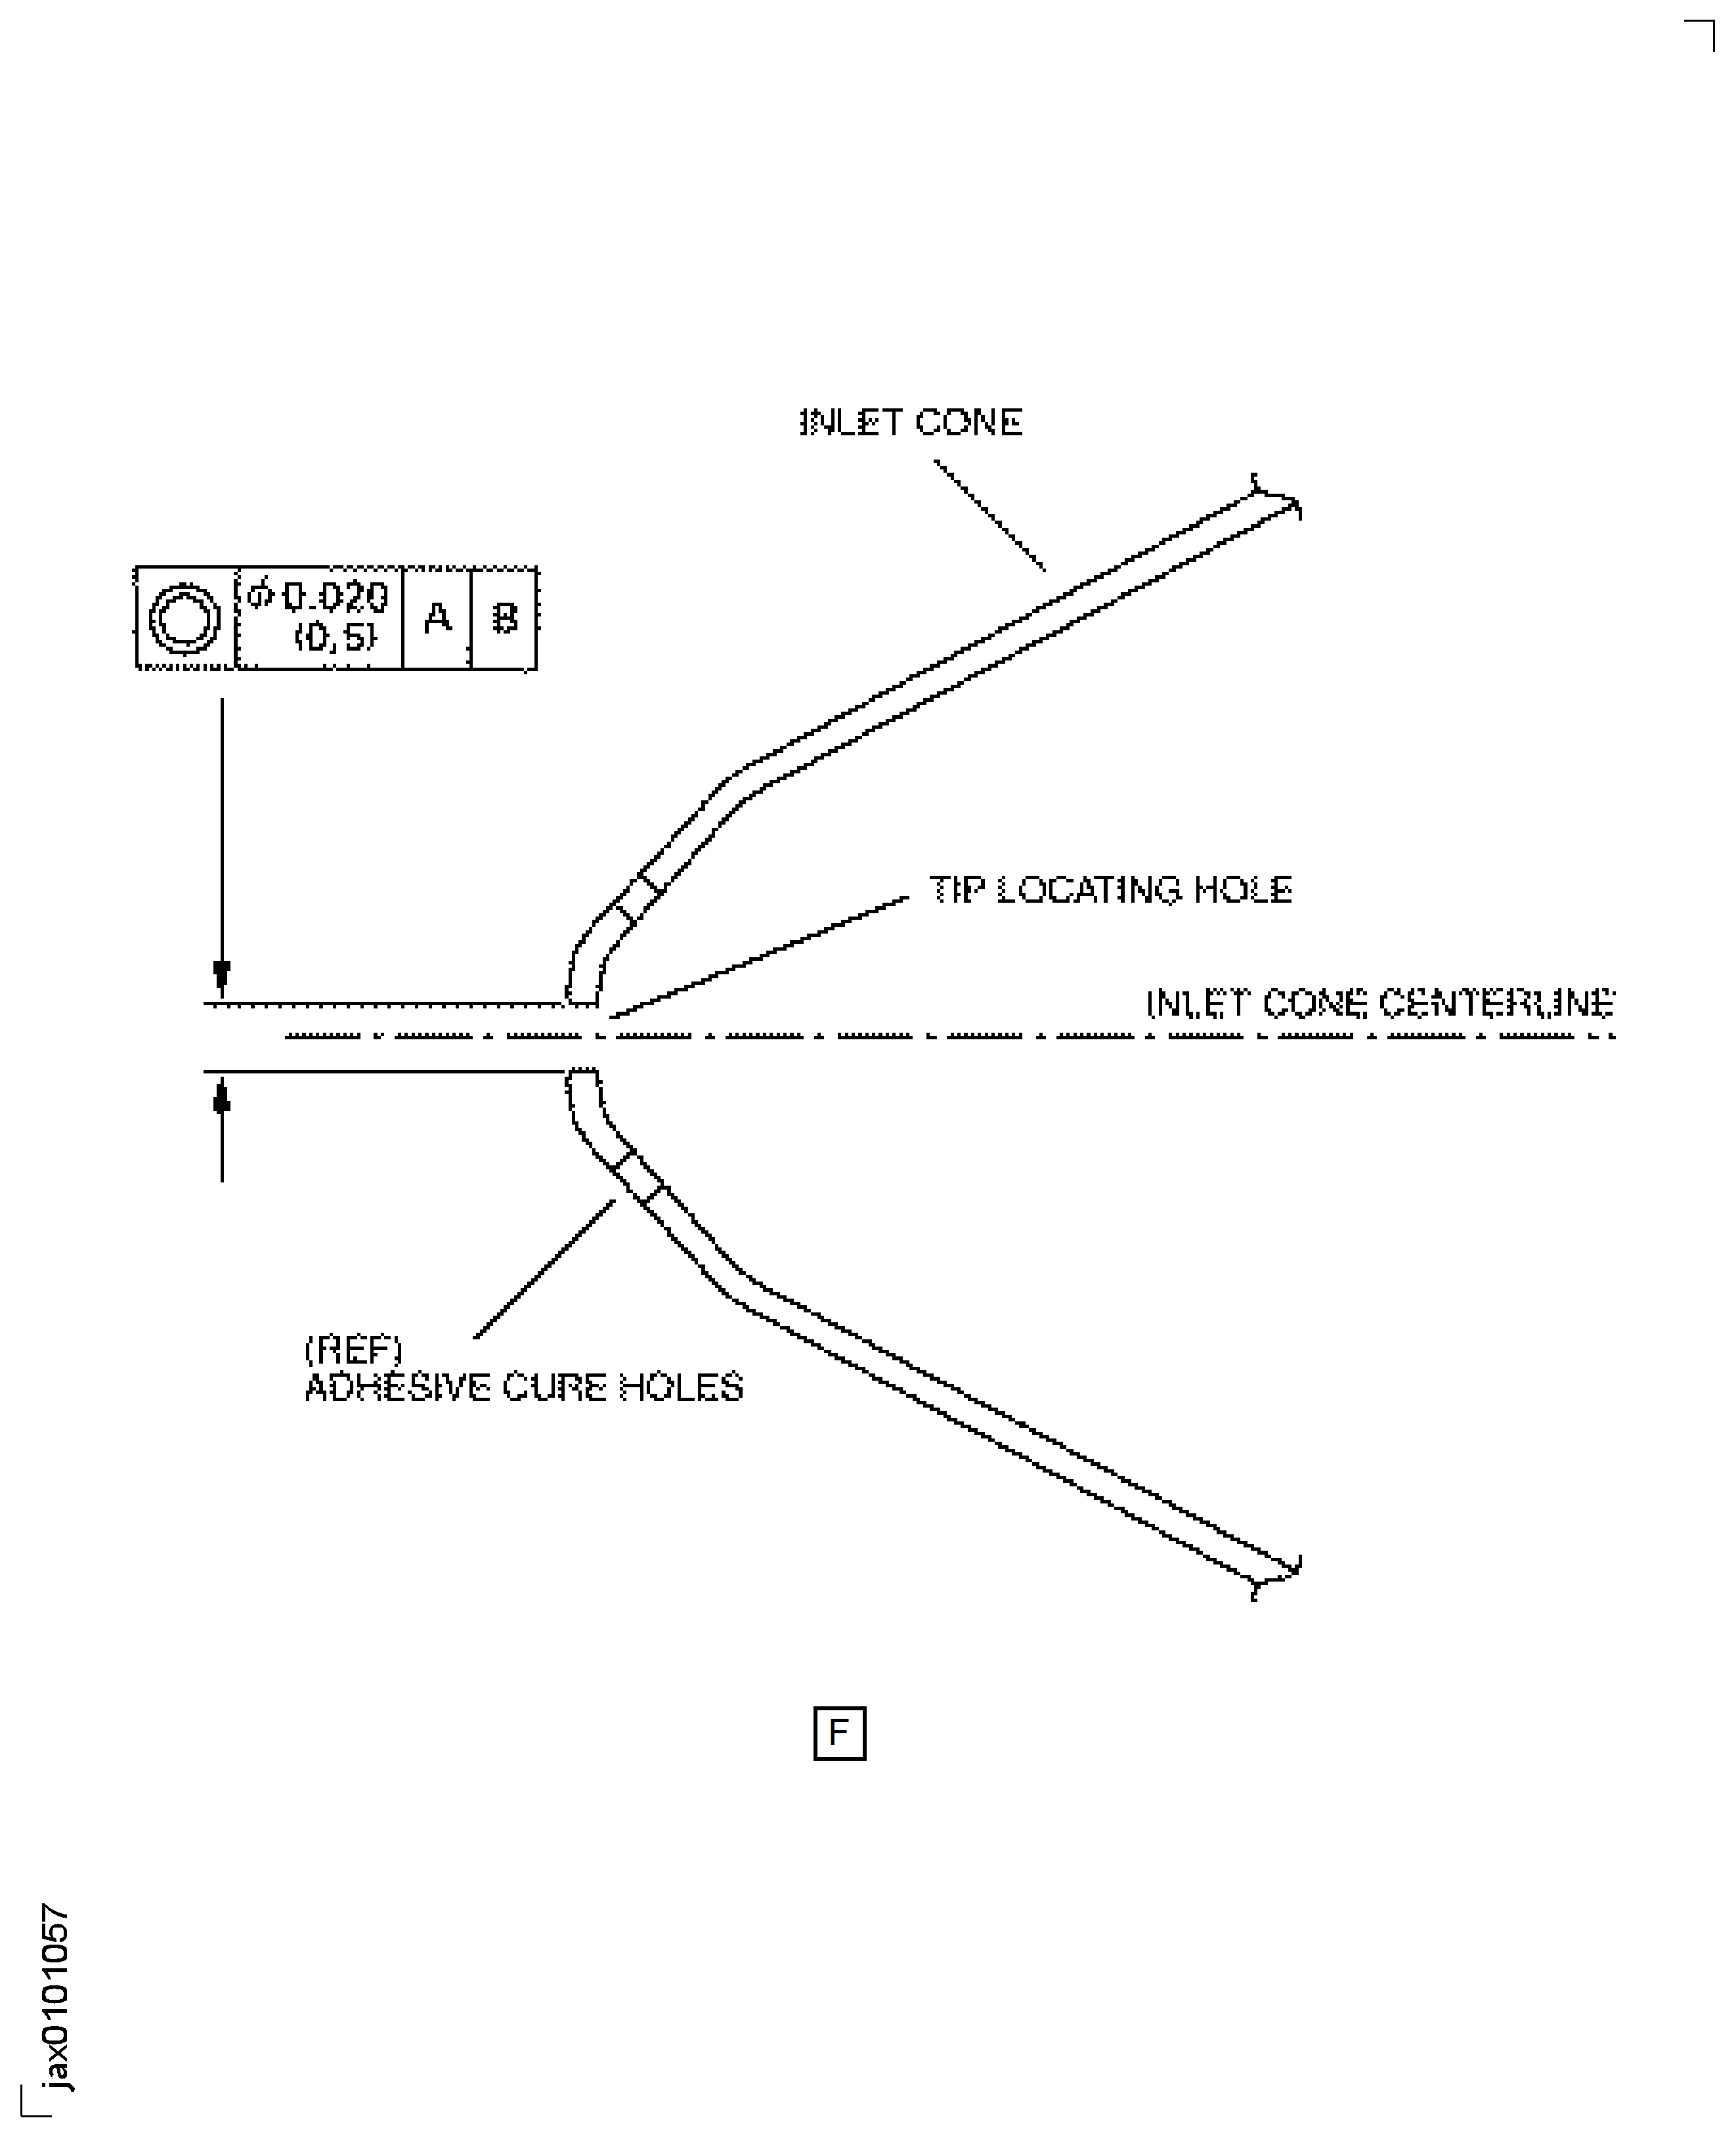
Figure: Inlet Cone Segment - Drilling
Inlet Cone Segment - Drilling

Figure: Repair Details And Dimensions
Repair Details And Dimensions

Figure: Repair Details And Dimensions
Repair Details And Dimensions
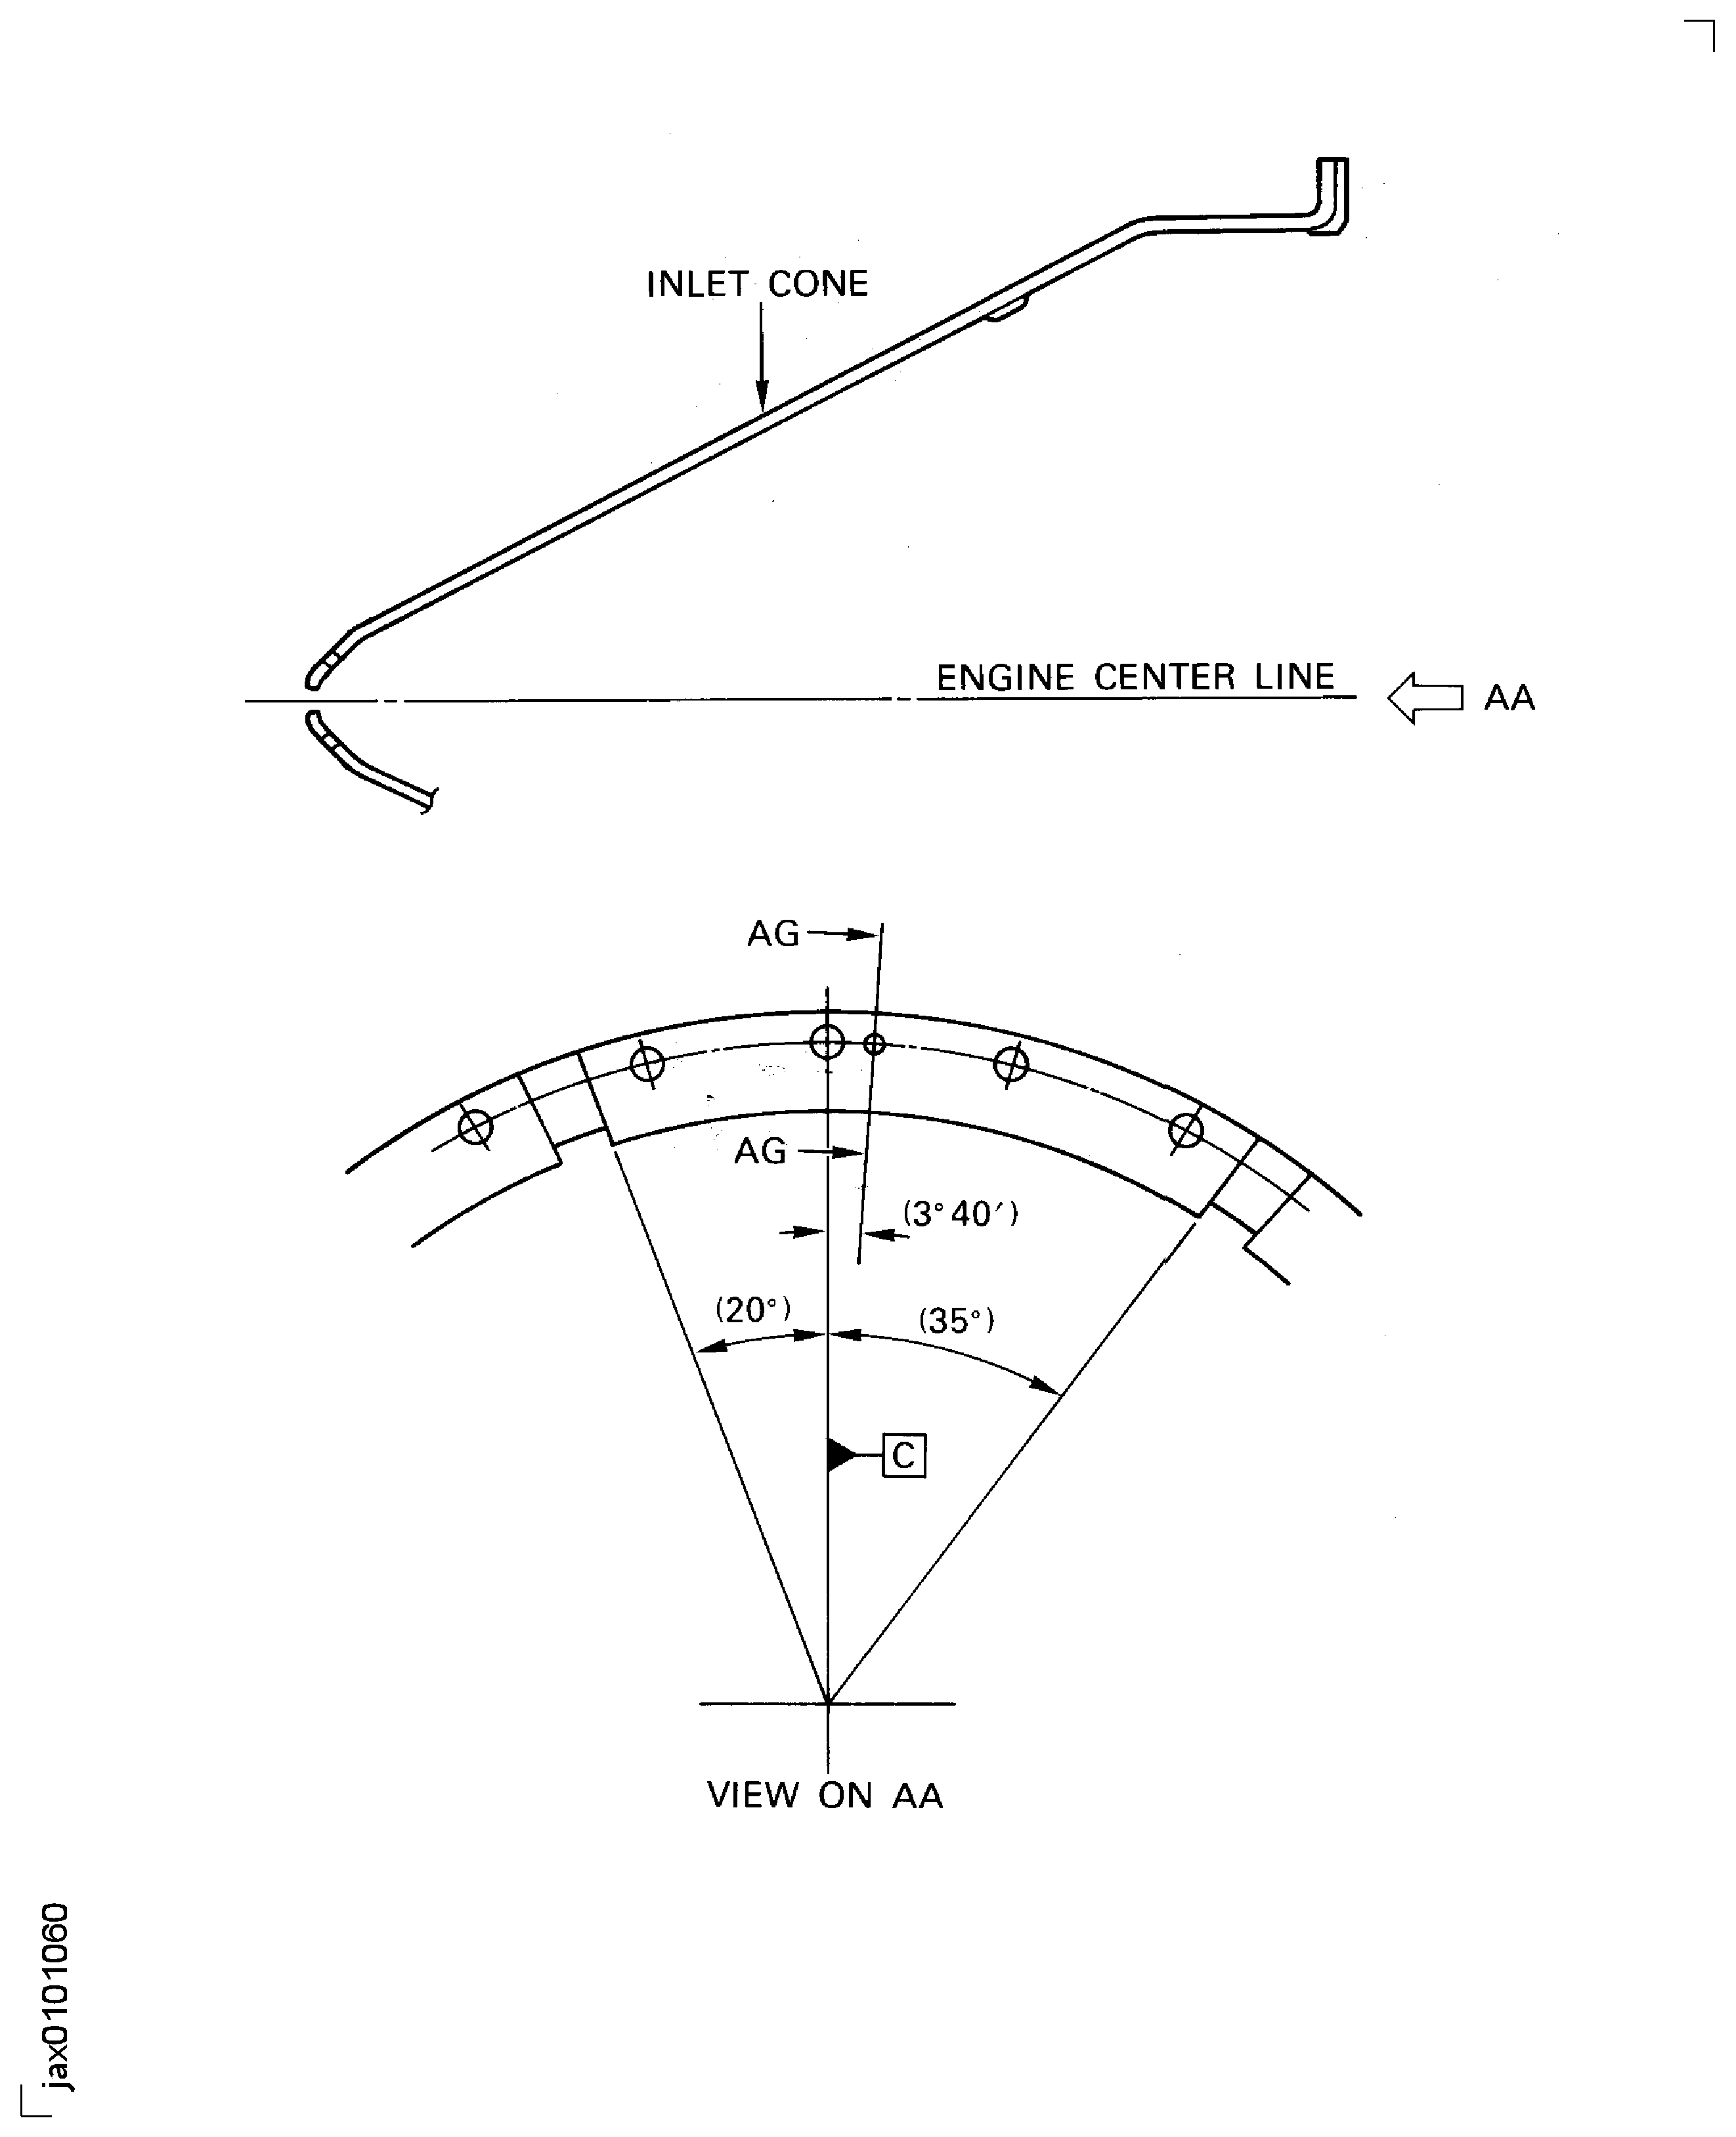
Figure: Repair Details And Dimensions
Repair Details And Dimensions
