Export Control
EAR Export Classification: Not subject to the EAR per 15 C.F.R. Chapter 1, Part 734.3(b)(3), except for the following Service Bulletins which are currently published as EAR Export Classification 9E991: SBE70-0992, SBE72-0483, SBE72-0580, SBE72-0588, SBE72-0640, SBE73-0209, SBE80-0024 and SBE80-0025.Copyright
© IAE International Aero Engines AG (2001, 2014 - 2021) The information contained in this document is the property of © IAE International Aero Engines AG and may not be copied or used for any purpose other than that for which it is supplied without the express written authority of © IAE International Aero Engines AG. (This does not preclude use by engine and aircraft operators for normal instructional, maintenance or overhaul purposes.).Applicability
All
Common Information
TASK 72-41-11-300-022 HPC Stage 3 - 8 Drum Disk - Blend Repair On The Stages 6 To 8 Wire Seal Grooves, Repair-022 (VRS6626)
Effectivity
FIG/ITEM | PART NO. | ASSEMBLY |
|---|---|---|
01-200 | 6A7379 | A |
01-200 | 6A7380 | A |
01-200 | 6A7382 | A |
01-200 | 6A7383 | A |
01-200 | 6A7384 | A |
01-200 | 6A7385 | A |
01-200 | 6A7401 | B |
01-200 | 6A7705 | B |
01-200 | 6A8236 | B |
01-200 | 6A8316 | B |
01-200 | 6A8318 | B |
01-200 | 6A8350 | B |
01-200 | 6B1379 | A |
01-200 | 6B1380 | A |
01-200 | 6B1381 | A |
01-200 | 6B1382 | A |
01-200 | 6B1383 | A |
01-200 | 6B1384 | B |
01-200 | 6B1385 | B |
01-200 | 6B1386 | B |
01-200 | 6B1387 | A |
01-200 | 6B1401 | B |
01-200 | 6B1402 | B |
01-200 | 6B1403 | B |
01-200 | 6B1404 | B |
01-200 | 6B1406 | B |
General
This Repair must only be done when the instruction to do so is given in 72-41-11 Inspection.
This TASK gives the procedure to repair the damaged HP compressor stage 3 to 8 disks shaft assembly, stage 6 to 8 damper wire grooves, by material removal.
This Repair must only be done by operators who are trained and qualified with operation. Only the specified equipment referenced in 2.A. can be used. Use of power tools are not permitted.
The term 'general repair limit' refers to the lesser blend limit. It can be done all around the subject damper wire groove.
The local repair limits divided into local light and local heavy. Refer to below paragraphs for limits and applicability of local light and local heavy blend repairs.
Local light blend repair limit for all parts:
The term 'local light blend repair' refers to repairs more than the 'general repair limit', limited to an arc length of 2.4 in. (60 mm) and exclude from 1.575 in. (40.00 mm) near the sides of stage 6 rear, stage 7 front and the stage 8 front blade loading grooves.
Local heavy blend repair limit for Assembly B PNs 6A8316, 6B1386, and 6B1404 only:
The term 'local heavy blend repair' refers to repairs more than the 'local light repair limit', limited to an arc length of 4.175 in. (106.00 mm) and exclude from 1.5 in. (38.10 mm) near the sides of stage 6 rear, stage 7 front and the stage 8 front blade loading grooves.
The shotpeen part of this repair is necessary to be source demonstrated and can only be done by approved vendors upto three times only for the same groove.
Repair Facilities
Only the shotpeen part of this repair is necessary for source demonstration. This means that the facilities which are not approved to shotpeen, can use the Approved Repair Vendors listed below or contact the IAE Repair Services Group to find out if a qualification program can be initiated at their facility.
IAE - International Aero Engines AG
400 Main Street, Mail Stop 121-10
East Hartford, CT 06118
USA
Email: gpiaecomms@iaev2500.com
ATTN: Manager, Maintenance Operations
Approved Repair Vendors for the shotpeen portion of VRS6626 are listed below:
None
The designation by IAE of an Approved Repair Vendor indicates that the Repair Vendor has demonstrated the necessary capability to enable it to carry out the listed repair work. But, IAE make no warranties or representations concerning the qualifications or quality standards of the Repair Vendors to carry out the repair work, and accepts no responsibility whatsoever for any work that may be carried out by a Repair or other than when IAE is listed as the Repair Vendor. Approved Repair Vendors do not act as agents or representatives of IAE.
A maximum of three blend repairs more than the general repair limit for the blend width is permitted per individual damper wire groove.
TASKS identified by SPM TASK are in the Standard Practices Manual (SPM).
Related repairs - none
NOTE
NOTE
It is possible that some materials in the Consumable Materials chart cannot be used for some or all of the necessary applications. Before you use the materials, make sure the types, quantities and applications of the materials necessary are legally permitted in your location. All persons must obey all applicable federal, state, local and provincial laws and regulations when it is necessary to work with these materials.
To identify the consumable materials, refer to the overhaul Processes and Consumables Index (PCI).
Other necessary consumable materials are referred to in the SPM TASKs.
Preliminary Requirements
Pre-Conditions
| Action/Condition | Data Module/Technical Publication |
|---|---|
| Make sure that all the necessary cleaning and inspection procedures are done before this repair. |
Support Equipment
NONEConsumables, Materials and Expendables
NONESpares
NONESafety Requirements
NONEProcedure
This subtask has been deleted.
SUBTASK 72-41-11-110-127 Clean the HP Compressor Stage 3 to Stage 8 Disks Shaft Assembly (DELETED)
Refer to SUBTASK 72-41-11-220-146-A00, SUBTASK 72-41-11-220-146-B00, SUBTASK 72-41-11-220-147-A00, SUBTASK 72-41-11-220-147-B00, SUBTASK 72-41-11-220-148-A00, SUBTASK 72-41-11-220-148-B00, SUBTASK 72-41-11-220-149-A00, SUBTASK 72-41-11-220-149-B00, SUBTASK 72-41-11-220-150-A00 and SUBTASK 72-41-11-220-150-B00.
Examine the damper wire grooves for existing local blend repair(s) and repair symbol marking(s), refer to SUBTASK 72-41-11-356-076, to find the number of repair(s), which are done before for each grooves.
The maximum number of local blend repairs (including OTC repairs, which are done before) for each individual damper wire groove is three.
If three local repairs are already done before, more repair is not permitted, reject the component.
More number of general repairs can be done for each groove.
Each new item of identified damage more than the general repair limit must be a minimum arc distance of 7.874 in. (200.00 mm) from the local repair, which is done before in the same damper wire groove.
Damage identified in less than an arc length of 7.874 in. (200.00 mm) of a local repair, which is done before is not permitted.
No damage more than general repair limit is permitted in less than the arc length 1.575 in. (40.00 mm) of the blade loading groove.
If such damage is found, reject the component.
Repair is not permitted for damage that is more than the local repair limit of each damper wire groove.
Visually and dimensionally examine stages 6 to 8 damper wire grooves for an indication of new damage and repairs, which are done before in accordance with VRS6626.
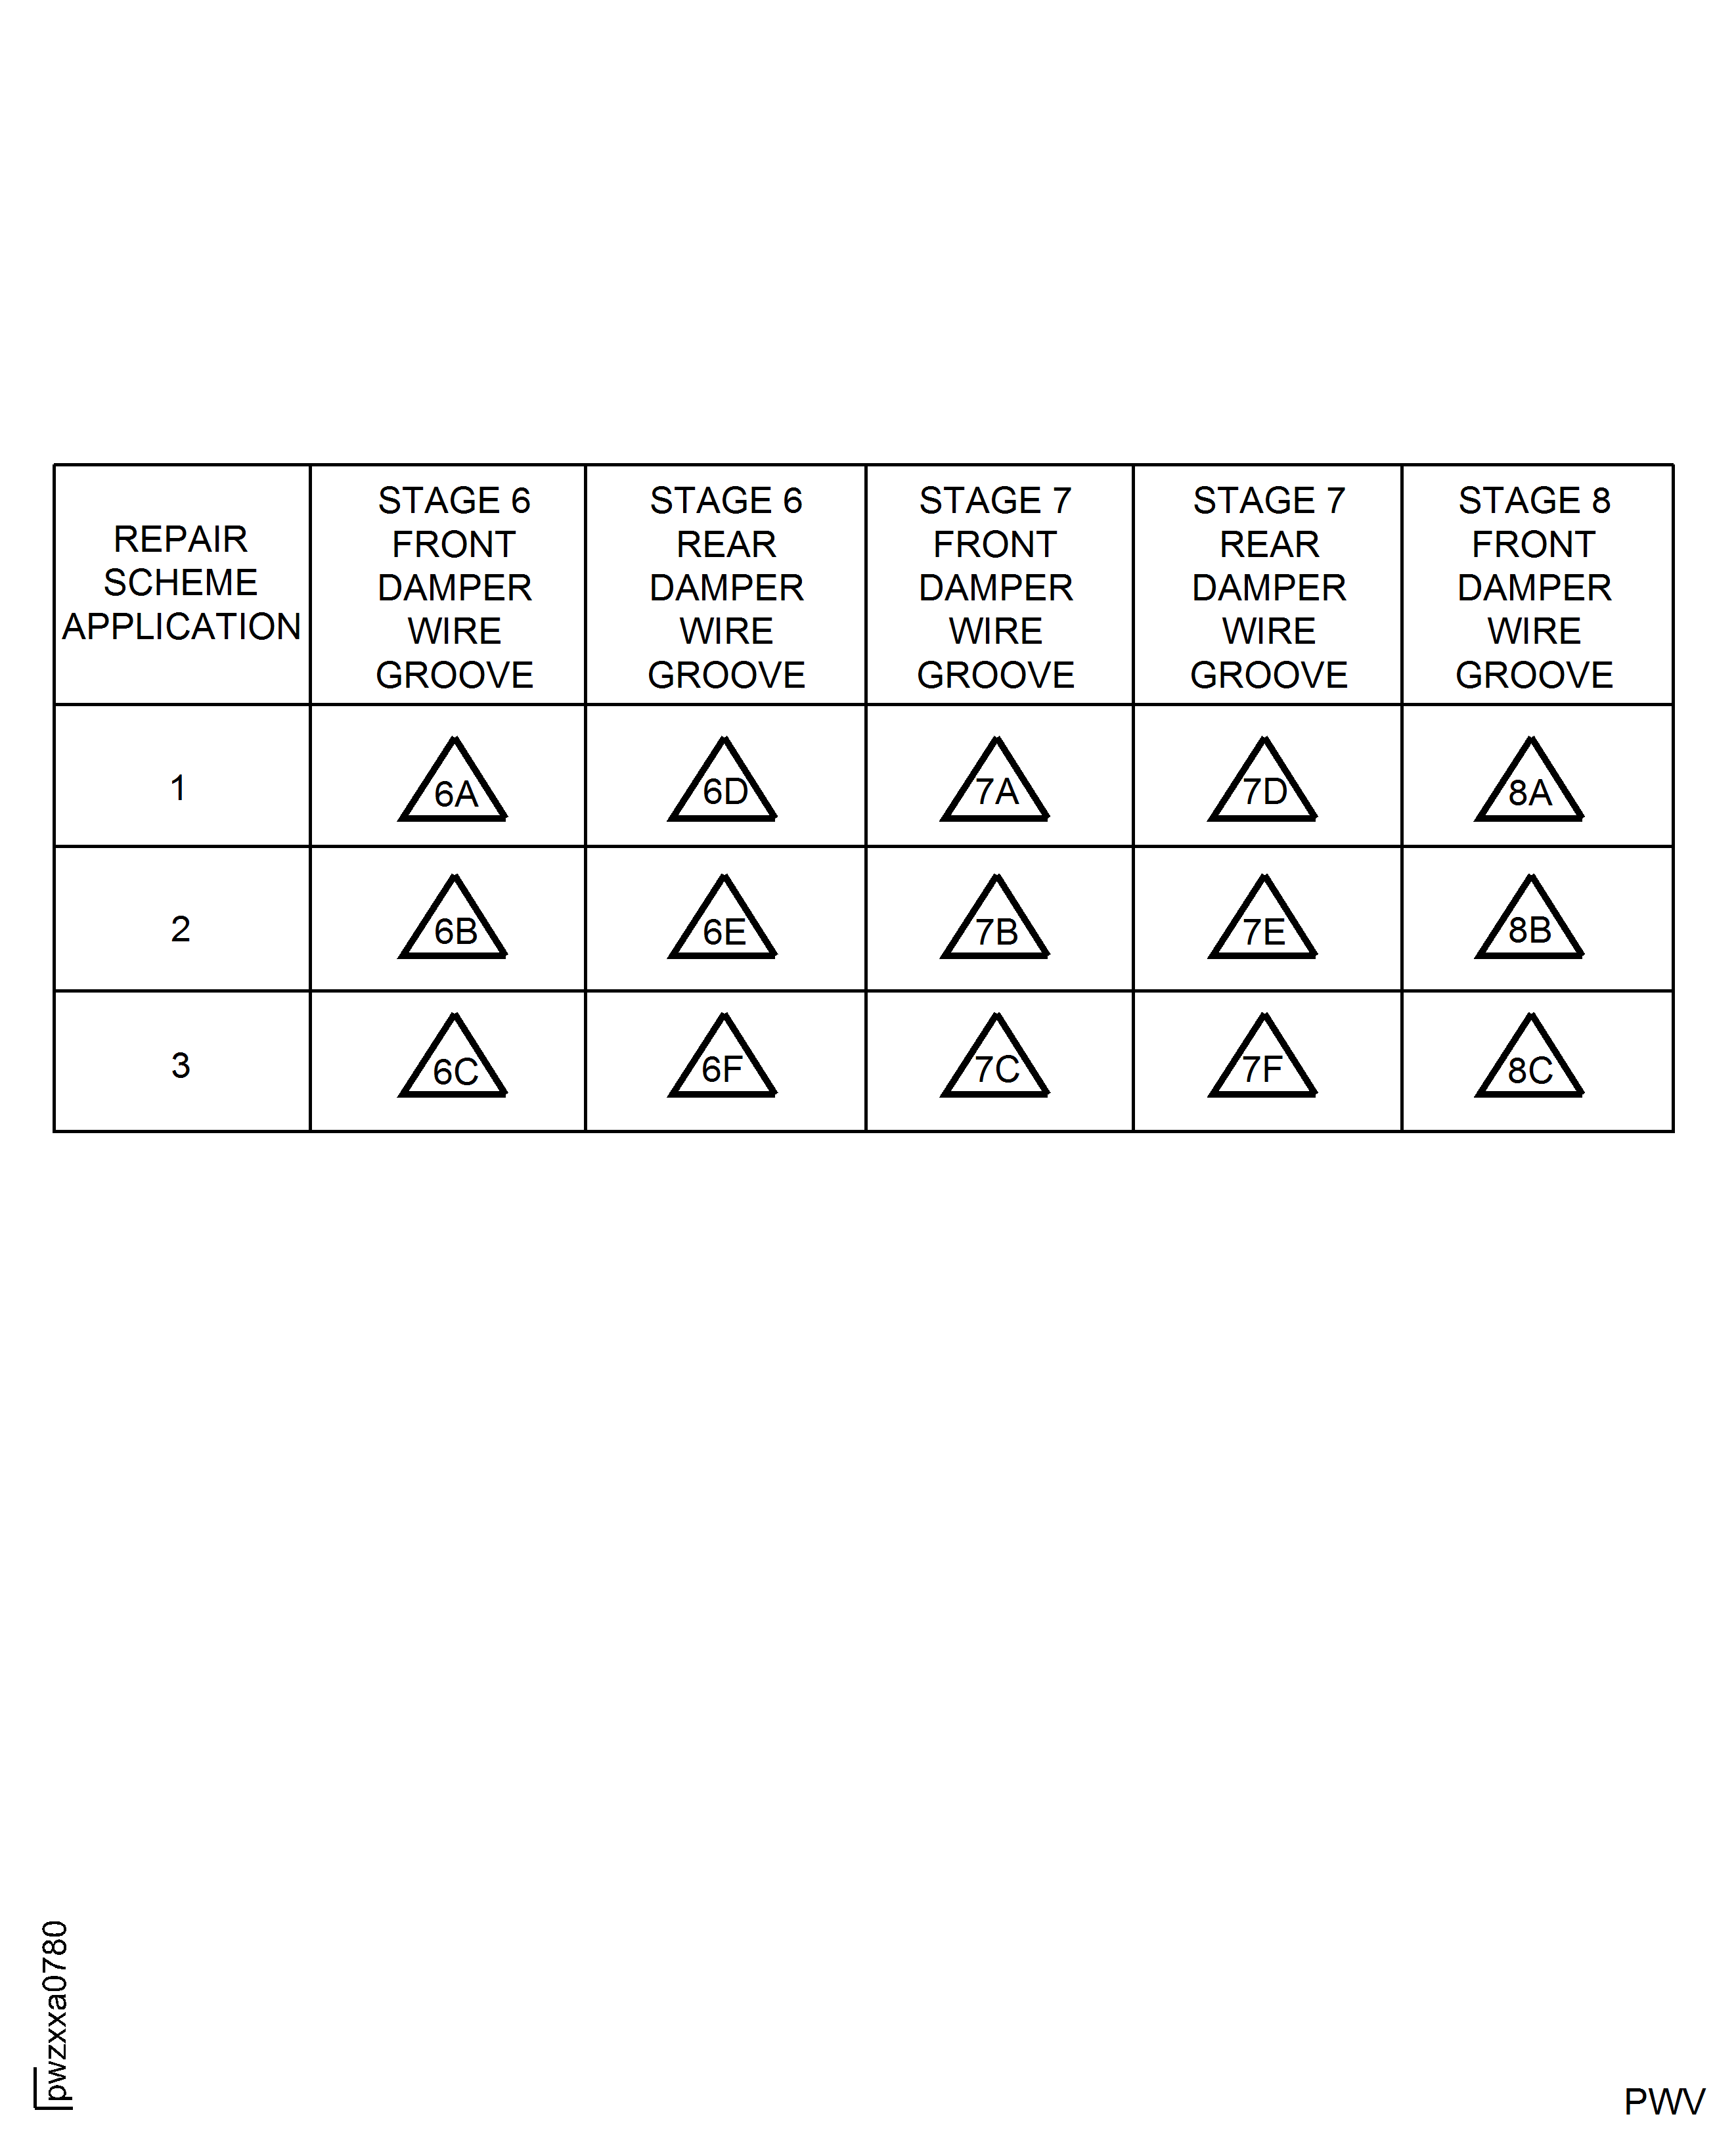
The shotpeen operation cannot be done again if you see any code symbol with 6C, 6F, 7C, 7F, and 8C.
Look for the shotpeen identification code symbol next to the part number.
Visually examine the stages 6 to 8 damper wire grooves for an indication of shot-peen which is done before in accordance with VRS6626. Refer to Figure.
SUBTASK 72-41-11-220-302 Examine the Damper Wire Grooves for Damage and Repairs
Refer to the SPM TASK 70-35-03-300-501.
Make sure all blend dimensions are contained in the limits.
NOTE
Make sure that for all damper wire grooves, all sharp edges are removed, refer to Figure.Keep the material removal in the proportions of 50 X Depth minimum for the circumferential length and 3 x Depth minimum for the width. Refer to Figure.For assembly A, local dressing is not permitted on the stage 7 rear and stage 8 front damper wire groove inner faces, refer to Figure.Blend the repair area(s).
SUBTASK 72-41-11-350-075 Remove Damage from the Damper Wire Groove(s)
Refer to the SPM TASK 70-11-03-300-503.
Chemically clean the repaired area(s).
SUBTASK 72-41-11-110-072 Chemically Clean
Refer to the SPM TASK 70-38-24-300-503.
Mask the rubstrip linings.
Refer to the SPM TASK 70-11-08-300-503.
Swab etch the repaired area(s).
SUBTASK 72-41-11-110-073 Do a Swab Etch
Refer to the SPM TASK 70-23-05-230-501, use ultra-high sensitivity. Cracks are not permitted.
Refer to the SPM TASK 70-23-04-230-501. Cracks are not permitted.
Do a penetrant crack test of the repaired area(s) by one of the following procedures.
Remove the masking tape applied at Step.
Remove rubstrip masking.
SUBTASK 72-41-11-230-125 Do a Crack Test
Refer to the SPM TASK 70-11-03-300-503.
Chemically clean the part.
SUBTASK 72-41-11-110-074 Chemical Clean
The dressing must be smooth with no sudden changes in surface contour and the dressing must blend smoothly with the adjacent area.
The maximum width of groove(s) AJ and AK after general repair must not be more than 0.089 in. (2.25 mm) along the free arc length.
Local light blend repair limit for all Assembly A parts: The maximum width of groove(s) AJ and AK after local repair must not be more than 0.098 in. (2.50 mm) along an arc length of 2.4 in. (60 mm).
No local repair is permitted for damage in less than 1.5 in. (38.10 mm) of the blade loading groove.
After all repairs dimension AV and edge radius must not be less than the minimum values specified.
Visually examine and measure the dimensions of the stage 6 damper wire groove(s).
SUBTASK 72-41-11-220-146-A00 Examine the Repair to the Stage 6 Damper Wire Groove(s), Assembly A
The dressing must be smooth with no sudden changes in surface contour and the dressing must blend smoothly with the adjacent area.
The maximum width of groove(s) AJ and AK after general repair must not be more than 0.089 in. (2.25 mm) along the free arc length.
Local light blend repair limit for all Assembly B parts: The maximum width of groove(s) AJ and AK after local repair must not be more than 0.102 in. (2.60 mm) along an arc length of 2.4 in. (60 mm).
Local heavy blend repair limit for Assembly B PNs 6A8316, 6B1386, and 6B1404 only: The maximum width of groove(s) AJ and AK after local repair must not be more than 0.115 in. (2.92 mm) along an arc length of 4.175 in. (106.00 mm). The minimum wall thickness of blade support post at BA is 0.025 in. (0.635 mm) and at BB is 0.030 in. (0.762 mm).
No local repair is permitted for damage in less than 1.5 in. (38.10 mm) of the blade loading groove.
After all repairs dimension AV and edge radius must not be less than the minimum values specified.
Visually examine and measure the dimensions of the stage 6 damper wire groove(s).
SUBTASK 72-41-11-220-146-B00 Examine the Repair to the Stage 6 Damper Wire Groove(s), Assembly B
The dressing must be smooth with no sudden changes in surface contour and the dressing must blend smoothly with the adjacent area.
The maximum width of groove AL after general repair must not be more than 0.051 in. (1.30 mm) along the free arc length.
Local light blend repair limit for all Assembly A parts: The maximum width of groove AL after local repair must not be more than 0.055 in. (1.40 mm) along an arc length of 2.4 in. (60 mm).
No local repair is permitted for damage in less than 1.5 in. (38.10 mm) of the blade loading groove.
After all repairs dimension AZ and edge radius must not be less than the minimum values specified.
Visually examine and measure the dimensions of the stage 7 front damper wire groove.
SUBTASK 72-41-11-220-147-A00 Examine the Stage 7 Front Damper Wire Groove, Assembly A
The dressing must be smooth with no sudden changes in surface contour and the dressing must blend smoothly with the adjacent area.
The maximum width of groove AL after general repair must not be more than 0.089 in. (2.25 mm) along the free arc length.
Local light blend repair limit for all Assembly B parts: The maximum width of groove AL after local repair must not be more than 0.102 in. (2.60 mm) along an arc length of 2.4 in. (60 mm).
Local heavy blend repair limit for Assembly B PNs 6A8316, 6B1386, and 6B1404 only: The maximum width of groove AL after local repair must not be more than 0.115 in. (2.92 mm) along an arc length of 4.175 in. (106.00 mm). The minimum wall thickness of blade support post at BC is 0.025 in. (0.635 mm).
No local repair is permitted for damage in less than 1.5 in. (38.10 mm) of the blade loading groove.
After all repairs dimension AZ and edge radius must not be less than the minimum values specified.
Visually examine and measure the dimensions of the stage 7 front damper wire groove.
SUBTASK 72-41-11-220-147-B00 Examine the Stage 7 Front Damper Wire Groove, Assembly B
The dressing must be smooth with no sudden changes in surface contour and the dressing must blend smoothly with the adjacent area.
The maximum width of groove AM after general repair must not be more than 0.078 in. (1.98 mm) along the free arc length.
Local light blend repair limit for all Assembly A parts: The maximum width of groove AM after local repair must not be more than 0.088 in. (2.24 mm) over an arc length of 2.4 in. (60 mm).
After all repairs dimension AV and edge radius must not be less than the minimum values specified.
Visually examine and measure the dimensions of the stage 7 rear damper wire groove.
SUBTASK 72-41-11-220-148-A00 Examine the Stage 7 Rear Damper Wire Groove, Assembly A
The dressing must be smooth with no sudden changes in surface contour and the dressing must blend smoothly with the adjacent area.
The maximum width of groove AM after general repair must not be more than 0.089 in. (2.25 mm) along the free arc length.
Local light blend repair limit for all Assembly B parts: The maximum width of groove AM after local repair must not be more than 0.102 in. (2.60 mm) along an arc length of 2.4 in. (60 mm).
Local heavy blend repair limit for Assembly B PNs 6A8316, 6B1386, and 6B1404 only: The maximum width of groove AM after local repair must not be more than 0.115 in. (2.92 mm) along an arc length of 4.175 in. (106.00 mm). The minimum wall thickness of blade support post at BD is 0.029 in. (0.737 mm).
After all repairs dimension AV and edge radius must not be less than the minimum values specified.
Visually examine and measure the dimensions of the stage 7 rear damper wire groove.
SUBTASK 72-41-11-220-148-B00 Examine the Stage 7 Rear Damper Wire Groove, Assembly B
The dressing must be smooth with no sudden changes in surface contour and the dressing must blend smoothly with the adjacent area.
The maximum width of groove AN after general repair must not be more than 0.078 in. (1.98 mm) along the free arc length.
Local light blend repair limit for all Assembly A parts: The maximum width of groove AN after local repair must not be more than 0.088 in. (2.24 mm) along an arc length of 2.4 in. (60 mm).
No local repair is permitted for damage in less than 1.5 in. (38.10 mm) of the blade loading groove.
After all repairs dimension AZ and edge radius must not be less than the minimum values specified.
Visually examine and measure the dimensions of the stage 8 front damper wire groove.
SUBTASK 72-41-11-220-149-A00 Examine the Stage 8 Front Damper Wire groove, Assembly A
The dressing must be smooth with no sudden changes in surface contour and the dressing must blend smoothly with the adjacent area.
The maximum width of groove AN after general repair must not be more than 0.089 in. (2.25 mm) along the free arc length.
Local light blend repair limit for all Assembly B parts: The maximum width of groove AN after local repair must not be more than 0.102 in. (2.60 mm) along an arc length of 2.4 in. (60 mm).
Local heavy blend repair limit for Assembly B PNs 6A8316, 6B1386, and 6B1404 only: The maximum width of groove AN after local repair must not be more than 0.115 in. (2.92 mm) along an arc length of 4.175 in. (106.00 mm). The minimum wall thickness of blade support post at BE is 0.025 in. (0.635 mm).
No local repair is permitted for damage in less than 1.5 in. (38.10 mm) of the blade loading groove.
After all repairs dimension AZ and edge radius must not be less than the minimum values specified.
Visually examine and measure the dimensions of the stage 8 front damper wire groove.
SUBTASK 72-41-11-220-149-B00 Examine the Stage 8 Front Damper Wire Groove, Assembly B
The dressing must be smooth with no sudden changes in surface contour and the dressing must blend smoothly with the adjacent area.
The maximum width of groove AP after general repair must not be more than 0.055 in. (1.40 mm) along the free arc length.
NOTE
For the stage 8 rear damper wire grooves, no dressing repair is permitted for more than the general repair limit of 0.055 in. (1.40 mm).Visually examine and measure the dimensions of the stage 8 rear damper wire groove.
SUBTASK 72-41-11-220-150-A00 Examine the Stage 8 Rear Damper Wire Groove, Assembly A
The dressing must be smooth with no sudden changes in surface contour and the dressing must blend smoothly with the adjacent area.
The maximum width of groove AP after general repair must not be more than 0.089 in. (2.25 mm) along the free arc length.
NOTE
For the stage 8 rear damper wire groove, no dressing repair is permitted for more than the general repair limit of 0.089 in. (2.25 mm).Visually examine and measure the dimensions of the stage 8 rear damper wire groove.
SUBTASK 72-41-11-220-150-B00 Examine the Stage 8 Rear Damper Wire Groove, Assembly B
Refer to Figure.
Shotpeen the local heavy blend repaired area(s) on stage 6 front and rear,stage 7 front and rear, stage 8 front damper wire seal grooves of Assembly B PNs 6A8316, 6B1386, and 6B1404 only.
Refer to SPM TASK 70-38-13-380-501.
Use S-110, CW-14, and SCW-14 shot size and peen to intensity of 4A. Complete coverage is necessary.
Shotpeen overspray is permitted on Stages 6-8 Disk Lug and blade slot areas only. Peening is not permitted on finish coated, or marked surfaces. Use masks or maskants.
No lines of demarcation or rolled edges permitted.
SUBTASK 72-41-11-380-001 Shotpeen the Repaired Area(s)
After the general repair, make a mark of VRS6626 adjacent to the part number. Refer to Figure.
If you do more general repairs, use the same repair identification marks (do not make the repair mark again).
Identification of general repairs:
After the local repair, make a mark of VRS6626 adjacent to the part number. Refer to Figure for local repair (including light and heavy) identification marks.
VRS6626 /1/10/11/2/7 shows the sequence of local repairs, that follows:
6 front groove 1 off repair.
7 Rear groove 2 off repair.
6 front groove 1 off repair (2nd in groove).
7 front groove 1 off repair.
Identification of local repair:
After the shotpeen, make a mark of code symbol adjacent to the part number. Refer to Figure.
NOTE
The letter inside the code symbol shows the number of times this area is shot-peened.
Identification of shotpeened area(s):
Refer to the SPM TASK 70-09-00-400-501. Use vibration peen method.
Identify the repair.
SUBTASK 72-41-11-350-076 Identify the Repair and Shotpeen Area(s)
Record the dimensions of the repaired groove(s) and the repaired position.
The replicast and the record of the repair(s) is to include all repair dimensions, part serial number, position of the repair related to the stage 6 blade loading groove and the hours and cycle data at the time of repair.
The repair record and replicast are to be permanently stored by the overhaul base for the life of the project.
Record the dimensional results of the completed local repair only.
SUBTASK 72-41-11-350-097 Record the Local Repair Results
If a local repair is complete, then change the assembly planning instructions to position damper wire ends 7.8 in. (200 mm) minimum distance between damper wire ends and local repair(s) and blade loading groove.
This is an additional requirement to the existing assembly instructions.
For components repaired to the general repair limit assembly task is not changed.
Make a planning instruction to position the damper wire ends.
SUBTASK 72-41-11-350-098 Instruct the Correct Assembled Position for the Damper Wire Ends
Figure: Repair Details and Dimensions
Repair Details and Dimensions

Figure: Repair Details and Dimensions
Repair Details and Dimensions

Figure: Repair Details and Dimensions
Repair Details and Dimensions
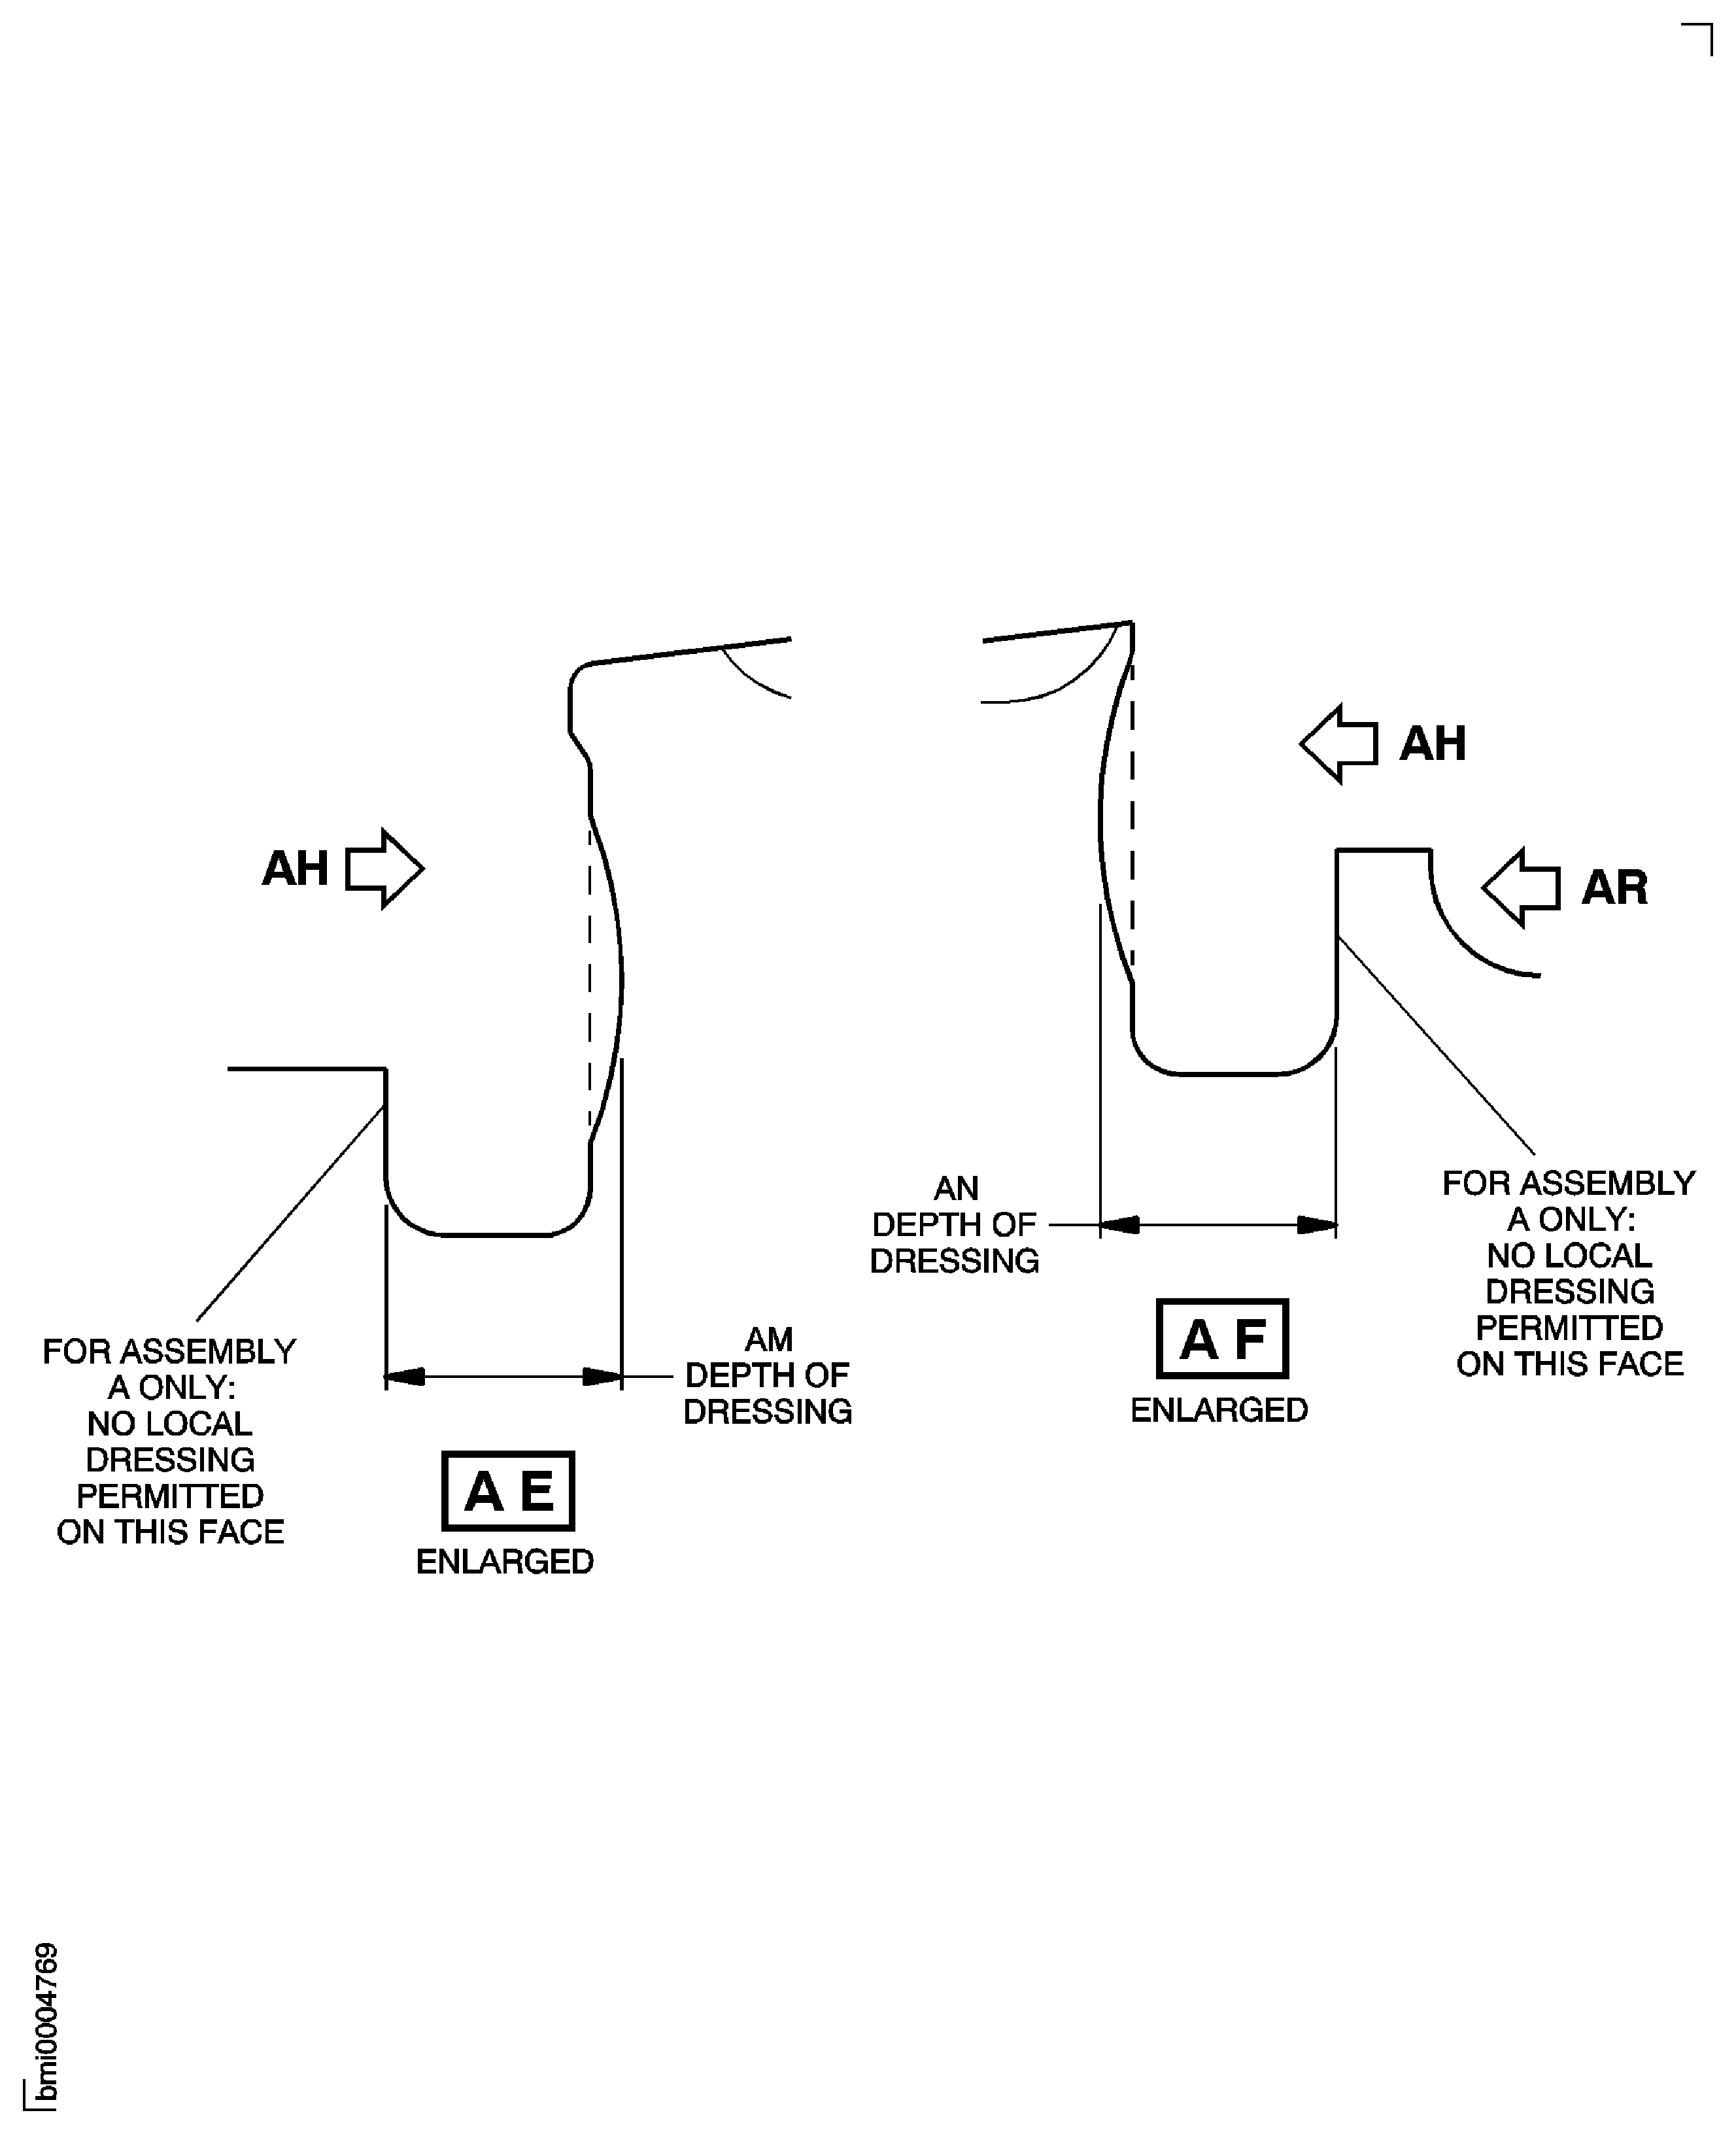
Figure: Repair Details and Dimensions
Repair Details and Dimensions
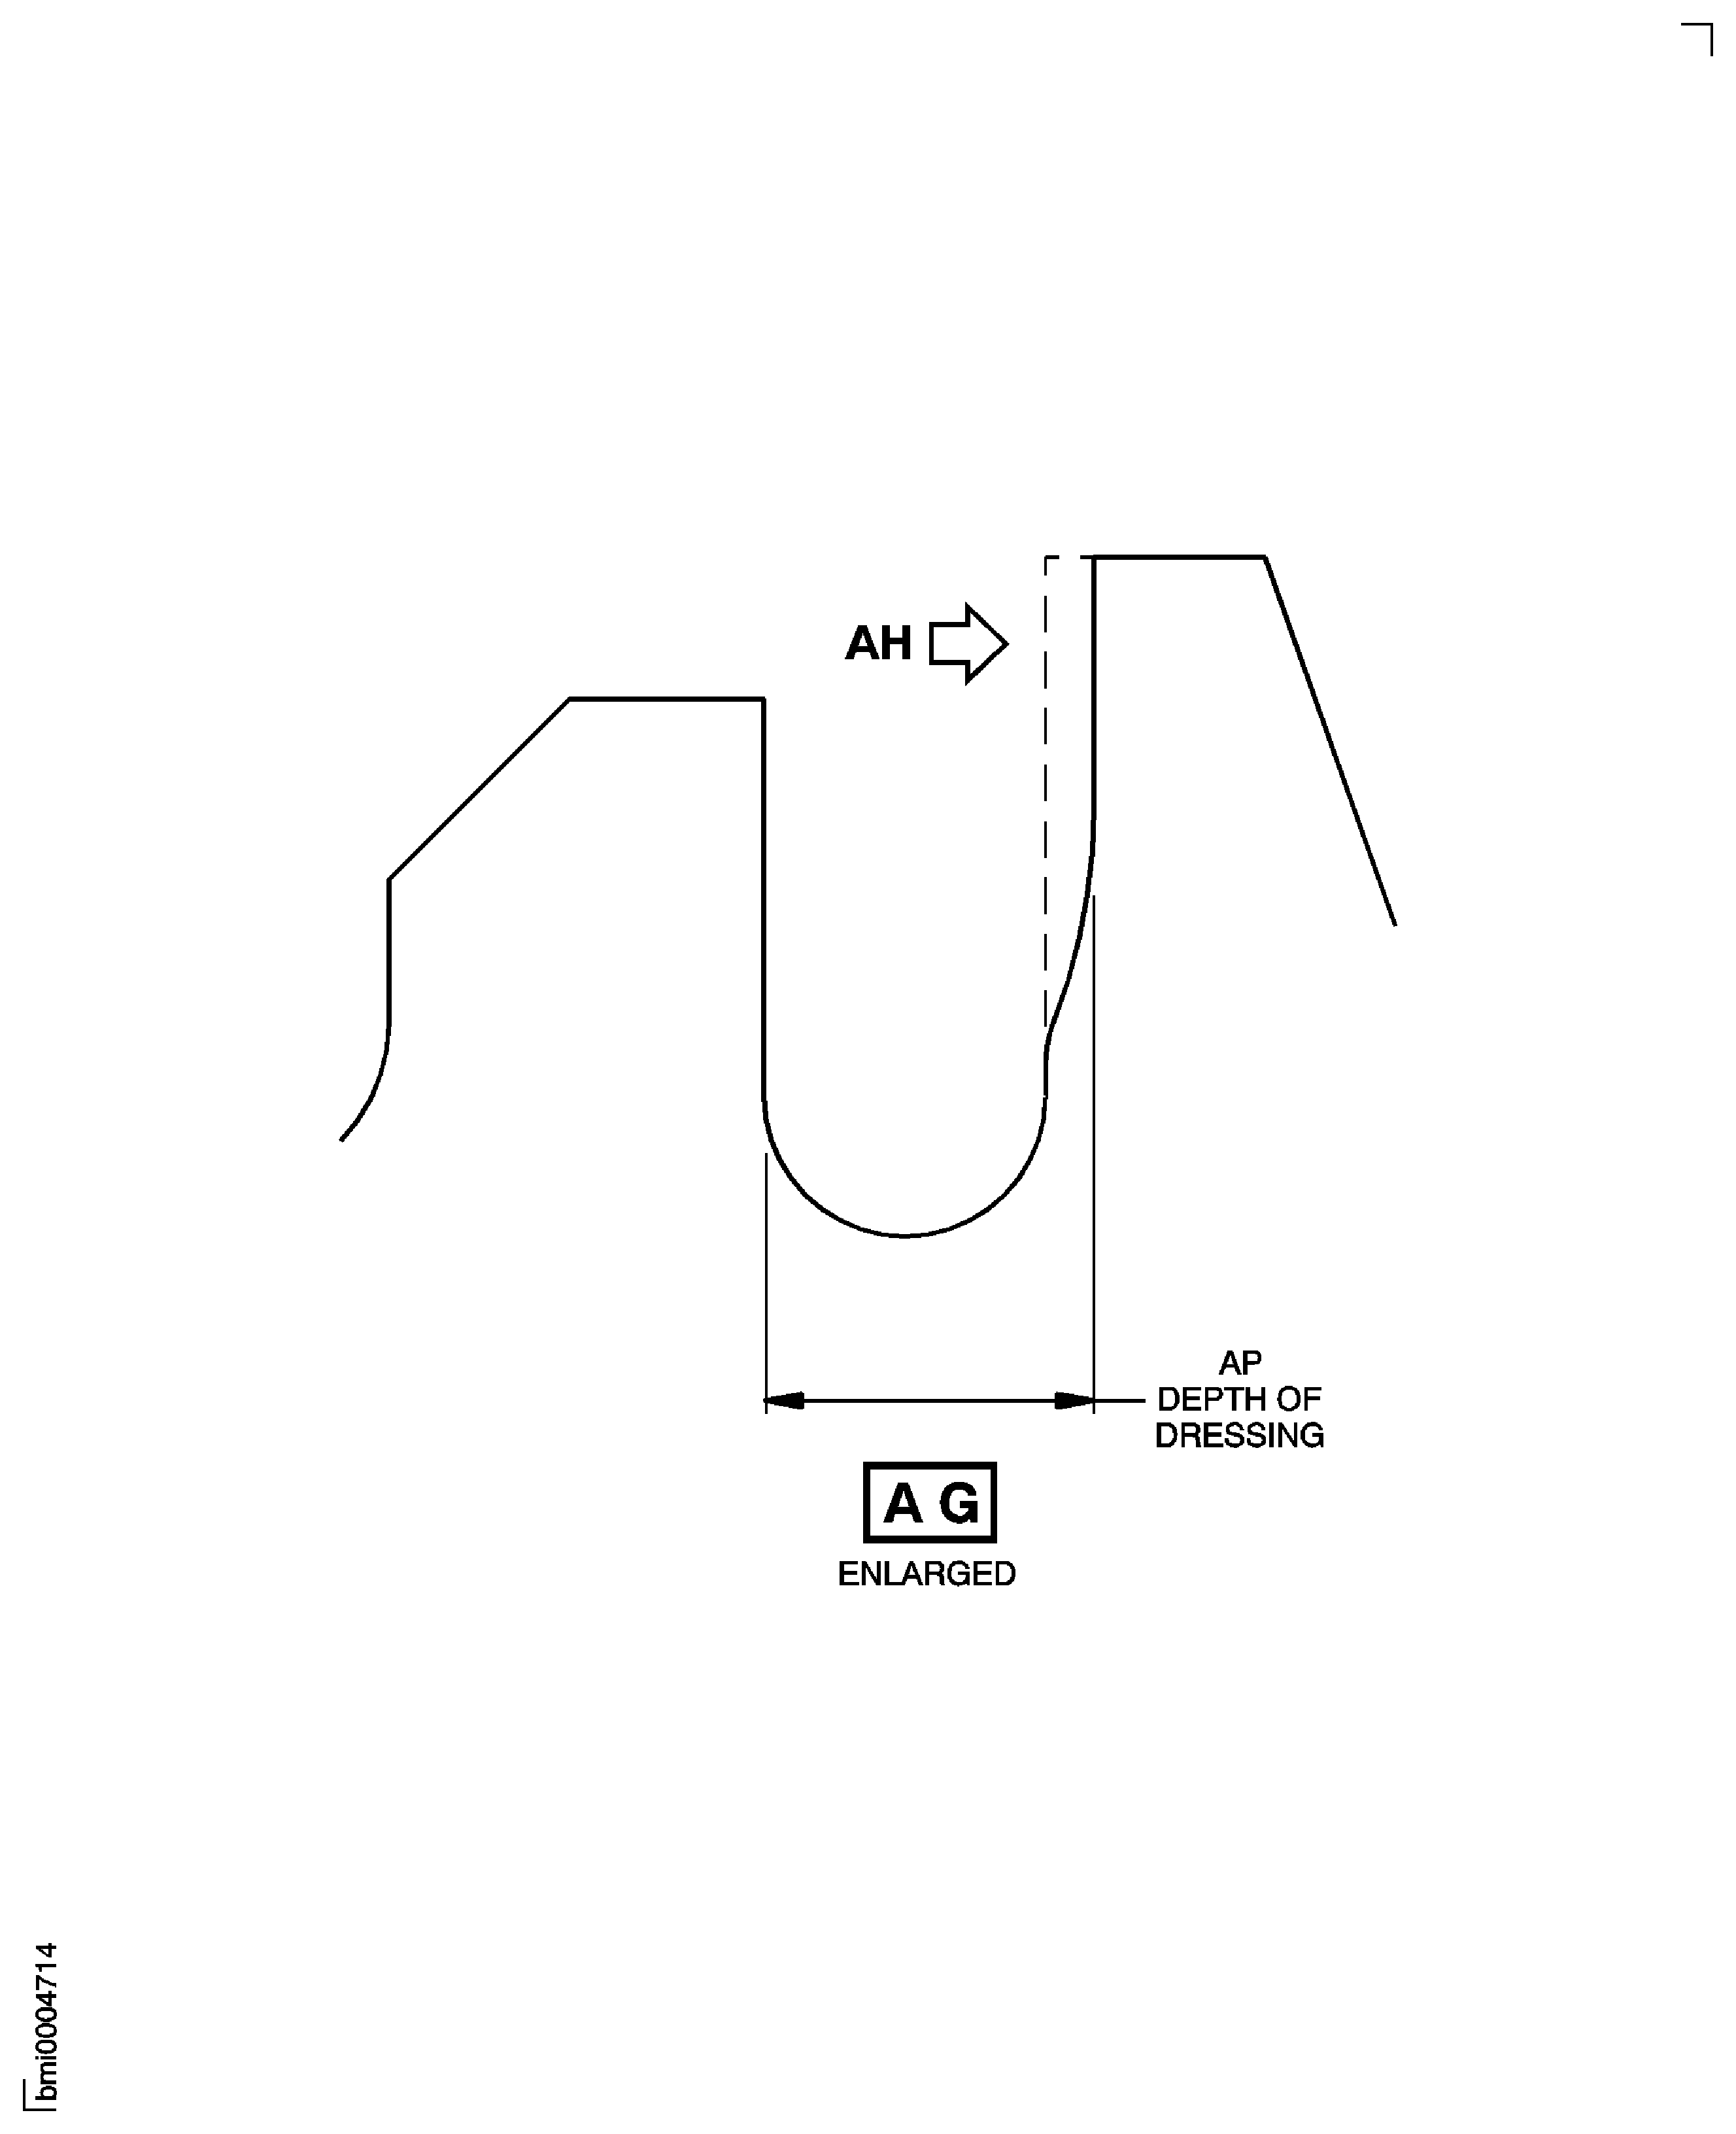
Figure: Repair Details and Dimensions
Repair Details and Dimensions
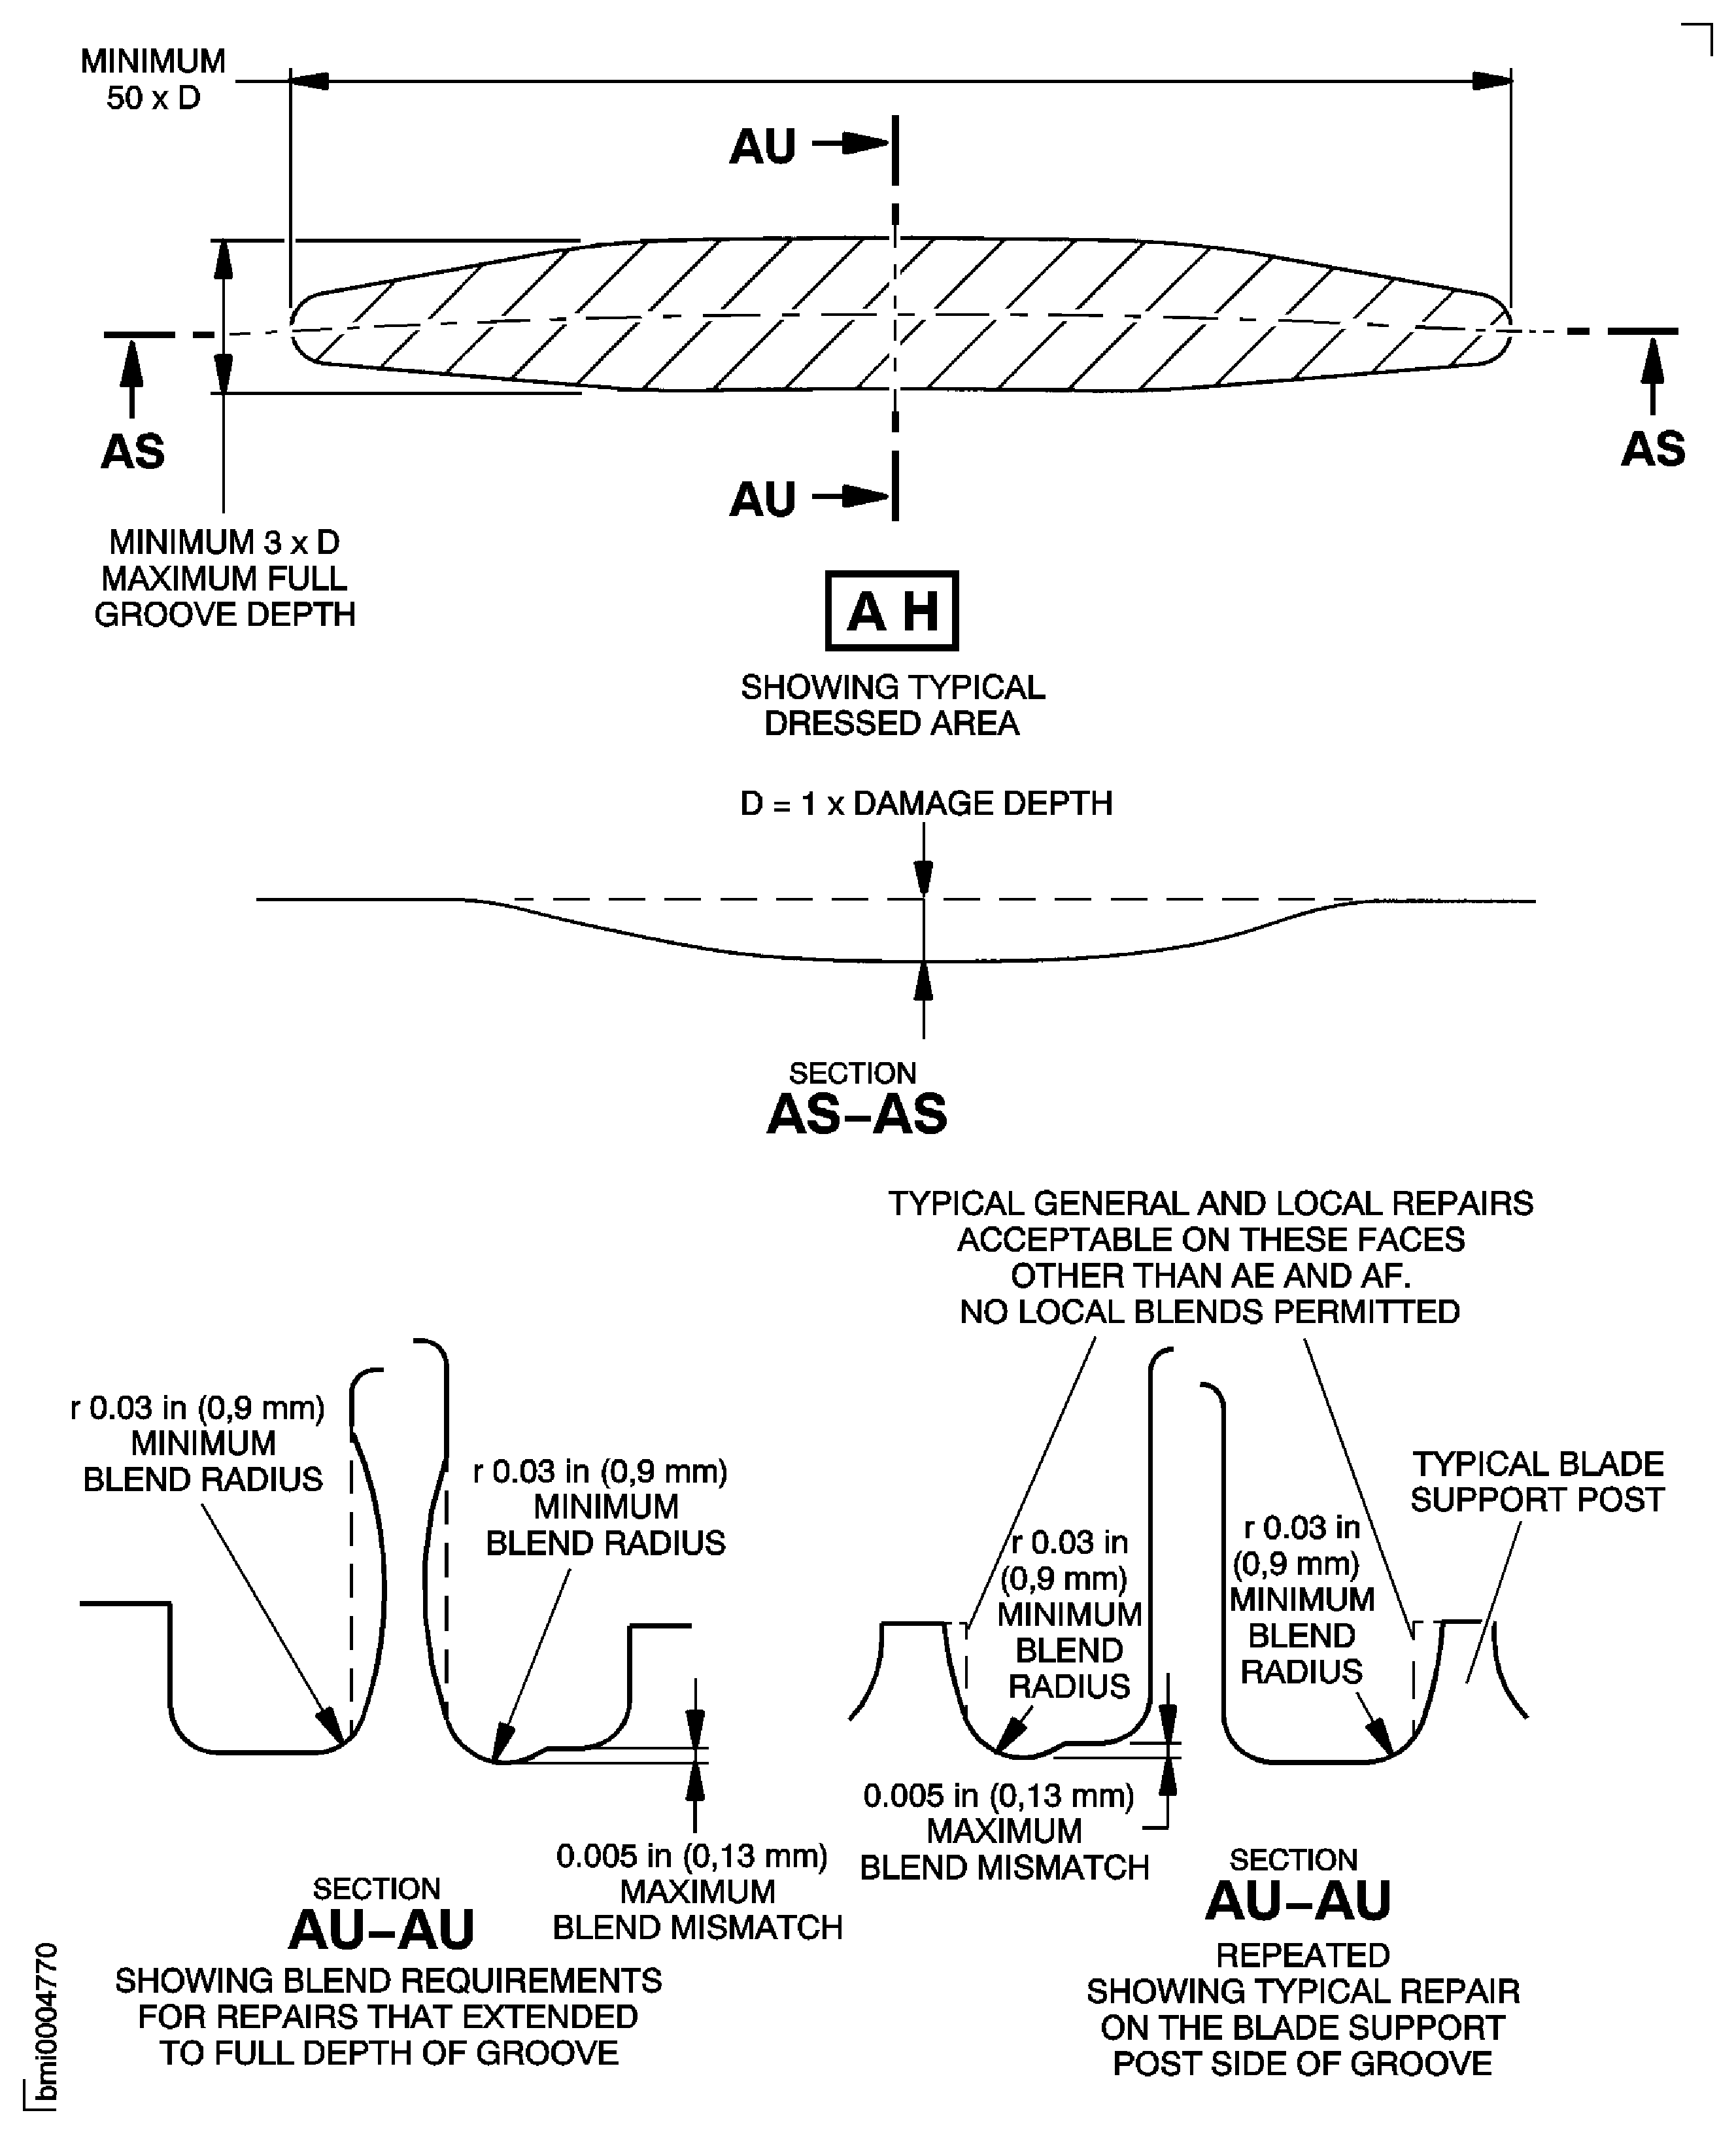
Figure: Repair Details and Dimensions
Repair Details and Dimensions
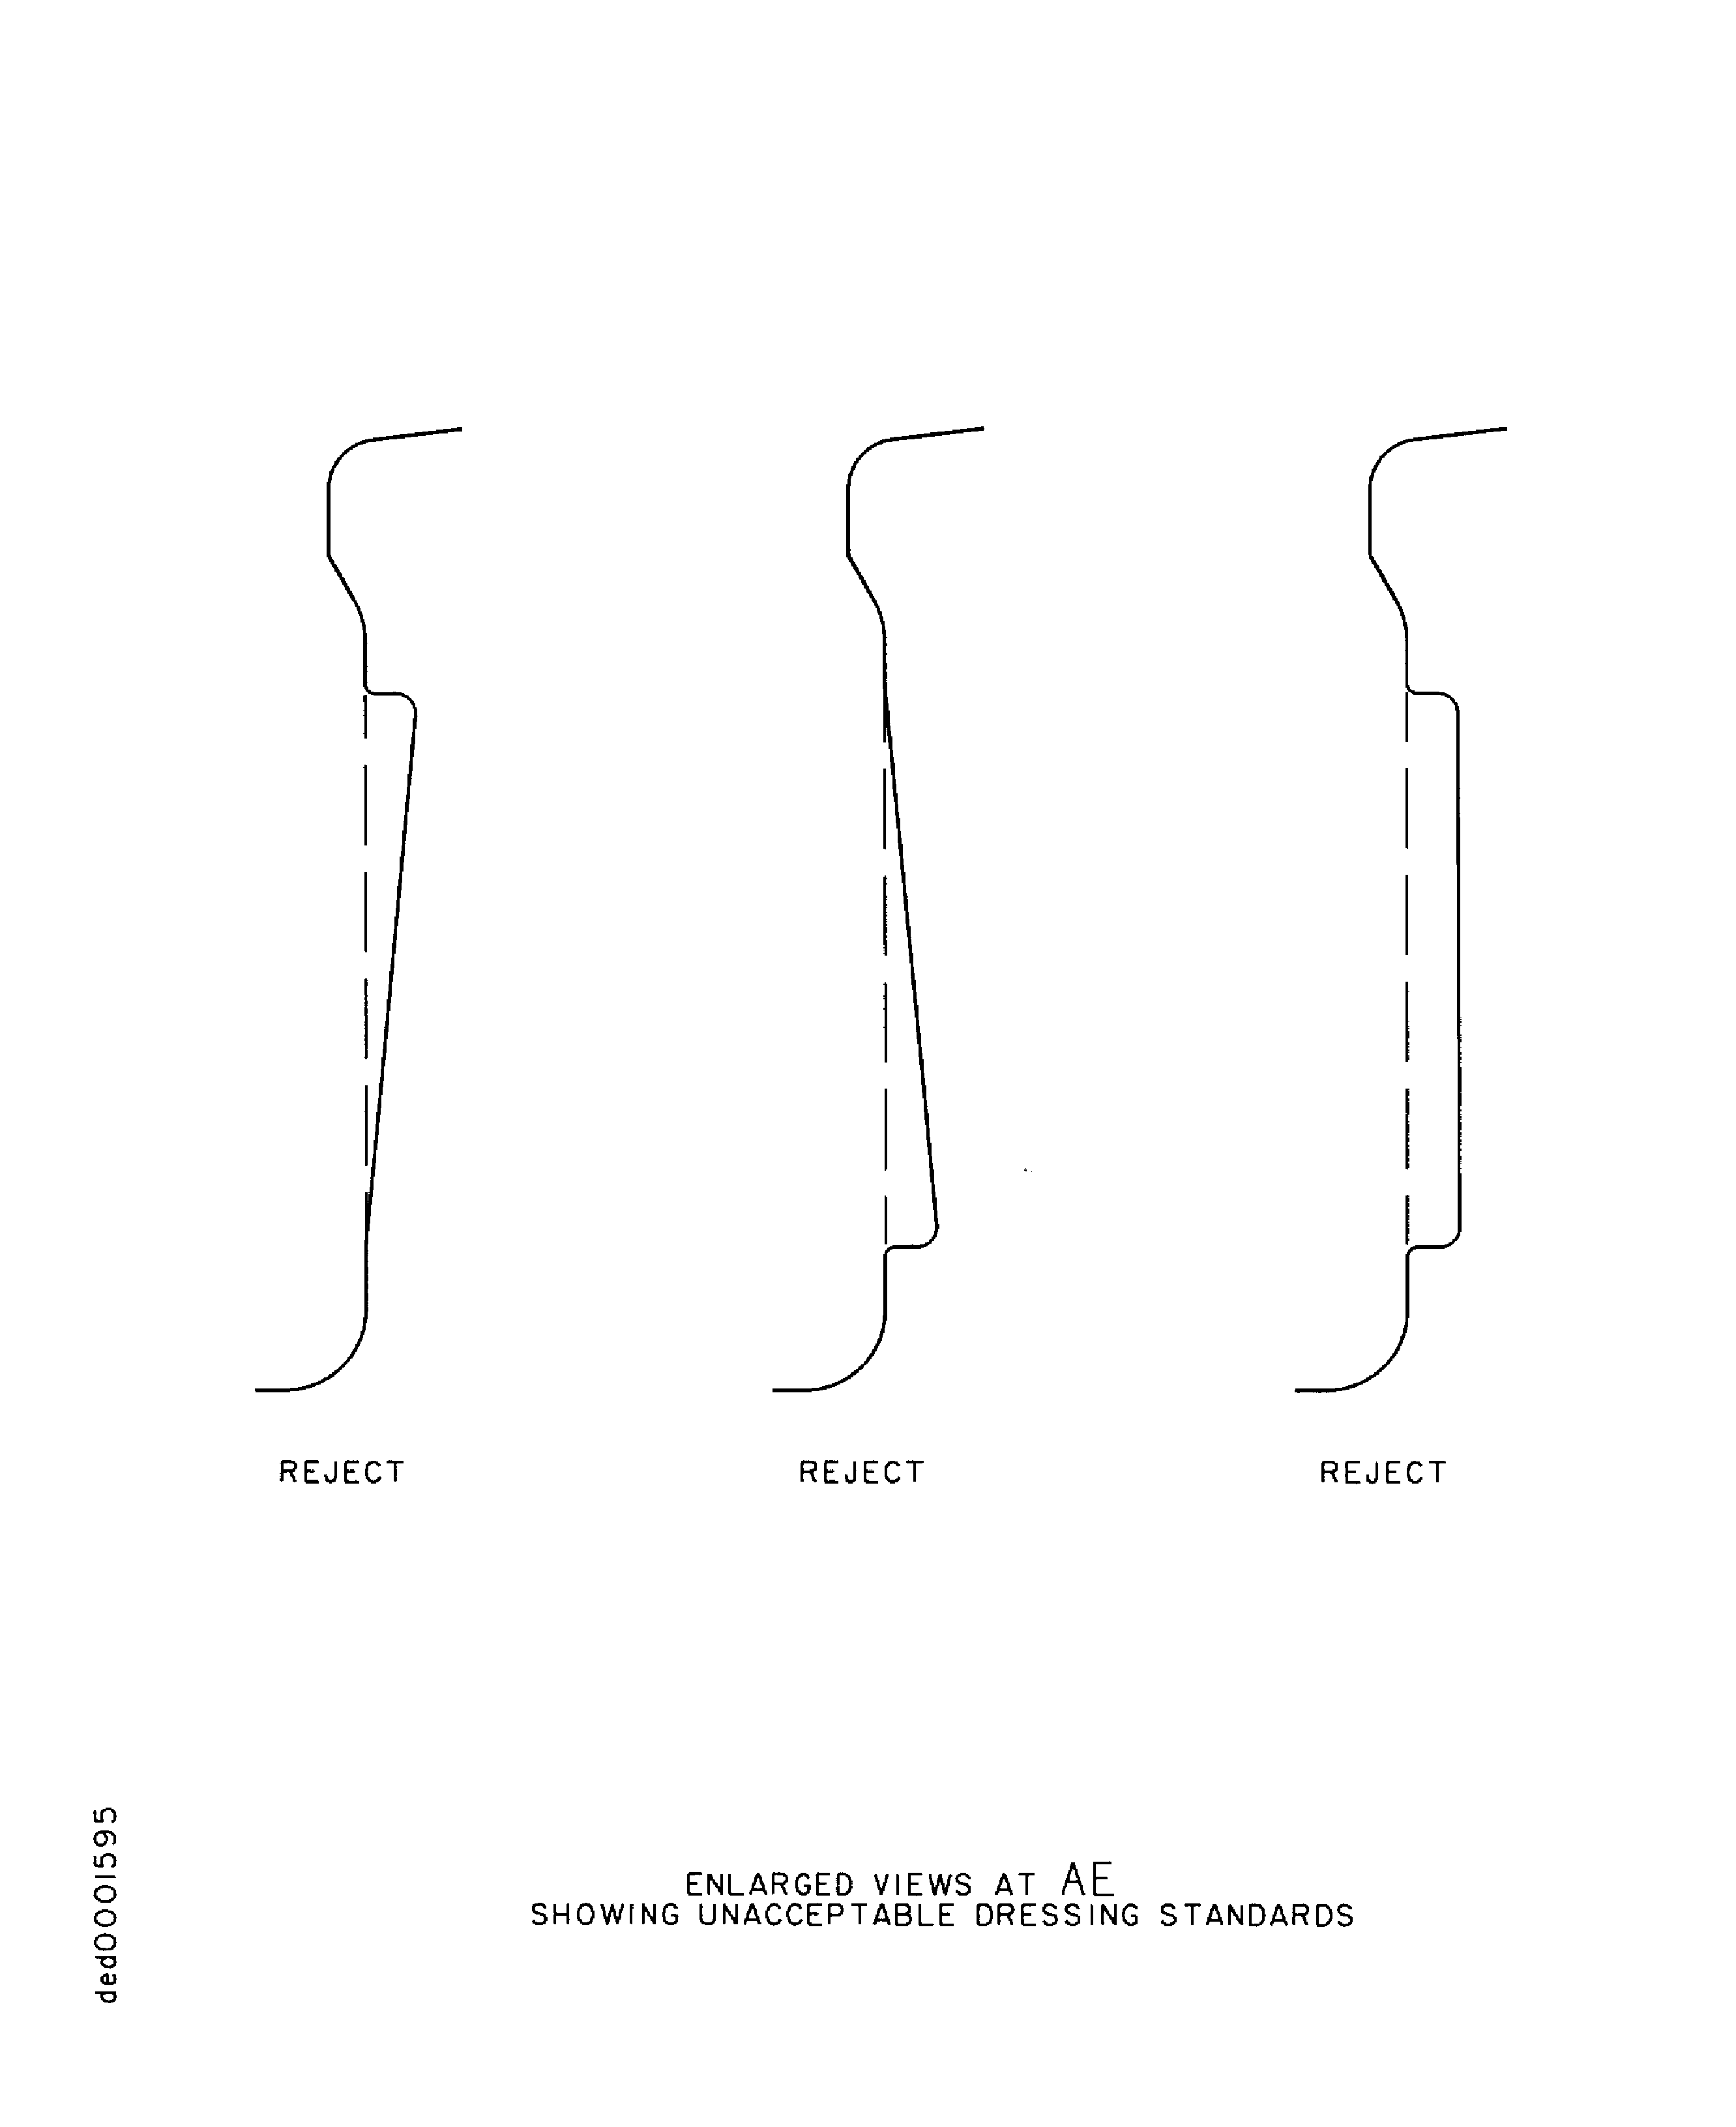
Figure: Repair Details and Dimensions
Repair Details and Dimensions
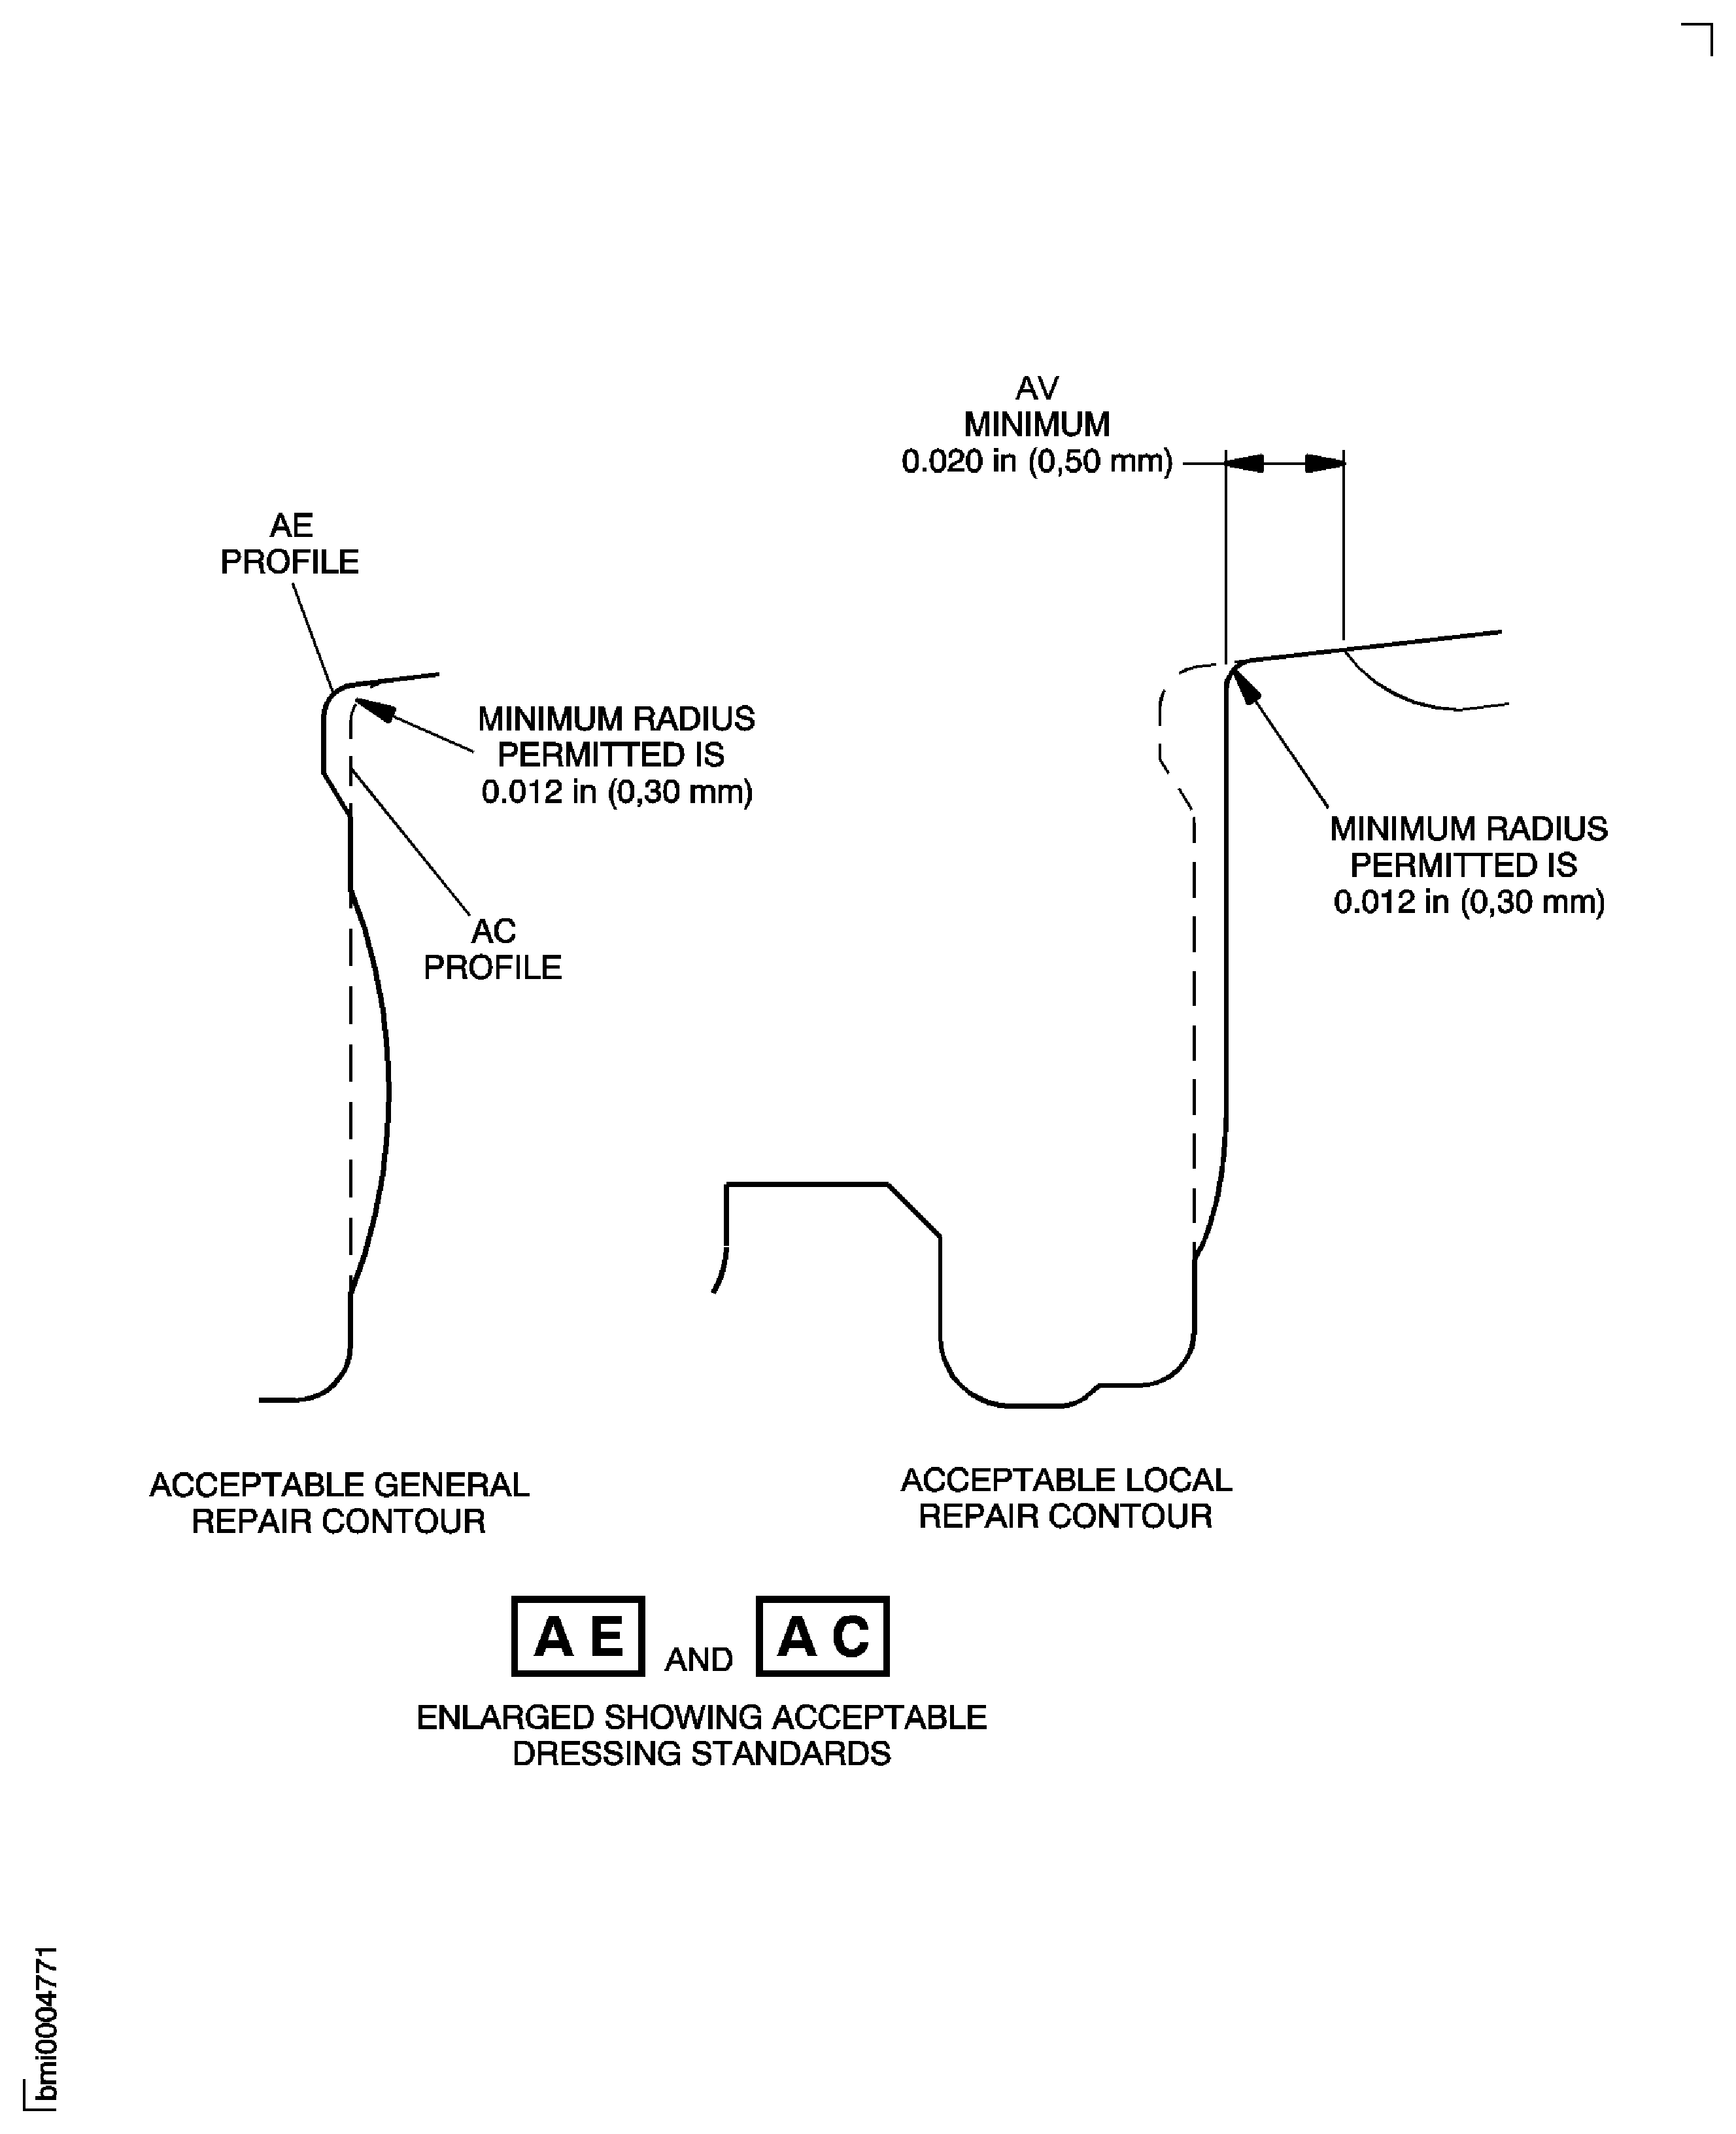
Figure: Repair Details and Dimensions
Repair Details and Dimensions

Figure: Repair Details and Dimensions
Repair Details and Dimensions
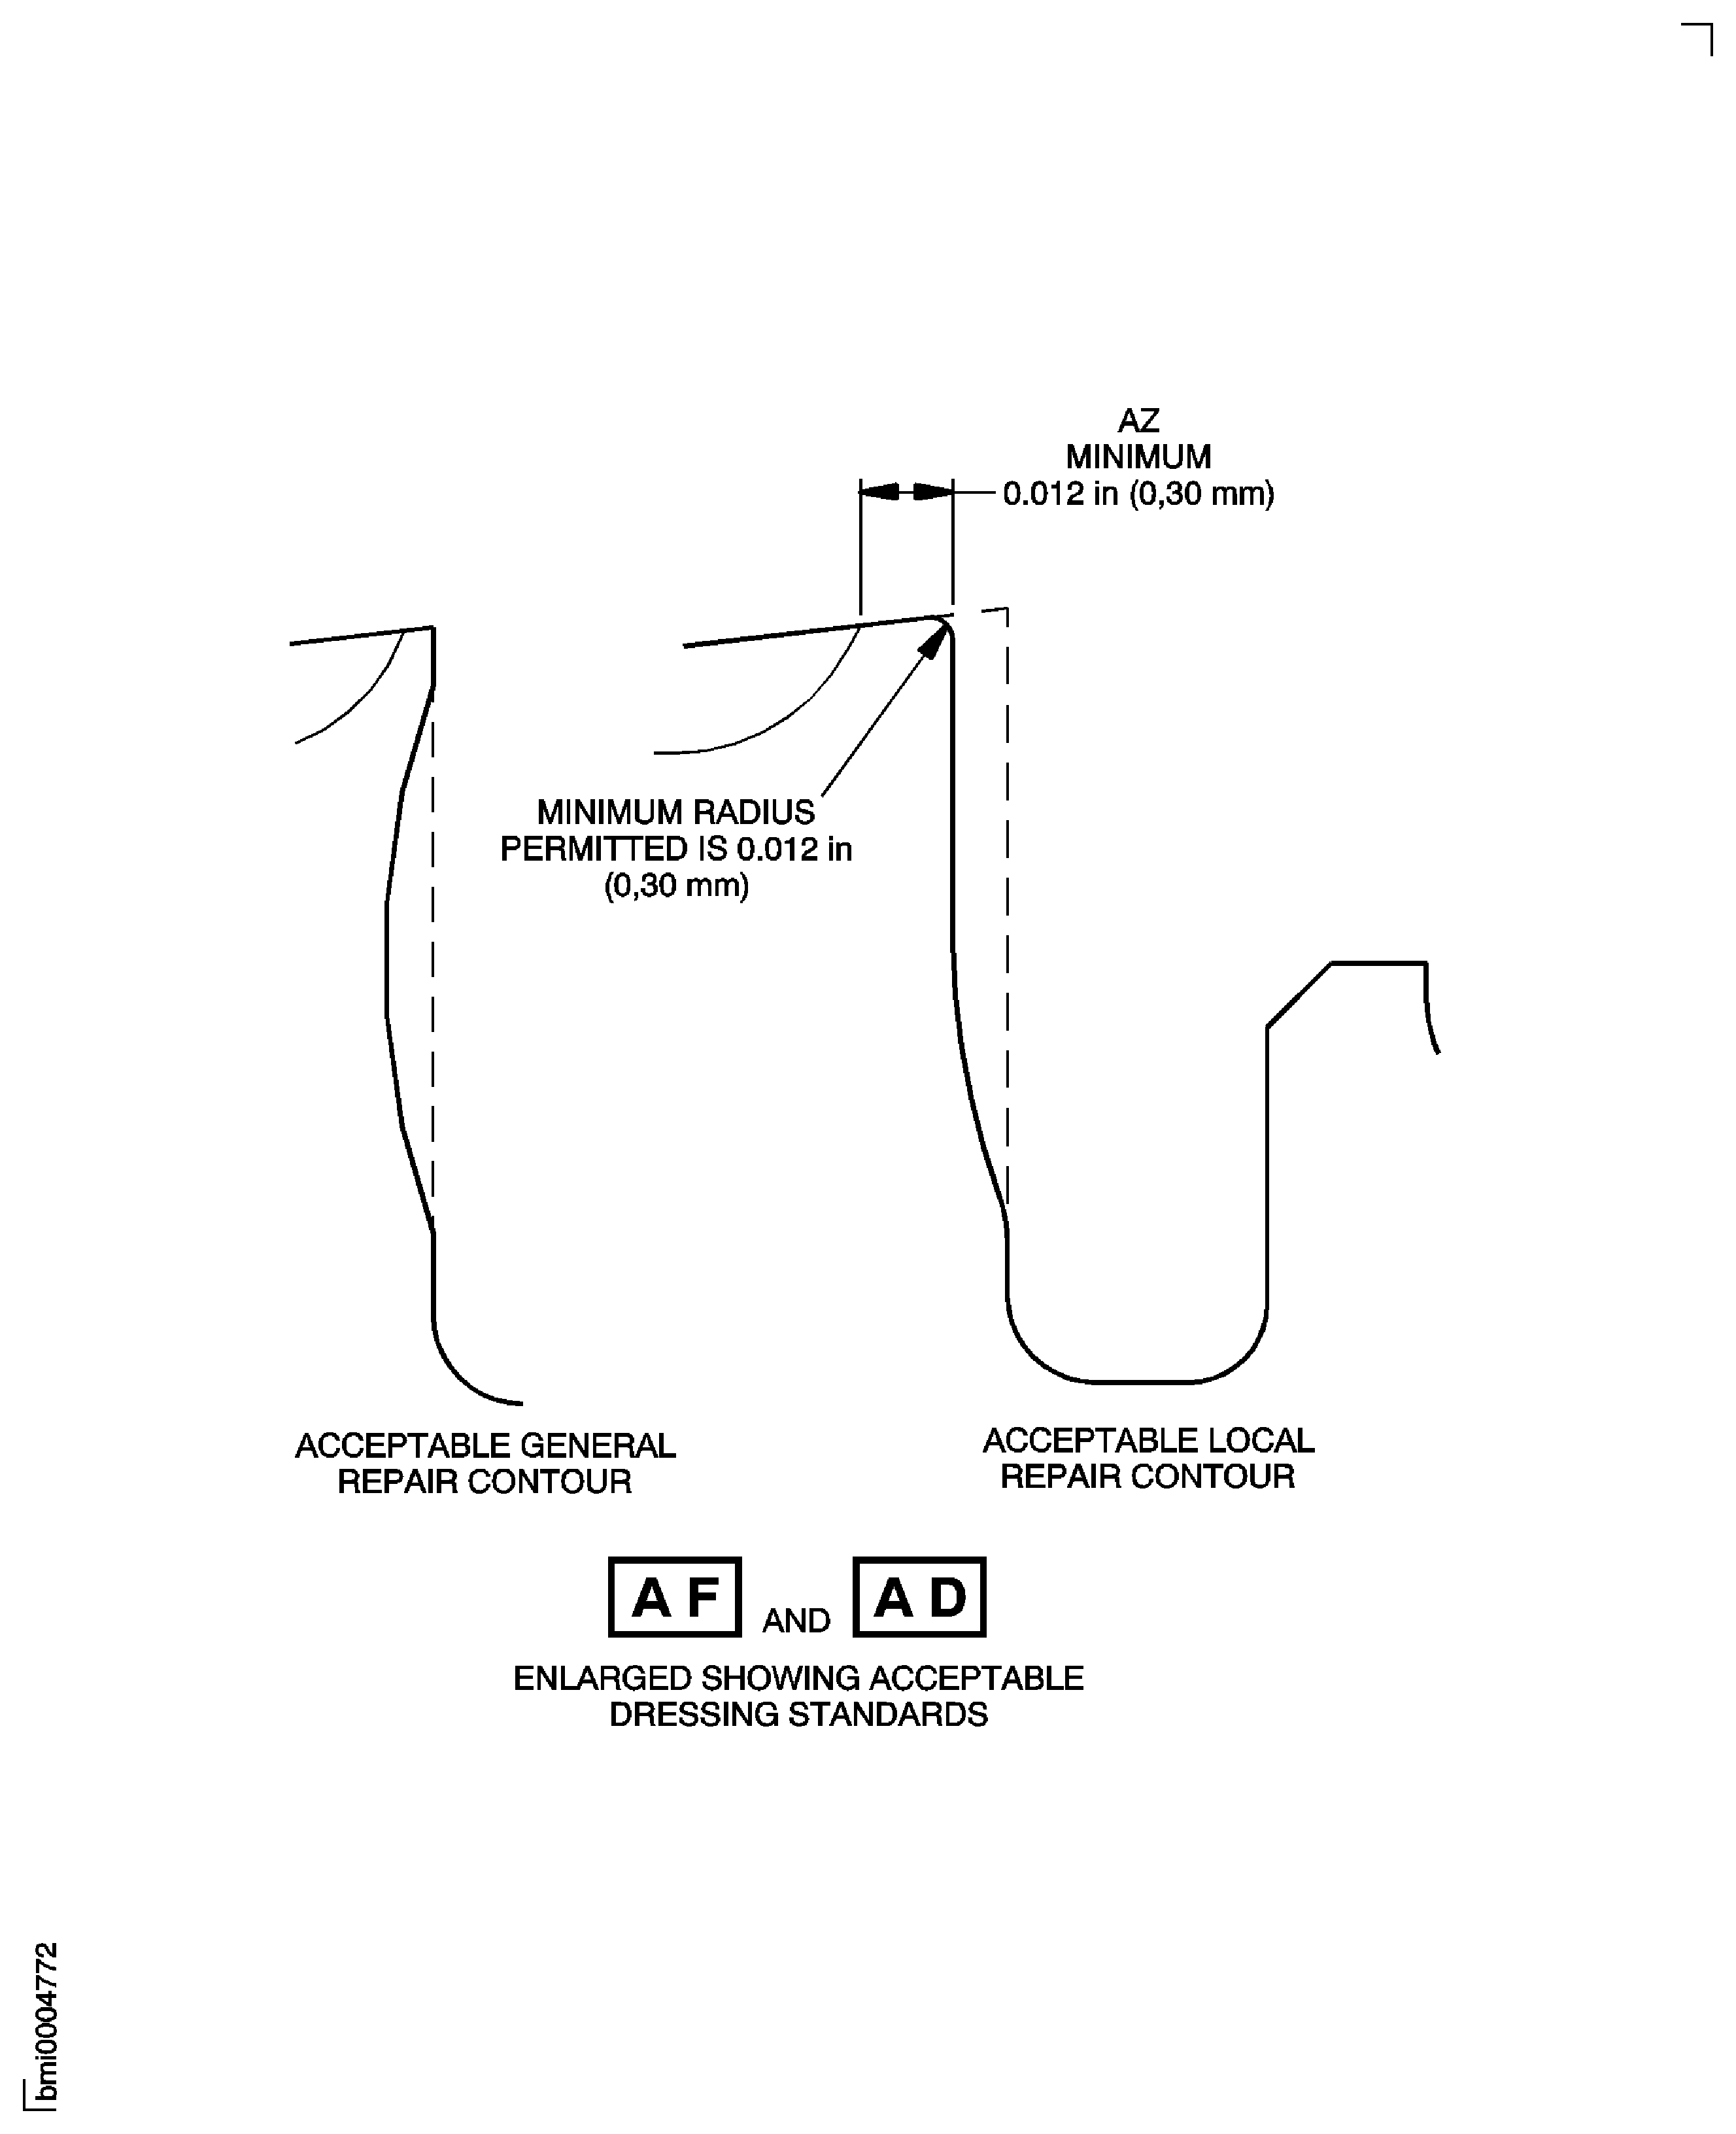
Figure: Repair Details and Dimensions
Repair Details and Dimensions
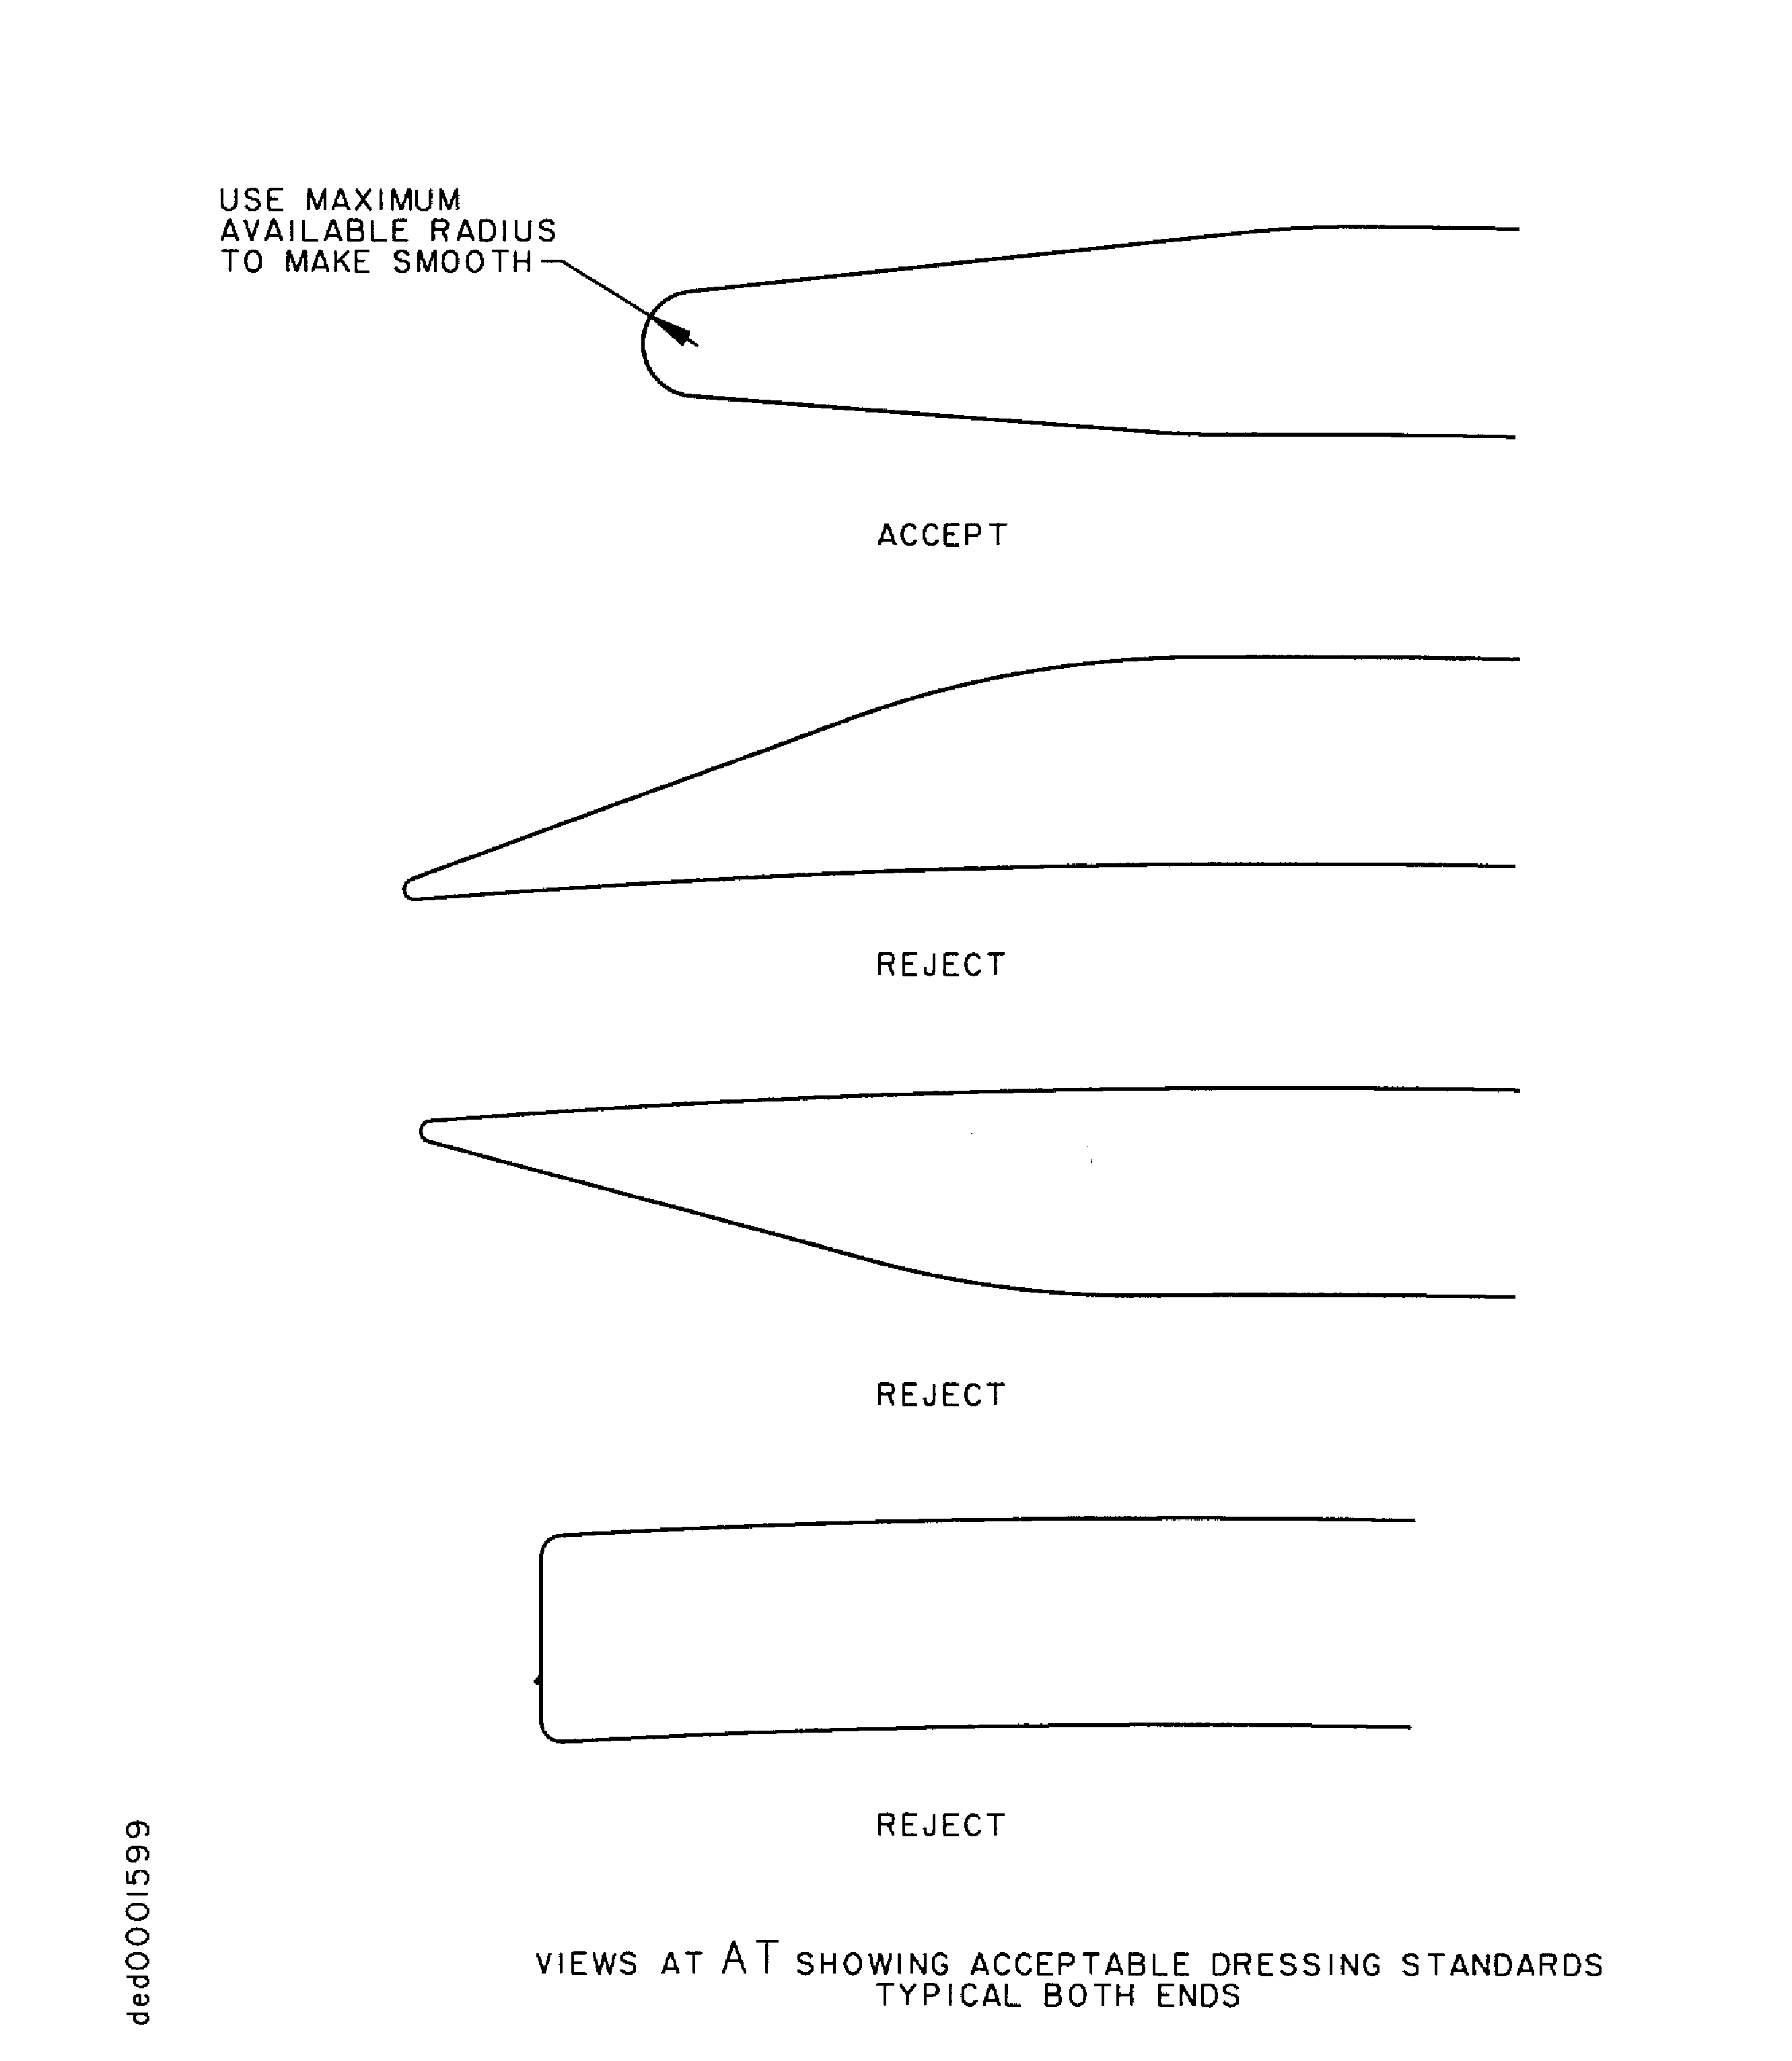
Figure: Repair Details and Dimensions
Repair Details and Dimensions

Figure: Repair Details and Dimensions
Repair Details and Dimensions
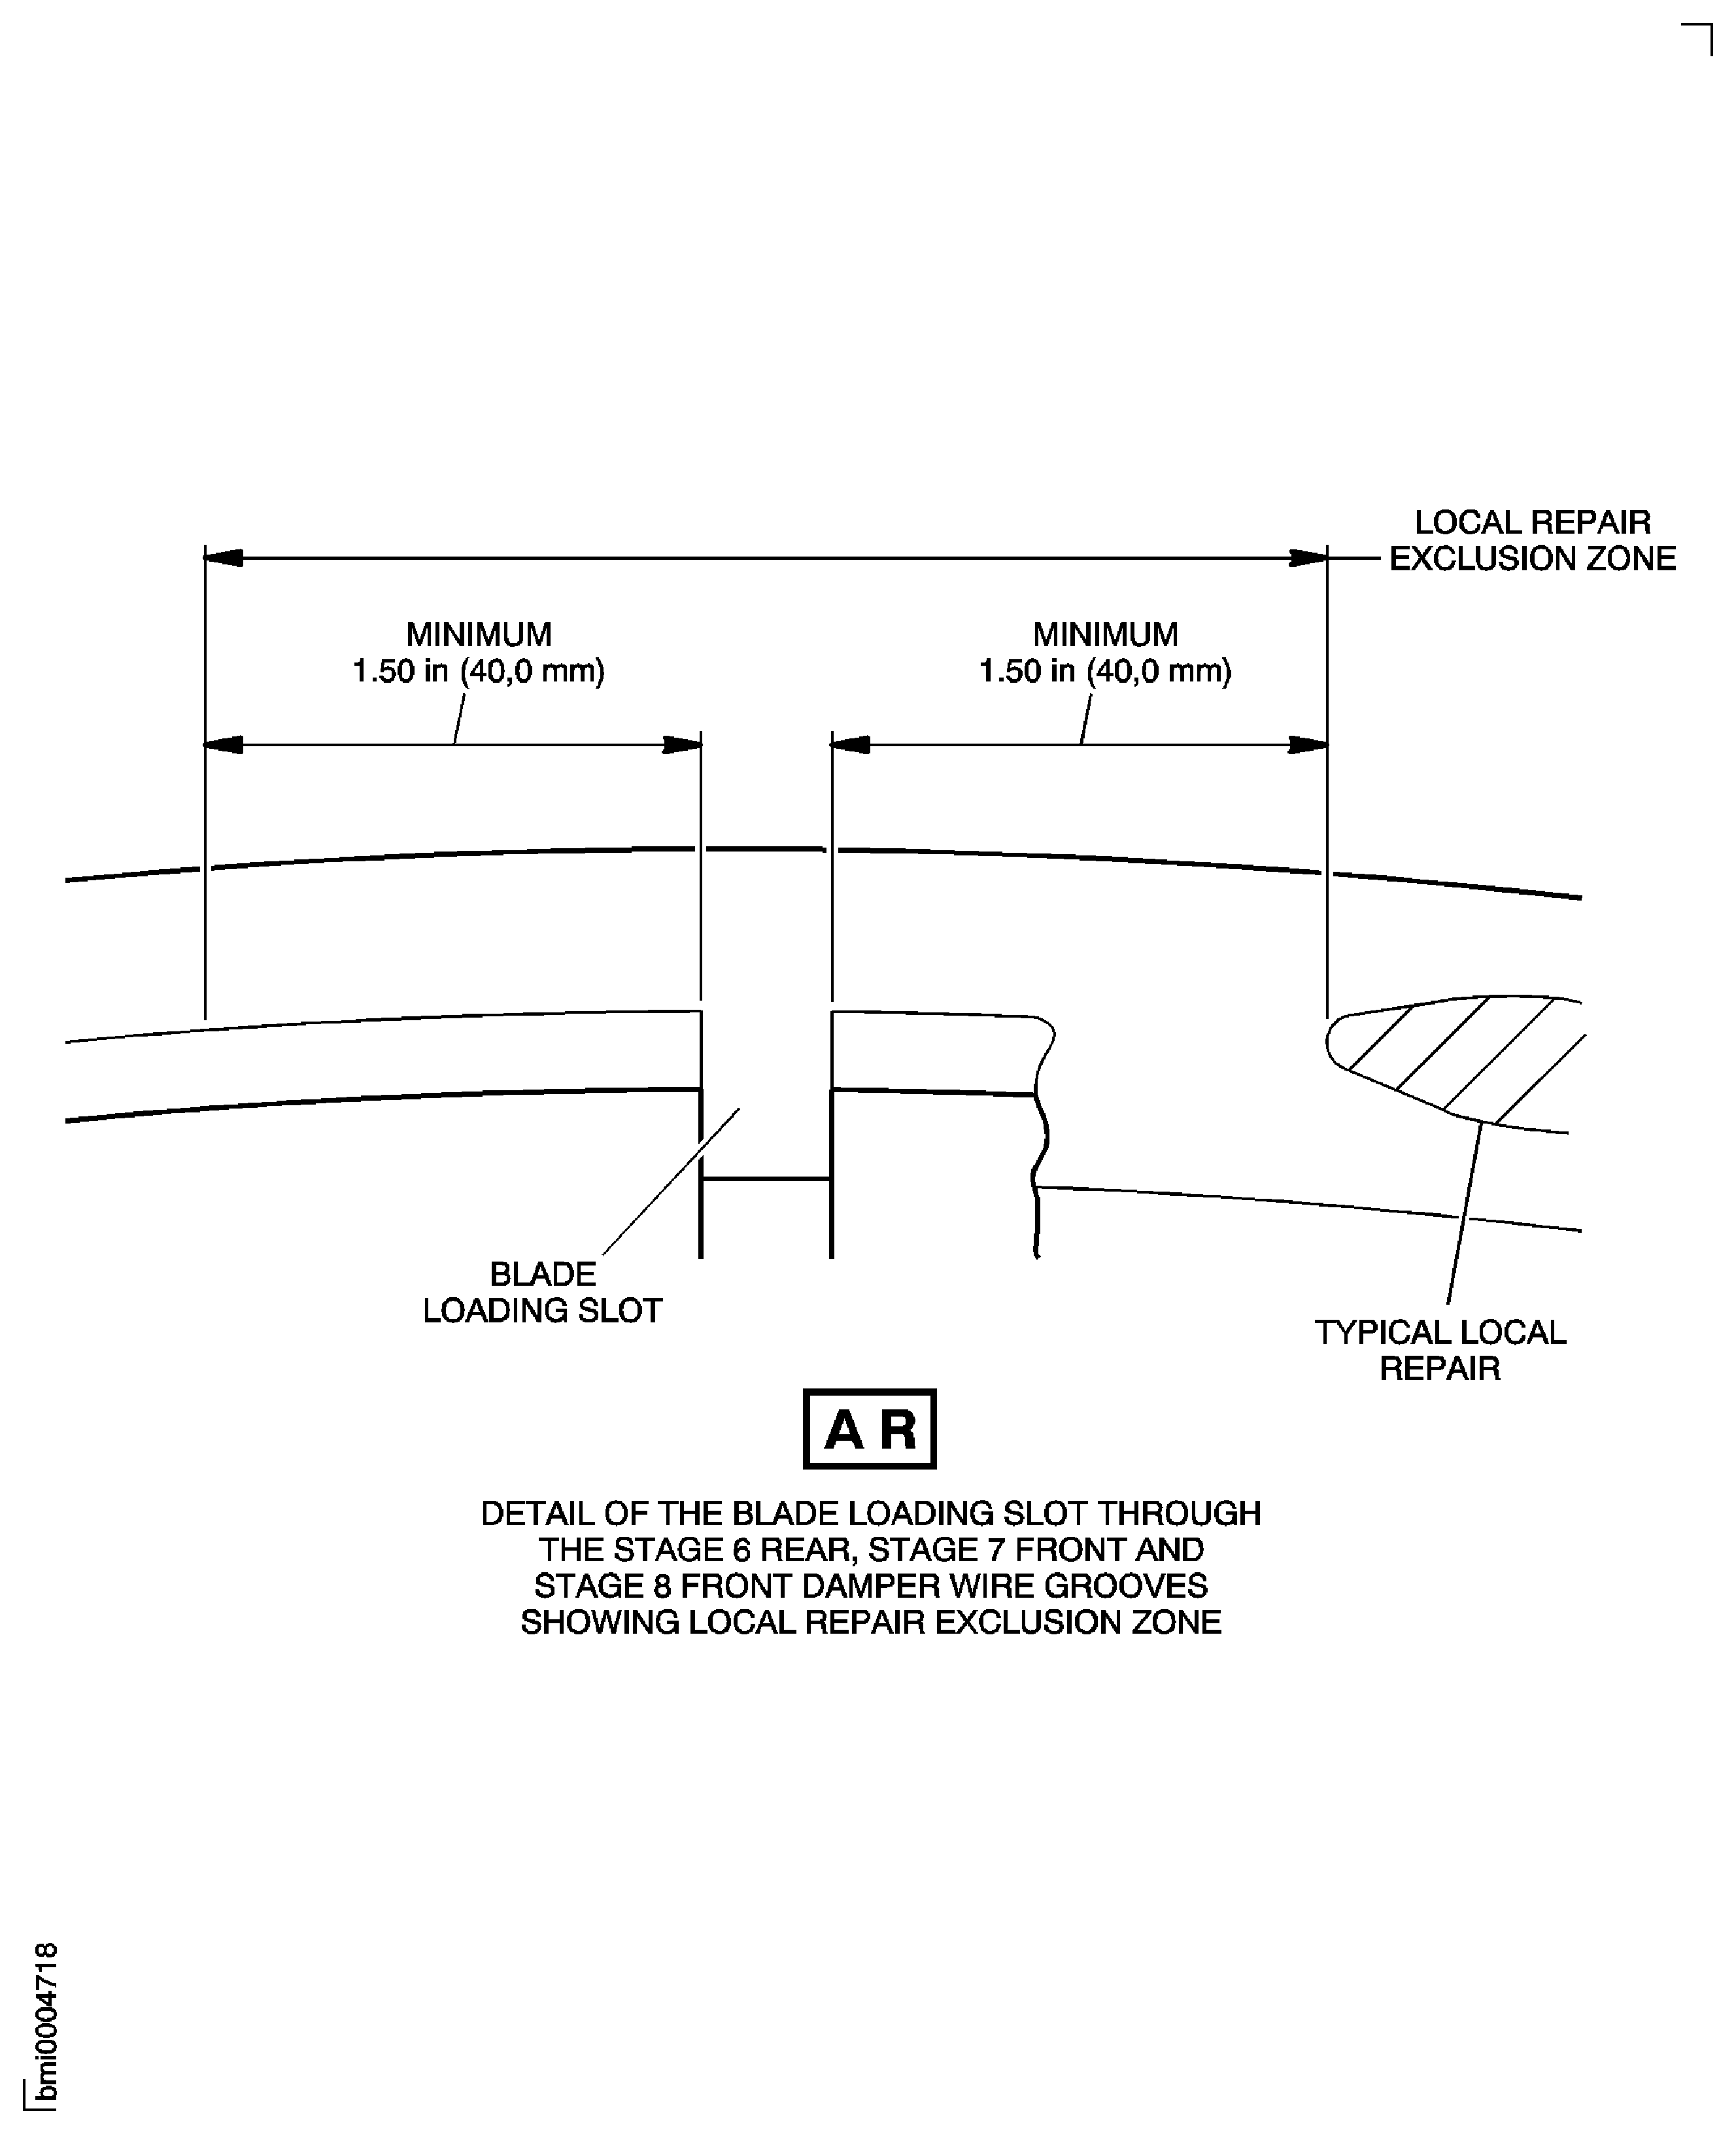
Figure: Repair Details and Dimensions
Repair Details and Dimensions

Figure: Repair Details and Dimensions
Repair Details and Dimensions

Figure: Repair Details and Dimensions
Repair Details and Dimensions
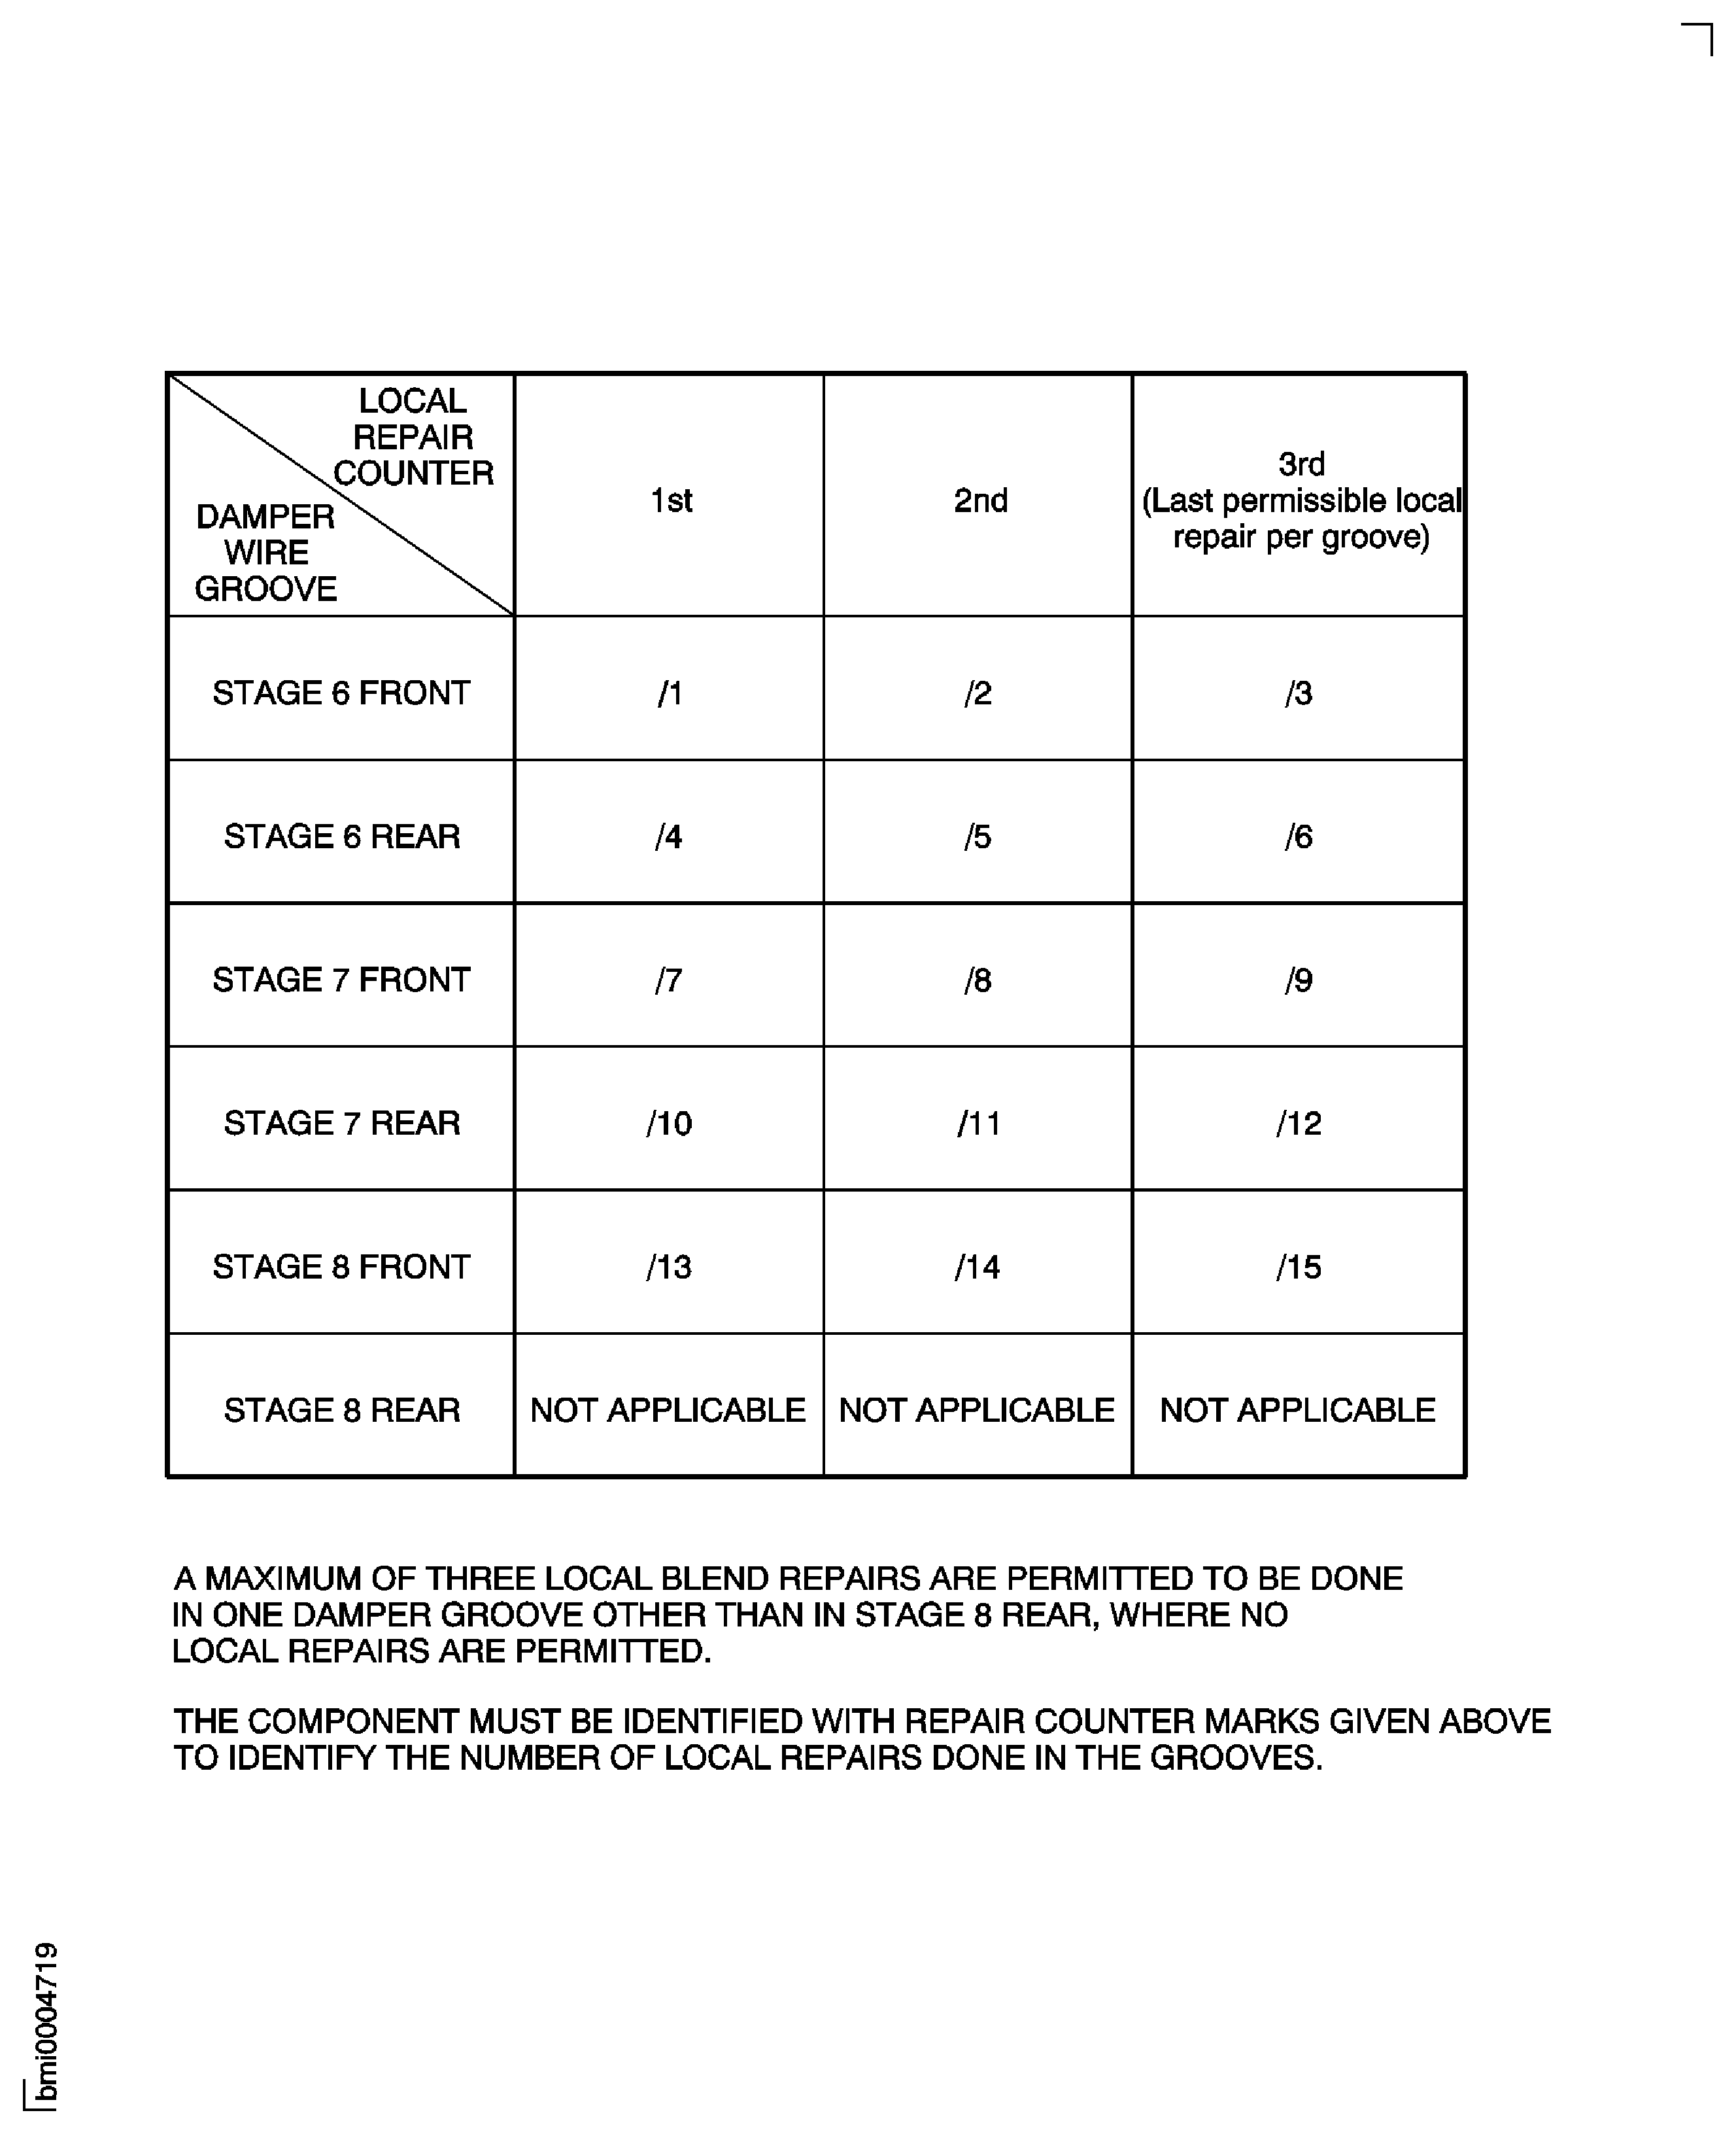
Figure: Showing Blade Support Post Limits For PNs 6A8316, 6B1386, and 6B1404 Only
Showing Blade Support Post Limits For PNs 6A8316, 6B1386, and 6B1404 Only
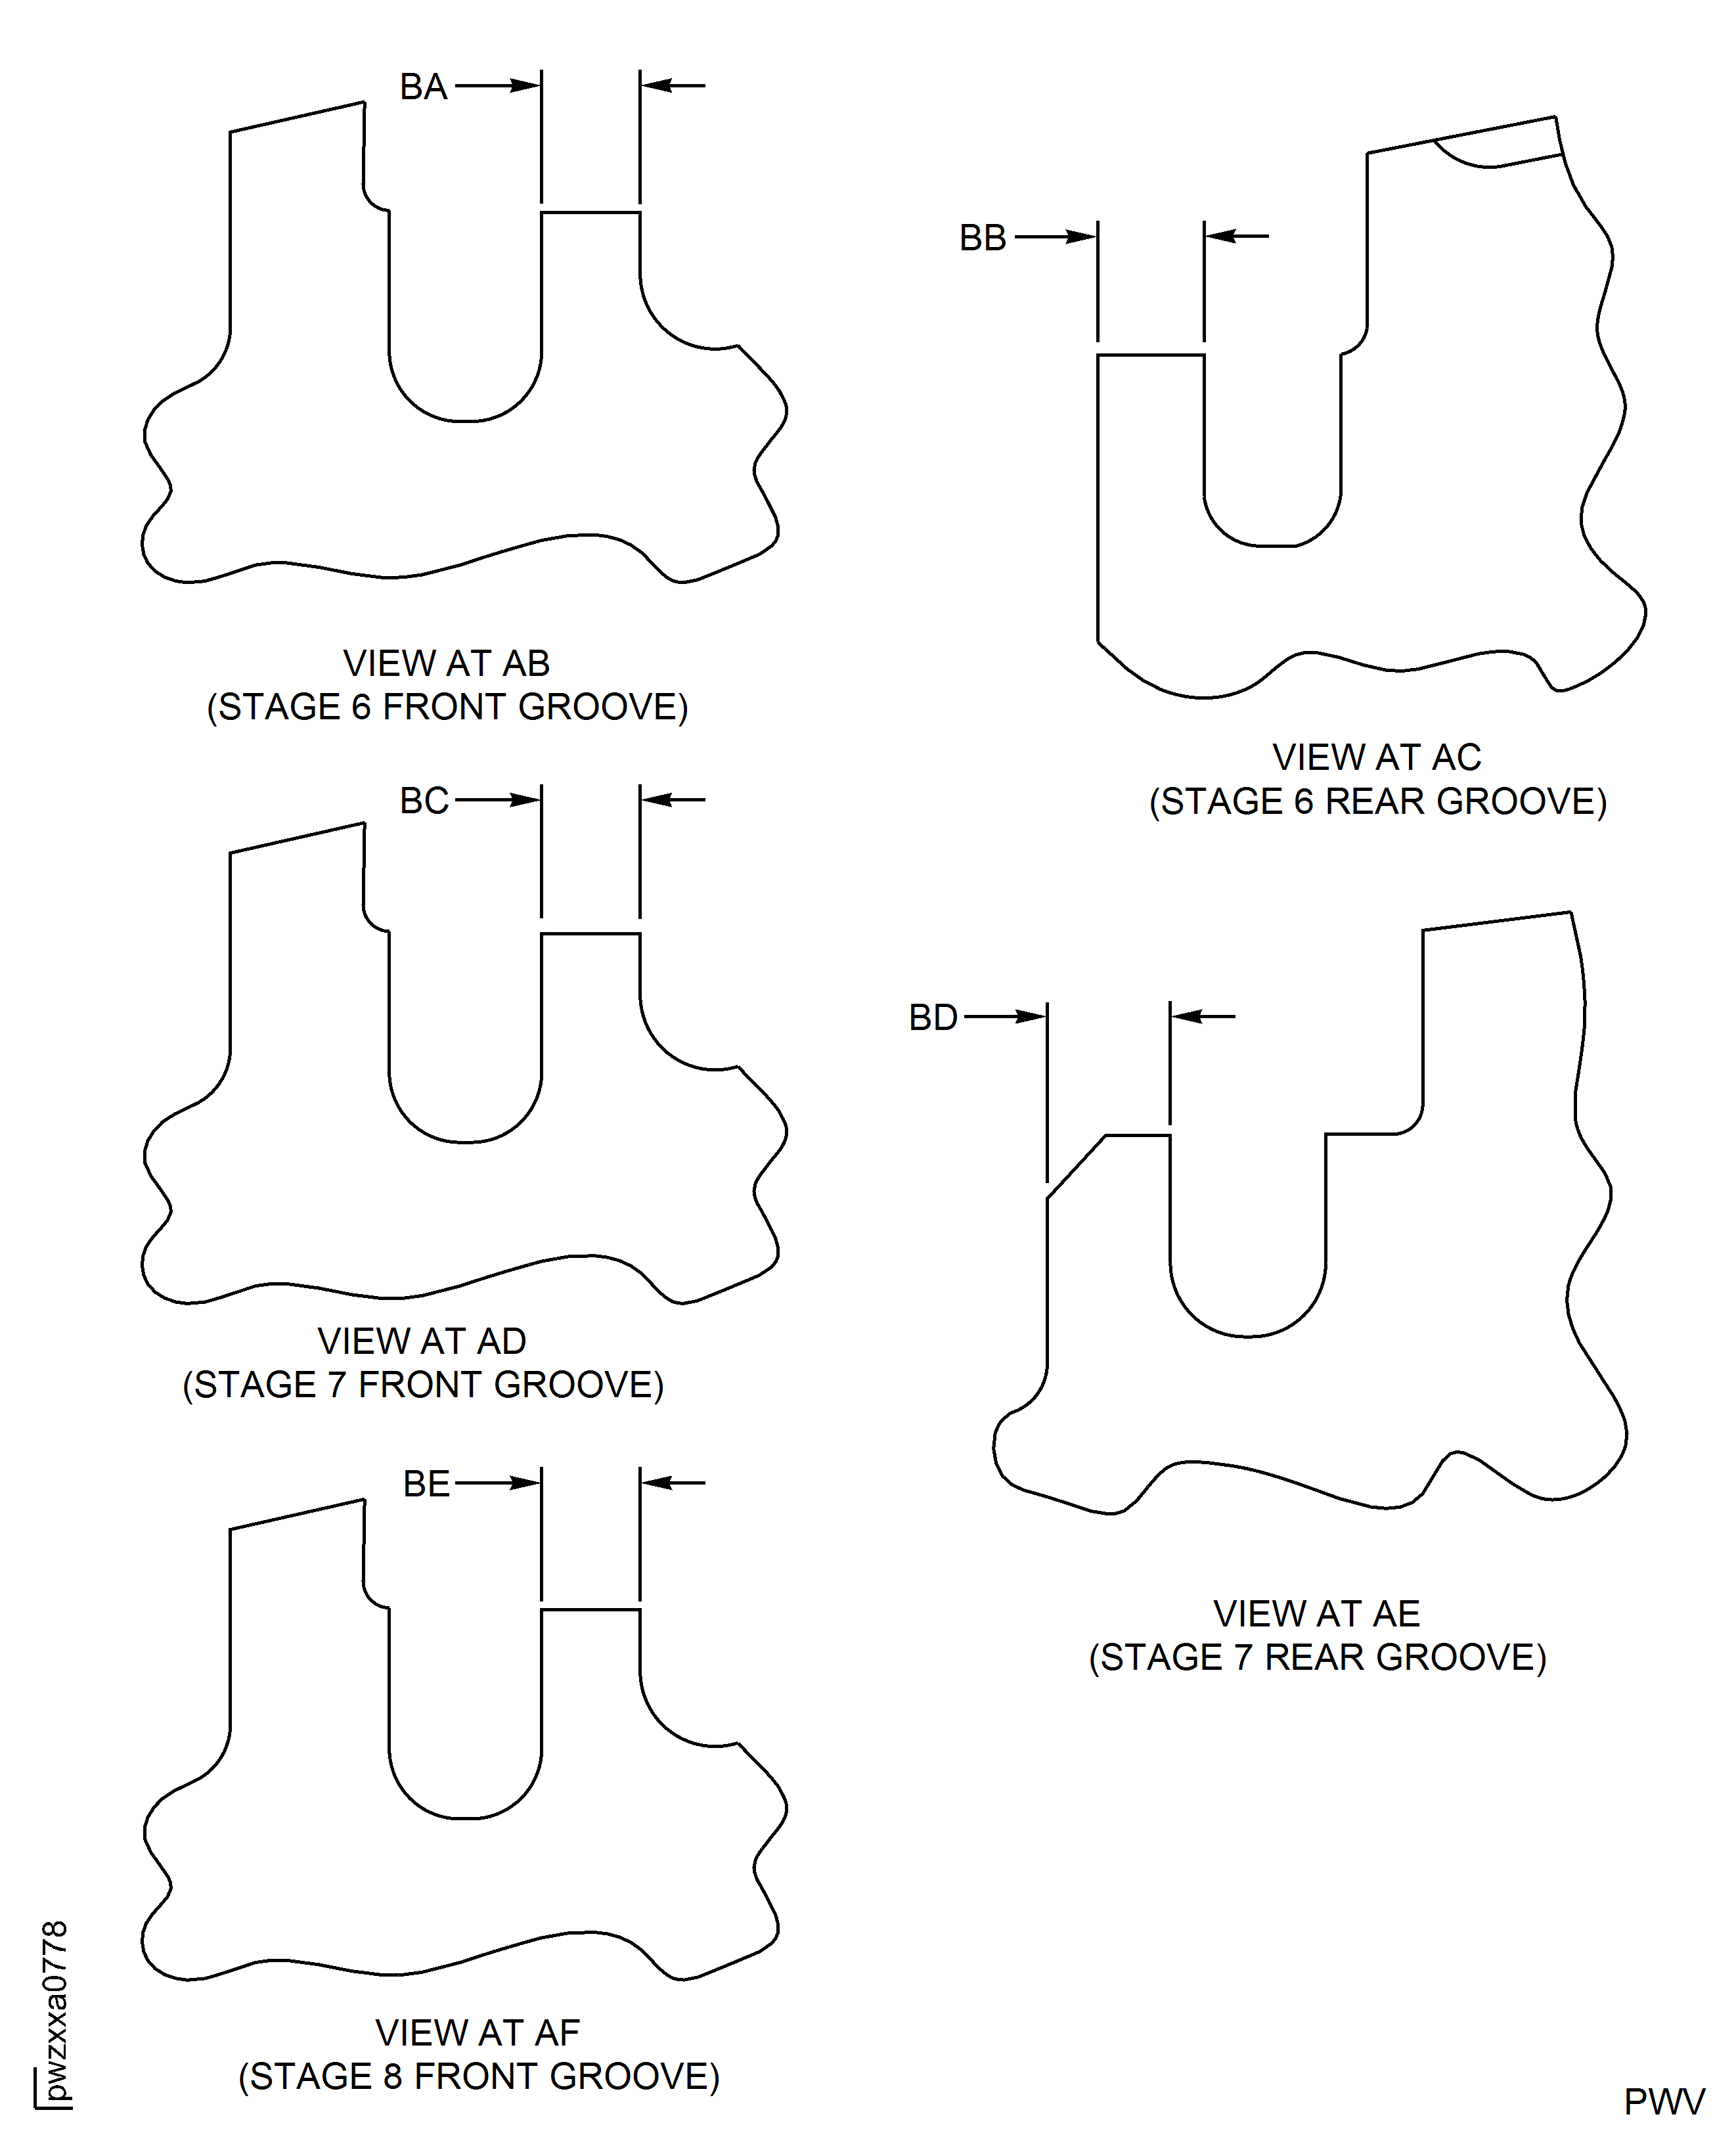
Figure: Showing Shotpeen Areas For PNs 6A8316, 6B1386, and 6B1404 Only
Showing Shotpeen Areas For PNs 6A8316, 6B1386, and 6B1404 Only
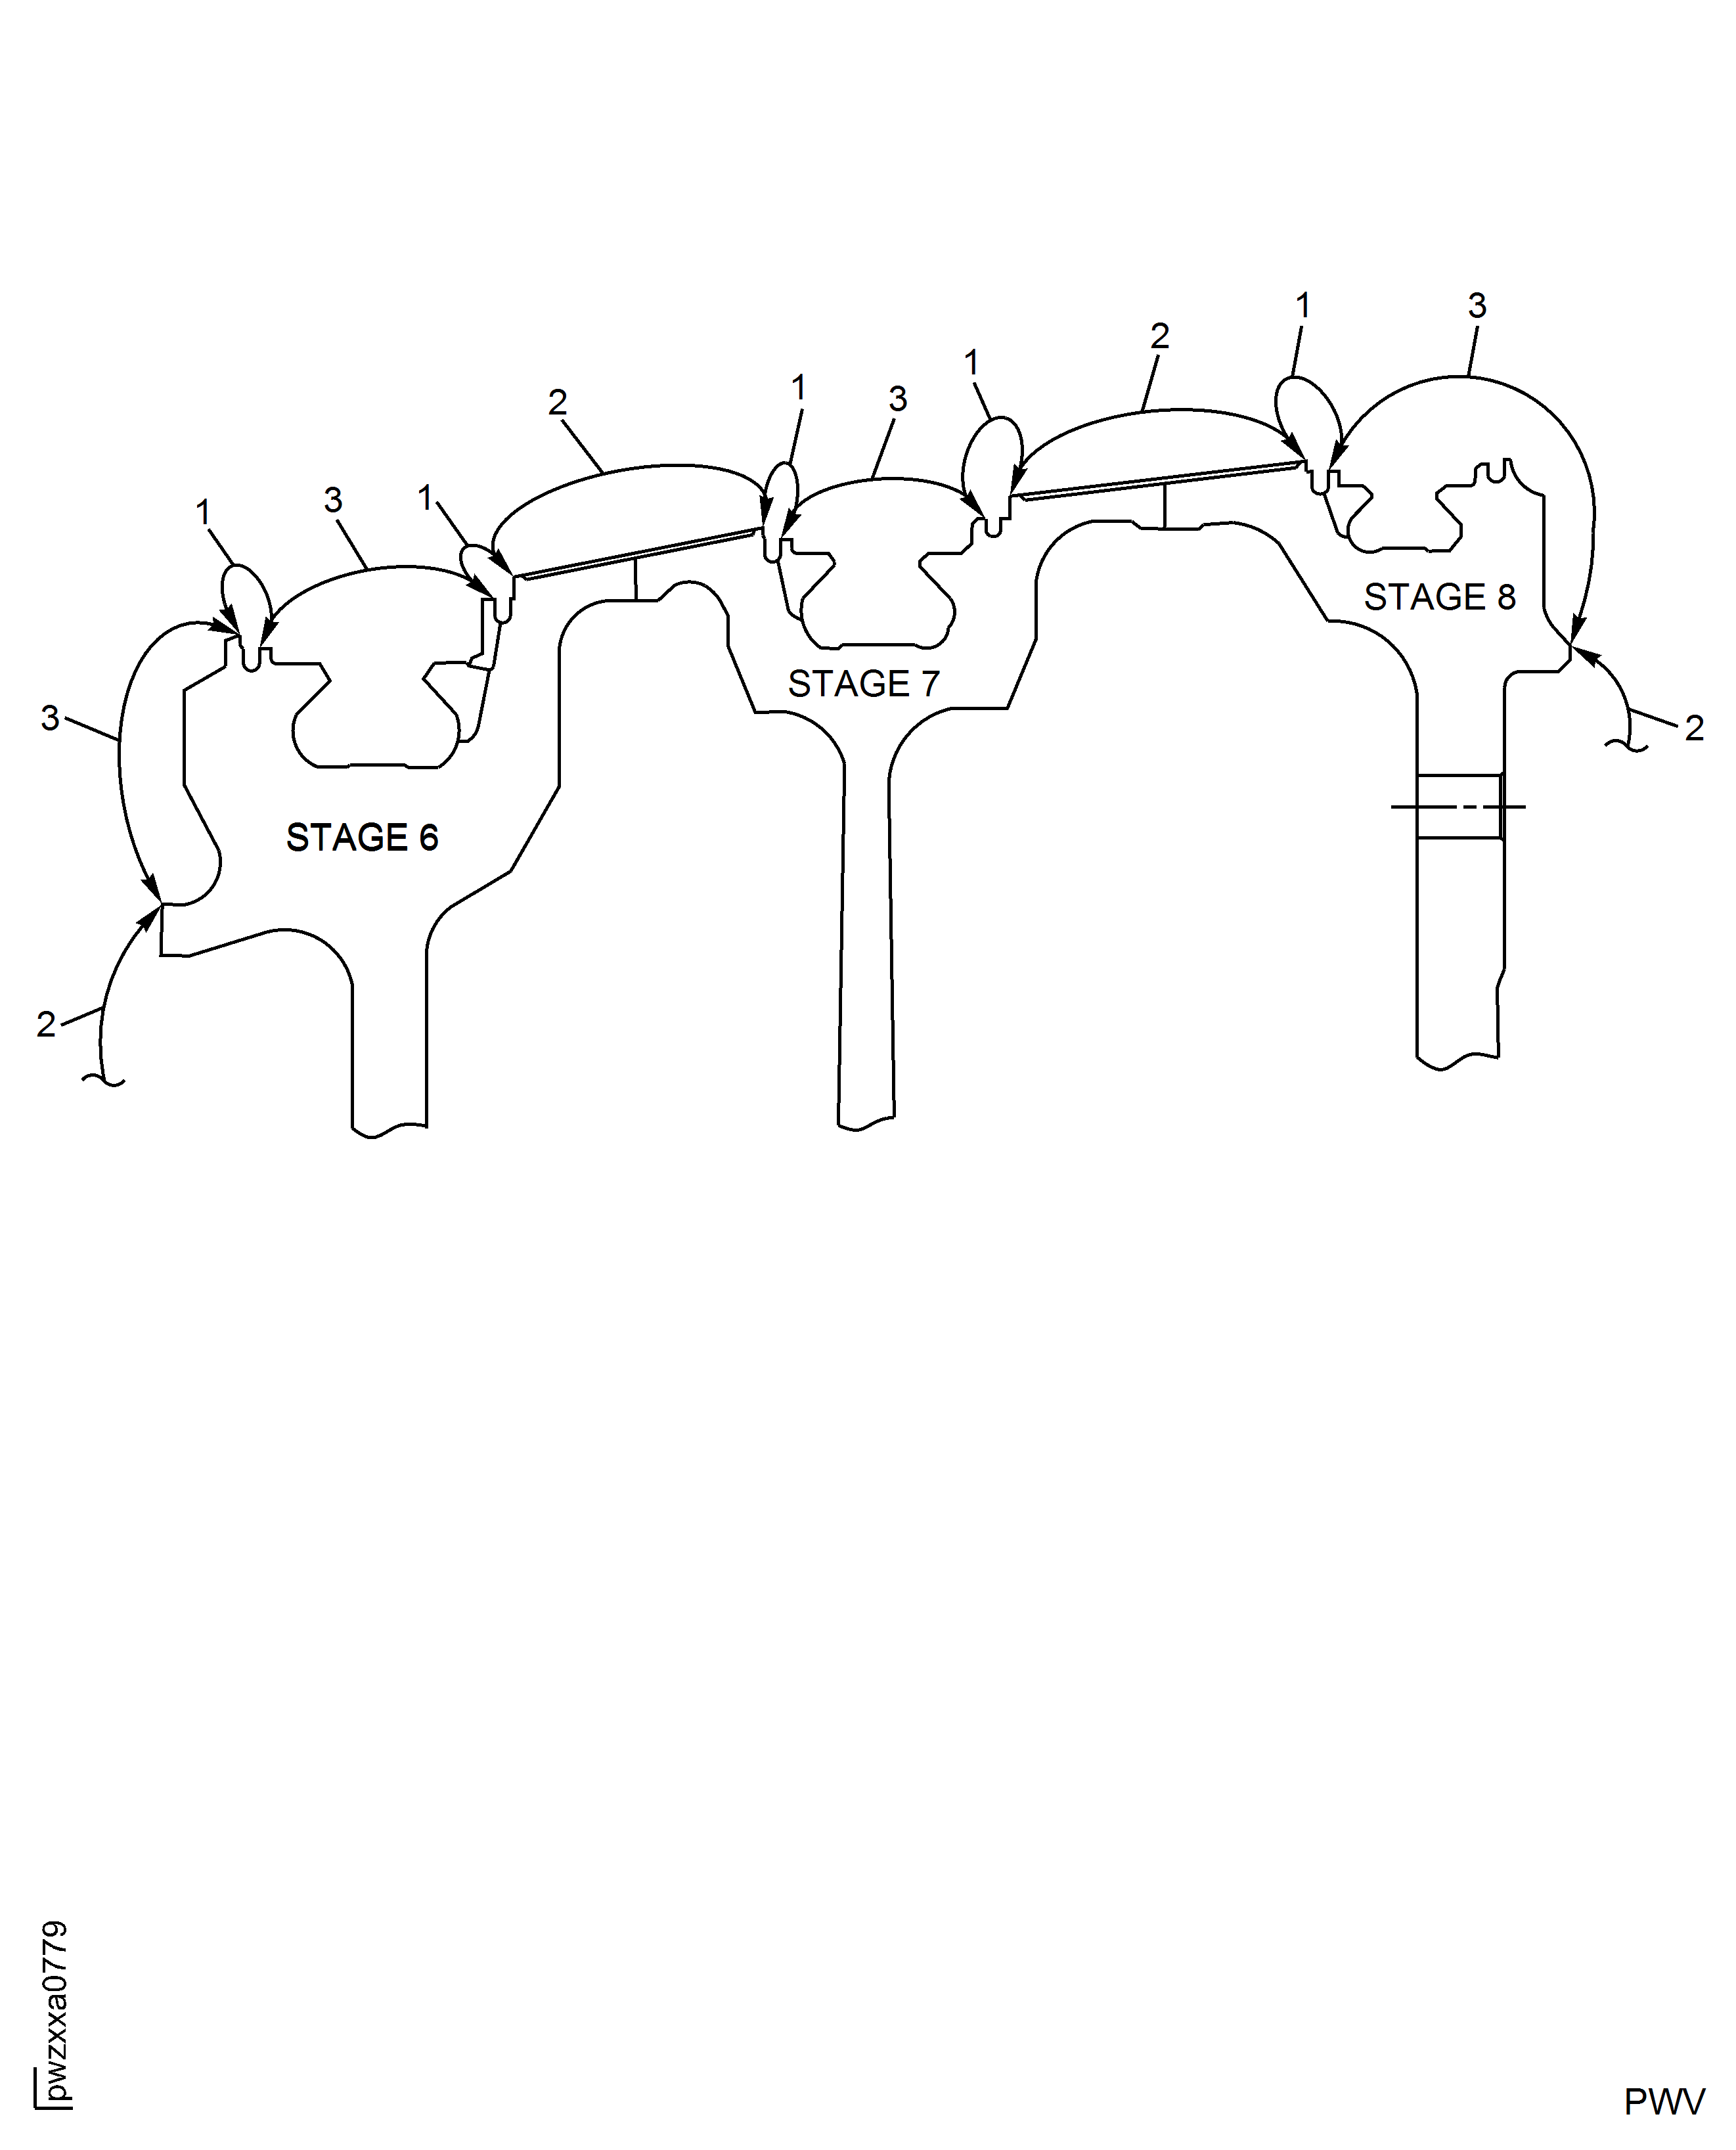
Figure: Showing Shotpeen Identification Mark Code Symbols For PNs 6A8316, 6B1386, and 6B1404 Only
Showing Shotpeen Identification Mark Code Symbols For PNs 6A8316, 6B1386, and 6B1404 Only
