TASK 72-41-10-440-003-B00 HPC Rotor Assembly - Do A Balance Check Of The Rotor Assembly And Install The Blades, Assembly-003 - Pre SBE 72-0300 And Pre SBE 72-0304

DMC:V2500-A0-72-41-1000-03C-710A-B|Issue No:003.00|Issue Date:2019-05-01

Export Control

EAR Export Classification: Not subject to the EAR per 15 C.F.R. Chapter 1, Part 734.3(b)(3), except for the following Service Bulletins which are currently published as EAR Export Classification 9E991: SBE70-0992, SBE72-0483, SBE72-0580, SBE72-0588, SBE72-0640, SBE73-0209, SBE80-0024 and SBE80-0025.

Copyright

© IAE International Aero Engines AG (2001, 2014 - 2021) The information contained in this document is the property of © IAE International Aero Engines AG and may not be copied or used for any purpose other than that for which it is supplied without the express written authority of © IAE International Aero Engines AG. (This does not preclude use by engine and aircraft operators for normal instructional, maintenance or overhaul purposes.).

Applicability

All

Common Information

TASK 72-41-10-440-003-B00 HPC Rotor Assembly - Do A Balance Check Of The Rotor Assembly And Install The Blades, Assembly-003 - Pre SBE 72-0300 And Pre SBE 72-0304

General

This TASK gives the procedure to do a balance check of the HP compressor rotor assembly and install the blades.

The procedure to measure, assemble and balance the HP compressor rotor assembly is given in the subsequent TASKs.

TASK 72-41-10-440-001 (ASSEMBLY-001, CONFIG-001) Measure the HP compressor rotor assembly parts.

TASK 72-41-10-440-002 (ASSEMBLY-002, CONFIG-002) Assemble the HP compressor rotor assembly.

TASK 72-41-10-440-004 (ASSEMBLY-004, CONFIG-002) Grind the tips of the HP compressor blades.

TASK 72-41-10-440-005 (ASSEMBLY-005, CONFIG-002) Final balance the HP compressor rotor assembly.

Fig/item numbers in parentheses in the procedure agree with those used in the IPC. Only the primary Fig/item numbers are used. For the service bulletin alpha variants refer to the IPC.

For all parts identified in a different Chapter/Section/Subject, the applicable Chapter/Section/Subject comes before the Fig/item numbers.

Overhaul processes referred to in the procedure by the TASK/SUBTASK number are in SPM.

For standard torque data and procedure refer to SPM TASK 70-41-00-400-501, SPM TASK 70-41-01-400-501 and SPM TASK 70-41-02-400-501.

Special torque data is identified with the symbol * after the torque value.

Special assembly tolerances are included in this procedure.

Lubricate all threads and mating faces of nuts and bolts with CoMat 10-077 APPROVED ENGINE OILS, unless other lubricants are referred to in the procedure.

All the curvic teeth and mating faces must be cleaned with CoMat 01-001 SOLVENT, DELETED or CoMat 01-002 SOLVENT, DELETED. before assembly. Refer to SPM TASK 70-11-01-300-503. They must also be dry assembled unless told differently in the procedure.

All of the temporary marks made in this procedure must be removed after completion of this task.

Data to balance.

The tools used in this procedure are used to adapt the HP compressor rotor assembly to the 'Schenck HL5' dynamic balancing machine. A balancing speed between 650 and 1000 RPM that gives stable and repeatable results is recommended. The best speed to use will be different for different machines. The correct RPM will usually agree with the gear ratios available. The balancing machine must turn the HP compressor rotor assembly in a clockwise direction (direction of engine turn) when seen from the rear of the engine.

Refer to Figure for an example view of the HP compressor rotor assembly.

NOTE

To identify the consumable materials refer to the PCI.

NOTE

Special tools are identified in the procedure by the tool primary number.

Preliminary Requirements

Pre-Conditions

NONE

Support Equipment

NameManufacturerPart Number / IdentificationQuantityRemark
Dynamic balancing machineLOCAL
Schenk 022748 end driveLOCAL
IAE 1R8590 Socket0AM53IAE 1R8590
IAE 1R18058 Protective cover0AM53IAE 1R180581
IAE 1R18059 Trolley0AM53IAE 1R18059
IAE 1R18060 Mounting foot0AM53IAE 1R180604
IAE 1R18061 Rail0AM53IAE 1R18061
IAE 1R18069 Rear anvil0AM53IAE 1R180691
IAE 1R18070 Front anvil0AM53IAE 1R180701
IAE 1R18071 Rear anvil0AM53IAE 1R180711
IAE 1R18072 Front anvil0AM53IAE 1R180721
IAE 1R18075 Support pedestal0AM53IAE 1R180751
IAE 1R18076 Slave lock plates0AM53IAE 1R180763
IAE 1R18079 Drift0AM53IAE 1R180791
IAE 1R18080 Drift0AM53IAE 1R180801
IAE 1R18081 Beam sling0AM53IAE 1R180811
IAE 1R18082 Pliers0AM53IAE 1R180821
IAE 1R18083 Hydraulic tool0AM53IAE 1R180831
IAE 1R18084 Pliers0AM53IAE 1R180841
IAE 1R18089 Lifting adapter0AM53IAE 1R18089
IAE 1R18090 Safety support stand0AM53IAE 1R180901
IAE 1R18091 Support stand0AM53IAE 1R180911
IAE 1R18095 Universal slinging adapter0AM53IAE 1R18095
IAE 1R18097 Drift0AM53IAE 1R180971
IAE 1R18245 Adapter0AM53IAE 1R182451
IAE 1R18590 Socket end0AM53IAE 1R185901
IAE 1R18683 Caliper adapter0AM53IAE 1R186831
IAE 1R18708 Protection cover0AM53IAE 1R18708
IAE 1R19812 Filing fixture0AM53IAE 1R198121
IAE 1R19813 Filing fixture0AM53IAE 1R198131

Consumables, Materials and Expendables

NameManufacturerPart Number / IdentificationQuantityRemark
CoMat 01-001 SOLVENT, DELETEDLOCALCoMat 01-001
CoMat 01-002 SOLVENT, DELETED.LOCALCoMat 01-002
CoMat 02-121 TEMPORARY MARKER PENCIL/CRAYONIE304CoMat 02-121
CoMat 02-122 TEMPORARY MARKER PENCIL/CRAYONK6835CoMat 02-122
CoMat 02-130 POLAR GRAPH PAPERLOCALCoMat 02-130
CoMat 02-181 MODELLING CLAYLOCALCoMat 02-181
CoMat 07-075 HIGH-HEAT RESISTING STOVING ENAMELk3504CoMat 07-075
CoMat 10-070 ANTI-SEIZE COMPOUNDLOCALCoMat 10-070
CoMat 10-077 APPROVED ENGINE OILSX333XCoMat 10-077

Spares

NameManufacturerPart Number / IdentificationQuantityRemark
LockplatesLockplates3

Safety Requirements

NONE

Procedure

    1. SUBTASK 72-41-10-440-145 Prepare the Balancing Machine for Use

    2. Refer to Figure and Figure.

      NOTE

      The bolts that attach the end drive to the balancing machine must all have the same weight.
    3. Attach Schenck 022748 end drive on to the balancing machine.

      1. Install the balancing machine rollers on the balancing machine pedestals.

      2. Install the small rollers on to the No. 1 pedestal.

      3. Install the large rollers on to the No. 2 pedestal.

    4. Set the distance between the No. 1 and No. 2 pedestals. The distance must be sufficient so that; the dummy stub shaft (attached to the stage 3 disk curvic coupling) touches the small rollers and the compressor shaft bearing location diameter (diameter A) touches the large rollers.

      1. Install IAE 1R18060 Mounting foot 4 off and IAE 1R18058 Protective cover 1 off on to the balancing machine. Refer to Figure.

      2. Install four tee-bolts in to each of the two slots in the balancing machine base.

      3. Position the tee-bolts and install a mounting foot over two of the tee-bolts. Make sure that the angled top of the mounting foot points in to the machine. Install two nuts on to the tee-bolts.

      4. Do Step again with the other three mounting feet.

      5. Attach an applicable sling and a hoist to the lift eyes on the top of the protective cover.

      6. WARNING

        MAKE SURE THAT THE PROTECTIVE COVER IS CLOSED AND THE KNOBS ARE IN THE SAFETY POSITION.

        NOTE

        The protective cover must be between the No. 1 and No. 2 pedestals.

        Lift the protective cover and put it above the mounting feet. Lower the protective cover until it is approximately one inch above the tops of the mounting feet.

      7. Adjust the position of the mounting feet until they are all adjacent to a pad on the bottom half of the protective cover. Tighten the nuts on the tee-bolts at the bottom of each mounting foot.

      8. Lower the protective cover on to the mounting feet.

      9. Install the 16 cap screws (four in each mounting foot) through the mounting feet in to the pads. Tighten the cap screws.

      10. Remove the sling and hoist.

    1. SUBTASK 72-41-10-440-146 Install the HP Compressor Rotor Assembly in to the Balancing Machine

      NOTE

      The HP compressor rotor assembly is installed in IAE 1R18059 Trolley.
    2. Refer to Figure, Figure, Figure and Figure.

      1. Remove IAE 1R18708 Protection cover from the compressor rotating air seals.

      2. Release the O ring from the O ring location.

      3. Carefully remove the protection cover from the compressor rotating air seals.

      4. Move the protection cover along the compressor shaft until it is on the universal sling adapter.

      1. Install IAE 1R18081 Beam sling 1 off on to the compressor rotor assembly.

      2. Make sure that the bracket is at the identified position for the center of gravity of the beam sling only.

      3. Attach a hoist to the ring.

      4. Lift the beam sling and put it above the compressor rotor assembly.

      5. Adjust the height of the beam sling until the shackles and screw pins can be attached to the universal sling adapters. Remove the screw pins.

      6. Install the screw pins through the shackles and universal sling adapters; tighten the screw pins.

      7. Set the beam sling to the identified position for the center of gravity of the beam sling and the compressor rotor assembly.

    3. Open the balancing machine protective cover.

    4. CAUTION

      DO NOT LET THE COMPRESSOR ROTOR ASSEMBLY HIT THE TROLLEY.

      NOTE

      Make sure that the dummy stub shaft points to the balancing machine drive.

      Lift the compressor rotor assembly out of the trolley and put it above the balancing machine pedestals.

    5. CAUTION

      YOU MUST NOT LET THE COMPRESSOR ROTOR ASSEMBLY HIT THE BALANCING MACHINE.

      Carefully lower the compressor rotor assembly on to the balancing machine. Make sure the dummy stub shaft touches the No. 1 pedestal and the bearing location diameter (Diameter A) touches the No. 2 pedestal.

      1. Remove the beam sling from the compressor rotor assembly.

      2. Set the beam sling to the identified position for the center of gravity of the beam sling only.

      3. Remove the screw pins from the shackles and disengage the shackles from the universal sling adapters.

      4. Install the screw pins in to the shackles and then lift the beam sling away from the compressor rotor. Put the beam sling on to an applicable surface and remove the hoist.

      1. Remove the universal sling adapters.

        1. Remove the universal sling adapter from the dummy stub shaft.

        2. Release the locknut.

        3. Remove the trunnion; remove the lifting end of the tool.

        4. Turn the adapter end to disengage the locations then remove the adapter end.

        1. Remove the universal sling adapter from the end of the compressor shaft.

        2. Remove the compressor rotating air seals protection cover from the sling adapter.

        3. Do Step thru Step again to remove the universal sling adapter.

    6. Remove the lifting adapter from the end of the compressor shaft.

    7. Close the top rollers on both pedestals.

      NOTE

      The bolts that attach the end drive to the dummy stub shaft must all have the same weight.
    8. Attach the end drive on to the dummy stub shaft with the six bolts. Make sure that the datum mark on the dummy stub shaft is aligned with the 0 degrees position on the balancing machine protractor.

    9. Close the protective cover and secure in position.

    1. SUBTASK 72-41-10-440-147 Do a Check Balance of the HP Compressor Rotor Assembly

      NOTE

      You must let the balancing machine run for a short time so that it can become stable, before balance values are read.
    2. Refer to Figure and Figure through Figure.

    3. Plane separate and calibrate the balancing machine to read static unbalance. Measure and record the quantity and angular position of the unbalance.

    4. Make a mark on CoMat 02-130 POLAR GRAPH PAPER to show the position and quantity of the unbalance. Identify this point as B1.

      NOTE

      The 180 degree turn of the compressor rotor assembly is necessary so that the tool unbalance can be removed (calculated).
      1. Install the compressor rotor assembly on to the dummy stub shaft, 180 degrees from the original position.

      2. Use CoMat 02-121 TEMPORARY MARKER PENCIL/CRAYON or CoMat 02-122 TEMPORARY MARKER PENCIL/CRAYON to make a mark that identifies the position of the dummy stub shaft in relation to the balancing machine drive head.

      3. Remove the HP compressor rotor assembly from the balancing machine and install it in IAE 1R18059 Trolley. Refer to Step.

        1. Install the HP compressor rotor assembly in to IAE 1R18090 Safety support stand.

        2. Install IAE 1R18091 Support stand 1 off on to the top of IAE 1R18090 Safety support stand 1 off. Make sure that the stand adapter is correctly engaged in the safety support stand.

        3. Attach a hoist to the rear universal sling adapter.

        4. Slowly adjust the position and height of the hoist so that the compressor rotor assembly turns to the vertical position.

        5. Lift the compressor rotor assembly off the trolley and put it above the safety support stand.

        6. CAUTION

          YOU MUST NOT LET THE COMPRESSOR ROTOR ASSEMBLY HIT THE SAFETY SUPPORT STAND.

          Slowly lower the compressor rotor assembly on to the safety support stand. Make sure the front universal sling adapter goes through the hole in the stand adapter.

        7. Continue to lower the compressor rotor assembly until the stage 3 disk touches the stand adapter.

        1. Remove the front universal sling adapter from the dummy stub shaft.

        2. Release the universal sling adapter locknut.

        3. Remove the trunnion pin and remove the lifting end of the tool.

        4. Turn the adapter end of the tool to disengage the locations then remove the adapter end.

        1. Remove the HP compressor rotor assembly from the dummy stub shaft and turn the assembly 180 degrees.

        2. Use the hoist to lift the compressor rotor assembly off the safety support stand and put it above IAE 1R18075 Support pedestal 1 off.

        3. CAUTION

          YOU MUST NOT LET THE COMPRESSOR ROTOR ASSEMBLY HIT THE SUPPORT PEDESTAL.

          Slowly lower the compressor rotor assembly on to the support pedestal. Make sure that the dummy stub shaft engages in to the top of the support pedestal.

        4. Use CoMat 02-121 TEMPORARY MARKER PENCIL/CRAYON or CoMat 02-122 TEMPORARY MARKER PENCIL/CRAYON to make a mark that identifies the position of the dummy stub shaft in relation to the stage 3 disk curvic coupling. Refer to SPM TASK 70-09-01-400-501.

        5. Release the 20 bolts that safety the dummy stub shaft to the stage 3 disk curvic coupling.

        6. Lift the compressor rotor assembly off the dummy stub shaft.

        7. Turn the compressor rotor assembly until the temporary mark on the stage 3 disk is 180 degrees opposite to the temporary mark on the dummy stub shaft.

        8. Slowly lower the compressor rotor assembly on to the dummy stub shaft. Make sure the location dowels in the dummy stub shaft engage in the location holes in the stage 3 disk curvic coupling.

        9. Install the 20 dummy stub shaft bolts in to the stage 3 disk curvic coupling nuts.

        10. Torque all of the bolts in sequence to 18 lbfin (2.034 Nm).

        11. Torque all of the bolts in sequence to 35 lbfin (3.955 Nm).

        12. Torque all of the bolts in sequence to 70 * lbfin (7.900 Nm).

        1. Install the HP compressor rotor assembly in to IAE 1R18090 Safety support stand.

        2. Lift the compressor rotor assembly off the support pedestal and put it above the safety support stand.

        3. CAUTION

          YOU MUST NOT LET THE COMPRESSOR ROTOR ASSEMBLY HIT THE SAFETY SUPPORT STAND.

          Slowly lower the compressor rotor assembly on to the safety support stand. Make sure that the dummy stub shaft goes through the hole in the stand adapter.

        4. Continue to lower the compressor rotor assembly until the stage 3 disk touches the top of the stand adapter.

        1. Install IAE 1R18095 Universal slinging adapter 1 off on to the dummy stub shaft.

        2. Lift the pin E and put the adapter end of the tool in to the dummy stub shaft. Turn the tool to engage the locations. Lower pin E.

        3. Install the lifting end of the tool in to the adapter end. Install the trunnion pin through both parts of the tool and tighten it.

        4. Tighten the lock nut on to the dummy stub shaft.

        1. Install the compressor rotor assembly in to IAE 1R18059 Trolley.

        2. Lift the compressor rotor assembly off the safety support stand and put it above the trolley. Make sure the trunnions on the front universal sling adapter are above the trunnion supports on the trolley.

        3. CAUTION

          YOU MUST NOT LET THE COMPRESSOR ROTOR ASSEMBLY HIT THE TROLLEY.

          Lower the compressor rotor assembly until the trunnions on the front universal sling adapter are engaged in the trunnion supports.

        4. Adjust the position and height of the hoist so that the compressor rotor assembly turns to the horizontal position. Make sure that the trunnions on the rear universal sling adapter engage in to the trunnion supports.

      4. Install the compressor rotor assembly in to the balancing machine. Refer to Step. Make sure that the temporary mark on the dummy stub shaft is aligned with the temporary mark on the balancing machine drive head.

    5. Plane separate and calibrate the balancing machine to read static unbalance. Measure and record the quantity and angular position of the unbalance.

    6. Make a mark on the polar graph paper to show the position of the unbalance. Identify this as B2.

      1. Calculate the correct unbalance in plane B.

      2. Make a line between the points B1 and B2. Make a mark at the middle position between the points B1 and B2. Identify this point as B3.

      3. Make a line between the point B3 and the center of the polar graph paper.

      4. The distance between the point B3 and either B1 or B2 (distance F) is the value of the amount of static unbalance in the compressor. Write down this value.

        NOTE

        The angle and amount of static unbalance can be checked by the temporary addition of CoMat 02-181 MODELLING CLAY on the stage 8 disk. This will move point B2 to point B3.
      5. Make a vertical line thru point B3. The angle (angle G) measured clockwise from 0 degrees to B2 indicates the angle of static unbalance in the compressor. Write down this value.

      6. The value of the static unbalance must not be more than 5.972 ozin (4300 gmm).

      7. If the static unbalance is more than 5.972 ozin (4300 gmm) then disassemble the compressor rotor assembly (refer to TASK 72-41-10-040-001) and examine the problem.

    1. SUBTASK 72-41-10-440-148 Install the HP Compressor Rotor Assembly in to the Trolley

    2. Refer to Figure, Figure, Figure and Figure.

    3. Release and remove the six bolts that attach the end drive to the dummy stub shaft.

    4. Put IAE 1R18708 Protection cover 1 off on to the end of the compressor shaft. Move the protection cover along the compressor shaft until it is adjacent to the No. 2 pedestal.

    5. Install IAE 1R18089 Lifting adapter 1 off on to the end of the compressor shaft. Tighten the lifting adapter.

      1. Attach one of IAE 1R18095 Universal slinging adapter 2 off on to the lifting adapter.

      2. Lift pin E and put the adapter end of the tool in to the adapter. Turn the tool to engage the locations. Lower pin E.

      3. Install the lifting end of the tool in to the adapter end. Install the trunnion pin through both parts of the tool and tighten it.

      4. Tighten the locknut on to the lifting adapter.

      1. Install the other universal sling adapter on to the dummy stub shaft.

      2. Do Step thru Step again to install the other universal sling adapter.

      1. Install IAE 1R18081 Beam sling 1 off on to the compressor rotor.

      2. Make sure that the bracket is at the identified position for the center of gravity of the beam sling only.

      3. Attach a hoist to the ring.

      4. Lift the beam sling and put it above the compressor rotor assembly.

      5. Adjust the height of the beam sling until the shackles and screw pins can be attached to the universal sling adapters. Remove the screw pins.

      6. Install the screw pins through the shackles and universal sling adapters; tighten the screw pins.

      7. Set the beam sling to the identified position for the center of gravity of the beam sling and the compressor rotor assembly.

    6. Open the top rollers on both pedestals.

    7. Lift the compressor rotor assembly out of the balancing machine.

      1. Install IAE 1R18708 Protection cover on to the compressor rotating air seals.

      2. Engage the protection cover over the compressor rotating air seals. Make sure the protection cover is correctly installed on the seals.

      3. Attach the O ring on to the O ring location to safety the protection cover.

      1. Install the compressor rotor assembly in to the trolley.

      2. Put the compressor rotor assembly above IAE 1R18059 Trolley 1 off. Make sure that the trunnions on the universal sling adapters are above the trunnion supports.

      3. CAUTION

        YOU MUST NOT LET THE COMPRESSOR ROTOR ASSEMBLY HIT THE TROLLEY.

        Lower the compressor rotor assembly in to the trolley. Make sure that the trunnions on the universal sling adapters engage in the trunnion supports of the trolley.

      1. Remove the beam sling from the compressor rotor assembly.

      2. Set the beam sling to the identified position for the center of gravity of the beam sling only.

      3. Remove the screw pins from the shackles and disengage the shackles from the universal sling adapters.

      4. Install the screw pins in to the shackles and then lift the beam sling away from the compressor rotor. Put the beam sling on to an applicable surface and remove the hoist.

    8. Install IAE 1R18061 Rail 2 off on to the trolley.

    1. SUBTASK 72-41-10-440-149 Find the Correct Selection of Stages 6 thru 8 Compressor Blades

      NOTE

      Make sure each jacking screw and locknut assembly is kept as a set.

      NOTE

      Use a CoMat 02-121 TEMPORARY MARKER PENCIL/CRAYON or CoMat 02-122 TEMPORARY MARKER PENCIL/CRAYON to make a mark on the jacking screw and locknut assembly and on the stage 6 thru 12 compressor disks so that they can be installed in the same positions.
    2. Refer to Figure, Figure, Figure and Figure.

    3. Release and remove the stage 6 thru 12 jacking screw and locknut assemblies from the disks.

      NOTE

      A selection of the 23 standard and the 23 undersize blades is used to get the correct platform build clearance.

      NOTE

      A maximum of 23 undersize blades is permitted.
      1. Find the correct selection of stage 6 compressor blades.

        A full set of stage 6 compressor blades includes the IPC Fig/item numbers that follow:

        2 LH locking blades HPC Rotor Blades (72-41-15, 02-170).

        2 RH locking blades HPC Rotor Blades (72-41-15, 02-185).

        52 Standard blades HPC Rotor Blades (72-41-15, 02-200).

        23 Standard blades HPC Rotor Blades (72-41-15, 02-215).

        23 Undersize blades HPC Rotor Blades (72-41-15, 02-217).

        1. CAUTION

          YOU MUST NOT USE THE DRIFT ON THE AIRFOIL SURFACES.

          Install the blades in to the disk.

        2. Install all of the standard blades in to the disk through the blade loading slot. Use IAE 1R18097 Drift 1 off positioned against the blade roots to move them around the disk in a counterclockwise direction when you look from the rear.

        3. Install one LH and then one RH locking blade in to the disk and move them counterclockwise.

        4. Install the second LH and then the second RH locking blade in to the disk and move them counterclockwise.

        1. Measure the platform build clearance, dimension A.

        2. CAUTION

          THE PLATFORM BUILD CLEARANCE IS MEASURED WITH ALL THE BLADE PLATFORMS TOUCHING. TAKE CARE NOT TO DAMAGE THE BLADES OR THE DISK ASSEMBLY.

          Use the drift against the blade roots to make sure all of the blade platforms touch.

        3. Use feeler gauges to measure dimension A. The feeler gauges must go through the full axial length X of both platforms and must span the full radial height Y of both platforms.

        4. Write a record of the platform build clearance.

      2. The platform build clearance (dimension A) must be 0.008 in. to 0.028 in. (0.20 mm to 0.70 mm).

        NOTE

        One undersize blade will give an increase in the platform build clearance of 0.016 in. (0.40 mm).
      3. Calculate the number of undersize blades that are required to get the correct platform build clearance.

      4. Remove the necessary number of standard blades and install the undersize blades.

      5. Do Step and Step again to make sure that the platform build clearance is correct.

      6. Remove all of the blades from the disk.

      7. Weigh each of the standard and undersize blades in turn and keep a record of the weight and the blade identification number.

        NOTE

        Do not include the LH and RH locking blades.
      8. Put the selection of standard and undersize blades on a suitable work surface in a light to heavy sequence.

        NOTE

        Undersize blades must not be installed adjacent to each other on assembly.

        NOTE

        Blades must be evenly distributed around the disk.
      9. Use CoMat 02-121 TEMPORARY MARKER PENCIL/CRAYON or CoMat 02-122 TEMPORARY MARKER PENCIL/CRAYON to identify the blades in a light-heavy-light sequence ready for assembly. Refer to Figure for an example of a light-heavy-light sequence.

        NOTE

        A selection of the 26 standard blades and the 26 undersize blades is used to get the correct platform build clearance.

        NOTE

        A maximum of 26 undersize blades is permitted.
      1. Find the correct selection of stage 7 compressor blades.

        A full set of stage 7 compressor blades includes the IPC Fig/item numbers that follow:

        2 LH locking blades HPC Rotor Blades (72-41-15, 02-270).

        2 RH locking blades HPC Rotor Blades (72-41-15, 02-285).

        63 Standard blades HPC Rotor Blades (72-41-15, 02-300).

        26 Standard blades HPC Rotor Blades (72-41-15, 02-315).

        26 Undersize blades HPC Rotor Blades (72-41-15, 02-317).

        NOTE

        Do not mark the stage 7 blades in a light-heavy-light sequence.
      2. Do steps C.(1) thru C.(9) again to get the correct selection of stage 7 blades.

        NOTE

        A selection of the 24 standard blades and the 24 undersize blades is used to get the correct platform build clearance.

        NOTE

        A maximum of 24 undersize blades is permitted.
      1. Find the correct selection of stage 8 compressor blades.

        A full set of stage 8 compressor blades includes the IPC Fig/item numbers that follow:

        2 LH locking blades HPC Rotor Blades (72-41-15, 02-370).

        2 RH locking blades HPC Rotor Blades (72-41-15, 02-385).

        56 Standard blades HPC Rotor Blades (72-41-15, 02-400).

        24 Standard blades HPC Rotor Blades (72-41-15, 02-415).

        24 Undersize blades HPC Rotor Blades (72-41-15, 02-417).

      2. Do steps C.(1) thru C.(10) again to get the correct selection of stage 8 blades.

    1. SUBTASK 72-41-10-440-150 Install the Stage 6 Disk Sealing Wires

      CAUTION

      WHEN INSTALLING THE DAMPER WIRES, POSITION THE DAMPER WIRE SO THAT THE SPLIT LINE IS AS FAR AWAY AS POSSIBLE FROM BOTH THE BLADE LOADING SLOT AND THE LOCATION OF THE MAXIMUM LOCAL WEAR TO THE DAMPER WIRE GROOVE.
    2. Refer to Figure.

    3. Install the stage 6 front sealing wire HPC Stage 3 - 8 Drum Disk And Wire Seals (72-41-11, 01-386) in to the stage 6 disk front groove.

    4. Push the sealing wire in to the bottom of the groove around the disk and measure the overlap (dimension B). Make sure that dimension B is a minimum of 0.236 in. (6.00 mm).

    5. Install the stage 6 rear sealing wire HPC Stage 3 - 8 Drum Disk And Wire Seals (72-41-11, 01-388) in to the stage 6 disk rear groove. The front and rear sealing wire joints must be 180 degrees apart.

    6. Do step B. again for the rear sealing wire.

    1. SUBTASK 72-41-10-440-151 Install the Correct Selection of Stage 6 Blades

      WARNING

      WHEN YOU USE CoMat 01-001 SOLVENT, DELETED OR CoMat 01-002 SOLVENT, DELETED. YOU MUST USE THE NECESSARY PROTECTIVE CLOTHING. DO NOT GET THE SOLVENT ON YOUR SKIN OR IN YOUR EYES. YOU MUST NOT SMOKE WHEN YOU USE THE SOLVENT AS THE VAPOUR CHANGES AND BECOMES TOXIC.
    2. Refer to Figure, Figure, Figure and Figure.

      1. Prepare the jacking screw and locknut assembly.

      2. Use CoMat 01-001 SOLVENT, DELETED or CoMat 01-002 SOLVENT, DELETED. and a cloth to clean the threads of the jacking screw and locknut assemblies removed in Step.

      3. Use a brush to apply CoMat 10-070 ANTI-SEIZE COMPOUND to the threads of the stage 6 jacking screw and locknut assemblies.

      4. Install the screws in to the nuts. Make sure that the bottom of the screws are below the surface of the nuts.

      1. CAUTION

        YOU MUST NOT USE THE DRIFT ON THE AIRFOIL SURFACES.

        NOTE

        The jacking screw and locknut assemblies must be installed in the positions that they were removed from. Refer to Step.

        Install the stage six standard and undersize blades which were selected in Step in to the disk in the identified light-heavy-light sequence. Use IAE 1R18097 Drift 1 off to move the blades around the disk in a counterclockwise direction when you look from the rear.

      2. Install one of the LH locking blades in to the blade loading slot and use the drift to move it counterclockwise when you look from the rear.

      3. Install one jacking screw and locknut assembly in to the blade loading slot and move it counterclockwise when you look from the rear.

      4. Install one of the RH locking blades in to the blade loading slot and use the drift to move it counterclockwise when you look from the rear.

      5. Install six standard or undersize blades in the blade loading slot and use the drift to move them clockwise when you look from the rear.

      6. Install the second RH locking blade in to the blade loading slot and use the drift to move it clockwise when you look from the rear.

      7. Install the second jacking screw and locknut assembly in to the blade loading slot and move it clockwise when you look from the rear.

      8. Install the second LH locking blade in to the blade loading slot and use the drift to move it clockwise when your look from the rear.

      9. Install the remaining stage six standard or undersize blades in the correct sequence. Use the drift to move them clockwise when you look from the rear.

        NOTE

        A blade platform joint will be in line with the center of the blade loading slot.
      10. Continue to move the blades in a clockwise direction until the jacking screw and locknut assemblies are in their correct positions. Refer to Figure.

      11. Use IAE 1R18590 Socket end 1 off to torque the screws to between 4 lbfin and 5 lbfin (0.45 Nm and 0.56 Nm) above the locking torque.

      1. Measure the blade platform gaps.

      2. Make sure that the blade platforms touch and that all the blades are pushed in a clockwise direction.

      3. Use a feeler gage to measure the gap in segment A. Refer to the table on Figure for the correct gap.

        NOTE

        The feeler gage must go through the full axial length X of both platforms and must span the full radial height Y of both platforms.
      4. Use a feeler gage to measure the gap in segment B. Refer to the table on Figure for the correct gap.

        1. Use IAE IAE 1R18683 Caliper adapter 1 Off to make sure that the jacking screws are correctly installed. Refer to Figure.

        2. The jacking screws must not be more than 0.0137 in. (0.35 mm) above the top of the locknuts and not more than 0.0787 in. (2.00 mm) below the top of the locknuts. Get the dimension at the position of the locknut that points to the front of the engine.

    1. SUBTASK 72-41-10-440-152 Find the Correct Selection of Stages 9 thru 12 Compressor Blades

    2. Refer to Figure, Figure and Figure.

      NOTE

      A selection of the 25 standard blades and the 25 undersize blades is used to get the correct platform build clearance.

      NOTE

      A maximum of 25 undersize blades is permitted.
      1. Find the correct selection of stage 9 compressor blades.

        A full set of stage 9 compressor blades includes the IPC Fig/item numbers that follow:

        2 LH locking blades HPC Rotor Blades (72-41-15, 02-470).

        2 RH locking blades HPC Rotor Blades (72-41-15, 02-485).

        60 Standard blades HPC Rotor Blades (72-41-15, 02-500).

        25 Standard blades HPC Rotor Blades (72-41-15, 02-515).

        25 Undersize blades HPC Rotor Blades (72-41-15, 02-517).

      2. The procedure to get the correct selection of stage 9 blades is the same as the procedure for stage 6 blades given in Step.

      3. The stage 9 platform build clearance (dimension A) must be 0.008 in. to 0.028 in. (0.20 mm to 0.70 mm).

        NOTE

        A selection of the 24 standard blades and the 24 undersize blades is used to get the correct platform build clearance.

        NOTE

        A maximum of 24 undersize blades is permitted.
      1. Find the correct selection of stage 10 compressor blades.

        A full set of stage 10 compressor blades includes the IPC Fig/item numbers that follow:

        2 LH locking blades HPC Rotor Blades (72-41-15, 02-570).

        2 RH locking blades HPC Rotor Blades (72-41-15, 02-585).

        57 Standard blades HPC Rotor Blades (72-41-15, 02-600).

        24 Standard blades HPC Rotor Blades (72-41-15, 02-615).

        24 Undersize blades HPC Rotor Blades (72-41-15, 02-617).

      2. The procedure to get the correct selection of stage 10 blades is the same as the procedure for stage 6 blades given in Step.

      3. The stage 10 platform build clearance (dimension A) must be 0.008 in. to 0.028 in. (0.20 mm to 0.70 mm).

        NOTE

        A selection of the 24 standard blades and the 24 undersize blades is used to get the correct platform build clearance.

        NOTE

        A maximum of 24 undersize blades is permitted.
      1. Find the correct selection of stage 11 compressor blades.

        A full set of stage 11 compressor blades includes the IPC Fig/item numbers that follow:

        2 LH locking blades HPC Rotor Blades (72-41-15, 02-670).

        2 RH locking blades HPC Rotor Blades (72-41-15, 02-685).

        50 Standard blades HPC Rotor Blades (72-41-15, 02-700).

        24 Standard blades HPC Rotor Blades (72-41-15, 02-715).

        24 Undersize blades HPC Rotor Blades (72-41-15, 02-717).

      2. The procedure to get the correct selection of stage 11 blades is the same as the procedure for stage 6 blades given in Step.

      3. The stage 11 platform build clearance (dimension A) must be 0.008 in. to 0.028 in. (0.20 mm to 0.70 mm).

        NOTE

        A selection of the 23 standard blades and the 23 undersize blades is used to get the correct platform build clearance.

        NOTE

        A maximum of 23 undersize blades is permitted.
      1. Find the correct selection of stage 12 compressor blades.

        A full set of stage 12 compressor blades includes the IPC Fig/item numbers that follow:

        2 LH locking blades HPC Rotor Blades (72-41-15, 02-770).

        2 RH locking blades HPC Rotor Blades (72-41-15, 02-785).

        44 Standard blades HPC Rotor Blades (72-41-15, 02-800).

        23 Standard blades HPC Rotor Blades (72-41-15, 02-815).

        23 Undersize blades HPC Rotor Blades (72-41-15, 02-817).

      2. The procedure to get the correct selection of stage 12 blades is the same as the procedure for stage 6 blades given in Step.

      3. The stage 12 platform build clearance (dimension A) must be 0.039 in. to 0.059 in. (1.00 mm to 1.50 mm).

    1. SUBTASK 72-41-10-440-153 Install the Correct Selection of Stage 9 Compressor Blades

      WARNING

      WHEN YOU USE CoMat 01-001 SOLVENT, DELETED OR CoMat 01-002 SOLVENT, DELETED. YOU MUST USE THE NECESSARY PROTECTIVE CLOTHING. DO NOT GET THE SOLVENT ON YOUR SKIN OR IN YOUR EYES. YOU MUST NOT SMOKE WHEN YOU USE THE SOLVENT AS THE VAPOR CHANGES AND BECOMES TOXIC.
    2. Refer to Figure through Figure.

      1. Prepare the jacking screw and locknut assemblies.

      2. Use CoMat 01-001 SOLVENT, DELETED or CoMat 01-002 SOLVENT, DELETED. and a cloth to clean the threads of the jacking screw and locknut assemblies removed in Step.

      3. Use a brush to apply CoMat 10-070 ANTI-SEIZE COMPOUND to the threads of the stage 9 jacking screw and locknut assemblies.

      4. Install the screws in to the nuts. Make sure that the bottom of the screws are below the surface of the nuts.

      1. CAUTION

        YOU MUST NOT USE THE DRIFT ON THE AIRFOIL SURFACES.

        NOTE

        The jacking screw and locknut assemblies must be installed in the positions that they were removed from. Refer to Step.

        Install the stage 9 standard and undersize blades which were selected in Step in to the disk in the identified light-heavy-light sequence. Use IAE 1R18097 Drift 1 off to move the blades around the disk in a counterclockwise direction when you look from the rear.

      2. Install one of the LH locking blades in to the blade loading slot and use the drift to move it counterclockwise when you look from the rear.

      3. Install one jacking screw and locknut assembly in the blade loading slot and move it counterclockwise when you look from the rear.

      4. Install one of the RH locking blades in to the blade loading slot and use the drift to move it counterclockwise when you look from the rear.

      5. Install 20 standard or undersize blades in the blade loading slot and use the drift to move them clockwise when you look from the rear.

      6. Install the second RH locking blade in to the blade loading slot and use the drift to move it clockwise when you look from the rear.

      7. Install the second jacking screw and locknut assembly in to the blade loading slot and move it clockwise when you look from the rear.

      8. Install the second LH locking blade in to the blade loading slot and use the drift to move it clockwise when you look from the rear.

      9. Install the remaining stage 9 standard or undersize blades in the correct sequence. Use the drift to move them clockwise when you look from the rear.

        NOTE

        A blade platform joint will be in line with the center of the blade loading slot.
      10. Continue to move the blades in a clockwise direction until the jacking screw and locknut assemblies are in their correct positions.

      11. Use IAE 1R18590 Socket end 1 off to torque the screws to between 4 lbfin and 5 lbfin (0.45 Nm and 0.56 Nm) above the locking torque.

      1. Measure the blade platform gaps.

      2. Make sure that the blade platforms touch and that all the blade are pushed in a clockwise direction.

      3. Use a feeler gage to measure the gap in segment A. Refer to Figure for the correct gap.

        NOTE

        The feeler gage must go through the full axial length X of both platforms and must span the full radial height Y of both platforms.
      4. Use a feeler gage to measure the gap in segment B. Refer to the table on Figure for the correct gap.

        1. Use IAE IAE 1R18683 Caliper adapter 1 off to make sure that the jacking screws are correctly installed.

        2. The jacking screws must not be more than 0.0137 in. (0.35 mm) above the top of the locknuts and not more than 0.0787 in. (2.00 mm) below the top of the locknuts at the front face of the disk.

    1. SUBTASK 72-41-10-440-164 Install the Correct Selection of Stage 10 Compressor Blades

      WARNING

      WHEN YOU USE CoMat 01-001 SOLVENT, DELETED OR CoMat 01-002 SOLVENT, DELETED. YOU MUST USE THE NECESSARY PROTECTIVE CLOTHING. DO NOT GET THE SOLVENT ON YOUR SKIN OR IN YOUR EYES. YOU MUST NOT SMOKE WHEN YOU USE THE SOLVENT AS THE VAPOR CHANGES AND BECOMES TOXIC.
    2. Refer to Figure through Figure.

      1. Prepare the jacking screw and locknut assemblies.

      2. Use CoMat 01-001 SOLVENT, DELETED or CoMat 01-002 SOLVENT, DELETED. and a cloth to clean the threads of the jacking screw and locknut assemblies removed in Step.

      3. Use a brush to apply CoMat 10-070 ANTI-SEIZE COMPOUND to the threads of the stage 10 jacking screw and locknut assemblies.

      4. Install the screws in to the nuts. Make sure that the bottom of the screws are below the surface of the nuts.

      1. CAUTION

        YOU MUST NOT USE THE DRIFT ON THE AIRFOIL SURFACES.

        NOTE

        The jacking screw and locknut assemblies must be installed in the positions that they were removed from. Refer to Step.

        Install the stage 10 standard and undersize blades which were selected in Step in to the disk in the identified light-heavy-light sequence. Use IAE 1R18097 Drift 1 off to move the blades around the disk in a counterclockwise direction when you look from the rear.

      2. Install one of the LH locking blades in to the blade loading slot and use the drift to move it counterclockwise when you look from the rear.

      3. Install one jacking screw and locknut assembly in to the blade loading slot and move it counterclockwise when you look from the rear.

      4. Install one of the RH locking blades in to the blade loading slot and use the drift to move it counterclockwise when you look from the rear.

      5. Install five standard or undersize blades in the blade loading slot and use the drift to move them clockwise when you look from the rear.

      6. Install the second RH locking blade in to the blade loading slot and use the drift to move it clockwise when you look from the rear.

      7. Install the second jacking screw and locknut assembly in to the blade loading slot and move it clockwise when you look from the rear.

      8. Install the second LH locking blade in to the blade loading slot and use the drift to move it clockwise when you look from the rear.

      9. Install the remaining stage 10 standard or undersize blades in the correct sequence. Use the drift to move them clockwise when you look from the rear.

        NOTE

        A blade platform joint will be in line with the center of the blade loading slot.
      10. Continue to move the blades in a clockwise direction until the jacking screw and locknut assemblies are in their correct positions.

      11. Use IAE 1R18590 Socket end 1 off to torque the screws to between 4 lbfin and 5 lbfin (0.45 Nm and 0.56 Nm) above the applicable locking torque.

      1. Measure the blade platform gaps.

      2. Make sure that the blade platforms touch and that all the blade are pushed in a clockwise direction.

      3. Use a feeler gage to measure the gap in segment A. Refer to Figure for the correct gap.

        NOTE

        The feeler gage must go through the full axial length X of both platforms and must span the full radial height Y of both platforms.
      4. Use a feeler gage to measure the gap in segment B. Refer to the table on Figure for the correct gap.

        1. Use IAE IAE 1R18683 Caliper adapter 1off to make sure that the jacking screws are correctly installed.

        2. The jacking screws must not be more than 0.0137 in. (0.35 mm) above the top of the locknuts and not more than 0.0787 in. (2.00 mm) below the top of the locknuts at the front face of the disk.

    1. SUBTASK 72-41-10-440-165 Install the Correct Selection of Stage 11 Blades

      WARNING

      WHEN YOU USE CoMat 01-001 SOLVENT, DELETED OR CoMat 01-002 SOLVENT, DELETED. YOU MUST USE THE NECESSARY PROTECTIVE CLOTHING. DO NOT GET THE SOLVENT ON YOUR SKIN OR IN YOUR EYES. YOU MUST NOT SMOKE WHEN YOU USE THE SOLVENT AS THE VAPOR CHANGES AND BECOMES TOXIC.
    2. Refer to Figure through Figure.

      1. Prepare the jacking screw and locknut assemblies.

      2. Use CoMat 01-001 SOLVENT, DELETED or CoMat 01-002 SOLVENT, DELETED. and a cloth to clean the threads of the jacking screw and locknut assemblies removed in Step.

      3. Use a brush to apply CoMat 10-070 ANTI-SEIZE COMPOUND to the threads of the stage 11 jacking screw and locknut assemblies.

      4. Install the screws in to the nuts. Make sure that the bottom of the screws are below the surface of the nuts.

      1. CAUTION

        YOU MUST NOT USE THE DRIFT ON THE AIRFOIL SURFACES.

        NOTE

        The jacking screw and locknut assemblies must be installed in the positions that they were removed from. Refer to Step.

        Install the stage 11 standard and undersize blades which were selected in Step in to the disk in the identified light-heavy-light sequence. Use IAE 1R18097 Drift 1 off to move the blades around the disk in a counterclockwise direction when you look from the rear.

      2. Install one of the LH locking blades in to the blade loading slot and use the drift to move it counterclockwise when you look from the rear.

      3. Install one jacking screw and locknut assembly in to the blade loading slot and move it counterclockwise when you look from the rear.

      4. Install one of the RH locking blades in to the blade loading slot and use the drift to move it counterclockwise when you look from the rear.

      5. Install eight standard or undersize blades in the blade loading slot and use the drift to move them clockwise when you look from the rear.

      6. Install the second RH locking blade in to the blade loading slot and use the drift to move it clockwise when you look from the rear.

      7. Install the second jacking screw and locknut assembly in to the blade loading slot and move it clockwise when you look from the rear.

      8. Install the second LH locking blade in to the blade loading slot and use the drift to move it clockwise when you look from the rear.

      9. Install the remaining stage 11 standard or undersize blades in the correct sequence. Use the drift to move them clockwise when you look from the rear.

        NOTE

        A blade platform joint will be in line with the center of the blade loading slot.
      10. Continue to move the blades in a clockwise direction until the jacking screw and locknut assemblies are in their correct positions.

      11. Use IAE 1R18590 Socket end 1 off to torque the screws to between 4 lbfin and 5 lbfin (0.45 Nm and 0.56 Nm) above the applicable locking torque.

      1. Measure the blade platform gaps.

      2. Make sure that the blade platforms touch and that all the blade are pushed in a clockwise direction.

      3. Use a feeler gage to measure the gap in segment A. Refer to Figure for the correct gap.

        NOTE

        The feeler gage must go through the full axial length X of both platforms and must span the full radial height Y of both platforms.
      4. Use a feeler gage to measure the gap in segment B. Refer to the table on Figure for the correct gap.

        1. Use IAE IAE 1R18683 Caliper adapter 1 off to make sure that the jacking screws are correctly installed.

        2. The jacking screws must not be more than 0.0137 in. (0.35 mm) above the top of the locknuts and not more than 0.0787 in. (2.00 mm) below the top of the locknuts at the front face of the disk.

    1. SUBTASK 72-41-10-440-166 Install the Correct Selection of Stage 12 Compressor Blades

      WARNING

      WHEN YOU USE CoMat 01-001 SOLVENT, DELETED OR CoMat 01-002 SOLVENT, DELETED. YOU MUST USE THE NECESSARY PROTECTIVE CLOTHING. DO NOT GET THE SOLVENT ON YOUR SKIN OR IN YOUR EYES. YOU MUST NOT SMOKE WHEN YOU USE THE SOLVENT AS THE VAPOR CHANGES AND BECOMES TOXIC.
    2. Refer to Figure through Figure.

      1. Prepare the jacking screw and locknut assemblies.

      2. Use CoMat 01-001 SOLVENT, DELETED or CoMat 01-002 SOLVENT, DELETED. and a cloth to clean the threads of the jacking screw and locknut assemblies removed in Step.

      3. Use a brush to apply CoMat 10-070 ANTI-SEIZE COMPOUND to the threads of the stage 12 jacking screw and locknut assemblies.

      4. Install the screws in to the nuts. Make sure that the bottom of the screws are below the surface of the nuts.

      1. CAUTION

        YOU MUST NOT USE THE DRIFT ON THE AIRFOIL SURFACES.

        NOTE

        The jacking screw and locknut assemblies must be installed in the positions that they were removed from. Refer to Step.

        Install the stage 12 standard and undersize blades which were selected in Step in to the disk in the identified light-heavy-light sequence. Use IAE 1R18097 Drift 1 off to move the blades around the disk in a counterclockwise direction when you look from the rear.

      2. Install one of the LH locking blades in to the blade loading slot and use the drift to move it counterclockwise when you look from the rear.

      3. Install one jacking screw and locknut assembly in to the blade loading slot and move it counterclockwise when you look from the rear.

      4. Install one of the RH locking blades in to the blade loading slot and use the drift to move it counterclockwise when you look from the rear.

      5. Install two standard or undersize blades in the blade loading slot and use the drift to move them clockwise when you look from the rear.

      6. Install the second RH locking blade in to the blade loading slot and use the drift to move it clockwise when you look from the rear.

      7. Install the second jacking screw and locknut assembly in to the blade loading slot and move it clockwise when you look from the rear.

      8. Install the second LH locking blade in to the blade loading slot and use the drift to move it clockwise when you look from the rear.

      9. Install the remaining stage 12 standard or undersize blades in the correct sequence. Use the drift to move them clockwise when you look from the rear.

        NOTE

        A blade platform joint will be in line with the center of the blade loading slot.
      10. Continue to move the blades in a clockwise direction until the jacking screw and locknut assemblies are in their correct positions.

      11. Use IAE 1R18590 Socket end 1 off to torque the screws to between 4 lbfin and 5 lbfin (0.45 Nm and 0.56 Nm) above the applicable locking torque.

      1. Measure the blade platform gaps.

      2. Make sure that the blade platforms touch and that all the blade are pushed in a clockwise direction.

      3. Use a feeler gage to measure the gap in segment A. Refer to Figure for the correct gap.

        NOTE

        The feeler gage must go through the full axial length X of both platforms and must span the full radial height Y of both platforms.
      4. Use a feeler gage to measure the gap in segment B. Refer to the table on Figure for the correct gap.

        1. Use IAE IAE 1R18683 Caliper adapter 1 off to make sure that the jacking screws are correctly installed.

        2. The jacking screw must not be more than 0.0137 in. (0.35 mm) above the top of the locknuts and not more than 0.0787 in. (2.00 mm) below the top of the locknuts at the front face of the disk.

    1. SUBTASK 72-41-10-440-154 Weigh the Stages 4 and 5 Compressor Blades and Retaining Plates

    2. Refer to Figure.

      1. Weigh the stage 4 compressor blades HPC Rotor Blades (72-41-15, 01-500).

      2. Weigh each of the compressor blades in turn and keep a record of the weight and the blade identification number.

      3. Put the blades on a suitable work surface in a light to heavy sequence.

      4. Use CoMat 02-121 TEMPORARY MARKER PENCIL/CRAYON or CoMat 02-122 TEMPORARY MARKER PENCIL/CRAYON to identify the blades in a light-heavy-light sequence ready for assembly. Refer to Figure for an example of a light-heavy-light sequence.

      1. Weigh the stage 5 compressor blades HPC Rotor Blades (72-41-15, 01-800).

      2. Do Step thru Step again.

      1. Weigh the 9 stage 4 retaining plates HPC Rotor Blades (72-41-15, 01-350).

      2. Weigh each of the retaining plates in turn to the nearest 0.0035 oz (0.10 g).

      3. Put the plates on a suitable work surface in a light to heavy sequence.

      4. Use CoMat 02-121 TEMPORARY MARKER PENCIL/CRAYON or CoMat 02-122 TEMPORARY MARKER PENCIL/CRAYON to identify the plates in a light-heavy-light sequence ready for assembly.

      1. Weigh the 12 stage 5 retaining plates HPC Rotor Blades (72-41-15, 01-650).

      2. Do Step thru Step again.

    1. SUBTASK 72-41-10-440-155 Install the Stages 4 and 5 Compressor Blades in the Disk Assembly

    2. Refer to Figure, Figure, Figure and Figure.

      1. Install the stage 5 compressor blades.

        NOTE

        Install the heaviest blade at the No. 1 blade slot position.

        NOTE

        Install the blades from the front of the disk.
      2. Install the stage 5 blades to the disk in the sequence found in Step. Start from the No. 1 blade slot and install the blades in a clockwise direction when you look from the rear.

      1. Install the stage 5 retaining plates.

      2. Move all of the stage 5 blades rearwards in the blade slots.

      3. Move forward the blade at the No. 1 blade position until the groove in the disk and the groove in the blade are aligned.

      4. Apply CoMat 07-075 HIGH-HEAT RESISTING STOVING ENAMEL to the mating surfaces of the retaining plates.

        NOTE

        You must ensure that if Repair VRS6630, TASK 72-41-11-300-023 (REPAIR-023) has been carried out, the retaining plate is fitted centrally over any area(s) of material removed.
      5. Install one of the plates into the two grooves.

      6. Align the groove of the next blade clockwise with the groove of the disk.

      7. Use IAE 1R18080 Drift 1 off to move the retaining plate around the disk in to the next blade groove.

      8. Do Step and Step until the plate is fully in to the grooves of the disk and blades.

      9. Do Step thru Step to install the remaining plates in to the blade and disk grooves. The plates must be installed in the light-heavy-light sequence identified in Step.

      1. Install HPC Rotor Blades (72-41-15, 01-725) stage 5 lockplates 3 off into the blade and disk grooves.

        NOTE

        If the last lockplate overlaps a retaining plate go to Step.
      2. Install the three stage 5 lockplates in position between the retaining plates. Use IAE 1R18080 Drift to move the lockplates and retaining plates around the disk until they touch. Measure the total clearance (dimension X) between a lockplate and a retaining plate.

      3. Use feeler gauges to measure the total clearance (dimension X). The total clearance (dimension X) must not exceed 0.010 in. (0.25 mm).

        1. If it is necessary to remove metal from a lockplate to get the correct plate clearance do the steps that follow:

        2. Remove the lockplates.

          NOTE

          Remove metal from the minimum number of lockplates.

          NOTE

          Remove metal from the edge opposite the extraction slot.
        3. Install a lockplate in to IAE 1R19813 Filing fixture 1 off and use a file to remove metal. The minimum permitted width (dimension Y) of the stage 5 lockplate after filing is 0.301 in. (7.64 mm).

        4. Remove the lockplate from the filing fixture.

        5. Do steps Step thru Step again.

      4. Remove all of the lockplates.

      5. Apply CoMat 07-075 HIGH-HEAT RESISTING STOVING ENAMEL to the mating surfaces of the disk and the lockplates.

        NOTE

        The lockplates must be in line with a blade root.

        NOTE

        You must ensure that if Repair VRS6630, TASK 72-41-11-300-023 (REPAIR-023) has been carried out, the Retaining Plate is fitted centrally over any area(s) of material removed.
      6. Install the lockplates in position.

      1. CAUTION

        YOU MUST USE THE CORRECT ANVILS AND PLIERS FOR EACH STAGE WHEN LOCKING THE LOCKPLATES.

        CAUTION

        LOCKPLATES THAT ARE DAMAGED IN ANY WAY DURING INSTALLATION, FOR EXAMPLE: OVER BENT, TWISTED OR NICKED SHOULD BE REPLACED WITH NEW PARTS. CORRECT ENGAGEMENT OF THE LOCKPLATES IS ESSENTIAL.

        Lock the lockplates in position.

      2. Install IAE 1R18245 Adapter 1 off between the pressure control valve and IAE 1R18083 Hydraulic tool 1 off.

      3. Connect the air supply to the hydraulic tool and then connect the hose from the pressure control valve to the pliers.

      4. Adjust the control valve until a sufficient pressure is shown on the pressure gauge when the foot pedal is pushed in.

      5. Engage the pliers in the position identified 'BEND'.

      6. Install the pliers so that the front anvil is located against the lockplates.

      7. Push in the foot pedal until the pliers are in the locked position.

      8. Release the air pressure to the pliers.

      9. Engage the pliers in the position identified 'NIP'.

      10. Install the pliers so that the front anvil is located against the lockplate.

      11. Push in the foot pedal until the pliers are in a locked position.

      12. Release the air pressure to the pliers.

      13. Do Step thru Step to lock the remaining lock plates in position.

      14. Use a cloth to remove the unwanted high heat resisting stoving enamel.

      1. Install the stage 4 compressor blades.

        NOTE

        Install the heaviest blade at the No. 1 blade slot position.

        NOTE

        Install the blades from the front of the disk.
      2. Install the stage 4 blades to the disk in the sequence found in Step. Start from the No. 1 blade slot and install the blades in a clockwise direction when you look from the rear.

      1. Install the stage 4 retaining plates.

      2. Do the same procedure as given in Step.

      1. Install HPC Rotor Blades (72-41-15, 01-425) stage 4 lockplates 3 off in to the grooves of the blades and the disk.

        1. Do Step thru Step again to install the stage 4 lockplates. If it is necessary to remove metal from the lockplate in Step do the step that follows:

        2. Do the procedure given in Step thru Step but use IAE 1R19812 Filing fixture 1 off. The minimum permitted width (dimension Y) of the stage 4 lockplate after filing is 0.402 in. (10.20 mm).

      1. CAUTION

        YOU MUST USE THE CORRECT ANVILS AND PLIERS FOR EACH STAGE WHEN LOCKING THE LOCKPLATES.

        CAUTION

        LOCKPLATES THAT ARE DAMAGED IN ANY WAY DURING INSTALLATION, FOR EXAMPLE: OVER BENT, TWISTED OR NICKED SHOULD BE REPLACED WITH NEW PARTS. CORRECT ENGAGEMENT OF THE LOCKPLATES IS ESSENTIAL.

        Lock the stage 4 lockplates in position.

      2. Do Step thru Step to lock the lockplates in position.

    1. SUBTASK 72-41-10-440-156 Do a Check Balance of the HP Compressor Rotor Assembly

    2. Refer to Figure.

    3. Install the compressor rotor assembly in to the balancing machine. Refer to Step.

    4. Do a check balance of the HP compressor rotor. Refer to Step. Make a record of the quantity and angle of static unbalance in plane B.

    5. The value of the static unbalance must not be more than 5.000 ozin (3600 gmm).

      1. If the static unbalance is more than 5.000 ozin (3600 gmm) do the steps that follow:

      2. Remove the blades. Refer to TASK 72-41-10-040-001-B00 (DISASSEMBLY, CONFIG-002).

      3. Install the stages 4, 5, 6 and 9 thru 12 blades again and do a check balance again.

      4. If the static unbalance is still more than 5.000 ozin (3600 gmm) but is similar to the first value then continue with the balance procedure.

    6. Install the compressor rotor in to the trolley. Refer to Step.

    1. SUBTASK 72-41-10-440-157 Install the Stages 7 and 8 Rotor Blades and Sealing Wires in to the Disks

      CAUTION

      WHEN INSTALLING THE DAMPER WIRES, POSITION THE DAMPER WIRE SO THAT THE SPLIT LINE IS AS FAR AWAY AS POSSIBLE FROM BOTH THE BLADE LOADING SLOT AND THE LOCATION OF THE MAXIMUM LOCAL WEAR TO THE DAMPER WIRE GROOVE.
    2. Refer to Figure, Figure, Figure and Figure.

      1. Install the stage 8 sealing wires.

      2. Install the stage 8 front sealing wire HPC Stage 3 - 8 Drum Disk And Wire Seals (72-41-11, 01-394) in the groove in the front of the stage 8 disk. The gap in the sealing wire must be 180 degrees from the blade loading slot.

      3. Install the stage 8 rear sealing wire HPC Stage 3 - 8 Drum Disk And Wire Seals (72-41-11, 01-396) in the groove in the rear of the stage 8 disk. The gap in the sealing wire must be 180 degrees from the blade loading slot.

      4. Push each sealing wire into the bottom of the grooves.

      1. Prepare the jacking screw and locknut assemblies.

      2. WARNING

        WHEN YOU USE CoMat 01-001 SOLVENT, DELETED OR CoMat 01-002 SOLVENT, DELETED. YOU MUST USE THE NECESSARY PROTECTIVE CLOTHING. DO NOT GET THE SOLVENT ON YOUR SKIN OR IN YOUR EYES. YOU MUST NOT SMOKE WHEN YOU USE THE SOLVENT AS THE VAPOR CHANGES AND BECOMES TOXIC.

        Use CoMat 01-001 SOLVENT, DELETED or CoMat 01-002 SOLVENT, DELETED. and a cloth to clean the threads of the jacking screw and locknut assemblies removed in Step.

      3. Use a brush to apply CoMat 10-070 ANTI-SEIZE COMPOUND to the threads of the stage 8 jacking screw and locknut assemblies.

      4. Install the screws into the nuts. Make sure that the bottom of the screws are below the surface of the nuts.

      1. CAUTION

        YOU MUST NOT USE THE DRIFT ON THE AIRFOIL SURFACES.

        Install the stage 8 standard and undersize blades which were identified in Step into the disk in the light-heavy-light sequence. Refer to Figure for an example of the light-heavy-light sequence.

        Use the IAE 1R18097 Drift 1 off to move the blades around the disk in a counterclockwise direction when you look from the rear.

      2. Install one of the LH locking blades into the blade loading slot and use the drift to move it counterclockwise when you look from the rear.

      3. Install one of the jacking screw and locknut assemblies into the blade loading slot and move it counterclockwise when you look from the rear.

      4. Measure the gaps in the sealing wires. The gaps must not be more than 0.236 in. (6.00 mm) in each sealing wire. Refer to dimension C on Figure.

      5. Install one of the RH locking blades into the blade loading slot and use the drift to move it counterclockwise when you look from the rear.

      6. Install 15 standard or undersize blades in the blade loading slot and use the drift to move them counter clockwise when you look from the rear.

      7. Install the second RH locking blade into the blade loading slot and use the drift to move it clockwise when you look from the rear.

      8. Install the second jacking screw and locknut assembly into the blade loading slot and move it clockwise when you look from the rear.

      9. Install the second LH locking blade into the blade loading slot and use the drift to move it clockwise when you look from the rear.

      10. Install the remaining stage 8 standard or undersize blades in the correct sequence. Use the drift to move them clockwise when you look from the rear.

        NOTE

        A blade platform joint will be in line with the center of the blade loading slot.
      11. Continue to move the blades in a clockwise direction until the jacking screw and locknut assemblies are in their correction positions.

      12. Use the IAE 1R8590 Socket 1 off to torque the screws to 4 to 5 lbfin (0.45 to 0.56 Nm) above the applicable locking torque.

      1. Measure the blade platform gaps.

      2. Make sure that the blade platforms touch and that all the blades are pushed in clockwise direction.

      3. Use a feeler gage to measure the gap in segment A. Refer to the table on Figure for the correct gap.

        NOTE

        The feeler gage must go through the full axial length X of both platforms and must span the full radial height Y of both platforms.
      4. Use a feeler gage to measure the gap in segment B. Refer to the table on Figure for the correct gap.

        1. Use IAE IAE 1R18683 Caliper adapter 1 off to make sure that the jacking screws are correctly installed.

        2. The jacking screws must not be more than 0.0137 in. (0.35 mm) above the top of the locknuts and not more than 0.0787 in. (2.00 mm) below the top of the locknuts at the front face of the disk.

      1. CAUTION

        WHEN INSTALLING THE DAMPER WIRES, POSITION THE DAMPER WIRE SO THAT THE SPLIT LINE IS AS FAR AWAY AS POSSIBLE FROM BOTH THE BLADE LOADING SLOT AND THE LOCATION OF THE MAXIMUM LOCAL WEAR TO THE DAMPER WIRE GROOVE.

        Install the stage 7 sealing wires.

      2. Install the stage 7 front sealing wire HPC Stage 3 - 8 Drum Disk And Wire Seals (72-41-11, 01-390) in the groove in the front of the stage 7 disk. The gap in the sealing wire must be 180 degrees from the blade loading slot.

      3. Install the stage 7 rear sealing wire HPC Stage 3 - 8 Drum Disk And Wire Seals (72-41-11, 01-392) in the groove in the rear of the stage 7 disk. The gap in the sealing wire must be 180 degrees from the blade loading slot.

      4. Push each of the sealing wires into the bottom of the grooves.

      1. Install the stage 7 compressor blades.

      2. CAUTION

        DO NOT USE THE DRIFT ON THE AIRFOIL SURFACES.

        Install the stage 7 compressor blades that were identified in Step. Use the drift to move the blades around the disk in a counterclockwise direction when you look from the rear.

        NOTE

        It is possible to correct up to approximately 2.500 ozin (1800 gmm) of the rotor static unbalance if you get the correct installation sequence of the blades.
      3. Install the stage 7 blades into the disk in a sequence that will get the static unbalance aimpoint. The static unbalance aimpoint is 50 per cent of the value recorded in Step and is at the same angle that was recorded.

      1. Prepare the jacking screw and locknut assemblies.

      2. WARNING

        WHEN YOU USE CoMat 01-001 SOLVENT, DELETED OR CoMat 01-002 SOLVENT, DELETED. YOU MUST USE THE NECESSARY PROTECTIVE CLOTHING. DO NOT GET THE SOLVENT ON YOUR SKIN OR IN YOUR EYES. YOU MUST NOT SMOKE WHEN YOU USE THE SOLVENT AS THE VAPOR CHANGES AND BECOMES TOXIC.

        Use CoMat 01-001 SOLVENT, DELETED or CoMat 01-002 SOLVENT, DELETED. and a cloth to clean the threads of the jacking screw and locknut assemblies removed in Step.

      3. Use a brush to apply CoMat 10-070 ANTI-SEIZE COMPOUND to the threads of the stage 7 jacking screw and locknut assemblies.

      4. Install the screws into the nuts. Make sure that the bottom of the screws are below the surface of the nuts.

      1. Install the LH and RH locking blades and lock assemblies.

      2. CAUTION

        YOU MUST NOT USE THE DRIFT ON THE AIRFOIL SURFACES.

        Install one of the LH locking blades into the blade loading slot and use the drift to move it counterclockwise when you look from the rear.

      3. Install one of the jacking screw and locknut assemblies into the blade loading slot and move it counterclockwise when you look from the rear.

      4. Measure the gaps in the sealing wires. The gaps must not be more than 0.236 in. (6.00 mm) in each sealing wire. Refer to dimension C on Figure.

      5. Install one of the RH locking blades into the blade loading slot and use the drift to move it counterclockwise when you look from the rear.

      6. Install the second RH locking blade into the blade loading slot and use the drift to move it clockwise when you look from the rear.

      7. Install the second jacking screw and locknut assembly into the blade loading slot and move it clockwise when you look from the rear.

      8. Install the second LH locking blade into the blade loading slot and use the drift to move it clockwise when you look from the rear.

        NOTE

        A blade platform joint will be in line with the center of the blade loading slot.
      9. Continue to move the blades in a clockwise direction until the jacking screw and locknut assemblies are in their correction positions.

      10. Use the IAE 1R8590 Socket 1 off to torque the screws to 4 to 5 lbfin (0.45 to 0.56 Nm) above the applicable locking torque.

        1. Use IAE IAE 1R18683 Caliper adapter 1 off to make sure that the jacking screws are correctly installed.

        2. The jacking screws must not be more than 0.0137 in. (0.35 mm) above the top of the locknuts and not more than 0.0787 in. (2.00 mm) below the top of the locknuts at the front face of the disk.

    1. SUBTASK 72-41-10-440-158 Do a Check Balance of the HP Compressor Rotor Assembly

    2. Refer to Figure.

    3. Install the compressor rotor assembly in to the balancing machine. Refer to Step.

    4. Do a check balance of the compressor rotor assembly. Refer to Step.

    5. NOTE

      The static unbalance aimpoint is 50 per cent of the value recorded in Step and is at the same angle as recorded.

      If the static unbalance aimpoint has been achieved within 0.210 ozin (150 gmm) do Step.

      1. If the static unbalance aimpoint has not been achieved within 0.210 ozin (150 gmm) do the steps that follow:

      2. Change the position of the stage 7 blades to try and get the static unbalance aimpoint.

      3. Do steps A. thru C. again.

      4. If it is not possible to get the static unbalance aimpoint with the stage 7 blades, change the position of the stage 8 blades as well.

      5. Do steps A. thru C. again.

      6. If it is not possible to get the static unbalance aimpoint with the stages 7 and 8 blades change the position of the stage 6 and/or 9 blades.

      7. Do steps A. thru C. again.

    1. SUBTASK 72-41-10-440-159 Dynamic Balance the HP Compressor Rotor Assembly

      NOTE

      You must let the balancing machine run for a short time so that it can become stable, before balance values are read.
    2. Refer to Figure.

    3. Plane separate and calibrate the balancing machine through planes AB and AC. Measure and record the quantity and angular positions of the unbalance in both planes.

    4. Install the compressor rotor assembly on to the dummy stub shaft, 180 degrees from the original position. Refer to Step.

    5. Do step A. again.

    6. Caculate the correct dynamic unbalance of the compressor in planes AB and AC. Write a record of the quantity and angle of unbalance in both planes.

    7. Install the compressor rotor in to the trolley. Refer to Step.

    1. SUBTASK 72-41-10-440-160 Weigh the Stage 3 Compressor Blades and Retaining Plates

    2. Refer to Figure, Figure and Figure.

      1. Weigh the stage 3 compressor blades HPC Rotor Blades (72-41-15, 01-200).

      2. CAUTION

        DAMAGE TO THE BLADES CAN OCCUR IF YOU DO NOT MAKE SURE THAT THE CORRECT MIXTURE OF BLADES ARE INSTALLED. REFER TO THE APPLICABLE SERVICE BULLETINS.

        Weigh each of the compressor blades in turn and keep a record of the weight and the blade identification number.

      3. Put the blades on a suitable work surface in a light to heavy sequence.

      1. Weigh the stage 3 retaining plates HPC Rotor Blades (72-41-15, 01-050 and HPC Rotor Blades01-070).

      2. Weigh the set of retaining plates to the nearest 0.0035 oz (0.10 g).

      3. Put the plates on a suitable work surface in a light to heavy sequence.

      4. Use CoMat 02-121 TEMPORARY MARKER PENCIL/CRAYON or CoMat 02-122 TEMPORARY MARKER PENCIL/CRAYON to identify the retaining plates HPC Rotor Blades (72-41-15, 01-050) in a light-heavy-light sequence ready for assembly.

    1. SUBTASK 72-41-10-440-161 Install the Stage 3 Compressor Blades in to the Disk Assembly

    2. Refer to Figure, Figure and Figure.

    3. CAUTION

      DAMAGE TO THE BLADES CAN OCCUR IF YOU DO NOT MAKE SURE THAT THE CORRECT MIXTURE OF BLADES ARE INSTALLED. REFER TO THE APPLICABLE SERVICE BULLETINS.

      NOTE

      Install the blades from the front of the disk.

      Install the stage 3 blades to the disk in a sequence to correct as much of the unbalance in plane AB as possible. The unbalance in plane AB was recorded in Step. Start at the No. 1 blade slot and install the blades in a clockwise direction when you look from the rear.

      1. Install the stage 3 retaining plates.

      2. Move all of the stage 3 blades forward in the blade slots.

      3. Move rearward the blade at the No. 1 blade position until the groove in the disk and the groove in the blade are aligned.

      4. Apply CoMat 07-075 HIGH-HEAT RESISTING STOVING ENAMEL to the mating surfaces of the retaining plates.

      5. Install one of the plates HPC Rotor Blades (72-41-15, 01-050) in to the two grooves.

      6. Align the groove of the next blade clockwise with the groove of the disk.

      7. Use IAE 1R18079 Drift 1 off to move the retaining plate around the disk in to the next blade groove.

      8. Do steps B.(5) and B.(6) again until the plate is fully in to the grooves of the disk and blades.

      9. Do steps B.(4) thru B.(7) to install the remaining plates in to the disk and blades grooves. The retaining plates HPC Rotor Blades (72-41-15, 01-050) must be installed in the light-heavy-light sequence identified in Step. The 2 retaining plates HPC Rotor Blades (72-41-15, 01-070) must be installed after the larger retaining plates and in the sequence shown in Figure.

    1. SUBTASK 72-41-10-220-089 Examine the Clapper Abutment Faces

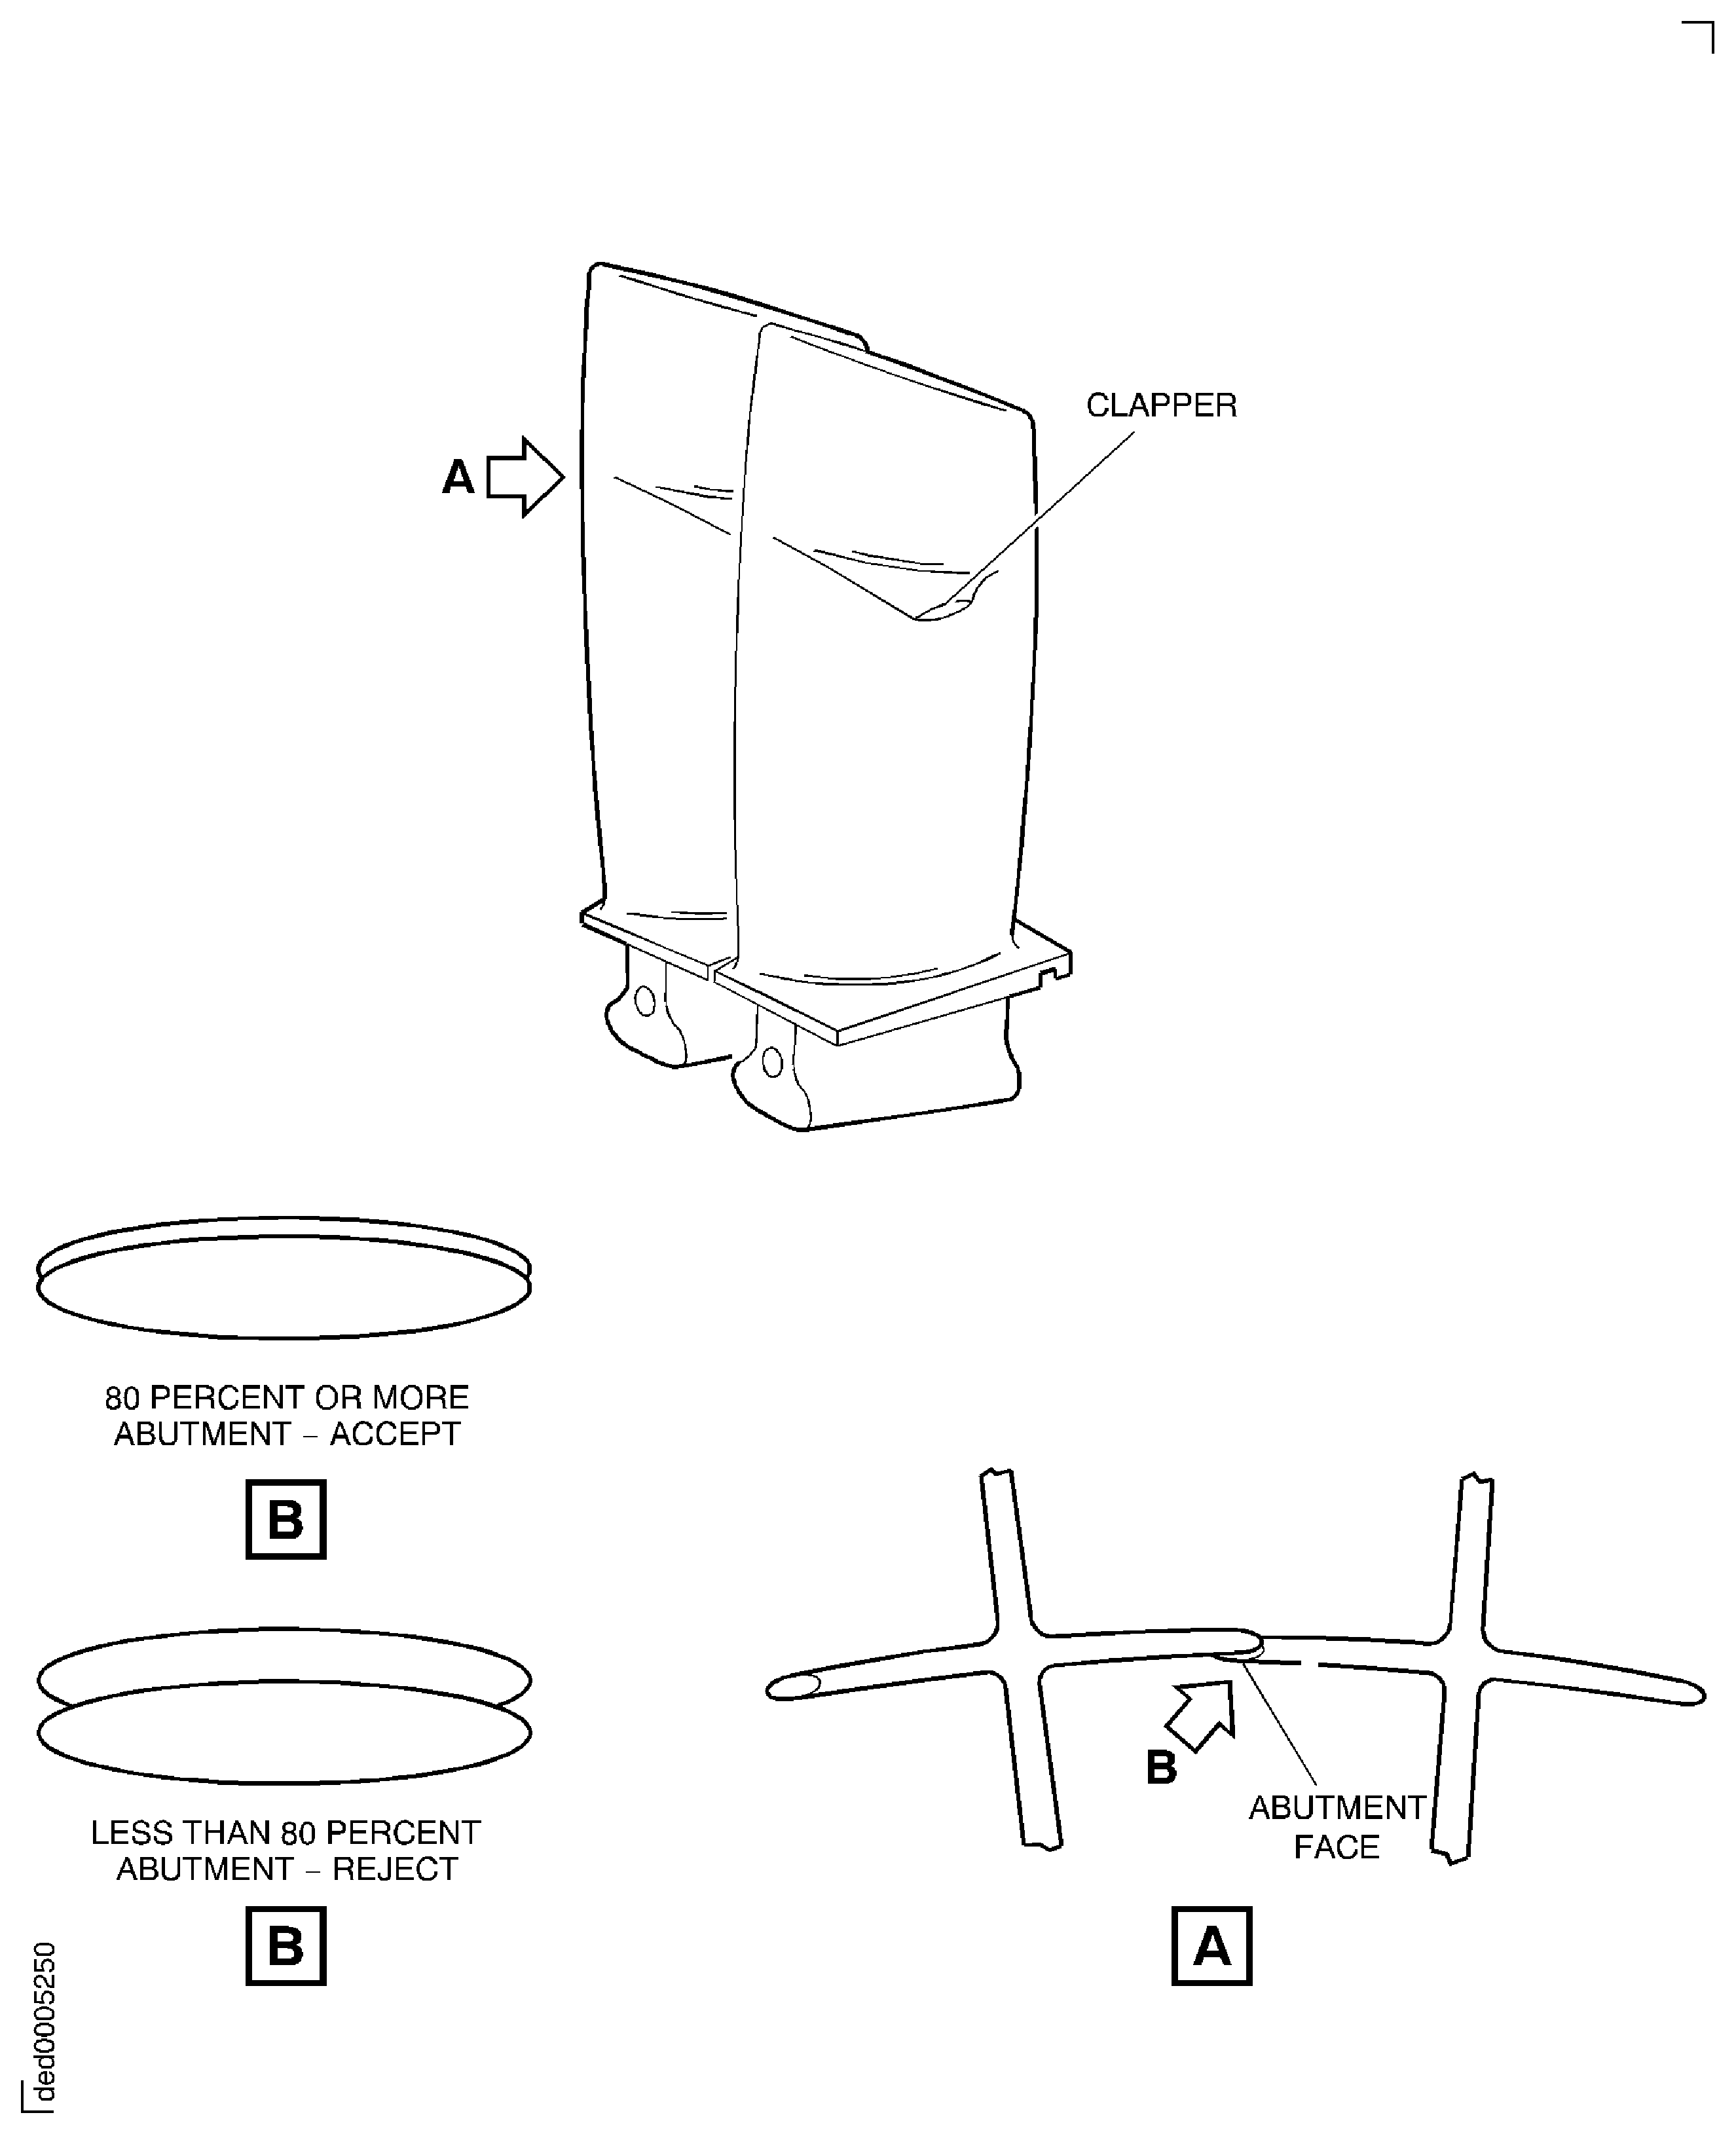
    2. Refer to Figure.

      1. Make sure the clapper abutment face aligns with the adjacent clapper face.

        1. 80 percent or more abutment

        2. Accept

        1. Less than in (1)

        2. Reject. Remove the rejected blades and install alternative blades. Refer to Step.

    1. SUBTASK 72-41-10-440-296 Install the Stage 3 Compressor Blade Lockplates

    2. Refer to Figure, Figure and Figure.

      1. Install IAE 1R18076 Slave lock plates 9 off in to the grooves of the disk and blades.

      2. Install the slave lockplates in position between the retaining plates at equal distances around the disk. Refer to Figure for an example of the slave lockplates positions.

    1. SUBTASK 72-41-10-440-162 Dynamic Balance the HP Compressor Rotor Assembly

    2. Refer to Figure.

    3. Install the compressor rotor assembly in to the balancing machine. Refer to Step.

    4. Do Step again.

    5. The unbalance values must not exceed 1.458 ozin (1050 gmm) in plane AB and 1.944 ozin (1400 gmm) in plane AC. If the unbalance values exceed the given values the rotor must be rejected.

    6. Install the compressor rotor assembly in to the trolley. Refer to Step.

  1. Figure: Example View of the HP Compressor Rotor Assembly

    Example View of the HP Compressor Rotor Assembly
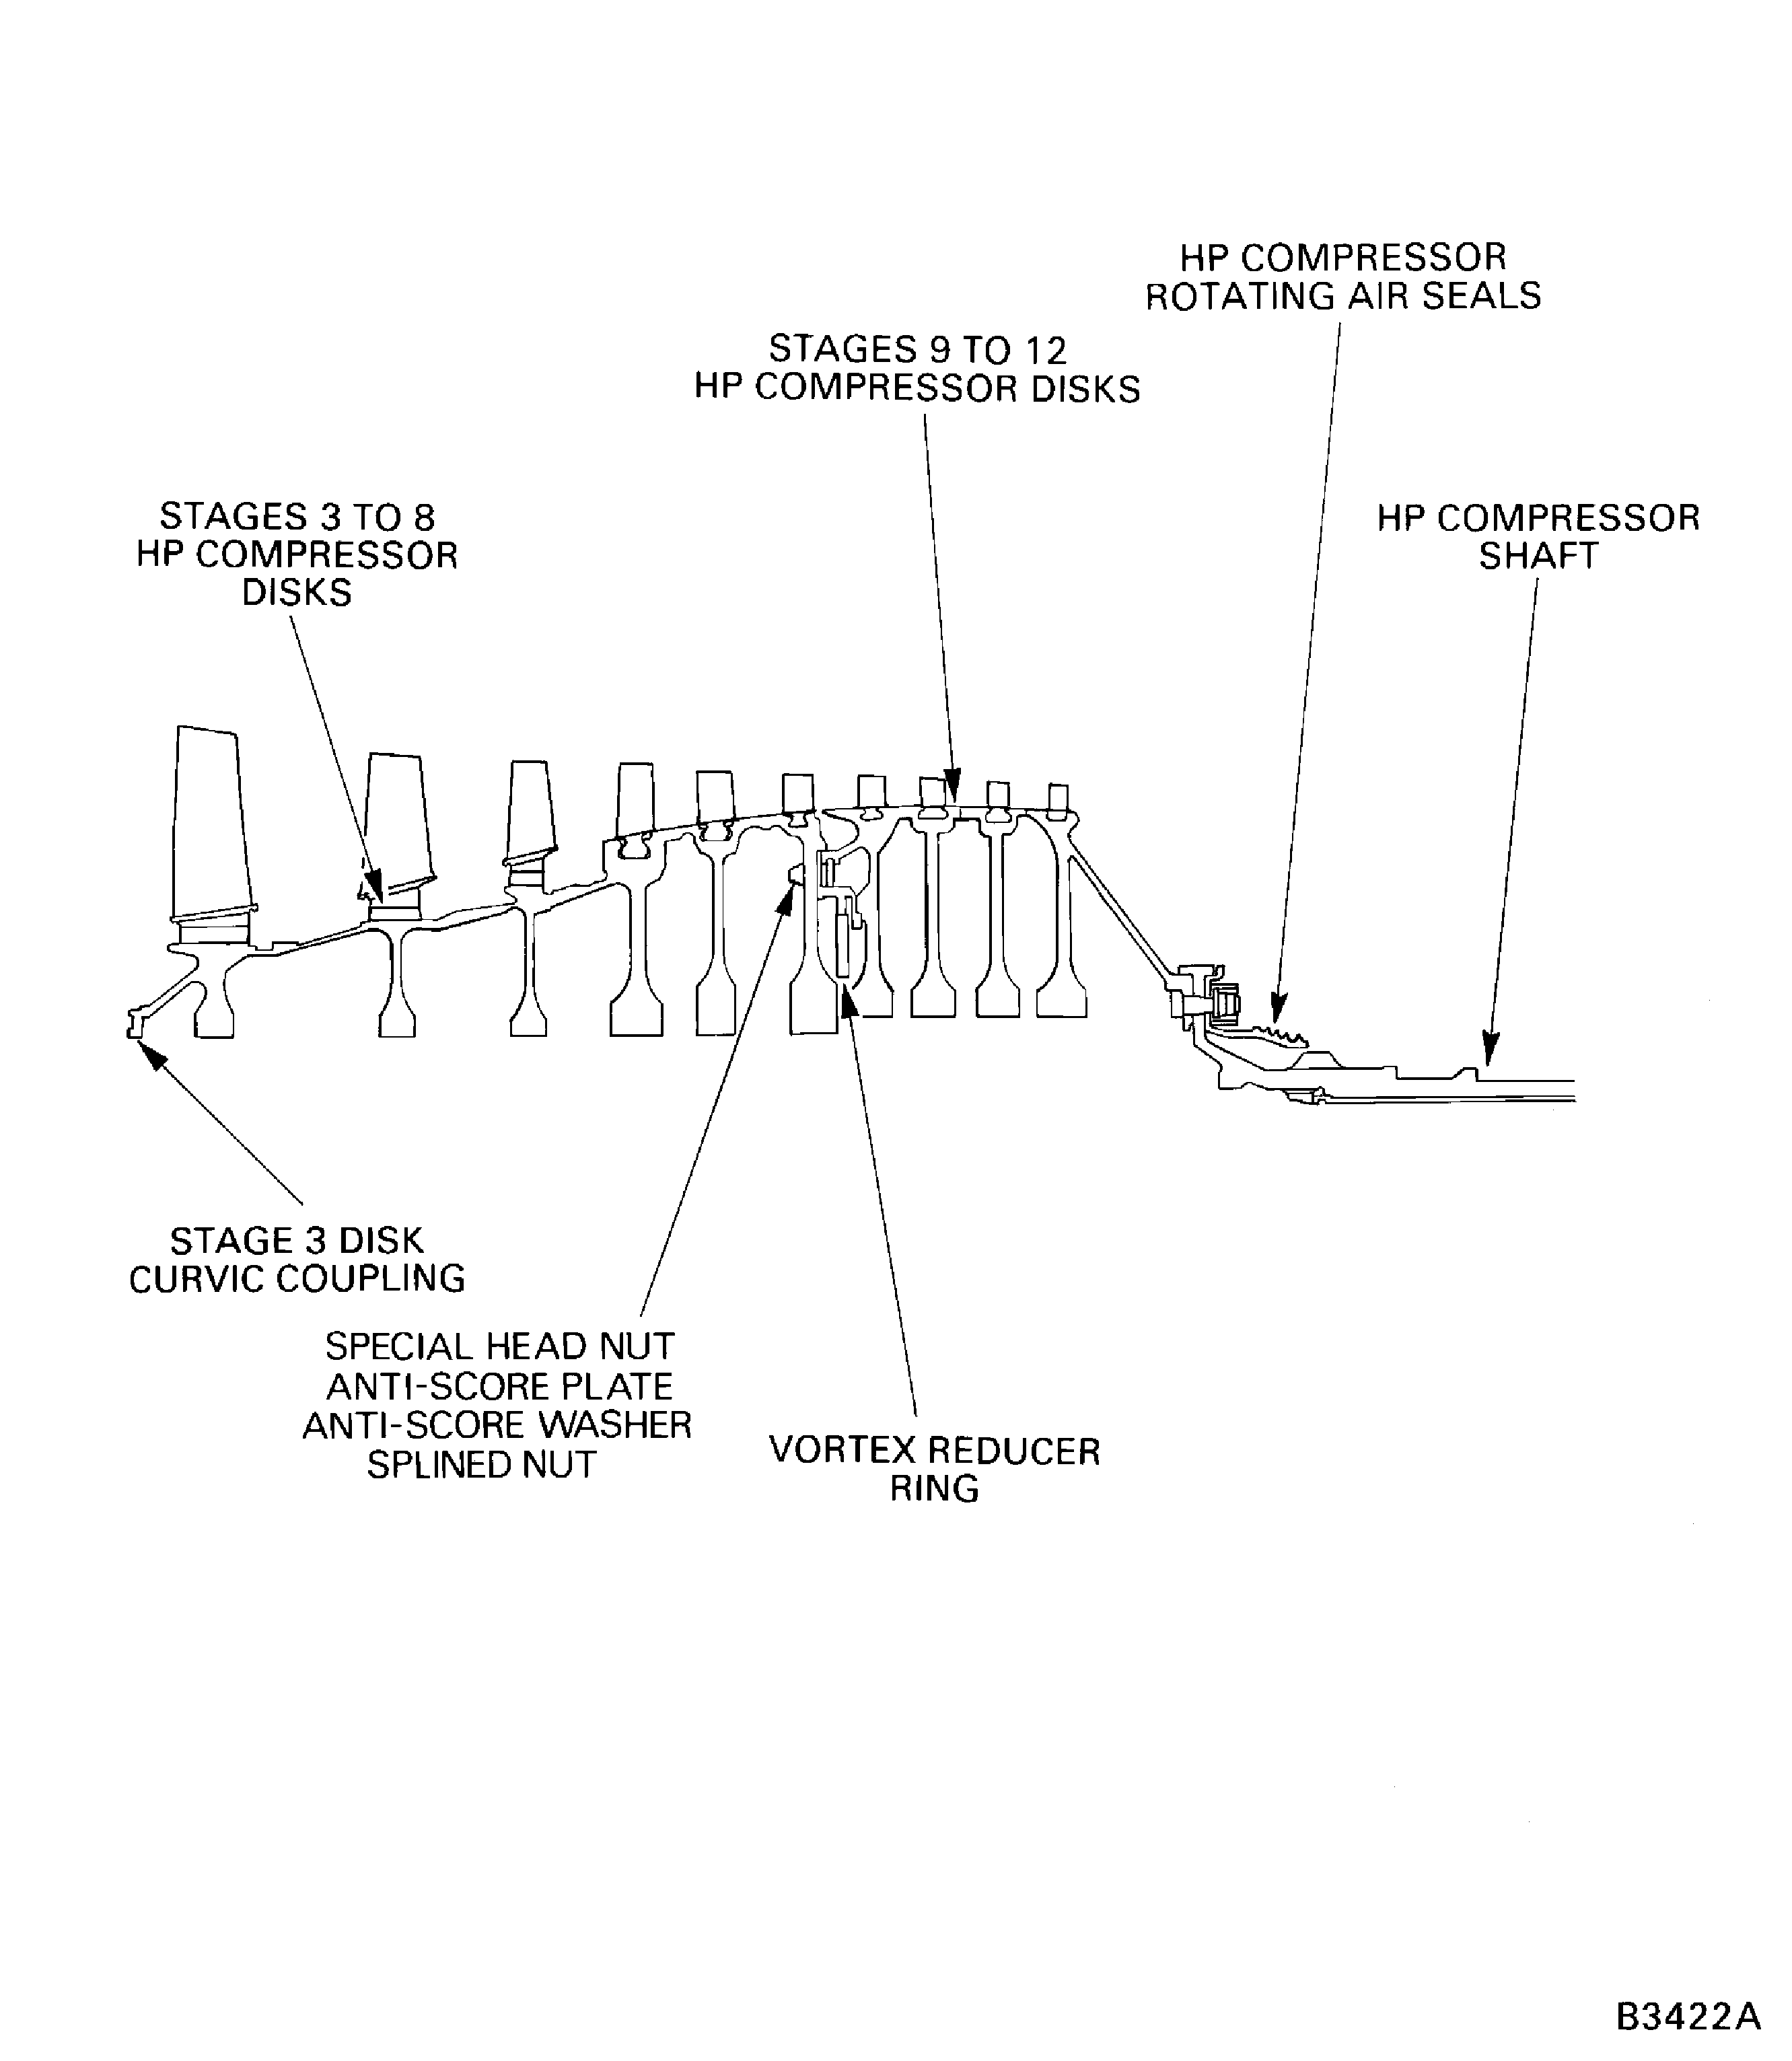
    Figure: Install the Stage 6, 7 and 8 Sealing Wires

    Install the Stage 6, 7 and 8 Sealing Wires
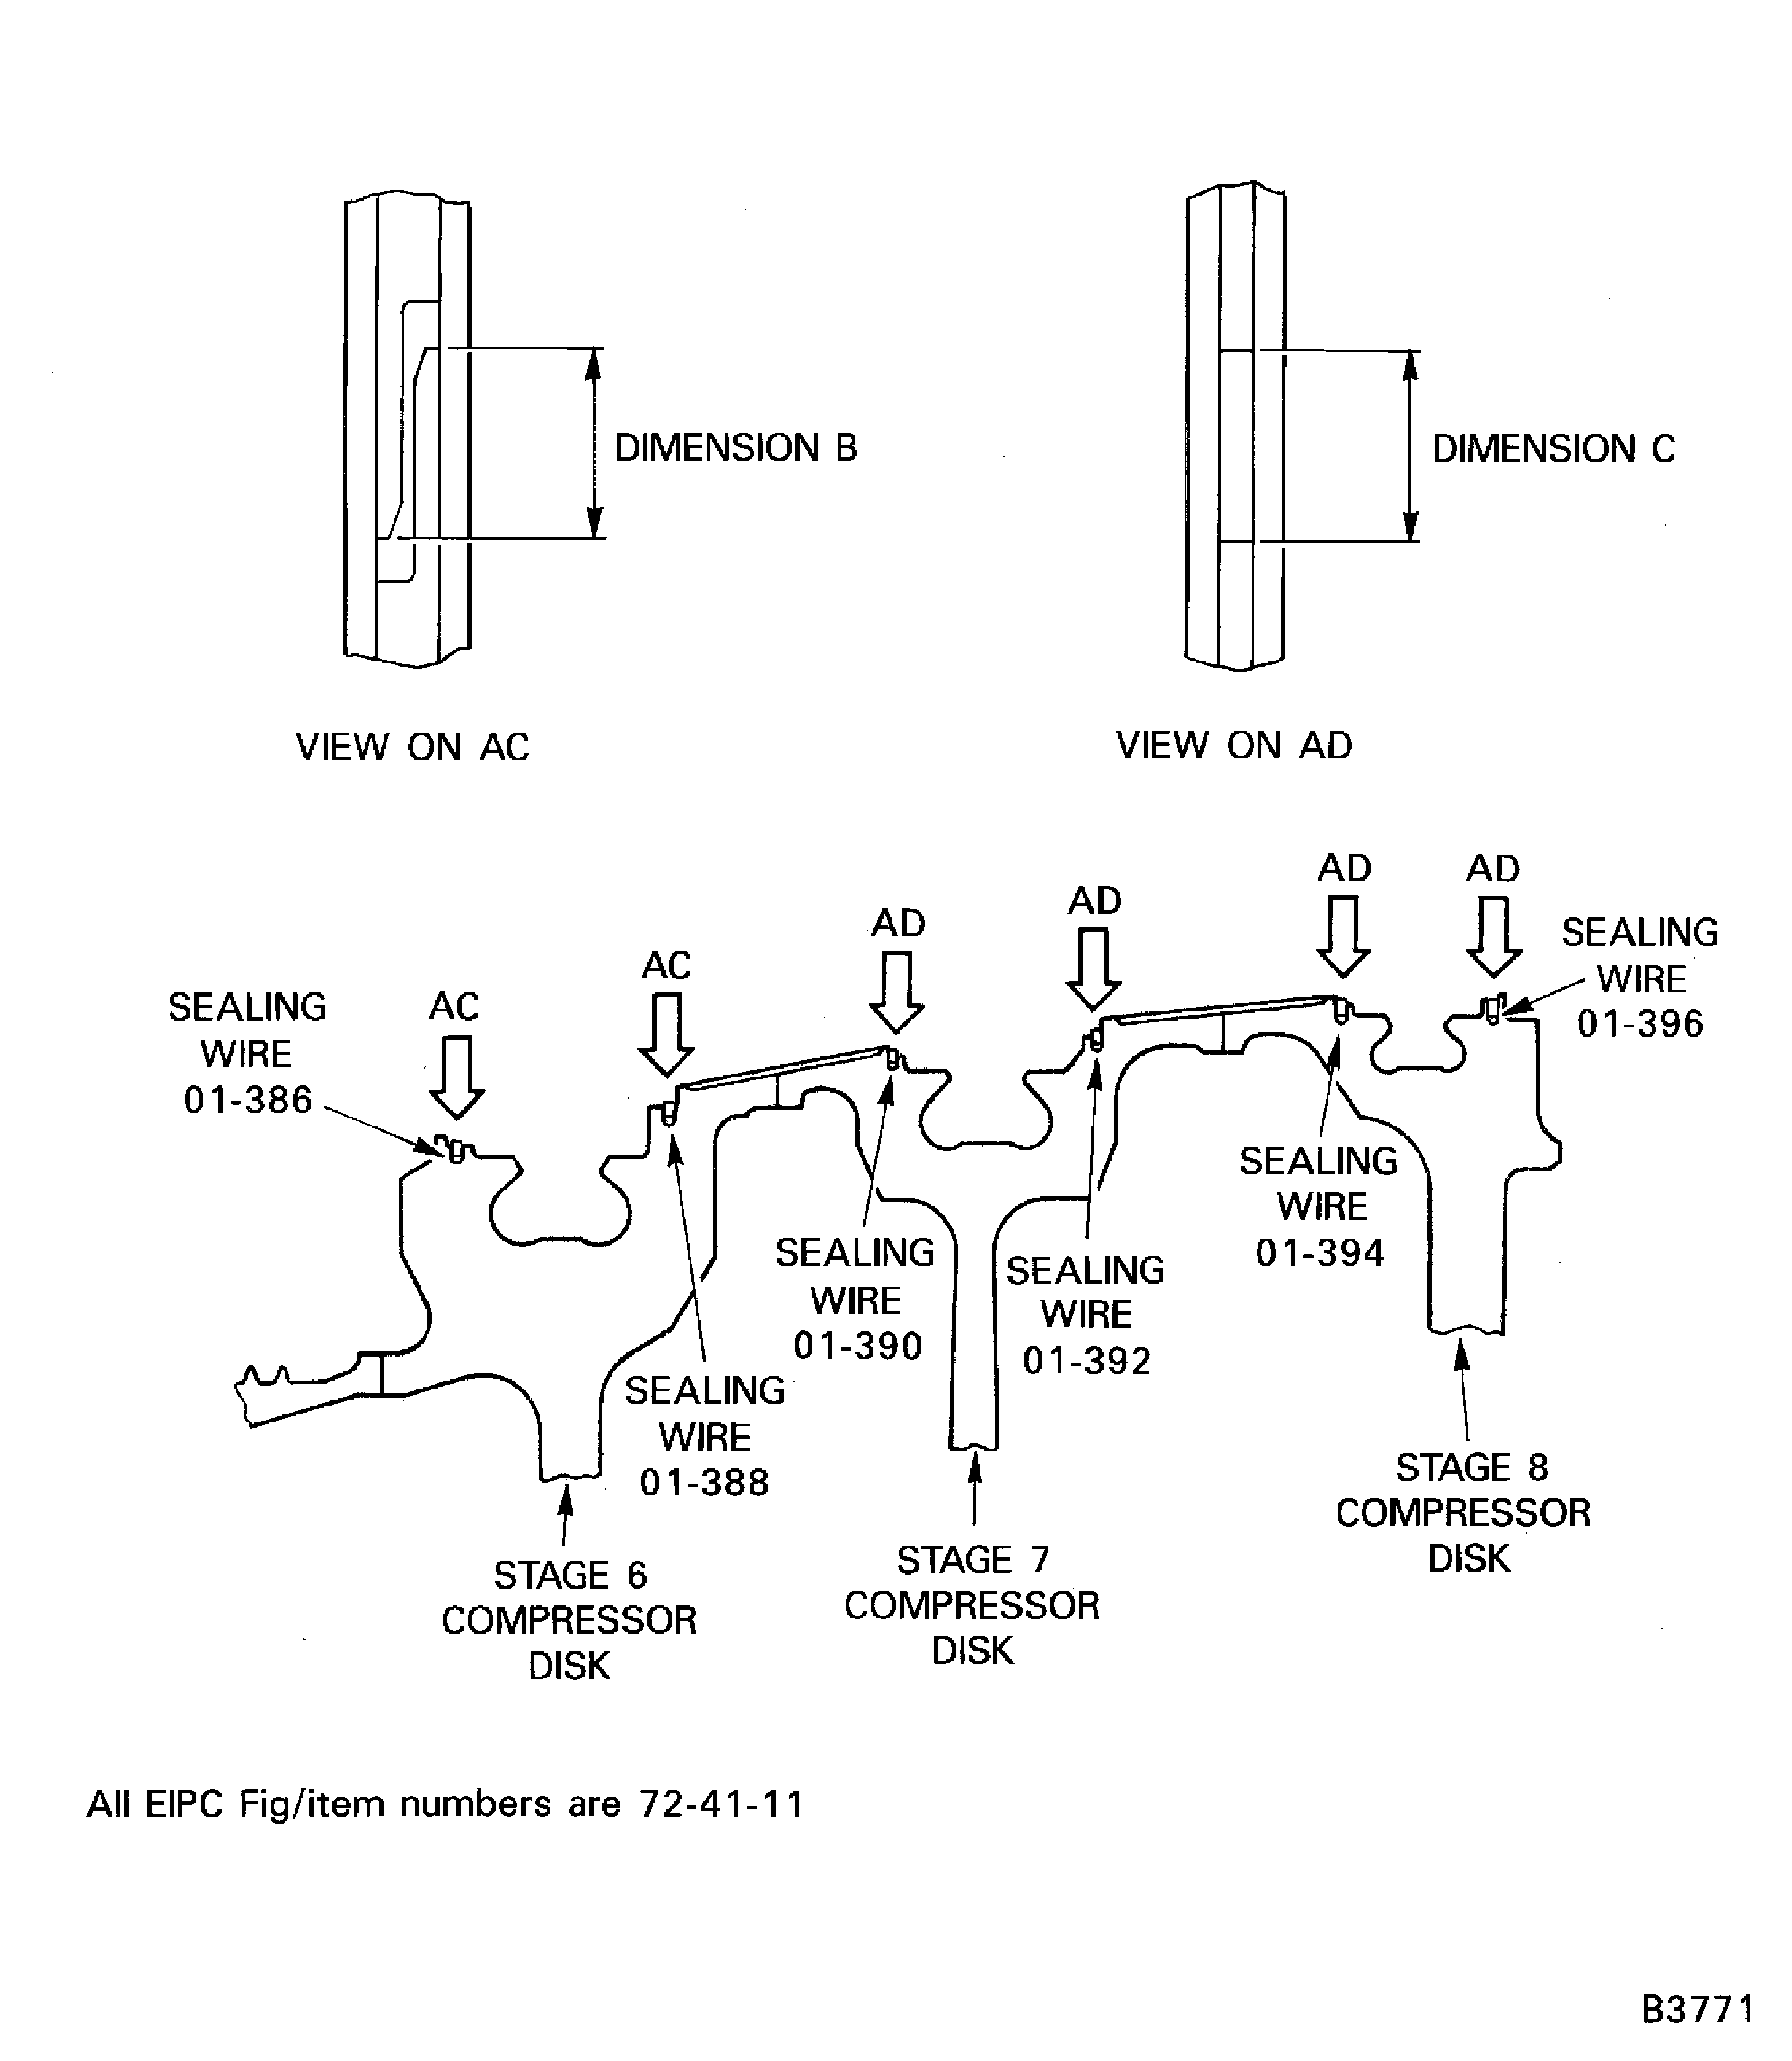
    Figure: Install the HP Compressor Rotor Assembly in to the Balancing Machine

    Install the HP Compressor Rotor Assembly in to the Balancing Machine
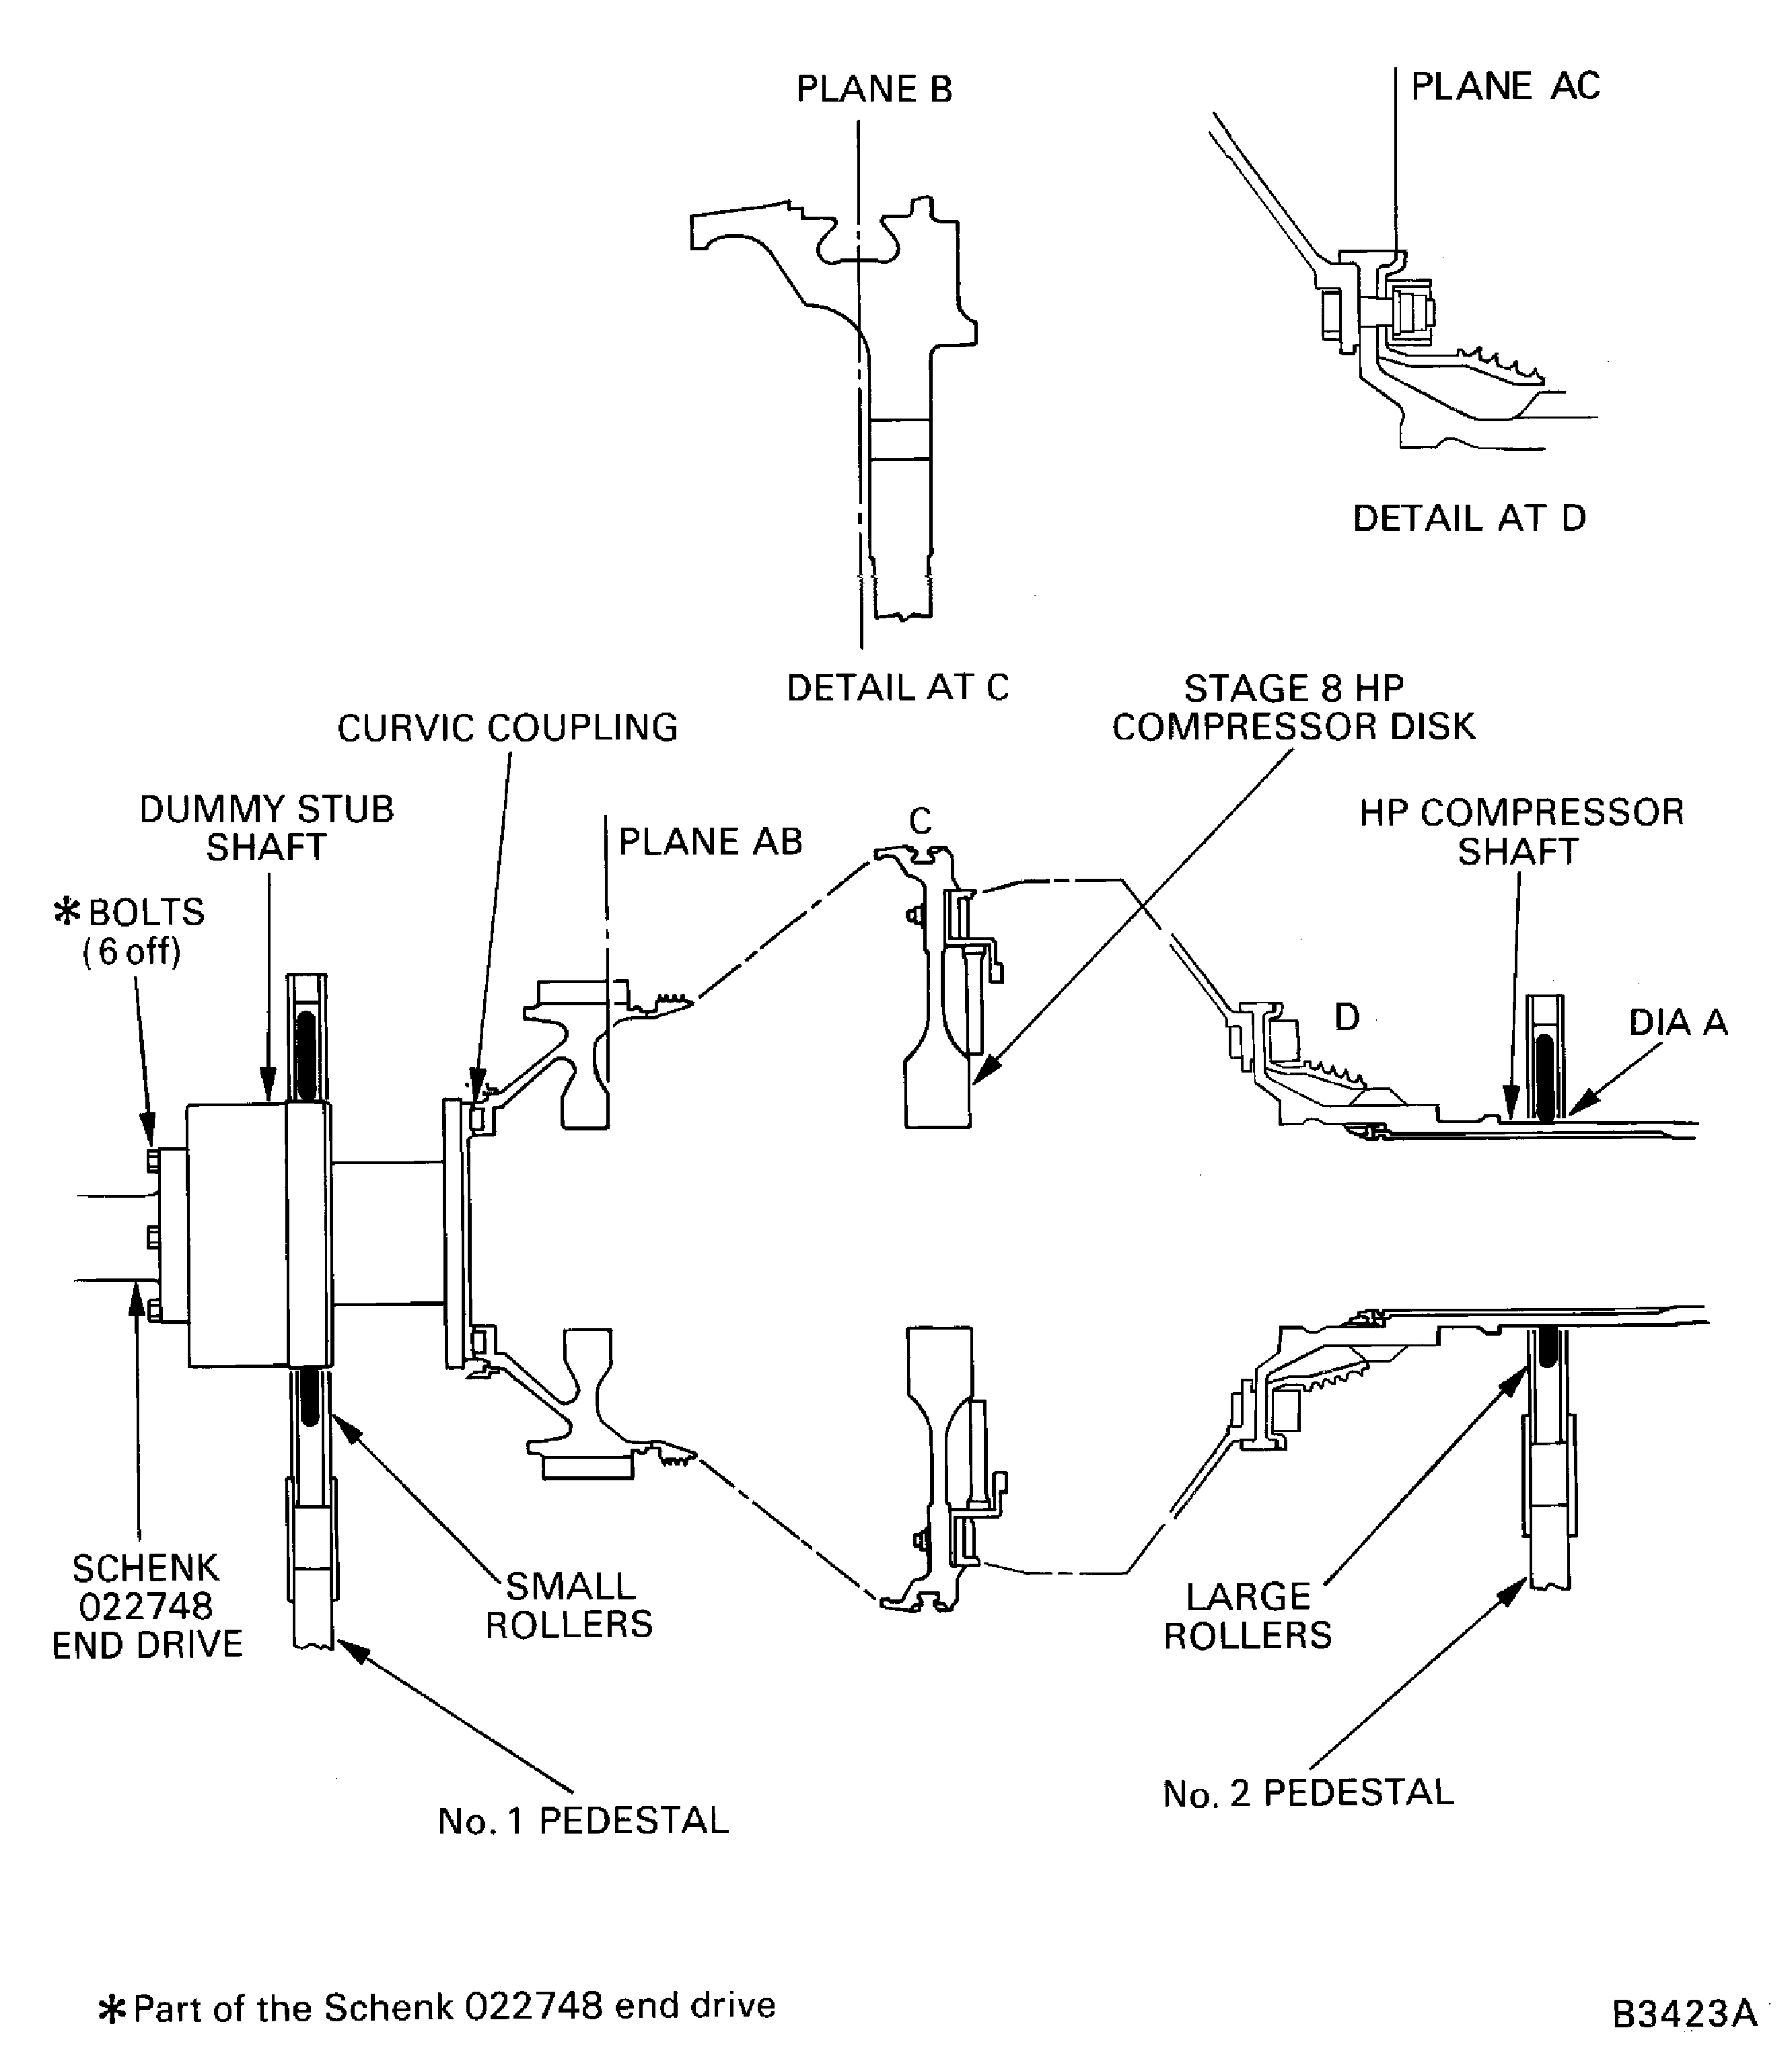
    Figure: Install the Protective Cover

    Install the Protective Cover
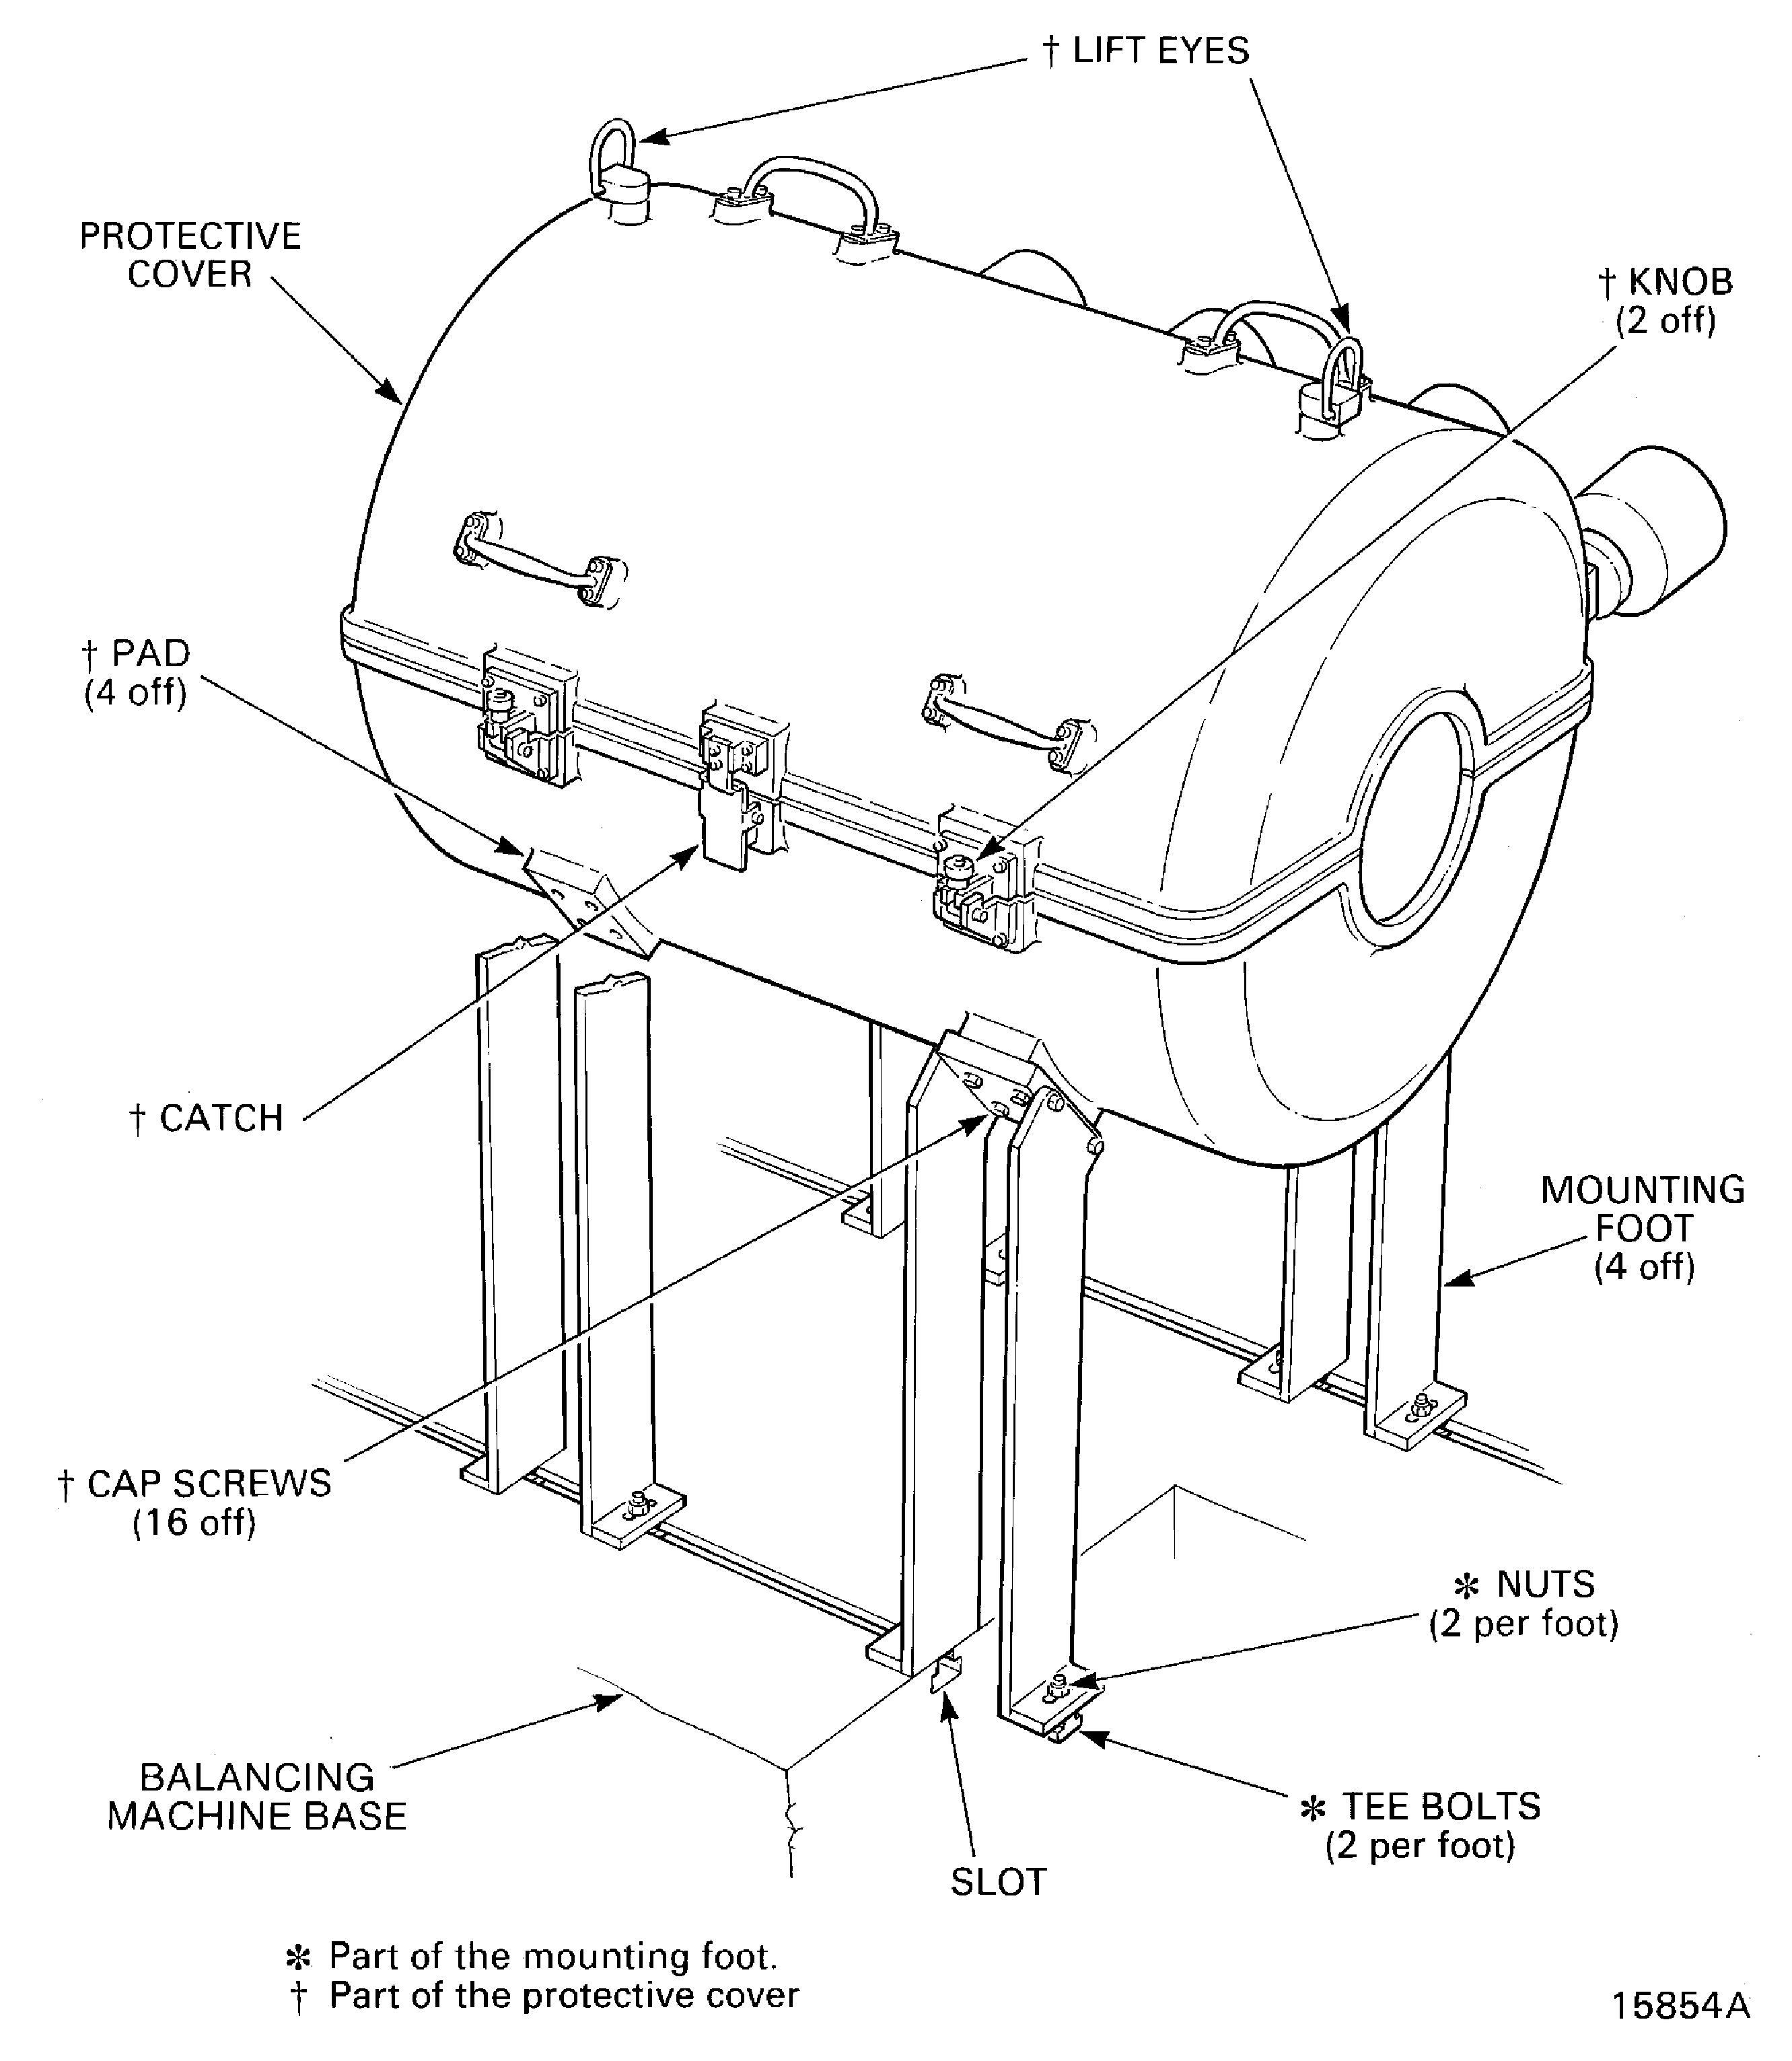
    Figure: Remove/Install the HP Compressor Rotating Air Seal Protective Cover

    Remove/Install the HP Compressor Rotating Air Seal Protective Cover
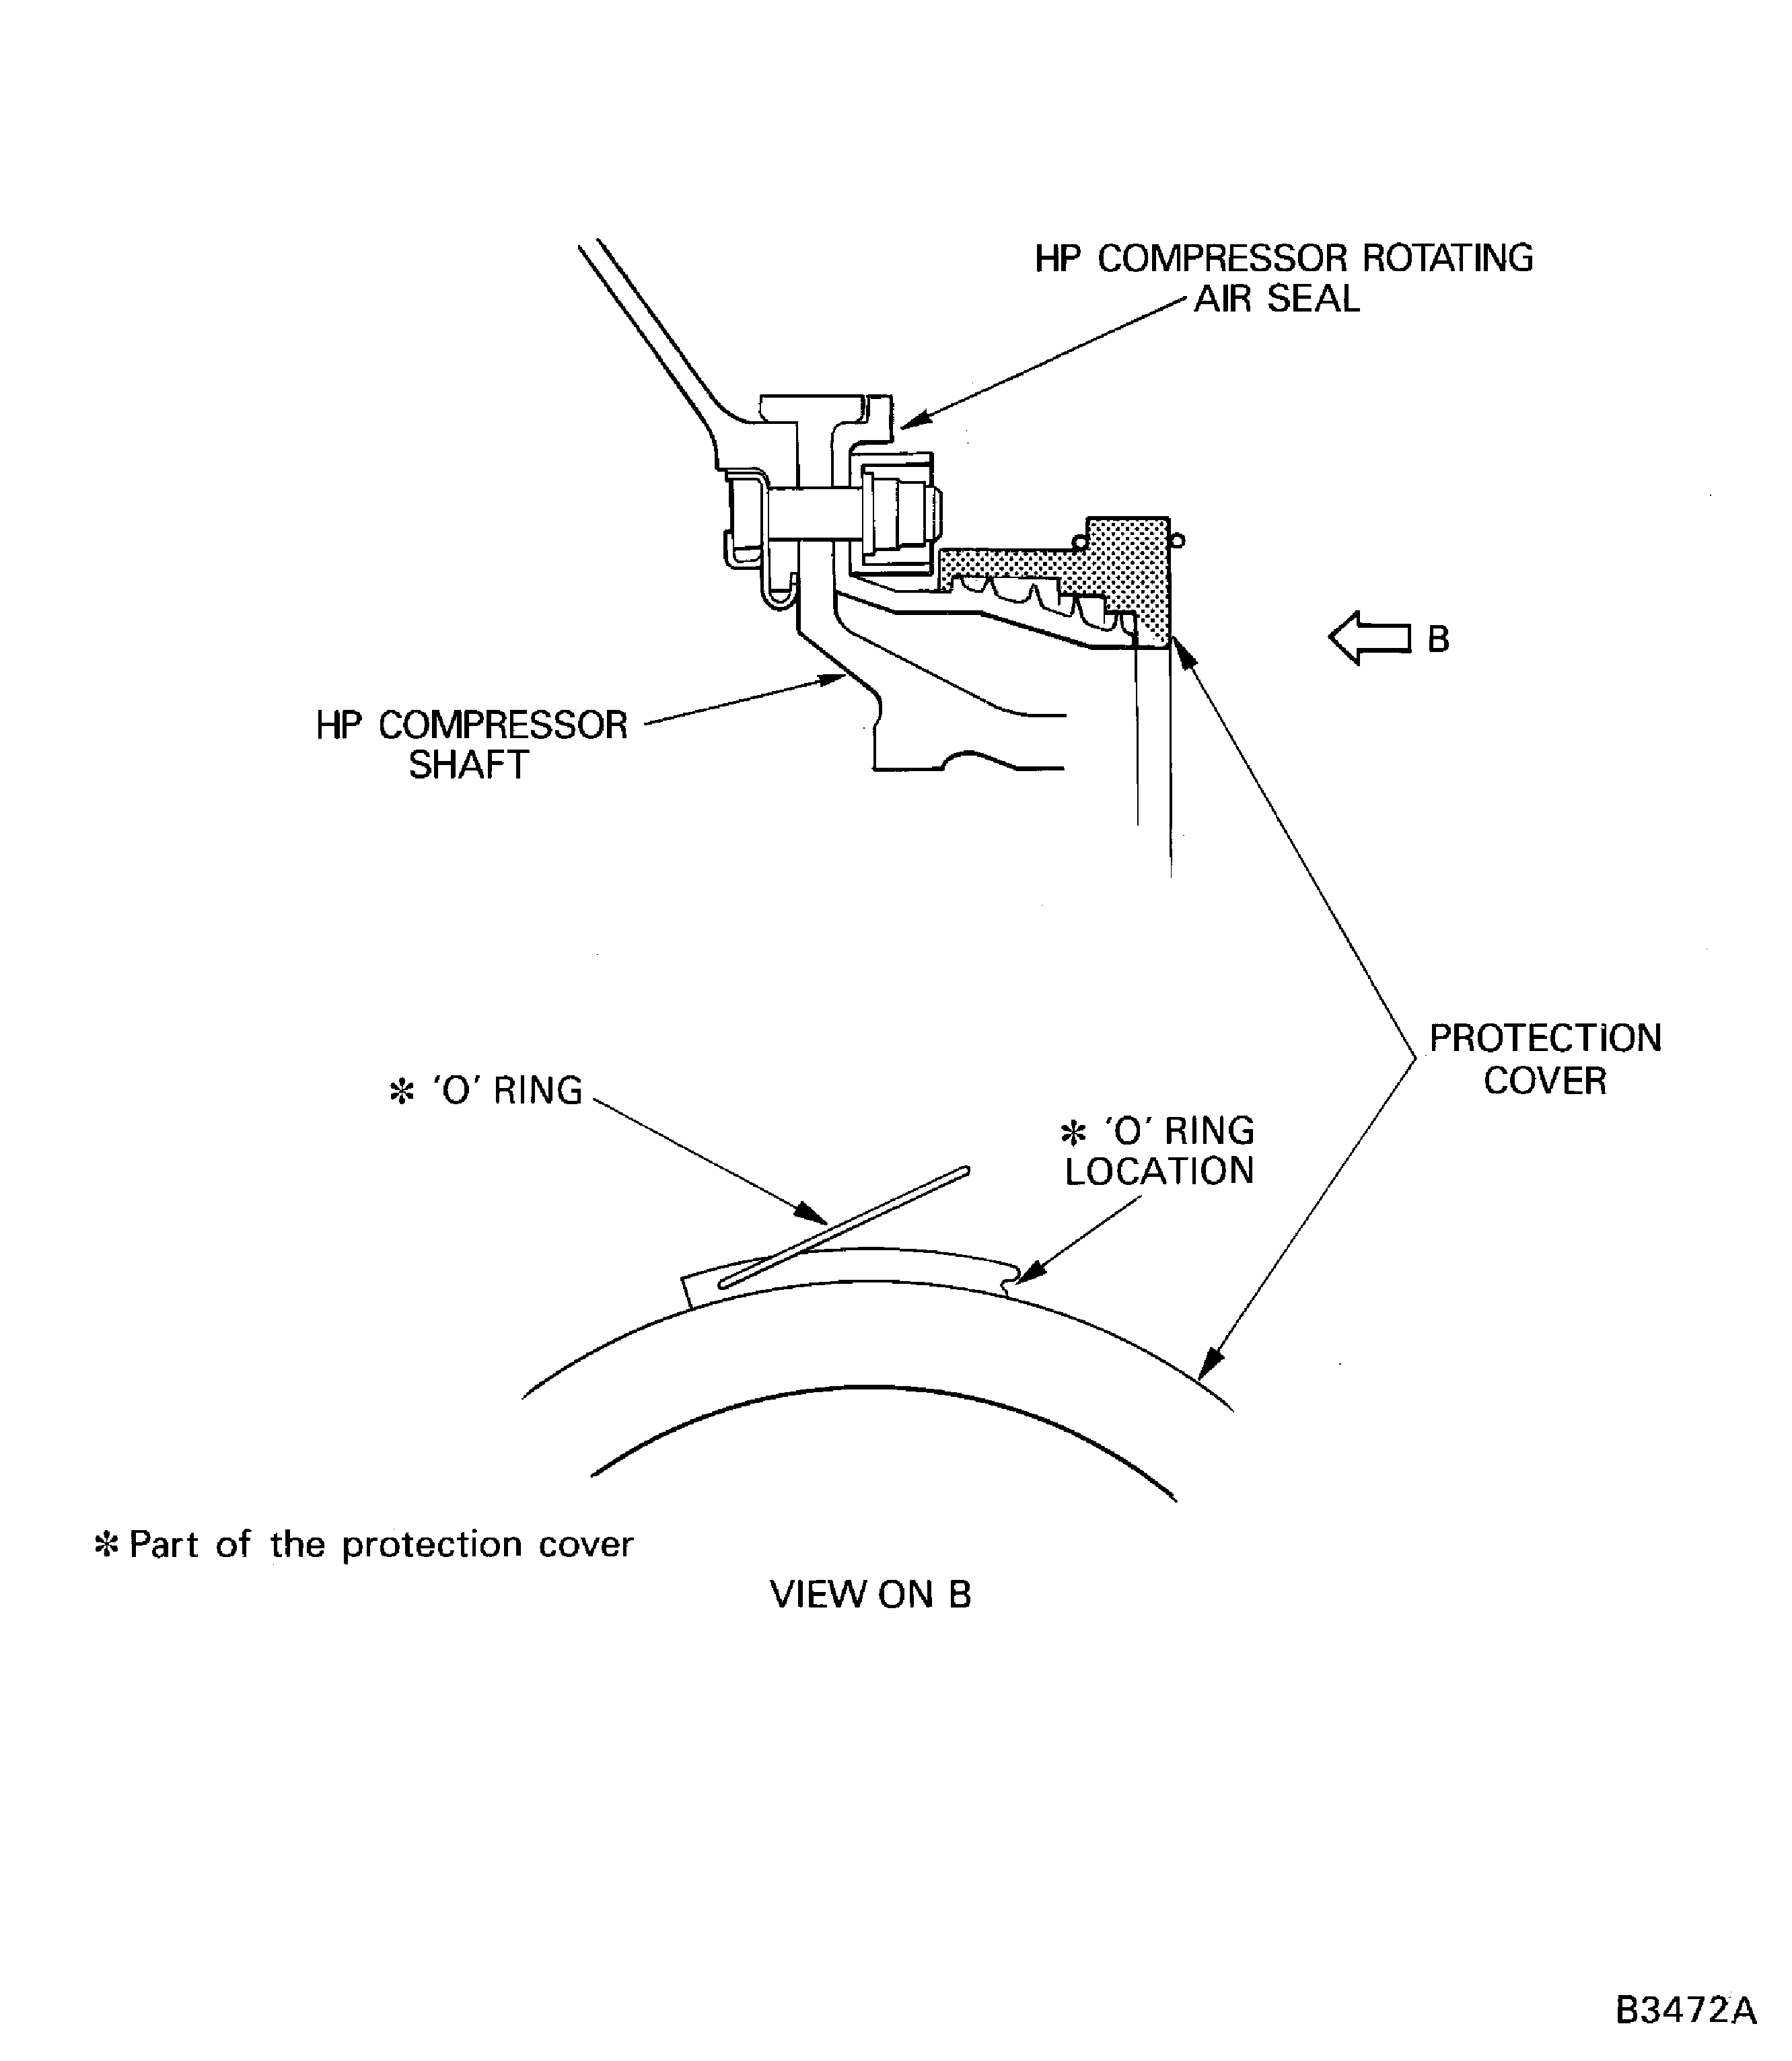
    Figure: Install the Beam Sling on to the HP Compressor Rotor Assembly

    Install the Beam Sling on to the HP Compressor Rotor Assembly
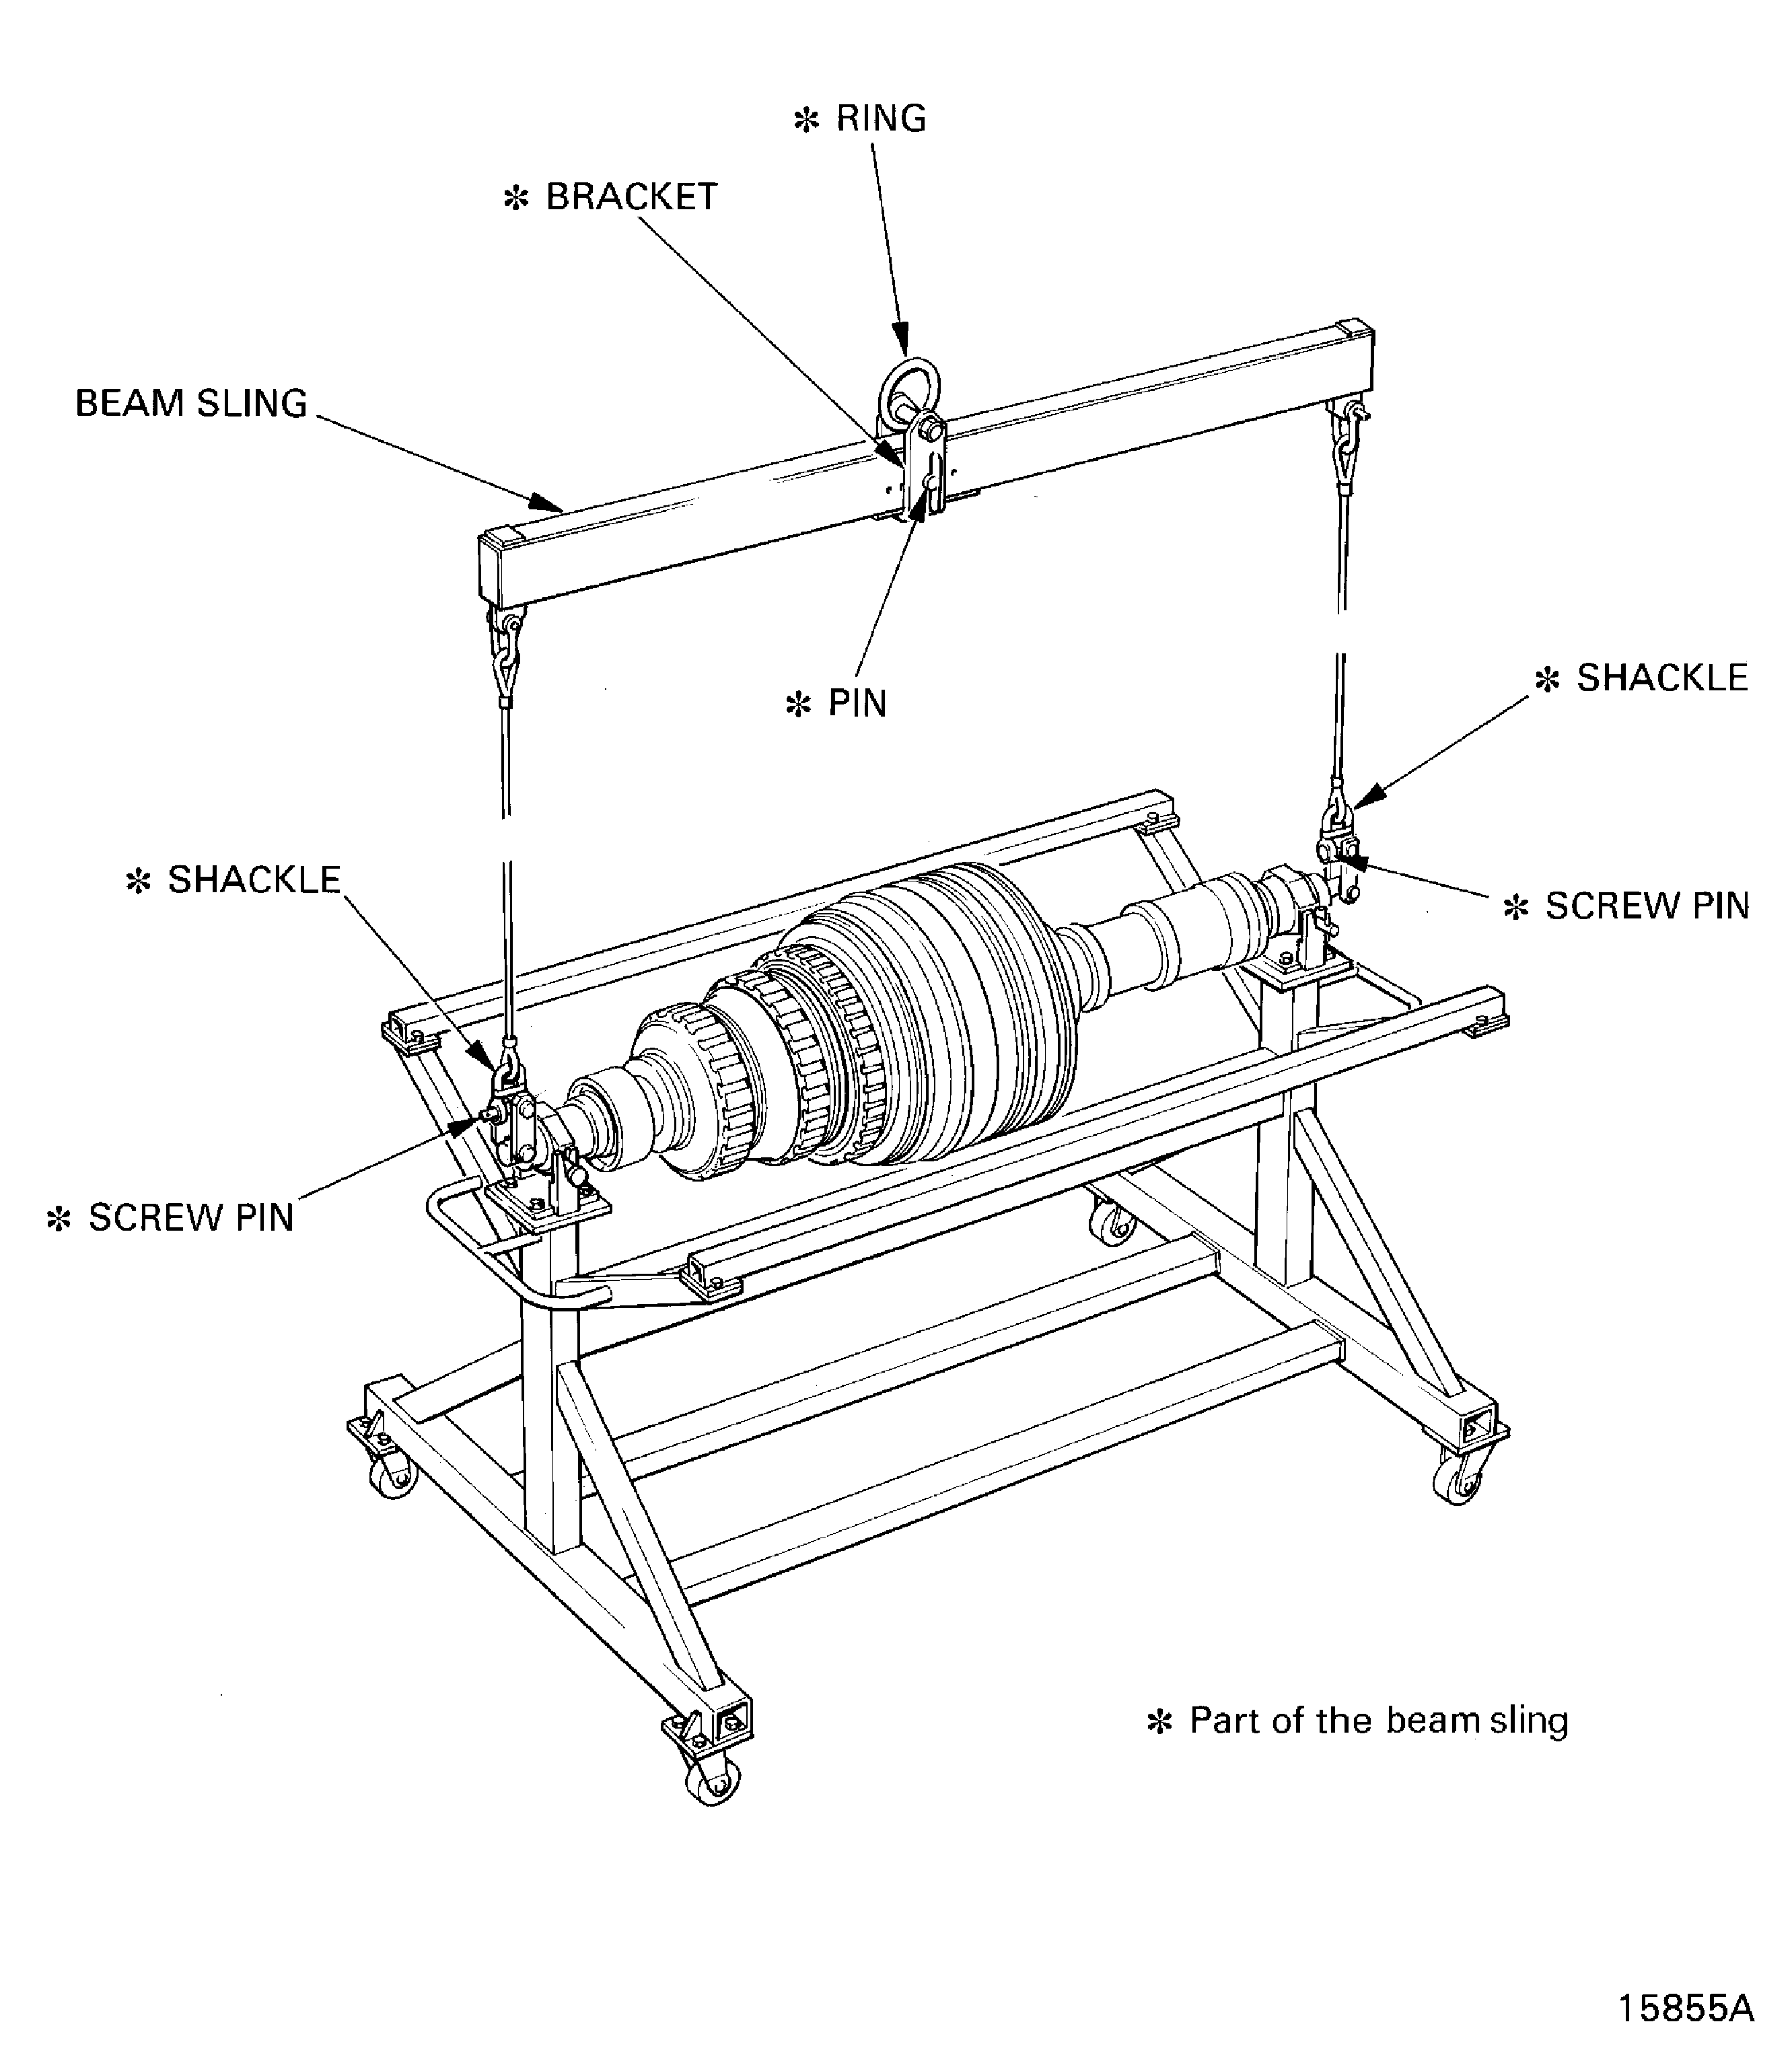
    Figure: Remove/Install the Universal Sling Adapters

    Remove/Install the Universal Sling Adapters

    Figure: Calculate the Static Unbalance

    Calculate the Static Unbalance
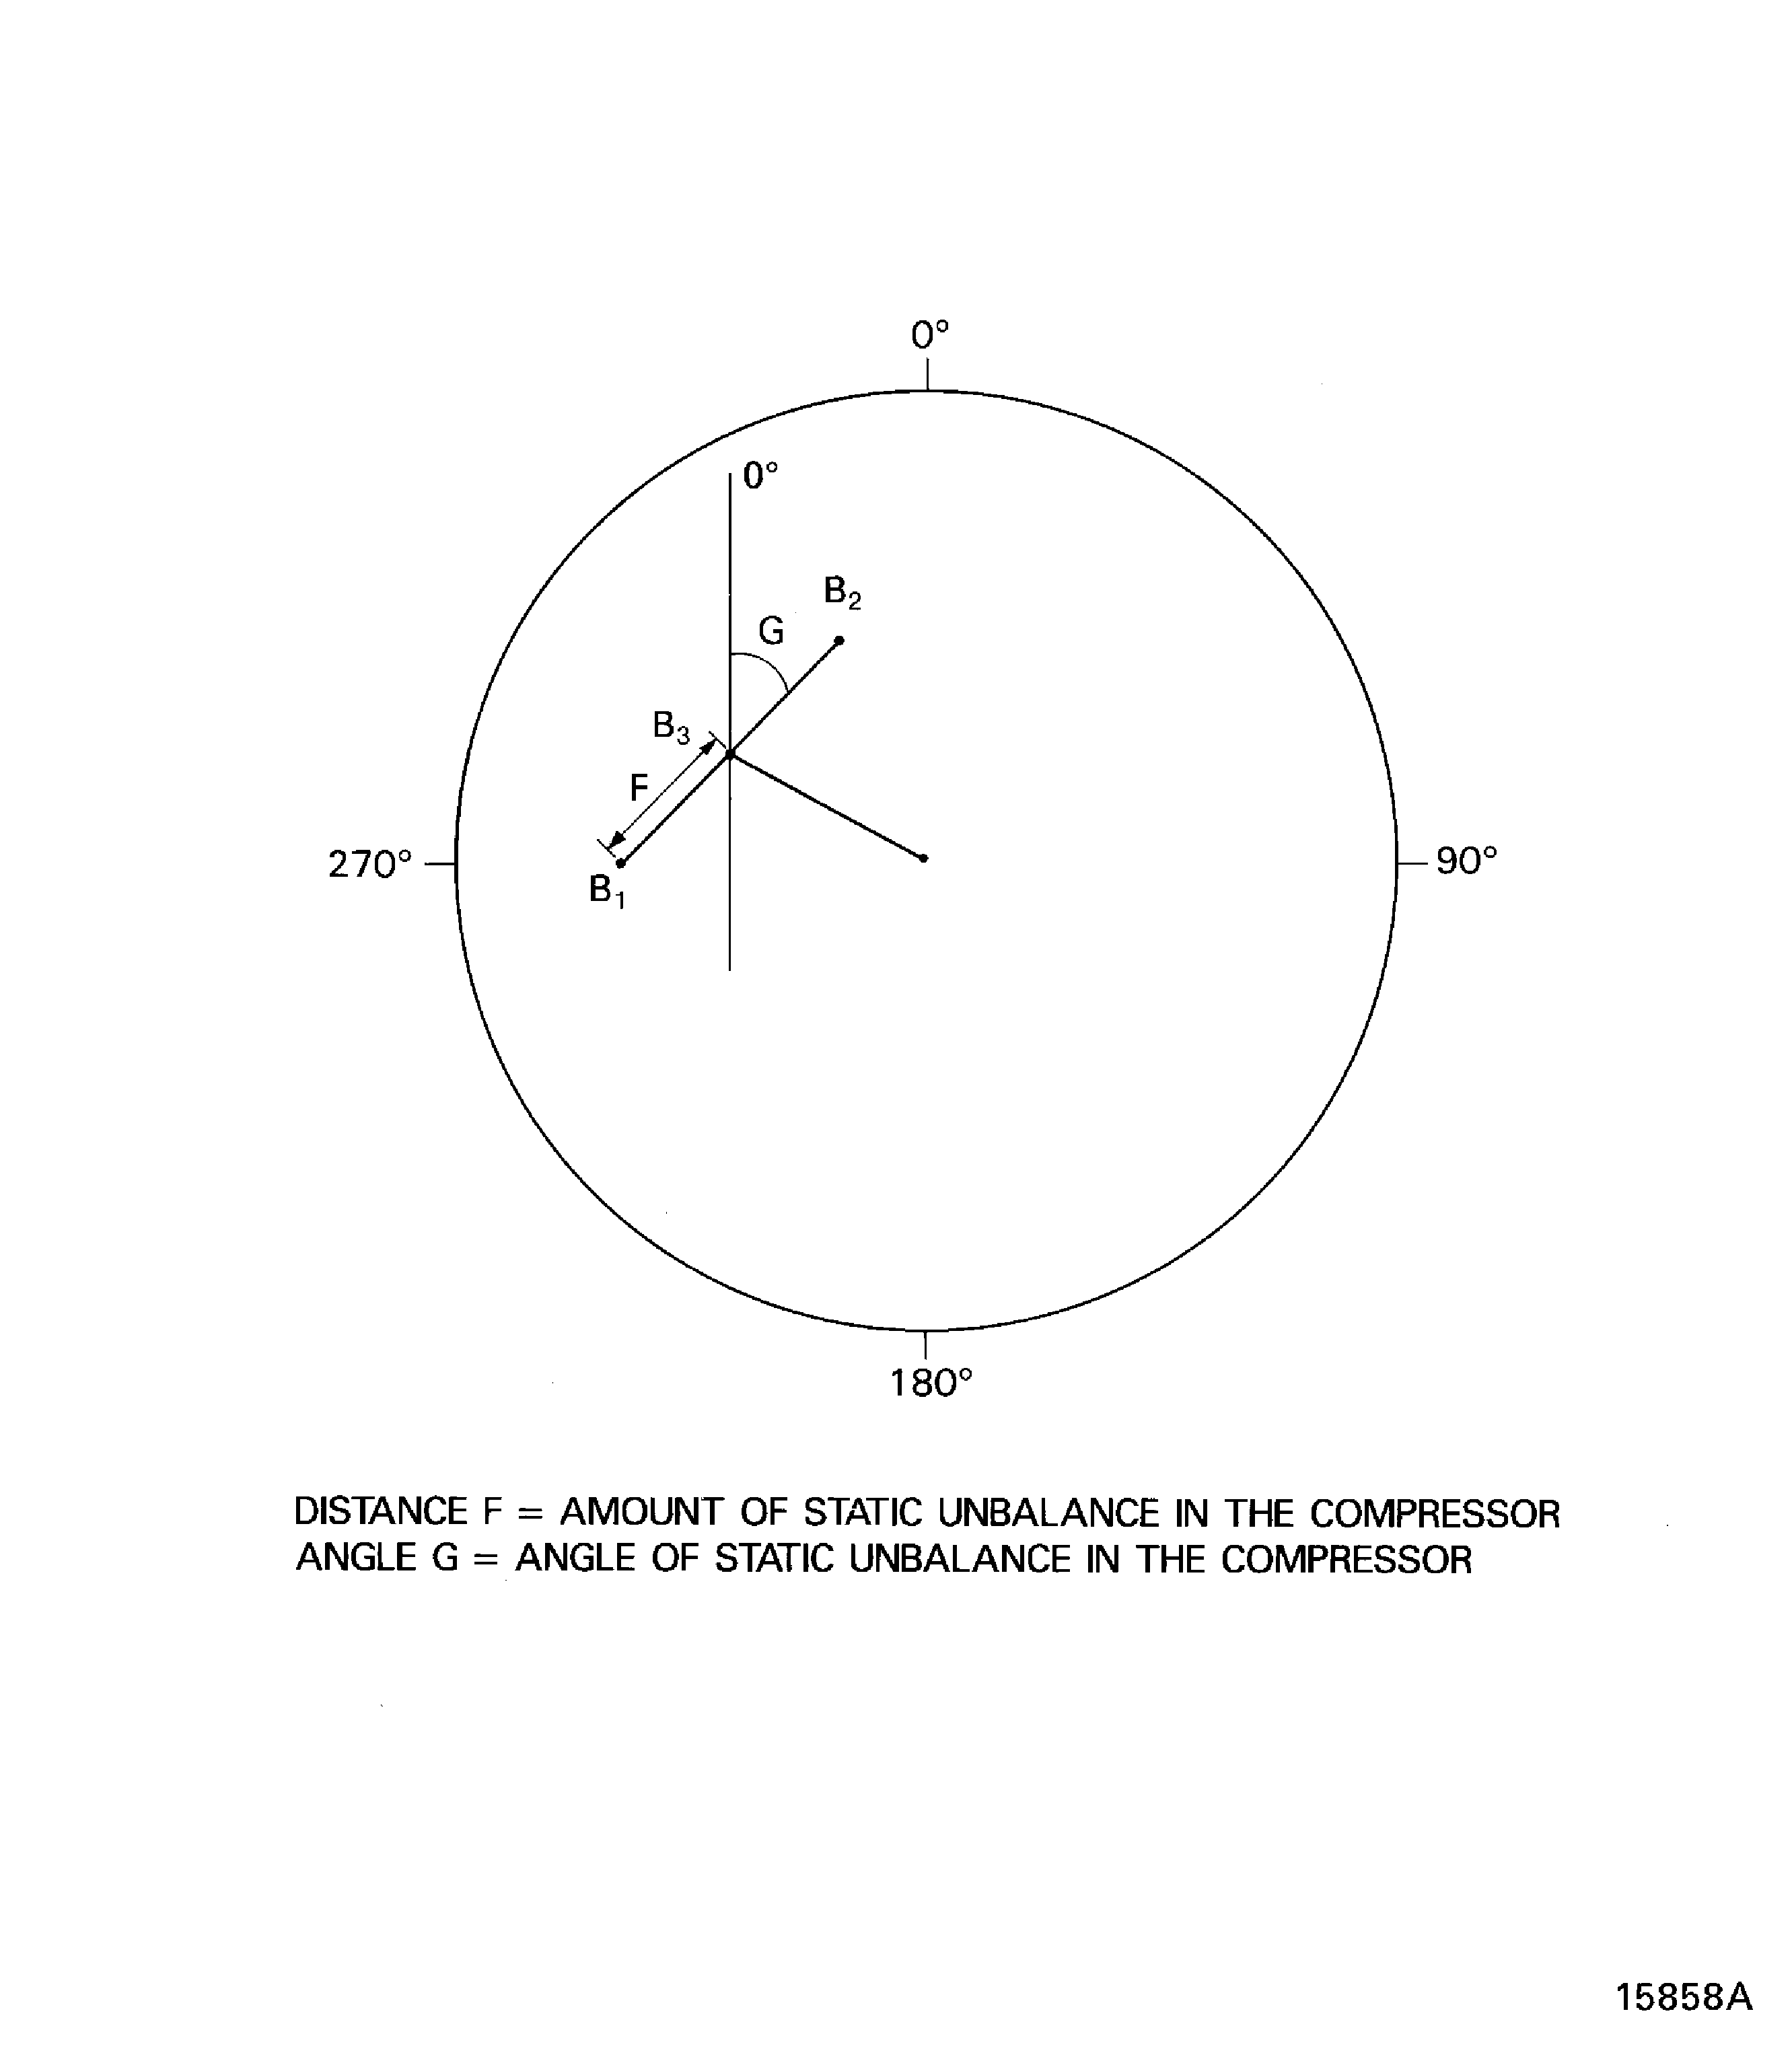
    Figure: Install the HP Compressor Rotor Assembly in to the Safety Support Stand

    Install the HP Compressor Rotor Assembly in to the Safety Support Stand
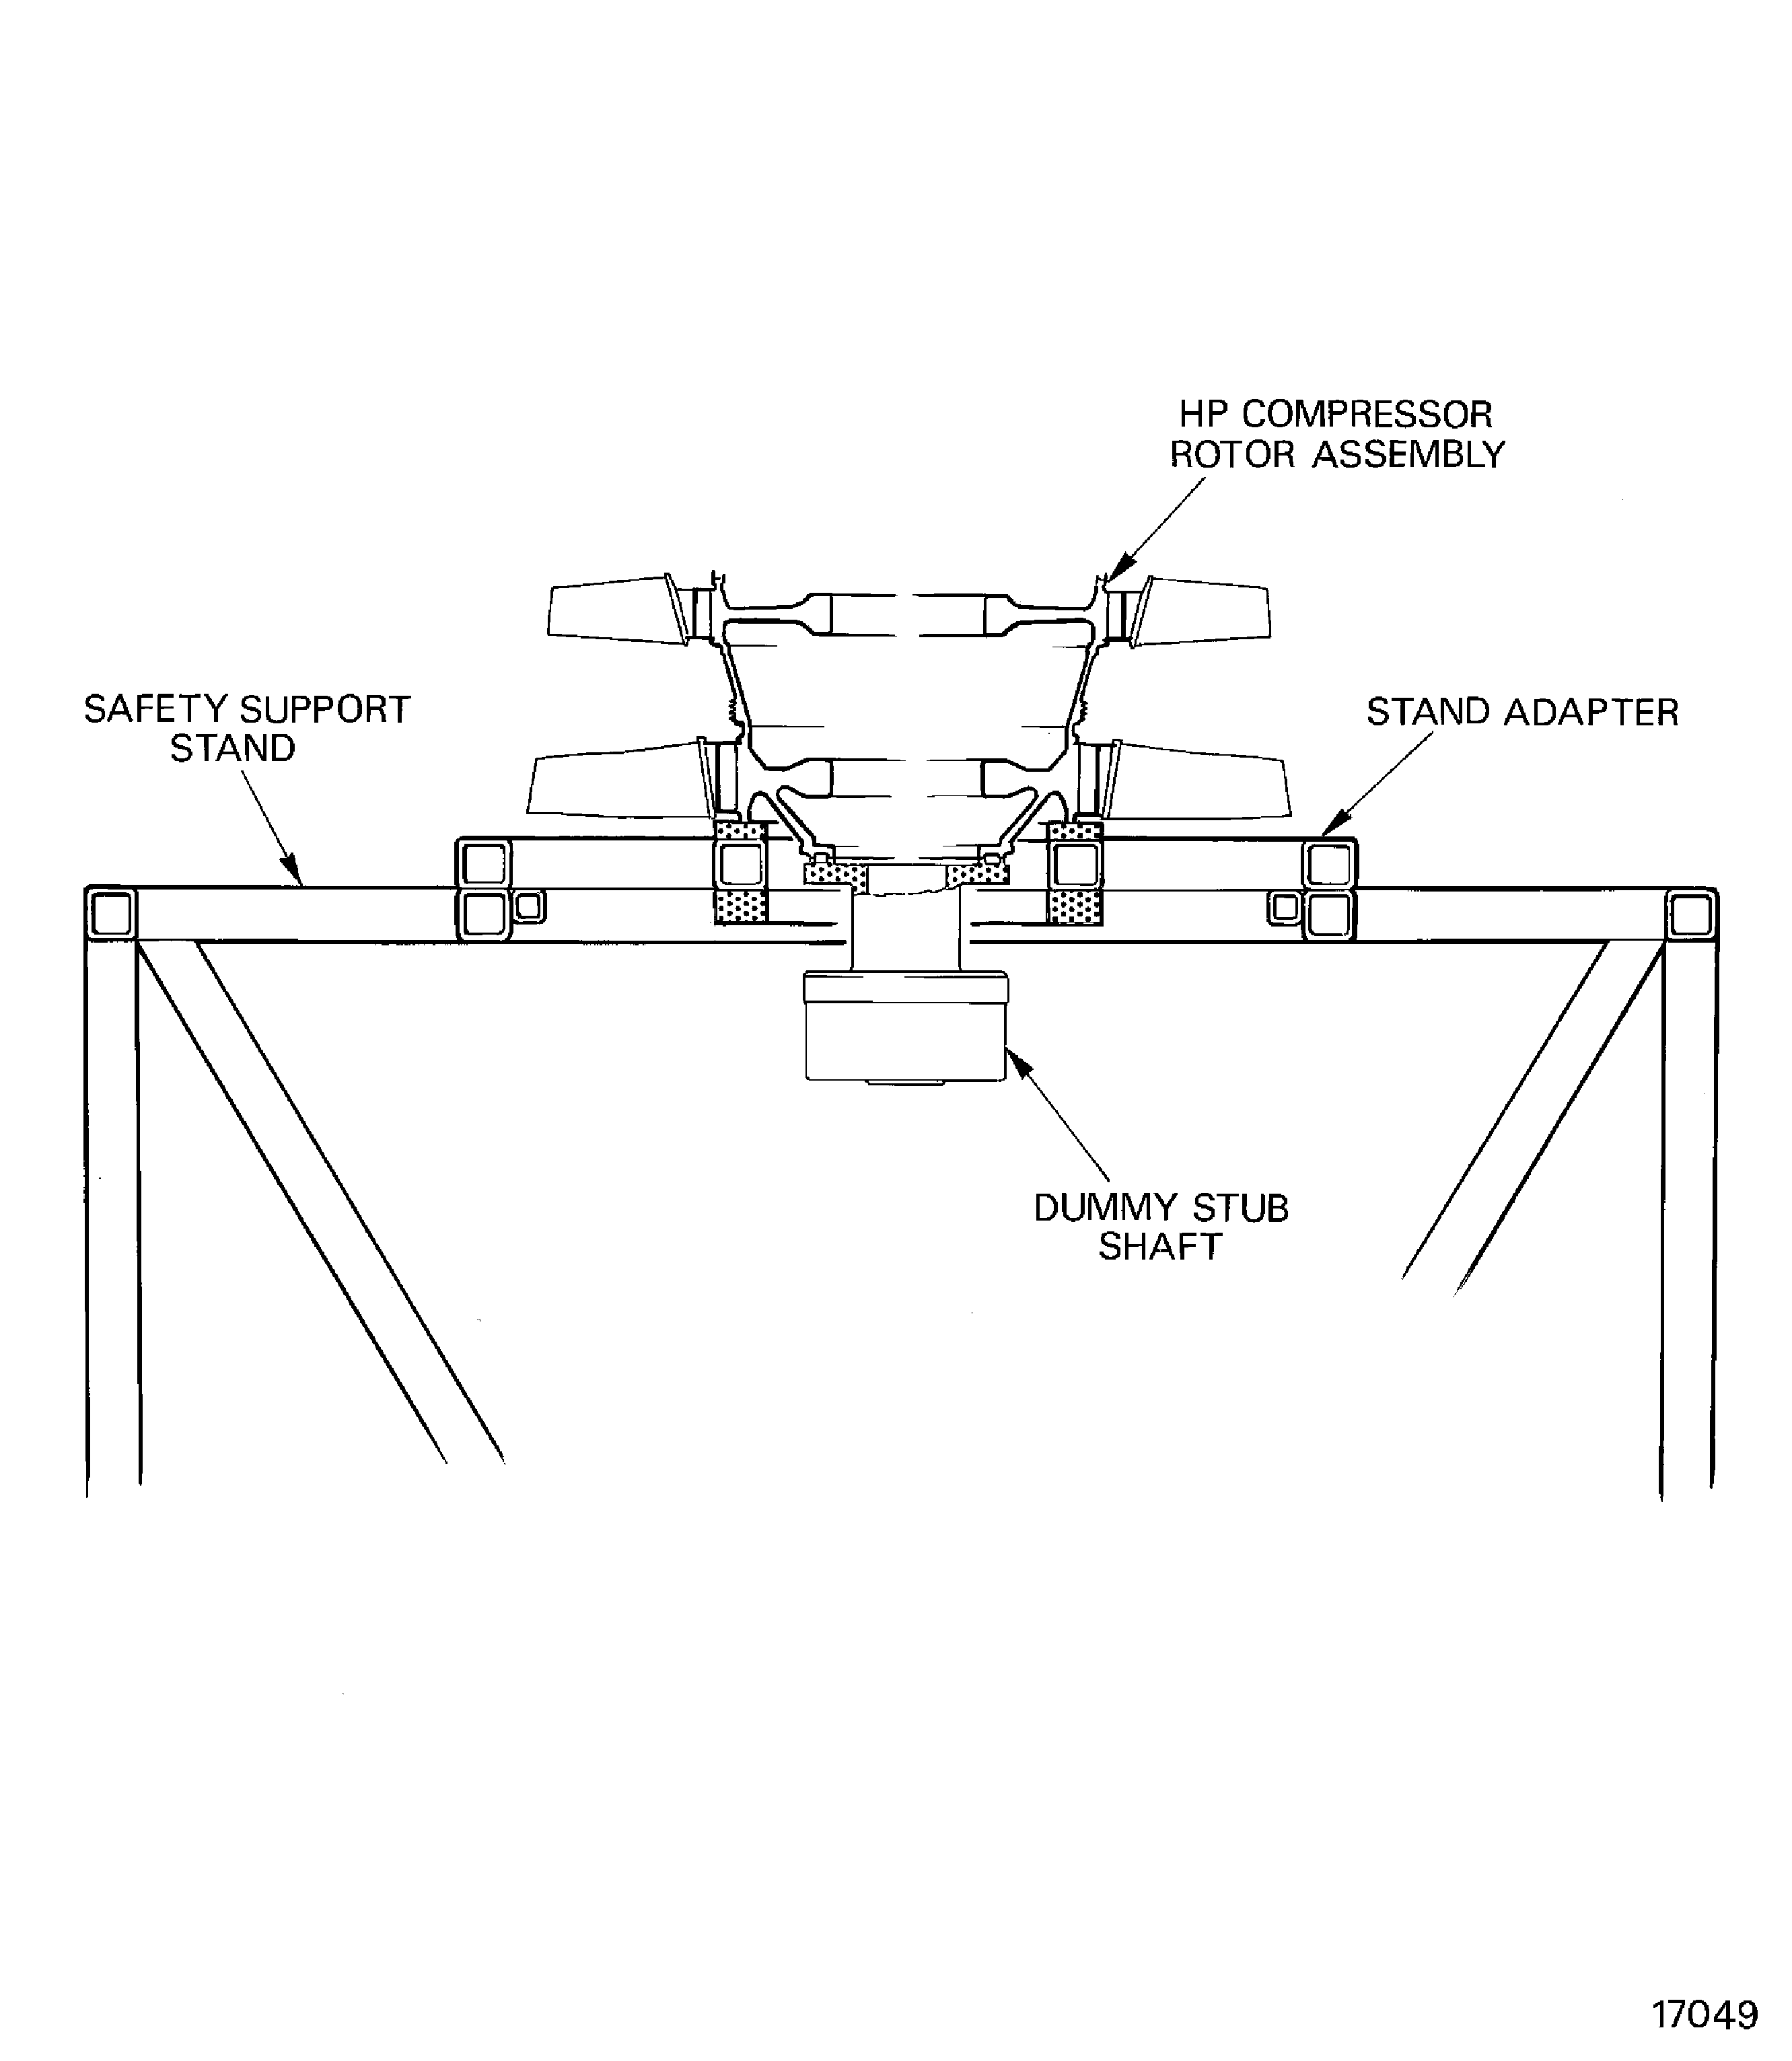
    Figure: Remove/Install the Dummy Stub Shaft

    Remove/Install the Dummy Stub Shaft
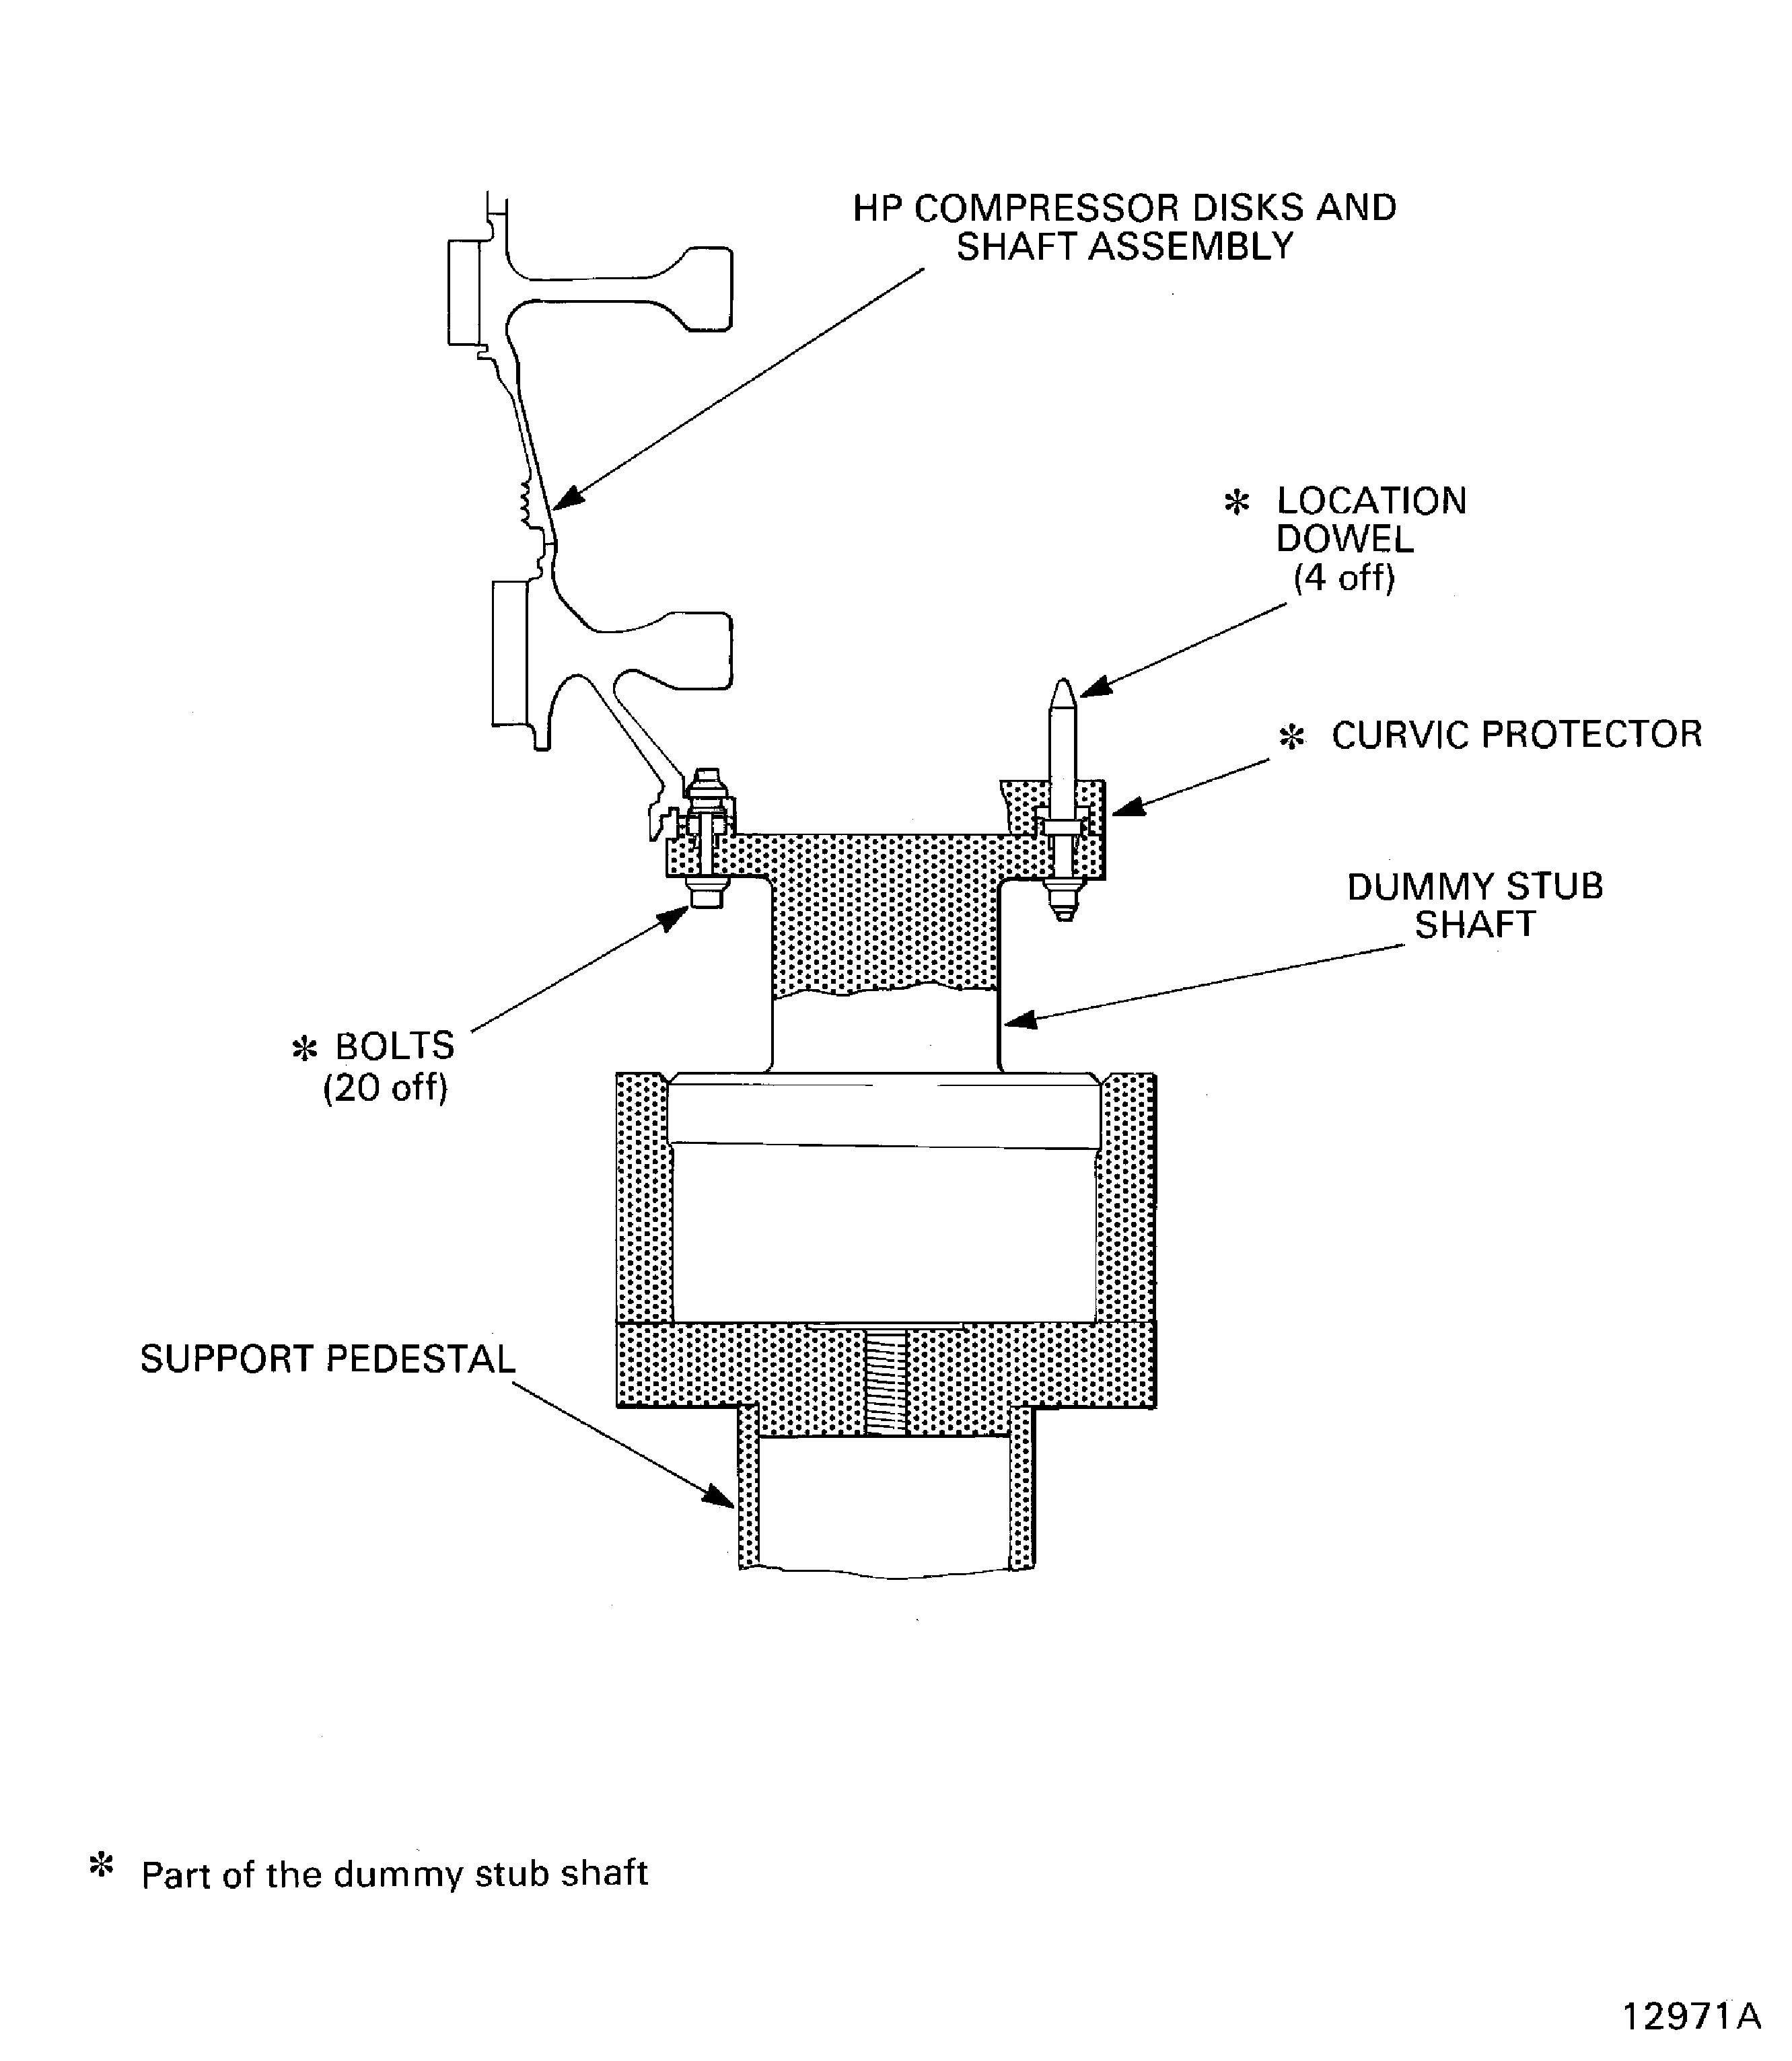
    Figure: Stage 3 Disk Curvic Coupling Bolt Torque Sequence

    Stage 3 Disk Curvic Coupling Bolt Torque Sequence
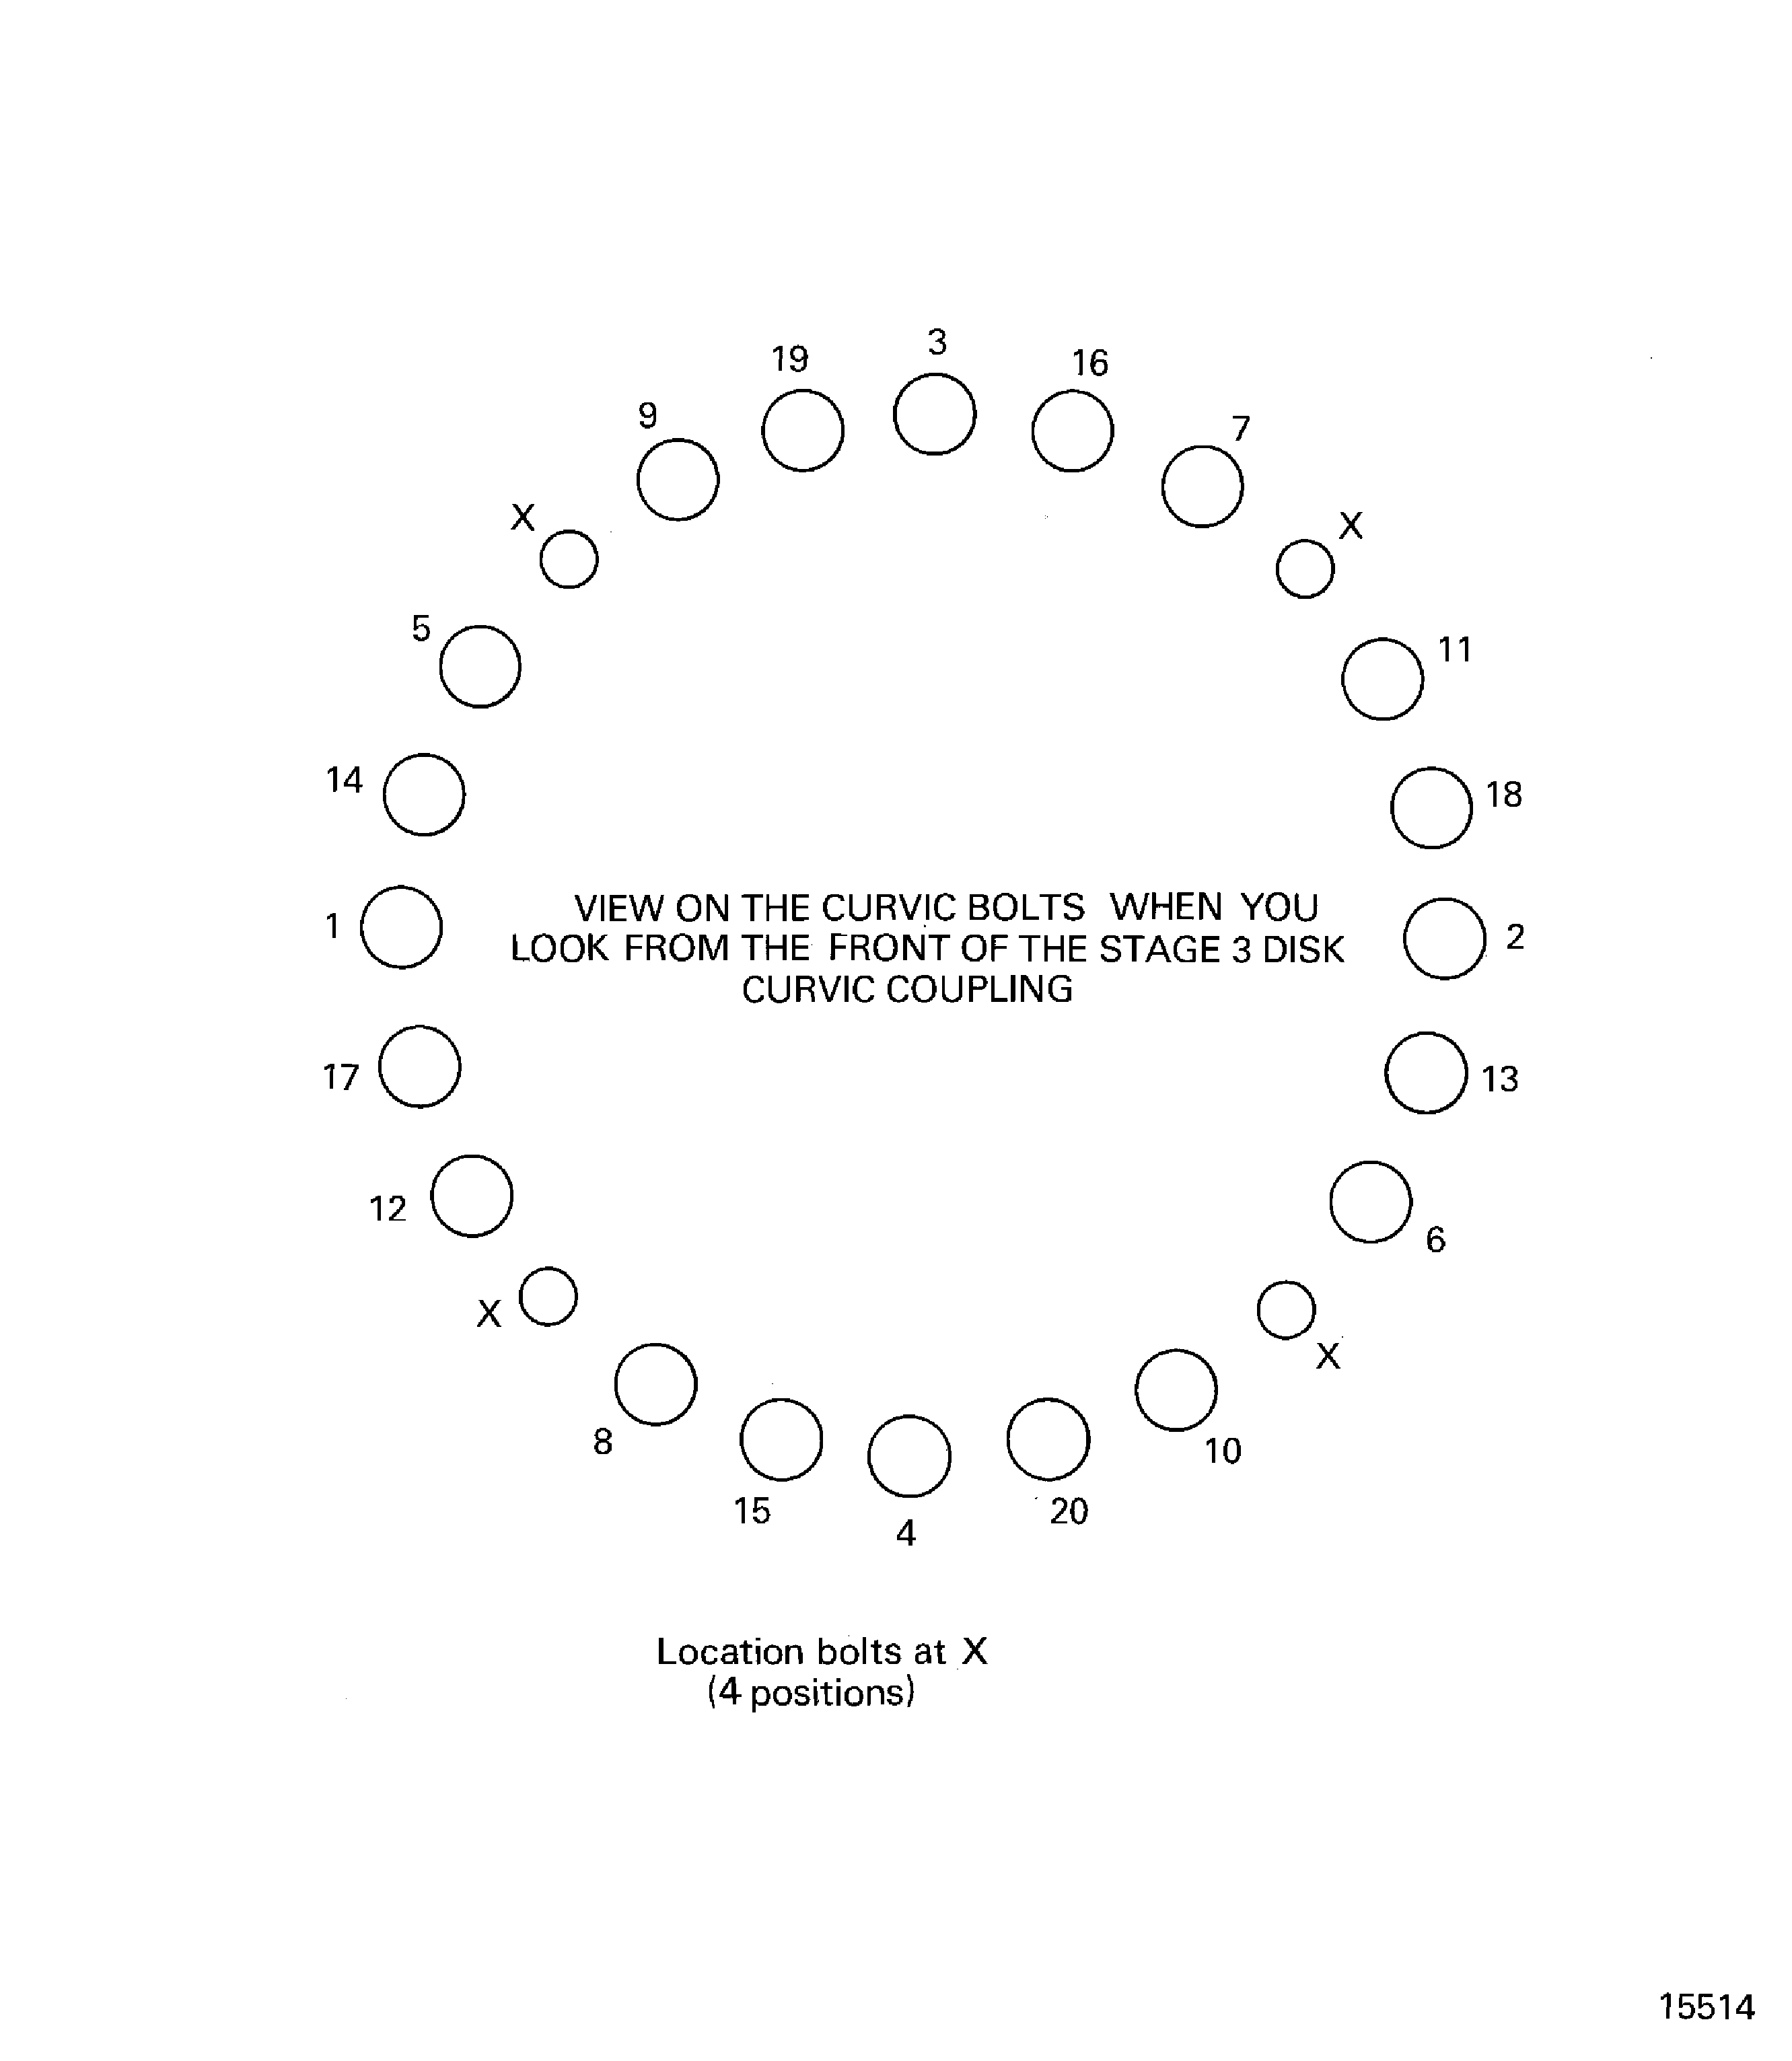
    Figure: Remove/Install the HP Compressor Rotor Assembly from/to the Trolley

    Remove/Install the HP Compressor Rotor Assembly from/to the Trolley
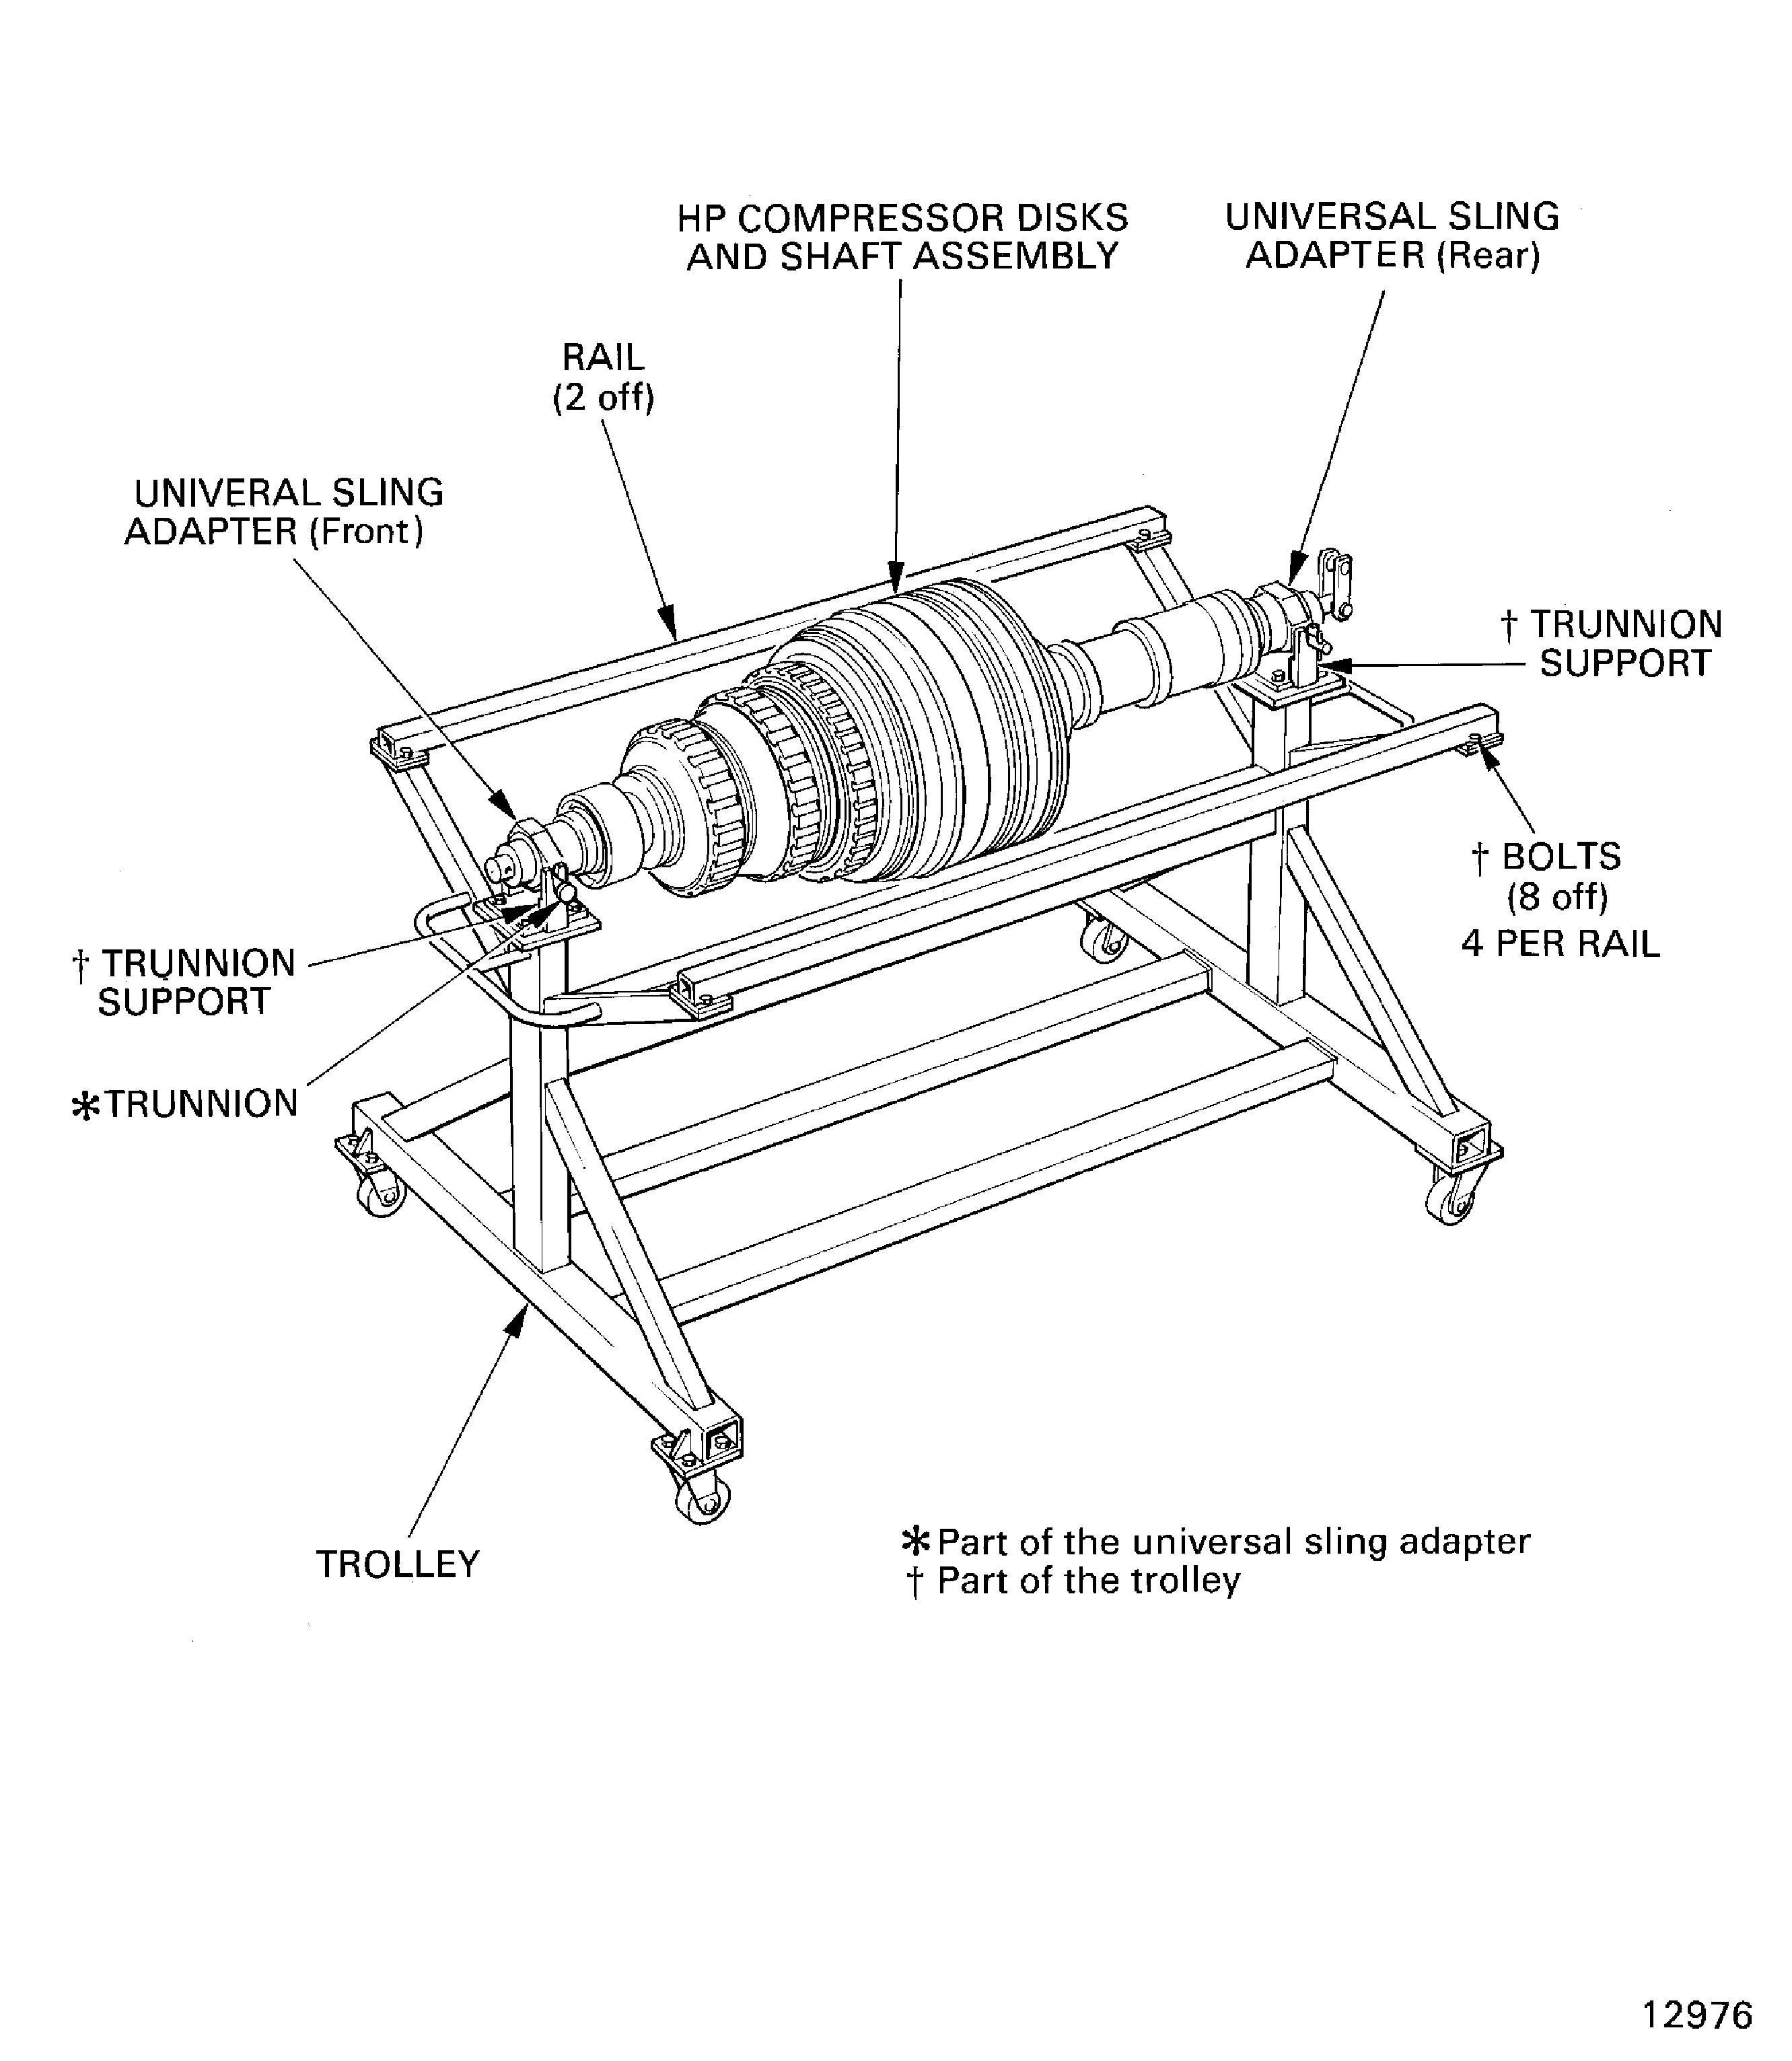
    Figure: Example of Stages 6 thru 12 Blade Loading Slot and Locknut Slots

    Example of Stages 6 thru 12 Blade Loading Slot and Locknut Slots
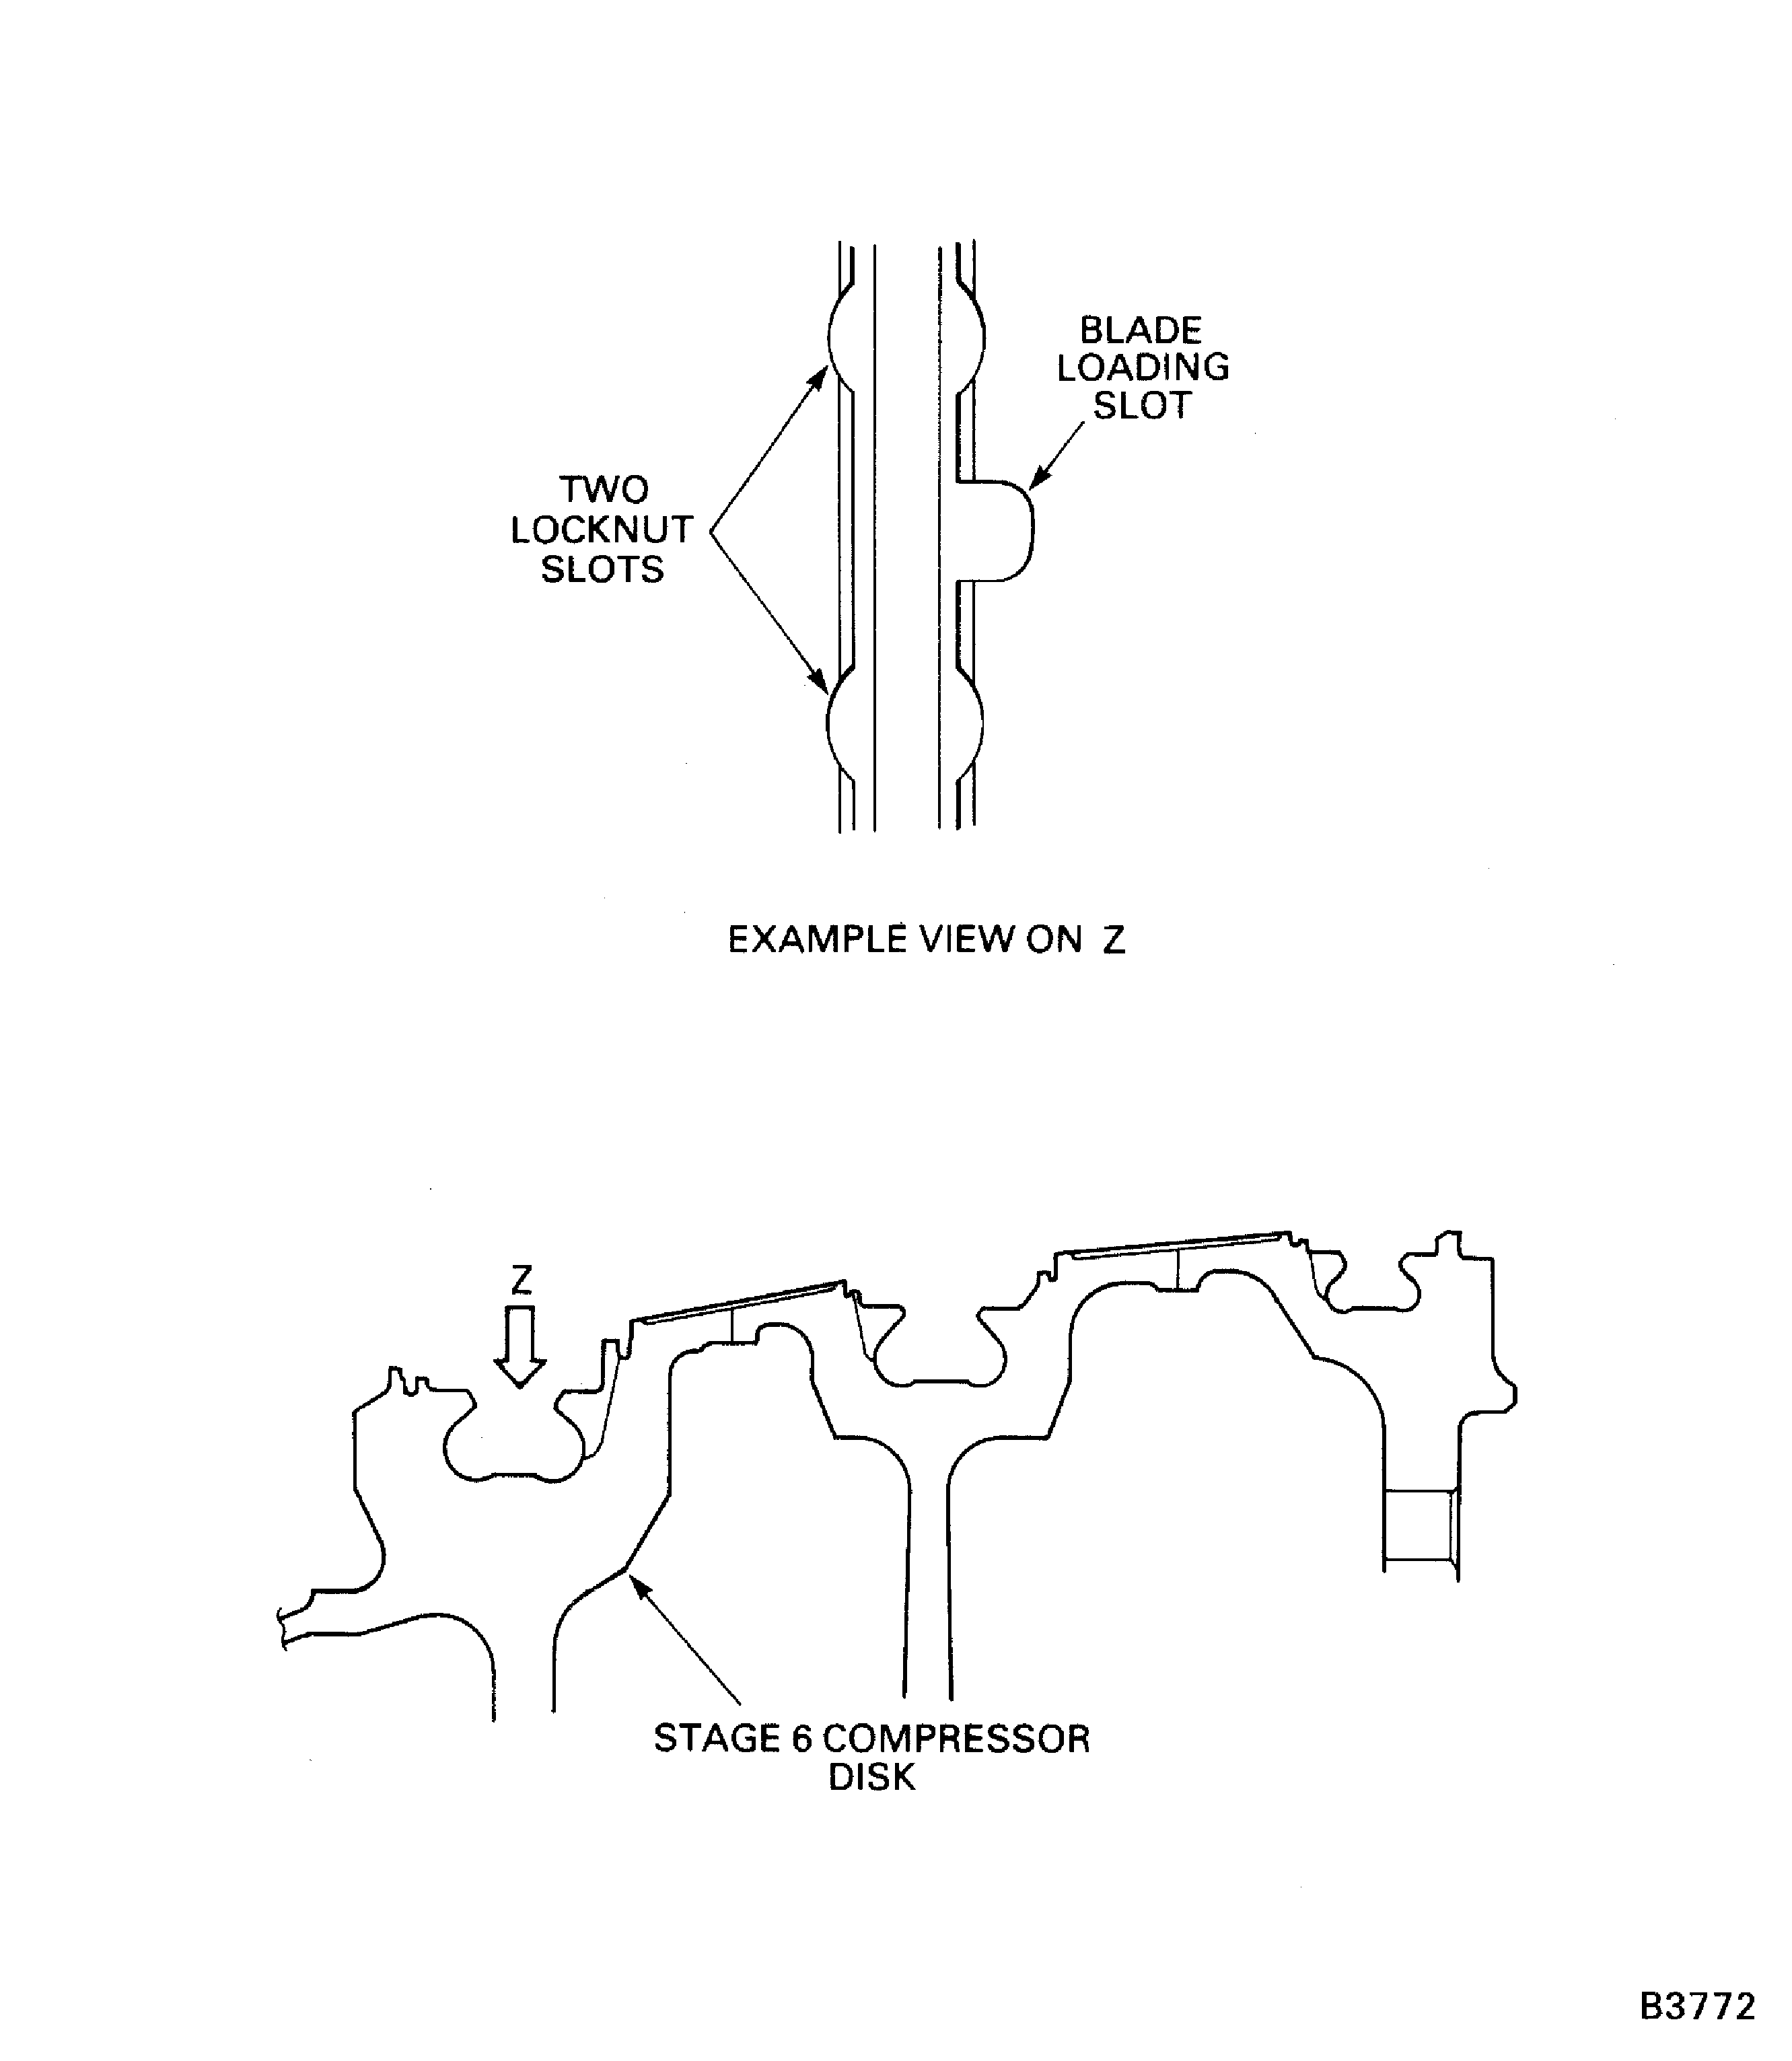
    Figure: Measure the Stages 6 thru 12 Platform Build Clearance

    Sheet 1
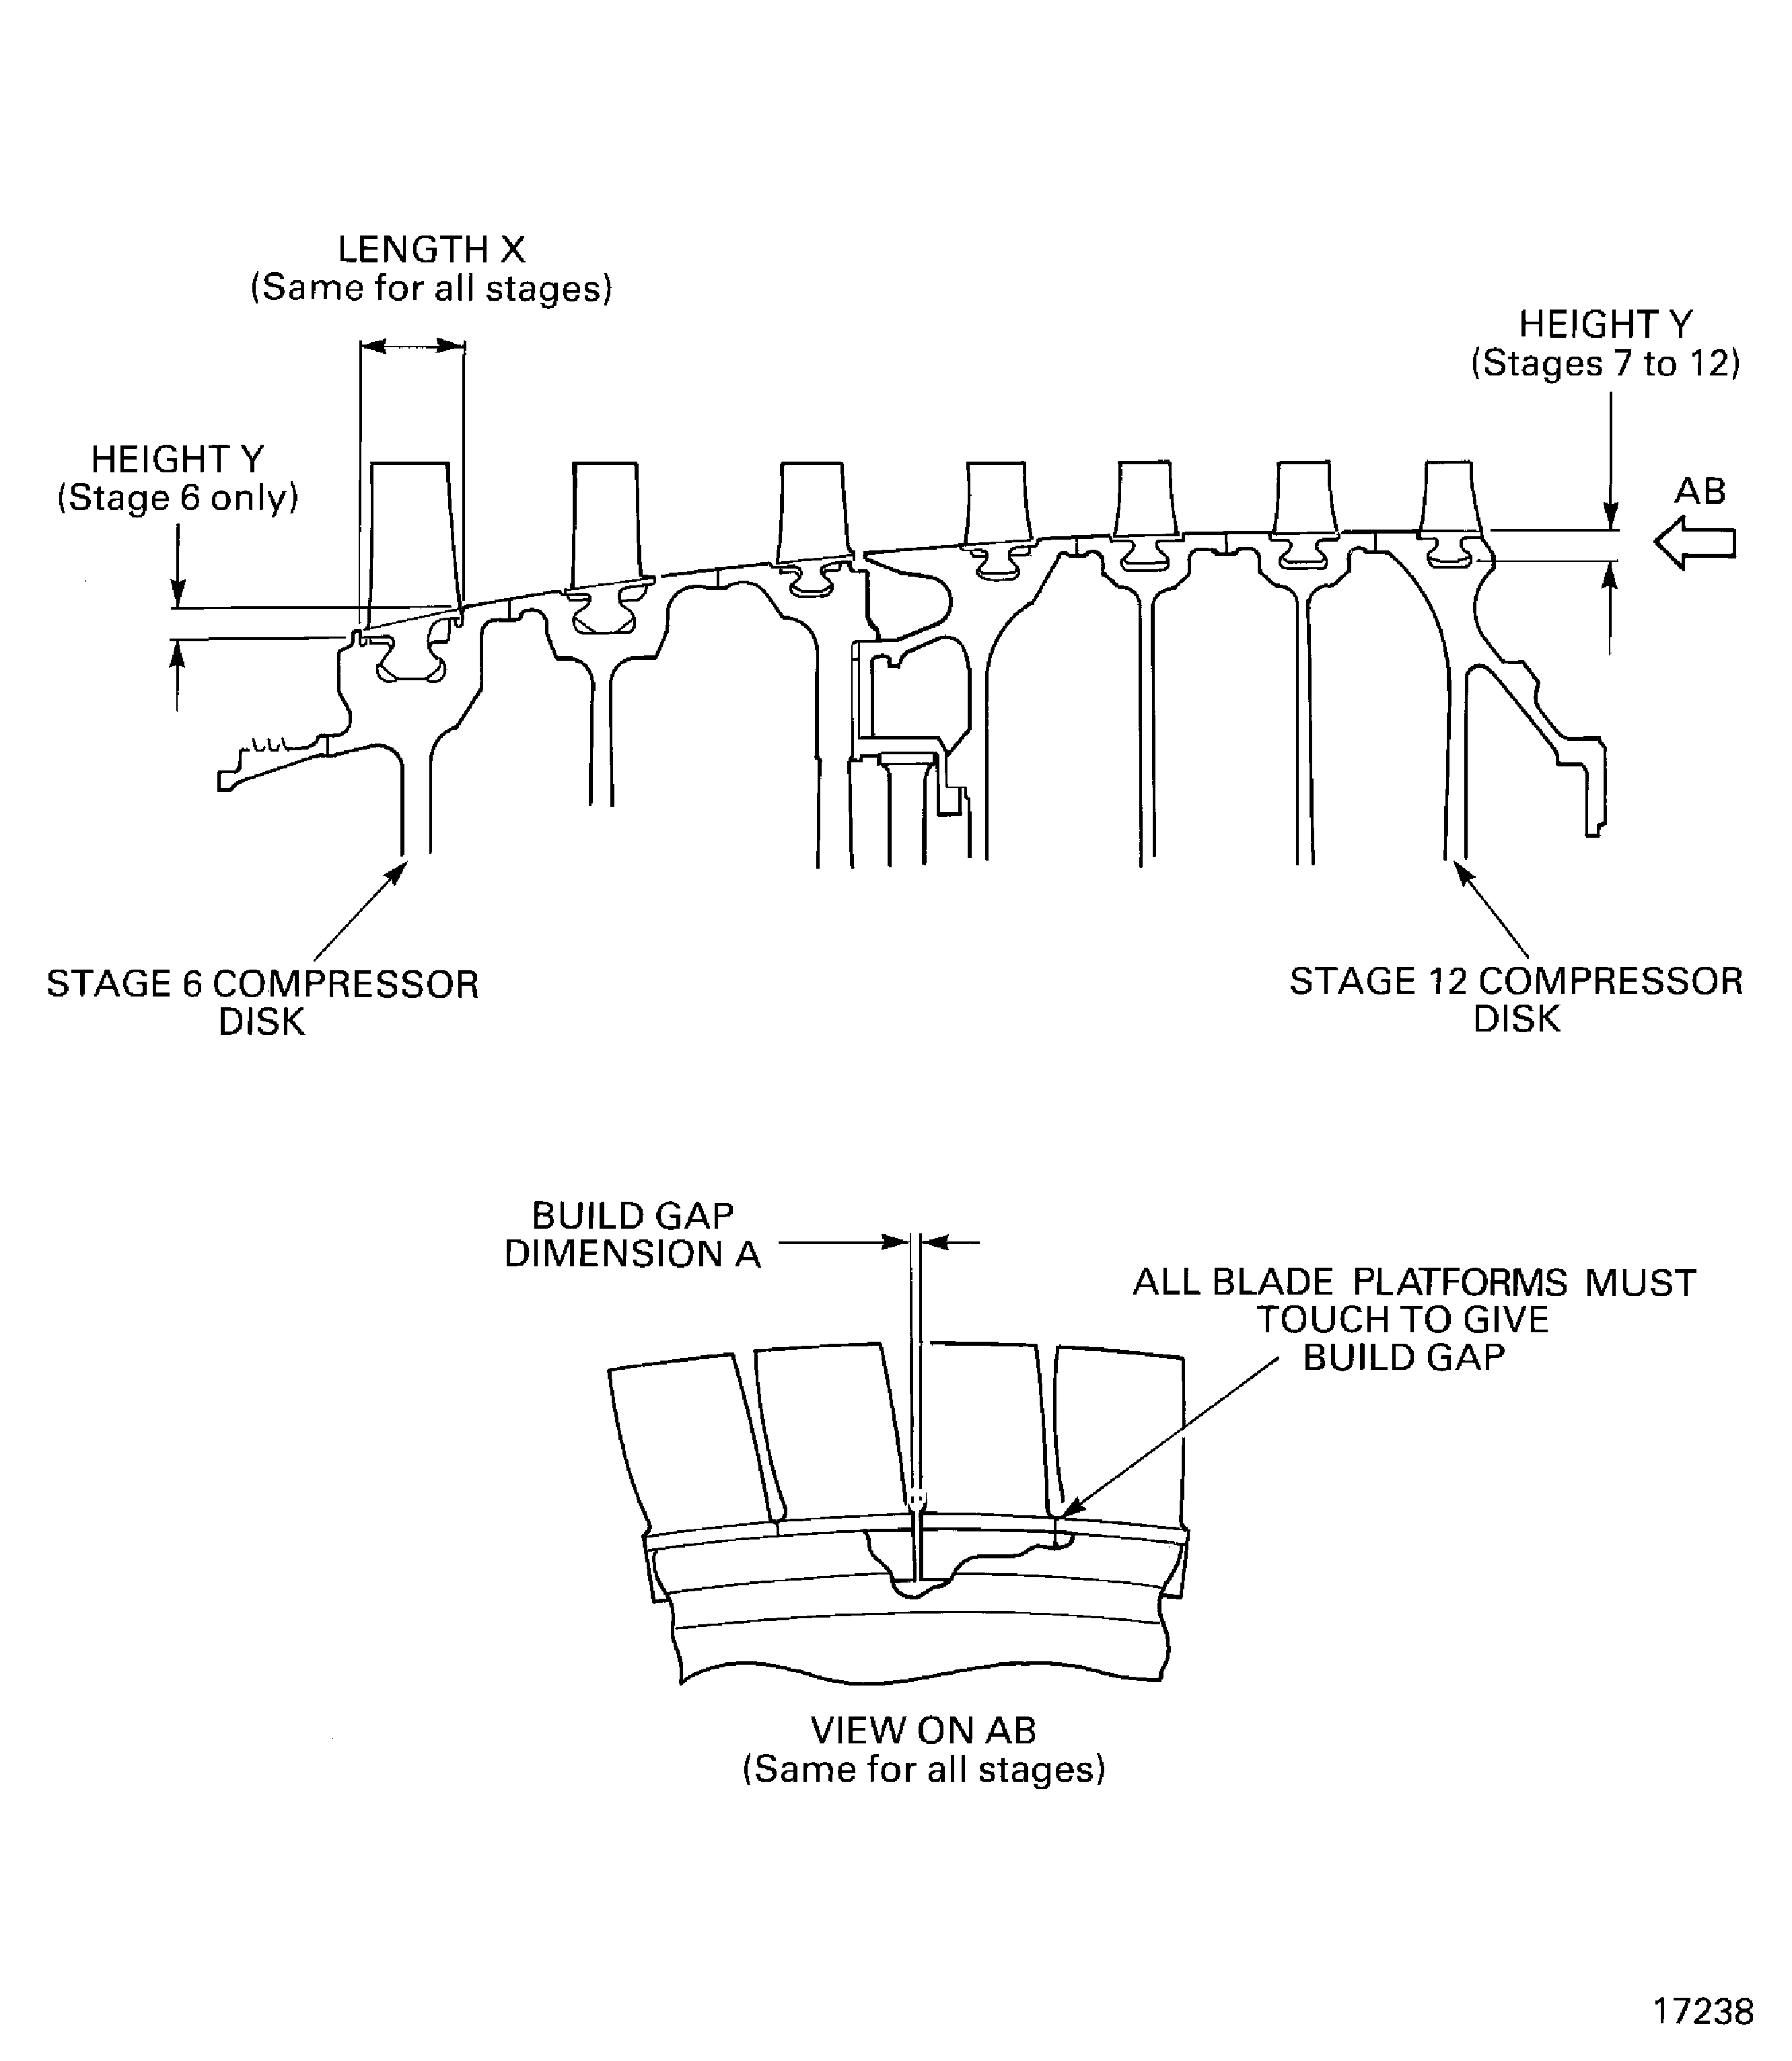
    Legend
    Measure the Stages 6 thru 12 Platform Build Clearance

    Sheet 1

    Close

    Figure: Measure the Stages 6 thru 12 Platform Build Clearances

    Sheet 2
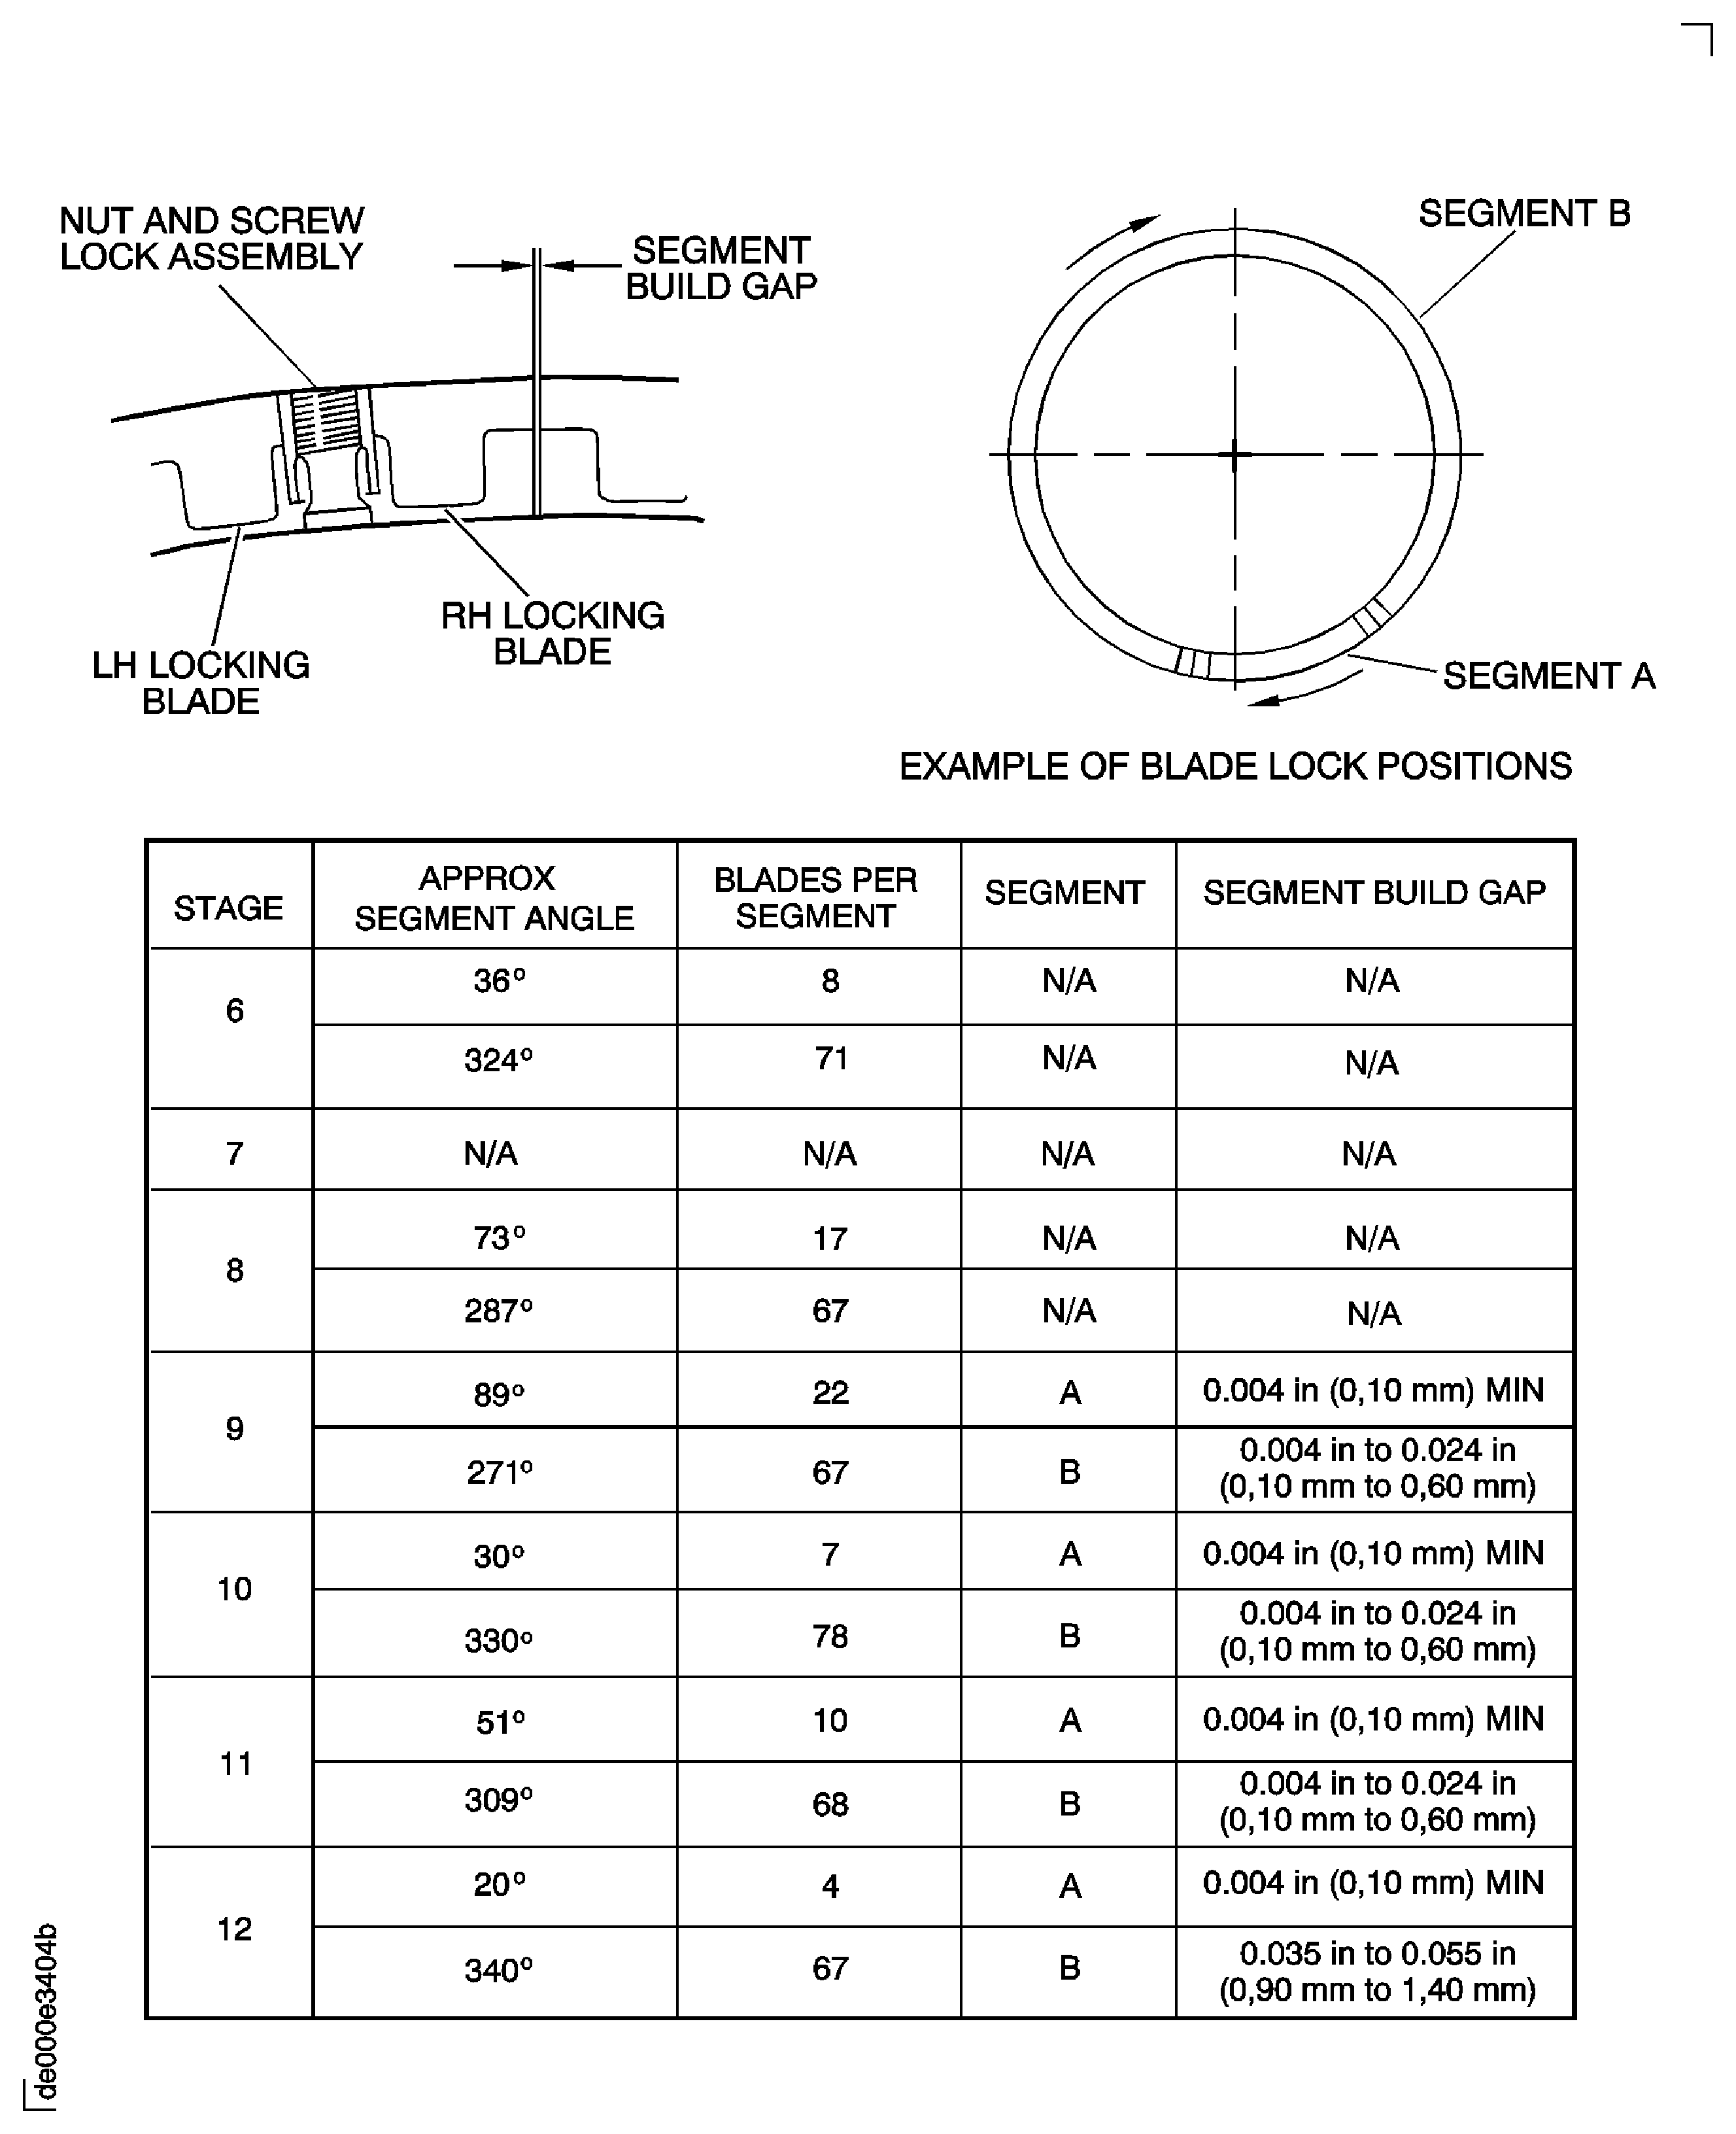
    Legend
    Measure the Stages 6 thru 12 Platform Build Clearances

    Sheet 2

    Close

    Figure: Example of a light-heavy-light Sequence
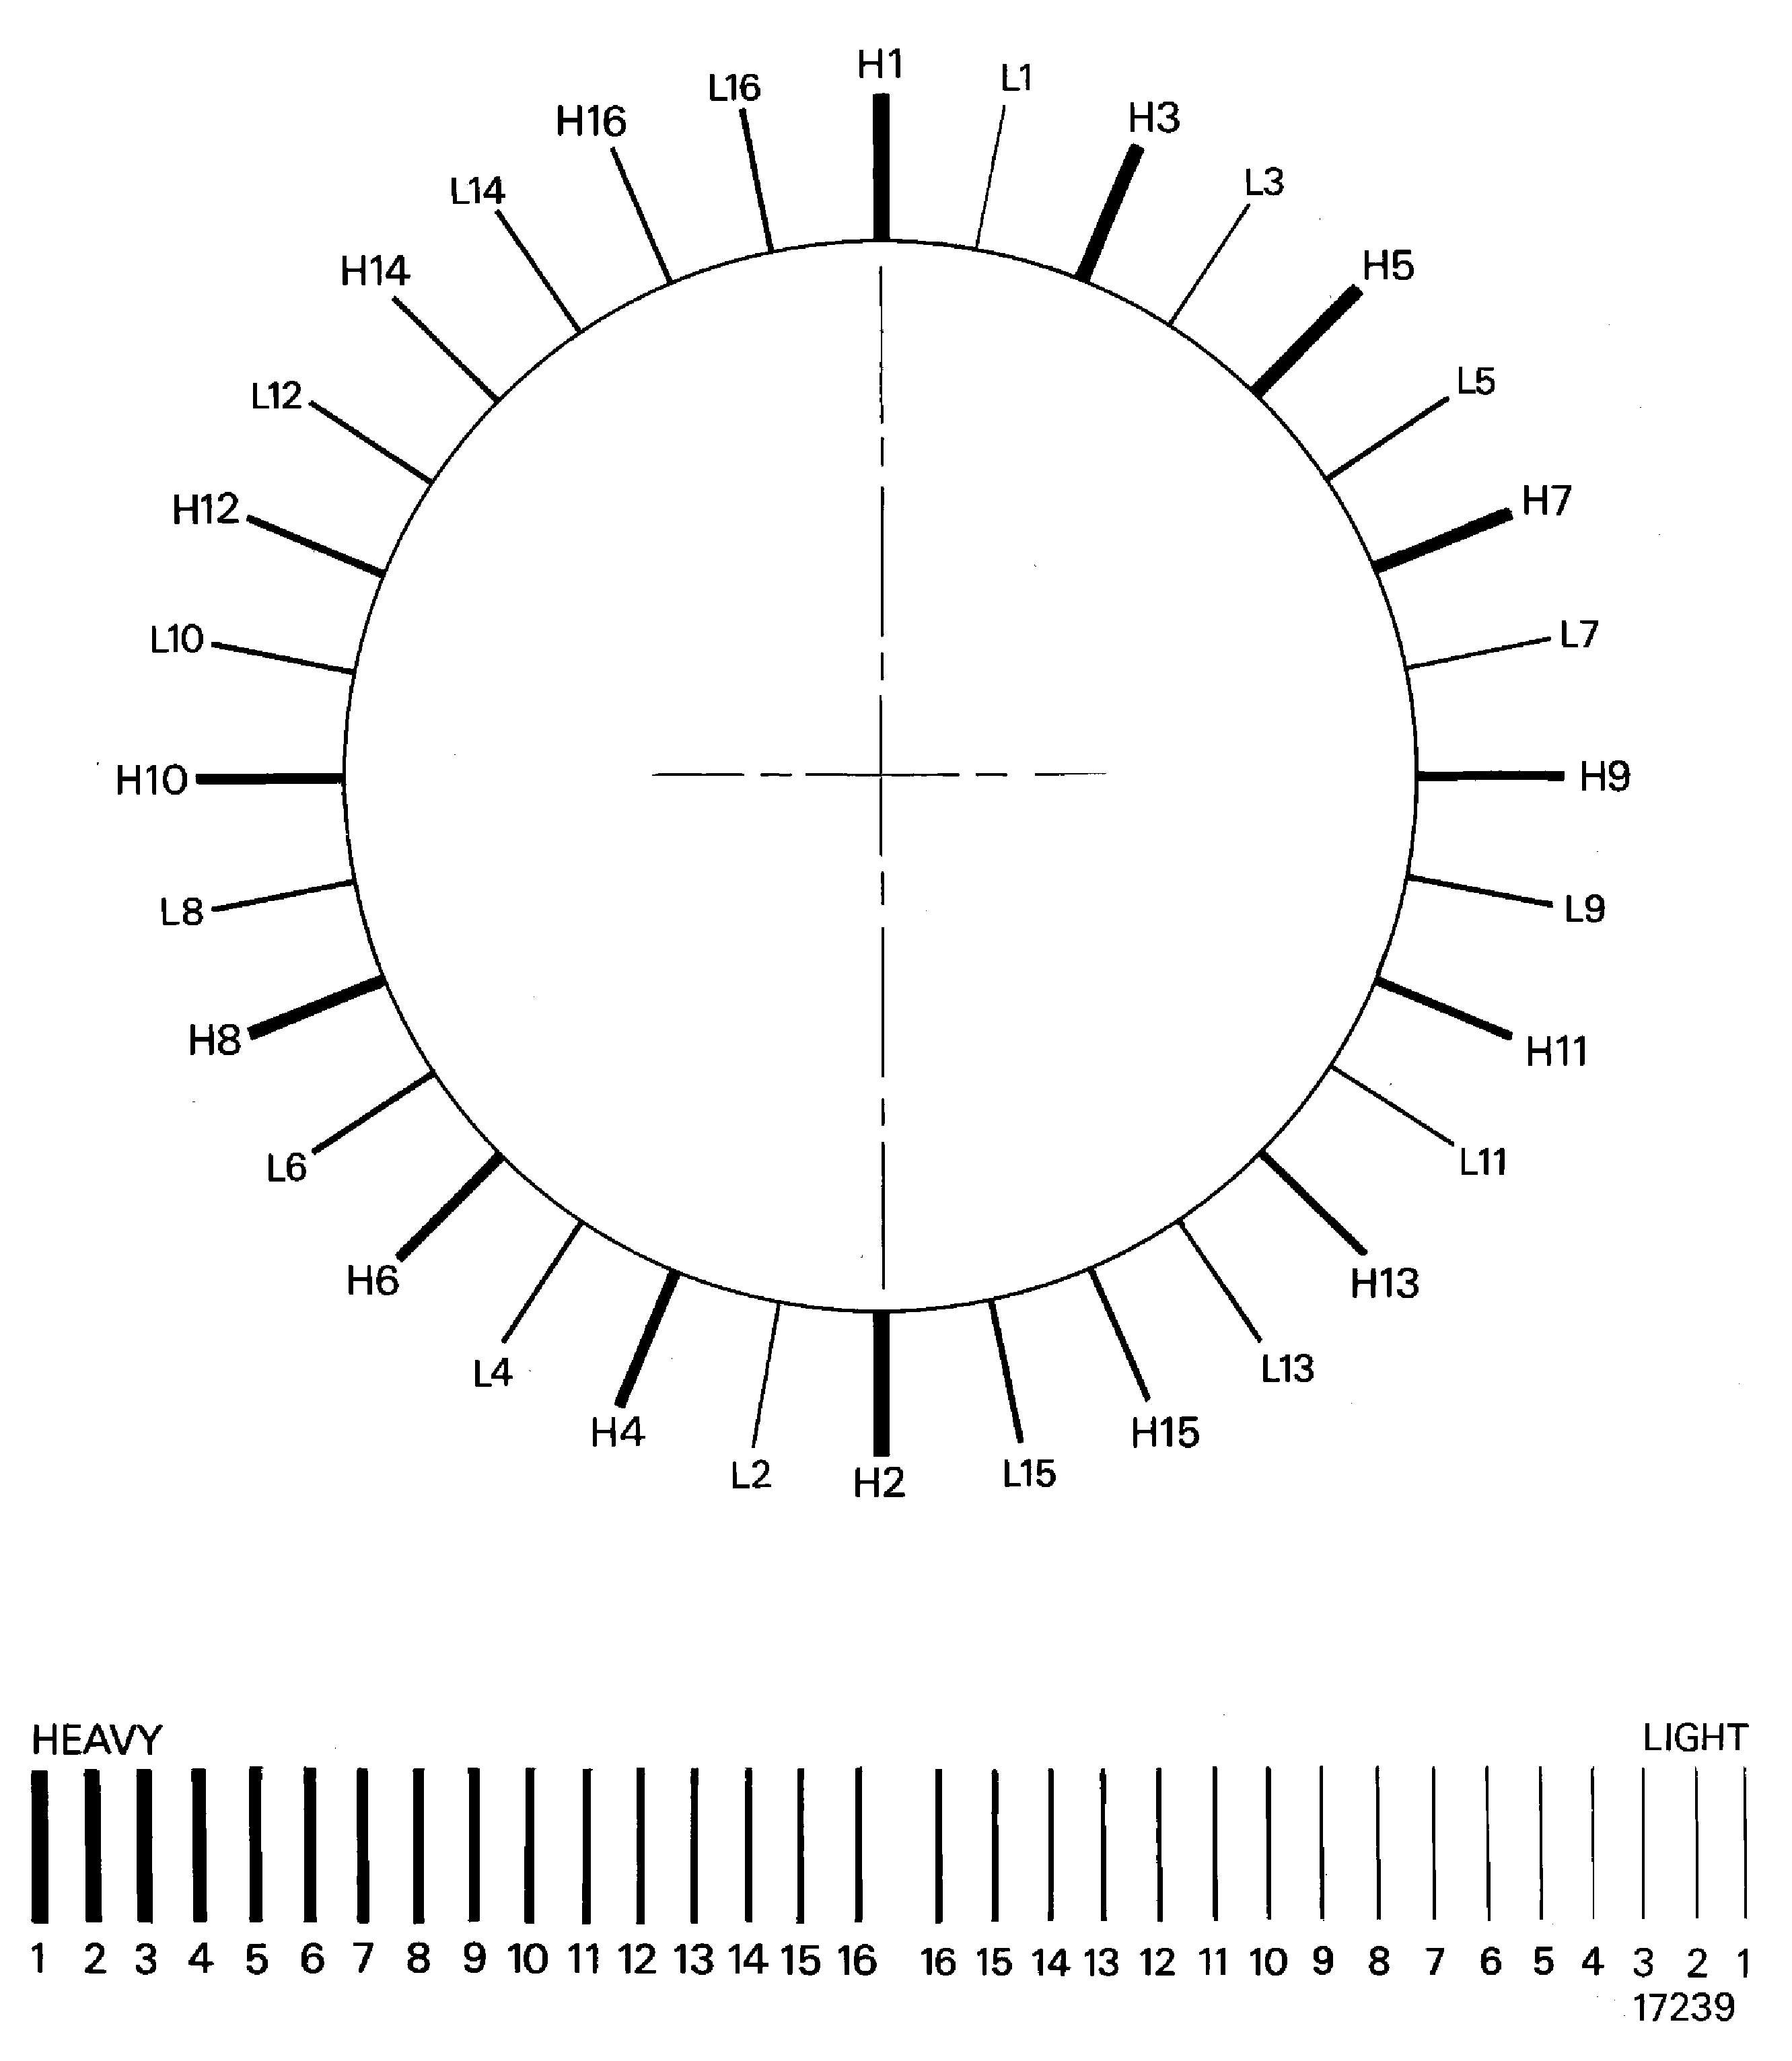
    Example of a light-heavy-light Sequence

    Figure: Install the Jacking Screw and Locknut Assemblies in to the Stages 6 thru 12 Disks

    Install the Jacking Screw and Locknut Assemblies in to the Stages 6 thru 12 Disks
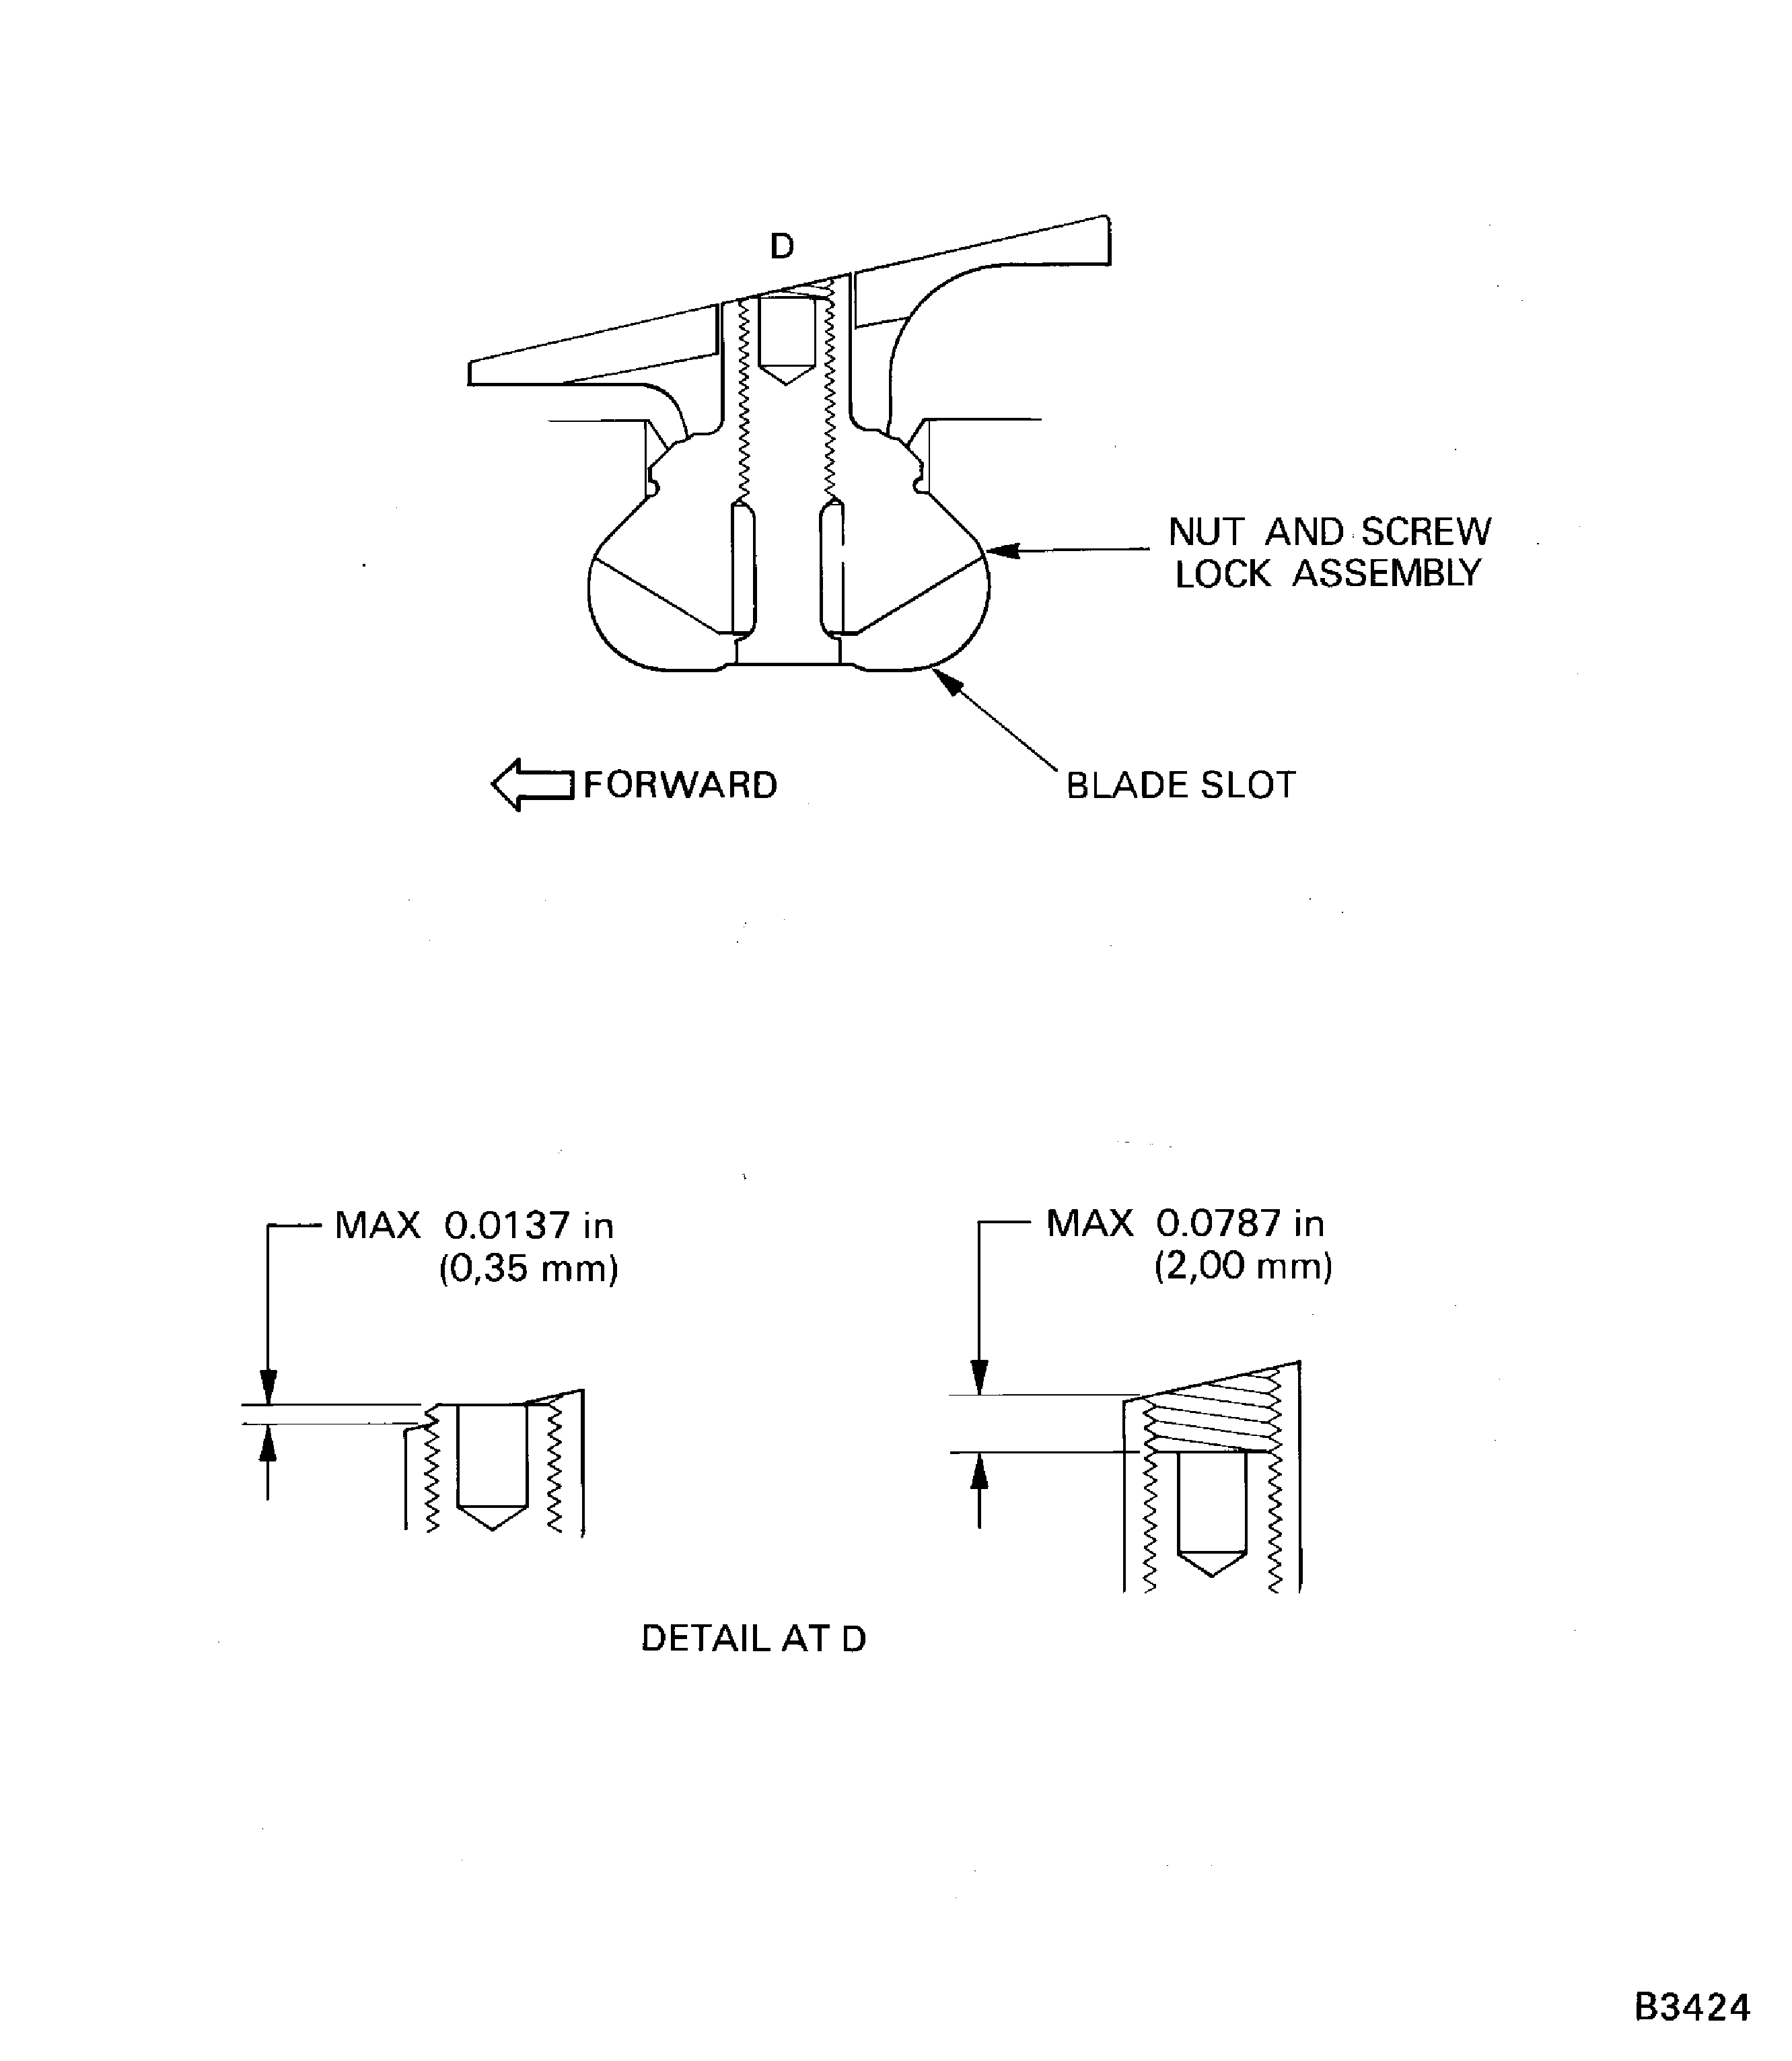
    Figure: Install the Stage 3 Retaining Plates and Lockplates

    Sheet 1
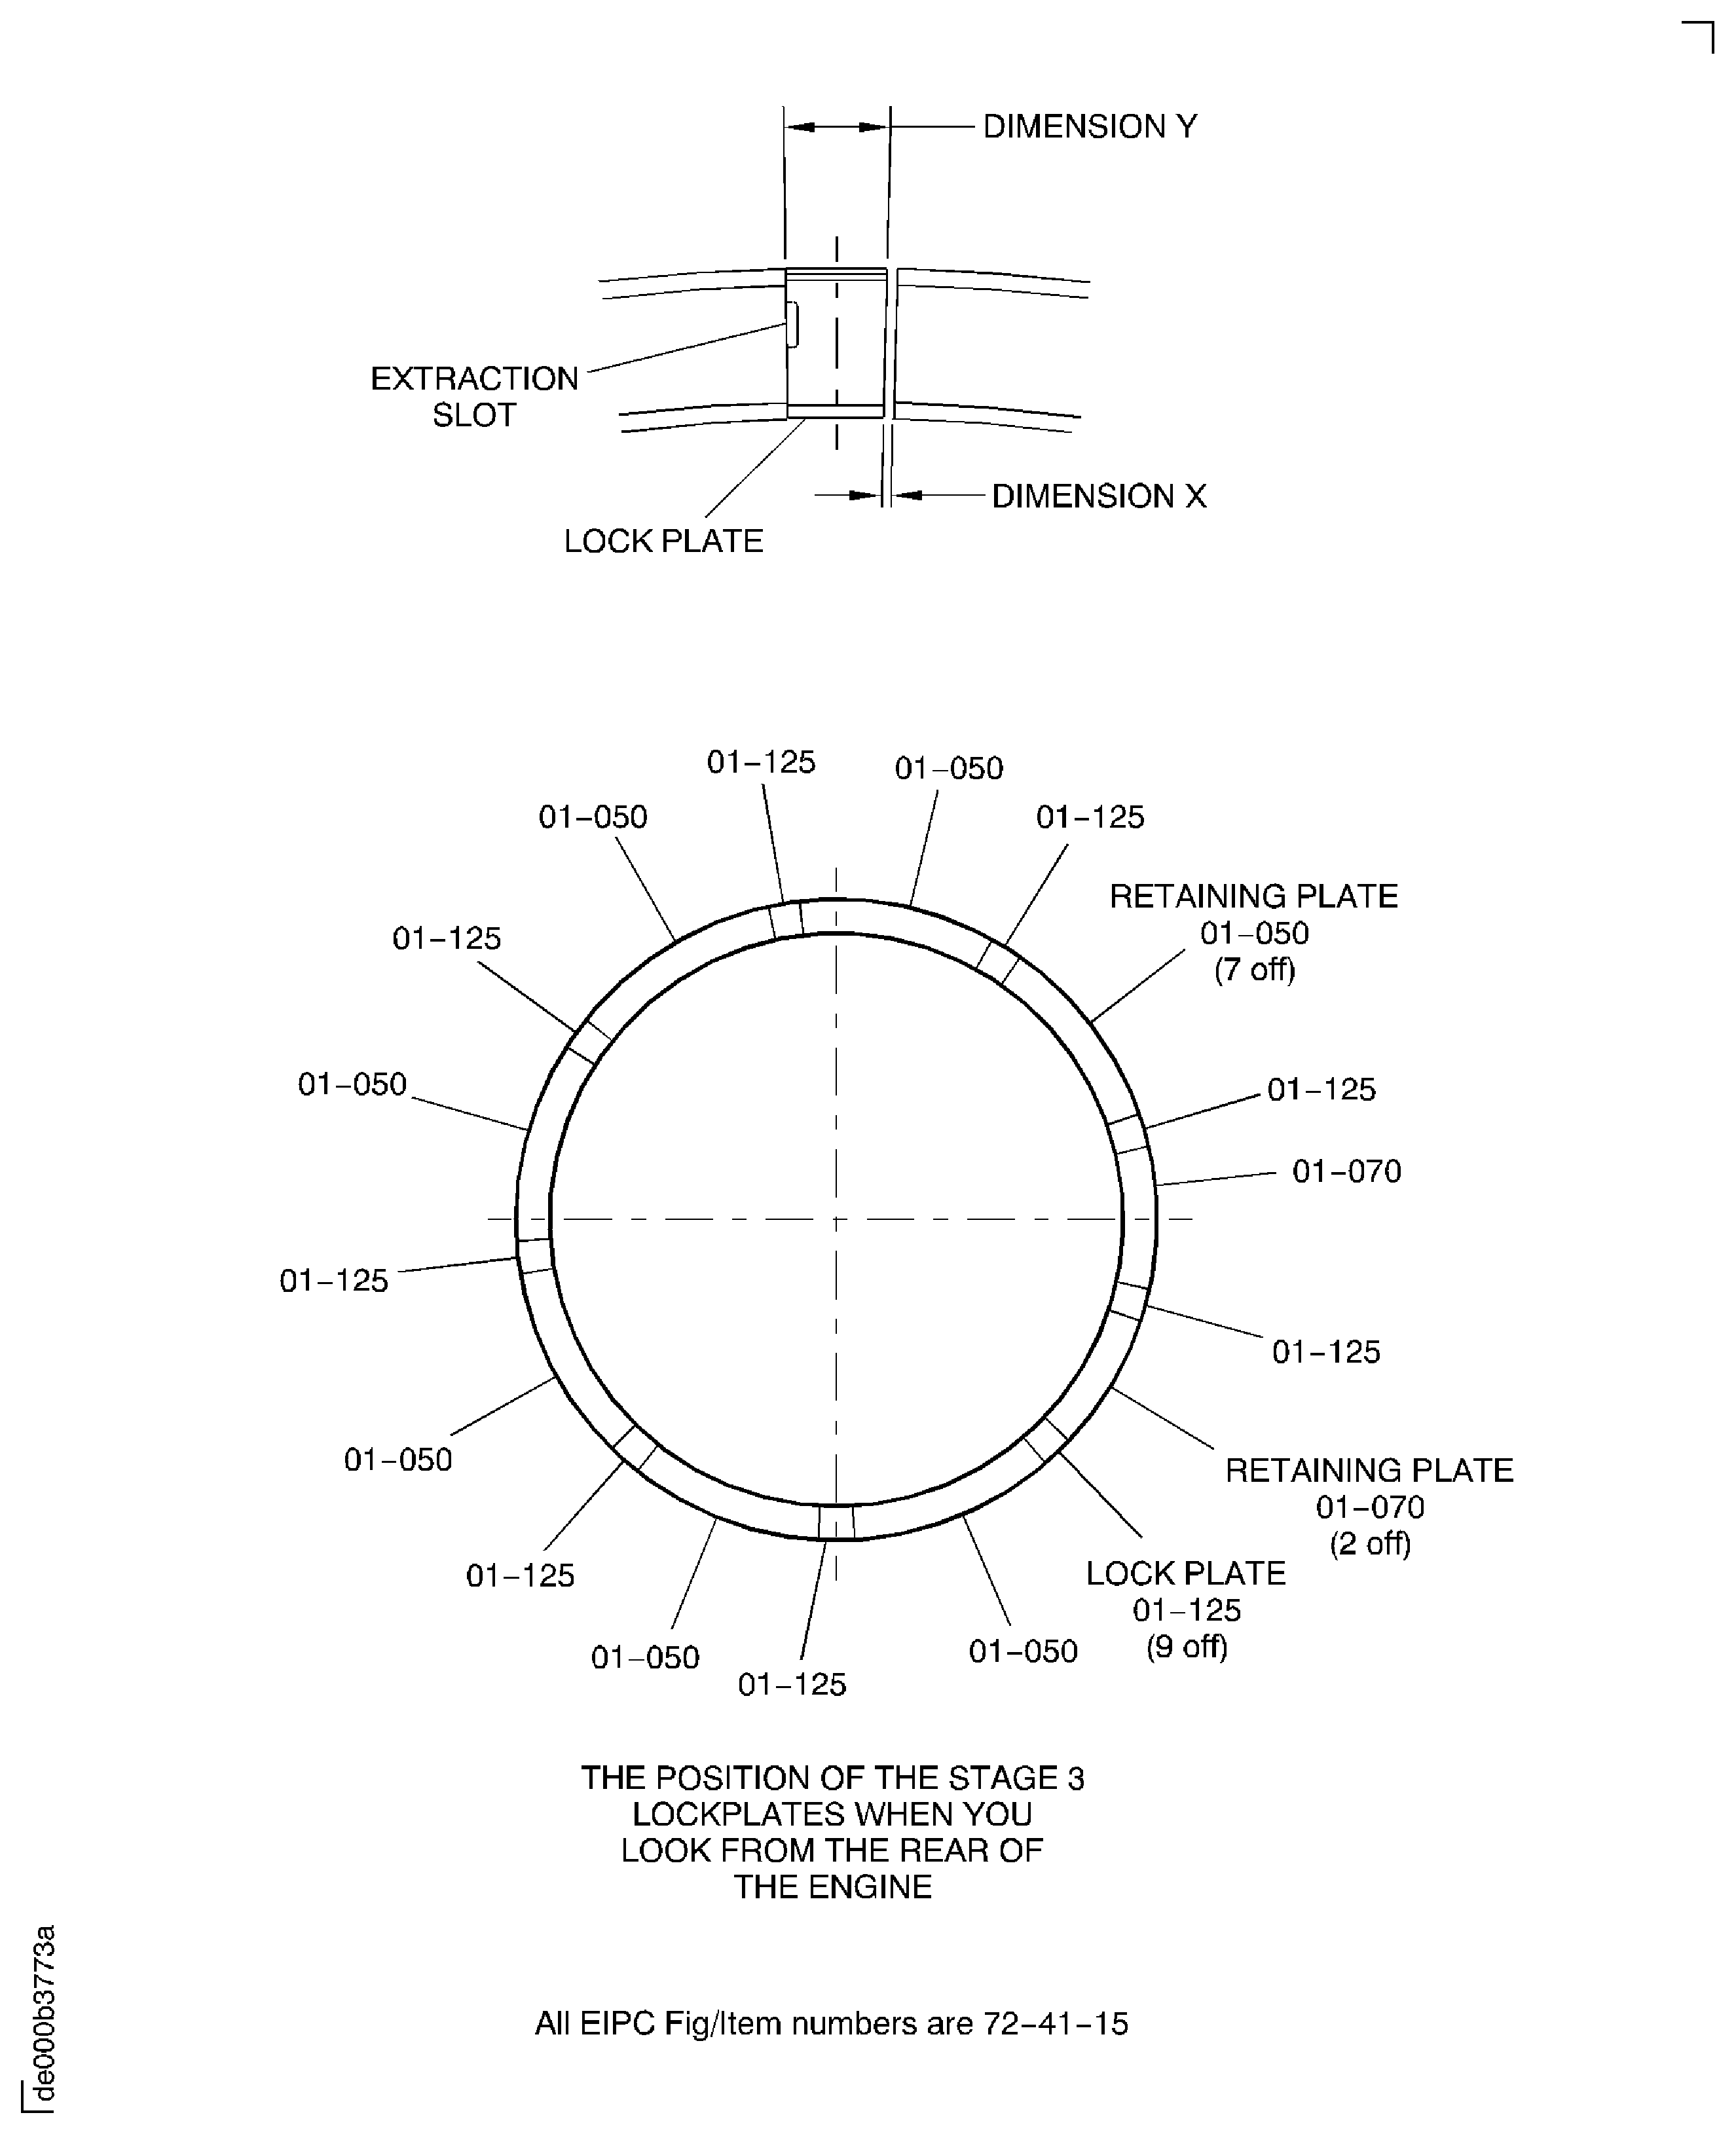
    Legend
    Install the Stage 3 Retaining Plates and Lockplates

    Sheet 1

    Close

    Figure: Install the Stages 4 and 5 Retaining Plates and Lockplates

    Sheet 2
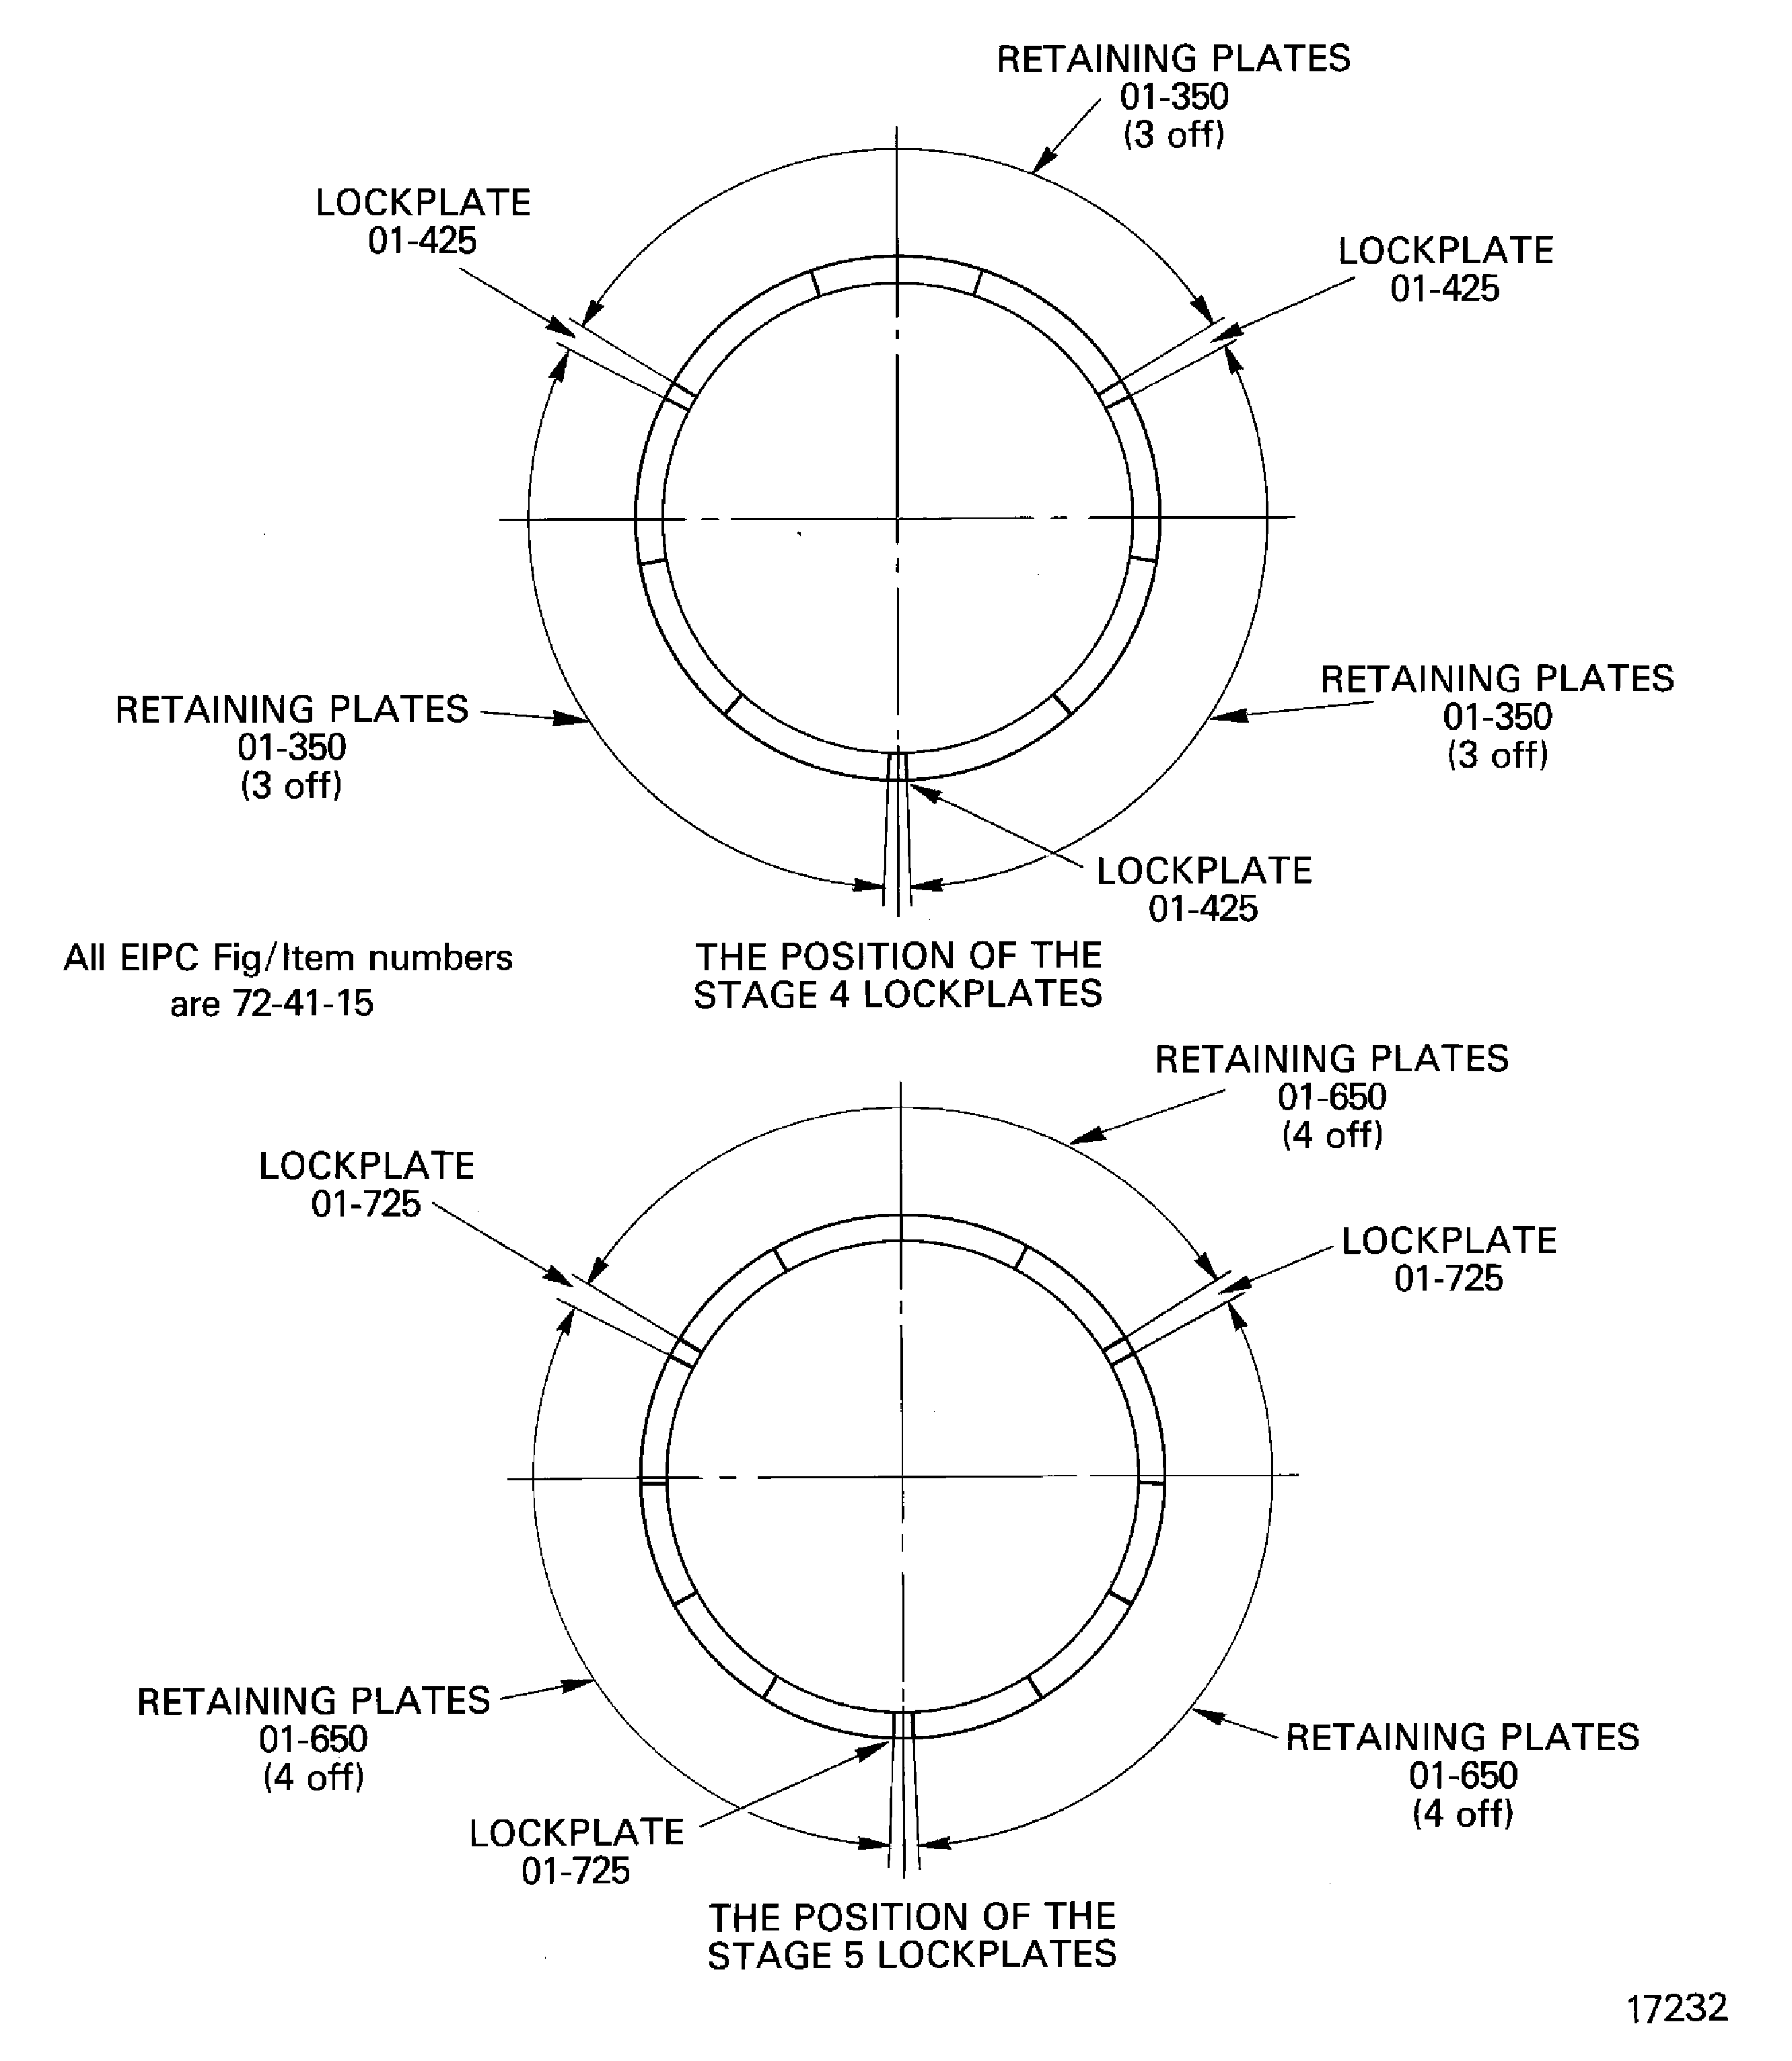
    Legend
    Install the Stages 4 and 5 Retaining Plates and Lockplates

    Sheet 2

    Close

    Figure: Lock the Lockplates in Position

    Lock the Lockplates in Position
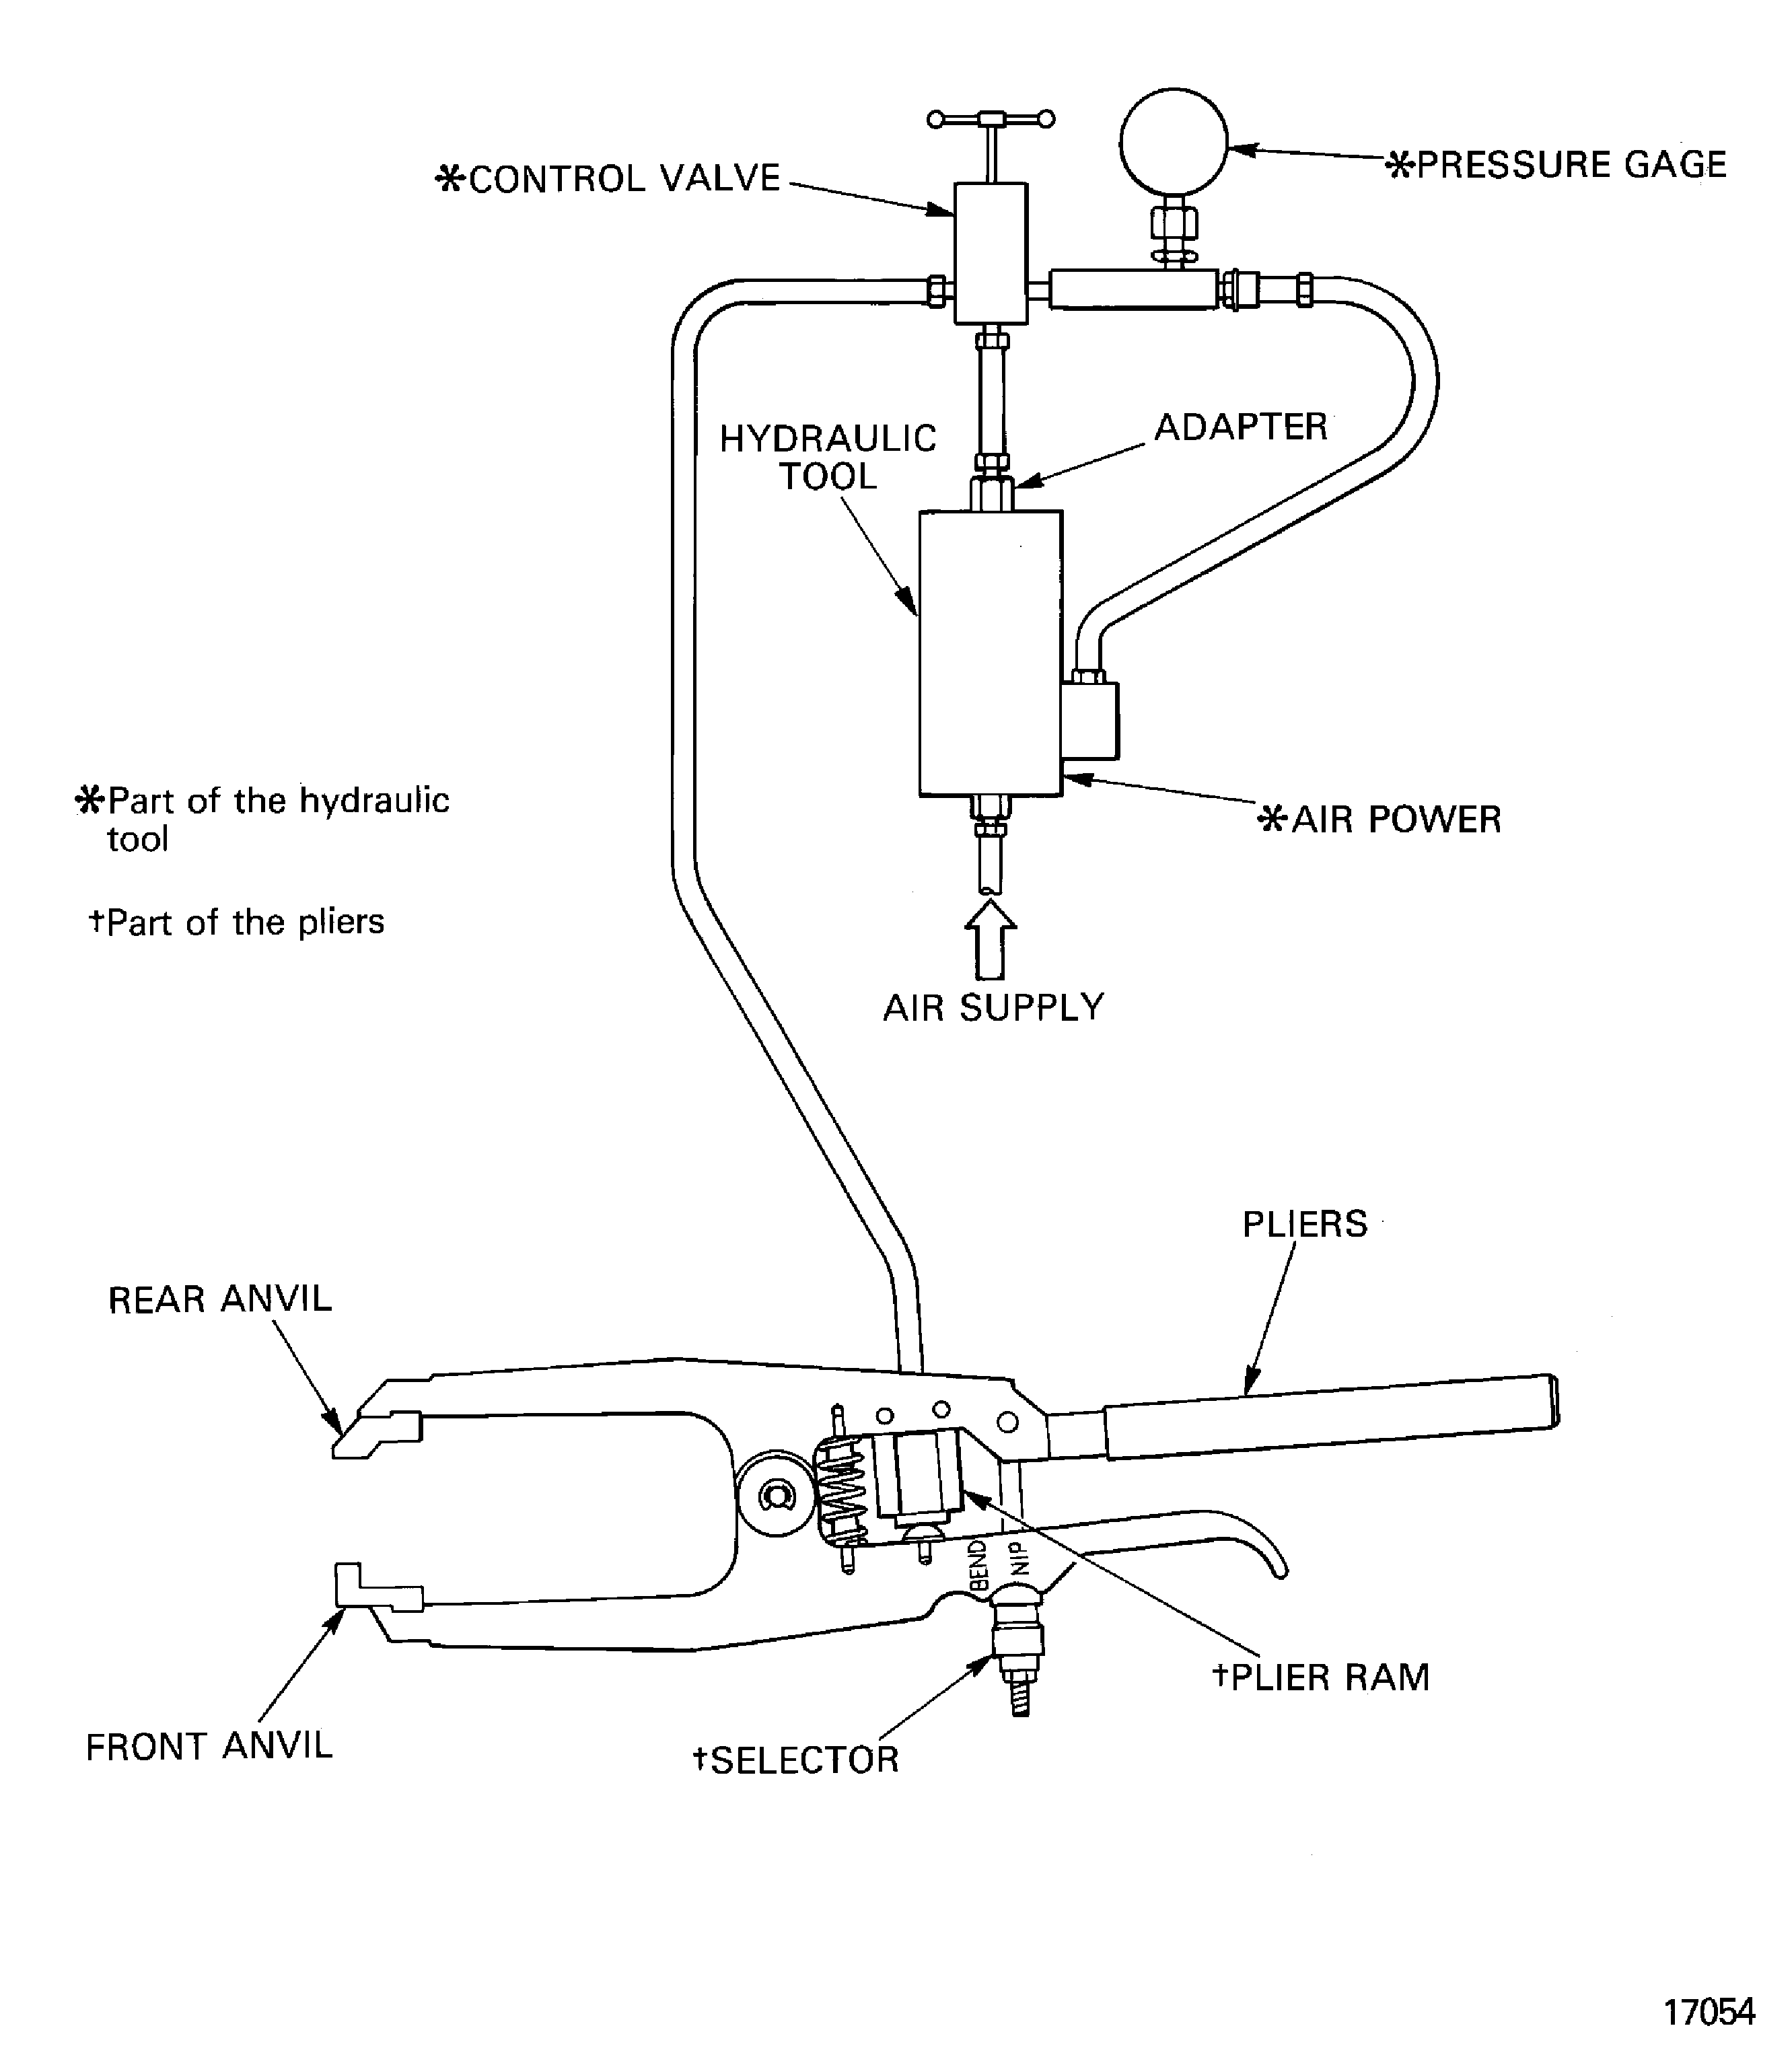
    Figure: Examine the Clapper Abutment Faces

    Examine the Clapper Abutment Faces
Requirements After Job Completion

Follow-On Conditions

NONE
Change Type:

Revised the temporary mark procedure. (18VG365)

Link not Found
Manufacturer Code:0AM53
Enterprise Name:IAE INTERNATIONAL AERO ENGINES AG
BU Name:NULL
Building:SUITE 400
Street:628 HEBRON AVENUE
City:GLASTONBURY
State:CT
Zip Code:06033
Country:USA
Manufacturer Code:IE304
Enterprise Name:DELETED
BU Name:DELETED,SEE CAGE CODE 0V6W9
Manufacturer Code:K6835
Enterprise Name:MED-LAB LTD
BU Name:MED-LAB LTD
Street:COPELAND ST
City:DERBY
Zip Code:DE1 2PU
Country:GREAT BRITAIN
Phone Number:44-1332-349094
Fax Number:44-1332-371237
Email:sales@med-lab.co.uk
Internet:www.med-lab.co.uk
Manufacturer Code:LOCAL
Enterprise Name:LOCALLY SUPPLIED
Manufacturer Code:X333X
Enterprise Name:REFER TO V2500 SB ENG-79-0108
Link not Found
Link not Found
Manufacturer Code:X111X
Supply Number:CoMat 01-001
Type:sp01
Supply Short Name:CoMat 01-001 SOLVENT, DELETED
Supply Name:CoMat 01-001 SOLVENT, DELETED
Specification Groups:
Doc NumberType
wiring harnesses. Where CoMat 01‐001 is specified to clean mechanical components, use one or more of the solvents that SPM TASK 70‐11‐26‐300‐503 specifies as applicable.DELETED. Where CoMat 01‐001 is specified to clean electrical contacts or wiring harnesses, use one or more of the solvents that SPM TASK 70‐11‐57‐110‐501 specifies to clean electrical contacts or
Suppliers:
ManufacturerRemarks
X111X
Manufacturer Code:X111X
Supply Number:CoMat 01-002
Type:sp01
Supply Short Name:CoMat 01-002 SOLVENT, DELETED.
Supply Name:CoMat 01-002 SOLVENT, DELETED.
Specification Groups:
Doc NumberType
wiring harnesses. Where CoMat 01‐002 is specified to clean mechanical components, use one or more of the solvents that SPM TASK 70‐11‐26‐300‐503 specifies as applicable.DELETED. Where CoMat 01‐002 is specified to clean electrical contacts or wiring harnesses, use one or more of the solvents that SPM TASK 70‐11‐57‐110‐501 specifies to clean electrical contacts or
Suppliers:
ManufacturerRemarks
X111X
Manufacturer Code:IE304
Supply Number:CoMat 02-121
Type:sp01
Supply Short Name:CoMat 02-121 TEMPORARY MARKER PENCIL/CRAYON
Supply Name:CoMat 02-121 TEMPORARY MARKER PENCIL/CRAYON
Specification Groups:
Doc NumberType
OMAT: 261BEROL VERITHIN (HARD TYPE)
Suppliers:
ManufacturerRemarks
IE304
K5720
K6835
LOCAL
Manufacturer Code:K6835
Supply Number:CoMat 02-122
Type:sp01
Supply Short Name:CoMat 02-122 TEMPORARY MARKER PENCIL/CRAYON
Supply Name:CoMat 02-122 TEMPORARY MARKER PENCIL/CRAYON
Specification Groups:
Doc NumberType
DELETED
Suppliers:
ManufacturerRemarks
K6835
IE133
Manufacturer Code:LOCAL
Supply Number:CoMat 02-130
Type:sp01
Supply Short Name:CoMat 02-130 POLAR GRAPH PAPER
Supply Name:CoMat 02-130 POLAR GRAPH PAPER
Specification Groups:
Doc NumberType
POLAR GRAPH PAPER
Suppliers:
ManufacturerRemarks
LOCAL
Manufacturer Code:LOCAL
Supply Number:CoMat 02-181
Type:sp01
Supply Short Name:CoMat 02-181 MODELLING CLAY
Supply Name:CoMat 02-181 MODELLING CLAY
Specification Groups:
Doc NumberType
OMAT: 249PLASTICINE A-A-51006
Suppliers:
ManufacturerRemarks
LOCAL
K6835
Manufacturer Code:X222X
Supply Number:CoMat 07-075
Type:sp01
Supply Short Name:CoMat 07-075 HIGH-HEAT RESISTING STOVING ENAMEL
Supply Name:CoMat 07-075 HIGH-HEAT RESISTING STOVING ENAMEL
Specification Groups:
Doc NumberType
Deleted. Use one of the CoMat 07-075 letter suffix materials.
Suppliers:
ManufacturerRemarks
X222X
Manufacturer Code:X222X
Supply Number:CoMat 10-070
Type:sp01
Supply Short Name:CoMat 10-070 ANTI-SEIZE COMPOUND
Supply Name:CoMat 10-070 ANTI-SEIZE COMPOUND
Specification Groups:
Doc NumberType
DELETED. USE COMAT 10-070A
Suppliers:
ManufacturerRemarks
X222X
Manufacturer Code:X333X
Supply Number:CoMat 10-077
Type:sp01
Supply Short Name:CoMat 10-077 APPROVED ENGINE OILS
Supply Name:CoMat 10-077 APPROVED ENGINE OILS
Specification Groups:
Doc NumberType
For V2500-A1/A5/D5 models - Refer to V2500 Service Bulletin ENG-79-0108
For V2500-E5 model - Refer to Service Bulletin E5-79-0001
Suppliers:
ManufacturerRemarks
X333X
Manufacturer Code:0AM53
Tool Number:IAE 1R18058
Tool Name:IAE 1R18058 Protective cover
Manufacturer Code:0AM53
Tool Number:IAE 1R18059
Tool Name:IAE 1R18059 Trolley
Manufacturer Code:0AM53
Tool Number:IAE 1R18060
Tool Name:IAE 1R18060 Mounting foot
Manufacturer Code:0AM53
Tool Number:IAE 1R18061
Tool Name:IAE 1R18061 Rail
Manufacturer Code:0AM53
Tool Number:IAE 1R18069
Tool Name:IAE 1R18069 Rear anvil
Manufacturer Code:0AM53
Tool Number:IAE 1R18070
Tool Name:IAE 1R18070 Front anvil
Manufacturer Code:0AM53
Tool Number:IAE 1R18071
Tool Name:IAE 1R18071 Rear anvil
Manufacturer Code:0AM53
Tool Number:IAE 1R18072
Tool Name:IAE 1R18072 Front anvil
Manufacturer Code:0AM53
Tool Number:IAE 1R18075
Tool Name:IAE 1R18075 Support pedestal
Manufacturer Code:0AM53
Tool Number:IAE 1R18076
Tool Name:IAE 1R18076 Slave lock plates
Manufacturer Code:0AM53
Tool Number:IAE 1R18079
Tool Name:IAE 1R18079 Drift
Manufacturer Code:0AM53
Tool Number:IAE 1R18080
Tool Name:IAE 1R18080 Drift
Manufacturer Code:0AM53
Tool Number:IAE 1R18081
Tool Name:IAE 1R18081 Beam sling
Manufacturer Code:0AM53
Tool Number:IAE 1R18082
Tool Name:IAE 1R18082 Pliers
Manufacturer Code:0AM53
Tool Number:IAE 1R18083
Tool Name:IAE 1R18083 Hydraulic tool
Manufacturer Code:0AM53
Tool Number:IAE 1R18084
Tool Name:IAE 1R18084 Pliers
Manufacturer Code:0AM53
Tool Number:IAE 1R18089
Tool Name:IAE 1R18089 Lifting adapter
Manufacturer Code:0AM53
Tool Number:IAE 1R18090
Tool Name:IAE 1R18090 Safety support stand
Manufacturer Code:0AM53
Tool Number:IAE 1R18091
Tool Name:IAE 1R18091 Support stand
Manufacturer Code:0AM53
Tool Number:IAE 1R18095
Tool Name:IAE 1R18095 Universal slinging adapter
Manufacturer Code:0AM53
Tool Number:IAE 1R18097
Tool Name:IAE 1R18097 Drift
Manufacturer Code:0AM53
Tool Number:IAE 1R18245
Tool Name:IAE 1R18245 Adapter
Manufacturer Code:0AM53
Tool Number:IAE 1R18590
Tool Name:IAE 1R18590 Socket end
Manufacturer Code:0AM53
Tool Number:IAE 1R18683
Tool Name:IAE 1R18683 Caliper adapter
Manufacturer Code:0AM53
Tool Number:IAE 1R18708
Tool Name:IAE 1R18708 Protection cover
Manufacturer Code:0AM53
Tool Number:IAE 1R19812
Tool Name:IAE 1R19812 Filing fixture
Manufacturer Code:0AM53
Tool Number:IAE 1R19813
Tool Name:IAE 1R19813 Filing fixture
Manufacturer Code:0AM53
Tool Number:IAE 1R8590
Tool Name:IAE 1R8590 Socket
Link not Found