TASK 72-41-10-440-001 HPC Rotor Assembly - Measure The Rotor Assembly Parts, Assembly-001

DMC:V2500-A0-72-41-1000-01A-710A-B|Issue No:005.00|Issue Date:2019-05-01

Export Control

EAR Export Classification: Not subject to the EAR per 15 C.F.R. Chapter 1, Part 734.3(b)(3), except for the following Service Bulletins which are currently published as EAR Export Classification 9E991: SBE70-0992, SBE72-0483, SBE72-0580, SBE72-0588, SBE72-0640, SBE73-0209, SBE80-0024 and SBE80-0025.

Copyright

© IAE International Aero Engines AG (2001, 2014 - 2021) The information contained in this document is the property of © IAE International Aero Engines AG and may not be copied or used for any purpose other than that for which it is supplied without the express written authority of © IAE International Aero Engines AG. (This does not preclude use by engine and aircraft operators for normal instructional, maintenance or overhaul purposes.).

Applicability

All

Common Information

TASK 72-41-10-440-001 HPC Rotor Assembly - Measure The Rotor Assembly Parts, Assembly-001

General

This TASK gives the procedure to measure the stages 3 to 8 HP compressor disks HPC Stage 3 - 8 Drum Disk And Wire Seals (72-41-11,01-200), the vortex reducer ring HPC Stage 9 - 12 Drum Disk And Vortex Reducer Ring (72-41-12,01-575), the stages 9 to 12 HP compressor disks HPC Stage 9 - 12 Drum Disk And Vortex Reducer Ring (72-41-12,01-600) and the HP compressor shaft HPC Rear Shaft And Heatshield Assembly (72-41-13,01-850). This data is used when you assemble the HP compressor rotor assembly.

The procedure to assemble and balance the HP compressor rotor assembly is given in the subsequent TASKS.

TASK 72-41-10-440-002-A00 (ASSEMBLY-002, CONFIG-001). Assemble the HP compressor rotor assembly.

TASK 72-41-10-440-003-A00 (ASSEMBLY-003, CONFIG-001). Do a balance check of the HP compressor rotor assembly and install the blades.

TASK 72-41-10-440-004-A00 (ASSEMBLY-004, CONFIG-001). Grind the tips of the HP compressor blades.

TASK 72-41-10-440-005-A00 (ASSEMBLY-005, CONFIG-001). Final balance the HP compressor rotor assembly.

Fig/item numbers in parentheses in the procedure agree with those used in the IPC. Only the primary Fig/item numbers are used. For the service bulletin alpha variants refer to the IPC.

For all parts identified in a different Chapter/Section/Subject, the applicable Chapter/Section/Subject comes before the Fig/item number.

Overhaul Processes referred to in the procedure by the TASK/SUBTASK number are in SPM.

For standard torque data and procedures, refer to SPM TASK 70-41-00-400-501, SPM TASK 70-41-01-400-501 and SPM TASK 70-41-02-400-501.

Special torque data is identified with the symbol * after the torque value.

Special assembly tolerances are included in this procedure.

Lubricate all threads and mating faces of nuts and bolts with CoMat 10-077 APPROVED ENGINE OILS unless other lubricants are referred to in the procedure.

All the mating faces and curvic teeth must be cleaned with CoMat 01-001 SOLVENT, DELETED or CoMat 01-002 SOLVENT, DELETED. before assembly. Refer to SPM TASK 70-11-01-300-503. They must also be dry assembled unless told differently in the procedure.

All of the temporary marks made in this procedure must be removed after completion of this task.

Data when you measure the HP compressor rotor assembly parts.

The data found in this procedure when used during assembly will cause the rotor assembly to be assembled with all of the parts concentric to specified limits.

It is important to prevent unwanted swash and run-out during this procedure. Thus, all of the rotor parts, tools and equipment used in this procedure must be kept very clean.

Run-out.

Run-out is the total movement of the measuring equipment display, in relation to a location diameter, when a part is turned. Run-out includes eccentricity.

Swash.

Swash is the total movement of the measuring equipment display, in relation to a mating face, when a part is turned.

Run-out and Swash data.

The subsequent data must be used when you measure run-out and swash, to permit the values to be put in to a computer.

All of the measured values are to be known as positive, if the location diameter moves radially out and/or the mating face moves rearwards in relation to a datum face.

This is correct if the measuring equipment display reads positive or negative values. Refer to Figure.

A minimum of nine values for run-out and swash must be read at eight equally spaced positions, for all components. The first and last values must be the same. If the first and last values are not the same, then continue as follows:

Read all of the nine values again and again until the first and last values are the same.

Refer to Figure for example views of the HP compressor rotor assembly parts.

NOTE

To identify the consumable materials refer to the PCI.

NOTE

Special tools are identified in the procedure by the tool primary number.

Preliminary Requirements

Pre-Conditions

NONE

Support Equipment

NameManufacturerPart Number / IdentificationQuantityRemark
Rotary air tableLOCAL
ComputerLOCAL
IAE 1R18025 Turnover stand adapter0AM53IAE 1R180251
IAE 1R18026 Lifting fixture0AM53IAE 1R180261
IAE 1R18062 Master curic base0AM53IAE 1R180621
IAE 1R18063 Location piece0AM53IAE 1R180631
IAE 1R18064 Bolt0AM53IAE 1R1806420
IAE 1R18065 Lifter0AM53IAE 1R180651
IAE 1R18067 Extractor0AM53IAE 1R180673
IAE 1R18068 Height block0AM53IAE 1R180683
IAE 1R18085 Adjusting unit0AM53IAE 1R180854
IAE 1R18086 Clamp assembly0AM53IAE 1R180864
IAE 1R18087 Block0AM53IAE 1R180874
IAE 1R18088 Pillar0AM53IAE 1R180881
IAE 1R18090 Safety support stand0AM53IAE 1R180901
IAE 1R18091 Support stand0AM53IAE 1R180911
IAE 1R18092 Support tool0AM53IAE 1R180921
IAE 1R18322 Turnover stand0AM53IAE 1R183221
IAE 1R18441 Lifting adapter0AM53IAE 1R184411
IAE 1R18691 Lifting fixture0AM53IAE 1R186911
IAE 1R19810 Computer program0AM53IAE 1R19810

Consumables, Materials and Expendables

NameManufacturerPart Number / IdentificationQuantityRemark
CoMat 01-001 SOLVENT, DELETEDLOCALCoMat 01-001
CoMat 01-002 SOLVENT, DELETED.LOCALCoMat 01-002
CoMat 02-121 TEMPORARY MARKER PENCIL/CRAYONIE304CoMat 02-121
CoMat 02-122 TEMPORARY MARKER PENCIL/CRAYONK6835CoMat 02-122
CoMat 02-130 POLAR GRAPH PAPERLOCALCoMat 02-130
CoMat 10-077 APPROVED ENGINE OILSX333XCoMat 10-077

Spares

NONE

Safety Requirements

NONE

Procedure

    1. SUBTASK 72-41-10-440-051 Assemble the Tools Used to Measure the Swash and Run-out of the Stages 3 to 8 HP Compressor Disks

    2. Refer to Figure.

    3. Examine the bottom faces of IAE 1R18062 Master curic base 1 off and the rotary air table for contamination and/or high metal. If there is contamination, the mating faces must be cleaned. If there is high metal, use a stone to make the surface smooth.

    4. Put the master curvic base on to the center of the rotary air table with the curvic teeth at the top.

      1. Install IAE 1R18086 Clamp assembly 4 off on to the rotary air table.

      2. Engage the 'tee' bolts in to the slots in the rotary air table. Make sure that they are equally spaced around, and adjacent to, the master curvic base.

      3. Put one of IAE 1R18087 Block 4 off behind each 'tee' bolt.

      4. Install the clamp assemblies on to the 'tee' bolts. Make sure they touch the top of the blocks and the master curvic base rear flange front face.

      5. Install the nuts on to the 'tee' bolts and lightly tighten.

      1. Install IAE 1R18085 Adjusting unit 4 off on to the rotary air table.

      2. Put the adjusting units on to the rotary air table, with the 'tee' bolts engaged in the slots. Make sure the adjusting units are equally spaced around the master curvic base.

      3. Move the adjusting units to the master curvic base until the adjustment bolts touch the master curvic base.

      4. Tighten the adjusting unit nuts.

    1. SUBTASK 72-41-10-440-052 Correct the Run-out of the Assembled Tools

    2. Refer to Figure.

    3. Remove the curvic protection from the master curvic base curvic coupling.

    4. Release the four clamp assembly nuts.

    5. Use IAE 1R18088 Pillar 1 off and measuring equipment to measure the run-out of diameter A of the master curvic base. The run-out must not be more than 0.0002 in. (0.005 mm).

    6. Use the adjusting unit adjustment bolts to move the position of the master curvic base to correct the run-out.

    7. When the run-out is 0.0002 in. (0.005 mm) or less, tighten the four clamp assembly nuts.

    8. Do step D. again to make sure the run-out is correct.

    1. SUBTASK 72-41-10-440-053 Install the Stages 3 to 8 HP Compressor Disks (72-41-11,01-200) on to the Master Curvic Base

    2. Refer to Figure, Figure, Figure and Figure.

    3. Install IAE 1R18063 Location piece 1 off on to the master curvic base. Refer to Figure.

      1. Attach IAE 1R18065 Lifter 1 off on to the rear of the stages 3 to 8 compressor disks. Refer to Figure.

      2. Loosen the two right hand nuts sufficient to let the right hand clamp be moved to the center of the lifter.

      3. Loosen the two left hand nuts, sufficient to let the left hand clamp be moved to the center of the lifter.

      4. Lift the right and left hand nuts and move them to the center of the lifter.

      5. Put the lifter on to the face C of the stage 8 compressor disk, with the lift eye to the top.

      6. Move the right and left hand nuts to the outer edge of the lifter.

      7. Tighten the right and left hand nuts.

      8. Attach a hoist to the lift eye.

      1. Examine the curvic teeth of the stage 3 disk and the master curvic base curvic coupling.

      2. Install IAE 1R18091 Support stand 1 off on to the top of IAE 1R18090 Safety support stand 1 off. Make sure that the stand adapter is correctly engaged in the safety support stand. Refer to Figure.

      3. Lift the stages 3 to 8 compressor disks and put it above the safety support stand.

      4. CAUTION

        YOU MUST NOT LET THE STAGES 3 TO 8 COMPRESSOR DISKS HIT THE SAFETY SUPPORT STAND.

        Slowly lower the stages 3 to 8 compressor disks on to the safety support stand. Make sure the stage 3 disk curvic coupling goes through the hole in the stand adapter.

      5. Continue to lower the stages 3 to 8 compressor disks until the stage 3 disk touches the stand adapter.

      6. Examine the curvic teeth of the stage 3 disk curvic coupling for contamination and/or high metal. If there is contamination then the curvic teeth must be cleaned. If there is high metal, use a stone to make the surface smooth.

      7. Examine the curvic teeth of the master curvic base for contamination and/or high metal. If there is contamination then the curvic teeth must be cleaned. If there is high metal, use a stone to make the surface smooth.

    4. Lift the stages 3 to 8 compressor disks off the safety support stand and put it above the master curvic base.

    5. CAUTION

      YOU MUST NOT LET THE STAGES 3 TO 8 COMPRESSOR DISKS HIT THE MASTER CURVIC BASE.

      Slowly lower the stages 3 to 8 compressor disks until the location piece is engaged in the bore of the stage 3 compressor disk. Make sure that the four location dowels in the master curvic base are aligned with the four holes in the stage 3 disk curvic coupling. Refer to Figure.

    6. Continue to lower the stages 3 to 8 compressor disk until the four location dowels are engaged in stage 3 disk curvic coupling. Lower the stage 3 compressor disk on to the master curvic base.

    7. Install IAE 1R18064 Bolt 20 off through the master curvic base, in to the stage 3 disk curvic coupling. Lightly tighten the bolts.

      1. NOTE

        The torque sequence is identified on the outer diameter of the master curvic base front flange.

        Torque all of the bolts. Do these three steps in the sequence shown. Refer to Figure.

      2. Torque all of the bolts to 28 lbfin (3.164 Nm).

      3. Torque all of the bolts to 35 lbfin (3.955 Nm).

      4. Torque all of the bolts to 70 * lbfin (7.900 Nm).

      1. Remove the lifter from the rear of the stages 3 to 8 compressor disks. Refer to Figure.

      2. Loosen the two right and the two left hand nuts sufficient to let the two clamps be moved to the center of the lifter.

      3. Move the two clamps to the center of the lifter.

      4. Lift the lifter off the stages 3 to 8 compressor disks.

      5. Remove the lifter from the hoist.

    1. SUBTASK 72-41-10-220-051 Measure the Swash and Run-out of the Stages 3 to 8 HP Compressor Disks (72-41-11, 01-200)

    2. Refer to Figure, Figure and Figure.

      1. NOTE

        The start and finish position (0 degrees) is the center line of the stage 3 disk, No. 1 dovetail location.

        Identify eight position numbers on the rear of the stages 3 to 8 compressor disks.

      2. Use CoMat 02-121 TEMPORARY MARKER PENCIL/CRAYON or CoMat 02-122 TEMPORARY MARKER PENCIL/CRAYON to identify the eight equally spaced positions. Give a number to each position in sequence. Refer to SPM TASK 70-09-01-400-501. Make the marks on the face F.

    3. Use the temporary marker to identify the position of the stages 3 to 8 compressor disks in relation to the master curvic base. Make the marks on the stage 3 disk and the master curvic base curvic couplings outer diameters. Refer to SPM TASK 70-09-01-400-501.

      1. Use IAE 1R18088 Pillar 1 off and measuring equipment to measure the swash of face D and the run-out of diameter E.

      2. Measure the swash at the eight positions identified in Step.

      3. Use IAE 1R19810 Computer program 1 off and put the swash values in the computer. The computer will calculate the FIR and the angle of the swash. Make a mark on CoMat 02-130 POLAR GRAPH PAPER to show the FIR and angle and identify it as S1.

      4. Measure the run-out at the eight positions identified in Step.

      5. Put the run-out values in to the computer. The computer will calculate the FIR and the angle of the run-out. Make a mark on the polar graph paper to show the FIR and angle, and identify it as R1.

      1. Turn the stages 3 to 8 compressor disks 180 degrees in relation to the master curvic base.

      2. Attach IAE 1R11806 1 off onto the rear of the stages 3 to 8 compressor disks. Refer to Step.

      3. Remove the 20 bolts from the master curvic base and the stage 3 disk curvic coupling.

      4. Lift the stages 3 to 8 compressor disks off the master curvic base.

      5. Turn the rotary air table and assembled tools through 180 degrees. Make sure the stages 3 to 8 compressor disks do not move.

      6. Install the stages 3 to 8 compressor disks on to the master curvic base. Refer to Step.

    4. Measure the swash and run-out, refer to Step Identify the swash as S2 and the run-out as R2 on the polar graph paper.

      1. Calculate the correct swash and run-out values.

      2. Make a line between the points S1 and S2. Make a mark at the middle position between the points S1 and S2. Identify this point as S3.

      3. Make a line between the points R1 and R2. Make a mark at the middle position between the points R1 and R2. Identify this point as R3.

      4. Make a line between the point S3 and the center of the polar graph paper.

      5. Make a line between the point R3 and the center of the polar graph paper.

      6. NOTE

        The distance between the point S1 or S2 and the point S3 (distance G) shows the swash error in the tools.

        The distance between the center of the polar graph paper and the point S3 (distance H) shows the correct swash of the stages 3 to 8 compressor disks.

      7. Write down the quantity and angle of the correct swash.

      8. NOTE

        The distance between the points R1 or R2 and the point R3 (distance J) shows the run-out error in the tools.

        The distance between the center of the polar graph paper and the point R3 (distance K) shows the correct run-out of the stages 3 to 8 compressor disk.

      9. Write down the quantity and angle of the correct run-out.

      1. The maximum permitted swash is 0.0060 in. (0.152 mm) and run-out is 0.0070 in. (0.178 mm). If the swash and/or run-out is more than these values, then continue as follows:

      2. Remove the stages 3 to 8 compressor disk from the master curvic base. Refer to Step thru Step.

      3. Examine the mating faces of the stage 3 disk and master curvic base curvic couplings. Refer to Step.

      4. Make sure that the run-out of the assembled tools is in limits. Refer to Step.

      5. NOTE

        To make sure the stages 3 to 8 compressor disks are in the initial position, align the temporary marks made in step C.

        Install the stages 3 to 8 compressor disks on to the assembled tools in the initial position. Refer to Step.

      6. Do Step thru Step again.

      7. NOTE

        If new stages 3 to 8 compressor disks are used, then its swash and run-out must be measured. Refer to Step and Step.

        If the swash is more than 0.0060 in. (0.152 mm) and/or the run-out is more than 0.0070 in. (0.178 mm), then the stages 3 to 8 compressor disks must be rejected and a new one used.

    1. SUBTASK 72-41-10-440-054 Install the Stages 3 to 8 HP Compressor Disks (72-41-11,01-200) on to the Support Tool

    2. Refer to Figure, Figure and Figure.

    3. Install IAE 1R18065 Lifter 1 off on to the rear of the stages 3 to 8 compressor disks. Refer to Figure and Step.

      1. Remove the stages 3 to 8 compressor disks from the master curvic base. Refer to Figure.

      2. Remove the 20 bolts from the stage 3 disk and the master curvic base curvic couplings.

      3. Lift the stages 3 to 8 compressor disks off the master curvic base and put it above the support tool.

      1. Install the stages 3 to 8 compressor disks on to IAE 1R18092 Support tool 1 off. Refer to Figure.

      2. CAUTION

        YOU MUST NOT LET THE STAGES 3 TO 8 COMPRESSOR DISKS HIT THE SUPPORT TOOL.

        Carefully lower the stages 3 to 8 compressor disks on to the support tool.

      3. Continue to lower the stages 3 to 8 compressor disks until the stage 6 disk touches the top of the support tool.

      4. Remove the lifter from the stage 8 compressor disk. Refer to Step.

    1. SUBTASK 72-41-10-220-052-A00 V2500-A1: Measure the Swash and Run-out of the Stages 9 to 12 HP Compressor Disks (72-41-12,01-600)

    2. Refer to Figure and Figure.

    3. Examine the mating faces of IAE 1R18066 height block 3 off and the stage 9 compressor disk front flange for contamination and/or high metal. If there is contamination, then the mating faces must be cleaned. If there is high metal, use a stone to make the surface smooth.

    4. Install the three height blocks on to the stage 9 compressor disk front flange. Install the height blocks at three equally spaced positions.

      1. Install IAE 1R18026 Lifting fixture 1 off onto the stage 12 compressor disk rear flange.

      2. Loosen the two right hand nuts sufficient to let the right hand clamp be moved to the center of the lifting fixture.

      3. Loosen the two left hand nuts sufficient to let the left hand clamp be moved to the center of the lifting fixture.

      4. Lift the right and left hand nuts and move the clamps to the center of the lifting fixture.

      5. Put the lifting fixture onto the stage 12 compressor disk rear flange with the lift eye to the top.

      6. Move the right and left hand clamps to the outer edge of the lifting fixture.

      7. Tighten the right and left hand nuts.

      8. Attach a hoist to the lift eye.

    5. Examine the mating face of the rotary air table for contamination and/or high metal. If there is contamination, then the mating face must be cleaned. If there is high metal, use a stone to make the surface smooth.

    6. Lift the stages 9 to 12 compressor disks and put it onto the center of the rotary air table.

      1. Remove the lifting fixture from stage 12 compressor disk rear flange.

      2. Loosen the two right and the two left hand nuts sufficient to let the two clamps be moved to the center of the lifting fixture.

      3. Lift the two right and the two left hand nuts and move the clamps to the center of the lifting fixture.

      4. Lift the lifting fixture off the stages 9 to 12 compressor disks.

      5. Remove the lifting fixture from the hoist.

      1. NOTE

        The start and finish position (0 degrees) is the stage 12 blade installation slot center line.

        Identify eight position numbers on the rear of the stages 9 to 12 compressor disks.

      2. Use CoMat 02-121 TEMPORARY MARKER PENCIL/CRAYON or CoMat 02-122 TEMPORARY MARKER PENCIL/CRAYON to identify eight equally spaced positions. Give a number to each position in sequence. Refer to SPM TASK 70-09-01-400-501. Make the marks on the face P.

      1. Set the run-out of the stage 9 compressor disk front flange outer diameter (diameter L).

      2. Use IAE 1R18088 Pillar 1 off and measuring equipment to measure the run-out of diameter L.

      3. Adjust the position of the stages 9 to 12 compressor disks relative to the rotary air table until the run-out is 0.0002 in. (0.005 mm) or less.

      1. Check the swash of the stage 9 compressor disk front flange (face K).

      2. Use the pillar and measuring equipment to measure the swash of face K.

        1. The maximum permitted swash is 0.0002 in. (0.005 mm). If the swash value is more than this value, then do the subsequent steps.

        2. Install the lifting fixture on to the stage 12 compressor rear flange. Refer to Step thru Step

        3. Lift the stages 9 to 12 compressor disks off the rotary air table.

        4. Remove the three height blocks from the stage 9 compressor disk front flange.

        5. Do Step, Step, Step, Step and Step thru Step again.

        6. Do Step and Step again.

          NOTE

          If new stages 9 to 12 compressor disks are used, then its swash and run-out must be measured. Thus, do Step to Step again.
        7. If the swash is more than 0.0002 in. (0.005 mm), then the stages 9 to 12 compressor disks must be rejected and a new one used.

      1. Use the pillar and measuring equipment to measure the swash of face M and the run-out of diameter N.

      2. Measure the swash at the eight positions identified in step H.(1).

      3. Use IAE 1R19810 Computer program and put the swash values in to the computer. The computer will calculate the FIR and the angle of the swash.

      4. Write down the quantity and angle of the calculated swash.

      5. Measure the run-out at the eight positions identified in step H.(1).

      6. Put the run-out values into the computer. The computer will calculate the FIR and the angle of the run-out.

      7. Write down the quantity and angle of the calculated run-out.

      1. The maximum permitted swash is 0.0008 in. (0.019 mm). If the calculated value of swash is more than this value, then do the subsequent steps.

      2. Install the lifting fixture on to the stage 12 compressor disk rear flange. Refer to Step thru Step.

      3. Lift the stages 9 to 12 compressor disks off the rotary air table.

      4. Remove the three height blocks from the stage 9 compressor disk front flange.

      5. Do Step, Step, Step, Step and Step thru Step again.

      6. Do Step, Step and Step thru Step again.

        1. If the swash is more than 0.0008 in. (0.019 mm), then do as follows:

        2. If the calculated value of swash is less than 0.0011 in. (0.028 mm), the HP compressor stages 9 to 12 drum assembly is acceptable if the final swash, refer to TASK 72-41-10-440-002-A00 and the static unbalance of the HP compressor rotor assembly are in specified limits, refer to TASK 72-41-10-440-003.

        3. If the calculated value of swash is more than 0.0011 in. (0.028 mm) the stages 9 to 12 compressor disks must be rejected and a new one used.

          NOTE

          If new stages 9 to 12 compressor disks are used, then its swash and run-out must be measured. Thus, do this SUBTASK again.
      1. The maximum permitted run-out is 0.0010 in. (0.025 mm). If the calculated value of run-out is more than this value, then do the subsequent steps.

      2. Make sure that the run-out of the stage 9 compressor disk front flange outer diameter (diameter L) is set correctly. Refer to Step and Step.

      3. Do Step thru Step again.

        1. NOTE

          If new stages 9 to 12 compressor disks are used, then its swash and run-out must be measured. Thus, do this SUBTASK again.

          If the run-out is more than 0.0010 in. (0.025 mm), then

        2. If the calculated value of run-out is less than 0.0020 in. (0.050 mm), the HPC 9 to 12 drum assembly is acceptable if the final run-out, refer to TASK 72-41-10-440-002-A00 and the static unbalance of the HPC rotor assembly are within defined limits, refer to TASK 72-41-10-440-003-A00.

        3. If the calculated value of run-out is more than 0.0020 in. (0.050 mm) the stage 9 to 12 compressor disks must be rejected and a new one used.

    1. SUBTASK 72-41-10-220-052-B00 V2500-A5: Measure the Swash and Run-out of the Stages 9 to 12 HP Compressor Disks (72-41-12,01-600)

    2. Refer to Figure and Figure.

    3. Examine the mating faces of IAE 1R18066 height block 3 off and the stage 9 compressor disk front flange for contamination and/or high metal. If there is contamination, then the mating faces must be cleaned. If there is high metal, use a stone to make the surface smooth.

    4. Install the three height blocks on to the stage 9 compressor disk front flange. Install the height blocks at three equally spaced positions.

      1. Install the IAE 1R18691 Lifting fixture 1 off on the stage 12 compressor disk rear flange.

      2. Loosen the two right hand nuts sufficient to let the right hand clamp be moved to the center of the lifting fixture.

      3. Loosen the two left hand nuts sufficient to let the left hand clamp be moved to the center of the lifting fixture.

      4. Lift the right and left hand nuts and move the clamps to the center of the lifting fixture.

      5. Put the lifting fixture on to the stage 12 compressor disk rear flange, with the lift eye to the top.

      6. Move the right and lift hand clamps to the outer edge of the lifting fixture.

      7. Tighten the right and left hand nuts.

      8. Attach a hoist to the lift eye.

    5. Examine the mating face of the rotary air table for contamination and/or high metal. If there is contamination, then the mating face must be cleaned. If there is high metal, use a stone to make the surface smooth.

    6. Lift the stages 9 to 12 compressor disks and put it onto the center of the rotary air table.

      1. Remove the lifting fixture from stage 12 compressor disk rear flange.

      2. Loosen the two right and the two left hand nuts sufficient to let the two clamps be moved to the center of the lifting fixture.

      3. Lift the two right and the two left hand nuts and move the clamps to the center of the lifting fixture.

      4. Lift the lifting fixture off the stages 9 to 12 compressor disks.

      5. Remove the lifting fixture from the hoist.

      1. NOTE

        The start and finish position (0 degrees) is the stage 12 blade installation slot center line.

        Identify eight position numbers on the rear of the stages 9 to 12 compressor disks.

      2. Use CoMat 02-121 TEMPORARY MARKER PENCIL/CRAYON or CoMat 02-122 TEMPORARY MARKER PENCIL/CRAYON to identify eight equally spaced positions. Give a number to each position in sequence. Refer to SPM TASK 70-09-01-400-501. Make the marks on the face P.

      1. Set the run-out of the stage 9 compressor disk front flange outer diameter (diameter L).

      2. Use IAE 1R18088 Pillar 1 off and measuring equipment to measure the run-out of diameter L.

      3. Adjust the position of the stages 9 to 12 compressor disks relative to the rotary air table until the run-out is 0.0002 in. (0.005 mm) or less.

      1. Check the swash of the stage 9 compressor disk front flange (face K).

      2. Use the pillar and measuring equipment to measure the swash of face K.

        1. The maximum permitted swash is 0.0002 in. (0.005 mm). If the swash value is more than this value, then do the subsequent steps.

        2. Install the lifting fixture onto the stage 12 compressor rear flange. Refer to Step thru Step.

        3. Lift the stages 9 to 12 compressor disks off the rotary air table.

        4. Remove the three height blocks from the stage 9 compressor disk front flange.

        5. Do Step, Step, Step, Step and Step thru Step again.

        6. Do Step and Step again.

        7. NOTE

          If new stages 9 to 12 compressor disks are used, then its swash and run-out must be measured. Thus, do Step to Step again.

          If the swash is more than 0.0002 in. (0.005 mm), then the stages 9 to 12 compressor disks must be rejected and a new one used.

      1. Use the pillar and measuring equipment to measure the swash of face M and the run-out of diameter N.

      2. Measure the swash at the eight positions identified in Step.

      3. Use IAE 1R19810 Computer program and put the swash values into the computer. The computer will calculate the FIR and the angle of the swash.

      4. Write down the quantity and angle of the calculated swash.

      5. Measure the run-out at the eight positions identified in Step.

      6. Put the run-out values, in to the computer. The computer will calculate the FIR and the angle of the run-out.

      7. Write down the quantity and angle of the calculated run-out.

      1. The maximum permitted swash is 0.0008 in. (0.019 mm). If the calculated value of swash is more than this value, then do the subsequent steps.

      2. Install the lifting fixture onto the stage 12 compressor disk rear flange. Refer to Step thru Step

      3. Lift the stages 9 to 12 compressor disks off the rotary air table.

      4. Remove the three height blocks from the stage 9 compressor disk front flange.

      5. Do Step, Step, Step, Step and Step thru Step again.

      6. Do Step, Step and Step thru Step again.

        1. If the swash is more than 0.0008 in. (0.019 mm), then do as follows:

        2. If the calculated value of swash is less than 0.0011 in. (0.028 mm), the HP compressor stages 9 to 12 drum assembly is acceptable if the final swash, refer to TASK 72-41-10-440-002-B00 and the static unbalance of the HP compressor rotor assembly are in specified limits, refer to TASK 72-41-10-440-003.

        3. If the calculated value of swash is more than 0.0011 in. (0.028 mm) the stages 9 to 12 compressor disks must be rejected and a new one used.

          NOTE

          If new stages 9 to 12 compressor disks are used, then its swash and run-out must be measured; do this SUBTASK again.
      1. The maximum permitted run-out is 0.0010 in. (0.025 mm). If the calculated value of run-out is more than this value, then do the subsequent steps.

      2. Make sure that the run-out of the stage 9 compressor disk front flange outer diameter (diameter L) is set correctly. Refer to Step and Step

      3. Do Step thru Step again.

        1. NOTE

          If new stages 9 to 12 compressor disks are used, then its swash and run-out must be measured. Thus, do this SUBTASK again.

          If the run-out is more than 0.0010 in. (0.025 mm), then

        2. If the calculated value of run-out is less than 0.0020 in. (0.050 mm), the HPC 9 to 12 drum assembly is acceptable if the final run-out, refer to TASK 72-41-10-440-002-B00 and the static unbalance of the HPC rotor assembly are within defined limits, refer to TASK 72-41-10-440-003-A00.

        3. If the calculated value of run-out is more than 0.0020 in. (0.050 mm) the stage 9 to 12 compressor disks must be rejected and a new one used.

    1. SUBTASK 72-41-10-440-055-A00 V2500-A1: Install the Stages 9 to 12 HP Compressor Disks (01-500) on to the Turnover Stand

    2. Refer to Figure, Figure and Figure

    3. Install IAE 1R18026 Lifting fixture 1off on to the stage 12 compressor disk rear flange. Refer to Figure and Step.

        1. Remove one half of the adapter plate from the turnover stand adapter.

        2. Remove the six nuts that safety the one half of the adapter plate to the turnover stand adapter.

        3. Remove one half of the adapter plate.

      1. Put the turnover stand adapter in to the turnover stand with the two angles adjacent to the turnover stand.

      2. Attach the angles to the turnover stand with the six screws, (three in each angle).

      3. Tighten the six screws.

      4. Make sure that the horizontal side of the angles are at the bottom.

    4. Lift the stages 9 to 12 compressor disks off the rotary air table.

    5. Remove the three height blocks from the stage 9 compressor disk front flange. Refer to Figure.

    6. Put the stages 9 to 12 compressor disks above the turnover stand adapter.

      1. Install the stages 9 to 12 compressor disks in to the turnover stand. Refer to Figure.

      2. CAUTION

        YOU MUST NOT LET THE STAGES 9 TO 12 COMPRESSOR DISKS HIT THE ADAPTER PLATE, THE TURNOVER STAND ADAPTER OR THE TURNOVER STAND.

        Lower the stages 9 to 12 compressor disks in to the turnover stand. Align the stage 10 compressor disk blade groove with the adapter plate location.

      3. Carefully engage the stage 10 compressor disk blade groove on to the adapter plate location.

      4. Adjust the position of the hoist to hold the stages 9 to 12 compressor disks in position.

        1. Attach the other half of the adapter plate on to the turnover stand.

        2. Engage the adapter plate half in to the stage 10 compressor disk blade groove and on to the six studs in the turnover stand adapter.

        3. Safety the adapter plate half to the turnover stand with the six nuts.

      5. Remove the hoist from the lifting fixture.

    1. SUBTASK 72-41-10-440-055-B00 V2500-A5: Install the Stages 9 to 12 HP Compressor Disks (01-500) on to the Turnover Stand

    2. Refer to Figure, Figure and Figure.

    3. Install IAE 1R18691 Lifting fixture 1 off on to the stage 12 compressor disk rear flange. Refer to Figure and Step.

        1. Remove one half of the adapter plate from the turnover stand adapter.

        2. Remove the six nuts that safety the one half of the adapter plate to the turnover stand adapter.

        3. Remove one half of the adapter plate.

      1. Put the turnover stand adapter in to the turnover stand with the two angles adjacent to the turnover stand.

      2. Attach the angles to the turnover stand with the six screws, (three in each angle).

      3. Tighten the six screws.

      4. Make sure that the horizontal side of the angles are at the bottom.

    4. Lift the stages 9 to 12 compressor disks off the rotary air table.

    5. Remove the three height blocks from the stage 9 compressor disk front flange. Refer to Figure.

    6. Put the stages 9 to 12 compressor disks above the turnover stand adapter.

      1. Install the stages 9 to 12 compressor disks in to the turnover stand. Refer to Figure.

      2. CAUTION

        YOU MUST NOT LET THE STAGES 9 TO 12 COMPRESSOR DISKS HIT THE ADAPTER PLATE, THE TURNOVER STAND ADAPTER OR THE TURNOVER STAND.

        Lower the stages 9 to 12 compressor disks in to the turnover stand. Align the stage 10 compressor disk blade groove with the adapter plate location.

      3. Carefully engage the stage 10 compressor disk blade groove on to the adapter plate location.

      4. Adjust the position of the hoist to hold the stages 9 to 12 compressor disks in position.

        1. Attach the other half of the adapter plate on to the turnover stand.

        2. Engage the adapter plate half in to the stage 10 compressor disk blade groove and on to the six studs in the turnover stand adapter.

        3. Safety the adapter plate half to the turnover stand with the six nuts.

      5. Remove the hoist from the lifting fixture.

    1. SUBTASK 72-41-10-220-053 Measure the Vortex Reducer Ring (72-41-12,01-575)

    2. Refer to Figure.

    3. Measure the thickness of the front flange of the vortex reducer ring (dimension AC) at eight equally spaced positions. Write down the value and the position of the maximum flange thickness.

      1. Identify the angular position of the maximum flange thickness.

      2. Use CoMat 02-121 TEMPORARY MARKER PENCIL/CRAYON or CoMat 02-122 TEMPORARY MARKER PENCIL/CRAYON to make a mark 'T'. Make the mark on the front flange outer diameter at the position of the maximum flange thickness. Refer to SPM TASK 70-09-01-400-501.

    1. SUBTASK 72-41-10-220-054 Measure the Swash and Run-out of the HP Compressor Shaft (72-41-13,01-850)

    2. Refer to Figure and Figure.

    3. Examine the mating faces of IAE 1R18068 Height block 3 off and the compressor shaft front flange for contamination and/or high metal. If there is contamination, then the surface must be cleaned. If there is high metal, use a stone to make the surface smooth.

    4. Install the height blocks on to the compressor shaft front flange. Install the height blocks at three equally spaced positions.

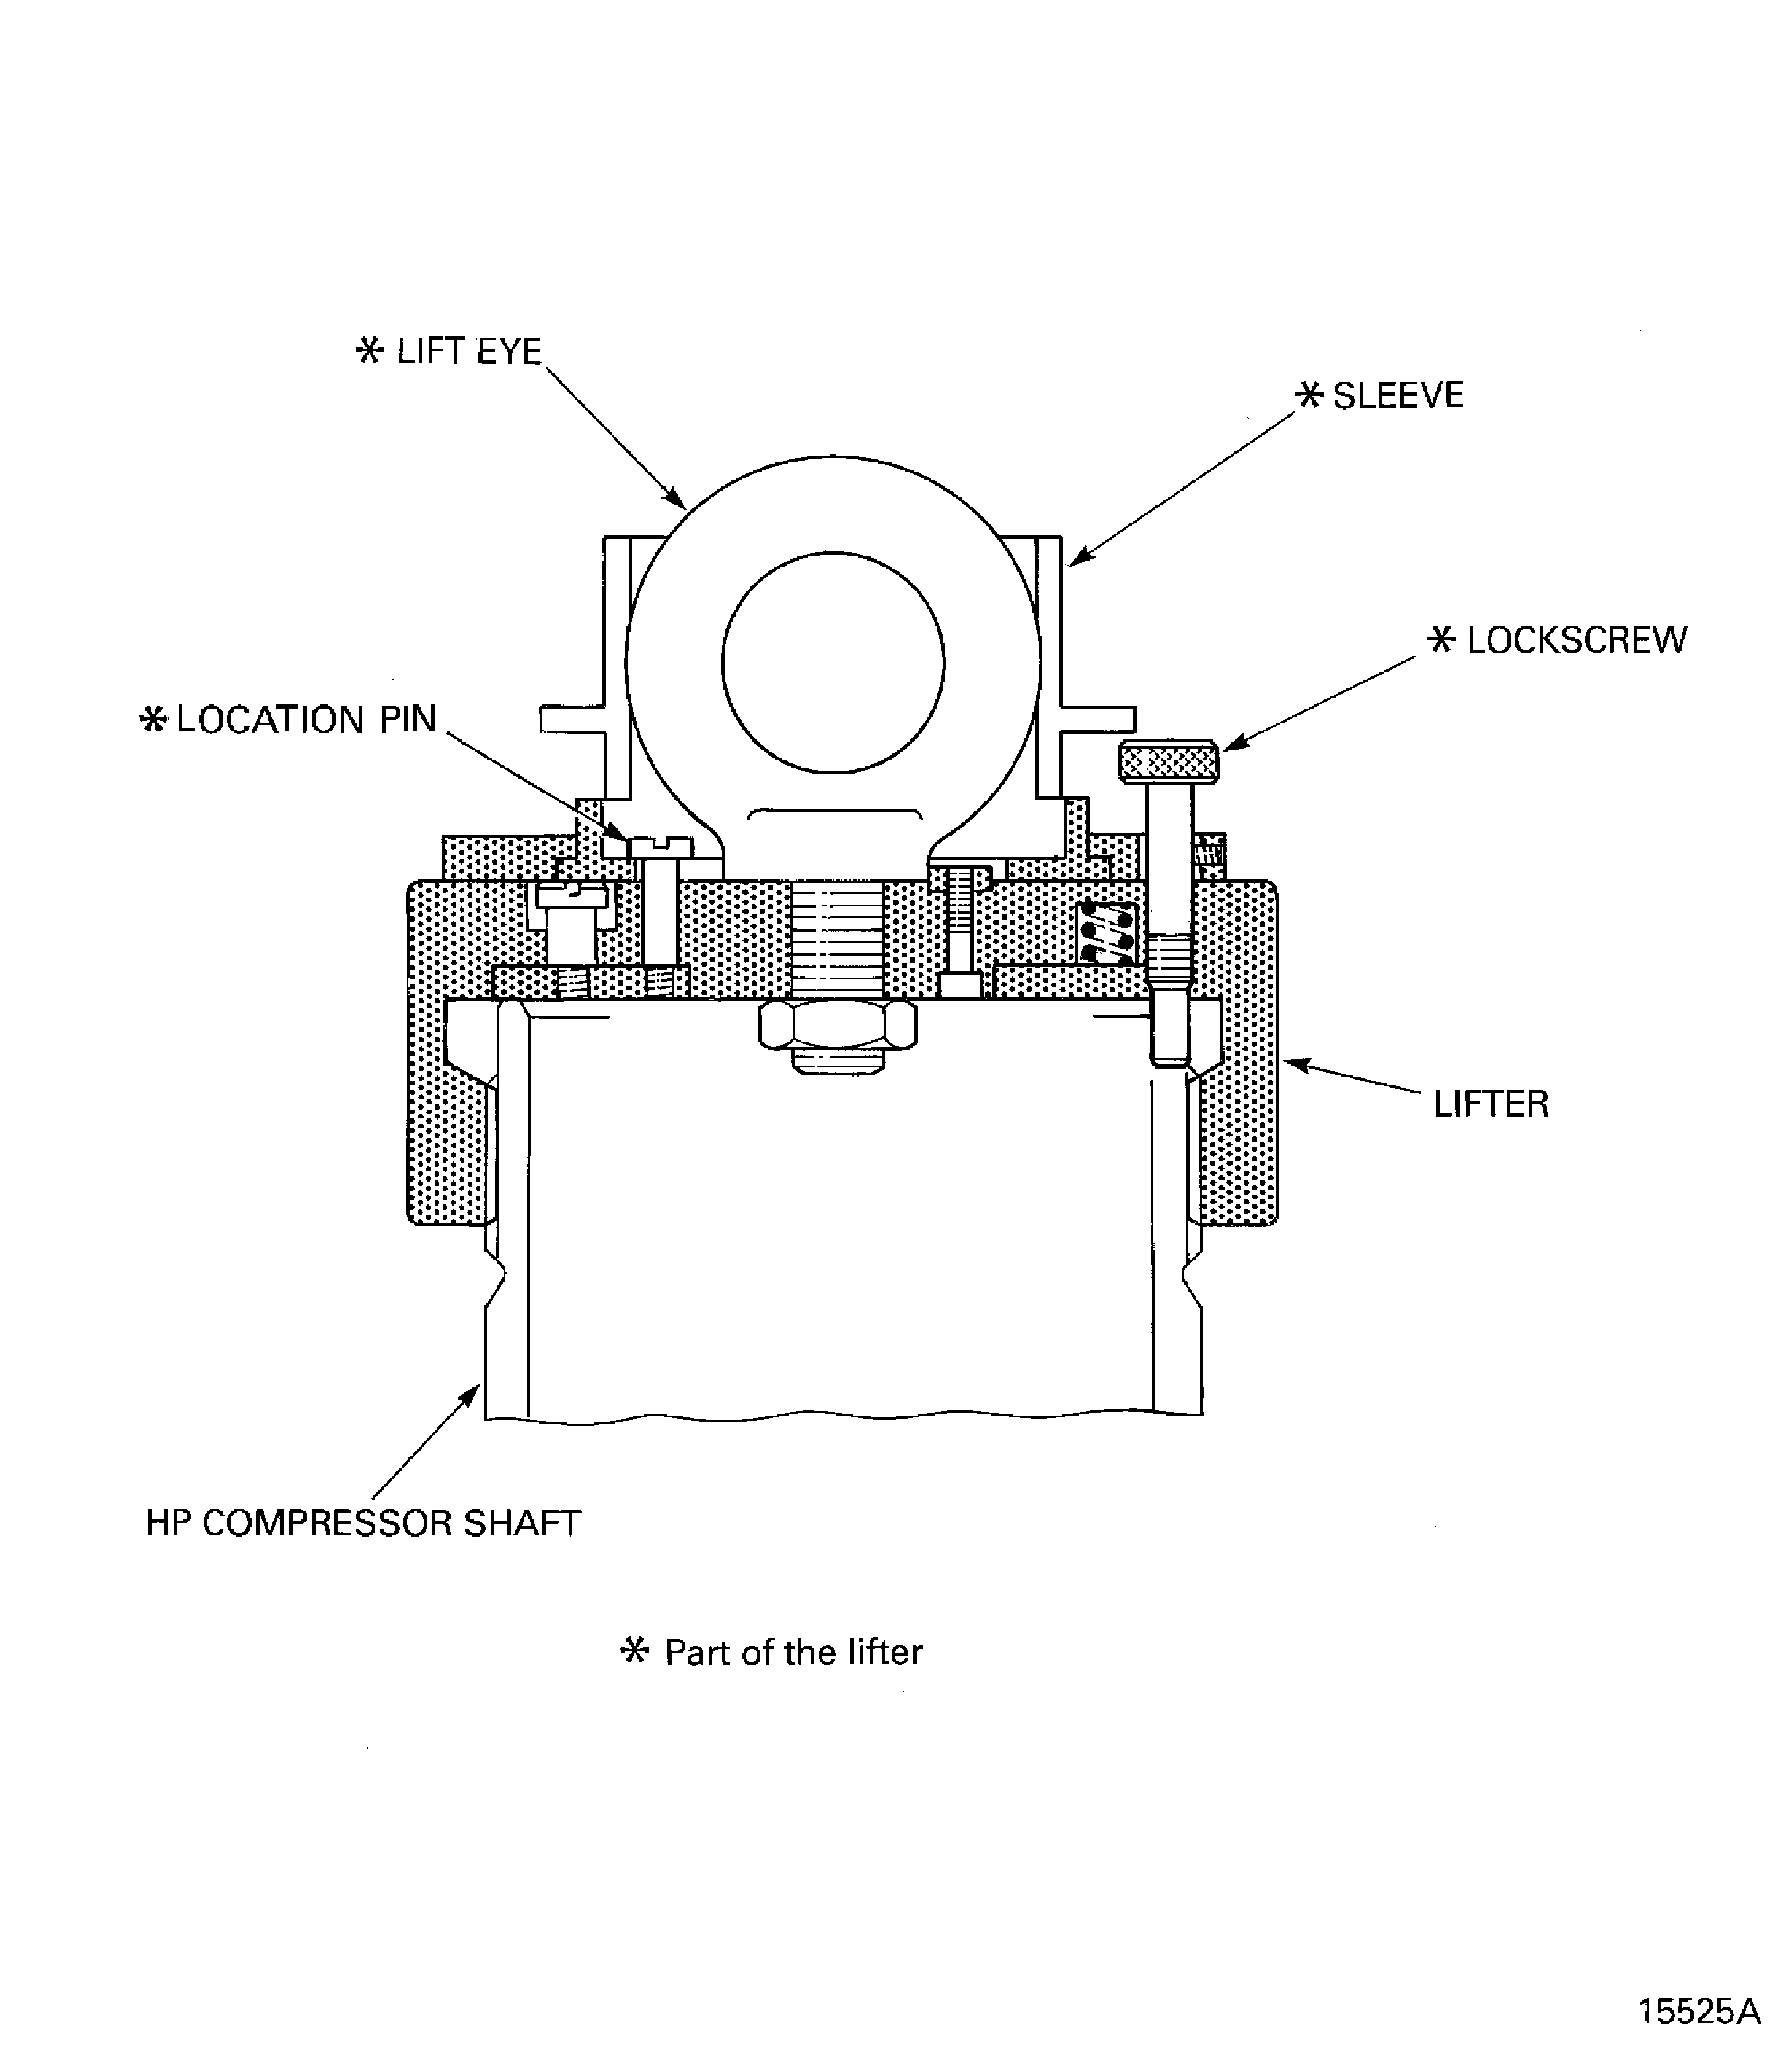
      1. Install IAE 1R18441 Lifting adapter 1 off onto the end of the compressor shaft.

      2. Engage the lifter onto the end of the compressor shaft.

      3. Turn the lifter clockwise to move the lifter onto the compressor shaft.

      4. Continue to turn the lifter clockwise until the location pin is clear of the sleeve and the lifter gets tight on the compressor shaft.

      5. Tighten the lock screw into the lifter. Make sure the lock screw goes into a slot on the end of the compressor shaft. If the lock screw does not go into a slot then turn the lifter anti-clockwise until the lock screw will go into the first available slot.

      6. Turn the sleeve until a hoist can be attached to the lift eye.

      7. Attach a hoist to the lift eye.

    5. Examine the mating face of the rotary air table for contamination and/or high metal. If there is contamination, then the mating face must be cleaned. If there is high metal, use a stone to make the surface smooth.

    6. Lift the compressor shaft and put it onto the center of the rotary air table. Remove the hoist from the lifter.

      1. Identify the eight position numbers on the compressor shaft.

      2. Make a mark on the front flange adjacent to the part number. This mark shows the start and finish point (0 degrees). Use CoMat 02-121 TEMPORARY MARKER PENCIL/CRAYON or CoMat 02-122 TEMPORARY MARKER PENCIL/CRAYON to make the mark. Refer to SPM TASK 70-09-01-400-501.

      3. Use the temporary marker to identify seven more marks that are equally spaced to each other and the mark made in step (1). Give a number to all eight positions in sequence. Make the marks on the face V.

      1. Set the run-out of the compressor shaft front flange inner diameter (diameter Q).

      2. Use IAE 1R18088 Pillar 1 off and measuring equipment to measure the run-out of diameter Q.

      3. Adjust the position of the compressor shaft relative to the rotary air table until the run-out is 0.0002 in. (0.005 mm) or less.

      1. Check the swash of the compressor shaft front flange inner face (face W).

      2. Use the pillar and measuring equipment to measure the swash of face W.

        1. The maximum permitted swash is 0.0002 in. (0.005 mm). If the swash value is more than this value, then do the subsequent steps.

        2. Attach a hoist to the lift eye of the lifter that is installed on the end of the compressor shaft.

        3. Lift the compressor shaft off the rotary air table.

        4. Remove the three height blocks from the compressor shaft front flange.

        5. Do Step, Step, Step and Step again.

        6. Do Step and Step again.

        7. NOTE

          If a new compressor shaft is used, then its swash and run-out must be measured. Thus, do Step to Step again.

          If the swash is more than 0.0002 in. (0.005 mm), then the compressor shaft must be rejected and a new one used.

      1. Use the pillar and measuring equipment to measure the swash of face T and the run-out of diameter U.

      2. Measure the swash at the eight positions identified in Step and Step.

      3. Use IAE 1R19810 Computer program and put the swash values into the computer. The computer will calculate the FIR and the angle of the swash.

      4. Write down the quantity and angle of the calculated swash.

      5. Measure the run-out at the eight positions identified in Step and Step.

      6. Put the run-out values into the computer. The computer will calculate the FIR and the angle of the run-out.

      7. Write down the quantity and angle of the calculated run-out.

      1. The maximum permitted swash is 0.0008 in. (0.019 mm). If the calculated value of swash is more than this value, then do the subsequent steps.

      2. Attach a hoist to the lift eye of the lifter that is installed on the end of the compressor shaft.

      3. Lift the compressor shaft off the rotary air table.

      4. Remove the three height blocks from the compressor shaft front flange.

      5. Do Step, Step, Step and Step again.

      6. Do Step, Step and Step thru Step again.

      7. NOTE

        If a new compressor shaft is used, then its swash and run-out must be measured. Thus, do this SUBTASK again.

        If the swash is more than 0.0008 in. (0.019 mm), then the compressor shaft must be rejected and a new one used.

      1. The maximum permitted run-out is 0.0010 in. (0.025 mm). If the calculated value of run-out is more than this value, then do the subsequent steps.

      2. Make sure that the run-out of the compressor shaft front flange inner diameter (diameter Q) is set correctly. Refer to Step and Step.

      3. Do Step thru Step again.

        1. If the run-out is more than 0.0010 in. (0.025 mm), then do as follows:

        2. If the calculated value of run-out is less than 0.0020 in. (0.050 mm), the HP compressor rear shaft assembly is acceptable if the final run-out, refer to TASK 72-41-10-440-002-B00 and the static unbalance, refer to TASK 72-41-10-440-003, of the HP compressor rotor assembly are in specified limits.

        3. If the calculated value of run-out is more than 0.0020 in. (0.050 mm) the HP compressor rear shaft assembly must be rejected and a new one used.

          NOTE

          If a new compressor shaft is used, then its swash and run-out must be measured. Thus, do this SUBTASK again.
      1. Remove the height blocks and the lifter from the compressor shaft.

      2. Attach a hoist to the lift eye of the lifter that is installed on the end of the compressor shaft.

      3. Lift the compressor shaft off the rotary air table.

      4. Remove the height blocks from the compressor shaft front flange.

      5. Put the compressor shaft onto a correct work surface. Remove the hoist from the lifter.

      6. Remove the lifter from the end of the compressor shaft.

      7. Move the sleeve on the lifter to make the lifter safe.

  1. Figure: Example view of the HP compressor rotor assembly parts

    Example view of the HP compressor rotor assembly parts
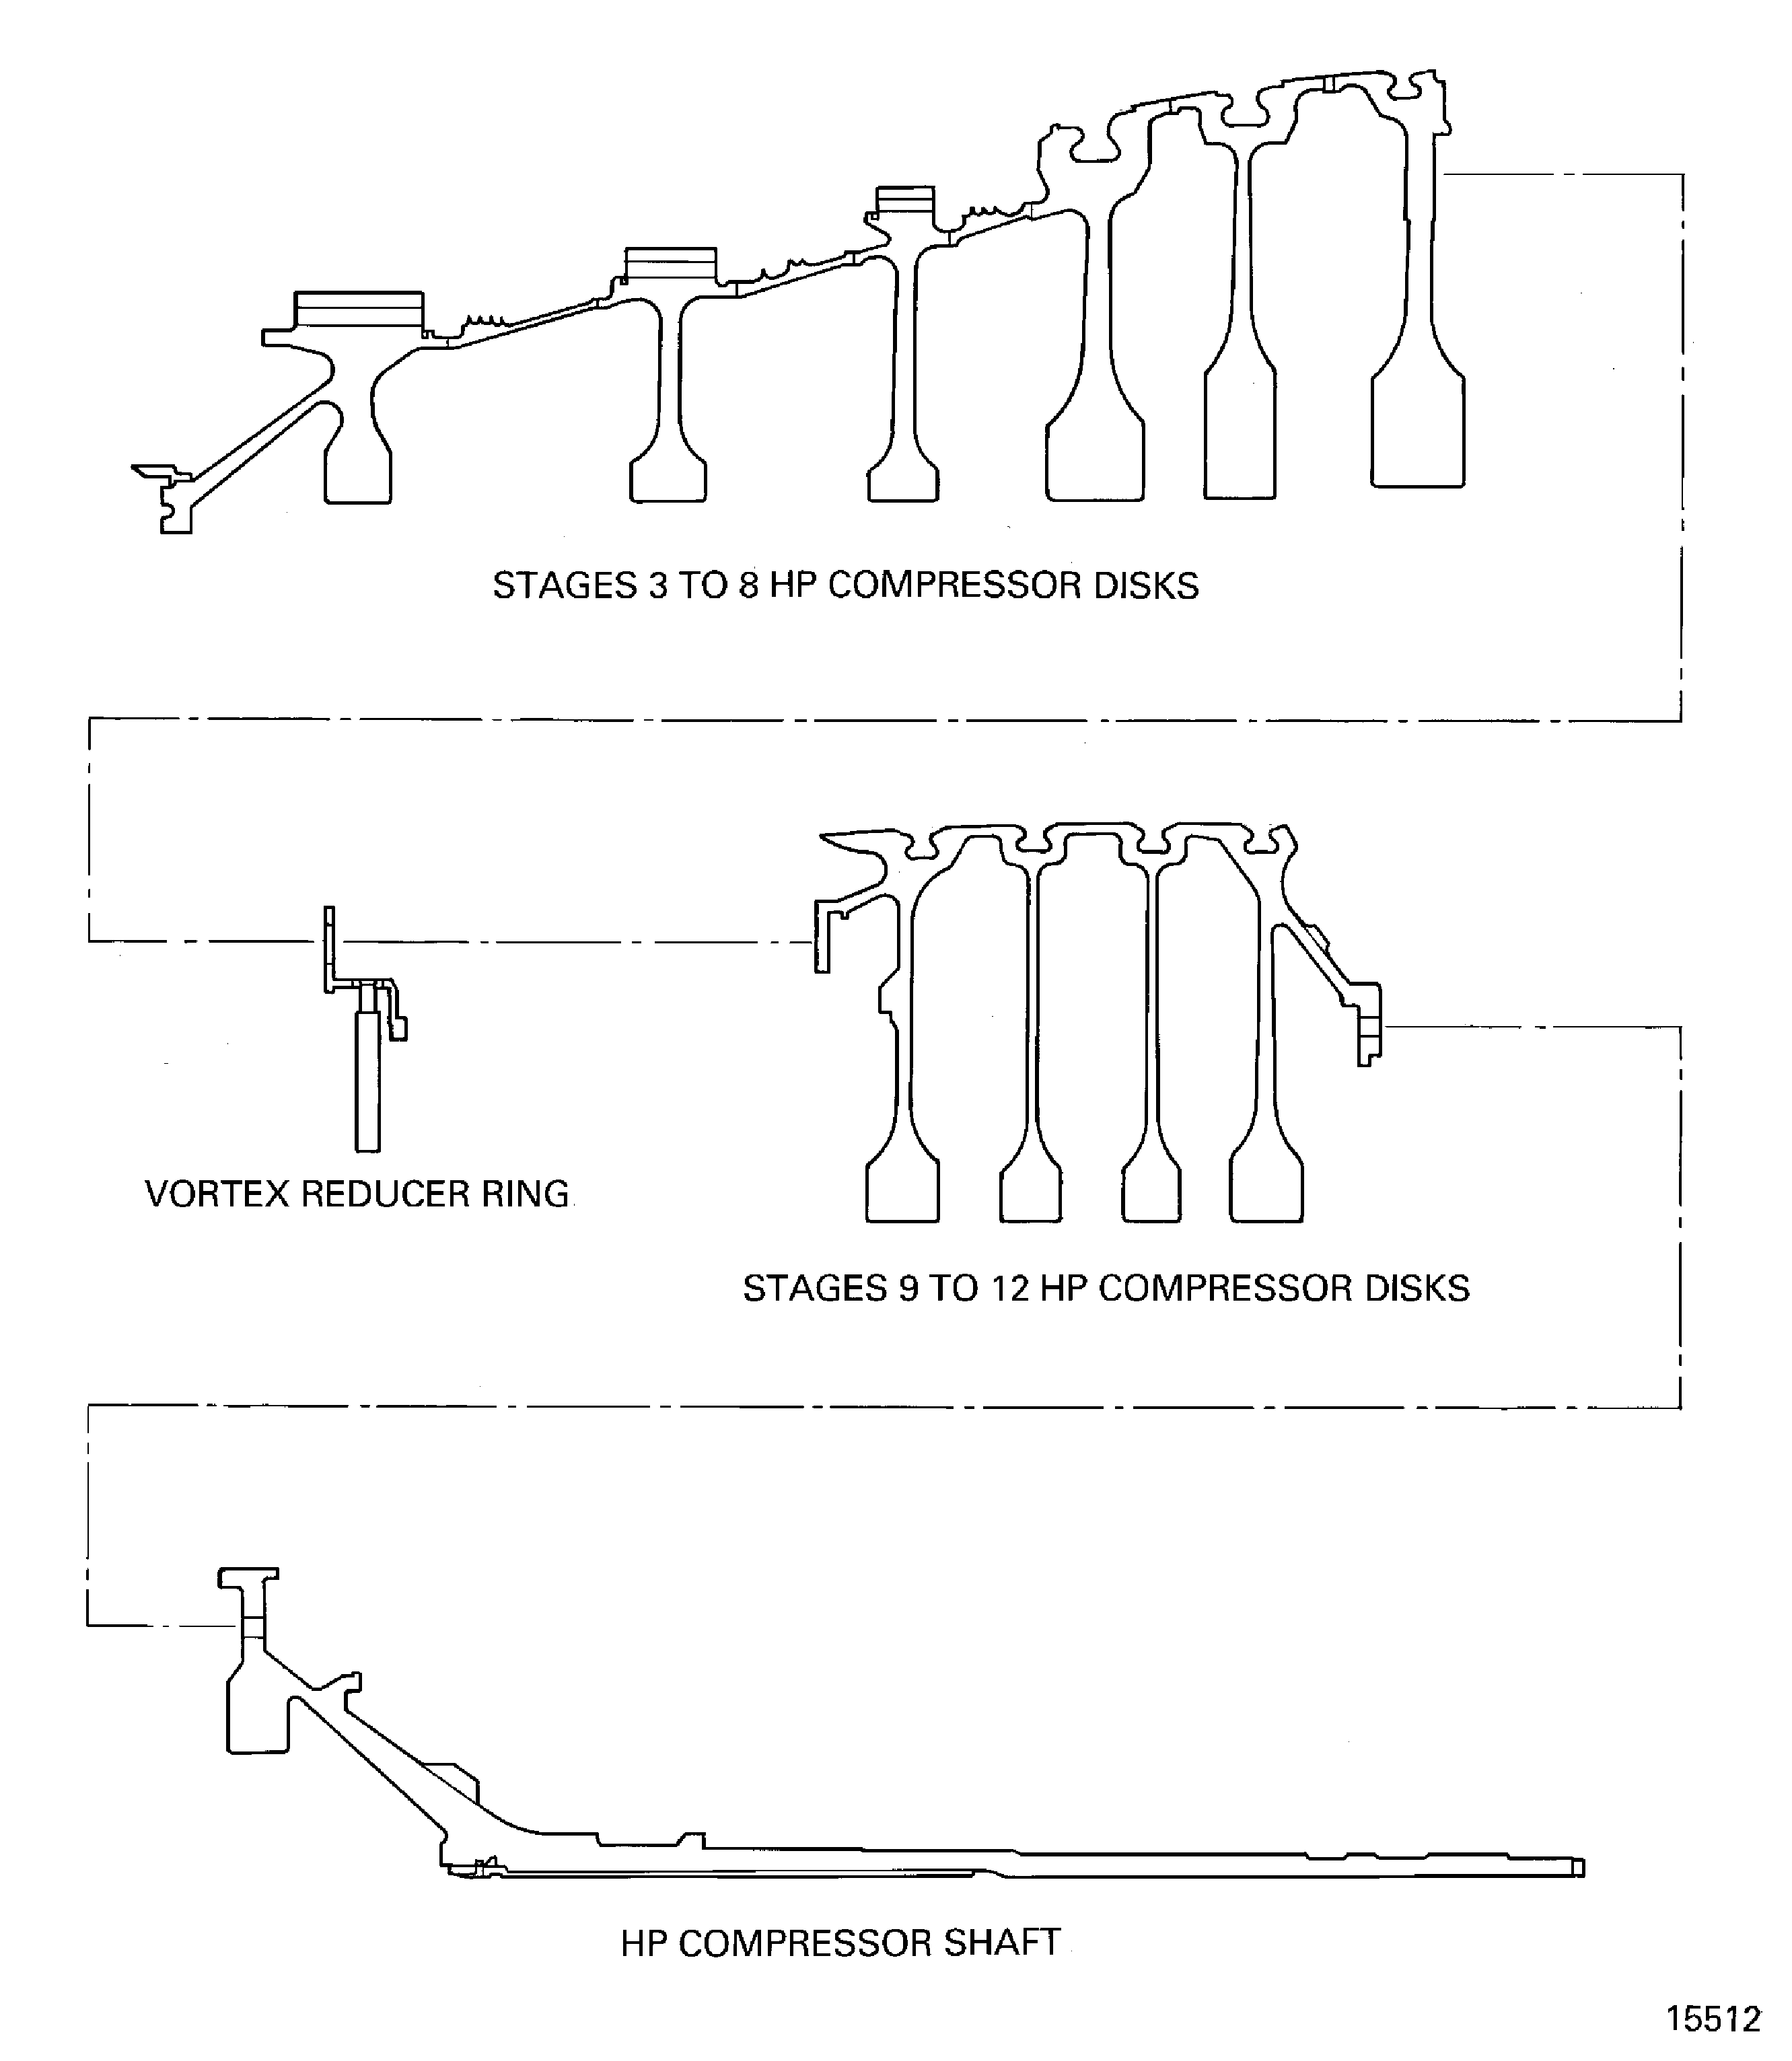
    Figure: Swash and run-out data

    Swash and run-out data
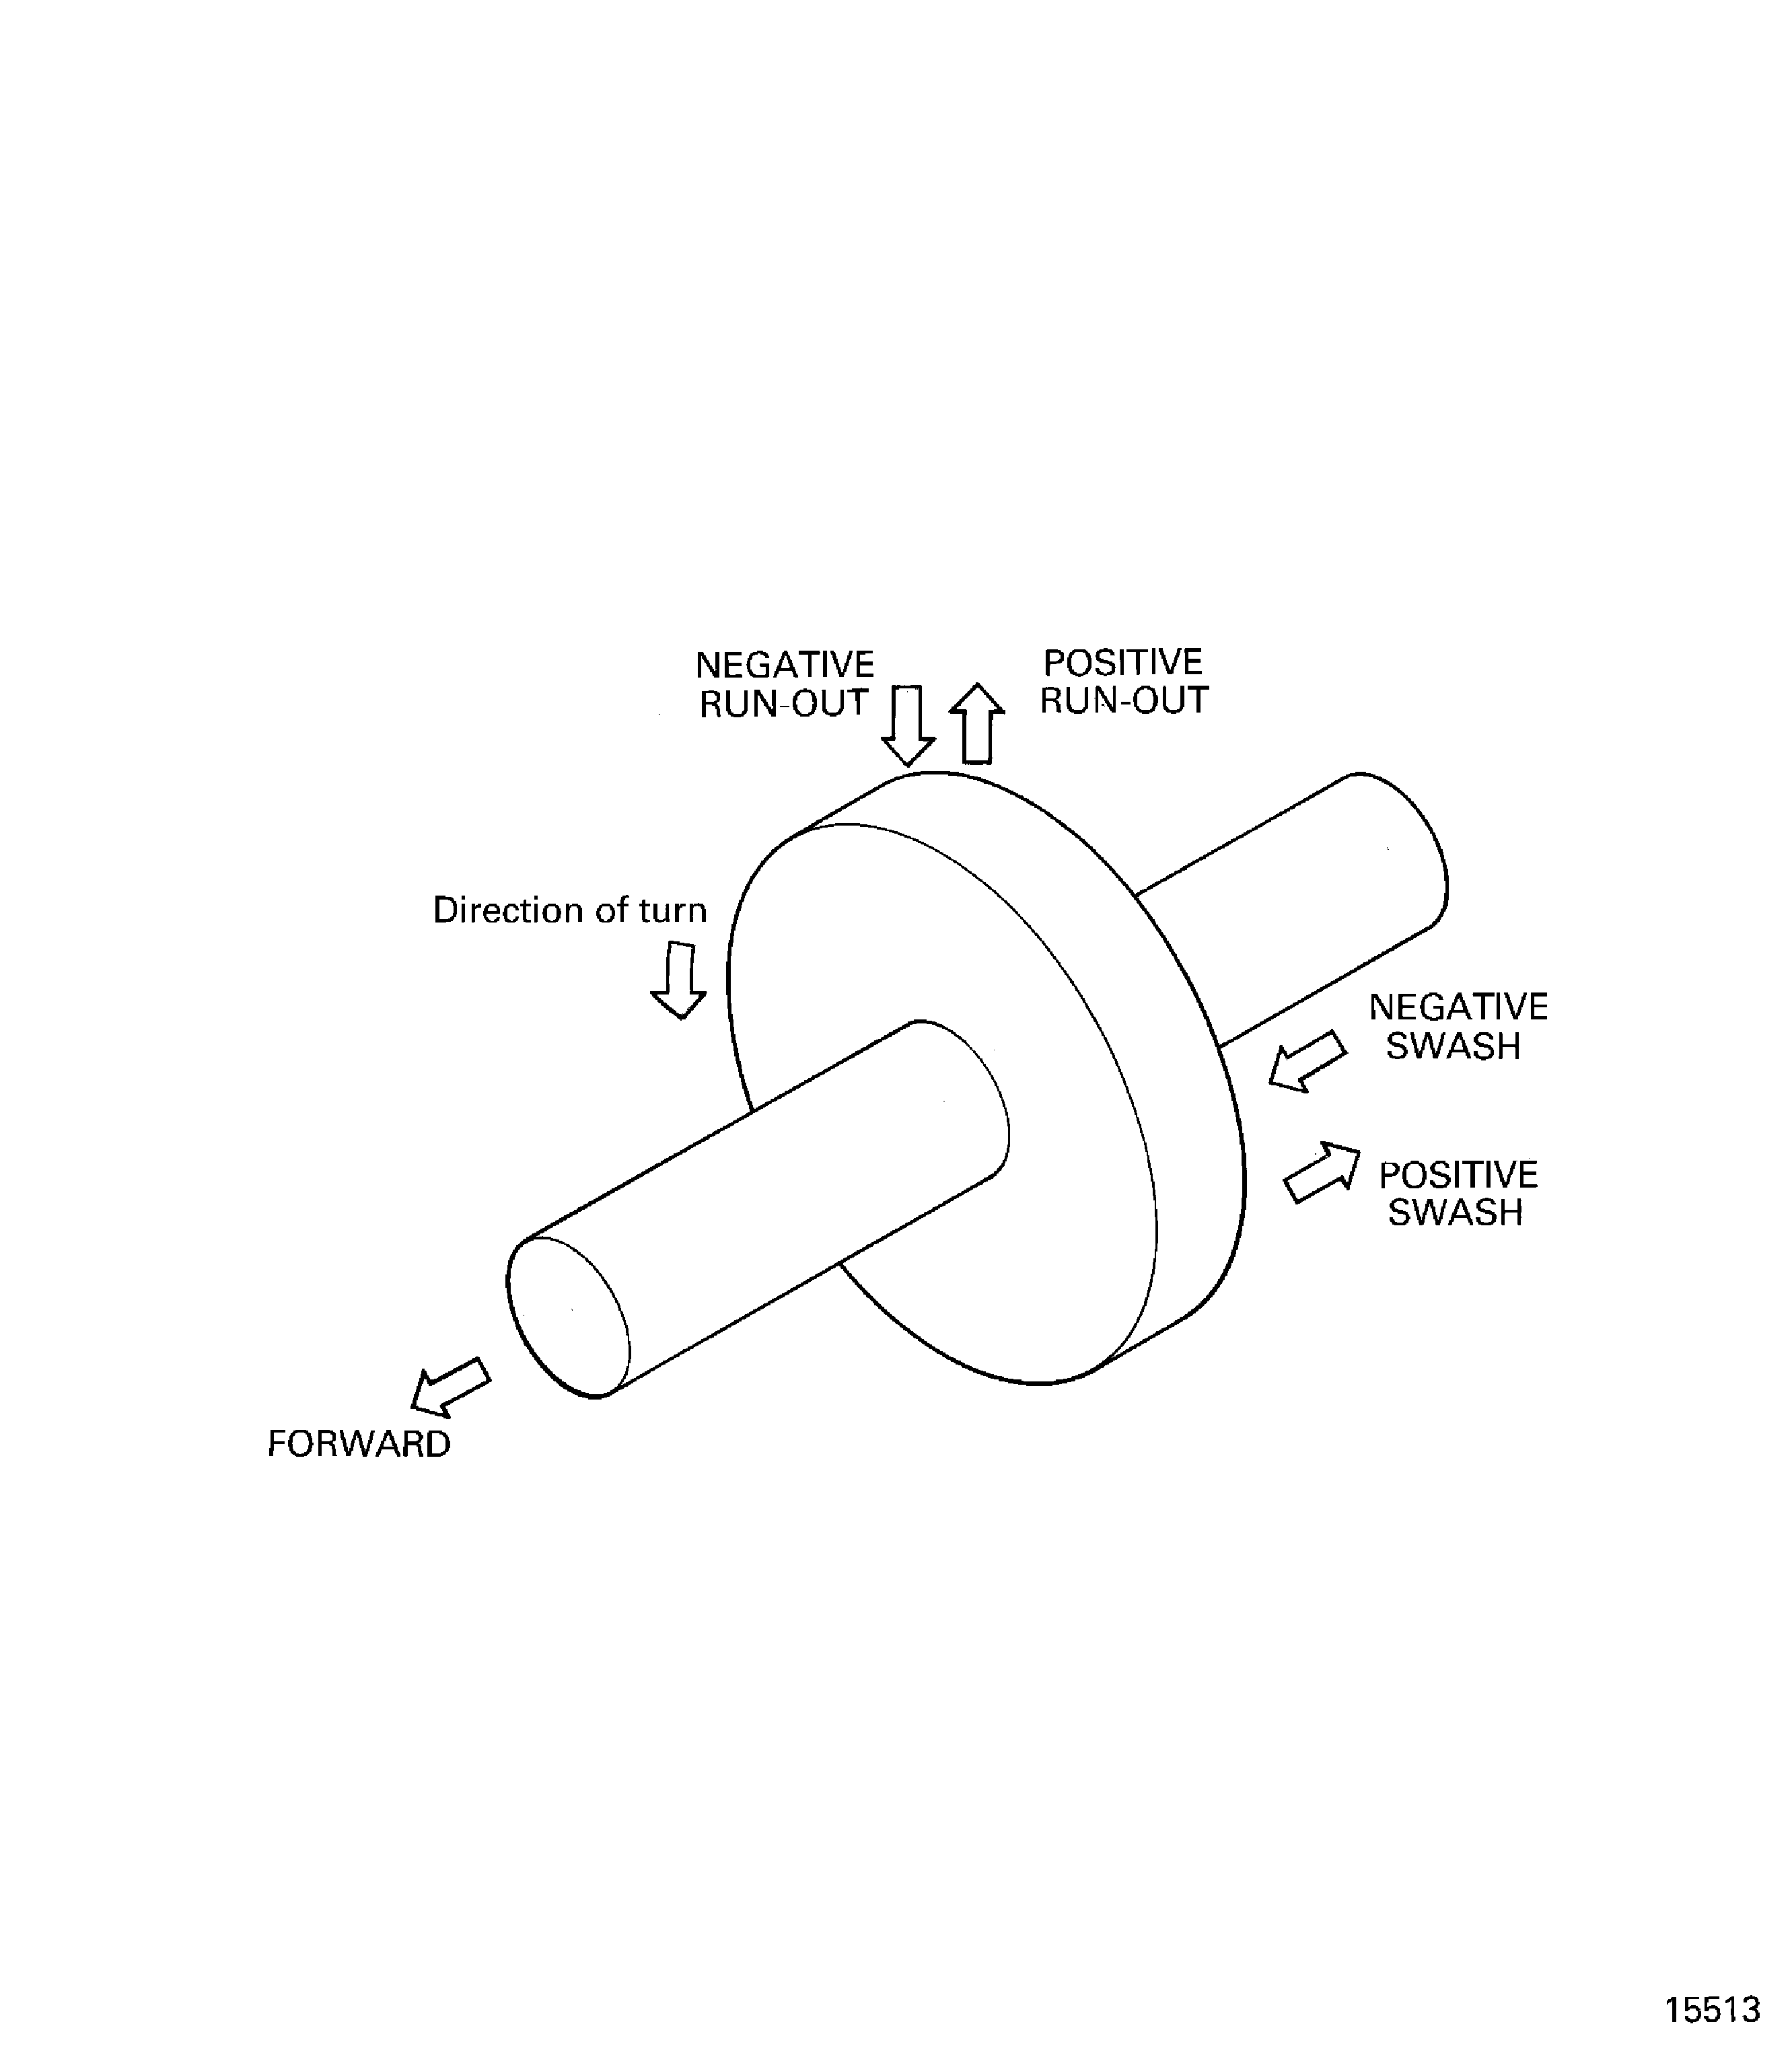
    Figure: Assemble the tools used to measure the swash and run-out of the stages 3 to 8 HP compressor disks

    Assemble the tools used to measure the swash and run-out of the stages 3 to 8 HP compressor disks
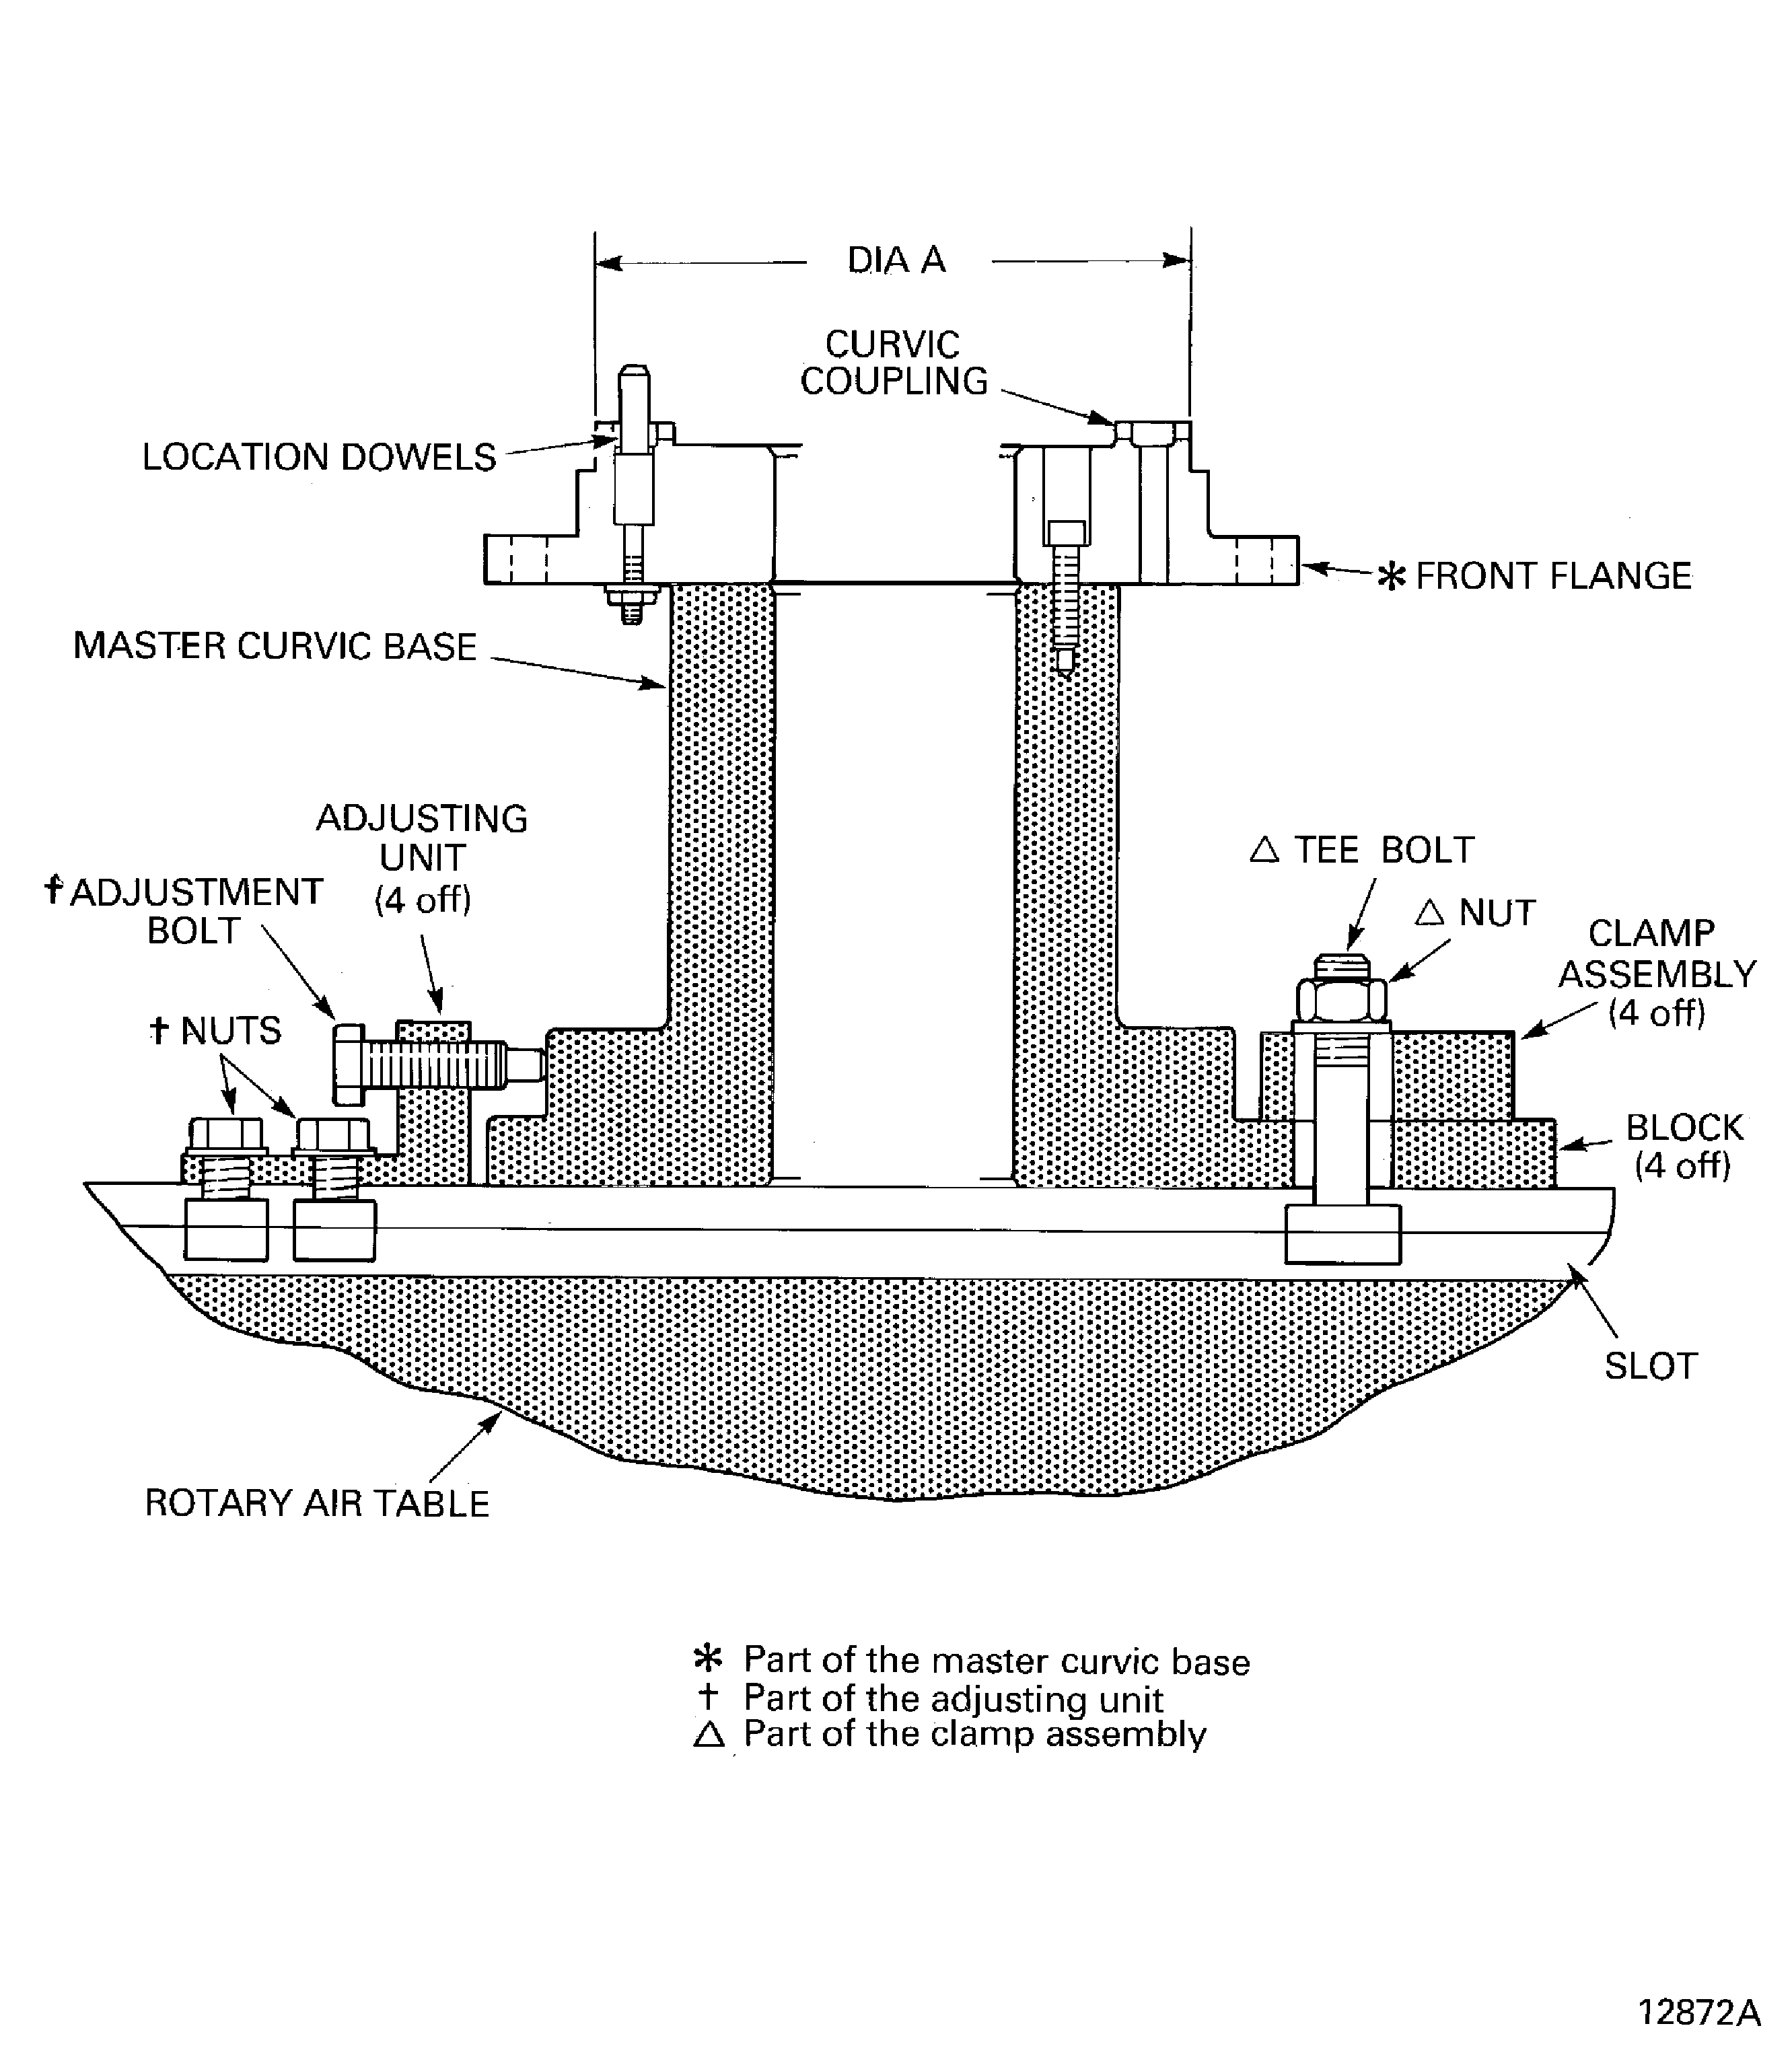
    Figure: Stage 3 disk curvic coupling bolts torque sequence

    Stage 3 disk curvic coupling bolts torque sequence
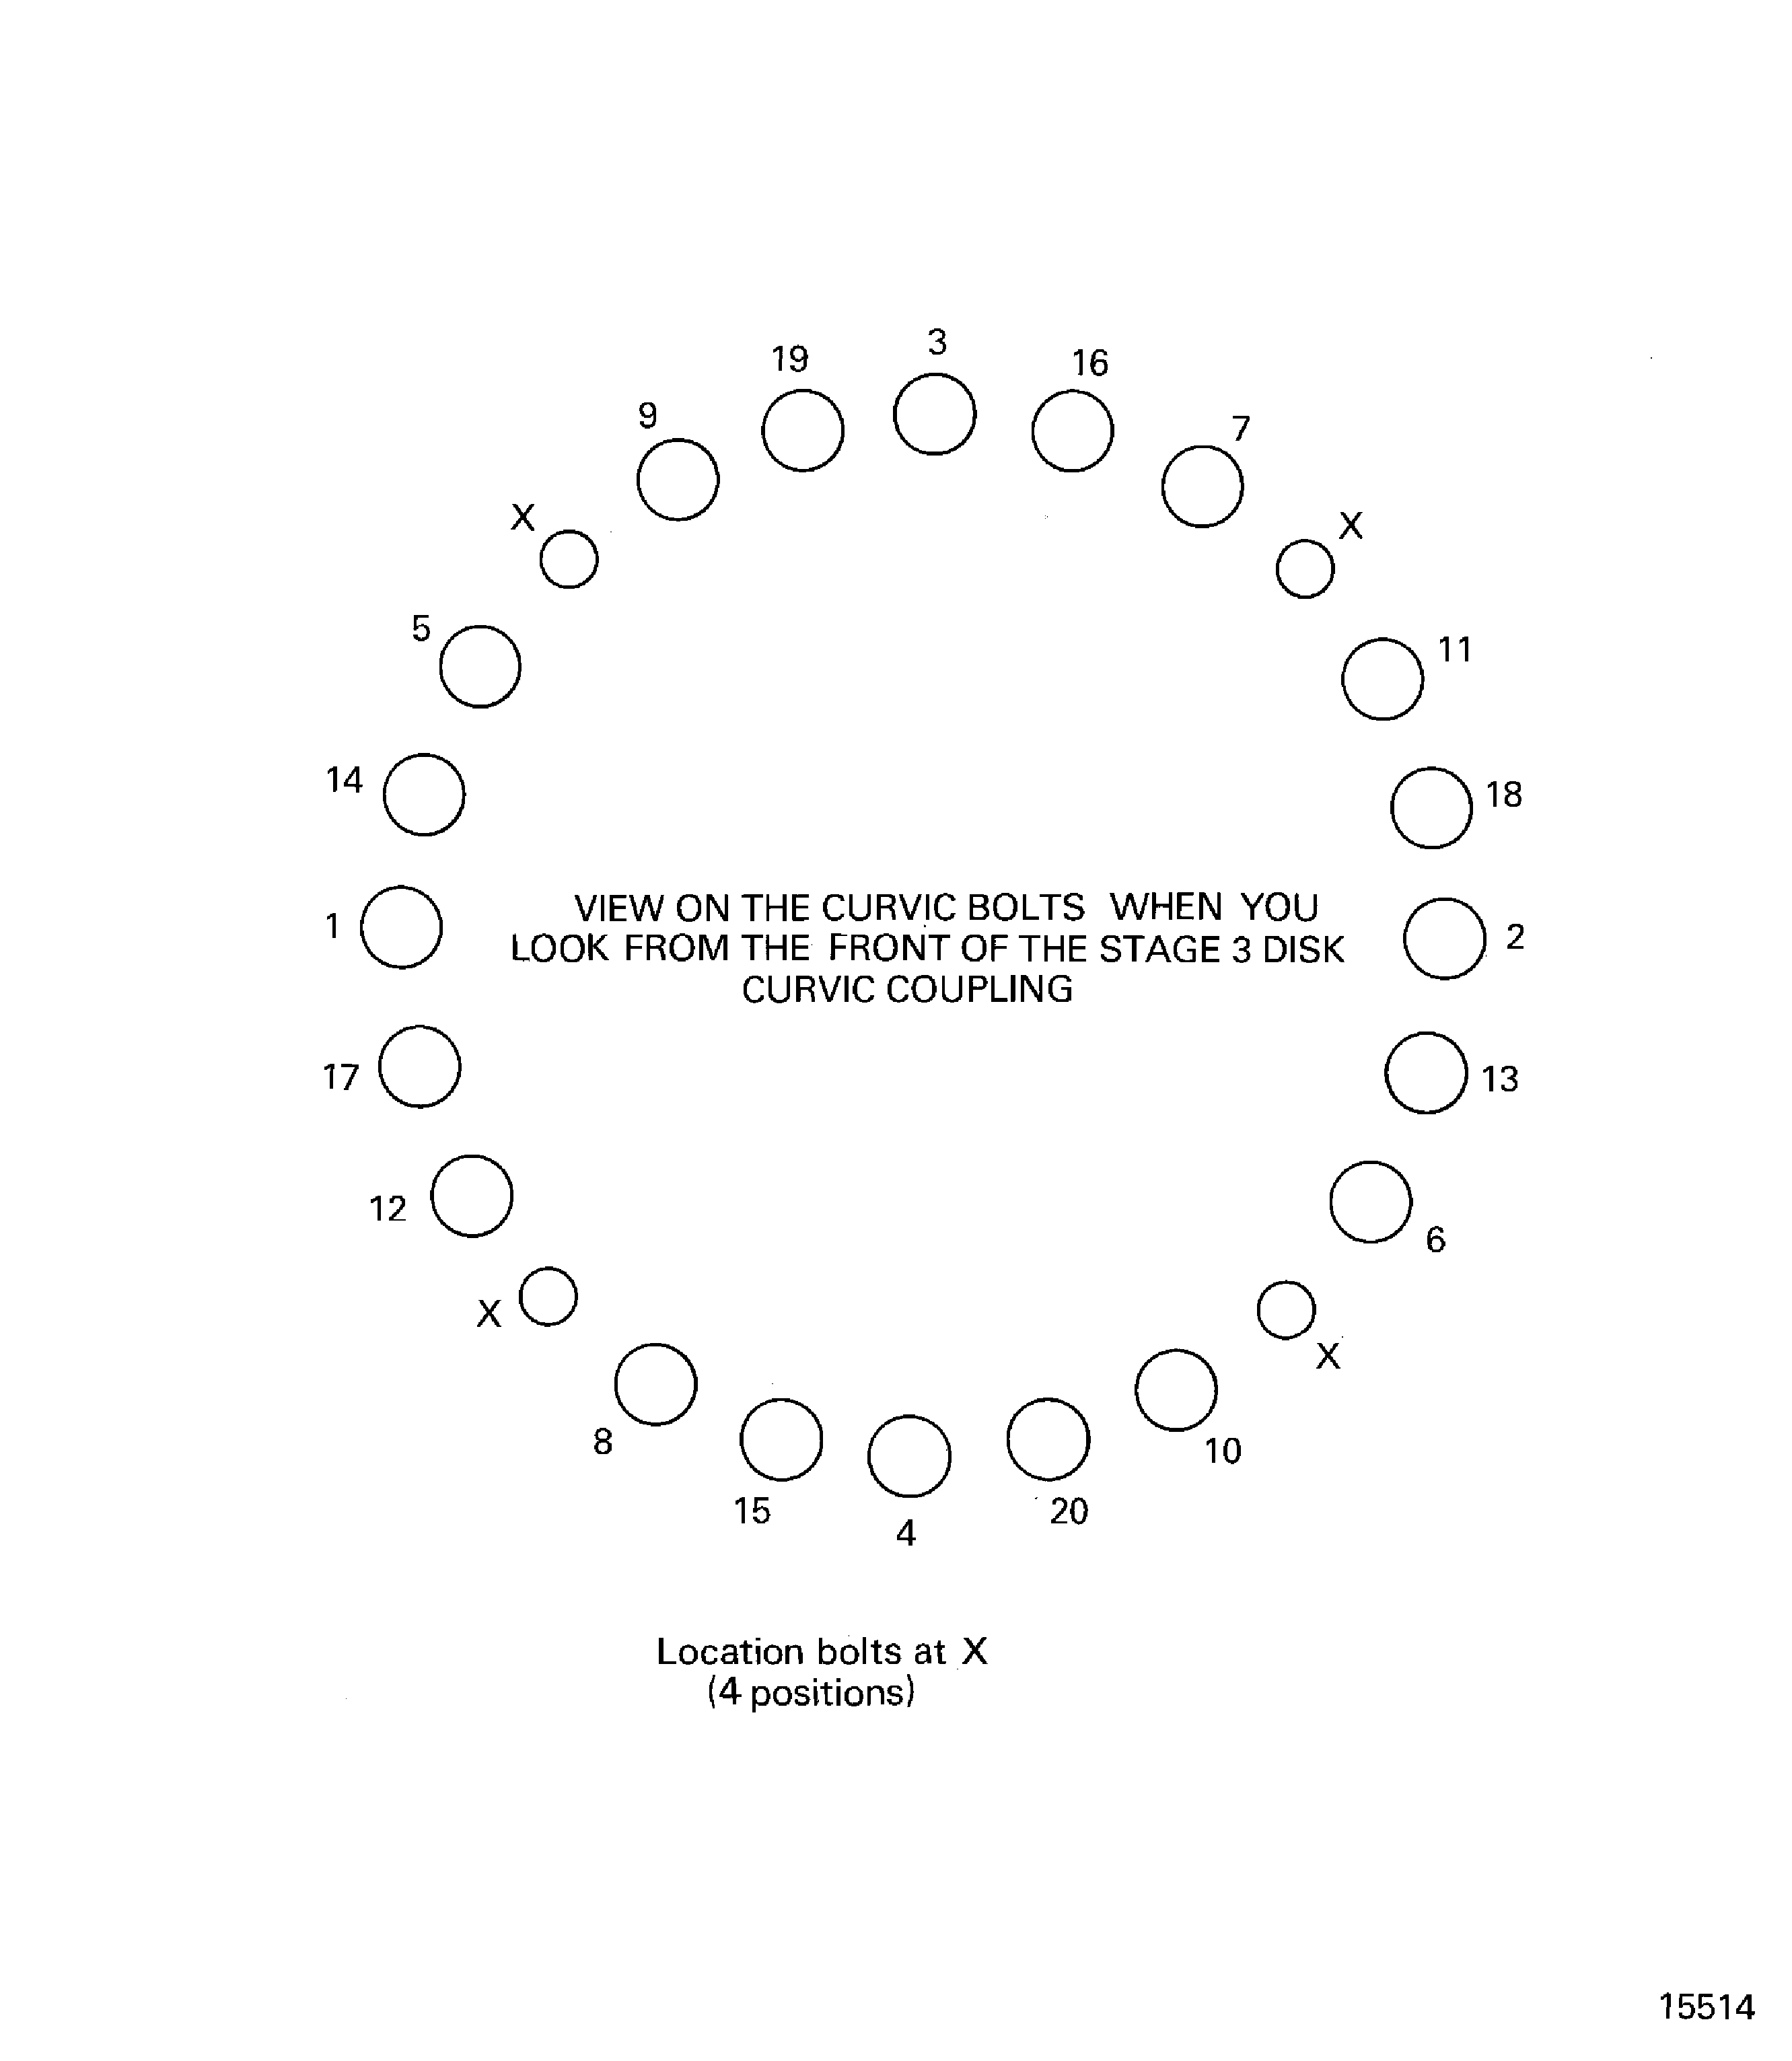
    Figure: Install the lifter on to the stages 3 to 8 HP compressor disks

    Install the lifter on to the stages 3 to 8 HP compressor disks
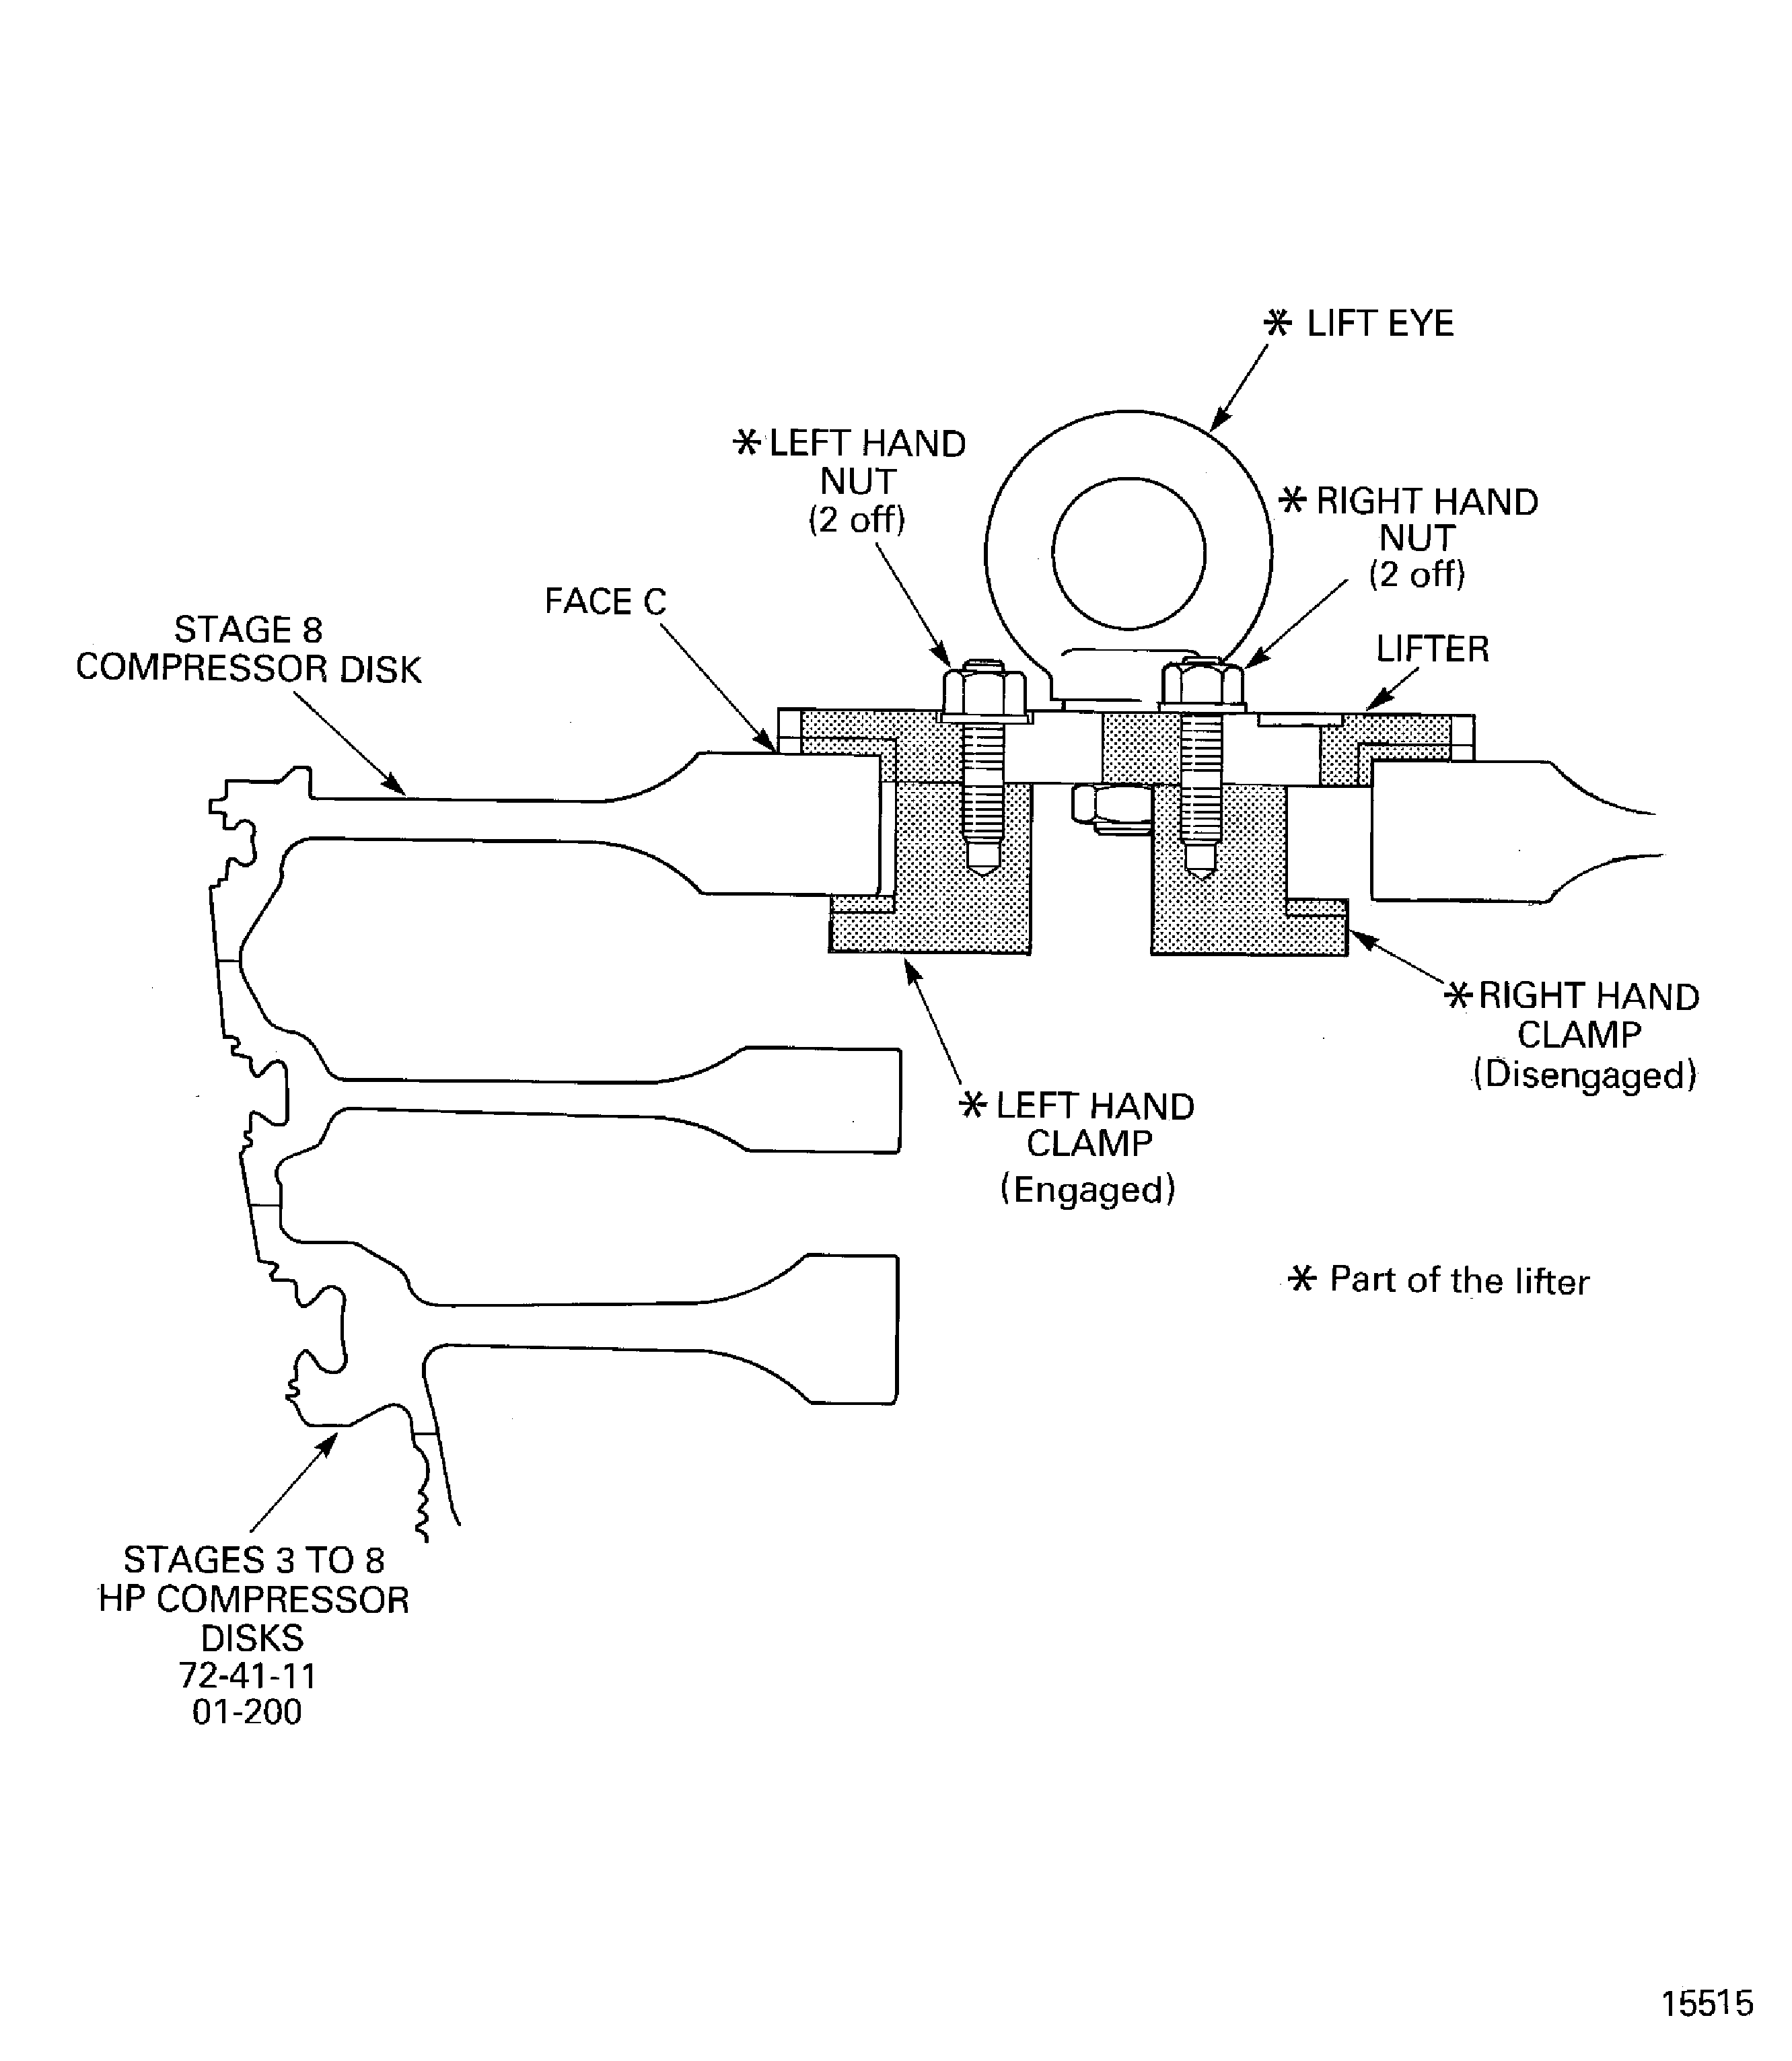
    Figure: Measure the swash and run-out of the stages 3 to 8 HP compressor disks

    Measure the swash and run-out of the stages 3 to 8 HP compressor disks
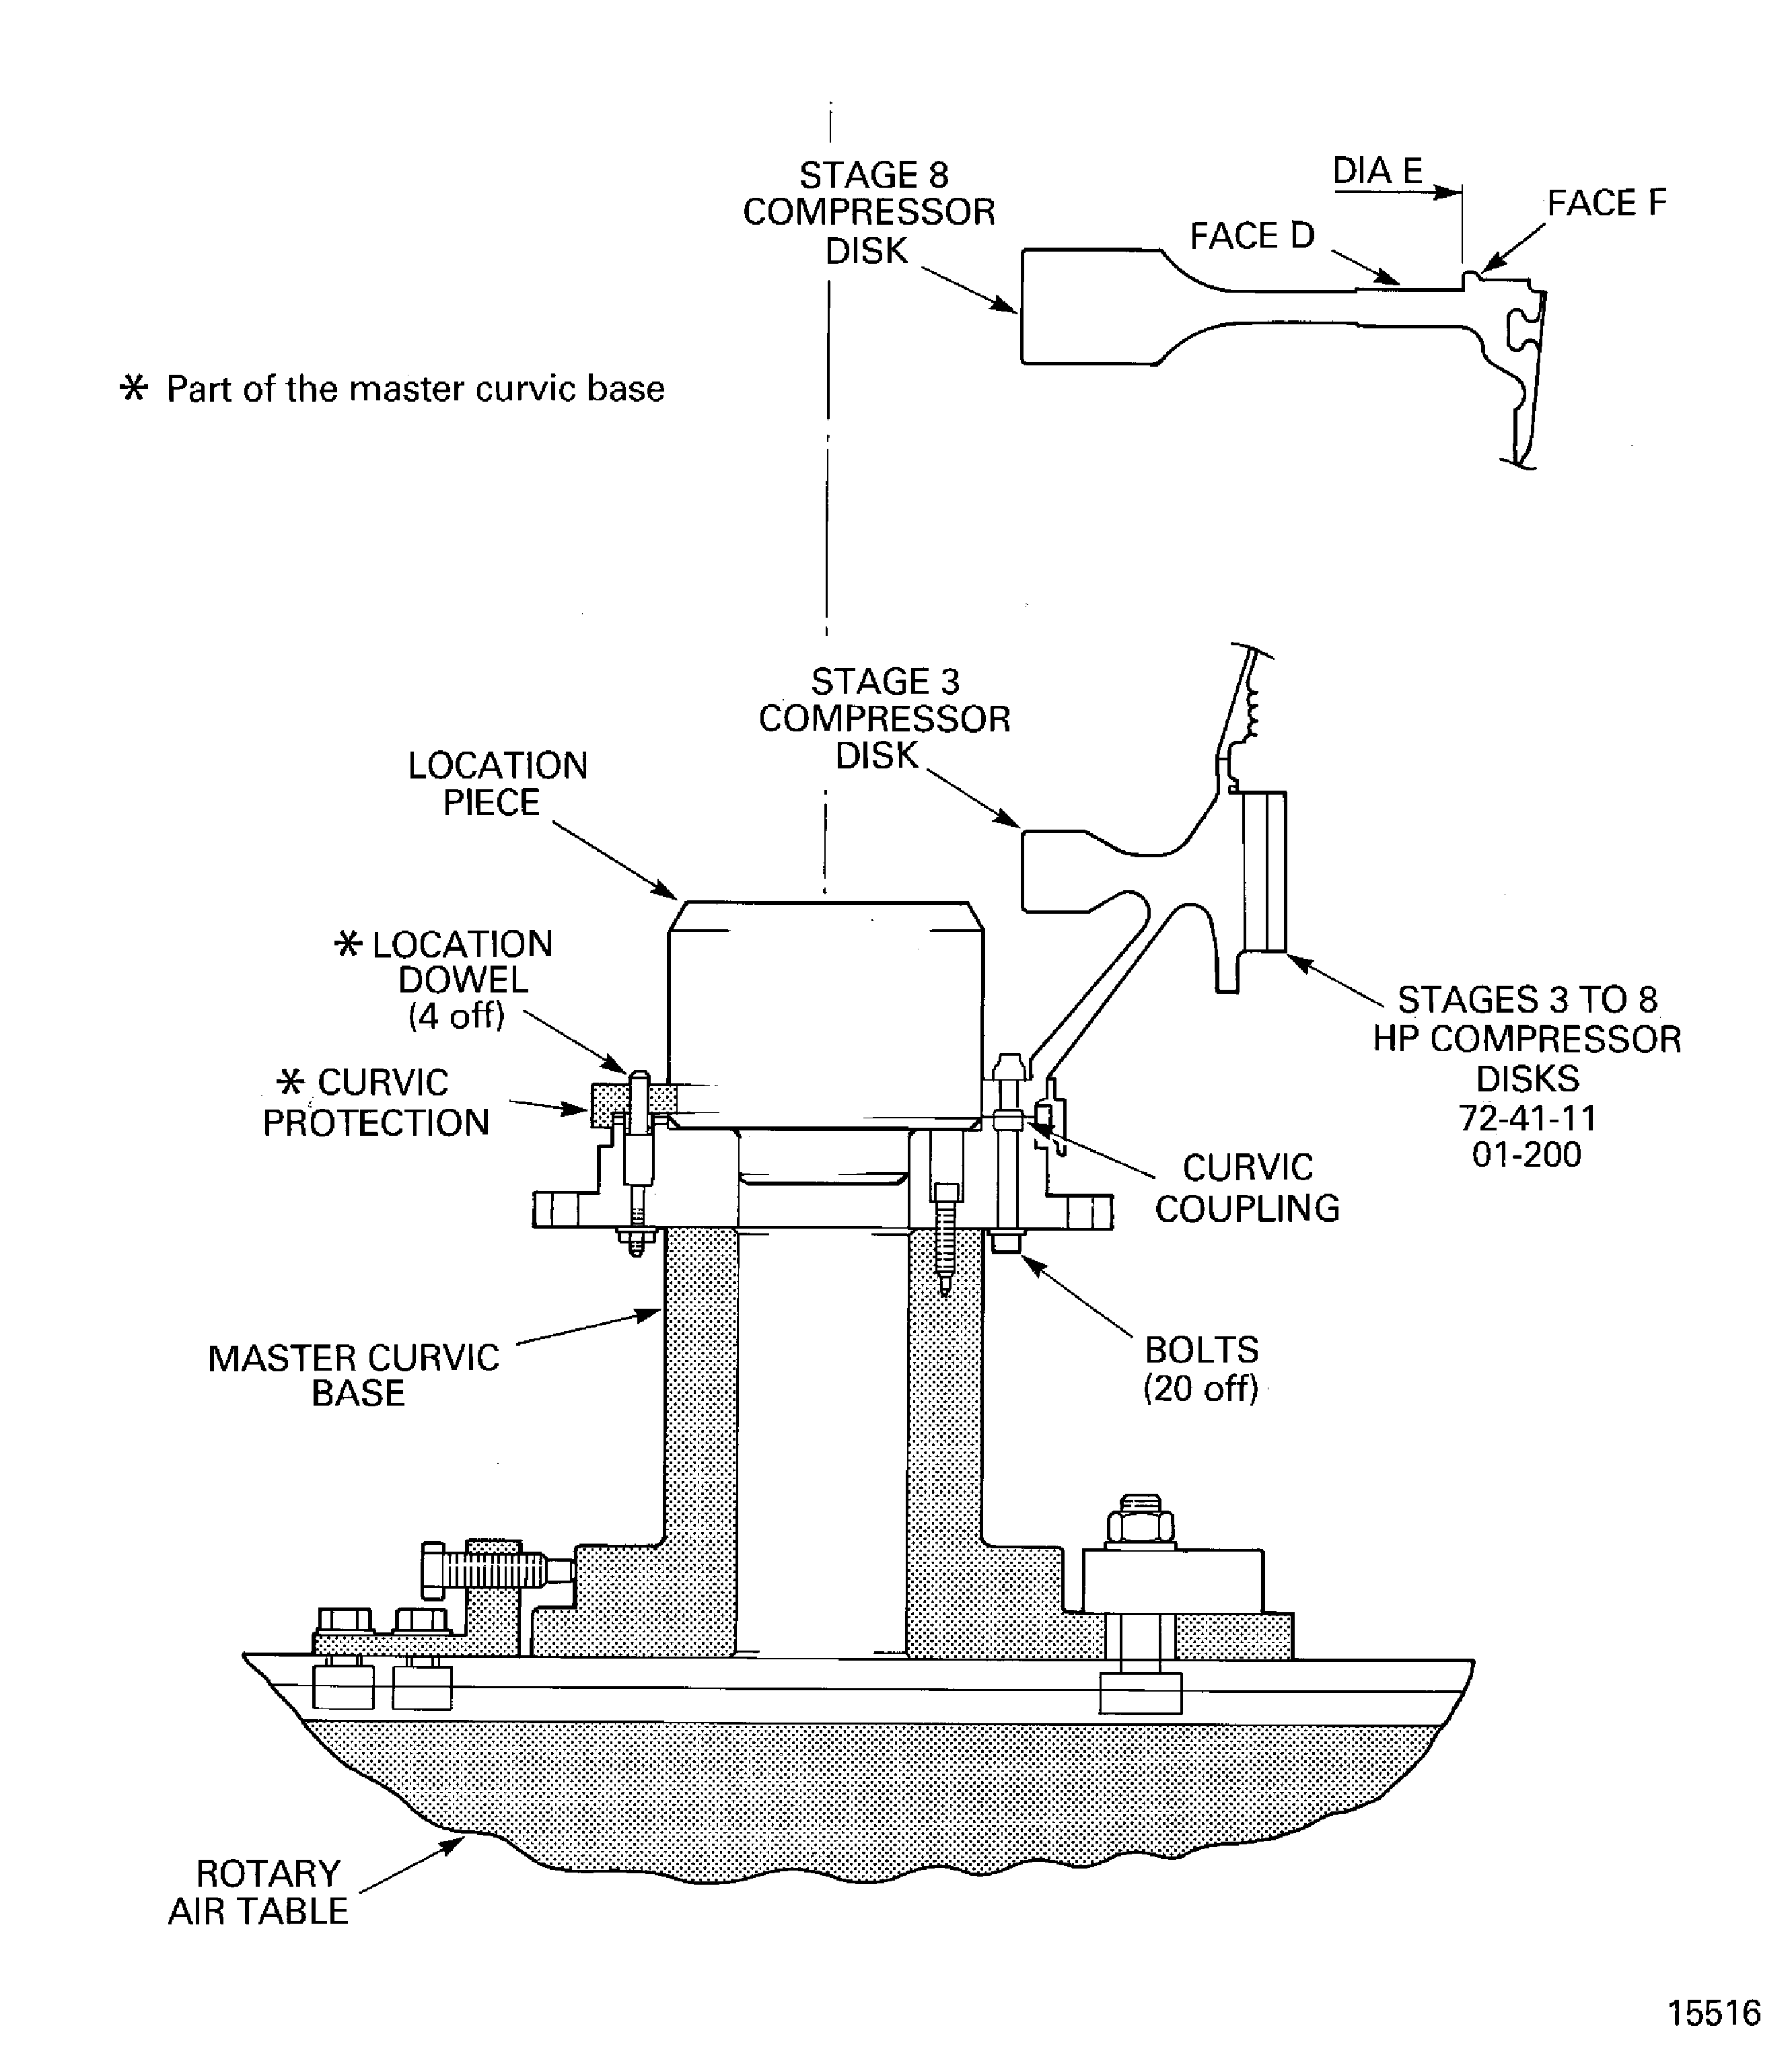
    Figure: Calculate the correct swash and run-out values

    Calculate the correct swash and run-out values
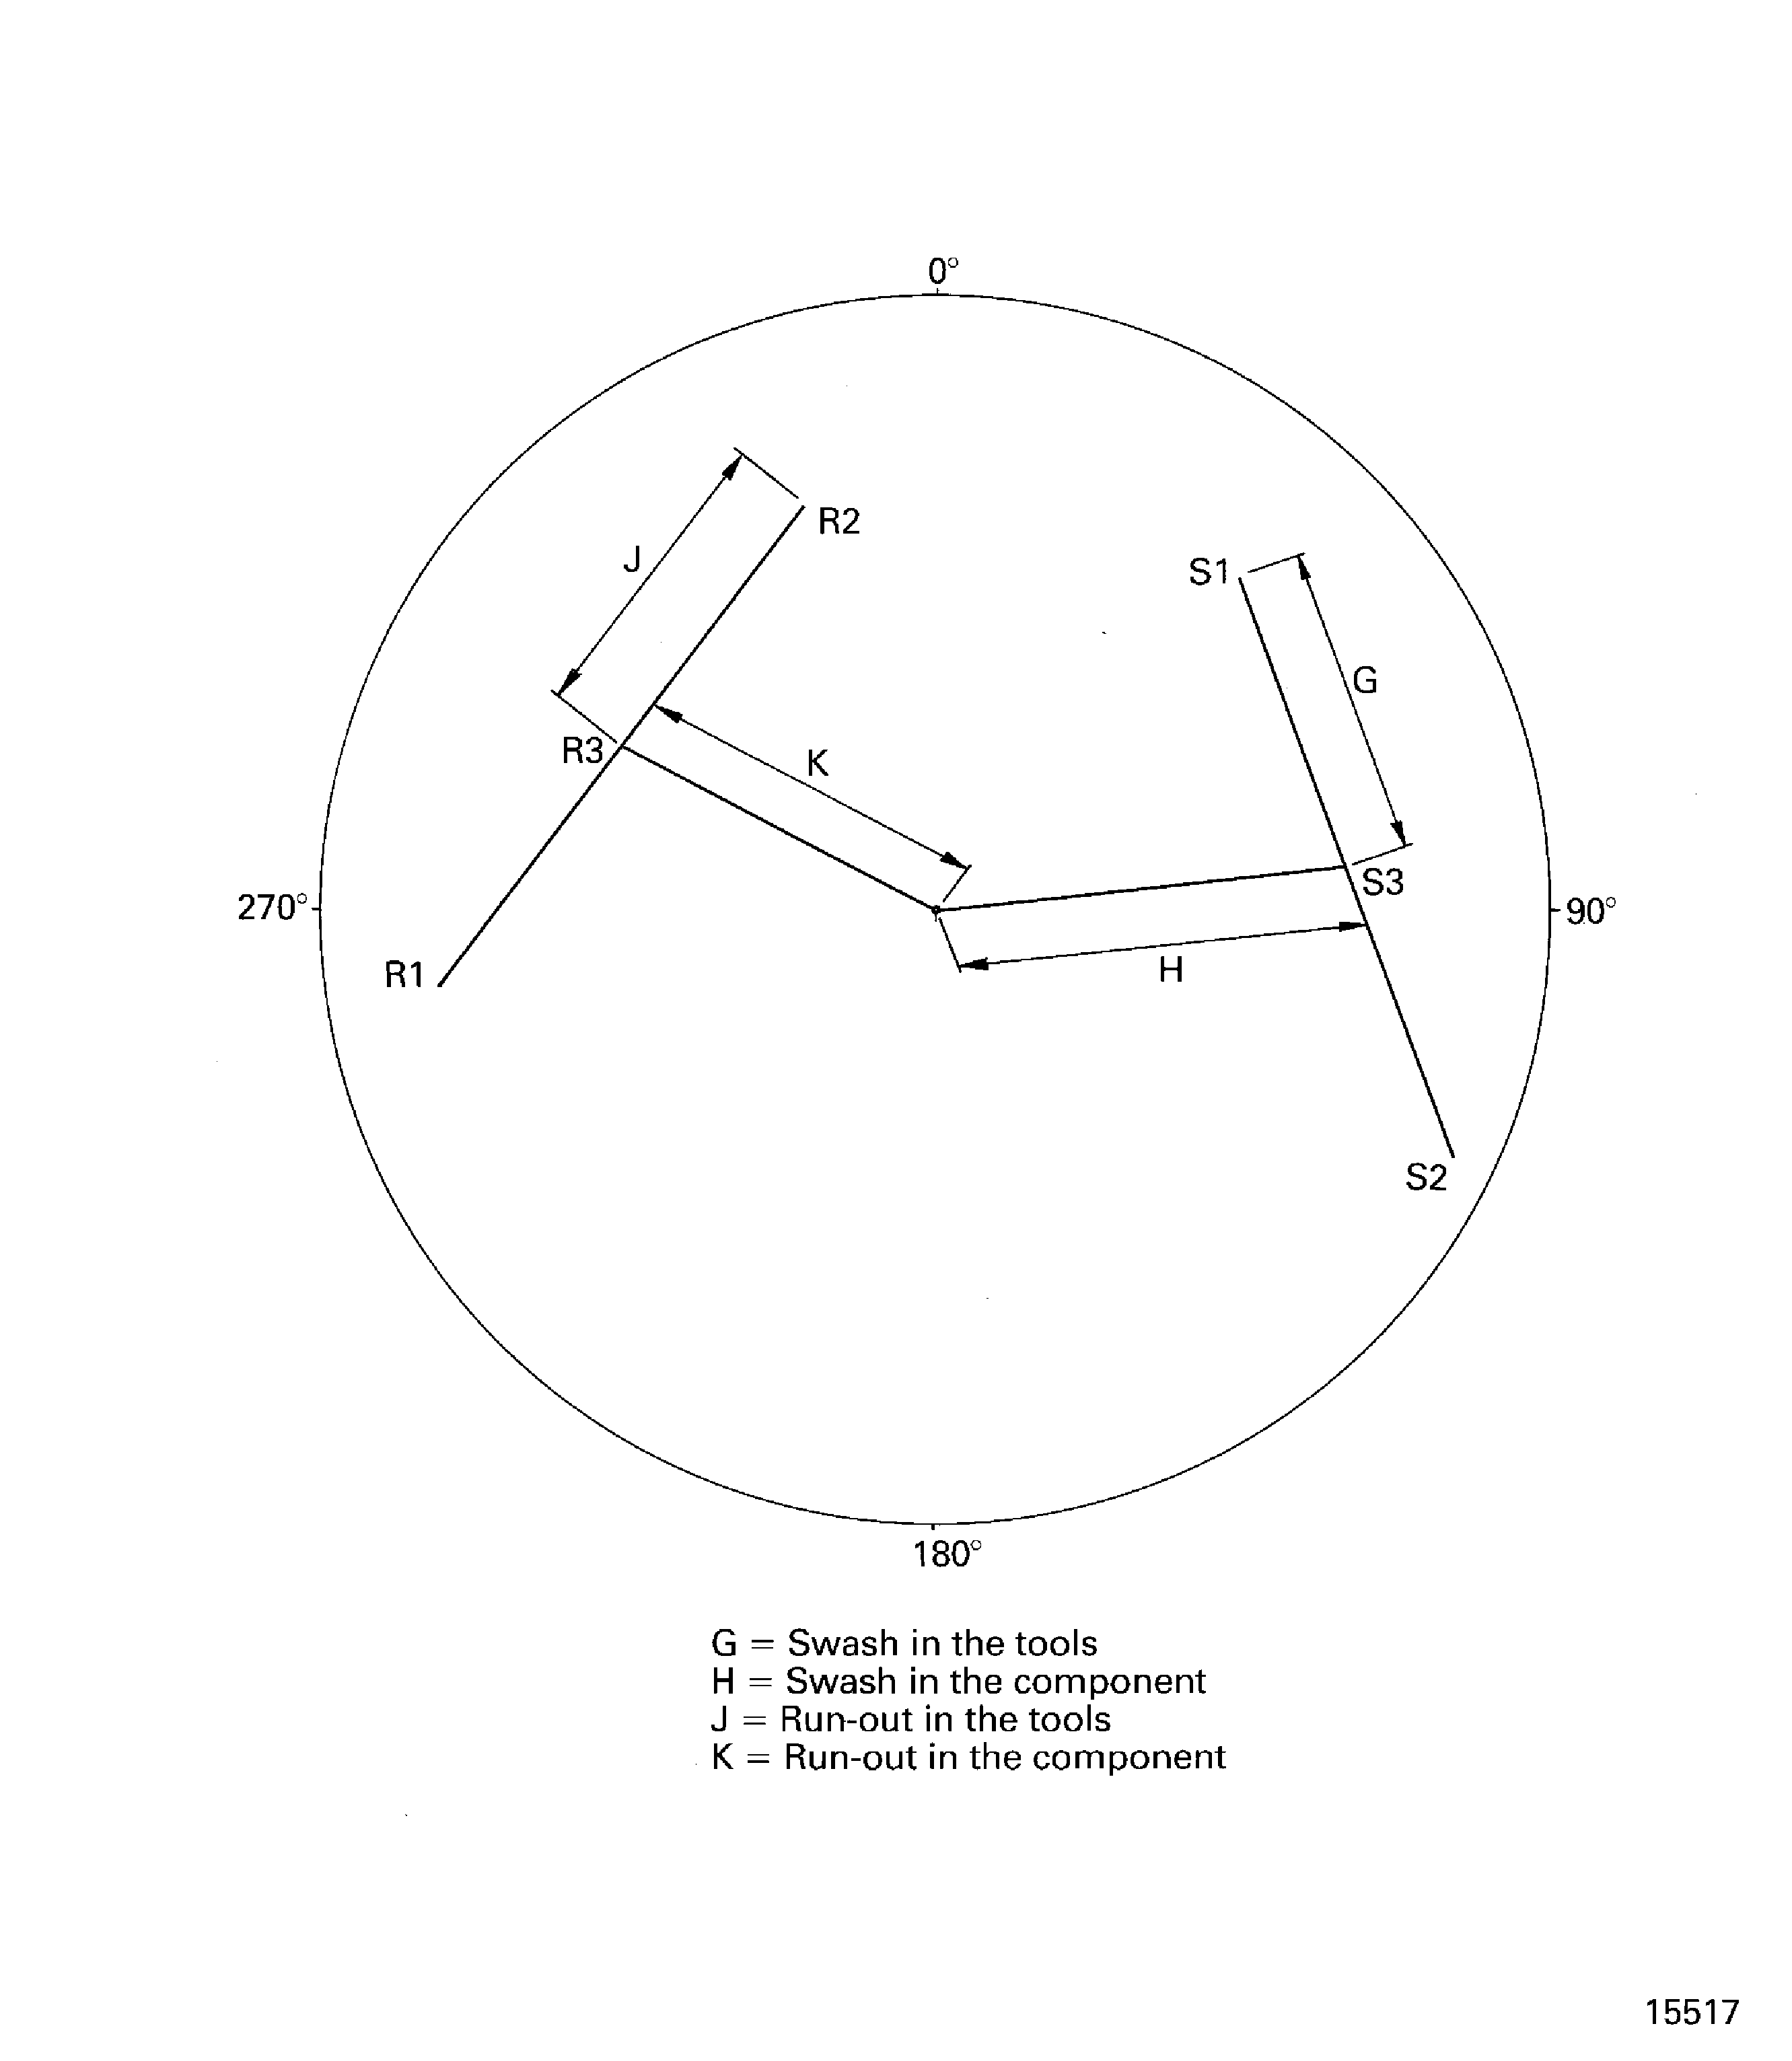
    Figure: Assemble the tools used to clean the stage 3 disk curvic coupling

    Assemble the tools used to clean the stage 3 disk curvic coupling
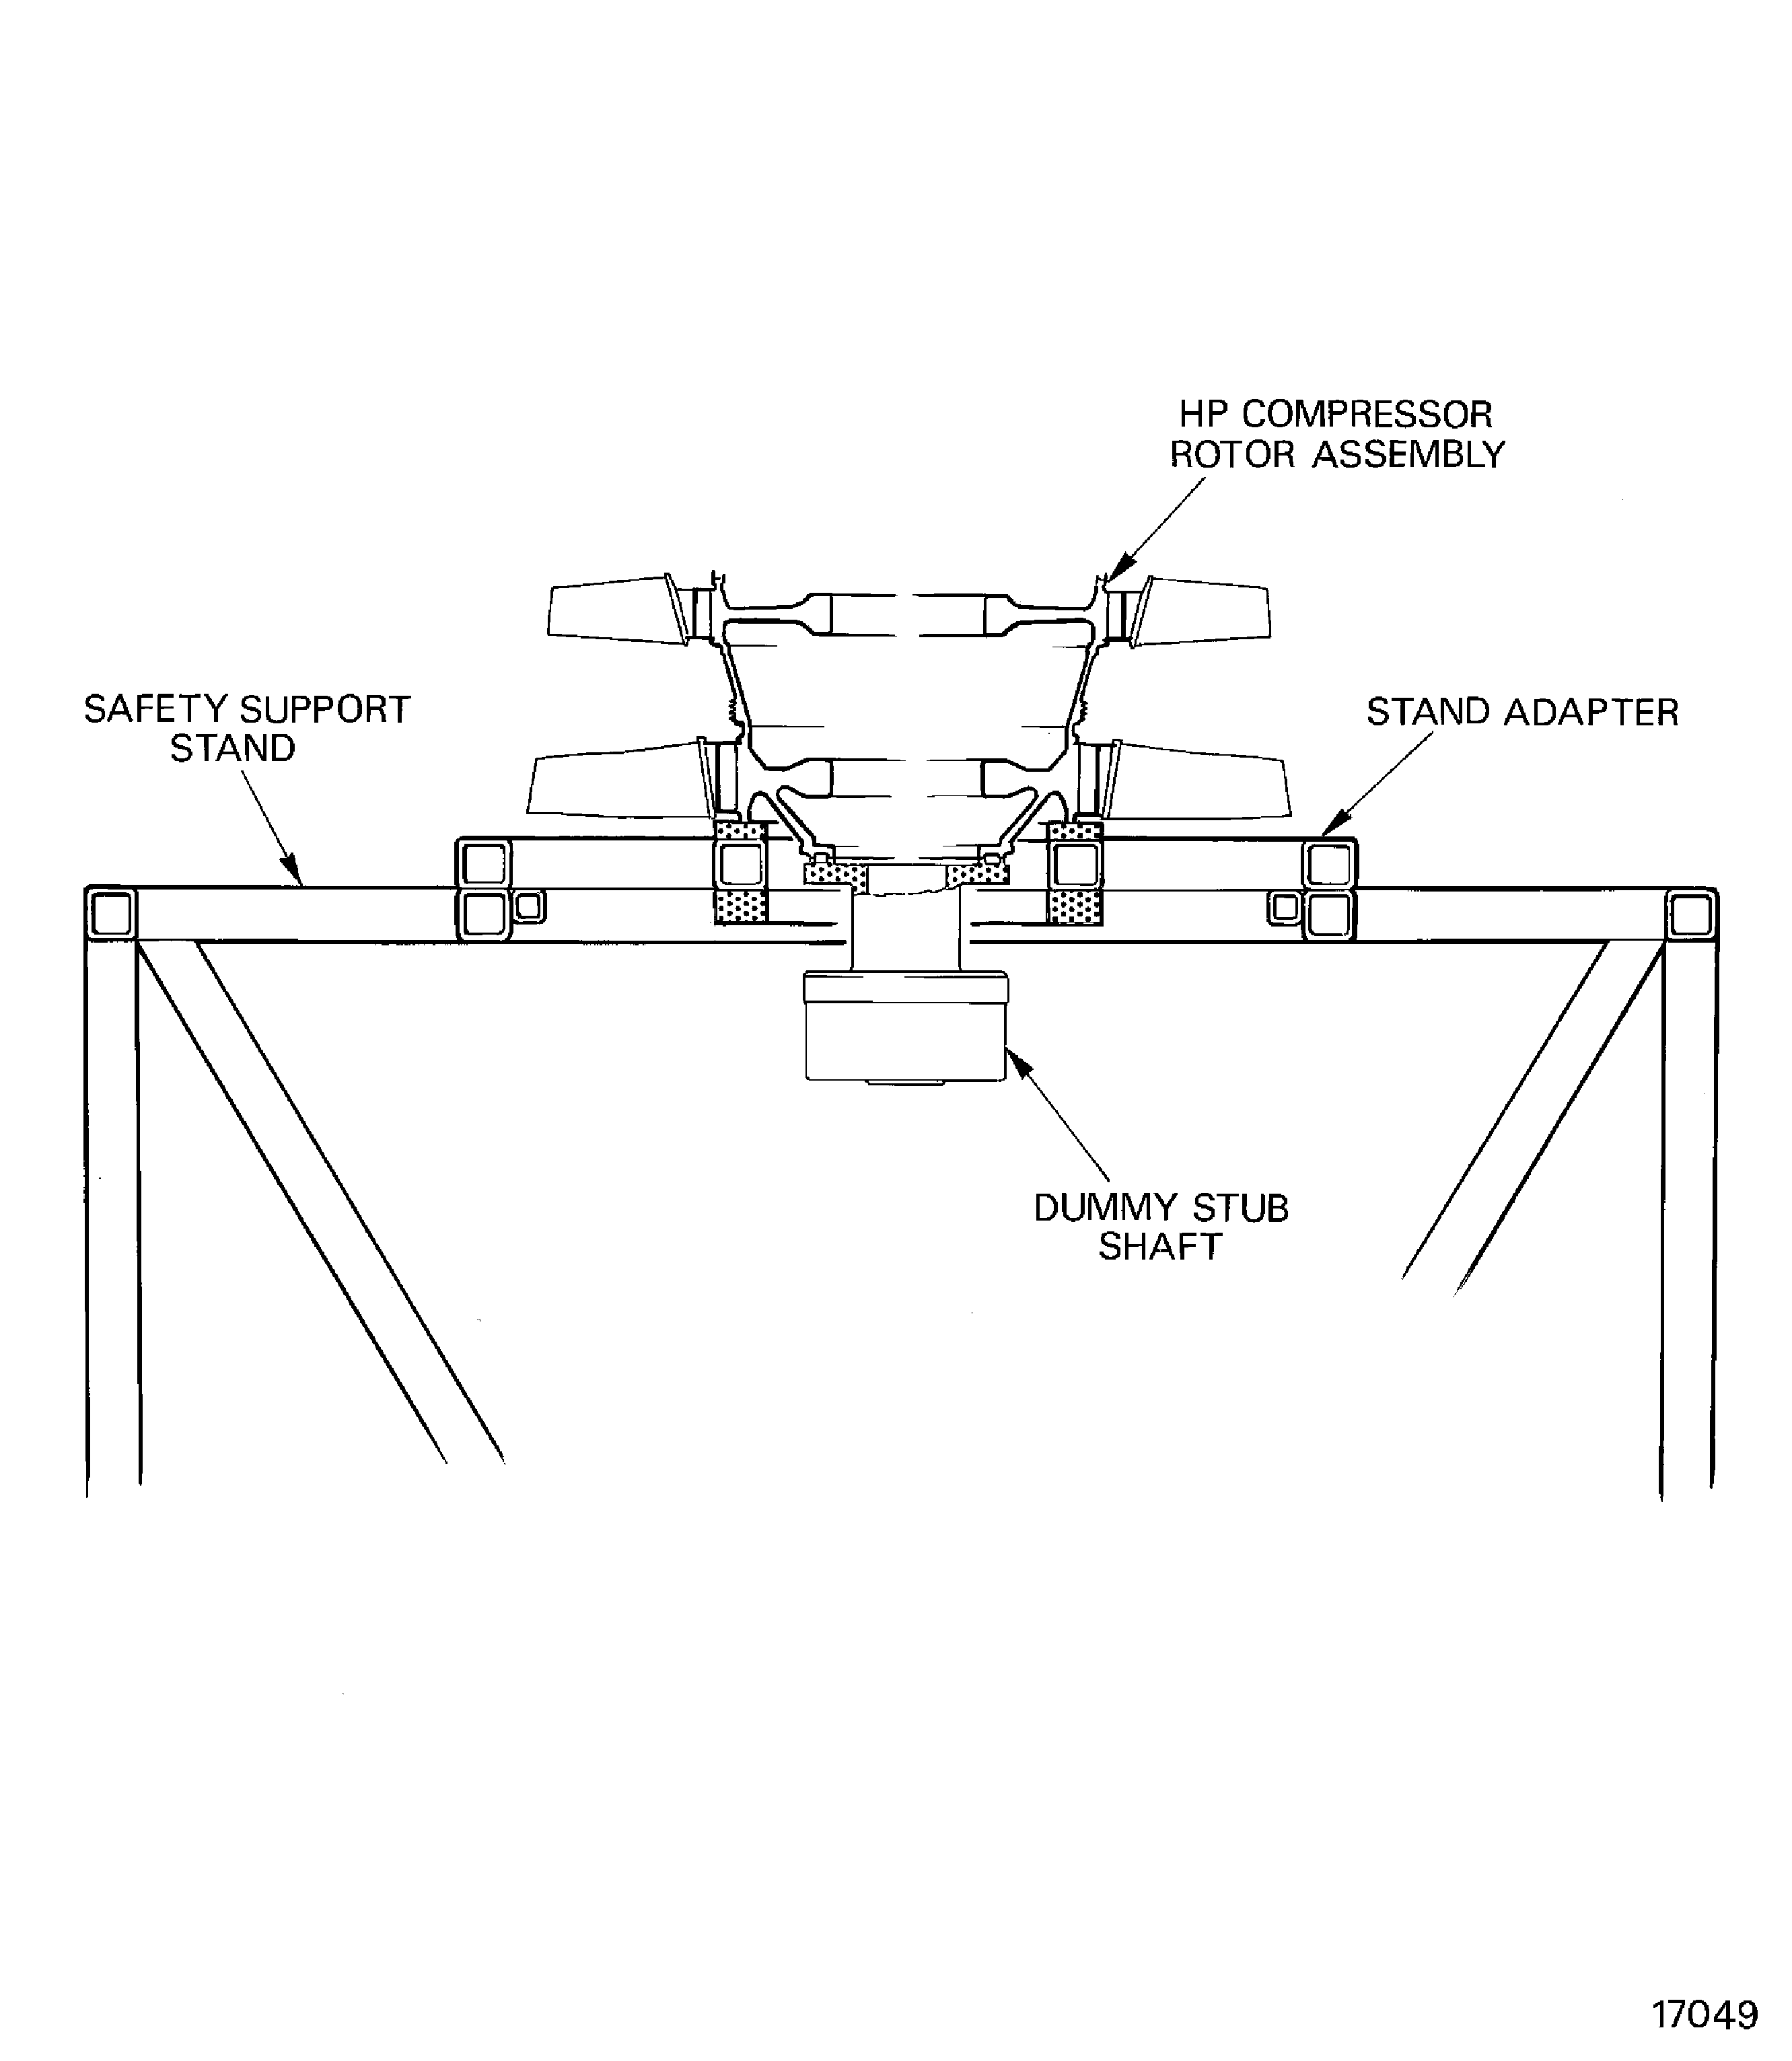
    Figure: Install the stages 3 to 8 HP compressor disks in to the support tool

    Install the stages 3 to 8 HP compressor disks in to the support tool
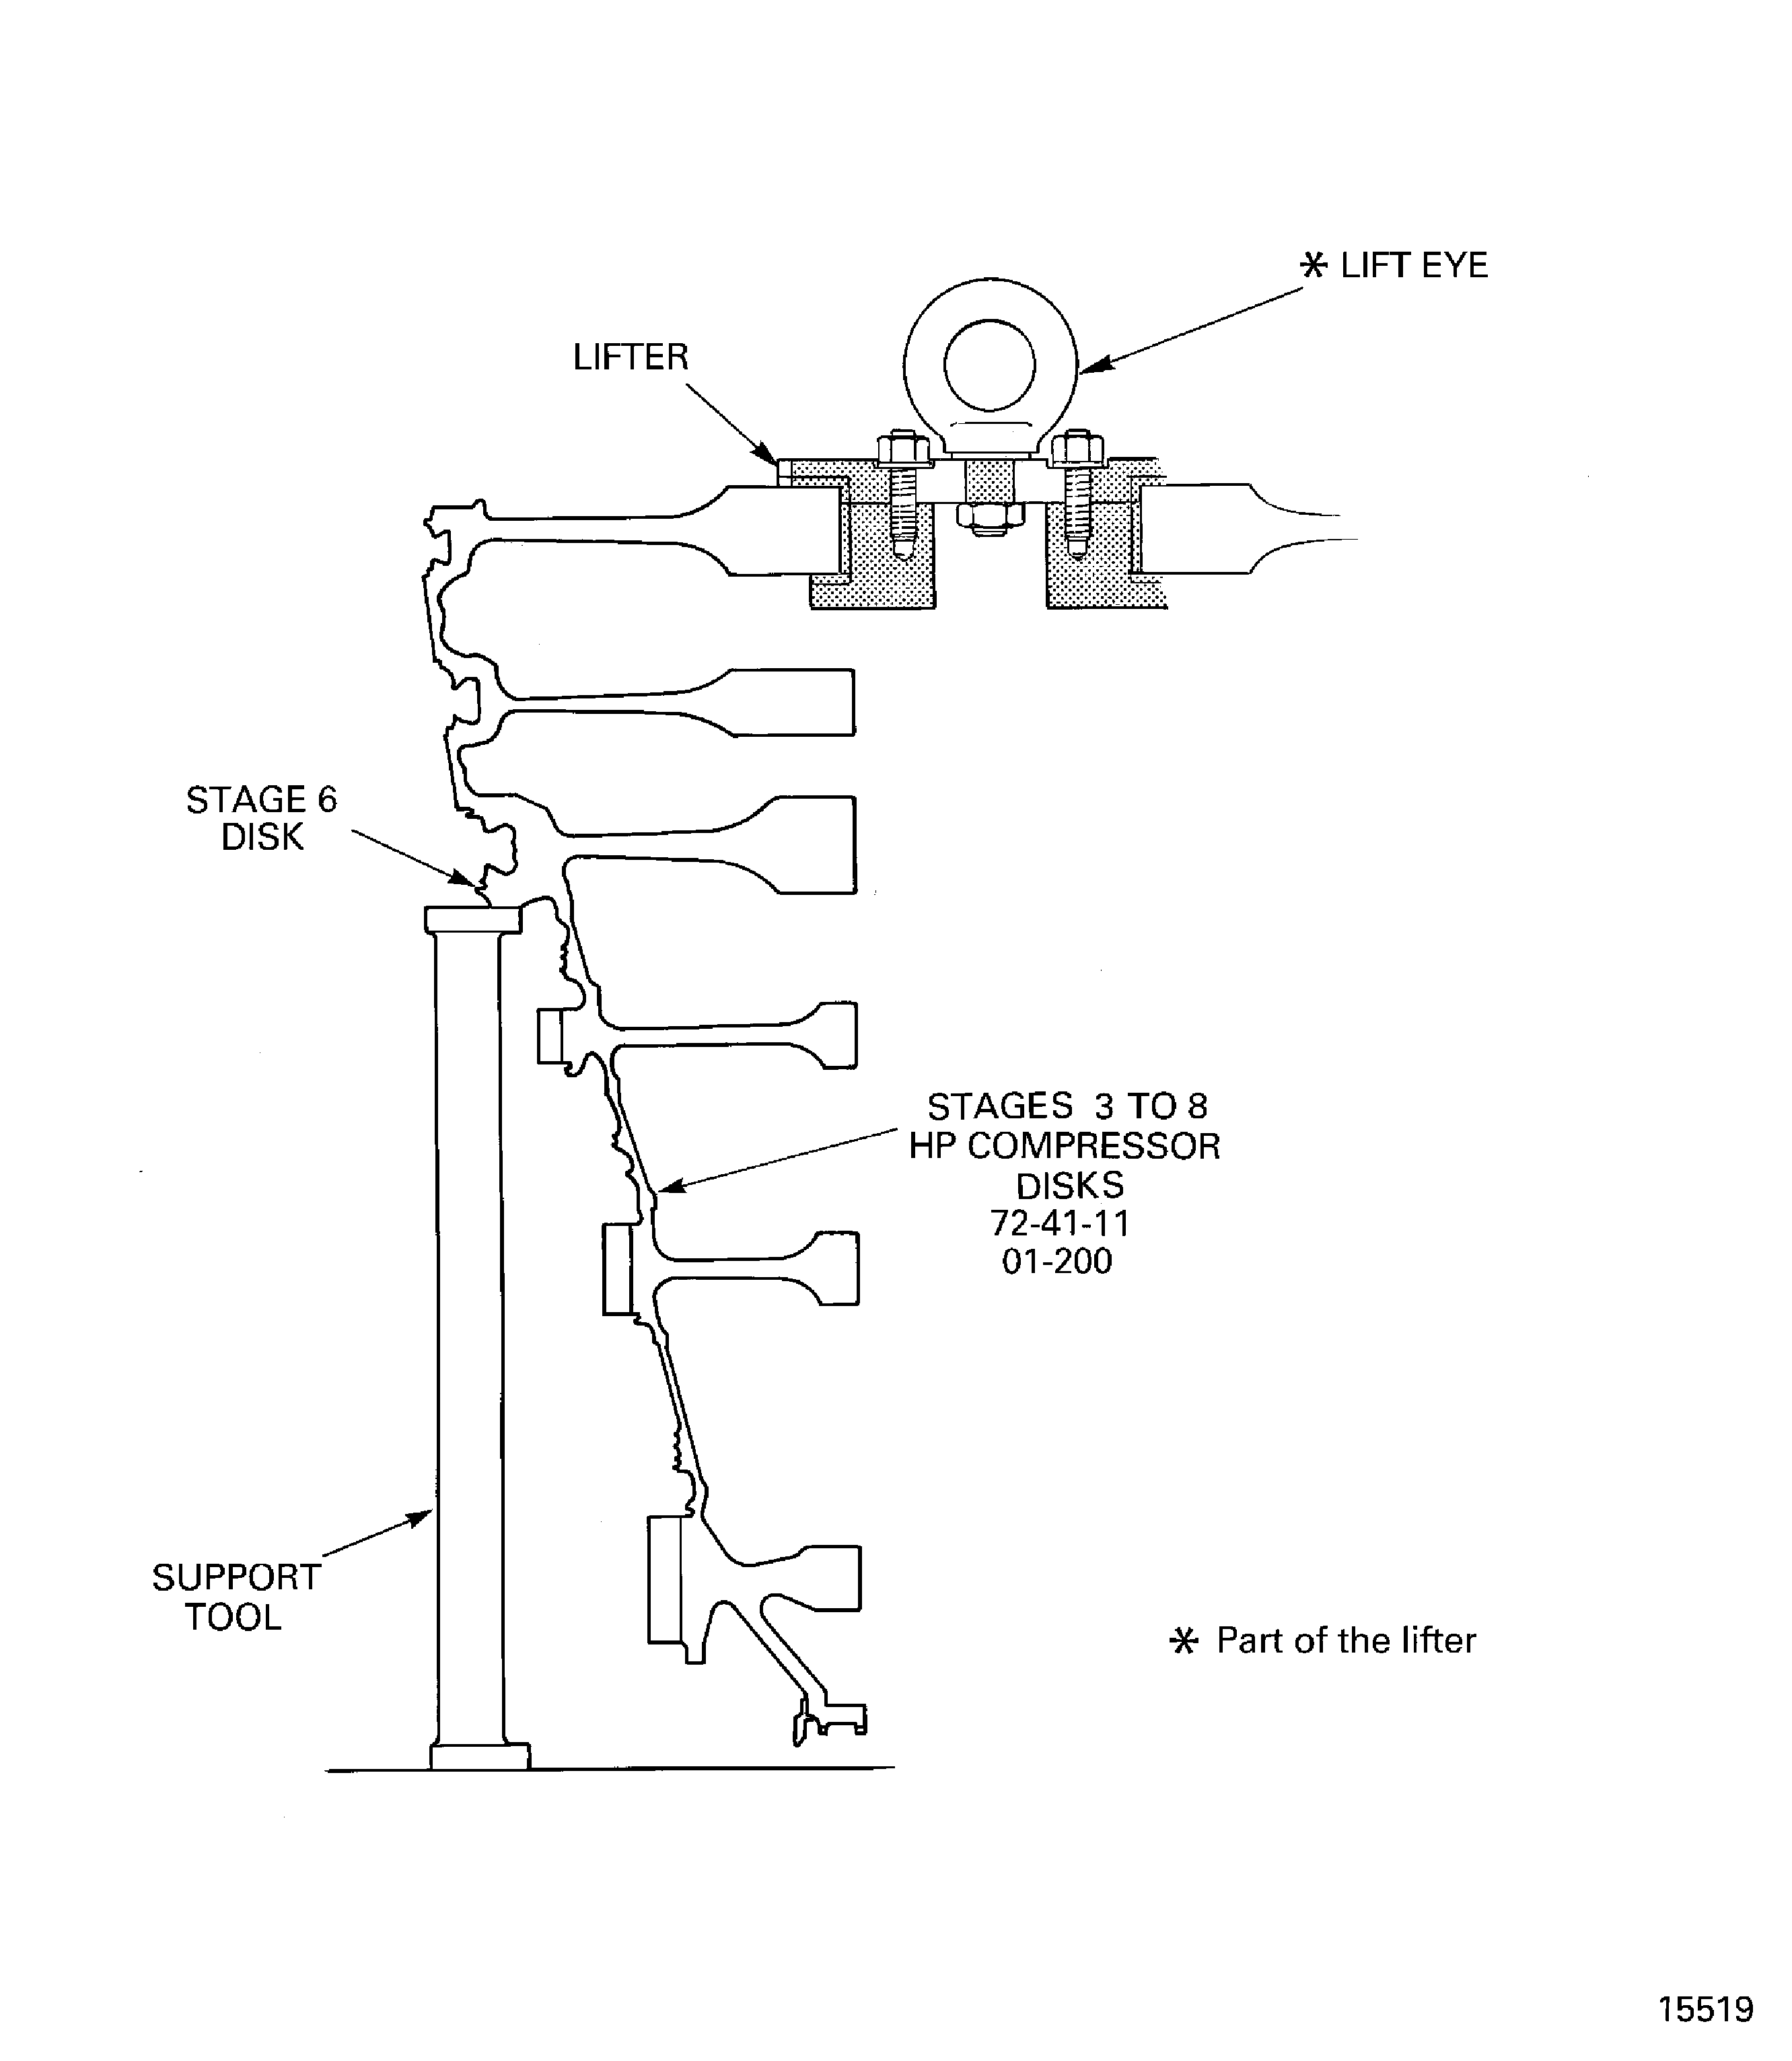
    Figure: Measure the swash and run-out of the stages 9 to 12 HP compressor disks

    Measure the swash and run-out of the stages 9 to 12 HP compressor disks
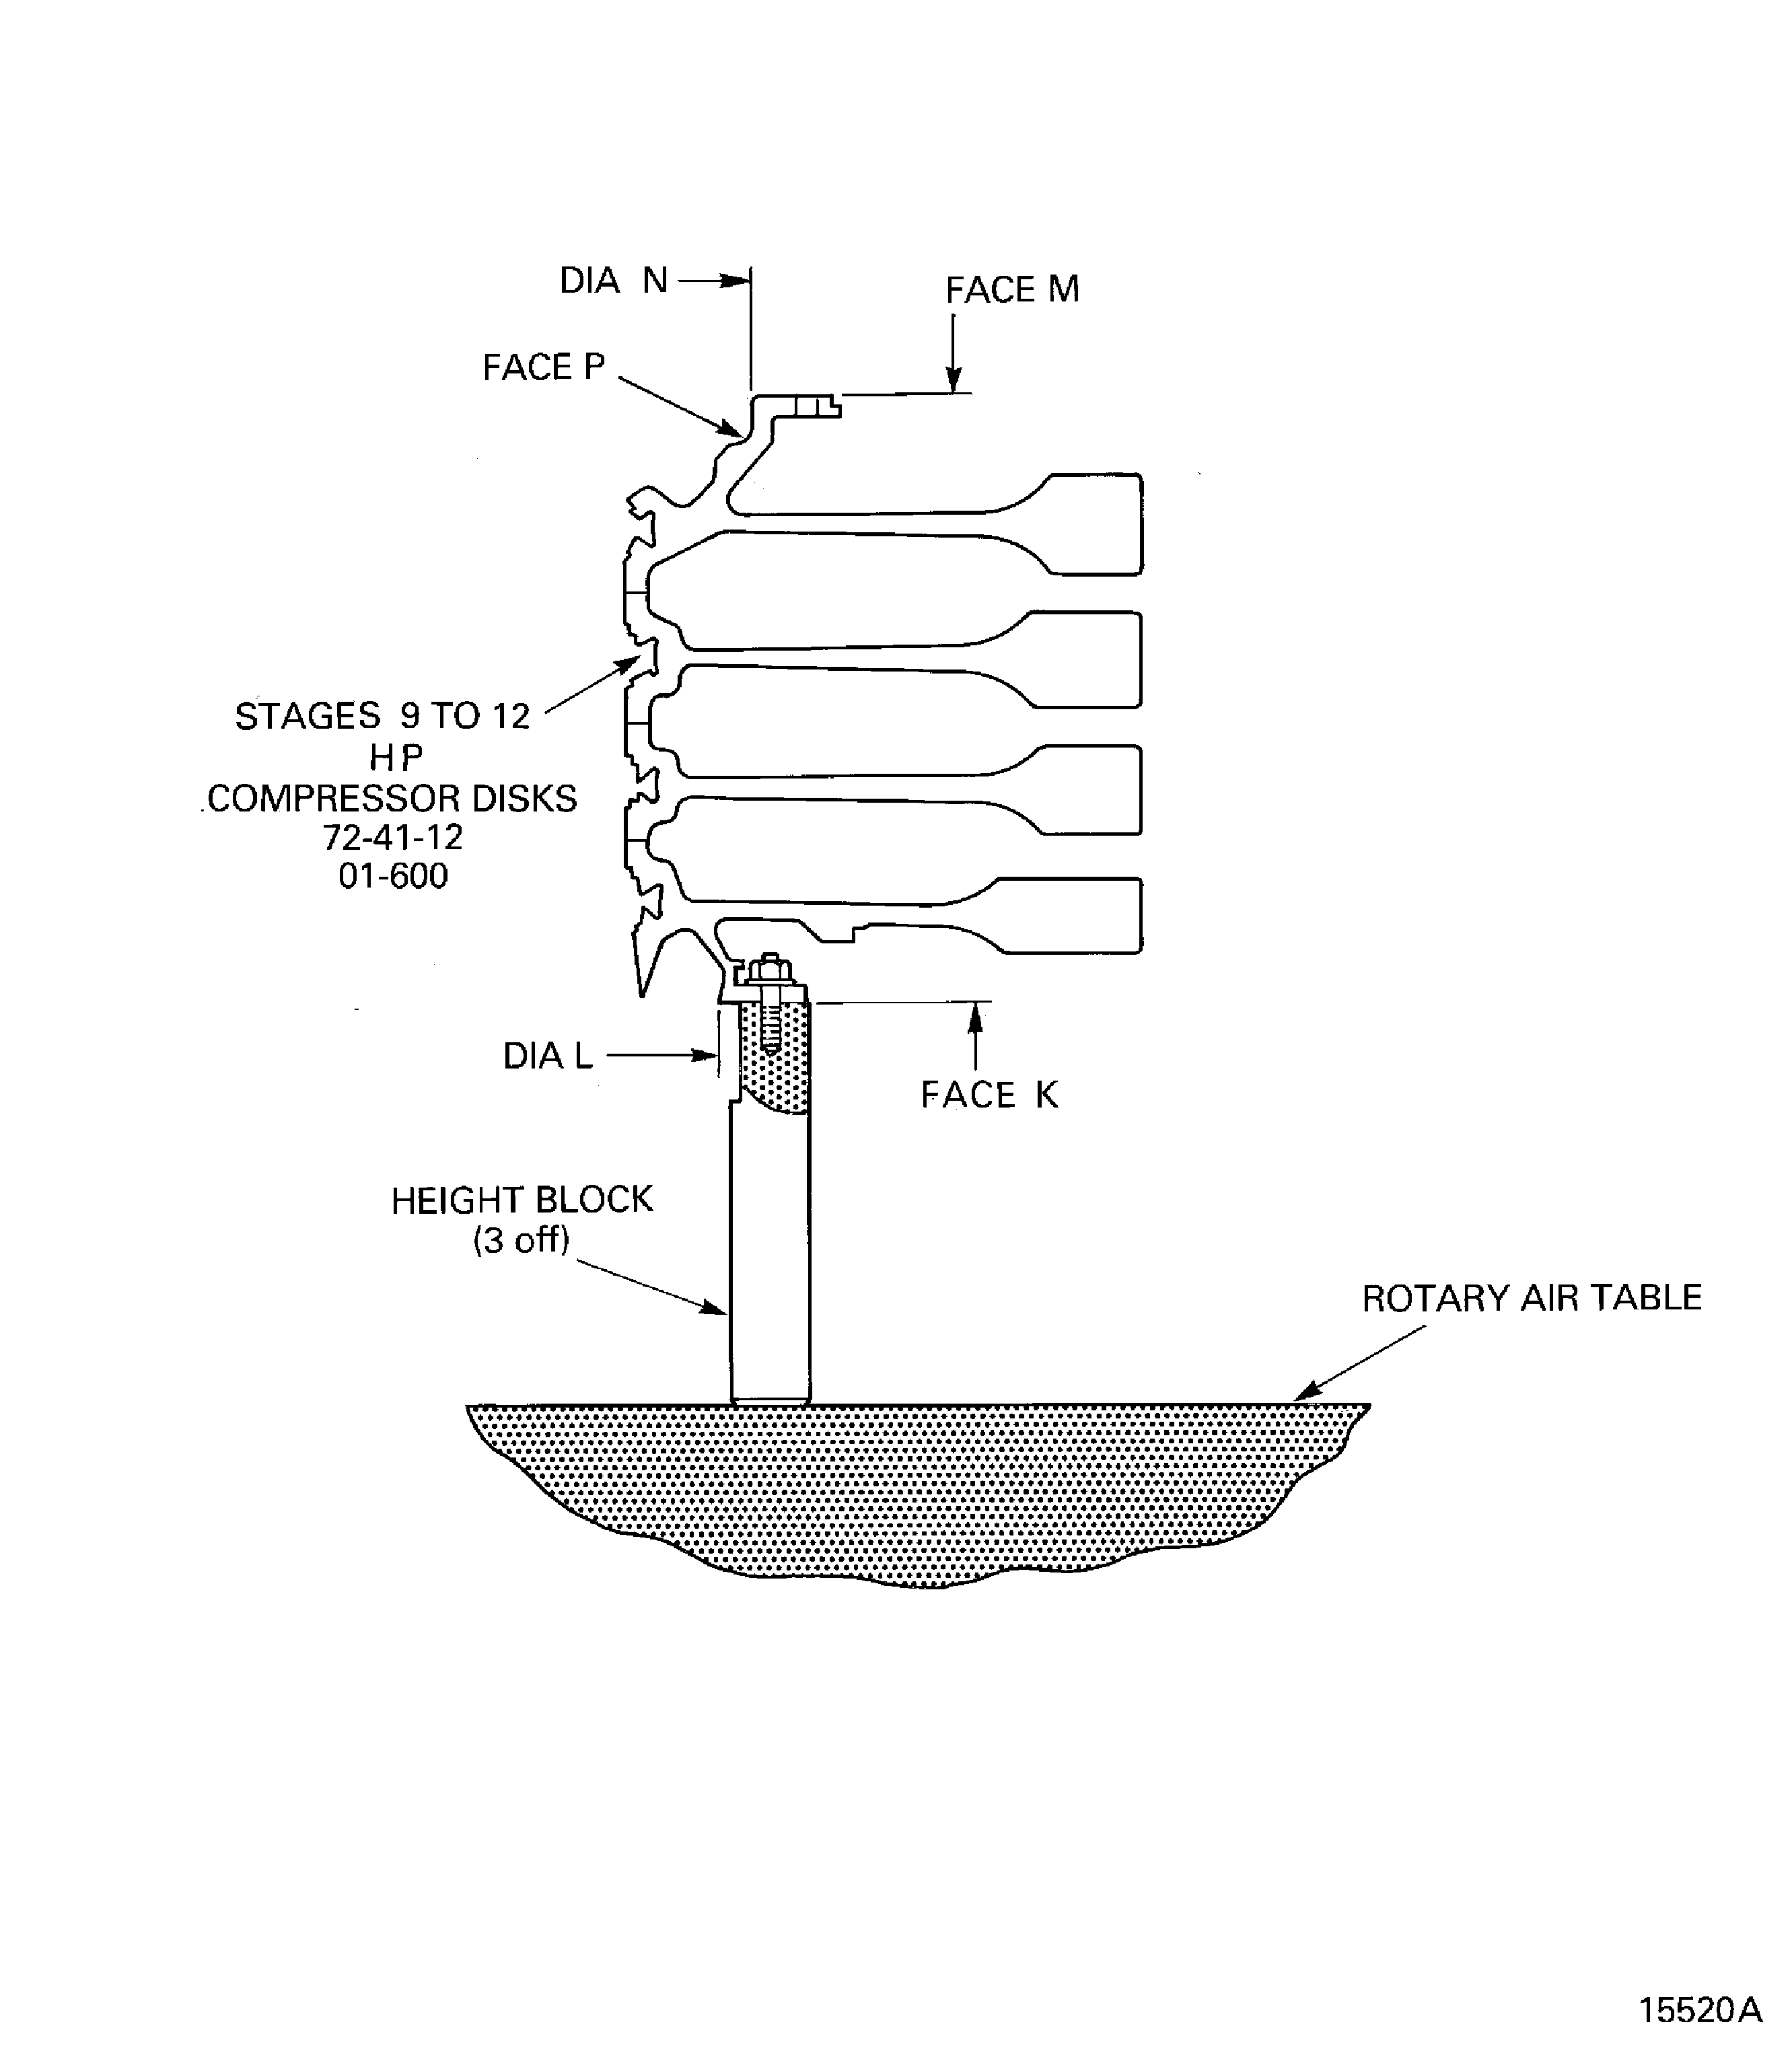
    Figure: Install the lifting fixture on to the stages 9 to 12 HP compressor disks

    Install the lifting fixture on to the stages 9 to 12 HP compressor disks
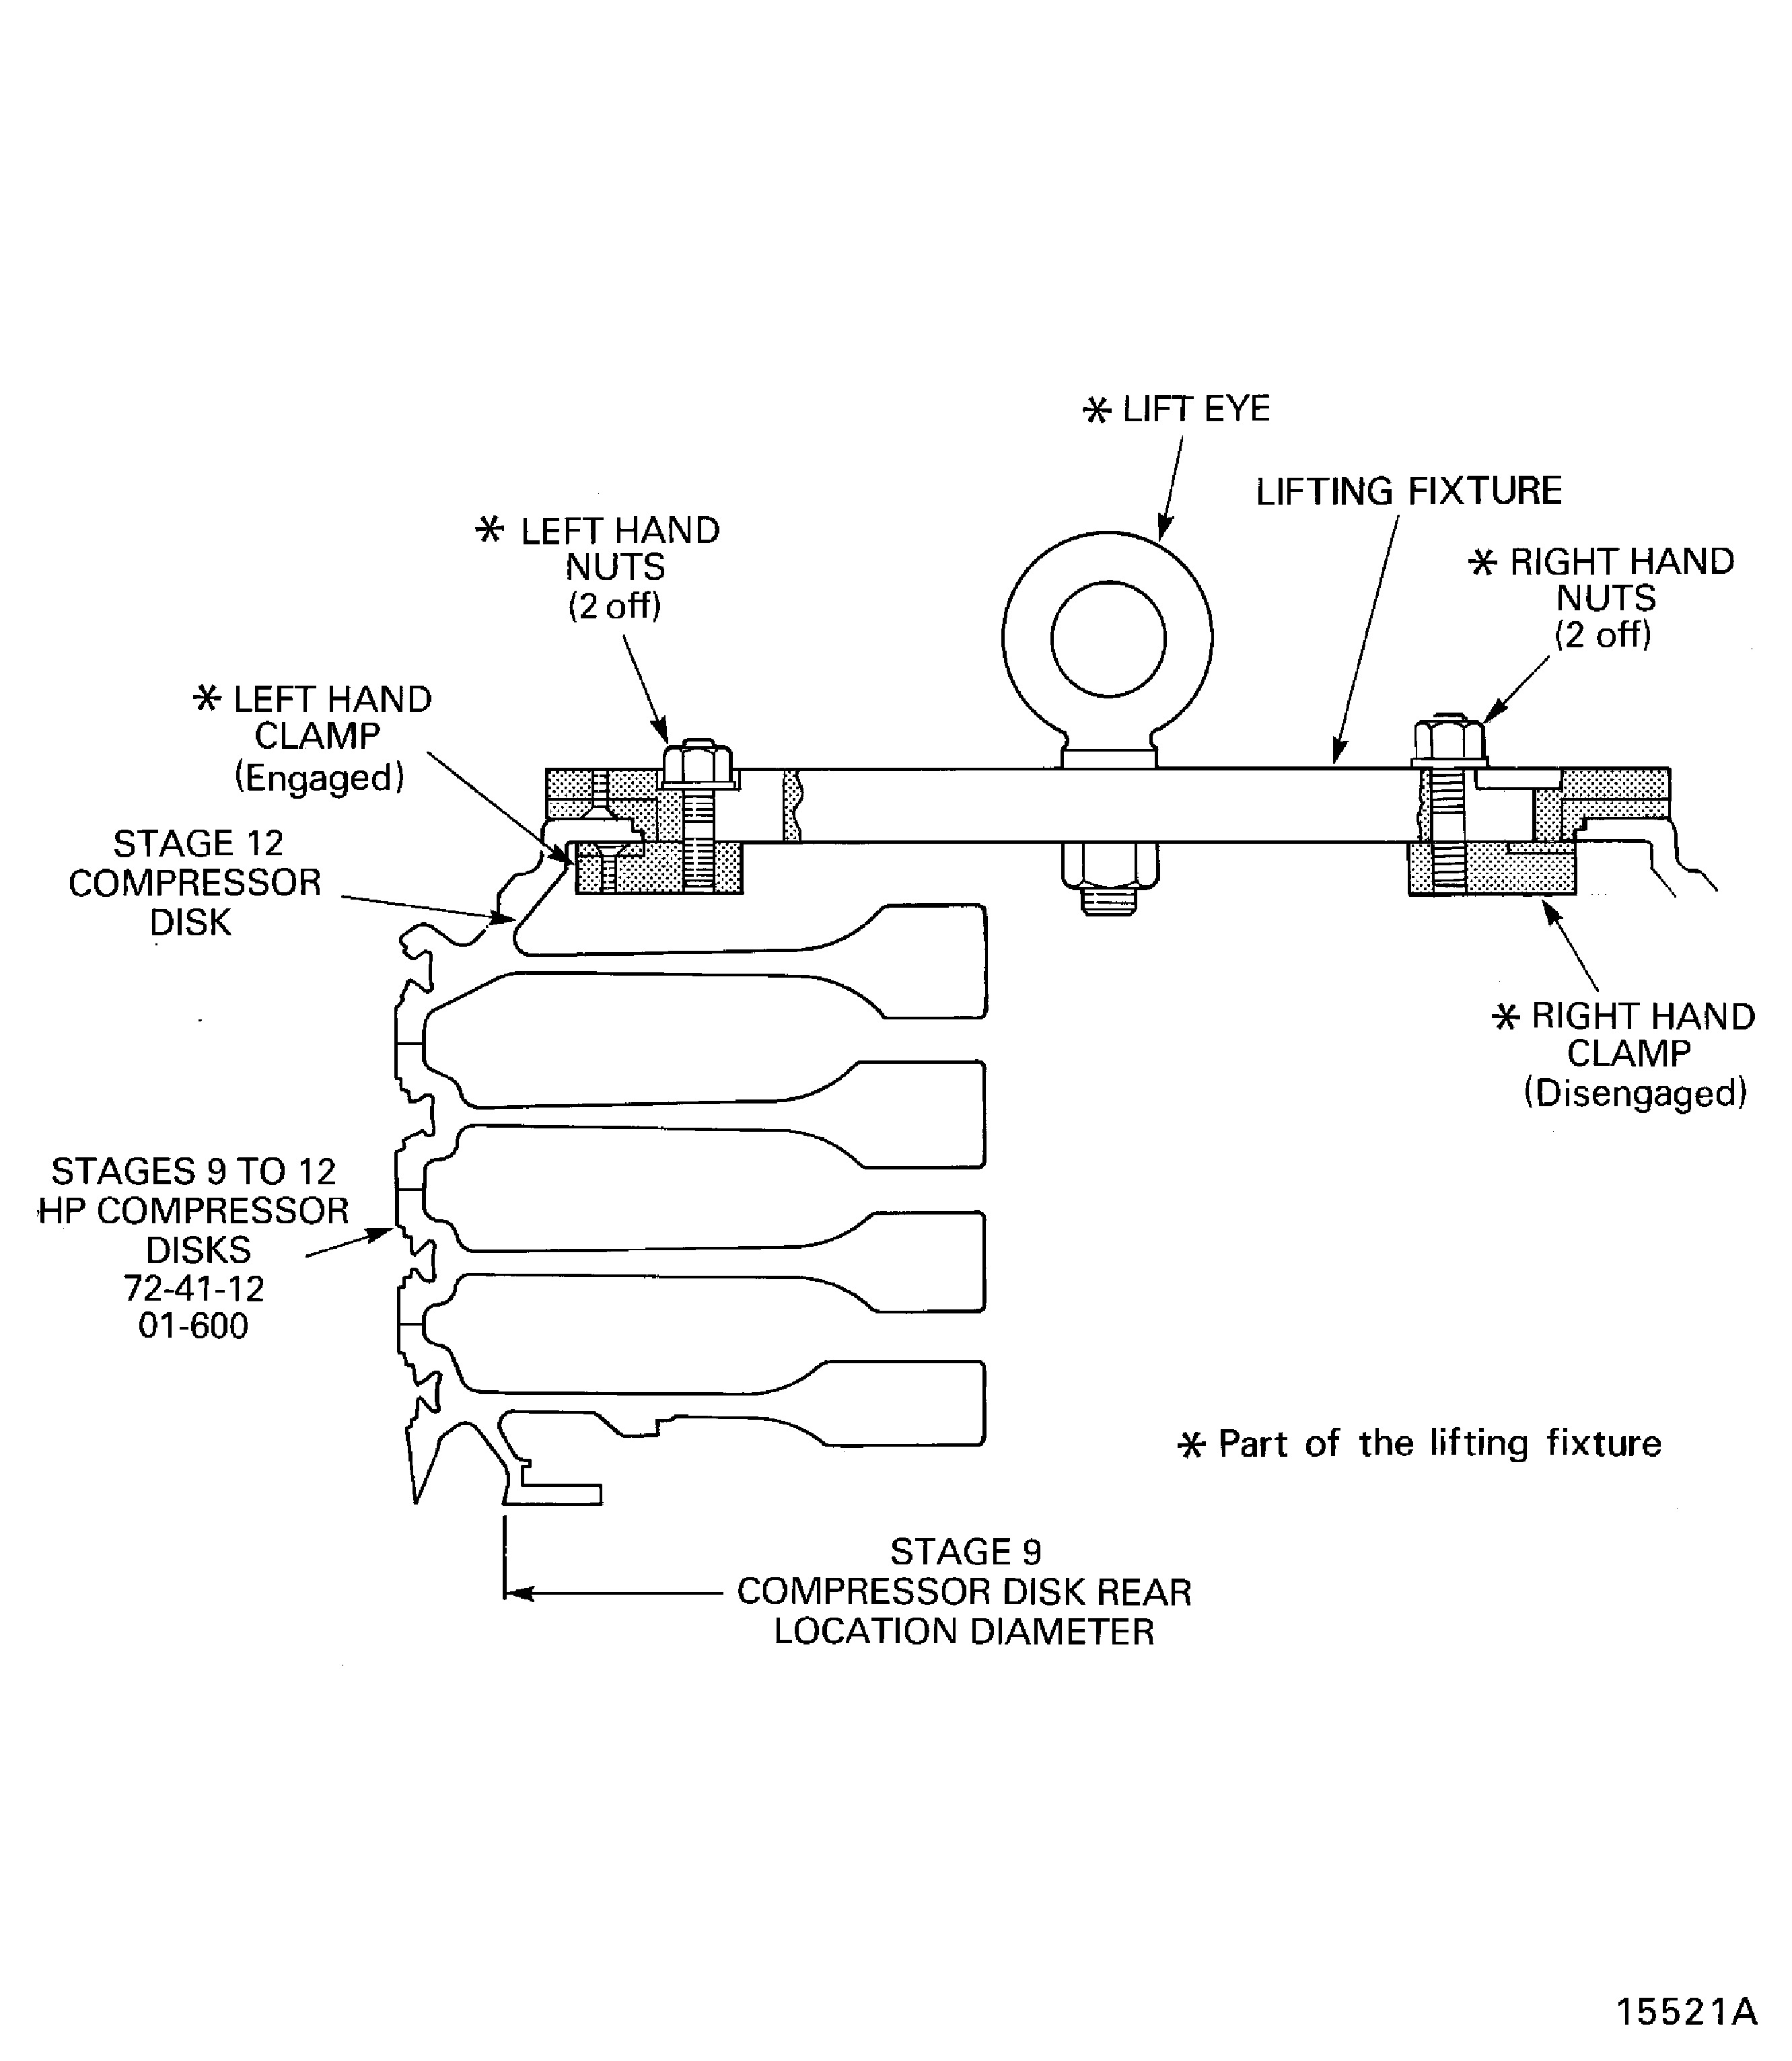
    Figure: Install the stages 9 to 12 HP compressor disks in to the turnover stand

    Install the stages 9 to 12 HP compressor disks in to the turnover stand
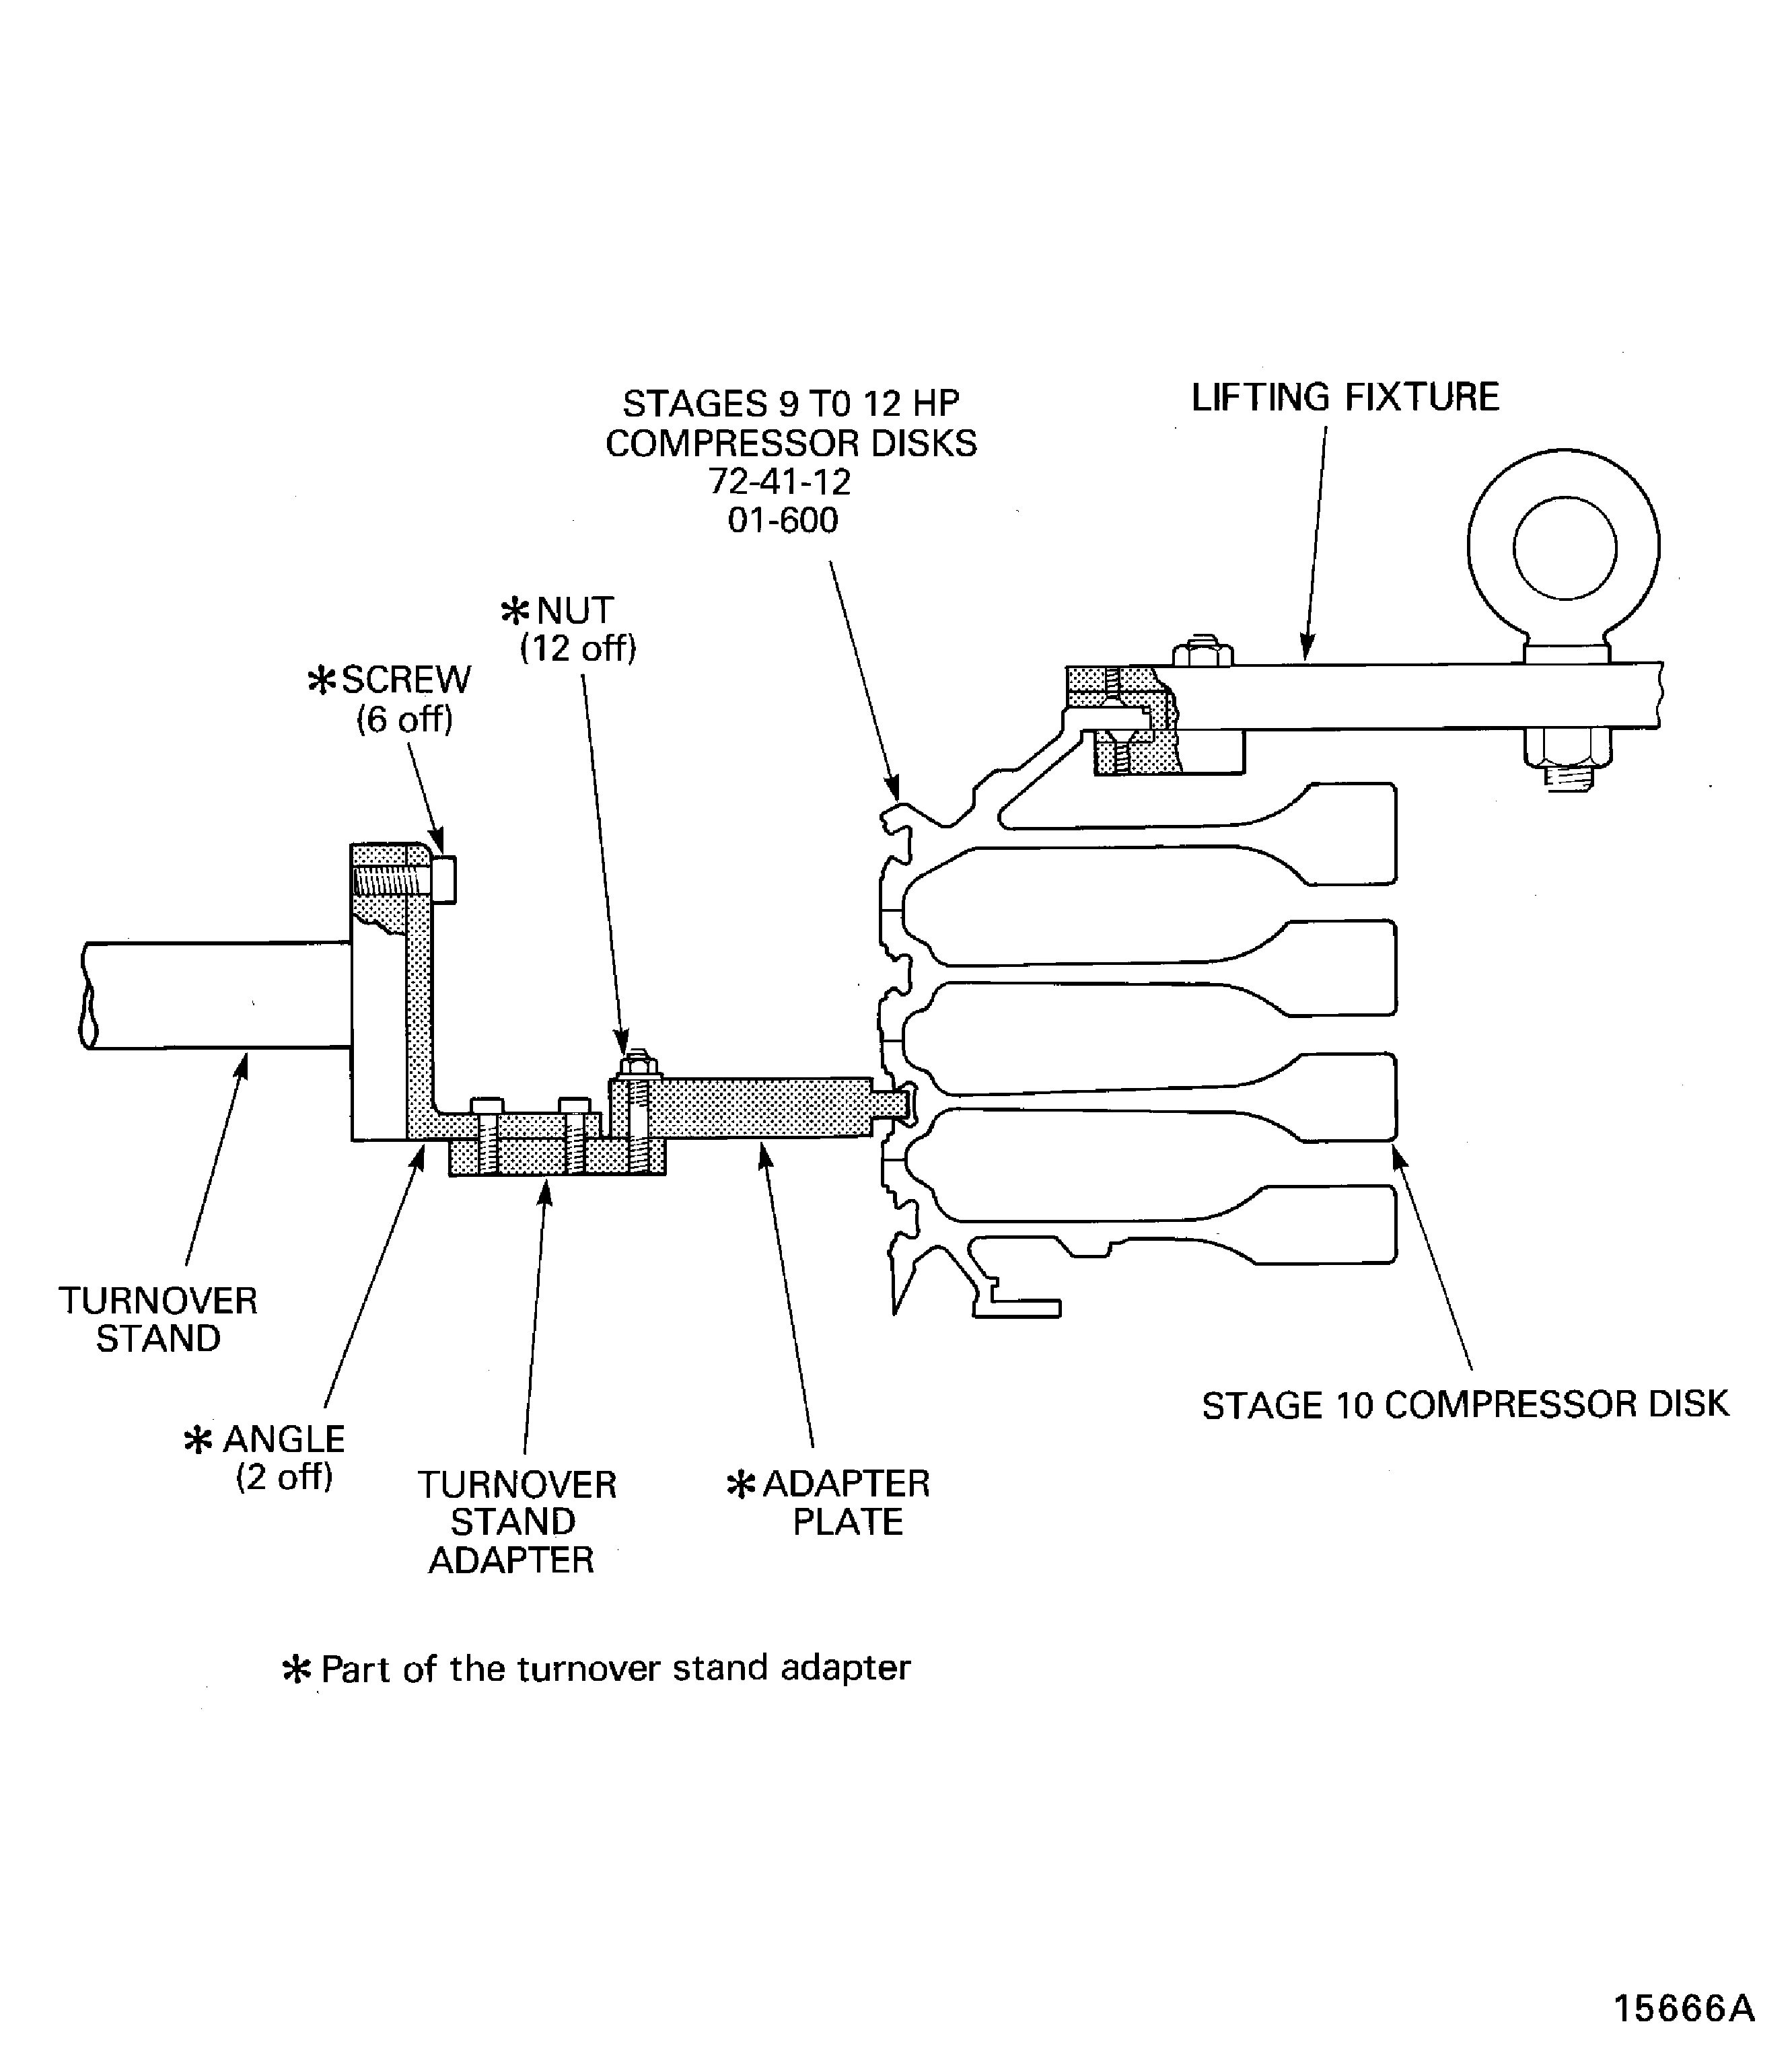
    Figure: Measure the vortex reducer ring

    Measure the vortex reducer ring
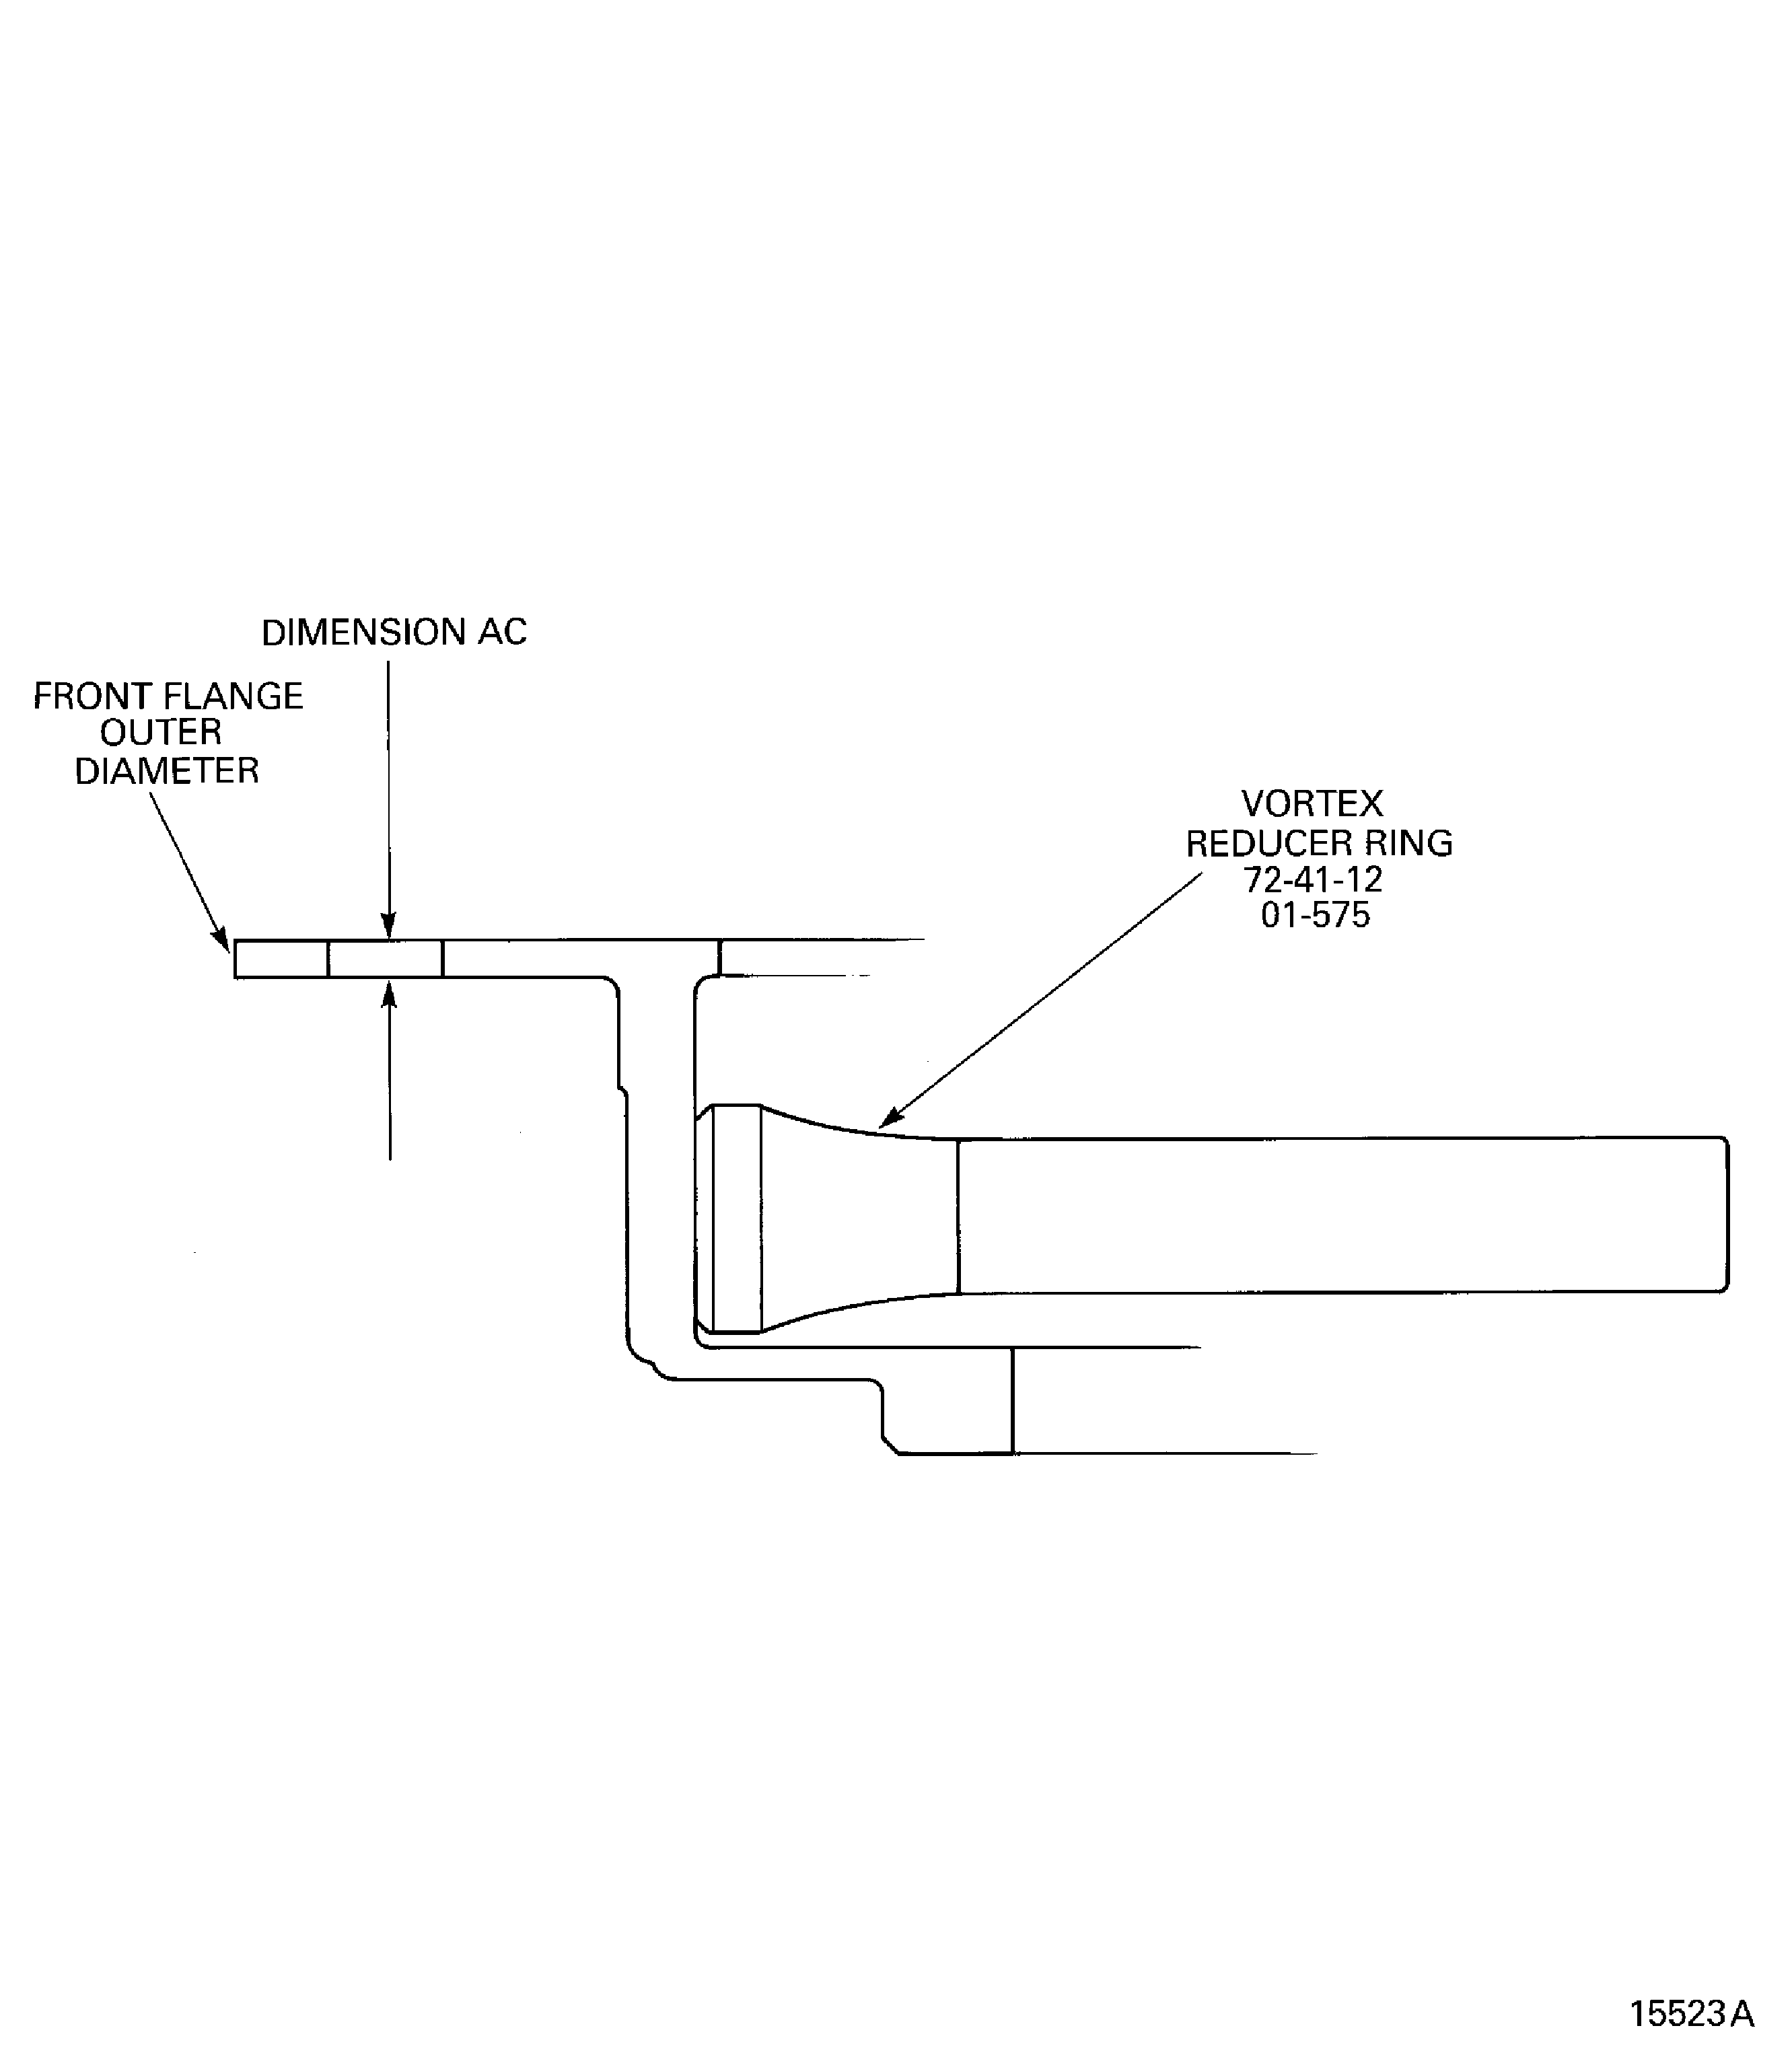
    Figure: Measure the swash and run-out of the HP compressor shaft

    Measure the swash and run-out of the HP compressor shaft
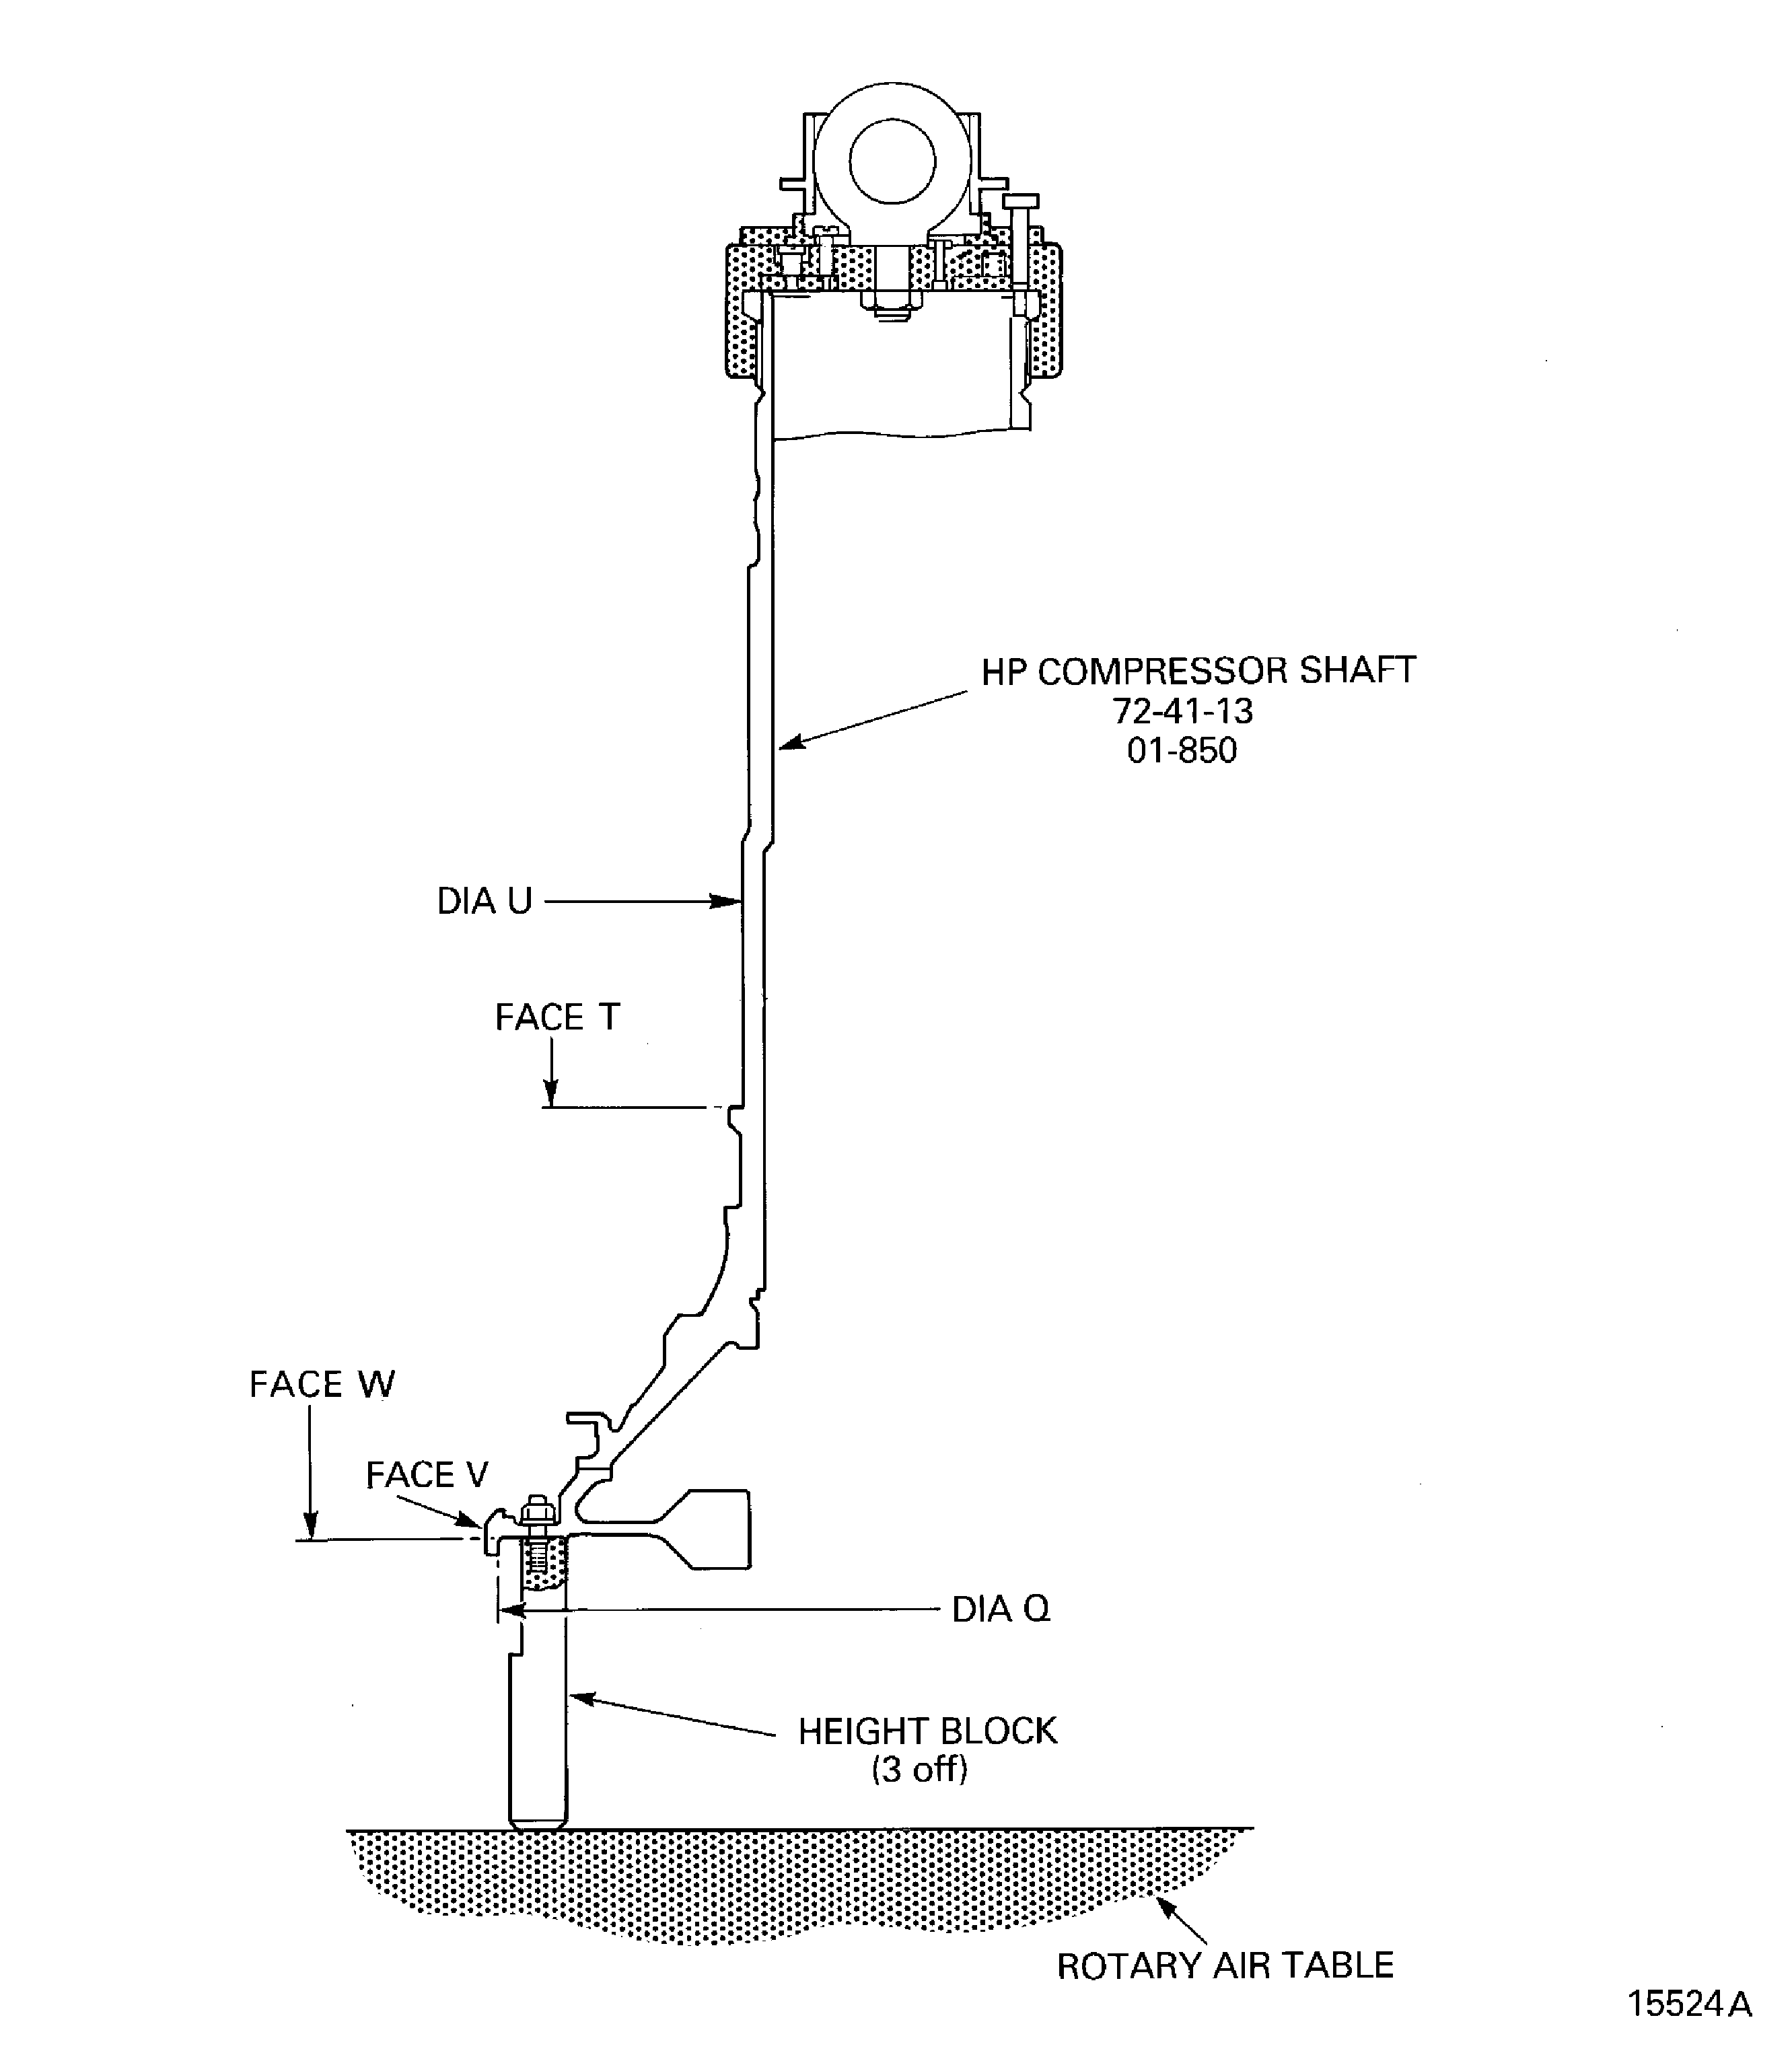
    Figure: Install the lifter on to the HP compressor shaft

    Install the lifter on to the HP compressor shaft
Requirements After Job Completion

Follow-On Conditions

NONE
Change Type:

Revised the temporary mark procedure. (18VG365)

Manufacturer Code:0AM53
Enterprise Name:IAE INTERNATIONAL AERO ENGINES AG
BU Name:NULL
Building:SUITE 400
Street:628 HEBRON AVENUE
City:GLASTONBURY
State:CT
Zip Code:06033
Country:USA
Manufacturer Code:IE304
Enterprise Name:DELETED
BU Name:DELETED,SEE CAGE CODE 0V6W9
Manufacturer Code:K6835
Enterprise Name:MED-LAB LTD
BU Name:MED-LAB LTD
Street:COPELAND ST
City:DERBY
Zip Code:DE1 2PU
Country:GREAT BRITAIN
Phone Number:44-1332-349094
Fax Number:44-1332-371237
Email:sales@med-lab.co.uk
Internet:www.med-lab.co.uk
Manufacturer Code:LOCAL
Enterprise Name:LOCALLY SUPPLIED
Manufacturer Code:X333X
Enterprise Name:REFER TO V2500 SB ENG-79-0108
Manufacturer Code:X111X
Supply Number:CoMat 01-001
Type:sp01
Supply Short Name:CoMat 01-001 SOLVENT, DELETED
Supply Name:CoMat 01-001 SOLVENT, DELETED
Specification Groups:
Doc NumberType
wiring harnesses. Where CoMat 01‐001 is specified to clean mechanical components, use one or more of the solvents that SPM TASK 70‐11‐26‐300‐503 specifies as applicable.DELETED. Where CoMat 01‐001 is specified to clean electrical contacts or wiring harnesses, use one or more of the solvents that SPM TASK 70‐11‐57‐110‐501 specifies to clean electrical contacts or
Suppliers:
ManufacturerRemarks
X111X
Manufacturer Code:X111X
Supply Number:CoMat 01-002
Type:sp01
Supply Short Name:CoMat 01-002 SOLVENT, DELETED.
Supply Name:CoMat 01-002 SOLVENT, DELETED.
Specification Groups:
Doc NumberType
wiring harnesses. Where CoMat 01‐002 is specified to clean mechanical components, use one or more of the solvents that SPM TASK 70‐11‐26‐300‐503 specifies as applicable.DELETED. Where CoMat 01‐002 is specified to clean electrical contacts or wiring harnesses, use one or more of the solvents that SPM TASK 70‐11‐57‐110‐501 specifies to clean electrical contacts or
Suppliers:
ManufacturerRemarks
X111X
Manufacturer Code:IE304
Supply Number:CoMat 02-121
Type:sp01
Supply Short Name:CoMat 02-121 TEMPORARY MARKER PENCIL/CRAYON
Supply Name:CoMat 02-121 TEMPORARY MARKER PENCIL/CRAYON
Specification Groups:
Doc NumberType
OMAT: 261BEROL VERITHIN (HARD TYPE)
Suppliers:
ManufacturerRemarks
IE304
K5720
K6835
LOCAL
Manufacturer Code:K6835
Supply Number:CoMat 02-122
Type:sp01
Supply Short Name:CoMat 02-122 TEMPORARY MARKER PENCIL/CRAYON
Supply Name:CoMat 02-122 TEMPORARY MARKER PENCIL/CRAYON
Specification Groups:
Doc NumberType
DELETED
Suppliers:
ManufacturerRemarks
K6835
IE133
Manufacturer Code:LOCAL
Supply Number:CoMat 02-130
Type:sp01
Supply Short Name:CoMat 02-130 POLAR GRAPH PAPER
Supply Name:CoMat 02-130 POLAR GRAPH PAPER
Specification Groups:
Doc NumberType
POLAR GRAPH PAPER
Suppliers:
ManufacturerRemarks
LOCAL
Manufacturer Code:X333X
Supply Number:CoMat 10-077
Type:sp01
Supply Short Name:CoMat 10-077 APPROVED ENGINE OILS
Supply Name:CoMat 10-077 APPROVED ENGINE OILS
Specification Groups:
Doc NumberType
For V2500-A1/A5/D5 models - Refer to V2500 Service Bulletin ENG-79-0108
For V2500-E5 model - Refer to Service Bulletin E5-79-0001
Suppliers:
ManufacturerRemarks
X333X
Manufacturer Code:0AM53
Tool Number:IAE 1R18025
Tool Name:IAE 1R18025 Turnover stand adapter
Manufacturer Code:0AM53
Tool Number:IAE 1R18026
Tool Name:IAE 1R18026 Lifting fixture
Manufacturer Code:0AM53
Tool Number:IAE 1R18062
Tool Name:IAE 1R18062 Master curic base
Manufacturer Code:0AM53
Tool Number:IAE 1R18063
Tool Name:IAE 1R18063 Location piece
Manufacturer Code:0AM53
Tool Number:IAE 1R18064
Tool Name:IAE 1R18064 Bolt
Manufacturer Code:0AM53
Tool Number:IAE 1R18065
Tool Name:IAE 1R18065 Lifter
Manufacturer Code:0AM53
Tool Number:IAE 1R18067
Tool Name:IAE 1R18067 Extractor
Manufacturer Code:0AM53
Tool Number:IAE 1R18068
Tool Name:IAE 1R18068 Height block
Manufacturer Code:0AM53
Tool Number:IAE 1R18085
Tool Name:IAE 1R18085 Adjusting unit
Manufacturer Code:0AM53
Tool Number:IAE 1R18086
Tool Name:IAE 1R18086 Clamp assembly
Manufacturer Code:0AM53
Tool Number:IAE 1R18087
Tool Name:IAE 1R18087 Block
Manufacturer Code:0AM53
Tool Number:IAE 1R18088
Tool Name:IAE 1R18088 Pillar
Manufacturer Code:0AM53
Tool Number:IAE 1R18090
Tool Name:IAE 1R18090 Safety support stand
Manufacturer Code:0AM53
Tool Number:IAE 1R18091
Tool Name:IAE 1R18091 Support stand
Manufacturer Code:0AM53
Tool Number:IAE 1R18092
Tool Name:IAE 1R18092 Support tool
Manufacturer Code:0AM53
Tool Number:IAE 1R18322
Tool Name:IAE 1R18322 Turnover stand
Manufacturer Code:0AM53
Tool Number:IAE 1R18441
Tool Name:IAE 1R18441 Lifting adapter
Manufacturer Code:0AM53
Tool Number:IAE 1R18691
Tool Name:IAE 1R18691 Lifting fixture
Manufacturer Code:0AM53
Tool Number:IAE 1R19810
Tool Name:IAE 1R19810 Computer program
Link not Found