Export Control
EAR Export Classification: Not subject to the EAR per 15 C.F.R. Chapter 1, Part 734.3(b)(3), except for the following Service Bulletins which are currently published as EAR Export Classification 9E991: SBE70-0992, SBE72-0483, SBE72-0580, SBE72-0588, SBE72-0640, SBE73-0209, SBE80-0024 and SBE80-0025.Copyright
© IAE International Aero Engines AG (2001, 2014 - 2021) The information contained in this document is the property of © IAE International Aero Engines AG and may not be copied or used for any purpose other than that for which it is supplied without the express written authority of © IAE International Aero Engines AG. (This does not preclude use by engine and aircraft operators for normal instructional, maintenance or overhaul purposes.).Applicability
All
Common Information
TASK 72-41-10-440-002-A00 HPC Rotor Assembly - Assemble The Rotor Assembly, Assembly-002
General
This TASK gives the procedure to assemble the HP Compressor Rotor Assembly. Refer to the TASKS that follow for other related procedures.
Measure the HP Compressor Rotor Assembly Parts by TASK 72-41-10-440-001 (ASSEMBLY-001).
Do a balance check of the HP Compressor Rotor Assembly and install the blades by TASK 72-41-10-440-003-A00 (ASSEMBLY-003).
Grind the tips of the HP Compressor Blades by TASK 72-41-10-440-004-A00 (ASSEMBLY-004).
Final balance the HP Compressor Rotor Assembly by TASK 72-41-10-440-005-A00 (ASSEMBLY-005).
Assemble the HP Compressor Rotor Disks using IAE1R19895 by TASK 72-41-10-440-008-A00 (ASSEMBLY-008).
Assemble the HP Compressor Rotor Disks using IAE1P16616 by TASK 72-41-10-440-008-B00 (ASSEMBLY-008).
Fig./item numbers in parentheses in the procedure agree with those used in the IPC. Only the primary Fig./item numbers are used. For the service bulletin alpha variants refer to the IPC.
For all parts identified in a different Chapter/Section/Subject, the applicable Chapter/Section/Subject comes before the Fig./item number.
Overhaul processes referred to in this procedure by the TASK/SUBTASK number are in SPM.
For standard torque data and procedures, refer to SPM TASK 70-41-00-400-501, SPM TASK 70-41-01-400-501 and SPM TASK 70-41-02-410-501.
Special torque data is identified with the symbol * after the torque value.
Special assembly tolerances are included in this procedure.
Lubricate all threads and mating faces of nuts and bolts with CoMat 10-077 APPROVED ENGINE OILS unless other lubricants are referred to in the procedure.
All the mating faces and curvic teeth must be cleaned with CoMat 01-001 SOLVENT, DELETED or CoMat 01-002 SOLVENT, DELETED. before assembly. Refer to SPM TASK 70-11-01-300-503. They must also be dry assembled unless told differently in the procedure.
After assembly apply CoMat 07-038 AIR DRYING ENAMEL to damaged surface protection, joint flanges and attach parts. Use the correct color of the air drying enamel. Refer to SPM TASK 70-63-02-380-501.
Do a check of the interference dimensions of the Stage 3 To 8 Disk Assembly to the Stage 9 To 12 Disk assembly. Also do a check of the Stage 9 To 12 Disk assembly to the HPC Rear Shaft. This must be done to make sure you get the correct interference fits.
All the temporary marks made in this procedure must be removed before the engine is started.
The data found in this procedure, when used during assembly, will permit the rotor assembly to be assembled with all of the parts concentric to specified limits.
The following SUBTASKS can also be achieved in conjunction with the Axiam V2500 High Pressure Compressor, Rotor Component Measurement and Smart Stack Assembly Process. Document No V2500-HPC-01, Revision G (last revised in August 2010). Use of other versions need to be validated by IAE.
Details of this procedure are available from.
Axiam Incorporated
58 Blackburn Center
Gloucester
Massachusetts
01930
USA
It is important to prevent unwanted swash and run-out during this procedure. Thus, all of the rotor parts, tools and equipment used in this procedure must be kept very clean.
Run-out
Run-out is the total movement of the measuring equipment display, in relation to a location diameter, when a part is turned. Run-out includes eccentricity and ovality, (or out of roundness).
All of the dimensions given in this procedure in relation to run-out, refer only to eccentricity. If there is ovality, it will be necessary to correct it. To correct the ovality, get the difference between two opposite values only. The difference between these values must not be more than the total specified dimension permitted.
If there is irregular ovality, it can be necessary to make a graph of the run-out values on CoMat 02-130 POLAR GRAPH PAPER. The quantity of ovality can then be calculated.
Swash
Swash is the total movement of the measuring equipment display, in relation to a mating face, when a part is turned.
Run-out and Swash data
The subsequent data must be used when you measure run-out and swash, to permit the values to be put in to a computer.
All of the measured values are to be known as positive if;
The location diameter moves radially out, and/or the mating face moves rearwards in relation to a datum face.
This is correct if the measuring equipment display reads positive or negative values.
A minimum of nine values for run-out and swash must be read at eight equally spaced positions, for all components. The first and last values must be the same. If the first and last values are not the same, read all of the nine values again and again until the first and last values are the same.
NOTE
NOTE
Preliminary Requirements
Pre-Conditions
NONESupport Equipment
| Name | Manufacturer | Part Number / Identification | Quantity | Remark |
|---|---|---|---|---|
| Air circulated oven | LOCAL | |||
| Computer | LOCAL | |||
| Protective Gloves | LOCAL | |||
| Rotary air table | LOCAL | |||
| Soft Faced Mallet | LOCAL | |||
| Nylon Drift (maximum length = 6 inches, maximum diameter = 0.75 inch) | LOCAL | |||
| IAE 1R18020 Build stand | 0AM53 | IAE 1R18020 | 1 | |
| IAE 1R18021 Support ring | 0AM53 | IAE 1R18021 | 1 | |
| IAE 1R18022 Support ring | 0AM53 | IAE 1R18022 | 1 | |
| IAE 1R18026 Lifting fixture | 0AM53 | IAE 1R18026 | 1 | |
| IAE 1R18027 Indexing ring | 0AM53 | IAE 1R18027 | 1 | |
| IAE 1R18059 Trolley | 0AM53 | IAE 1R18059 | 1 | |
| IAE 1R18061 Rail | 0AM53 | IAE 1R18061 | 2 | |
| IAE 1R18062 Master curic base | 0AM53 | IAE 1R18062 | 1 | |
| IAE 1R18063 Location piece | 0AM53 | IAE 1R18063 | 1 | |
| IAE 1R18064 Bolt | 0AM53 | IAE 1R18064 | 20 | |
| IAE 1R18065 Lifter | 0AM53 | IAE 1R18065 | 1 | |
| IAE 1R18075 Support pedestal | 0AM53 | IAE 1R18075 | 1 | |
| IAE 1R18078 Clamp assembly | 0AM53 | IAE 1R18078 | 6 | |
| IAE 1R18085 Adjusting unit | 0AM53 | IAE 1R18085 | 4 | |
| IAE 1R18086 Clamp assembly | 0AM53 | IAE 1R18086 | 4 | |
| IAE 1R18087 Block | 0AM53 | IAE 1R18087 | 4 | |
| IAE 1R18088 Pillar | 0AM53 | IAE 1R18088 | 1 | |
| IAE 1R18089 Lifting adapter | 0AM53 | IAE 1R18089 | 1 | |
| IAE 1R18090 Safety support stand | 0AM53 | IAE 1R18090 | 1 | |
| IAE 1R18091 Support stand | 0AM53 | IAE 1R18091 | ||
| IAE 1R18094 Washer | 0AM53 | IAE 1R18094 | 8 | |
| IAE 1R18095 Universal slinging adapter | 0AM53 | IAE 1R18095 | 2 | |
| IAE 1R18096 Pallet | 0AM53 | IAE 1R18096 | 1 | |
| IAE 1R18223 Spacer | 0AM53 | IAE 1R18223 | 20 | |
| IAE 1R18441 Lifting adapter | 0AM53 | IAE 1R18441 | ||
| IAE 1R18443 Puller | 0AM53 | IAE 1R18443 | 1 | |
| IAE 1R18629 Protective cover | 0AM53 | IAE 1R18629 | 1 | |
| IAE 1R18673 Dummy stub shaft | 0AM53 | IAE 1R18673 | 1 |
Consumables, Materials and Expendables
| Name | Manufacturer | Part Number / Identification | Quantity | Remark |
|---|---|---|---|---|
| CoMat 01-001 SOLVENT, DELETED | X111X | CoMat 01-001 | ||
| CoMat 01-002 SOLVENT, DELETED. | X111X | CoMat 01-002 | ||
| CoMat 02-121 TEMPORARY MARKER PENCIL/CRAYON | IE304 | CoMat 02-121 | ||
| CoMat 02-122 TEMPORARY MARKER PENCIL/CRAYON | K6835 | CoMat 02-122 | ||
| CoMat 02-130 POLAR GRAPH PAPER | LOCAL | CoMat 02-130 | ||
| CoMat 03-026 LIQUID NITROGEN | LOCAL | CoMat 03-026 | ||
| CoMat 07-038 AIR DRYING ENAMEL | k3504 | CoMat 07-038 | ||
| CoMat 07-090 YELLOW MARKING PAINT,WATER BASED | LOCAL | CoMat 07-090 | ||
| CoMat 07-091 POTASSIUM SILICATE SOLUTION | LOCAL | CoMat 07-091 | ||
| CoMat 10-070 ANTI-SEIZE COMPOUND | LOCAL | CoMat 10-070 | ||
| CoMat 10-077 APPROVED ENGINE OILS | X333X | CoMat 10-077 | ||
| CoMat 10-142 ANTI-SEIZE PASTE | 71984 | CoMat 10-142 |
Spares
| Name | Manufacturer | Part Number / Identification | Quantity | Remark |
|---|---|---|---|---|
| Bolt | 34 | (SBE 72-0632) | ||
| Anti-fret plate | 17 | (SBE 72-0632) | ||
| Double retaining washer | 20 | (SBE 72-0632) |
Safety Requirements
NONEProcedure
Refer to Figure.
Reference dimensions at Location 1005. If required use the data written as a note in the applicable TASK. Refer to TASK 72-41-11-200-000 and TASK 72-41-12-200-000.
Table 1. Fits and Clearances (all dimensions are in inches) NEW PART
WORN PART
DIMENSIONS
DIMENSIONS
PART IDENT
Size
Clearance
Non-select
REJECT IF
MORE THAN
LOCATION 1005
Stages 3 To 8 HP Compressor Disks HPC Stage 3 - 8 Drum Disk And Wire Seals (72-41-11, 01-200), Rear Location Bore
The Stages 9 to 12 HP Compressor Disks HPC Stage 9 - 12 Drum Disk And Vortex Reducer Ring (72-41-12, 01-600), Front Location Diameter
Compressor Disk Bore
16.1417
16.1442
0.0002
Compressor Disk Diameter
16.1438
0.0044
16.1462
Intf
Table 2. Fits and Clearances (all dimensions are in millimeters) NEW PART
WORN PART
DIMENSIONS
DIMENSIONS
PART IDENT
Size
Clearance
Non-select
REJECT IF
MORE THAN
LOCATION 1005
Stages 3 To 8 HP Compressor Disks HPC Stage 3 - 8 Drum Disk And Wire Seals (72-41-11, 01-200), Rear Location Bore
The Stages 9 to 12 HP Compressor Disks HPC Stage 9 - 12 Drum Disk And Vortex Reducer Ring (72-41-12, 01-600), Front Location Diameter
Compressor Disk Bore
410.000
410.063
0.005
Compressor Disk Diameter
410.053
0.113
410.113
Intf
SUBTASK 72-41-10-220-084 Reference Fits and Clearances of the HP Compressor Rotor Assembly at Location 1005
Refer to Figure.
Reference dimensions at Location 1006. If required use the data written as a note in the applicable TASK. Refer to TASK 72-41-12-200-000.
Table 3. Fits and Clearances (all dimensions are in inches) NEW PART
WORN PART
DIMENSIONS
DIMENSIONS
PART IDENT
Size
Clearance
Non-select
REJECT IF
MORE THAN
LOCATION 1006
Vortex Reducer Ring HPC Stage 9 - 12 Drum Disk And Vortex Reducer Ring (72-41-12, 01-575), Rear Location Diameter
The Stages 9 To 12 HP Compressor Disks HPC Stage 9 - 12 Drum Disk And Vortex Reducer Ring (72-41-12, 01-600), Front Location Bore.
Reducer Ring Diameter
12.522
Intf
12.526
0.010
Compressor Disk Bore
12.510
0.016
12.512
Table 4. Fits and Clearances (all dimensions are in millimeters) NEW PART
WORN PART
DIMENSIONS
DIMENSIONS
PART IDENT
Size
Clearance
Non-select
REJECT IF
MORE THAN
LOCATION 1006
Vortex Reducer Ring HPC Stage 9 - 12 Drum Disk And Vortex Reducer Ring (72-41-12, 01-575), Rear Location Diameter
The Stages 9 to 12 HP Compressor Disks HPC Stage 9 - 12 Drum Disk And Vortex Reducer Ring (72-41-12, 01-600), Front Location Bore
Reducer Ring Diameter
318.062
Intf
318.160
0.258
Compressor Disk Bore
317.754
0.406
317.804
SUBTASK 72-41-10-220-056 Reference Fits and Clearances of the HP Compressor Rotor Assembly at Location 1006
Refer to Figure.
Reference dimensions at location 1007. If required use the data written as a note in the applicable TASK. Refer to TASK 72-41-12-200-000 and TASK 72-41-13-200-000.
Table 5. Fits and Clearances (all dimensions are in inches) NEW PART
WORN PART
DIMENSIONS
DIMENSIONS
PART IDENT
Size
Clearance
Non-select
REJECT IF
MORE THAN
LOCATION 1007
Stages 9 To 12 HP Compressor Disks HPC Stage 9 - 12 Drum Disk And Vortex Reducer Ring (72-41-12, 01-600), Rear Location Diameter
The HP Compressor Shaft HPC Rear Shaft And Heatshield Assembly (72-41-13, 01-850), Front Location Bore
Compressor Disk Diameter
13.5080
Intf
13.5080
13.5090
0.0020
13.5090
Compressor Shaft Bore
13.5040
0.0050
13.5030
13.5060
Intf
13.5060
Table 6. Fits and Clearances (all dimensions are in millimeters) NEW PART
WORN PART
DIMENSIONS
DIMENSIONS
PART IDENT
Size
Clearance
Non-select
REJECT IF
MORE THAN
LOCATION 1007
Stages 9 To 12 HP Compressor Disks HPC Stage 9 - 12 Drum Disk And Vortex Reducer Ring (72-41-12, 01-600), Rear Location Diameter
The HP Compressor Shaft HPC Rear Shaft And Heatshield Assembly (72-41-13, 01-850) Front Location Bore
Compressor Disk Diameter
343.104
Intf
343.104
343.129
0.052
343.129
Compressor Shaft Bore
343.002
0.127
342.976
343.052
Intf
343.052
SUBTASK 72-41-10-220-085 Reference Fits and Clearances of the HP Compressor Rotor Assembly at Location 1007
Refer to Figure.
Divide the value from Step by two. This will give the radius. Write down this value.
Calculate the radius of the Stages 3 To 8 Compressor Disks rear location diameter.
Use the subsequent formula to calculate the TSE.
where;
TSE = S x L divided by r.
S
-
The swash of the stages 3 to 8 compressor rear mating face (face D). Refer to TASK 72-41-10-440-001.
L
-
The length of the Stages 9 To 12 Compressor Disk (refer to Step), plus the maximum thickness of the vortex reducer ring front flange (dimension AC). Refer to TASK 72-41-10-440-001.
r
-
The radius of the Stages 3 To 8 Compressor Disks rear location diameter. Refer to Step.
NOTE
The angle of TSE is the angle of the swash of the Stages 3 To 8 Compressor Disks plus 180 degrees.
Calculate the total swash effect, (TSE).
Put the run-out of the Stages 3 To 8 Compressor Disks rear location diameter in to the computer. Refer to TASK 72-41-10-440-001. Put the value of the run-out in to the computer as Vector L1. Put the angle of the run-out in to the computer as Angle A1.
Put the TSE value and angle in to the computer. Refer to Step. Put the value of the TSE in to the computer as Vector L2. Put the angle of the TSE in to the computer as Angle A2.
Make a mark on face F of the Stages 3 To 8 Compressor Disks at the position of the combined swash and run-out effect. Use CoMat 02-121 TEMPORARY MARKER PENCIL/CRAYON or CoMat 02-122 TEMPORARY MARKER PENCIL/CRAYON to make the mark. Refer to SPM TASK 70-09-01-400-501.
Calculate the combined swash and run-out effect of the Stages 3 To 8 Compressor Disks.
SUBTASK 72-41-10-440-056 Calculate the Data Used to Find the Best Position of the Stages 3 to 8 HP Compressor Disks (01-200), the Vortex Reducer Ring (01-575) and the Stages 9 to 12 HP Compressor Disks (01-600), in Relation to Each Other
Install the 17 new anti-fret plates HPC Stage 9 - 12 Drum Disk And Vortex Reducer Ring (72-41-12, 01-610) and the 34 new special head bolts HPC Stage 9 - 12 Drum Disk And Vortex Reducer Ring (72-41-12, 01-608) through the rear of the Stages 9 Compressor Disk front flange. Turn the special head bolts so that they are correctly engaged.
Find the position of correct run-out of the Stages 12 Compressor Disk rear location diameter (diameter N). Refer to TASK 72-41-10-440-001.

WARNING
YOU MUST PUT ON THE CORRECT GLOVES BEFORE YOU USE LIQUID NITROGEN.Lower the vortex reducer ring rear location diameter in to CoMat 03-026 LIQUID NITROGEN until the strong bubbles have stopped.
Install IAE 1R18094 Washer 8 off on to eight equally spaced special head bolts.
Install eight new splined nuts HPC Stage 9 - 12 Drum Disk And Vortex Reducer Ring (72-41-12, 01-602) onto the special head bolts and washers. Torque the bolts in sequence to 110* lbfin (12.43* Nm).
Install the vortex reducer ring on to the Stages 9 Compressor Disk.
Make sure that the 34 special head bolts HPC Stage 9 - 12 Drum Disk And Vortex Reducer Ring (72-41-12, 01-608) can not be turned more than five degrees in the two directions.
If one or more of the special headed bolts can turn more than five degrees, then do Step.
Make sure that the 34 special head bolts HPC Stage 9 - 12 Drum Disk And Vortex Reducer Ring (72-41-12, 01-608) are engaged correctly.
Install IAE 1R18443 Puller 1 off onto the vortex reducer ring.
Do Step again and again until the vortex reducer ring is disengaged from the Stages 9 Compressor Disk.
Correct the incorrectly engaged special headed bolt(s).
SUBTASK 72-41-10-440-057 Install the Vortex Reducer Ring (72-41-12, 01-575) onto the Stages 9 to 12 HP Compressor Disks (72-41-12, 01-600) (SBE 72-0632)
Prepare the Stages 9 To 12 Compressor Disks to be installed on to the Stages 3 To 8 Compressor Disks. Refer to Figure.
Remove the eight screws from the top of IAE 1R18020 Build stand 1 off.
Put IAE 1R18022 Support ring 1 off on to the top of the build stand with the spigot diameter at the bottom.
Safety the support ring to the build stand with the eight screws.
NOTE
The maximum thickness of the vortex reducer ring front flange can be used to help get the minimum swash and run-out. Refer to TASK 72-41-10-440-001.
Prepare the build stand for use. Refer to Figure.
Refer to the run-out of the Stages 9 To 12 Compressor Disks (Refer to TASK 72-41-10-440-001), and the combined swash and run-out effect of the Stages 3 To 8 Compressor Disks (refer to Step). Use these values to calculate the position of the Stages 9 To 12 Compressor Disks in relation to the Stages 3 To 8 Compressor Disks. Calculate the position that will give the minimum swash and run-out of the rear of the Stages 12 Compressor Disk after assembly. Write down the calculated values of swash and run-out.
Install IAE 1R18065 Lifter 1 off on to the Stages 8 Compressor Disk. Refer to Figure.
Carefully lift the Stages 3 To 8 Compressor Disks out of the support tool. Refer to Figure.

WARNING
YOU MUST PUT ON THE CORRECT PROTECTIVE GLOVES BEFORE YOU TOUCH THE STAGES 3 TO 8 COMPRESSOR DISKS OR THE SUPPORT TOOL.Prepare the Stages 3 To 8 Compressor Disks for assembly.
Examine the stage 9 to 12 compressor disk assembly location diameter. Refer to TASK 72-41-12-200-001, 72-41-12-220-051.
and/or.
Examine the stage 3 to 8 compressor disk assembly location diameter. Refer to TASK 72-41-11-200-001-A00, 72-41-11-220-063, para. A.
If you can not get the interference fit given in para. (1).
Do a check of the interference location 1005. Refer to Figure and SUBTASK 72-41-10-220-084.
Make sure the position of the Stages 9 To 12 Compressor Disks, in relation to the Stages 3 To 8 Compressor Disks, is that calculated in Step.
Attach IAE 1R18078 Clamp assembly 6 off on to the stages 8 to 9 joint.
Remove the lifter from the Stages 12 Compressor Disk rear flange. Refer to Figure.
Install the Stages 9 To 12 Compressor Disks on to the Stages 3 To 8 Compressor Disks. Refer to Figure.
SUBTASK 72-41-10-440-058 Install the Stages 9 to 12 HP Compressor Disks and Vortex Reducer Ring Assembly on to the Stages 3 to 8 HP Compressor Disks (01-200)
Refer to TASK 72-41-10-440-008-A00.
For disk assembly using Tool Part number IAE1R19895.
Refer to TASK 72-41-10-440-008-B00.
For disk assembly using Tool Part number IAE1P16616.
SUBTASK 72-41-10-440-351 Assemble the HP Compressor Rotor Disks
Refer to Figure.
Other than Step.
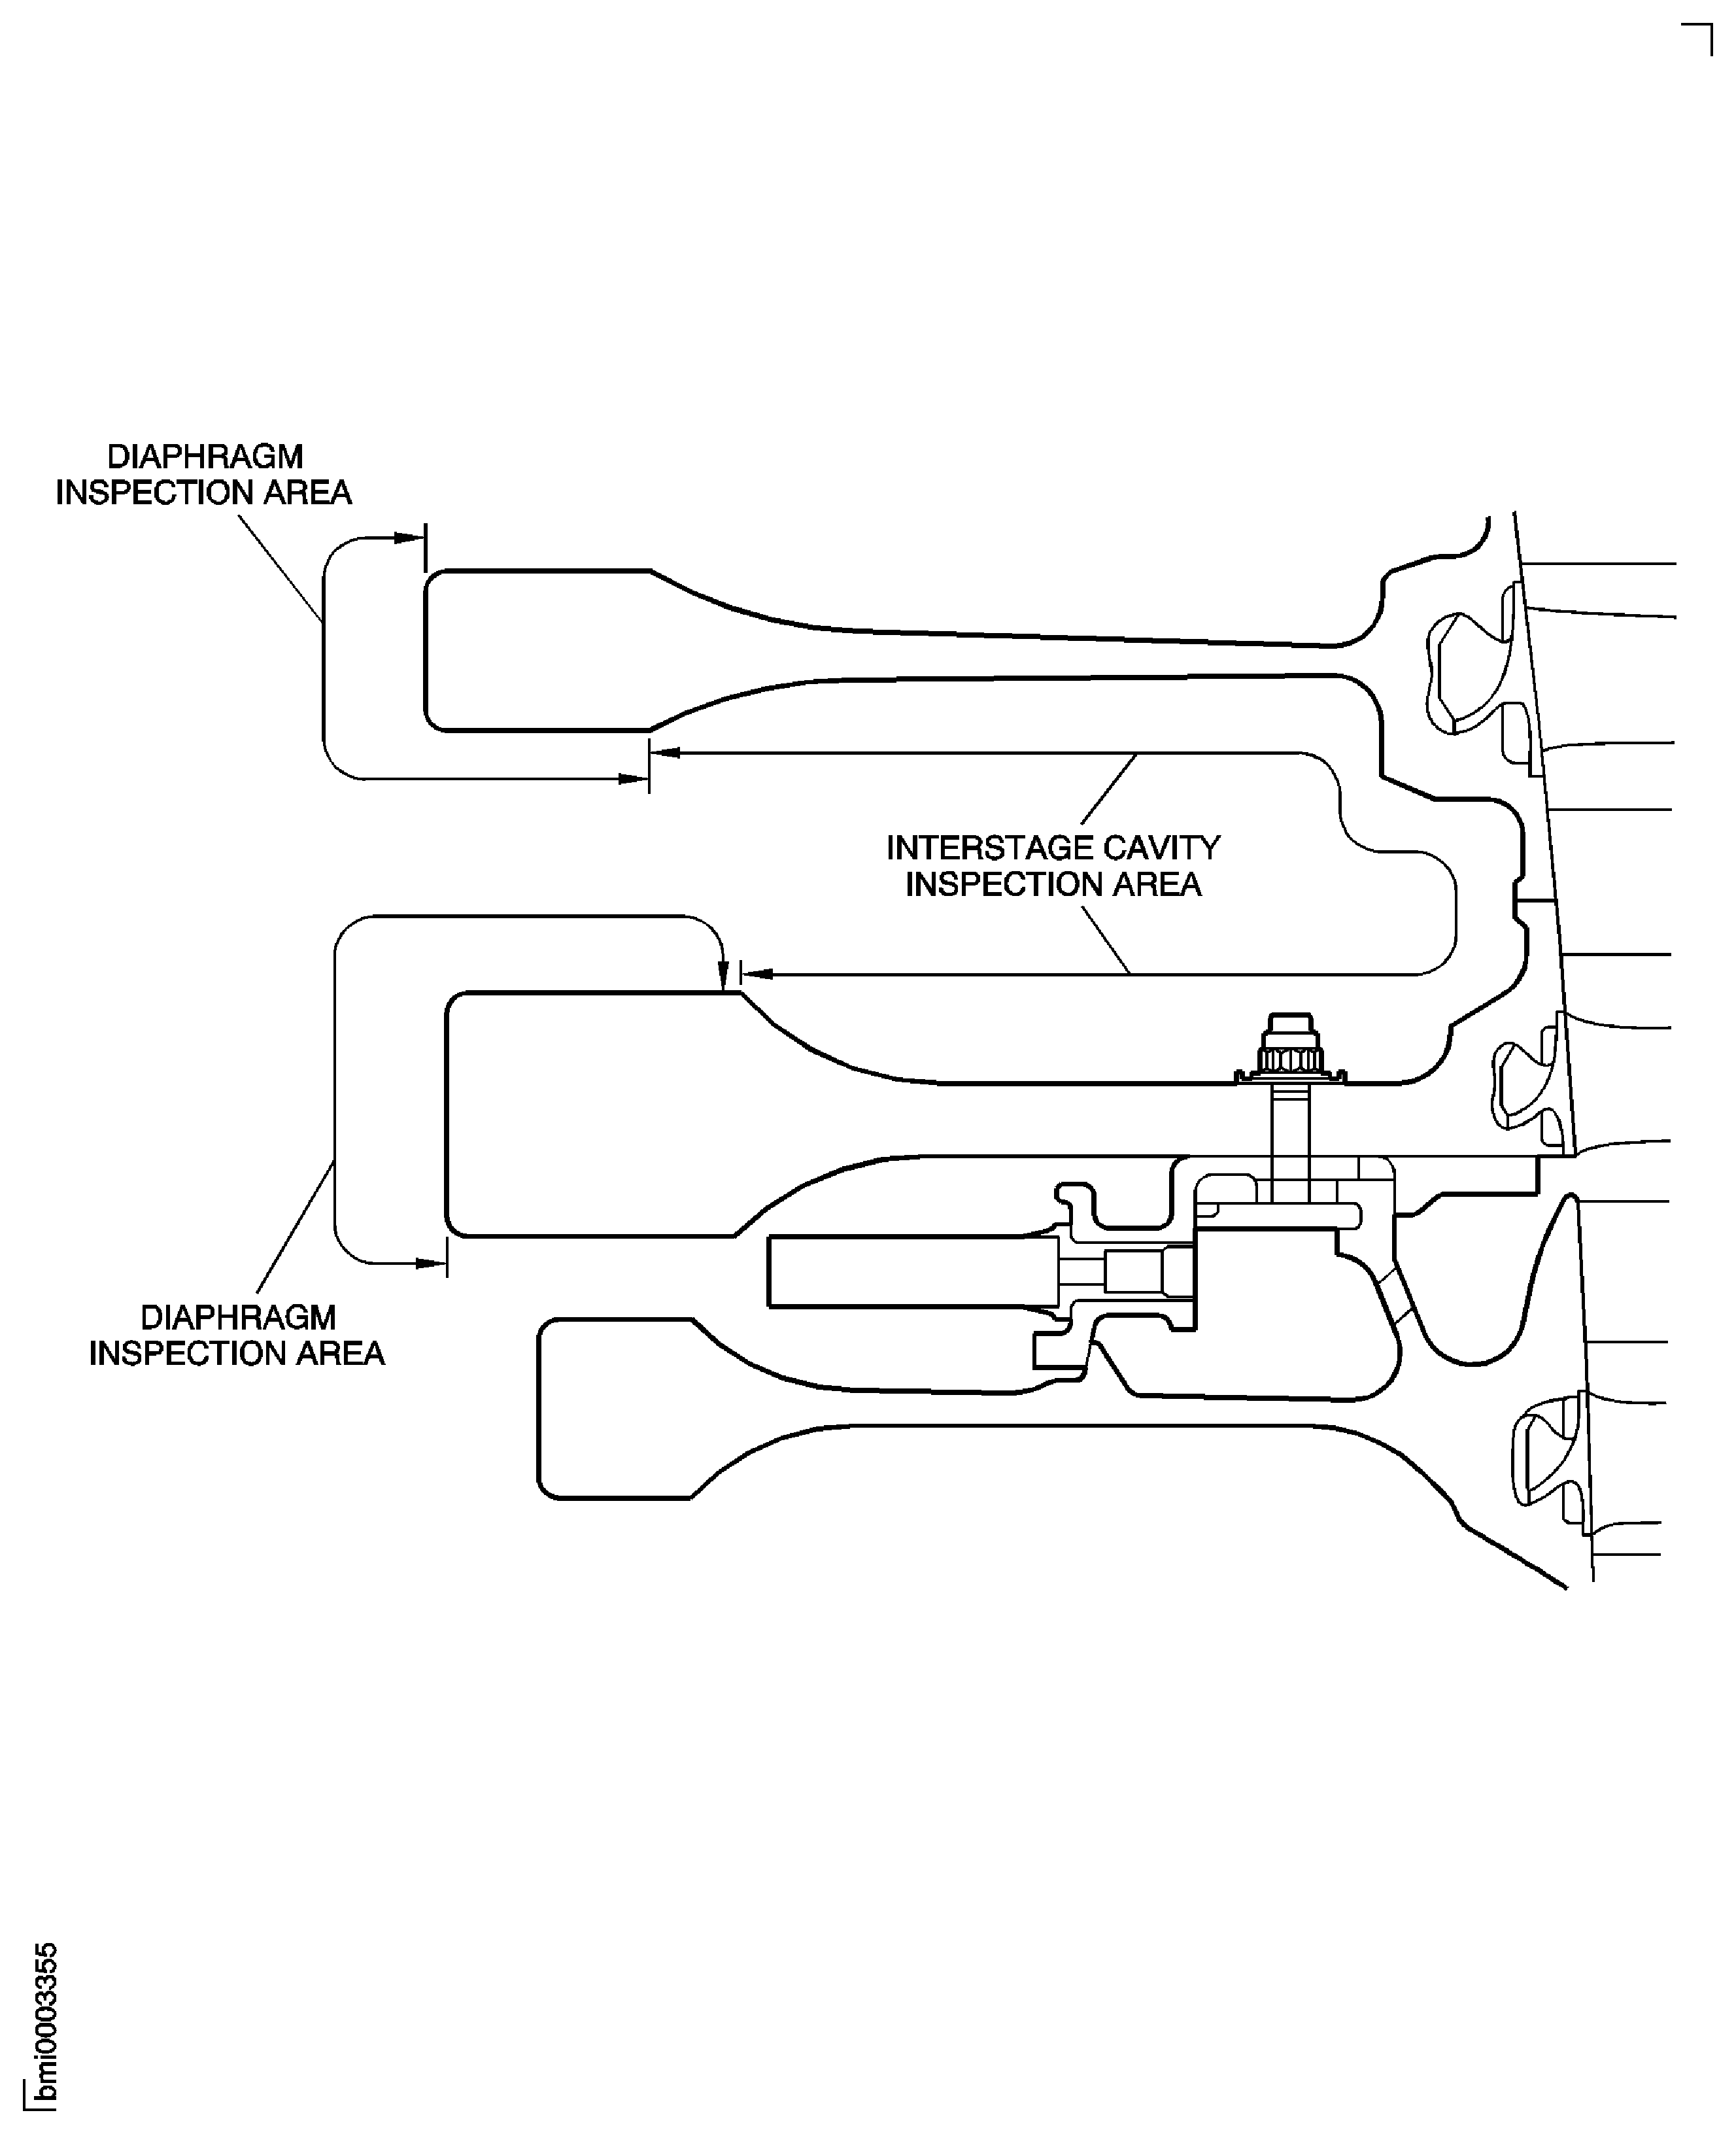
Examine the HP Compressor stage 3 to 8 disk interstage cavity between at stage 7 and 8 disks for damage. Refer to TASK 72-41-11-200-000 (INSPECTION-000).
Reject.
Other than Step.
Examine the bolts and nuts.
Examine the HP Compressor stage 3 to 8 disks at stage 7 and 8 diaphragm bore and surface for damage. Refer to TASK 72-41-11-200-000 (INSPECTION-000).
SUBTASK 72-41-10-220-097 Examine the HP Compressor Stage 3 to 8 Disk for Surface Damage
Refer to Figure
Install IAE 1R18062 Master curic base 1 off, IAE 1R18086 Clamp assembly 4 off, IAE 1R18087 Block 4 off and IAE 1R18085 Adjusting unit 4 off on to the Rotary air table. Refer to TASK 72-41-10-440-001.
SUBTASK 72-41-10-440-065 Assemble the Tools used to Measure the Swash and Run-out of the Stages 3 to 12 HP Compressor Disks Assembly
Use IAE 1R18088 Pillar 1 off and measuring equipment to correct the run-out of the assembled tooling. Refer to TASK 72-41-10-440-001.
SUBTASK 72-41-10-440-066 Correct the Run-out of the Assembled Tools
Install IAE 1R18026 Lifting fixture 1 off on to the Stages 12 Compressor Disk rear flange. Refer to Figure.

CAUTION
YOU MUST NOT LET THE STAGES 3 TO 12 COMPRESSOR DISKS ASSEMBLY HIT THE BUILD STAND.Lift the stages 3 to 12 compressor disks assembly off the build stand. Refer to Figure.
Install IAE 1R18091 Support stand 1 off on to the top of IAE 1R18090 Safety support stand 1 off. Make sure that the stand adapter is correctly engaged in the safety support stand. Refer to Figure.
Examine the curvic teeth of the master curvic base and the stage 3 disk curvic coupling for contamination and/or high metal. If there is contamination then the curvic teeth must be cleaned. If there is high metal, use a stone to make the surface smooth. Refer to Figure.
Examine the curvic teeth of the stage 3 disk and the master curvic base curvic couplings.
Install IAE 1R18063 Location piece 1 off on the master curvic base.

CAUTION
YOU MUST NOT LET THE STAGES 3 TO 12 COMPRESSOR DISKS ASSEMBLY HIT THE MASTER CURVIC BASE.Slowly lower the stages 3 to 12 compressor disks assembly until the location piece is engaged in the bore of the stage 3 compressor disk. Make sure that the four location dowels in the master curve base are aligned with the four holes in the stage 3 disk curvic coupling.
Install the IAE 1R18064 Bolt 20 off through the master curvic base, in to the stage 3 disk curvic coupling. Lightly tighten the bolts.
NOTE
The torque sequence is identified on the outer diameter of the master curvic base front flange.Torque all of the bolts. Do these three steps in the sequence shown. Refer to Figure.
Remove the lifting fixture from the Stages 12 Compressor Disk rear flange. Refer to Figure.
SUBTASK 72-41-10-440-067 Install the Stages 3 to 12 HP Compressor Disks Assembly on to the Master Curvic Base
Find the eight numbered positions on the rear of the Stages 12 Compressor Disk. The positions are identified on the face P. Refer to TASK 72-41-10-440-001.
Measure the swash at the eight positions found in Step.
Set the computer to the applicable program and put the swash values in to the computer. The computer will calculate the FIR and the angle of the swash. Make a mark on CoMat 02-130 POLAR GRAPH PAPER to show the FIR and angle and identify it as S1.
Measure the run-out at the eight positions found in Step.
Put the run-out values in to the computer. The computer will calculate the FIR and the angle of the run-out. Make a mark on the CoMat 02-130 POLAR GRAPH PAPER to show the FIR and the angle and identify it as R1.
Use IAE 1R18088 Pillar 1 off and measuring equipment to measure the swash of face M and the run-out of face N.
Attach IAE 1R18026 Lifting fixture 1 off on to the Stages 12 Compressor Disk rear flange. Refer to Step.
Turn the Rotary air table and assembled tools through 180 degrees. Make sure the stages 3 to 12 compressor disks assembly does not move.
Install the stages 3 to 12 compressor disks assembly on to the master curvic base. Refer to Step.
Turn the stages 3 to 12 compressor disks assembly 180 degrees in relation to the master curvic base.
Measure the swash and run-out, refer to Step. Identify the swash as S2 and the run-out as R2 on the CoMat 02-130 POLAR GRAPH PAPER.
Make a line between the point S3 and the center of the CoMat 02-130 POLAR GRAPH PAPER.
Make a line between the point R3 and the center of the CoMat 02-130 POLAR GRAPH PAPER.
NOTE
The distance between the points S1 or S2 and the point S3, (distance G), shows the swash error in the tools.The distance between the center of the CoMat 02-130 POLAR GRAPH PAPER and the point S3, (distance H), shows the correct swash of the stages 3 to 12 compressor disks assembly.
The distance between the center of the CoMat 02-130 POLAR GRAPH PAPER and the point R3, (distance K), shows the correct run-out of the stages 3 to 12 compressor disks assembly.
Calculate the correct swash and run-out values.
If the difference between the two sets of swash and run-out values is less than 0.0003 in. (0.008 mm), then continue to Step.
If the final runout and swash after assembly of the HPC Rear Shaft are less than the limits given in Step, continue assembly of the rotor.
If the final runout and swash after assembly of the HPC Rear Shaft are more than the limits given in Step, do the TASK 72-41-10-440-002-A00 again.
If the difference between the two sets of swash and run-out values is more than 0.0003 in. (0.008 mm), then continue to Step.
Make an analysis of the stages 3 to 12 compressor disks assembly, swash and run-out values.
SUBTASK 72-41-10-220-057 Measure the Swash and Run-out of the Stages 3 to 12 HP Compressor Disks Assembly
Remove the stages 3 to 12 compressor disks assembly from the master curvic base. Refer to Step and Figure.
NOTE
The build stand has had IAE 1R18022 Support ring 1 off installed in Step.Remove the lifting fixture from the Stages 12 Compressor Disk rear flange. Refer to Step.
Install the stages 3 to 12 compressor disks in to IAE 1R18020 Build stand 1 off. Refer to Figure.
Install the stages 3 to 12 compressor disks assembly on to the master curvic base. Refer to Step.
Measure the swash and run-out of the stages 3 to 12 compressor disks assembly. Refer to Step.
If the difference between the two sets of swash and run-out values is more than 0.0003 in. (0.008 mm), then continue to Step.
Make an analysis of the stages 3 to 12 compressor disks assembly, swash and run-out values.
Make sure that the swash and run-out of the master curvic base is correct. Refer to TASK 72-41-10-440-001.
If the swash and run-out of the master curvic base was correct, then continue to Step.
If the swash and run-out of the master curvic base was incorrect, then do the subsequent procedure.
Remove the Stages 9 To 12 Compressor Disks and vortex reducer ring assembly from the Stages 3 To 8 Compressor Disks. Remove the vortex reducer ring from the Stages 9 To 12 Compressor Disks. The procedure to do this is given in TASK 72-41-10-040-001.
Remove the temporary marks from all of the compressor parts.
NOTE
It is very important that:All of the mating faces are examined for contamination and/or high metal. If there is contamination and/or high metal, it must be removed. The procedure to do this is given in the related SUBTASK.
During assembly, all of the joints are fully engaged and the related torque sequences must be followed.
You must make sure that all of the values measured and the subsequent calculations are correct.
Measure and assemble the Stages 3 To 8 Compressor Disks HPC Stage 3 - 8 Drum Disk And Wire Seals (72-41-11, 01-200), the vortex reducer ring HPC Stage 9 - 12 Drum Disk And Vortex Reducer Ring (72-41-12, 01-575) and the Stages 9 To 12 Compressor Disks HPC Stage 9 - 12 Drum Disk And Vortex Reducer Ring (72-41-12, 01-600). Refer to TASK 72-41-10-440-001 and Step.
If the swash and run-out of the stages 3 to 12 compressor disks assembly is more than the limits given in Step, then the assembly must be rejected.
SUBTASK 72-41-10-440-068 Disassemble, Examine and Assemble the Stages 3 to 12 HP Compressor Disks Assembly
Install the stages 3 to 12 compressor disks assembly in to IAE 1R18020 Build stand 1 off that has got IAE 1R18022 Support ring 1 off attached. Refer to Step and Figure.
SUBTASK 72-41-10-440-069 Install the Stages 3 to 12 HP Compressor Disks Assembly in to the Build Stand
Refer to Figure
Measure the width of the location slot (dimension A) of one of the HPC Rear Shaft And Heatshield Assembly (72-41-13, 01-856) double retaining washer 20 off.
SUBTASK 72-41-10-220-059 Examine the Double Retaining Washer
Refer to Figure
Reference dimensions at location 1062. If required use the data written as a note in Step and the applicable TASK. Refer to TASK 72-41-12-200-000.
Table 8. Fits and Clearances (all dimensions are in inches) NEW PART
WORN PART
DIMENSIONS
DIMENSIONS
PART IDENT
Size
Clearance
Non-select
REJECT IF
MORE THAN
LOCATION 1062
Double Retaining Washer HPC Rear Shaft And Heatshield Assembly (72-41-13, 01-856), Location Slot
To The Stages 9 to 12 HP Compressor Disks HPC Stage 9 - 12 Drum Disk And Vortex Reducer Ring (72-41-12, 01-600), Rear Flange Inner Location
Location Slot Width
0.138
0.146
0.002
Inner Location Width
0.134
0.012
0.136
Table 9. Fits and Clearances (all dimensions are in millimeters) NEW PART
WORN PART
DIMENSIONS
DIMENSIONS
PART IDENT
Size
Clearance
Non-select
REJECT IF
MORE THAN
LOCATION 1062
Double Retaining Washer HPC Rear Shaft And Heatshield Assembly (72-41-13, 01-856), Location Slot
The Stages 9 to 12 HP Compressor Disks HPC Stage 9 - 12 Drum Disk And Vortex Reducer Ring (72-41-12, 01-600), Rear Flange Inner Location
Location Slot Width
3.50
3.70
0.05
Inner Location Width
3.40
0.30
3.45
SUBTASK 72-41-10-220-060 Reference Fits and Clearances of the HP Compressor Rotor Assembly at Location 1062
Refer to Figure.
Divide the value from Step by two. This will give the radius. Write down this value.
Calculate the radius of the compressor shaft front location bore.
Use the subsequent formula to calculate the TSE.
TSE = S x L
r
Where;
S
-
The swash of the stages 3 to 12 compressor disks assembly rear mating face (face M). Refer to Step.
L
-
The length of the compressor shaft (refer to Step).
r
-
The radius of the compressor shaft front location bore (refer to Step).
NOTE
The angle of the TSE is the angle of the swash of stages 3 to 12 compressor disks assembly plus 180 degrees.
Calculate the total swash effect, (TSE).
Put the run-out of the Stages 9 To 12 Compressor Disks assembly rear location diameter (diameter N) in to the computer. Refer to Step. Put the value of the run-out in to the computer as vector L1. Put the angle of the run-out in to the computer as angle A1.
Put the TSE value and angle in to the computer. Refer to Step Put the value of the TSE in to the computer as vector L2. Put the angle of the TSE in to the computer as angle A2.
Write down the value and angle of combined swash and run-out effect. These values are necessary when you do Step.
Calculate the combined swash and run-out effect of the stages 3 to 12 compressor disks assembly.
SUBTASK 72-41-10-440-144 Calculate the Data Used to Find the Best Position of the HP Compressor Shaft (01-850) in Relation to the Stages 3 to 12 HP Compressor Disks Assembly
Examine the stage 9 to 12 compressor disk assembly location diameter. Refer to TASK 72-41-12-200-002-A00, 72-41-12-220-069.
and/or.
Examine the HP Compressor rear shaft location diameter at location 3. Refer to TASK 72-41-13-200-001-A00, 72-41-13-220-078.
If you can not get the interference fit given in para. (1).
Hold the square headed bolts in position with IAE 1R18223 Spacer and 2 slave nuts.

CAUTION
YOU MUST NOT USE AN ALUMINUM DRIFT TO BEND THE RETAINING WASHER LOCKING TABS. USE OF AN ALUMINUM DRIFT CAN CAUSE DAMAGE TO THE HARDWARE AND TOOLS.
CAUTION
USE OF EXCESSIVE FORCE MAY DAMAGE THE HARDWARE OR TOOLS.Using a Nylon Drift (maximum length = 6 inches, maximum diameter = 0.75 inch) and Soft Faced Mallet, lightly tap the retaining washer tabs until they bend around the heads of the bolts.
Remove the slave nuts and spacer plates.

CAUTION
A NEW DOUBLE RETAINING WASHER MUST BE USED IF THE TABS ARE MADE STRAIGHT DURING ASSEMBLY.Install 40 square head bolts HPC Rear Shaft And Heatshield Assembly (72-41-13, 01-858) and HPC Rear Shaft And Heatshield Assembly (72-41-13, 01-856) double retaining washer 20 off through the rear of the Stages 12 Compressor Disk rear flange.
SUBTASK 72-41-10-440-070 Prepare the Stages 3 to 12 HP Compressor Disks Assembly for the Installation of the HP Compressor Shaft (01-850),and.
Install IAE 1R18441 Lifting adapter 1 off on to the end of the compressor shaft. Refer to Figure.
Lift the rear shaft and put it above IAE 1R18096 Pallet 1 off.
Carefully lower the compressor shaft on to the tray on the pallet. Refer to Figure.
Refer to the run-out of the compressor shaft (refer to TASK 72-41-10-440-001) and the combined swash and run-out effect of the stages 3 to 12 compressor disks assembly (refer to Step. Use these values to calculate the position of the compressor shaft in relation to the stages 3 to 12 compressor disks assembly. Calculate the position that will give the minimum swash and run-out of the compressor shaft. Write down the calculated values of swash and run-out.

CAUTION
YOU MUST MAKE SURE THE SLAVE NUTS AND SPACERS INSTALLED IN TASK 72-41-00-440-002-A00, 72-41-00-440-070 ARE REMOVED BEFORE INSTALLING THE COMPRESSOR SHAFT.Make sure the position of the compressor shaft in relation to the stages 3 to 12 compressor disks assembly is that calculated in Step.
Lower the compressor shaft on to the stages 3 to 12 compressor disks. Make sure the 40 square headed bolts engage in the holes in the compressor shaft front flange. Refer to Figure.
Install eight slave nuts, on to the square head bolts at position numbers 1, 25, 3, 27, 2, 26, 4 and 28. Refer to Figure. Torque the eight nuts to 180 lbfin to 220 lbfin (20 Nm to 25 Nm), in sequence.
Install the 40 nuts HPC Rear Shaft And Heatshield Assembly (72-41-13, 01-852) on to the square headed bolts.
Torque all the nuts to 180 lbfin to 220 lbfin (20 Nm to 25 Nm), in the sequence given in Figure.
Install the compressor shaft on to the stages 3 to 12 compressor disks assembly.
SUBTASK 72-41-10-440-071 Install the HP Compressor Shaft (01-850) on to the Stages 3 to 12 HP Compressor Disks Assembly
Refer to Figure
Install IAE 1R18062 Master curic base 1 off, IAE 1R18086 Clamp assembly 4 off, IAE 1R18087 Block 4 off and IAE 1R18085 Adjusting unit 4 off on to the Rotary air table. Refer to TASK 72-41-10-440-001.
SUBTASK 72-41-10-440-072 Assemble the Tools Used to Measure the Stages 3 to 12 HP Compressor Disks and HP Compressor Shaft Assembly
Use IAE 1R18088 Pillar 1 off and measuring equipment to correct the run-out of the assembled tools. Refer to TASK 72-41-10-440-001.
SUBTASK 72-41-10-440-073 Correct the Run-out of the Assembled Tools
Install IAE 1R18441 Lifting adapter 1 off on to the end of the compressor shaft. Refer to Figure.
Install IAE 1R18091 Support stand 1 off on to the top of IAE 1R18090 Safety support stand 1 off. Make sure that the stand adapter is correctly engaged in the safety support stand. Refer to Figure.

CAUTION
YOU MUST NOT LET THE STAGES 3 TO 12 COMPRESSOR DISKS AND COMPRESSOR SHAFT ASSEMBLY HIT THE SAFETY SUPPORT STAND.Slowly lower the stages 3 to 12 compressor disks and compressor shaft assembly on to the safety support stand. Make sure the stage 3 disk curvic coupling goes through the hole in the stand adapter.
Examine the curvic teeth of the master curvic base and the stage 3 disk curvic coupling for contamination and/or high metal. If there is contamination then the curvic teeth must be cleaned. If there is high metal, use a stone to make the surface smooth. Refer to Figure.
Examine the curvic teeth of the stage 3 disk and the master curvic base curvic couplings.
Install IAE 1R18063 Location piece 1 off on to the master curvic base.

CAUTION
YOU MUST NOT LET THE STAGES 3 TO 12 COMPRESSOR DISKS AND COMPRESSOR SHAFT ASSEMBLY HIT THE MASTER CURVIC BASE.Slowly lower the stages 3 to 12 compressor disks and compressor shaft assembly until the location piece is engaged in the bore of the stage 3 compressor disk. Make sure that the four location dowels in the master curvic base are aligned with the four holes in the stage 3 disk curvic coupling.
Install the IAE 1R18064 Bolt 20 off through the master curvic base in to the stage 3 disk curvic coupling. Lightly tighten the bolts.
NOTE
The torque sequence is identified on the outer diameter of the master curvic base front flange.Torque all of the bolts. Do these three steps in the sequence shown. Refer to Figure.
SUBTASK 72-41-10-440-074 Install the Stages 3 to 12 HP Compressor Disks and HP Compressor Shaft Assembly on to the Master Curvic Base
Find the eight numbered positions on the compressor shaft front seal face (face V). Refer to TASK 72-41-10-440-001.
Measure the swash at the eight positions found in Step.
Set the computer to the applicable program and put the swash values in to the computer. The computer will calculate the FIR and the angle of the swash. Make a mark on CoMat 02-130 POLAR GRAPH PAPER to show the FIR and angle and identify it as S1.
Measure the run-out at the eight positions found in Step.
Put the run-out values in to the computer. The computer will calculate the FIR and the angle of the run-out. Make a mark on the CoMat 02-130 POLAR GRAPH PAPER to show the FIR and angle and identify it as R1.
Use IAE 1R18088 Pillar 1 off and measuring equipment to measure the swash of face T and the run-out of diameter U. Refer to Figure and Figure.
Attach IAE 1R18441 Lifting adapter 1 off on to the end of the compressor shaft. Refer to Step.
Turn the Rotary air table and assembled tools through 180 degrees. Make sure the stages 3 to 12 compressor disks and compressor shaft assembly do not move.
Install the stages 3 to 12 compressor disks and compressor shaft assembly on to the master curvic base. Refer to Step.
Turn the stages 3 to 12 compressor disks and compressor shaft assembly 180 degrees in relation to the master curvic base.
Measure the swash and run-out, refer to Step.Identify the swash as S2 and the run-out as R2 on the CoMat 02-130 POLAR GRAPH PAPER.
Make a line between the point S3 and the center of the CoMat 02-130 POLAR GRAPH PAPER.
Make a line between the point R3 and the center of the CoMat 02-130 POLAR GRAPH PAPER.
NOTE
The distance between the points S1 or S2 and the point S3, (distance G), shows the swash error in the tools.The distance between the center of the CoMat 02-130 POLAR GRAPH PAPER and the point S3, (distance H), shows the correct swash of the stages 3 to 12 compressor disks and compressor shaft assembly.
The distance between the center of the CoMat 02-130 POLAR GRAPH PAPER and the point R3, (distance K), shows the correct run-out of the stages 3 to 12 compressor disks and compressor shaft assembly.
Calculate the correct swash and run-out values.
Use a brush to apply CoMat 07-091 POTASSIUM SILICATE SOLUTION in line with the maximum run-out. Apply the solution on face W. Refer to Figure.
Use a brush to apply CoMat 07-090 YELLOW MARKING PAINT,WATER BASED on to the potassium silicate solution in line with the maximum run-out.
Identify the stage 3 disk with the position of the maximum positive run-out of the rear bearing diameter (diameter U) on the compresser shaft.
SUBTASK 72-41-10-220-061 Measure the Swash and Run-out of the Stages 3 to 12 HP Compressor Disks and HP Compressor Shaft Assembly
Refer to Figure.
Reference dimensions at location 1008. If required use the data written as a note in the applicable TASK. Refer to TASK 72-41-13-200-000 and TASK 72-41-14-200-000.
Table 12. Fits and Clearances (all dimensions are in inches) NEW PART
WORN PART
DIMENSIONS
DIMENSIONS
PART IDENT
Size
Clearance
Non-select
REJECT IF
MORE THAN
LOCATION 1008
HP Compressor Shaft HPC Rear Shaft And Heatshield Assembly (72-41-13, 01-850), Rear Location Bore
HP Compressor Rotating Air Seals ENGINE-HP COMPRESSOR ROTATING AIR SEALS (72-41-14, 01-800), Front Location Diameter Shaft Bore
Compressor Shaft Bore
10.1340
Intf
10.1330
10.1360
0.0018
10.1360
Seal Diameter
10.1380
0.0060
10.1380
10.1400
Intf
10.14000
Table 13. Fits and Clearances (all dimensions are in millimeters) NEW PART
WORN PART
DIMENSIONS
DIMENSIONS
PART IDENT
Size
Clearance
Non-select
REJECT IF
MORE THAN
LOCATION 1008
HP Compressor Shaft HPC Rear Shaft And Heatshield Assembly (72-41-13, 01-850), Rear Location Bore
HP Compressor Rotating Air Seals ENGINE-HP COMPRESSOR ROTATING AIR SEALS (72-41-14, 01-800), Front Location Diameter Shaft Bore
Compressor Shaft Bore
257.404
Intf
257.378
257.454
0.046
257.454
Seal Diameter
257.500
0.146
257.500
257.550
Intf
257.550
SUBTASK 72-41-10-220-062 Reference Fits and Clearances of the HP Compressor Rotor Assembly at Location 1008
Put IAE 1R18673 Dummy stub shaft 1 off in to IAE 1R18075 Support pedestal 1 off with the curvic teeth at the top. Refer to Figure.
NOTE
The compressor disks and shaft assembly is installed in the master curvic base. Refer to Step.Install IAE 1R18441 Lifting adapter 1 off on to the end of the compressor shaft. Refer to Figure.
Install IAE 1R18091 Support stand 1 off on to the top of IAE 1R18090 Safety support stand 1 off. Make sure that the stand adapter is correctly engaged in the safety support stand. Refer to Figure.
Examine the curvic teeth of the dummy stub shaft. Refer to Figure.
Examine the curvic teeth of the stage 3 disk and the dummy stub shaft curvic couplings.
Torque all of the bolts. Do these three steps in the sequence shown. Refer to Figure.

CAUTION
YOU MUST NOT LET THE COMPRESSOR DISKS AND SHAFT ASSEMBLY HIT THE DUMMY STUB SHAFT OR THE SUPPORT PEDESTAL.Install the dummy stub shaft.
SUBTASK 72-41-10-440-075 Install the Dummy Stub Shaft on to the HP Compressor Disks and Shaft Assembly
Lift the compressor disks and shaft assembly off the support pedestal and put it above IAE 1R18020 Build stand 1 off. Refer to Figure.
Put one half of IAE 1R18021 Support ring 1 off on to the top of the build stand and align the four holes in the support ring with four holes in the build stand. Install four of the screws through the support ring in to the build stand. Tighten the screws.
Install the other half of the support ring. Refer to Step.
Remove the lifter from the end of the compressor shaft. Refer to Figure.
SUBTASK 72-41-10-440-076 Install the HP Compressor Disks and Shaft Assembly in to the Build Stand

WARNING
YOU MUST PUT ON THE CORRECT GLOVES BEFORE YOU USE LIQUID NITROGEN.Put the compressor rotating air seal fully in to CoMat 03-026 LIQUID NITROGEN until the violent action of the bubbles decreases.
Install eight of the 18 bolts ENGINE-HP COMPRESSOR ROTATING AIR SEALS (72-41-14, 01-808) through the compressor rotating air seal in to the compressor shaft. Install the bolts at the position numbers 1 thru 8. Refer to Figure.
Install the compressor rotating air seal on to the compressor shaft. Refer to Figure.
Install the other 10 bolts ENGINE-HP COMPRESSOR ROTATING AIR SEALS (72-41-14, 01-808) through the compressor rotating air seal in to the compressor shaft. Install the bolts at the position numbers 9 thru 18. Lightly tighten the bolts.
Install the 18 bolts ENGINE-HP COMPRESSOR ROTATING AIR SEALS (72-41-14, 01-785) through the compressor rotating air seal in to the compressor shaft. Install the bolts at the position numbers 19 thru 36. Lightly tighten the bolts.
Release the bolts tightened in Step.
Torque the 18 bolts ENGINE-HP COMPRESSOR ROTATING AIR SEALS (72-41-14, 01-808) to 85 lbfin to 105 lbfin (10 Nm to 12 Nm) in the sequence given on Figure position numbers 1 thru 18.
Torque the 18 bolts ENGINE-HP COMPRESSOR ROTATING AIR SEALS (72-41-14, 01-785) to 36 lbfin to 45 lbfin (4 Nm to 5 Nm) in the sequence given on Figure position numbers 19 thru 36.
Torque all of the 36 bolts.
SUBTASK 72-41-10-440-077 Install the HP Compressor Rotating Air Seal (01-800)
Install IAE 1R18629 Protective cover 1 off on to the compressor rotating air seal. Refer to Figure.
Install IAE 1R18089 Lifting adapter 1 off on to the end of the compressor shaft.
Attach one of IAE 1R18095 Universal slinging adapter 2 off, on to the lifting adapter. Refer to Figure.
Install IAE 1R18091 Support stand 1 off on to IAE 1R18090 Safety support stand 1 off and install the compressor disks and shaft assembly on to the safety support stand. Refer to Step.
Install the other universal slinging adapter on to the dummy stub shaft.
Install the compressor disks and shaft assembly in to IAE 1R18059 Trolley 1 off. Refer to Figure.
Install IAE 1R18061 Rail 2 off on to the trolley.
SUBTASK 72-41-10-440-078 Install the stages 3 to 12 HP Compressor Disks and HP Compressor Shaft Assembly in to the Trolley

WARNING
WHEN YOU USE CoMat 01-001 SOLVENT, DELETED OR CoMat 01-002 SOLVENT, DELETED. YOU MUST USE THE NECESSARY PROTECTIVE CLOTHING. DO NOT GET THE SOLVENT ON YOUR SKIN OR IN YOUR EYES. YOU MUST NOT SMOKE WHEN YOU USE THE SOLVENT AS THE VAPOR CHANGES AND BECOMES TOXIC.Use CoMat 01-001 SOLVENT, DELETED or CoMat 01-002 SOLVENT, DELETED. and a cloth to clean the threads of the two Stage 6 nut and screw lock assemblies HPC Rotor Blades (72-41-15, 02-165).
Use a brush to apply CoMat 10-070 ANTI-SEIZE COMPOUND to the threads of the Stage 6 nut and screw and lock assemblies.
Install the two nut and screw lock assemblies HPC Rotor Blades (72-41-15, 02-265) in the Stage 7 Disk.
Install the two nut and screw lock assemblies HPC Rotor Blades (72-41-15, 02-365) in the stage 8 disk.
Install the two nut and screw lock assemblies HPC Rotor Blades (72-41-15, 02-465) in the stage 9 disk.
Install the two nut and screw lock assemblies HPC Rotor Blades (72-41-15, 02-565) in the Stage 10 disk.
Install the two nut and screw lock assemblies HPC Rotor Blades (72-41-15, 02-665) in the Stage 11 Disk.
Install the two nut and screw lock assemblies HPC Rotor Blades (72-41-15, 02-765) in the stage 12 disk.
SUBTASK 72-41-10-440-079 Install the Nut and Screw Lock Assemblies in to the Stages 6 thru 12 HP Compressor Disks
Figure: Stages 3 to 8 HP Compressor Disks, the Vortex Reducer Ring, the Stages 9 to 12 HP Compressor Disks and the HP Compressor Shaft
Stages 3 to 8 HP Compressor Disks, the Vortex Reducer Ring, the Stages 9 to 12 HP Compressor Disks and the HP Compressor Shaft
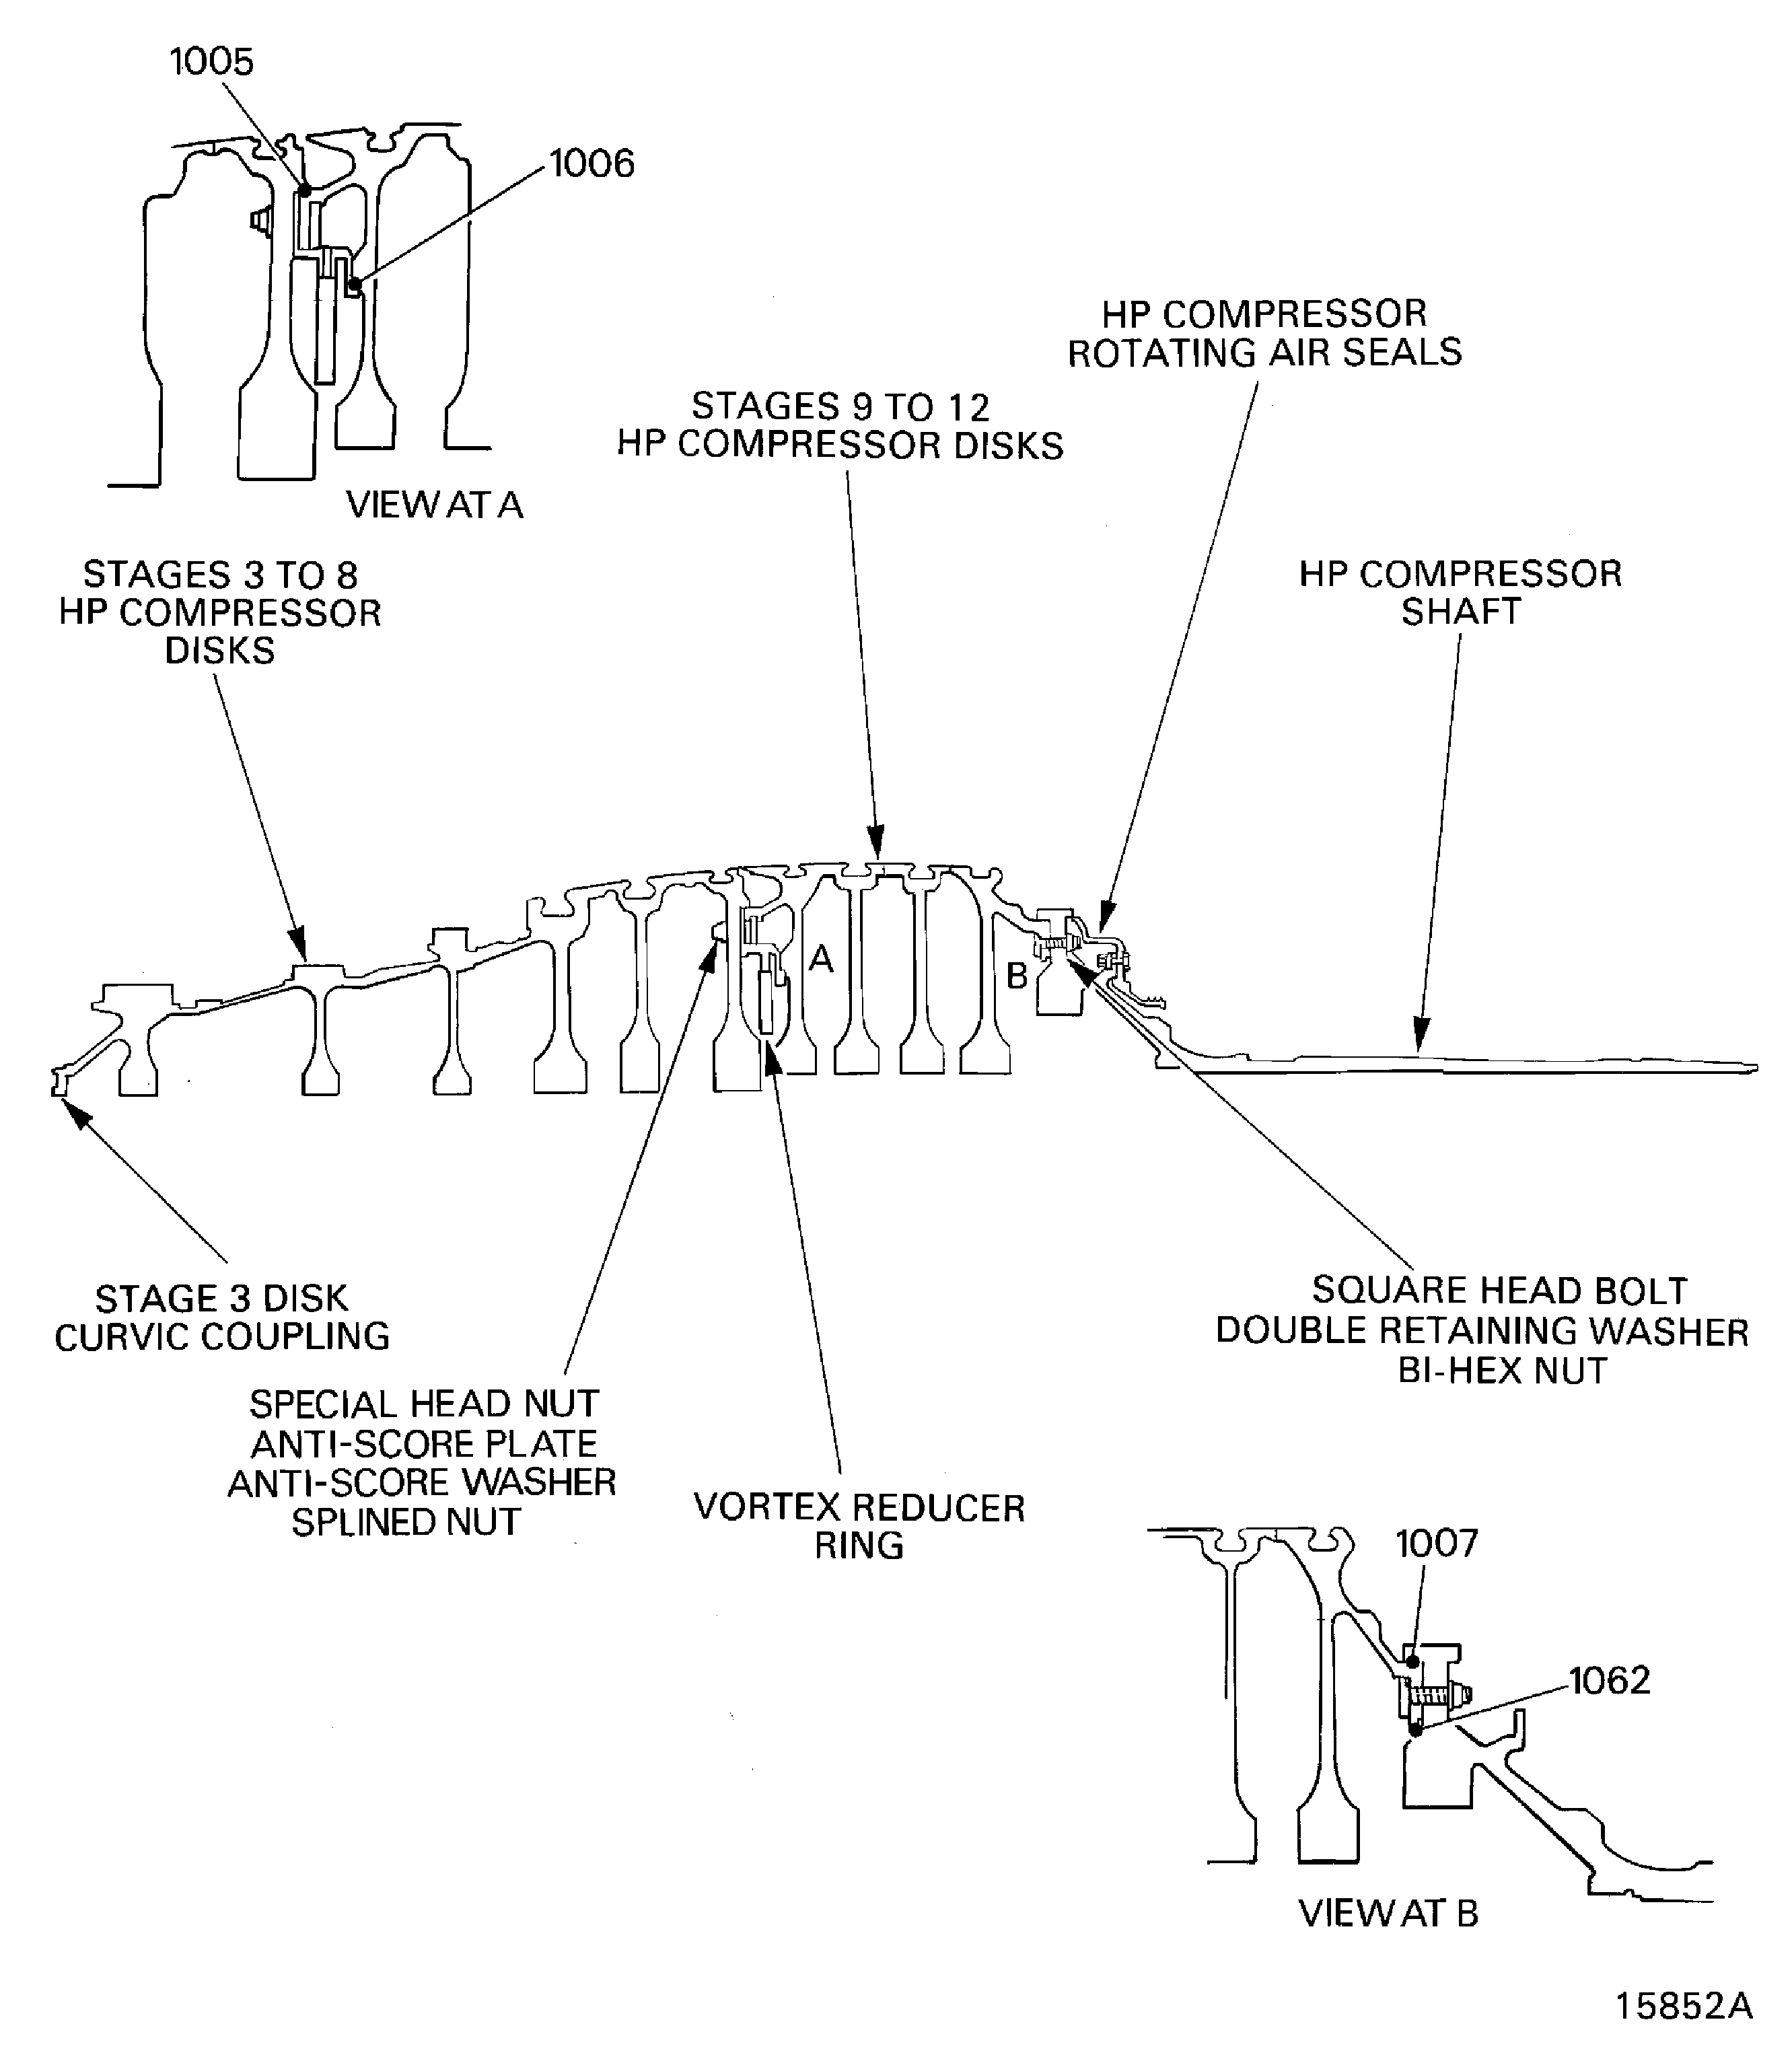
Figure: Stages 3 to 8 HP Compressor Disks and Vortex Reducer Ring Data
Stages 3 to 8 HP Compressor Disks and Vortex Reducer Ring Data
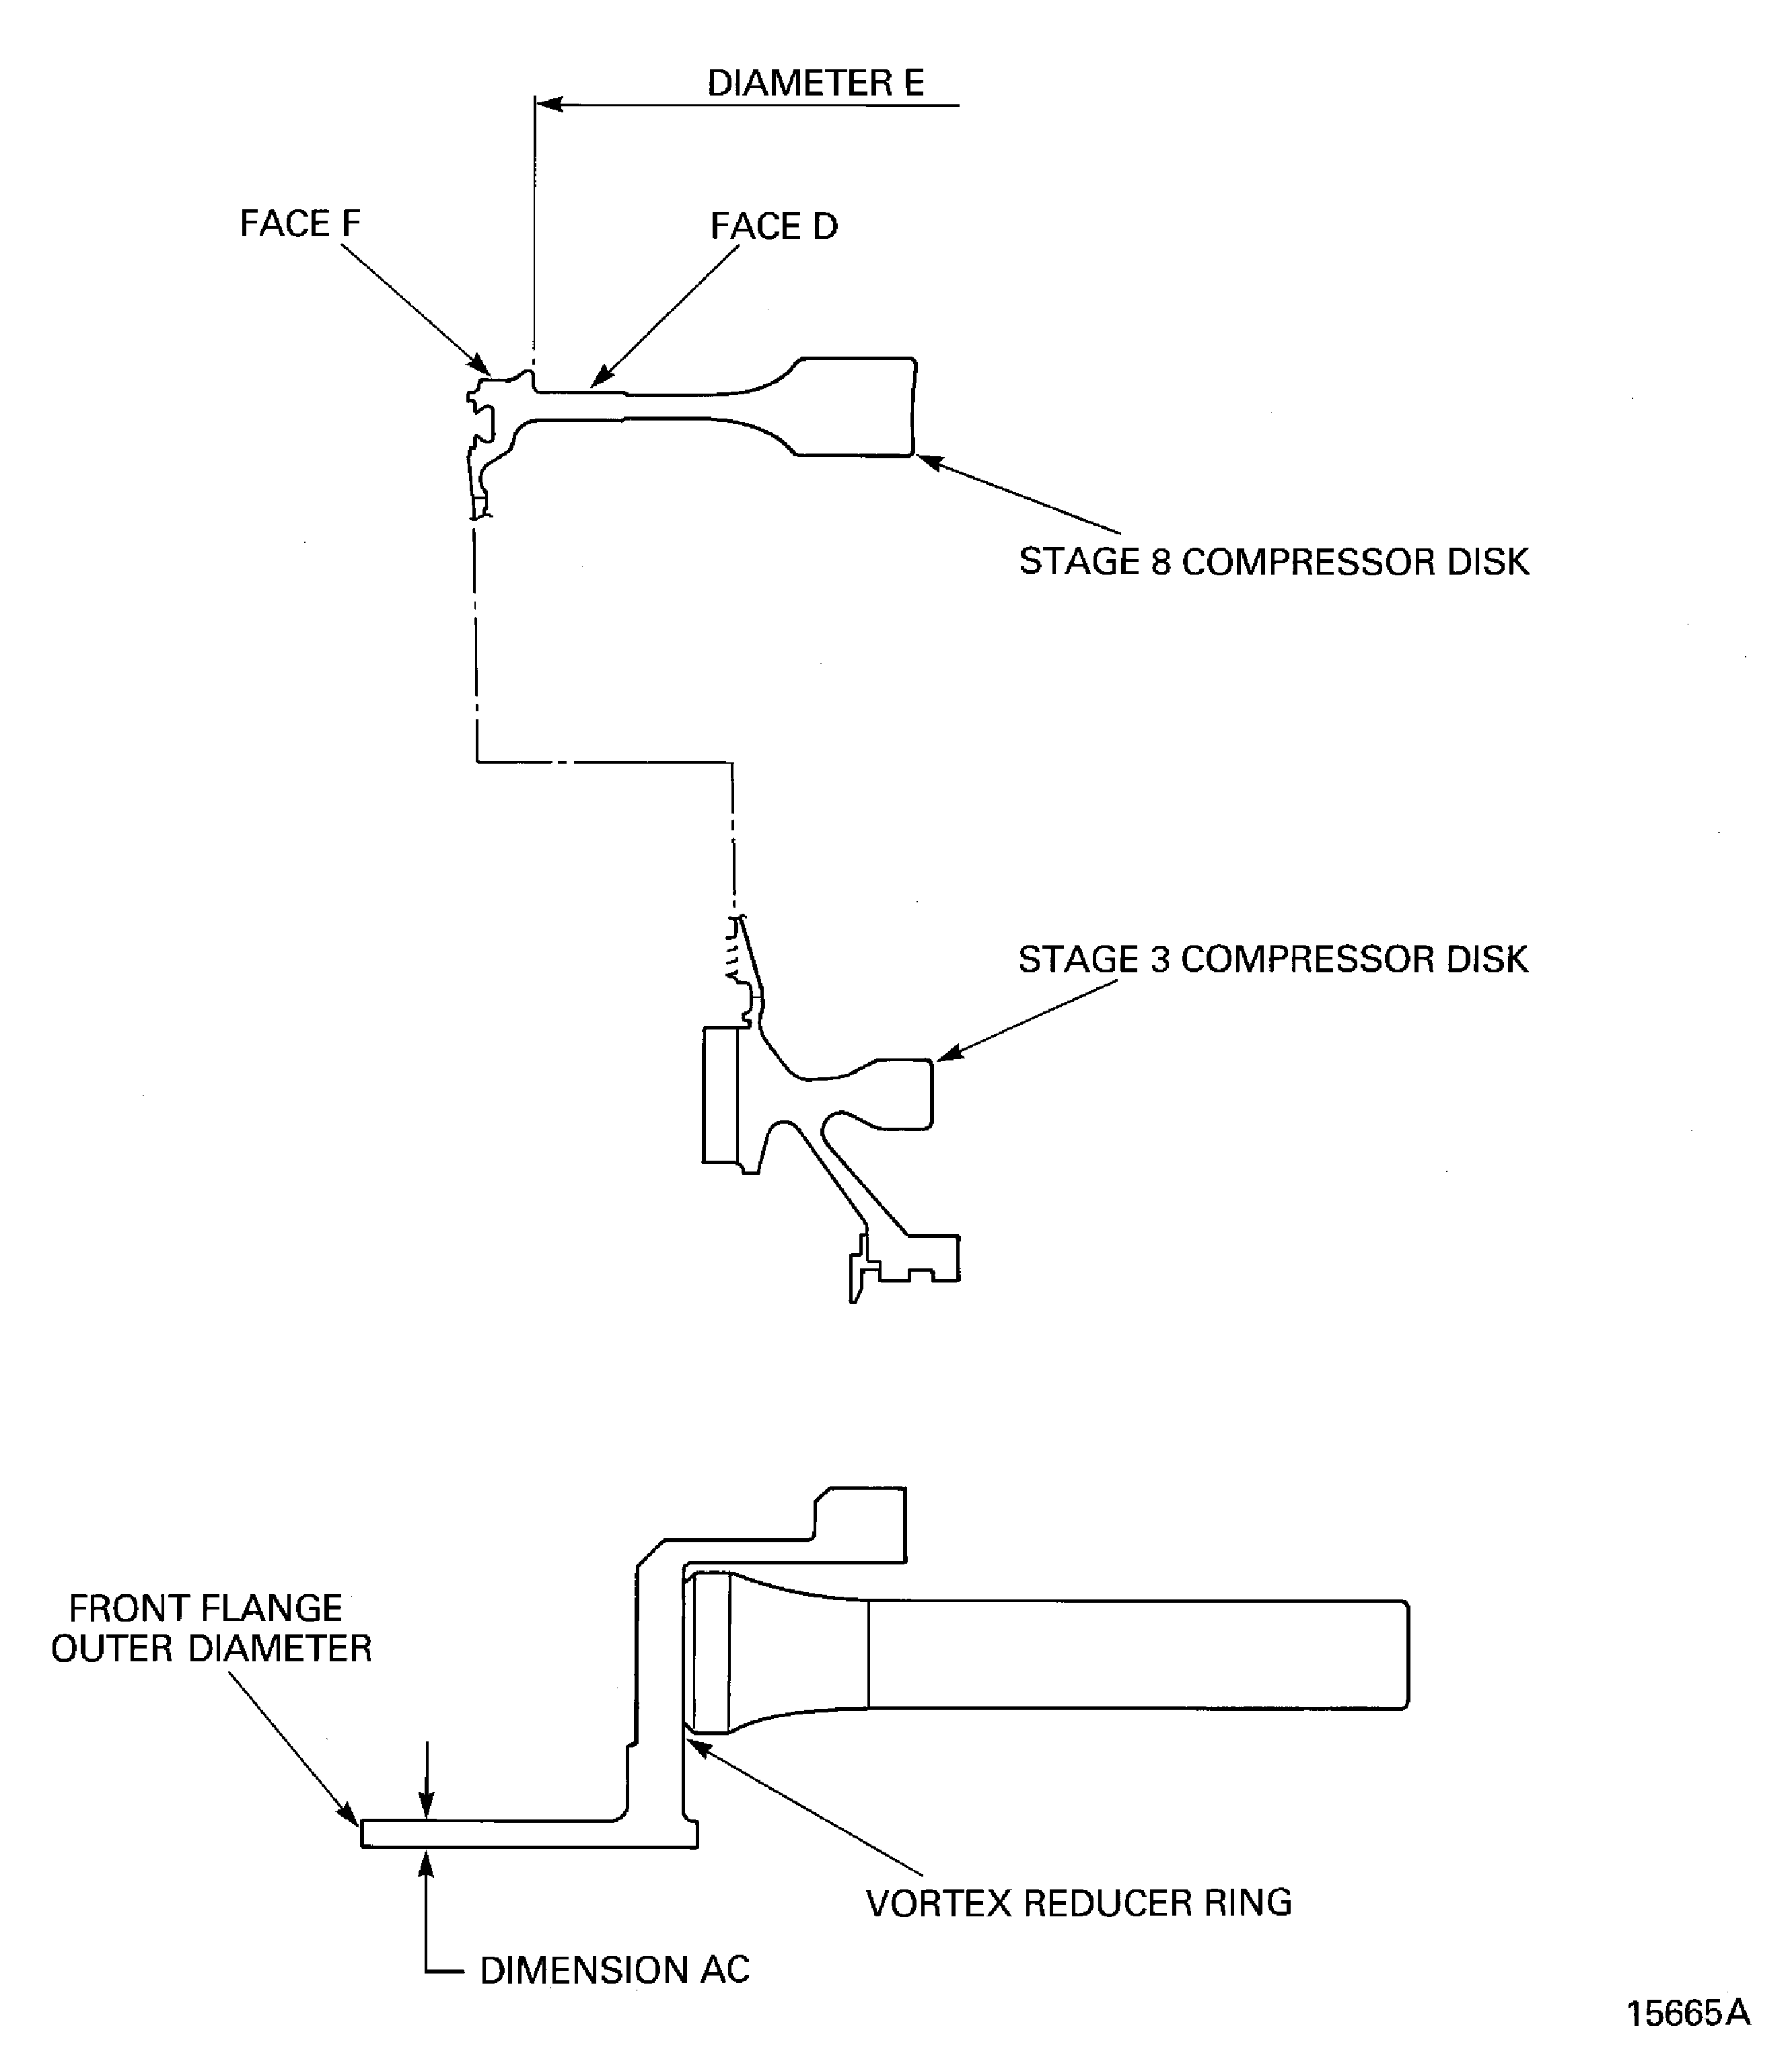
Figure: Install the vortex Reducer Ring on to the Stages 9 to 12 HP Compressor Disks
Sheet 1
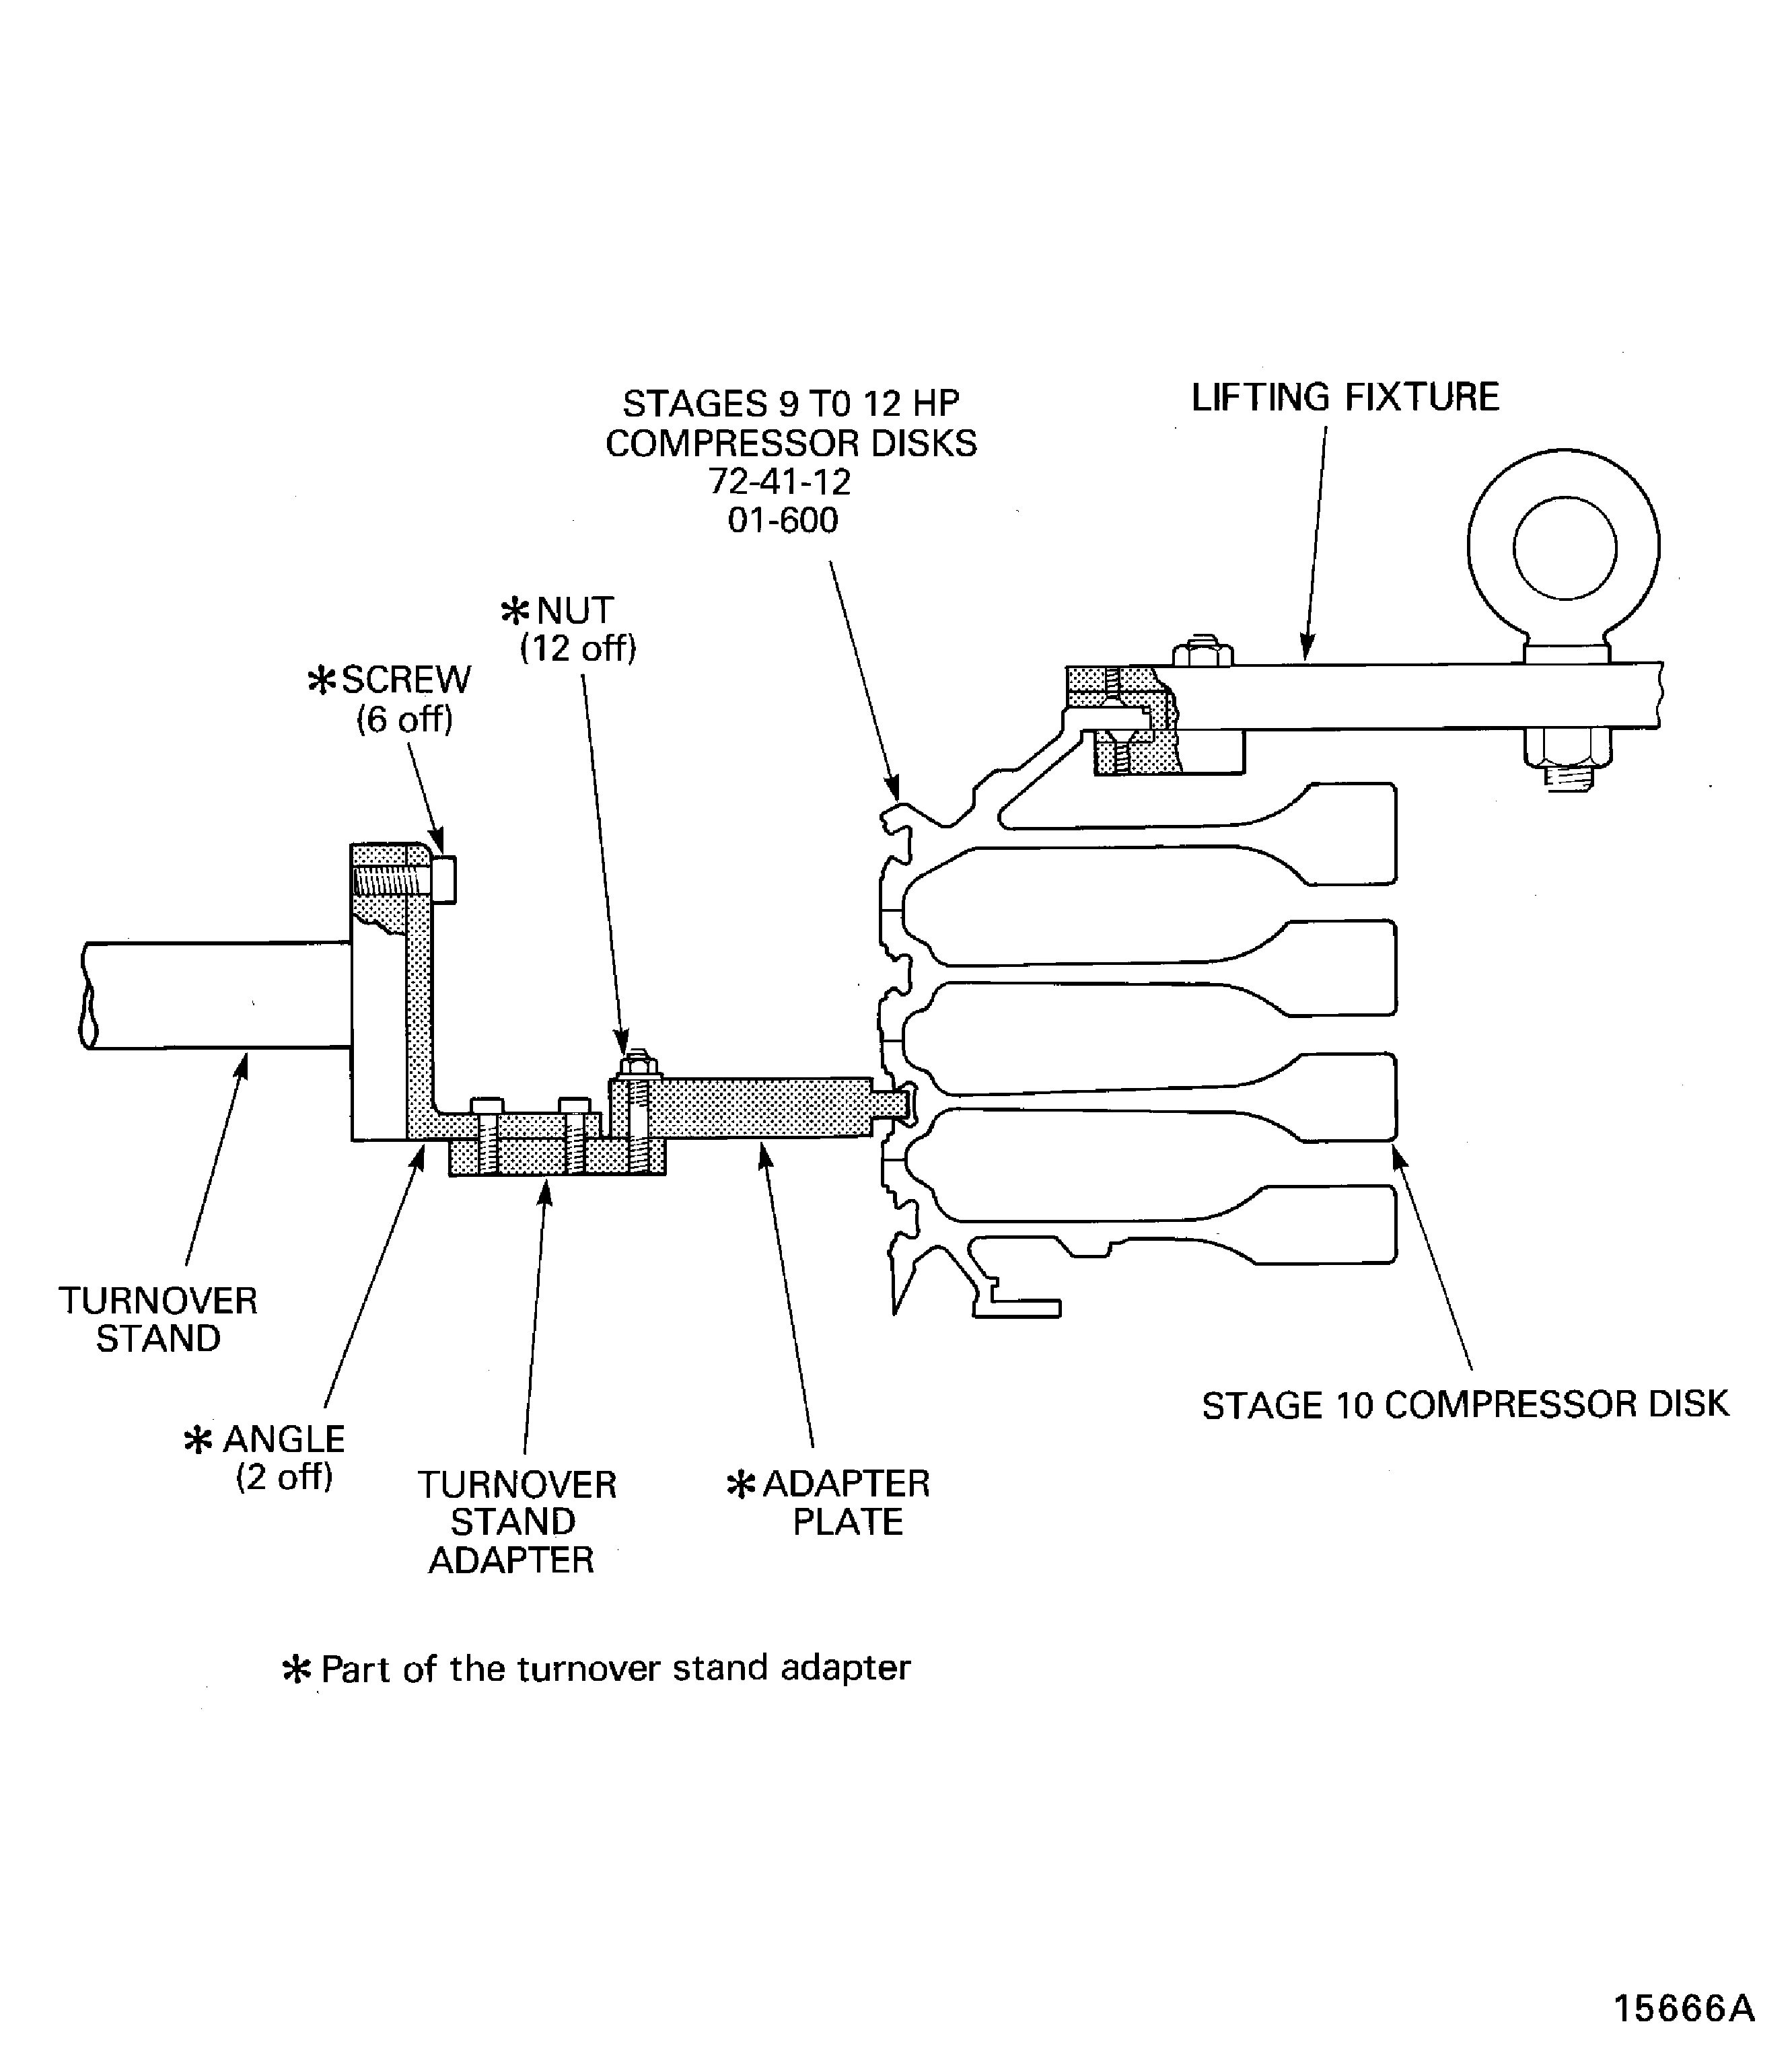
Figure: Install the Vortex Reducer Ring on to the Stages 9 to 12 HP Compressor disks
Sheet 2
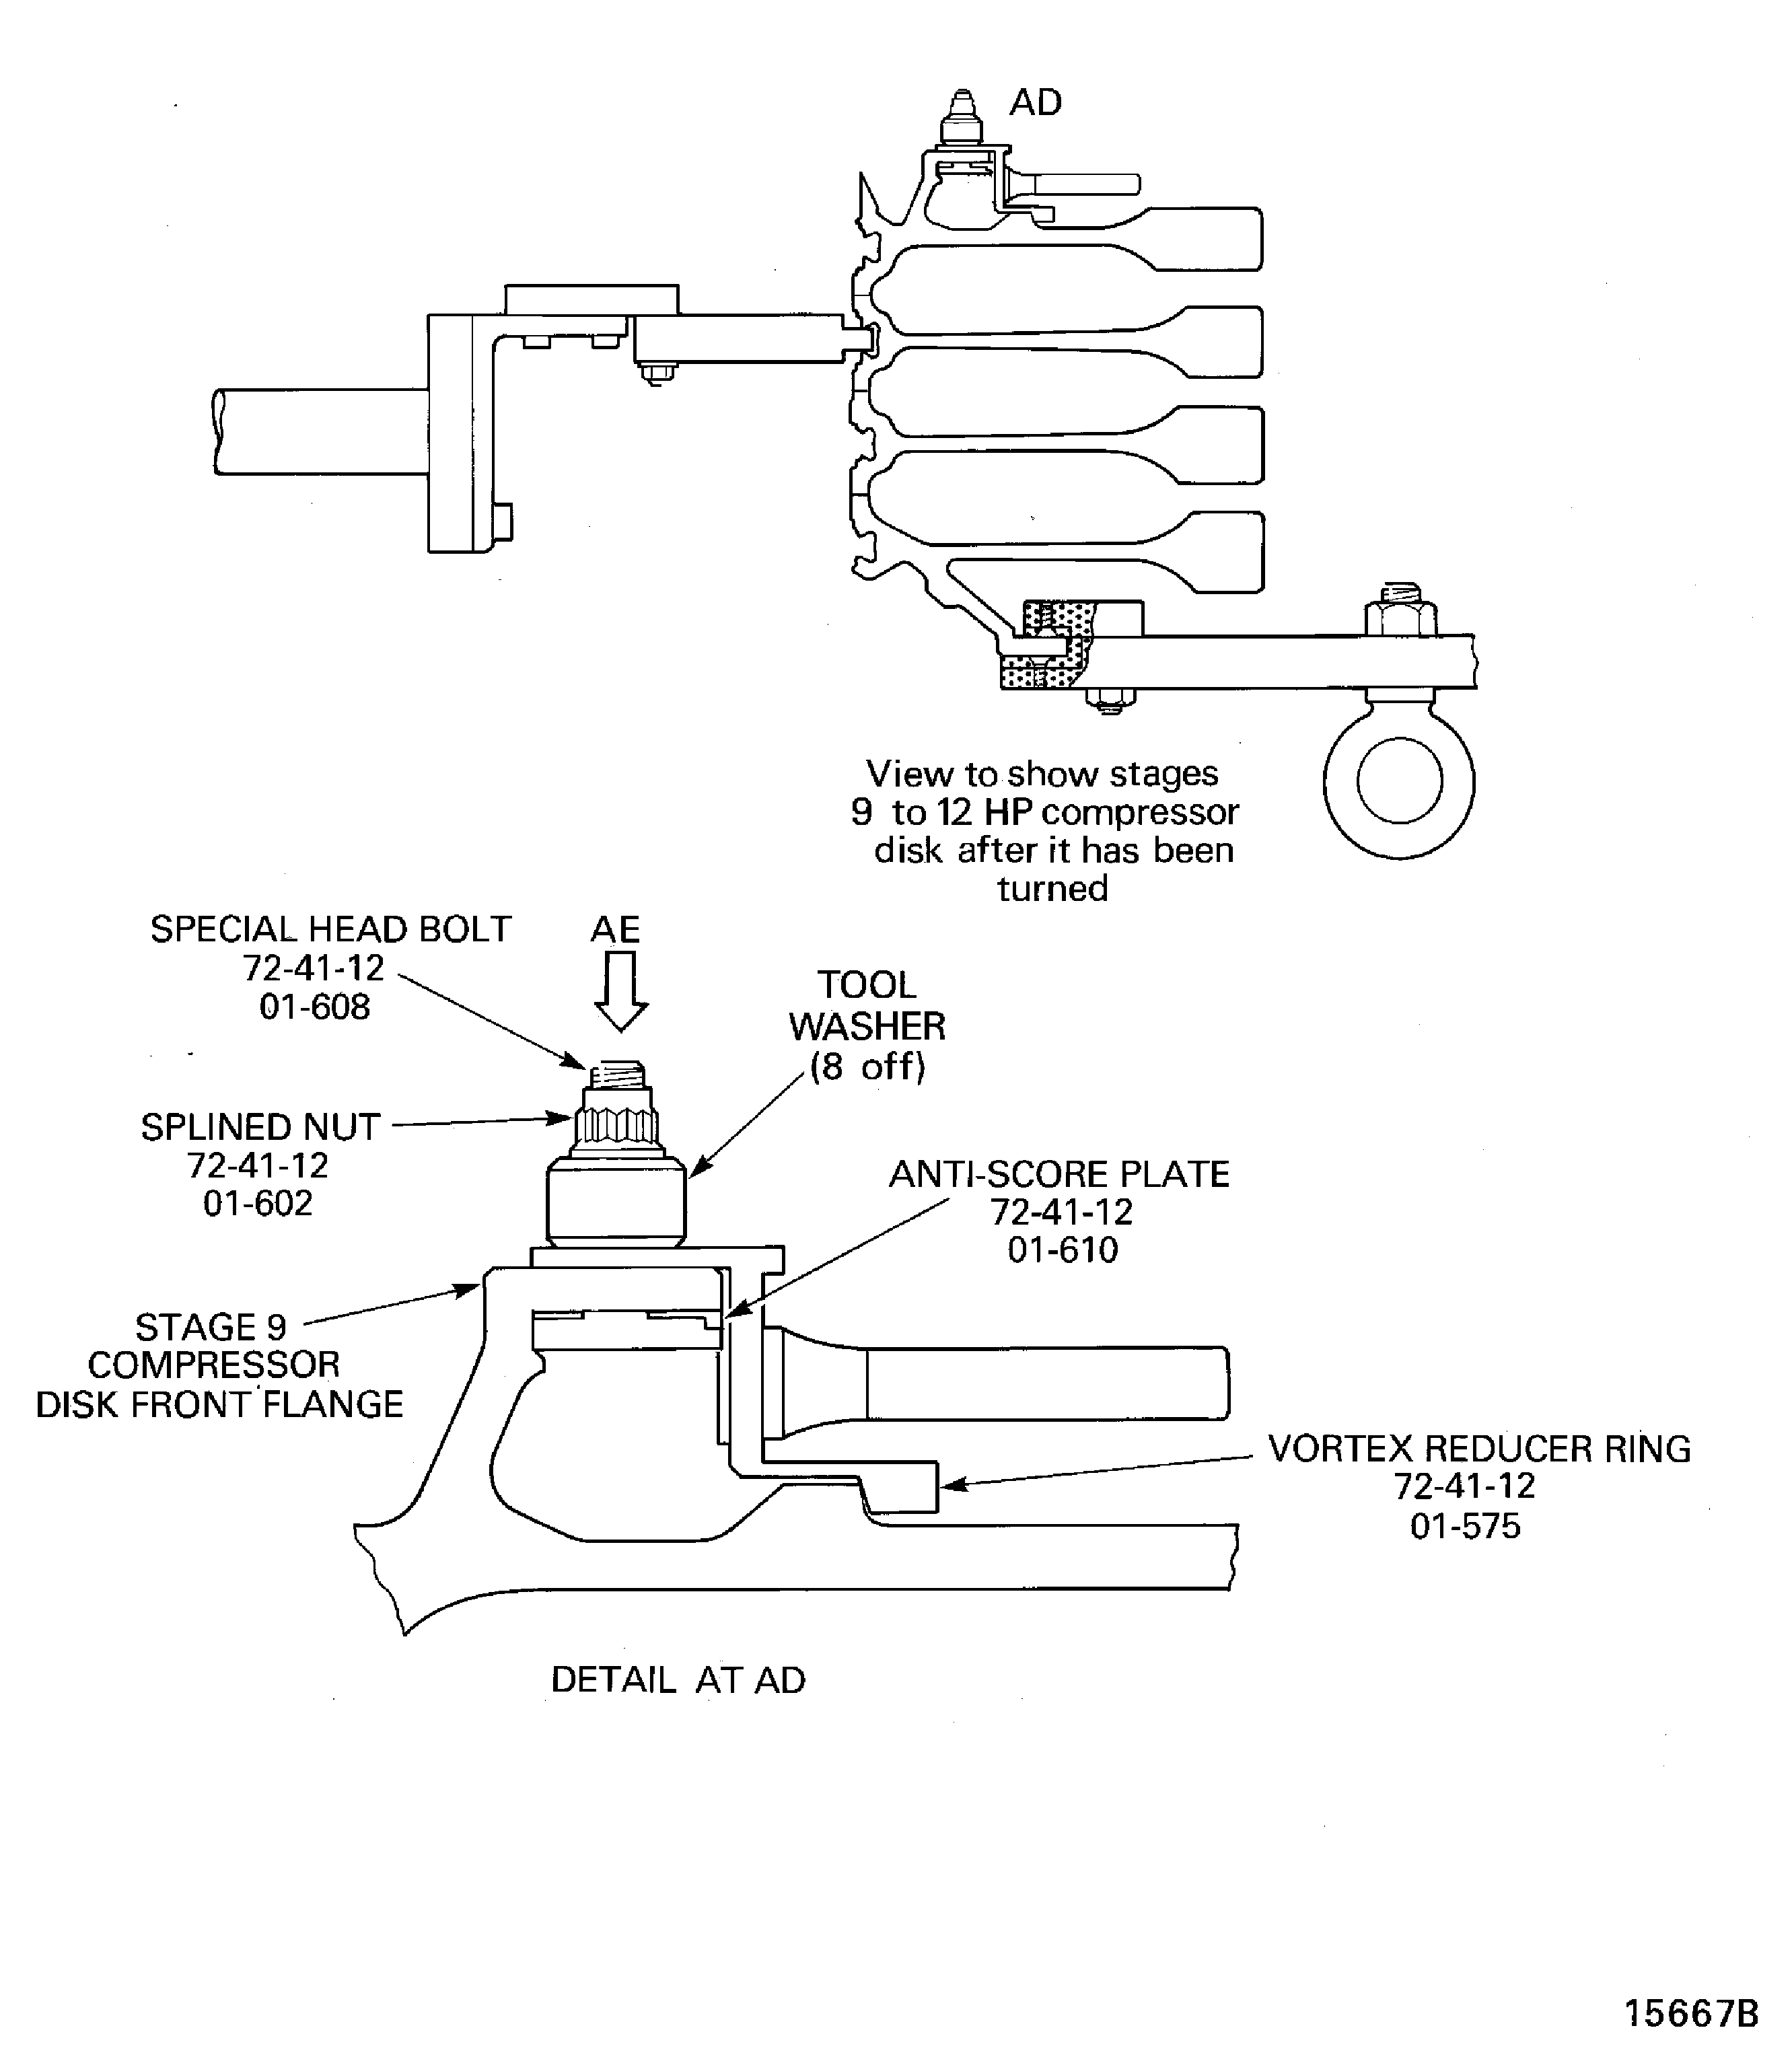
Figure: Remove the Vortex Reducer Ring from the Stages 9 to 12 HP Compressor Disks
Remove the Vortex Reducer Ring from the Stages 9 to 12 HP Compressor Disks
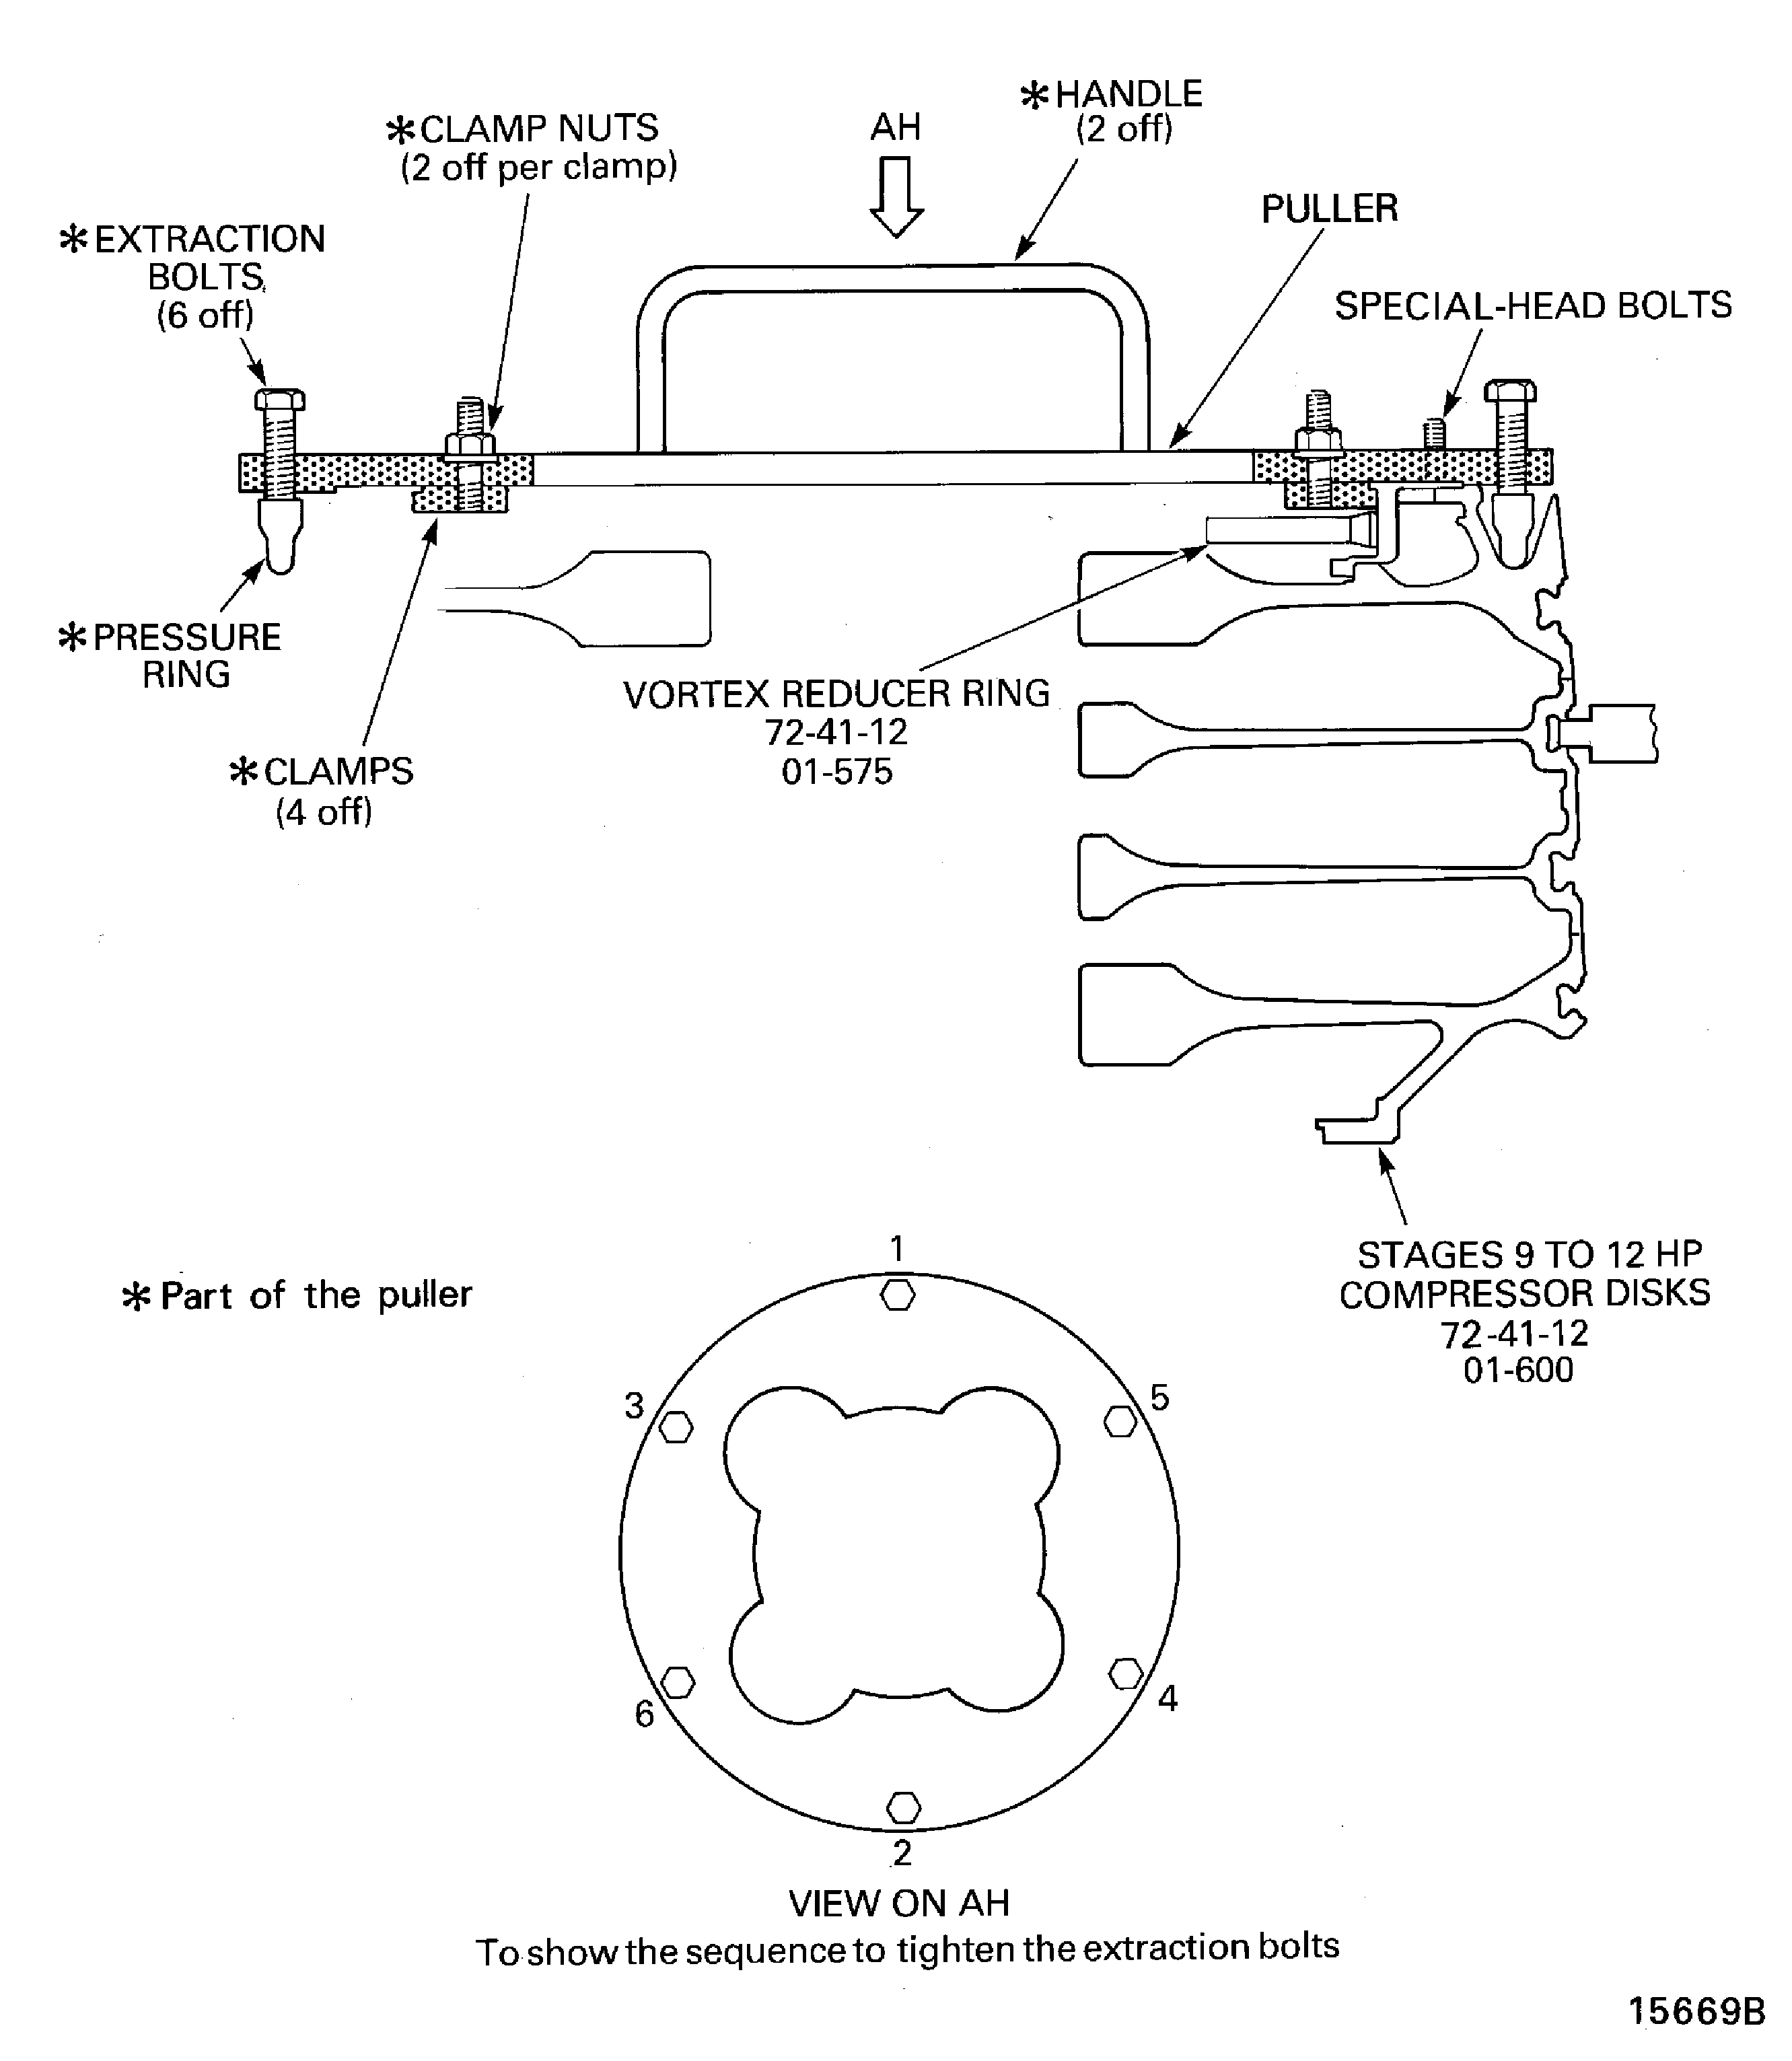
Figure: Remove the Stages 3 to 8 HP Compressor Disks from the Support Tool
Remove the Stages 3 to 8 HP Compressor Disks from the Support Tool
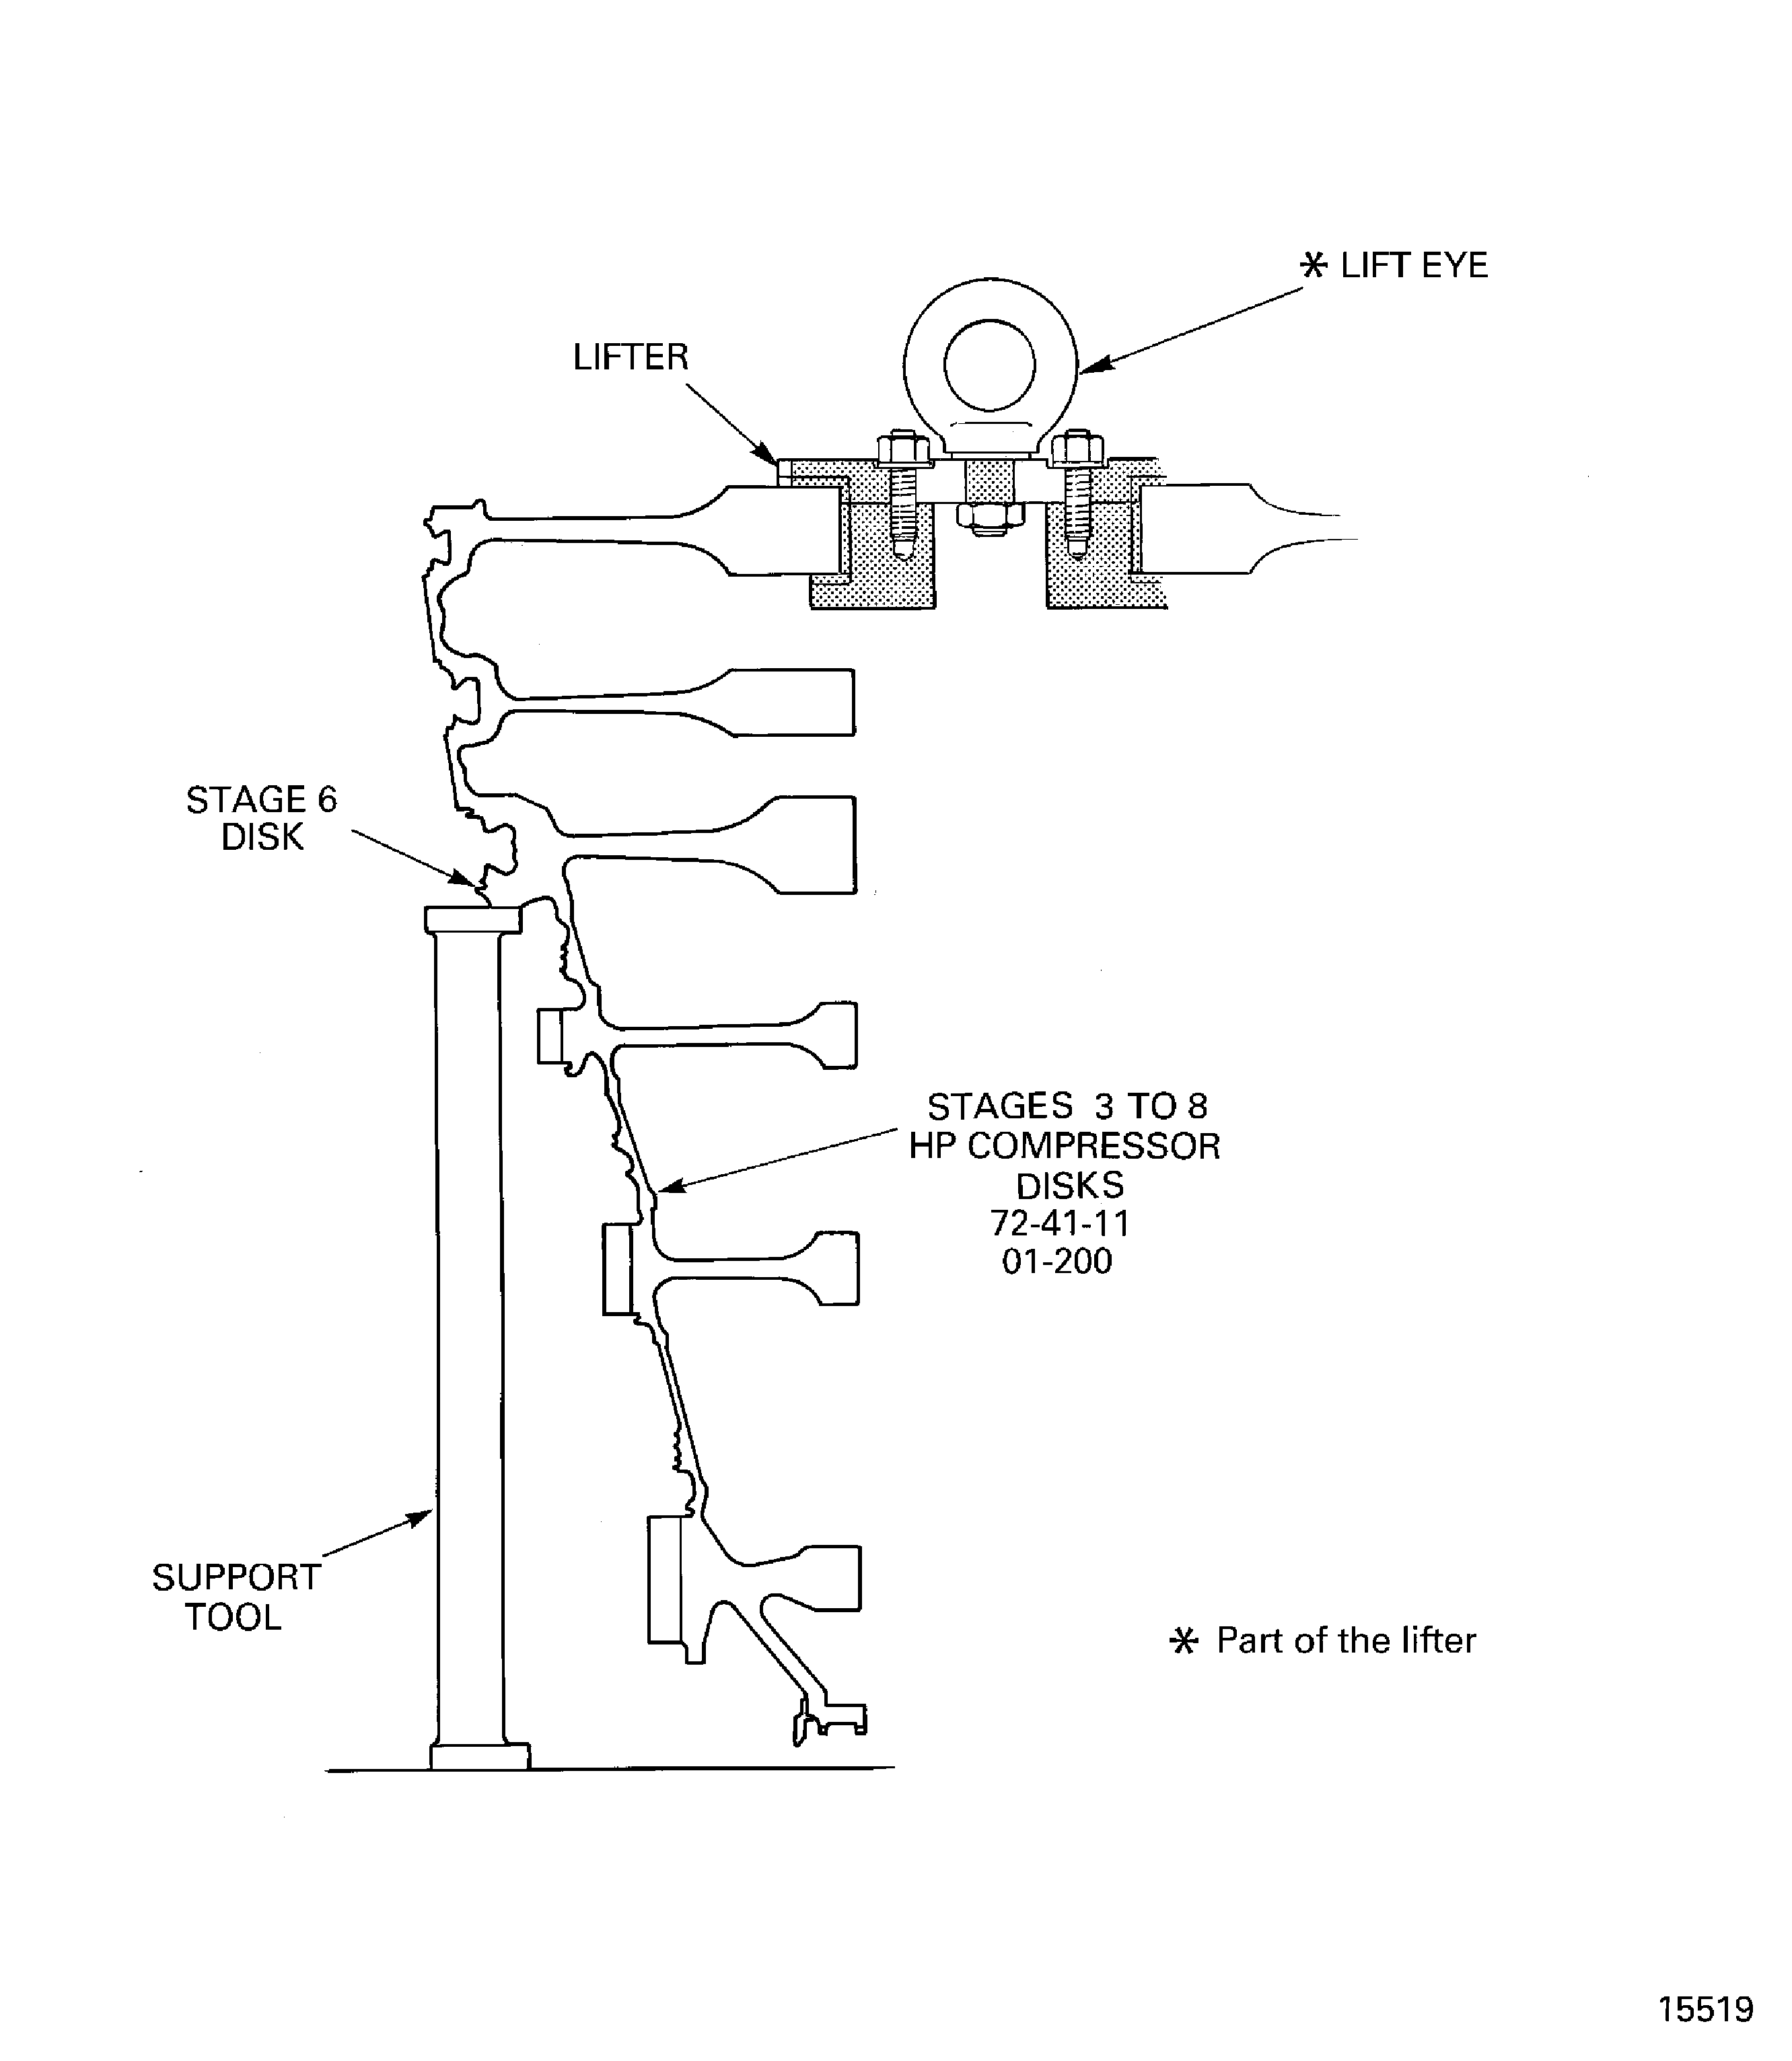
Figure: Install the Stages 3 to 8 HP Compressor Disks in to the Build Stand
Install the Stages 3 to 8 HP Compressor Disks in to the Build Stand
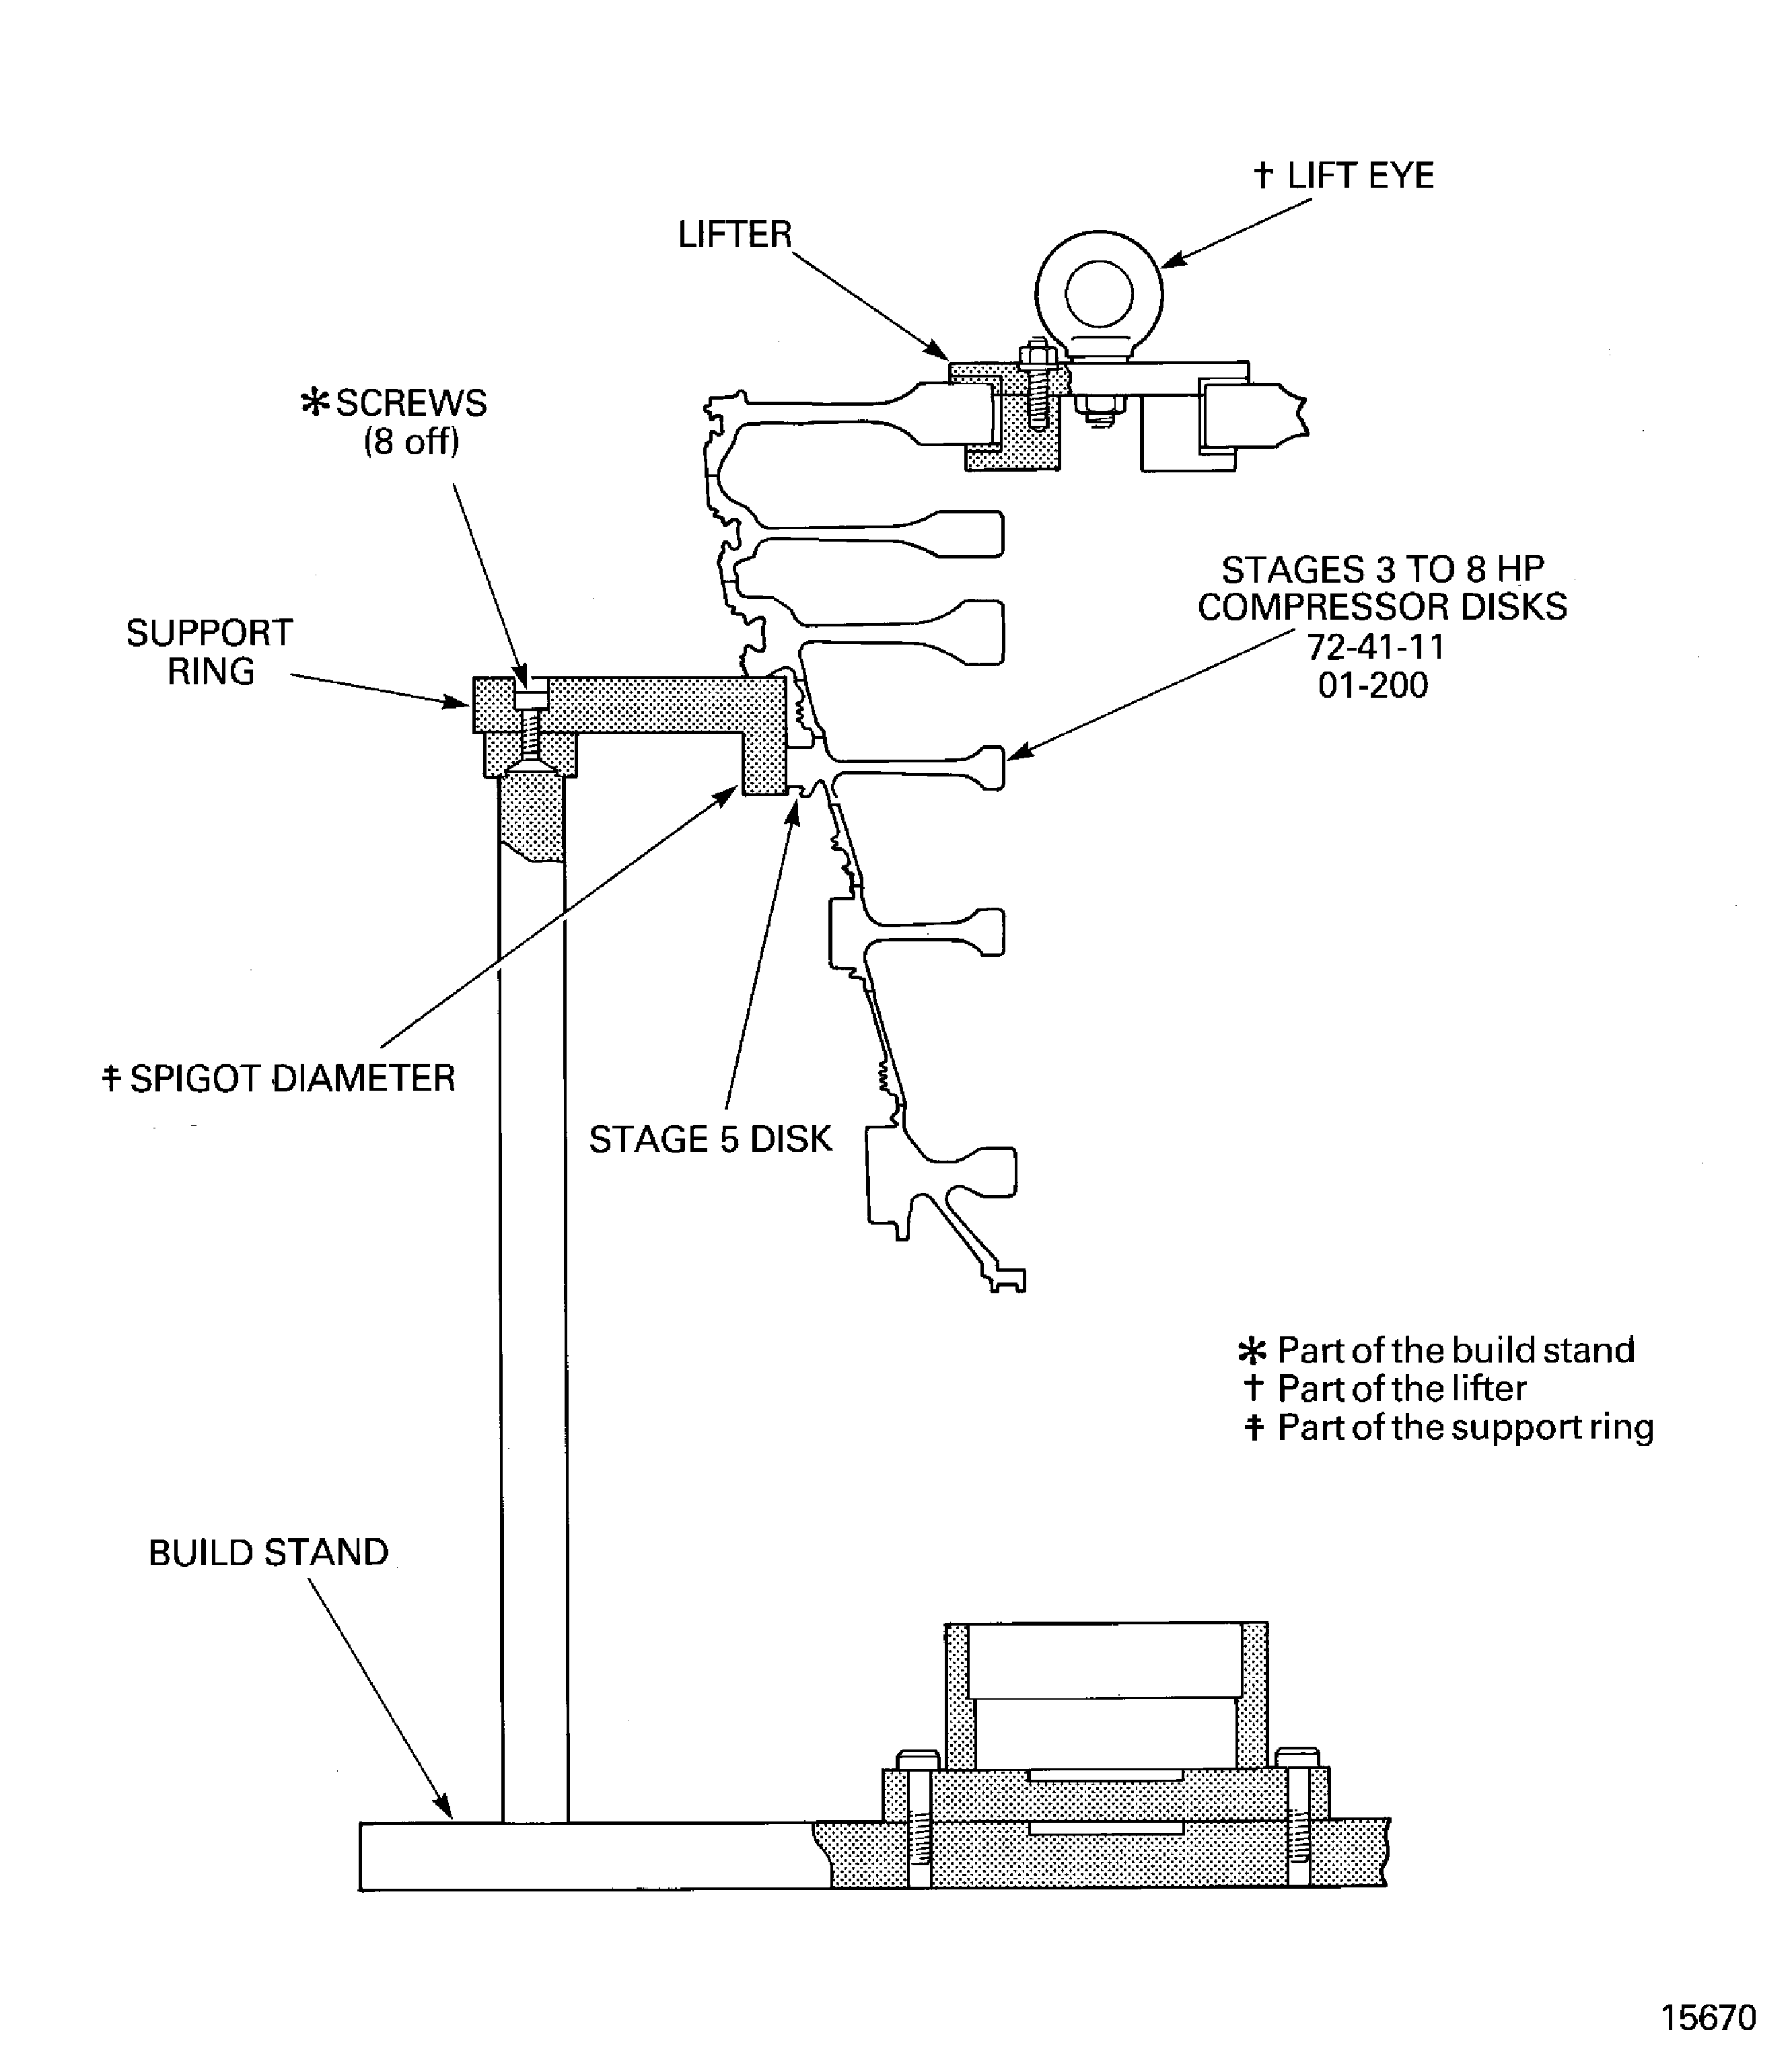
Figure: Install the Lifter on to the Stages 3 to 8 HP Compressor Disks
Install the Lifter on to the Stages 3 to 8 HP Compressor Disks
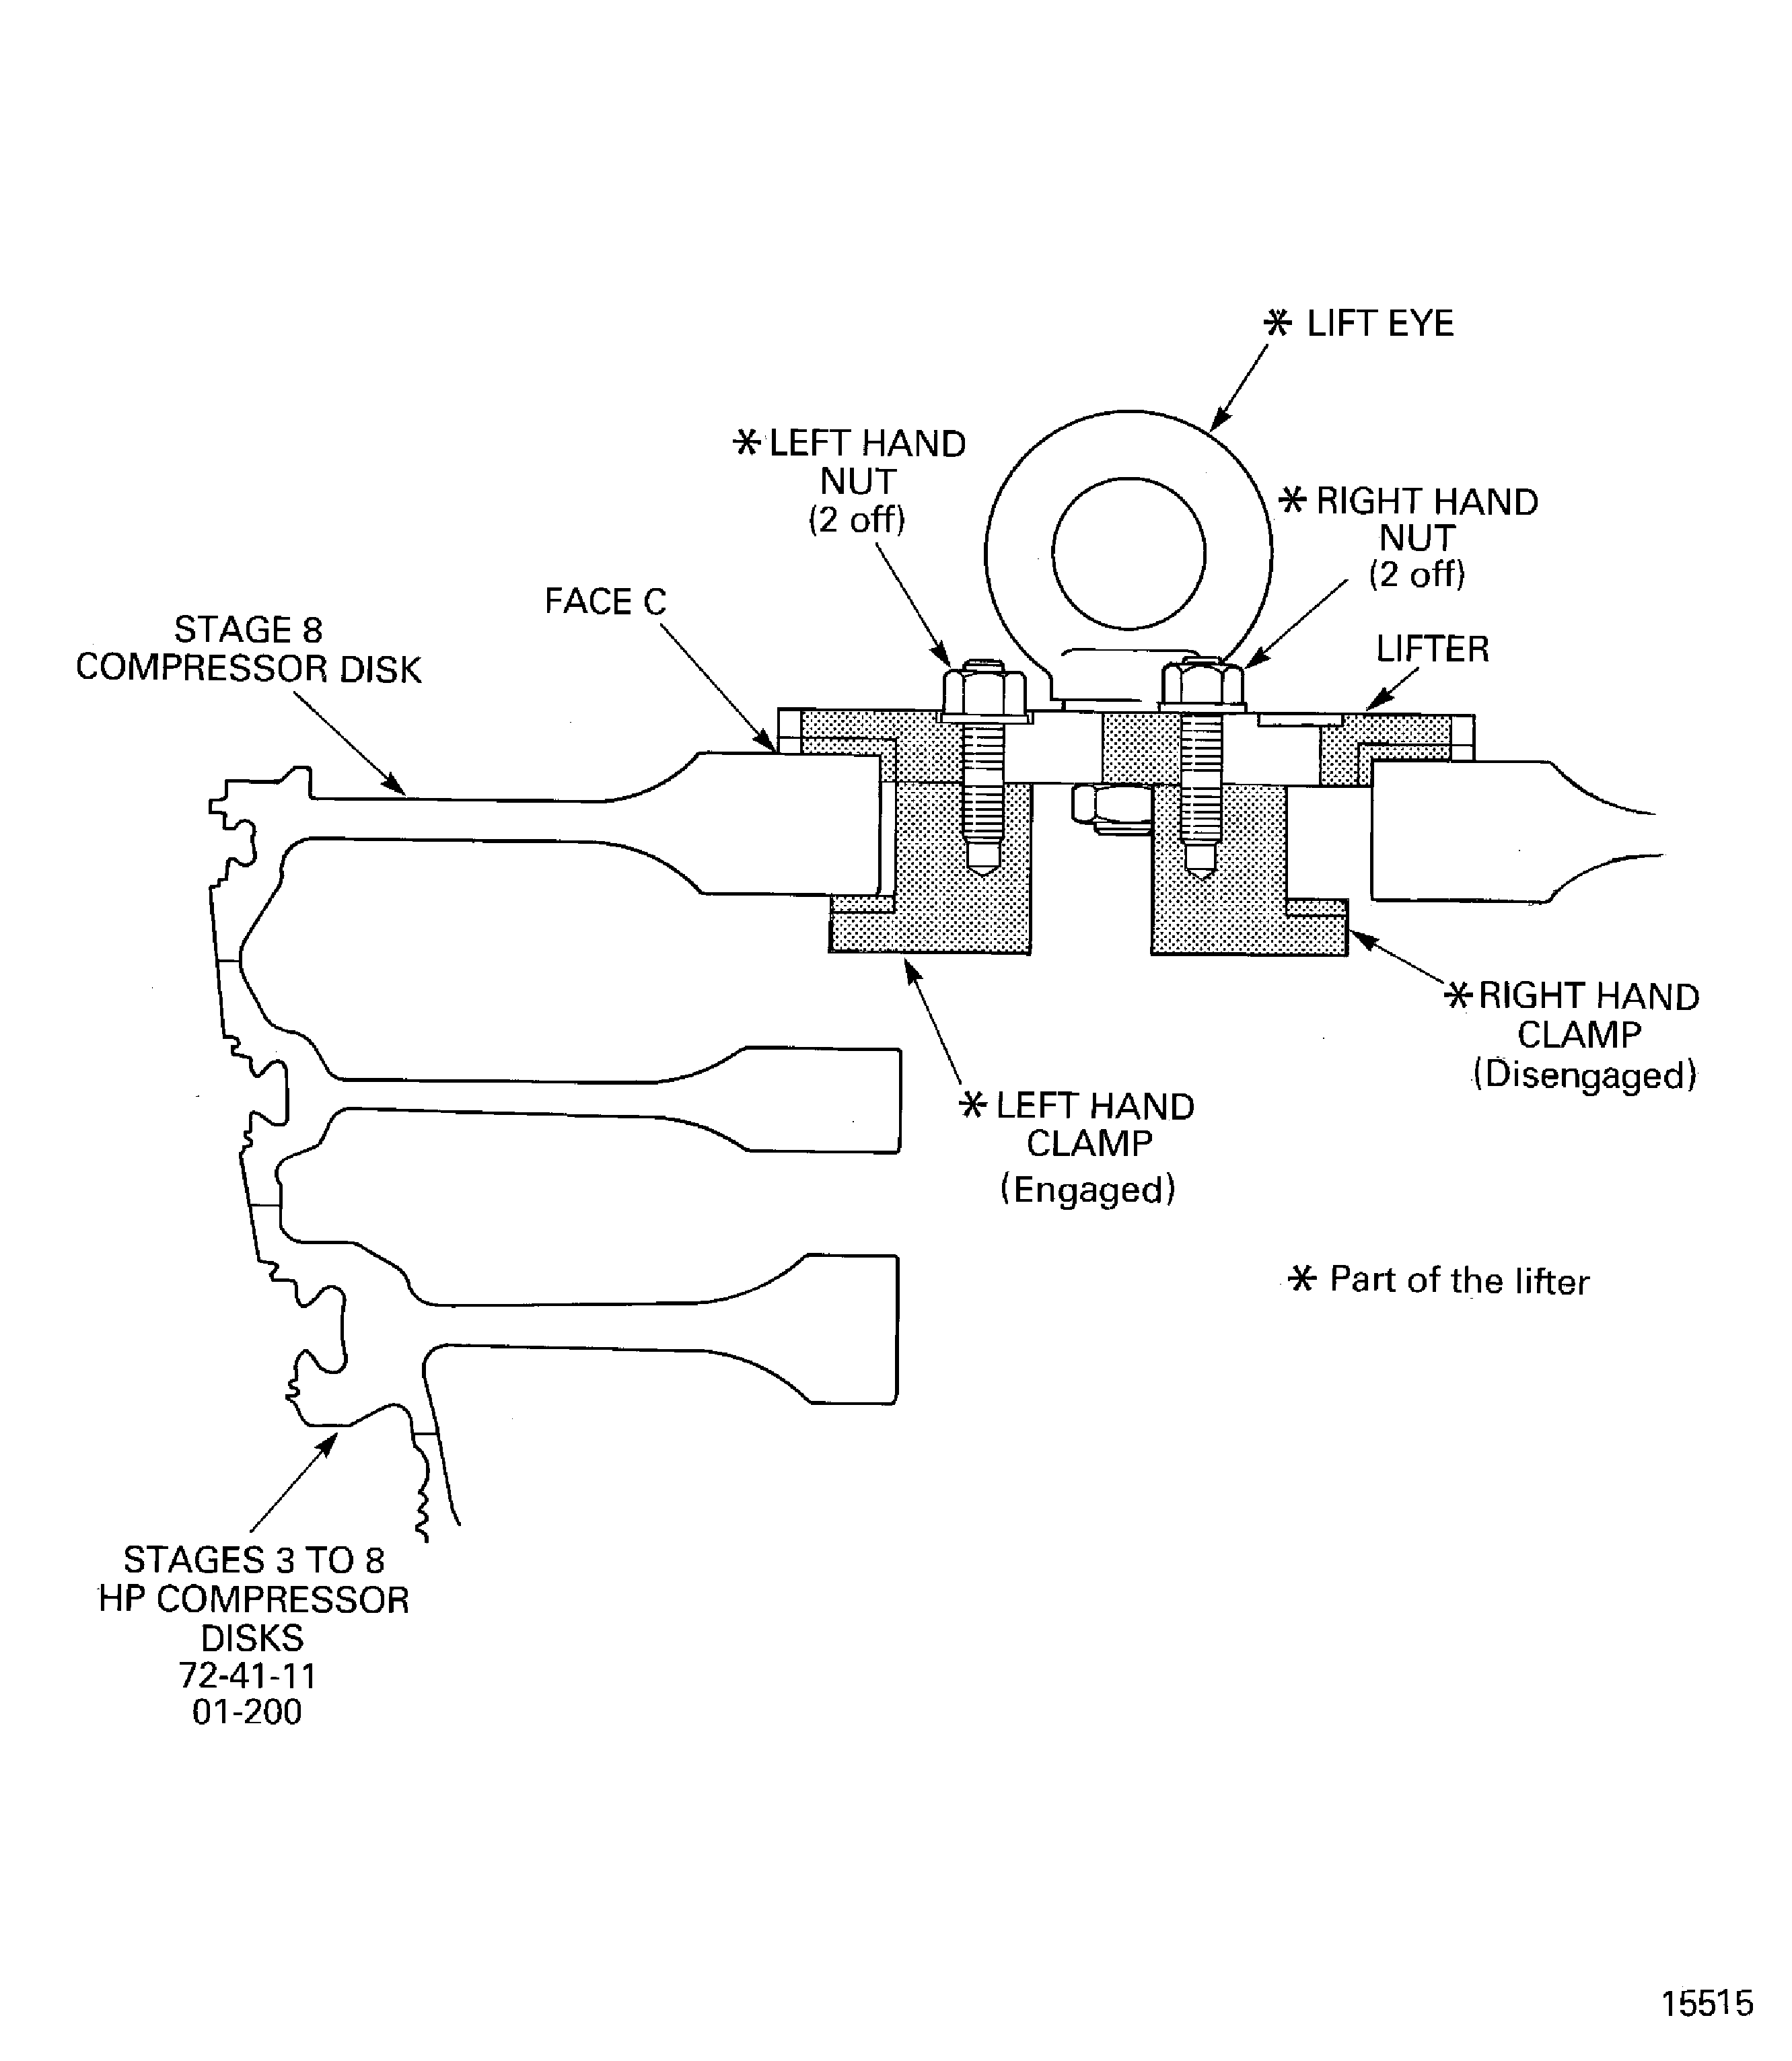
Figure: Install the Stages 9 to 12 HP Compressor Disks and Vortex Reducer Ring Assembly on to the Stages 3 to 8 HP Compressor Disks
Install the Stages 9 to 12 HP Compressor Disks and Vortex Reducer Ring Assembly on to the Stages 3 to 8 HP Compressor Disks
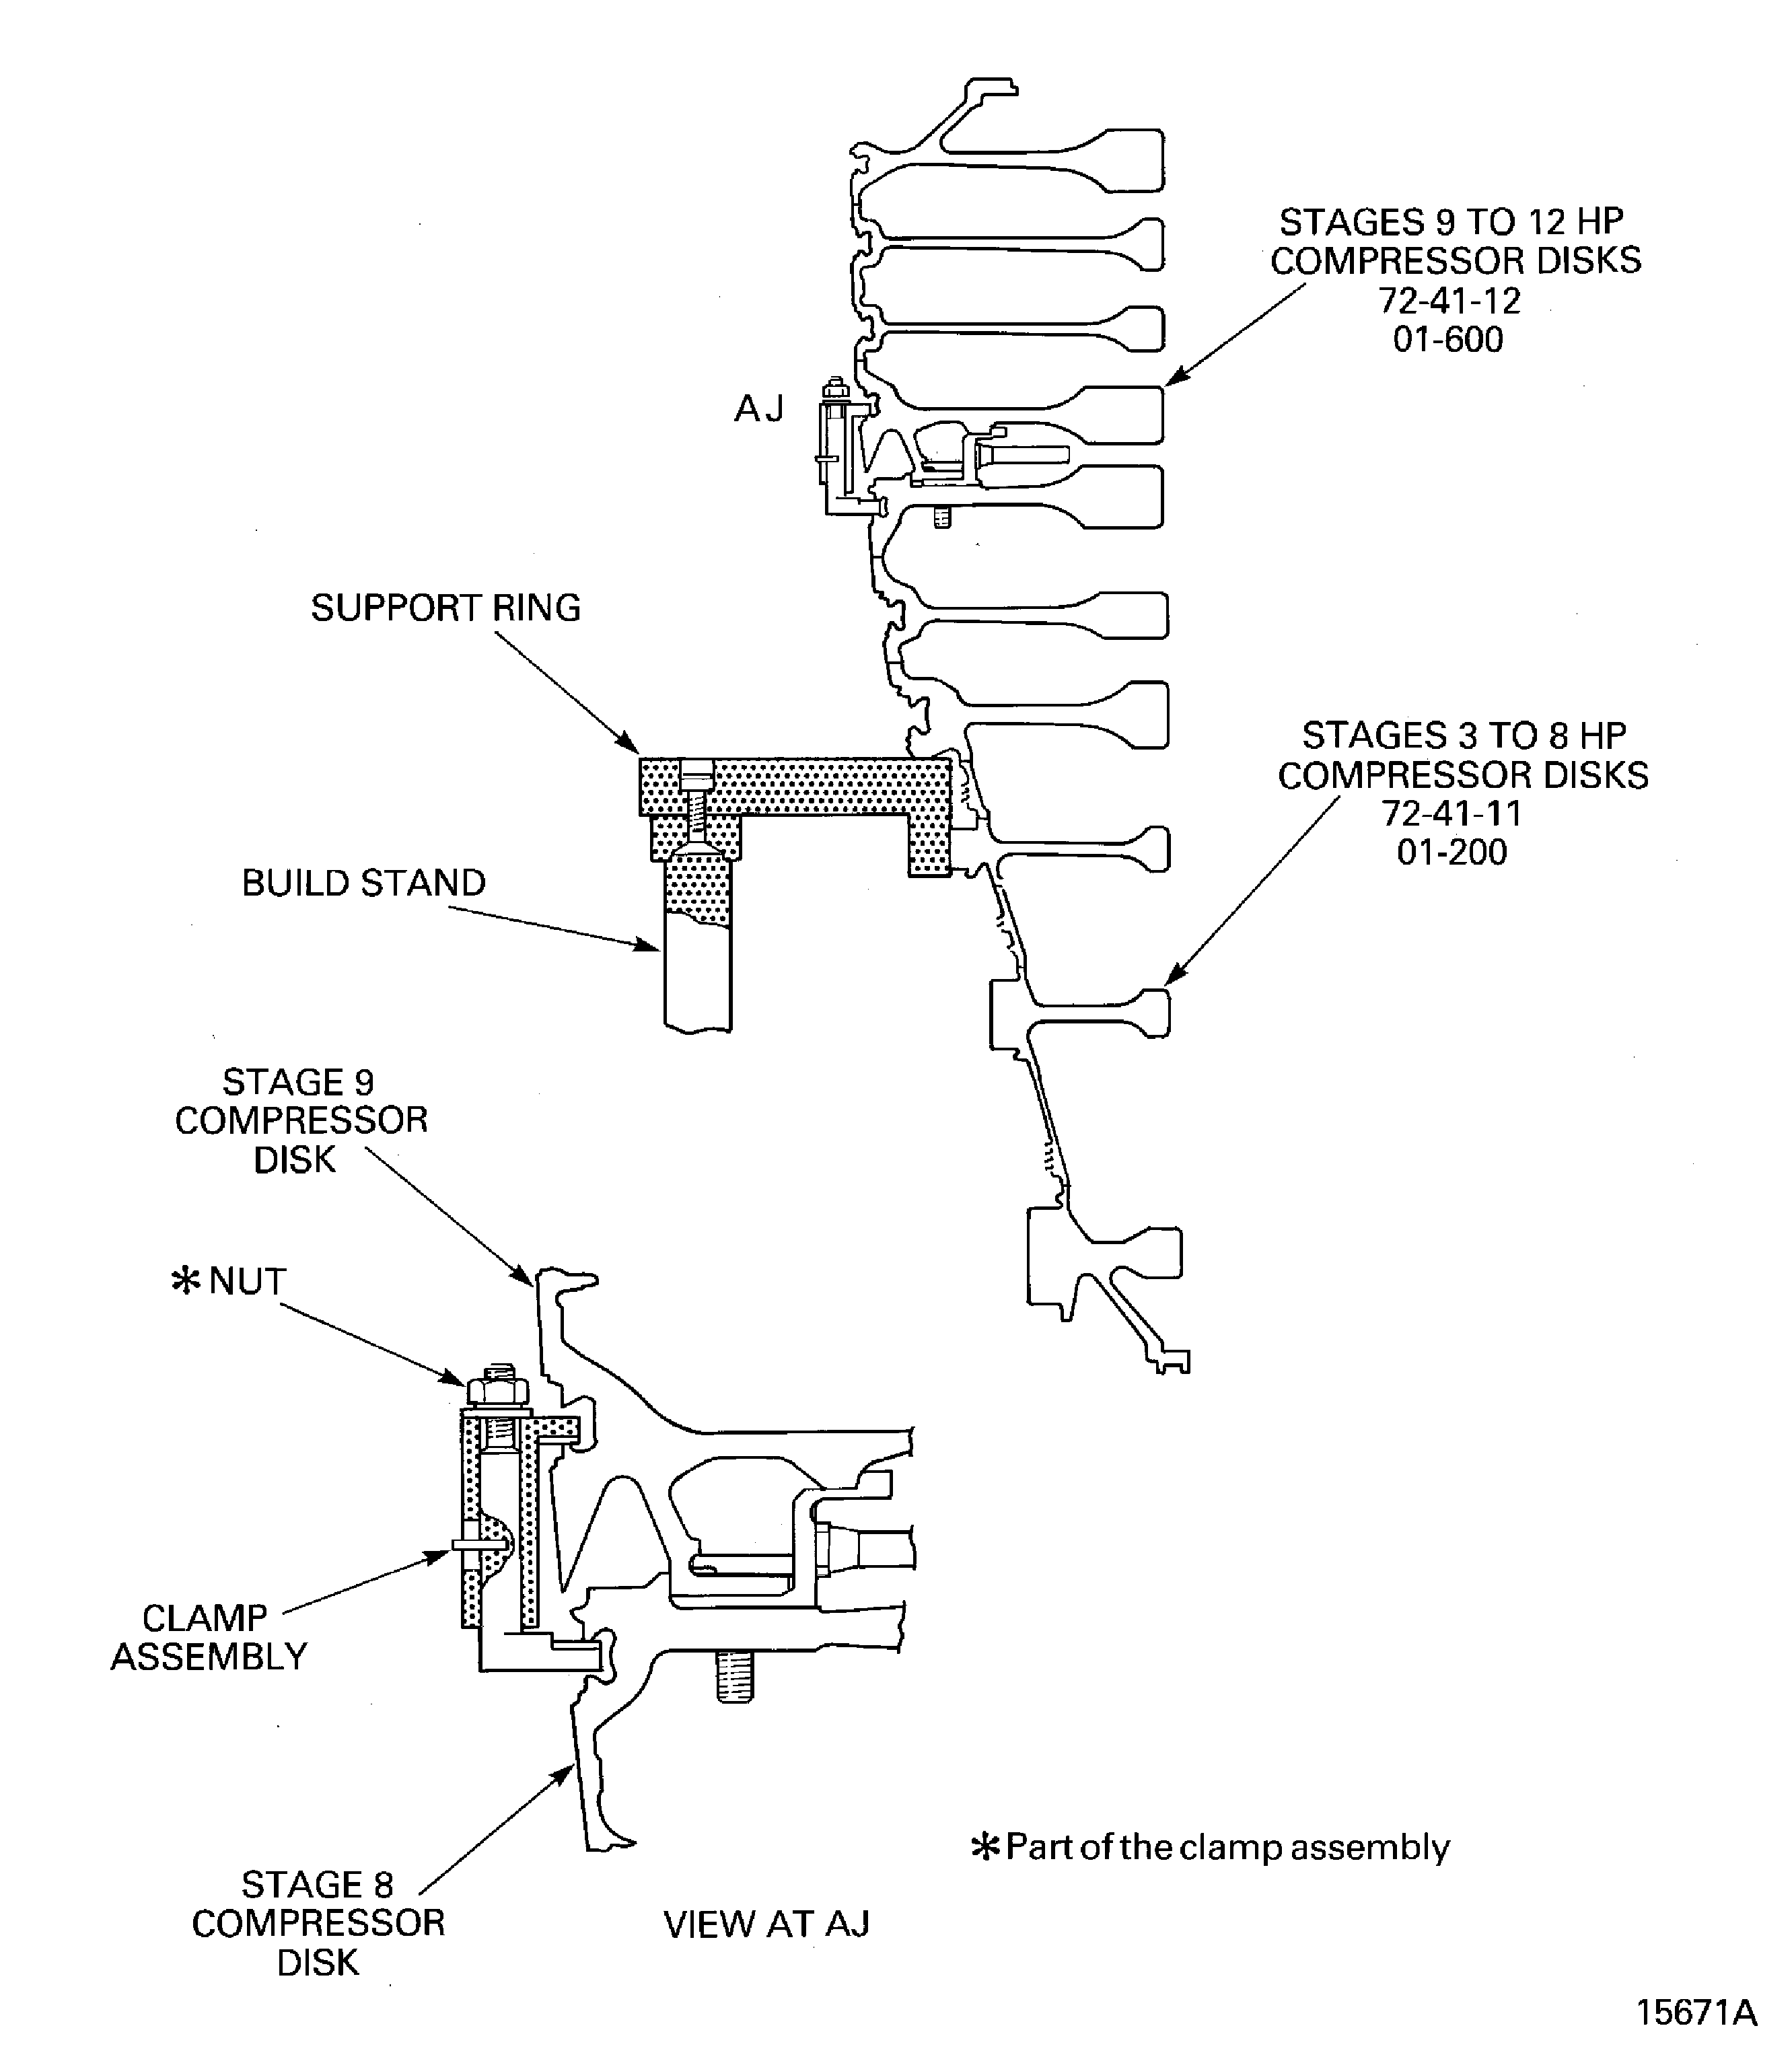
Figure: Remove the Lifting Fixture from the Stage 12 HP Compressor Disk Rear Flange
Remove the Lifting Fixture from the Stage 12 HP Compressor Disk Rear Flange
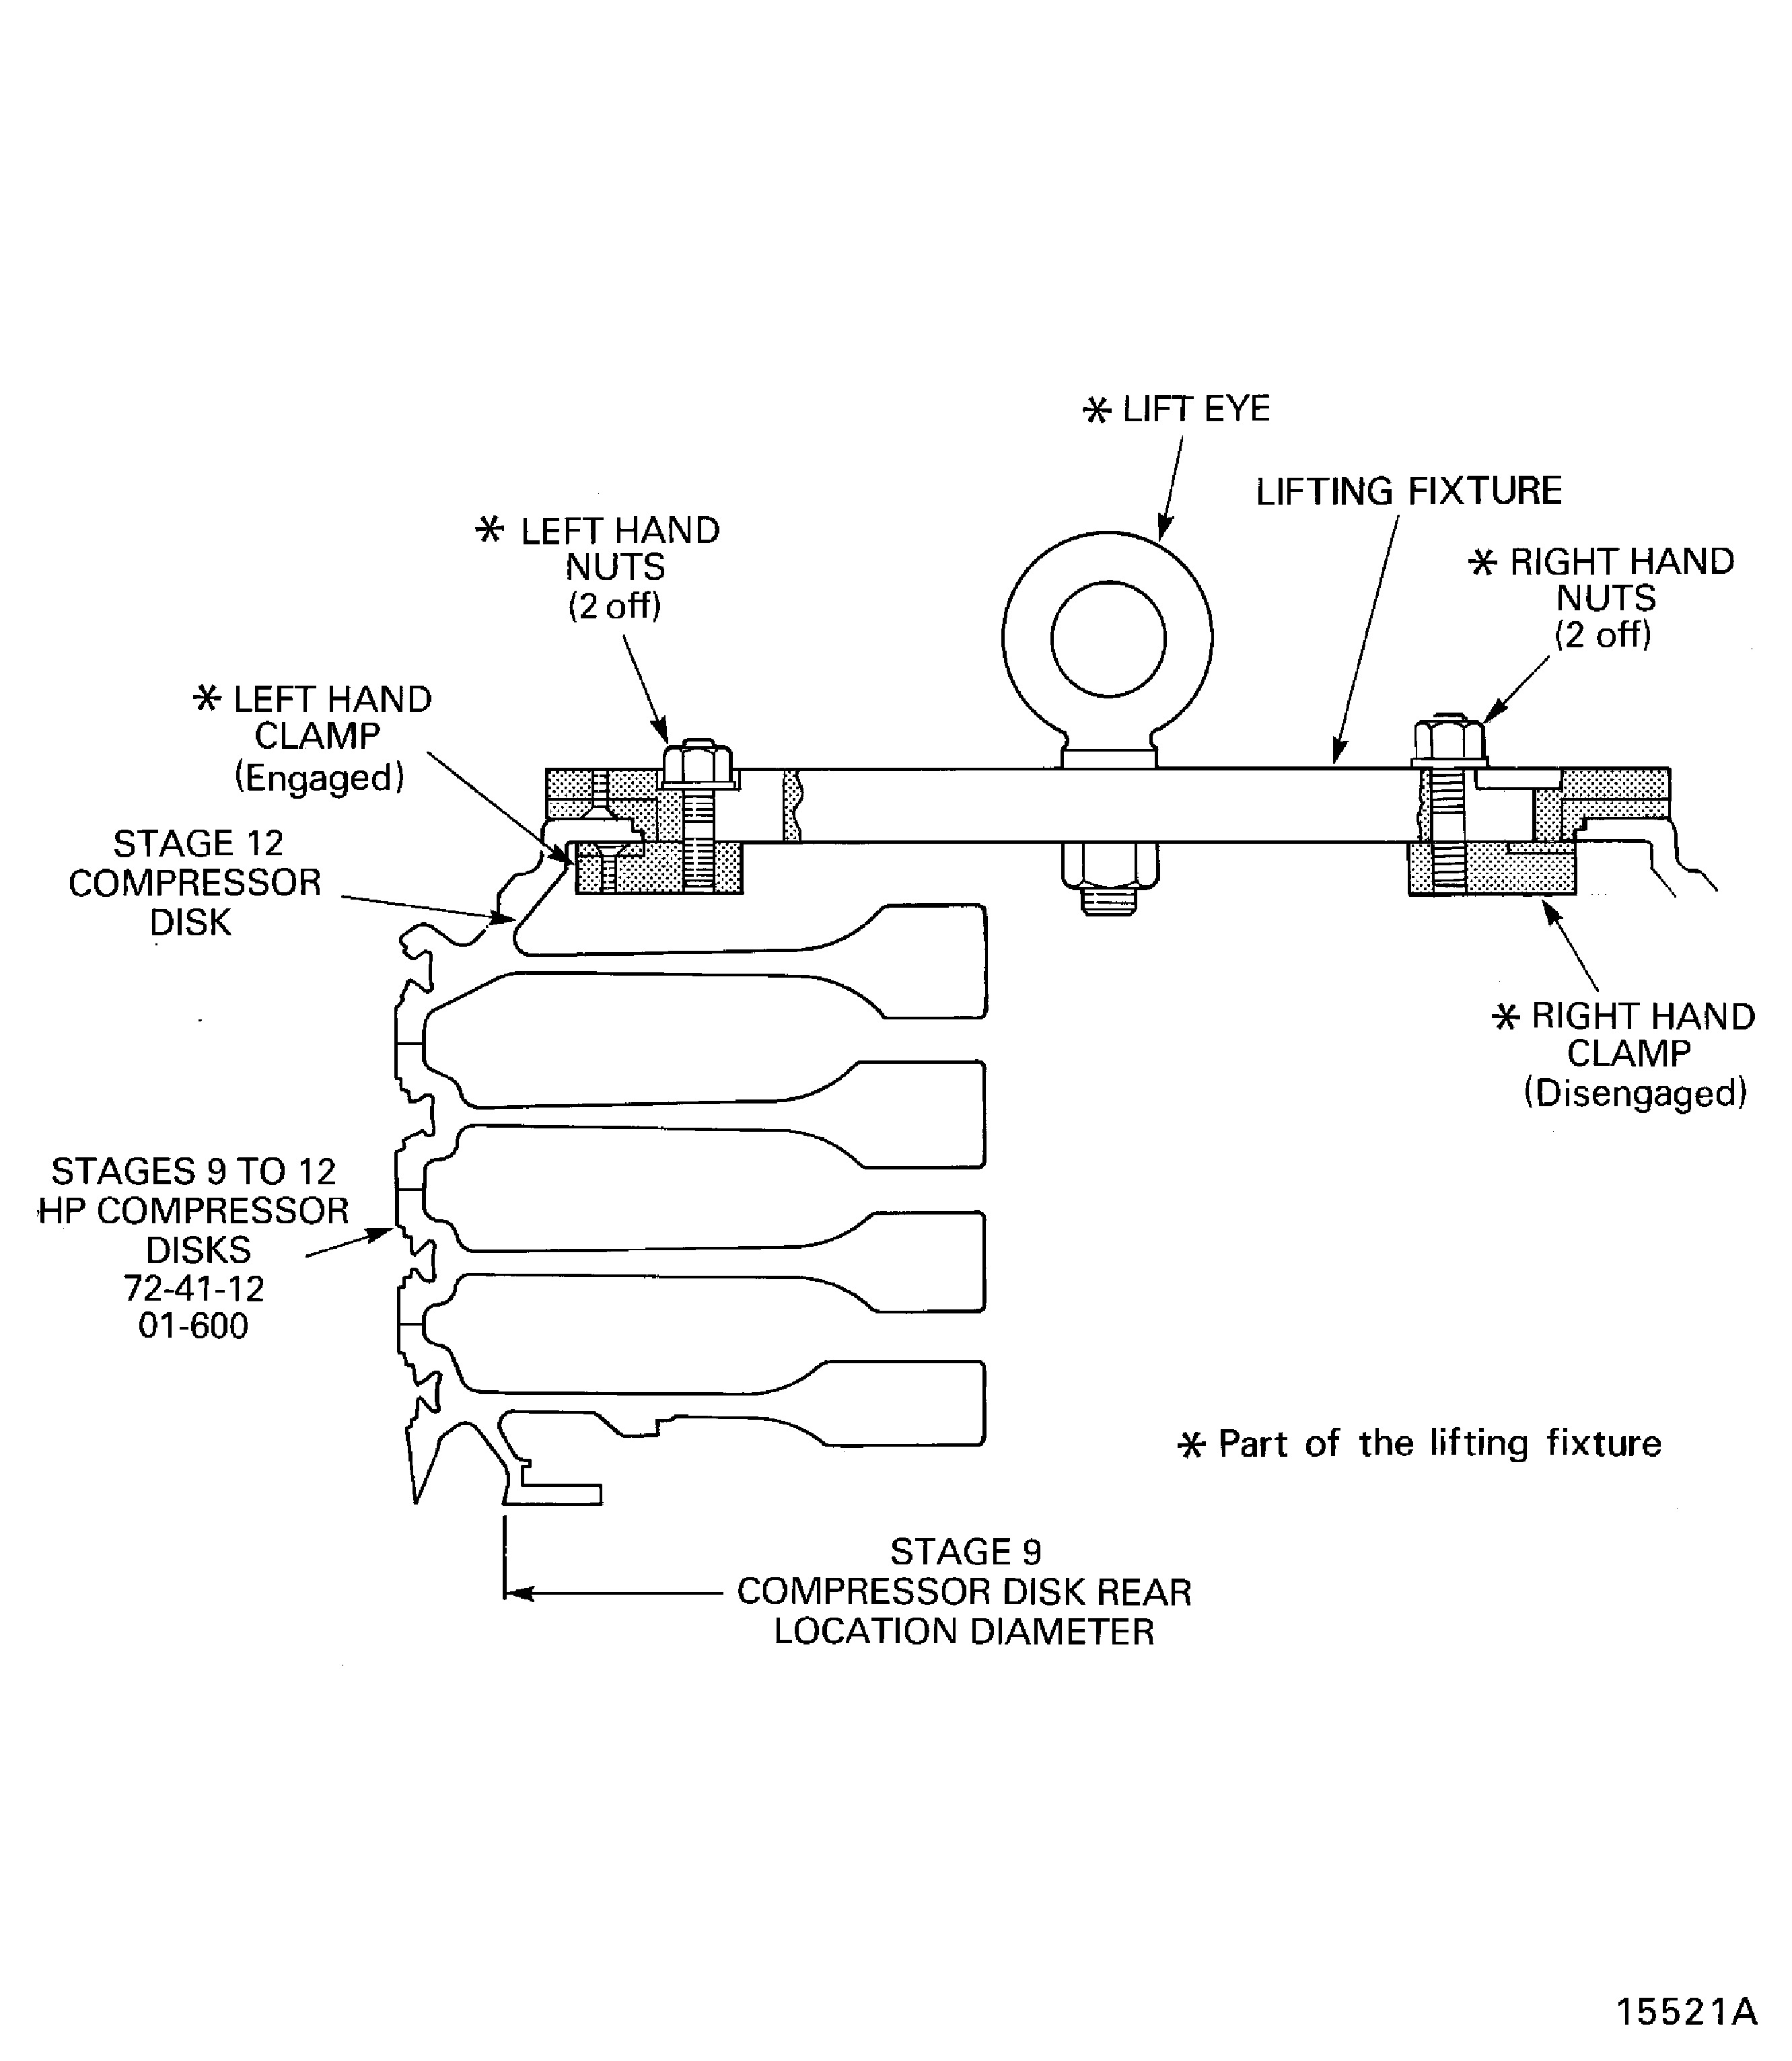
Figure: Swash and run-out Data
Swash and run-out Data
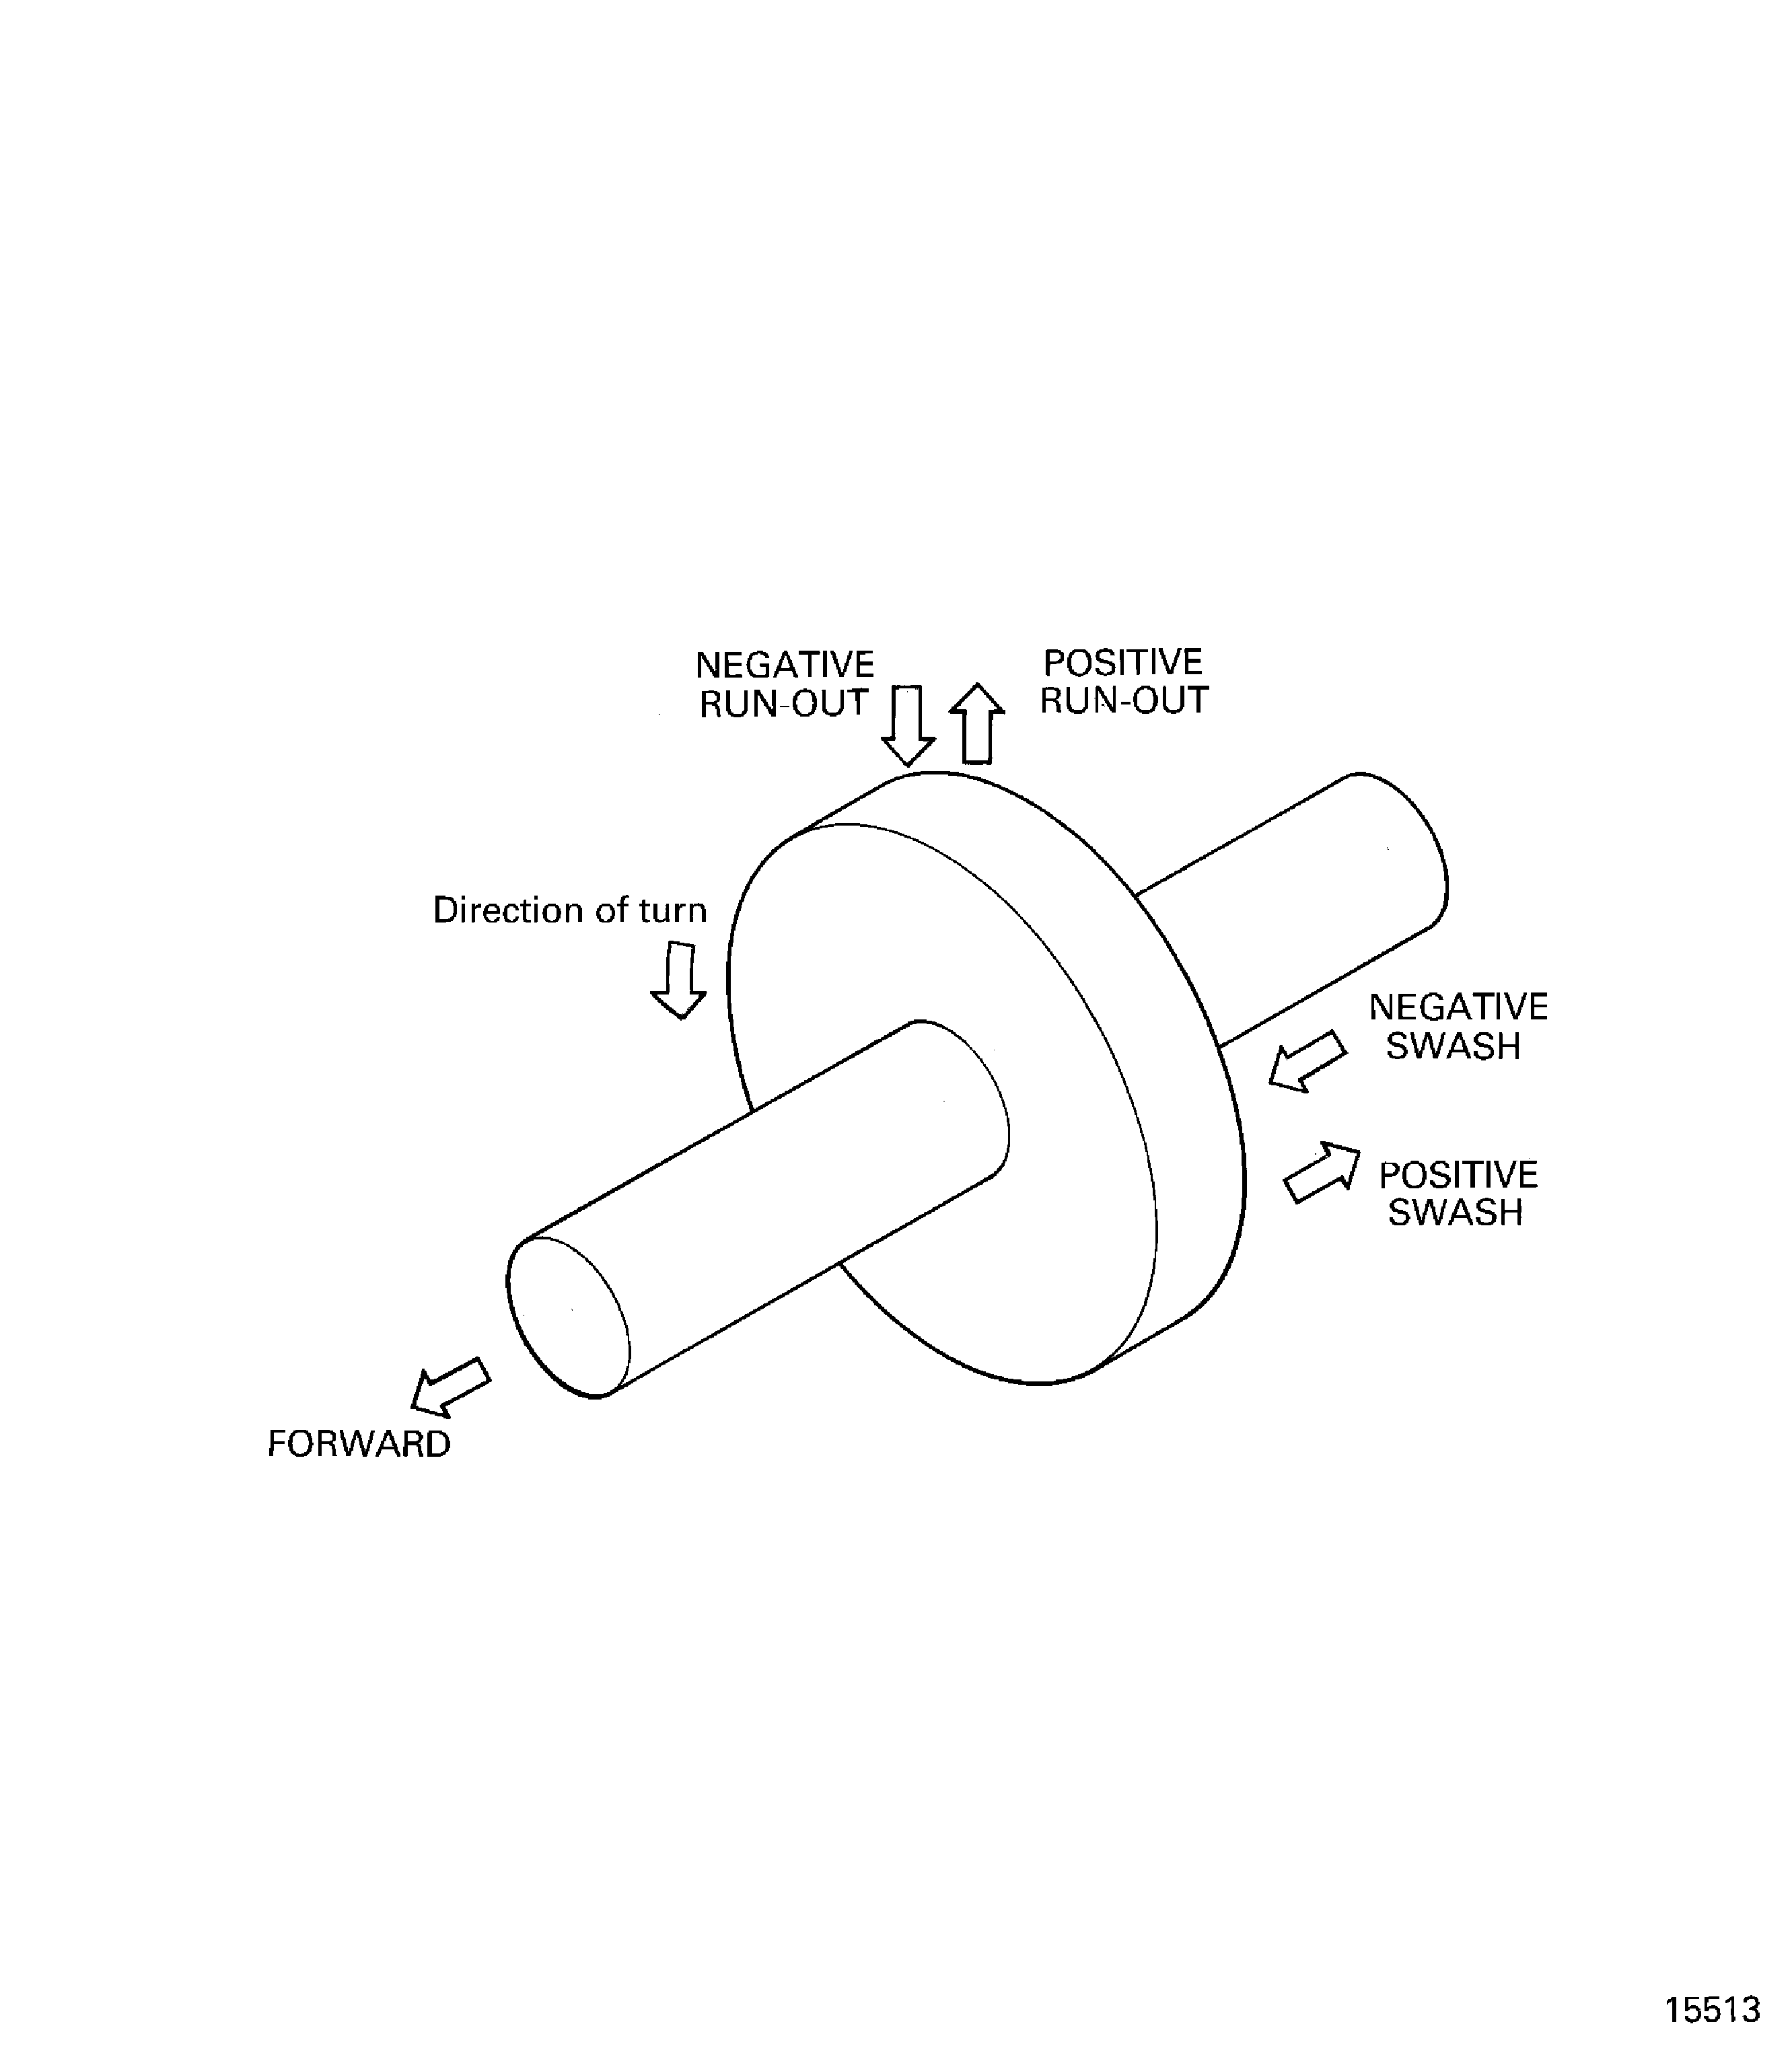
Figure: Assemble the Tools used to Measure the Swash and run-out of the Stages 3 to 12 HP Compressor Disks assembly
Assemble the Tools used to Measure the Swash and run-out of the Stages 3 to 12 HP Compressor Disks assembly
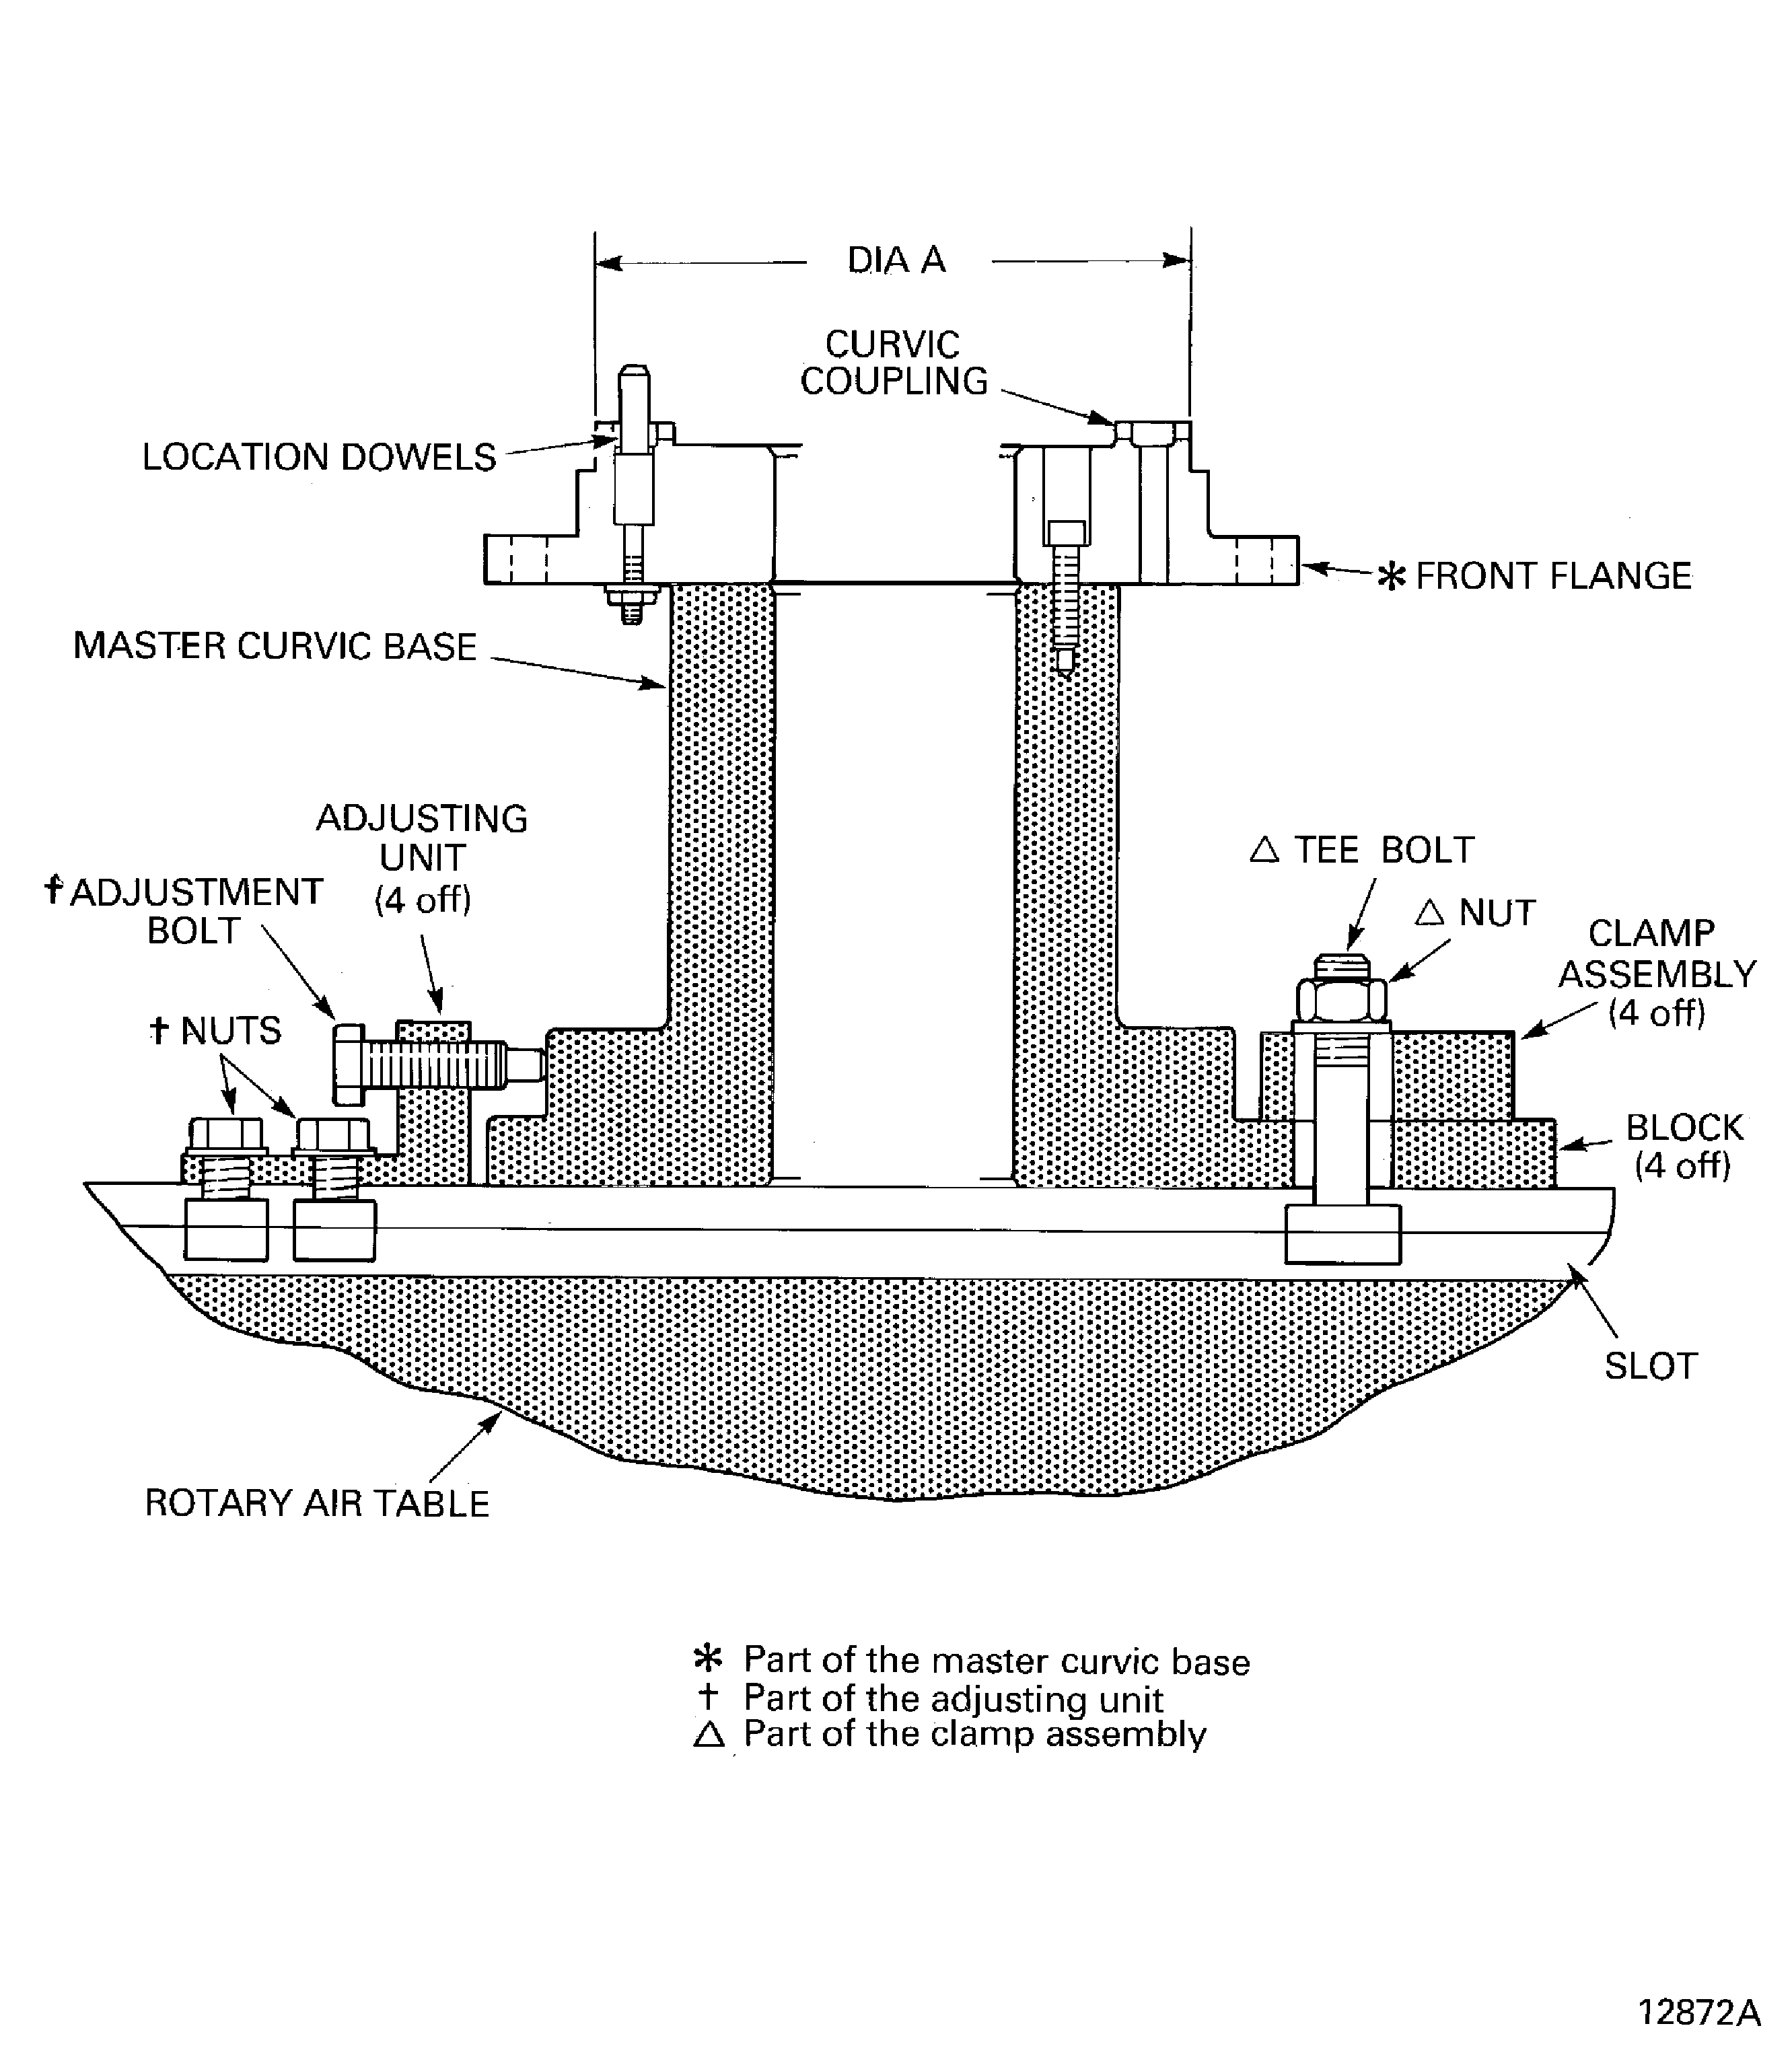
Figure: Remove the Stages 3 to 12 HP Compressor Disks Assembly from the Build Stand
Remove the Stages 3 to 12 HP Compressor Disks Assembly from the Build Stand
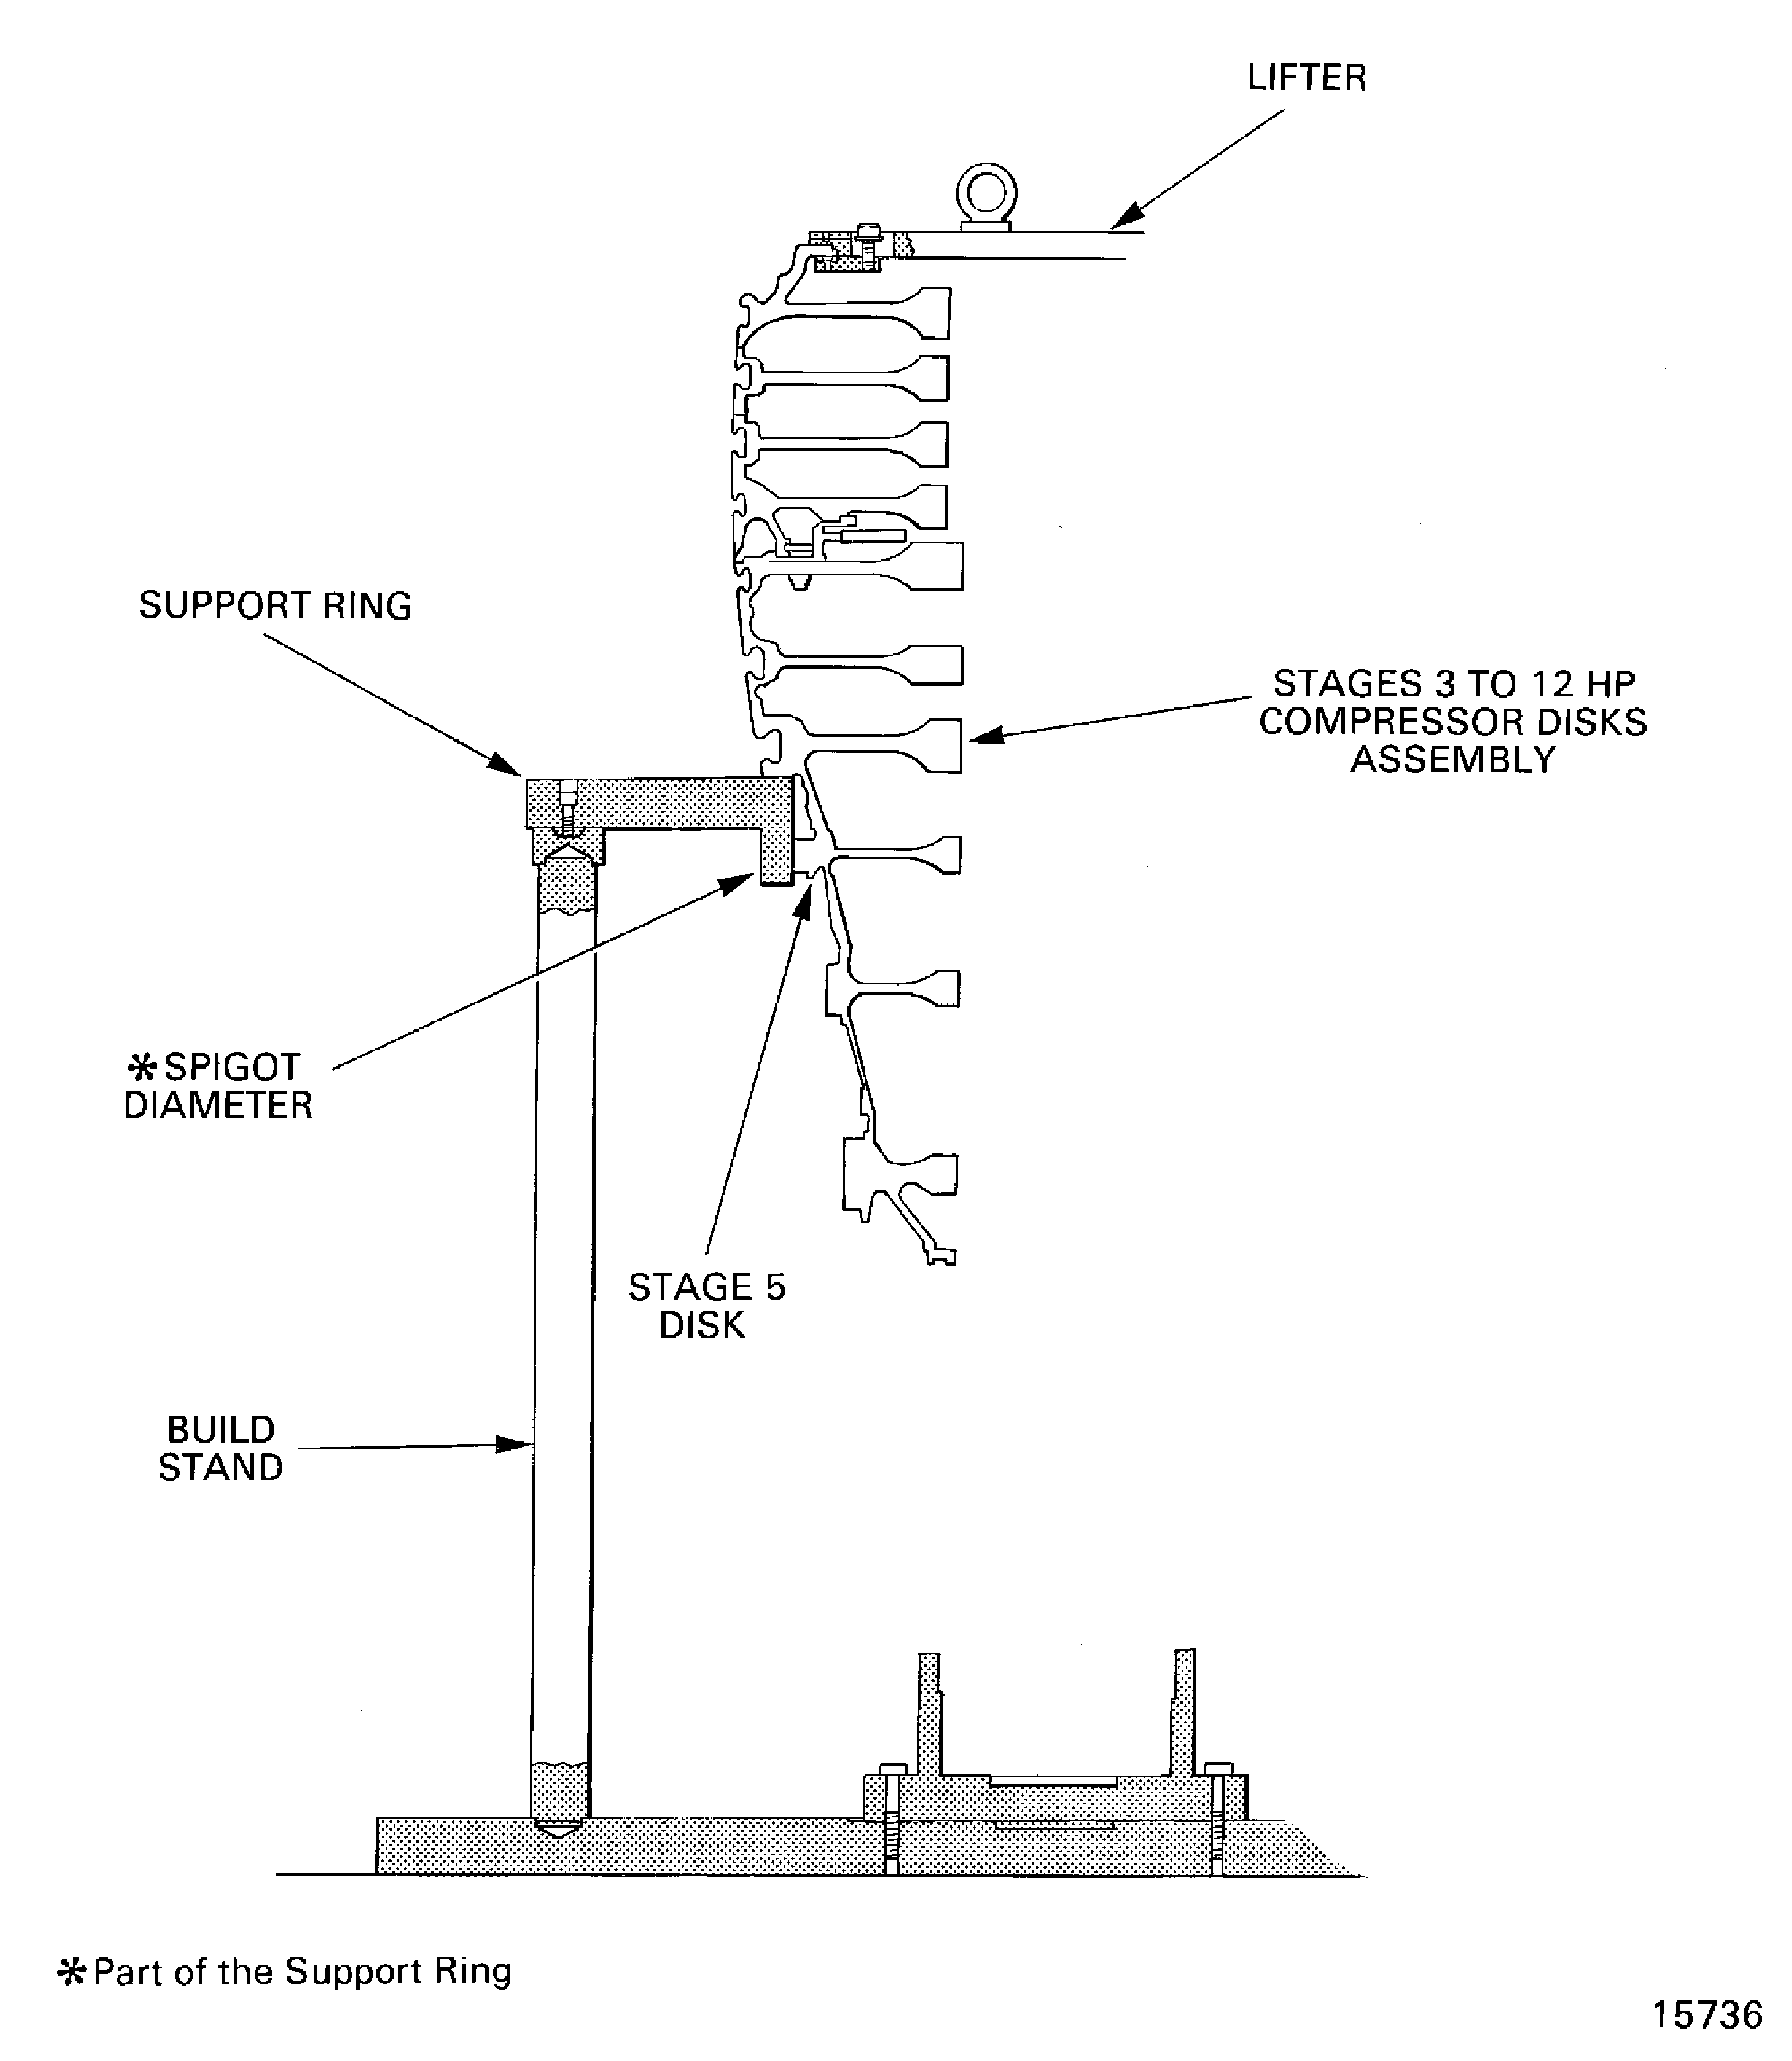
Figure: Install the Stage 3 to 12 Compressor Disks in the Safety Support Stand
Install the Stage 3 to 12 Compressor Disks in the Safety Support Stand
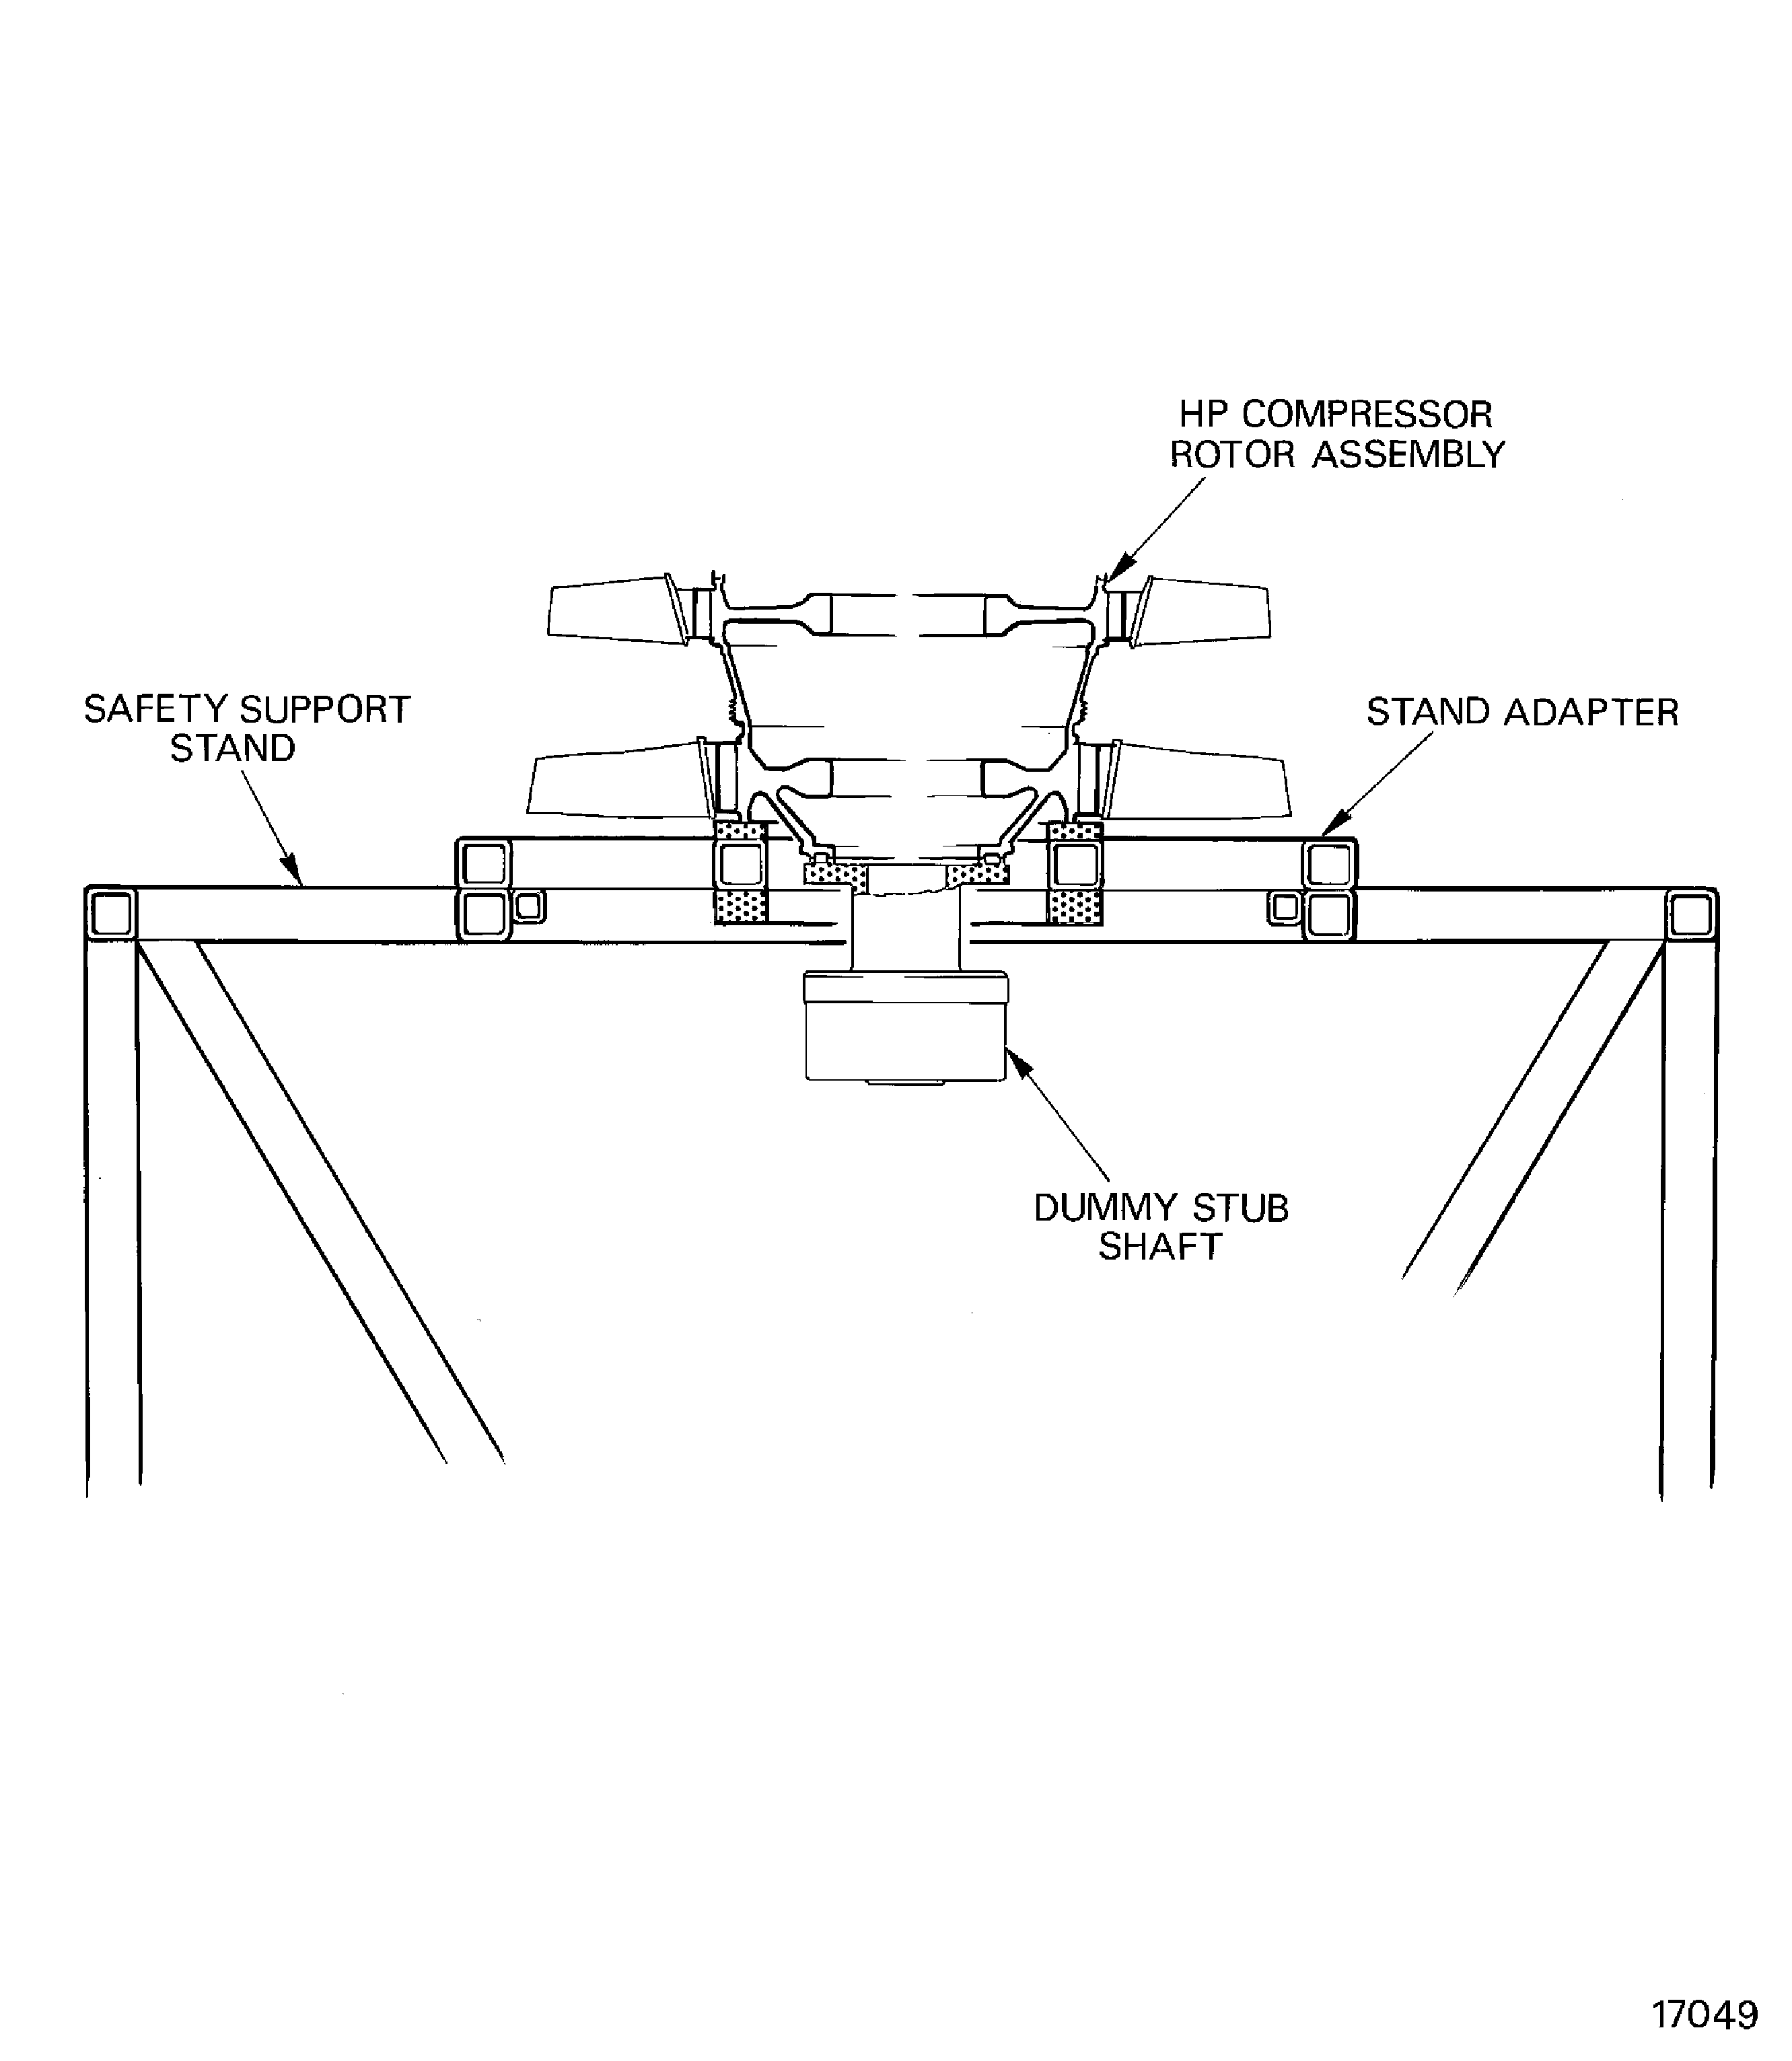
Figure: Measure the Stages 3 to 12 HP Compressor Disks Assembly
Measure the Stages 3 to 12 HP Compressor Disks Assembly
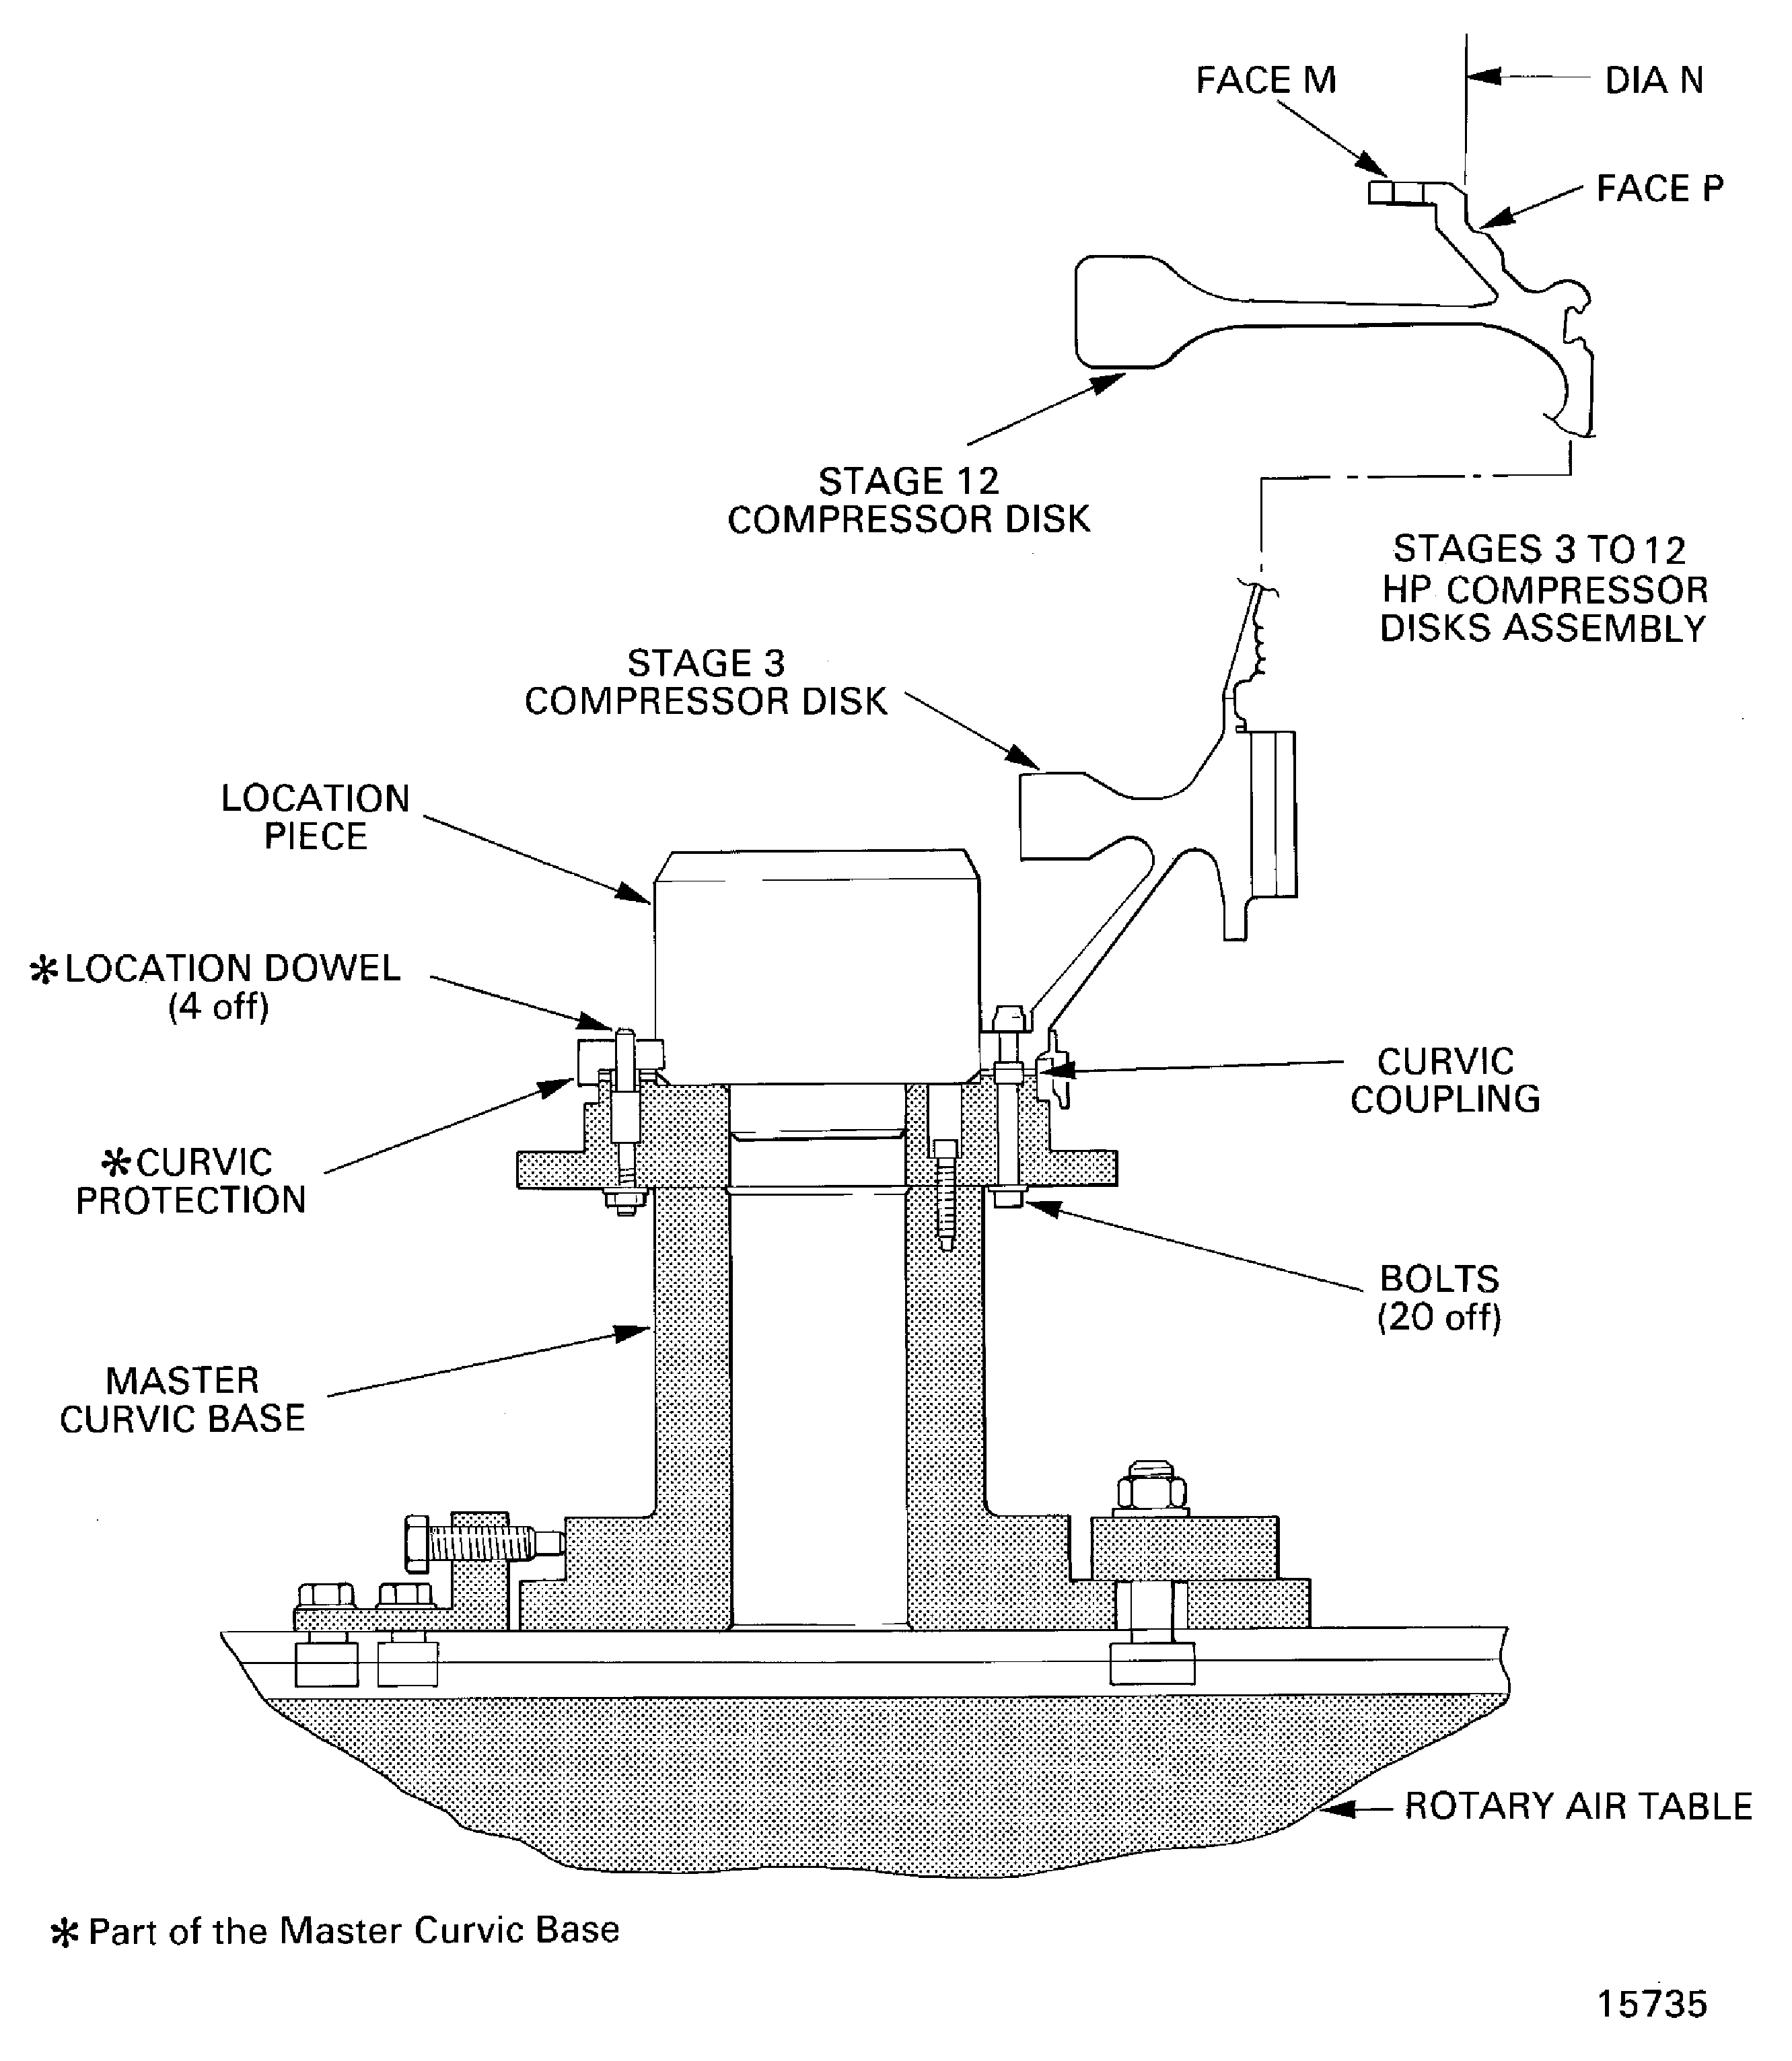
Figure: Stage 3 Disk Curvic Coupling Bolts Torque Sequence
Stage 3 Disk Curvic Coupling Bolts Torque Sequence
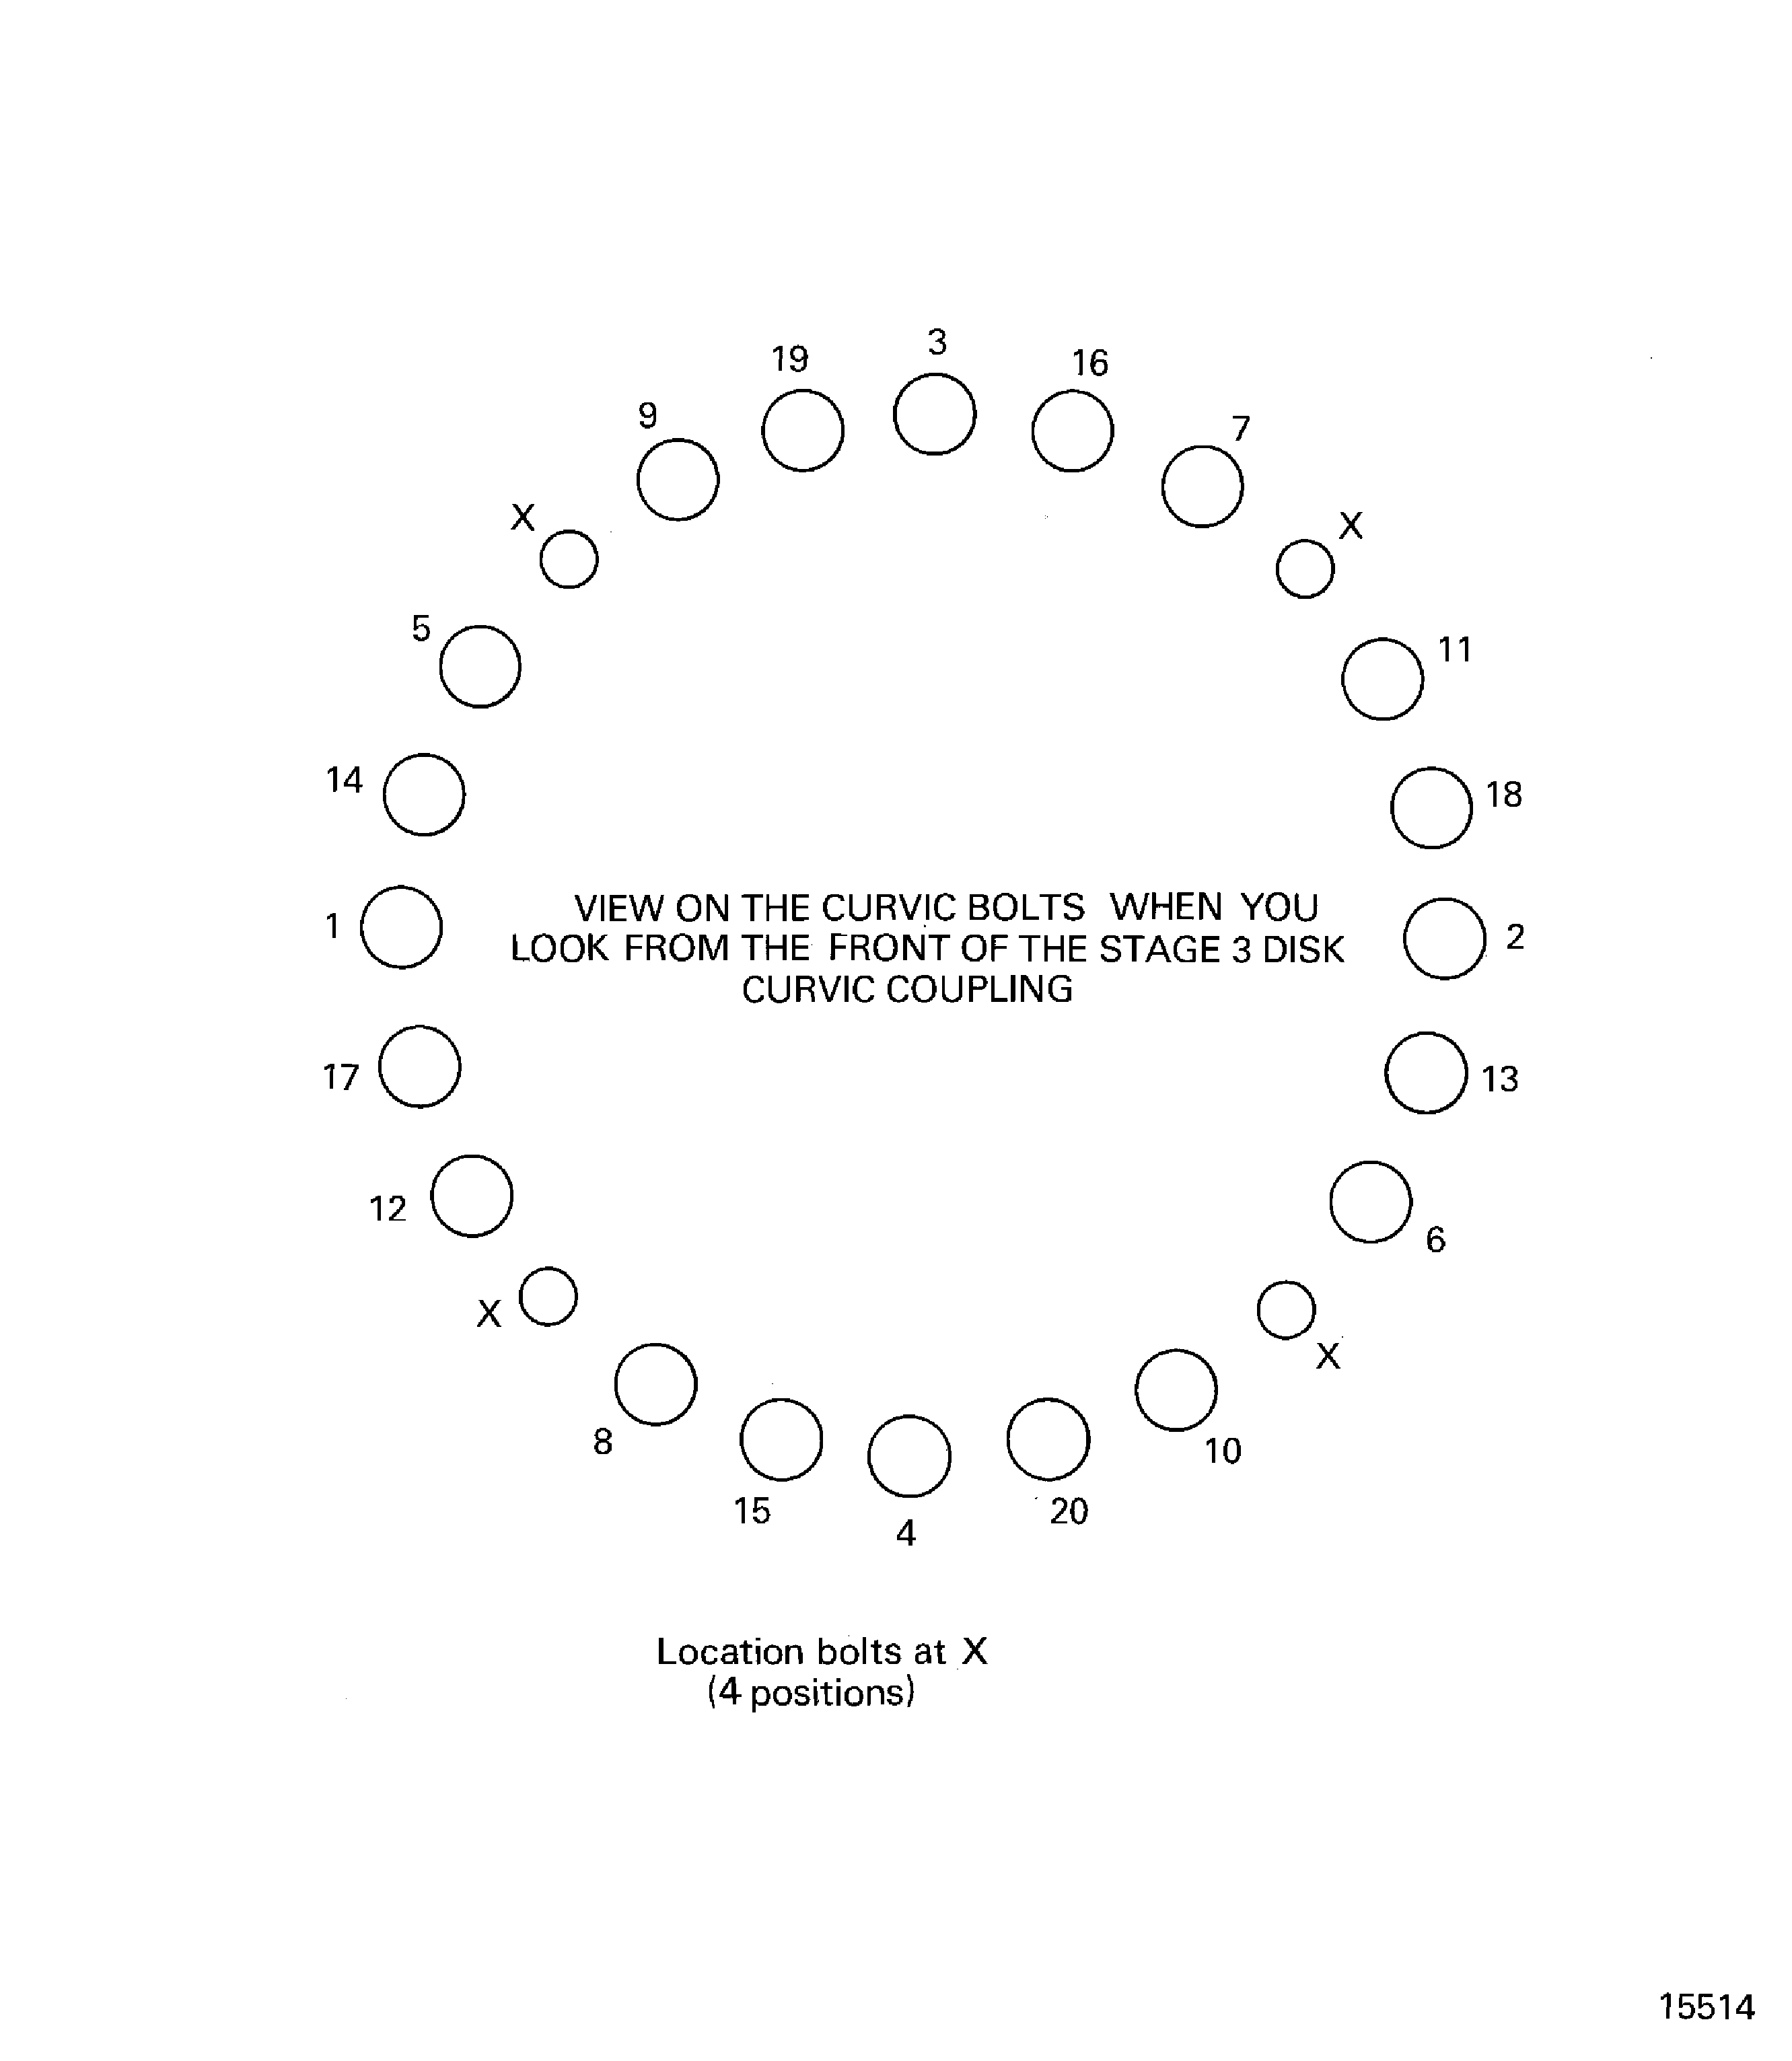
Figure: Calculate the Correct Swash and run-out Values
Calculate the Correct Swash and run-out Values
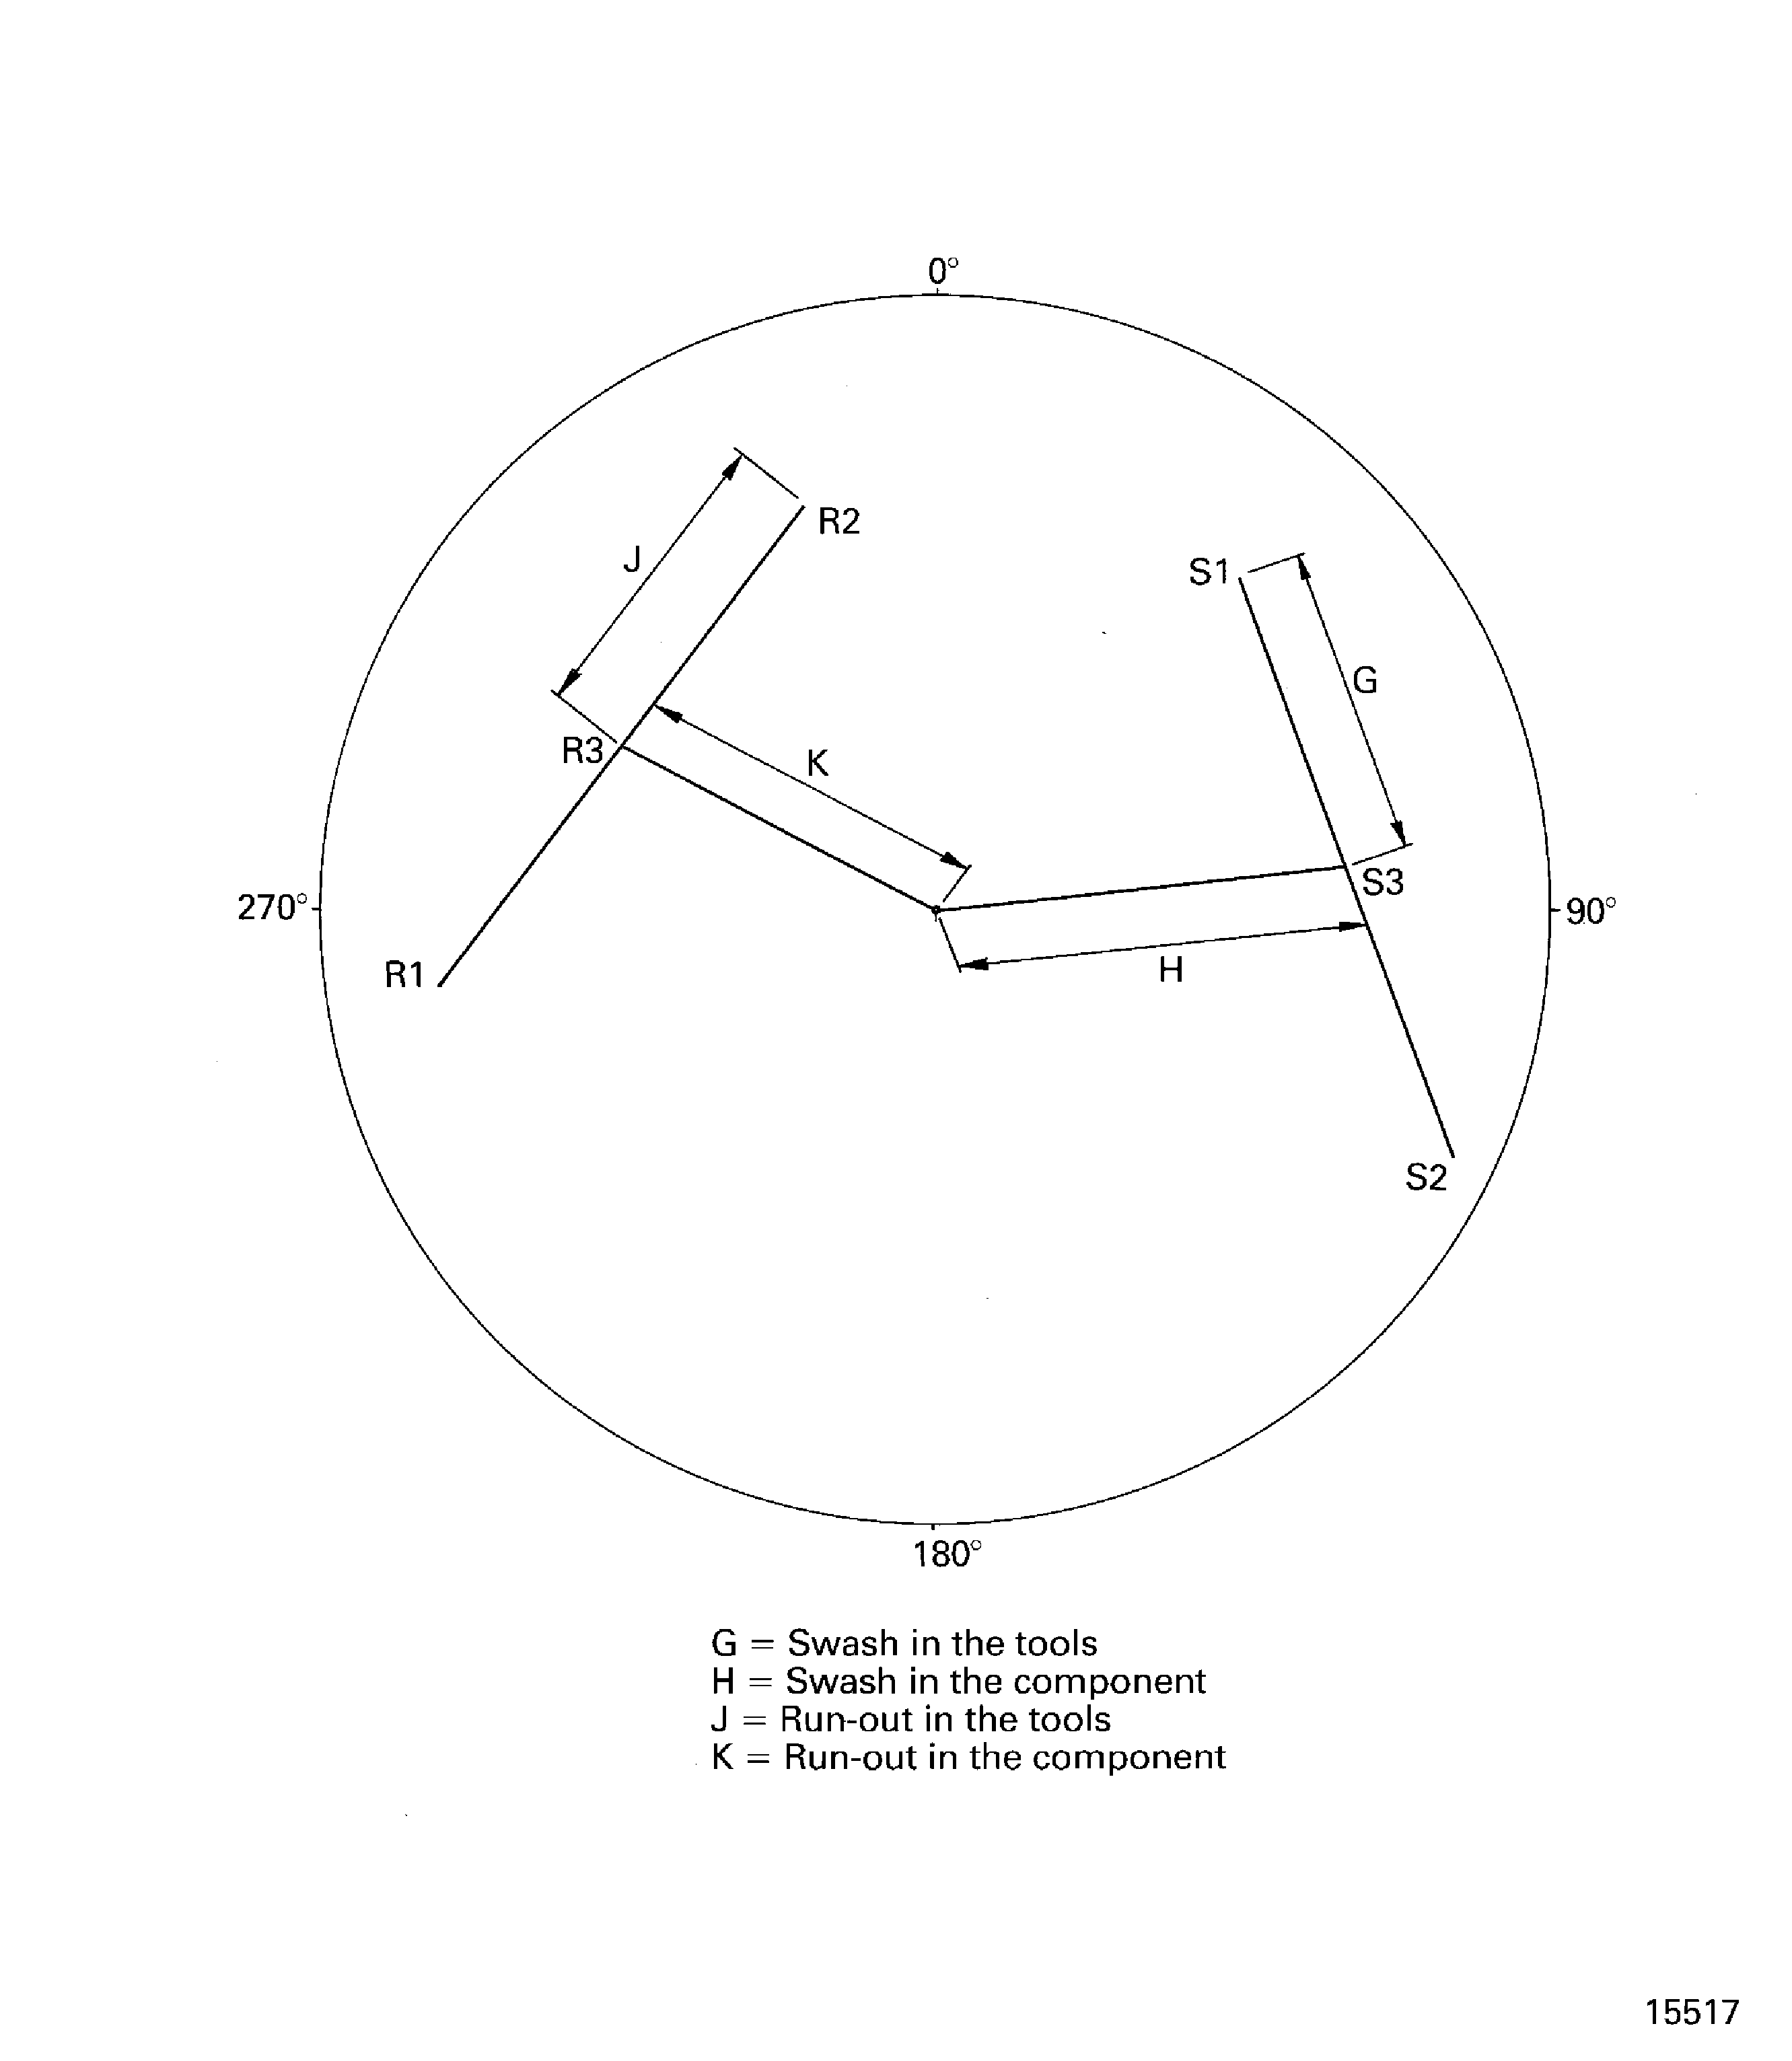
Figure: Examine the Double Retaining Washer
Examine the Double Retaining Washer
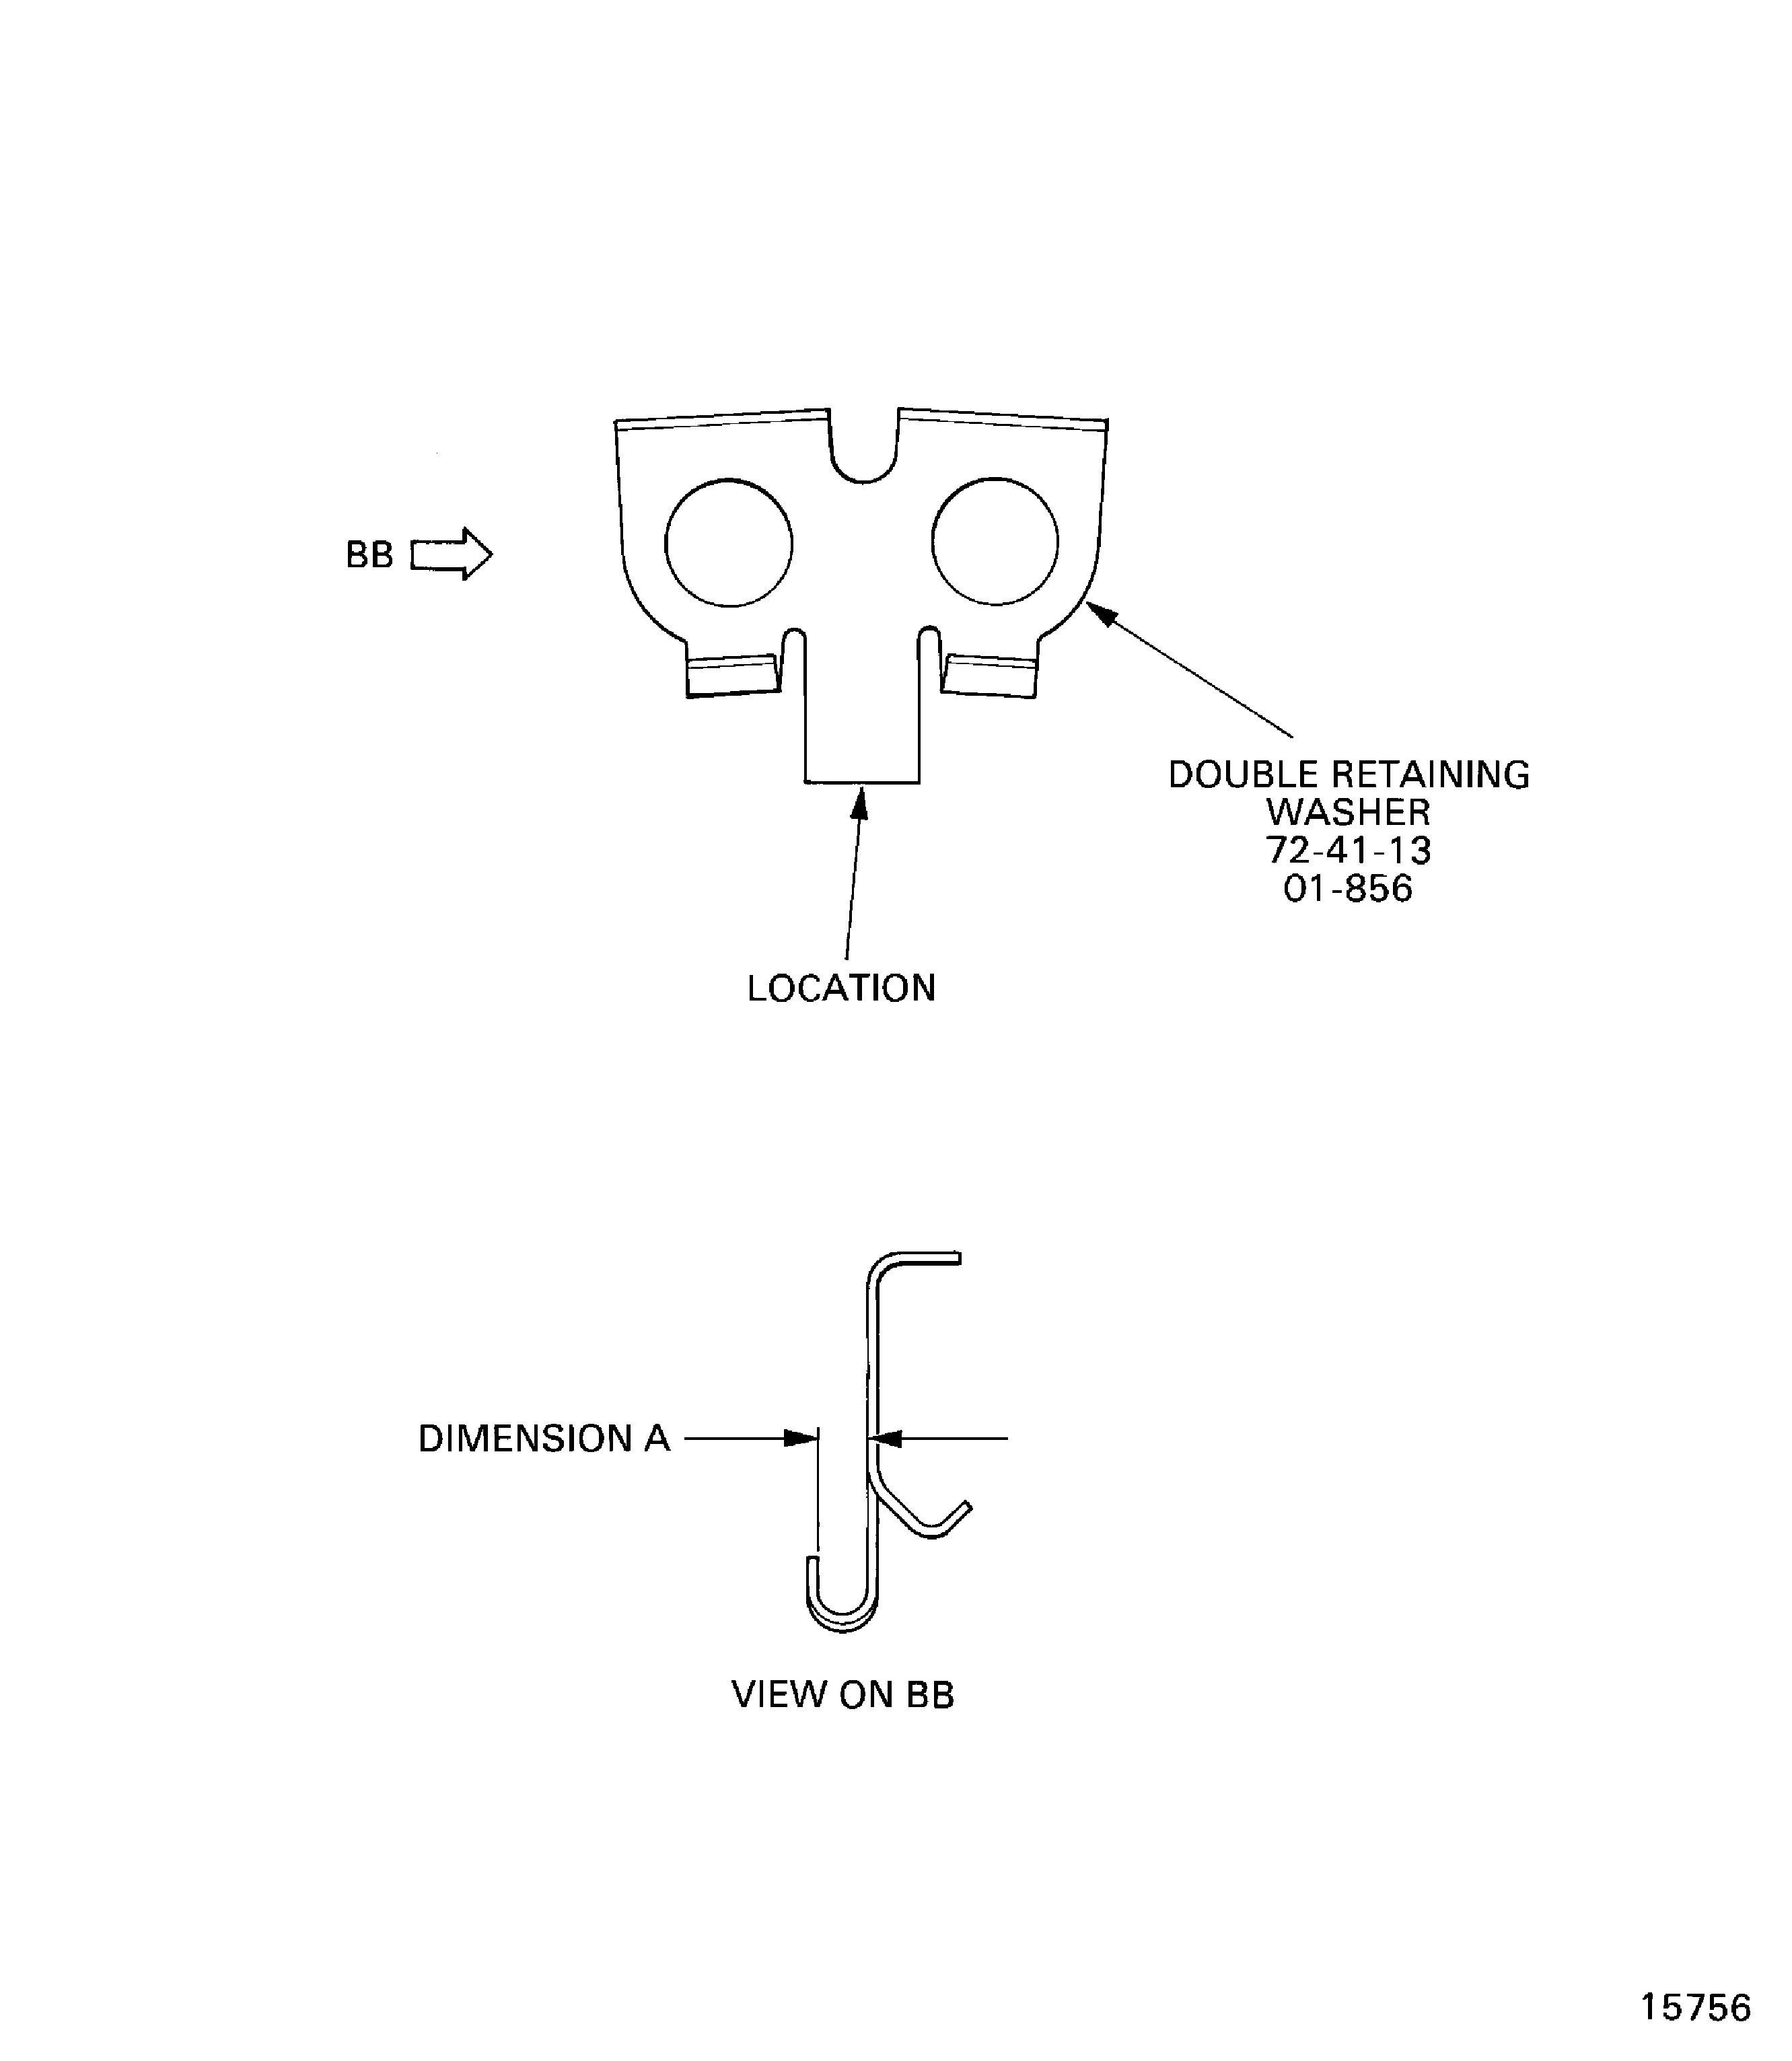
Figure: Stages 3 to 12 HP Compressor Disks Assembly and HP Compressor Shaft Data
Stages 3 to 12 HP Compressor Disks Assembly and HP Compressor Shaft Data
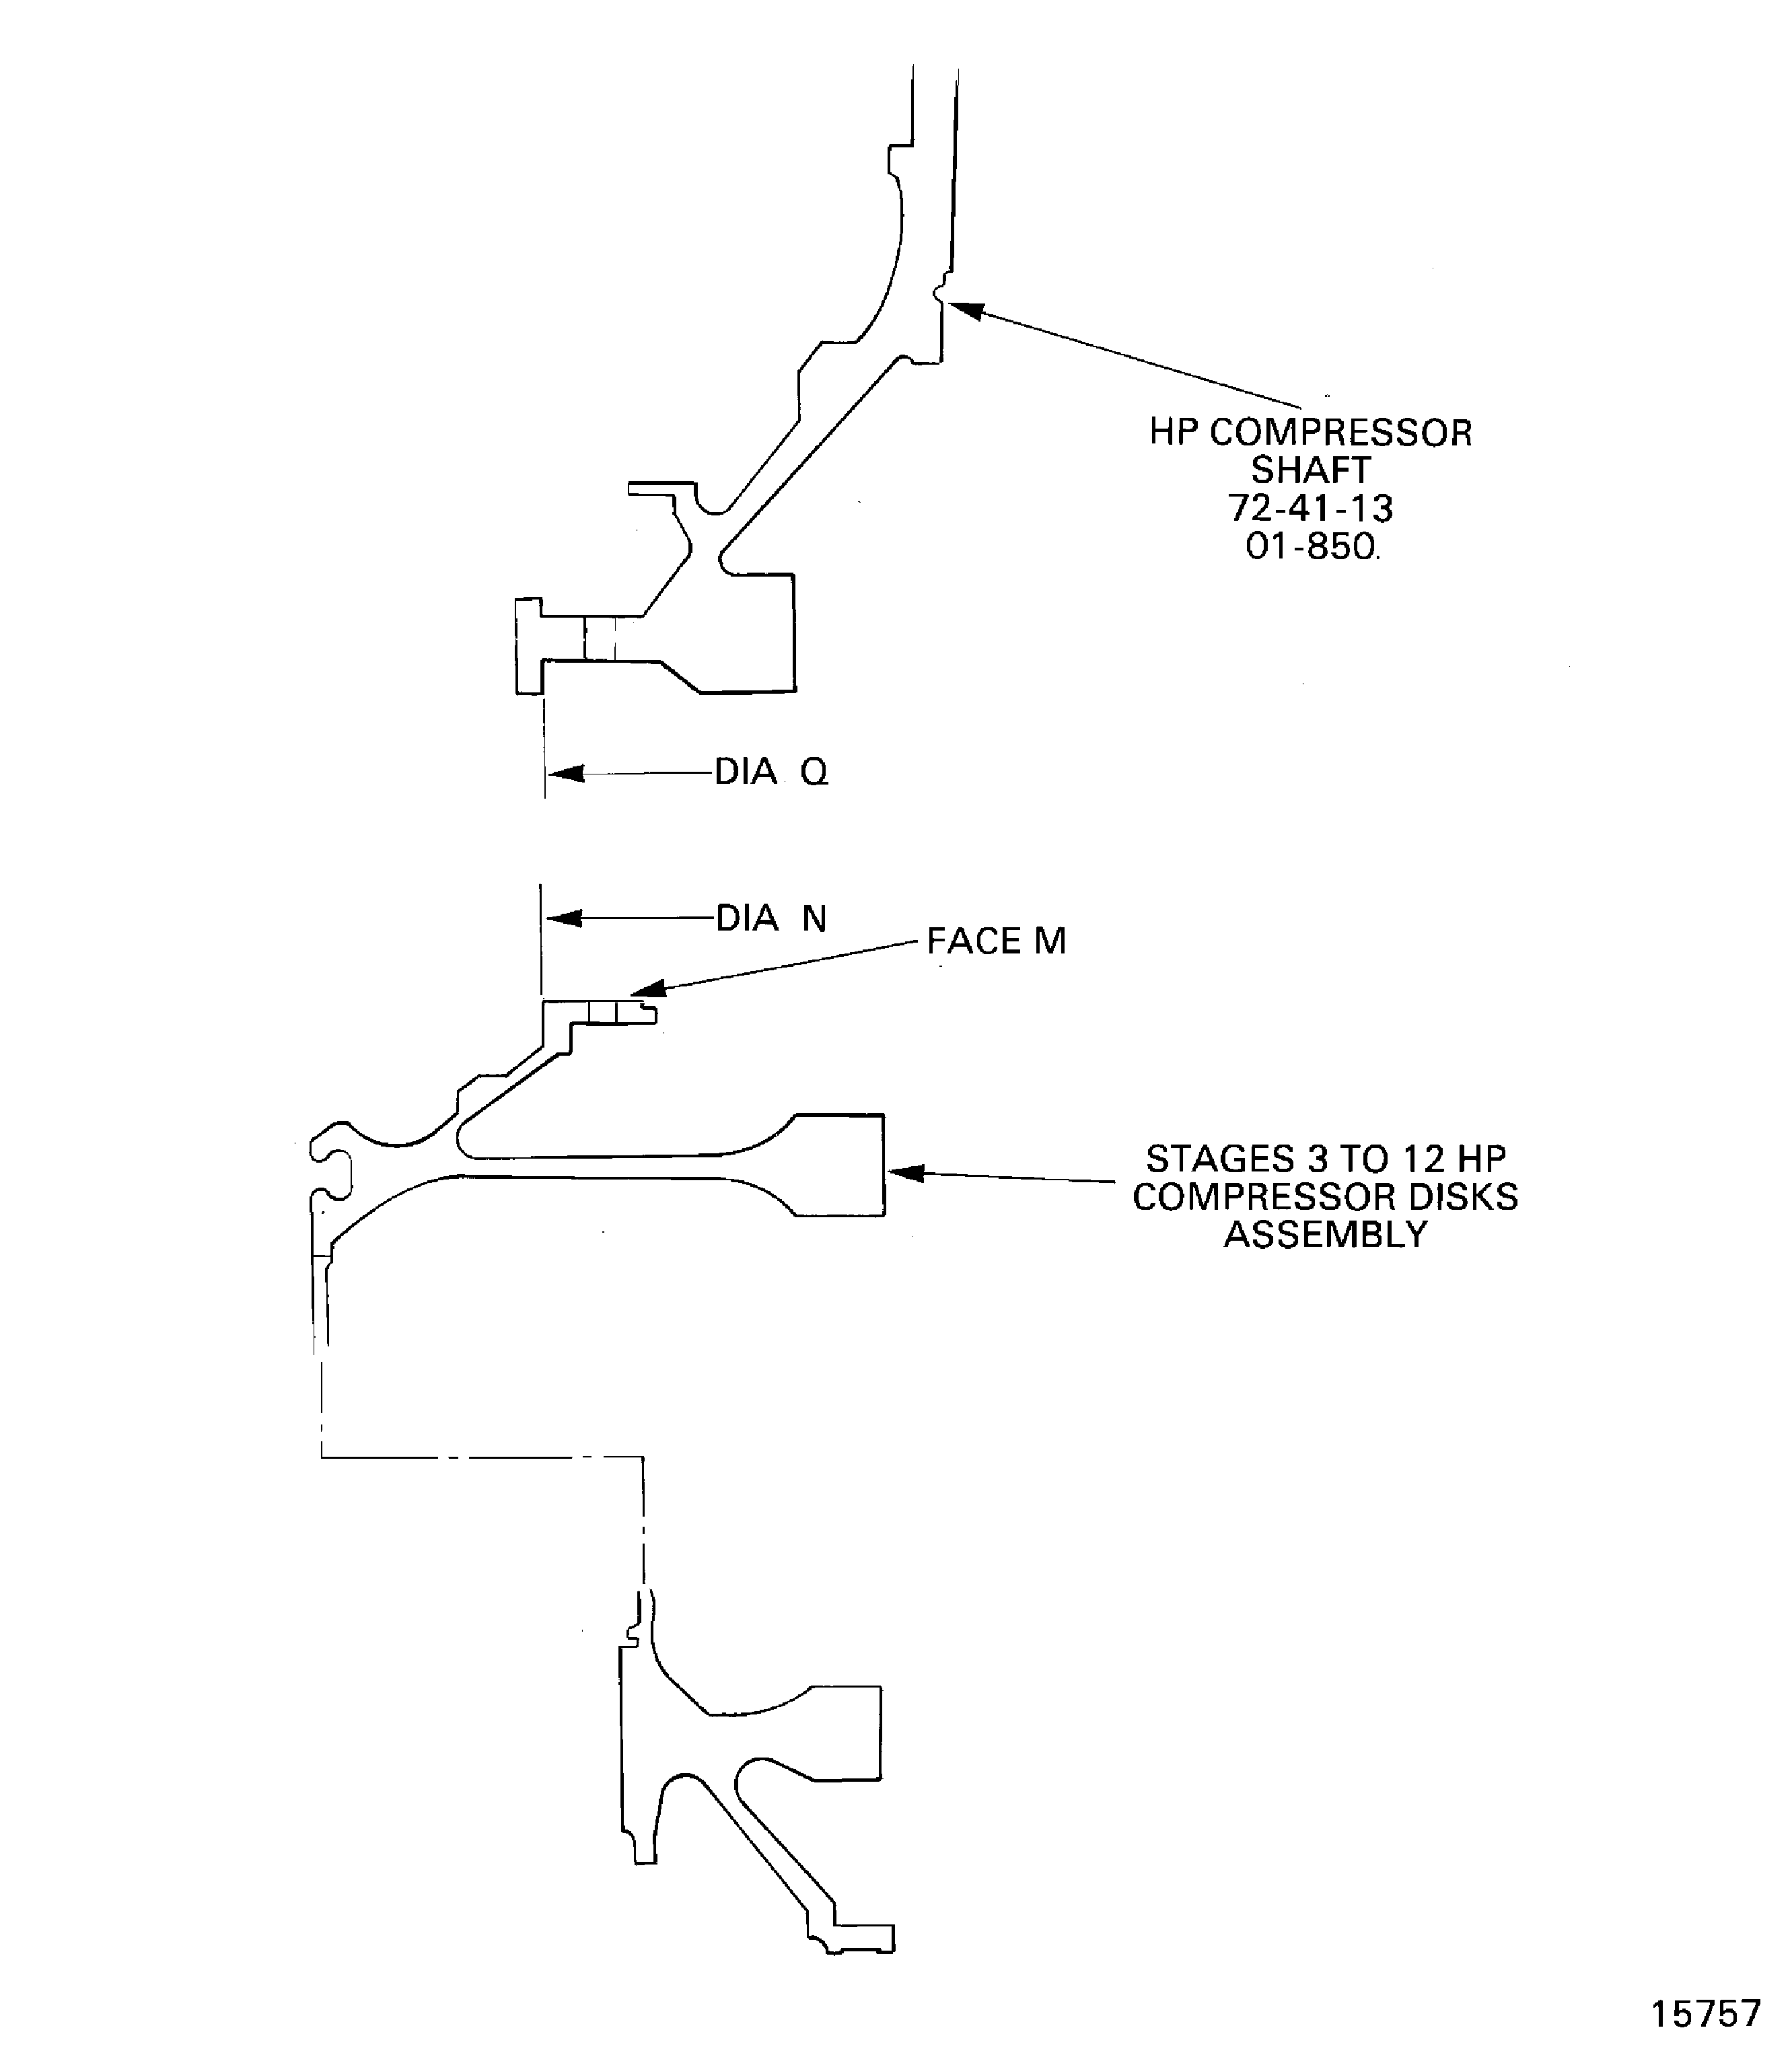
Figure: Prepare the Stages 3 to 12 HP Compressor Disks Assembly
Prepare the Stages 3 to 12 HP Compressor Disks Assembly
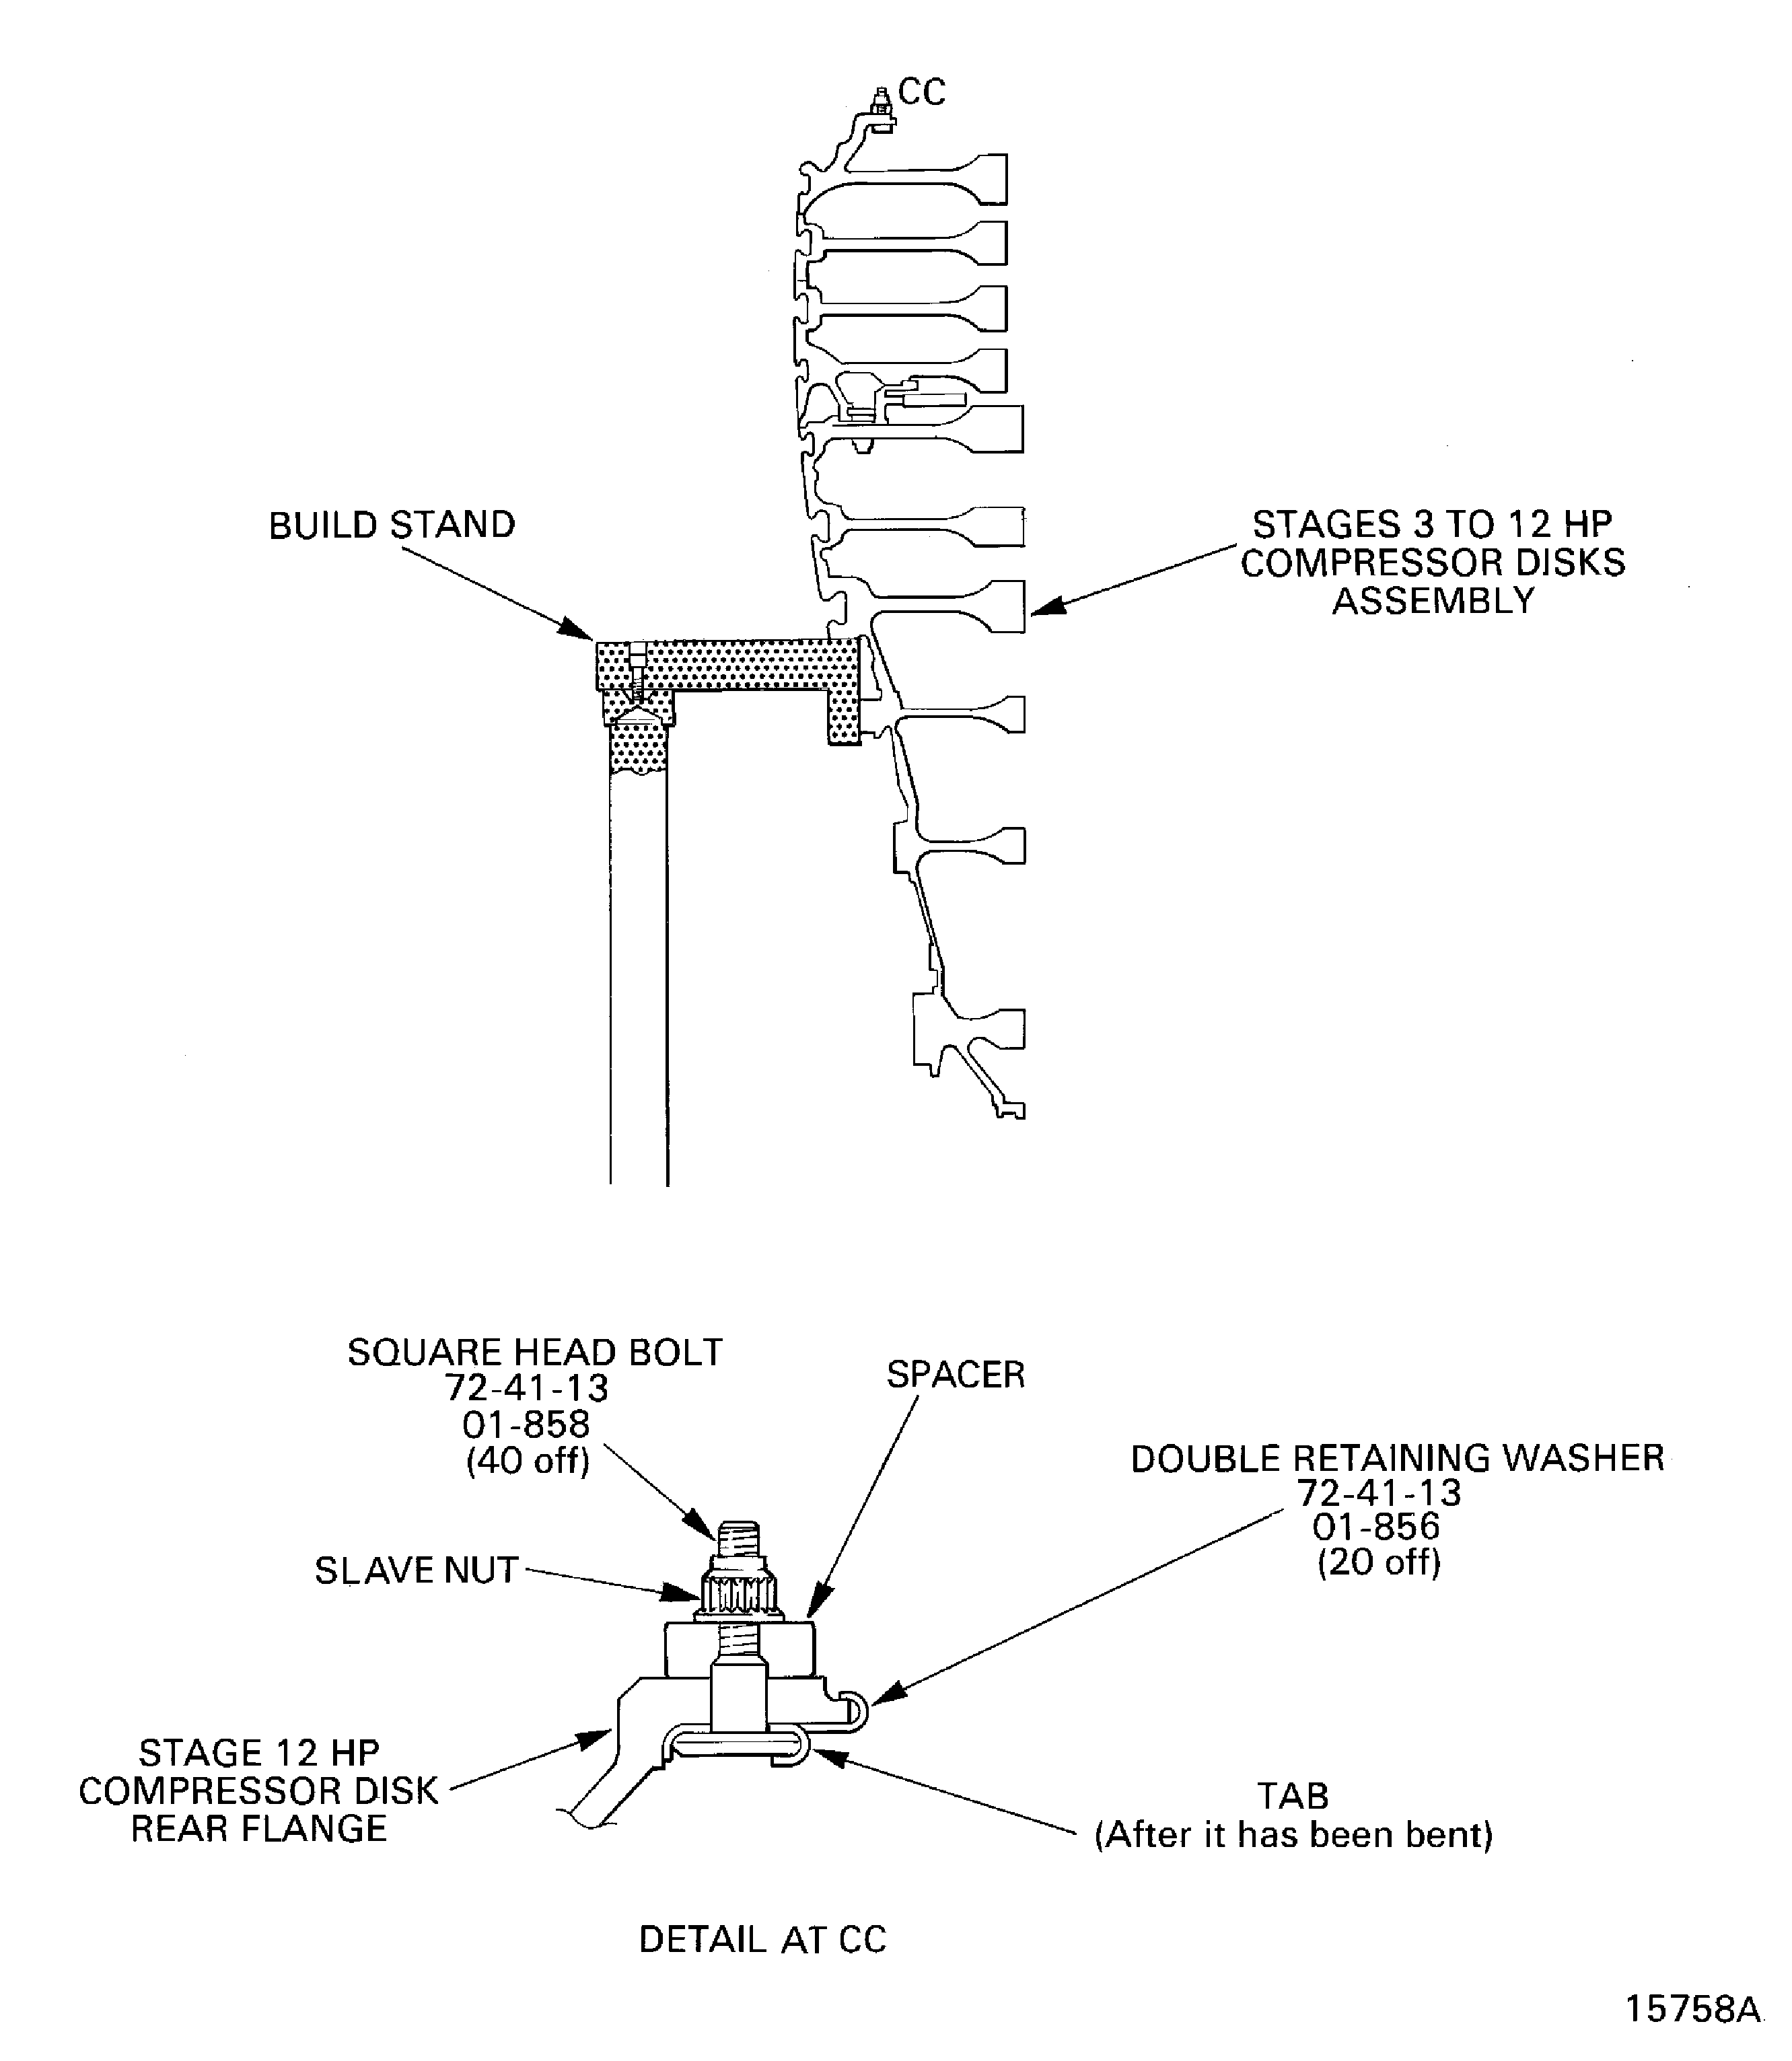
Figure: Install the Lifter on to the HP Compressor Shaft
Install the Lifter on to the HP Compressor Shaft
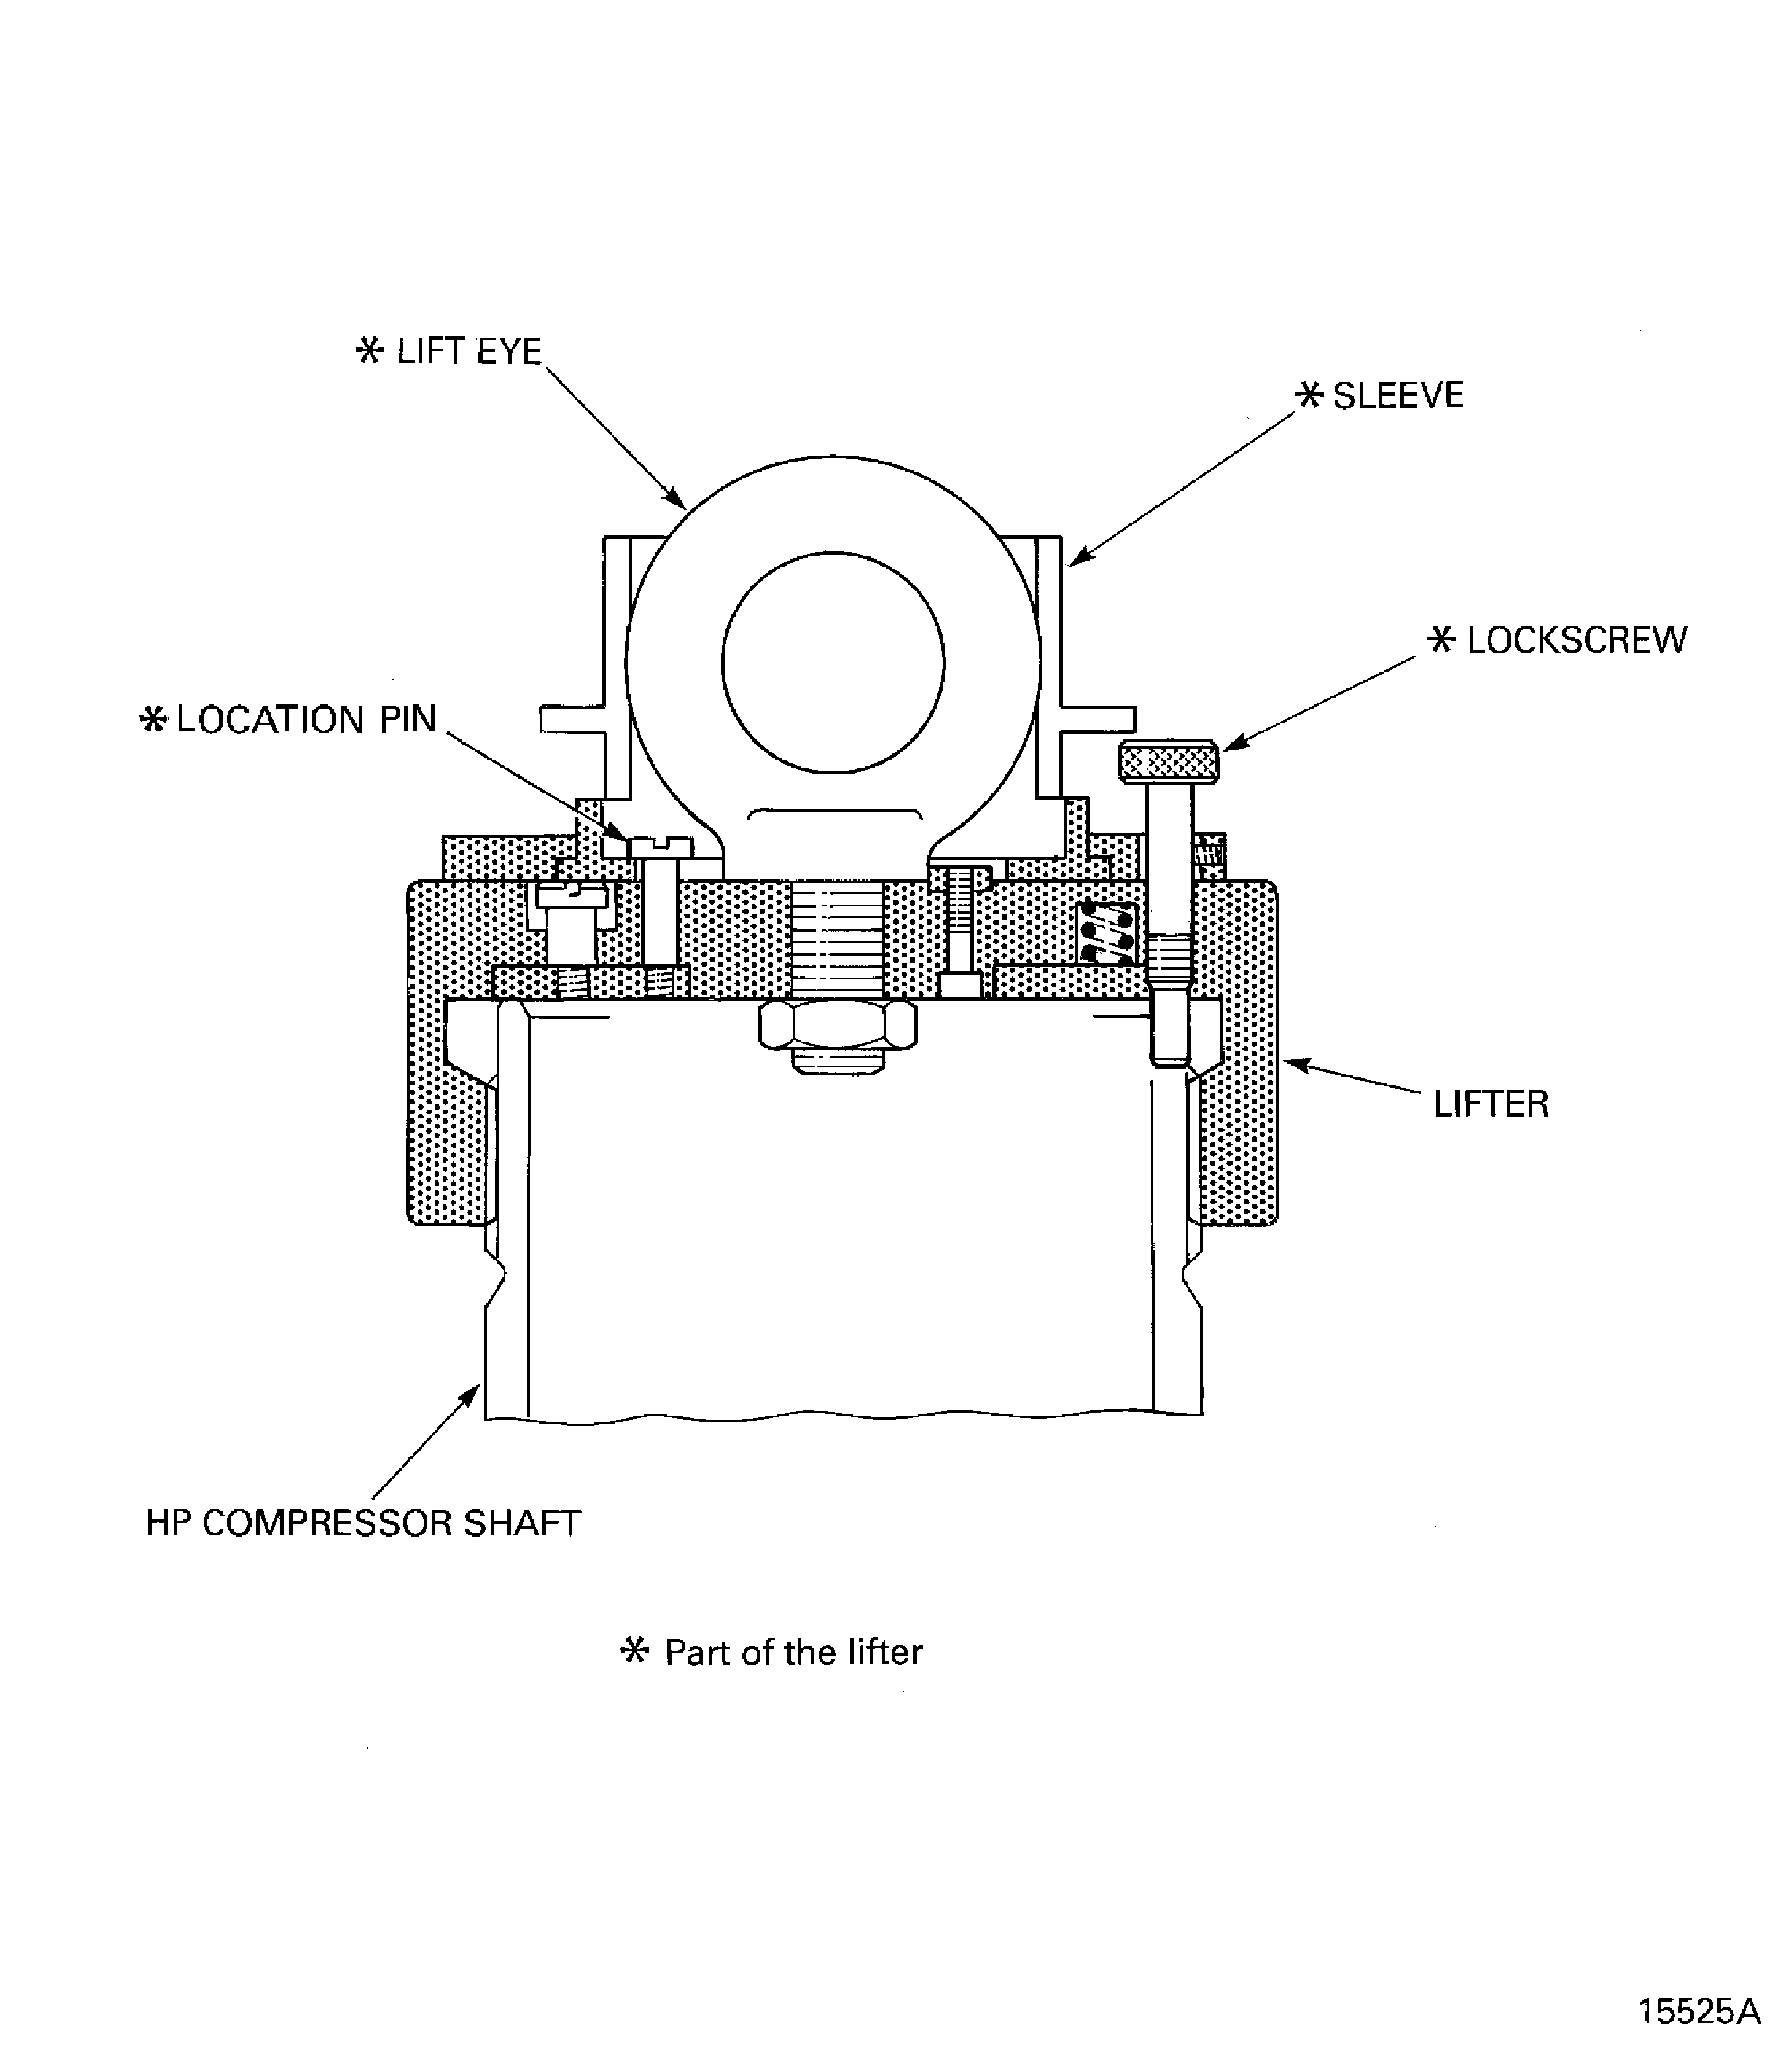
Figure: Put the HP Compressor Shaft in to the Oven
Put the HP Compressor Shaft in to the Oven
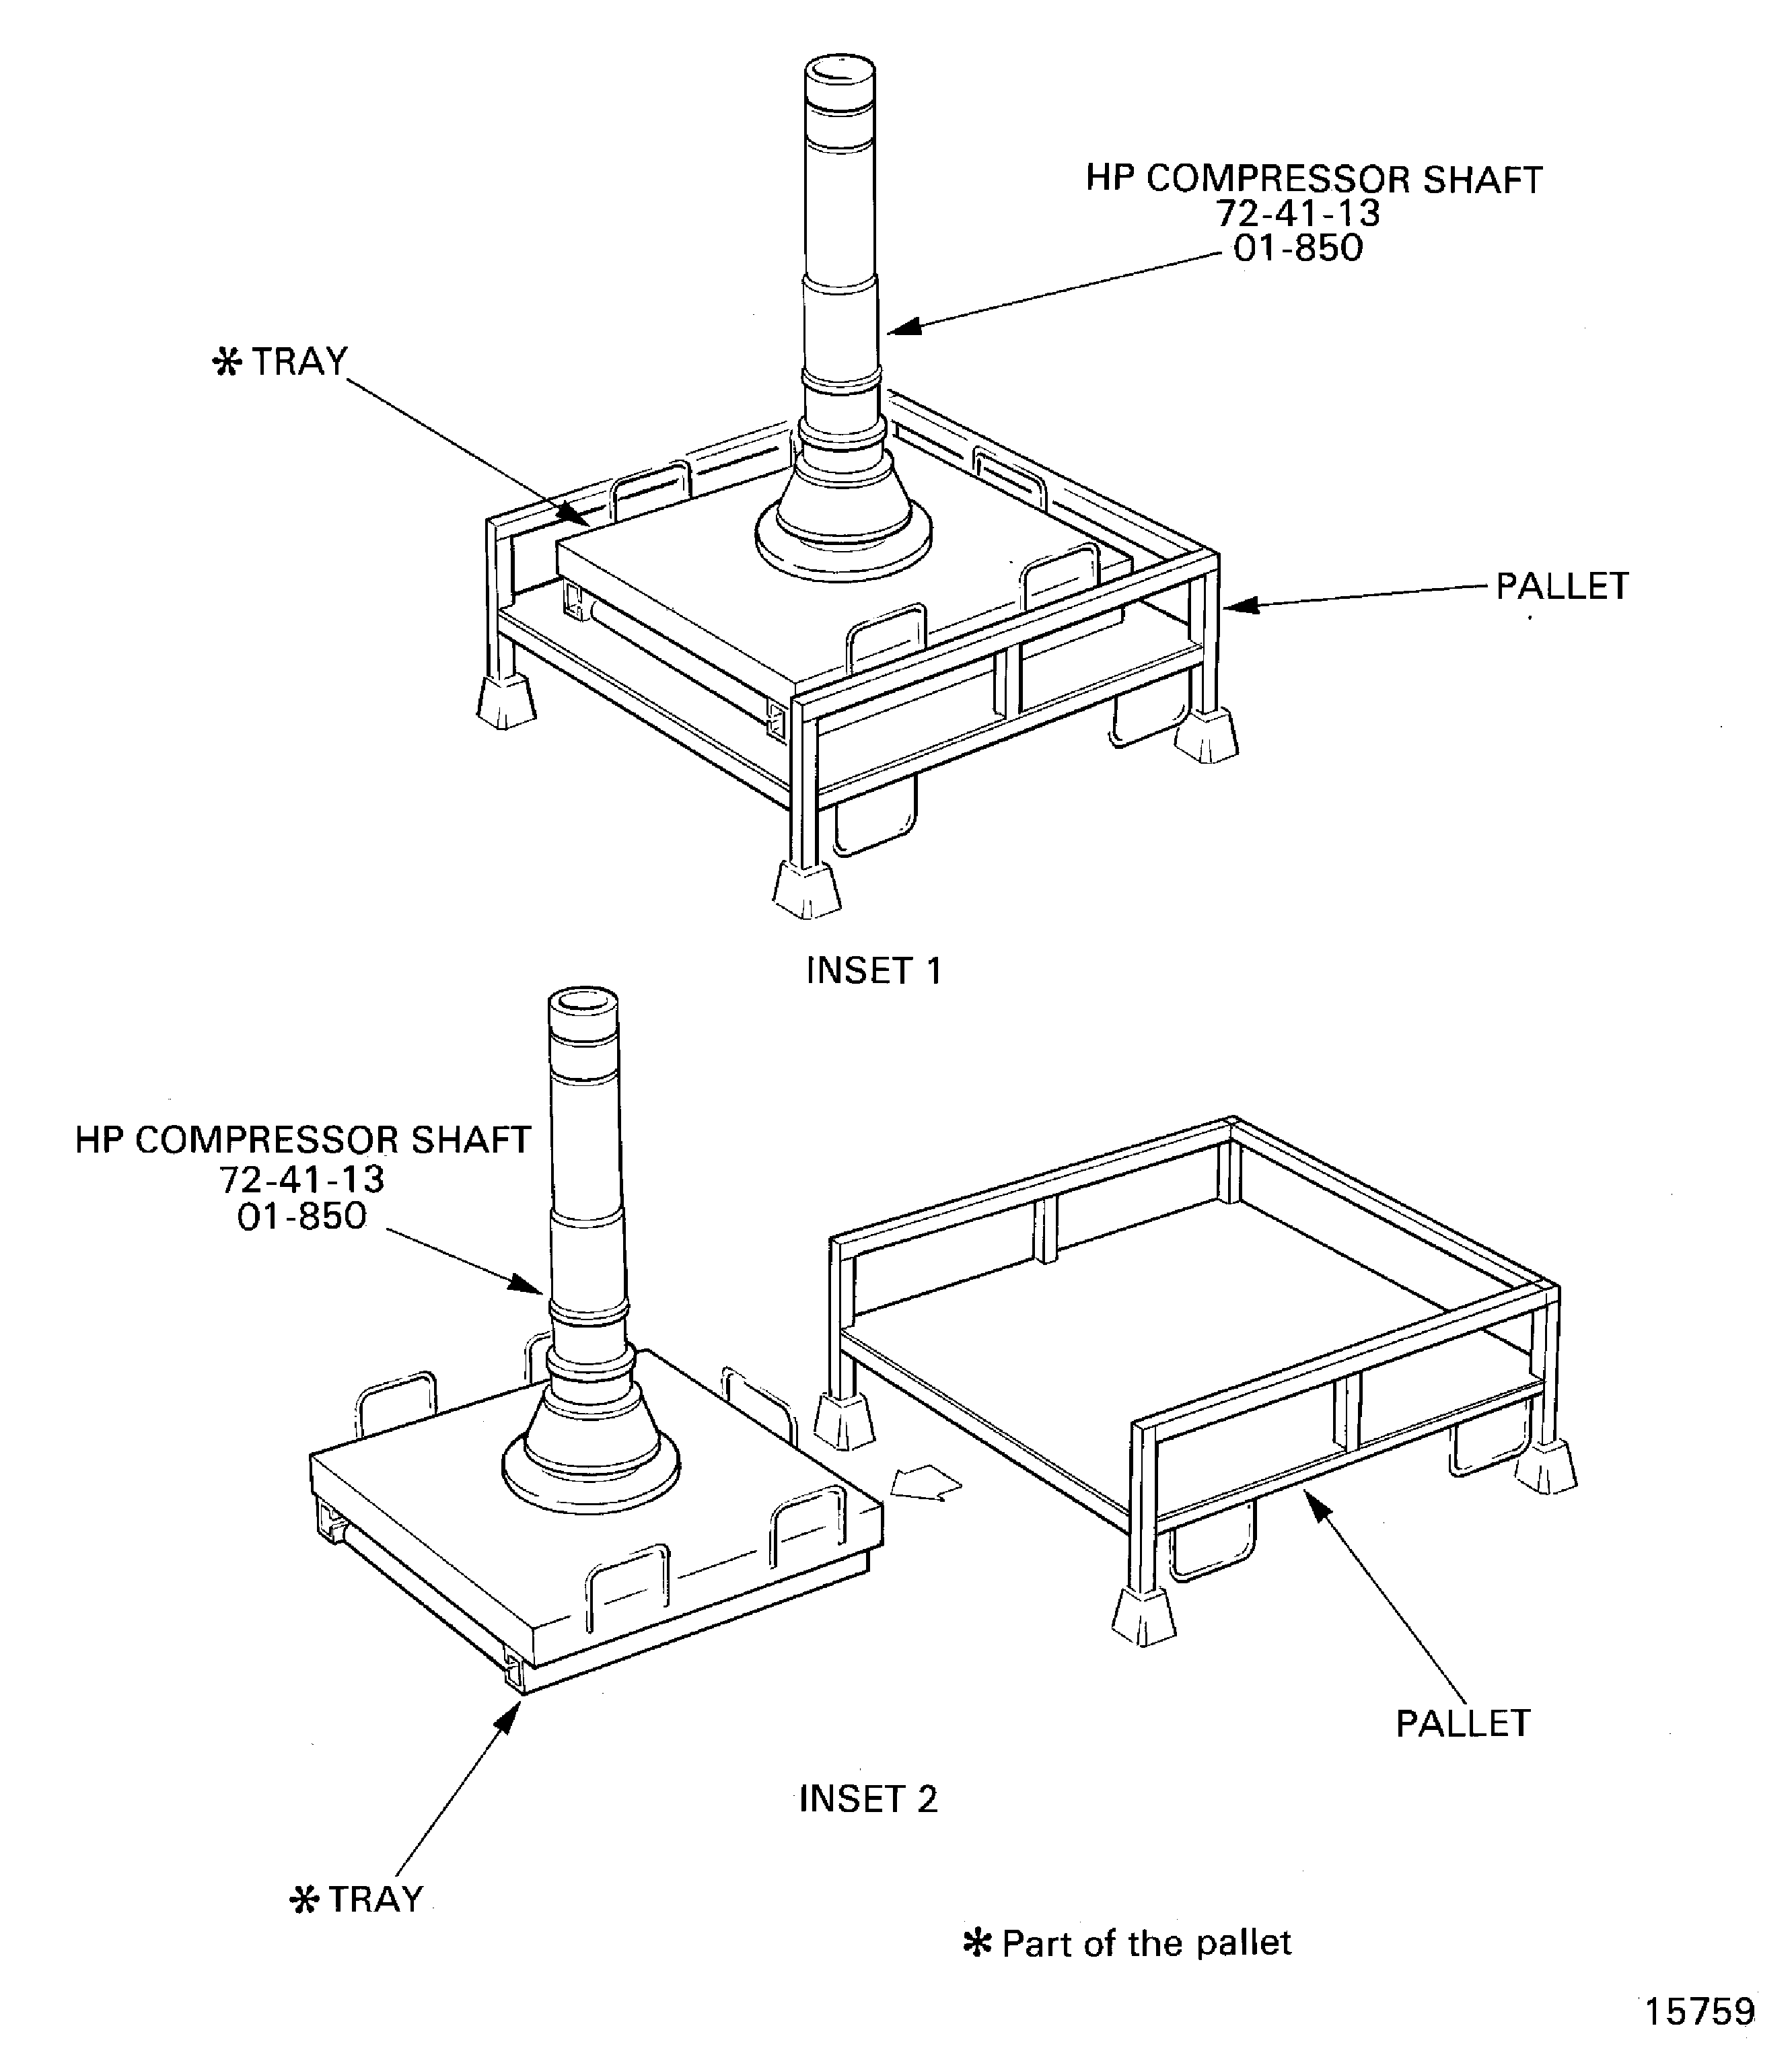
Figure: Install the HP Compressor Shaft on to the Stages 3 to 12 HP Compressor Disks Assembly
Install the HP Compressor Shaft on to the Stages 3 to 12 HP Compressor Disks Assembly
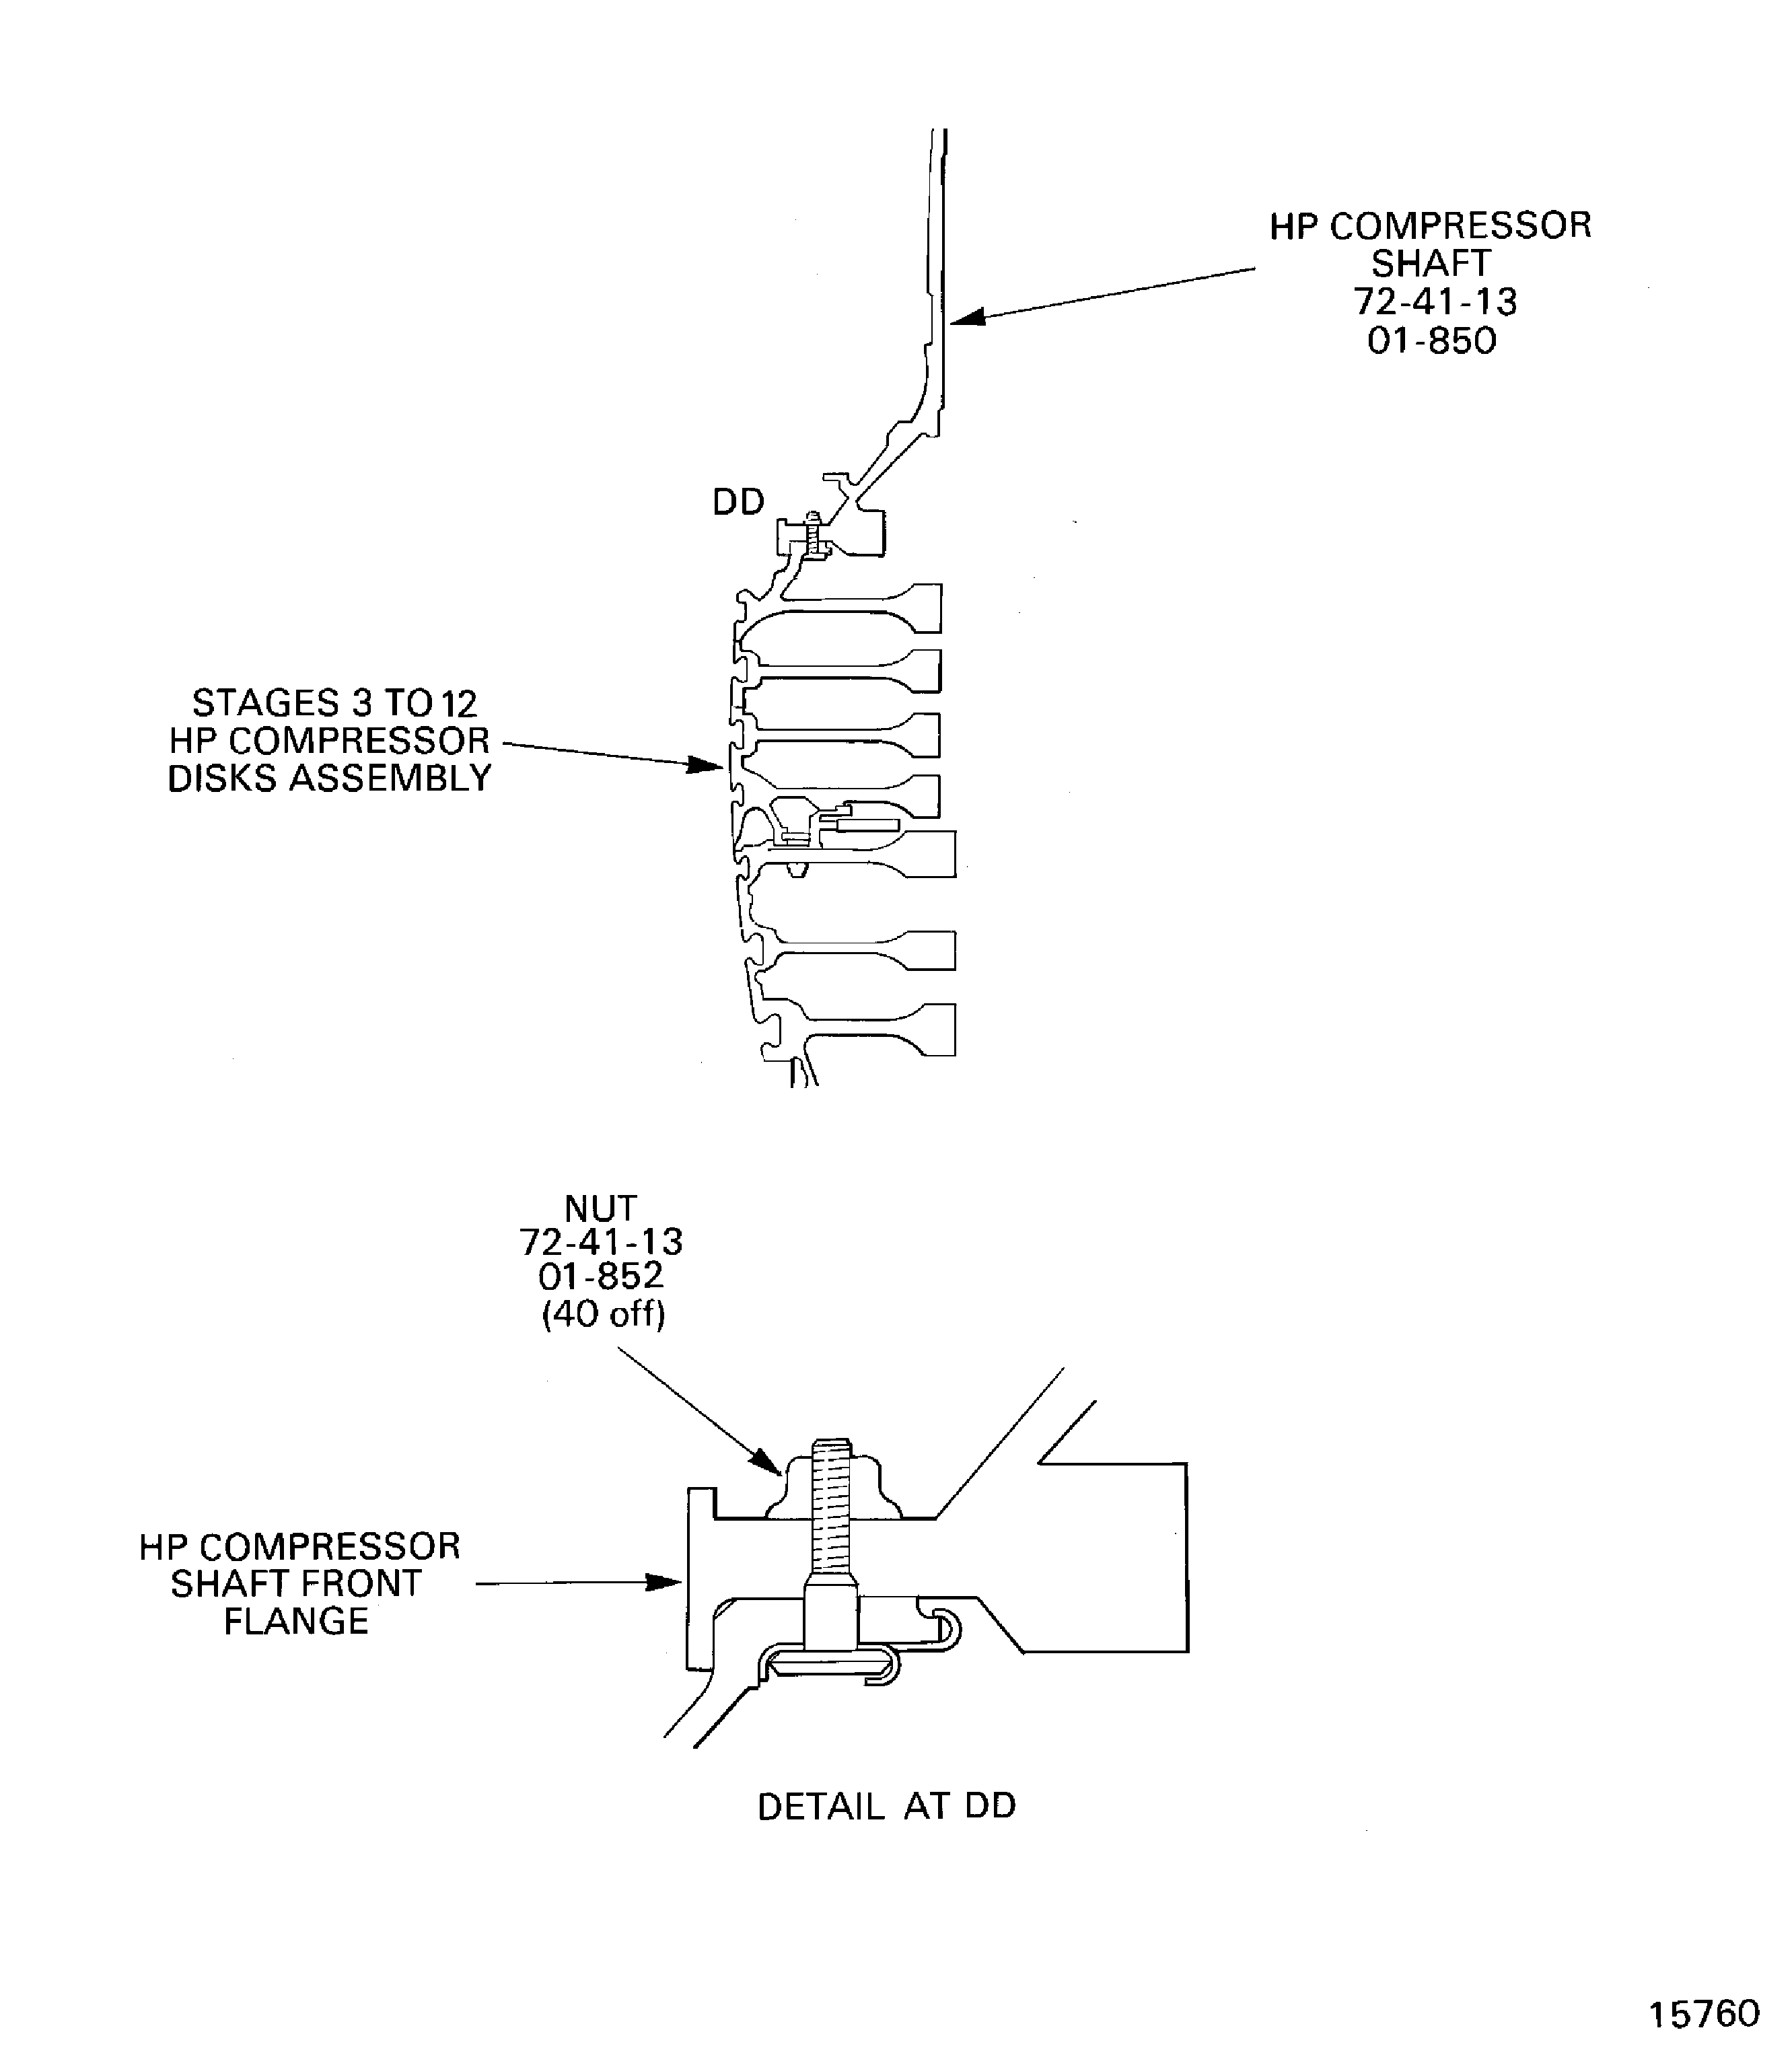
Figure: Sequence to Tighten the Stage 12 disk to HP Compressor Shaft Joint Nuts
Sequence to Tighten the Stage 12 disk to HP Compressor Shaft Joint Nuts

Figure: Measure the Swash and the run-out of the Stages 3 to 12 HP Compressor Disks and the HP Compressor Shaft Assembly
Measure the Swash and the run-out of the Stages 3 to 12 HP Compressor Disks and the HP Compressor Shaft Assembly
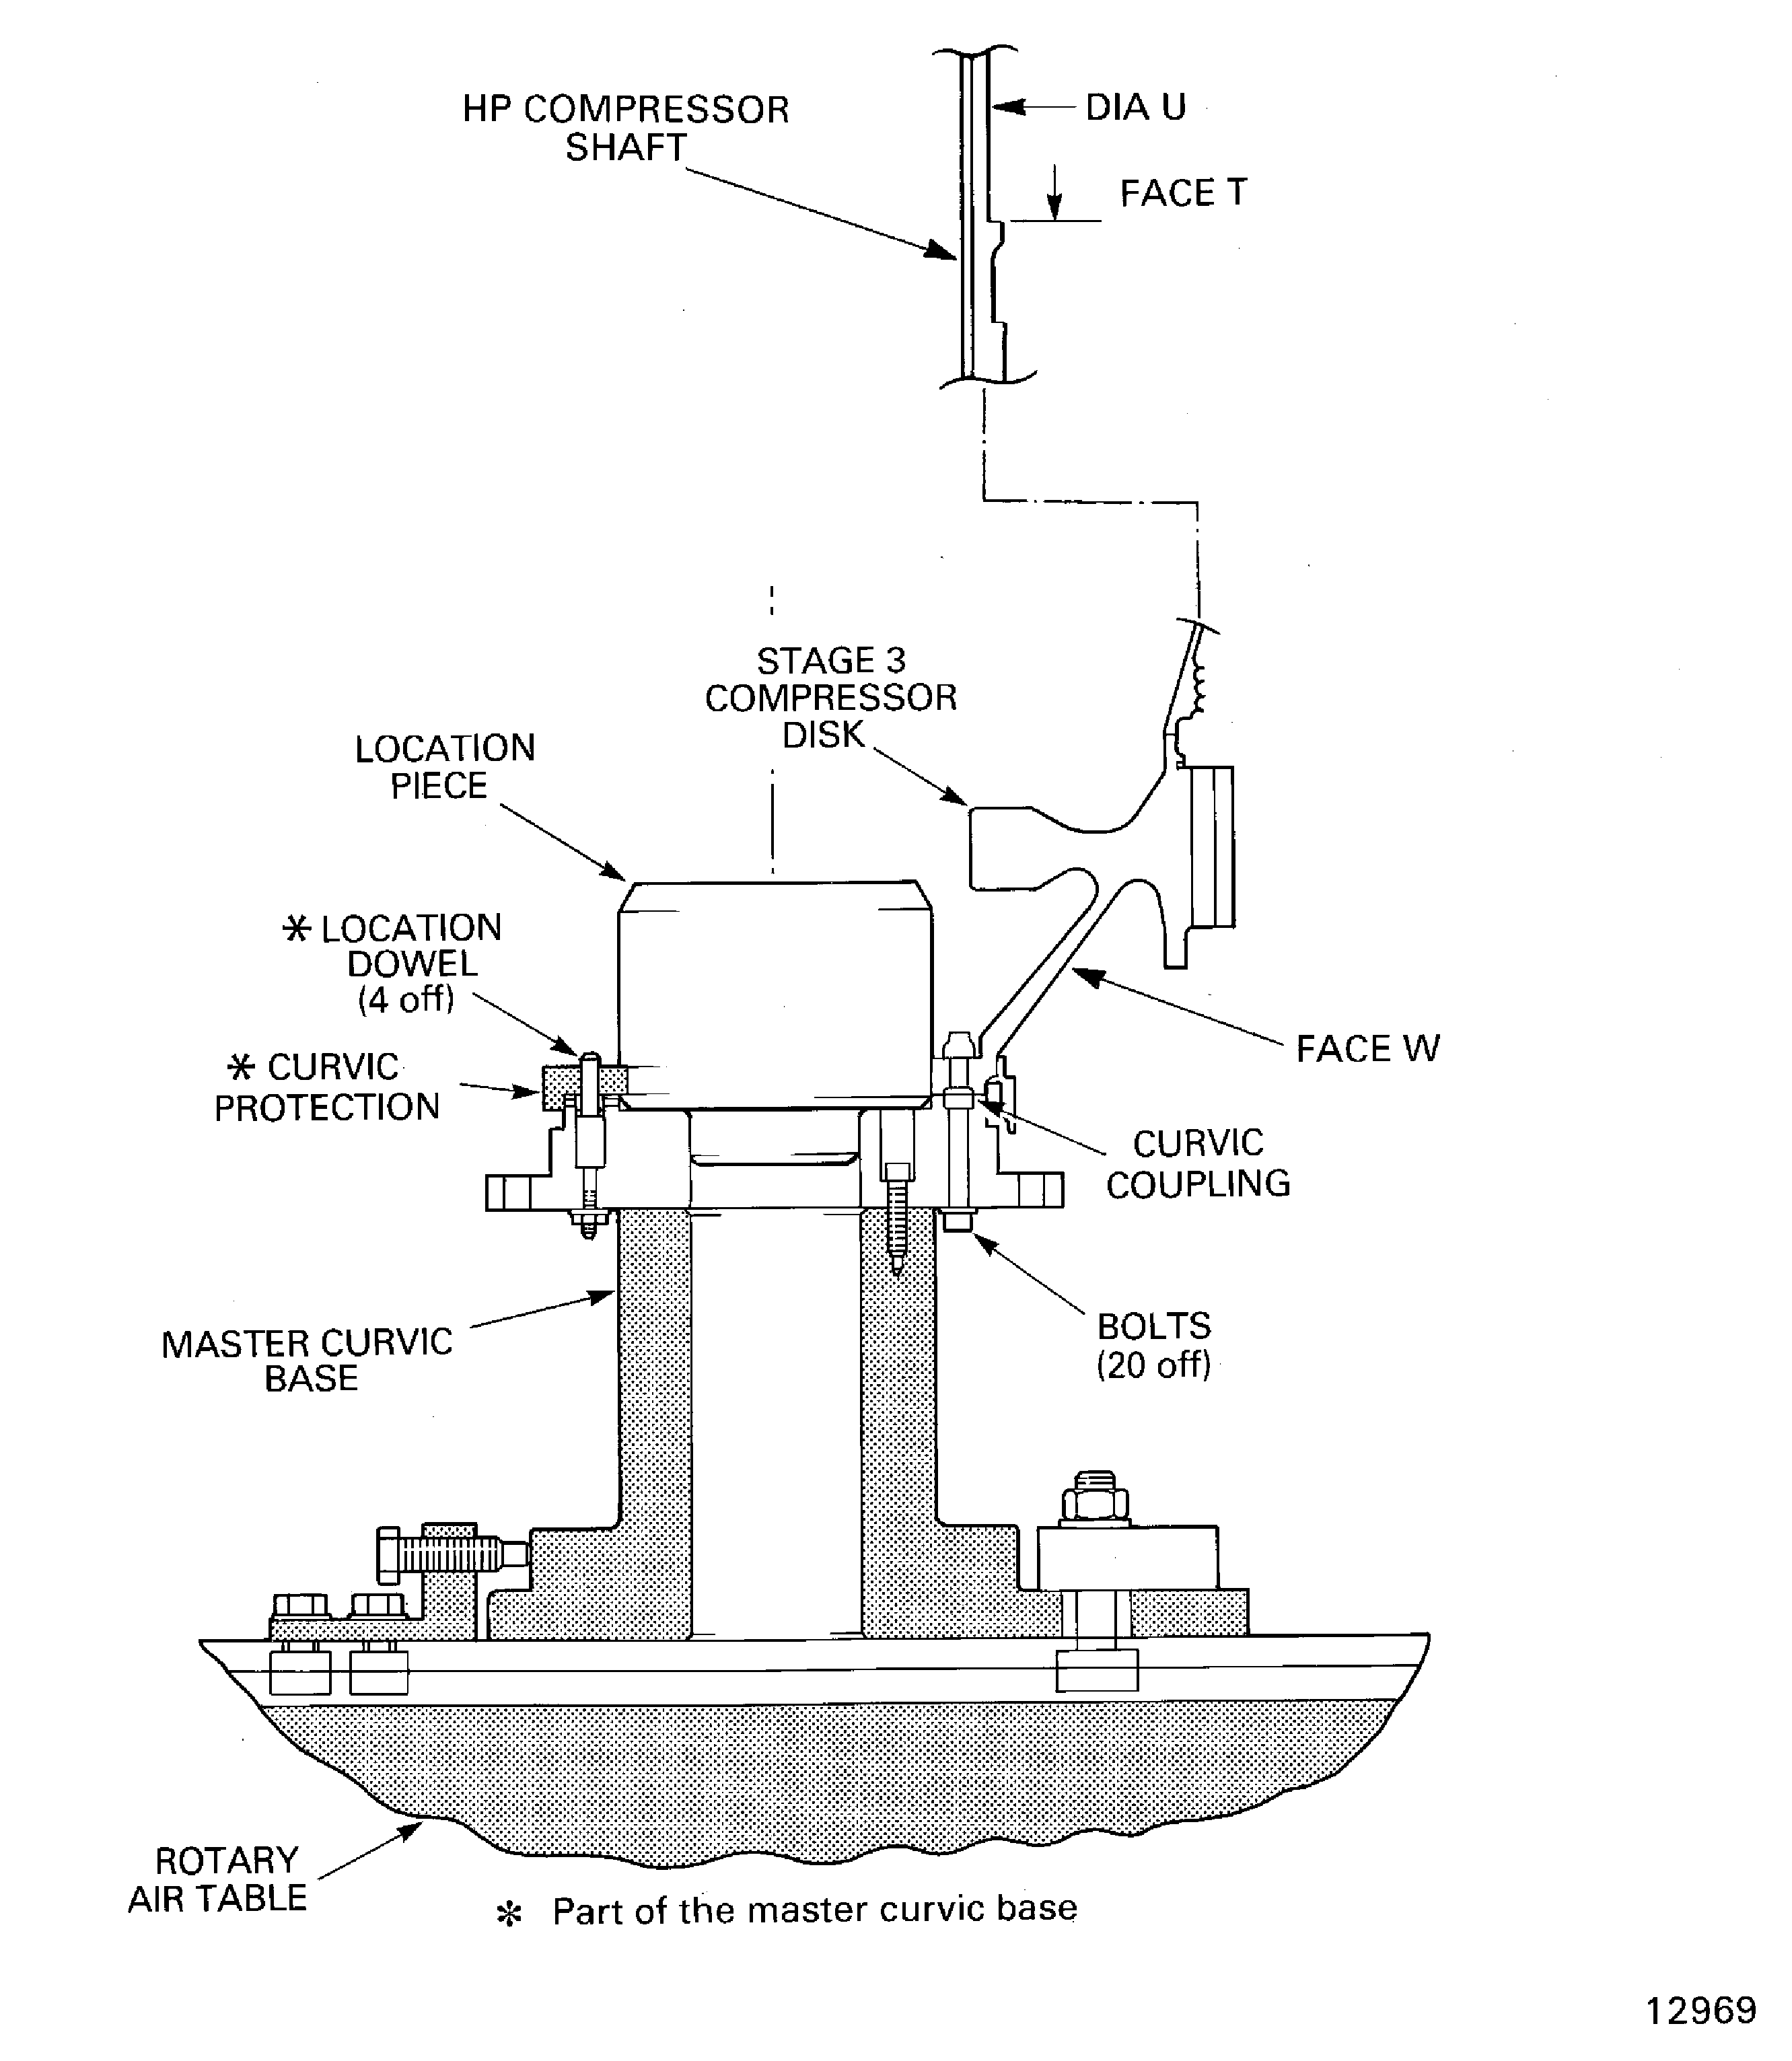
Figure: Install the HP Compressor Rotating Air Seal
Install the HP Compressor Rotating Air Seal

Figure: Install the Dummy Stub Shaft
Install the Dummy Stub Shaft
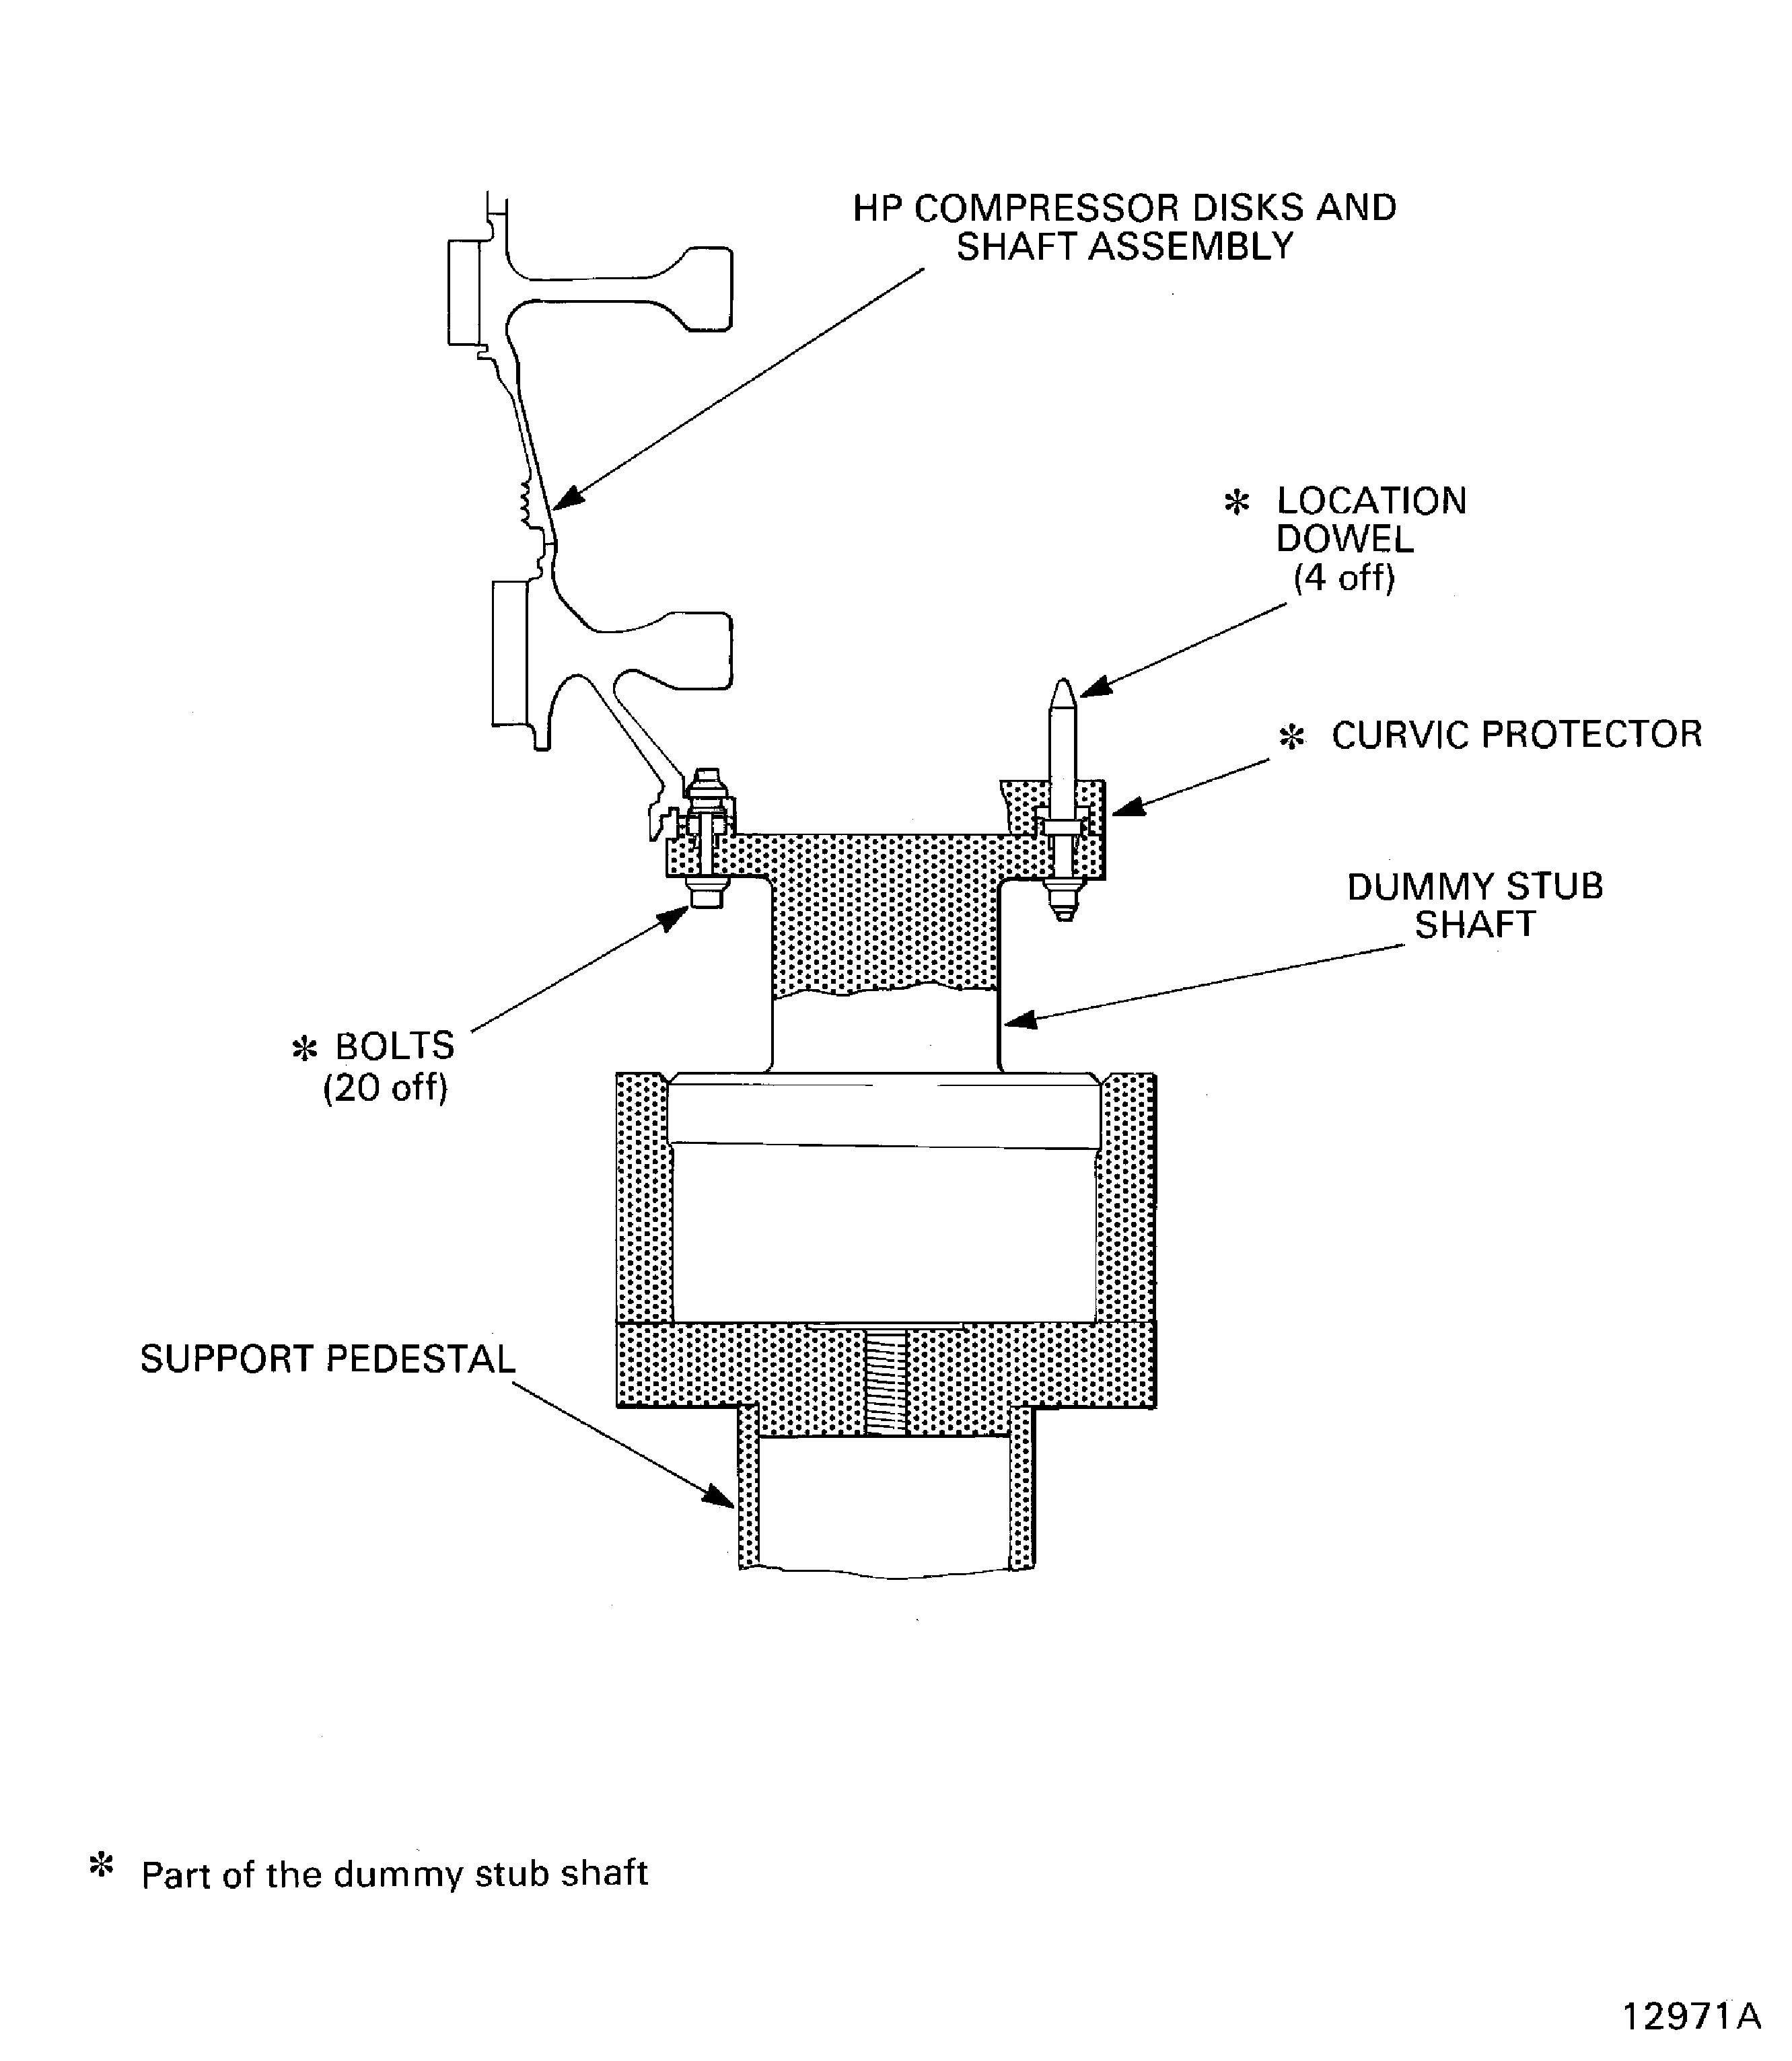
Figure: Install the Stages 3 to 12 HP Compressor Disks and HP Compressor Shaft Assembly in to the Build Stand
Install the Stages 3 to 12 HP Compressor Disks and HP Compressor Shaft Assembly in to the Build Stand
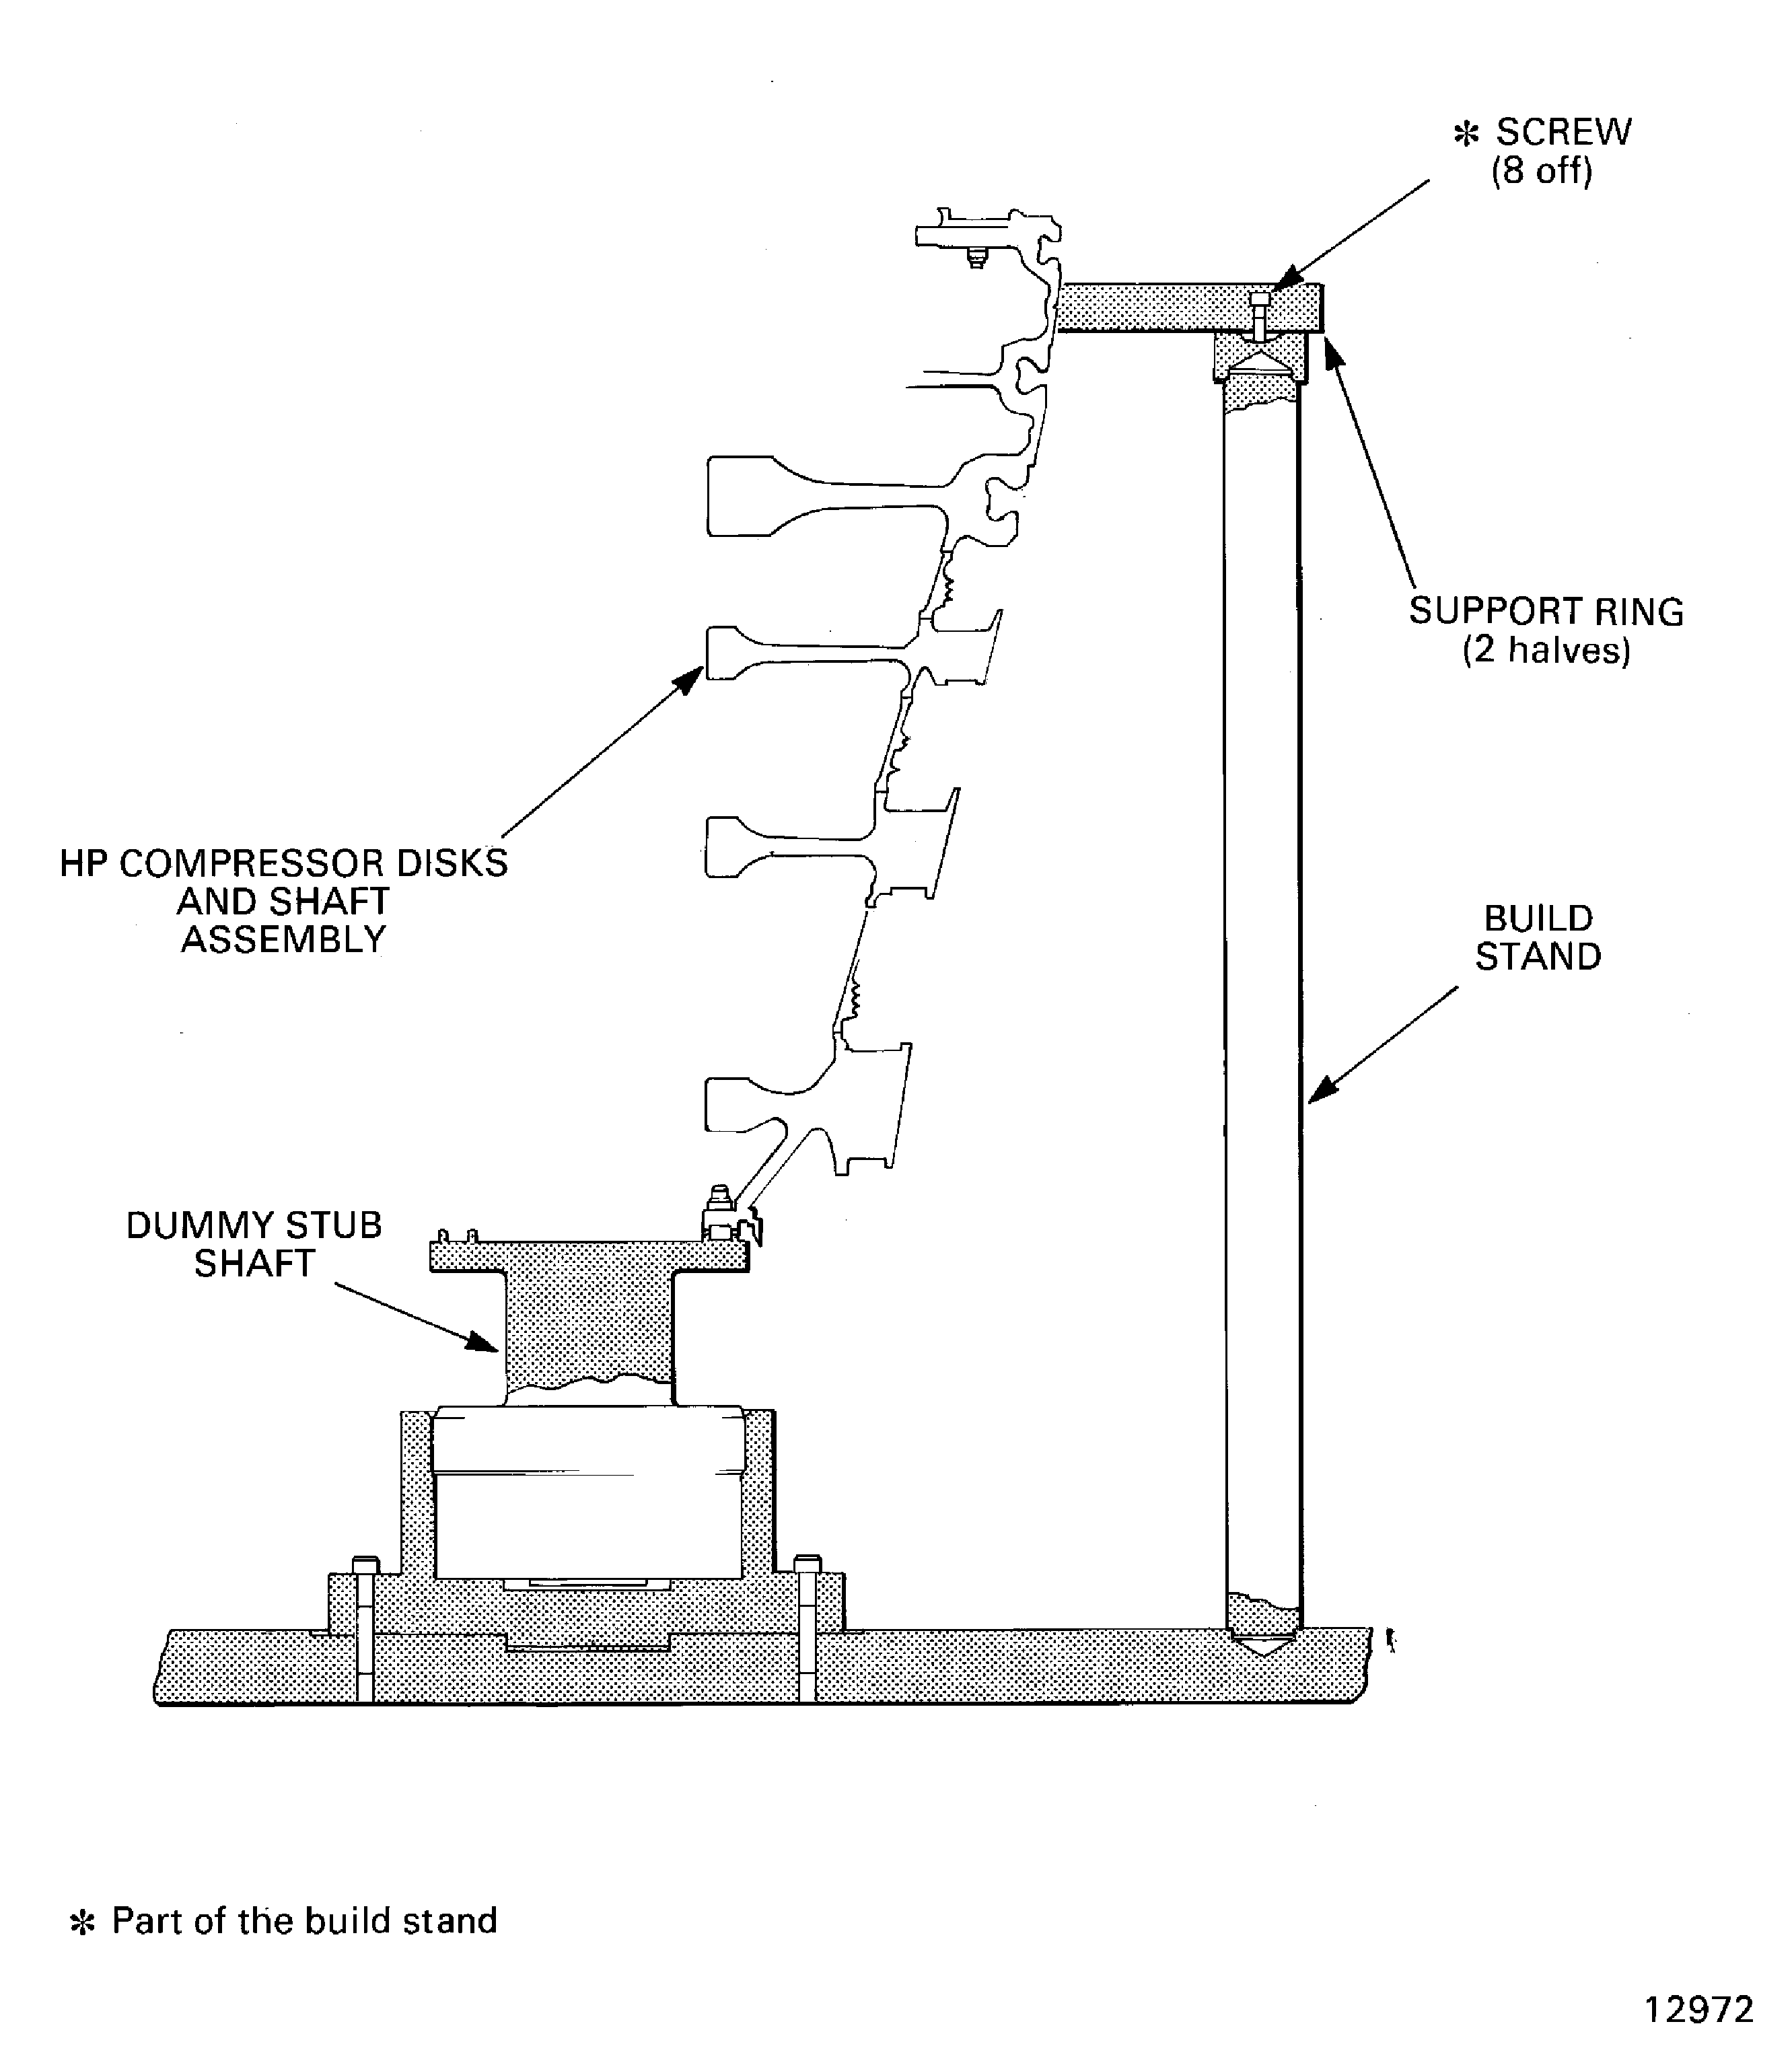
Figure: HP Compressor Rotating Air Seal Bolts Torque Sequence
HP Compressor Rotating Air Seal Bolts Torque Sequence
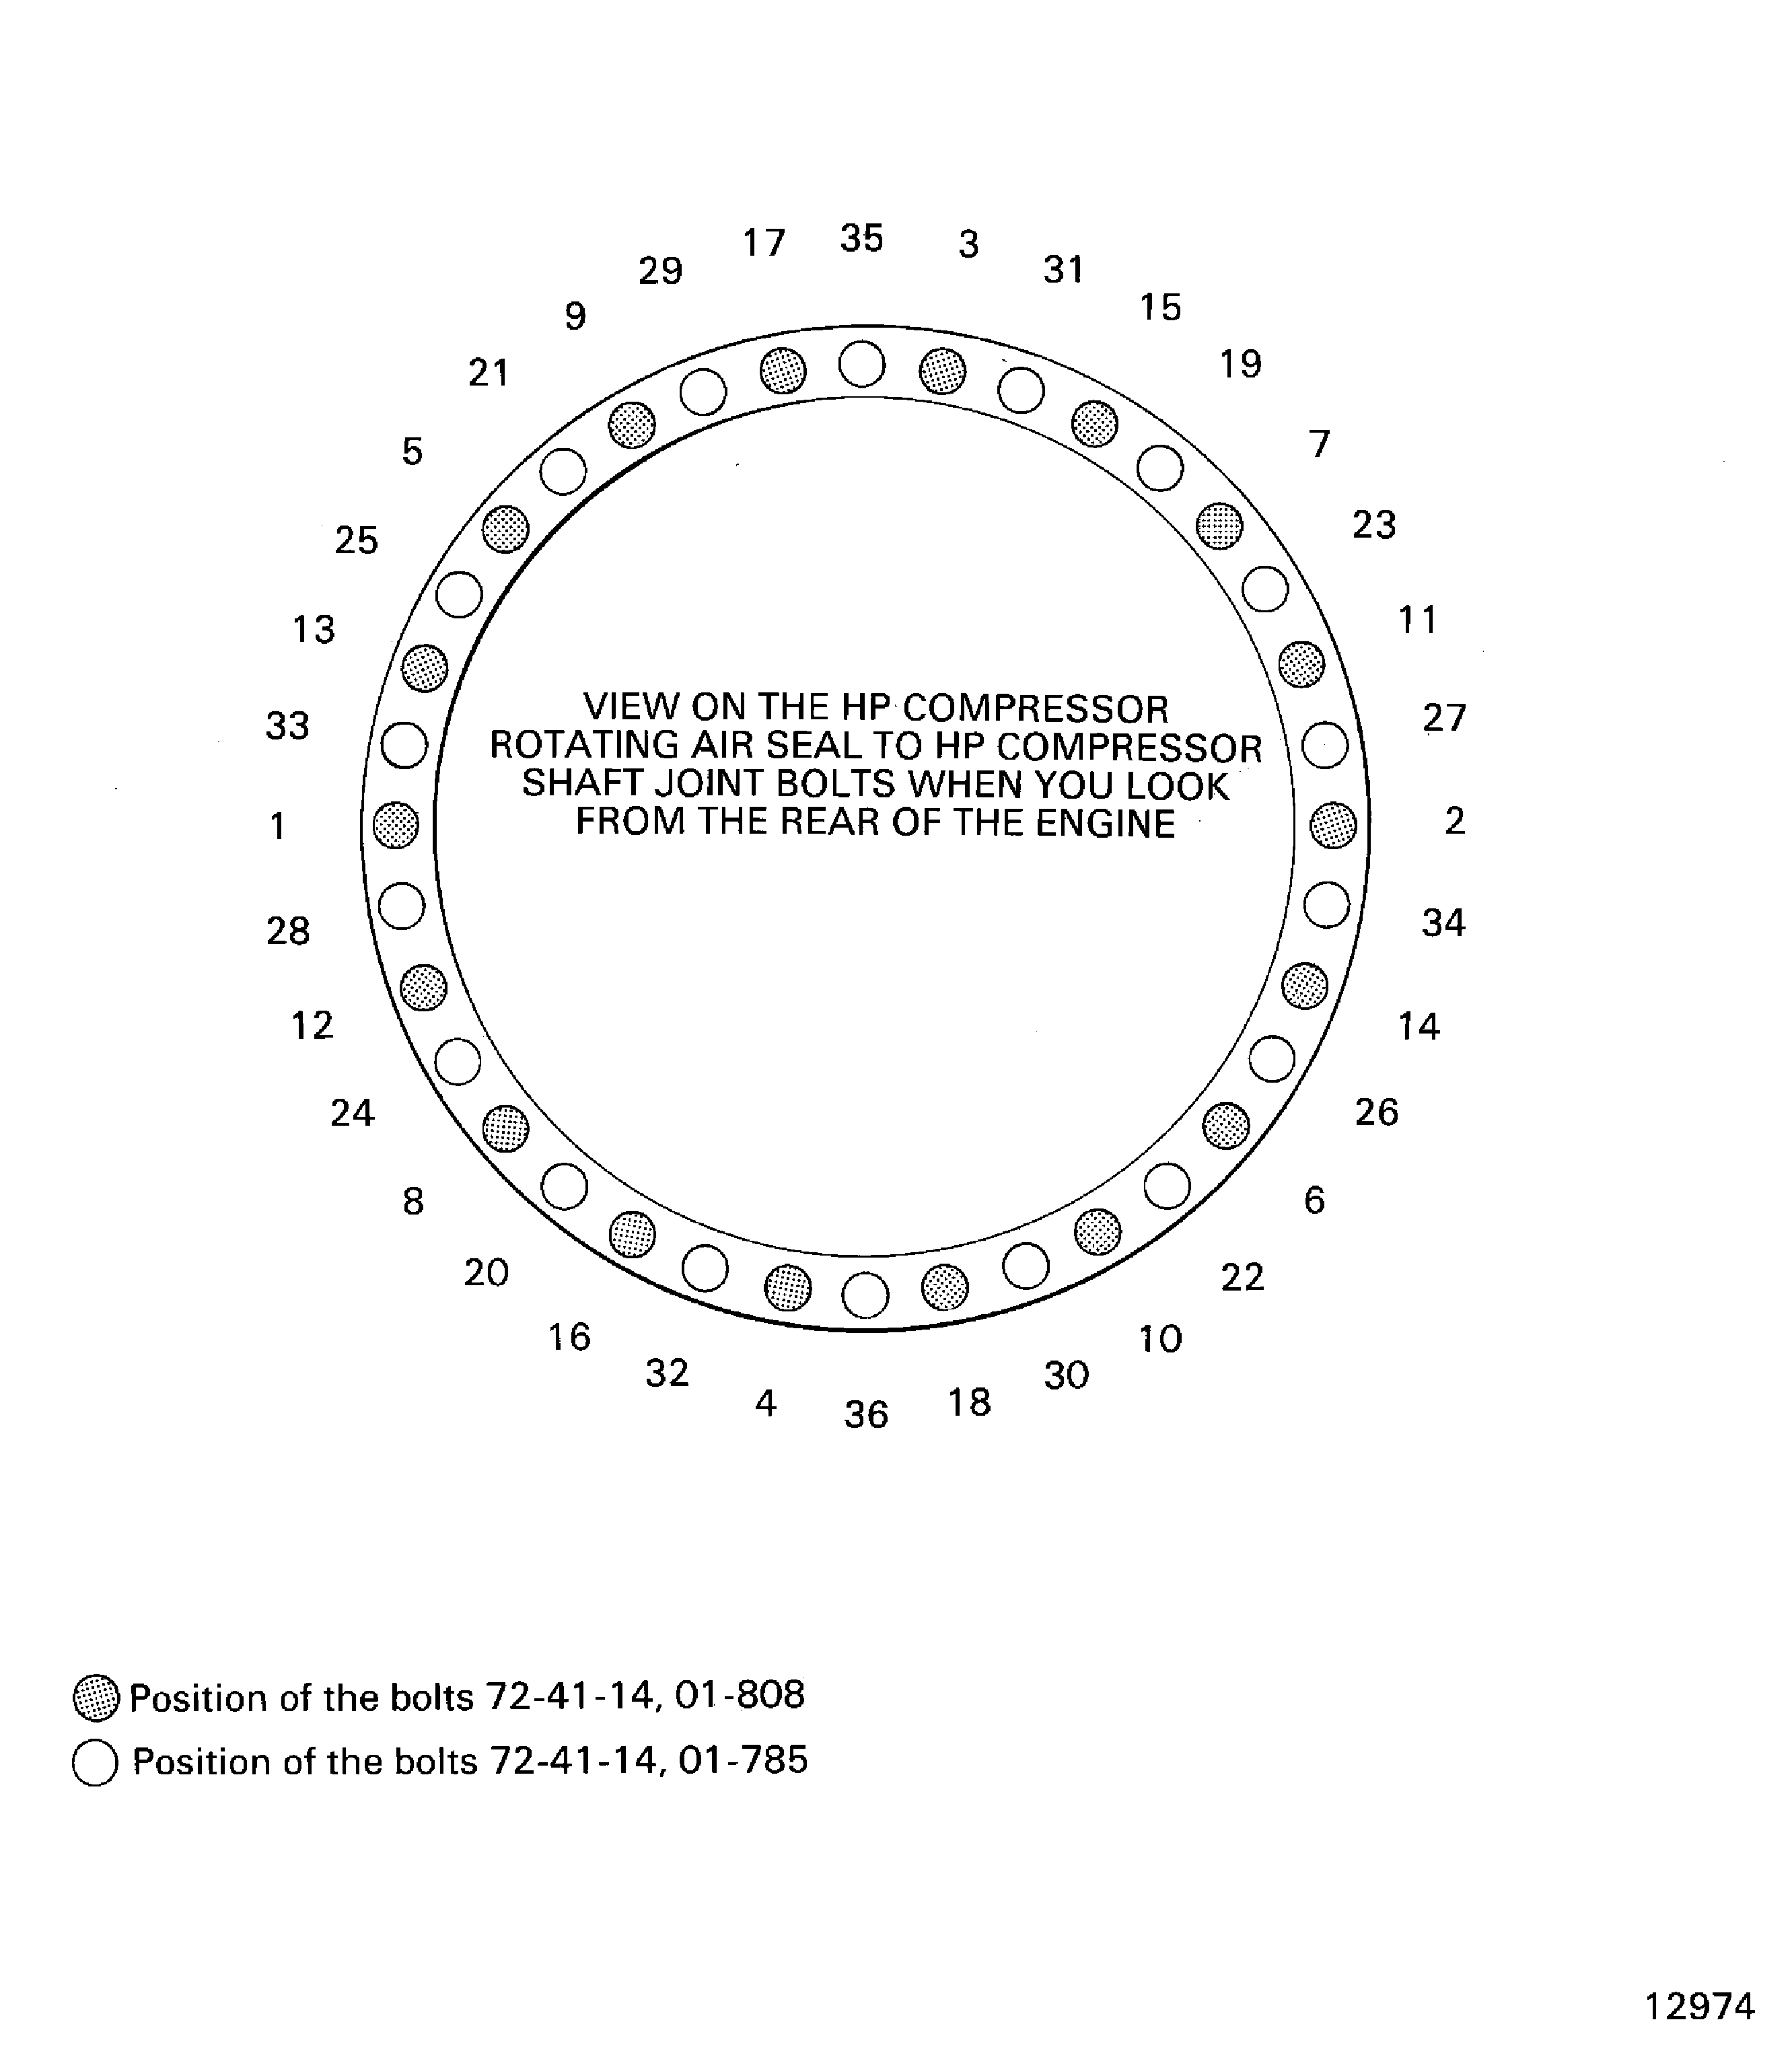
Figure: Install the Protective Cover on to the HP Compressor Rotating Air Seal
Install the Protective Cover on to the HP Compressor Rotating Air Seal
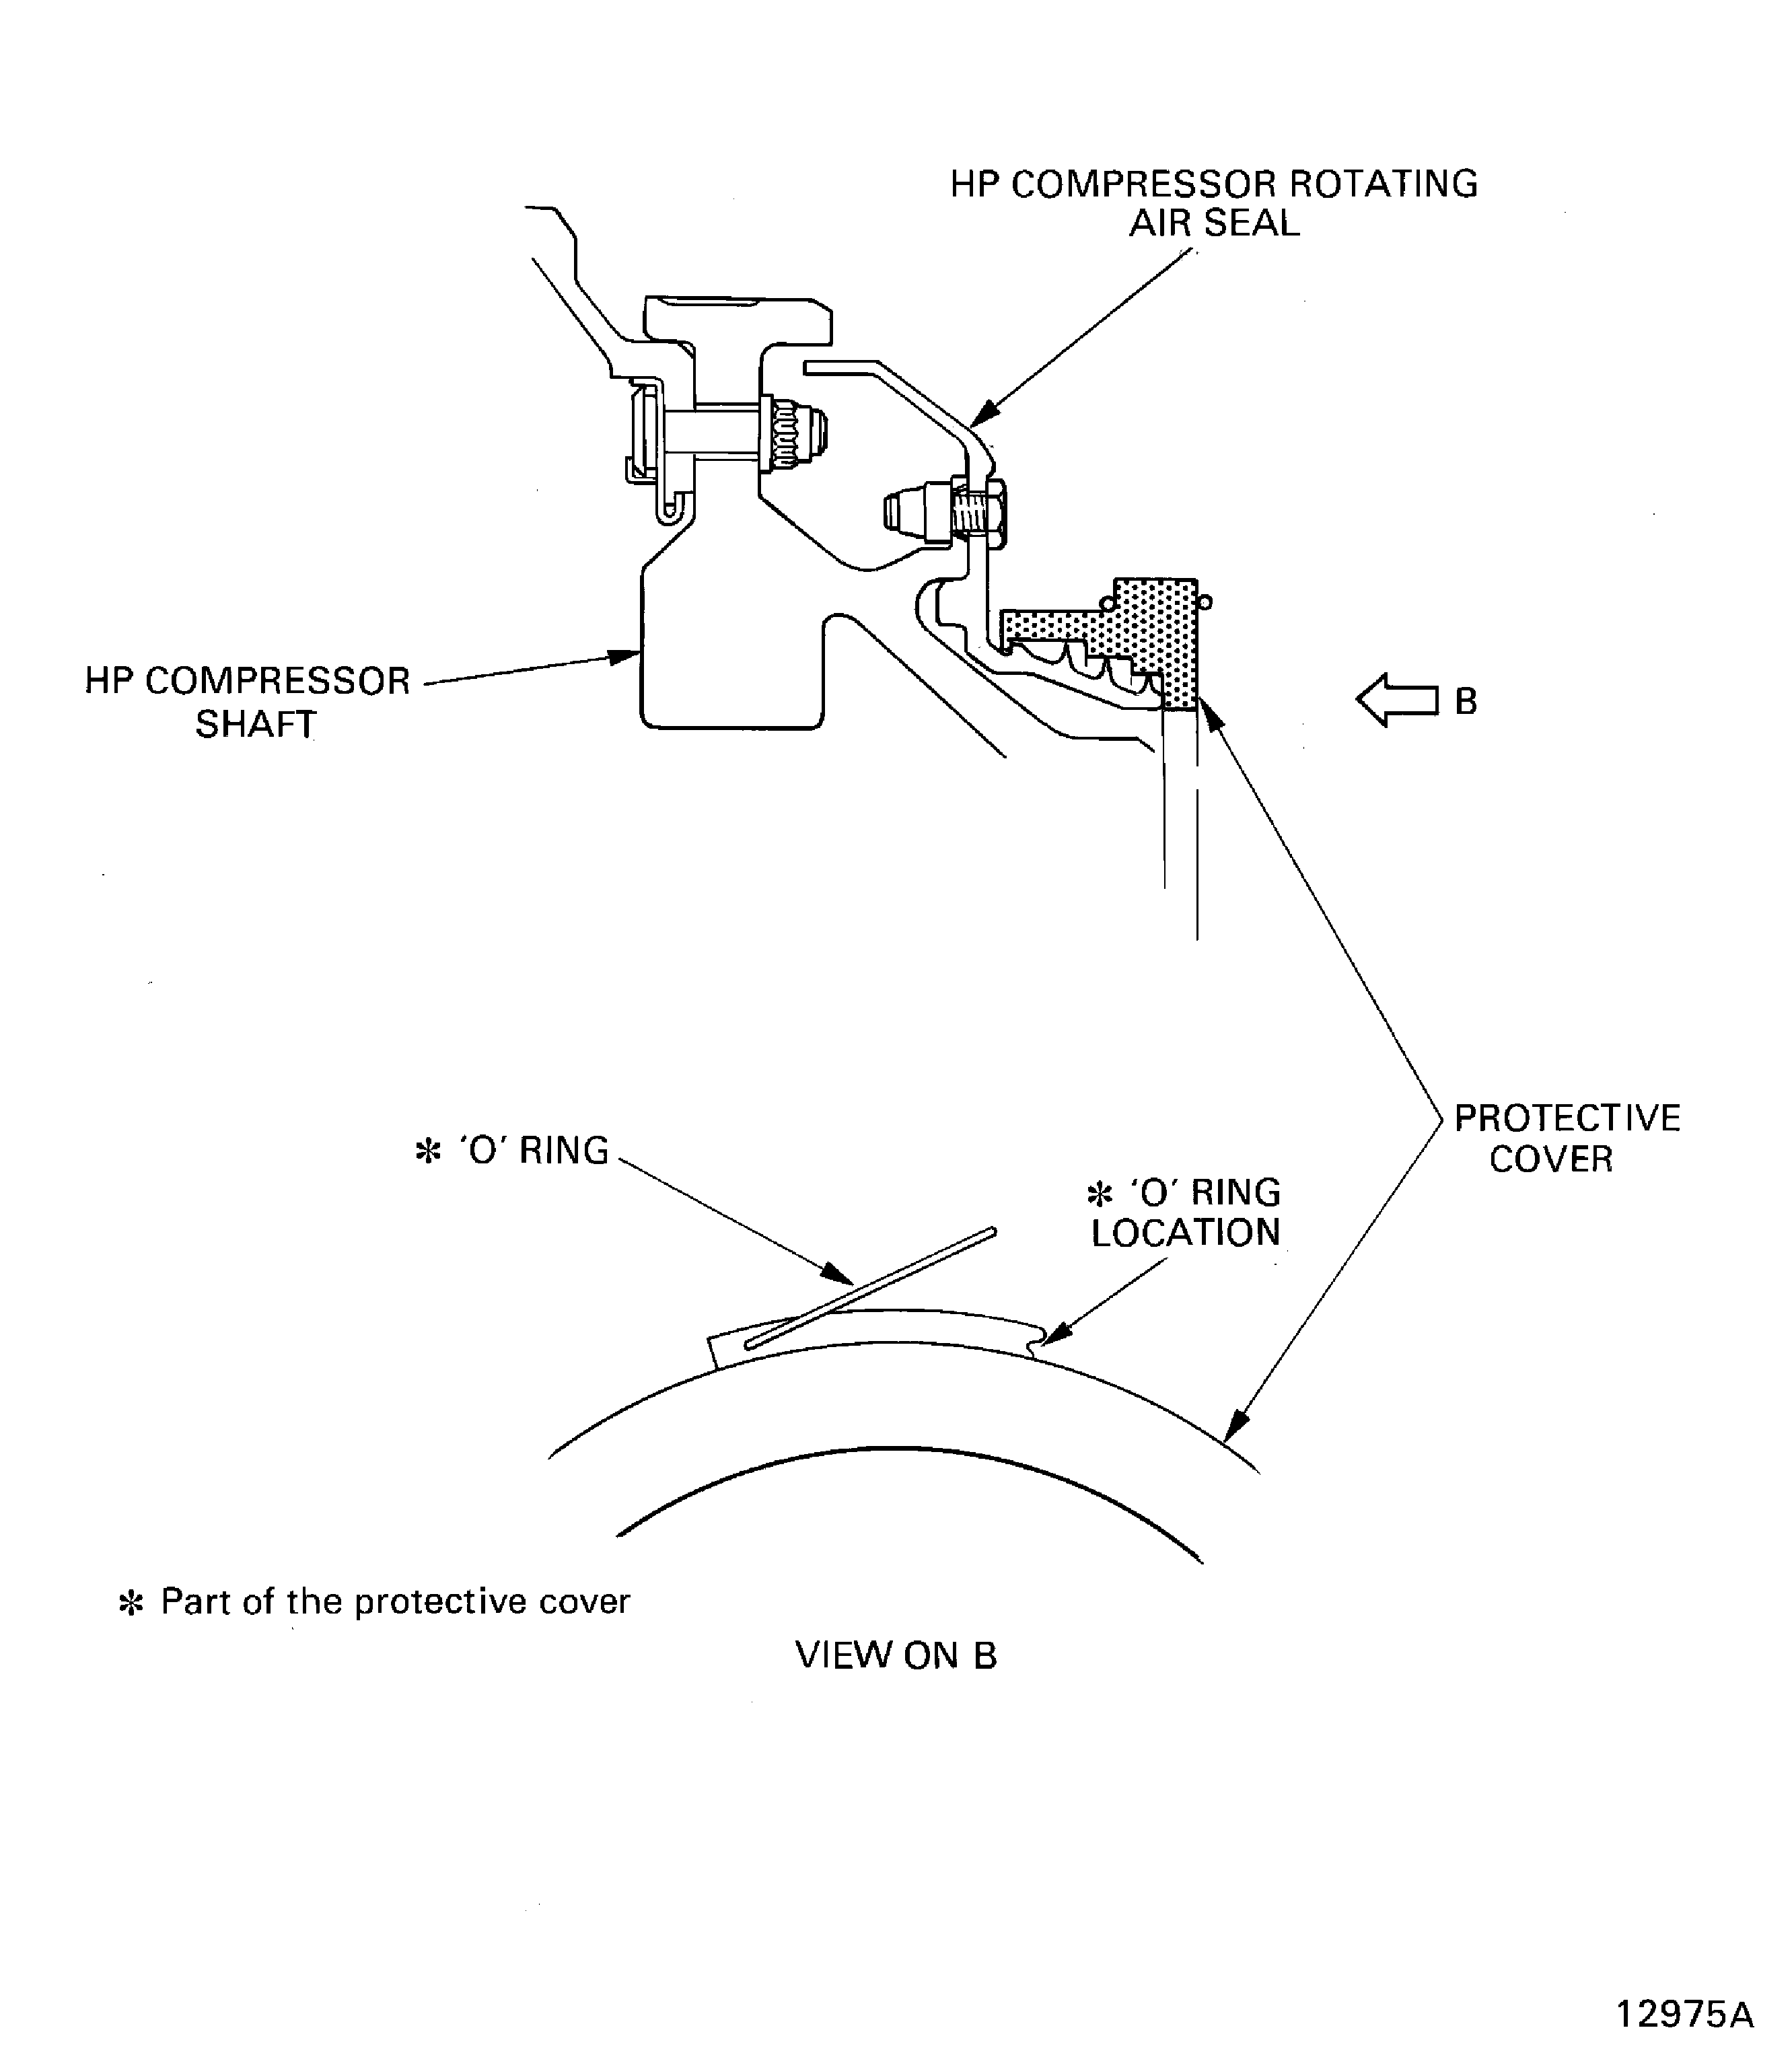
Figure: Install the Lifting Adapter and the Universal Slinging Adapter on to the HP Compressor Shaft
Install the Lifting Adapter and the Universal Slinging Adapter on to the HP Compressor Shaft

Figure: Install the Stages 3 to 12 HP Compressor Disks and HP Compressor Shaft Assembly in to the Trolley
Install the Stages 3 to 12 HP Compressor Disks and HP Compressor Shaft Assembly in to the Trolley
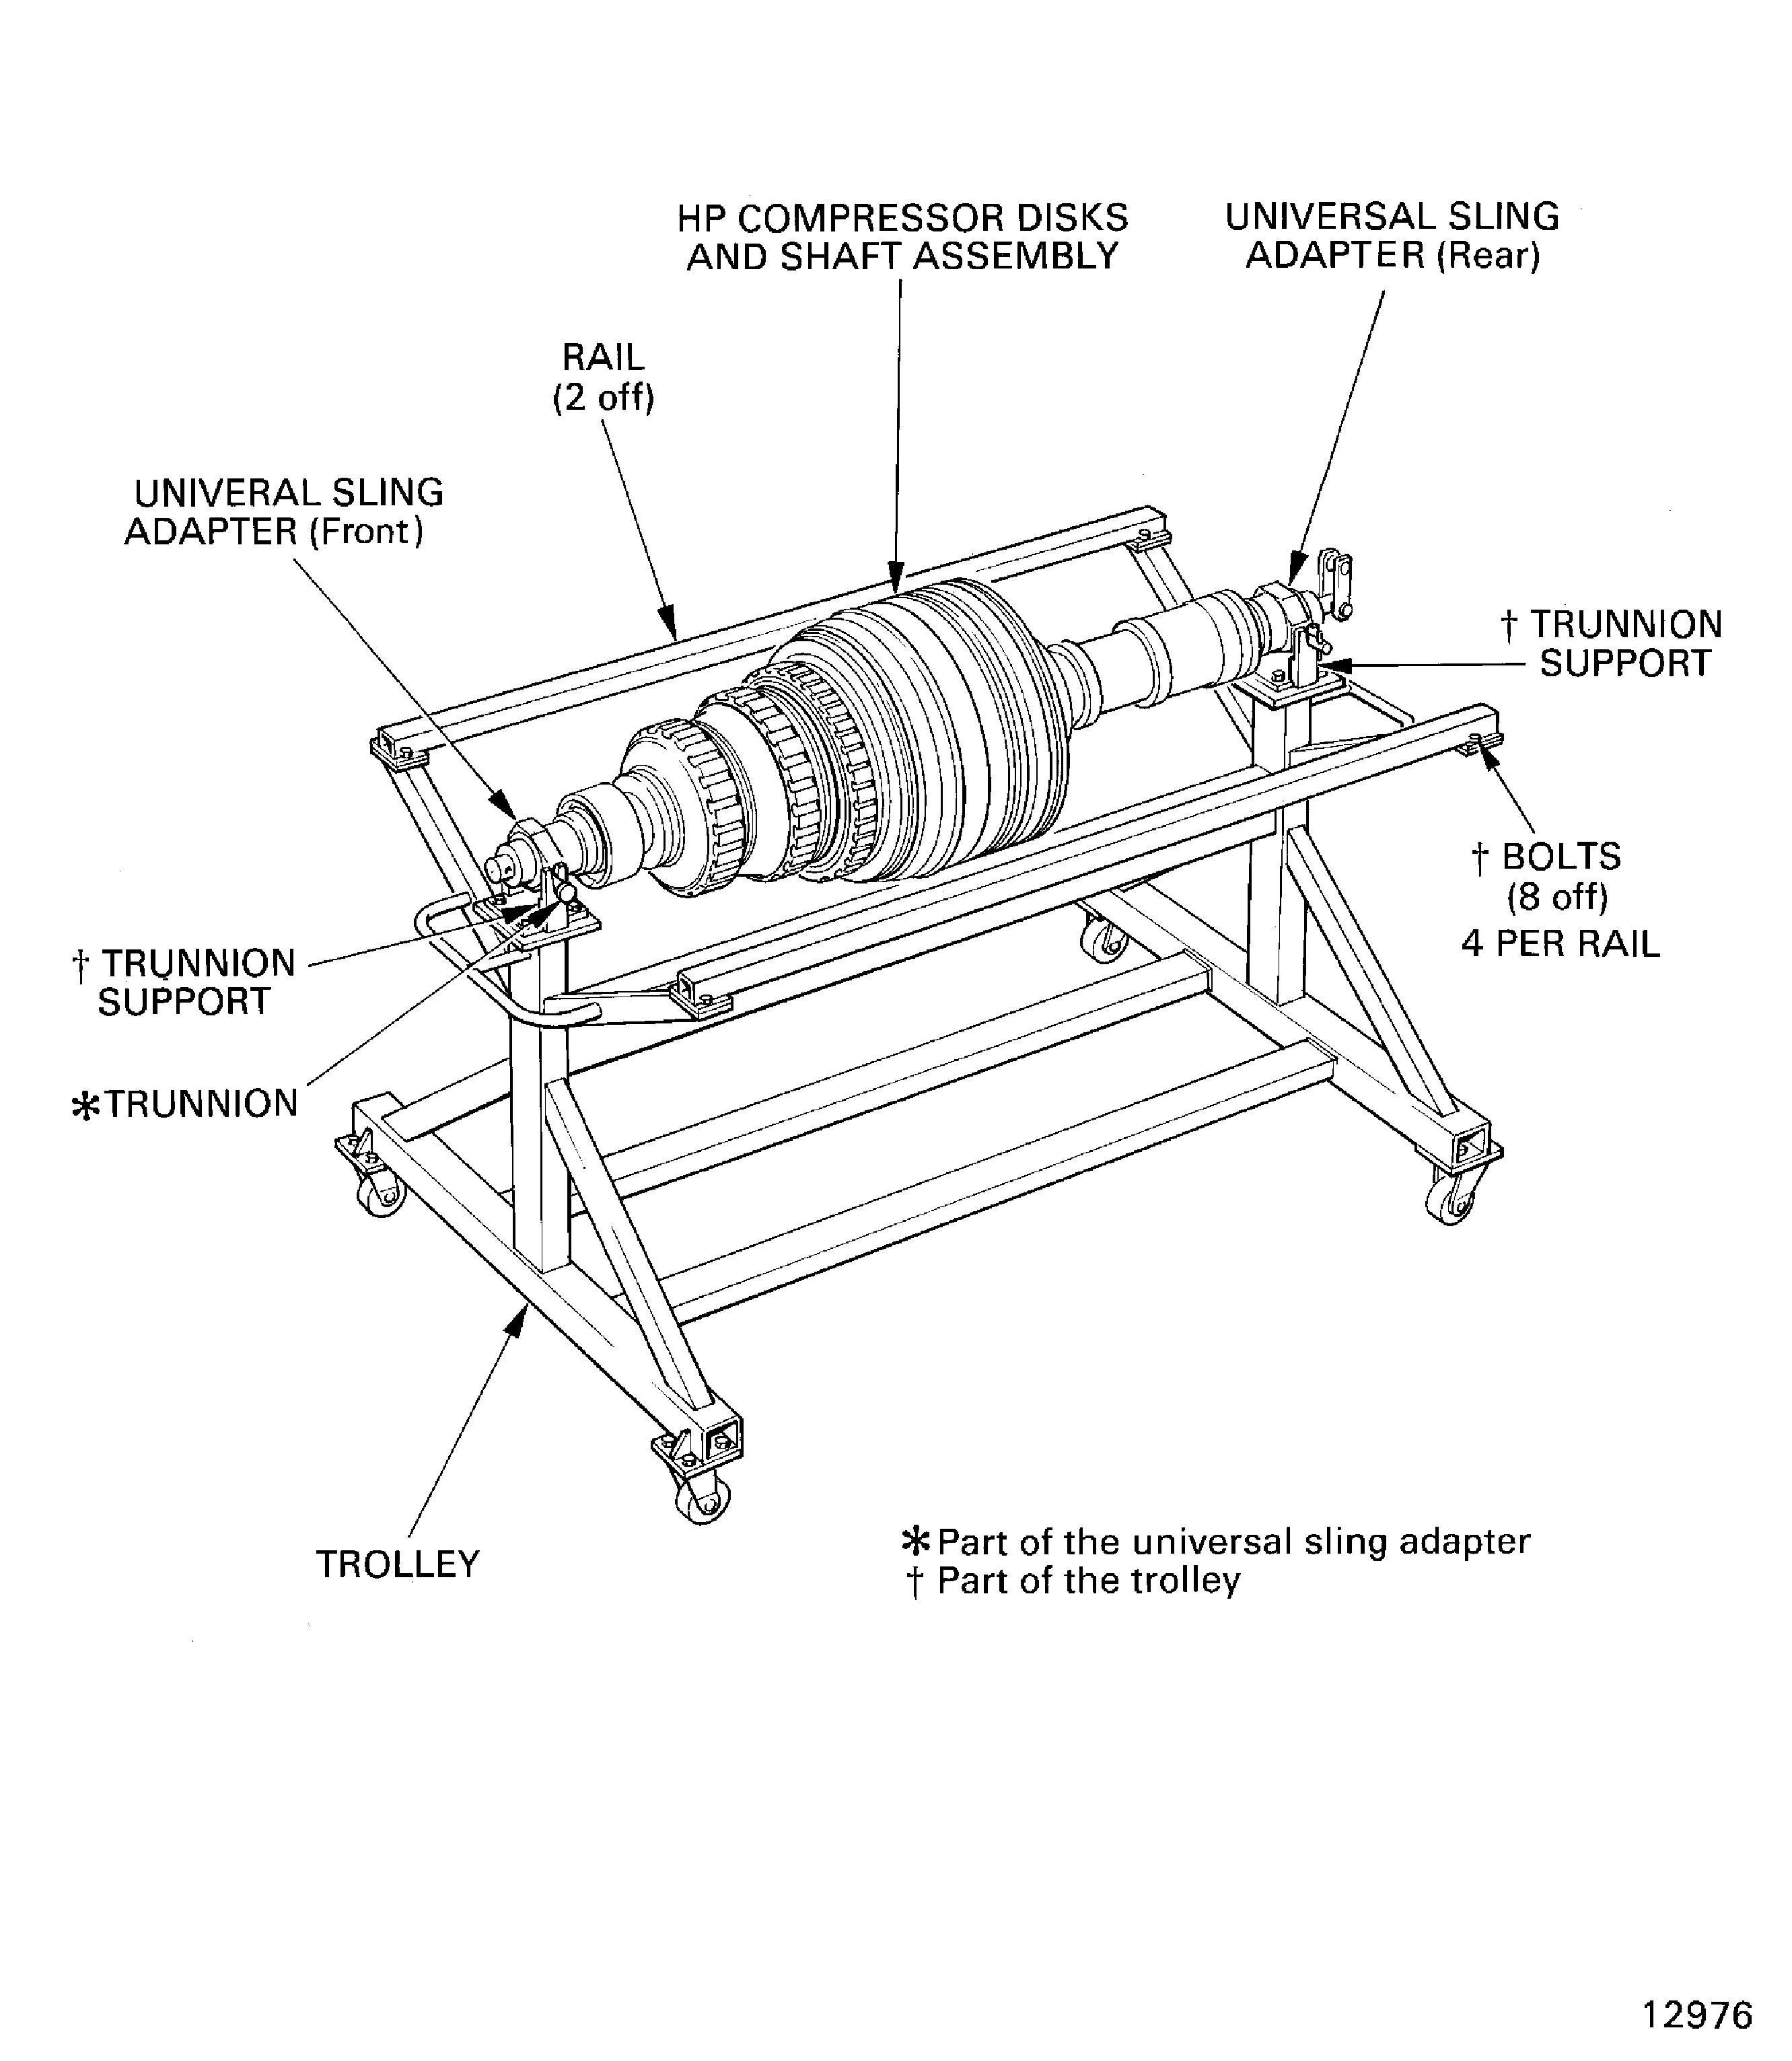
Figure: Install the Nut and Screw Lock Assemblies in to the Stages 6 thru 12 HP Compressor Disks
Install the Nut and Screw Lock Assemblies in to the Stages 6 thru 12 HP Compressor Disks
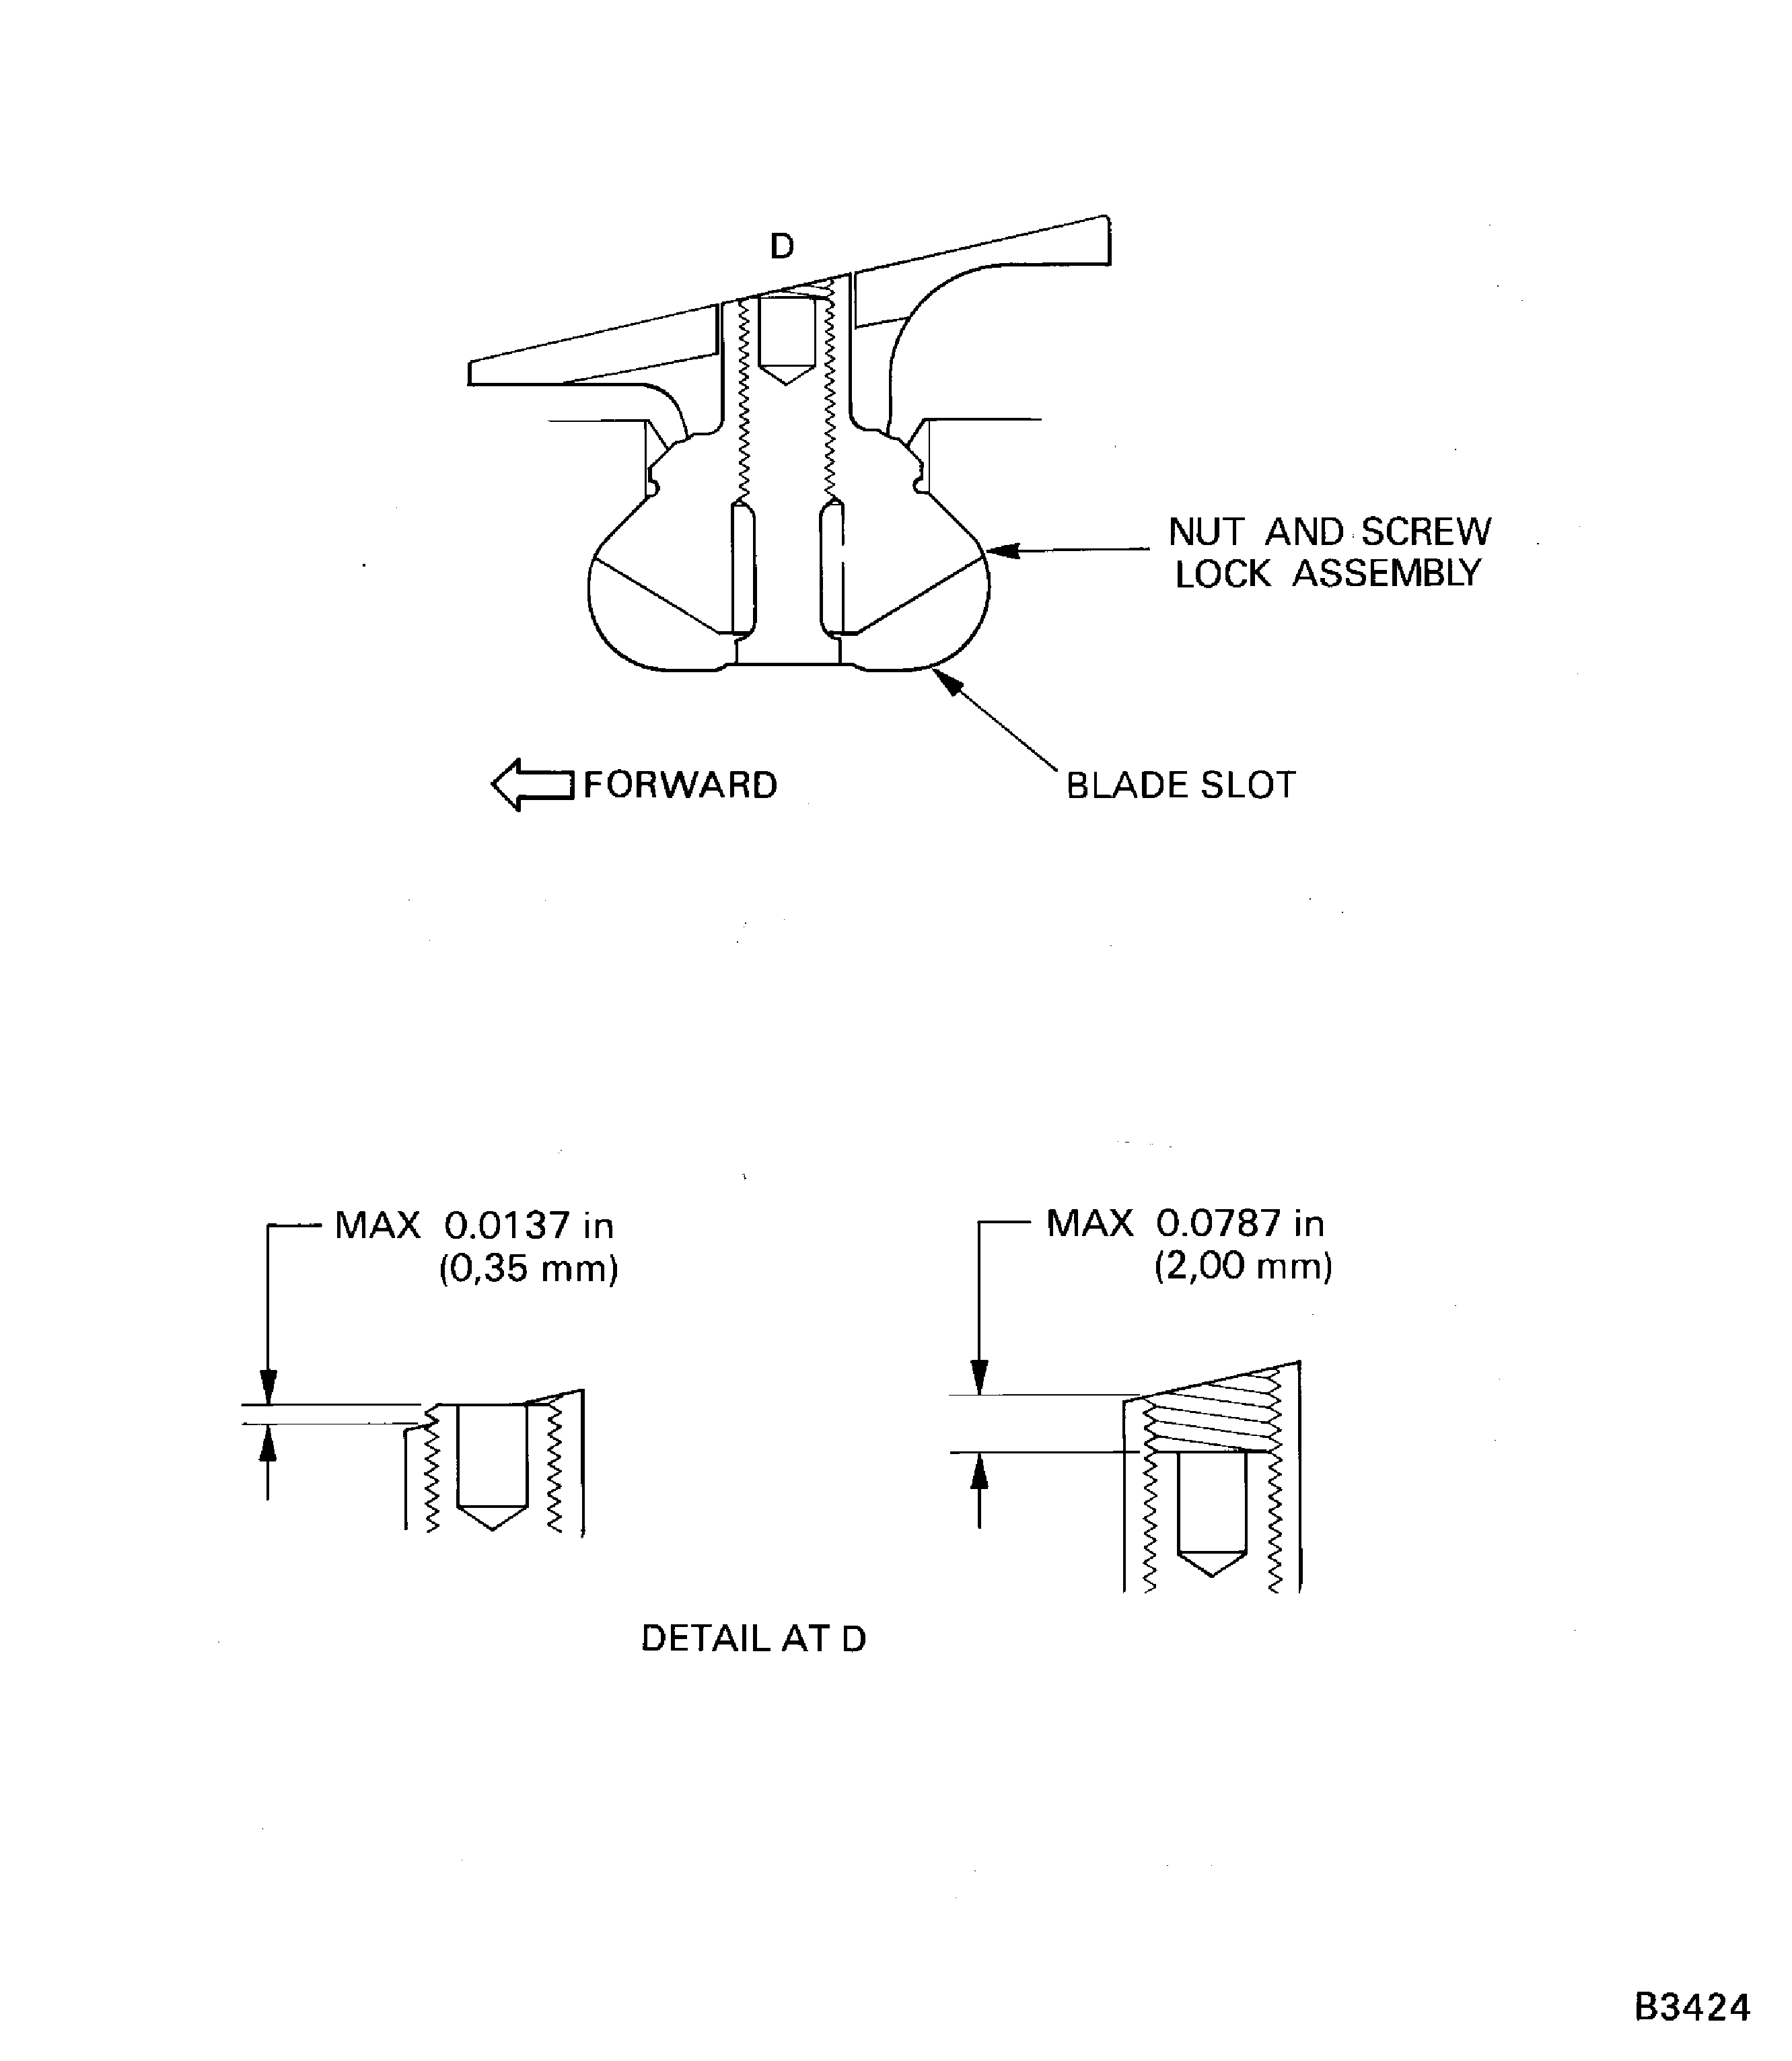
Figure: HP Compressor Stage 3 to 8 Disks Inspection Location for Damage
HP Compressor Stage 3 to 8 Disks Inspection Location for Damage
