Export Control
EAR Export Classification: Not subject to the EAR per 15 C.F.R. Chapter 1, Part 734.3(b)(3), except for the following Service Bulletins which are currently published as EAR Export Classification 9E991: SBE70-0992, SBE72-0483, SBE72-0580, SBE72-0588, SBE72-0640, SBE73-0209, SBE80-0024 and SBE80-0025.Copyright
© IAE International Aero Engines AG (2001, 2014 - 2021) The information contained in this document is the property of © IAE International Aero Engines AG and may not be copied or used for any purpose other than that for which it is supplied without the express written authority of © IAE International Aero Engines AG. (This does not preclude use by engine and aircraft operators for normal instructional, maintenance or overhaul purposes.).Applicability
All
Common Information
TASK 72-41-12-200-002-A00 HPC Stage 9 - 12 Drum Disk - Examine, Inspection-002
Effectivity
FIG/ITEM | PART NO. |
|---|---|
01-600 | 2A2100-01 |
01-600 | 2A2200-01 |
01-600 | 2A2600-01 |
01-600 | 2A3200-01 |
01-600 | 2A3300-01 |
01-600 | 2A3400-01 |
01-600 | 2A3500-01 |
General
This TASK gives the procedure for the inspection of the rear HPC discs.
Fig./Item numbers is parentheses in the procedure agree with those used in the IPC.
The policy that is necessary for inspection is given in SPM TASK 70-20-00-200-501.
All the parts must be cleaned before any part is examined. Refer to SPM TASK 70-10-00-100-501.
All parts must be visually examined for damage, corrosion and wear. Any defects that are not identified in the procedure must be referred to IAE.
The procedure for those parts which must have a crack test is given in Step and TASK 72-41-12-230-079. Do the test before the part is visually inspected.
A ** following repair referenced in this inspection indicates that the repair is not yet published in the current revision of the manual and the part must be rejected. Contact IAE for additional information concerning FAA approved repair date.
Do not discard any part until you are sure there are no repairs available. Refer to the instructions in the Repair before a discarded part is used again or oversize parts are installed.
Parts which should be discarded can be held although no repair is available. The repair of a discarded part could be shown to be necessary at a later date.
All parts must be examined to make sure that all the repairs have been completed satisfactorily.
The practices and processes referred to in the procedure by the TASK numbers are in SPM.
References
Refer to SPM for data on these items.
Definitions of Damage, SPM TASK 70-02-02-350-501.
Inspection of Parts, SPM TASK 70-20-01-200-501.
Some data on these items is contained in this TASK. For more data on these items refer to SPM.
Method of Testing for Crack Indications.
Chemical Processes.
Surface Protection.
NOTE
Preliminary Requirements
Pre-Conditions
NONESupport Equipment
NONEConsumables, Materials and Expendables
| Name | Manufacturer | Part Number / Identification | Quantity | Remark |
|---|---|---|---|---|
| CoMat 02-005 ADHESIVE TAPE (MASKING) | LOCAL | CoMat 02-005 |
Spares
NONESafety Requirements
CAUTION
Procedure
NOTE
The examination of the whole component using Ultra High Sensitivity Fluorescent Penetrant is required.Clean the Part. Refer to the TASK 72-41-12-100-000 (CLEANING-000).
SUBTASK 72-41-12-230-055 Examine the Rear HPC Disc (01-600) for Cracks
Inspect according to TASK 72-41-12-200-004, Subtask 72-41-12-230-079.
SUBTASK 72-41-12-230-084 Focus Inspect the Rear HPC Disc for Cracks
Refer to Figure.
Repair, VRS3436 TASK 72-41-12-300-004 (REPAIR-004).
Other than Step
Examine the disk at Locations 1, 2 and 4 for damage.
Repair, VRS3436 TASK 72-41-12-300-004 (REPAIR-004).
Other than Step.
Examine the disk at Locations 3 and 5 for damage.
SUBTASK 72-41-12-220-061 Examine the Rear HPC Disk (01-600) for Damage on the Front Slots
Refer to Figure.
SUBTASK 72-41-12-220-062 Examine the Rear HPC Disk (01-600) for Damage on the Front Flange and Bent Segments
Refer to Figure.
Repair, VRS3436 TASK 72-41-12-300-004 (REPAIR-004).
Other than Step.
Examine the disk at Location 1 for damage on the rear bolt holes (40 Locations).
SUBTASK 72-41-12-220-063 Examine the Rear HPC Disk (01-600) for Damage and Wear on the Rear Bolt Holes
Refer to Figure.
Repair, VRS3436 TASK 72-41-12-300-004 (REPAIR-004).
Other than Step.
Examine the disk at Locations 3 and 4 for damage.
Repair, VRS3436 TASK 72-41-12-300-004 (REPAIR-004).
Other than Step.
Examine the disk at Location 5 for damage.
SUBTASK 72-41-12-220-064 Examine the Rear HPC Disk (01-600) for Damage on the Rear Flange and Bent Segments
Refer to Figure.
Repair, VRS3436 TASK 72-41-12-300-004 (REPAIR-004).
Other than Step.
Examine the disk at Location 1 for damage in the vent holes.
SUBTASK 72-41-12-220-065 Examine the Rear HPC Disk (01-600) for Damage in the Vent Holes
Refer to Figure.
Repair, VRS3436 TASK 72-41-12-300-004 (REPAIR-004).
Examine the disk at Locations 2, 4, 6, 8, 10, 13 and 15 for damage.
Repair, VRS3436 TASK 72-41-12-300-004 (REPAIR-004).
Other than Step.
Examine the disk at Locations 3, 12 and 14 for damage.
Repair, VRS3436 TASK 72-41-12-300-004 (REPAIR-004).
Other than Step.
Examine the disk at Location 5, 7, 9 and 11 for damage.
Accept.
Inner cavity weld spatter.
Weld spatter.
SUBTASK 72-41-12-220-066 Examine the Rear HPC Disk (01-600) for Internal Damage
Refer to Figure.
Repair VRS3436 TASK 72-41-12-300-004 (REPAIR-004).
Other than Step.
Examine the disk at Location 1 (both sides) for damage on the upper area of the slots.
Repair, VRS3436 TASK 72-41-12-300-004 (REPAIR-004).
Other than Step.
Examine the disk at Locations 2 thru 5 for damage on the lower area of the blade slot and on the loading and locking slots.
SUBTASK 72-41-12-220-067 Examine the Rear HPC Disk (01-600) for Damage in the Blade Slots, the Loading Slots, and the Locking Slots
Refer to Figure.
Repair, VRS3051 TASK 72-41-12-300-023 (REPAIR-023).
Repair, VRS3437 TASK 72-41-12-300-005 (REPAIR-005).
Other thanStep.
Chips.
Repair, VRS3051 TASK 72-41-12-300-023 (REPAIR-023).
Repair, VRS3437 TASK 72-41-12-300-005 (REPAIR-005).
Other than Step.
Pits.
Repair, VRS3051 TASK 72-41-12-300-023 (REPAIR-023).
Repair, VRS3437 TASK 72-41-12-300-005 (REPAIR-005).
Other than Step.
Scratches.
Repair, VRS3051 TASK 72-41-12-300-023 (REPAIR-023).
For PNs 2A2100-01, 2A2200-01, 2A3300-01 and 2A3400-01.
Repair, VRS3437 TASK 72-41-12-300-005 (REPAIR-005).
For all other PNs.
Loose coating or blisters.
Repair, VRS3051 TASK 72-41-12-300-023 (REPAIR-023).
Repair, VRS3437 TASK 72-41-12-300-005 (REPAIR-005).
Other than Step.
Rub track.
Examine the disk at Location 1, 2, 3 and 4 for damage on the stage 8, 9, 10 and 11 ceramic rub strip.
SUBTASK 72-41-12-220-068 Examine the Rear HPC Disk (01-600) for Damage on the Ceramic Rub Strips
Refer to Figure.
Repair, VRS3444 TASK 72-41-12-300-012 (REPAIR-012).
Other than Step.
Examine the disk at Location 1 for the front outside diameter.
Repair, VRS3441 TASK 72-41-12-300-009 (REPAIR-009).
Other than Step.
Examine the disk at Location 2 for the rear outside diameter.
Other than Step.
Examine the disk at Location 1 for the disk bore diameters (4 Locations).
Repair, VRS3443 TASK 72-41-12-300-011 (REPAIR-011).
Other than Step.
Examine the disk at Location 2 for the front inside diameter.
SUBTASK 72-41-12-220-069 Examine the Rear HPC Disk (01-600) for the Diameters

CAUTION
DO NOT USE A PI TAPE TO MEASURE THE DIAMETERS, THE DIAMETERS ARE ON A CONICAL SURFACE.Refer to Figure.
Repair, VRS3051 TASK 72-41-12-300-023 (REPAIR-023).
For PNs 2A2100-01, 2A2200-01, 2A3300-01 and 2A3400-01.
Repair VRS3437 TASK 72-41-12-300-005 (REPAIR-005).
For all other PNs.
Other than Step.
Examine the disk at Location 1 for the outside diameter of the stage 8 ceramic rub strip.
Repair, VRS3051 TASK 72-41-12-300-023 (REPAIR-023).
For PNs 2A2100-01, 2A2200-01, 2A3300-01 and 2A3400-01.
Repair, VRS3437 TASK 72-41-12-300-005 (REPAIR-005).
For all other PNs.
Other than Step.
Examine the disk at Location 2 for the outside diameter of the stage 9 ceramic rub strip.
Repair, VRS3051 TASK 72-41-12-300-023 (REPAIR-023).
For PNs 2A2100-01, 2A2200-01, 2A3300-01 and 2A3400-01.
Repair, VRS3437 TASK 72-41-12-300-005 (REPAIR-005).
For all other PNs
Other than Step.
Examine the disk at Location 3 for the outside diameter of the stage 10 ceramic rub strip.
Repair, VRS3051 TASK 72-41-12-300-023 (REPAIR-023).
For PNs 2A2100-01, 2A2200-01, 2A3300-01 and 2A3400-01.
Repair, VRS3437 TASK 72-41-12-300-005 (REPAIR-005).
For all other PNs
Other than Step.
Examine the disk at Location 4 for the outside diameter of the stage 11 ceramic rub strip.
SUBTASK 72-41-12-220-070 Examine the Rear HPC Disk (01-600) for the Outside Diameters
Figure: Rear HPC disk inspection locations
Rear HPC disk inspection locations
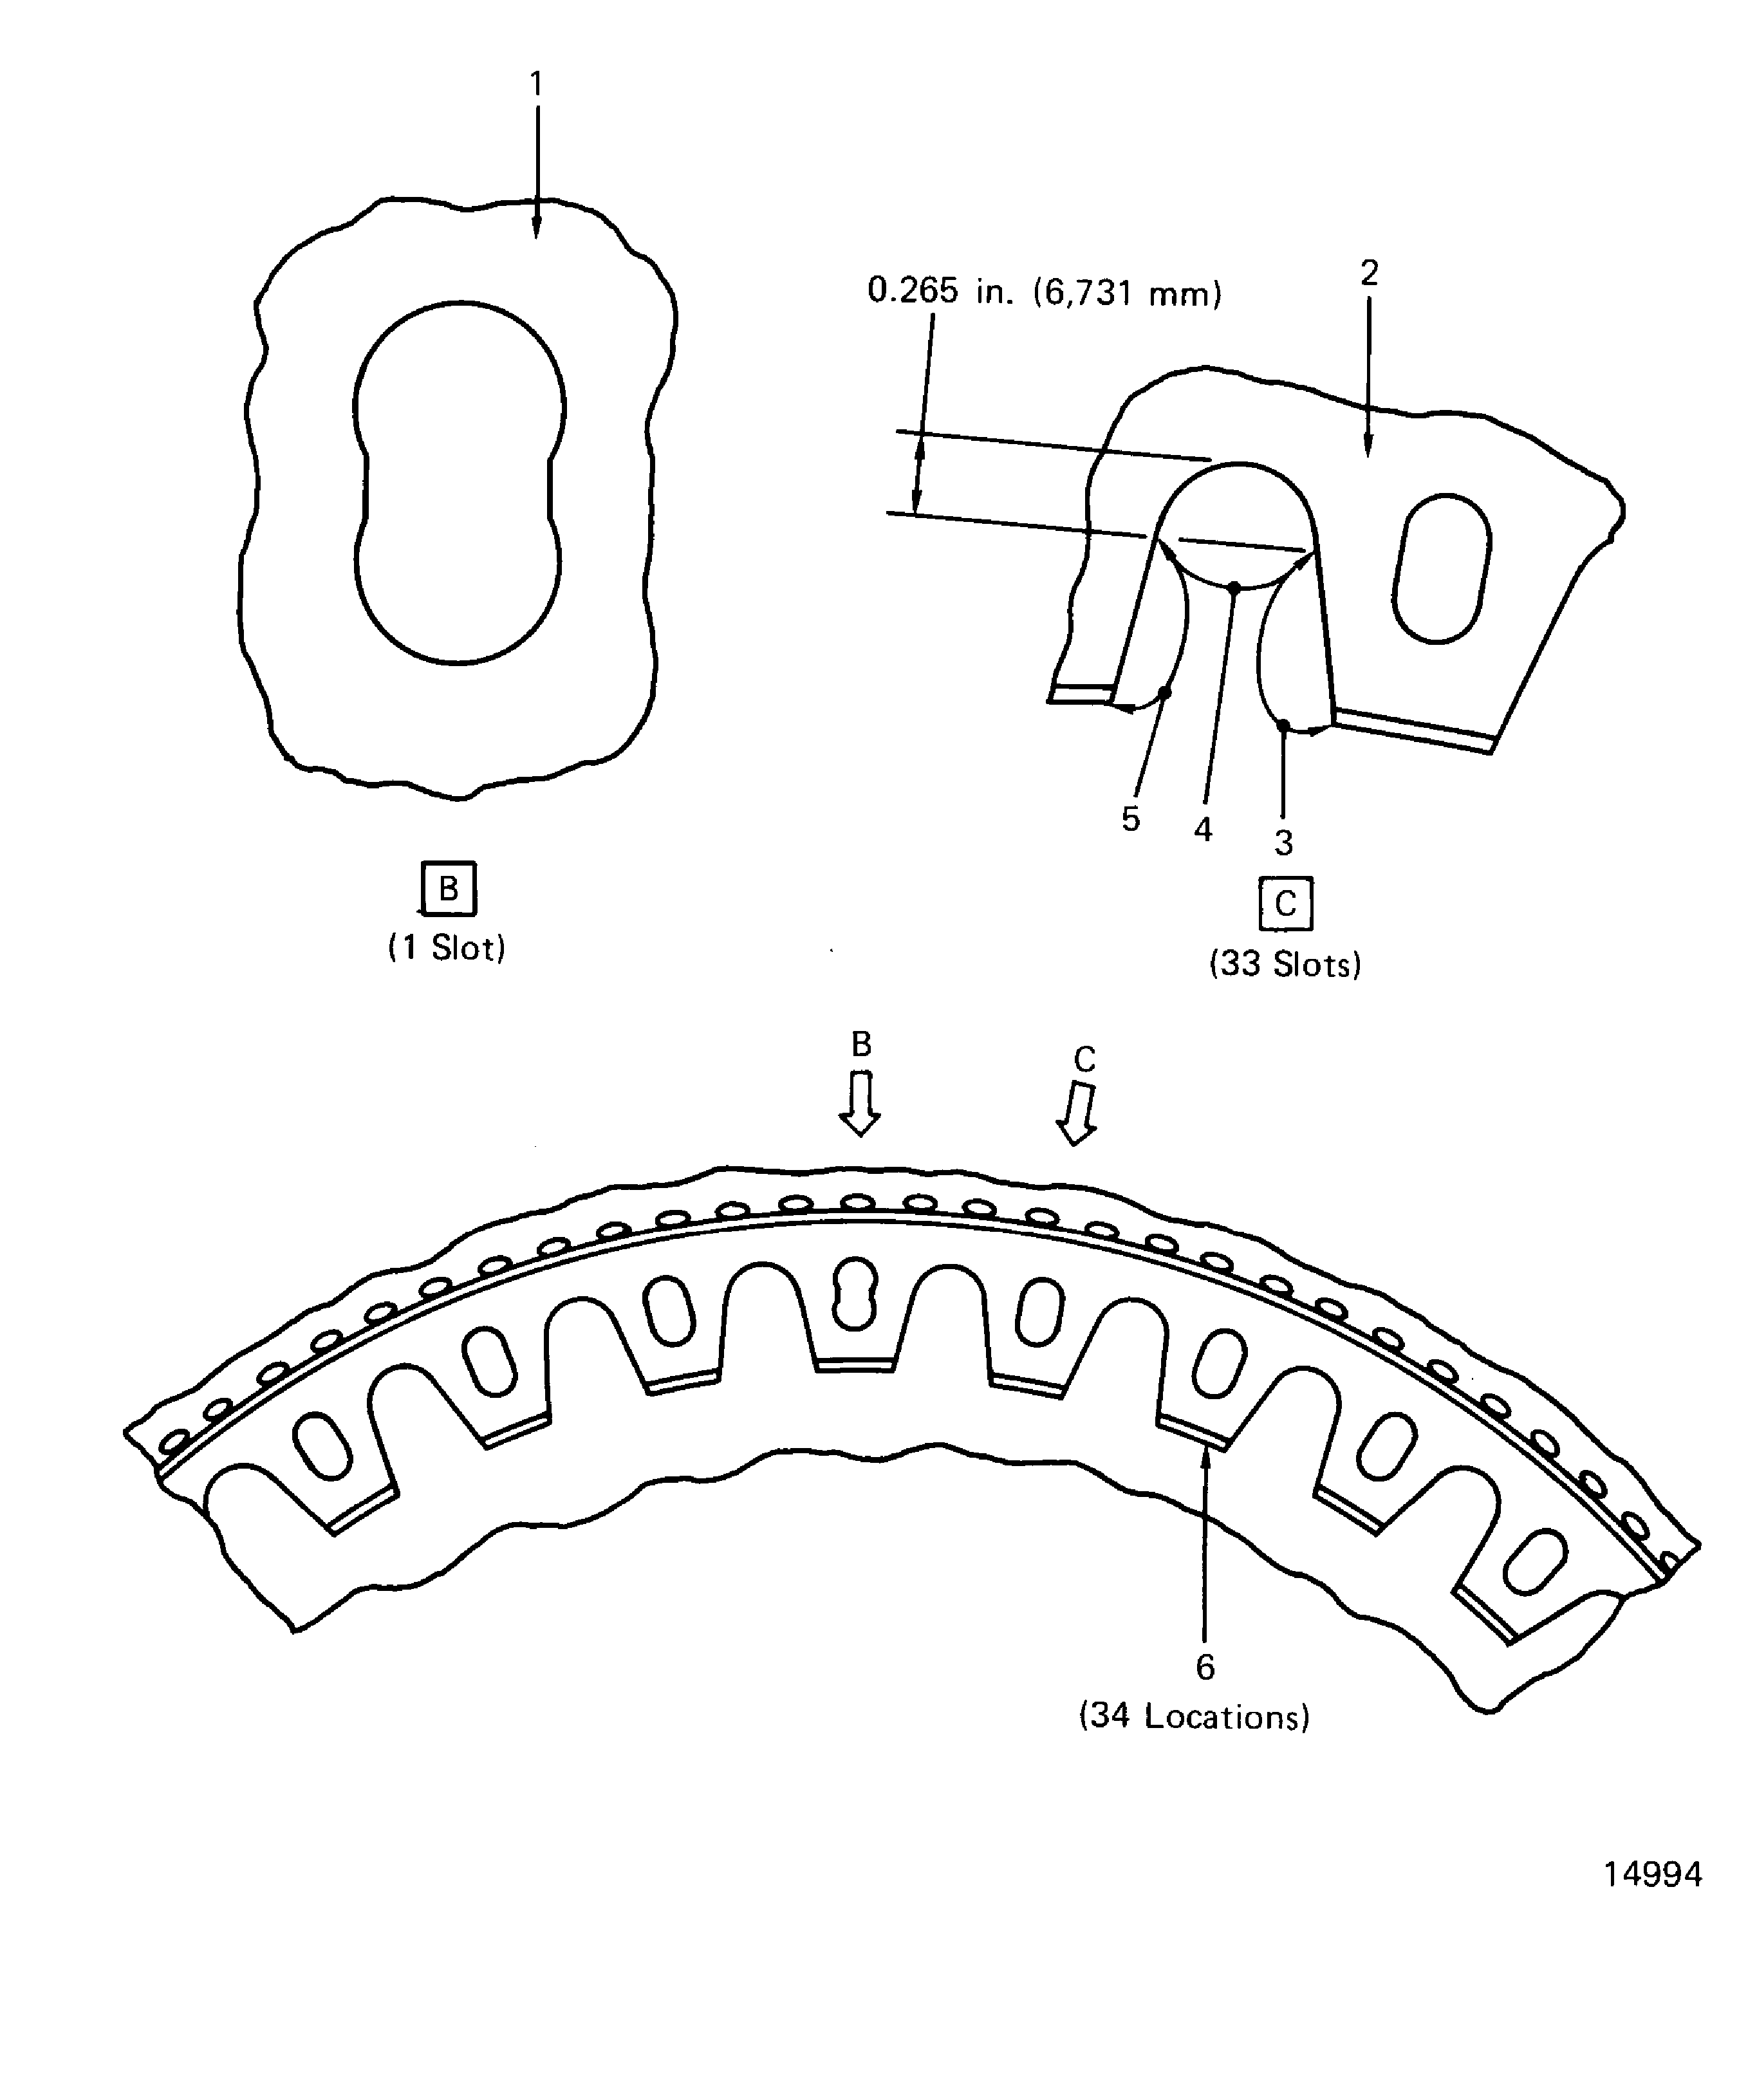
Figure: Rear HPC disk inspection locations
Rear HPC disk inspection locations
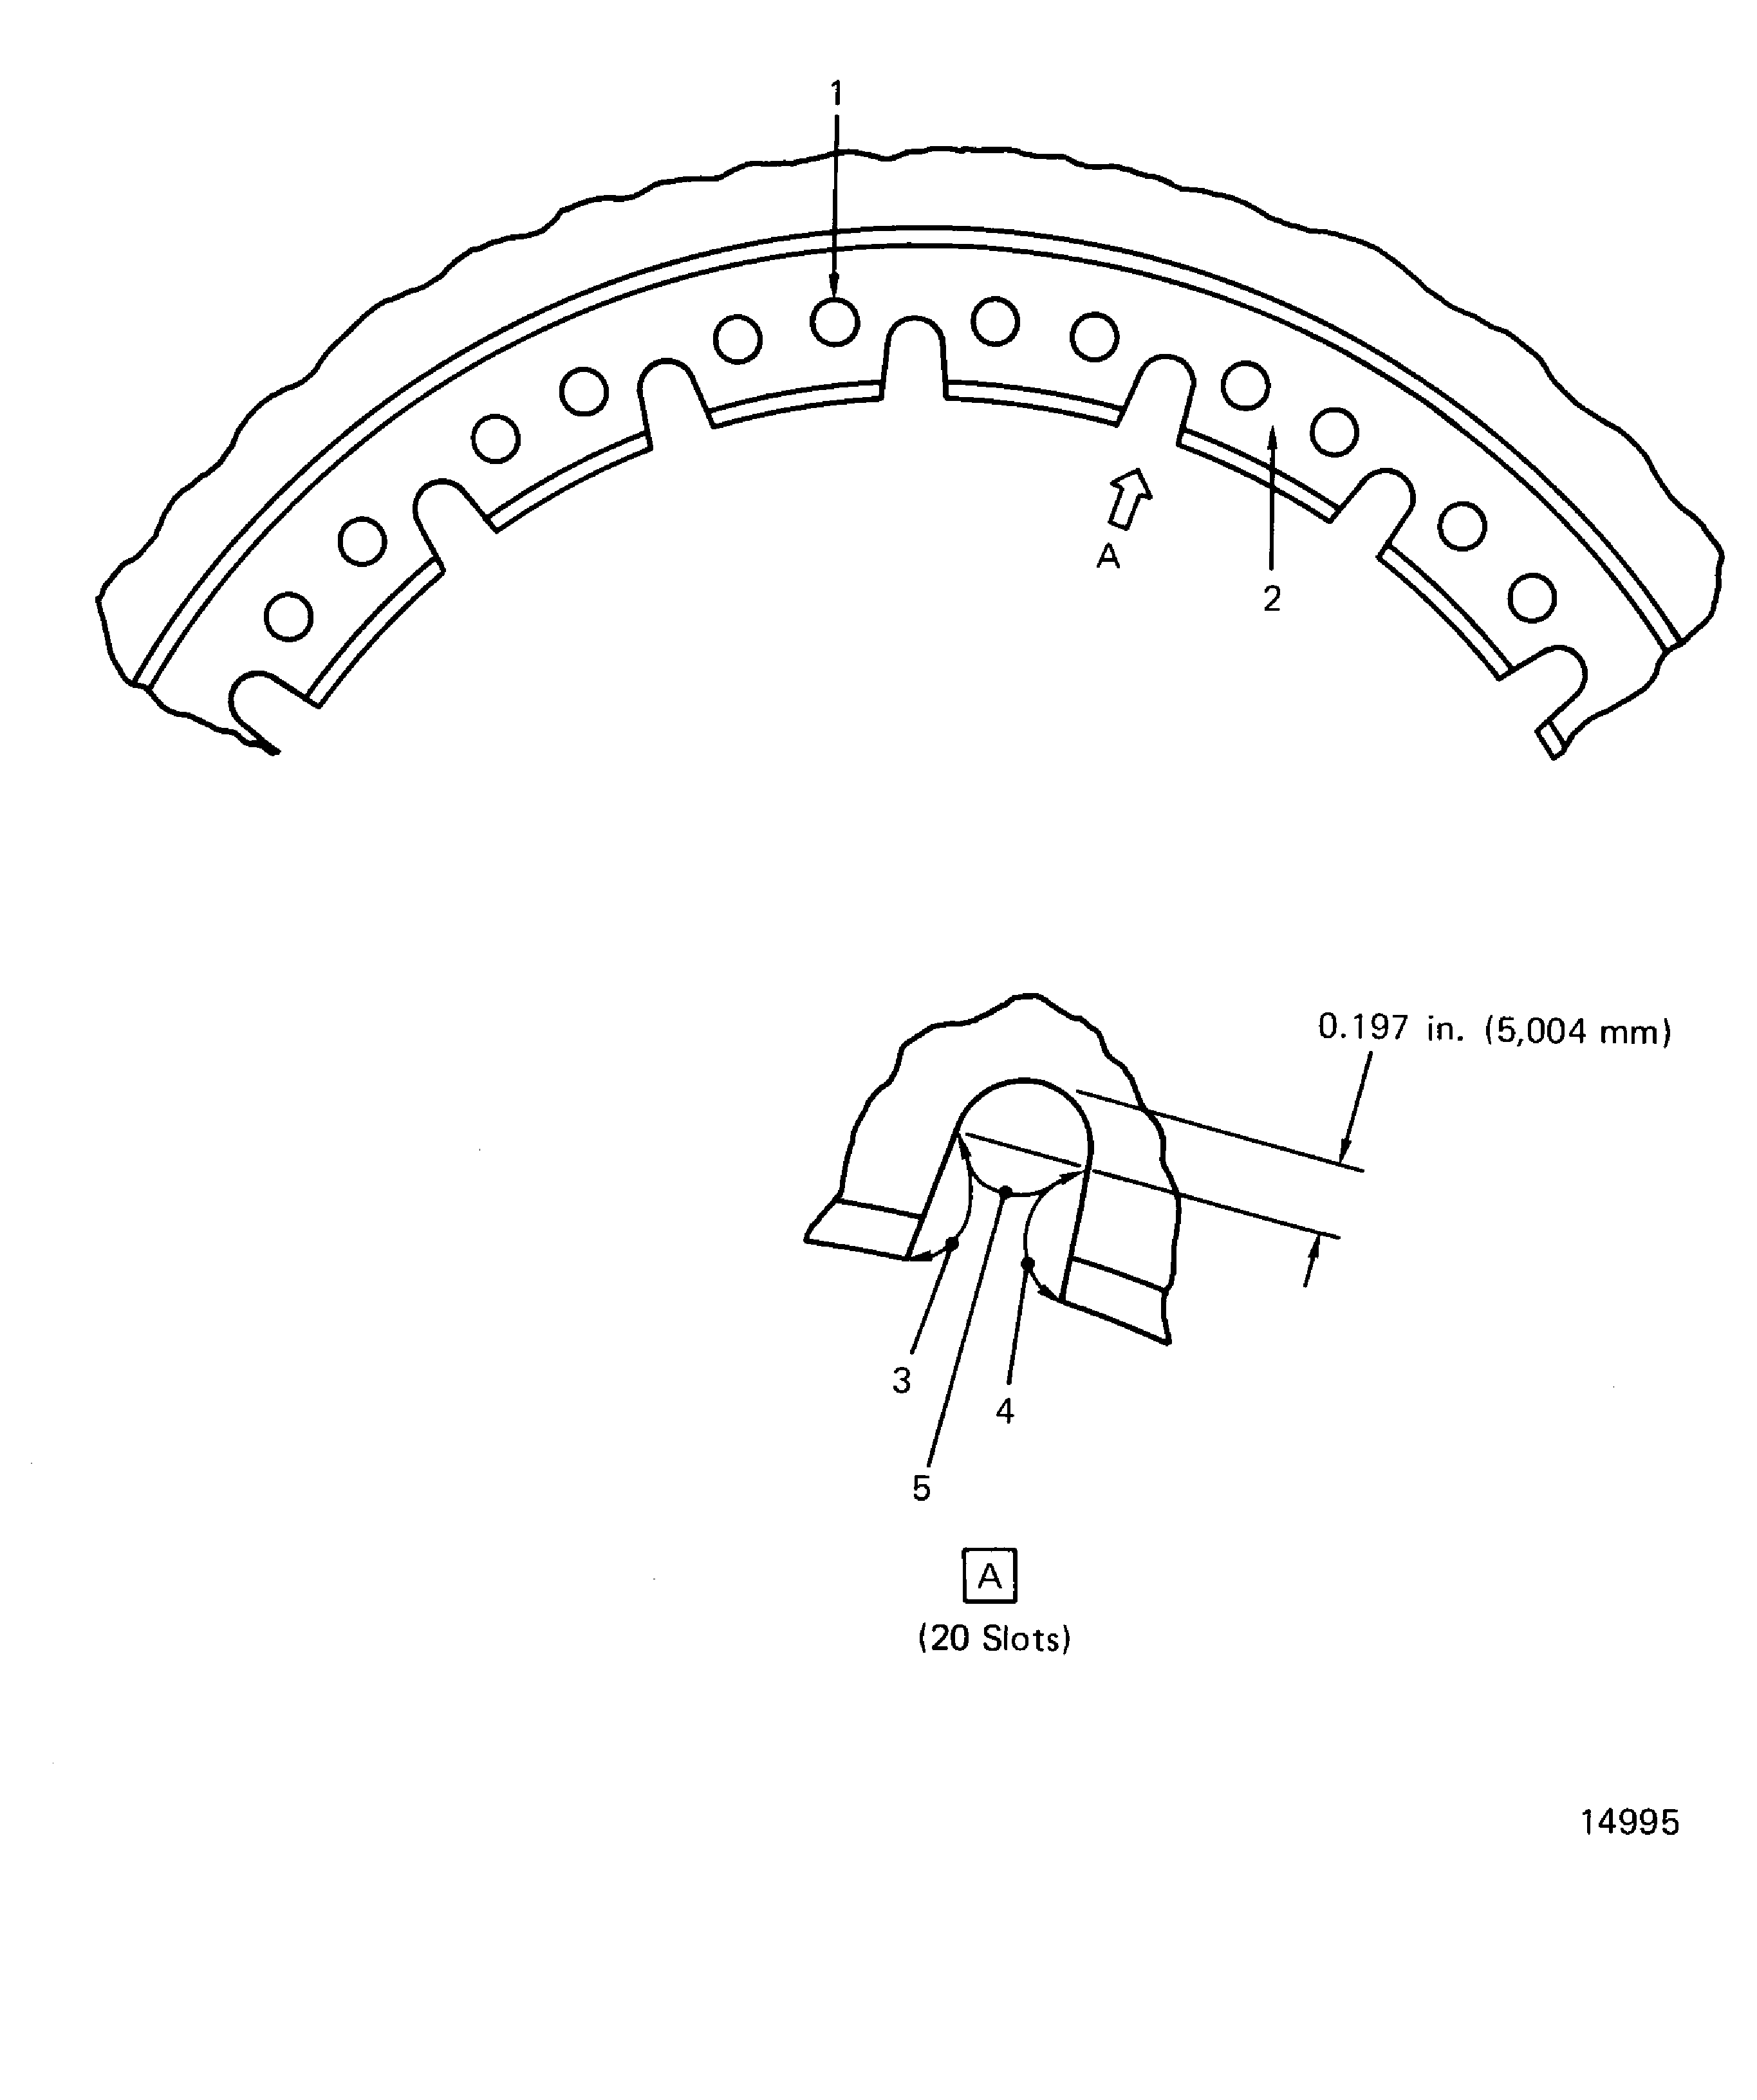
Figure: Rear HPC disk inspection locations
Rear HPC disk inspection locations
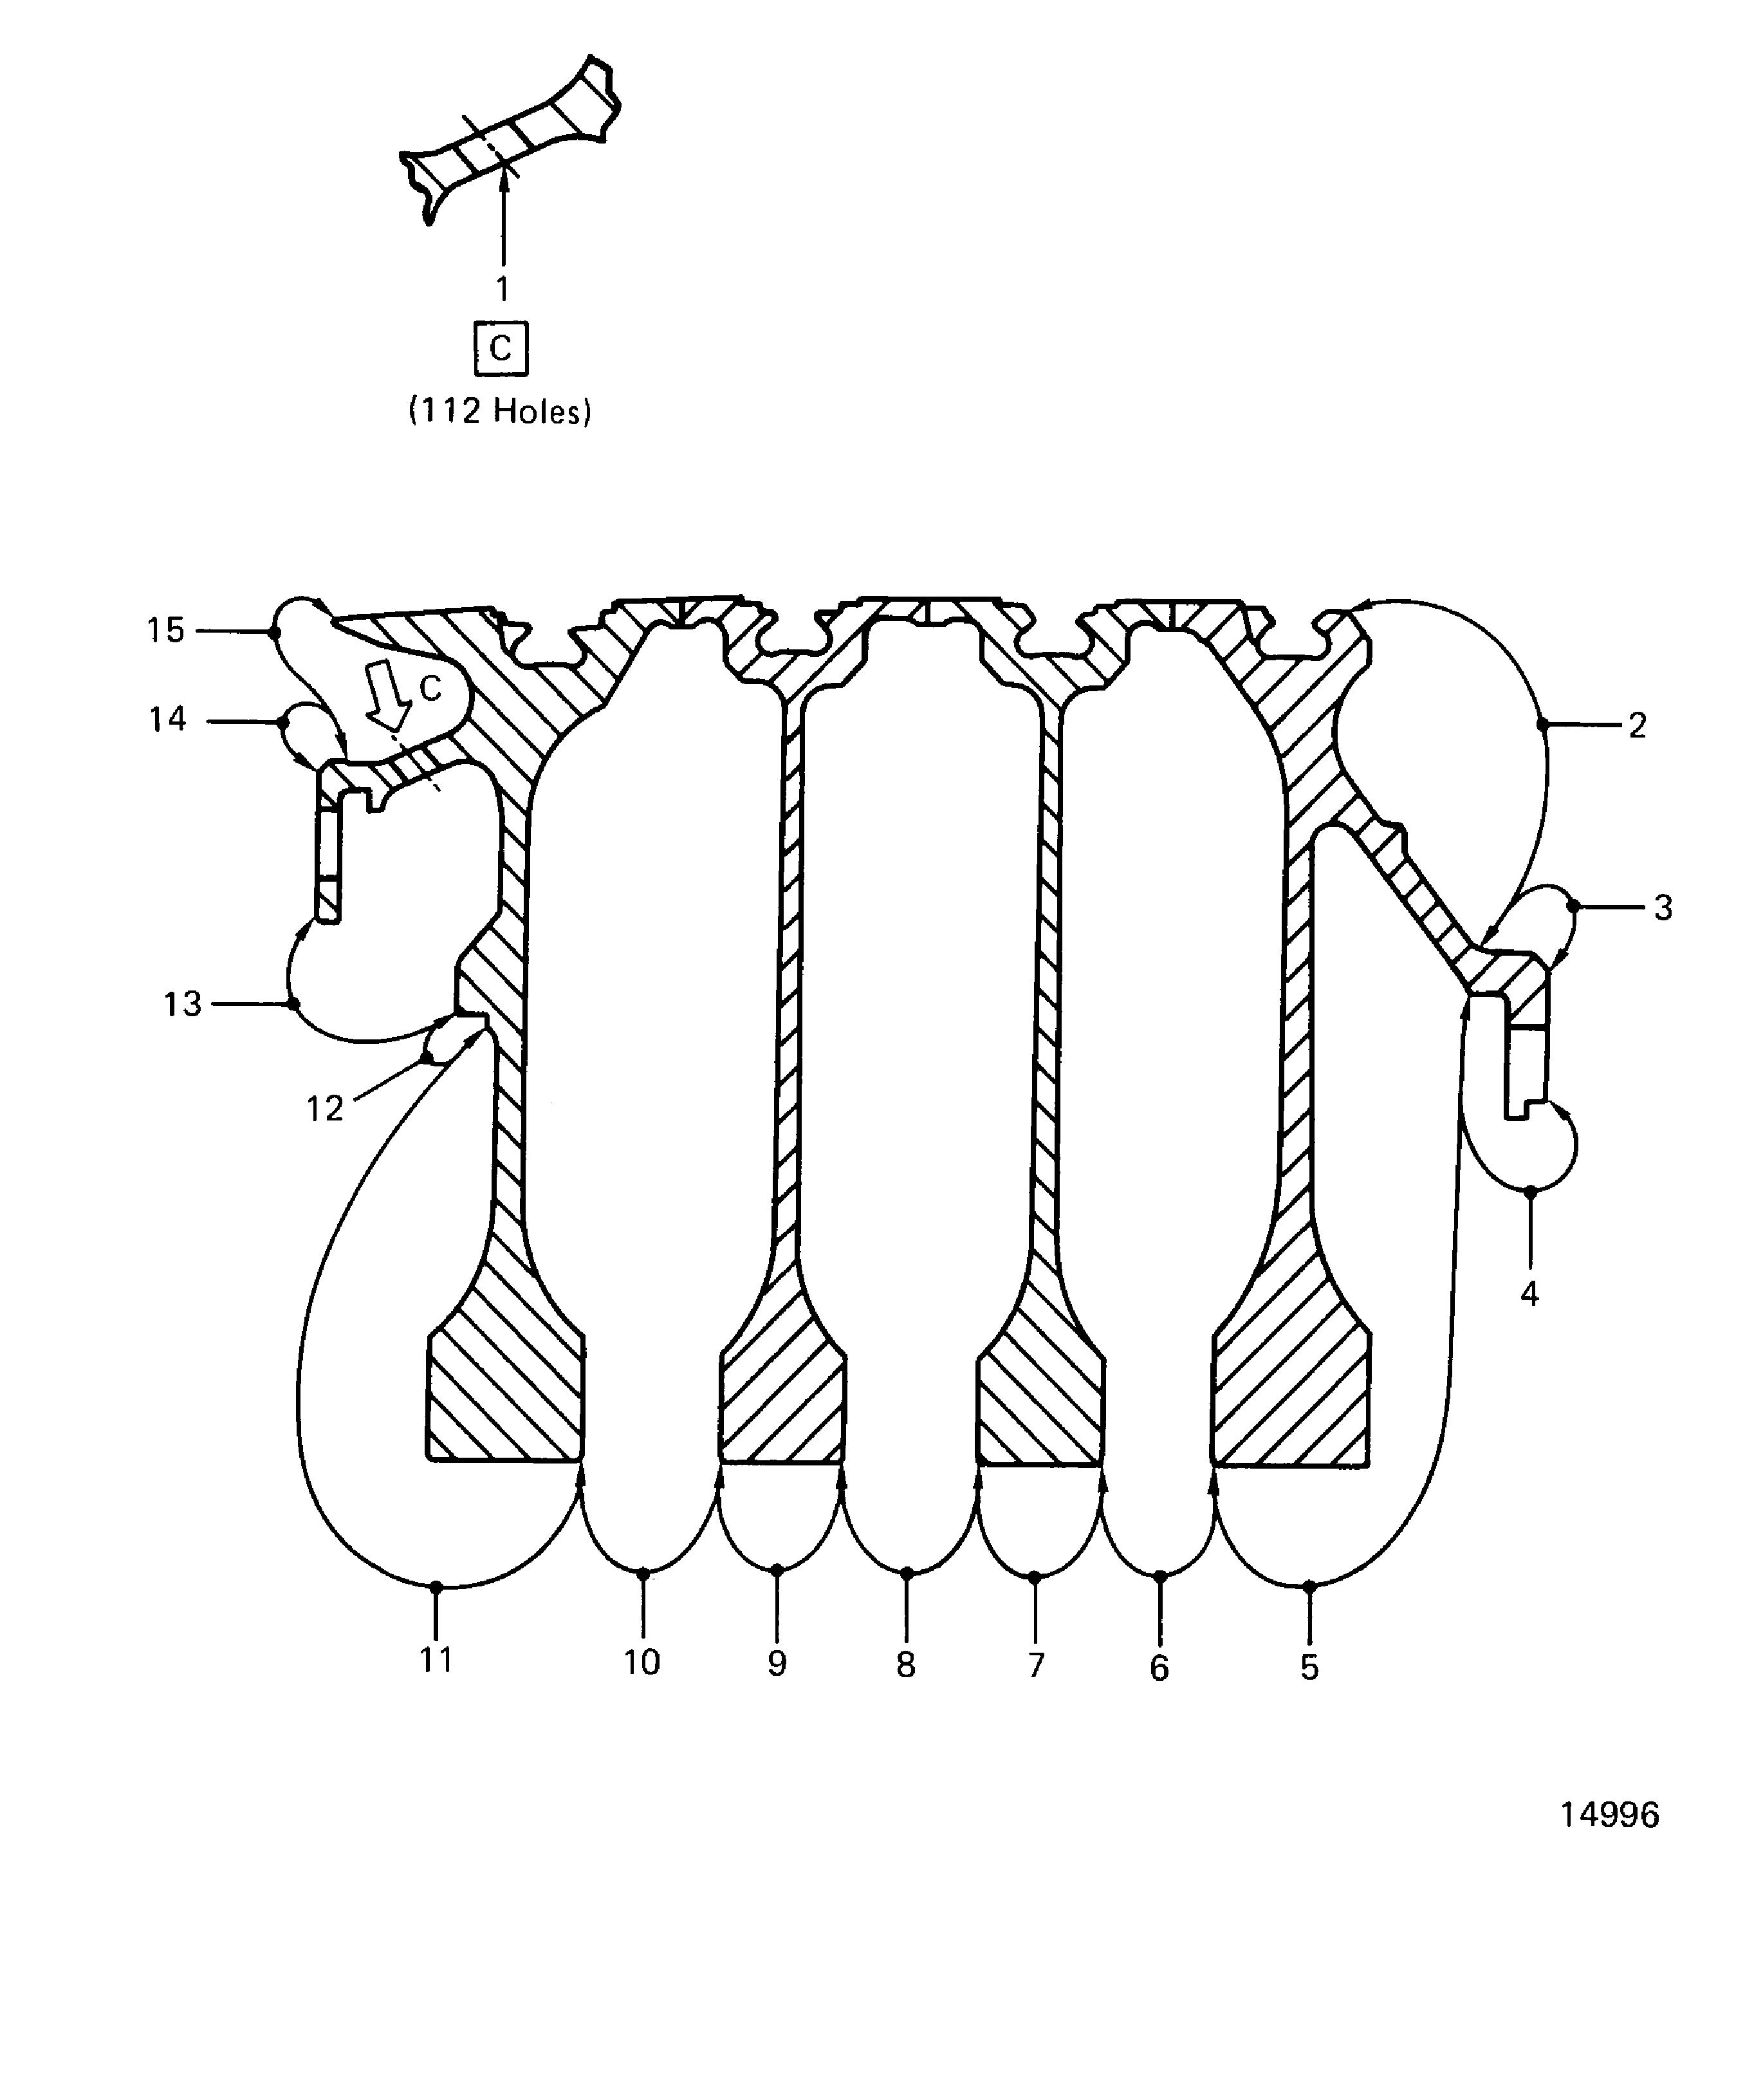
Figure: Rear HPC disk inspection locations
Rear HPC disk inspection locations
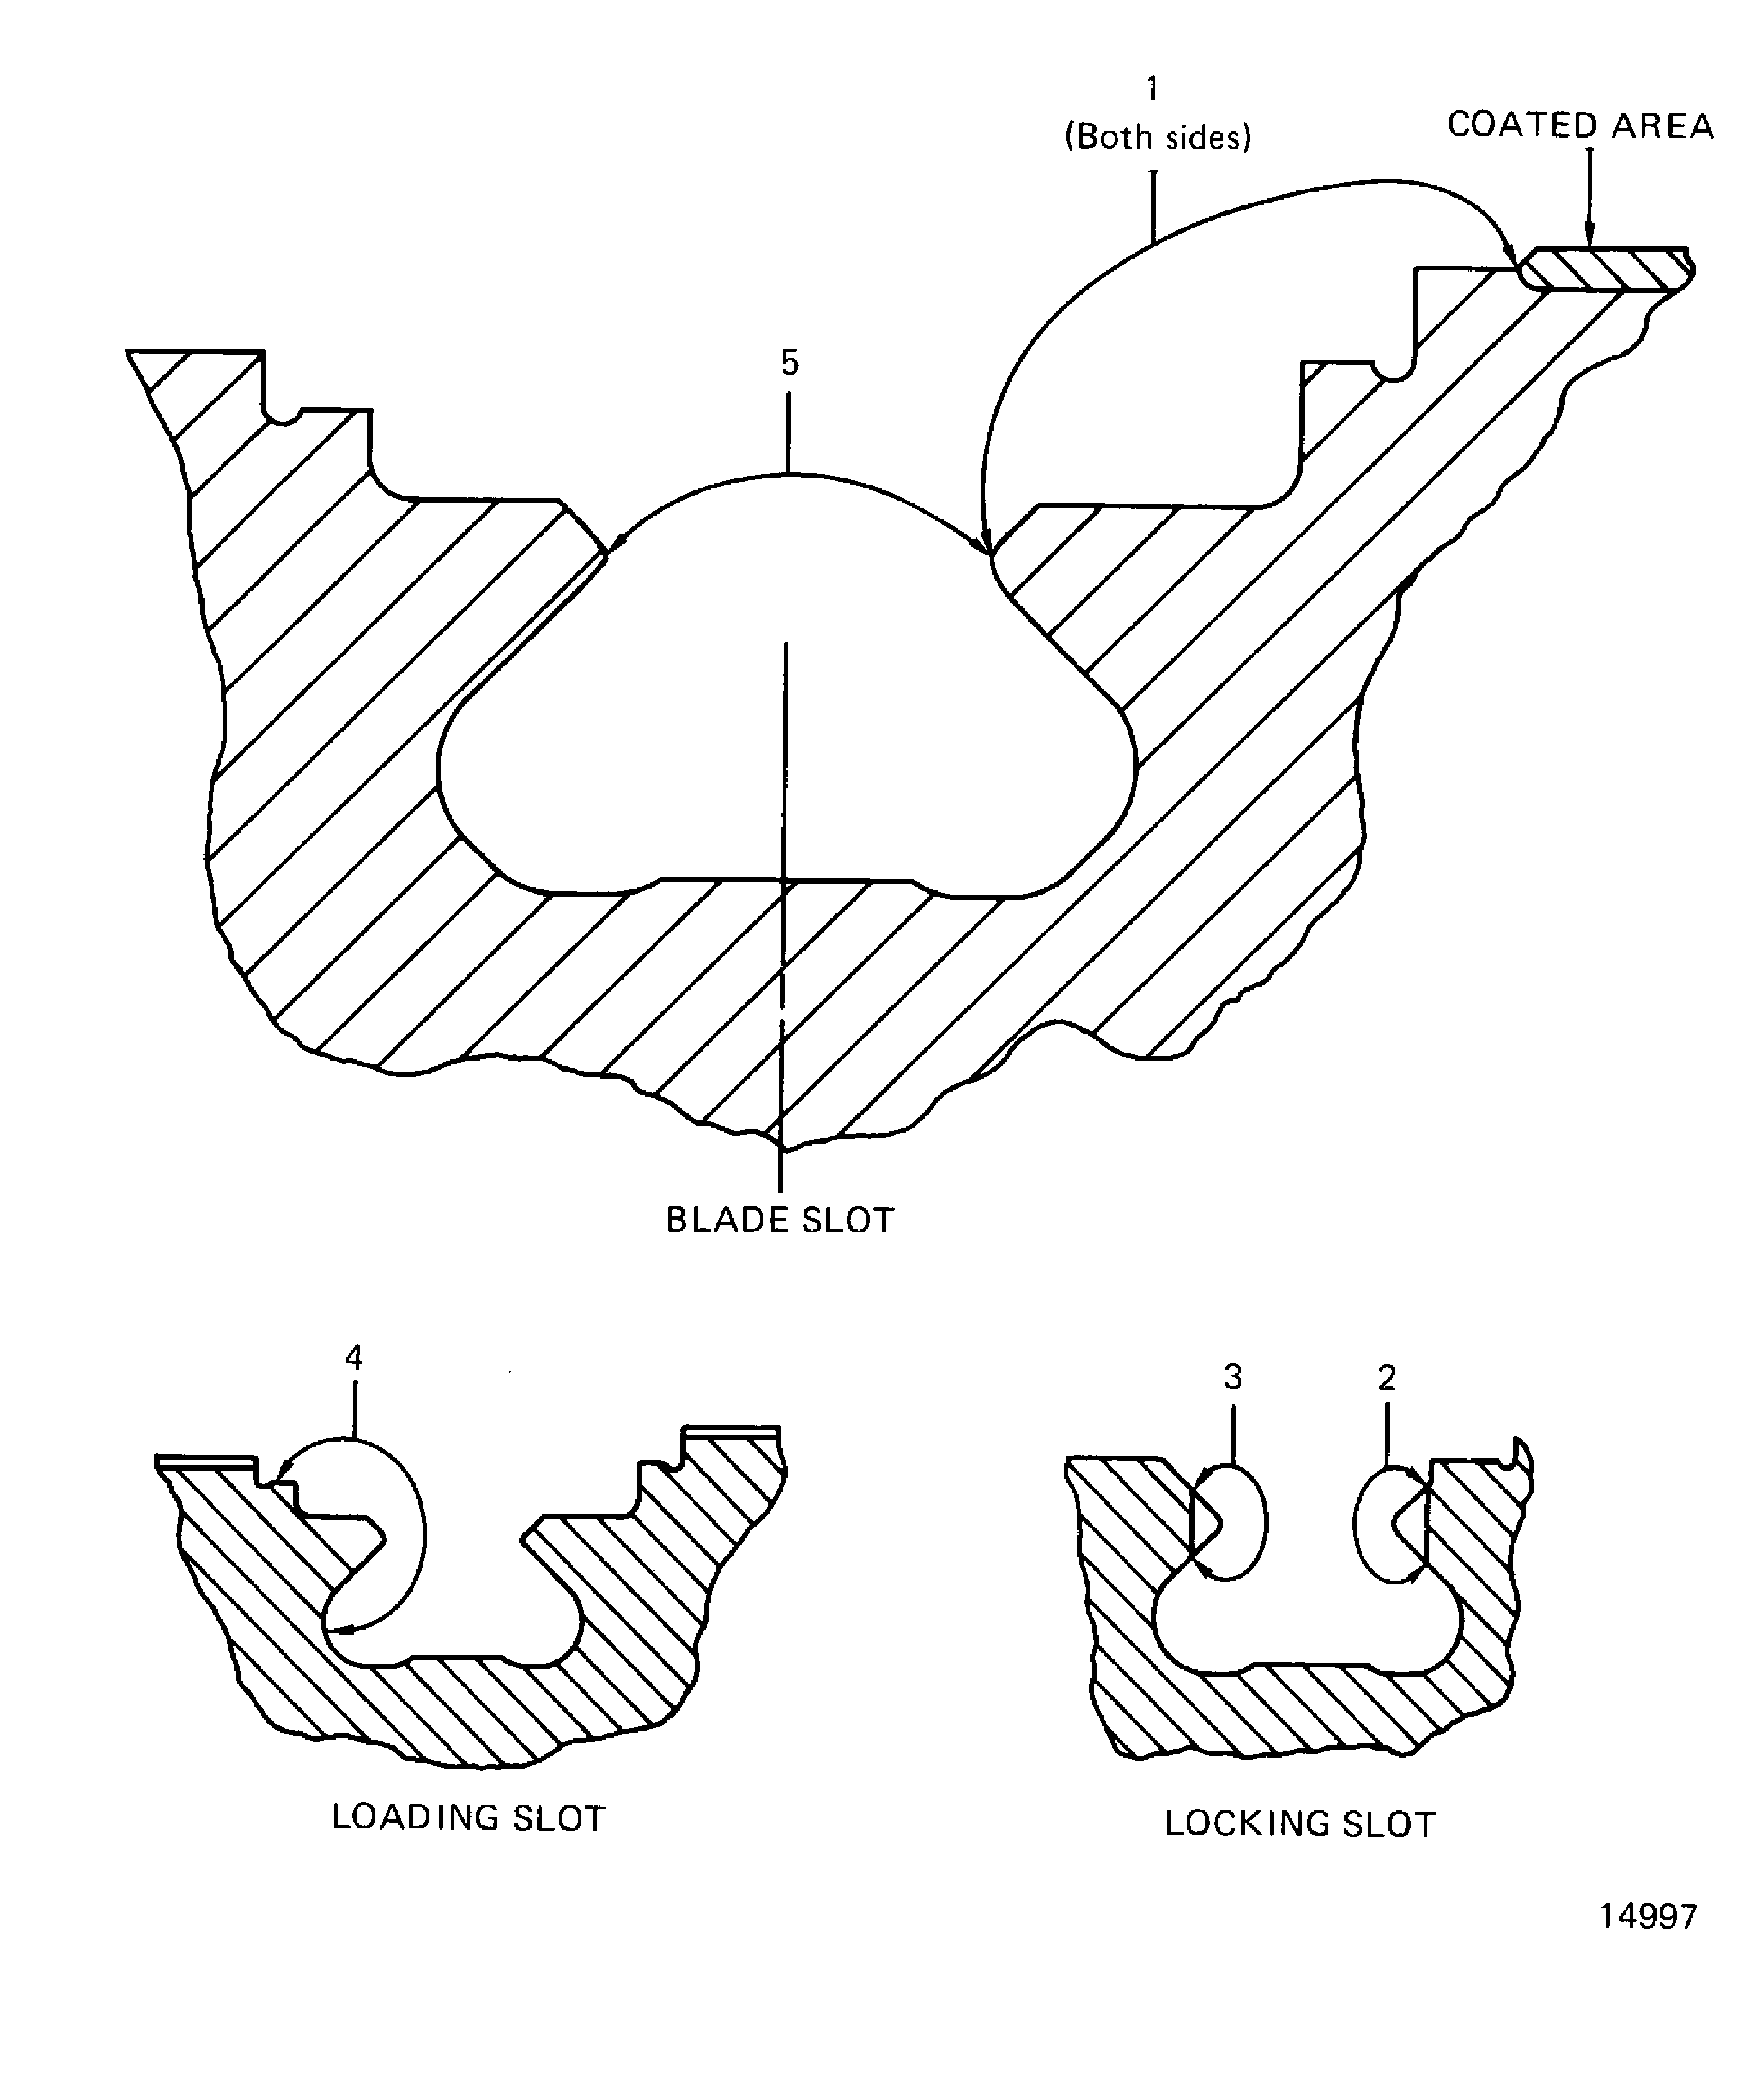
Figure: Rear HPC Disk inspection locations
Rear HPC Disk inspection locations
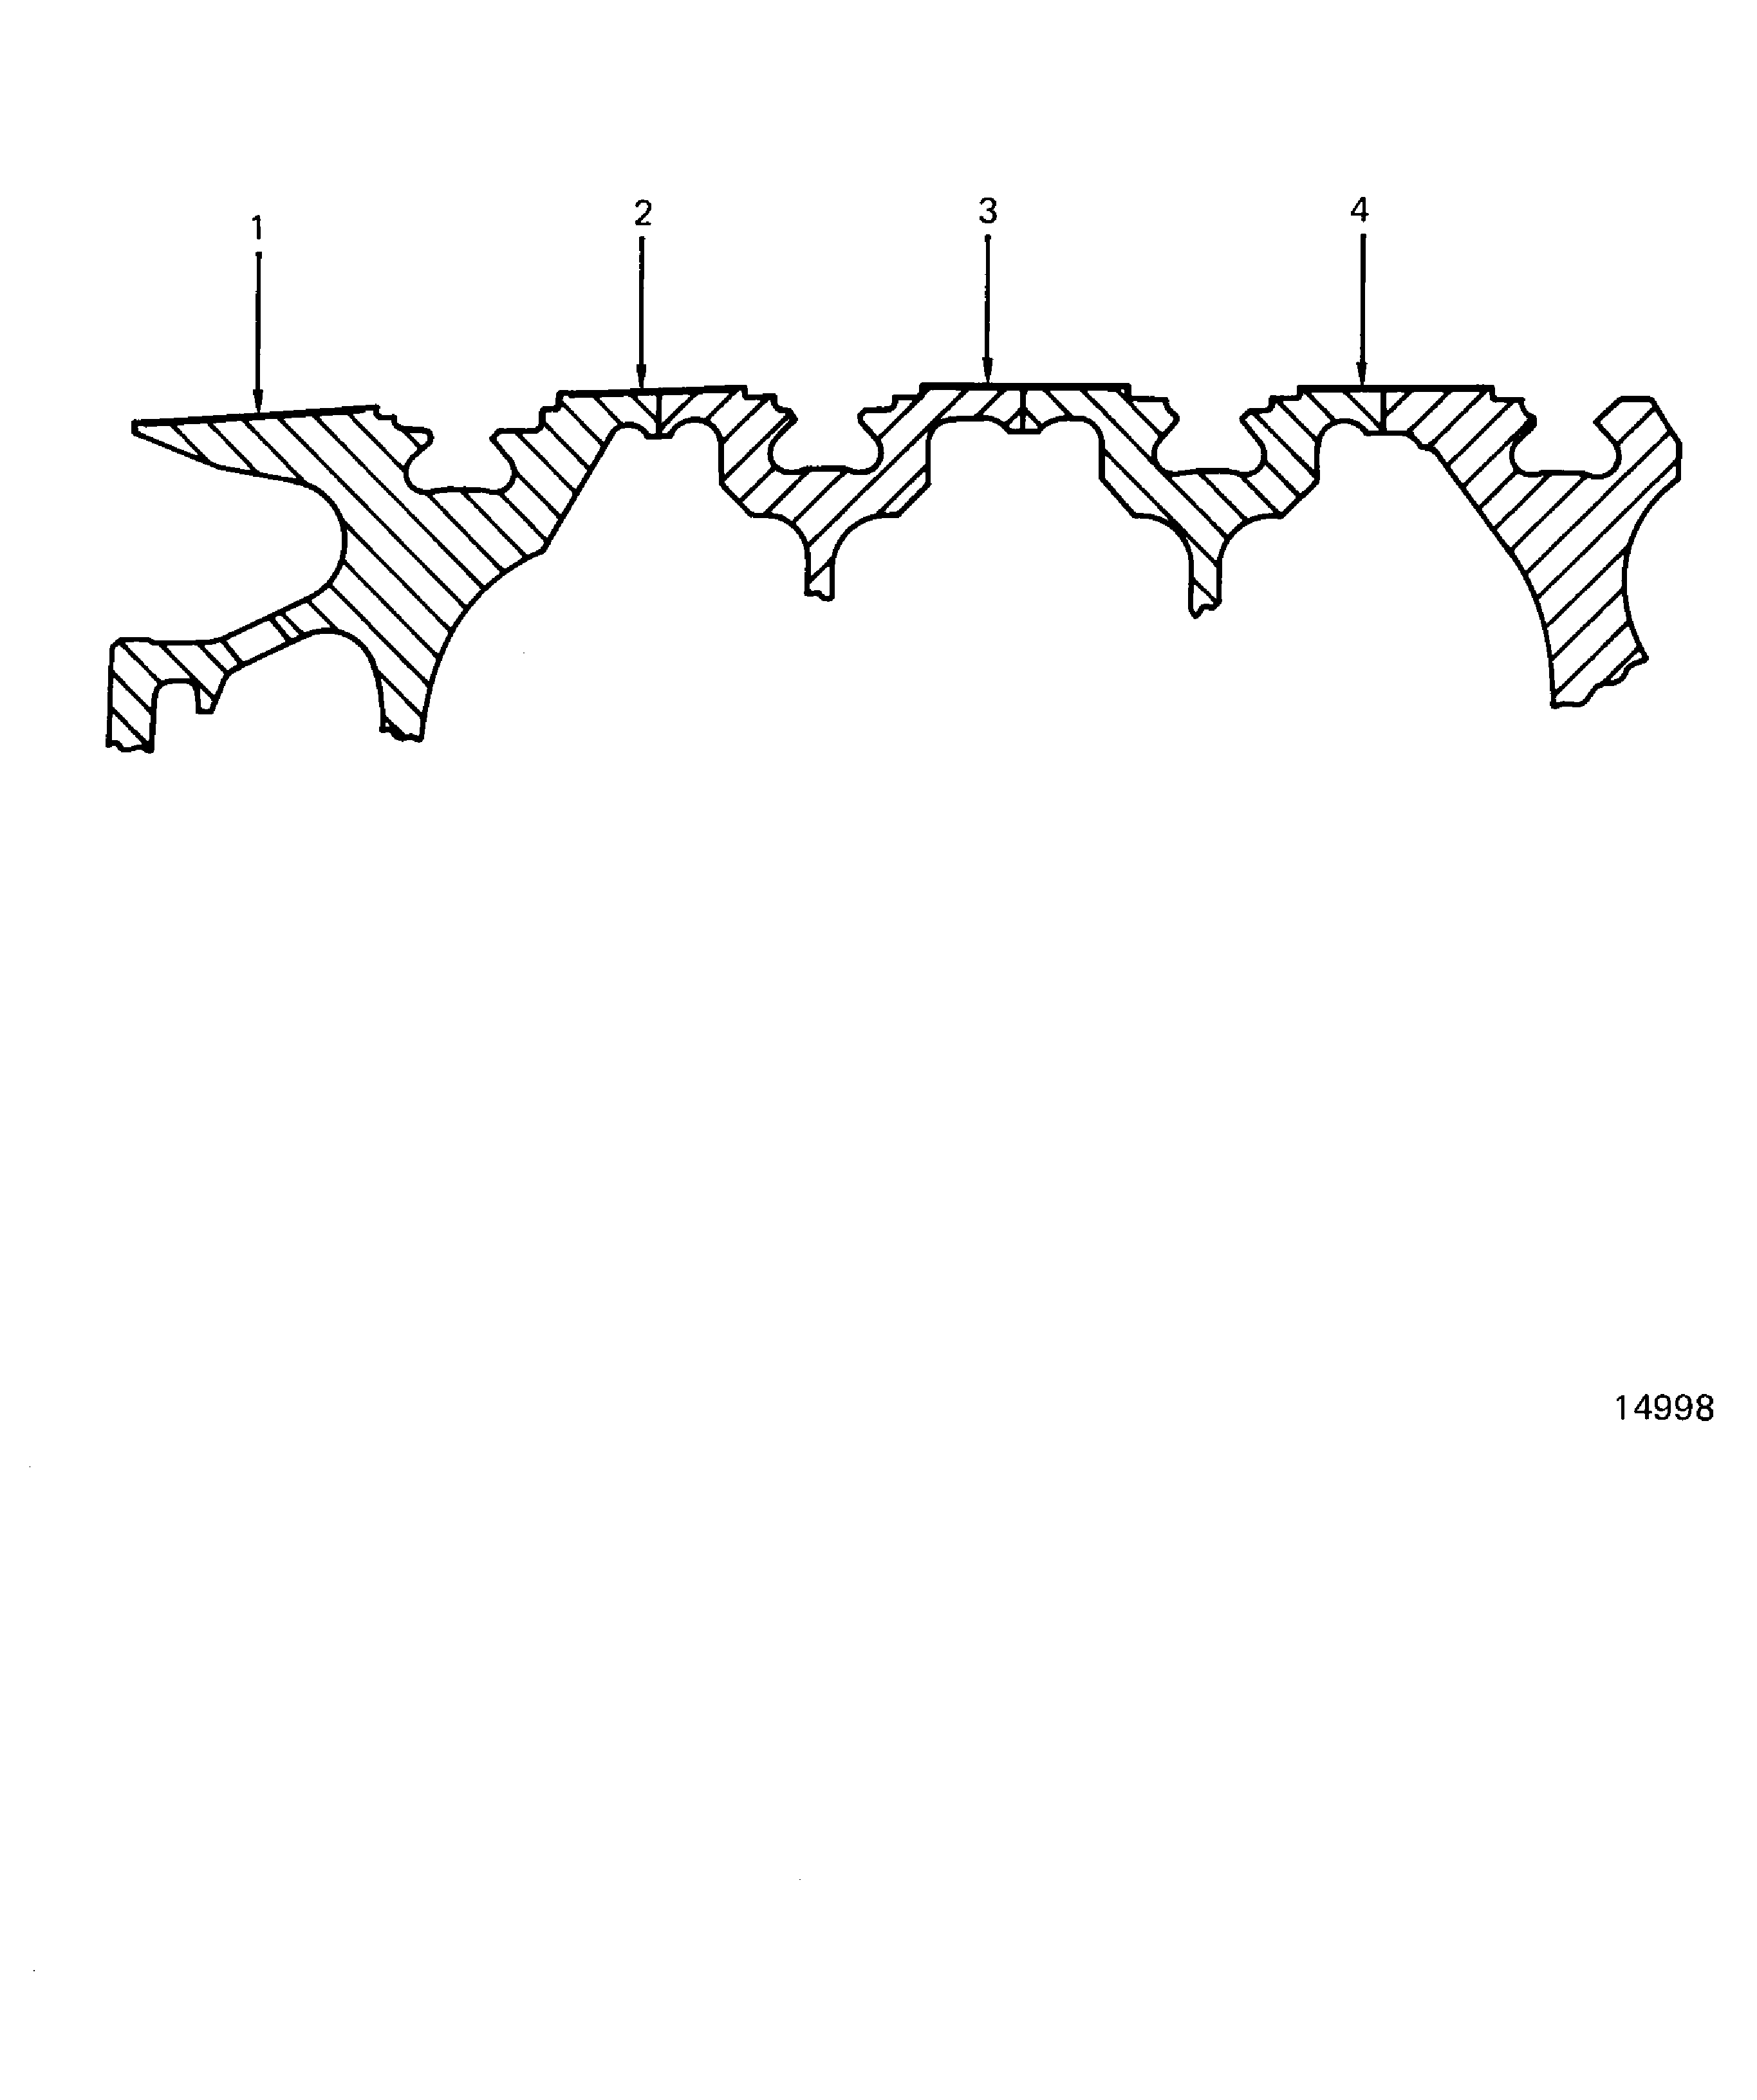
Figure: Rear HPC disk inspection locations
Rear HPC disk inspection locations
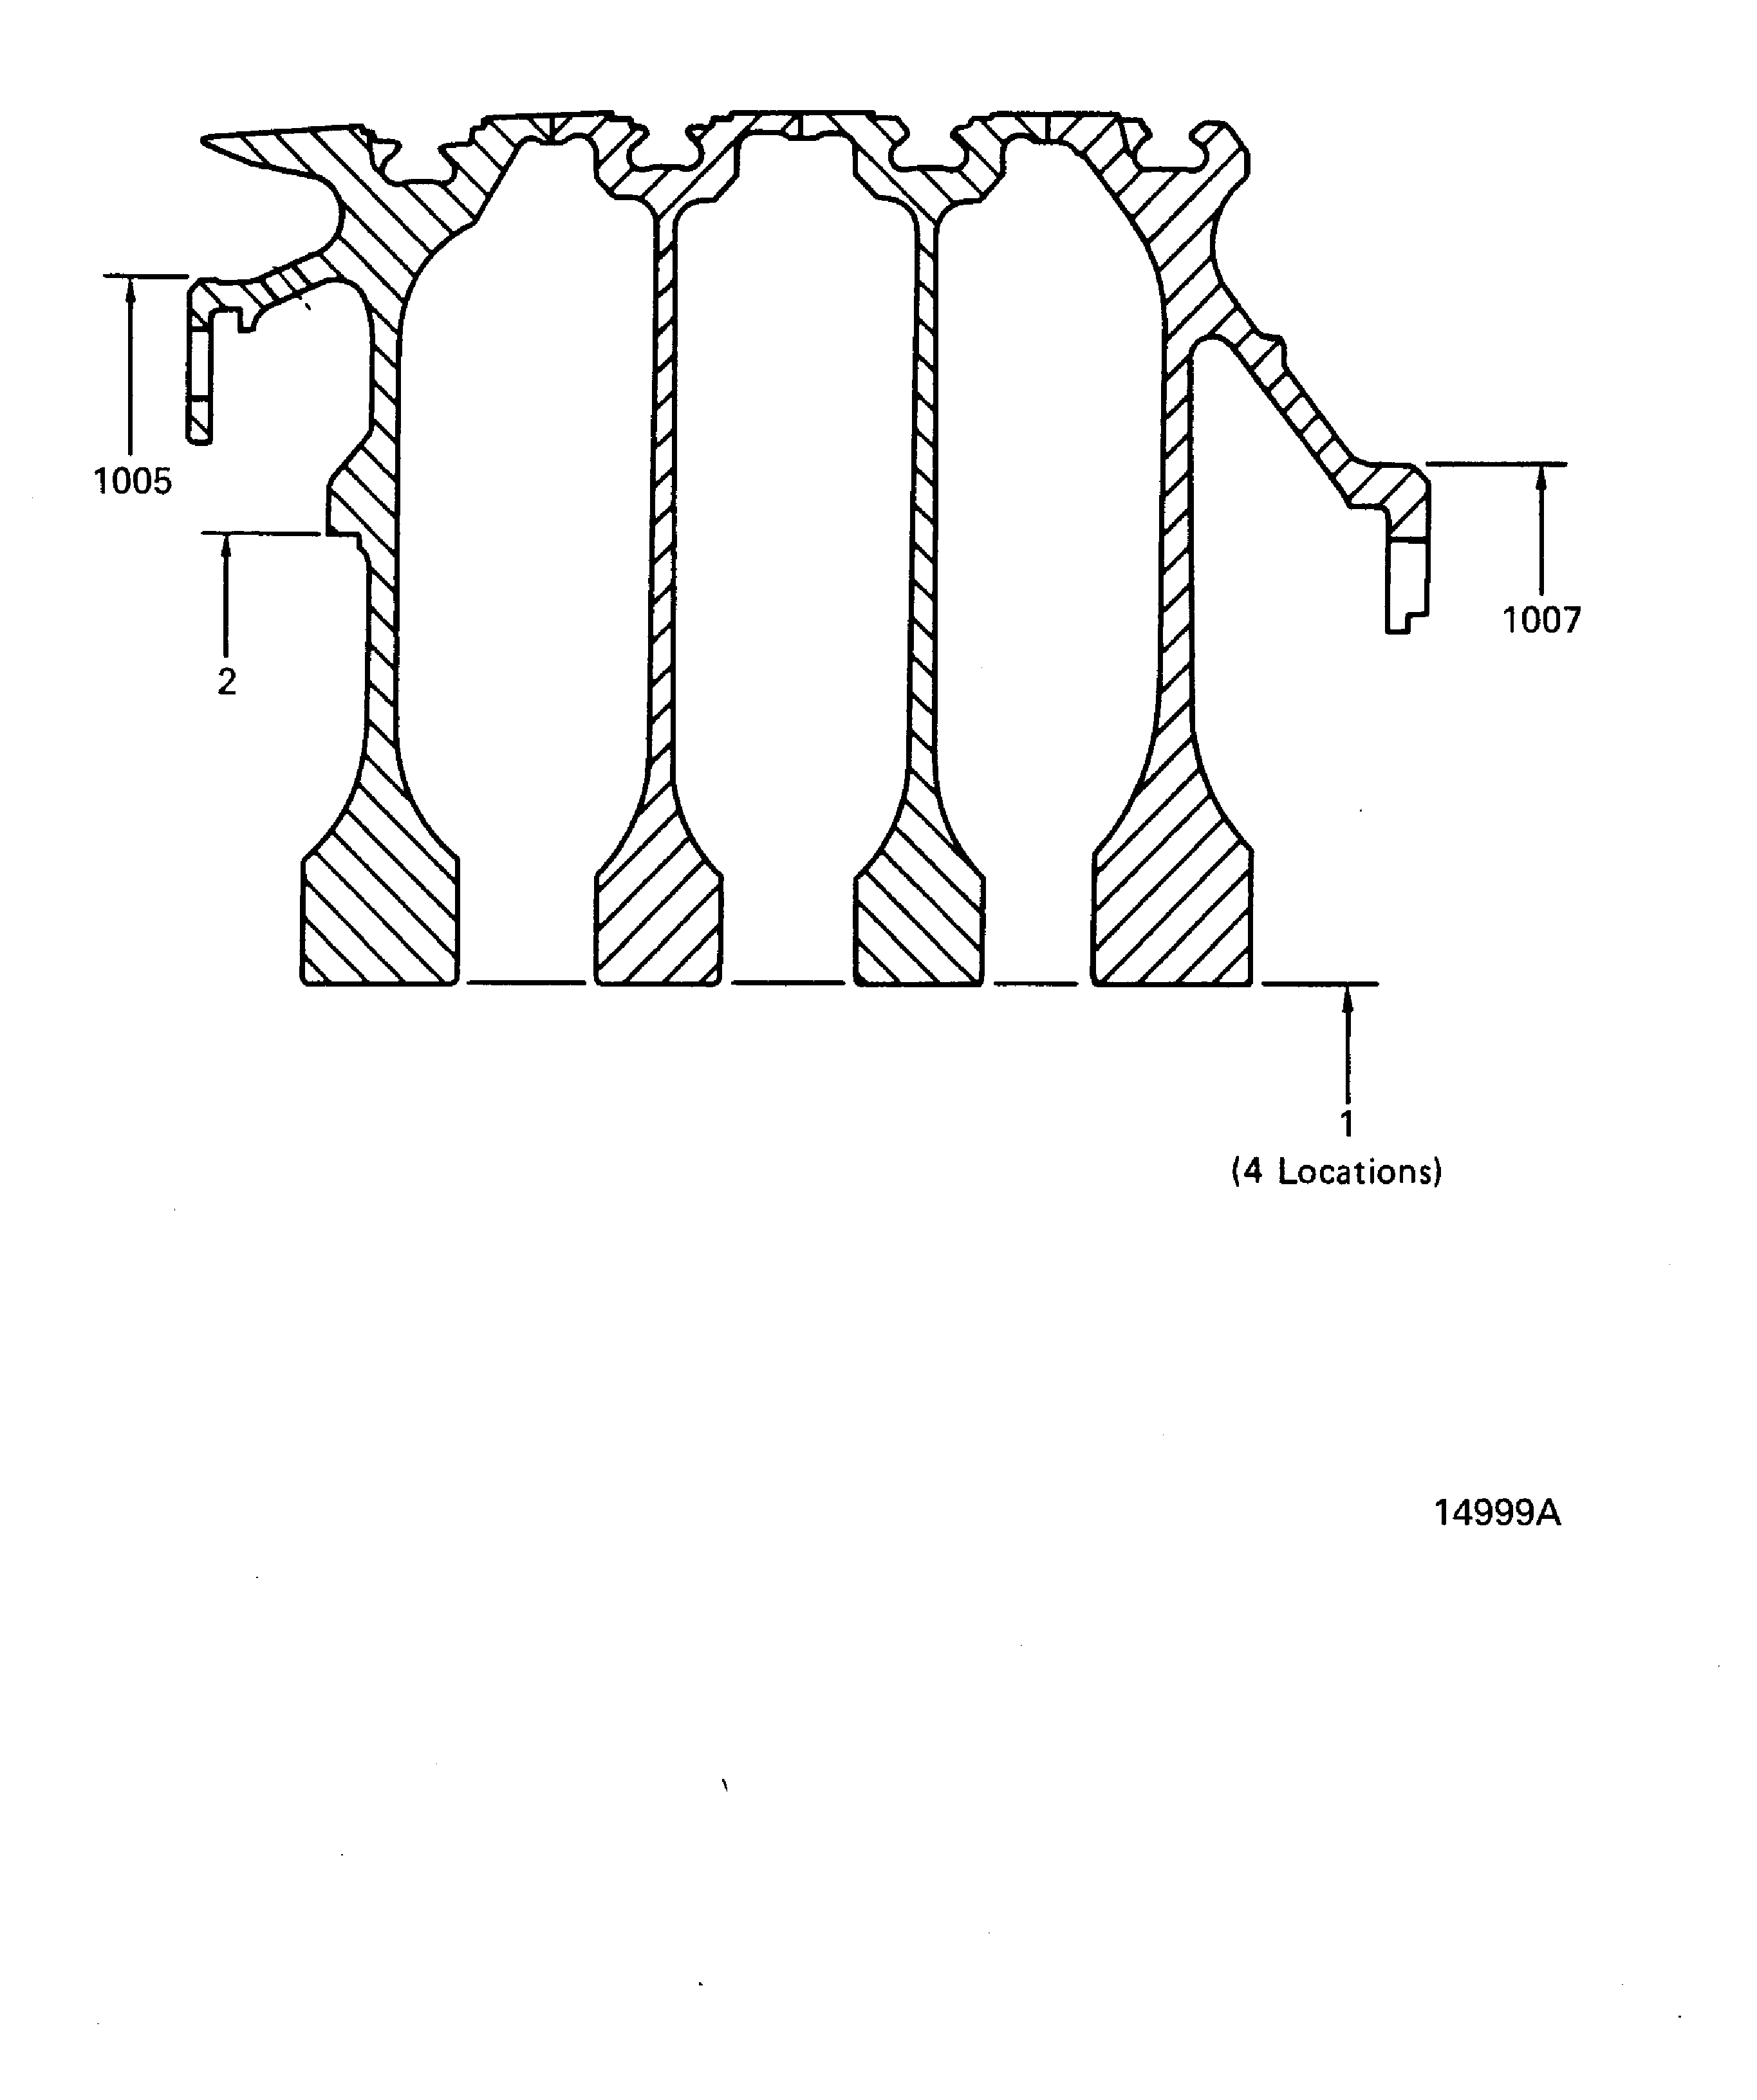
Figure: Rear HPC disk inspection locations
Rear HPC disk inspection locations
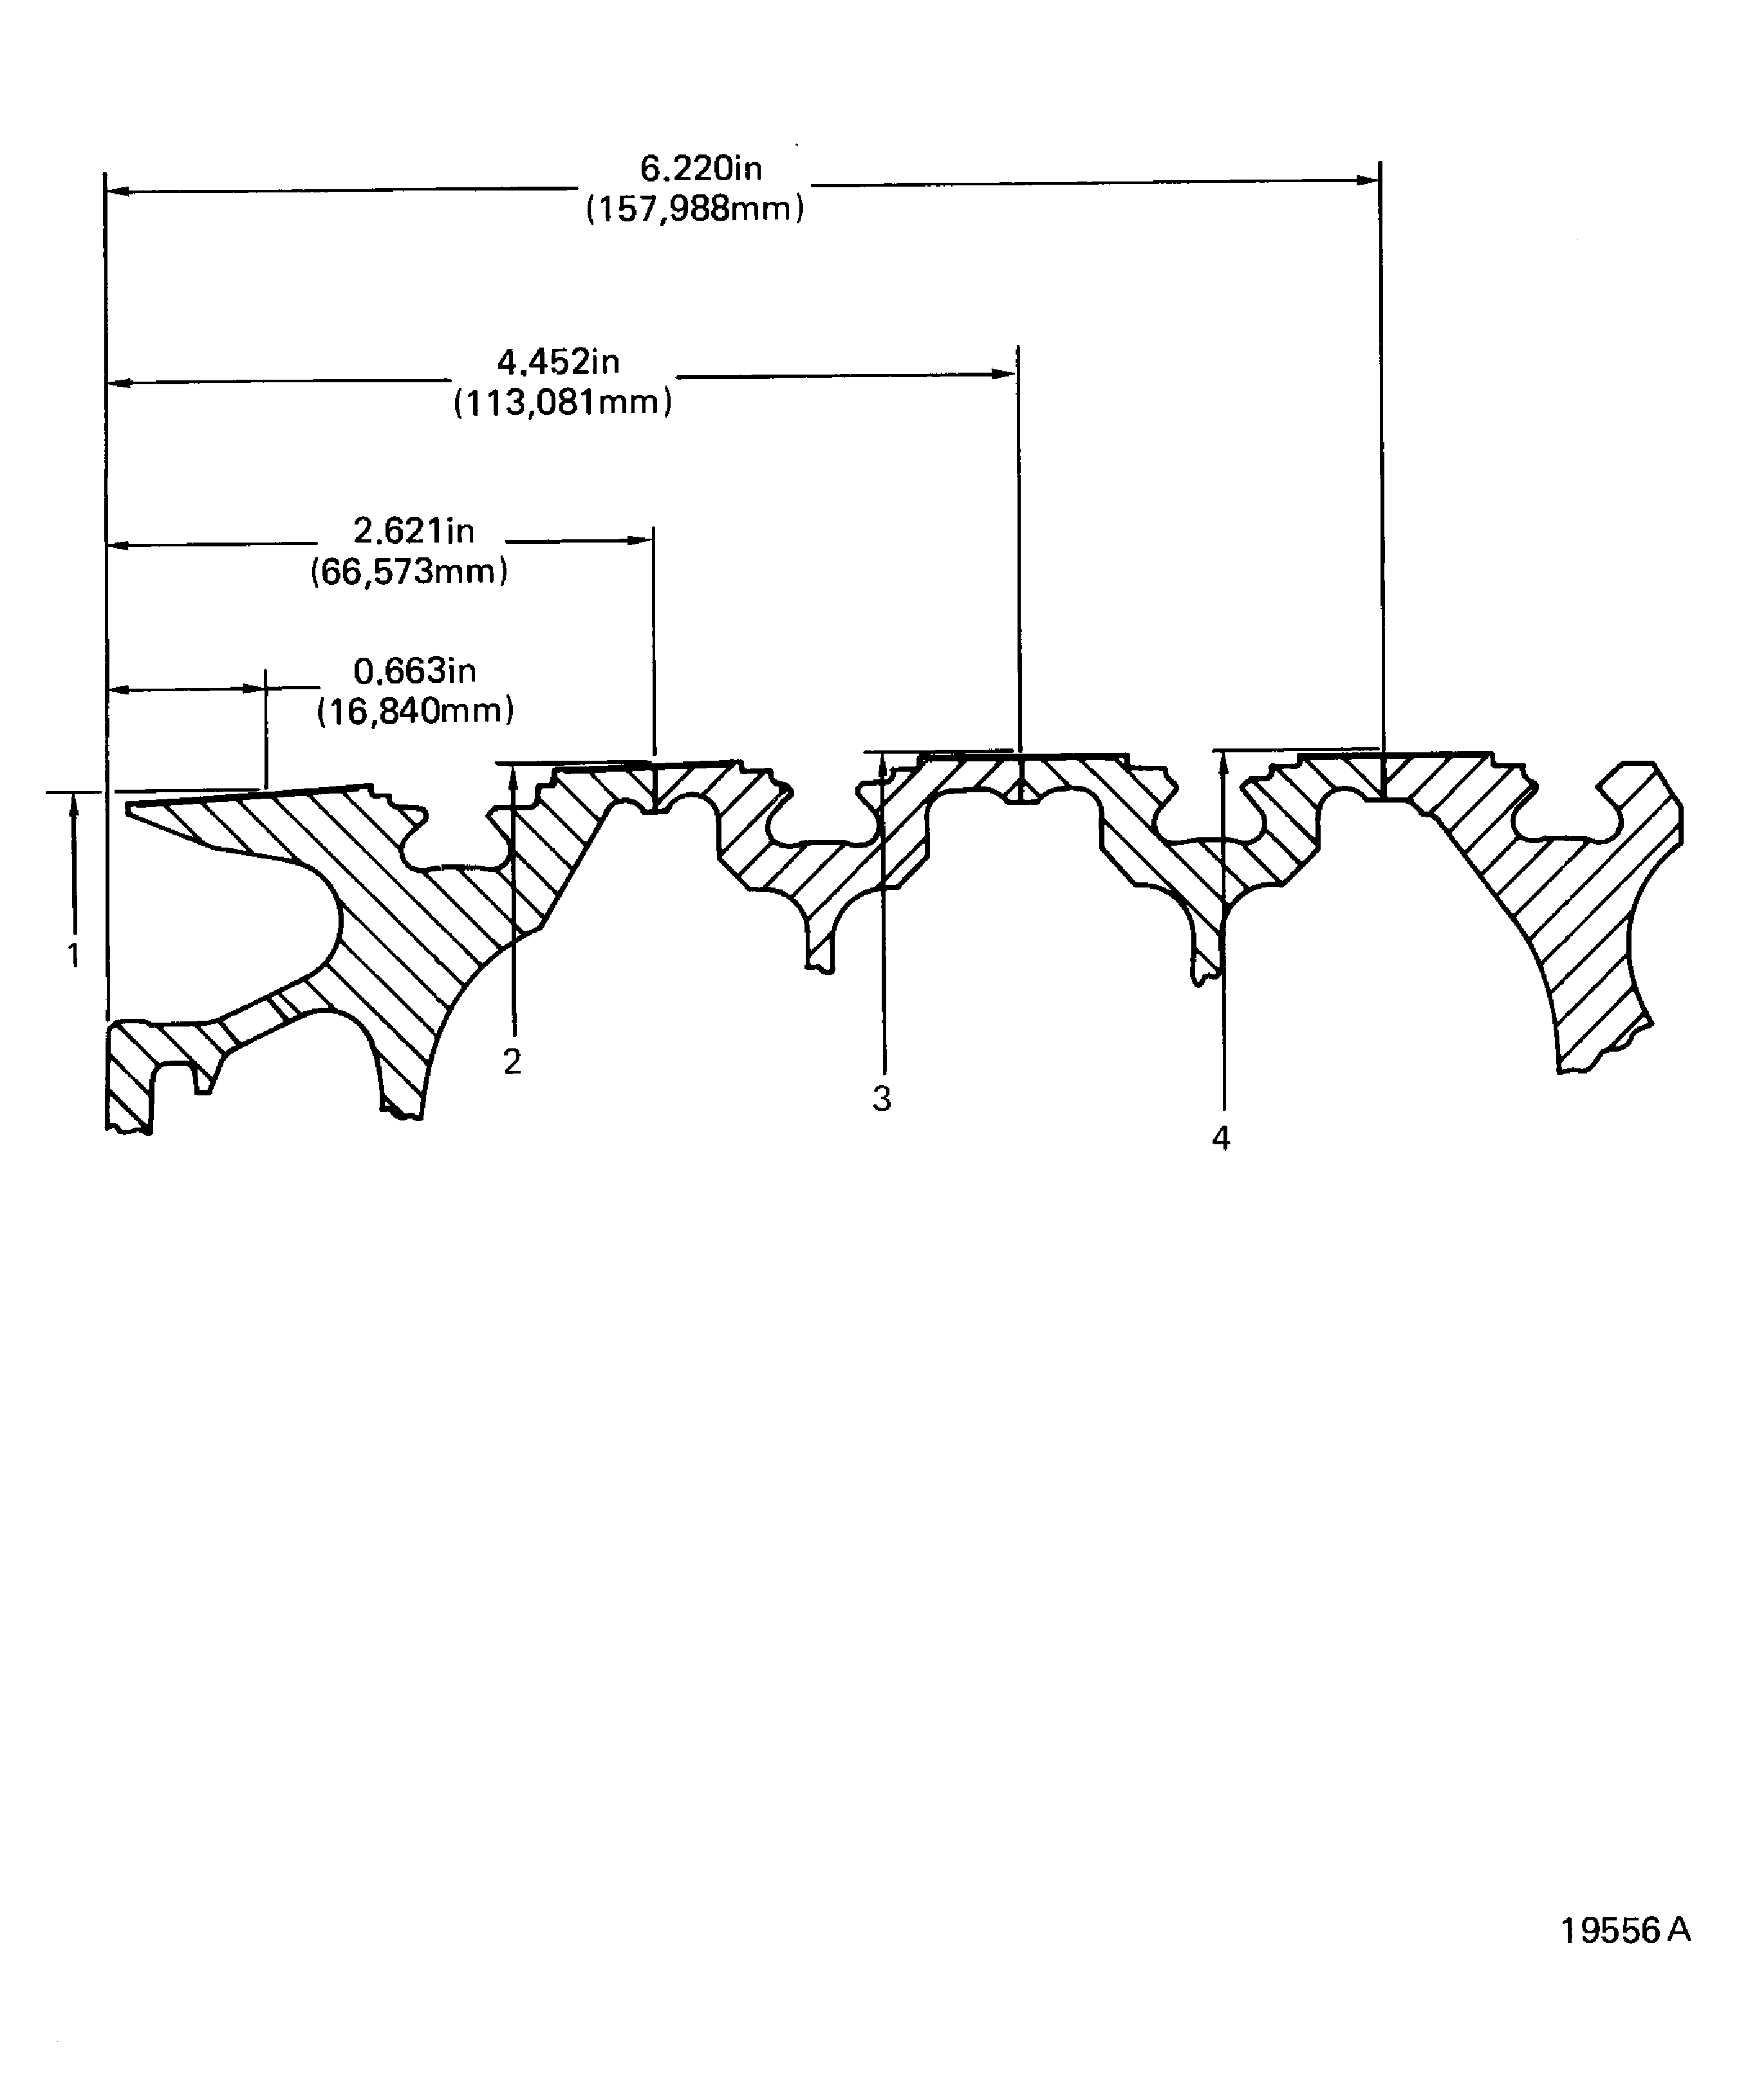
Figure: Focused Inspection - Stages 9, 10, 11 and 12 disks bore and Stage 9 Air transfer holes (Vent Holes)
Focused Inspection - Stages 9, 10, 11 and 12 disks bore and Stage 9 Air transfer holes (Vent Holes)
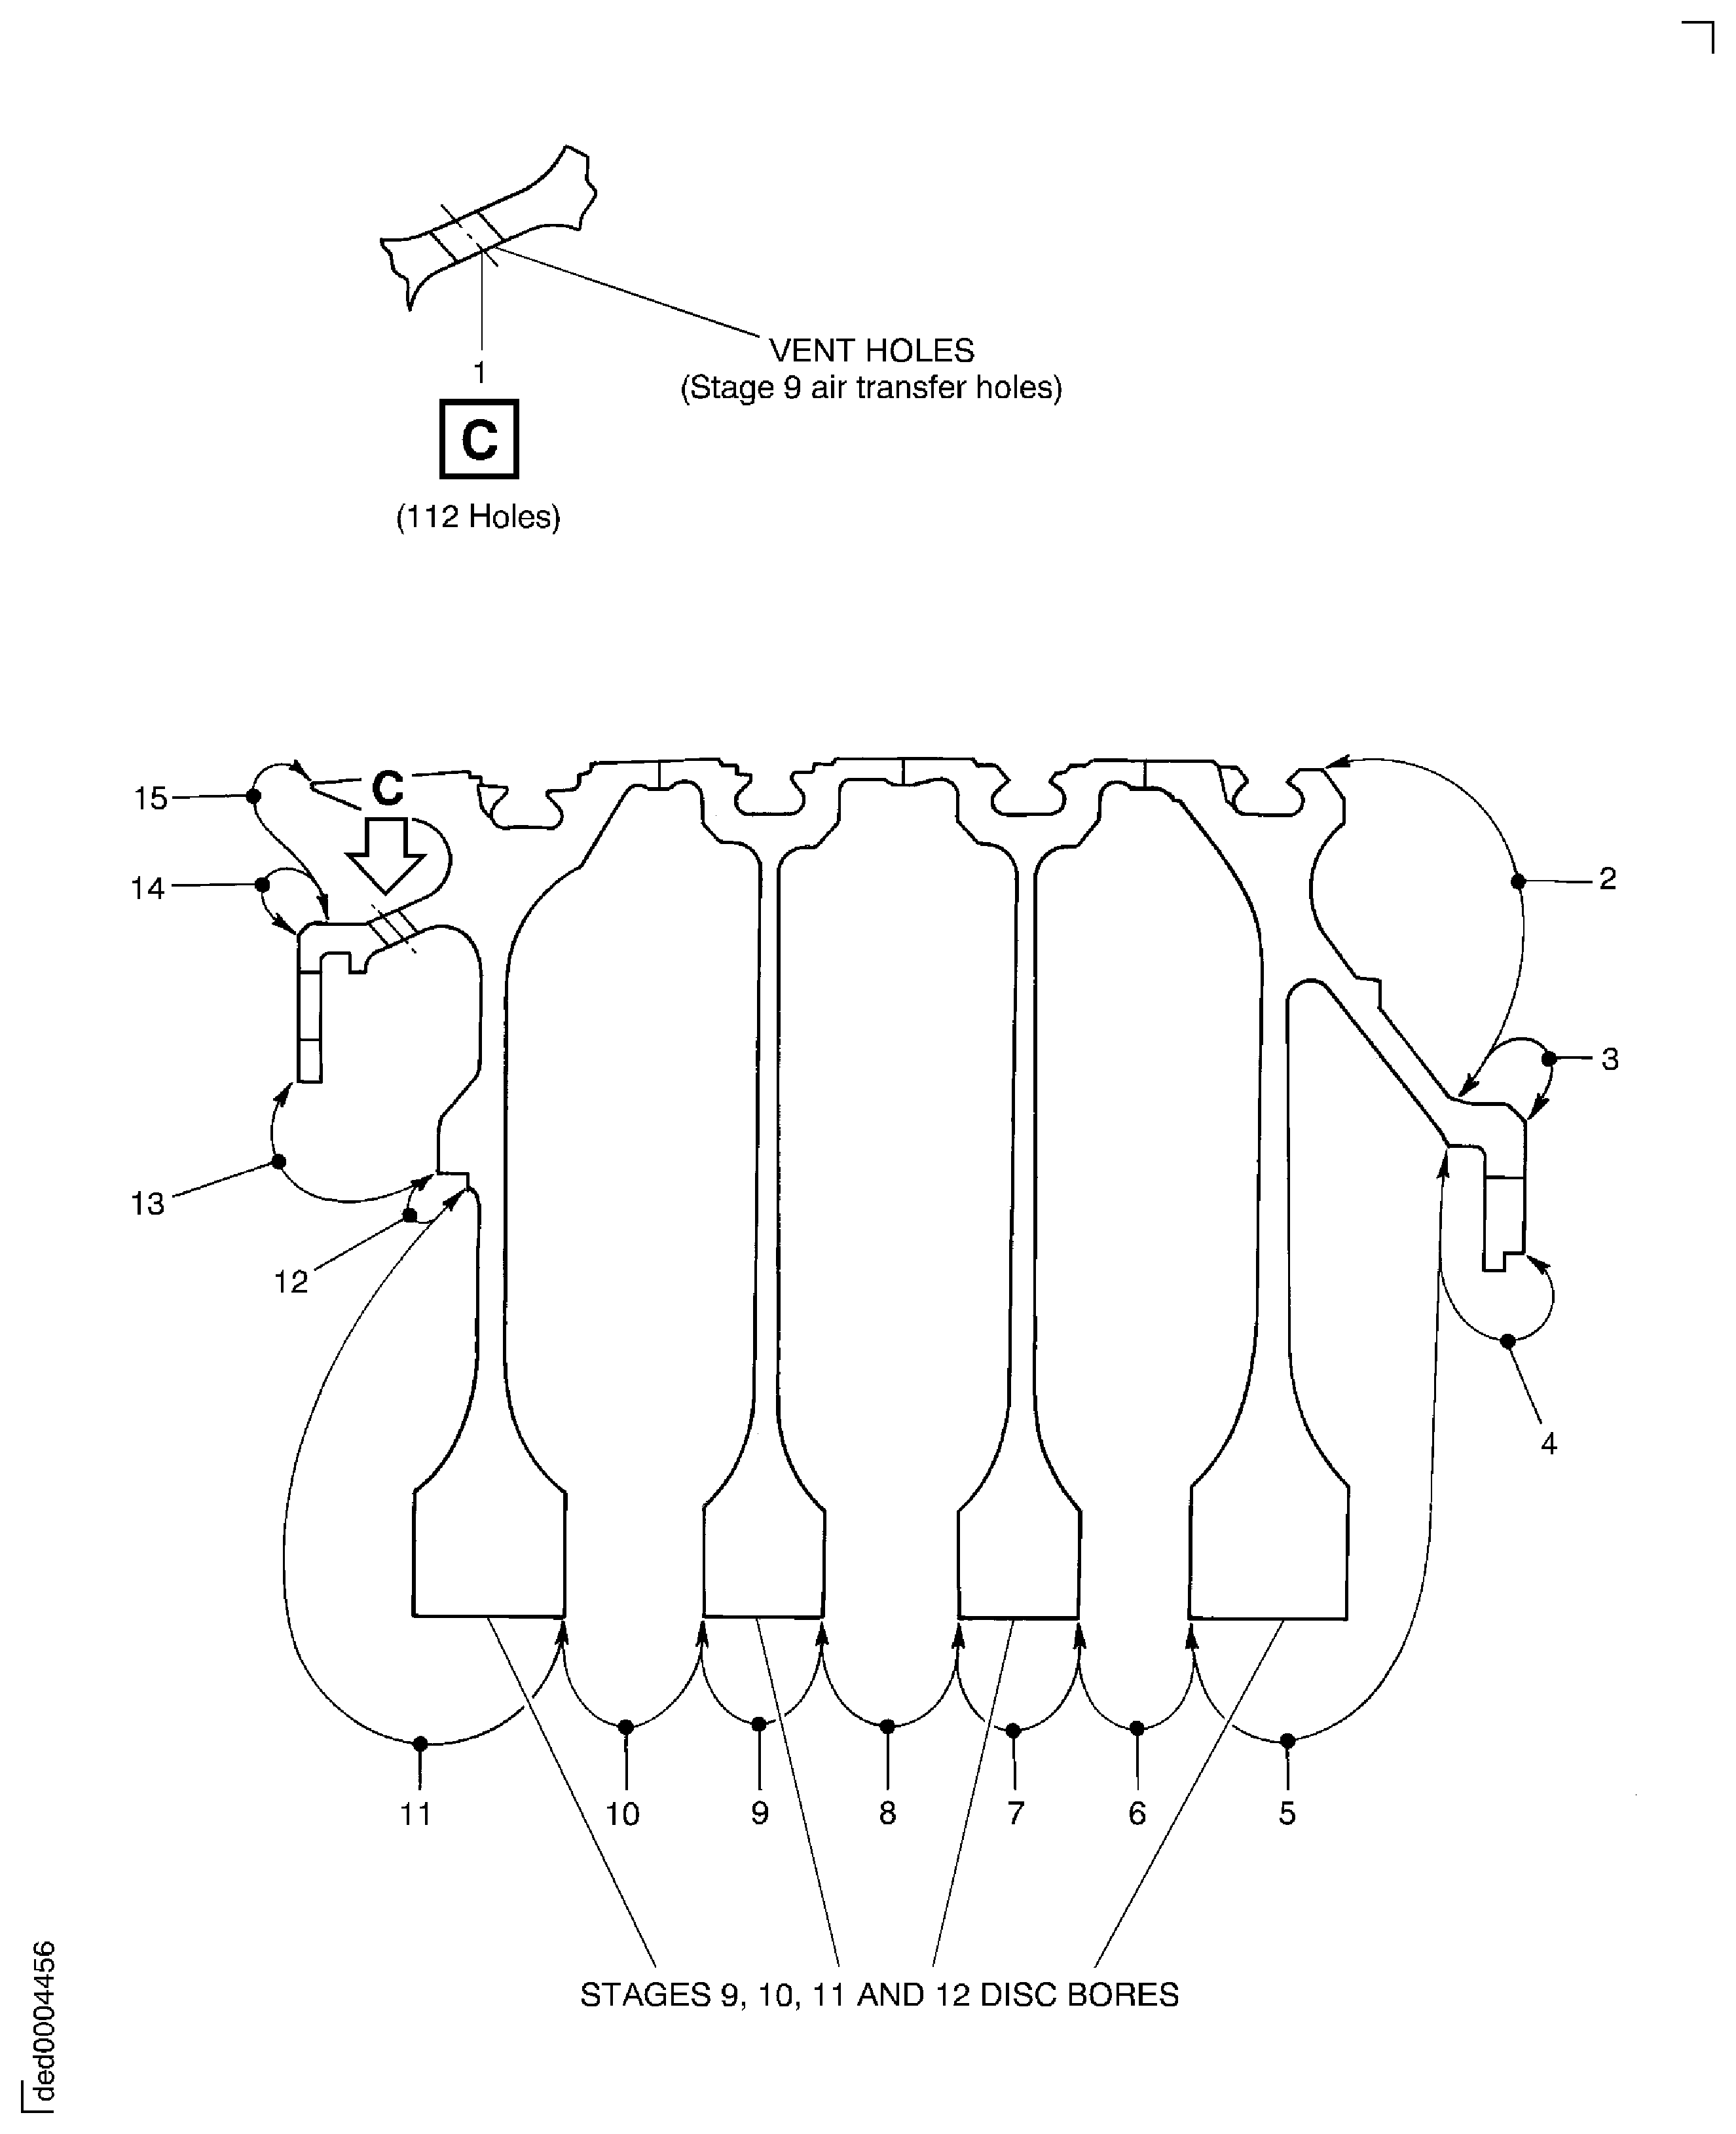
Figure: Focused Inspection - Blade Loading and Locking Slots Stages 9, 10, 11 and 12
Focused Inspection - Blade Loading and Locking Slots Stages 9, 10, 11 and 12

Figure: Focused Inspection - Front Flange Slots
Focused Inspection - Front Flange Slots

Figure: Focused Inspection - Rear Bolt Holes
Focused Inspection - Rear Bolt Holes

