Export Control
EAR Export Classification: Not subject to the EAR per 15 C.F.R. Chapter 1, Part 734.3(b)(3), except for the following Service Bulletins which are currently published as EAR Export Classification 9E991: SBE70-0992, SBE72-0483, SBE72-0580, SBE72-0588, SBE72-0640, SBE73-0209, SBE80-0024 and SBE80-0025.Copyright
© IAE International Aero Engines AG (2001, 2014 - 2021) The information contained in this document is the property of © IAE International Aero Engines AG and may not be copied or used for any purpose other than that for which it is supplied without the express written authority of © IAE International Aero Engines AG. (This does not preclude use by engine and aircraft operators for normal instructional, maintenance or overhaul purposes.).Applicability
All
Common Information
TASK 72-41-15-300-012 HPC Stage 4 Rotor Blade - Weld Repair The Airfoil, Repair-012 (VRS6050)
Effectivity
FIG/ITEM | PART NO. | ASSEMBLY |
|---|---|---|
01-500 | 6A3333 | A |
01-500 | 6A3635 | A |
01-500 | 6A3939 | A |
01-500 | 6A4254 | B |
01-500 | 6A7635 | C |
General
This repair must only be done when the instruction to do so is given in 72-41-15 Inspection/Check.
This repair restores the HP compressor rotor blade, stage 4 tip length by welding.
The practices and processes referred to in the procedure by the TASK/SUBTASK numbers are in the SPM.
This is a source demonstrated repair which can only be done by approved vendors.
To keep the HP compressor efficiency, rotor blades are repaired as near to the new blade condition as possible.
Rotor blades must be repaired as soon as damage or wear is monitored, to get back HP compressor efficiency and extend the rotor blade life.
This repair can be done again to the welded rotor blades if:
The minimum airfoil dimensions are as given in 72-41-15 Inspection/Check.
The airfoil surface has been polished up to two times, refer to VRS6150, TASK 72-41-15-300-040 (REPAIR-040).
Discard the blades if, during the weld procedure, arcing has occurred on any part of the blades.
Price and Availability
Refer to International Aero Engines
Related Repairs
HP Compressor - Stages 3 to 12 - Rotor Blades - Restore Airfoil Surface Finish, refer to VRS6150, TASK 72-41-15-300-040 (REPAIR-040).
HP Compressor Rotor Blades - Stage 3 to 6 - Shot Peen Root of Blade to Restore Fatigue Strength, refer to VRS6151, TASK 72-41-15-300-041 (REPAIR-041).
HP Compressor Blades - Restore Stage 3 to 5 Anti-Fret Treatment, refer to VRS6486, TASK 72-41-15-300-046 (REPAIR-046).
HP Compressor - Stage 4 Rotor Blade - Repair by Replacement of Seal Strip, refer to VRS6214, TASK 72-41-15-300-031 (REPAIR-031).
NOTE
NOTE
Preliminary Requirements
Pre-Conditions
NONESupport Equipment
| Name | Manufacturer | Part Number / Identification | Quantity | Remark |
|---|---|---|---|---|
| Chemical cleaning equipment | LOCAL | Chemical cleaning equipment | ||
| Penetrant Crack Test Equipment | LOCAL | Penetrant crack test equipment | ||
| Abrasive blast equipment | LOCAL | Abrasive blast equipment | ||
| Welding equipment | LOCAL | Welding equipment | Argonarc | |
| Heat treatment equipment | LOCAL | Heat treatment equipment | ||
| Hardness tester | LOCAL | Hardness tester | ||
| Grinding machine | LOCAL | Grinding machine | ||
| Standard workshop equipment | LOCAL | Standard workshop equipment | ||
| Radiographic equipment | LOCAL | Radiographic equipment | ||
| Vibrating marking pencil | LOCAL | Vibrating marking pencil |
Consumables, Materials and Expendables
| Name | Manufacturer | Part Number / Identification | Quantity | Remark |
|---|---|---|---|---|
| CoMat 02-001 ADHESIVE TAPE (MASKING) | LOCAL | CoMat 02-001 | ||
| CoMat 03-195 WELDING WIRE TITANIUM | LOCAL | CoMat 03-195 | ||
| CoMat 05-003 ABRASIVE MEDIUM ALUMINUM OXIDE, 120/220 GRADE | LOCAL | CoMat 05-003 |
Spares
NONESafety Requirements
NONEProcedure
The designation by IAE of an Authorized Repair Vendor indicates that the Repair Vendor has demonstrated the necessary capability to enable it to carry out the listed repair work. However, IAE makes no warranties or representations concerning the qualifications or quality standards of the Repair Vendors to carry out the repair work and accepts no responsibility whatsoever for any work that may be carried out by a Repair Vendor other than when IAE is listed as the Repair Vendor. Authorized Repair Vendors do not act as agents or representatives of IAE.
Authorized Repair Vendors for Repair VRS6050 are listed below:
Chromalloy Dallas
14042 Distribution Way
Dallas, TX 75234
U.S.A
MTU Maintenance GmbH
Flughafen Hannover
Muncher Strasse 31
30855 LANGENHAGEN
GERMANY
Rolls-Royce Aero-Engine Services Ltd.
Component Refurbishment
Mavor Avenue
Nerston
East Kilbride
Glasgow G74 4PY
SCOTLAND
Airfoil Technologies International (ATI)
High Holborn Road
Codnor
Ripley
Derbyshire
DE5 3NW
ENGLAND
Ishikawajimia-Harima Heavy Industries Co. Ltd.
229 Tonogaya, Mizuho-Machi
Nishitama-gun
Tokyo 190-1297
JAPAN
Airfoil Services Sdn Bhd (ASSB)
No. 12 Jalan Teknologi
Taman Sains Selangor 1
Kota Damansara PJU5
47810 Petailing Jaya
Selangor Darul Ehsan
MALAYSIA
Turbine Overhaul Services Pte, Ltd. (TOS)
5 Tuas Drive Two - Mail Stop 107-58
Singapore 638639
Tel: 65-6860-2260
Fax: 65-6862-1068
Rolls-Royce Inchinnan
Inchinnan Drive
Inchinnan Business Park
Inchinnan, PA4 9AF
Scotland
The Source Demonstration requirements of this repair means that any facility not authorized to accomplish this repair either, utilize the Authorized Repair Vendors listed below or contact the IAE Repair Services Group to determine if a qualification program can be initiated at their facility.
IAE International Aero Engines AG
400 Main Street
M/S 121-10
East Hartford CT 06118
U.S.A.
Attn: Manager Technical Services
Repair Facilities
Refer to TASK 72-41-15-100-000.
Use chemical cleaning equipment.
Chemically clean the blades.
SUBTASK 72-41-15-110-090 Clean the Stage 4 Rotor Blades
Refer to TASK 72-41-15-100-002.
Use standard workshop equipment and chemical cleaning equipment.
Remove the rubber sealing strip.
SUBTASK 72-41-15-110-091 Remove the Rubber Sealing Strip
Refer to TASK 72-41-15-100-000.
Use chemical cleaning equipment.
Remove the dry film lubricant from the blade root.
SUBTASK 72-41-15-110-092 Remove the Dry Film Lubricant
Refer to TASK 72-41-15-200-000.
Use penetrant crack test equipment.
Do a penetrant crack test.
SUBTASK 72-41-15-230-076 Do a Crack Test
Refer to Figure.
Refer to the SPM TASK 70-12-01-120-501.
Use CoMat 05-003 ABRASIVE MEDIUM ALUMINUM OXIDE, 120/220 GRADE with abrasive blast equipment.
Vapour blast areas of the blade to be welded.
SUBTASK 72-41-15-120-057-A00 Vapour Blast the Stage 4 Rotor Blades, Assembly A
Refer to Figure.
Refer to the SPM TASK 70-12-01-120-501.
Use CoMat 05-003 ABRASIVE MEDIUM ALUMINUM OXIDE, 120/220 GRADE with abrasive blast equipment.
Vapour blast areas of the blade to be welded.
SUBTASK 72-41-15-120-057-B00 Vapour Blast the Stage 4 Rotor Blades, Assembly B
Refer to Figure.
Refer to the SPM TASK 70-12-01-120-501.
Use CoMat 05-003 ABRASIVE MEDIUM ALUMINUM OXIDE, 120/220 GRADE with abrasive blast equipment.
Vapour blast areas of the blade to be welded.
SUBTASK 72-41-15-120-057-C00 Vapour Blast the Stage 4 Rotor Blades, Assembly C
Refer to the SPM TASK 70-11-01-300-503.
Use chemical cleaning equipment.
Chemically clean the blade.
SUBTASK 72-41-15-110-093 Clean the Stage 4 Rotor Blades
Refer to the SPM TASK 70-31-02-310-501-001.
Use CoMat 03-195 WELDING WIRE TITANIUM with argonarc welding equipment.
Weld Data: Refer to approved vendor in 4. Repair Facilities, Para.B., for weld parameters.
Build up the blade tip with weld to restore the length.
SUBTASK 72-41-15-310-052-A00 Weld the Stage 4 Rotor Blade Tips, Assembly A
Refer to the SPM TASK 70-31-02-310-501-001.
Use CoMat 03-195 WELDING WIRE TITANIUM with argonarc welding equipment.
Weld Data
Refer to approved vendor in 4. Repair Facilities, Para.B., for weld parameters.
Build up the blade tip with weld to restore the length.
SUBTASK 72-41-15-310-052-B00 Weld the Stage 4 Rotor Blade Tips, Assembly B
Refer to the SPM TASK 70-31-02-310-501-001. Use CoMat 03-195 WELDING WIRE TITANIUM with argonarc welding equipment.
Weld Data
Refer to approved vendor in 4. Repair Facilities, Para.B., for weld parameters.
Build up the blade tip with weld to restore the length.
SUBTASK 72-41-15-310-052-C00 Weld the Stage 4 Rotor Blade Tips, Assembly C
Refer to the SPM TASK 70-31-02-310-501-001.
Heat-treat the blade in a vacuum or a controlled atmosphere.
SUBTASK 72-41-15-370-052 Heat-Treat the Stage 4 Rotor Blades
NOTE
If the sample blade is outside the hardness variation limits, additional blades must be sampled, if more than 10 percent have a variation in hardness greater than 30 HV, then the cause must be investigated.Use a sample blade. The hardness variation should be within 30 HV across the weld material, heat affected zone and parent material. This is a guide for quality control and is not an absolute limit. Use a hardness tester.
Do a hardness check on a longitudinal cross section of a sample blade.
SUBTASK 72-41-15-220-211 Do a Hardness Check

CAUTION
TITANIUM COMPONENT - YOU MUST USE SILICON CARBIDE TYPE ABRASIVE WHEELS, STONES AND PAPERS TO DRESS, BLEND AND POLISH THIS COMPONENT.
CAUTION
TITANIUM COMPONENT - AVOID BUILD UP OF HEAT BY APPLYING ONLY GENTLE PRESSURE AND KEEPING THE TOOL SPEED AS LOW AS POSSIBLE.
CAUTION
TITANIUM COMPONENT - YOU MUST MAKE SURE THAT WHEN YOU DRESS MATERIAL, BLEND AND POLISH, TO MAKE SMOOTH, THAT NO SPARKS ARE PRODUCED.
CAUTION
TITANIUM COMPONENT - IF THE MATERIAL SHOWS A CHANGE IN COLOR, TO DARKER THAN A LIGHT STRAW COLOR, THE COMPONENT IS TO BE REJECTED.Put the shape back on the blade contour.
Refer to Figure. Use a grinding machine.
Grind the blade tip to the correct height.
SUBTASK 72-41-15-350-098-A00 Put the Shape Back on the Stage 4 Rotor Blade Contour and Height, Assembly A

CAUTION
TITANIUM COMPONENT - YOU MUST USE SILICON CARBIDE TYPE ABRASIVE WHEELS, STONES AND PAPERS TO DRESS, BLEND AND POLISH THIS COMPONENT.
CAUTION
TITANIUM COMPONENT - AVOID BUILD UP OF HEAT BY APPLYING ONLY GENTLE PRESSURE AND KEEPING THE TOOL SPEED AS LOW AS POSSIBLE.
CAUTION
TITANIUM COMPONENT - YOU MUST MAKE SURE THAT WHEN YOU DRESS MATERIAL, BLEND AND POLISH, TO MAKE SMOOTH, THAT NO SPARKS ARE PRODUCED.
CAUTION
TITANIUM COMPONENT - IF THE MATERIAL SHOWS A CHANGE IN COLOR, TO DARKER THAN A LIGHT STRAW COLOR, THE COMPONENT IS TO BE REJECTED.Put the shape back on the blade contour.
Refer to Figure. Use a grinding machine.
Grind the blade tip to the correct height.
SUBTASK 72-41-15-350-098-B00 Put the Shape Back on the Stage 4 Rotor Blade Contour and Height, Assembly B

CAUTION
TITANIUM COMPONENT - YOU MUST USE SILICON CARBIDE TYPE ABRASIVE WHEELS, STONES AND PAPERS TO DRESS, BLEND AND POLISH THIS COMPONENT.
CAUTION
TITANIUM COMPONENT - AVOID BUILD UP OF HEAT BY APPLYING ONLY GENTLE PRESSURE AND KEEPING THE TOOL SPEED AS LOW AS POSSIBLE.
CAUTION
TITANIUM COMPONENT - YOU MUST MAKE SURE THAT WHEN YOU DRESS MATERIAL, BLEND AND POLISH, TO MAKE SMOOTH, THAT NO SPARKS ARE PRODUCED.
CAUTION
TITANIUM COMPONENT - IF THE MATERIAL SHOWS A CHANGE IN COLOR, TO DARKER THAN A LIGHT STRAW COLOR, THE COMPONENT IS TO BE REJECTED.Put the shape back on the blade contour.
Refer to Figure. Use a grinding machine.
Grind the blade tip to the correct height.
SUBTASK 72-41-15-350-098-C00 Put the Shape Back on the Stage 4 Rotor Blade Contour and Height, Assembly C
If scratches or scores are shown on the airfoil surface, do Step.
SUBTASK 72-41-15-220-212-A00 Examine the Stage 4 Rotor Blades, Assembly A
If scratches or scores are shown on the airfoil surface, do Step.
SUBTASK 72-41-15-220-212-B00 Examine the Stage 4 Rotor Blades, Assembly B
If scratches or scores are shown on the airfoil surface, do Step.
SUBTASK 72-41-15-220-212-C00 Examine the Stage 4 Rotor Blades, Assembly C

CAUTION
TITANIUM COMPONENT - YOU MUST USE SILICON CARBIDE TYPE ABRASIVE WHEELS, STONES AND PAPERS TO DRESS, BLEND AND POLISH THIS COMPONENT.
CAUTION
TITANIUM COMPONENT - AVOID BUILD UP OF HEAT BY APPLYING ONLY GENTLE PRESSURE AND KEEPING THE TOOL SPEED AS LOW AS POSSIBLE.
CAUTION
TITANIUM COMPONENT - YOU MUST MAKE SURE THAT WHEN YOU DRESS MATERIAL, BLEND AND POLISH, TO MAKE SMOOTH, THAT NO SPARKS ARE PRODUCED.
CAUTION
TITANIUM COMPONENT - IF THE MATERIAL SHOWS A CHANGE IN COLOR, TO DARKER THAN A LIGHT STRAW COLOR, THE COMPONENT IS TO BE REJECTED.Refer to Figure.
SUBTASK 72-41-15-350-099 Polish the Stage 4 Rotor Blade Airfoil Surface and Contour
Refer to the SPM TASK 70-11-08-300-503 SUBTASK 70-11-08-300-001. Use chemical cleaning equipment.
Chemically clean.
Refer to the SPM TASK 70-11-08-300-503 SUBTASK 70-11-08-300-002. Use chemical cleaning equipment.
Swab etch the repaired area.
SUBTASK 72-41-15-110-152 Do a Swab Etch
Refer to the SPM TASK 70-23-04-230-501.
Use penetrant crack test equipment.
Discard any cracked blades.
Do a penetrant crack test.
SUBTASK 72-41-15-230-077 Do a Crack Test
Pores larger than 0.006in. (0.15 mm) diameter are not permitted.
Pores with a distance of less than 0.200in. (5.10 mm) between them, are not permitted.
Surfaces broken by pores are not permitted.
Pores are not permitted less than 0.040in. (1.00 mm) from the leading and trailing edges.
Cracks or unwanted material are not permitted.
Radiographic Data: Refer to approved vendor in 4. Repair Facilities, Para.B., for the appropriate data card and Radiographic Examination parameters.
Use radiographic equipment.
Radiographically examine the welded blade tip.
SUBTASK 72-41-15-260-073 Radiographically Examine the Stage 4 Rotor Blades
Refer to VRS6150, TASK 72-41-15-300-040.
Restore the airfoil surface finish.
SUBTASK 72-41-15-380-081 Restore the Airfoil Surface Finish
Refer to VRS6151, TASK 72-41-15-300-041.
Shot-peen the dovetail root of the HP Compressor stage 4 rotor blade.
SUBTASK 72-41-15-380-126 Shot-Peen the Dovetail Root of the HP Compressor Stage 4 Rotor Blade
Refer to VRS6214, TASK 72-41-15-300-031.
Replace the rubber sealing strip.
SUBTASK 72-41-15-360-054 Replace the Rubber Sealing Strip
Refer to VRS6486, TASK 72-41-15-300-046.
Apply the dry film lubricant to the blade root.
SUBTASK 72-41-15-380-082 Apply the Dry Film Lubricant
Refer to the SPM TASK 70-09-00-400-501 SUBTASK 70-09-00-400-001. Use Vibrating marking pencil.
Make a mark VRS6050 adjacent to the assembly number.
SUBTASK 72-41-15-350-072 Identify the Repair

CAUTION
DO NOT VIBRO-ENGRAVE ON THE BLADE AIRFOIL OR LOCATION FACES.
Figure: Repair details and dimensions - Assembly A
Repair details and dimensions - Assembly A
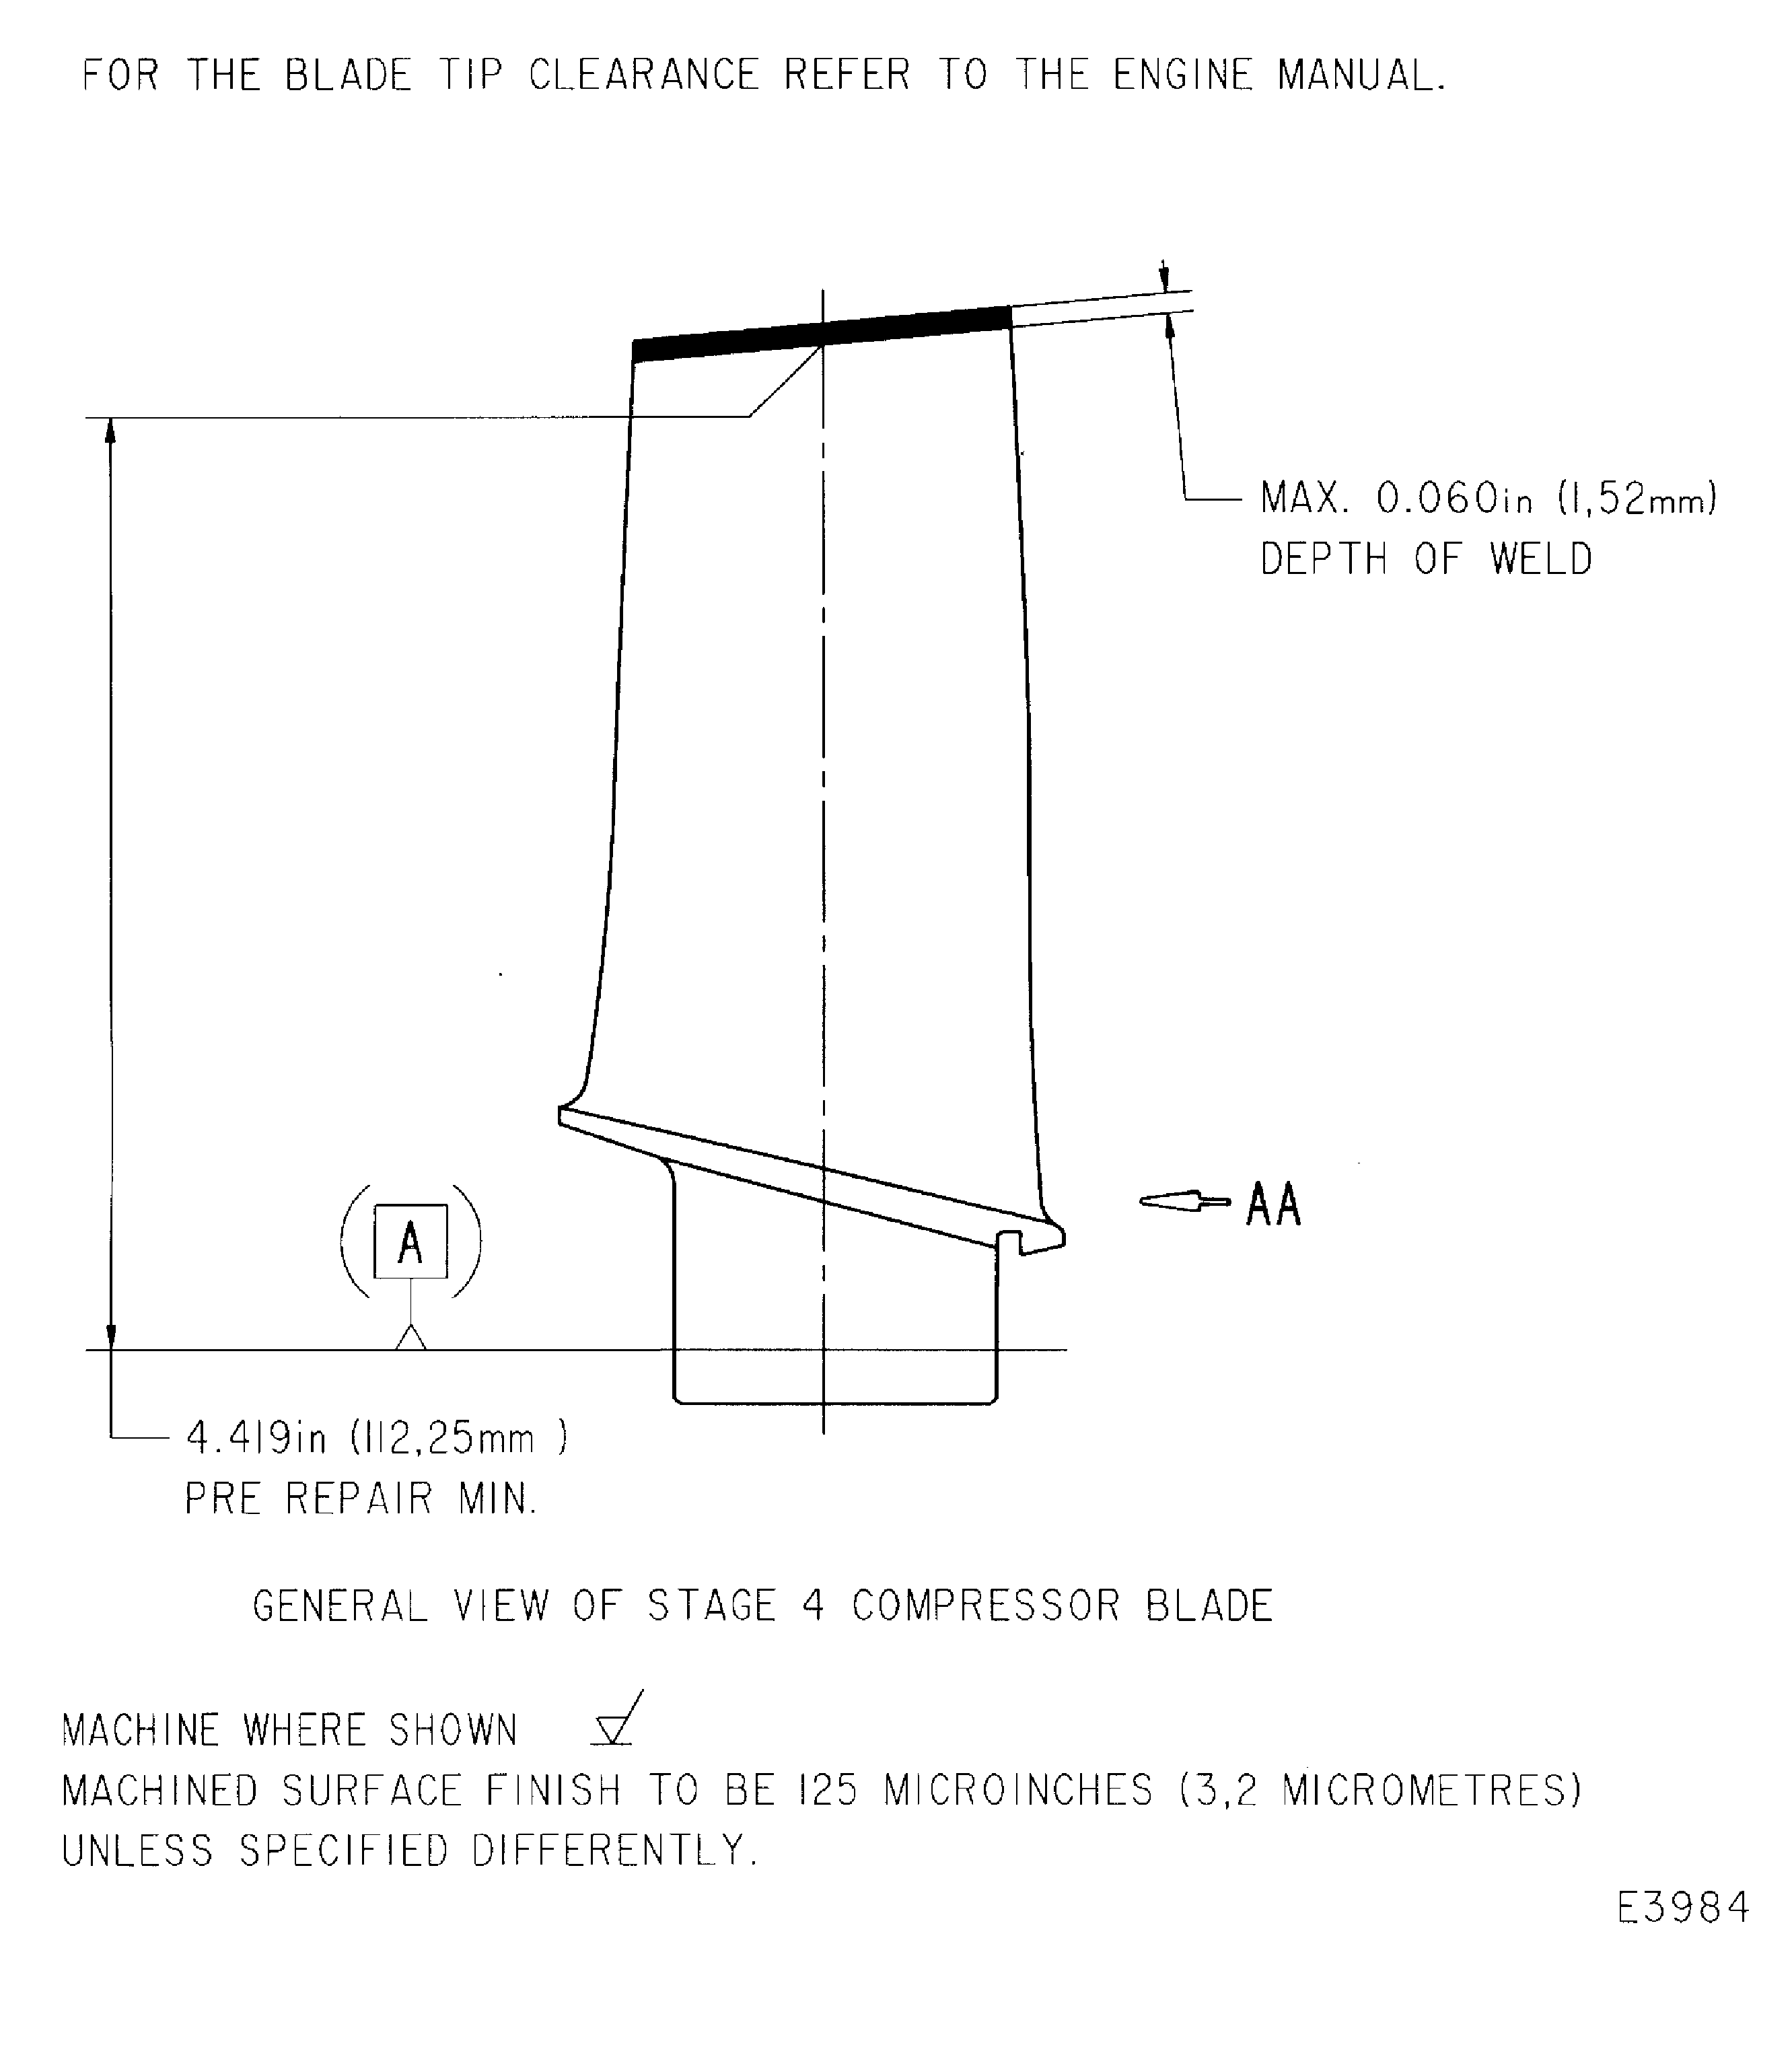
Figure: Repair details and dimensions - Assembly B
Repair details and dimensions - Assembly B
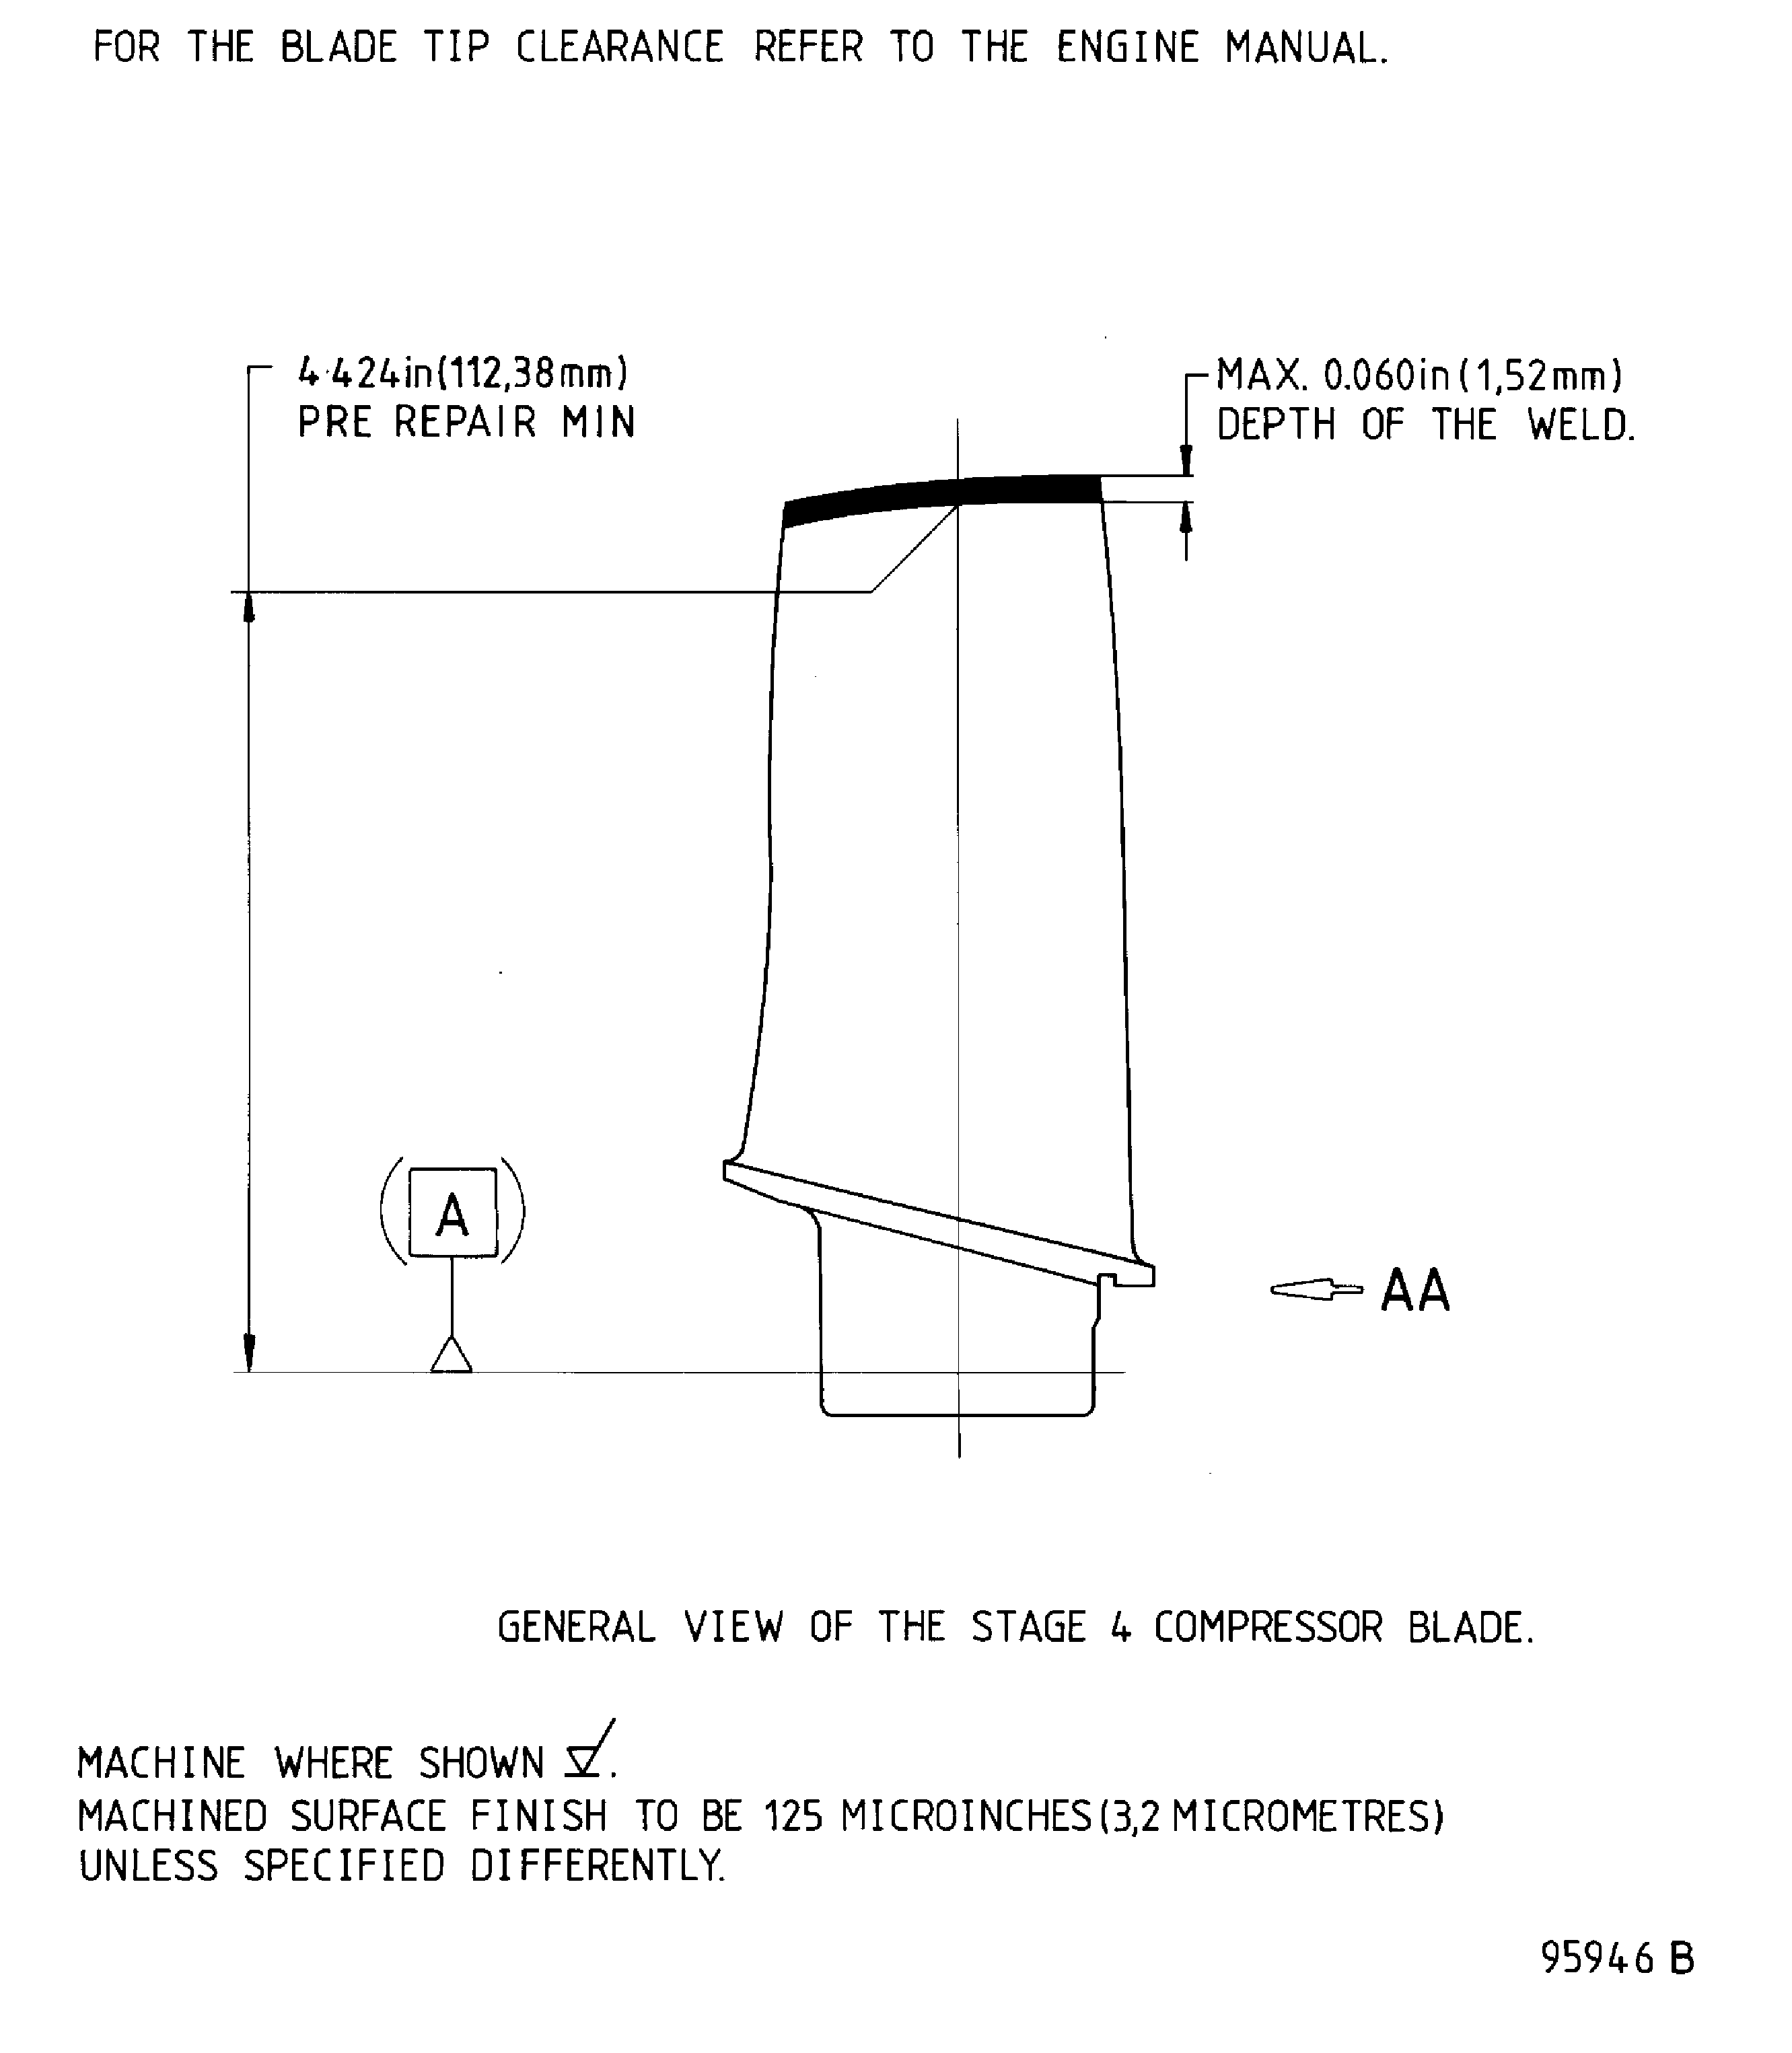
Figure: Repair details and dimensions - Assembly C
Repair details and dimensions - Assembly C
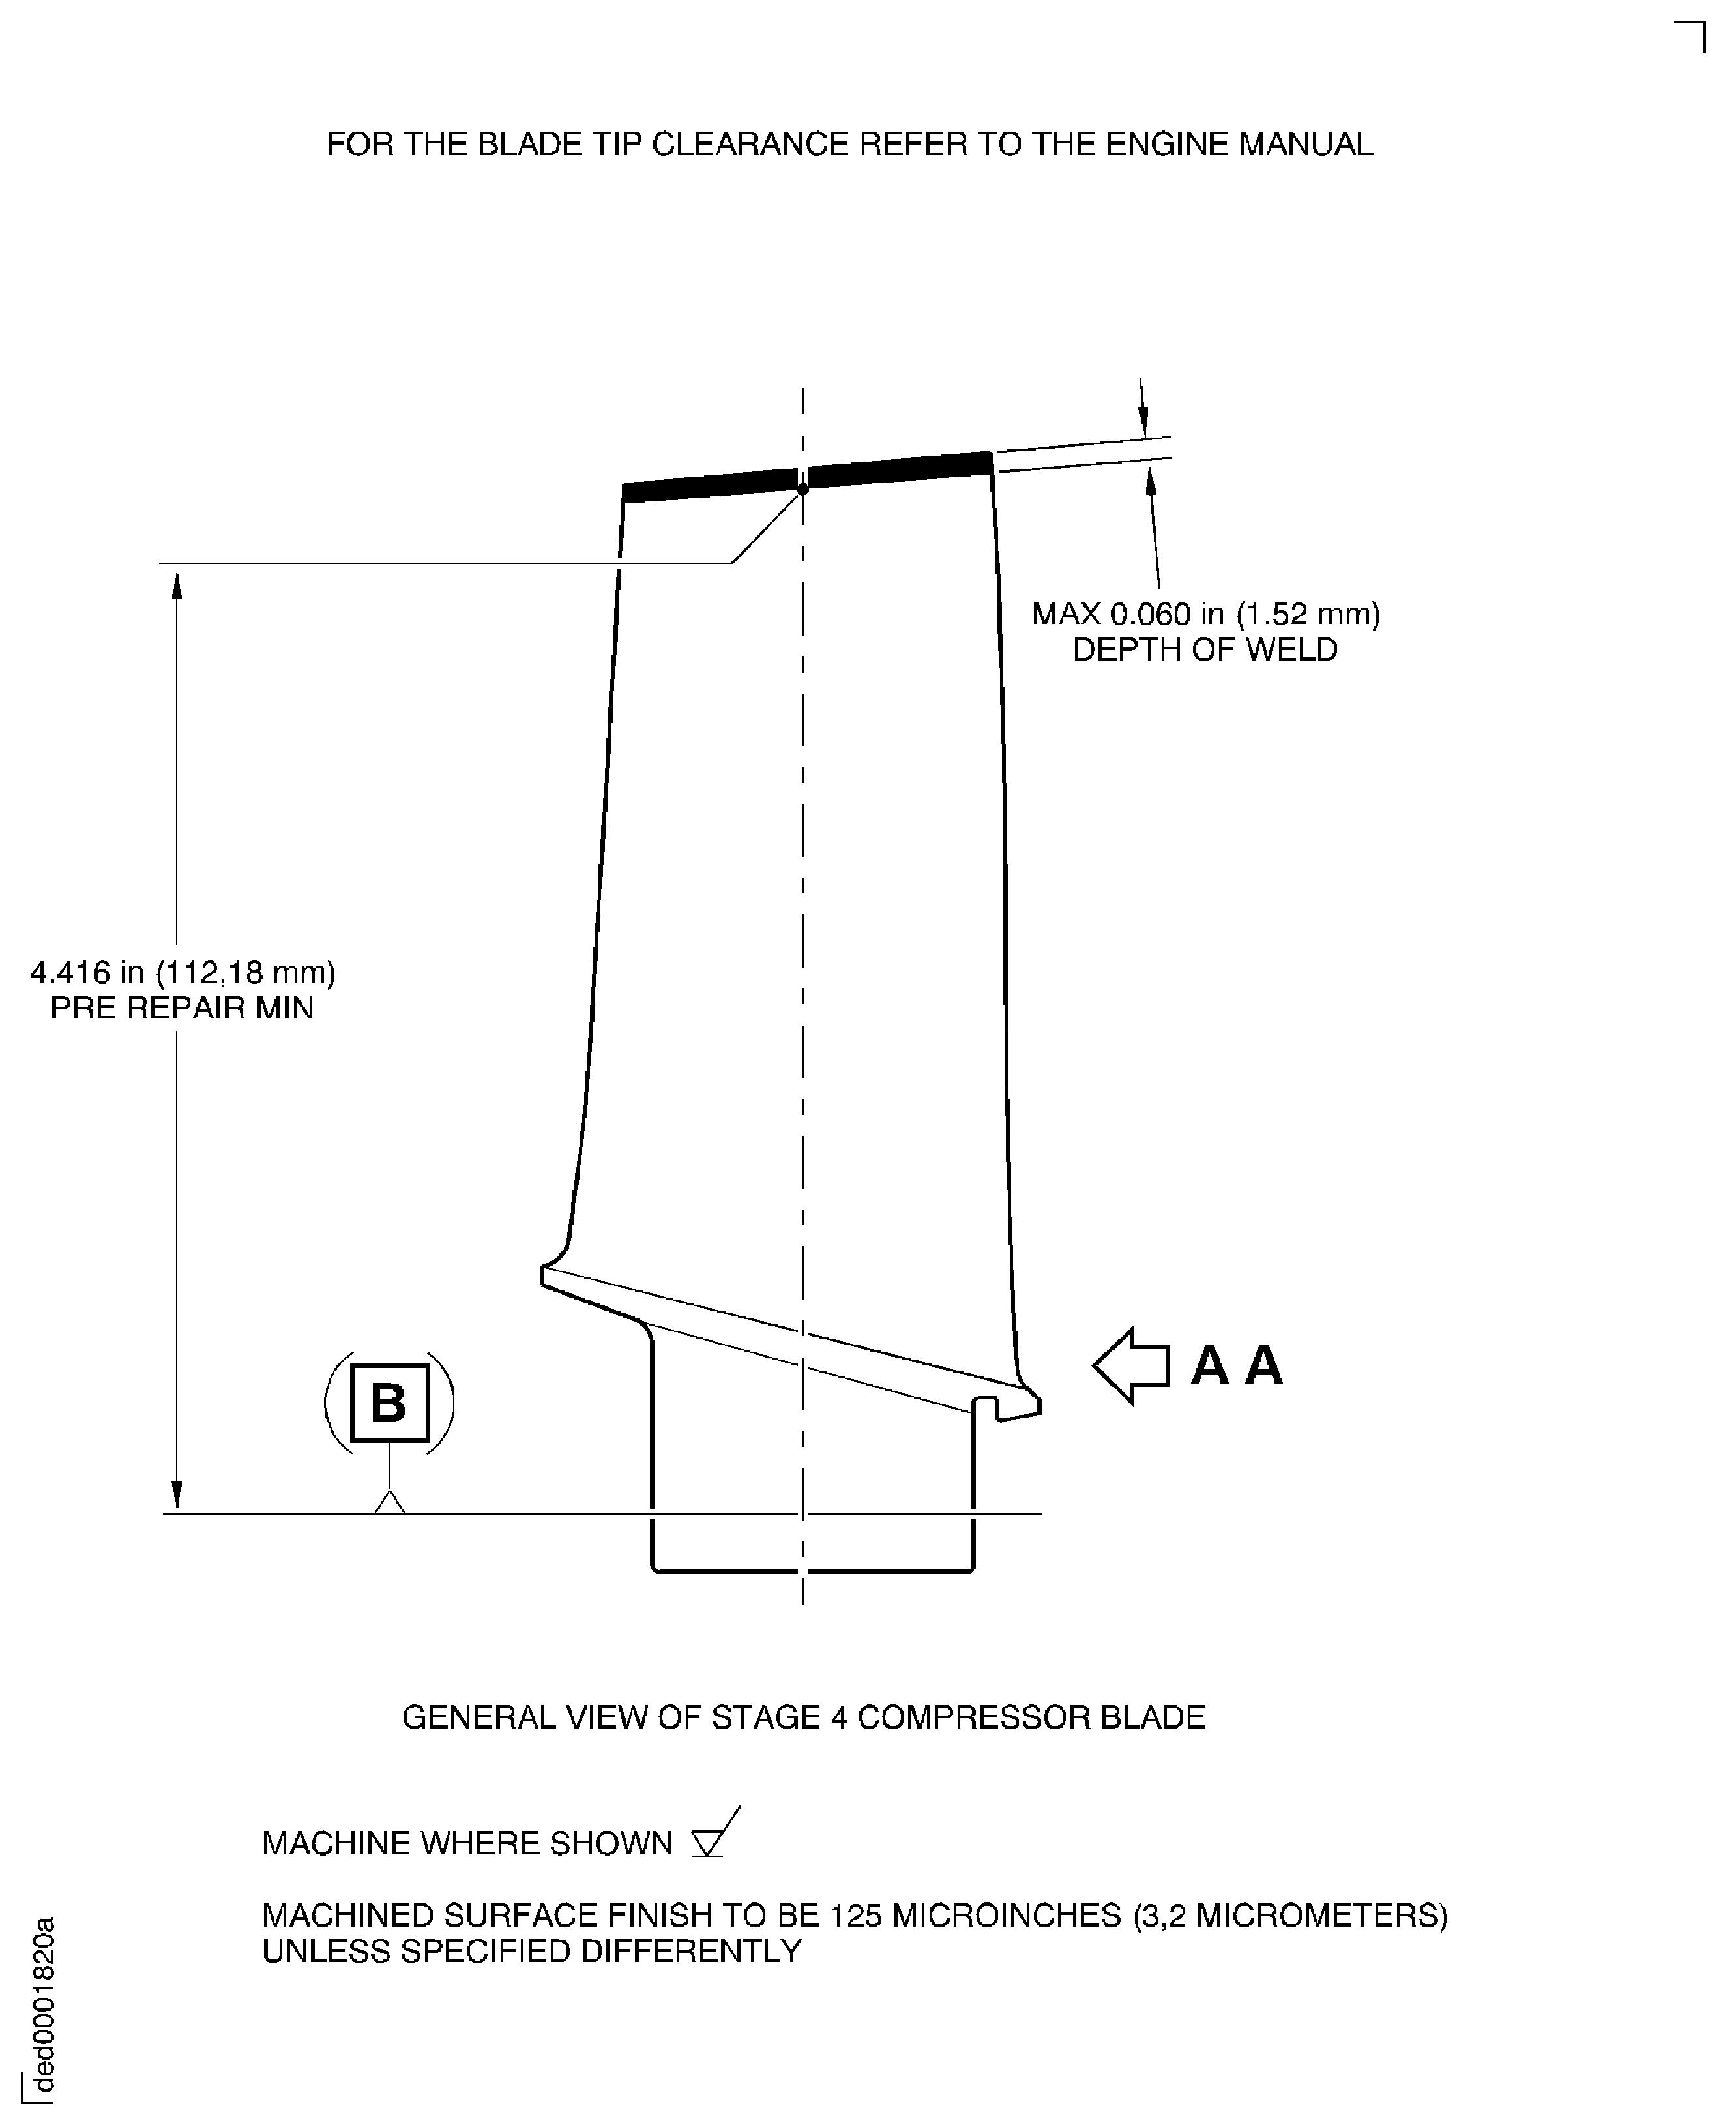
Figure: Repair details and dimensions - Assemblies A, B and C
Repair details and dimensions - Assemblies A, B and C
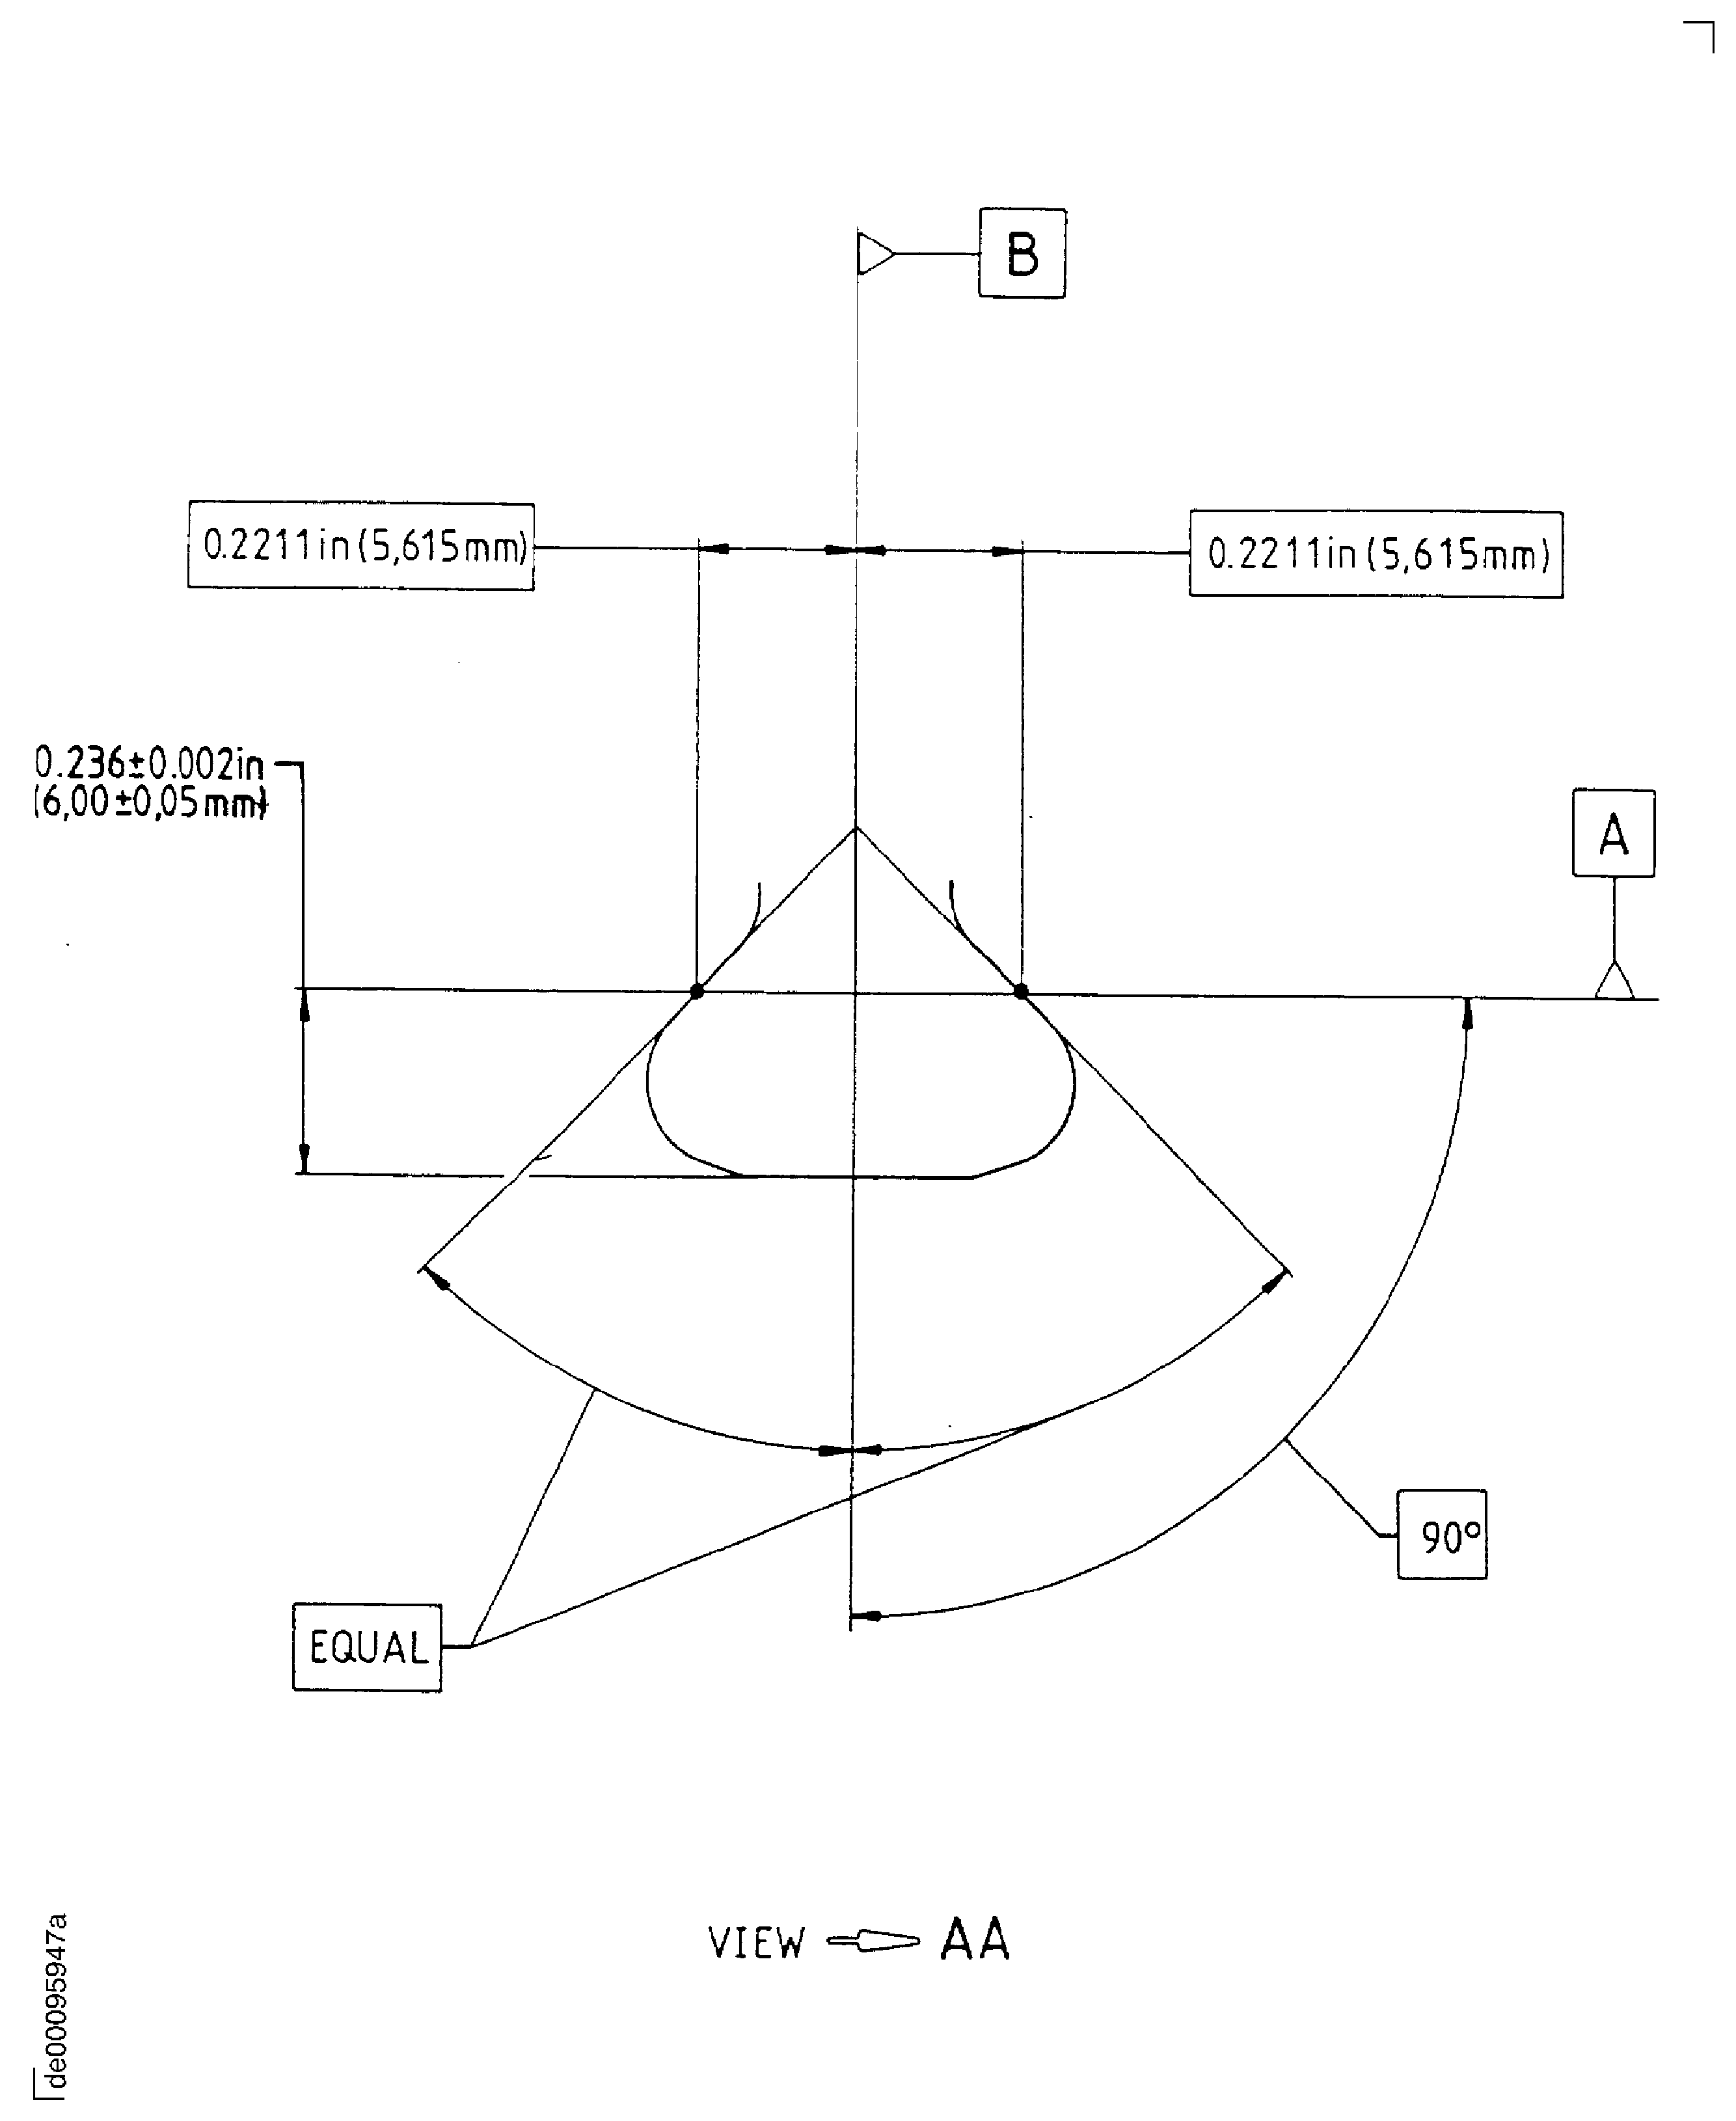
Figure: Repair details and dimensions - Assembly A
Repair details and dimensions - Assembly A

Figure: Repair details and dimensions - Assembly B
Repair details and dimensions - Assembly B
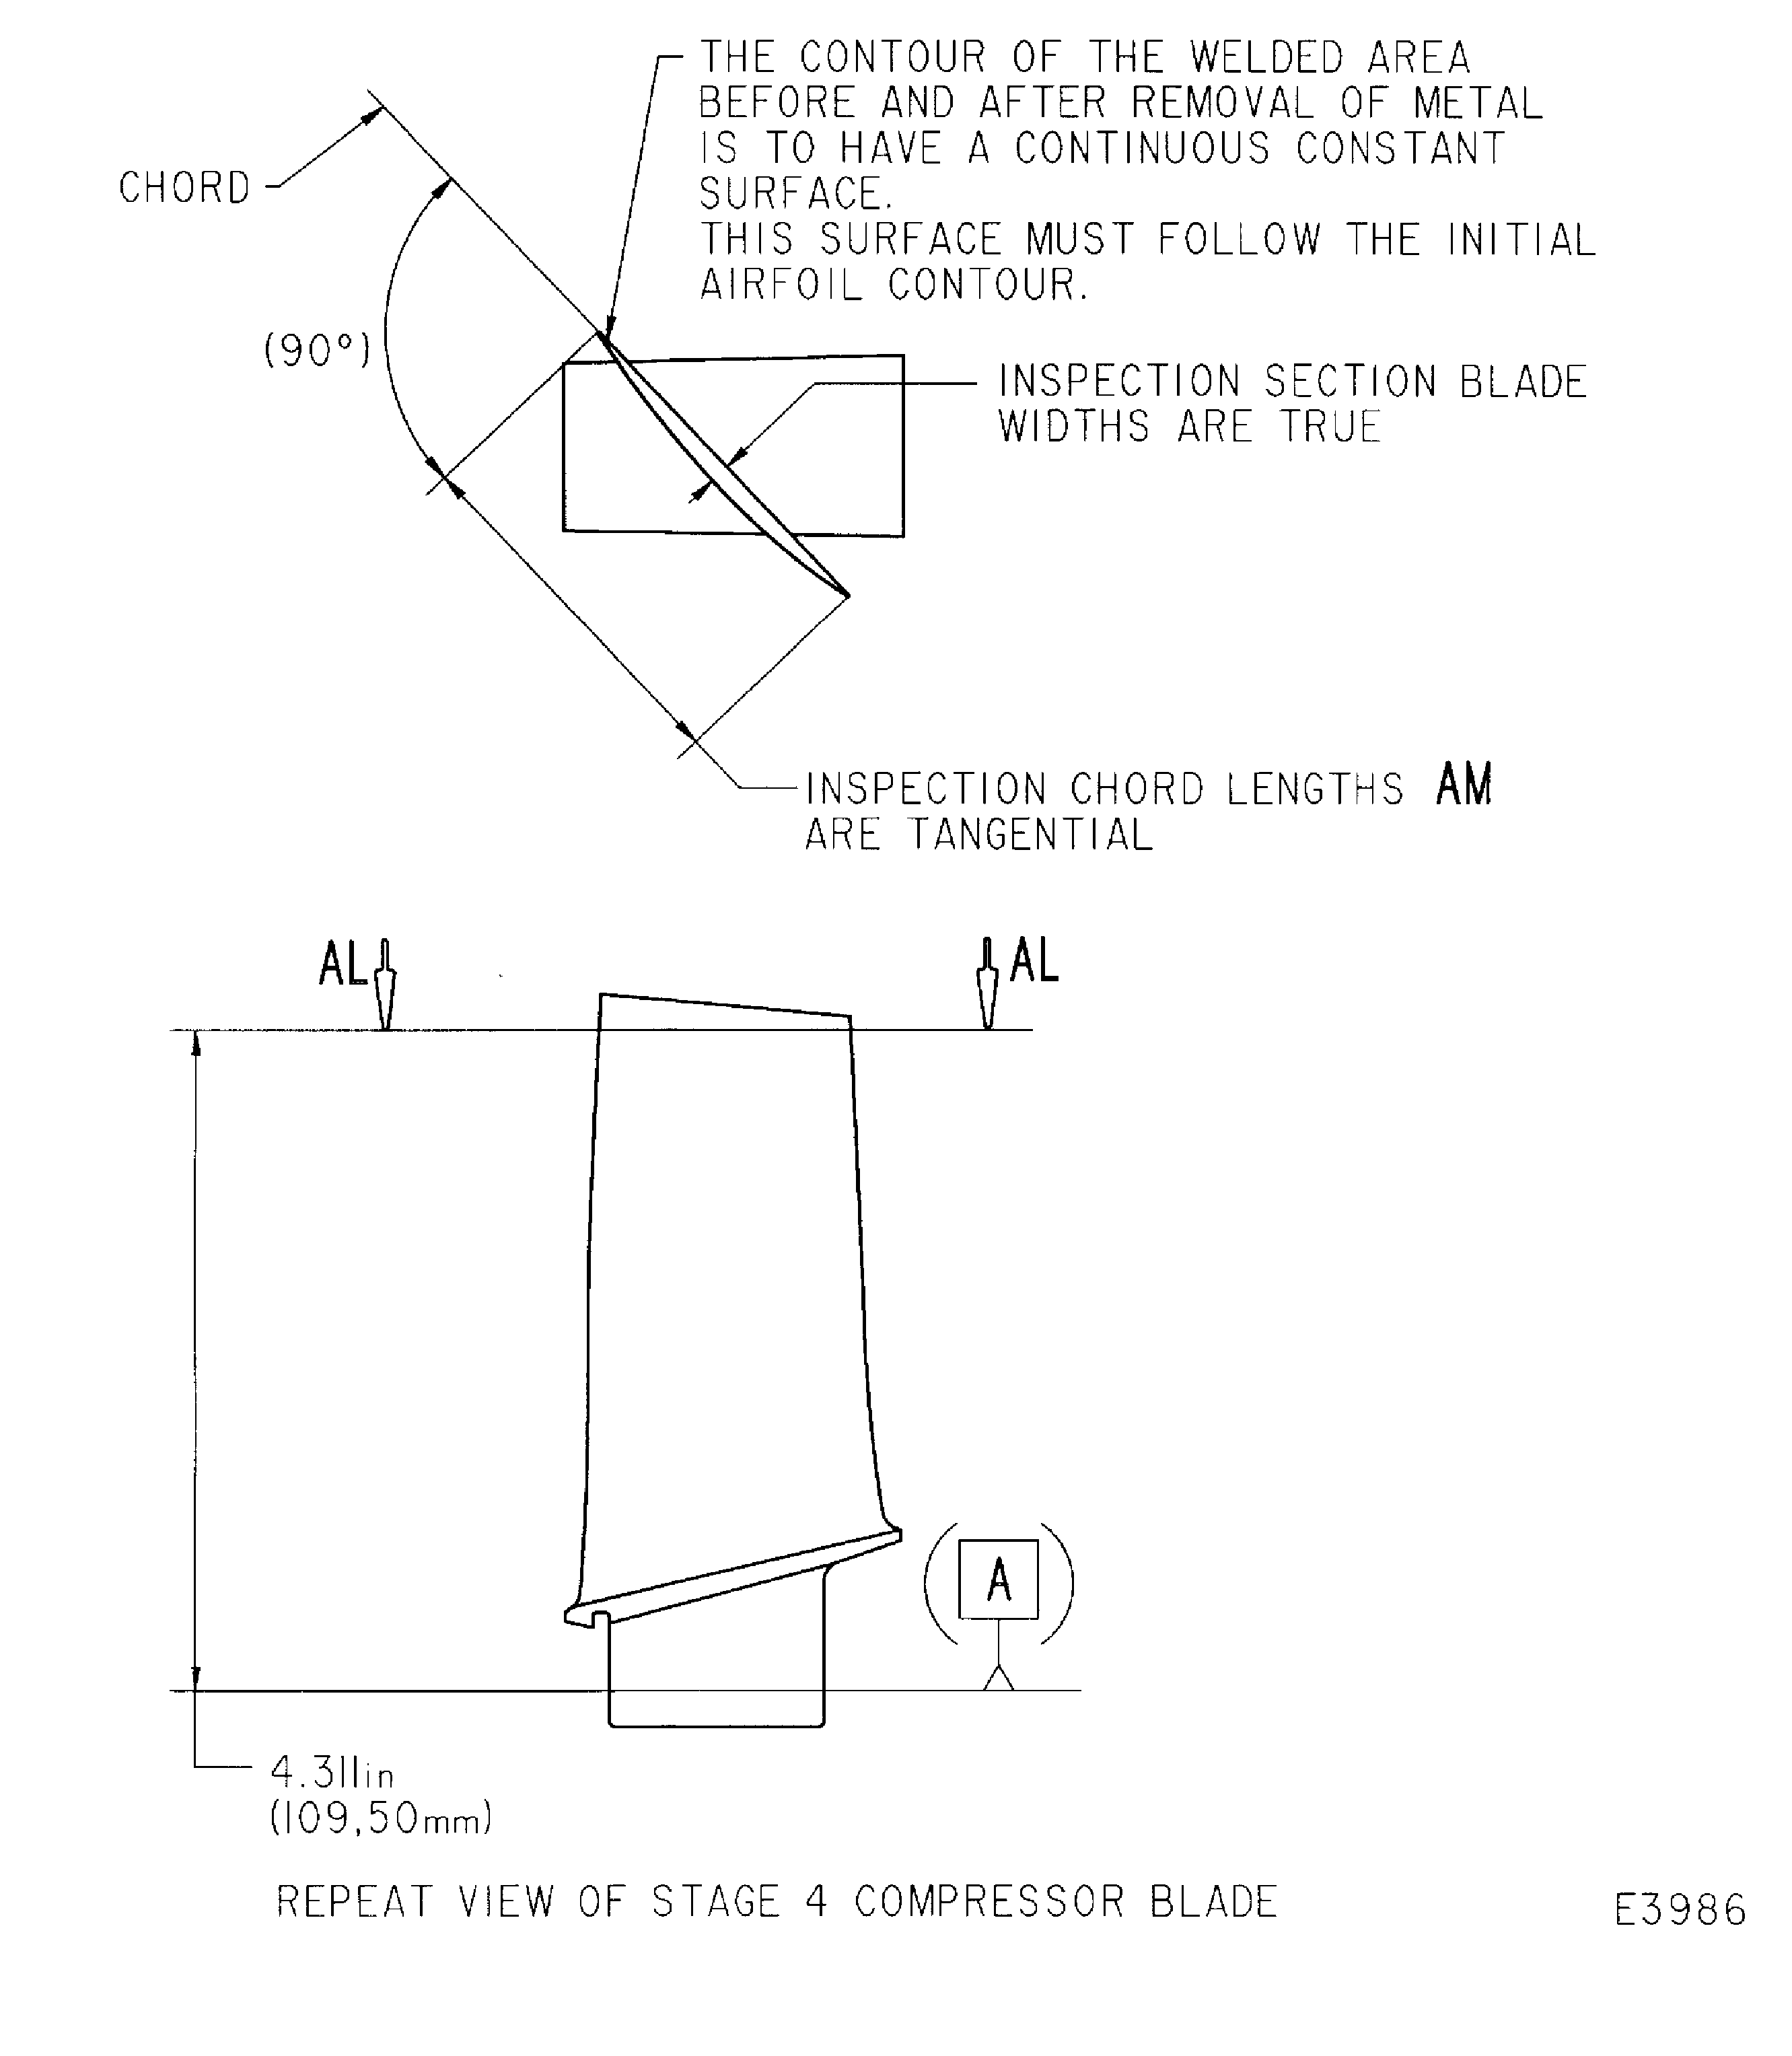
Figure: Repair details and dimensions - Assembly C
Repair details and dimensions - Assembly C
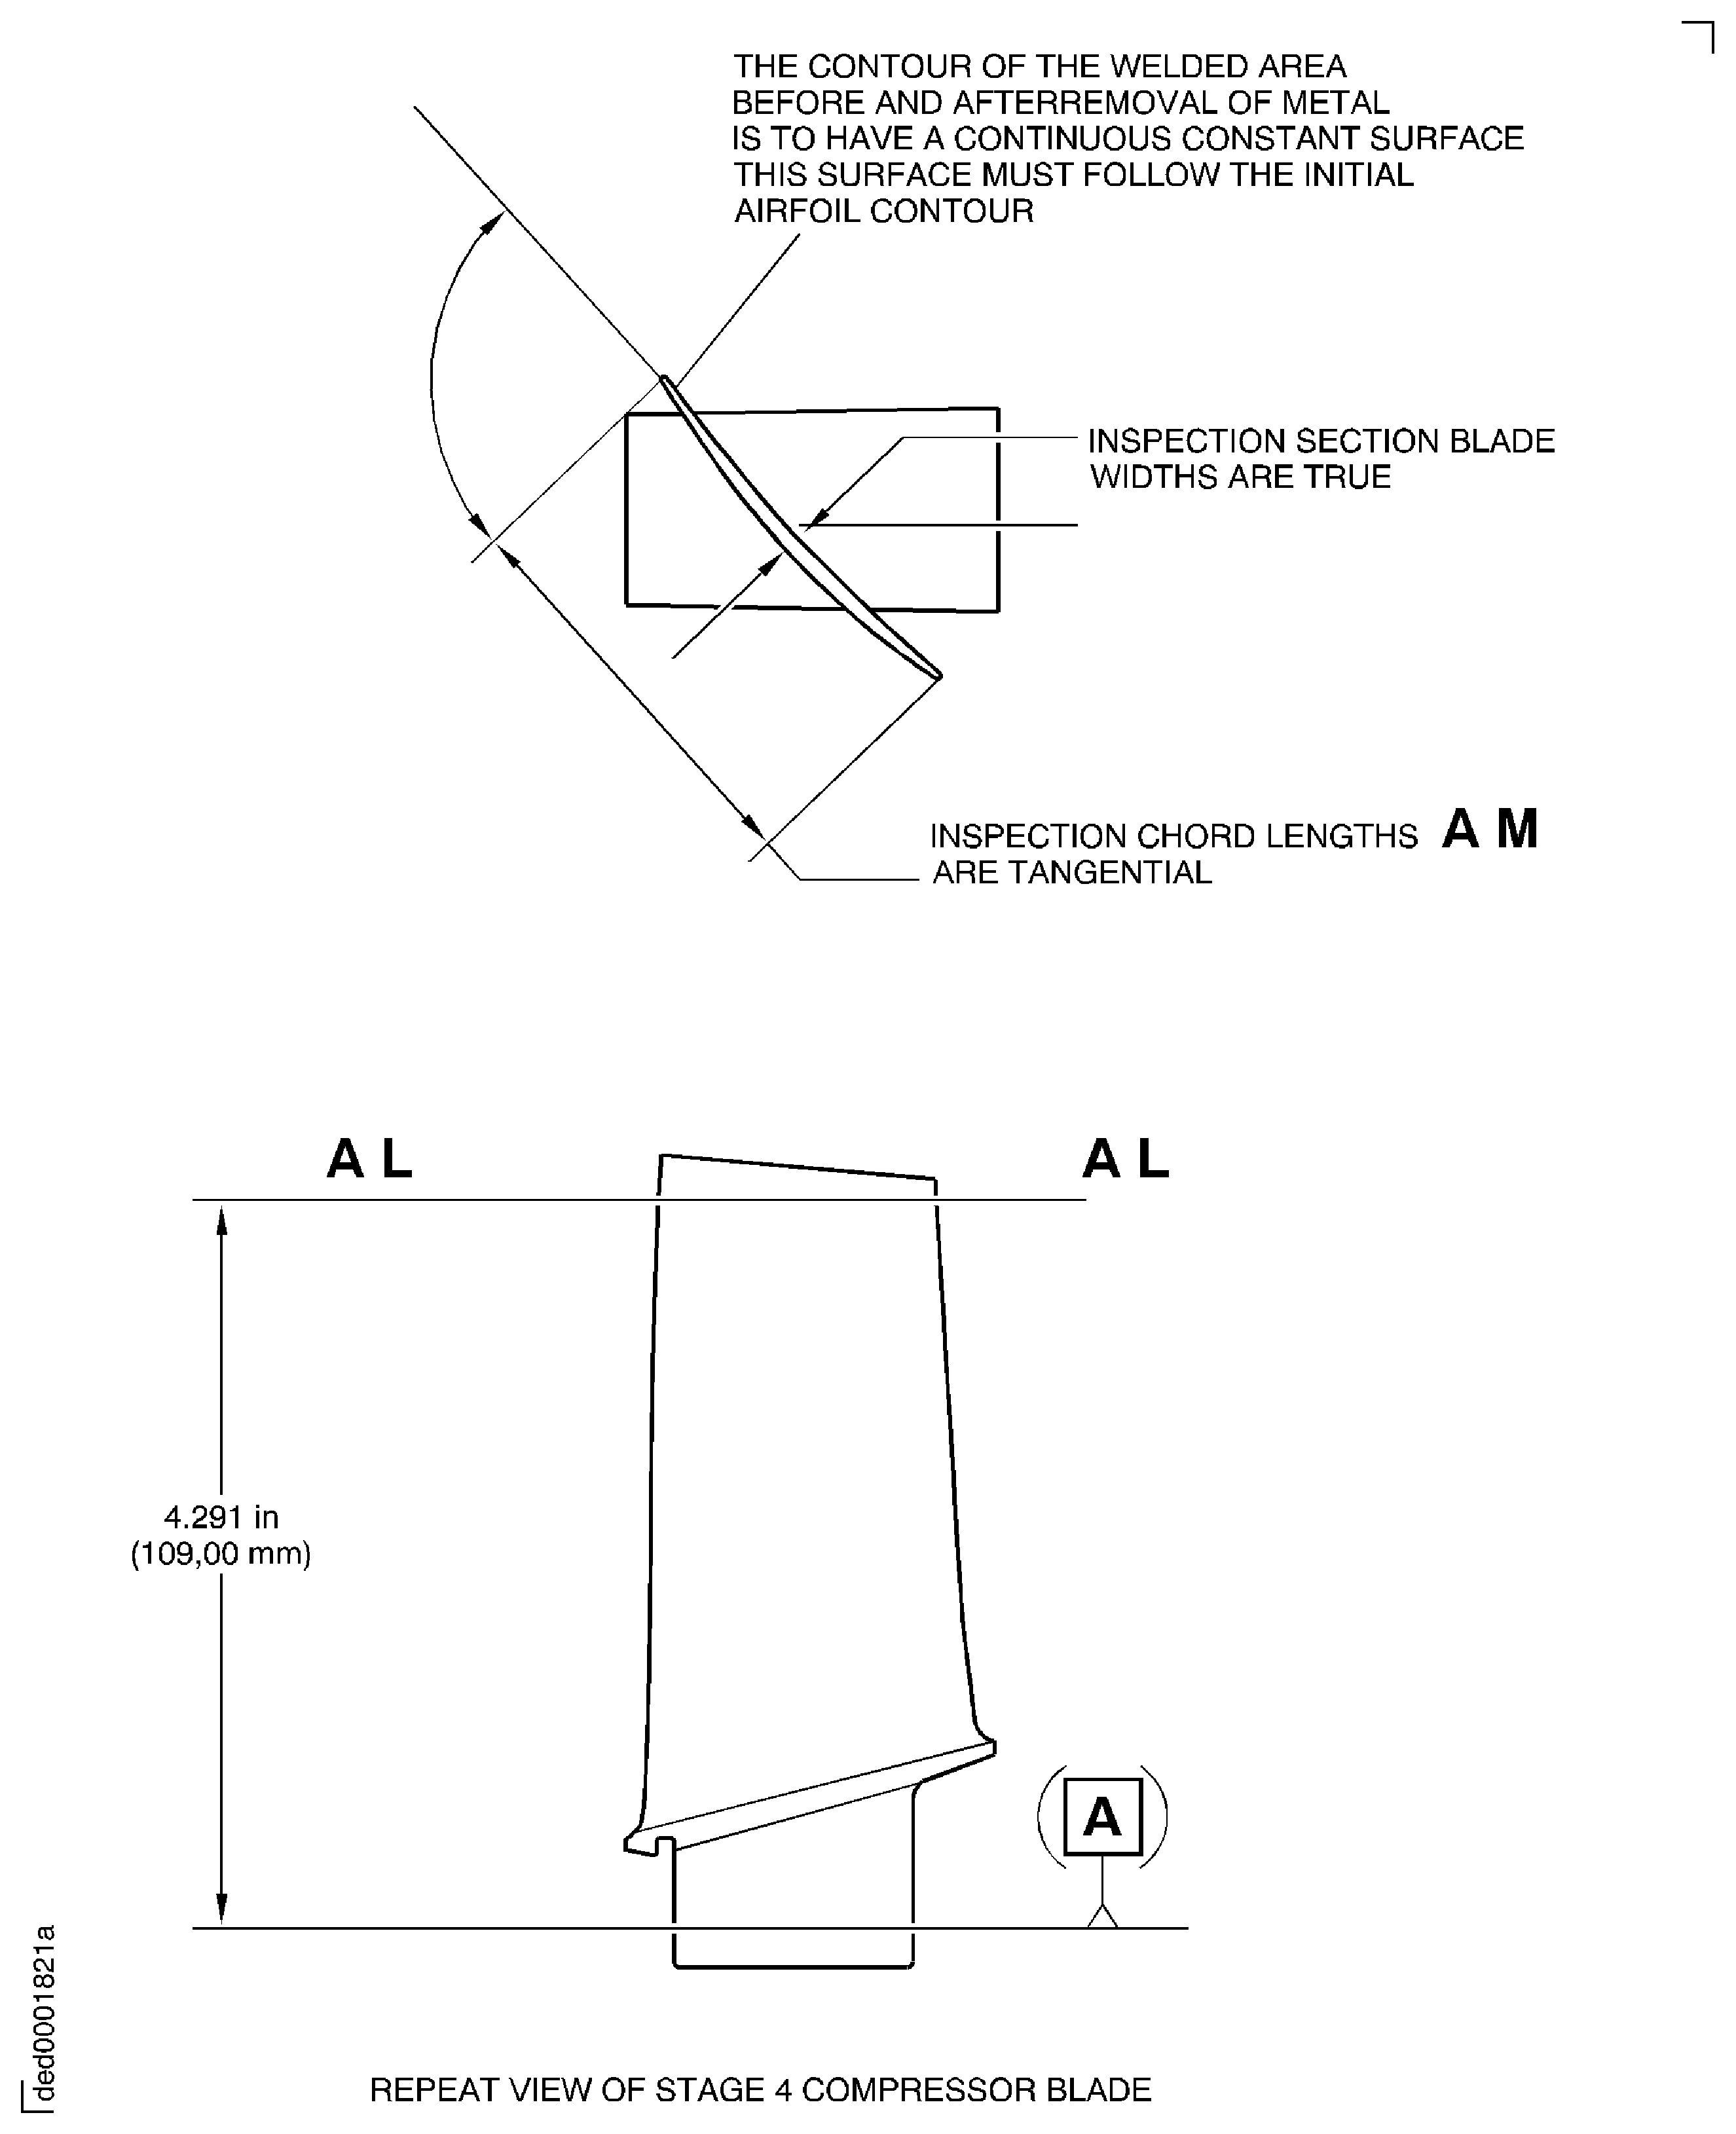
Figure: Repair details and dimensions - Assembly A
Repair details and dimensions - Assembly A
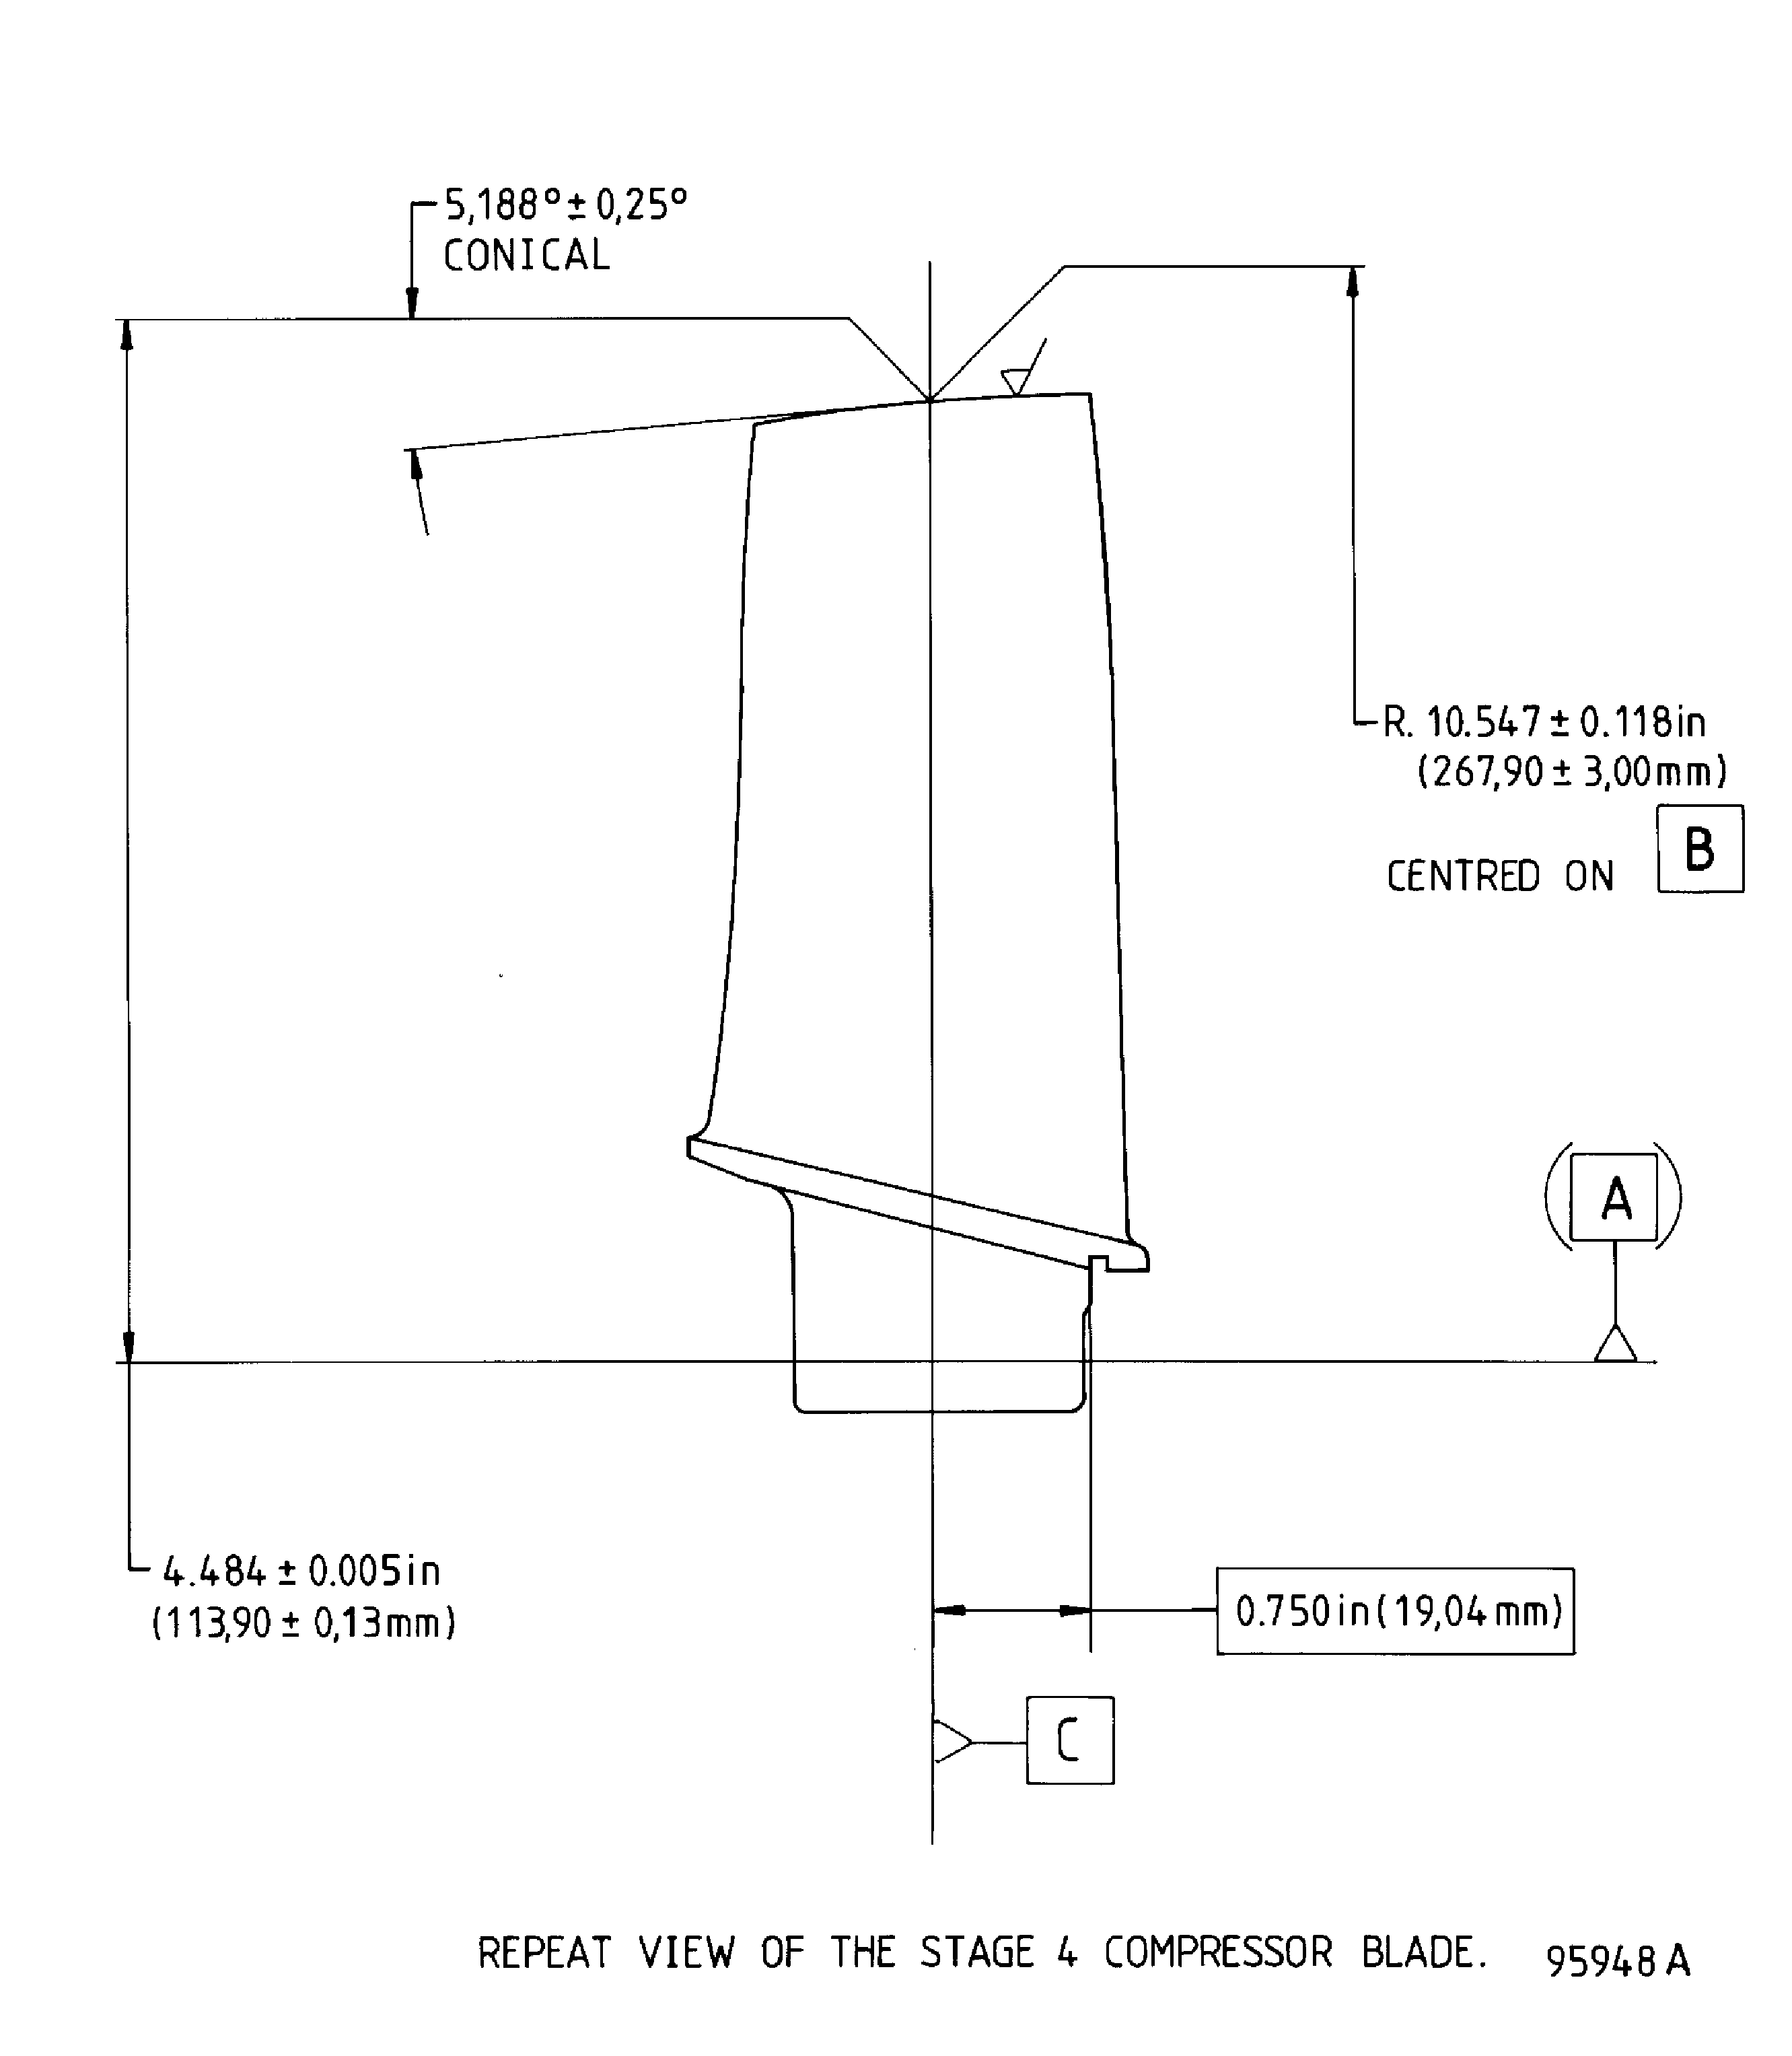
Figure: Repair details and dimensions - Assembly B
Repair details and dimensions - Assembly B
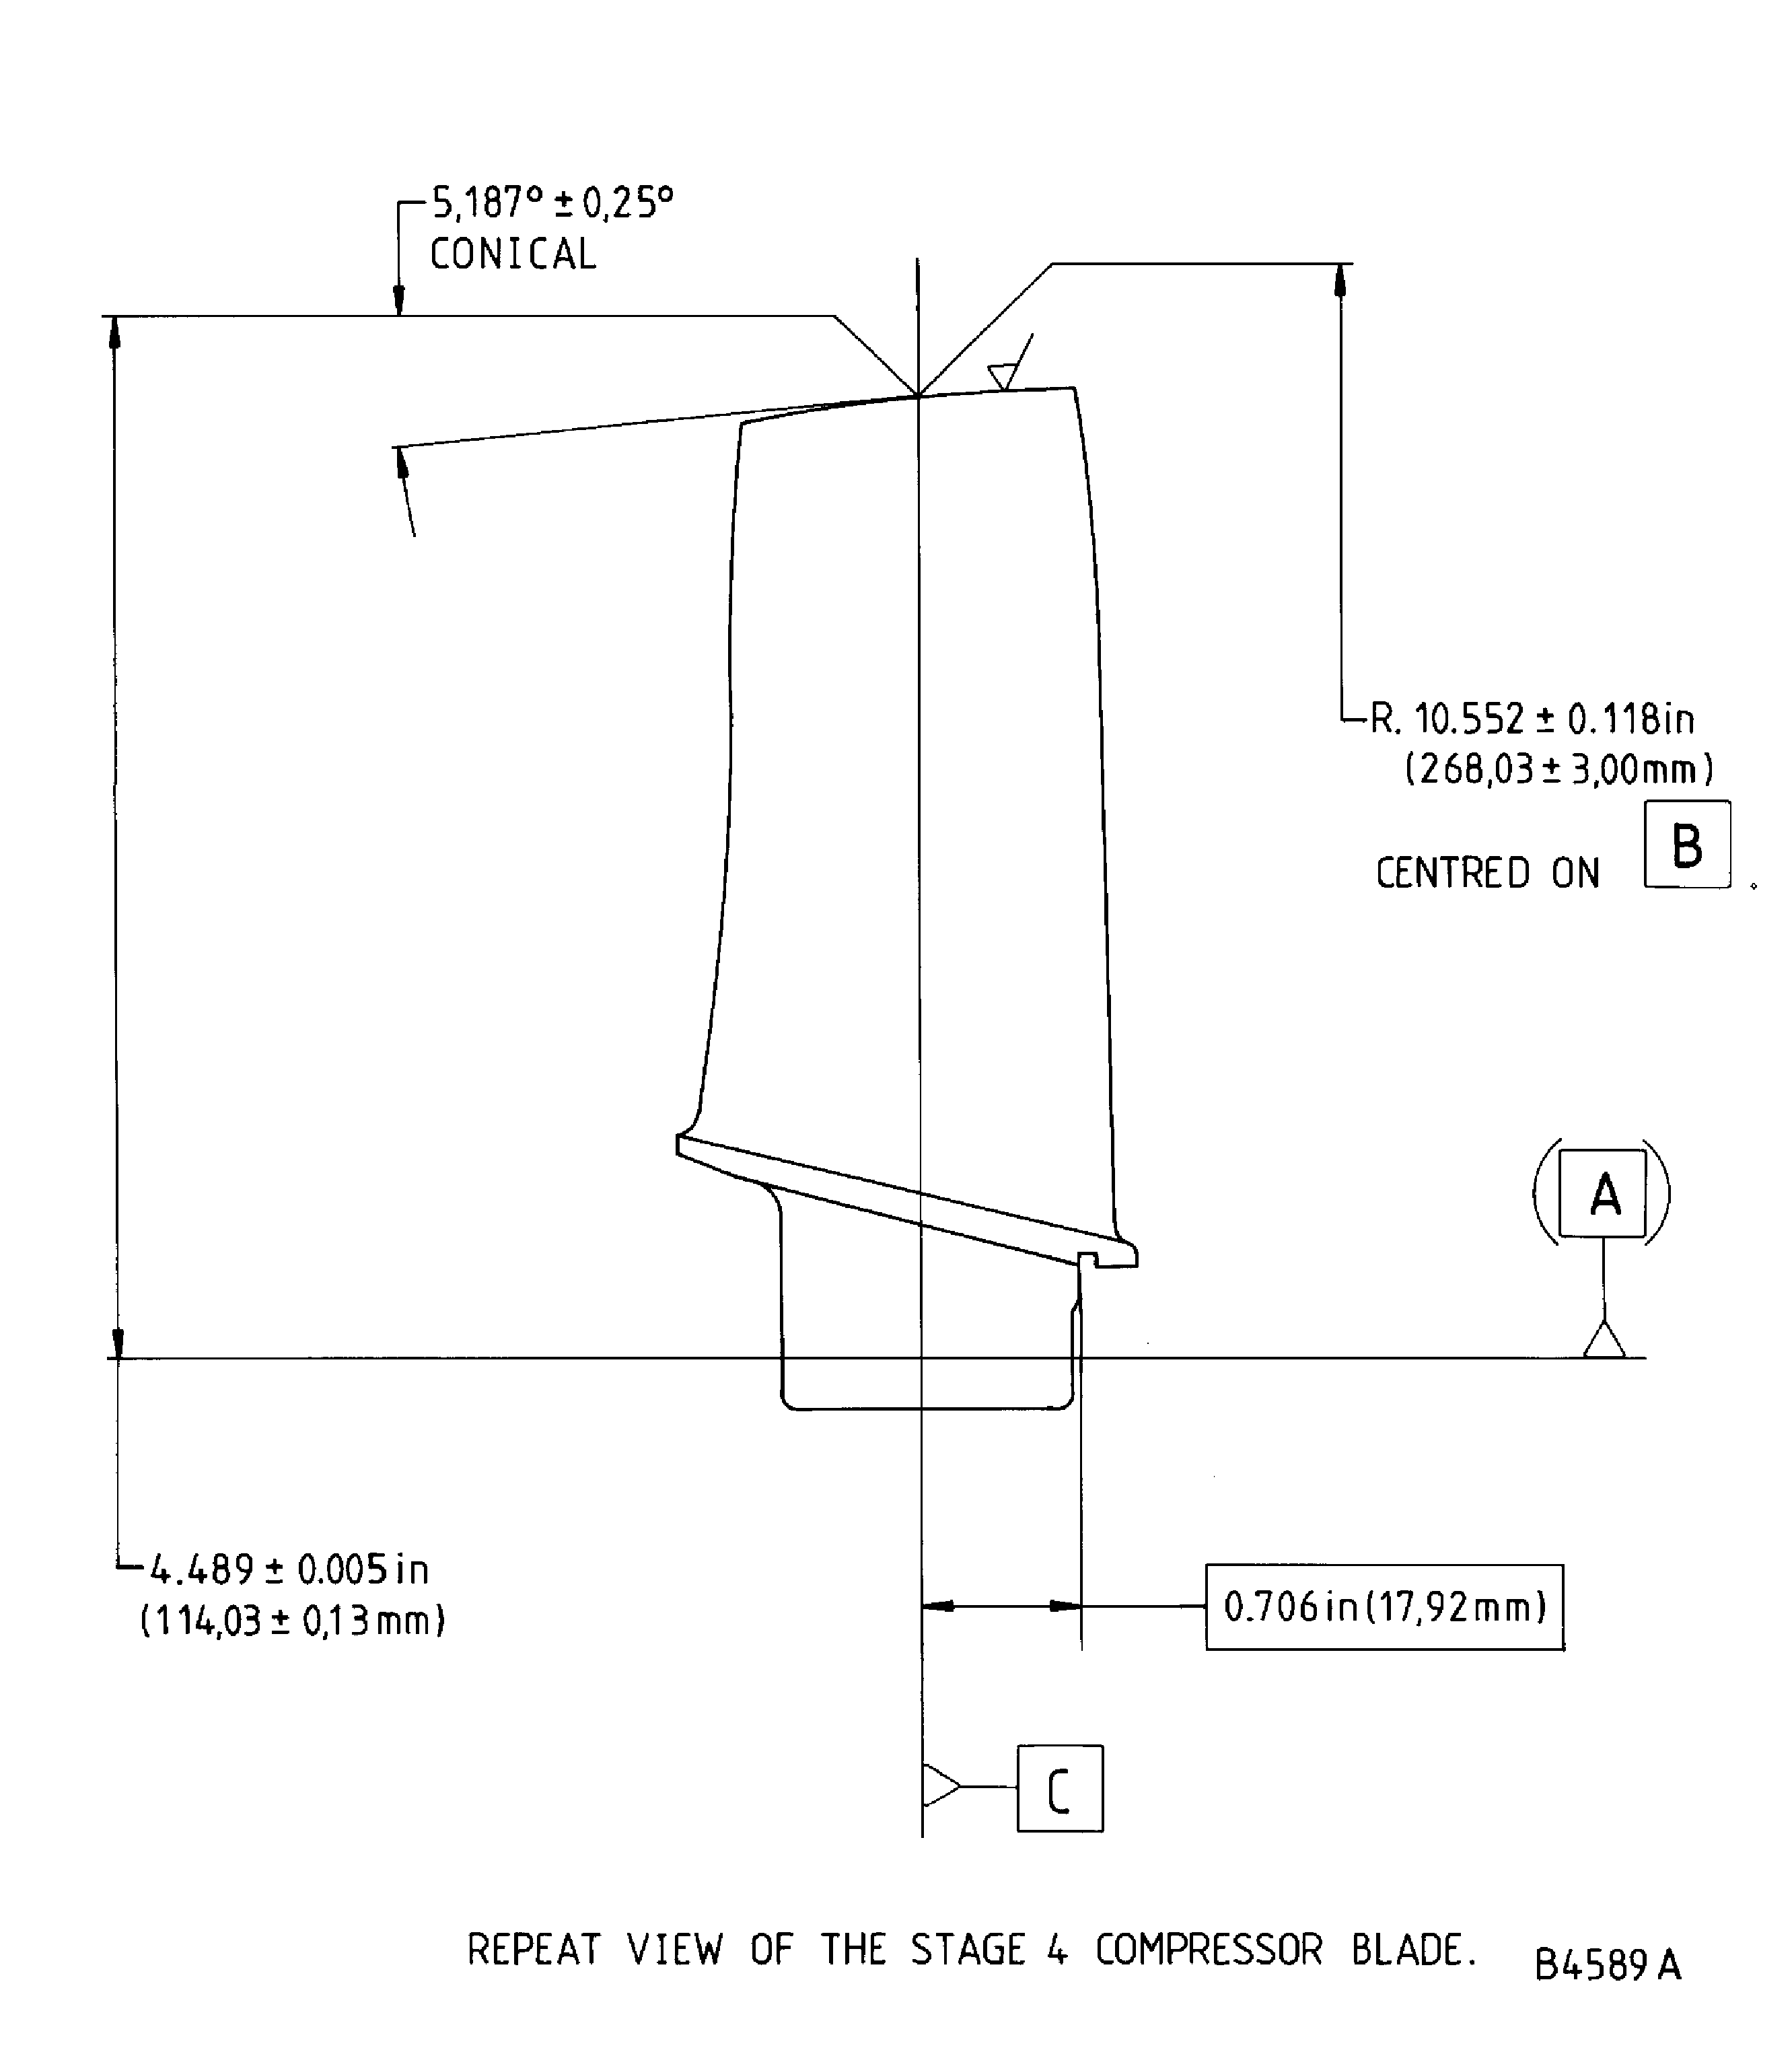
Figure: Repair details and dimensions - Assembly C
Repair details and dimensions - Assembly C

Figure: Repair details and dimensions - Assembly A
Repair details and dimensions - Assembly A
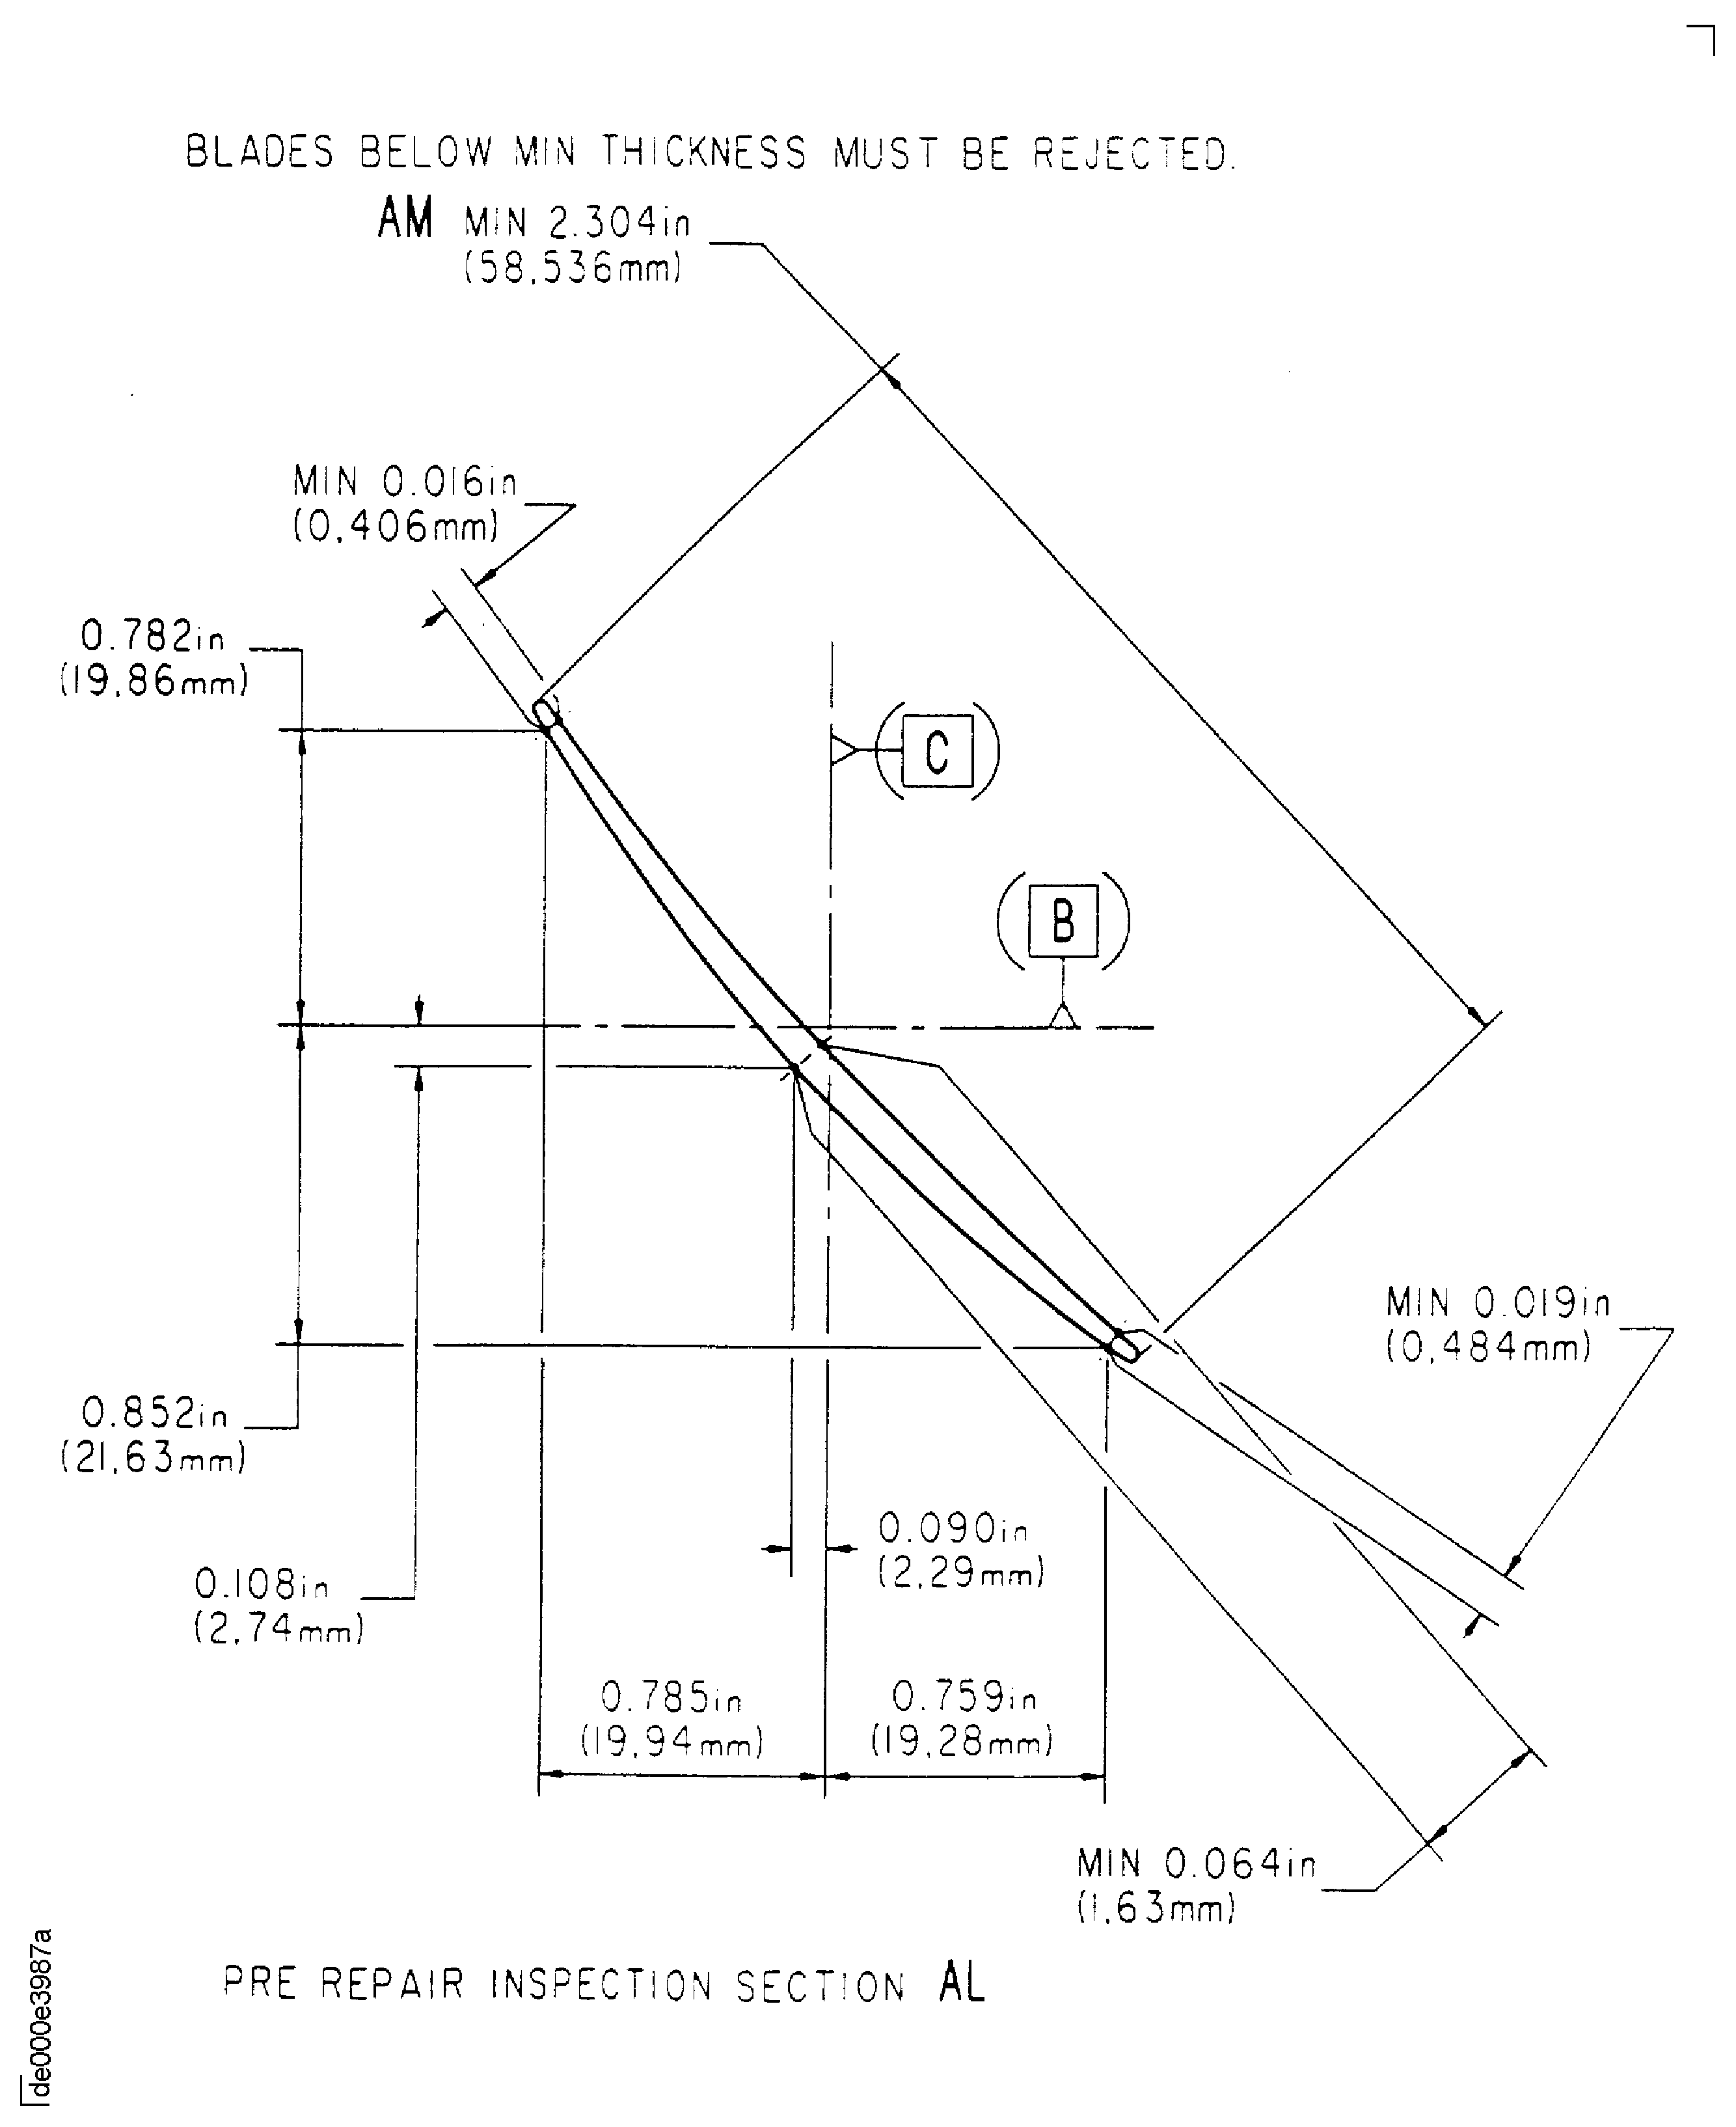
Figure: Repair details and dimensions - Assembly B
Repair details and dimensions - Assembly B
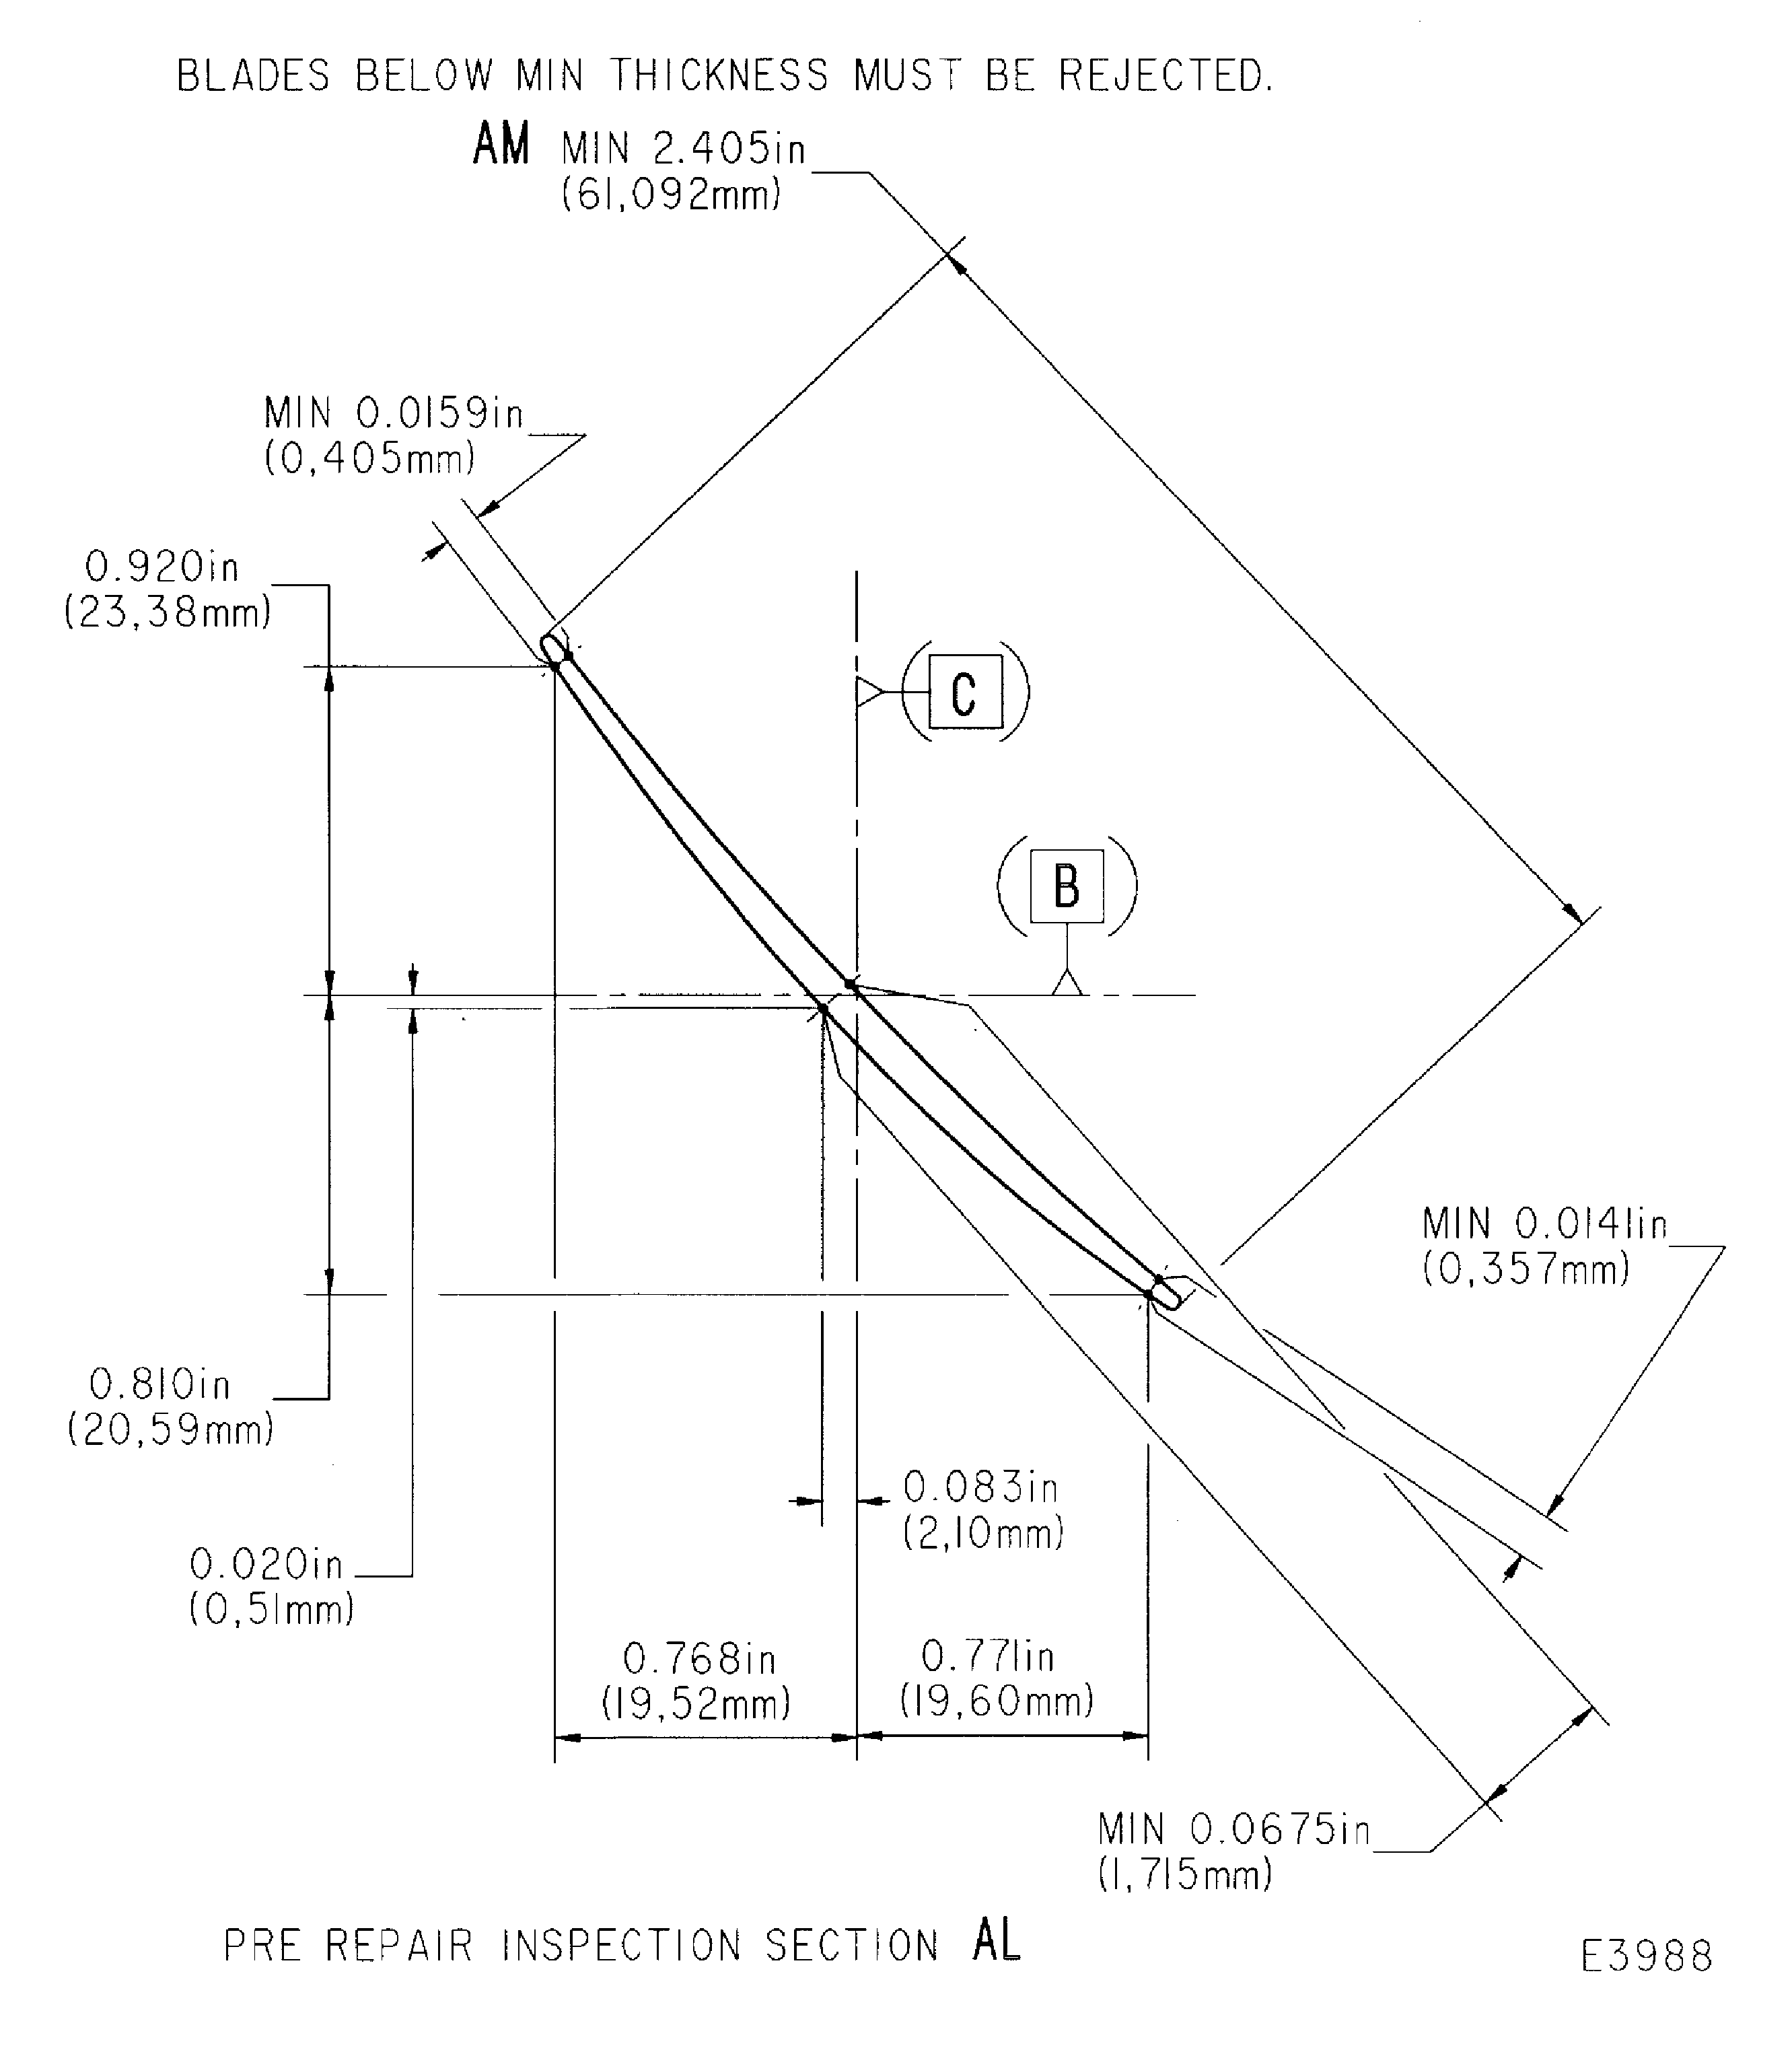
Figure: Repair details and dimensions - Assembly C
Repair details and dimensions - Assembly C
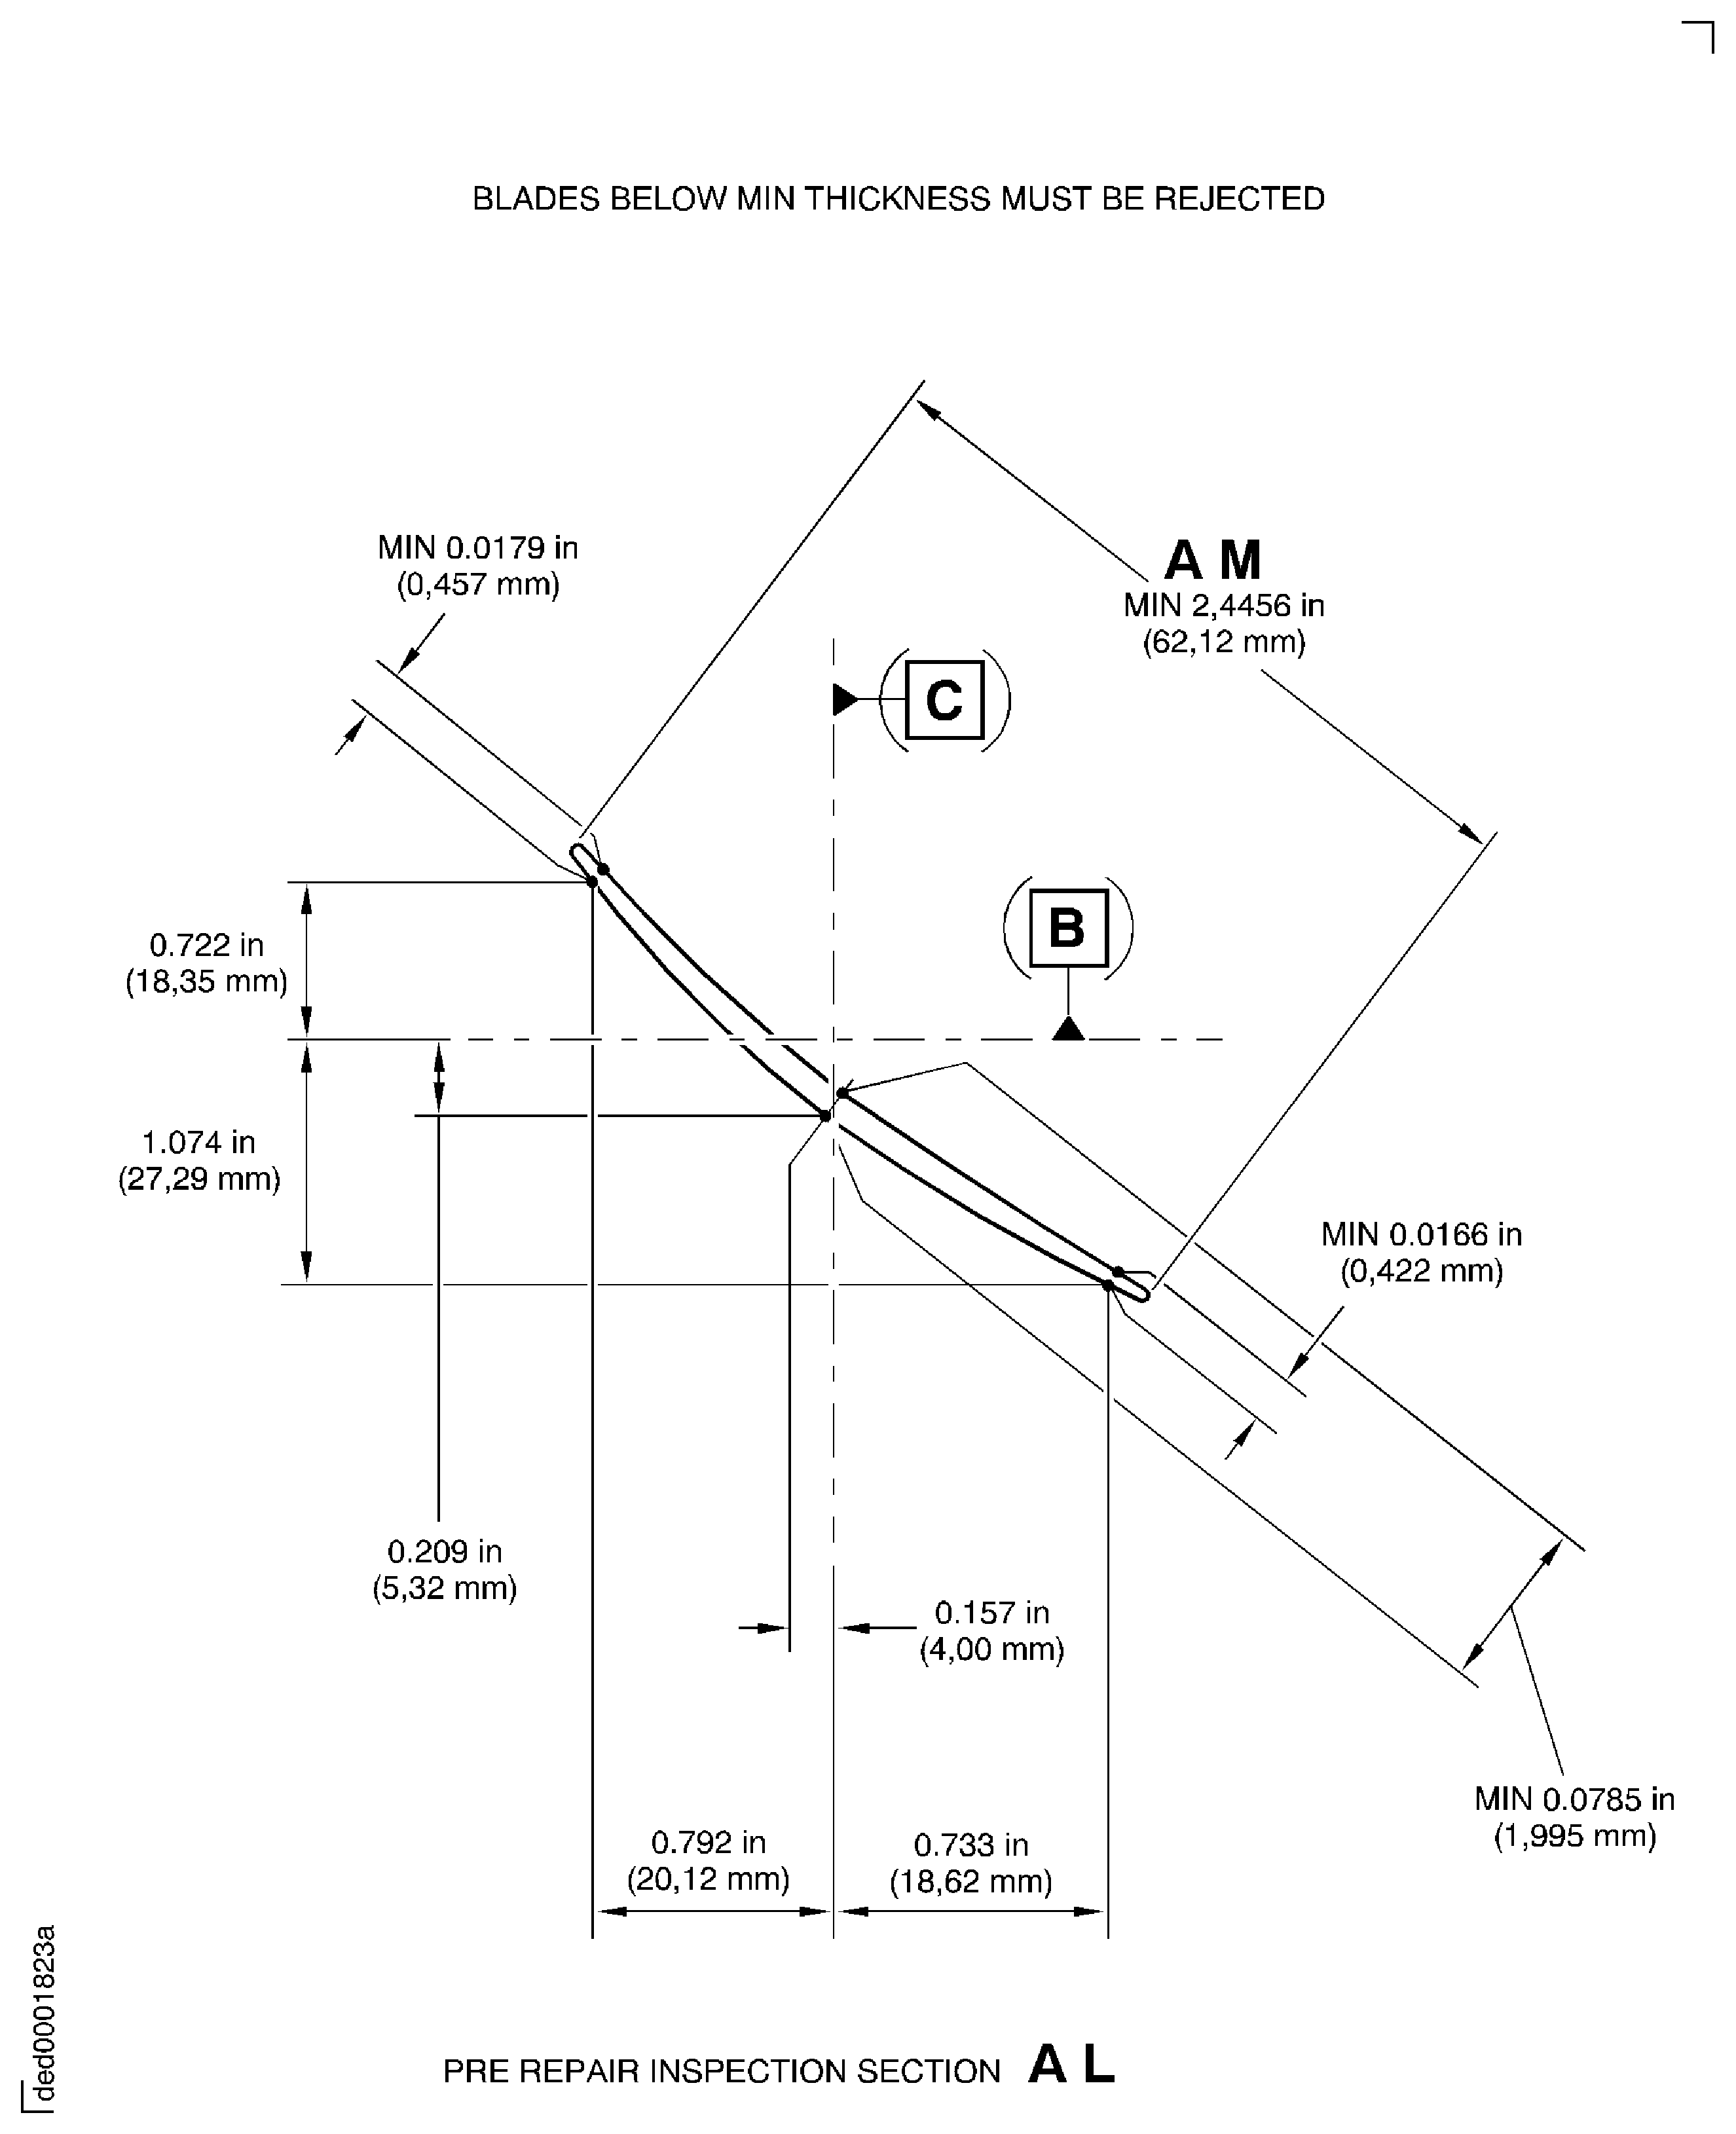
Figure: Repair details and dimensions - Assembly A
Repair details and dimensions - Assembly A
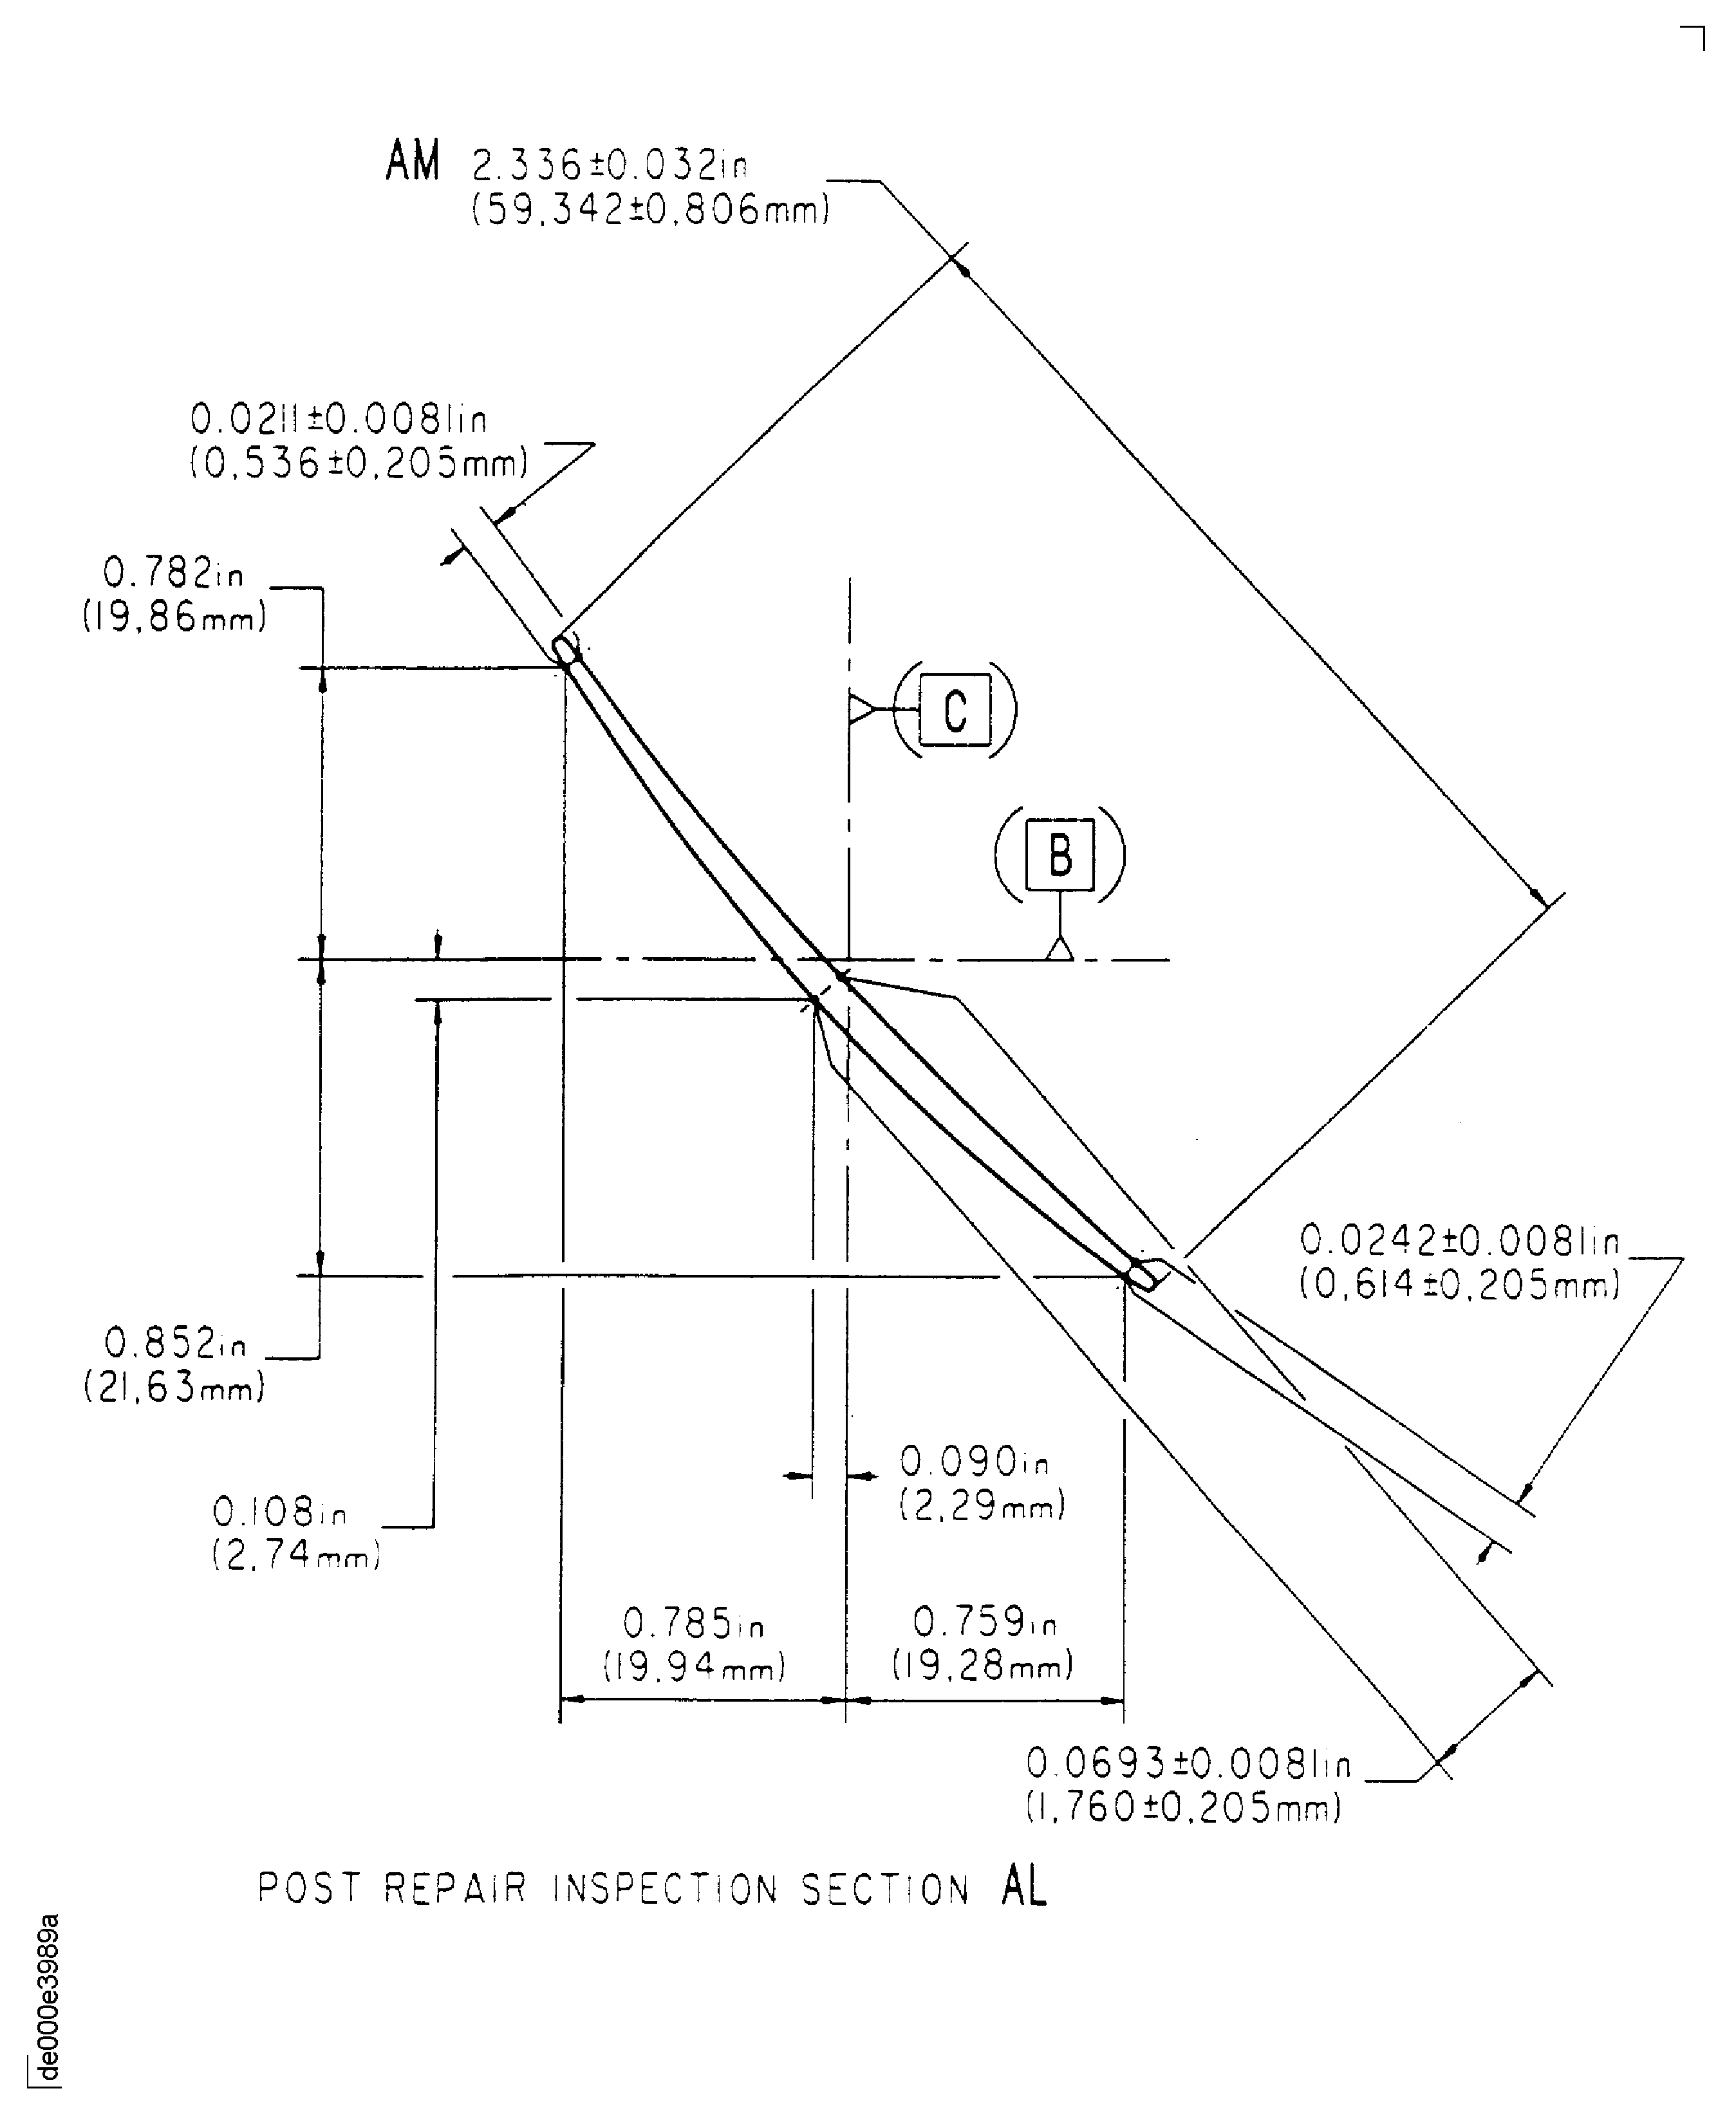
Figure: Repair details and dimensions - Assembly B
Repair details and dimensions - Assembly B
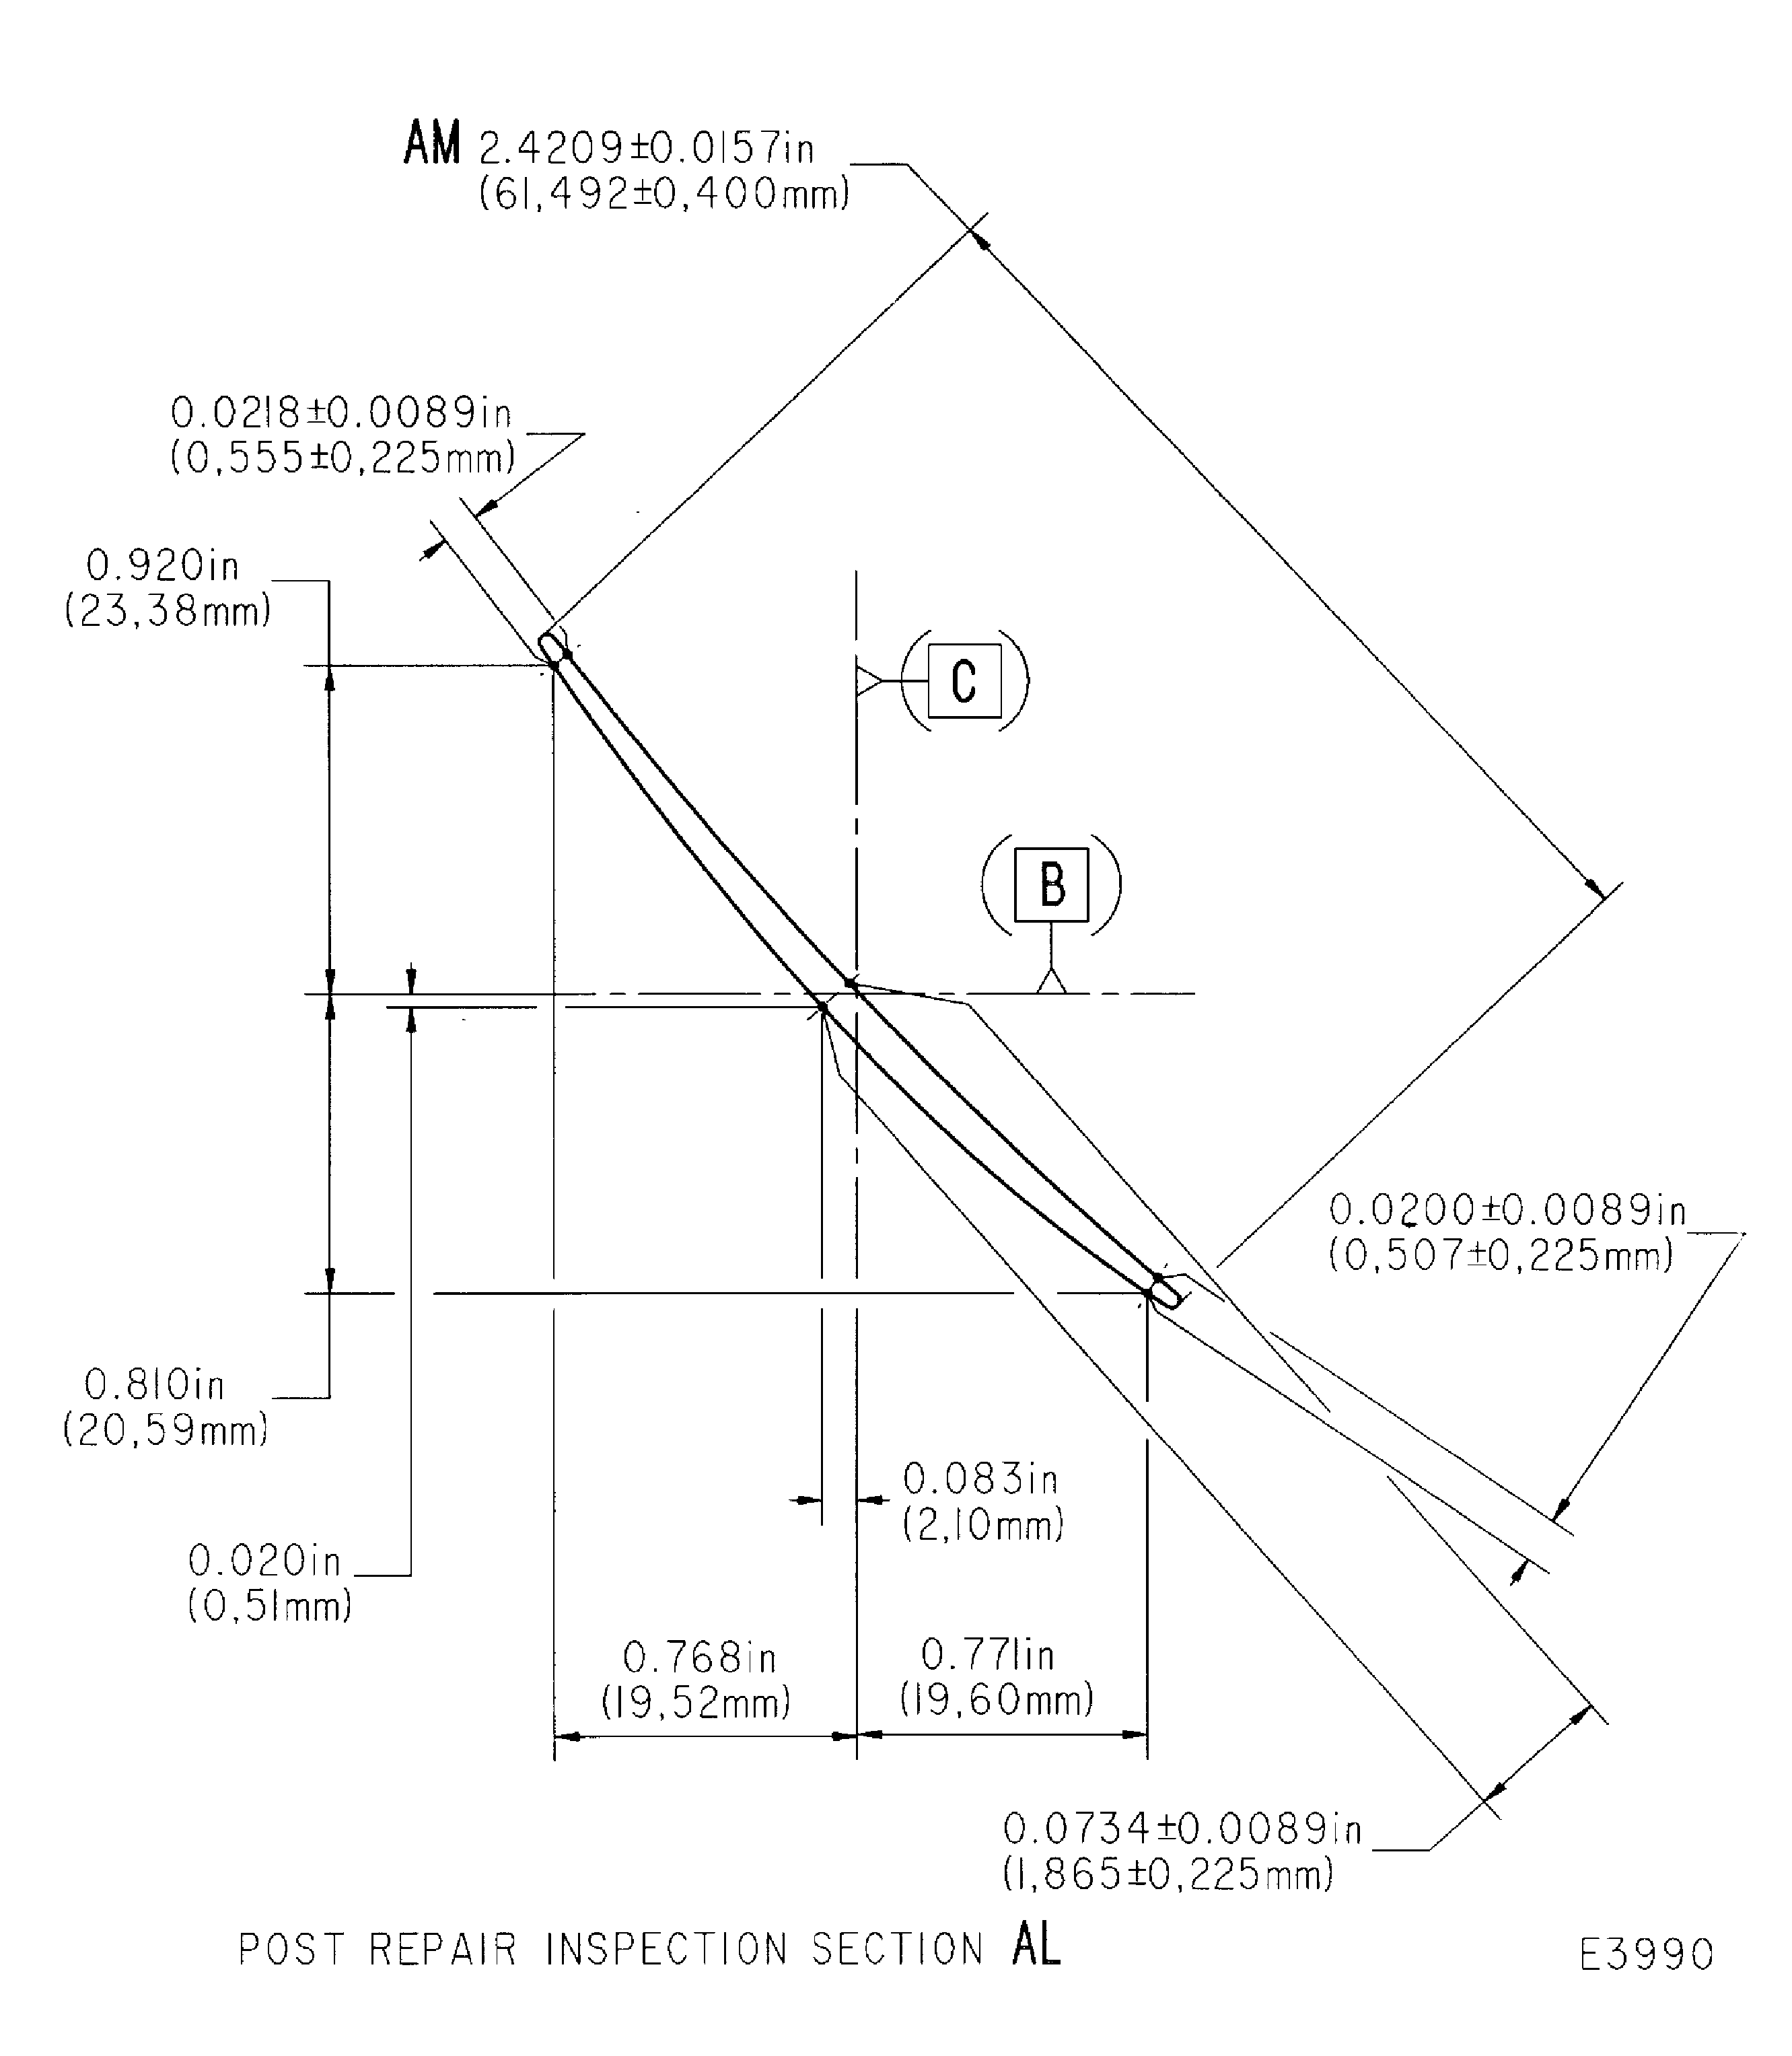
Figure: Repair details and dimensions - Assembly C
Repair details and dimensions - Assembly C
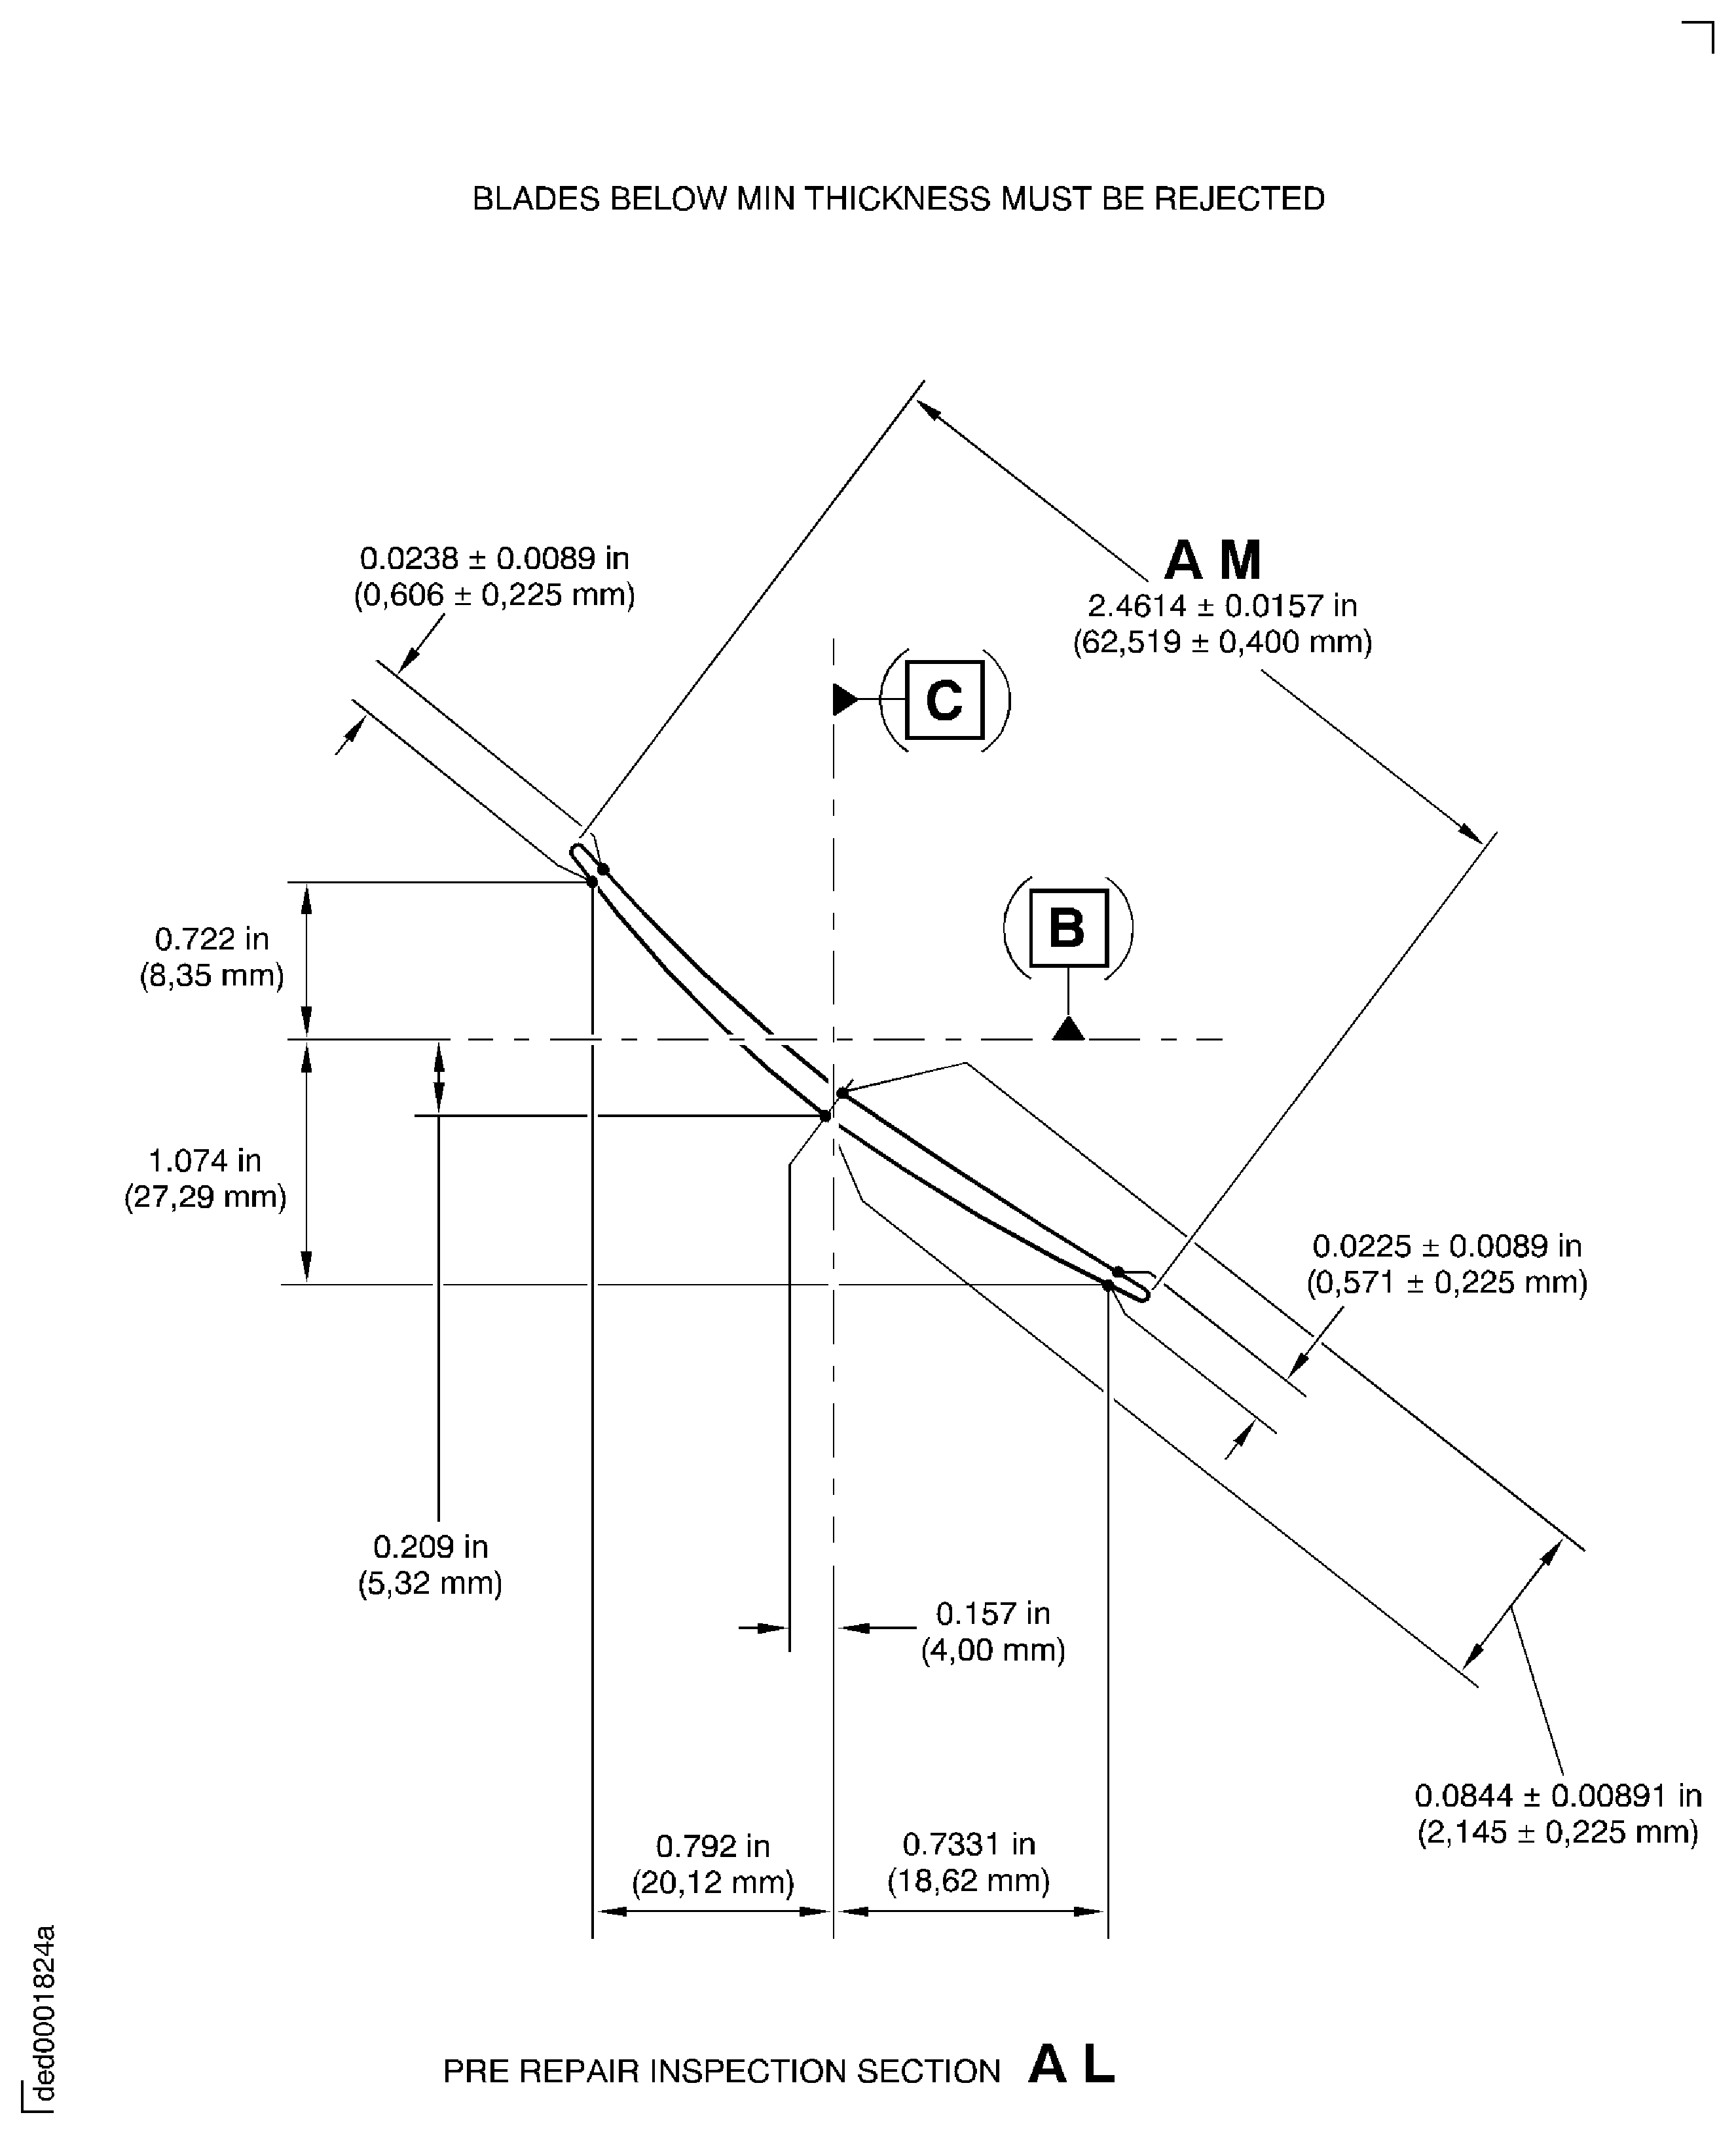
Figure: Repair details and dimensions - Assemblies A, B and C
Repair details and dimensions - Assemblies A, B and C

Figure: Repair details and dimensions - Assemblies A, B and C
Repair details and dimensions - Assemblies A, B and C

