Export Control
EAR Export Classification: Not subject to the EAR per 15 C.F.R. Chapter 1, Part 734.3(b)(3), except for the following Service Bulletins which are currently published as EAR Export Classification 9E991: SBE70-0992, SBE72-0483, SBE72-0580, SBE72-0588, SBE72-0640, SBE73-0209, SBE80-0024 and SBE80-0025.Copyright
© IAE International Aero Engines AG (2001, 2014 - 2021) The information contained in this document is the property of © IAE International Aero Engines AG and may not be copied or used for any purpose other than that for which it is supplied without the express written authority of © IAE International Aero Engines AG. (This does not preclude use by engine and aircraft operators for normal instructional, maintenance or overhaul purposes.).Applicability
All
Common Information
TASK 72-41-21-200-004-D00 HPC Stage 8 Case - Examine, Inspection-004
General
This TASK gives the procedure for the inspection of the stage 8 rotor path case assembly.
Fig/item numbers in parentheses in the procedure agree with those used in the IPC. Only the primary Fig/item numbers are used. For the service bulletin alpha variant refer to the IPC.
The policy that is necessary for inspection is given in SPM TASK 70-20-01-200-501.
All the parts must be cleaned before any part is examined.
All the parts must be visually examined for damage, corrosion and wear. Any defects that are not identified in the procedure must be referred to IAE.
The procedure for the parts which must have a crack test is given in Step. Do the crack test before a part is visually examined.
Do not discard any part until you are sure there are no repairs available. Refer to the instructions in repair before a discarded part is used again or oversize parts are installed.
Parts which should be discarded can be held although no repair is available. The repair of a discarded part can be shown to be necessary at a subsequent date.
All the parts must be examined to make sure that all the repairs have been completed satisfactorily.
The practices and processes referred to in the procedure by the TASK/SUBTASK number are in SPM.
References
Refer to SPM for data on these items:
Definition of Damage, SPM TASK 70-02-02-350-501,
Inspection of Parts, SPM TASK 70-20-01-200-501.
Some data on these items are contained in this TASK. For more data on these items refer to SPM:
Methods of Testing for Crack Indications.
Chemical Processes.
Surface Protection.
Preliminary Requirements
Pre-Conditions
NONESupport Equipment
NONEConsumables, Materials and Expendables
NONESpares
NONESafety Requirements
NONEProcedure
Clean the parts. Refer to TASK 72-41-21-100-000 (CLEANING-000).
SUBTASK 72-41-21-230-216 Examine the Stage 8 Rotor Path Case Assembly for Cracks
SBE 72-0343: Introduction of Integral HPC Cases and Rotor Path.
SBE 72-0358: Introduction of Revised HPC Stage 7 and Stage 10 Case Assemblies with Reduced Quantity of Bleed Slots.
Refer to Figure.
SUBTASK 72-41-21-220-521-A00 Examine the Stage 8 Rotor Path Case Assembly Lining at Location 1051, (6A6548 and 6A7529) (SBE 72-0343 and SBE 72-0358)
SBE 72-0369: Introduction of HPC Stage 6, 7 and 8 Rotor Paths with Revised Abradable Lining.
Refer to Figure.
Repair, VRS6663 TASK 72-41-21-300-092 (REPAIR-092).
More than Step.
Scored.
Repair, VRS6663 TASK 72-41-21-300-092 (REPAIR-092).
Chipped.
Repair, VRS6663 TASK 72-41-21-300-092 (REPAIR-092).
If the lining radius is other than Step.
Wear.
SUBTASK 72-41-21-220-521-B00 Examine the Stage 8 Rotor Path Case Assembly Lining at Location 1051, (6A7578 and 6A7624) (SBE 72-0369)
Refer to Figure.
Repair, VRS6093 TASK 72-41-21-300-005 (REPAIR-005).
More than Step.
Galled.
Repair, VRS6093 TASK 72-41-21-300-005 (REPAIR-005).
More than Step.
Scored.
Repair, VRS6093 TASK 72-41-21-300-005 (REPAIR-005).
Corrosion pitting (Face at location 1 and 2).
SUBTASK 72-41-21-220-522 Examine the Stage 8 Rotor Path Ring Faces at Locations 1, 2 and 1103
Refer to Figure.
Repair, VRS6093 TASK 72-41-21-300-005 (REPAIR-005, PB-901).
More than Step.
Galled.
Repair, VRS6093 TASK 72-41-21-300-005 (REPAIR-005, PB-901).
More than Step.
Scored.
Repair, VRS6093 TASK 72-41-21-300-005 (REPAIR-005).
Corrosion Pitting (Face at Location 1 and 2).
SUBTASK 72-41-21-220-524 Examine the Stage 8 Rotor Path Case Assembly Front and Rear Flanges at Face Locations 1, 2 and 1101
Refer to Figure.
Repair, VRS6093 TASK 72-41-21-300-005 (REPAIR-005).
Burred edges.
Repair, VRS6093 TASK 72-41-21-300-005 (REPAIR-005).
Scored
SUBTASK 72-41-21-220-525 Examine the Stage 8 Rotor Path Case Assembly Bolt Holes at Locations 3 and 4
Refer to Figure.
Repair, VRS6093 TASK 72-41-21-300-005 (REPAIR-005).
Burred edges.
If the diameter is other than Step.
Stop location holes 1147.
Repair, VRS6093 TASK 72-41-21-300-005 (REPAIR-005, PB-901).
Burred edges.
More than Step.
Dowel holes 5 and 6.
Repair, VRS6093 TASK 72-41-21-300-005 (REPAIR-005, PB-901).
Burred edges.
If the diameter is other than Step.
Location dowel hole 1187.
SUBTASK 72-41-21-220-526 Examine the Stage 8 Rotor Path Case Assembly Holes at Locations 5, 6, 1147 and 1187
Refer to Figure.
Repair, VRS6266 TASK 72-41-21-300-034 (REPAIR-034).
Loose.
Repair, VRS6266 TASK 72-41-21-300-034 (REPAIR-034).
Spacers that are not there.
SUBTASK 72-41-21-220-527 Examine the Stage 8 Rotor Path Case Assembly Spacers at Location 7
Refer to Figure.
Repair, VRS6549 TASK 72-41-21-300-027 (REPAIR-027).
Loose.
Repair, VRS6549 TASK 72-41-21-300-027 (REPAIR-027).
Other than Step.
Outer diameter.
SUBTASK 72-41-21-220-528 Examine the Stage 8 Rotor Path Case Assembly Location Dowel at Location 1189
Repair, VRS6163 TASK 72-41-21-300-006 (REPAIR-006).
Damaged.
SUBTASK 72-41-21-220-529 Examine the Stage 8 Rotor Path Case Assembly Surface Protection
Repair, VRS6093 TASK 72-41-21-300-005 (REPAIR-005, PB-901).
More than Step.
Nicked, scored or galled.
SUBTASK 72-41-21-220-530 Examine the Stage 8 Rotor Path Case Assembly Remaining Surfaces
Refer to Figure.
Repair, VRS6093 TASK 72-41-21-300-005 (REPAIR-005).
More than Step.
Nicked, Scored or Galled.
Repair, VRS6093 TASK 72-41-21-300-005 (REPAIR-005).
Corrosion pitting.
SUBTASK 72-41-21-220-755 Examine the Stage 8 Rotor Path Case Assembly Front Flange Rear Face at Location 3
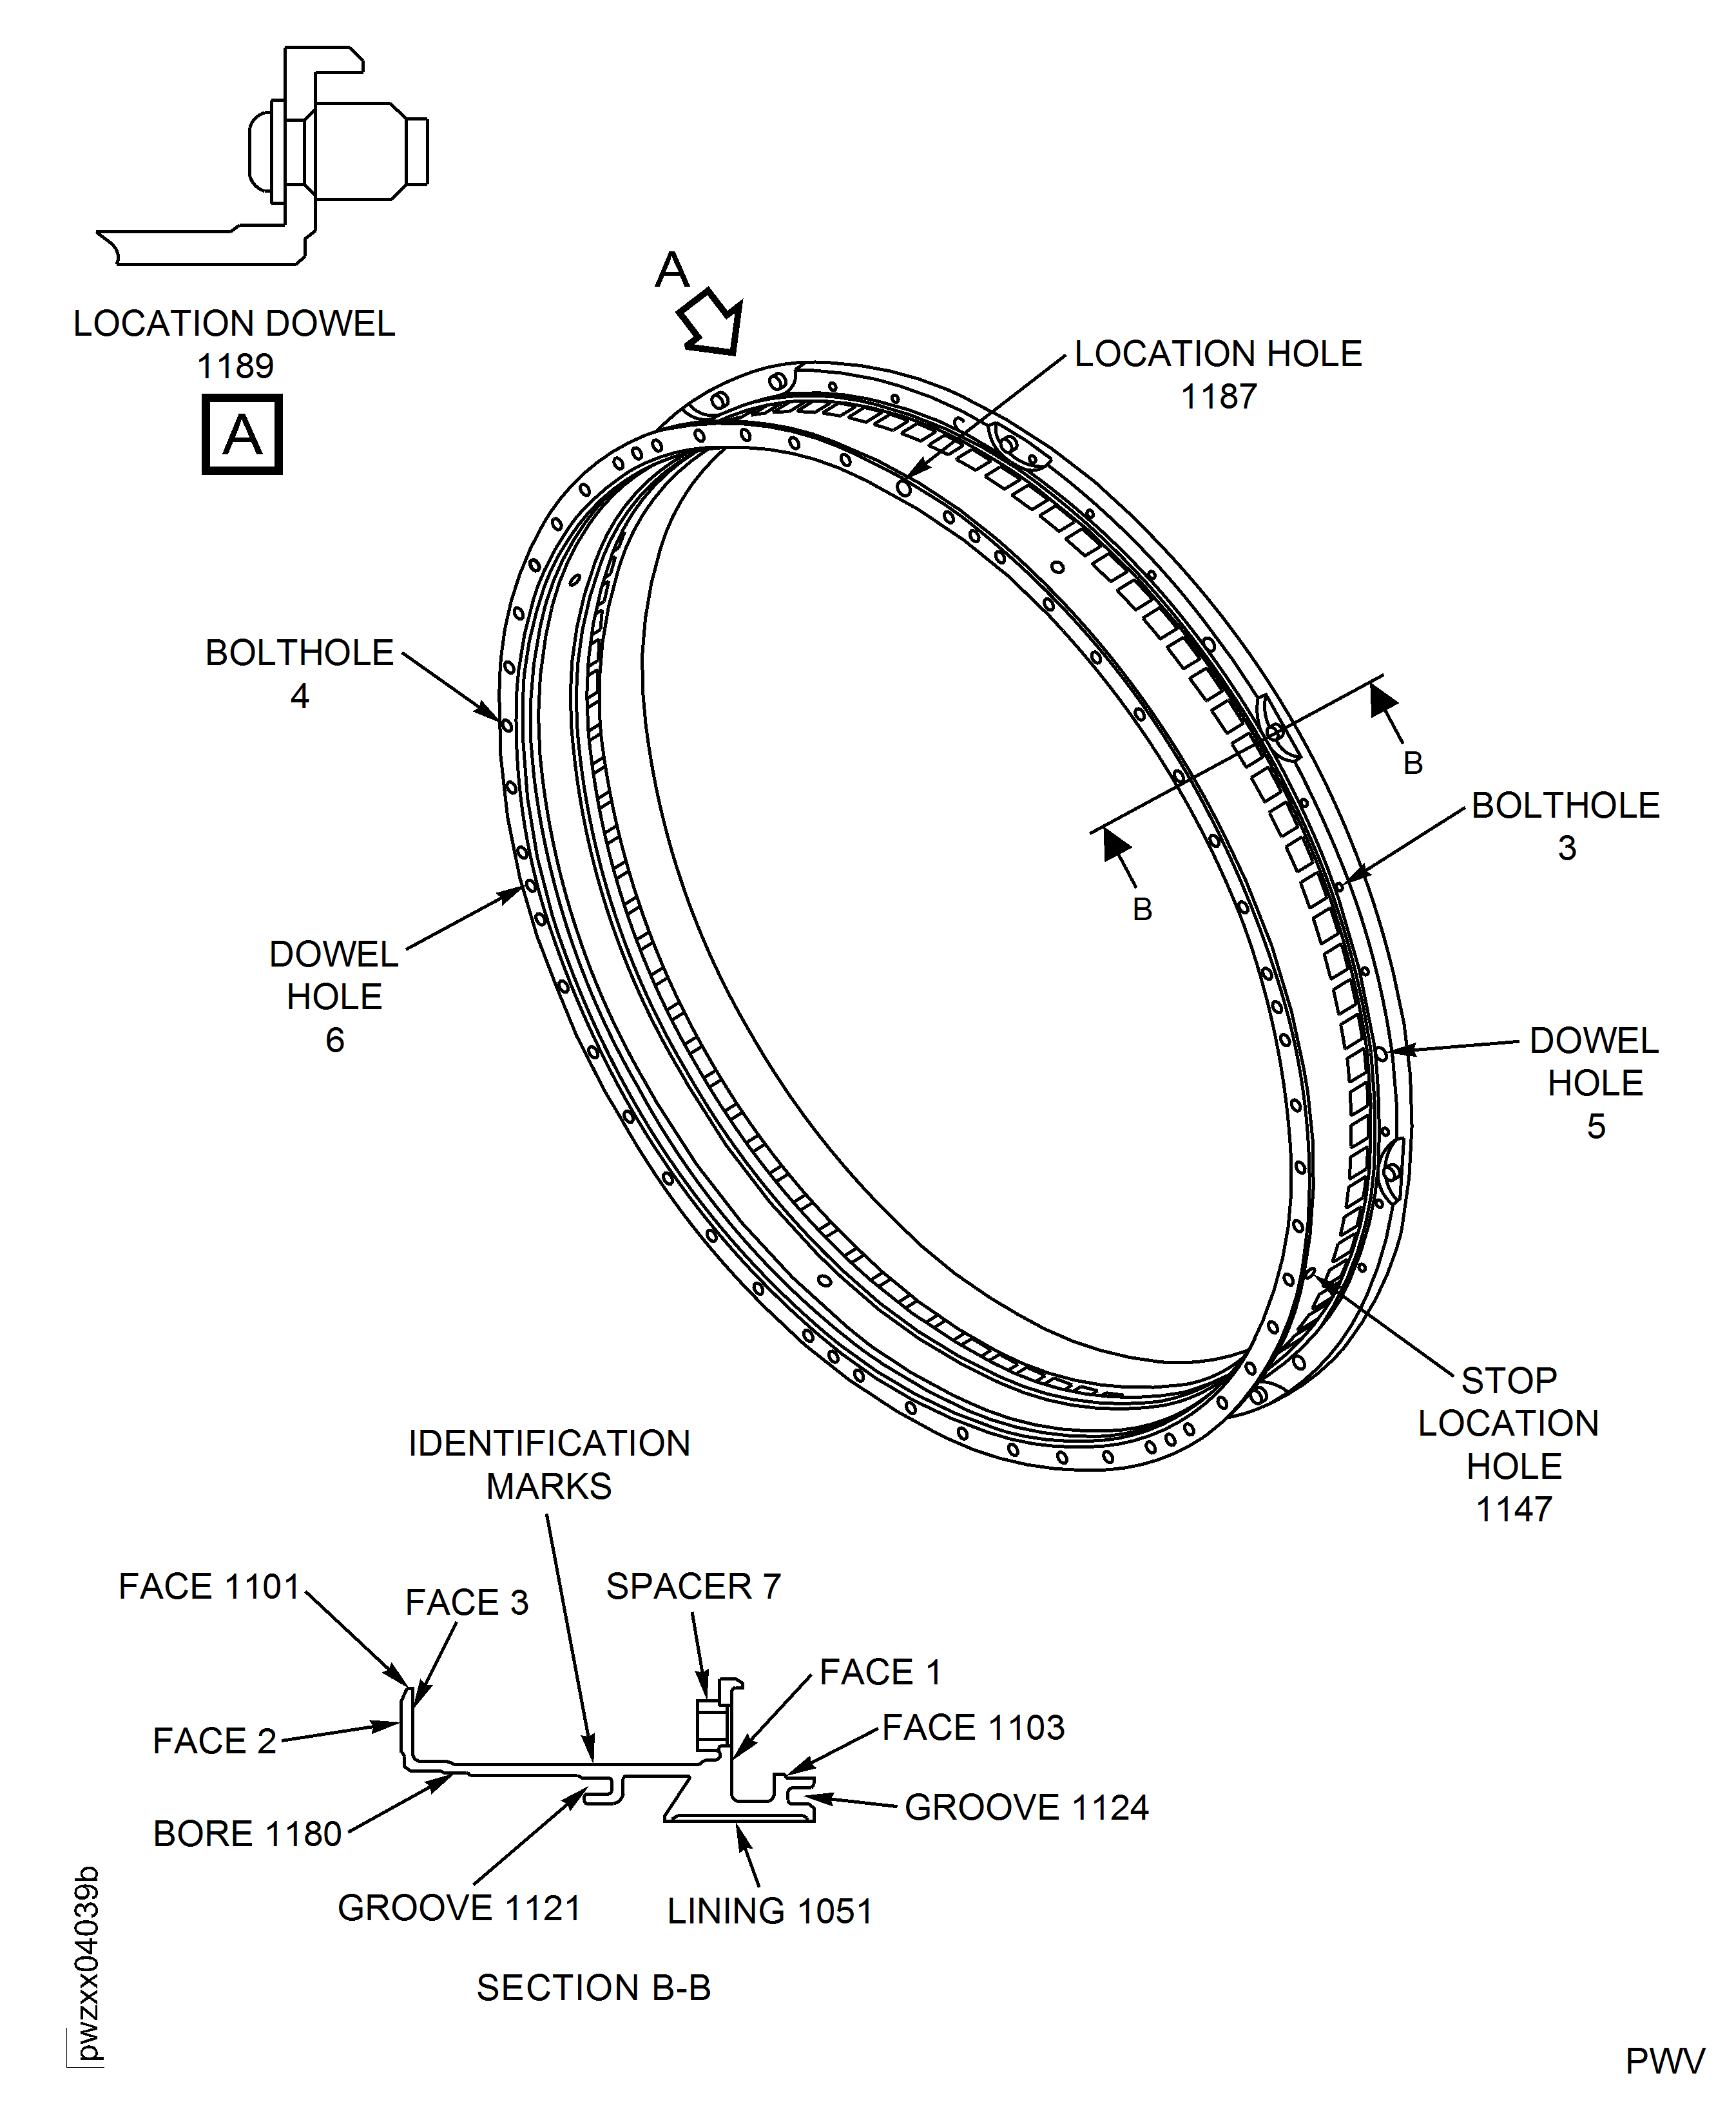
Figure: Stage 8 Rotor Path Case Assembly - Inspection Locations
Stage 8 Rotor Path Case Assembly - Inspection Locations

